In this article, I’m going to show you how to Build vSphere Infrastructure on Windows Server 2008 R2 vCenter Server. This guide is the continuity of my previous article which was about creating a Domain Controller for vSphere Infrastructure. If you didn’t check that guide, you can check down below. The guide below is very important and if you don’t know the first part and you can’t do this part because every part is connected. So check part 1 of building vSphere infrastructure domain controller.
Please read the Tips and Note carefully because there I mentioned very important information.

ESXi & vCenter Server Architectures
Related: How to Build vSphere Infrastructure on Windows Server 2008 R2 Part1
In this guide, I’m going to cover the following objectives.
- Create Windows Server 2008 R2 VM
- Install VMware Tools
- Windows Server 2008 R2 Initial Configuration
- Join vCenter Server to Domain
- Create a User Account (VCAdmin)
- Install vCenter Single Sign-On (SSO)
- Install Inventory Service
- Install vCenter Server
- Install vSphere Client
Requirements
- VMware vSphere vCenter Server ISO File
- At least 4GB RAM
- Disk Space 40GB or Higher
- Up and Running Windows Server 2008 R2 or Higher
Build vSphere Infrastructure on Windows Server 2008 R2 vCenter Server
I’m not going to go in so detail about creating Virtual Machine, Installing VMware Tools, Windows Server 2008 R2 Initial Configuration because I’ve covered those in Part 1 of this infrastructure. Just check part 1 that linked earlier in this guide. However, I’ll mention every objective very briefly in this post so please follow the guide exactly. If you miss any steps, then it might not work.
#1. Create Windows Server 2008 R2 VC VM
Step #1. For our vCenter Server, we going to use the same Windows Server 2008 R2 so create a New Virtual Machine and name it VC.

Name the Virtual Machine VC
Step #2. This time give it a bit more Disk Space like 60GB.

Specify 60GB Disk Space
Step #3. Navigate to VMware Virtual Machine Settings and select around 6GB Memory, 4 Processors, tick mark Virtualize Intel VT-x/EPT or AMD-V/RVI. Finally, Browse ISO file of Windows Server into your DVD Drive.

Enable Virtualization Technology
Step #4. For VC virtual machine, your final settings should look something like snapshot down below. Install Windows Server and follow the next step of this guide.

Power on the Virtual Machine
#2. Install VMware Tools on Windows Server 2008 R2
Once you’ve successfully installed Windows Server, it’s highly recommended to install VMware tools because it’ll fix the screen resolution and as well as speed up your virtual machine. So do it navigate to VM tab>Install VMware Tools then run the setup and click Next for a couple of times. Finally, Restart your VM then it should be fine. For more details, again have a look to our previous guide which is linked at the beginning of this article.

VMware Tools Setup
#3. Windows Server 2008 R2 Initial Configuration
This part is a really important step that you should do it to have a clean process. You’ve to prepare the following objectives.
- Activate Windows Server 2008 R2
- Change the time zone
- Change computer name + add DNS Suffix
- Changing the default administrator account
- Windows update
- Installing “.Net framework 3.5.1”
- Disabling IE ESC
- Disabling Shutdown Event Tracker
- Add static IP address
Tip: Once the initial configuration part is done then you need to change your Network Adapter to VMnet2 same as your DC

Change the Network Adapter
and because we didn’t install DHCP to provide automatic IP address so for every virtual machine that we create, we should set a static IP address. For vCenter (VC) server use the IP 10.0.0.2. with Subnet Mask of 255.255.255.0. We used 10.0.0.1 for our DC.
If you don’t know how to perform the mentioned topics, then follow our previous guide. I’m not going to cover here because this post will be so long and I don’t want to do it. Everything is the same because it is also Windows Server 2008 R2. If you stuck at any step or didn’t work just let me know in the comment section below.

Set Static IP Address on VC VM
#4. Join vCenter Server to Domain
Once you’ve performed task 1 to 3 then it’s time to join our VC virtual machine to the domain controller (DC). To join VC to the domain, you should have done the following tasks.
- Chosen VMnet2 in VC VM
- Used Static IP Address 10.0.0.2
If you’ve done the above task, then you can join the vCenter virtual machine to the domain controller. Now, open Run and type sysdm.cpl and press Enter. Click Change button and select Domain. Type your domain name “wikigain.com”. You should see a window that asks for a username and password. Type your Domain Controller username and Password. In my case, my username for DC is Admin and my password is Wiki123!

Join VC VM to Domain
Once you’ve joined your VC, you should Restart your virtual machine to get an effect.
Tip: If you get any error in this step, you need to check your prefered DNS server on your DC. Make sure it’s configured correctly. If still, you have the problem with joining VC to DC then check the firewall on both VMs. Turn Off the firewall and try again. If still you couldn’t join let me know in the comment section and send me your error.
#5. Create a User Account (VCAdmin)
In this step, I’m going to create a user account in my Domain Controller so you have to do the same.
Step #1. On your DC, navigate to Start Menu>Administrative Tools>Active Directory Users and Computers. Create VCAdmin Account.

Create VCAdmin Account
Step #2. Also, select Password Never Expires.

Choose Password Never Expire
Step #3. Once the user is created, get back to your VC virtual machine and open up Run then type lusrmgr.msc and press Enter. Now, you should see local users and groups window. Select Groups and Right Click on Administrators>Properties. Click Add button and type VCAdmin and enter.

Add VCAdmin user to Local Administrator
Step #4. If you asked for the username and password, enter your DC username and password.

Select Administrator Groups
Step #5. Finally, should see something like the screenshot below. Click OK.

Administrators Group
Step #6. Logoff your VM then Login with VCAdmin account on your VC VM.

Login as VCAdmin Account
#6. Install vCenter Single Sign-On (SSO)
Now that you’ve done everything correctly so far then follow the next steps to install vSphere vCenter 5.1 on this VC VM.
Step #1. Go to VM Settings> CD/DVD then select VMware vSphere vCenter 5.1 ISO image.

Browse VMware vSphere
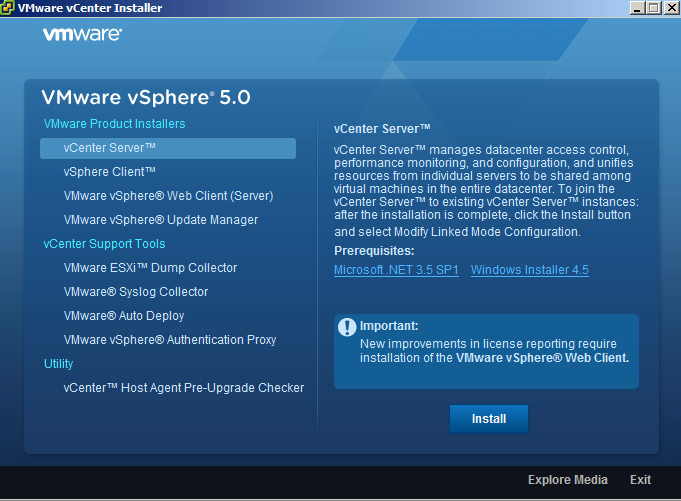
Step #2. Wait for a few second that VMware vSphere setup.exe pops up. Please be patient because this installation needs sometimes to get completed. From VMware Product category select VMware vCenter Simple Install. Click Install button to get started.

VMware vCenter Simple Install
Step #3. On the “Welcome to the install shield wizard for vCenter Single Sign-On” click Next. Make sure that every time type a password, write it down somewhere that you might need them in the future. Just click Next and Next. Every step is clearly marked in the screenshot down below.
Note: Use complex password (eg. Az!@#$%^&) for database and admin accounts.

Set Database User Information
The SQL server instance will be installed and the SSO database will be created along with installing the program.
Tip: Be patient if the installer hangs at this step as it’s still working. If you get an error try to install every session separately. For instance, first, install vCenterTM Single Sign-On then VMware vCenter Inventory Service and finally install vCenter Serve plus vSphere Client.

Ready To Install
#7. Install Inventory Service
If you didn’t get any error in part 6 “Install vCenter Single Sign-On” then every upcoming section should appear automatically otherwise, you should install them individually. Anyway, install Inventory Service now. The Installation is pretty straightforward and you need to click Next. Wherever it asks to enter the password, use a complex password and put other settings to default.

vCenter Single Sign-On Information
Also, don’t forget to Install Certificates in the final step.

Certificate Installation for Secure Connection
#8. Install vCenter Server
Step #1. This is the second last step, to sum up, this guide. Now, you should install the vCenter Server. When you installed Inventory Service then vCenter Service should automatically appear on the screen. If it didn’t, just use the VMware vSphere Product window to install it manually. If you’ve bought the VMware vSphere then you should have a product key otherwise, use the evaluation version which allows you to use it for a couple of months.

Install vCenter Server
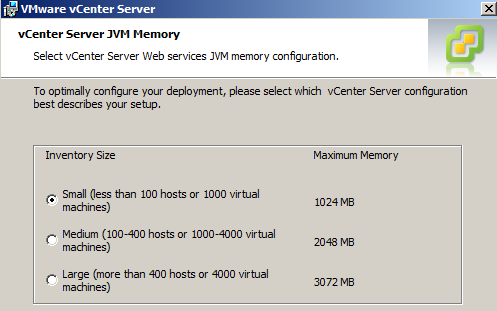
Step #2. Follow the screenshots below to get a clear idea that what to choose in every window.

vCenter Server JVM Memory
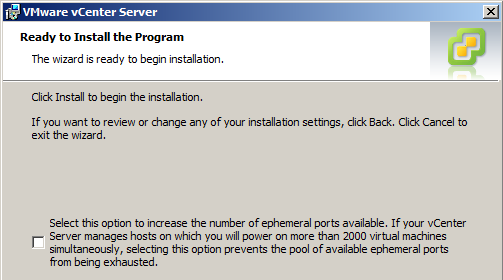
Step #3. Don’t forget to tick “This administrator is a user group” box.

Ready To Install vCenter Server
#9. Install vSphere Client
This is the final step and I hope you’re following everything correctly. If you missed something or something is not working properly, don’t hesitate and share in the comment section down below and we’ll answer ASAP. Anyway, the last step you should install vSphere Client.
Step #1. If vSphere Client Window automatically popped up then install it otherwise, open VMware vSphere Installer then selects VMware vSphere Client from the product list. Click Next for a couple of times and put everything to default.

Install vSphere Client
Step #2. Once VMware vSphere Client is installed on your VC VM then you should see vCenter Client’s shortcut on your Desktop. Double click on it then select VC VM IP address. Finally, tick “Use Windows session credentials” and press Login. If security warning pops up, just install the Certificates and you’re Done.

Install SSL Certification
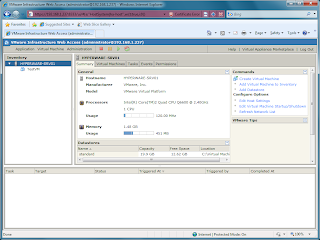
If you’ve done everything correctly so far then you should be able to see the screenshot below after you Login to your vSphere Client.

VMware vSphere vCenter Server
Conclusion
In this post, I’ve covered building vSphere Infrastructure vCenter Server part 2 which has the following objectives.
- Create Windows Server 2008 R2 VM
- Install VMware Tools
- Windows Server 2008 R2 Initial Configuration
- Join vCenter Server to Domain
- Create a User Account (VCAdmin)
- Install vCenter Single Sign-On (SSO)
- Install Inventory Service
- Install vCenter Server
- Install vSphere Client
I hope you guys have learned something useful from this guide and if you get any kind of error or problem just share with us and if we knew the solution then absolutely, we are going to answer the comment as soon as possible.
Next Guide: How to Build vSphere Infrastructure on Windows Server 2008 R2 (ESXi Host) -Part3
Прочитано:
996
Начну с предисловия, данная заметка является полностью работоспособным вариантом установки и настройке системы управления виртуальной инфраструктурой. У меня на работе встала задача, настроить «VMware vCenter», для себя я расписал и мне кажется, что для многих это будет, тоже полезно.
Данная заметка опирается на нижепредставленные:
| Установка MS SQL Server 2008 R2 Rus на Server 2008 R2 Ent |
| Создаем базу данных под VMware vCenter |
| Источник данных «DSN» при разворачивании VMware vCenter |
| Процесс удаления компонента SQL Server Reporting Service |
Предварительные действия:
- Системные требования смотрите на сайте «VMware».
- CPU – 2GHz и более
- Memory – 2GB of RAM и более
- Database – minimum of 1Gb
- Networking – 100MB, а лучше 1Gb
- Microsoft .NET 3.5 SP1
- Windows Installer 4.5
- Станция, на которую буду ставить «VMware vCenter» располагается, в домене (polygon.local).
Монтируем образ VMwarevCenter5.0.0 в систему:
![]()
Запускаем autorun.exe:

Выбираем vCenter Server инажимаем «Install»:
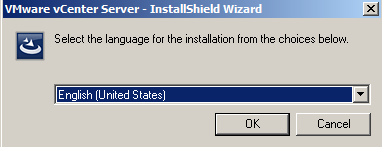
Выбираем язык, на котором будет происходить последующая установка: — «English».
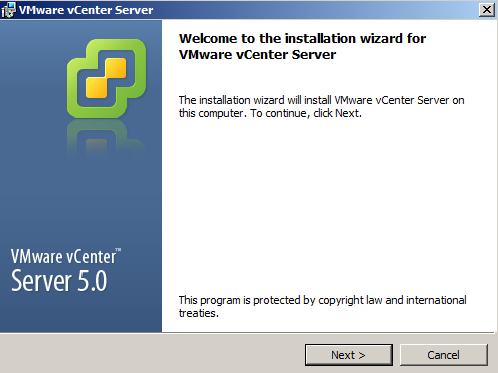
Далее переходим уже собственно к установке, нажимаем кнопку «Next».
И снова нажимаем кнопку «Next»:
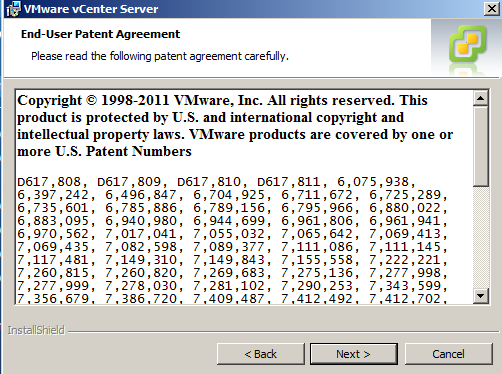
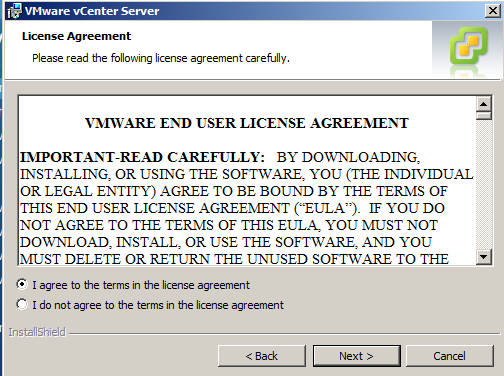
Внимательно читаем лицензионное соглашение (если очень хочется), и после ставим чекрыжек напротив пункта: «I Agree to the terms in the license agreement» и нажимаем кнопку «Next»:
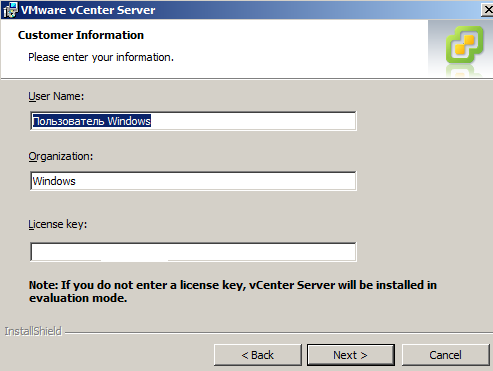
Теперь нужно ввести регистрационные данные, поля «User Name» и «Organization» можно указать произвольно, а поле «License key» отвечает за регистрацию продукта (либо приобретали, либо достали каким-либо другим образом). По окончании ввода нажимаем кнопку «Next».
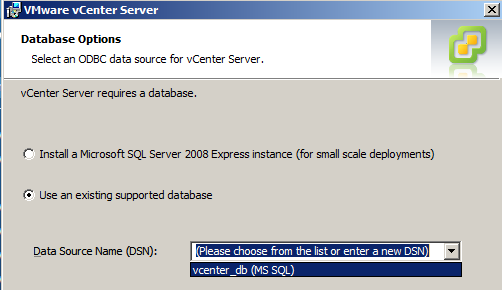
Далее укажем установщику использовать специально развернутую базу данных «vcenter_db» с настроенным «DSN» (vcenter_db (MS SQL)) и нажимаем кнопку «Next».
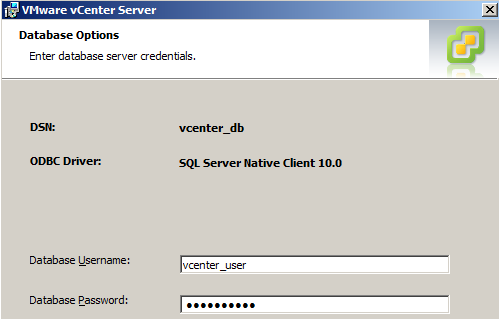
Указываем параметры подключения к «DSN» с использованием «ODBC» драйвера:
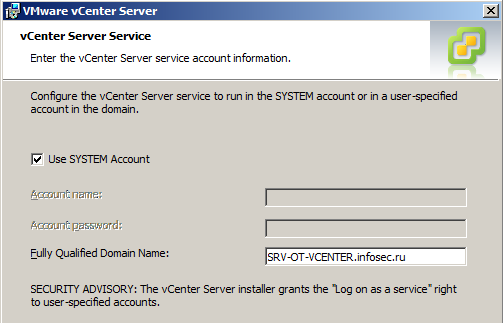
Далее указываем от имени кого запускать службу «VMware vCenter Server», оставляем по умолчанию:
На следующем шаге нажимаем кнопку «Next» .
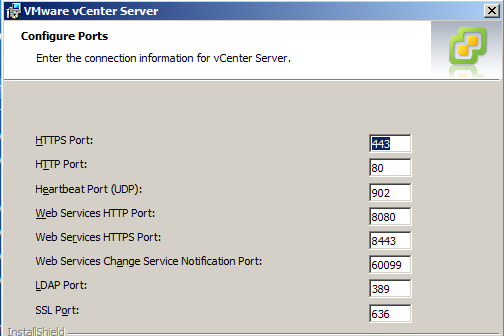
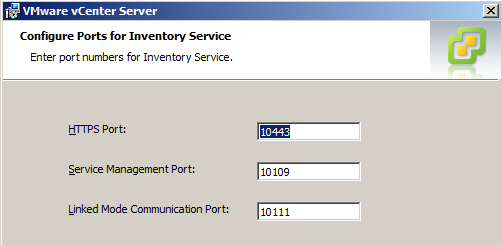
На следующем шаге, если нужно может изменить порты, с которыми предстоит работать серверу «vCenter». Я оставляю по умолчанию, после нажимаем кнопку «Next».
Последующее информационное окно, свидетельствующее ниже, говорит, что уже на сервере используется «80» порт и установка не может продолжиться дальше пока: мы либо не изменим его для «vCenter», либо переназначим виновника. Нажимаем на этом информационном окне кнопку «OK» и остаемся в мастере установки «vCenter».
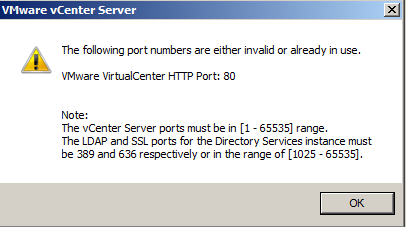
Для решения проблемы нужно произвести удаление компоненты «Microsoft SQL Server Reporting Services», как это сделать см. здесь.
Снова нажимаем кнопку «Next» и уже переходим на следующий шаг «Configure Ports for Inventory Service».
Активируем режим «vCenter» сервера по использовании памяти, из ходя из Ваших потребностей выбираете либо «Small», «Medium», «Large», т.е. то количество хостов которое будет обслуживать Ваш «vCenter». В моем случаем – это «Small». И не забываем нажать по окончании кнопку «Next».
А теперь нажимаем кнопку «Install».
Теперь ожидаем, покуда всё это установиться:
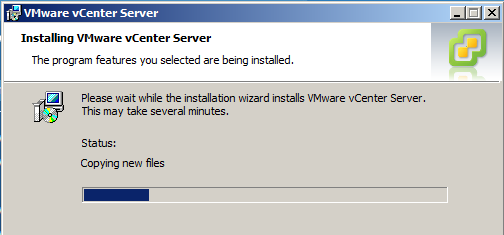
И так установка завершена.
Я рассмотрел пошагово процесс установки и нюансы возникающих проблем. На этом всё, с уважением ekzorchik.

on
November 23, 2009, 10:18 PM PST
Installing VMware vCenter prerequisites on Windows Server 2008 R2
Scott Lowe explains how to prepare a Windows Server 2008 R2 server for VMware vCenter and how to tackle two problems that are sure to arise during the installation process.
With Windows Server 2008 R2, Microsoft has finally abandoned the 32-bit world in server land in favor of a 64-bit only operating system. While this is a very good step in the right direction toward solving the 32-bit/64-bit selection dilemma, it can present some installation challenges.
I recently encountered this issue when our organization installed VMware vCenter Server on Windows Server 2008 R2. With older versions of Windows, there is a 32-bit option, so vCenter has no trouble installing; however, once things move in the 64-bit direction, there are two items that you’ll need to address before the vCenter installation will be successful:
- The need for the .NET Framework 3.5.1.
- The need for a 32-bit Database Source Name (DSN)/ODBC connection pointing to the vCenter database.
I’ll outline tips that will help you with the installation process.
Important notes
Before we proceed, you should be aware of these important product and article notes:
- Although VMware indicates that small organizations can safely run vCenter on a 32-bit OS, it recommends that administrators consider 64-bits for all new installations.
- If you’re installing vCenter on a virtual machine running under vSphere/ESX 4, you should know that support for Windows Server 2008 R2 is currently experimental. Even though everything will probably work just fine, VMware won’t provide support if you have problems.
- This article assumes that you have already followed VMware’s guidance as outlined in the documentation and created a database and database user for vCenter. For my purposes, I created a database named VCDB and a SQL Server account named vcenteruser.
- Bear in mind that VMware does not yet support vCenter on Windows Server 2008 R2. Proceed at your own risk!
.NET Framework 3.5.1
To install the .NET Framework 3.5.1 on Windows Server 2008 R2, follow these steps:
- Open Server Manager.
- Select the Features navigation item.
- On the Feature Summary page, click Add Features.
- When you get to the Select Features page of the wizard, expand the .NET Framework 3.5.1 Features option.
- Select the .NET Framework 3.5.1 item. (Do not choose to install both the .NET Framework 3.5.1 and WCF Activation together — doing so will force the installation of IIS 7.5, which will interfere with vCenter’s Web services.) Figure A shows you the Select Features window.
- Click the Next button.
- On the Confirm Installation Selections page, click the Install button to complete the process.
Figure A
32-bit DSN to the vCenter database
When you create a DSN on an out-of-the-box Windows Server 2008 R2 system, the DSN is created as a 64-bit object, whereas the vCenter installer will only be looking for 32-bit DSNs. In order to create a 32-bit DSN on your 64-bit Windows Server 2008 R2 server, you need to download and install the SQL Server Native Client on your server and use the new client’s utilities to create the DSN. For this article, I’m using SQL Server 2005 because that is what we’re using in production at Westminster College.
The SQL Server Native Client is included as a part of the SQL Server 2005 Feature Pack. From the Feature Pack download page, download the X64 package under the SQL Server 2005 Native Client option. Although you’re installing the 64-bit package, this is only because you’re installing the tool to a 64-bit operating system; the package includes a method to create 32-bit DSNs. Once you download the package, install it.
Next, go to Start and, in the Search box, type odbcad32. Select the odbcad32 option under the Programs heading to run this utility.
Figure B
This is a 32-bit version of the ODBC Data Source Administrator utility; in this utility, create a System DSN that points to your vCenter database. To do so, follow these steps:
- Select the System DSN tab.
- Click the Add button.
- On the first page of the Create New Data Source wizard, choose SQL Native Client.
- When prompted, provide a name and description of the new System DSN and indicate on which SQL Server the vCenter database resides.
- For my example, I’ve used SQL Server authentication. On the authentication page, choose the authentication method most appropriate for your use. If you use SQL Server authentication, use the same login ID and password that you created as per the VMware documentation. This page is shown in Figure C.
- When prompted, test the data source to make sure it’s set up properly.
Figure C
When you’re done, you will see the vCenter DSN appear in the ODBC Data Source Administrator.
Summary
With these two items in place, your vCenter installation should proceed without interruption. The true test will come when you get to the installation step that asks you to provide the 32-bit DSN that you want to use for the vCenter database. If you’ve set the DSN up properly that DSN will be available to you; if it’s not set up properly, make sure that you didn’t accidentally create a 64-bit DSN.
Want to keep up with Scott Lowe’s posts on TechRepublic?
- Automatically sign up to the Servers and Storage newsletter
- Subscribe to the Servers and Storage RSS feed
- Follow Scott Lowe on Twitter
-
Data Centers
A co-worker and myself were asked to create a VMware vSphere (ESX) template for Server 2008 R2 and it’s not as easy as you might think. Over the course of a day and half and through much research and trial and error, we have come up with the perfect template for our organization. It’s a perfect base template for us but depending on where you intend to deploy it and your own organization’s requirements, you may have to edit it a bit. We intend to tweak the template even further and possibly even create separate images depending on if the VM will be deployed internally or externally. Please do comment if you have any suggestions or think we may have missed something.
Building a VMware template for Server 2008 vs. Server 2008 R2 has some differences. This blog post will cover everything we did to successfully get it working and a detailed explanation of why we chose certain settings. Big thanks to to Jeremy Waldrop and his blog post that described setting up a template for 2008 which helped us quite a bit in our research to create the perfect template for 2008 R2.
OS Used: Windows Server 2008 R2 Standard (x64) Volume License Edition
VM Hardware config:
- Single vCPU
- 4 GB RAM
- 40 GB Primary Hard Drive (for Operating System)
- 10 GB Secondary Hard Drive (for Page File
- LSI Logic SAS SCSI Controller
- VMXNet 3 Network Adapter
I know most organizations using Server 2003 have always done a 20 GB C: partition. With 2008, I suggest going to 40 GB OS drives as a standard. Server 2008 (especially x64 versions) requires more space. Out of the box 2008 R2 x64 takes up 10 GB. Also Server 2008 has a component store (c:windowswinsxs) which is very large. This is because 2008 no longer uses i386, everything is stored locally already in this component store folder. Remember, Server 2008 and any future MS product is all about componentization!! When you install a component from this store, my understanding is that it is “projected” to the OS. So basically Windows 2008 installed components run from this component store essentially. As the system receives updates over time, expect this directory to grow even larger since it never deletes old stuff. Think of the different versions of kind of stacking on each other. I believe with each service pack there is a tool to uninstall components that are no longer necessary or superseded. So stick with a 40 GB OS partition and you should be fine for a long time. You will also notice we have a 10 GB secondary drive for a page file. We’ll get to that later in the article.
Now on to the actual build:
- First create a new VM
- Select Custom Configuration
- Enter VM Name and Inventory Location
- Select Datastore
- Select Virtual Machine Version: 7
- Select “Microsoft Windows Server 2008 R2 (64-bit)” as OS Version
- # of Virtual Processors: 1
- Amount of RAM: 4GB
- Network
- # of NICs: 1
- Adapter Type: VMXNET 3
- Select “Connect at Power On
- SCSI Controller: LSI Logic SAS
- Create New Virtual Disk: 40GB
- Advanced Options: No Change
- Now prepare the virtual hardware:
- Edit VM Settings > Options > General Section > Uncheck “Enable logging”
- Boot Options > Check box to force going into the BIOS on next boot
- Power on the VM (will go directly to BIOS) > Advanced > I/O Device Configuration:
- Disable Serial port A
- Disable Serial port B
- Disable Parallel port
- Exit and Save
- OS Installation and Configuration
- Install Windows 2008 R2 Standard – Full Install
- After OS install and reboot, change Administrator Password (will prompt)
- Disconnect Windows 2008 R2 ISO and set device type to Client Device
- Set Time Zone
- VMware Tools Install
- Install VMtools, choose Custom Install Type
- Disable the “Shared Folders” drive and install Tools ** Note we are disable Shared Folder due to profile loading issues which was documented even back in ESX 3.5 and VMware Tools here on the VMare Communities forum. I have not personally had an issue leaving it enabled but just to be cautious and the fact we don’t use this feature in our organization, we have left it disabled.
- Set time synching between the VM and ESX host
- Reboot after Tools Install
- Network Configuration
- From Server Manager, select View Network Connections
- Right click on Local Area Connection and select properties
- Uninstall QoS Packet Scheduler and both Link-Layer Topologies (Mapper & Responder) ** We don’t do QOS at the server level, our switches do that. Link Layer is not used by us.
- Uncheck IPv6 and close network connection screens ** We don’t use IPv6 yet so we disabled it for now
- Server Name
- From Server Manger select Change System Properties
- On System Properties screen click Change on Computer Name Tab
- Set Server Name and restart
- Windows Updates
- From Server Manager under Security Information, select Configure Updates
- Select Let me choose
- Under Important Updates, select Never check for updates, click ok
- Start > All Programs > Windows Update > Check for updates and install all Recommended Updates
- Enable Remote Desktop, choose “Allow connections from computers running any version of Remote Desktop” (2nd option)
- Disable Windows Firewall **Not best practice to disable, but my environment requires it
- From Server Manager, select “Do not show me this console at logon” and close Server Manager
- Taskbar Changes
- Right click 3rd icon from Start Button (Windows Explorer) and select “Unpin this program from taskbar”
- Right click 2nd icon from Start Button (Windows PowerShell) and select “Unpin this program from taskbar”
- Right click Taskbar and choose Properties and choose Customize under Notification Area
- Select “Turn system icons on or off”, and turn Volume Off, click Ok
- System Performance
- From Server Manager select Change System Properties
- Select Advanced Tab > Settings and choose “Adjust for best performance”
- Folder and Search Options
- Open “Computer” > Select Organize > Choose Folder and search options
- Under View Tab
- Select “Show hidden files, folders and drives”
- Uncheck “Hide extensions for known file types”
- IE ESC
- From Security Information Section, select Configure IE ESC
- Change Administrators to Off and leave Users On ** My reasoning for this is the only “Users” should be service accounts on a server so leaving it On should not matter
- From Security Information Section, select Configure IE ESC
- Change IE Home Page to blank so you don’t get that pesky Internet Exploer Enhanced Security Configuration warning page
- Under Computer, right click c: and select properties, uncheck “Allow files on this drive to have contents indexed in addition to file properties”
- Apply changes to c: and all subfolder/files
- Continue/Ignore on Access Denied errors
- Power Options (from Control Panel)
- Change option to High Performance
- Disable Hibernation
- Command Prompt, enter powercfg.exe –h off
- Delete the Page file and reboot (so c: can be fully defragmented)
- Run defrag
- Page File
- Edit VM Properties
- Add a 2nd hard drive (10GB) and change to SCSI (1:0)
- Run Disk Manager and format as Z: drive ** We use Z: as the drive letter so it does not interfere with adding additional drives later on.
- From Server Manager, select System Properties > Advanced > Performance Settings > Advanced > Virtual Memory Change
- Assign 1024MB Page file to c:
- Assign 5120MB Page file to z:
- SNMP
- Server Manager > Add Features > SNMP
- Server Manager > Configuration > Services > SNMP > Security
- Accepted community names – Add your community (as READ ONLY)
- Accept SNMP Packets from these hosts – Add your hosts (remember to leave localhost in there)
- Turn VM into a Template
This procedure will copy the Administrator account profile into the default user profile so that all users that login or that will be created in the future will get the same profile with all the customizations you have done above. When you sysrep a server template and create a new VM from it, a new SID is generated which means a new local Administratior account is created during the sysrep procedure. This means all the customizations you have done will be wiped out above unless you copy all your settings above when you create a new VM. In the past with Server 2003 and even Server 2008, you had the “Copy To” feature to copy a user profile to another. With Server 2008 R2, Microsoft has disabled this feature. It is now done via an unattend.xml file using the “CopyProfile” node. I actually prefer this method now after doing it a few times. This procedure is detailed per the Microsoft KB article http://support.microsoft.com/kb/959753- Create unattend.xml in “
c:windowssystem32sysprep” folder as follows. NOTE: Do not copy and paste the text below because my website messes up the quotes which will lead to errors during sysprep. Please right click-save as this link and copy and paste from the txt file instead.<?xml version=«1.0» encoding=«utf-8»?>
<unattend xmlns=«urn:schemas-microsoft-com:unattend»>
<settings pass=«specialize»>
<component name=«Microsoft-Windows-Shell-Setup» processorArchitecture=«amd64» publicKeyToken=«31bf3856ad364e35» language=«neutral» versionScope=«nonSxS» xmlns:wcm=«http://schemas.microsoft.com/WMIConfig/2002/State» xmlns:xsi=«http://www.w3.org/2001/XMLSchema-instance»>
<RegisteredOrganization>Your Organization Name</RegisteredOrganization>
<RegisteredOwner>Your Registered Owner</RegisteredOwner>
<CopyProfile>true</CopyProfile>
</component>
</settings>
<cpi:offlineImage cpi:source=«wim:f:/sources/install.wim#Windows Server 2008 R2 SERVERSTANDARD» xmlns:cpi=«urn:schemas-microsoft-com:cpi» />
</unattend>
- At command prompt, type the following command:
C:windowssystem32sysprepsysprep.exe /generalize /unattend:unattend.xml - System Preparation Tool 3.14
- Choose Enter System OOBE
- Check Generalize button
- Leave shutdown option as reboot
- Click OK
- Release the IP and turn VM into a template in Virtual Center
- Create unattend.xml in “
I hope this guide we wrote helps someone out there and saves you time. If you have any suggestions or questions, please leave a comment. I can take screenshots of any parts above you are confused on. I am also interested in knowing about more performance related customizations you guys might use we can add to your template so if you have any, please let me know. 🙂
So, you have to build a Windows Server 2008 R2 VM Template ESX/ESXi? Â Theres a lot of folks out there that give their 2 cents on the matter, and a few walkthroughs but everytime you read one thing you come across something new…So I decided to put my procedure online and I also added some notes about each task with reasoning for why I do each task.
Remember to setup vCenter for Guest Customizations by placing the sysprep files for all the various versions of Windows in the proper locations, refer to this VMware KB Article for locations and instructions: VMware KB: 1005593
Things you may need to keep out of your templates: (research your particular product)
| Task | Notes/Reasoning |
| Mount Windows 2008 R2 ISO | How else are you going to install? (anyone still using RIS out there?) |
| Boot to CD Drive | … |
| Install Windows 2008 R2 (Full) | Select full, we aren’t doing a core edition template… |
| Set Admin Password when prompted | yes… |
| Log in | Setup will have rebooted the machine and you’ll be looking at the login screen |
| Set Time Zone | Time is important |
| Install VMware Tools | Fix that laggy mouse and gain the additional benefits |
| Enable Remote Desktop w/ NLA | Allow Secure RDP |
| Install Telnet Client | Nice to have it installed before you need it your netadmin will <3 you for this |
| Install SNMP Services feature (SNMP Service, SNMP WMI Provider) | Most people have some kind of network monitoring that will take advantage of the additional info SNMP will provide |
| Configure SNMP: Contact: Help Desk Location: VMware Services: Physical, Applications, End-to-end |
This is SysContact, SysLocation and SysServices (as defined by RFC1213)- these are picked up by alot of network monitoring tools, letting them know it’s virtual without having to nmap or otherwise find the NICs mac and see it’s VMware is nice |
| Disable Windows Firewall on all 3 profiles | You can turn it back on and punch your holes later |
| Disable Indexing on C: | This is really a performance thing, and is augmented further by virtualization, imagine your VMs sitting idle indexing the C: drive, awesome use of CPU cycles! |
Configure IE:
|
These are what I like, home pages slow down IE loading, when I’m just going to navigate elsewhere, Google > Bing, Kill Bing, Remove accelerators–because we aren’t mapping or blogging from our servers…, and advanced settings, ensure temp files are cleared when you exit IE, and turn off those friendly HTTP errors |
| Configure systray to always show icons/notifications | Personal preference, I don’t want to have to unhide icons when I’m looking for something… |
| Configure IE ESC to be disabled for Administrators | Admins are going to do this anyway… |
| Adjust visual effects for performance | Save some CPU, removes the unnoticable fancy stuff, window shadows, cursor shadows, etc. |
| Lower Boot Menu timeout to 5 seconds | In case something else ends up in the boot menu, don’t want reboots to take longer then they have to…oh and this won’t survive sysprep anyway… |
Modify Folder Options to:
|
This is all self explanatory no? |
| Set Control Panel to Large Icons | Not even sure if this survives sysprep |
| Set Windows Update to Never check for updates | This won’t survive sysprep but is required so you can check for updates |
| Windows Update -> Check for updates | |
| Apply Updates | |
| Restart (required for Windows Updates) | |
| Log in | |
| Windows Update -> Check for updates | |
No more updates required to apply–Did not apply:
|
I don’t put any of these updates into images (.NET 4.0 can present problems, you can always install it if required on a per machine basis, but not hose up the works on every other VM that likely won’t need it. |
| Install BGInfo to C:BGInfo Create Shortcut with switches in C:ProgramDataMicrosoftWindowsStart MenuProgramsStartup |
BGInfo is your friend! – click here for more info on BGInfo |
| Rename Computer to Win2k8-R2-E-Template | This is just personal preference, when you deploy the VM your guest customization will rename it to whatever you want anyway |
| Add Description: “VMware Template†| Let AD know this is a VM |
| Delete desktop.ini file on desktop | House keeping before defrag |
| Empty C:UsersAdministratorAppDataLocalTemp | House keeping before defrag |
| Disable Hibernation via powercfg.exe -h off (deletes hiberfile.sys) | Our servers aren’t going to hibernate |
| Disable Paging | Don’t be afraid, this is to defrag as much as possible |
| Restart (required for disabling paging) | |
| Defrag C: | Optimize everything |
| Renable Paging | self explanatory… |
| Set Power Plan to High Performance & Never Turn off the display | Ensure that the server never sleeps or anything |
| Create temp user and add to local administrators group | This is the beginning of the h4x! |
| Log out | because your going to login with the temp account |
| Log in as temp user | mkay… |
| Copy Administrator Profile to Default Profile | Now you see why we made that temp account, some people use sysprep to do this, I like to use Windows Enabler since this option is grayed out in Windows Server 2008 |
| Log out | |
| Delete temp user | |
| Restart | required to delete locked temp user profile bits |
| Log in as Administrator | |
| Delete temp user profile | |
| Delete ntuser.dat.* files from Default Profile | |
| Test IE and verify settings | An update may have botched your IE settings, so double check! |
| Shutdown | Bye guys |
| Detach ISO | Ya… |
| Convert to Template | Mkay… |
Что будет, если скрестить ужа и ежа? (c) Народное
Если отбросить очевидный для многих ответ: «два метра колючей проволоки», то чем еще может пригодиться установка VMware Server поверх Microsoft Hyper-V Server?
Из плюсов использования Hyper-V Server 2008 R2 в качестве ОС, устанавливаемой на сервер можно отметить следующие:
Лицензия Hyper-V Server бесплатна, что поможет вам сэкономить, если вы планируете запускать на сервере только виртуальные клиентские ОС, вроде Windows XP/Vista или различные виртуальные оснастки (virtual appliances), на базе linux/unix.
Hyper-V Server поддерживает большой список устройств (дисковые/raid-контроллеры, сетевые карты), поддерживает технологии Bitlocker, Clustering Services, имеет встроенный брандмауэр и клиент (iSCSI Initiator) для подключения к СХД по протоколу iSCSI; Hyper-V просто устанавливается и настраивается из консоли sconfig, а также интегрируется с доменом Active Directory. Из-за небольшого ‘отпечатка’ Hyper-V Server 2008 R2 занимает около 6 Гб на диске и потребляет меньше памяти, чем полнофункциональные версии Windows Server 2008 за счет небольшого количества запущенных программ и служб.
Наконец, Hyper-V Server 2008 R2 можно загружать с flash накопителя или переносного диска, что может пригодиться, например, при организации мобильного демо-стенда, когда у вас нет доступа к собственным серверам.
С другой стороны, VMware Server может пригодиться по следующим причинам:
В отличии от Hyper-V, для работы VMware Server (и запуска 32-битных гостевых ОС) не требуются процессоры с поддержкой DEP и Intel VT-X/AMD-V. Управлять VMware Server можно через Web браузер, в качестве управляющих ОС поддерживаются Windows XP/2003 (в отличии от оснастки Hyper-V Manager, которая может быть установлена только на ОС Windows Vista SP1 и выше). Кроме того, у VMware Server есть аналог технологии Memory Overcommitment, позволяющей запускать виртуальные машины с большим объемом памяти, чем есть физически на сервере.
Для настройки Hyper-V Server 2008 R2 (задания IP адресов, имени сервера, включения в домен) вы можете воспользоваться консолью sconfig или настроить параметры вручную, как описано в данной статье.

Важный шаг — перед тем, как установить VMware Server потребуется удалить роль Hyper-V Server (в противном случае, у вас могут возникнуть проблемы с запуском виртуальных машин). Сделать это можно с помощью команды:
dism /online /disable-feature /featurename:Microsoft-Hyper-V
dism /online /disable-feature /featurename:Microsoft-Hyper-V-Configuration

Другим вариантом может служить создание альтернативного варианта загрузки ОС с выключенным гипервизором, как описано в данной статье.
Установка VMware Server производится в автоматическом режиме:
VMware-server-2.0.2-203138.exe /s /v /qn
После завершения установки сервер перезагрузится.
Теперь можно удаленно подключиться к серверу по имени или IP адресу (порт по-умолчанию 8333):
В случае, если у вас есть несколько сетевых адаптеров, то настроить привязку к нужному вы можете с помощью графической утилиты vmnetcfg.exe, устанавливаемую в папку по-умолчанию «%ProgramFiles(x86)%VMwareVMware Workstation«.