In this quick article we are going to review the steps to install Windows Server 2016 VMware tools. In particular this one refers to a manual setup on a single virtual machine. It is possible to execute the VMware tools setup on multiple virtual machines as well. By running an unattended setup using the command line or during the SysPrep for Windows Operating Systems. We’ll cover these steps with a separate article.
So the question would be: why install VMware Tools?
VMware Tools enhance the performances of the operating system also adding extra features that otherwise would not be available until their installation. For example the ability to drag and drop files between the Guest OS and the Host. to name one. And the Windows Server 2016 VMware tools in this respect make no difference.
The VMware tools for Guest OSes include lots of components categorized in Drivers and Toolbox components.
So in the list of Drivers we can find:
- Audio
- LSI
- MemCtl
- Mouse
- PVSCSI
- SVGA
- Sync
- VMCI
- Hgfs
- VMXNet
- VMXNet3
- FileIntrospection
- NetworkIntrospection
- VSS
In the list of Toolbox features we find:
- Unity
- Perfmon
It is possible to dictate which drivers or component we want to install using either Manual or Unattended setup. In this case this article refers to a simple manual install for Windows Server 2016 VMware tools.
Install Windows Server 2016 VMware tools
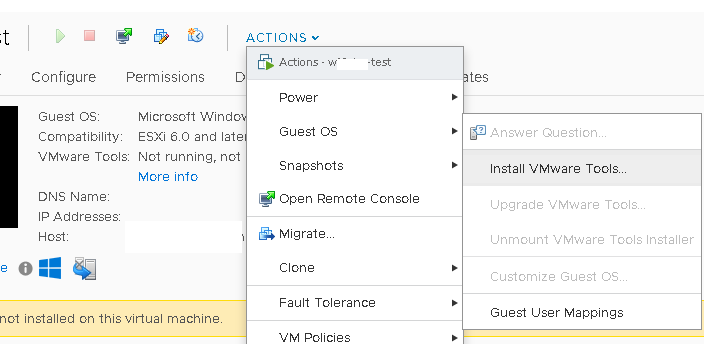
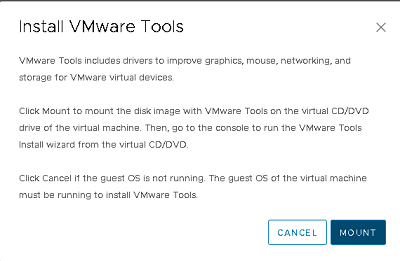
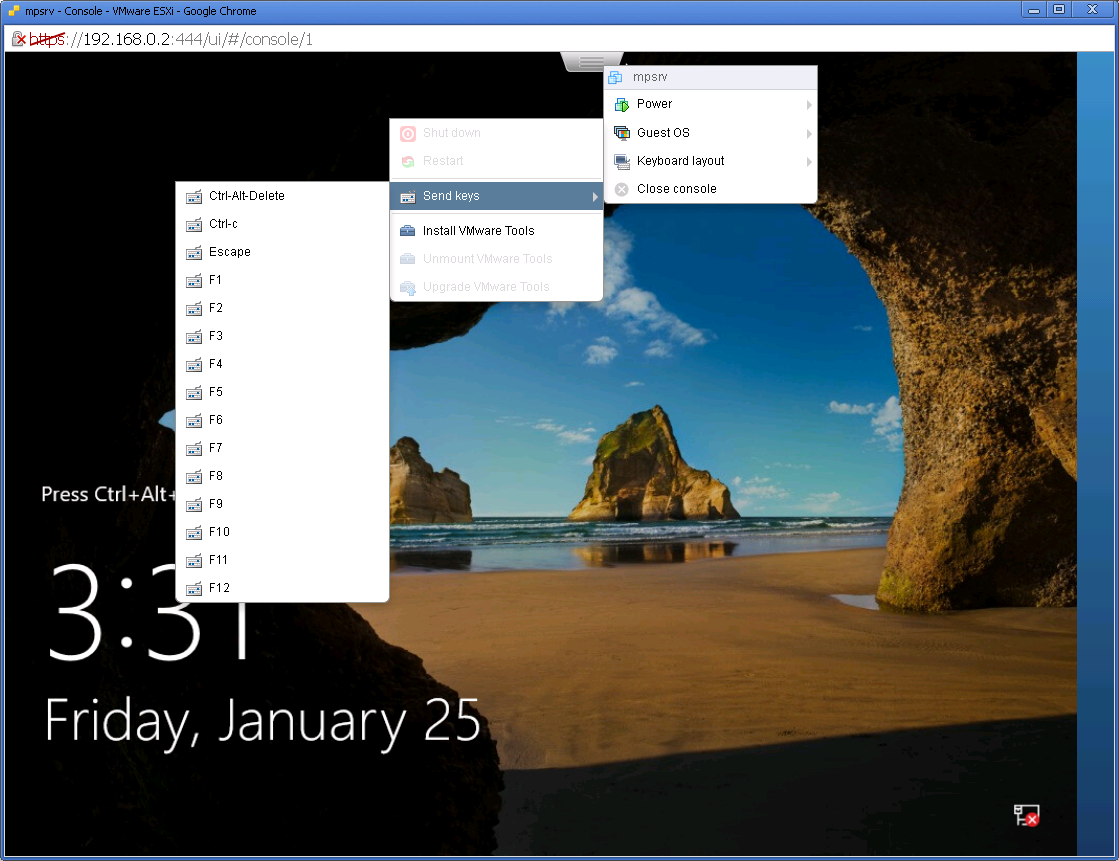
From the Virtual Machine Actions menu and then under Guest OS we have the option to manually install the VMware tools. As soon as we select this option the vSphere Hypervisor in this case will automatically unmount any CD/DVD and mount the Windows.ISO file which include the VMware tools. From here we can start the wizard. the same wizard will automatically detect the version of the operating system.

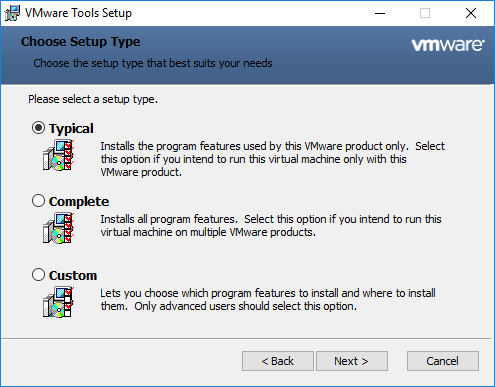
In this step we can choose the type of installation to perform. The Typical option applies to the large majority of cases. Of course it is possible to use a complete or even a Custom one. Custom setup allows to choose which components the wizard will install. Very useful in situations where drivers might conflict with current components. Very unlikely to happen but there might be situations for example where 3rd parties require exclusive access to specific functions like VSS.

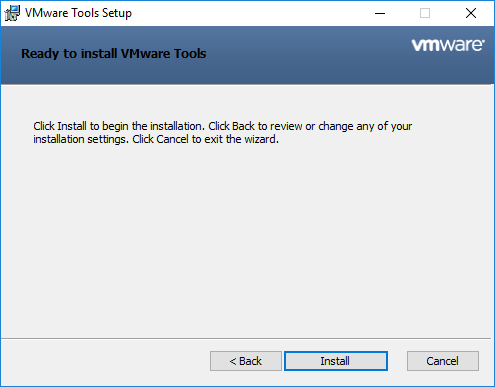
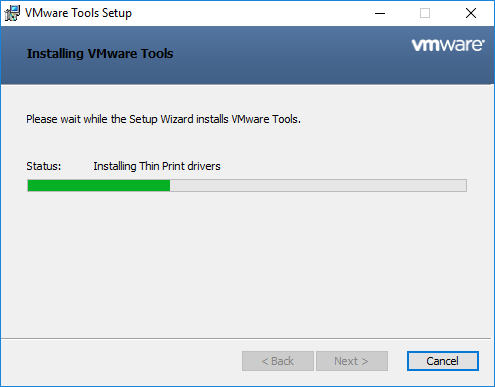
As soon as the selection is chosen now the wizard is ready to install the selected components.

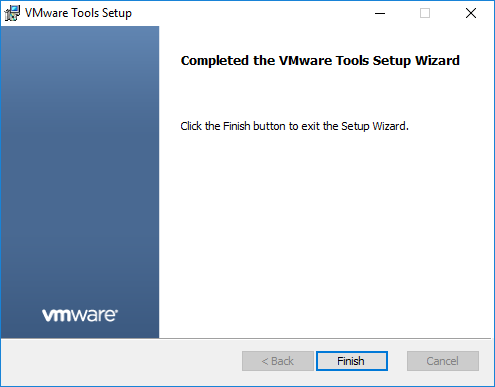
The installation takes only a few minutes if not seconds. Let’s click Finish to complete the installation.

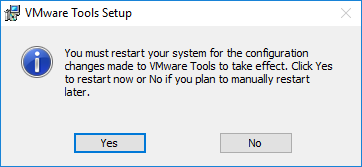
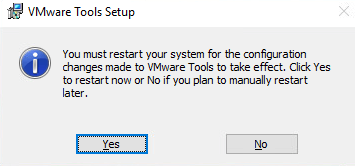
To make the new changes effective we need to reboot the virtual machine. Of course this operation can be deferred allowing to save all work before rebooting.

As a best practice all virtual machines should have VMware tools installed as aside from performances enhancements also greatly helps to interact with the operating system residing in the virtual machine Guest OS. A few examples include:
- when running Backups and Restore operations is helping freezing access to the file system achieving crash and application consistent backups.
- better Memory management including memory ballooning features
- better access to the file system inside the virtual disks (in particular with SCSI disks)
- enhanced network performances including the support of plenty of enterprise features including the ones for security
As a next step we are now ready to use this Windows Server 2016 virtual machine as a template to start building or upgrading our home lab. In the next article we’ll review the options about deploying custom Windows Server 2016 virtual machines.
Summary:
In this part, I will create a new VM and Install Windows server 2016, then convert it as a template. This template is the one that will be used for all the virtual servers for the lab, servers such as: Active Directory, SQL Database, vCenter, View Connection, Login VSI, and Launchers. Previously I have worked with Windows server 2012 and everything works just fine, but I think it was a perfect time for an update.
This is part 4 out of 12 of the VDI LAB series. Check out the introduction first.
The ultimate VDI deployment guide (from scratch) with VMware vSphere 6.5 and Horizon View 7.3 – 2018. 😉
1. Prerequisites
- ESXi host previously configured.
- Windows server 2016 ISO file and upload it into the local Datastore.
Important notes
- I am using the evaluation ISO of windows server because this template is for testing purpose and I think the 180 days period will be enough.
- Alos, the server could be rearmed up to 2 times using the following command: slmgr.vbs -rearm
I am trying to keep simple the configuration, due to the server is for different purposes. There are more thing to configure and tune to improve performance, it could be also considered (as needed):
- Select VMware Paravirtual SCSI controller.
- Partition and size the installation disk
- Place page files on a separated disk.
- Change the Firewall (turn off) if necessary
- Set Feedback and Diagnostic Settings to Full
- Add Features as Telnet or others you’ll need.
- Disable the weekly optimize option for disk defragmentation
- Software installation. In my case, only google chrome will be installed.
2. VM Creation from ESXi host
— Advertisement —
NOTE: I decided to use ESXi Web client for this VM creation, at this point VCSA web client interface could be used as well.
@ ESXi Web Client
- From Navigator, go to Virtual Machines / Create/Register VM
- Select Create a new virtual machine and click Next.

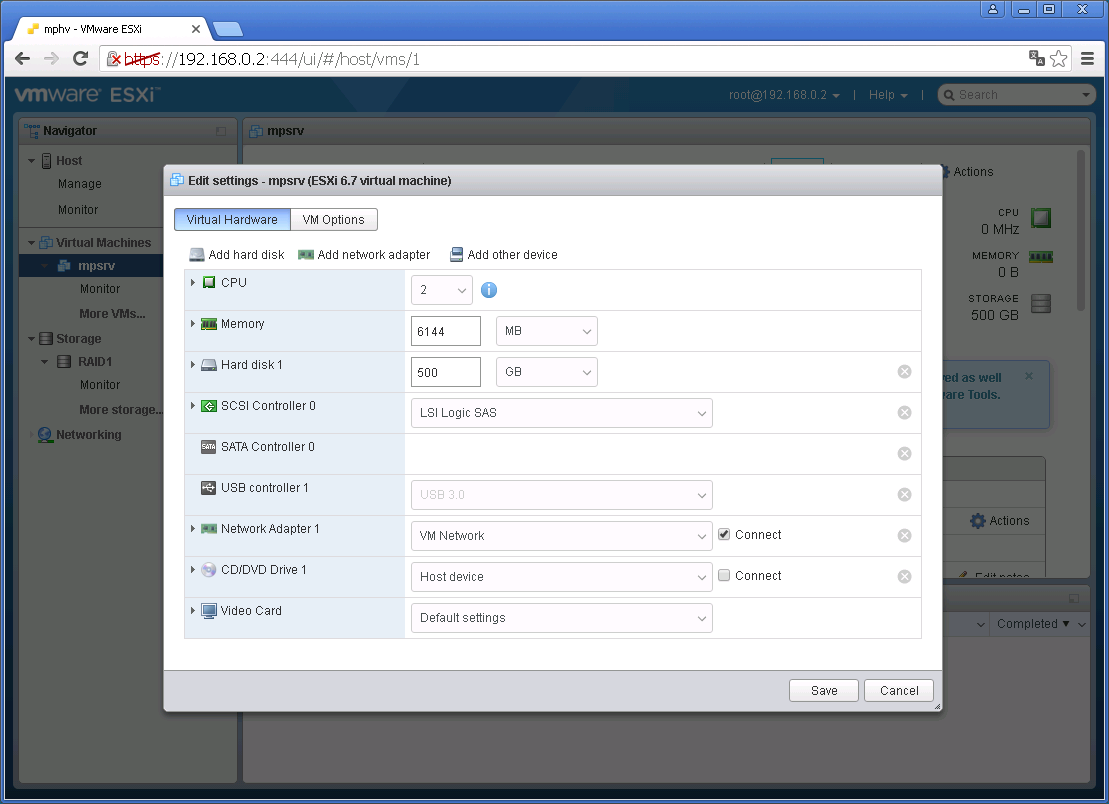
- Name your VM, (like “Win2106_Template”) and select Microsoft Windows Server 2016 (64-bit) as Guest OS version. Click Next.

- Select datastore to store VM and click Next.

- From Virtual Hardware tab, left CPU, RAM and Hard disk by default. (This can be modified later as required) and from Network Adapter 1, change Adapter Type to VMXNET 3.

- Still on Virtual Hardware, select Datastore ISO file and look for the Windows 2016 server ISO.

- From VM Options tab, go to Boot Options and check Force BIOS setup screen like the image below. Click Save.

- Review settings and hit Finish.

3. Windows Server 2016 — Installation
- Power on the VM. The BIOS should appear when starting the VM.

- Go to Advanced tab, hit enter on I/O Device Configuration.

- Disable all serial and parallel ports.

- Go to Exit and choose Exit Saving Changes (or hit F10).
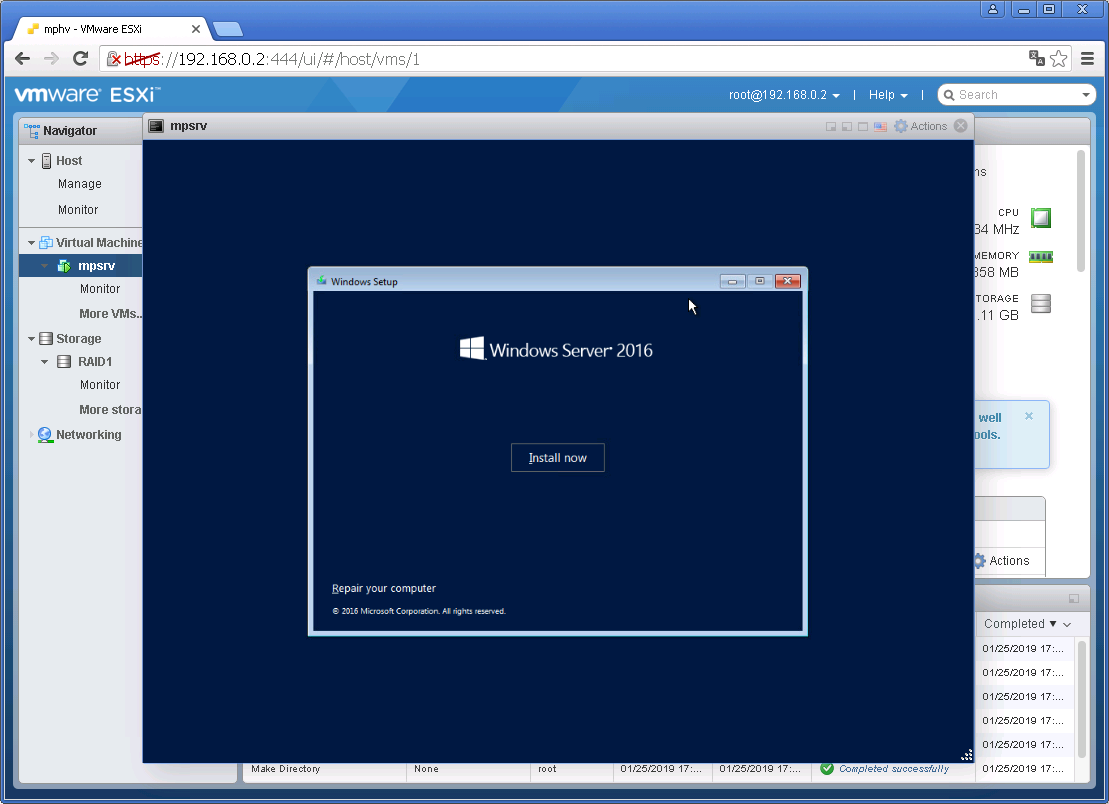
- The VM should boot now with the Windows Setup, left by default (or as the image below) and click Next.

- Click Install now.

- Select Windows Server 2016 Datacenter Evaluation (Desktop Experience). Click Next.

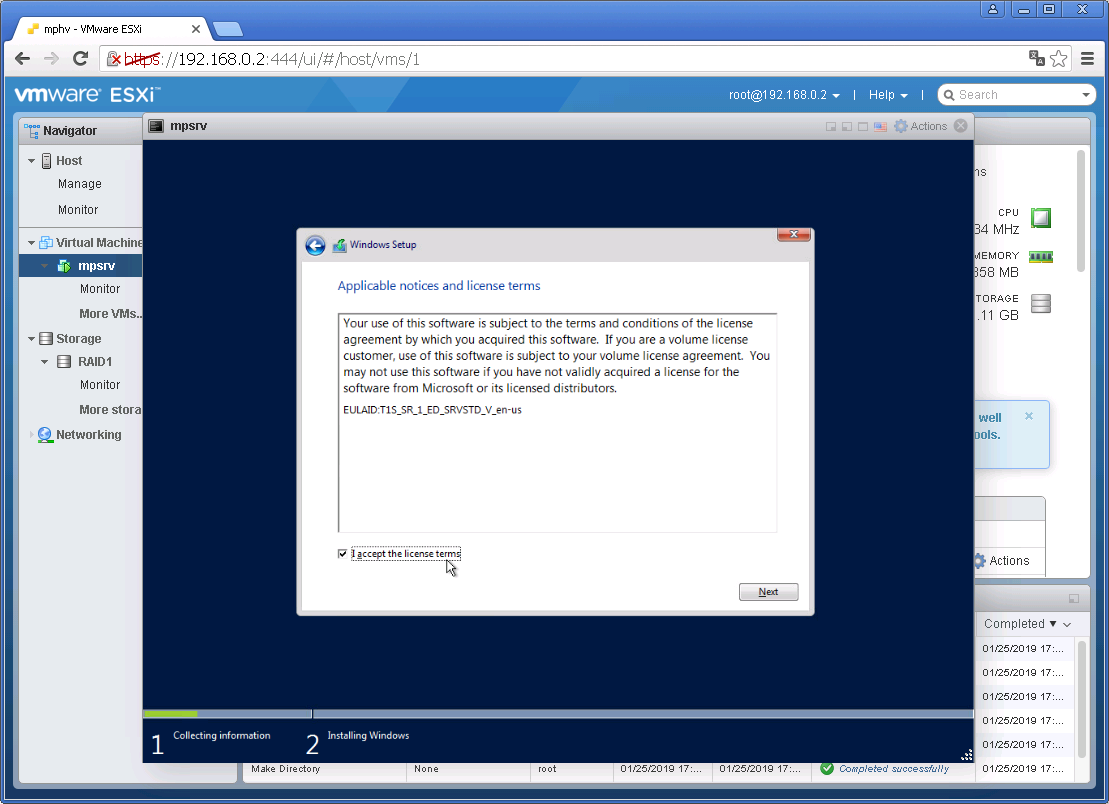
- Accept license terms.

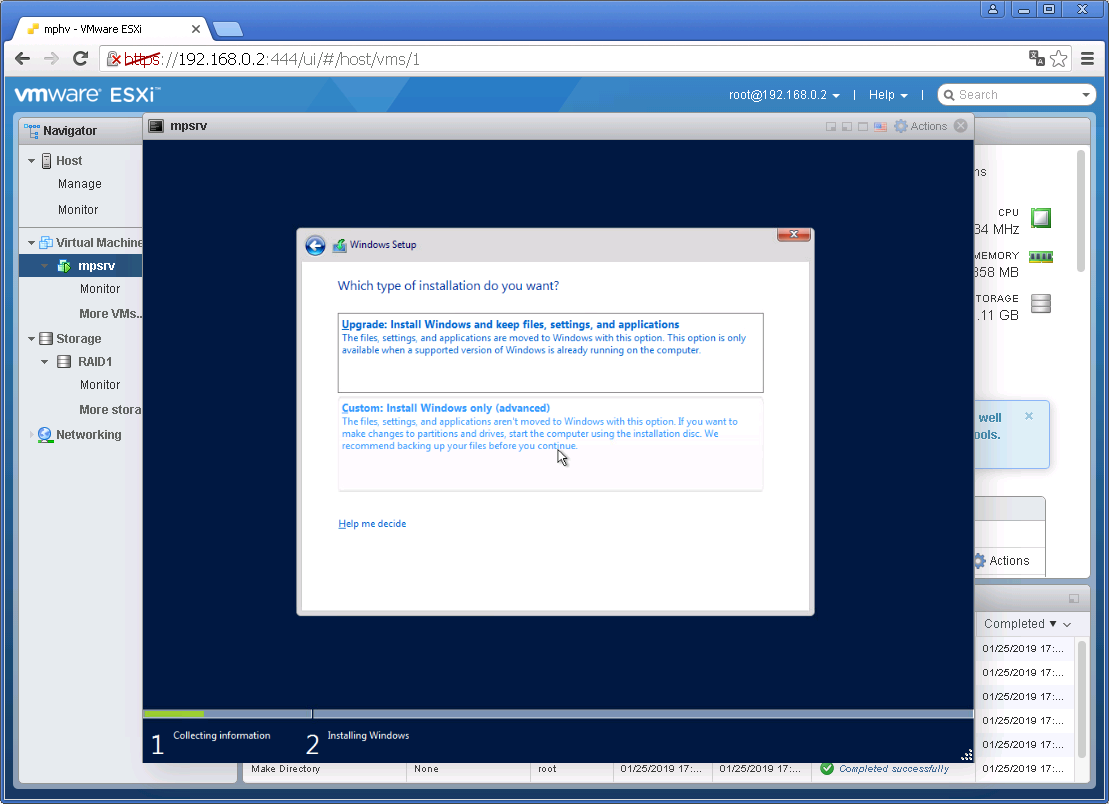
- In «type of installation» select Custom: Install Windows only (advanced).

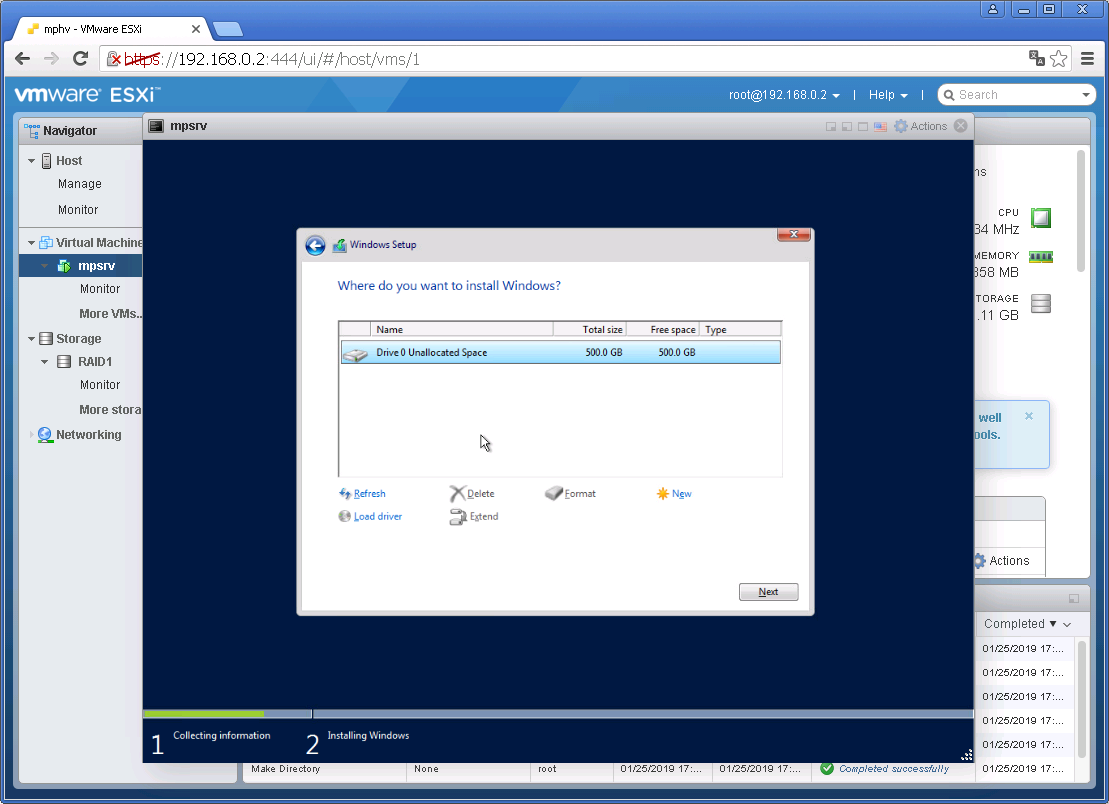
- Hit Next to install windows on the default drive.

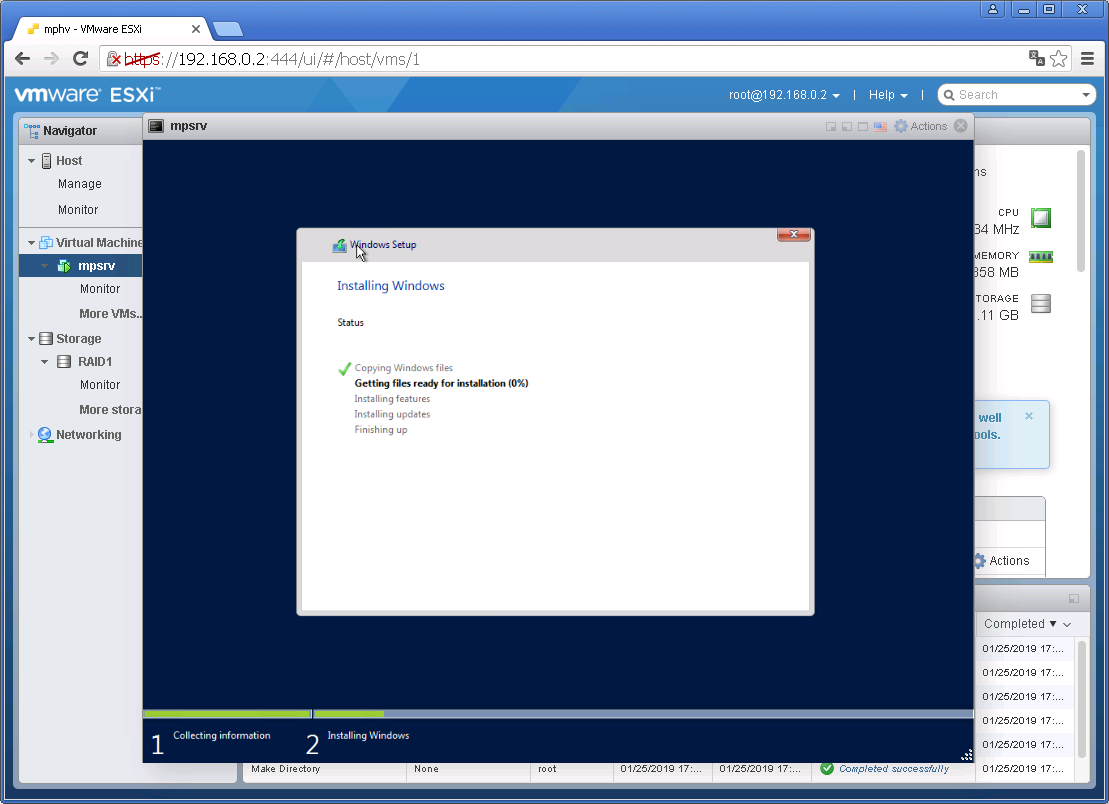
- The installation will start. Will take about 5 min and then the VM will be restarted.

- On «Customize settings», input a password for the Administrator account. Remember to choose a strong password or you’ll get a similar message as the image below. Click Next.

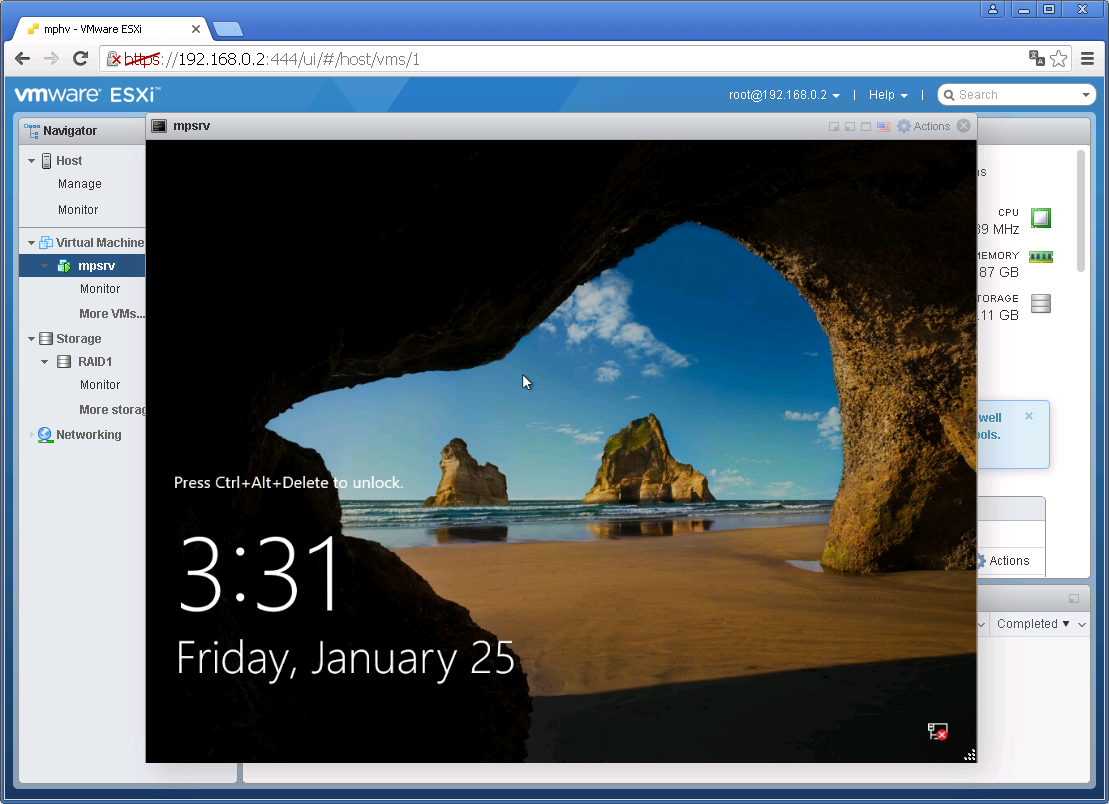
- Finally, Windows welcome page will show up.

4. Windows Server 2016 — VMware tools
@ESXi
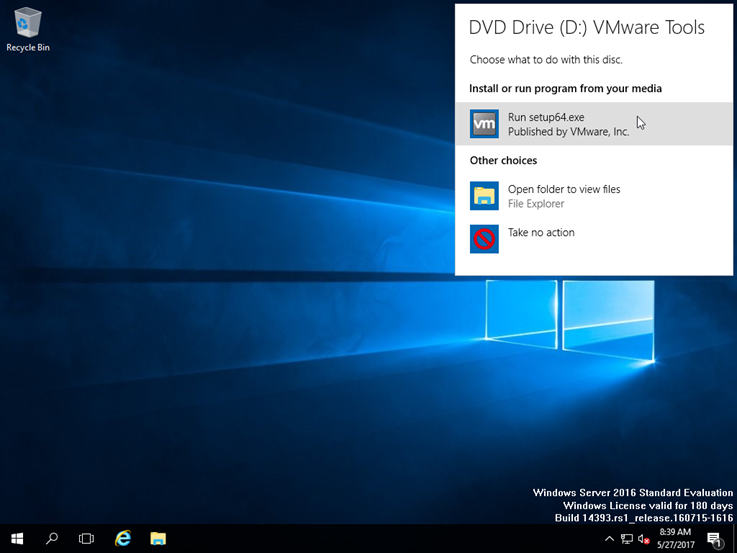
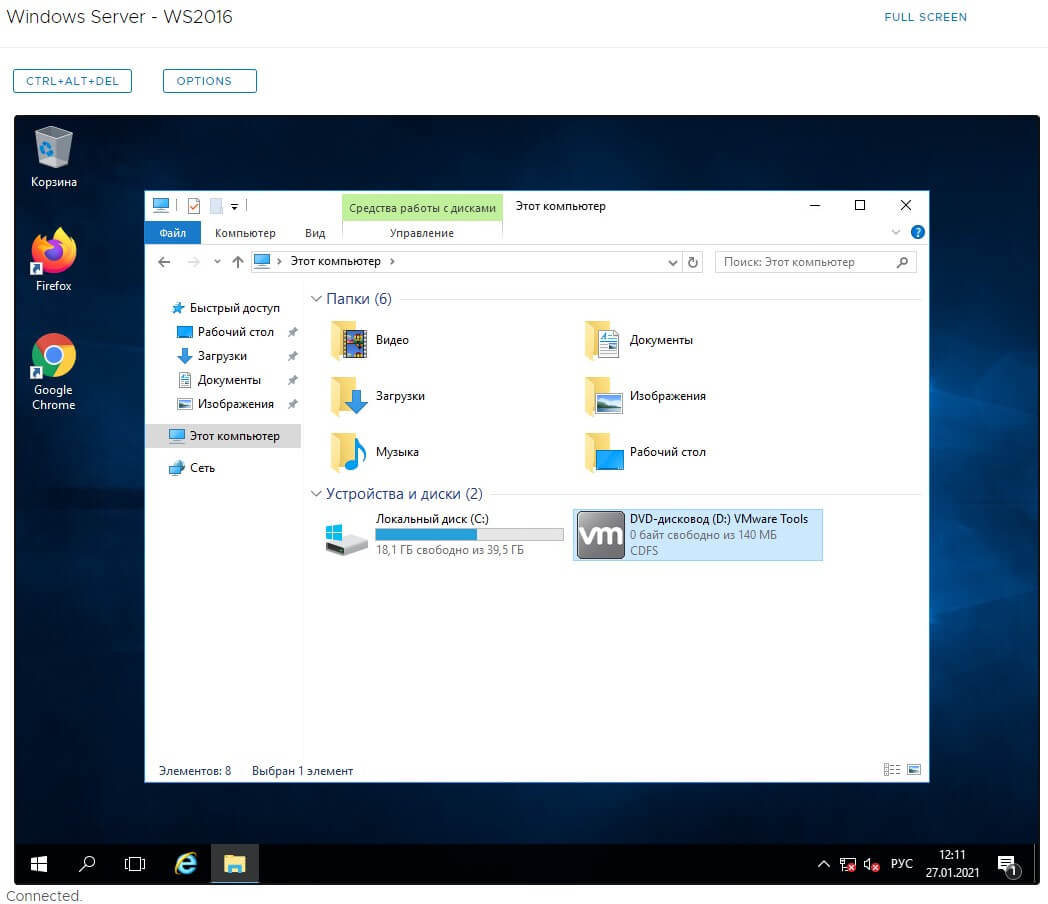
- From new VM created, right click on it and go to Guest OS / Install VMware tools. VMware tools ISO will be mounted on the Guest OS.

@VM Guest
- Go to This PC and double click on Drive D: VMware Tools.

- Double click on setup64.

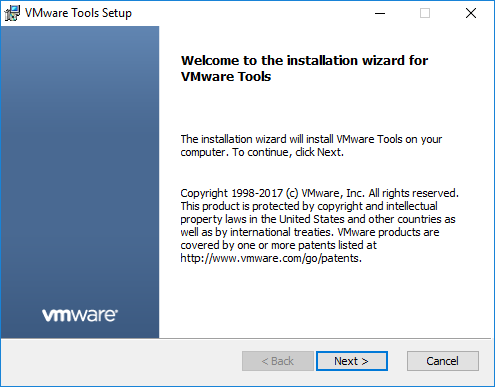
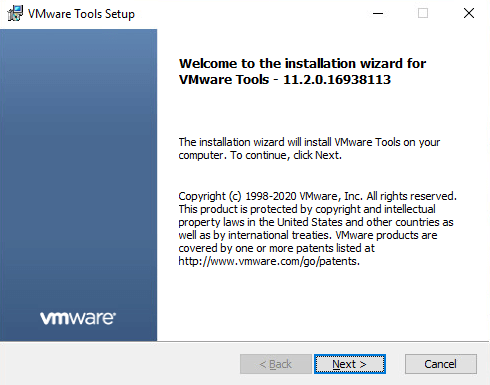
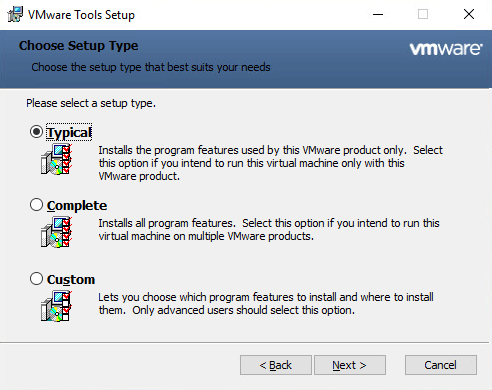
- Follow the VMware Tools Setup, select typical installation, leave everything by default, hit Install and finish.

- After the installation is finished, reboot the server.
5. Windows Server 2016 — Configuration and Tuning
@VM Guest
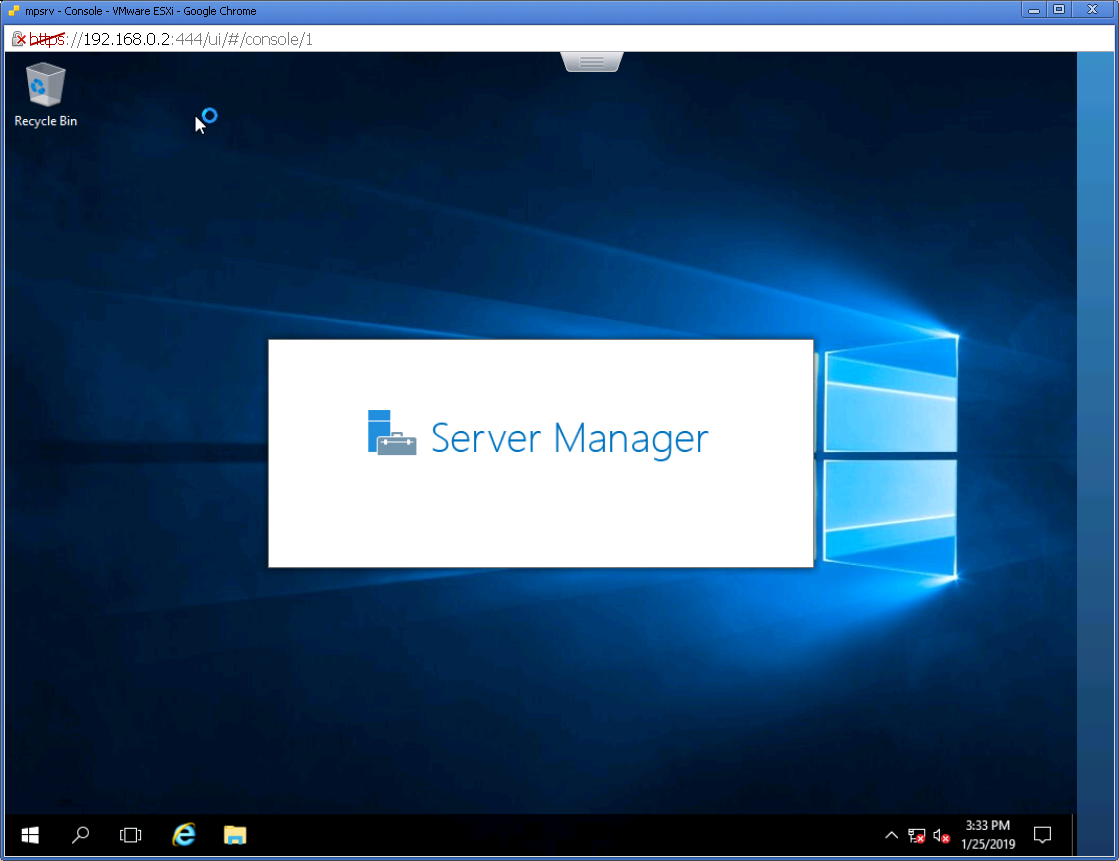
5.1 Disable Server Manager at logon
- From Server Manager, go to Manage / Server Manager Properties.

- Check Do not start Server Manager automatically at logon and click OK.

5.2 Update the server until no more patches are available.
— Advertisement —
Note: Keep updating the server regularly in order to have it ready for quick deployment.
- From Server Manager / Local Server, click any of the 3 options related to Windows update.

- From Update status, hit Check for updates.

- Wait for the updates to be downloaded and install them. Go and grab a coffee, this will take a while, more than an hour in my case.
NOTE: Install and repeat until you see no more updates

5.3 Change Time zone
After updates are made and the server is rebooted, let’s change the Time zone. This can truly impact the performance of some tests, especially when working with the active directory. Time zone setup is also important for all the ESXi host in our environment.
- From Server Manager / Local Server, click Time zone.

- Click Change time zone… and well, select according to yours.

5.4 Change computer name
- From Server Manager / Local Server, click on the current computer name.

- From the Computer Name tab, click Change.

- Input the new name for the template and click OK.

- Restart the VM.
5.5 Change System Properties
- Go back to Server Manager / Local Server and click on your new server name. Go to Advanced tab and configure Performance and Setup and Recovery option.

- From Performance click settings, in Visual Effects tab, select Adjust for best performance, click OK.

- Go back to Advanced tab and from Setup and Recovery click Settings and change both “Time to display…” to 5.

5.6 IE configuration
- From Server Manager / Local Server, go to IE Enhanced Security Configuration and click on «On».

- Check Off for both options and click OK. (You might decide only to turn off Administrators).

- Go to IE / Internet Option / General tab and set home page as blank (About:blank).

5.7 Clean up backup updates and logs.
- Clear backups. Run command prompt as admin.
- Use this command: Dism.exe /online /Cleanup-Image /StartComponentCleanup /ResetBase. This took about 15 min for me! (Grab another coffee?)

- Clear all event logs. Run Windows PowerShell as admin.
- Us this command line: Get-EventLog -List | foreach{Clear-EventLog -LogName $_.log}

5.8 Others (important):
- Disable hibernation: Open command prompt as admin and run: powercfg -h off.

- Disable indexing: Right click on (C:), from General tab, uncheck Allow files on this drive to have contents indexed in addition to file properties. Apply also to all subfolder.

- From Windows Explorer / Folder Option / View, check Hidden Items.

- Go to the Network Adapter and disable IPv6.

- Go to Control Panel / Power Options and choose High Performance for power plan.

- Install google chrome.
- Disconnect the ISO files.
- Run Sysprep

- Select options as the image below:

6. Convert VM to a template
@ VCSA
Finally, turn the VM into a template.
Convert template….. Click Yes in the following windows.

Here we’ll have our Windows Server 2016 template!


Juan Mulford
I have been active in IT for over fourteen years now. I am a solutions architect, working with storage, virtualization, and VDI solutions. For the past ten years, I have been living and working in Taiwan.
VMWare Tools — это набор утилит и драйверов, который повышает производительность гостевой операционной системы и улучшает управление виртуальной машиной VMWare. В состав VMWare Tools входят драйверы необходимые для корректной работы гостевой ОС в среде виртуализации. После установки VMTools некоторые из драйверов ОС заменяются оптимизированными драйверами (например, сетевой драйвер vmxnet3).
В этой статье мы рассмотрим, как установить VMWare Tools на различных гостевых ОС.
VMware Tools поддерживается на 32-и 64-разрядных операционных системах, включая Windows, Linux, Solaris, Mac OS X и другие.
- Установка VMWare Tools в Windows
- Установка VMware Tools в Linux
Содержание:
Если в виртуальной машине не установлен набор VMWare Tools, то в гостевой операционной системе ВМ отсутствуют некоторые важные функции и возможности.
Также благодаря наличию VMTools в гостевой ОС обеспечивается:
- Корректность и плавность миграции (VMotion and Storage VMotion) между хостами ESXi;
- Выполнение автоматического перезапуска зависшей ВМ на другом хосте с помощью VMware High Availability (HA);
- Корректное подключение и отключение дисков и файлов ISO образов;
- Доступна кастомизация ОС при установке из шаблона (смена пароля администратора, настройка автовхода в ОС, смена уникального UID при клонировании с помощью sysprep и т.д.);
- Повышается производительность ОС;
- Использование memory ballooning для оптимизации использования оперативной памяти хоста.
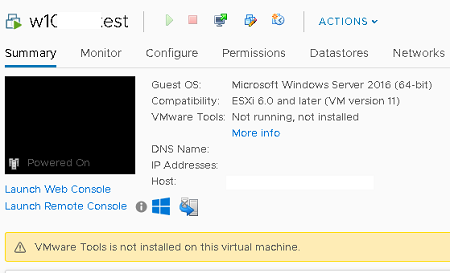
Чтобы проверить, установлена ли VMWare tools в гостевой ОС виртуальной машине, выберите ее в клиенте vSphere.
Если VMTools не установлены, статус будет “Not Running, not installed”
Установка VMWare Tools в Windows
Чтобы установить VMTools в гостевой ВМ с Windows, нужно подключить ISO файл.
- Выберите меню Actions -> Guest OS -> Install VMWare Tools;

- Подтвердите монтирование файла. Это действие подключит монтирует к ВМ iso образ с установочными файлами;

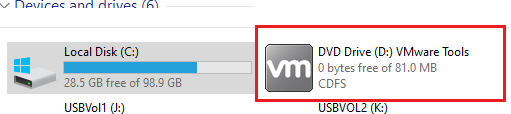
- Теперь войдите в гостевую Windows через консоль VMWare или по RDP. Запустите File Explorer и перейдите в This PC. Найдите в списке подключенных дисков VMWare Tools DVD drive и щелкните по нему;

- В открывшемся окне установки VMTools нажмите несколько раз Next и согласитесь с перезагрузкой виртуальной машины;

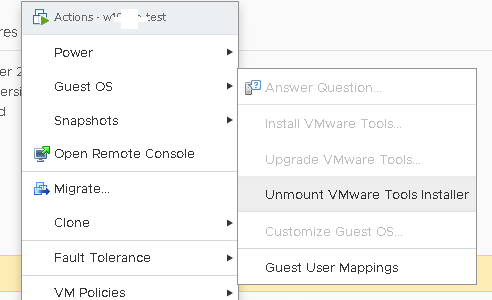
- Теперь можно отключить установочный диск VMware Tools из виртуальной машины (Action -> Guest OS -> Unmount VMWare Tools Installer).

- В свойствах виртуальной машины вы можете проверить, что VMware Tool установлены в гостевой ОС (VMWare Tools: Running, version:xxx (Current)).


Установка VMware Tools в Linux
В дистрибутивах Linux есть два способа установки VMWare tools – с помощью ISO файла vmtools (по аналогии с Windows) и с помощью open-source пакета Open-VM-Tools.
Установка VMTools через ISO образ аналогична установке в Windows, только для запуска установки используется perl-скрипт.
Например, в CentOS установка выполняется так:
Вы можете установить все зависимости, необходимые для установки VMTools с помощью команды: yum -y install kernel-devel gcc dracut make perl
- Смонтируйте ISO образ с VMTools;
- В гостевой Linux смонтируйте ISO образ в каталог /mnt:
mount /dev/cdrom /mnt/ - Распакуйте архив с VMTools:
cd /mnt/tar -zxvf VMwareTools-versionxxxx.tar.gz -C /tmp/ - Перейдите в каталог /tmp/vmware-tools-distrib/ и запустите perl скрипт:
cd /tmp/vmware-tools-distrib/ - Завершите установку пакета VMware Tools ответив на вопросы установщика (для установки в автоматическом режиме используется параметр —force-install);
- Если нужно, перезагрузите гостевую ОС;
- Проверьте, что служба запущена:
systemctl is-active vmware-tool - Осталось удалить временные файлы и отмонтировать ISO образ:
rm -rf vmware-* VMwareTools-*umount -f /dev/cdrom
./vmware-install.pl
Также вы можете установить VMTools с помощью пакета Open-VM-Tools (OVT) от VMware. Они доступны для установки из базовых репозиториев с помощью YUM или APT.
Например, в Debian/Ubuntu для установки OVT используется команды:
apt-get update
apt-get install open-vm-tools
Если вы используете Ubuntu с графическим интерфейсом, установите open-vm-tools-desktop:
apt-get install open-vm-tools open-vm-tools-desktop
В CentOS/RHEL используются такие команды:
yum update
yum -y install open-vm-tools
Для запуска службы и добавления ее в автозагрузку, выполните:
service vmtoolsd start
chkconfig vmtoolsd on
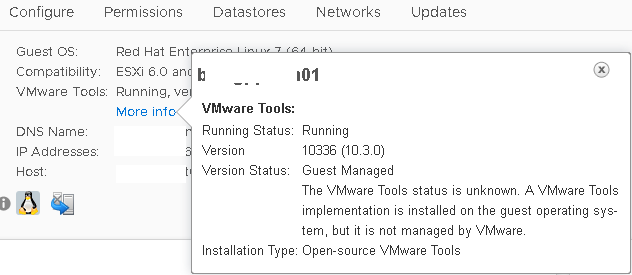
Обратите внимание, что после установки OVT в статусе ВМ будет указано:
- Running Status: Running
- Version Status: Guest Managed
The VMware Tools status is unknown. A VMware Tools implementation is installed on the guest operating system, but it is not managed by VMware. - Installation Type: Open-source VMware Tools
The steps below were done on a Windows Server 2016 installation, but the process is the same for all recent versions of Windows and Windows Server.
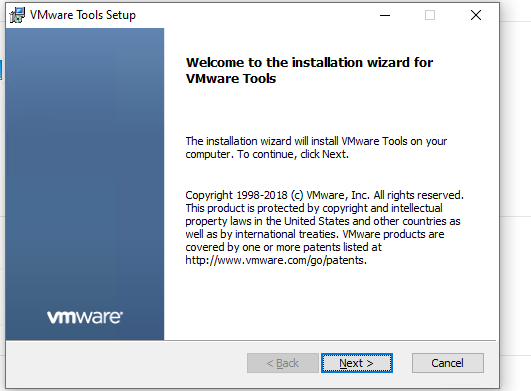
After you have finished installing the operating system and logged in with a Windows Administrator account, open the VM menu and click Install VMware Tools.

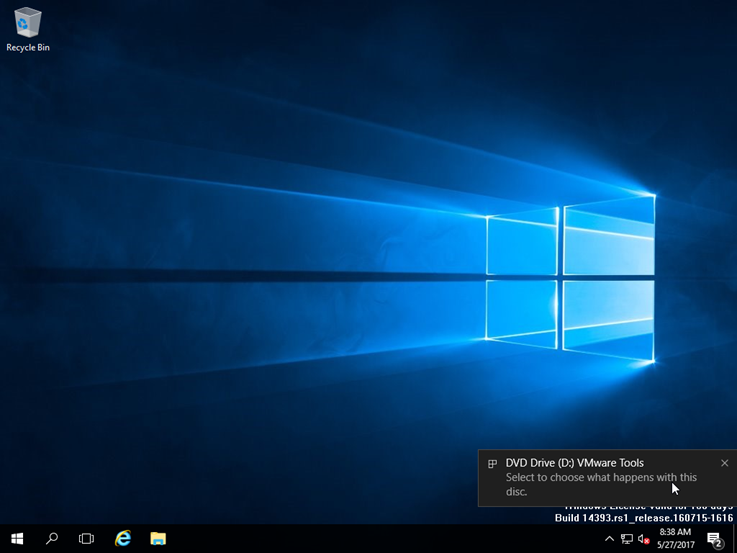
You will then see that the virtual DVD of VMware Tools has been loaded into VM’s DVD drive. Tap on the message that will appear to continue. Alternatively, if the message is gone, open File Explorer, enter the contents of the DVD and run Setup.exe.
Click Run setup64.exe to start the process.
Click Next to continue.
In a typical installation of a VM, select Typical and then Next to continue. For more advanced customization, select Complete or Custom.
Click the Install button to continue.
The VMware Tools installation process is in progress. Wait for it to finish.
Finally, click Finish to finish the process.
Since it is Windows, VMware Tools will need to restart the VM in order to fully complete the installation of VMware Tools. Click Yes to continue.
That’s it!
After the VM restarts, the VMware Tools installation is complete.
For more information about installing VMware Tools on other operating systems like Linux, read more here.
- Virtual Lab
- VMware Tools
- VMware Workstation

My name is Dimitris Tonias, IT Pro, G(r)eek, focused on Server, Virtualization, and Cloud technologies.
Related Articles
Установка VMware Tools Windows Server + Core Edition
При установке операционной системы Windows с установочного диска для её корректной работы в среде VMware необходимо установить ПО VMware Tools. Данное ПО содержит актуальные драйвера для ОС, а также обеспечивает выполнение мониторинга и базовых функций ОС, например, функцию «Shutdown Guest OS» (выключение ОС).
Для начала необходимо подключить к ОС установочный диск VMware Tools. Как это сделать, можно узнать из следующей инструкции: Создание сервера из ISO-образа в vCloud Director 10
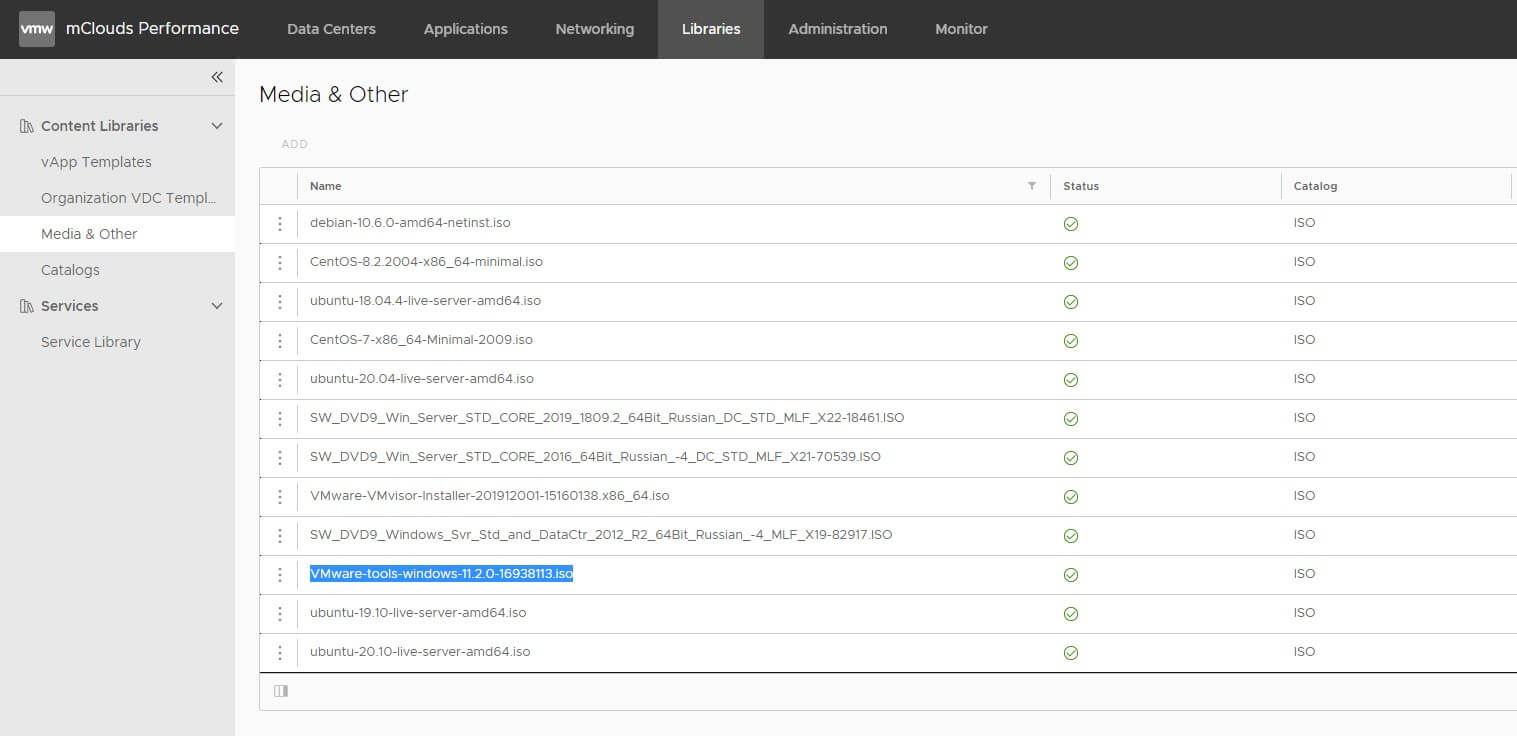
В большинстве случаев, самую актуальную версию установочного диска можно найти в нашей библиотеке ISO образов (Libraries – Media & Other). Установочный диск имеет название типа: VMware-Tools-windows-ХХ..Х.iso
Следует учитывать, что без установки ПО VMware Tools возможности управления виртуальной машиной через консоль ограничены. Например, не работает устройство ввода «мышь».
Для Windows Server с GUI рабочего стола
После входа в систему через консоль выберите необходимый вам диск (в данном случае диск D:)
В итоге автоматически запустится программа установки ПО VMware Tools, нажмите кнопку «Next»
В следующем окне выберите «Typical» для установки конкретно под данный продукт виртуализации или «Complete», чтобы установить все возможные компоненты. Нажмите «Next» и «Install» в следующем окне.
По завершении установки выберите «Finish» и ответьте утвердительно на запрос перезагрузки ОС – это необходимо для корректной работы ОС и ПО.
После перезагрузки мы видим, что средство ввода «мышь» работает корректно и определился сетевой адаптер ОС, осталось только ввести его сетевые настройки:
Панель управления – Сеть и Интернет – Центр управления сетями и общим доступом – Изменение параметров адаптера – Свойства – IPv4 – вводим сетевые настройки, соответствующие нашей ВМ
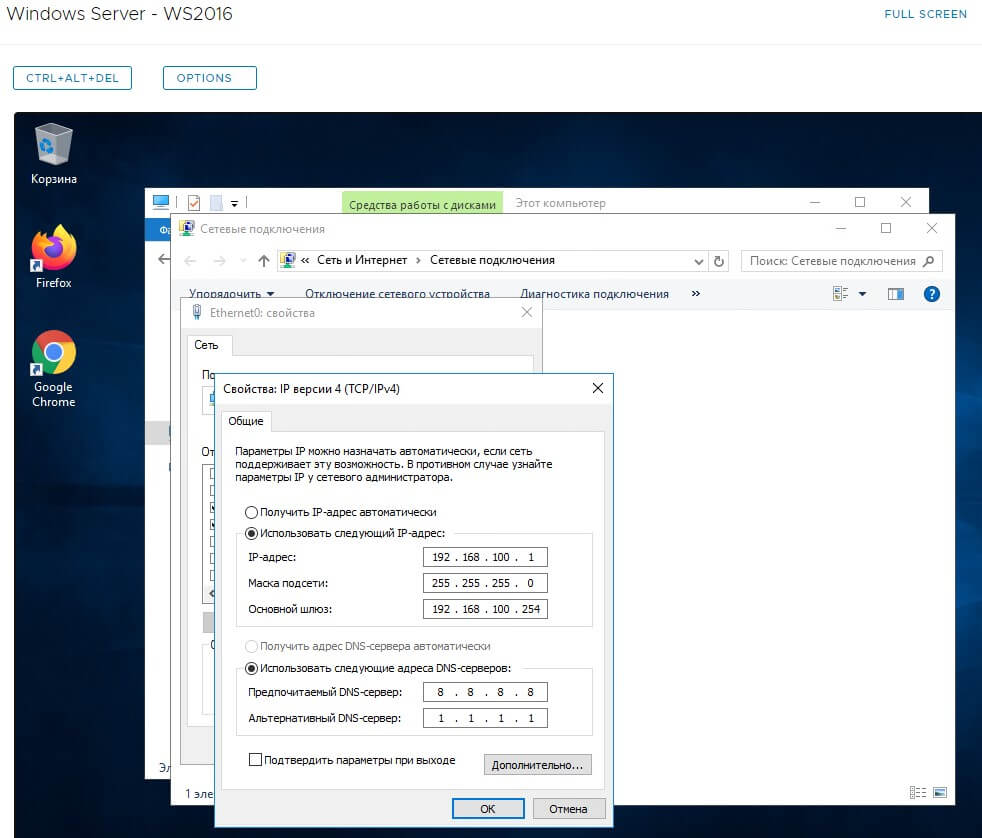
После нажатия «Ок» и корректной настройке правил NAT и Firewall на виртуальном Edge маршрутизаторе видим активность сетевого подключения.
Для Windows Server Core – без возможностей удаленного рабочего стола
После подключения образа установочного диска определите букву диска, под которым диск был подключен. Для этого введите команду:
fsutil fsinfo drives
Вывод команды покажет все буквы подключенных к ОС дисков:
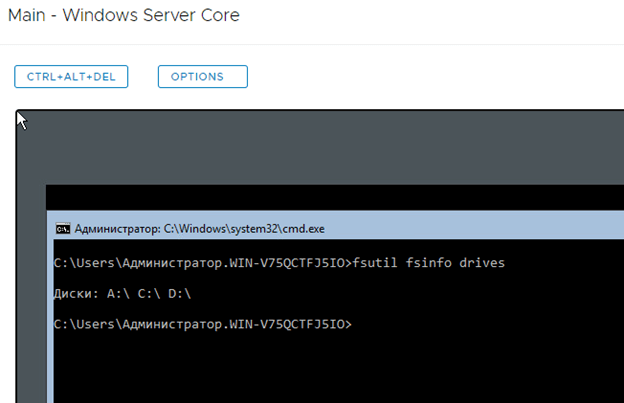
В нашем случае нужный нам – диск D:
Входим в интерфейс управления PowerShell, переходим на указанный диск и проверяем содержимое директории командами:
powershell
cd D:
dir
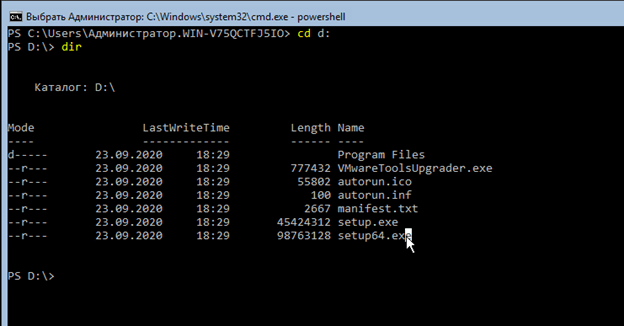
Все верно, выполняем следующую команду для автоматической установки ПО VMware Tools:
.setup64.exe /s /v /qn
После успешной установки система должна перезагрузиться самостоятельно. В случае, если в консоли вы можете передвинуть окно с помощью мыши, установка была завершена успешно.
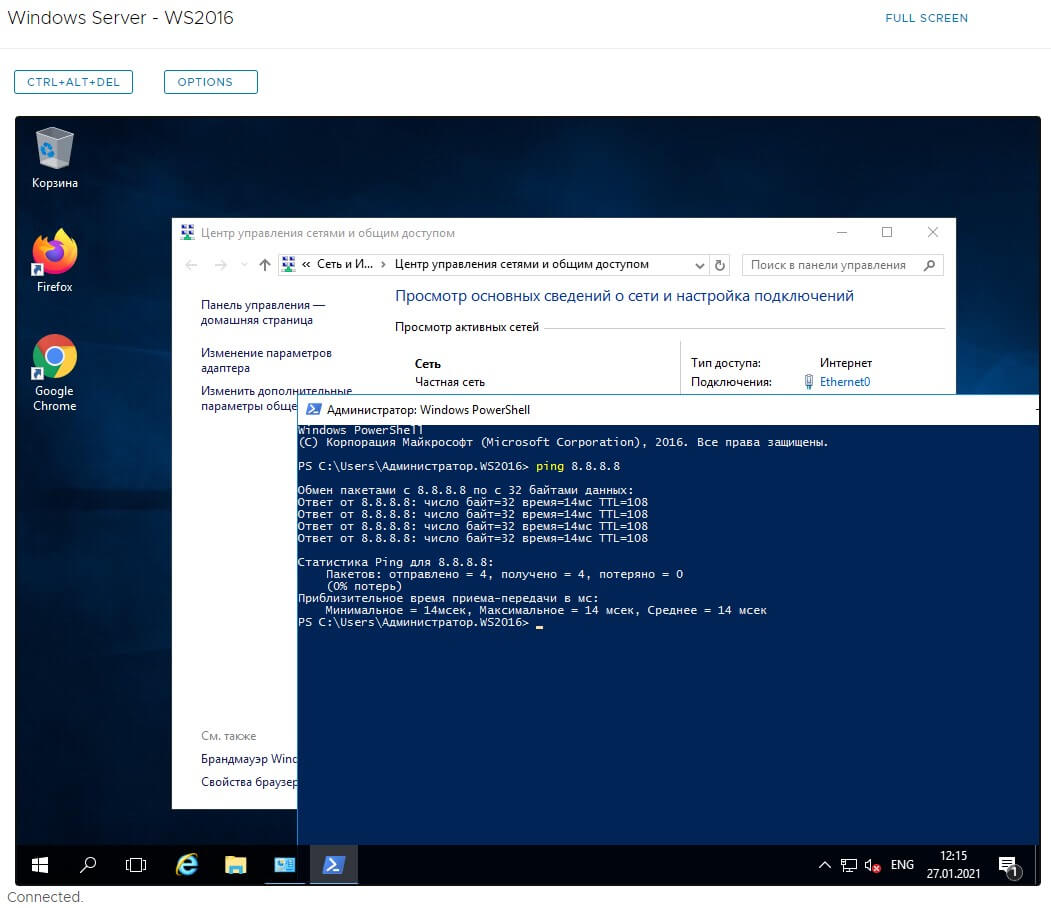
Далее проверяем сетевые настройки через PowerShell:
powershellGet-NetIPConfiguration
Здесь мы видим, что сетевой адаптер определился, однако ip-адресация не настроена и сервер назначил сетевому интерфейсу адрес типа APIPA. Запоминаем показатель InterfaceIndex.
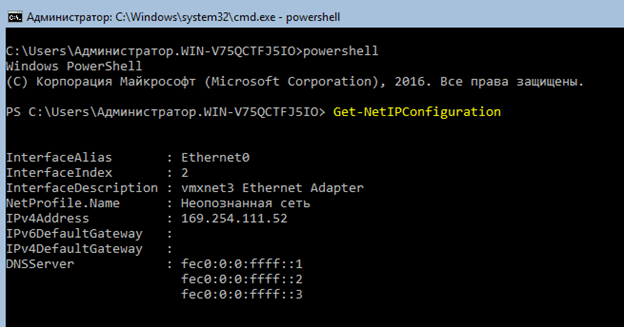
Назначим сетевому адаптеру статический ip адрес, соответствующий нашей ВМ.
IndexInterface мы знаем из предыдущего шага:
New-NetIPAddress -InterfaceIndex 2 -IPAddress 192.168.100.2 -PrefixLength 24 -DefaultGateway 192.168.100.254
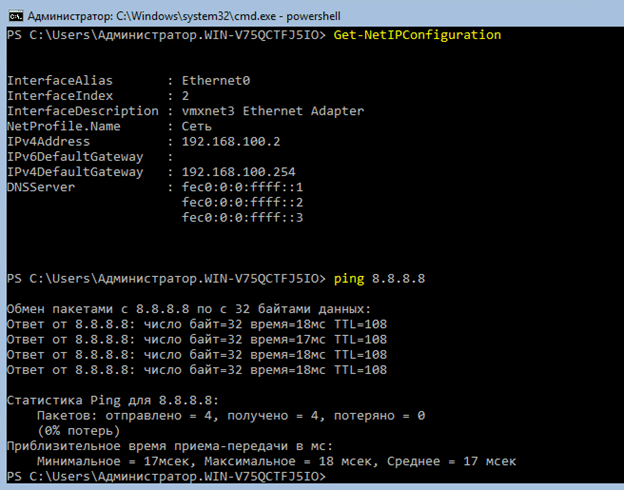
При корректной настройке правил NAT и Firewall на виртуальном Edge маршрутизаторе видим активность сетевого подключения:
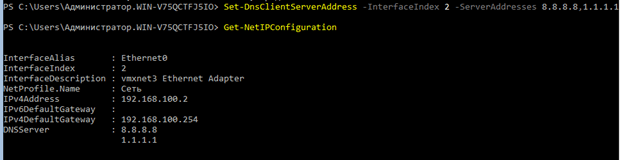
Для настройки DNS серверов необходимо ввести следующую команду:
Set-DNSClientServerAddress –InterfaceIndex 2 -ServerAddresses 8.8.8.8,1.1.1.1
In today’s post, I’ll be showing you how to install Windows Server 2016 on VMware ESXi with Desktop Experience on an ESXi 6.5 U1 host managed by a vCSA 6.5 U1 instance. This step-by-step how-to install Windows Server 2016 on VMware vSphere guide is aimed at readers who have yet to install a Windows OS on a VMware hypervisor. For something a little bit more advanced in relation to installing Windows Server on VMware, you can take your pick from the complete list of published posts to date.
Windows Server Flavors and Requirements
Windows Server 2016 comes in 3 flavors; Server Core (no GUI), Server with Desktop Experience (with GUI) and Nano Server. The latter is Microsoft’s headless server, one that is completely managed remotely with no local logon capabilities making it a perfect solution cloud deployments. Nano server has recently been refactored to primarily support and run containers.
Windows Server 2016 also comes in 3 editions; Essentials, Standard, and Datacenter. Have a look at this link to learn how each edition differs from the rest.
As far as hardware requirements go, Microsoft’s documentation suggests the following.
-
- Processor: 1.4 GHz 64-bit. The CPU must support NX, DEP, CMPXCHG16b, LAHF/SAHF, PrefetchW and second-level address translation.
-
- RAM: 512MB or 2GB for a Desktop Experience installation. 800 MB is the required minimum when installing Windows Server 2016 as a VM.
-
- Storage: 32GB absolute minimum
-
- NIC: 1 Gigabit
As often is the case, the minimum hardware requirements quoted by Microsoft rarely come close to mirror what’s actually needed to run production boxes. With that in mind, consider increasing the resources allocated in accordance with the role(s) assigned to the server and its anticipated workload.
Some optional requirements are;
-
- UEFI firmware to support secure boot where applicable.
-
- Trusted Platform Module (TPM) capabilities to enable encryption features such as BitLocker.
Creating the base VM
I’ll be using the new vSphere client (HTML5) to create the base VM. Here are the steps.
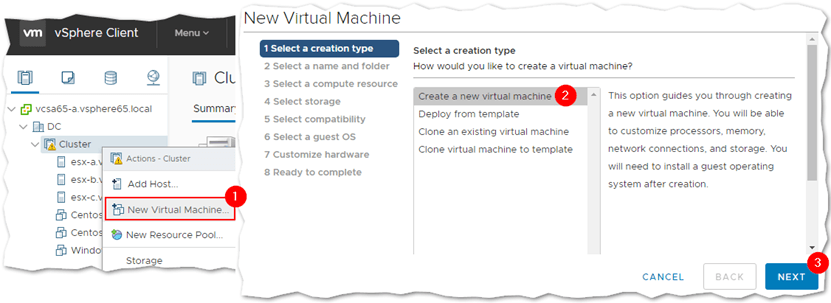
Step 1 – Right-click on a cluster, or host, and select New Virtual Machine (1). Select Create a new virtual machine (2) from the wizard. Click Next.
Step 2 – Type in a name for the virtual machine (1) and select a location (2), such as a datacenter, where you want it installed. The Windows folder shown is something I created.

Step 3 – Select the ESXi host where the VM will be deployed to. In the example, I selected a DRS enabled cluster (1) so placement is done automatically.

Step 4 – Select a datastore (2) where the VM will be created. If you’re using storage policies, make sure to select the correct one from the VM Storage Policy drop-down box (1).

Step 5 – Select the correct compatibility mode according to the ESXi version installed. In my case, I’ve selected ESXi 6.5 or later.

Step 6 – Select Microsoft Windows Server 2016 (64bit) guest OS Family and Version types. If you’re running this on older versions of ESXi, select Microsoft Windows Server 2012 (64 bit) instead.

Step 7 – For the hardware requirements, I’m sticking with the values suggested to me by the wizard. The only hardware settings I changed are the ones for the SCSI controller, which I set to VMWare Paravirtual, and the vNIC driver which I set to vmxnet3. This should improve the overall performance of the virtual machine. I also set the VMDK type to thin since I’m a bit short on storage space.

To use the Secure Boot feature, change the BIOS firmware setting to EFI by navigating to Boot Options -> Firmware under the VM Options tab.

Step 8 – Review the configuration and press Finish to create the VM.

Installing Windows Server 2016
Now that the VM has been created, it’s time to install the guest OS. For this task, I’ll be using the Remote Console client as I find it easier to use when mounting ISOs on VMs and such.
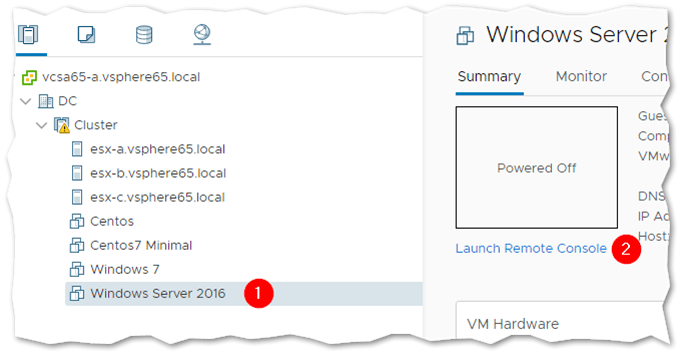
Step 1 – Highlight the VM just created and click on Launch Remote Console link.
Step 2 – Power up the VM and select Connect to Disk Image File (iso) from the VMRC -> Removable Devices -> CD/DVD drive 1. Navigate to the folder containing the Windows Server 2016 ISO image and select it.

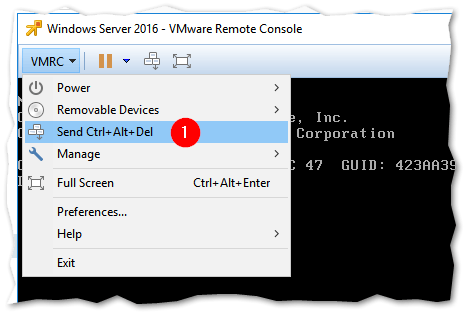
Step 3 – Select Send Ctrl+Alt+Del from the VMRC drop-down menu. You should see the Windows installer booting up.
Step 4 – Select the language and localization settings matching your time zone and country and click Next.

Step 5 – Click on Install now to kick off the installation.

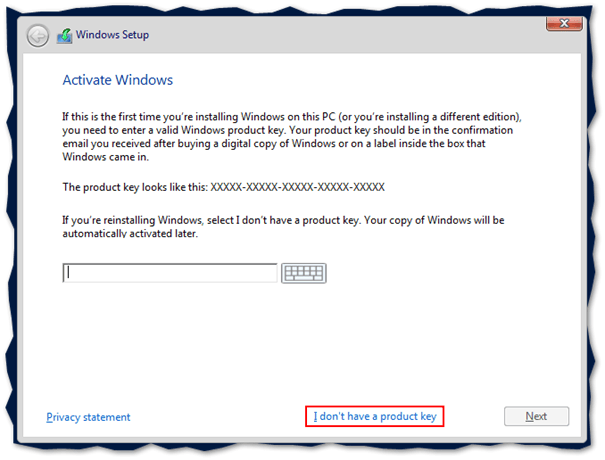
Step 6 – Type in the product key, if you have one, and press Next. If you don’t, just click on the I don’t have a product key link to install Windows Server in evaluation mode.
Step 7 – Select the Windows Server edition and deployment type. For this example, I’ve selected Windows Server 2016 Standard (Desktop Experience). Press Next.

Step 8 – Accept the license terms by ticking on the option at the bottom and press Next.

Step 9 – Select Custom: Install Windows only (advanced)

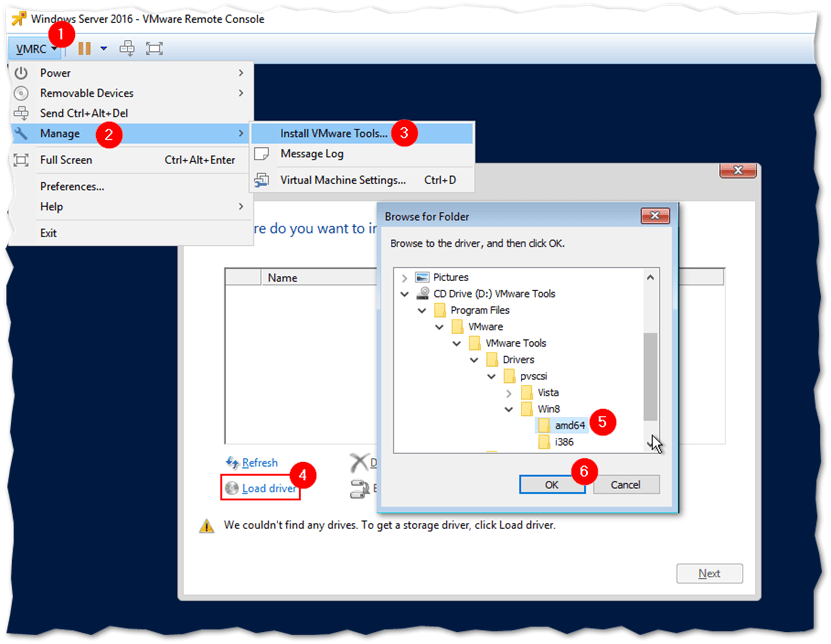
Step 10a – At this point on how to install Windows Server 2016 on VMware vSphere, I must mount the vmtools ISO image since I selected VMware Paravirtual as the SCSI controller. This step is not required if you stick by the default setting (LSI Logic SAS). To this, we simply select Install VMware Tools from VMRC -> Manage. This will mount the corresponding ISO image on the VM. Once you do, click on Load driver, select the CD drive labelled VMware Tools and drill down to the /Program Files/VMware/VMware Tools/Drivers/pvscsi/Win8/amd64 folder as shown next.
Step 10b – The VMware PVSCSI Controller driver is automatically selected for you. Click Next to continue.

Step 11 – If you see Drive 0 Unallocated Space listed, it means that the paravirtual driver has correctly detected the VMDK specified for the VM.
Before pressing Next, disconnect the VMware Tools ISO image and reconnect the one for Windows Server 2016. You won’t be able to proceed with the process of installing Windows Server on VMware unless you do this.

Once you reconnect the Windows Server ISO, press Refresh and make sure that the Windows can’t be installed … at the bottom clears. Press Next to use the entire disk for the Windows Server installation.

Step 12 – Wait for the installation of Windows to finish.

Step 13 – Set a password for the administrator account and press Finish.

Step 14 – Log in and install the VMware Tools. Disconnect the Windows Server ISO image as described and mount the VMware Tools ISO image still using the VMware Remote Console client (VMRC -> Manage -> Install VMware Tools). Click on the mounted DVD Drive or taskbar notification to run the vmtools installer. Follow the instructions and reboot the VM when done.

Congratulations! You now have Windows Server 2016 with Desktop Experience running on VMware. For production environments, you should go for the Server Core version for better performance and improved security. Also, note that the steps covered today apply to installing Windows Server 2016 on both physical ESXi hosts as well as nested ones. If you wish to learn how to set up a nested vSphere environment, have a look at this post.
What to do next?
Although these were easy steps, they were rather time-consuming, especially if you deploy several VMs a week. This is why installing Windows Server in a VM is usually done with the aim to convert it to a template afterwards. That way you can simply deploy a new VM from the template and ensure consistency in terms of custom configuration and installed applications.
Once you’ve installed Windows Server and the VMware Tools, it is usually a good measure to set whatever settings you want across the board when deploying a new VM.
A lot of these can be done via GPO or deployment tools but you may get the odd change you want to be done locally. For instance:
-
- Add a specific local user
-
- Add specific user in the remote desktop group
-
- Install agents for monitoring, backup, antivirus…
-
- Install tools such as BGInfo
-
- Run Windows Update and clean up files
-
- …
You can find interesting resources on how to prep a Windows environment with the VMware OS Optimization Tool that is used for Horizon Desktops.
Conclusion
Note that the steps on how to install Windows Server 2016 on VMware ESXi covered today also apply to installing Windows Server 2016 on both physical ESXi hosts as well as nested ones.
Installing Microsoft Windows Server 2016 on a virtual machine hosted on VMware ESXi is straightforward if you follow our steps and perform the operations explained above with illustrations.
The illustrated practices show how you can build a virtual machine for Windows hosted by VMware ESXi.
It is a fantastic opportunity for anyone willing to get started with virtualization.
If you wish to learn how to set up a nested vSphere environment, have a look at this post.

![]()
Инструкция в картинках по установке операционной системы Windows Server 2016 на виртуальную машину, которая находится на гипервизоре ESXi 6.7.
Для начала создадим саму виртуальную машину, если её у нас ещё нет:
ESXi 6.7 — создаём виртуальную машину
В UI гипервизора ESXi 6.7 кликаем на нашу виртуалку. Edit:
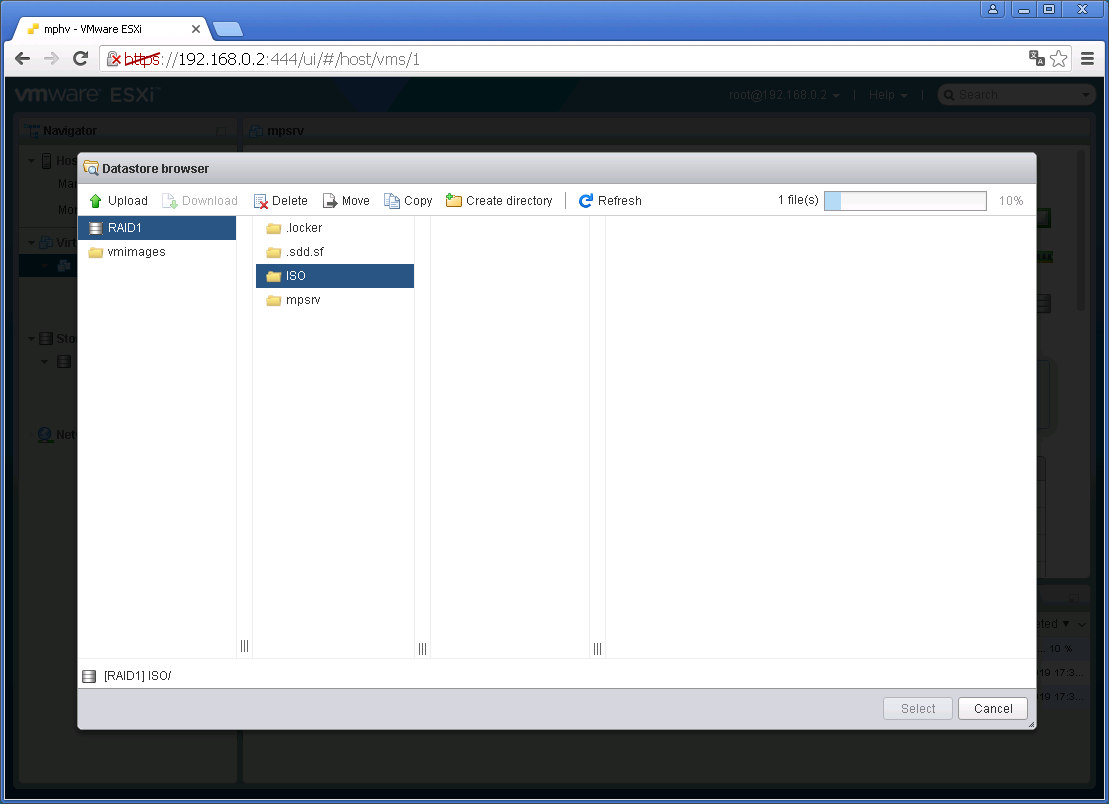
Наша задача, воткнуть ISO образ инсталлятора Windows в дисковод. В CD/DVD Drive 1 выбираем Datastore ISO file, откроется Datastore browser:
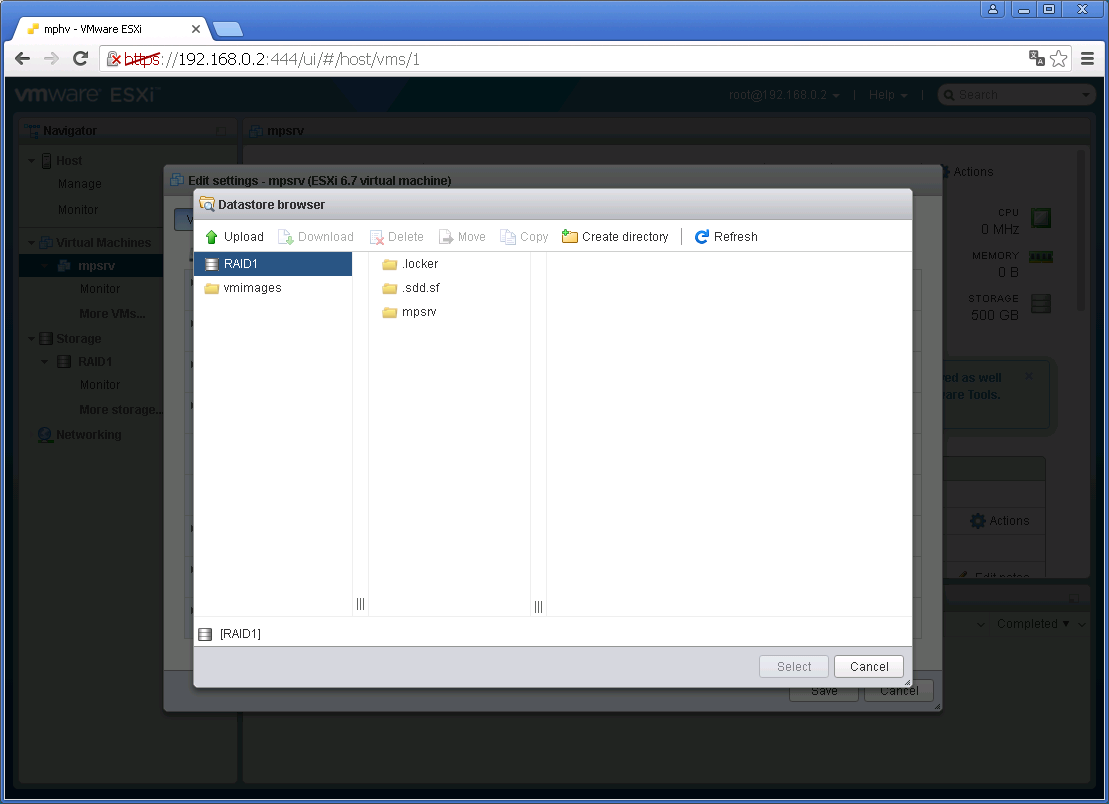
Образ у меня не загружен в хранилище, создам папочку для ISO файлов. Create directory:
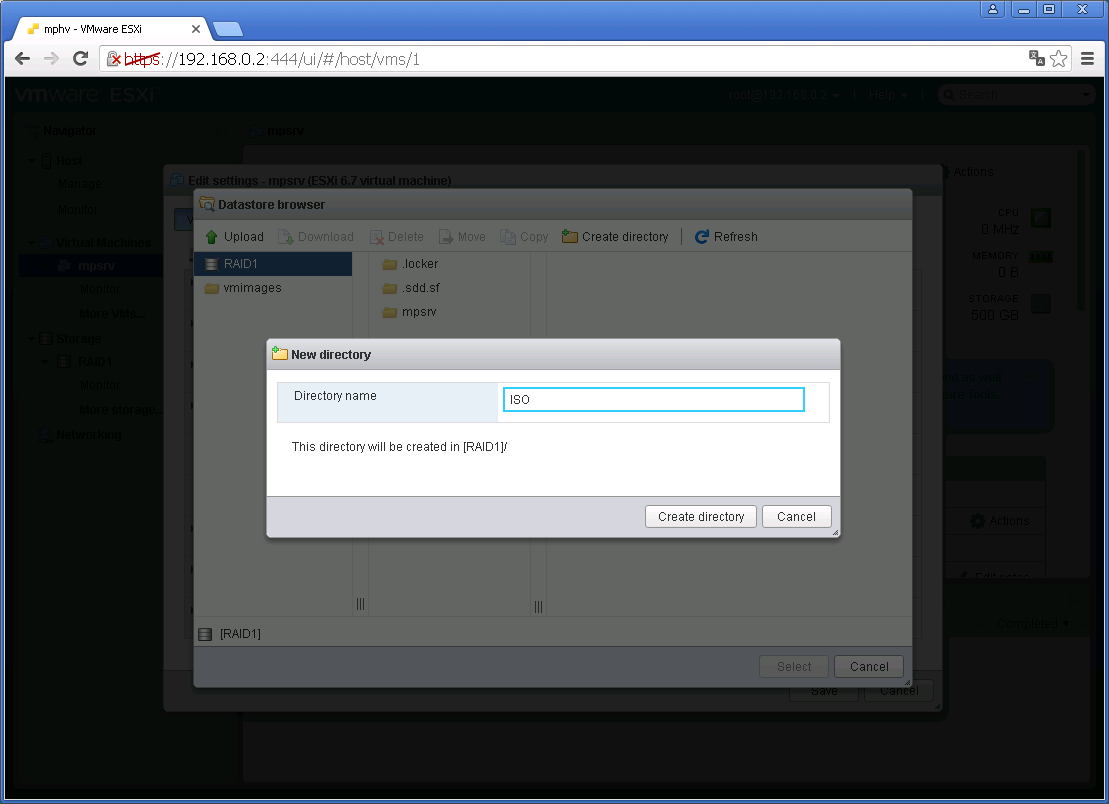
Указываем название директории, у меня будет ISO, Create directory:
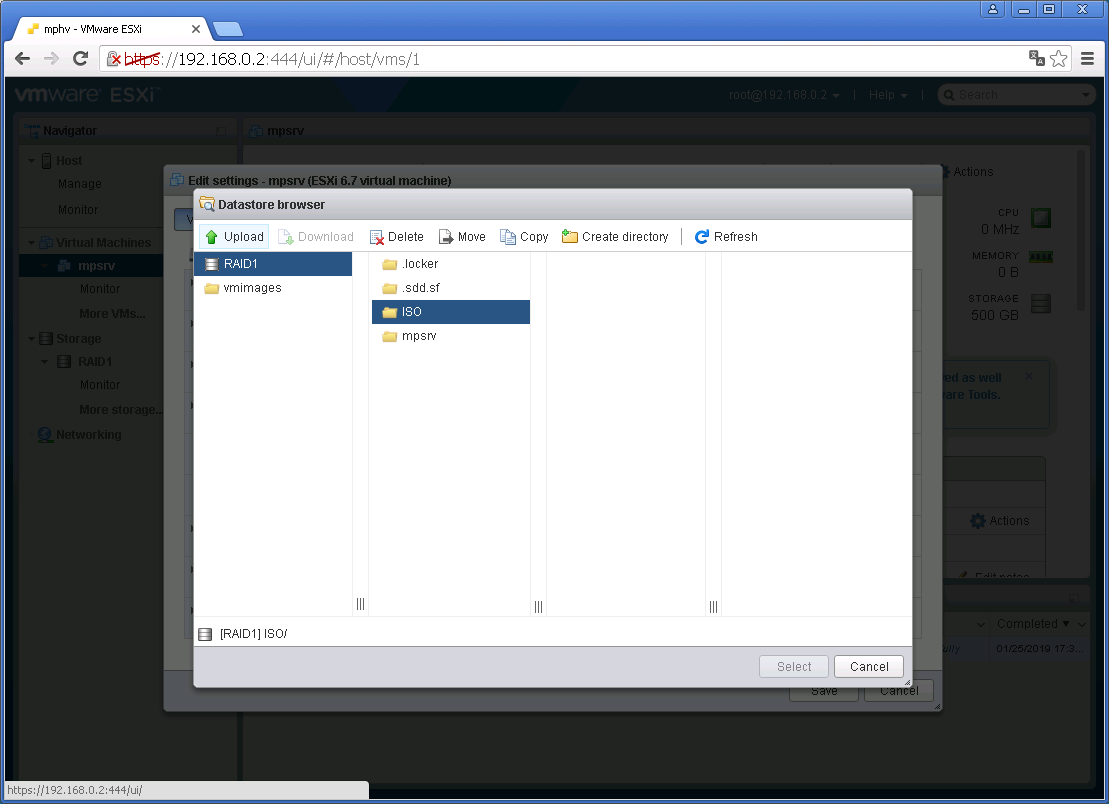
Папочка создалась. Кликаем на неё, потом Upload, выбираем ISO образ инсталлятора Windows Server 2016:
В правом верхнем углу показывается прогрусс загрузки файла. Итак, файл загрузился в хранилище, кликаем на него, потом Select:
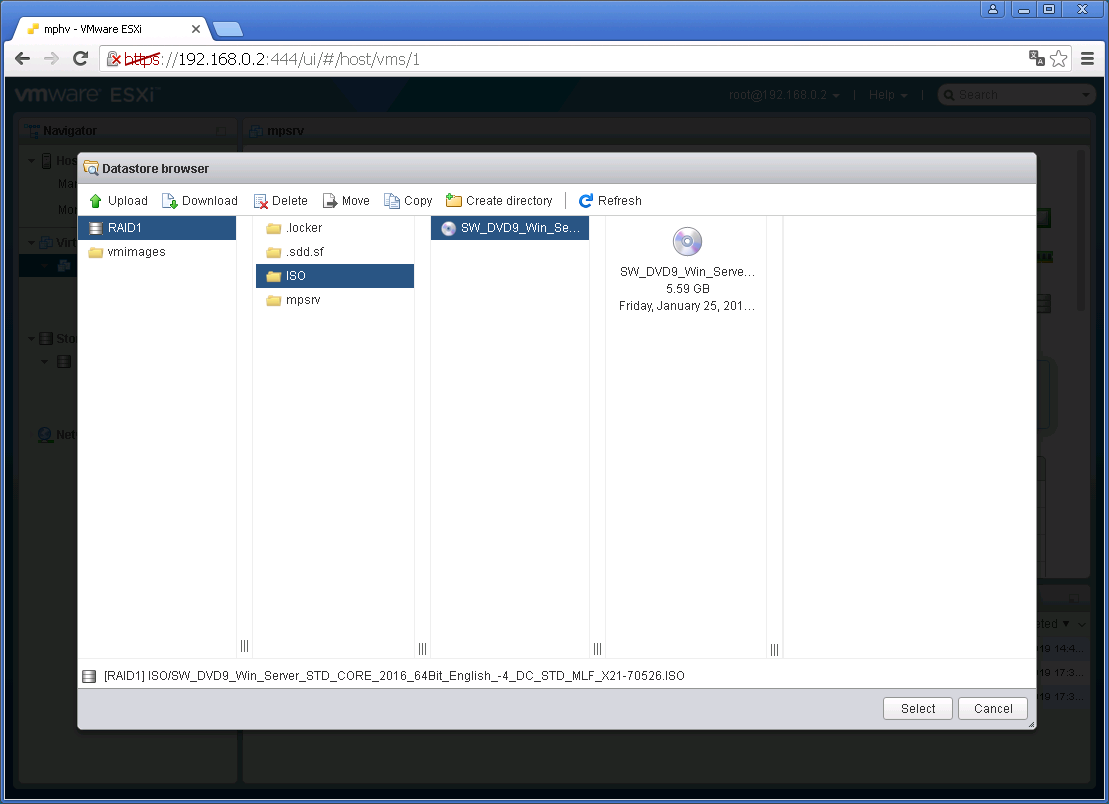
ISO образ цепляется к дисководу виртуалки:

Устанавливаем две галки. Connect at power on и Connect. Save. Включаем виртуалку:
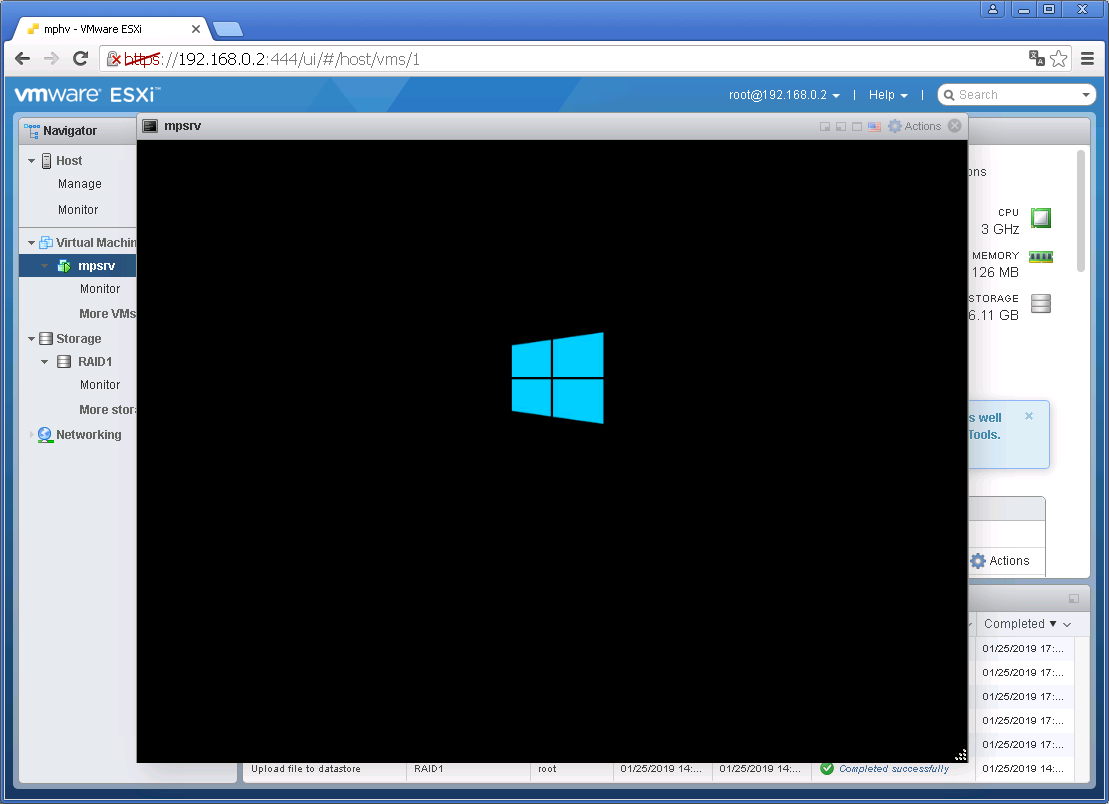
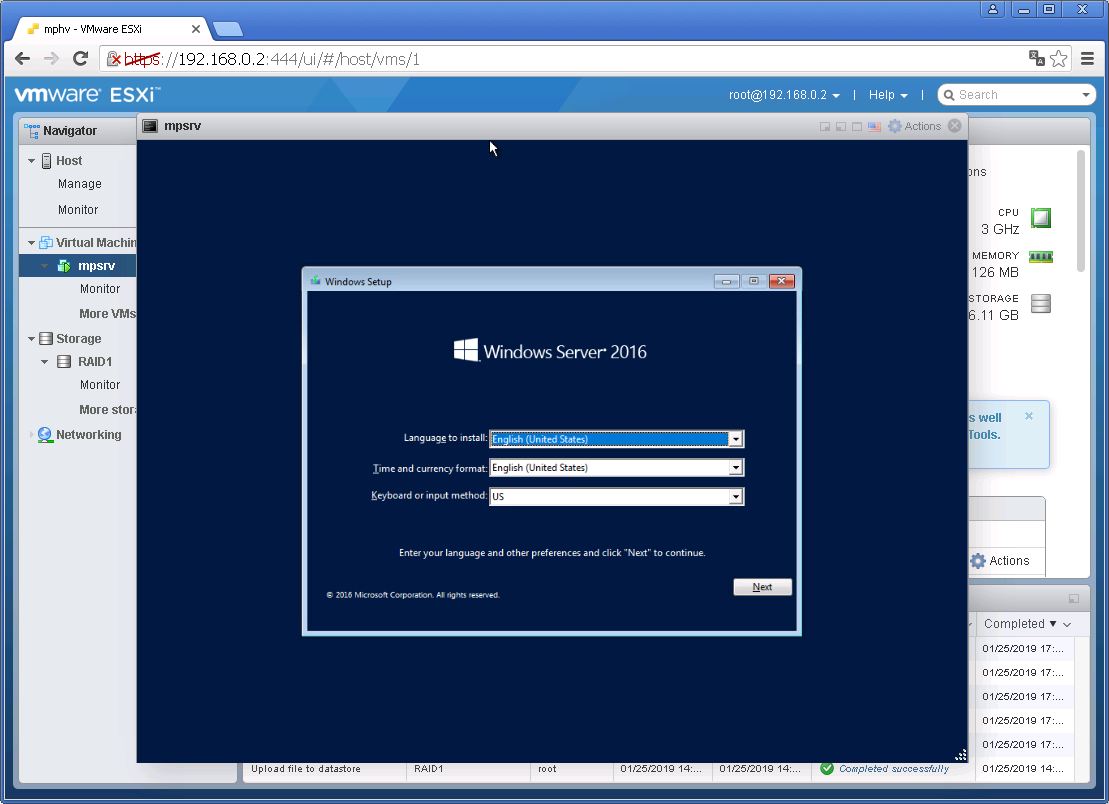
Для начала установки нужно будет успеть нажать любую клавишу. Выбираем язык, время, клавиатуру. Next.
Install now:
Setup is starting:

Выбираем тип установки.
- Standard без GUI
- Standard с GUI
- Datacenter без GUI
- Datacenter с GUI
Next:

Принимаем лицензионное соглашение, Next:
Выбираем Custom: Install Windows only (advanced):
Выбираем винт, у меня он уже выбран, поскольку один. Next:
Потекло по трубам:
Через несколько минут нам предложат указать пароль от пользователя Administrator. Указываем, Finish:

Винда поставилась. Очень напоминает десятку.
Посылаем Ctrl+Alt+Del:
Логинимся.
Внутри смесь десятки, метро и 2012-го сервера.
This TechNet Wiki article provides an overview on how to deploy Windows Server 2016 Nano Server as a Virtual Machine in VMware vSphere virtualization platform. This page focuses on Windows Server 2016 Technical Previews and General Availability (GA) Nano
Server deployment preparation in VMware virtualization environment.
Table of Contents
- 1. Introduction
- 2. Preparation for Nano Server Image
- 2.1. Where is the NanoServer content?
- 2.2. Where do I start?
- 2.3. Planning Nano Server image format for the environment
- 3. Preparation for VMware Tools Drivers
- 3.1. Where is the VMware Tools for Windows media located?
- 3.2. How do I extract VMware Tools content from the ISO media file?
- 3.3. How do I extract VMware Tools content from manually mounted ISO image?
- 3.4. What VMware Tools drivers should I include in NanoServer?
- 4. Getting Started with Nano Server Creation
- 4.1. How to import New-NanoServerImage PowerShell module for Technical Preview 3?
- 4.2. How to import New-NanoServerImage PowerShell module for Technical Preview 4?
- 4.3. How to import New-NanoServerImage PowerShell module for Technical Preview X or GA?
- 4.4. How to create your first Nano Server image for Technical Preview 3?
- 4.5. How to create your first Nano Server image for Technical Preview 4?
- 4.6. How to create your first Nano Server image for General Availability (GA)?
- 4.7. How to manually inject additional driver into an existing Nano Server image?
- 4.8. Adding role or feature over the existing Nano Server VHD
- 5. Getting Started with Nano Server Disk Footprint
- 5.1. How to reduce Nano Server 40GB VHD to 4GB VHD?
- 6. Getting Started with Nano Server deployment in vSphere ESXi
- 6.1. What is the requirement?
- 6.2. Preparing Nano Server VHD using Windows PE for vSphere ESXi
- 6.2.1. Example of creating a Windows PE media content for Technical Preview 3
- 6.2.2. Example of creating a Windows PE media content for Technical Preview X or GA
- 6.2.3. Example on creating the VHD folder in the Windows PE media content folder for Technical Preview 3
- 6.2.4. Example on creating the VHD folder in the Windows PE media content folder for Technical Preview X or GA
- 6.2.5. Example of copying the Nano Server Technical Preview 3 VHD to VHD folder in Windows media content folder
- 6.2.6. Example of copying the Nano Server Technical Preview X or GA VHD to VHD folder in Windows media content folder
- 6.2.7. Example of compiling Windows PE for Technical Preview 3
- 6.2.8. Example of compiling Windows PE for Technical Preview X or GA
- 6.3. Partitioning the VMDK using DiskPart in Windows PE
- 6.4. Creating the Boot Configuration File using Windows PE
- 7. Having the first look of Nano Server from vSphere Remote Console
- 7.1. First console view of Technical Preview 3 after login
- 7.2. First console view of Technical Preview 4 after login
- 7.3. First console view of Technical Preview 5 after login
- 7.4. First console view of General Availablity (GA) after login
- 7.5. How to manage the Nano Server remotely?
- 8. References
- 9. See Also
1. Introduction
Have you heard of the new awesome Microsoft Windows Nano Server? Most of the built articles are revolving on physical hardware, Hyper-V and not forget, Azure. If your hypervisor environment is using VMware vSphere, those may just slightly miss the bandwagon
to test Nano Server in their environment. Well, this article is going to change the game play a bit because we want you to test it out on vSphere 6.0 and we just cannot let the Hyper-V hypervisor enthusiasts have all the fun.
Other Hypervisor Articles;
- OpenStack + Windows Nano Server
So this article will handle integration of Windows Server 2016 Nano Server guest on VMware hypervisor host. Let us begin the journey with;
- Windows Server 2016 Technical Preview 3
- Windows Server 2016 Technical Preview 4
- Windows Server 2016 Technical Preview 5
- Windows Server 2016 General Availability (GA)
↑ Return to Top
2. Preparation for Nano Server Image
At the time of creating this article, we will be focusing on Windows Server 2016 Technical Preview 3 and VMware vSphere 6.0. The technique on this article will not contribute huge differences between VMware vSphere ESXi hypervisor versions. Older version
of VMware vSphere ESXi hypervisor may not support Windows Technical Preview as the Guest Operating System when creating a new Virtual Machine.
With the release of Windows Server 2016 Technical Preview 4 on 20/11/2015, Technical Preview 5 on 28/04/2016 and General Availability (GA) on 26/09/2016, we have updated this article with the same concept and proof the technique is still achievable with
minor changes on some commands that also shows the progressive improvements between each preview to the release to market edition.
↑ Return to Top
2.1. Where is the NanoServer content?
The NanoServer folder reside in the Windows Server 2016 Technical Preview / General Availability (GA) DVD Media.
↑ Return to Top
2.2. Where do I start?
Copy the NanoServer folder from the media to the local drive using PowerShell.
Firstly, find out the CD/DVD-ROM drive letter.
# Find out the CD-ROM Drive Letter
Get-Volume
| `
?{$_.DriveType
-eq «CD-ROM»} ;
Next, copy the Nano Server content from the Windows Server 2016 Technical Preview X / General Availability (GA) media to the local drive.
# Copy the NanoServer folder from the Windows Server 2016
# Technical Preview 3 DVD media
Copy-Item `
-Path
Z:NanoServer `
-Destination
C: `
-Recurse `
-Verbose ;

↑ Return to Top
2.3. Planning Nano Server image format for the environment
Which Nano Server image format should I choose? VHD, VHDX or WIM format? This really depends on your environment and your infrastructure planning for the future.
- VHD Format
- Recommended Nano Server image format for Windows Server 2008 R2 HyperV host in Production environment.
- Plausible to use VHD format and manually mount the VHDX into a new VM in VMware ESXi host but recommends for Development or Test environment because servicing the disk capacity takes a little more effort.
- Plausible to take advantage of multiple boot of different Nano Server VHD image loaded within a single VMDK file for Development or Testing purposes.
- Plausible to copy the VHD file out of VMDK file and mount it into Windows Server 2008 R2 HyperV host instantly.
- VHDX Format
- Recommended Nano Server image format for Windows Server 2012 R2 or higher HyperV host in Production environment.
- Plausible to use VHDX format and manually mount the VHDX into a new VM in VMware ESXi host but recommends for Development or Test environment because servicing the disk capacity takes a little more effort.
- Plausible to take advantage of multiple boot of different Nano Server VHDX image loaded within a single VMDK file for Development or Testing purposes.
- Plausible to copy the VHDX file out of VMDK file and mount it into Windows 10 workstation, Windows Server 2012 R2 or higher HyperV host instantly.
- WIM Format
- Recommended Nano Server image format for physical hardware, PXE deployment or VMware ESXi host in Production environment.
- Extracting WIM file structure on VMDK allows Nano Server to take advantage of VMware ESXi host hypervisor & VMFS technology directly.
- Plausible to use WIM format and manually extract the file structure into a new VM in Windows Server 2008 R2 or higher HyperV Host but it takes a little more effort.
↑ Return to Top
3. Preparation for VMware Tools Drivers
This section focuses on extracting VMware Tools in preparation to slipstream the mandatory drivers. If you are struggling with this, you may want to collaborate with your VMware evangelist and work together.
↑ Return to Top
3.1. Where is the VMware Tools for Windows media located?
SSH to VMware vSphere ESXi 6.0 Host using
PuTTY.
ls
-l vmimages/tools-isoimages/win*

Download the vmimages/tools-isoimages/windows.iso file using WinSCP to the machine for content extraction
If your machine is also a VMware virtual machine, you can manually mount the ISO by following the article below;
- Installing VMware Tools manually from the ISO image (1003910)
↑ Return to Top
3.2. How do I extract VMware Tools content from the ISO media file?
This is how to extract the VMware Tools content using the ISO Media with VMware Tools Installation Wizard to the destination folder below using PowerShell.
Firstly, we create an extracted folder to store all the VMware Tools content.
# Create a VMware_Tools_Extracted folder for extracting
# VMware Tools installation content
New-Item `
-Path
C:NanoServerVMware_Tools_Extracted `
-Type
directory ;
Next, we mount the VMware Tools for Windows ISO image.
# Mount the Windows VMware Tools ISO
Mount-DiskImage `
-ImagePath
C:windows.iso ;
Once it is mounted, we need to know the drive letter of the mounted image.
# Find the mounted Windows VMware Tools ISO Drive Letter
(Get-DiskImage
-ImagePath C:windows.iso
| Get-Volume).DriveLetter
With the drive letter identified, we can manually execute the command to extract the VMware Tools installation to the destination folder.
# Execute VMware Tools Setup64.exe and extract the content to
# C:NanoServerVMware_Tools_Extracted folder using the
# Installation Wizard
<# Drive Letter #>:setup64.exe
/a /p
C:NanoServerVMware_Tools_Extracted
# Eg. d:setup64.exe /a /p C:NanoServerVMware_Tools_Extracted

Unfortunately, the VMware Tools command will prompt the VMware Tools Installation Wizard graphical user interface and therefore it cannot be scripted. User intervention on the graphical user interface is required to complete the extraction to the destination
folder as shown on the screenshots below;
- Select Next

- Select Destination Folder
- Select Finish


Once the VMware Tools Installation Wizard has completed the extraction to the destination folder, remember to dismount the VMware Tools ISO media using the PowerShell.
# Dismount the Windows VMware Tools ISO
Dismount-DiskImage `
-ImagePath
C:windows.iso ;

↑ Return to Top
3.3. How do I extract VMware Tools content from manually mounted ISO image?
Create a folder to contain the extracted VMware Tools content using PowerShell.
# Create a VMware_Tools_Extracted folder for extracting
# VMware Tools installation content
New-Item `
-Path
C:NanoServerVMware_Tools_Extracted `
-Type
directory ;
If your machine is also a VMware virtual machine and you have already mounted the VMware Tools ISO image, you can extract the VMware Tools content by following the article below;
- Extracting the drivers from VMware Tools bundled with VMware Workstation (2032184)
Extract the content into the destination folder using the VMware Tools Installation Wizard graphical user interface and unmount the ISO image.
↑ Return to Top
3.4. What VMware Tools drivers should I include in NanoServer?
Before we prepare the VMware Tools drivers to be included in NanoServer, I like to be a bit tidy in containing what I need in a separate folder so that I don’t get confuse. Create a VMware Drivers folder within the parent NanoServer folder using PowerShell.
# Create a VMware Drivers folder
New-Item `
-Path
C:NanoServerVMware-Drivers `
-ItemType
directory ;
Selecting the VMware drivers required for NanoServer as a guest virtual machine is very important. In order to understand what are those from the documentation link below;
- vSphere 6.0 — VMware Tools Device Drivers
# Copy VMware Tools Memory Control Driver — This driver is Mandatory
Copy-Item `
-Path
‘C:NanoServerVMware_Tools_ExtractedVMwareVMware ToolsVMwareDriversmemctl*’ `
-Destination
C:NanoServerVMware-Drivers `
-Recurse `
-Verbose ;
# Copy VMware Tools Paravirtual SCSI (PVSCSI) Drivers — Optional
Copy-Item `
-Path
‘C:NanoServerVMware_Tools_ExtractedVMwareVMware ToolsVMwareDriverspvscsi*’ `
-Destination
C:NanoServerVMware-Drivers `
-Recurse `
-Verbose ;
# Copy VMware Tools SVGA 3D Video (SVGA) Drivers — Optional
Copy-Item `
-Path
‘C:NanoServerVMware_Tools_ExtractedVMwareVMware ToolsVMwareDriversvideo_wddm*’ `
-Destination
C:NanoServerVMware-Drivers `
-Recurse `
-Verbose ;
# Copy VMware Tools Virtual Machine Communication Interface (VMCI)
# Drivers — Optional
Copy-Item `
-Path
‘C:NanoServerVMware_Tools_ExtractedVMwareVMware ToolsVMwareDriversvmcidevice*’ `
-Destination
C:NanoServerVMware-Drivers `
-Recurse `
-Verbose ;
# Copy VMware Tools VMXNet NIC (VMXNET3) Drivers — This
# driver is Mandatory for using VMXNET3 Network Interface.
Copy-Item `
-Path
‘C:NanoServerVMware_Tools_ExtractedVMwareVMware ToolsVMwareDriversvmxnet3NDIS6*’ `
-Destination
C:NanoServerVMware-Drivers `
-Recurse `
-Verbose ;

↑ Return to Top
4. Getting Started with Nano Server Creation
With Windows Server 2016 Technical Preview 3, Microsoft has simplified the Nano Server creation with 2 PowerShell scripts that we have copied across to the local drive during the preparation for Nano Server image and we will use them in the example below.
Firstly, we need to ensure that we are at the working folder where the New-NanoServerImage PowerShell script is located. The reason is that if you are not in that working folder, you may encounter errors when the script is going to invoke the
Convert-WindowsImage PowerShell script written by
Pronichkin.
# Ensure you are at C:NanoServer working folder
Set-Location `
-Path
C:NanoServer ;
Secondly, we will have to import the New-NanoServerImage PowerShell script module using PowerShell.
↑ Return to Top
4.1. How to import New-NanoServerImage PowerShell module for Technical Preview 3?
# Import New-NanoServerImage PowerShell Module for Technical Preview 3
Import-Module `
-Global
C:NanoServernew-nanoserverimage.ps1 ;
↑ Return to Top
4.2. How to import New-NanoServerImage PowerShell module for Technical Preview 4?
You will notice that Microsoft had made some improvement changes to the PowerShell module and renamed the file to NanoServerImageGenerator.psm1.
# Import New-NanoServerImage PowerShell Module for Technical Preview 4
Import-Module `
-Global
C:NanoServerNanoServerImageGenerator.psm1 ;
↑ Return to Top
4.3. How to import New-NanoServerImage PowerShell module for Technical Preview X or GA?
With Technical Preview 5 and General Availability (GA), you will notice that Microsoft had made some improvement changes to the PowerShell module and moved the file NanoServerImageGenerator.psm1 to a NanoServerImageGenerator folder.
# Import New-NanoServerImage PowerShell Module for Technical Preview 5
Import-Module `
-Global
C:NanoServerNanoServerImageGeneratorNanoServerImageGenerator.psm1 ;
Next, we will create a basic NanoServer image with no role or feature except for the basic necessities. For a more detail documentation of how to create a NanoServer, you can read up more from the link below;
- TechNet — Getting Started with Nano Server
With Technical Preview 4 or older, we need to ensure that -GuestDrivers parameter is included to allow you to have keyboard functionality when you launch the remote console using VMware vSphere 6.0 Web Client.
Remember the VMware Tools drivers that we have extracted and copied to another destination folder just now? We will need to include the -DriversPath parameter and specify the copied VMware drivers folder path.
Using the PowerShell command, we will concatenate those parameters into a single command to initiate the creation of a new basic Nano Server.
↑ Return to Top
4.4. How to create your first Nano Server image for Technical Preview 3?
# Create New Basic NanoServer Image for Technical Preview 3
New-NanoServerImage `
-MediaPath
Z: `
-BasePath
C:NanoServerBase `
-TargetPath
C:NanoServerNanoServer `
-ComputerName
NanoServer `
-EnableRemoteManagementPort `
-Language
‘en-us’ `
-GuestDrivers `
-DriversPath
C:NanoServerVMware-Drivers `
-AdministratorPassword (ConvertTo-SecureString
-String «Password»
-AsPlainText -Force) ;
↑ Return to Top
4.5. How to create your first Nano Server image for Technical Preview 4?
Since there are improvement changes on the PowerShell module, we need to include the filename of the VHD file type in the -TargetPath parameter now that also mean that you can change the filename of the VHD file type to be different from the computer name.
# Create New Basic NanoServer Image for Technical Preview 4
New-NanoServerImage `
-MediaPath
Z: `
-BasePath
C:NanoServerBase `
-TargetPath
C:NanoServerNanoServerNanoServer.vhd `
-ComputerName
NanoServer `
-EnableRemoteManagementPort `
-Language
‘en-us’ `
-GuestDrivers `
-DriversPath
C:NanoServerVMware-Drivers `
-AdministratorPassword (ConvertTo-SecureString
-String «Password»
-AsPlainText -Force) ;
Done. We have a Nano Server created on a Generation 1 VHD virtual disk that can be mounted and boot up on a Hyper-V host. If you have included the VMware Paravirtual SCSI (PVSCSI) Drivers, you definitely can boot it up on your VMware vSphere ESXi 6.0 host
provided that your virtual machine is using PVSCSI controller for the VMDK disk. But. Firstly, we generally prefer LSI SAS controller for Windows. Secondly, how do you get it running in vSphere?

↑ Return to Top
4.6. How to create your first Nano Server image for General Availability (GA)?
With Technical Preview 5 and General Availability (GA), we can use the the New-NanoServerImage cmdlet to slipstream all the required drivers during the build process and simplify the Nano Server deployment. In the first example, we will demonstrate how to
create a Nano Server image in VHD/VHDX format for development environment where it is possible to mount multiple different Nano Server VHD/VHDX to the boot manager within a single VMDK file for development or user acceptance testing.
# Create New Basic NanoServer Image for General Availability (GA)
New-NanoServerImage `
-MediaPath
‘D:’ `
-Edition
‘Datacenter’ `
-DeploymentType
Guest `
-TargetPath
‘C:NanoServerNanoServer.vhdx’ `
-MaxSize
3GB `
-EnableRemoteManagementPort `
-DriverPath (‘C:NanoServerVMware-Driverspvscsi.inf’,
`
‘C:NanoServerVMware-Driversvm3d.inf’, `
‘C:NanoServerVMware-Driversvmci.inf’, `
‘C:NanoServerVMware-Driversvmxnet3ndis6.inf’, `
‘C:WindowsSystem32DriverStoreFileRepositorylsi_sas.inf_amd64_2bd0ac9c0d7785b0’ `
-ComputerName
‘NanoServer’ `
-SetupCompleteCommand (‘tzutil.exe /s «New Zealand Standard Time»‘) `
-AdministratorPassword (ConvertTo-SecureString
-String «Password»
-AsPlainText -Force) ;
In the second example, we will demonstrate how to create a Nano Server image in WIM format for production environment where the operating system is stored in a single volume within the VMDK file.
# Create New Basic NanoServer Image for General Availability (GA)
New-NanoServerImage `
-MediaPath
‘D:’ `
-Edition
‘Datacenter’ `
-DeploymentType
Guest `
-TargetPath
‘C:NanoServerNanoServer.wim’ `
-MaxSize
3GB `
-EnableRemoteManagementPort `
-DriverPath (‘C:NanoServerVMware-Driverspvscsi.inf’,
`
‘C:NanoServerVMware-Driversvm3d.inf’, `
‘C:NanoServerVMware-Driversvmci.inf’, `
‘C:NanoServerVMware-Driversvmxnet3ndis6.inf’, `
‘C:WindowsSystem32DriverStoreFileRepositorylsi_sas.inf_amd64_2bd0ac9c0d7785b0’ `
-ComputerName
‘NanoServer’ `
-SetupCompleteCommand (‘tzutil.exe /s «New Zealand Standard Time»‘) `
-AdministratorPassword (ConvertTo-SecureString
-String «Password»
-AsPlainText -Force) ;

↑ Return to Top
4.7. How to manually inject additional driver into an existing Nano Server image?
In this example, it will demonstrates how we can manually inject the LSI SAS storage controller driver to an existing Nano Server image that does not contain the lsi_sas.sys driver. This step is totally optional if you have already defined the lsi_sas.sys
driver when you are creating a new Nano Server image.
This example is to provide the concept on how you can incorporate any other additional drivers into an existing Nano Server image and servicing the Nano Server image with any new driver requirement due to changes in production environment.
In order to get started with this example demonstration, we will need to find the LSI SAS storage controller driver folder path within a Windows Operating System since it is a Microsoft driver. Make sure that you are injecting the driver that comes from
the same operating system version or release that your Nano Server image is generated. This is to ensure that the Nano Server will be able to load the LSI SAS storage controller driver that has the compatible or verified driver digital signature.
# Find lsi_sas.sys Storage Driver
Get-ChildItem `
-Path
C:WindowsSystem32DriverStore `
-Filter
lsi_sas.sys `
-Recurse ;
Next, we need to create an empty mountdir folder for DISM to mount the VHD.
# Create a MountDir folder for Deployment Image Servicing and Management (DISM)
New-Item `
-Path
C:NanoServermountdir `
-ItemType
directory ;
Next, we use DISM to mount the NanoServer in VHD format into the mountdir folder.
# Mount NanoServer.vhd vDisk on C:MountDir folder
dism
/mount-image /imagefile:c:nanoservernanoservernanoserver.vhd
/index:1 /mountdir:c:nanoservermountdir
If your Nano Server image is in VHDX format, follow the command below:
# Mount NanoServer.vhdx vDisk on C:MountDir folder
dism
/mount-image /imagefile:c:nanoservernanoservernanoserver.vhdx
/index:1 /mountdir:c:nanoservermountdir
If your Nano Server image is in WIM format, follow the command below:
# Mount NanoServer.wim vDisk on C:MountDir folder
dism
/mount-image /imagefile:c:nanoservernanoservernanoserver.wim
/index:1 /mountdir:c:nanoservermountdir
Once we done that, we can inject the LSI SAS storage controller driver by specifying the folder path.
# Add the lsi_sas.sys storage controller driver into C:MountDir folder
dism
/add-driver /image:c:nanoservermountdir
/driver:C:WindowsSystem32DriverStoreFileRepositorylsi_sas.inf_amd64_2bd0ac9c0d7785b0
After that, we dismount the mountdir folder.
# Unmount NanoServer.vhd vDisk from C:MountDir folder
dism
/unmount-image /mountdir:c:nanoservermountdir
/commit
Once this is performed, the Nano Server will be able to boot up on LSI SAS storage controller with VMDK disk attached. We can also safely regard this NanoServer.vhd is the new base image for your VMware environment although I haven’t shown you how to get
it into the vSphere 6.0 yet.

With the General Availability (GA) release of Windows Server 2016, you can also use the Edit-NanoServerImage cmdlet from the NanoServerImageGenerator PowerShell module to easily and quickly add additional drivers or other configuration changes to the image
with ease.
In this example below, it will demonstrate how to inject additional vmmouse.sys and vmusbmouse.sys VMware drivers into an existing Nano Server image by using Edit-NanoServerImage cmdlet.
# Edit Nano Server and add more additional drivers
Edit-NanoServerImage `
-BasePath
‘.Base’ `
-TargetPath
‘C:NanoServerTargetNanoServer.vhdx’ `
-DriverPath ( `
‘C:NanoServerVMware_Tools_ExtractedVMwareVMware ToolsVMwareDriversmousevmmouse.inf’,
`
‘C:NanoServerVMware_Tools_ExtractedVMwareVMware ToolsVMwareDriversmousevmusbmouse.inf’) ;

↑ Return to Top
4.8. Adding role or feature over the existing Nano Server VHD
Alright, a Nano Server without any role or feature will not be of any use to anyone. Since we currently have a proper NanoServer.vhd base image, we can use the new base image to recreate another Nano Server VHD with roles or feature.
Let’s find out the full path of our base image that we created just now.
# Verify the existing NanoServer VHD Path
Get-ChildItem `
-Path
C:NanoServerNanoServer
| `
Select `
FullName, `
Length ;
In this process of adding a Hyper-V role, we included the -Compute parameter on the PowerShell command. This will instruct it to include the Microsoft-NanoServer-Compute-Package.cab file during repackaging. We also need to include the -ExistingVHDPath parameter
and specify our existing base image full path.
For a full reference of the available Nano Server role and feature included in Windows Server 2016 Technical Preview 3, you can find them in the link of the documentation below;
- TechNet — Getting Started with Nano Server
# Create a New NanoServer with Hyper-V role
# using existing NanoServer Base Image with Technical Preview 3
New-NanoServerImage `
-MediaPath Z: `
-BasePath C:NanoServerBase `
-TargetPath C:NanoServerNanoServer-Compute `
-ExistingVHDPath C:NanoServerNanoServerNanoServer.vhd `
-ComputerName NanoServer `
-Compute `
-EnableRemoteManagementPort `
-Language ‘en-us’ `
-GuestDrivers `
-AdministratorPassword (ConvertTo-SecureString
-String «Password»
-AsPlainText -Force) ;
Once this is completed, you will notice that the new NanoServer-Compute.vhd has a different file length size now. It is slightly bigger than the base image.
# Verify the new NanoServer with Hyper-V role VHD Path
Get-ChildItem `
-Path
C:NanoServerNanoServer-Compute
| `
Select `
FullName, `
Length ;

Unfortunately with Windows Server 2016 Technical Preview 4 or higher, the -ExistingVHDPath parameter is deprecated and is no longer available. Therefore you will need to repeat the process of
Getting Started with Nano Server Creation to recreate a new Nano Server image with all the required role or feature from the beginning. Alternatively, you can make a copy of the original NanoServer VHD image, use the Edit-NanoServerImage cmdlet to edit
the copied VHD image and rename the copied VHD image as version 2.
With General Availability (GA) release of Windows Server 2016, the example below will demonstrate on how to create a Nano Server with Hyper-V, Containers and Clustering roles with Defender and ShieldedVM features including SCVMM agent to the image as an
example.
# Create a New NanoServer with Hyper-V role
New-NanoServerImage `
-MediaPath ‘D:’ `
-Edition ‘Datacenter’ `
-DeploymentType Guest `
-TargetPath ‘C:NanoServerNanoServer-HV.vhdx’ `
-Compute `
-Clustering `
-Containers `
-Package Microsoft-NanoServer-SCVMM-Package,
Microsoft-NanoServer-ShieldedVM-Package `
-Defender `
-MaxSize 3GB `
-EnableRemoteManagementPort `
-DriverPath (‘C:NanoServerVMware-Driverspvscsi.inf’, `
‘C:NanoServerVMware-Driversvm3d.inf’, `
‘C:NanoServerVMware-Driversvmci.inf’, `
‘C:NanoServerVMware-Driversvmxnet3ndis6.inf’, `
‘C:WindowsSystem32DriverStoreFileRepositorylsi_sas.inf_amd64_2bd0ac9c0d7785b0lsi_sas.inf’) `
-ComputerName ‘NanoServer-HV’ `
-SetupCompleteCommand (‘tzutil.exe /s «New Zealand Standard Time»‘) `
-AdministratorPassword (ConvertTo-SecureString
-String «Password»
-AsPlainText -Force) ;

In this example, it will demonstrate on using Edit-NanoServerImage cmdlet to add the required roles and features on an existing Nano Server image instead of recreating a new Nano Server image with the required roles and features. This alternate method will
overwrite your existing Nano Server image and therefore you may want to make a copy of the original Nano Server image.
# Edit Nano Server to change the hostname and
# add Hyper-V and other roles or features
Edit-NanoServerImage `
-BasePath
‘.Base’ `
-TargetPath
‘C:NanoServerTargetNanoServer.vhdx’ `
-Compute `
-Clustering `
-Containers `
-Package
Microsoft-NanoServer-SCVMM-Package,
Microsoft-NanoServer-ShieldedVM-Package `
-Defender `
-ComputerName
‘NanoServer-HV’ ;

↑ Return to Top
5. Getting Started with Nano Server Disk Footprint
Since we have found out that adding a role or feature increases the NanoServer-Compute.vhd file size, we need to find out the actual size of our VHD because it represent the hard disk size of the Nano Server operating system volume. This section on reducing
the Nano Server disk footprint is absolutely optional but it is a great knowledge for anyone who wish to obtain a leaner Nano Server disk or reclaiming disk consumption.
# Get the NanoServer-Compute.vhd current default disk size information
Get-VHD `
-Path
C:NanoServerNanoServer-ComputeNanoServer-Compute.vhd
| `
Select `
@{L=‘Path’;E={$_.Path}},
`
VhdFormat, `
VhdType, `
@{L=‘FileSize in Byte’;E={$_.FileSize}},`
@{L=‘FileSize in KB’;E={$_.FileSize/1KB}},
`
@{L=‘FileSize in MB’;E={$_.FileSize/1MB}},
`
@{L=‘FileSize in GB’;E={$_.FileSize/1GB}},
`
@{L=‘Size in Byte’;E={$_.Size}},
`
@{L=‘Size in GB’;E={$_.Size/1GB}},
`
@{L=‘MinimumSize in Byte’;E={$_.MinimumSize}},
`
@{L=‘MinimumSize in GB’;E={$_.MinimumSize/1GB}},
`
FragmentationPercentage ;
By default using New-NanoServerImage command in Windows Server 2016 Technical Preview 3, the Nano Server will be created with Generation 1 VHD in Dynamic VHD Type with 40GB disk partition containing about ~461MB of files. For VMware enthusiasts, it means
40GB Thin Provisioned Disk with about ~461MB consumed space for files.

↑ Return to Top
5.1. How to reduce Nano Server 40GB VHD to 4GB VHD?
True, Nano Server is indeed very small and it can be less than 1GB depending on how many drivers, roles or features has been included in the built. But do we really need 40GB Dynamic VHD? I do not have an answer for it. But the process below demonstrates
on how to reduce the disk from 40GB to less than 4GB to fit into a 4GB VMDK.
Firstly, we need to convert the Nano Server Generation 1 VHD to a Generation 2 VHD. If your Nano Server image is already a Generation 2 VHD, you can skip the conversion.
# Convert the NanoServer-Compute.vhd Generation 1 VHD to
# NanoServer-Compute.vhdx Generation 2 VHDX format
Convert-VHD `
-Path
C:NanoServerNanoServer-ComputeNanoServer-Compute.vhd `
-DestinationPath
C:NanoServerNanoServer-ComputeNanoServer-Compute.vhdx `
-VHDType
Dynamic `
-DeleteSource ;
Prior to resizing, we will get the current disk information of the VHDX to prove that the resizing has performed accordingly to plan.
# Get the new NanoServer-Compute.vhdx current default disk size
# information
Get-VHD `
-Path
C:NanoServerNanoServer-ComputeNanoServer-Compute.vhdx
| `
Select `
@{L=‘Path’;E={$_.Path}},
`
VhdFormat, `
VhdType, `
@{L=‘FileSize in Byte’;E={$_.FileSize}},`
@{L=‘FileSize in KB’;E={$_.FileSize/1KB}},
`
@{L=‘FileSize in MB’;E={$_.FileSize/1MB}},
`
@{L=‘FileSize in GB’;E={$_.FileSize/1GB}},
`
@{L=‘Size in Byte’;E={$_.Size}},
`
@{L=‘Size in GB’;E={$_.Size/1GB}},
`
@{L=‘MinimumSize in Byte’;E={$_.MinimumSize}},
`
@{L=‘MinimumSize in GB’;E={$_.MinimumSize/1GB}},
`
FragmentationPercentage ;
Next, we mount the VHDX locally and get the virtual disk internal volume information to verify the volume structure is correct as stated before any manipulation made.
# Mount the NanoServer-Compute.vhdx and get the NanoServer
# system drive partition volume size
Mount-VHD `
-Path
C:NanoServerNanoServer-ComputeNanoServer-Compute.vhdx `
-Passthru
| `
Get-Disk
| `
Get-Partition
| `
Get-Volume ;
By default, the New-NanoServerImage.ps1 PowerShell Module utilise the Convert-WindowsImage.ps1 PowerShell Module to create the VHD vDisk with the default size value of 40GB and the default size of 40GB may not fit into a USB Flash Thumb Drive if your solution
implementation required although it is a Dynamic VHD Type.

With the VHD being mounted, we can start resizing the VHD virtual disk internal partition.
# Resize the Partition inside Generation 2 VHD
Resize-Partition `
-DriveLetter D `
-Size (((4GB
— ((512KB
* 2)
+ (512KB
* 2)))
— 300MB )
— 600MB) ;
Well, it is arguable that the Disk Size in GB is going to be far less than 4GB and that is because;
- We reduced 1024KB for VHD Header and 1024KB VHD Footer to align the space to fit into 4GB VMDK
- We reduced 300MB for System Reserved partition for Boot Manager code and Boot Configuration Database
- We reduced 600MB from the Partition and VHD to provide free working space on the VMDK for the expansion of the attached VHD vDisk during boot up.
Next, we dismount the VHD vDisk from the local machine to resize the VHD.
# Dismount the NanoServer-Compute.vhdx Generation 2 VHD
Dismount-VHD `
-Path C:NanoServerNanoServer-ComputeNanoServer-Compute.vhdx ;
Once the VHD has been dismounted, the VHD file will not be locked and we can start resizing the VHD.
# Resize the NanoServer-Compute.vhdx Generation 2 VHD
Resize-VHD `
-Path C:NanoServerNanoServer-ComputeNanoServer-Compute.vhdx `
-ToMinimumSize ;
After the VHD has been resized, we can start converting the Generation 2 VHD back to Generation 1 VHD to keep consistent file type with the script output.
# Convert the NanoServer-Compute.vhdx Generation 2 VHD back
# to NanoServer-Compute.vhd Generation 1 VHD format
Convert-VHD `
-Path C:NanoServerNanoServer-ComputeNanoServer-Compute.vhdx `
-DestinationPath C:NanoServerNanoServer-ComputeNanoServer-Compute.vhd `
-VHDType Dynamic `
-DeleteSource ;
Now the moment of truth, we will obtain the VHD information and verify it has been reduced in size.
# Get the new NanoServer.vhd current default disk size information
Get-VHD `
-Path
C:NanoServerNanoServer-ComputeNanoServer-Compute.vhd
| `
Select `
@{L=‘Path’;E={$_.Path}},
`
VhdFormat, `
VhdType, `
@{L=‘FileSize in Byte’;E={$_.FileSize}},`
@{L=‘FileSize in KB’;E={$_.FileSize/1KB}},
`
@{L=‘FileSize in MB’;E={$_.FileSize/1MB}},
`
@{L=‘FileSize in GB’;E={$_.FileSize/1GB}},
`
@{L=‘Size in Byte’;E={$_.Size}},
`
@{L=‘Size in GB’;E={$_.Size/1GB}},
`
@{L=‘MinimumSize in Byte’;E={$_.MinimumSize}},
`
@{L=‘MinimumSize in GB’;E={$_.MinimumSize/1GB}},
`
FragmentationPercentage ;
Now we have Nano Server with Hyper-V role that is less than 4GB in VHD which can fit into a 4GB VMDK, but it is still in a VHD format for Hyper-V Host and we need to get it hosted within a vSphere ESXi host.

↑ Return to Top
6. Getting Started with Nano Server deployment in vSphere ESXi
Before we start, we will have to ensure that have created a Virtual Machine on vSphere ESXi host with the correct virtual hardware specification where the Nano Server image will boot up from. We will also requires a Windows Preinstallation Environment (WinPE)
to boot up and perform some system preparation configuration on the Virtual Machine.
↑ Return to Top
6.1. What is the requirement?
We will need to download and install the Windows Assessment and Deployment Kit (ADK) for Windows 10 and install the Windows Preinstallation Environment (Windows PE) feature to allows us to create a Windows PE image.
To obtain Windows Assessment and Deployment Kit (ADK) for Windows 10, you can download it from the
here.
↑ Return to Top
6.2. Preparing Nano Server VHD using Windows PE for vSphere ESXi
With all the preparation of the Nano Server VHD completed, we will need to prepare a media to boot into Windows Preinstallation Environment with our Nano Server VHD file. This is because we cannot mount the VHD file type into the Guest Virtual Machine on
ESXI using vSphere 6.0 Web Client.
Let’s jump into the Windows Assessment and Deployment environment now.
|
# Enter into the Windows Assessment and Deployment # Kit (ADK) environment from PowerShell console C:Windowssystem32cmd.exe /k "C:Program Files (x86)Windows Kits10Assessment and Deployment KitDeployment ToolsDandISetEnv.bat" |
Use the command script provided in that environment to copy the Windows PE media content.
↑ Return to Top
6.2.1. Example of creating a Windows PE media content for Technical Preview 3
This is how we will using the CopyPE command script to create a WIndows PE media content folders with all the required files.
|
# Copy the Windows Preinstallation Environment (WinPE) # media content for amd64 into your working folder # for Technical Preview 3 "C:Program Files (x86)Windows Kits10Assessment and Deployment KitWindows Preinstallation Environmentcopype.cmd" amd64 "C:NanoServerWindowsPE |
↑ Return to Top
6.2.2. Example of creating a Windows PE media content for Technical Preview X or GA
There is no difference in term of the command between Technical Preview 3, Technical Preview 4, Technical Preview 5 or GA except for the destination path.
|
# Copy the Windows Preinstallation Environment (WinPE) # media content for amd64 into your working folder # for Technical Preview 4 "C:Program Files (x86)Windows Kits10Assessment and Deployment KitWindows Preinstallation Environmentcopype.cmd" amd64 "C:NanoServerWindowsPE |

Let’s exit the ADK environment into PowerShell environment.
|
# Return back to PowerShell Console PowerShell |
We will have to manually create an empty VHD folder within the Windows PE media folder to keep our Nano Server VHD file.
↑ Return to Top
6.2.3. Example on creating the VHD folder in the Windows PE media content folder for Technical Preview 3
|
# Create a VHD folder in Windows PE Media Folder # for Technical Preview 3 New-Item ` -Path "C:NanoServerWindowsPE AMD64 - Windows Server 2016 TP3 - Nano ServermediaVHD" ` -Type directory ; |
↑ Return to Top
6.2.4. Example on creating the VHD folder in the Windows PE media content folder for Technical Preview X or GA
There is no difference in term of the command between Technical Preview 3, Technical Preview 4, Technical Preview 5 or GA except for the folder path.
|
# Create a VHD folder in Windows PE Media Folder # for Technical Preview 4 New-Item ` -Path "C:NanoServerWindowsPE AMD64 - Windows Server 2016 TP4 - Nano ServermediaVHD" ` -Type directory ; |
Copy the Nano Server VHD file to that newly create VHD folder in the Windows PE media folder. It has to be in the media folder so that the file will be included when we compile it into an ISO image.
↑ Return to Top
6.2.5. Example of copying the Nano Server Technical Preview 3 VHD to VHD folder in Windows media content folder
|
001 002 003 004 005 006 007 |
# Copy NanoServer-Compute.vhd vDisk to Windows PE # Media VHD Folder for Technical Preview 3 Copy-Item ` -Path C:NanoServerNanoServer-ComputeNanoServer-Compute.vhd ` -Destination "C:NanoServerWindowsPE AMD64 - Windows Server 2016 TP3 - Nano ServermediaVHD" ` -Recurse ` -Verbose ; |
↑ Return to Top
6.2.6. Example of copying the Nano Server Technical Preview X or GA VHD to VHD folder in Windows media content folder
There is no difference in term of the command between Technical Preview 3, Technical Preview 4, Technical Preview 5 or GA except for the destination path.
|
001 002 003 004 005 006 007 |
# Copy NanoServer-Compute.vhd vDisk to Windows PE # Media VHD Folder for Technical Preview 4 Copy-Item ` -Path C:NanoServerNanoServer-ComputeNanoServer-Compute.vhd ` -Destination "C:NanoServerWindowsPE AMD64 - Windows Server 2016 TP4 - Nano ServermediaVHD" ` -Recurse ` -Verbose ; |
Let’s return back to the ADK environment to use another command script for compiling to ISO image.
|
# Return back into the Windows Assessment and Deployment # Kit (ADK) environment from PowerShell console C:Windowssystem32cmd.exe /k "C:Program Files (x86)Windows Kits10Assessment and Deployment KitDeployment ToolsDandISetEnv.bat" |
Using the command script, we begin the compilation by specifying the Windows PE folder and the ISO Image file destination path.
↑ Return to Top
6.2.7. Example of compiling Windows PE for Technical Preview 3
|
# Create the Windows PE ISO from the Windows PE # Media folder for Technical Preview 3 "C:Program Files (x86)Windows Kits10Assessment and Deployment KitWindows Preinstallation EnvironmentMakeWinPEMedia.cmd" /ISO "C:NanoServerWindowsPE |
↑ Return to Top
6.2.8. Example of compiling Windows PE for Technical Preview X or GA
There is no difference in term of the command between Technical Preview 3, Technical Preview 4, Technical Preview 5 or GA except for the source and destination path.
|
# Create the Windows PE ISO from the Windows PE # Media folder for Technical Preview 4 "C:Program Files (x86)Windows Kits10Assessment and Deployment KitWindows Preinstallation EnvironmentMakeWinPEMedia.cmd" /ISO "C:NanoServerWindowsPE |

Once you obtained the ISO image file, you will need to mount the ISO image file on the Guest Virtual Machine using vSphere 6.0 Web Client and Power On the Guest VM.

↑ Return to Top
6.3. Partitioning the VMDK using DiskPart in Windows PE
Powering On the Guest for the first time with Windows PE, we will automatically boot into Windows PE with a Command Prompt and it will be the interface that we will be using to partition the VMDK.
Firstly, we will use DiskPart to clean the VMDK Disk to ensure that the disk has no volume or partition structure.
|
:: Clean the Disk 0 diskpart select disk 0 clean |
If you prefer to do this using PowerShell instead of DiskPart within Windows Preinstallation Environment (Windows PE), you will have to follow this guide on how to add PowerShell support into Windows PE prior creating the bootable ISO Image below.
- WinPE: Adding PowerShell support to Windows PE

Next, we will have to manually create a System Reserved partition to store the Boot file configuration.
|
:: Create the System Reserved 300MB Partition create partition primary size=300 format fs=ntfs label="System Reserved" quick assign letter=s active |

Next, we will use the remaining free space to create an Operating System partition where the Nano Server VHD file will be located and exit DiskPart.
|
:: Create the Operating System Partition create partition primary format fs=ntfs label="Operating System" quick assign letter=c exit |

With the Operating System partition created, we will copy the Nano Server VHD file to the Operating System drive.
|
:: Copy the NanoServer-Compute.vhd from WindowsPE ISO to C: Operating System Drive xcopy D:VHDNanoServer-Compute.vhd C: /V /F |

Next, we will using DiskPart again to attach the Nano Server VHD file as a vDisk volume.
|
:: Attach the NanoServer.vhd vDisk using Diskpart diskpart select vDisk File=C:NanoServer-Compute.vhd attach vDisk list volume |
If your Nano Server image is in WIM Format for production environment, you will need to apply the WIM image to the Operating System drive and proceed to section 6.4 to create the boot information in boot manager.
|
:: Apply the NanoServer-Compute.wim from WindowsPE ISO to C: Operating System Drive dism /apply-image /imagefile:D:VHDNanoServer-Compute.wim /index:1 /applydir:C: |

To make our life easy, we will assign a drive letter to identify the vDisk volume and exit DiskPart. And this is not the end of it because the attached vDisk volume is still not bootable due to the fact that the System Reserved partition do not have a boot
file configuration of this virtual disk volume.
|
:: Assign a Drive Letter to the NanoServer-Compute.vhd vDisk volume select volume 3 assign letter=v exit |

↑ Return to Top
6.4. Creating the Boot Configuration File using Windows PE
With the vDisk drive letter assigned and exited the DiskPart, we will change to the vDisk drive and navigate to the WindowsSystem32 folder. We will use the BCDboot tool and specify the source of the boot environment file that requires to be copied to the
System Reserved drive.
|
:: Create boot file on System Reserved drive V: cd V:WindowsSystem32 bcdboot V:Windows /s S: |
If you are not using a vDisk for Nano Server image that is in VHD/VHDX format and have already applied the Nano Server image in WIM format to the operating system drive, we will use the BCDboot tool and specify the source of the boot environment file that
requires to be copied to the System Reserved drive.
|
:: Create boot file on System Reserved drive C: cd C:WindowsSystem32 bcdboot C:Windows /s S: |
If you are interested in understanding BCDBoot, you can refer to this document link below;
- BCDboot Command-Line Options

Once the boot files has created successfully, we will return to DiskPart, detach the virtual disk volume and exit everything for an automatic reboot.
|
:: Detach the vDisk and exit to reboot diskpart select vDisk File=C:NanoServer-Compute.vhd detach vDisk exit exit |

↑ Return to Top
7. Having the first look of Nano Server from vSphere Remote Console
After exiting Windows PE environment and reboot automatically, you can view login screen on your Remote Console. Check that the keyboard is working on the Remote Console and you can really type to login.

↑ Return to Top
7.1. First console view of Technical Preview 3 after login
After logging into the Nano Server through Remote Console, there is nothing much except text information of the Server Configuration. We cannot do anything in here except for these 4 tasks;
- Navigate using Up and Down arrows
- Initiate to Log Off using ESCape button
- Initiate a Restart or Reboot using ConTroL and
F6 button together - Initiate a Shut down using ConTroL and
F12 button

↑ Return to Top
7.2. First console view of Technical Preview 4 after login
With Technical Preview 4, there are a lot of significant improvements with the console and these are the things you can do;
- Toggle Network Adapter state to Enable or Disable
- Customise IPv4 configuration to be Static or DHCP on Network Adapter
- Customise IPv6 configuration to be Static or DHCP on Network Adapter
- View Routing Table
- Add IPv4 Static route to the Routing Table
- Add IPv6 Static route to the Routing Table
- View Window Firewall Rules
- Toggle Windows Firewall rule to Enable or Disable

↑ Return to Top
7.3. First console view of Technical Preview 5 after login
With Technical Preview 5, there are a few enhancements with the console such as:
- Request to change your password when you first login to the console
- Seperate layout of Inbound and Outbound Firewall Rules
- Reset Windows Remote Management (WinRM) configuration and WinRM firewall rules
- Everything that you already knew in Technical Preview 4

↑ Return to Top
7.4. First console view of General Availablity (GA) after login
With the General Availability (GA) release of Windows Server 2016, the Nano Server Recovery Console has not changed since Technical Preview 5 except that it is now displaying the official operating system name and edition instead.

↑ Return to Top
7.5. How to manage the Nano Server remotely?
Since it has no Graphical User Interface and it limited on what we can do in remote console, the most preferred method will be using PowerShell to remotely connect to the Nano Server for any management at this stage.
# Verify if the Nano Server is a Trusted Hosts
Get-Item `
-Path
WSMan:localhostClientTrustedHosts ;
# Set the Nano Server IP Address to be a Trusted Hosts
Set-Item `
-Path
WSMan:localhostClientTrustedHosts `
-Value
192.168.100.14 `
-Force ;
# Establish a remote PowerShell Session to the Nano Server
Enter-PSSession `
-ComputerName
192.168.100.14 `
-Credential (New-Object `
-TypeName
System.Management.Automation.PSCredential `
-ArgumentList
«192.168.100.14Administrator», `
(ConvertTo-SecureString `
-String
«Password» `
-AsPlainText `
-Force) `
) ;

↑ Return to Top
8. References
- Microsoft TechNet Evaluation Center — Windows Server 2016 Technical Preview 4
- Nano Server installation option of Windows Server Technical Preview 4 for Developers
- GitHub — NanoVHD
- Microsoft TechNet — Getting Started with Nano Server
- Microsoft Developer Network — Getting Started with Nano Server
- Microsoft Virtual Academy — A Deep Dive into Nano Server
- Microsoft TechNet Blog — Deploying Nano Server to a Bare-Metal Machine using a WIM and WinPE by
Refaat Issa [MSFT]
- Microsoft TechNet Blog — How to use WDS to PxE Boot a Nano Server VHD by
Refaat Issa [MSFT]
↑ Return to Top
9. See Also
- Nano Server Survival Guide by
Ryen Tang - Microsoft Azure: Managing Nano Server with Server Management Tools
by
Ryen Tang - Microsoft Azure: Deploying Windows Server 2016 Nano Server by
Ryen Tang - Nano Server: Getting Started with Image Builder
by
Ryen Tang - Nano Server: Using New-NanoServerImage with Show-Command to deploy Nano Server by
Ryen Tang - Nano Server: Viewing Application, Security and System Event Logs using WMI by
Ryen Tang - Nano Server: Deploying an Internet Information Services (IIS) Web Server by
Ryen Tang - Nano Server: Deploying ASP.NET 5 site on Internet Information Services (IIS) Web Server
by
Ryen Tang - Nano Server: Deploying PHP 7.0.6 on Internet Information Services (IIS) Web Server
by
Ryen Tang - Nano Server: Deploying MySQL Database Server by
Ryen Tang - Nano Server: Deploying Python 3.x interpreter by
Ryen Tang - Nano Server: Getting Started in Container with Docker by
Ryen Tang
↑ Return to Top