With all the emulators and other tricks to play old games on modern machines, there’s often not much of a demand to run old OSs on virtual machines any more. However, there are still some games that must be run on their original OS and as I have found some of my old games recently that doggedly require Windows 9x to be running before they’ll so much as play the intro video, I thought I’d document my method for getting Windows 98 (Second Edition) running on VMWare for anyone that needs it.
It’s worth noting that this method may well work fine with VMWare Player (although some of the steps may not apply) which is a free virtual machine software package, but as I have Workstation this tutorial will be for that.
Step 1 – Initial Setup
I’ll assume you have VMWare Workstation already up and running, so now it’s time to crack out your Windows 98 SE install disk, or if you have lost it then find one online somewhere. Have your serial code handy also.
Open Workstation and start the new virtual machine wizard.
- First of all, choose “Custom configuration”
- Choose Hardware Compatibility for Workstation 5.x
- Browse to your W98 disc (or disc image). The wizard should detect W98 automatically.
For the rest of the wizard you can accept the default values for everything. Afterwards, if the machine hasn’t done so already, power it up and you should be presented with the W98 installation wizard.

Enable large disk support
Nothing to complicated here, just install it as you would normally with all the default settings etc. (I’ll assume you know how to do this). Just be sure that on the first boot up (the first time you run the VM after setting it up) when the Windows partition is created you choose to enable large disk support.
After the reboots and everything, you should finally be presented with your Windows 98 desktop. One problem you may have noticed already is that your ears weren’t soothed by the beautiful opening melody as the desktop was loaded, that’s because the sound isn’t functioning owing to the lack of drivers in the OS. Unfortunately, W98 is not officially supported by Workstation v10 and that’s why we needed to activate the Hardware Compatibility at the start – this doesn’t seem to fix the sound drivers though. What we need to do is install our own, but first things first we must install the VMWare Tools to make our interactions with the W98 system much more pleasant.
Step 2 – VMWare Tools

Install VMWare Tools
These tools are essential for making your new W98 setup run smoothly, and it sorts out all kinds of problems with the mouse and video drivers etc. If there’s a message at the bottom of the Workstation window prompting you to install them then simply click that and the installation will start. If not, then navigate to VM/Install VMWare Tools to get the same result. Installation should be a cinch, just follow the wizard and after a reboot your desktop should be running at a much better resolution and you will have to ability to simply glide your mouse in and out of the guest OS. Lovely.
UPDATE 24/02/16 –

I have found that I need to click “Cancel” here to begin the installation process
It seems now that the latest version of the VMWare tools (7.7.0) has trouble installing on Workstation 10 with a W98 SE client. It throws an error message (after you choose to download and install) that the installation failed. I have found that a fix for this is to conversely click Cancel when given the option to installs. You may also need to choose to override the CD-ROM lock before the installer actually starts.
Step 3 – Sound

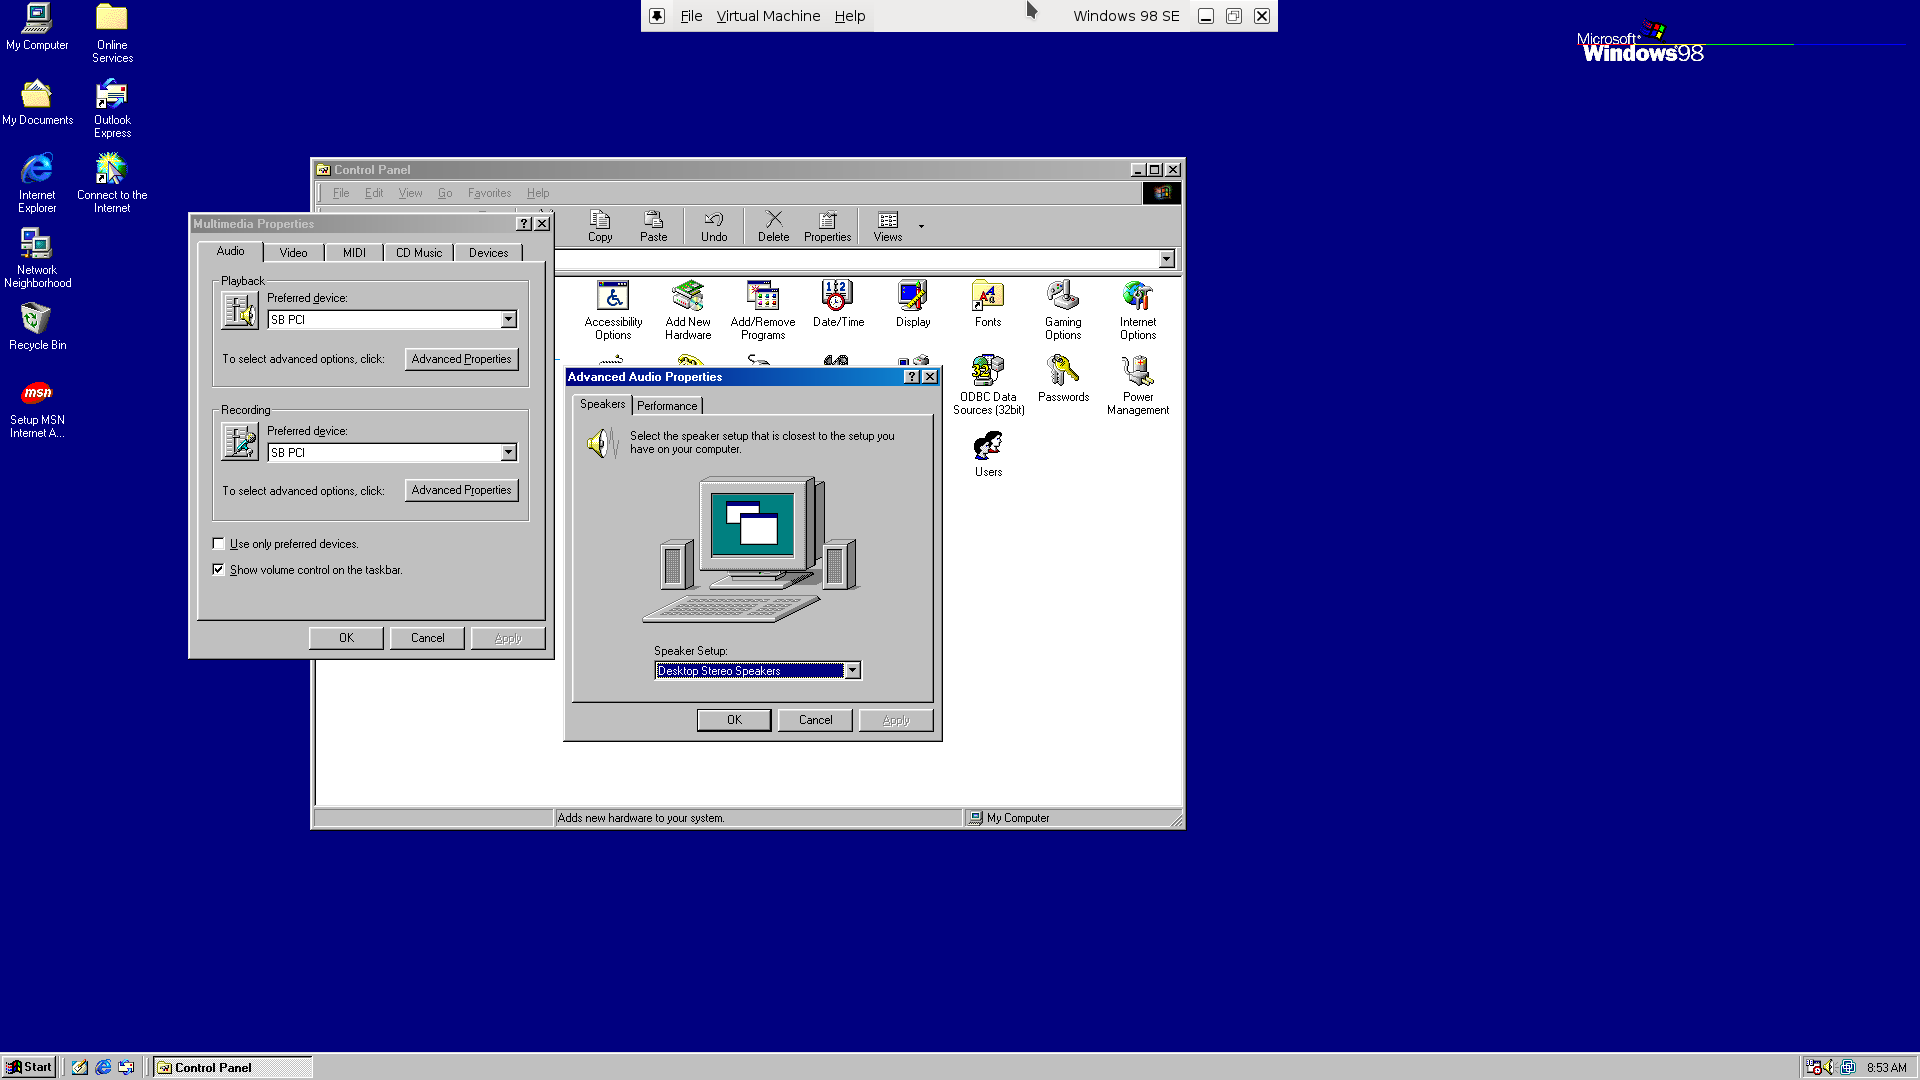
Ensure Sound Card is connected
Now we can sort out that pesky sound issue. Firstly, check in the VM/Removable Devices menu that your sound card is Connected, if it isn’t then connect it. Download these SoundBlaster drivers, and drag-drop them onto your Windows 98 desktop (the VMWare Tools now allows you to copy files this way). Run the installer and follow the instructions. You should now see the New Hardware window pop up and inform you that the drivers for your sound devices are being installed, once that’s done you should see the familiar little speaker symbol in the system tray (if you can’t see it, you can activate it in the Multimedia dialogue of the Control Panel) and the virtual machine can be rebooted.
Step 4 – DirectX 9.0c
As this is a gaming blog, I assume that anyone doing this has the intention of playing some old games on their new VM. To that end you should now install DirectX for the best compatibility with all games made for Windows 9x. The last version of DirectX that supported W98 SE was the December 2006 distribution of 9.0c, and you can download it here. Simply download, unzip, then install it the same way as the sound drivers.
Step 5 – [Optional] 16 bit Colour Mode

Switch to 16 bit colour for some applications
This is an optional step that will be useful for playing games that insist on the OS being in 16 bit colour mode. I will assume that your “normal” OS is running in 32 bit colour mode, so you should see in the Display properties of the W98 machine that the colour depth is also 32 bit – furthermore you won’t have the option of selecting 16 bit depth. To enable this mode we need to add a line of code to configuration file for the machine. Firstly, close the machine and navigate to the folder where your virtual machines are stored. Find the file ending in .vmx and open it in Notepad, scroll to the bottom and add this line to the file:
svga.spoof16bppHost = "TRUE"
Now save the file and reboot the virtual machine, you should see that it is running with 16 bit colour depth.
Step 6 – [Optional] Full Screen with Stretching

Choose to stretch the guest to enjoy games in full screen, even at low resolutions
Most of your old games that you decide to play within your new virtual machine will be limited to an old-school resolution like 640×480 or 800×600, which won’t go very far to filling up your modern 1080p or 4k monitor. Luckily, one of the biggest advantages that VMWare Workstation has over many other similar programs is the ability to stretch the guest OS while in full-screen mode. Simply go to View/Autosize to select the stretching mode and enjoy your old games in full-screen.
Done!
Well, that should do it. You should now have a pretty functional W98 SE installation accessible at your whim for playing games and running legacy software. Enjoy!
– Jaska

Oh, the memories…
I’ve tried Manage previously without success.
So there are ISO images locally — good to know…
I found two images inside C:Program Files (x86)VMwareVMware Player one ‘Windows.iso’ and one ‘winPre2k.iso’.
I run the later as ISO image for the CD-ROM and it installed properly, providing the missing features,but when I shut down the host and changed the res to a wide ratio one, at the next boot it gave me an error that the vmware tools were not for that player or something. So after reboot, I went into the image contents and I run VMwareToolsUpgrader9x.exe (there was a VMwareToolsUpgraderNT.exe too). No more problems after shut-down and I found that the window mode works fine too. Thanx for your assistance!
___________________
BTW a couple of issues as a feedback: Some times, I couldn’t eject the CD-ROM by pressing the physical button. I could only eject it by selecting ‘eject’ in the windows explorer in the host OS (Windows 7).
Also, for the other guest OS I have (XP Professional), I have noticed that when I shutdown the guest OS, it causes problems to the host OS, I even had BSOD yesterday.
In this article, we will examine how to set up and run Microsoft Windows 98 on a new virtual machine using the VMware Workstation 17 Pro virtualization program on Windows 11.

How to Set Up Windows 98 using VMware Workstation 17 Pro on Windows 11 PC with Intel 12th Gen 12700H (Alder Lake) CPU
To improve Windows 95’s shortcomings and some additional security issues, Microsoft developed and released the Windows 98 operating system, codenamed Memphis, on June 25, 1998.
MS-DOS was a standard operating system at the time when computers were widely used by home users. But over time, Windows 98 was developed using MS-DOS and the previous Windows 95 system. In this operating system, a better graphical interface, multitasking support, and easier configuration of network connections were aimed for users.
With Windows 98, the need to use DOS has completely disappeared, but some applications can still be run over DOS without being installed on the system.
It can still be used today to update the firmware of some hardware to an old and outdated operating system. To do this, you may need to install the operating system your device supports, so you may need an old computer or a virtual machine.
If you are using an up-to-date operating system such as Windows 11, you can use VMware Workstation virtualization software to install and run old systems on your computer.
How to Create a New Virtual Machine for Windows 98
If you do not have a physical computer with old hardware, you can use a virtual computer and old systems on your host. Before starting the installation, install the Workstation program on your Windows 10 computer, and be sure to restart your computer.
Then, after downloading the Windows 98 ISO file for VMware to your computer by clicking here, you can prepare a new VM by following the steps below.
Step 1
After running the VMware 17 Pro software, click Create a New Virtual Machine from the options on the main screen of the program.
The Custom (Advanced) option is selected by default when the virtual machine creation wizard is opened. When you continue with the installation with this option, you will configure the hardware of the virtual computer better, so just click the Next button in this window.

Step 2
You can better select available hardware if you go with an older hardware version for Windows 98 in the virtual hardware compatibility window. In fact, if you select 5.x and continue, the hardware version will appear as 17.x when you prepare the virtual PC.
This is because you cannot change the hardware version without installing VMware Tools. However, to prepare a more stable guest machine, select 5.x compatibility at this stage and continue.

Step 3
You can choose which method you want to install the guest operating system using from this window. You can choose from this window with the physical installation media or ISO image as the installation method of a Windows or Linux system.
However, to create a more accurate VM first, check I will install the operating system later and click Next.

Step 4
To select a guest operating system, you must first select the platform of the system you will install, and then the operating system distribution from the Version section. In this window, select Microsoft Windows and then Windows 98, and click Next.

Step 5
You can change the name of the virtual machine to be displayed in the VMware Pro library from this window. To do this, type a new name in the Name field or use the default name specified by the program.
This step is important when preparing the VM because you need to configure the location where you want to install the VM, and where you want to store the VM. If your host’s hard disk has enough storage space, you can leave the VM’s installation location in the default C drive. However, in order to use the VM more efficiently and with performance, create a folder on a USB 3.0/3.1 external HDD device and install it in that folder.

Step 6
Configure 1 processor for the processor configuration for the VMware Windows 98 virtual machine. Even if you configure more processor settings, the system will use only 1 core.

Step 7
It is important to correctly configure the RAM size for the Win98 VM as the maximum RAM size this system can support is 1GB.
If you configure the RAM size of the Win98 virtual computer to 2 GB or 4 GB, the system will reboot and loop constantly.

Step 8
Select the NAT (Network Address Translation) structure for the network type configuration and click Next. If you choose NAT for the VM’s network connection, you should choose the Bridged type if you want to get an IP address different from your host’s IP block but want to get an IP address from the same IP block.

Step 9
In the I/O Controller window, select BusLogic for your virtual disk to work in harmony, efficiency and performance and click Next.

Step 10
Configure the disk type for the VM as IDE and continue. In this window, the NVMe disk type is disabled because this disk structure is not supported by Windows 98.
NOTE: If you are going to install the drivers for the hardware in your virtual PC, do not select SATA at this step. If you choose the SATA disk type, you cannot configure VMware hardware compatibility of drivers for installation and your virtual disk will fail.

Step 11
Since you will be installing a clean operating system, select Create a New Virtual Disk in the Select a Disk window and click Next.
If you have installed Win98 with an older version of the VMware program and you want to use the disk of that system in the new version, you must select the Use an existing virtual disk option.

Step 12
Configure the disk capacity of the virtual computer and select Store virtual disk as a single file to store the virtual disk as a single file type on your host disk and click Next.

Step 13
You can change the name of the disk file from this window, or if you plan to save it to a different location than the VM’s installation location, you can also change the location where the virtual disk will be saved via Browse.

Step 14
You will see the hardware settings you have configured in the summary window of the virtual machine. Now click on the Customize Hardware button to add the Windows 98 ISO file to the VM.

Step 15
Finally, to add the ISO image file to the virtual PC, click on the CD/DVD device, enable the Use ISO image file option, and then select the location of the ISO file you downloaded to your computer via the Browse button.

Step 16
For Windows 98 operating system, close the VM wizard after making sure that the USB compatibility type is configured as 1.1 in Workstation Pro.

Step 17
Close the hardware summary window of the virtual machine by clicking the Finish button.

Step 18
After creating and preparing the Microsoft Windows 98 virtual computer, you can click the Power on this virtual machine button to run it and start the installation.

How to Install Windows 98
It is important to prepare a new virtual machine for the system you will install using VMware Workstation on your Windows 10 computer because old operating systems have minimum system requirements.
After running the Windows 98 machine, you should continue from this step as if you were installing it on a physical computer.
Step 1
After powering up your virtual computer, the Microsoft Windows 98 CD-ROM Startup Menu will open. You can see two ways to install using a Hard Disk or CD-ROM in the Boot menu.
Continue the installation by pressing Enter on the Boot from CD-ROM option on the boot screen.

Step 2
Likewise, press Enter on the Start Windows 98 Setup from CD-ROM option.

Step 3
You can start the installation process by pressing Enter on the Microsoft Windows 98 Setup screen. You can also press F1 to get more information about the installation on this screen, and press F3 to exit the wizard.

Step 4
After starting the installation, you need to configure the unallocated disk space on the disk configuration screen. Press Enter in Configure unallocated disk space option and continue.

Step 5
In Windows 9x systems, when you have a disk size of more than 512MB, you will encounter a large disk setting. In order to use the 8GB virtual disk size you have assigned to the VM, press Enter on the Yes, and enable the large disk support option.

Step 6
Press Enter for the setup wizard to reboot your system. After this process, your system will restart and when the boot screen appears, follow the same steps until step 4.

Step 7
After configuring the large disk space usage, the wizard will automatically start formatting the C drive.

Step 8
After the setup wizard formats your virtual disk, press Enter to continue.

Step 9
In this step, the Microsoft ScanDisk tool will open and scan and verify your system’s file integrity, such as operations.

Step 10
After confirming the integrity of the installation media and system files with Microsoft ScanDisk, your system will restart and the necessary files for installation will begin to be copied.

Step 11
When Windows 98 Setup is opened, click the Continue button in the window that states that the installation will take between 30 and 60 minutes depending on the speed of your computer.

Step 12
Wait while the wizard prepares to do the rest of the installation process.

Step 13
In the Select Directory window, you can configure the directory where you will install Windows 98 as a different location, but select the default location C:WINDOWS and click Next.

Step 14
Wait while the Windows installation directory and installed components are checked.

Step 15
In the Setup Options window, continue with the Typical checked by default. If you want to configure all the available options, such as the components to be installed in your virtual system, you can choose the Custom option.

Step 16
If you want to configure the system applications or tools that you want to use on your system in the Windows Components window, continue with the option below. In this step, we recommend installing the most common system components.

Step 17
In the Identification window, type a new name for your virtual computer and continue without changing the workgroup. You can also fill in the Description field to write a description for your virtual PC.

Step 18
In the location configuration step, select the country you live in and click Next.

Step 19
Click Next to start copying Win98 system files.

Step 20
When your virtual computer restarts, Win98 system files will start to be copied. Copying system files will take time depending on the speed of your system.

Step 21
After the operating system files are copied, restart your VM.

Step 22
Wait while the Microsoft Windows 98 system boots up.

Step 23
Wait while the setup wizard updates the configuration files.

Step 24
If you have a computer with Intel’s 12th-generation processor, you may not be able to install Win98 on the virtual machine. So shut down your VM in the second phase of the operating system as you need to patch.

Step 25
Open the virtual machine settings and click the Add button to add a new device. In the Hardware Type window, select Floppy Drive and click Finish.

Step 26
To add a bootable image file to the floppy drive, enable the Use Floppy Image File option and then add the Patch.ima file you downloaded to your PC from the button below via the Browse button.
Win98 Fix CPU – Floppy Boot – Intel 12th Alder Lake (patcher9x-0.6.14-boot.ima)
To run 9x versions of Windows on the latest CPUs, you can download patcher9x-0.6.14-boot.ima from the article published on the Vogons website or from the Github link.

Step 27
When your Win98 virtual system boots, type the “patch9x” command in the A:> drive and press Enter. In the next step, press Enter and select “1” to execute the operation, and press Enter again.
In order for your virtual operating system to work on your current computer, turn off and on your system after editing the relevant files.

Step 28
After the necessary configuration files are prepared, the User Information window will open. In this window, type a name for the user account of your Win98 system. If you are going to use your VM in a corporate environment, you can also write the company information.

Step 29
To accept the license agreement of the Win98 operating system, select the option I accept the agreement and click Next.

Step 30
In the Product Key window, type your Windows 98 product key and click Next to continue.

Step 31
After configuring all the settings of the operating system, click Finish to continue to boot the system.

Step 32
When your virtual VM restarts, the setup wizard will scan for hardware to identify plug-and-play devices. Do not restart your computer until the hardware scan is complete.

Step 33
Wait while the wizard configures your virtual computer’s hardware and Plug and Play devices.

Step 34
In this step, rearrange your date and time settings to the location you live in and close the window.

Step 35
Wait while the setup wizard updates the system settings.

Step 36
When the Enter Network Password window opens, type your user name to log in to the system with the user name you created and click OK.

Step 37
Wait while the personalized settings are configured.

Step 38
After typing your username, you will be greeted with the Microsoft Win98 desktop screen.

Step 39
You can check your system information by right-clicking on My Computer and then clicking Properties.

How to Install VMware Tools
After installing an operating system on virtual machines, the first thing you need to do is to install VMware Tools. With this software, you can install system drivers that are not installed on VMs. In this way, you can use the VM in full-screen resolution or use your host’s USB and Webcam devices.
Step 1
To install VMware Tools on a Microsoft Win98 guest machine, click VM / Install VMware Tools from the menu. When you receive the warning that the guest operating system has locked the CD-ROM, click the Yes button to continue.

Step 2
In the virtual machine, VM Tools will start as in the image below and will be prepared for installation.

Step 3
Click Next when the installation wizard of the virtual machine tools starts.

Step 4
Select Complete as the installation type of VM Tools and click Next.

Step 5
Click the Install button to start the installation of the virtual PC tools.

Step 6
When you encounter the 25010 warning during the HTML Help Runtime inspection, click Yes to install the HTML Help engine.

Step 7
After installing VMware Tools, click OK when the virtual machine presents you with an Eject request, and then click Finish to close the wizard.

Step 8
You can now use your virtual PC in a full-screen resolution supported by your host. If your VM is not adapting to full screen resolution, open Display Properties and configure the screen resolution to 1024×768 or higher and click View / Fit Guest Now after saving the settings.

Step 9
In addition, one of the other benefits of VM Tools is that it enables file transfer between the host and the VM by drag and drop method.
Create a new text document on your host’s system and drag and drop it onto your VM and you will see the file transfer done successfully.

How to Configure the Internet Connection
After installing your Guest virtual system, you may want to check the Internet connection at the first stage.
Step 1
To check your Internet connection via VM, open MS-DOS prompt and ping Google servers with the ping 8.8.8.8 command and test your network connection.

Step 2
Go to Start / Programs / Internet Explorer and open Internet Explorer.

Step 3
Since you already have a network connection when the Internet Connection Wizard opens, select option 3 and click Next.

Step 4
When you try to access the Google search engine through the Internet Explorer web browser, you can now see that your connection is OK.

How to Install Drivers
After installing Windows 98FE, you can configure the network connections and use them for testing purposes only. However, you can experience the system more professionally by installing drivers for devices such as audio and USB.
You can download the Win98 USB and audio drivers from the table at the bottom of the article to your computer.
Step 1
First, right-click on My Computer and click Properties from the pop-up options. When the System Properties window opens, click the Device Manager tab and check the drivers for the devices that are not installed on your system.
The Driver list that VMware Tools could not install is as follows.
- PCI Multimedia Audio Device
- PCI System Peripheral

Step 2
After checking the uninstalled drivers, shut down your virtual computer. Then click VM / Manage / Change Hardware Compatibility from the menu to configure the compatibility of the VM so that the hardware can be found appropriately by the system.

Step 3
When the VMware hardware version change wizard opens, click Next and continue. In the next window, change the Hardware Compatibility value to Workstation 5.x to install the drivers for the virtual machine and click Next.

Step 4
After changing the hardware compatibility to Workstation 5.x, select Alter this virtual machine and click Next. After converting the VM to version 5.x, click the Close button.

Step 5
After running your virtual system, you will see that new devices such as Standard Floppy Disk Controller are determined on the screen this time.

Step 6
Some drivers will be updated automatically, but you have to manually install the drivers for devices such as USB.
When the Intel 82371AB/EB PCI to USB Universal Host Controller device is found by the system, click Next and proceed to the next step. In the add new hardware wizard, click Next to have Windows install the best drivers.
Check CD-ROM Drive and click Next to install the USB driver. In this step, make sure the Win98 ISO file is mounted on the VM.

Step 7
Select The Updated Driver option because Windows has found a more recent driver version for USB and click Next. Windows will install the USB Controller driver to C:WINDOWSINFUSB.INF.

Step 8
Also, install the drivers of the AMD PCNET Family Ethernet Adapter (PCI-ISA) device found by the system by following the same steps.
")
Step 9
One of the biggest problems in using Win98 VM is the sound driver. After changing the hardware version, the audio device will be automatically found by the system.
An important point here is that if you try to install the sound driver with Workstation 16.x or 17.x version, you will get a Windows Protection Error. Therefore, you must change the hardware version of the VM.
Click the Cancel button when the system finds the PCI Multimedia Audio Device.

Step 10
You have to manually install the driver for the audio device, because the CD-ROM cannot automatically install the drivers for this device.
Copy the Eapci8m.ecw file in the Audio Driver that you downloaded to your computer from the table at the bottom of the article into C:WINDOWSSYSTEM.

Step 11
Now, copy the Creative Ensoniq AudioPCI Driver (epw9xup) file to the VM and run it. After running the setup file, the Audio device will be automatically scanned again and the drivers will be installed.

Step 12
After copying the EAPCI8M.ECW file to the corresponding location, open Device Manager and open the settings of the Creative Ensoniq AudioPCI device and select MIDI Synthesizer Waveset setting “Export 8 MB GM/GS Waveset 5” and click OK.
After installing Creative Ensoniq AudioPCI Driver you will get an error like below because you need to configure the MIDI settings of the system.
The Creative Ensoniq AudioPCI driver cannot load MIDI waveset. MIDI playback
has been disabled.
Step 13
You will no longer receive MIDI alerts when you restart your system. In addition, you can see the AudioPCI Mixer application launched in the taskbar.

How to Use USB Flash Memory
We recommend using a USB flash drive so that you can quickly copy large files to your virtual machine.
Step 1
Now, plug a USB Flash Memory into your system on your host PC. In the New USB Device Detected window opened automatically by VMware, check the “Connect to the host” option and click OK.

Step 2
Create a new folder or document inside the USB disk on your host and then click VM / Removable Devices / Name of your USB / Connect in Workstation Pro’s tool menu to connect it to your VM.

Step 3
You must also manually install the USB Mass Storage Controller driver to be able to use flash drives in the VM. First, install the Generic USB Hub driver found by the system from the Windows ISO file.

Step 4
You must also manually install the USB Mass Storage Controller driver to be able to use flash drives in the VM.
Likewise, download the USB Mass Storage Controller Driver (nusb320-Eng-98FE) file to your computer and double-click on it to start the installation. When the Native USB Driver window opens, extract the contents of the archived file to C:USB.
")
Step 5
Click the Refresh button in Device Manager and scan for hardware again. This time, install the Generic USB Hub driver manually. For Generic USB Hub, select “Search for the best driver for your device” and click Next. Select the folder you extracted to C:USB for USB Hub Driver and click OK.
After installing the driver for the DataTraveler 3.0 device, if the system cannot find the USBNTMAP.SYS file, you can find it in C:USB.

Step 6
Finally, you can see that the USB flash memory 3.0 device is now running smoothly on it. Also, you can see the “KINGSTON DataTraveler 3.0” device when you check “Disk Drives” via Device Manager.

How to Delete the Virtual Machine
If for some reason you no longer want to use the Win98 guest machine that you have installed with Workstation on your host PC, we recommend that you delete it completely from your host disk.
Right-click the VM you want to delete from the left panel of Workstation Pro and click Manage / Delete From Disk, then click Yes.

Video 1
Video 2
Video 3
Windows 98 FE (First Edition) Driver Download
Windows 98 FE (First Edition) ISO
Audio Driver (Creative Ensoniq AudioPCI)
USB Driver (USB Mass Storage Controller)
Windows 98 SE (Second Edition) Driver Download
Windows 98SE (Second Edition) ISO
Sound Driver (Creative SB PCI (WDM))
Installing Old Versions
Workstation Version
YouTube Video
Slide
Related Articles
♦ How to Install Windows 10 on a Virtual Machine
♦ How to Install Windows XP on a Virtual Machine
♦ How to Install Windows 7 on a Virtual Machine
♦ How to Install Windows Me on a Virtual Machine
♦ How to Install Windows Vista on a Virtual Machine
Table of contents
- Introduction
- Video
- Download Links
- Setup VMware Player
- Installing Windows 98SE
- Installation of VMWare Tools
- Installing Updates
- Installing System Drivers
- Addition of Legacy Devices
Introduction
The Windows 98SE Operating System Reached End of Life on the 11th of July 2006.
This guide will instruct on installing Windows 98SE in VMWare Player Workstation 15.2.
Video
Download Links
Install VMWare Workstation Player on a Windows 10 64 Bit Host:
The website WinWorld has a Windows 98SE ISO with a Generic Serial Key on the Right Hand Side of their Website. Ensure you download the OEM Full 544.44MB ISO as it is the only one that is Bootable.
Install 7zip and use it to extract the ISO:
You will also need the following update packages and system drivers:

Setup VMware Player
Select Player → File → New Virtual Machine:

Select Browse, load your Windows 98 SE ISO. You should get a balloon stating that Windows 98 SE is detected. Select Nect:

You will be given a default value for your VM name and location. I will add SE to the end of the default name. When done select Next:

Change the size to 20 GB:

Select customise hardware:

Under Memory move the slider up to 1 GB:

Select Network Adaptor and make sure Connect at Power On is unchecked (we do not want to give an OS that hasn’t had security updates for 15 years internet connectivity).

Select USB Controller and change USB Compatibility to 1.1. VMware Tools do not have a USB 2.0 or 3.0 driver for Windows 98 SE. Once you’ve made the changes select Close,

Select Finish:

Installing Windows 98SE
Select the Play Button to Start the VM:

VMware will also tell you the magic keyboard shortcut keys. [Ctrl] + [g] to take your mouse to the VM:

And [Ctrl] + [Alt] to take your mouse away from the VM.

Press [↓] and select Boot from CD-ROM and press [Enter]:

Select Remind me later if you get a prompt for VMware Tools:

Select Start Windows 98 Setup from CD-ROM:


Press [Enter]:

Select «Configure Unallocated Space» and press [Enter]:

Press the [↓] key and select «Yes Enable «Large» Disk Support» and press [Enter]. This is still tiny by todays standards:

Ignore any mention of the floppy drive A: and press [Enter]:

Your VM will restart, you will see the Legacy BIOS splash screen:

Once again press the [↓] key and highlight Boot from CD-ROM. Then press [Enter]:

Select the first option and press [Enter]:

Windows 98SE will then format the virtual hard disk:

Press [Enter]:


Select [Continue]:


Use the default directory and press [Enter]:

Select Typical and press [Next]:

Select the Recommended Option and press Next:

Type in your Computer’s name and press Next:

Select your Country and select Next:

Select Next:

Your Windows 98SE VM will restart:

You will see the Virtual Legacy BIOS Splash screen and Windows 98SE logo:


Input the generic Product Key and select Next. There was no product activation with Windows 98SE as many users never had an internet connection:

Select Finish:

The setup will configure on the Virtual Hardware:


The VM will restart, you will see the Windows 98 splash screen followed by the Virtual Legacy BIOS splash screen followed by the Windows 98 splash screen:


Windows 98SE will setup hardware:

Select your time zone and select Apply:

Then select OK:

The System Settings will Update and the Windows 98 VM will once again restart:


You» once again see the Windows 98 splash screen, the Virtual Legacy BIOS splash screen and the Windows 98 splash screen again:


Select OK to log in:

Windows 98SE will Add New Found Hardware:


It will Update the System Settings again:

You will see the Welcome to Windows 98 splash screen. Uncheck «Show this screen every time Windows 98 starts» and select Close:

Select Player → Manage → Install VMWare Tools:

You will be prompted to Download and Install VMware tools (note the download will come via your host PC and not via your guest PC).

The tools will download:

You will get a message about the CD-ROM Drive. Select Yes

The VMware Tools will extract:

Select Next:

Select Next:

Select Install:

Select Yes:

Select Finish:

Select OK:

Select Finish:

Select Yes to restart:

You will see the Windows 98 splash screen, the Virtual Legacy BIOS splash screen and the Windows 98 splash screen again:


Select OK to log in:

You can now resize the VM however the first time you do this, it won’t resize.

Right click the Desktop and select Properties:

Now select Settings and change the slider to the maximum position:

Select Apply and then OK:

Now the screen will be too big, but select Yes anyway:

When you resize the Window, the VM will now resize with it. Select cancel at display properties:

That’s you got VMware tools installed:

Installing Updates
You should now be able to drag and drop the Unofficial Service Pack U98sesp3 to the VM:

Double click it and select Yes:

It will extract:

You can close the information:

Check Main Updates/System Core Files (Install Separately) only and then select OK:

When done select OK and restart as prompted.

Relaunch the U98sesp3 and then select Microsoft DirectX 9.0c End-User Runtime (Install Seperately) and then select OK:

Restart when prompted. Relaunch U98sesp3 and select Universal Plug-n-Play 4.90.3003.0

You can optional install anything else here.
Installing System Drivers
Right click Computer and Select Properties:


Select Device Manager. You should have two unknown Devices:
- PCI Multimedia Device → Soundblaster PCI128
- PCI System Peripheral → This is the VMCI and VMWare has no Windows 98SE driver

If there is also:
- PCI USB (You have USB2.0 or USB3.0 settings, which are not supported in Windows 98SE, change your VM Settings to have USB 1.1)
Drag SBPCI_WebDrvsV5_12_01 over to your VM and install:

Select OK to proceed with the install:

Select No when you get the Version Conflict warnings.

Your Device Manager should look as follows.

It is recommended to install the Logitech Mouse Driver.
Addition of Legacy Devices
You can add more hardware such as a floppy drive (virtual floppy drive with .flp images or an onboard/USB floppy drive), serial port (onboard or USB serial port) and parallel port (onboard or USB serial port). Power off the VM and right click your VM and select settings:

Select Add Hardware:

Select yes at the User Account Control:

You may add a floppy drive, parallel port and/or serial port depending on the legacy hardware you wish to connect to:

I advise not setting the Floppy to Connect at Power on otherwise the system will try to boot from the Floppy Disk before the HDD> This can be amended in the BIOS setup however:


These and USB devices can be accessed via the Player Menu. Each optical drive, floppy drive, network adapter, serial port, parallel port and soundcard will be listed separately. Below these any USB device are listed. If the USB devices have a tick they are connected to the VM (and removed from the Host OS). The Ability to connect to all of these Removable Devices and the installation of legacy Windows OS make the VM very powerful:

VMDK image for VMware products e.g. VMware Workstation containing an installed copy of Microsoft Windows 98 Second Edition (including all updates that I am aware of) — tested with VMware Workstation 16.1.0 with the virtual machine set up to have 256MB RAM, 1 processor, operating system set to Windows 98, IDE hard drive.
comment
Reviews
Reviewer:
Axor The Axolotl
—
favoritefavoritefavoritefavoritefavorite —
February 3, 2023
Subject:
Wow
The argument here goes crazy oh my goodness gracious. Y’all need to chill it is NOT that serious.
Anyways it works really well, bit laggy but pretty sure its on my end.
Reviewer:
NinaThePocoyoFan2017
—
—
January 29, 2023
Subject:
I want to notify you guys.
When I was testing old 9x releases in VMware Workstation 16.2, there’s a bunch of glitches, such as the mouse pointer disappearing and reappearing when the user right clicks. Beware of that.
Reviewer:
StupidKorok
—
favoritefavoritefavorite —
January 23, 2023
Subject:
To reviewer Fre4KSkull
No YOU SHUT THE (BLANK) Up! People have a right to report issues they have with a setup! Just because you don’t have any problems doesn’t mean someone else on a different machine doesn’t!
This generation of free for all drugs have f’ked up right and wrong and it’s sad what todays young ones suffer and will be taught about not being civil.
To Quote Liz on Magic School Bus «Did you ever think about clicking on the bus?»
Reviewer:
Fre4kSkull
—
favoritefavoritefavoritefavoritefavorite —
January 1, 2023
Subject:
Great
Works perfectly.
RE: Bastiro03
Can you please shut the fuck up.
Reviewer:
Bastiro03
—
favorite —
December 25, 2022
Subject:
Guest OS not working correctly
I use VMware Workstation 17. When importing the image into a newly created VM, the OS gives a lot of errors on boot, stating that DLL files (with corrupt file names) were not found. It otherwise seems to work ok at first glance (not counting lag with the boot sound, might be my slow CPU), but trying to execute any program either does nothing (for third-party apps) or gives a «Rundll32» error (for system apps like control panel). Binding ISO files to the VM also doesn’t work, no files on the CD will be detected by Windows except (sometimes) the CDs name.
Reviewer:
hecker84
—
favoritefavoritefavoritefavoritefavorite —
December 29, 2021
Subject:
Thanks so much!
Edit: And you even added Office XP!
Установка VMWare Tools в составе VMWare (Player, Workstation or Server) даёт возможность запускать Windows 9X в полноэкранном режиме на HD мониторах с глубиной цвета 32 bit, а так же обеспечивает совместимость с другим физическим железом, однако не устанавливает звуковой драйвер.
Ниже расположена ссылка на zip-архив для решения этой проблемы. В архиве кроме непосредственно самого драйвера (SBPCI_WebDrvsV5_12_01.exe) расположен так же бинарник для воспроизведения midi-файлов и DirectX 9c для решения возможных проблем с ошибками NTKERN.VXD и MMDEVLDR.VXD.
Установка.
1. Распакуйте архив и поместите его содержимое в любое удобное место в среде гостевой Windows 98.
2. Установите сам драйвер (файл SBPCI_WebDrvsV5_12_01.exe). Не перезагружайте ОС после завершения установки. В процессе Windows попросит установочный диск Windows 98. В настройках виртуальной машины укажите путь к ISO образу или путь к физическому диску (не важно как, но гостевая ОС должна увидеть установочный диск Windows).
3. Поместите файл «eapci8m.bin» в C:windowssystem.
4. Установите DirectX (файл directx_9c_redist.exe). Для тех, кто забыл как это было — установка спросит путь до папки, куда следует распаковать содержимое. После чего необходимо вручную запустить установку DirectX из указанной папки.
5. Перезагрузите гостевую ОС.
После повторной загрузки звук должен работать. На скриншоте показаны настройки звука. Опции будут неактивны, если драйвер не установлен.
Драйвер гарантированно работает на Windows 98 SE, но так же должен работать и на других версиях Windows 98. Возможно будет работать и на других редакциях Windows 9X, таких как Windows 95 и Millennium.
Ошибка типа «The NTKERN.VXD and MMDEVLDR.VXD device loader(s) for this device could not load the device driver. (Code 2)».
Ошибка по всей видимости вызвана тем, что при написании кода Creative Technology, Inc использовали API DirectX, или библиотеки, не включённые по умолчанию в Windows 98. В любом случае, установка DirectX устраняет эту проблему.

Установка легендарной Win98 заката тысячелетия на Vmware
Не многие из вас наверное застали и помнят времена, когда иметь компьютер дома мог позволить не каждый, а уж еще и с Dialup интернетом и подавно. Windows 98 – система, впервые вышедшая в 1998 году и показанная самим Биллом Гейтсом навела немало шороха и инновацией по сравнению с ее предшественником – Windows 95.

Сама система, как и 95-ая визуально мало чем отличалась. Отличилась однако Windows 98 более успешными продажами в США и знаменитой презентацией с синим экраном смерти. Чуть позже, в 1999 году даже вышло обновленное издание Windows 98 Second Edition исправляющее множество багов, добавив поддержку USB, модемов, обновленного браузера Internet Explorer 5 и других особенностей.
Именно в этой статье мы рассмотрим последнюю версию – Windows 98 SE, которую установим на современный ПК при помощи виртуальной машины Vmware Workstation.
Где взять ОС?
В этой статье я не буду подробно рассказывать, где взять эту старую ОС. К сожалению устаревшие Windows невозможно загрузить с официального сайта Microsoft, а их поддержка уже давно была прекращена.
Поэтому среди немногочисленных вариантов будет поиск лицензионной/пиратской копии на CD/дискете или же более современный вариант – Скачивание копии (образа) через интернет на файлообменниках/трекерах. Установочный диск весит максимум до 700мб – Размер обычного CD диска.
Почему выбор пал именно на Windows 98, а не на Windows 95? Да потому что та версия устанавливается сложнее, а работает она еще хуже, чем Windows 98. К тому же, на Windows 98 вас ждет встроенный интернет-браузер (IE5), стандарт Plug-and-Play, более удобный интерфейс, и вы сможете запустить на порядок больше программ с играми без поиска необходимых драйверов.

Процесс Установки
Перед началом установки нашей Windows 98 SE нам прежде всего понадобится виртуальная машина Vmware Workstation Player, которую можно скачать здесь с официального сайта. На выбор есть версия для Linux и Windows.
С помощью виртуальной машины можно установить любую ОС, но мы рассмотрим только Windows 98.
После скачивания VMware Можно приступать к первой настройке.

- Запустив Vmware Workstation Player в верхней части окна можно добавить новую операционную систему.
- В следующем окне нам предложат указать путь до установочного диска (для дисководов) или же выбрать образ диска (Iso формата). Выбираем второй вариант и указываем путь до образа диска, который вы скачали до этого. Программа автоматически обнаружит, что данный образ является Win98 и подберет все дальнейшие настройки за вас.

- В следующих пунктах вас спросят как назвать виртуальную машину и сколько выделить места на жестком диске под Windows 98. 8 Гб места вполне достаточно для данной ОС.
- Запускаем нашу Виртуальную машину и начинаем установку ОС. В предложенных пунктах выбираем Boot from CD-ROM и затем Start Windows 98 Setup From CD-ROM. Тем самым начнется установка Windows через установочный ISO образ. Займет этот процесс от 5 до 15 минут.


- Дальше дело за малым. Подтвердив все этапы с дальнейшей перезагрузкой и повторно указав загрузку с CD-ROM мы попадем в установку Windows 98 в которой вам понадобится ввести дату и время, имя пользователя и лицензионный ключ для активации ОС. Начнется установка системы, которая займет пару минут.

- После всех проделанных этапов Windows 98 будет считаться установленной и полностью готовой к работе, но в нашем случае еще предстоит установить драйвера от Vmware, настроить Звук и подключиться к интернету.
Добавление Драйверов, звука и интернета
Драйвера Vmware
Прежде всего рекомендуется установить драйвера для Vmware. Это позволит нам включить аппаратное ускорение GPU и прямой обмен файлов между главной и виртуальной ОС.
Для этого уже в запущенной системе заходим в Player и выбираем Manage > Install/Reinstall Vmware Tools

После установки драйверов и перезагрузки системы в системном трее рядом с часами у вас появится иконка Vmware Tools сигнализирующая об успешной установке всех инструментов.
Драйвера Звука
Следующим этапом будет установка звуковых драйверов. Для этого нам подойдут драйвера от Creative SoundBlaster Audigy (SBPCI-webdrvsv5_12). Найти эти драйвера можно на официальном сайте Creative или сторонних ресурсах как для Windows 95-98 так и для Windows 98SE.

После загрузки этих драйверов на ваш ПК, достаточно перетянуть файлы драйверов в окно запущенной виртуальной машины Win98. После этого данные файлы окажутся внутри Vmware и их можно будет запустить внутри Windows 98 для установки звука. Windows так же попросит вас указать путь до установочного диска Windows. Поэтому не спешите удалять образ Iso диска с системы.
Настройка доступа в Интернет
Никаких драйверов и настроек модема не потребуется. Все, что необходимо сделать – это запустить Internet Connection Wizard внутри Windows 98 и поэтапно следовать инструкции по настройке ниже.

- Выбрать последний пункт – I want to set up My Internet connection manually (LAN). Настроить подключение к интернету через Локальную Сеть
- Далее I connect through a local area network (LAN)
- Поставить галочку Automatic discovery of proxy server (опционально)

В следующем пункте выбрать No – не настраивать почтовый аккаунт и затем завершить настройку подключившись к интернету.

Поздравляем! На этом подключение к интернету успешно завершено и можно приступать к полноценной работе с Windows 98 SE. Рекомендую так же заменить стандартный браузер на Opera v9.64 для Win98, так как с ней станет проще взаимодействовать с современными сайтами.
Зачем сейчас нужна Win98?
Несмотря на то, что система уже кардинально устарела, она может использоваться и по сей день. Конечно Windows 98 не заменит современные ОС, но с основными задачами типа работы с документами и файлами справляется без особых проблем (необходимо лишь обзавестись всеми необходимыми драйверами и софтом).
Целесообразно установить такую устаревшую ОС можно разве что ради ностальгических чувств – поиграть в игры былых лет, которые не могут запуститься на современных ПК и поэкспериментировать с различными программами.