In this article, I’m going to show you how to Build vSphere Infrastructure on Windows Server 2008 R2 vCenter Server. This guide is the continuity of my previous article which was about creating a Domain Controller for vSphere Infrastructure. If you didn’t check that guide, you can check down below. The guide below is very important and if you don’t know the first part and you can’t do this part because every part is connected. So check part 1 of building vSphere infrastructure domain controller.
Please read the Tips and Note carefully because there I mentioned very important information.

ESXi & vCenter Server Architectures
Related: How to Build vSphere Infrastructure on Windows Server 2008 R2 Part1
In this guide, I’m going to cover the following objectives.
- Create Windows Server 2008 R2 VM
- Install VMware Tools
- Windows Server 2008 R2 Initial Configuration
- Join vCenter Server to Domain
- Create a User Account (VCAdmin)
- Install vCenter Single Sign-On (SSO)
- Install Inventory Service
- Install vCenter Server
- Install vSphere Client
Requirements
- VMware vSphere vCenter Server ISO File
- At least 4GB RAM
- Disk Space 40GB or Higher
- Up and Running Windows Server 2008 R2 or Higher
Build vSphere Infrastructure on Windows Server 2008 R2 vCenter Server
I’m not going to go in so detail about creating Virtual Machine, Installing VMware Tools, Windows Server 2008 R2 Initial Configuration because I’ve covered those in Part 1 of this infrastructure. Just check part 1 that linked earlier in this guide. However, I’ll mention every objective very briefly in this post so please follow the guide exactly. If you miss any steps, then it might not work.
#1. Create Windows Server 2008 R2 VC VM
Step #1. For our vCenter Server, we going to use the same Windows Server 2008 R2 so create a New Virtual Machine and name it VC.

Name the Virtual Machine VC
Step #2. This time give it a bit more Disk Space like 60GB.

Specify 60GB Disk Space
Step #3. Navigate to VMware Virtual Machine Settings and select around 6GB Memory, 4 Processors, tick mark Virtualize Intel VT-x/EPT or AMD-V/RVI. Finally, Browse ISO file of Windows Server into your DVD Drive.

Enable Virtualization Technology
Step #4. For VC virtual machine, your final settings should look something like snapshot down below. Install Windows Server and follow the next step of this guide.

Power on the Virtual Machine
#2. Install VMware Tools on Windows Server 2008 R2
Once you’ve successfully installed Windows Server, it’s highly recommended to install VMware tools because it’ll fix the screen resolution and as well as speed up your virtual machine. So do it navigate to VM tab>Install VMware Tools then run the setup and click Next for a couple of times. Finally, Restart your VM then it should be fine. For more details, again have a look to our previous guide which is linked at the beginning of this article.

VMware Tools Setup
#3. Windows Server 2008 R2 Initial Configuration
This part is a really important step that you should do it to have a clean process. You’ve to prepare the following objectives.
- Activate Windows Server 2008 R2
- Change the time zone
- Change computer name + add DNS Suffix
- Changing the default administrator account
- Windows update
- Installing “.Net framework 3.5.1”
- Disabling IE ESC
- Disabling Shutdown Event Tracker
- Add static IP address
Tip: Once the initial configuration part is done then you need to change your Network Adapter to VMnet2 same as your DC

Change the Network Adapter
and because we didn’t install DHCP to provide automatic IP address so for every virtual machine that we create, we should set a static IP address. For vCenter (VC) server use the IP 10.0.0.2. with Subnet Mask of 255.255.255.0. We used 10.0.0.1 for our DC.
If you don’t know how to perform the mentioned topics, then follow our previous guide. I’m not going to cover here because this post will be so long and I don’t want to do it. Everything is the same because it is also Windows Server 2008 R2. If you stuck at any step or didn’t work just let me know in the comment section below.

Set Static IP Address on VC VM
#4. Join vCenter Server to Domain
Once you’ve performed task 1 to 3 then it’s time to join our VC virtual machine to the domain controller (DC). To join VC to the domain, you should have done the following tasks.
- Chosen VMnet2 in VC VM
- Used Static IP Address 10.0.0.2
If you’ve done the above task, then you can join the vCenter virtual machine to the domain controller. Now, open Run and type sysdm.cpl and press Enter. Click Change button and select Domain. Type your domain name “wikigain.com”. You should see a window that asks for a username and password. Type your Domain Controller username and Password. In my case, my username for DC is Admin and my password is Wiki123!

Join VC VM to Domain
Once you’ve joined your VC, you should Restart your virtual machine to get an effect.
Tip: If you get any error in this step, you need to check your prefered DNS server on your DC. Make sure it’s configured correctly. If still, you have the problem with joining VC to DC then check the firewall on both VMs. Turn Off the firewall and try again. If still you couldn’t join let me know in the comment section and send me your error.
#5. Create a User Account (VCAdmin)
In this step, I’m going to create a user account in my Domain Controller so you have to do the same.
Step #1. On your DC, navigate to Start Menu>Administrative Tools>Active Directory Users and Computers. Create VCAdmin Account.

Create VCAdmin Account
Step #2. Also, select Password Never Expires.

Choose Password Never Expire
Step #3. Once the user is created, get back to your VC virtual machine and open up Run then type lusrmgr.msc and press Enter. Now, you should see local users and groups window. Select Groups and Right Click on Administrators>Properties. Click Add button and type VCAdmin and enter.

Add VCAdmin user to Local Administrator
Step #4. If you asked for the username and password, enter your DC username and password.

Select Administrator Groups
Step #5. Finally, should see something like the screenshot below. Click OK.

Administrators Group
Step #6. Logoff your VM then Login with VCAdmin account on your VC VM.

Login as VCAdmin Account
#6. Install vCenter Single Sign-On (SSO)
Now that you’ve done everything correctly so far then follow the next steps to install vSphere vCenter 5.1 on this VC VM.
Step #1. Go to VM Settings> CD/DVD then select VMware vSphere vCenter 5.1 ISO image.

Browse VMware vSphere
Step #2. Wait for a few second that VMware vSphere setup.exe pops up. Please be patient because this installation needs sometimes to get completed. From VMware Product category select VMware vCenter Simple Install. Click Install button to get started.

VMware vCenter Simple Install
Step #3. On the “Welcome to the install shield wizard for vCenter Single Sign-On” click Next. Make sure that every time type a password, write it down somewhere that you might need them in the future. Just click Next and Next. Every step is clearly marked in the screenshot down below.
Note: Use complex password (eg. Az!@#$%^&) for database and admin accounts.

Set Database User Information
The SQL server instance will be installed and the SSO database will be created along with installing the program.
Tip: Be patient if the installer hangs at this step as it’s still working. If you get an error try to install every session separately. For instance, first, install vCenterTM Single Sign-On then VMware vCenter Inventory Service and finally install vCenter Serve plus vSphere Client.

Ready To Install
#7. Install Inventory Service
If you didn’t get any error in part 6 “Install vCenter Single Sign-On” then every upcoming section should appear automatically otherwise, you should install them individually. Anyway, install Inventory Service now. The Installation is pretty straightforward and you need to click Next. Wherever it asks to enter the password, use a complex password and put other settings to default.

vCenter Single Sign-On Information
Also, don’t forget to Install Certificates in the final step.

Certificate Installation for Secure Connection
#8. Install vCenter Server
Step #1. This is the second last step, to sum up, this guide. Now, you should install the vCenter Server. When you installed Inventory Service then vCenter Service should automatically appear on the screen. If it didn’t, just use the VMware vSphere Product window to install it manually. If you’ve bought the VMware vSphere then you should have a product key otherwise, use the evaluation version which allows you to use it for a couple of months.

Install vCenter Server
Step #2. Follow the screenshots below to get a clear idea that what to choose in every window.

vCenter Server JVM Memory
Step #3. Don’t forget to tick “This administrator is a user group” box.

Ready To Install vCenter Server
#9. Install vSphere Client
This is the final step and I hope you’re following everything correctly. If you missed something or something is not working properly, don’t hesitate and share in the comment section down below and we’ll answer ASAP. Anyway, the last step you should install vSphere Client.
Step #1. If vSphere Client Window automatically popped up then install it otherwise, open VMware vSphere Installer then selects VMware vSphere Client from the product list. Click Next for a couple of times and put everything to default.

Install vSphere Client
Step #2. Once VMware vSphere Client is installed on your VC VM then you should see vCenter Client’s shortcut on your Desktop. Double click on it then select VC VM IP address. Finally, tick “Use Windows session credentials” and press Login. If security warning pops up, just install the Certificates and you’re Done.

Install SSL Certification
If you’ve done everything correctly so far then you should be able to see the screenshot below after you Login to your vSphere Client.

VMware vSphere vCenter Server
Conclusion
In this post, I’ve covered building vSphere Infrastructure vCenter Server part 2 which has the following objectives.
- Create Windows Server 2008 R2 VM
- Install VMware Tools
- Windows Server 2008 R2 Initial Configuration
- Join vCenter Server to Domain
- Create a User Account (VCAdmin)
- Install vCenter Single Sign-On (SSO)
- Install Inventory Service
- Install vCenter Server
- Install vSphere Client
I hope you guys have learned something useful from this guide and if you get any kind of error or problem just share with us and if we knew the solution then absolutely, we are going to answer the comment as soon as possible.
Next Guide: How to Build vSphere Infrastructure on Windows Server 2008 R2 (ESXi Host) -Part3
Прочитано:
3 005
Сейчас я распишу те действия, которые нужно сделать, чтобы установить в гостевую систему (Windows 7 x86/x64, Server 2008/R2) утилиты «VMware Tools” для взаимодействия с виртуальной средой внутри «ESXi”.
Предположим, Вы установили систему, далее что бы исключить задержки при обработке виде-информации, на виртуальной консоли управления виртуальной машины нужно установить комплект «VMware Tools”.
Запускаем виртуальную машину, после проходим по меню:
“VM” – «Guest” – «Install/Upgrade VMware Tools”, после этого в систему монтируется диск и появляется окно автозапуска установщика, см. скриншот для наглядного понимания, о чем я говорю:
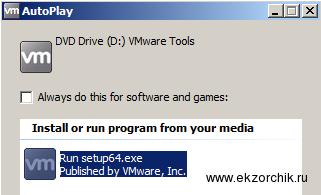
Устанавливаем, на одном из шагов нужно будет выбрать, что именно ставить – конечно же, полный комплект утилит.
После нужно перенастроить драйвер видео, делается это так:
На англоязычной системе:
“Start” – “Control Panel” – “Display” – “Change Display settings” – “Advanced settings” – “Adapter” – “Properties” – “Driver” – “Update Driver…”.
“Browse my computer for driver software” и указываем: — через “Browse…” путь до драйвера.
“C:Program FilesCommon FilesVMwareDriverswddm_video”
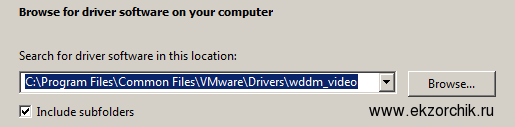
Или действия на русскоязычной системе:
«Панель управления» – «Экран» – «Настройка разрешения экрана» – «Дополнительные параметры» – «Адаптер» – «Свойства» – «Драйвер» – «Обновить» – Выполнить поиск драйвера на этом компьютере и указываем путь ниже::::
“C:Program FilesCommon FilesVMWareDriverswddm_video”
В итоге у Вас должно получиться, вот так:
Adapter Type = VMware SVGA 3D (WDDM)
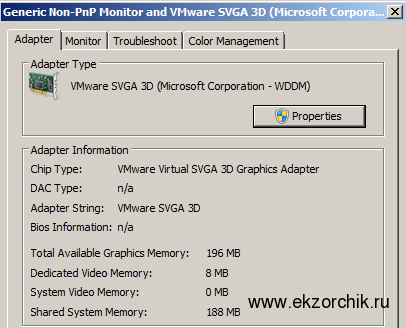
И не забудьте, что после установки «VMware tools” обязательно следует перезагрузить систему. Вот собственно и весь процесс установки утилит. На этом всё, с уважением, ekzorchik.
![]()
VMware Tools installation on Windows 2008 (R2) Server Core
As I’ve been asked about this several times, I thought I should post something about it as this doesn’t seem to be common knowledge: VMware Tools can be installed on Windows 2008 (R2) Server Core. A common misconception is that since Server Core doesn’t have a GUI (Graphical User Interface), it can’t run the VMware Tools installer. That’s a misconception as Server Core does contain all the files necessary for a GUI – it just doesn’t run one by default! You can prove that by running “OCsetup” (to install server roles/features) or even taskmgr.exe, which will promptly bring up the trusty Task Manager. This should put the myth to bed that Server Core doesn’t have a GUI.
Anyway, back to the issue. One can indeed install VMware Tools on Server Core. All that needs to be done is to invoke the install in the normal fashion i.e. by running “Install VMware Tools…”. The usual install message comes up. After that, it seems that nothing is happening but that’s because Autorun is disabled on Server Core. For that reason, one has to go to the CD-ROM drive to invoke the installer. Just browse to the location and run “setup.exe”. Setup will now continue and run the correct version of the VMware Tools installer. Go through the installation in the normal fashion and once complete, give the machine a reboot. Next time it comes up, it will be a lot faster and with better graphics. Enjoy!
Share This Story, Choose Your Platform!

Being in the industry for over 25 years, Ather has been a vExpert for 10 years running and is also vExpert NSX/HCX/CloudProvider. He has also been an official VMware blogger at VMworld EU and US and is one of the founding members and contributor to Open HomeLab Wiki and co-hosts @OpenTechCast as well.
Ather’s natural habitat is tech events like VMworld, Cloud (and other) Field Days, VMUGs etc. and he thrives on meeting like-minded people and having a good old chat about technology. He’s friendly and not dangerous at all so please do interact with him whenever you spot him in such surroundings.
Related Posts
Page load link
Go to Top
Due to a planned power outage on Friday, 1/14, between 8am-1pm PST, some services may be impacted.
- About
- Blog
- Projects
- Help
-
Donate
Donate icon
An illustration of a heart shape - Contact
- Jobs
- Volunteer
- People
Item Preview

Screenshot 2021-04-28 161727.png
software
VMWare Tools For Windows Vista and Server 2008
- by
- VMWare
This is the last version of VMWare Tools that is compatible for Windows Vista and Windows Server 2008 R1 guests.
Checksum (SHA 256):
8F1CC3181055891B98672F715E0CA7BBE4018960EAE945D7A4B9F640C44C3D79
- Addeddate
- 2021-04-28 15:25:39
- Identifier
- vmware-tools-for-windows-vista
- Scanner
- Internet Archive HTML5 Uploader 1.6.4
- Year
- 2020
comment
Reviews
Reviewer:
ComputerGeek64
—
favoritefavoritefavoritefavoritefavorite —
July 6, 2022
Subject:
Thanks so much
This is the only one I could find that works!
8,640
Views
25
Favorites
1
Review
DOWNLOAD OPTIONS
Uploaded by
Vista2003
on April 28, 2021
SIMILAR ITEMS (based on metadata)
- Remove From My Forums
-
Question
-
I need to install VmWare tools extentions on Windows Server 2008 R2 Server Core. How would I do this on the command line?
Answers
-
Hi,
First of all, it is recommend that you contact VMware to ensure that the core installation of Windows Server 2008 R2 is supported on the VMware product
you used.By the way, the issue seems to be related to VMware. As we mainly focus on the Server Core question about Windows Server system and here is not the best
support resource for VMware, it is recommend you to get further support in the VMware community so that you can get the most qualified pool of respondents. Thanks for your understanding.Best Regards,
Vincent Hu
-
Marked as answer by
Monday, November 1, 2010 6:28 AM
-
Marked as answer by