As of 12/11/2020, VMware no longer signs Tools for Windows Vista with SHA-1, so you need Windows 7 SP1 or later to use the latest version.
However, you can use an older version of VMware Tools, which is here: https://media.githubusercontent.com/media/thepwrtank18/thepwrtank18/master/VMware%20Tools%20for%20Windows%207%20RTM%20and%20Vista.iso
Link is dead. Instead, here’s a full on guide.
Step 0: Foreword
This is an unsupported operating system, with unsupported drivers. Use this at your own risk.
Step 1: Preparation
You will need:
- Either a:
- x64 Windows Vista ISO
- x64 Windows Vista Disc + Reader
- VMware Workstation (Pro or Player) 15.x, or Pro 16.x.
- An old version of the VMware Tools ISO (10.3.5 to be precise), from here
Step 2: Creation
Note: Do not let VMware scan your ISO or disc, Easy Install may use the wrong version of Windows, whether a wrong edition or architecture.
Make a VM. If you have Pro or Player 15.x, do what you normally do. If you have Pro 16.x, make sure compatibility is set to Workstation 15.x (in Custom settings). After that, customize the settings you want. (Player does not support custom settings, so you either need to get 15.x, which is what you need anyway, or Pro 16.x.)
Step 3: Modification
Make sure you have your ISO or disc selected in the VM options. If there’s a floppy disc or extra DVD drive with «autoinst» or the like on it, remove that drive.
Step 4: Installation
Install as usual. When it tells you do create a user profile, don’t do that. Go to the VM settings, then put in the VMware Tools ISO you got earlier. Don’t install VMware Tools via VM>Install VMware Tools. After that, press Shift+F10 in the VM. Put in D:setup64.exe.
Step 5: Initialization
Do the VMware Tools installation as usual. When it says if it wants to restart the machine, say «Yes», then go to VM>Power>Reset. When it reboots, do the setup as normal. Let it monitor your computer’s performance, as drivers are installed.
Updated on: 23rd AUG 2022
VMware Tools | 23rd AUG 2022 | Build 20219665
Check back for additions and updates to these release notes.
What’s in the Release Notes
The release notes cover the following topics:
- What’s New
- Earlier Releases of VMware Tools
- Before You Begin
- Internationalization
- Product Support Notice
- End of Feature Support Notice
- Compatibility Notes
- Guest Operating System Customization Support
- Interoperability Matrix
- Installation and Upgrades for This Release
- Known Issues
What’s New
- Updated zlib version from 1.2.11 to 1.2.12.
- This release resolves CVE-2022-31676. For more information on this vulnerability and its impact on VMware products, see https://www.vmware.com/security/advisories/VMSA-2022-0024.html.
Earlier Releases of VMware Tools
- For earlier releases of VMware Tools, see the VMware Tools Documentation page.
Before You Begin
- VMware Tools 12.1.0 supports the following guest operating systems:
windows.isosupports Windows 7 SP1 or Windows Server 2008 R2 SP1 and later.- The Microsoft Visual C++ Redistributable package is a prerequisite for installing VMware Tools for Windows 12.1.0 and ships with the VMware Tools 12.1.0 download package. While preparing a Windows guest for installation, VMware Tools runs the Microsoft Visual C++ Redistributable Package installer which checks for the presence of a more recent version on the guest. If the guest has a more recent version already present, the package does not install.
For a 32-bit Windows guest, the prerequisite version is Microsoft Visual C++ 2015-2022 Redistributable (x86) version 14.32.31326.
For a 64-bit Windows guest, the prerequisite versions are Microsoft Visual C++ 2015-2022 Redistributable (x86) version 14.32.31326 and Microsoft Visual C++ 2015-2022 Redistributable (x64) version 14.32.31326. - Installing or upgrading to VMware Tools 12.1.0 is not supported for Windows versions that do not meet the prerequisite. Customers should continue to use VMware Tools 10.2.x or older until they can patch or update their Windows OS to meet the prerequisites for VMware Tools 12.1.0. Refer to Microsoft’s update KB2977003 for latest supported Visual C++ downloads.
- Windows OS level prerequisites
- Windows Server 2022
- Windows 11
- Windows Server 2019
- Windows Server 2016
- Windows 10
- Windows Server 2012 R2 with Microsoft’s update KB2919355
- Windows 8.1 with Microsoft’s update KB2919355
- Windows Server 2012
- Windows 8
- Windows Server 2008 R2 Service Pack 1 (SP1) with Microsoft’s update KB4474419.
- Windows 7 Service Pack 1 (SP1) with Microsoft’s update KB4474419.
- The Microsoft Visual C++ Redistributable package is a prerequisite for installing VMware Tools for Windows 12.1.0 and ships with the VMware Tools 12.1.0 download package. While preparing a Windows guest for installation, VMware Tools runs the Microsoft Visual C++ Redistributable Package installer which checks for the presence of a more recent version on the guest. If the guest has a more recent version already present, the package does not install.
darwin.isosupports Mac OS X versions 10.11 and later.- For details on
linux.iso, refer to VMware Tools 10.3.25 Release Notes. - For details on
solaris.iso, refer to VMware Tools 10.3.10 Release Notes.
- VMware Tools ISO images are frozen for some end of life guest operating systems. Some ISO images are not included with ESXi in the tools-light VIB. For more details, see the VMware Tools Documentation page. All VMware Tools ISO images are available for download from https://customerconnect.vmware.com/home.
- VMware Tools for Windows: 32-bit and 64-bit installer executable (.exe) files are available for download. These files are provided for easier access and installation of VMware Tools in Windows guest operating systems.
Important note about upgrading to ESXi 6.5 or later
Resolution on incompatibility and general guidelines: While upgrading ESXi hosts to ESXi 6.5 or later, and using older versions of Horizon View Agent, refer to the knowledge base article:
- Connecting to View desktops with Horizon View Agent 6.1.x hosted on ESXi 6.0 or later fails with a black screen.
Internationalization
VMware Tools 12.1.0 is available in the following languages:
- English
- French
- German
- Spanish
- Italian
- Japanese
- Korean
- Simplified Chinese
- Traditional Chinese
Product Support Notice
- VMware Tools 12.1.0 is the last regular release for macOS. Refer KB 88698 for details.
- The Windows pre-Vista iso image for VMWare Tools is no longer packaged with ESXi. The Windows pre-Vista iso image is available for download by users who require it. For download information, see the Product Download page.
End of Feature Support Notice
- AppDefense support is removed from VMware Tools 12.0.0 version onwards.
- VMware Tools ships PVSCSI floppy images and PVSCSI drivers in Tools ISO for OS installation on a PVSCSI disk controller. The PVSCSI floppy images for supporting OS versions Vista, Server 2008, and Windows 7 will be removed in the next release of VMware Tools.
- «VMXNET 2 (Enhanced)» Network Adapter is not supported.
For users who have configured a virtual machine with the «VMXNET 2 (Enhanced)» adapter running Windows Server 2008 R2 version of windows, switching to the VMXNET3 Network adapter is recommended. - The tar tools (linux.iso) and OSPs shipped with VMware Tools 10.3.x release will continue to be supported. However, releases after VMware Tools 10.3.5 will only include critical and security fixes. No new feature support will be provided in these types of VMware Tools (tar tools and OSP’s). It is recommended that customers use open-vm-tools for those operating systems that support open-vm-tools. For more information about open-vm-tools, see KB 2073803.
Compatibility Notes
- Starting with VMware Tools version 10.2.0, Perl script-based VMware Tools installation for FreeBSD has been discontinued. FreeBSD systems are supported only through the open-vm-tools packages directly available from FreeBSD package repositories. FreeBSD packages for open-vm-tools 10.1.0 and later are available from FreeBSD package repositories.
Guest Operating System Customization Support
The Guest OS Customization Support Matrix provides details about the guest operating systems supported for customization.
Interoperability Matrix
The VMware Product Interoperability Matrix provides details about the compatibility of current and earlier versions of VMware Products.
Installation and Upgrades for this release
VMware Tools can be downloaded from the Product Download page.
The steps to install VMware Tools vary depending on your VMware product and the guest operating system you have installed. For general steps to install VMware Tools in most VMware products, see General VMware Tools installation instructions (1014294).To set up productLocker to point to the shared datastore, see KB 2004018.
This release provides packages to upgrade VMware Tools 11.2.5 or later deployments using GuestStore.
For specific instructions to install, upgrade, and configure VMware Tools, see the VMware Tools Documentation page.
Windows guest drivers installed by VMware Tools
VMware Tools 12.1.0 supports the following driver versions on a Windows Guest Operating System:
| Drivers | VMware Tools 12.1.0 |
| Hardware Drivers | |
| efifwfromhost.bin |
1.0.0.0 |
| pvscsi.sys |
For Windows 7 and Windows Server 2008 Release 2: 1.3.25.0 For Windows 8, Windows 8.1, Windows 10, Windows 11, Windows Server 2012, Windows Server 2012 Release 2, Windows Server 2016, Windows Server 2019, and Windows Server 2022: 1.3.25.0 |
| vmaudio.sys |
5.10.0.3506 |
| vmci.sys |
9.8.18.0 |
| vmmouse.sys |
12.5.12.0 |
| vmusbmouse.sys |
12.5.12.0 |
| vmxnet3.sys |
1.9.9.0 |
| vm3dmp.sys |
9.17.04.0001 |
| Software Drivers | |
| vmhgfs.sys |
11.0.44.0 |
| vmmemctl.sys |
7.5.7.0 |
| vmrawdsk.sys |
1.1.7.0 |
| vnetWFP.sys |
12.1.0.0 |
| vsepflt.sys |
12.1.0.0 |
| vsock.sys |
9.8.19.0 |
| Security DLL | |
| vmwsu.dll |
2.5.1.0 |
Known Issues
The known issues are grouped as follows.
- VMware Tools Issues
- VMware Tools Issues in VMware Workstation or Fusion
- VMware Tools Issue in VMware Horizon
VMware Tools Issues
- Installation of Windows Vista, Server 2008, or Windows 7 fails in a virtual machine.
Installing a Windows OS Vista, Server 2008, or Windows 7 in a virtual machine with a boot disk on a PVSCSI controller, fails to install the required PVSCSI driver.
Download the VMware Tools package version 11.1.5 from https://customerconnect.vmware.com/, extract the contents, and use the VMware Tools windows.iso or the floppies for Windows OS Vista or Server 2008.
Note:
Users managing ESXi hosts or having a requirement to perform multiple installations of the same Windows OS version on a PVSCSI controller, can see the steps outlined in KB 84200.
- ICMP related IDFW rules not working.
After upgrade to VMware Tools 12.0.0 version, NSX-IDFW customers can find that ICMP related IDFW rules are not working as expected.
This problem occurs because from VMware Tools 12.x.x version release onwards, ICMP filtering is disabled by default due to ICMP packet loss issue. Refer to KB 88273 for enabling registry settings to enable ICMP filtering.
- VMware Tools upgrade failed with error code 1072 (The specified service has been marked for deletion.)
When upgrading VMware Tools to a new version, if the previous version’s VMware Tools service is not deleted completely, this incomplete service removal causes installing the new VMware Tools version service to fail and leads to a fatal error for the upgrade.
When detecting an incomplete service removal to prevent VMware Tools upgrade from failing catastrophically every time, the new service creation will pause and retry to see if the condition clears. The VMware Tools installer will pause for up to 2 1/2 minutes. After this, a fatal error will occur. If the condition clears, the upgrade creates the new service and continues.
For more information, see KB 84269.
Workaround:
Retry installing VMware Tools.
- After upgrading to a new version VMware Tools with an installer parameter to remove the NetworkIntrospection feature, the old version of the vnetflt or vnetWFP driver service continues to run.
After the upgrade, the NetworkIntrospection feature is not present in the system’s VMware Tools MSI database, but the feature’s vnetflt or vnetWFP driver service still exists.
Workaround:
Refer to KB 78016.
Note: This issue applies to VMware Tools upgrades from versions older than 11.1.0 only.
- VMware Tools upgrade fails on Windows 7 SP1 and Windows Server 2008 R2 SP1 without SHA-2 code signing support.
Microsoft has changed Windows driver signing to use the SHA-2 algorithm exclusively starting December 3, 2019. Legacy Windows systems without SHA-2 code signing support fail driver signature verification.
Workaround:
Refer to KB 78708.
- Installing or upgrading versions earlier than VMware Tools 10.3.0 to VMware Tools 11.1.x might take longer and Windows OS might need a restart.
Installation process might appear to be in progress and displays a message similar to the following:
«Preparing ‘VMware Tools’ for installation…»During this process, the user might be prompted to restart the operating system.
Workaround:
For more information, see KB 55798.
- High CPU usage by VGAuthService.exe process after upgrading to VMware Tools version 12.1.0
The VMs with vmx option
guest_rpc.rpci.usevsocket = "FALSE"are affected.Workaround:
To fix this issue, shut down the VM and remove the vmx option guest_rpc.rpci.usevsocket = «FALSE» from the VM’s vmx file.
This vmx option was a workaround for the issue in KB 2149941 which has been resolved since ESXi 6.0 Patch Release ESXi600-201706001 and ESXi 6.5 Update 1. Newer ESXi versions should not have this vmx option.
VMware Tools Issues in VMware Workstation or Fusion
- Shared Folders mount is unavailable on Linux VM.
If the Shared Folders feature is enabled on a Linux VM while it is powered off, the shared folders mount is not available on restart.
Note: This issue is applicable to VMware Tools running on Workstation and Fusion.
Workaround:
If the VM is powered on, disable and enable the Shared Folders feature from the interface. For resolving the issue permanently, edit /etc/fstab and add an entry to mount the Shared Folders automatically on boot.
For example, add the line:
vmhgfs-fuse /mnt/hgfs fuse defaults,allow_other 0 0
- Drag functionality fails to work in Ubuntu.
Drag functionality fails to work in Ubuntu 16.04.4 32-bit virtual machines installed using Easy Install. Also, failure of the copy and paste functionality is observed in the same systems.
Note: This issue is applicable to VMware Tools running on Workstation and Fusion.
Workaround:
- Add the modprobe.blacklist=vmwgfx linux kernel boot option.
- To gain access to larger resolutions, remove svga.guestBackedPrimaryAware = «TRUE» option from the VMX file.
VMware Tools Issue in VMware Horizon
- WDDM driver fails on Windows Update installation when Horizon Agent is installed on Windows 8/Windows 8.1/Windows Server 2008 R2.
When Horizon Agent is installed on Windows 8/Windows 8.1/Windows Server 2008 R2, the WDDM driver fails on Windows Update installation.
The WDDM driver will be made available through Windows Update service, when the driver publication process completes.
Previously, when you installed Windows 7 SP1 as a guest OS, you could install VMware Tools without problem.
However, since VMware Workstation 16, some warnings and an error occur if the guest OS is not up to date.
- Warnings displayed when installing VMware Tools on Windows 7
- Installation of prerequisites
- Install VMware Tools on Windows 7
1. Warnings displayed when installing VMware Tools on Windows 7
To begin, warnings will be displayed regarding the installation :
- VSock Virtual Machine Communication Interface Sockets driver
- Host Guest Shared Folders driver
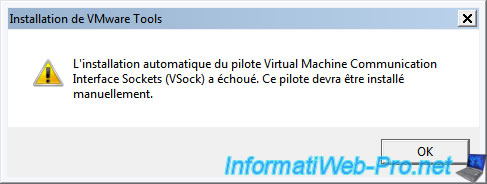
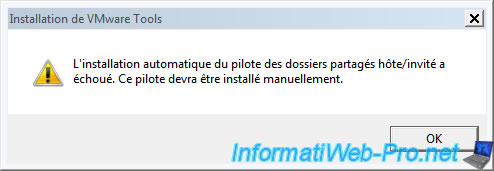
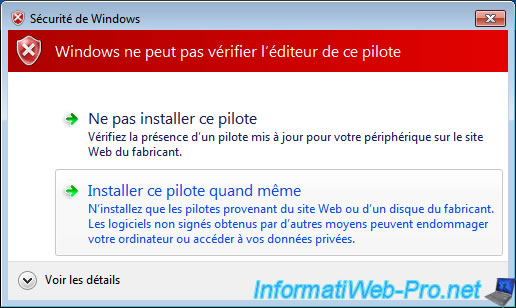
Then, you will get a «Windows can’t verify the publisher of this driver software» error.
This is because VMware has updated the certificates used to sign these drivers using the SHA-2 encryption algorithm. Except that this algorithm is not supported by default by Windows 7.
2. Installation of prerequisites
To find out about the prerequisites required for installing the VMware Tools of VMware Workstation 16 on Windows 7, simply consult the informations regarding VMware Tools 11.1.5.
As you can check on the VMware site, you will see that this new version of VMware Tools requires Windows 7 SP1 with the KB4474419 update.
To get started, install Windows 7 SP1 if you haven’t already.
Otherwise, download the service pack 1 of Windows 7 from the Microsoft Update catalog and install it in the virtual machine.

If you click on the «KB4474419» link referenced on the VMware site, you will arrive on a page : SHA-2 code signing support update …
As you can see, this update will add support for the SHA-2 algorithm for code signing.
This will allow Windows 7 to be able to correctly check the signature of the various drivers that will be installed by VMware Tools in your virtual machine.
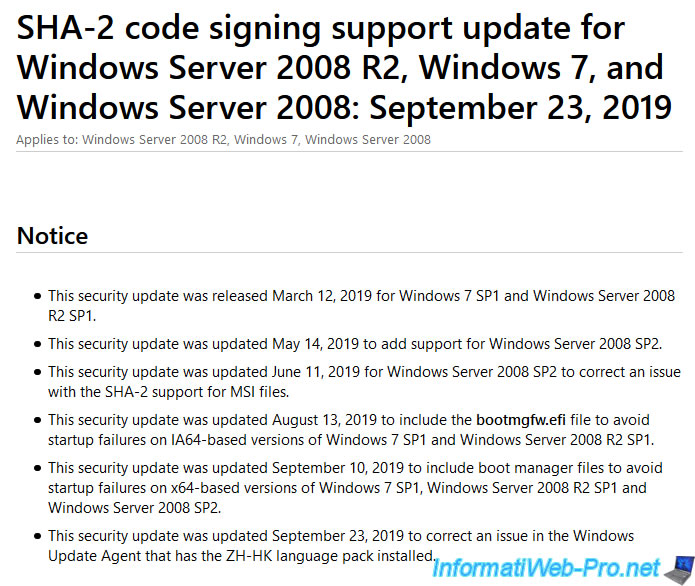
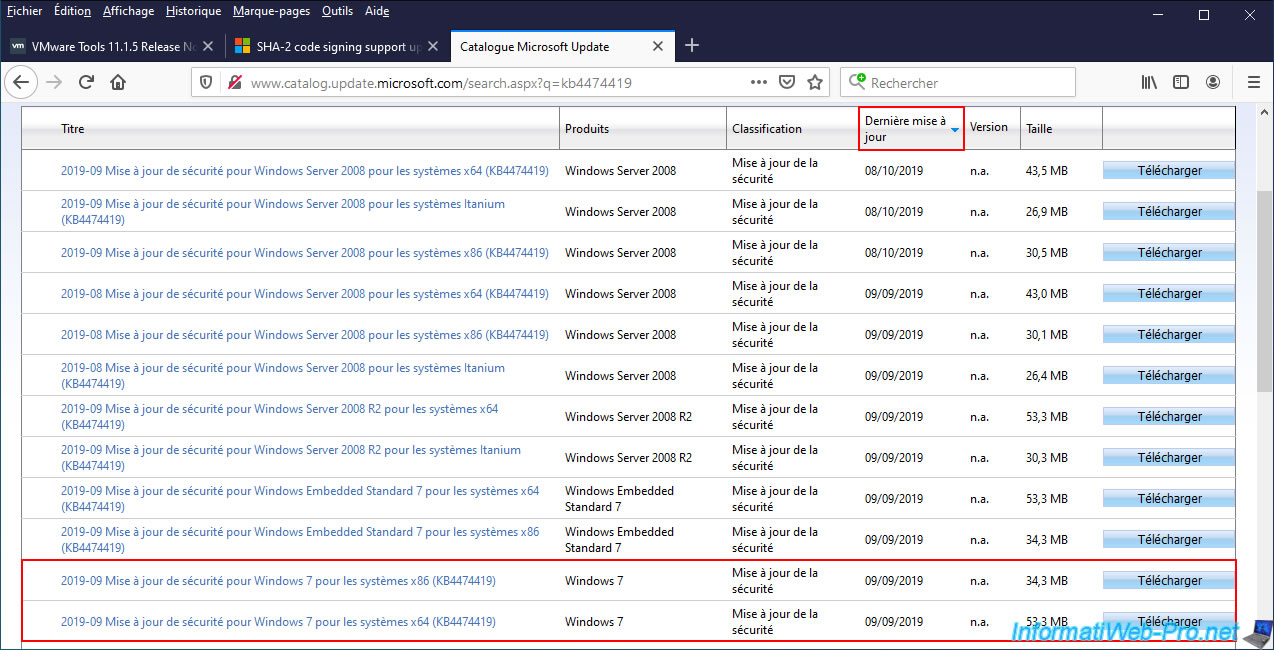
To download this update, you can use Windows Update or download it manually from the Microsoft Update Catalog by clicking on this link : KB4474419.
On the site that appears, sort the list by date of the last update to find the most recent version of this Windows update and download the one adapted to the architecture of Windows 7 that you have installed :
- Windows 7 x86 : Windows 7 in 32-bit
- Windows 7 x64 : Windows 7 in 64-bit
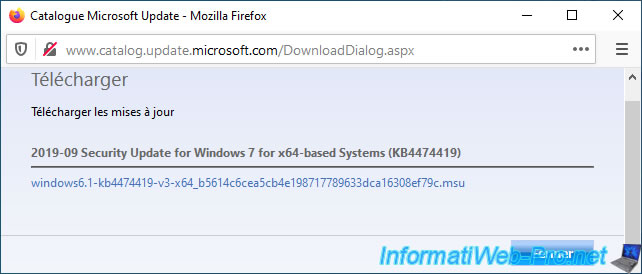
Once you click on the «Download» button, you will have a small window like this with a download link.
Just click on it to download this update.
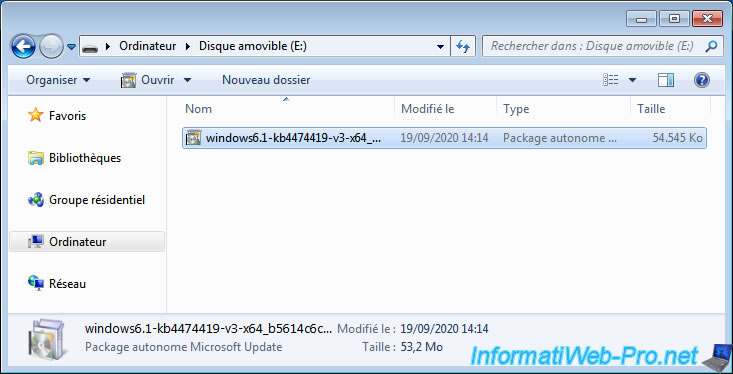
To transfer this update to the virtual machine, you have several options :
- download it directly from the virtual machine
- store it on an USB key and plug it virtually into your virtual machine from the VMware Workstation interface.
Indeed, drag/drop and VMware Workstation shared folders don’t work for the moment since VMware Tools are not installed in your virtual machine.
Launch the downloaded file and a window will appear telling you : Security Update for Windows (KB4474419).
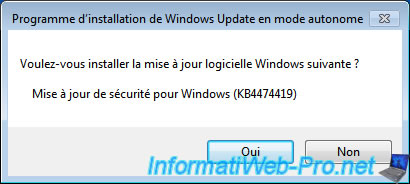
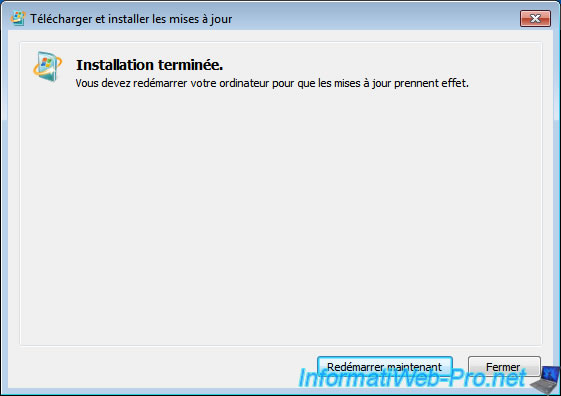
Wait while this Windows update is installed.
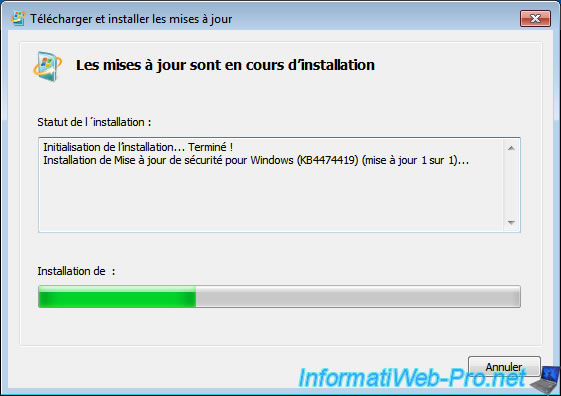
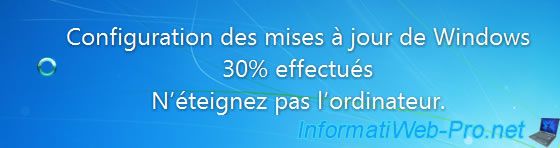
Restart the virtual machine after its installation is complete.
The «Configuring Windows updates» message appears while restarting the virtual machine.
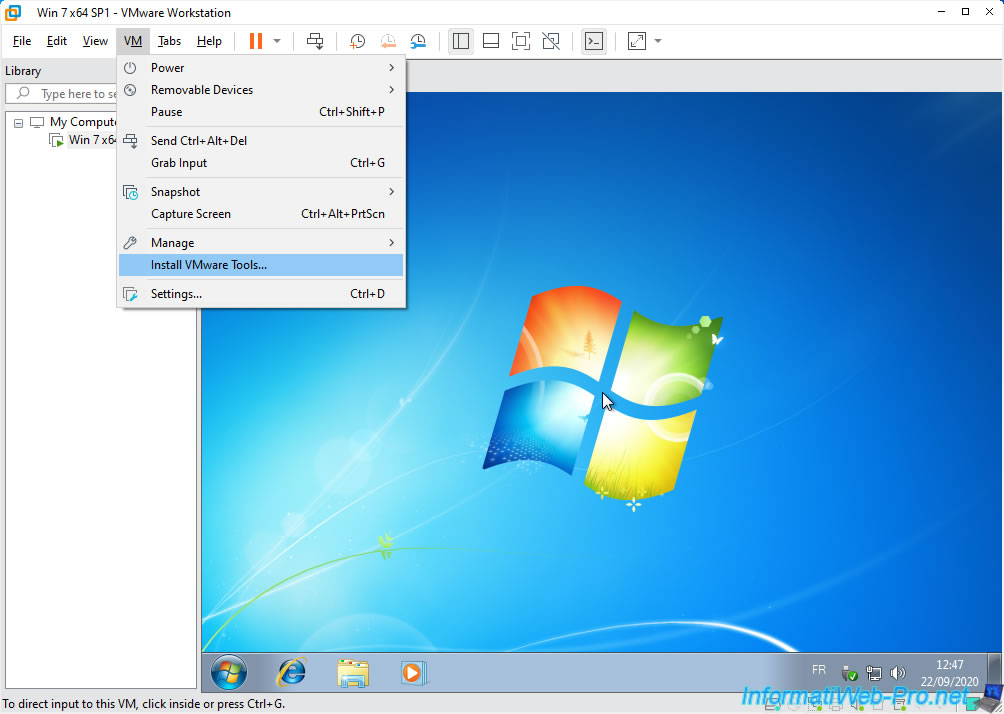
Now, you can install VMware Tools by clicking on : VM -> Install VMware Tools.
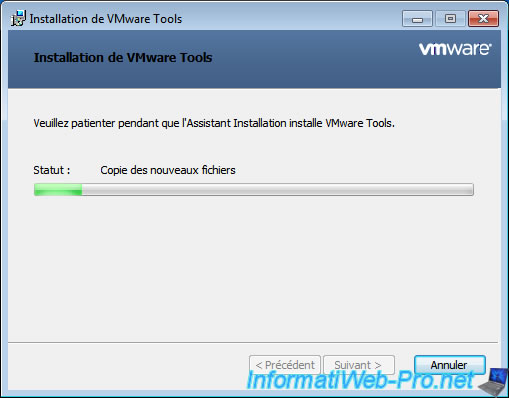
Wait while the VMware Tools install.
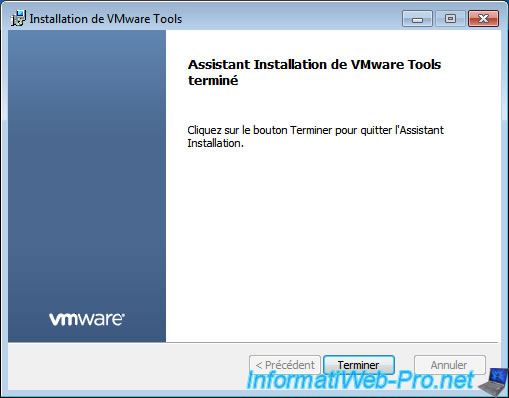
As expected, the installation completes without any warning and without any error.
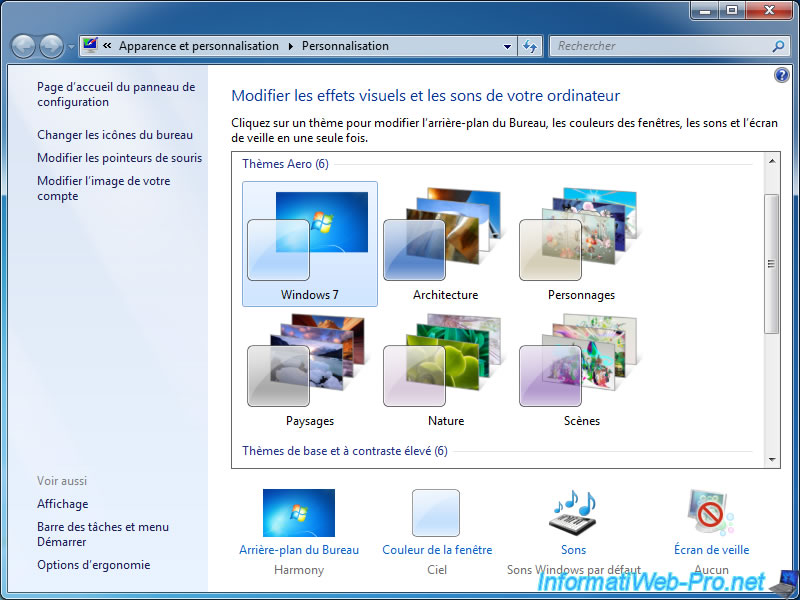
Once the virtual machine has restarted, don’t forget to activate Windows 7 aero, by right-clicking «Personalize» on the desktop, then clicking on the «Windows 7» Aero theme.
In this article, we will build VMware Tools on Win 7 running on VMware Workstation virtual machine.

How to Setup VMware Tools on Windows 7
First, install Windows 7 on your Windows or Linux computer with VM Workstation, and then follow the steps in this article to install Guest Tools on your VM.
After installing a Windows virtual machine using the VMware software on Windows and Linux operating systems, the first thing you should do is install VMware Tools.
VMware Tools provides a variety of functionality for virtual computers. For example, the following are the changes that will occur on the VM after installing VMware Tools on Microsoft Win7;
- Guest machine graphics performance will increase.
- You will be able to share files between the host and the Guest machine.
- You will be able to copy and paste between host and Guest machine.
- The time between the host and the Gues will be synchronized.
- A better mouse function between guest and host.
How to Build VMware Tools on Guest Machine
Virtual machine software are not installed automatically when installing a Windows 7 system on a VMware Guest machine. Therefore, you will need to setup VMware Guest software manually.
Follow the stages below to setup guest sofware on Microsoft Win7.
Step 1
When you review the image below, you can understand if the VM program installed on the Windows 7 machine did not change the screen resolution.

Step 2
To automatically fix the screen resolution of the VM, you must click View / Fit Guest Now. However, this option is disabled because the Guest Tools is not installed.

Step 3
To setup Guest Tools in Win 7, click VM / Install VM Tools.

Step 4
When the VM Tools image is automatically mounted on the system, open My Computer and double-click the drive to start the setup.

Step 5
Click Yes to continue the operation in the User Account Control window.

Step 6
VM tools installation is starting …

Step 7
Preparing the installation …

Step 8
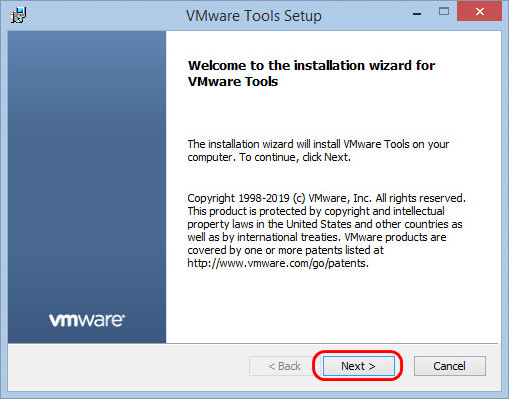
In the VM Tools Setup window, click Next.

Step 9
When installing VM program on a Windows Guest, select Complete. If you install all of the VM Tools, it means that you can run this VM on different VMware platforms in the future.
After selecting Complete, click Next to continue.

Step 10
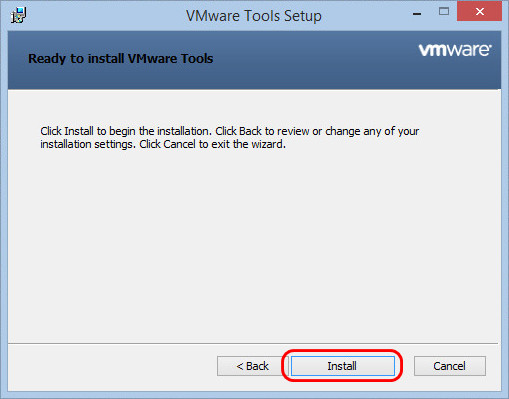
When VM software is ready for setup, click Install.

Step 11
Wait while setting up VM software on a Win7 operating system.

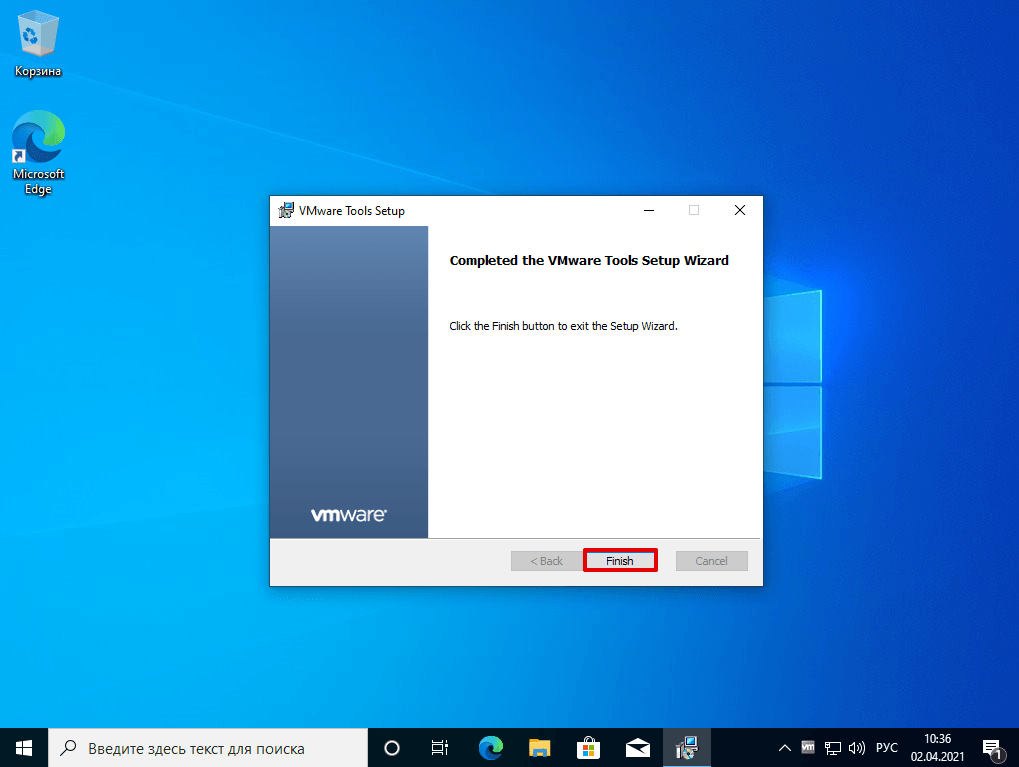
Step 12
After the VM software installation is completed on the VM, click Finish.

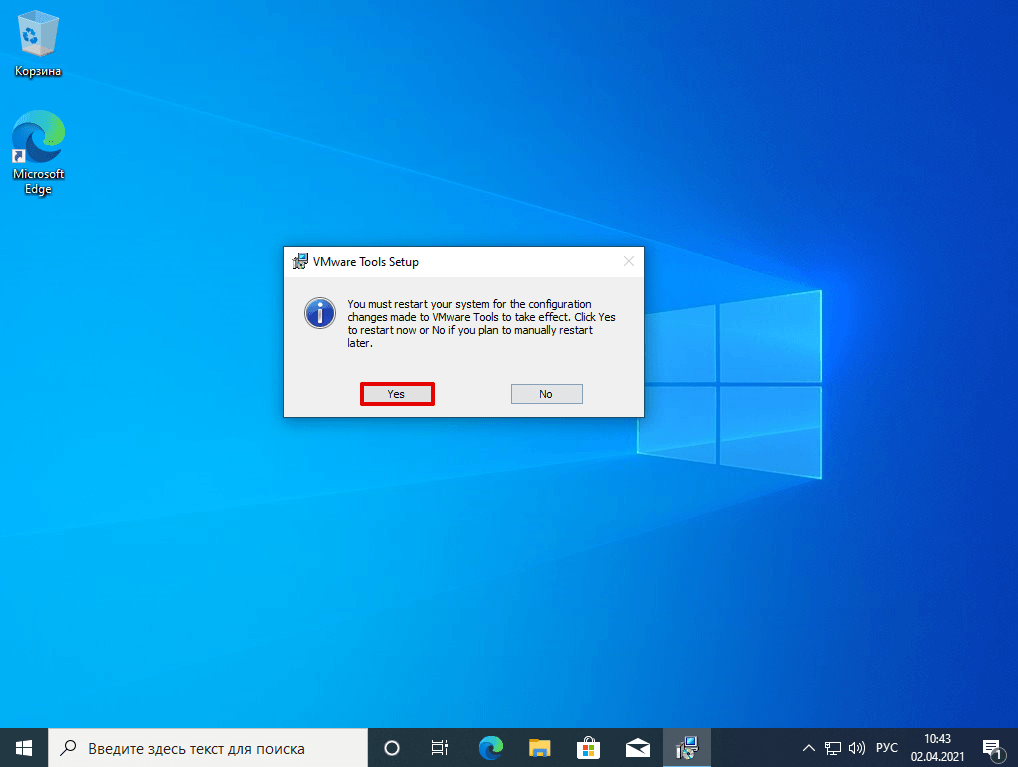
Step 13
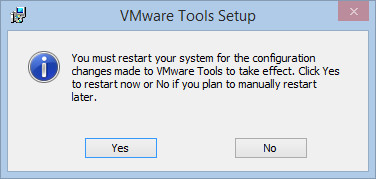
Restart your virtual computer for the changes to take effect. To do this, you can click Yes in the following window.

Step 14
When the Windows 7 virtual machine restarts, click on View / Fit Guest Now.

Step 15
As soon as you click Fit Guest Now, the screen resolution of the virtual machine will be changed as shown in the image below.

Step 16
You can now transfer files between your physical computer and the virtual machine!

How to Setup Guest Software on Win 7 VM ⇒ Video
You can watch the video below to setup VM Tools step by step on a Guest virtual machine running on VMware Workstation, and you can also subscribe to our YouTube channel to support us!

Final Word
In this article, we have examined how to install VM Tools on Windows 7 operating system step by step. Installing VMware Tools on Win Guest machines is very important because it is useful for performance. Thanks for following us!
Related Articles
♦ What is VM Workstation?
♦ What is VMware Fusion?
♦ Download VMware Unlocker
♦ How to Increase HDD Space in VM Workstation
♦ How to Install VM Tools in Ubuntu
VMware Workstation – лучший гипервизор для Windows, лучший, чем другие, во многих аспектах, в частности, в плане интеграции гостевых ОС (установленных внутри виртуальных машин систем) в хост-систему (установленную на компьютере). У этой программы лучше других гипервизоров реализован пакет дополнений для гостевой ОС — VMware Tools, внедряемый в гостевую ОС софт для её сообщения с хост-системой.
Реализуемое VMware Tools сообщение между системами предоставляет больше возможностей, чем RDP-подключение Microsoft Hyper-V и дополнения гостевой ОС VirtualBox. Но главное – такое сообщение стабильно, настраивается достаточно просто (как минимум для гостевой Windows) и при определённых условиях может быть реализовано автоматически в едином процессе установки гостевой ОС.
Ниже поговорим о специфике VMware Tools и рассмотрим установку этого пакета внутри гостевой Windows.
Роль VMware Tools
Дополнения VMware Tools – это многокомпонентный пакет софта, внедряемого в гостевую ОС с целью её интеграции в хост-систему. Пакет дополнений реализует внутри гостевой ОС драйверы и службы, повышающие производительность виртуальной машины, делающие более манёвренным управление в ней и реализующие функции в части сообщения гостевой ОС и хост-системы.
В числе последних:
• Динамическая подстройка разрешения экрана гостевой ОС при оттягивании краёв окна VMware Workstation в хост-системе;
• Автоматическая подстройка масштаба гостевой ОС под масштаб хост-системы;
• Реализация между системами общего буфера обмена;
• Возможность перетаскивания файлов между системами;
• Реализация общих папок систем;
• Возможность отображения виртуальной машины на нескольких мониторах, подключённых к физическому компьютеру;
• Использование единого режима, в котором окна и приложения гостевой ОС отображаются и работают в интерфейсе хост-системы;
• Настройка автоматического входа в учётную запись гостевой ОС.
Установка VMware Tools – это процесс, проводимый пользователем, но в некоторых случаях, как упоминалось, он может быть произведён автоматически в едином процессе создания виртуальной машины и установки на неё гостевой ОС.
Автоматическое внедрение VMware Tools
Пакет VMware Tools внедряется автоматически в рамках работы функции быстрой установки гостевой ОС. Эта функция в VMware Workstation применяется автоматически, если программа распознаёт дистрибутив Windows. Когда мы запускаем создание новой машины,
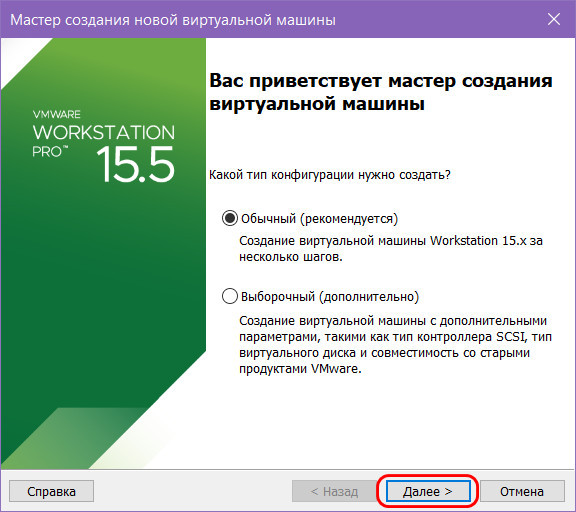
на втором этапе после указания ISO-образа установки гостевой ОС увидим отметку об использовании быстрой установки.
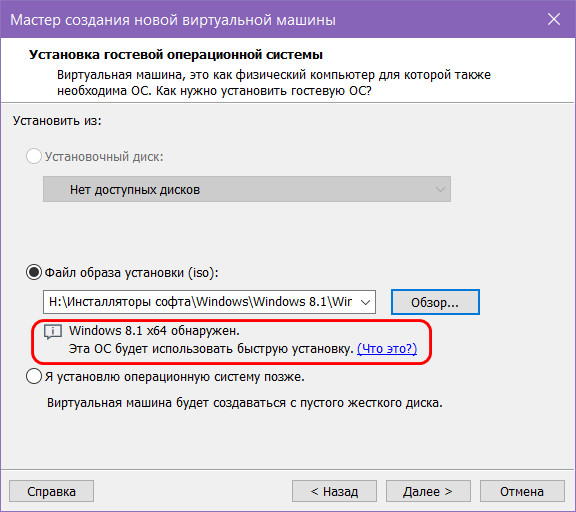
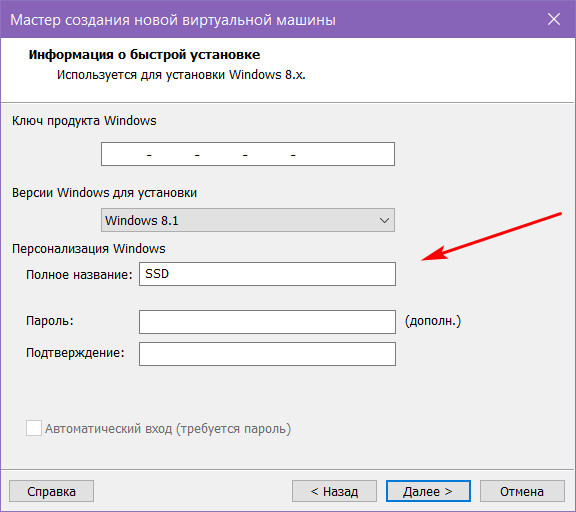
Это значит, что установка будет проведена полностью в автоматическом режиме: гипервизор сам произведёт разметку виртуального диска, установит гостевую ОС без нашего участия и внедрит VMware Tools. Всё, что нам нужно – это указать на следующем этапе мастера создания машины информацию о быстрой установке. Для систем Linux это название компьютера, имя пользователя и пароль.

Для Windows это редакция дистрибутива и имя учётной записи. При желании можем также указать пароль учётной записи и лицензионный ключ.
Функция быстрой установки работает только с поддерживаемыми дистрибутивами операционных систем. Функция может не работать с некоторыми кастомными сборками операционных систем. И не работает с версиями, вышедшими позднее обновления VMware Workstation. Поэтому чтобы иметь возможность использовать быструю установку для обновляемых накопительными апдейтами версий Windows 10 (1809, 1903, 1909 и т.п.), необходимо постоянно обновлять саму программу VMware Workstation. Поддержку новых дистрибутивов для быстрой установки компания VMware реализует по мере их официальных релизов.
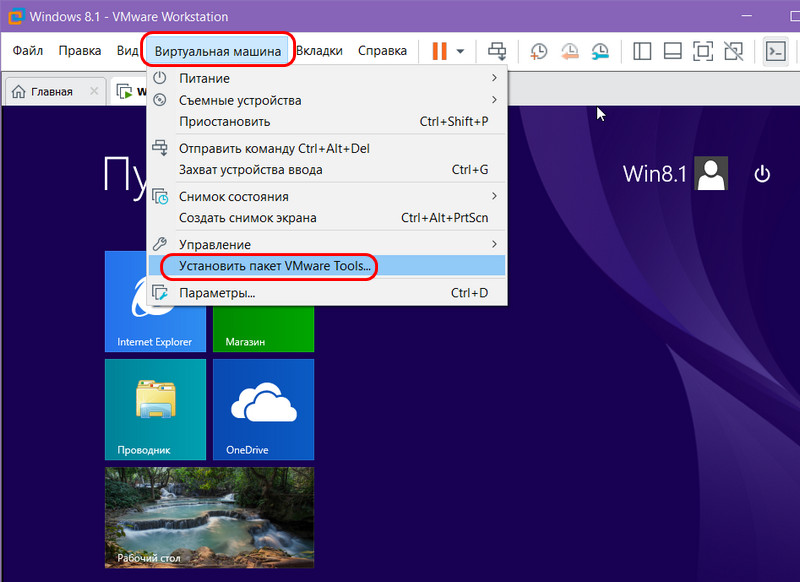
Пользовательская установка VMware Tools
Если пакет дополнений не был внедрён автоматически, мы можем его установить вручную. Делается это при работающей машине, в меню «Виртуальная машина» нажимаем опцию установки пакета.
Далее в среде Windows открываем проводник и открываем смонтированный образ диска с VMware Tools.
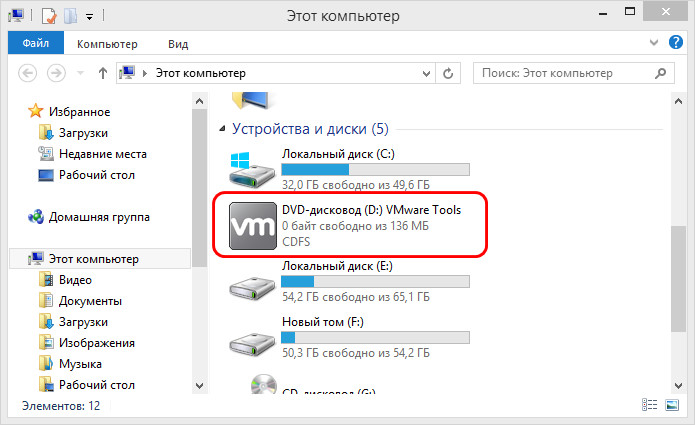
И здесь открываем файл либо setup для 32-битной гостевой ОС, либо setup64 для 64-битной.
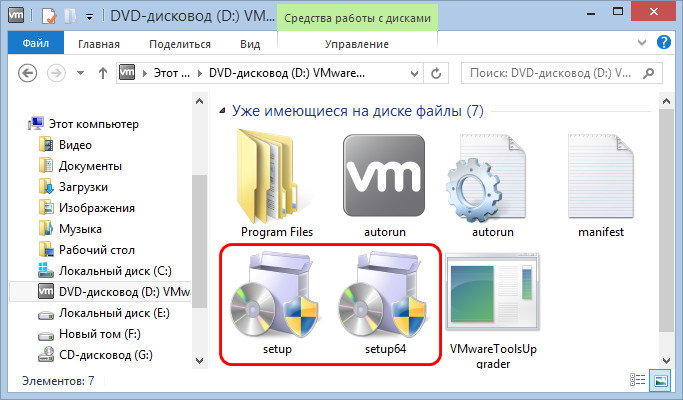
Запускаем установку.
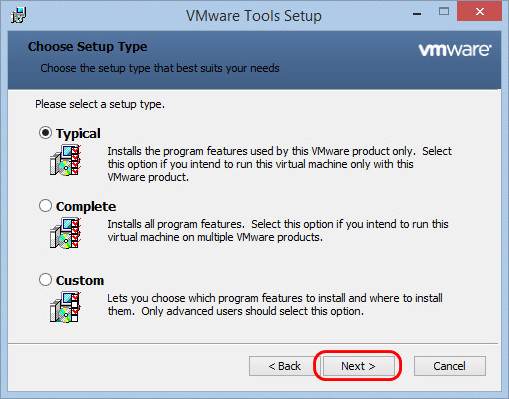
Есть три типа установки VMware Tools:
• Typical – типичный пакет, предназначен для работы VMware Workstation;
• Complete – полный пакет, предназначен для нескольких продуктов VMware;
• Custom – настраиваемый пакет, позволяет выбирать компоненты.
Если не используются другие продукты VMware, выбираем тип пакета Typical.
И проводим установку.
По итогу увидим сообщение о необходимости перезагрузки. Кнопка «Yes» мгновенно перезагрузит виртуальную машину. А при нажатии «No» от перезагрузки сможем отказаться и выполнить её позднее.
С процессом внедрения VMware Tools в другие гостевые ОС можно ознакомиться в базе знаний на сайте VMware по этому адресу:
https://kb.vmware.com/s/article/1014294
Здесь приведены ссылки на отдельные мануалы по установке пакета дополнений в системах Linux, Solaris и пр.
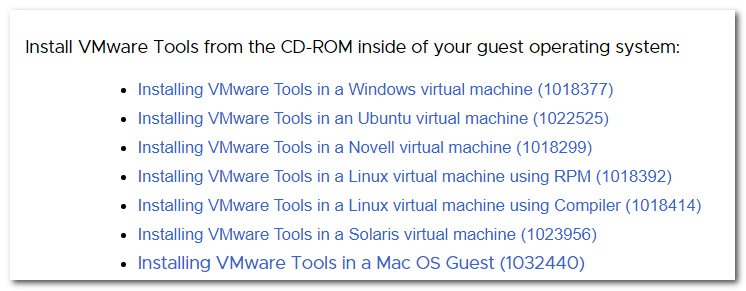
Правда, база знаний VMware только на английском языке. Но зато мануалы содержат подробные инструкции как текстовые, так и изложенные в видеороликах.
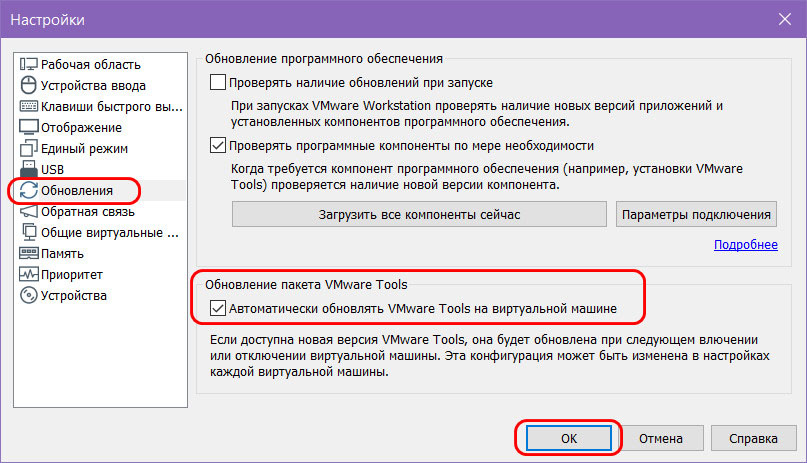
Обновление VMware Tools
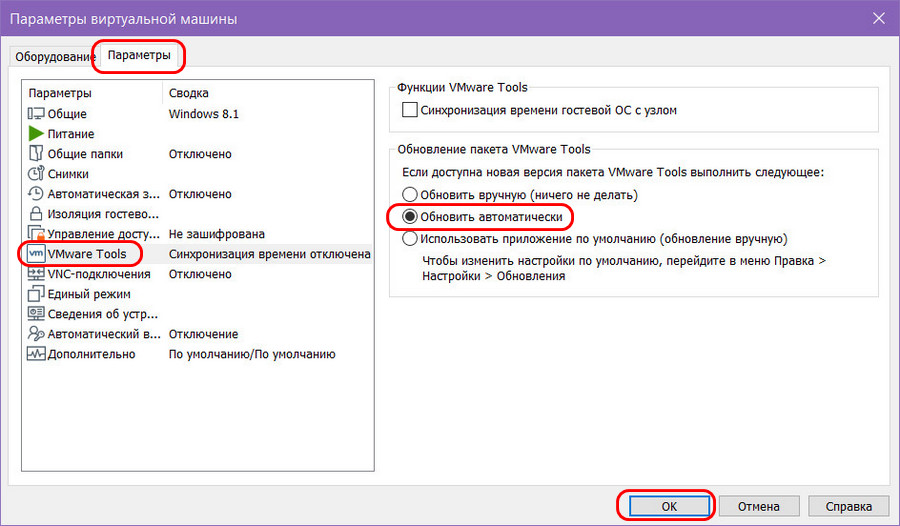
Дополнения VMware Tools – постоянно обновляемый софт, компания VMware постоянно устраняет обнаруженные ошибки, улучшает механизмы интеграции гостевых ОС в хост-системы, адаптирует дополнения под новые дистрибутивы и т.п. Обновление пакета выполняется отдельно от самой программы VMware Workstation. Её настройки по умолчанию предусматривают обновление VMware Tools нами вручную, программа лишь поставляет нам уведомления о появлении новых версий пакета. Но мы можем настроить его автоматическое обновление. Оно настраивается для каждой отдельной виртуальной машины в её параметрах, во вкладке «Параметры», в разделе «VMware Tools». Здесь нужно сделать активным пункт «Обновить автоматически» и применить изменения.
Также можно настроить обновление VMware Tools во всей программе VMware Workstation, чтобы это было применимо ко всем виртуальным машинам. Идём в общие настройки: в меню «Правка» кликаем «Настройки».
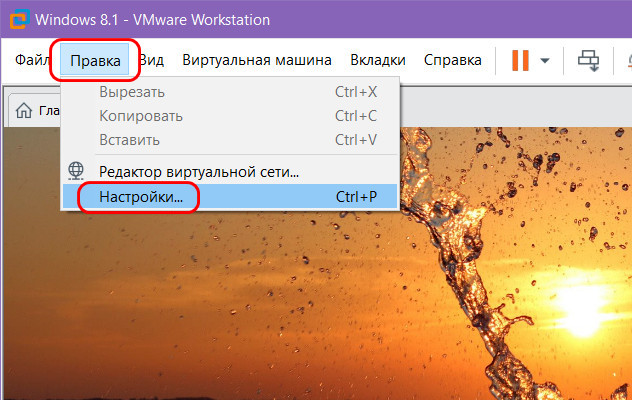
В разделе «Обновления» делаем активным автоматическое обновление VMware Tools.
И жмём «Ок».
![]() Загрузка…
Загрузка…
В статье мы подробно расскажем, зачем нужен VMware Tools, а также покажем способы его установки на операционную систему Windows 10. Если вы хотите установить этот пакет программ на ОС Ubuntu, используйте инструкцию Установка VMware Tools в Ubuntu.
Что такое VMware Workstation Tools
Чтобы одновременно запускать на одной физической машине (сервере или компьютере) несколько операционных систем, были придуманы специальные программы. Одной из таких программ является VMware Workstation Player. С её помощью можно создавать на компьютере с одной ОС, ещё один компьютер с совершенно другой ОС — виртуальную машину (ВМ или VM). VMware Workstation можно установить на macOS, Windows, а также на Linux и его дистрибутивы.
Однако, чтобы виртуальная машина работала наравне с физической, желательно установить дополнительные программы и утилиты. Например, VMware Workstation Tools.
VMware Tools — это специальный пакет программ, с помощью которого можно оптимизировать взаимодействие виртуальной машины и физической, ресурсы которой использует для работы виртуальная. Он позволяет улучшить управляемость и производительность операционной системы ВМ.
Tools усиливает интеграцию с гипервизором — элементом, который отвечает за распределение ресурсов основного компьютера между несколькими гостевыми операционными системами и изоляцию их друг от друга.
VMTools позволяет:
- использовать не только опцию Power, но и опции Shutdown и Restart,
- использовать оптимизированные драйверы ОС (например, vmxnet3),
- увеличить скорость работы курсора и видеоадаптера,
- использовать фреймворки API (например, VIX),
- раскрывать информацию (например, IP-адреса),
- настроить автоматический вход в учетную запись VM,
- настроить буфер обмена между двумя ОС,
- настроить отображение виртуальной машины на нескольких физических мониторах,
- использовать динамическую подстройку разрешения экрана гостевой ОС,
- открывать гостевую ОС как приложение через интерфейс основной ОС,
- перезагружать и выключать гостевую ОС без потери данных.
Тулс можно запускать на 32-разрядных и 64-разрядных операционных системах. Инструмент интеграции подойдёт для работы как на Windows, так и Linux и других дистрибутивах.
Пакет устанавливается одним из двух способов: сразу при создании гостевой ОС (через функцию Open-VM-Tools) или после её создания. Чтобы использовать первый способ, в старых версиях достаточно выбрать автоматическую интеграцию (OVT) при установке машины. В новых версиях пакет чаще всего устанавливается по умолчанию.
Во втором случае установка происходит вручную. Нужно смонтировать ISO-файл, который будет содержать двоичные файлы (установочные файлы, скрипты и другое) в виртуальный CD-ROM гостевой машины.
Ниже мы покажем, как установить Windows 10 на Workstation, а также разберём установку Tools вручную.
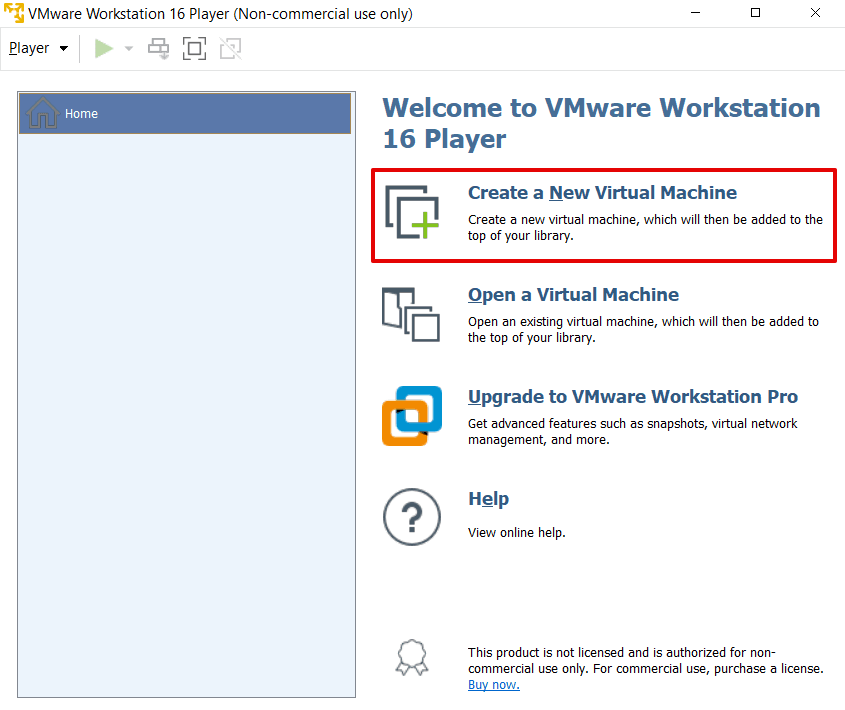
Как создать виртуальную машину Windows 10
-
1.
Запустите Workstation Player и нажмите Create a New Virtual Machine:

-
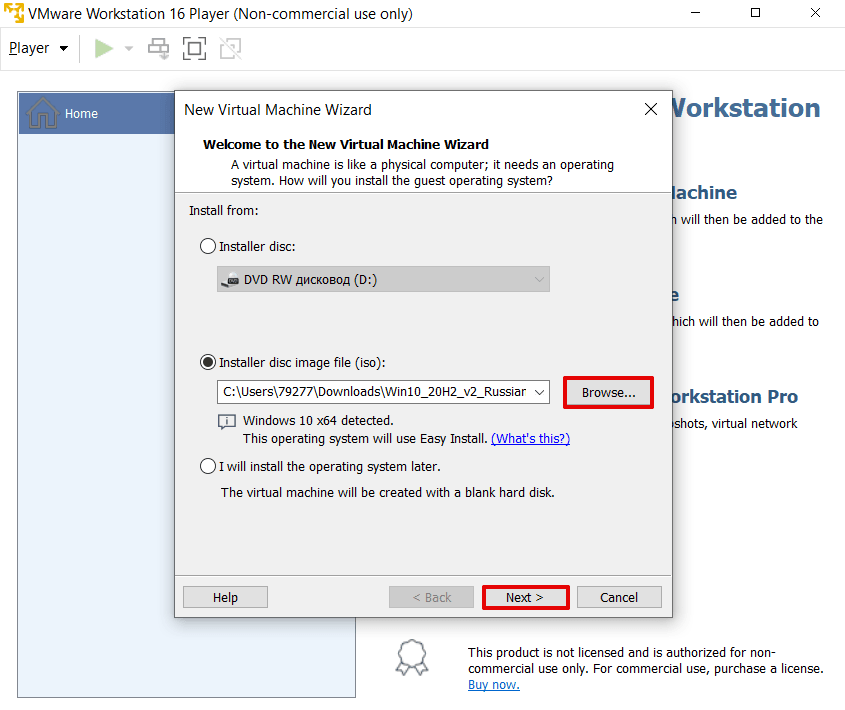
2.
Нажмите Browse и в локальной папке компьютера выберите ISO-образ Windows 10. После этого кликните Next.
-
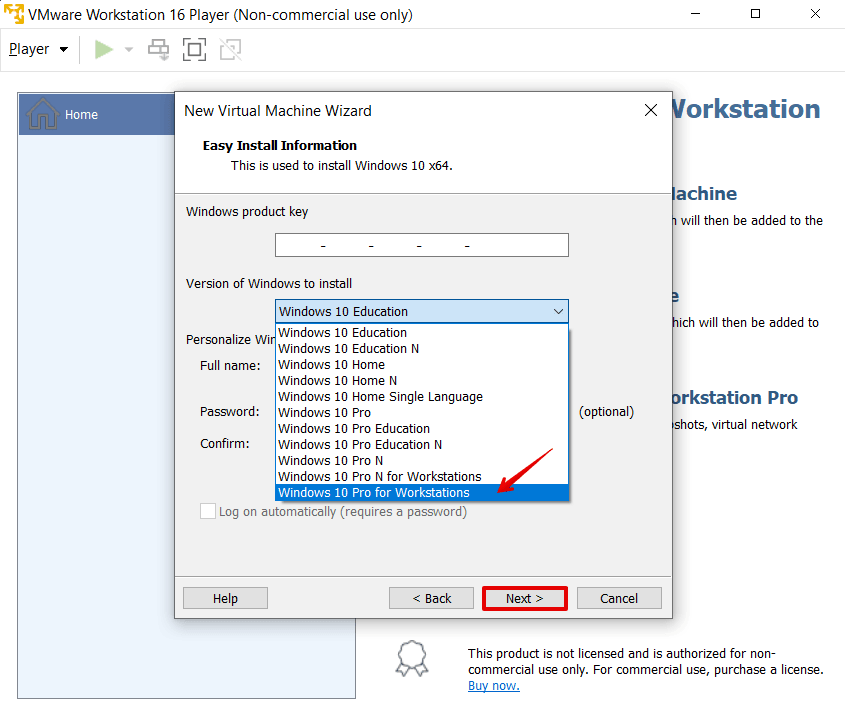
3.
Кликните на строку Version of Windows to install. В выпадающем списке выберите Windows 10 Pro for Workstation и нажмите Next:
-
4.
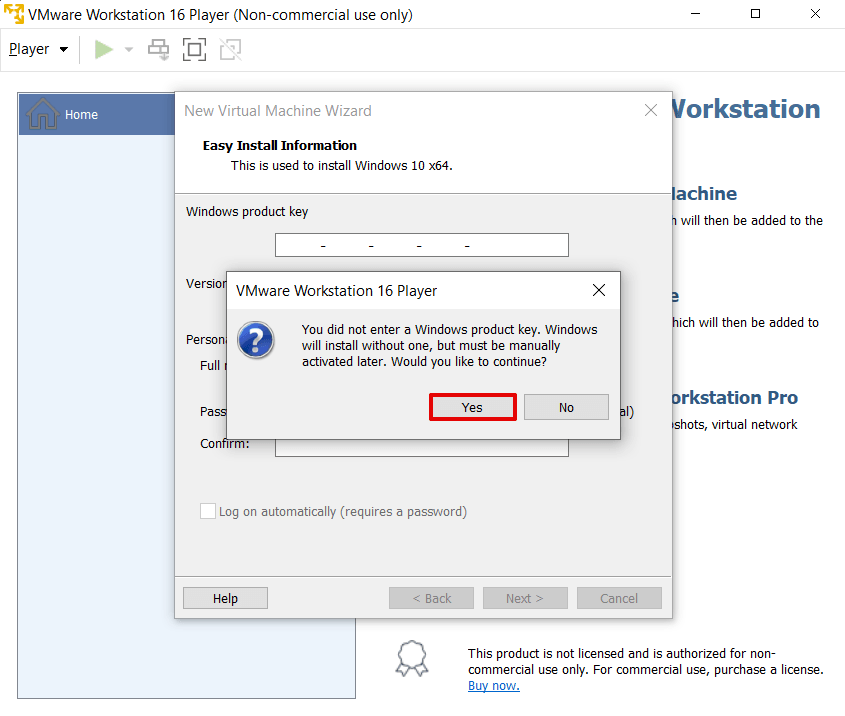
Во всплывающем окне нажмите Yes:
-
5.
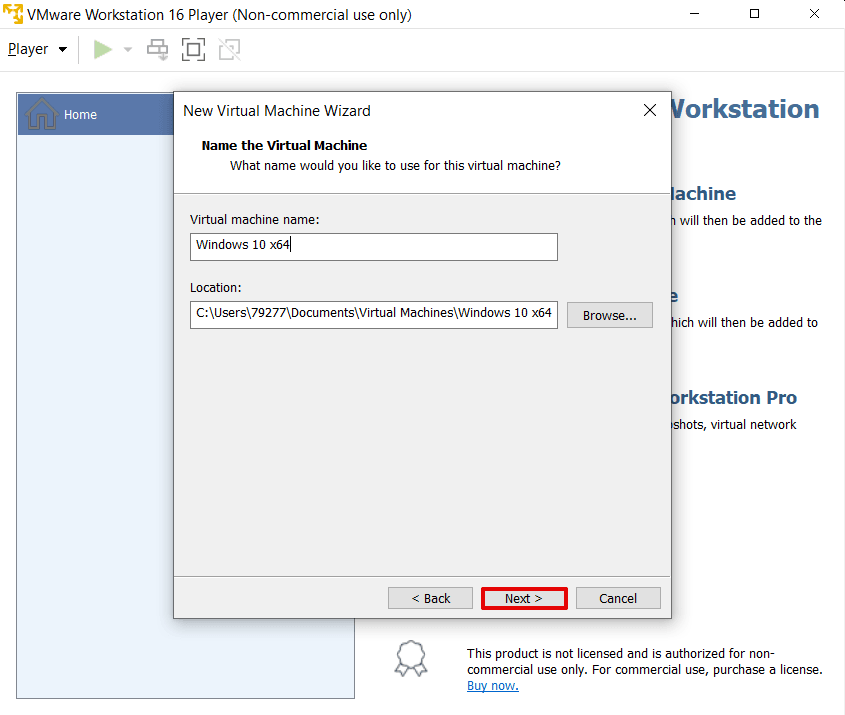
Затем кликните Next:
-
6.
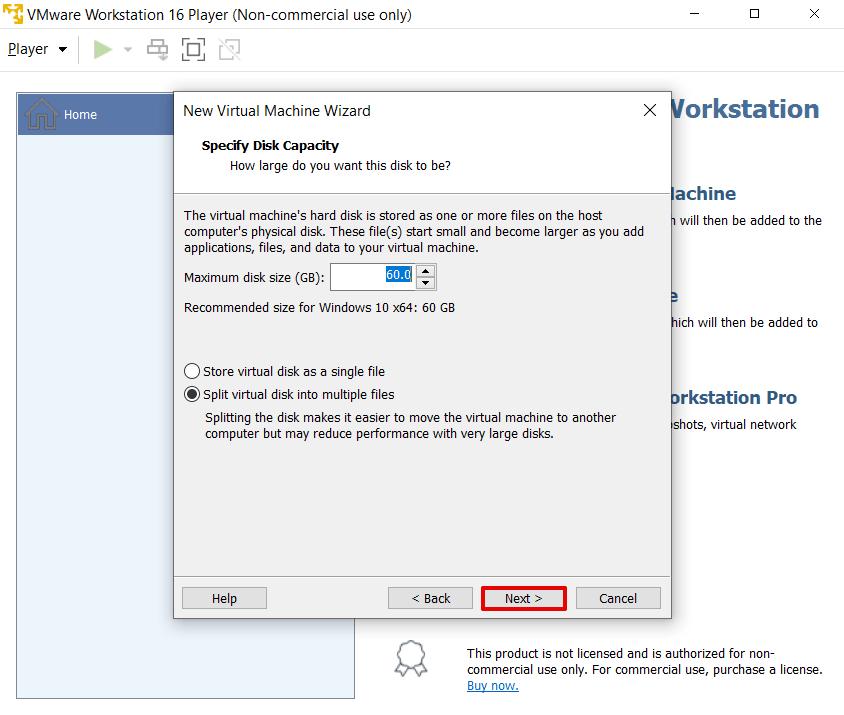
Выберите максимальное количество дисковой памяти, которое сможет использовать BM, и нажмите Next:
-
7.
Чтобы завершить настройку, нажмите Finish. Создание машины займёт 5-10 минут.
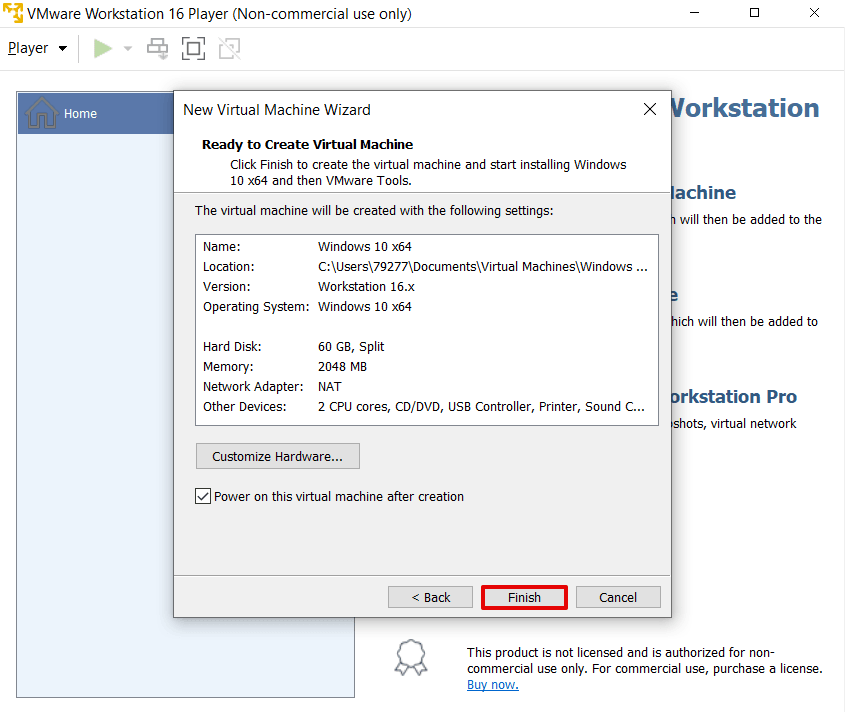
Готово, установка завершена.
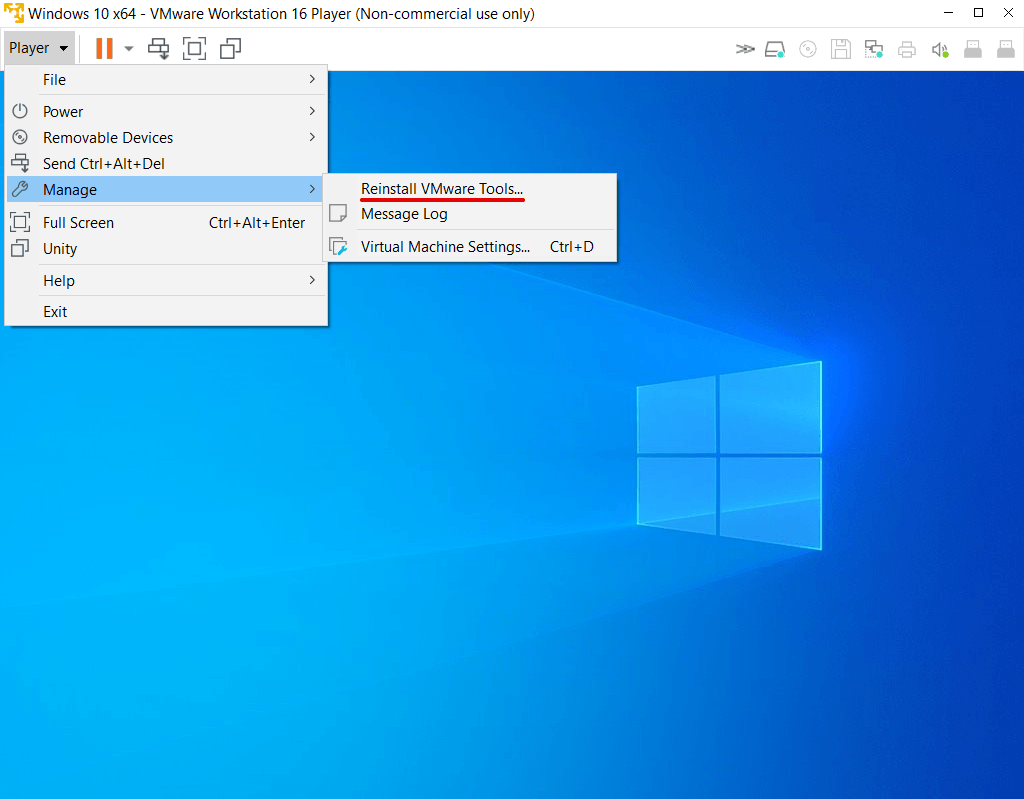
Часто пакет Тулс устанавливается автоматически при создании VM. Чтобы проверить, активирован ли Тулс, в панели управления ВМ нажмите Player:

В списке наведите курсор на раздел Manage. Если в первом пункте выпадающего списка вы увидите «Reinstall», значит пакет тулс уже установлен. Если в пункте будет указано «Installation», значит пакет нужно установить вручную по инструкции.
Если кнопка Tools в настройках неактивна
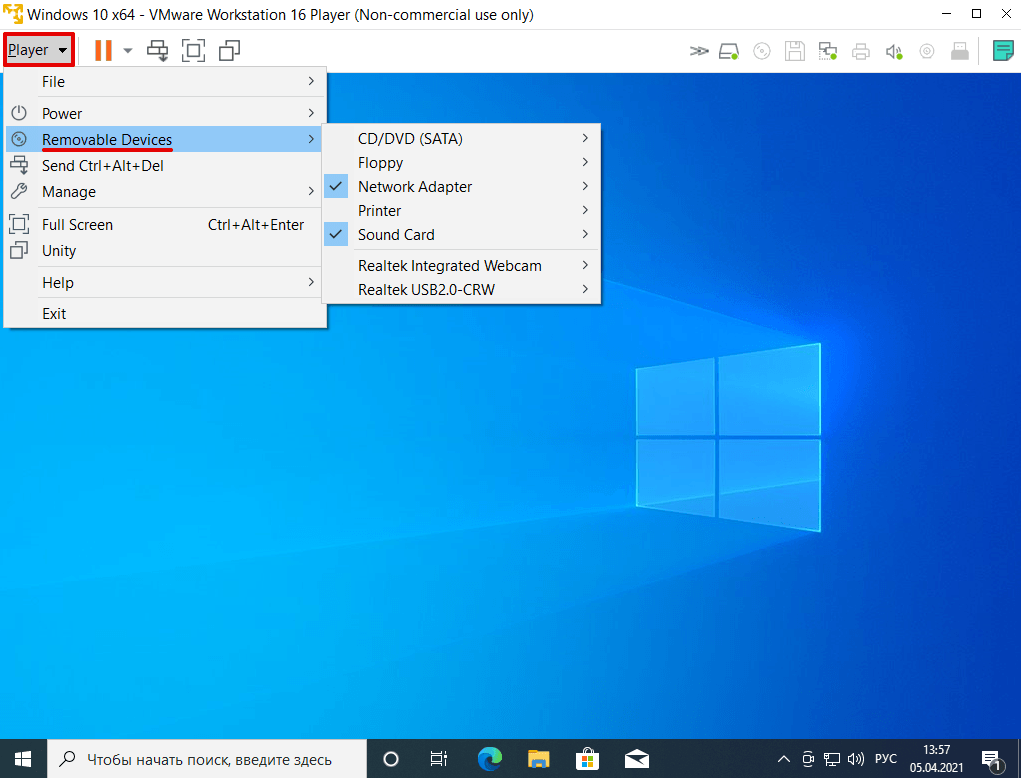
-
1.
В панели управления нажмите Player и наведите курсор на раздел Removable Devices:
-
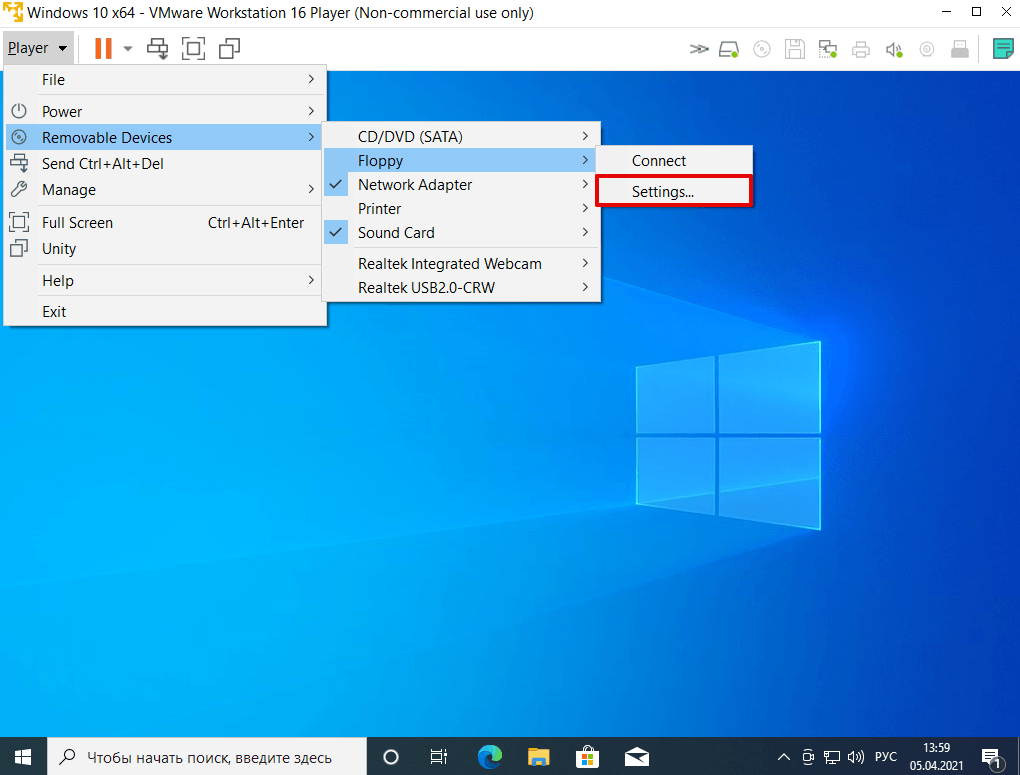
2.
Наведите курсор на пункт Floppy и кликните Settings..:
-
3.
Кликните по строке Floppy и нажмите Remove:
-
4.
Подтвердите удаление. Для этого кликните Ок во всплывающем окне, а затем Ок внизу страницы:
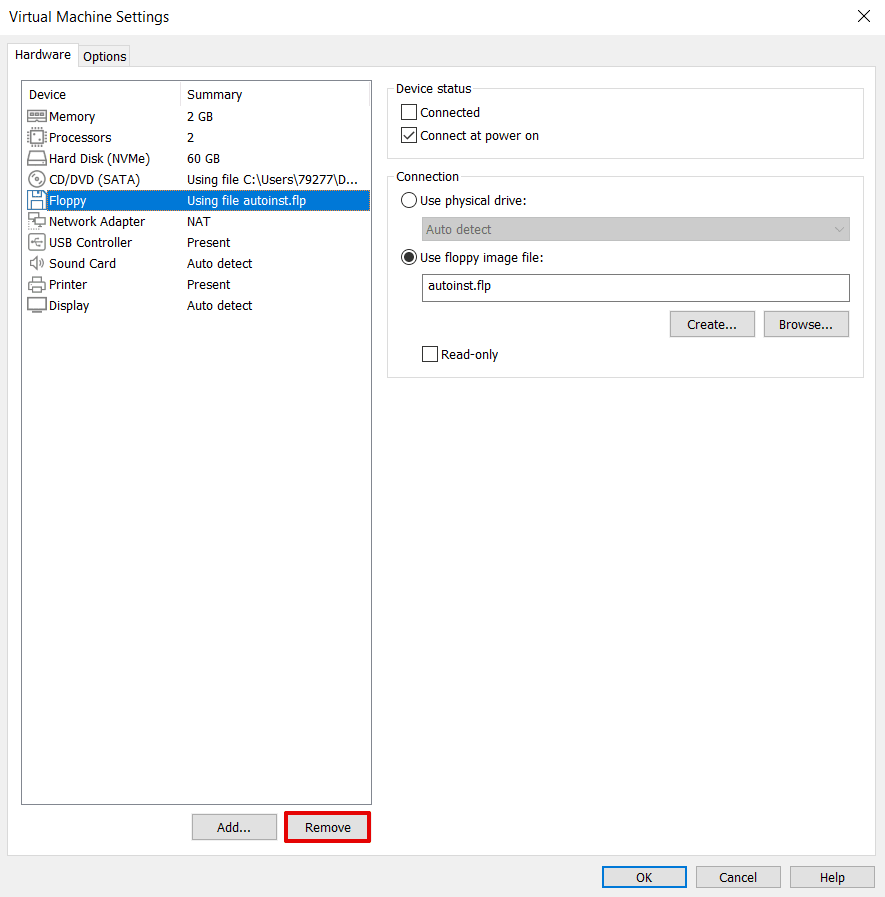
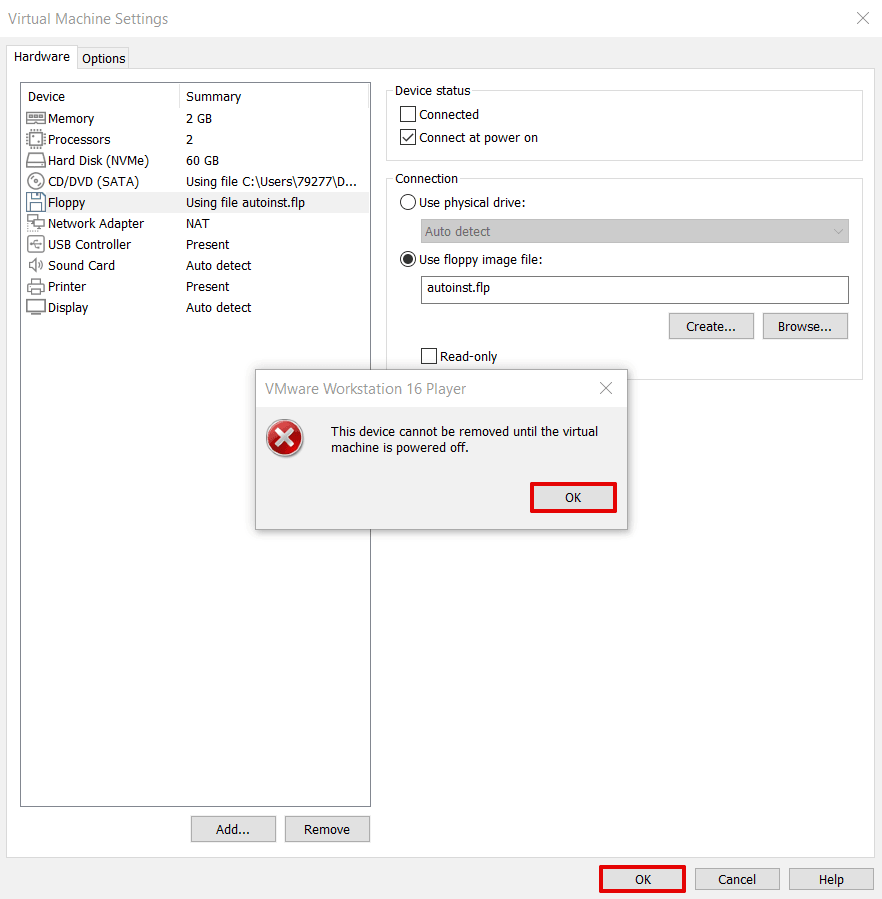
Готово, вы активировали кнопку.
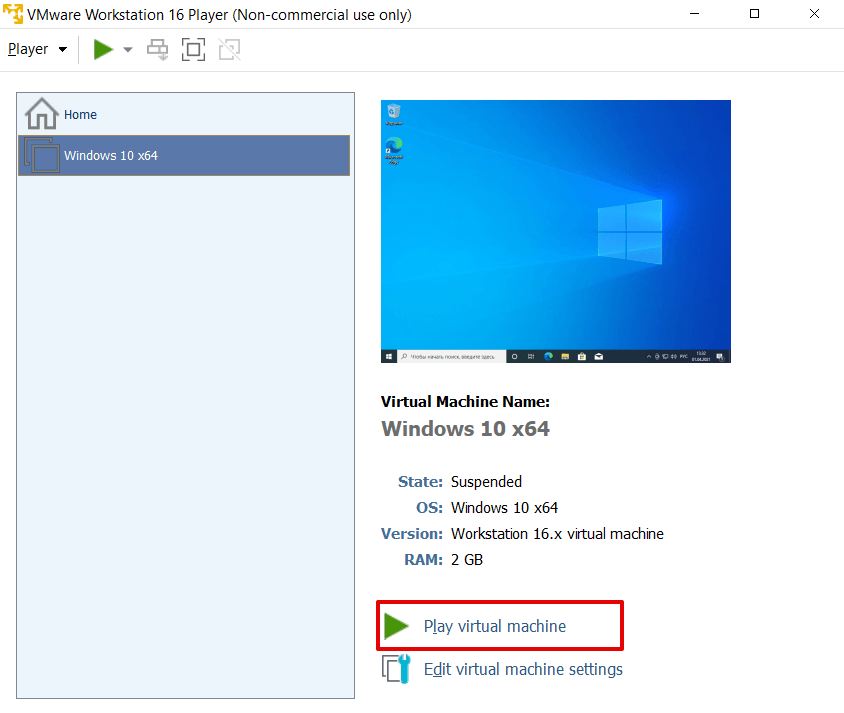
Как установить VMware Tools на виртуальную машину Windows 10
-
1.
Запустите виртуальную машину Windows 10:
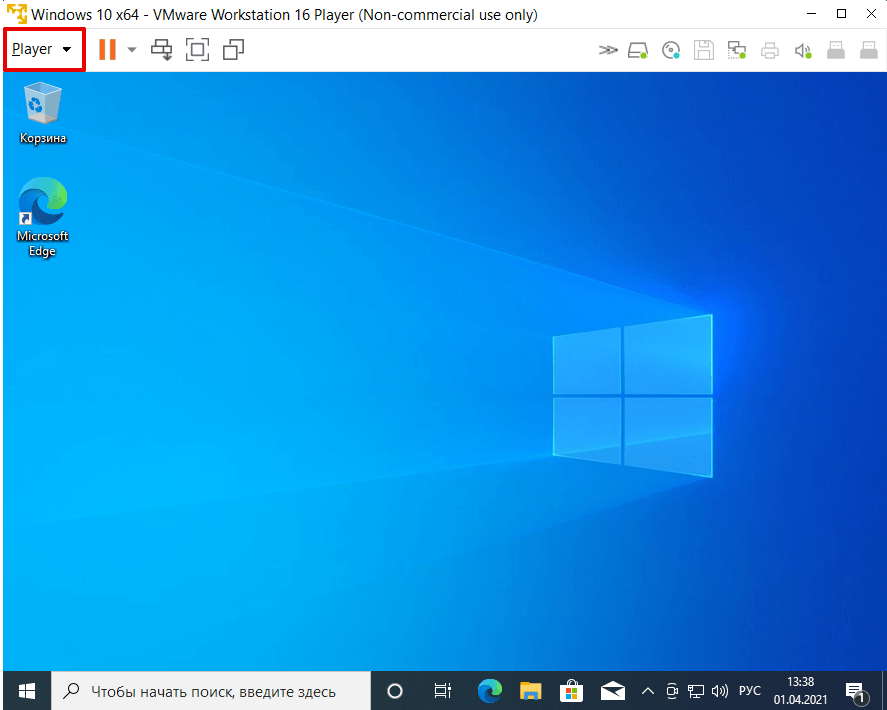
-
2.
В панели управления ВМ нажмите Player:
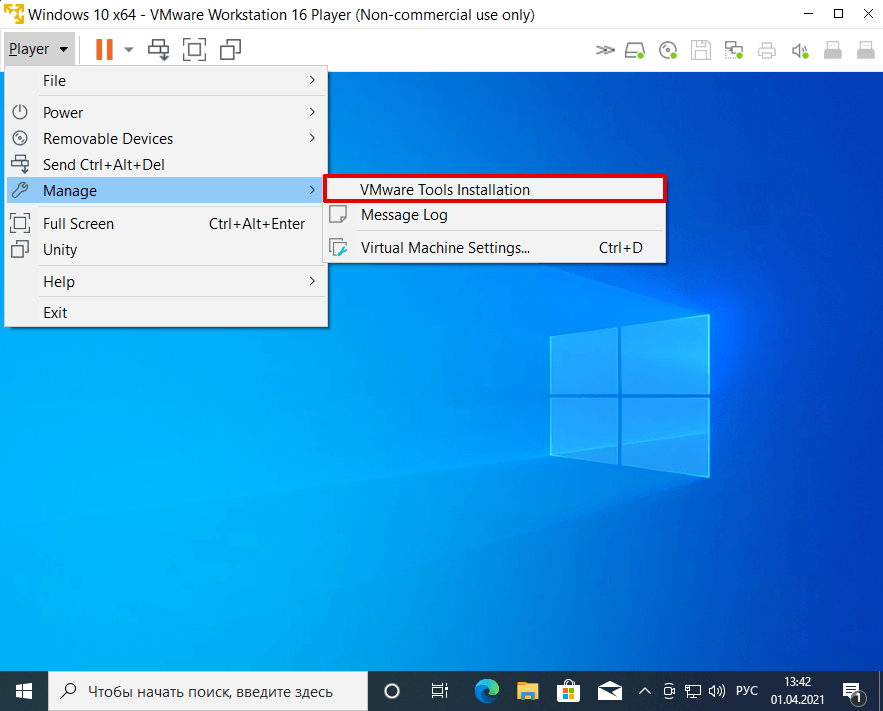
-
3.
В списке выберите Manage — VMware Tools Installation:
-
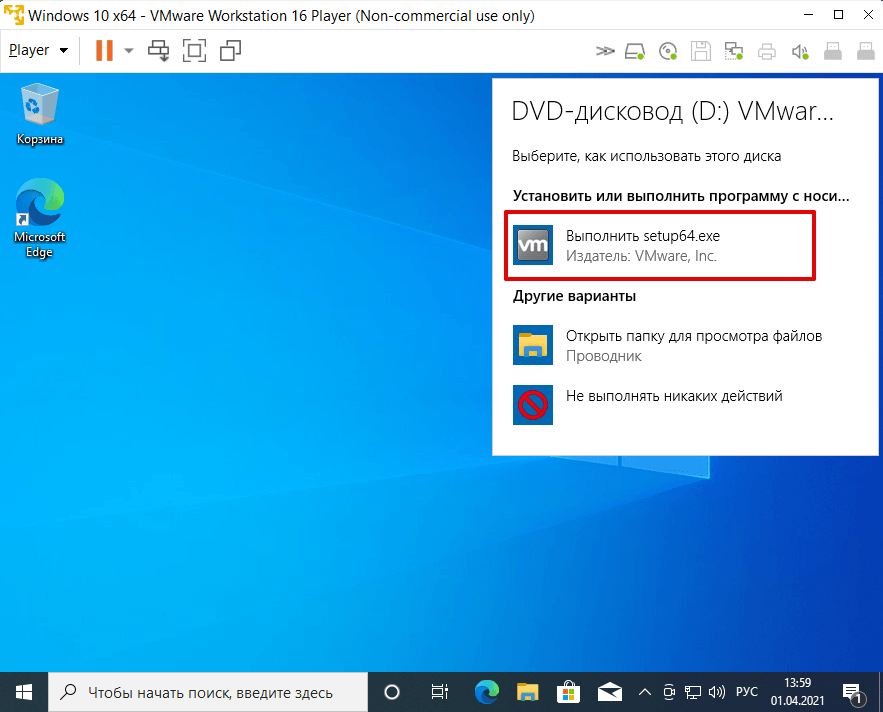
4.
Кликните по всплывающему окошку DVD-дисковод (D:) VMware Tools:
-
5.
В появившемся окне нажмите Выполнить setup64.exe:
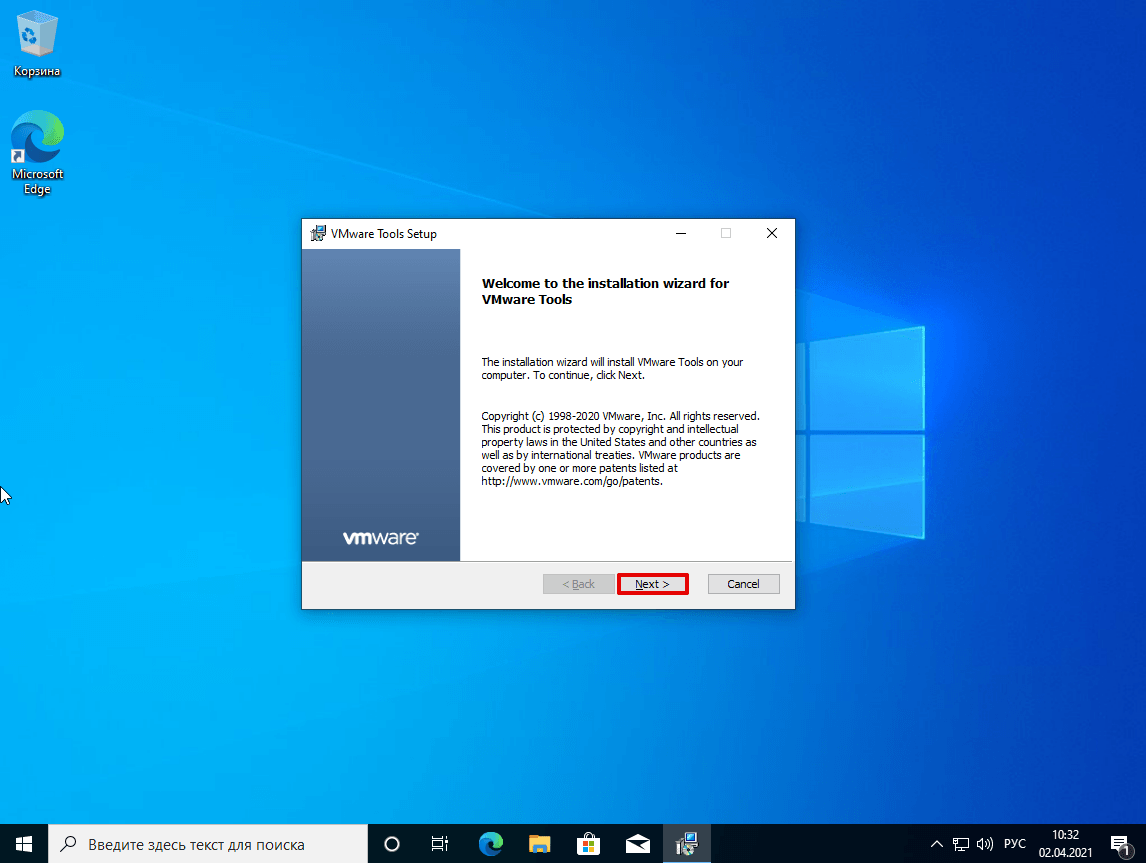
-
6.
Чтобы запустить установку, нажмите Next:
-
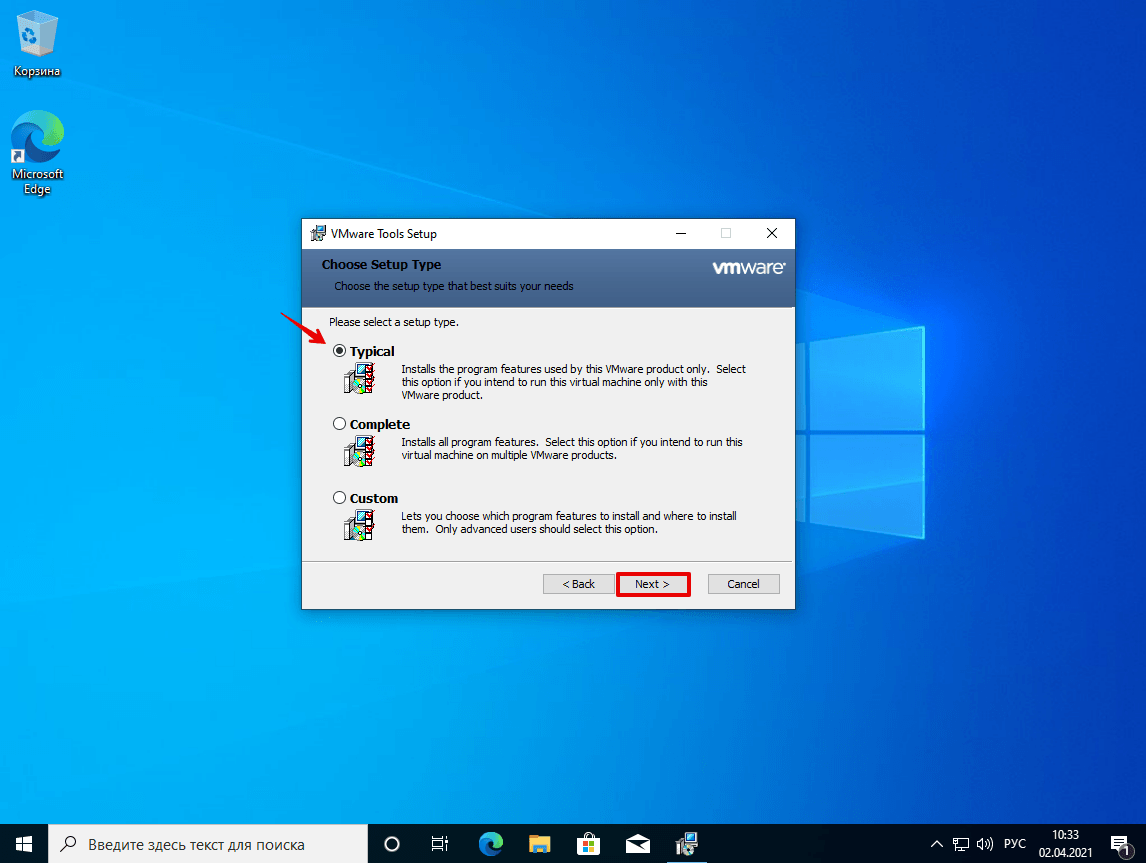
7.
Выберите один из установочных пакетов:
- Typical – пакет, который подходит для интеграции с VMware Workstation,
- Complete – полный пакет, который подойдёт для интеграции с несколькими продуктами VMware,
- Custom – настраиваемый пакет: компоненты можно выбирать самостоятельно.
Если вы используете только Workstation, выберите пакет Typical:
-
8.
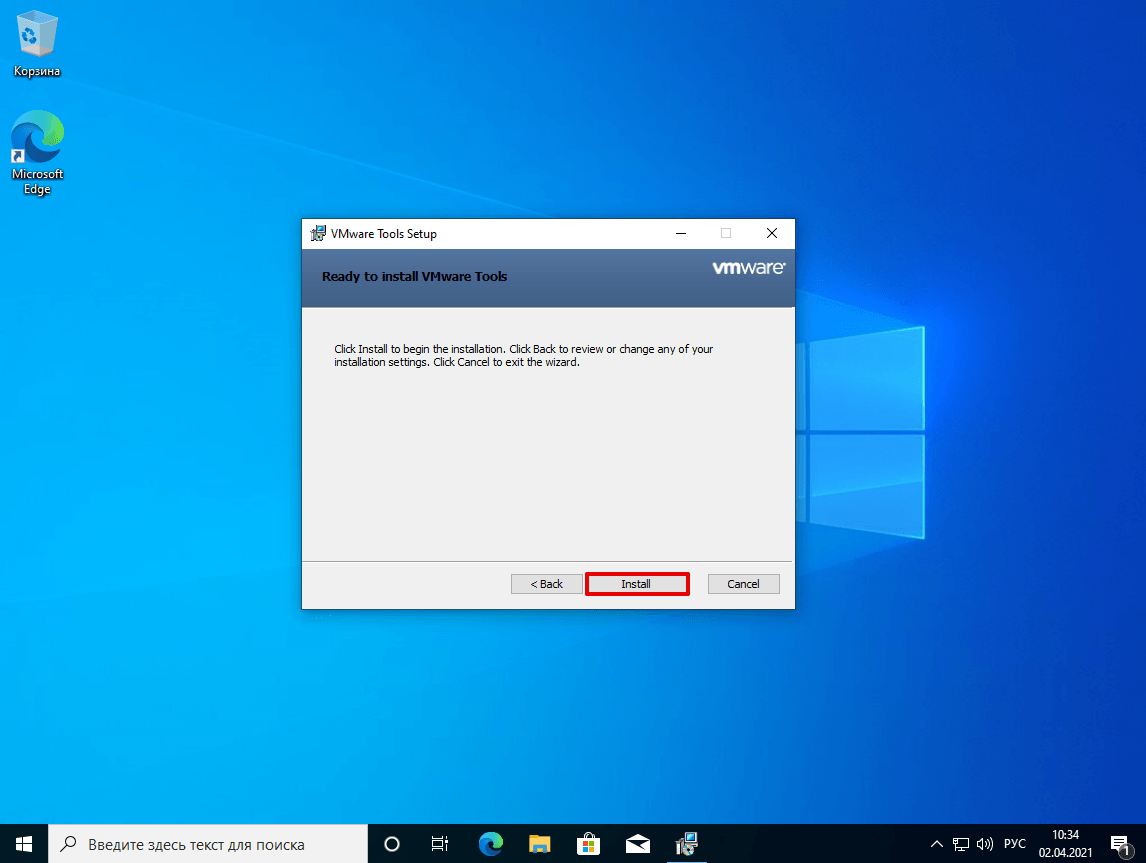
Затем нажмите Install:
Установка на виртуальной машине -
9.
Для завершения установки кликните Finish:
-
10.
Перезагрузите виртуальную машину. Для этого нажмите Yes. Если вы хотите выполнить перезагрузку позже, нажмите No.

Готово. Аналогичным образом вы можете установить VMware Tools на Windows 7.
Right-click the virtual machine and select Guest OS > Install VMware Tools. If you are using vCenter Server and are performing an upgrade or reinstallation, in the Install/Upgrade VMware Tools dialog box, select Interactive Tools Installation or Interactive Tools Upgrade and click OK.
To setup Guest Tools in Win 7, click VM / Install VM Tools. When the VM Tools image is automatically mounted on the system, open My Computer and double-click the drive to start the setup. Click Yes to continue the operation in the User Account Control window. In the VM Tools Setup window, click Next.
Procedure. Select the menu command to mount the VMware Tools virtual disc on the guest operating system. Right-click the virtual machine and select All vCenter Actions > Guest OS > Install/Upgrade VMware Tools.
Procedure
- Start the vSphere Web Client and log in to the vCenter Server.
- Select the virtual machines. …
- Power on the virtual machines to upgrade.
- Right-click your selections.
- Select Guest OS > Install/Upgrade VMware Tools and click OK.
- Select Interactive Upgrade or Automatic Upgrade and click Upgrade.
To install VMware Tools, follow this procedure:
- Start the virtual machine.
- On the menu of the VMware console window, choose Player→Manage→Install VMware Tools. The dialog box shown here appears. …
- Click Download and Install. …
- Follow the instructions in the Setup program to install the VMware tools.
Right-click the virtual machine you want to install VMware Tools on, in your inventory. Choose to cancel or end the VMware Tools installation. Right-click the virtual machine you want to install VMware Tools on, in your inventory. Choose to install VMware Tools.
Why is install VMware tools disabled? The Install VMware tools option grays out when you start installing it on a guest system with the function already mounted. It also happens when the guest machine doesn’t have a virtual optical drive.
For example, if you do not have VMware Tools installed in your virtual machine, you cannot interact with the Guest OS to perform a graceful / clean shutdown or restart. This means you can only use the VM power options to perform a hard power off or power on of the virtual machine from the toolbar.
To open the VMware Tools control panel, double-click the VMware Tools icon in the system tray. If the VMware Tools icon does not appear in the system tray, go to Start > Control Panel. Locate the VMware Tools icon and double-click it.
Upgrading to the latest version of VMware Tools is not always necessary. Newer versions of VMware Tools are compatible with several host versions.
Windows guest drivers installed by VMware Tools
| Drivers | VMware Tools 11.3.0 |
|---|---|
| pvscsi.sys | For Windows 7 and Windows Server 2008 Release 2: 1.3.15.0 For Windows 8, Windows 8.1, Windows 10, Windows Server 2012, Windows Server 2012 Release 2, Windows Server 2016, and Windows Server 2019: 1.3.17.0 |
| vmaudio.sys | 5.10.0.3506 |
If you are currently running a version of VMware Tools older than 5.1 on a version of Windows older than Windows Vista, upgrading always requires a reboot. If you are running VMware Tools 5.1 on Windows Vista or newer, you may have to reboot if: One or more components of VMware Tools is installed.
Since VMware Tools cannot be installed without a CD-ROM drive, the incorrect network driver is also assigned to the NIC. To resolve this issue, you must assign the correct driver. To assign the correct driver: … select add a new device and select the CD-ROM under Disk, Driver and storage.
Checking the VMware Tools version
- Locate the VMware Tools icon in the System Tray. Move the mouse pointer over the icon. …
- To check which version is installed, right-click the VMware Tools icon and select About VMware Tools. The About VMware Tools dialog displays information about the currently installed version.
Without VMware Tools installed in your guest operating system, guest performance lacks important functionality. Installing VMware Tools eliminates or improves these issues: … Provides the ability to take quiesced snapshots of the guest OS. Synchronizes the time in the guest operating system with the time on the host.
Содержание
- VMWare Tools не устанавливается: VMWare Tools installation cannot be started while Easy Install is in progress
- install vmware tools не активно
- … заметки IT’шника…
- Не устанавливается VMware tools? есть причина.
- How to install VMWare tools if the option is grayed out
- Here’s what I tried (and failed)
- How to install VMWare tools if the option is grayed out
- About Ashwin
- Related content
- How to enable the new TweetDeck Preview interface in Firefox and Chrome
- Use the Windows Task Manager to find power leeching processes quickly
- How to download YouTube videos with Internet Download Manager
- How to turn off the News and Interests feature of Windows 10
- How to turn off Text Predictions in Word and Outlook
- Create your own SDelete shortcut for secure file deletion
- Comments
- Install vmware tools не активно windows 7
- install vmware tools не активно
- … заметки IT’шника…
- Не устанавливается VMware tools? есть причина.
При установке VMware Tools на новую виртуалку очень часто, а может быть даже и всегда, получаю ошибку «VMWare Tools installation cannot be started while Easy Install is in progress», что переводится примерно так «Установка VMware Tools не может быть запущена в то время как идет Easy Install «.

Не помню уже сколько времени я потратил на поиск того, как отключить Easy Install в настройках самой программы, но даже похожего в настройках не нашел. Искал как получается всегда не там где нужно. Как потом оказалось, эта ошибка возникает по вине не размонтированной загрузочной дискеты в флоппи дисководе, необходимой для установки Операционной Системы. Вот это нами мешает. Если вы зайдете на флоппи дисковод то увидите примерно тоже самое, что и на картинке внизу.

Чтобы навсегда избавиться от ошибки надо сделать несколько действий. Если виртуальная машина у вас запущена, то ее следует выключить и зайти в настройки. В настройки можно попасть выбрав вашу машину и нажав на «Edit virtual machine settings» или нажав комбинацию клавиш CTRL+D. В настройках следует перейти на вкладку Floppy и в группе Connection выбрать «Use physical drive», в выпадающем меню «Auto detect» и нажать OK. Вот мы и размонтировали загрузочную дискету, которая нам мешала установить VMware Tools.

Загрузив Операционную Систему вы сможете без ошибок установить VMware Tools.
Источник
Бывает так что по каким-то причинам вы не можете ни установить дополнения для виртуальной машины VMWare ни загрузить их через саму программу.

В таком случае придется или переустанавливать виртуальную машину, что мягко говоря «не очень» или искать отдельно VMWare Tools.
Оказывается есть открытый официальный источник, где можно загрузить VMWare Tools не только для Windows, но и для других ОС.
Но после этого будьте готовы к следующей преграде — это перенести дополнения в виртуальную машину, для этого используйте функцию Map жесткого диска в настройках виртуальной ОС. Это позволит открыть диск в физической ОС.
Здесь можно загрузить последние дополнения для вашей виртуальной машины.
Переходим по ссылке.

В самом низу должна быть папка latest, в которой должны быть последние версии VMWare Tools для разных ОС. Переходим в нее.

После этого в зависимости от ОС выбираете папку, у меня это папка windows.

После чего выбираем архитектуру, у меня это x86.

После этого мы попадаем уже собственно в папку нашего дополнения.

Осталось только сохранить и установить на виртуальную машину, то есть именно сперва перенести любым способом в виртуальную и уже там установить.
Для того чтобы перенести стоит просто открыть виртуальный диск в физ. системе и туда «закинуть» это дополнение. Открыть можно через настройки, там где диск в меню Utilities выбрать Map и снять галочку «только чтение», после чего откроется доступ к виртуальному диску.
Рубрика: Программы / Метки: VMWare / 19 Ноябрь 2014 / Подробнее
При установке VMware Tools на новую виртуалку очень часто, а может быть даже и всегда, получаю ошибку «VMWare Tools installation cannot be started while Easy Install is in progress», что переводится примерно так «Установка VMware Tools не может быть запущена в то время как идет Easy Install «.
Не помню уже сколько времени я потратил на поиск того, как отключить Easy Install в настройках самой программы, но даже похожего в настройках не нашел. Искал как получается всегда не там где нужно. Как потом оказалось, эта ошибка возникает по вине не размонтированной загрузочной дискеты в флоппи дисководе, необходимой для установки Операционной Системы. Вот это нами мешает. Если вы зайдете на флоппи дисковод то увидите примерно тоже самое, что и на картинке внизу.
Чтобы навсегда избавиться от ошибки надо сделать несколько действий. Если виртуальная машина у вас запущена, то ее следует выключить и зайти в настройки. В настройки можно попасть выбрав вашу машину и нажав на «Edit virtual machine settings» или нажав комбинацию клавиш CTRL+D. В настройках следует перейти на вкладку Floppy и в группе Connection выбрать «Use physical drive», в выпадающем меню «Auto detect» и нажать OK. Вот мы и размонтировали загрузочную дискету, которая нам мешала установить VMware Tools.
Загрузив Операционную Систему вы сможете без ошибок установить VMware Tools.
… заметки IT’шника…
 Работая с виртуальными машинами, всегда стараюсь устанавливать в гостевую систему инструментарий от среды виртуализации. Это дает более гибкое управление и мониторинг за состоянием гостевой системы. Чаще мне приходится работать с виртуализацией от VMware, на различных платформах. Установка VMware tools в среде MS Wndows — вообще никогда не вызывает проблем. С установкой в системах GNU/Linux приходится больше работать вручную.
Казалось бы в чем может быть дело? Однако уже в конце рабочего дня у меня включился мозг и я вспомнил процесс инсталяции VMware Tools в среде Линукса. Там кликая пункт меню — мы просто помещаем образ в устройство чтения компакт дисков. А потом монтируем и сетапим все ручками. А вот полная автоматизация процесса в Windows заблокировала мой мозг…
Оказывается при конвертации и переносе виртуальной машниы, VMware Converter отрубил все лишние устройства, в том числе был и виртуальный привод копакт дисков…. После ручного добавления в виртуальную машину нвоого привода установка Tools’ов прошла в привычном автоматическом режиме….
Вот так всегда, можно над одной мелочью «битый час» возиться и изводить свой разум 🙂
Источник
I use VMWare Workstation Player primary to run Linux but a few days ago I wanted to install a virtual copy of Windows 10 to test some upcoming features. Virtual machines are great for testing operating systems or programs as they can be set up relatively quickly, don’t alter existing installations and don’t interfere with the underlying operating system.

I got the ISO using Martin’s guide and the installation went fine. But then, I noticed that it didn’t install the VMWare tools like it would normally do.
One of the important features that these tools add is the ability to copy data from the virtual machine to the host operating system or vice-versa. That’s how I actually came to know that the tools weren’t installed, it didn’t let me move some folders from my main Windows 10 to the VM version.
I knew that I had chosen the option to download VMWare tools when creating the virtual machine. I even remember the message log displaying the notification that the tools had been downloaded. Oddly, when I clicked the Manage option the install VMWare tools option was grayed out.
Hoping to find a fix, I began to look around and came across official documentation on VMWare’s support portal. According to the page, the virtual CD/DVD drive should be set to «Auto Detect» so that VMWare would let the user install VMWare Tools. The option which I wanted to change in the virtual machine’s CD/DVD drive was set to use my Windows 10 ISO and I couldn’t change this setting.

Here’s what I tried (and failed)
None of this worked. This is when I searched the VMWare forums and found the solution on this thread.
How to install VMWare tools if the option is grayed out
1. Shut down the virtual machine.
2. Open VMWare Workstation Player and right-click on the VM. (Don’t start the VM)
3. Select the «Settings» option to edit the hardware settings.
4. Highlight the CD/Drive on the left side-bar under the Hardware tab and click on the remove button.
5. Repeat the above step to remove the Floppy Drive. (Optional, but this is what fixed it for me. Courtesy: AskUbuntu forums)
6. Click on the «Add button» and select «CD/DVD» Drive and select finish. The right pane should have now have the option «Use Physical Drive > Auto Detect» enabled. (Previously, it had the Windows ISO selected)

7. Click on «OK» to close the window, and Start the VM as normal.
8. Once it has booted to the desktop, click on the menu at the top left corner and go to «Player > Manage > Install VMWare Tools».
The option should no longer be greyed out. Click on it to install the VMWare Tools. You will also see a new tab at the bottom of the screen prompting you to install the tools.

If this doesn’t work, you can try to manually download the VMWare Tools ISO, mount it in a virtual drive and install it. This isn’t limited to Windows 10 VMs, it should work on any VM be it Linux, macOS, or older versions of Windows.

About Ashwin
Related content

How to enable the new TweetDeck Preview interface in Firefox and Chrome

Use the Windows Task Manager to find power leeching processes quickly

How to download YouTube videos with Internet Download Manager

How to turn off the News and Interests feature of Windows 10

How to turn off Text Predictions in Word and Outlook

Create your own SDelete shortcut for secure file deletion
Good to find a non-enterprise user of VMware. Several years ago I considered getting up to speed on it but VMware reportedly laid off the development staff of Workstation (or Player, or whatever they call it this week :().
Say, what do they call it now and what version is it?
Is the free version hard to find and are there any significant limitations compared to Virtualbox or KVM?
TIA, Mike
VMware Workstation free version =
I prefer VirtualBox simply because it works well with any distro. I rather doubt Ashwin’s problem would occur on VirtualBox.
Yet, when it works and one does whatever is necessary, I find VMware to have a more polished look and feel.
One will eventually encounter a problem with either tool which will require a bit of research–no “real” problems, though.
Windows Hyper-V works fine.
VMWare Workstation Player also requires some VMX file editing to tweak some of the features not available via GUI.
Why not just use VirtualBox instead?
These days the most important and most valuable product of Oracle is VirtualBox! Nobody cares about Oracle Database, Oracle eBusiness Suite and the like anymore.
Thank you. This article helped me. My issue was my 2019 MacBook Pro doesn’t have a CD/DVD so my VM image never had a CD drive. Adding the CD to the VM allowed the VM to boot with CD in a disconnected state but it was there. Then the option to install VMware Tools was not grey! hurray! Got my VMware tools installed and was then able to use the features such as sharing a drive with my VM.
Thanks for the tip of adding a CD drive. I never realized this before because all my other VM hosts had CD drives. This should allow my other Kubernetes VM’s to also get the tools now. I’ll try that next.
Thank you so much. This got me out of the few hours rant of frustration.
Very Helpful! Thank you
thanks. Worked instantly
Thank you so much. You saved my time!
This procedure really helped me.
It worked! Best solution
Thank you so much – really helped me out of a problem
May cause an issue with the IDE device configured as a slave. See, for solution:
https://kb.vmware.com/s/article/2010477
Appreciate it. It was useful.
Thank, Ten seconds to find your tips and five sends to fix my issue.
It saved me so much time instead of reinstalling the entire VM.
Removing the floppy disk did it for me, thanks!
Thank you very much! Followed your instructions to a tee to remove the CD/DVD and Floppy drives on my Windows 7 VM. Much appreciated!
This really helped a lot. Thanks!
Thanks a lot, I spent hours tying to find a fix.
This works very well!
Thank you … the steps mentioned here work as is…
Thank you – exactly what I needed!
Thanks bro, i was really about to give up
I have an OS X Mavericks (10.9.5) VM under VMware Fusion 11.5.5 under MacOS Catalina 10.5.5
on a 2019 16″ Macbook Pro.
I have even removed and re-installed ‘VMware Fusion’.
This has, so far, defeated VMware support. Mind you they didn’t realise
‘Library/Application Support/VMware Tools/’ was root and not the user,
so I am not sure she knows enough!
worked first time! thanks again
Thank you so much for your guide! Now it work.
Thanks, this worked perfectly
Thanks a lot! Enabling CD-ROM totally missed out of my mind. And I struggled a lot for accessing shared drive inside guest. Now it is working after enabling CD-ROM and installing VMWare tools.
this fantastic even the vendor has no solution
Really, Thank you sooooo much
Worked a treat, thanks for posting
It works perfectly for fusion
You Sir, are a legend
I had the same problem in Vmware Workstation pro 16. The guest os being windows 7 x32 bit. Tried all the above methods. They didnot work. Then after much research found this page:
Registered my name and downloaded vmware tools separately. Details
VMware Tools packages for Windows
File size: 125.33 MB
File type: zip
Name: VMware-Tools-windows-11.2.0-16938113.zip
Release Date: 2020-10-15
Build Number: 16938113
VMware Tools packages for Windows
VMware Tools packages for Windows. These packages support the following operating systems: Windows 7 Service Pack 1 (SP1) or Windows Server 2008 R2 Service Pack 1 (SP1) and later
MD5SUM: 409742dfcd24bee8798e7596430fd259
SHA1SUM: e257e07a9e2899f882cf3dde30acbe8e195982f5
SHA256SUM: 3659f65af38d704914bb566d790043678275c694d87b4fc8fb485a2a164cd952
Extracted the *.iso file. Mounted the *.iso file to cd/dvd drive in the vmware console. The vmware tools exe was seen inside the guest os and installation was as usual.
P.S.: Sometimes software companies try to test whether their end users are intelligent or not by making their lives miserable and sending them in wild goose chase. I think it was one such attempt. Worst of all it worked.
Thank you very much. Worked perfectly for my installation of a Windows 7 VM under VMware 16.1 (Windows).
Thanks sir, I was worried.
It worked like charm so I couldn’t stop myself to comment 😊
Thanks a lot, got it working by following your guide.
Thak you very much. This really works! Saved me hours of frustration.
I must say that I think that the effort required to install is ridiculous. I could not find any decent information on the web explaining how to install the tools (the method is completely obscure), or even how to verify they were installed. This is by fare the worst thing about VMWare.
Источник


Bugatt1 (3 posts since Dec 5, 2013) Oct 13, 2014 11:23 PM
в свойствах ВМ для CD-ROM стоит галка Connected?
Нет не стоит, и поставить не получается поле не активно

прикрепи скрин с настройками вм.
скрин в прикреплённом файле
машина выключена, пункты CONNECTED не активны
добавлял CD-ROM, тоже самое
После запуска установки из меню InstallUpgrade VMware tools, если в клиенте руками попробывать примапить диск к виртуалке что пишет?
Да, кстати, а какая операционная система выбрана в настройках ВМ, и соответствует ли она реально установленной ОС?
В настройках ВМ выбрана ОС Windows 7 х86, фактически она же и стоит
После запуска установки из меню InstallUpgrade VMware tools, вылазит стандартное окно и ВСЁ, больше ничего не происходит, исошник не монтируется
Руками можно примонтировать iso из datastore, но это не по феншую
Та же самая проблема, как вручную можно примапить образ vmtools? Т.к. даже скачав в гостевую машину, vmtools из инета, не получается их запустить.
Только в одной виртуалке вы наблюдаете подобное поведение или в разных?
Запостите vmware.log виртуальной машины после запуска попытки инсталляции тулзов.
Источник
Бывает так что по каким-то причинам вы не можете ни установить дополнения для виртуальной машины VMWare ни загрузить их через саму программу.
В таком случае придется или переустанавливать виртуальную машину, что мягко говоря «не очень» или искать отдельно VMWare Tools.
Оказывается есть открытый официальный источник, где можно загрузить VMWare Tools не только для Windows, но и для других ОС.
Но после этого будьте готовы к следующей преграде — это перенести дополнения в виртуальную машину, для этого используйте функцию Map жесткого диска в настройках виртуальной ОС. Это позволит открыть диск в физической ОС.
Здесь можно загрузить последние дополнения для вашей виртуальной машины.
Переходим по ссылке.
В самом низу должна быть папка latest, в которой должны быть последние версии VMWare Tools для разных ОС. Переходим в нее.
После этого в зависимости от ОС выбираете папку, у меня это папка windows.
После чего выбираем архитектуру, у меня это x86.
После этого мы попадаем уже собственно в папку нашего дополнения.
Осталось только сохранить и установить на виртуальную машину, то есть именно сперва перенести любым способом в виртуальную и уже там установить.
Для того чтобы перенести стоит просто открыть виртуальный диск в физ. системе и туда «закинуть» это дополнение. Открыть можно через настройки, там где диск в меню Utilities выбрать Map и снять галочку «только чтение», после чего откроется доступ к виртуальному диску.
Рубрика: Программы / Метки: VMWare / 19 Ноябрь 2014 / Подробнее
При установке VMware Tools на новую виртуалку очень часто, а может быть даже и всегда, получаю ошибку «VMWare Tools installation cannot be started while Easy Install is in progress», что переводится примерно так «Установка VMware Tools не может быть запущена в то время как идет Easy Install «.
Не помню уже сколько времени я потратил на поиск того, как отключить Easy Install в настройках самой программы, но даже похожего в настройках не нашел. Искал как получается всегда не там где нужно. Как потом оказалось, эта ошибка возникает по вине не размонтированной загрузочной дискеты в флоппи дисководе, необходимой для установки Операционной Системы. Вот это нами мешает. Если вы зайдете на флоппи дисковод то увидите примерно тоже самое, что и на картинке внизу.
Чтобы навсегда избавиться от ошибки надо сделать несколько действий. Если виртуальная машина у вас запущена, то ее следует выключить и зайти в настройки. В настройки можно попасть выбрав вашу машину и нажав на «Edit virtual machine settings» или нажав комбинацию клавиш CTRL+D. В настройках следует перейти на вкладку Floppy и в группе Connection выбрать «Use physical drive», в выпадающем меню «Auto detect» и нажать OK. Вот мы и размонтировали загрузочную дискету, которая нам мешала установить VMware Tools.
Загрузив Операционную Систему вы сможете без ошибок установить VMware Tools.
… заметки IT’шника…
Работая с виртуальными машинами, всегда стараюсь устанавливать в гостевую систему инструментарий от среды виртуализации. Это дает более гибкое управление и мониторинг за состоянием гостевой системы. Чаще мне приходится работать с виртуализацией от VMware, на различных платформах. Установка VMware tools в среде MS Wndows — вообще никогда не вызывает проблем. С установкой в системах GNU/Linux приходится больше работать вручную.
Казалось бы в чем может быть дело? Однако уже в конце рабочего дня у меня включился мозг и я вспомнил процесс инсталяции VMware Tools в среде Линукса. Там кликая пункт меню — мы просто помещаем образ в устройство чтения компакт дисков. А потом монтируем и сетапим все ручками. А вот полная автоматизация процесса в Windows заблокировала мой мозг…
Оказывается при конвертации и переносе виртуальной машниы, VMware Converter отрубил все лишние устройства, в том числе был и виртуальный привод копакт дисков…. После ручного добавления в виртуальную машину нвоого привода установка Tools’ов прошла в привычном автоматическом режиме….
Вот так всегда, можно над одной мелочью «битый час» возиться и изводить свой разум 🙂
Источник