The Freedom of Virtualization
For awhile now I have been enjoying the freedom of developing with virtual machines. The biggest advantage it has given me lately is the freedom to do whatever I want to the laptop I use as a workstation. What I mean by that is I don’t even blink twice if I want to try a new operating system anymore. Maybe I want to run a version of Debian Linux or Ubuntu to keep my Unix skills polished up. Or maybe I want to try running a 64bit version of Windows Server as my main operating system to see if all of my hardware works. To consider doing this previously without virtualization would be almost unthinkable because of the amount of time it would take to get everything back up and running.
All of this freedom of choice is made possible through virtualization, specifically with VMWare Workstation. VMware runs on a variety of operating systems including Windows, Linux and Mac. Once my operating system is installed along with the needed vitalization tools I can literally go back to work by just starting up a virtual machine where all of my tools are stored. Compared to setting up a full blown development machine this is huge. Not only that but virtualization allows developers like myself to try out alphas, CTPs, betas and more without harming the main development operating system. This ability to test software is made possible through cloning and what is called snapshots within VMWare.
I’m writing this article about virtualization for two reasons. One because I’ve spent a lot of time tweaking my setup and I wanted to document it. And two, I know there are others that can benefit from this information as well. In this article I’m going to cover setting up a VM (virtual machine) from scratch. Then how to configure the operating system specifically for development in VMWare. The purpose of this setup is to configure Windows Server 2008 as a development platform using VMWare. Let’s get going!
Creating Your Base Virtual Machine
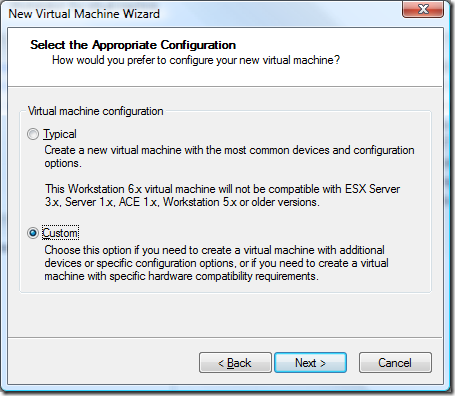
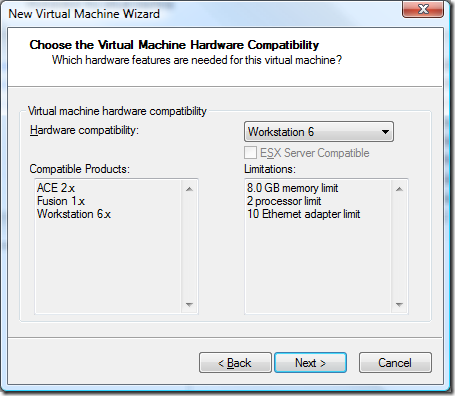
When starting from scratch I always create what I call a base virtual machine (VM). This VM serves as my base image for all of my needs and will be re-used for various setups. There are few things you need to keep in mind when you create a base image. I’ll mark these as we go along in the screen shots below. For posterity sakes, note that I’m using VMWare Workstation 6.
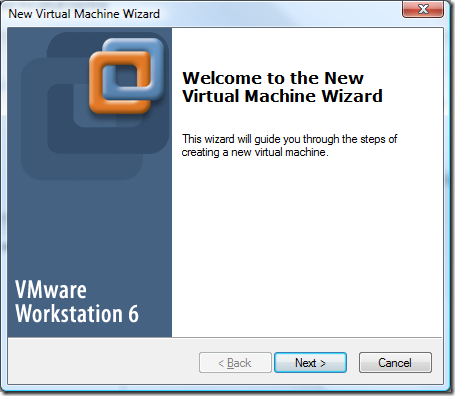
Once VMWare Workstation is installed click File->New Virtual Machine.
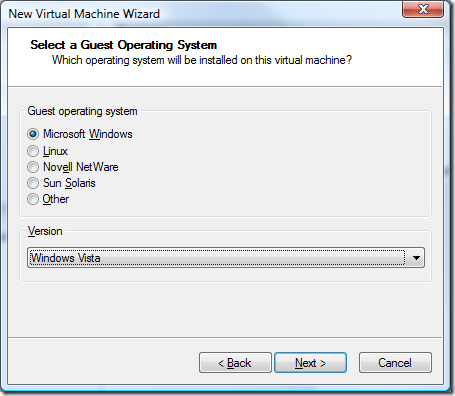
Although VMWare supports Server 2008 as “experimental” I’ve found that choosing Windows Vista works just as well. Once 2008 support is fully supported in a future release of Workstation this will not be hard to change.
You’ll notice below that I’m storing this VM on the F: drive not the C: drive. To really get performance out of your virtual machines you need to separate them onto a different spindle or disk. I use an external Western Digital 500GB MyBook which has a 7200RPM hard drive. When I travel I sync my virtual machines with my portable 250GB passport drive. This allows me to use a faster disk when I’m in the office which provides more speed and also provides a backup of the virtual machines.

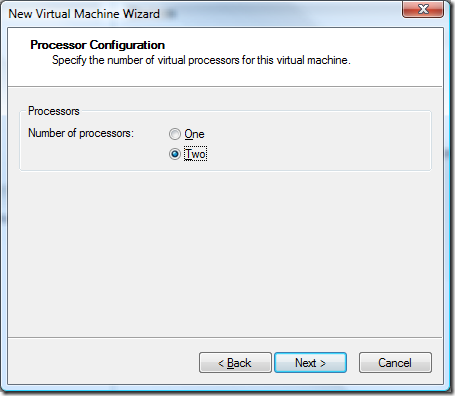
I have 4GBs of memory in my laptop of which 3.3GB is really accessible. While I could give the VM 2GB of memory, I find that sticking between 1-1.5GB of memory seems to be the sweet spot. If you use too much it slows the host machine down.

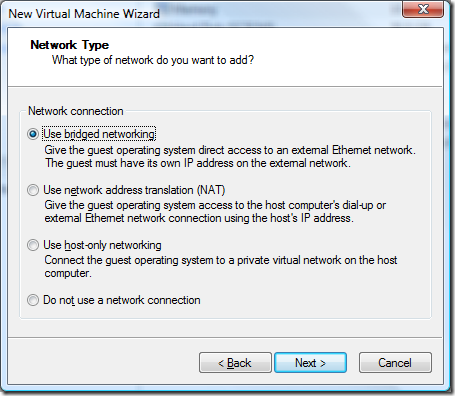
For networking I use bridge networking for some VMs and NAT for others. As you’ll see later on I will create two different setups from this base image. One will be for work, the other for presentations and speaking. For work I use a bridge network since this allows me to separate the VPN connection from my host machine completely. While I’m at home this allows me to access my local area network from my host machine (printers, home server, file storage, backups, etc). For the other VM I use NAT.
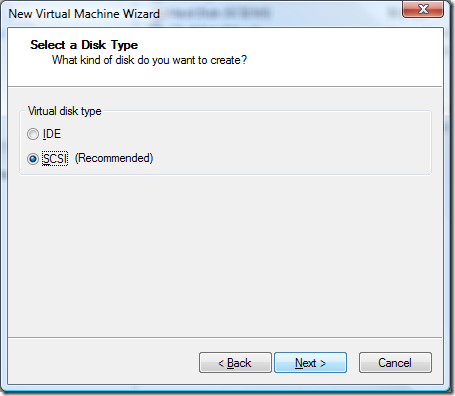
Doing some reading and research the LSI Logic I/O adapter is supposedly the faster choice for SCSI adapters.

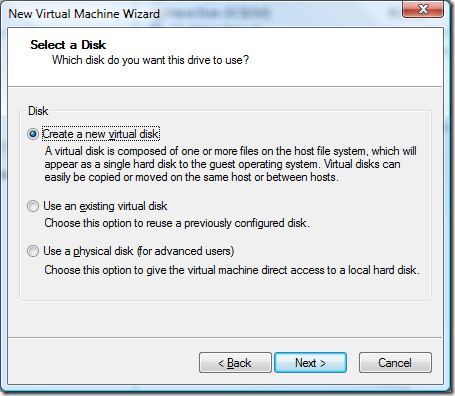
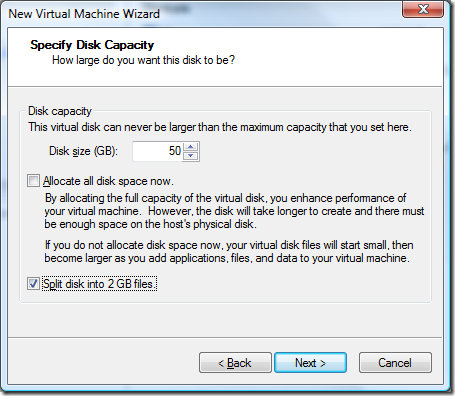
Disk capacity is something you really need to think about before setting this option. I made the mistake of setting up a complete VM environment only to realize I needed more space. While virtual machines can be resized using the disk manager utility, they cannot be resized if there are clones or snapshots tied to the VM. For me this meant I had to blow away a lot of my work and go back to my base images (which is another reason why I do full cloning to start with as you’ll see later on).
You’ll notice I didn’t choose “Allocate all disk space now”. Essentially what this does is it reserves all of your hard drive space for your VM. Think of it like formatting your VM image files. As noted there is a performance gain. However, this also means you are going to take up as much disk space as you enter in the field below. In my case if this was checked, I’d eat up 50GB of disk space on the drive. Not fun, especially when cloning full images (50GB + 50GB + 50GB). Thus I do not check this option. I do however split the files into 2GB files. The main reason is for defragmentation. If you have one large image file you need twice the amount of space to defrag it. With 2GB files you’ll only need an additional 2GB of space.
That’s my notes or tips for setting up a base virtual machine. After the virtual machine is setup be sure to check your settings and configure your monitors and other peripherals.
Setting Up Windows Server 2008 for VMWare Workstation
Once you get your settings tweaked launch the VM and get the Windows startup started. I like using server as my development operating system (OS) because it is tuned for speed unlike Vista. There is a big difference in developing on Vista and Server 2008. Even comparing XP and Server 2003 there was a huge speed difference. A lot of things are turned off in server that are enabled in Vista and this is what contributes to its speed. This setup will walk through how to configure Server as a workstation along with some specific VMWare things you need to do as well.
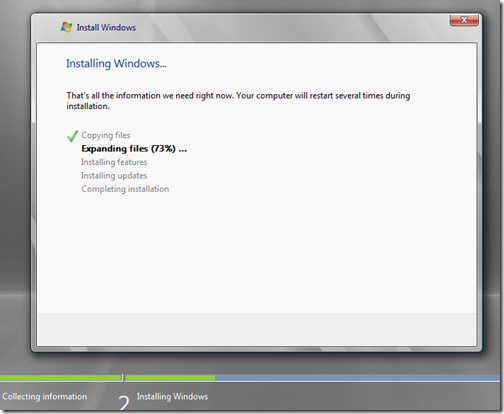
Once the operating system is installed, follow these simple steps to prepare the image.
Step 1 – Tools
The very first thing you need to do after the OS boots up is install VMWare Tools. This will provide drivers for the OS to run smoother and help you keep your sanity. Things like the mouse jumping around randomly for no apparent reason will be fixed once this is installed. After installed, reboot.
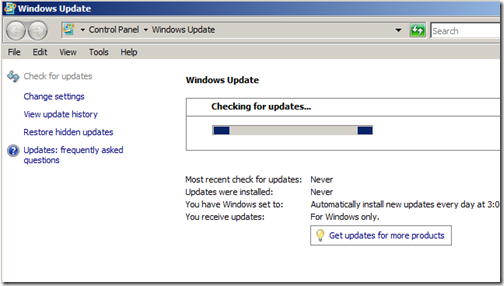
Step 2 – Updates
Check for updates. This is pretty much something you need to do on any operating system you install. Install the updates and reboot. Note: at the time of this article there are 9 updates for Server 2008.
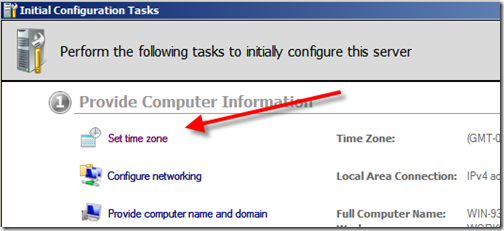
Step 3 – Time Zone
Using the “Initial Configuration Tasks” screen which should be on the screen after the reboot there are a few things you need to do. For starters check your time zone. Review the other options while you are in there and make sure your computer name is setup the way you want and other things.
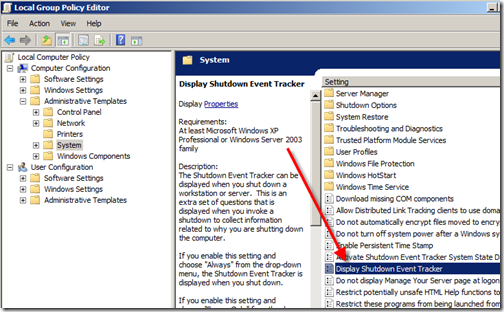
Step 4 – Shutdown Tracker
If you are familiar with Server you know it annoyingly asks you why it was restarted after it reboots. While this might be handy for *real* servers for a workstation used for development it is just annoying. To disable this open Start->Run->gpedit.msc. Find the “Display Shutdown Event Tracker” as shown below, right click properties and disable it.
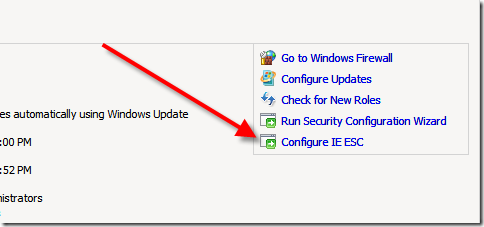
Step 5 – IE Security
In order to use Server 2008 as a workstation within your VM you will need to remove the baked in security settings for IE. From within Server Manager as show here select “Configure IE ESC”.
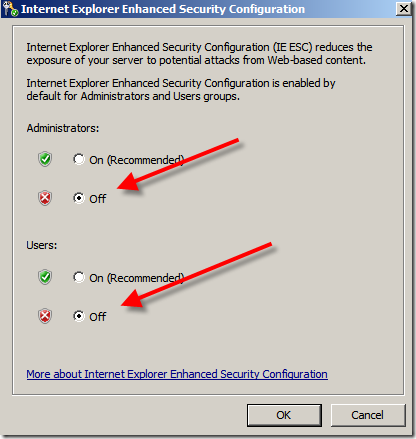
Set both settings to OFF.
Reboot.
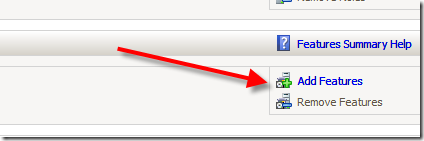
Step 6 – Features
Within Server Manager you will also need to enable all the features you want.
Here are the options I enable since I know this image is going to be primarily used for .Net development.
- .NET Framework 3.0
- Desktop Experience – This includes eye candy features from Vista as well as allows you to support the Vista Themes (we’ll enable this later on).
- Remote Assistance
- Powershell
- Windows Process Activation Service
In the next screen you’ll be asked to configure IIS. I always select a minimal setup but feel free to select what you know you will need.
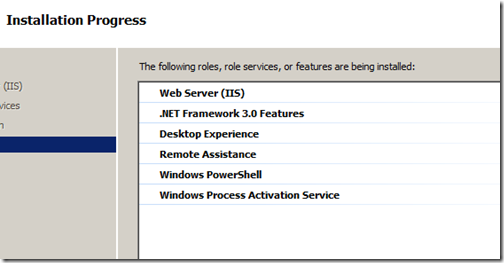
Restart to complete installation.
Step 7 – Roles
In order to get fast file searching and other features you’ll need to turn on the role for File Services as shown here.
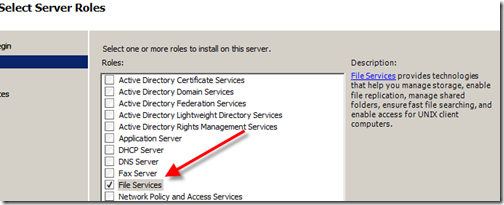
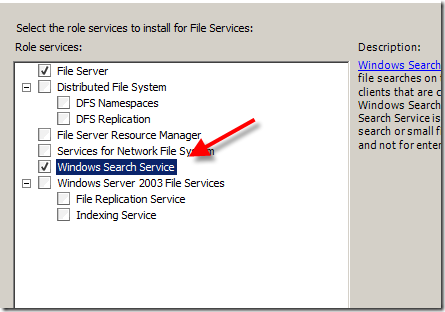
Since this is running in a VM depending on your usage you *could* leave this off. I am basically going to be working day in and day out from this image so having the ability to search and find emails and files quickly is important.
Step 7 – Registry Settings (optional)
Open the registry editor by doing Start->Run->regedit
Add the following keys:
HKEY_LOCAL_MACHINESYSTEMCurrentControlSetControlSession ManagerMemory ManagementPrefetchParameters
Add a new DWORD by the name of EnablePrefetcher and assign is the value of 3
Add a new DWORD by the name of EnableSuperfetch and assign is the value of 3
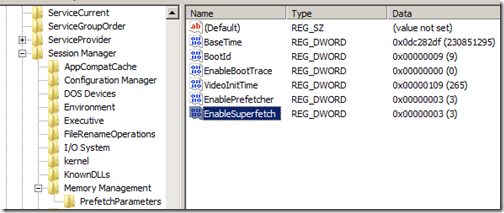
What does this do? It enables Windows to learn which programs you use so it can pre-load those applications before you run then. It is a feature that was added in Vista. You can also skip this step if you feel there is no value in this feature but it is *suppose* to speed things up down the road.
Step 8 – Services
There are several services we need to enable to get Server 2008 to behave more like a workstation. These are disabled by default.
Within Server Manager select Configuration->Services. Or you can do Start->Run-Services.msc.
Enable the following services:
- Themes
- SuperFetch (only if you enabled the registry setting above)
- Windows Audio
- Windows Audio Endpoint Builder
Step 9 (optional) – Make it pretty
Totally optional and something you may or may not want to enable since this is running in a VM. I’ve found that things are still pretty snappy but you may want to see how your mileage varies. Right click on the desktop and select Theme. Choose the Vista Theme in the drop down to get a Vista look and feel for your virtual machine.
Before:
After:
Step 10 – Setup Sound
When you install Server 2008 you’ll notice that sound doesn’t work. Vista does the same thing so this will work in either case. In order to get sound to work you have to install the Creative Labs PCI sound driver. It is a pita to find so I am attaching it to this article so I can easily find it down the road as well as to ease your setup pains.
Download Sound Driver: Create Labs Driver
Step 11 – Activate Windows
We are going to be in the control panel tweaking some things next. While we are here, go ahead and activate Windows. Nothing is worse than forgetting to do this, then having to do it on every clone or snapshot down the line as you build up your VMs.
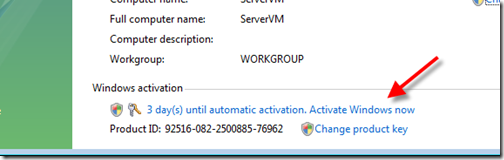
Note: If you are using a MSDN License, you will get a DNS error code while trying to activate after installing Windows. This is because you need to change the product key and enter your *real* product key.
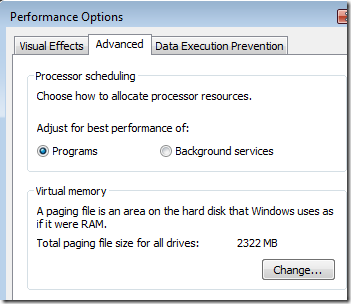
Step 12 – Performance Settings
Adjust the processor scheduling which is in Control Panel->System->Advanced Settings->Advanced.
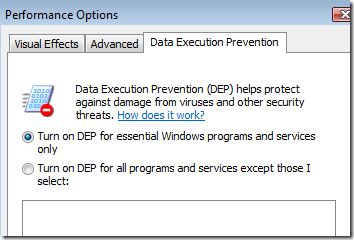
In the next tab, turn on DEP.
Step 13 – Defragment
In order to make this the fastest VM we can, we need to defrag the drive. Defragmenting the VM is the key to keeping things fast.
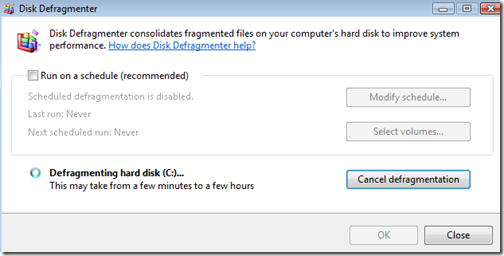
After I install a big product like Office, or Visual Studio I defrag the drive. Also remember to defrag the drive the virtual machine is running from! The more you defrag, the more performance you’ll get out of your VMs.
Step 14 – VM Optimizations
I’m not a VMWare expert but there are a few things I have found out that work well. For one since I/O is important because the VMs will be run from an external drive, I disable page sharing. Add this line to your .VMX configuration file.
sched.mem.pshare.enable = “FALSE”
Another option is memory trimming which doesn’t eat up host memory and then give it back when it needs it.
MemTrimRate = 0
Step 15 – Setup Your User Account
We’ve been logged into the VM as Administrator up until this point. We need to create an account that we will use to login with and do work. We want to create this account now because we want to set our desktop settings once and then each VM we clone from this base image we’ll already have everything setup. Create your account in the control panel, I suggest setting the account as an administrator. Once the account is created, log out of the administrator account and then setup that account.
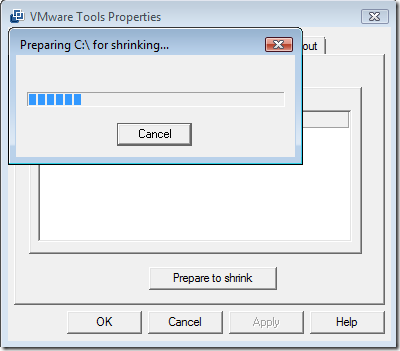
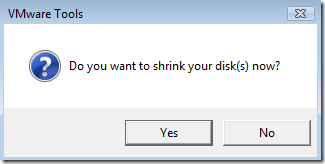
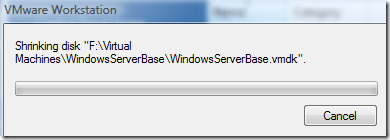
Step 16 – Shrink Disk
Before moving forward we need to shrink our VM disk. This reclaims unused space on the drive. Note, we cannot shrink a disk if it has been cloned or has a snapshot. We also can’t shrink a disk that has been pre-allocated. If you followed the steps up to this point, none of this should be a concern. There are several steps. The first is VMWare tools prepares the image and then the second is where Workstation performs the actual shrinking. Remember to defrag everything first!
To shrink the disk go into Control Panel->VMWare Tools. Select the shrink tab and press the “Prepare to shrink” button. Then wait.
Once this process finishes you will be prompted with this dialog. Click yes to begin the process.
At this point we have a clean VM image to build other virtual machines from. It has all the updates applied to it, is configured for workstation use, is defragged and has been shrunk. The only thing in this virtual machine is the operating system. This is what I call the base image. Note: My base image is 6.1GB after it has been shrunk.
Step 17 – Create Full Clone
Now that you have this image setup. Create a full clone of it. Using the clone, add your development tools like Visual Studio, SQL Server, etc.
UPnP Tip
If you are running Server 2008 on a private network and want to connect to UPnP devices and see them via network discovery then see this post which enables that.
Strategy For Cloning Virtual Machines
Once I get through the process above I split this base image off into two full clones. It takes a long time to get this base image setup thus it isn’t something one wants to repeat often. By using a feature of VMWare Workstation called cloning we can create an exact clone of this base image to build other images.
What I do is create two full clones of this base image. I use one for work since it has to be bound to the domain. The other I use for installing various pieces of software for personal use and for speaking engagements.
For the VM at work I create one called work base. This image will serve as my base image that I will install VPN software, Office 2007 and a few other utilities needed for work. Once I get this image setup I create another clone of it that is a linked clone. In this clone I install all of my development tools. This gives me a hard restore / starting point where I can install or test software without development tools. The reason I do all of this is it allows me to go back to points in time and try something different out without having to build everything from scratch. For example let’s say a new version of Visual Studio comes out I need to test or something like that. To play with that type of software it is important to start from a fairly clean machine. Here is a chart I put together to show how I layout my virtual machines.
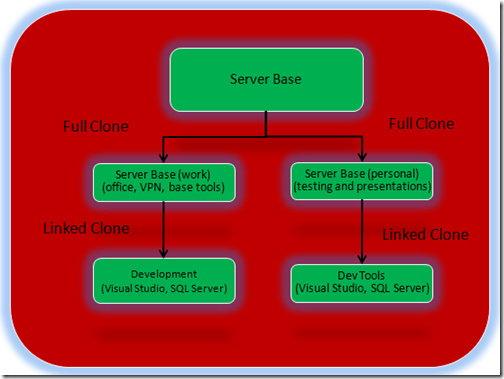
You’ll notice there are no snapshots listed above (another feature VMWare supports). Snapshots are really meant for temporary use, not to run for long periods of time. This setup gives me really good flexibility. At least to the point to where I haven’t needed to alter it much at all. That’s pretty much it. Once this setup is done I don’t touch the “Server Base” image except to start it up occasionally to apply updates. The only thing I use it for moving forward is for cloning so I have an optimized image to start with no matter the scenario.
I hope this helps someone out. I know I wish I’d had something like this to refer to when I started out playing with virtualization images for development. As I find new tricks or things I’m sure I’ll update this over time thus I consider this article a moving target. One thing that is for sure is the way you do things today will not be the way you do things tomorrow. If you haven’t explored virtualizing your development give it a try. Here are some Words of Wisdom ‘ll leave you with:
“When you virtualize your development or main body of work, it doesn’t matter which operating system you run to host it.” – The Elder
Note: I have added the latest Windows server versions in the title, but the below demonstration had been done with Windows 2008 R2 server version in VMware workstation. The key point is, the below steps are applicable for Windows 2012/2016 and even the latest Windows 2019 server cluster setup. Also, if you are a VirtualBox or Hyper-V on Windows 10 user, you can follow the same steps. Technically, you do not need many settings on the virtualization software to make this setup work. Mainly the VMs you are creating for this purpose should communicate among them to make the failover cluster work. They should be on the same virtual network.
You need to understand the requirements and configuration, then you can replicate the same setup either on VMware, VirtualBox or Hyper-V and with any version of Windows Server Operating Systems. You need to have a good physical computer to host these latest server virtual machines with minimal hardware requirements. Also, the latest FreeNAS version supports the iSCSI that can work with the Microsoft Failover cluster.
Here you can see how to setup Microsoft Windows 2008 R2 failover cluster in VMware Workstation. This article contains step by step method to install and setup Microsoft Windows 2008 R2 failover cluster with FreeNAS iSCSI disks in VMware workstation on a single physical computer.
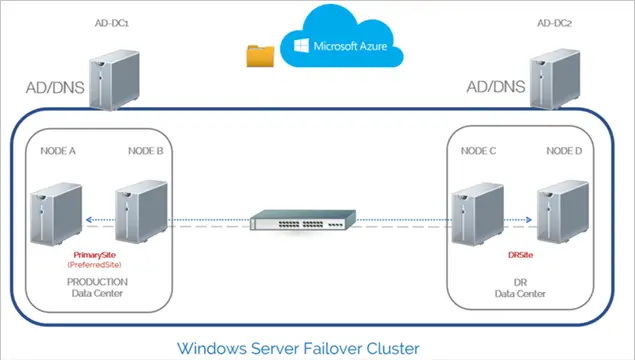
Cluster disks are important to set up a failover cluster. The two (or more) servers should be able to see the storage which should run on a centralized place. In a production environment, it could be a SAN or NAS. In this example, we will use iSCSI disks with FreeNAS.
Windows Server failover clusters require SCSI-3 persistent reservation target disks as their cluster disks. Now the question is how to setup SCSI-3 persistent reservation cluster disks in VMware workstation or Oracle VirtualBox? Those steps are mentioned below.
Required Software
a) VMware workstation/VirtualBox/Hyper-V
b) Windows 2012/2016/2019 Operating System (or the latest Windows servers) as a virtual machine
c) FreeNAS as VM
Read more about Microsoft Windows 2008 R2 Failover cluster in the normal environment
Prerequisites setup
a) Install and configure Windows 2008 R2 (or 2012/2016/2019) Operating System in VMware Workstation (Minimum 3 servers are required. One will be the domain controller and other two will be cluster nodes). Do the same steps if you are doing it on VirtualBox.
b) Setup a domain (Active Directory) on a server and join other two servers with the domain. Use the domain administrator to log in to all servers. In this example, the domain name is sysprobs.net and cluster server names are vm-clus1 and vm-clus2. I assume you already have experience in setting up a domain controller in a virtual environment.
c) Install failover cluster feature on both Windows server VMs that we are going to set up a failover cluster in VMware workstation.
d) Add a 2nd network card to both cluster servers, it can be done in VMWare virtual machine settings. Give two separate IP addresses (not in the same range of other network cards), so both servers can communicate through this network also. This network will be the ‘heartbeat’ network for both servers. Make sure that all network cards/connections are identical in both servers. (in this example, heartbeat network named as ‘internal’ on both servers)
When you do the setup in VirtualBox, add second network adapter in VirtualBox settings for both cluster servers. This adapter will be configured for ‘Heartbeat network’.
Set the network type to ‘internal’ and assign separate IP address range than other networks. Make sure both nodes are communicating through this network also.
e) Create cluster disks in FreeNAS virtual machine. Read this guide about installing and configuring FreeNAS iSCSI disks in a virtual environment.
My setup is like below.
Qurom disk – 512MB,
Storage disk1- 2GB,
Storage disk 2- 2GB,
Storage disk 3 – 2GB,
and Backup disk 4GB)

1) In the first cluster server, Open iSCSI initiator under administrative tools. Click Yes, if it asks to start the iSCSI service.
2) Give FreeNAS VM IP address in Target and press Quick Connect. Let’s assume that the all 3 Windows servers (1 DC and 2 cluster nodes) and FreeNAS virtual machines can communicate via the network (It is one of the critical requirement).
It will detect your target disks. Press Done.

3) The disks will be shown as Inactive. Click on each target and press connect until all targets show as connected.

4) Go to Volumes and Devices tab, and press the Auto-Configure button. All targets will be displayed as disks under this tab.

5) All iSCSI disks will be listed under disk management. Right Click on each disk, make them online and Initialize.

6) Create simple volumes by right-clicking and selecting on each unallocated space. Format the drives and give a name for each disk.
7) Once all disks are formatted and named successfully, right-click on each drive and make them offline again like below.

 Just to remind you, we have done these steps in one server only. Now go to second cluster server. Start iSCSI services and detect all target disks as we did in the first server. But you do not need to format and give the name the disks in the second server. This step is to make the connectivity from the 2nd server to iSCSI disks.
9) Now, start failover cluster manager in features under the server manager. Before creating the cluster, better to validate cluster configuration, especially the tricky part of SCSI-3 persistent reservation iSCSI disks which we configured with FreeNAS. All Windows servers have a similar interface to do the setup, hence it will not confuse you here.
10) Click on Validate a configuration under management.

11) Click Next and browse the cluster servers from the directory or enter full name of servers.

12) Run all tests and wait for the results. All main tests passed in my setup. We are ready to create Windows 2008 or R2 cluster in VMware workstation. The interface and steps almost remain the same on recent Windows server versions such as 2016 and 2019.

13) Final validation report will look like below.

Create the cluster now. Other steps are very easy. I don’t need to explain here since the cluster validation already succeeded.
14) I gave the cluster name as ‘ vm-cluster’ and separate IP address 192.5.2.250 for the cluster.

15) That’s it. We have successfully created a Windows 22019/2016/2012 R2 failover cluster in VMware workstation (or VirtualBox) using FreeNAS.

Unfortunately, it took one of my 2GB disks as a quorum disk. But no problem, we can change it later. That option is available in Windows cluster manager.
Now we have a working Windows failover cluster on VMware workstation which is running on our single physical computer. For testing purpose, you can install file-sharing or IIS server on the cluster and check the failover of the service. It will work well. It is the ideal way for testing and learning purpose if you are preparing for any Microsoft certifications.
Feel free to share your comments and problems with this. If you are satisfied with this post and blog, please share with others.
VMWare-образ с установленной Windows Server 2008 R2 SP1 x64 EE VL
Update 6: установлены апдейты с MS Windows Update (по 11.01.2021) и обновлены VMWare Tools.
Удалены все резервные копии патчей с помощью «DiskCleanup» (http://support.microsoft.com/kb/2852386).
Также обновлена конфигурация ВМ до версии VMWare Workstation 16
Затем виртуальный диск был дефрагментирован, в свободное пространство записаны нули, затем был сжат.
Вашему вниманию представляется мощная виртуальная машина для ознакомления и обучения технологиям MS Windows 2008 R2
Год выпуска: 2016
Версия: 2008 R2 ServicePack1 x64 EE
Разработчик: Microsoft
Платформа: MS Windows 2008 R2 SP1 x64
Совместимость с Vista: полная
Язык интерфейса: только английский
Таблэтка: Отсутствует
Описание: Готовый VMWare образ с уже установленной в нем Windows 2008 R2 x64 Service Pack 1 EE
Запускается или из под VMWare WorkStation 12 /ESX Server 6 (требуется конвертация с помощью VMWare Converter|)
Или из бесплатного VMWare Player 12
https://my.vmware.com/web/vmware/free#desktop_end_user_computing/vmware_player/6_0
Установлена только операционная система с софтом по умолчанию и основные обновления.
Так же установлены VMWare Tools.
Запаковано в 7z (сжатие в 4 раза)
После открытия Воркстейшыном или Плеером , при запросе «I move it / I Copy it» выбирайте первое.В образе установлена Винда с корпоративной лицензий, требующая активации.
Если Вы собираетесь использовать эту Виртуальную машину, Вам необходимо купить Windows 2008 R2 и ввести ключ продукта на свой купленный , и пройти активацию в стандартном режиме.Требования:
CPU — Intel Core2 Duo 2.4Gz или более мощные
RAM: 4096Mb free
HDD: 22Gb free
Особенности:
Если при старте виртуальной машиын Вы получаете ошибку: «This virtual machine cannot be powered on because its working directory is not valid. Please use the configuration editor to set a valid working directory, and then try again.», тогда зайдите в свойства машины («Settings… -> Options -> Working directory») укажите путь к каталогу в котором лежит эта виртуальная машина.
В виртуальной машине созданы два диска: первый системный — объемом 40Gb,
второй — для установки прикладного софта и данных (сейчас в ВМ он пустой — объемом тоже 40Gb).
Пароль на administrator: «ruTracker2010«
Также внутри ВМ есть два сетевых интерфейса: первый «смотрит» в внешнюю сеть (bridget network), второй — «видит» только сеть внутри хоста (host-only network).
Для увеличения быстродействия проделан следующий «тюнинг»:
— в качестве SCSI контроллеров используются новейшие паравиртуализированые SCSI-контроллеры и драйвера от VMWare (pvscsi);
— тип сетевых интерфейсов — также наиболее производительный paravirtual NIC (vmxnet3).
Паравиртуализированые драйвера установлены в ВМ.
Обратите внимание — загрузочный диск тоже «висит» на pvscsi-контроллере !
Обращаю Ваше внимание — это НЕ образ дистрибутива от майкрософта.
Из этой раздачи нельзя установить Windows 2008 R2 на свой компьютер.
Контрольная сумма
SHA1 hash of Windows2008R2x64SP1_v6.7z:
6e0567b0cd805afb1e609675c13f994dda236862
Скриншоты
| [only-soft.org].t162148.torrent | ||
|---|---|---|
| Торрент: |
Зарегистрирован [ 2022-05-08 02:50 ] |
11 KB |
| Статус: |
√ проверено |
|
| Скачан: | 0 раз | |
| Размер: | 4,08 GB | |
| Оценка: |
(Голосов: 0) |
|
| Поблагодарили: | 0  |
|
|
Виртуальная машина VMWare с установленной Windows Server 2008 R2 SP1 x64 EE VL — updated! скачать торрент бесплатно и без регистрации |

