Простыми словами о сложном. Мы сравним 3 ведущие платформы виртуализации, расскажем о преимуществах виртуальной машины Hyper-V и поможем выбрать лучшую среду для вашего компьютера.

Содержание статьи:
- Что такое виртуальная машина
- Модель лицензирования виртуальных платформ
- Программная и аппаратная виртуализация
- Работа с операционными системами
- Требование к хостам
- Поддержка гостевых систем
- Пользовательский интерфейс
- Oracle VirtualBox
- VMware Workstation
- Microsoft Hyper-V
- Функция “Общие папки”
- Гостевые дополнение VirtualBox и VMware
- VM снэпшоты
- Поддержка 3D-графики
- Форматы виртуальных дисков
- Подведение итогов
Что такое виртуальная машина
Виртуализация — это удобный способ получить широкий спектр возможностей разных операционных систем без необходимости устанавливать их. Несомненно, вам по прежнему придется их загружать и проводить своего рода инсталляцию в соответствующих программах, тем не менее работать с BIOS и, уж тем более, убивать файлы жесткого диска ради установки ОС больше не придется.
В IT-индустрии существует несколько программ, предоставляющих возможность виртуализации: Oracle VirtualBox, VMware и Microsoft Hyper-V. Особый акцент мы сделаем на VirtualBox и VMware, поскольку Hyper-V хоть и удобен, но он по прежнему существенно отстает от своих конкурентов и не обладает нужной гибкостью.
Все приложения разные. Oracle предоставляет VirtualBox в качестве гипервизора для запуска виртуальных машин, в то время как VMware разработали сразу несколько приложений под индивидуальные нужды. Обе платформы быстры, надежны и обладают широким набором интересных функций. Некоторые из них доступны сразу на обоих платформах, но есть и уникальные возможности, на которых мы сделаем остановку в дальнейших главах.

Если вы ищете лучшую платформу для виртуализации, мы вам поможем. В этой статье будут разобраны все основные функции Oracle VirtualBox, VMware и Microsoft Hyper-V.
Модель лицензирования
Каждая компания разработала свои собственные системы лицензирования, поэтому важно знать и понимать нюансы каждой.
Oracle VirtualBox — это программное обеспечение с открытым исходным кодом, распространяющееся по стандартам общественной лицензии GNU версии* 2 точка ноль. Последняя доступная версия программы в настоящий момент 6 и 1.
VirtualBox Extension Pack уже является закрытым пакетом, который добавляет продукту некоторые дополнительные возможности, включая поддержку USB 2.0 и 3.0, VirtualBox RDP, PXE Boot и шифрование дисков VM. При условии установленного на компьютере хоста. VirtualBox Extension Pack предоставляется совершенно бесплатно для некоммерческого использования. То есть вы спокойно можете загружать и применять программу дома. Но стоит вам перенести ее в офис для корпоративных нужд, придется уже платить деньги. Не так много, но все же придется потратиться. Стоит это дело 3 с половиной тысячи рублей.
Теперь рассмотрим лицензию VMware Workstation.
Данное программное обеспечение предлагает каждому новому пользователю 30-дневный пробный период в течении которого вам будут доступны все функции для их оценки. Полная же версия стоит 250 долларов США, или же около 18-19 тысяч рублей в зависимости от настоящего курса. В то время как VMware Player включает в себя только базовые функции виртуализации, VMware Workstation поддерживает полный набор возможностей, которые предоставляет компания для своих пользователей.
Программная и аппаратная виртуализация
Платформы виртуализации поддерживают два типа работы: программный и аппаратный. Давайте разберемся в нюансах.
Аппаратная виртуализация использует гипервизор для эмуляции разного рода железа на котором будет стоять новая система. Необходимым условием для успешной работы является поддержка функций Intel VT-x или AMD-V на вашем процессоре, в зависимости от производителя. Включаются они только через BIOS, ссылка на статью с подробным разбором процесса в описании к видео. Обратите также внимание на то, что хост и гостевая система обязаны использовать одинаковую разрядность. То есть, если вы используете 32-битную винду, у вас не будет работать iOS 64-бита. Это же правило работает в обратном направлении. При установленной 64-битной винде, у вас не пойдет Linux 32-бита.
Как VMware, так и VirtualBox — оба поддерживают аппаратную виртуализацию.
Программная виртуализация. Данный тип работы с операционными системами требует от хост-системы полной эмуляции всей гостевой платформы. Включая функционал процессора. Это говорит о том, что программная виртуализация не требовательна к процессору, так как не обращается к нему в момент работы. Таким образом, нагрузка на ПК значительно ниже, но в то же время мы теряем и производительность. Этот тип виртуализации бесполезен для мощных ПК, но крайне эффективен для слабых.
Программную виртуализацию, среди двух конкурентов, поддерживает только VirtualBox.
Работа с операционными системами
Требование к хостам
Oracle VirtualBox — это кроссплатформенное решение. Программа может быть установлена на любую операционную систему. Linux, Windows, Solaris, macOS и FreeBSD.
В случае же с VMware ситуация несколько усложняется. Например, VMware Workstation и VMware Player могут быть установлены только на Linux и Windows, а вот на MacOS может быть установлено только VMware Fusion.
Как вы видите, VirtualBox является более универсальным.
Поддержка гостевых систем
На виртуальных машинах, работающих с VirtualBox, могут быть установлены такие операционные системы как Linux, Windows, Solaris, FreeBSD и MacOS. Полный набор.
Продукты VMware поддерживают тот же самый набор предложений, с одним небольшим ограничением. Официально, MacOS может быть установлена только лишь в качестве гостевой системы на продуктах VMware Fusion или VMware Fusion Pro. Тем не менее, технически MacOS заработает и при установке на Vmware Workstation с использованием специального патча. Однако перед этим вам нужно убедиться, соблюдается ли лицензионное соглашение с разработчиком.
Пользовательский интерфейс
Oracle VirtualBox

Когда заходит речь о таких сложных программах, как устройства виртуализации, мы иногда можем представить что-то непонятное и требующее каких-то особых знаний, без которых даже приложение не запустится. К счастью, дело обстоит несколько иначе. Разумеется, придется воспользоваться несложными гайдами по их настройки, но базовая простота и клиентоориентированность компаний существенно упрощают нашу задачу.
VirtualBox выглядит крайне похоже на всем привычные менеджеры файлов. Интерфейс программы не использует сложных слов, которые и переводчик не факт что правильно опишет, и не выводит на экран кучу непонятных кнопок.

Меню настроек поможет вам выбрать нужный язык, тип ввода, параметры дисплея виртуальной машины, подключить или отключить нужные плагины. Все что нужно для комфортной работы.
Как создать новую виртуальную машину:
1. Чтобы добавить новую машину, достаточно щелкнуть по клавише Машина и выбрать команду Создать, или воспользуйтесь основным интерфейсом. Клавиша Добавить предполагает, что у вас уже есть существующая виртуальная машина в виде файла и вы хотите подгрузить ее в программу.

2. Далее введите Имя виртуальной машины, укажите путь установки и выберите тип системы.

3. Проследуйте несложной инструкции и завершите создание машины.

VMware Workstation

Данная программа представляет мощный функциональный интерфейс, а также утилиту командной строки под названием vmrun. Она позволяет управлять всеми виртуальными машинами.
На первый взгляд интерфейс кажется гораздо более запутанным, чем у VirtualBox. Да, он менее интуитивный, однако удобнее в использовании. В самом верху вы можете найти инструменты по управлению размером окна, снапшотами и клавишу запуска виртуалки. Если что-то остается непонятным, всегда есть клавиша Help.

Меню настроек программы несколько шире, чем возможности Oracle VirtualBox, однако русского языка платформа не предполагает. К главным плюсам VMware я бы отнес возможность создания приоритизации процесса и выделения объема памяти подо всю программу, а не только лишь под конкретную виртуальную машину.
Как создать виртуальную машину:
1. Для этого достаточно кликнуть по клавишу Create a New Virtual Machine или, по-русски, Создать новую виртуальную машину.

2. Рекомендую оставить вариант по умолчанию. Custom подходит только для опытных пользователей, применяйте его только в случае если вы знаете зачем вам нужно менять стандартные параметры и чем вы хотите этим достичь.

3. Укажите путь к установщику операционной системы.

4. Выберите тип устанавливаемой операционной системы и проследуйте далее по несложной инструкции.

Microsoft Hyper-V

Microsoft Hyper-V это стандартная платформа для виртуализации, которая поставляется вместе с операционной системой Windows 10. Она крайне удобна и не требует особых знаний в этой сфере, чтобы начать работать. Главный недостаток программы в том, что она работает только на ОС Windows, так еще поддерживает виртуализацию только Linux и среды разработки. Тем не менее, Linux установить невероятно просто. Достаточно щелкнуть по названию ОС в левом меню и нажать клавишу Создать виртуальную машину.

Система автоматически загрузится с серверов Microsoft и установится на ваш компьютер.

Помимо быстрого меню создания виртуальной машины, Microsoft Hyper-V обладает собственным диспетчером. В нем вы можете настроить все необходимые параметры, чтобы персонализировать работу с операционной системой.

Наиболее удобной возможностью Hyper-V является доступность выбора местоположения ваших виртуальных систем. Выберите любую папку на жестком диске и приложение не будет засорять основной системный раздел.
Функция “Общие папки”
Функция общих папок позволяет удобно обмениваться файлами между двумя операционными системами: хостом и гостевой ОС. Создайте общую папку в ОС хоста с помощью приложения виртуализации, а затем просто подгрузите файлы с хоста в гостевую систему.
Такая возможность присутствует как в Oracle VirtualBox, так и в VMware Workstation.
Обратите внимание, функция общих папок не работает на виртуальных машинах с хостом ESXi — для них нужно создавать папку вручную на физической или виртуальной машине с помощью встроенных инструментов ОС.
Гостевые дополнения VirtualBox и VMware
Гостевые дополнения VirtualBox представляют собой набор драйверов и системных приложений для сторонних операционных систем. Они могут быть использованы для повышения производительности компьютера и удобства при использовании VM. Гостевые дополнения предоставляются для всех поддерживаемых операционных систем.
Файл VBoxGuestAdditions.iso находится в каталоге с установленной программой VirtualBox. Чтобы его установить, смонтируйте ISO-образ и проведите стандартную установку.
VMware Tools — это аналог гостевых дополнений от VirtualBox. Естественно, работает он только с платформой VMware. Разработчики дополнений решили не ограничиваться одним единственным файлом-пакетом, а создали целый набор ISO-образов, которые вы сможете вручную скачать с их сайта.
VM снэпшоты
Снэпшоты помогают сохранить текущее состояние виртуальной машины. То есть, если у вас в процессе работы возник баг и накрылась гостевая система, с помощью сделанного ранее снэпшота можно легко откатиться до состояния когда ОС была работоспособна. Таких сохранений можно сделать несколько. Поэтому, если об этой функции не забывать, шанс безвозвратно повредить гостевую систему крайне мал.
Поддержка 3D-графики
Некоторые программы, например приложения для создания и рендеринга 3D-моделей могут нуждаться в поддержке 3D-ускорения.
VirtualBox имеет ограниченную поддержку 3D-графики, вплоть до этапа OpenGL 3.0 и Direct3D 9. Включать настройку объемной графики придется вручную, функция расположена в меню параметров приложения. Важно также отметить, что вам предоставляется лишь 128 Мб видеопамяти на обработку 3D-графики.
В случае с VMware, ситуация обстоит несколько лучше. Приложения данной компании поддерживают DirectX 10 и OpenGL 3.3 для Player, WOrkstation, Fusion и ESXi. 3D-ускорение включено по умолчанию во всех последних версиях платформ. Кроме того, объем видеопамяти VMware существенно выше, он достигает объема аж в 2 Гб.
Форматы виртуальных дисков
Виртуальные диски — это не более чем эмуляция, так же как и установленные гостевые системы. Виртуальные диски представляют собой нечто вроде контейнеров с данными или папками на вашем жестком диске.
VirtualBox поддерживает следующие форматы дисков:
- VDI (Virtual Disk Image) — родной формат виртуальных дисков платформы. Используется по умолчанию при создании новой виртуальной машины.
- VMDK (Virtual Machine Disk) — формат виртуального диска, разработанный VMware и используемый ими по сей день.
- VHD (Virtual Hard Drive) — это формат виртуального жесткого диска, разработанный Microsoft для Hyper-V.
- HDD образ виртуального диска формата Parallels Desktop (особенно популярен на MacOS).
VMware поддерживает только VMDK формат виртуальных жестких дисков.
Проблема неиспользуемой памяти
При использовании виртуальных машин иногда возникает проблема при которой приложения не используют достаточно оперативной памяти, хотя ее более чем достаточно. Для решения данной неполадки используется техника Memory Overcommit. Она работает с памятью, которая позволяет хосту эффективно перераспределить ее на все работающие виртуальные машины. Функция активируется тогда, когда у хоста заканчивается физическая память.
Подведение итогов
VirtualBox и VMware являются двумя ведущими платформами виртуализации на рынке, что затрудняет выбор между этими двумя продуктами. Ранее мы разобрали наиболее важные функции приложений обоих этих компании и теперь самое время подвести итоги. К сожалению, Microsoft Hyper-V не может пока конкурировать с этими гигантами, но он по прежнему очень хорош, если вам необходима только последняя версия Linux Ubuntu.
Так как же все таки выбрать подходящую платформу для виртуализации?
- Если вы заинтересованы в бесплатных платформах, вам идеально подойдет VirtualBox.
- Если вам нужно установить виртуалку на сервер, вам подойдет VirtualBox или VMware ESXi Free Edition.
- Если вам нужно решение с расширенной поддержкой 3D-графики, смело выбирайте VMware Workstation (или VMware Fusion для операционной системы MacOS).
- Если вам нужна производительная платформа на слабый компьютер, можете не задумываясь ставить VirtualBox.
- Если у вас вопрос корпоративного уровня с необходимостью развертки нескольких серверов и запуска большого числа виртуальных машин, ставьте VMware vSphere на базе серверов ESXi с vCenter.
Похожие статьи про восстановление данных:
Дата: 14/09/2020
Теги: Windows, Жесткий диск, Компьютер, Программа
VMWare ESX и vSphere, Citrix XenServer и Oracle VM являются гипервизорами типа 1.
Гипервизор типа 2 устанавливается в операционной системе, как и любое другое программное обеспечение, и называется размещенным гипервизором.
Среда виртуальной машины работает как процесс на хост-машине и по-прежнему использует системное оборудование, но управление виртуальной машиной направляется через хост вместо непосредственного выполнения команд. Следствием такой договоренности является небольшая задержка между действиями.
VirtualBox, VMware Workstation и VMware Workstation Player являются яркими примерами гипервизора типа 2.
В чем разница между VirtualBox, VMware Workstation Player и Hyper-V?
Теперь вы знаете разницу между типами гипервизоров, легче понять различия, ограничения и преимущества каждого варианта. Давайте разбить его на несколько разделов.
Простота использования
Hyper-V интегрирован с Windows 10 Pro, Education и Enterprise, но не с Windows 10 Home. Вы должны включить Hyper-V с помощью компонентов Windows или команды PowerShell, но он сам позаботится об активации.
После активации Hyper-V предлагает возможность быстрого создания виртуальной машины и расширенную возможность создания виртуальной машины с помощью диспетчера Hyper-V.
Создать виртуальную машину с помощью каждого параметра Hyper-V очень просто. Однако опция быстрого создания виртуальной машины автоматически заполняет параметры, которые могут вызвать сбои или ошибки при попытке запуска виртуальной машины.
Более обширная опция создания виртуальной машины в Hyper-V позволяет лучше контролировать настройки.

В VirtualBox и VMware Workstation Player есть мастер создания виртуальных машин. Мастер каждой программы проведет вас через процесс создания виртуальной машины. Хотя есть и отличия.
Например, мастер VirtualBox предлагает вам создать базовую виртуальную машину, для которой вы впоследствии редактируете настройки, но он предлагает некоторые рекомендуемые значения для конкретных типов виртуальных машин. Вот как вы настраиваете и используете VirtualBox .
Принимая во внимание, что мастер VMware Workstation Player позволяет настраивать параметры в процессе создания виртуальной машины.
Разница невелика, но она означает, что виртуальная машина VMware Workstation Player готова к запуску после завершения работы мастера, а не для изменения других настроек после его завершения.
Производительность
Производительность виртуальной машины зависит от оборудования, которое вы используете для ее запуска. С виртуализацией аппаратное обеспечение — король. Кроме того, виртуальная машина, которую вы используете, имеет огромное значение.
Я тестирую каждую опцию виртуальной машины, используя гостевую операционную систему Lubuntu на своем рабочем столе, которая имеет Intel i5-3570K, 16 ГБ ОЗУ и Nvidia GTX 1070. Это не самый мощный процессор, но он обрабатывает большинство вещей.
Проще говоря, VirtualBox является одним из самых медленных доступных вариантов виртуальной машины.
Если у вас приличное оборудование, вы не заметите заиканий и жужжания. Но на машине с низким энергопотреблением VirtualBox не дает наилучшего опыта виртуализации.
Дефицит производительности наиболее заметен при переходе на VMware Workstation Player. Запуск той же гостевой операционной системы на том же оборудовании показывает, что проигрыватель VMware Workstation Player более плавный и приятный.
Итак, где Hyper-V вписывается во все это? Установка Hyper-V Lubuntu работала хорошо и была заметно гладкой. Важно отметить, что некоторые пользователи Windows 10 Hyper-V сообщают о проблемах производительности в других областях после включения Hyper-V в своей системе.
Поскольку Hyper-V работает на уровне BIOS, а не как программное обеспечение в ОС, виртуализация всегда включена, даже если вы не используете виртуальную машину.
Временное выключение и включение виртуализации Hyper-V
Если вы чувствуете, что Windows 10 Hyper-V влияет на вашу игровую производительность или иным образом (без запуска среды виртуальной машины), вы можете использовать команду для отключения служб виртуализации Hyper-V.
Введите команду в строке поиска меню «Пуск» и выберите « Запуск от имени администратора» . Затем введите следующую команду:
bcdedit / отключить тип гипервизора
Затем перезагрузите вашу систему. Виртуализация Hyper-V не запустится после перезагрузки, и вы увидите, что ваша производительность нормализуется. Если вы хотите снова включить виртуализацию Hyper-V, используйте следующую команду:
bcdedit / установить тип гипервизора на
Перезагрузите вашу систему снова.
функциональность
Если вы не знаете, как выбрать один из трех вариантов, рассмотрите функциональность каждого из них. Вы можете запустить гостевую операционную систему, используя VirtualBox, VMware Workstation Player или Hyper-V, но у каждого гипервизора есть свои особенности.
Снимки и контрольные точки
Одним из главных плюсов для VirtualBox и Hyper-V являются моментальные снимки и контрольные точки .
Хотя платформы используют разные имена, моментальные снимки и контрольные точки очень похожи. Они позволяют вам взять образ виртуальной машины в ее текущем состоянии. Образ сохраняет виртуальную машину, позволяя вам вернуться к этому конкретному моменту.

К сожалению, VMware Workstation Player не поддерживает моментальные снимки или контрольные точки. Вы можете временно приостановить гостевую операционную систему для возобновления работы с определенной точки, но это не то же самое, что создание истории образов для виртуальной машины.
Обмен файлами
Каждый гипервизор позволяет перетаскивать файлы между хостом и гостевой операционной системой. Вы также можете активировать общие файлы и папки, хотя Windows 10 Hyper-V значительно усложняет процесс, чем VirtualBox или VMware Workstation Player.
Бесшовный режим
VirtualBox и VMware Workstation Player используют цельный режим для интеграции среды виртуальной машины в операционную систему хоста. Плавный режим убирает дополнительные окна и меню виртуальной машины, создавая впечатление, что гостевая операционная система является частью хоста.
К сожалению, Windows 10 Hyper-V не поддерживает плавный режим.
Шифрование виртуальной машины
Если вы хотите зашифровать свои виртуальные машины, вам повезло. Каждый гипервизор поддерживает шифрование того или иного вида.
VMware Workstation Player поддерживает шифрование виртуальной машины из коробки.
VirtualBox поддерживает шифрование с установкой гостевых дополнений VirtualBox, доступных для каждой гостевой среды VirtualBox.
Hyper-V в Windows 10 поддерживает шифрование с использованием Microsoft BitLocker.
Каждый вариант безопасен и хорошо работает с соответствующей платформой.
Стоимость
Каждый гипервизор бесплатный, но некоторые свободнее других. Почему?
VirtualBox и VMware Workstation Player бесплатны для любого пользователя. До тех пор, пока ваше оборудование может работать с гостевой операционной системой, не разрушая хост в процессе, вы можете использовать бесплатное программное обеспечение виртуальной машины.
Принимая во внимание, что Windows 10 Hyper-V также бесплатна, но только если у вас установлена правильная версия Windows 10.
Существуют обходные пути для пользователей Windows 10 Home, которые хотят использовать Hyper-V на своем оборудовании. Но эти люди могут также использовать одну из бесплатных альтернатив, а не искать решение проблемы.
Не забывайте, что исправление может сработать сегодня, но не со следующим обновлением Windows 10.
Гостевые операционные системы
Windows 10 Hyper-V имеет некоторые ограничения в отношении гостевых операционных систем. Hyper-V поддерживает виртуальные машины Windows, Linux и FreeBSD. Он не поддерживает macOS.
VirtualBox и VMware Workstation Player поддерживают практически все гостевые операционные системы, включая macOS.
Обратите внимание, что гостевая операционная система MacOS не будет работать сразу после установки. Следуйте нашему руководству о том, как установить macOS в VirtualBox или VMware Workstation Player. о Windows 10.
Какой лучший инструмент для виртуальных машин в Windows 10?
Выбор между VirtualBox, VMware Workstation Player и Windows 10 Hyper-V довольно сложен. Если у вас есть мощный компьютер под управлением Windows 10 Pro, Education или Enterprise, вы можете выбрать гипервизоры.
Если вы используете менее мощную машину, я бы посоветовал использовать VMware Workstation Player. Он предлагает лучшую поддержку и стабильность для широкого спектра оборудования.
Все еще не уверены, нужна ли вам виртуальная машина? Ознакомьтесь с этими практическими причинами, чтобы начать использовать виртуальную машину.
Hyper-V vs VMware: Which One to Choose?
Virtualization has long since become a significant part of modern-day businesses. Popularity of virtualization technology is attributable to the long list of benefits it provides, including flexibility, cost-efficiency, on-demand scalability, reliability, and portability. Essentially, hardware virtualization is made possible with the use of virtualization platforms, which help manage workloads in a virtual environment. Currently, there are two major players who dominate the virtualization market – Hyper-V vs VMware. This blog post highlights the main Hyper-V vs VMware differences and helps you determine which platform is best for you.
Data Protection with NAKIVO Backup & Replication
Hyper-V backup software from NAKIVO delivers comprehensive data protection with multi-platform support. With only one deployment, you can protect Hyper-V, VMware, Nutanix AHV, Microsoft 365 and more. Download Free Trial to see NAKIVO’s solution in action.
What Is Hyper-V?
Hyper-V is a type-1, native hypervisor designed by Microsoft, which allows creating and managing multiple virtualized versions of a computer, called virtual machines (VMs). Hyper-V provides a virtualization platform on which you can build IT infrastructure of any level of complexity. Each VM, in this case, is running in its own isolated space, without interfering with the processes in other VMs.
What Is VMware?
VMware vSphere is a server virtualization platform created by VMware. Essentially, vSphere encompasses a set of virtualization products, which include the ESXi hypervisor, vSphere Client, VMware Workstation, vCenter, and others. All of these products combined constitute the VMware infrastructure, which enables centralized management of the created virtual environment.

Comparing Hyper-V vs VMware
Hyper-V and VMware have a set of unique features which differentiate them from one another. Moreover, each virtualization platform entails a number of advantages and disadvantages to consider when deciding between the two. The following excerpt will outline the main components that both platforms offer as well as the differences and similarities between Hyper-V and VMware.
Architecture
Hyper-V vs. VMware vSphere
Microsoft Hyper-V exists in two modes. The two variants are fairly similar in structure and perform the same functions:
- As the Hyper-V role, which is an in-built Windows Server feature that can be enabled by a server administrator.
- As a stand-alone Microsoft product (also known as Hyper-V Server), with limited functionality and Hyper-V management components.
The architecture of Hyper-V is based upon micro-kernelized hypervisors, meaning that a host server (also called the parent partition) provides direct access to hardware and computing resources (virtualization stack). Hyper-V allows you to isolate VMs into logical units (partitions), including operating systems (OSes) and applications. Partitions are divided into the parent and the child partitions. Each Hyper-V environment can have only one parent partition, which should run a supported version of Windows Server. The parent partition can create multiple child partitions for hosting guest OSes. Child partitions can’t directly access hardware resources but they can present a virtual view of the resources in the form of virtual devices. The communication between the parent and the child partitions is conducted via the VMBus, which lets you manage the requests directed to virtual devices. The parent partition also includes a Virtualization Service Provider (VSP), which enables the connection to the VMBus for managing device access requests from child partitions.
Hyper-V can host two types of OSes in child partitions: enlightened and un-enlightened. The main difference is that the enlightened child partition has Hyper-V integration components and a Virtualization Service Client (VSC), which lets you avoid device emulation and enable direct communication with the virtualization layer. At the same time, the unenlightened child partition does not have the same components and simply emulates software.
VMware vSphere is a virtualization platform consisting of multiple components which need to be installed and set up. Essentially, vSphere is a suite of virtualization products, which, when combined, allow you to build a computing platform. At the core of VMware vSphere lies VMware ESXi, which is a type-1, native hypervisor used to directly manage host servers and run multiple guest VMs. VMware ESXi enables direct access to the physical machine’s computing resources, which are shared by the VMs running in the system.
The earlier version of VMware ESXi — VMware ESX – ran on a Linux kernel, which acted as the primary VM. Later, ESXi hypervisor was introduced to minimize the overhead imposed by VMware ESX. VMware ESXi requires a minimum amount of hardware resources and enables a small footprint of 70 MB. High performance of ESXi is ensured by VMkernel, which forms the basis of the virtualization process. VMkernel runs directly on hosts and provides connection between VMs and the physical hardware.
In order to manage the VMware virtualization platform, other components of vSphere, such as VMware vSphere Client or VMware vCenter Server, are provided. They function as the management tools used for running ESXi hosts.
Management Tools
VMware vCenter Server vs. System Centre Virtual Machine Manager
It is also rather important to mention the management tools, which are essential for operating in any virtual environment, in the Hyper-V vs VMware comparison. VMware and Hyper-V are managed by VMware vCenter and Microsoft System Centre Virtual Machine Manager (SCVMM), respectively.
VMware vCenter Server is the centralized data management application which is used to manage VMware vSphere environments and build virtualized cloud infrastructures. VMware vCenter Server is basically a virtual machine manager, which is installed on the primary server for monitoring the VMs running in the virtual platform. The tool allows you to view and control all ESXi hosts and host clusters from a single console, thus reducing the burden of management.
SCVMM is a management tool designed by Microsoft for operating multiple VMs existing in the same environment. SCVMM is available in two versions: as an in-built feature of the Windows OS or as a stand-alone product. SCVMM allows you to create, control, and delete VMs. The tool manages the processes occurring in the VMs by providing access to necessary hardware resources, such as memory, drivers, storage and others.
Storage Deployment
vSphere VMFS vs. Microsoft ReFS
With virtualization, the software is abstracted from the hardware and all the VM data is stored in a virtual disk file. In this case, a virtual disk file functions as the hard disk of a VM and is regarded as a complete VM. Both platforms use virtual hard disks for storing information. The data inside the vSphere environment is stored in the VMDK (virtual machine disk) format, while Hyper-V applies the VHD (Virtual Hard Disk) format.
Virtual disk files existing in the virtual environment are generally stored and organized via the file system. Both Microsoft and VMware have introduced their native file systems for managing the data on a storage device.
VMware VMFS (Virtual Machine File System) is the clustered file system used for storage virtualization of the data contained in a virtualized environment. Multiple VMs can simultaneously access and use a single VMFS volume as a virtualized storage, which helps to reduce management overhead and improve resource utilization. With VMFS, you can manage VMware ESXi hosts across the cluster, meaning that you can add, migrate, or remove multiple hosts. VMFS has the on-disk locking feature which ensures that the data can be accessed only by one user or process at a time so as to avoid data corruption.
The equivalent to this solution in the Hyper-V environment is ReFS (Resilient File System), which was introduced as a built-in feature of Windows Server 2012. ReFS is based on its earlier file system – NTFS – and was designed to eliminate the issues existing in NTFS and address modern data storage requirements. ReFS permits users access to VM files directly from a host server. ReFS can detect and promptly fix data corruptions. This can be done online, thus causing no volume downtime. Moreover, through the new features of Block Cloning and Sparse VDL (Valid Data Length), the operations running in VMs can be considerably accelerated. However, when it comes to clustering, Hyper-V doesn’t provide the same level of flexibility. Even though Hyper-V includes Cluster Shared Volume (CSV), the use of this functionality is much more complex than the one in VMware VMFS.
Guest Operating System Services
VMware Tools vs. Microsoft Integration Services
To ensure efficient performance within the virtual environment, both VMware and Hyper-V provide a set of system services and tools which can be easily installed.
With VMware vSphere, you can install VMware Tools, which is a set of utilities and drivers used for seamless integration between the host and the guest ESXi servers, and efficient management of the VM data. VMware Tools include: VMware Tools Services, VMware Device Drivers, VMware User Process, and VMware Tools Control Panel. VMware Tools Control Panel provides a graphical overview of VMware tools and permits users to configure them. VMware Tools Services enables communication between the host and the guest OSes. With VMware User Process, you can copy/paste text and drag/drop files between the host and guest OSes. VMware Device Drivers provides a set of drivers for installation, which can enhance mouse operations, networking performance, and the quality of sound and graphics. Installing VMware Tools offers multiple benefits: enhanced graphics performance, high-level synchronization between the host and guest file systems, and shared access to files and folders within the virtual environment.
Hyper-V provides the opportunity to install Microsoft Integration Services, which helps in performing various tasks and solving reoccurring issues. The main application of Hyper-V Integration Services, also known as SQL Server Integration Services (SSIS), is in data migration as it enables data integration and workflow optimization. Its component – the SSIS Import/Export Wizard – allows users to create packages that move data from one point to another, without affecting its integrity. Moreover, you can easily edit and manage the created packages in the Business Intelligence Development Studio (BIDS) with the help of its user-friendly interface. Another exclusive Hyper-V feature is the Server Integration Services Database Package (SSISDB) Upgrade Wizard. This feature enables the upgrading of a catalog database, which stores and monitors all database packages in the system. Upgrading the catalogue database is necessary for avoiding any issues which might occur if the version in use is older than that of SQL Server.
Snapshot Technology
Snapshots vs. Checkpoints
Snapshot technology allows you to capture a point-in-time copy of a VM and all the data that it contains. If the VM fails or a disaster strikes the production site, the VM can be recovered to the original state with the help of the saved snapshot. Snapshots in VMware and Hyper-V not only work differently, but also have different names. VMware uses the term ‘snapshots,’ whereas in Hyper-V they are called ‘checkpoints.’
Administrators working in Hyper-V or VMware environment should be aware of how snapshot technology works so as to improve memory space management.
The main differences between snapshots and checkpoints are presented in the table below:
| VMware Snapshots | Hyper-V Checkpoints |
| Stored as a set of files in the same directory as other files that comprise a virtual machine | Stored on the host server, but you can later export checkpoints to another location |
| Transient | Persistent |
| 32 snapshots per VM | 64 snapshots per VM |
| Changed blocks are identified on the file system level | Changed blocks are identified in each file of the file system |
| Running snapshots in production is not available | Running snapshots in production is available |
Note that snapshots can’t be used instead of backups because they aren’t suitable for long-term storage and can be lost if the VM’s virtual disk is damaged.
Change Tracking
Changed Block Tracking vs. Resilient Change Tracking
The feature of change tracking lets you identify block-level changes that have occurred in the system. Changed Block Tracking (CBT) was first introduced by VMware vSphere 4.0. It is based on incremental backup technology, meaning that the initial backup of the VM is full, whereas in all consequent backups only the new data is backed up. CBT speeds up the backup process considerably and provides maximum efficiency.
Hyper-V has introduced its own change tracking technology – Resilient Change Tracking (RCT) – with Windows Server 2016, which functions in the same way as CBT. Note that if you had been running a VM on Windows Server 2012 R2 or earlier versions, and later moved it to the host server with Windows Server 2016, you should upgrade the VM to the latest version before backing it up. This can be done in the Hyper-V Manager.
Memory Management
Oversubscription vs. Dynamic Memory
Both VMware and Hyper-V apply a variety of memory-management techniques. Some of the techniques used by VMware to achieve a high level of RAM optimization are presented below:
- Memory compression is used as a more efficient and less expensive alternative of disk swapping. When there is little space left on RAM, virtual pages are compressed and made small enough so as to fit them in memory. Moreover, compressed files can be accessed faster and will not interrupt the workflow. Memory compression is enabled by default.
- Guest Ballooning is installed as part of VMware Tools. This technique enables a VM of your choice to extract the unused memory from other VMs and distribute it to the ones that lack RAM resources.
- Transparent Page Sharing. Essentially, this is a deduplication technique used for memory management. When the CPU isn’t used by any program, this technique allows you to track the VM memory pages that are identical and then share them among other VMs. This way, space being filled by redundant memory pages gets freed up.
- VMware Oversubscription/Overcommit. This technique allows you to assign more RAM resources than available on the physical host to the VMs running on that host. The system actively monitors the VMs and the amount of memory that they are currently using. With the Idle Memory Tax feature, the hypervisor can estimate the amount of idle memory and active memory used by each VM. VM memory that is not in active use will then be ‘taxed’ and reassigned to other VMs which need it more.
As you can see, VMware provides a wide variety of memory management techniques. However, Hyper-V provides only one tool, called Dynamic Memory, which functions in the same way as the VMware Oversubscription feature. Dynamic Memory allows you to set up a specific amount of memory, memory priority, and other memory optimization settings on the basis of which Hyper-V then defines how much memory should be allocated to a particular VM. Dynamic memory can be configured in Hyper-V Manager, where you can specify the following values: Startup RAM, Minimum RAM, Maximum RAM, Memory Buffer, and Memory Weight.
The administrator has more freedom when operating with Dynamic Memory in Hyper-V than with VMware memory management techniques. Even though the oversubscription technique isn’t as advanced as its counterpart in VMware, the administrator can optimize the VM memory management process and adjust it to their specific needs.
Workload Migration
vMotion vs. Live Migration
Workload migration has long become a necessity when operating in a virtual environment. Both VMware and Hyper-V have introduced their own tools which enable the migration of production workloads across the infrastructure. Thus, VMware vMotion and Hyper-V Live Migration should be considered as separate entities.
VMware vMotion is a part of VMware vSphere which enables the seamless migration of workloads between servers in almost real time. Moreover, the workload migration doesn’t interfere with the processes within the virtual environment, and all applications can still be accessed. Thus, zero downtime is achieved and VM productivity isn’t affected. Also, with the VMware vSphere Distributed Resource Scheduler, you can schedule migrations to occur at a specific time, which allows you to automate workload migrations.
Hyper-V Live Migration is the migration tool designed for transferring a running VM or an application between physical hosts, without causing the system downtime. However, the implementation of Live Migration is much more complex than that of vMotion. Before performing the workload migration, you need to set up Microsoft Failover Clustering on all physical hosts that will participate in the process and adjust network settings so as to ensure the seamless data transfer.
Supported Operating Systems
Guest OSes supported by VMware and Hyper-V can vary. Thus, VMware supports the Windows, Linux, Unix, Macintosh, and other operating systems. You can read the full list of the supported OSes in the guest operating system installation guide.
As for Hyper-V, the number of supported guest OSes is limited. According to the information found on the official site, Hyper-V supports not only Windows, but also Linux, FreeBSD, SUSE, and other OSes.
VMware supports multiple OS versions available in the market, whereas Hyper-V places more emphasis on the support of Microsoft OS, which is the most widely used OS in the world.
Scalability
Scalability of the virtual infrastructure should always be considered by organizations when choosing a hypervisor. Due to the fact that the organization’s workload can either increase or decrease with time, it is important to be prepared for any scenario and identify the opportunities for scalability provided by hypervisors.
The table below outlines the Hyper-V vs VMware scalability differences.
| System | Resource | Hyper-V on Windows Server 2016 | VMware vSphere 6.7 |
| Host | Logical CPUs | 512 | 768 |
| Physical RAM | 24 TB | 16 TB | |
| Virtual CPUs per Host | 2048 | 4096 | |
| VMs per Host | 1024 | 1024 | |
| VM | Virtual CPUs per VM | 240 for generation 2 VMs
64 for generation 1 VMs 320 available to the host OS |
128 |
| Memory per VM | 12 TB for generation 2 VMs
1 TB for generation 1 VMs |
6128 GB | |
| Maximum Virtual Disk Size | 64 TB (VHDX format)
2040 GB (VHD format) |
62 TB | |
| Number of Virtual SCSI disks | 256 | 256 | |
| Cluster | Maximum number of VMs per cluster | 8000 | 8000 |
| Maximum number of nodes | 64 | 64 |
As you can see, there are some features in which Hyper-V exceeds VMware and vice versa. Therefore, when choosing between Hyper-V and VMware, consider your business needs and priorities, physical resources of your infrastructure, and the available budget.
Security
A virtual environment can be rather fragile. Thus, it needs to be securely protected against any malicious attacks or viruses. Both Hyper-V and VMware ensure security for your virtual environment with the help of various services and tools.
VMware vSphere 6.7 applies VM Encryption which is designed for data protection at rest and in motion and prevention of unauthorized access to the system. Moreover, data protection is guaranteed even during the workload migration. In this case, the feature of Encrypted vMotion is enabled, which allows you to protect data when it is moved between physical servers and even across a hybrid cloud environment.
Due to the fact that Hyper-V functions as a Windows Server role, it can be managed via Active Directory. Hyper-V also provides a set of advanced security components, such as Guarded Fabric, Host Guardian Service, and Shielded VMs. Guarded Fabric is a data-protection technique that lets you build a safe environment for VMs. A guarded fabric includes Host Guardian Service (HGS) and several shielded VMs. HGS helps to monitor the state of shielded VMs and protect the keys used for decrypting the VMs. If HGS is not enabled, the shielded VM cannot be powered on and will remain encrypted.
The latest additions to the data protection system of Hyper-V are Windows Defender Advanced Threat Protection (ATP), which allows to detect to cyber-attacks and respond to threats in advance with the help of machine learning, and Windows Defender Exploit Guard (EG), which protects against ransomware attacks and reduces the attack surface of critical applications.
It is worth noting that vSphere 6.7 introduced support for a wide number of Hyper-V security components released with Windows 10 and Windows Server 2016. Both Hyper-V and VMware have worked together to ensure the seamless integration for the VMs running on Windows OS in vSphere environment.
Costs
Hyper-V and VMware provide an opportunity to use a free version of their virtualization platforms. This way you can see how the product works and what kind of benefits it provides. However, the trial version of the product includes only the basic-level functionality, meaning that you won’t be able to test all of its components.
It is difficult to compare the pricing policies of Hyper-V vs VMware due to the fact that VMware ESXi is licensed per socket (physical CPU), whereas Hyper-V has been licensed per core since 2016.
Microsoft’s licensing model calculates the price based on the number of physical cores on the host. Depending on how many hosts have the software installed, you can identify the total number of cores for which licenses are required. Each license is a two-core pack. Note that the minimal number of cores which can be licensed is four, meaning that processors with one and two cores still would be assigned four cores.
VMware vSphere 6.7 is licensed on a per-processor basis. Therefore, each server CPU should be assigned at least one processor license key. Note that VMware imposes no limits on the size of RAM and the number of CPUs and VMs running on the licensed processor.
The table below shows the differences in pricing of Hyper-V vs VMware.
| Editions | Pricing | |
| Hyper-V | Windows Server Datacenter | US $6,155 |
| Windows Server Standard | US $972 | |
| Windows Server Essentials | US $501 | |
| VMware | VMware vSphere Standard | US $995 |
| VMware vSphere Enterprise Plus | US $3,495 | |
| VMware vSphere with Operations Management Enterprise Plus (effective until February 1, 2019) | US $4,525 | |
| VMware vSphere Platinum | US $4,595 with 1 year VMware AppDefense Subscription |
VMware and Hyper-V VM Protection with NAKIVO Backup & Replication
It is important to consider all aspects of a hypervisor, both its strengths and weaknesses. Despite all the benefits that both of the virtualization platforms provide, they are still exposed to security risks and threats that might undermine their performance and result in the loss of critical data and applications. Therefore, to ensure that your system is securely protected, it is advisable to find and install a reliable and affordable data-protection solution. NAKIVO Backup & Replication is perfect for any organization that wants to protect its virtual environment against any security risks and threats.
Overview of the Backup and Replication Technology
NAKIVO Backup & Replication provides a variety of data-protection options, which can greatly simplify the process of backup, replication, and recovery. The product can be rapidly deployed by downloading a pre-configured VMware Virtual Appliance (VA) or by installing the product on Windows or Linux. Let’s look at the data-protection options it offers.
VM Backup
By running backup jobs with NAKIVO Backup & Replication, you can create a VM backup, which is a point-in-time copy of the source VM. VM backups can be stored locally, offsite, and in private/public clouds. VM backup jobs in NAKIVO Backup & Replication are snapshot-based. Thus, when a backup job is executed, the product automatically creates temporary snapshots of backed up VMs, detects the changes in the data, sends the new data to the backup repository, and then deletes the temporary snapshot.
VM backup jobs rely on VMware Changed Block Tracking (CBT) and Hyper-V Resilient Change Tracking (RCT), which allows to identify and copy only new changes (increments) that have been added to a VM since the latest backup.
Backups in NAKIVO Backup & Replication are image-based, meaning that the VMs can be saved to the fullest extent, including disks, applications, and files. Also, VM backups are application-aware, which allows to keep the application data in both Hyper-V and VMware environments transactionally consistent.
Backup Copy
Even though creating backups is a popular data-protection option, you should also consider creating copies of your backups. This way, you will be able to recover your data even if a VM backup gets accidentally deleted or the production site is hit by a disaster.
When running backup copy jobs, the backups are copied from one backup repository to another, without affecting the source ESXi hosts or VMs. Due to this, the VM data is read only once, while backups can be copied to one or multiple locations.
Backup to Cloud
With NAKIVO Backup & Replication, you can move the critical data from the production center to a cloud, thus providing an additional security level. NAKIVO Backup & Replication integrates with any public or private cloud. Moreover, the features like VM Backup Encryption and Network Acceleration ensure that data can be transferred to another location securely and fast.
Replication
VM replication lets you create an exact copy of the entire VMware or Hyper-V VM running on the host server. A VM replica is then sent to the disaster recovery (DR) site and kept in a powered-off state. Thus, VM replicas do not consume any resources but you can easily power them during a DR event. The initial VM replication is full, whereas the following replications are incremental, which ensures that the data in a VM replica is constantly updated.
Moreover, replication considerably improves a recovery point objective (RPO), which is the point in time to which your VMs will be reverted in case of a DR event. You can set up replication jobs to run every other minute, ensuring that your VM replica represents the latest version of the VM and you can fail over to it in a few clicks. Due to the fact that recovery from the disaster can be performed by simply powering on VM replicas, it allows to considerably improve a recovery time objective (RTO), which is the period of time during which your virtual infrastructure is expected to be restored.
Site Recovery Workflows
NAKIVO Backup & Replication provides its clients with an exclusive feature of Site Recovery (SR). By creating an SR job (workflow), you are able to arrange actions and conditions into an automated algorithm to deal with a DR scenario of any complexity level. The actions and conditions which can be included in an SR job are the following: start/stop VMs; failover/failback VMs; run/stop/enable/disable jobs; wait; etc. You can create multiple SR jobs, with each of them having a specific purpose and use case. All you need is to configure an SR workflow which can be executed automatically, which would ensure 24/7 availability of your virtual environment.
Conclusion
Building and operating in a virtual environment would be impossible without a reliable and efficient virtualization platform, such as VMware and Hyper-V. Before deciding which platform to choose for conducting your business operations, consider the differences in VMware and Hyper-V management, architecture, licensing, scalability, and backup integration as well as what advantages each has.
Moreover, ensure that your virtualization platform can be seamlessly integrated with the data-protection solution that you use. NAKIVO Backup & Replication is a fast, reliable, and cost-effective VM backup solution, which also equips you with a full-fledged DR toolset designed for dealing with security risks and threats, and minimizing data loss. NAKIVO Backup & Replication can be seamlessly integrated with VMware and Hyper-V environments, thus allowing you to enjoy the benefits that both platforms provide to the fullest extent.

Does your business run multiple servers, each running its operating system at different locations? Worry no more, as virtualization is here to solve your problem. Virtualization allows you to run multiple operating systems in one physical machine, and there are two most common platforms you can pick, VMware and Hyper-V.
In this tutorial, you’ll explore and compare the two different virtualization technologies and their use cases.
Get ready, and start virtualizing!
Prerequisites
This tutorial is a hands-on demonstration in which you’d require the following:
- A computer running Windows Operating System with Hyper-V enabled – This tutorial uses Windows 10 Pro v21H2 build 19044.1889.
- VMware Workstation installed – This tutorial uses VMware Workstation 16 Pro v16.2.4 build 20089737.
- A Virtual Machine guest OS ISO image – This tutorial uses a Linux Mint ISO image.
Exploring the VMware Workstation
VMware virtualization technologies are based on a bare metal hypervisor (Type 1/Bare Metal hypervisor) known as ESX/ESXi that runs on x86 architecture. Virtualization platforms, like VMware, enable you to simulate multiple virtual instances over your computer hardware to utilize your system’s underlying resources fully.
VMware supports Windows, Linux, Unix, and macOS operating systems. And to better understand how VMware Workstation works, start by creating a VM you can manage in the following sections.
Creating a VM on VMware Workstation
Before jumping into VMware’s features, you’ll need a VM to manage when working on a virtualization platform. If you don’t have one yet, VMware lets you create a VM with a few clicks.
To create and set up a new VM:
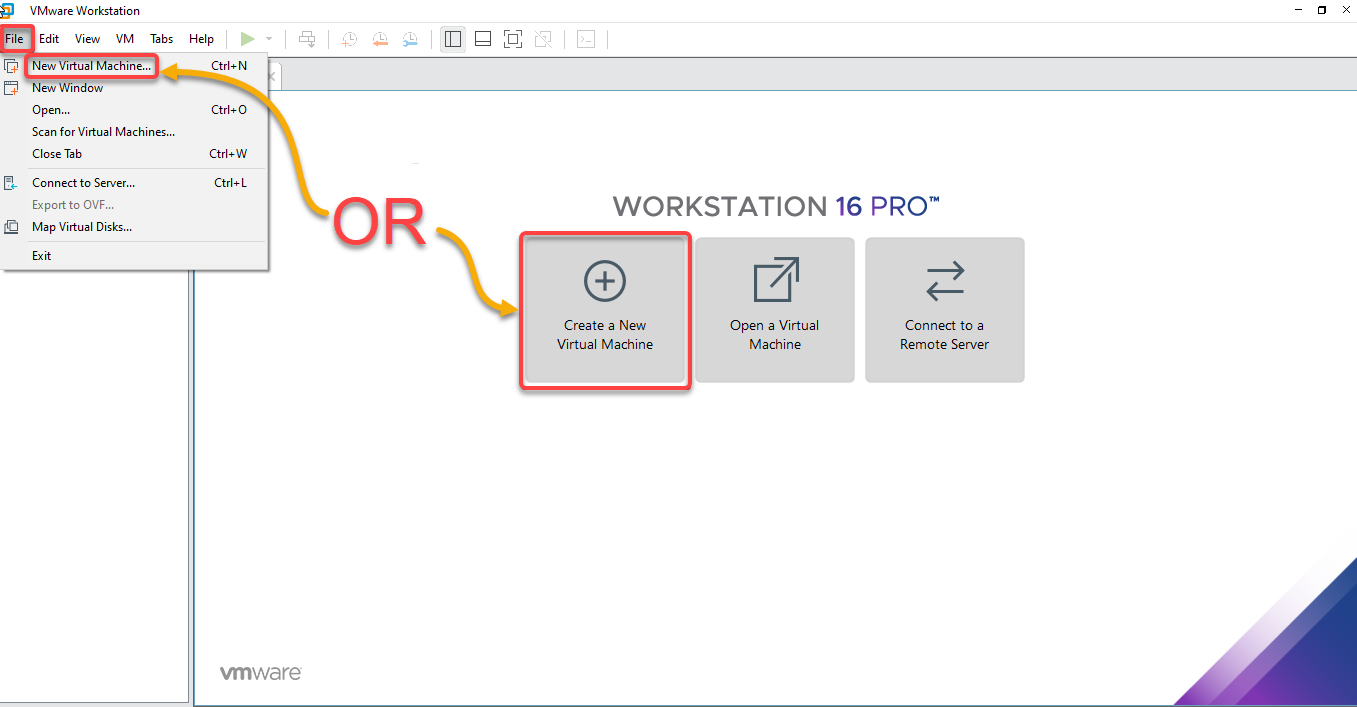
1. Launch VMware Workstation 16 Pro application on your Windows computer.
2. Next, click on the File menu (Ctrl+N), and choose New Virtual Machine (or Create a New Virtual Machine at the Home tab). The Virtual Machine Wizard appears (step three), where you can configure your VM.
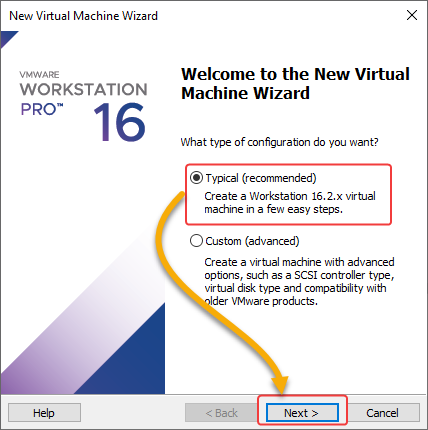
3. On the wizard, select a configuration type for your VM. But for this tutorial, choose Typical for simplicity, and click Next to continue.
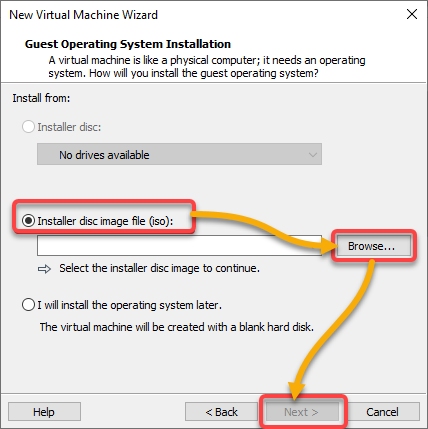
4. Now, select the Installer disc image file (iso) option, click Browse to choose the ISO image to install, and click Next.
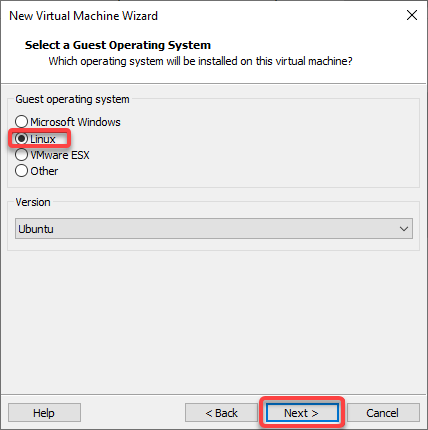
5. Choose Linux as your guest OS, and click Next to continue.
6. Next, configure your virtual disk with the following:
- Input the recommended size (or larger) for your virtual hard disk (VHD) in the Maximum disk size field.
- Choose the Split virtual disk into multiple files option for easier migrating your VM to another computer.
- Click Next to continue.
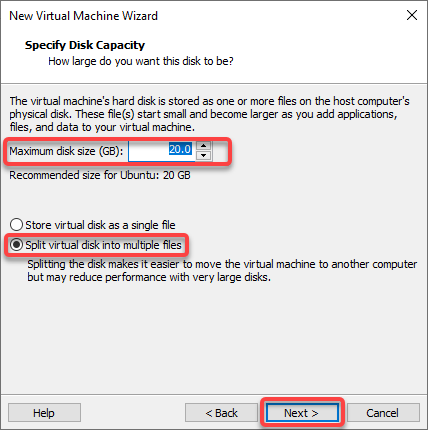
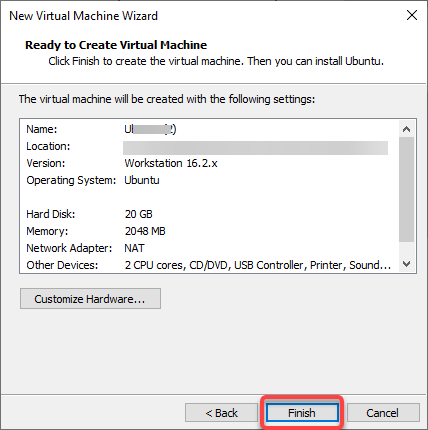
7. Finally, click Finish to complete setting up your VM.
Starting and Shutting Down a VM
You’ve just created your VM, but you still have to start your VM to see if it works and shut it down entirely later on.
Select your VM in the left panel, click on the VM menu → Power, and choose Start Up Guest (Ctrl+B) or Power On to start your VM.
Always select your VM before making any changes or performing any actions.
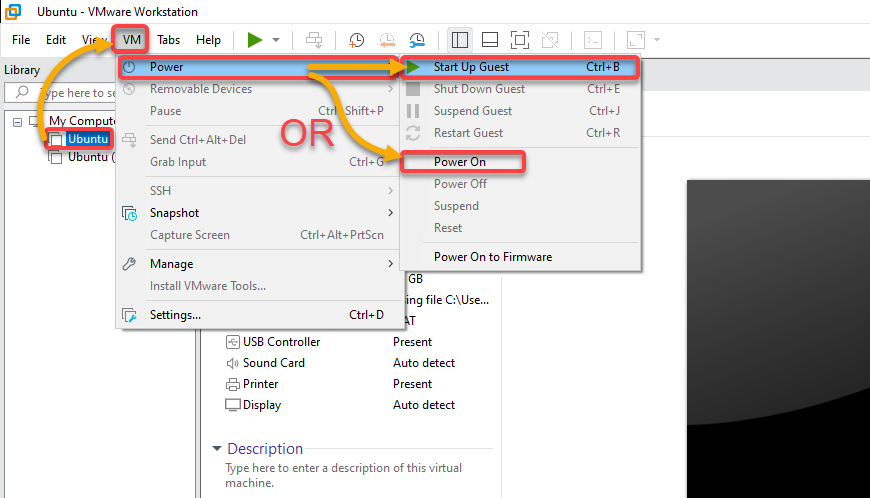
If successful, you’ll see your OS launch on your VM, as shown below.

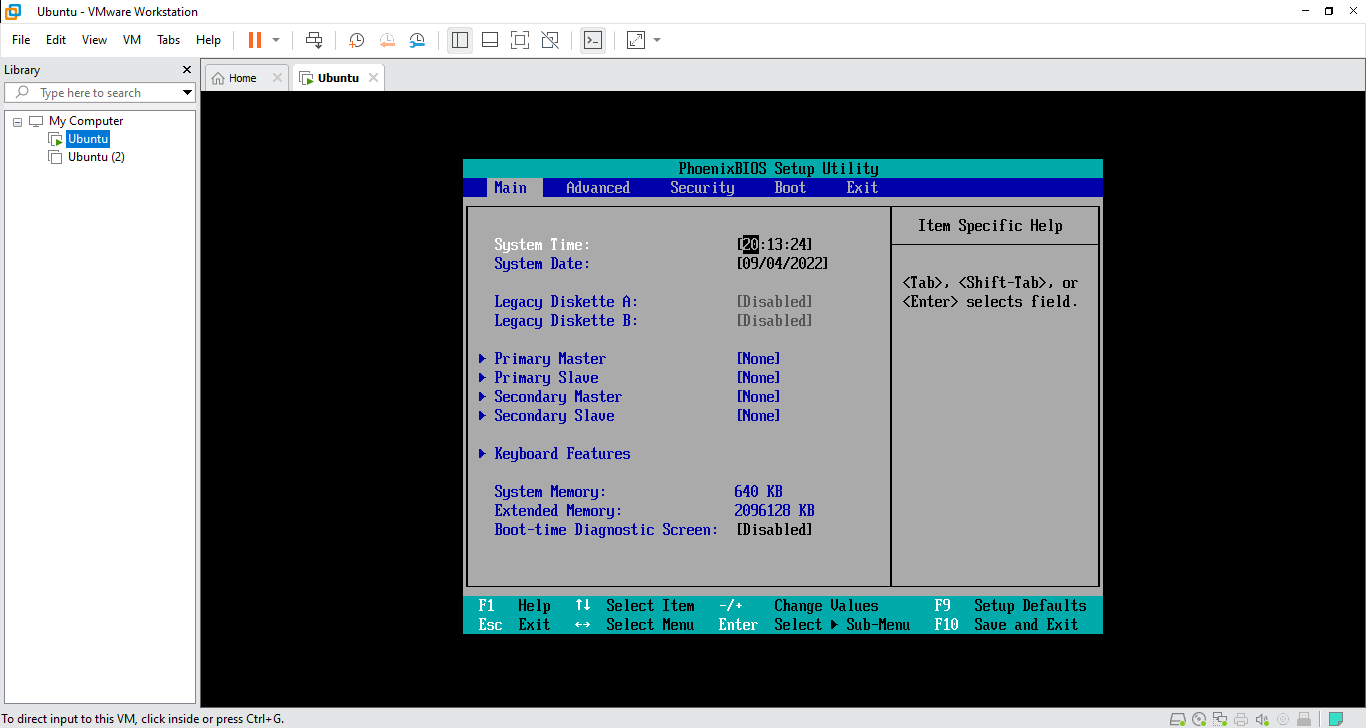
Perhaps you plan to look into the VM’s BIOS setup. If so, choose Power On to Firmware instead to access the BIOS, as shown below.
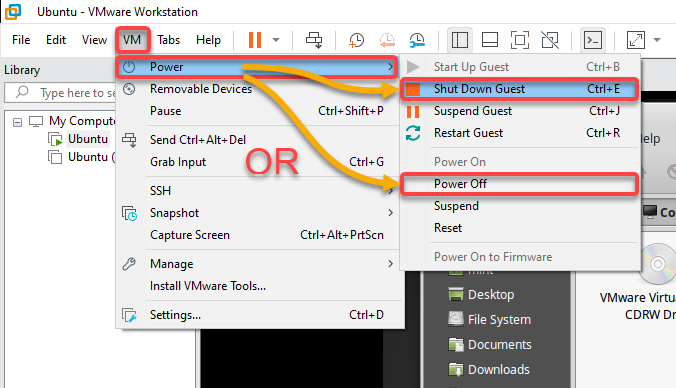
Now, click the VM menu → Power, and select either of the following:
- Power Off – Shuts down your VM abruptly without considering work in progress.
- Shut Down Guest (Ctrl+E) – Sends a shutdown signal to the guest OS.
Configuring a VM’s Network
You’ve just created and started your first VM in VMware and confirmed that it works fine. But still, you must ensure your VM has a good network connection by configuring your VM’s network.
To configure your VM’s network:
1. Select your VM, and click on Edit virtual machine to open the Virtual Machine Settings window (step two).
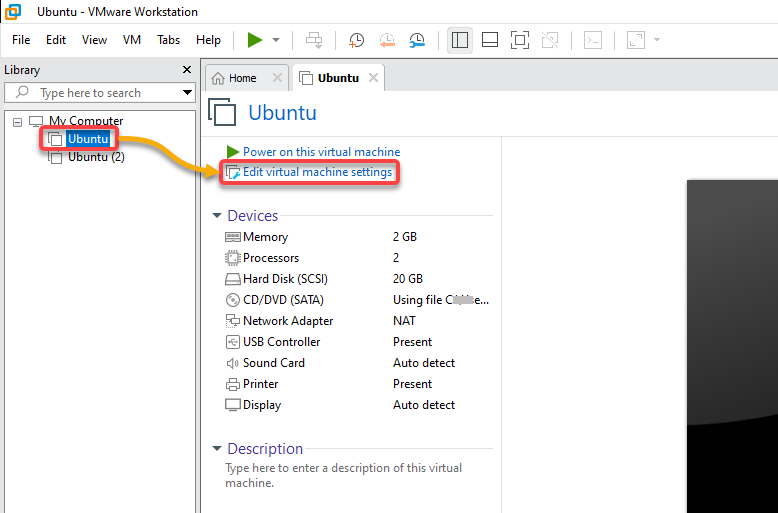
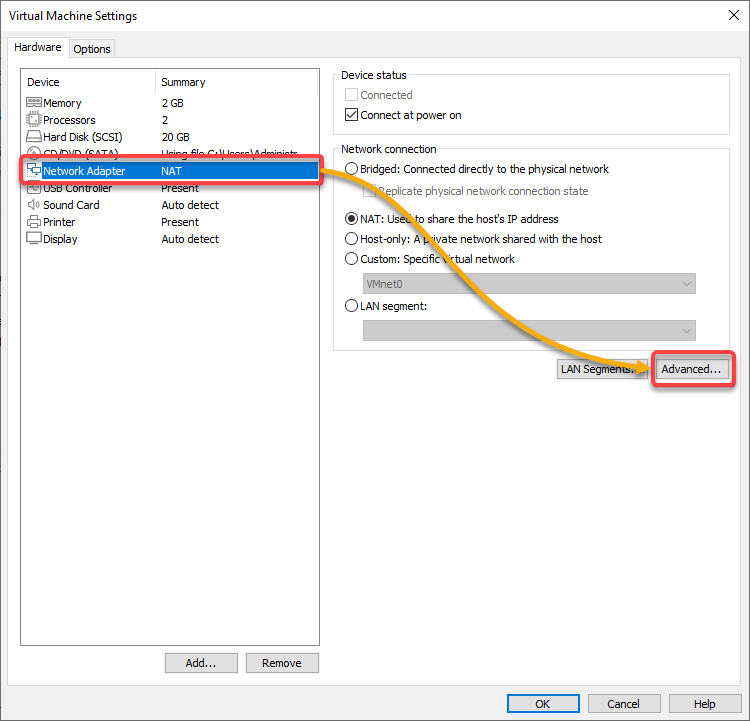
2. Next, select the Network Adapter (left panel), and click on Advanced to scale down your VM’s bandwidth usage.
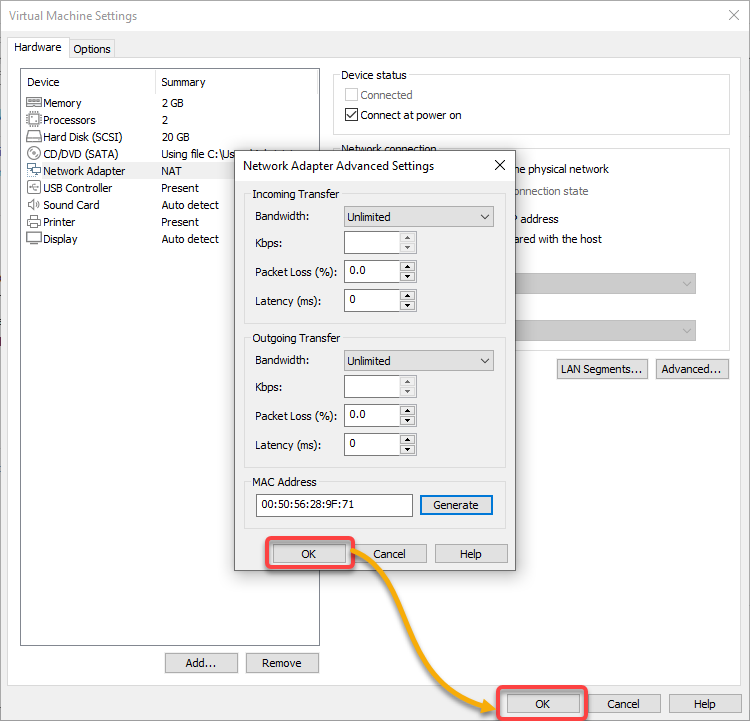
3. Now, on the pop-up window, set the incoming and outgoing bandwidths accordingly.
Once set, click OK to close the Network Adapter Advanced Settings and Virtual Machine Settings windows.
Suspending and Resuming a VM
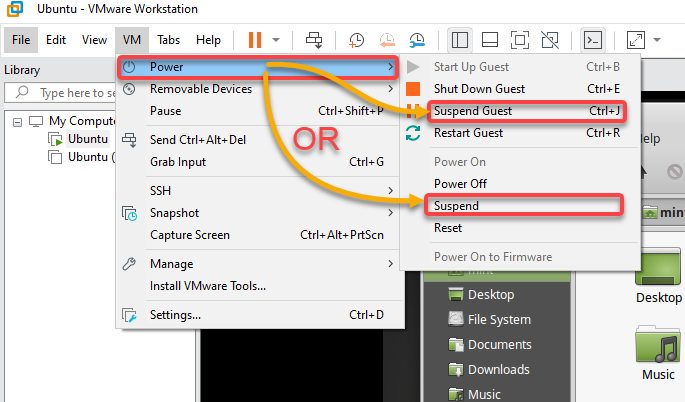
Perhaps you’ll be away from your computer but don’t want to shut it down yet. In that case, suspending your VM will do the trick. The suspend operation creates a VM suspended state (.vmss or .vmem) file in your VM disk files directory.
The suspended state file lets you resume the applications running with their content unchanged before you suspend your VM.
Click on the VM menu → Power, and choose either of the following to suspend your VM:
- Suspend – Suspends the VM and leaves it connected to the network.
- Suspend Guest (Ctrl+J) – Suspends the VM and disconnects it from the network.
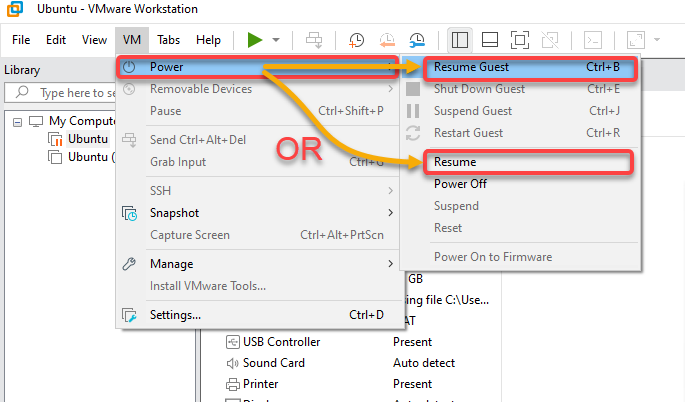
Now, click on the VM menu again → Power, and choose either of the following options to resume your suspended VM:
- Resume – Resumes your VM from the suspended state.
- Resume Guest (Ctrl+B) – Resumes your VM from the suspended state and reconnects it to the network.
Upon resuming a VM after you made changes or added contents, you can’t return to the state your VM was in when you suspended it. To repeatedly return to the same state, you’ll need to take a snapshot, which you’ll learn in the later sections of this tutorial.
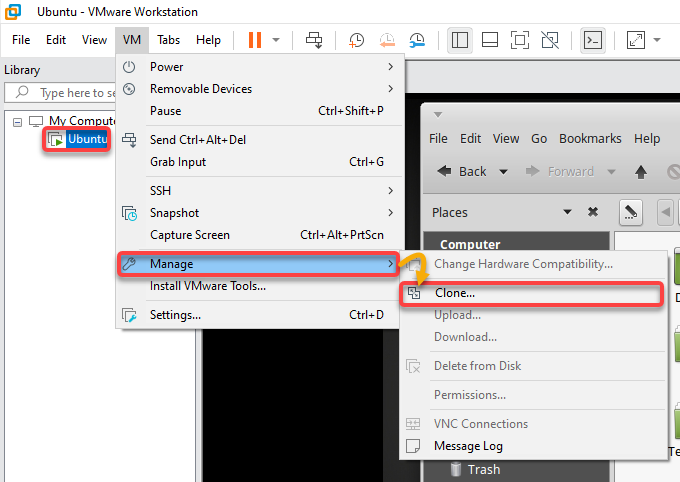
Cloning an Existing VM
Perhaps you plan to add another VM that is the same as the existing one. In that case, VMware lets you clone a VM, its OS, network configuration, and all other settings.
1. Select your VM (left panel), click the VM menu → Manage → Clone to open the VM cloning wizard.
2. Next, choose the Create a full clone option to create a complete copy of the selected VM, and click Next.
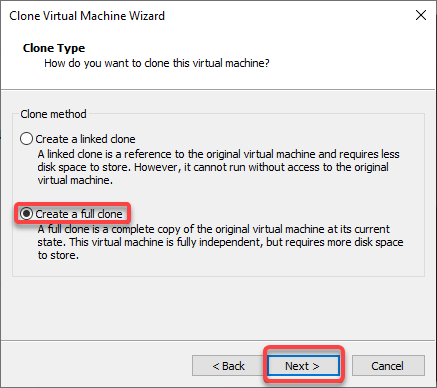
3. Lastly, provide a name (Clone of Ubuntu), location to save the clone, and click Finish to clone the selected VM.
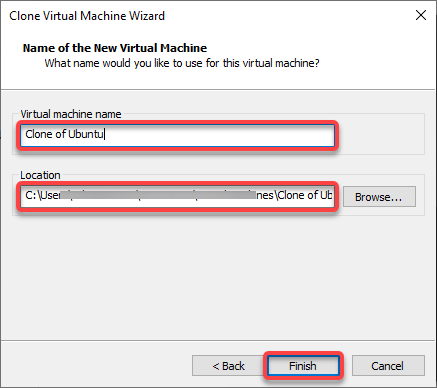
Once the cloning process is complete, you’ll see the cloned VM with the name you specified (Clone of Ubuntu).

Taking and Reverting to a VM Snapshot
Having a fail-safe helps in case your VM gets messed up. Taking a snapshot of your VM lets you revert to your VM’s good condition anytime.
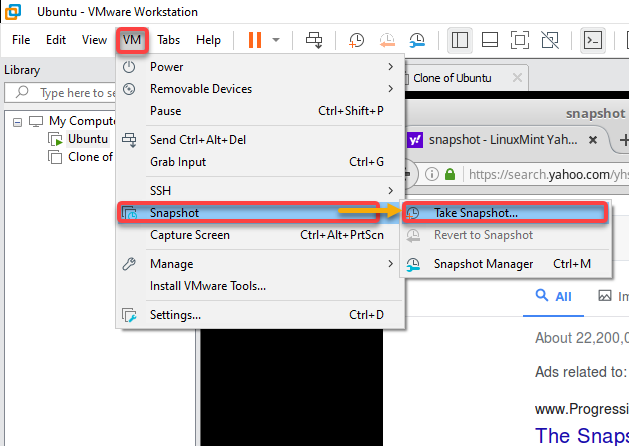
1. Select your VM, click on the VM → Snapshot → Take Snapshot to take a snapshot of your VM.
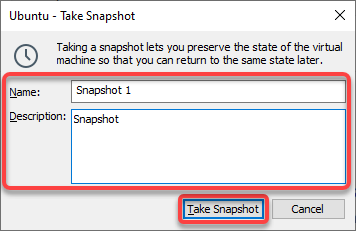
2. Next, provide a unique snapshot Name and a Description (optional), and click Take Snapshot to take a snapshot of the selected VM.
When you take a snapshot, the Workstation captures the entire state of the VM, and the snapshot is saved in your VM’s location.
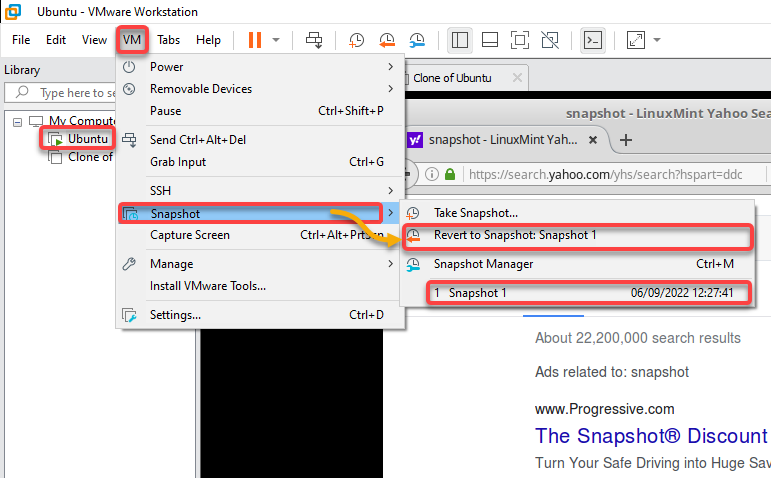
3. Select your VM, click the VM menu → Snapshot → Revert to Snapshot <snapshot_name> to revert your VM to its previous state.
4. Now, select your VM, and click the VM menu → Settings to access your VM settings.
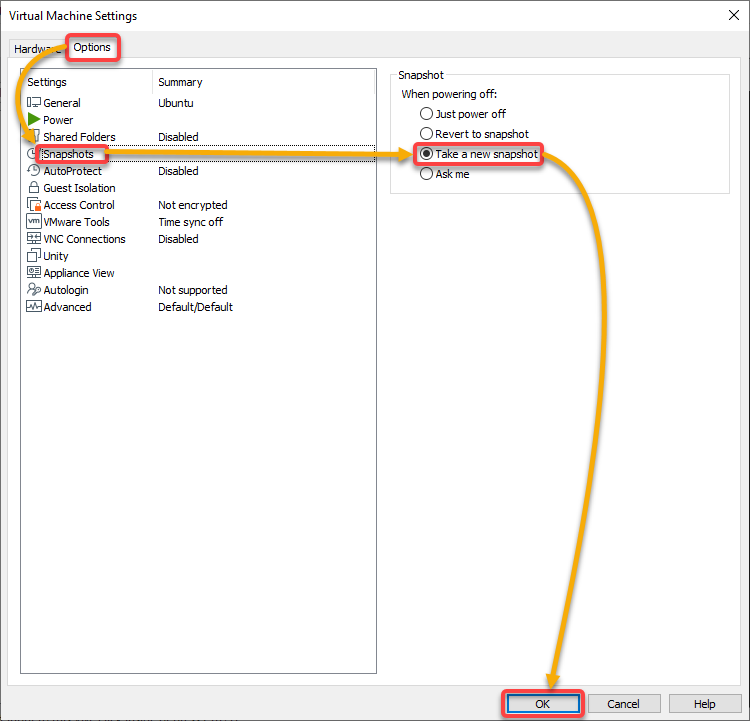
5. Finally, set a snapshot action VMware takes when you power off your VM with the following:
- On the Options tab, select Snapshots (left panel).
- Choose the Take a new snapshot option to make VMware take a new snapshot of your VM as it powers off.
- Click OK to save your changes.
Enabling the AutoProtect Feature to Keep a Range of Snapshots
Another feature that makes VMware stand out when it comes to snapshots is that you get to choose from different restore points. How? By enabling the AutoProtect feature, which lets you keep a range of snapshots.
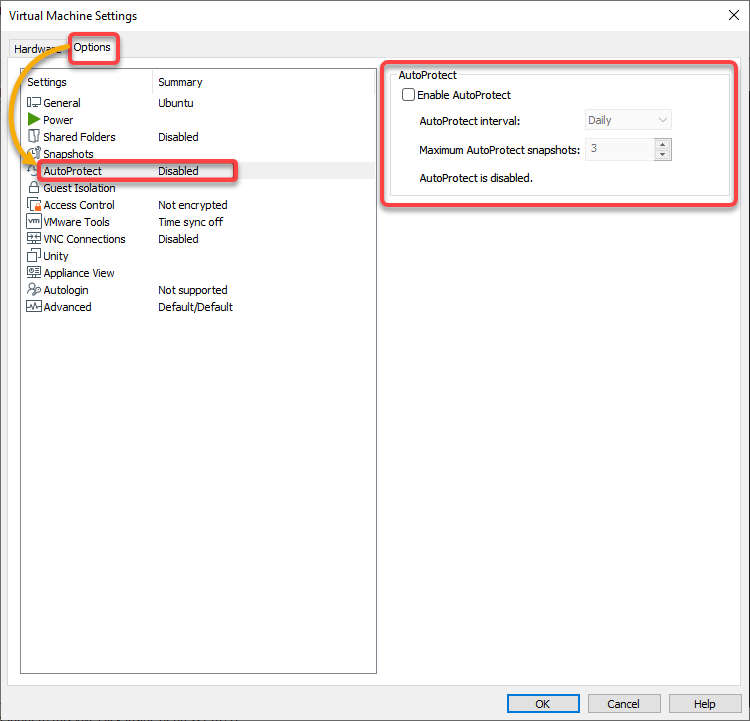
Navigate to the Options tab in the Virtual Machine Settings window, and select AutoProtect (left panel) to access the AutoProtect settings.
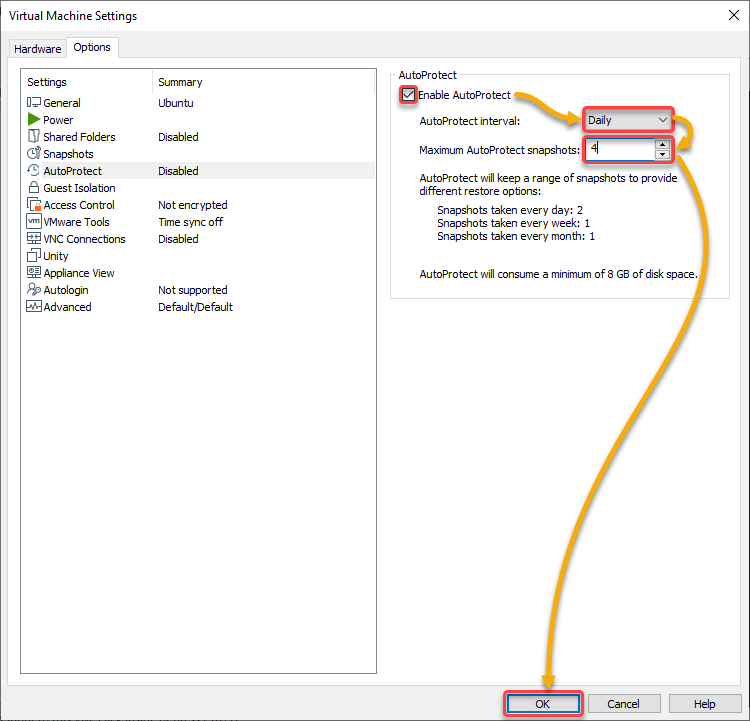
Now configure the AutoProtect settings with the following:
- Tick the Enable AutoProtect box to enable the feature.
- Select an interval between snapshots (i.e., Daily). This option preserves the state of a VM by taking snapshots at regular specified intervals.
- Select the maximum number of AutoProtect snapshots to retain.
- Click OK to save your changes.
Deleting a Snapshot
Having snapshots is undoubtedly helpful, but having too many snapshots can also be confusing, especially if you leave unused snapshots lying around. No worries, though. VMware lets you delete snapshots in a few clicks.
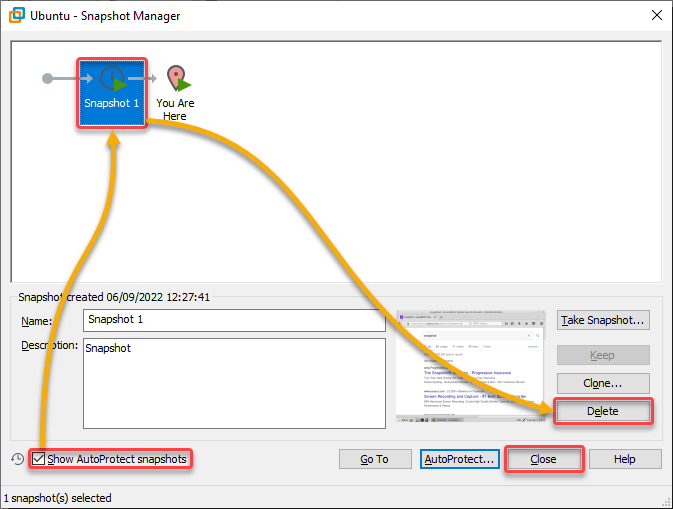
Select your VM, and click the VM menu → Snapshot → Snapshot Manager to access the Snapshot Manager.
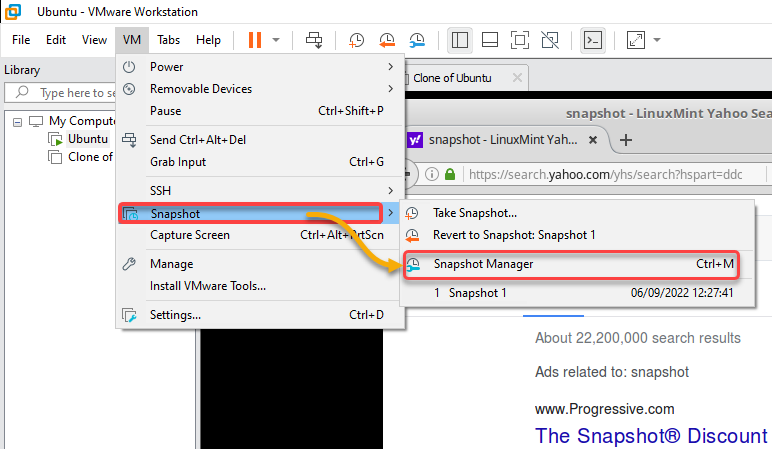
Now, delete a snapshot with the following:
- Tick the Show AutoProtect snapshots option to see the list of snapshots taken by the AutoProtect feature.
- Select the snapshot and click on the Delete button to delete the snapshot.
- Click Close to exit the Snapshot Manager.
Take caution when deleting a snapshot. Doing so removes the previously preserved VM state, and you can never return to that state again.
Keeping VMs Running in the Background
Perhaps you want to avoid restarting your VMs when you accidentally close VMware. If so, keeping them running in the background will do the trick.
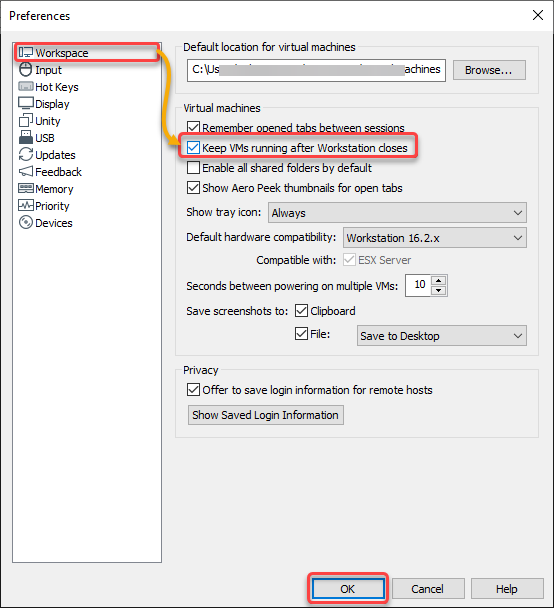
Click the Edit menu, and choose Preferences to access VMware preferences for VMs.
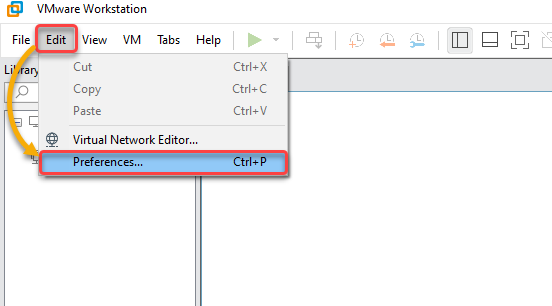
Next, select Workspace (left panel), tick the Keep VMs running after Workstation closes box and click OK to save your changes.
Enabling this feature ensures VMs always run in the background, and you are not prompted to select an action when you close powered-on VMs.
Virtualizing Machines in Hyper-V Manager
Perhaps uncomfortable using third-party software like VMware. In that case, Hyper-V, another virtualization platform, may pique your interest. Hyper-V is a Microsoft Corporation virtualization product that allows you to create and run VMs, which is also a bare-metal hypervisor.
Hyper-V supports Windows, Linux, and FreeBSD operating systems. And like what you did in VMware, you’ll create a VM you can manage in Hyper-V in the following sections.
Creating a VM in Hyper-V
Creating a VM in Hyper-V is similar to VMware, but the steps are different between the two platforms.
Instead of creating a VM, you can also import a VM on Hyper-V. Hyper-V supports exporting and importing VMs, the equivalent of cloning an existing VM.
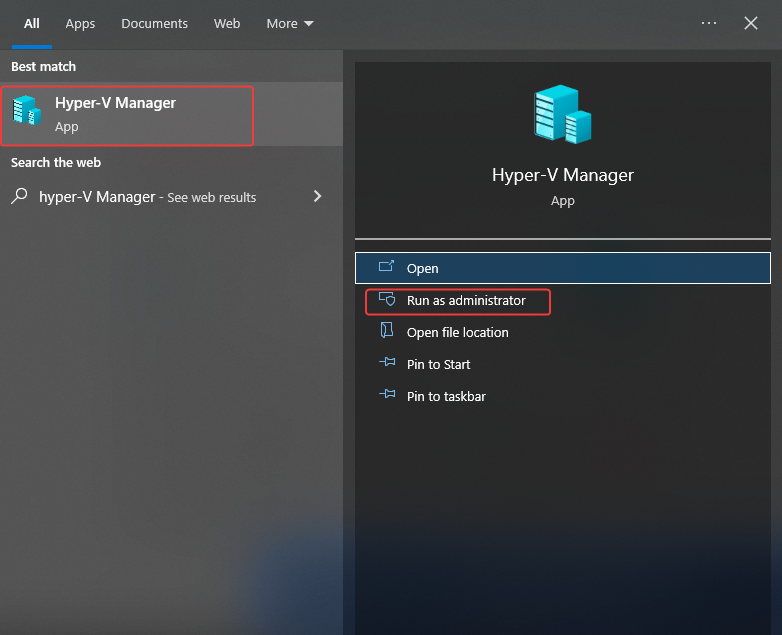
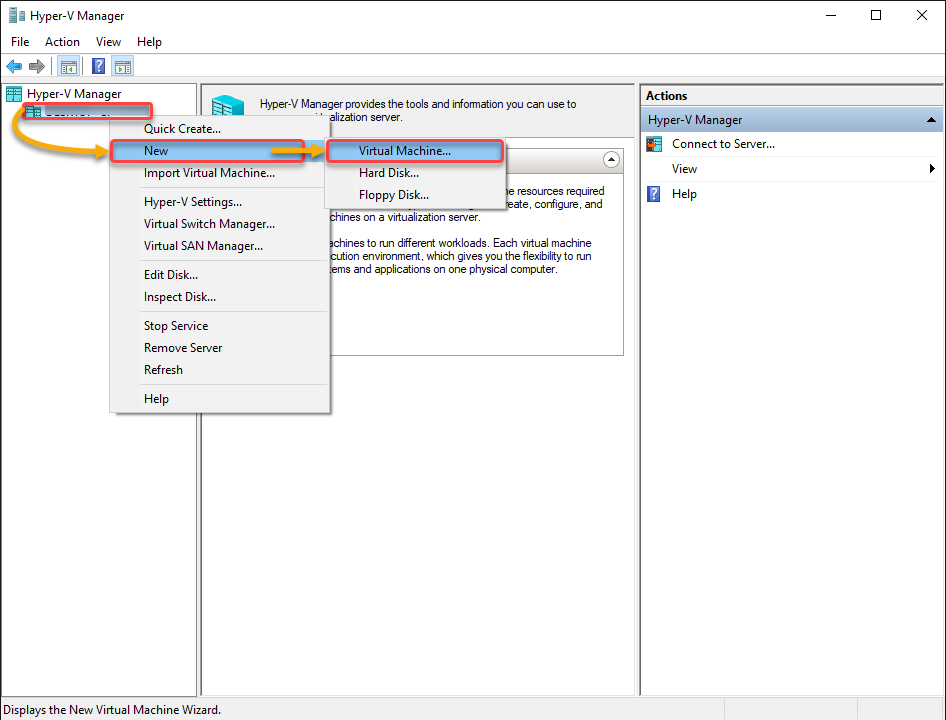
1. Launch the Hyper-V Manager as administrator from your Desktop or the Start menu.
2. Next, right-click on your device (left panel), and select New in the context menu → Virtual Machine to initiate creating a new VM.
A New Virtual Machine Wizard opens where you can configure your new VM (step three).
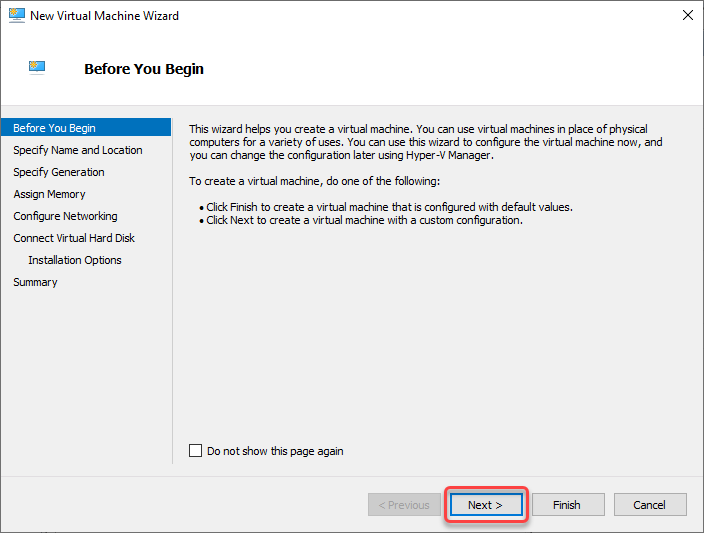
3. Click Next when you see the Before You Begin page since it is just introductory.
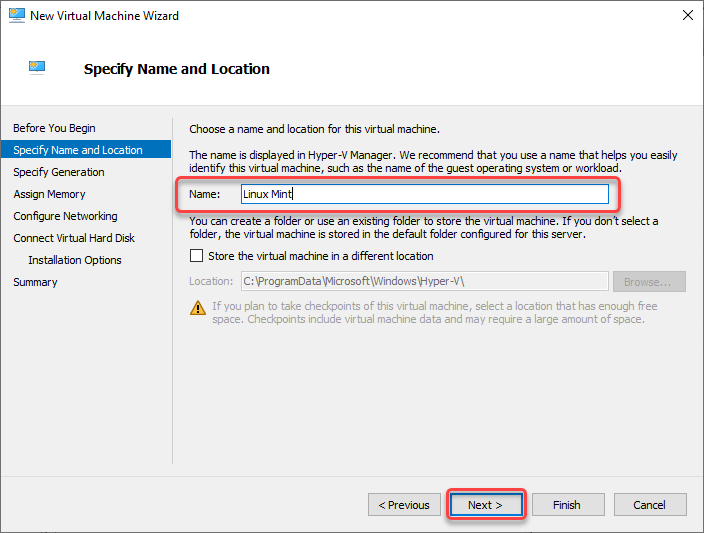
4. Now, specify a Name for your new VM, and click Next.
Perhaps you have a different VM location in mind. In that case, tick the Store the virtual machine in a different location box, and click Browse to set the location.
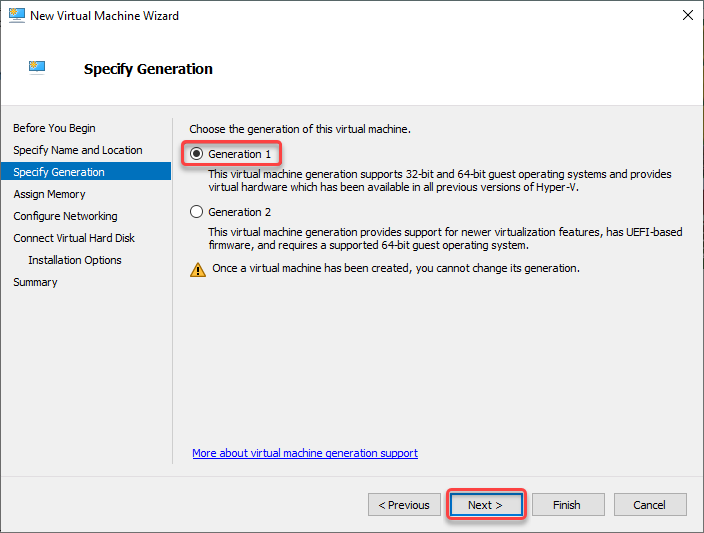
5. Specify the generation depending on the purpose of your new VM, as follows, and click Next:
- Generation 1 – for legacy and new programs run on 32-bit and 64-bit OS versions, respectively.
- Generation 2 – for advanced programs that support only 64-bit systems.
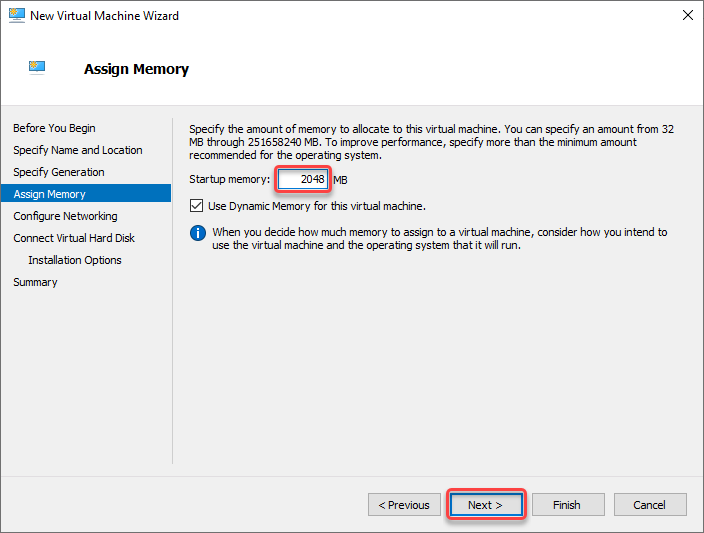
6. Next, check the minimum memory requirements of the guest OS you wish to install and allocate enough memory for better performance, and click Next.
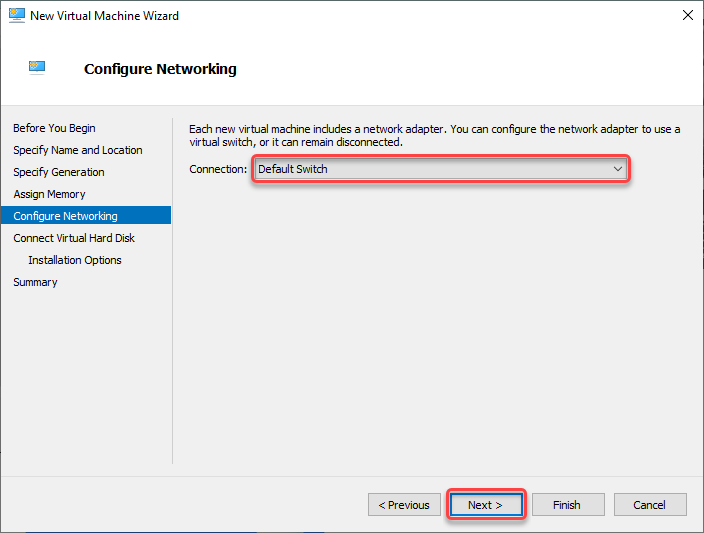
7. Choose the Default Switch option in the dropdown field to configure the VM network access, and click Next.
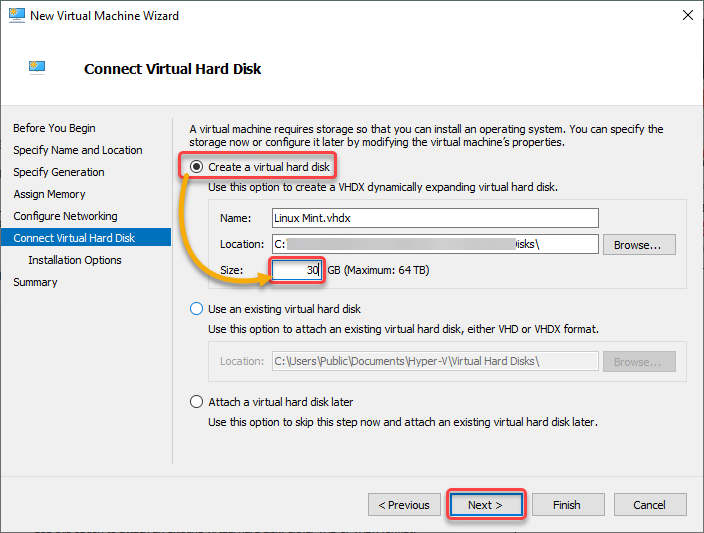
8. Next, choose the Create a virtual hard disk option, specify enough storage space (30) for the virtual disk where the guest OS will be installed, and click Next.
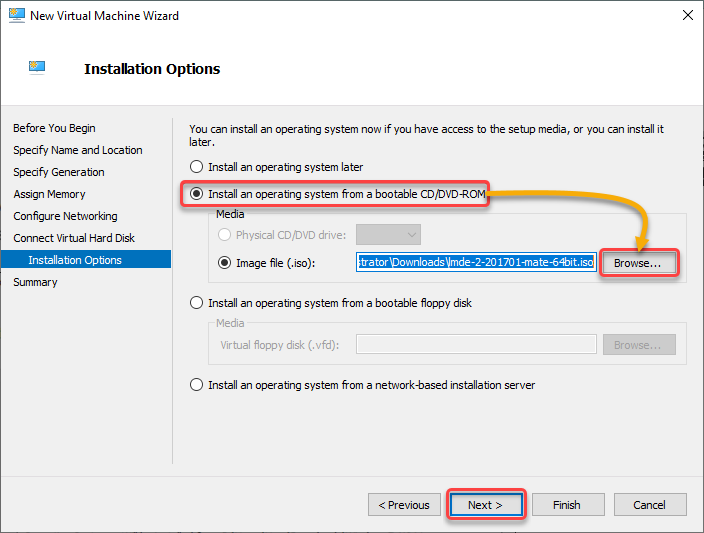
9. Choose the Install an operating system from a bootable CD/DVD-ROM option, click Browse to locate your ISO, and click Next.
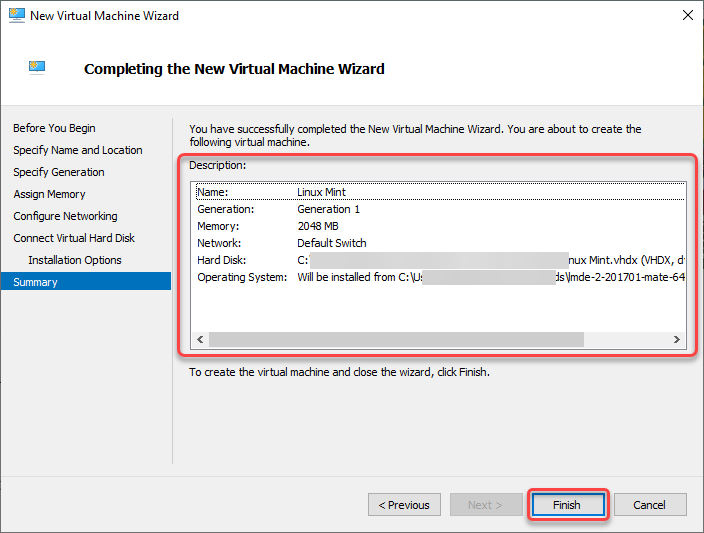
10. Finally, review your VM configuration, and click Finish to create the new VM.
Running and Shutting Down a VM
Like VMware, the actions to perform to your VM in Hyper-V are already laid out in a separate pane (rightmost) labeled as Actions.
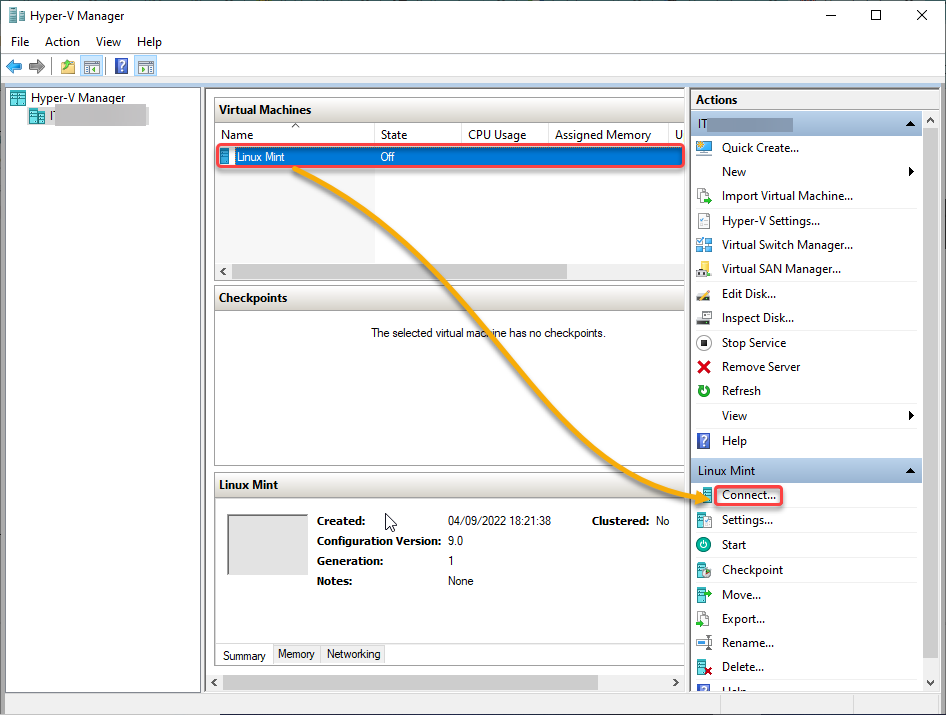
1. Select your newly-created VM from the list, and click Connect (right pane) under your guest OS section (Linux Mint) to run the VM. A separate console opens where you can access your guest OS.
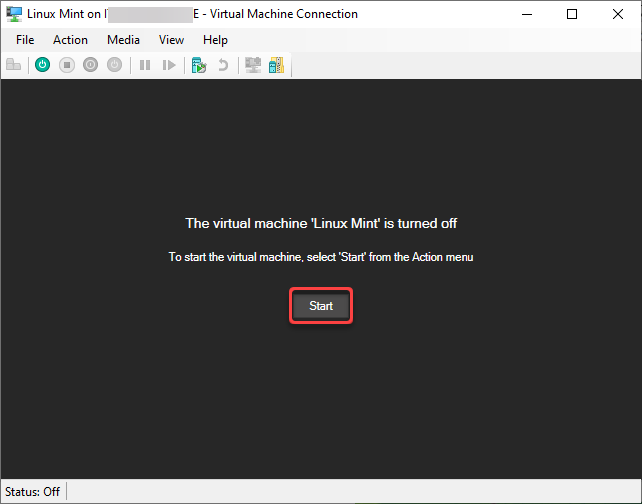
2. Next, click Start to begin the installation of the OS on your VM.
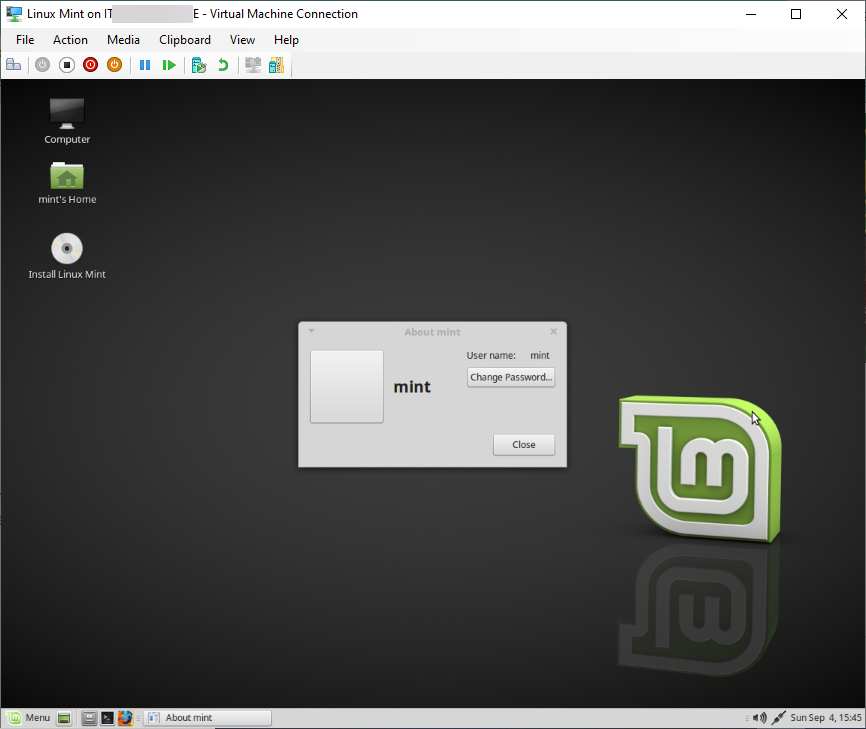
Once installed, your guest OS boots on your VM, as shown below.
3. Now, right-click on your VM and choose either of the following options to power down your VM:
- Turn Off – The virtual equivalent of removing power to a physical computer.
- Shut Down – Instructs the guest OS to perform an orderly shutdown.

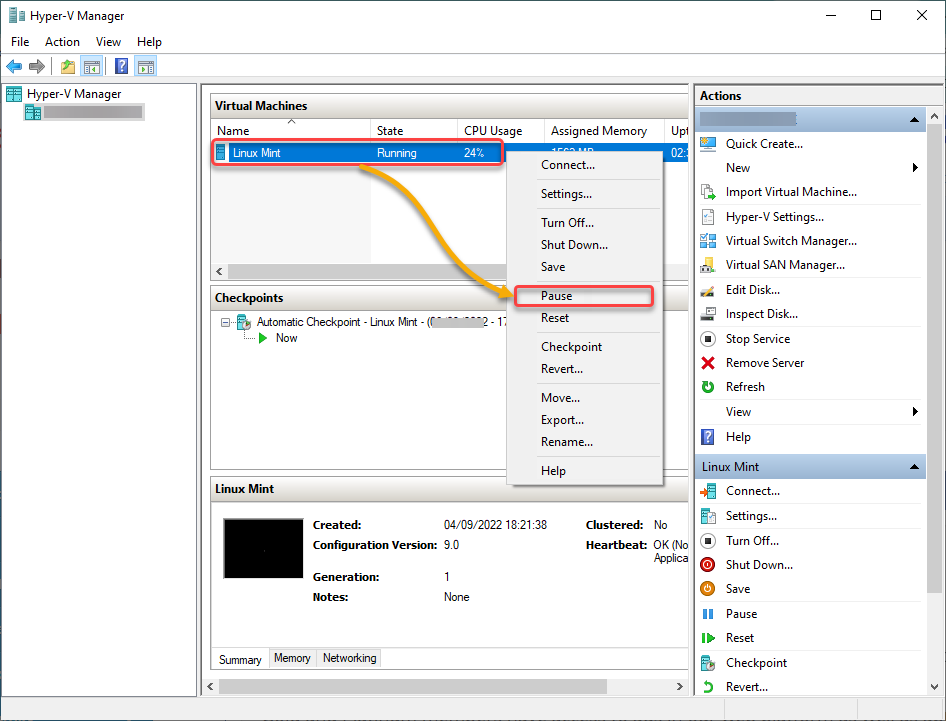
Pausing and Resuming a VM
Pausing a VM in Hyper-V is similar to suspending VM in VMware, freezing the VM temporarily. But note that pausing a VM does not release its allocated memory. As a result, memory is not available to start other VMs.
Select and right-click your VM from the list, and choose Pause in the context menu to pause the selected VM.
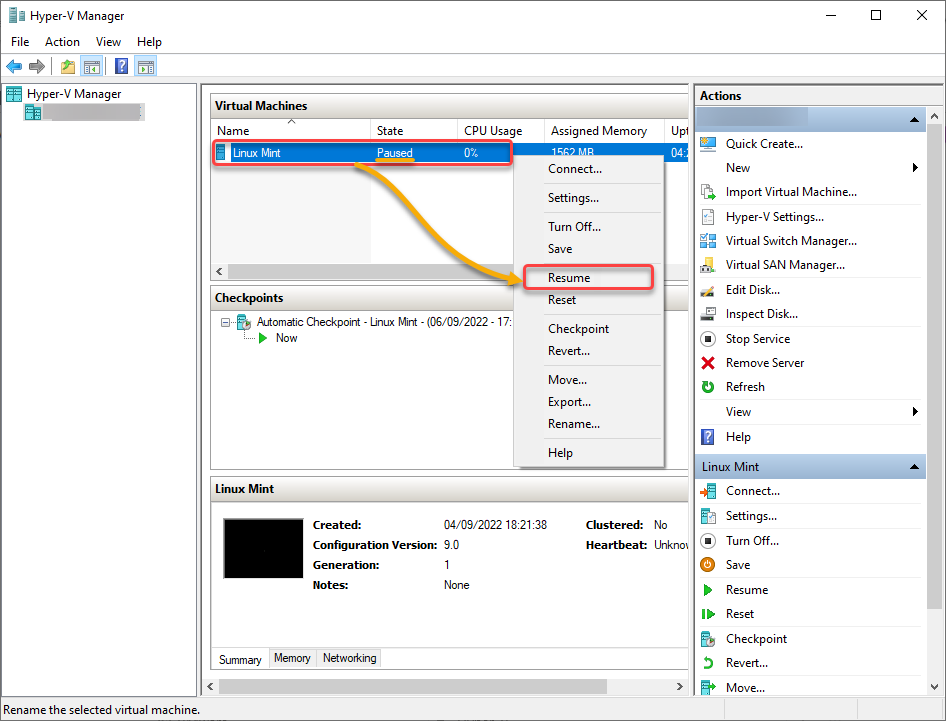
Now, right-click on your paused VM, and choose resume in the context menu to resume your VM.
Configuring Network in a Hyper-V Workstation
You can’t leave your VM as it is without configuring its network. With Hyper-V, configuring your VM’s network is similar to VMware but with different steps and features.
Note that you can only add or remove a virtual adapter while the VM is off. But most of the settings can be changed while the VM is online.
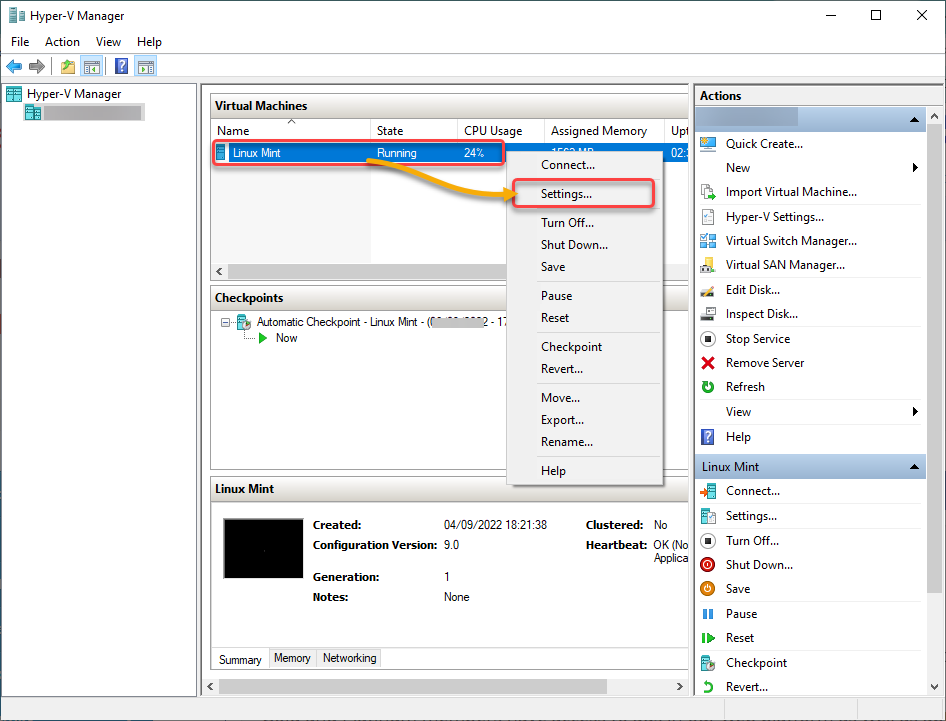
To configure your VM’s network:
Right click on your VM, and choose Settings to access the VM settings.
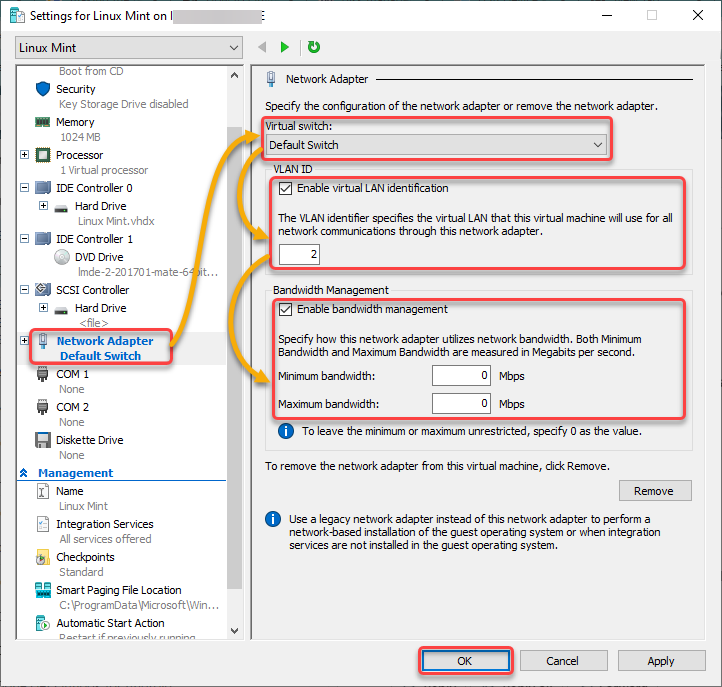
Now, configure the network for your VM with the following:
- Select Network Adapter in the left panel to access your VM’s network adapter configuration.
- Choose the Default Switch option from the Virtual switch dropdown.
- Tick the Enable Virtual LAN identification box to place the virtual adapter in a specific Virtual LAN (VLAN).
- Tick the Enable bandwidth management box, and adjust the Minimum and Maximum bandwidth to shape the traffic characteristics of your virtual adapter.
- Click OK to save your VM’s network configuration.
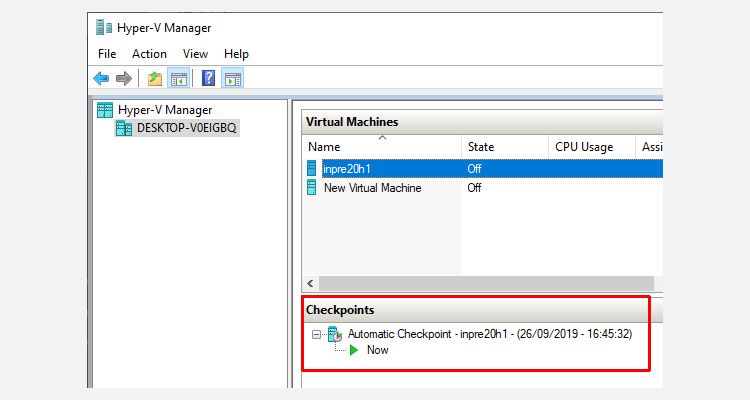
Saving and Reverting to a Checkpoint
Checkpoints allow you to save the VM state at a particular time, like the snapshots in VMware. These checkpoints are helpful when you plan to adopt some new changes to the system. If an unexpected error occurs, you can always revert a VM to a previous state, discarding all the changes made.
To save a checkpoint for your VM:
1. Select, and right-click the VM to create a checkpoint, and select Checkpoint in the context menu to initiate creating a checkpoint.
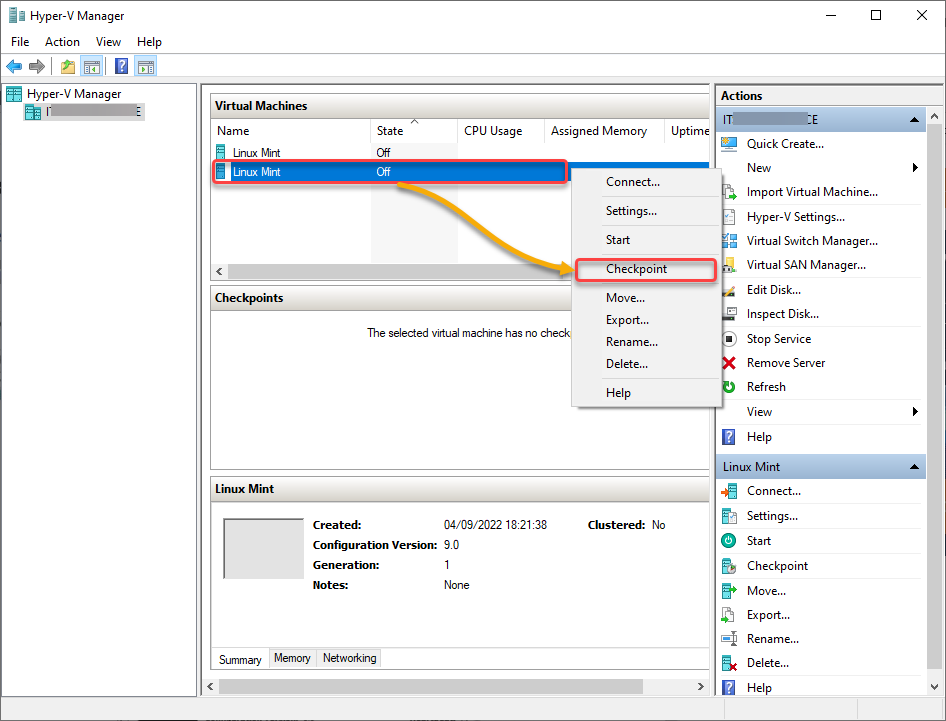
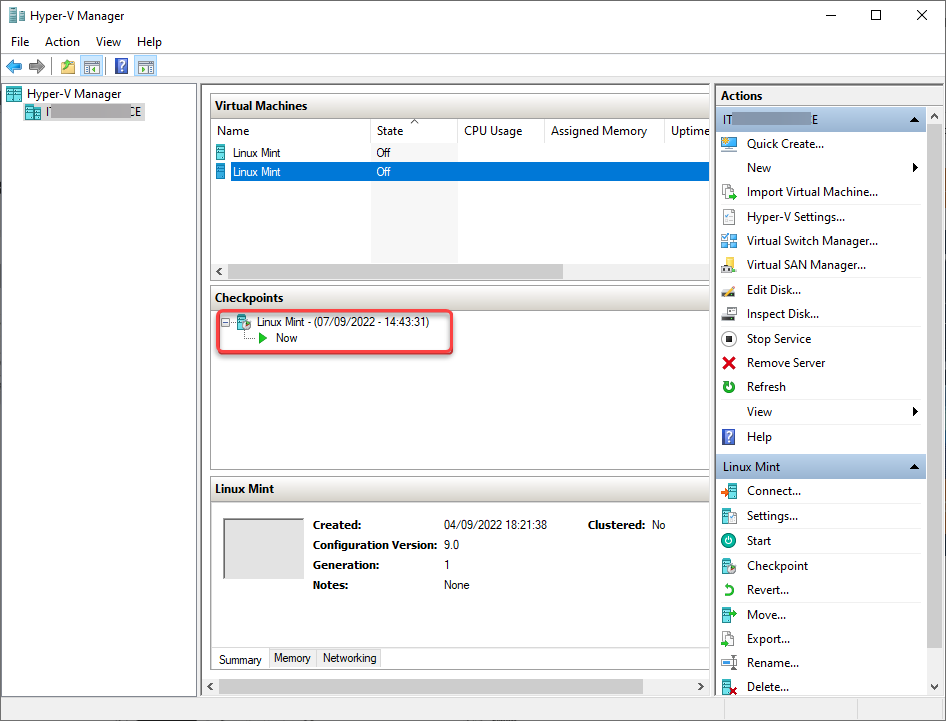
As shown below, the checkpoint is created and can be accessed in the Checkpoints section.
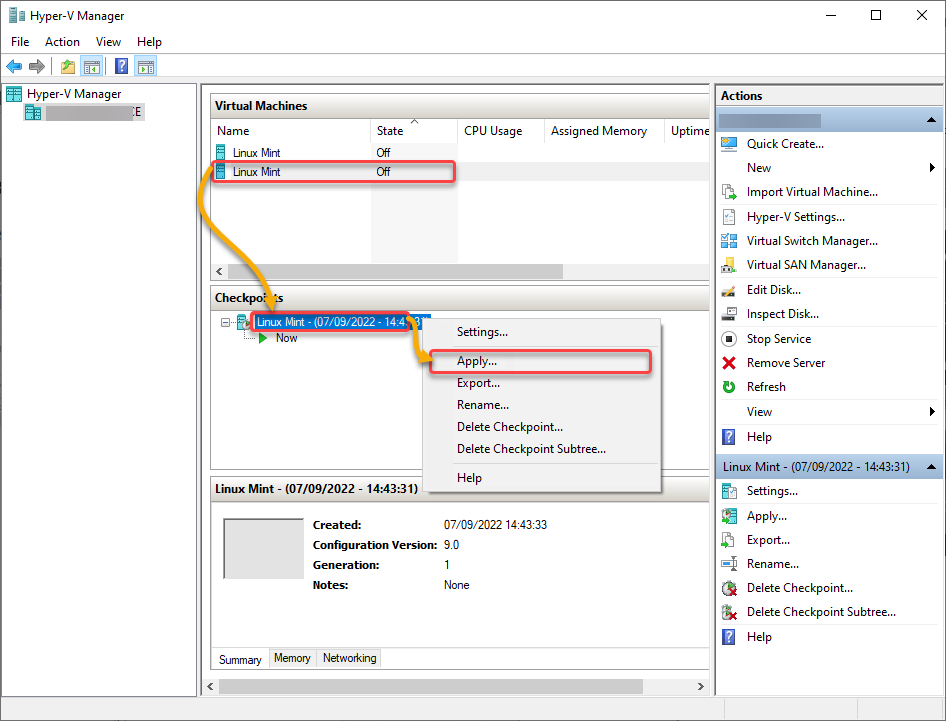
2. Select your VM, right-click on the checkpoint to revert to, and select Apply to revert to the selected checkpoint.
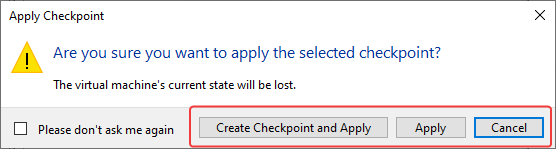
3. Now, choose an option in the dialog box shown below, where the options function as follows:
- Create Checkpoint and Apply – Before the chosen checkpoint is applied, a new checkpoint of the VM is created.
- Apply – Only the chosen checkpoint is applied. Note that this action cannot be undone.
- Cancel – The dialog box will be closed without applying any changes.
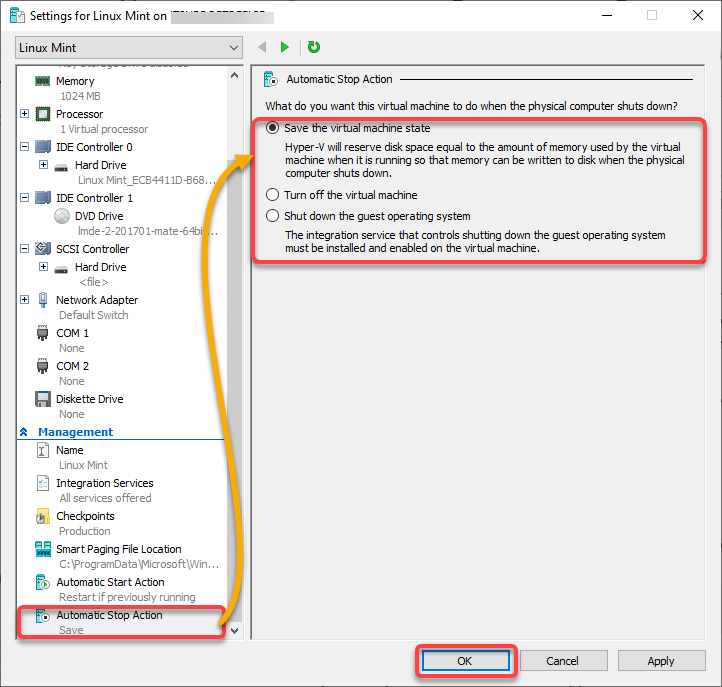
Setting a VM’s Automatic Stop Action
A machine tends to shut down unexpectedly at some point, which causes you to lose your work on your VM. As a resolution, you may want to change the Automatic Stop Action set on your VM, which is Hyper-V’s behavior towards your VM when your computer shuts down.
Set your Automatic Stop Action with the following:
- On your VM’s Settings window, navigate to Automatic Stop Action (left panel).
- Choose the Save the virtual machine state option to reserve, and save your VM’s state as your computer shuts down or restarts. This option tells Hyper-V to start your VM running before a shutdown or restart automatically at the next startup.
- Click OK to save the changes.
Conclusion
Throughout this tutorial, you’ve learned how to create and manage multiple virtual instances of the physical hardware devices via VMware Workstation or Hyper-V.
At this point, you can confidently set up and run your VMs efficiently with minimal effort and cost. Maximize the benefit of either virtualization platform covered in this tutorial, depending on your preferences and specific business needs!
There are several virtualization tools available to Windows 10 users. But three tools dominate the market: VirtualBox, VMware, and Microsoft Hyper-V. But which of these virtual machine tools is best?
Moreover, aren’t they all the same?
Choosing between VirtualBox, VMware Workstation Player, and Windows 10 integrated Hyper-V is difficult. Here’s how the three virtual machine tools stack up and which one you should use for certain tasks.
What Is a Hypervisor?
Let’s start with the big question: how are VirtualBox, VMware Workstation Player, and Hyper-V on Windows different? They all allow you to run a virtual environment on your host machine, right?
Well, yes, they do. But despite that similarity, the virtual machine tools work differently under the hood. That is because virtual machines depend on two different types of software called hypervisors to install and run.
The hypervisor acts as the platform for virtual machines, providing the necessary division between the virtual machine operating system and the host machine hardware. As a result, the host machine can share its resources, like memory and processing power, across multiple workloads.
There are two types of hypervisor: Type 1 and Type 2.
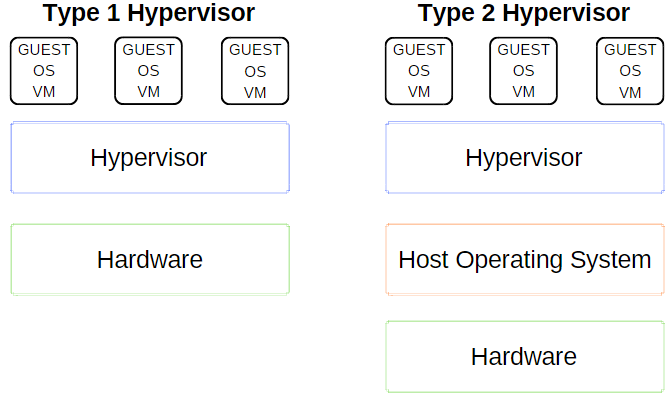
Type 1 Hypervisor
A Type 1 hypervisor runs directly on the host machine’s hardware and is sometimes referred to as a bare-metal hypervisor.
Microsoft Hyper-V is a prime example of a Type 1 hypervisor. It doesn’t require additional installation through an external package and directly manages the guest operating system.
VMWare ESX and vSphere, Citrix XenServer, and Oracle VM are all Type 1 hypervisors.
Type 2 Hypervisor
A Type 2 hypervisor installs on the operating system, just like any other software, and is known as a hosted hypervisor.
The virtual machine environment runs as a process on the host machine and still shares the system hardware, but the management of the virtual machine routes through the host instead of executing commands directly. The consequence of this arrangement is a slight latency between actions.
VirtualBox, VMware Workstation, and VMware Workstation Player are prime examples of a Type 2 hypervisor.
What Is the Difference Between VirtualBox, VMware Workstation Player, and Hyper-V?
Now you know the difference between hypervisor types, understanding the differences, limitations, and positives of each option is easier. Let’s break it down into three key sections.
1. VirtualBox vs. VMware Workstation Player vs. Hyper-V: Ease of Use
Hyper-V is integrated with Windows 10 and Windows 11 Pro, Education, and Enterprise, but not Windows 10 or Windows 11 Home. You have to enable Hyper-V using Windows Features or a PowerShell command, but it takes care of activation itself.
Once activated, Hyper-V offers a quick virtual machine creation option and a more extensive virtual machine creation option through the Hyper-V Manager.
Creating a virtual machine through each Hyper-V option is easy. However, the quick virtual machine creation option auto-fills in the settings, which can cause faults or errors when you attempt to start the virtual machine.
Hyper-V’s more extensive custom virtual machine creation option allows greater control over the settings.
Both VirtualBox and VMware Workstation Player have a virtual machine creation wizard. The wizard on each program guides you through the virtual machine creation process. There are differences, though.
For example, the VirtualBox wizard has you create a basic virtual machine for which you edit the settings afterward, but it does offer some suggested values for specific virtual machine types. Here’s how you set up and use VirtualBox. Furthermore, as a working example, here’s how you can use VirtualBox to install Ubuntu.
Whereas, the VMware Workstation Player wizard allows you to customize settings during the virtual machine creation process.
The difference isn’t much, but it does mean the VMware Workstation Player virtual machine is ready to run after finishing the wizard, rather than having to alter more settings once it completes.
2. VirtualBox vs. VMware Workstation Player vs. Hyper-V: Performance
The performance of a virtual machine relates to the hardware you use to run it. With virtualization, hardware is king. Furthermore, the virtual machine you use makes a huge difference.
I’m testing each virtual machine option using a Lubuntu guest operating system on my desktop, which has an Intel i5-3570K, 16GB RAM, and an Nvidia GTX 1070. It isn’t the most powerful CPU, but it handles most things.
Simply put, VirtualBox is one of the slowest virtual machine options available.
If you have decent hardware, you won’t notice the stutters and whirring quite as much. But on a low power machine, VirtualBox doesn’t give the best virtualization experience.
The performance deficit is most noticeable when you switch to VMware Workstation Player. Running the same guest operating system on the same hardware shows that the VMware Workstation Player is a smoother, slicker experience.
So, where does Hyper-V fit into all of this? The Hyper-V installation of Lubuntu performed well and was noticeably smooth. However, it is important to note that some Windows 10 Hyper-V users report performance issues in other areas once they enable Hyper-V on their system.
Temporarily Switching Hyper-V Virtualization Off and On
If you feel Windows 10 Hyper-V is affecting your gaming performance or otherwise (without a virtual machine environment running), you can use a command to switch Hyper-V virtualization services off.
- Type command in your Start Menu search bar and select Run as Administrator. Then input the following command: bcdedit /set hypervisorlaunchtype off
- Restart your system. Hyper-V virtualization will not start after the reboot, and you should find your performance returns to normal.
- If you want to turn Hyper-V virtualization on again, use the following command: bcdedit /set hypervisorlaunchtype on
- Restart your system again.
3. VirtualBox vs. VMware Workstation Player vs. Hyper-V: Functionality
If you’re unsure about how to choose between the three options, consider the functionality of each option. You can run a guest operating system using VirtualBox, VMware Workstation Player, or Hyper-V, but each hypervisor has its quirks.
Snapshots and Checkpoints
One major plus for VirtualBox and Hyper-V are Snapshots and Checkpoints.
Although the platforms use different names, Snapshots and Checkpoints are very similar tools. They allow you to take an image of the virtual machine in its current status. The image preserves the virtual machine, allowing you to return to that specific moment.
Unfortunately, VMware Workstation Player does not support Snapshots or Checkpoints. You can temporarily suspend the guest operating system to resume from a specific point, but it isn’t the same as creating an image history for the virtual machine.
File Sharing
Each hypervisor allows you to drag and drop files between the host and guest operating system. You can also activate shared files and folders, although Windows 10 Hyper-V makes the process vastly more complicated than VirtualBox or VMware Workstation Player.
Seamless Mode
VirtualBox and VMware Workstation Player both use seamless mode to integrate the virtual machine environment into the host operating system. Seamless mode strips away the additional virtual machine window and menus, making it feel like the guest operating system is part of the host.
Unfortunately, Microsoft Hyper-V does not feature seamless mode.
Virtual Machine Encryption
If you want to encrypt your virtual machines, you’re in luck. Each hypervisor supports encryption of one kind or another.
- VMware Workstation Player supports virtual machine encryption out of the box.
- VirtualBox supports encryption with the installation of VirtualBox Guest Additions, available to each VirtualBox guest environment.
- Hyper-V on Windows 10 and Windows 11 support encryption using Microsoft’s BitLocker.
Each option is secure and works well with the respective platform.
Cost
Each hypervisor is free, but some are freer than others. Why?
VirtualBox and VMware Workstation Player are free for any user. So long as your hardware can run the guest operating system without destroying the host in the process, you can use the free virtual machine software.
Whereas, Windows Hyper-V is also free but only if you have the correct version of Windows 10 or Windows 11.
There are workarounds for Windows 10 and Windows 11 Home users desperate to use Hyper-V on their hardware. But those people may as well use one of the free alternatives rather than shoehorn a solution.
Don’t forget, the fix might work today, but it might not with the next Windows update.
Guest Operating Systems
Windows 10 Hyper-V has some limitations regarding guest operating systems. Hyper-V supports Windows, Linux, and FreeBSD virtual machines. It does not support macOS.
VirtualBox and VMware Workstation Player support almost all guest operating systems, including macOS.
Please note that a macOS guest operating won’t work out of the box. Follow our tutorial on how to install macOS in VirtualBox or VMware Workstation Player on Windows 10.
Choosing between VirtualBox, VMware Workstation Player, and Hyper-V is tricky. If you have a powerful machine running Windows 10 or Windows 11 Pro, Education, or Enterprise, you can take your pick of the hypervisors.
If you are running a less powerful machine, I would advise using VMware Workstation Player. It offers better support and stability for a wide range of hardware.
Organizations today often require many servers in different physical locations, each operating at their highest capacity to drive efficiency and ROI. This has been made possible with the use of virtualization technologies that allow a single physical server to run multiple virtual machines that each have their own guest operating system.
Virtualization technology has its origins in the 1960s, with work that was done at IBM on time-sharing of mainframe computers. VMware didn’t arrive on the scene until the late 1990s. In 2001, VMware introduced ESX Server, a Type-1 hypervisor. This technology doesn’t require a host operating system to run virtual machines. Instead, the hypervisor runs on the “bare metal.”

Today, it’s standard practice to use virtualization to increase the utilization of the computing resources in the computer.
There are several different types of virtualization including server, network and desktop virtualization.
Server Virtualization – This allows for the creation of multiple virtual server instances on a single physical server. This means companies can run multiple business applications, each in their own virtual machine (VM), on these servers. The increased server utilization allows businesses to buy fewer physical machines and it also reduces the power and cooling costs associated with running datacenter servers.
Network Virtualization – This involves separating network resources from hardware and recreating them on a single, software-based administrative unit. Applications can run on a virtual network as if they were running on a physical network. The physical hardware, though still required, need not be reconfigured when a new virtual machine is added to the network or moved to a different part of the network. Networks can be cloned and recreated in seconds with network virtualization.
Desktop Virtualization – Virtualization of desktops is done to create a virtual version of the workstation along with its operating system that can be accessed remotely.
What Is Hyper-V and How Does It Work?
Microsoft’s hardware virtualization product, Hyper-V, enables you to create and run a software version of a computer, called a virtual machine (VM). Hyper-V can have multiple virtual machines, each with their own operating system (OS), on one computer, allowing VMs to run these multiple OSes alongside each other. This eliminates the need to dedicate a single machine to a specific OS.
Microsoft Hyper-V is also a Type-1 Hypervisor. In Hyper-V, there is a parent partition and any number of child partitions. The host OS runs in the parent partition. Each child partition is a VM that is a complete virtual computer, with a guest OS (need not be Microsoft) and programs running on it. The VMs use the same hardware resources as the host. A single Hyper-V host can have many VMs created on it.
Why Is Hyper-V used?
Hyper-V allows you to use your physical hardware more effectively by running multiple workloads on a single machine. It lets you use fewer physical servers, thereby reducing hardware costs and saving space, power and cooling costs.
With Hyper-V, you can set up and scale your own private cloud environment. Many organizations use Hyper-V to centralize the management of server farms. This allows them to control their VMs efficiently and reduce the time spent on IT infrastructure management.
What Does Hyper-V Consist of?
Hyper-V includes multiple components that make up the Microsoft virtualization platform. These include:
- Windows Hypervisor
- Hyper-V Virtual Machine Management Service
- Virtualization WMI provider
- Virtual machine bus (VMbus)
- Virtualization service provider (VSP)
- Virtual infrastructure driver (VID)
Additional Hyper-V tools that need to be installed include:
- Hyper-V Manager
- Hyper-V module for Windows PowerShell
- Virtual Machine Connection (VMConnect)
- Windows PowerShell Direct
Hyper-V is available in three versions:
- Hyper-V on Windows 10
- Hyper-V Servers
- Hyper-V on Windows Server
What Are the Benefits of Hyper-V?
There are many benefits of Hyper-V, a few of them being:
High Scalability and Flexibility
With the installation of Hyper-V on a private cloud environment, organizations can be more flexible with their on-demand IT services and expand when required. Hyper-V puts existing hardware to the maximum use, ultimately reducing costs and increasing efficiency.
Minimized Downtime
Having multiple instances of virtual servers minimizes the impact of sudden downtime, which means system availability increases and companies can improve business continuity.
Improved Security
Hyper-V safeguards VMs from malware and unauthorized access, making your IT environment and your data more secure.
What Is VMware?
VMware is also a hypervisor-based virtualization technology that allows you to run multiple virtual machines on the same physical hardware. Each VM can run its own OS and applications. As a leader in virtualization software, VMware allows multiple copies of the same operating system or several different operating systems to run on the same x86-based machine.
Hyper-V vs. VMware: What Are the Differences?
Hyper-V and VMware each have their own advantages and disadvantages and choosing between the two depends on your specific business requirements.
Let’s take a look at a few of the noticeable differences when it comes to their product maturity, complexity and pricing.
| Hyper-V | VMWare |
|---|---|
| Hyper-V supports Windows, Linux and FreeBSD operating systems. | VMware supports Windows, Linux, Unix and macOS operating systems. |
| Hyper-V’s pricing depends on the number of cores on the host and may be preferred by smaller companies. | VMware charges per processor and its pricing structure might appeal to larger organizations. |
| Hyper-V’s Cluster Shared Volume is somewhat more complex and more difficult to use than VMware’s storage deployment system. | VMware’s Virtual Machine File System (VMFS) holds a slight edge when it comes to clustering. |
| Hyper-V uses a single memory technique called “Dynamic Memory.” Using the dynamic memory settings, Hyper-V virtual machine memory can be added or released from the virtual machine back to the Hyper-V host. | VMware implements a variety of techniques, such as memory compression and transparent page sharing, to ensure that RAM use in the VM is optimized. It is a more complex system than Hyper-V’s memory technique. |
Discovery, Mapping and Monitoring of VMware and Hyper-V Environments
Your endpoint management tool should discover and include VMware and Hyper-V hosts and VMs on its network topology map. This provides the visibility you need to effectively manage your entire IT infrastructure. In addition, the ability to monitor hosts and VMs allows IT teams to use the endpoint management solution to maintain high uptime and performance of VMs.
Kaseya VSA monitors and manages both VMware and Hyper-V infrastructure efficiently. With endpoint management and network monitoring in one platform, Kaseya VSA monitors everything including traditional endpoints (servers, desktops, laptops), SNMP network devices and printers. Learn more about Kaseya VSA by requesting a demo.
