SSH access on volumio
Volumio supports command-line access via SSH. This can be helpful if you need
full access to the device, for example if you are debugging a problem or
want to test changes to the system.
Most popular operating systems support making SSH connections in some way:
-
Windows : Install Putty, or use
ssh.exeon Windows 10 -
Linux : ssh command from a terminal
-
macOS : ssh command from the Terminal app
(You may need to install openssh first)
Once you have enabled SSH access (see below), you can log in with:
-
user: volumio
-
password: volumio
Example (Linux) :
laptop$ ssh volumio@192.168.1.54
volumio@192.168.1.54's password:
Type in the password at the prompt and press the <Enter> key.
(The password will not be shown on the screen)
And here you are !
volumio@192.168.1.54's password:
                       ___
                      /_                         __
         __  __    ___//     __  __    ___ ___ /_    ___
        / /   / __`\    / /  /' __` __`/   / __`
          _/ |/ L \_ _  _ / / /   / L
          ___/  ____//____\ ____/ _ _ _ _ ____/
          /__/   /___/ /____/ /___/  /_//_//_//_//___/

             Free Audiophile Linux Music Player - Version 2.0

          C 2015 Michelangelo Guarise - Volumio Team - Volumio.org


Volumio Debian GNU/Linux comes with ABSOLUTELY NO WARRANTY, to the extent
permitted by applicable law.
volumio@192.168.1.54:~$
From here you can get full access to your device.
Sometimes you will want to run commands that require superuser (or ‘root’)
privileges. To do that use the sudo command. For example:
volumio@192.168.1.54:~$ sudo nano /etc/samba/smb.conf
[sudo] password for volumio:
This runs the command nano /etc/samba/smb.conf as the superuser.
When prompted for the password, use the same one you used to log in with.
WARNING! You can damage your Volumio with sudo. If you delete
the wrong file or use incorrect syntax when editing a file, the system may
stop working correctly.
Please be aware that editing system files may stop you being able to update
Volumio over the air. This is because the system does an integrity check
(to make sure the update will apply correctly). If changes are detected, the
integrity check will fail and the update will not proceed.
How to enable SSH
For security reasons, SSH is disabled by default on all versions after 2.199 (except first boot). It is easy to enable (and disable).
First method: DEV UI (easy)
Navigate to http://volumio.local/dev or http://yourvolumioip/dev, where ‘yourvolumioip’ is the actual IP addess of your device eg. 192.168.1.54.
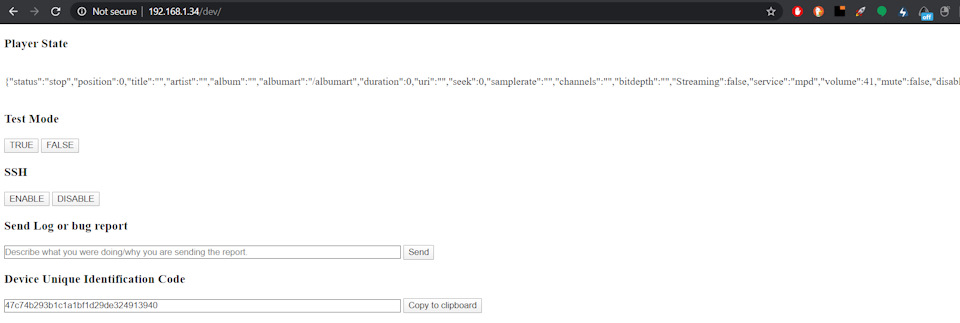
Find the SSH section, and click ‘enable’. From now on your SSH will be permanently enabled. To disable SSH again, click ‘disable’.
Note : When clicking on the ‘enable’ (or ‘disable’) button, you will see no change in the browser window, but the SSH server will be started (or stopped).
Second method: file (more advanced)
This involves adding a file with a special name to the SD card containing your Volumio.
- Flash Volumio to the SD card, if you have not done so already
- Mount the SD card on your computer
- Create a file called
sshin the/bootpartition on the card.
The file does not need anything inside it, but the name must bessh.
Содержание
- Как установить Volumio на свой компьютер?
- Как запустить Volumio на моем компьютере?
- Как установить Volumio на Windows 10?
- Как подключить Volumio к WIFI?
- Volumio бесплатный?
- Как мне получить доступ к Volumio?
- Как мне войти в Volumio?
- Как добавить прилив в Volumio?
- Как использовать Spotify на Volumio?
- Как включить SSH на Volumio?
- Как настроить Volumio на Raspberry Pi?
- Может ли Raspberry Pi воспроизводить музыку?
- Что такое Volumio?
- Что такое Roon audio?
- Volumio на пк
- Volumio для ПК: Как скачать и установить на ПК Windows
- 1: Загрузить эмулятор приложения Andriod
- 3: С помощью Volumio на компьютере
- Другие источники загрузки
- Volumio Описание
- VirtualBox: устанавливаем Volumio
- Устанавливаем Volumio как виртуальную машину VirtualBox
- Что такое Volumio?
- Конвертируем образ img в VDI
- Создаем виртуальную машину в VirtulBox
- Переходим в настройки созданного виртуального хоста (Ctrl+s)
- Авторизация в системе
- Volumio для Khadas
- Оптимизация Volumio и Moode для работы с BubbleUPnP
Как установить Volumio на свой компьютер?
Вставьте карту MicroSD в свой компьютер, вы можете использовать внешний кардридер или слот SD, если он есть на вашем компьютере. Нажмите Выбрать диск и выберите SD Card SD Card reader. Сделанный! Volumio теперь на вашей SD-карте!
Как запустить Volumio на моем компьютере?
Самый простой способ установки на ПК — использовать USB-накопитель с соответствующим образом Volumio. После того, как система будет запущена и запущена (но не установлена на жесткий диск), в графическом интерфейсе пользователя появится опция для установки на жесткий диск.
Как установить Volumio на Windows 10?
Volumio — это не приложение, а операционная система. Вы не можете установить его как приложение в Windows. Вы можете заставить его работать с новой сборкой терминала Ubuntu в Windows 10. Для этого потребуются некоторые знания Linux и приложения.
Как подключить Volumio к WIFI?
В веб-интерфейсе выберите настройки и сеть. Если вы немного подождете, вы должны увидеть список найденных сетей Wi-Fi, и вы сможете выбрать свою и ввести пароль. После этого Wi-Fi будет сброшен, и Volumio подключится к вашей сети.
Volumio бесплатный?
Да, Volumio всегда будет бесплатным и открытым исходным кодом. Оплачиваются только компоненты премиум-класса.
Как мне получить доступ к Volumio?
ПОДКЛЮЧИТЕСЬ К ЭТОМ
Как мне войти в Volumio?
Разрешите Volumio загрузиться, подключитесь к точке доступа Volumio (пароль «Volumio2») на внешнем устройстве (мобильном телефоне, ноутбуке или планшете) и войдите в пользовательский интерфейс Volumio в браузере по IP-адресу 192.168.0. 1.254. Затем вы можете настроить различные параметры, а также установить плагин Touch Display.
Как добавить прилив в Volumio?
Запустите AudFree Tidal Downloader, и приложение Tidal откроется автоматически. Войдите в свою учетную запись Tidal и найдите трек / альбом / плейлист Tidal, который вы хотите воспроизвести на Volumio.
Как использовать Spotify на Volumio?
Как включить SSH на Volumio?
Перейдите к пользовательскому интерфейсу DEV, указав в браузере VOLUMIOIP / DEV или volumio. местный / DEV. Найдите раздел SSH и нажмите «Включить». С этого момента ваш SSH будет постоянно включен.
Как настроить Volumio на Raspberry Pi?
Как установить Volumio на Raspberry Pi
Может ли Raspberry Pi воспроизводить музыку?
Вы можете не только использовать Raspberry Pi в качестве медиацентра Kodi, Raspberry Pi также может воспроизводить музыку. Благодаря порту аудиовыхода (см. Ниже) вы можете передавать музыку через специальный динамик или простые наушники. С помощью HDMI вы даже можете отправлять звук на свой телевизор (о чем вы, вероятно, уже знали).
Что такое Volumio?
Volumio — это музыкальный проигрыватель без наушников с открытым исходным кодом, который позволяет воспроизводить практически каждый музыкальный файл, обеспечивая поддержку MP3, FLAC, WAV, AAC, ALAC, DSD и многих других.
Что такое Roon audio?
Что такое Роон? Roon — это программа для подключения, потоковой передачи и управления музыкой, которая привносит интеллектуальные возможности мультирум в ваше Hi-Fi оборудование. Что и где делать, подсказывает вашей музыке мозг — полицейский, управляющий движением. Roon не является сервисом потоковой передачи музыки сам по себе.
Источник
Volumio на пк
Volumio для ПК: Как скачать и установить на ПК Windows


Чтобы получить Volumio работать на вашем компьютере легко. Вам обязательно нужно обратить внимание на шаги, перечисленные ниже. Мы поможем вам скачать и установить Volumio на вашем компьютере в 4 простых шага ниже:
1: Загрузить эмулятор приложения Andriod
2: Теперь установите программный эмулятор на ПК с Windows
3: С помощью Volumio на компьютере
После установки откройте приложение эмулятора и введите Volumio в строке поиска. Теперь нажмите Поиск. Вы легко увидите желаемое приложение. Нажмите здесь. Это будет отображаться Volumio в вашем программном обеспечении эмулятора. Нажмите кнопку Установить, и ваше приложение начнет установку. Чтобы использовать приложение, сделайте это:
Вы увидите значок «Все приложения».
Нажмите, чтобы перейти на страницу, содержащую все ваши установленные приложения.
Вы увидите app icon. Нажмите, чтобы начать использовать ваше приложение. Вы можете начать использовать Volumio для ПК!
Другие источники загрузки
Volumio разработан Michelangelo Guarise. Этот сайт не имеет прямого отношения к разработчикам. Все товарные знаки, зарегистрированные товарные знаки, названия продуктов и названия компаний или логотипы, упомянутые здесь, являются собственностью их соответствующих владельцев.
Если вы считаете, что это приложение / игра нарушает ваши авторские права, пожалуйста, Свяжитесь с нами здесь. Мы DMCA-совместимы и рады работать с вами. Пожалуйста, найдите DMCA страница здесь.
Volumio Описание
Источник
VirtualBox: устанавливаем Volumio
Устанавливаем Volumio как виртуальную машину VirtualBox
В рамках данного блога уже была статья об установке Volumio как виртуальную машину.
Но прошлый вариант у меня работал, но в интернете были сведения, что кто-то не смог запустить.
Тем более, что сегодняшний вариант удобней и проще:)
Что такое Volumio?
Это по сути сетевой плеер, разработчики позиционируют его как аудиофильский:)
По сути это MPD проигрыватель с наличием web-интерфейса и поддержки широкого спектра ЦАП.
Разработчики обещают, что он останется свободным и бесплатным.
Но в данный момент существует два вида подписки на так называемый сервис MyVolumio.
Если два года назад подписка нужна была для доступа к вашей музыкально библиотеке из любой сети.
То сегодня к примеру возможность проигрывания с Bluetooth вы сможете получить только в рамках ежемесячной подписки.
Volumio построен на Debian X86 и распространяется в виде img образов для различных платформ.
Образ содержит в себе несколько разделов.
Скачиваем образ Volumio, выбрав платформу PC (X86/X64).
Распаковываем скаченный zip файл в директорию…
Пусть будет C:temp
Конвертируем образ img в VDI
Создаем виртуальную машину в VirtulBox
Если вы планируете загружать музыку непосредственно в Volumio, то имеет смысл увеличить размер диска.
Но это можно сделать и потом.
Остановив виртуальный хост и добавить размер, при этом Volumio автоматически распределит новое свободное пространство.
Для меня будет проще создать в GUI VirtualBox:)
Количество памяти на ваше усмотрение (2GB — будет достаточно)
Переходим в настройки созданного виртуального хоста (Ctrl+s)
Где устанавливаем сеть как Бридж (Сетевой мост), включаем в Аудиоконтроллер.
Сохраняем и стартуем.
Для доступа по SSH необходимо запустить openssh сервер.
Делается это на странице http://ip_volumio/dev
Авторизация в системе
Имя: volumio
Пароль: volumio
Источник
Volumio для Khadas
Есть люди, которые пользуются тем что им дают. Есть другие, кому мало того что есть, такие люди начинают создавать чтото свое…
Вот именно людьми, которые не готовы идти на компромиссы, и была создана аудиофильская версия линукс под наименованием Volumio.
Данная система представляет собой только плеер и больше ничего. Нельзя проигрывать видео или ставить приложения для навигации, тут только звук, но какой!
Управлять volumio можно только удаленно по по сети Ethernet или wifi с любого android, apple или windows устройства. Официальное приложение есть во всех магазинах, а можно и без приложения — просто через браузер. Монитор (дисплей) с тачскрином НЕ НУЖЕН, т.к. кроме командной строки и лога загрузки там больше ничего не увидишь!
Для Khadas уже собраны первые тестовые образы системы — скачать можно тут.Данные образы подходят как для Vim1, так и для Vim2. А тестовость заключается в том что Wi-Fi не работает, вывод звука на бортовой i2s и s/pdif тоже не работает. Звук пока выводится только в USB. Управление с ИК пульта тоже не работает.
UPD_10/04/2018: начиная с версии 0.6 — wifi уже работает, точка доступа тоже работает (пароль на нее: volumio2), i2s работает, spdif работает.
Больше информации тут
Источник
Оптимизация Volumio и Moode для работы с BubbleUPnP
Часто приходится слышать, что доступные одноплатники малинка&Co как источники автозвука слишком капризны и нестабильны. Особенно когда хочется слушать стриминговые сервисы, причем в lossless.
На самом деле, пеняющие на малинку с Volumio обычно просто не умеют их готовить.
Достаточно отключить протокол OpenHome и транскодирование ffmpeg чтобы популярный андроидный плейер BubbleUPnP начал качественно, стабильно и быстро стримить музыку по WiFi на любой одноплатник с Volumio или Moode Audio.
Настройки эти закопаны довольно глубоко в конфигурационных файлах Линукса, так что привожу пошаговую инструкцию.
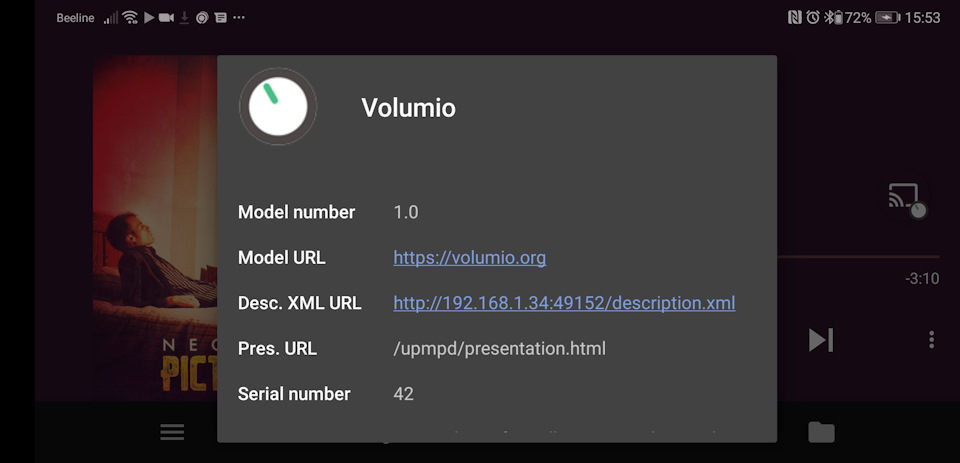
1. Выяснить IP-адрес подопытной Volumio/Moode. Достаточно ткнуть в иконку выбора приемника в BubbleUPnP, в контекстном меню (три точки) выбрать Info и посмотреть строку Desc. XML URL.
2. Скачать и установить любой терминал с поддержкой SSH. Я использовал Tera Term
3. Включить SSH в Volumio, открыв в браузере “IP-адрес Volumio”/dev/ (вместо “IP-адрес Volumio” подставьте IP из первого пункта, в моем случае адрес 192.168.1.34/dev/) и нажав кнопку Enable под заголовком SSH. Для Moode Audio этот шаг следует пропустить.
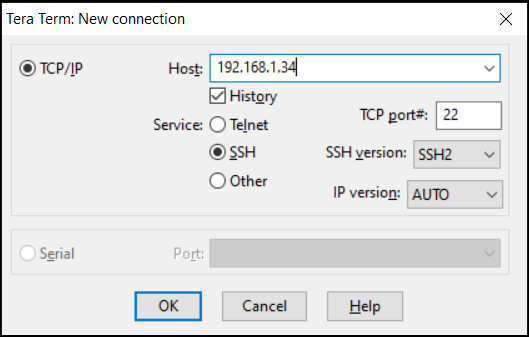
4. Загрузить Tera Term, нажать Alt-N, в меню “New Connection” выбрать TCP/IP, SSH, задать IP-адрес Volumio/Moode в строке Host: и нажать Ok
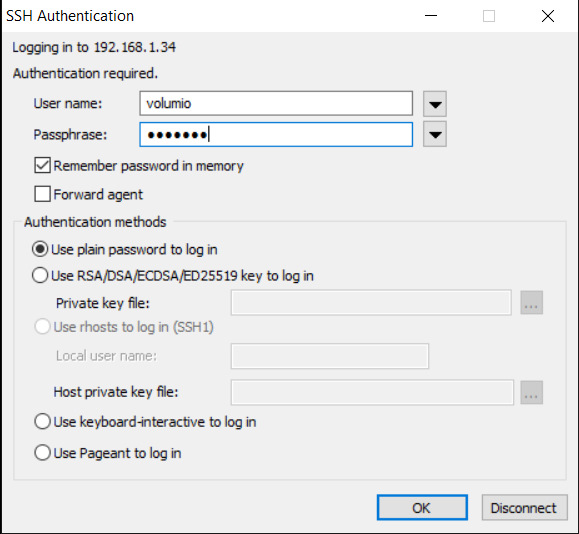
5. В окне SSH Authentication в поля User Name: и Passphrase: для Volumio дважды ввести слово volumio.
Для Moode ввести слова pi и moodeaudio соответственно
6. В командной строке Volumio ввести команду:
sudo nano /volumio/app/plugins/audio_interface/upnp/upmpdcli.conf.tmpl
затем при запросе админского пароля еще раз ввести volumio
Для Moode ввести команду:
sudo nano /etc/upmpdcli.conf
7. Откроется простенький текстовый редактор nano. Для Volumio стрелками подведите курсор к строке “openhome = 1” (без кавычек) и замените 1 на 0
Для Moode в самом начале файла нужно добавить строку
openhome = 0
8. Сохранить изменения, нажав Ctrl-O, затем Enter
9. Выйти из nano, нажав Ctrl-X
10. Перегрузить Volumio/Moode, введя в командной строке: sudo reboot
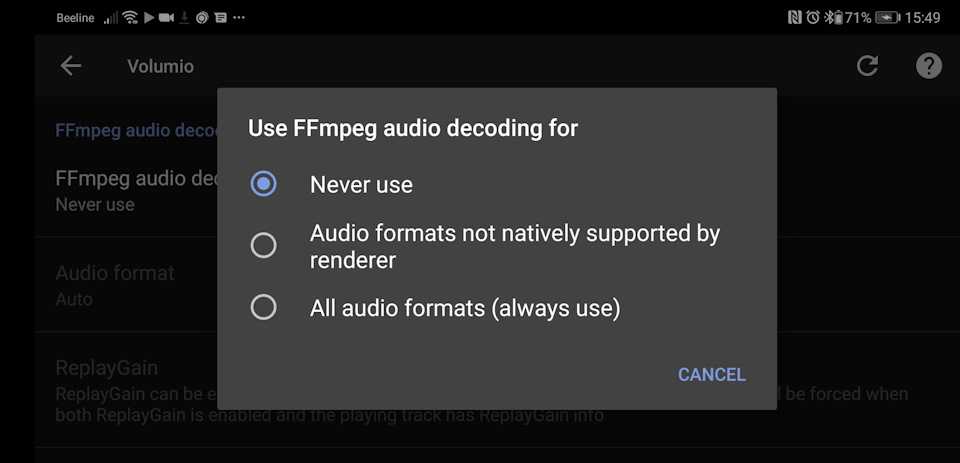
Для качества полезно также полностью отключить ffmpeg, загрузив BubbleUPnP в меню Settings->Individual UPnP/DLNA renderers settings->Volumio->FFmpeg audio decoding и выбрать “Never use”
После этих нехитрых операций Бублик станет работать с Volumio ощутимо стабильнее, быстрее и качественнее.
Рецепт уже проверен и подтвержден несколькими читателями моего бложика.
Всем здоровья, весенней погоды и любимого звука!
Источник
-
#5
всё получилось с первого раза … Супер Спасибо
Влад
Well-known member
-
#6
Доброго времени. Я, опробовал установку плагина GPIO-Button, минуя регистрацию — всё отлично получилось. Ранее, до установки, использовал обычные записи оверлеев в файле userconfig.txt Аналогично установил touch_display_1_2_1Busterbeta. Теперь Volumio трудится без использования внешнего управления.
Небольшая добавка. Немного позже установил PeppyMeter Screensaver, весьма интересный плагин с живыми стрелочными индикаторами.
Вид индикаторов можно настраивать. Но, индикатор показывает внутренний уровень сигнала, не на выходе усилителя. На мой взгляд, плагин ещё развивается, но прикольный.
Последнее редактирование: 31.03.2022
Часто приходится слышать, что доступные одноплатники малинка&Co как источники автозвука слишком капризны и нестабильны. Особенно когда хочется слушать стриминговые сервисы, причем в lossless.
Нюанс в том, что альтернативы им либо, мягко говоря, дороговаты (от $500 за Bluesound Node 2i), либо еще более привередливы как семейство Chromecast.
На самом деле, пеняющие на малинку с Volumio обычно просто не умеют их готовить.
Достаточно отключить протокол OpenHome и транскодирование ffmpeg чтобы популярный андроидный плейер BubbleUPnP начал качественно, стабильно и быстро стримить музыку по WiFi на любой одноплатник с Volumio или Moode Audio.
Настройки эти закопаны довольно глубоко в конфигурационных файлах Линукса, так что привожу пошаговую инструкцию.
1. Выяснить IP-адрес подопытной Volumio/Moode. Достаточно ткнуть в иконку выбора приемника в BubbleUPnP, в контекстном меню (три точки) выбрать Info и посмотреть строку Desc. XML URL.
Полный размер
В данном случае IP-адрес 192.168.1.34
2. Скачать и установить любой терминал с поддержкой SSH. Я использовал Tera Term
3. Включить SSH в Volumio, открыв в браузере “IP-адрес Volumio”/dev/ (вместо “IP-адрес Volumio” подставьте IP из первого пункта, в моем случае адрес 192.168.1.34/dev/) и нажав кнопку Enable под заголовком SSH. Для Moode Audio этот шаг следует пропустить.
4. Загрузить Tera Term, нажать Alt-N, в меню “New Connection” выбрать TCP/IP, SSH, задать IP-адрес Volumio/Moode в строке Host: и нажать Ok
5. В окне SSH Authentication в поля User Name: и Passphrase: для Volumio дважды ввести слово volumio.
Для Moode ввести слова pi и moodeaudio соответственно
Пример для Volumio
6. В командной строке Volumio ввести команду:
sudo nano /volumio/app/plugins/audio_interface/upnp/upmpdcli.conf.tmpl
затем при запросе админского пароля еще раз ввести volumio
Для Moode ввести команду:
sudo nano /etc/upmpdcli.conf
Полный размер
Еще один пример для Volumio
7. Откроется простенький текстовый редактор nano. Для Volumio стрелками подведите курсор к строке “openhome = 1” (без кавычек) и замените 1 на 0
Для Moode в самом начале файла нужно добавить строку
openhome = 0
8. Сохранить изменения, нажав Ctrl-O, затем Enter
9. Выйти из nano, нажав Ctrl-X
10. Перегрузить Volumio/Moode, введя в командной строке: sudo reboot
Для качества полезно также полностью отключить ffmpeg, загрузив BubbleUPnP в меню Settings->Individual UPnP/DLNA renderers settings->Volumio->FFmpeg audio decoding и выбрать “Never use”
После этих нехитрых операций Бублик станет работать с Volumio ощутимо стабильнее, быстрее и качественнее.
Рецепт уже проверен и подтвержден несколькими читателями моего бложика.
Всем здоровья, весенней погоды и любимого звука!
General
What is Volumio?
Volumio is a free and Open Source Linux Distribution, which runs on a variety of devices, typically small and cheap computers like the Raspberry Pi, but also on low power PCs, notebooks or thin clients. It is designed and finely-tuned exclusively for bit-perfect music playback, transforming your device into a headless Audiophile Music Player, that is controlled via your mobile phone, computer or tablet.
What devices are supported?
There are recent images available for the Raspberry Pi (all variants : Raspberry Pi 3 Model B, Raspberry Pi 3 Model B+, Raspberry Pi Zero, Raspberry Pi Zero W.), x86/x64 (PC/MAC), Odroid C1/C2, Allo Sparky, Asus Tinkerboard.
In the community portings page of the forum, you’ll find image for other devices : Pine64, Rock64, Sopine and other system : Community portings on the forum
What are the device RAM (memory) requirements for Volumio?
Volumio will work much more smoothly and quickly in devices with more RAM. The recommended minimum is 1GB, but people are running devices with less.
How do I enable ssh?
ssh is disabled by default, except on the first boot, for security reasons. It is a simple procedure to enable it if required.
What is a plugin?
The concept of a plugin is to expand the functionality of Volumio in a particular way, for example backup of data files. Most of these are written by the Volumio Community, and can be installed from the ‘Plugins’ section of the Volumio UI. Officially approved plugins may be installed directly from within the UI, whereas others are required to be downloaded as a zip file first.
For more details, have look here : Plugins System Overview
There is a list of the currently available plugins here.
Is there an app for Volumio?
Many people like to control Volumio simply from a browser, but there are dedicated apps available from both Apple’s App Store & Google Play. Indeed, the official Volumio android app is one way of showing your support for Volumio.
What files format can be read ?
Volumio uses mpd and other players.
Mpd is compiled in order to read following files :
Readable formats:
- [mad] mp3 mp2
- [mpg123] mp3
- [vorbis] ogg oga
- [oggflac] ogg oga
- [flac] flac
- [opus] opus ogg oga
- [sndfile] wav aiff aif au snd paf iff svx sf voc w64 pvf xi htk caf sd2
- [audiofile] wav au aiff aif
- [dsdiff] dff
- [dsf] dsf
- [faad] aac
- [mpcdec] mpc
- [wavpack] wv
- [modplug] 669 amf ams dbm dfm dsm far it med mdl mod mtm mt2 okt s3m stm ult umx xm
- [ffmpeg] 16sv 3g2 3gp 4xm 8svx aa3 aac ac3 afc aif aifc aiff al alaw amr anim apc ape asf atrac au aud avi avm2 avs bap bfi c93 cak cin cmv cpk daud dct divx dts dv dvd dxa eac3 film flac flc fli fll flx flv g726 gsm gxf iss m1v m2v m2t m2ts m4a m4b m4v mad mj2 mjpeg mjpg mka mkv mlp mm mmf mov mp+ mp1 mp2 mp3 mp4 mpc mpeg mpg mpga mpp mpu mve mvi mxf nc nsv nut nuv oga ogm ogv ogx oma ogg omg opus psp pva qcp qt r3d ra ram rl2 rm rmvb roq rpl rvc shn smk snd sol son spx str swf tak tgi tgq tgv thp ts tsp tta xa xvid uv uv2 vb vid vob voc vp6 vmd wav webm wma wmv wsaud wsvga wv wve
- [gme] ay gbs gym hes kss nsf nsfe sap spc vgm vgz
- [pcm]
Web Radios
Volumio can play web radio.
Airplay
Volumio can read Airplay streams using shairport-sync-reader
Upnp
Volumio can read Upnp stream
More readable files
With use of plugins, Volumio can read miscellanious streaming services
- Spotify (from webUI or Spotify connect)
- Youtube streams
- Qobuz (using MyVolumio)
- Tidal (using MyVolumio)
- Other to come
01st July 2018
VOLUMIO SPOTIFY CONNECT PLUGIN
IMPORTANT
- Requires a Premium or Family account
IMPORTANT 2
-
Now the plugin works with armv6 RPI (previvous to RPI 2) even if just tested on RPI B…And of course with armv7 device (RPI 2, RPI3, Sparky )
-
Version for armV6 requires a chroot system (11Mo). Installation may be long…10min! Be patient !
This plugin is designed to use Spotify connect web with volumio
Base on this work : https://github.com/Fornoth/spotify-connect-web
With the great work of ashthespy for the webUI integration!
Thank you to all developpers !
But from a external device and the offcial Spotify app, you’ll be able to send your music to your device.
- This version supports Family account : every member can use the device !
To install
Before intalling the dev version, REMOVE, if exists, the plugin from your system using the webUI plugins page.
Due to a Volumio decision, now third party or dev plugin can only be install through SSH. Here is how:
1. Enable SSH and connect to Volumio
For security reasons, SSH is disabled by default on all versions after 2.199 (except first boot). It can be however enabled very easily.
Navigate to the DEV ui by pointing your browser to http://VOLUMIOIP/DEV or http://volumio.local/DEV . Find the SSH section, and click enable. From now on your SSH will be permanently enabled.
Now you can connect to Volumio with username volumio and password volumio.
ssh volumio@volumio.local (if you changed the name of your device, replace the second volumio by it or use its IP address.
2. Download and install the plugin
Type the following commands to download and install plugin:
wget https://github.com/balbuze/volumio-plugins/raw/master/plugins/music_service/volspotconnect/volspotconnect.zip
mkdir ./volspotconnect
miniunzip volspotconnect.zip -d ./volspotconnect
cd ./volspotconnect2
volumio plugin install
Issues
- Possible problem with softvol…
Last changes
July 1st 2018
- add dutch tanslation.Thank you @LeonCB https://github.com/LeonCB
April 22th
- functionnal play next previous buttons (@ash !)
- update readme
November 26th
possible fix for softvol with i2s dac
November 14th
fix for jack output (maybe hdmi ?)
November 12th
possible fix for some dac / board (kali+piano)
correction for UI not login after install
November 11th
correction for no sound for arm6 (rpi 0 rpi B)
correct display for sample rate
works with volspimpleequal and softvol
November 8th
use of speexrate for resampling
force sample to 44100Hz
fix for the issue when changing user thanks to : https://github.com/markubiak and https://github.com/ashthespy
November 7th
correction
possible fix for the no sound problem…
October 8th
Now works with volsimpleequal and brutefir plugin
September 30th
GReat improvement : info title album artist album art in webUI! Thanks ashthespy!
warning webUI buttons not operationnal (yet)!
solved some problem with armv7 version ( mixer error )
June 17th 2017
merged PR from Saiyato
Febuary 5th
Better translation for help tips
January 27th
add support for aarch64 cpu (odroid c2)
reverse — escape special characters in password — because it does not work in some case. Need to investigate
January 26th
Merge branch ‘petternorman-master’ volspotconnect — escape special chars in password
January 14th
change in install (downloaded files location) are nox in /tmp
remove redondant message in webUI
December 27th
autoconfig mixer_device_index from alsa setting
December 24th
ver1.5.5 seems to works with software mixer !!!!
add missing alsa mixer in chroot package
December 23th
correction for some case of dac/mixer setting — ! something is broken with softvol !
December 21th
Fix the problem when no mixer is selected («none» setting)
December 19th
Chroot Version Revert some file removing… Should be solved : laggy sound, unworking plugin with softvol, unworking plugin….
December 18th
Correction for in volspotconnectchroot.tar.xz Fails to work due to a missing file
December 16th
New cleanup to reduce packages size
December 15th
new volspotconnectchroot.tar.xz with new sorting and new compression : 11Mo !!! ( 180Mo at the begining)
December 13th
Thanks to a drastic sorting, Volspotconnectchroot.tar.gz in now 55Mo ! (prévious was 180Mo )
December 11th
correction for low bitrate
December 8th
new repo (github) to store package
Change in avahi config. Share device should be seenable by any user on the local network
November 30 th
changes in install
chroot version should uninstall properly now ( without braking volumio)
November 27 th
change output hw in plughw
copy asound.conf in chroot /etc in case of software mixer
November 26 th
desinstall now remove configuration file
remove x bit on volspotconnect.service chroot
November 20th
- change to suppport mixer name with space
October 24 th
- update readme
October 21th
- work on install script — a special service is used for rpi1
October 20th
- properly stop chroot system with RPI 1
October 18th
- uncomment avahi installation in install script
October 17th
- correction in install script
October 16th
- install script now return a error if download lib failed
October 14th
- correction for software mixer
October 13th
- correction in install.sh
- armv6 now supported !
October 12th
- Support for armv6l ( rpi B, B+) — but fails to install…
- spotify connect lib are downloaded from volumio repo
October 8th
- correction mixer_device_index
October 7th
- new work in case of software mixer or No mixer — seems to work
- mod in volspotconnect.service (set user as root) (useful for a next release suppporting RPI 1 and ZERO !
October 3rd
- remove useless node modules
- clean code
October 2nd
- work to remove mixer settings if no mixer in volumio. Should help with hifiberry digi+
- correct output device
October 1st
- volspotconnect is now managed as a systemctl service
- add switch to enable/ disable family share
Previous changes…
- Software mixer support
- now the plugin is automatically updated when output or device or device name is changed in volumio
Issues :
- wrong music speed on some usb dac
- some problem to uninstall plugin with armv6 devices if plugin not disabled before uninstall
Todo
- Add album art and working button in volumio UI


