Если вам не удается найти файл на компьютере или если вы случайно удалили или изменили его, то вы можете восстановить его из резервной копии (если вы используете программу архивации данных) или попытаться восстановить его предыдущую версию. Предыдущие версии — это копии файлов и папок, которые Windows автоматически сохраняет в составе точки восстановления. Предыдущие версии иногда называют теневыми копиями.
Чтобы восстановить файл из резервной копии, убедитесь, что доступен носитель или диск, на который сохранена резервная копия, а затем выполните указанные ниже действия.
Восстановление файлов из резервной копии
-
Откройте функцию «Резервное копирование и восстановление», нажатием кнопки
«Начните», выберите панель управления,выберите «Система и обслуживание», а затем выберите «Резервное копирование и восстановление».
-
Выберите Восстановить мои файлы, а затем следуйте инструкциям в мастере.
Восстановите удаленные файлы и папки или предыдущее состояние файла или папки.
Восстановление удаленного файла или папки
-
Откройте «Компьютер», нажатием кнопки «Начните
«Компьютер» и выберите «Компьютер».
-
Найдите папку, в которой хранился нужный файл или папка, щелкните ее правой кнопкой мыши, а затем щелкните «Восстановить прежнюю версию». Если папка была расположена на верхнем уровне диска, например по пути C:, щелкните диск правой кнопкой мыши и выберите Восстановить прежнюю версию.
Вы увидите список доступных предыдущих версий файла или папки. В этот список включаются и файлы, сохраненные при резервном копировании (если вы используете программу архивации данных), и точки восстановления (если доступны оба типа архивации).
Примечание: Чтобы восстановить прежнюю версию файла или папки, включенных в библиотеку, щелкните файл или папку правой кнопкой мыши в расположении, в котором он или она сохранены, а не в библиотеке. Например, чтобы восстановить предыдущую версию рисунка, включенного в библиотеку «Изображения», но сохраненного в папке «Мои рисунки», щелкните папку «Мои рисунки» правой кнопкой мыши, а затем — «Восстановить предыдущую версию».
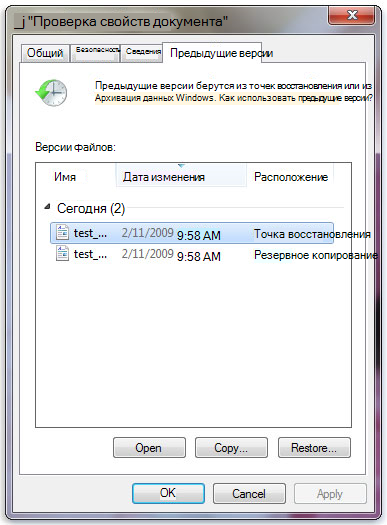
Предыдущие версии файлов
-
Дважды щелкните предыдущую версию папки с файлом или папкой, которую нужно восстановить. (Например, если файл был удален сегодня, выберите версию папки со вчерашнего дня, которая должна содержать файл.)
-
Перетащите файл или папку, которую вы хотите восстановить, в другое место, например на рабочий стол или в другую папку.
Версия файла или папки будет сохранена в выбранном расположении.
Совет: Если вы не помните точное имя или расположение файла или папки, можно выполнить их поиск, введя часть имени в поле поиска в библиотеке «Документы».
Восстановление файла или папки в предыдущее состояние
-
Щелкните правой кнопкой мыши файл или папки и выберите Восстановить прежнюю версию.
Вы увидите список доступных предыдущих версий файла или папки. В этот список включаются и файлы, сохраненные при резервном копировании (если вы используете программу архивации данных), и точки восстановления (если доступны оба типа архивации).
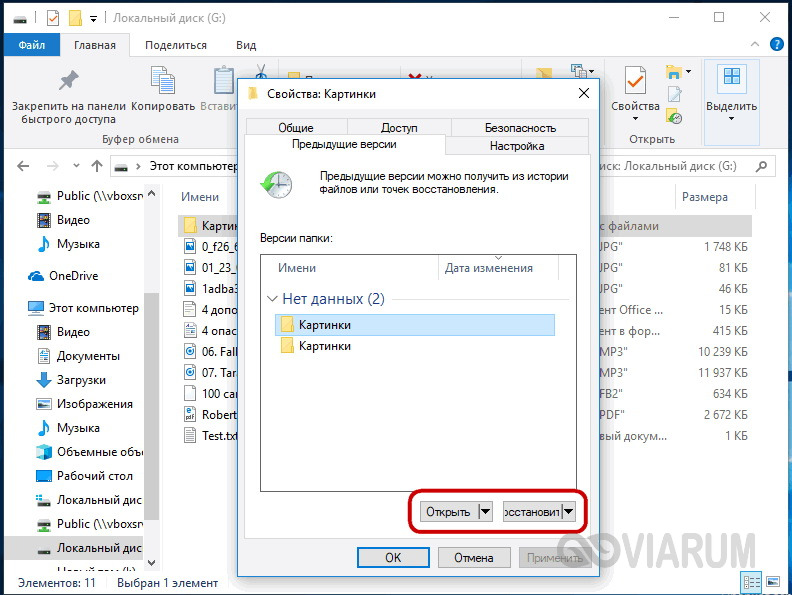
Вкладка «Предыдущие версии», на которой отображены предыдущие версии файлов -
Прежде чем восстанавливать предыдущую версию файла или папки, выберите ее, а затем щелкните Открыть, чтобы убедиться, что это нужная вам версия.
Примечание: Вам не удастся открыть или скопировать предыдущие версии файлов, созданных программой архивации данных, но вы можете восстановить их.
-
Для восстановления предыдущей версии выберите ее, а затем щелкните Восстановить.
Предупреждение: Этот файл или папка заменит текущую версию файла или папки на вашем компьютере, причем замена будет необратимой.
Примечание: Если эта кнопка «Восстановить» недоступна, вам не удастся восстановить предыдущую версию файла или папки в его или ее первоначальном расположении. Возможно, вам удастся открыть или сохранить их в другое расположение.
Нужна дополнительная помощь?
Содержание:
- 1 Восстановление удаленных файлов средствами Windows
- 2 Восстановление файлов с помощью специальных программ
- 2.1 R-Studio
- 2.2 Ontrack EasyRecovery
- 2.3 Recuva
- 3 Об этом нужно знать
Хранение информации в цифровом виде имеет множество преимуществ, среди которых самым значимым является тот объём данных, который может быть записан в минимальную единицу памяти цифрового устройства. Но есть у этого способа хранения и свои недостатки. При выходе запоминающего устройства из строя, сбое операционной системы либо ошибочных действиях пользователя данные могут оказаться утраченными. К счастью, в большинстве случаев ненамеренное удаление файлов не является окончательным и при правильном и своевременном подходе их можно восстановить.
Восстановление удалённых файлов возможно благодаря самому алгоритму записи информации на жёсткий диск. Новые файлы записываются не в пустые сектора или ячейки, а поверх ранее удалённых, физически сохраняемых на диске до момента их полной перезаписи. То есть при удалении файлы не уничтожаются сразу. Вместо этого система стирает первый символ имени файла и помечает занимаемое им место как свободное, при этом сам файл остается на диске. Исключение составляют SSD-диски с включенной функцией TRIM, ячейки таких носителей очищаются полностью, поэтому восстановление случайно удалённых файлов становится практически невыполнимой задачей.
Итак, можно ли восстановить удалённые с компьютера файлы? Да, вполне, если только они не были перезаписаны другими данными. Для этих целей лучше всего использовать специальные программы, так как сама Windows не обладает сколь-либо внятными средствами. Восстановить файлы с помощью штатных инструментов можно, только если они были перемещены в Корзину, а также если в системе включена функция теневого копирования и/или история файлов. Для начала давайте рассмотрим пример восстановления файлов, удалённых с жесткого диска, не используя сторонние программы.
Восстановление удаленных файлов средствами Windows
В Windows 7 и 10, если открыть свойства любой папки или файла, можно увидеть вкладку «Предыдущие версии», а в ней – список резервных копий объектов. Даже если файлы были удалены мимо Корзины, достаточно выбрать нужную версию бэкапа и нажать кнопку «Восстановить» либо «Открыть».
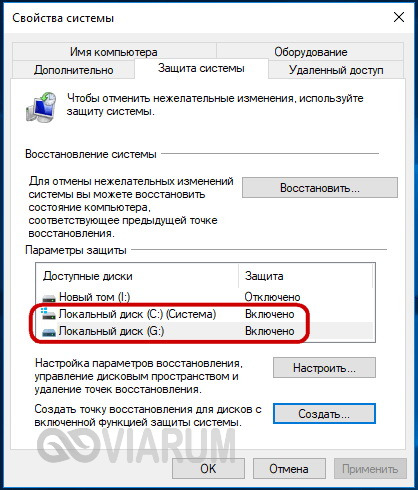
Но не всё так просто. Дело в том, что вкладка «Предыдущие версии» у вас, скорее всего, будет пуста, по крайней мере, в свойствах каталогов на пользовательском диске. Чтобы копии могли создаваться, в свойствах системы для соответствующего раздела должна быть включена защита, то есть создание точек восстановления.
Примечание: вернуть удалённые файлы с помощью функции «Предыдущие версии» можно только в том случае, если они располагались в папках, а не в корне диска.
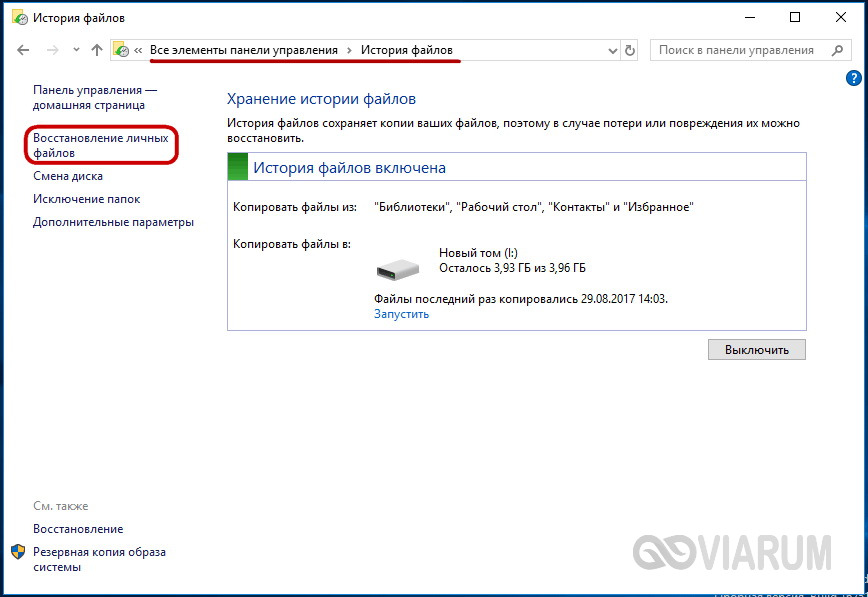
Весьма желательно, чтобы в системе также была задействована функция «История файлов», обеспечивающая периодическое резервное копирование содержимого пользовательских библиотек и рабочего стола.
Это, прежде всего, касается систем Windows 8 и 8.1, в которых вкладка «Предыдущие версии» в свойствах объектов отсутствует. Трудно сказать наверняка, что побудило разработчиков Microsoft её удалить из восьмой версии, а потом вернуть в десятой, впрочем, сама технология теневого копирования была нетронута.
Как восстановить удаленные с компьютера файлы, получив непосредственный доступ к теневым копиям, будет сказано чуть ниже, а пока скажем пару слов об «Истории файлов». Опция эта появилась в Windows 8 как альтернатива функции «Предыдущие версии», которые были привязаны к созданию системных точек восстановления. Функция «Истории файлов» является независимой, но чтобы ею воспользоваться, к компьютеру должен быть подключен дополнительный физический диск или флешка либо, как вариант, сетевой диск.
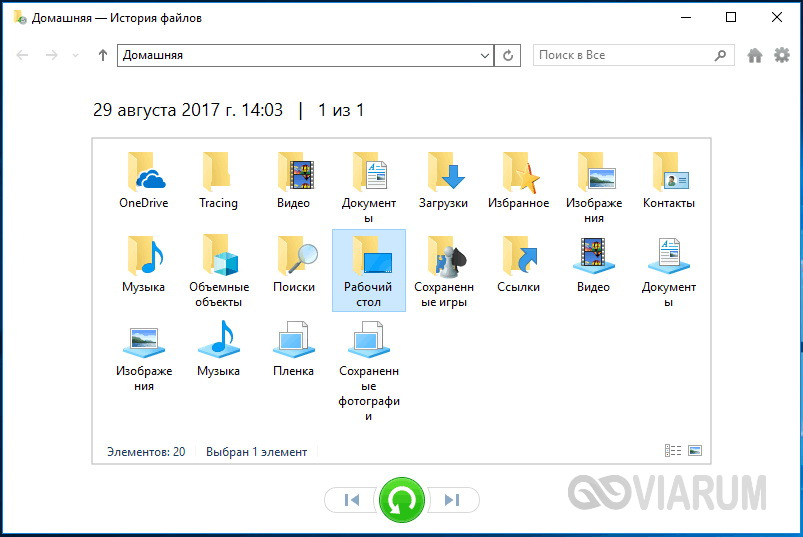
Восстановить удаленные данные с ее помощью очень просто. Для этого нужно кликнуть по ссылке «Восстановить личные файлы», выбрать в открывшемся окне папку или расположенный в ней файл и нажать кнопку с закруглённой стрелкой.
Теперь что касается восстановления файлов из теневых копий в Windows 8 и 8.1. Как уже было сказано, вкладка «Предыдущие версии» в этих версиях системы отсутствует. Так как быть, если нужно восстановить конкретный файл, неужели для этого нужно откатываться к предыдущей точке восстановления? Совсем необязательно.
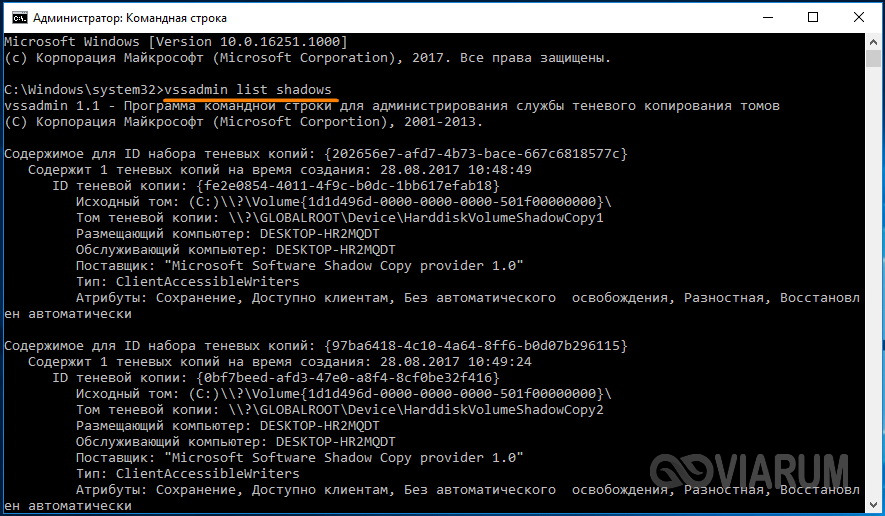
Откройте от имени администратора командную строку и выполните в ней команду vssadmin list shadows.
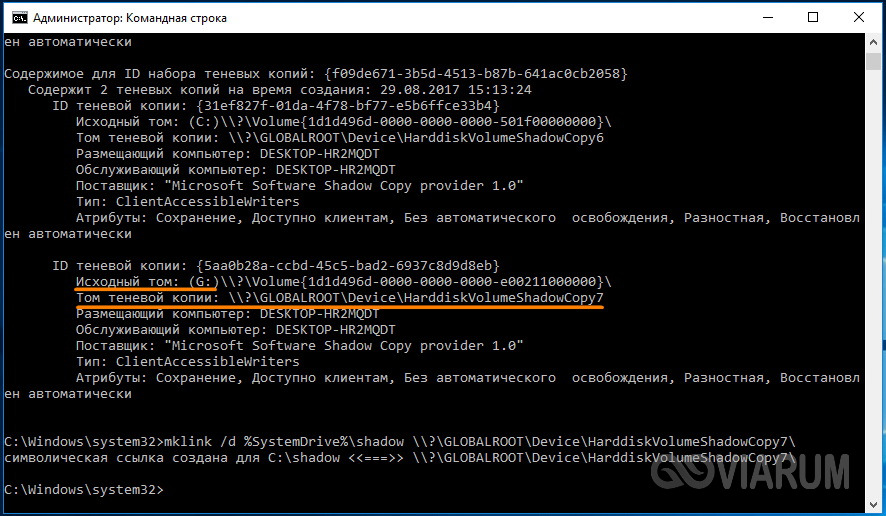
В результате вы получите список всех точек восстановления. Обратите внимание на параметр «Исходный том», в нём будет указана буква диска, с которого вы собираетесь восстанавливать данные. Затем, определив номер резервной копии (он указан в конце значения параметра «Том теневой копии»), выполните команду следующего вида:
mklink /d %SystemDrive%/shadow //?/GLOBALROOT/Device/HarddiskVolumeShadowCopy7/
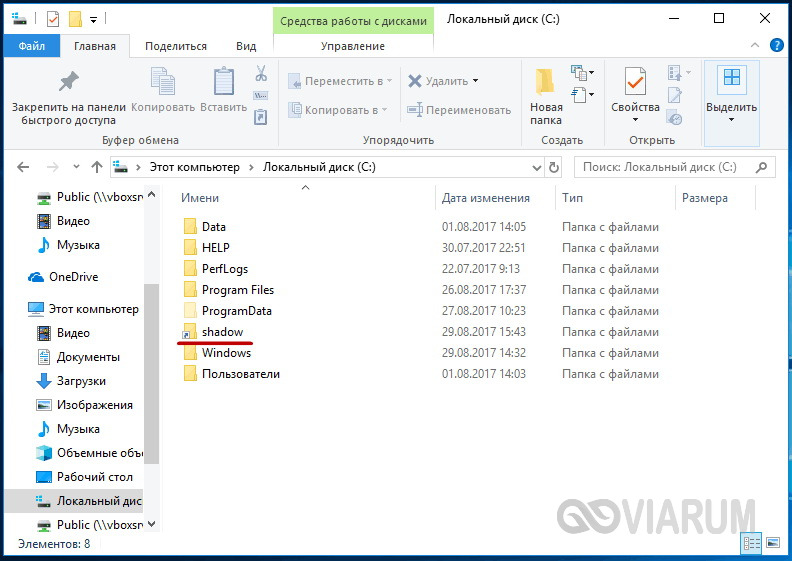
В данном примере точка восстановления имеет номер 7, у вас значение будет другим. В результате выполнения команды в корне диска С появится символическая ссылка shadow.
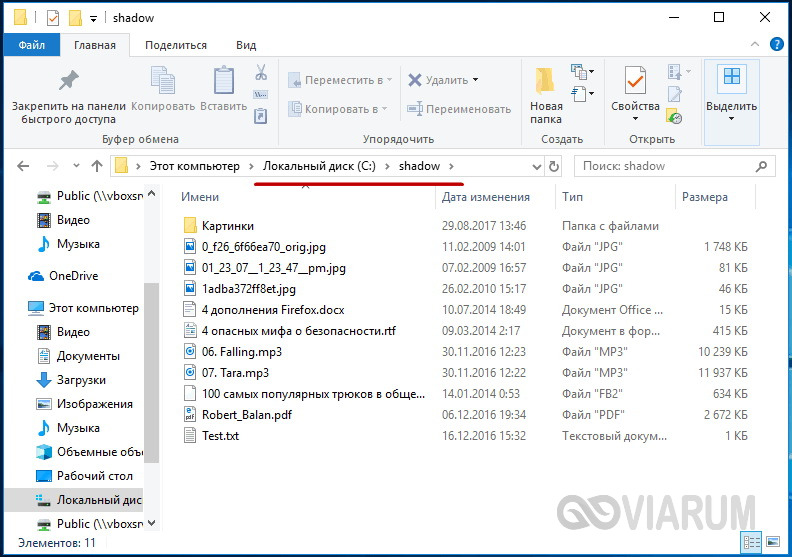
Перейдя по ней, вы попадёте точно в теневую копию!
Этот способ одинаково хорошо работает в Windows 7, 8, 8.1 и 10, но опять же нужно помнить, что прибегать к нему есть смысл, если только в системе включена функция создания системных точек восстановления.
Восстановление файлов с помощью специальных программ
Выше мы подробно рассмотрели, как восстановить файлы, удалённые из Корзины при её очистке либо потерянные по иным причинам, средствами самой системы. Как было показано выше, все эти способы имеют существенные ограничения. Чтобы иметь возможность восстанавливать данные непосредственно с диска, а не с резервных копий, следует использовать специальные программы, среди которых имеются как платные, так и бесплатные.
R-Studio
R-Studio – мощная профессиональная программа для восстановления удаленных файлов с самых разных цифровых устройств, начиная от жёстких дисков и заканчивая CD/DVD-дисками и картами памяти. Приложение поддерживает работу со всеми популярными файловыми системами, массивами RAID, может создавать образы физических дисков и отдельных томов. Несмотря на то, что ориентирована R-Studio на опытных пользователей, процедура восстановления данных в ней не отличается сложностью.
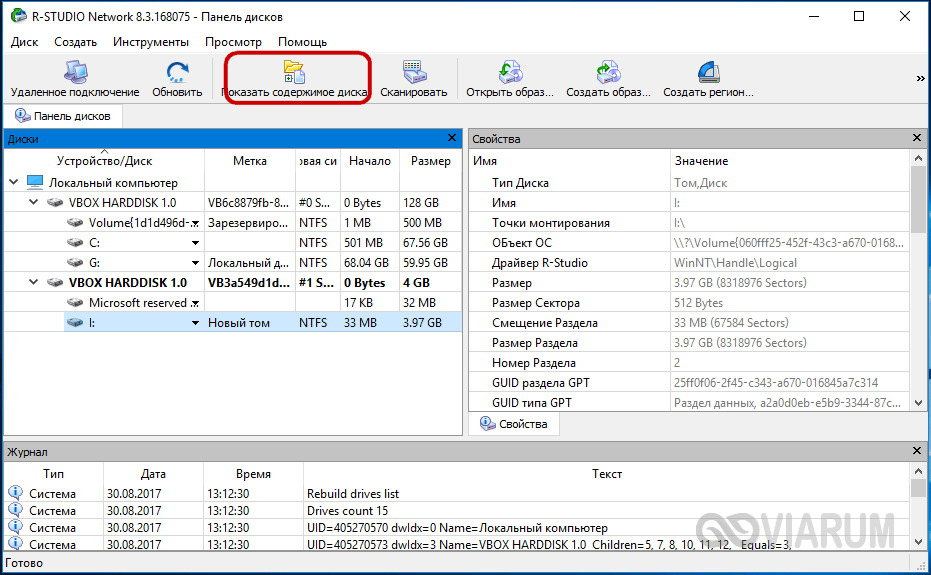
Запустив программу, выделите в левой колонке целевой диск или раздел и нажмите на панели инструментов иконку «Показать содержимое диска».
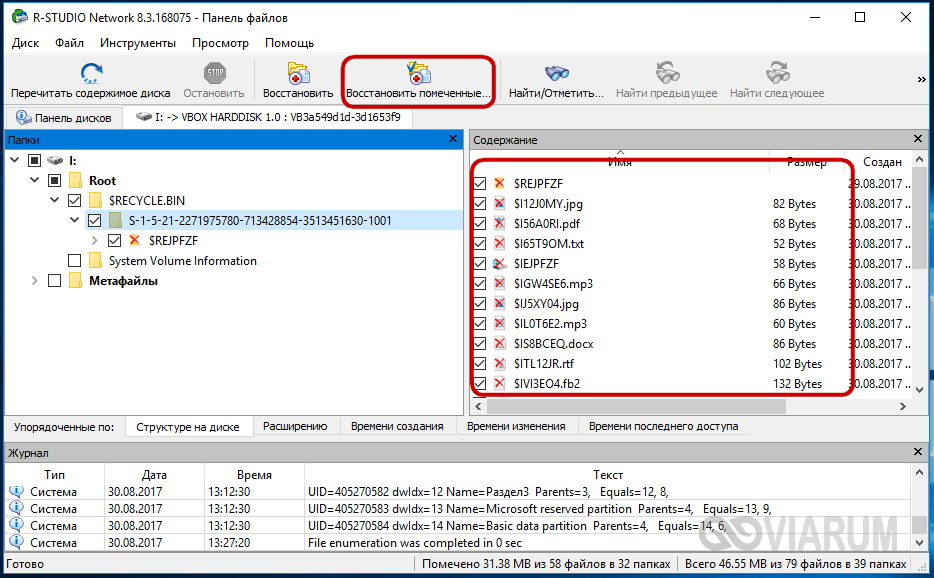
При этом слева отобразится список удалённых каталогов, а справа – их содержимое, помеченное красными крестиками.
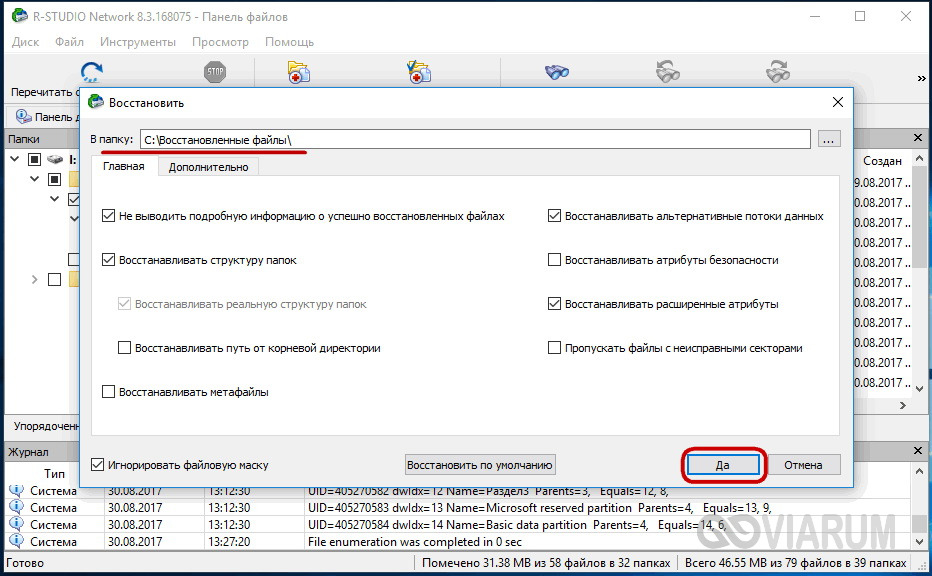
Отметьте галочками объекты, которые хотели бы восстановить и выберите в главном меню опцию «Восстановить помеченные». Далее в открывшемся окне вам нужно будет указать папку для сохранения файлов, задать при необходимости дополнительные параметры восстановления и нажать «OK».
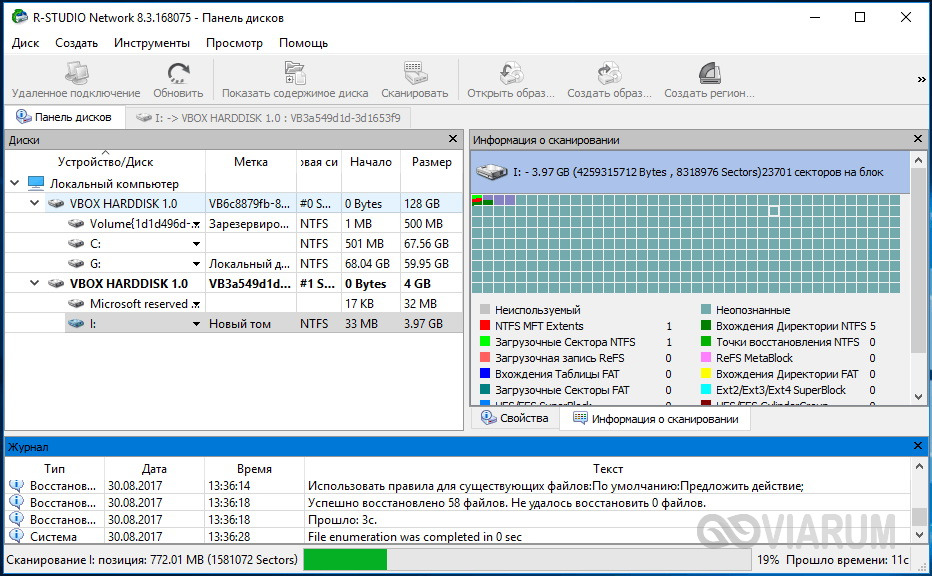
Если файлы были потеряны вследствие повреждения файловой системы или форматирования, диск желательно отсканировать, выбрав в главном меню соответствующую опцию.
Предварительное сканирование носителя позволяет выполнить более целостный и глубокий анализ, а значит увеличить шанс на восстановление утраченных данных.
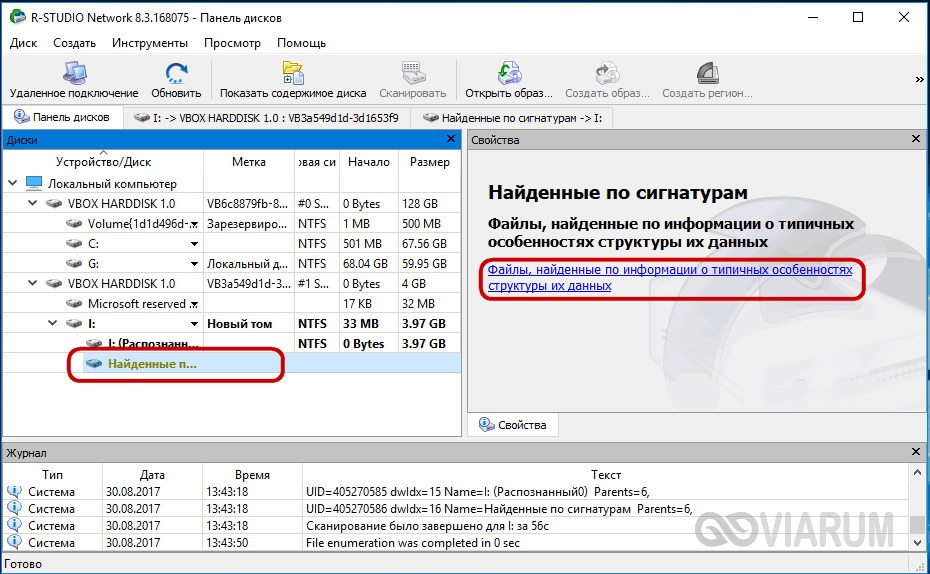
По завершении процедуры в списке дисков появится новый элемент «Найденные по сигнатурам».
Выделите его мышкой, кликните в правой колонке по ссылке «Файлы, найденные по информации о типичных особенностях структуры их данных», отметьте в следующем окне нужные элементы и восстановите их.
Ontrack EasyRecovery
Ещё один профессиональный коммерческий продукт, позволяющий быстро и эффективно восстановить удалённые файлы. Ontrack EasyRecovery имеет удобный интерфейс в виде пошагового мастера, что существенно облегчает работу с программой. Приложение поддерживает восстановление информации с жёстких, ZIP- и CD/DVD-дисков, флешек, карт памяти, RAID-массивов, а также различных устройств с flash-памятью.
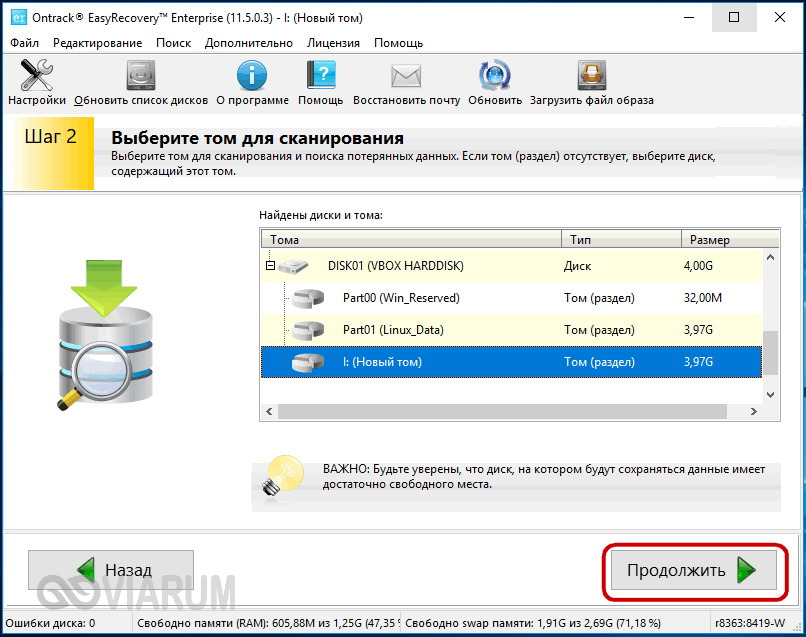
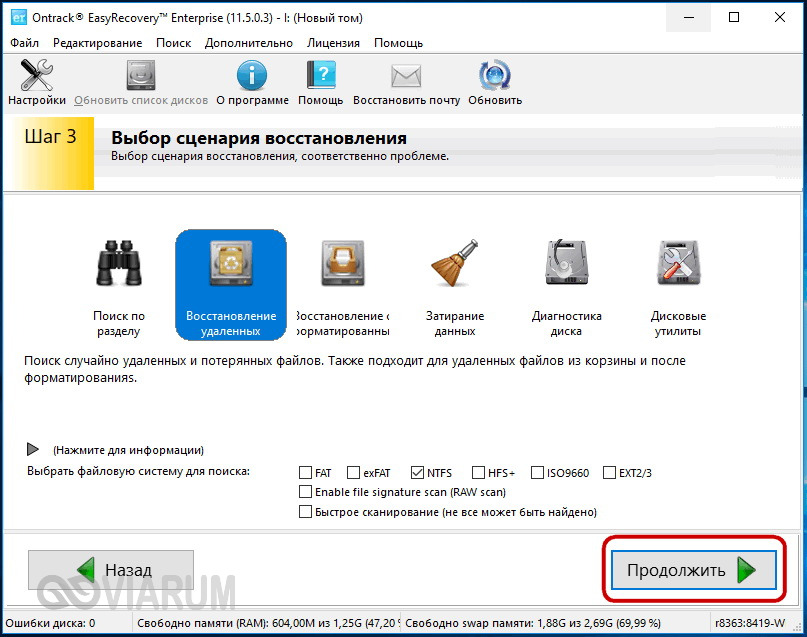
Процедура восстановления в Ontrack EasyRecovery состоит из нескольких этапов. На первом этапе вам будет предложено выбрать тип носителя, на втором нужно указать конкретный диск или раздел, на третьем потребуется выбрать операцию (в данном примере это восстановление).
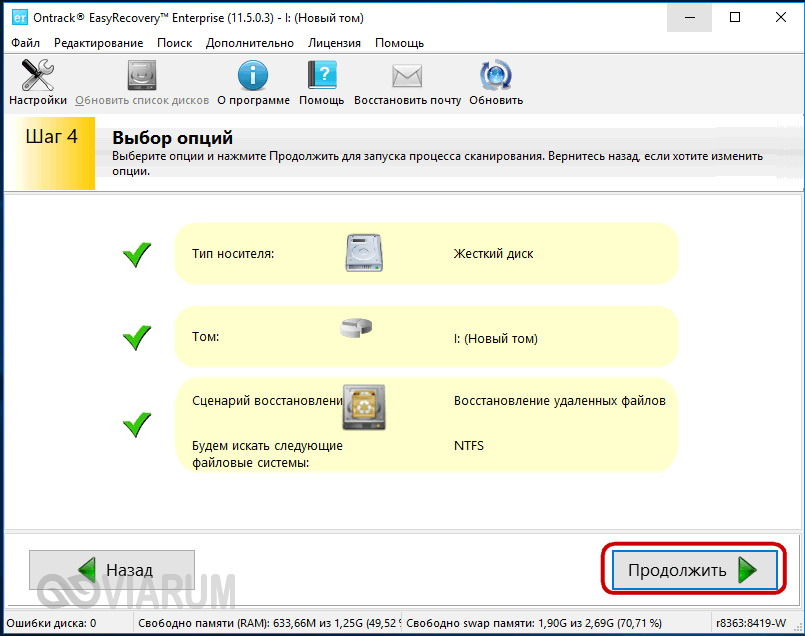
Далее программа предложит убедиться в правильности выбранных параметров, наконец, на пятом этапе можно будет приступать к самому восстановлению.
Для этого в древовидном списке выделите каталог с удалёнными файлами (он будет отмечен зелёным цветом), кликните по нему ПКМ и выберите в меню опцию «Сохранить как».
Также вы можете восстановить отдельные файлы, проделав то же самое в правой колонке окна программы. Если же переключиться на вкладку «Превьюшки», можно будет просмотреть миниатюры восстанавливаемых файлов, правда, доступен такой просмотр только для изображений.
Recuva
Из бесплатных программ для восстановления удалённых файлов можно порекомендовать Recuva. Этот простой и вместе с тем эффективный инструмент позволяет восстанавливать любые типы данных с разных цифровых носителей, поддерживает просмотр превью изображений и шестнадцатеричного кода файлов разных форматов.
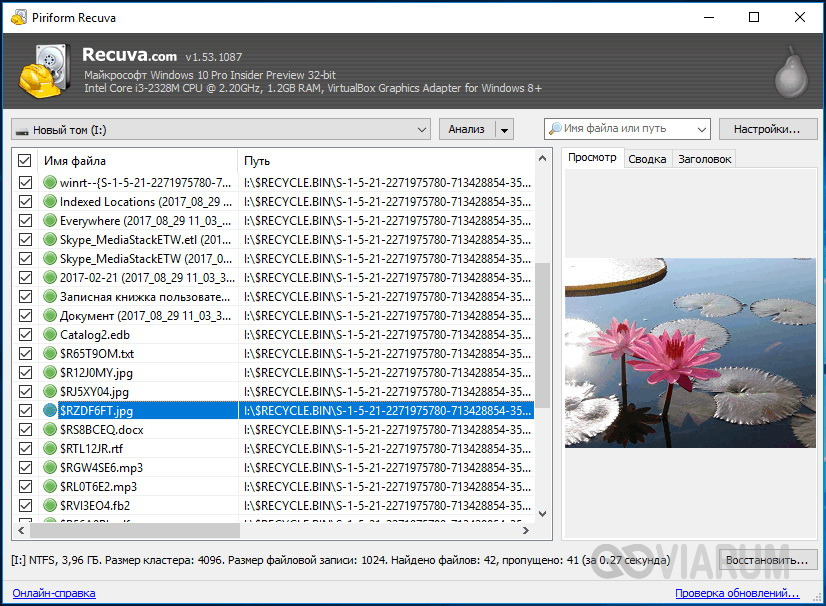
Пользоваться Recuva очень просто. После запуска программы в выпадающем списке нужно выбрать том и нажать кнопку «Анализ». Программа выполнит сканирование носителя и выведет список удалённых файлов.
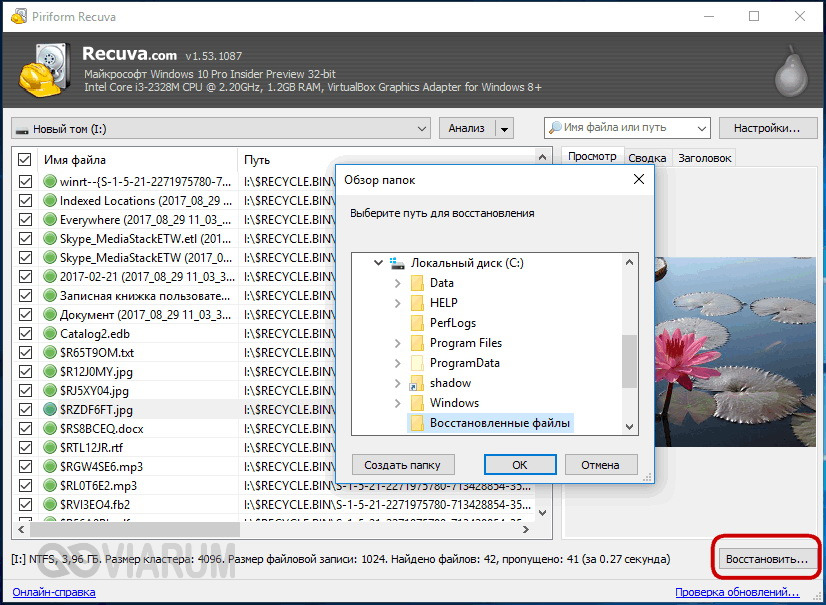
Отметьте нужные вам элементы галочками, нажмите кнопку «Восстановить» и укажите каталог для их сохранения.
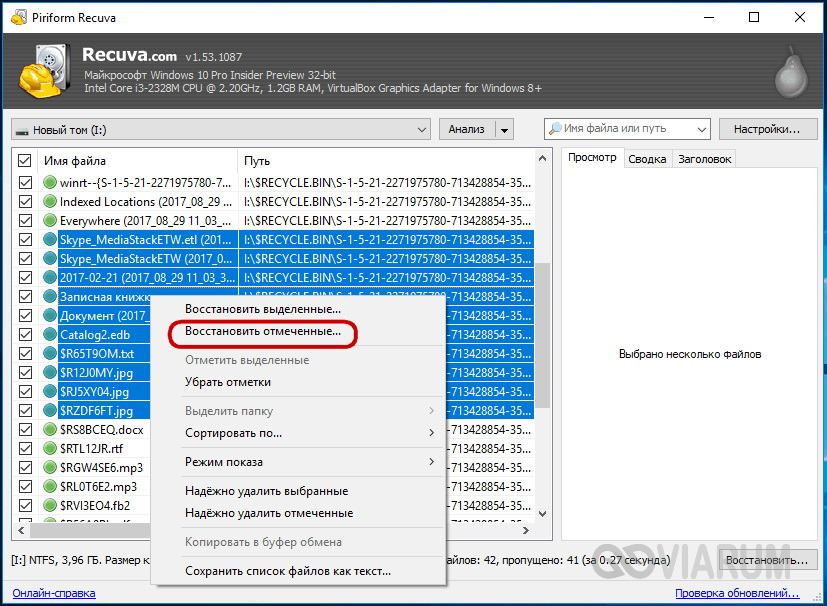
Также можно воспользоваться контекстным меню, выбрав в нём опцию «Восстановить выделенные».
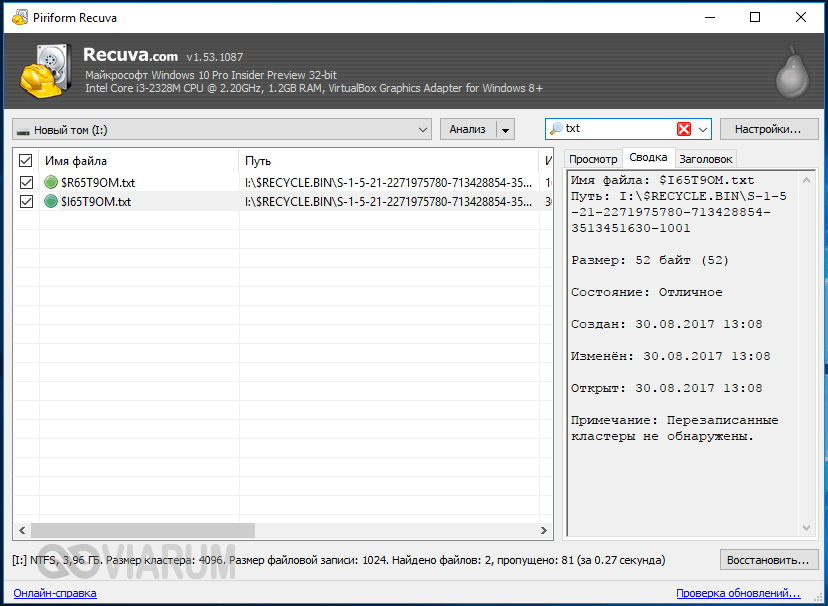
В программе имеется простой поиск по имени файла и его формату, доступен просмотр основной информации – состояние, дата создания и модификации, размер и полный путь.
Об этом нужно знать
Итак, мы подробно рассмотрели, что делать, если ты удалил нужный файл. Использование сторонних программ в данном случае имеет свои преимущества, так как позволяет восстанавливать файлы даже при удалении раздела и повреждении файловой системы, но есть то, о чём следует помнить. Если вы случайно удалили или потеряли файлы, ни в коем случае не записывайте в раздел, в котором они находились, какие-либо данные, поскольку есть риск перезаписать содержащие их сектора.
По этой причине программу для восстановления следует устанавливать на «свободный» раздел, отличный от того, с которого собираетесь производить восстановление. В идеале необходимо снять жёсткий диск, подключить его к другому компьютеру и запускать сканирование с него. Сохранять восстановленные файлы на тот же самый раздел также нельзя, в этом случае вы рискуете потерять их окончательно. То есть если вы восстанавливаете файлы с диска D, следует сохранить их на диск С или флешку.
Download Article
Download Article
This wikiHow teaches you how to restore a file you’ve deleted from your Windows or macOS computer. If you’ve only recently deleted the file, you can usually restore it quickly from the Recycle Bin (PC) or the Trash (Mac). As long as you back up your computer, you should be able to restore deleted files from one of your recent backups. If you run out of options, you can use file recovery software like Recuva (Windows) or Disk Drill (Mac) to increase your chances of recovering the file.
-
1
Open the Recycle Bin. You’ll usually find this trashcan icon on your desktop. If you don’t see it, open the Windows search bar next to the Start menu, type recycle, and then click Recycle Bin in the search results.
- Deleting files from your hard drive generally puts them into the Recycle Bin for a period of time before permanently erasing them, so if it hasn’t been long since you opened the file―and you haven’t emptied the Recycle Bin recently—there’s a good chance they’ll still be there.[1]
- Deleting files from your hard drive generally puts them into the Recycle Bin for a period of time before permanently erasing them, so if it hasn’t been long since you opened the file―and you haven’t emptied the Recycle Bin recently—there’s a good chance they’ll still be there.[1]
-
2
Select the file you want to restore. Scroll down and select the file, or use the «Search» bar at the top-right corner of the screen to search by file name. Clicking the file once will highlight it.
- If you can’t find the file using this method, you can try restoring it from a backup or a data recovery tool like Recuva.
Advertisement
-
3
Click the Restore the selected items button. It’s the icon that looks like a sheet of paper with a green arrow at the top of the window. This places the file back into its original location.
Advertisement
-
1
Click the Trash icon on the Dock. The Dock is the row of icons typically found at the bottom of the screen.
- If you deleted a file from your Mac within the last 30 days, you can usually recover it from the Trash.
-
2
Search for the deleted file. Scroll down through the files in the Trash window to look for your deleted file.
- If there are a lot of files in the Trash, you can search for the file by name. Type part or all of the file name into the «Search» bar at the top-right corner of the window, then press ⏎ Return to search. You may have to click the Trash tab above the results to show only files in the Trash bin.[2]
- If the file you’re looking for is no longer in your Trash, you may be able to recover it from a Time Machine backup or from your iCloud drive.
- If there are a lot of files in the Trash, you can search for the file by name. Type part or all of the file name into the «Search» bar at the top-right corner of the window, then press ⏎ Return to search. You may have to click the Trash tab above the results to show only files in the Trash bin.[2]
-
3
Drag the deleted file to another folder. You can drag it to the desktop for easy access, or just drag it to the desired folder in the left panel of the window. This restores the file.
Advertisement
-
1
Type restore files into the Search bar. This bar is usually next to the Start menu at the bottom-left corner of the screen, although you may have to click the Start menu or a magnifying glass to open it first.
- If you have File History backups set up on your Windows 10 PC, you can use it to restore files and folders you’ve deleted or overwritten with different data.[3]
- If you back up your Windows PC to an external hard drive, connect that hard drive before you continue.
- If you have File History backups set up on your Windows 10 PC, you can use it to restore files and folders you’ve deleted or overwritten with different data.[3]
-
2
Click Restore your files with File History. It should be at the top of the search results.
- If you see a message that says «No file history was found,» File History is turned off and you’ll need to try another method.
-
3
Select the deleted file. If the file has been backed up multiple times, you can use the arrows to browse through the backed-up versions and select the one you want.
- You can use the Search box at the top-right corner of the window to search by file name or any other criteria.
-
4
Click Restore. This moves the selected version of the file to its original location.
- If you want to place the restored file in a different folder instead, right-click Restore, click Restore To, and then choose a location.
Advertisement
-
1
Open Finder
. It’s the two-toned smiling face icon on the Dock, which usually runs along the bottom of the screen. If you use Time Machine to back up files on your Mac, you can restore deleted files with a simple Spotlight search.[4]
- If you don’t use Time Machine to back up the files on your Mac, you’ll need to use another method.
- If your files are backed with iCloud, see the Restoring from iCloud method instead.
-
2
Type file name into the search bar and press ⏎ Return. It’s at the top-right corner of the Finder window. This displays a list of matching results.
- You can refine your search by clicking the plus + on the right side of the search window and selecting different criteria.[5]
- You can refine your search by clicking the plus + on the right side of the search window and selecting different criteria.[5]
-
3
Click the Time Machine icon in the menu bar. It’s near the top-right corner of the screen, generally to the left of the time. The icon looks like a clock with a curved arrow around it. A menu will expand.
- If you don’t see this icon, click the Apple menu at the top-left corner, select System Preferences, click Time Machine, and then select «Show Time Machine in menu bar.» The icon should then appear.
-
4
Click Enter Time Machine on the menu.
-
5
Go to the backup that contains the deleted file. You can use the arrows and/or the timeline to find the backup that contains the file you searched for.
-
6
Select the file and click Restore. This restores the file to its original location.
Advertisement
-
1
Select a data recovery program. If you’ve been unable to restore your deleted file from the Recycle Bin or a backup, you may be able to use a data recovery tool. You may find some free apps that claim to recover deleted files, but the paid options usually yield better results. Intel recommends Piriform Recuva, Stellar Data Recover, and Disk Drill as reliable programs.[6]
- The rest of this method will walk you through using Recuva, as there’s a free option that can perform advanced file recovery. Other apps should work similarly.
-
2
Go to https://www.piriform.com/recuva/download in a browser. This is the official download site for Recuva.
- The software has recently been purchased by CCleaner, so don’t worry if you’re redirected to CCleaner’s version of the download site.[7]
- The software has recently been purchased by CCleaner, so don’t worry if you’re redirected to CCleaner’s version of the download site.[7]
-
3
Click Download under the «FREE» option. You may be prompted to click Save or another option to start the download at this point.
-
4
Start the Recuva installer. The installer file will be called something like «rcsetup153.exe» and be saved to your default download folder. Double-click the file to launch the installer, or just click the file name once if it appears along the bottom edge of your web browser.
- If prompted to allow the app to run, click Yes.
-
5
Click the orange Install button. This installs the app onto your computer. When the install is complete, you’ll see a message that says «Recuva v.153 Setup Completed.»
-
6
Click the orange Run Recuva button. It’s at the center of the window.
-
7
Click Next to start the recovery wizard. It’s at the bottom-right corner of the window.
-
8
Select a file type and click Next. If you’re not sure which type of file to select, choose All Files at the top of the list.
-
9
Select the file’s original location. Check the box to the left of one of the file locations on your computer, or leave I’m not sure selected to look everywhere.
-
10
Click Next.
-
11
Check the «Enable Deep Scan» box. It’s near the bottom of the window. This will allow Recuva to perform an advanced scan of your computer, which increases the chances that you’ll recover the file(s).
-
12
Click Start. This is at the bottom of the window. Recuva will now scan for deleted files.
- A deep scan can take several hours to complete, especially if you chose the All Files and I’m not sure options earlier. A progress bar and time estimation will stay on the screen during the scan.
- Once the scan is complete, a list of deleted files will appear.
-
13
Locate and select your deleted file(s). Once the scan completes, click the check box next to the file you want to restore.
- To narrow down the search results, click the Switch to advanced mode button at the top-right corner of the window to choose certain locations or refine the search to specific file types.
-
14
Click the Recover… button. It’s at the bottom-right corner of the window. This restores the selected file its original location.
Advertisement
-
1
Select a data recovery program. If you’ve tried recovering from the Trash, Time Machine, and iCloud and still haven’t been able to restore your file, you may be able to use a data recovery program. Although data recovery programs for macOS generally cost money, reputable apps allow you to do a free scan so you can figure out if the file is recoverable before you spend money.[8]
Some apps recommended by Macworld and other reputable sites are Stellar Data Recovery Pro, Disk Drill, and Data Rescue 5.- The rest of this method will walk you through using Disk Drill, although other options should work similarly.
-
2
-
3
Click the green Free Download button. It’s near the center of the page. This downloads the image to your Downloads folder.
-
4
Double-click the DMG file. It’s called «diskdrill.dmg» and is in the Downloads folder.
-
5
Drag the Disk Drill icon onto the Applications folder. This installs Disk Drill on your Mac.
-
6
Open Disk Drill. You can do this by double-clicking Disk Drill in the Applications folder or on the Launchpad.
- If the deleted file was on an external drive, make sure that drive is connected before you continue.
-
7
Leave the first three boxes checked and click Next. These settings are recommended by the developer.[9]
-
8
Give Disk Drill permission to scan your drive(s). Follow the on-screen instructions to verify your password and give the app permission to run.
-
9
Select No thanks, Basic edition is OK. You can use the Basic (free) version of the app to scan for the missing file. If the file can be restored, the app will give you the option to upgrade so you can restore it.
-
10
Select the drive on which the file was located. For example, if the file was on your USB drive, select that.
-
11
Click Recover to start the scan. Disk Drill will proceed through various scans to help you find the correct file.
-
12
Follow the on-screen instructions to locate your file. If Disk Drill’s first scan doesn’t return the file you’re looking for, you’ll be prompted to do a Quick Scan. If that doesn’t pull up your file, the final option is to do a Deep Scan.
- If Deep Scan finds your files and other scans did not, it will not be able to display file names. You’ll have to sort and preview the results to see if the file you’re looking for is there.
-
13
Check the box next to the file you want to restore. If a lot of files were found, you can refine the search by typing a file name or keyword into the search box at the top-right corner of the window. You can also narrow the results by date and file type. Check the box next to the file you want to restore.
- If you are unable to find your deleted file using this method, the file may not be recoverable. You won’t need to pay for the upgrade or continue with this method.
-
14
Click the Recover button. It’s at the top-right corner of the window.
-
15
Follow the on-screen instructions to upgrade to the Pro version. This will require you to make a payment. Once your payment is processed, you’ll be returned to the search results where you can click Recover again to start the recovery. Once the file is restored, it will be in its original location.
Advertisement
-
1
Go to https://www.icloud.com in a web browser. If you use iCloud to back up files on your computer, you can use the iCloud website to restore deleted files. You’ll just need to make sure it’s been fewer than 30 days since you deleted the file.[10]
-
2
Sign in with your Apple ID. Use the Apple ID you use to sign into iCloud on your computer, phone, or tablet.
-
3
Click Account Settings. It’s the blue link below your name at the top-center part of the page.
-
4
Click Restore Files. It’s under the «Advanced» header near the bottom-left corner of the page. You may have to scroll down to find it.
-
5
Select the file(s) you want to restore. You can click multiple files if you wish.
- If you don’t see the file you want to restore, it’s no longer saved to iCloud. Try another method to restore the file.
-
6
Click Restore. This moves the file back to its original location on your computer.
-
7
Click Done when the process is complete. The file is now restored.
Advertisement
Add New Question
-
Question
How can I recover deleted files from my computer?
Yaffet Meshesha is a Computer Specialist and the Founder of Techy, a full-service computer pickup, repair, and delivery service. With over eight years of experience, Yaffet specializes in computer repairs and technical support. Techy has been featured on TechCrunch and Time.
Computer Specialist
Expert Answer
Support wikiHow by
unlocking this expert answer.The first thing you should do is to check the Recycling Bin. You might also see if they’re backed up to cloud storage like One Drive or DropBox. If it’s not there, you may need to run a data recovery software, or even send your computer to a data recovery company service.
-
Question
My file was deleted last month. I’ve installed things since then. Is there a way to recover my file without installing a recovery program?
Probably not, the space where that program was has been overwritten by these new programs.
-
Question
I deleted a file a few hours ago. Can I still get the file back?
Yes, you can; try data recovery using the methods listed above. Your method will depend on your operating system.
See more answers
Ask a Question
200 characters left
Include your email address to get a message when this question is answered.
Submit
Advertisement
-
If a data recovery software doesn’t work to retrieve your files, you may need to send your computer to a data recovery service. This can be expensive, but if the information is important, it may be worth it.[11]
-
In the future, remember to back up your data to an external hard drive and/or an online cloud storage service.
Advertisement
-
Most Mac recovery software is in the $80 to $100 price range. Without a Time Machine backup, you will have to pay for recovery software to bring back your deleted data.
Advertisement
About This Article
Article SummaryX
1. Try recovering from the Recycle Bin or Trash.
2. Attempt to restore from a local backup.
3. Restore from your iCloud Drive if you use it to back up files.
4. Try a reputable data recovery app.
Did this summary help you?
Thanks to all authors for creating a page that has been read 1,178,096 times.
Is this article up to date?
Download Article
Download Article
This wikiHow teaches you how to restore a file you’ve deleted from your Windows or macOS computer. If you’ve only recently deleted the file, you can usually restore it quickly from the Recycle Bin (PC) or the Trash (Mac). As long as you back up your computer, you should be able to restore deleted files from one of your recent backups. If you run out of options, you can use file recovery software like Recuva (Windows) or Disk Drill (Mac) to increase your chances of recovering the file.
-
1
Open the Recycle Bin. You’ll usually find this trashcan icon on your desktop. If you don’t see it, open the Windows search bar next to the Start menu, type recycle, and then click Recycle Bin in the search results.
- Deleting files from your hard drive generally puts them into the Recycle Bin for a period of time before permanently erasing them, so if it hasn’t been long since you opened the file―and you haven’t emptied the Recycle Bin recently—there’s a good chance they’ll still be there.[1]
- Deleting files from your hard drive generally puts them into the Recycle Bin for a period of time before permanently erasing them, so if it hasn’t been long since you opened the file―and you haven’t emptied the Recycle Bin recently—there’s a good chance they’ll still be there.[1]
-
2
Select the file you want to restore. Scroll down and select the file, or use the «Search» bar at the top-right corner of the screen to search by file name. Clicking the file once will highlight it.
- If you can’t find the file using this method, you can try restoring it from a backup or a data recovery tool like Recuva.
Advertisement
-
3
Click the Restore the selected items button. It’s the icon that looks like a sheet of paper with a green arrow at the top of the window. This places the file back into its original location.
Advertisement
-
1
Click the Trash icon on the Dock. The Dock is the row of icons typically found at the bottom of the screen.
- If you deleted a file from your Mac within the last 30 days, you can usually recover it from the Trash.
-
2
Search for the deleted file. Scroll down through the files in the Trash window to look for your deleted file.
- If there are a lot of files in the Trash, you can search for the file by name. Type part or all of the file name into the «Search» bar at the top-right corner of the window, then press ⏎ Return to search. You may have to click the Trash tab above the results to show only files in the Trash bin.[2]
- If the file you’re looking for is no longer in your Trash, you may be able to recover it from a Time Machine backup or from your iCloud drive.
- If there are a lot of files in the Trash, you can search for the file by name. Type part or all of the file name into the «Search» bar at the top-right corner of the window, then press ⏎ Return to search. You may have to click the Trash tab above the results to show only files in the Trash bin.[2]
-
3
Drag the deleted file to another folder. You can drag it to the desktop for easy access, or just drag it to the desired folder in the left panel of the window. This restores the file.
Advertisement
-
1
Type restore files into the Search bar. This bar is usually next to the Start menu at the bottom-left corner of the screen, although you may have to click the Start menu or a magnifying glass to open it first.
- If you have File History backups set up on your Windows 10 PC, you can use it to restore files and folders you’ve deleted or overwritten with different data.[3]
- If you back up your Windows PC to an external hard drive, connect that hard drive before you continue.
- If you have File History backups set up on your Windows 10 PC, you can use it to restore files and folders you’ve deleted or overwritten with different data.[3]
-
2
Click Restore your files with File History. It should be at the top of the search results.
- If you see a message that says «No file history was found,» File History is turned off and you’ll need to try another method.
-
3
Select the deleted file. If the file has been backed up multiple times, you can use the arrows to browse through the backed-up versions and select the one you want.
- You can use the Search box at the top-right corner of the window to search by file name or any other criteria.
-
4
Click Restore. This moves the selected version of the file to its original location.
- If you want to place the restored file in a different folder instead, right-click Restore, click Restore To, and then choose a location.
Advertisement
-
1
Open Finder
. It’s the two-toned smiling face icon on the Dock, which usually runs along the bottom of the screen. If you use Time Machine to back up files on your Mac, you can restore deleted files with a simple Spotlight search.[4]
- If you don’t use Time Machine to back up the files on your Mac, you’ll need to use another method.
- If your files are backed with iCloud, see the Restoring from iCloud method instead.
-
2
Type file name into the search bar and press ⏎ Return. It’s at the top-right corner of the Finder window. This displays a list of matching results.
- You can refine your search by clicking the plus + on the right side of the search window and selecting different criteria.[5]
- You can refine your search by clicking the plus + on the right side of the search window and selecting different criteria.[5]
-
3
Click the Time Machine icon in the menu bar. It’s near the top-right corner of the screen, generally to the left of the time. The icon looks like a clock with a curved arrow around it. A menu will expand.
- If you don’t see this icon, click the Apple menu at the top-left corner, select System Preferences, click Time Machine, and then select «Show Time Machine in menu bar.» The icon should then appear.
-
4
Click Enter Time Machine on the menu.
-
5
Go to the backup that contains the deleted file. You can use the arrows and/or the timeline to find the backup that contains the file you searched for.
-
6
Select the file and click Restore. This restores the file to its original location.
Advertisement
-
1
Select a data recovery program. If you’ve been unable to restore your deleted file from the Recycle Bin or a backup, you may be able to use a data recovery tool. You may find some free apps that claim to recover deleted files, but the paid options usually yield better results. Intel recommends Piriform Recuva, Stellar Data Recover, and Disk Drill as reliable programs.[6]
- The rest of this method will walk you through using Recuva, as there’s a free option that can perform advanced file recovery. Other apps should work similarly.
-
2
Go to https://www.piriform.com/recuva/download in a browser. This is the official download site for Recuva.
- The software has recently been purchased by CCleaner, so don’t worry if you’re redirected to CCleaner’s version of the download site.[7]
- The software has recently been purchased by CCleaner, so don’t worry if you’re redirected to CCleaner’s version of the download site.[7]
-
3
Click Download under the «FREE» option. You may be prompted to click Save or another option to start the download at this point.
-
4
Start the Recuva installer. The installer file will be called something like «rcsetup153.exe» and be saved to your default download folder. Double-click the file to launch the installer, or just click the file name once if it appears along the bottom edge of your web browser.
- If prompted to allow the app to run, click Yes.
-
5
Click the orange Install button. This installs the app onto your computer. When the install is complete, you’ll see a message that says «Recuva v.153 Setup Completed.»
-
6
Click the orange Run Recuva button. It’s at the center of the window.
-
7
Click Next to start the recovery wizard. It’s at the bottom-right corner of the window.
-
8
Select a file type and click Next. If you’re not sure which type of file to select, choose All Files at the top of the list.
-
9
Select the file’s original location. Check the box to the left of one of the file locations on your computer, or leave I’m not sure selected to look everywhere.
-
10
Click Next.
-
11
Check the «Enable Deep Scan» box. It’s near the bottom of the window. This will allow Recuva to perform an advanced scan of your computer, which increases the chances that you’ll recover the file(s).
-
12
Click Start. This is at the bottom of the window. Recuva will now scan for deleted files.
- A deep scan can take several hours to complete, especially if you chose the All Files and I’m not sure options earlier. A progress bar and time estimation will stay on the screen during the scan.
- Once the scan is complete, a list of deleted files will appear.
-
13
Locate and select your deleted file(s). Once the scan completes, click the check box next to the file you want to restore.
- To narrow down the search results, click the Switch to advanced mode button at the top-right corner of the window to choose certain locations or refine the search to specific file types.
-
14
Click the Recover… button. It’s at the bottom-right corner of the window. This restores the selected file its original location.
Advertisement
-
1
Select a data recovery program. If you’ve tried recovering from the Trash, Time Machine, and iCloud and still haven’t been able to restore your file, you may be able to use a data recovery program. Although data recovery programs for macOS generally cost money, reputable apps allow you to do a free scan so you can figure out if the file is recoverable before you spend money.[8]
Some apps recommended by Macworld and other reputable sites are Stellar Data Recovery Pro, Disk Drill, and Data Rescue 5.- The rest of this method will walk you through using Disk Drill, although other options should work similarly.
-
2
-
3
Click the green Free Download button. It’s near the center of the page. This downloads the image to your Downloads folder.
-
4
Double-click the DMG file. It’s called «diskdrill.dmg» and is in the Downloads folder.
-
5
Drag the Disk Drill icon onto the Applications folder. This installs Disk Drill on your Mac.
-
6
Open Disk Drill. You can do this by double-clicking Disk Drill in the Applications folder or on the Launchpad.
- If the deleted file was on an external drive, make sure that drive is connected before you continue.
-
7
Leave the first three boxes checked and click Next. These settings are recommended by the developer.[9]
-
8
Give Disk Drill permission to scan your drive(s). Follow the on-screen instructions to verify your password and give the app permission to run.
-
9
Select No thanks, Basic edition is OK. You can use the Basic (free) version of the app to scan for the missing file. If the file can be restored, the app will give you the option to upgrade so you can restore it.
-
10
Select the drive on which the file was located. For example, if the file was on your USB drive, select that.
-
11
Click Recover to start the scan. Disk Drill will proceed through various scans to help you find the correct file.
-
12
Follow the on-screen instructions to locate your file. If Disk Drill’s first scan doesn’t return the file you’re looking for, you’ll be prompted to do a Quick Scan. If that doesn’t pull up your file, the final option is to do a Deep Scan.
- If Deep Scan finds your files and other scans did not, it will not be able to display file names. You’ll have to sort and preview the results to see if the file you’re looking for is there.
-
13
Check the box next to the file you want to restore. If a lot of files were found, you can refine the search by typing a file name or keyword into the search box at the top-right corner of the window. You can also narrow the results by date and file type. Check the box next to the file you want to restore.
- If you are unable to find your deleted file using this method, the file may not be recoverable. You won’t need to pay for the upgrade or continue with this method.
-
14
Click the Recover button. It’s at the top-right corner of the window.
-
15
Follow the on-screen instructions to upgrade to the Pro version. This will require you to make a payment. Once your payment is processed, you’ll be returned to the search results where you can click Recover again to start the recovery. Once the file is restored, it will be in its original location.
Advertisement
-
1
Go to https://www.icloud.com in a web browser. If you use iCloud to back up files on your computer, you can use the iCloud website to restore deleted files. You’ll just need to make sure it’s been fewer than 30 days since you deleted the file.[10]
-
2
Sign in with your Apple ID. Use the Apple ID you use to sign into iCloud on your computer, phone, or tablet.
-
3
Click Account Settings. It’s the blue link below your name at the top-center part of the page.
-
4
Click Restore Files. It’s under the «Advanced» header near the bottom-left corner of the page. You may have to scroll down to find it.
-
5
Select the file(s) you want to restore. You can click multiple files if you wish.
- If you don’t see the file you want to restore, it’s no longer saved to iCloud. Try another method to restore the file.
-
6
Click Restore. This moves the file back to its original location on your computer.
-
7
Click Done when the process is complete. The file is now restored.
Advertisement
Add New Question
-
Question
How can I recover deleted files from my computer?
Yaffet Meshesha is a Computer Specialist and the Founder of Techy, a full-service computer pickup, repair, and delivery service. With over eight years of experience, Yaffet specializes in computer repairs and technical support. Techy has been featured on TechCrunch and Time.
Computer Specialist
Expert Answer
Support wikiHow by
unlocking this expert answer.The first thing you should do is to check the Recycling Bin. You might also see if they’re backed up to cloud storage like One Drive or DropBox. If it’s not there, you may need to run a data recovery software, or even send your computer to a data recovery company service.
-
Question
My file was deleted last month. I’ve installed things since then. Is there a way to recover my file without installing a recovery program?
Probably not, the space where that program was has been overwritten by these new programs.
-
Question
I deleted a file a few hours ago. Can I still get the file back?
Yes, you can; try data recovery using the methods listed above. Your method will depend on your operating system.
See more answers
Ask a Question
200 characters left
Include your email address to get a message when this question is answered.
Submit
Advertisement
-
If a data recovery software doesn’t work to retrieve your files, you may need to send your computer to a data recovery service. This can be expensive, but if the information is important, it may be worth it.[11]
-
In the future, remember to back up your data to an external hard drive and/or an online cloud storage service.
Advertisement
-
Most Mac recovery software is in the $80 to $100 price range. Without a Time Machine backup, you will have to pay for recovery software to bring back your deleted data.
Advertisement
About This Article
Article SummaryX
1. Try recovering from the Recycle Bin or Trash.
2. Attempt to restore from a local backup.
3. Restore from your iCloud Drive if you use it to back up files.
4. Try a reputable data recovery app.
Did this summary help you?
Thanks to all authors for creating a page that has been read 1,178,096 times.
Is this article up to date?
Содержание
- Вариант 1: Системные средства
- Вариант 2: Сторонний софт
- Способ 1: Recuva
- Способ 2: R.saver
- Способ 3: Handy Recovery
- Способ 4: Active@ File Recovery
- Способ 5: EaseUS Data Recovery Wizard
- Вопросы и ответы
Когда папка была удалена из «Корзины» безвозвратно, есть несколько способов ее вернуть. В большинстве случаев потребуется воспользоваться сторонними программами.
Вариант 1: Системные средства
При условии, что в операционной системе до удаления папки была активна функция автоматического создания точки восстановления, вернуть файлы можно с помощью встроенных средств.
Читайте также: Как создать точку восстановления в Windows 10 / Windows 8 / Windows 7
Самый быстрый способ выполнить поставленную задачу – это воспользоваться свойствами каталога, где она хранилась. В этом случае требуется знать, где точно находились данные. Например, если на рабочем столе, алгоритм действий следующий:
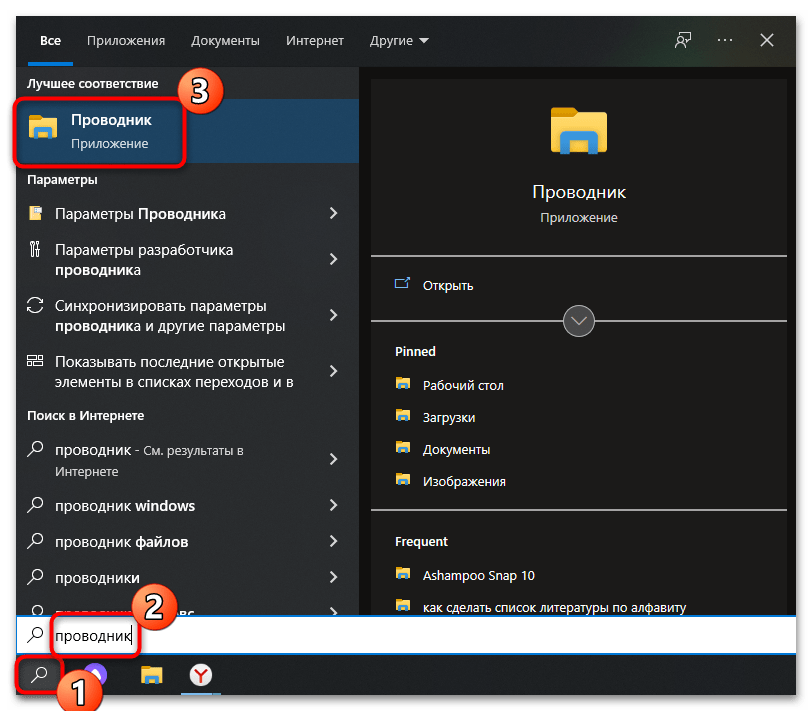
- Откройте «Проводник» системы через иконку «Этот компьютер» или «Мой компьютер» в более старых ОС.
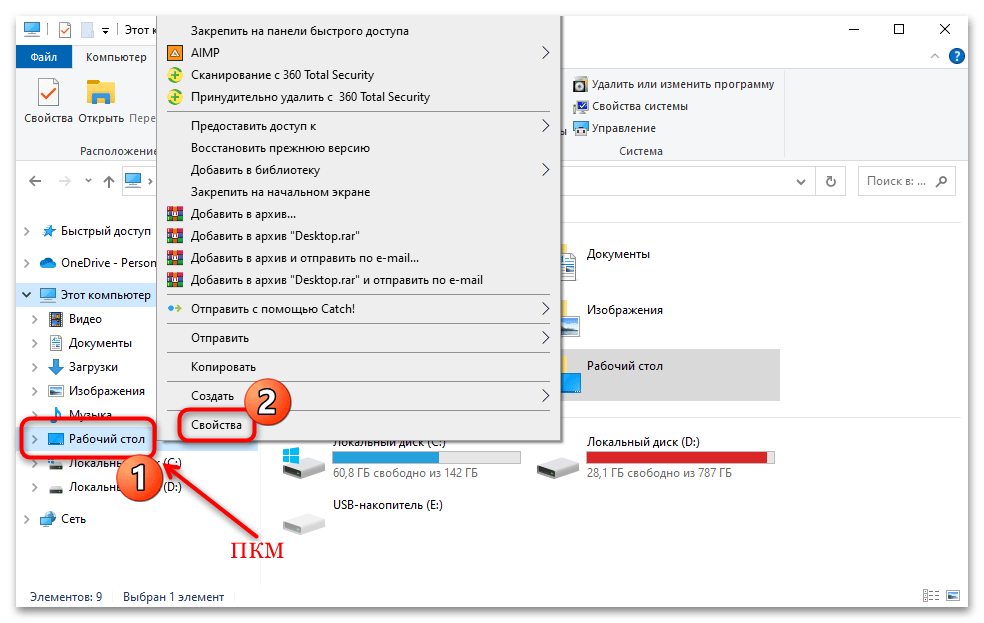
- В разделе слева найдите «Рабочий стол» и щелкните по нему правой кнопкой мыши. Из появившегося меню выберите пункт «Свойства».
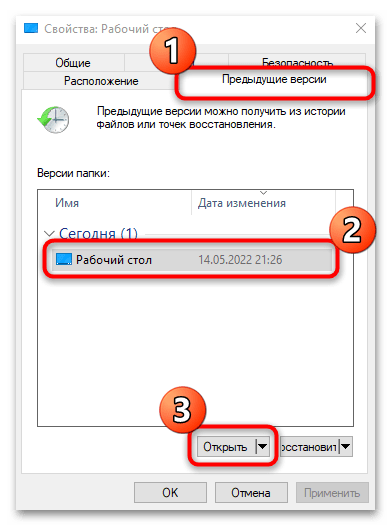
- Откроется окно, где нужно перейти на вкладку «Предыдущие версии». В списке отобразятся доступные версии для восстановления. Выделите нужную и нажмите на кнопку «Открыть».
- В новом окне появятся все файлы и папки, которые были на момент создания точки восстановления. Найдите нужный каталог и нажмите по нему правой кнопкой мыши, чтобы вызвать контекстное меню. Здесь потребуется выбрать копирование.
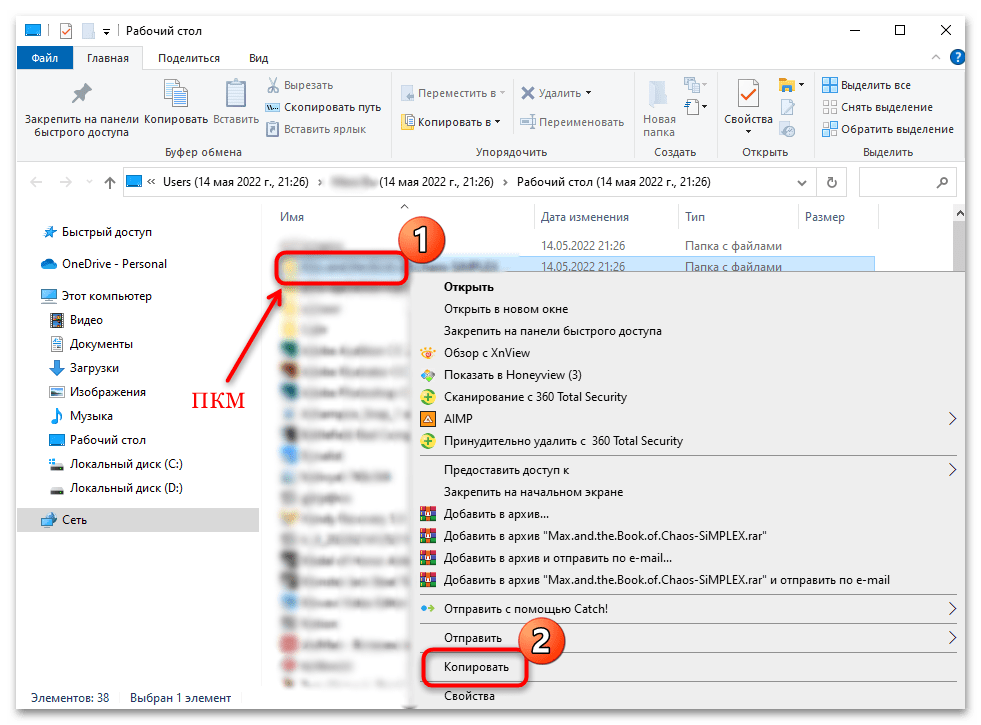
В нужном месте на локальном диске снова используйте контекстное меню и функцию «Вставить» или комбинацию «Ctrl + V», чтобы добавить скопированную папку.
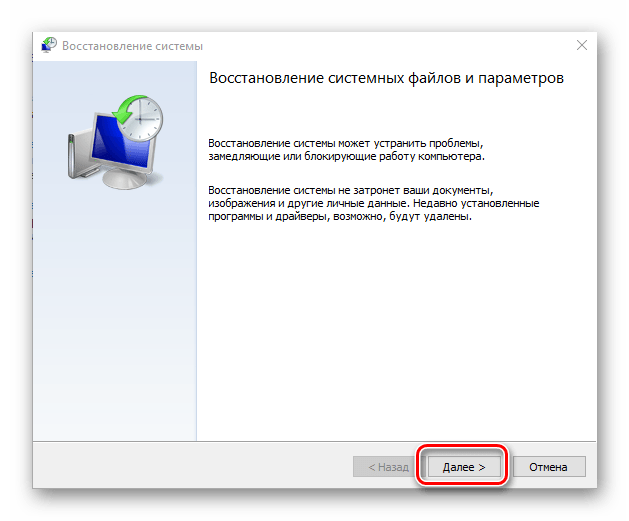
Если неизвестно, где находилась удаленная безвозвратно папка, остается использовать функцию отката всей системы. В этом случае будут восстановлены все данные на ПК или ноутбуке на момент создания точки восстановления, но при этом пропадут некоторые новые файлы и установленные приложения, если они появились на компьютере после создания точки восстановления. В наших отдельных материалах подробно описаны все способы восстановления актуальных ОС Windows.
Подробнее: Использование функции «Восстановление системы» в Windows 10 / Windows 7 / Windows XP
Вариант 2: Сторонний софт
Если встроенные средства системы не помогли или инструмент восстановления отключен, предлагаем воспользоваться альтернативным методом в виде сторонних специализированных программ. Следует отметить, что большинство из них распространяется на платной основе, но есть несколько бесплатных решений с базовыми функциями, которых хватит для несложных операций.
Читайте также: Лучшие программы для восстановления удаленных файлов
Важно! Восстановление данных получится выполнить только если папка хранилась на жестком диске. Вернуть папку, удаленную с SSD, не удастся, так как работают эти накопители совсем иначе. Удаляемые файлы с этих устройств действительно стираются и не подлежат восстановлению. Есть некоторый шанс вернуть их лишь тем, у кого еще до удаления была отключена функция TRIM (активирована по умолчанию для всех современных SSD).
Общая рекомендация для обладателей HDD, не зависящая от выбранной программы: копируйте найденную папку на съемный носитель или другой диск (физический, не логический том), чтобы избежать ошибок при восстановлении. Суть восстановления с жесткого диска такова, что удаленные из системы файлы на самом деле остаются храниться, а впоследствии перезаписываются новыми данными (т. е. в момент, когда на этот же участок начинается запись). При восстановлении происходит та же самая процедура, что и может привести к повреждению восстанавливаемых файлов. Особенно это касается дисков, где свободного места почти нет. Удачно перенесенные файлы потом можно будет вернуть на HDD, с которого и происходило восстановление.
Способ 1: Recuva
Программа Recuva – одна из самых популярных и эффективных, поскольку располагает необходимыми для восстановления папок и файлов инструментами с указанием пути, где они до этого находились. Таким образом, можно вернуть все данные из удаленного каталога. Существует бесплатная версия приложения, позволяющая проделать необходимую процедуру:
Скачать Recuva
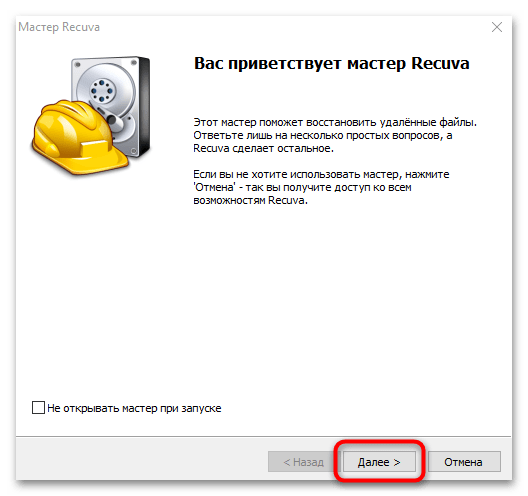
- Скачайте и установите программу. После первого запуска откроется окно с подсказками. Выберите кнопку продолжения, чтобы перейти к выбору параметров восстановления.
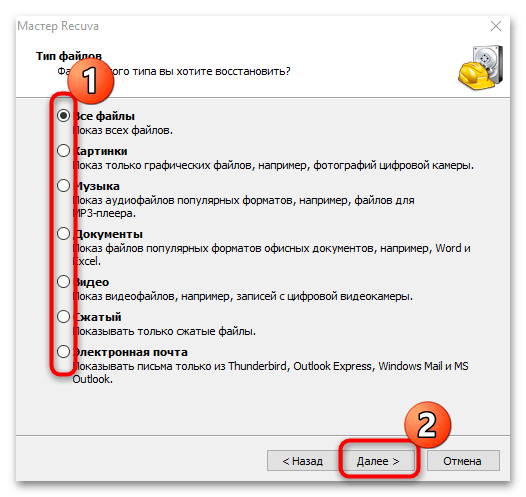
- Отметьте типы файлов, которые необходимо вернуть. Всего доступно несколько вариантов, включая мультимедийные данные, документы, письма или сжатые архивы. После завершения выбора кликните по «Далее».
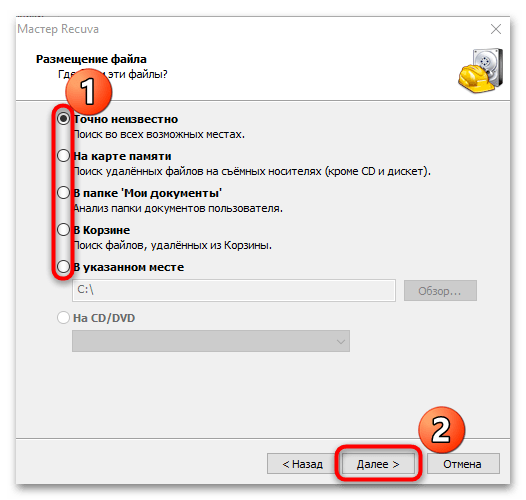
- Выберите каталог, где находилась папка. Также есть возможность указать путь, выбрав соответствующий пункт. Продолжите восстановление с помощью кнопки.
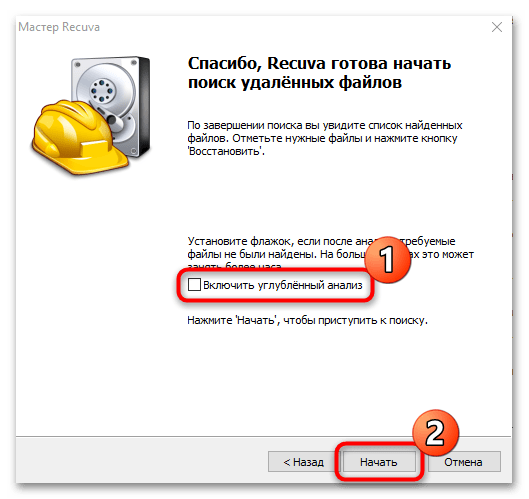
- В следующем окне нажмите на кнопку «Начать». При первой процедуре можно не использовать функцию «Углубленный анализ», поскольку это займет продолжительное время. Если простой поиск не помог, то можно в следующий раз включить ее.
- Через некоторое время в интерфейсе программы отобразятся все файлы, которые были удалены. После того как процедура завершится, отметьте те данные, которые нужно вернуть, и щелкните по «Восстановить». Потребуется выбрать местоположение для сохранения найденных файлов, затем нажать на кнопку «ОК».
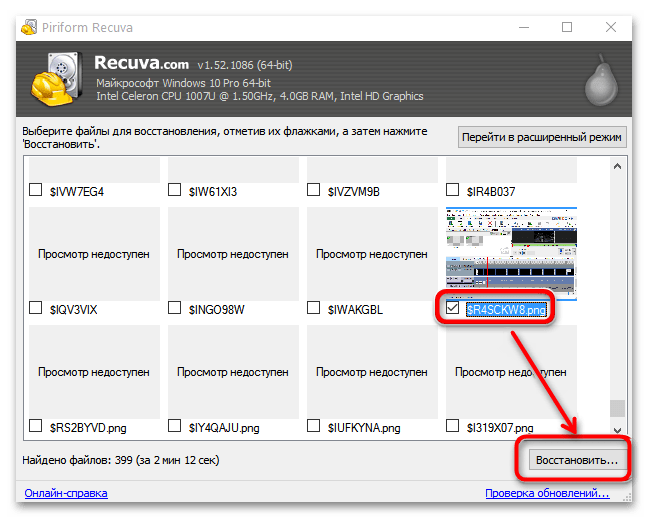
Когда перенос найденных файлов завершится, восстановленные файлы можно найти в той папке, которая была указана на последнем шаге.
Способ 2: R.saver
Еще одна полезная программа, распространяемая бесплатно, — это R.saver. Она позволяет отыскать безвозвратно удаленные данные и восстановить их. Кроме того, упрощает задачу простой и интуитивно понятный интерфейс на русском языке, функциональность и портативность.
Скачать R.saver
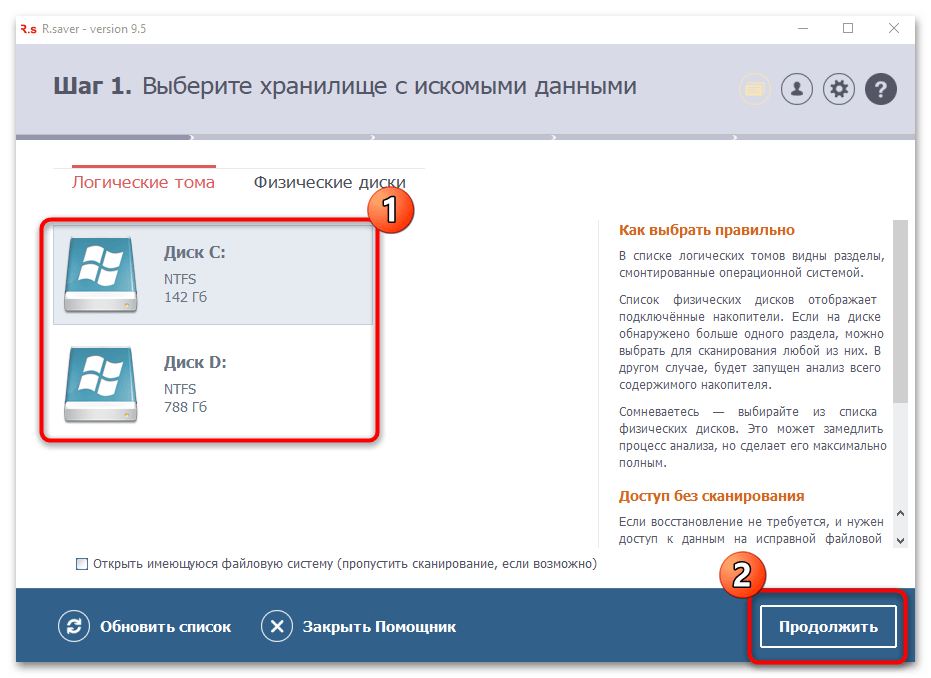
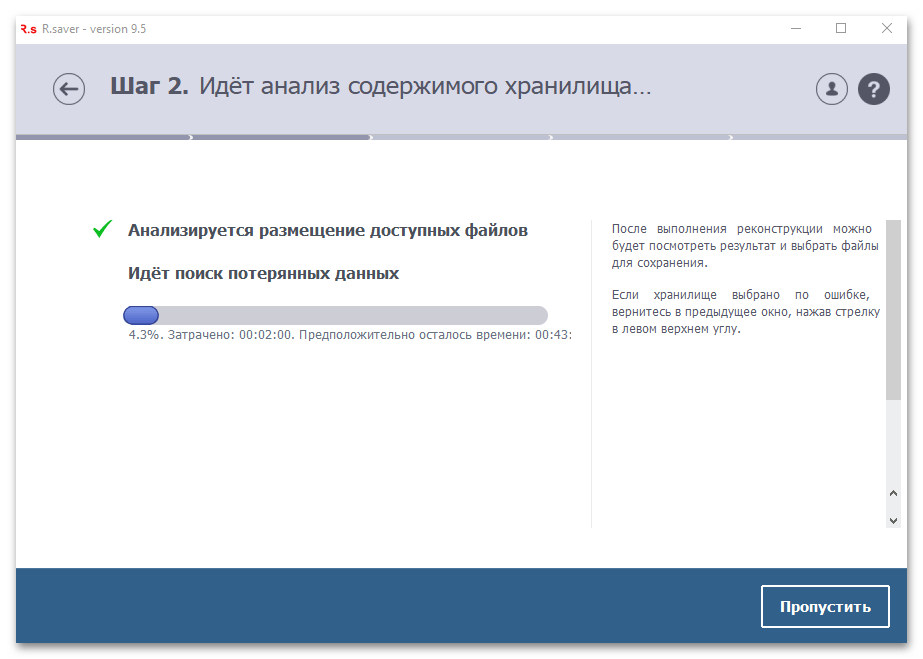
- Скачайте и запустите приложение. Интерфейс логично разделен на несколько разделов. На панели, которая располагается слева, выберите локальный диск или носитель, где находилась удаленная папка. Чтобы запустить процедуру поиска, в главном окне кликните по кнопке «Продолжить».
- После анализа содержимого выбранного хранилища появится процесс его сканирования. Дождитесь завершения проверки.
- Когда анализ выбранного тома или носителя будет завершен, появятся результаты, где слева отображаются папки, а справа – их содержимое. Перейдите на вкладку «Потерянные файлы» или «Все файлы» и выделите то, что нужно вернуть, затем нажмите на «Восстановить выбранное». Потом нужно выбрать место сохранения и нажать на соответствующую кнопку для подтверждения.
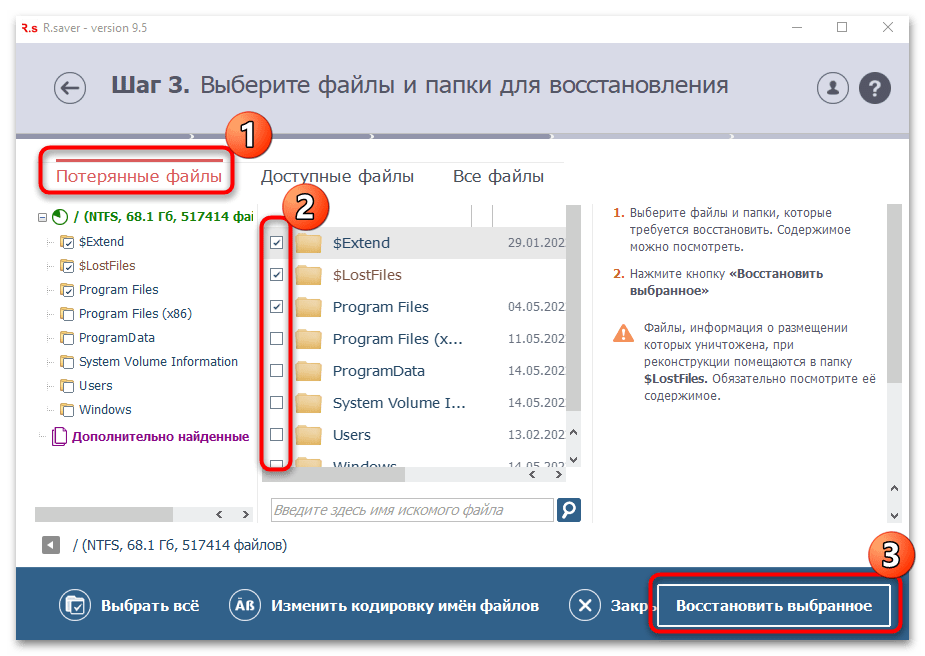
Следует отметить, что процесс сканирования зависит от некоторых параметров, поэтому он не всегда происходит быстро. Например, на него влияют технические характеристики ПК или то, насколько заполнен выбранный диск.
Способ 3: Handy Recovery
В отличие от предыдущих вариантов, Handy Recovery — платная программа, но при этом она отличается расширенными функциями и возможностями. Для ознакомления предусматривается пробный период в течение 30 дней, но этого достаточно, если необходимо разово восстановить папку, которая удалена безвозвратно.
Скачать Handy Recovery
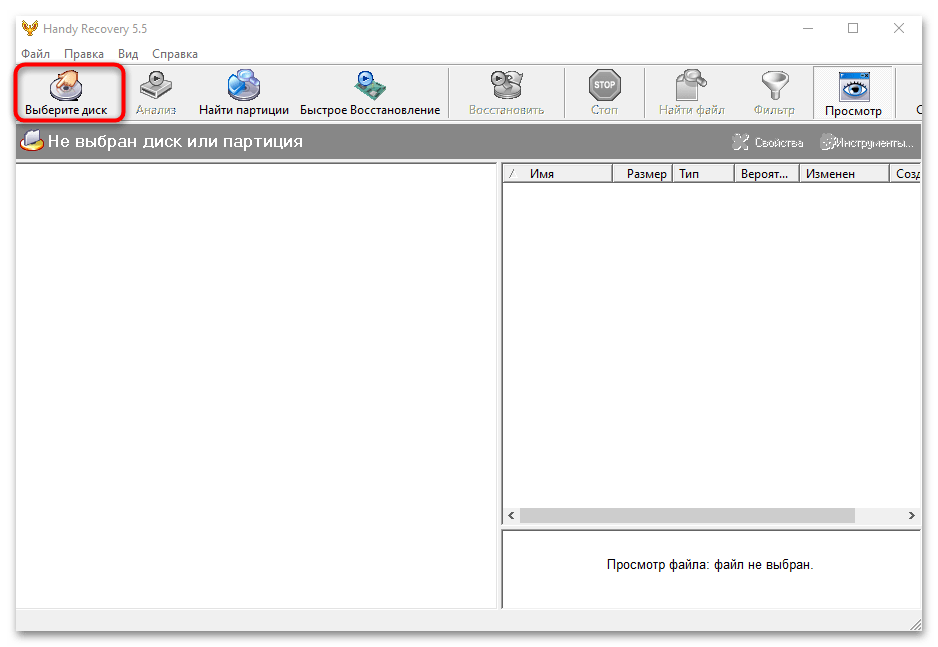
- Установите программу с помощью пошагового мастера. После инсталляции запустите ее и выберите локальный диск или съемный носитель для анализа. Для этого щелкните по соответствующей кнопке вверху.
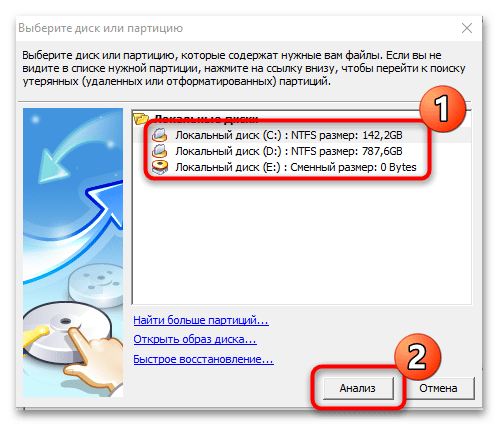
- В новом окне выберите том и нажмите на кнопку «Анализ».
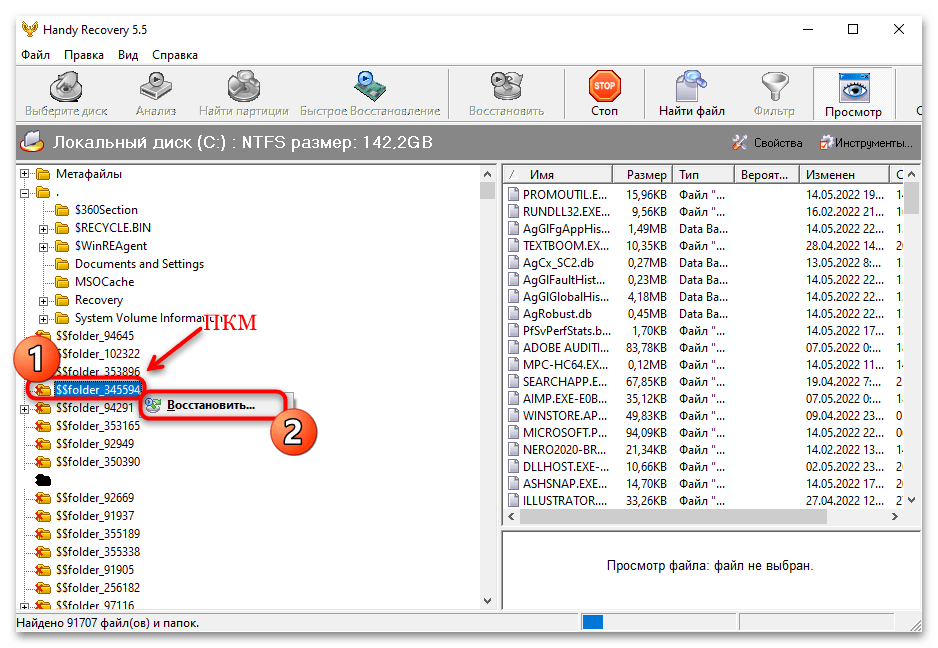
- На панели слева отобразятся найденные папки. Их имя может отличаться от того, что придумывали вы, но доступен просмотр содержимого в окне справа. Выделите нужную и щелкните по ней правой кнопки мыши. В появившемся окне нажмите на кнопку восстановления.
- Отобразится новое окно, где можно самостоятельно указать путь для сохранения данных. Программа может вернуть структуру папок и восстанавливать только те данные, которые были удалены. Для этого потребуется отметить соответствующие пункты. Нажмите на кнопку «ОК» для подтверждения процедуры.
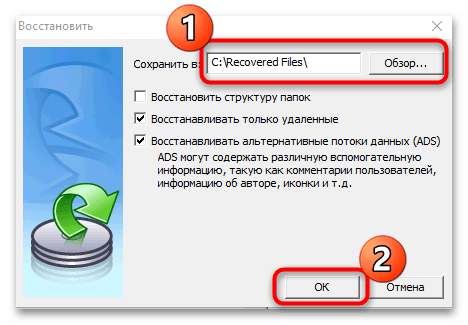
На этом восстановление папки завершено. В программе реализована поисковая строка для удобства навигации в каталогах, а также система фильтров для более тонкой настройки анализа, например выбор примерной даты удаления и определение размера папки.
Способ 4: Active@ File Recovery
Программа Active@ File Recovery позволяет просканировать локальные диски и съемные носители информации на наличие удаленных файлов, затем восстановить их с помощью встроенных средств. Приложение платное, но вернуть папку можно с помощью демоверсии.
Скачать Active@ File Recovery с официального сайта
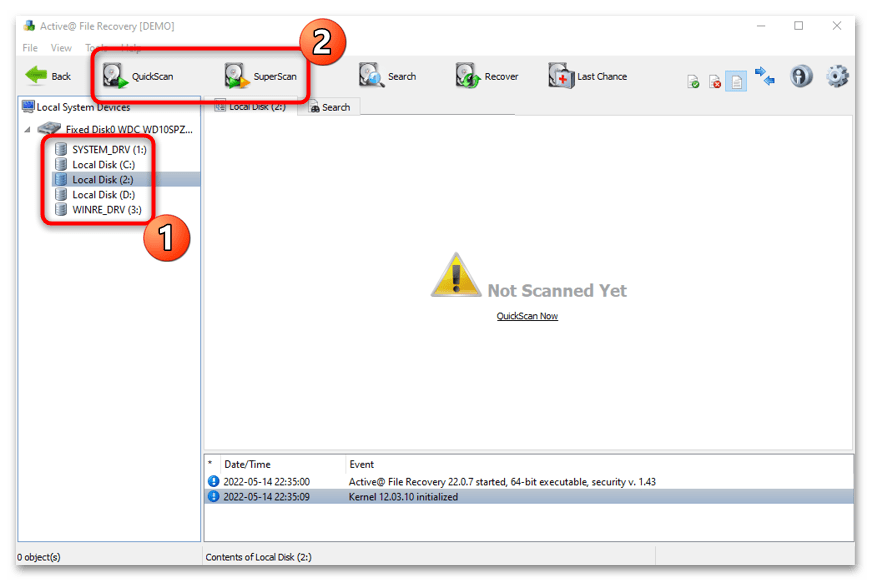
- После установки запустите программу. Отобразится интерфейс, где на панели слева необходимо выбрать локальный диск или носитель, который надо просканировать. Выделите его, затем нажмите на кнопку «SuperScan» вверху. Также доступна функция «QuickScan» для более поверхностного анализа.
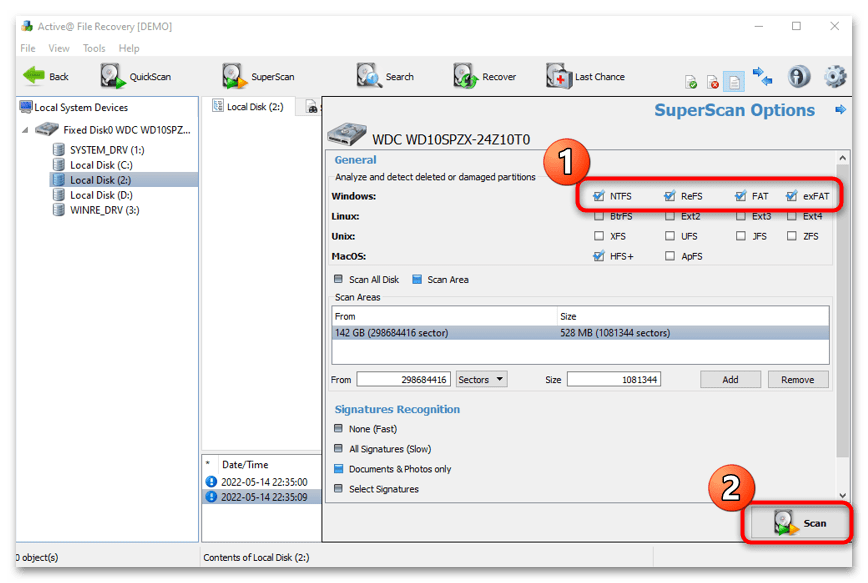
- По умолчанию у носителя информации выбраны все типы файловых систем. Если есть уверенность, какая из них используется, то лучше отметить ее. Кликните по кнопке «Scan».
- После анализа в главном окне интерфейса отобразится список доступных для восстановления файлов и папок на вкладке «Signature Files». Если нужный каталог найден, выделите его и выберите соответствующую функцию в контекстном меню. В новом окне потребуется указать путь, куда будет восстановлена папка.
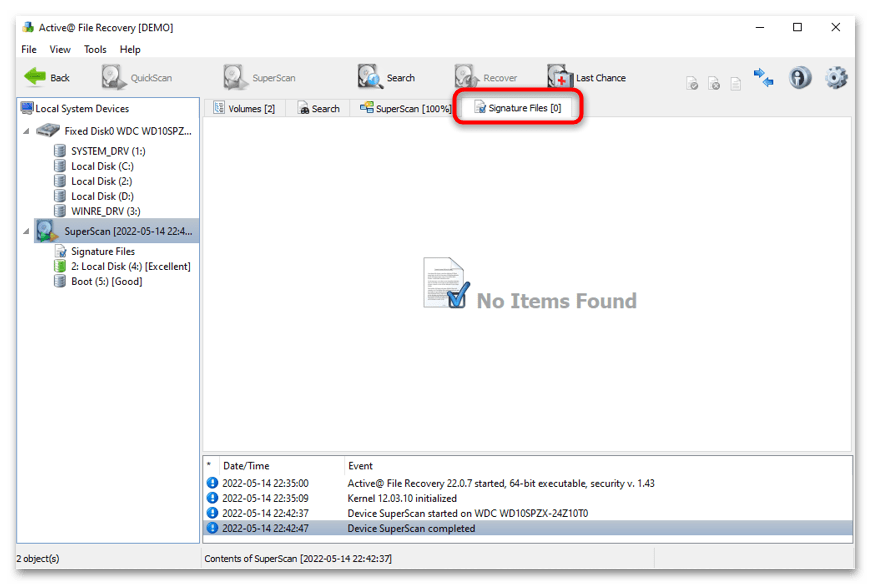
При углубленном сканировании процедура занимает намного больше времени, чем при быстрой проверке. Но при этом обеспечивается более тщательный анализ, который, скорее всего, позволит найти все нужные файлы.
Способ 5: EaseUS Data Recovery Wizard
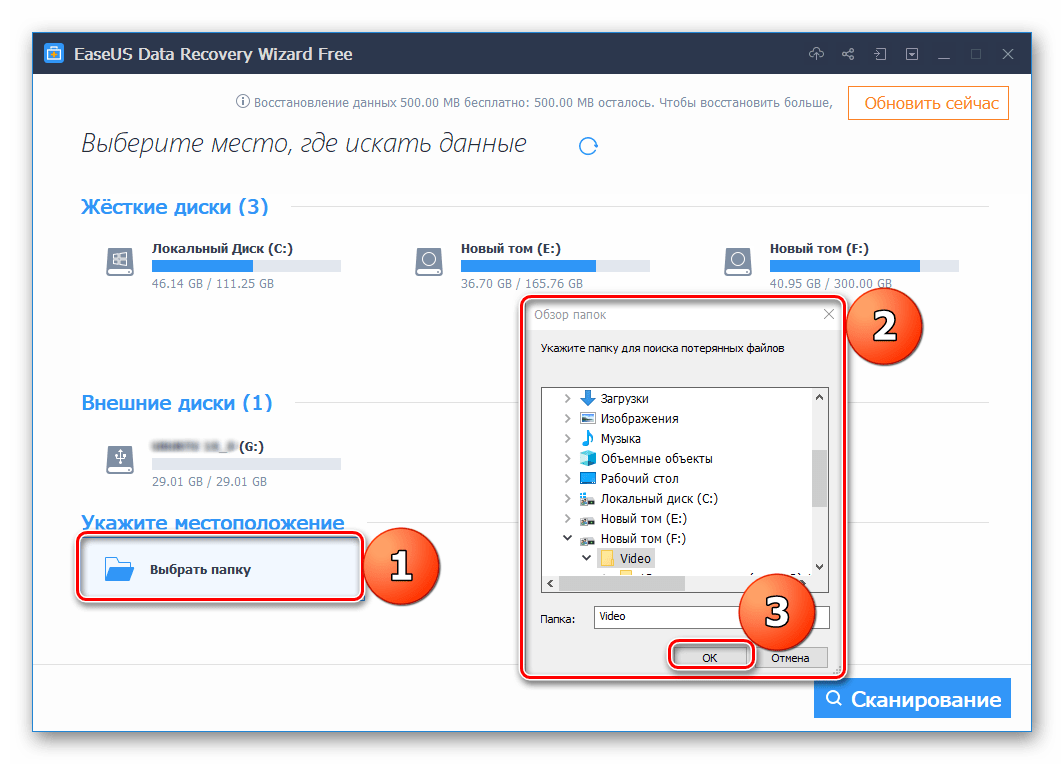
Еще одно приложение, которое позволяет восстановить безвозвратно удаленные данные и папки, – это EaseUS Data Recovery Wizard, предоставляющее бесплатную и ПРО-версию. Для простых задач хватит первого варианта: этого достаточно, чтобы вернуть каталог объемом до 500 МБ. В отдельной статье наш автор подробно разбирал алгоритм установки софта, а также процедуру сканирования и восстановления файлов на компьютере.
Подробнее: Восстановление данных в программе EaseUS Data Recovery Wizard
Загрузить PDF
Загрузить PDF
Если вы случайно удалили файл или папку на компьютере под управлением Windows 7, их можно восстановить из корзины. Но если вы уже очистили корзину, придется восстановить резервную копию файла; если это не удалось, воспользуйтесь специальной программой Recuva, которая находит и восстанавливает удаленные файлы.
-
1
Дважды щелкните по значку корзины. Он находится на рабочем столе.
-
2
Щелкните правой кнопкой мыши по удаленному файлу.
-
3
Нажмите Восстановить.
-
4
Закройте окно корзины. Удаленный файл будет восстановлен в той папке, из которой вы его удалили.
Реклама
-
1
Нажмите ⊞ Win. Windows 7 автоматически создает резервные копии файлов; если вы удалили файлы, их можно восстановить из резервной копии.
-
2
Нажмите Панель управления.
-
3
Щелкните по Система и безопасность.
-
4
Нажмите Архивация и восстановление.
-
5
Щелкните по Восстановить файлы.
-
6
Выберите файлы, которые хотите восстановить. Найти нужные файлы в резервных копиях можно тремя способами:[1]
- Нажмите Поиск и введите имя файла.
- Щелкните по Поиск файлов и найдите файлы в соответствующих папках.
- Нажмите Поиск папок и найдите папки.
-
7
Щелкните по Далее.
-
8
Выберите папку, в которой будут восстановлены файлы. Их можно восстановить в исходной папке (по умолчанию) или щелкнуть по ползунку у «В папке», а затем выбрать папку.
-
9
Нажмите Просмотр восстановленных файлов.
-
10
Нажмите Завершить. Файлы будут восстановлены.
Реклама
-
1
Дважды щелкните по «Компьютер». Если этого значка на рабочем столе нет, нажмите ⊞ Win > «Компьютер» (на правой панели меню).
-
2
Дважды щелкните по папке, из которой удалили файл. Например, если вы удалили файл из папки «Музыка», дважды щелкните по ней.
-
3
Щелкните правой кнопкой мыши по подпапке, в которой хранился файл. Например, если файл хранился в подпапке «iTunes», щелкните по ней правой кнопкой мыши.
-
4
Нажмите Восстановить прежнюю версию.
-
5
Выберите точку восстановления.
-
6
Нажмите OK. Если на компьютере активирована функция «История файлов», файл будет восстановлен.[2]
Реклама
-
1
Откройте сайт программы Recuva. Recuva является бесплатной программой, которая ищет на диске удаленные файлы и восстанавливает их. Имейте в виду, что на самом деле удаленные файлы все еще находятся на жестком диске, поэтому некоторые из них можно восстановить.
-
2
Нажмите Free Download (Скачать бесплатно).
-
3
Нажмите на ссылку для скачивания.
-
4
Дождитесь, когда установочный файл загрузится на компьютер. Ищите файл в папке для загрузок.
-
5
Дважды щелкните по скачанному файлу. Когда появится запрос, разрешите установить Recuva.
-
6
Нажмите «No thanks, I don’t need CCleaner» (Нет, спасибо, мне не нужен CCleaner).
-
7
Щелкните по Install (Установить).
-
8
Нажмите Run Recuva (Запустить Recuva). Чтобы пропустить информацию о текущем релизе, снимите флажок у «View Release Notes» (Просмотреть данные о релизе) под кнопкой Install (Установить).
-
9
Нажмите Next (Далее).
-
10
Выберите тип файла. Если вы не знаете, какой тип выбрать, установите флажок у «All files» (Все файлы).
- На поиск всех файлов уйдет немало времени.
-
11
Нажмите Next (Далее).
-
12
Выберите папку, из которой удалили файл. Если вы не знаете, какую папку выбрать, установите флажок у «I’m not sure» (Не знаю).
-
13
Нажмите Next (Далее).
-
14
Нажмите «Start» (Приступить). Если вы ищете файлы во второй раз, также установите флажок у «Enable Deep Scan» (Активировать глубокое сканирование).
-
15
Установите флажки у файлов, которые нужно восстановить.
-
16
Нажмите Recover (Восстановить).
-
17
Выберите папку, в которой будут восстановлены файлы.
-
18
Нажмите OK. Файлы будут восстановлены.
Реклама
Советы
- Recuva — это отличная программа для восстановления файлов, но можно воспользоваться и другой аналогичной программой (к примеру, MiniTool Data Recovery).
Реклама
Предупреждения
- Если после удаления файлов вы активно пользовались компьютером (записывали и удаляли другие файлы), шансы на успешное восстановление файлов уменьшаются.
Реклама
Об этой статье
Эту страницу просматривали 9012 раз.

 «Начните», выберите панель управления,выберите «Система и обслуживание», а затем выберите «Резервное копирование и восстановление».