Use a reliable L2TP/IPsec VPN client and quickly set it up to your PC
by Elena Constantinescu
Elena started writing professionally in 2010 and hasn’t stopped exploring the tech world since. With a firm grasp of software reviewing and content editing, she is always trying… read more
Updated on September 26, 2022
Reviewed by
Edgar Nicov

Since the dial-up Internet era, Edgar was interested in online resources. From forums to e-commerce websites, he started digging into how those resources could generate revenue. Today he… read more
- You create an IPsec VPN connection on a PC without having to install anything.
- But you still need the IPsec connection details of a VPN client.
- Follow our step-by-step guide to quickly install an IPsec VPN client in Windows.
- Learn how to find your L2TP/IPSec credentials and configure it from Settings.

If you need to set up an IPsec VPN client on Windows 10 PC, we’re here to help. Using a virtual private network, you can hide your IP address, encrypt your data traffic, and ultimately protect your online privacy.
There are numerous benefits to using a VPN, such as finding cheaper flights online, fixing network congestion, or reducing ping in multiplayer games.
You can also watch unlimited streaming by using a VPN to circumvent geoblocks and unblock Netflix libraries that aren’t normally available in your country.
What’s an IPsec VPN client?
An IPsec VPN client is a virtual private network service that supports the IPsec protocol. IPsec is used by the VPN to encrypt and protect your data across the Internet.
IPsec (Internet Protocol security) is a VPN protocol that authenticates and encrypts data transferred over the web. It supports multiple encryption methods, including 256-bit AES.
An IPsec VPN client is a virtual private network client that uses the IPsec protocol. However, IPsec can’t be used standalone because it’s only an encryption protocol that provides data security and privacy.
A VPN connection also requires a tunneling protocol to deliver data. As such, IPsec is typically accompanied by L2TP or IKEv2, resulting in the L2TP/IPsec and IKEv2/VPN protocols.
Does Windows 10 support IPsec VPN?
Windows 10 has native support for L2TP/IPsec. You can also set up a VPN on Windows Vista or older editions if you can find one that’s still compatible.
You can use this protocol to set up the built-in Windows VPN (for Windows 10 and 11). It is also compatible with third-party VPN clients that support it.
It’s possible to create a VPN connection in Windows 10 using the built-in OS settings and then add the VPN client’s login information, but it’s recommended to use a dedicated client for best performance.
How do I set up an IPsec VPN client on Windows 10?
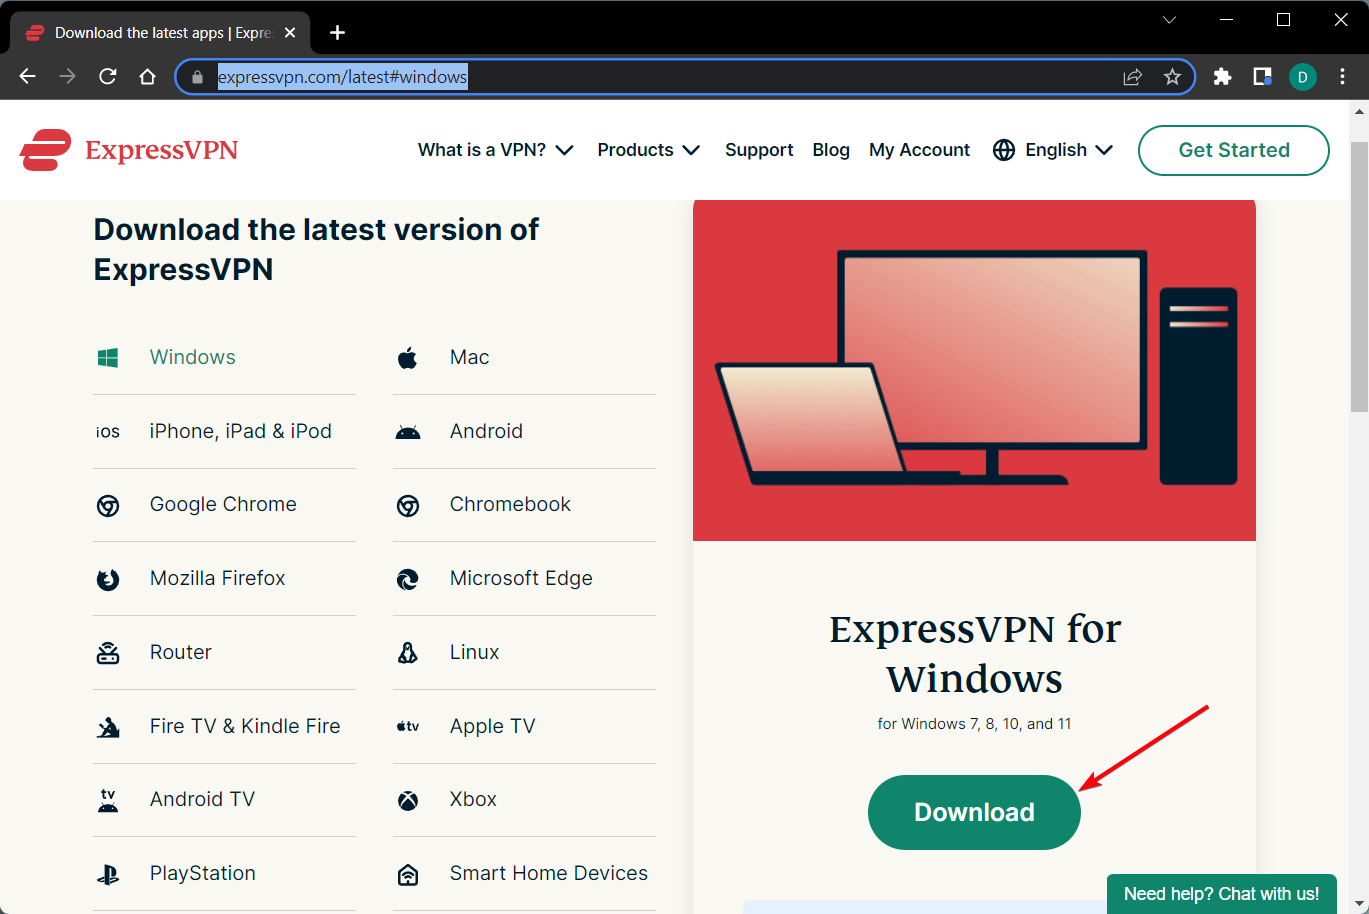
To set up a VPN with IPsec on Windows, you need a client that offers you the possibility to connect using this protocol, and our top choice in this regard is ExpressVPN.
The VPN has thousands of fast servers all around the world and industry-leading VPN security to make sure your data stays completely private: military-grade encryption,
1.Get IPsec VPN client credentials
- Sign up for an ExpressVPN subscription.

- In your browser, open the ExpressVPN manual configuration page.
- Enter your credentials and select L2TP/IPsec.

- You’ll get information about your username and password + IPsec server addresses.
- Save this information so you can add it to your VPN connection.

The user name and password for the IPsec connection will be necessary once you configure your VPN connection using Windows settings.
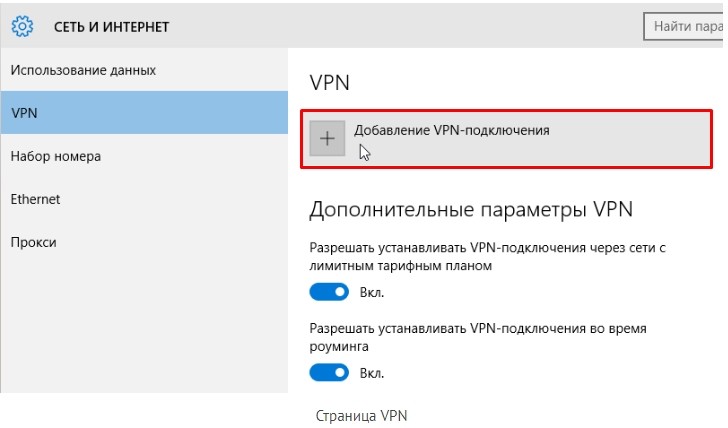
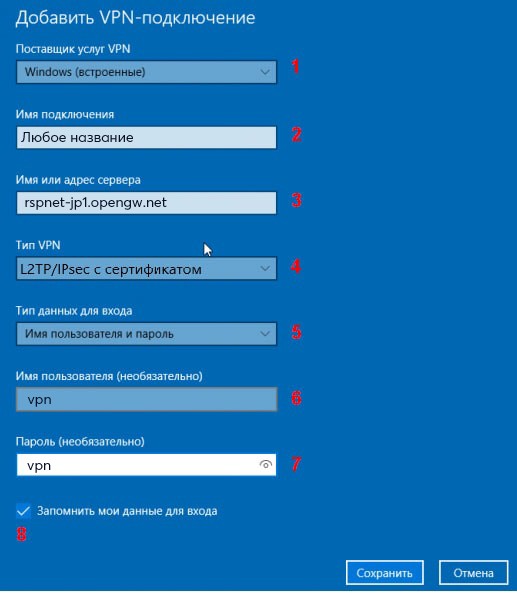
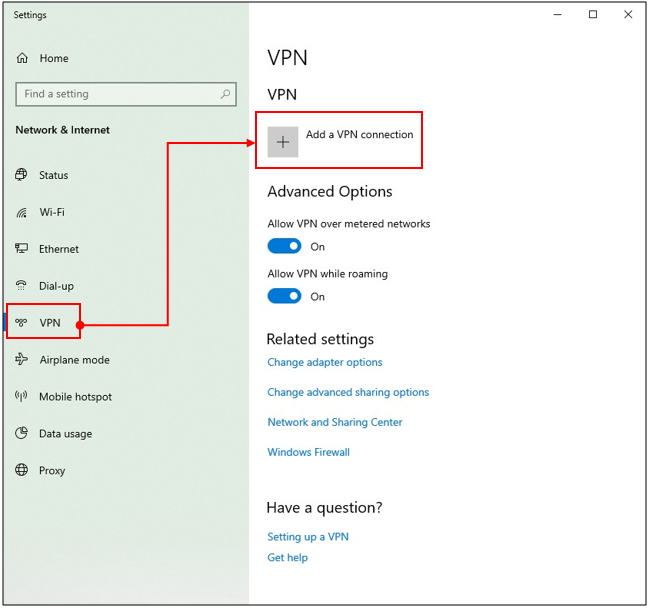
2. Create a VPN connection
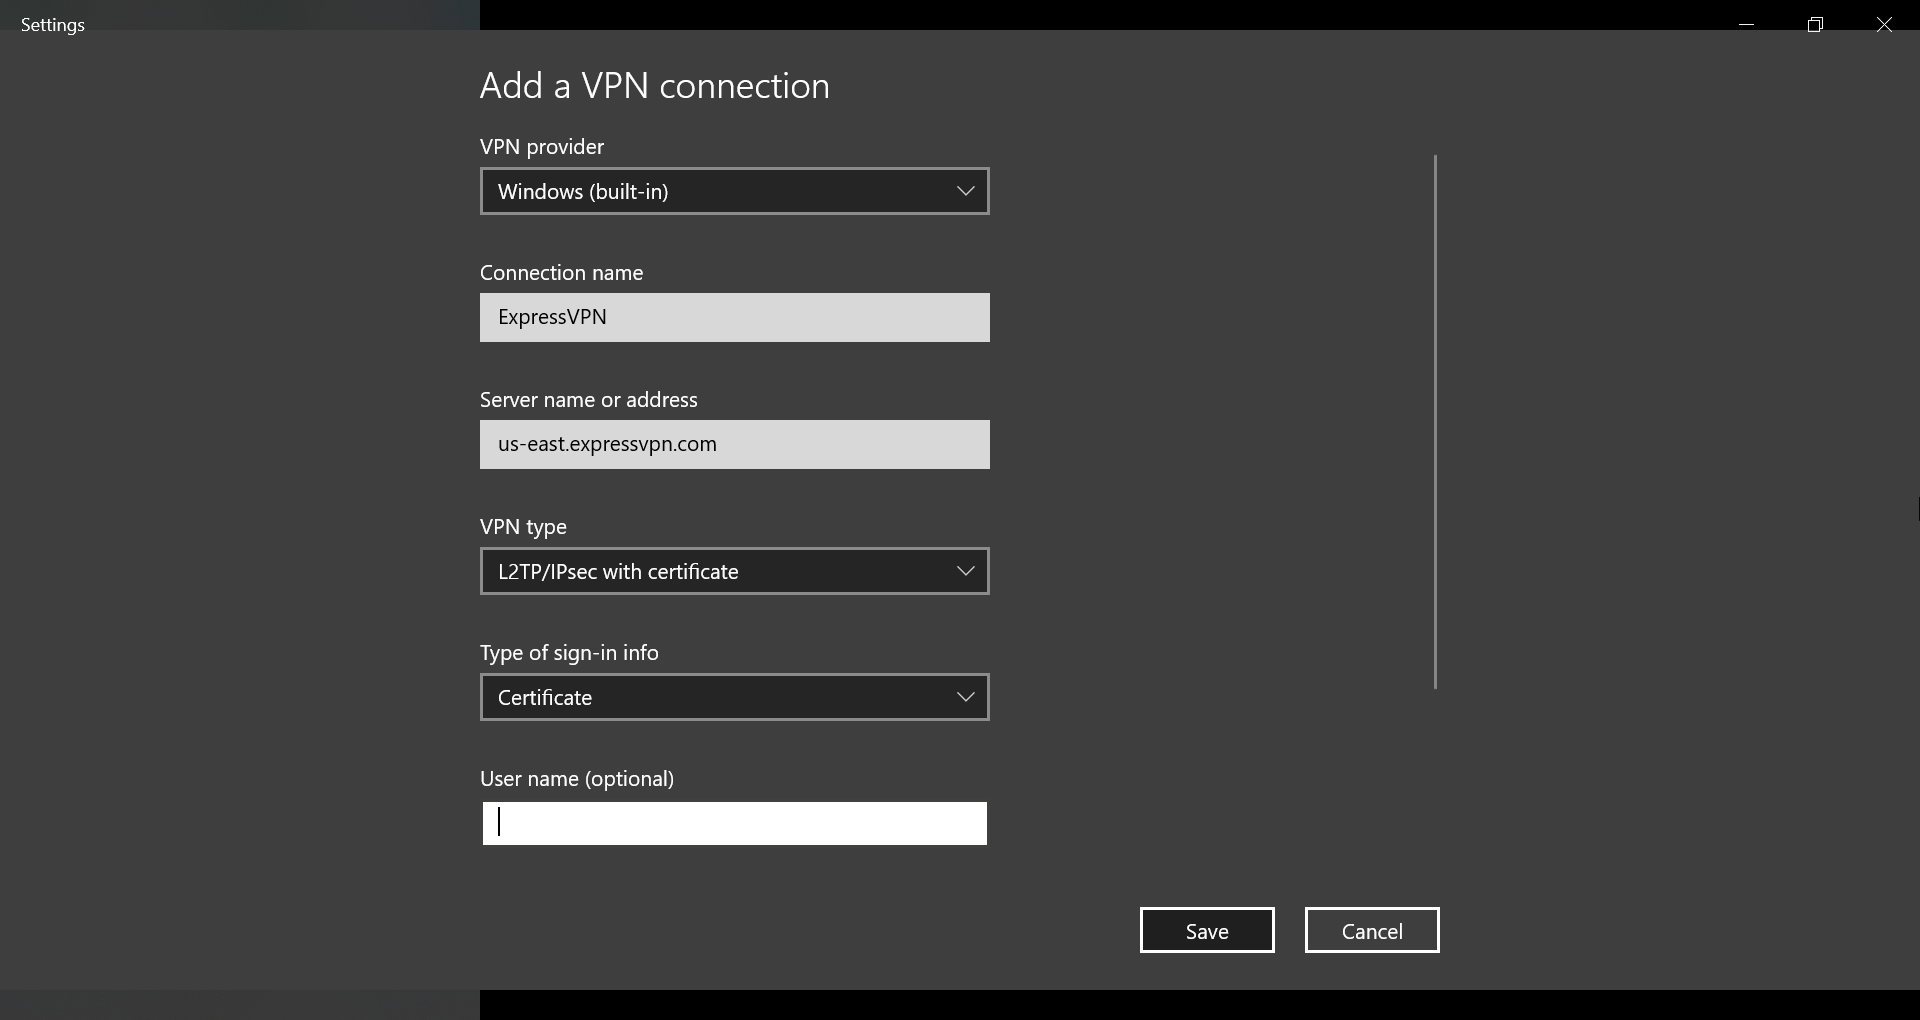
- Right-click the Start button and go to Network Connections.
- Select VPN on the left side and click Add a VPN connection.
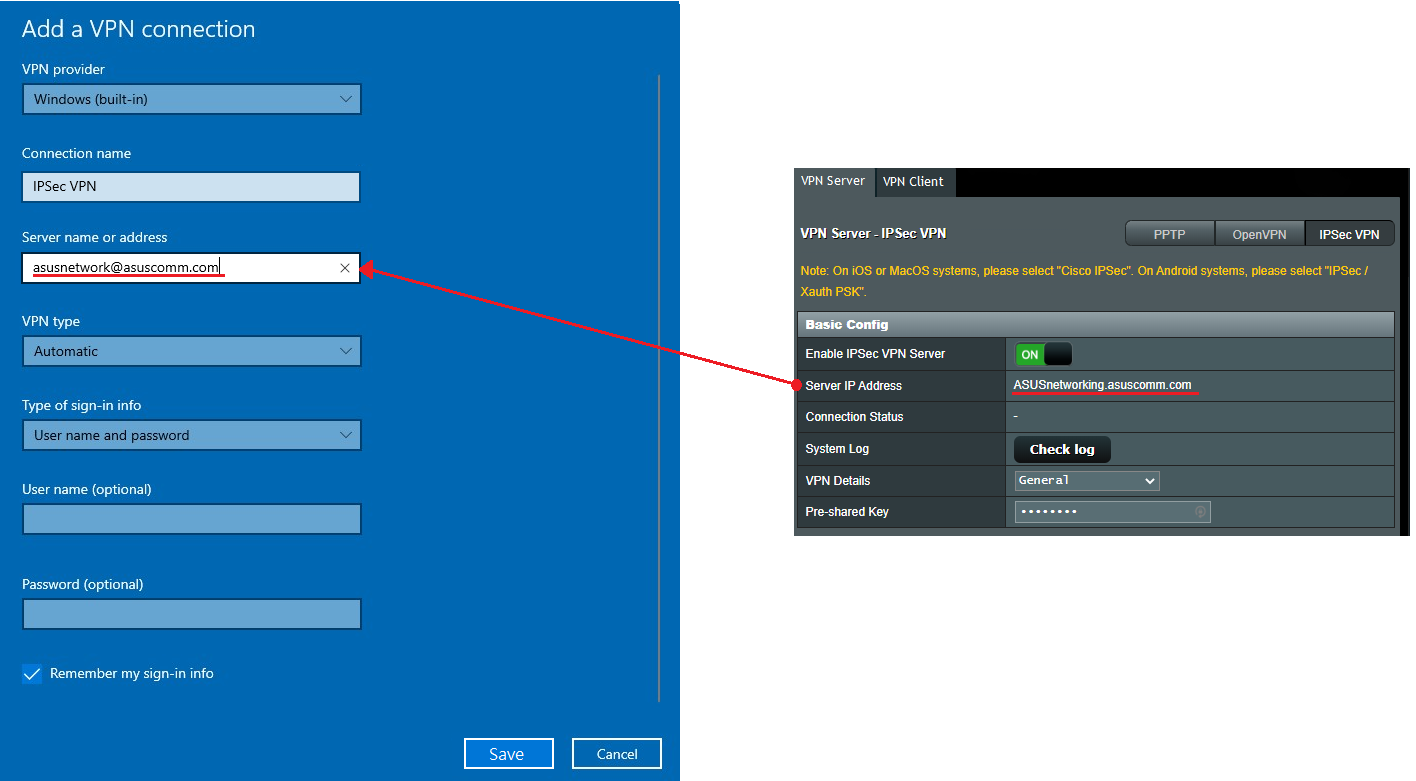
- Set VPN provider to Windows (built-in) and write a Connection name.
- At Server name or address, type one of the server addresses provided by the ExpressVPN configuration page.
- Set VPN type to L2TP/IPsec with certificate.
- At Type of sign-in info, select User name and password.
- At User name (optional) and Password (optional), paste the ExpressVPN credentials you previously obtained.
- Enable Remember my sign-in info and click Save.
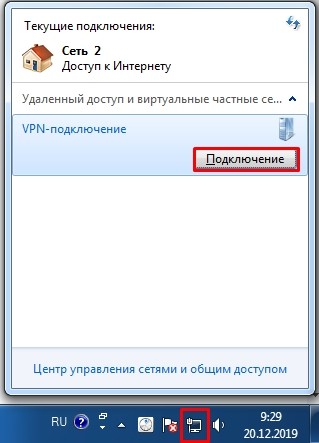
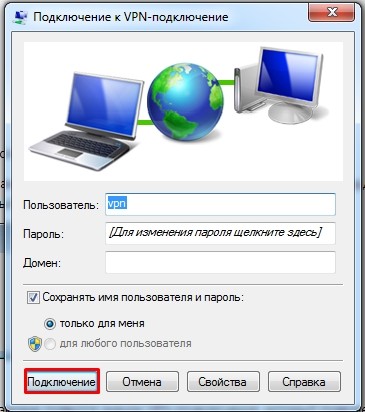
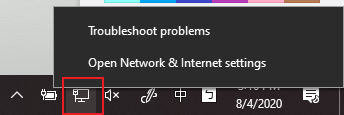
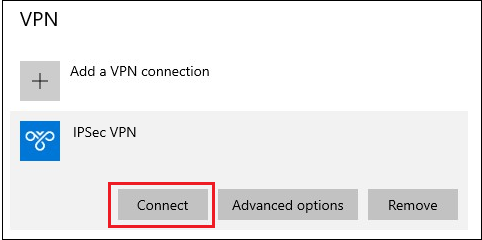
3. Connect and disconnect from the IPsec VPN
- Click the Network icon in the systray.
- Select the IPsec VPN connection.
- Click Connect or Disconnect.
4. Change IPsec VPN settings
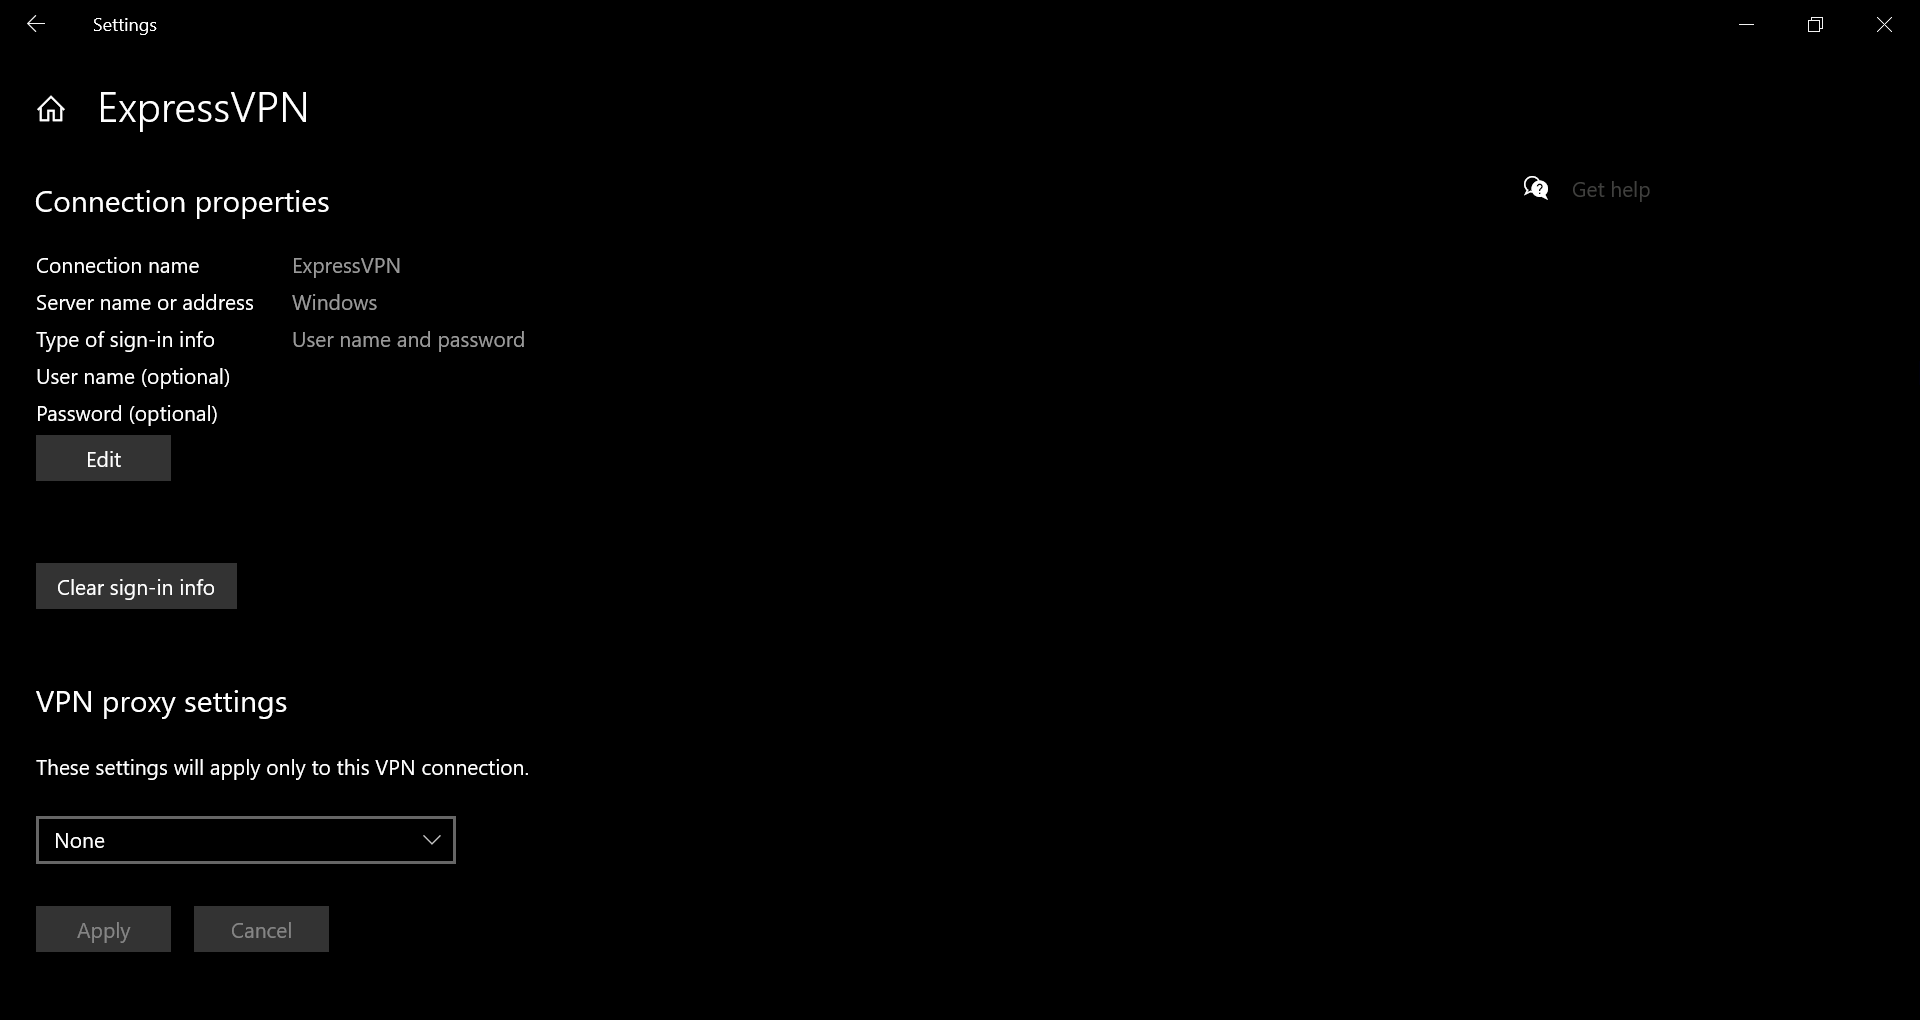
- Right-click the Start button and go to Network Connections > VPN.
- Select the IPsec VPN connection and click Advanced options.
- At Connection properties, click Edit.
- Change VPN connection details and click Save.
If you want to connect to a different VPN server, you can either edit VPN connection details to set the new address or create a new VPN connection for each address.
5. Remove the IPsec VPN connection
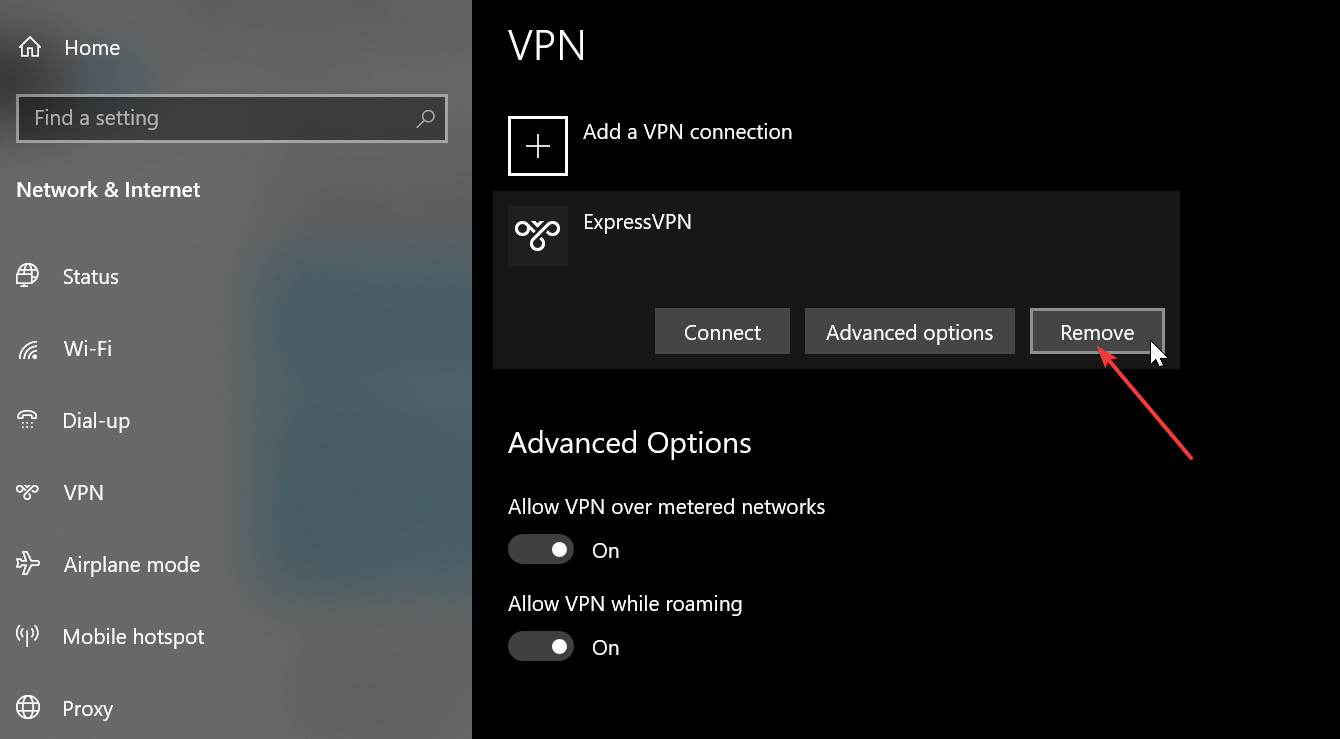
- Right-click the Start button and go to Network Connections > VPN.
- Select the IPsec VPN connection.
- Click Remove.
Why use ExpressVPN
ExpressVPN is compatible with all popular platforms, including Mac, Linux, Android, and iOS.
You can even set it up on a router to share VPN access with all connected devices. Otherwise, up to 5 devices can share the VPN account for ExpressVPN.
Furthermore, ExpressVPN supports OpenVPN and Lightway, in addition to PPTP and L2TP with IPsec.
It comes with private DNS, gaming optimized servers, SOCKS5 and Shadowsocks proxy servers, port forwarding, split tunneling, and a kill switch.
What else you should know about ExpressVPN:
- +4000+ servers in 94 countries
- No traffic logs
- 24/7 live chat support
- 30-days money-back guarantee
- 7-day free trial (mobile)
ExpressVPN
Quickly set up an IPsec VPN client connection on Windows 10 using this fast and secure VPN app.
In conclusion, you can easily set up an IPsec VPN client on Windows 10 in order to protect your online privacy and computer security, as well as to unblock streaming services and minimize jitter. You can even set up an IPsec connection on XP by using the best VPN for Windows XP.
You just need to get equipped with a premium VPN that not only supports the IPsec protocol but also comes with high-speed VPN servers and superior security features, like ExpressVPN.
Your connection is not secure — websites you visit can find out your details:

- Your IP Address:
loading

Companies can sell this information, alongside your location and internet provider name, and profit from it by serving targeted ads or monitoring your data usage.
We recommend Private Internet Access, a VPN with a no-log policy, open source code, ad blocking and much more; now 79% off.
![]()
Newsletter
Существует множество приложений, которые будут реализовывать аутентификацию и шифрование сетевого трафика через отдельную стороннюю программу.
Тем не менее, операционная система Microsoft может также реализовать это через конфигурацию IPSEC. В этой статье мы рассмотрим, что такое IPSEC, и простой пример реализации.
Internet Protocol Security или IPSEC — это протокол, используемый для аутентификации и шифрования IP-коммуникаций. Это достигается путем взаимной аутентификации между агентами, а также обмена криптографическими ключами в начале сеанса.
IPSEC также позволит добавлять ограничения IP и шифрование на уровне TCP / UDP к приложениям, которые иначе не могут его поддерживать. IPSEC использует IP-протокол 50 (ESP), IP-протокол 51 (AH) и UDP-порт 500.
Внедрение IPSEC
В этом примере мы настроим IPSEC для шифрования связи между двумя компьютерами Windows. Первый компьютер, сервер Windows 2012 будет выступать в качестве сервера VPN.
Второй компьютер, клиент Windows 10, будет действовать как клиент VPN. LT2P IPSEC VPN может обмениваться либо предварительным общим ключом, либо сертификатом. В этом примере мы будем обмениваться предварительным общим ключом.
Настройка VPN-сервера
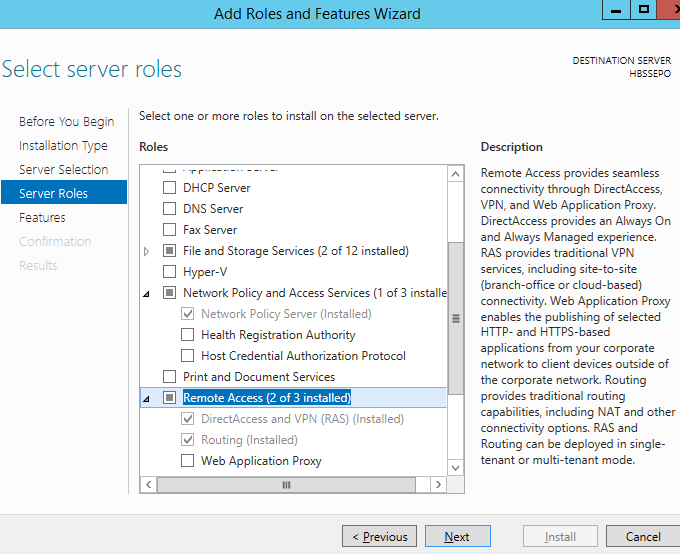
На компьютере с Windows 2012 нам потребуется установить функции маршрутизации и удаленного доступа. Для этого перейдите в диспетчер серверов и добавьте роли и компоненты . Выберите установку на основе ролей или функций . Выберите локальный сервер. Выберите для установки следующие роли сервера.
Сетевая политика и службы доступа
Сервер сетевой политики
Удаленный доступ
Прямой доступ и VPN (RAS)
Маршрутизация
После установки этих новых функций вам потребуется оснастка для управления ими. Откройте mmc.exe с правами администратора. Перейти к файлу | Добавить / удалить оснастку. Добавьте оснастку маршрутизации и удаленного доступа .
Эта оснастка позволяет настраивать многопротокольные службы маршрутизации LAN-to-LAN, LAN-to-WAN, виртуальная частная сеть (VPN) и трансляция сетевых адресов (NAT).
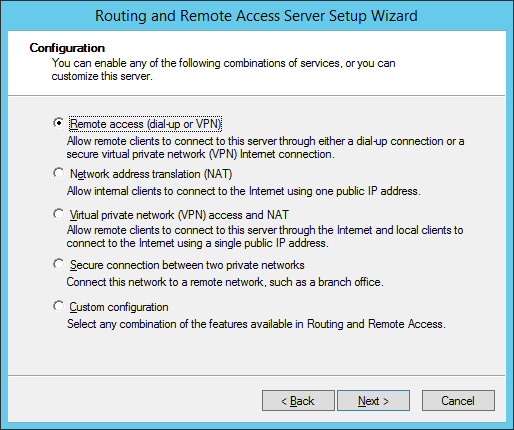
В консоли MMC щелкните правой кнопкой мыши на маршрутизации и удаленного доступа и выберите, чтобы добавить сервер. Выберите локальную машину. Затем щелкните правой кнопкой мыши на только что созданном компьютере и выберите «Настроить и включить маршрутизацию и удаленный доступ» . Выберите Удаленный доступ (Dial Up или VPN).
Затем проверьте параметр VPN . У вас должно быть как минимум две сетевые карты, чтобы это работало. Одним из них может быть петля. Укажите диапазон адресов, которые будут предоставлены для входящего соединения. Убедитесь, что они не конфликтуют с другими адресами, выделенными в вашей существующей сети. В этом примере мы не будем использовать радиус-сервер.
Далее попытайтесь запустить службу маршрутизации и удаленного доступа. Следующий ключ реестра может потребоваться удалить, чтобы запустить службу.
HKEY_LOCAL_MACHINESYSTEMCurrentControlSetServicesRemoteAccessRouterManagersIpv6
В консоли mmc.exe щелкните правой кнопкой мыши на имени компьютера и перейдите в Свойства. Измените эти свойства на вкладке безопасности.
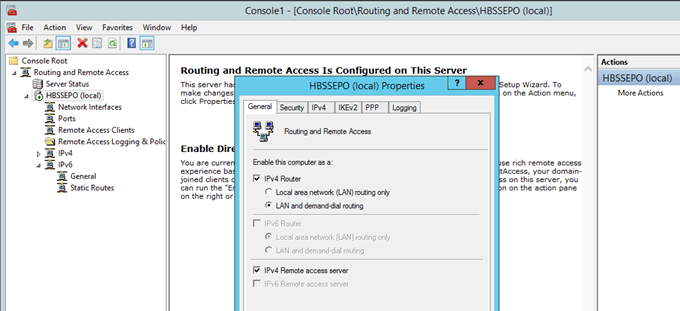
Выберите методы аутентификации, как показано ниже.
Установите флажок, чтобы разрешить настраиваемую политику IPSEC для соединения L2TP / IKEv2. Добавьте предварительный общий ключ.
Наконец, вам нужно будет изменить пользователя, чтобы получить доступ к VPN. Откройте compmgmt.msc, перейдите в раздел «Локальные пользователи и группы» и выберите свойства пользователя, которого вы хотите использовать для VPN.
Перейдите на вкладку Dial Up. Выберите Разрешить доступ и нажмите Применить . На вашем компьютере потребуется перезагрузка. После перезагрузки вы будете готовы протестировать свой первый клиент.
Настройка машины с Windows 10
На компьютере с Windows 10 откройте «Настройки сети и Интернета». Выберите VPN на левой панели и добавьте VPN-соединение. Отредактируйте дополнительные параметры.
Разместите IP-адрес вашего VPN-сервера под именем или адресом сервера. Выберите L2TP/IPSEC с параметром предварительного общего ключа в разделе Тип VPN. Добавьте предварительно общий ключ и имя пользователя и пароль.
Свойства безопасности для VPN должны быть изменены под сетевым адаптером. На адаптере VPN выберите «Свойства» и перейдите на вкладку «Безопасность». Установите переключатель EAP и выберите Microsoft: защищенный пароль (EAP-MSCHAPv2) (шифрование включено).
Наконец, снова щелкните правой кнопкой на адаптере для подключения. Поздравляем! Вы создали VPN-туннель IPSEC.
English | 中文
Configure IPsec/L2TP VPN Clients
After setting up your own VPN server, follow these steps to configure your devices. IPsec/L2TP is natively supported by Android, iOS, OS X, and Windows. There is no additional software to install. Setup should only take a few minutes. In case you are unable to connect, first check to make sure the VPN credentials were entered correctly.
- Platforms
- Windows
- OS X (macOS)
- Android
- iOS (iPhone/iPad)
- Chrome OS (Chromebook)
- Linux
- IKEv1 troubleshooting
Windows
You may also connect using IKEv2 mode (recommended).
Windows 11
- Right-click on the wireless/network icon in your system tray.
- Select Network and Internet settings, then on the page that opens, click VPN.
- Click the Add VPN button.
- Select Windows (built-in) in the VPN provider drop-down menu.
- Enter anything you like in the Connection name field.
- Enter
Your VPN Server IPin the Server name or address field. - Select L2TP/IPsec with pre-shared key in the VPN type drop-down menu.
- Enter
Your VPN IPsec PSKin the Pre-shared key field. - Enter
Your VPN Usernamein the User name field. - Enter
Your VPN Passwordin the Password field. - Check the Remember my sign-in info checkbox.
- Click Save to save the VPN connection details.
Note: This one-time registry change is required if the VPN server and/or client is behind NAT (e.g. home router).
To connect to the VPN: Click the Connect button, or click on the wireless/network icon in your system tray, click VPN, then select the new VPN entry and click Connect. If prompted, enter Your VPN Username and Password, then click OK. You can verify that your traffic is being routed properly by looking up your IP address on Google. It should say «Your public IP address is Your VPN Server IP«.
If you get an error when trying to connect, see Troubleshooting.
Windows 10 and 8
- Right-click on the wireless/network icon in your system tray.
- Select Open Network & Internet settings, then on the page that opens, click Network and Sharing Center.
- Click Set up a new connection or network.
- Select Connect to a workplace and click Next.
- Click Use my Internet connection (VPN).
- Enter
Your VPN Server IPin the Internet address field. - Enter anything you like in the Destination name field, and then click Create.
- Return to Network and Sharing Center. On the left, click Change adapter settings.
- Right-click on the new VPN entry and choose Properties.
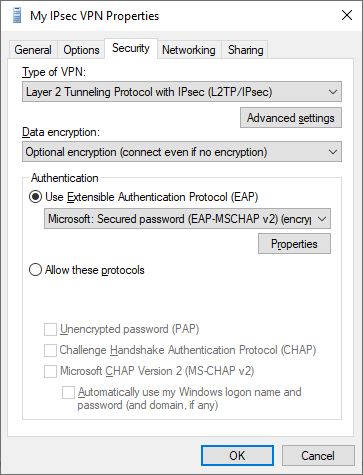
- Click the Security tab. Select «Layer 2 Tunneling Protocol with IPsec (L2TP/IPSec)» for the Type of VPN.
- Click Allow these protocols. Check the «Challenge Handshake Authentication Protocol (CHAP)» and «Microsoft CHAP Version 2 (MS-CHAP v2)» checkboxes.
- Click the Advanced settings button.
- Select Use preshared key for authentication and enter
Your VPN IPsec PSKfor the Key. - Click OK to close the Advanced settings.
- Click OK to save the VPN connection details.
Note: This one-time registry change is required if the VPN server and/or client is behind NAT (e.g. home router).
To connect to the VPN: Click on the wireless/network icon in your system tray, select the new VPN entry, and click Connect. If prompted, enter Your VPN Username and Password, then click OK. You can verify that your traffic is being routed properly by looking up your IP address on Google. It should say «Your public IP address is Your VPN Server IP«.
If you get an error when trying to connect, see Troubleshooting.
Alternatively, instead of following the steps above, you may create the VPN connection using these Windows PowerShell commands. Replace Your VPN Server IP and Your VPN IPsec PSK with your own values, enclosed in single quotes:
# Disable persistent command history
Set-PSReadlineOption –HistorySaveStyle SaveNothing
# Create VPN connection
Add-VpnConnection -Name 'My IPsec VPN' -ServerAddress 'Your VPN Server IP' ^
  -L2tpPsk 'Your VPN IPsec PSK' -TunnelType L2tp -EncryptionLevel Required ^
  -AuthenticationMethod Chap,MSChapv2 -Force -RememberCredential -PassThru
# Ignore the data encryption warning (data is encrypted in the IPsec tunnel)
Windows 7, Vista and XP
- Click on the Start Menu and go to the Control Panel.
- Go to the Network and Internet section.
- Click Network and Sharing Center.
- Click Set up a new connection or network.
- Select Connect to a workplace and click Next.
- Click Use my Internet connection (VPN).
- Enter
Your VPN Server IPin the Internet address field. - Enter anything you like in the Destination name field.
- Check the Don’t connect now; just set it up so I can connect later checkbox.
- Click Next.
- Enter
Your VPN Usernamein the User name field. - Enter
Your VPN Passwordin the Password field. - Check the Remember this password checkbox.
- Click Create, and then Close.
- Return to Network and Sharing Center. On the left, click Change adapter settings.
- Right-click on the new VPN entry and choose Properties.
- Click the Options tab and uncheck Include Windows logon domain.
- Click the Security tab. Select «Layer 2 Tunneling Protocol with IPsec (L2TP/IPSec)» for the Type of VPN.
- Click Allow these protocols. Check the «Challenge Handshake Authentication Protocol (CHAP)» and «Microsoft CHAP Version 2 (MS-CHAP v2)» checkboxes.
- Click the Advanced settings button.
- Select Use preshared key for authentication and enter
Your VPN IPsec PSKfor the Key. - Click OK to close the Advanced settings.
- Click OK to save the VPN connection details.
Note: This one-time registry change is required if the VPN server and/or client is behind NAT (e.g. home router).
To connect to the VPN: Click on the wireless/network icon in your system tray, select the new VPN entry, and click Connect. If prompted, enter Your VPN Username and Password, then click OK. You can verify that your traffic is being routed properly by looking up your IP address on Google. It should say «Your public IP address is Your VPN Server IP«.
If you get an error when trying to connect, see Troubleshooting.
OS X
You may also connect using IKEv2 (recommended) or IPsec/XAuth mode.
- Open System Preferences and go to the Network section.
- Click the + button in the lower-left corner of the window.
- Select VPN from the Interface drop-down menu.
- Select L2TP over IPSec from the VPN Type drop-down menu.
- Enter anything you like for the Service Name.
- Click Create.
- Enter
Your VPN Server IPfor the Server Address. - Enter
Your VPN Usernamefor the Account Name. - Click the Authentication Settings button.
- In the User Authentication section, select the Password radio button and enter
Your VPN Password. - In the Machine Authentication section, select the Shared Secret radio button and enter
Your VPN IPsec PSK. - Click OK.
- Check the Show VPN status in menu bar checkbox.
- (Important) Click the Advanced button and make sure the Send all traffic over VPN connection checkbox is checked.
- (Important) Click the TCP/IP tab, and make sure Link-local only is selected in the Configure IPv6 section.
- Click OK to close the Advanced settings, and then click Apply to save the VPN connection information.
To connect to the VPN: Use the menu bar icon, or go to the Network section of System Preferences, select the VPN and choose Connect. You can verify that your traffic is being routed properly by looking up your IP address on Google. It should say «Your public IP address is Your VPN Server IP«.
If you get an error when trying to connect, see Troubleshooting.
Android
Important: Android users should instead connect using IKEv2 mode (recommended), which is more secure. Android 12+ only supports IKEv2 mode. The native VPN client in Android uses the less secure modp1024 (DH group 2) for the IPsec/L2TP and IPsec/XAuth («Cisco IPsec») modes.
If you still want to connect using IPsec/L2TP mode, you must first edit /etc/ipsec.conf on the VPN server. Find the line ike=... and append ,aes256-sha2;modp1024,aes128-sha1;modp1024 at the end. Save the file and run sudo service ipsec restart.
Docker users: Add VPN_ENABLE_MODP1024=yes to your env file, then re-create the Docker container.
After that, follow the steps below on your Android device:
- Launch the Settings application.
- Tap «Network & internet». Or, if using Android 7 or earlier, tap More… in the Wireless & networks section.
- Tap VPN.
- Tap Add VPN Profile or the + icon at top-right of screen.
- Enter anything you like in the Name field.
- Select L2TP/IPSec PSK in the Type drop-down menu.
- Enter
Your VPN Server IPin the Server address field. - Leave the L2TP secret field blank.
- Leave the IPSec identifier field blank.
- Enter
Your VPN IPsec PSKin the IPSec pre-shared key field. - Tap Save.
- Tap the new VPN connection.
- Enter
Your VPN Usernamein the Username field. - Enter
Your VPN Passwordin the Password field. - Check the Save account information checkbox.
- Tap Connect.
Once connected, you will see a VPN icon in the notification bar. You can verify that your traffic is being routed properly by looking up your IP address on Google. It should say «Your public IP address is Your VPN Server IP«.
If you get an error when trying to connect, see Troubleshooting.
iOS
You may also connect using IKEv2 (recommended) or IPsec/XAuth mode.
- Go to Settings -> General -> VPN.
- Tap Add VPN Configuration….
- Tap Type. Select L2TP and go back.
- Tap Description and enter anything you like.
- Tap Server and enter
Your VPN Server IP. - Tap Account and enter
Your VPN Username. - Tap Password and enter
Your VPN Password. - Tap Secret and enter
Your VPN IPsec PSK. - Make sure the Send All Traffic switch is ON.
- Tap Done.
- Slide the VPN switch ON.
Once connected, you will see a VPN icon in the status bar. You can verify that your traffic is being routed properly by looking up your IP address on Google. It should say «Your public IP address is Your VPN Server IP«.
If you get an error when trying to connect, see Troubleshooting.
Chrome OS
You may also connect using IKEv2 mode (recommended).
- Go to Settings -> Network.
- Click Add connection, then click Add built-in VPN.
- Enter anything you like for the Service name.
- Select L2TP/IPsec in the Provider type drop-down menu.
- Enter
Your VPN Server IPfor the Server hostname. - Select Pre-shared key in the Authentication type drop-down menu.
- Enter
Your VPN Usernamefor the Username. - Enter
Your VPN Passwordfor the Password. - Enter
Your VPN IPsec PSKfor the Pre-shared key. - Leave other fields blank.
- Enable Save identity and password.
- Click Connect.
Once connected, you will see a VPN icon overlay on the network status icon. You can verify that your traffic is being routed properly by looking up your IP address on Google. It should say «Your public IP address is Your VPN Server IP«.
If you get an error when trying to connect, see Troubleshooting.
Linux
You may also connect using IKEv2 mode (recommended).
Ubuntu Linux
Ubuntu 18.04 (and newer) users can install the network-manager-l2tp-gnome package using apt, then configure the IPsec/L2TP VPN client using the GUI.
- Go to Settings -> Network -> VPN. Click the + button.
- Select Layer 2 Tunneling Protocol (L2TP).
- Enter anything you like in the Name field.
- Enter
Your VPN Server IPfor the Gateway. - Enter
Your VPN Usernamefor the User name. - Right-click the ? in the Password field, select Store the password only for this user.
- Enter
Your VPN Passwordfor the Password. - Leave the NT Domain field blank.
- Click the IPsec Settings… button.
- Check the Enable IPsec tunnel to L2TP host checkbox.
- Leave the Gateway ID field blank.
- Enter
Your VPN IPsec PSKfor the Pre-shared key. - Expand the Advanced section.
- Enter
aes128-sha1-modp2048for the Phase1 Algorithms. - Enter
aes128-sha1for the Phase2 Algorithms. - Click OK, then click Add to save the VPN connection information.
- Turn the VPN switch ON.
If you get an error when trying to connect, try this fix.
Once connected, you can verify that your traffic is being routed properly by looking up your IP address on Google. It should say «Your public IP address is Your VPN Server IP«.
Fedora and CentOS
Fedora 28 (and newer) and CentOS 8/7 users can connect using IPsec/XAuth mode.
Other Linux
First check here to see if the network-manager-l2tp and network-manager-l2tp-gnome packages are available for your Linux distribution. If yes, install them (select strongSwan) and follow the instructions above. Alternatively, you may configure Linux VPN clients using the command line.
Configure Linux VPN clients using the command line
Advanced users can configure Linux VPN clients using the command line. Alternatively, you may connect using IKEv2 mode (recommended), or configure using the GUI. Instructions below are inspired by the work of Peter Sanford. Commands must be run as root on your VPN client.
To set up the VPN client, first install the following packages:
# Ubuntu and Debian
apt-get update
apt-get install strongswan xl2tpd net-tools

# Fedora
yum install strongswan xl2tpd net-tools

# CentOS
yum install epel-release
yum --enablerepo=epel install strongswan xl2tpd net-tools
Create VPN variables (replace with actual values):
VPN_SERVER_IP='your_vpn_server_ip'
VPN_IPSEC_PSK='your_ipsec_pre_shared_key'
VPN_USER='your_vpn_username'
VPN_PASSWORD='your_vpn_password'
Configure strongSwan:
cat > /etc/ipsec.conf <<EOF
# ipsec.conf - strongSwan IPsec configuration file

conn myvpn
  auto=add
  keyexchange=ikev1
  authby=secret
  type=transport
  left=%defaultroute
  leftprotoport=17/1701
  rightprotoport=17/1701
  right=$VPN_SERVER_IP
  ike=aes128-sha1-modp2048
  esp=aes128-sha1
EOF

cat > /etc/ipsec.secrets <<EOF
: PSK "$VPN_IPSEC_PSK"
EOF

chmod 600 /etc/ipsec.secrets

# For CentOS and Fedora ONLY
mv /etc/strongswan/ipsec.conf /etc/strongswan/ipsec.conf.old 2>/dev/null
mv /etc/strongswan/ipsec.secrets /etc/strongswan/ipsec.secrets.old 2>/dev/null
ln -s /etc/ipsec.conf /etc/strongswan/ipsec.conf
ln -s /etc/ipsec.secrets /etc/strongswan/ipsec.secrets
Configure xl2tpd:
cat > /etc/xl2tpd/xl2tpd.conf <<EOF
[lac myvpn]
lns = $VPN_SERVER_IP
ppp debug = yes
pppoptfile = /etc/ppp/options.l2tpd.client
length bit = yes
EOF

cat > /etc/ppp/options.l2tpd.client <<EOF
ipcp-accept-local
ipcp-accept-remote
refuse-eap
require-chap
noccp
noauth
mtu 1280
mru 1280
noipdefault
defaultroute
usepeerdns
connect-delay 5000
name "$VPN_USER"
password "$VPN_PASSWORD"
EOF

chmod 600 /etc/ppp/options.l2tpd.client
The VPN client setup is now complete. Follow the steps below to connect.
Note: You must repeat all steps below every time you try to connect to the VPN.
Create xl2tpd control file:
mkdir -p /var/run/xl2tpd
touch /var/run/xl2tpd/l2tp-control
Restart services:
service strongswan restart

# For Ubuntu 20.04, if strongswan service not found
ipsec restart

service xl2tpd restart
Start the IPsec connection:
# Ubuntu and Debian
ipsec up myvpn

# CentOS and Fedora
strongswan up myvpn
Start the L2TP connection:
echo "c myvpn" > /var/run/xl2tpd/l2tp-control
Run ifconfig and check the output. You should now see a new interface ppp0.
Check your existing default route:
Find this line in the output: default via X.X.X.X .... Write down this gateway IP for use in the two commands below.
Exclude your VPN server’s public IP from the new default route (replace with actual value):
route add YOUR_VPN_SERVER_PUBLIC_IP gw X.X.X.X
If your VPN client is a remote server, you must also exclude your Local PC’s public IP from the new default route, to prevent your SSH session from being disconnected (replace with actual value):
route add YOUR_LOCAL_PC_PUBLIC_IP gw X.X.X.X
Add a new default route to start routing traffic via the VPN server:
route add default dev ppp0
The VPN connection is now complete. Verify that your traffic is being routed properly:
wget -qO- http://ipv4.icanhazip.com; echo
The above command should return Your VPN Server IP.
To stop routing traffic via the VPN server:
route del default dev ppp0
To disconnect:
# Ubuntu and Debian
echo "d myvpn" > /var/run/xl2tpd/l2tp-control
ipsec down myvpn

# CentOS and Fedora
echo "d myvpn" > /var/run/xl2tpd/l2tp-control
strongswan down myvpn
IKEv1 troubleshooting
Read this in other languages: English, 中文.
See also: IKEv2 troubleshooting and Advanced usage.
- Check logs and VPN status
- Windows error 809
- Windows error 789 or 691
- Windows error 628 or 766
- Windows 10 connecting
- Windows 10 upgrades
- Windows DNS leaks and IPv6
- Android MTU/MSS issues
- Android 6 and 7
- macOS send traffic over VPN
- iOS 13+ and macOS 10.15/11+
- iOS/Android sleep mode
- Debian 11/10 kernel
- Other errors
Check logs and VPN status
Commands below must be run as root (or using sudo).
First, restart services on the VPN server:
service ipsec restart
service xl2tpd restart
Docker users: Run docker restart ipsec-vpn-server.
Then reboot your VPN client device, and retry the connection. If still unable to connect, try removing and recreating the VPN connection. Make sure that the VPN server address and VPN credentials are entered correctly.
For servers with an external firewall (e.g. EC2/GCE), open UDP ports 500 and 4500 for the VPN.
Check the Libreswan (IPsec) and xl2tpd logs for errors:
# Ubuntu & Debian
grep pluto /var/log/auth.log
grep xl2tpd /var/log/syslog

# CentOS/RHEL, Rocky Linux, AlmaLinux, Oracle Linux & Amazon Linux 2
grep pluto /var/log/secure
grep xl2tpd /var/log/messages

# Alpine Linux
grep pluto /var/log/messages
grep xl2tpd /var/log/messages
Check the status of the IPsec VPN server:
Show currently established VPN connections:
Windows error 809
Error 809: The network connection between your computer and the VPN server could not be established because the remote server is not responding. This could be because one of the network devices (e.g, firewalls, NAT, routers, etc) between your computer and the remote server is not configured to allow VPN connections. Please contact your Administrator or your service provider to determine which device may be causing the problem.
Note: The registry change below is only required if you use IPsec/L2TP mode to connect to the VPN. It is NOT required for the IKEv2 and IPsec/XAuth modes.
To fix this error, a one-time registry change is required because the VPN server and/or client is behind NAT (e.g. home router). Download and import the .reg file below, or run the following from an elevated command prompt. You must reboot your PC when finished.
-
For Windows Vista, 7, 8, 10 and 11 (download .reg file)
REG ADD HKLMSYSTEMCurrentControlSetServicesPolicyAgent /v AssumeUDPEncapsulationContextOnSendRule /t REG_DWORD /d 0x2 /f -
For Windows XP ONLY (download .reg file)
REG ADD HKLMSYSTEMCurrentControlSetServicesIPSec /v AssumeUDPEncapsulationContextOnSendRule /t REG_DWORD /d 0x2 /f
Although uncommon, some Windows systems disable IPsec encryption, causing the connection to fail. To re-enable it, run the following command and reboot your PC.
-
For Windows XP, Vista, 7, 8, 10 and 11 (download .reg file)
REG ADD HKLMSYSTEMCurrentControlSetServicesRasManParameters /v ProhibitIpSec /t REG_DWORD /d 0x0 /f
Windows error 789 or 691
Error 789: The L2TP connection attempt failed because the security layer encountered a processing error during initial negotiations with the remote computer.
Error 691: The remote connection was denied because the user name and password combination you provided is not recognized, or the selected authentication protocol is not permitted on the remote access server.
For error 789, click here for troubleshooting information. For error 691, you may try removing and recreating the VPN connection, by following the instructions in this document. Make sure that the VPN credentials are entered correctly.
Windows error 628 or 766
Error 628: The connection was terminated by the remote computer before it could be completed.
Error 766: A certificate could not be found. Connections that use the L2TP protocol over IPSec require the installation of a machine certificate, also known as a computer certificate.
To fix these errors, please follow these steps:
- Right-click on the wireless/network icon in your system tray.
- Select Open Network and Sharing Center. Or, if using Windows 10 version 1709 or newer, select Open Network & Internet settings, then on the page that opens, click Network and Sharing Center.
- On the left, click Change adapter settings. Right-click on the new VPN and choose Properties.
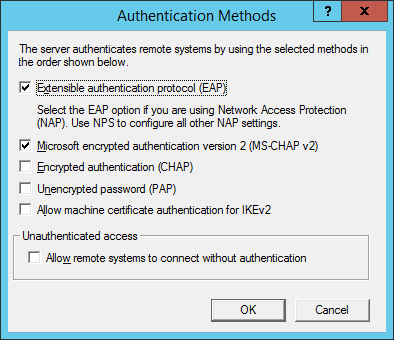
- Click the Security tab. Select «Layer 2 Tunneling Protocol with IPsec (L2TP/IPSec)» for Type of VPN.
- Click Allow these protocols. Check the «Challenge Handshake Authentication Protocol (CHAP)» and «Microsoft CHAP Version 2 (MS-CHAP v2)» checkboxes.
- Click the Advanced settings button.
- Select Use preshared key for authentication and enter
Your VPN IPsec PSKfor the Key. - Click OK to close the Advanced settings.
- Click OK to save the VPN connection details.
For reference, see this screenshot of the VPN connection properties dialog.
Windows 10 connecting
If using Windows 10 and the VPN is stuck on «connecting» for more than a few minutes, try these steps:
- Right-click on the wireless/network icon in your system tray.
- Select Open Network & Internet settings, then on the page that opens, click VPN on the left.
- Select the new VPN entry, then click Connect. If prompted, enter
Your VPN UsernameandPassword, then click OK.
Windows 10 upgrades
After upgrading Windows 10 version (e.g. from 1709 to 1803), you may need to re-apply the fix above for Windows Error 809 and reboot.
Windows DNS leaks and IPv6
Windows 8, 10 and 11 use «smart multi-homed name resolution» by default, which may cause «DNS leaks» when using the native IPsec VPN client if your DNS servers on the Internet adapter are from the local network segment. To fix, you may either disable smart multi-homed name resolution, or configure your Internet adapter to use DNS servers outside your local network (e.g. 8.8.8.8 and 8.8.4.4). When finished, clear the DNS cache and reboot your PC.
In addition, if your computer has IPv6 enabled, all IPv6 traffic (including DNS queries) will bypass the VPN. Learn how to disable IPv6 in Windows. If you need a VPN with IPv6 support, you could instead try OpenVPN.
Android MTU/MSS issues
Some Android devices have MTU/MSS issues, that they are able to connect to the VPN using IPsec/XAuth («Cisco IPsec») mode, but cannot open websites. If you encounter this problem, try running the following commands on the VPN server. If successful, you may add these commands to /etc/rc.local to persist after reboot.
iptables -t mangle -A FORWARD -m policy --pol ipsec --dir in
  -p tcp -m tcp --tcp-flags SYN,RST SYN -m tcpmss --mss 1361:1536
  -j TCPMSS --set-mss 1360
iptables -t mangle -A FORWARD -m policy --pol ipsec --dir out
  -p tcp -m tcp --tcp-flags SYN,RST SYN -m tcpmss --mss 1361:1536
  -j TCPMSS --set-mss 1360

echo 1 > /proc/sys/net/ipv4/ip_no_pmtu_disc
Docker users: Instead of running the commands above, you may apply this fix by adding VPN_ANDROID_MTU_FIX=yes to your env file, then re-create the Docker container.
Reference: [1].
Android 6 and 7
If your Android 6.x or 7.x device cannot connect, try these steps:
- Tap the «Settings» icon next to your VPN profile. Select «Show advanced options» and scroll down to the bottom. If the option «Backward compatible mode» exists (see screenshot), enable it and reconnect the VPN. If not, try the next step.
- Edit
/etc/ipsec.confon the VPN server. Find the linesha2-truncbugand toggle its value. i.e. Replacesha2-truncbug=nowithsha2-truncbug=yes, or replacesha2-truncbug=yeswithsha2-truncbug=no. Save the file and runservice ipsec restart. Then reconnect the VPN.
Docker users: You may set sha2-truncbug=yes (default is no) in /etc/ipsec.conf by adding VPN_SHA2_TRUNCBUG=yes to your env file, then re-create the Docker container.
macOS send traffic over VPN
OS X (macOS) users: If you can successfully connect using IPsec/L2TP mode, but your public IP does not show Your VPN Server IP, read the OS X section above and complete these steps. Save VPN configuration and re-connect.
- Click the Advanced button and make sure the Send all traffic over VPN connection checkbox is checked.
- Click the TCP/IP tab, and make sure Link-local only is selected in the Configure IPv6 section.
After trying the steps above, if your computer is still not sending traffic over the VPN, check the service order. From the main network preferences screen, select «set service order» in the cog drop down under the list of connections. Drag the VPN connection to the top.
iOS 13+ and macOS 10.15/11+
If your device running iOS 13+, macOS 10.15 (Catalina), macOS 11 (Big Sur) or above cannot connect, try these steps: Edit /etc/ipsec.conf on the VPN server. Find sha2-truncbug=yes and replace it with sha2-truncbug=no. Save the file and run service ipsec restart. Then reconnect the VPN.
In addition, users running macOS Big Sur 11.0 should update to version 11.1 or newer, to fix some issues with VPN connections. To check your macOS version and update, refer to this article.
iOS/Android sleep mode
To save battery, iOS devices (iPhone/iPad) will automatically disconnect Wi-Fi shortly after the screen turns off (sleep mode). As a result, the IPsec VPN disconnects. This behavior is by design and cannot be configured.
If you need the VPN to auto-reconnect when the device wakes up, you may connect using IKEv2 mode (recommended) and enable the «VPN On Demand» feature. Alternatively, you may try OpenVPN instead, which has support for options such as «Reconnect on Wakeup» and «Seamless Tunnel».
Android devices will also disconnect Wi-Fi shortly after entering sleep mode, unless the option «Keep Wi-Fi on during sleep» is enabled. This option is no longer available in Android 8 (Oreo) and newer. Alternatively, you may try enabling the «Always-on VPN» option to stay connected. Learn more here.
Debian 11/10 kernel
Debian 11 or 10 users: Run uname -r to check your server’s Linux kernel version. If it contains the word «cloud», and /dev/ppp is missing, then the kernel lacks ppp support and cannot use IPsec/L2TP mode. The VPN setup scripts try to detect this and show a warning. In this case, you may instead use IKEv2 or IPsec/XAuth mode to connect to the VPN.
To fix the issue with IPsec/L2TP mode, you may switch to the standard Linux kernel by installing e.g. the linux-image-amd64 package. Then update the default kernel in GRUB and reboot your server.
Other errors
If you encounter other errors, refer to the links below:
- http://www.tp-link.com/en/faq-1029.html
- https://documentation.meraki.com/MX-Z/Client_VPN/Troubleshooting_Client_VPN#Common_Connection_Issues
- https://stackoverflow.com/questions/25245854/windows-8-1-gets-error-720-on-connect-vpn
License
Note: This license applies to this document only.
Copyright (C) 2016-2023 Lin Song
Inspired by the work of Joshua Lund
This program is free software: you can redistribute it and/or modify it under the terms of the GNU General Public License as published by the Free Software Foundation, either version 3 of the License, or (at your option) any later version.
This program is distributed in the hope that it will be useful, but WITHOUT ANY WARRANTY; without even the implied warranty of MERCHANTABILITY or FITNESS FOR A PARTICULAR PURPOSE. See the GNU General Public License for more details.
NCP Software Downloads
You can download the full version for a free 30-day trial
The universal IPsec clients offer easy to use features (personal firewall, internet connecter, etc.) and strong authentication support, e.g. electronic certificates, for deployment in VPN environments by third-parties.
Additional information for updates, upgrades, major releases, what’s new and discontinued versions.
How do I update my NCP VPN client?
Download license terms
Starting January 1st 2022, the NCP Exclusive Entry Client for Juniper SRX becomes Juniper Secure Connect.
The NCP Exclusive Entry Client will be discontinued on December 31st 2021 (END-OF-SALE) and will continue to be supported and updated by NCP until December 31st 2024 (END-OF-LIFE).
Download link
Customers who would like to purchase Juniper Secure Connect should contact their Juniper sales partner.
Download universal IPsec Clients (NCP Secure Entry Clients)
![]()
NCP Secure Entry Windows Client
Version 13.11 Rev 29631
Windows 11, 10
(on Intel x86-64 Processorarchitecture)
Important:
When updating from a version 10.1, or older, to this version, you need to purchase a new license key.
From version 11.x on, you must just buy an Update.
All major releases can be found here.
Here you can find older versions of the NCP Secure Entry Windows Client.
![]()
NCP Secure Entry macOS Client
Version 4.61 Rev 29053
macOS 13 Ventura, macOS 12 Monterey, macOS 11 Big Sur
(Apple M1/M2 Chip and Intel-CPU)
Here you can find older versions of the NCP Secure Entry macOS Client.
Download IPsec VPN Client for Android
![]()
NCP Secure Android Client Volume Edition*
Version 4.30 Rev 27989
for current Android versions (4.4 and above)
Free 10 day evaluation copy.
*Only available in conjunction with NCP Volume License Server or NCP Secure Enterprise Management Server
![]()
NCP Volume License Server
Software for central distribution and management of any number of volume licenses
Version 2.00 Rev 19725
Microsoft Windows (32 & 64 Bit): Windows 8.x & 7
Microsoft Windows (32 & 64 Bit) Server: Windows 2003 R2 32-Bit, Windows 2008 SP2 32/64-Bit, Windows 2008 R2 SP1 64-Bit
Download Add-Ons
![]()
Friendly Net Detection Server
Version 4.00 Rev 29170
Windows 8.x (32 and 64 bit), Windows 7 (32 and 64 bit), Windows Server
Information Friendly Net Detection
![]()
Friendly Net Detection Server
Version 4.00 Rev 29170
Server Linux x86-64
Information Friendly Net Detection
Check the version information page for the latest version of the client and any news relative to older versions.
Further information on NCP Secure Entry Clients can be foundhere.
Всем привет! Я потратил примерно неделю, чтобы найти для вас хорошие, работоспособные, бесплатные VPN для ПК. Все сервисы я протестировал на своем компе и ручаюсь, что они полностью работоспособны.
Почему я решил написать эту статью? Потому что большинство, что вы встретите в поисковике по данному запросу – это обычная реклама, и 99% VPN программ на компьютер, указанных на подобных сайтах, или платные, или имеют сильное ограничение по скорости, а то ещё хуже – ограничены по времени. Поэтому все эти «лучшие бесплатные ТОП-ы» – обычное разводилово.
Рассказывать про платные VPN для ноутбука или компа – особого смысла нет. Они примерно все одинаковые, как по цене, так и по качеству предоставляемых услуг. Поэтому не будем тянуть резину и начнем. Если у вас будут какие-то дополнения, вопросы, вылезет какая-то ошибка или будут проблемы, о которых я не написал – срочно пишем в комментарии, чтобы я вам помог. Также пишите про свои варианты бесплатных ВПН, и я после проверки добавлю их в статью.

Содержание
- 1.1.1.1
- VPN Gate
- Приложение
- L2TP / IPsec VPN и MS-SSTP
- OpenVPN
- ВПН Браузеры
- Задать вопрос автору статьи
1.1.1.1
Компания CloudFlare наконец-то выпустила бесплатную программу для ПК, которая работает с Windows и iOS. Помимо того, что они используют выделенный и более быстрый DNS, они бесплатно предоставляют возможность использовать их VPN сети. ПО спокойно можно скачать с официального сайта. Кстати, есть приложения также для Android и iOS, если кому нужно.
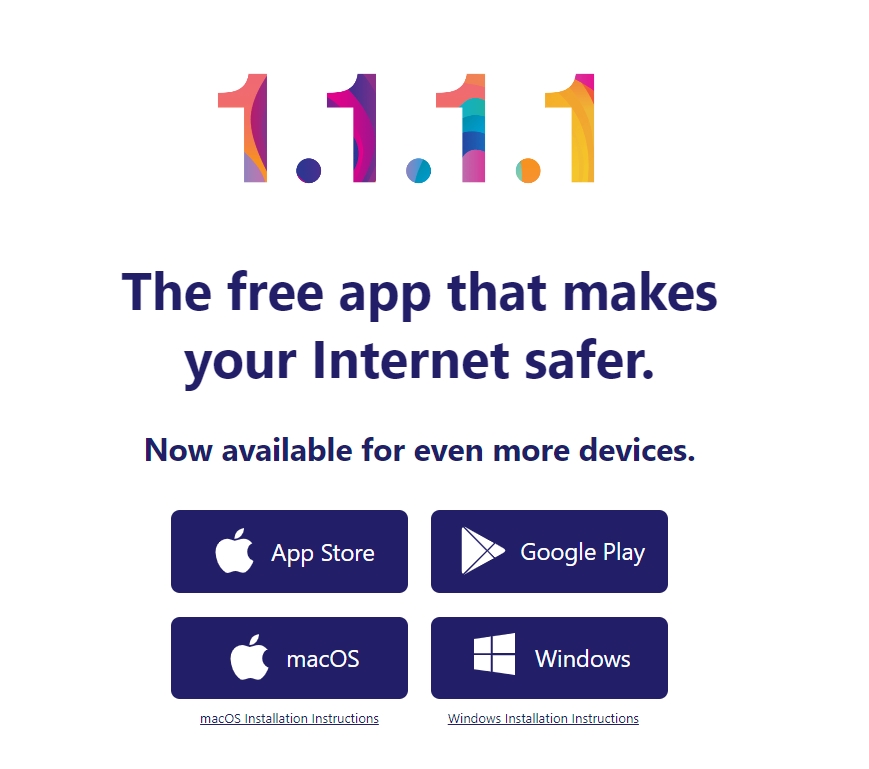
После установки достаточно открыть утилиту в трее и запустить WARP режим, который подключит ваш компьютер к выделенной и беслпатной VPN. Более подробно про это можно почитать тут.

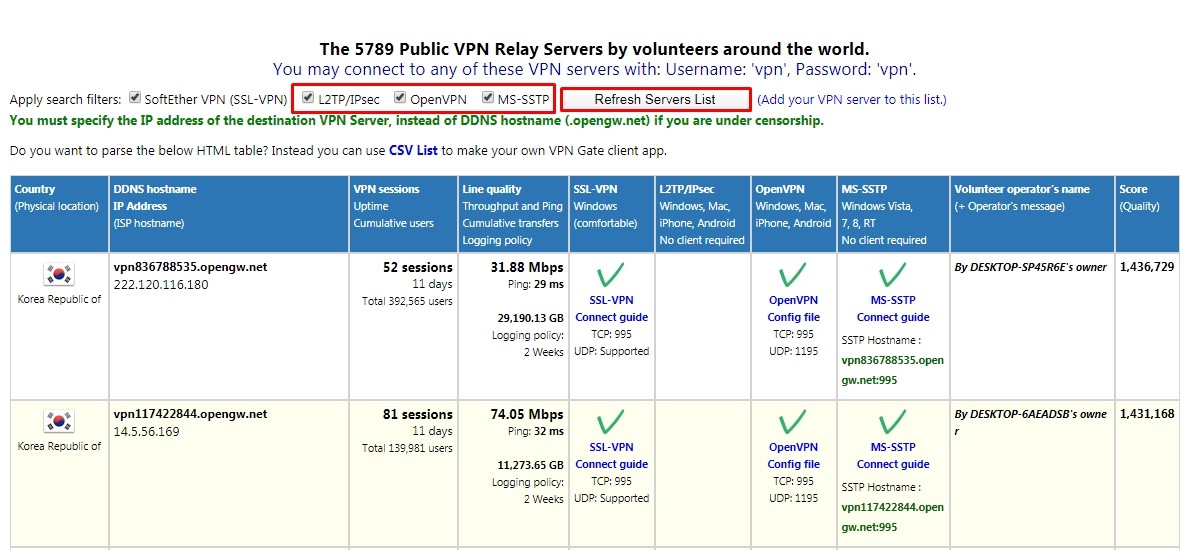
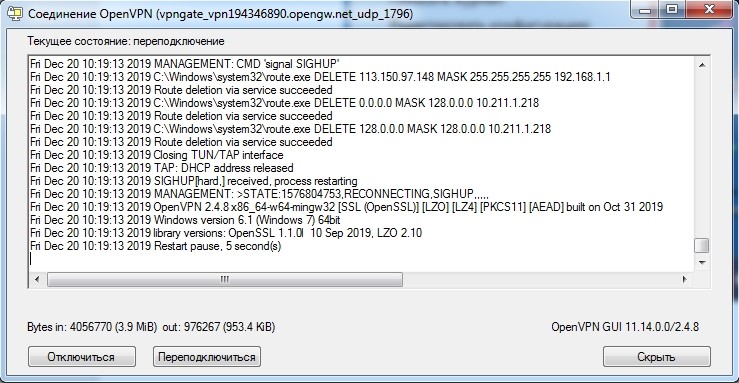
VPN Gate
Полное название VPN Gate Academic Experiment Project — это онлайн-сервис, созданный в высшей школе университета Цукуба, в Японии. Проект полностью бесплатный и не требует регистрации. Работает достаточно просто – в интернете есть ряд добровольцев, которые выступают в качестве Free VPN серверов. Любой участник может подключиться к подобному серверу и использовать все прелести ВПН: обход блокировок, смена IP адреса, шифрование при передаче данных.
При этом вы можете работать практически со всеми платформами: Windows, Mac, iPhone, iPad и Android. Для шифрования используются протоколы: SSLVPN (SoftEther VPN), L2TP/IPsec, OpenVPN и Microsoft SSTP – обо всех них мы поговорим далее.
Правда есть несколько небольших минусов. Сервер может в любой момент отключиться, так как в качестве VPN для вашего компьютера выступает доброволец, и он просто может его выключить. Но на моей практике это бывает крайне редко. Тогда вы просто можете переподключиться к другому серверу – их сейчас более 5000. Второй минус – это динамический IP адреса серверов, именно поэтому мы будем использовать DDNS.
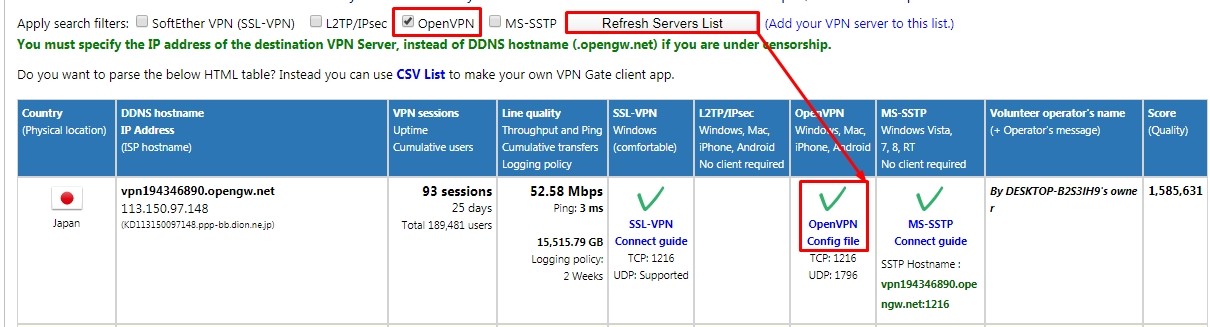
ВНИМАНИЕ! Для подключения протоколов: L2TP/IPsec, OpenVPN и Microsoft SSTP (без использования программы) – вам понадобится DDNS или IP адрес сервера. Эти данные постоянно обновляются на официальной странице (запомните эту ссылку, так как мы будем к ней постоянно обращаться). Во время настройки вам нужно будет в таблице выбрать определенный протокол (L2TP/IPsec, OpenVPN или Microsoft SSTP) и нажать «Refresh Servers List», чтобы увидеть конкретные сервера. На всякий случай я ещё раз напомню об этом во время настройки.
ПРИМЕЧАНИЕ! Если у вас MAC-бук, то по настройке вы можете посмотреть инструкцию тут.
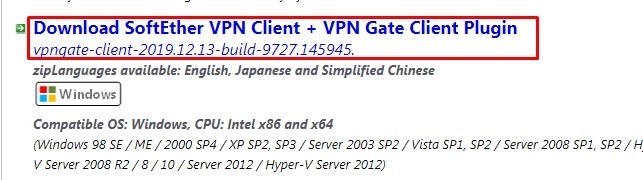
Приложение
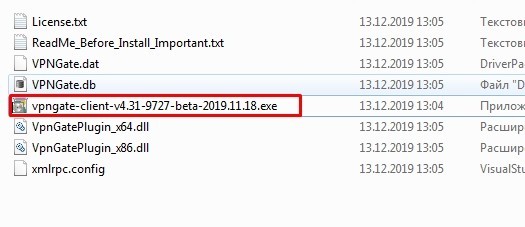
- Для более удобной настройки и подключения, лучше использовать «VPN клиент-программу» для Windows (7, 8, 10). Переходим по ссылке и скачиваем ПО. Кстати, код программы открыт и находится в общем доступе. Так что вы с ним можете ознакомиться там же на сайте. Интерфейс не на русском языке, поэтому я написал более подробную инструкцию.
- Вскрываем архив и запускаем «exe» файл.
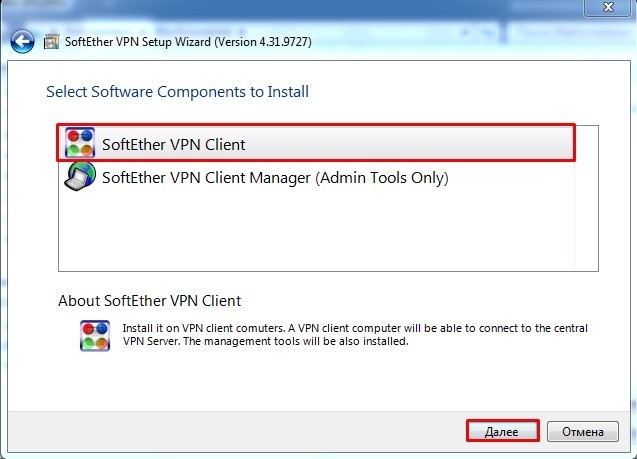
- Установка стандартная, только на одном из шагов вам нужно выбрать «Soft Ether VPN Client».
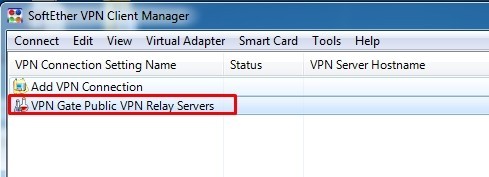
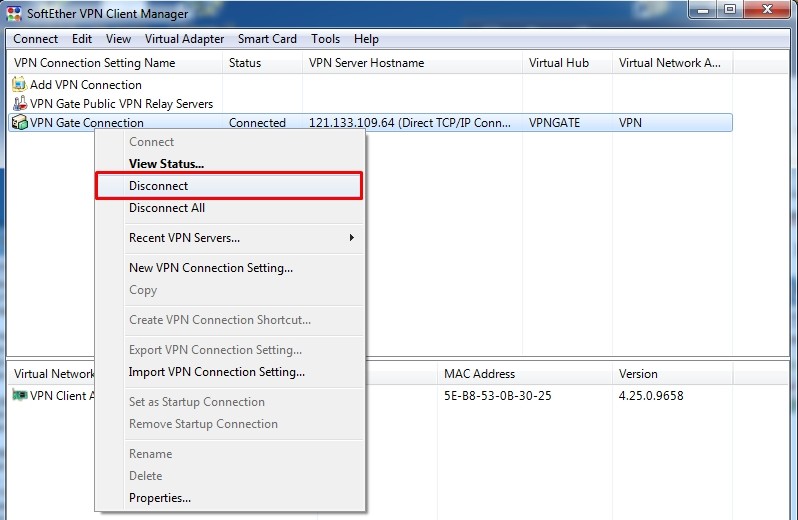
- Когда программа установится на компьютер, запустите второй пункт «VPN Gate Public VPN Relay Servers».
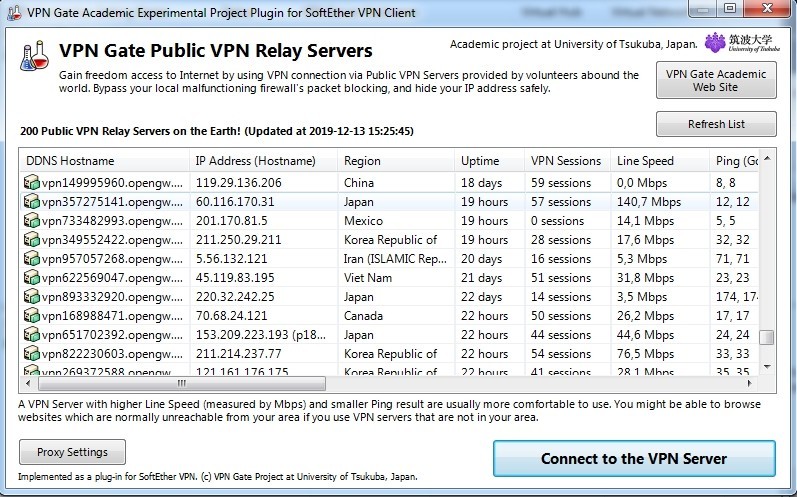
- Теперь вы видите список всех ВПН серверов. Лучше всего выбирать машину с низким пингом, высокой пропускной способностью и, самое главное, с большим показателем «Uptime» (время работы), так как они периодически могут отключаться. Всю информацию вы можете посмотреть в таблице.
- Если сервер поддерживает сразу два протокола связи TCP и UDP, то вы увидите вот такое окошко. Лучше всего использовать именно «TCP» протокол.
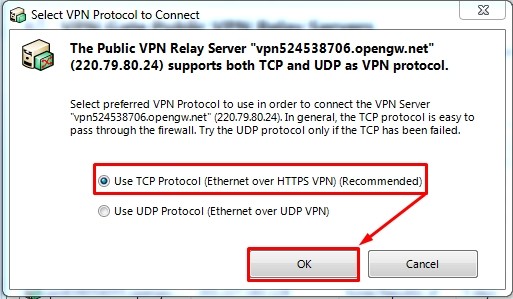
ПРИМЕЧАНИЕ! Если вылезет окно «Connect Error – VPN Gate Connection», то просто попробуйте переподключиться, нажав на кнопку «Retry». Если это не поможет – выберите другой сервер.
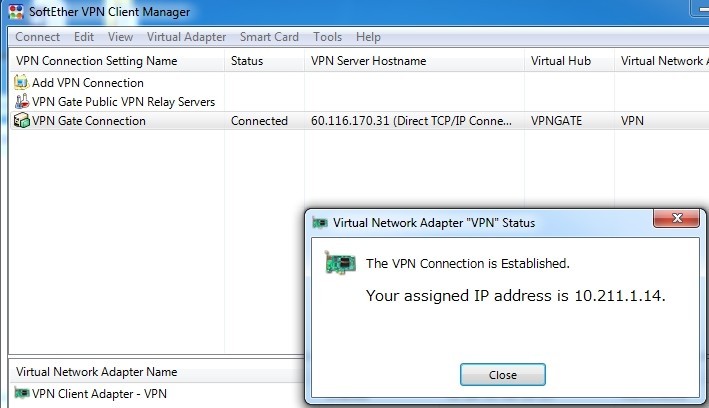
- После коннекта вы должны увидеть, что ваш IP адрес изменен.
Если вы захотите отключиться, то просто нажмите правой кнопкой на подключение и выберите «Disconnect».
L2TP / IPsec VPN и MS-SSTP
Если вы не хотите устанавливать программу, то подключиться к серверам можно будет вручную. При этом настройка делается только один раз. Не забудьте про ту ссылку с конфигурациями VPN серверов, которую я указал ранее – она нам понадобится.
Windows 7
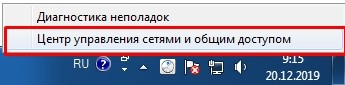
- Нажимаем по подключению в правом нижнем углу экрана и выбираем центр управления сетями.
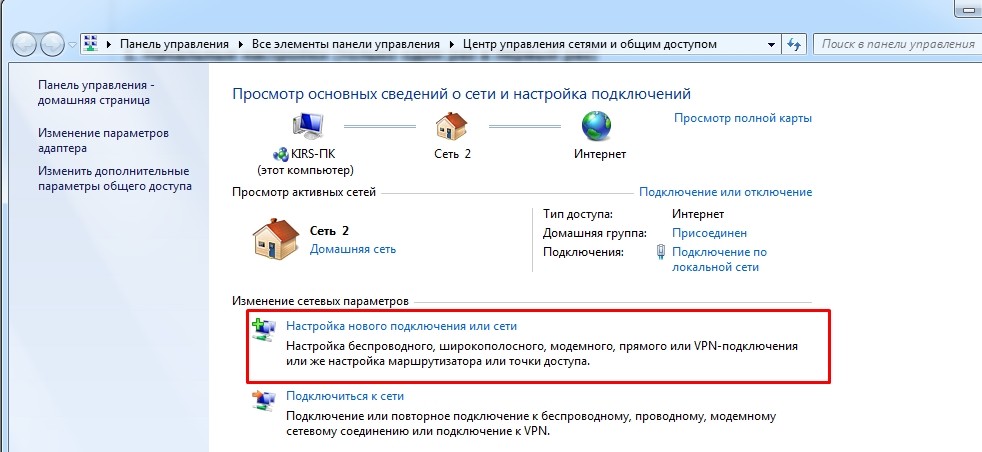
- Кликаем на первый пункт «Настройка нового подключения или сети».
- Выбираем третий пункт – «Подключение к рабочему месту».
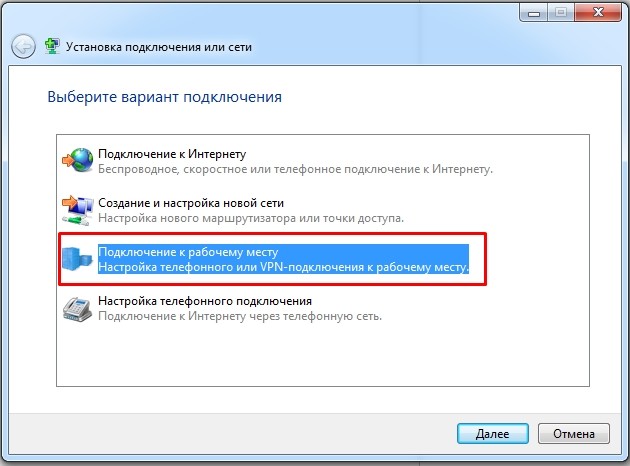
- «Использовать мое подключение к Интернету (VPN)».
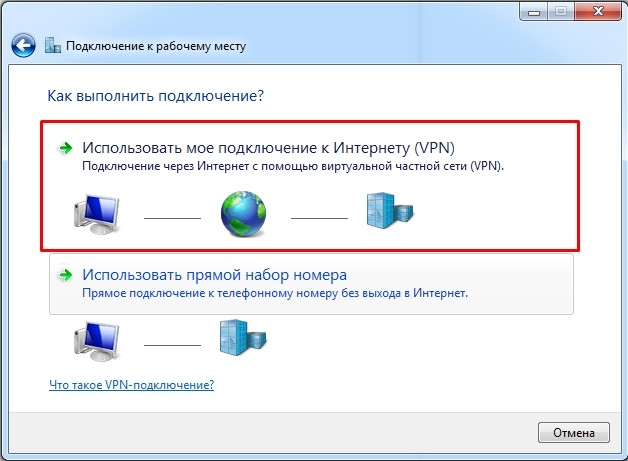
- Теперь идём на официальную страничку и отфильтровываем сервера так, чтобы остались только L2TP/IPsec или MS-SSTP (как это сделать – я уже писал выше).
L2TP/IPsec: Вписываем DDNS в первую строку. Если в будущем будут какие-то проблемы с подключением, то можно попробовать IP. Убедитесь, чтобы стояла нижняя галочка «Не подключаться сейчас, только выполнить установку для подключения в будущем».
MS-SSTP: Здесь можно использовать только DDNS. Также если у вас будут проблемы с подключением и вылезет ошибка, то скорее всего сервер использует выделенный порт. В таком случае вам после DDNS адреса нужно дописать порт напрямую – смотрим в столбец «MS-SSTP» (если порт не указан или ошибка остаётся, используем «:443»). В конце нужно убрать галочку, которая выделена на картинке ниже.
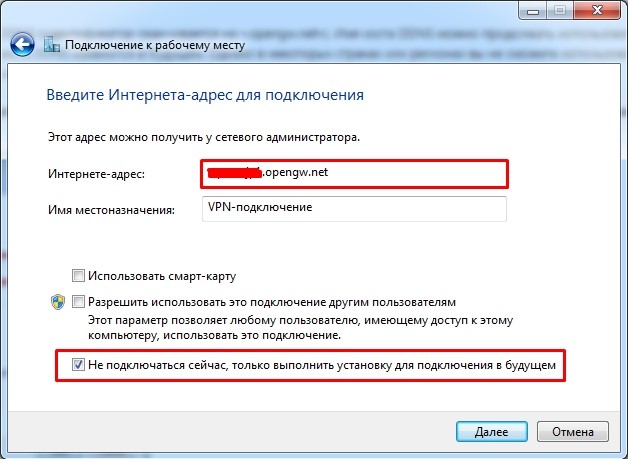
- В обе строки вводим три буквы «vpn». Установите галочку «Запомнить этот пароль».
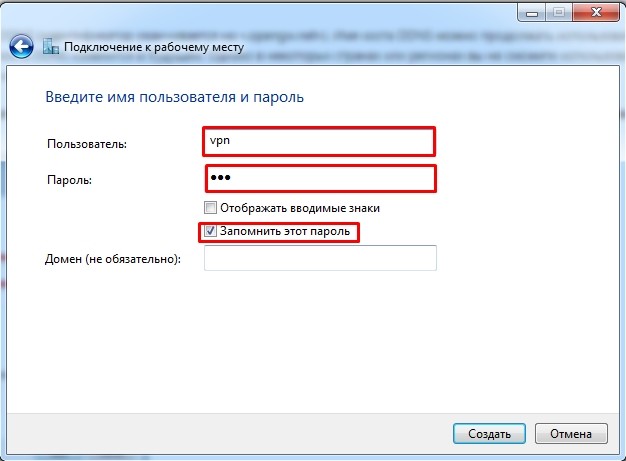
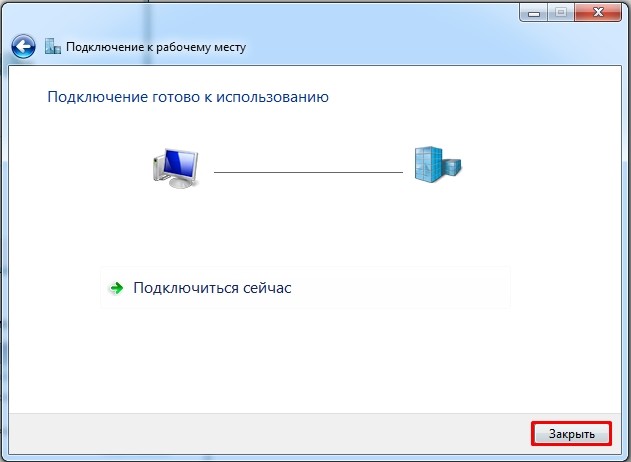
L2TP/IPsec: Самое главное сейчас не подключаться, так как мы ещё выполнили не все настройки. Нажмите «Закрыть» и перейдите к следующему шагу.
MS-SSTP: Соединение будет установлено. Можете проверять IP. На этом всё!
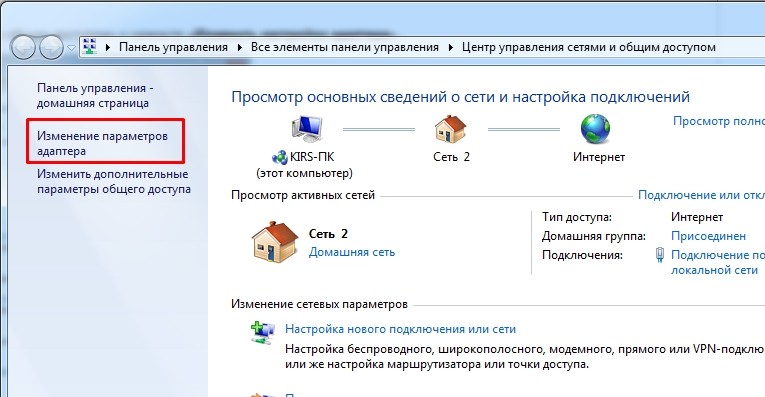
- Опять переходим в центр управления сетями и нажимаем «Изменение параметров адаптера».
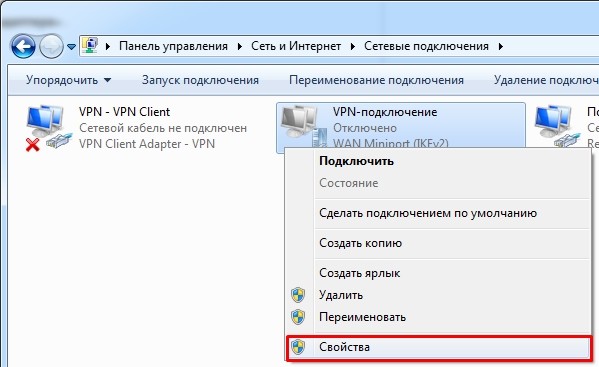
- Найдите то подключение, которое вы создали, нажмите правой кнопкой и выберите «Свойства».
- Во вкладке «Безопасность» сразу в верхней части выберите тип протокола «L2TP IPsec». Теперь нажмите на «Дополнительные параметры».
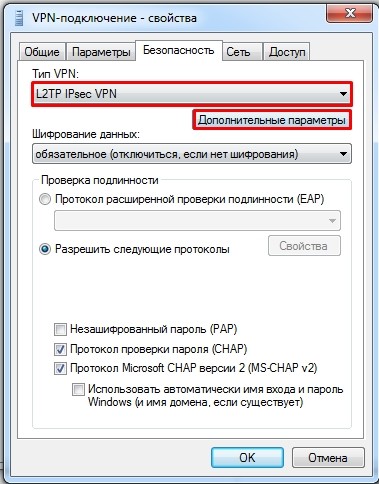
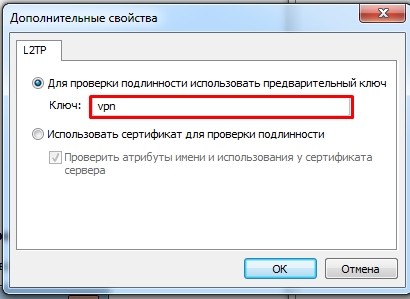
- В качестве ключа вводим опять те же самые три буквы.
- Подтверждаем все настройки кнопками «ОК». Нажимаем левой кнопкой по сетевому подключению и далее активируем наш ВПН.
- Логин и пароль не меняется и остается всегда прежним. Просто нажимаем «Подключить».
Windows 10
- Заходим в меню «Пуск», нажимаем по шестеренке, выбираем раздел «Сеть и настройки».

- Находим раздел «VPN», заходим туда и нажимаем на плюсик для добавления нового подключения.
- «Имя подключения» можете задать любое (на английском языке). Далее вставляем DDNS сервера, указываем «Тип VPN» как «L2TP/IPsec с сертификатом». «Тип данных для входа» – указываем так, чтобы можно было ввести логин и пароль. В качестве аутентификации используем три буквы «vpn». Обязательно установите галочку, чтобы запомнить данные для входа. Сохраняем параметры и подключаемся.
OpenVPN
- Нам понадобится бесплатная программа «OpenVPN». Заходим на официальный сайт, пролистываем чуть вниз и выбираем вашу ОС. Скачиваем установочный пакет с надписью «install». Там ничего сложного нет, просто следуем шагам установщика.

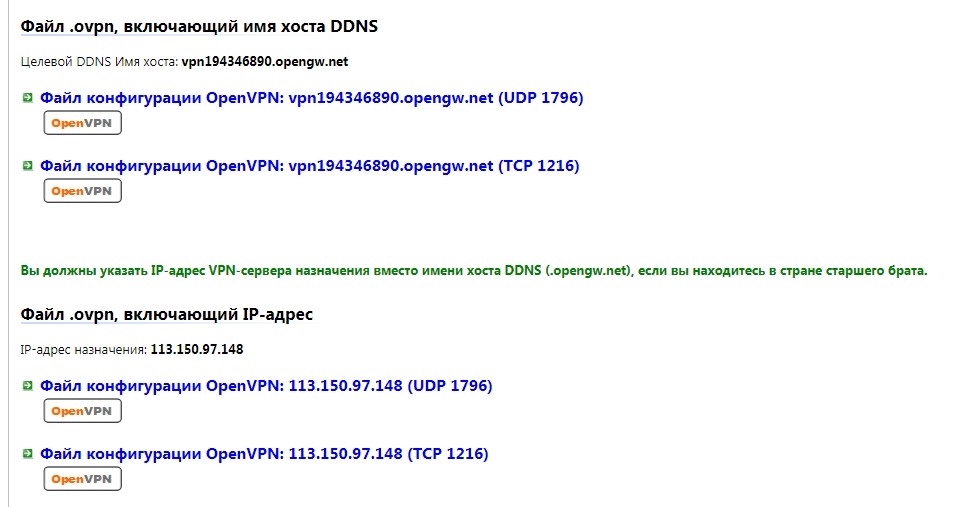
- Теперь, заходим на официальный сайт, который был указан в самом начале, указываем тип подключения «OpenVPN», нажимаем «Refresh Servers List». Теперь в строке «OpenVPN» надо скачать конфигурационный файл.
- Вас перебросит на страницу с «ovpn» файлами. Как видите, есть 4 варианта. Лучше всего выбираем именно DDNS и протокол UDP. Нажимаем по ссылке и скачиваем файл.
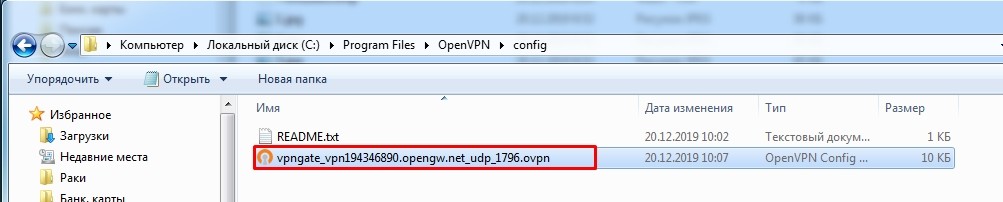
- Файл нужно закинуть в папку «config», где установлена программа. По умолчанию это путь:
C:Program FilesOpenVPNconfig
- Запускаем «OpenVPN GUI» с правами администратора.

- Находим в трее программу, нажимаем по ней правой кнопкой и выбираем «Подключить».
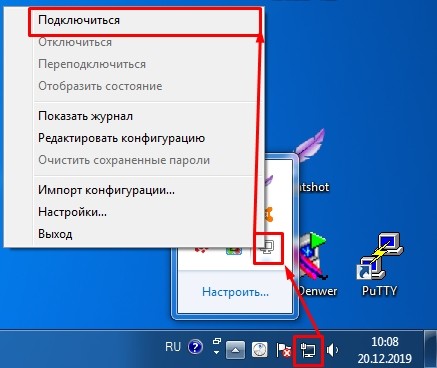
Далее вы увидите процесс подключения к серверу. Как только соединение будет установлено, окно свернется, а значок начнет подсвечиваться зеленым. В некоторых случаях понадобится ввести логин и пароль – в обе строки вводим «vpn».
ВПН Браузеры
17.06.2021 г. Роскомнадзор ограничил сервисы VPN VyprVPN и Opera VPN. Возможно, на текущий момент они еще не доступны. Но есть интересная статья для ознакомления.
Если вам лень скачивать какие-то программы, и вам нужно всего лишь зайти на заблокированный сайт, то можно воспользоваться двумя вариантами. Первый – это скачать и установить браузер Opera на свой бук или ноут. После запуска программы вам останется просто нажать на кнопку «VPN» правее адресном строки, и перевести бегунок в режим «вкл».
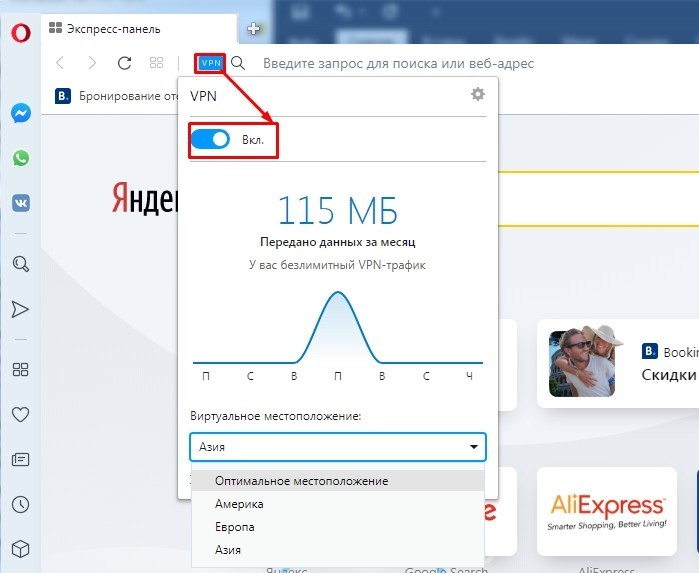
Как видите, тут можно выбрать один из бесплатных серверов. Чуть ниже отображается информация о трафике и измененном IP адресе. Выключается функция аналогично. Второй вариант – это использовать браузер «TOR», который можно скачать по этой ссылке (ссылочка заблокирована). После скачивания открываем папку и запускаем программу. Приложение полностью бесплатное, и позволяет шифровать данные с помощью передачи данных через три свободных прокси-сервера. Правда скорость при этом сильно режется.
Если вы используете Яндекс.Браузер, то вы можете посмотреть мою подборку расширений с возможностью бесплатного использования – по этой ссылке. Я очень скептически отношусь к подобным дополнениям, так как они слишком сильно режут скорость, но при этом дают слишком маленький выбор серверов.

достаточно сильный лебедь
Если вы когда-либо искали VPN, который будет работать на десктопах, мобильных устройствах и роутерах без установки дополнительного ПО и перепрошивки роутера, вы, вероятно, выбирали между PPTP и L2TP+IPsec. У протокола PPTP имеются проблемы с безопасностью и прохождением через брандмауеры и NAT, так что в 2015 году его уже использовать не стоит, а использование L2TP излишне, т.к. L2 VPN, по моему мнению, для обычного удаленного доступа не нужен практически никогда.
Удивительно, что в интернете не так-то просто можно найти информацию о настройке чего-то помимо L2TP+IPsec в транспортном режиме, учитывая, что это обширный стек протоколов, который можно конфигурировать буквально как душе угодно, поэтому я попытаюсь устранить такое несовершенство мира.
Небольшое введение в мир IPsec
Вообще говоря, не совсем правильно называть IPsec VPN. IPsec не предназначен для построения «виртуальных частных сетей», а создан для шифрования или защиты от подмены передаваемых по IP данных. Это специальный слой поверх IP, который, в зависимости от режима и настроек, работает по-разному. В отличие от привычного VPN, который создает новый интерфейс в системе, на который вы, как это чаще всего бывает, назначаете IP-подсеть из диапазона частных адресов (т.е. создаете новый сетевой сегмент), и через который маршрутизируется трафик в зашифрованном виде, IPsec просто шифрует трафик магическим образом между «внешними» интерфейсами сервера и клиента.
В современном IPsec используются:
- Authentication Header (AH) — протокол, обеспечивающий аутентификацию отправителя и целостность данных. Подписывает не только данные пакета, но и все заголовки, кроме изменяемых полей (ToS, TTL, чексумма).
- Encapsulating Security Payload (ESP) — протокол, обеспечивающий аутентификацию, целостность и конфиденциальность
- Security Association (SA) — параметр с настройками шифрования канала
- Internet Key Exchange (IKE и IKEv2) — протокол обмена параметрами, настройками и согласования SA
AH и ESP — транспортные протоколы, инкапсулируемые прямо в IP, имеющие собственные значение для поля Protocol в IP-заголовке. В современном мире, где NAT стоит за NAT у NAT с NAT’ом, следует использовать что-то более привычное, поэтому сейчас повсеместно используется инкапсуляция ESP-пакетов в UDP. AH не поддерживает работу через NAT.
Сам IPsec поддерживает работу в двух режимах:
- Транспортный режим. Подписывает заголовки и данные (если AH) или подписывает и шифрует данные (если ESP) пакета. Не скрывает IP-адрес получателя пакета, если он маршрутизируется. Этот режим используется для связки L2TP+IPsec.
- Туннельный режим. Подписывает (если AH) и еще шифрует (если ESP) весь пакет.
Протокол IKE позволяет проводить аутентификацию клиента с использованием X.509-сертификатов, Pre-Shared Key и Extensible Authentication Protocol (EAP). Поддерживается двухэтапная аутентификация.
Все современные десктопные ОС (Windows Vista/7/8/8.1, OS X, Linux), мобильные устройства (Android, iOS, Windows Phone, Blackberry) и некоторые роутеры поддерживают VPN с использованием IPsec ESP в туннельном режиме и его настройкой через протокол Internet Key Exchange (IKE) версии 1 или 2, а значит IPsec мы именно так и будем настраивать.
Кстати, писать правильно IPsec, но Cisco IPSec.
IPsec в Linux
Сам IPsec (AH/ESP, SA) работает в ядре, поэтому нам нужен IKE-демон для передачи настроек подключающимся клиентам. Их довольно много, но полноценных и активных на данный момент всего два: strongSwan и libreswan. Вторым я не пользовался, ничего сказать о нем не могу, зато первый — прекрасный и удивительный, к тому же, это единственный демон, у которого есть своя userspace-реализация IPsec, поэтому его можно использовать в контейнерах OpenVZ со старым, как динозавры, ядром 2.6.32 с поломанной поддержкой маршрутизации IPsec.
Нам потребуется strongSwan версии минимум 5.0.0. Я рекомендую использовать версию не ниже 5.2.0, т.к. именно в этой версии появилась утилита «swanctl», которая заметно удобней старой «ipsec». Утилита потребуется, по большому счету, только для вывода какой-то информации или статистики, она не обязательна для настройки и можно обойтись только ipsec, но в статье будет использоваться только она.
Скрытый текст
Жизнь со swanctl:

Жизнь без swanctl:

Нам могут потребоваться некоторые модули, которых может не быть в стандартной поставке:
- xauth-noauth — поддельный аутентификатор, позволяет вводить любой логин и пароль. Нужен для iPhone и iPad при аутентификации только по ключам, т.к. там нет возможности отключить аутентификацию по логину и паролю.
- vici — интерфейс для swanctl.
- libipsec — для userspace IPsec (для OpenVZ и, возможно, других контейнеров).
Если вас не смущает необходимость вводить логин и пароль на iPhone, вам не нужен swanctl и вы не собираетесь запускать это все в OpenVZ-контейнере, то и пересобирать ничего не нужно.
К большому сожалению, мейнтейнеры strongSwan в Debian не запаковали ничего из этого (на февраль 2015), поэтому я сделал патчик, который вы можете использовать.
Переходим к настройке
Будем настраивать подключение через IKEv2 (Windows, Linux, Blackberry), IKEv1+XAUTH (iOS, OS X, Android) и IKEv2+EAP-TLS (Windows Phone). Используем ключи, никаких PSK!
Разработчики strongSwan предлагают нам использовать команду «ipsec pki» для генерации ключей, но она настолько же неудобная, насколько и обычный openssl, поэтому я адаптировал Easy-RSA v3 из OpenVPN для генерации как OpenVPN, так и IPsec-совместимых ключей. С ним вы можете использовать одну связку ключей для двух протоколов!
github.com/ValdikSS/easy-rsa-ipsec
Easy-RSA чрезвычайно простой, поддерживать PKI-инфраструктуру с ним одно удовольствие!
Итак, инициализируем PKI и создаем CA, серверный и клиентский ключи. Важно, чтобы название серверного ключа совпадало с FQDN (доменом, проще говоря) вашего сервера!
$ git clone https://github.com/ValdikSS/easy-rsa-ipsec.git
$ cd easy-rsa-ipsec/easyrsa3
$ ./easyrsa init-pki

init-pki complete; you may now create a CA or requests.

$ ./easyrsa build-ca nopass
Generating a 2048 bit RSA private key
…
Common Name (eg: your user, host, or server name) [Easy-RSA CA]:IPsec CA
…

$ ./easyrsa build-server-full uk1.pvpn.pw nopass
Generating a 2048 bit RSA private key
…
Write out database with 1 new entries
Data Base Updated

$ ./easyrsa build-client-full client1 nopass
Generating a 2048 bit RSA private key
…
Write out database with 1 new entries
Data Base Updated

$ ./easyrsa export-p12 client1 nopass
Successful export of p12 file. Your exported file is at the following
location…
Ключи сгенерированы. Я добавлял параметр nopass на каждом шагу, чтобы ключи не были защищены паролем (его можно установить позже в любое время).
Теперь нам необходимо скопировать их в нужные директории внутри /etc/ipsec.d/, чтобы strongSwan нашел их:
# cp pki/ca.crt /etc/ipsec.d/cacerts/
# cp pki/issued/uk1.pvpn.pw.crt /etc/ipsec.d/certs/
# cp pki/private/uk1.pvpn.pw.key /etc/ipsec.d/private/
Переходим к настройке strongSwan!
Первым делом, указываем наш приватный ключ в /etc/ipsec.secrets
# This file holds shared secrets or RSA private keys for authentication.

# RSA private key for this host, authenticating it to any other host
# which knows the public part.

# this file is managed with debconf and will contain the automatically created private key
include /var/lib/strongswan/ipsec.secrets.inc

: RSA uk1.pvpn.pw.key
Редактируем конфигурационный файл /etc/ipsec.conf
# ipsec.conf - strongSwan IPsec configuration file

# basic configuration

config setup
	# strictcrlpolicy=yes
	# uniqueids = no

include /var/lib/strongswan/ipsec.conf.inc

conn %default
	dpdaction=clear
	dpddelay=35s
	dpdtimeout=300s

	fragmentation=yes
	rekey=no

	ike=aes256gcm16-aes256gcm12-aes128gcm16-aes128gcm12-sha256-sha1-modp2048-modp4096-modp1024,aes256-aes128-sha256-sha1-modp2048-modp4096-modp1024,3des-sha1-modp1024!

	esp=aes128gcm12-aes128gcm16-aes256gcm12-aes256gcm16-modp2048-modp4096-modp1024,aes128-aes256-sha1-sha256-modp2048-modp4096-modp1024,aes128-sha1-modp2048,aes128-sha1-modp1024,3des-sha1-modp1024,aes128-aes256-sha1-sha256,aes128-sha1,3des-sha1!

	# left - local (server) side
	left=%any
	leftauth=pubkey
	leftcert=uk1.pvpn.pw.crt
	leftsendcert=always
	leftsubnet=0.0.0.0/0,::/0

	# right - remote (client) side
	right=%any
	rightauth=pubkey
	rightsourceip=192.168.103.0/24,2002:25f7:7489:3::/112
	rightdns=8.8.8.8,2001:4860:4860::8888

conn ikev2-pubkey
	keyexchange=ikev2
	auto=add

conn ikev2-pubkey-osx
	also="ikev2-pubkey"
	leftid=uk1.pvpn.pw

conn ikev1-fakexauth
	keyexchange=ikev1
	rightauth2=xauth-noauth
	auto=add

conn ikev2-eap-tls
	also="ikev2-pubkey"
	rightauth=eap-tls
	eap_identity=%identity
Как видите, конфигурационный файл состоит из нескольких секций. В секции config setup два закомментированных параметра: strictcrlpolicy = yes будет требовать неистекший лист отзывов для проведения аутентификации клиента, а uniqueids = no позволяет подключаться нескольким клиентам с одним сертификатом одновременно.
Далее идут секции с описаниями подключений. Секция с названием %default описывает подключение по умолчанию, от которого будут наследоваться другие подключения. Здесь устанавливаются следующие параметры:
dpdaction=clearвключает механизм Dead Peer Detection (DPD) и указывает, что нужно забывать о клиенте, если он не отзывался дольше таймаутаdpddelay=35s— задержка до включения DPDdpdtimeout=300s— таймаут для DPDfragmentation=yes— включение внутренней фрагментации пакетов. Позволяет использовать IPsec с провайдерами, у которых сломана IP-фрагментация пакетов (привет, мобильный МТС!)rekey=no— выключение инициации смены ключей со стороны сервера. Windows это не любит.ike— перечень ciphersuites для использования с IKE (т.е. во время установки шифрованного соединения для передачи конфигурационных параметров, в том числе и ключей для установки SA)esp— перечень ciphersuites для шифрования трафикаleftиright— случаем все интерфейсы и принимаем всех клиентовleftid— указываем наш FQDN. Нужно для сломанного IKEv2 в OS X El Capitanleftauth/rightauth=pubkey— используем аутентификацию по ключамleftsubnet— подсети, которые мы отправляем клиенту для маршрутизации (весь IPv4 и IPv6-интернет). Уберите IPv6, если не используете его.rightsourceip— пул IP-адресов, из которого выдаем адрес клиенту. Уберите IPv6, если не используете его.rightdns— IP-адреса DNS-серверов
Давайте разберемся с ciphersuites в ike и esp. Здесь перечислены методы шифрования в порядке убывания приоритета, и их так много из-за того, что некоторые из них могут быть недоступны на каких-то устройствах, например, мобильных. Первым делом идут так называемые AEAD-алгоритмы, т.е. такие шифры, которые не требуют отдельного алгоритма для аутентификации, с убывающей группой Диффи-Хеллмана для реализации Perfect Forward Secrecy (PFS). Это самые быстрые шифры, которые доступны в IPsec. Хоть это и AEAD-режим, в ike должны быть алгоритмы хеширования для процесса хендшейка. Затем идет привычный AES-CBC с группами Диффи-Хеллмана. Клиентам, которые не поддерживают PFS, мы не позволим подключиться.
Если у вас нет модуля xauth-noauth для соединения ikev1-fakexauth, то вы можете заменить его просто на xauth и создать пользователя в /etc/ipsec.secrets, например, с логином и паролем client1:
client1 : XAUTH "client1"
Теперь у нас есть три подключения: ikev2-pubkey для IKEv2, ikev1-fakexauth для IKEv1 с фейковой проверкой логина и пароля и ikev2-eap-tls — IKEv2+EAP-TLS для Windows Phone. Перезапускаем strongSwan.
Если все верно, вы увидите следующий вывод команды swanctl -L
$ swanctl -L
ikev2-pubkey: IKEv2
  local:  %any
  remote: %any
  local public key authentication:
    id: CN=uk1.pvpn.pw
    certs: CN=uk1.pvpn.pw
  remote public key authentication:
  ikev2-pubkey: TUNNEL
    local:  0.0.0.0/0 2000::/3
    remote: dynamic
ikev1-fakexauth: IKEv1
  local:  %any
  remote: %any
  local public key authentication:
    id: CN=uk1.pvpn.pw
    certs: CN=uk1.pvpn.pw
  remote public key authentication:
  remote XAuth authentication:
  ikev1-fakexauth: TUNNEL
    local:  0.0.0.0/0 2000::/3
    remote: dynamic
ikev2-eap-tls: IKEv2
  local:  %any
  remote: %any
  local public key authentication:
    id: CN=uk1.pvpn.pw
    certs: CN=uk1.pvpn.pw
  remote EAP authentication:
  ikev2-eap-tls: TUNNEL
    local:  0.0.0.0/0 2000::/3
    remote: dynamic
Проблемы MTU
Из-за особенностей и ошибок в реализации разных IPsec-клиентов, MTU внутри туннеля нельзя угадать заранее, а на Android вообще устанавливается MTU 1500, из-за чего большие пакеты не передаются и вообще ничего не работает. Чтобы нивелировать этот недостаток, достаточно изменять параметр TCP MSS в момент установки TCP-соединения на стороне сервера. Будем использовать значение 1360 для IPv4 и 1340 для IPv6, чтобы размер пакета не превышал 1400 байт внутри туннеля:
# iptables -t mangle -I FORWARD -p tcp -m policy --pol ipsec --dir in --syn -m tcpmss --mss 1361:1536 -j TCPMSS --set-mss 1360
# iptables -t mangle -I FORWARD -p tcp -m policy --pol ipsec --dir out --syn -m tcpmss --mss 1361:1536 -j TCPMSS --set-mss 1360
# ip6tables -t mangle -I FORWARD -p tcp -m policy --pol ipsec --dir in --syn -m tcpmss --mss 1341:1536 -j TCPMSS --set-mss 1340
# ip6tables -t mangle -I FORWARD -p tcp -m policy --pol ipsec --dir out --syn -m tcpmss --mss 1341:1536 -j TCPMSS --set-mss 1340
На этом настройка сервера закончена. Не забудьте настроить NAT, если вам он нужен!
Настройка клиентов
Алгоритм настройки клиентов в общих чертах заключается в импорте сертификатов из файла *.p12, создании нового подключения с типом IPsec PKI, IPsec XAUTH RSA или IKEv2 (в зависимости от устройства), указания клиентского сертификата и адреса сервера.
Внимание! Нужно вводить именно тот адрес сервера, который вы вводили при создании серверного ключа. Подключиться по другому домену или просто по IP-адресу, если сертификат был сгенерирован на домен, не получится!
Windows
Windows 7, 8, 8.1 (IKEv2)
Установка сертификатов
Создание соединения
Подключение
Windows Vista (IKE)
IKE на Windows Vista
OS X и iOS
Настройка подключения на iOS и OS X
Android
Вы можете использовать как IPsec-клиент Android и подключаться по протоколу IKE, так и клиент strongSwan и использовать IKEv2. Клиент strongSwan работает стабильнее и надежно переподключает в случае потери соединения.
Импортируйте сертификат либо через файловый менеджер, либо используя пункт «Установка с SD-карты» в разделе «Безопасность». Перейдите в настройки VPN, создайте новое подключение с типом «IPSec Xauth RSA», в поле «Адрес сервера» впишите, собственно, адрес сервера, в поле «Сертификат пользователя IPSec» и «Сертификат ЦС IPSec» укажите сертификат «client1». Нажмите на соединение, введите любые логин и пароль и попробуйте подключиться.
Заключение
IPsec, по моему мнению, является замечательной альтернативой OpenVPN, который любят многие администраторы. Почему большинство VPN-провайдеров все еще используют L2TP+IPsec для меня остается загадкой, т.к. strongSwan предоставляет всю необходимую функциональность для такого рода серивисов (полная поддержка Radius, море плагинов). Я использую strongSwan на своем сервисе уже около полугода в режиме закрытого тестирования и он оставил о себе исключительно положительные впечатления.
IPsec, как я уже говорил, очень гибкий и поддерживает уйму аутентификаторов, поэтому вы можете делать даже такие сумасшедшие вещи, как аутентификация по SIM-карте в мобильном устройстве и хранение публичных ключей в IPSECKEY-записи домена, защищенной DNSSEC.
Если вы боитесь использовать IPsec из-за документов NSA, которые опубликовывал Эдвард Сноуден, пожалуйста, прочитайте статью Don’t stop using IPsec just yet, чтобы развеять сомнения.
-
Ensure IPSEC Passthrough is enabled on your router (if you’re not using a USG on your client network)
-
Ensure Enable LCP Extensions is selected under your VPN Connection Network Properties — Options — PPP. Ensure Enable Software Compression and Multi-Link are both not selected in the same place.
-
VPN Connection Network Properties — Security — Require Encryption is selected. Allow these Protocols selected. Microsoft CHAP Version 2 ticked, no other boxes ticked.
-
Ensure the Windows Registry value AssumeUDPEncapsulationContextOnSendRule is set to 2
-
Ensure Windows 10 is up to date.
If still having problems, open Device Manager, Network adapters, delete any L2TP and IKEv2 WAN Miniport devices and reboot.
With these settings I have get a rock solid VPN connection from my home network which has a USG, using my mobiles 4G hotspot with the carrier using CGNAT, and from my parents house which has a bog standard ISP supplied Wifi router.
If your server end ISP uses CGNAT, I can see the problems you’re experiencing occurring also. L2tp / IPSEC is very specific about requiring the server ports to be UDP 500, 1701 and 4500, and ESP protocol 50, although when using NAT transversal the ESP packets get sent over UDP. A CGNAT at your server ISP may mangle these ports, and that could happen to port 4500 intermittently.
Как настроить IPsec VPN-соединение в Windows 10 (поддержка прошивки доступна для 3.0.0.4.386_4xxxx)
IKEv2 — это функция, доступная только в версиях прошивки 3004.386.4xxxx и выше. Найдите маршрутизатор, поддерживающий такие версии прошивки. Вы можете скачать последнюю версию прошивки в ASUS Центре загрузок
[Примечание] Поддержка прошивки доступна для 3.0.0.4.386_4xxxx
RT-AC3100
RT-AC5300
RT-AC86U
RT-AC88U
RT-AX88U
RT-AX92U
GT-AC2900
GT-AC5300
GT-AX11000
ZenWiFi XT8
Настройте роутер ASUS
- Включите VPN Сервер
- Настройте логин и пароль для VPN клиента
- Экспорт сертификации
Настройте ПК с Windows 10
- Добавьте параметр в реестр
- Установите сертификат в Windows
- Создайте VPN соединение
Настройте роутер ASUS
Шаг 1. Включите VPN сервер
1. Откройте веб-браузер и введите http://router.asus.com. Войдите в веб-интерфейс вашего маршрутизатора.

Для получения дополнительных сведений см. [Беспроводной маршрутизатор] Как войти в графический интерфейс маршрутизатора (ASUSWRT).
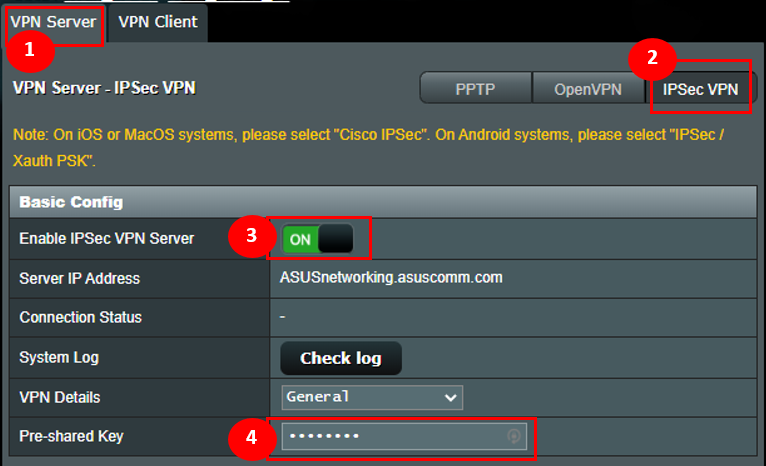
2. Нажмите [VPN] слева в дополнительных настройках > [VPN Сервер].
3. Включите IPsec VPN Сервер
Примечание: убедитесь, что WAN IP это публичный IP адрес и рекомендуется также настроить DDNS.
4. Введите учетные данные в поле Pre-shared Key.
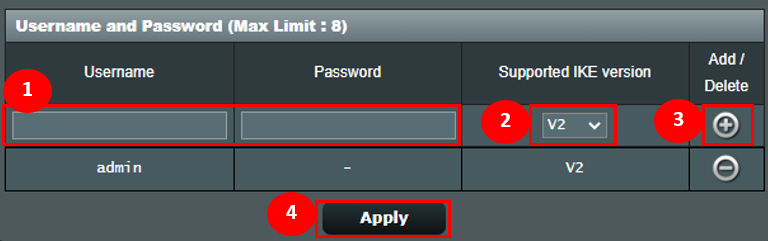
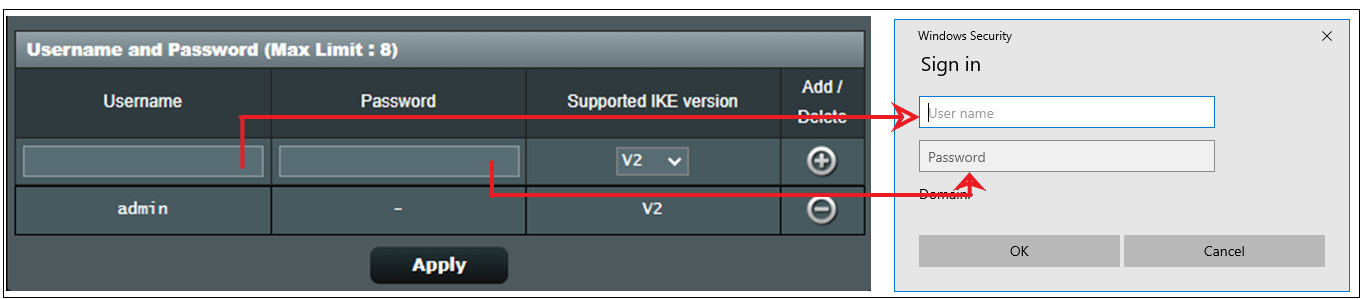
Шаг 2. Настройте логин и пароль для VPN клиента
- Введите имя пользователя и пароль для доступа к серверу VPN.
- Выберите “V2” для Поддерживаемая версия IKE.
- Щелкните значок [+], затем щелкните Применить для сохранения.
Шаг 3. Экспортируйте сертификат
1. Кнопка экспорта будет доступна после нажатия кнопки Применить.
2. Выберите [для Windows].
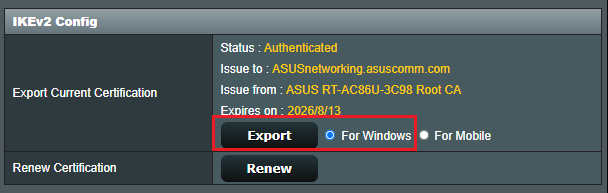
3. Нажмите кнопку Экспорт, после чего вы загрузите файл сертификации с именем cert ikev2_cert_windows.der.
Настройте ПК с Windows 10
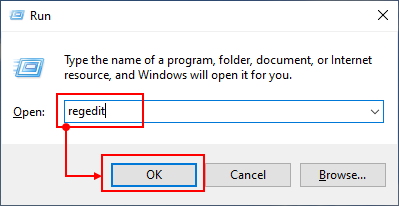
Шаг 4. Добавьте параметр в реестр
1. Нажмите клавишу Windows  +
+ одновременно.
2. Укажите: [regedit] и нажмите OK.
Примечание: нажмите да, если вас спросят, хотите ли вы разрешить приложению вносить изменения в ваш компьютер.
3. На левой панели найдите и щелкните папку: HKEY_LOCAL_MACHINESYSTEMCurrentControlSetservicesRasManParameters
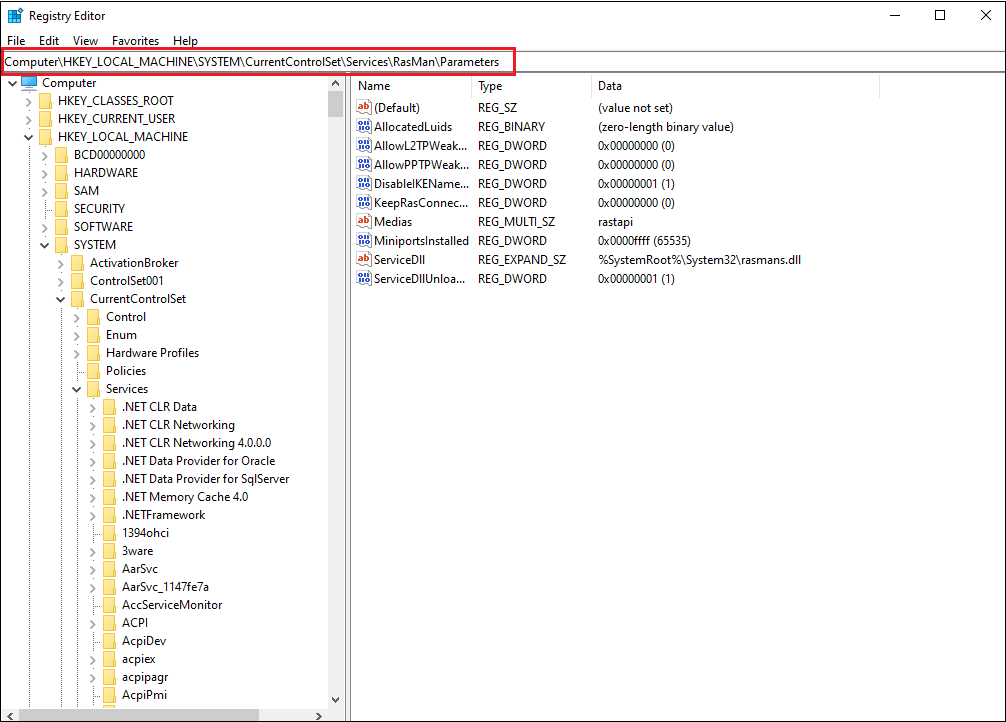
4. Щелкните меню Правка и наведите курсор на Создать. Щелкните Значение DWORD.
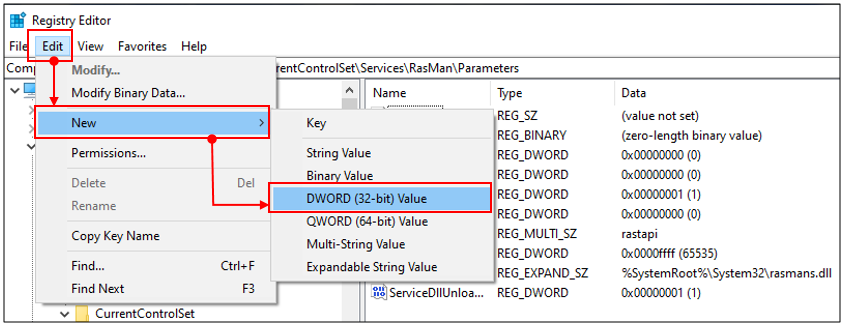
На правой панели появится новый реестр с именем DisableIKENameEkuCheck.

и установите значение 1.
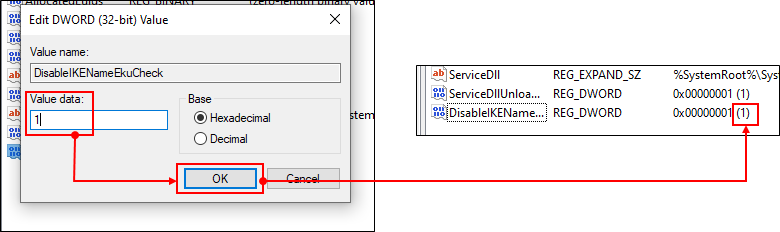
5. Перезагрузите компьютер.
Шаг 5. Установите сертификат в Windows
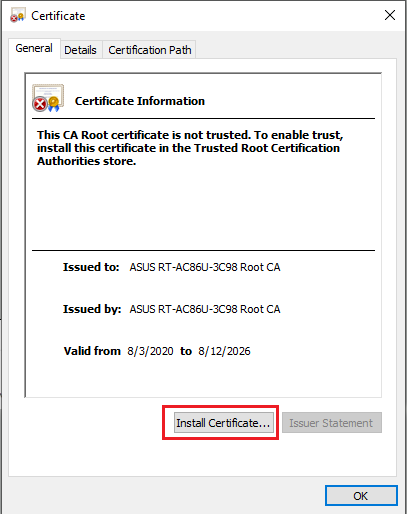
1. Дважды кликните на сертификат.

2. Нажмите на “Установить сертификат”
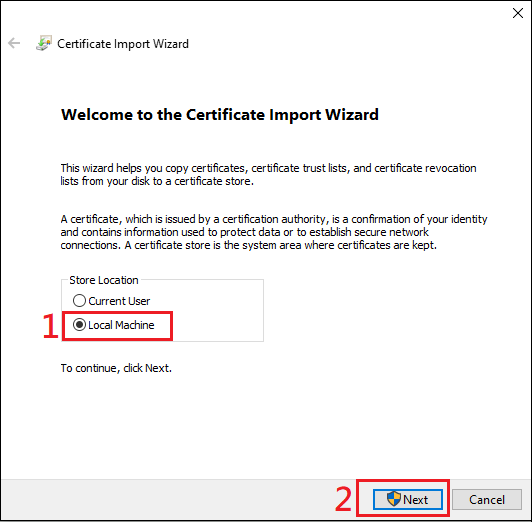
3. Выберите “Данное устройство” и нажмите Далее.
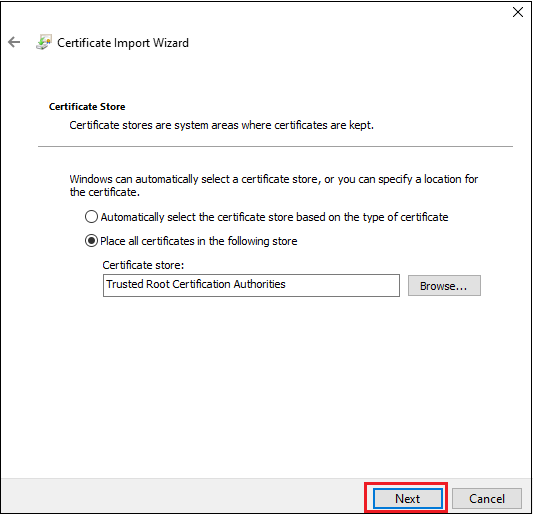
4. Выберите “Поместить все сертификаты в следующее хранилище” и нажмите “Обзор”.
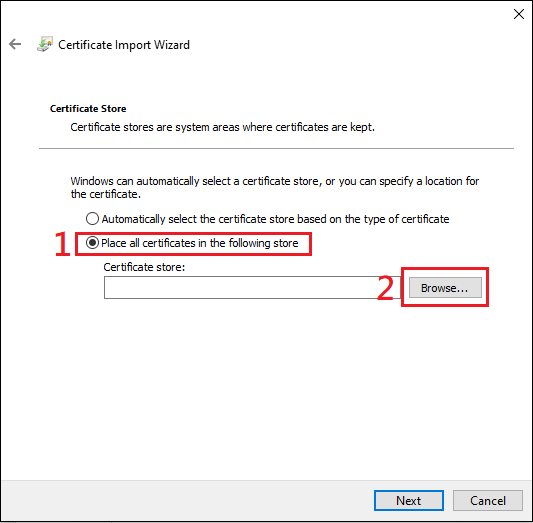
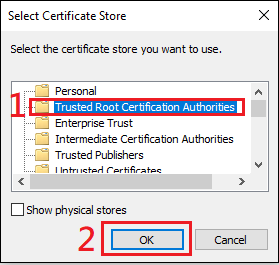
5. Выберите “Доверенные корневые центры сертификации” нажмите ОК.
6. Затем нажмите “Далее”
7. Нажмите Готово.

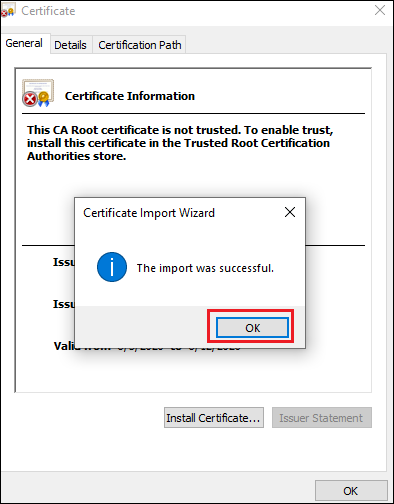
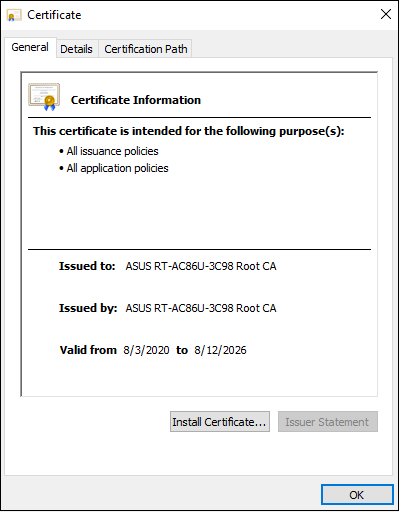
8. Дважды щелкните файл сертификации, чтобы проверить. Вы можете проверить, как показано ниже, если сертификация успешно установлена.
Шаг 6. установите подключение VPN
1. Откройте Параметры сети и Интернета
2. Перейдите на страницу настроек VPN. Нажмите кнопку [+], чтобы добавить VPN-соединение.
3. В поле Имя или адрес сервера на экране конфигурации VPN введите имя домена или IP-адрес, отображаемый в поле IP-адрес сервера на странице Сервер VPN. Нажмите Сохранить, чтобы завершить настройку.
4. Нажмите кнопку Подключиться над созданным профилем VPN.
5. Введите имя пользователя и пароль, затем нажмите OK, чтобы подключиться к VPN-серверу. Готово!
Примечание:
1. Если вы подключаетесь к маршрутизатору из Интернета через IPSec VPN и не можете получить доступ к серверу внутри локальной сети, отключите или проверьте настройки брандмауэра сервера локальной сети.
2. Если вы одновременно настроили соединение IPSec VPN с мобильным устройством или ПК, подключенным к маршрутизатору, после его завершения вы можете подключиться к другим устройствам в локальной сети через IPSec VPN без доступа в Интернет. В этом случае отключите Wi-Fi на своем мобильном устройстве или ПК, а затем подключитесь к Интернету через мобильную сеть 3G / 4G. Теперь вы в другой сети. Попробуйте снова подключиться к VPN.
3. Может быть максимум 8 клиентов с соединениями IPSec.
4. Одна учетная запись / пароль IPsec может позволить подключаться только одному клиенту (максимум до 8 правил учетной записи / пароля).
5. IPsec требует учетной записи / пароля для подключения, а не поддержки бесплатного входа.
Как скачать (Утилиты / ПО)?
Вы можете загрузить последние версии драйверов, программного обеспечения, микропрограмм и руководств пользователя из ASUS Центраз агрузок.
Узнать больше о Центре загрузок ASUS можно по ссылке.