В операционной системе Windows 10 настроить VPN-подключение по протоколу IKEv2 не составит большого труда — достаточно выполнить все действия, как показано на картинках, и уже через минуту вы сможете анонимно посещать любые сайты, обойти блокировку Вконтакте, безопасно использовать бесплатный Wi-Fi.
1
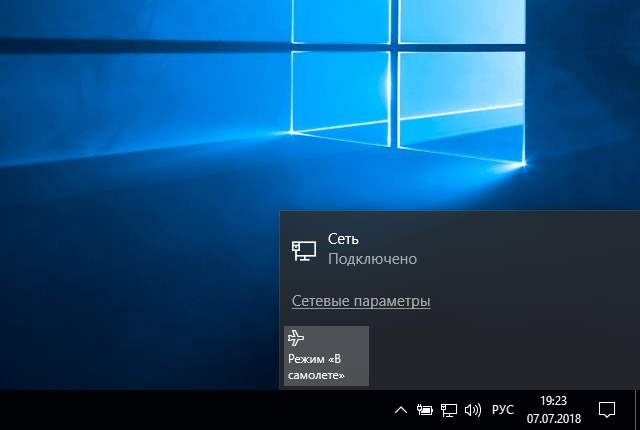
Кликнуть на иконке сетевого подключения в системном трее, и в появившемся окне выбрать Сетевые параметры.
Далее


4
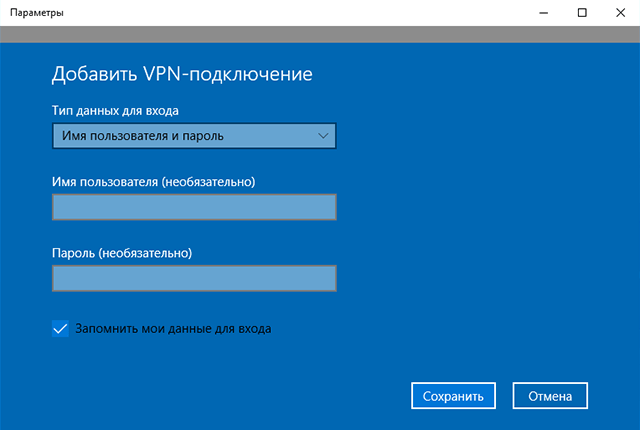
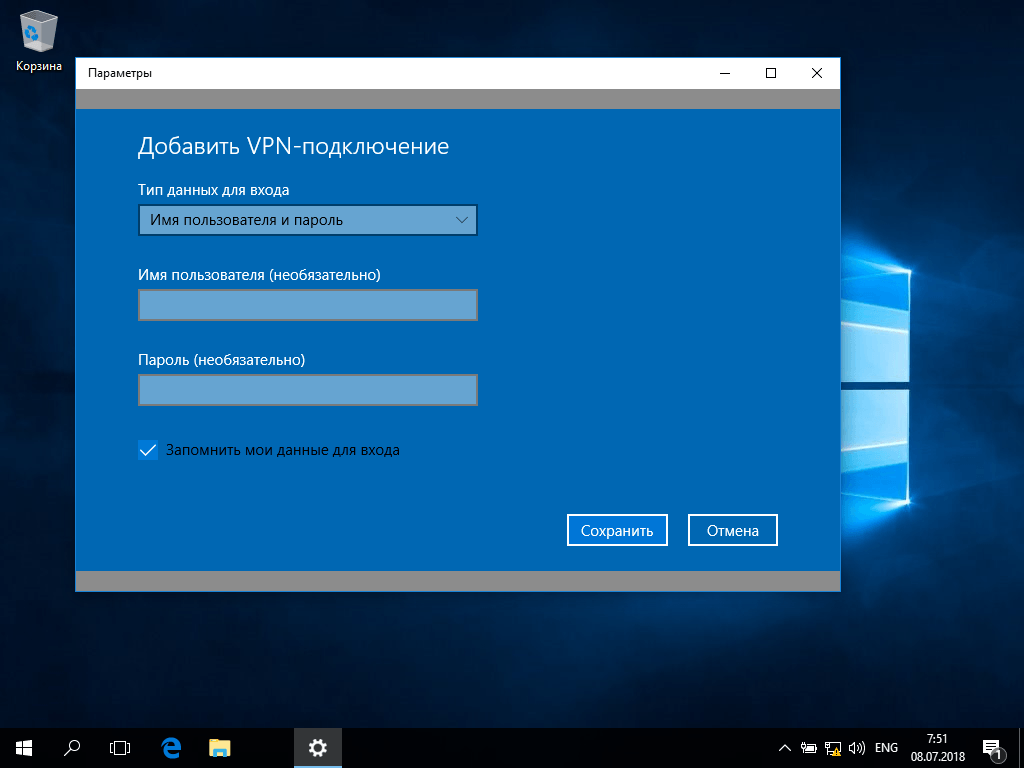
Указать идентификационные данные:
- Тип данных для входа — Имя пользователя и пароль
- Имя пользователя — username
- Пароль — password
Для завершения настройки нажать Сохранить.
Важное замечание: имя пользователя и пароль находятся в файле readme.txt, отправленном на Вашу почту после заказа подписки.
Далее
username
password
5
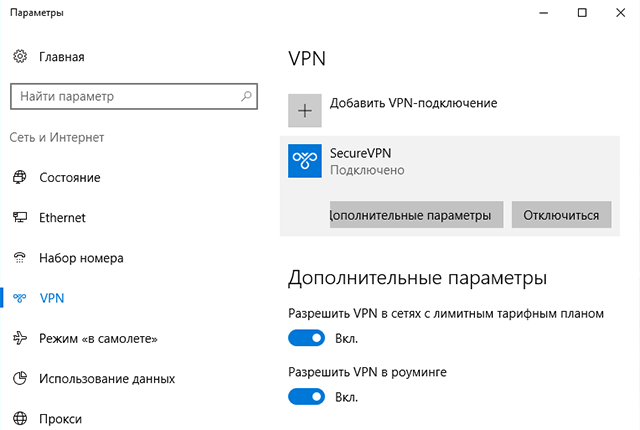
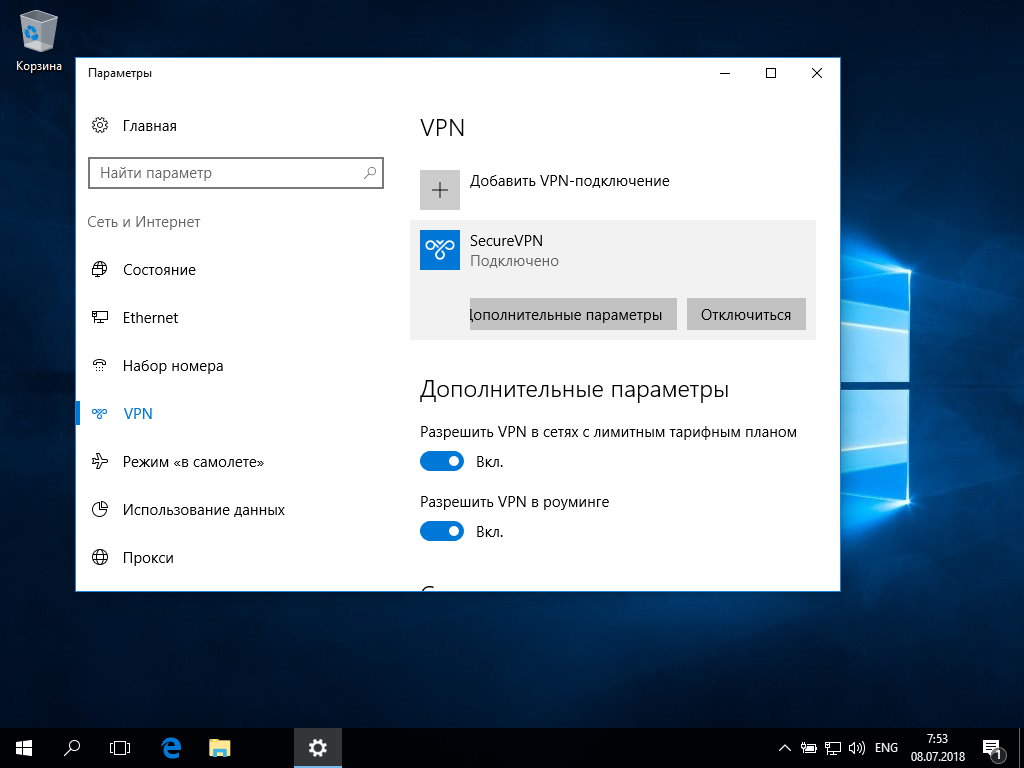
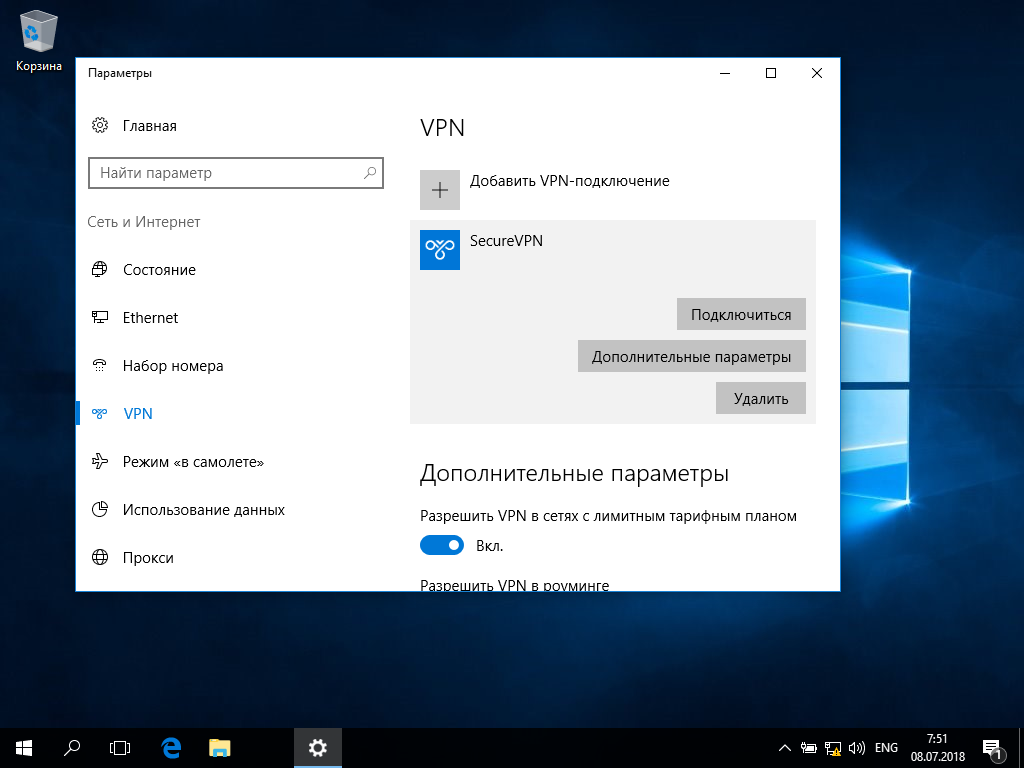
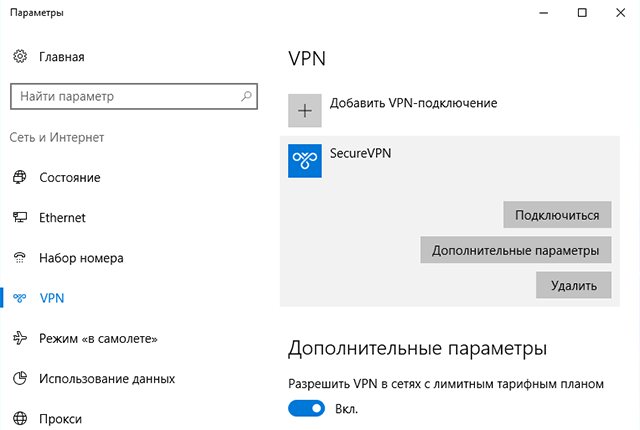
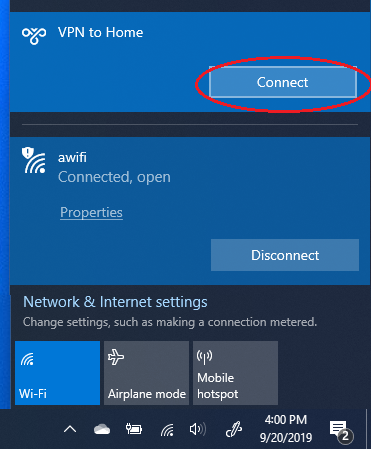
Для подключения выбрать только что созданное соединение, и нажать кнопку Подключиться.
Далее


6
Соединение будет установлено через некоторое время. Для отключения нажать Отключиться.
Далее

8
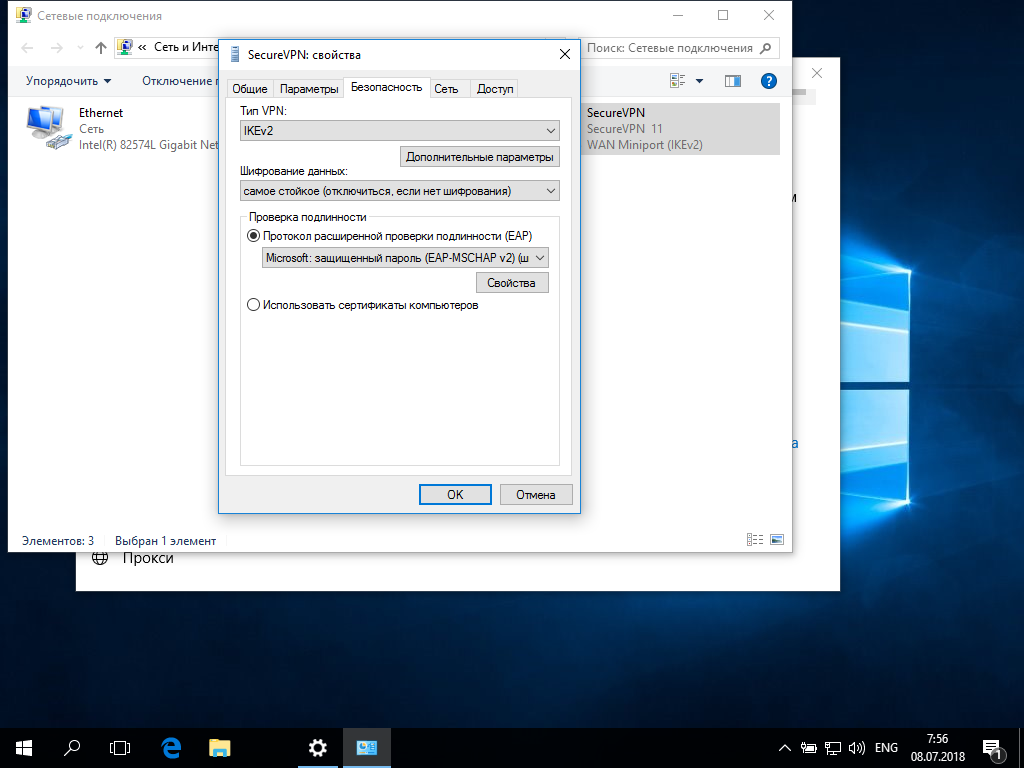
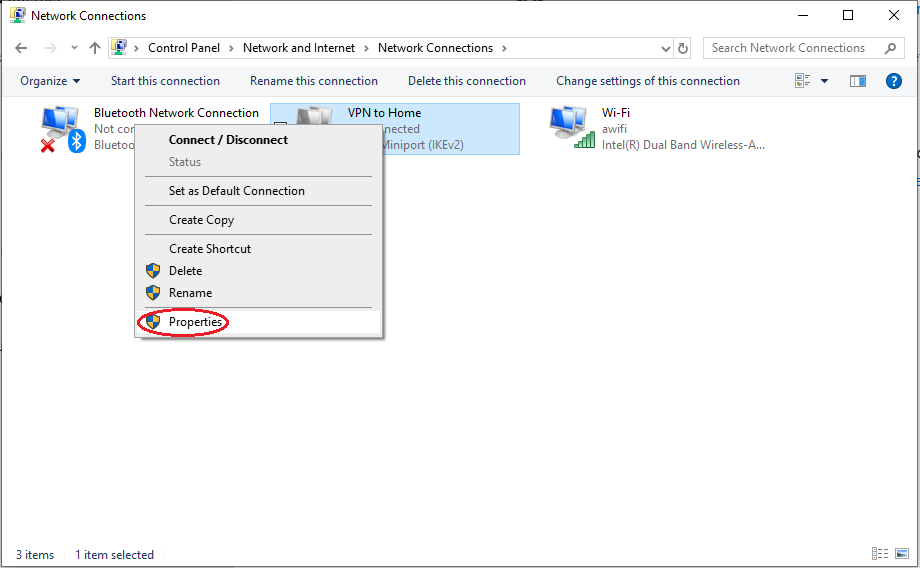
В открывшемся окне Сетевые подключения кликнуть правой кнопкой на созданном подключении, и выбрать Свойства.
Далее


Note: We have an official Proton VPN app for Windows that provides the easiest way to connect to our servers and allows you to benefit from many of Proton VPN’s advanced features. For example:
- Kill switch and permanent kill switch
- Choose between IKEv2, OpenVPN, and WireGuard VPN protocols
- Smart protocol
- DNS leak protection
- NetShield Ad-blocker
- Moderate NAT
- VPN Accelerator
- Port forwarding
Get Proton VPN for Windows
You can also connect to Proton VPN servers manually using the following VPN protocols:
- OpenVPN (using OpenVPN GUI )
- WireGuard (using any “vanilla” WireGuard client, including the official open-source app)
- IKEv2 (using the built-in Windows VPN client)
In this guide, we show you how to manually configure devices running Windows 10 to connect to our servers using the IKEv2 protocol. The instructions for Windows 11 are very similar.
Please note that connecting in this way means you will not benefit from the advanced features available through the official Proton VPN Windows app.
Windows manual IKEv2 VPN setup for Proton VPN
Import the Proton VPN IKEv2 certificate
1. Click here to download the certificate, and open it in Explorer.
2. Click Install Certificate.
 3. Select Local Machine and click Next.

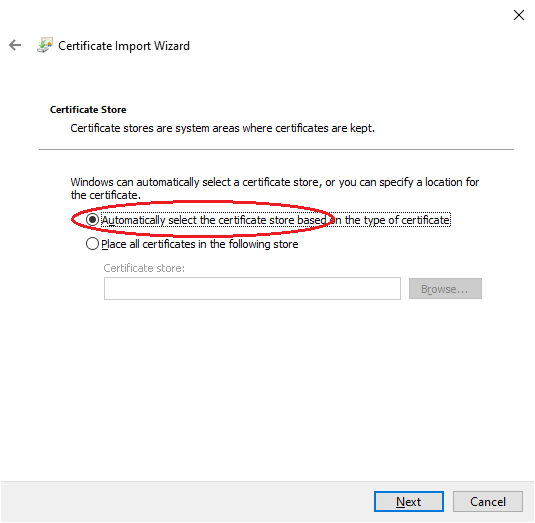
4. Select Place all certificates in the following store and click Browse… (Click Yes if asked to allow this app to make changes to your device.)

4. Select Trusted Root Certification Authorities and click OK, then Next.

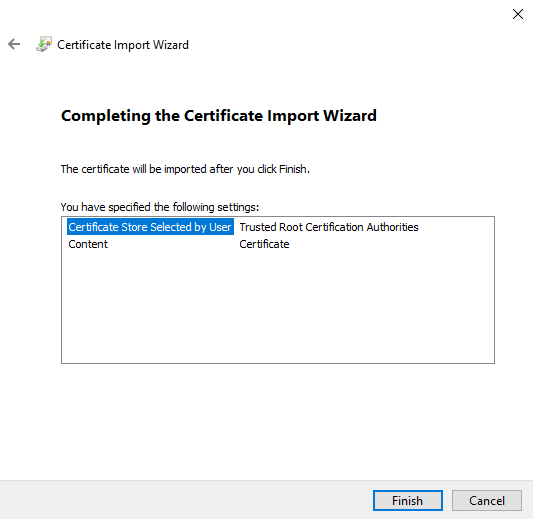
5. Click Finish and then OK on the Certificate Import Wizard window.
Add an IKEv2 VPN connection to Windows
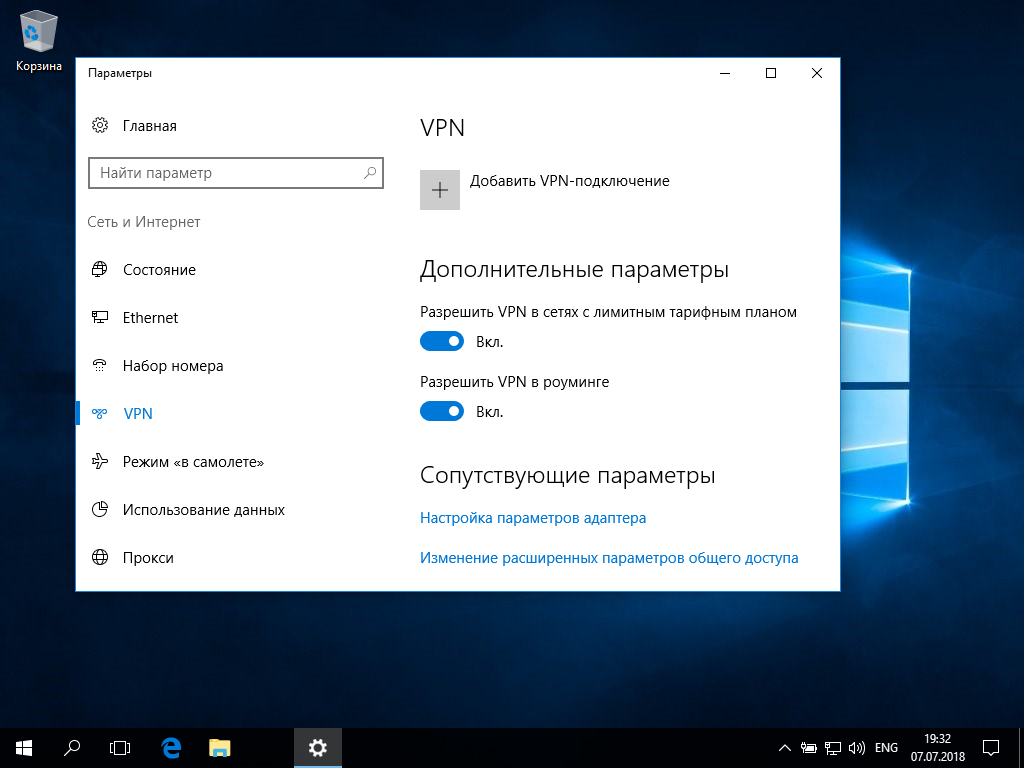
1. Go to Start → Settings → Network & Internet → VPN → Add a VPN connection.
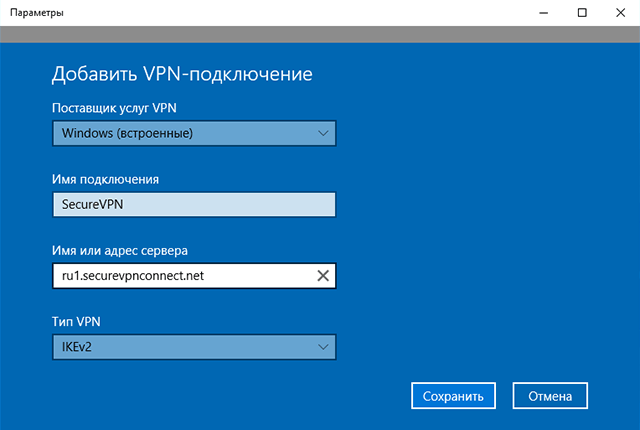
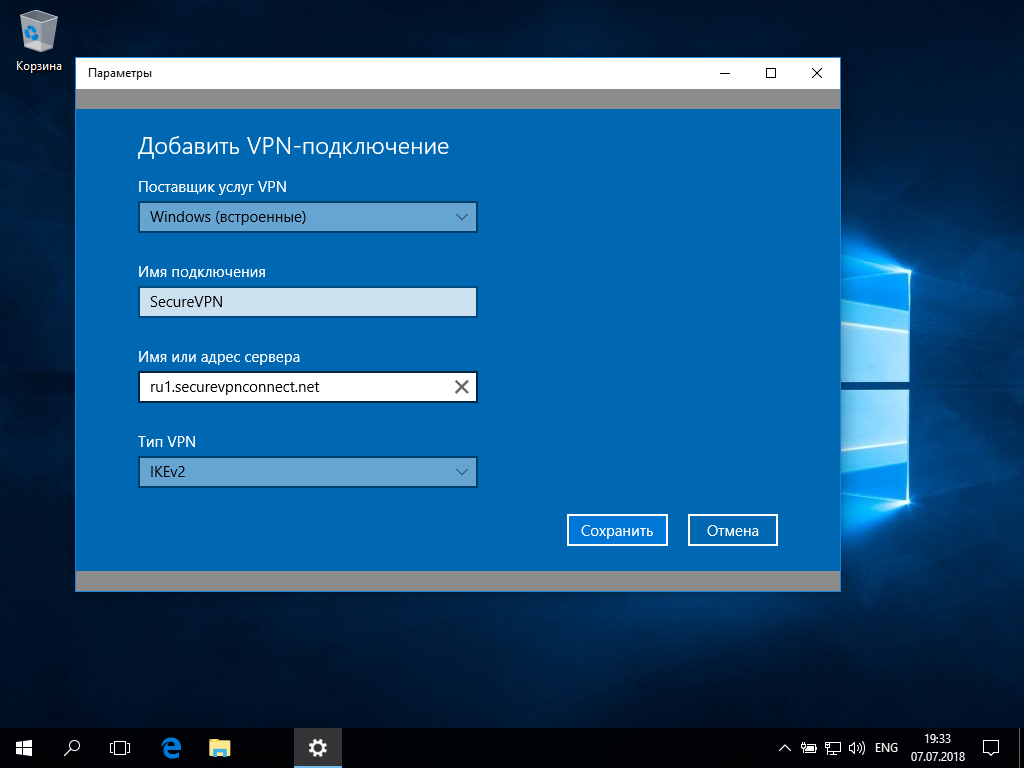
2. Fill in the following information and click Save:
- VPN Provider: Windows (built-in)
- Connection name: Choose any name for the VPN connection that makes sense to you
- Server name or address: see below
- VPN type: IKEv2
- Type of sign-in info: User name and password
- User name: Your Proton VPN IKEv2 username (see below)
- Password: Your Proton VPN IKEv2 password (see below)

To find the names of our VPN servers: Log in to account.protonvpn.com using your browser and go to Downloads → OpenVPN Configuration files → select the server you would like to connect to, and in the Actions column next to it, click the dropdown icon to see the server name.
Clicking on the server name will save it to your clipboard for easy pasting into the Windows Settings menu.

To find your IKEv2 username and password: your IKEv2 login details are not the same as your regular Proton VPN login details. To find your IKEv2 login details, log in to account.protonvpn.com and go to Account → OpenVPN / IKEv2 username.

3. Back on the main Windows VPN Settings page, select the VPN connection you just created → Connect.

You are now connected to Proton VPN using IKEv2!

How to fix a “Policy match error”
If you are prevented from connecting by a Policy match error:
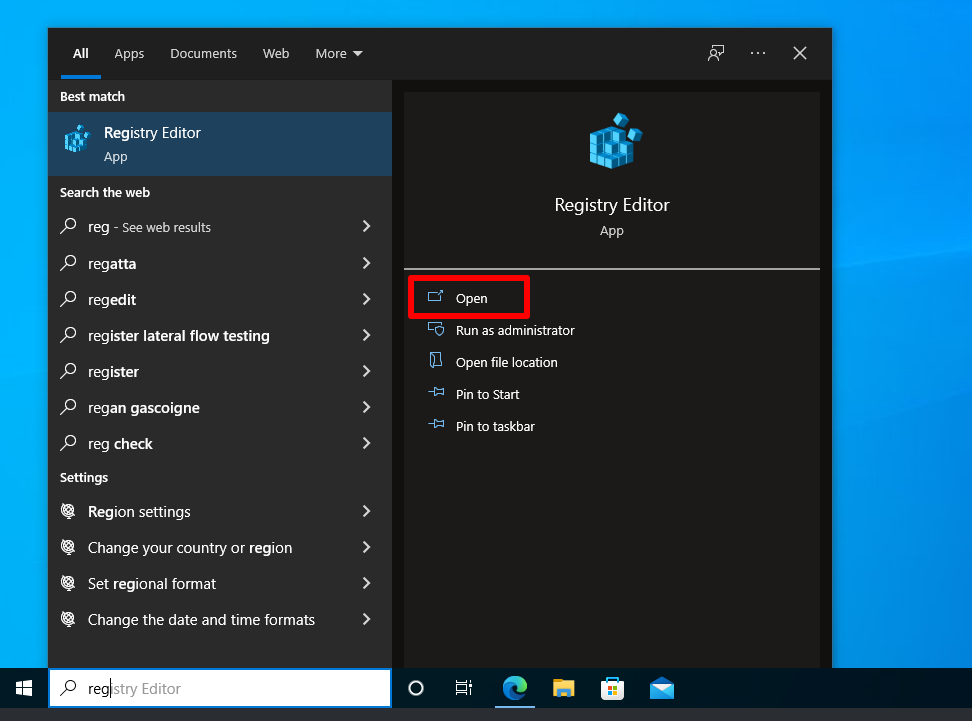
1. Search for the Registry Editor app and Open it.
2. Go to HKEY_LOCAL_MACHINESYSTEMCurrentControlSetServicesRasManParameters → right-click on any area of white space → New → DWORD (32-bit) Value.

3. Name the newly created value NegotiateDH2048_AES256, then right-click on it → Modify…

4. Enter a Value data of 2 and click OK.
 4. The registry entry should now look as follows. Close the Registry Editor and try connecting again.

Related articles:
Proton VPN Windows app tutorial
Proton VPN Windows OpenVPN GUI tutorial
English | 中文
Guide: How to Set Up and Use IKEv2 VPN
- Introduction
- Configure IKEv2 VPN clients
- IKEv2 troubleshooting
- Manage IKEv2 clients
- Change IKEv2 server address
- Update IKEv2 helper script
- Set up IKEv2 using helper script
- Manually set up IKEv2
- Remove IKEv2
Introduction
Modern operating systems support the IKEv2 standard. Internet Key Exchange (IKE or IKEv2) is the protocol used to set up a Security Association (SA) in the IPsec protocol suite. Compared to IKE version 1, IKEv2 contains improvements such as Standard Mobility support through MOBIKE, and improved reliability.
Libreswan can authenticate IKEv2 clients on the basis of X.509 Machine Certificates using RSA signatures. This method does not require an IPsec PSK, username or password. It can be used with Windows, macOS, iOS, Android, Chrome OS, Linux and RouterOS.
By default, IKEv2 is automatically set up when running the VPN setup script. If you want to learn more about setting up IKEv2, see Set up IKEv2 using helper script. Docker users, see Configure and use IKEv2 VPN.
Configure IKEv2 VPN clients
Note: To add or export IKEv2 clients, run sudo ikev2.sh. Use -h to show usage. Client config files can be safely deleted after import.
- Windows 7, 8, 10 and 11
- OS X (macOS)
- iOS (iPhone/iPad)
- Android
- Chrome OS (Chromebook)
- Linux
- Mikrotik RouterOS
Learn how to change the IKEv2 server address.
In certain circumstances, you may need to change the IKEv2 server address. For example, to switch to use a DNS name, or after server IP changes. Learn more in this section.
Windows 7, 8, 10 and 11
Auto-import configuration
Screencast: IKEv2 Auto Import Configuration on Windows
Windows 8, 10 and 11 users can automatically import IKEv2 configuration:
- Securely transfer the generated
.p12file to your computer. - Right-click on ikev2_config_import.cmd and save this helper script to the same folder as the
.p12file. - Right-click on the saved script, select Properties. Click on Unblock at the bottom, then click on OK.
- Right-click on the saved script, select Run as administrator and follow the prompts.
To connect to the VPN: Click on the wireless/network icon in your system tray, select the new VPN entry, and click Connect. Once connected, you can verify that your traffic is being routed properly by looking up your IP address on Google. It should say «Your public IP address is Your VPN Server IP«.
If you get an error when trying to connect, see Troubleshooting.
Manually import configuration
[Supporters] Screencast: IKEv2 Manually Import Configuration on Windows
Alternatively, Windows 7, 8, 10 and 11 users can manually import IKEv2 configuration:
-
Securely transfer the generated
.p12file to your computer, then import it into the certificate store.To import the
.p12file, run the following from an elevated command prompt:# Import .p12 file (replace with your own value) certutil -f -importpfx "pathtoyourfile.p12" NoExport
Note: If there is no password for client config files, press Enter to continue, or if manually importing the
.p12file, leave the password field blank.Alternatively, you can manually import the .p12 file. Make sure that the client cert is placed in «Personal -> Certificates», and the CA cert is placed in «Trusted Root Certification Authorities -> Certificates».
-
On the Windows computer, add a new IKEv2 VPN connection.
For Windows 8, 10 and 11, it is recommended to create the VPN connection using the following commands from a command prompt, for improved security and performance.
# Create VPN connection (replace server address with your own value)
powershell -command ^"Add-VpnConnection -ServerAddress 'Your VPN Server IP (or DNS name)' ^
  -Name 'My IKEv2 VPN' -TunnelType IKEv2 -AuthenticationMethod MachineCertificate ^
  -EncryptionLevel Required -PassThru^"
# Set IPsec configuration
powershell -command ^"Set-VpnConnectionIPsecConfiguration -ConnectionName 'My IKEv2 VPN' ^
  -AuthenticationTransformConstants GCMAES128 -CipherTransformConstants GCMAES128 ^
  -EncryptionMethod AES256 -IntegrityCheckMethod SHA256 -PfsGroup None ^
  -DHGroup Group14 -PassThru -Force^"
Windows 7 does not support these commands, you can manually create the VPN connection.
Note: The server address you specify must exactly match the server address in the output of the IKEv2 helper script. For example, if you specified the server’s DNS name during IKEv2 setup, you must enter the DNS name in the Internet address field.
-
This step is required if you manually created the VPN connection.
Enable stronger ciphers for IKEv2 with a one-time registry change. Download and import the
.regfile below, or run the following from an elevated command prompt. Read more here.-
For Windows 7, 8, 10 and 11 (download .reg file)
REG ADD HKLMSYSTEMCurrentControlSetServicesRasManParameters /v NegotiateDH2048_AES256 /t REG_DWORD /d 0x1 /f
-
To connect to the VPN: Click on the wireless/network icon in your system tray, select the new VPN entry, and click Connect. Once connected, you can verify that your traffic is being routed properly by looking up your IP address on Google. It should say «Your public IP address is Your VPN Server IP«.
If you get an error when trying to connect, see Troubleshooting.
Remove the IKEv2 VPN connection.
Using the following steps, you can remove the VPN connection and optionally restore the computer to the status before IKEv2 configuration import.
-
Remove the added VPN connection in Windows Settings — Network — VPN. Windows 7 users can remove the VPN connection in Network and Sharing Center — Change adapter settings.
-
(Optional) Remove IKEv2 certificates.
-
Press Win+R, or search for
mmcin the Start Menu. Open Microsoft Management Console. -
Open
File - Add/Remove Snap-In. Select to addCertificatesand in the window that opens, selectComputer account -> Local Computer. Click onFinish -> OKto save the settings. -
Go to
Certificates - Personal - Certificatesand delete the IKEv2 client certificate. The name of the certificate is the same as the IKEv2 client name you specified (default:vpnclient). The certificate was issued byIKEv2 VPN CA. -
Go to
Certificates - Trusted Root Certification Authorities - Certificatesand delete the IKEv2 VPN CA certificate. The certificate was issued toIKEv2 VPN CAbyIKEv2 VPN CA. Before deleting, make sure that there are no other certificate(s) issued byIKEv2 VPN CAinCertificates - Personal - Certificates.
-
-
(Optional. For users who manually created the VPN connection) Restore registry settings. Note that you should backup the registry before editing.
-
Press Win+R, or search for
regeditin the Start Menu. Open Registry Editor. -
Go to
HKEY_LOCAL_MACHINESystemCurrentControlSetServicesRasmanParametersand delete the item with nameNegotiateDH2048_AES256, if it exists.
-
OS X (macOS)
[Supporters] Screencast: IKEv2 Import Configuration and Connect on macOS
First, securely transfer the generated .mobileconfig file to your Mac, then double-click and follow the prompts to import as a macOS profile. If your Mac runs macOS Big Sur or newer, open System Preferences and go to the Profiles section to finish importing. When finished, check to make sure «IKEv2 VPN» is listed under System Preferences -> Profiles.
To connect to the VPN:
- Open System Preferences and go to the Network section.
- Select the VPN connection with
Your VPN Server IP(or DNS name). - Check the Show VPN status in menu bar checkbox.
- Click Connect.
(Optional feature) Enable VPN On Demand to automatically start a VPN connection when your Mac is on Wi-Fi. To enable, check the Connect on demand checkbox for the VPN connection, and click Apply. You can customize VPN On Demand rules to exclude certain Wi-Fi network(s) such as your home network. See «Guide: Customize IKEv2 VPN On Demand rules for macOS and iOS» in 📖 Book: Set Up Your Own IPsec VPN, OpenVPN and WireGuard Server.
If you manually set up IKEv2 without using the helper script, click here for instructions.
First, securely transfer the generated .p12 file to your Mac, then double-click to import into the login keychain in Keychain Access. Next, double-click on the imported IKEv2 VPN CA certificate, expand Trust and select Always Trust from the IP Security (IPsec) drop-down menu. Close the dialog using the red «X» on the top-left corner. When prompted, use Touch ID or enter your password and click «Update Settings».
When finished, check to make sure both the new client certificate and IKEv2 VPN CA are listed under the Certificates category of login keychain.
- Open System Preferences and go to the Network section.
- Click the + button in the lower-left corner of the window.
- Select VPN from the Interface drop-down menu.
- Select IKEv2 from the VPN Type drop-down menu.
- Enter anything you like for the Service Name.
- Click Create.
- Enter
Your VPN Server IP(or DNS name) for the Server Address.
Note: If you specified the server’s DNS name (instead of its IP address) during IKEv2 setup, you must enter the DNS name in the Server Address and Remote ID fields. - Enter
Your VPN Server IP(or DNS name) for the Remote ID. - Enter
Your VPN client namein the Local ID field.
Note: This must match exactly the client name you specified during IKEv2 setup. Same as the first part of your.p12filename. - Click the Authentication Settings… button.
- Select None from the Authentication Settings drop-down menu.
- Select the Certificate radio button, then select the new client certificate.
- Click OK.
- Check the Show VPN status in menu bar checkbox.
- Click Apply to save the VPN connection information.
- Click Connect.
Once connected, you can verify that your traffic is being routed properly by looking up your IP address on Google. It should say «Your public IP address is Your VPN Server IP«.
If you get an error when trying to connect, see Troubleshooting.
Remove the IKEv2 VPN connection.
To remove the IKEv2 VPN connection, open System Preferences -> Profiles and remove the IKEv2 VPN profile you added.
iOS
[Supporters] Screencast: IKEv2 Import Configuration and Connect on iOS (iPhone & iPad)
First, securely transfer the generated .mobileconfig file to your iOS device, then import it as an iOS profile. To transfer the file, you may use:
- AirDrop, or
- Upload to your device (any App folder) using File Sharing, then open the «Files» App on your iOS device, move the uploaded file to the «On My iPhone» folder. After that, tap the file and go to the «Settings» App to import, or
- Host the file on a secure website of yours, then download and import it in Mobile Safari.
When finished, check to make sure «IKEv2 VPN» is listed under Settings -> General -> VPN & Device Management or Profile(s).
To connect to the VPN:
- Go to Settings -> VPN. Select the VPN connection with
Your VPN Server IP(or DNS name). - Slide the VPN switch ON.
(Optional feature) Enable VPN On Demand to automatically start a VPN connection when your iOS device is on Wi-Fi. To enable, tap the «i» icon on the right of the VPN connection, and enable Connect On Demand. You can customize VPN On Demand rules to exclude certain Wi-Fi network(s) such as your home network, or to start the VPN connection both on Wi-Fi and cellular. See «Guide: Customize IKEv2 VPN On Demand rules for macOS and iOS» in 📖 Book: Set Up Your Own IPsec VPN, OpenVPN and WireGuard Server.
If you manually set up IKEv2 without using the helper script, click here for instructions.
First, securely transfer the generated ca.cer and .p12 files to your iOS device, then import them one by one as iOS profiles. To transfer the files, you may use:
- AirDrop, or
- Upload to your device (any App folder) using File Sharing, then open the «Files» App on your iOS device, move the uploaded files to the «On My iPhone» folder. After that, tap each file and go to the «Settings» App to import, or
- Host the files on a secure website of yours, then download and import them in Mobile Safari.
When finished, check to make sure both the new client certificate and IKEv2 VPN CA are listed under Settings -> General -> VPN & Device Management or Profile(s).
- Go to Settings -> General -> VPN & Device Management -> VPN.
- Tap Add VPN Configuration….
- Tap Type. Select IKEv2 and go back.
- Tap Description and enter anything you like.
- Tap Server and enter
Your VPN Server IP(or DNS name).
Note: If you specified the server’s DNS name (instead of its IP address) during IKEv2 setup, you must enter the DNS name in the Server and Remote ID fields. - Tap Remote ID and enter
Your VPN Server IP(or DNS name). - Enter
Your VPN client namein the Local ID field.
Note: This must match exactly the client name you specified during IKEv2 setup. Same as the first part of your.p12filename. - Tap User Authentication. Select None and go back.
- Make sure the Use Certificate switch is ON.
- Tap Certificate. Select the new client certificate and go back.
- Tap Done.
- Slide the VPN switch ON.
Once connected, you can verify that your traffic is being routed properly by looking up your IP address on Google. It should say «Your public IP address is Your VPN Server IP«.
If you get an error when trying to connect, see Troubleshooting.
Remove the IKEv2 VPN connection.
To remove the IKEv2 VPN connection, open Settings -> General -> VPN & Device Management or Profile(s) and remove the IKEv2 VPN profile you added.
Android
[Supporters] Screencast: Connect using Android strongSwan VPN Client
- Securely transfer the generated
.sswanfile to your Android device. - Install strongSwan VPN Client from Google Play, F-Droid or strongSwan download server.
- Launch the strongSwan VPN client.
- Tap the «more options» menu on top right, then tap Import VPN profile.
- Choose the
.sswanfile you transferred from the VPN server.
Note: To find the.sswanfile, tap the three-line menu button, then browse to the location you saved the file. - On the «Import VPN profile» screen, tap IMPORT CERTIFICATE FROM VPN PROFILE, and follow the prompts.
- On the «Choose certificate» screen, select the new client certificate, then tap Select.
- Tap IMPORT.
- Tap the new VPN profile to connect.
Alternatively, Android 11+ users can also connect using the native IKEv2 client.
[Supporters] Screencast: Connect using Native VPN Client on Android 11+
- Securely transfer the generated
.p12file to your Android device. - Launch the Settings application.
- Go to Security -> Advanced -> Encryption & credentials.
- Tap Install a certificate.
- Tap VPN & app user certificate.
- Choose the
.p12file you transferred from the VPN server.
Note: To find the.p12file, tap the three-line menu button, then browse to the location you saved the file. - Enter a name for the certificate, then tap OK.
- Go to Settings -> Network & internet -> VPN, then tap the «+» button.
- Enter a name for the VPN profile.
- Select IKEv2/IPSec RSA from the Type drop-down menu.
- Enter
Your VPN Server IP(or DNS name) in the Server address field.
Note: This must exactly match the server address in the output of the IKEv2 helper script. - Enter anything (e.g.
empty) in the IPSec identifier field.
Note: This field should not be required. It is a bug in Android. - Select the certificate you imported from the IPSec user certificate drop-down menu.
- Select the certificate you imported from the IPSec CA certificate drop-down menu.
- Select (receive from server) from the IPSec server certificate drop-down menu.
- Tap Save. Then tap the new VPN connection and tap Connect.
If your device runs Android 6.0 or older, click here for additional instructions.
If your device runs Android 6.0 (Marshmallow) or older, in order to connect using the strongSwan VPN client, you must make the following change on the VPN server: Edit /etc/ipsec.d/ikev2.conf on the server. Append authby=rsa-sha1 to the end of the conn ikev2-cp section, indented by two spaces. Save the file and run service ipsec restart.
(Optional feature) You can choose to enable the «Always-on VPN» feature on Android. Launch the Settings app, go to Network & internet -> Advanced -> VPN, click the gear icon on the right of «strongSwan VPN Client», then enable the Always-on VPN and Block connections without VPN options.
If you manually set up IKEv2 without using the helper script, click here for instructions.
Android 10 and newer:
- Securely transfer the generated
.p12file to your Android device. - Install strongSwan VPN Client from Google Play, F-Droid or strongSwan download server.
- Launch the Settings application.
- Go to Security -> Advanced -> Encryption & credentials.
- Tap Install a certificate.
- Tap VPN & app user certificate.
- Choose the
.p12file you transferred from the VPN server, and follow the prompts.
Note: To find the.p12file, tap the three-line menu button, then browse to the location you saved the file. - Launch the strongSwan VPN client and tap Add VPN Profile.
- Enter
Your VPN Server IP(or DNS name) in the Server field.
Note: If you specified the server’s DNS name (instead of its IP address) during IKEv2 setup, you must enter the DNS name in the Server field. - Select IKEv2 Certificate from the VPN Type drop-down menu.
- Tap Select user certificate, select the new client certificate and confirm.
- (Important) Tap Show advanced settings. Scroll down, find and enable the Use RSA/PSS signatures option.
- Save the new VPN connection, then tap to connect.
Android 4 to 9:
- Securely transfer the generated
.p12file to your Android device. - Install strongSwan VPN Client from Google Play, F-Droid or strongSwan download server.
- Launch the strongSwan VPN client and tap Add VPN Profile.
- Enter
Your VPN Server IP(or DNS name) in the Server field.
Note: If you specified the server’s DNS name (instead of its IP address) during IKEv2 setup, you must enter the DNS name in the Server field. - Select IKEv2 Certificate from the VPN Type drop-down menu.
- Tap Select user certificate, then tap Install certificate.
- Choose the
.p12file you transferred from the VPN server, and follow the prompts.
Note: To find the.p12file, tap the three-line menu button, then browse to the location you saved the file. - (Important) Tap Show advanced settings. Scroll down, find and enable the Use RSA/PSS signatures option.
- Save the new VPN connection, then tap to connect.
Once connected, you can verify that your traffic is being routed properly by looking up your IP address on Google. It should say «Your public IP address is Your VPN Server IP«.
If you get an error when trying to connect, see Troubleshooting.
Chrome OS
First, on your VPN server, export the CA certificate as ca.cer:
sudo certutil -L -d sql:/etc/ipsec.d -n "IKEv2 VPN CA" -a -o ca.cer
Securely transfer the generated .p12 and ca.cer files to your Chrome OS device.
Install user and CA certificates:
- Open a new tab in Google Chrome.
- In the address bar, enter chrome://settings/certificates
- (Important) Click Import and Bind, not Import.
- In the box that opens, choose the
.p12file you transferred from the VPN server and select Open. - Click OK if the certificate does not have a password. Otherwise, enter the certificate’s password.
- Click the Authorities tab. Then click Import.
- In the box that opens, select All files in the drop-down menu at the bottom left.
- Choose the
ca.cerfile you transferred from the VPN server and select Open. - Keep the default options and click OK.
Add a new VPN connection:
- Go to Settings -> Network.
- Click Add connection, then click Add built-in VPN.
- Enter anything you like for the Service name.
- Select IPsec (IKEv2) in the Provider type drop-down menu.
- Enter
Your VPN Server IP(or DNS name) for the Server hostname. - Select User certificate in the Authentication type drop-down menu.
- Select IKEv2 VPN CA [IKEv2 VPN CA] in the Server CA certificate drop-down menu.
- Select IKEv2 VPN CA [client name] in the User certificate drop-down menu.
- Leave other fields blank.
- Enable Save identity and password.
- Click Connect.
Once connected, you will see a VPN icon overlay on the network status icon. You can verify that your traffic is being routed properly by looking up your IP address on Google. It should say «Your public IP address is Your VPN Server IP«.
(Optional feature) You can choose to enable the «Always-on VPN» feature on Chrome OS. To manage this setting, go to Settings -> Network, then click VPN.
If you get an error when trying to connect, see Troubleshooting.
Linux
Before configuring Linux VPN clients, you must make the following change on the VPN server: Edit /etc/ipsec.d/ikev2.conf on the server. Append authby=rsa-sha1 to the end of the conn ikev2-cp section, indented by two spaces. Save the file and run service ipsec restart.
To configure your Linux computer to connect to IKEv2 as a VPN client, first install the strongSwan plugin for NetworkManager:
# Ubuntu and Debian
sudo apt-get update
sudo apt-get install network-manager-strongswan

# Arch Linux
sudo pacman -Syu  # upgrade all packages
sudo pacman -S networkmanager-strongswan

# Fedora
sudo yum install NetworkManager-strongswan-gnome

# CentOS
sudo yum install epel-release
sudo yum --enablerepo=epel install NetworkManager-strongswan-gnome
Next, securely transfer the generated .p12 file from the VPN server to your Linux computer. After that, extract the CA certificate, client certificate and private key. Replace vpnclient.p12 in the example below with the name of your .p12 file.
# Example: Extract CA certificate, client certificate and private key.
#          You may delete the .p12 file when finished.
# Note: You may need to enter the import password, which can be found
#       in the output of the IKEv2 helper script. If the output does not
#       contain an import password, press Enter to continue.
# Note: If using OpenSSL 3.x (run "openssl version" to check),
#       append "-legacy" to the 3 commands below.
openssl pkcs12 -in vpnclient.p12 -cacerts -nokeys -out ca.cer
openssl pkcs12 -in vpnclient.p12 -clcerts -nokeys -out client.cer
openssl pkcs12 -in vpnclient.p12 -nocerts -nodes  -out client.key
rm vpnclient.p12

# (Important) Protect certificate and private key files
# Note: This step is optional, but strongly recommended.
sudo chown root.root ca.cer client.cer client.key
sudo chmod 600 ca.cer client.cer client.key
You can then set up and enable the VPN connection:
- Go to Settings -> Network -> VPN. Click the + button.
- Select IPsec/IKEv2 (strongswan).
- Enter anything you like in the Name field.
- In the Gateway (Server) section, enter
Your VPN Server IP(or DNS name) for the Address. - Select the
ca.cerfile for the Certificate. - In the Client section, select Certificate(/private key) in the Authentication drop-down menu.
- Select Certificate/private key in the Certificate drop-down menu (if exists).
- Select the
client.cerfile for the Certificate (file). - Select the
client.keyfile for the Private key. - In the Options section, check the Request an inner IP address checkbox.
- In the Cipher proposals (Algorithms) section, check the Enable custom proposals checkbox.
- Leave the IKE field blank.
- Enter
aes128gcm16in the ESP field. - Click Add to save the VPN connection information.
- Turn the VPN switch ON.
Once connected, you can verify that your traffic is being routed properly by looking up your IP address on Google. It should say «Your public IP address is Your VPN Server IP«.
If you get an error when trying to connect, see Troubleshooting.
RouterOS
Note: These steps were contributed by @Unix-User. It is recommended to run terminal commands via an SSH connection, e.g. via Putty.
-
Securely transfer the generated
.p12file to your computer.Click to see screencast.

-
In WinBox, go to System > certificates > import. Import the
.p12certificate file twice (yes, import the same file two times!). Verify in your certificates panel. You will see 2 files, the one that is marked KT is the key.Click to see screencast.
Or you can use terminal instead (empty passphrase):
[admin@MikroTik] > /certificate/import file-name=mikrotik.p12
passphrase:

  certificates-imported: 2
  private-keys-imported: 0
         files-imported: 1
    decryption-failures: 0
  keys-with-no-certificate: 0

[admin@MikroTik] > /certificate/import file-name=mikrotik.p12
passphrase:

     certificates-imported: 0
     private-keys-imported: 1
            files-imported: 1
       decryption-failures: 0
  keys-with-no-certificate: 0
-
Run these commands in terminal. Replace the following with your own values.
YOUR_VPN_SERVER_IP_OR_DNS_NAMEis your VPN server IP or DNS name.
IMPORTED_CERTIFICATEis the name of the certificate from step 2 above, e.g.vpnclient.p12_0
(the one flagged with KT — Priv. Key Trusted — if not flagged as KT, import certificate again).
THESE_ADDRESSES_GO_THROUGH_VPNare the local network addresses that you want to browse through the VPN.
Assuming that your local network behind RouterOS is192.168.0.0/24, you can use192.168.0.0/24
for the entire network, or use192.168.0.10for just one device, and so on./ip firewall address-list add address=THESE_ADDRESSES_GO_THROUGH_VPN list=local /ip ipsec mode-config add name=ike2-rw responder=no src-address-list=local /ip ipsec policy group add name=ike2-rw /ip ipsec profile add name=ike2-rw /ip ipsec peer add address=YOUR_VPN_SERVER_IP_OR_DNS_NAME exchange-mode=ike2 name=ike2-rw-client profile=ike2-rw /ip ipsec proposal add name=ike2-rw pfs-group=none /ip ipsec identity add auth-method=digital-signature certificate=IMPORTED_CERTIFICATE generate-policy=port-strict mode-config=ike2-rw peer=ike2-rw-client policy-template-group=ike2-rw /ip ipsec policy add group=ike2-rw proposal=ike2-rw template=yes -
For more information, see #1112.


tested on
mar/02/2022 12:52:57 by RouterOS 6.48
RouterBOARD 941-2nD
IKEv2 troubleshooting
Read this in other languages: English, 中文.
See also: Check logs and VPN status, IKEv1 troubleshooting and Advanced usage.
- Cannot connect to the VPN server
- Unable to connect multiple IKEv2 clients
- IKE authentication credentials are unacceptable
- Policy match error
- Parameter is incorrect
- Cannot open websites after connecting to IKEv2
- Windows 10 connecting
- Other known issues
Cannot connect to the VPN server
First, make sure that the VPN server address specified on your VPN client device exactly matches the server address in the output of the IKEv2 helper script. Refer to the sections below and Check logs and VPN status.
For servers with an external firewall (e.g. EC2/GCE), open UDP ports 500 and 4500 for the VPN. Aliyun users, see #433.
Unable to connect multiple IKEv2 clients
To connect multiple IKEv2 clients from behind the same NAT (e.g. home router) at the same time, you will need to generate a unique certificate for each client. Otherwise, you could encounter the issue where a later connected client affects the VPN connection of an existing client, which may lose Internet access.
To generate certificates for additional IKEv2 clients, run the helper script with the --addclient option. To customize client options, run the script without arguments.
sudo ikev2.sh --addclient [client name]
IKE authentication credentials are unacceptable
If you encounter this error, make sure that the VPN server address specified on your VPN client device exactly matches the server address in the output of the IKEv2 helper script. For example, you cannot use a DNS name to connect if it was not specified when setting up IKEv2. To change the IKEv2 server address, read this section.
Policy match error
To fix this error, you will need to enable stronger ciphers for IKEv2 with a one-time registry change. Download and import the .reg file below, or run the following from an elevated command prompt.
- For Windows 7, 8, 10 and 11 (download .reg file)
REG ADD HKLMSYSTEMCurrentControlSetServicesRasManParameters /v NegotiateDH2048_AES256 /t REG_DWORD /d 0x1 /f
Parameter is incorrect
If you encounter «Error 87: The parameter is incorrect» when trying to connect using IKEv2 mode, try the solutions in this issue, more specifically, step 2 «reset device manager adapters».
Cannot open websites after connecting to IKEv2
If your VPN client device cannot open websites after successfully connecting to IKEv2, try the following fixes:
-
Some cloud providers, such as Google Cloud, set a lower MTU by default. This could cause network issues with IKEv2 VPN clients. To fix, try setting the MTU to 1500 on the VPN server:
# Replace ens4 with the network interface name on your server
sudo ifconfig ens4 mtu 1500
This setting does not persist after a reboot. To change the MTU size permanently, refer to relevant articles on the web.
-
If changing the MTU size does not fix the issue, try the fix in Android MTU/MSS issues.
-
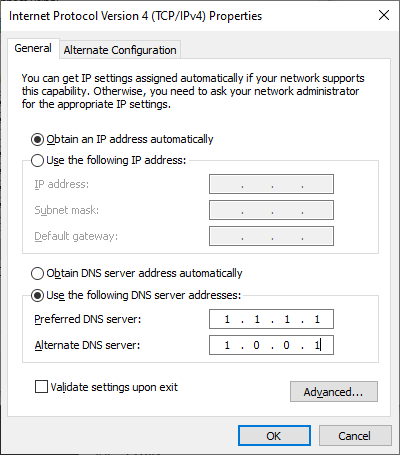
In certain circumstances, Windows does not use the DNS servers specified by IKEv2 after connecting. This can be fixed by manually entering DNS servers such as Google Public DNS (8.8.8.8, 8.8.4.4) in network interface properties -> TCP/IPv4.
Windows 10 connecting
If using Windows 10 and the VPN is stuck on «connecting» for more than a few minutes, try these steps:
- Right-click on the wireless/network icon in your system tray.
- Select Open Network & Internet settings, then on the page that opens, click VPN on the left.
- Select the new VPN entry, then click Connect.
Other known issues
The built-in VPN client in Windows may not support IKEv2 fragmentation (this feature requires Windows 10 v1803 or newer). On some networks, this can cause the connection to fail or have other issues. You may instead try the IPsec/L2TP or IPsec/XAuth mode.
Manage IKEv2 clients
- List existing clients
- Add a client certificate
- Export configuration for an existing client
- Delete a client certificate
- Revoke a client certificate
List existing clients
To list the names of existing IKEv2 clients, run the helper script with the --listclients option. Use option -h to show usage.
sudo ikev2.sh --listclients
Add a client certificate
To generate certificates for additional IKEv2 clients, run the helper script with the --addclient option. To customize client options, run the script without arguments.
sudo ikev2.sh --addclient [client name]
Alternatively, you may manually add a client certificate. Refer to step 4 in this section.
Export configuration for an existing client
By default, the IKEv2 helper script exports client configuration after running. If later you want to export an existing client, you may use:
sudo ikev2.sh --exportclient [client name]
Delete a client certificate
Important: Deleting a client certificate from the IPsec database WILL NOT prevent VPN client(s) from connecting using that certificate! For this use case, you MUST revoke the client certificate instead of deleting it.
First, read the important note above. Then click here for instructions.
Warning: The client certificate and private key will be permanently deleted. This cannot be undone!
To delete an existing client:
sudo ikev2.sh --deleteclient [client name]
Alternatively, you can manually delete a client certificate.
-
List certificates in the IPsec database:
certutil -L -d sql:/etc/ipsec.d
Example output:
Certificate Nickname Trust Attributes SSL,S/MIME,JAR/XPI IKEv2 VPN CA CTu,u,u ($PUBLIC_IP) u,u,u vpnclient u,u,u -
Delete the client certificate and private key. Replace «Nickname» below with the nickname of the client certificate you want to delete, e.g.
vpnclient.certutil -F -d sql:/etc/ipsec.d -n "Nickname" certutil -D -d sql:/etc/ipsec.d -n "Nickname" 2>/dev/null
-
(Optional) Delete the previously generated client configuration files (
.p12,.mobileconfigand.sswanfiles) for this VPN client, if any.
Revoke a client certificate
In certain circumstances, you may need to revoke a previously generated VPN client certificate.
To revoke an existing client:
sudo ikev2.sh --revokeclient [client name]
Alternatively, you can manually revoke a client certificate.
Alternatively, you can manually revoke a client certificate. This can be done using crlutil. See example steps below, commands must be run as root.
-
Check the database, and identify the nickname of the client certificate you want to revoke.
certutil -L -d sql:/etc/ipsec.d
Certificate Nickname Trust Attributes SSL,S/MIME,JAR/XPI IKEv2 VPN CA CTu,u,u ($PUBLIC_IP) u,u,u vpnclient-to-revoke u,u,uIn this example, we will revoke the certificate with nickname
vpnclient-to-revoke, issued byIKEv2 VPN CA. -
Find the serial number of this client certificate.
certutil -L -d sql:/etc/ipsec.d -n "vpnclient-to-revoke"Certificate: Data: Version: 3 (0x2) Serial Number: 00:cd:69:ff:74 ... ...From the output, we see that the serial number is
CD69FF74in hexadecimal, which is3446275956in decimal. It will be used in the next steps. -
Create a new Certificate Revocation List (CRL). You only need to do this once for each CA.
if ! crlutil -L -d sql:/etc/ipsec.d -n "IKEv2 VPN CA" 2>/dev/null; then crlutil -G -d sql:/etc/ipsec.d -n "IKEv2 VPN CA" -c /dev/null fi
CRL Info: : Version: 2 (0x1) Signature Algorithm: PKCS #1 SHA-256 With RSA Encryption Issuer: "O=IKEv2 VPN,CN=IKEv2 VPN CA" This Update: Sat Jun 06 22:00:00 2020 CRL Extensions: -
Add the client certificate you want to revoke to the CRL. Here we specify the certificate’s serial number in decimal, and the revocation time in GeneralizedTime format (YYYYMMDDhhmmssZ) in UTC.
crlutil -M -d sql:/etc/ipsec.d -n "IKEv2 VPN CA" <<EOF addcert 3446275956 20200606220100Z EOF
CRL Info: : Version: 2 (0x1) Signature Algorithm: PKCS #1 SHA-256 With RSA Encryption Issuer: "O=IKEv2 VPN,CN=IKEv2 VPN CA" This Update: Sat Jun 06 22:02:00 2020 Entry 1 (0x1): Serial Number: 00:cd:69:ff:74 Revocation Date: Sat Jun 06 22:01:00 2020 CRL Extensions:Note: If you want to remove a certificate from the CRL, replace
addcert 3446275956 20200606220100Zabove withrmcert 3446275956. For othercrlutilusage, read here. -
Finally, let Libreswan re-read the updated CRL.
Change IKEv2 server address
In certain circumstances, you may need to change the IKEv2 server address after setup. For example, to switch to use a DNS name, or after server IP changes. Note that the server address you specify on VPN client devices must exactly match the server address in the output of the IKEv2 helper script. Otherwise, devices may be unable to connect.
To change the server address, run the helper script and follow the prompts.
wget https://get.vpnsetup.net/ikev2addr -O ikev2addr.sh sudo bash ikev2addr.sh
Important: After running this script, you must manually update the server address (and remote ID, if applicable) on any existing IKEv2 client devices. For iOS clients, you’ll need to export and re-import client configuration using the IKEv2 helper script.
Update IKEv2 helper script
The IKEv2 helper script is updated from time to time for bug fixes and improvements (commit log). When a newer version is available, you may optionally update the IKEv2 helper script on your server. Note that these commands will overwrite any existing ikev2.sh.
wget https://get.vpnsetup.net/ikev2 -O /opt/src/ikev2.sh chmod +x /opt/src/ikev2.sh && ln -s /opt/src/ikev2.sh /usr/bin 2>/dev/null
Set up IKEv2 using helper script
Note: By default, IKEv2 is automatically set up when running the VPN setup script. You may skip this section and continue to configure IKEv2 VPN clients.
Important: Before continuing, you should have successfully set up your own VPN server. Docker users, see here.
Use this helper script to automatically set up IKEv2 on the VPN server:
# Set up IKEv2 using default options sudo ikev2.sh --auto # Alternatively, you may customize IKEv2 options sudo ikev2.sh
Note: If IKEv2 is already set up, but you want to customize IKEv2 options, first remove IKEv2, then set it up again using sudo ikev2.sh.
When finished, continue to configure IKEv2 VPN clients. Advanced users can optionally enable IKEv2-only mode.
Error: «sudo: ikev2.sh: command not found».
This is normal if you used an older version of the VPN setup script. First, download the IKEv2 helper script:
wget https://get.vpnsetup.net/ikev2 -O /opt/src/ikev2.sh
chmod +x /opt/src/ikev2.sh && ln -s /opt/src/ikev2.sh /usr/bin
Then run the script using the instructions above.
You may optionally specify a DNS name, client name and/or custom DNS servers.
When running IKEv2 setup in auto mode, advanced users can optionally specify a DNS name for the IKEv2 server address. The DNS name must be a fully qualified domain name (FQDN). Example:
sudo VPN_DNS_NAME='vpn.example.com' ikev2.sh --auto
Similarly, you may specify a name for the first IKEv2 client. The default is vpnclient if not specified.
sudo VPN_CLIENT_NAME='your_client_name' ikev2.sh --auto
By default, IKEv2 clients are set to use Google Public DNS when the VPN is active. You may specify custom DNS server(s) for IKEv2. Example:
sudo VPN_DNS_SRV1=1.1.1.1 VPN_DNS_SRV2=1.0.0.1 ikev2.sh --auto
By default, no password is required when importing IKEv2 client configuration. You can choose to protect client config files using a random password.
sudo VPN_PROTECT_CONFIG=yes ikev2.sh --auto
View usage information for the IKEv2 script.
Usage: bash ikev2.sh [options]
Options:
--auto run IKEv2 setup in auto mode using default options (for initial setup only)
--addclient [client name] add a new client using default options
--exportclient [client name] export configuration for an existing client
--listclients list the names of existing clients
--revokeclient [client name] revoke an existing client
--deleteclient [client name] delete an existing client
--removeikev2 remove IKEv2 and delete all certificates and keys from the IPsec database
-h, --help show this help message and exit
To customize IKEv2 or client options, run this script without arguments.
Manually set up IKEv2
As an alternative to using the helper script, advanced users can manually set up IKEv2 on the VPN server. Before continuing, it is recommended to update Libreswan to the latest version.
The following example shows how to manually configure IKEv2 with Libreswan. Commands below must be run as root.
View example steps for manually configuring IKEv2 with Libreswan.
-
Find the VPN server’s public IP, save it to a variable and check.
PUBLIC_IP=$(dig @resolver1.opendns.com -t A -4 myip.opendns.com +short) [ -z "$PUBLIC_IP" ] && PUBLIC_IP=$(wget -t 2 -T 10 -qO- http://ipv4.icanhazip.com) printf '%sn' "$PUBLIC_IP"
Check to make sure the output matches the server’s public IP. This variable is required in the steps below.
Note: Alternatively, you may specify the server’s DNS name here. e.g.
PUBLIC_IP=myvpn.example.com. -
Add a new IKEv2 connection:
if ! grep -qs '^include /etc/ipsec.d/*.conf$' /etc/ipsec.conf; then echo >> /etc/ipsec.conf echo 'include /etc/ipsec.d/*.conf' >> /etc/ipsec.conf fi
Note: If you specified the server’s DNS name (instead of its IP address) in step 1 above, you must replace
leftid=$PUBLIC_IPin the command below withleftid=@$PUBLIC_IP.cat > /etc/ipsec.d/ikev2.conf <<EOF conn ikev2-cp left=%defaultroute leftcert=$PUBLIC_IP leftid=$PUBLIC_IP leftsendcert=always leftsubnet=0.0.0.0/0 leftrsasigkey=%cert right=%any rightid=%fromcert rightaddresspool=192.168.43.10-192.168.43.250 rightca=%same rightrsasigkey=%cert narrowing=yes dpddelay=30 retransmit-timeout=300s dpdaction=clear auto=add ikev2=insist rekey=no pfs=no ike=aes256-sha2,aes128-sha2,aes256-sha1,aes128-sha1 phase2alg=aes_gcm-null,aes128-sha1,aes256-sha1,aes128-sha2,aes256-sha2 ikelifetime=24h salifetime=24h EOF
We need to add a few more lines to that file. First check your Libreswan version, then run one of the following commands:
For Libreswan 3.23 and newer:
cat >> /etc/ipsec.d/ikev2.conf <<EOF modecfgdns="8.8.8.8 8.8.4.4" encapsulation=yes mobike=no EOF
Note: The MOBIKE IKEv2 extension allows VPN clients to change network attachment points, e.g. switch between mobile data and Wi-Fi and keep the IPsec tunnel up on the new IP. If your server (or Docker host) is NOT running Ubuntu Linux, and you wish to enable MOBIKE support, replace
mobike=nowithmobike=yesin the command above. DO NOT enable this option on Ubuntu systems or Raspberry Pis.For Libreswan 3.19-3.22:
cat >> /etc/ipsec.d/ikev2.conf <<EOF modecfgdns1=8.8.8.8 modecfgdns2=8.8.4.4 encapsulation=yes EOF
For Libreswan 3.18 and older:
cat >> /etc/ipsec.d/ikev2.conf <<EOF modecfgdns1=8.8.8.8 modecfgdns2=8.8.4.4 forceencaps=yes EOF
-
Generate Certificate Authority (CA) and VPN server certificates.
Note: Specify the certificate validity period (in months) with «-v». e.g. «-v 120».
Generate CA certificate:
certutil -z <(head -c 1024 /dev/urandom) -S -x -n "IKEv2 VPN CA" -s "O=IKEv2 VPN,CN=IKEv2 VPN CA" -k rsa -g 3072 -v 120 -d sql:/etc/ipsec.d -t "CT,," -2
Generating key. This may take a few moments... Is this a CA certificate [y/N]? y Enter the path length constraint, enter to skip [<0 for unlimited path]: > Is this a critical extension [y/N]? NGenerate VPN server certificate:
Note: If you specified the server’s DNS name (instead of its IP address) in step 1 above, you must replace
--extSAN "ip:$PUBLIC_IP,dns:$PUBLIC_IP"in the command below with--extSAN "dns:$PUBLIC_IP".certutil -z <(head -c 1024 /dev/urandom) -S -c "IKEv2 VPN CA" -n "$PUBLIC_IP" -s "O=IKEv2 VPN,CN=$PUBLIC_IP" -k rsa -g 3072 -v 120 -d sql:/etc/ipsec.d -t ",," --keyUsage digitalSignature,keyEncipherment --extKeyUsage serverAuth --extSAN "ip:$PUBLIC_IP,dns:$PUBLIC_IP"
Generating key. This may take a few moments... -
Generate client certificate(s), then export the
.p12file that contains the client certificate, private key, and CA certificate.Note: You may repeat this step to generate certificates for additional VPN clients, but make sure to replace every
vpnclientwithvpnclient2, etc. To connect multiple IKEv2 clients from behind the same NAT (e.g. home router) at the same time, you will need to generate a unique certificate for each client.Generate client certificate:
certutil -z <(head -c 1024 /dev/urandom) -S -c "IKEv2 VPN CA" -n "vpnclient" -s "O=IKEv2 VPN,CN=vpnclient" -k rsa -g 3072 -v 120 -d sql:/etc/ipsec.d -t ",," --keyUsage digitalSignature,keyEncipherment --extKeyUsage serverAuth,clientAuth -8 "vpnclient"
Generating key. This may take a few moments...Export
.p12file:pk12util -d sql:/etc/ipsec.d -n "vpnclient" -o vpnclient.p12Enter password for PKCS12 file: Re-enter password: pk12util: PKCS12 EXPORT SUCCESSFULEnter a secure password to protect the exported
.p12file (when importing into an iOS or macOS device, this password cannot be empty). -
(For iOS clients) Export the CA certificate as
ca.cer:certutil -L -d sql:/etc/ipsec.d -n "IKEv2 VPN CA" -a -o ca.cer -
The database should now contain:
certutil -L -d sql:/etc/ipsec.d
Certificate Nickname Trust Attributes SSL,S/MIME,JAR/XPI IKEv2 VPN CA CTu,u,u ($PUBLIC_IP) u,u,u vpnclient u,u,uNote: To display a certificate, use
certutil -L -d sql:/etc/ipsec.d -n "Nickname". To revoke a client certificate, follow these steps. For othercertutilusage, read here. -
(Important) Restart the IPsec service:
Before continuing, you must restart the IPsec service. The IKEv2 setup on the VPN server is now complete. Follow instructions to configure VPN clients.
Remove IKEv2
If you want to remove IKEv2 from the VPN server, but keep the IPsec/L2TP and IPsec/XAuth («Cisco IPsec») modes (if installed), run the helper script. Warning: All IKEv2 configuration including certificates and keys will be permanently deleted. This cannot be undone!
sudo ikev2.sh --removeikev2
After removing IKEv2, if you want to set it up again, refer to this section.
Alternatively, you can manually remove IKEv2.
To manually remove IKEv2 from the VPN server, but keep the IPsec/L2TP and IPsec/XAuth («Cisco IPsec») modes, follow these steps. Commands must be run as root.
Warning: All IKEv2 configuration including certificates and keys will be permanently deleted. This cannot be undone!
-
Rename (or delete) the IKEv2 config file:
mv /etc/ipsec.d/ikev2.conf /etc/ipsec.d/ikev2.conf.bak
Note: If you used an older version (before 2020-05-31) of the IKEv2 helper script or instructions, file
/etc/ipsec.d/ikev2.confmay not exist. In this case, please instead remove theconn ikev2-cpsection from file/etc/ipsec.conf. -
(Important) Restart the IPsec service:
-
List certificates in the IPsec database:
certutil -L -d sql:/etc/ipsec.d
Example output:
Certificate Nickname Trust Attributes SSL,S/MIME,JAR/XPI IKEv2 VPN CA CTu,u,u ($PUBLIC_IP) u,u,u vpnclient u,u,u -
Delete the Certificate Revocation List (CRL), if any:
crlutil -D -d sql:/etc/ipsec.d -n "IKEv2 VPN CA" 2>/dev/null
-
Delete certificates and keys. Replace «Nickname» below with each certificate’s nickname. Repeat these commands for each certificate. When finished, list certificates in the IPsec database again, and confirm that the list is empty.
certutil -F -d sql:/etc/ipsec.d -n "Nickname"
certutil -D -d sql:/etc/ipsec.d -n "Nickname" 2>/dev/null
References
- https://libreswan.org/wiki/VPN_server_for_remote_clients_using_IKEv2
- https://libreswan.org/wiki/HOWTO:_Using_NSS_with_libreswan
- https://libreswan.org/man/ipsec.conf.5.html
- https://docs.strongswan.org/docs/5.9/interop/windowsClients.html
- https://docs.strongswan.org/docs/5.9/os/androidVpnClient.html
- https://firefox-source-docs.mozilla.org/security/nss/legacy/tools/nss_tools_certutil/index.html
- https://firefox-source-docs.mozilla.org/security/nss/legacy/tools/nss_tools_crlutil/index.html
License
Copyright (C) 2016-2023 Lin Song
This work is licensed under the Creative Commons Attribution-ShareAlike 3.0 Unported License
Attribution required: please include my name in any derivative and let me know how you have improved it!
Блог компании RUVDS.com, Сетевые технологии, Лайфхаки для гиков
Рекомендация: подборка платных и бесплатных курсов PR-менеджеров — https://katalog-kursov.ru/

Сейчас все вокруг настраивают VPN для удаленных сотрудников. Мне больно смотреть, как люди устанавливают монструозные глючные программы, настраивают какие-то сертификаты, устанавливают драйвера TUN/TAP и делают множество сложных операций, в то время как лучшее решение уже встроено в операционную систему.
IKEv2 — это современный протокол VPN, разработанный Microsoft и Cisco. Он используется по умолчанию для новых VPN-подключений в Windows, macOS, iOS. Он быстрее и безопаснее большинства VPN-протоколов и может легко настраиваться на стороне клиента в два клика без использования сторонних программ.
Я считаю, что IPsec IKEv2 отлично подходит не только для соединения серверов, но и для обычных VPN-подключений конечных пользователей. В этом посте я постараюсь убедить вас использовать IPsec IKEv2 для обычных домашних пользователей вместо OpenVPN.
IKEv2 быстрее
При прочих равных условиях, IKEv2 будет всегда быстрее OpenVPN. Это особенно заметно на маломощных системах с медленной памятью, например на роутерах или одноплатных компьютерах.
Дело в том, что IPsec работает в контексте ядра операционной системы, а OpenVPN в контексте пользователя (userspace), и на обработку каждого пакета происходит переключение контекста между процессами ядра и процессами пользователя. Это влияет как на пропускную способность, так и на задержки.
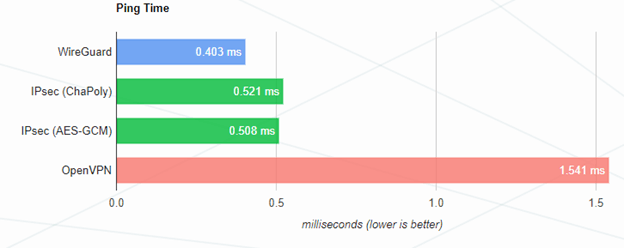
Сравнение задержек для разных протоколов VPN.
Скриншот выше показывает разницу в задержке в два раза между IPsec и OpenVPN. Разумеется, разницу в 1мс невозможно заметить на глаз, но при нагрузке на систему эти значения могут значительно изменяться. Кроме того, реальные показатели сильно зависят от характеристик конкретной системы, поэтому я не буду приводить абсолютные цифры для сравнения двух протоколов. Задержки очень важны при использовании голосовой и видеосвязи через VPN.
По моим субъективным ощущениям IKEv2 на Windows 10 работает заметно отзывчивее чем OpenVPN. Ведь реальное использование десктопного компьютера сильно отличается от синтетических тестов VPN-протоколов. Нагрузка на процессор и память непостоянная, пользователь может запускать ресурсоемкие программы, все это будет влиять на показатели.
IKEv2 проще в настройке
Все современные операционные системы (кроме Android) поддерживают IPsec IKEv2 прямо из коробки. Не нужно устанавливать никакие программы, драйвера виртуальных адаптеров TUN/TAP и прочее. Всё управление VPN происходит из системного меню.
При этом настройку на клиенте можно упростить до трех строчек:
- Домен — для IPsec домен обязателен, так как для него выпускается SSL-сертификат
- логин
- пароль
Не нужно больше передавать клиенту файлы с сертификатами и ключами, заставлять его импортировать корневые сертификаты в системное хранилище. Достаточно логина и пароля, при этом соединение будет так же надежно защищено, как и в OpenVPN при использовании сертификатов, ведь для установки соединения используется такой же x.509 сертификат, как и для веб-сайтов с HTTPS.
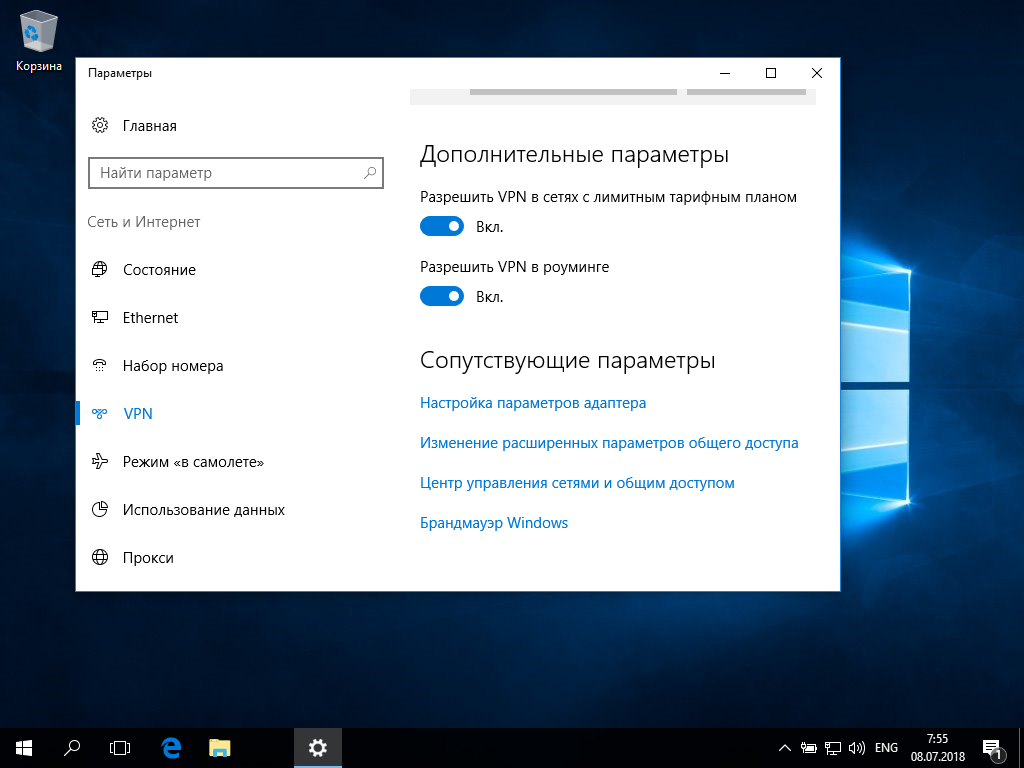
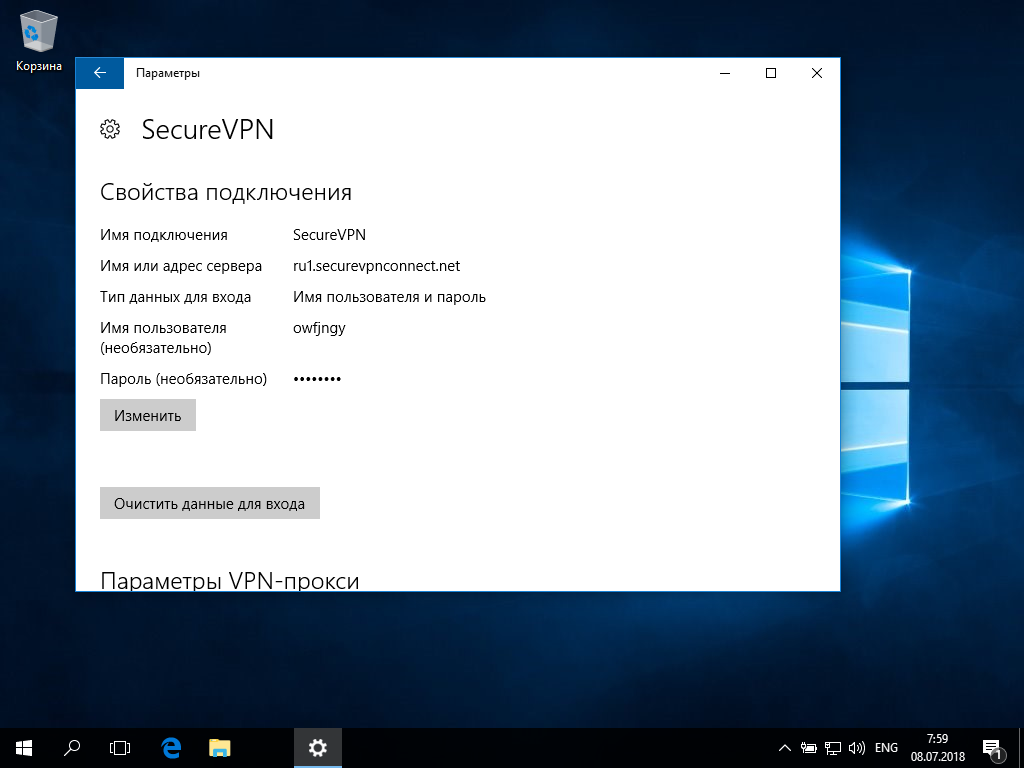
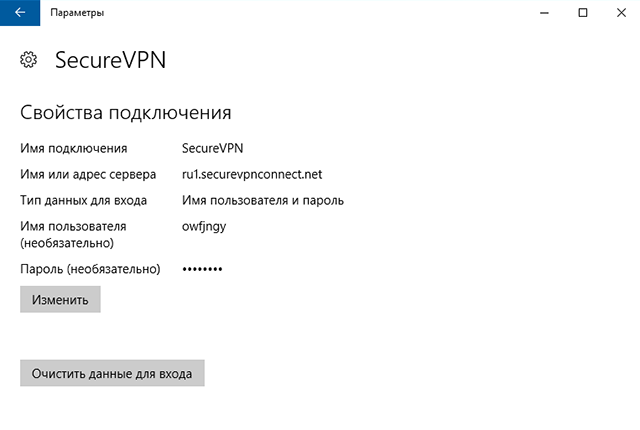
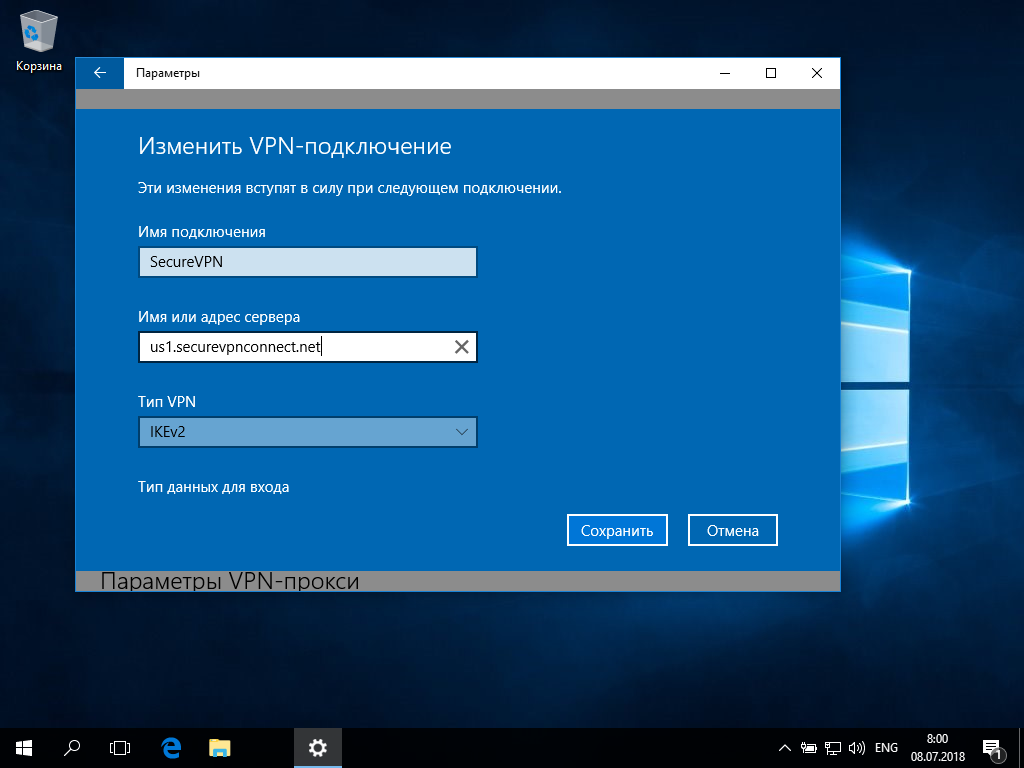
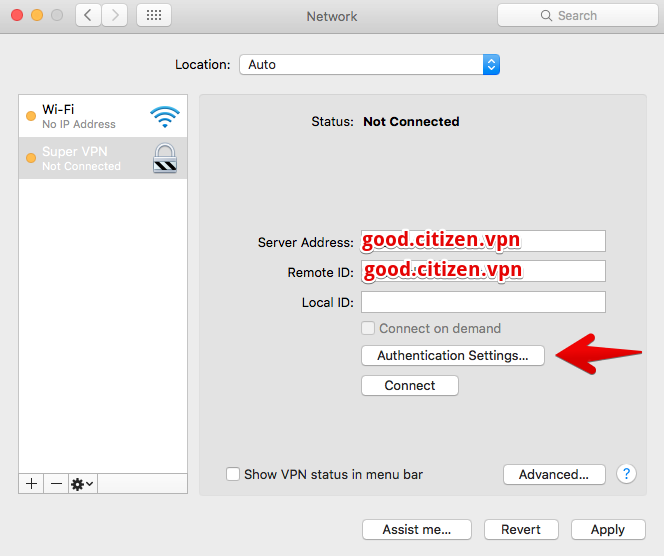
Настройка на Windows 10
Мастер настройки VPN вызывается из меню подключения к WiFi. С настройкой одного окна справится пользователь любой квалификации. Созданное подключение активируется из меню со списком WiFi-сетей.
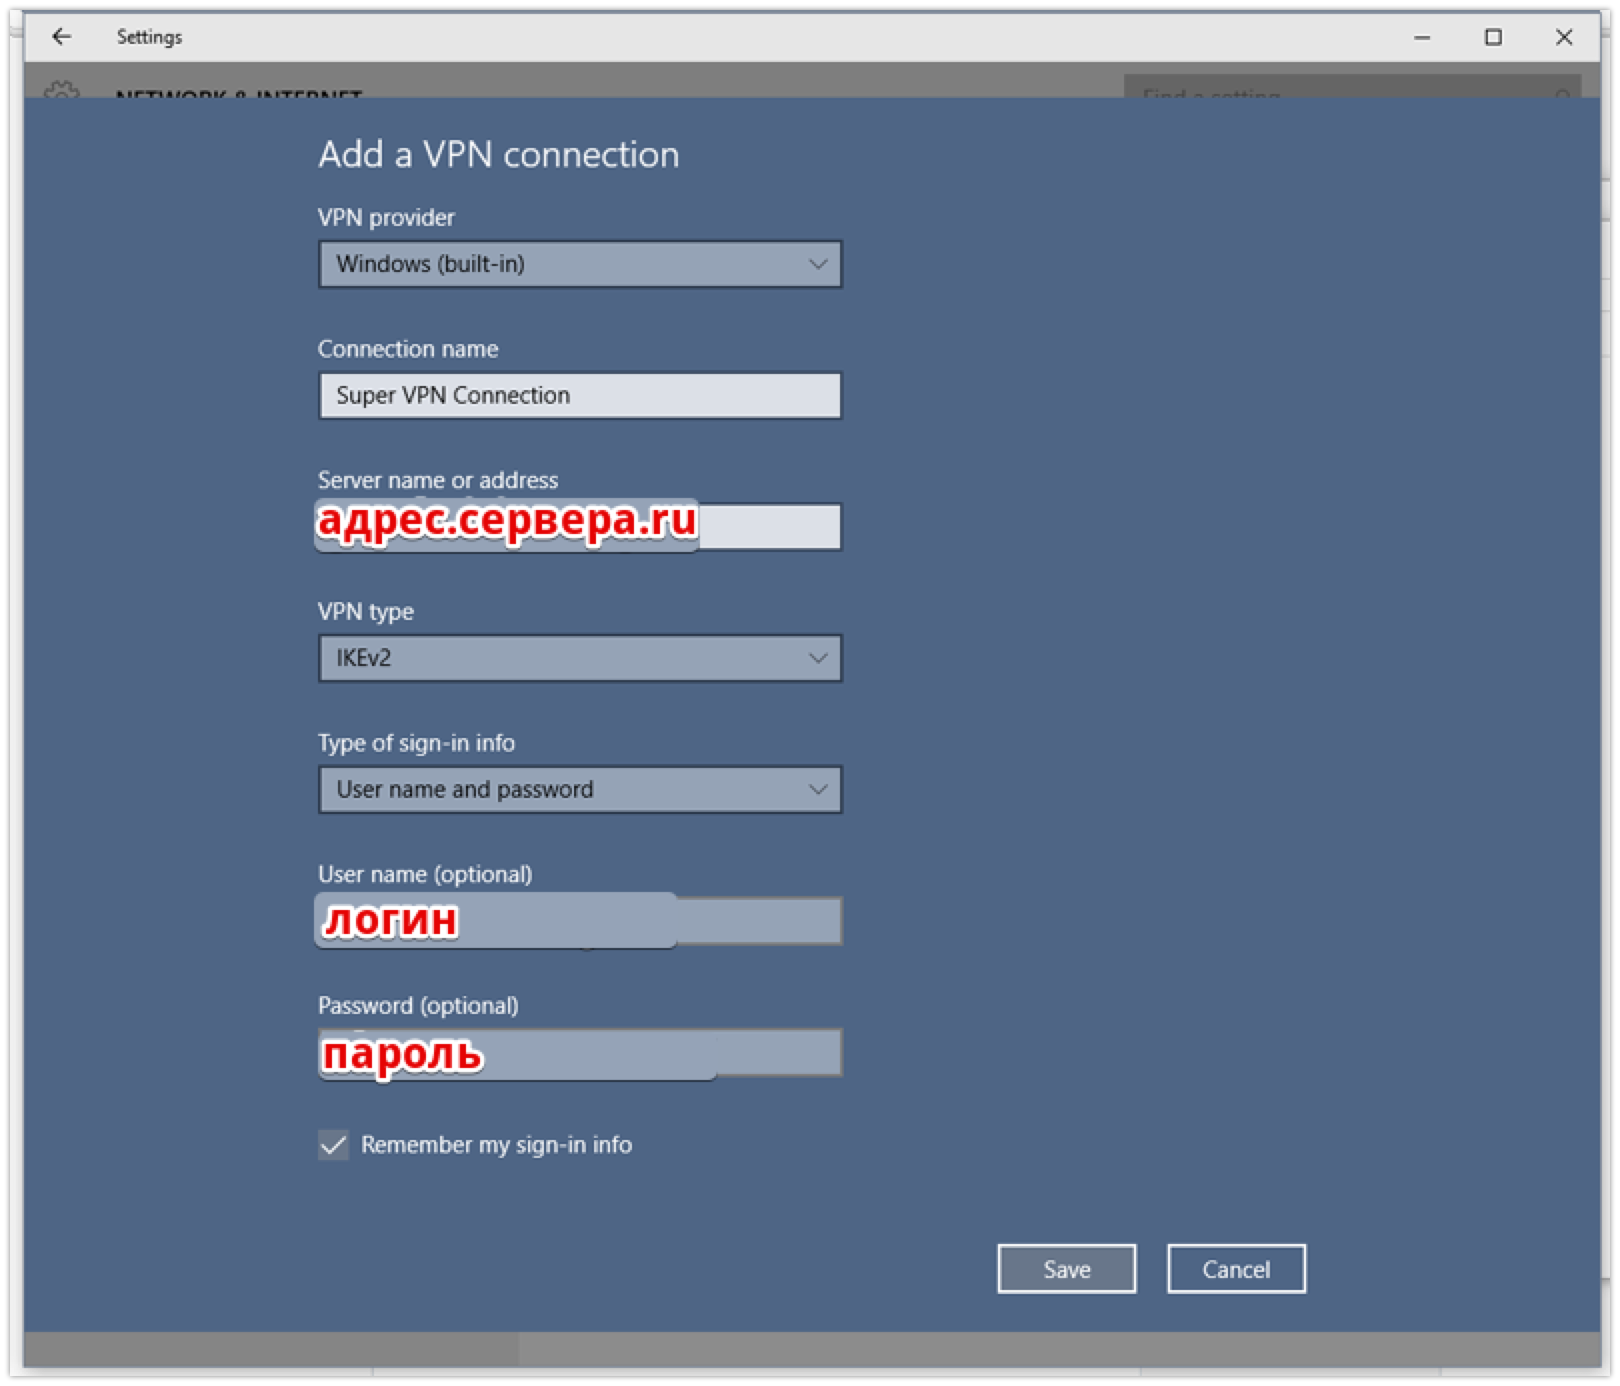
Интерфейс настройки нового IKEv2 подключения в Windows 10
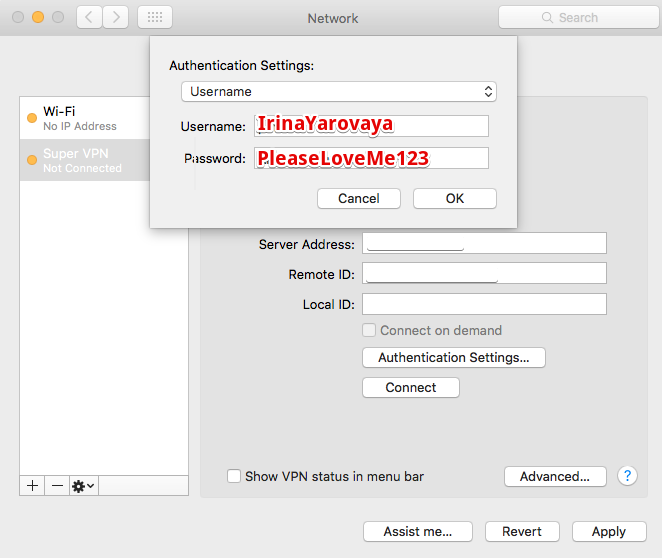
Настройка macOS
В macOS поддерживается IKEv2 начиная с версии 10.11 (El Capitan). Создание подключения происходит через меню настроек сети.
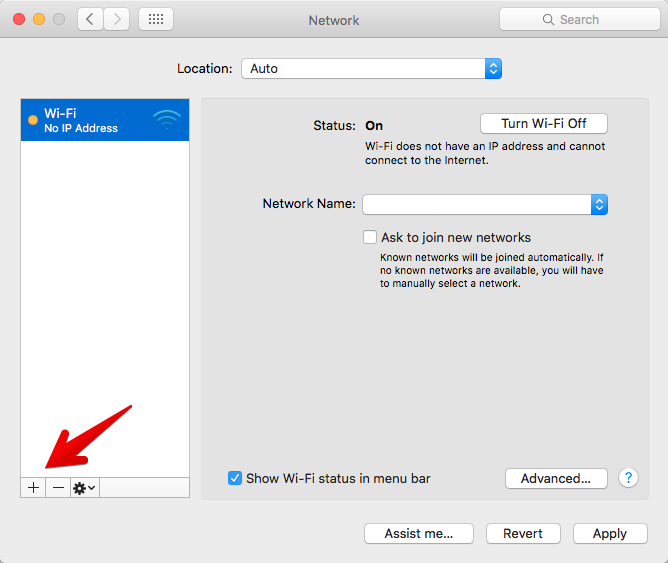
Добавляем новое подключение. В качестве имени подключения задаем любое произвольное имя.

Для проверки подлинности сертификата, нужно указать доменное имя. При этом в поле «Server Address» можно указать IP-адрес сервера, а домен только в «Remote ID», тогда для подключения не будет выполняться DNS-резолв, и оно будет происходить чуть быстрее.
Логин и пароль пользователя указываем из файла /etc/ipsec.secrets
Настройка iOS
Настройку iOS можно выполнить вручную через мастер, но намного удобнее использовать профиль автоконфигурации mobileconfig.
Ручная настройка по смыслу аналогична десктопной macOS:
Настройки -> VPN -> Добавить конфигурацию VPN
IKEv2 это безопасно
На предыдущем шаге мы выяснили, что для настройки подключения достаточно логина и пароля. Но как клиенту проверить, что подключение не прослушивается, не подменяются данные и сервер действительно тот, за кого себя выдает? Для этого используются обычные SSL-сертификаты, которые мы привыкли использовать для веб-сайтов и HTTPS.
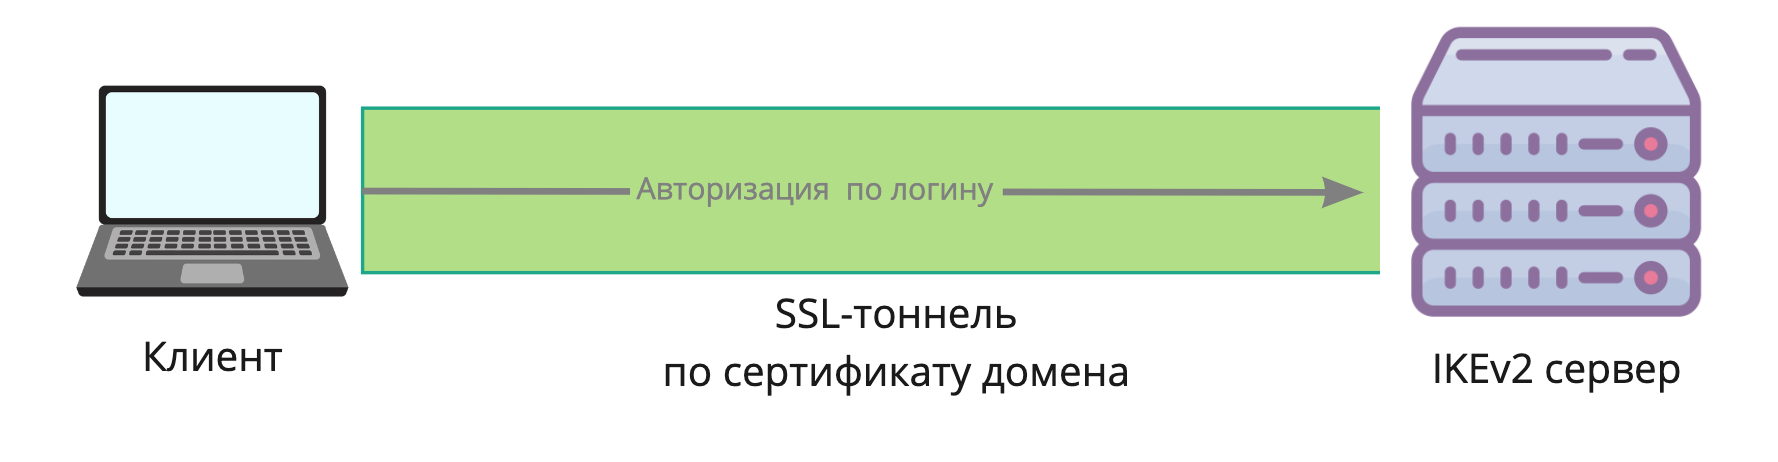
Клиент устанавливает защищенный SSL-тоннель с сервером, и уже внутри него передается логин-пароль. По умолчанию в Windows и macOS для передачи пароля используется алгоритм mschapv2. Таким образом с помощью SSL-сертификата клиент проверяет подлинность сервера, а по логину-паролю сервер проверяет подлинность клиента.
Сервер IKEv2 может использовать один и тот же сертификат вместе с веб-сервером, например от популярного Let’s Encrypt. Это сильно упрощает управлением сертификатами.
Такая же модель используется в OpenVPN, и при желании в нем можно использовать сертификат от Lets Encrypt, однако администратору в любом случае потребуется передать пользователю файл для настройки VPN.
Настраиваем IKEv2 сервер
Развернуть свой IKEv2 сервер можно за пару минут с помощью скриптов автоматической установки или используя готовые контейнеры. Использовать docker не рекомендуется, так как его сетевая подсистема снижает производительность IPsec на дешевых тарифах VPS. Вы также можете настроить IKEv2-сервер вручную, на Хабре есть статьи с примерами настройки сервера Strongswan.
Мы будем использовать один из наиболее удачных вариантов скриптов автонастройки github.com/jawj/IKEv2-setup
Этот скрипт хорош тем, что использует сертификаты от Lets Encrypt и автоматически генерирует валидный сертификат.
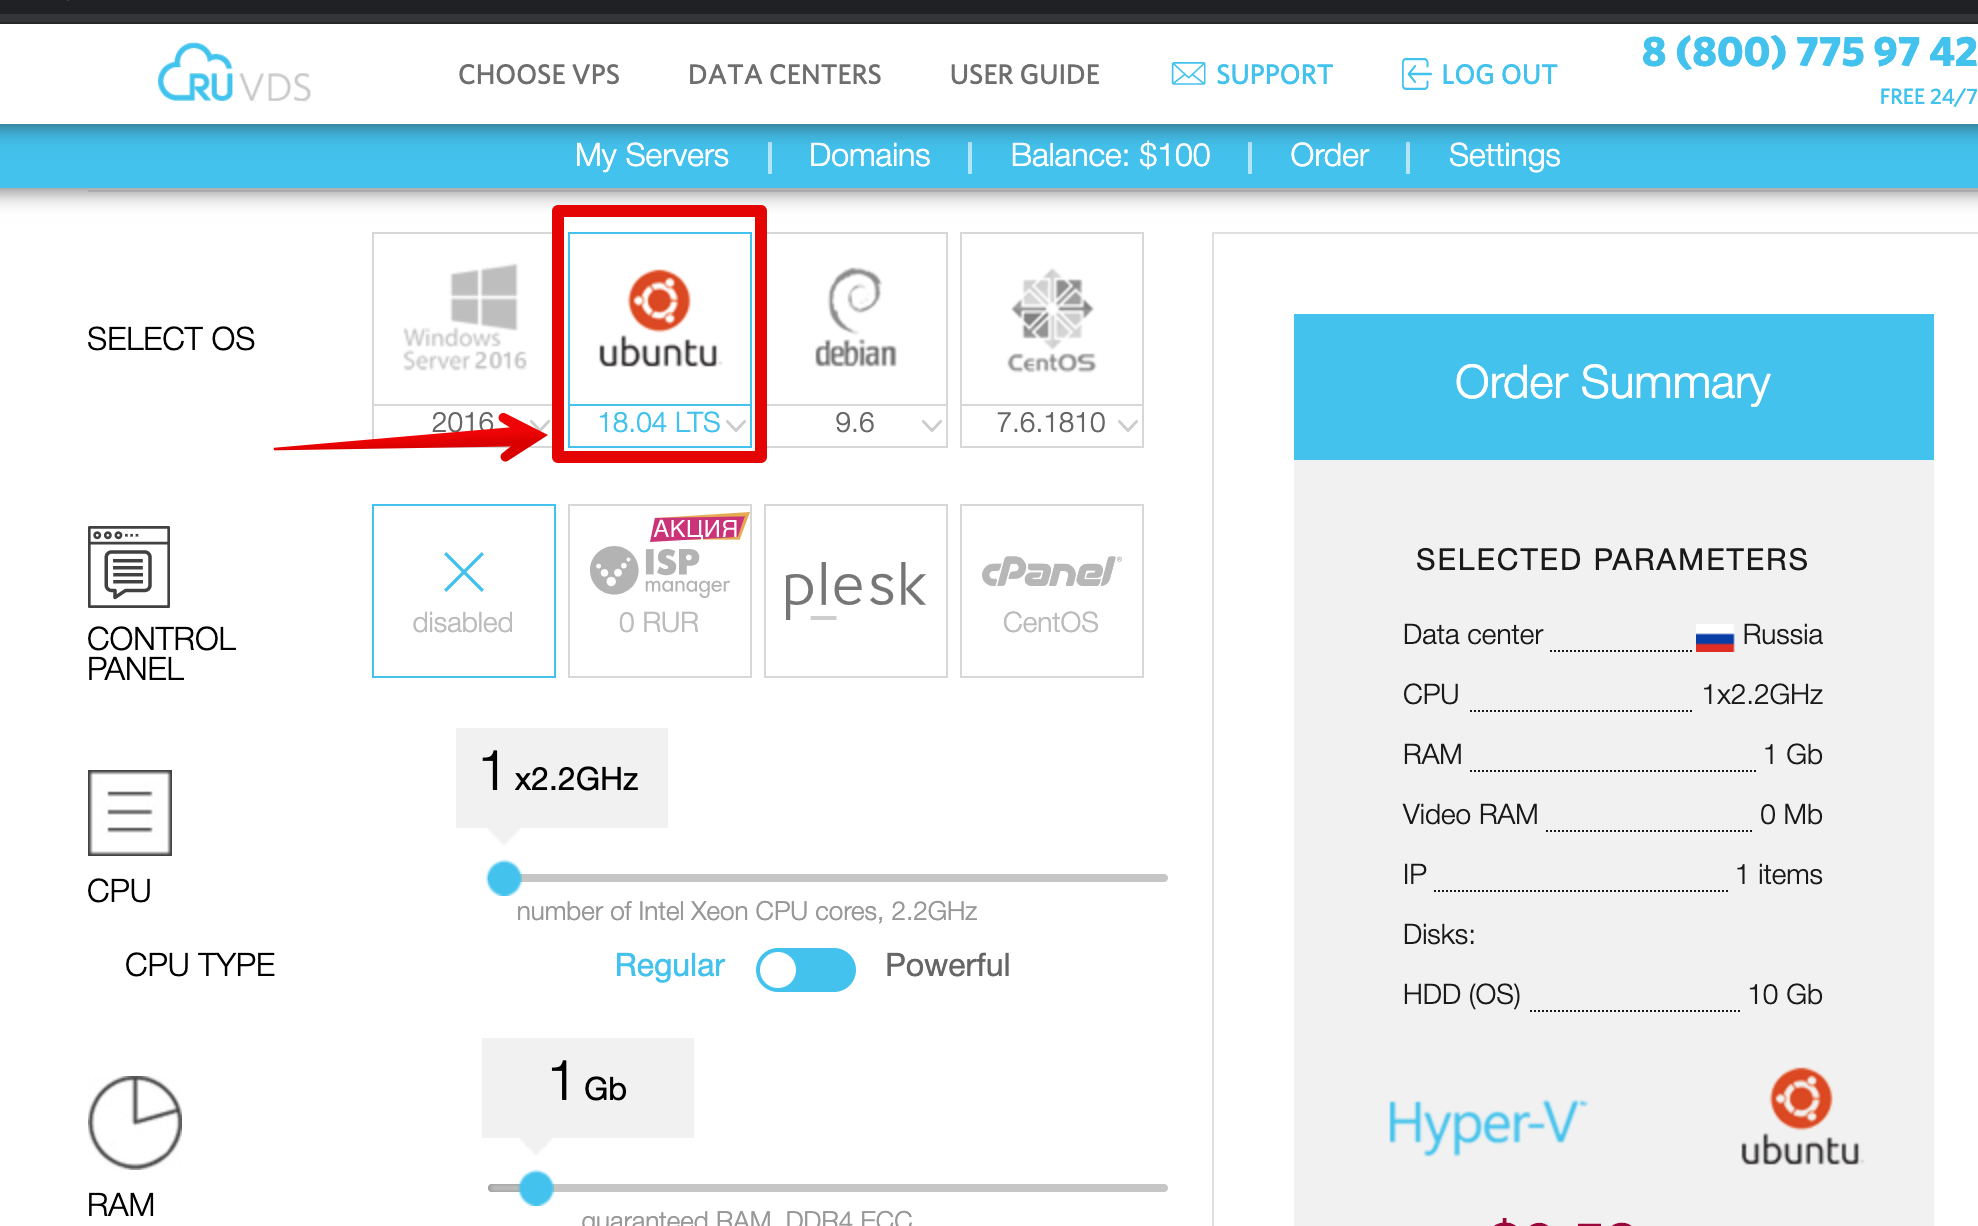
Шаг 1: Выбор сервера
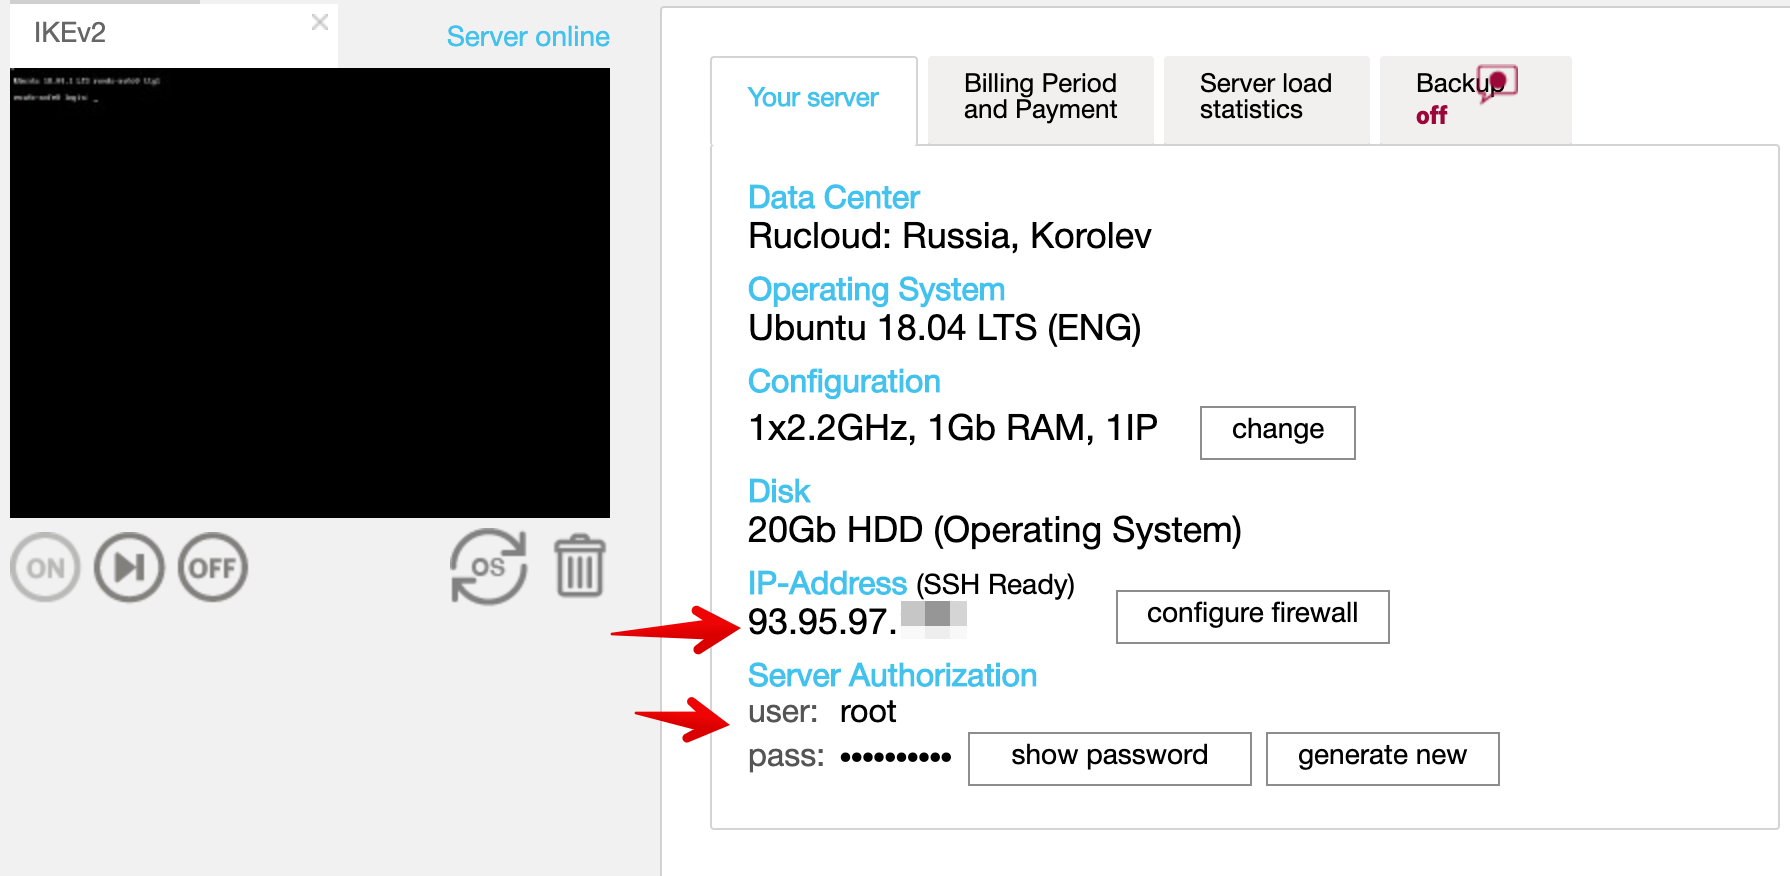
Для запуска VPN сервера нам потребуется VDS. Подойдет самая простая конфигурация с одним ядром процессора. Скрипт из нашего примера лучше всего протестирован на Ubuntu 18.04, поэтому при создании сервера выбираем этот образ ОС.
Ждем окончания установки сервера и копируем реквизиты для подключения. Пароль root придет на почту, либо его можно задать вручную через веб-интервейс. Далее все команды мы вводим
Шаг 2: Установка Strongswan
Подключаемся SSH-клиентом и запускаем скрипт установки:
# запуск автоматической установки сервера IKEv2
wget https://raw.githubusercontent.com/jawj/IKEv2-setup/master/setup.sh
chmod u+x setup.sh
./setup.sh
....
# Введите имя домена направленного на IP-адрес сервера
# используйте сервис sslip.io если у вас нет домена
Hostname for VPN: 123-45-67-89.sslip.io
# Имя пользователя VPN
VPN username: coolguy
# пароль
VPN password (no quotes, please):
....
# скрипт запрос создать нового SSH-пользователя, этот шаг нельзя пропускать.
Шаг 3: Настройка клиента
Введенные реквизиты пользователя VPN теперь нужно использовать для настройки на клиенте. Важно использовать именно то доменное имя, которое вы вводили в Hostname for VPN.
Шаг 4: Добавление новых пользователей
Чтобы добавить нового пользователя в уже созданный сервер, отредактируйте файл /etc/ipsec.sectes.
# nano /etc/ipsec.secrets
123-45-67-89.sslip.io : RSA "privkey.pem"
coolguy : EAP "C00lPassword"
badguy : EAP "bAdP$$word"
После добавления пользователя выполните команду ipsec secrets чтобы Strongswan перечитал конфиг.
Заключение
Мы рассмотрели удобство IKEv2 со стороны пользователя. Администрирование такого сервера не сложнее, а иногда даже проще чем OpenVPN. Если вы только планируете организовать удаленный доступ для своих сотрудников, обязательно посмотрите в сторону IKEv2. Не заставляйте своих пользователей устанавливать лишние программы, если все необходимое уже есть на их компьютере. Это удобнее, безопаснее и намного прогрессивнее.

Home » How To » How to set up IKEv2 VPN Connection on Windows 10 with Certificate or EAP-MSCHAP v2 Authentication
-
- Posted by
- in How To
- on October 10, 2019
This guide assumes that you have obtained a Personal Information Exchange (p12) file from your VPN service provider. The file contains the server certificate and maybe the client private key & certificate (if using certificate authentication instead of EAP-MACHAP v2).
There are two major tasks: install the certificates and create a VPN connection.
Task 1: install the certificates.
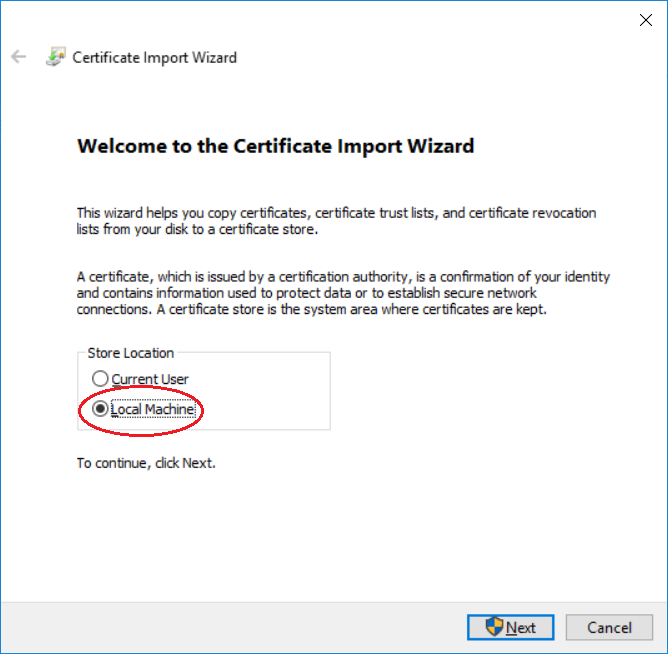
- Double click the p12 file. Select “Local Machine” on the “Certificate Import Wizard” dialog.

- Click “Next”.

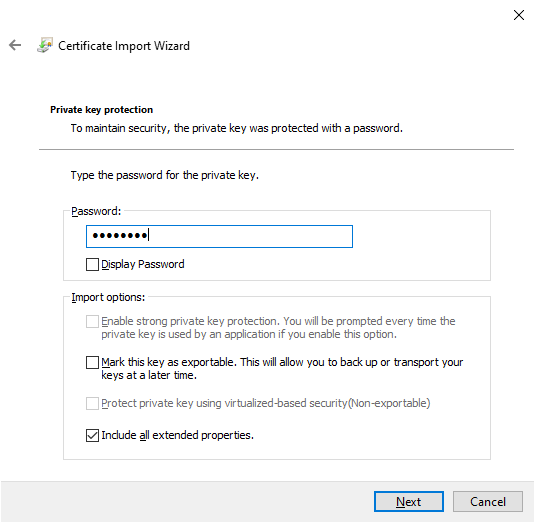
- Enter the password (if there is one).
- Select “Automatic…” for the certificate store.
- Click “Finish”.
Task 2: create the VPN connection.
- Click the network icon at the bottom right corner of the screen, then click “Network & Internet Settings”.

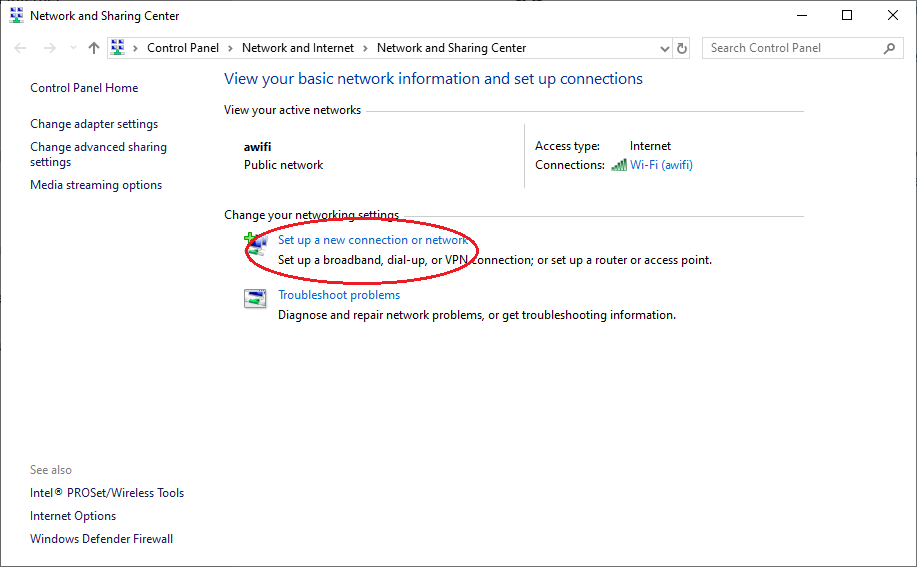
- Click on the “Network and Sharing Center” link (you might need to scroll down a bit).

- Click on “Set up a new connection or network”.

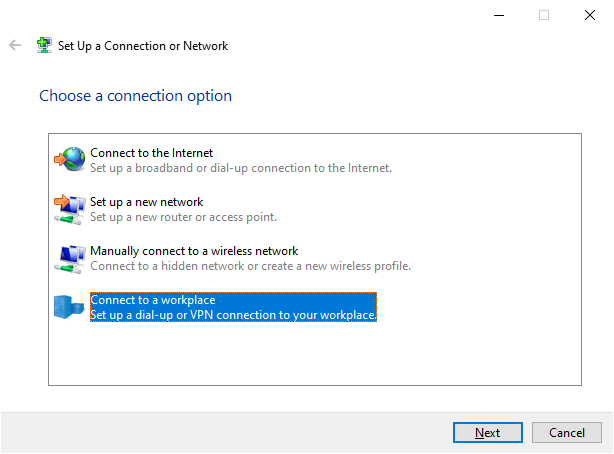
- Select “Connect to a workplace”.

- Click on “Use my Internet connection (VPN)”.
- Enter the VPN server domain name or IP address, give a name to the VPN connection. Then click “Create”.
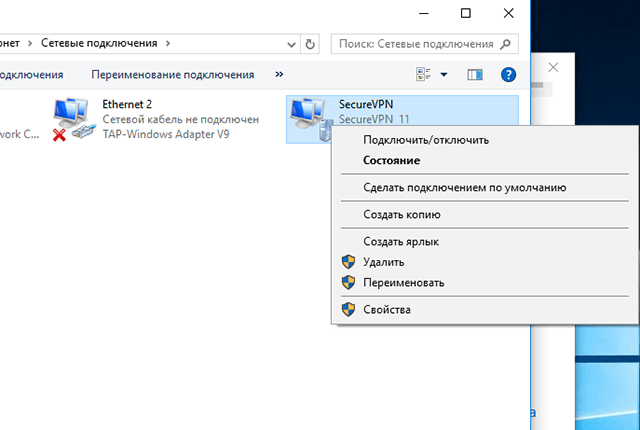
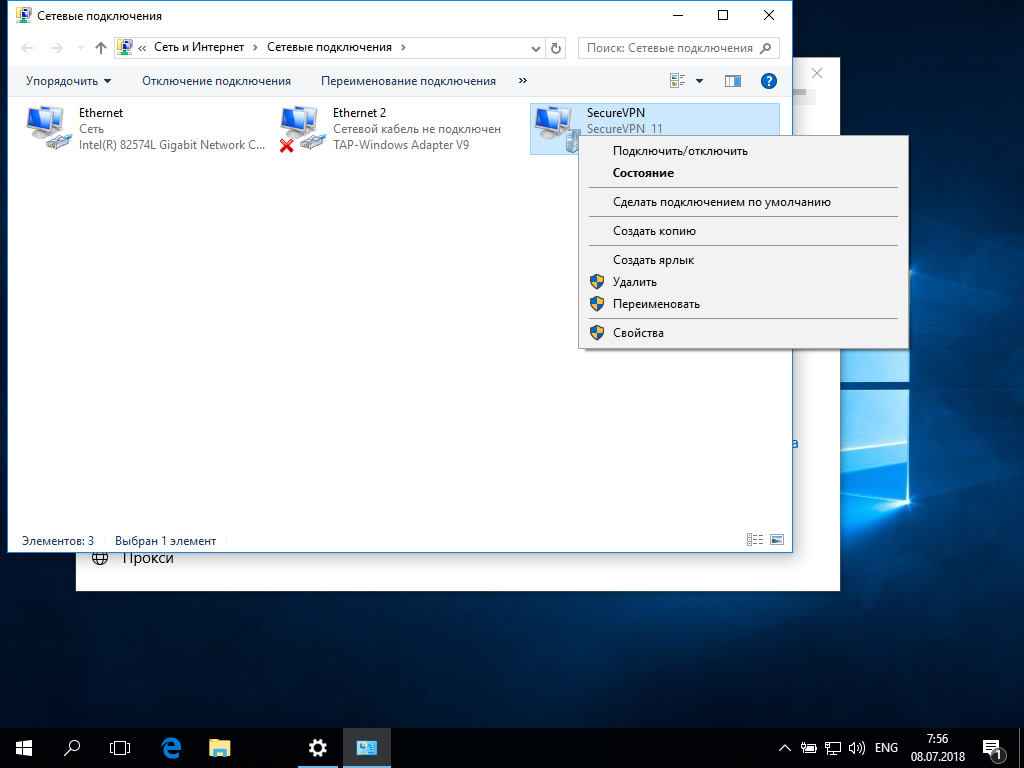
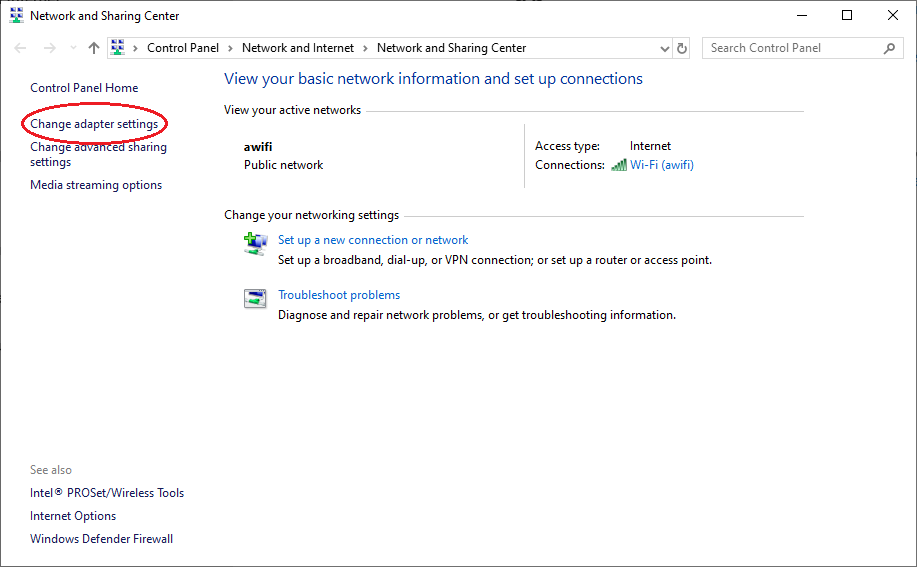
- Go back to the “Network and Sharing Center” dialog and click “Change adapter settings”.
- Right click on the newly created VPN connection, select “Properties”.

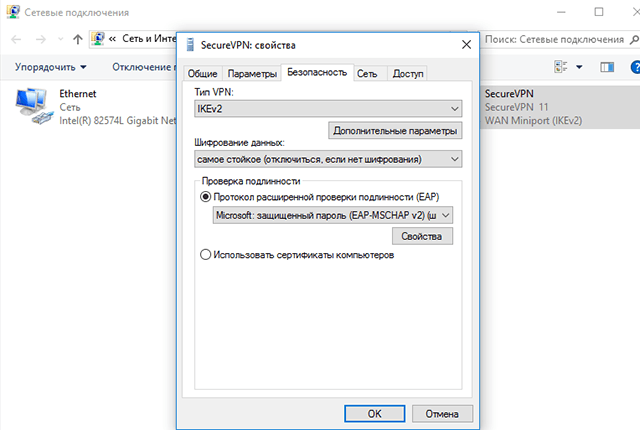
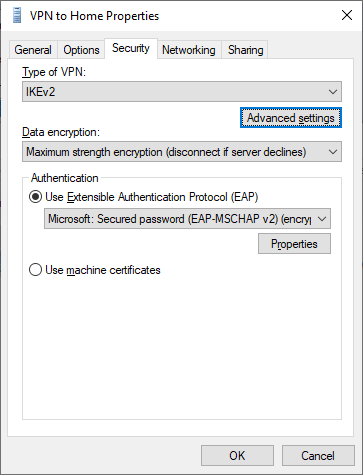
- Click on the “Security” tab, select “IKEv2” for “Type of VPN”. Select “Maximum strength encryption”, and “Use machine certificate” for Authentication (if you are authenticating with EAP-MSCHAP v2 user name and password, see alternative task below).

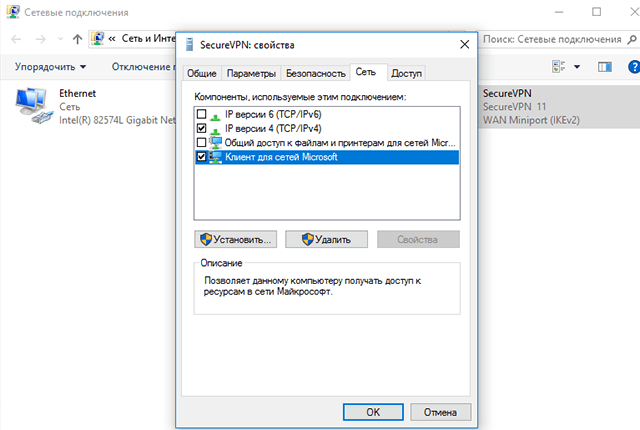
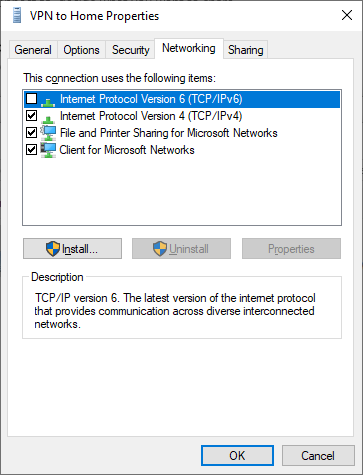
- Click on the “Networking” tab. Uncheck TCP/IPv6.
- Click the network icon at the bottom right corner of the screen, then click on the VPN connection to connect to the VPN.

Alternative task 2: if authenticating with EAP-MSCHAP v2.
- In step 9 above, select “Use Extensible Authentication Protocol (EAP), then EAP-MSCHAP v2.
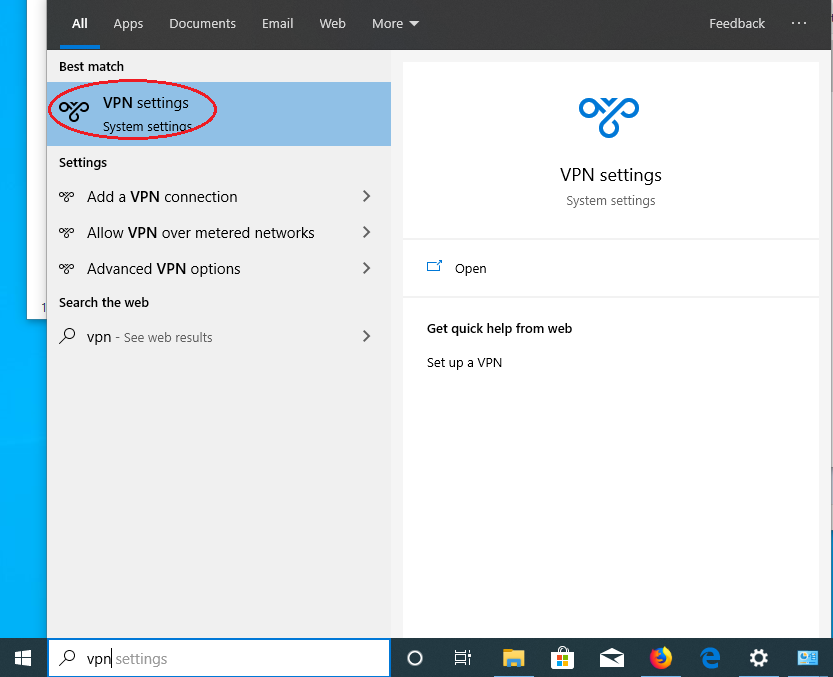
- Click the Windows icon at the left bottom corner of the screen and enter “vpn”. Then click on “VPN settings”.

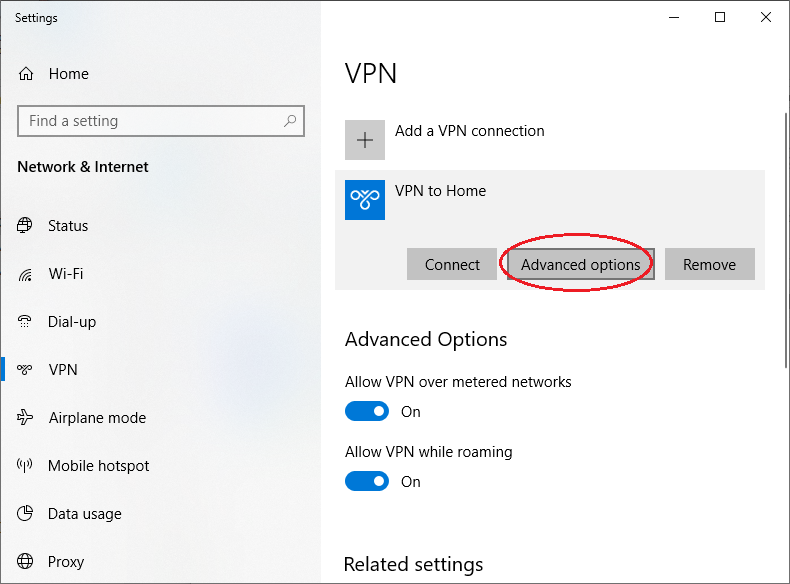
- Click on the VPN connection, then click “Advanced options”.

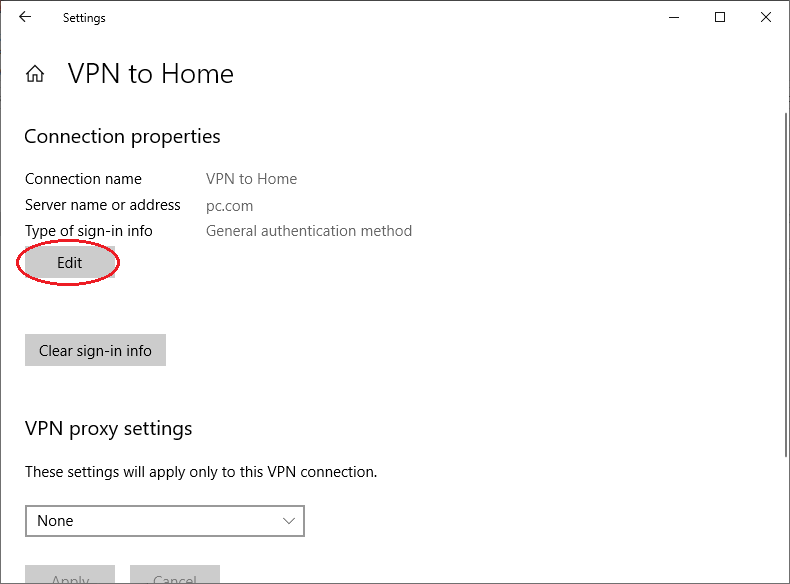
- Click “Edit”.
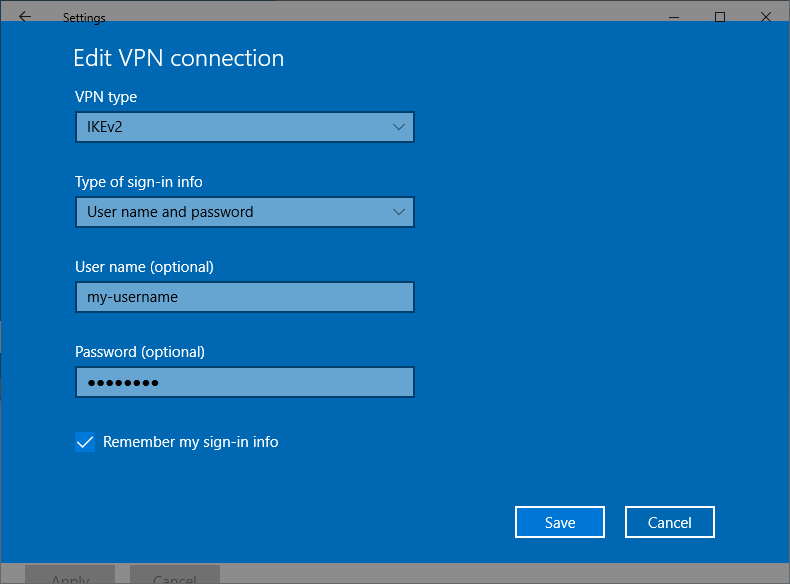
- Select “User name and Password” for “Type of sign-in info”. Enter user name and password. Click “Save”.
Task 3: Check that your VPN connection is working
- Open a web browser, enter https://ipleak.net/. Make sure that your IP address is that of the VPN service (i.e., no longer your ISP assigned IP address), and DNS addresses are also that from the VPN service.
- If your VPN server is located in the same geographical region as your ISP connection, sometimes it’s hard to tell if your DNS service has changed to that provided by the VPN. This page will tell you who is your DNS provider: http://whoismydns.com/
- There are instances that your browser is stuck with the ISP assigned DNS server. In that case, manually set the DNS service on your ISP connection (WiFi or Ethernet adapter) to a third party DNS service, for example, Cloudflare DNS. Just to be safe, disable IPv6 on the WiFi or Ethernet adapter too.


Introduction
A virtual private network, or VPN, allows you to securely encrypt traffic as it travels through untrusted networks, such as those at the coffee shop, a conference, or an airport.
IKEv2, or Internet Key Exchange v2, is a protocol that allows for direct IPSec tunneling between the server and client. In IKEv2 VPN implementations, IPSec provides encryption for the network traffic. IKEv2 is natively supported on some platforms (OS X 10.11+, iOS 9.1+, and Windows 10) with no additional applications necessary, and it handles client hiccups quite smoothly.
In this tutorial, you’ll learn how to set up Windows, macOS, Ubuntu, iOS, and Android clients. Some contents from internet were referenced in writing this tutorial.
Prerequisites
To complete this tutorial, you will need:
- Download CA certificate
- If you are one of the Creekside Networks managed service clients,please download the CA certificate creekside.authority.cer to your device first.
- Obtain following information from your IT admin
- VPN server’s domain name, such as ‘vpn.creekside.network’;
- Your VPN user ID and password
- Download Android client
- Strongswan Android client 2.3.0
Windows 10
Install CA certificate
It takes a little bit time to install a certificate on Windows 10, please follow the slide below.
win10-install-certs-1
1. Search for mmc.exe, and righ click to Run as administrator.
win10-install-certs-2
2. From the File menu, navigate to Add or Remove Snap-in
win10-install-certs-3
3. Select Certificates from the list of available snap-ins, and click Add.
win10-install-certs-4
4. Select Computer Account and click Next.
win10-install-certs-5
5. Select Local Computer, then click Finish.
win10-install-certs-7
7. Right click Trusted Root Certificate Store, select All Tasks and click Import.
win10-install-certs-8
8. From the Certificate Import Wizard. Click Next to move past the introduction
win10-install-certs-9
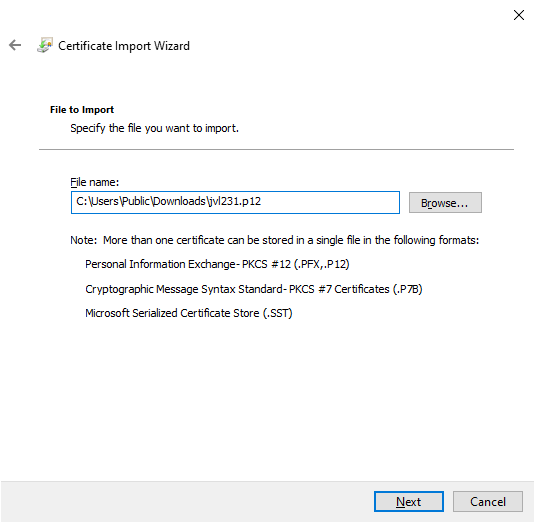
9. On the File to Import screen, press the Browse button.
win10-install-certs-10
10. Select the certificate file creekside.authority, and click Open.
win10-install-certs-11
11. Ensure that the Certificate Store is set to Trusted Root Certification Authorities, and click Next.
win10-install-certs-12
12. Click Finish to import the certificate.
Setup VPN connection
Windows has built-in IKEv2 VPN client. Follow the steps below, you may need to fill the server information at step 4.
- VPN provider
- Seletct “Windows (build-in)”
- Connection name
- Pick a name easy for you to recognize
- You may use alphabets and numbers.
- Server name or address
- fill in your VPN server’s domain name
- Don’t use the name in the slides.
- If you don’t have it, check with your IT admin.
- VPN Type
- Use “IKEv2”
- Type of sign-in info
- “User name and password”
- Username
- The username that IT admin sent to you.
- Password
- The VPN user’s password
win10-ikev2-conn-1
1. From right of the task bar,click network icon to call out Network and Internet settings。
win10-ikev2-conn-2
2. Click the VPN menu on the left panel.
win10-ikev2-conn-3
3. Select Add a VPN connection on the right panel.
win10-ikev2-conn-4
4. Enter the VPN server details from IT admin. Don’t copy samples above。
win10-ikev2-conn-5
5. Your new VPN connection will be visible under the list of networks. Select the VPN and click Connect. You’ll be prompted for your username and password. Type them in, click OK, and you’ll be connected.
Options: Connect to internet via VPN server
These steps are only applicable if you want to use VPN to bypass censorship in some countries, or you are told by your IT admin do so.
win10-use-remote-gateway-1
1. Under your VPN connection, click Change adapter options under Related settings.
win10-use-remote-gateway-2
2. Right click your VPN connection, then select Properties from the drop down menu.
win10-use-remote-gateway-3
3. Choose Network tab, select Internet Protocol Version 4(TCP/IP4), then click Properties
win10-use-remote-gateway-4
win10-use-remote-gateway-5
5. Make sure Use default gateway on remote network is checked, Unselect Automatic metric, input 1 in the Interface metric value.
Android
Follow these steps to import the certificate:
- Send yourself an email with the CA certificate attached. Save the CA certificate to your downloads folder.
- Download the StrongSwan VPN client from the Play Store or APK file from our mirror site.
- Open the app. Tap the “more” icon in the upper-right corner (the three dots icon) and select CA certificates.
- Tap the “more” icon in the upper-right corner again. Select Import certificate.
- Browse to the CA certificate file in your downloads folder and select it to import it into the app.
Now that the certificate is imported into the StrongSwan app, you can configure the VPN connection with these steps:
- In the app, tap ADD VPN PROFILE at the top.
- Fill out the Server with your VPN server’s domain name or public IP address.
- Make sure IKEv2 EAP (Username/Password) is selected as the VPN Type.
- Fill out the Username and Password with the credentials you defined on the server.
- Deselect Select automatically in the CA certificate section and click Select CA certificate.
- Tap the IMPORTED tab at the top of the screen and choose the CA you imported (it will be named “VPN root CA” if you didn’t change the “DN” earlier).
- If you’d like, fill out Profile name (optional) with a more descriptive name.
When you wish to connect to the VPN, click on profile you just created in the StrongSwan application.
macOS
Follow these steps to import the certificate:
- Double-click the certificate file. Keychain Access will pop up with a dialog that says “Keychain Access is trying to modify the system keychain. Enter your password to allow this.”
- Enter your password, then click on Modify Keychain
- Double-click the newly imported VPN certificate. This brings up a small properties window where you can specify the trust levels. Set IP Security (IPSec) to Always Trust and you’ll be prompted for your password again. This setting saves automatically after entering the password.
Now that the certificate is important and trusted, configure the VPN connection with these steps:
- Go to System Preferences and choose Network.
- Click on the small “plus” button on the lower-left of the list of networks.
- In the popup that appears, Set Interface to VPN, set the VPN Type to IKEv2, and give the connection a name.
- In the Server and Remote ID field, enter the server’s domain name or IP address. Leave the Local ID blank.
- Click on Authentication Settings, select Username, and enter your username and password you configured for your VPN user. Then click OK.
Finally, click on Connect to connect to the VPN. You should now be connected to the VPN.
iOS
To configure the VPN connection on an iOS device, follow these steps:
- Send yourself an email with the root certificate attached.
- Open the email on your iOS device and tap on the attached certificate file, then tap Install and enter your passcode. Once it installs, tap Done.
- Go to Settings, General, VPN and tap Add VPN Configuration. This will bring up the VPN connection configuration screen.
- Tap on Type and select IKEv2.
- In the Description field, enter a short name for the VPN connection. This could be anything you like.
- In the Server and Remote ID field, enter the server’s domain name or IP address. The Local ID field can be left blank.
- Enter your username and password in the Authentication section, then tap Done.
- Select the VPN connection that you just created, tap the switch on the top of the page, and you’ll be connected.
Ubuntu
Ubuntu 16.04
First, let’s download source and build the strongswan package:
cd ~
sudo apt-get install -y libssl-dev libglib2.0-dev libnm-dev
wget http://download.strongswan.org/strongswan-5.6.3.tar.bz2
tar xjf strongswan-5.6.3.tar.bz2
cd ~/strongswan-5.6.3
./configure --sysconfdir=/etc --prefix=/usr --libexecdir=/usr/lib
   --disable-aes --disable-des --disable-md5 --disable-sha1
   --disable-sha2 --disable-fips-prf --disable-gmp --enable-openssl
   --enable-nm --enable-agent --enable-eap-gtc --enable-eap-md5
   --enable-eap-mschapv2 --enable-eap-identity
make
sudo make install
And the network-manager GUI plugin
cd ~
sudo apt-get install -y intltool libgtk-3-dev libsecret-1-dev
  libnma-dev network-manager-dev libnm-util-dev libnm-glib-dev
  libnm-glib-vpn-dev libnm-gtk-dev

wget http://download.strongswan.org/NetworkManager/NetworkManager-strongswan-1.4.4.tar.bz2

tar xjf NetworkManager-strongswan-1.4.4.tar.bz2
cd ~/NetworkManager-strongswan-1.4.4
./configure --sysconfdir=/etc --prefix=/usr --libexecdir=/usr/lib

make
sudo make install
Ubuntu 18.04
First, we need to install strongswan and network manager plugin.
sudo apt install -y strongswan libcharon-extra-plugins network-manager-strongswan
Setup VPN connections
Ok, now client software is ready, we can set up the VPN connections.
- Open System Settings, then select Network;
- Ubuntu 16.04:
- Click the + sign at the left-bottom corner, choice Interface type to VPN, then click Create;
- Ubuntu 18.04
- Click the + sign at the right side of VPN list.
- Ubuntu 16.04:
- A VPN connection type dialog box will pop out, choose IPSec/IKEv2 (Strongswan), click Create;
- Now a configuration dialog box will pop out. fill in information as directed below;
- Name: Any text you like to name the VPN connection
- Gateway
- Address: The VPN server’s domain name IT sent to you.
- Certificate: Browse to choose the certificate file you received.
- Client
- Authentication: Select “EAP”
- Username: Use the userid that is given to you.
- Password:
- Click the icon at the end of input box.
- Select the 2nd option: Store the password for all users.
- Input your password
- Options:
- Make sure you check the “Request an inner IP address”.
- Optionally you may also check Enforce UDP encapsulation
- Leave use IP compression unchecked.
- Cipher Proposals
- Leave this section blank.
- Finally click the “Add” button to save the configuration.
- Now a configuration dialog box will pop out. fill in information as directed below;