English | 中文
Configure IPsec/L2TP VPN Clients
After setting up your own VPN server, follow these steps to configure your devices. IPsec/L2TP is natively supported by Android, iOS, OS X, and Windows. There is no additional software to install. Setup should only take a few minutes. In case you are unable to connect, first check to make sure the VPN credentials were entered correctly.
- Platforms
- Windows
- OS X (macOS)
- Android
- iOS (iPhone/iPad)
- Chrome OS (Chromebook)
- Linux
- IKEv1 troubleshooting
Windows
You may also connect using IKEv2 mode (recommended).
Windows 11
- Right-click on the wireless/network icon in your system tray.
- Select Network and Internet settings, then on the page that opens, click VPN.
- Click the Add VPN button.
- Select Windows (built-in) in the VPN provider drop-down menu.
- Enter anything you like in the Connection name field.
- Enter
Your VPN Server IPin the Server name or address field. - Select L2TP/IPsec with pre-shared key in the VPN type drop-down menu.
- Enter
Your VPN IPsec PSKin the Pre-shared key field. - Enter
Your VPN Usernamein the User name field. - Enter
Your VPN Passwordin the Password field. - Check the Remember my sign-in info checkbox.
- Click Save to save the VPN connection details.
Note: This one-time registry change is required if the VPN server and/or client is behind NAT (e.g. home router).
To connect to the VPN: Click the Connect button, or click on the wireless/network icon in your system tray, click VPN, then select the new VPN entry and click Connect. If prompted, enter Your VPN Username and Password, then click OK. You can verify that your traffic is being routed properly by looking up your IP address on Google. It should say «Your public IP address is Your VPN Server IP«.
If you get an error when trying to connect, see Troubleshooting.
Windows 10 and 8
- Right-click on the wireless/network icon in your system tray.
- Select Open Network & Internet settings, then on the page that opens, click Network and Sharing Center.
- Click Set up a new connection or network.
- Select Connect to a workplace and click Next.
- Click Use my Internet connection (VPN).
- Enter
Your VPN Server IPin the Internet address field. - Enter anything you like in the Destination name field, and then click Create.
- Return to Network and Sharing Center. On the left, click Change adapter settings.
- Right-click on the new VPN entry and choose Properties.
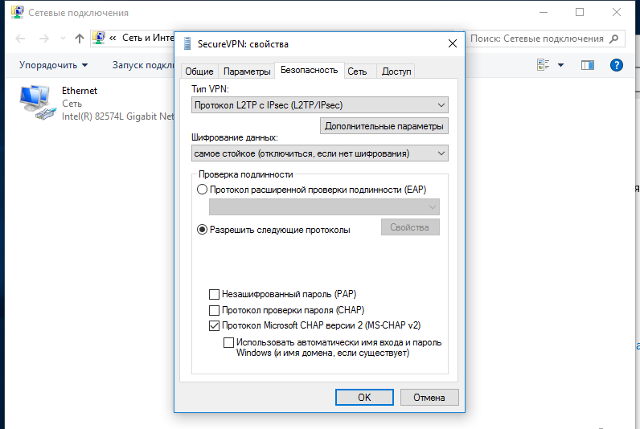
- Click the Security tab. Select «Layer 2 Tunneling Protocol with IPsec (L2TP/IPSec)» for the Type of VPN.
- Click Allow these protocols. Check the «Challenge Handshake Authentication Protocol (CHAP)» and «Microsoft CHAP Version 2 (MS-CHAP v2)» checkboxes.
- Click the Advanced settings button.
- Select Use preshared key for authentication and enter
Your VPN IPsec PSKfor the Key. - Click OK to close the Advanced settings.
- Click OK to save the VPN connection details.
Note: This one-time registry change is required if the VPN server and/or client is behind NAT (e.g. home router).
To connect to the VPN: Click on the wireless/network icon in your system tray, select the new VPN entry, and click Connect. If prompted, enter Your VPN Username and Password, then click OK. You can verify that your traffic is being routed properly by looking up your IP address on Google. It should say «Your public IP address is Your VPN Server IP«.
If you get an error when trying to connect, see Troubleshooting.
Alternatively, instead of following the steps above, you may create the VPN connection using these Windows PowerShell commands. Replace Your VPN Server IP and Your VPN IPsec PSK with your own values, enclosed in single quotes:
# Disable persistent command history
Set-PSReadlineOption –HistorySaveStyle SaveNothing
# Create VPN connection
Add-VpnConnection -Name 'My IPsec VPN' -ServerAddress 'Your VPN Server IP' ^
  -L2tpPsk 'Your VPN IPsec PSK' -TunnelType L2tp -EncryptionLevel Required ^
  -AuthenticationMethod Chap,MSChapv2 -Force -RememberCredential -PassThru
# Ignore the data encryption warning (data is encrypted in the IPsec tunnel)
Windows 7, Vista and XP
- Click on the Start Menu and go to the Control Panel.
- Go to the Network and Internet section.
- Click Network and Sharing Center.
- Click Set up a new connection or network.
- Select Connect to a workplace and click Next.
- Click Use my Internet connection (VPN).
- Enter
Your VPN Server IPin the Internet address field. - Enter anything you like in the Destination name field.
- Check the Don’t connect now; just set it up so I can connect later checkbox.
- Click Next.
- Enter
Your VPN Usernamein the User name field. - Enter
Your VPN Passwordin the Password field. - Check the Remember this password checkbox.
- Click Create, and then Close.
- Return to Network and Sharing Center. On the left, click Change adapter settings.
- Right-click on the new VPN entry and choose Properties.
- Click the Options tab and uncheck Include Windows logon domain.
- Click the Security tab. Select «Layer 2 Tunneling Protocol with IPsec (L2TP/IPSec)» for the Type of VPN.
- Click Allow these protocols. Check the «Challenge Handshake Authentication Protocol (CHAP)» and «Microsoft CHAP Version 2 (MS-CHAP v2)» checkboxes.
- Click the Advanced settings button.
- Select Use preshared key for authentication and enter
Your VPN IPsec PSKfor the Key. - Click OK to close the Advanced settings.
- Click OK to save the VPN connection details.
Note: This one-time registry change is required if the VPN server and/or client is behind NAT (e.g. home router).
To connect to the VPN: Click on the wireless/network icon in your system tray, select the new VPN entry, and click Connect. If prompted, enter Your VPN Username and Password, then click OK. You can verify that your traffic is being routed properly by looking up your IP address on Google. It should say «Your public IP address is Your VPN Server IP«.
If you get an error when trying to connect, see Troubleshooting.
OS X
You may also connect using IKEv2 (recommended) or IPsec/XAuth mode.
- Open System Preferences and go to the Network section.
- Click the + button in the lower-left corner of the window.
- Select VPN from the Interface drop-down menu.
- Select L2TP over IPSec from the VPN Type drop-down menu.
- Enter anything you like for the Service Name.
- Click Create.
- Enter
Your VPN Server IPfor the Server Address. - Enter
Your VPN Usernamefor the Account Name. - Click the Authentication Settings button.
- In the User Authentication section, select the Password radio button and enter
Your VPN Password. - In the Machine Authentication section, select the Shared Secret radio button and enter
Your VPN IPsec PSK. - Click OK.
- Check the Show VPN status in menu bar checkbox.
- (Important) Click the Advanced button and make sure the Send all traffic over VPN connection checkbox is checked.
- (Important) Click the TCP/IP tab, and make sure Link-local only is selected in the Configure IPv6 section.
- Click OK to close the Advanced settings, and then click Apply to save the VPN connection information.
To connect to the VPN: Use the menu bar icon, or go to the Network section of System Preferences, select the VPN and choose Connect. You can verify that your traffic is being routed properly by looking up your IP address on Google. It should say «Your public IP address is Your VPN Server IP«.
If you get an error when trying to connect, see Troubleshooting.
Android
Important: Android users should instead connect using IKEv2 mode (recommended), which is more secure. Android 12+ only supports IKEv2 mode. The native VPN client in Android uses the less secure modp1024 (DH group 2) for the IPsec/L2TP and IPsec/XAuth («Cisco IPsec») modes.
If you still want to connect using IPsec/L2TP mode, you must first edit /etc/ipsec.conf on the VPN server. Find the line ike=... and append ,aes256-sha2;modp1024,aes128-sha1;modp1024 at the end. Save the file and run sudo service ipsec restart.
Docker users: Add VPN_ENABLE_MODP1024=yes to your env file, then re-create the Docker container.
After that, follow the steps below on your Android device:
- Launch the Settings application.
- Tap «Network & internet». Or, if using Android 7 or earlier, tap More… in the Wireless & networks section.
- Tap VPN.
- Tap Add VPN Profile or the + icon at top-right of screen.
- Enter anything you like in the Name field.
- Select L2TP/IPSec PSK in the Type drop-down menu.
- Enter
Your VPN Server IPin the Server address field. - Leave the L2TP secret field blank.
- Leave the IPSec identifier field blank.
- Enter
Your VPN IPsec PSKin the IPSec pre-shared key field. - Tap Save.
- Tap the new VPN connection.
- Enter
Your VPN Usernamein the Username field. - Enter
Your VPN Passwordin the Password field. - Check the Save account information checkbox.
- Tap Connect.
Once connected, you will see a VPN icon in the notification bar. You can verify that your traffic is being routed properly by looking up your IP address on Google. It should say «Your public IP address is Your VPN Server IP«.
If you get an error when trying to connect, see Troubleshooting.
iOS
You may also connect using IKEv2 (recommended) or IPsec/XAuth mode.
- Go to Settings -> General -> VPN.
- Tap Add VPN Configuration….
- Tap Type. Select L2TP and go back.
- Tap Description and enter anything you like.
- Tap Server and enter
Your VPN Server IP. - Tap Account and enter
Your VPN Username. - Tap Password and enter
Your VPN Password. - Tap Secret and enter
Your VPN IPsec PSK. - Make sure the Send All Traffic switch is ON.
- Tap Done.
- Slide the VPN switch ON.
Once connected, you will see a VPN icon in the status bar. You can verify that your traffic is being routed properly by looking up your IP address on Google. It should say «Your public IP address is Your VPN Server IP«.
If you get an error when trying to connect, see Troubleshooting.
Chrome OS
You may also connect using IKEv2 mode (recommended).
- Go to Settings -> Network.
- Click Add connection, then click Add built-in VPN.
- Enter anything you like for the Service name.
- Select L2TP/IPsec in the Provider type drop-down menu.
- Enter
Your VPN Server IPfor the Server hostname. - Select Pre-shared key in the Authentication type drop-down menu.
- Enter
Your VPN Usernamefor the Username. - Enter
Your VPN Passwordfor the Password. - Enter
Your VPN IPsec PSKfor the Pre-shared key. - Leave other fields blank.
- Enable Save identity and password.
- Click Connect.
Once connected, you will see a VPN icon overlay on the network status icon. You can verify that your traffic is being routed properly by looking up your IP address on Google. It should say «Your public IP address is Your VPN Server IP«.
If you get an error when trying to connect, see Troubleshooting.
Linux
You may also connect using IKEv2 mode (recommended).
Ubuntu Linux
Ubuntu 18.04 (and newer) users can install the network-manager-l2tp-gnome package using apt, then configure the IPsec/L2TP VPN client using the GUI.
- Go to Settings -> Network -> VPN. Click the + button.
- Select Layer 2 Tunneling Protocol (L2TP).
- Enter anything you like in the Name field.
- Enter
Your VPN Server IPfor the Gateway. - Enter
Your VPN Usernamefor the User name. - Right-click the ? in the Password field, select Store the password only for this user.
- Enter
Your VPN Passwordfor the Password. - Leave the NT Domain field blank.
- Click the IPsec Settings… button.
- Check the Enable IPsec tunnel to L2TP host checkbox.
- Leave the Gateway ID field blank.
- Enter
Your VPN IPsec PSKfor the Pre-shared key. - Expand the Advanced section.
- Enter
aes128-sha1-modp2048for the Phase1 Algorithms. - Enter
aes128-sha1for the Phase2 Algorithms. - Click OK, then click Add to save the VPN connection information.
- Turn the VPN switch ON.
If you get an error when trying to connect, try this fix.
Once connected, you can verify that your traffic is being routed properly by looking up your IP address on Google. It should say «Your public IP address is Your VPN Server IP«.
Fedora and CentOS
Fedora 28 (and newer) and CentOS 8/7 users can connect using IPsec/XAuth mode.
Other Linux
First check here to see if the network-manager-l2tp and network-manager-l2tp-gnome packages are available for your Linux distribution. If yes, install them (select strongSwan) and follow the instructions above. Alternatively, you may configure Linux VPN clients using the command line.
Configure Linux VPN clients using the command line
Advanced users can configure Linux VPN clients using the command line. Alternatively, you may connect using IKEv2 mode (recommended), or configure using the GUI. Instructions below are inspired by the work of Peter Sanford. Commands must be run as root on your VPN client.
To set up the VPN client, first install the following packages:
# Ubuntu and Debian
apt-get update
apt-get install strongswan xl2tpd net-tools

# Fedora
yum install strongswan xl2tpd net-tools

# CentOS
yum install epel-release
yum --enablerepo=epel install strongswan xl2tpd net-tools
Create VPN variables (replace with actual values):
VPN_SERVER_IP='your_vpn_server_ip'
VPN_IPSEC_PSK='your_ipsec_pre_shared_key'
VPN_USER='your_vpn_username'
VPN_PASSWORD='your_vpn_password'
Configure strongSwan:
cat > /etc/ipsec.conf <<EOF
# ipsec.conf - strongSwan IPsec configuration file

conn myvpn
  auto=add
  keyexchange=ikev1
  authby=secret
  type=transport
  left=%defaultroute
  leftprotoport=17/1701
  rightprotoport=17/1701
  right=$VPN_SERVER_IP
  ike=aes128-sha1-modp2048
  esp=aes128-sha1
EOF

cat > /etc/ipsec.secrets <<EOF
: PSK "$VPN_IPSEC_PSK"
EOF

chmod 600 /etc/ipsec.secrets

# For CentOS and Fedora ONLY
mv /etc/strongswan/ipsec.conf /etc/strongswan/ipsec.conf.old 2>/dev/null
mv /etc/strongswan/ipsec.secrets /etc/strongswan/ipsec.secrets.old 2>/dev/null
ln -s /etc/ipsec.conf /etc/strongswan/ipsec.conf
ln -s /etc/ipsec.secrets /etc/strongswan/ipsec.secrets
Configure xl2tpd:
cat > /etc/xl2tpd/xl2tpd.conf <<EOF
[lac myvpn]
lns = $VPN_SERVER_IP
ppp debug = yes
pppoptfile = /etc/ppp/options.l2tpd.client
length bit = yes
EOF

cat > /etc/ppp/options.l2tpd.client <<EOF
ipcp-accept-local
ipcp-accept-remote
refuse-eap
require-chap
noccp
noauth
mtu 1280
mru 1280
noipdefault
defaultroute
usepeerdns
connect-delay 5000
name "$VPN_USER"
password "$VPN_PASSWORD"
EOF

chmod 600 /etc/ppp/options.l2tpd.client
The VPN client setup is now complete. Follow the steps below to connect.
Note: You must repeat all steps below every time you try to connect to the VPN.
Create xl2tpd control file:
mkdir -p /var/run/xl2tpd
touch /var/run/xl2tpd/l2tp-control
Restart services:
service strongswan restart

# For Ubuntu 20.04, if strongswan service not found
ipsec restart

service xl2tpd restart
Start the IPsec connection:
# Ubuntu and Debian
ipsec up myvpn

# CentOS and Fedora
strongswan up myvpn
Start the L2TP connection:
echo "c myvpn" > /var/run/xl2tpd/l2tp-control
Run ifconfig and check the output. You should now see a new interface ppp0.
Check your existing default route:
Find this line in the output: default via X.X.X.X .... Write down this gateway IP for use in the two commands below.
Exclude your VPN server’s public IP from the new default route (replace with actual value):
route add YOUR_VPN_SERVER_PUBLIC_IP gw X.X.X.X
If your VPN client is a remote server, you must also exclude your Local PC’s public IP from the new default route, to prevent your SSH session from being disconnected (replace with actual value):
route add YOUR_LOCAL_PC_PUBLIC_IP gw X.X.X.X
Add a new default route to start routing traffic via the VPN server:
route add default dev ppp0
The VPN connection is now complete. Verify that your traffic is being routed properly:
wget -qO- http://ipv4.icanhazip.com; echo
The above command should return Your VPN Server IP.
To stop routing traffic via the VPN server:
route del default dev ppp0
To disconnect:
# Ubuntu and Debian
echo "d myvpn" > /var/run/xl2tpd/l2tp-control
ipsec down myvpn

# CentOS and Fedora
echo "d myvpn" > /var/run/xl2tpd/l2tp-control
strongswan down myvpn
IKEv1 troubleshooting
Read this in other languages: English, 中文.
See also: IKEv2 troubleshooting and Advanced usage.
- Check logs and VPN status
- Windows error 809
- Windows error 789 or 691
- Windows error 628 or 766
- Windows 10 connecting
- Windows 10 upgrades
- Windows DNS leaks and IPv6
- Android MTU/MSS issues
- Android 6 and 7
- macOS send traffic over VPN
- iOS 13+ and macOS 10.15/11+
- iOS/Android sleep mode
- Debian 11/10 kernel
- Other errors
Check logs and VPN status
Commands below must be run as root (or using sudo).
First, restart services on the VPN server:
service ipsec restart
service xl2tpd restart
Docker users: Run docker restart ipsec-vpn-server.
Then reboot your VPN client device, and retry the connection. If still unable to connect, try removing and recreating the VPN connection. Make sure that the VPN server address and VPN credentials are entered correctly.
For servers with an external firewall (e.g. EC2/GCE), open UDP ports 500 and 4500 for the VPN.
Check the Libreswan (IPsec) and xl2tpd logs for errors:
# Ubuntu & Debian
grep pluto /var/log/auth.log
grep xl2tpd /var/log/syslog

# CentOS/RHEL, Rocky Linux, AlmaLinux, Oracle Linux & Amazon Linux 2
grep pluto /var/log/secure
grep xl2tpd /var/log/messages

# Alpine Linux
grep pluto /var/log/messages
grep xl2tpd /var/log/messages
Check the status of the IPsec VPN server:
Show currently established VPN connections:
Windows error 809
Error 809: The network connection between your computer and the VPN server could not be established because the remote server is not responding. This could be because one of the network devices (e.g, firewalls, NAT, routers, etc) between your computer and the remote server is not configured to allow VPN connections. Please contact your Administrator or your service provider to determine which device may be causing the problem.
Note: The registry change below is only required if you use IPsec/L2TP mode to connect to the VPN. It is NOT required for the IKEv2 and IPsec/XAuth modes.
To fix this error, a one-time registry change is required because the VPN server and/or client is behind NAT (e.g. home router). Download and import the .reg file below, or run the following from an elevated command prompt. You must reboot your PC when finished.
-
For Windows Vista, 7, 8, 10 and 11 (download .reg file)
REG ADD HKLMSYSTEMCurrentControlSetServicesPolicyAgent /v AssumeUDPEncapsulationContextOnSendRule /t REG_DWORD /d 0x2 /f -
For Windows XP ONLY (download .reg file)
REG ADD HKLMSYSTEMCurrentControlSetServicesIPSec /v AssumeUDPEncapsulationContextOnSendRule /t REG_DWORD /d 0x2 /f
Although uncommon, some Windows systems disable IPsec encryption, causing the connection to fail. To re-enable it, run the following command and reboot your PC.
-
For Windows XP, Vista, 7, 8, 10 and 11 (download .reg file)
REG ADD HKLMSYSTEMCurrentControlSetServicesRasManParameters /v ProhibitIpSec /t REG_DWORD /d 0x0 /f
Windows error 789 or 691
Error 789: The L2TP connection attempt failed because the security layer encountered a processing error during initial negotiations with the remote computer.
Error 691: The remote connection was denied because the user name and password combination you provided is not recognized, or the selected authentication protocol is not permitted on the remote access server.
For error 789, click here for troubleshooting information. For error 691, you may try removing and recreating the VPN connection, by following the instructions in this document. Make sure that the VPN credentials are entered correctly.
Windows error 628 or 766
Error 628: The connection was terminated by the remote computer before it could be completed.
Error 766: A certificate could not be found. Connections that use the L2TP protocol over IPSec require the installation of a machine certificate, also known as a computer certificate.
To fix these errors, please follow these steps:
- Right-click on the wireless/network icon in your system tray.
- Select Open Network and Sharing Center. Or, if using Windows 10 version 1709 or newer, select Open Network & Internet settings, then on the page that opens, click Network and Sharing Center.
- On the left, click Change adapter settings. Right-click on the new VPN and choose Properties.
- Click the Security tab. Select «Layer 2 Tunneling Protocol with IPsec (L2TP/IPSec)» for Type of VPN.
- Click Allow these protocols. Check the «Challenge Handshake Authentication Protocol (CHAP)» and «Microsoft CHAP Version 2 (MS-CHAP v2)» checkboxes.
- Click the Advanced settings button.
- Select Use preshared key for authentication and enter
Your VPN IPsec PSKfor the Key. - Click OK to close the Advanced settings.
- Click OK to save the VPN connection details.
For reference, see this screenshot of the VPN connection properties dialog.
Windows 10 connecting
If using Windows 10 and the VPN is stuck on «connecting» for more than a few minutes, try these steps:
- Right-click on the wireless/network icon in your system tray.
- Select Open Network & Internet settings, then on the page that opens, click VPN on the left.
- Select the new VPN entry, then click Connect. If prompted, enter
Your VPN UsernameandPassword, then click OK.
Windows 10 upgrades
After upgrading Windows 10 version (e.g. from 1709 to 1803), you may need to re-apply the fix above for Windows Error 809 and reboot.
Windows DNS leaks and IPv6
Windows 8, 10 and 11 use «smart multi-homed name resolution» by default, which may cause «DNS leaks» when using the native IPsec VPN client if your DNS servers on the Internet adapter are from the local network segment. To fix, you may either disable smart multi-homed name resolution, or configure your Internet adapter to use DNS servers outside your local network (e.g. 8.8.8.8 and 8.8.4.4). When finished, clear the DNS cache and reboot your PC.
In addition, if your computer has IPv6 enabled, all IPv6 traffic (including DNS queries) will bypass the VPN. Learn how to disable IPv6 in Windows. If you need a VPN with IPv6 support, you could instead try OpenVPN.
Android MTU/MSS issues
Some Android devices have MTU/MSS issues, that they are able to connect to the VPN using IPsec/XAuth («Cisco IPsec») mode, but cannot open websites. If you encounter this problem, try running the following commands on the VPN server. If successful, you may add these commands to /etc/rc.local to persist after reboot.
iptables -t mangle -A FORWARD -m policy --pol ipsec --dir in
  -p tcp -m tcp --tcp-flags SYN,RST SYN -m tcpmss --mss 1361:1536
  -j TCPMSS --set-mss 1360
iptables -t mangle -A FORWARD -m policy --pol ipsec --dir out
  -p tcp -m tcp --tcp-flags SYN,RST SYN -m tcpmss --mss 1361:1536
  -j TCPMSS --set-mss 1360

echo 1 > /proc/sys/net/ipv4/ip_no_pmtu_disc
Docker users: Instead of running the commands above, you may apply this fix by adding VPN_ANDROID_MTU_FIX=yes to your env file, then re-create the Docker container.
Reference: [1].
Android 6 and 7
If your Android 6.x or 7.x device cannot connect, try these steps:
- Tap the «Settings» icon next to your VPN profile. Select «Show advanced options» and scroll down to the bottom. If the option «Backward compatible mode» exists (see screenshot), enable it and reconnect the VPN. If not, try the next step.
- Edit
/etc/ipsec.confon the VPN server. Find the linesha2-truncbugand toggle its value. i.e. Replacesha2-truncbug=nowithsha2-truncbug=yes, or replacesha2-truncbug=yeswithsha2-truncbug=no. Save the file and runservice ipsec restart. Then reconnect the VPN.
Docker users: You may set sha2-truncbug=yes (default is no) in /etc/ipsec.conf by adding VPN_SHA2_TRUNCBUG=yes to your env file, then re-create the Docker container.
macOS send traffic over VPN
OS X (macOS) users: If you can successfully connect using IPsec/L2TP mode, but your public IP does not show Your VPN Server IP, read the OS X section above and complete these steps. Save VPN configuration and re-connect.
- Click the Advanced button and make sure the Send all traffic over VPN connection checkbox is checked.
- Click the TCP/IP tab, and make sure Link-local only is selected in the Configure IPv6 section.
After trying the steps above, if your computer is still not sending traffic over the VPN, check the service order. From the main network preferences screen, select «set service order» in the cog drop down under the list of connections. Drag the VPN connection to the top.
iOS 13+ and macOS 10.15/11+
If your device running iOS 13+, macOS 10.15 (Catalina), macOS 11 (Big Sur) or above cannot connect, try these steps: Edit /etc/ipsec.conf on the VPN server. Find sha2-truncbug=yes and replace it with sha2-truncbug=no. Save the file and run service ipsec restart. Then reconnect the VPN.
In addition, users running macOS Big Sur 11.0 should update to version 11.1 or newer, to fix some issues with VPN connections. To check your macOS version and update, refer to this article.
iOS/Android sleep mode
To save battery, iOS devices (iPhone/iPad) will automatically disconnect Wi-Fi shortly after the screen turns off (sleep mode). As a result, the IPsec VPN disconnects. This behavior is by design and cannot be configured.
If you need the VPN to auto-reconnect when the device wakes up, you may connect using IKEv2 mode (recommended) and enable the «VPN On Demand» feature. Alternatively, you may try OpenVPN instead, which has support for options such as «Reconnect on Wakeup» and «Seamless Tunnel».
Android devices will also disconnect Wi-Fi shortly after entering sleep mode, unless the option «Keep Wi-Fi on during sleep» is enabled. This option is no longer available in Android 8 (Oreo) and newer. Alternatively, you may try enabling the «Always-on VPN» option to stay connected. Learn more here.
Debian 11/10 kernel
Debian 11 or 10 users: Run uname -r to check your server’s Linux kernel version. If it contains the word «cloud», and /dev/ppp is missing, then the kernel lacks ppp support and cannot use IPsec/L2TP mode. The VPN setup scripts try to detect this and show a warning. In this case, you may instead use IKEv2 or IPsec/XAuth mode to connect to the VPN.
To fix the issue with IPsec/L2TP mode, you may switch to the standard Linux kernel by installing e.g. the linux-image-amd64 package. Then update the default kernel in GRUB and reboot your server.
Other errors
If you encounter other errors, refer to the links below:
- http://www.tp-link.com/en/faq-1029.html
- https://documentation.meraki.com/MX-Z/Client_VPN/Troubleshooting_Client_VPN#Common_Connection_Issues
- https://stackoverflow.com/questions/25245854/windows-8-1-gets-error-720-on-connect-vpn
License
Note: This license applies to this document only.
Copyright (C) 2016-2023 Lin Song 
Inspired by the work of Joshua Lund
This program is free software: you can redistribute it and/or modify it under the terms of the GNU General Public License as published by the Free Software Foundation, either version 3 of the License, or (at your option) any later version.
This program is distributed in the hope that it will be useful, but WITHOUT ANY WARRANTY; without even the implied warranty of MERCHANTABILITY or FITNESS FOR A PARTICULAR PURPOSE. See the GNU General Public License for more details.
Всем привет! Я потратил примерно неделю, чтобы найти для вас хорошие, работоспособные, бесплатные VPN для ПК. Все сервисы я протестировал на своем компе и ручаюсь, что они полностью работоспособны.
Почему я решил написать эту статью? Потому что большинство, что вы встретите в поисковике по данному запросу – это обычная реклама, и 99% VPN программ на компьютер, указанных на подобных сайтах, или платные, или имеют сильное ограничение по скорости, а то ещё хуже – ограничены по времени. Поэтому все эти «лучшие бесплатные ТОП-ы» – обычное разводилово.
Рассказывать про платные VPN для ноутбука или компа – особого смысла нет. Они примерно все одинаковые, как по цене, так и по качеству предоставляемых услуг. Поэтому не будем тянуть резину и начнем. Если у вас будут какие-то дополнения, вопросы, вылезет какая-то ошибка или будут проблемы, о которых я не написал – срочно пишем в комментарии, чтобы я вам помог. Также пишите про свои варианты бесплатных ВПН, и я после проверки добавлю их в статью.

Содержание
- 1.1.1.1
- VPN Gate
- Приложение
- L2TP / IPsec VPN и MS-SSTP
- OpenVPN
- ВПН Браузеры
- Задать вопрос автору статьи
1.1.1.1
Компания CloudFlare наконец-то выпустила бесплатную программу для ПК, которая работает с Windows и iOS. Помимо того, что они используют выделенный и более быстрый DNS, они бесплатно предоставляют возможность использовать их VPN сети. ПО спокойно можно скачать с официального сайта. Кстати, есть приложения также для Android и iOS, если кому нужно.

После установки достаточно открыть утилиту в трее и запустить WARP режим, который подключит ваш компьютер к выделенной и беслпатной VPN. Более подробно про это можно почитать тут.

VPN Gate
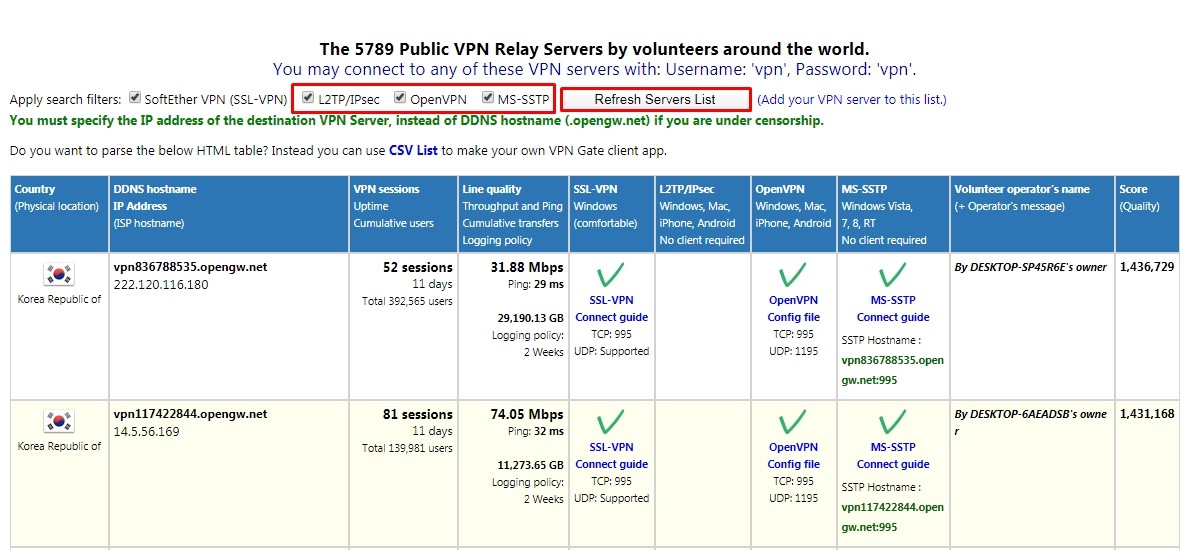
Полное название VPN Gate Academic Experiment Project — это онлайн-сервис, созданный в высшей школе университета Цукуба, в Японии. Проект полностью бесплатный и не требует регистрации. Работает достаточно просто – в интернете есть ряд добровольцев, которые выступают в качестве Free VPN серверов. Любой участник может подключиться к подобному серверу и использовать все прелести ВПН: обход блокировок, смена IP адреса, шифрование при передаче данных.
При этом вы можете работать практически со всеми платформами: Windows, Mac, iPhone, iPad и Android. Для шифрования используются протоколы: SSLVPN (SoftEther VPN), L2TP/IPsec, OpenVPN и Microsoft SSTP – обо всех них мы поговорим далее.
Правда есть несколько небольших минусов. Сервер может в любой момент отключиться, так как в качестве VPN для вашего компьютера выступает доброволец, и он просто может его выключить. Но на моей практике это бывает крайне редко. Тогда вы просто можете переподключиться к другому серверу – их сейчас более 5000. Второй минус – это динамический IP адреса серверов, именно поэтому мы будем использовать DDNS.
ВНИМАНИЕ! Для подключения протоколов: L2TP/IPsec, OpenVPN и Microsoft SSTP (без использования программы) – вам понадобится DDNS или IP адрес сервера. Эти данные постоянно обновляются на официальной странице (запомните эту ссылку, так как мы будем к ней постоянно обращаться). Во время настройки вам нужно будет в таблице выбрать определенный протокол (L2TP/IPsec, OpenVPN или Microsoft SSTP) и нажать «Refresh Servers List», чтобы увидеть конкретные сервера. На всякий случай я ещё раз напомню об этом во время настройки.
ПРИМЕЧАНИЕ! Если у вас MAC-бук, то по настройке вы можете посмотреть инструкцию тут.
Приложение
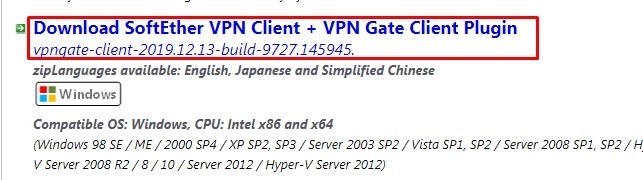
- Для более удобной настройки и подключения, лучше использовать «VPN клиент-программу» для Windows (7, 8, 10). Переходим по ссылке и скачиваем ПО. Кстати, код программы открыт и находится в общем доступе. Так что вы с ним можете ознакомиться там же на сайте. Интерфейс не на русском языке, поэтому я написал более подробную инструкцию.
- Вскрываем архив и запускаем «exe» файл.
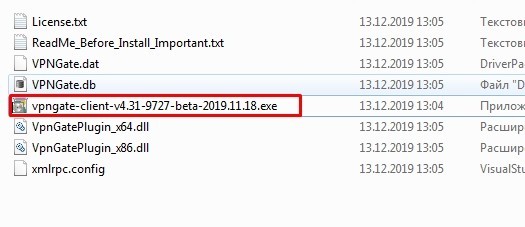
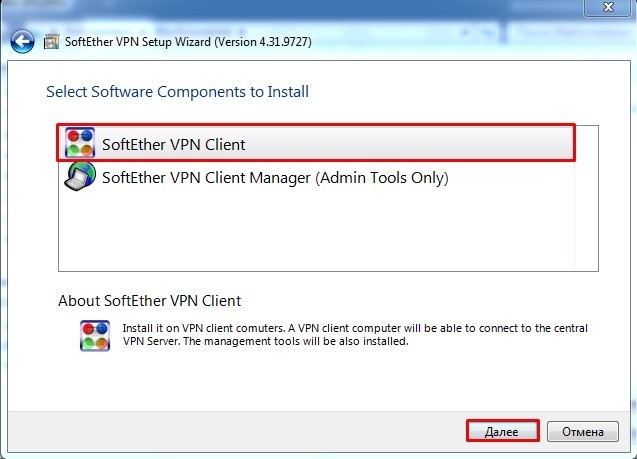
- Установка стандартная, только на одном из шагов вам нужно выбрать «Soft Ether VPN Client».
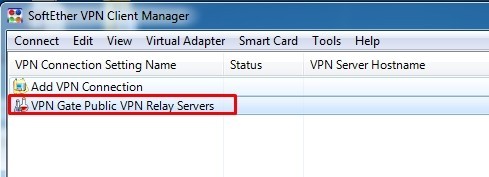
- Когда программа установится на компьютер, запустите второй пункт «VPN Gate Public VPN Relay Servers».
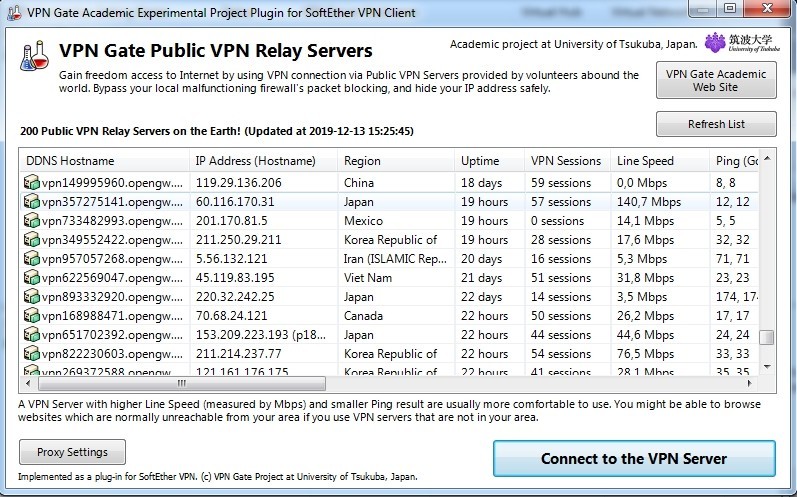
- Теперь вы видите список всех ВПН серверов. Лучше всего выбирать машину с низким пингом, высокой пропускной способностью и, самое главное, с большим показателем «Uptime» (время работы), так как они периодически могут отключаться. Всю информацию вы можете посмотреть в таблице.
- Если сервер поддерживает сразу два протокола связи TCP и UDP, то вы увидите вот такое окошко. Лучше всего использовать именно «TCP» протокол.
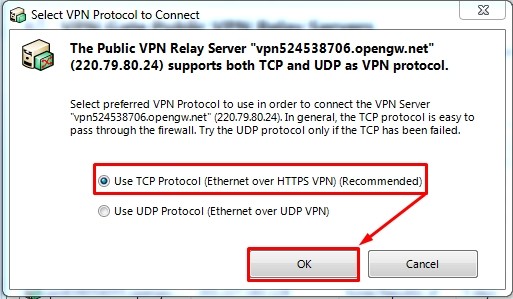
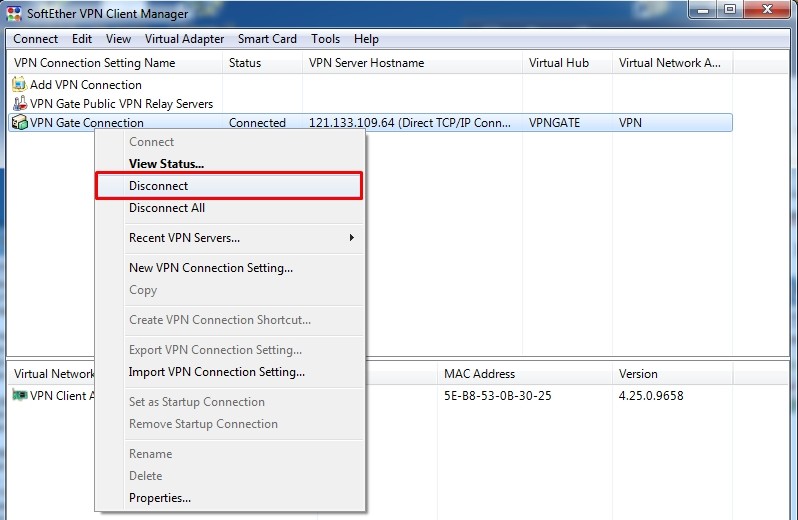
ПРИМЕЧАНИЕ! Если вылезет окно «Connect Error – VPN Gate Connection», то просто попробуйте переподключиться, нажав на кнопку «Retry». Если это не поможет – выберите другой сервер.
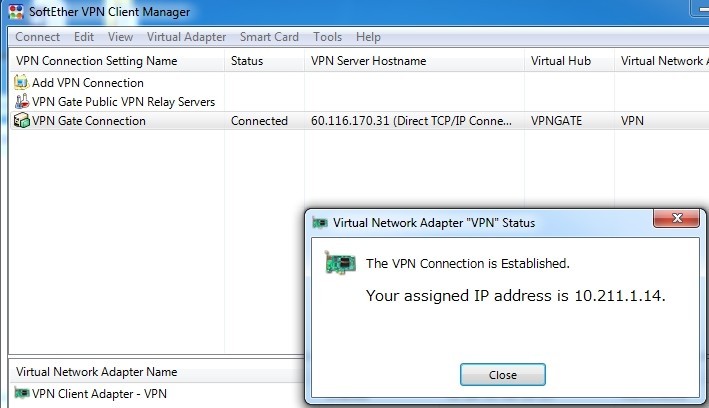
- После коннекта вы должны увидеть, что ваш IP адрес изменен.
Если вы захотите отключиться, то просто нажмите правой кнопкой на подключение и выберите «Disconnect».
L2TP / IPsec VPN и MS-SSTP
Если вы не хотите устанавливать программу, то подключиться к серверам можно будет вручную. При этом настройка делается только один раз. Не забудьте про ту ссылку с конфигурациями VPN серверов, которую я указал ранее – она нам понадобится.
Windows 7
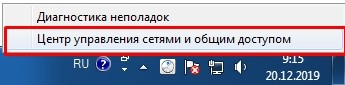
- Нажимаем по подключению в правом нижнем углу экрана и выбираем центр управления сетями.
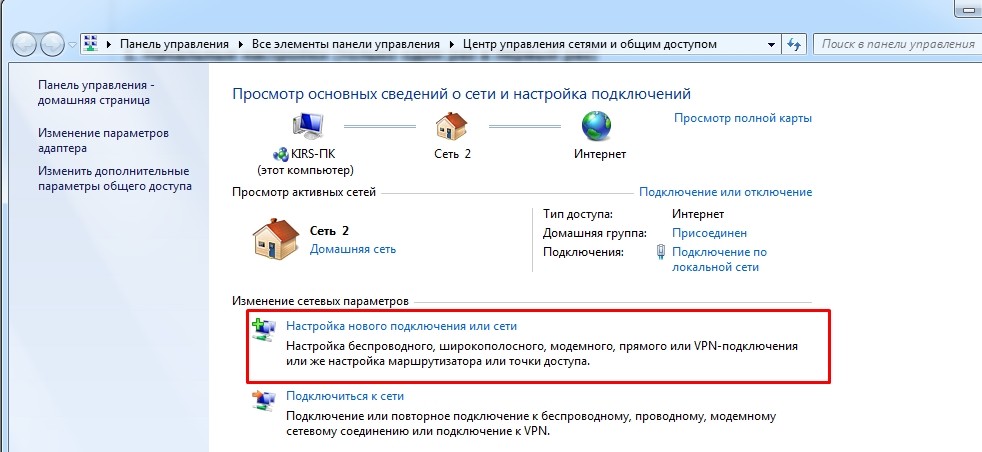
- Кликаем на первый пункт «Настройка нового подключения или сети».
- Выбираем третий пункт – «Подключение к рабочему месту».
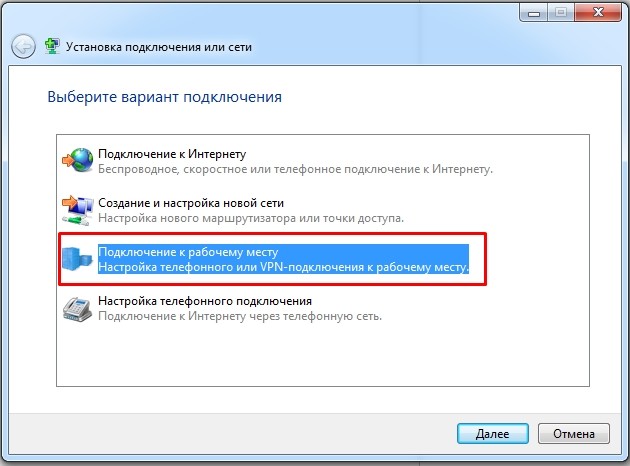
- «Использовать мое подключение к Интернету (VPN)».
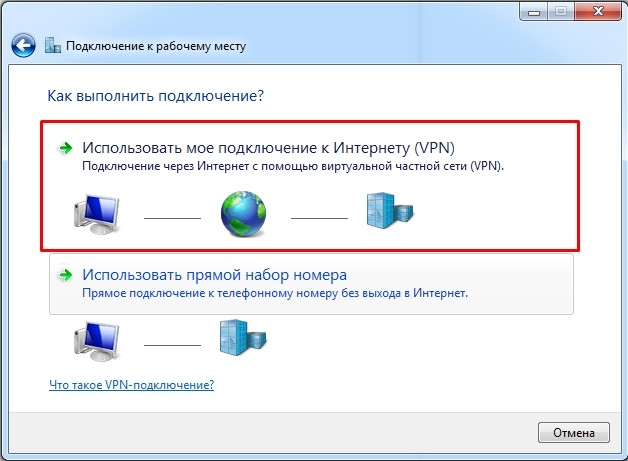
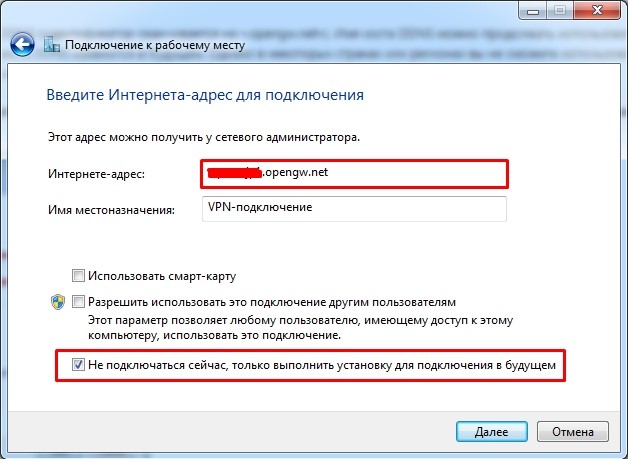
- Теперь идём на официальную страничку и отфильтровываем сервера так, чтобы остались только L2TP/IPsec или MS-SSTP (как это сделать – я уже писал выше).
L2TP/IPsec: Вписываем DDNS в первую строку. Если в будущем будут какие-то проблемы с подключением, то можно попробовать IP. Убедитесь, чтобы стояла нижняя галочка «Не подключаться сейчас, только выполнить установку для подключения в будущем».
MS-SSTP: Здесь можно использовать только DDNS. Также если у вас будут проблемы с подключением и вылезет ошибка, то скорее всего сервер использует выделенный порт. В таком случае вам после DDNS адреса нужно дописать порт напрямую – смотрим в столбец «MS-SSTP» (если порт не указан или ошибка остаётся, используем «:443»). В конце нужно убрать галочку, которая выделена на картинке ниже.
- В обе строки вводим три буквы «vpn». Установите галочку «Запомнить этот пароль».
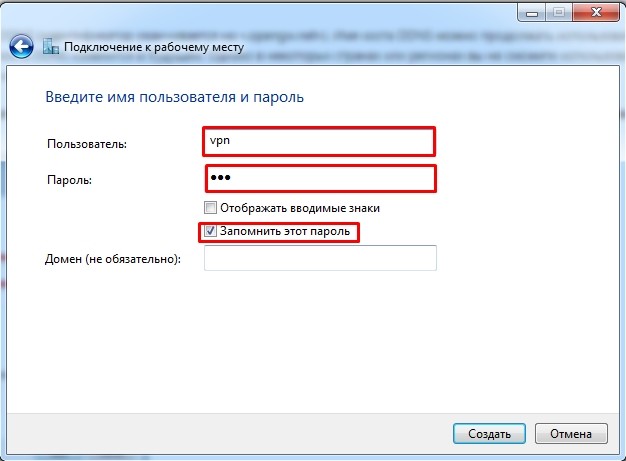
L2TP/IPsec: Самое главное сейчас не подключаться, так как мы ещё выполнили не все настройки. Нажмите «Закрыть» и перейдите к следующему шагу.
MS-SSTP: Соединение будет установлено. Можете проверять IP. На этом всё!
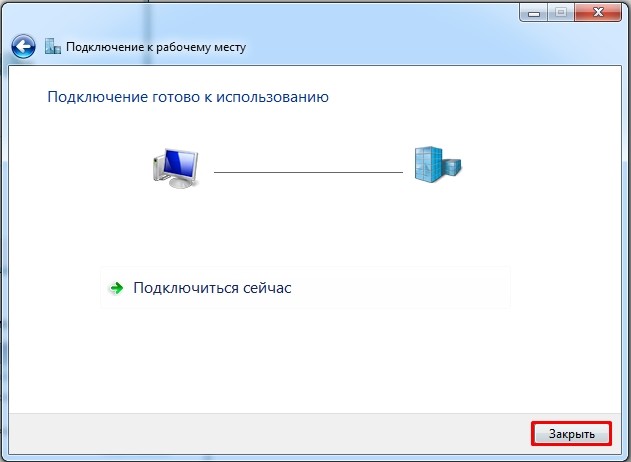
- Опять переходим в центр управления сетями и нажимаем «Изменение параметров адаптера».
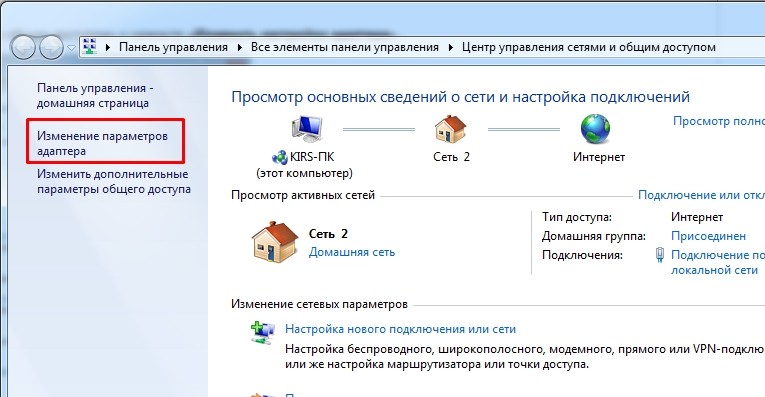
- Найдите то подключение, которое вы создали, нажмите правой кнопкой и выберите «Свойства».
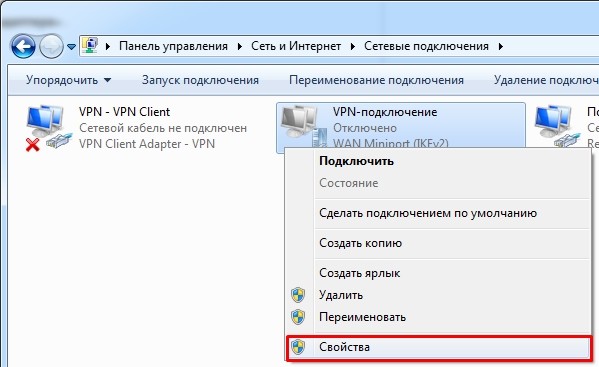
- Во вкладке «Безопасность» сразу в верхней части выберите тип протокола «L2TP IPsec». Теперь нажмите на «Дополнительные параметры».
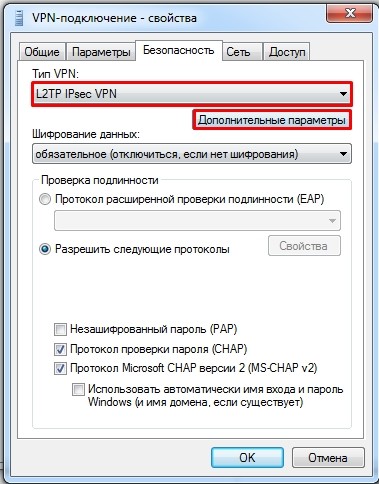
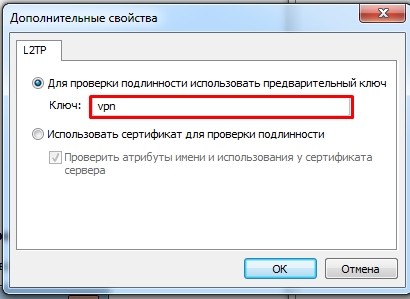
- В качестве ключа вводим опять те же самые три буквы.
- Подтверждаем все настройки кнопками «ОК». Нажимаем левой кнопкой по сетевому подключению и далее активируем наш ВПН.
- Логин и пароль не меняется и остается всегда прежним. Просто нажимаем «Подключить».
Windows 10
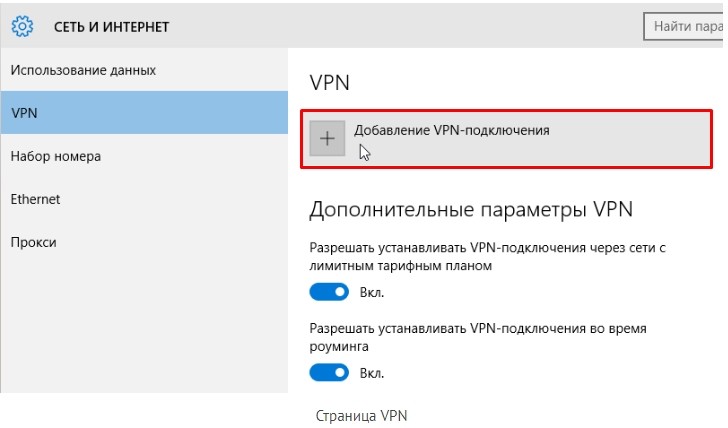
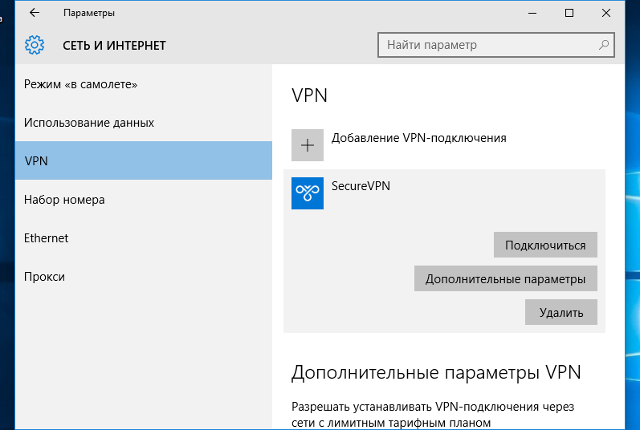
- Заходим в меню «Пуск», нажимаем по шестеренке, выбираем раздел «Сеть и настройки».

- Находим раздел «VPN», заходим туда и нажимаем на плюсик для добавления нового подключения.
- «Имя подключения» можете задать любое (на английском языке). Далее вставляем DDNS сервера, указываем «Тип VPN» как «L2TP/IPsec с сертификатом». «Тип данных для входа» – указываем так, чтобы можно было ввести логин и пароль. В качестве аутентификации используем три буквы «vpn». Обязательно установите галочку, чтобы запомнить данные для входа. Сохраняем параметры и подключаемся.
OpenVPN
- Нам понадобится бесплатная программа «OpenVPN». Заходим на официальный сайт, пролистываем чуть вниз и выбираем вашу ОС. Скачиваем установочный пакет с надписью «install». Там ничего сложного нет, просто следуем шагам установщика.

- Теперь, заходим на официальный сайт, который был указан в самом начале, указываем тип подключения «OpenVPN», нажимаем «Refresh Servers List». Теперь в строке «OpenVPN» надо скачать конфигурационный файл.
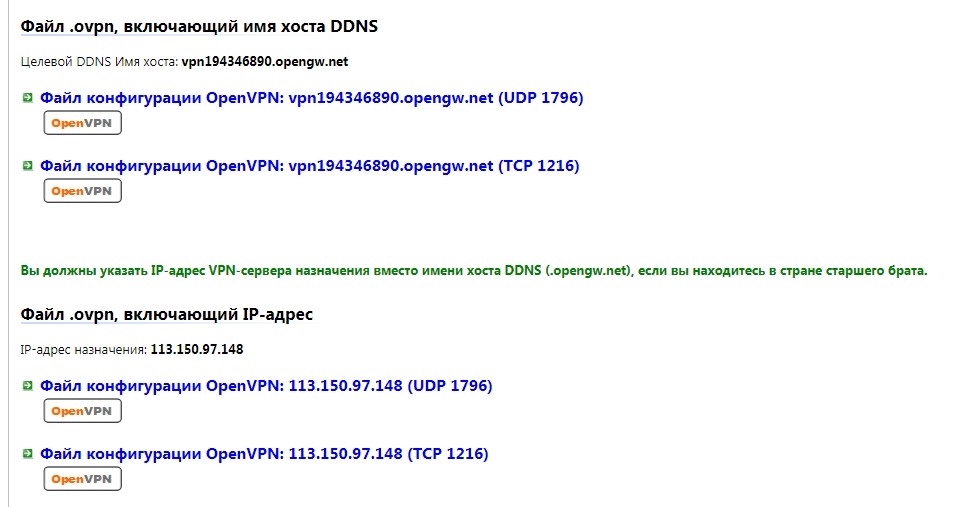
- Вас перебросит на страницу с «ovpn» файлами. Как видите, есть 4 варианта. Лучше всего выбираем именно DDNS и протокол UDP. Нажимаем по ссылке и скачиваем файл.
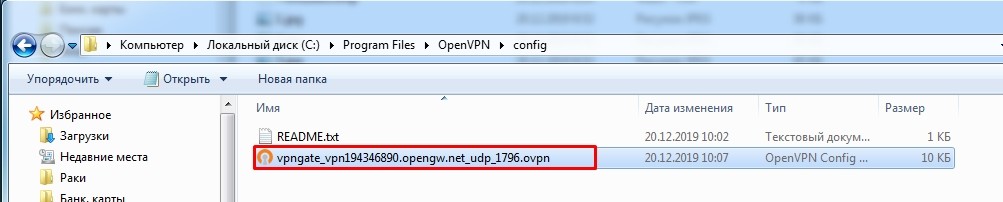
- Файл нужно закинуть в папку «config», где установлена программа. По умолчанию это путь:
C:Program FilesOpenVPNconfig
- Запускаем «OpenVPN GUI» с правами администратора.

- Находим в трее программу, нажимаем по ней правой кнопкой и выбираем «Подключить».
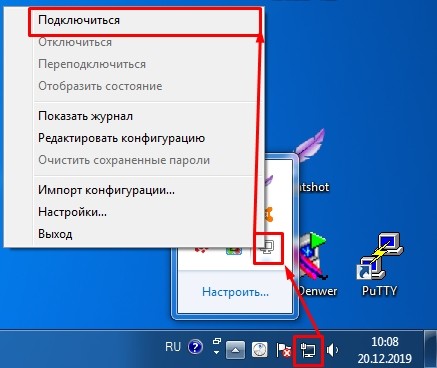
Далее вы увидите процесс подключения к серверу. Как только соединение будет установлено, окно свернется, а значок начнет подсвечиваться зеленым. В некоторых случаях понадобится ввести логин и пароль – в обе строки вводим «vpn».
ВПН Браузеры
17.06.2021 г. Роскомнадзор ограничил сервисы VPN VyprVPN и Opera VPN. Возможно, на текущий момент они еще не доступны. Но есть интересная статья для ознакомления.
Если вам лень скачивать какие-то программы, и вам нужно всего лишь зайти на заблокированный сайт, то можно воспользоваться двумя вариантами. Первый – это скачать и установить браузер Opera на свой бук или ноут. После запуска программы вам останется просто нажать на кнопку «VPN» правее адресном строки, и перевести бегунок в режим «вкл».
Как видите, тут можно выбрать один из бесплатных серверов. Чуть ниже отображается информация о трафике и измененном IP адресе. Выключается функция аналогично. Второй вариант – это использовать браузер «TOR», который можно скачать по этой ссылке (ссылочка заблокирована). После скачивания открываем папку и запускаем программу. Приложение полностью бесплатное, и позволяет шифровать данные с помощью передачи данных через три свободных прокси-сервера. Правда скорость при этом сильно режется.
Если вы используете Яндекс.Браузер, то вы можете посмотреть мою подборку расширений с возможностью бесплатного использования – по этой ссылке. Я очень скептически отношусь к подобным дополнениям, так как они слишком сильно режут скорость, но при этом дают слишком маленький выбор серверов.
В операционной системе Windows 10 настроить VPN-подключение по протоколу L2TP не составит большого труда — достаточно выполнить все действия, как показано на картинках, и уже через минуту вы сможете анонимно посещать любые сайты, обойти блокировку Вконтакте, безопасно использовать бесплатный Wi-Fi.
1
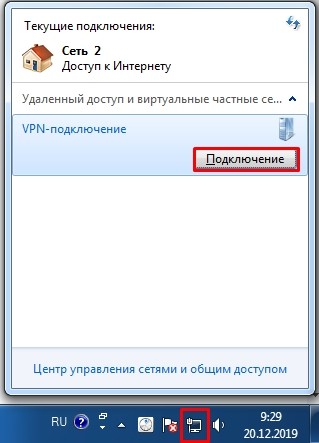
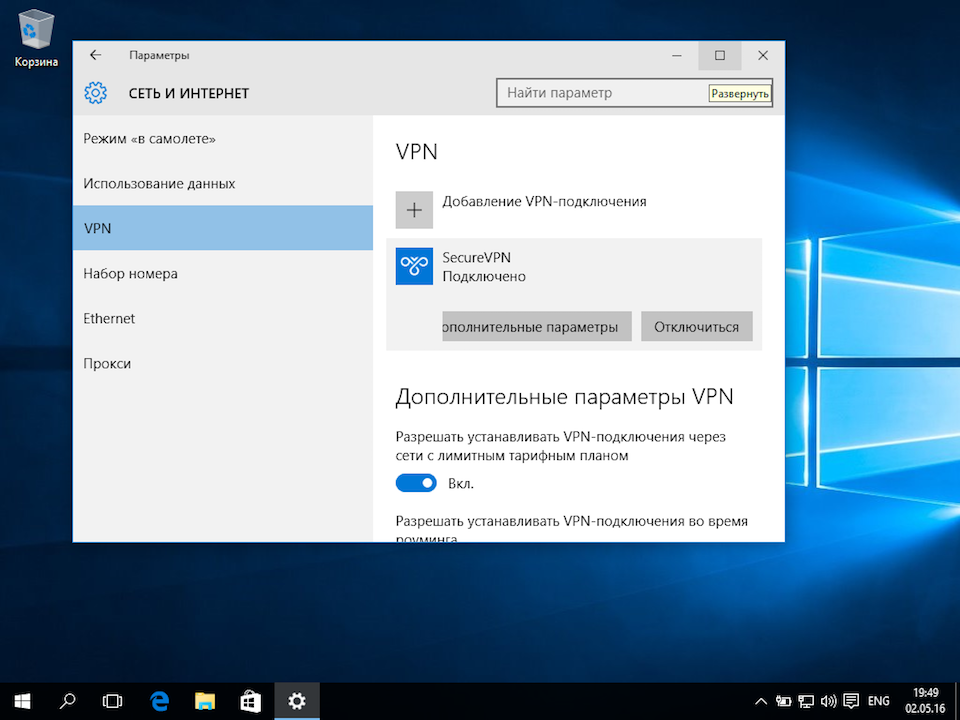
Кликнуть на иконке сетевого подключения в системном трее, и в появившемся окне выбрать Сетевые параметры.
Далее


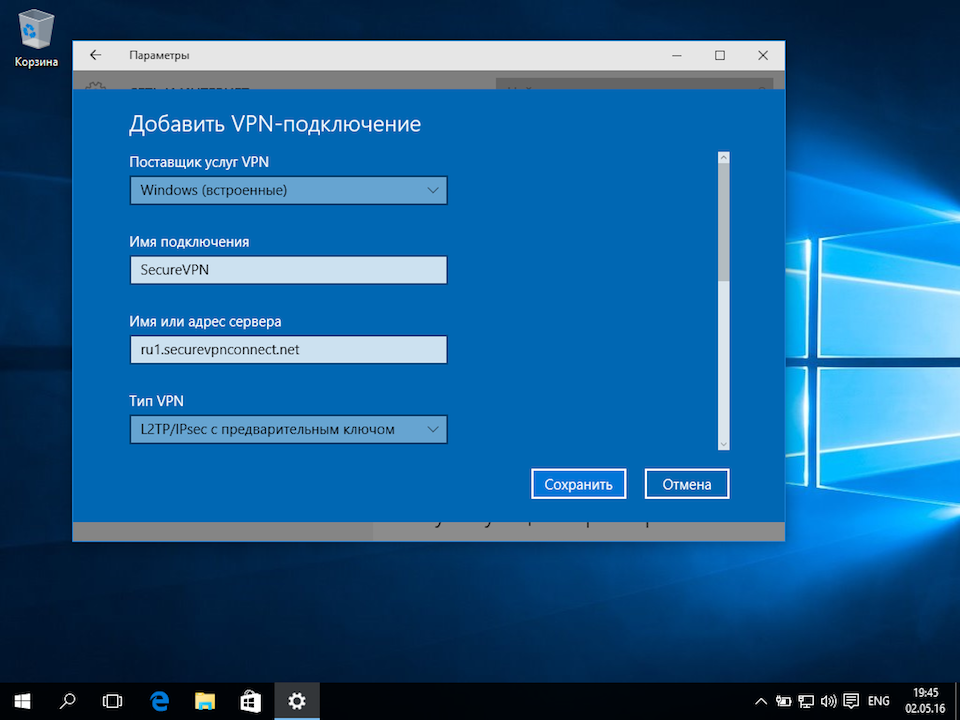
4
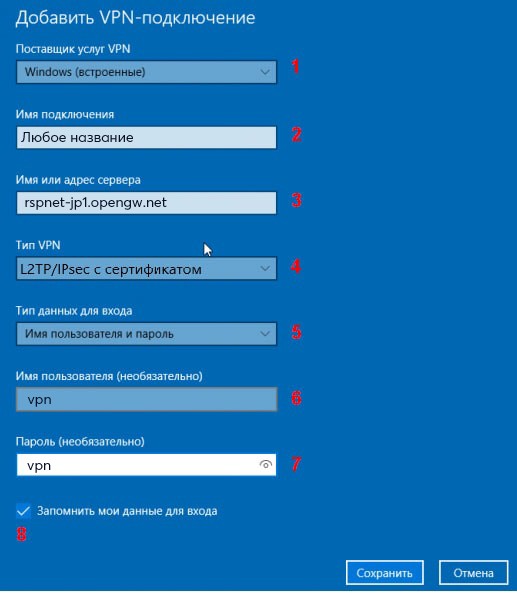
Указать идентификационные данные:
- Общий ключ — a-secure-psk
- Тип данных для входа — Имя пользователя и пароль
- Имя пользователя — username
- Пароль — password
Для завершения настройки нажать Сохранить.
Важное замечание: имя пользователя и пароль находятся в файле readme.txt, отправленном на Вашу почту после заказа подписки.
Далее
a-secure-psk
username
password


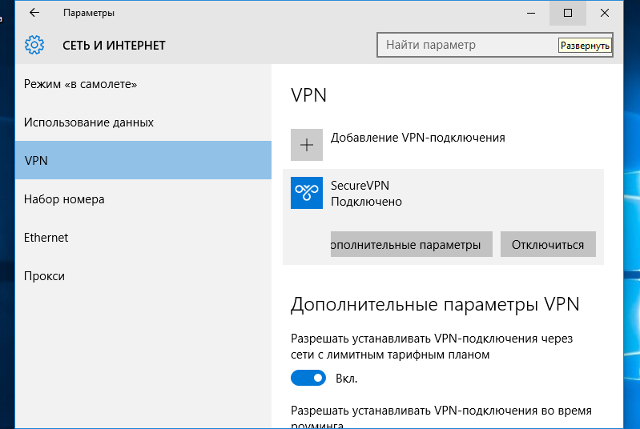
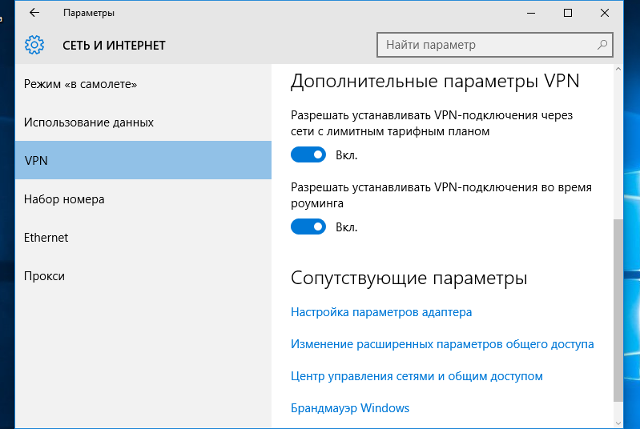
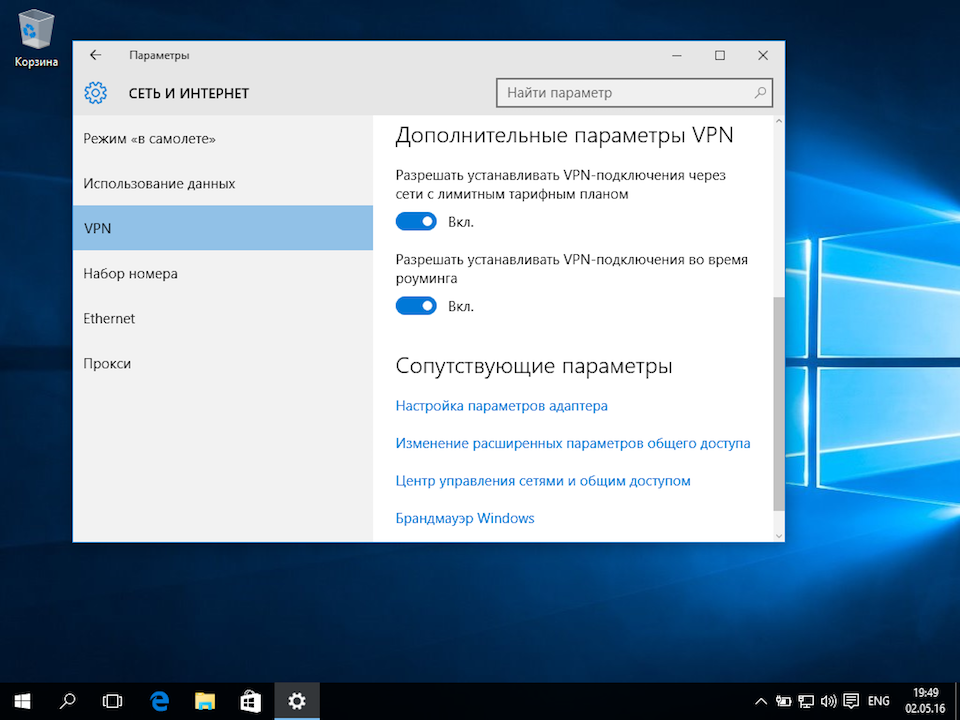
5
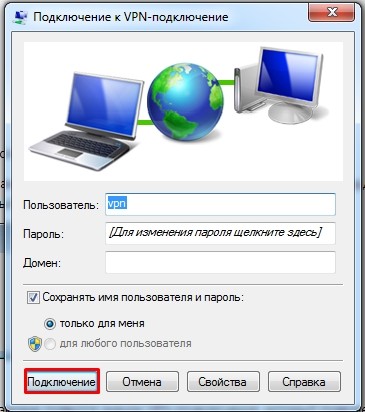
Для подключения выбрать только что созданное соединение, и нажать кнопку Подключиться.
Далее
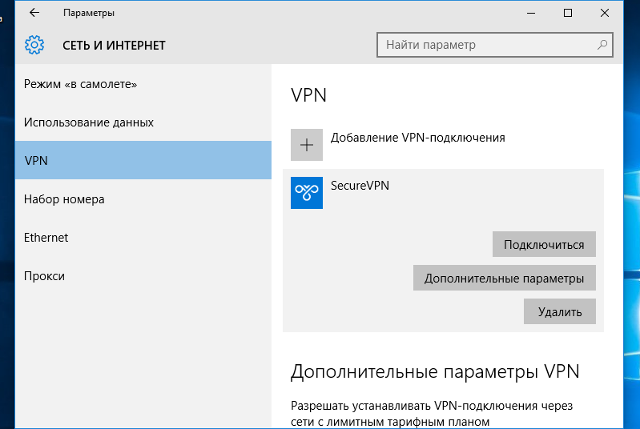
6
Соединение будет установлено через некоторое время. Для отключения нажать Отключиться.
Далее
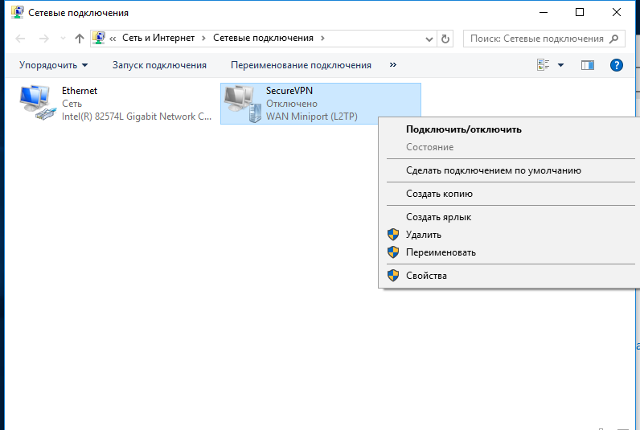
8
В открывшемся окне Сетевые подключения кликнуть правой кнопкой на созданном подключении, и выбрать Свойства.
Далее


Configure IPsec/L2TP VPN Clients
Read this in other languages: English, 简体中文.
Note: You may also connect using IKEv2 (recommended) or IPsec/XAuth mode.
After setting up your own VPN server, follow these steps to configure your devices. IPsec/L2TP is natively supported by Android, iOS, OS X, and Windows. There is no additional software to install. Setup should only take a few minutes. In case you are unable to connect, first check to make sure the VPN credentials were entered correctly.
- Platforms
- Windows
- OS X (macOS)
- Android
- iOS (iPhone/iPad)
- Chromebook
- Linux
- Troubleshooting
Windows
ℹ️ You may also connect using IKEv2 mode (recommended).
Windows 11
- Right-click on the wireless/network icon in your system tray.
- Select Network and Internet settings, then on the page that opens, click VPN.
- Click the Add VPN button.
- Select Windows (built-in) in the VPN provider drop-down menu.
- Enter anything you like in the Connection name field.
- Enter
Your VPN Server IPin the Server name or address field. - Select L2TP/IPsec with pre-shared key in the VPN type drop-down menu.
- Enter
Your VPN IPsec PSKin the Pre-shared key field. - Enter
Your VPN Usernamein the User name field. - Enter
Your VPN Passwordin the Password field. - Check the Remember my sign-in info checkbox.
- Click Save to save the VPN connection details.
Note: This one-time registry change is required if the VPN server and/or client is behind NAT (e.g. home router).
To connect to the VPN: Click the Connect button, or click on the wireless/network icon in your system tray, click VPN, then select the new VPN entry and click Connect. If prompted, enter Your VPN Username and Password, then click OK. You can verify that your traffic is being routed properly by looking up your IP address on Google. It should say «Your public IP address is Your VPN Server IP«.
If you get an error when trying to connect, see Troubleshooting.
Windows 10 and 8
- Right-click on the wireless/network icon in your system tray.
- Select Open Network & Internet settings, then on the page that opens, click Network and Sharing Center.
- Click Set up a new connection or network.
- Select Connect to a workplace and click Next.
- Click Use my Internet connection (VPN).
- Enter
Your VPN Server IPin the Internet address field. - Enter anything you like in the Destination name field, and then click Create.
- Return to Network and Sharing Center. On the left, click Change adapter settings.
- Right-click on the new VPN entry and choose Properties.
- Click the Security tab. Select «Layer 2 Tunneling Protocol with IPsec (L2TP/IPSec)» for the Type of VPN.
- Click Allow these protocols. Check the «Challenge Handshake Authentication Protocol (CHAP)» and «Microsoft CHAP Version 2 (MS-CHAP v2)» checkboxes.
- Click the Advanced settings button.
- Select Use preshared key for authentication and enter
Your VPN IPsec PSKfor the Key. - Click OK to close the Advanced settings.
- Click OK to save the VPN connection details.
Note: This one-time registry change is required if the VPN server and/or client is behind NAT (e.g. home router).
To connect to the VPN: Click on the wireless/network icon in your system tray, select the new VPN entry, and click Connect. If prompted, enter Your VPN Username and Password, then click OK. You can verify that your traffic is being routed properly by looking up your IP address on Google. It should say «Your public IP address is Your VPN Server IP«.
If you get an error when trying to connect, see Troubleshooting.
Alternatively, instead of following the steps above, you may create the VPN connection using these Windows PowerShell commands. Replace Your VPN Server IP and Your VPN IPsec PSK with your own values, enclosed in single quotes:
# Disable persistent command history
Set-PSReadlineOption –HistorySaveStyle SaveNothing
# Create VPN connection
Add-VpnConnection -Name 'My IPsec VPN' -ServerAddress 'Your VPN Server IP' -L2tpPsk 'Your VPN IPsec PSK' -TunnelType L2tp -EncryptionLevel Required -AuthenticationMethod Chap,MSChapv2 -Force -RememberCredential -PassThru
# Ignore the data encryption warning (data is encrypted in the IPsec tunnel)
Windows 7, Vista and XP
- Click on the Start Menu and go to the Control Panel.
- Go to the Network and Internet section.
- Click Network and Sharing Center.
- Click Set up a new connection or network.
- Select Connect to a workplace and click Next.
- Click Use my Internet connection (VPN).
- Enter
Your VPN Server IPin the Internet address field. - Enter anything you like in the Destination name field.
- Check the Don’t connect now; just set it up so I can connect later checkbox.
- Click Next.
- Enter
Your VPN Usernamein the User name field. - Enter
Your VPN Passwordin the Password field. - Check the Remember this password checkbox.
- Click Create, and then Close.
- Return to Network and Sharing Center. On the left, click Change adapter settings.
- Right-click on the new VPN entry and choose Properties.
- Click the Options tab and uncheck Include Windows logon domain.
- Click the Security tab. Select «Layer 2 Tunneling Protocol with IPsec (L2TP/IPSec)» for the Type of VPN.
- Click Allow these protocols. Check the «Challenge Handshake Authentication Protocol (CHAP)» and «Microsoft CHAP Version 2 (MS-CHAP v2)» checkboxes.
- Click the Advanced settings button.
- Select Use preshared key for authentication and enter
Your VPN IPsec PSKfor the Key. - Click OK to close the Advanced settings.
- Click OK to save the VPN connection details.
Note: This one-time registry change is required if the VPN server and/or client is behind NAT (e.g. home router).
To connect to the VPN: Click on the wireless/network icon in your system tray, select the new VPN entry, and click Connect. If prompted, enter Your VPN Username and Password, then click OK. You can verify that your traffic is being routed properly by looking up your IP address on Google. It should say «Your public IP address is Your VPN Server IP«.
If you get an error when trying to connect, see Troubleshooting.
OS X
ℹ️ You may also connect using IKEv2 (recommended) or IPsec/XAuth mode.
- Open System Preferences and go to the Network section.
- Click the + button in the lower-left corner of the window.
- Select VPN from the Interface drop-down menu.
- Select L2TP over IPSec from the VPN Type drop-down menu.
- Enter anything you like for the Service Name.
- Click Create.
- Enter
Your VPN Server IPfor the Server Address. - Enter
Your VPN Usernamefor the Account Name. - Click the Authentication Settings button.
- In the User Authentication section, select the Password radio button and enter
Your VPN Password. - In the Machine Authentication section, select the Shared Secret radio button and enter
Your VPN IPsec PSK. - Click OK.
- Check the Show VPN status in menu bar checkbox.
- (Important) Click the Advanced button and make sure the Send all traffic over VPN connection checkbox is checked.
- (Important) Click the TCP/IP tab, and make sure Link-local only is selected in the Configure IPv6 section.
- Click OK to close the Advanced settings, and then click Apply to save the VPN connection information.
To connect to the VPN: Use the menu bar icon, or go to the Network section of System Preferences, select the VPN and choose Connect. You can verify that your traffic is being routed properly by looking up your IP address on Google. It should say «Your public IP address is Your VPN Server IP«.
If you get an error when trying to connect, see Troubleshooting.
Android
ℹ️ You may also connect using IKEv2 (recommended) or IPsec/XAuth mode. Android 12 only supports IKEv2 mode.
- Launch the Settings application.
- Tap «Network & internet». Or, if using Android 7 or earlier, tap More… in the Wireless & networks section.
- Tap VPN.
- Tap Add VPN Profile or the + icon at top-right of screen.
- Enter anything you like in the Name field.
- Select L2TP/IPSec PSK in the Type drop-down menu.
- Enter
Your VPN Server IPin the Server address field. - Leave the L2TP secret field blank.
- Leave the IPSec identifier field blank.
- Enter
Your VPN IPsec PSKin the IPSec pre-shared key field. - Tap Save.
- Tap the new VPN connection.
- Enter
Your VPN Usernamein the Username field. - Enter
Your VPN Passwordin the Password field. - Check the Save account information checkbox.
- Tap Connect.
Once connected, you will see a VPN icon in the notification bar. You can verify that your traffic is being routed properly by looking up your IP address on Google. It should say «Your public IP address is Your VPN Server IP«.
If you get an error when trying to connect, see Troubleshooting.
iOS
ℹ️ You may also connect using IKEv2 (recommended) or IPsec/XAuth mode.
- Go to Settings -> General -> VPN.
- Tap Add VPN Configuration….
- Tap Type. Select L2TP and go back.
- Tap Description and enter anything you like.
- Tap Server and enter
Your VPN Server IP. - Tap Account and enter
Your VPN Username. - Tap Password and enter
Your VPN Password. - Tap Secret and enter
Your VPN IPsec PSK. - Make sure the Send All Traffic switch is ON.
- Tap Done.
- Slide the VPN switch ON.
Once connected, you will see a VPN icon in the status bar. You can verify that your traffic is being routed properly by looking up your IP address on Google. It should say «Your public IP address is Your VPN Server IP«.
If you get an error when trying to connect, see Troubleshooting.
Chromebook
- If you haven’t already, sign in to your Chromebook.
- Click the status area, where your account picture appears.
- Click Settings.
- In the Internet connection section, click Add connection.
- Click Add OpenVPN / L2TP.
- Enter
Your VPN Server IPfor the Server hostname. - Enter anything you like for the Service name.
- Make sure Provider type is L2TP/IPSec + pre-shared key.
- Enter
Your VPN IPsec PSKfor the Pre-shared key. - Enter
Your VPN Usernamefor the Username. - Enter
Your VPN Passwordfor the Password. - Click Connect.
Once connected, you will see a VPN icon overlay on the network status icon. You can verify that your traffic is being routed properly by looking up your IP address on Google. It should say «Your public IP address is Your VPN Server IP«.
If you get an error when trying to connect, see Troubleshooting.
Linux
ℹ️ You may also connect using IKEv2 mode (recommended).
Ubuntu Linux
Ubuntu 18.04 (and newer) users can install the network-manager-l2tp-gnome package using apt, then configure the IPsec/L2TP VPN client using the GUI.
- Go to Settings -> Network -> VPN. Click the + button.
- Select Layer 2 Tunneling Protocol (L2TP).
- Enter anything you like in the Name field.
- Enter
Your VPN Server IPfor the Gateway. - Enter
Your VPN Usernamefor the User name. - Right-click the ? in the Password field, select Store the password only for this user.
- Enter
Your VPN Passwordfor the Password. - Leave the NT Domain field blank.
- Click the IPsec Settings… button.
- Check the Enable IPsec tunnel to L2TP host checkbox.
- Leave the Gateway ID field blank.
- Enter
Your VPN IPsec PSKfor the Pre-shared key. - Expand the Advanced section.
- Enter
aes128-sha1-modp2048for the Phase1 Algorithms. - Enter
aes128-sha1for the Phase2 Algorithms. - Click OK, then click Add to save the VPN connection information.
- Turn the VPN switch ON.
If you get an error when trying to connect, try this fix.
Once connected, you can verify that your traffic is being routed properly by looking up your IP address on Google. It should say «Your public IP address is Your VPN Server IP«.
Fedora and CentOS
Fedora 28 (and newer) and CentOS 8/7 users can connect using IPsec/XAuth mode.
Other Linux
First check here to see if the network-manager-l2tp and network-manager-l2tp-gnome packages are available for your Linux distribution. If yes, install them (select strongSwan) and follow the instructions above. Alternatively, you may configure Linux VPN clients using the command line.
Troubleshooting
Read this in other languages: English, 简体中文.
See also: Check logs and VPN status, IKEv2 troubleshooting and Advanced usage.
- Windows error 809
- Windows error 789 or 691
- Windows error 628 or 766
- Windows 10 connecting
- Windows 10 upgrades
- Windows DNS leaks and IPv6
- Android MTU/MSS issues
- Android 6 and 7
- macOS send traffic over VPN
- iOS 13+ and macOS 10.15/11+
- iOS/Android sleep mode
- Debian 11/10 kernel
- Other errors
- Check logs and VPN status
Windows error 809
Error 809: The network connection between your computer and the VPN server could not be established because the remote server is not responding. This could be because one of the network devices (e.g, firewalls, NAT, routers, etc) between your computer and the remote server is not configured to allow VPN connections. Please contact your Administrator or your service provider to determine which device may be causing the problem.
Note: The registry change below is only required if you use IPsec/L2TP mode to connect to the VPN. It is NOT required for the IKEv2 and IPsec/XAuth modes.
To fix this error, a one-time registry change is required because the VPN server and/or client is behind NAT (e.g. home router). Download and import the .reg file below, or run the following from an elevated command prompt. You must reboot your PC when finished.
-
For Windows Vista, 7, 8, 10 and 11 (download .reg file)
REG ADD HKLMSYSTEMCurrentControlSetServicesPolicyAgent /v AssumeUDPEncapsulationContextOnSendRule /t REG_DWORD /d 0x2 /f -
For Windows XP ONLY (download .reg file)
REG ADD HKLMSYSTEMCurrentControlSetServicesIPSec /v AssumeUDPEncapsulationContextOnSendRule /t REG_DWORD /d 0x2 /f
Although uncommon, some Windows systems disable IPsec encryption, causing the connection to fail. To re-enable it, run the following command and reboot your PC.
-
For Windows XP, Vista, 7, 8, 10 and 11 (download .reg file)
REG ADD HKLMSYSTEMCurrentControlSetServicesRasManParameters /v ProhibitIpSec /t REG_DWORD /d 0x0 /f
Windows error 789 or 691
Error 789: The L2TP connection attempt failed because the security layer encountered a processing error during initial negotiations with the remote computer.
Error 691: The remote connection was denied because the user name and password combination you provided is not recognized, or the selected authentication protocol is not permitted on the remote access server.
For error 789, click here for troubleshooting information. For error 691, you may try removing and recreating the VPN connection, by following the instructions in this document. Make sure that the VPN credentials are entered correctly.
Windows error 628 or 766
Error 628: The connection was terminated by the remote computer before it could be completed.
Error 766: A certificate could not be found. Connections that use the L2TP protocol over IPSec require the installation of a machine certificate, also known as a computer certificate.
To fix these errors, please follow these steps:
- Right-click on the wireless/network icon in your system tray.
- Select Open Network and Sharing Center. Or, if using Windows 10 version 1709 or newer, select Open Network & Internet settings, then on the page that opens, click Network and Sharing Center.
- On the left, click Change adapter settings. Right-click on the new VPN and choose Properties.
- Click the Security tab. Select «Layer 2 Tunneling Protocol with IPsec (L2TP/IPSec)» for Type of VPN.
- Click Allow these protocols. Check the «Challenge Handshake Authentication Protocol (CHAP)» and «Microsoft CHAP Version 2 (MS-CHAP v2)» checkboxes.
- Click the Advanced settings button.
- Select Use preshared key for authentication and enter
Your VPN IPsec PSKfor the Key. - Click OK to close the Advanced settings.
- Click OK to save the VPN connection details.
For reference, see this screenshot of the VPN connection properties dialog.
Windows 10 connecting
If using Windows 10 and the VPN is stuck on «connecting» for more than a few minutes, try these steps:
- Right-click on the wireless/network icon in your system tray.
- Select Open Network & Internet settings, then on the page that opens, click VPN on the left.
- Select the new VPN entry, then click Connect. If prompted, enter
Your VPN UsernameandPassword, then click OK.
Windows 10 upgrades
After upgrading Windows 10 version (e.g. from 1709 to 1803), you may need to re-apply the fix above for Windows Error 809 and reboot.
Windows DNS leaks and IPv6
Windows 8, 10 and 11 use «smart multi-homed name resolution» by default, which may cause «DNS leaks» when using the native IPsec VPN client if your DNS servers on the Internet adapter are from the local network segment. To fix, you may either disable smart multi-homed name resolution, or configure your Internet adapter to use DNS servers outside your local network (e.g. 8.8.8.8 and 8.8.4.4). When finished, clear the DNS cache and reboot your PC.
In addition, if your computer has IPv6 enabled, all IPv6 traffic (including DNS queries) will bypass the VPN. Learn how to disable IPv6 in Windows. If you need a VPN with IPv6 support, you could instead try OpenVPN.
Android MTU/MSS issues
Some Android devices have MTU/MSS issues, that they are able to connect to the VPN using IPsec/XAuth («Cisco IPsec») mode, but cannot open websites. If you encounter this problem, try running the following commands on the VPN server. If successful, you may add these commands to /etc/rc.local to persist after reboot.
iptables -t mangle -A FORWARD -m policy --pol ipsec --dir in
  -p tcp -m tcp --tcp-flags SYN,RST SYN -m tcpmss --mss 1361:1536
  -j TCPMSS --set-mss 1360
iptables -t mangle -A FORWARD -m policy --pol ipsec --dir out
  -p tcp -m tcp --tcp-flags SYN,RST SYN -m tcpmss --mss 1361:1536
  -j TCPMSS --set-mss 1360

echo 1 > /proc/sys/net/ipv4/ip_no_pmtu_disc
Docker users: Instead of running the commands above, you may apply this fix by adding VPN_ANDROID_MTU_FIX=yes to your env file, then re-create the Docker container.
References: [1] [2].
Android 6 and 7
If your Android 6.x or 7.x device cannot connect, try these steps:
- Tap the «Settings» icon next to your VPN profile. Select «Show advanced options» and scroll down to the bottom. If the option «Backward compatible mode» exists (see screenshot), enable it and reconnect the VPN. If not, try the next step.
- Edit
/etc/ipsec.confon the VPN server. Find the linesha2-truncbugand toggle its value. i.e. Replacesha2-truncbug=nowithsha2-truncbug=yes, or replacesha2-truncbug=yeswithsha2-truncbug=no. Save the file and runservice ipsec restart. Then reconnect the VPN.
Docker users: You may set sha2-truncbug=yes (default is no) in /etc/ipsec.conf by adding VPN_SHA2_TRUNCBUG=yes to your env file, then re-create the Docker container.
macOS send traffic over VPN
OS X (macOS) users: If you can successfully connect using IPsec/L2TP mode, but your public IP does not show Your VPN Server IP, read the OS X section above and complete these steps. Save VPN configuration and re-connect.
- Click the Advanced button and make sure the Send all traffic over VPN connection checkbox is checked.
- Click the TCP/IP tab, and make sure Link-local only is selected in the Configure IPv6 section.
After trying the steps above, if your computer is still not sending traffic over the VPN, check the service order. From the main network preferences screen, select «set service order» in the cog drop down under the list of connections. Drag the VPN connection to the top.
iOS 13+ and macOS 10.15/11+
If your device running iOS 13+, macOS 10.15 (Catalina), macOS 11 (Big Sur) or above cannot connect, try these steps: Edit /etc/ipsec.conf on the VPN server. Find sha2-truncbug=yes and replace it with sha2-truncbug=no. Save the file and run service ipsec restart. Then reconnect the VPN.
In addition, users running macOS Big Sur 11.0 should update to version 11.1 or newer, to fix some issues with VPN connections. To check your macOS version and update, refer to this article.
iOS/Android sleep mode
To save battery, iOS devices (iPhone/iPad) will automatically disconnect Wi-Fi shortly after the screen turns off (sleep mode). As a result, the IPsec VPN disconnects. This behavior is by design and cannot be configured.
If you need the VPN to auto-reconnect when the device wakes up, you may connect using IKEv2 mode (recommended) and enable the «VPN On Demand» feature. Alternatively, you may try OpenVPN instead, which has support for options such as «Reconnect on Wakeup» and «Seamless Tunnel».
Android devices will also disconnect Wi-Fi shortly after entering sleep mode, unless the option «Keep Wi-Fi on during sleep» is enabled. This option is no longer available in Android 8 (Oreo) and newer. Alternatively, you may try enabling the «Always-on VPN» option to stay connected. Learn more here.
Debian 11/10 kernel
Debian 11 or 10 users: Run uname -r to check your server’s Linux kernel version. If it contains the word «cloud», and /dev/ppp is missing, then the kernel lacks ppp support and cannot use IPsec/L2TP mode. The VPN setup scripts try to detect this and show a warning. In this case, you may instead use IKEv2 or IPsec/XAuth mode to connect to the VPN.
To fix the issue with IPsec/L2TP mode, you may switch to the standard Linux kernel by installing e.g. the linux-image-amd64 package. Then update the default kernel in GRUB and reboot your server.
Other errors
If you encounter other errors, refer to the links below:
- http://www.tp-link.com/en/faq-1029.html
- https://documentation.meraki.com/MX-Z/Client_VPN/Troubleshooting_Client_VPN#Common_Connection_Issues
- https://stackoverflow.com/questions/25245854/windows-8-1-gets-error-720-on-connect-vpn
Check logs and VPN status
Commands below must be run as root (or using sudo).
First, restart services on the VPN server:
service ipsec restart
service xl2tpd restart
Docker users: Run docker restart ipsec-vpn-server.
Then reboot your VPN client device, and retry the connection. If still unable to connect, try removing and recreating the VPN connection. Make sure that the VPN credentials are entered correctly.
Check the Libreswan (IPsec) and xl2tpd logs for errors:
# Ubuntu & Debian
grep pluto /var/log/auth.log
grep xl2tpd /var/log/syslog

# CentOS/RHEL, Rocky Linux, AlmaLinux & Amazon Linux 2
grep pluto /var/log/secure
grep xl2tpd /var/log/messages

# Alpine Linux
grep pluto /var/log/messages
grep xl2tpd /var/log/messages
Check the status of the IPsec VPN server:
Show currently established VPN connections:
Configure Linux VPN clients using the command line
After setting up your own VPN server, follow these steps to configure Linux VPN clients using the command line. Alternatively, you may connect using IKEv2 mode (recommended), or configure using the GUI. Instructions below are based on the work of Peter Sanford. Commands must be run as root on your VPN client.
To set up the VPN client, first install the following packages:
# Ubuntu and Debian
apt-get update
apt-get install strongswan xl2tpd net-tools

# Fedora
yum install strongswan xl2tpd net-tools

# CentOS
yum install epel-release
yum --enablerepo=epel install strongswan xl2tpd net-tools
Create VPN variables (replace with actual values):
VPN_SERVER_IP='your_vpn_server_ip'
VPN_IPSEC_PSK='your_ipsec_pre_shared_key'
VPN_USER='your_vpn_username'
VPN_PASSWORD='your_vpn_password'
Configure strongSwan:
cat > /etc/ipsec.conf <<EOF
# ipsec.conf - strongSwan IPsec configuration file

conn myvpn
  auto=add
  keyexchange=ikev1
  authby=secret
  type=transport
  left=%defaultroute
  leftprotoport=17/1701
  rightprotoport=17/1701
  right=$VPN_SERVER_IP
  ike=aes128-sha1-modp2048
  esp=aes128-sha1
EOF

cat > /etc/ipsec.secrets <<EOF
: PSK "$VPN_IPSEC_PSK"
EOF

chmod 600 /etc/ipsec.secrets

# For CentOS and Fedora ONLY
mv /etc/strongswan/ipsec.conf /etc/strongswan/ipsec.conf.old 2>/dev/null
mv /etc/strongswan/ipsec.secrets /etc/strongswan/ipsec.secrets.old 2>/dev/null
ln -s /etc/ipsec.conf /etc/strongswan/ipsec.conf
ln -s /etc/ipsec.secrets /etc/strongswan/ipsec.secrets
Configure xl2tpd:
cat > /etc/xl2tpd/xl2tpd.conf <<EOF
[lac myvpn]
lns = $VPN_SERVER_IP
ppp debug = yes
pppoptfile = /etc/ppp/options.l2tpd.client
length bit = yes
EOF

cat > /etc/ppp/options.l2tpd.client <<EOF
ipcp-accept-local
ipcp-accept-remote
refuse-eap
require-chap
noccp
noauth
mtu 1280
mru 1280
noipdefault
defaultroute
usepeerdns
connect-delay 5000
name "$VPN_USER"
password "$VPN_PASSWORD"
EOF

chmod 600 /etc/ppp/options.l2tpd.client
The VPN client setup is now complete. Follow the steps below to connect.
Note: You must repeat all steps below every time you try to connect to the VPN.
Create xl2tpd control file:
mkdir -p /var/run/xl2tpd
touch /var/run/xl2tpd/l2tp-control
Restart services:
service strongswan restart

# For Ubuntu 20.04, if strongswan service not found
ipsec restart

service xl2tpd restart
Start the IPsec connection:
# Ubuntu and Debian
ipsec up myvpn

# CentOS and Fedora
strongswan up myvpn
Start the L2TP connection:
echo "c myvpn" > /var/run/xl2tpd/l2tp-control
Run ifconfig and check the output. You should now see a new interface ppp0.
Check your existing default route:
Find this line in the output: default via X.X.X.X .... Write down this gateway IP for use in the two commands below.
Exclude your VPN server’s public IP from the new default route (replace with actual value):
route add YOUR_VPN_SERVER_PUBLIC_IP gw X.X.X.X
If your VPN client is a remote server, you must also exclude your Local PC’s public IP from the new default route, to prevent your SSH session from being disconnected (replace with actual value):
route add YOUR_LOCAL_PC_PUBLIC_IP gw X.X.X.X
Add a new default route to start routing traffic via the VPN server:
route add default dev ppp0
The VPN connection is now complete. Verify that your traffic is being routed properly:
wget -qO- http://ipv4.icanhazip.com; echo
The above command should return Your VPN Server IP.
To stop routing traffic via the VPN server:
route del default dev ppp0
To disconnect:
# Ubuntu and Debian
echo "d myvpn" > /var/run/xl2tpd/l2tp-control
ipsec down myvpn

# CentOS and Fedora
echo "d myvpn" > /var/run/xl2tpd/l2tp-control
strongswan down myvpn
Credits
This document was adapted from the Streisand project, maintained by Joshua Lund and contributors.
License
Note: This license applies to this document only.
Copyright (C) 2016-2022 Lin Song
Based on the work of Joshua Lund (Copyright 2014-2016)
This program is free software: you can redistribute it and/or modify it under the terms of the GNU General Public License as published by the Free Software Foundation, either version 3 of the License, or (at your option) any later version.
This program is distributed in the hope that it will be useful, but WITHOUT ANY WARRANTY; without even the implied warranty of MERCHANTABILITY or FITNESS FOR A PARTICULAR PURPOSE. See the GNU General Public License for more details.
-
Ensure IPSEC Passthrough is enabled on your router (if you’re not using a USG on your client network)
-
Ensure Enable LCP Extensions is selected under your VPN Connection Network Properties — Options — PPP. Ensure Enable Software Compression and Multi-Link are both not selected in the same place.
-
VPN Connection Network Properties — Security — Require Encryption is selected. Allow these Protocols selected. Microsoft CHAP Version 2 ticked, no other boxes ticked.
-
Ensure the Windows Registry value AssumeUDPEncapsulationContextOnSendRule is set to 2
-
Ensure Windows 10 is up to date.
If still having problems, open Device Manager, Network adapters, delete any L2TP and IKEv2 WAN Miniport devices and reboot.
With these settings I have get a rock solid VPN connection from my home network which has a USG, using my mobiles 4G hotspot with the carrier using CGNAT, and from my parents house which has a bog standard ISP supplied Wifi router.
If your server end ISP uses CGNAT, I can see the problems you’re experiencing occurring also. L2tp / IPSEC is very specific about requiring the server ports to be UDP 500, 1701 and 4500, and ESP protocol 50, although when using NAT transversal the ESP packets get sent over UDP. A CGNAT at your server ISP may mangle these ports, and that could happen to port 4500 intermittently.
Мы покажем вам, как вручную настроить VPN в Windows 10 с использованием протоколов OpenVPN, IPSec (L2TP, IKEv2, SSTP) и Wireguard.
Большинство коммерческих провайдеров VPN в наши дни создают свои собственные приложения. Приложения VPN упрощают настройку VPN за счет простого процесса установки: загрузки, установки, входа в систему и подключения. Приложения поставляются с предварительно настроенными всеми серверами провайдера, готовыми к работе.
Но по той или иной причине приложение Plug-and-Play VPN может не подходить. Возможно, ваш провайдер VPN не создает собственное приложение, приложение недоступно там, где вы живете, или у вас нет разрешения на установку новых приложений на ваше устройство. Если у вашего работодателя есть собственная корпоративная VPN, велика вероятность, что потребуется настройка вручную.
В некоторых случаях ручная настройка может работать в местах, где приложение VPN заблокировано. Например, в ОАЭ местный провайдер интернет-услуг Etisalat заблокировал подключения из приложения NordVPN, но разрешил подключения NordVPN, которые были настроены вручную.
В этих сценариях вам придется вручную настроить VPN. Как вы это делаете, во многом зависит от протокола VPN, используемого вашим провайдером. Это руководство покажет вам, как вручную настроить VPN в Windows 10, используя следующие протоколы:
- OpenVPN
- IPSec: L2TP, SSTP и IKEv2
- Wireguard
Это наиболее распространенные протоколы VPN, которые используются сегодня. Windows 10 имеет встроенную поддержку протоколов IPSec, а для других требуется стороннее приложение.
Перед тем как начать, спросите своего поставщика VPN или ИТ-администратора, какой протокол использовать. Затем перейдите к соответствующему разделу ниже. Мы будем использовать NordVPN и StrongVPN для наших руководств, но процесс аналогичен любому провайдеру VPN.
См. Также: Лучшие VPN для Windows 10
Как вручную настроить клиент OpenVPN в Windows 10
Что вам понадобится:
- Клиентское приложение OpenVPN
- Файлы конфигурации OpenVPN от вашего провайдера (.ovpn)
- Имя пользователя
- Пароль
Windows не поддерживает OpenVPN из коробки, поэтому для настройки соединения вам понадобится стороннее приложение. Если ваш провайдер или ИТ-администратор не указывает, какое приложение использовать, мы рекомендуем загрузить официальный графический интерфейс OpenVPN для Windows 10. Доступны как 64-разрядные, так и 32-разрядные версии.
Если ваш провайдер использует OpenVPN, у него должны быть файлы конфигурации OpenVPN, доступные для загрузки. Эти файлы обычно содержат спецификации подключения, ключ сертификации и ключ шифрования. Вы можете открывать и редактировать их в текстовом редакторе, но для наших целей в этом нет необходимости.
Вот как настроить соединение OpenVPN в Windows 10:
- Загрузите и установите приложение OpenVPN в папку по умолчанию. Для этой демонстрации мы будем использовать официальное приложение с графическим интерфейсом OpenVPN, указанное выше. Используется стандартный мастер установки.
- Получите файл (ы) конфигурации OpenVPN для сервера (ов), к которому вы хотите подключиться. Они будут иметь расширения файлов .ovpn или .conf. NordVPN позволяет мне загружать файлы .ovpn прямо со своего веб-сайта. Один файл конфигурации на сервер. Обратите внимание, нужны ли вам файлы конфигурации UDP или TCP, которые будут определены вашим провайдером.
- Скопируйте или извлеките файлы конфигурации в каталог конфигурации вашего приложения OpenVPN. По умолчанию в Windows это будет C: Program Files OpenVPN config. Нажмите «Продолжить», если будет предложено разрешение администратора. В некоторых приложениях может потребоваться встроенная функция импорта.
- Откройте клиентское приложение OpenVPN и позвольте ему внести изменения в ваше устройство, если будет предложено. В Windows приложение OpenVPN запускается на панели задач в правом нижнем углу.
- Щелкните правой кнопкой мыши значок на панели задач, выберите импортированную конфигурацию и нажмите «Подключиться».
- Введите имя пользователя и пароль своей учетной записи VPN.


Если все пойдет по плану, приложению потребуется несколько секунд для подключения, после чего VPN будет готов к использованию.

Как вручную настроить IPSec VPN в Windows 10 (L2TP, SSTP, IKEv2)
Что вам понадобится:
- Имя хоста сервера
- Имя пользователя
- Пароль
- Сертификат или общий секрет
Windows имеет встроенную поддержку протоколов VPN на основе IPSec, включая L2TP, SSTP и IKEv2. Хотя каждый из этих протоколов работает немного по-разному, настройка более или менее одинакова. В этом руководстве я сосредоточусь на IKEv2.
Обратите внимание, что разные провайдеры могут использовать разные схемы шифрования. Например, если ваш провайдер использует сертификат, вам может потребоваться установить сертификат и импортировать его в доверенные корневые центры сертификации вашего ПК. Это выходит за рамки данной статьи, поэтому мы просто сделаем базовую настройку VPN.
Вот как настроить соединение IPSec VPN в Windows 10 (IKEv2):
- Введите «Панель управления» в строку поиска Windows и выберите верхний вариант.
- Перейдите в Сеть и Интернет> Центр управления сетями и общим доступом.
- Щелкните Настроить новое соединение или сеть.
- Выберите Подключиться к рабочему месту.
- Отметьте опцию «Нет, создавать новое соединение» и нажмите «Далее».
- Выберите Использовать мое подключение к Интернету (VPN).
- Введите имя хоста вашего сервера в поле Интернет-адреса, введите любое имя, которое вы хотите в качестве имени назначения, и нажмите «Создать».
- Вернувшись в окно Центра управления сетями и общим доступом, щелкните Изменить параметры адаптера на левой боковой панели.
- Щелкните правой кнопкой мыши только что созданное соединение и выберите «Свойства». Перейдите на вкладку Безопасность.
- Введите данные подключения, указанные вашим поставщиком VPN, включая тип VPN, шифрование и аутентификацию.
- Необязательно: перейдите на вкладку «Сеть» и снимите флажок «Протокол Интернета версии 6 (TCP / IPv6)». Это может помочь предотвратить утечку данных IPv6.
- Щелкните ОК, чтобы сохранить изменения.
- В строке поиска Windows введите «vpn» и выберите настройки VPN, что для меня является лучшим результатом.
- Щелкните только что настроенное VPN-соединение и выберите Дополнительные параметры.
- В разделе ” Свойства подключения” нажмите ” Изменить”.
- При необходимости введите свое имя пользователя и пароль, затем нажмите «Сохранить».
- Вернувшись на страницу настроек VPN, щелкните свое VPN-соединение, а затем нажмите «Подключиться».


Через несколько секунд соединение будет установлено, и VPN отобразит статус Connected.
Как вручную настроить клиент Wireguard в Windows 10
Что вам понадобится:
- Клиентское приложение Wireguard
- Файл конфигурации Wireguard
Настройка Wireguard похожа на OpenVPN в том, что для нее требуется сторонний клиент и файл конфигурации от вашего провайдера. Файл конфигурации будет содержать все необходимые спецификации подключения и шифрования, включая учетные данные для входа.
Вы можете скачать и установить официальное приложение Wireguard отсюда. Мы будем использовать его для подключения к StrongVPN в этом руководстве, хотя процесс должен быть аналогичным для других провайдеров.
Вот как вручную настроить клиент Wireguard в Windows 10:
Через несколько секунд вы должны получить уведомление о том, что VPN подключен.
Источник записи: https://www.comparitech.com

Шаг 1.
Нажмите кнопку “Пуск” (1) и выберите “Параметры” (2).

Шаг 2.
В открытом окне “Параметров” кликните подраздел “Сеть и Интернет”.

Шаг 3.
В меню “VPN” (1) перейдите к пункту “Добавление VPN-подключения” (2).

Шаг 4.
- (1) “Поставщик услуг VPN” – Windows;
- (2) “Имя подключения” – любое удобное вам имя подключения;
- (3) “Имя или адрес сервера” – IP-адрес вашего сервера из письма;
- (4) “Тип VPN” – L2TP/IPsec с предварительным ключом;
- (5) “Общий ключ” – vpnext;
- (6) “Тип данных для входа” – Имя пользователя и пароль;
- (7) “Имя пользователя” – заданное вами при настройке сервера;
- (8) “Пароль” – заданный вами при настройке сервера.
(Не путать с логином/паролем от Личного Кабинета).
Нажмите «Сохранить».

Шаг 5.
VPN-профиль успешно создан (1). Перейдите к разделу “Сопутствующие параметры” и выберите “Центр управления сетями и общим доступом” (2).

Шаг 6.
В новом окне сведений о сети выберите “Изменение параметров адаптера”.

Шаг 7.
Кликните правой кнопкой мыши на сетевом подключении с выбранным вами именем профиля (1) и в функциональном меню выберите “Свойства” (2).

Шаг 8.
На вкладке “Безопасность” (1) установите:
- (2) “Тип VPN” – Протокол L2TP с IPSec;
- (3) “Шифрование данных” – самое стойкое;
- (4) “Разрешить следующие протоколы” – оба пункта “Протокол проверки CHAP…”.

Шаг 9.
В свойствах протокола нажмите “Дополнительные параметры” (1) и в новом окне введите ключ – vpnext (2), если вы не сделали этого на Шаге 4.
После всех настроек нажмите кнопку “Ок”.

Шаг 10.
Перейдите ко вкладке “Сеть” (1) и выберите “IP версии 4” (2), после чего нажмите кнопку “Свойства” (3).

Шаг 11.
Выберите автоматическое получение IP-адреса и автоматическое получение адреса DNS-сервера (1).
После изменения сетевой конфигурации нажмите кнопку “Ок” (3).

Шаг 12.
Для подключения нажмите на значок сети (1) в правом нижнем углу. Затем выберите созданный ранее профиль (2).