Последнее обновление: 11.11.2022
Для создания графических приложений на C# можно использовать .NET CLI, но также можно
использовать бесплатную и полнофункциональную среду разработки — Visual Studio Community 2022, которая в ряде случаев облегчает проектирование
приложения. Так, загрузим установщик Visual Studio по адресу:
https://www.visualstudio.com/en-us/downloads.

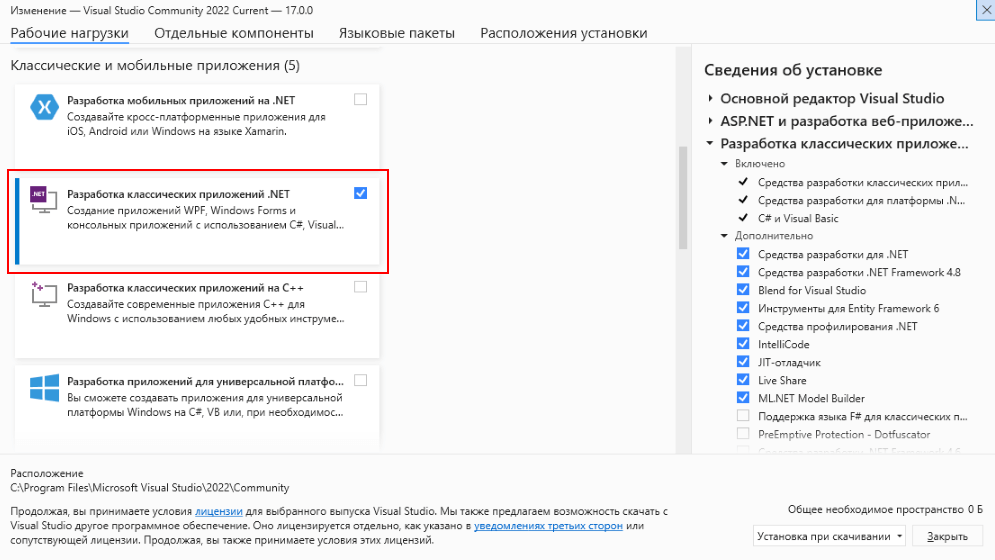
Чтобы добавить в Visual Studio поддержку проектов для Windows Forms и C# и .NET 7, в программе установки среди рабочих нагрузок нужно
выбрать только пункт Разработка классических приложений .NET. Можно выбрать и больше опций или вообще все опции, однако стоит
учитывать свободный размер на жестком диске — чем больше опций будет выбрано, соответственно тем больше места на диске будет занято.
После установки среды и всех ее компонентов, запустим Visual Studio и создадим проект графического приложения.
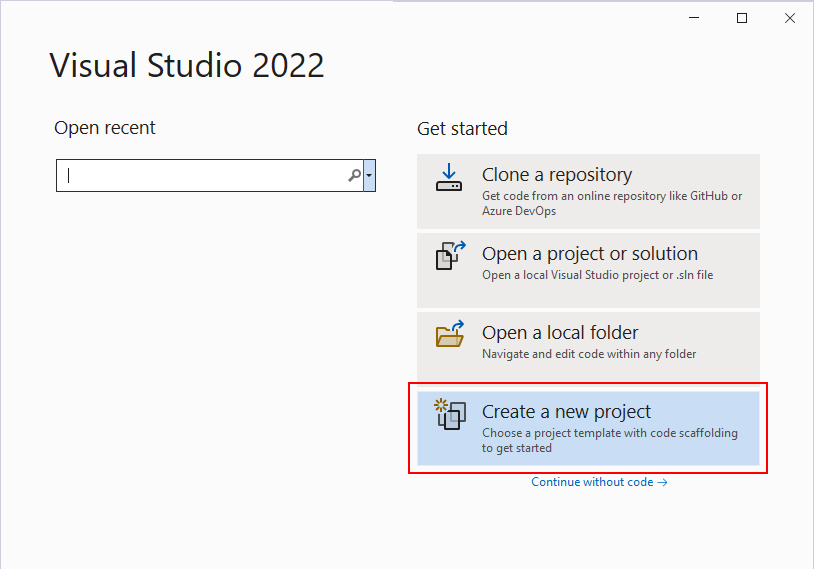
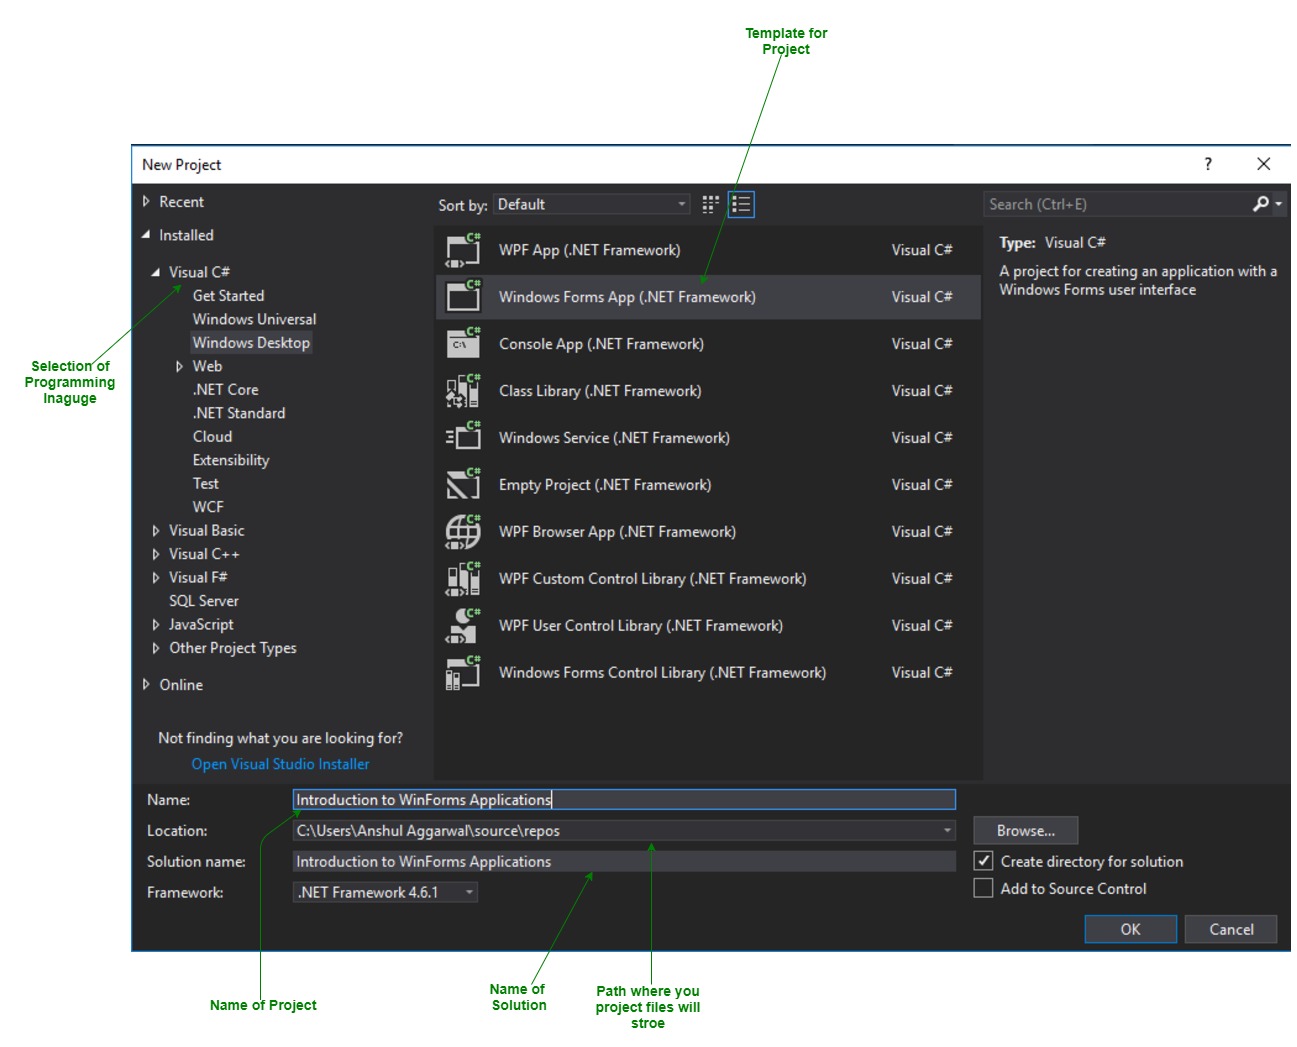
На стартовом экране выберем Create a new project (Создать новый проект)
На следующем окне в качестве типа проекта выберем Windows Forms App:

Стоит отметить, что среди шаблонов можно увидеть еще тип Windows Forms App (.NET Framework) — его НЕ надо выбирать, необходим именно тип
Windows Forms App.
Далее на следующем этапе нам будет предложено указать имя проекта и каталог, где будет располагаться проект.
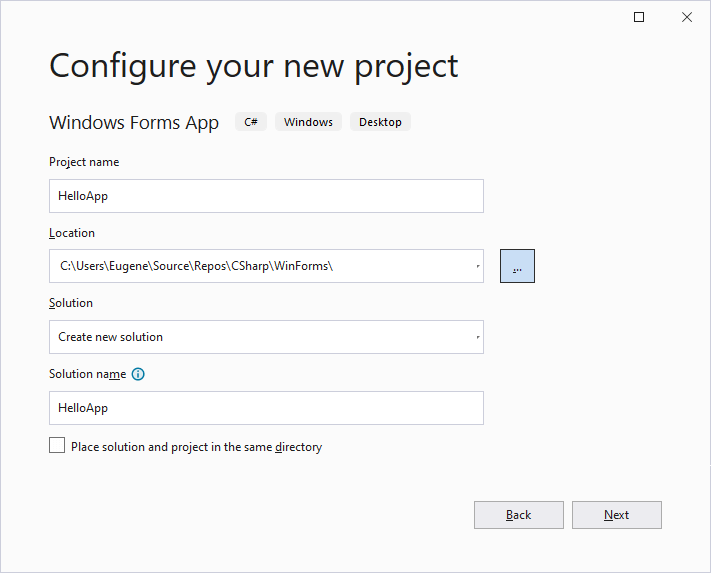
В поле Project Name дадим проекту какое-либо название. В моем случае это HelloApp.
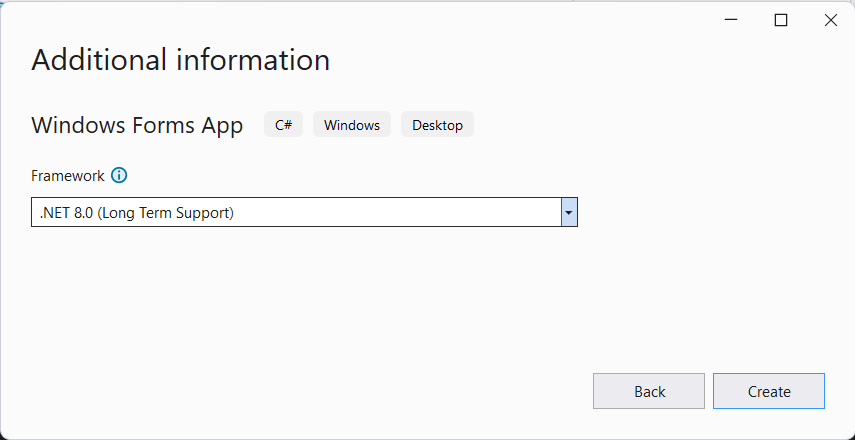
На следующем окне Visual Studio предложит нам выбрать версию .NET, которая будет использоваться для проекта. Выберем последнюю на данный момент версию — .NET 7.0 и нажмен на кнопку Create (Создать) для создания проекта.
После этого Visual Studio откроет наш проект с созданными по умолчанию файлами:
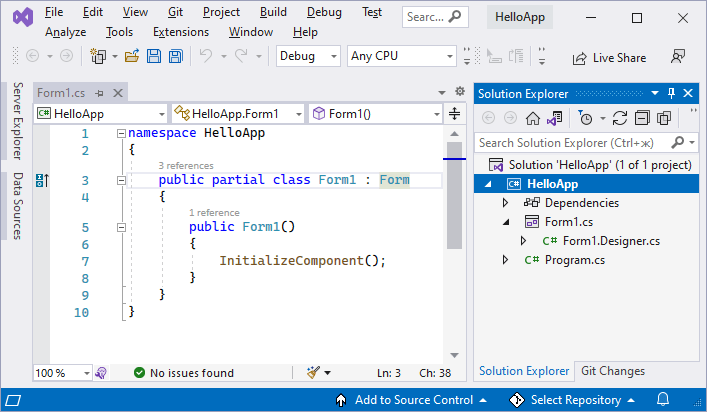
Справа находится окно Solution Explorer, в котором можно увидеть структуру нашего проекта. Практически этот тот же проект, который создается с
помощью .NET CLI:
-
Dependencies — это узел содержит сборки dll, которые добавлены в проект по умолчанию.
Эти сборки как раз содержат классы библиотеки .NET, которые будет использовать C# -
Form1.Designer.cs: он содержит определение компонентов формы, добавленных
на форму в графическом дизайнере -
Далее идет файл единственной в проекте формы — Form1.cs, который по умолчанию открыт в центральном окне.
-
Program.cs определяет точку входа в приложение
Запуск приложения
Чтобы запустить приложение в режиме отладки, нажмем на клавишу F5 или на зеленую стрелочку на панели Visual Studio.
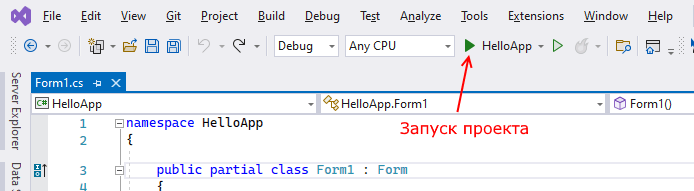
После этого запустится пустая форма Form1 по умолчанию.

После запуска приложения студия компилирует его в файл с расширением exe. Найти данный файл можно, зайдя в папку проекта и далее в каталог
binDebugnet7.0-windows
Рассмотрев вкратце создание проекта графического приложения, мы можем перейти к обзору основных компонентов и начнем мы с форм.
Improve Article
Save Article
Improve Article
Save Article
Windows Forms is a Graphical User Interface(GUI) class library which is bundled in .Net Framework. Its main purpose is to provide an easier interface to develop the applications for desktop, tablet, PCs. It is also termed as the WinForms. The applications which are developed by using Windows Forms or WinForms are known as the Windows Forms Applications that runs on the desktop computer. WinForms can be used only to develop the Windows Forms Applications not web applications. WinForms applications can contain the different type of controls like labels, list boxes, tooltip etc.
Creating a Windows Forms Application Using Visual Studio 2017
- First, open the Visual Studio then Go to File -> New -> Project to create a new project and then select the language as Visual C# from the left menu. Click on Windows Forms App(.NET Framework) in the middle of current window. After that give the project name and Click OK.

Here the solution is like a container which contains the projects and files that may be required by the program.
- After that following window will display which will be divided into three parts as follows:
- Editor Window or Main Window: Here, you will work with forms and code editing. You can notice the layout of form which is now blank. You will double click the form then it will open the code for that.
- Solution Explorer Window: It is used to navigate between all items in solution. For example, if you will select a file form this window then particular information will be display in the property window.
- Properties Window: This window is used to change the different properties of the selected item in the Solution Explorer. Also, you can change the properties of components or controls that you will add to the forms.
You can also reset the window layout by setting it to default. To set the default layout, go to Window -> Reset Window Layout in Visual Studio Menu.
- Now to add the controls to your WinForms application go to Toolbox tab present in the extreme left side of Visual Studio. Here, you can see a list of controls. To access the most commonly used controls go to Common Controls present in Toolbox tab.
- Now drag and drop the controls that you needed on created Form. For example, if you can add TextBox, ListBox, Button etc. as shown below. By clicking on the particular dropped control you can see and change its properties present in the right most corner of Visual Studio.
In the above image, you can see the TextBox is selected and its properties like TextAlign, MaxLength etc. are opened in right most corner. You can change its properties’ values as per the application need. The code of controls will be automatically added in the background. You can check the Form1.Designer.cs file present in the Solution Explorer Window.
- To run the program you can use an F5 key or Play button present in the toolbar of Visual Studio. To stop the program you can use pause button present in the ToolBar. You can also run the program by going to Debug->Start Debugging menu in the menubar.


Improve Article
Save Article
Improve Article
Save Article
Windows Forms is a Graphical User Interface(GUI) class library which is bundled in .Net Framework. Its main purpose is to provide an easier interface to develop the applications for desktop, tablet, PCs. It is also termed as the WinForms. The applications which are developed by using Windows Forms or WinForms are known as the Windows Forms Applications that runs on the desktop computer. WinForms can be used only to develop the Windows Forms Applications not web applications. WinForms applications can contain the different type of controls like labels, list boxes, tooltip etc.
Creating a Windows Forms Application Using Visual Studio 2017
- First, open the Visual Studio then Go to File -> New -> Project to create a new project and then select the language as Visual C# from the left menu. Click on Windows Forms App(.NET Framework) in the middle of current window. After that give the project name and Click OK.
Here the solution is like a container which contains the projects and files that may be required by the program.
- After that following window will display which will be divided into three parts as follows:
- Editor Window or Main Window: Here, you will work with forms and code editing. You can notice the layout of form which is now blank. You will double click the form then it will open the code for that.
- Solution Explorer Window: It is used to navigate between all items in solution. For example, if you will select a file form this window then particular information will be display in the property window.
- Properties Window: This window is used to change the different properties of the selected item in the Solution Explorer. Also, you can change the properties of components or controls that you will add to the forms.
You can also reset the window layout by setting it to default. To set the default layout, go to Window -> Reset Window Layout in Visual Studio Menu.
- Now to add the controls to your WinForms application go to Toolbox tab present in the extreme left side of Visual Studio. Here, you can see a list of controls. To access the most commonly used controls go to Common Controls present in Toolbox tab.
- Now drag and drop the controls that you needed on created Form. For example, if you can add TextBox, ListBox, Button etc. as shown below. By clicking on the particular dropped control you can see and change its properties present in the right most corner of Visual Studio.
In the above image, you can see the TextBox is selected and its properties like TextAlign, MaxLength etc. are opened in right most corner. You can change its properties’ values as per the application need. The code of controls will be automatically added in the background. You can check the Form1.Designer.cs file present in the Solution Explorer Window.
- To run the program you can use an F5 key or Play button present in the toolbar of Visual Studio. To stop the program you can use pause button present in the ToolBar. You can also run the program by going to Debug->Start Debugging menu in the menubar.
На чтение 5 мин. Опубликовано 10.08.2021
WindowsForms – необходимый компонент, если планируется создание своей собственной программы, где необходим пользовательский интерфейс. Это нужно для того, чтобы пользователь мог без проблем использовать приложение на C++, не работая напрямую с командной строкой. И тем более, будет презентабельнее выглядеть программа, если применить WindowsForms. О том, что это такое и как работает – будет рассказано в статье.
Но для начала, необходимо уточнить, что WindowsFormsнеобходим для того, чтобы делать именно классический интерфейс. Никаких специальных элементов оформления добавить не получится. В общем, если добавить к своей программе на C++ WindowsForms, то выглядеть она будет очень просто, зато не нужно будет вводить каждый раз вручную те или иные команды.
Нужен данный компонент от Microsoft для облегчения пользования программой. Требуется только выбрать тот или иной элемент в интерфейсе и нажать на него, как правило. Иногда, когда нужно определенное значение, которое не указано в базе данных, требуется ввести текст в поле. Но зачастую, в интерфейсе программы присутствуют только кнопки – элементы управления.
Создание нового проекта C++ в VisualStudio
Первое, что нужно сделать для создания своей программы с качественным интерфейсом – это приготовить проект C++ в VisualStudio. Следует начать с самого основного. Непосредственно, с создания нового проекта на языке C++ в IDE. Для этого необходимо запустить программу, а далее выбрать пункт «Создать проект»(так реализовано в версии 2019 года, в других может быть другой алгоритм).
Далее, перед пользователем появится окно, где необходимо указать все параметры нового проекта. Здесь необходимо указать «Тип проекта», а также написать «WindowsForms», чтобы в дальнейшем обозначить в VisualStudio, что для интерфейса станет использоваться компонент от Microsoft и что программа не станет консольным вариантом. Также, требуется обозначить шаблон на этом экране, который назовется «Приложение WindowsForms (.NETFramework). После таких манипуляций остается только нажать на кнопку «Далее» внизу.
Третий и последний шаг создания проекта на C++ — это указание наименования программы. В поле «Настроить новый проект» и «Имя проекта» требуется указать «Hello, World!»(к примеру). После этого, останется только создать саму разработку. А далее – следует работа над кодом в C++, а также связка с WindowsForms. Однако, об этом речь пойдет далее. Проект уже создан, остается главная часть работы – написание кода.
Если же проект C++ создан без WindowsForms, то эту ситуацию можно исправить. То есть, необходимо пользователю только иметь при себе проект на C++ без каких-либо дополнительных элементов. Сперва нужно открыть таковой, после чего у человека на экране появится та самая разработка. Но она сама не нужна, требуется только окно «Обозреватель решений».
Найдя свой проект, нужно щелкнуть по его названию правой кнопкой мыши, чтобы открылось контекстное меню, где выбирается пункт «Добавить», наведя на который курсор, появится действие «Создать элемент». Как раз-таки нажав на это, у пользователя будет возможность добавить WindowsForms. А если же хочется быстро это сделать, то достаточно нажать сочетание клавиш на клавиатуре – Ctrl+Shift+A.
В новом открывшемся окне откроется то, что и требовалось. Добавить можно любой элемент, но требуется в данном случае «Форма WindowsForms», которая адаптирована под язык C++. Как раз-таки это и выбирается пользователем, если необходим графический интерфейс для программы. Также, можно изменить наименование формы, чтобы обозначалось окно по-другому.
После того, как будет добавлена форма, требуется привнести кое-какие изменения в файл «MyForm.cpp»(или же название будет другим, если пользователь переименовал форму) с исходным кодом.
Там необходимо прописать следующий набор строк:
using namespace System;
using namespace System::Windows::Forms;[STAThread]
void main(array<String^>^ arg) {
Application::EnableVisualStyles();
Application::SetCompatibleTextRenderingDefault(false);WinFormsTest::MyForm form; //WinFormsTest — имя вашего проекта
Application::Run(%form);
}
При вводе этого кода, требуется указать имя своего проекта, так как его название будет отличаться от «WinFormsTest».
Далее, после того, как были внесены изменения в файл, требуется сохранить таковой. Дальнейшие действия будут проводиться в VisualStudio. Нажав правой кнопкой по названию своего проекта, необходимо выбрать пункт «Свойства», после чего зайти в меню «Компоновщик»-«Система»-«Подсистема». Там требуется указать «Windows» и применить изменения.
Также, требуется произвести дополнительные изменения. Не выходя из «Компоновщик»-«Дополнительно»-«Точка входа». В поле требуется указать «main». После такой манипуляции, опять же, нужно применить новые значения и выйти из этого окна.
На этом добавление WindowsForm заканчивается. Теперь можно писать свою программу с использованием графического интерфейса для более удобного пользования.
Создание форм и элементов управления(Create forms and controls)
Вообще, создавать элементы управления в WindowsForms – простое дело. Здесь необходимо лишь поработать над расположением кнопок, так как форма уже есть. Запустив форму, сбоку появится панель инструментов, где необходимо выбрать «Панель элементов», либо же нажать сочетание Ctrl+Alt+X. Для большего удобства появившееся окно рекомендуется закрепить.
Далее, выбрав объект «Кнопка», можно располагать его на форме и регулировать размеры. А зайдя в раздел с ее свойствами, возможно поменять текст, к примеру, на «ClickThis»(вкладка «Внешний вид»), а также задать специальные параметры, вроде имени кнопки с «Button1» на «btnClickThis»(вкладка «Проектирование»).
После этого, самый стандартный элемент управления будет на форме. То же самое можно делать и с другими объектами. Главное – указать для них правильные параметры. И тогда работать с программой, написанной на WindowsFormsпри участии языка C++ будет комфортнее, ведь графический интерфейс будет настроен.
На чтение 7 мин Просмотров 2.8к. Опубликовано 07.04.2022
Освойте Microsoft Visual Studio и разрабатывайте собственные приложения с помощью Windows Forms практически без написания кода.
Windows Forms — это платформа, доступная в Visual Studio, которая позволяет создавать настольные приложения с помощью графического пользовательского интерфейса. Это позволяет вам щелкать и перетаскивать виджеты, такие как кнопки или метки, прямо на холст и управлять свойствами каждого виджета, такими как размер шрифта, цвет или граница.
В этой статье простой конвертер градусов Цельсия в градусы Фаренгейта будет использоваться в качестве примера для изучения основ настройки приложения Windows Form. В этом руководстве используется Visual Studio 2019 Community Edition.
Содержание
- Как создать проект Windows Forms в Visual Studio
- Как добавить элементы на холст проекта
- Как обрабатывать события и писать код в коде программной части
- Как запускать и отлаживать программу Windows Forms
- Отладка программы Windows Forms
- Запуск программы с помощью исполняемого файла
- Добавление дополнительных элементов в форму Windows
Как создать проект Windows Forms в Visual Studio
Сначала создайте проект в Visual Studio.
- Откройте Visual Studio и выберите Создать новый проект.
- Visual Studio предоставит вам список шаблонов проектов, из которых вы можете выбрать.
- Чтобы создать приложение Windows Forms, найдите приложение Windows Formи выберите его из списка шаблонов. Как только это будет выбрано, нажмите » Далее».

- Добавьте имя и местоположение для проекта и нажмите » Далее». Расположение — это каталог, в котором будут храниться файлы кода.
- На следующем экране сохраните выбор по умолчанию.NET Core 3.1.
- Щелкните Создать.
- Когда Visual Studio завершит создание проекта, он откроется.


Как добавить элементы на холст проекта
Холст — это белая область, расположенная в верхнем левом углу экрана. Нажмите и перетащите точки в нижней, правой или нижней правой части холста, чтобы изменить его размер, если это необходимо.
Чтобы создать пользовательский интерфейс приложения, добавьте на холст такие виджеты, как кнопки или текстовые поля.
- Откройте вкладку «Вид» в верхней части окна и выберите » Панель инструментов «.

- Это добавит панель инструментов в левую часть приложения. Выберите значок булавкив правом верхнем углу панели инструментов, чтобы закрепить его там навсегда.
- Здесь вы можете перетащить любой виджет из панели инструментов на холст. Выделите кнопку на панели инструментов и перетащите ее на холст.

- Перетащите на холст еще два текстовых поля вместе с тремя метками (две метки для каждого текстового поля и одна метка для заголовка в верхней части приложения).

- Каждый виджет на холсте имеет связанные с ним свойства. Выделите виджет, чтобы отобразить окно свойствв правом нижнем углу Visual Studio, в котором перечислены все свойства этого виджета. Эти свойства могут включать текст, имя, размер шрифта, границу или выравнивание выделенного виджета.
- На данный момент текст этих виджетов по-прежнему говорит label1, label2или button1. Выберите виджет label1и отредактируйте свойство Text в окне свойств, указав «Цельсий в Фаренгейт». Измените размер шрифта на 22pt.

- Аналогичным образом отредактируйте свойства других виджетов на холсте, чтобы они были следующими:


|
Виджет |
Имущество |
Новое значение |
| метка2 | Текст | Цельсия |
| этикетка3 | Текст | по Фаренгейту |
| кнопка | Текст | Рассчитать |
| Текстовое поле Фаренгейта | Только для чтения | Истинный |
Как обрабатывать события и писать код в коде программной части
Виджеты на холсте можно привязывать к событиям. События могут включать в себя такие вещи, как нажатие кнопки, изменение текста внутри текстового поля или выбор определенного переключателя. Когда происходят эти события, это может привести к срабатыванию части кода в программном коде.
C# — это язык, используемый при создании Windows Forms. Если вы еще не использовали C#, есть много практических причин для изучения программирования на C#.
Для этого конкретного приложения добавьте событие к кнопке » Рассчитать «, чтобы инициировать выполнение части кода при нажатии этой кнопки.
1. Дважды щелкните кнопку » Рассчитать«, чтобы автоматически открыть Form1.cs с новым методом Event:
private void calculateButton_Click(object sender, EventArgs e)
2. Здесь вы добавите код, который будет выполнять расчет градусов Цельсия по Фаренгейту и отображать результат в текстовом поле Фаренгейта. Для этого вам нужно иметь возможность прочитать значение из текстового поля Цельсия и изменить текстовое поле Фаренгейта, чтобы отобразить результат.
3. Вернитесь на холст и повторно отредактируйте свойства, как показано ранее. На этот раз отредактируйте свойство Nameдля текстовых полей Цельсия и Фаренгейта. Эти имена можно использовать для ссылки на текстовые поля в коде.
| Виджет | Имущество | Новое значение |
| Текстовое поле Цельсия | Имя | ЦельсияTextBox |
| Текстовое поле Фаренгейта | Имя | по ФаренгейтуTextBox |
4. Вернитесь к функции calculateButton_Click в Form1.cs.
5. Теперь на текстовое поле Celsius можно ссылаться в коде, используя имя «celsiusTextBox». Введенное пользователем значение Цельсия сохраняется в его свойстве Text. Однако, поскольку это строка, разберите ее на двойную, чтобы включить ее в будущие расчеты по Фаренгейту.
private void calculateButton_Click(object sender, EventArgs e)
{
// Get the value that the user entered in the Celsius Text Box
double celsiusValue = Double.Parse(celsiusTextBox.Text);
}
6. Переменная celsiusValue теперь хранит значение, введенное пользователем в текстовом поле Celsius. Формула для преобразования градусов Цельсия в градусы Фаренгейта: (celsiusValue * 9 / 5) + 32.Таким образом, результат теперь можно рассчитать и сохранить в текстовом поле Фаренгейта.
private void calculateButton_Click(object sender, EventArgs e)
{
// Get the value that the user entered in the Celsius Text Box
double celsiusValue = Double.Parse(celsiusTextBox.Text);
// Apply the calculation
double result = (celsiusValue * 9 / 5) + 32;
// Store the result in the Fahrenheit Textbox
fahrenheitTextBox.Text = result.ToString();
}
Как запускать и отлаживать программу Windows Forms
Запуск программы Windows Forms в Visual Studio
Теперь, когда пользовательский интерфейс и логика кода настроены, запустите программу, чтобы увидеть, как она работает.
1. Чтобы запустить программу, выберите зеленую стрелку вверху панели инструментов в Visual Studio. 
2. После загрузки проекта добавьте значение в текстовое поле Цельсия и нажмите кнопку » Рассчитать». Это добавит результат в текстовое поле по Фаренгейту. 
3 Если программа размыта во время выполнения, вероятно, ваше приложение не поддерживает DPI. Это может вызвать проблемы с масштабированием и разрешением, поэтому его необходимо включить.
4. Щелкните правой кнопкой мыши проект TemperatureConverterв обозревателе решений. Выберите Добавить, затем выберите Новый элемент.
5. Найдите файл манифеста приложения и нажмите » Добавить «. 
6. Скопируйте следующий код в новый файл app.manifest как дочерний элемент тега сборки (если код уже сгенерирован, просто раскомментируйте его).
<application xmlns=»urn:schemas-microsoft-com:asm.v3″>
<windowsSettings>
<dpiAware xmlns=»http://schemas.microsoft.com/SMI/2005/WindowsSettings«>true</dpiAware>
<longPathAware xmlns=»http://schemas.microsoft.com/SMI/2016/WindowsSettings«>true</longPathAware>
</windowsSettings>
</application>
7. Чтобы это изменение вступило в силу, перезапустите программу. Нажмите красную кнопку остановки в верхней части панели инструментов, затем снова нажмите зеленую кнопку воспроизведения.
Отладка программы Windows Forms
Вы можете отладить программу, если логика вашего приложения Windows Forms не работает должным образом.
- Вернитесь к функции calculateButton_Click в Form1.cs и щелкните в любом месте серой полосы в крайнем левом углу экрана. Это добавит точку останова, которая обозначена красным кружком.
- Нажмите кнопку «Рассчитать» еще раз, чтобы запустить этот метод. Программа приостановится, когда достигнет точки останова, чтобы показать все значения, хранящиеся в переменных в этой точке.
- Чтобы продолжить работу программы, нажмите зеленую стрелку » Продолжить» в верхней части панели инструментов.

Запуск программы с помощью исполняемого файла
Если вы не хотите запускать свою программу через Visual Studio, используйте автономный исполняемый файл для программы. Это автоматически генерируется.
Перейдите к исполняемому файлу, который можно найти здесь:
<your-project-folder>/bin/Debug/netcoreapp3.1/TemperatureConverter.exe
Нажмите на исполняемый файл, чтобы запустить программу напрямую.
Добавление дополнительных элементов в форму Windows
Надеюсь, теперь у вас есть общее представление об основной структуре приложения Windows Form. Вы можете продолжить изучение дополнительных функций Windows Forms, поэкспериментировав с новыми виджетами и углубившись в другие различные события, которые можно обрабатывать.
Как только вы лучше познакомитесь с Windows Forms, вы сможете приступить к созданию более сложных приложений. Вы также можете изучить многие другие способы создания приложений на рабочем столе Windows.
So far we have seen how to work with C# to create console based applications. But in a real-life scenario team normally use Visual Studio and C# to create either Windows Forms or Web-based applications.
A windows form application is an application, which is designed to run on a computer. It will not run on web browser because then it becomes a web application.
This Tutorial will focus on how we can create Windows-based applications. We will also learn some basics on how to work with the various elements of C# Windows application.
In this Windows tutorial, you will learn-
- Windows Forms Basics
- Hello World in Windows Forms
- Adding Controls to a form
- Event Handling for Controls
- Tree and PictureBox Control
Windows Forms Basics
A Windows forms application is one that runs on the desktop computer. A Windows forms application will normally have a collection of controls such as labels, textboxes, list boxes, etc.
Below is an example of a simple Windows form application C#. It shows a simple Login screen, which is accessible by the user. The user will enter the required credentials and then will click the Login button to proceed.

So an example of the controls available in the above application
- This is a collection of label controls which are normally used to describe adjacent controls. So in our case, we have 2 textboxes, and the labels are used to tell the user that one textbox is for entering the user name and the other for the password.
- The 2 textboxes are used to hold the username and password which will be entered by the user.
- Finally, we have the button control. The button control will normally have some code attached to perform a certain set of actions. So for example in the above case, we could have the button perform an action of validating the user name and password which is entered by the user.
C# Hello World
Now let’s look at an example of how we can implement a simple ‘hello world’ application in Visual Studio. For this, we would need to implement the below-mentioned steps
Step 1) The first step involves the creation of a new project in Visual Studio. After launching Visual Studio, you need to choose the menu option New->Project.

Step 2) The next step is to choose the project type as a Windows Forms application. Here we also need to mention the name and location of our project.

- In the project dialog box, we can see various options for creating different types of projects in Visual Studio. Click the Windows option on the left-hand side.
- When we click the Windows options in the previous step, we will be able to see an option for Windows Forms Application. Click this option.
- We will give a name for the application. In our case, it is DemoApplication. We will also provide a location to store our application.
- Finally, we click the ‘OK’ button to let Visual Studio create our project.
If the above steps are followed, you will get the below output in Visual Studio.
Output:-

You will see a Form Designer displayed in Visual Studio. It’s in this Form Designer that you will start building your Windows Forms application.

In the Solution Explorer, you will also be able to see the DemoApplication Solution. This solution will contain the below 2 project files
- A Form application called Forms1.cs. This file will contain all of the code for the Windows Form application.
- The Main program called Program.cs is default code file which is created when a new application is created in Visual Studio. This code will contain the startup code for the application as a whole.
On the left-hand side of Visual Studio, you will also see a ToolBox. The toolbox contains all the controls which can be added to a Windows Forms. Controls like a text box or a label are just some of the controls which can be added to a Windows Forms.
Below is a screenshot of how the Toolbox looks like.

Step 3) In this step, we will now add a label to the Form which will display “Hello World.” From the toolbox, you will need to choose the Label control and simply drag it onto the Form.

Once you drag the label to the form, you can see the label embedded on the form as shown below.

Step 4) The next step is to go to the properties of the control and Change the text to ‘Hello World’.
To go to the properties of a control, you need to right-click the control and choose the Properties menu option

- The properties panel also shows up in Visual Studio. So for the label control, in the properties control, go to the Text section and enter “Hello World”.
- Each Control has a set of properties which describe the control.

If you follow all of the above steps and run your program in Visual Studio, you will get the following output
Output:-

In the output, you can see that the Windows Form is displayed. You can also see ‘Hello World’ is displayed on the form.
Adding Controls to a form
We had already seen how to add a control to a form when we added the label control in the earlier section to display “Hello World.”
Let’s look at the other controls available for Windows forms and see some of their common properties.
In our Windows form application in C# examples, we will create one form which will have the following functionality.
- The ability for the user to enter name and address.
- An option to choose the city in which the user resides in
- The ability for the user to enter an option for the gender.
- An option to choose a course which the user wants to learn. There will make choices for both C# and ASP.Net
So let’s look at each control in detail and add them to build the form with the above-mentioned functionality.
Group Box
A group box is used for logical grouping controls into a section. Let’s take an example if you had a collection of controls for entering details such as name and address of a person. Ideally, these are details of a person, so you would want to have these details in a separate section on the Form. For this purpose, you can have a group box. Let’s see how we can implement this with an example shown below
Step 1) The first step is to drag the Groupbox control onto the Windows Form from the toolbox as shown below

Step 2) Once the groupbox has been added, go to the properties window by clicking on the groupbox control. In the properties window, go to the Text property and change it to “User Details”.

Once you make the above changes, you will see the following output
Output:-

In the output, you can clearly see that the Groupbox was added to the form. You can also see that the text of the groupbox was changed to “User Details.”
Label Control
Next comes the Label Control. The label control is used to display a text or a message to the user on the form. The label control is normally used along with other controls. Common examples are wherein a label is added along with the textbox control.
The label indicates to the user on what is expected to fill up in the textbox. Let’s see how we can implement this with an example shown below. We will add 2 labels, one which will be called ‘name’ and the other called ‘address.’ They will be used in conjunction with the textbox controls which will be added in the later section.
Step 1) The first step is to drag the label control on to the Windows Form from the toolbox as shown below. Make sure you drag the label control 2 times so that you can have one for the ‘name’ and the other for the ‘address’.

Step 2) Once the label has been added, go to the properties window by clicking on the label control. In the properties window, go to the Text property of each label control.

Once you make the above changes, you will see the following output
Output:-

You can see the label controls added to the form.
Textbox
A textbox is used for allowing a user to enter some text on the Windows application in C#. Let’s see how we can implement this with an example shown below. We will add 2 textboxes to the form, one for the Name and the other for the address to be entered for the user
Step 1) The first step is to drag the textbox control onto the Windows Form from the toolbox as shown below

Step 2) Once the text boxes have been added, go to the properties window by clicking on the textbox control. In the properties window, go to the Name property and add a meaningful name to each textbox. For example, name the textbox for the user as txtName and that for the address as txtAddress. A naming convention and standard should be made for controls because it becomes easier to add extra functionality to these controls, which we will see later on.

Once you make the above changes, you will see the following output
Output:-

In the output, you can clearly see that the Textboxes was added to the form.
List box
A Listbox is used to showcase a list of items on the Windows form. Let’s see how we can implement this with an example shown below. We will add a list box to the form to store some city locations.
Step 1) The first step is to drag the list box control onto the Windows Form from the toolbox as shown below

Step 2) Once the list box has been added, go to the properties window by clicking on the list box control.

- First, change the property of the Listbox box control, in our case, we have changed this to lstCity
- Click on the Items property. This will allow you to add different items which can show up in the list box. In our case, we have selected items “collection”.
- In the String Collection Editor, which pops up, enter the city names. In our case, we have entered “Mumbai”, “Bangalore” and “Hyderabad”.
- Finally, click on the ‘OK’ button.
Once you make the above changes, you will see the following output
Output:-

In the output, you can see that the Listbox was added to the form. You can also see that the list box has been populated with the city values.
RadioButton
A Radiobutton is used to showcase a list of items out of which the user can choose one. Let’s see how we can implement this with an example shown below. We will add a radio button for a male/female option.
Step 1) The first step is to drag the ‘radiobutton’ control onto the Windows Form from the toolbox as shown below.

Step 2) Once the Radiobutton has been added, go to the properties window by clicking on the Radiobutton control.

- First, you need to change the text property of both Radio controls. Go the properties windows and change the text to a male of one radiobutton and the text of the other to female.
- Similarly, change the name property of both Radio controls. Go the properties windows and change the name to ‘rdMale’ of one radiobutton and to ‘rdfemale’ for the other one.
One you make the above changes, you will see the following output
Output:-

You will see the Radio buttons added to the Windows form.
Checkbox
A checkbox is used to provide a list of options in which the user can choose multiple choices. Let’s see how we can implement this with an example shown below. We will add 2 checkboxes to our Windows forms. These checkboxes will provide an option to the user on whether they want to learn C# or ASP.Net.
Step 1) The first step is to drag the checkbox control onto the Windows Form from the toolbox as shown below

Step 2) Once the checkbox has been added, go to the properties window by clicking on the Checkbox control.

In the properties window,
- First, you need to change the text property of both checkbox controls. Go the properties windows and change the text to C# and ASP.Net.
- Similarly, change the name property of both Radio controls. Go the properties windows and change the name to chkC of one checkbox and to chkASP for the other one.
Once you make the above changes, you will see the following output
Output:-

Button
A button is used to allow the user to click on a button which would then start the processing of the form. Let’s see how we can implement this with an example shown below. We will add a simple button called ‘Submit’ which will be used to submit all the information on the form.
Step 1) The first step is to drag the button control onto the Windows Form from the toolbox as shown below

Step 2) Once the Button has been added, go to the properties window by clicking on the Button control.

- First, you need to change the text property of the button control. Go the properties windows and change the text to ‘submit’.
- Similarly, change the name property of the control. Go the properties windows and change the name to ‘btnSubmit’.
Once you make the above changes, you will see the following output
Output:-

Congrats, you now have your first basic Windows Form in place. Let’s now go to the next topic to see how we can do Event handling for Controls.
C# Event Handling for Controls
When working with windows form, you can add events to controls. An event is something that happens when an action is performed. Probably the most common action is the clicking of a button on a form. In C# Windows Forms, you can add code which can be used to perform certain actions when a button is pressed on the form.
Normally when a button is pressed on a form, it means that some processing should take place.
Let’s take a look at one of the event and how it can be handled before we go to the button event scenario.
The below example will showcase an event for the Listbox control. So whenever an item is selected in the listbox control, a message box should pop up which shows the item selected. Let’s perform the following steps to achieve this.
Step 1) Double click on the Listbox in the form designer. By doing this, Visual Studio will automatically open up the code file for the form. And it will automatically add an event method to the code. This event method will be triggered, whenever any item in the listbox is selected.

Above is the snippet of code which is automatically added by Visual Studio, when you double-click the List box control on the form. Now let’s add the below section of code to this snippet of code, to add the required functionality to the listbox event.

- This is the event handler method which is automatically created by Visual Studio when you double-click the List box control. You don’t need to worry about the complexity of the method name or the parameters passed to the method.
- Here we are getting the SelectedItem through the lstCity.SelectedItem property. Remember that lstCity is the name of our Listbox control. We then use the GetItemText method to get the actual value of the selected item. We then assign this value to the text variable.
- Finally, we use the MessageBox method to display the text variable value to the user.
One you make the above changes, and run the program in Visual Studio you will see the following output
Output:-

From the output, you can see that when any item from the list box is selected, a message box will pops up. This will show the selected item from the listbox.
Now let’s look at the final control which is the button click Method. Again this follows the same philosophy. Just double click the button in the Forms Designer and it will automatically add the method for the button event handler. Then you just need to add the below code.

- This is the event handler method which is automatically created by Visual Studio when you double click the button control. You don’t need to worry on the complexity of the method name or the parameters passed to the method.
- Here we are getting values entered in the name and address textbox. The values can be taken from the text property of the textbox. We then assign the values to 2 variables, name, and address accordingly.
- Finally, we use the MessageBox method to display the name and address values to the user.
One you make the above changes, and run the program in Visual Studio you will see the following output
Output:-

- First, enter a value in the name and address field.
- Then click on the Submit button
Once you click the Submit button, a message box will pop, and it will correctly show you what you entered in the user details section.
Tree and PictureBox Control
There are 2 further controls we can look at, one is the ‘Tree Control’ and the other is the ‘Image control’. Let’s look at examples of how we can implement these controls
Tree Control
– The tree control is used to list down items in a tree like fashion. Probably the best example is when we see the Windows Explorer itself. The folder structure in Windows Explorer is like a tree-like structure.
Let’s see how we can implement this with an example shown below.
Step 1) The first step is to drag the Tree control onto the Windows Form from the toolbox as shown below

Step 2) The next step is to start adding nodes to the tree collection so that it can come up in the tree accordingly. First, let’s follow the below sub-steps to add a root node to the tree collection.

- Go to the properties toolbox for the tree view control. Click on the Node’s property. This will bring up the TreeNode Editor
- In the TreeNode Editor click on the Add Root button to add a root node to the tree collection.
- Next, change the text of the Root node and provide the text as Root and click ‘OK’ button. This will add Root node.
Step 3) The next step is to start adding the child nodes to the tree collection. Let’s follow the below sub-steps to add child root node to the tree collection.

- First, click on the Add child button. This will allow you to add child nodes to the Tree collection.
- For each child node, change the text property. Keep on repeating the previous step and this step and add 2 additional nodes. In the end, you will have 3 nodes as shown above, with the text as Label, Button, and Checkbox respectively.
- Click on the OK button
Once you have made the above changes, you will see the following output.
Output:-

You will be able to see the Tree view added to the form. When you run the Windows form application, you can expand the root node and see the child nodes in the list.
PictureBox Control
This control is used to add images to the Winforms C#. Let’s see how we can implement this with an example shown below.
Step 1) The first step is to drag the PictureBox control onto the C# Windows Form from the toolbox as shown below

Step 2) The next step is to actually attach an image to the picture box control. This can be done by following the below steps.

- First, click on the Image property for the PictureBox control. A new window will pops out.
- In this window, click on the Import button. This will be used to attach an image to the picturebox control.
- A dialog box will pop up in which you will be able to choose the image to attach the picturebox
- Click on the OK button
One you make the above changes, you will see the following output
Output:-

From the output, you can see that an image is displayed on the form.
Summary
- A Windows form in C# application is one that runs on the desktop of a computer. Visual Studio Form along with C# can be used to create a Windows Forms application.
- Controls can be added to the Windows forms C# via the Toolbox in Visual Studio. Controls such as labels, checkboxes, radio buttons, etc. can be added to the form via the toolbox.
- One can also use advanced controls like the tree view control and the PictureBox control.
- Event handlers are used to respond to events generated from controls. The most common one is the one added for the button clicked event.
Welcome to the first lesson of the course, where we’ll learn how to create
form (window) applications in C# .NET and try using individual components. We’ll
work with buttons, text fields, tables, but also with images, timers and other
controls available in these applications.
I wrote the course so that you don’t need any advanced knowledge. I assume,
however, that you know at least the basics of
object-oriented programming.
Windows Forms
Windows Forms is the first framework from .NET that allows creating form
applications easily using a graphic designer. We can find there a full set of
ready-made controls (sometimes referred to as components) for most situations.
And if we wouldn’t be satisfied with them, we can of course create our own or
modify an existing one. It’s Windows Forms that we’re going to focus on in this
course.
Currently there’s one more modern framework — WPF (Windows Presentation Foundation) along with
WinForms. It separates logic and the user interface better, supports faster
rendering, animations, bindings, and other new technologies. In practice, both
frameworks are used to build form applications, newer applications use WPF,
existing applications mostly use WinForms. Currently, WinForms isn’t marked as
obsolete and is still in use, its use is simple and you’ll surely encounter many
applications written in WinForms. So you should at least be aware of them,
although it’s certainly better to create new applications in WPF, which is technologically much further.
Our First Form Application
We won’t start with anything other than the classic Hello World application,
this time in forms  If you
haven’t read local course, let me repeat that it’s a simple application that
does nothing but write some text.
Create a new project, select Windows Forms Application as the project type.
Type HelloForms as the project name:
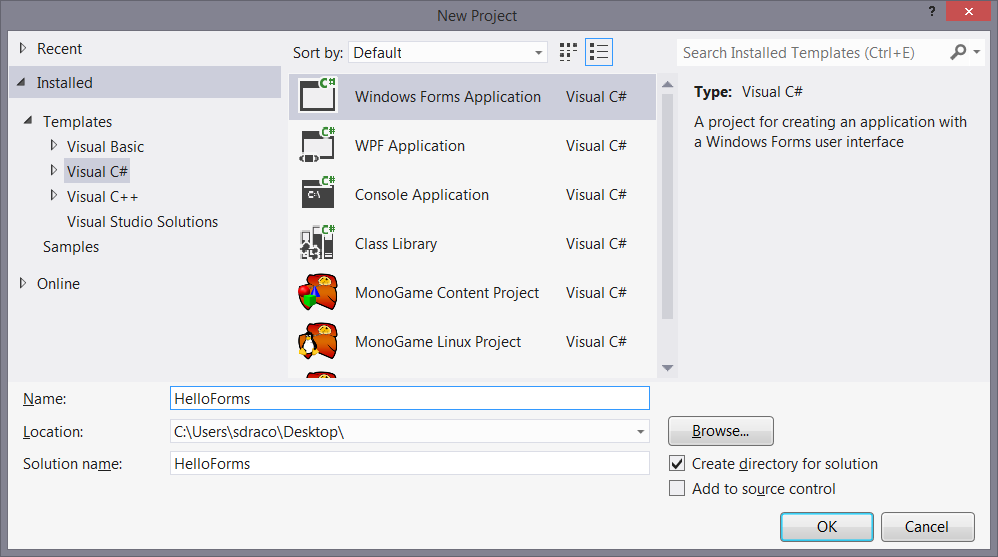
Your Visual Studio window should now look something like this:
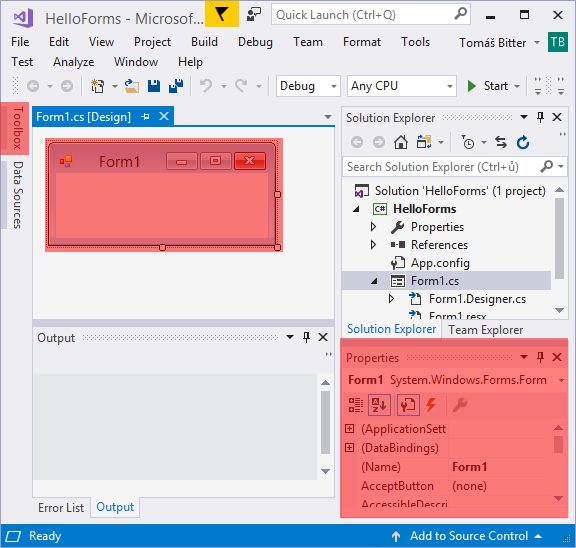
Let’s describe its individual parts, which we’ll use to develop form
applications. Important parts are highlighted in red in the image above.
- Designer — In the Designer we see what the form looks like.
So far, it’s just an empty window. - Properties — In the Properties window, we can see the
properties of the currently selected element on the form. If you don’t see the
window, enable it in View -> Properties Window. - Toolbox — Toolbox is a sliding window that serves as a
palette with individual controls that we can add to the form.
Setting control properties
When we select an element on the form or the form itself, we can change the
properties of that element in the Properties window.
Since we got no element on the form, it’s the form what is selected. We’ll
change the title to "Hello". Find the Text property
and enter Hello in it. The result is reflected in the designer
immediately. This way we’ll set the properties of all elements on the form.
Adding Controls to the Form
Now we’ll open the Toolbox and select the Label control, which
is a text label. We’ll insert it into the form either by double-clicking on it
or by dragging it. Reduce the form size and simply drag the label in the middle.
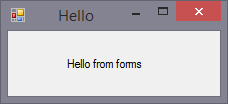
In the Properties window, set the label to "Hello from forms".
As always, you can start your first window application with the green Play
button or the F5 key. You should get a similar result:
Under the Hood
Let’s explain how the application works inside. The form itself is of course
an object (how else ). It’s
declared as the Form1 class which we can find in the
Form1.cs file. Of course you can rename the file in Solution
Explorer, the class will also be renamed. For our application, the form could be
named HelloForm, rename it so you can navigate in it better.
Visual Studio displays either a visual preview of the form or its source
code. We can switch between these modes either by right-clicking on the form
(resp. on the code) and selecting View Code (resp. View Designer). It’s useful
to know the keyboard shortcuts Shift + F7 to move to the
designer and Ctrl + Alt + 0 to move to the
code. It must be the zero on the alphanumeric keyboard (the left one).
Move to form code that looks like this (I omitted the initial
using statements):
namespace HelloForms
{
    public partial class HelloForm : Form
    {
        public HelloForm()
        {
            InitializeComponent();
        }
    }
}
We can see that the form is a class inherited from the Form
class. We can’t see any trace of anything we added or set to the form, only the
constructor calls the strange InitializeComponent() method.
The class is marked as partial, meaning it’s defined in multiple
files. Specifically, there’s also a HelloForm.Designer.cs file that
contains less readable code that is automatically generated by us clicking in
the designer.
This code is separated into another file on purpose, to make the form’s
source code clear. Never tamper with the Designer.cs file manually,
you even wouldn’t have to know that it exists. But let’s look at its content to
understand how the application works:
namespace HelloForms
{
    partial class HelloForm
    {


        private System.ComponentModel.IContainer components = null;


        protected override void Dispose(bool disposing)
        {
            if (disposing && (components != null))
            {
                components.Dispose();
            }
            base.Dispose(disposing);
        }

        #region Windows Form Designer generated code


        private void InitializeComponent()
        {
            this.label1 = new System.Windows.Forms.Label();
            this.SuspendLayout();


            this.label1.AutoSize = true;
            this.label1.Location = new System.Drawing.Point(75, 32);
            this.label1.Name = "label1";
            this.label1.Size = new System.Drawing.Size(135, 17);
            this.label1.TabIndex = 0;
            this.label1.Text = "Hello from forms";


            this.AutoScaleDimensions = new System.Drawing.SizeF(8F, 16F);
            this.AutoScaleMode = System.Windows.Forms.AutoScaleMode.Font;
            this.ClientSize = new System.Drawing.Size(282, 80);
            this.Controls.Add(this.label1);
            this.Name = "Form1";
            this.Text = "Helloz";
            this.ResumeLayout(false);
            this.PerformLayout();

        }

        #endregion

        private System.Windows.Forms.Label label1;
    }
}
In the code, we see the hidden InitializeComponent() method,
which does nothing but create all the elements on the form one by one and set
the appropriate properties we’ve chosen. Here we can see how our label is
created and its properties set. The method is then called in the constructor to
initialize the form. An unaware programmer is then completely encapsulated from
the code that the designer generates. Of course, this is mainly to prevent them
from breaking it However,
it’s important to know how it works to be able to, for example, add controls at
runtime or fix errors in the designer file.
Today’s project can be downloaded in the article’s attachment, including the
source code, and it’ll always be like this. If you had any problems, you can
easily find your mistake like this. In the next lesson, Simple Calculator in C# .NET Windows Forms, we’ll explain
how events work and program a simple calculator.
Did you have a problem with anything? Download the sample application below and compare it with your project, you will find the error easily.