В системе, в которой работает сканер Nessus, откройте командную строку. Использовать обновление Nessuscli gz имя_файла> команда специфичен для вашей операционной системы.
…
Установите плагины вручную.
| Платформа | Command |
|---|---|
| Mac OS X | # / Library / Nessus / run / sbin / nessuscli update |
| Windows | C: Program FilesTenableNessus> обновление nessuscli.exe |
Как обновить Nessus в Windows?
Обновление программного обеспечения Nessus вручную в автономной системе
- В автономной системе с запущенным сканером Nessus (A) на верхней панели навигации выберите «Настройки».
- В левом навигационном меню выберите «Обновление программного обеспечения».
- Нажмите кнопку «Обновление программного обеспечения вручную».
Как обновить подключаемые модули Nessus с помощью CMD?
Обновите только плагины
- Linux: скопируйте. / opt / nessus / sbin / nessuscli update –plugins-only.
- macOS: скопируйте. / Library / Nessus / run / sbin / nessuscli update –plugins-only.
- Windows: Копировать. C: Программа FilesTenableNessusnessuscli.exe update –plugins-only.
Как открыть Nessus в Windows?
Перейдите в Сервисы. В столбце Имя щелкните Tenable Nessus.
…
Запуск или остановка Nessus
- Перейдите в Системные настройки.
- Щелкните значок. кнопка.
- Щелкните значок. кнопка.
- Введите ваше имя пользователя и пароль.
- Чтобы остановить службу Nessus, нажмите кнопку «Остановить Nessus». -или- Чтобы запустить службу Nessus, нажмите кнопку «Запустить Nessus».
Почему запущен Nessusd EXE?
Иногда процесс nessusd.exe может слишком много использовать CPU или GPU. Если это вредоносное ПО или вирус, он может работать в фоновом режиме. Расширение .exe файла nessusd.exe указывает, что это исполняемый файл для операционной системы Windows например Windows XP, Windows 7, Windows 8 и Windows 10.
Что такое Nessuscli EXE?
Некоторыми функциями Nessus можно управлять через интерфейс командной строки с помощью утилиты nessuscli. Это позволяет пользователю управлять учетными записями пользователей, изменять расширенные настройки, управлять цифровыми сертификатами, сообщать об ошибках, обновлять Nessus и получать необходимую информацию о лицензии.
Как Nessus получает подключаемые модули и обновления программного обеспечения?
По умолчанию автономный Nessus Professional настроен на получать свои плагины автоматически с plugins.nessus.org с интервалом в день. Пользователь также может запустить обновление вручную, перейдя в «Настройки»> щелкнув колесико рядом с разделом «Последнее обновление». Пользователь всегда может проверить здесь последние установленные плагины.
Как обновить агенты Nessus?
Чтобы вручную загрузить обновления агента:
- Посетите страницу Tenable Downloads.
- Щелкните Агенты Nessus. Доступны последние файлы обновлений приложений для агентов.
- Щелкните файл обновления приложения, которое хотите загрузить. …
- Щелкните «Я согласен». …
- В зависимости от вашей операционной системы выполните одно из следующих действий:
Как загрузить плагины Nessus в автономном режиме?
Скачайте и скопируйте плагины
- Скопируйте сжатый файл TAR в автономную (A) систему. Используйте каталог, специфичный для вашей операционной системы: Platform. Справочник. Linux. # / opt / nessus / sbin / FreeBSD. # / usr / local / nessus / sbin / Mac OS X.…
- Затем в автономной (A) системе, на которой запущен Nessus, установите подключаемые модули вручную.
На каком порту работает сканер Nessus?
Nessus требует порт TCP / 443 для связи с Tenable.io и TCP / 8834 для Tenable.sc.
Vulnerability scanners are automated tools that allow organizations to check if their networks, systems and applications have security weaknesses that could expose them to attacks.
Nessus is one of the best and comes in both free and paid versions. Nessus has a feature whereby it updates its plugins automatically every day.
However, it is still possible to do a manual update or automate this process via cron. Doing a manual update also allows us to update the Nessus application and it’s license. This is especially useful when the Nessus installation is on a laptop or virtual machine which is not connected to the internet at the time of the automatic updates.
Manual updates can be done in three different ways.
To just update the plugins, run the following command:
sudo /opt/nessus/sbin/nessuscli update --plugins-onlyTo update the Nessus application, plugins and license, run the command:
sudo /opt/nessus/sbin/nessuscli update --allNote that you will have to STOP the Nessus Daemon to update the application itself.
To do a standard update, run the command:
sudo /opt/nessus/sbin/nessuscli updateIn this tutorial we will be detailing installation and update of the Nessus Professional vulnerability scanner and its plugins using the Offline method.
Offline method is useful in situations where we are required to perform a vulnerability scan of an isolated environment, without having access to the Internet.
- New Nessus offline installation
- Overview and prerequisites
- 1. Install Nessus offline
- 2. Generate challenge code
- 3. Generate and download license
- 4. Activate Nessus offline
- 5. Install Nessus plugins offline
- Update Nessus plugins offline
- Overview and prerequisites
- 1. Generate challenge code
- 2. Download plugins
- 3. Update Nessus plugins offline
- Conclusion
This tutorial follows the official Tenable instructions for managing Nessus installations offline.
New Nessus offline installation
In order to demonstrate the installation process, we will be using Microsoft Windows as the target (offline) operating system which is deployed in an isolated environment.
We will be connecting to it over a secure channel (e.g. VPN) using Remote Desktop Protocol (RDP) interface. This will allow us to access the desktop and to transfer installation files.
Note that the selection of Microsoft Windows is purely arbitrary and solely for the demonstration purposes. The steps documented in this tutorial are applicable to all other supported operating systems:
- Linux
- FreeBSD
- Mac OS X
Overview and prerequisites
There are 2 important prerequisites for installing Nessus offline.
First, we need to have administrative privileges on the target offline system. This is needed in order to install the Nessus package on the system.
Secondly, we need to have access to at least one other computer connected to the Internet. This is because some steps of the installation process have to be performed on the Tenable website online.
Therefore, throughout this tutorial we will be differentiating between:
- Computer A – target / offline Nessus scanner
- Computer B – our online computer
Here’s an overview of the installation process in a nutshell and what needs to be done on which computer:
| Operation | Computer A (offline Nessus scanner) |
Computer B (online computer) |
| Download Nessus installer | X | |
| Install Nessus | X | |
| Generate challenge code | X | |
| Generate and download license | X | |
| Download latest plugins | X | |
| Activate Nessus offline | X | |
| Update plugins | X |
Let’s start.
1. Install Nessus offline
1.1. First we have to download the latest Nessus installation package from the official Downloads page:
- https://www.tenable.com/downloads/nessus
The latest Windows package is ‘Nessus-8.12.0-x64.msi’ at the time of writing of this article.
1.2. Transfer the installer onto the target offline computer (A).
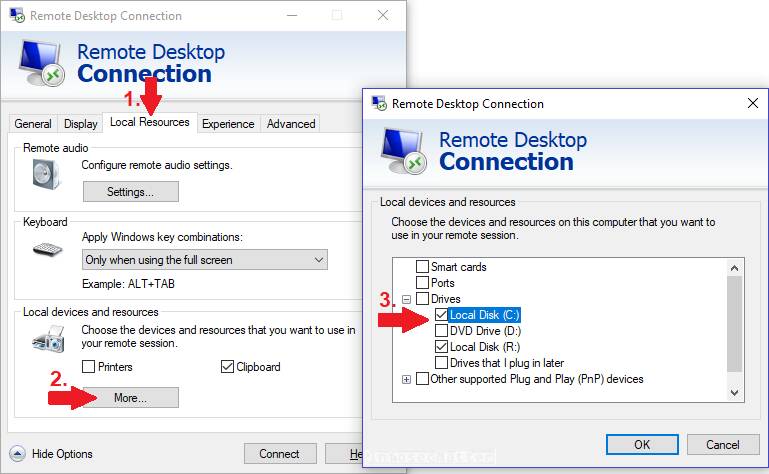
If we are connecting from a Windows system, we can use the built-in RDP drive sharing functions to upload the installer package onto the target system. Here’s a quick illustration on how to enable it:
If we are connecting using Linux (e.g. Kali), we could use the xfreerdp client and its ‘/drive’ option to upload the installer. For instance:
cd /home/kali/Downloads
xfreerdp /d:ABC /u:admin /p:password /v:10.100.202.43 /drive:data,`pwd`
Using these methods we should be able to comfortably share files with the target offline system (A) and vice versa.
1.3. Install the package (Nessus-8.10.1-x64.msi) on the target system.
1.4. After the installation process is finished and the nessus service is started, we have to continue with the installation using the web interface.
1.5. Open a web browser (on the target offline system A) and navigate to the following URL:
- https://localhost:8834/
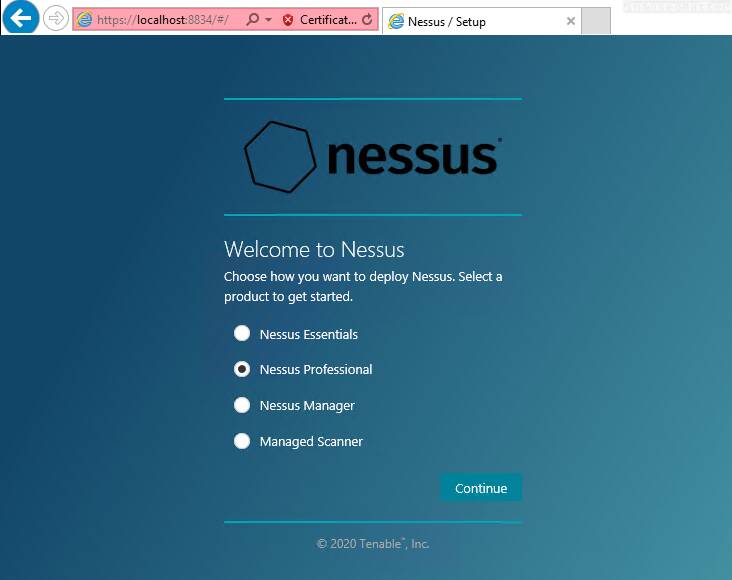
Select ‘Nessus Professional’ and click ‘Continue’.
2. Generate challenge code
In the next step we are presented with the Nessus activation page (Register Nessus):
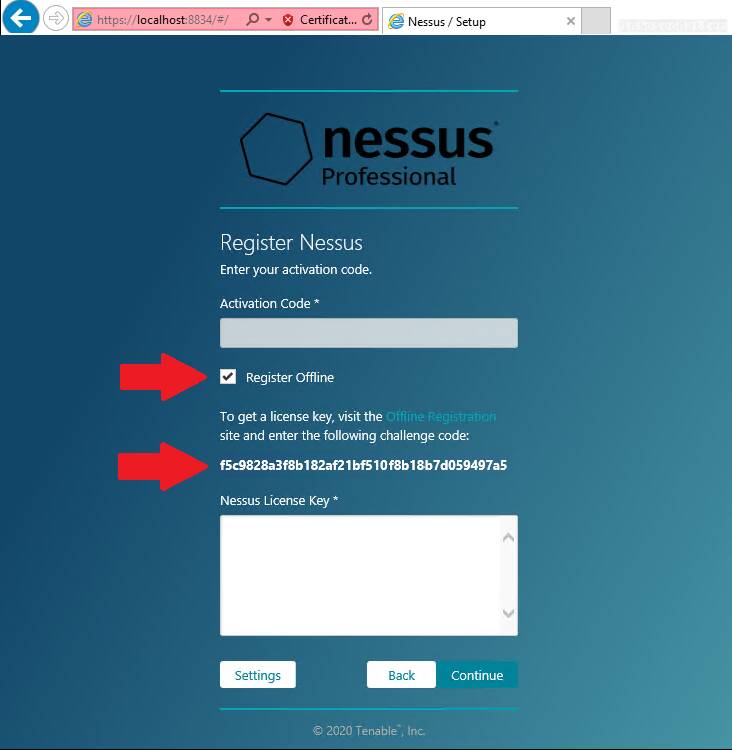
In order to install Nessus using the offline method, we have to select the ‘Register Offline’ option and make note of the challenge code.
We will need the challenge code in the next step which has to be performed on the online computer (B).
3. Generate and download license
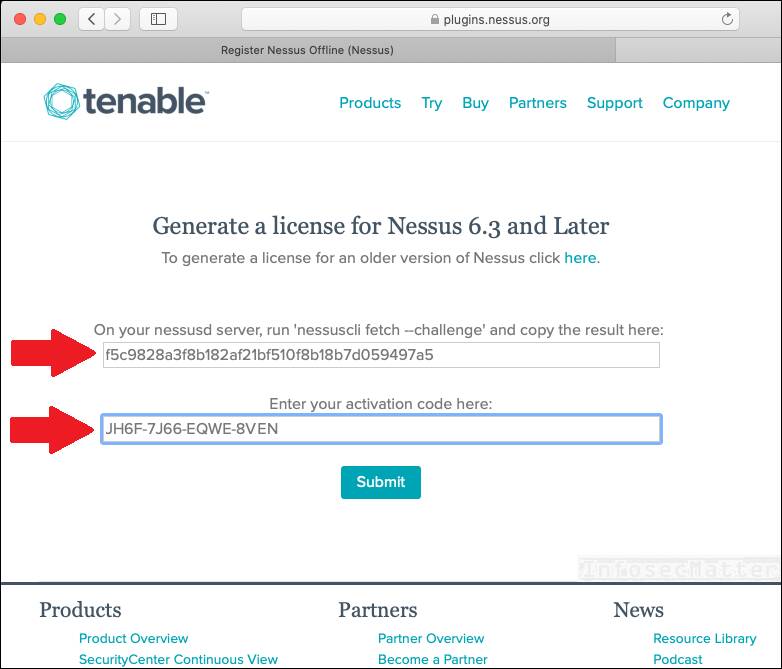
On the online computer (B), open a web browser and navigate to the Tenable offline registration page on the following URL:
- https://plugins.nessus.org/v2/offline.php
Here on this page we have to provide the challenge code obtained from the target offline computer (A) and also provide our Nessus activation code (license) that we possess.
The following screenshot illustrates:
After submitting the activation codes, we should obtain:
- Tenable license file
- A link to the latest plugins
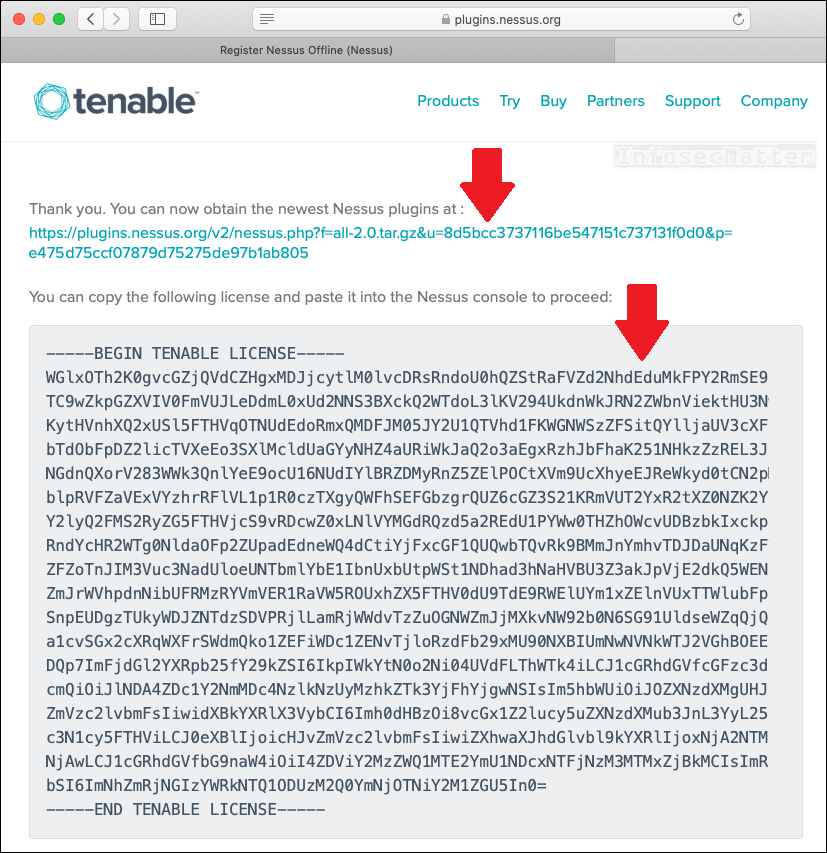
Now take the obtained license file along with the plugins archive all-2.0.tar-gz (approx. 239 MiB) and transfer them onto the target offline computer (A).
4. Activate Nessus offline
To complete the activation process on the offline computer (A), paste the license file to the ‘Nessus License Key’ text area and click ‘Continue’, similarly as in this screenshot:
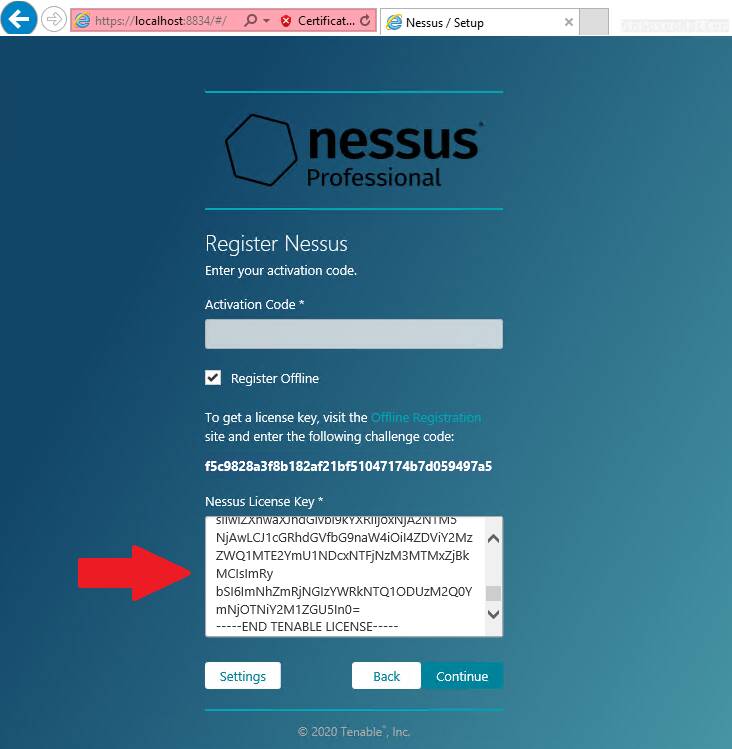
After the submit, we should have fully activated our Nessus scanner instance and we should now be able to create our administrative user.
5. Install Nessus plugins offline
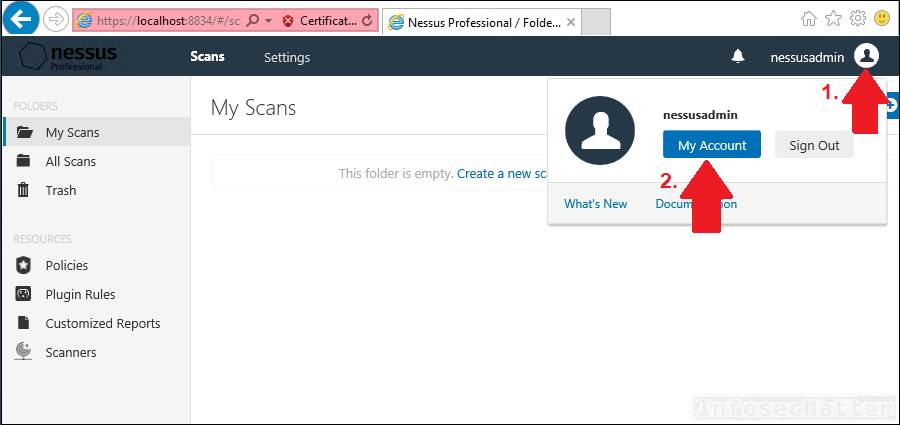
Now when we can login and navigate through the Nessus web user interface, it’s time to upload the latest plugins that we downloaded in the step 3.
In the Nessus top navigation menu navigate to ‘My account’:
Click the ‘Software Update tab’. In the upper-right corner, click the ‘Manual Software Update’ button.
The Manual Software Update dialog box appears. Select ‘Upload your own plugin archive’, and then select ‘Continue’:
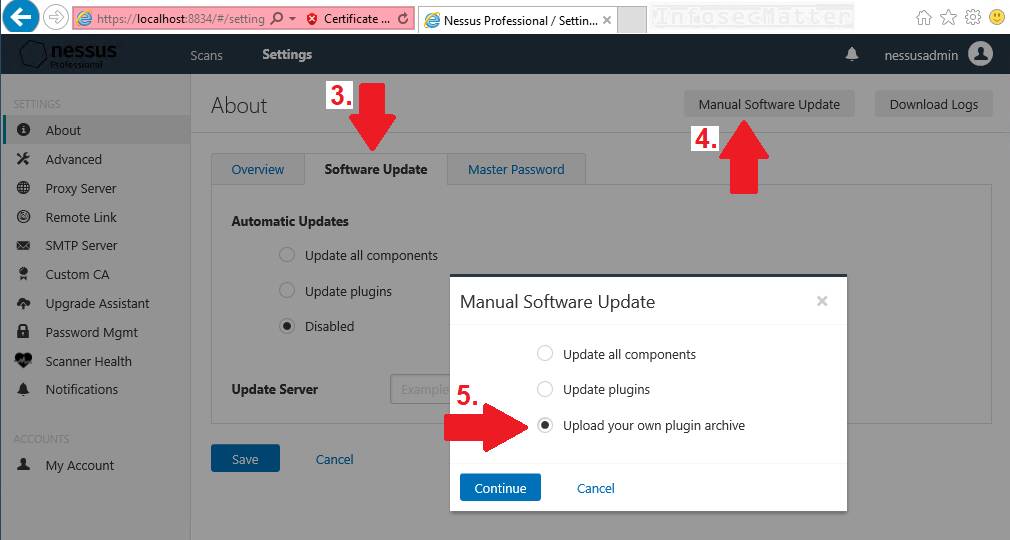
Navigate to the compressed TAR file that we have uploaded onto the system (all-2.0.tar.gz), select it and then click ‘Open’.
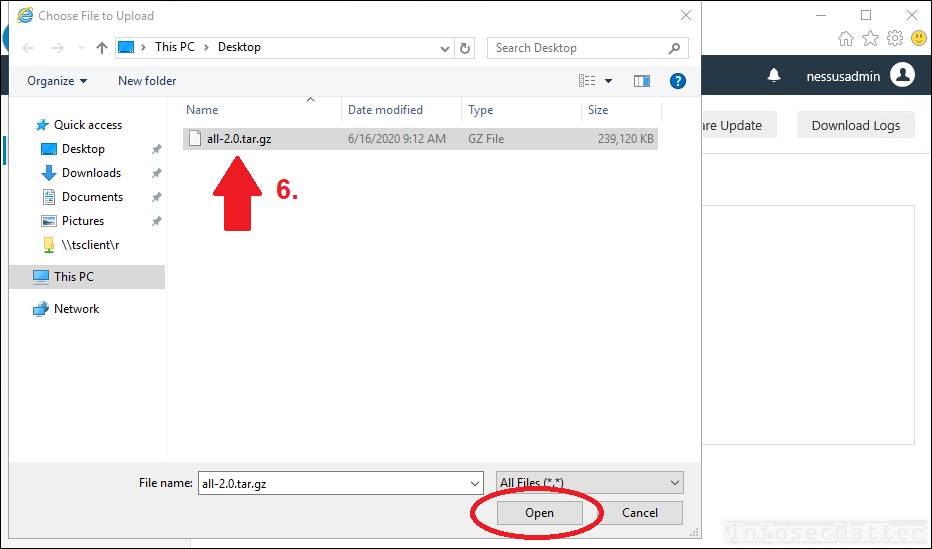
Now the plugin installation will begin.
Note that the plugin installation will probably take anywhere from 15-30 minutes to complete and we should wait for it to complete before doing any scanning.
Unfortunately we cannot directly see the progress, but in the Windows Task Manager we can see that the Nessus process (nessusd) is busy processing the plugins:
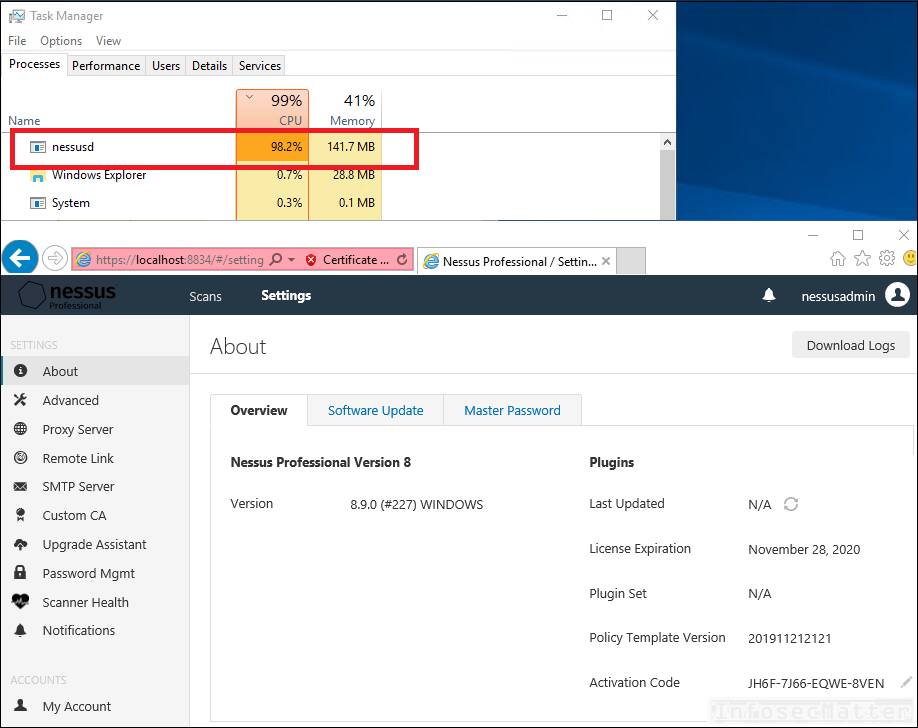
We simply have to wait.
Once the CPU load drops to 0%, it is an indication of completion. As a proof, check the Plugins “Last Updated” date in the web interface.
Once the date is refreshed, congratulations! You have successfully installed, activated and fully updated your Nessus scanner offline!
Go back to top.
This section applies to cases when we have an existing offline Nessus instance in an isolated environment which we would like to update with newest plugins.
Overview and prerequisites
In order to download latest plugins from the Tenable website, we are going to need the following information:
- Challenge code (e.g. aaaaaa11b2222cc33d44e5f6666a777b8cc99999)
- License key (e.g. AAAA-BBBB-CCCC-DDDD)
In the following sections, we will go in detail on how to get them from our existing Nessus installation.
Here’s an overview of the update process in a nutshell:
| Operation | Computer A (offline Nessus scanner) |
Computer B (online computer) |
| Generate challenge code | X | |
| Download latest plugins | X | |
| Update plugins | X |
1. Generate challenge code
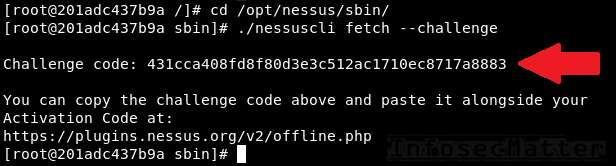
To generate challenge code from our existing Nessus installation (offline computer A), we have to run the following command:
nessuscli fetch --challengeThe ‘nessuscli’ command is typically located in these directories:
| OS | Location |
| Linux | /opt/nessus/sbin/nessuscli |
| FreeBSD | /usr/local/nessus/sbin/nessuscli |
| Mac OS X | /Library/Nessus/run/sbin/nessuscli |
| Windows | C:Program FilesTenableNessusnessuscli.exe |
Here’s an example of obtaining challenge code from Nessus installed on Kali Linux:
The current Nessus activation key (license) can be located in the Nessus web user interface:
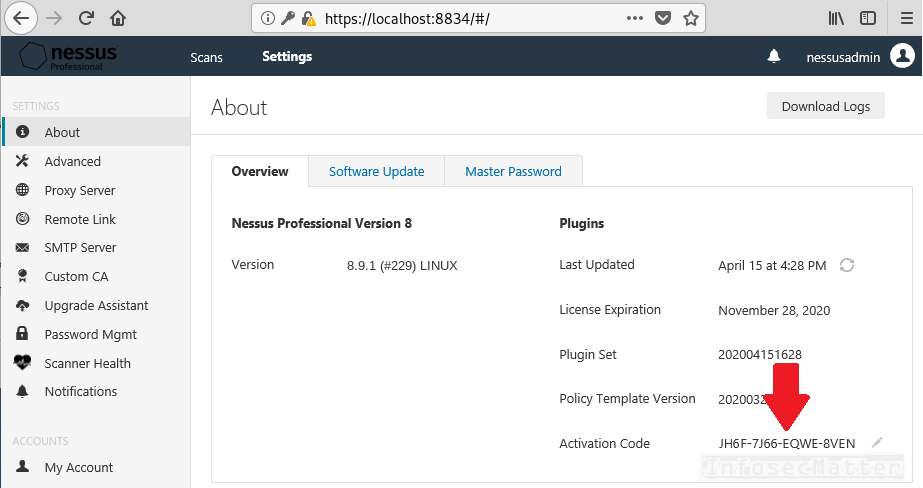
With these 2 pieces of information, we can now download the latest plugins.
2. Download plugins
On the online computer (B), navigate to the Tenable offline registration page on the following URL:
- https://plugins.nessus.org/v2/offline.php
Provide the challenge code and the Nessus activation code (license).
Here’s an example:
After submitting the activation codes, we should obtain a link to the latest plugins:
Download the plugins archive all-2.0.tar-gz (approx. 239 MiB) and transfer it onto our offline Nessus instance (computer A).
3. Update Nessus plugins offline
Once we have the plugins archive transferred onto our target offline computer (A), we can use the same procedure as described in step 5 above to install them.
Alternatively, we could also just simply run the following command to install the plugins archive:
nessuscli update all-2.0.tar-gzAnd that’s it! Now we just have to wait 15-30 minutes for the plugins to be compiled and fully applied.
Make sure to check the ‘nessusd’ process once in a while and the Nessus web interface (https://localhost:8834) to find out whether the plugins has been already fully applied.
Go back to top.
Conclusion
In this article we have learned how to install Nessus Professional on a computer without Internet connection. We have also learned how to update Nessus plugins on an offline Nessus installation / without Internet connection.
If you would like to learn more about Nessus capabilities, please check out our detailed Nessus overview.
nessus installation
download
https://www.tenable.com/downloads/nessusinstallation
rpm -ivh Nessus-7.0.1-es6.x86_64.rpm start up
service nessusd startWEB access
https://127.0.0.1:8834/activation
Activation code to obtain the address
https://www.tenable.com/products/nessus-homeJust fill in the information, you can

Enter the received verification code into the activation code to complete the activation. If you can use the global # # # stably, you can use it.
If the initialization fails, it means that it cannot communicate with the update server. You need to use the following method after the local # # #: (Some people say: «Don’t still want # # #, yes P use», but I want to say that my computer can easily # # #, but the server where nessus is installed is really bad # # #! If the server is convenient, please check the online upgrade section directly)
Offline upgrade
/opt/nessus/sbin/nessuscli fetch --challengeOutput the following code
Challenge code: 748f6bd567cf3f653eb3c63158769ee3259ac3d9

You can copy the challenge code above and paste it alongside your
Activation Code at:
https://plugins.nessus.org/v2/offline.php
Keep the Challenge code in mind, visithttps://plugins.nessus.org/v2/offline.phpUpdate package download from website

The activation code needs to be applied again. Please apply for another email address. It seems that one email address can only apply for one activation code within a period of time. There should be a lot of email addresses o( ̄︶ ̄)o
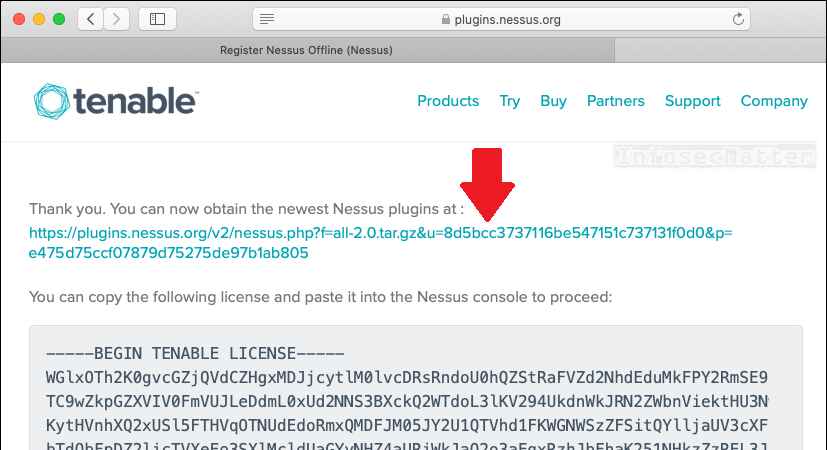
After inputting, return to the following interface:
Thank you. You can now obtain the newest Nessus plugins at :
https://plugins.nessus.org/v2/nessus.php?f=all-2.0.tar.gz&u=70b83875c21bb1466edf72749c485fa9&p=fa23b1213d7876140827ca43dc1353d2

You can copy the following license and paste it into the Nessus console to proceed:
-----BEGIN TENABLE LICENSE-----
b2I5QlNNY2JtMm5YNWZ6YlIybXJlZFp5TXcrSUhJMEtRRkZkNjNmaFNvbXZBcXlSZTFzWHcydDRo
RVZVbHIwaDczZ1dkQlB2bC95b1RHb0ZsWTQ2N2I4RE9jMGU5WWZ0QjZWODJ0a002NlFucmFPZWZ1
OVNDU3hsalFudlNlaXV3OXIvbUl3eHN6L0VlQTZpb0VCV3dMMHVwY2ZVNktOT1p2SksyOHdpbUJY
N3k2R05qTzhRWEQ4TnRIb1lDLzNuNnJBZEV1NEM3SHAzU1hBL1U0aDJRelJwSTFDRENiaW9ONy9a
dHAzb09CWFpEOGVhNEdHOGFGZHllWlpra2RPcjVqWFl3WS93blIxUXp5M3cybXdBaTVDNkN2a3FW
cE16ekxwK0E3dmRYODduWjhRak9MeHc2ZGZSTExmWlpBSTN2dVowckdFQVNRaXMrT0ZSckQrU2RF
M3ZBTjhXWkNRRFBiYzZuNUV3SExxcW5hWHZPY2h5OVJOVWVUVHV2RHpWRHpHY0l4ZlBRaVBYSDJa
eVNLWGxnMDVJQk0zQ1N5ZUt5Q1dhWWRuVVZrRGkxN2oybUJ0R1lPN0UwMHZ0SCtxQ1BYZHVLa0ZF
clhVUzhoUVVyRmJiRDFMamlBbHJ1NGljRE5aVjVwUFE2citBV3UrUmhyRW9HVVlYRk5ybjVUUWxV
MWpmRVBWZmM3aUlVNGd4UGZVT2JETFB6OGtOaTdiUkNpUUNRTDczVTBzRzBTZ2VqRTJtcE5LdFk5
TkgwbzIvZlpTaFdnMGRFNFFyYk1FY21CQkFMZjU2cy9FTndEOTJac3dRejZsK0dMcU96U20raUdT
ODYrLzRmcDRFb3A4TUQyaFh4TkJrVEt3OGR2ZzBOU0FFZHFSRzI1TWpxaUNDd0dvM0FCT2FQbFU9
DQp7ImFjdGl2YXRpb25fY29kZSI6Ijk5RkItNTAyQS05QTlBLUYwN0QtQzMyQyIsInVwZGF0ZV9w
YXNzd29yZCI6ImZhMjNiMTIxM2Q3ODc2MTQwODI3Y2E0M2RjMTM1M2QyIiwibmFtZSI6Ik5lc3N1
cyBIb21lIiwidXBkYXRlX3VybCI6Imh0dHBzOi8vcGx1Z2lucy5uZXNzdXMub3JnL3YyL25lc3N1
cy5waHAiLCJ0eXBlIjoiaG9tZSIsImV4cGlyYXRpb25fZGF0ZSI6MTY2MTkxNjc0MSwidXBkYXRl
X2xvZ2luIjoiNzBiODM4NzVjMjFiYjE0NjZlZGY3Mjc0OWM0ODVmYTkiLCJkcm0iOiIwNjE5ZGZl
NjhhNzRhMjY1Y2VmYmVhMmZmZjljZDkxZiJ9
-----END TENABLE LICENSE-----


OR

You may also install the license using Nessus command line tools:
/opt/nessus/sbin/nessuscli fetch --register-offline nessus.license(Linux/Unix)
C:\Program Files\Tenable\Nessus\nessuscli.exe fetch --register-offline nessus.license (Windows Vista/7/8/2008/2012)
/Library/Nessus/run/sbin/nessuscli fetch --register-offline nessus.license (Mac OS X)
/usr/local/nessus/sbin/nessuscli fetch --register-offline nessus.license (FreeBSD)
And a download link of nessus.license.
Need to download the offline update package and license file
upload to nessus server
Import authorization
/opt/nessus/sbin/nessuscli fetch --register-offline nessus.licenseOffline update package
/opt/nessus/sbin/nessuscli update all-2.0_.tar.gzRestart service
service nessusd restartNow you can use the latest scan library.
Online upgrade
Seeing the above offline update method is not troublesome, anyway, you must # # #, you can directly use the server OR virtual machine science, please use the following command to update, simple and convenient, happy, the command is as follows, please choose your own.
/opt/nessus/sbin/nessuscli update --plugins-only        ##(Update plugin)
/opt/nessus/sbin/nessuscli update --all          ##Update all (including software and plug-ins)
Agent upgrade
NESSUS provides a proxy method for updating and using, the interface is as follows, the specific information is based on the proxy service configuration built by itself

The above interface is suitable for methods that can be directly accessed in some ways, and some can directly enable local port proxy. some! ! ! Now some of these are not highly available.
Others may have some cheating consequences, such as those l2tp I am using! ! Produced the following moths! The local gateway is gone, no more! ! Up! ! ! Xiaobai’s NESSUS server is on the VM platform, and it is blocked across network segments! ! !

The routing table points to the VPN peer by default


cmd add host route
route add 192.168.55.55 mask 255.255.255.255 172.16.1.1
Build a proxy server
download link
http://www.youngzsoft.net/ccproxy/proxy-server-download.htmfree download 3 link authorization, enough
After the proxy test is passed, please use the online update method to update.
The rest of you guys find out for yourself.
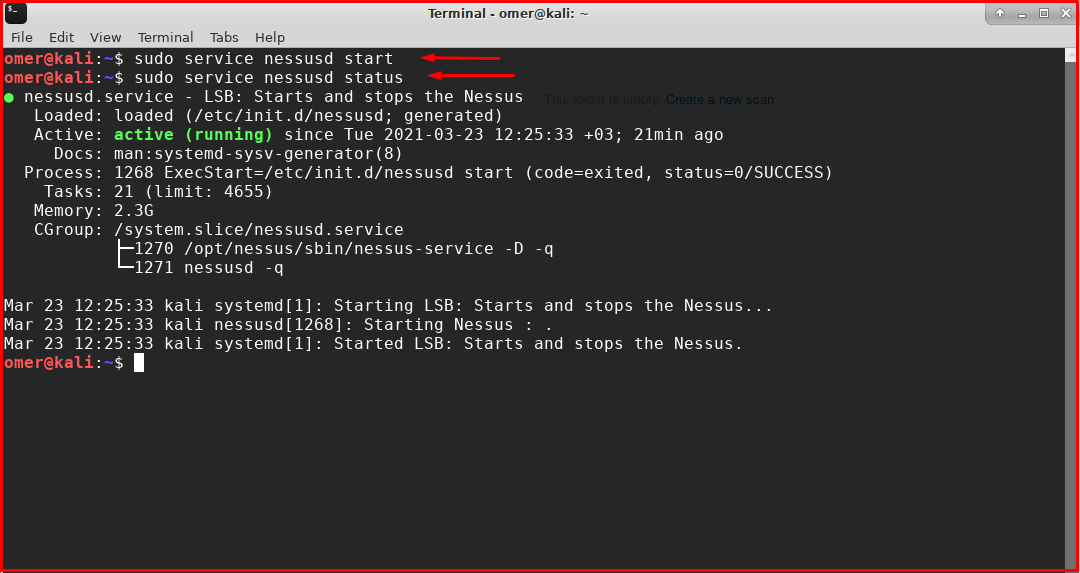
After using the “Nessus” program, you can follow the steps below assuming we have forgotten the user and password. At first, we run the Nessus service with the command below. We check that the Nessus service is running with the “service nessusd status” command.
sudo service nessusd start
sudo service nessusd status
We run the command below to list Nessus users.
Linux
We run the following command to list Nessus users on Linux.
/opt/nessus/sbin/nessuscli lsuser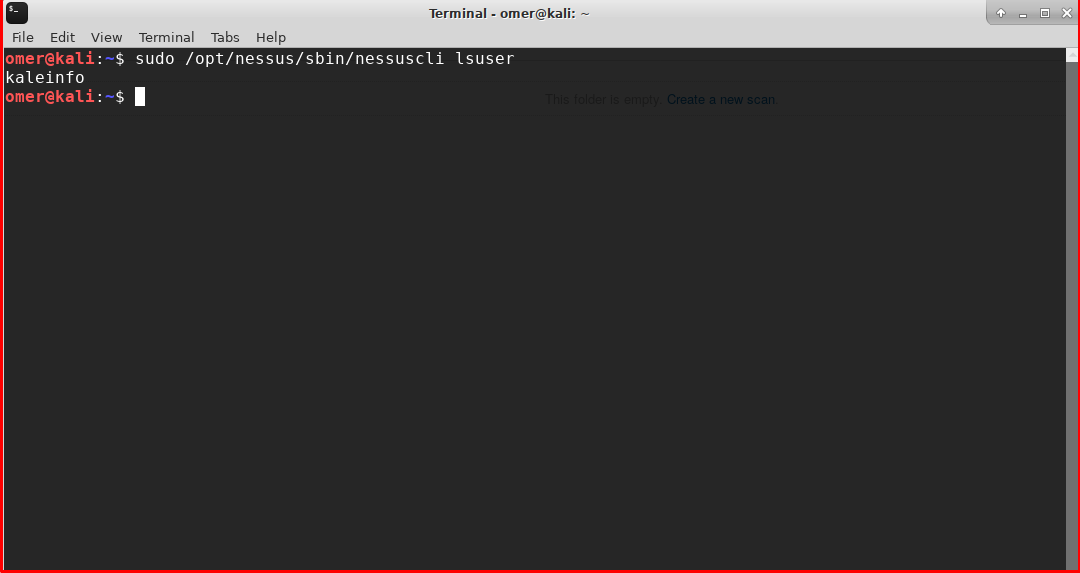
macOS
We run the following command to list Nessus users on macOS.
/Library/Nessus/run/sbin/nessuscli lsuserWindows
We run the following command to list Nessus users on Windows.
C:Program FilesTenableNessusnessuscli.exe lsuserNessus User Password Restart
You can use the command below to change the password of the Nessus user.
nessuscli chpasswd <username>
Linux
You can use the following command to change the password of the Nessus user in Linux. The password does not appear on the screen as you type.
/opt/nessus/sbin/nessuscli chpasswd <username>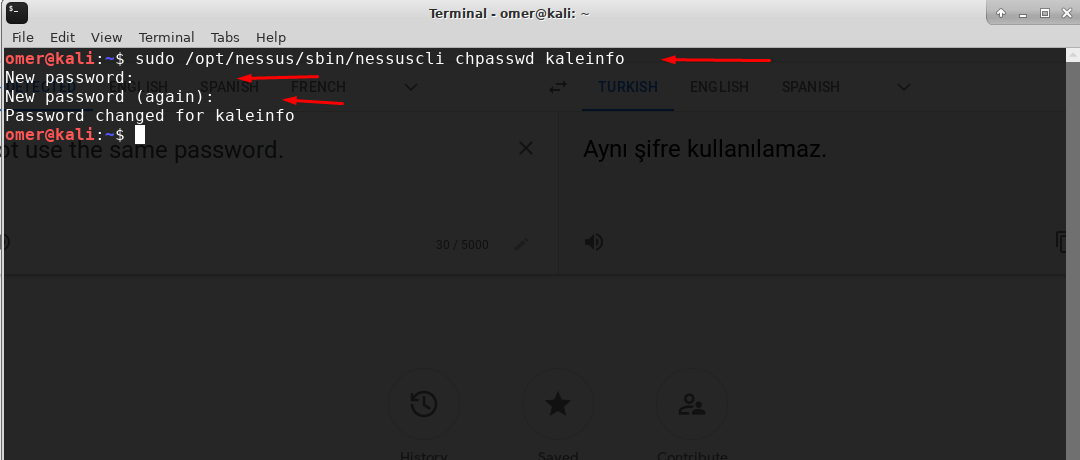
macOS
You can use the following command to change the password of the Nessus user in macOS.
/Library/Nessus/run/sbin/nessuscli.exe chpasswd <username>Windows
You can use the following command to change the password of the Nessus user in Windows.
C:Program FilesTenableNessusnessuscli.exe chpasswd <username>Nessus Plugin Update
If you want to update the Nessus plugins, you can use the command below.
nessuscli update --plugins-only
Linux
If you want to update Nessus plugins in Linux, you can use the command below.
/opt/nessus/sbin/nessuscli update --plugins-only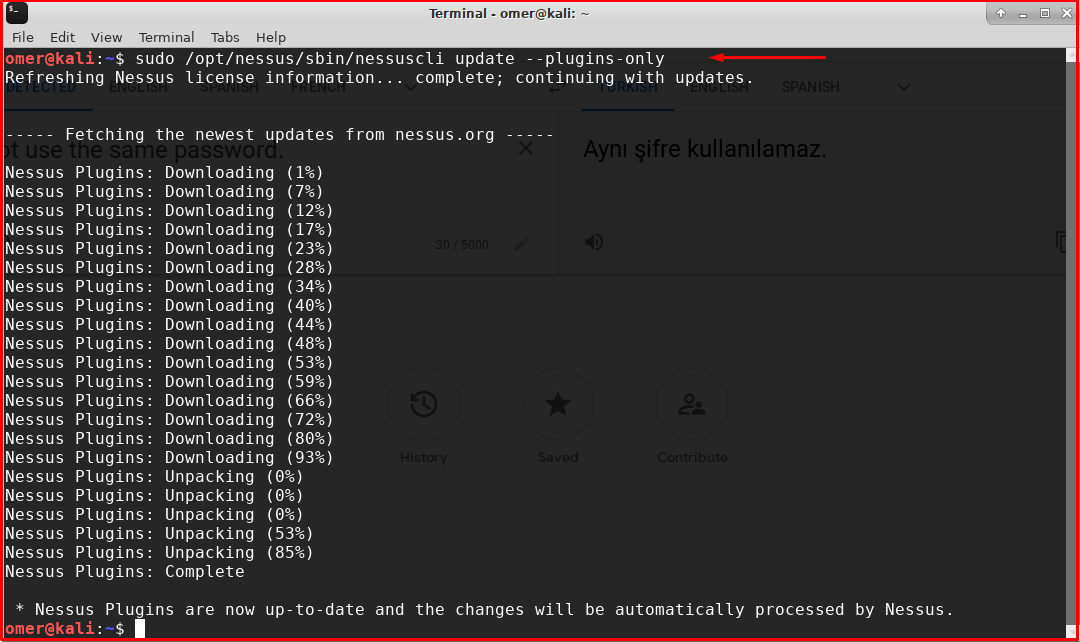
macOS
If you want to update Nessus plugins in macOS, you can use the command below.
/Library/Nessus/run/sbin/nessuscli update --plugins-onlyWindows
If you want to update Nessus plugins in Windows, you can use the command below.
C:Program FilesTenableNessusnessuscli.exe update --plugins-only

I had an issue the other day with one of my Nessus Vulnerability Scanners which is being managed by Security Center. In Security Center the status of one of the Nessus scanners showed «Plugin Out of Sync«. I tried to push the plugins to the Nessus scanner from the Security Center, but I was getting a status error of «Connection timed out«. So basically I was getting a latency issue on the connection. The Nessus scanner and the Security Center are in different states, so this may be why there is so much latency. I just built this Nessus scanner, so there were just too many plugins to be pushed over the wire by Security Center. To fix this issue, I just manually copied the plugins to the Nessus scanner. Then I manually loaded the plugins into the Nessus scanner. After I did this, I have not had this issue again.
Manually updating the Plugins can sometimes fix error or scanner status of «Protocol error«. These instructions work on Nessus 5x and 6x, when managed by Security Center 4x or 5x.
Follow the instructions below to manually install plugins for the Nessus scanner on a Windows computer. For Linux computers click here.
1. Login to the Nessus scanner.
2. Open PowerShell or the Windows command line (CMD) as privileged user.
3. Stop the Nessus service
# net stop «Tenable Nessus»
4. Remove the Nessus scanner from Security Center
5. Reset the scanner
# …Program FilesTenableNessus>nessuscli fetch fix —reset
6. Connect the Nessus scanner
# …Program FilesTenableNessus>nessuscli fetch –security-center
7. Load the plugins into Nessus
# …Program FilesTenableNessus>nessuscli update plugins_file.tar.qz
8. Start the Nessus scanner
# net start “Tenable Nessus”
9. Login to the web interface for Nessus and verify that the configuration is complete.
https://localhost:8834
10. Login to the web interface for the Security Center. Add the Nessus scanner back and verify connectivity.
Your done.
Related posts
On this Blog
Представьте подробные этапы процесса установки Nessus в Kali и решение проблемы загрузки подключаемого модуля.
- лабораторная среда
- Процесс установки
- Скачать Nessus
- Установить Nessus
- Запустите Nessus
- получить код активации
- Веб-интерфейс входа
- Nessus скачать плагин решение ошибки
- ссылка
лабораторная среда
Хост Windows: Windows 10 Enterprise Edition
VMware:VMware Workstation Pro 12
Kali:kali-linux-2016.2-amd64
Процесс установки
Скачать Nessus
Скачайте соответствующую версию Nessus на официальном сайте:http://www.tenable.com/products/nessus/select-your-operating-system
Выберите версию, соответствующую Kali здесь


согласитесь с соглашением и загрузите

Сохраните файл и сохраните его в каталоге загрузки по умолчанию
Установить Nessus
Загрузка — это файл deb, аналогичный обычному методу установки файла deb, выполнить
dpkg -i Nessus-6.10.5-debian6_amd64.deb- 1

Запустите Nessus
Согласно сообщению подсказки после успешной установки в предыдущем шаге

Далее запустите и войдите в веб-интерфейс.
Следуйте инструкциям и выполните следующую команду, чтобы запустить nessus
/etc/init.d/nessusd start- 1

Вы можете проверить статус запуска nessus после запуска
netstat -ntpl | grep nessus- 1

Есть два сообщения, как показано на рисунке выше, которые указывают, что оно было успешно запущено.
получить код активации
Поскольку код активации nessus необходимо вводить при входе в веб-интерфейс позже, чтобы не прерывать промежуточный процесс установки, мы заранее получаем код активации для дальнейшего использования.
Откройте сайт:http://www.tenable.com/products/nessus/nessus-plugins/obtain-an-activation-code

Нажмите «Зарегистрироваться сейчас» в версии «Nessus Home»

Перейдите на страницу регистрации, просто введите здесь имя и адрес электронной почты, имя можно написать по своему желанию, введите свой реальный адрес электронной почты, чтобы получить код активации, а затем нажмите «Зарегистрироваться».

Когда вы видите эту страницу, вы можете успешно зарегистрироваться. Вы можете проверить электронную почту по электронной почте.

Нажмите на электронное письмо от «Регистрация Nessus»

Красное поле — это код активации, который будет использован позже. (На самом деле здесь нет необходимости кодировать, потому что этот код активации можно использовать только один раз, после использования он будет недействительным)
Веб-интерфейс входа
Следуйте предыдущим инструкциям, чтобы открыть веб-страницу:https://guet:8834/
Этот URL-адрес является моим локальным URL-адресом, и он открывается в соответствии с информацией подсказки в «Start Nessus»https://localhost:8834/

В начале вы можете увидеть ошибку доступа, как показано на рисунке выше, но нажмите «Дополнительно», чтобы добавить этот веб-сайт в список доверенных в соответствии с запросом. Подробные причины и шаги настройки см. в:https://support.mozilla.org/en-US/kb/what-does-your-connection-is-not-secure-mean
После того, как страница вернется в нормальное состояние, откроется страница приветствия, как показано ниже.


Введите имя пользователя и пароль, здесь все настроено и может быть установлено в соответствии с вашей ситуацией.

На этом этапе вам нужно ввести код активации, который вы только что получили по электронной почте.

Начните загрузку плагина здесь.

Вообще говоря, эта страница сбоя загрузки будет отображаться. Я чувствую, что самая большая трудность при установке Nessus заключается в следующем. Вот два решения двух ошибок плагина загрузки Nessus.
Nessus скачать плагин решение ошибки
- первый метод
Выполните операцию обновления в соответствии с сообщением на странице сбоя загрузки.
/opt/nessus/sbin/nessuscli update- 1

Если вам повезет, он оценивается как успешный, но я несколько раз пробовал процесс загрузки, и он был прерван, и загрузка не удалась.
- Способ второй
Этот метод использует автономный метод, чтобы загрузить плагин, а затем установить его.
В автономном режиме требуется код вызова и код активации, и код активации только что использовался, поэтому он недействителен, вы можете ввести информацию и отправить новый код активации, кажется, что в течение часа Код активации можно отправить один раз. Если уведомление достигло предела, вы также можете получить код активации, изменив почтовый ящик.
Теперь сгенерируйте код вызова в каталоге/opt/nessus/sbinказнить
./nessuscli fetch --challenge- 1

Как показано выше, вы получите код вызова, сохраните код вызова.
откройте веб-страницу:https://plugins.nessus.org/v2/offline.php

Введите код вызова и код активации в соответствующие позиции, а затем нажмите «Отправить»

перейдет на страницу загрузки выше, щелкните две ссылки в красном поле, чтобы загрузить подключаемый модуль и регистрационный код соответственно.
Этот плагин имеет более ста триллионов, и загрузка может быть медленной, регистрационный код относительно небольшим, а загрузка быстрой.
После загрузки скопируйте оба файла в каталог/opt/nessus/sbin/Далее зарегистрируйтесь
./nessuscli fetch --register-offline nessus.license- 1

Затем установите плагин
./nessuscli update all-2.0.tar.gz - 1

Наконец перезапустить
./nessusd- 1

Просмотр информации на картинке выше показывает, что она была запущена.
Вы можете обновить веб-страницу в это время:https://guet:8834/

Введите имя пользователя и пароль, установленные ранее.

Интерфейс после входа в систему, как показано на рисунке, вы можете определить различные правила в соответствии с вашими потребностями.
На этом этапе установка Nessus от Kali завершена.
ссылка
Официальная документация по установке:https://docs.tenable.com/nessus/Content/InstallNessus.htm
Университетский бюллетень Kali Linux: руководство по проникновению в систему безопасности:https://wizardforcel.gitbooks.io/daxueba-kali-linux-tutorial/content/10.html
Установка Nessus6.5.4 и загрузка плагина Fail:http://blog.csdn.net/ling_xiao007/article/details/50670441