ONLYOFFICE Groups
v12.0
История изменений ONLYOFFICE Groups
Version 12.0
Release date: 05/25/2022
General portal changes
- Added the ability to connect apps for authorization via AppleId and Microsoft.
- Changed keys for authorization via Twilio.
- Changed keys for authorization via bitly.
- Added the portal name in logs.
- Updated to CKEditor v4.16.1, added new styles for TextCut and Magicline.
- Edited bottom paddings in the layout.
- Redesigned Feed and Mail drop-down lists.
- Redesigned textarea for the Chrome browser.
- Added a new page with UserVisits information in ASC.Web.Stat.
- Disabled Community module by default for new portals.
- Updated default image for the authorization page.
- Default logo for the About page cannot be changed by an administrator via the WhiteLabel settings in the SaaS version.
- Fixed Telegram notifications and Zendesk chat.
- Portal name cannot be less than 3 characters.
- DotNetZip library replaced with ICSharpCode.SharpZipLib, AjaxMin library replaced with NUglify.
- Fixed the bug related with IP Security and Talk vulnerabilities.
- Removed the ASC.Mail.Autoreply project and service.
- Removed the log cleaner for NLog.
- Fixed the AjaxPro and BinaryFormatter vulnerabilities.
- Redesigned userselector, added avatars.
- Updated emails about changing email and password.
- Added a tip on security in the general settings for the server version.
- Duplicated password entry field.
- Fixed deprecated methods after updating jquery.
- In the DNS settings, a custom domain can be added via the request to support for the SaaS version.
- Added mentions in comments to tasks, email messages, discussions.
- Added support for deep link: when opening a document in a mobile browser, user can choose if the document should be opened in a browser or in a mobile app.
- Disabled asp.net sessions in the project.
Documents module
- Added a new page when opening documents in the Private Room via a web browser.
- Updated empty files.
- Added new settings to automatically clean up the Trash folder.
- Added support of fb2 files for viewing.
- Added the ability to download xml files with conversion / open for viewing.
- Added the ability to download text files with conversion to epub, fb2, html, dotx, ott.
- Added the ability to download spreadsheets with conversion to xltx, ots.
- Added the ability to download presentations with conversion to potx, otp.
- Added the ability to download oxps files with conversion to pdf / open for viewing.
- Added the ability to download oxps files with conversion to pdf / open for viewing.
- Added the ability to download files with conversion to OOXML with macros (docm, dotm, xlsm, xltm, pptm, potm).
- When interacting with editors, a file type is processed in incoming requests and is added in outgoing requests.
- The default About window is displayed in editors in the SaaS version. The logo and advanced branding are transferred to the editors About window in the server version.
- Added a link to FAQ when connecting Yandex.
- Fixed the file selection area.
- Redesigned the Sharing settings window.
- Added a new feature in the Sharing settings window — Can’t print, download and copy file (for Read Only and Comment).
- Added a new feature in the Sharing settings window — Can’t change sharing settings (for Full Access).
- Added a new feature in Common settings — Default access rights in sharing settings.
- Added a new section in the Admin settings — Sharing settings.
- Hidden the Private Room section in the FileChoice, SaveAs dialogs.
- When converting files, regional settings are transferred.
- Added missing logs for actions with files and folders, added new api methods for actions.
- Added the ability to add folders to Favorites.
- Added support of WebDAV server.
Calendar module
- Added WYSIWYG CKEditor in the Description field of the event.
- Connected a new config for the Toolbar.
- Redesigned the Description column for the List page.
- Added DOMPurify sanitizer to prevent possible XSS.
- Added the ability to attach local files and links to files from the Documents module to events.
Projects module
- Added the ability to drag-and-drop subtasks.
- Reworked reports: User Activity, Project List, add a time interval.
People module
- Added Telegram in Contact information.
- Moved Birthdays from Community to People.
- Added Birthdays and New employees to Feed.
- Added the connection list in the profile with the ability to log out.
- Added the ability for administrators to log out all connections of the certain user.
- Removed import from Yahoo.
- Added the ability to create CardDAV address books.
Mail module
- Added IMAP synchronization for Mail Server.
- Added the ability to perform Mail Server database backup and restore.
- Added the ability to request a read receipt.
- Moved the Aggregator, StorageCleaner and Watchdog mail services from the .Net Framework platform to .NET 6.0.
Control Panel
- Added the Data Import page that allows to import data from Nextcloud, ownCloud and GoogleWorkspace to ONLYOFFICE Workspace.
- Moved Elasticsearch to a separate container.
- Fixed bugs.
Version 11.6
Release date: 01/18/2022
Documents module
- Added the
.docxfand.oformformat definition. Own format icons are displayed. - Added the ability to download
.docxas.docxf..docxfcan be downloaded in the same formats as for.docxand in the.oformformat. - Added the ability to create an empty
.docxffile and to create it on the base of an existing.docxfile. - Added the ability to create an
.oformfile from a.docxffile via the context menu. - Added the ability to create an
.oformfile from a.docxffile from the editor specifying a folder. - The ability to share a file with the Fill in the form permissions is only available for the
.oformfiles. It’s not possible to share encrypted files and files from third-party accounts for form filling. The Form Filling option is not available when sharing an.oformfile via an external link. - Added the Fill in the form icon in the file list to open an
.oformfile in the editor. - If the
.oformfile is shared with the Form Filling rights, a copy of the file is created in the My documents section when a user opens the shared file. Filling in the form is performed in this copy and does not affect the original file. If the original file is changed by the owner, its copy will not be up-to-date. - If the
.oformfile is shared with the Full Access rights, filling in the form is performed in the original file. - Added sample
.docxfand.oformfiles. - For the editor dark theme, the usual logo is transferred so that it displays correctly in the embedded mode.
Version 11.5.3
Release date: 07/20/2021
General portal changes
- Added a dialog with the editors statistics on Payments page in Control Panel.
- Added a new slide to the start banner, added the Product Demo item to the Feedback & Support menu for trial SaaS portals.
- Added the Request training item to the Feedback & Support menu for paid portals (SaaS and Server versions).
- Added the Live Chat switcher to the Feedback & Support menu for paid portals (SaaS and Server versions). It allows to turn the chat on/off.
- Added the Email support item to the Feedback & Support menu for paid portals (SaaS and Server versions).
Version 11.5.2
Release date: 06/05/2021
General portal changes
- Restored the mail migration functionality hidden in the version 11.5.0.
- Added the text about resetting users’ passwords on the Restore settings page, added an email notification about the successful completion of the restoring process.
Documents module
- Added the ability to select the archiving type in the settings:
zip(by default) ortar.gz.
CRM module
- Moved queue settings to the configuration. 2 streams are allocated for data export.
Version 11.5
Release date: 04/17/2021
General portal changes
- Added the Zendesk chat display on the Payments page in the SaaS version.
- Updated the Payments page in the SaaS version. Prices are based on a number of users. The free Startup and paid Business (+trial) payment plans are available.
- Added the welcome dialog window for the portal owner on the main portal page. The dialog is displayed only once when the owner first enters the portal.
- Removed the limitation on the amount of portal data when creating a backup.
- When storing backups to a third party service, chunk loading is now used.
- The Restore feature is available in the SaaS version if the pricing plan includes this option. In the SaaS version, only the hashed backup file can be restored, i.e. the backup file created in the version 11.5 and later. Removing temporary files when starting a backup.
- Filter: a tip on the search is enabled in all modules, excepting People and Sample.
- Fixed calculating the totalcurrent number of full-text search indexes.
- The full-text search feature is available in the SaaS version if the pricing plan includes this option. Updated ElasticSearch to the version 7.9.
- Reworked the receipt of data from the payment system for authorized requests in the SaaS version.
- The LDAP feature is available in the SaaS version if the pricing plan includes this option.
- Added the
tempsetting to specify a path for creating temporary files instead of the systemPath.GetTempFileName()one, so that the system disk does not overflow. - Changed email notifications for the SaaS version and messages about changing an email.
- Changed the assembly for archiving backup.
- Reworked the mechanism for working with resource files.
- All the available languages are enabled in the Personal cloud, reworked the drop-down list of available languages on the start page.
- The SSO feature is available in the SaaS version if the pricing plan includes this option. The
ssoauthservice moved from the control panel to portals. - Updated the Yandex icons on the user profile page, authorization page and third party service connection settings.
- Added a checkpoint to the migration page and changed the email notification about the successful completion of the migration.
Documents module
- Removed the support of the version 5.3 of the editors.
- Updated the Google Drive icons.
- Fixed calculating a quote when downloading several files in an archive.
- Removed transferring the anonymous name to the editor for using the renaming functionality in the versions 6.2, 6.3 of the editors.
- Added the ability to convert the
fb2files. - Files can be shared with guests for viewing only.
- Removed the button to share a file with a group in the Private Room.
- Transferring the favorite status of a file to the version 6.3 of the editors. Changing the favorite status from the editors.
- Signing in JWT the
callbackUrlof the editor initialization configuration. - Video and audio files are added to start samples in all languages.
- Archiving and compressing via
tar.gzinstead ofzipwhen downloading several files. - Removed the limitation on the size of files when downloading several files in an archive.
- The EasyBib and WordPress plugins are not available in the free version of the editors.
Mail module
- Added the ability to get the connection settings for connecting a mailbox to third-party mail clients and the ability to change passwords for mailboxes created on the Mail Server in the SaaS version.
Calendar
- Fixed bugs.
Version 11.1
Release date: 03/10/2021
General portal changes
- ASC.Web.Studio: the
onlyoffice_logofolder renamed tologo. - Added a banner for the ONLYOFFICE Projects app in the App Store.
- Removed the button for downloading a paid invoice on the Payments page (11.0.2).
- Defining work from the Desktop on the server via
userAgent(starting from version 6.1).
Documents module
- Added Thumbnails view. Thumbnails are not generated for video. Thumbnails are not generated in third-party storages.
Version 11.0.1
Release date: 12/10/2020
General portal changes
- Using global recaptcha.
- Removed collection of analytics from the installation.
- Disabled mini chat.
Bug fixes
- Bug Fixes & Performance Improvements.
Version 11.0
Release date: 10/14/2020
General portal changes
- Added the possibility to receive portal notifications via Telegram;
- Added the possibility to make an addon (Mail, Chat, Calendar) a default portal page;
- Added the additional license check when replacing ONLYOFFICE in the About this program window;
- Added the vsyscall check to the installation scripts when installing Mail Server on Debian with kernel 4.18.0 and later;
- Updated copirights in the source files;
- Added the possibility to connect the Mail.ru, VK and Yandex applications for authorization;
- Added new icons and texts in the welcome placeholders of the empty modules;
- Added icons to context menus;
- Added two scrolling areas on the page: navigation and content;
- Reworked the mechanics for displaying messages on the authorization page;
- Updated Elasticsearch to v.7.4. Added the possibility to rebuild the index.
- Updated Mono to v.6.8, updated builds, improved performance;
- Added the file encryption at rest feature for server versions;
- When requesting the password recovery, it’s not possible to check if an email address is used on the portal;
- It is prohibited to specify the current password when changing a password;
- Updated minimal password length to 8 characters;
- The password complexity check is now performed in the client-side browser;
- Added password hashing with the PBKDF2 algorithm when transmitting passwords to the server;
- Added the Sign in to domain option on the authorization page for the portals where the LDAP Authentication is enabled;
- Added a request for subscription to newsletters in the free Community version installation wizard;
- Control Panel is available in the free Community version with all settings excepting the editors logo replacement;
- Removed the link to the forum;
- Added data cleaning before restoring backup;
- When the license expires, Document Server updates are blocked in the installation;
- Portals with an expired license and Enterprise portals with a free default license are not blocked;
- In the free Community version, a block with a proposal to install Enterprise Edition is added;
- The Payment page redirects to the Control Panel (if it is installed);
- Added the
-it, --installation_typeparameter to the installation scripts. The possible values areGROUPS | WORKSPACE | WORKSPACE_ENTERPRISE.
Documents module
- Changed the note about the mention in the comment pop-up window depending on the ability to provide access to the document;
- Added the support for the
.webpimages; - Using a new MailMerge API for the editors;
- Opening the default portal page when clicking to the logo in the upper left corner of the editors interface;
- Added the possibility to connect kDrive via WebDav;
- Added the Favorites section, added the ability to add files to favorites via context menu;
- Added the Recent section;
- Added translations for the EasyBib and WordPress plugins;
- Added the possibility to provide the Custom Filter access rights for spreadsheets;
- Replaced an empty tab with a static page containing the logo when creating a new file;
- If the DocuSign service is not connected, the instructions are displayed when clicking the Sign with DocuSign context menu option;
- Added a new Private Room section for the server version only;
- If an administrator disabled the Allow users to connect third-party storages option, he/she also cannot connect third-party clouds;
- Added a separate section for quick access to admin settings on the left panel;
- Added links to download desktop and mobile apps.
- Added empty files for creation in Japanese (ja-JP).
CRM module
- Added the Make a VoIP call action in the contact context menu;
- Removed the unnecessary Quantity field when creating a new invoice item;
- Added the possibility to enter decimal fractions with two decimal places in the Discount field when creating an invoice.
Mail module
- Added a new scroll mechanism for the screen width greater than 1200 px.
Talk
- Removed the third-party messengers integration due to the necessity to store user passwords in the explicit form which is not secure.
Control Panel
- Control Panel is available in the free Community version with all settings excepting the editors logo replacement;
- Added the vsyscall check to the installation scripts when installing Mail Server on Debian with kernel 4.18.0 and later;
- Redesign of the navigation menu: added Common and Portal settings sections, added icons to menu items;
- Added the advanced rebranding page in the Common Settings;
- Added the possibility to reindex the full-text search;
- Updated
node.js, updated packages (transition tosamlifyfor SSO); - Added the Encryption at rest block in the Storage section;
- Added the Private Room section for the server version only;
- Added the
upgradepage with a proposal to upgrade to Enterprise Edition; - Added the
activatepage with a possibility to upload a license file; - Added the HideAuthPage option to the SSO settings to hide the authorization page. When the HideAuthPage option is enabled, an automatic redirect from the authorization page to the SSO service will occur.
LDAP
- Added the Sign in to domain option on the authorization page.
Single Sign-on
- Transition to the new
samlifylibrary; - Added the HideAuthPage option to the SSO settings to hide the authorization page. When the HideAuthPage option is enabled, an automatic redirect from the authorization page to the SSO service will occur.
Calendar
- Improved the Calendar API security;
- Reworked the authorization method for the CalDAV calendars;
- Reworked the Radicale plugins for the new version 3.0.
Version 10.5
Release date: 12/17/2019
General portal changes
- Added new mail messages for portals;
- Docker installation in the
install.shscript is now performed using the script by Docker developers; - Added scripts for the installation from DigitalOcean Marketplace;
- Added the reCAPTCHA verification after N failed attempts to sign in;
- Sending only 200 emails per day to non-activated email addresses for a SaaS portal during the trial period;
- Fixed the issue when downloading large files from a Storage, e.g. backup files.
Documents module
New features
- Added the possibility to open the version and revision history when clicking on the Preview file version icon;
- Added the possibility to open a file at the position of the previously added bookmark;
- Added a notification about the conversion when uploading a file that must be converted before it can be opened;
- Added support for the conversion of the password protected files: the password is now required to open a file that that must be converted before it can be opened;
- Added the possibility to rename files using the F2 hotkey;
- Added the possibility for administrators to adjust intermediate revision settings;
- Added the possibility for users to save intermediate revisions when editing a document by using Ctrl+S or the Save button;
- Added the button that allows to upload a folder;
- Added the possibility to mention portal users when adding a comment in an editor. The mentioned user will automatically be granted with read-only access to the file and will receive a notification.
Viewers
- Redesigned image/video Viewers;
- Playback of the
avi,mpgandmpegfiles up to 100 Mb is now performed by means of the intermediate conversion into the.mp4format.
Encryption mode
- When connecting to the portal via the desktop editors interface with the encryption mode enabled, uploading folders as well as uploading with the drag-and-drop method is not available; OOXML documents (.docx, .xlsx, .pptx) become encrypted when they are uploaded to the portal or created.
Various changes
- Minor changes in the file history display.
Bug fixes
- Fixed the issue when downloading a lot of files added to an archive.
Projects module
New features
- Added the button that allows to upload a folder;
- Added the possibility to delete several projects at once.
Tasks/milestones
- Added the possibility to create custom task statuses.
Various changes
- Removed the Back button from the interface;
- Projects are now removed without refreshing the page;
- The Follow button is now moved to the Actions menu;
- A complete name is now displayed in the entity profile.
CRM module
- The
pngandjpgformats are only available for the CRM contact avatars.
Mail module
- Added the new email Templates functionality;
- Added the possibility to Download all attachments as a single archive;
- Added the possibility to display the last quoted message in a conversation;
- Added the indication of the mailbox deletion process.
Mail Server
- Opened the following ports in Dockerfile: 465(SMTPS), 993(IMAPS), 995(POP3S);
- Disabled the redundant DKIM generation;
- Removed the
reject_unverified_senderkey in the Postfix config.
Control Panel
New features
- Redesigned the Backup module;
- Added the section that displays all Online Users at the Login History tab;
- Added the Storage module.
LDAP
- Added the possibility to send invitation messages containing the button that allows to go to the portal sign in page and the email activation link when adding users to the portal.
Calendar
New features
- Added the synchronization option for calendars from the Other Calendars section.
Various changes
- Optimized the page display when there are a large number of events in the calendar.
Version 10.0.4
Release date: 08/28/2019
General portal changes
- The Mono version used is updated to 6.0;
- The sample module (see the documentation here) is now present in the portal and can be enabled in the portal settings;
- Fixed various bugs.
Version 10.0.1
Release date: 04/25/2019
Documents module
- Added the possibility to view
AVI,MPEGandMPGfiles; - If the portal has HTTPS enabled, the address of the editors is also checked for the presense of the secure HTTPS connection alternative.
People module
- Added the restriction for the number of all users (both active and guests) on the portal.
Mail Server
New features
- Added permanent Fail2Ban
ignoreipsection for docker containers and its gateway; - Added the possibility to create sieve rules for users inside
/var/vmail/sieve/; - Added new extension to sieve:
sieve_extensions -> editheader; - Exposed port 4190 for
ManageSieveservice; - Added the possibility to run an external script from the
/var/vmail/external.shor/app/onlyoffice/MailServer/data/external.shpath; - Changed the default
FIRST_DOMAINparameter; - Replaced the hard-coded password used for the first mailbox with a random one;
- Removed old useless descriptions for iRedMail administrator console path;
- Added backticks to the
'CREATE DATABASE'commands; - Added the possibility to send mail messages from
alias_domain,alias_addressandfull alias; - Added the
imapsynccommand; - Added the new Python scripts allowing to create mailboxes, change password and run imapsync batch in
/usr/src/iRedMail/tools/scriptsfolder inside theonlyoffice-mail-servercontainer; - Added the Python PIP manager and installation requirements.
Bug fixes
- Fixed the bug with mailbox not being removed when using third level domain (issue: wrong domain regex);
- Fixed the bug with the
Cannot load 1024-bit DH parameters from file /etc/pki/tls/dhparams.pemwarning; - Fixed the bug with the
No such file or directorybeing shown in many cases; - Fixed the bug with the
ECHO_INFO: command not foundwarning.
Version 10.0
Release date: 03/17/2019
General portal changes
For all users
- Added two-factor authentication using the authentication applications for code generation;
- Added the page with the list of links for mobile and desktop editor installations.
For administrators
- Added the possibility to create administrators for the Mail module;
- Removed SMTP settings from the CRM module and added them to SaaS installations;
- Added the possibility to connect third-party providers for static data storage and CDN;
- Added the possibility to backup/restore from the local folder;
- Added the possibility to backup/restore using
mysqldump(for server installations only).
Backend
- Replaced sphinx with Elasticsearch, adding the possibility to search by content in documents, mail and chat messages;
- Added analytics to the periodic SaaS mail messages;
- Added the generation of the unique machinekey when installing the Docker containers using script; the key is stored in the
/app/onlyoffice/CommunityServer/data/.privatehidden folder; - Enabled caching using Redis;
- The thumbnail generation is done via a new service;
- Added Bearer authentication;
- Most icons are replaced with
SVGformat images to enhance their display on high DPI screens; - Removed lots of outdated limitations for mobile devices.
Documents module
Sorting and filtering
- Added sorting of files in all sections, including Shared with me and Project documents;
- Added descending sorting by modification date by default;
- The search and sorting results are taken into account when opening images for preview;
- Added the filtering by media file formats.
Sharing options
- Added the possibility to share documents for commenting only;
- Added the possibility to share
DOCXfiles for form filling only; - Added the shortening of the link to the people outside portal in the sharing dialog window by user request only;
- Removed the possibility to rename files and add comments for guests.
Various changes
- Added support for the new request signing to the document editing service (with JWT in request body);
- Updated the file/folder selection and moving using the mouse;
- Added the viewers for video and audio files;
- Added the display of the date in the file name when opening not the latest file version for viewing;
- When sending the file by mail from the Documents module, a draft is created with the file attached.
Upcoming changes (will be available with the release of Document Server v5.3)
- Added the possibility to Save as the documents to the portal from editors;
- Added the possibility to insert the images from the document manager to the editors;
Server installations
- Added the search by the document title and content;
- Enhanced the checks of the connection to the editors settings;
- Added the possibility to upload the license file after the support and updates period end.
Projects module
Tasks/milestones
- When creating a milestone the project manager is selected by default instead of the first person on the list;
- Added the loader when performing the group actions;
- Added a separate filter for the No milestone tasks;
- Added the milestone icon and deadline date for the tasks with no deadline belonging to a milestone;
- Fixed the display of the number of project team in the common list;
- Replaced the autosuggest input with the
advancedSelectorfor the project creation dialog; - The order of tasks/milestones is now saved when creating a project.
Reports
- Added the report generation using document builder service;
- Added the setting to select the report storage place;
- Added the page with the list of the generated reports.
Discussions
- Added the possibility to edit the documents when editing discussions;
- Added the possibility to attach documents when creating discussions;
- Updated the dialog with file selection to attach it to the task or discussion.
CRM module
- The list export uses a separate thread with progress display.
People module
- Updated the user avatar generation;
- Optimized the work with user list for a large number of users;
- Added the wizard for the mass user import;
- Updated the loading and parsing of
CSVfile, added the possibility to map the user fields manually; - Updated the user editing interface available before adding them to the portal;
- Added the counters of the users ready for importing and import progress;
- Added the possibility to import files previously exported from various sources (Google, Yahoo or Thunderbird) as a
CSVfile; - Added the possibility to create the email address at the domain connected to the Mail Server;
- Added the possibility to set the temporary password for portal access manually.
Mail module
User folders
- Added a separate page to create, edit and move/delete the user folders;
- Added the link for faster user folder creation;
- Added the modal window to create/edit user folders with the possibility to select their nesting within each other;
- Added drag’n’drop for mail messages and folders;
- Added the new Move to button to move mail messages to folders;
- Added the possibility to quickly select several mail messages using the mouse;
- Added the indication for the unread mail messages in the user folders;
- When the folder is deleted all the mail messages from it will be moved to the trash.
Tags
- Changed the tags popup, now it is optimized for tablet devices.
User filters/rules
- Added the new user filters/rules option for faster actions with mail messages;
- Added the new page for filters display, where it is possible to change the filter order, enable and disable them, apply to existing messages, edit/delete the filters;
- Added the new page for filter creation and editing, where it is possible to add filter name and trigger rules and actions, list the messages fitting the filter, apply the filter to existing messages.
Notification request
- Added the request for delivery/read notification option when creating a mail message.
Backend
- Updated the file selection dialog when attaching the file to the mail message;
- Server code refactoring and optimization;
- Replaced the Log4net logging system with NLog;
- Replaced the sanitizer with the third-party DOMPurify XSS sanitizer;
- Fixed a lot of bugs.
Mail Server
- Code refactoring and optimization to speed up the Mail Server settings page opening;
- Redesigned the wizard for domain connection in installations (four steps instead of five);
- Added the possibility to connect third-party clients (for server installations only);
- Added new Connection settings context menu option to show common connections settings (for server installations only);
- Added new Change password context menu option to change password by administrator (for server installations only);
- Added the possibility for the user to change the password and see the connection settings for the Mail Server mailbox (for server installations only);
- Added the possibility to send the mail messages when creating boxes on Mail Server and when changing passwords (for server installations only);
- Redesigned modal windows and lists in them;
- Added the warning when the server uses self-signed certificates.
Calendar
- Redesigned the calendar;
- Added the possibility to create, delete, edit tasks from the list and from the calendar grid;
- Updated Ical.Net to the latest version;
- Added the possibility to sync new calendars via CalDAV protocol (for the calendars from My calendars section added after update to Community Server version 10.0 only);
- Fixed the problem with daylight saving.
Talk
- Removed the possibility to set a status;
- Fixed the problem with reconnections of several chat tabs open;
- Added the reconnection when the connection is lost, when exiting the sleep mode;
- Added the restoring of the previously opened chat tabs;
- Added the restoring and display of the unread messages when opening the chat;
- In web version only opened chat tabs are marked read, this is done to allow reading the unread messages on other devices.
Control Panel
LDAP
- Added more fields mapped for the users loaded via LDAP: user photo, birthday, contacts, primary phone number;
- Added the setting to autosync LDAP on schedule;
- Added the possibility to give administrator rights to the user group at the portal via LDAP;
- Updated the rules for LDAP users.
Version 9.6.4
Release date: 10/31/2018
General portal changes
- Now the user skin is used when the portals are opened from desktop;
- Fixed opening the authentication page (including personal.onlyoffice.com) from desktop.
Documents module
- Development of the file encryption based on the blockchain technology.
Version 9.6.3
Release date: 07/25/2018
General portal changes
- Added the More languages option which appears at the bottom of the available languages list; when clicked it will trigger the popup with the invitation to take part in the translation;
- Added the new advertisement for Twilio.
Mail module
- Fixed the mechanism of mail service logging rotation.
Backend
- Fixed the God service hanging due to the previous logging updates.
Version 9.6.2
Release date: 07/09/2018
General portal changes
- Twilio service is now used by default for the portal two-factor authentication instead of clickatel;
- Added the possibility to subscribe to and unsubscribe from email messages and phone calls;
- ONLYOFFICE Personal now allows to delete accounts;
- Added limit to 2 GB storage space for ONLYOFFICE Personal;
- New users loaded using LDAP/SSO now must confirm their email addresses by default.
Documents module
- Fixed the bug with the plugin opening in the OpenSource editor versions;
- Fixed the issue with the file opening if it was copied or moved overwriting the existing one.
Backend
- Changes concerning Google Analytics service.
Version 9.6.1
Release date: 04/07/2018
General portal changes
- Fixed the issue with the portal notifications not sent with the selected SMTP settings via the installed ONLYOFFICE Mail Server under Mono (the problem with the self-signed certificates);
- When entering the phone number
+1characters now detect US and+7detect Russia; - Two-factor authentication is now enabled when the portal is created (even for the trial period).
Documents module
- Fixed the issue with downloading the file shared with the people outside the portal;
- Fixed the issue with moving the file with the help of the context menu.
Control Panel
LDAP
- Fixed the
Server internal errorerror when using the groups enclosed inside each other in the AD (bug #37414).
Single Sign-on
- Fixed the issue when the user data between the Service Provider and the portal was transferred via HTTP only, even when HTTPS was enabled.
Version 9.6.0
Release date: 03/15/2018
General portal changes
- Added the progress and notification to the portal administrator when reassigning or deleting the data for the disabled users;
- Added the text message sending to the Americas for the two-factor authentication;
- Added the authentication verification when opening the links to the SaaS files;
- Replaced the service.teamlab.com with the service.onlyoffice.com domain when authorizing via social networks.
Documents module
- Added the Document Server connection option using two addresses: for the internal and external requests;
- Document editing status is now obtained via the SocketIO service;
- Added the option to remove the confirmation for moving the elements to the recycle bin;
- Fixed the error which occurred when trying to open files and folders with non-Latin characters in their names using WebDav in Chrome v.63;
- Added the plugin to publish the documents in WordPress;
- Added the plugin to create bibliographic lists with the help of EasyBib.
Mail module
- Sped up opening the list of unread messages clicking the icon in the portal header;
- Fixed the bug when Office 365 account could not be connected to the Mail module (bug #36820).
Talk
- Fixed the incorrect text field display when using smiley (bug #36548).
Control Panel
LDAP
- Fixed the bug when the account of the user added via LDAP could not be connected in third-party clients (bug #26073);
- Fixed the bug when users which are members of the groups with not allowed characters could not pass LDAP authorization (bug #36891);
- Fixed the
Internal Server Errorerror when updating the users havingNULLvalues in theirlocationortitlefields.
Backend
- Optimized the work with database: dramatically reduced the number of the created connections.
Version 9.5.4
Release date: 01/13/2018
General portal changes
- Fixed the bug with the display of the logo at the authorization and white labeling pages;
- Fixed the link to the support for the Latvian language.
Control Panel
Single Sign-on
- Fixed the
Invalid ssoConfigerror which occurred when the link to the IdP contained the question mark ‘?’, e.g.:IdP Single Sign-On Endpoint URL: https://accounts.google.com/o/saml2/idp?idpid=777777; - Fixed the
Invalid authentication tokenerror which prevented from adding a user to the portal using the AD FS, in case the+or-characters were present when sending the encrypted data.
Version 9.5.3
Release date: 12/23/2017
General portal changes
- Fixed the request to get the mail messages from the Mail module when making a backup.
Projects module
- Fixed the bug with the reports and the reassignment of the closed subtasks.
Mail module
- Fixed the deletion of the mail data when deleting a user.
Control Panel
LDAP
- Fixed the bug occurring in the enclosed groups, when the users were displayed not in all groups.
Version 9.5.2
Release date: 12/15/2017
General portal changes
- Edited the notification message received by the administrator in six months after trial starts;
- Added the tip for the Remember field for the portal authorization;
- Added the
CustomNavigationsetting to allow inserting own links to the portal navigation.
CRM module
- Fixed the bug when the reports were generated in the portal language, not the user selected one;
- Fixed the bug with currency settings, so that all the currencies were shown not only the convertable ones;
- Added the currency to the report headings, number format for the currencies;
- Added the possibility to set the fractional values for the taxes.
Mail module
- Added the possibility to migrate data from MS Exchange to ONLYOFFICE;
- Added links to the articles describing the migration from MS Exchange to ONLYOFFICE (available in Docker version only).
Control Panel
General
- Added the changelog for Control Panel and link to it;
- Fixed the bug when JWT parameters were not sent when updating Document Server(bug #36270);
- Fixed the bug when
Audit Trailheading was present at the login history page (bug #36026); - The current machine is now checked for being linked with the domain name for multiple portals.
LDAP
- Fixed the bug with the
LDAP Domain not founderror which occurred if the DN record had no DC records (the users with Sun/Oracle DS were affected); now if the LDAP domain could not be specified, the LDAP domain will acquire theunknownvalue or theldap.domainvalue from theweb.appsettings.configconfiguration file; - Fixed the bug with the
Sizelimit Exceedederror when trying to get more than 1000 users from the Active Directory; - Increased the login speed with the Group Membership setting enabled;
- Added additional logging;
- Fixed the bug with LDAP operation hanging when using Mono v5.2.0 and older;
- Fixed the bug with the error when trying to login using the email address entered in the fields different from the
Mail Attribute.
Talk
- Fixed the bug when the file removal window could be closed on the second try only (bug #36492);
- Fixed the bug with the new message counter in the portal header being updated with the whole page reloading only (bug #36144).
Backend
General
- Fixed the
domainparameter sending when getting promotions; - Renamed the
CookieSettingssetting and set the default value to 1 day; - The session cookie is now set only if the
CookieSettingsis disabled.
Installation script
- Added different installation scenarios for Docker under Debian for Wheezy, Jessie and Stretch releases;
- Added the
apt-get updatecommand before installing curl; - Added the access right change for the
onlyoffice.cnffile.
Version 9.5.0
Release date: 11/02/2017
General portal changes
- Added the contact import from the third-party services;
- Added the option to connect your Yahoo application for the contact import;
- Added the option to connect your Clickatell, SMSC applications to enable the SMS on the portals, Twilio service is now also used to send SMS;
- Added the disk statistics used by the Talk module;
- Added data reassigment (tasks, projects, contacts, documents) from the disabled user to others;
- Added the possibility to delete the data (mail messages, mailboxes, documents) when deleting the disabled user;
- Added new tips to all modules.
Documents module
- The connection of OneDrive file storage is now using the official SDK, not the outdated SharpBox library;
- Fixed the error with the filter not cleared when changing the folder.
Projects module
- Added an option to set access rights to the team when creating a private project;
- The Gantt Chart button is moved to the menu;
- Added the tag display on the project description page;
- The notifications are now sent for the active projects only;
- Added the possibility to give all the users the rights to create projects (disabled by default);
- Added the possibility to select the start section for every user (Tasks by default);
- Added the possibility to hide the contents of the paused projects (enabled by default);
- Added the group Delete, Close and Move actions for the tasks, the group Delete action for milestones;
- Added the possibility to select the filtered list items using checkbox.
CRM module
- Added the CRM Reports section;
- Changed the settings item for the default currency;
- Added the settings item for the currency exchange rate;
- Fixed the CRM SMTP work on port 465 (due to the MailKit use).
Control Panel
General
- Added the documentserver-prepare4shutdown.sh launch when updating the document-server for the correct edited document saving.
LDAP
- Dramatically changed LDAP integration, migrated to the single library for the work with LDAP (Novell.Directory.Ldap.NETStandard, Nuget, MIT);
- Login and email are now split into two separate fields;
- Added the support for big data;
- Increased the work speed via the LDAP protocol (the connection to the server and receiving the data is now made once per session, added the limits when only a certain number of results is necessary, fixed the slow login for bit data, removed the sorting out used to find the SID parameter);
- Fixed the user re-creation issue;
- Fixed the duplicate username issue;
- Fixed the already existing email issue;
- Replaced the LDAP user deletion with account deactivation (for further data migration and data safety);
- Instead of re-creating a user with an unknown SID but an existing email the data is updated;
- Added the attempt to save the correct UserName/Login in case a similar one is already taken on the portal.
Single Sign-on
- Added the AD FS support;
- Replaced the Single Sign-on link at the authorization page with the customizable button, added the button customization to the SSO setting of the Control Panel.
Talk
- Added the option to delete the uploaded files;
- Changed the Talk interface design.
Backend
- Replaced Unity with Autofac;
- Replaced SignalR with SocketIO, enabled mini-chat, VoIP and counter updates;
- Updated the ckeditor version to 4.7.2;
- Replaced the portal warmup with precompiling.
Version 9.1.0
Release date: 07/03/2017
Documents module
- Changed the group selection mechanism when selecting folder elements with mouse cursor;
- Optimized My Documents, Project Documents folders and generally optimized all requests.
Control Panel
- Added the support of letsencrypt service for the domain certificate generation;
- Added the new
sso.authservice (written in Node.js) and the new SSO settings page; now SSO supports Shibboleth.
Talk
- Interface redesign;
- Added the notifications about the incoming Talk messages when its window is closed.
Backend
- Portals migrated to Microsoft .NET Framework 4.6.2.
Version 9.0
Release date: 04/08/2017
General portal changes
- Updated the authorization keys page for the third-party services connection;
- Allow to add administrator to the People module;
- Added the possibility to make payment page visible to portal administrators only.
Documents module
- Changed work with DropBox so that it used official SDK instead of SharpBox;
- Added the option to change the file author using the context menu or the sharing dialog window;
- Added the possibility to get the notification about mail merge end to the Talk;
- Added the possibility to subscribe to/unsubscribe from the notification about mail merge end;
- Changed the order of and grouped the actions in the context menu;
- Added the possibility to overwrite, create copy or skip files when copying or moving them creates conflict situation;
- Added the possibility to use the
@#$%&;'characters in the file name; - When creating a new file, a blank file is used as the first revision;
- Added the user profile display when hovering the cursor over the user name in the sharing dialog window and in the file history;
- Added the option to restore the file revisions or editing changes when watching the history within the editors;
- Added the possibility to rename the file when editing it withing the editors;
- Added the integration with DocuSign;
- Fixed the sharing button highlighting when it was shared by other user;
- Redesigned the sharing menu and dialog window.
Projects module
- Added the possibility to create the task copy and move it;
- Added the possibility to create the subtask copy;
- Now the task list is opened automatically if there is at least one open task in it;
- Redesigned the page with the tasks and discussions description;
- Some pages are visited without the page reload;
- Many controls were moved to templates;
- General optimizition and refactoring of the Projects module.
CRM module
- Added IP-telephony integration based on Twilio.
Mail module
- Added the new General Settings option in the module settings which allows to set the messages grouping, always display images from all users, cache the unread messages in the Inbox folder and go to the next unread message after moving/deleting the current message;
- Added the Cancel button (the cross in the upper right corner) to the mail composition form;
- The module work is fixed and sped up when working with big data.
Backend
- jQuery was updated to use version 3.1;
- The support for IE 8 and earlier versions is discontinued;
- Added ApiSystem service fuctionality for the hosted solutions;
- Some scripts (jQuery, jQuery.BlockUI, Magnific.Popap, jquery.mousewheel) are not included into the project and are loaded from nuget;
- Fixed authorization problems with Twitter;
- Copying to buffer now uses HTML5;
- Added the mechanism for the preliminary bundle assembly;
- Added gzip-compression for the client script and the bundle saved to the disk.
Version 8.9.2
Release date: 12/05/2016
Portal settings & Control Panel
LDAP
- Added LDAP synchronization for users and groups when saving the settings, after login and using the Sync button;
- Changed email formation for LDAP users;
- Fixed the problem of creation of users with invalid emails;
- Fixed the problem of duplicate users;
- Added icons and hints to the users in the list for the admin;
- Blocked for editing the user profile fields imported using LDAP;
- Added the real LDAP password saving to the database during login in case LDAP Auth is disabled, now the LDAP users will become common portal users when LDAP Auth is disabled;
- Added new API Settings method — Sync LDAP;
- Added new translations;
- Bug fixes.
Control Panel for Windows
- Made changes at the Update page for the Control Panel for Windows;
- Updates are performed using the downloaded installation packages for each module.
- The current installed component version numbers are obtained via API request to the Community Server.
- The new versions available for download are obtained via the request to the https://download.onlyoffice.com/install/windows/updates.txt file, where all the latest component version numbers and links for their download are stored in the JSON format.
Documents module
- Added support for the history of changes which has a new format in document editing service (Document Server versions later than 4.1.5);
- Added support for plugin connection.
Mail Server
Connection Settings
- Added page to the Settings for the integration of Community Server with Mail Server.
Installation Script
- Fixed the error shown if the mail domain is not specified, now Mail Server will not be installed if this is the case;
- Fixed the installation of the latest Docker version;
- Removed chmod 777 to the created folders;
- Added hardware checks (40Gb HDD space, ~6Gb RAM, 2 Core Processor) and 6Gb swap creation;
- The components are installed via network by default;
Version 8.8
Release date: 03/09/2016
General portal changes
- New mail notification templates;
- Changed old SaaS notification mail texts and added new mail messages;
- Added new mail messages for Enterprise Edition;
- Fixed mail notification placeholders for the whitelabel texts;
- Added the currency selector at the pricing page;
- Enabled browser spellcheck in ckeditor
Documents module
- Disabled support for Document Server with version earlier than 3.0.
- If the Upload the documents in original format as well option is disabled, the uploaded converted file is placed not as a separate new file, but as a new revision of the original file;
- Box storage service is connected using secure connection with oAuth 2.0 authorization.
- Added sharing of documents in
DOCXformat for review.
Calendar module
- Changes to the quick event creation window;
- Added event details window;
- Added the page for the event advanced creation/editing;
- Added selection of event organizer;
- Event guests emails are checked for correctness, the CRM contacts, address book contacts and portal user list are used to autosearch guests;
- Added email notifications to the event guests when event is created or changed;
- Added event export into
.icsformat.
Mail module
Address book
- Added new address book, which includes contacts from portal users, CRM and user personal contacts.
Mail and Calendar modules integration
- Added integration of Mail module with Calendar module using the
iCalendaropen source format as described in RFC 5545 specification; - The mail messages containing
iCalendarformat are detected automatically with the ASC.Mail.Aggregator service, can be added to custom filters; - Details of the event found in mail can be viewed, added to the Calendar module automatically or manually;
- Added the possibility to send invitations to the events from the Calendar module, reply to the invitations sent from third-party calendar software, notify the event guests about the changes or cancellation of events.
Mail autoreply
- Added mail autoreplying option with the settings in the Mail module at the Account page;
- Mail autoreply can be quickly set up and disabled/enabled on demand.
Mail address control
- Updated the control to enter mail addresses to enable the email and contact search among People, CRM, user personal contacts, mail accounts and frequently contacted recepients;
- Added keyboard shortcut support and better interaction with mouse and keyboard.
Mail and CRM and Documents modules integration
- Added an option to create a CRM contact directly from the mail message linking the current mail thread to the new contact history;
- Added a new contect menu allowing to select a folder in the Documents module to save the message attachment.
Mail Server settings
- Redesigned Mail Server settings page.
Version 8.6
Release date: 08/02/2015
General portal changes
- Added white label options for paid portals;
- Added the possibility to resize left menu panel in all portal modules.
Documents module
- Added version history view in the editors;
- The search is conducted both in the folder and all subfolders.
Mail module
- Added the possibility to print mail messages;
- Added the possibility to select the mail box on own domain to send notifications inside portal;
- Various code optimizations.
Portal backup
- Changed the archive format from
.zipto.tar.gz; - Removed limitations for the backup file from the Community Server installation, the SaaS version now has the limit of 10 GB for backups.
Version 8.5
Release date: 03/26/2015
General portal changes
- News, unread chat messages and mail messages counters are now updated without the page reloading in all the tabs (via Signalr);
- Changed pricing plans at the pricing page.
Documents module
- Added support for the folder upload via drag-n-drop in Google Chrome retaining the whole folder inner structure.
Mail module
Mail Server
- Mail Server first release, now the mail boxes can be created for the onlyoffice.com, onlyoffice.eu and onlyoffice.sg domains.
Mail client
- Better synchronization of the client using SignalR (folder state update, message list update, sending notifications, tab synchronization);
- Updated the recepients list filtering;
- Added the selection for the default mail box, which is now offered as first mail address when writing a mail message;
- Added the possibility to add links to the portal documents as mail attachments;
- Optimized work of mail aggregator and stability of work under Mono;
- Optimized styles for filter, dashboard and popups.
Talk
- (Server version only) Added the support of the
web.max-upload-sizeparameter to the configuration file, which allows to set the limit for the size of the files uploaded to Talk (1 MB by default).
Version 8.1
Release date: 02/24/2015
General portal changes
- Public portals are available now for trial and nonprofit portals.
Documents module
- Added new supported third-party document storages (OneDrive for Business via
SharePointconnection, Yandex.Disk, OwnCloud and other third-party services which useWebDavprotocol for connection); - Updated work with GoogleDrive, now the connection is made via
OAuth 2.0protocol and work with Google API is performed viaGoogleDrive SDK; - When portal administrator enters the Documents module, the window offering to select the document editors version (2.5 or 3.0) is shown, if this has not been done before.
Mail module
- Mail Server is out for beta testing in EU region.
Backup
- A temporary storage for backup files is selected by default;
- Added the possibility of automatic backup creation;
- Added the possibility to backup Mail module data.
Version 8.0
Release date: 11/19/2014
General portal changes
Redesign
- TeamLab is now officially rebranded to ONLYOFFICE;
- Redesigned menus, added loaders and page views for the modules without any content.
Public portals
- When using a free of charge portal a new option is available in Settings > Security > Portal Access > Portal Access Settings allowing to make the portal available to the people who are not registered there.
Unregistered users
- Added access rights for the unregistered portal users.
Videos
- Link to the videos is moved from the top menu to the left navigation menu;
- Removed videos from the welcome page.
Documents module
- Added integration with OneDrive for Business.
Projects module
- Added the possibility to select a project template at the project creation page;
- Added the possibility to add milestones and tasks during the project creation.
Community module
- Changes to the dashboard empty page.
Backup/restore
- Added the possibility to select the storage for the created backup (temporary storage is selected by default);
- Added the possibility to select the backup which will be used to restore the portal.
Version 7.7
Release date: 06/23/2014
Server
HTTPS
- Added the possibility to upload a certificate in the
.pfxformat with the required password at the settings page.
Monitoring
- Added the new page to the portal settings, which has the following options: Alerts (showing the ports necessary for TeamLab Office correct work), Services (displaying the list of Windows services necessary for the Feed and Mail module work), Logs (allowing to collect all the server logs in a single
.ziparchive file which can be sent to our support), and the button allowing to reset all cache and rebuild script files, if necessary.
Version 7.6
Release date: 04/15/2014
General portal changes
- Mini-chat embedded into the left panel is displayed on all portal pages;
- Added integration with LDAP/Active Directory;
- Added two factor authentication option using SMS service;
- Old controls were replaced by new ones in People, Projects, CRM modules and the portal Settings;
- Replaced old loaders, icons, information panels everywhere on the portals.
Documents module
- Added revisions to the document version history with the possibility to add comments to each revision;
- Added the possibility to block the document file for changes;
- Made SharePoint as a third-party provider to access Box, DropBox, GoogleDrive and Skydrive storages;
- Added possibility to share several files at once selecting them simultaneously and using the corresponding context menu option.
Projects module
- Updated the Gantt charts to version 2.0 adding the possibility to display several projects at the same chart and allowing to select the options to be displayed on the chart;
- Removed reloading the page when switching among the Projects module main tabs (Projects, Tasks, Milestones, Discussions, and Time tracking);
- Added pagination ot the time tracking tab;
- The errors and some successful actions are no notified via toaster.
CRM module
- Added invoicing to the CRM module;
- Removed reloading the page when switching among the CRM module main tabs (Contacts, Tasks, Opportunities, etc).
Mail module
- Added the possibility to automatically attach signature templates to mail messages;
- Added the option to save attachments to the selected folder in the Documents module;
- Added the possibility to send CRM module invoices via Mail module, attaching them to the mail message;
- Changes to the mail thread detection;
- Fixed work with non-latin characters in attachment name;
- Fixed work with images and files embedded into the mail message body;
- Enhanced work with the context menu;
- Enhanced collapsing the quotation in the reply message;
- The Mail module interface was redesigned to follow the other module guidelines.
Version 7.5
Release date: 09/06/2013
General portal changes
Portal redesign
- Portal minimal width changed to 1024 pixels;
- Added the new setting to change the portal color scheme.
Portal transfer to another region
- Changed the work of the portal transfer to another region mechanism;
- Added the possibility to fill the portal with demo content.
Documents module
- If the user has full access rights to the document, the sharing button will be present at the document information tab.
Projects module
- Added the possibility to use Gantt charts with the Projects module.
CRM module
- Changed the available sorting list depending on the filter used;
- Removed the Set permissions group action from the contact list;
- Added the Create new task group action to the contact list;
- The contact types are renamed into Contact warmth;
- Added new Contact type option;
- Changed the way the the contact manager is appointed;
- Added the possibility to change Contact warmth and add tags to a group of contacts;
- Added the pagination instead of the Show more button;
- Improved integration with the Mail module;
- Enhanced automatization and refactoring.
Version 7.4.1
Release date: 05/15/2013
General portal changes
- When a user joins the portal via an invitation link, the email address used to do that will not be activated automatically and will require conscious actions from the user side;
- The email address used for registration on the portal will be automatically activated only when registering via social networks.
Documents module
- A portal guest can only open the document for viewing if the document author gave such access rights to him/her.
CRM module
- Added sorting by date to CRM module.
Version 7.4
Release date: 04/25/2013
General portal changes
- Added the possibility to move the portal to another region, which will be closer to the portal users location;
- Added tips when the user accesses the portal for the first time;
- Added the icon for video guides in the header menu;
- Added the links to the support to the left side menu.
Documents module
- Updated the document loader in the Documents module and the Project documents section of the Projects module.
Projects module
- Added new statuses in the time tracking section;
- Added the new task start time field, the time will be also displayed at the task detail page;
- Added the possibility to sort the tasks by the start time;
- Added the setting to manage access rights to the contacts of a private project;
- Updated the filter of the task responsible users;
- Removed the outdated styles from the reports;
- Changed the way the blocked users are displayed in the project team;
- No project access rights are displayed for the disabled users in private projects;
- Changed the list of available options in the menu for all users;
- The guests do not have any access to the project team.
People module
- Added a new user role — guest users (users with limited access and content creation rights);
- Added new filters by user role (user, guest) and by status (active, disabled and pending);
- Added group operations with users (changing the roles for several users at once);
- Added a birthday icon;
- Changed the user profile and subscriptions page (moved it to a separate page, added the possibility to change photo, display the user status, birthday icon).
Community module
- Moved user birthdays to a separate page;
- Now all the users will be subscribed to other users birthdays by default;
- Guest user birthdays are neither displayed or generate notifications about.
-
серверная версия
-
Установка ONLYOFFICE Groups на локальном сервере
-
Установка серверной версии ONLYOFFICE Workspace Enterprise Edition для Windows на локальном сервере
-
Компиляция ONLYOFFICE Groups для локального сервера
-
Переход с облачной версии на серверную версию
-
Миграция ONLYOFFICE Groups с Windows на Linux
-
Обновление ONLYOFFICE Groups для Windows до последней версии
-
Миграция с ONLYOFFICE Workspace на Enterprise Edition в Windows
-
Обновление ONLYOFFICE Workspace Enterprise Edition до последней версии
-
Подключение ONLYOFFICE Docs к ONLYOFFICE Groups
-
Переключение ONLYOFFICE Talk на протокол TLS в Windows-версии
-
Интеграция сторонних сервисов в серверной версии
-
Добавление ONLYOFFICE Mail в инсталляцию ONLYOFFICE Workspace
-
Обновление ONLYOFFICE Workspace до последней версии
-
Использование функции резервного копирования и восстановления данных в Панели управления
-
Защита данных через шифрование
-
Подключение сторонних хранилищ
-
Быстрая навигация при помощи полнотекстового поиска
-
Брендинг онлайн-офиса
-
Переключение на протокол HTTPS с помощью Панели управления
-
Изменение настроек LDAP
-
Развертывание нескольких порталов с помощью функции мультитенантности
-
Using the Private Room to work on your documents securely
-
Private Rooms in ONLYOFFICE Workspace for Secure Collaboration on Documents
-
How to use Control Panel in ONLYOFFICE Workspace
-
How to use the backup/restore feature
-
Общие сведения о функции единого входа (SSO) ONLYOFFICE
-
Настройка ONLYOFFICE SP и Shibboleth IdP
-
Настройка ONLYOFFICE SP и OneLogin IdP
-
Настройка ONLYOFFICE SP и AD FS IdP
-
Отслеживание истории входов в систему
-
Получение данных журнала аудита
-
Как начать работу с ONLYOFFICE Workspace Enterprise Edition?
-
Как купить подписку на ONLYOFFICE Workspace Enterprise Edition?
-
Использование ONLYOFFICE Docs через прокси-сервер
- Настройка JWT для ONLYOFFICE Docs
-
Языки, доступные для интерфейса ONLYOFFICE Docs
-
Языки, доступные для интерфейса ONLYOFFICE Groups
-
Добавление собственных модулей в ONLYOFFICE Groups
-
Создание API для пользовательских модулей ONLYOFFICE Groups
-
Создание WebDAV-сервера в Ubuntu и подключение его к ONLYOFFICE
-
Создание WebDAV-сервера в Windows и подключение его к ONLYOFFICE
-
Установка серверной версии ONLYOFFICE Workspace для Windows на локальном сервере
-
Устранение неполадок ONLYOFFICE Groups для Windows
-
FAQ по ONLYOFFICE Groups
-
Развертывание ONLYOFFICE Docs на своем сервере
-
Установка версии ONLYOFFICE Docs Enterprise Edition для Windows на локальном сервере
-
Установка Windows-версии ONLYOFFICE Docs Developer Edition на локальном сервере
-
Подключение ONLYOFFICE Docs к ONLYOFFICE Groups
-
Переключение на протокол HTTPS для Windows-версии
-
Добавление новых шрифтов, языков и средств проверки орфографии в ONLYOFFICE Docs
-
Удаление неиспользуемых шрифтов из ONLYOFFICE Docs
-
Добавление новых тем в редактор презентаций ONLYOFFICE Docs
-
Устранение возможных неполадок ONLYOFFICE Docs для Windows
-
Переключение ONLYOFFICE Docs Enterprise Edition на протокол HTTPS
-
Updating ONLYOFFICE Docs Developer Edition for Windows to the latest version
-
Updating ONLYOFFICE Docs Enterprise Edition for Windows to the latest version
-
Updating ONLYOFFICE Docs Community Edition for Windows to the latest version
-
Установка ONLYOFFICE Groups для Debian, Ubuntu и производных
-
Установка ONLYOFFICE Groups для Red Hat, CentOS и производных
-
Миграция ONLYOFFICE Groups с Windows на Linux
-
Миграция ONLYOFFICE Groups с Docker на Linux
-
Миграция ONLYOFFICE Groups с Linux на Docker
-
Обновление ONLYOFFICE Groups для Linux до последней версии
-
Обновление ONLYOFFICE Docs для Linux до последней версии
-
Подключение ONLYOFFICE Docs к ONLYOFFICE Groups
-
Переключение ONLYOFFICE Groups на протокол HTTPS
-
Переключение на протокол HTTPS при установке из RPM/DEB-пакетов
-
Переключение ONLYOFFICE Talk на протокол TLS в Linux-версии
-
Устранение неполадок ONLYOFFICE Groups для Linux
-
Running ONLYOFFICE Docs Community Edition as Podman on Fedora
-
Running ONLYOFFICE Docs Enterprise Edition as Podman on Fedora
-
Running ONLYOFFICE Docs Developer Edition as Podman on Fedora
-
Компиляция ONLYOFFICE Docs для локального сервера
-
Установка ONLYOFFICE Docs на Debian, Ubuntu и производные
-
Установка версии ONLYOFFICE Docs Enterprise Edition на Debian, Ubuntu и производные
-
Установка ONLYOFFICE Docs Developer Edition на Debian, Ubuntu и производные
-
Установка ONLYOFFICE Docs на CentOS и производные
-
Установка версии ONLYOFFICE Docs Enterprise Edition на CentOS и производные
-
Установка ONLYOFFICE Docs Developer Edition на CentOS и производные
-
Установка версии ONLYOFFICE Docs для Linux из snap-пакета
-
Подключение ONLYOFFICE Docs к ONLYOFFICE Groups
-
Добавление шрифтов в ONLYOFFICE Docs
-
Переключение ONLYOFFICE Docs на протокол HTTPS
-
Добавление нового языка интерфейса в ONLYOFFICE Docs
-
Добавление новых тем в редактор презентаций ONLYOFFICE Docs
-
Устранение возможных неполадок ONLYOFFICE Docs для Linux
-
Updating ONLYOFFICE Docs Developer Edition for Docker to the latest version
-
Updating ONLYOFFICE Docs Enterprise Edition for Docker to the latest version
-
Updating ONLYOFFICE Docs Community Edition for Docker to the latest version
-
Установка ONLYOFFICE Groups для Docker на локальном сервере
-
Установка ONLYOFFICE Workspace при помощи Docker Compose
-
Миграция ONLYOFFICE Groups с Docker на Linux
-
Миграция ONLYOFFICE Groups с Linux на Docker
-
Установка всех компонентов ONLYOFFICE Workspace, интегрированных между собой
-
Обновление ONLYOFFICE Groups для Docker до последней версии
-
Миграция с ONLYOFFICE Workspace на Enterprise Edition с помощью скрипта Docker
-
Использование дополнительных портов для ONLYOFFICE Groups
-
Подключение базы данных MySQL к ONLYOFFICE Groups
-
Запуск ONLYOFFICE Groups с использованием протокола HTTPS
-
Настройка ONLYOFFICE Groups для работы за NAT
-
Удаление с компьютера ONLYOFFICE Groups для Docker
-
Устранение неполадок ONLYOFFICE Groups для Docker
-
Установка ONLYOFFICE Docs на локальном сервере
-
Установка версии ONLYOFFICE Docs Enterprise Edition для Docker
-
Установка Docker-версии ONLYOFFICE Docs Developer Edition на локальном сервере
-
Installing ONLYOFFICE Docs Community Edition using the provided script
-
Installing ONLYOFFICE Docs Enterprise Edition using the provided script
-
Installing ONLYOFFICE Docs Developer Edition using the provided script
-
Запуск ONLYOFFICE Docs с помощью Docker Compose
-
Установка всех компонентов ONLYOFFICE Workspace, интегрированных между собой
-
Добавление нового языка интерфейса в ONLYOFFICE Docs
-
Удаление с компьютера ONLYOFFICE Docs для Docker
-
Устранение неполадок ONLYOFFICE Docs для Docker
-
Установка ONLYOFFICE Mail для Docker на локальном сервере
-
Установка всех компонентов ONLYOFFICE Workspace, интегрированных между собой
-
Обновление ONLYOFFICE Mail, интегрированного с ONLYOFFICE Groups
-
Подключение ONLYOFFICE Mail к ONLYOFFICE Groups на Windows
-
Подключение ONLYOFFICE Mail к ONLYOFFICE Groups через настройки портала
-
Подключение ONLYOFFICE Mail к ONLYOFFICE Groups на Linux
-
Изменение домена, используемого с ONLYOFFICE Mail
-
Запуск внешнего скрипта после запуска Docker-контейнера ONLYOFFICE Mail
-
Создание почтовых ящиков на почтовом сервере с помощью скрипта
-
Смена паролей к почтовым ящикам на почтовом сервере с помощью скрипта
-
Синхронизация новых почтовых ящиков со старыми с помощью скрипта
-
Удаление с компьютера ONLYOFFICE Mail для Docker
-
Устранение неполадок ONLYOFFICE Mail для Docker
-
Включение vsyscall в Debian
-
Экспорт данных из MS Exchange в ONLYOFFICE
-
Работа с плагинами при использовании CSP
-
Работа с плагинами при использовании CSP
-
Uninstall default plugin from the server editors
-
Adding new plugins to server editors
-
-
ONLYOFFICE Groups
Введение
Если в вашей локальной сети есть сервер, который используется как хранилище файлов и содержит множество документов, возможно, вы не захотите загружать их все в какой-то веб-сервис и продолжите работать с ними традиционным способом. Но есть простое, надежное и безопасное решение, позволяющее использовать все преимущества редактирования документов онлайн. Все, что для этого нужно:
- Настроить WebDAV на сервере. WebDAV (англ. Web Distributed Authoring and Versioning) — это расширение протокола HTTP, позволяющее управлять файлами на удаленном сервере, получать доступ к документам через интернет и совместно работать над ними.
- Подключить WebDAV-хранилище документов к модулю «Документы» ONLYOFFICE. Это позволит существенно расширить возможности управления файлами и совместной работы. Вы сможете:
- задавать различные права доступа к файлам и папкам для пользователей и групп;
- управлять историей версий и восстанавливать любую предыдущую версию или ревизию;
- создавать и редактировать документы онлайн, используя самые мощные онлайн-редакторы;
- использовать широкие возможности для совместной работы, например, совместное редактирование в режиме реального времени, рецензирование, отслеживание изменений, комментирование и многое другое.
Шаг 1. Создание и настройка WebDAV-сервера в Windows
Установите расширение WebDAV в IIS
Для создания сервера WebDAV на вашем компьютере должен быть установлен IIS v. 7.0 или более поздней версии, а также должен существовать Веб-узел по умолчанию, созданный IIS. Все остальные необходимые компоненты IIS можно установить и настроить в ходе установки расширения WebDAV. В этой статье описывается установка WebDAV в IIS 8.5 (Windows Server 2012 R2). Процесс установки может отличаться в зависимости от используемой версии IIS.
- В Диспетчере серверов откройте меню Управление и выберите опцию Добавить роли и компоненты. Откроется Мастер добавления ролей и компонентов.
- Следуйте инструкциям мастера. На страницах Перед началом работы, Тип установки и Выбор сервера можно оставить параметры, выбранные по умолчанию, и нажать кнопку Далее.
- На странице Роли сервера разверните пункт Веб-сервер (IIS), разверните подпункт Веб-сервер, а затем откройте раздел Общие функции HTTP. Отметьте опцию Публикация WebDAV.

Откройте раздел Безопасность.
- Отметьте типы проверки подлинности, которые вы хотите использовать, например, Обычная проверка подлинности или Дайджест-проверка подлинности, (чтобы в дальнейшем можно было включить нужный метод).
- Отметьте опцию Авторизация URL-адреса (чтобы в дальнейшем иметь возможность изменить существующее или создать новое правило авторизации).
- Нажмите кнопку Далее.
- На странице Компоненты разверните пункт Пользовательские интерфейсы и инфраструктура и отметьте опцию Возможности рабочего стола (чтобы установить Перенаправитель WebDAV), затем нажмите кнопку Далее. В новом открывшемся окне нажмите на кнопку Добавить компоненты, затем нажмите Далее.
- На странице Подтверждение нажмите кнопку Установить. Когда установка завершится, нажмите кнопку Закрыть. Потребуется перезагрузить компьютер.
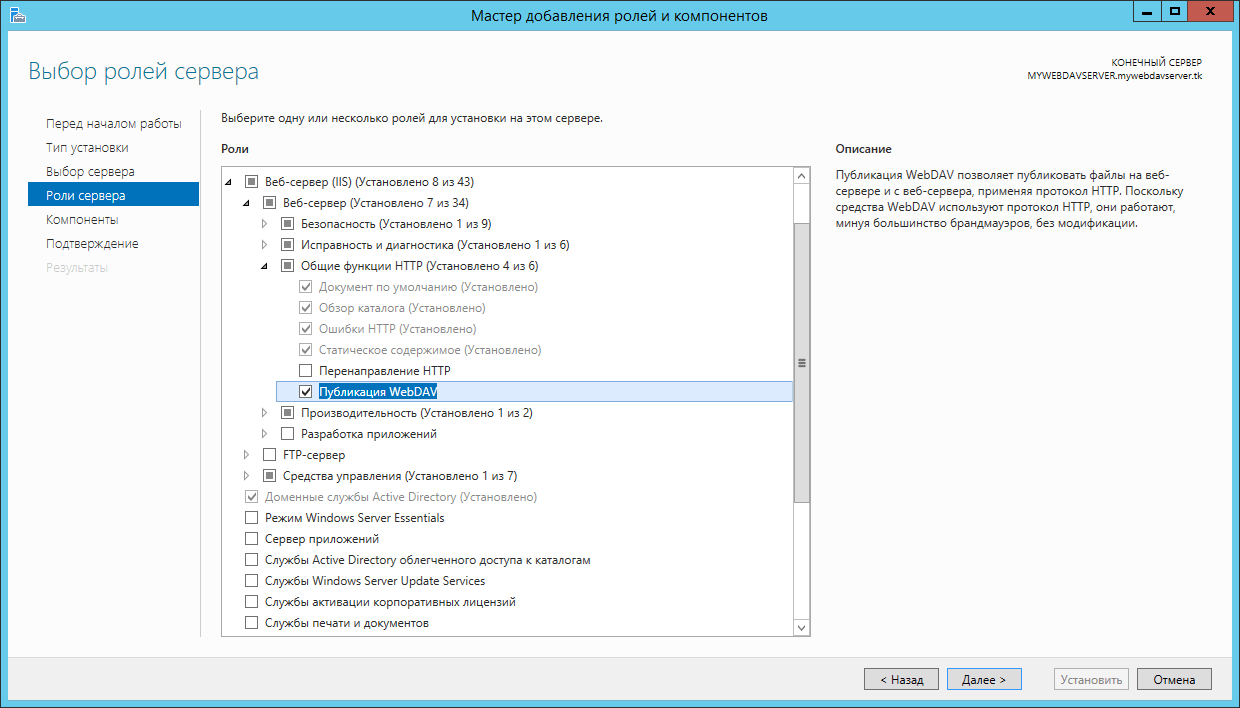


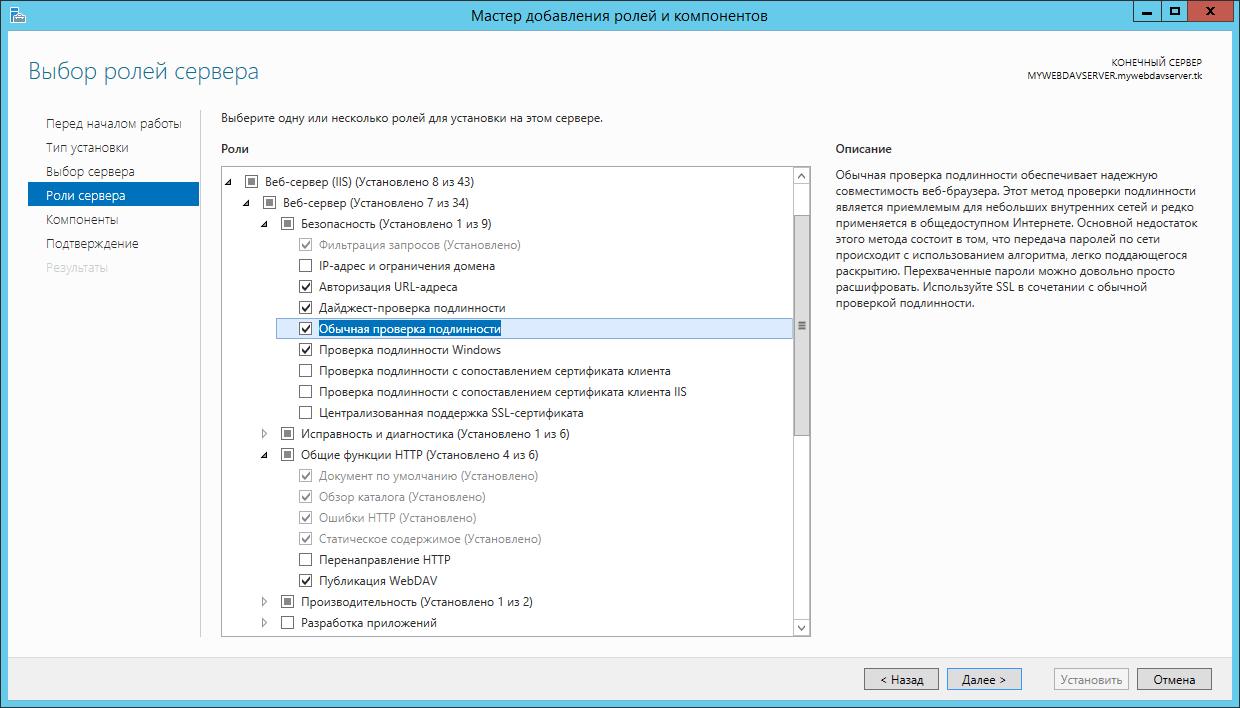

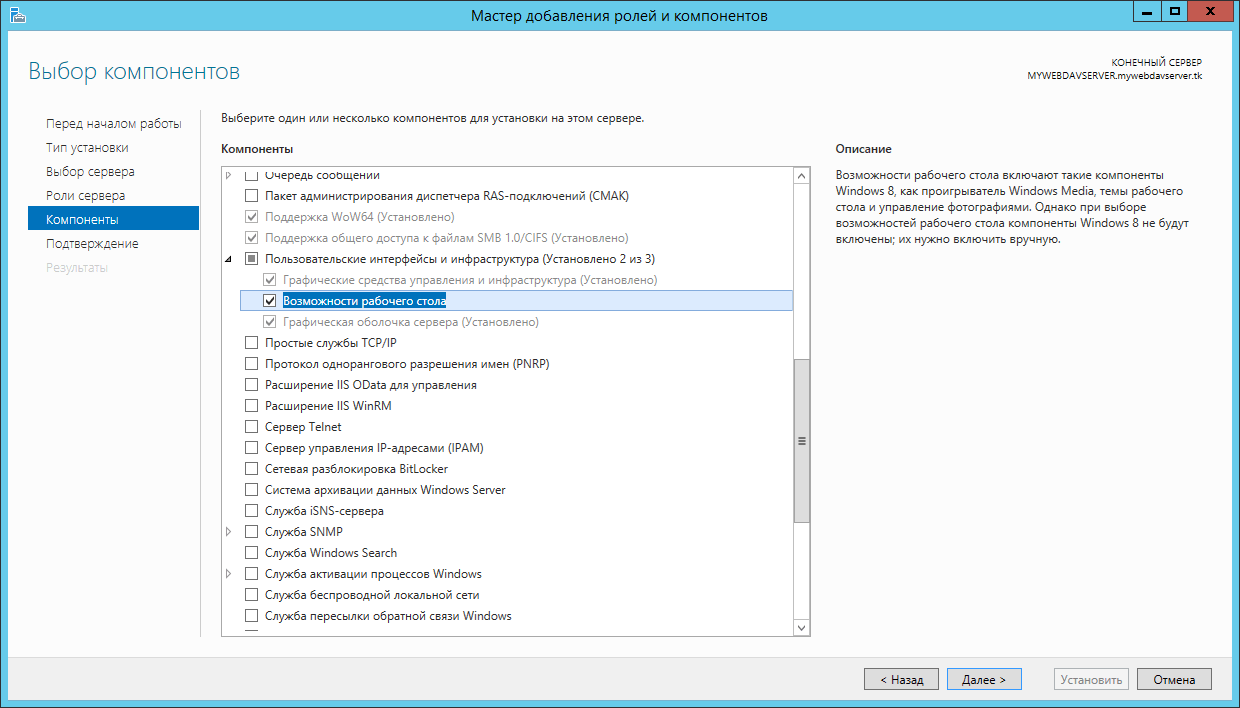
Создайте правило разработки WebDAV
- В Диспетчере серверов откройте меню Средства и выберите опцию Диспетчер служб IIS. Откроется Диспетчер служб IIS.
- На панели Подключения слева разверните элемент Сайты, затем выберите Default Web Site.
- Дважды щелкните по опции Правила разработки WebDAV.
- Нажмите на опцию Включить WebDAV на панели Действия справа.
- Нажмите на опцию Добавить правило разработки… на панели Действия справа.
- В окне Добавить правило разработки выберите следующие опции:
- В разделе Разрешить доступ к: оставьте отмеченной опцию Все содержимое.
- В разделе Разрешить доступ к этому содержимому: отметьте опцию Указанные пользователи и введите имя пользователя, у которого должен быть доступ к вашему хранилищу WebDAV. Можно добавить несколько пользователей, перечислив их через запятую.
- В разделе Разрешения выберите опции Чтение, Источник и Запись.
- Нажмите кнопку OK.
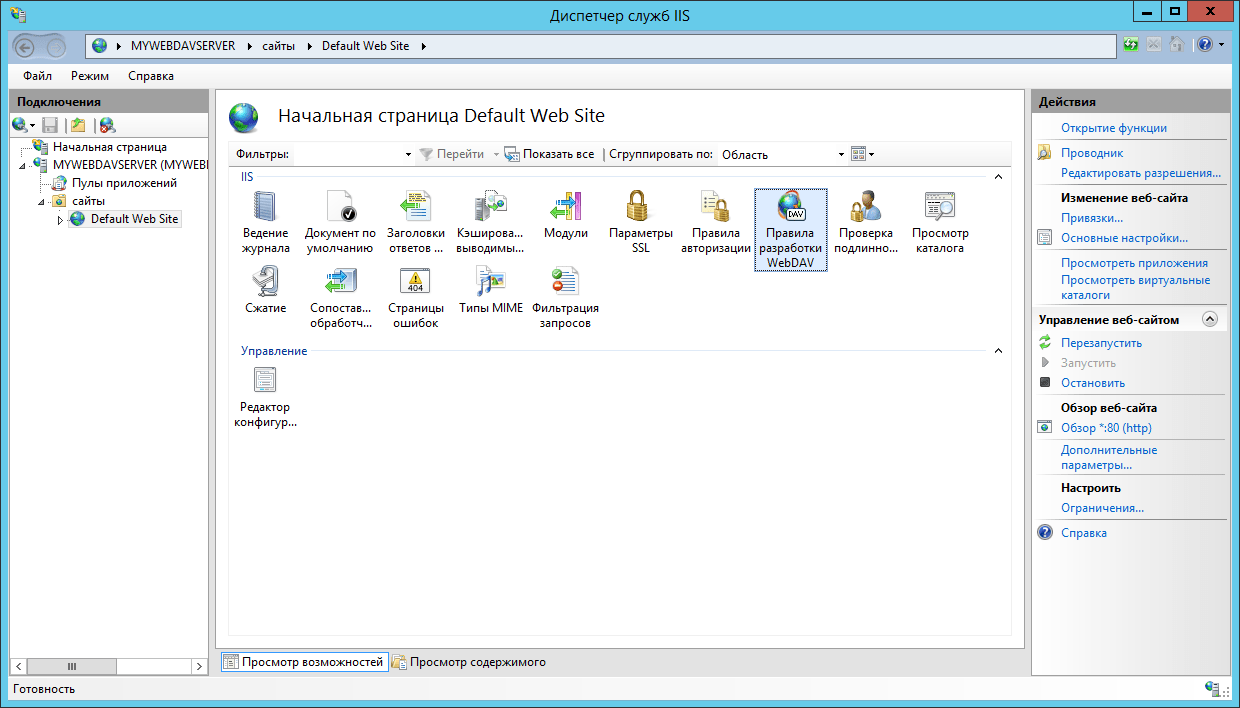

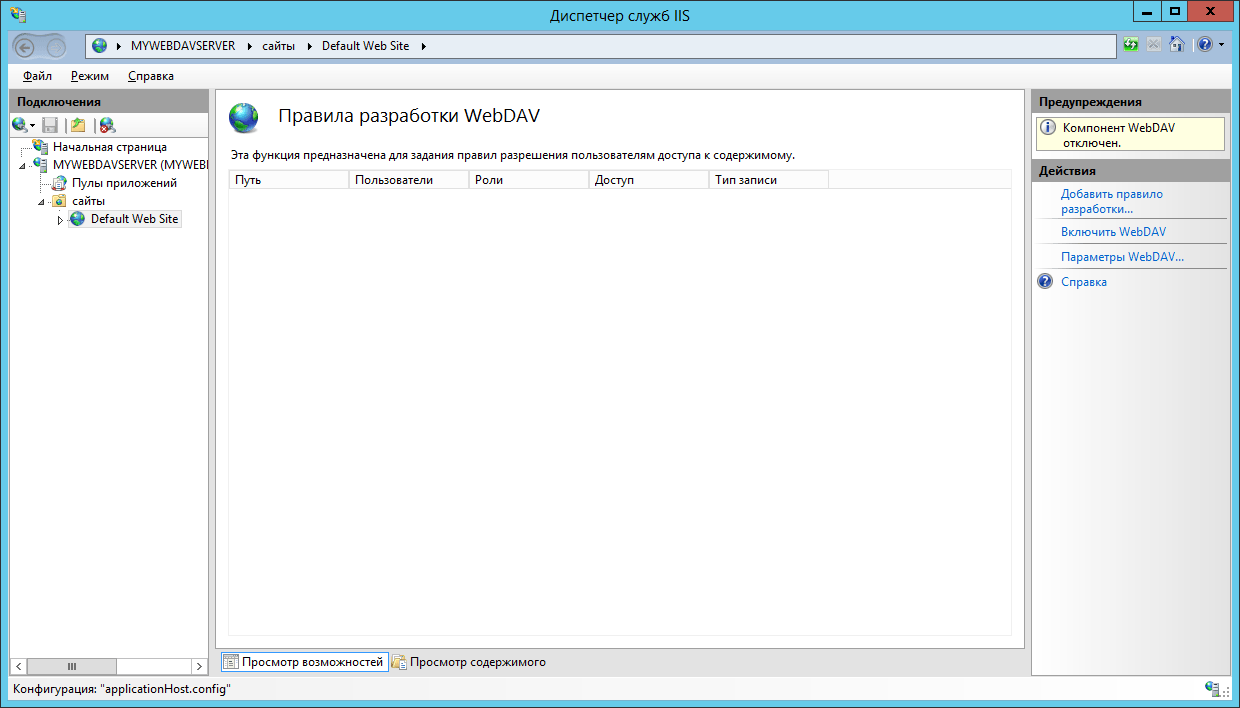


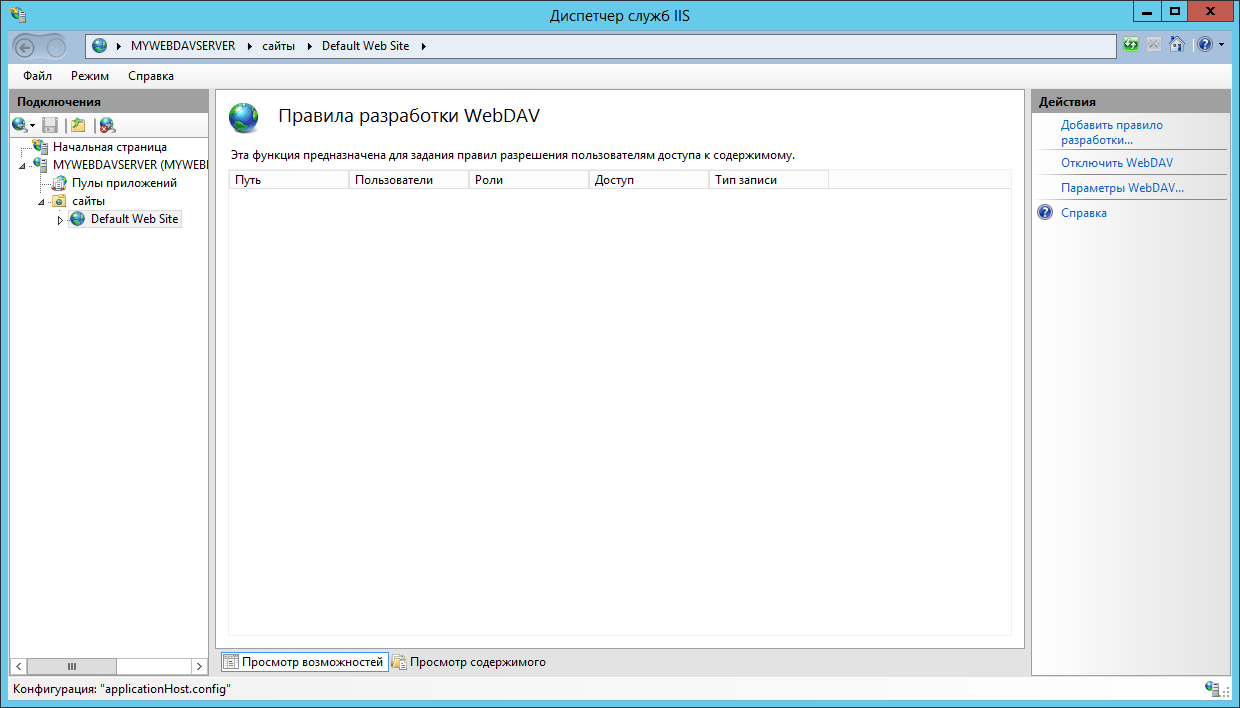
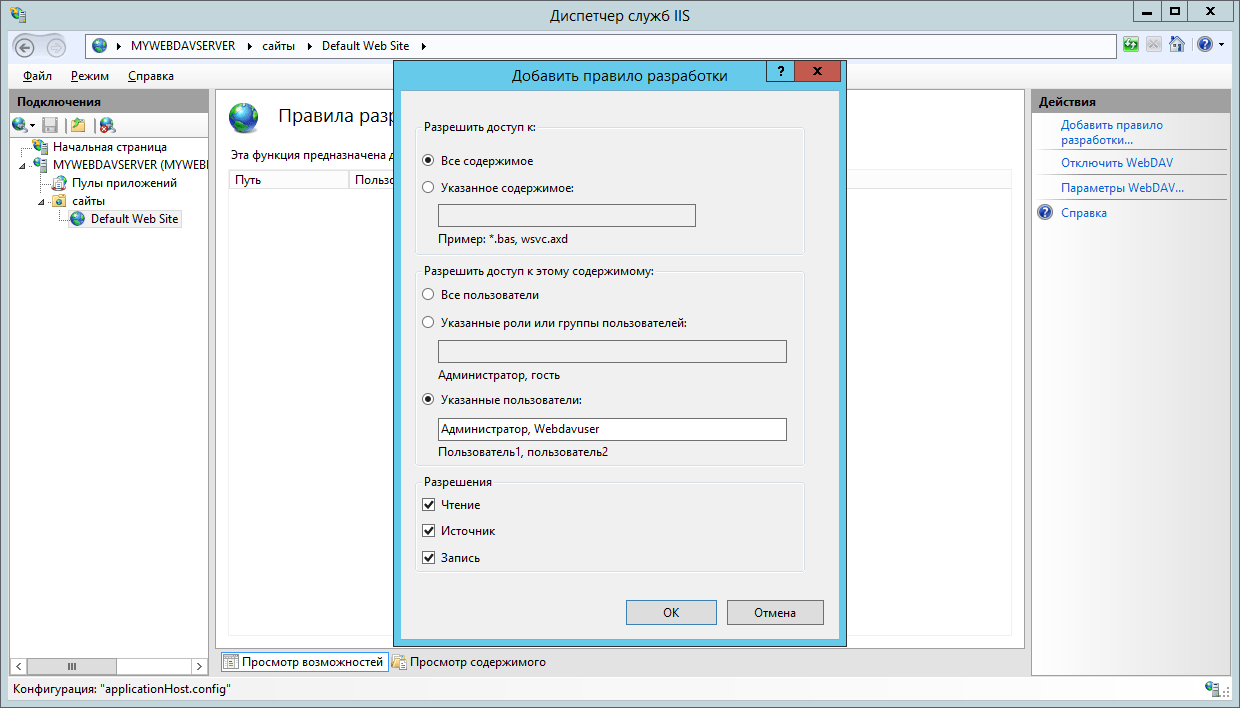

Настройте проверку подлинности
- В Диспетчере служб IIS, разверните элемент Сайты на панели Подключения слева, затем выберите Default Web Site.
- Дважды щелкните по опции Проверка подлинности.
- Выделите в списке нужный тип проверки подлинности и нажмите Включить на панели Действия справа. Убедитесь, что отключены другие типы проверки подлинности (чтобы отключить ранее включенный тип проверки подлинности, выделите его в списке и щелкните по опции Отключить на панели Действия).
Выберите нужный тип проверки подлинности в зависимости от того, какую версию ONLYOFFICE (Windows или Linux) вы используете. С помощью следующей таблицы можно выбрать подходящий тип проверки подлинности.
HTTP WebDAV HTTPS WebDAV Linux-версия ONLYOFFICE Обычная Обычная Windows-версия ONLYOFFICE Обычная, Дайджест Обычная, Дайджест Дополнительные требования для обычной проверки подлинности
Обычную проверку подлинности рекомендуется использовать совместно с протоколом HTTPS. Для включения HTTPS с помощью самозаверенного сертификата SSL можно воспользоваться следующими инструкциями:
- В Диспетчере служб IIS выделите ваш сервер на панели Подключения слева.
- Дважды щелкните на опции Сертификаты сервера в разделе IIS.
- Используйте опцию Создать самозаверенный сертификат на правой панели, чтобы открыть соответствующее диалоговое окно.
- Введите нужное имя сертификата и нажмите кнопку OK. Теперь у вас есть самозаверенный сертификат со сроком действия 1 год.
- Выберите Default Web Site и используйте опцию Привязки… на правой панели, чтобы открыть диалоговое окно Привязки сайта.
- В открывшемся окне нажмите кнопку Добавить….
- В меню Тип выберите опцию https, укажите доменное имя в поле Имя узла, выберите предварительно созданный сертификат из выпадающего меню SSL-сертификат и нажмите кнопку OK.
- Удалите привязку http и закройте окно Привязки сайта.
Если вы хотите использовать Обычную проверку подлинности с протоколом HTTP, эту возможность можно включить, изменив соответствующую запись в Реестре Windows. В окне Выполнить введите regedit и нажмите клавишу Enter. Откройте следующую запись реестра:
HKEY_LOCAL_MACHINESYSTEMCurrentControlsetservicesWebClientParametersBasicAuthLevelИзмените указанное значение на 2. Откройте окно Администрирование->Службы и перезапустите службу Веб-клиент. Это позволит использовать Обычную проверку подлинности с протоколом HTTP. Пожалуйста, обратите внимание, что в этом случае имя пользователя и пароль будут передаваться в виде незашифрованного текста.
Дополнительные требования для дайджест-проверки подлинности
Функцию Дайджест-проверки подлинности можно включить только если ваш сервер присоединен к домену. Для использования Дайджест-проверки подлинности также должны выполняться следующие условия:
- сервер WebDAV и клиентская машина, на которой установлен ONLYOFFICE, должны быть присоединены к одному домену в Active Directory, или между доменами сервера WebDAV и сервера ONLYOFFICE должны быть созданы отношения доверия,
- пользователь WebDAV должен иметь действительную учетную запись Windows, сохраненную в Active Directory.
После включения Дайджест-проверки подлинности в Диспетчере служб IIS также потребуется указать Область проверки подлинности (выделите в списке опцию Дайджест-проверка подлинности, щелкните по опции Изменить… на правой панели, в новом открывшемся окне укажите свое доменное имя и нажмите кнопку OK).
- После того как нужный тип аутентификации будет включен, выберите Default Web Site на панели Подключения слева, а затем дважды щелкните по опции Правила авторизации.
- Убедитесь, что разрешающее правило (Режим — «Разрешить») включает учетные записи тех пользователей, которые были перечислены при создании правила разработки WebDAV. По умолчанию выбрана опция Все пользователи.

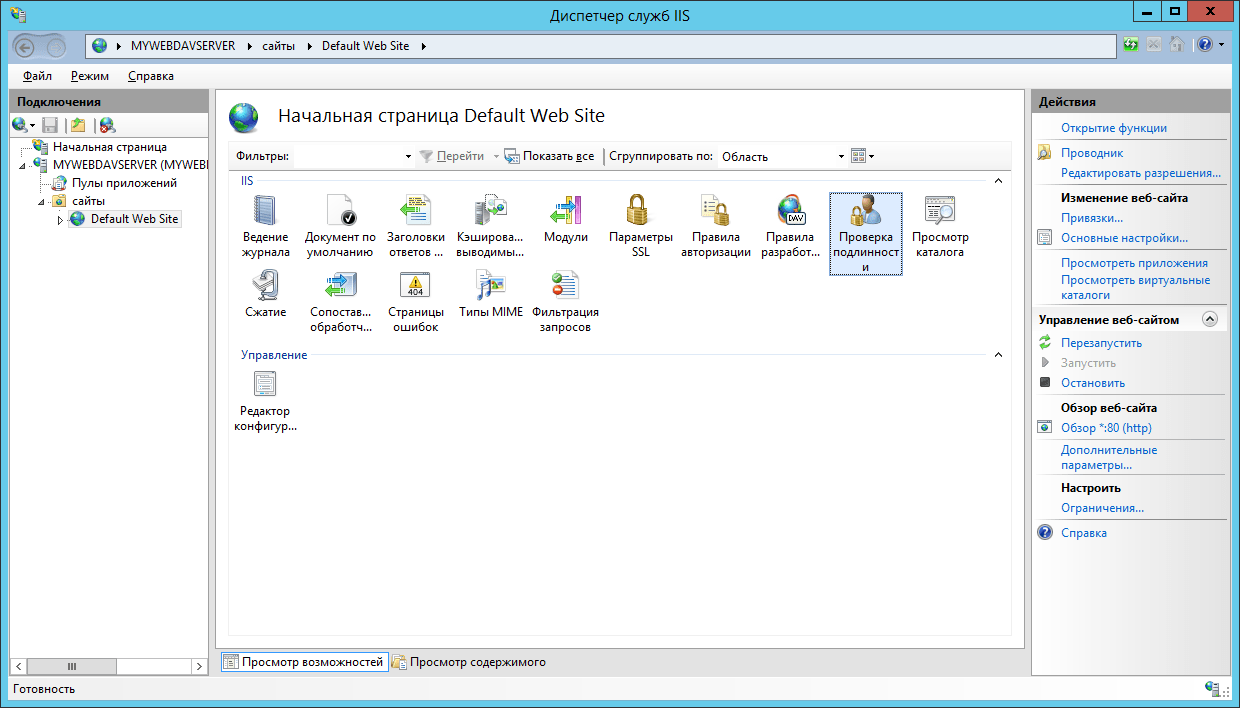

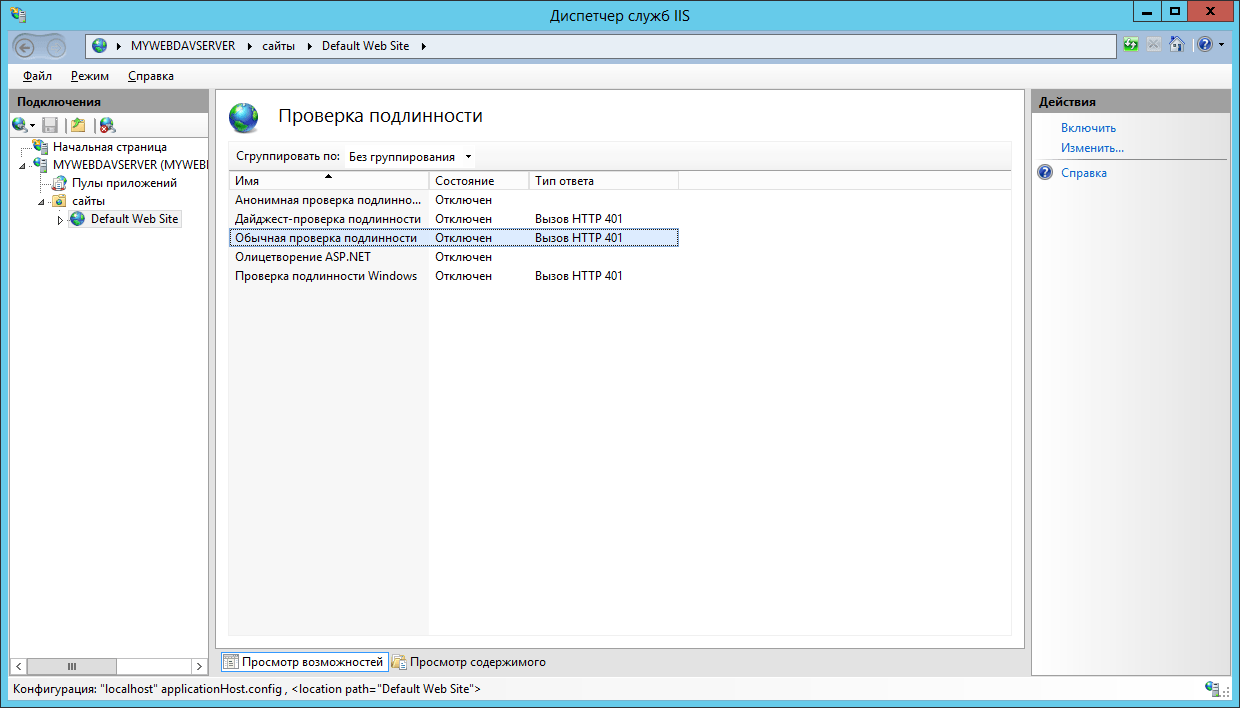


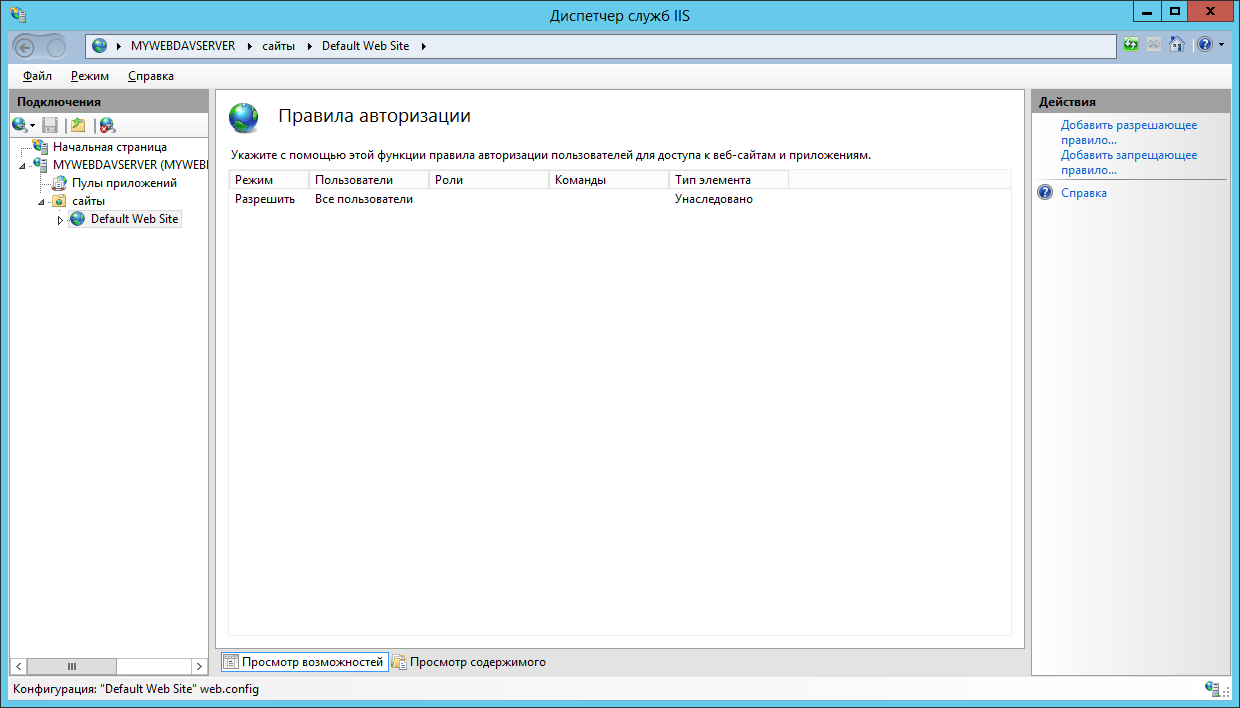

Подключитесь к серверу WebDAV
- Запустите Командную строку от имени Администратора.
- Если вы используете HTTP, введите следующую команду:
net use * http://localhostЕсли вы используете HTTPS, введите следующую команду:
net use * https://localhostВам будет предложено ввести учетные данные. Введите имя пользователя и пароль учетной записи пользователя WebDAV.
Будет добавлен новый сетевой диск, привязанный к сайту WebDAV.

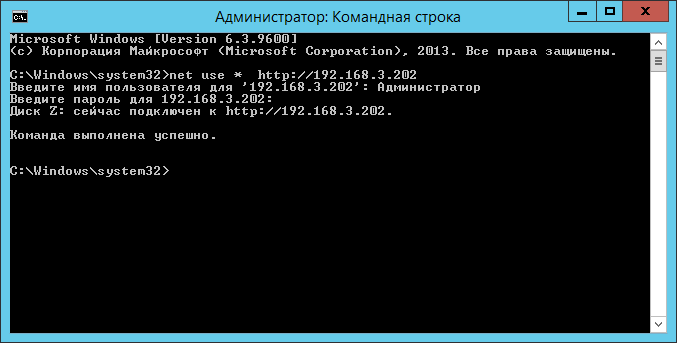
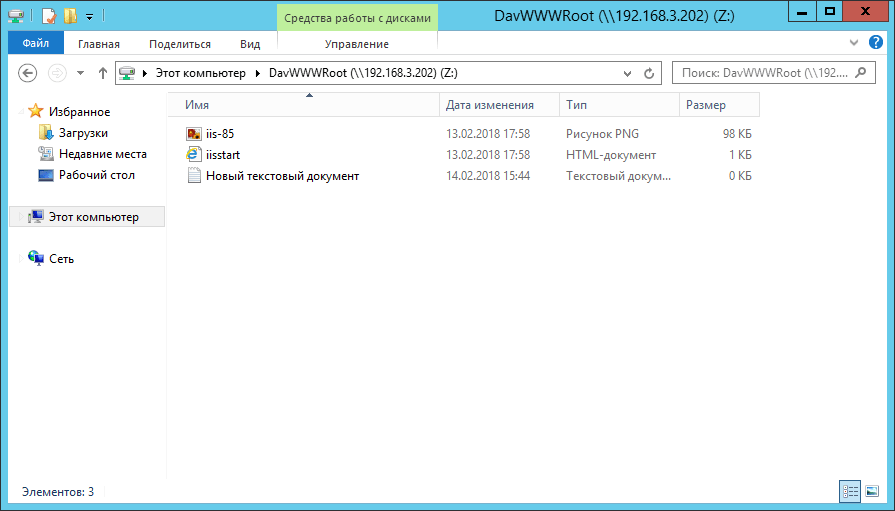

Шаг 2. Подключение WebDAV-сервера к модулю «Документы»
Теперь вы можете перейти в модуль Документы и подключить сервер WebDAV.
- Нажмите на ссылку Документы на стартовой странице портала.
- В открывшемся модуле Документы нажмите на кнопку , расположенную под надписью Добавить аккаунт.
- В окне Подключение аккаунта нажмите на кнопку Другой аккаунт.
- Откроется новая форма. Введите в ней параметры для подключения каталога WebDAV:
- Введите URL-адрес подключения в следующей форме:
http://<hostname>/илиhttps://<hostname>/Где
<hostname>— это IP-адрес или имя хоста WebDAV-сервера. - В полях Логин и Пароль укажите имя пользователя WebDAV и его пароль.
- В случае необходимости измените заданное по умолчанию имя каталога WebDAV в поле Название папки.
- Вы также можете добавить каталог WebDAV не в ваши персональные документы, а в раздел Общие документы, доступный для всех пользователей портала. Для этого отметьте опцию Сделать доступным и поместить в папку ‘Общие документы’.
- Введите URL-адрес подключения в следующей форме:
- Нажмите кнопку Сохранить.
 , расположенную под надписью Добавить аккаунт.
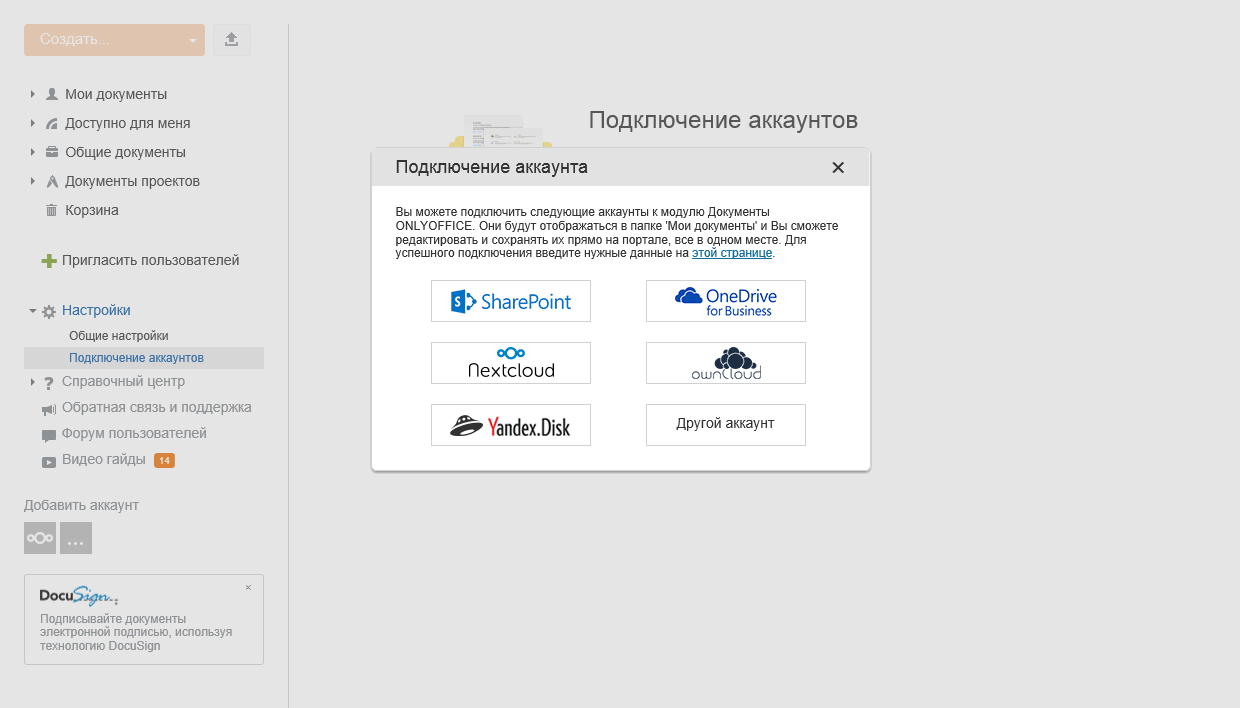

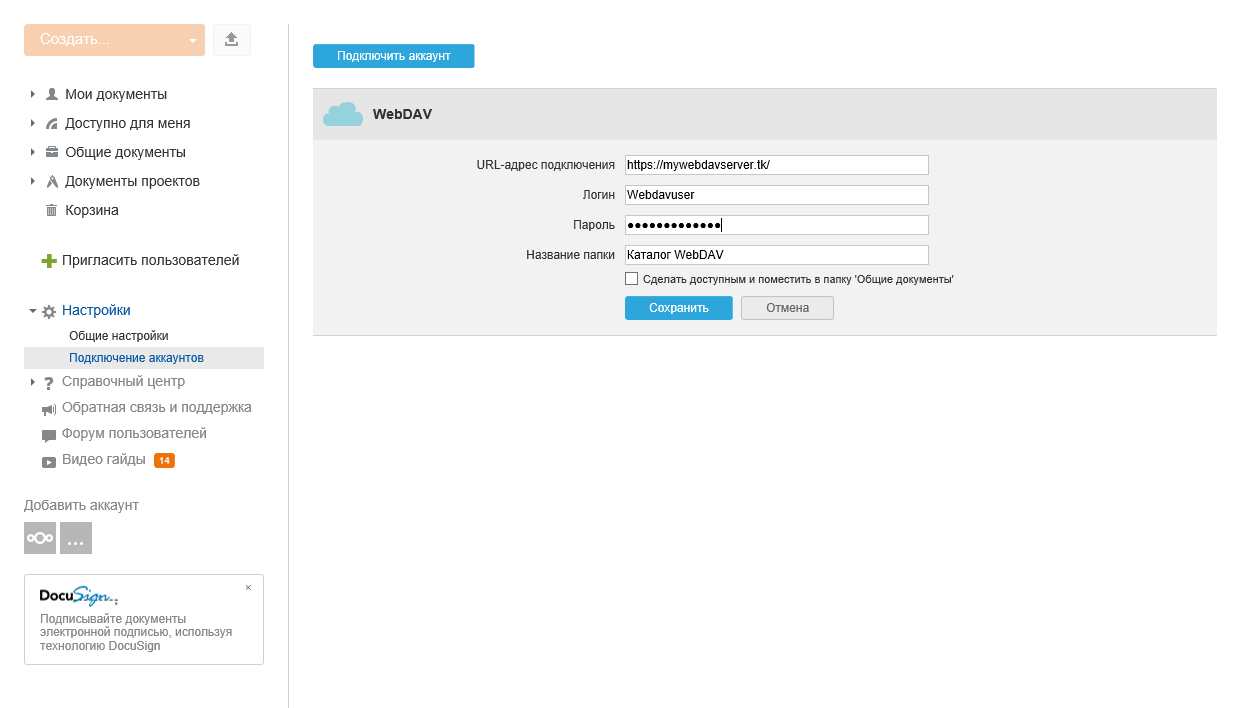
Вы успешно подключили WebDAV-сервер к модулю Документы ONLYOFFICE. Теперь вы можете:
- менять права доступа к папкам и документам внутри подключенного каталога WebDAV. Для получения дополнительной информации о правах доступа в модуле Документы можно обратиться к этой статье.
- редактировать документы, используя полнофункциональные онлайн-редакторы. Чтобы узнать больше о возможностях онлайн-редакторов, обратитесь к этому разделу.
- Remove From My Forums
-
Общие обсуждения
-
Здравствуйте.
Пытаюсь подключить сетевой диск webdav средствами проводника Windows 10 Pro.
Webdav развернут на Windows Server 2019. Это не сервер, а просто файловое хранилище. Домена нет, пользователи локальные, права розданы, по локальной сети все ок работает.
Webdav виртуальный каталог. Адрес в интернете https://*.*.*.*/shares. Сертификат ssl самоподписанный. Базовая аутентификация. Доступ всем пользователям.С Мака сетевой диск подключается, с приложений в смартфоне подключается. В Windows через плагин Total commander подключается, через Internet Explorer (и другие браузеры) – ругается на сертификат, но подключается. Через проводник – никак. Запрашивает
имя пользователя и пароль, указываю корректные, но подключение не происходит: Вход в сеть не произведен. Через командную строку: Системная ошибка 1244. Запрошенная операция не была выполнена, так как пользователь не зарегистрирован.На клиентской машине стоит Windows 10 Pro. Сертификат добавлен в доверенные, служба webclient запущена, параметры реестра аутентификации и доверенных адресов BasicAuthLevel и AuthForwardServerList пробовал изменять, брандмауэр отключал,
параметры безопасности IE снижал – ничего не помогает.Учитывая, что любые сторонние программы и приложения могут без проблем подключаться и работать, я предполагаю, что проблема в клиенте Windows, а не сервере. Задача вроде довольно простая, но никак не могу найти решение.
Помогите советом, или скажите, к кому можно обратиться за помощью в настройке — очень нужно для удаленной работы.
-
Изменен тип
13 июля 2020 г. 7:24
Отсутствие активности
-
Изменен тип
В этой заметке мы поговорим о замечательной надстройке над службой Internet Information Services (IIS) под названием WebDAV. WebDAV это протокол для доступа к общим файлам и папкам через интернет, чем то похожий на FTP. Передача файлов по протоколу WebDAV может быть осуществлена через различные межсетевые экраны и брандмауэры, передаваемую информацию можно шифровать, да и работа с файлами и папками реализована намного удобнее, полностью напоминая работу службы общего доступа к фалам и папкам в Windows.
Вместе с выходом Windows Server 2008 Microsoft презентовала обновленную версию модуля WebDAV для IIS 7. Данный модуль существенно расширил возможности, удобство и безопасность использования WebDAV для доступа к файлам в Интернет, кроме того теперь он стал поддерживать многопользовательскую работу и блокировку файлов.
В этой статье мы поговорим о том, как установить WebDAV на ОС Windows 7 и Windows Server 2008 R2, как его настроить и каким образом можно получить доступ к файлам и папкам, к которым открыт общий сетевой доступ по WebDAV .
Еще раз напомню, что WebDAV это расширение службы IIS, поэтому, если у вас еще не установлен IIS, сделайте это (как вы, наверное, помните и в Windows 7 и в Windows Server 2008 R2, IIS идет по умолчанию, но в целях безопасности этот компонент нужно включать отдельно). Установка WebDAV в Windows 7 и в Windows 2008 R2 немного отличается.
Установка WebDAV на IIS 7.5 в Windows Server 2008 R2
- Откройте меню Start-> Administrative Tools-> Server Manager.
- В окне управления сервером выберите Roles и отметьте Web Server (IIS).
- В окне Web Server (IIS), найдите секцию Role Services и добавьте новую роль Add Role Services.
- В списке служб разверните элемент Common HTTP Features, выберите опцию WebDAV Publishing и нажмите Next.

- Затем нажмите Install.
- После установки расширения WebDAV, закройте окно установки кнопкой Close.

Установка WebDAV на IIS 7.5 в Windows 7
- Перейдите в панель управления.
- В панели управления откройте элемент Programs and Features, и перейдите в режим установки функций Windows (Turn Windows Features on or off).
- Разверните узел Internet Information Services, затем World Wide Web Services, и Common HTTP Features.

- Отметьте WebDAV Publishing и нажмите OK.

Настраиваем публикацию WebDAV в менеджере IIS
На этом этапе мы включим WebDAV для сайта IIS и дадим права на редактирование содержимого локальному администратору.
- В менеджере IIS Manager, разверните дерево сайтов и выберите Default Web Site.
- Как показано на рисунке, щелкните по элементу WebDAV Authoring Rules.

- На странице WebDAV Authoring Rules щелкните в правой колонке(Actions) по сслыке Enable WebDAV
- После включения WebDAV, создадим правила доступа к содержимому, нажав кнопку Add Authoring Rule.
- В окне Add Authoring Rule укажем:
- All content – значит, что правило будет применяться для контента всех типов.
- Выберите «Specified users»и введте имя пользователя «administrator»
- Права доступа: Read, Source и Write.
- После настройки, жмите OK.

- В панели управления IIS выберите опцию Authentication.
- В окне аутентификации активируйте аутентификацию Windows (Windows Authentication), если IIS будет работать только в качестве сервера WebDAV, анонимную аутентификацию можно отключить.
- Вернитесь на уровень сайта Default Web Site и выберите Authorization Rules (либо .Net Authorization Rules)
- Создайте Allow правило (либо убедитесь, что оно уже существует), в котором администратору было бы разрешено получать доступ к серверу (в моем случае, такое правило уже было, и всем пользователям — All Users, в том числе администратору был разрешен доступ к IIS).


Попробуем теперь подключиться к сайту WebDAV c учетной записью администратора, для чего в командной строке наберите:
net use * http://localhost/
В результате в системе появиться новый сетевой диск, подключенный с сервера с помощью WebDAV.
Совет. Если при попытке подключить каталог по WebDav появляется ошибка «System error 67 has occurred. The network name cannot be found.«, в Windows 8 /Windows Server 2012 попробуйте установить компонент Desktop Experience и убедится, что служба Web Client запущена.
Если же нужно расшарить определенную папку на диске, необходимо создать виртуальный каталог IIS. Для этого щелкните правой кнопкой мыши по сайту и выберите ‘Add New Virtual Directory’:
Укажите алиас (имя виртуального каталога IIS) и путь к папке, к которой необходимо открыть доступ и нажмите OK.
Теперь, чтобы подключить данный каталог, нужно воспользоваться командой:
net use * _https://winitpro.ru/projects
Сетевой диск, подключенный по WebDAV выглядит так:
Как вы видите WebDAV — это отличное средство для удаленного доступа к файлам и папкам в Windows поверх протокола HTTP, которое можно использовать, даже через межсетевой экран. Кроме того, так как WebDAV базируется на службе IIS, это означает, что в такой архитектуре мы можем использовать различные технологии обеспечения безопасности и средства управления IIS, в том числе HTTPS для шифрования передаваемых данных (при использовании обычного HTTP вся информация передается в открытом виде, кроме пароля, который при использовании Windows Authentication шифруется).
Опишем еще несколько аспектов использования WebDAV
- Если вы используете Basic authentication вместе с HTTP, это означит, что ваш пароль будет пересылаться в открытом виде, поэтому лучше использовать протокол HTTPS или все-таки включить аутентификацию Windows.
- Не забудьте, что IIS работает из под учетной записи, у которой нет доступа к большинству каталогов и файлам, поэтому придется назначить NTFS права этой учетной записи вручную.
- Для того, чтобы подключить диск по WebDAV с клиента Windows XP, необходимо убедится, что запущена служба WebClient

- Чтобы подключить каталог WebDAV по HTTPS, воспользуйтесь командой:
net use x: "_https:// winitpro.ru/projects " /User:UserName Password

Содержание
- 1 Как в Windows подключить облачное хранилище в качестве сетевого диска по протоколу WebDav
- 2 Введение
- 3 Шаг 1. Создание и настройка WebDAV-сервера в Windows
- 4 Шаг 2. Подключение WebDAV-сервера к модулю «Документы»
- 5 Установка WebDAV на IIS 7.5 в Windows Server 2008 R2
- 6 Установка WebDAV на IIS 7.5 в Windows 7
- 7 Настраиваем публикацию WebDAV в менеджере IIS
Информация к новости
- Просмотров: 15 352
- Автор: admin
- Дата: 14-01-2019
14-01-2019
Категория: Функционал Windows / Интернет / Программы
Привет, друзья. Недавно на сайте была опубликована статья о двух программках Air Live Drive и Air Explorer, реализующих в среде Windows доступ к различным облачным сервисам по типу локальных дисков. Эти программы предлагают большой перечень готовых настроек подключения популярных облаков. Но в бесплатных редакциях они ограничены возможностью подключения к системе не более 3-х хранилищ с одним аккаунтом. Некоторых из вас смутили такие ограничения, и в этой статье я решил осветить процедуру совершенно бесплатного подключения облаков в среду Windows в качестве сетевых дисков по протоколу WebDav. Ну и заодно поговорим о специфике подключения по WebDav.
Что даёт подключение по WebDav
WebDav – это набор расширений и дополнений к протоколу HTTP, который позволяет управлять файлами на удалённых серверах. Облако – это и есть этот самый удалённый сервер. Преимущество подключения облака по WebDav заключается в том, что все наши данные будут нам доступны в среде Windows без их скачивания на жёсткий компьютера, как это реализуют официальные программы-клиенты облаков. Только при запуске и редактировании файлов облачного хранилища, подключённого по WebDav, эти файлы будут скачиваться в системный кэш, а потом выгружаться из него назад в облако. С хранящимися в облаке файлами можем удалённо проводить любые управленческие операции – копирование, перемещение, переименование, удаление – с использованием проводника Windows или любого установленного файлового менеджера.Кроме того, что подключение по WebDav не захламляет место на локальном компьютере, оно имеет ещё одно преимущество перед официальным клиентским софтом облаков – отсутствие лишних фоновых процессов для обеспечения функционирования клиента и синхронизации данных. Что немаловажно для слабых устройств.В чём подключение по WebDav уступает официальному клиентскому софту облачных сервисов?Во-первых, в скорости доступа к данным. Управление будет осуществляться по типу удалённого доступа, и, естественно, операции не будут проводиться так быстро, как в условиях работы с жёстким диском компьютера.Во-вторых, мы не получим удобной возможности расшаривания ссылок на файлы – в контекстном меню в проводнике или файловом менеджере, как это реализует официальный клиентский софт. Чтобы сделать файл общедоступным и получить его ссылку, нам нужно будет отправиться в веб-интерфейс облака.В-третьих, не все облачные хранилища предусматривают подключение по WebDav. В их числе, кстати, популярные сервисы Google Диск и Облако Mail.Ru. В таком случае можно либо прибегнуть к помощи сервисов, которые решают эту проблему и реализуют доступ к облаку по WebDav, как, например, сервис DAV-pocket service, либо использовать программы с готовыми пресетами настроек нужных хранилищ. Об одной из таких программ будем говорить ниже.Как в среде Windows подключить облачный диск по WebDav?
Подключение по WebDav средствами Windows
Подключить облачное хранилище по WebDav можно с использованием штатных средств Windows. В проводнике Windows 8.1 и 10 кликаем вкладку «Компьютер». В проводнике Windows 7 жмём клавишу Alt, выбираем «Сервис». Жмём «Подключить сетевой диск».

В окне подключения можем выбрать букву диска для содержимого облака. В графе «Папка» вводим адрес подключения облака по WebDav. Жмём «Готово».

Авторизуемся в облаке. Выставляем галочку запоминания данных авторизации. Жмём «Ок».
В проводнике должен появиться облачный диск. Можем переименовать его так, как удобно нам.
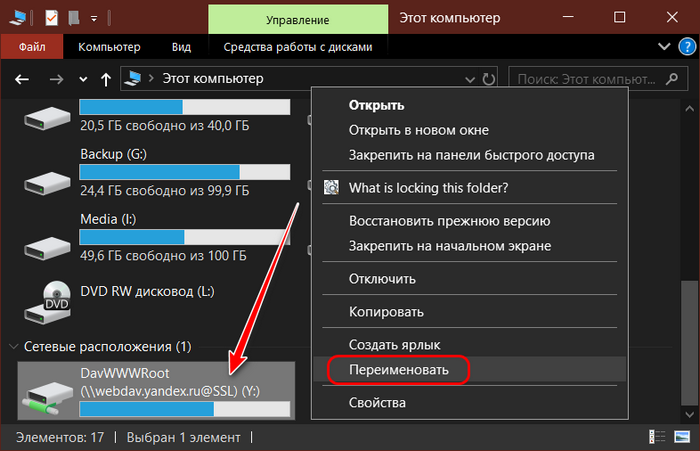
Если облачный диск станет не нужен, отключаем его в контекстном меню.
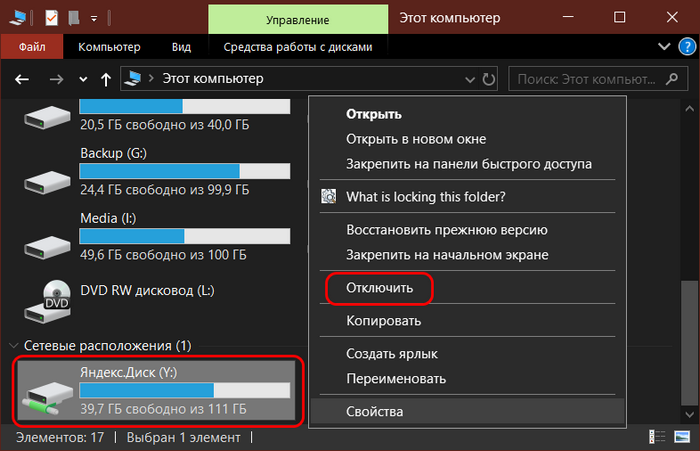
Вот так всё просто, если, конечно, знать адрес WebDav. Как узнать этот адрес? • Для Яндекс.Диска это https://webdav.yandex.ru • Для Box это https://box.net/dav• Для OneDrive это https://docs.live.net/ИдентификаторВ случае с OneDrive вместо значения «Идентификатор» необходимо подставить свой уникальный код, который отображается в веб-интерфейса хранилища после значения «id=».
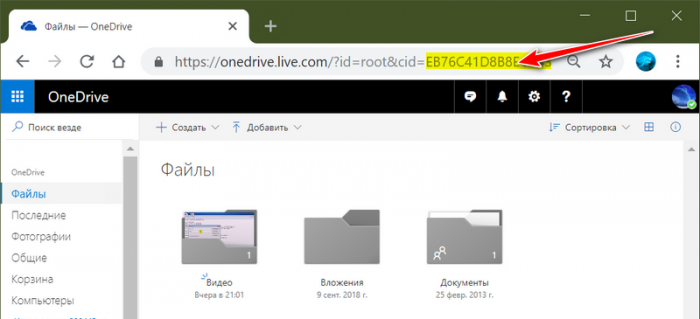
Ну а адреса подключения других облаков, если они поддерживают доступ по WebDav, вы, друзья, можете найти в Интернете. Либо же можете обратиться в службу поддержки сервиса.
Подключение по WebDav с помощью Raidrive
Альтернативный способ подключения облачных хранилищ по WebDav – программа RaiDrive. Она полностью бесплатная, это аналог упомянутой выше программы Air Live Drive. RaiDrive не ограничена числом подключаемых сервисов и их аккаунтов, однако, в отличие от Air Live Drive, предлагает весьма скудный перечень готовых настроек подключения облаков. У RaiDrive есть поддержка только Google Drive, Google Photos, Dropbox и OneDrive. Все остальные облачные сервисы подключаются по WebDav, FTP или SFTP при указании нами их адресов. Скачать программу можно на её официальном сайте:https://www.raidrive.comRaiDrive как альтернатива Air Live Drive, конечно же, уступает последней. Но если Raidrive рассматривать как альтернативу штатному способу подключения облаков по WebDav, то у неё есть несколько преимуществ:• Удобство подключения/отключения сетевых дисков;• Возможность выбора папки кэша;• Корректность отображения в проводнике общего и занятого облачного пространства. При подключении по WebDav штатными средствами Windows по объёму хранилищ отображаются неверные сведения.

Как работать с RaiDrive? Запускаем программку. Жмём «Добавить». WebDav в качестве типа подключения выбран по умолчанию. Вводим адрес, логин и пароль аккаунта облака. Жмём «Ок».

В окне RaiDrive подключением можем управлять – отключать, включать, удалять.
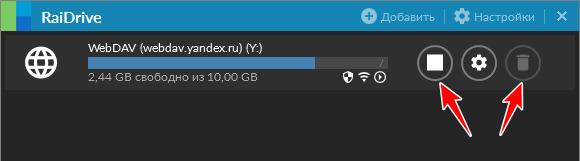
Предустановленную папку кэша программы можно сменить в настройках.
***Читайте также о других программах интеграции облачных хранилищ в среду Windows. ВернутьсяКомментариев: 68 Дорогой посетитель, Вы можете задать на сайте любой вопрос и обязательно получите ответ! Справочный центр
Сервер совместной работы
Подключение Сервера документов к Серверу совместной работыУстановка Сервера совместной работы для Debian, Ubuntu и производных![]()
Введение
Если в вашей локальной сети есть сервер, который используется как хранилище файлов и содержит множество документов, возможно, вы не захотите загружать их все в какой-то веб-сервис и продолжите работать с ними традиционным способом. Но есть простое, надежное и безопасное решение, позволяющее использовать все преимущества редактирования документов онлайн. Все, что для этого нужно:
- Настроить WebDAV на сервере. WebDAV (англ. Web Distributed Authoring and Versioning) — это расширение протокола HTTP, позволяющее управлять файлами на удаленном сервере, получать доступ к документам через интернет и совместно работать над ними.
- Подключить WebDAV-хранилище документов к модулю «Документы» ONLYOFFICE. Это позволит существенно расширить возможности управления файлами и совместной работы. Вы сможете:
- задавать различные права доступа к файлам и папкам для пользователей и групп;
- управлять историей версий и восстанавливать любую предыдущую версию или ревизию;
- создавать и редактировать документы онлайн, используя самые мощные онлайн-редакторы;
- использовать широкие возможности для совместной работы, например, совместное редактирование в режиме реального времени, рецензирование, отслеживание изменений, комментирование и многое другое.
Шаг 1. Создание и настройка WebDAV-сервера в Windows
Установите расширение WebDAV в IIS
Для создания сервера WebDAV на вашем компьютере должен быть установлен IIS v. 7.0 или более поздней версии, а также должен существовать Веб-узел по умолчанию, созданный IIS. Все остальные необходимые компоненты IIS можно установить и настроить в ходе установки расширения WebDAV. В этой статье описывается установка WebDAV в IIS 8.5 (Windows Server 2012 R2). Процесс установки может отличаться в зависимости от используемой версии IIS.
- В Диспетчере серверов откройте меню Управление и выберите опцию Добавить роли и компоненты. Откроется Мастер добавления ролей и компонентов.
- Следуйте инструкциям мастера. На страницах Перед началом работы, Тип установки и Выбор сервера можно оставить параметры, выбранные по умолчанию, и нажать кнопку Далее.
- На странице Роли сервера разверните пункт Веб-сервер (IIS), разверните подпункт Веб-сервер, а затем откройте раздел Общие функции HTTP. Отметьте опцию Публикация WebDAV.
Откройте раздел Безопасность.
- Отметьте типы проверки подлинности, которые вы хотите использовать, например, Обычная проверка подлинности или Дайджест-проверка подлинности, (чтобы в дальнейшем можно было включить нужный метод).
- Отметьте опцию Авторизация URL-адреса (чтобы в дальнейшем иметь возможность изменить существующее или создать новое правило авторизации).
- Нажмите кнопку Далее.
- На странице Компоненты разверните пункт Пользовательские интерфейсы и инфраструктура и отметьте опцию Возможности рабочего стола (чтобы установить Перенаправитель WebDAV), затем нажмите кнопку Далее. В новом открывшемся окне нажмите на кнопку Добавить компоненты, затем нажмите Далее.
- На странице Подтверждение нажмите кнопку Установить. Когда установка завершится, нажмите кнопку Закрыть. Потребуется перезагрузить компьютер.
Создайте правило разработки WebDAV
- В Диспетчере серверов откройте меню Средства и выберите опцию Диспетчер служб IIS. Откроется Диспетчер служб IIS.
- На панели Подключения слева разверните элемент Сайты, затем выберите Default Web Site.
- Дважды щелкните по опции Правила разработки WebDAV.
- Нажмите на опцию Включить WebDAV на панели Действия справа.
- Нажмите на опцию Добавить правило разработки… на панели Действия справа.
- В окне Добавить правило разработки выберите следующие опции:
- В разделе Разрешить доступ к: оставьте отмеченной опцию Все содержимое.
- В разделе Разрешить доступ к этому содержимому: отметьте опцию Указанные пользователи и введите имя пользователя, у которого должен быть доступ к вашему хранилищу WebDAV. Можно добавить несколько пользователей, перечислив их через запятую.
- В разделе Разрешения выберите опции Чтение, Источник и Запись.
- Нажмите кнопку OK.
Настройте проверку подлинности
- В Диспетчере служб IIS, разверните элемент Сайты на панели Подключения слева, затем выберите Default Web Site.
- Дважды щелкните по опции Проверка подлинности.
- Выделите в списке нужный тип проверки подлинности и нажмите Включить на панели Действия справа. Убедитесь, что отключены другие типы проверки подлинности (чтобы отключить ранее включенный тип проверки подлинности, выделите его в списке и щелкните по опции Отключить на панели Действия).
Выберите нужный тип проверки подлинности в зависимости от того, какую версию ONLYOFFICE (Windows или Linux) вы используете. С помощью следующей таблицы можно выбрать подходящий тип проверки подлинности.
HTTP WebDAV HTTPS WebDAV Linux-версия ONLYOFFICE Обычная Обычная Windows-версия ONLYOFFICE Обычная, Дайджест Обычная, Дайджест Дополнительные требования для обычной проверки подлинности
Обычную проверку подлинности рекомендуется использовать совместно с протоколом HTTPS. Для включения HTTPS с помощью самозаверенного сертификата SSL можно воспользоваться следующими инструкциями:
- В Диспетчере служб IIS выделите ваш сервер на панели Подключения слева.
- Дважды щелкните на опции Сертификаты сервера в разделе IIS.
- Используйте опцию Создать самозаверенный сертификат на правой панели, чтобы открыть соответствующее диалоговое окно.
- Введите нужное имя сертификата и нажмите кнопку OK. Теперь у вас есть самозаверенный сертификат со сроком действия 1 год.
- Выберите Default Web Site и используйте опцию Привязки… на правой панели, чтобы открыть диалоговое окно Привязки сайта.
- В открывшемся окне нажмите кнопку Добавить….
- В меню Тип выберите опцию https, укажите доменное имя в поле Имя узла, выберите предварительно созданный сертификат из выпадающего меню SSL-сертификат и нажмите кнопку OK.
- Удалите привязку http и закройте окно Привязки сайта.
Если вы хотите использовать Обычную проверку подлинности с протоколом HTTP, эту возможность можно включить, изменив соответствующую запись в Реестре Windows. В окне Выполнить введите regedit и нажмите клавишу Enter. Откройте следующую запись реестра:
HKEY_LOCAL_MACHINESYSTEMCurrentControlsetservicesWebClientParametersBasicAuthLevelИзмените указанное значение на 2. Откройте окно Администрирование->Службы и перезапустите службу Веб-клиент. Это позволит использовать Обычную проверку подлинности с протоколом HTTP. Пожалуйста, обратите внимание, что в этом случае имя пользователя и пароль будут передаваться в виде незашифрованного текста.
Дополнительные требования для дайджест-проверки подлинности
Функцию Дайджест-проверки подлинности можно включить только если ваш сервер присоединен к домену. Для использования Дайджест-проверки подлинности также должны выполняться следующие условия:
- сервер WebDAV и клиентская машина, на которой установлен ONLYOFFICE, должны быть присоединены к одному домену в Active Directory, или между доменами сервера WebDAV и сервера ONLYOFFICE должны быть созданы отношения доверия,
- пользователь WebDAV должен иметь действительную учетную запись Windows, сохраненную в Active Directory.
После включения Дайджест-проверки подлинности в Диспетчере служб IIS также потребуется указать Область проверки подлинности (выделите в списке опцию Дайджест-проверка подлинности, щелкните по опции Изменить… на правой панели, в новом открывшемся окне укажите свое доменное имя и нажмите кнопку OK).
- После того как нужный тип аутентификации будет включен, выберите Default Web Site на панели Подключения слева, а затем дважды щелкните по опции Правила авторизации.
- Убедитесь, что разрешающее правило (Режим — «Разрешить») включает учетные записи тех пользователей, которые были перечислены при создании правила разработки WebDAV. По умолчанию выбрана опция Все пользователи.
Подключитесь к серверу WebDAV
- Запустите Командную строку от имени Администратора.
- Если вы используете HTTP, введите следующую команду:
net use * http://localhostЕсли вы используете HTTPS, введите следующую команду:
net use * https://localhostВам будет предложено ввести учетные данные. Введите имя пользователя и пароль учетной записи пользователя WebDAV.
Будет добавлен новый сетевой диск, привязанный к сайту WebDAV.
Шаг 2. Подключение WebDAV-сервера к модулю «Документы»
Теперь вы можете перейти в модуль Документы и подключить сервер WebDAV.
- Нажмите на ссылку Документы на стартовой странице портала.
- В открывшемся модуле Документы нажмите на кнопку
 , расположенную под надписью Добавить аккаунт.
 - В окне Подключение аккаунта нажмите на кнопку Другой аккаунт.
- Откроется новая форма. Введите в ней параметры для подключения каталога WebDAV:
- Введите URL-адрес подключения в следующей форме:
http:///илиhttps:///Где
— это IP-адрес или имя хоста WebDAV-сервера. - В полях Логин и Пароль укажите имя пользователя WebDAV и его пароль.
- В случае необходимости измените заданное по умолчанию имя каталога WebDAV в поле Название папки.
- Вы также можете добавить каталог WebDAV не в ваши персональные документы, а в раздел Общие документы, доступный для всех пользователей портала. Для этого отметьте опцию Сделать доступным и поместить в папку ‘Общие документы’.
- Введите URL-адрес подключения в следующей форме:
- Нажмите кнопку Сохранить.
Вы успешно подключили WebDAV-сервер к модулю Документы ONLYOFFICE. Теперь вы можете:
- менять права доступа к папкам и документам внутри подключенного каталога WebDAV. Для получения дополнительной информации о правах доступа в модуле Документы можно обратиться к этой статье.
- редактировать документы, используя полнофункциональные онлайн-редакторы. Чтобы узнать больше о возможностях онлайн-редакторов, обратитесь к этому разделу.
В этой заметке мы поговорим о замечательной надстройке над службой Internet Information Services (IIS) под названием WebDAV. WebDAV это протокол для доступа к общим файлам и папкам через интернет, чем то похожий на FTP. Передача файлов по протоколу WebDAV может быть осуществлена через различные межсетевые экраны и брандмауэры, передаваемую информацию можно шифровать, да и работа с файлами и папками реализована намного удобнее, полностью напоминая работу службы общего доступа к фалам и папкам в Windows.
Вместе с выходом Windows Server 2008 Microsoft презентовала обновленную версию модуля WebDAV для IIS 7. Данный модуль существенно расширил возможности, удобство и безопасность использования WebDAV для доступа к файлам в Интернет, кроме того теперь он стал поддерживать многопользовательскую работу и блокировку файлов.
В этой статье мы поговорим о том, как установить WebDAV на ОС Windows 7 и Windows Server 2008 R2, как его настроить и каким образом можно получить доступ к файлам и папкам, к которым открыт общий сетевой доступ по WebDAV .
Еще раз напомню, что WebDAV это расширение службы IIS, поэтому, если у вас еще не установлен IIS, сделайте это (как вы, наверное, помните и в Windows 7 и в Windows Server 2008 R2, IIS идет по умолчанию, но в целях безопасности этот компонент нужно включать отдельно). Установка WebDAV в Windows 7 и в Windows 2008 R2 немного отличается.
Установка WebDAV на IIS 7.5 в Windows Server 2008 R2
- Откройте меню Start-> Administrative Tools-> Server Manager.
- В окне управления сервером выберите Roles и отметьте Web Server (IIS).
- В окне Web Server (IIS), найдите секцию Role Services и добавьте новую роль Add Role Services.
- В списке служб разверните элемент Common HTTP Features, выберите опцию WebDAV Publishing и нажмите Next.
- Затем нажмите Install.
- После установки расширения WebDAV, закройте окно установки кнопкой Close.
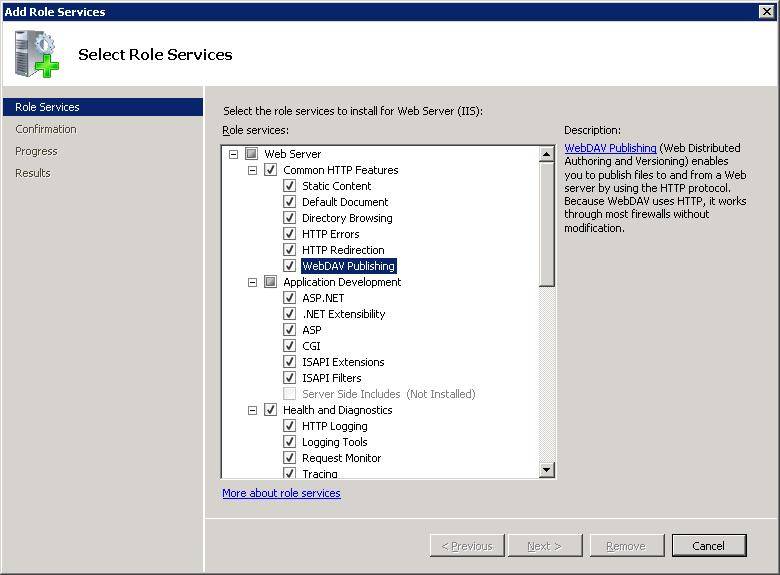
Установка WebDAV на IIS 7.5 в Windows 7
- Перейдите в панель управления.
- В панели управления откройте элемент Programs and Features, и перейдите в режим установки функций Windows (Turn Windows Features on or off).
- Разверните узел Internet Information Services, затем World Wide Web Services, и Common HTTP Features.
- Отметьте WebDAV Publishing и нажмите OK.
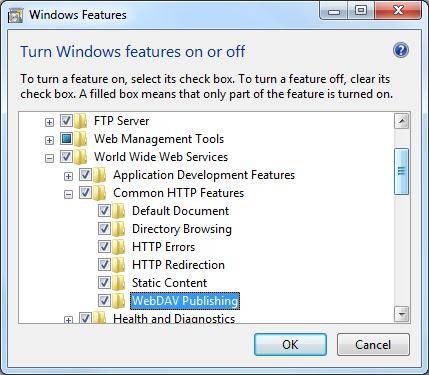
Настраиваем публикацию WebDAV в менеджере IIS
На этом этапе мы включим WebDAV для сайта IIS и дадим права на редактирование содержимого локальному администратору.
- В менеджере IIS Manager, разверните дерево сайтов и выберите Default Web Site.
- Как показано на рисунке, щелкните по элементу WebDAV Authoring Rules.
- На странице WebDAV Authoring Rules щелкните в правой колонке(Actions) по сслыке Enable WebDAV
- После включения WebDAV, создадим правила доступа к содержимому, нажав кнопку Add Authoring Rule.
- В окне Add Authoring Rule укажем:
- All content – значит, что правило будет применяться для контента всех типов.
- Выберите «Specified users»и введте имя пользователя «administrator»
- Права доступа: Read, Source и Write.
- После настройки, жмите OK.
- В панели управления IIS выберите опцию Authentication.
- В окне аутентификации активируйте аутентификацию Windows (Windows Authentication), если IIS будет работать только в качестве сервера WebDAV, анонимную аутентификацию можно отключить.
- Вернитесь на уровень сайта Default Web Site и выберите AuthorizationRules (либо .Net Authorization Rules)
- Создайте Allow правило (либо убедитесь, что оно уже существует), в котором администратору было бы разрешено получать доступ к серверу (в моем случае, такое правило уже было, и всем пользователям — All Users, в том числе администратору был разрешен доступ к IIS).
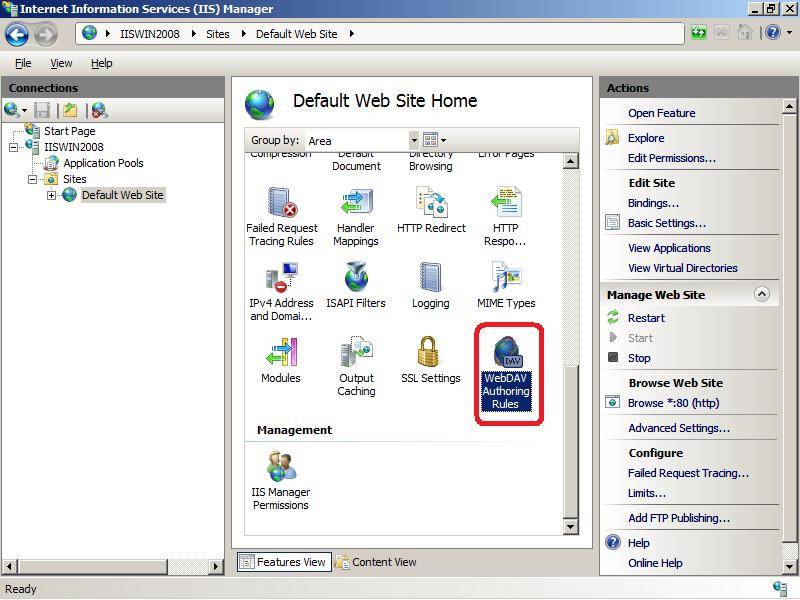
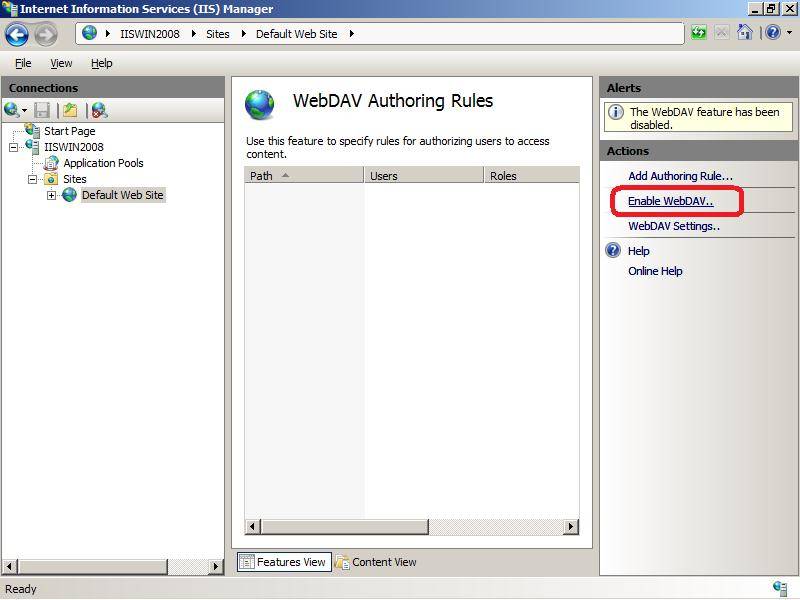
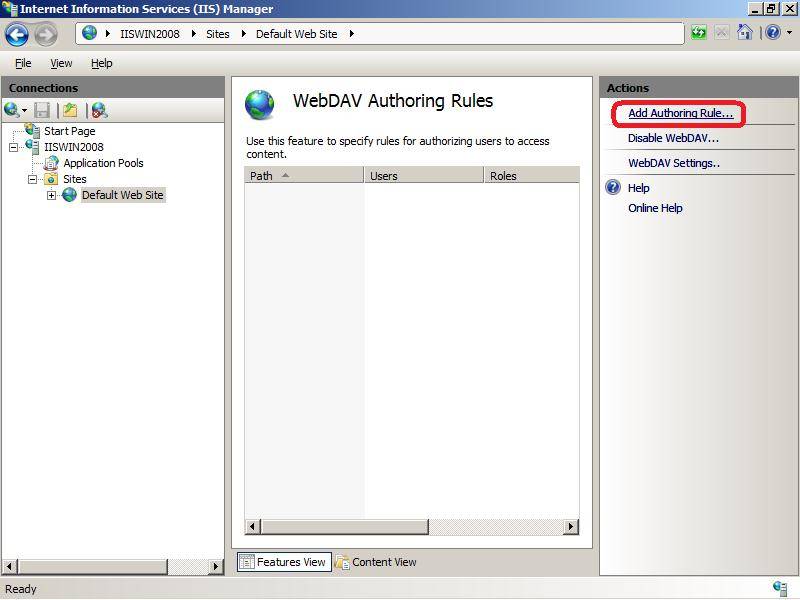
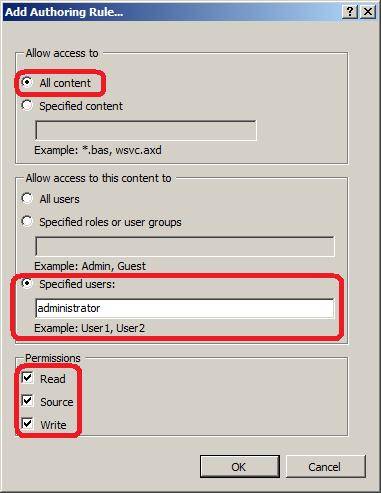
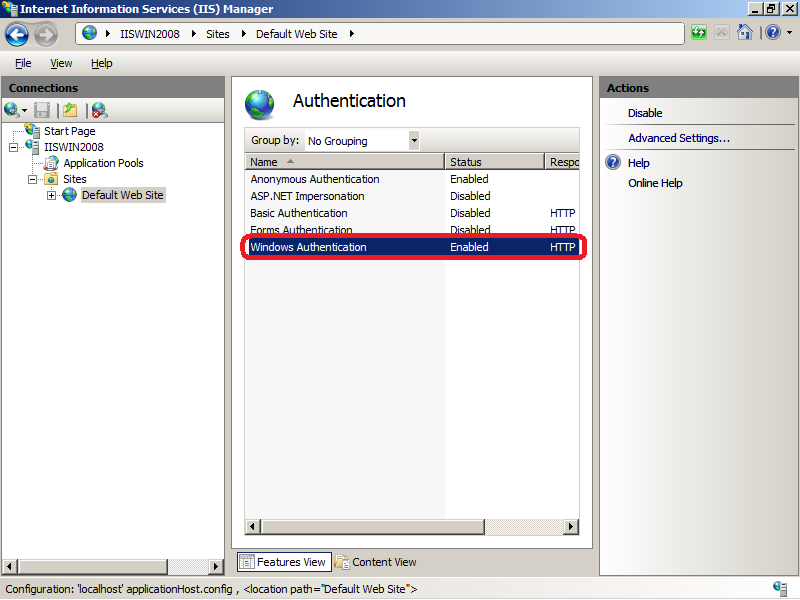
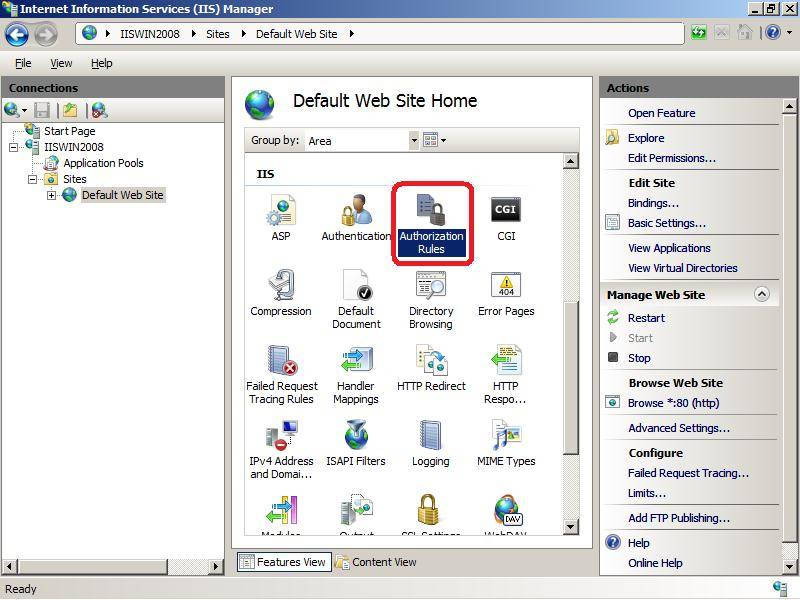

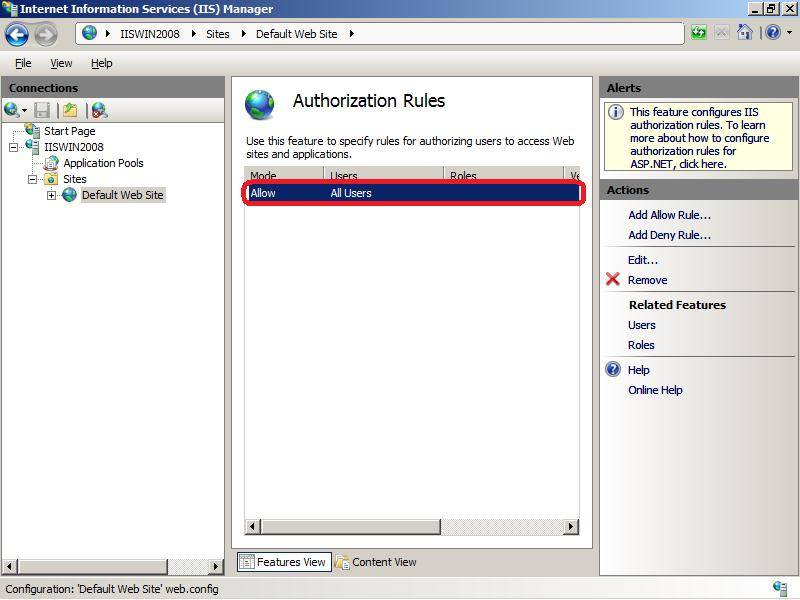
Попробуем теперь подключиться к сайту WebDAV c учетной записью администратора, для чего в командной строке наберите:
net use * http://localhost/
В результате в системе появиться новый сетевой диск, подключенный с сервера с помощью WebDAV.
Совет. Если при попытке подключить каталог по WebDav появляется ошибка «System error 67 has occurred. The network name cannot be found.«, в Windows 8 /Windows Server 2012 попробуйте установить компонент Desktop Experience и убедится, что служба Web Client запущена.
Если же нужно расшарить определенную папку на диске, необходимо создать виртуальный каталог IIS. Для этого щелкните правой кнопкой мыши по сайту и выберите ‘Add New Virtual Directory’: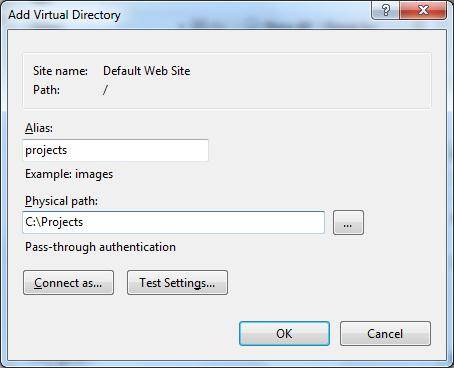
Укажите алиас (имя виртуального каталога IIS) и путь к папке, к которой необходимо открыть доступ и нажмите OK.
Теперь, чтобы подключить данный каталог, нужно воспользоваться командой:
net use * _https://winitpro.ru/projects
Сетевой диск, подключенный по WebDAV выглядит так: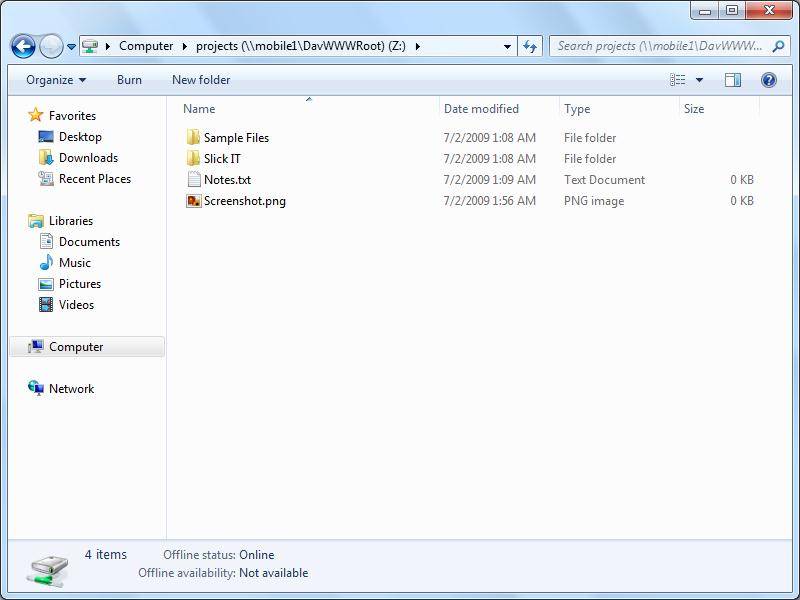
Как вы видите WebDAV — это отличное средство для удаленного доступа к файлам и папкам в Windows поверх протокола HTTP, которое можно использовать, даже через межсетевой экран. Кроме того, так как WebDAV базируется на службе IIS, это означает, что в такой архитектуре мы можем использовать различные технологии обеспечения безопасности и средства управления IIS, в том числе HTTPS для шифрования передаваемых данных (при использовании обычного HTTP вся информация передается в открытом виде, кроме пароля, который при использовании Windows Authentication шифруется).
Опишем еще несколько аспектов использования WebDAV
- Если вы используете Basic authentication вместе с HTTP, это означит, что ваш пароль будет пересылаться в открытом виде, поэтому лучше использовать протокол HTTPS или все-таки включить аутентификацию Windows.
- Не забудьте, что IIS работает из под учетной записи, у которой нет доступа к большинству каталогов и файлам, поэтому придется назначить NTFS права этой учетной записи вручную.
- Для того, чтобы подключить диск по WebDAV с клиента Windows XP, необходимо убедится, что запущена служба WebClient
- Чтобы подключить каталог WebDAV по HTTPS, воспользуйтесь командой:
net use x: "_https:// winitpro.ru/projects " /User:UserName Password
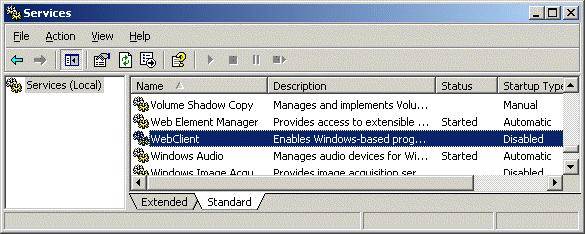
Используемые источники:
- https://remontcompa.ru/windows/funkcional-windows/1832-kak-v-windows-podklyuchit-oblachnoe-hranilische-v-kachestve-setevogo-diska-po-protokolu-webdav.html
- https://helpcenter.onlyoffice.com/ru/server/community/connect-webdav-server-windows.aspx
- https://winitpro.ru/index.php/2011/12/13/ustanovka-i-nastrojka-webdav-na-iis-v-windows/
|
Последний раз редактировалось: dimo70 (2022-09-06 18:52), всего редактировалось 1 раз |


Отправлено: 02-Сен-2022 16:27
(спустя 55 минут)
 Отправлено: 02-Сен-2022 16:27
(спустя 55 минут)
Отправлено: 02-Сен-2022 16:41
(спустя 13 минут)
Отправлено: 02-Сен-2022 16:41
(спустя 13 минут)
dimo70 |
|
Отправлено: 02-Сен-2022 16:47
(спустя 5 минут)
Отправлено: 02-Сен-2022 16:47
(спустя 5 минут)
Gvint64 |
96741
А в рутера понадобиться ковырять или переадресация Ну тут не знаю — скорее всего чего-то потребуется — порты наверное всёравно надо будет назначать. По ходу дела — разберёшься. |
Отправлено: 04-Сен-2022 14:27
(спустя 1 день 21 час)
Отправлено: 04-Сен-2022 14:27
(спустя 1 день 21 час)
dimo70 |
|

Отправлено: 04-Сен-2022 14:44
(спустя 17 минут)
Отправлено: 04-Сен-2022 14:44
(спустя 17 минут)
Adler |
|


Отправлено: 04-Сен-2022 15:47
(спустя 1 час 2 минуты)
Отправлено: 04-Сен-2022 15:47
(спустя 1 час 2 минуты)
dimo70 |
|

Отправлено: 05-Сен-2022 16:55
(спустя 1 день 1 час)
Отправлено: 05-Сен-2022 16:55
(спустя 1 день 1 час)
Adler |
|
Отправлено: 05-Сен-2022 20:50
(спустя 3 часа)
Отправлено: 05-Сен-2022 20:50
(спустя 3 часа)
Paravis |
|

Отправлено: 06-Сен-2022 08:53
(спустя 12 часов)
Отправлено: 06-Сен-2022 08:53
(спустя 12 часов)
dimo70 |
|
Отправлено: 06-Сен-2022 18:49
(спустя 9 часов)
Отправлено: 06-Сен-2022 18:49
(спустя 9 часов)
dimo70 |
|
Отправлено: 06-Сен-2022 20:25
(спустя 1 час 36 минут)
Отправлено: 06-Сен-2022 20:25
(спустя 1 час 36 минут)
Adler |
96806
А кто нибудь пробовал делать NAS Server с FREE NAS OS? Это очень сильно для фанатов FreeBSD. |
Отправлено: 06-Сен-2022 21:08
(спустя 43 минуты)
Отправлено: 06-Сен-2022 21:08
(спустя 43 минуты)
dimo70 |
|
Отправлено: 07-Сен-2022 02:44
(спустя 5 часов)
Отправлено: 07-Сен-2022 02:44
(спустя 5 часов)
Adler |
96809
Adler, да, я слышал давно хорошие вещи про FreeBSD. Только там пологаю будет трудно настроить. Попробую вариант который предлагаешь с Ubuntu LINUX и Nextcloud. Что-то ничего особо хорошего за FreeBSD не слышал. Очень специфическая, архаичная ОС. |
Отправлено: 07-Сен-2022 17:46
(спустя 15 часов)
Отправлено: 07-Сен-2022 17:46
(спустя 15 часов)
UserX |
96809
Только там пологаю будет трудно настроить. Я вообще не понимаю, зачем городить весь этот огород при наличии тьмы облачных хранилищ. Чтоб было своё? Типа, своё всегда круче? |


The Web Server (IIS) role in Windows Server 2019 provides a secure, easy-to-manage, modular, and extensible platform for reliably hosting websites, services, and applications. With IIS 10 you can share information with users on the Internet, intranet, or extranet. IIS 10 is a unified web platform that integrates IIS, ASP.NET, FTP services, PHP, and Windows Communication Foundation (WCF). It supports HTTP, HTTP/2, HTTPS, FTP, FTPS, and SMTP etc. Kindly refer to the following related contents: Event ID 5059: Application pool has been disabled or Changing identity user for IIS Application Pool, how to install Pleasant Password Server, how to perform redirection from HTTP to HTTPS, how to create a self-signed certificate using PowerShell and how to configure SSL between WSUS upstream and downstream servers and how to setup and configure Windows server update services (WSUS).
In this article, I will deliberately miss a role service installation and I will be showing you how to do (install and uninstall this service) via PowerShell. But then, let us install the IIS role via this via the Server Manager. Click on the Server Manager icon on your desktop in order to open Server Manager. From the Server Manager,
– Click on Manage and then
– Click on click on “Add Roles and Features”. You may want to see the following guide too How to Disable HTTP TRACE Method for Apache, IIS, sunOne, and Lotus Domino.

Note: You can decide to skip the “Before you begin” page for just click on Next as shown below.

Select Role based or feature based installation as shown below. We are not interested in setting up Remote Desktop Services, so this option is irrelevant.

Choose the server from the server pool on the Server Selection page and then click on Next. We currently have one server and this is selected by default. When there are multiple serves in the server pool, please take not to select the right server.

Here, I will be installing the Web Server (IIS) as shown below. You can also select the role and any other role you may want to install. As you can see it has been selected.


I will be clicking on Next to continue as I do not have any feature to install. This may not be your case!

You will be prompted with the following Window below. Click on the Add Features to dd the management tools for IIS

On the Web Server Role (IIS), click on Next. This is only informational.

As I said, I will not be adding additional role service I need on purpose just to demonstrate how this can be done via PowerShell.
– Please check all applicable roles that you need.

Now you will have to confirm (verify) on this page that the features, roles, and role services which you have selected are correct. When they are not correct, please use the “Previous” button, otherwise
– Click on Install to install the role, features and role services.

On the result page, the installation progress will be displayed. You can close this window below if you are impatient even when the installation has not completed and it will complete in the background.

As you can see from the image above, the installation has succeeded. We will not launch the IIS tool. There are various ways to launch the IIS console. You can use the Tool menu and select “IIS Manager” or
– Select IIS as shown below, right click on the server and select “IIS Manager”

This will Open IIS 10 console as shown below. That is all you need to install the IIS web server role.

Install IIS with PowerShell: You can automate the IIS role and features installation by using the Powershell cmdlet. Please run the commands below. You can optionally also install additional features by using the “Add Roles and Features” wizard.
Install-WindowsFeature -name Web-Server -IncludeManagementTools
Install WebDAV redirector server 2019: This guide walks you through the installation of WebDAV redirector. If you want to access a WebDAV share on a Windows Server 2016 or 2019, you have to install a feature that is not activated in the standard installation. The best way to do this is to start a PowerShell as admin and enter the following:
Install-WindowsFeature WebDAV-Redirector –Restart

Note: You can also launch the Add roles and features wizard and select the WebDAV-Redirector and have it installed as well. But I just wanted to show to you that PowerShell is capable of doing this.
To uninstall IIS via the Server Manager: If you wish to remove certain roles (IIS in my case) and features, you will have to use the “Remove Roles and Features” wizard of Server Manager. By just unchecking the IIS Web Server Role, you will be able to remove (uninstall) the IIS web server role at once. You can remove a single role, role service, or feature by simply unchecking it in the wizard. Please follow the steps below to remove the ISS role from Windows Server 2019.
Click on the Server Manager icon on your desktop in order to open Server Manager. From the Server Manager, click on Manage and then click on click on the “Remove Roles and Features”.

Note: You can decide to skip the “Before you begin” page for just click on Next as shown below.

Choose the server from the server pool on the Server Selection page and then click on Next. We currently have one server and this is selected by default. When there are multiple serves in the server pool, please take not to select the right server.

Here, I will be unchecking the Web Server (IIS) as shown below. You can also remove every other role you no longer want from this window.
– Just clear its checkbox. If you have additional features installed, you will be promoted to remove them. In my case, I do not have any feature, so I will skip this window below.

Now you will have to confirm (verify) on this page that the features, roles, and role services which you have selected are correct.
– You can optionally click on the “Restart the destination server automatically if required”.
– When you are done, please click on Remove.
– Click on YES when prompted to acknowledge the automatic server restart
It is recommended to have your server restarted after removing features, roles, and role services. You can continue working if you have other actions to perform on the server, but remember to restart the server afterwards. 

You will be prompted with the result page as shown below. This will also show you the IIS web server removal progress

Remove the IIS Web Server Role with PowerShell: To remove the webserver role via PowerShell, you will have to launch the PowerShell console as administrator and issue the following command in PowerShell. This will remove your IIS configuration and yu must restart your server.
Uninstall-WindowsFeature -remove Web-Server

I hope you found this blog post helpful. If you have any questions, please let me know in the comment session.