It is recommended to turn this feature on for better protection in your system. However, in case you turn it on, it might cause compatibility issue and some errors in some systems and if that happens turn it off. However, in case you turn it on and everything works fine, leave it on.
Memory Integrity is disabled by default on PCs that upgraded to the April 2018 Update, but you can enable it. It will be enabled by default on new installations of Windows 10 going forward. … This should make it nearly impossible for malware to tamper with the code integrity checks and gain access to the Windows kernel.
Should I turn on memory integrity?
Not sure, but enabling this feature may break some apps, especially those that make use of hardware-assisted virtualization such as VirtualBox and VMware. If you have such software then it is not recommended to enable the Memory Integrity feature; otherwise they will fail to work.
Does memory integrity slow down PC?
Memory integrity is a security feature of Core isolation that prevents attacks from inserting malicious code into high-security processes. So the question is…will this slow down your system? The answer would be – yes; but, with caveats.
What is memory integrity protection?
Memory Integrity is a feature inside a broader set of protections called Core Isolation. It uses hardware virtualisation to protect sensitive processes from infection. These features are a subset of virtualisation-based security features that Microsoft has offered to enterprise users since Windows 10 shipped.
How do I enable memory integrity?
To enable this security feature on your device running Windows 10 version 1803, do the following:
- Open Windows Defender Security Center.
- Click on Device security.
- Under “Core isolation,” click the Core isolation details link.
- Turn on the Memory integrity toggle switch.
How do I turn off memory integrity in Windows 10?
Press “Start” and type “Windows Security”. Click the first result under ‘best match’. You can find Core isolation details by clicking on “Device Security” in the left sidebar and then clicking “Core isolation details” under the “Core isolation” heading. Under the “Memory integrity” heading, switch the toggle to “Off”.
Why do incompatible drivers prevent using memory integrity?
Turning on the Memory integrity setting would block these incompatible drivers from loading. Because blocking these drivers might cause unwanted or unexpected behaviors, the Memory integrity setting is turned off to allow these drivers to load.
What is Core Isolation memory integrity?
Memory integrity is a feature of core isolation. By turning on the Memory integrity setting, you can help prevent malicious code from accessing high-security processes in the event of an attack.
Should I turn on core isolation in Windows 10?
It is recommended to turn this feature on for better protection in your system. However, in case you turn it on, it might cause compatibility issue and some errors in some systems and if that happens turn it off.
Is Windows virus protection enough?
In AV-Comparatives’ July-October 2020 Real-World Protection Test, Microsoft performed decently with Defender stopping 99.5% of threats, ranking 12th out of 17 antivirus programs (achieving a robust ‘advanced+’ status).
What is standard hardware security?
Standard hardware security is a Windows 10 jargon which indicates that you have all three hardware security features (core isolation, security processor, secure boot) enabled.
What is memory isolation?
A technique that prohibits one program in memory from accidentally clobbering another active program in memory. Using various methods, a protective boundary is created around the program, and instructions within the program are prohibited from referencing data outside of that boundary.
Does Windows 10 include Windows Defender?
No need to download—Microsoft Defender comes standard on Windows 10, protecting your data and devices in real time with a full suite of advanced security safeguards.
How do I turn off device security?
Procedure
- Tap Apps.
- Tap Settings.
- Tap Lock screen and security.
- Tap Device administrators.
- Tap Other security settings.
- Tap Device Administrators.
- Ensure that the toggle switch next to Android Device Manager is set to OFF.
- Tap DEACTIVATE.
How do I disable core isolation?
Turn On or Off Tabs in apps (Sets) in Windows Security
- Open Windows Security, and click/tap on the Device security icon. ( …
- Click/tap on the Core isolation details link. ( …
- Turn On or Off (default) Memory integrity for what you want. ( …
- Click/tap on Yes when prompted by UAC.
- Restart the computer to apply. (
22 мар. 2018 г.
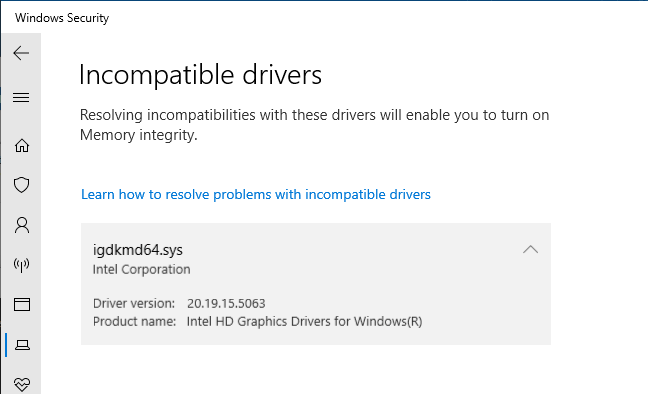
When you attempt to turn on Memory Integrity in Windows Security, the Windows Security page scans the drivers to check their compatibility with the Core Isolation/Memory Integrity feature. If there are incompatible drivers found, the list of incompatible drivers is shown. You’ll be asked to address the issue before enabling Memory Integrity.
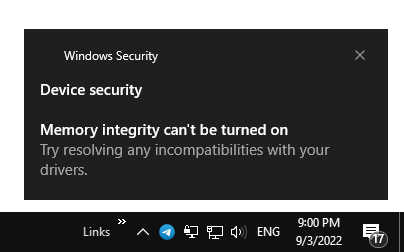
Device security

Memory integrity can't be turned on
Try resolving any incompatibilities with your drivers.
Clicking on the “Review incompatible drivers” shows you the list of incompatible drivers.
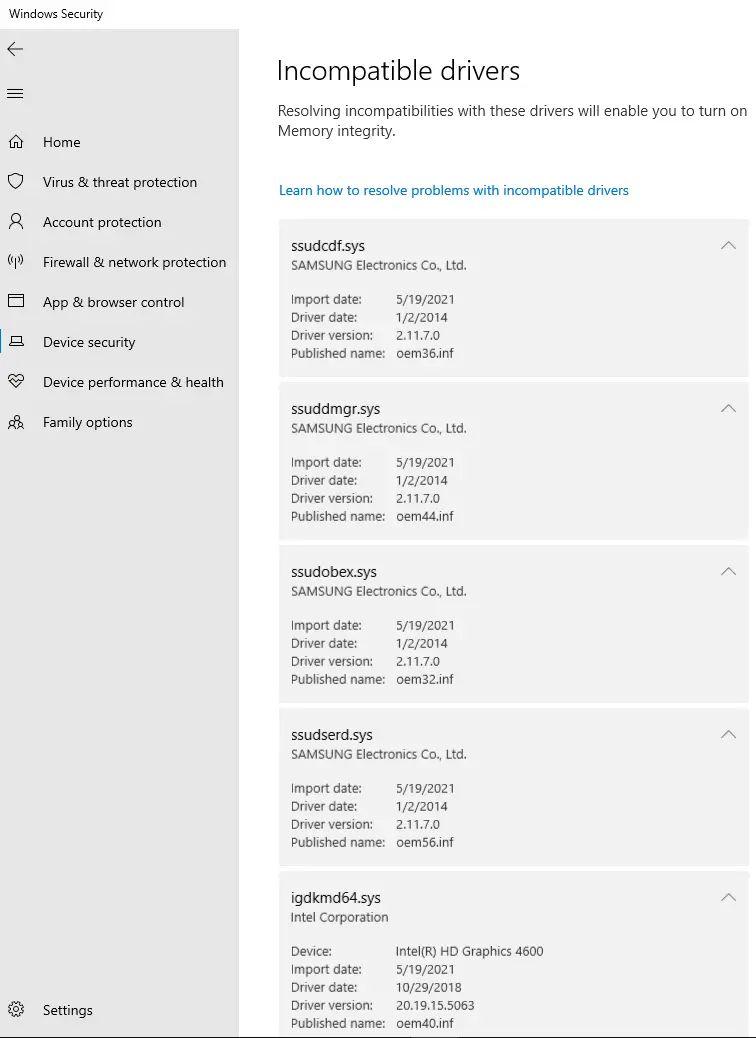
You need to click on each incompatible driver entry shown on the Windows (Defender) Security page to expand the section. It shows the Published name, Manufacturer name, driver information, and date. If the INF file name is not shown, the driver file name is displayed.
The following drivers were shown as being incompatible with the Memory integrity feature:
- ssudcdf.sys [Published Name: oem36.inf]
- ssudmgr.sys [Published Name: oem34.inf]
- ssudobex.sys [Published Name: oem42.inf]
- ssudserd.sys [Published Name: oem36.inf]
- igdkmd64.sys [Published Name: oem56.inf]
- igdkmd64.sys [Published Name: oem40.inf]
- igdkmd64.sys (without an INF file name**) – this item is not showing in the above screenshot.
**Note: If the Windows Security page doesn’t show any OEM#.INF names on your computer, you can use Microsoft Sysinternals Autoruns or the SC.exe console tool to find and delete the driver.
According to Microsoft: If you want to restore the Memory integrity setting, you can try to resolve a driver incompatibility by seeing if an updated and compatible driver is available through Windows Update or from the driver manufacturer. Microsoft does not recommend that you delete drivers to attempt to restore this setting.
However, an updated device driver version may be unavailable for some devices from the hardware vendor or Windows Update. In that case, you can uninstall the driver if it’s insignificant to the system.
Can I delete the drivers?
Warning: Please exercise caution when deleting device drivers. Delete them only if you’re 100% sure that the device driver is optional for the computer, or you no longer use the corresponding hardware anymore, or you’re found an updated version of the driver from the hardware vendor’s site.
If you open the C:WindowsINFOEM##.inf indicated on the Windows Security page, you can find the function of that driver.
For instance, the OEM##.inf had the following information in the headers:
[OEM32.inf]
; Name : ssudobex.inf
; Function : Install SAMSUNG Escape USB Obex Serial Port driver

[OEM36.inf]
; Name : ssudcdf.inf
; Function : Install SAMSUNG Escape USB CD Free driver

[OEM40.inf]
; Installation INF for the Intel Corporation graphics adapter.

[OEM44.inf]
; Name : ssuddmgr.inf
; Function : Install SAMSUNG Escape USB Device Management Serial Port driver

[OEM56.inf]
; Name : ssudserd.inf
; Function : Install SAMSUNG Escape USB Diagnostic Serial Port driver
Four items out of the above six appeared to be unnecessary components. The other entry igdkmd64.sys belongs to Intel Graphics, which is currently in use.
Deleting the drivers
After backing all the device drivers, I decided to bite the bullet and delete all six drivers.
(To know how to backup the device drivers using DISM or PowerShell, check out the article How to Backup and Restore Device Drivers in Windows 11/10.)
The command-line syntax to delete a driver from Admin Command Prompt is:
pnputil /delete-driver <Published Name> /uninstall
Here are the actual commands I used:
pnputil /delete-driver oem44.inf /uninstall

pnputil /delete-driver oem32.inf /uninstall

pnputil /delete-driver oem56.inf /uninstall

pnputil /delete-driver oem36.inf /uninstall

pnputil /delete-driver oem40.inf /uninstall
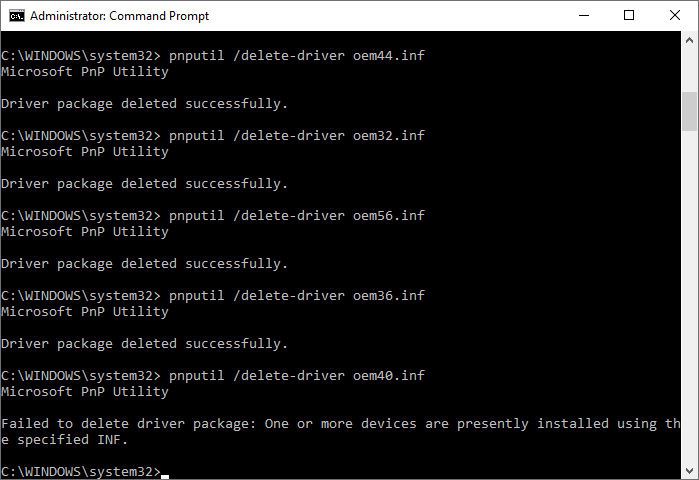
The first four commands were executed successfully, and their driver packages have been deleted. The 5th one (Intel graphics driver) returned the following error:
Failed to delete drivers package: One or more devices are presently installed using the specified INF.
I reran the pnputil command, but this time used the /force option.
pnputil /delete-driver oem40.inf /force
That did the trick!
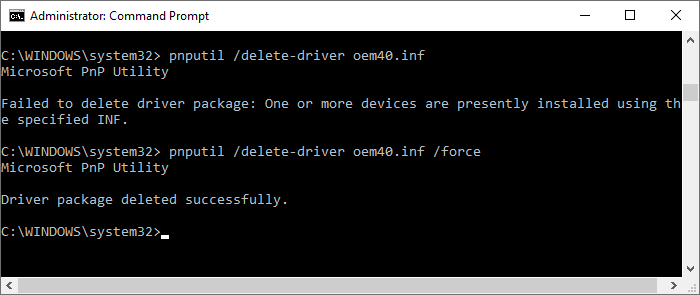
You can also try the following command-line, which is more comprehensive than the earlier one:
pnputil /delete-driver oem40.inf /uninstall /force
After rebooting, the Core Isolation again showed the incompatibility list (the 6th item igdkmd64.sys – without an OEM#.INF file name showed up again.)
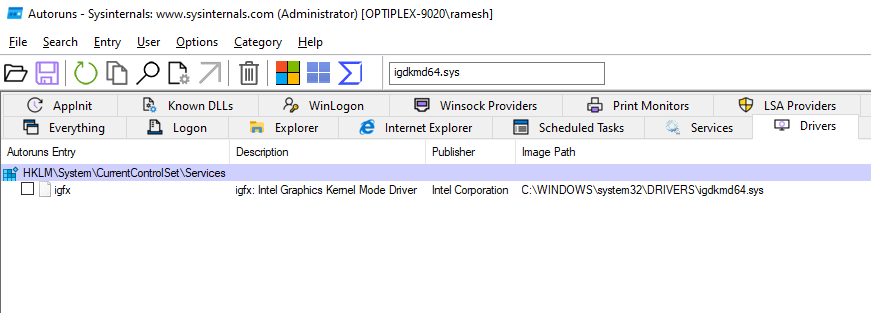
Deleted the driver using Autoruns
I downloaded Autoruns from Microsoft, searched for the exact driver file name (igdkmd64.sys), and deleted the driver/service from the “Drivers” tab.
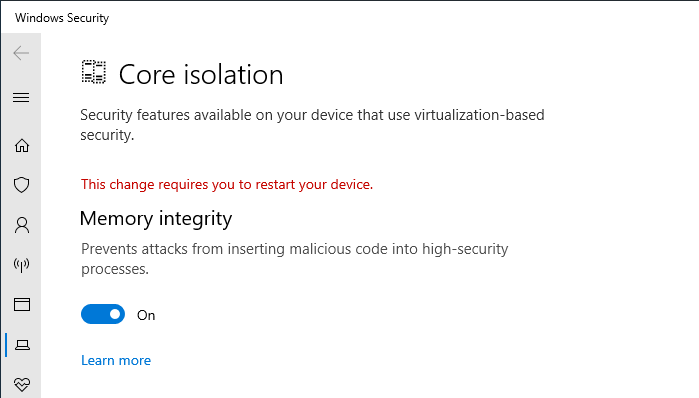
After another reboot, I could turn on the Memory integrity feature under Core isolation on Windows (Defender) Security page.
Editor’s note: After the reboot, my Intel Graphics driver didn’t load, but the system was working perfectly fine even without it. Device Manager showed a yellow exclamation (Code 48 error) next to the Intel Graphics driver.
It stated the following:
The driver for this device has been blocked from starting because it is known to have problems with Windows. Contact the hardware vendor for a new driver. (Code 48)

Click 'Check for solutions' to send data about this device to Microsoft and to see if there is a solution available.
I got the following pop-up at startup, which I dismissed.
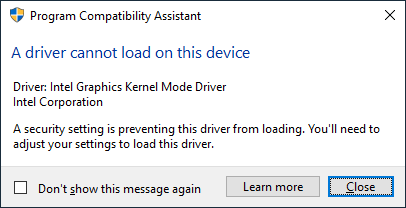
A driver cannot load on this device

Driver: Intel Graphics Kernel Mode Driver
Intel Corporation

A security setting is preventing this driver from loading. You'll need to adjust your settings to load this driver.
Neither Intel nor Dell has the updated drivers for this hardware. The latest version (20.19.15.5063, A08 – Released three years ago) available on Dell’s site is what I had installed and is incompatible with Microsoft Defender’s Core Isolation.
Anyway, the system (“OptiPlex 9020”) is working fine with Memory Integrity turned On, except that the “Sleep” feature is disabled due to the missing Graphics driver. The “Power” menu will no longer list “Sleep”.
Running powercfg.exe /a (which reports the sleep states available on the system) from a Command Prompt window will show this:
The following sleep states are available on this system:
-
- Hibernate
-
- Fast Startup
The following sleep states are not available on this system:
-
- Standby (S1) The system firmware does not support this standby state. An internal system component has disabled this standby state. Graphics
However, the hibernate option works fine for me.
Additional Information
An alternate way to delete the drivers
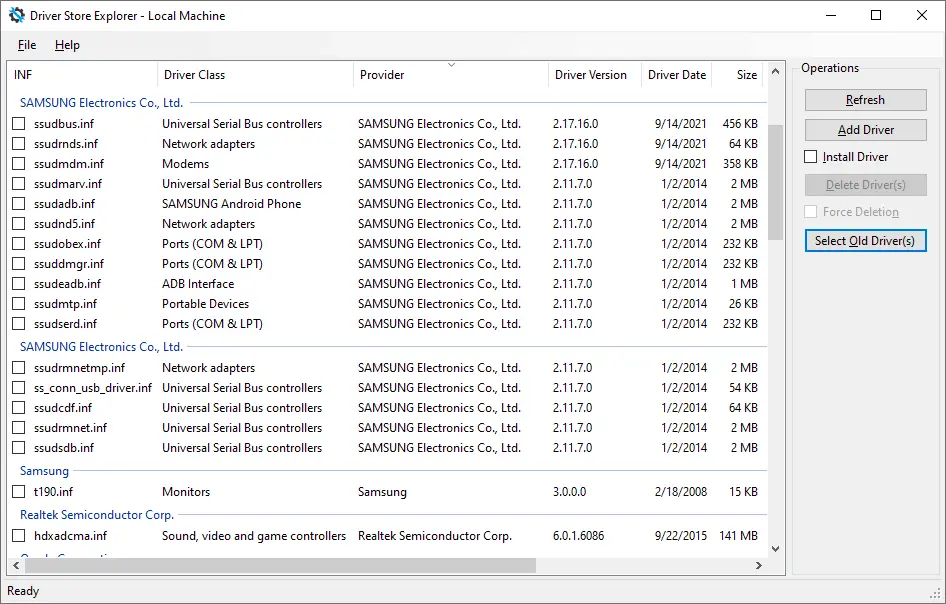
You can also delete driver packages using the “Driver Store Explorer” software as an alternative to Pnputil.exe. But it shows the “Original Name” instead of the “Published Name” for the drivers/INF files.
So, it would be easier if you ran the following DISM command-line first and noted the INF file name under the “Original File Name” column.
dism /online /get-drivers /format:table
The above command shows the driver information in the following format:
(Note: The list below is shown as an example. It’s not the complete list of drivers.)
Obtaining list of 3rd party drivers from the driver store...

Driver packages listing:


-------------- | ----------------------- | ----- | --------------------- | ------------------------------ | ---------- | ---------------
Published Name | Original File Name      | Inbox | Class Name            | Provider Name                  | Date       | Version
-------------- | ----------------------- | ----- | --------------------- | ------------------------------ | ---------- | ---------------
oem0.inf       | ssudrmnetmp.inf         | No    | Net                   | SAMSUNG Electronics Co., Ltd.  | 1/2/2014   | 2.11.7.0
oem1.inf       | jswpslwfx.inf           | No    | NetService            | Atheros                        | 5/15/2008  | 1.0.0.50
oem10.inf      | hpoa1ss.inf             | No    | Image                 | Hewlett-Packard                | 6/21/2006  | 6.2.8306.0
oem11.inf      | iastorac.inf            | No    | SCSIAdapter           | Intel Corporation              | 11/17/2015 | 14.8.1.1043
oem12.inf      | ntprint.inf             | No    | Printer               | Microsoft                      | 6/21/2006  | 10.0.19041.1806
oem13.inf      | netwtw02.inf            | No    | net                   | Intel                          | 4/29/2019  | 18.33.17.1
oem14.inf      | dbutildrv2.inf          | No    | DellUtils             | Dell Technologies              | 5/6/2021   | 2.7.0.0
oem15.inf      | netwtw04.inf            | No    | net                   | Intel                          | 4/29/2019  | 19.51.21.1
oem16.inf      | ss_conn_usb_driver.inf  | No    | USB                   | SAMSUNG Electronics Co., Ltd.  | 1/2/2014   | 2.11.7.0
oem18.inf      | intcdaud.inf            | No    | MEDIA                 | Intel(R) Corporation           | 4/26/2018  | 6.16.0.3208
oem19.inf      | ssudmarv.inf            | No    | USB                   | SAMSUNG Electronics Co., Ltd.  | 1/2/2014   | 2.11.7.0
oem2.inf       | oemvista.inf            | No    | Net                   | ExpressVPN                     | 4/30/2019  | 9.24.2.45
Once you note the “Original File Name”, switch to Driver Store Explorer and delete the corresponding items.
wdcsam64_prewin8.sys
If the Western Digital external hard disk driver wdcsam64_prewin8.sys is shown as incompatible, note down its OEM#.inf number as explained earlier, and delete it using the following command:
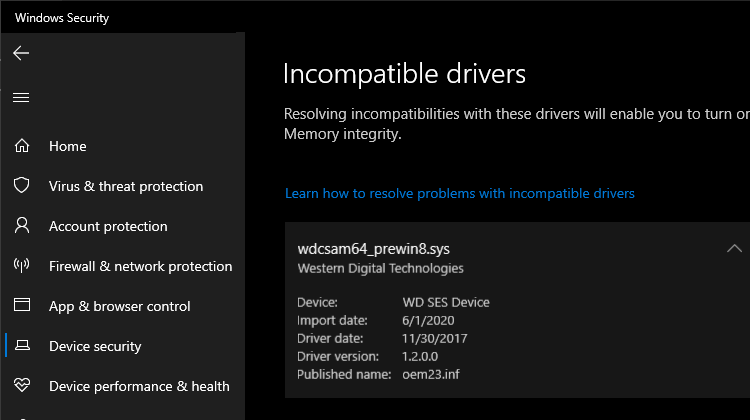
In the above case, run this command:
pnputil /delete-driver oem23.inf /uninstall /force
The above command deletes the driver from the driver store (location mentioned below) and the registry.
C:WindowsSystem32DriverStoreFileRepositorywdcsam.inf_amd64_7ce69fc8798d6116
wdcsam64.sys
On some systems, the driver wdcsam64.sys shows up without an OEM#inf number.
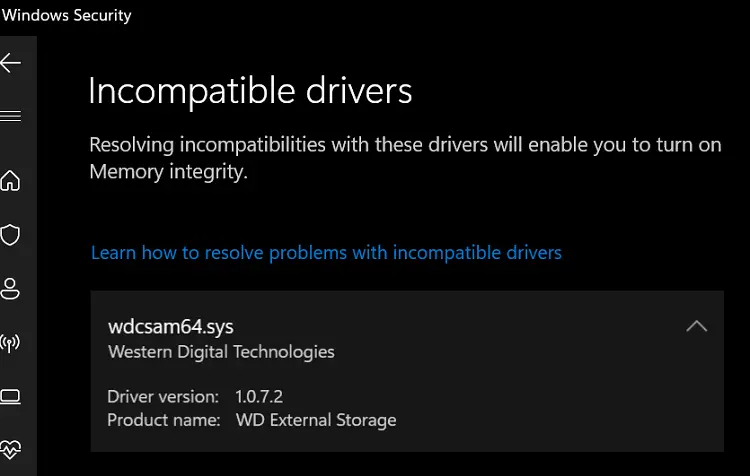
Company: Western Digital Technologies
Description: WD SCSI Architecture Model (SAM) driver
Product: WD External Storage
Machine Type: 64-bit
Binary Version: 1.0.7.2
You should be able to find and delete the above item (wdcsam64.sys) from the Drivers tab of Autoruns, like we deleted the Intel Graphics driver igdkmd64.sys.

That deletes the WDC_SAM driver/service. Next, delete the corresponding driver file “C:WindowsSystem32Driverswdcsam64.sys” manually. If the file is in use, please reboot and then delete the file.
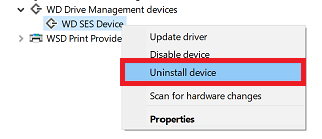
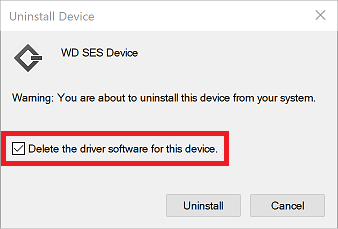
Delete WD driver via Device Manager
Western Digital suggests that you delete the incompatible driver via Device Manager.
- Uninstall all WD software.
- Uninstall the older WD driver.
- Access Device Manager.
- From the the View menu, click “Show Hidden Devices”.
- Look for WD Drive Management devices.
- Select WD SES Device, right-click, and click “Uninstall device”.

- Check the box for “Delete the driver software for this device.”

- Click Uninstall.
- Reboot the computer.
- Enable memory integrity.
- Download and install the latest release of WD Software if available.
Here is a related WD support forum thread you may want to check out.
- Unable to Enable Core Isolation Memory Integrity due to Western Digital Driver
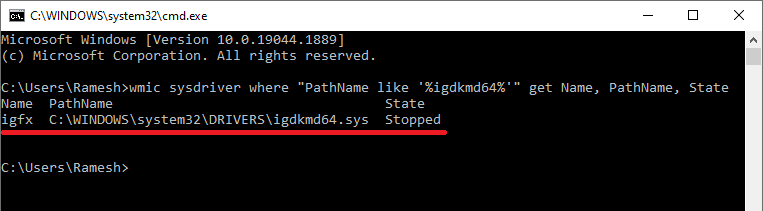
You can use the SC.exe command as well
The SC.exe command-line can also be used to delete the driver/service if you want to automate the task on other systems; if you don’t want to download Autoruns on every computer.
First, find the service’s short name using WMIC.exe console tool.
Example 1: igdkmd64.sys
Assuming you want to find the service name of the driver “igdkmd64.sys“, run this command:
wmic sysdriver where "PathName like '%igdkmd64%'" get Name, PathName, State
The output looks like this:
Name  PathName                                  State
igfx  C:WINDOWSsystem32DRIVERSigdkmd64.sys  Stopped
Optionally, if you want to get additional info about the driver, run the following:
wmic sysdriver where "PathName like '%igdkmd64%'" get Name, PathName, State, Description, Caption
or
wmic sysdriver where "PathName like '%igdkmd64%'" get /format:list
Now that you know the service name (“igfx“), run this command to delete the service:
sc.exe delete igfx
That’s it. The Intel Graphics service is now deleted.
Example 2: wdcsam64.sys
Likewise, for wdcsam64.sys, find its service’s short name (which is “WDC_SAM“) using this command:
wmic sysdriver where "PathName like '%wdcsam64%'" get Name, PathName, State
Then run:
sc.exe delete WDC_SAM
Output:
C:windowssystem32>sc.exe delete WDC_SAM
[SC] DeleteService SUCCESS
The Western Digital driver is now deleted.
Example 3: xhunter1.sys
xhunter1.sys is a component of XIGNCODE3 anti-cheat program, which is installed with various game titles. If uninstalling the component or the respective game software doesn’t help you enable Core Isolation, then you may delete its driver (whose service name “xhunter1“) using the following command:
sc.exe delete xhunter1
Then, manually delete C:WindowsSystem32Driversxhunter1.sys after a reboot.
Example 4: PxHlpa64.sys
PxHlpa64.sys is a module supplied with DVD-burning programs such as Roxio/Sonic, which Corel Corporation now owns. Other programs, such as Adobe Premiere Elements, seem to use this module for DVD-burning capability.
To delete the service, run this command:
sc.exe delete PxHlpa64
And then run:
ren C:WINDOWSsystem32driversPxHlpa64.sys PxHlpa64.sys.old
Restart Windows.
Also, check out this Corel KB article You cannot enable the Windows Memory Integrity feature because PxHlpa64.sys is not compatible.
One small request: If you liked this post, please share this?
One «tiny» share from you would seriously help a lot with the growth of this blog.
Some great suggestions:
- Pin it!
- Share it to your favorite blog + Facebook, Reddit
- Tweet it!
So thank you so much for your support. It won’t take more than 10 seconds of your time. The share buttons are right below. 
Click on Windows Security in the System Tray, or go to Start > Settings > Update & security > Windows Security > Open Windows Security. Click on Device security. Click on Core isolation details . Under Core Isolation, you can turn Memory Integrity on, or off.
Should I turn on memory integrity on Windows 10?
Memory integrity is one feature of core isolation which regularly verifies the integrity of the code running those core processes in an attempt to prevent any attacks from altering them. We recommend that you leave this setting on, if your system supports it.”Jul 6, 2021.
It is recommended to turn this feature on for better protection in your system. However, in case you turn it on, it might cause compatibility issue and some errors in some systems and if that happens turn it off. However, in case you turn it on and everything works fine, leave it on.
Can I turn off memory integrity in Windows 10?
This one setting could cause hardware problems for your PC “Memory integrity is a feature of Windows that ensures code running in the Windows kernel is securely designed and trustworthy. All you do need to understand is this feature is supposed to protect your computer but right now it can negatively affect your PC.
Why can I turn on memory integrity?
Memory integrity is a feature of core isolation. By turning on the Memory integrity setting, you can help prevent malicious code from accessing high-security processes in the event of an attack.
How do I turn off HVCI mode?
How to turn off HVCI Restart the device. To confirm HVCI has been successfully disabled, open System Information and check Virtualization-based security Services Running, which should now have no value displayed.
What is HVCI mode?
The HVCI service in Windows 10 determines whether code executing in kernel mode is securely designed and trustworthy. It offers Zero Day and vulnerability exploit protection capabilities by ensuring that all software running in kernel mode, including drivers, securely allocate memory and operate as they are intended.
Why do incompatible drivers prevent using memory integrity?
Turning on the Memory integrity setting would block these incompatible drivers from loading. Because blocking these drivers might cause unwanted or unexpected behaviors, the Memory integrity setting is turned off to allow these drivers to load.
Does memory integrity slow down PC?
Memory integrity is a security feature of Core isolation that prevents attacks from inserting malicious code into high-security processes. So the question iswill this slow down your system? The answer would be – yes; but, with caveats.
How do I disable memory integrity?
Click on Windows Security in the System Tray, or go to Start > Settings > Update & security > Windows Security > Open Windows Security. Click on Device security. Click on Core isolation details . Under Core Isolation, you can turn Memory Integrity on, or off.
What is Windows 10 hypervisor protected code integrity HVCI?
Hypervisor-protected Code Integrity (HVCI) is a virtualization based security (VBS) feature available in Windows. In the Windows Device Security settings, HVCI is referred to as Memory Integrity.
How do I turn on HVCI?
How to Enable (HVCI)? Launch the “Windows Security” app. Navigate to “Device Security” Click on “Core isolation details” Enable HVCI – Click to toggle “Memory integrity” to “On” There will be prompt from Device Security to Restart. Restart to apply these protection changes.
How do I enable my CPU security?
Go to Start > Settings > Update & Security > Windows Security > Device security . Under Security processor, select Security processor details.
Should secure boot be enabled or disabled Windows 10?
Secure Boot must be enabled before an operating system is installed. If an operating system was installed while Secure Boot was disabled, it will not support Secure Boot and a new installation is required. Secure Boot requires a recent version of UEFI.
How do I disable device guard in BIOS?
Go to Local Computer Policy > Computer Configuration > Administrative Templates > System. Double Click on Device Guard on the right hand side to open. Double Click on “Turn On Virtualization Security” to open a new window. It would be “Not Configured”, Select “Disable” and click “Ok”Sep 9, 2020.
What is Windows code integrity?
What is code integrity? Code integrity is a threat protection feature that checks the drivers and system files on your device for signs of corruption or malicious software. For code integrity to work on your device, another security feature called Secure Boot must be enabled.
How do I turn off device guard in Windows 10?
Press Windows Key + R to open Run. Type gpedit. In the Group Policy Editor, navigate to the following location: Select Device Guard. On the right pane, double-click the “Turn on Virtualization Based Security” policy. In the new dialogue box, select Disabled / Not Configured option. Click OK to save the changes.
How do I know if HVCI is enabled?
How do I verify that HVCI is enabled? HVCI is labeled Memory integrity in the Windows Security app and it can be accessed via Settings > Update & Security > Windows Security > Device security > Core isolation details > Memory integrity.
Does credential Guard require Hyper V?
Requirements for running Windows Defender Credential Guard in Hyper-V virtual machines. The Hyper-V host must have an IOMMU, and run at least Windows Server 2016 or Windows 10 version 1607. TPM is not a requirement, but we recommend that you implement TPM.
Will there be a Windows 11?
Microsoft has officially announced Windows 11, the next major software update, which will be coming to all compatible PCs later this year. Microsoft has officially announced Windows 11, the next major software update that will be coming to all compatible PCs later this year.
How do you fix incompatible drivers?
Press Windows Key + R, type devmgmt. In Device Manager, expand Mice and other pointing devices. Right-click on your mouse and select Update driver. Select Browser my computer for driver software. Select the downloaded driver file and click Open. Restart the PC once the driver is successfully installed.
How do I get rid of incompatible drivers?
How to uninstall drivers from Windows, in 5 steps Try to delete a driver by using the device’s uninstaller. Open the Device Manager. Find the device or hardware component with the faulty drivers. Open the properties of the hardware device with the bad drivers. Uninstall and delete the drivers completely.
What is the Pnputil command?
Pnputil.exe is a command line utility that you can use to manage the driver store. You can use this command to add driver packages, remove driver packages, and list driver packages that are in the store.

Windows 10 and 11 have a security feature called Core Isolation Memory Integrity that isolates important core processes from malicious software. It accomplishes this by running those core processes in a virtual environment.
In this post, we provide solutions to the Memory Integrity greyed out or won’t turn on or off for Device Security in the Windows Security app on Windows 11 and Windows 10 computers.
Recently some windows users are facing this issue where when they open their windows security, they get the following message:
Memory integrity is off your device may be vulnerable
And later when they try to fix it, they get an error saying
“memory integrity can’t be turned on try resolving any incompatibilities with your drivers”
Theis error usually occurs when you have some incompatible drivers installed in your windows 10 or windows 11. In this article we will see …
How to fix memory integrity cannot be turned on windows
By removing all those incompatible drivers.
Before we start make sure your windows 10 or 11 is up to date to the latest version.
To check for update open settings by pressing [windows] + [i] and then go to the windows Update section, it should show that you’re up to date, if it shows any update available click on update and restart your windows.

Solution 1: Delete incompatible drivers manually
In order to fix memory integrity cannot be turned on in windows, we will be manually deleting all the incompatible drivers one by one, to do that follow the steps:
- First open setting and then go to privacy and security
- After that go to windows security and click on open windows security
- Under device security click on go to settings
- From there click on review incompatible drivers
- You’ll find a list of incompatible drivers listed with their names.

- Now press the [windows] + [x] key and from the list of menus click on device manager.

- After opening device manager click on view and the click on devices by driver

- There you’ll find a list of drivers by their name, now find those incompatible drivers’ names from step 5 and delete it from the device manager.

- To delete those drivers simply find that incompatible driver from step 5 and copy their published name and look for that published name in device manager, after that right click on that driver
- Now click on remove driver and after that check both boxes and click on remove.


Do this for all the incompatible drivers and after that restart your computer, it should solve memory integrity cannot be turned on error.
In case you find this method a little intimidating and are looking for an easy solution to remove those drivers, the below solution might be a good fit.
Solution 2: Delete incompatible automatically using DriverStore explorer
To delete incompatible drivers using driver explorer follow the steps:
- First visit here and download driverstore explorer zip file

- Now extract the zip folder somewhere and install the Rapr application.

- Now open the app and after a few seconds of scanning it will show you all the drivers.

- Now open setting by pressing [windows] + [i]
- then go to privacy and security
- After that go to windows security and click on open windows security
- Under device security click on go to settings
- From there click on review incompatible drivers
- You’ll find a list of incompatible drivers listed with their names.

- Now from step 4 look for all the incompatible drivers and uninstall them one by one.


After deleting all the incompatible drivers, restart your computer.
Hopefully it should fix your memory integrity won’t turn on issues.
you can also watch this video for better understanding
Also read:
How to take full page scrolling screenshot in windows 10 or 11 easily
steam_api64.dll : Free Download for windows
[Fixed] minecraft stuck on white loading screen problem in windows 10 edition
How To Fix blinking Red Light On Spectrum Router in 2022: Easy Guide