Troubleshooting network problems in Windows
If you can’t get email, browse the web, or stream music, chances are you’re not connected to your network and can’t get onto the internet. To fix the problem, here are some things you can try.
Things to try first
Try these things first to help you fix or narrow down the connection problem.
-
Make sure Wi‑Fi is turned on. Select the «No internet connection» icon on the right side of the taskbar, and make sure Wi-Fi is turned on. If it isn’t, select it to turn it on. Also, make sure Airplane mode is turned off.
-
Select Manage Wi-Fi connections (>) on the Wi-Fi quick setting, see if a Wi-Fi network you recognize and trust appears in the list of networks. If it does, select the Wi-Fi network, and they try to connect to it. If it says Connected underneath the network name, select Disconnect, wait a moment, and then select Connect again.
-
Try connecting to a network on a different frequency band. Many consumer Wi-Fi routers broadcast at two different network frequency bands: 2.4 GHz and 5 GHz. These will appear as separate networks in the list of available Wi-Fi networks. If your list of available Wi-Fi networks includes both a 2.4 GHz network and a 5 GHz network, try connecting to the other network. To learn more about the differences between 2.4 GHz networks and 5 GHz networks, check out Wi-Fi problems and your home layout.
-
Make sure the physical Wi‑Fi switch on your laptop is turned on. (An indicator light usually shows when it’s on.)
-
Run the Network troubleshooter. The Network troubleshooter can help diagnose and fix common connection problems.
To run the Network troubleshooter
-
Select Start > Settings > System > Troubleshoot > Other troubleshooters .
-
Under Other, select Network Adapter > Run.
-
Follow the steps in the troubleshooter and see if that fixes the problem.
-
Restart your modem and wireless router. This helps create a new connection to your internet service provider (ISP).
When you do this, everyone that is connected to your Wi-Fi network will be temporarily disconnected. The steps you take to restart your modem and router can vary, but here are the general steps.
Note: If you have a cable modem/Wi-Fi router combo device, you only need to follow the steps for the single device.
-
Unplug the power cable for the router from the power source.
-
Unplug the power cable for the modem from the power source.
Some modems have a backup battery. If you unplug the modem and lights stay on, remove the battery from the modem.
-
Wait at least 30 seconds or so.
If you had to remove the battery from the modem, put it back in.
-
Plug the modem back into the power source. The lights on the modem will blink. Wait for them to stop blinking.
-
Plug your router back into the power source.
Wait a few minutes for the modem and router to fully power on. You can usually tell when they’re ready by looking at the status lights on the two devices.
-
On your PC, try to connect again.
Connection problems can be due to a variety of reasons—problems with the website, your device, the Wi-Fi router, modem, or your Internet Service Provider (ISP). Try the following steps to help narrow down the source of the problem.
-
If the «Wi-Fi connected» icon appears on the right side of the taskbar, visit a different website. If the website opens, there might be a problem with the specific website. If you can’t connect to another website, go to the next step.
-
On another laptop or phone, try to connect to the same network. If you can connect, the source of the problem is likely due to your device—go to the section Network troubleshooting on your device. If you can’t connect to the network on any device, continue to the next step.
-
Check to see if there is a problem with the connection to your Wi-Fi router. Do this by using a ping test.
-
Select Search on the taskbar, and type command prompt. The Command Prompt button will appear. To the right of it, select Run as administrator > Yes.
-
At the command prompt, type ipconfig, and then select Enter. Look for the name of your Wi-Fi network within the results, and then find the IP address listed next to Default gateway for that Wi-Fi network. Write down that address if you need to. For example: 192.168.1.1
-
At the prompt, type ping <DefaultGateway> and then select Enter. For example, type ping 192.168.1.1 and select Enter. The results should be something like this:
-
-
Reply from 192.168.1.1: bytes=32 time=5ms TTL=64
-
Reply from 192.168.1.1: bytes=32 time=5ms TTL=64
-
Reply from 192.168.1.1: bytes=32 time=5ms TTL=64
-
Reply from 192.168.1.1: bytes=32 time=5ms TTL=64
-
Ping statistics for 192.168.1.1: Packets: Sent = 4, Received = 4, Lost = 0 (0% loss), Approximate round trip times in milli-seconds: Minimum = 4ms, Maximum = 5ms, Average = 4ms
If you see results like this and are getting a reply, then you have a connection to your Wi-Fi router, so there might be a problem with your modem or ISP. Contact your ISP or check online on another device (if you can) to see if there’s a service outage.
If the results of the ping test indicate that you are not getting a reply from the router, try connecting your PC directly to your modem by using an Ethernet cable (if you can). If you can connect to the internet using an Ethernet cable, it confirms the connection problem is due to the Wi-Fi router. Make sure you’ve installed the latest firmware and see the documentation for your router.
Run network commands
Try running these network commands to manually reset the TCP/IP stack, release and renew the IP address, and flush and reset the DNS client resolver cache:
-
Select Search on the taskbar, and type command prompt. The Command Prompt button will appear. To the right of it, select Run as administrator > Yes.
-
At the command prompt, run the following commands in the listed order, and then check to see if that fixes your connection problem:
-
Type netsh winsock reset and select Enter.
-
Type netsh int ip reset and select Enter.
-
Type ipconfig /release and select Enter.
-
Type ipconfig /renew and select Enter.
-
Type ipconfig /flushdns and select Enter.
-
Uninstall the network adapter driver and restart
If the previous steps didn’t work, try to uninstall the network adapter driver, and then restart your computer. Windows will automatically install the latest driver. Consider this approach if your network connection stopped working properly after a recent update.
Before uninstalling, make sure you have drivers available as a backup. Visit the PC manufacturer’s website and download the latest network adapter driver from there. If your PC can’t connect to the internet, you’ll need to download a driver on a different PC and save it to a USB flash drive so you can install the driver on your PC. You’ll need to know the PC manufacturer and model name or number.
-
Select Search on the taskbar, type device manager, and then select Device Manager from the list of results.
-
Expand Network adapters, and locate the network adapter for your device.
-
Select the network adapter, press and hold (or right-click), and then select Uninstall device > check the Attempt to remove the driver for this device check box > Uninstall.
-
After uninstalling the driver, select Start > Power > Restart .
After your PC restarts, Windows will automatically look for and install the network adapter driver. Check to see if that fixes your connection problem. If Windows doesn’t automatically install a driver, try to install the backup driver you saved before uninstalling.
Check if your network adapter is compatible with the latest Windows Update
If you lost your network connection immediately after upgrading to or updating Windows 11, it’s possible that the current driver for your network adapter was designed for a previous version of Windows. To check, try temporarily uninstalling the recent Windows Update:
-
Select Start > Settings > Windows Update > Update history > Uninstall updates .
-
Select the most recent update, then select Uninstall.
If uninstalling the most recent update restores your network connection, check to see if an updated driver is available:
-
Select Search on the taskbar, type device manager, and then select Device Manager from the list of results.
-
Expand Network adapters, and locate the network adapter for your device.
-
Select the network adapter, press and hold (or right-click), then select Update driver > Search automatically for updated driver software, and then follow the instructions.
-
After installing the updated driver, select Start > Power > Restart if you’re asked to restart, and see if that fixes the connection issue.
If Windows can’t find a new driver for your network adapter, visit the PC manufacturer’s website and download the latest network adapter driver from there. You’ll need to know the PC manufacturer and model name or number.
Do one of the following:
-
If you couldn’t download and install a newer network adapter driver, hide the update that’s causing you to lose your network connection. To learn how to hide updates, see Hide Windows Updates or driver updates.
-
If you could successfully install updated drivers for your network adapter, then reinstall the latest updates. To do this, select Start > Settings > Windows Update > Check for updates.
Use network reset
Using network reset should be the last step you try. Consider using it if the steps above don’t help to get you connected.
This can help solve connection problems you might have after upgrading from Windows 10 to Windows 11. It can also help to fix the problem where you can connect to the internet, but can’t connect to shared network drives. Network reset removes any network adapters you have installed and the settings for them. After your PC restarts, any network adapters are reinstalled, and the settings for them are set to the defaults.
-
Select Start > Settings > Network & internet > Advanced network settings > Network reset.
Open Network & Internet Status settings -
On the Network reset screen, select Reset now > Yes to confirm.
Wait for your PC to restart, and see if that fixes the problem.
Notes:
-
After using network reset, you might need to reinstall and set up other networking software you might be using, such as VPN client software or virtual switches from Hyper‑V (if you’re using that or other network virtualization software).
-
Network reset might set each one of your known network connections to a public network profile. In a public network profile, your PC is not discoverable to other PCs and devices on the network, which can help make your PC more secure. However, if your PC is used for file or printer sharing, you’ll need to make your PC discoverable again by setting it to use a private network profile. To do this, select Start > Settings > Network & internet > Wi-Fi . On the Wi-Fi screen, select Manage known networks > the network connection you want to change. Under Network profile type, select Private.
Check your Wi-Fi settings
Wi-Fi adapter manufacturers might have different advanced settings you can change based on your network environment or connection preferences.
Check the Wireless Mode setting for your network adapter and make sure it matches the capabilities of the network you’re trying to connect to. If it doesn’t match, you won’t be able to connect, and the network might not appear in the list of available networks. The Wireless Mode will often be set to Auto or something similar by default, which enables connection for every kind of network that’s supported.
To find the wireless mode setting
-
In Device Manager, select Network adapters, and then double-click the network adapter name.
-
Select the Advanced tab and look for a Wireless Mode setting. Make sure it’s set to the mode your network is using.
Wi-Fi profile settings
Windows uses the Wi-Fi profile to save the settings that are needed to connect to a Wi-Fi network. These settings include the network security type, key, network name (SSID), and so on. If you can’t connect to a Wi-Fi network that you could connect to before, it’s possible that the network settings might have changed or the profile is corrupted.
To fix this, remove (or «forget») the network connection, then reconnect to the network. When you forget a network connection, it removes the Wi-Fi network profile from your PC.
To forget a network
-
Select Start > Settings > Network & internet .
-
Select Wi-Fi , then select Manage known networks.
-
Select the network you want to forget, then select Forget.
Afterwards, select the Wi-Fi icon on the taskbar and try to reconnect to the network to renew the network connection.
Check your home layout
Your Wi-Fi network might be affected by the network’s frequency band, channel congestion, and/or signal strength. For more info, see Wi-Fi problems and your home layout.
Check for additional symptoms for the «No internet connection» icon.
There may be additional troubleshooting steps you can try, depending on which symptoms you’re having. To view these steps, check out Wi-Fi connection icons and what they mean.
Related topics
-
Setting up a wireless network
-
How to find your wireless network password
-
Analyze the wireless network report
-
Wi-Fi tools and apps
-
Make a Wi-Fi network public or private in Windows
Things to try first
Try these things first to help you fix or narrow down the connection problem.
-
Make sure Wi‑Fi is turned on. Select the «No internet connection» icon
 on the right side of the taskbar, and make sure Wi-Fi is turned on. If it isn’t, select it to turn it on. Also, make sure Airplane mode is turned off.

-
Afterwards, see if a Wi-Fi network you recognize and trust appears in the list of networks. If it does, select the Wi-Fi network, and they try to connect to it. If it says Connected underneath the network name, select Disconnect, wait a moment, and then select Connect again.
-
Try connecting to a network on a different frequency band. Many consumer Wi-Fi routers broadcast at two different network frequency bands: 2.4 GHz and 5 GHz. These will appear as separate networks in the list of available Wi-Fi networks. If your list of available Wi-Fi networks includes both a 2.4 GHz network and a 5 GHz network, try connecting to the other network. To learn more about the differences between 2.4 GHz networks and 5 GHz networks, check out Wi-Fi problems and your home layout.
-
Make sure the physical Wi‑Fi switch on your laptop is turned on. (An indicator light usually shows when it’s on.)
-
Run the Network troubleshooter. The Network troubleshooter can help diagnose and fix common connection problems.
To run the Network troubleshooter
-
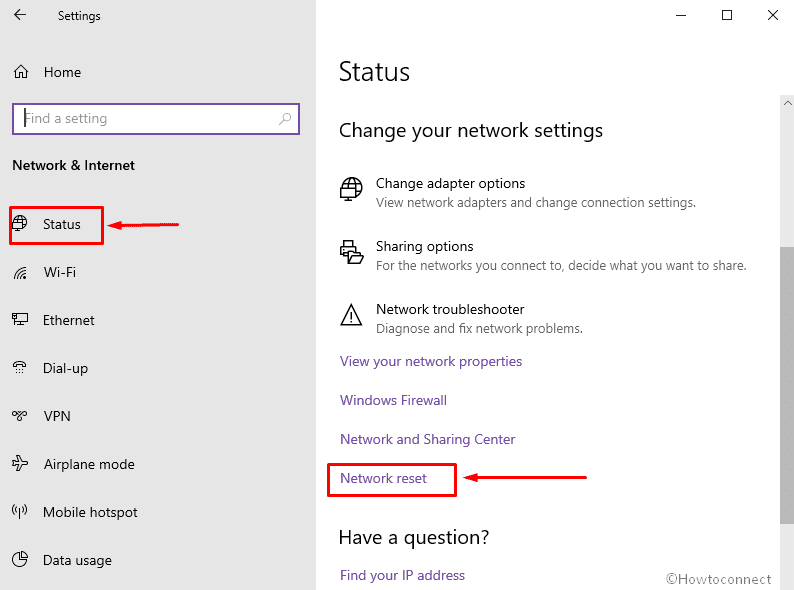
Select the Start button > Settings > Network & Internet > Status.
Open Network & Internet Status settings -
Under Change your network settings, select Network troubleshooter.
-
Follow the steps in the troubleshooter, and see if that fixes the problem.
-
Restart your modem and wireless router. This helps create a new connection to your internet service provider (ISP).
When you do this, everyone that is connected to your Wi-Fi network will be temporarily disconnected. The steps you take to restart your modem and router can vary, but here are the general steps. (Note: If you have a cable modem/Wi-Fi router combo device, you only need to follow the steps for the single device.)-
Unplug the power cable for the router from the power source.
-
Unplug the power cable for the modem from the power source.
Some modems have a backup battery. If you unplug the modem and lights stay on, remove the battery from the modem.
-
Wait at least 30 seconds or so.
If you had to remove the battery from the modem, put it back in.
-
Plug the modem back into the power source. The lights on the modem will blink. Wait for them to stop blinking.
-
Plug your router back into the power source.
Wait a few minutes for the modem and router to fully power on. You can usually tell when they’re ready by looking at the status lights on the two devices.
-
On your PC, try to connect again.
-
Connection problems can be due to a variety of reasons—problems with the website, your device, the Wi-Fi router, modem, or your Internet Service Provider (ISP). Try the following steps to help narrow down the source of the problem.
-
If the «Wi-Fi connected» icon appears on the right side of the taskbar, visit a different website. If the website opens, there might be a problem with the specific website. If you can’t connect to another website, go to the next step.
-
On another laptop or phone, try to connect to the same network. If you can connect, the source of the problem is likely due to your device—go to the section Network troubleshooting on your device. If you can’t connect to the network on any device, continue to the next step.
-
Check to see if there is a problem with the connection to your Wi-Fi router. Do this by using a ping test.
-
In the search box on the taskbar, type command prompt. The Command Prompt button will appear. To the right of it, select Run as administrator > Yes.
-
At the command prompt, type ipconfig, and then select Enter. Look for the name of your Wi-Fi network within the results, and then find the IP address listed next to Default gateway for that Wi-Fi network. Write down that address if you need to. For example: 192.168.1.1
-
At the prompt, type ping <DefaultGateway> and then select Enter. For example, type ping 192.168.1.1 and select Enter. The results should be something like this:
-
-
Reply from 192.168.1.1: bytes=32 time=5ms TTL=64
-
Reply from 192.168.1.1: bytes=32 time=5ms TTL=64
-
Reply from 192.168.1.1: bytes=32 time=5ms TTL=64
-
Reply from 192.168.1.1: bytes=32 time=5ms TTL=64
-
Ping statistics for 192.168.1.1: Packets: Sent = 4, Received = 4, Lost = 0 (0% loss), Approximate round trip times in milli-seconds: Minimum = 4ms, Maximum = 5ms, Average = 4ms
If you see results like this and are getting a reply, then you have a connection to your Wi-Fi router, so there might be a problem with your modem or ISP. Contact your ISP or check online on another device (if you can) to see if there’s a service outage.
If the results of the ping test indicate that you are not getting a reply from the router, try connecting your PC directly to your modem by using an Ethernet cable (if you can). If you can connect to the internet using an Ethernet cable, it confirms the connection problem is due to the Wi-Fi router. Make sure you’ve installed the latest firmware and see the documentation for your router.
Run network commands
Try running these network commands to manually reset the TCP/IP stack, release and renew the IP address, and flush and reset the DNS client resolver cache:
-
In the search box on the taskbar, type command prompt. The Command Prompt button will appear. To the right of it, select Run as administrator > Yes.
-
At the command prompt, run the following commands in the listed order, and then check to see if that fixes your connection problem:
-
Type netsh winsock reset and selectEnter.
-
Type netsh int ip reset and select Enter.
-
Type ipconfig /release and select Enter.
-
Type ipconfig /renew and select Enter.
-
Type ipconfig /flushdns and select Enter.
-
Uninstall the network adapter driver and restart
If the previous steps didn’t work, try to uninstall the network adapter driver, and then restart your computer. Windows will automatically install the latest driver. Consider this approach if your network connection stopped working properly after a recent update.
Before uninstalling, make sure you have drivers available as a backup. Visit the PC manufacturer’s website and download the latest network adapter driver from there. If your PC can’t connect to the internet, you’ll need to download a driver on a different PC and save it to a USB flash drive so you can install the driver on your PC. You’ll need to know the PC manufacturer and model name or number.
-
In the search box on the taskbar, type device manager, and then select Device Manager from the list of results.
-
Expand Network adapters, and locate the network adapter for your device.
-
Select the network adapter, press and hold (or right-click), and then select Uninstall device > check the Attempt to remove the driver software for this device check box > Uninstall.
-
After uninstalling the driver, select the Start button > Power > Restart.
After your PC restarts, Windows will automatically look for and install the network adapter driver. Check to see if that fixes your connection problem. If Windows doesn’t automatically install a driver, try to install the backup driver you saved before uninstalling.
Check if your network adapter is compatible with the latest Windows Update
If you lost your network connection immediately after upgrading or updating Windows 10, it’s possible that the current driver for your network adapter was designed for a previous version of Windows. To check, try temporarily uninstalling the recent Windows Update:
-
Select the Start button, then select Settings > Update & Security >Windows Update > View update history >Uninstall updates.
-
Select the most recent update, then select Uninstall.
If uninstalling the most recent update restores your network connection, check to see if an updated driver is available:
-
In the search box on the taskbar, type device manager, and then select Device Manager from the list of results.
-
Expand Network adapters, and locate the network adapter for your device.
-
Select the network adapter, select Update driver >Search automatically for updated driver software, and then follow the instructions.
-
After installing the updated driver, select the Start button > Power > Restart if you’re asked to restart, and see if that fixes the connection issue.
If Windows can’t find a new driver for your network adapter, visit the PC manufacturer’s website and download the latest network adapter driver from there. You’ll need to know the PC manufacturer and model name or number.
Do one of the following:
-
If you couldn’t download and install a newer network adapter driver, hide the update that’s causing you to lose your network connection. To learn how to hide updates, see Hide Windows Updates or driver updates.
-
If you could successfully install updated drivers for your network adapter, then reinstall the latest updates. To do this, select the Start button, then select Settings > Update & Security > Windows Update > Check for updates.
Use network reset
Using network reset should be the last step you try. Consider using it if the steps above don’t help to get you connected.
This can help solve connection problems you might have after upgrading from a previous version of Windows to Windows 10. It can also help to fix the problem where you can connect to the internet, but can’t connect to shared network drives. Network reset removes any network adapters you have installed and the settings for them. After your PC restarts, any network adapters are reinstalled, and the settings for them are set to the defaults.
Note: To use network reset, your PC must be running Windows 10 Version 1607 or later. To see which version of Windows 10 your device is currently running, select the Start button, then select Settings > System > About.
-
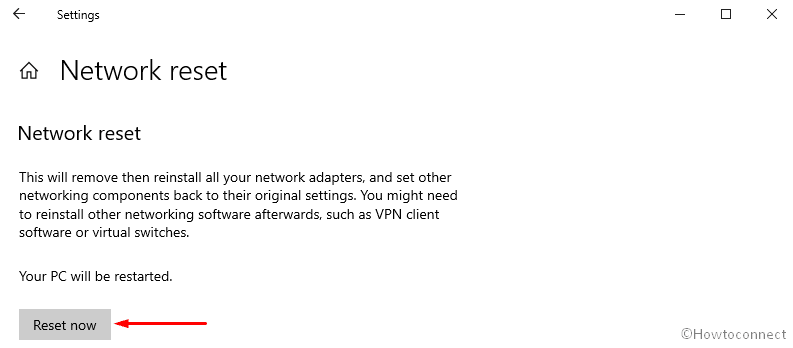
Select the Start button, then select Settings > Network & Internet > Status > Network reset.
Open Network & Internet Status settings -
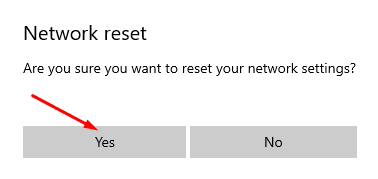
On the Network reset screen, select Reset now > Yes to confirm.
Wait for your PC to restart, and see if that fixes the problem.
Notes:
-
After using network reset, you might need to reinstall and set up other networking software you might be using, such as VPN client software or virtual switches from Hyper‑V (if you’re using that or other network virtualization software).
-
Network reset might set each one of your known network connections to a public network profile. In a public network profile, your PC is not discoverable to other PCs and devices on the network, which can help make your PC more secure. However, if your PC is used for file or printer sharing, you’ll need to make your PC discoverable again by setting it to use a private network profile. To do this, select the Start button, then select Settings > Network & Internet > Wi-Fi . On the Wi-Fi screen, select Manage known networks > the network connection you want to change > Properties. Under Network profile, select Private.
Check your Wi-Fi settings
Wi-Fi adapter manufacturers might have different advanced settings you can change based on your network environment or connection preferences.
Check the Wireless Mode setting for your network adapter and make sure it matches the capabilities of the network you’re trying to connect to. If it doesn’t match, you won’t be able to connect, and the network might not appear in the list of available networks. The Wireless Mode will often be set to Auto or something similar by default, which enables connection for every kind of network that’s supported.
To find the wireless mode setting
-
In Device Manager, select Network adapters, and then double-click the network adapter name.
-
Select the Advanced tab and look for a Wireless Mode setting. Make sure it’s set to the mode your network is using.
Wi-Fi profile settings
Windows uses the Wi-Fi profile to save the settings that are needed to connect to a Wi-Fi network. These settings include the network security type, key, network name (SSID), and so on. If you can’t connect to a Wi-Fi network that you could connect to before, it’s possible that the network settings might have changed or the profile is corrupted.
To fix this, remove (or «forget») the network connection, then reconnect to the network. When you forget a network connection, it removes the Wi-Fi network profile from your PC.
To forget a network
-
Select the Wi-Fi network icon on the right side of the taskbar, then select Network & Internet settings.
-
Select Wi-Fi , then select Manage known networks.
-
Select the network you want to forget, then select Forget.
Afterwards, select the Wi-Fi icon on the taskbar and try to reconnect to the desired network to renew the network connection.
Check your home layout
Your Wi-Fi network might be affected by the network’s frequency band, channel congestion, and/or signal strength. For more info, see Wi-Fi problems and your home layout.
Check for additional symptoms for the «No internet connection» icon 
There may be additional troubleshooting steps you can try, depending on which symptoms you’re having. To view these steps, check out Wi-Fi connection icons and what they mean.
Related topics
-
Setting up a wireless network
-
How to find your wireless network password
-
Analyze the wireless network report
-
Wi-Fi tools and apps
-
Make a Wi-Fi network public or private in Windows 10
-
Make sure Wi-Fi is turned on.
-
Swipe in from the right edge of the screen, select Settings, then select the Network icon.
-
Turn on Wi-Fi.
-
-
Make sure the physical Wi‑Fi switch on your laptop is turned on. (An indicator light usually shows when it’s on.)
-
Make sure your PC isn’t in airplane mode.
-
Swipe in from the right edge of the screen, select Settings, then select the Network icon.
-
Turn off Airplane mode.
-
-
Move closer to the router or access point if you can.
-
If you don’t see the network name at all, the router or access point might not be set to broadcast the network name. In this case, you’ll need to connect to it manually.
-
Swipe in from the right edge of the screen, and then select Settings.
-
Select the Network icon, and then select Hidden network.
-
Type the network name and select Next.
-
Type the password and select Next.
-
Follow any additional instructions to get connected.
-
-
The network will be added to your list of networks and will be available to connect to when your computer is in range of the network. To connect to the network, follow these steps:
-
Open Connect to a Network by selecting the network icon in the notification area.
-
Select Unnamed Network, select Connect, and then type the network information. The network will be added to your list of networks and will be available to connect to in the future when your computer is in range of the network..
-
Let Windows try to help you fix the problem. Try running the Network troubleshooter to see if it can diagnose and fix the problem.
Select the Start button, start typing Network problems, and then select Identify and repair network problems in the list.
The Network Troubleshooter (mentioned above) can help diagnose and fix common connection problems. After using that, try running the network commands below because the combination of doing these two things can help you get connected.
If your problem isn’t fixed after running the Network troubleshooter, try to:
-
Reset the TCP/IP stack.
-
Release the IP address.
-
Renew the IP address.
-
Flush and reset the DNS client resolver cache.
Here’s how to run networking commands in a command prompt:
-
Select the Start button, start typing cmd, right-click Command Prompt in the list, select Run as Administrator, and then select Yes.
-
At the command prompt, run the following commands in the listed order and then check to see if that fixes your connection problem:
-
Type netsh winsock reset and press Enter.
-
Type netsh int ip reset and press Enter.
-
Type ipconfig /release and press Enter.
-
Type ipconfig /renew and press Enter.
-
Type ipconfig /flushdns and press Enter.
-
This helps create a new connection to your Internet service provider (ISP). When you do this, everyone that is connected to your Wi-Fi network will be temporarily disconnected.
The steps you take to restart your modem and router can vary, but here are the general steps:
-
Unplug the power cable for the router from the power source.
-
Unplug the power cable for the modem from the power source.
Some modems have a backup battery. So if you unplug the modem and lights stay on, remove the battery from the modem.
-
Wait at least 30 seconds or so.
If you had to remove the battery from the modem, put it back in.
-
Plug the modem back into the power source. The lights on the modem will blink. Wait for them to stop blinking.
-
Plug your router back into the power source.
Wait a few minutes for the modem and router to fully power on. You can usually tell when they’re ready by looking at the status lights on the two devices.
-
On your PC, try to connect again.
Make sure it’s not a problem with your cable modem or Internet service provider (ISP). If it is, contact your ISP.
-
Select the Start button, start typing cmd, right-click Command Prompt in the list, select Run as Administrator, and then select Yes.
-
At the command prompt, type ipconfig.
Look for the IP address listed next to Default gateway. Write down that address if you need to. For example, 192.168.1.1.
-
At the prompt, type ping <Default gateway> and press Enter. For example, type ping 192.168.1.1 and press Enter.
The result should be something like this:
Reply from 192.168.1.1: bytes=32 time=5ms TTL=64
Reply from 192.168.1.1: bytes=32 time=5ms TTL=64
Reply from 192.168.1.1: bytes=32 time=5ms TTL=64
Reply from 192.168.1.1: bytes=32 time=5ms TTL=64
Ping statistics for 192.168.1.1: Packets: Sent = 4, Received = 4, Lost = 0 (0% loss), Approximate round trip times in milli-seconds: Minimum = 4ms, Maximum = 5ms, Average = 4ms
If the ping is successful and you see results similar to the results above, but you can’t connect to the Internet on your PC, there may be a problem with your modem or Internet service provider (ISP).
If you’re still having trouble connecting to a network, it might be related to your network adapter.
-
Try using the Network Adapter troubleshooter to automatically find and fix some problems. This troubleshooter will disable and re-enable the adapter, and try some other common repairs.
Select the Start button, start typing Troubleshooting, and then select Troubleshooting in the list. Select View all > Network Adapter.
-
Update the network adapter driver. An outdated or incompatible network adapter driver can cause connection problems. Check to see if an updated driver is available.
-
Select the Start button, start typing Device Manager, and then select it in the list.
-
In Device Manager, select Network adapters, right-click your adapter, and then select Properties.
-
Select the Driver tab, and then select Update Driver.
-
Select Search automatically for updated driver software.
-
If Windows can’t find a new driver for your network adapter, visit the PC manufacturer’s website and download the latest network adapter driver from there. If your PC can’t connect to the Internet, you’ll need to download a driver on a different PC and save it to a USB flash drive so you can install the driver on your PC. You’ll need to know the PC manufacturer and model name or number.
Here are some things to check and try with your router if you’re at home and having trouble getting connected.
-
If you don’t see the network name, sign in to your router and check to see if it’s set to broadcast the network name.
-
Connect your PC to your router using an Ethernet cable.
-
Open your web browser and type the IP address for your wireless router. (For example, 192.168.1.1 or 172.16.0.0—check the documentation for your router to find the default IP address.)
-
Sign in with your user name and password, then make sure an option labeled Enable SSID Broadcast, Wireless SSID broadcast, or something similar is turned on. This setting is often on a Wireless Settings page.
-
-
Check to see if your Wi-Fi network uses Media Access Control (MAC) address filtering for security. If it does, you’ll need to add the MAC address for your PC to the access list on your router before you can connect.
-
Select the Start button. Start typing cmd and right-click Command Prompt in the list. Select Run as Administrator, and then select Yes.
-
At the command prompt, type ipconfig /all.
Write down the address that appears next to Physical Address for your wireless network adapter. This is the address you’ll need to add to the access list on your router.
To add the MAC address to the access list on your router:
-
Open your web browser and type the IP address for your wireless router. (For example, 192.168.1.1 or 172.16.0.0—check the documentation for your router to find the default IP address.)
-
Sign in with your user name and password, then look for a setting that says MAC Address Filter or something similar.
-
Add the MAC address you wrote down for your PC to the access list and save your changes.
On your PC, try to connect to the Wi-Fi network again.
-
-
Make sure Wi-Fi is turned on.
-
On a laptop, open Windows Mobility Center by selecting the Start
button and then selecting Control Panel > Mobile PC > Windows Mobility Center. -
Look in the Wireless Network section. If Wi-Fi is on, the button should say Turn wireless off.
-
-
Make sure the physical Wi‑Fi switch on your laptop is turned on. (An indicator light usually shows when it’s on.)
-
Check and make sure your PC isn’t in airplane mode.
-
Move closer to the router or access point if you can.
-
If you don’t see the network name at all, the router or access point might not be set to broadcast the network name. In this case, you’ll need to connect to it manually.
-
Open Manage Wireless Networks by selecting the Start
button, and then selecting Control Panel. In the search box , type wireless and then select Manage wireless networks. -
Select Add, and then select Manually create a network profile.
-
Type the network information.
-
If you want Windows to automatically connect when the network is in range, select the Start this connection automatically check box.
-
Select the Connect even if the network is not broadcasting check box, select Next, and then select Close.
-
-
The network will be added to your list of networks and will be available to connect to when your computer is in range of the network. To connect to the network, follow these steps:
-
Open Connect to a Network by selecting the network icon in the notification area.
-
Select Unnamed Network, select Connect, and then type the network information. The network will be added to your list of networks and will be available to connect to in the future when your computer is in range of the network..
-
 button and then selecting Control Panel > Mobile PC > Windows Mobility Center.
Let Windows try to help you fix the problem. Try running the Network troubleshooter to see if it can diagnose and fix the problem.
Open the Network troubleshooter by right-clicking the network icon in the notification area and then selecting Troubleshoot problems.
The Network Troubleshooter (mentioned above) can help diagnose and fix common connection problems. After using that, try running the network commands below because the combination of doing these two things can help you get connected.
If your problem isn’t fixed after running the Network troubleshooter, try to:
-
Reset the TCP/IP stack.
-
Release the IP address.
-
Renew the IP address.
-
Flush and reset the DNS client resolver cache.
Here’s how to run networking commands in a command prompt:
-
Select the Start button
. Type cmd in the search box, right-click cmd in the list, select Run as administrator, and then select Yes. -
At the command prompt, run the following commands in the listed order and then check to see if that fixes your connection problem:
-
Type netsh winsock reset and press Enter.
-
Type netsh int ip reset and press Enter.
-
Type ipconfig /release and press Enter.
-
Type ipconfig /renew and press Enter.
-
Type ipconfig /flushdns and press Enter.
-
This helps create a new connection to your Internet service provider (ISP). When you do this, everyone that is connected to your Wi-Fi network will be temporarily disconnected.
The steps you take to restart your modem and router can vary, but here are the general steps:
-
Unplug the power cable for the router from the power source.
-
Unplug the power cable for the modem from the power source.
Some modems have a backup battery. So if you unplug the modem and lights stay on, remove the battery from the modem.
-
Wait at least 30 seconds or so.
If you had to remove the battery from the modem, put it back in.
-
Plug the modem back into the power source. The lights on the modem will blink. Wait for them to stop blinking.
-
Plug your router back into the power source.
Wait a few minutes for the modem and router to fully power on. You can usually tell when they’re ready by looking at the status lights on the two devices.
-
On your PC, try to connect again.
Make sure it’s not a problem with your cable modem or Internet service provider (ISP). If it is, contact your ISP.
-
Select the Start button
. Type cmd in the search box, right-click cmd in the list, select Run as administrator, and then select Yes. -
At the command prompt, type ipconfig.
Look for the IP address listed next to Default gateway. Write down that address if you need to. For example, 192.168.1.1.
-
At the prompt, type ping <Default gateway> and press Enter. For example, type ping 192.168.1.1 and press Enter.
The result should be something like this:
Reply from 192.168.1.1: bytes=32 time=5ms TTL=64
Reply from 192.168.1.1: bytes=32 time=5ms TTL=64
Reply from 192.168.1.1: bytes=32 time=5ms TTL=64
Reply from 192.168.1.1: bytes=32 time=5ms TTL=64
Ping statistics for 192.168.1.1: Packets: Sent = 4, Received = 4, Lost = 0 (0% loss), Approximate round trip times in milli-seconds: Minimum = 4ms, Maximum = 5ms, Average = 4ms
If the ping is successful and you see results similar to the results above, but you can’t connect to the Internet on your PC, there may be a problem with your modem or Internet service provider (ISP).
If you’re still having trouble connecting to a network, it might be related to your network adapter.
-
Try using the Network Adapter troubleshooter to automatically find and fix some problems. This troubleshooter will disable and re-enable the adapter, and try some other common repairs.
Open the Network Adapter troubleshooter by selecting the Start button
and then selecting Control Panel. In the search box, type troubleshooter and then select Troubleshooting > View all > Network Adapter. -
Update the network adapter driver. An outdated or incompatible network adapter driver can cause connection problems. Check to see if an updated driver is available.
-
Open Device Manager by selecting the Start button
, selecting Control Panel, selecting System and Security, and then, under System, selecting Device Manager . If you’re prompted for an administrator password or confirmation, type the password or provide confirmation. -
In Device Manager, select Network adapters, right-click your adapter, and then select Properties.
-
Select the Driver tab, and then select Update Driver.
-
Select Search automatically for updated driver software.
-
 . If you’re prompted for an administrator password or confirmation, type the password or provide confirmation.
If Windows can’t find a new driver for your network adapter, visit the PC manufacturer’s website and download the latest network adapter driver from there. If your PC can’t connect to the Internet, you’ll need to download a driver on a different PC and save it to a USB flash drive so you can install the driver on your PC. You’ll need to know the PC manufacturer and model name or number.
Here are some things to check and try with your router if you’re at home and having trouble getting connected.
-
If you don’t see the network name, sign in to your router and check to see if it’s set to broadcast the network name.
-
Connect your PC to your router using an Ethernet cable.
-
Open your web browser and type the IP address for your wireless router. (For example, 192.168.1.1 or 172.16.0.0—check the documentation for your router to find the default IP address.)
-
Sign in with your user name and password, then make sure an option labeled Enable SSID Broadcast, Wireless SSID broadcast, or something similar is turned on. This setting is often on a Wireless Settings page.
-
-
Check to see if your Wi-Fi network uses Media Access Control (MAC) address filtering for security. If it does, you’ll need to add the MAC address for your PC to the access list on your router before you can connect.
-
Select the Start
button. Type cmd in the search box and right-click cmd in the list. Select Run as administrator, and then select Yes. -
At the command prompt, type ipconfig /all.
Write down the address that appears next to Physical Address for your wireless network adapter. This is the address you’ll need to add to the access list on your router.
To add the MAC address to the access list on your router:
-
Open your web browser and type the IP address for your wireless router. (For example, 192.168.1.1 or 172.16.0.0—check the documentation for your router to find the default IP address.)
-
Sign in with your user name and password, then look for a setting that says MAC Address Filter or something similar.
-
Add the MAC address you wrote down for your PC to the access list and save your changes.
On your PC, try to connect to the Wi-Fi network again.
-
Очень много пользователей, которые обновились, или просто установили Windows 10, столкнулись с проблемами в работе Wi-Fi. У кого-то ноутбук вообще не видит беспроводного адаптера, не отображаются доступные для подключения сети, возникают проблемы при подключении к Wi-Fi. А если все подключается, то может возникнуть проблема «Подключение ограничено», когда интерн просто не работает.
И практически во всех этих случаях, причина только одна: драйвер беспроводного Wi-Fi адаптера. Либо он не установлен вообще, либо установлен, но работает неправильно. Windows 10 как правило уже сама устанавливает драйвер на Wi-Fi адаптер, но этот драйвер не всегда работает так как нужно. А производители ноутбуков и Wireless адаптеров еще не все выпустили новые драйвера для своих моделей. Да и Windows 10 все время обновляется, а проблемы появляются обычно после этих обновлений (судя по комментариям к статьям на этом сайте).
Так вот, практически все проблемы и ошибки и-за драйвера. Драйвер дает команды системе как правильно «общаться» с железом. В нашем случае с беспроводным адаптером. И если сам адаптер и Windows 10 не очень понимают друг друга, то у нас на компьютере появляются проблемы в работе интернета при подключении по Wi-Fi. Поэтому, первым делом нужно проверять и экспериментировать с драйвером беспроводного адаптера.
Мы рассмотрим случаи, когда драйвер все же установлен (возможно, самой Windows 10), но появляются проблемы с Wi-Fi. Либо, не получается подключится к беспроводной сети по стандартной схеме, которая описана в этой статье.
Замена драйвера Wi-Fi адаптера в Windows 10
Как правило, при каких-то проблемах, переустановка (обновление) драйвера не помогает. В любом случае, вы можете попробовать скачать новый драйвер для вашей модели с официального сайта производителя ноутбука (адаптера), и установить его. При возникновении каких-либо проблем, это нужно делать первым делом. Еще, есть возможно выбрать один из нескольких установленных в системе драйверов. Что мы сейчас и попробуем сделать.
Что бы открыть Диспетчер устройств, нажмите на кнопку поиска, и введите «диспетчер устройств». В результатах поиска нажимаем на сам диспетчер. Вот так:

Дальше, в самом диспетчере устройств находим вкладку «Сетевые адаптеры». Там должен быть ваш беспроводной адаптер. В его названии будут слова «Wi-Fi», или «Wireless». Если такого адаптера там нет, то значит он не установлен вообще. Нужно установить. У меня адаптер Qualcomm Atheros, поэтому и драйвер так называется. У вас же может быть другое название (Intel, Broadcom).
Возле адаптера беспроводной сети, может быть желтый восклицательный знак. Нажмите на сам адаптер правой кнопкой мыши, и выберите Обновить драйверы.

Выберите пункт Выполнить поиск драйверов на этом компьютере.
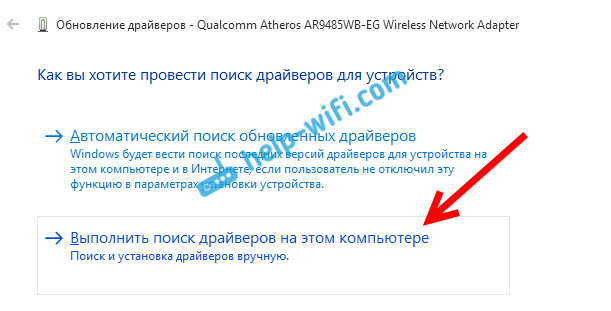
Нажимаем на Выбрать драйвер из списка уже установленных драйверов.

Теперь внимание, в окне у вас должно быть несколько вариантов драйверов (у меня 2). Выделяем тот, который на данный момент не установлен. Который отличается от того, который в диспетчере устройств. Получается, что мы пробуем другой вариант драйвера. Выделяем его, и нажимаем Далее.

Нужный драйвер будет установлен. Теперь, перезагружаем компьютер, и тестируем работу Wi-Fi. Если не помогло, и есть еще другие варианты драйверов, то делаем все еще раз, только в списке выбираем уже другой драйвер. Думаю, смысл этих действий понятен. Помню в Windows 8, этот способ помогла решить проблему с подключением без доступа к интернету (ограничено).
Удаляем драйвер беспроводного адаптера
В этом нет ничего страшного. Если способ описанный выше не помог решить вашу проблему, например с статусом «Подключение ограничено», то можно попробовать удалить драйвер Wireless в диспетчере устройств.
Зайдите в диспетчер устройств, как я показывал выше. Нажмите правой кнопкой мыши на наш беспроводной адаптер и выберите Удалить.

Появится предупреждение. Нажимаем Ok.

После его перезагружаем компьютер. Драйвер снова будет установлен автоматически.
Пробуем откатить драйвер беспроводного адаптера в Windows 10
Откатить драйвер – еще один способ заставить Wi-Fi работать стабильно, или хотя бы просто работать :). Никаких гарантий что поможет, но если уже ничего не помогает, то попробовать стоит. Все в том же диспетчере устройств нажимаем правой кнопкой мыши на все тот же Wi-Fi адаптер. И выбираем в меню Свойства.

Переходим на вкладку Драйвер, и нажимаем кнопку Откатить. Может быть такое, что кнопка откатить не активна. Здесь уже ничего не сделать, значит нет в системе более старого драйвера.

Появится сообщение о том, что откат к более старой версии драйвера может понизить функциональность, и все такое. Нажимаем Да.

Перезагружаем ноутбук, и проверяем как работает Wi-Fi.
Вот такие советы. Если узнаю что-то новое по этой теме, обязательно обновлю статью. Если у вас есть полезная информация по решению проблем с работой Wi-Fi в Windows 10, то можете поделится в комментариях.
-
MiniTool
-
MiniTool News Center
- WiFi Driver Windows 10: Download, Update, Fix Driver Issue
By Alisa | Follow |
Last Updated October 21, 2022
![]()
The WiFi driver for Windows 10 is used for the Windows 10 wireless network adapters. It makes the wireless adapter work properly on your PC. This post introduces how to download, install, uninstall, reinstall, troubleshoot Windows 10 WiFi driver. For more computer tricks and free utilities, you can go to MiniTool official website.
This post teaches you how to download and install WiFi driver in Windows 10, how to update WiFi driver in Windows 10, how to uninstall and reinstall wireless network adapter driver in Windows 10, etc. Check the details below.
WiFi (Wireless) Driver for Windows 10 Download and Install
Normally the WiFi driver is automatically installed for the wireless network adapter on your Windows 10 computer.
If the WiFi driver is missing or the network adapter is not working well on your Windows 10 computer, you can manually download and install the Windows 10 WiFi driver on your PC. Check how to download and install WiFi driver in Windows 10.
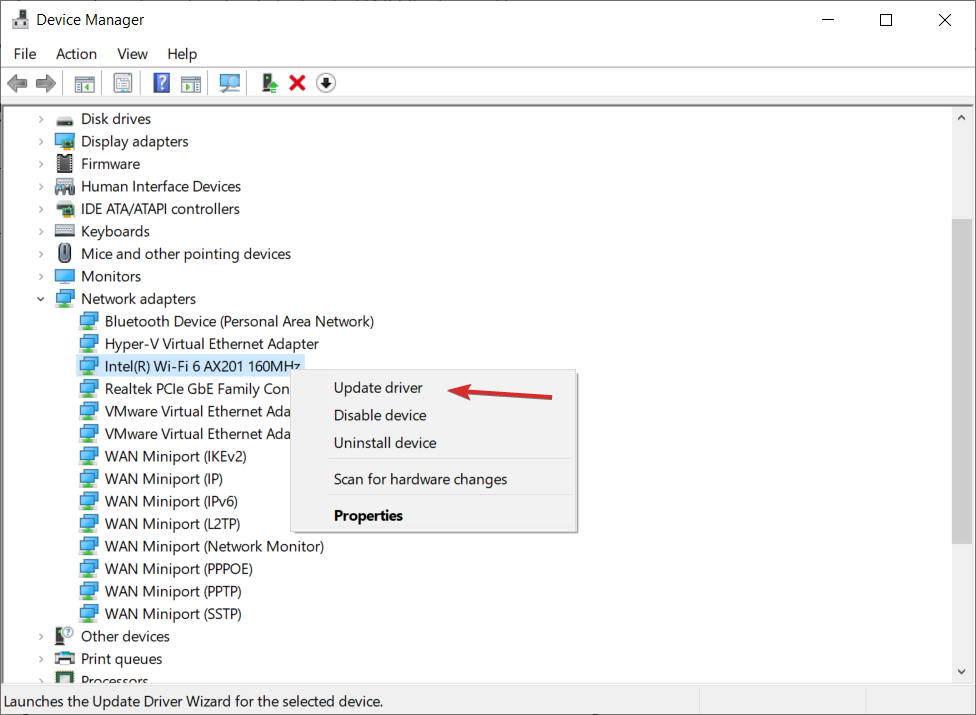
One way is to press Windows + X, select Device Manager to open Device Manager in Windows 10. Expand Network adapters, right-click your wireless network adapter device, and select Update driver. Click Search automatically for updated driver software to search for the computer and internet for the latest WiFi driver. Alternatively, you can also select Uninstall device, then restart your computer to automatically install the new version of the WiFi driver.
If the first way doesn’t work, you can also go to the official website of your wireless adapter to find and download the WiFi driver file on your PC and double-click the file to run the installation.
Alternatively, you can also install some free driver updater software on your PC to automatically detect and install driver updates.

Hola VPN Free Download for Chrome, PC, Mac, Android, iOS, etc.
Learn how to download free Hola VPN for Chrome, Edge, PC, Mac, Android, iOS, etc. to use it to unblock and access worldwide content online with no limit.
Read More
How to Find WiFi Driver in Windows 10
To check the WiFi driver name and version in your Windows 10 computer, you can follow the steps below.
- Press Windows + X and select Device Manager to open it.
- Expand Network adapters, right-click your wireless adapter, and select Properties.
- Click the Details tab and select Hardware Ids under Property to check the wireless network adapter driver name and version.
Tip: If you want to find and check Windows 10 WiFi driver folder, you can go to Windows 10 driver location to search for the wireless driver folder.
How to Update, Uninstall and Reinstall Windows 10 WiFi Driver
The WiFi driver in Windows 10 needs to be updated to fit the new versions of the wireless adapter in Windows 10. If the WiFi driver gets outdated, you can go to Device Manager, expand Network adapters, right-click the wireless adapter, and select Update driver to update it. To uninstall and reinstall the Windows 10 WiFi driver, you can select Uninstall device, and restart your computer to reinstall it.
Alternatively, you can also update to a new version of Windows 10 to get the outdated drivers also updated. To update Windows 10, you can click Start -> Settings -> Update & Security -> Windows Update -> Check for updates.
How to Fix WiFi Driver Windows 10 Not Working
If you meet WiFi connection issues in Windows, you can follow the guide above to update or reinstall the wireless network adapter driver in Windows 10 or check how to troubleshoot internet connection problems to fix WiFi issues in Windows 10.

Download VeePN for PC, Mac, Mobile, and Browser
This post gives a VeePN review and offers guides on how to download VeePN for Chrome, Edge, Firefox, PC, Mac, Android, iOS, etc. to use this VPN service.
Read More
About The Author

Position: Columnist
Alisa is a professional English editor with 4-year experience. She loves writing and focuses on sharing detailed solutions and thoughts for computer problems, data recovery & backup, digital gadgets, tech news, etc. Through her articles, users can always easily get related problems solved and find what they want. In spare time, she likes basketball, badminton, tennis, cycling, running, and singing. She is very funny and energetic in life, and always brings friends lots of laughs.
A lot of users are getting puzzled with WiFi missing Problem after they have upgraded to Windows 10 from 8 or 8.1 on their machines. Microsoft has cared for the issues and says that this is due to old version VPN software running during the upgrade. But the most important part is how to fix this problem. Read How to Fix WiFi Missing or Not Working in Windows 10.
WiFi Missing or Not Working in Windows 10 after you install or upgrade enforce you to look for the driver update, change properties of the adapter, the correct physical switch for WiFi adapter. But none of these works. Sometimes this problem also impacts ethernet connection. Few users are getting trouble also in the wired network connection and few are getting Airplane mode stuck. You might be facing the WiFi option is grayed out on your network and internet settings.
The real cause of this problem is the older version of VPN Software. The software has an incompatible driver which hinders the Wireless network on your machine. Microsoft says that Older software versions contain a Filter Driver (the Deterministic Network Enhancer) which is not properly upgraded, leading to the issue”.
Related:
Fix Cellular missing from Network & Internet in Windows 10
Manually Update Wi-Fi Adapter
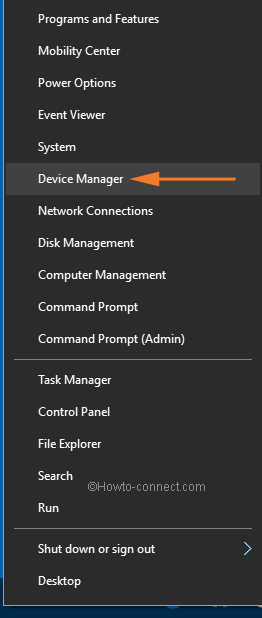
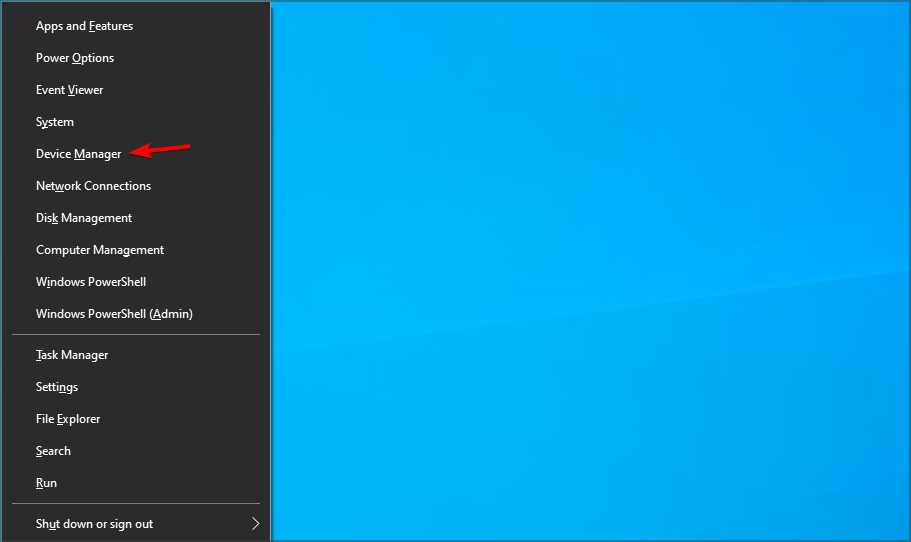
Step-1: Right-click Start and from the list of options, select Device Manager.
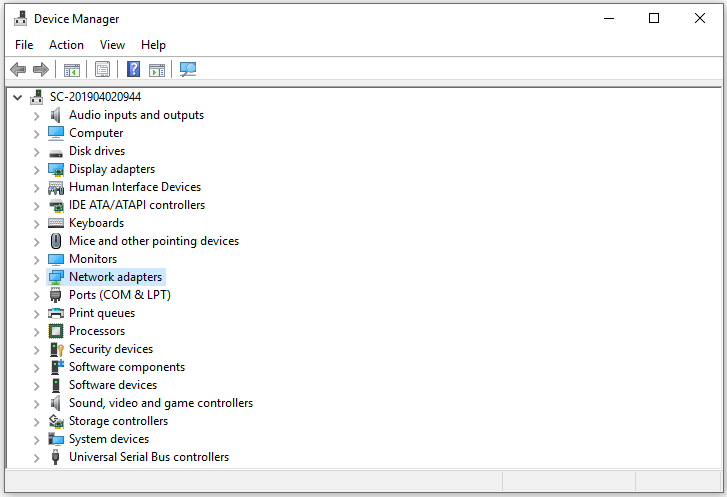
Step-2: Now, locate Network adapters on the Device Manager and double-click on it. Alternatively, you can also click the arrow that resides on the left side of the category.
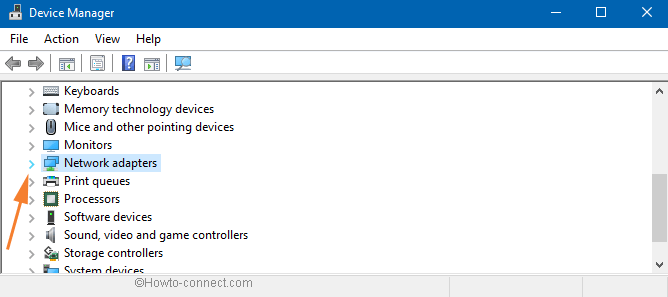
Step-3: Under Network adapters, various drivers will appear. Since WiFi adapters differ from computer to computer, so it is important to correctly find the WiFi adapter of your PC.
Step-4: After ensuring the wireless adapter, do a right-click on it. Quickly few options will appear on a list, click Update driver.
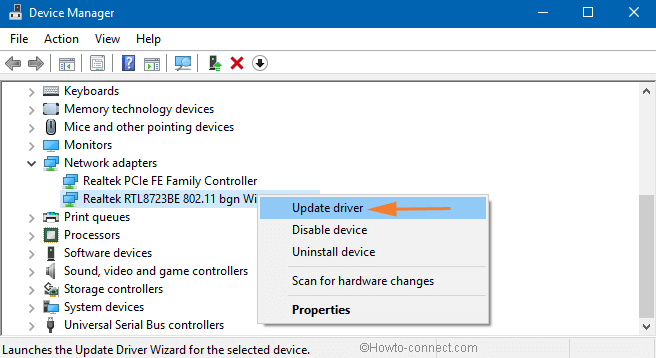
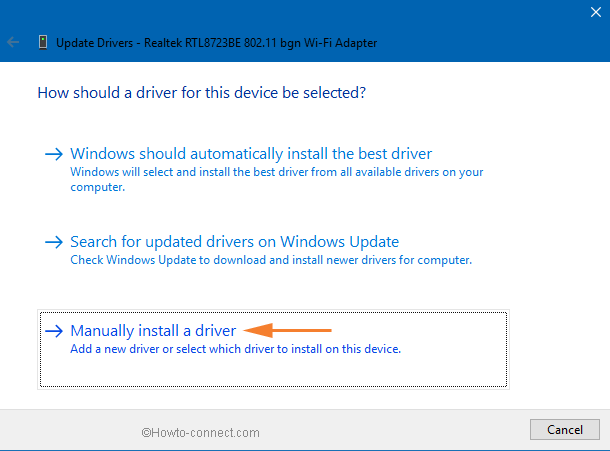
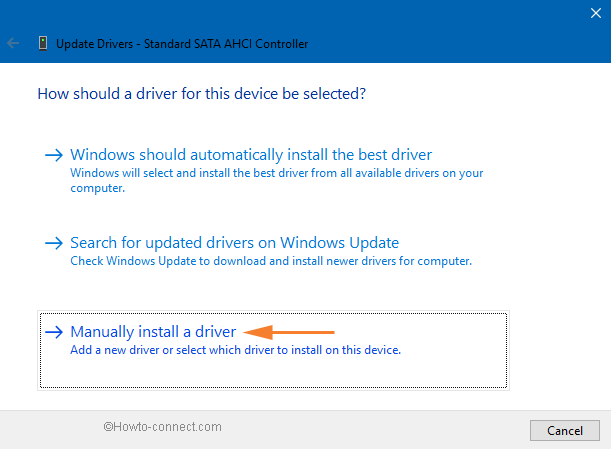
Step-5: Now, in the Update Drivers wizard, three options are available. Click on the last option Manually install a driver.
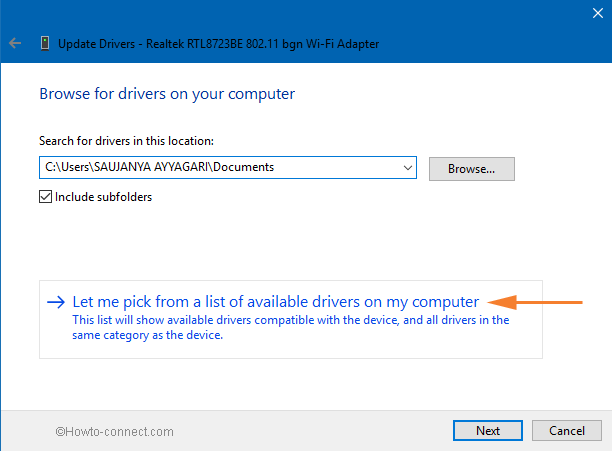
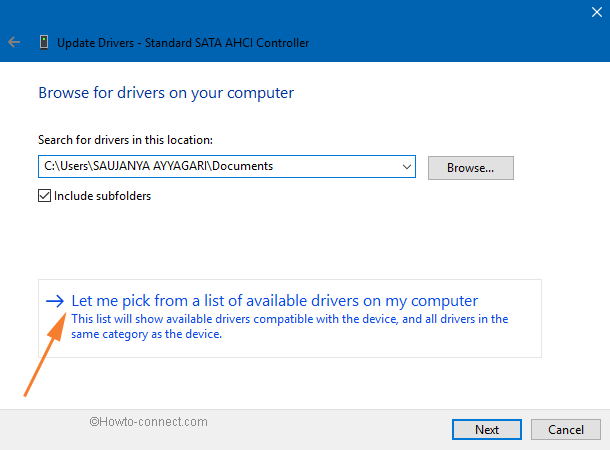
Step-6: On the coming window, select “Let me pick from a list of available drivers on my computer”.
Step-7: This will show you all the versions of the wireless adapter your PC has. So, select the latest version and click Next.
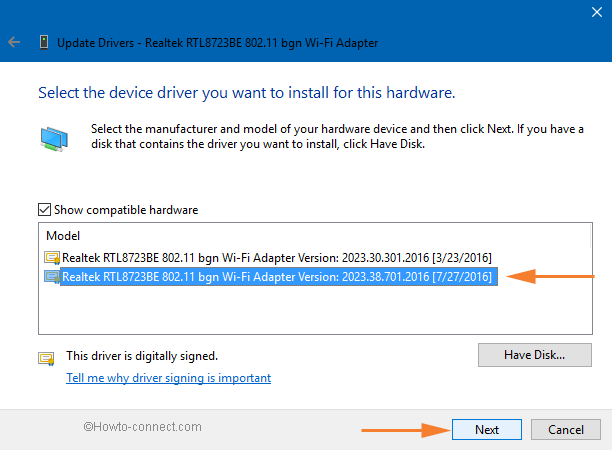
Step-8: After the installation gets over, reboot the system to apply the changes.
Scan IDE ATA/ATAPI controllers for Hardware change
Step-1: Launch Device Manager by right-clicking Start and selecting the same from the list of options.
Step-2: Locate and right-click the category IDE ATA/ATAPI. Two options will show up on the menu, click Scan for hardware changes.
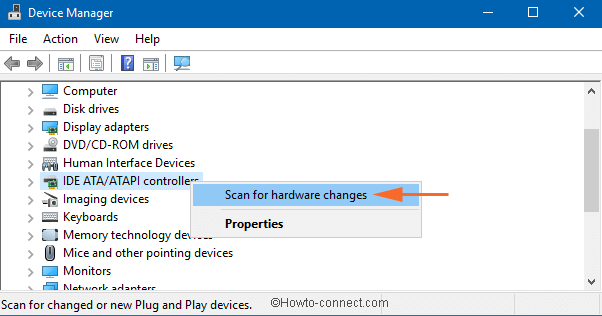
Step-3: – Once the scanning gets over, reboot the system.
Manually Update Standard SATA AHCI Controller
Step-1: Click Start, write device manager. Quickly Cortana will show up with the same result, click on it.
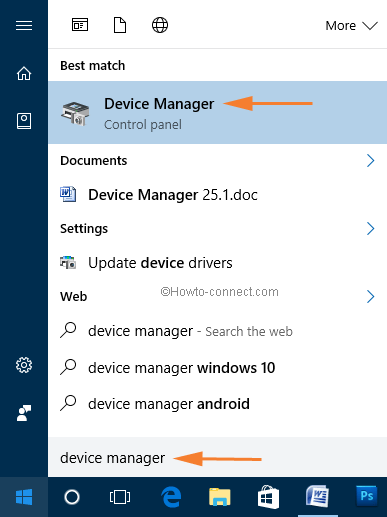
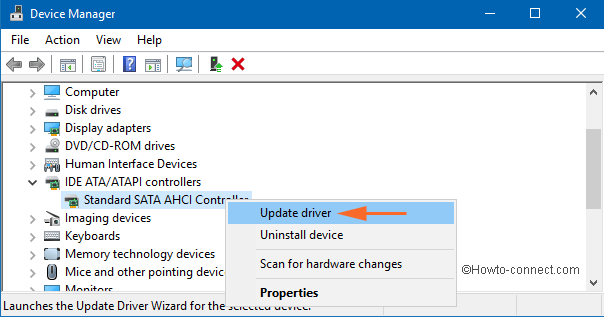
Step-2: In the Device Manager, find and double-click the category IDE ATA/ATAPI.
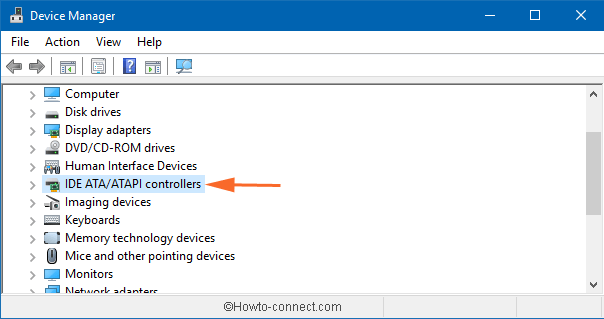
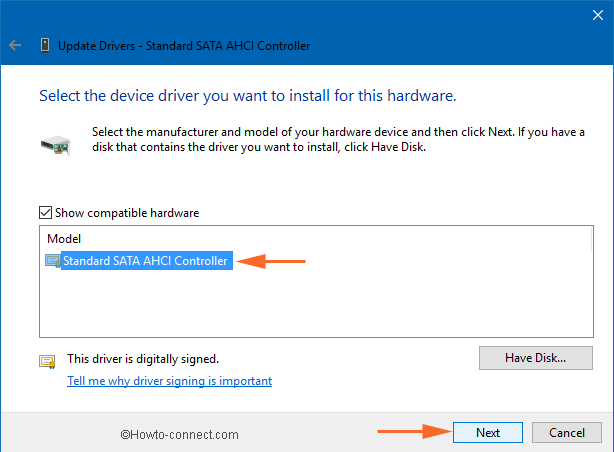
Step-3: You will see Standard SATA AHCI Controller. Right-click on it and from the options that appear, click Update driver.
Step-4: Three different options will show up in the next wizard. Select the last option Manually install a driver.
Step-5: Click “Let me pick from a list of available drivers on my computer” on the next window.
Step-6: The compatible driver will appear, select it and click Next. Once you complete the steps carefully, reboot the PC.
Note – Before starting to follow the steps, remember to ensure that you have the correct WiFi adapter. Many times laptop companies issue updates for the Driver software and you have no information. Due to this unawareness the WiFi Missing or Not Working troubles. So get at the manufacturer webpage for your device, locate the appropriate driver and grab it first. Avoid getting the driver from third party websites because they can cause unnecessary issues.
Troubleshoot
- At first, don’t forget to troubleshoot your Network.
- Right-click on the Network icon on the taskbar and click Troubleshoot problems.
![]()
Command Prompt
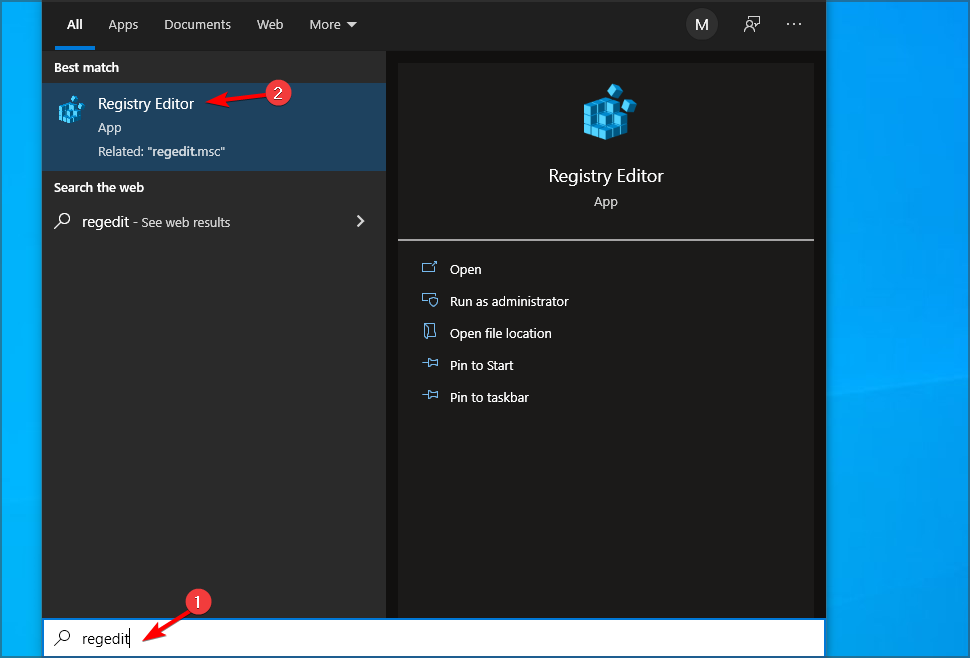
- Launch the elevated command prompt on the screen. For this objective write cmd at the bottom of the Cortana search and make a right click on the Command prompt (Desktop app) in the search result at the top. Hit (Tap) the choice Run as administrator.
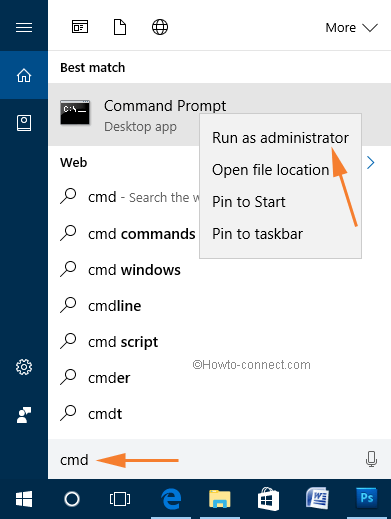
- A small UAC Confirmation dialog box emerges. Press Yes.
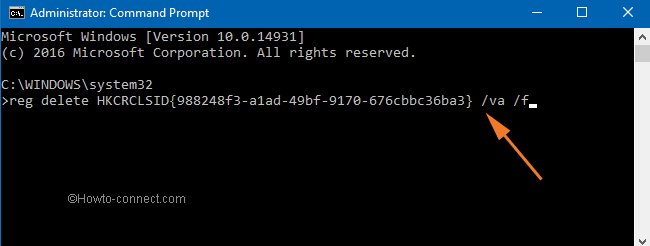
- Command prompt unfolds on the PC screen. Copy the below written command after then paste into command prompt:
reg delete HKCRCLSID{988248f3-a1ad-49bf-9170-676cbbc36ba3} /va /f
- Press Enter.
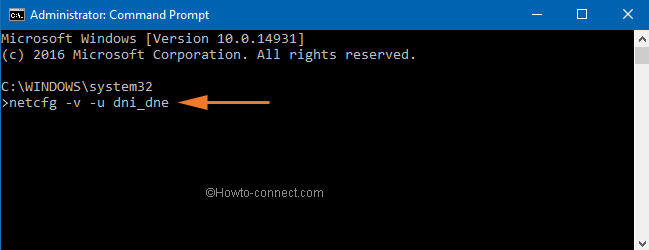
- A little later copy the underneath command after then paste into the command prompt like you have done in the earlier step.
netcfg -v -u dni_dne
- Hit Enter.
- Reboot your Windows 10 PC. Launch the WiFi in the Settings app and look at the WiFi network in which you have the problem. You will find your network is visible along with other networks there.
Microsoft Support page for WiFi Missing
These are the ways to overcome the WiFi Missing or Not Working in Windows 10, Airplane mode stuck, WiFi grayed out, and not visible like problems you get after the upgrade your system to Windows 10.
Update –
Reset Network Settings to Fix WiFi Missing or Not Working in Windows 10
Sometimes WiFi Missing or Not Working issue in Windows 10 requires Network Reset as a solution. The method works to remove and re-install all network adapters back to its original settings. Moreover, Network reset sends other networking components to back to the default. The workaround has helped most of the users when fixing WiFi problem so follow the steps carefully –
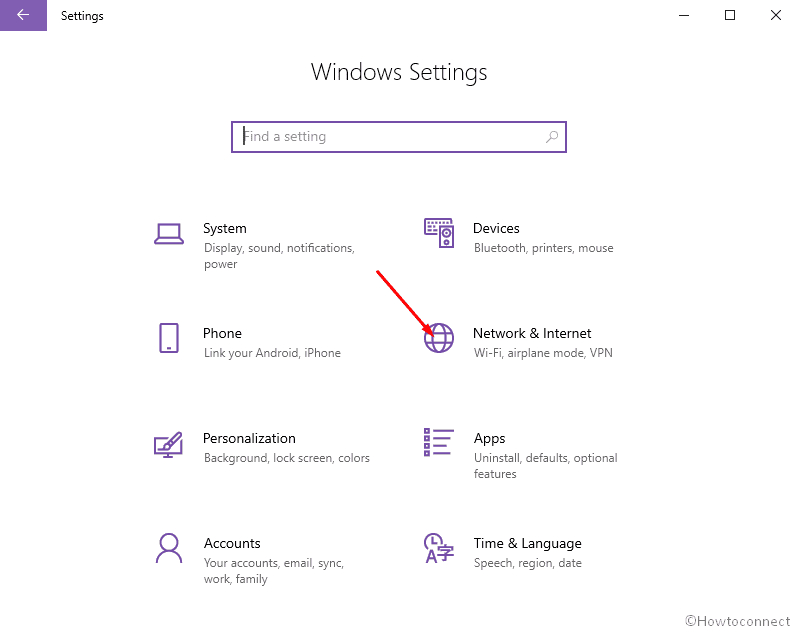
- Press Win and I keys simultaneously and select Network & Internet after the Windows Settings appear.
- Once Status page opens up; navigate to the right side and click on Network reset from the lower part.
- Click on Reset now button from the next page of Settings app.
- A pop up will prompt saying – Are you sure you want to reset your network settings?; choose Yes.
- Soon, you will mark a dialog – You’re about to be sign out, Windows will shutdown in 5 minutes. So store your running work comfortably and let the resetting perform.
You can also follow the instructions from here – How to Reset Network Settings to Default in Windows 10.
Let the System start and experience relentless network without WiFi Missing or Not Working in Windows 10
Repair any Windows problems such as Blue/Black Screen, DLL, Exe, application, Regisrty error and quickly recover system from issues using Reimage.
Find out everything you need to fix the problem
by Ivan Jenic
Passionate about all elements related to Windows and combined with his innate curiosity, Ivan has delved deep into understanding this operating system, with a specialization in drivers and… read more
Published on November 14, 2022
Reviewed by
Alex Serban

After moving away from the corporate work-style, Alex has found rewards in a lifestyle of constant analysis, team coordination and pestering his colleagues. Holding an MCSA Windows Server… read more
- When the Wi-Fi adapter is not working in Windows 10, you only have the wired option at your disposal unless you take action.
- Some users reported wireless connection issues immediately after a Windows update.
- In most cases, updating the drivers or modifying the settings did the trick for users.
XINSTALL BY CLICKING THE DOWNLOAD FILE
This software will repair common computer errors, protect you from file loss, malware, hardware failure and optimize your PC for maximum performance. Fix PC issues and remove viruses now in 3 easy steps:
- Download Restoro PC Repair Tool that comes with Patented Technologies (patent available here).
- Click Start Scan to find Windows issues that could be causing PC problems.
- Click Repair All to fix issues affecting your computer’s security and performance
- Restoro has been downloaded by 0 readers this month.
Various software and hardware-related issues may occur after a Windows update. One of these problems is that the Wi-Fi adapter is no longer working for some users.
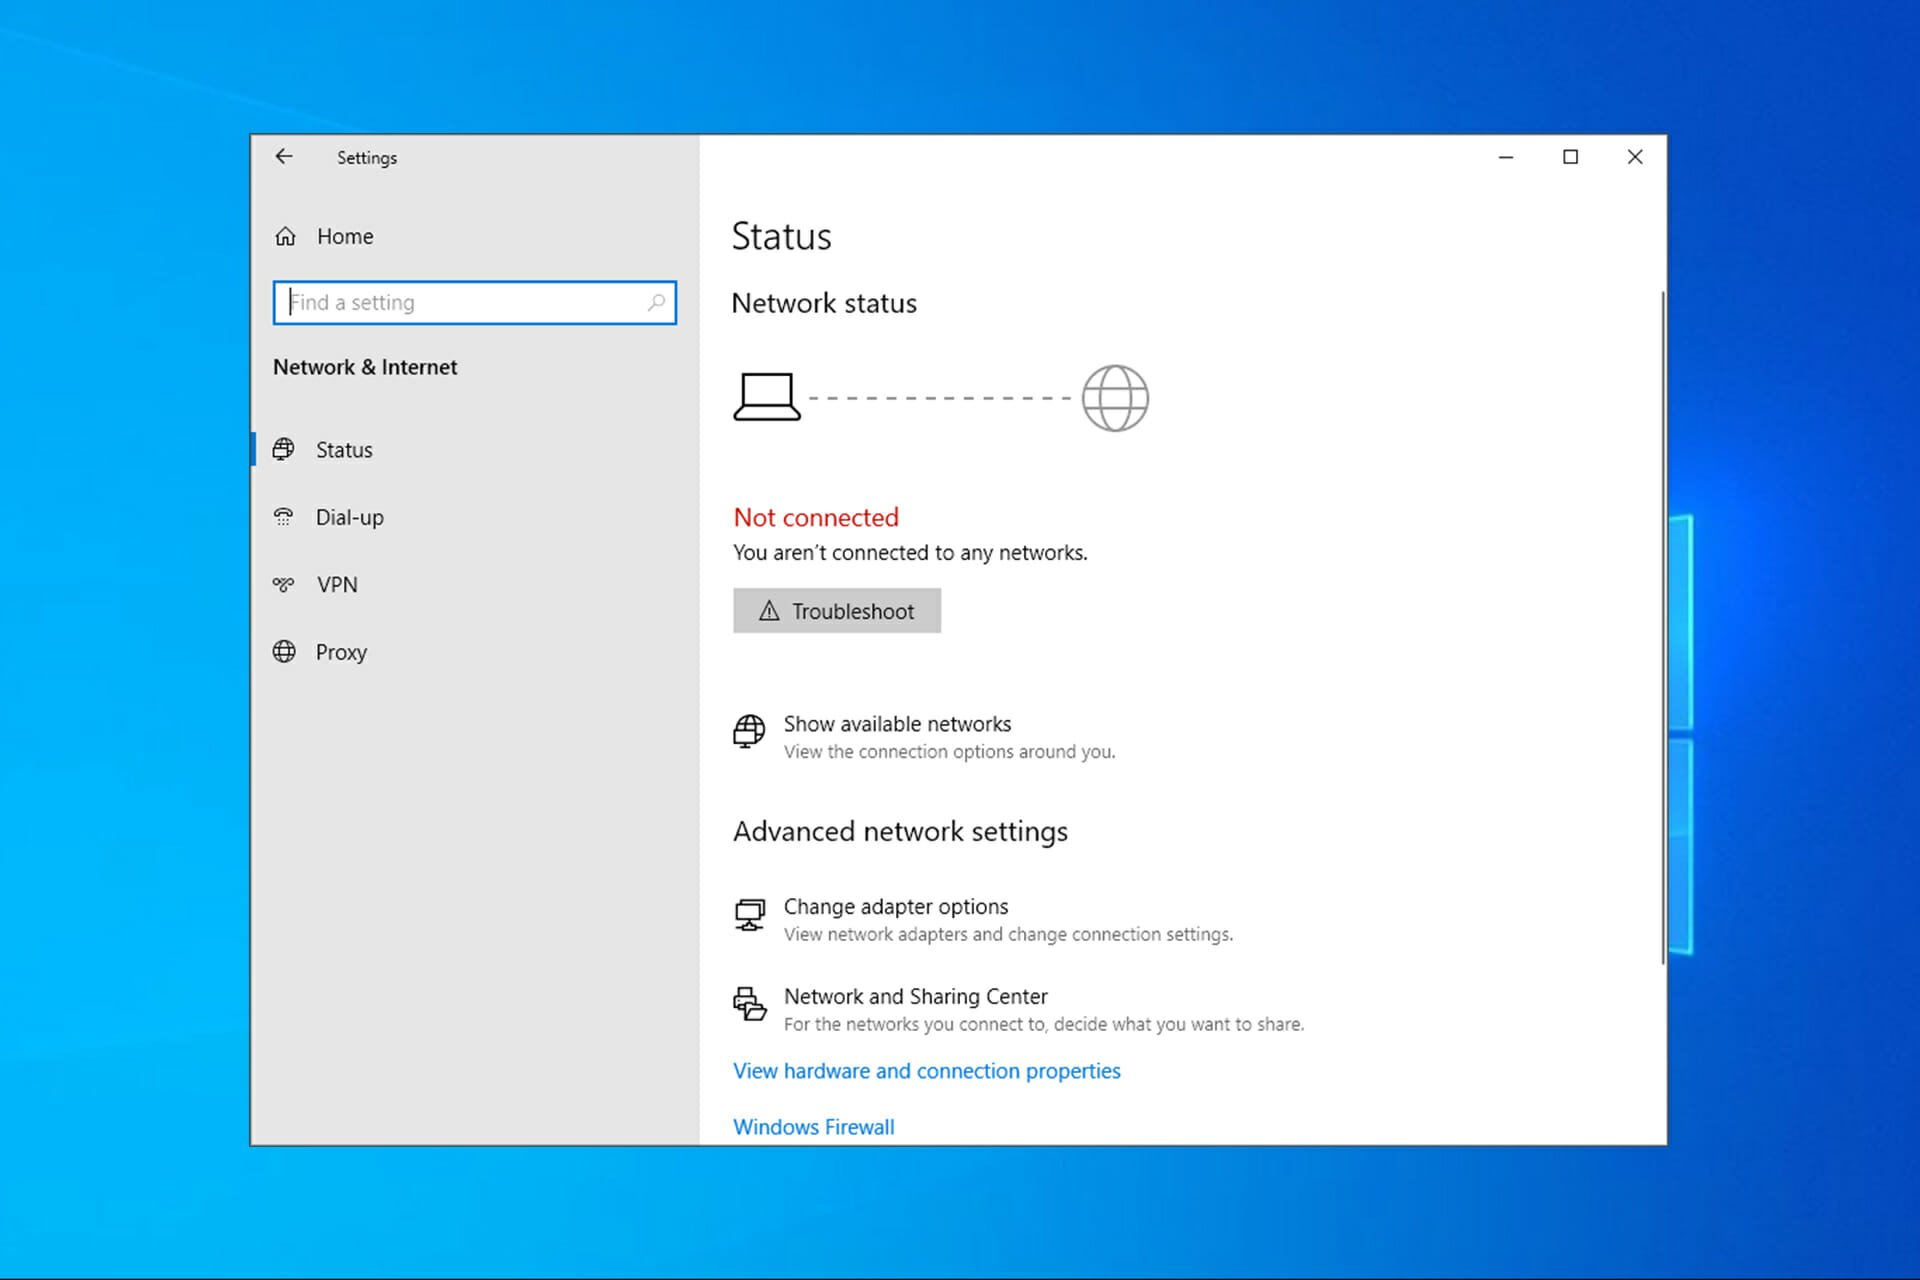
Many reported that their computers couldn’t detect and recognize the wireless network adapter, which worked fine before, and, as a result, they couldn’t connect to any network. But, don’t worry, we have plenty of solutions for this problem.
Why is my Wi-Fi adapter not working?
Let’s see some common reasons for this issue:
- Malfunctioning drivers – Especially after an OS update, you can encounter problems with the drivers that are not working correctly. Updating the drivers, as listed below, will solve the issue.
- Improper settings – Some adaptor settings may have changed without warning, which can affect its functionality.
- The adapter is damaged – Although highly unlikely, if the problem coincides with a drop of your laptop, you might consider that this component is damaged.
What are other common Wi-Fi adapter issues?
Here are some similar issues reported by our users that you can also resolve with the fixes presented below:
- Windows 10 Wi-Fi adapter missing, not showing, not working – If your computer fails to recognize the adapter, you won’t see it in Device Manager.
- My Windows 10 Wi-Fi disconnects frequently – If your connection is unstable, one of the solutions below will fix that too.
- Windows 10 has no Wi-Fi option in settings – Just as with the taskbar, the Wi-Fi option may also disappear from the Settings page.
- Windows 10 Wi-Fi connected but no Internet – This one’s the worst – when everything seems right, you just can’t connect to the Internet. But don’t worry, you’ll be able to resolve this when applying the solutions presented below.
- Realtek Wi-Fi adapter not working – It is possible that the inability of your Wi-Fi adapter to function is attributable to the fact that its driver was recently removed.
- The Wi-Fi adapter stopped working – On certain laptops, the Wi-Fi may be turned on and off using either a dedicated hardware button or a set of keys on the keyboard.
- No Wi-Fi adapters available Cisco AnyConnect – In the NAM section of the Anyconnect client, the message No network adapters appears.
- No Wi-Fi adapters available in Windows 11 – Start the Network Adapter troubleshooter on your Windows PC if you can’t find your Wi-Fi adapter on that machine.
- Wi-Fi adapter not showing in Device Manager – If the wireless adapter still does not appear in Device Manager, you may use the System Restore point to roll back to a previous state in time when the wireless device was functioning normally.
How do I fix Wi-Fi adapter issues on Windows?
- Why is my Wi-Fi adapter not working?
- What are other common Wi-Fi adapter issues?
- How do I fix Wi-Fi adapter issues on Windows?
- 1. Update the network drivers (Internet needed)
- 2. Use the built-in troubleshooter
- 3. Reset network adapters
- 4. Perform a registry tweak with Command Prompt
- 5. Change the adapter settings
- 6. Reinstall the network adapter
- 7. Reset your router
- 8. Update the router firmware
- 9. Switch to the Maximum Performance mode
- What do I do if the Wi-Fi adapter is not working on Windows 11?
- How do I avoid Wi-Fi connection problems?
- 1. Choose a less crowded channel
- 2. Move between 2.4 GHz and 5 GHz
- 3. Remove unwanted devices
- 4. Upgrade your device (change the Wi-Fi card)
- 5. Get the right router for your needs
- 6. Keep your drivers updated
- 7. Pick the correct Wi-Fi hotspot
- Should I use a 5GHz or 2.4GHz wireless network?
Here are a few quick tricks we recommend you try first:
- Restart the computer.
- Make sure there are no devices in the vicinity that interrupt the functioning of the Wi-Fi adapter or the router. If you find any, remove them.
- Install the latest version of Windows if there are any pending updates.
In case none work, head to the solutions listed next.

NOTE
If the Wi-Fi adapter is not working, you will have to find an external Wi-Fi adapter temporarily or connect to a wired network.
1. Update the network drivers (Internet needed)
- Right-click the Start button and select Device Manager.

- Click on the Network adapters section, locate the Wi-Fi adapter, right-click on it and select Update driver.

- Now select Search automatically for drivers.
- If the system finds a new driver, it will be installed, and you will be prompted for a restart.
Updating the driver will work only if you have an Ethernet cable connection besides your Wi-Fi. If unavailable, download the necessary drivers on another computer or device and run the setup on the affected PC.
To make this process faster, we suggest using driver updater software to update all drivers on your PC automatically.
Some of the most common Windows errors and bugs are a result of old or incompatible drivers. The lack of an up-to-date system can lead to lag, system errors or even BSoDs.
To avoid these types of problems, you can use an automatic tool that will find, download, and install the right driver version on your Windows PC in just a couple of clicks, and we strongly recommend DriverFix. Here’s how to do it:
- Download and install DriverFix.
- Launch the application.
- Wait for DriverFix to detect all your faulty drivers.
- The software will now show you all the drivers that have issues, and you just need to select the ones you’d liked fixed.
- Wait for DriverFix to download and install the newest drivers.
- Restart your PC for the changes to take effect.

DriverFix
Drivers will no longer create any problems if you download and use this powerful software today.
Disclaimer: this program needs to be upgraded from the free version in order to perform some specific actions.
2. Use the built-in troubleshooter
When you’re encountering issues with your Wi-Fi adapter on your PC, a reliable option is the Internet Connections troubleshooter to identify and eliminate the source of the problem.
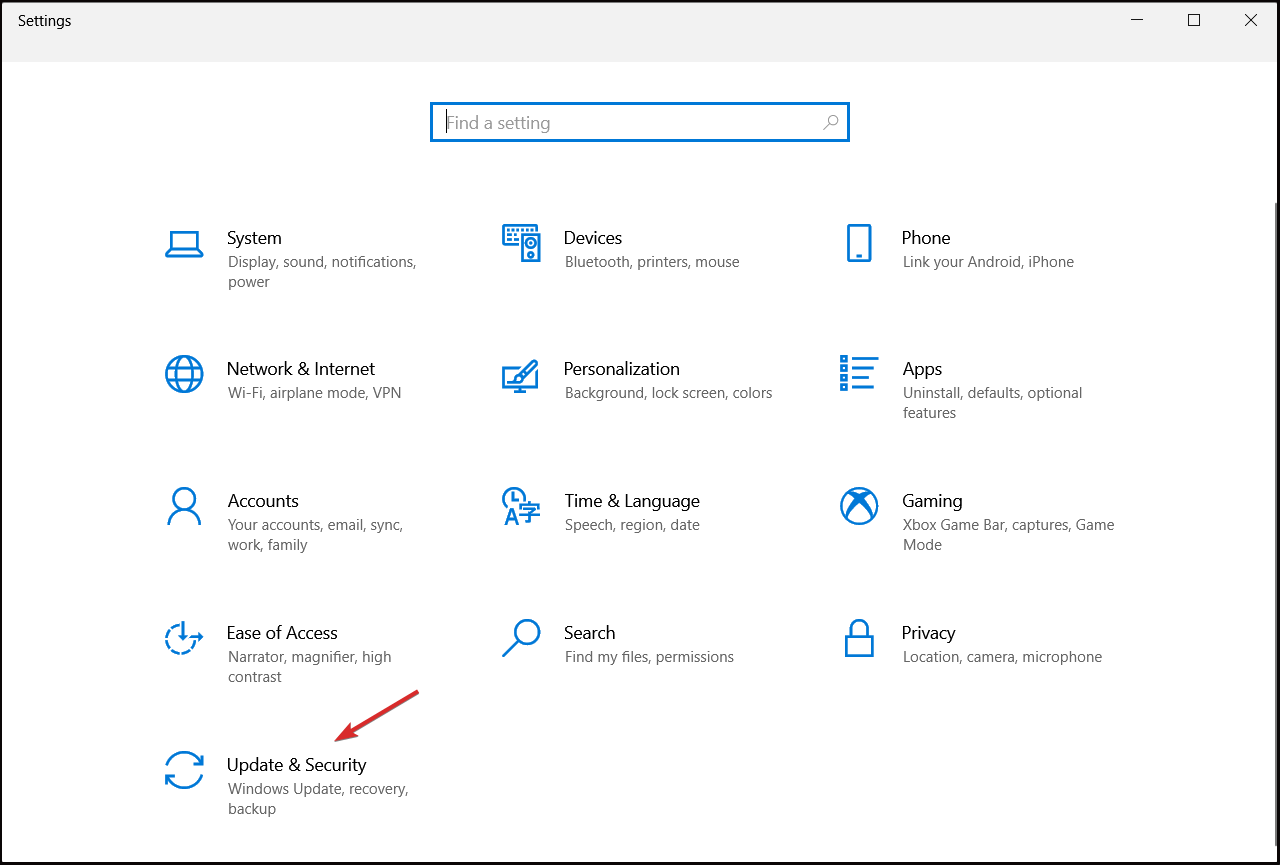
1. Press the Windows key + I to open Settings, then head to Updates & Security.
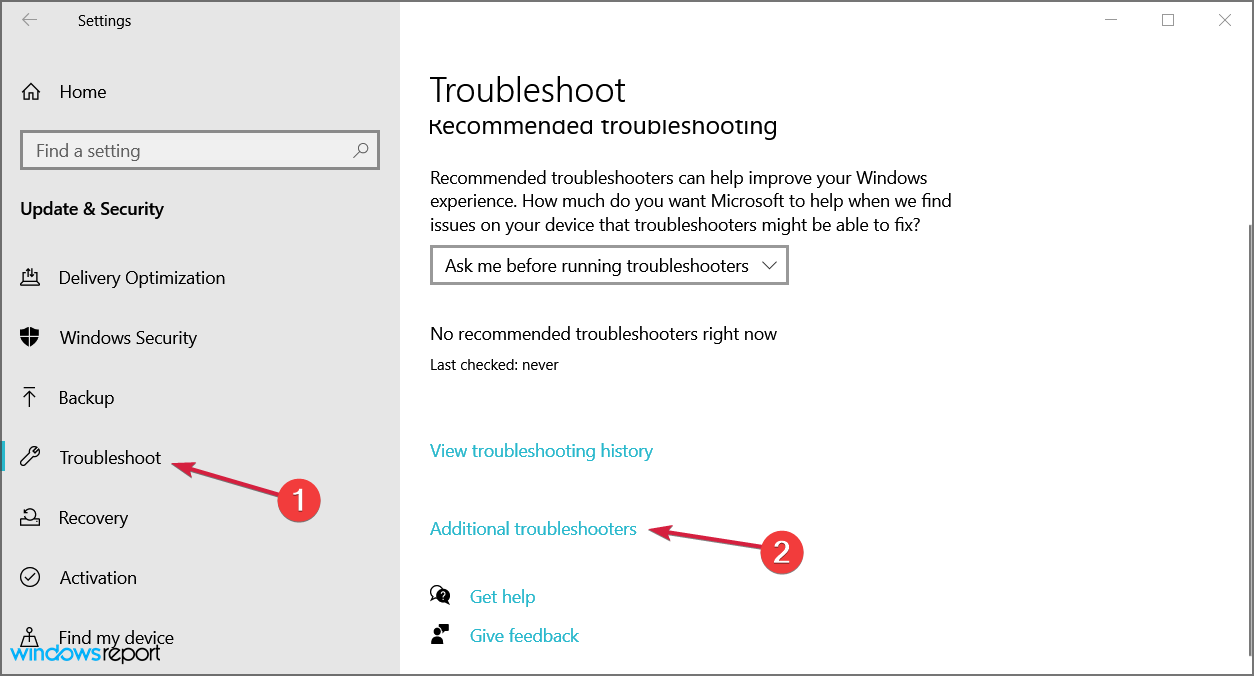
2. Select Troubleshoot from the left pane and click on Additional troubleshooters.
3. Select Internet Connections and click the Run the troubleshooter button.

4. Follow further on-screen instructions and let the process finish.
5. Restart your computer.
3. Reset network adapters
NOTE
Resetting the network adapter can be very effective, but remember that this procedure will erase saved Wi-Fi passwords and Bluetooth connections. So note down the passwords beforehand.
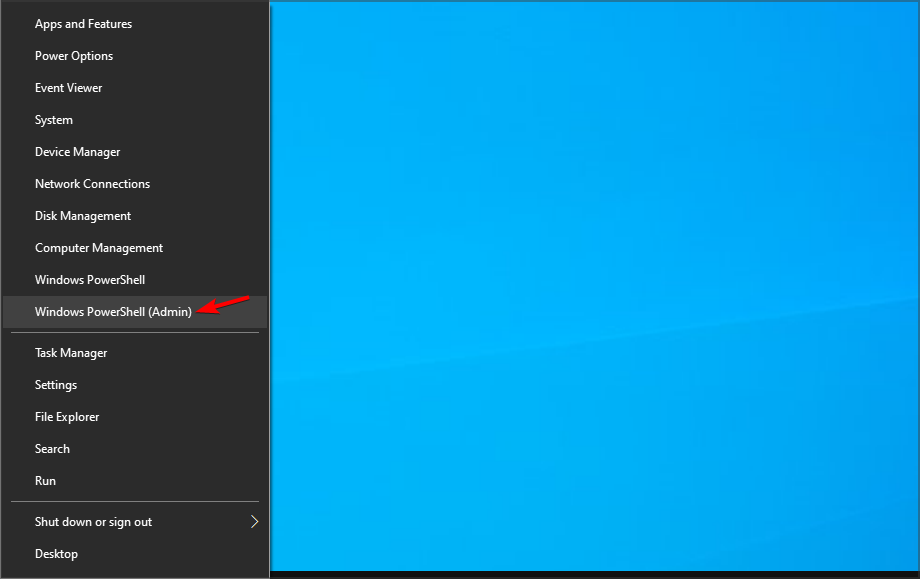
- Right-click on the Start button and choose Windows PowerShell (Admin).

- Type or paste the following lines into Windows Powershell and press Enter after each one:
netsh winsock resetnetsh int ip resetipconfig /releaseipconfig /renew
Once done, restart the computer and verify whether the Wi-Fi adapter is still not working
- Fix wireless adapter or access point issues on PC
- USB Wi-Fi adapter is not connecting to the Internet
- There might be a problem with driver for Wi-Fi adapter
- No Wi-Fi network found on Windows 10/11
- USB Wi-Fi adapter not detected in Windows 10/11
4. Perform a registry tweak with Command Prompt
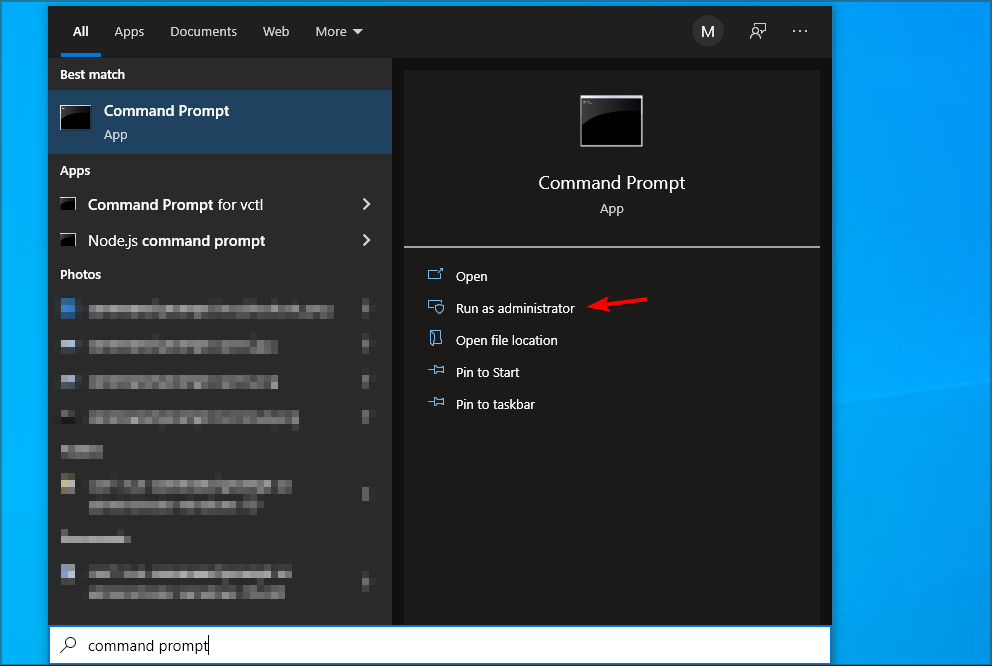
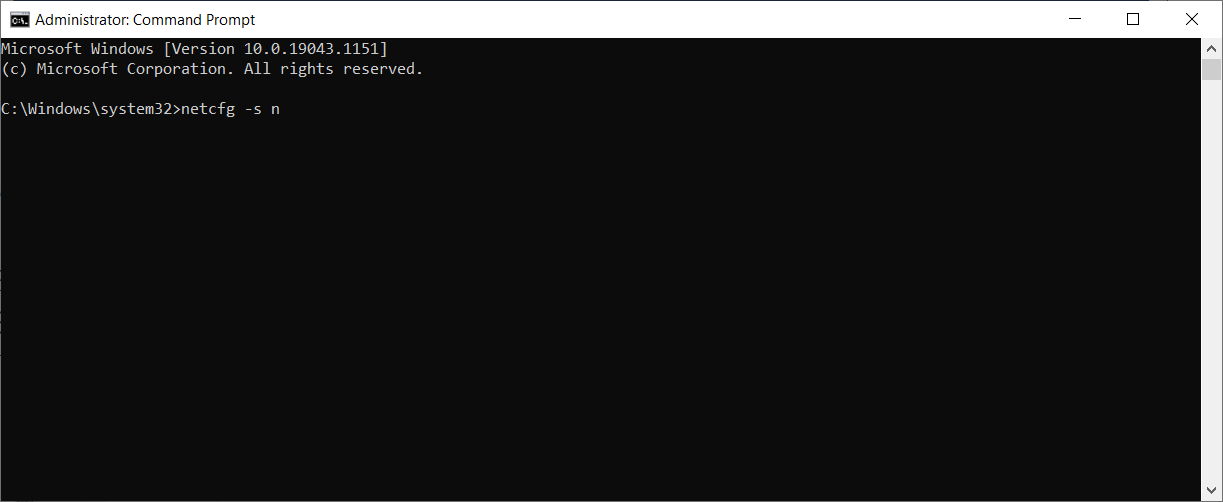
- Type Command Prompt in the search bar and click on Run as administrator.

- Paste the following line and press Enter:
netcfg –s n
- This command will show a list of network protocols, drivers, and services. First, check if DNI_DNE is on the list; if it is, you have a problem.
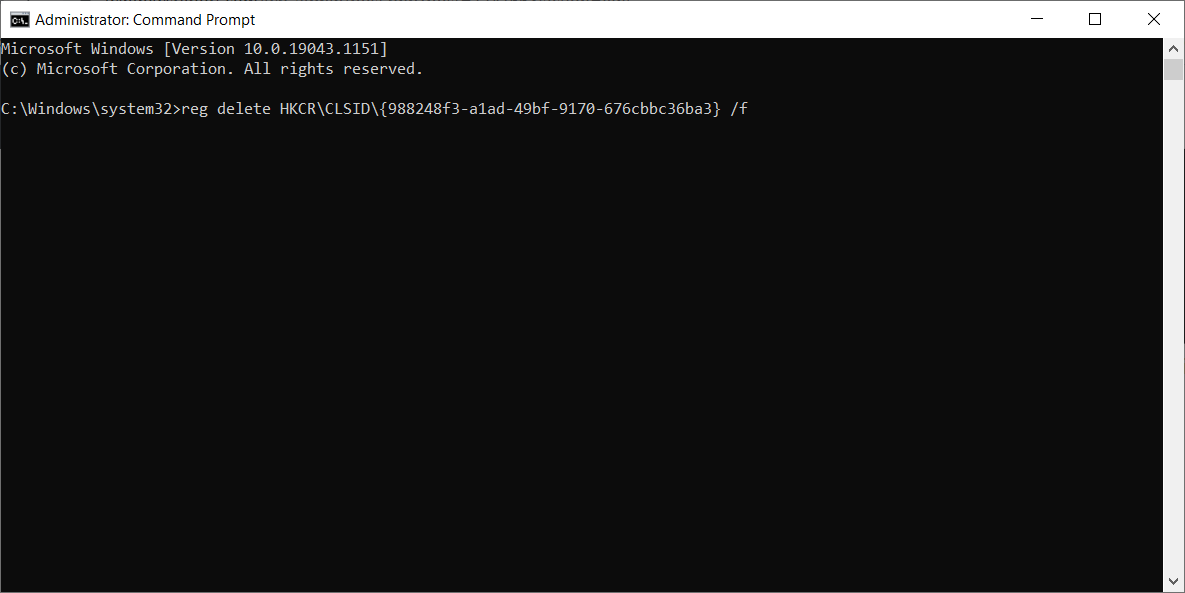
- If DNI_DNE is listed, type the following commands and press Enter:
reg delete HKCRCLSID{988248f3-a1ad-49bf-9170-676cbbc36ba3} /fnetcfg -v -u dni_dne
This should solve the issue, but if you receive the error 0x80004002 after entering the command, this value needs to be deleted slightly differently.
Here’s what to do if you receive this error code:
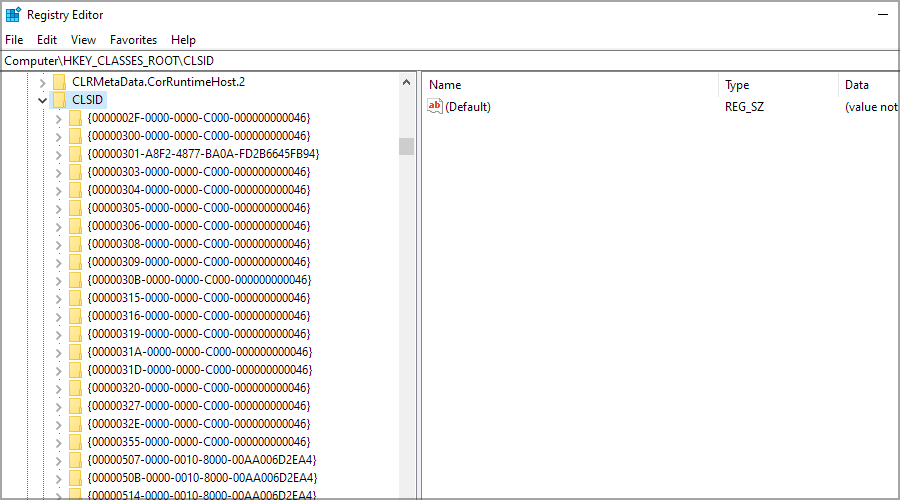
- First, go to Search, type regedit, and open the Registry Editor.

- Navigate to the following path:
ComputerHKEY_CLASSES_ROOTCLSID{988248f3-a1ad-49bf-9170-676cbbc36ba3}
- Delete DNI_DNE if it still exists.
5. Change the adapter settings
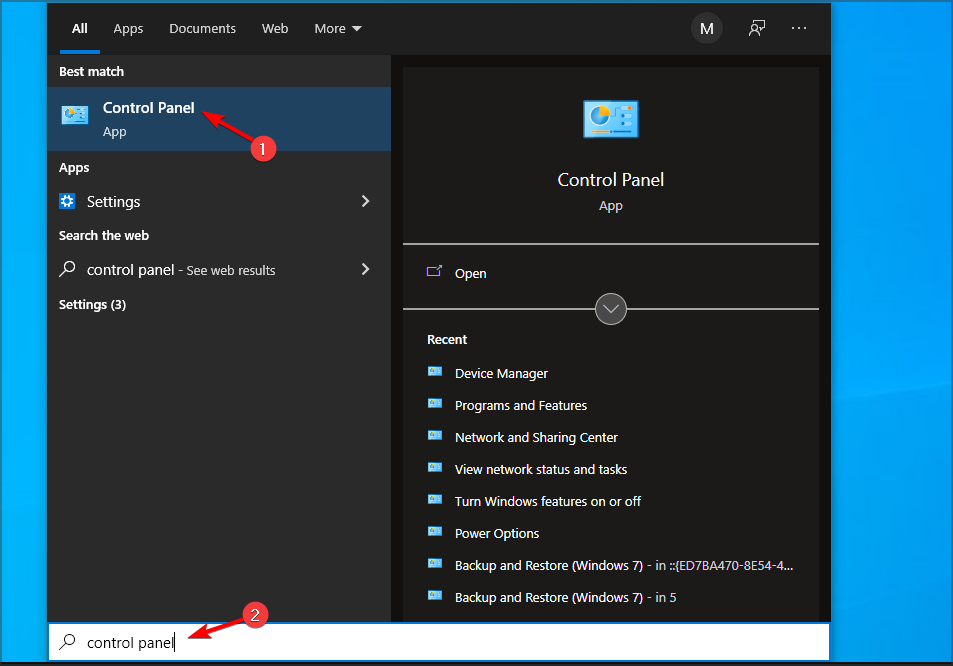
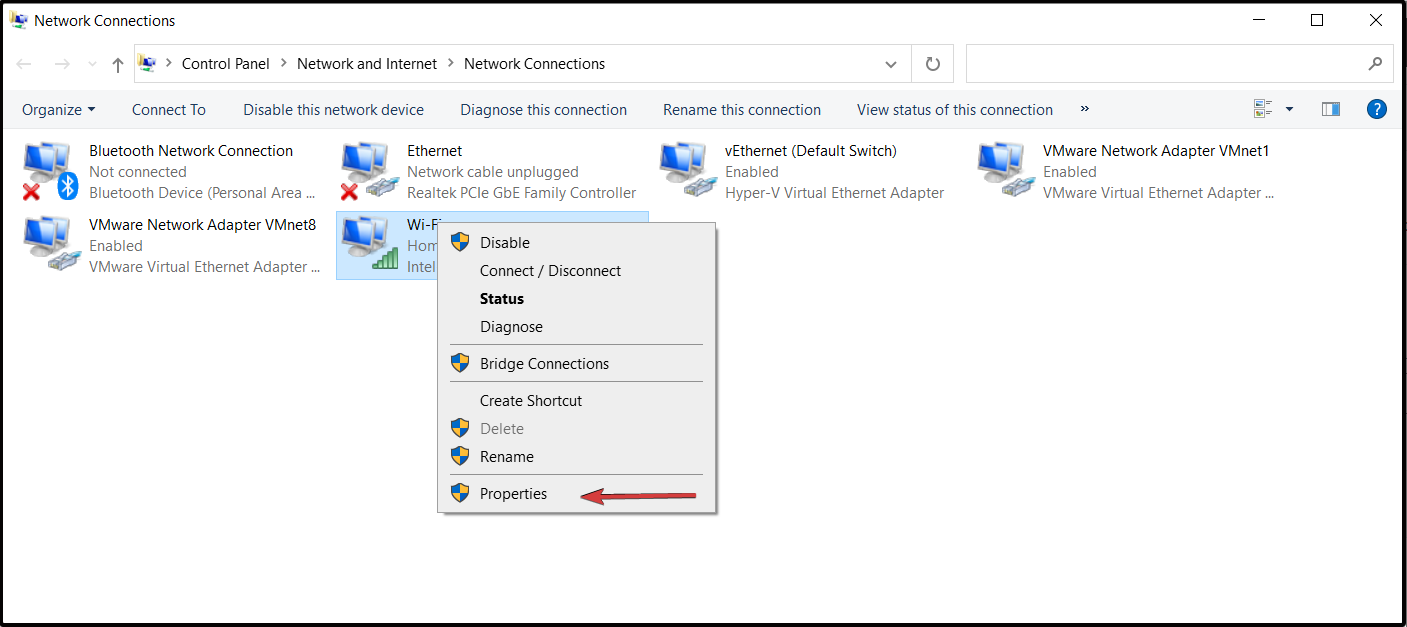
- Click on the Start button, type control panel, and then click on the relevant search result.

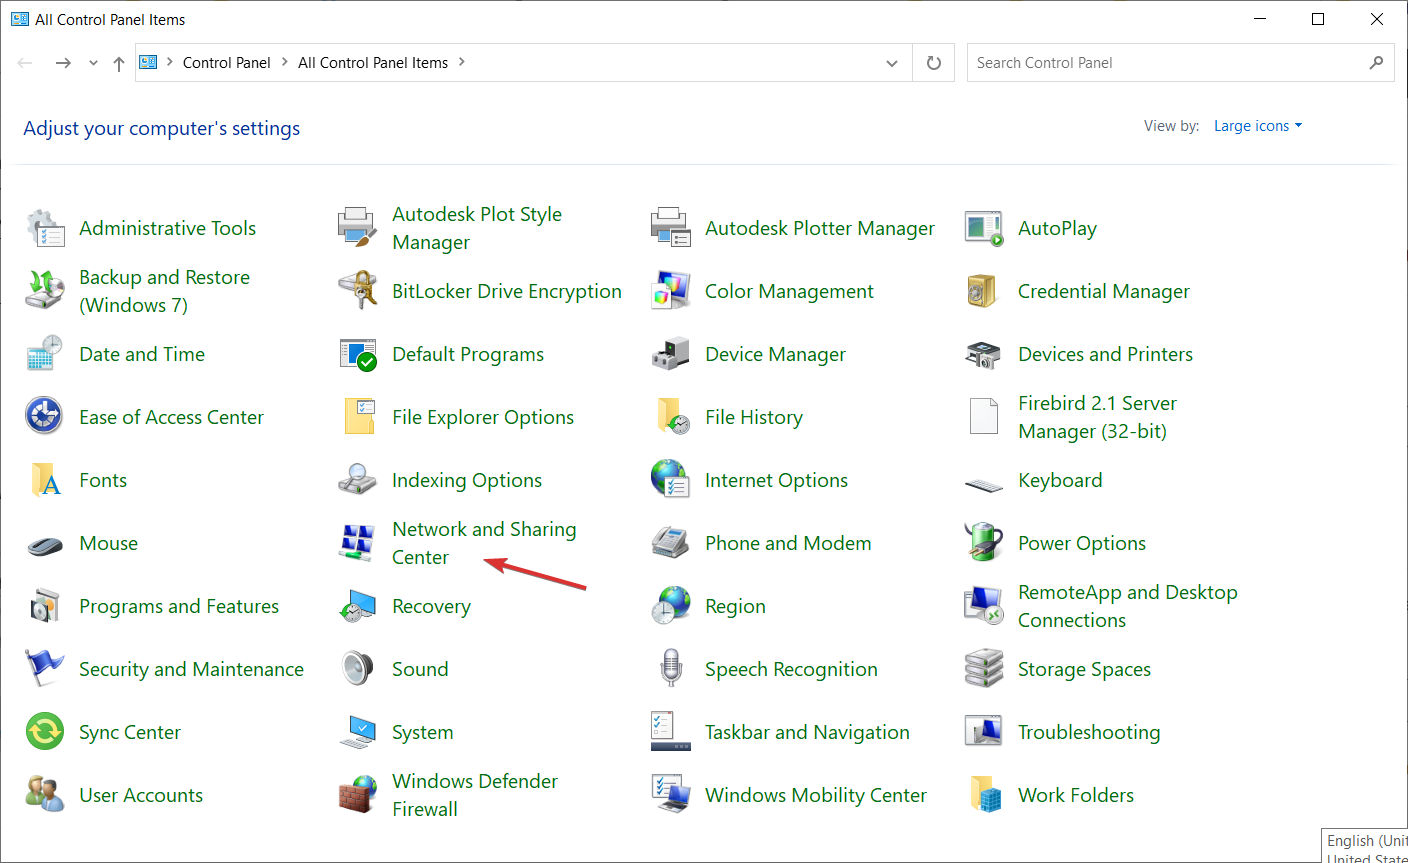
- Go to the top right corner and change the View by option to Large icons.

- Select Network and Sharing Center.

- Click on Change adapter settings.

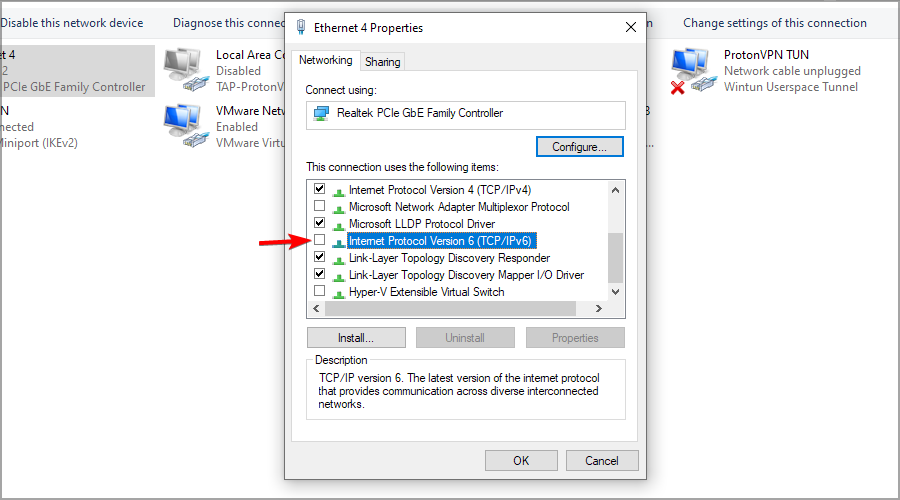
- Right-click the wireless adapter and select Properties.

- Search for Internet Protocol Version 6 (TCP/IPv6), and uncheck the option to disable it.
- Click on OK and restart the computer to enforce the changes you made.

6. Reinstall the network adapter
- Right-click the Start button and choose Device Manager from the list.
- Click on the Network adapters section to expand it.
- Right-click your network adapter and select Uninstall device.
- Follow further on-screen instructions.
- Restart your computer, and Windows will automatically install the best available drivers for the device.

7. Reset your router
NOTE
After you reset the router, you must reconfigure it. Therefore, before resetting it, take notes of the present configuration.
- Look for the Reset button at the back of the device.
- Press and hold it for more than 10 seconds until the SYS led starts flashing quickly, and release the button.
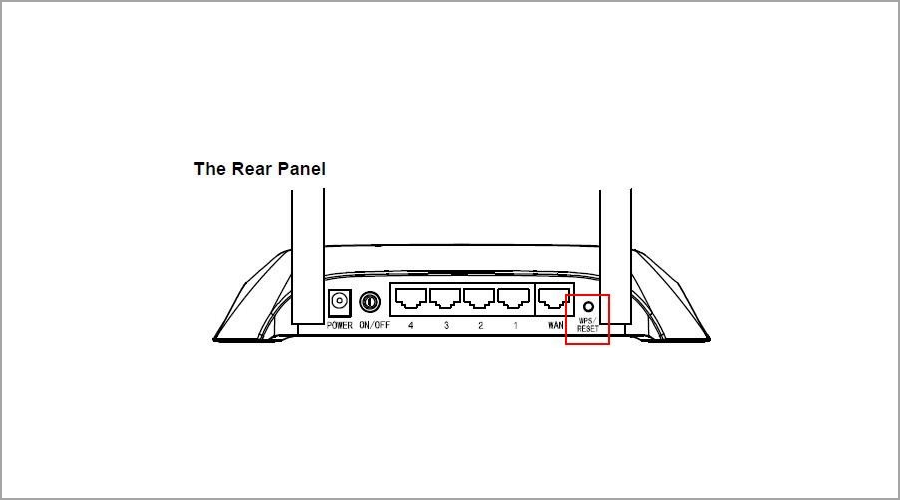
Resetting the router can do wonders, as cliche as it sounds. Though the steps to reset the router are different for each manufacturer, every router usually has a reset button. So, find the instructions for your manufacturer and get done with the process.
8. Update the router firmware
NOTE
Router updates can be dangerous if not performed correctly, so always check your instruction manual for detailed instructions.
- Use an Ethernet cable to connect the router to your PC.
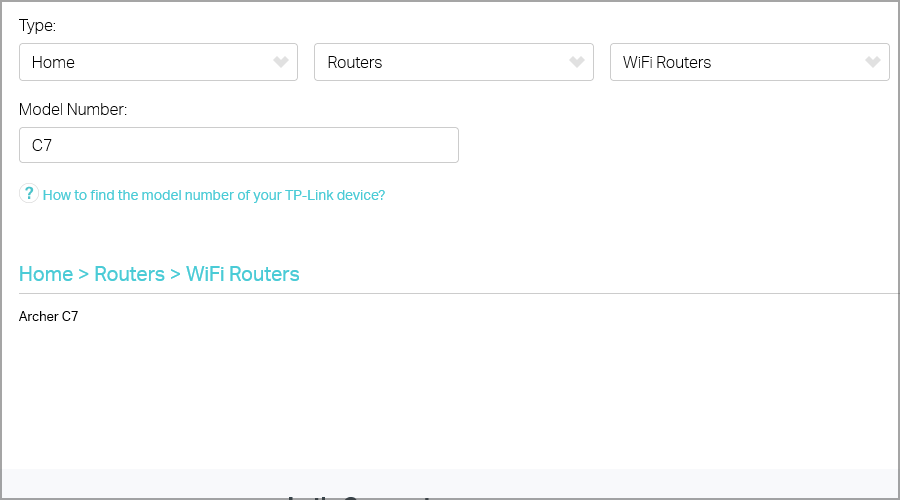
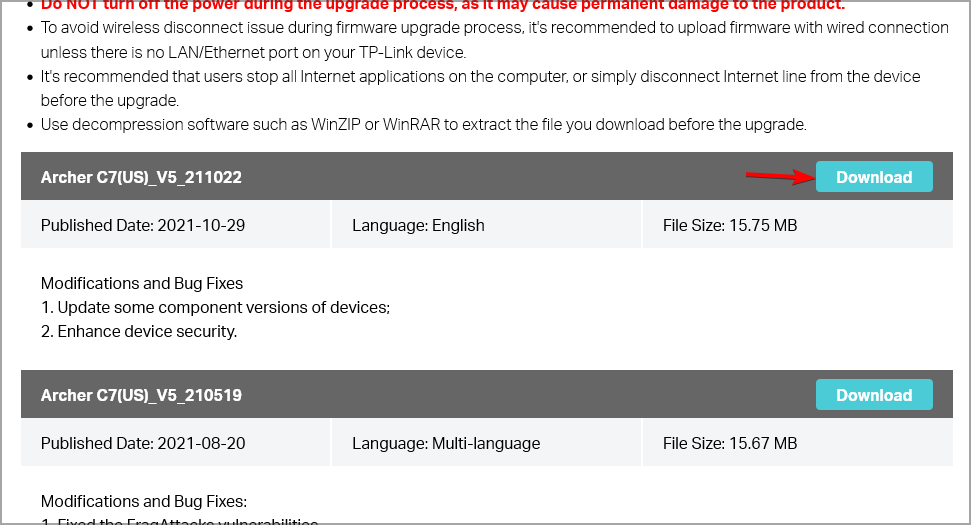
- Visit your router’s manufacturer’s website.
- Locate your model on the list.
- Download the latest firmware version for your model.

- Open your web browser and type the IP address or the router’s link (as an example, our router’s IP address is 192.168.0.1, but yours may be different).
- Now enter the username and password provided by the manufacturer (available in the manual or on the bottom of the device) or the ones you set.
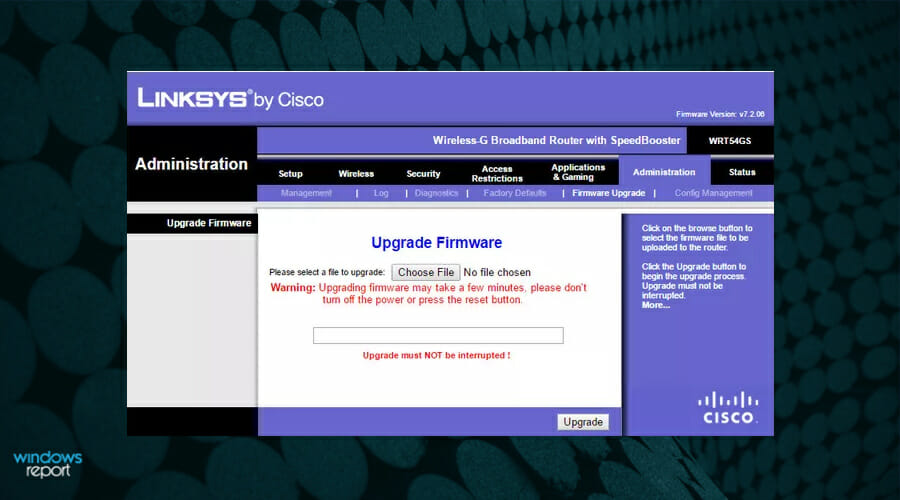
- Navigate to the Firmware section and find the Choose file or Browse button to let you add the firmware you’ve downloaded.
- Wait for the process to finish, and do not interrupt it at any cost.
For more information, we suggest that you visit our guide on how to update your router firmware guide.
9. Switch to the Maximum Performance mode
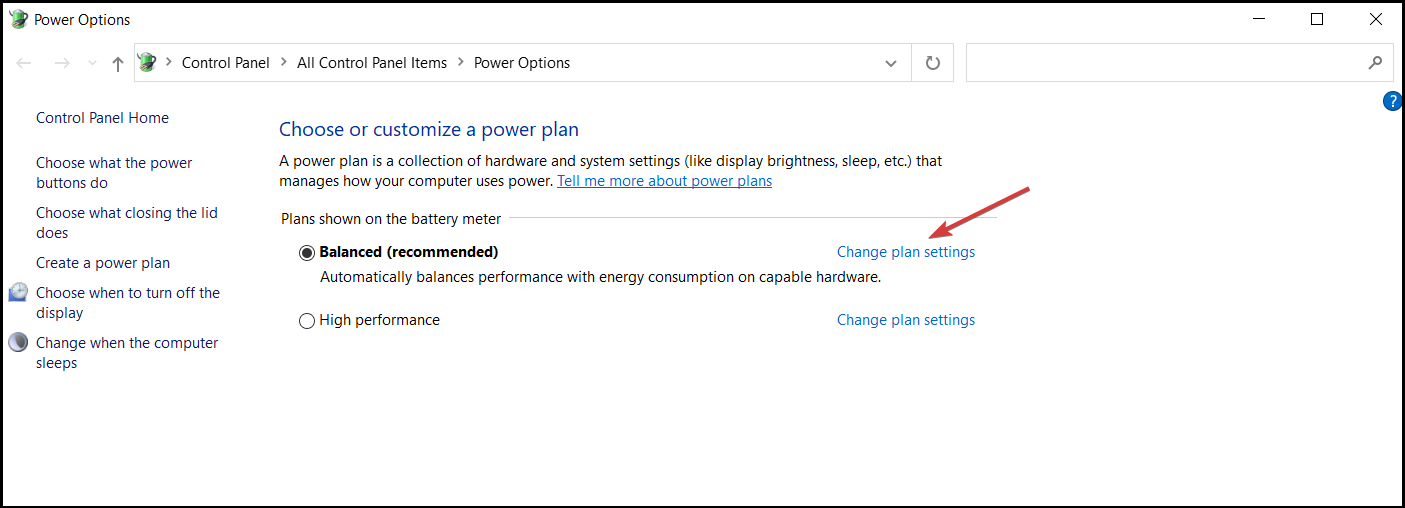
- Press Windows key + S and enter power plan. Now click on Choose a power plan.

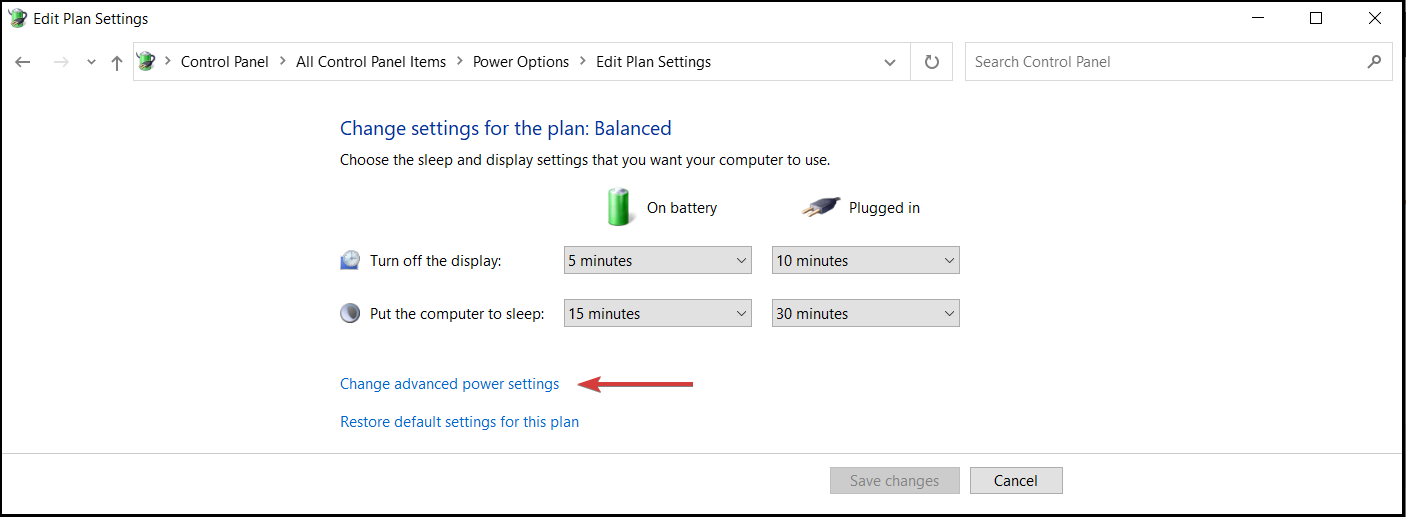
- Once the Power Options window opens, locate your current plan and click Change plan settings.

- Go to Change advanced power settings.

- Expand Wireless Adapter Settings, and set the Power Saving Mode to Maximum Performance.
- Click Apply and OK to save the changes.

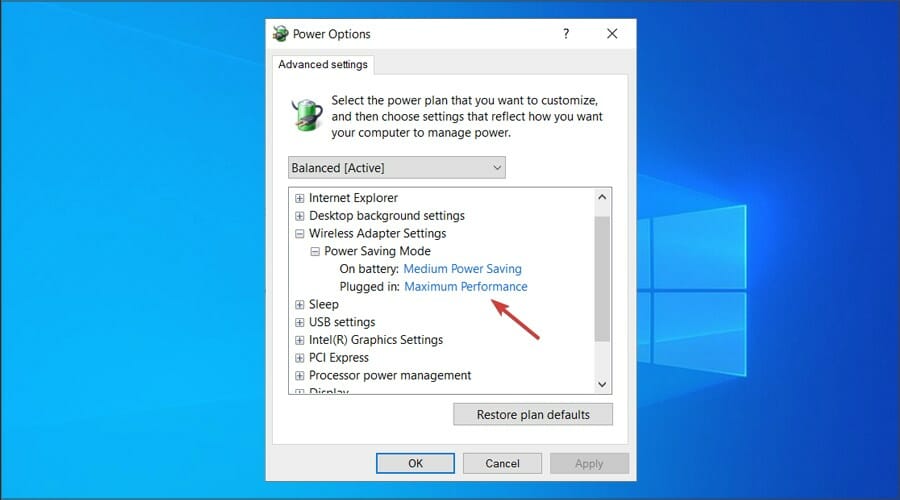
Just keep in mind that the Maximum Performance mode will put some extra pressure on your device, so your laptop battery may drain more quicker. But, it should, in all likelihood, fix the problem with the Wi-Fi adapter.
What do I do if the Wi-Fi adapter is not working on Windows 11?
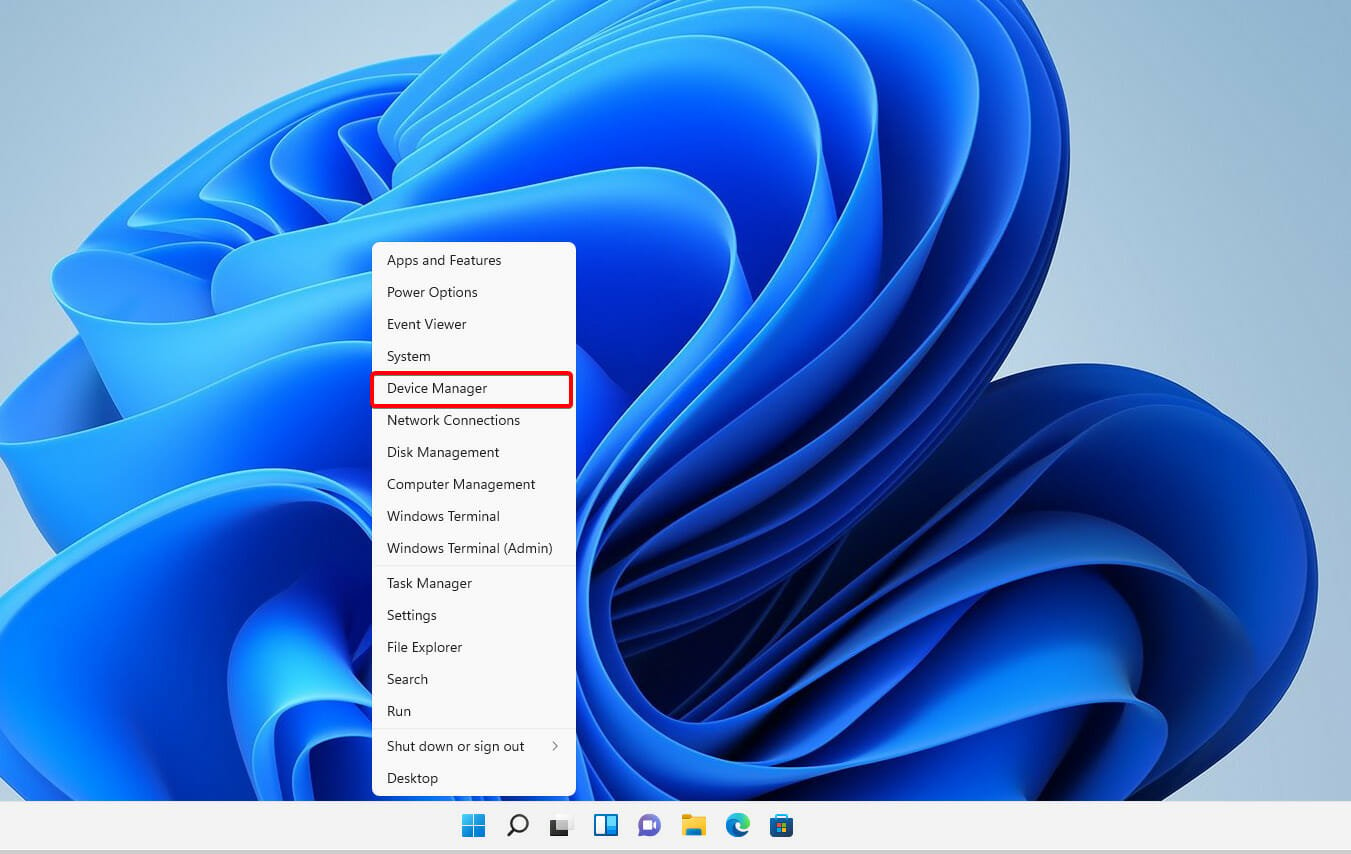
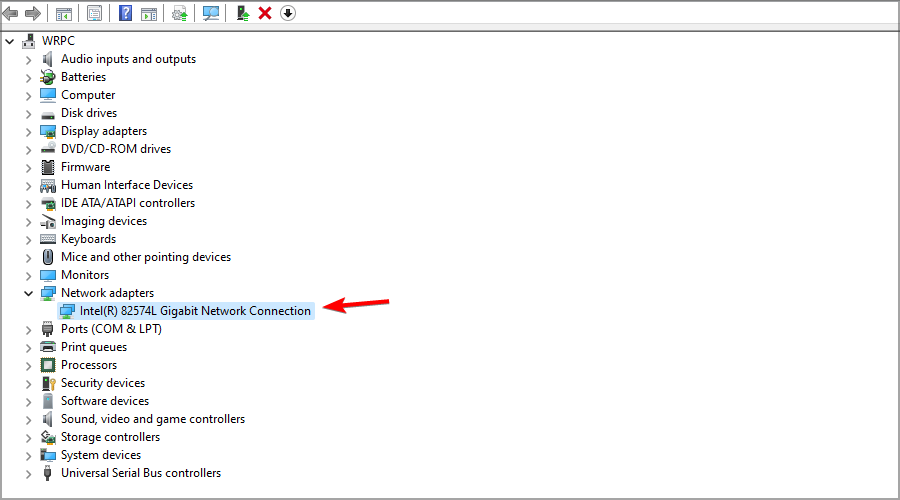
- Press Windows key + X and select Device Manager from the list.

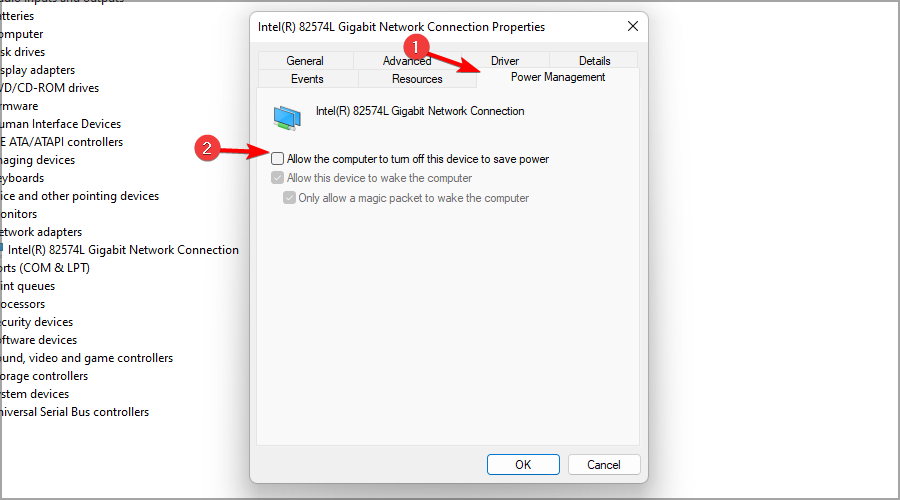
- Locate your wireless adapter from the list and double-click it to open its Properties.
- Navigate to the Power Management tab and disable Allow the computer to turn off this device to save power option.
- Click OK to save the changes.
Some PC issues are hard to tackle, especially when it comes to corrupted repositories or missing Windows files. If you are having troubles fixing an error, your system may be partially broken.
We recommend installing Restoro, a tool that will scan your machine and identify what the fault is.
Click here to download and start repairing.
If you’re still having problems, visit our guide on what to do if Wi-Fi disappears in Windows 11 for more solutions.
How do I avoid Wi-Fi connection problems?
1. Choose a less crowded channel
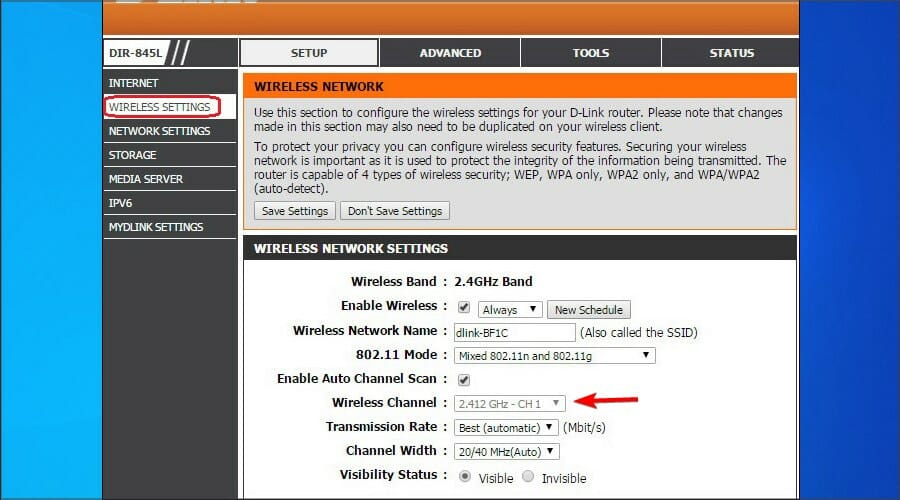
- Open your router’s configuration page.
- Navigate to the Wireless section.
- Select your network and choose a different channel for it.
2. Move between 2.4 GHz and 5 GHz
If you have a dual-band router, switching between the two frequencies can be a good idea.
You can usually find the frequency settings in the Wireless Settings menu on your router, just like in the image above.
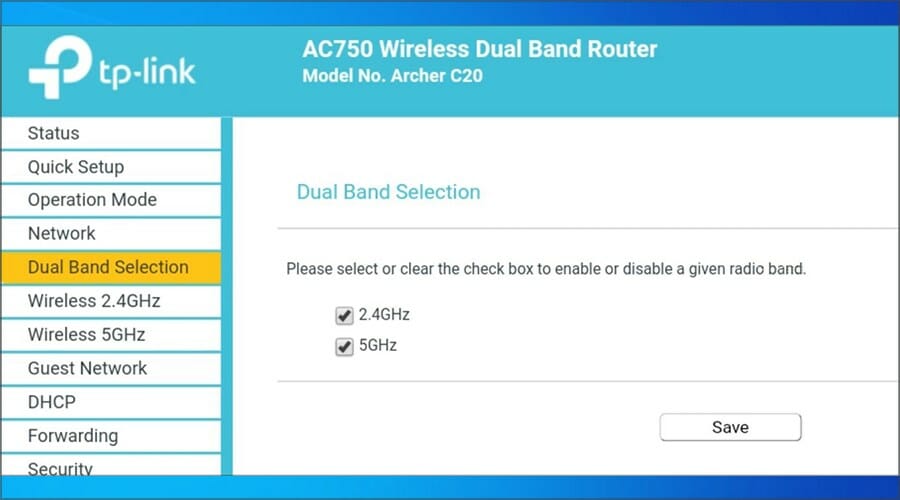
Just like we mentioned before, they may differ on your device. Therefore, feel free to consult the manual of your device.
3. Remove unwanted devices
You might have forgotten that you gave the router password to some friends, especially neighbors who may still connect to your Wi-Fi network.
To get them off your network, go into your router’s settings, look for connected devices, and delete the ones you don’t recognize.
4. Upgrade your device (change the Wi-Fi card)
The Wi-Fi card or adapter is usually embedded in your motherboard, but that doesn’t mean you can’t use an external one.
If you conclude that your one is not working correctly, you can use a new Wi-Fi adapter that will fit your needs better.
5. Get the right router for your needs
When talking about your home network, ensure that the router can provide signal coverage wherever you are in the house.
If the connection fails from time to time, it’s either a problem with the router itself or the signal power to your device.
You can even choose one of the best routers with an internal antenna but remember to stay with your device within range.
6. Keep your drivers updated
As you’ve read in our guide, drivers can cause a lot of mess when it comes to Wi-Fi adapters, and not only, so it’s recommended that you regularly update the network drivers.
7. Pick the correct Wi-Fi hotspot
Although it may sound hilarious, sometimes we can connect to another network by mistake, a slower or a more crowded one.
That is why, when you encounter an Internet connection problem, you first need to ensure that you have the correct link from the ISP and that your router or access point is working correctly.
After that, check if other devices can connect to the Wi-Fi network; if they do, you can conclude that there might be a problem with your device.
Should I use a 5GHz or 2.4GHz wireless network?
5GHz networks offer incredible speed and less latency, so if you want a fast connection with low ping, this is the better option.
However, 2.4GHz offers a better range, and its signal is better at penetrating through obstacles, such as walls. Also, remember that many devices aren’t fully compatible with 5GHz networks.
As a basic rule, troubleshoot the most common possible issues and gradually move on to the more complex ones.
Once you have managed to fix things, find out how to boost the performance of a Windows PC for a better experience.
If you have any comments, questions or suggestions, let us know in the comments below.
![]()
Newsletter
Обновившись до Windows 10 либо установив последнюю версию обновлений операционной системы, многие пользователи сталкиваются с неработоспособностью беспроводной сети. Связано это чаще всего с драйверами беспроводного Wi-Fi адаптера. В вязи с этим, могут быть следующие проблемы:
- Невозможно подключить сеть, поскольку компьютер ее не отображает.
- Не работает беспроводной адаптер.
- Не подключается по беспроводной (Wi-Fi) сети — выдает ошибки.
- Соединение есть, но в ограниченном состоянии и сеть, следовательно, не работает.
Именно все эти четыре проблемы вызваны тем, что беспроводной адаптер не имеет драйвера или установленная на компьютере версия устарела, не поддерживается или выпущена с ошибками. При обновлении или установке «с нуля» системы, десятой версии Windows, драйвер закачивается и устанавливается в автоматическом режиме. Но это не означает, что он работает корректно. Причины кроются в частом появлении новых редакций ОС Майкрософт и в том, что производители адаптеров и ПК не поспевают за этими обновлениями и, следовательно, их драйвера устаревшие.

Если драйвер работает некорректно, то и аппаратная часть ноутбука «порадует» сбоями. Если говорить о драйвере для адаптера, то при его неправильной работе невозможно будет подключиться к интернету. ОС неправильно понимает команды драйвера, и у пользователя появляются проблемы при подключении ноутбука по Wi-Fi сети. Исходя из этого, если у вас появились проблемы с подключением в новой версии ОС, сразу обратите внимание на адаптер. Поменяйте драйвер, предварительно удалив старую версию, если она присутствует на компьютере. Не используйте для загрузки «левые» ресурсы. Лучше всего скачать драйвер с официальной страницы разработчика. При этом учитывайте при загрузке модель адаптера.
Если ноутбук не находит подключенные к нему сети или не отображает адаптер (беспроводное устройство) или кнопку Wi-Fi, все дело в драйвере. Если вы видите такие ошибки, значит, драйвер отсутствует на устройстве. Чтобы включить беспроводную сеть, вам просто надо скачать и установить драйвер.
- Но если драйвер присутствует, появился в автоматическом режиме, но ошибки подключения есть, мы попробуем решить эту проблему своими методами.
Решение проблемы заменой драйвера Wi-Fi адаптера в Windows 10
Есть такие проблемы, когда установка нового драйвера не помогает. Вы можете удалить старый драйвер безвозвратно, установить самую новую версию, но это не решит проблемы. Впрочем, это не означает, что вы не должны попробовать этот вариант. Это первое, что вы должны сделать. Обычно при обновлении или чистой установке система загружает несколько драйверов, и нам важно выбрать один из них — тот, который работает правильно.
- В поисковой строке укажите «Диспетчер устройств» и нажмите на полученный результат, как на картинке.

- Перейдите к «Сетевым адаптерам». На этой вкладке вы найдете свое устройство. Если в списке не отображены ни Wireless, ни Wi-Fi, адаптера на вашем компьютере нет. Загрузите его и посмотрите, есть ли драйвер. Если вы видите предупредительный знак желтого цвета, кликните на адаптер и обновите драйвер.

- Обновление драйвера выполните следующим образом: найдите его с помощью опции поиска на этом устройстве.

- Теперь нужно нажать на “Выбрать из списка установленных“.

- Вы увидите несколько драйверов, которые уже есть в системе. Здесь нам нужно выбрать тот драйвер, который не совпадает с тем, что в диспетчере. Установив этот новый драйвер, вы попробуете его на работоспособность. Выберите его и продолжайте «Дальше».

- Нажатие кнопки активирует установку выбранного драйвера.

После окончания процедуры обязательно следует перезагрузиться. Теперь можете тестировать подключение по беспроводной сети. Если и этот драйвер работает неправильно, возвращайтесь к поиску, ищите новый драйвер, устанавливайте и тестируйте заново. Если драйверов много, возможно, найдется работоспособный, который решит проблему с подключением к интернету в десятой версии ОС Windows.
Решаем с помощью удаления установленного драйвера беспроводного адаптера
Если ни один драйвер, установленный в системе, не подключил интернет, его необходимо удалить полностью. Это делается в диспетчере.
- В поисковой строке укажите «Диспетчер устройств» и нажмите на полученный результат (пояснялось выше в статье). Вы перейдете к «Сетевым адаптерам», найдете там свое устройство и нажмете «Удаление».

- Кликните «ОК».

- После того как драйвер удалится нужно перезагрузить компьютер. Затем система вновь установит его в автоматическом режиме.
Пробуем откатить драйвер беспроводного адаптера в Windows 10
Если ничего не помогает, попробуем сделать откат драйвера для беспроводного адаптера. Возможно, это заставит беспроводную сеть заработать стабильно или, наконец, подключиться.
- Открывайте вновь «Диспетчер» и открывайте «Сетевые адаптеры». Выбирайте свое беспроводное устройство и кликните на него, чтобы открыть «Свойства».

- В «Свойствах» перейдите к «Драйверу» и нажмите «Откат» (Если кнопа не нажимается, вариант вам не подходит, и драйвер, который установлен сейчас в системе, не имеет более старой версии).

- Если есть такая возможность, жмите соответствующую кнопку. Система предупредит о понижении функциональности, если вы перейдете к более старой версии драйвера для беспроводного устройства. Игнорируйте уведомление и просто нажмите кнопку «Да». Произойдет откат нового драйвера и на компьютере будет установлена в автоматическом режиме прежняя, более старая версия. Возможно, она окажется работоспособной, ведь раньше, до обновления, интернет подключался и стабильно работал.

- Прежде чем протестировать произведенные изменения, нажмите перезагрузку операционной системы. Теперь пробуйте.
Вот эти рекомендации мы можем предложить вам для решения проблемы с подключением к сети по беспроводному, Wi-Fi, адаптеру. Если у вас есть дополнительные советы или вы знаете, как исправить проблемы, поделитесь с нами. Мы следим за ситуацией.
Источник
Jun. 24, 2022 / Updated by
Daphne to
Windows 10
Main Content of this article:
-
Windows 10 Wi-Fi Problem You May Get
-
What Causes Wi-Fi Not Working on Windows 10
-
2 Solutions to Fix Wi-Fi Not Available Issue after Windows 10 Update
Windows 10 Wi-Fi Problem: No Wireless Internet Connection and No Wi-Fi after Windows 10 Update
Recently, many users encounter the no Wi-Fi available after Windows 10 update issue. The Windows 10 Wi-Fi problems include: Wi-Fi is not available after Windows 10 update (Creators Update / Fall Creators Update 1709 / Spring Creators Update / April 2018 Update 1803 / October 2018 Update 1809 / May 2019 Update 1903), no Wi-Fi connections available or no wireless connection after Windows 10 update (Creators Update / Fall Creators Update 1709 / Spring Creators Update / April 2018 Update 1803 / October 2018 Update 1809 / May 2019 Update 1903), no Wi-Fi in network connection, no Wi-Fi network found or Wi-Fi adapters not showing up in the system. In this case, when you try to connect to wireless network on your Windows 10 laptop or desktop, your Microsoft Edge is not working, or the Google Chrome browser is not working.
Here are some of the reports we’ve received from users about this broken Windows 10 Wi-Fi issue.
-
There’s no Wi-Fi available on my computer after Windows 10 update.
-
Windows 10 Wi-Fi is not working. No Internet, Secured.
-
Can’t turn on WiFi after Windows 10 update. No WiFi adapter option.
-
Wi-Fi connected but no Internet access.
-
There’s no Wi-Fi connection after Windows 10 Update on my HP laptop.
-
Why there is dreaded broken Wi-Fi after I installed Windows 10?
-
My computer gets unidentified network in Windows 10, 64 bit.
-
No wireless connection after upgrate to Windows 10 Creators Update. No wireless network connections or Wi-Fi.
-
No Wi-Fi adapter found after Windows 10 upgrade. The wireless adapter is not showing up in Device Manager.
-
How to fix a red cross on WiFi icon in Windows 10?
-
My Wi-Fi stopped working after update to Windows 10. I have no WiFi settings, no Wi-Fi drivers, and even no sign of Wi-Fi.
Luckily, there are workable solutions to fix this Wi-Fi not working issue after Windows 10 update, applied to Windows 10 Fall Creators Update / Spring Creators Update / Anniversary Update / April 2018 Update 1803 / October 2018 Update 1809 / May 2019 Update 1903. The methods are effective on all brand PCs, like Asus, Acer, Dell, HP, Sony, Lenovo, Samsung, Toshiba, IBM, Alienware, Compaq, Gateway, LG, Microsoft, MSI, etc..
Why Wi-Fi Is Not Available after Windows 10 Update
What causes Windows 10 not connecting to Wi-Fi? There are 2 main reasons why your Wi-Fi is not available after upgrade to Windows 10.
1. The Wi-Fi or the wireless adapter driver is not updated and not compatible with Windows 10 Fall Creators Update / Creators Update / Anniversary Update / April 2018 Update 1803 / October 2018 Update 1809 / May 2019 Update 1903. In some cases, the Wi-Fi driver is missing after Windows 10 update.
2. If reinstalling Wi-Fi drivers doesn’t help, the problem may be triggered by unsupported VPN software present during the Windows 10 upgrade. If you have an old VPN client, specifically the Cisco VPN client, or Sonic Global client, it’s certain that the piece of software is what is causing the no internet connection issue on Windows 10.
Microsoft has explained it: «This issue may occur if older VPN software is installed on Windows 8.1 and is present during the upgrade to Windows 10. Older software versions contain a Filter Driver (the Deterministic Network Enhancer) which is not properly upgraded, leading to the issue.»
You can uninstall the VPN software to troubleshoot the no Wi-Fi issue on Windows 10.
Wired Ethernet connections may also not function properly, if you are using built-in Ethernet adapter or a USB Ethernet adapter. Please note that some connected devices (like the very old ones) may also cause this no Internet issue.
Top 2 Solutions to Fix Windows 10 Wi-Fi Not Available Issue
Try the 2 ways below to solve the Windows 10 Wi-Fi not working or Wi-Fi won’t turn on problem on your laptop, desktop or tablet. Here is how to make Wi-Fi available on your Windows 10 Fall Creators Update / Creators Update / Anniversary Update / April 2018 Update 1803 / October 2018 Update 1809 / May 2019 Update 1903 computer. Also see the Updated information at the end of the post.
Way 1. Update Wi-Fi Adapter Drivers on Windows 10
In this case, you can fix the Wi-Fi driver issue with Driver Talent (formerly called DriveTheLife).
Driver Talent can help to check if the Wi-Fi driver causes the problem and then update the outdated driver either by repairing it or downloading the latest one to match the wireless adapter for Windows 10.
Download and install this tool on your laptop, notebook or desktop to solve your Windows 10 Wi-Fi not working issue.
Download Now
Step 1. Run Driver Talent and click the Scan button to detect your computer. It can check all driver problems.

Step 2. Click the Update or Repair button on the right of your Wi-Fi or wireless adapter driver to fix the Wi-Fi driver issue.

Step 3. Reboot to make your Wi-Fi or wireless adapter driver take effect. Now your wireless network connection is available.
Note: You can also try the network version: Driver Talent for Network Card. This version can help to fix the driver issues without Internet connection. You should install this tool before updating to Windows 10. Alternatively, download it with an available computer that has Internet connection and move it to your computer to install network driver offline.
Way 2. Enter Command to Fix No Wi-Fi after Windows 10 Update
To resolve the Windows 10 Wi-Fi not available issue, way 2 is used to fix the wireless adapter driver that causes the no Wi-Fi issue on Windows 10.
Important: Follow the steps below carefully. Serious problems might occur if you modify the registry incorrectly. Before you modify it, back up the registry for restoration in case problems occur.
You can use command to fix this Windows 10 no Wi-Fi problem if it’s triggered by VPN software.
Step 1. Type cmd into the search box on the taskbar and right-click the Command Prompt for Run as administrator. This can launch Command Prompt as Administrator.
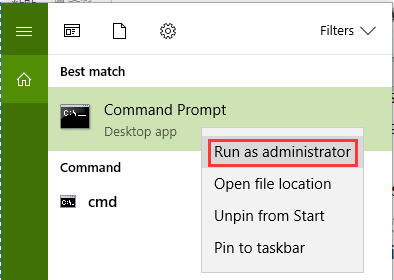
Step 2. Enter the following command and hit the Enter key:
reg delete HKCRCLSID{988248f3-a1ad-49bf-9170-676cbbc36ba3} /va /f
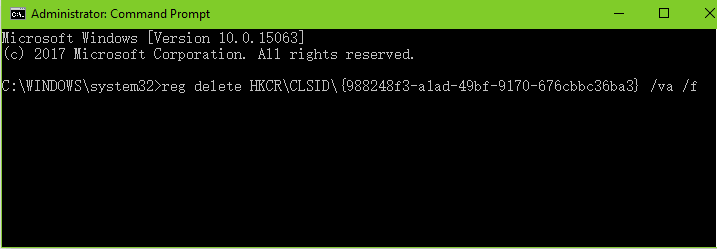
Step 3. Enter the command below in the Command Prompt box and press Enter once more:
netcfg -v -u dni_dne
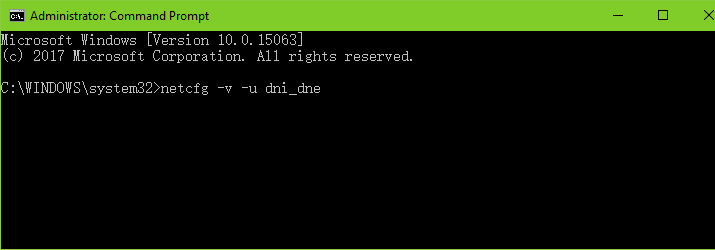
Step 4. Restart the computer and check back with your Wi-Fi settings. You now should see a revived list of all the available networks within range.
Note: If you have the Cisco VPN client, Sonic Global client or other VPN software running on your computer and you are planning to upgrade to Windows 10, you can uninstall the VPN before proceeding.
Bonus Tip: Optimize Wireless Adapter Settings for Best Wi-Fi Performance
If your computer drops Wi-Fi or shows no Wi-Fi available, you could change the wireless adapter power settings to get the best Wi-Fi performance. The default power option is «Power saving mode», which will result in Windows 10 Wi-Fi problem while connecting to distant WAPs. Take the following steps to fix the Wi-Fi issue.
Step 1. Use Windows shortcut keys Win + X or right-click the Start menu. Select Power Options.

Step 2. Scroll down and click the Additional power settings. (This is available for Windows 10 Fall Creators Update / Creators Update users. For the predecessors, go to Step 3 directly.)

Step 3. Locate your current power plan and click Change plan settings.
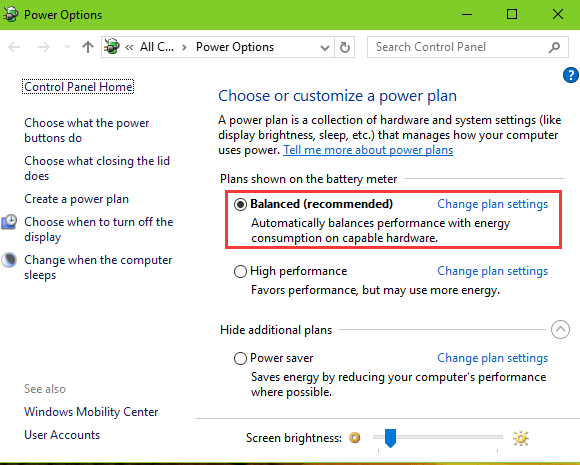
Step 4. Click Change advanced power settings.
Step 5. Choose the Maximum Performance under the entry Wireless Adapter settings.
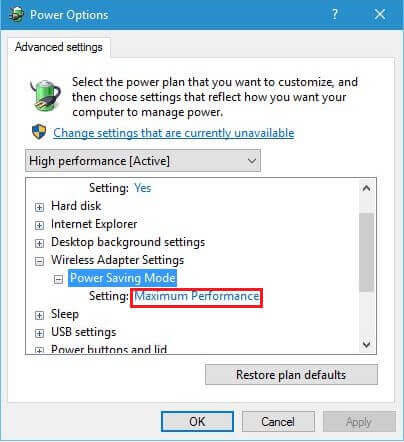
Step 6. Click Apply, and then click OK to fix Windows 10 Wi-Fi issue.
Updated: Other Workarounds for No Wi-Fi Available after Windows 10 Update
Windows 10 offers a built-in tool named Internet Connection Troubleshooter to fix the no wireless connection issue after Windows 10 Fall Creators Update / Creators Update / Anniversary Update / April 2018 Update 1803 / October 2018 Update 1809 / May 2019 Update 1903. You can try this tool to troubleshoot the Wi-Fi not working problem after the update.
Step 1. Use Windows shortcut keys Win + I to open the Settings.
Step 2. Go to the Update & security menu.
Step 3. On the left side, choose the Troubleshoot tab.
Step 4. Click the Internet Connections and detect if there is the no Wi-Fi connection issue.
Step 5. Follow the on-screen instructions to complete the troubleshooting process.
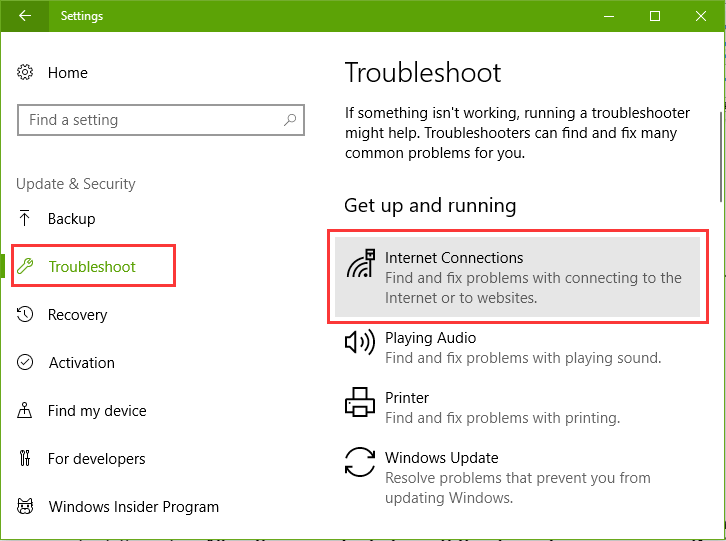
In addition, we’ve seen many users sharing their methods to troubleshoot the Windows 10 Wi-Fi not working problem in the comments. If the above solutions don’t work for you, try to turn on the Wi-Fi again in Settings, or uncheck the option Allow the computer to turn off this device to save power on Device Manager >> Network Adapters >> Properties >> Power Management tab.
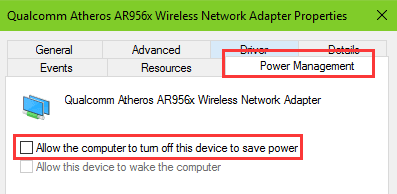
You may also like to check out:
-
How to Fix Windows 10 WiFi Problems
-
How to Disable Windows Defender in Windows 10/8/7
-
Top 8 Ways to Fix No WiFi after Windows 10 Creators Update
-
Fix IPv4/IPv6 No Internet Access on Windows 10 Fall Creators Update
-
5 Ways to Fix WiFi «No Internet, Secured» Issue on Windows 10 Creators Update
-
Top 7 Ways to Fix Windows 10 Network Connection Issues
-
Fix WiFi Adapter Not Showing up after Windows 10 Creators Update
If you still fail to fix the Windows 10 no Wi-Fi available or no wireless connection problem with the methods above, you can factory reset your laptop or desktop, or go to the LEFT MENU for special technical support. If you know other ways to solve Wi-Fi not available issue after Windows 10 Fall Creators Update / Creators Update / Anniversary Update / April 2018 Update 1803 / October 2018 Update 1809 / May 2019 Update 1903, share with us in the comments section below.
Any other Windows-10 issues, such as no sound, black screen, blue screen, PC slow, keyboard not working, etc., please go to the Windows 10 section on this site or our blog for solutions. Many thanks.
Recommended Download

|
ExplorerMax |

|
Driver Talent for Network Card | |
| Smart and advanced file explorer tool for Windows platforms | Download & Install Network Drivers without Internet Connection | |||
|
30-day Free Trial |
Free Download |
If you are facing Wifi not Working in Windows 10 issue, Read this post to fix all your wifi related issues in Windows 10 with easy instructions with illustration.

Hey, is your wifi not working in Windows 10? That’s exactly what happened to me. Recently I was working on my computer which was connected to the internet through wifi. Suddenly wifi stopped working. It took me hours to figure out how to fix the issue by trial and error method. That’s why I am writing this blog to help people like you who are facing this problem.
I have mentioned all the possible fixes of this problem. This is an effective blog that will save you time and help you fix your wifi immediately. The methods mention in this blog is applicable for HP, Dell, Lenovo, Samsung and all other laptops and desktop. You also read an exclusive post on laptop not connecting to wifi, Chromebook not connecting to wifi & Surface not connecting to wifi.
Wifi not Working in Windows 10: Problem Overview
wifi not working in Windows 10 problem has been reported by many users of Windows 10. Nowadays not being connected with the internet can hamper our productivity & at the same time, it is quite frustrating. when you do not get connected to the internet then you are not even able to do stuff like checking email, browsing the web and other important work.
In this post we are going to cover all the issues related to wifi not working in Windows 10. first part we will cover general troubleshooting and after that, we will cover situation-specific problems related to wifi not working. You will be able to fix the below mention problem by reading this post.
- Desktop wifi not working in Windows 10
- laptop wifi not working in Windows 10 (HP, Acer, Lenovo, Dell)
- Windows 10 wifi disconnects frequently
- internet connection issues in windows 10
- can’t connect to this network windows 10
- wifi network not showing up windows 10
- Connected but Don’t Have internet
- No wifi Networks Found
There can be a lot of reasons for wifi not working in Windows 10. It is possible that the internet is not working, wires can be loose, there can be some network conflict and some fault with the router. Network passwords could have been changed or network related drivers may require an update. Other issues may also cause wifi not working problem which we will cover in this blog.
Basic Troubleshooting for Wifi Not Working
Wifi not working in Windows 10 issue needs to perform complex steps to fix this issue. However, some simple and basic steps can also solve the problem when the reason behind this problem is a simple one. Perform these steps before going into the complexities of the matter.
- Make sure, Wifi is turned on
- Check the wifi button on laptop
- Check wifi connection on the computer
- Restart the wifi router
- Restart your computer or laptop
We have seen that in some cases, these steps have solved the wifi not working in Windows 10 problem. If they have solved your problem then great otherwise read more on this blog to fix the issue.
Advanced Troubleshooting Steps for Wifi not Working in Windows 10
- Methods-1 : Check for Network Password.
- Methods-2 : Network Name Changed.
- Method-3 : Direct Connect with USB Cable.
- Method-4 : Connect with a Different Network.
- Method-5 : Forget Wifi Network.
- Method-6 : Troubleshoot Internet Connection.
- Method-7 : Reinstall Network Adapter Driver.
- Method-8 : Update Network Adapter Driver.
- Method-9 : IP Configuration Settings.
- Method-10 : Wifi button stuck.
- Method-11 : Adapter is not working.
- Method-12 : Update Windows 10 OS.
- Method-13 : Check for Virus & Malware.
- Method-14 : Disable Antivirus.
- Method-15 : Problem with VPN.
- Method-16 : Turn off Firewall.
Solution of Other Wifi Not working Related Issues
- Windows 10 WIFI disconnects frequently
- Can’t connect to this network windows 10
- WIFI network not showing up windows 10
- WIFI doesn’t have a valid IP configuration
Method-1
Check for Network Password
The wifi works through router which is connected to a network. Sometimes the password of network is changed by the administrator which leads to wifi not working in Windows 10. In this case you will need to change your password and enter the new password for your network. Follow these steps to change your network password.
- Click on the wifi icon
- Right-click on your network
- Select the Properties option
- Under the Security tab
- Enter the new password
Now you have successfully changed the network password. Your computer or laptop will automatically connect to the new network. If the password for your network is not changed then try a different method given below.
Method-2
Network Name Changed
The network admin can change the network name for security purposes. Admins can change the network name for hiding it from hackers too. When your network name is changed it will not show in your network list until you disconnect from the old connection. This phenomenon will cause the wifi not working in Windows 10 issue. Follow these steps to disconnect from old network name and connect to the new one.
- Click on the wifi icon
- Click on your network name
- Disconnect from the network
- Click on the new network name
- Select the Connect button
- Enter the new password
Now you have successfully changed the network name on your computer or laptop. The wifi not working in Windows 10 issue should be fixed by now. If your network name is not changed and wifi is still not working then try the next method.
whether you are looking especially for a gaming router, mesh router for a big home, latest faster WiFi 6 router or a simple budget router.
Method-3
Direct Connect with USB Cable
When wifi not working in windows 10 then we need to refresh the connection in the system. We have to establish a direct connection between the router and computer to refresh the connection without wifi. This is relatively easy task as you are connecting with the same network. Follow these steps given below.
- Disconnect the network connection
- Connect the router to computer or laptop in the LAN port
- Let the router wizard install
- Open the connection interface
- Connect with the internet
- Do some browsing activity
- Disconnect the internet
- Remove the Cable from LAN port
- Turn on the wifi
- Connect using wifi connection
Now that you have refreshed the internet connection, the wifi should start working. Now the wifi not working in Windows 10 problem should be fixed. If this step does not solves your problem then try the method in the next paragraph.
Method-4
Connect with a Different Network
To see if everything is alright with the computer you need to perform a check. You should connect your computer to either your smartphone or some other network. If everything is fine then you should be able to connect and use internet on other network. Follow these steps
- Establish network connection with other network
- Disconnect from this network
- Connect with the new network
You can also connect to that smartphone with a portable hot spot. If still, wifi is not working in Windows 10 then there can be some other problem. You should try the other methods given in this blog. Read the next paragraph.
Method-5
Forget Wifi Network
This option should be used when the above-given methods do not work. When you forget the wifi network and recreate the network then many irregularities are addressed with the new connection. Perform the instructions given her to forget and recreate the network.
- Click the network icon.
- Select Network & Intenet Settings option.

- Now Click on Wifi from Left options.

- Click on manage known password.

- Now Click to your network and click on the Forgot button.


Now you have forgotten the network and you are ready for fresh network installation. Follow this simple step by step process for establishing the network once again.
- Go to Network and Sharing center
- Click on Set Up a new connection or network
- Look for your preferred network
- Follow the onscreen instructions
When you will connect to this network, you should be able to access the internet via wifi. The wifi not working in Windows 10 should be fixed. If not then try the next method.
whether you are looking especially for a gaming router, mesh router for a big home, latest faster WiFi 6 router or a simple budget router.
Method-6
Troubleshoot Internet Connection
It is very much possible that an internal conflict is causing the wifi not working in Windows 10 problem. Windows 10 provides a troubleshooting wizard to address such issues. Follow these steps to start and run the troubleshooting wizard for internet connection.
- Click the Start menu.

- Go to the Settings.

- Click on Update and Security.

- Choose Troubleshoot from the left options.

- Now Click on Internet Connection.

- Then click on run the troubleshoot.


Let the troubleshooting wizard run and fix any issues and internal conflict. The wifi should start to work after troubleshooting is done. If still wifi is not working on Windows 10 then try the next method given below.
Method-7
Reinstall Network Adapter Driver
Network adapter driver plays an important role in accessing the internet through wifi. If wifi not working windows 10 problem then network adapter driver can be misconfigured or corrupt. In this case, it is advised to reinstall the network adapter driver. Follow the step by step instruction given here.
- Press the Windows logo key and X together.

- Select the Device Manager option.

- Click on Network Adapters and expand it.

- Right-click on your network adapter and select Uninstall Driver.


When the uninstallation is complete then you should restart the computer. Fresh network adapter drivers will automatically install after system is rebooted. Wifi should work now. If still the wifi is not fixed then read the next section below.
Method-8
Update Network Adapter Driver
If the wifi is not working in Windows 10 even after the network adapter driver is reinstalled then may be the adapter driver is out of date. Such a driver will not be able to communicate with other devices in the network. Follow these steps to update the network adapter driver.
- Type device Manager in the box and hit enter to open it.

- Right-click the Network Adapter and expand it.
- Right-click on your Network adaptor and choose Update driver.
- Select the automatically browse drivers from the internet.


Let the system browse the internet for drivers and update. Restart computer after drivers are updated. If wifi is still not working then read the next segment.
Method-9
IP Configuration Settings
When you browse the internet, the websites you visit drops cookies, cache and some other scripts on your computer. These scripts mean no harm to visitor but they can change some IP configuration settings on your computer to enhance your website viewing experience. These altered settings can cause the wifi not working in Windows 10. Follow these instructions to reset these settings.
- Go to the Start menu.
- Type Command Prompt in the box.

- Right-click on command prompt.
- Select ‘Run as Administrator’ option.


Now enter the following commands one by one and keep checking whether the wifi works or not in between.
- netsh winsock reset.

- ipconfig /release.

- ipconfig /renew.

- netsh int ip reset.
- ipconfig /flushdns.


One of these settings can correct IP configuration. This should fix the wifi not working in Windows 10 issue. If these commands fail to fix the issue then try the next method.
Method-10
Wifi button stuck
Make sure that the wifi button on the wifi router is alright. Sometimes this button gets stuck and wifi stops working. Follow these steps to check the wifi button.
- Push the wifi button
- Check the wifi icon
- Again push the wifi button
If the wifi icon is flagged while turning off the wifi button then it is working fine otherwise the wifi button is stuck. You need to get expert help. Read the end of this blog to know more.
Method-11
The adapter is not working
Every laptop has a built-in wifi adapter. If this adapter is not working then wifi will not work properly. Follow these steps to check whether the wifi adapter is working fine or not.
- Arrange a USB wifi dongle
- Connect with router using this dongle
If you can access the internet with this USB dongle then you need to get it checked with some expert. Read the second last section of this blog for more information.
Method-12
Update Windows 10 OS
Last method to fix the Wifi not working in Windows 10 issue is to update the Windows 10 OS. This can fix some unknown issues in the system causing wifi issues. Follow these steps to update Windows 10 on your PC.
- Click on the Start Menu
- Select Settings icon
- Choose Updates and Security option
- Select Windows Update from left pane
- Now click the check for updates button
Once you have updated the system restart the computer. This should fix the wifi not working in Windows 10 OS issue.
Method-13
Check for Virus & Malware
It has been seen that in many cases virus & malware restrict, block or interfere with you WIFI connection and lead to WiFi not working in windows 10. Sometimes virus & malware can create proxy server, even can change DNS settings or it can change or alter network settings.
You need to check for any virus or malware in your pc. Windows 10 has inbuilt antivirus you can run it and scan for virus & malware. If you have any third-party Antivirus software, you can scan with it too.
Method-14
Disable Antivirus
Antivirus are very essential to protect from viruses, malware & online threat. It blocks all the internet threats. But in many cases, Antivirus itself interferes with WIFI signal & settings and block the WIFI connectivity. So, it may be cause of your Wi-Fi not working in windows 10.
To check and resolve the issue you can temporarily disable your Antivirus. If it works then you can contact your antivirus support team for help.
Method-15
Problem with VPN
VPN can help you protect your privacy online but at the same time it creates issue with WiFi connection. Many users have noticed that using VPN sometimes creates problem in WIFI connection.
If It is the case, if you are using VPN then simply turn it off and check if it has resolved your problem
Method-16
Turn off Firewall
Firewall could be one of the reasons of our WiFi not working in windows 10. Many cases it blocks the complete internet. You can turn off firewall & check the wifi connection status. To turn off firewall follow the below steps.
- Type command prompt in search box on taskbar
- Select Run as administrator
- On the command prompt type netsh advfirewall set allprofiles state off
To turn on again
Type command netsh advfirewall set allprofiles state on
It will work for both firewall, third-party firewall or default firewall of windows 10.
Other Wifi Not working Related Issues
Windows 10 WIFI disconnects frequently
Many windows 10 user have reported that their WIFI get disconnected frequently. There WIFI get connected but it gets disconnected soon. If you are sure that there is no problem with your internet then power management of network adapter may cause this problem.
Windows 10 has a feature to save power, it turns off the adapter itself. Most of the time this feature leads to this WIFI disconnects frequently problem. You just need to disable this power management feature. To disable this feature, follow the below steps.
- Hold Windows Logo Key + X.
- A menu will appear.
- Select the device manager from the list.
- Find your Network Adapter.
- Right-click on it and select properties.

- A small window will open.
- Click on the Power Management tab.

- Uncheck “Allow the computer to turn off this device to save power”.
- Hit Ok


Your problem should be resolved.
Can’t connect to this network windows 10
One very common error we see in windows 10 related to WIFI that can’t connect to this network. in this particular case first of all you should try Forget Network and connect again with putting password. You can refer above steps to forget network and reconnect steps.
If its not solve this problem then you should once disable and again enable the network adapter to fix this issue. To disable & re-enable the network adapter follow the below steps.
- Click on the start menu and go to the settings option.

- Now click on the Network & Internet Option.

- Click on Change adapter options.

- Now Right-Click on to your Wifi Network adapter and choose to disable option.

- wait for 3 sec. and re-enable your wifi network adapter.


Finally, if you still get this error then you need to uninstall the network adapter and Reinstall it. To uninstall & reinstall the network adapter follow the step as mentioned above.
WIFI network not showing up windows 10
Sometime user faces this WIFI network not showing problem in windows 10. Windows 10 has feature to discover & connect with the available WIFI network. It automatically gets connect with previous connected WIFI network.
If no WIFI network name is showing, it means there could be problem with the network discovery feature. You will have to check that your network discovery is turn on. To check follow the steps below.
- Click on Windows Logo
- Click on settings.
- Select Network & Internet.
- Click on the sharing option.

- Check that Turn on network discovery selected, if not select it.

- Save now


WIFI doesn’t have a valid IP configuration
It is another common WIFI issue of Windows 10 that user get this message WIFI doesn’t have a valid IP configuration. Windows 10 has many troubleshooting tools for issue which user can get while running their PC. But sometime this tools not fix the problem instead give a message related to that problem.
This message appears generally when we run the troubleshooter. To resolve this issue, you need to fix IP Configuration setting. follow the step mentioned above to fix IP Configuration setting.
Tips to Avoid Wifi Not working Windows 10 Problems in Future
Wifi not working in Windows 10 problem has occurred because of some technical reasons or faults. This problem can occur in the future also. If you follow our tips and advice with your computer and router then you can avoid facing this issue.
- Keep the drivers updated
- Update yourself with network name password and other information
- Keep the computer Up to date
- Give some rest to the router when not in use
If you follow the tips given above then you will not face any problems with the wifi in Windows 10.
Take Expert Help
If you cannot fix the wifi not working in Windows 10 then there can be problems with the hardware. You will need expert help with such problems. The problem can be either with the router or the laptop. You need to visit the respective help and support website of these devices and get expert help for the hardware related issue. We recommend starting with your laptop manufacturer like for HP Laptop: HP Computer Support, For Lenovo PC: Lenovo PC support
Final Words: Conclusion
Hopefully, this post helps you fix Your wifi not working in Windows 10 problem. In this post we have written most comprehensive guide so that you can fix any wifi not working problem in windows 10. we have written troubleshooting steps with most possible details so that you can resolve your Wifi problem on your own.
Do let us know, if this guide has helped you. You can leave your comment about your experience. Please like & share this post to help others.
Главная » Уроки и статьи » Софт
В среднем, человек использует интернет более 5 часов в день. В сети есть все нужные инструменты: от книг до всевозможных сервисов. Кроме того, некоторые пользователи работают дистанционно. Но что делать, если нет интернета на ноутбуке? В большинстве таких случаев помогает обновление WIFI драйверов на Виндовс 10.

Как узнать, установлен ли драйвер Вай-Фай
Перед загрузкой и установкой программного обеспечения стоит убедиться, действительно ли с ним проблемы. Часто неполадки возникают из-за операционной системы или поломки модуля беспроводной сети ноутбука. Проверить наличие ПО для Wifi в ОС Виндовс 10 можно двумя способами:
- использовать диспетчер устройств;
- через настройки адаптера.
Первый способ: через диспетчер
Для проверки наличия драйвера для беспроводного подключения в Windows 10 нужно сделать следующее:
- Сначала нужно открыть диспетчер устройств. Список показывает, какие аппараты подключены к ноутбуку. Для этого необходимо нажать на комбинацию клавиш «Win» + «X». Затем в списке выбрать нужный пункт.
- Второй шаг — раскрыть ветку «Сетевые адаптеры». Как правило, в списке два или более пунктов. Один предназначен для беспроводной сети, второй — для подключения через Ethernet кабель. Wifi часто обозначается словом «Wireless» или «Wi-Fi». Если его нет, то программное обеспечение не установлено.
Имейте в виду, что названия аппаратов от разных производителей отличаются. Стоит обратить внимание на все пункты. Возможно там будет что-то похожее на «802.11g Network Adapter».
Второй способ: зайти в параметры адаптера
Если с помощью предыдущего способа не удалось определить, установлен ли драйвер Вай-Фай, стоит открыть вкладку настройки адаптера:
- Сначала нужно нажать на иконку Вайфая в системном трее. Она находится внизу справа. Если таковой нет — раскрыть панель задач, нажав на стрелку.
- Далее, нажать на кнопку «Параметры сети и Интернета». Она расположена внизу окна доступных подключений, над включением «в самолете» и других функций.
- После этого, зайти в «Настройка параметров адаптера».

Перед пользователем появится окно с несколькими иконками. Это доступные подключения. В списке есть не только Вайфай и Ethernet, но и сети от программ-эмуляторов. Например, Hamachi, Tunngle. Следующий шаг — проверить, есть ли беспроводная сеть Если нет — ПО отсутствует. Но бывает, что пункт неактивный. Для этого нужно нажать правой кнопкой мыши по иконке, выбрать «Включить». Высвечивается ошибка или Wifi не включается — необходимо обновить ПО.
Как скачать драйвер Вай-Фай на ноутбук с Windows 10
Любое программное обеспечение на конкретный ноутбук поставить невозможно. Нужно учитывать производителя модуля беспроводной связи. Вместе с покупкой устройства иногда дают небольшой диск. Но от него, как правило, толку ноль. Поэтому стоит воспользоваться следующими двумя способами.
Скачать с сайта производителя ноутбука
Следующая инструкция зависит от конкретной компании, ведь у всех сайты разные. Но суть похожа. Как пример, был выбран ноутбук Asus:
- Сначала нужно зайти на официальный сайт. Пользоваться сторонними веб-ресурсами нужно в последнюю очередь, чтобы не заразить ноут вирусами. Найти страницу производителя можно в поисковике, написав туда название компании.
- Второй шаг — выбрать «Сервис», затем — «Поддержка».
- Далее, найти модель и линейку ноутбука.
- В разделе с драйверами понадобится выбрать версию ОС — Windows 10, скачать программное обеспечение для Вай-Фай (Wireless).

После загрузки необходимо открыть установщик, дождаться окончания и перезагрузить устройство.
Обратите внимание, что не всегда помогает новая версия ПО. Иногда стоит скачать более ранний софт.
Скачать драйвера для Вай-Фай на Виндовс 10 — сайт производителя Wi-Fi модуля
Иногда первый способ не помогает. Это значит, что компания, создавшая ноутбук, не обслуживает беспроводной адаптер. В таком случае понадобится зайти на страницу производителя самого модуля. Последовательность действий практически идентичная с предыдущей инструкцией:
- Открыть сайт.
- Найти вкладку поддержки.
- Выбрать модель, драйвер и операционную систему.
Модель сетевого адаптера можно узнать из диспетчера устройств. Если его нет, то стоит поискать ноутбук в интернет-магазинах, и поискать характеристики. В крайнем случае — написать в техническую поддержку компании-разработчика или снять заднюю крышку.
Установка ПО для Wi-Fi: AIDA64 и DevId.info
Существует два самых распространенных сервиса для поиска соответствующего программного обеспечения для ноутбука или компьютера. Руководство по использованию AIDA64:
- Скачать софт с официального сайта.
- Открыть утилиту, выбрать вкладку «Сеть». Нажать на «Сеть PCI/PnP».
- В окне написана нужная информация для поиска драйверов. Достаточно просто скопировать текст, и найти файл в поисковике.
Инструкция по сайту DevID.info:
- Сначала нужно скопировать ID адаптера. Для этого необходимо зайти в диспетчер устройств («Win + X»).
- Найти сетевой адаптер, кликнуть по нему дважды. Открыть вкладку «Сведения». Выбрать «ИД оборудования».
- Следующий шаг — скопировать информацию, и найти файл на devid.info.

Как обновить Вай-Фай драйвер на Виндовс 10
Самый лучший способ — зайти на сайт производителя ноутбука или адаптера беспроводной сети и скачать более новый файл, установить его и перезагрузить гаджет. Но нужное программное обеспечение найти удается не всегда, потому что гаджет может больше не поддерживаться разработчиками, потому что он устарел.
Полезная информация. Перед следующим руководством рекомендуется подключить ноутбук к сети при помощи Ethernet кабеля, поскольку диспетчеру нужен интернет для поиска файла.
Обновление программного обеспечения:
- Для начала нужно открыть сам диспетчер нажатием сочетания клавиш «Win + X». Также можно воспользоваться поиском в меню «Пуск», если горячие клавиши не работают.
- Далее, раскрыть ветку с сетевыми адаптерами ноутбука. Выбрать модуль беспроводного подключения.
- Нажать на него правой кнопкой мыши для открытия контекстного меню.
- Выбрать пункт «Обновить драйверы».
- Во всплывшем окне нужно нажать на автоматическое обновление программного обеспечения. Если система предложит выбрать — использовать поиск в интернете.
После обновления ПО для Вай-Фай пропал интернет: что делать
Самая распространенная причина — программное обеспечение не подходит для конкретного устройства. Такие действия приводят к конфликту в операционной системе. Соответственно, интернет пропадает, чтобы Windows мог работать дальше. Решение:
- Открыть диспетчер устройств.
- Выбрать адаптер. Щелкнуть по нему правой кнопкой мыши.
- Нажать на «Свойства».
- Перейти во вкладку «Драйвер». Использовать функцию «Откатить…».
- Дальше — следовать инструкции системы.
Windows вернет более старую версию софта. Загрузка обычно длится 3-4 минуты.

Эти инструкции помогут установить или обновить ПО для ОС Windows 10. Если ничего из вышеперечисленного не помогло, и интернета нет, — стоит обратиться в сервисный центр. Возможно сломан адаптер. Еще одна причина отсутствия подключения — неправильная настройка интернета.
Понравилось? Поделись с друзьями!
Дата: 18.05.2020
Автор/Переводчик: DM