
You don’t have to have two different computers to use Linux and Windows 10. It’s possible to have a Linux distro installed on a computer with Windows 10 preinstalled.
In this article, I will show you how to dual boot Windows 10 and the popular Ubuntu Linux distro. But before that, you have to install Ubuntu on your Windows 10 PC.
Before you go through this process, you must backup your files. That’s because installing an OS is a risky process. Sometimes it can overwrite the existing OS and delete all your files.
N.B.: Most of the processes in this article take time to get done, so you need to be patient.
What We’ll Cover – A step-by-step Guide to Dual-Booting Windows 10 and Linux
- Prerequisites
- How to Partition your Hard Drive for Ubuntu
- How to Optimize your Hard Drive for More Partition Space (Optional)
- How to Download Ubuntu in ISO Image Format
- How to Make an Ubuntu (Linux) Bootable USB Drive
- How to Install Ubuntu Linux Distro along with Windows 10
- Now You Can Dual Boot Ubuntu and Windows 10
- Conclusion
Prerequisites
Most importantly, there are some things you must have in place if you want to use (and dual boot) Ubuntu and Windows 10 on the same PC:
- A computer preinstalled with Windows 10
- A partitioned hard drive
- A BIOS in UEFI mode (Unified Extensible Firmware Interface)
- An empty USB drive of at least 4Gig for creating a bootable disk
- An internet connection to download Ubuntu ISO image (the Linux distro) and Rufus (a bootable drive creation tool)
How to Check If Your PC BIOS is in UEFI Mode
To check if your PC BIOS comes in UEFI mode, search for “system information” and hit ENTER.
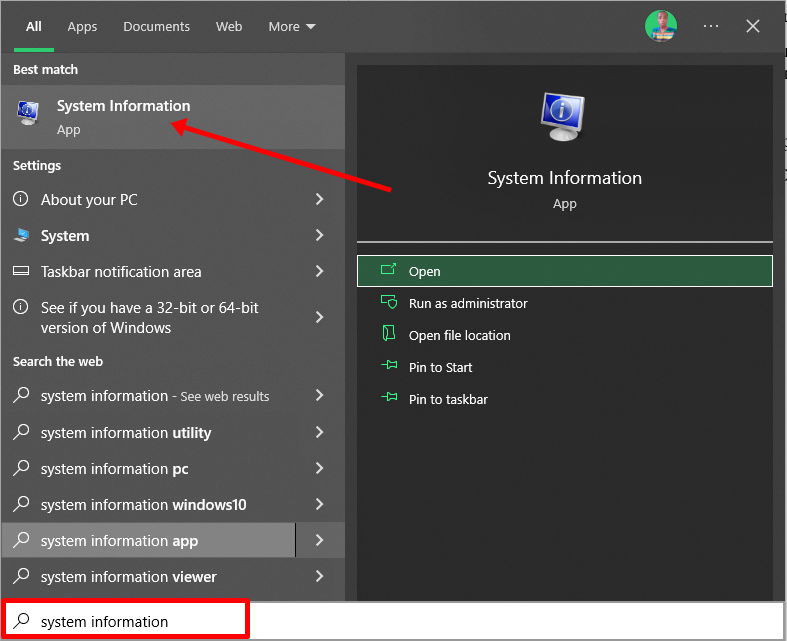
Look under BIOS mode to confirm that your PC BIOS mode comes as UEFI.
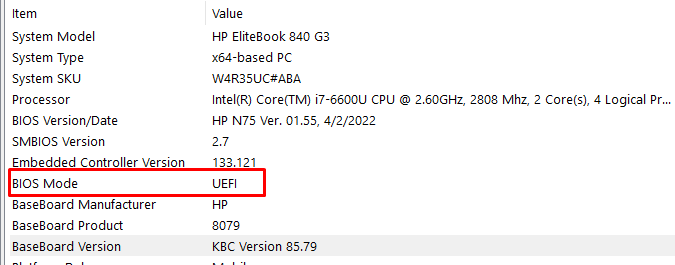
If your PC BIOS is not in UEFI mode, the two operating systems won’t see each other. You can learn more about the difference between these two modes here.
How to Partition your Hard Drive for Ubuntu
You have to partition your hard drive because you must set aside at least 20Gig for Ubuntu to live in and boot from.
To partition your hard drive, follow the steps below:
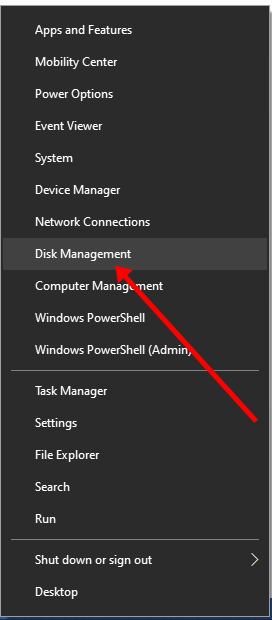
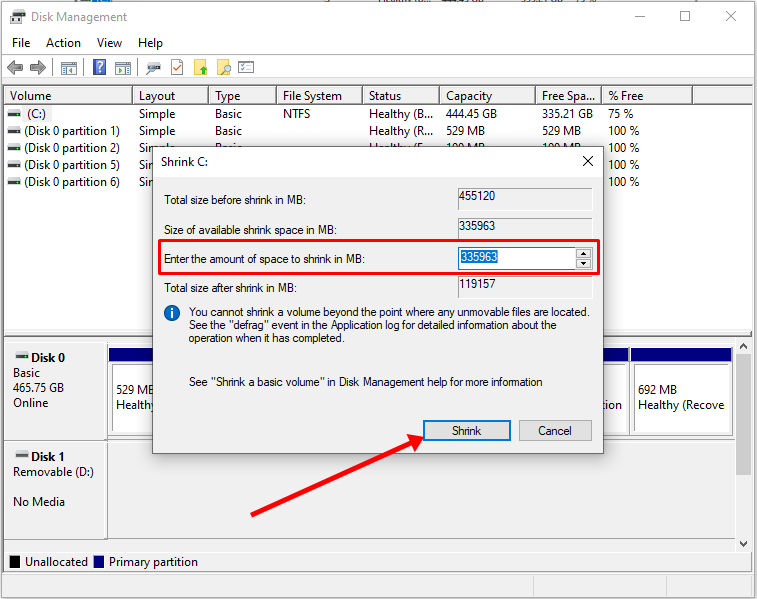
Step 1: Right-click on Start and select “Disk Management”.
Step 2: Right-click on your C drive and select shrink volume.
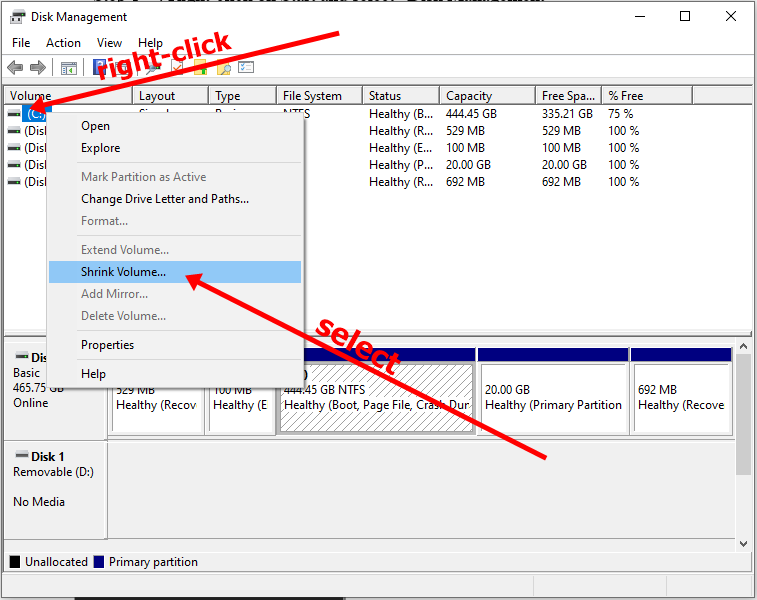
Step 3: Select at least (20000) 20Gig for Ubuntu and click “Shrink”. IT can take some time to complete, so be patient.
Step 4 (optional): You can go ahead and assign a letter to the new volume. Right-click on the unallocated space and select “New Simple Volume”.
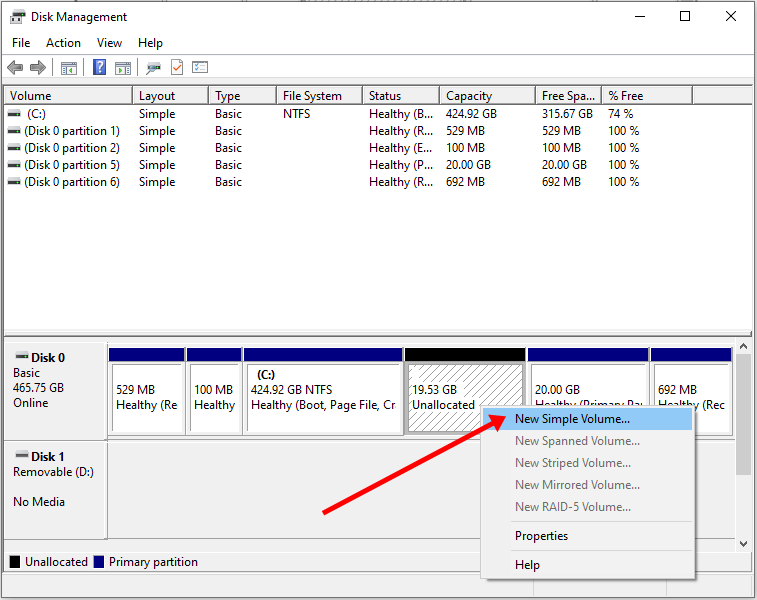
Step 5: Follow the wizard and assign a letter to the drive, then follow the rest of it.
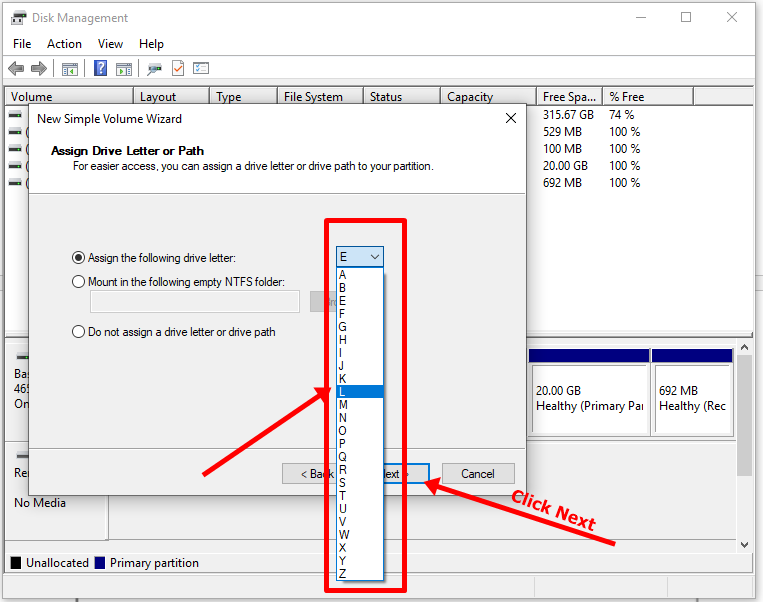
After completing the wizard, the drive should be listed on your computer.
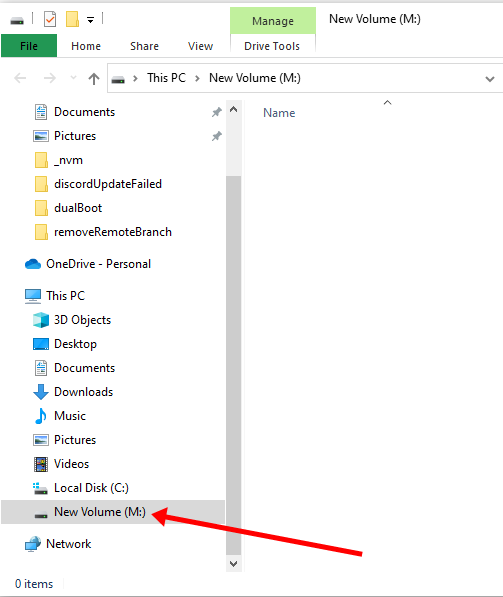
Congrats! You’ve successfully partitioned your hard drive.
N.B.: If you have a lot of free space in your hard drive but your PC still didn’t give you up to 20Gig partition space, then you need to optimize your PC’s hard drive. Proceed to the next section of this article to do that.
How to Optimize your Hard Drive for More Partition Space (Optional)
The common purpose of hard disk optimization is to speed up your computer during boot time and make it run smoother.
At the same time, the process will defragment the hard disk and make free space more available for partitioning.
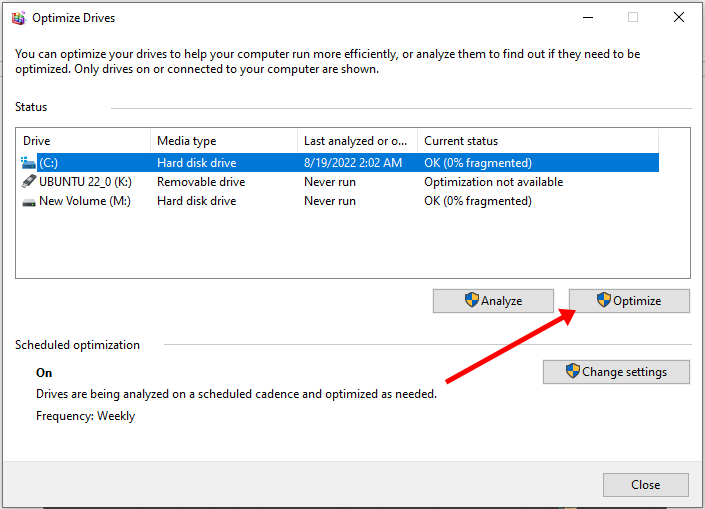
To optimize your hard drive, click Start (Windows logo key), search for “defrag” and select “Defragment and Optimize Drives”.
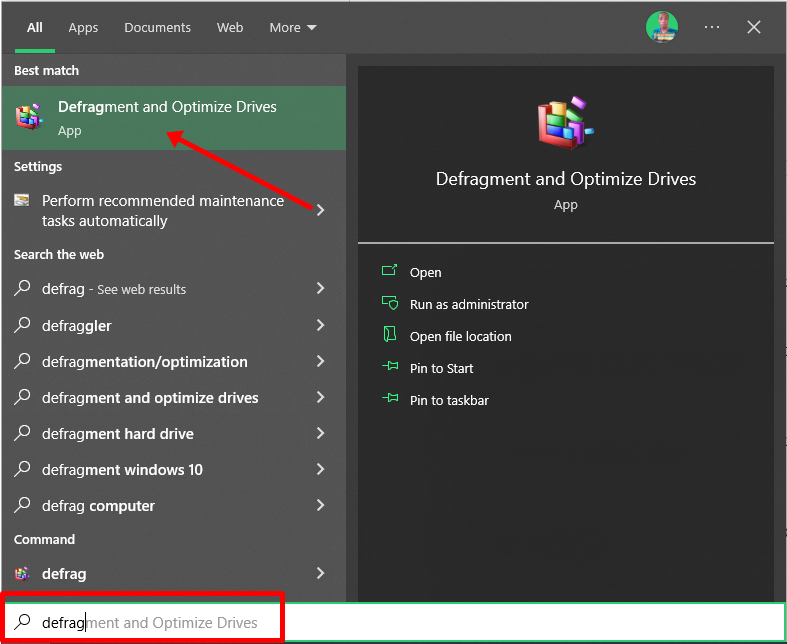
Make sure your C drive is highlighted, then click “Optimize”.
After you’ve been able to set aside at least 20Gig for Ubuntu by partitioning your hard drive, then it’s time to download Ubuntu and make a bootable USB.
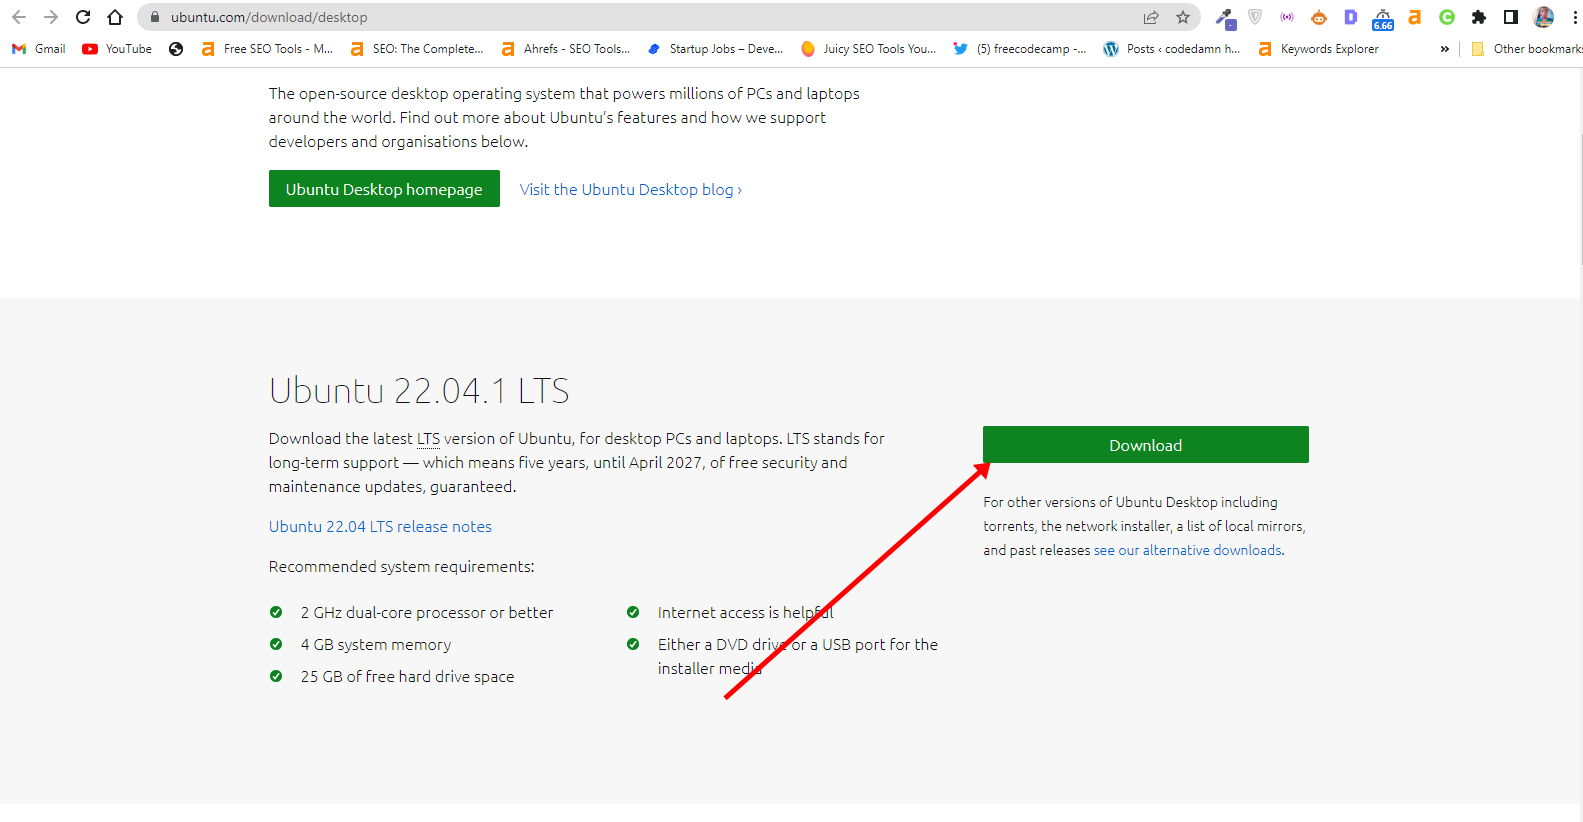
How to Download Ubuntu in ISO Image Format
The next thing is to download Ubuntu in ISO image format so you can install Ubuntu. You can download it from the Ubuntu distro website.
After downloading Ubuntu, don’t do anything with it yet. You need to make a bootable USB and put it in there. That’s how you’ll be able to use it.
The reason you can’t install Ubuntu just like that is that it doesn’t come as an executable. It comes in form of ISO (optical disk image). That means you have to find a disk to put it in before it can work.
The next part of this guide shows how you can put the downloaded Ubuntu ISO on a USB stick.
How to Make an Ubuntu (Linux) Bootable USB Drive
You won’t be able to make a bootable USB drive for Ubuntu by just placing the downloaded ISO image in it. Follow these steps to get it done:
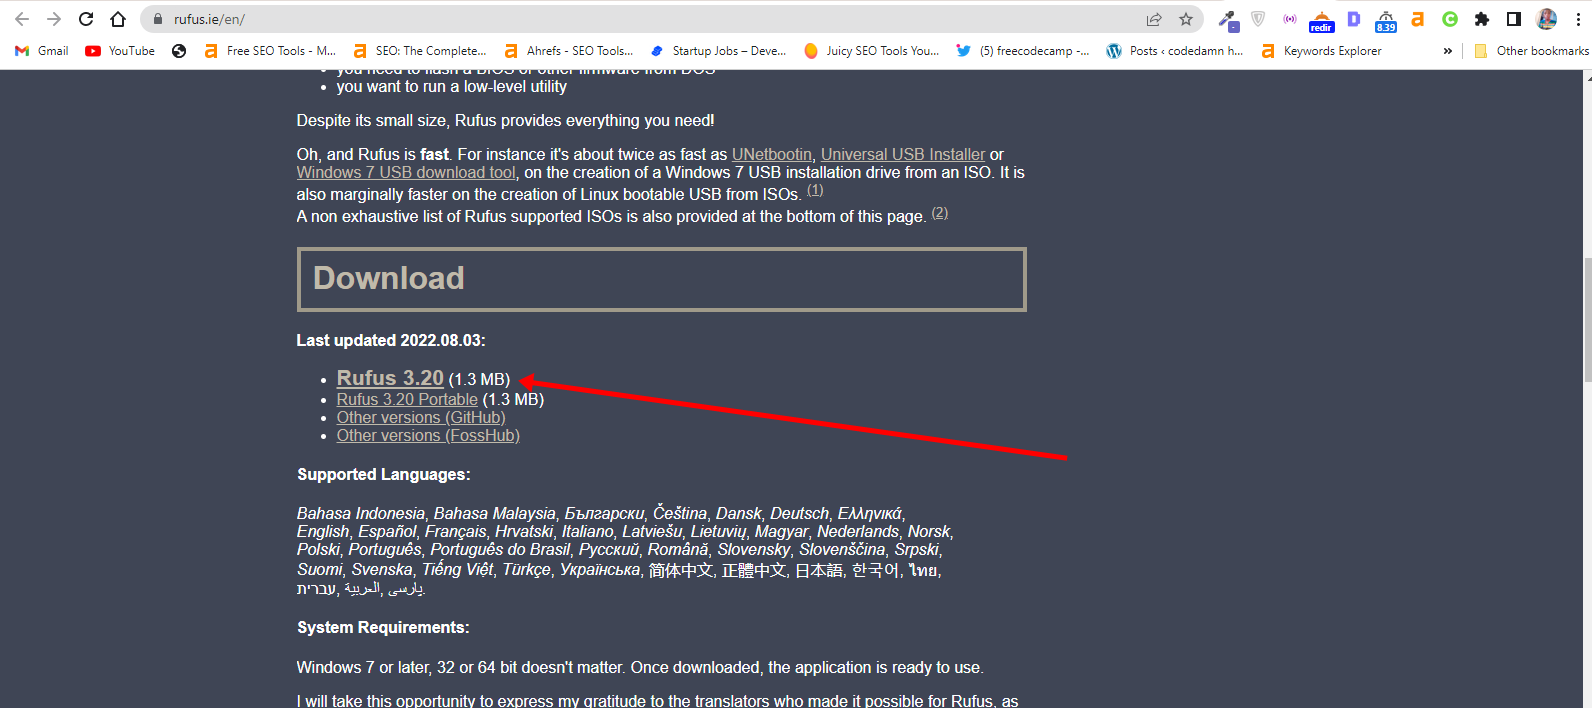
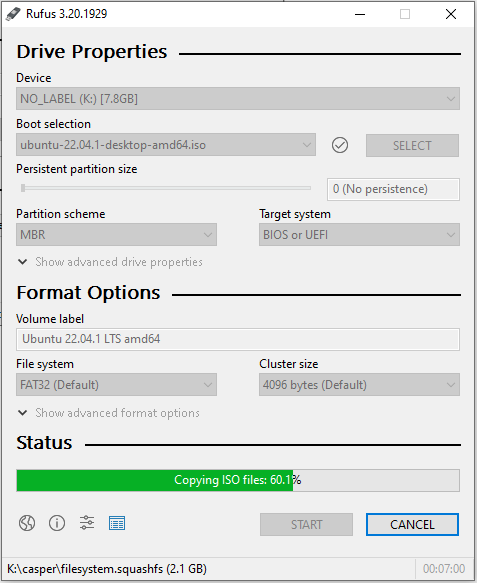
Step 1: You need to download a bootable USB drive creation tool like Rufus. You can download Rufus from their website.
Step 2: Insert the empty USB drive into your Windows 10 PC. Right-click on Rufus and select “Open”.
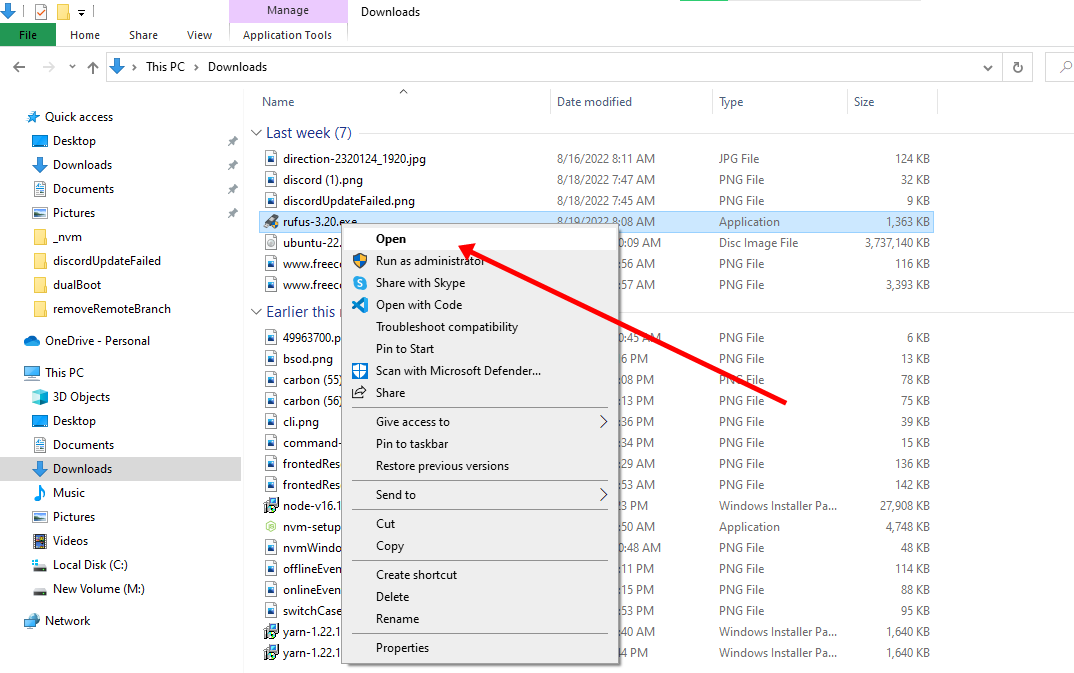
Step 3: Under “Device”, select your USB drive. And under “Boot selection”, click the “Select” button and select the Ubuntu ISO file you downloaded
Step 4: Leave every other thing as default and click the “START” button to start burning the Ubuntu distro to the drive.

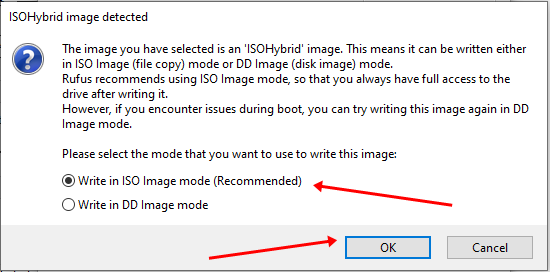
Step 5: Click OK to start the process.
Once the process is done, you should see “READY” on a green background. Click the Close button. Its time to install Ubuntu.
Congrats! Now you have a bootable drive with which you can install Linux.
The next step is to install the Ubuntu distro on your Windows 10 PC. To do this, you have to boot your PC from the bootable USB drive you created.
How to Install Ubuntu Linux Distro along with Windows 10
Step 1: Ensure the bootable drive is inserted into your Windows 10 PC
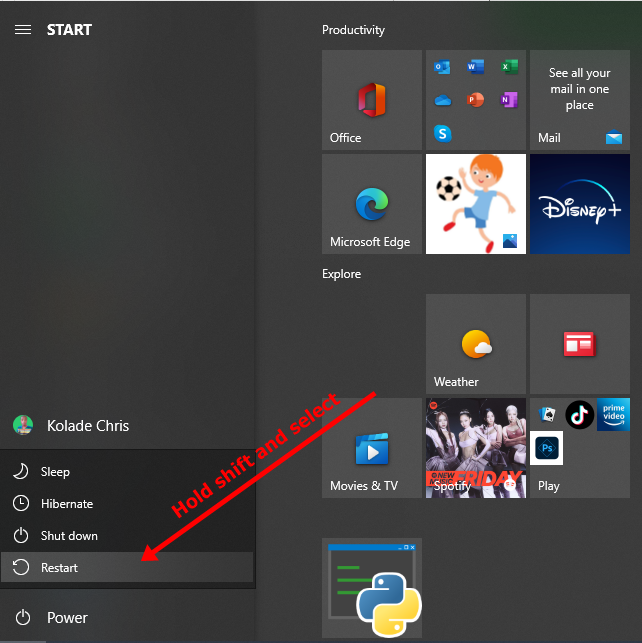
Step 2: Right-click on Start, hold SHIFT, and select Restart.
Step 2: Select “Use a Device”.
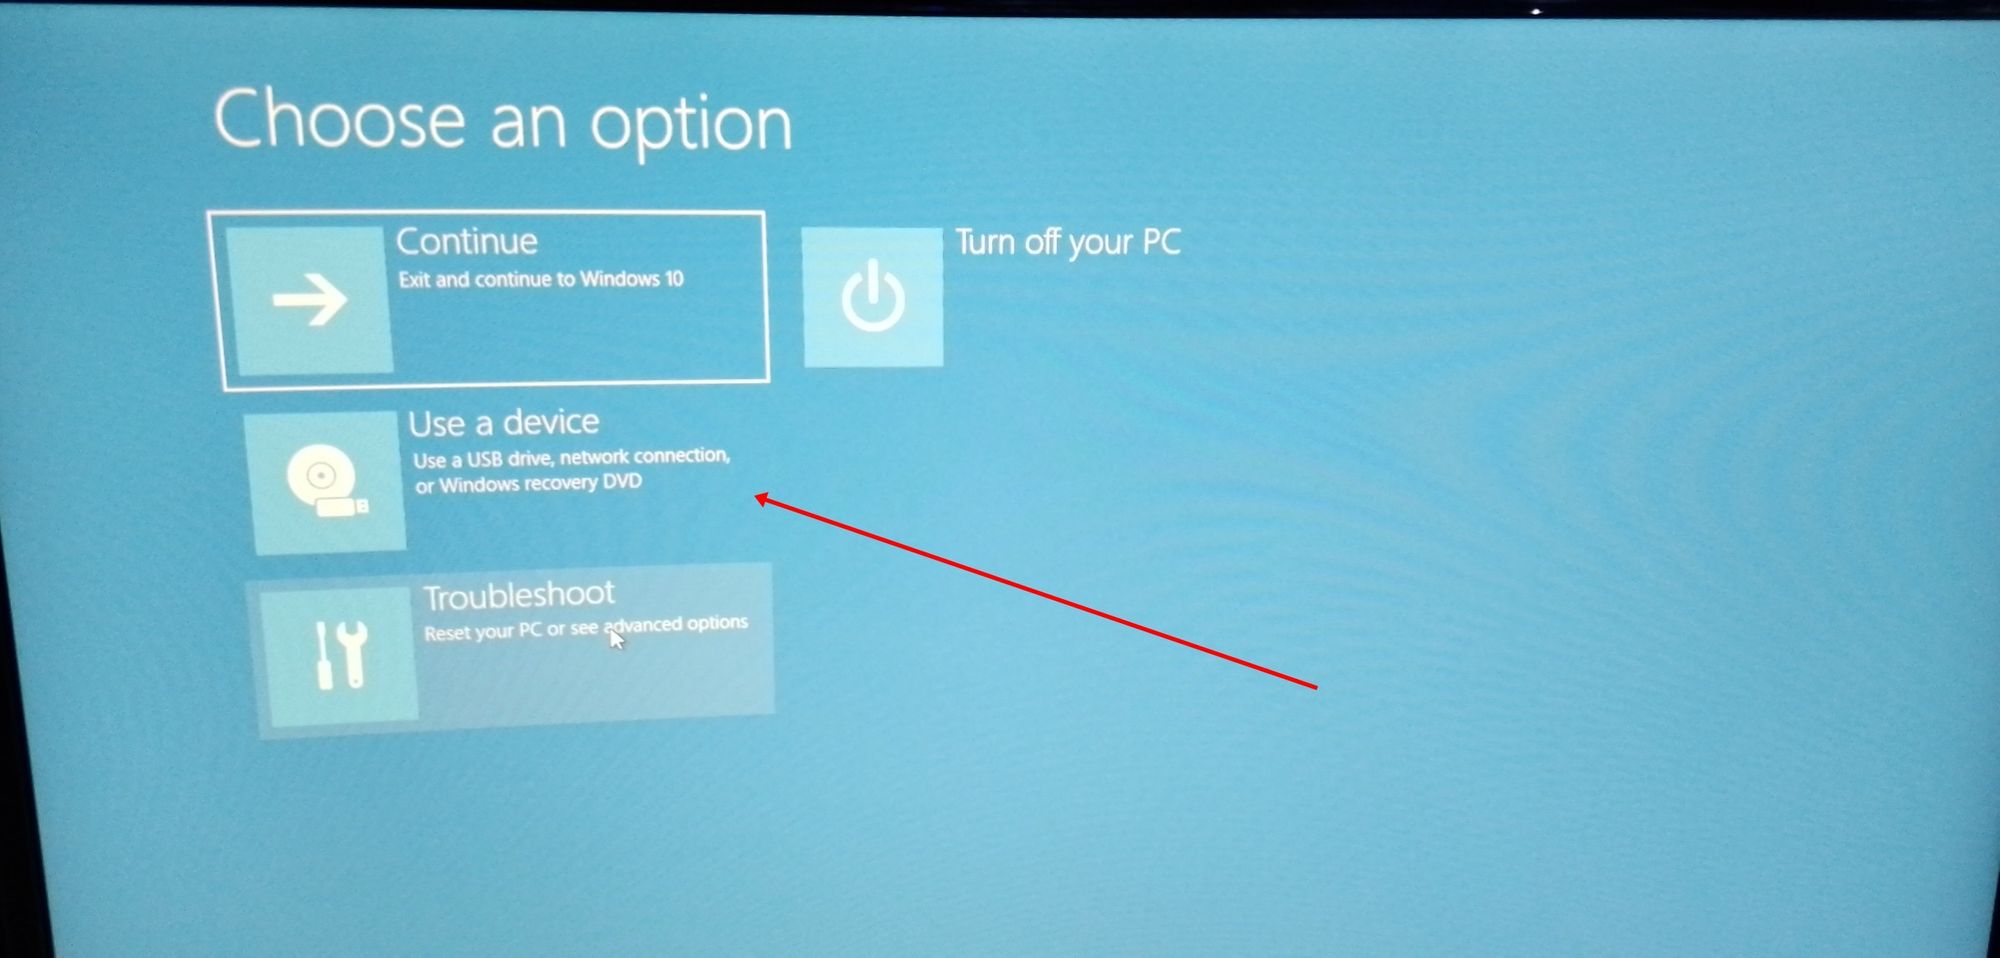
Step 3: On the next screen, you should see several devices you can boot from.
You may see the bootable drive as the name of the USB brand.
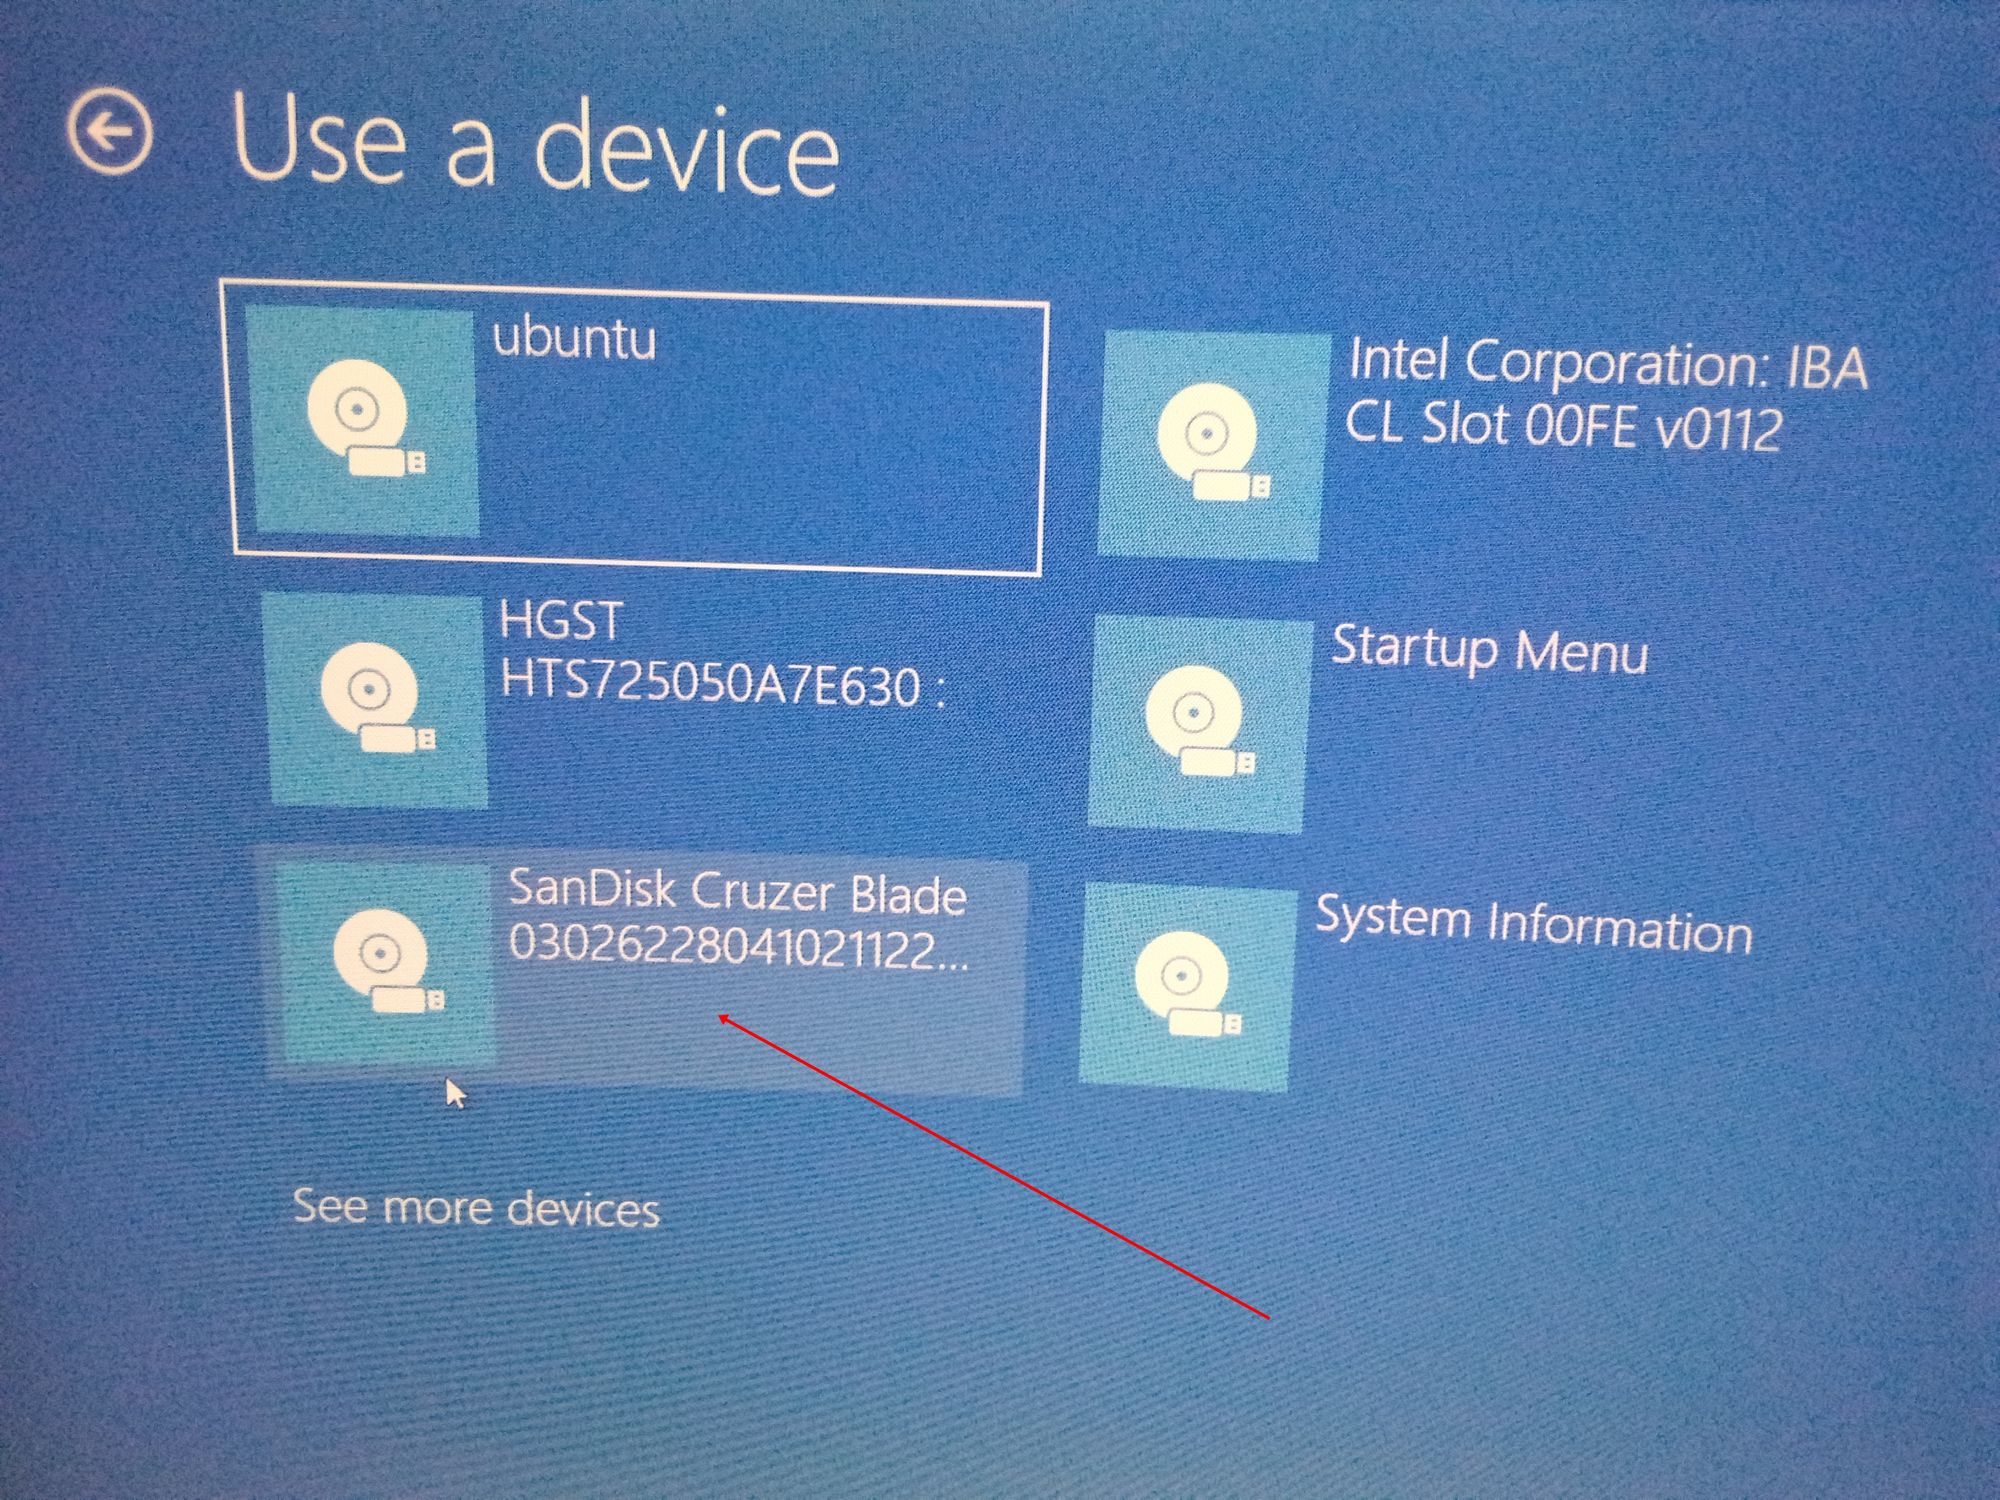
It’s possible to see it as “Ubuntu” too. Some other times, you might not see it, so you need to click on “See more devices».
If you still cannot see your bootable drive, head over to your boot menu by getting into BIOS. You will see it there.
N.B.: You should be very careful while making changes in BIOS. Whatever you do there has a lasting effect on your computer. If you are not sure of what you’re doing there, you should contact an IT professional.
Step 4: Choose «Install Ubuntu». You can also try it before installing it.
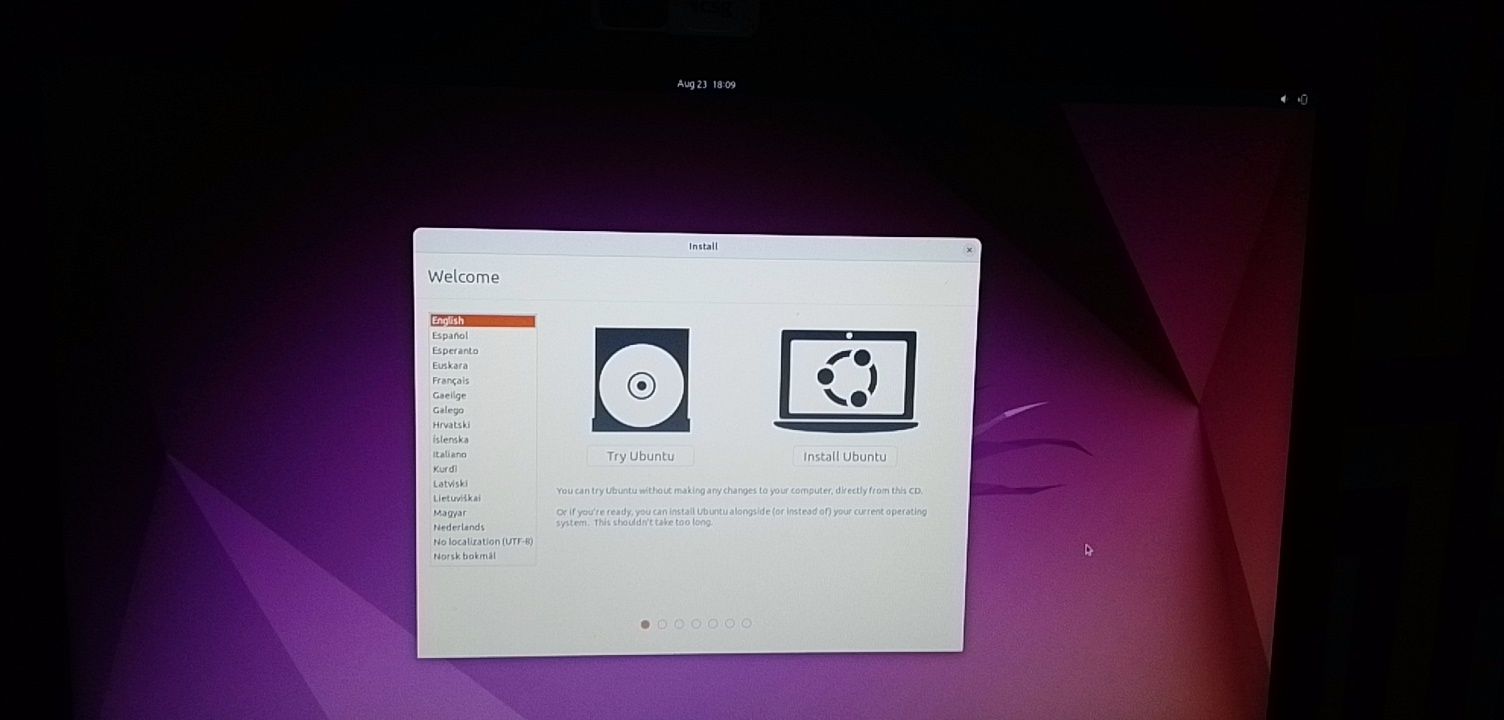
Follow other prompts of the installation wizard and make sure you don’t replace your Windows 10 OS installation with Ubuntu. This is why I suggested you back up all your files.
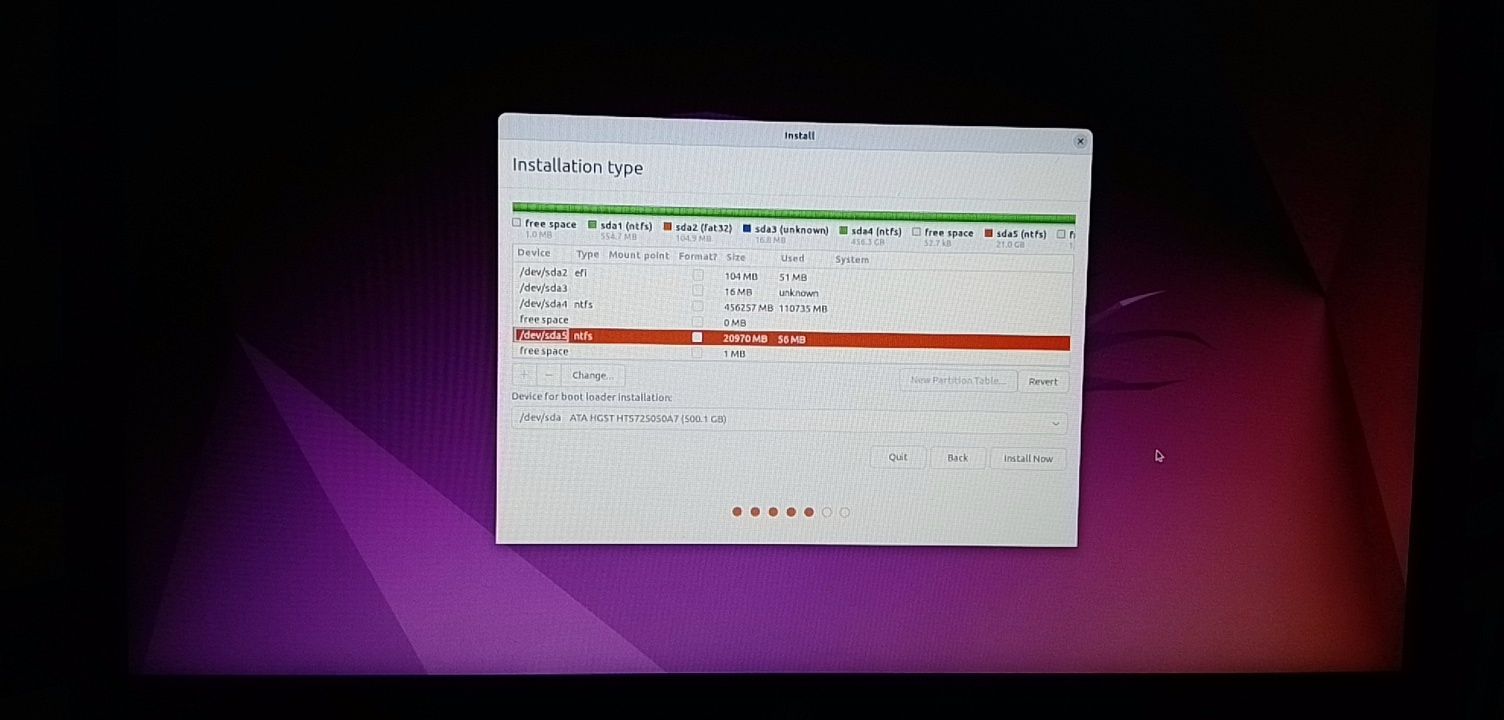
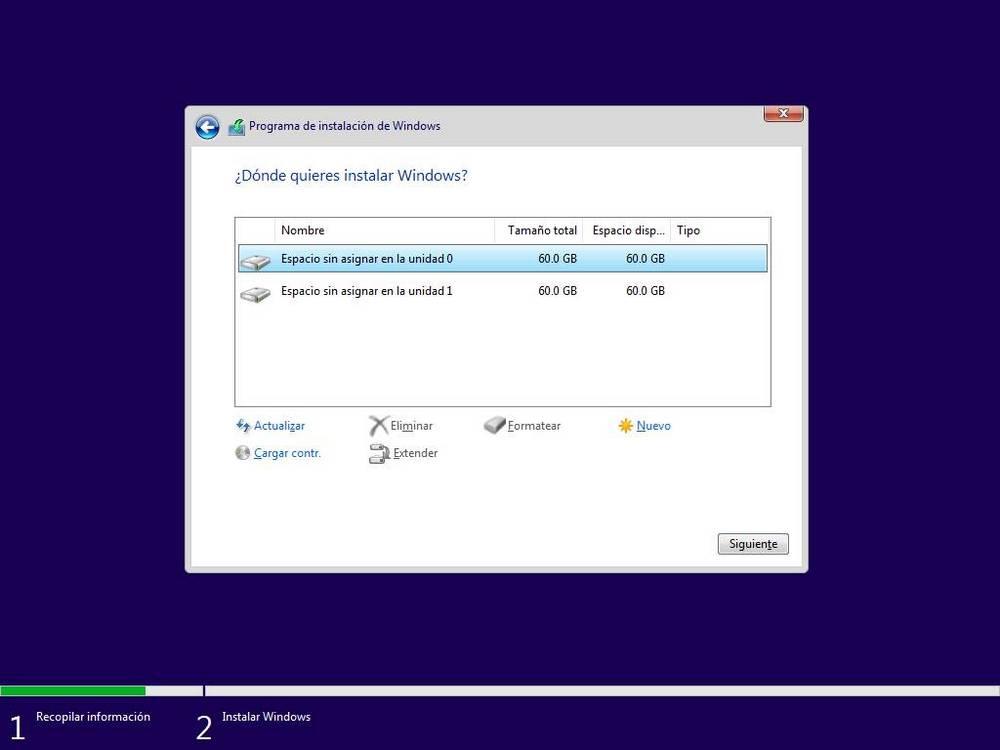
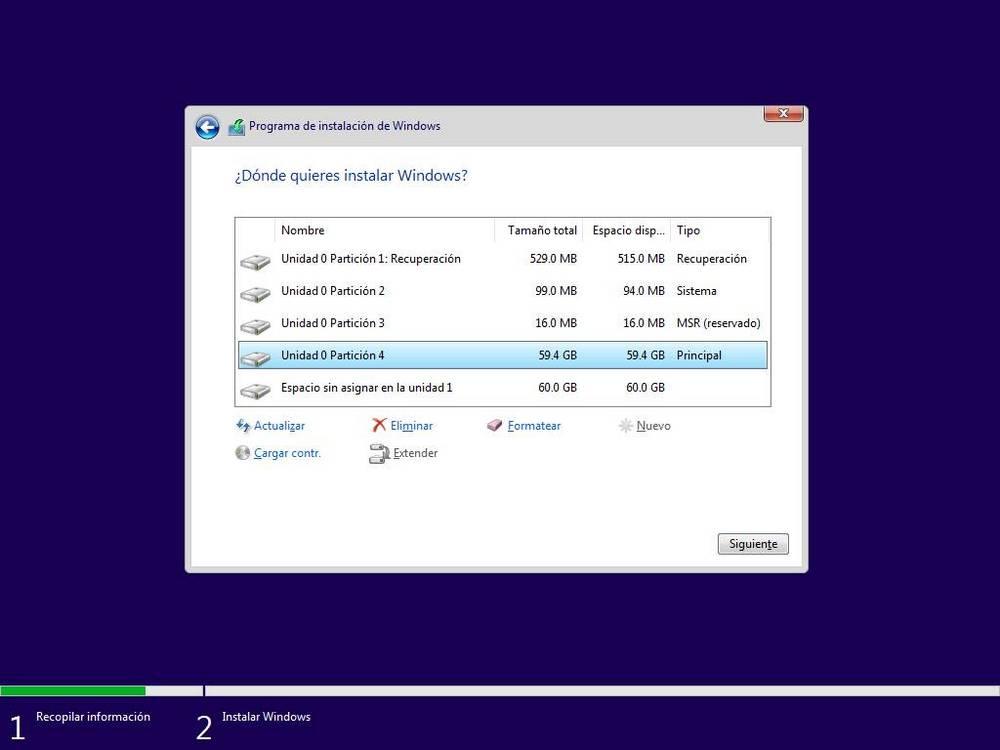
When you get to the point to select the partition you made, scroll to the partition you made earlier and press ENTER.
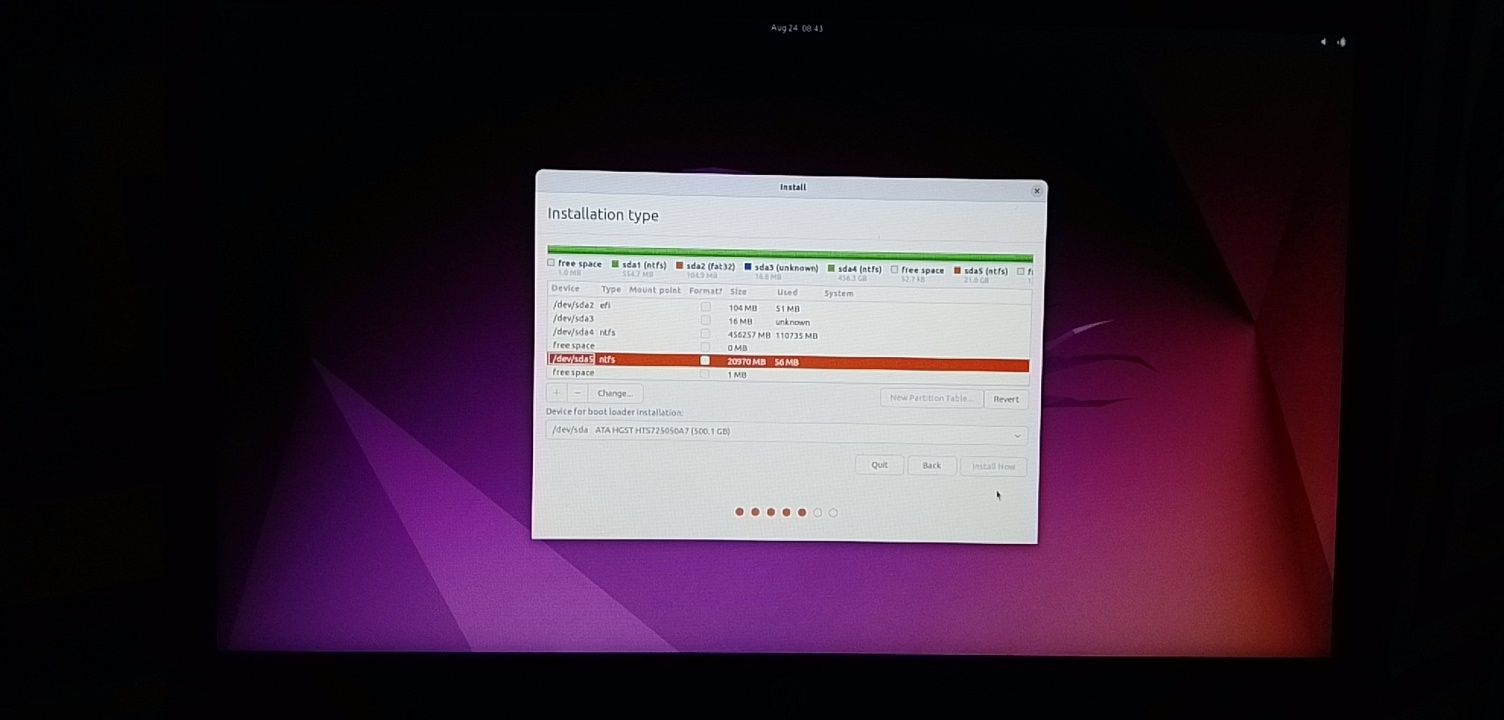
Click OK to select all the space in the partition.
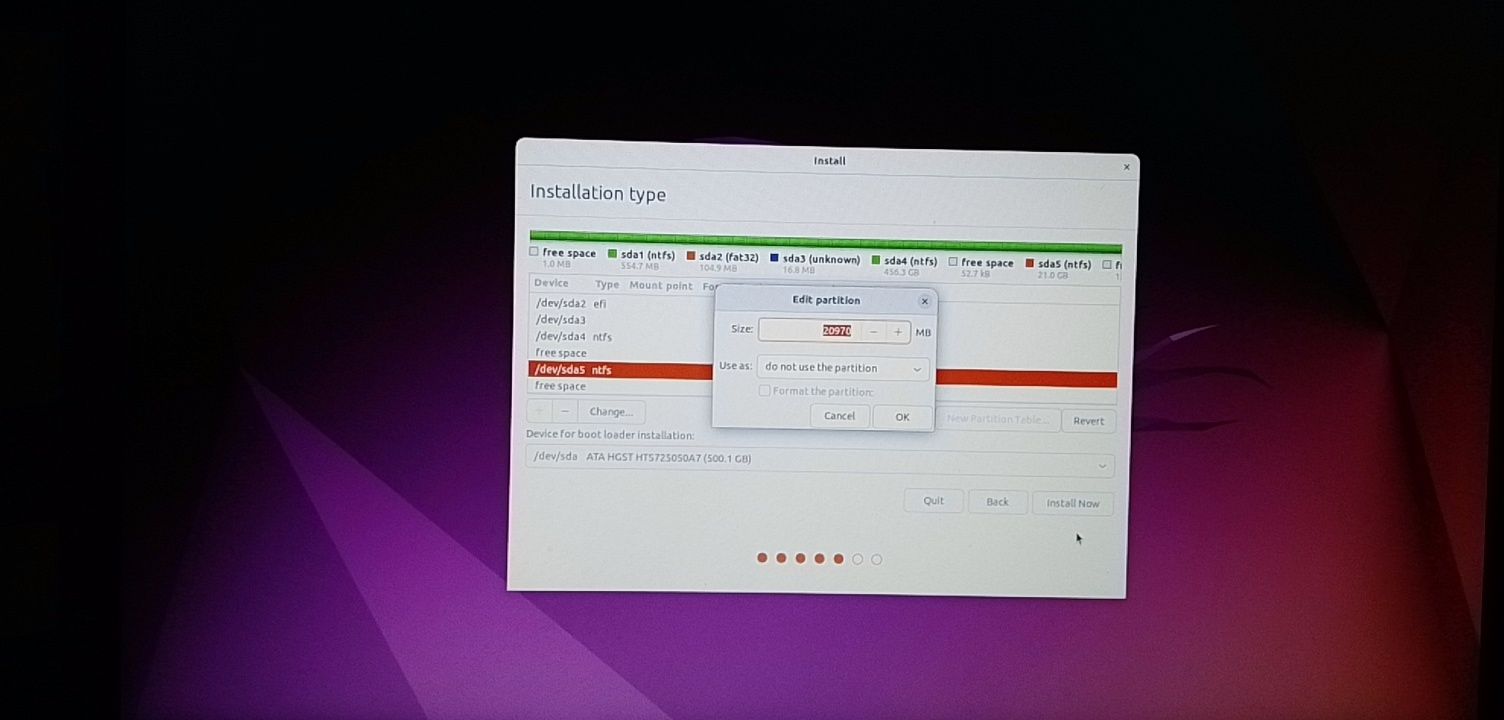
This time around, the “Install now” button will not be greyed out anymore.
Follow other prompts until Ubuntu starts installing.
After the installation is done, Ubuntu will prompt you to remove the bootable drive and press ENTER to reboot your Computer.
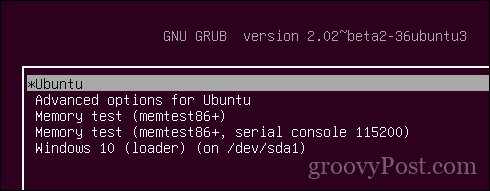
Now You Can Dual Boot Ubuntu and Windows 10
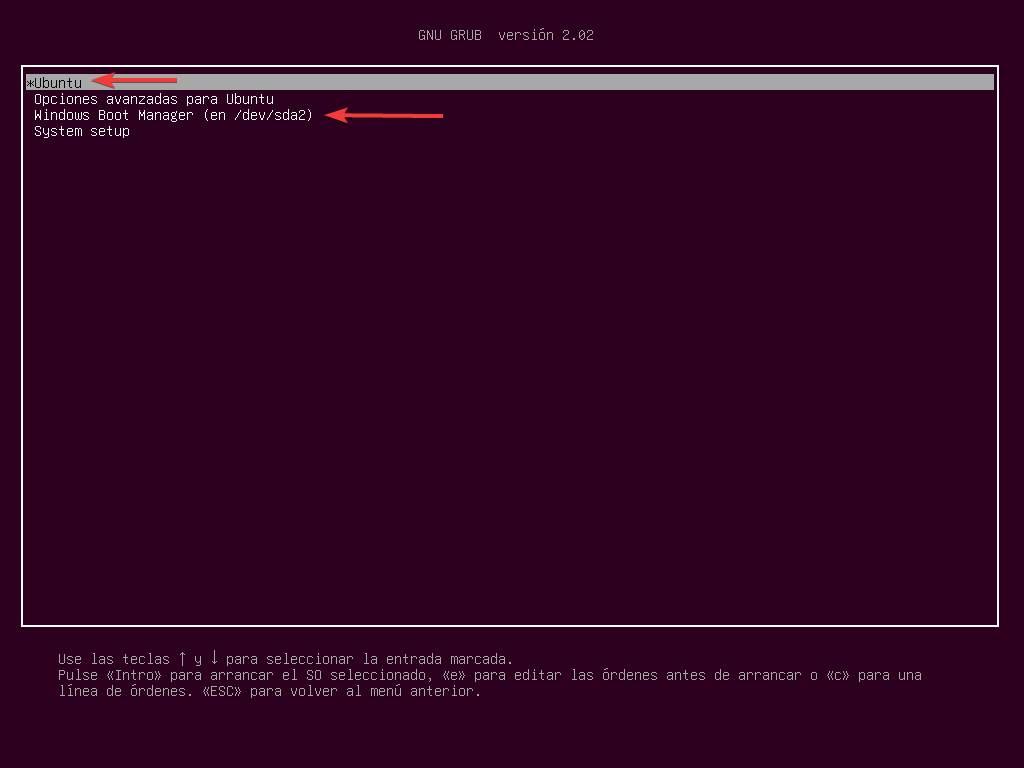
Immediately after you reboot the computer, you should see a screen that looks as shown below:
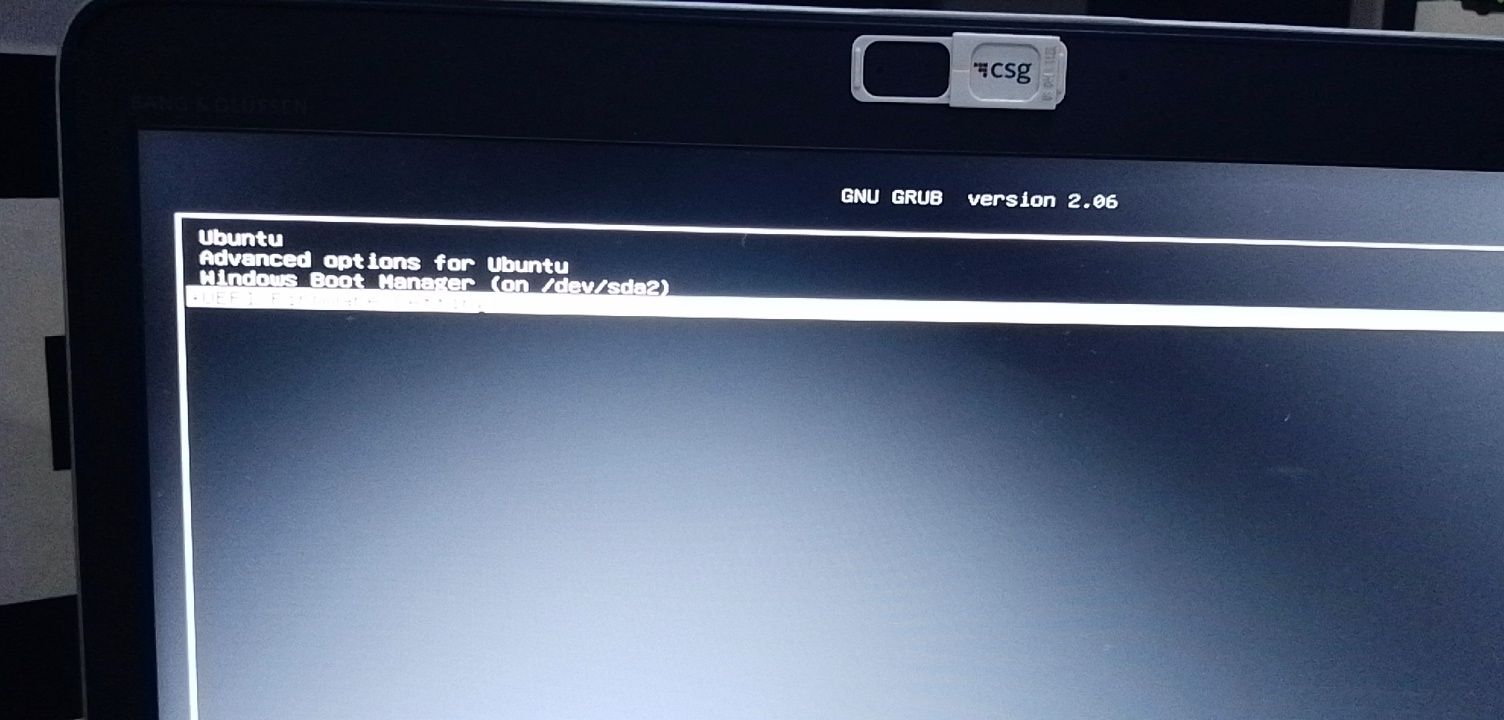
Now, you can select which one to boot into between Ubuntu and Windows 10.
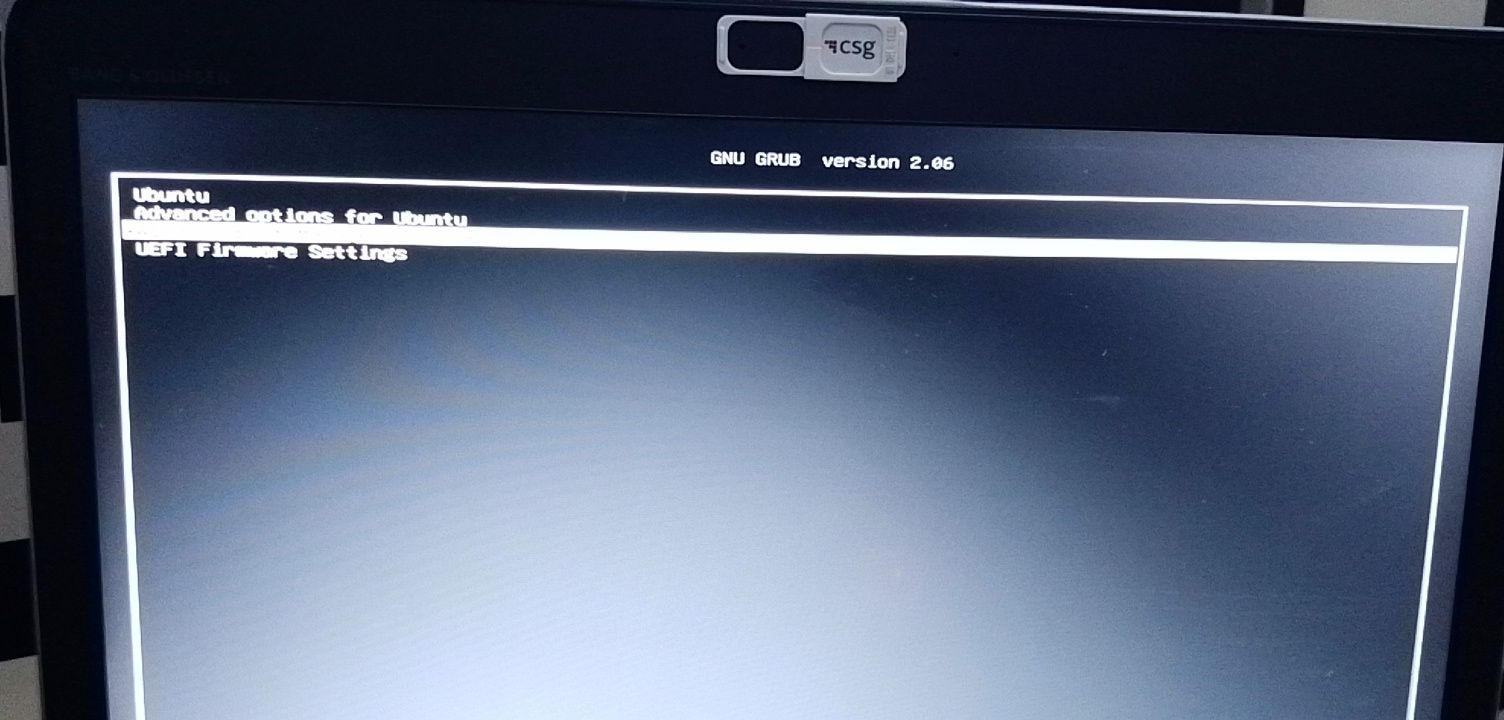
To boot into Ubuntu, select Ubuntu. And to boot into Windows 10, select Windows boot manager.
You can also get into your BIOS from the same place by choosing UEFI Firmware Settings.
Conclusion
I hope this article helps you dual boot Ubuntu and Windows 10 on your computer.
The ultimate aim of this article was to show you how to dual boot Ubuntu and Windows 10.
But the article went beyond that to show you how to:
- check if your PC’s BIOS is in UEFI mode
- partition your hard drive
- optimize your hard drive
- make a bootable USB drive
- install Ubuntu Linux Distro along with Windows on your Windows 10 PC.
If you find this article helpful, kindly share it with your friends and family.
Learn to code for free. freeCodeCamp’s open source curriculum has helped more than 40,000 people get jobs as developers. Get started
Linux is a great operating system with widespread hardware and software support, but the reality is that sometimes you have to use Windows, perhaps due to key apps that won’t run on Linux. Thankfully, dual-booting Windows and Linux is very straightforward—and I’ll show you how to set it up, with Windows 10 and Ubuntu, in this article.
Before you get started, make sure you’ve backed up your computer. Although the dual-boot setup process is not very involved, accidents can still happen. So take the time to back up your important files in case chaos theory comes into play. In addition to backing up your files, consider taking an image backup of the disk as well, though that’s not required and can be a more advanced process.
Prerequisites
To get started, you will need the following five items:
1. Two USB flash drives (or DVD-Rs)
I recommend installing Windows and Ubuntu via flash drives since they’re faster than DVDs. It probably goes without saying, but creating bootable media erases everything on the flash drive. Therefore, make sure the flash drives are empty or contain data you don’t care about losing.
If your machine doesn’t support booting from USB, you can create DVD media instead. Unfortunately, because no two computers seem to have the same DVD-burning software, I can’t walk you through that process. However, if your DVD-burning application has an option to burn from an ISO image, that’s the option you need.
2. A Windows 10 license
If Windows 10 came with your PC, the license will be built into the computer, so you don’t need to worry about entering it during installation. If you bought the retail edition, you should have a product key, which you will need to enter during the installation process.
3. Windows 10 Media Creation Tool
Download and launch the Windows 10 Media Creation Tool. Once you launch the tool, it will walk you through the steps required to create the Windows media on a USB or DVD-R. Note: Even if you already have Windows 10 installed, it’s a good idea to create bootable media anyway, just in case something goes wrong and you need to reinstall it.
4. Ubuntu installation media
Download the Ubuntu ISO image.
5. Etcher software (for making a bootable Ubuntu USB drive)
For creating bootable media for any Linux distribution, I recommend Etcher. Etcher works on all three major operating systems (Linux, MacOS, and Windows) and is careful not to let you overwrite your current operating system partition.

Image by:
Les Pounder, CC-BY-SA 4.0
Once you have downloaded and launched Etcher, click Select image, and point it to the Ubuntu ISO you downloaded in step 4. Next, click Select drive to choose your flash drive, and click Flash! to start the process of turning a flash drive into an Ubuntu installer. (If you’re using a DVD-R, use your computer’s DVD-burning software instead.)
Install Windows and Ubuntu
You should be ready to begin. At this point, you should have accomplished the following:
- Backed up your important files
- Created Windows installation media
- Created Ubuntu installation media
There are two ways of going about the installation. First, if you already have Windows 10 installed, you can have the Ubuntu installer resize the partition, and the installation will proceed in the empty space. Or, if you haven’t installed Windows 10, install it on a smaller partition you can set up during the installation process. (I’ll describe how to do that below.) The second way is preferred and less error-prone. There’s a good chance you won’t have any issues either way, but installing Windows manually and giving it a smaller partition, then installing Ubuntu, is the easiest way to go.
If you already have Windows 10 on your computer, skip the following Windows installation instructions and proceed to Installing Ubuntu.
Installing Windows
Insert the Windows installation media you created into your computer and boot from it. How you do this depends on your computer, but most have a key you can press to initiate the boot menu. On a Dell PC for example, that key is F12. If the flash drive doesn’t show up as an option, you may need to restart the computer. Sometimes it will show up only if you’ve inserted the media before turning on the computer. If you see a message like, «press any key to boot from the installation media,» press a key. You should see the following screen. Select your language and keyboard style and click Next.

Click on Install now to start the Windows installer.

On the next screen, it asks for your product key. If you don’t have one because Windows 10 came with your PC, select «I don’t have a product key.» It should automatically activate after the installation once it catches up with updates. If you do have a product key, type that in and click Next.

Select which version of Windows you want to install. If you have a retail copy, the label will tell you what version you have. Otherwise, it is typically located with the documentation that came with your computer. In most cases, it’s going to be either Windows 10 Home or Windows 10 Pro. Most PCs that come with the Home edition have a label that simply reads «Windows 10,» while Pro is clearly marked.

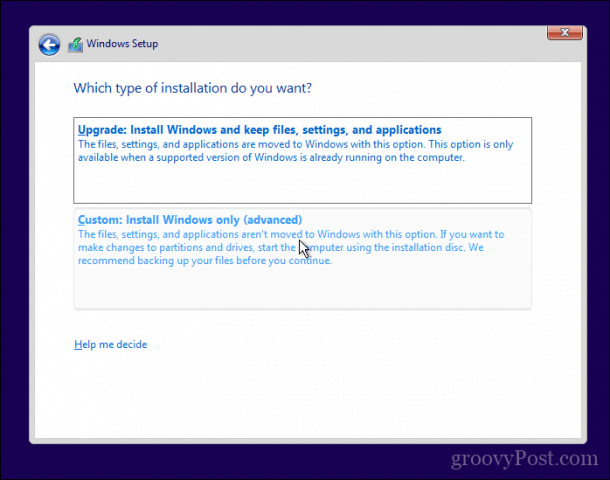
Accept the license agreement by checking the box, then click Next.

After accepting the agreement, you have two installation options available. Choose the second option, Custom: Install Windows only (advanced).

The next screen should show your current hard disk configuration.

Your results will probably look different than mine. I have never used this hard disk before, so it’s completely unallocated. You will probably see one or more partitions for your current operating system. Highlight each partition and remove it.
At this point, your screen will show your entire disk as unallocated. To continue, create a new partition.

Here you can see that I divided the drive in half (or close enough) by creating a partition of 81,920MB (which is close to half of 160GB). Give Windows at least 40GB, preferably 64GB or more. Leave the rest of the drive unallocated, as that’s where you’ll install Ubuntu later.
Your results will look similar to this:

Confirm the partitioning looks good to you and click Next. Windows will begin installing.

If your computer successfully boots into Windows, you’re all set to move on to the next step.
Install Ubuntu
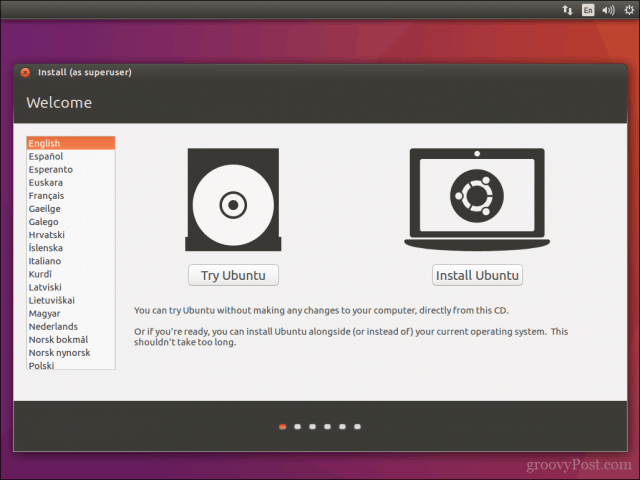
Whether it was already there or you worked through the steps above, at this point you have Windows installed. Now use the Ubuntu installation media you created earlier to boot into Ubuntu. Insert the media and boot your computer from it. Again, the exact sequence of keys to access the boot menu varies from one computer to another, so check your documentation if you’re not sure. If all goes well, you see the following screen once the media finishes loading:

Here, you can select between Try Ubuntu or Install Ubuntu. Don’t install just yet; instead, click Try Ubuntu. After it finishes loading, you should see the Ubuntu desktop.

By clicking Try Ubuntu, you opt to try out Ubuntu before you install it. Here, in Live mode, you can play around with Ubuntu and make sure everything works before you commit to the installation. Ubuntu works with most PC hardware, but it’s always better to test it out beforehand. Make sure you can access the internet and get audio and video playback. Going to YouTube and playing a video is a good way of doing all of that at once. If you need to connect to a wireless network, click on the networking icon at the top-right of the screen. There, you can find a list of wireless networks and connect to yours.
Once you’re ready to go, double-click on the Install Ubuntu 20.04 LTS icon on the desktop to launch the installer.
Choose the language you want to use for the installation process, then click Continue.

Next, choose the keyboard layout. Once you’ve made your selection, click Continue.
You have a few options on the next screen. You can choose a Normal or a Minimal installation. For most people, Normal installation is ideal. Advanced users may want to do a Minimal install instead, which has fewer software applications installed by default. In addition, you can choose to download updates and whether or not to include third-party software and drivers. I recommend checking both of those boxes. When done, click Continue.

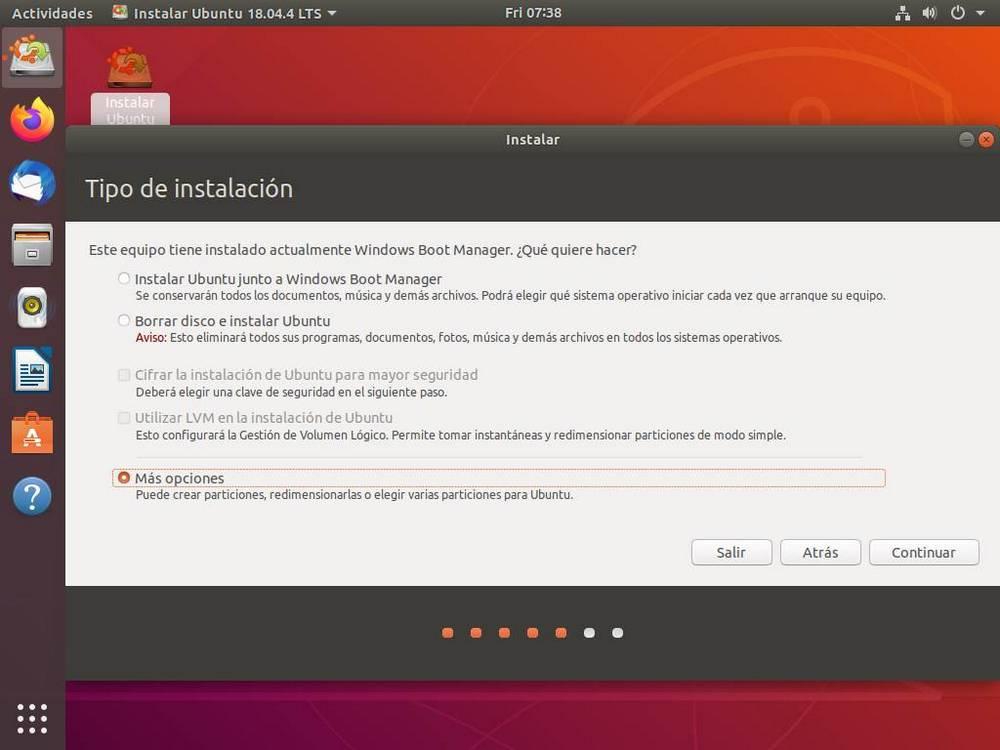
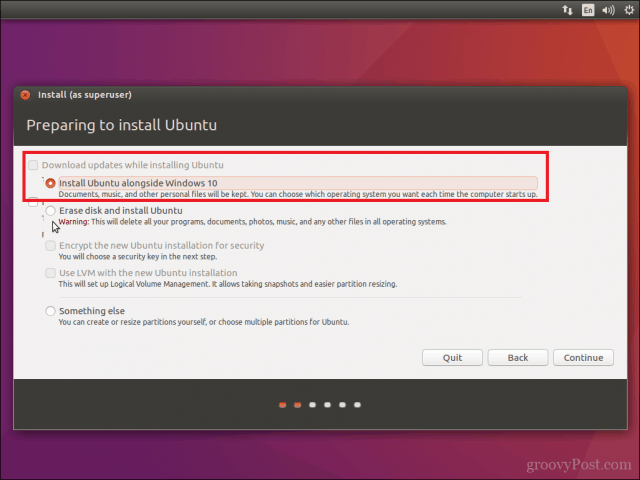
The next screen asks whether you want to erase the disk or set up a dual-boot. Since you’re dual-booting, choose Install Ubuntu alongside Windows 10. Click Install Now.

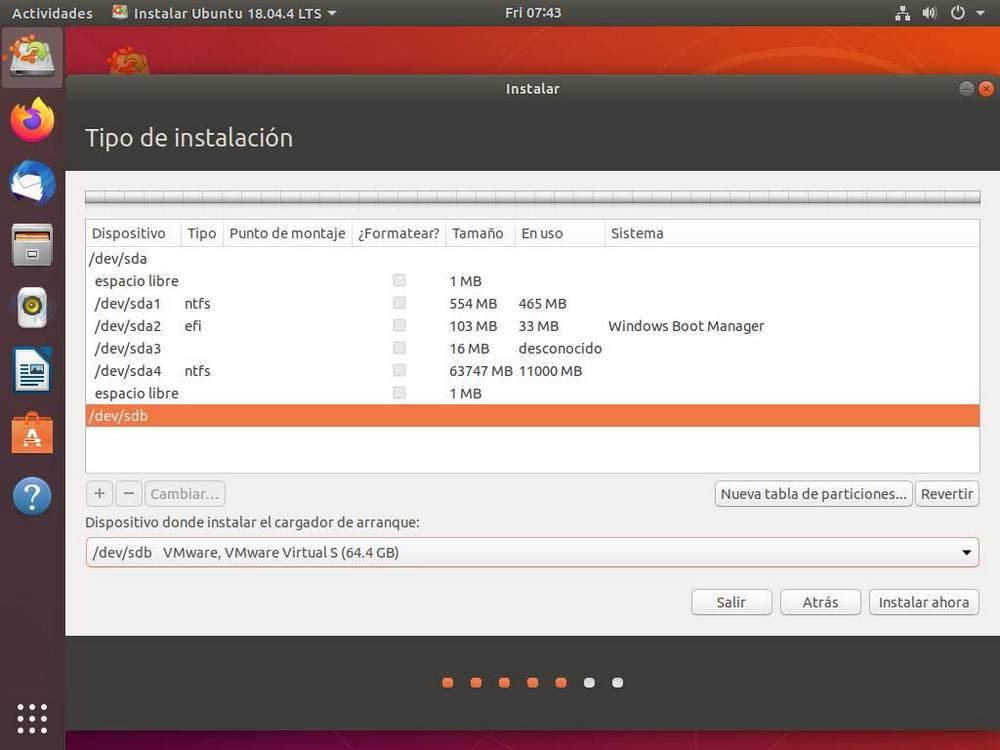
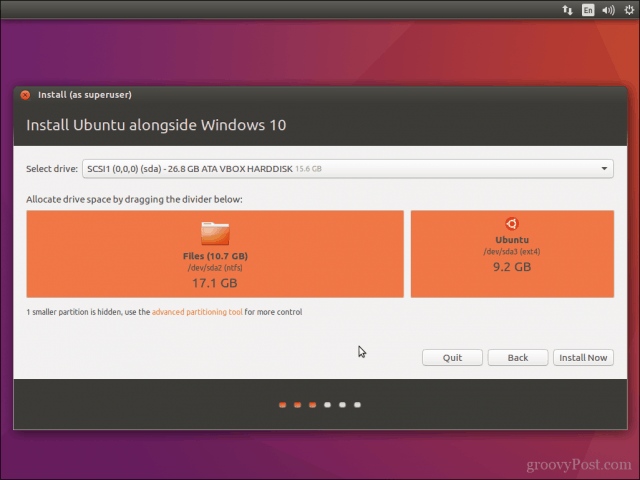
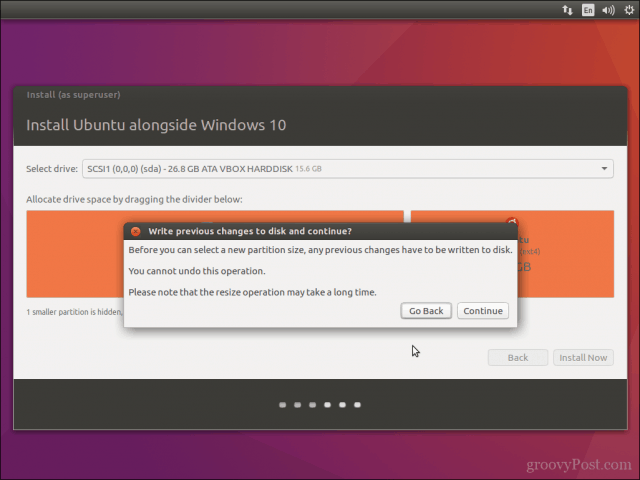
The following screen may appear. If you installed Windows from scratch and left unallocated space on the disk, Ubuntu will automatically set itself up in the empty space, so you won’t see this screen. If you already had Windows 10 installed and it’s taking up the entire drive, this screen will appear and give you an option to select a disk at the top. If you have just one disk, you can choose how much space to steal from Windows and apply to Ubuntu. You can drag the vertical line in the middle left and right with your mouse to take space away from one and gives it to the other. Adjust this exactly the way you want it, then click Install Now.

You should see a confirmation screen indicating what Ubuntu plans on doing. If everything looks right, click Continue.
Ubuntu installs in the background, but you still have some configuration to do. While Ubuntu tries its best to figure out your location, you can click on the map to narrow it down to ensure your time zone and other things are set correctly.

Next, fill in the user account information: your name, computer name, username, and password. Click Continue when you’re done.

Once the installation finishes, reboot your PC.
If all went according to plan, you should see a screen similar to this when your computer restarts. Choose Ubuntu or Windows 10; the other options are for troubleshooting, so I won’t go into them.

Try booting into both Ubuntu and Windows to test them out and make sure everything works as expected. If it does, you now have both Windows and Ubuntu installed on your computer.
This article was originally published in 2018 and has been updated by Seth Kenlon.
 This work is licensed under a Creative Commons Attribution-Share Alike 4.0 International License.
Двойная загрузка Как видно из названия, это конфигурация, с помощью которой мы можем установить две (или более) операционных системы одновременно на компьютер. Когда мы включаем компьютер, появляется загрузчик, спрашивающий нас, какую операционную систему мы хотим загрузить. Если мы не выберем ни одного, будет загружен либо тот, который был загружен ранее, либо тот, который мы настроили в качестве операционной системы по умолчанию.
Каждая операционная система установлена в отдельном разделе нашего компьютера. Таким образом, все, что происходит в одном из них, никак не влияет на другие. Конечно, с помощью соответствующего программного обеспечения мы можем получить доступ к жестким дискам и данным всех из них из любой установленной системы.

Содержание
- Все, что нам нужно сделать Dual Boot
- Какой загрузчик использовать для загрузки Windows и Ubuntu
- Могу ли я установить Linux, отличный от Ubuntu?
- Начните установку Windows и Linux на одном компьютере
- Установка Windows
- Установить Ubuntu
- Проблемы, которые мы должны учитывать при двойной загрузке Windows и Ubuntu
Все, что нам нужно сделать Dual Boot
Первое, о чем стоит подумать, — это какие операционные системы мы хотим установить. Существуют конфигурации двойной загрузки с Windows 10 и Windows 7, другие конфигурации, которые смешивают Ubuntu и Windows, и другие, более сложные с другими операционными системами.
Мы будем предполагать, что мы собираемся установить Windows 10 и Ubuntu на одном компьютере с двойной загрузкой. Итак, нам нужны либо два жестких диска для установки каждой операционной системы на одном, либо жесткий диск с как минимум двумя разделами. Делать это с двумя жесткими дисками удобнее и проще, но если мы собираемся сделать это в двух разделах позже, мы объясним, как это сделать.
Нам также понадобятся установочные носители двух операционных систем. USB являются наиболее удобными для этой задачи. По этой причине мы рекомендуем вам создать установочный USB для Windows 10, а также создать Ubuntu Live USB.
Какой загрузчик использовать для загрузки Windows и Ubuntu
Windows имеет свой собственный загрузчик, так же как и Ubuntu GRUB по умолчанию . Кроме того, если мы хотим, мы также можем использовать сторонний менеджер загрузки, чтобы иметь возможность выбирать между операционными системами, которые мы хотим запустить.
Загрузчик Windows распознает большинство дистрибутивов Linux, а загрузчик Linux обычно распознает Windows без проблем. Разница в том, что Windows с обновлениями операционной системы, как правило, дает сбой.
По этой причине мы рекомендуем вам лучше использовать Linux, который, безусловно, GRUB. И для этого лучше всего оставить эту вторую операционную систему последней.
Могу ли я установить Linux, отличный от Ubuntu?
Мы привели Ubuntu в качестве примера, так как это один из самых известных и используемых дистрибутивов в мире. Однако, если вы хотите установить любой другой дистрибутив Linux, кроме Ubuntu , процесс будет таким же. Единственное, что изменится, это скриншоты, которые мы разместили в этой статье, так как они будут другими.
Даже если у нас много места или много жестких дисков, мы можем установить три или более разных операционных систем, следуя одному и тому же процессу, одна за другой. Тот, который мы установим последним, будет отвечать за обновление загрузчика (ГРУБ) и позволяя нам запускать операционные системы, которые мы хотим использовать.
Начните установку Windows и Linux на одном компьютере
Установка Windows
Если у нас уже есть все вышеперечисленное, мы уже можем приступить к установке нашей собственной операционной системы Dual Boot. Первое, что мы собираемся сделать, это установить Windows 10 с нуля. Процесс установки этой операционной системы не скрывает никаких загадок. Единственное, на что стоит обратить внимание — это при выборе перегородок.
В нашем случае, например, два жесткие диски появится. Если мы выберем один из них, мастер создаст разделы, необходимые для установки на нем Windows. И если мы создадим новый раздел вручную, то же самое, мы сможем увидеть необходимые системные разделы, чтобы можно было установить и использовать Windows 10.
Если мы хотим установить операционную систему на раздел что мы должны сделать, это создать новый раздел из этого мастера установки, выбрав место, которое мы хотим оставить для Windows 10, и убедившись, что достаточно места для Ubuntu. Мастер установки Windows сам создаст ваши системные разделы и начнет установку.
Когда процесс установки закончится, у нас уже будет Windows 10 установлена на компьютере. Следующим шагом будет удаление установочного USB для Windows 10, вставка Ubuntu USB, перезагрузка компьютера и запуск снова.
Установить Ubuntu
Теперь, когда на компьютере установлена Windows 10, следующим шагом будет установка Ubuntu. Мы запустим Ubuntu в режиме Live (От Оперативная память) и запустите мастер установки операционной системы.
Мы просто должны следовать этой системе до раздела, где мы должны выбрать жесткий диск или разделы, где мы будем устанавливать это Linux.
 Ubuntu будет обнаружить, что у нас уже установлена Windows, и позволить нам установить ее вместе с системой Microsoft очень быстро и без настроек. Это также позволит нам стереть весь диск и установить Ubuntu на него с нуля (не рекомендуется) и откройте панель «Дополнительные параметры», чтобы создать собственные разделы. Мы выберем этот последний вариант.
Как мы видим, появятся два жестких диска. С одной стороны, у нас будет первый жесткий диск с Windows 10 и все разделы, необходимые для работы этой операционной системы. А с другой стороны у нас будет второй жесткий диск, который будет пустым и без разделов.
Первое, что мы сделаем, это создадим новую таблицу разделов, чтобы преобразовать жесткий диск в пустое пространство без разбиения. Как только это будет сделано, мы будем выберите пустое место и создайте разделы, которые мы хотим использовать в соответствии с имеющимися у нас знаниями о Linux.
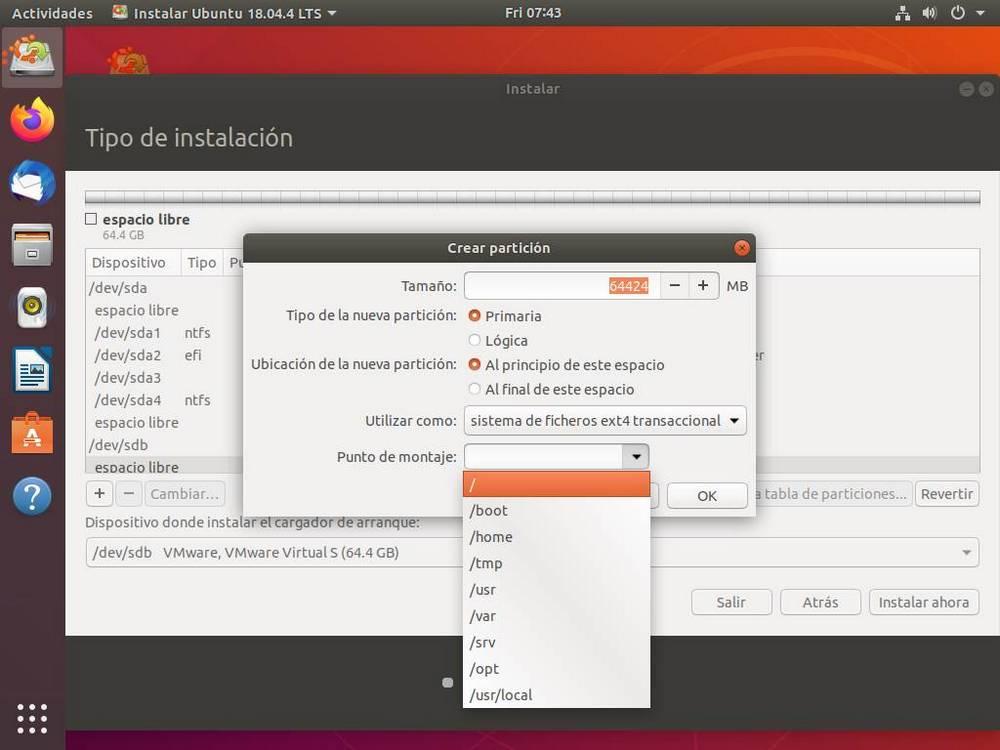
Важно создать раздел с точка крепления /, поскольку именно там будет установлена вся система. Но мы также можем создать точки монтирования для загрузки, для дома и для других каталогов в системе Linux. Но это уже для продвинутых пользователей. Если у нас нет большого опыта работы с Linux, этого будет достаточно, чтобы создать один раздел с корневой точкой монтирования (/). Что касается файловой системы, мы должны выбрать EXT4.
В случае, если вместо двух жестких дисков мы пытаемся установить его в один в разделе, нам нужно создать новый раздел со свободным пространством в формате EXT4 и назначить точку монтирования / указанному разделу. Таким образом, у нас будет без проблем раздел Ubuntu между Windows.
Наконец, мы должны указать, что мы хотим установить загрузчик на этот второй жесткий диск. Таким образом, каждый диск будет иметь свой собственный менеджер загрузки, что-то полезное, чтобы в случае сбоя одного из них мы могли загрузить хотя бы одну из операционных систем с другой.
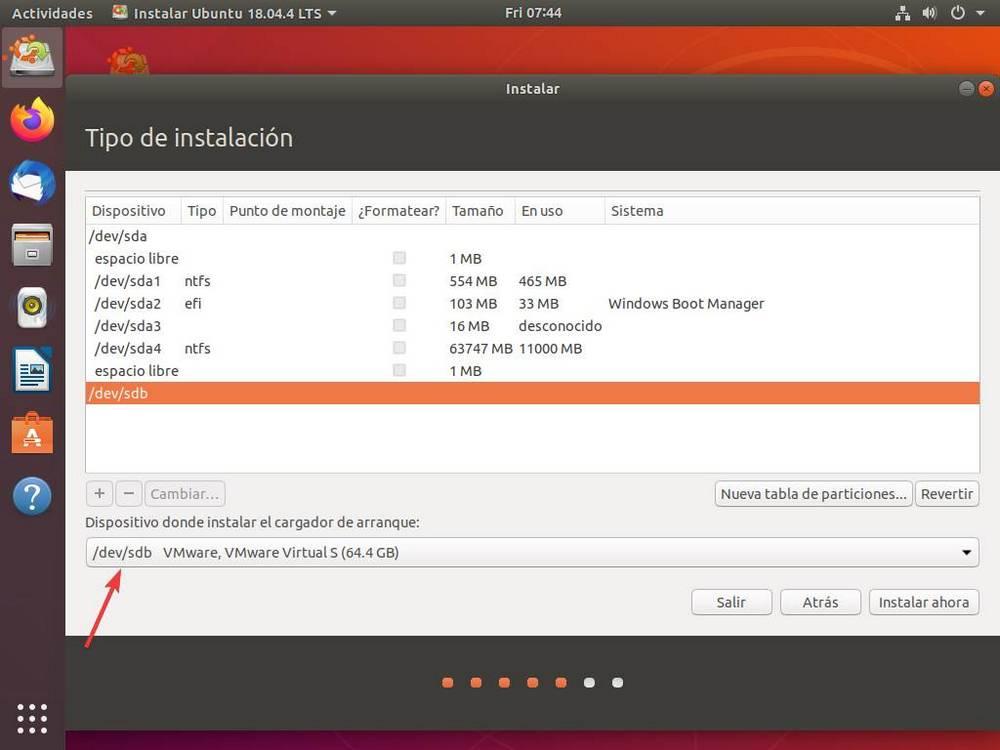
В случае наличия только жесткого диска (для установки двух систем в разных разделах), устройство для загрузки будет единственным жестким диском, который у нас есть.
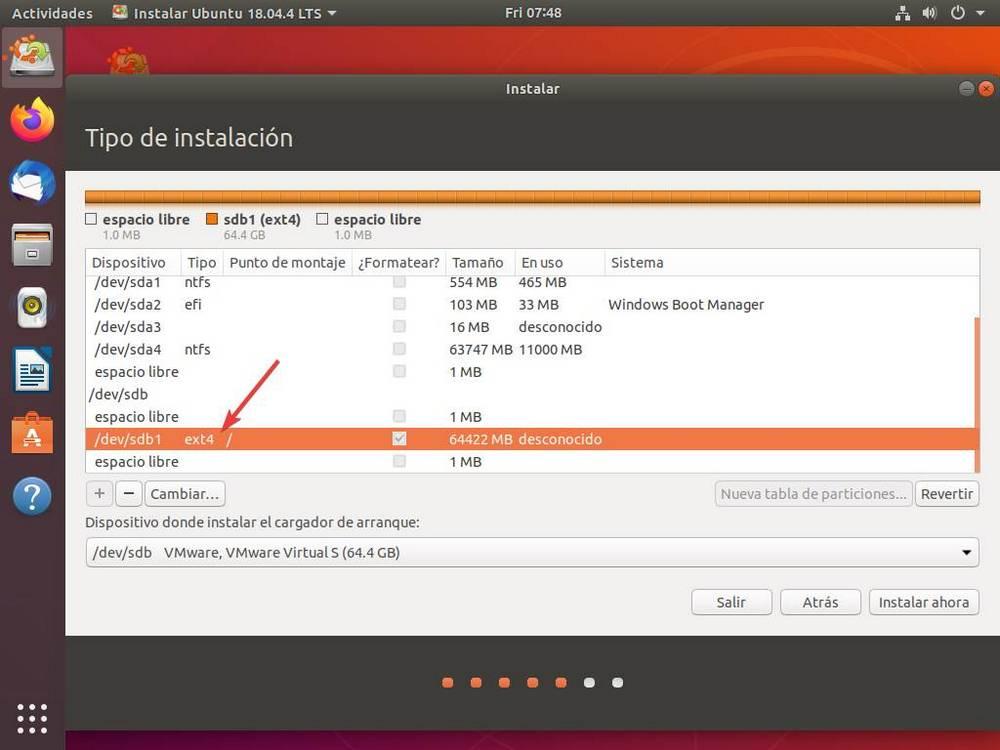
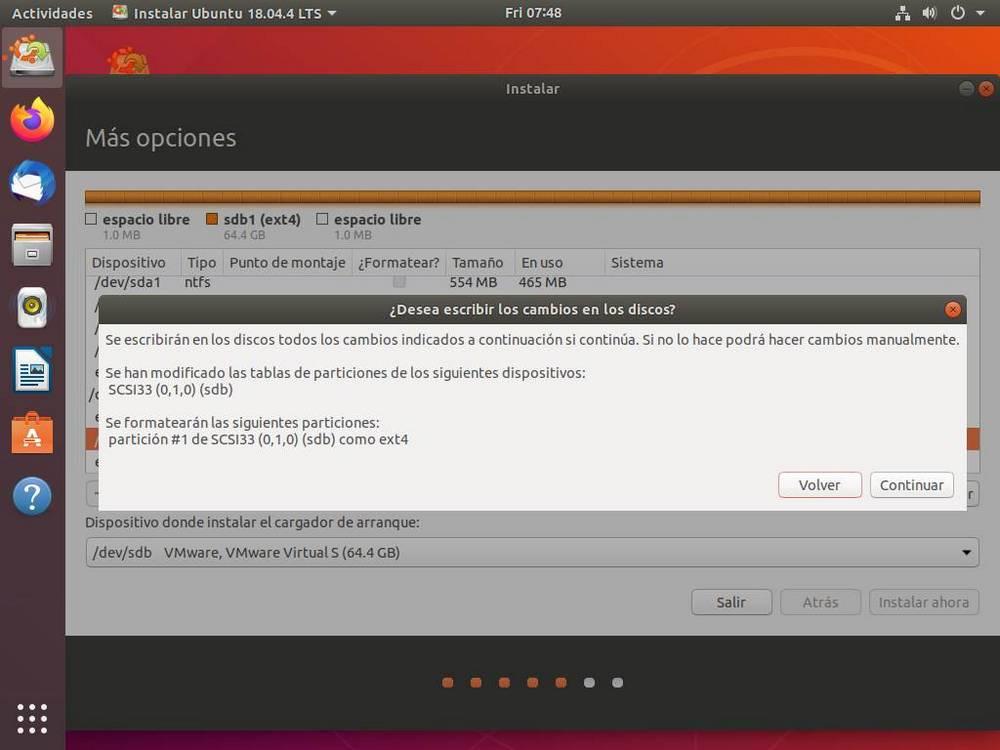
Готов. Теперь мы увидим уведомление, в котором будут указаны все изменения, которые будут внесены в наши жесткие диски, которые, если они правильные, мы должны принять. И процесс установки Ubuntu начнется.
Когда весь процесс завершен, мы перезагружаем компьютер и при загрузке видим менеджер загрузки Ubuntu (GRUB), который спросит нас, какую операционную систему мы хотим загрузить.
И этот экран будет появляться каждый раз, когда мы включаем компьютер, что позволяет нам каждый раз выбирать нужную систему в соответствии с тем, что мы собираемся делать на компьютере. Затем из Ubuntu мы можем использовать программы или терминальные команды, чтобы упорядочить его, настроить его внешний вид и многое другое.
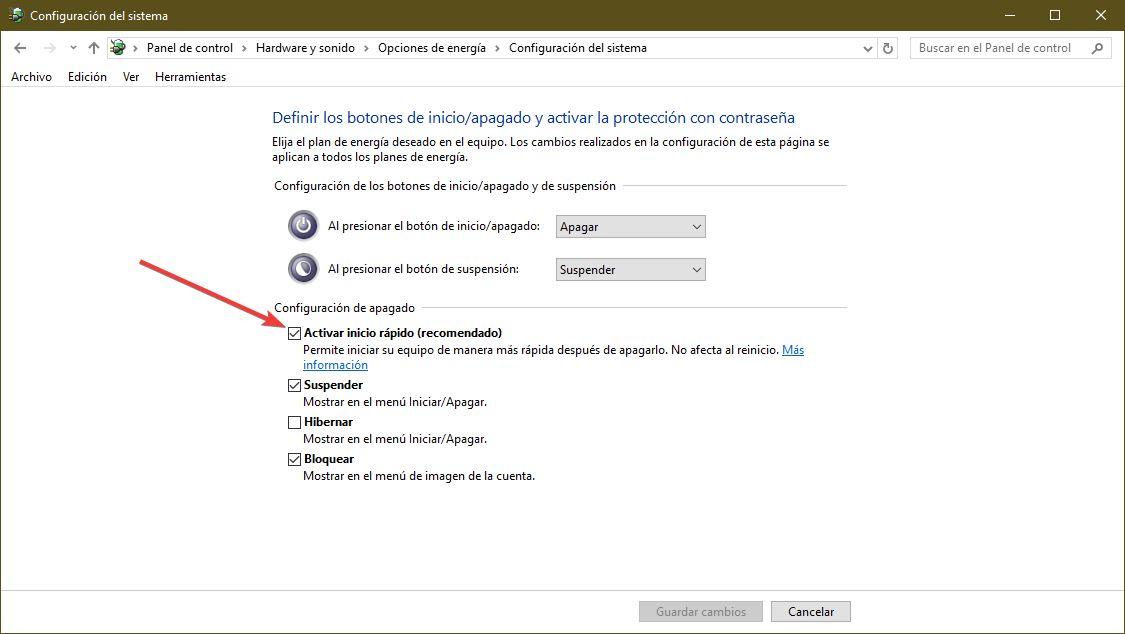
Одна из наиболее распространенных проблем, с которыми мы столкнемся при использовании этой конфигурации, заключается в том, что Ubuntu может не запуститься после завершения работы Windows. Даже Windows может не вернуться к нему после использования Ubuntu. Эта ошибка связана с Быстрая загрузка или Быстрая загрузка Windows 10.
Быстрая загрузка — это своего рода режим гибернации операционной системы, когда ядро вместо полной остановки сбрасывается на жесткий диск, поэтому при загрузке оно возвращается непосредственно в память. Это значительно ускоряет запуск Windows 10.
При переключении между операционными системами это ядро загружается и настраивается для загрузки. Поэтому при использовании другой операционной системы проблемы генерируются и даже исчезают.
Если у нас будет компьютер с двойной загрузкой, лучше всего отключить быструю загрузку из вариантов питания Windows 10. Таким образом, мы решим более 80% проблем, с которыми мы можем столкнуться при переходе с операционной системы на другую.
Другая проблема, которая может возникнуть, заключается в том, что вместо GRUB Загрузочный загрузчик Windows 10 появляется. Это, безусловно, потому, что после обновления Microsoft изменила конфигурацию нашего UEFI, чтобы разместить жесткий диск Windows в качестве основного и загружаться с него.
В этом случае нам нужно снова ввести настройки BIOS или UEFI и изменить порядок загрузки так, чтобы жесткий диск Linux с GRUB сначала перезагружался.
Наконец, если вы не можете загрузить какую-либо операционную систему, возможно, у вас жесткий диск или USB-накопитель подключен к компьютеру с которого вы пытаетесь загрузиться , Мы должны убедиться, что мы отключили USB-память Windows 10 и Ubuntu, чтобы избежать проблем с загрузкой.

Running Windows 10 and Linux on the same computer is easier than ever. Here’s how to do it.
A computer that boots both Windows 10 and Linux can easily be the best of both worlds. Having easy access to either of the operating systems lets you enjoy the benefits of both. You can hone your Linux skills and enjoy the free software only available for Linux platforms. Or, you can switch back to Windows 10 to use apps like Photoshop, AutoCAD or Microsoft Office. The beauty of dual booting is that it lets each operating system take full advantage of the hardware resources of your computer. While virtual machines and the Windows Subsystem for Linux can give you a taste of the Linux experience, dual booting lets you tap its full potential.
The good news is that Windows 10 and Linux live in harmony better than ever these days. Dual booting Windows 10 and Linux used to be a precarious process that could wreck your Windows installation, your Linux installation or both. While the process isn’t quite a smooth as dual booting macOS and Windows with Boot Camp, it comes close. In this article, we’ll show you how to safely install Windows 10 and Linux on the same hard drive. It doesn’t matter if you’re starting with Linux or starting with Windows—dual booting is easy to set up either way.
Dual Boot Linux with Windows 10 – Linux Installed First
Let’s start with the (slightly) harder way first; you already have a copy Linux installed and you want to install Windows on a partition. The first step is to create the partition where Windows 10 will be installed. We have covered how to create partitions in Linux, so, start by reviewing our article on how to do that.
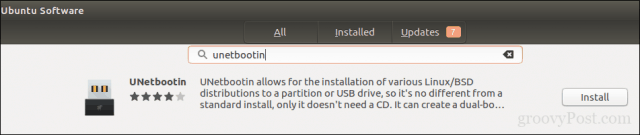
Once you have your partition set up, you will need to purchase Windows 10, download the ISO file then create a bootable copy. Creating a bootable copy of Windows 10 on Linux can be done using the free Unetbootin (USB thumb drive) or Brasero software if you are installing from a DVD.
Create Bootable Windows 10 Install Media Using Unetbootin
Unetbootin can be downloaded from the Software Center in Ubuntu. Once you have it up and running, launch it. Make sure you are using a thumb drive with at least 8 GBs of free space.
Select the Disk Image radio box, click the browse button (represented by an ellipsis …), browse to the ISO file then click Open. Chose the medium from the Type list box—in this case, your USB drive. Click on the drive list box then select your USB thumb drive.
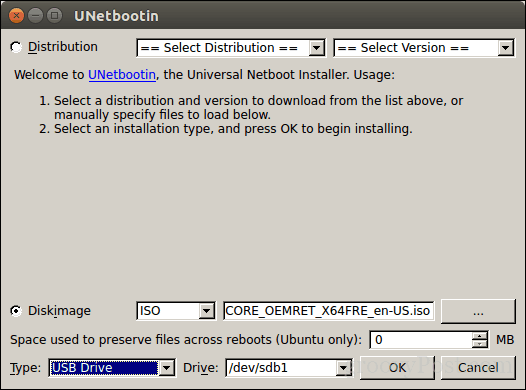
Note: If you are not offered the option to select your thumb drive, you need to format it using the FAT32 file system. Open the file manager, right-click the thumb drive then click Format.
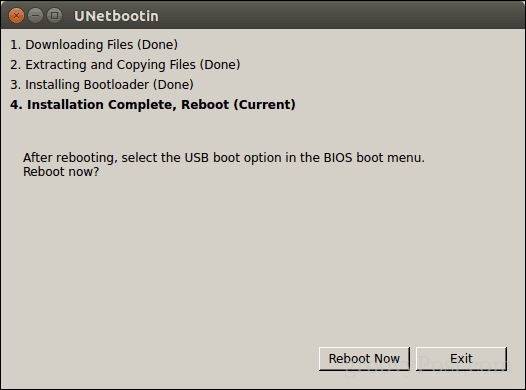
Click OK, then wait while the bootable copy is created.
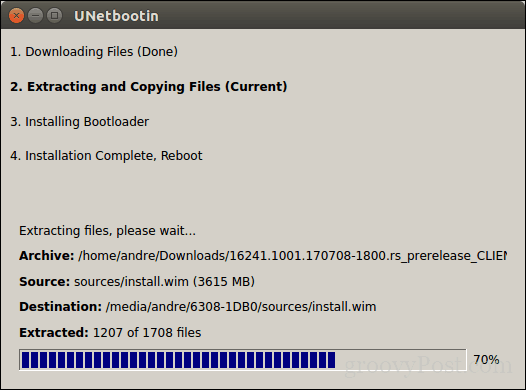
When complete, click Exit.
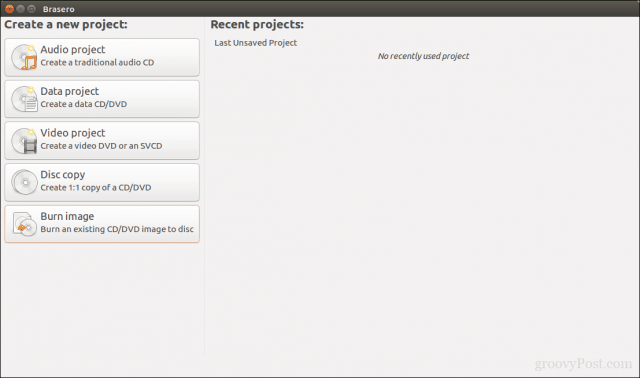
Create Bootable Windows 10 Install Media Using Brasero
If you already made a bootable USB with Unetbootin, you can skip this part. If you are still using an old school system with a DVD drive, you can use the Brasero DVD Burning software, which you can download from the Software Center also. Please keep in mind, Windows 10 ISO files are getting larger beyond the standard 4.7 GB DVDs. So, in some cases, it’s best you use 8.5 GB dual-layer DVDs if supported by your drive. If you can’t, then it’s best you use a USB thumb drive.
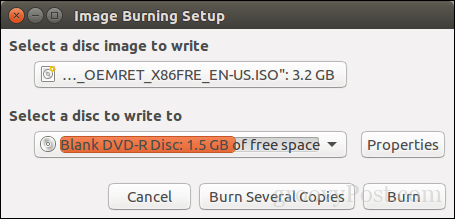
In Brasero, click Burn Image.
Select your disc image, make sure a blank DVD disc is inserted then click Burn.
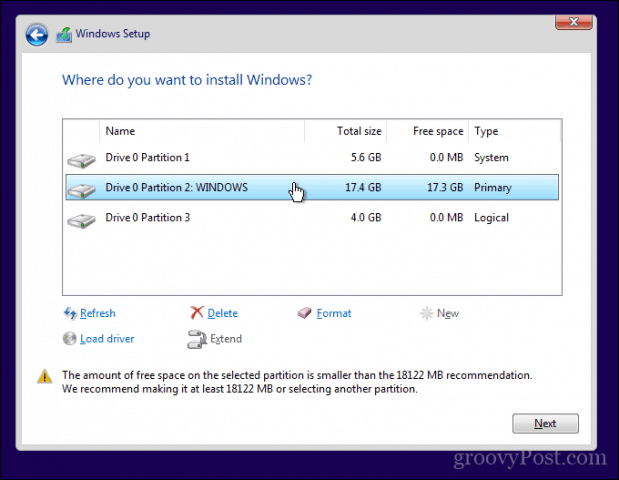
After preparing your install media, insert it or connect it. Reboot your computer, then configure your BIOS to boot from the drive. Windows 10 will boot into setup as it normally does. After you arrive at the setup screen, click Custom: Install Windows only (advanced).
Make sure you select the right partition; don’t wipe out your Linux installation. Click Next then wait while Windows 10 Setup copies files to the drive. Your computer will be rebooted several times.
When setup is complete, follow the instructions to complete the out of box experience.
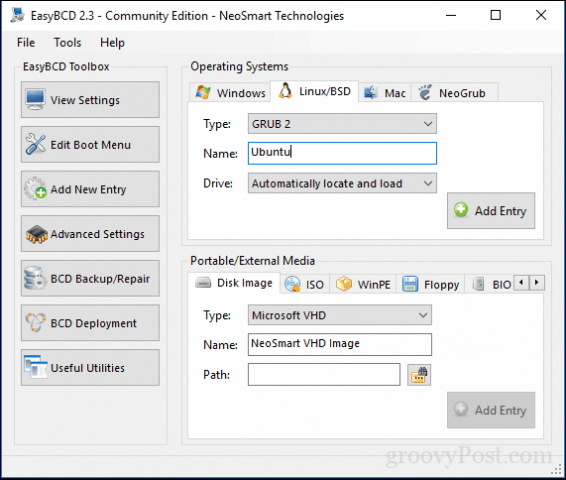
After that’s complete, you might notice the obvious—there is no way to boot into Linux anymore. Here is how you fix that. Download a free utility called EasyBCD from Neosmart Technologies. Proceed to install EasyBCD then launch it. Select the Linux/BSD tab. Click in the type list box, select Ubuntu; enter the name of the Linux distribution, choose automatically locate and load then click Add Entry. Reboot your computer.
You will now see a boot entry for Linux on the Windows graphical boot manager.
Dual Boot Linux with Windows 10 – Windows Installed First
For many users, Windows 10 installed first will be the likely configuration. In fact, this is the ideal way to dual boot Windows and Linux. Again, I will be using the Ubuntu Linux distribution. You can download the Ubuntu Linux ISO image from Canonical’s web page then create a bootable copy using Unetbootin for Windows or burn to a blank DVD using disc image in Windows 10.
After creating your install media, configure your BIOS to boot from it. Ubuntu’s installation wizard intelligently detects existing Windows installations. It will ask you if you would like to install Ubuntu alongside Windows.
At the Ubuntu install screen, click Install Ubuntu.
Choose whether you want to download and install updates and third-party drivers and codecs then click Continue.

Select the option Install Ubuntu alongside Windows 10 then click Continue.
Ubuntu’s installer will set a default allocation of space for the installation. If you have enough space, you can resize the partition by placing your mouse between the divider then drag it left or right to make adjustments. Once you are satisfied with the allocated amount for your Ubuntu installation, click Install Now.
Click Continue to confirm changes.
Click Continue again.
Enter your time zone then click Continue.

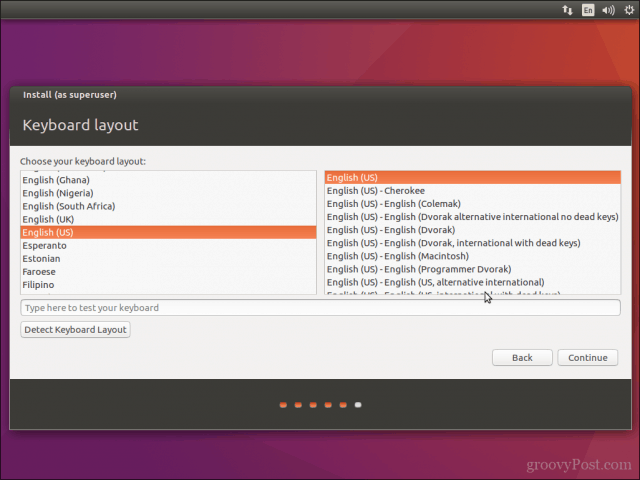
Select your keyboard layout, click Continue.
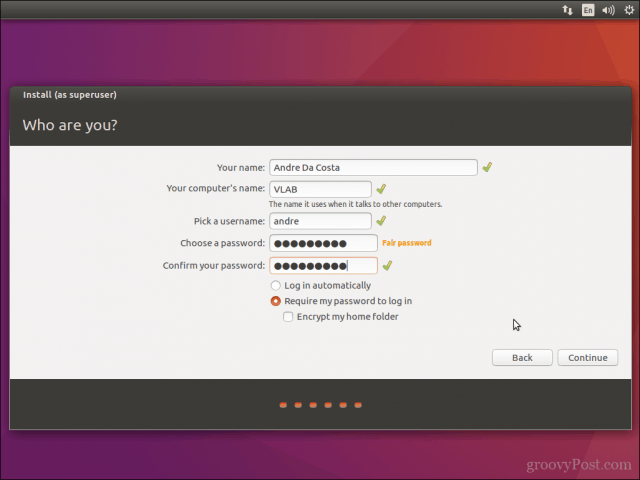
Create your user account by providing your full name, computer name, login name, and password. Choose whether you want to log in automatically or be prompted for a password. You can also encrypt your home folder for extra security. Click Continue.
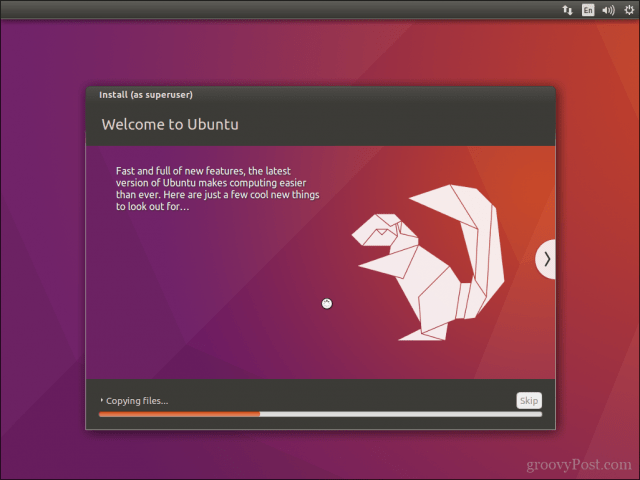
Wait while Ubuntu copies files.
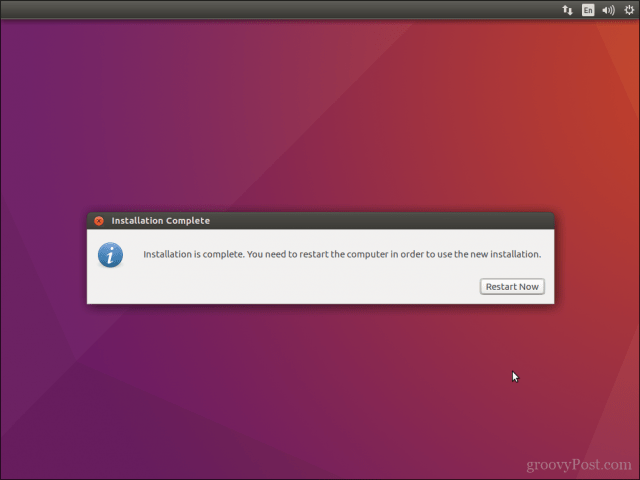
When complete, click Restart Now.
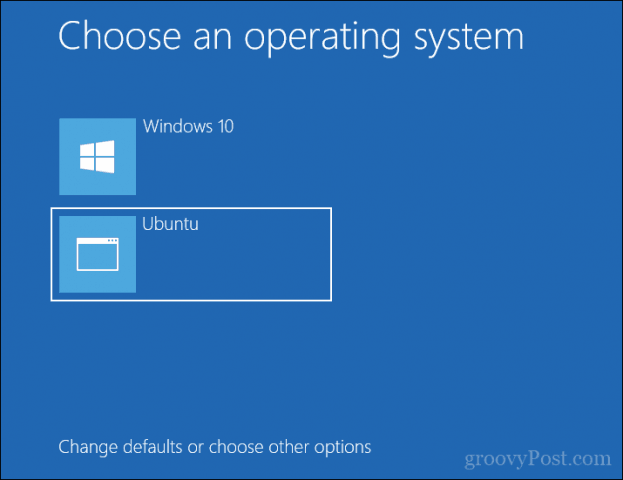
Ubuntu will add a boot entry for Windows 10 to the GRUB boot manager, which you can select using the up or down arrow then hitting Enter.
That’s it, Windows 10 and Ubuntu is now set up on your computer.
Let us know what you think. If you have done this before, share some of your tips with us. By the way, what’s your favorite distro?
![]()
Dual boot Windows 10 and Linux — Introduction
If you are looking forward to running both Kali and Windows on your system, you have two options:
- Virtualization
- Dual-booting
Virtualization is the concept of running an operating system (virtual machine) inside your host/ main operating system using virtualization software like VMware and VirtualBox. On the other hand, dual-booting refers to installing two operating systems on your computer and selecting the one you want to use on boot.
In this post, we are going to look at how to dual boot Windows 10 and Kali Linux. Kali Linux is a Debian-based Linux distribution with a focus on security auditing and penetration testing. Windows OS, on the other hand, is one of the most popular Operating Systems used worldwide. Imagine having access to these two systems on your single PC. Windows enables you to perform your day-to-day activities like development, editing, etc. On the other hand, you can practice your penetration skills and hunt for vulnerabilities on digital systems with Kali Linux.
ALSO READ: Perform VNC Brute Force Attack [100% Working]
Step-1: Requirements
- Microsoft Windows 10 (Already installed, preferably Windows 10)
- Free Disk Space — Minimum 25 GB free space recommended.
- Kali Linux ISO image.
- USB Drive (At least 4GB size)
- Rufus / Balena Etcher
NOTE:
In this post, we will assume you already have Windows installed and running on your machine. Additionally, if you are just getting started with a Linux system, I highly emphasize installing Windows first, followed by Kali Linux or any other Linux distribution you have in mind. After installing Linux, installing Windows will overwrite the Grub configuration, and your Linux system will not boot. Even though that can be fixed, it can be quite an overwhelming process for a newbie.
Step-2: Disk Partitioning
HINT:
When setting up a dual-boot or multi-boot, every operating system should be installed in its own partition. If you install an operating system in a partition containing another OS’s files, they will be overwritten, and the operating system won’t boot. The first step in this tutorial will be creating a partition where we will install Kali Linux.
Follow the steps below:
On your keyboard, press Windows key + R hotkey and type diskmgmt.msc on the small window that appears. Click OK or hit the Enter key to open the disk management window.
ALSO READ: How to install Issabel PROPERLY [Step-by-Step]
A new window will open showing all the drives connected to your PC and their different partitions, similar to the image below.
![Dual boot Windows 10 and Linux [Step-by-Step]](https://www.golinuxcloud.com/wp-content/uploads/Disk-Management.png "Dual boot Windows 10 and Linux [Step-by-Step]")
Right-click on the partition you want to resize, select shrink volume, and set the size of the disk where you want to install the virtual machine. This post will resize partition C and create a new partition with a 40 GB storage size, as shown in the image below. This is the partition where we will install Kali Linux.
![Dual boot Windows 10 and Linux [Step-by-Step]](https://www.golinuxcloud.com/wp-content/uploads/Create-new-partition-1.png "Dual boot Windows 10 and Linux [Step-by-Step]")
Step-3: Download Kali Linux
As of writing this post, Kali Linux comes packaged for different platforms. Some of them include:
- Bare metal: Meant for installing directly on your PC hardware
- Virtual machines: These are packaged ISO files meant to run on VirtualBox or VMware.
- ARM: This ISO format is meant for systems running on the ARM architecture, such as the Raspberry Pi.
Since we want to perform a dual-boot, we will download the Kali Bare Metal ISO file.
Step-4: Create a Bootable Disk of Kali Linux
Previously, we wrote a post on creating Kali Linux bootable USB [3 Different Methods]. Please check it out. In this post, we will use Rufus. It’s an open-source tool available for Windows systems. If you are on a Linux pc, you can use Balena Etcher or the DD command. Follow the steps below.
ALSO READ: Configure kickstart server | PXE boot server | RHEL/CentOS 8
Download Rufus and execute the setup file. On running Rufus, a screen similar to this will appear.
![Dual boot Windows 10 and Linux [Step-by-Step]](https://www.golinuxcloud.com/wp-content/uploads/Rufus-1.png "Dual boot Windows 10 and Linux [Step-by-Step]")
First, ensure that your USB drive is selected on the Device dropdown menu.
In the boot selection, locate the Kali Linux ISO file you downloaded and select it.
Click the Start button for the process to start, wait for the process to complete.
Once the process is complete, click ‘CLOSE‘ to close Rufus Window.
Step-5: Boot PC from the Bootable Kali USB Drive
Since we have dealt with all initial stages, we can now begin with the essential part of the dual boot setup — Booting your PC from the bootable USB drive and installing Kali Linux. Before getting started, ensure you disable secure boot on your BIOS (if it’s enabled) since it doesn’t work well with most Linux systems.
When done, shut down the PC completely, then start it again. You need to change the normal boot order to boot it from the bootable Kali Linux USB drive. To do so, you will need to press specific Function keys depending on the PC brand. On HP, it’s F9, Dell laptops use F12, and so on. When the boot devices window appears, select the bootable Kali Linux USB drive and hit Enter. In our case, the USB drive is listed as ‘Removable devices.’
![Dual boot Windows 10 and Linux [Step-by-Step]](https://www.golinuxcloud.com/wp-content/uploads/bootmenu.png "Dual boot Windows 10 and Linux [Step-by-Step]")
After a few seconds of booting the kernel, you will see the Kali Linux installer menu.
ALSO READ: Metasploit Tutorial on Kali Linux [Step-by-Step]
Step-6: Install Kali Linux Alongside Windows
There are different options for installing Kali Linux; in our case, we will use “Graphical Install.”
![Dual boot Windows 10 and Linux [Step-by-Step]](https://www.golinuxcloud.com/wp-content/uploads/kali-17.jpg "Dual boot Windows 10 and Linux [Step-by-Step]")
After a few minutes of starting up the Linux kernel, you will see the Select Language Screen. Choose the language that you wish to use during the installation and hit Enter.
![Dual boot Windows 10 and Linux [Step-by-Step]](https://www.golinuxcloud.com/wp-content/uploads/kali-18.png "Dual boot Windows 10 and Linux [Step-by-Step]")
Next, select your Location and proceed to set the desired Keyboard layout. Press Enter when done. You will be required to set the Hostname that identifies your system on the Network. It can be any name. Click Continue.
![Dual boot Windows 10 and Linux [Step-by-Step]](https://www.golinuxcloud.com/wp-content/uploads/kali-19.png "Dual boot Windows 10 and Linux [Step-by-Step]")
On the next screen, you will be prompted to set the Domain name. That should be something that ends with a ‘.com,’ ‘.edu,’ ‘.org,’ and so on. Alternatively, you can leave this field empty and hit Continue.
![Dual boot Windows 10 and Linux [Step-by-Step]](https://www.golinuxcloud.com/wp-content/uploads/Domain-Name.png "Dual boot Windows 10 and Linux [Step-by-Step]")
Next, we are going to set up the Full name of our user. Enter the desired username and hit Continue.
![Dual boot Windows 10 and Linux [Step-by-Step]](https://www.golinuxcloud.com/wp-content/uploads/Full-name.png "Dual boot Windows 10 and Linux [Step-by-Step]")
On the next screen, we will set the desired Username. Click Continue when done.
![Dual boot Windows 10 and Linux [Step-by-Step]](https://www.golinuxcloud.com/wp-content/uploads/username-1.png "Dual boot Windows 10 and Linux [Step-by-Step]")
On the next screen, we will set up the password for our new user. Click Continue when done.
![Dual boot Windows 10 and Linux [Step-by-Step]](https://www.golinuxcloud.com/wp-content/uploads/Password.png "Dual boot Windows 10 and Linux [Step-by-Step]")
IMPORTANT NOTE: This is most critical part. Perform partition as guided to avoid loosing your Windows 10 OS data
ALSO READ: How to create windows undetectable payload — technowlogger
On the next screen, select your time zone and hit Continue. You will now get to the Partition disks window, the most crucial part of our installation process. You will see four options:
- Guided — Use the entire disk
- Guided — Use the entire disk and set up LVM
- Guided — Use entire disk and set up encrypted LVM
- Manual
![Dual boot Windows 10 and Linux [Step-by-Step]](https://www.golinuxcloud.com/wp-content/uploads/partition-disks-3.png "Dual boot Windows 10 and Linux [Step-by-Step]")
Select ‘Manual‘ and hit Enter.
On the new screen that appears, you will see all the partitions available on your internal hard drive, as shown in the image below. Yours might be a little different since we are demonstrating this dual-boot setup on VirtualBox.
![Dual boot Windows 10 and Linux [Step-by-Step]](https://www.golinuxcloud.com/wp-content/uploads/Disks.png "Dual boot Windows 10 and Linux [Step-by-Step]")
Select the partition that you want to install Kali Linux and hit Enter. In our case, it’s the 40 GB that we created in the ‘Disk Partioning’ section. If yours is not labeled as ‘FREE SPACE,’ hit the ‘Delete the partition’ option as shown below.
![Dual boot Windows 10 and Linux [Step-by-Step]](https://www.golinuxcloud.com/wp-content/uploads/Delete-Partition.png "Dual boot Windows 10 and Linux [Step-by-Step]")
Select the newly created ‘FREE SPACE’ and hit Enter. On the window that appears, set the parameters below:
- Use as: Ext4 journaling system
- Mount point: /
When done, click ‘Done setting up the partition.’
![Dual boot Windows 10 and Linux [Step-by-Step]](https://www.golinuxcloud.com/wp-content/uploads/Setup-partition.png "Dual boot Windows 10 and Linux [Step-by-Step]")
You will be taken back to the ‘Partition disks’ screen. Scroll down and select ‘Finish partitioning and write changes to disk.’
ALSO READ: How to Hack Social Media Accounts — ZPhisher [5 Simple Steps]
![Dual boot Windows 10 and Linux [Step-by-Step]](https://www.golinuxcloud.com/wp-content/uploads/Finish-partition-setup.png "Dual boot Windows 10 and Linux [Step-by-Step]")
You will see the prompt ‘Do you want to return to partioning menu?,’ select ‘No’ and click Continue. When you see the prompt ‘Write the changes to disks?,’ select ‘Yes’ and hit Continue to start the installation process.
![Dual boot Windows 10 and Linux [Step-by-Step]](https://www.golinuxcloud.com/wp-content/uploads/Install-system.png "Dual boot Windows 10 and Linux [Step-by-Step]")
The installation process might take quite some time — please be patient. After a while, you will see the ‘Select Software’ screen. Select the Software that you want to install during the installation and hit ‘Enter.’
Note:
Some of these packages will be downloaded from the Kali repositories, and your internet speed might impact the total installation time.
![Dual boot Windows 10 and Linux [Step-by-Step]](https://www.golinuxcloud.com/wp-content/uploads/install-software-2.png "Dual boot Windows 10 and Linux [Step-by-Step]")
After some time, you will see a prompt to install GRUB, select ‘Yes’ and hit Continue. Next, you will be required to select where to install the GRUB boot loader. Select your internal hard drive (/dev/sda) and hit Enter.
![Dual boot Windows 10 and Linux [Step-by-Step]](https://www.golinuxcloud.com/wp-content/uploads/install-Kali.png "Dual boot Windows 10 and Linux [Step-by-Step]")
Step-7: Dual boot Windows 10 and Kali Linux
After a successful installation of Kali Linux, you will be prompted to reboot your PC. Hit Enter. After restarting your PC, you will be greeted by the GRUB menu, which will list the two operating systems installed on your PC, as shown below.
![Dual boot Windows 10 and Linux [Step-by-Step]](https://www.golinuxcloud.com/wp-content/uploads/Dual-boot.png "Dual boot Windows 10 and Linux [Step-by-Step]")
Select the operating system that you want to use and hit Enter.
ALSO READ: Steps to encrypt usb drive with VeraCrypt [100% secure]
Wrapping Up!
This post has given you a step-by-step guide to install dual boot Windows 10 and Kali Linux on your PC in a dual-boot setup. You can use the same concept of creating a new partition to install another Linux operating system which will now become a «multi-boot» setup.
If you encounter any issues carrying out any step above, please feel free to hit the comments below. We are here to help you.