Jun. 24, 2022 / Updated by
Bessie Shaw to
Windows 10
Main Content of this article:
-
What is Blue Screen of Death
-
Why Blue Screen of Death Occurs
-
Top 7 Fixes for Blue Screen of Death after Windows 10 Update
After upgrade to Windows 10 from Windows 8.1, Windows 8 or Windows 7, many users encounter various computer issues, such as black screen, no sound, no Wi-Fi available, bluetooth not available, reboot loop, etc. Apart from the aforementioned issues, the Blue Screen of Death error on Windows 10 is also a very frustrating problem. This post will show you how to fix the Blue Screen issue after Windows 10 upgrade, also applied to Windows 10 Creators Update and Windows 10 Fall Creators Update.
What is Blue Screen of Death (BSOD)
The Blue Screen of Death error, also known as the STOP Error, will pop up when a serious issue takes place which can cause your Windows operating system to terminate. The Blue Screen of Blue Death may appear before or after login, while booting or working on Windows 10.
Why Blue Screen of Death Occurs
A Blue Screen of Death error is usually hardware or software related. Below are a number of general reasons why the Blue Screen of Death occurs on Windows 10.
— Outdated graphics driver
— External hardware devices are installed improperly
— Not enough free space on the drive where Windows 10 is installed
— Viruses or malicious software
— Outdated BIOS
According to Microsoft, the Windows 10 Anniversary update will add a QR-code in the error screen. From then on, you could pull out your phone to scan the code to know the specific root cause of the Windows 10 Blue Screen of Death error.
Top 7 Methods to Fix Windows 10 Blue Screen during Install or after Update
If you encounter the Blue Screen of Death during Windows 10 install or after Windows 10 update, please try any of the 7 troubleshooting methods below, applied to all laptops, desktop PCs, or notebook computers, including Asus, Acer, Dell, Gigabyte, Lenovo, HP, ThinkPad, Toshiba, IBM, Microsoft, MSI, Sony, Gateway, Samsung, etc.
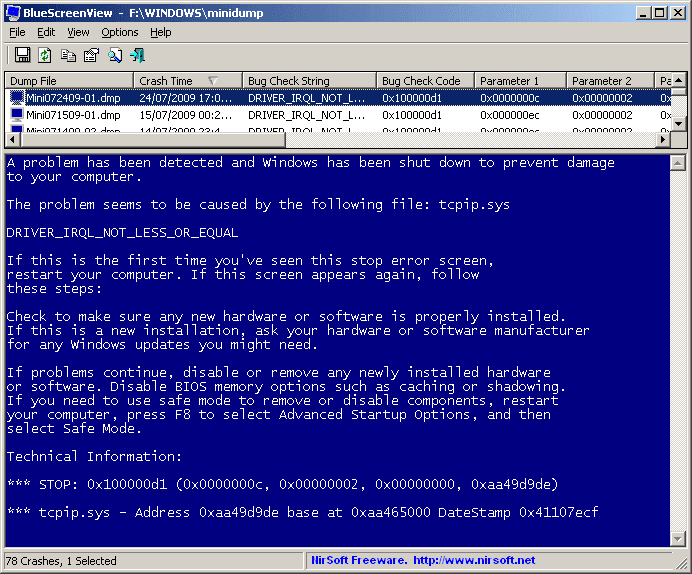
Note:If you want to figure out what is the exact cause for th blue screen, BlueScreenView can help you. It is a BSoD errors monitoring utility which can help to scan the minidump files created during ‘blue screen of death’ crashes, and display the detail crash information and corresponding methods. You can navigate to BlueScreenView to get it. It detects the error code, error causes and even fixes on blue screen errors as below picture shows.
Method 1. Update Graphics Drivers to Fix Blue Screen after Windows 10 Update
Once you upgrade your operating system to Windows 10, your existing hardware drivers become incompatible with the new system. Outdated drivers usually could cause the Blue Screen of Death error on Windows 10. Of course, you need to download and update your graphics drivers.
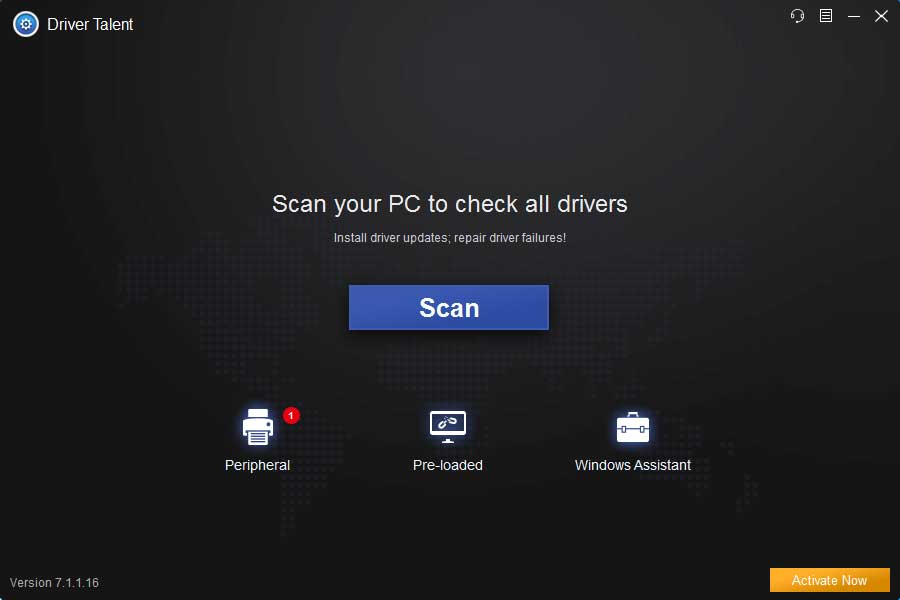
To do it, you can try Driver Talent. It is a widely-used and reliable drivers updater utility, which could instantly identify whether your graphics driver is outdated, missing, corrupted or broken in seconds, and then download and install the best-matched Windows 10 graphics driver automatically in minutes to make your computer run normally again.
Click the below button to free download Driver Talent.
Download Now
Here are 3 easy steps to download and update the appropriate graphics driver for Windows 10 to fix your Blue Screen of Death issue.
1. Scan Your PC
Launch Driver Talent and perform a safe scan of your computer to find out all driver issues.
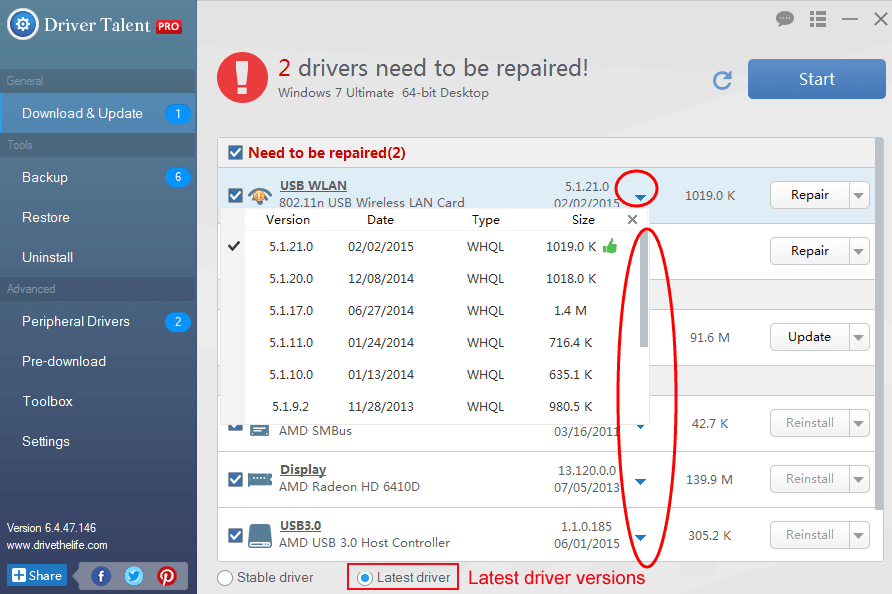
2. Download and Update Graphics Drivers to Fix Blue Screen after Windows 10 Update
If there are corrupted, broken, damaged or missing graphics drivers, one-click “Repair” to fix them. You are also allowed to one-click “Update” to download and install the most updated graphics driver for Windows 10.
3. Reboot Your PC
Restart your computer after the graphics driver install is complete.
You may also like these related posts:
-
Download and Update Graphics/Display/Video Driver for Windows 10
-
Free Download & Update Graphics Driver, Video Card Driver, Monitor Driver, Display Card Driver
-
Fix Display/Video/Graphics Problems after Windows 10 Update
-
Toshiba Graphics/Video/Display Drivers Download and Update on Windows 10, 8.1, 8, 7, Vista, XP
-
Top 4 Ways to Download and Update Intel HD Graphics Driver on Windows 10, 8.1, 8, 7, Vista, XP
Method 2. Check the External Hardware Devices to Fix Blue Screen in Windows 10
Some external hardware devices you plug into the computer might also cause the Blue Screen of Death during Windows 10 update.
Step 1. Unplug all external devices.
Step 2. Reboot your computer.
Step 3. If your computer boots successfully, plug the devices back in to check which hardware device is causing this Blue Screen of Death issue.
Step 4. Install updated drivers for the hardware with Driver Talent.
See Also: Top 8 Ways to Fix Blue Screen after Windows 10 Creators Update
Method 3. Fix Blue Screen after Windows 10 Upgrade in Safe Mode
Safe Mode can help to get out of the Blue Screen of Death on Windows 10 error.
Step 1. Boot computer to Safe Mode with Networking.
Step 2. Press Windows key + C.
Step 3. Select Settings and Change PC settings.
Step 4. Select Update and recovery and Windows Update.
Step 5. Select View details and Check for updates. Under Optional, install the updates.
See Also: How to Enter Safe Mode in Windows 10, 8.1, 8, 7, Vista, XP
Method 4. Disable Fast Startup
Some Windows users posted that disabling fast startup help to solve the blue screen on Windows 10. You can have a try.
Step 1. Go to Control Panel, click System and Security, select Power options, and click on Change what the power buttons do.
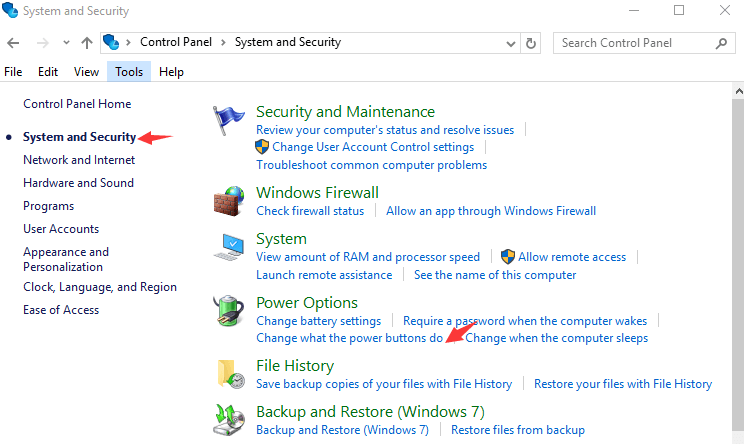
Step 2. Click on Change settings that are currently unavailable.
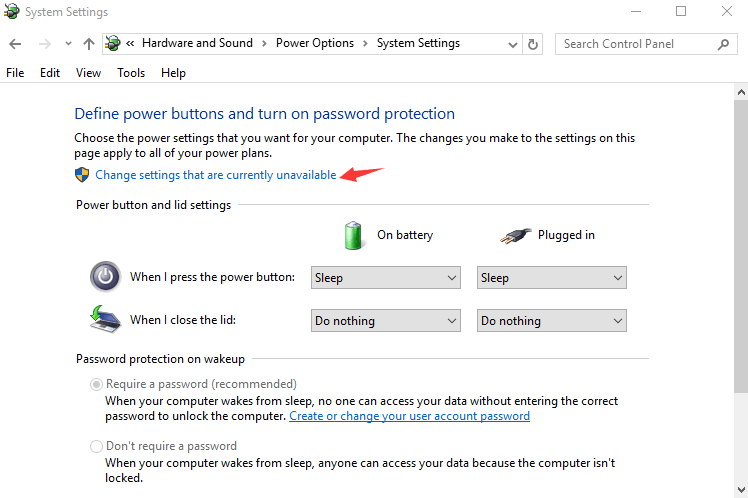
Step 3. Uncheck the box next to Turn on fast startup.
Method 5. Check Whether Your Disk Partition Has Enough Free Space
Not enough free space on the primary partition where Windows 10 is installed could also trigger the Blue Screen of Death error or data corruption issue. In this situation, you could apply the free partition manager — AOMEI Partition Assistant to resize the partition which has Windows 10 installed on it.
In addition, remove all unimportant files to free up your disk space once there’s low disk space available. To prevent Windows 10 from BSOD, you can also use free backup software AOMEI Backupper to create a system image backup so that you will be able to restore your computer when there is a blue screen of death on Windows 10.
Note: According to Microsoft, the minimum size of the system partition is 100MB.
Method 6. Scan for Viruses
The Blue Screen of Death error can also be caused by viruses after upgrade to Windows 10. It is recommended that you use a piece of anti-virus software to scan your computer for viruses and then eliminate the viruses and other malicious software.
Note: Please make sure your anti-virus software is the latest version.
Method 7. Update Your BIOS
In some instances,outdated computer BIOS can also lead to the Blue Screen of Death issue on Windows 10. That said, your current BIOS is incompatible with the new system.
See Also: Easy Way to Free Update Your BIOS on Dell, Acer, Asus, HP, Toshiba, IBM, Sony, Lenovo
You may also like to check out:
-
How to Tell If Your Computer Has Bluetooth
-
How to Determine If Windows 10 Is 32-bit or 64-bit
-
How to Remove Test Mode Watermark in Windows 10
-
How to Enter Safe Mode in Windows 10, 8.1, 8, 7, Vista, XP
-
How to Launch Command Prompt on Windows 10, 8.1, 8, 7, Vista, XP
-
4 Fixes for Igdkmd64.sys Blue Screen Error in Windows 10/8/7
If the above-mentioned methods can’t resolve your Blue Screen of Death after Windows 10 update, please make comments for further assistance. If you have other solutions, share your advice with us below this post. Thank you.
Recommended Download

|
ExplorerMax |

|
Driver Talent for Network Card | |
| Smart and advanced file explorer tool for Windows platforms | Download & Install Network Drivers without Internet Connection | |||
|
30-day Free Trial |
Free Download |
If you are facing blue screen of death Windows 10, you can read this post which offers the causes and corresponding solutions to this issue. Furthermore, this post also shows how to back up data and recover data via MiniTool Partition Wizard.
Causes of Windows 10 Blue Screen of Death
Blue Screen of Death (BSOD for short), also called Stop Error, emerges whenever Windows detects a serious error it cannot recover from, and it shuts down or restarts itself to avoid any damage.
Note: Black Screen of Death is also called BSOD, but reasons for both errors should be different. For more information about this black screen, please view the post Full Guide to Repairing Black Screen Error When Booting Windows.
Windows 10 blue screen often comes with error codes displayed in white text, for example:
But sometimes it is just a blank blue screen or with spinning dots:

Sometimes, it just happens once, and you’ll not see it again when you restart, but sometimes you’ll be stuck in BSOD restart loop.
Well, why does Windows 10 Blue Screen of Death emerge? How can we quickly fix this issue? These must be what you are eager to know, right? See this post to get what you want.
Hardware related causes:
- External or internal hardware devices are installed improperly.
- One or some of hardware devices are malfunctioning, such as RAM, CPU, and internal hard disk.
- New hardware device is incompatible with your BIOS.
Software related causes:
- Not enough free space on the partition where Windows is installed.
- Driver of your hardware is out of date, especially graphics driver.
- Install incompatible Windows update or program.
- Virus attack.
- System files, including boot files damaged or corrupted.
- Bug of Windows 10.
- BIOS is out of date.
- BIOS is misconfigured or overclocked.
After knowing causes for Windows 10 Stop Error, next let’s talk about how to fix Windows 10 BSOD.
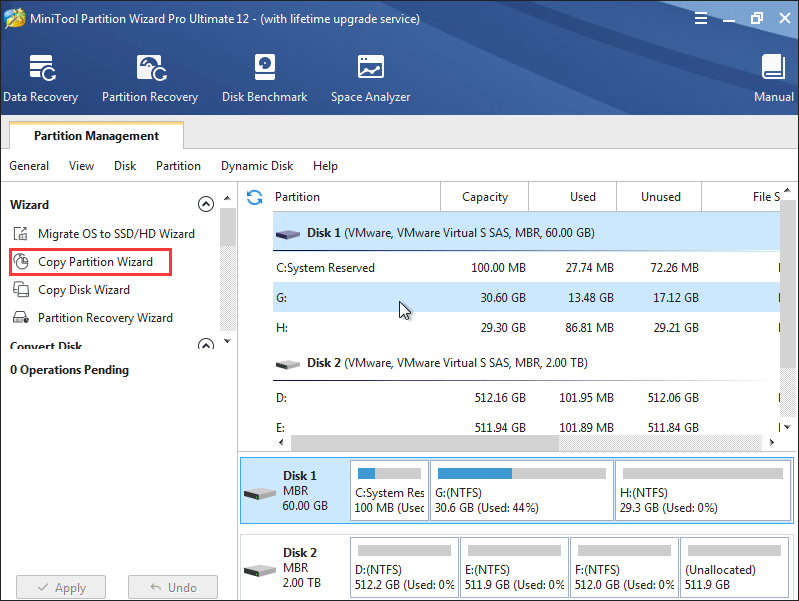
Before repairing Windows 10 BSOD, you’d better recover the data or back up all useful data saved in the system partition via MiniTool Partition Wizard Pro Ultimate Edition and Pro Edition respectively, which could help you avoid data loss. In addition, it is also the first step if you have to reinstall Windows.
Buy Now
Then, let’s start fixing blue screen issue of Windows 10.
Quickly Fix: Windows 10 Blue Screen of Death after Upgrade
Many users reported that they were blocked by a blue screen during the process of upgrading Windows 7 or Windows 8.1 to Windows 10 and their PC was set to the original state. Many factors could cause this issue, and next we picked out some typical cases.
Case 1: Windows 10 BSOD Without Error Code: C Drive Might Run in Low Disk Space
If drive C does not have enough free space for upgrade, you may receive blue screen. Therefore, it’s necessary to check free space of drive C in Windows 7 or Windows 8.1 Explorer. If it indeed does not have much free space left, enlarge it.
However, if your drive C has enough free space, take other factors, like virus into consideration.
Case 2: Windows 10 Blue Screen of Death Error Code: C1900101-20017
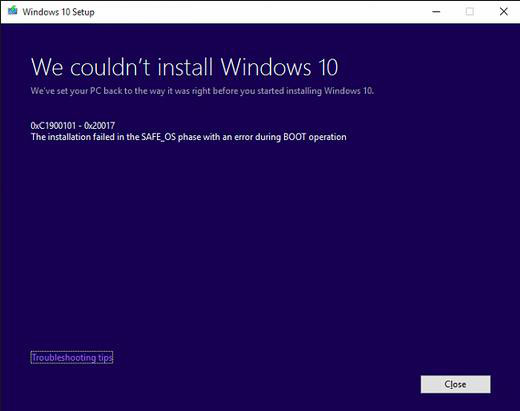
This is a quite common BSOD error when we are upgrading Windows 7 or Windows 8.1 to Windows 10.
From the error description we know the installation failed in the SAFE_OS phase, which shows the issue occurs largely because of faulty BIOS setting (always on UEFI + Legacy BIOS).
That means we can fix the error by changing some settings in BIOS. Just try doing the following operations in your current version of Windows to fix the error:
Step 1: Go to C:/Windows/Software Distribution/Download and delete all files and folders under Download folder. Then, go back to the root directory of C: drive and delete $Windows.~BT folder.
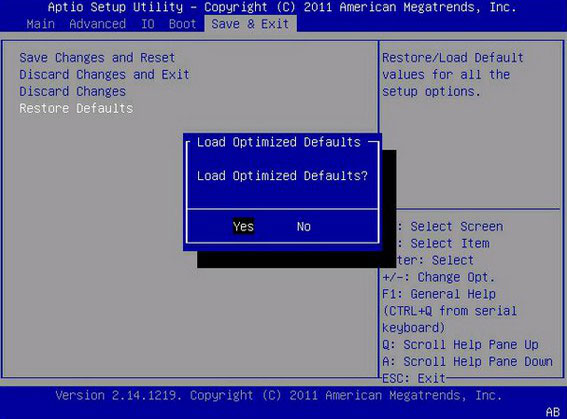
Step 2: Restart computer and enter BIOS by pressing F2, Delete, or Esc. Different computer requires different key, so you had better google «how to enter BIOS plus computer mode or motherboard type» at first. Then, enable «Load Optimized Defaults» to disable all overclocking options.
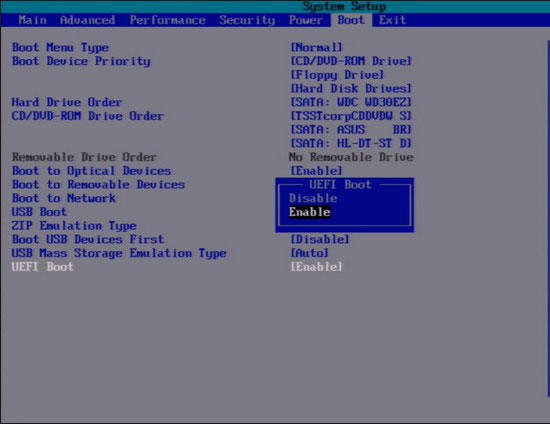
Step 3: Enable UEFI boot under Boot menu.
Step 4: Disable Secure Boot.
Step 5: Once all these changes are made, please press on F10 key to save changes and exit from BIOS. After that, you may upgrade Windows 7 or Windows 8.1 to Windows 10 successfully.
Case 3:Windows Blue Screen of Death Error Code: 0XC1900101 — 0X40017
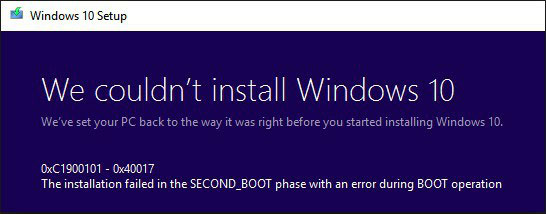
This is another common blue screen error when we are upgrading to Windows 10. From one of Microsoft support engineers we know this error occurs largely because there is an incompatible driver or hardware defect which is important for booting the intermediary environment that is necessary to perform the upgrade actions.
And he gives the following troubleshoot methods:
Step 1: When our computer is set back to Windows 7 or Windows 8.1, disable or uninstall all antivirus software.
Step 2: Disconnect all unnecessary external devices or peripherals connected to the computer except the mouse and the keyboard, and then disable general USB devices, like smart card reader.
Step 3: If you are using a SCSI hard disk, make sure you have drivers available for this disk. During Windows 10 setup, click the Custom Advanced Option and use the Load Driver command to load the appropriate driver for the SCSI drive. If this does not work and setup still fails, try switching to IDE in BIOS.
Step 4: If you are updating through Windows Update, when the download reaches 100%, disconnect from the Internet LAN (Ethernet) or Wi-Fi, and proceed with the installation.
However, if all methods above fail to work, you may need to set your Windows 7 or Windows 8.1 computer to factory state, and then do the upgrade.
The post also mentions Windows 10 BOSD on Startup and when using computer. To learn about them, please read the following content.
Quickly Fix: Windows 10 Blue Screen of Death on Startup
Most Windows 10 Stop Errors emerge on boot, some of which could be fixed after a restart, but in most situations, you’ll be stuck in restart loop and have to manually shut computer down.
To fix this kind of Windows 10 Blue Screen of Death errors, please think about what actions you did right before the BSOD, and then undo the operation.
Situation 1: Get Windows 10 BSOD after Installing an Update, Program, or Driver
If Windows 10 Blue Screen of Death appears after you are installing a Windows update, driver, or application, please uninstall it to see whether Windows can start as before. View the following solutions and choose the most proper one.
Solution 1: Windows boots successfully after restart.
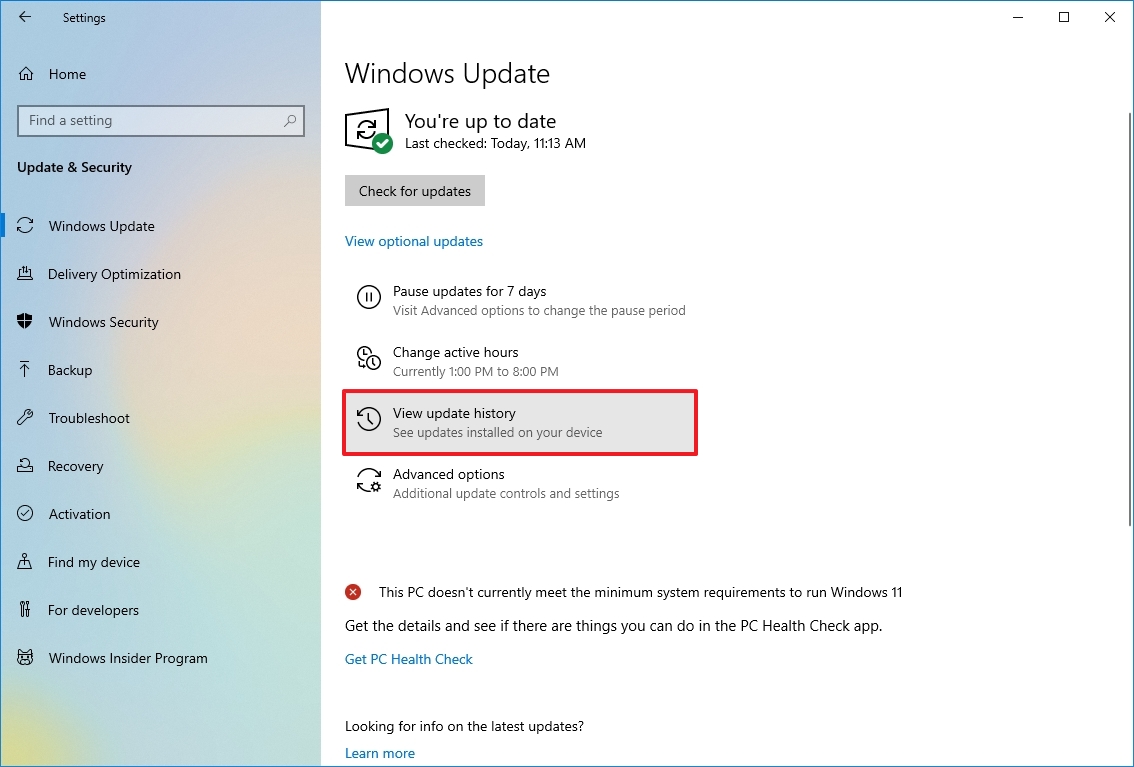
To uninstall Windows update:
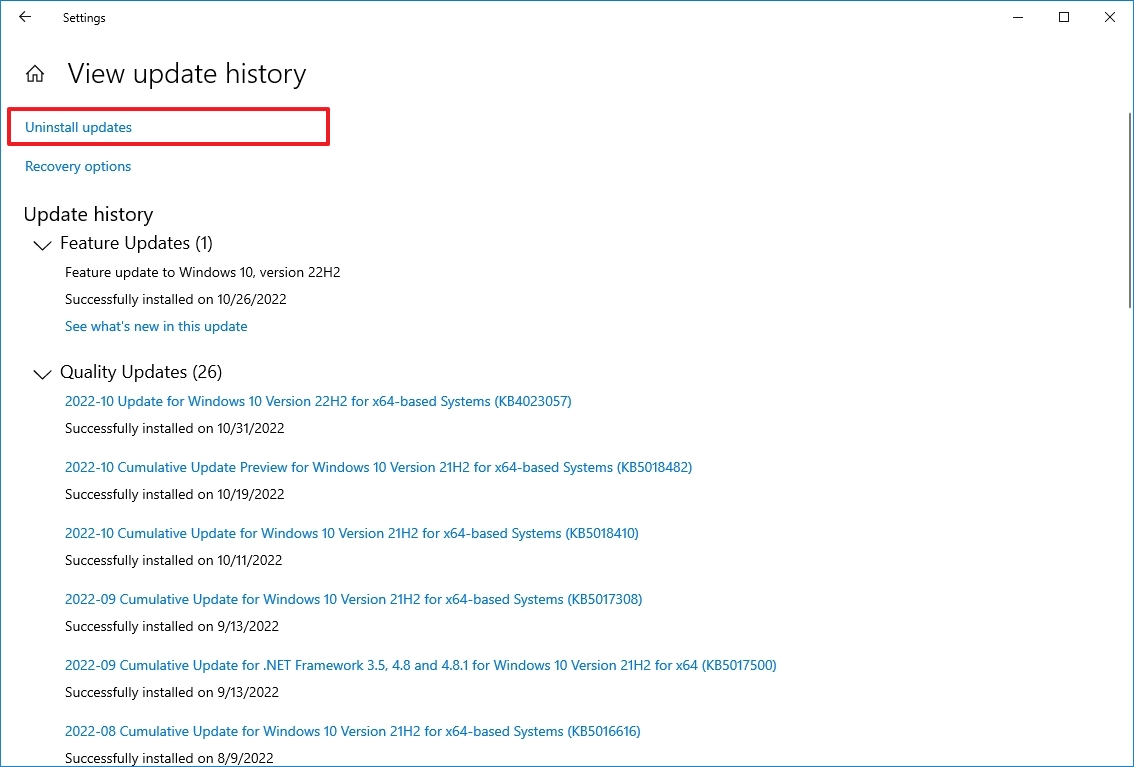
Please click Start button, choose Settings, navigate to Update & security > Windows Update > Advanced options > View your update history > Uninstall updates. Then, you’ll see the following interface:
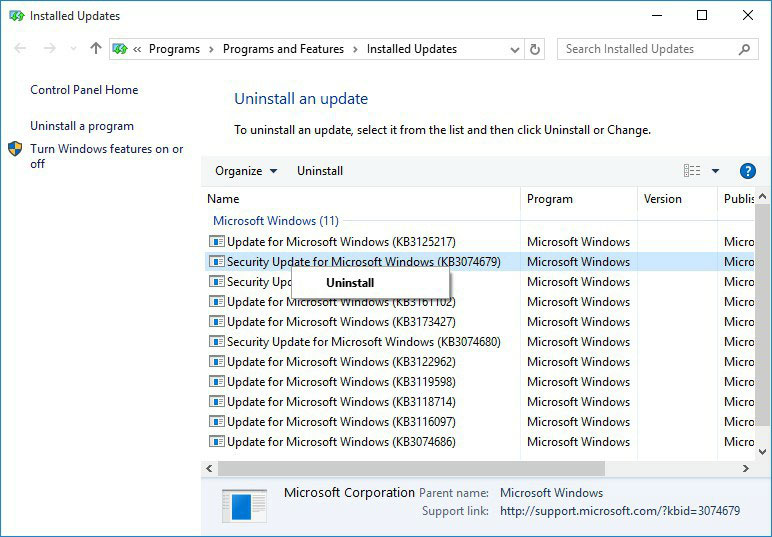
Here, please right click the update that may cause BSOD and Uninstall it. Of course, you can double click the update to uninstall it.
To uninstall hardware driver:
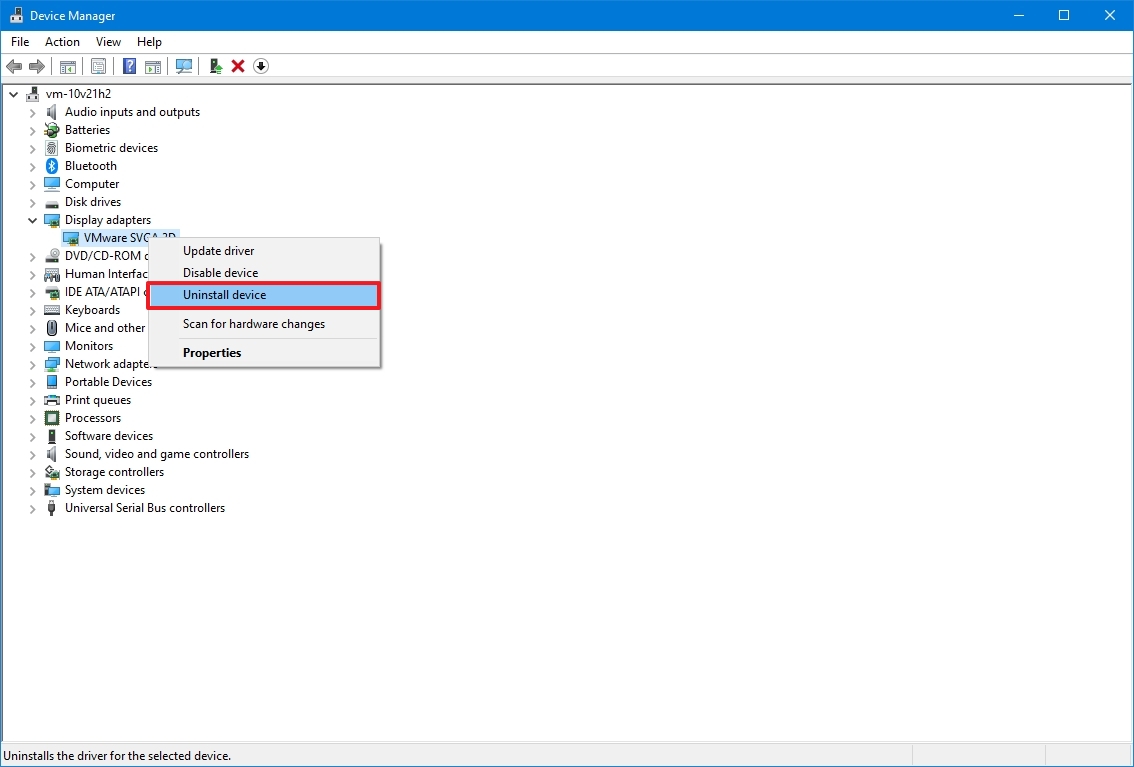
Please right click Start button windows and choose Device Manager to enter the following window:
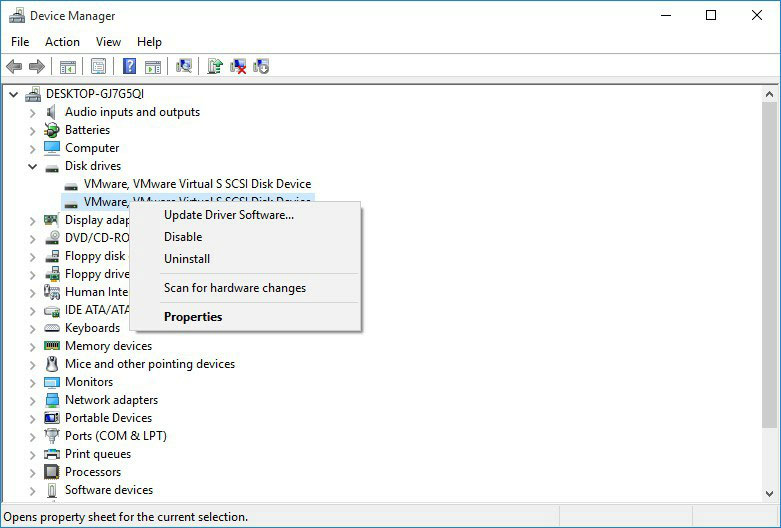
Here, please find the device driver that needs installing, then right click it, choose Uninstall, and click OK to confirm uninstalling. Then, Windows will uninstall the device driver.
To uninstall a program:
Just go to Control Panel, and then Program > Uninstall a program.
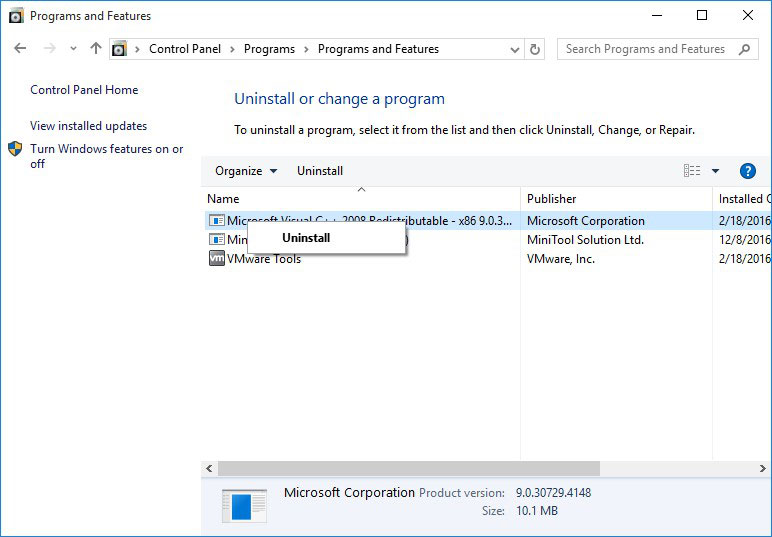
Then, right click the program, choose Uninstall, and click Yes to confirm uninstalling.
After uninstalling the wrong Windows update, device driver, or program, you should be able to boot Windows.
However, if you forget the name of update, driver, or software, just try uninstalling the most recent one by viewing its installation date.
Solution 2: You are stuck in Windows 10 Blue Screen of Death restart loop.
Since Windows is unbootable under this situation, you need to uninstall Windows update, driver, or program in Safe Mode.
Safe Mode is a diagnostic mode for Windows that starts your computer in a limited state. Only the basic files and drivers necessary to run Windows are started. This helps us in identifying whether the issue is due to some third-party programs conflict.Microsoft
But it should be noted that pressing F8 or F8 + Shift might fail to start computer from Safe Mode, which is largely because Windows 10 is designed with a very fast boot procedure. But it’s not bad to try pressing F8 or Shift + F8 at first, and then use Windows 10 installation disc or recovery drive.
Step 1: Start computer from Windows 10 installation disc or recovery drive, and click Next > Repair your computer > Troubleshoot > Advanced options > Startup Settings > Restart:
Step 2: Press on 4/F4 or 5/F5 to enter normal Safe Mode.
Step 3: Once in Safe Mode, you can uninstall Windows update, software, and device driver by above steps.
Tip: If an update is proved to be the culprit for Windows 10 BSOD, you need to temporarily prevent the update from automatically installing again.
Situation 2: Get Windows 10 Blue Screen of Death Without Doing Any Change
Action 1: Check your hardware devices to see whether they are connectedly properly. If they are not fully pushed into their slots, BSOD is very likely to emerge.
Action 2: If this is not the cause, please check if your C drive is out of space using MiniTool Partition Wizard. If so, extend it using the Extend Partition feature of Partition Wizard. We suggest keeping at least 15% of drive C’s capacity free all the time.
Action 3: You can try clearing Virus when drive C has much free space. Some viruses attack your MBR (master boot record) or boot sector, which could cause BSOD.
It’s easy to scan our computer for virus when Windows is bootable: just launch the anti-virus software, scan, and remove. But if Windows is unbootable, you need to do this in Safe Mode, and we suggest choosing Enable Safe Mode with Networking.
Action 4: If virus is also not the case, try:
- Setting BIOS to its default state.
- Updating your BIOS to newest version.
- Updating Windows to the latest version.
- Fixing boot using bootrec /fixmbr, bootrec /fixboot, and bootrec /rebuildbcdcommands in Command Prompt of Windows installation disc or repair drive.
Maybe, one of these actions could fix your issue.
Quickly Fix: Windows 10 Blue Screen of Death When Using Computer
If the Stop Error appears when you are using your computer, you can try doing these repair attempts:
- Remove newly added hardware devices, such as webcam, printer, and monitor, and then restart computer.
- Scan your computer for virus or malware. If Windows cannot start, do it in Safe Mode with Networking.
- Uninstall most recently installed programs and Windows updates.
- Install the latest Windows update.
Steps for all these methods have been shown in the section Quickly Fix: Windows 10 Blue Screen of Death on Startup. So here, we do not give details.
Nevertheless, when all solutions here are useless for your case, you may need to reinstall Windows.
If you have backed up data saved in C drive, now you can reinstall Windows without losing personal files.
Hi, I found multiple factors which could cause blue screen of death Windows 10, and the corresponding solutions.Click to Tweet
Bottom Line
Some of our solutions have been proved to be useful for Windows 10 BSOD error, so it’s your turn to try them out. However, if you find other solutions, please share it with us in Comment part or contact us via [email protected].
Blue Screen Error During Windows 10 Upgrade FAQ
???? Is blue screen death bad?
When your system senses that something goes wrong and could cause real harm, it will stop everything, resulting BSOD. In other words, the whole point of BSOD is to protect your hardware. When you ran into BSOD frequently, you need to take that seriously.
???? What does blue screen mean?
A BSOD does not necessarily mean that your computer is dead but it does mean the following cases.
For one, everything has to stop, including your operating system. Moreover, in almost all cases, the BSOD also indicates that a serious enough problem appears and it needs to be corrected. Once the problem has been repaired, you can use your computer normally.
???? How do I check my blue screen error?
You can check the information of a BSOD by using Windows Event Viewer. To use this tool, you can follow the path: right-click the Start button > select Event Viewer.
???? Does blue screen mean bad hard drive?

(Image credit: Future)
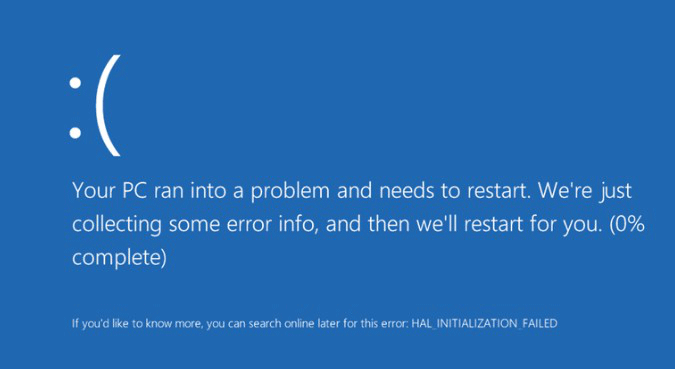
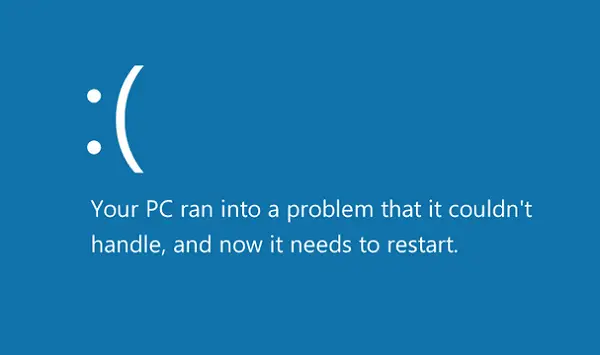
The Blue Screen of Death (BSoD) — also known as «blue screen,» «stop error,» or «system crash» — could happen after a critical error occurs that Windows 10 is not able to handle and resolve automatically.
You will typically experience a blue screen error during the upgrade process of Windows 10, when the computer boots up, or randomly when actively using the device. The most annoying part is that you’ll only see a solid blue background and a sad kaomoji without enough information to determine the real cause of the problem.
The system will display a message like, «Your PC ran into a problem and needs to restart. We’re just collecting some error info, and then we’ll restart for you.» Or general stop error codes (such as VIDEO_TDR_TIMEOUT_DETECTED, PAGE_FAULT_IN_NONPAGE_AREA, CRITICAL_PROCESS_DIED, SYSTEM_SERVICE_EXCEPTION, DPC_WATCHDOG_VIOLATION, or IRQL_NOT_LESS_OR_EQUAL). Or hexadecimal codes (such as 0x000000D1, 0x0000000A, or 0x0000007B) are just hieroglyphics for regular users.
Although a stop error does not have a straight answer, it’s almost always a problem with a quality or feature update for Windows 10, a recently installed driver, an incompatible program, or a hardware-related issue.
This guide will walk you through several troubleshooting steps to resolve a blue screen error.
How to fix blue screen error during upgrade on Windows 10
When you upgrade to a new version of Windows 10, a blue screen error may appear for many reasons. For example, it could result from a compatibility problem with an old program or security software. Or it could be because of corrupted files in the current installation or damaged installation media.
Typically, when an error occurs, the setup will revert the changes to the previous installation without an explanation.
If you are dealing with errors during the installation, uninstalling non-essential apps, clearing out corrupt downloads, disconnecting non-essential peripherals, or doing a clean install of Windows 10 may resolve the issue.
Uninstall incompatible app
To uninstall an app that may conflict with the Windows 10 installation, use these steps:
- Open Settings.
- Click on Apps.
- Click on Apps & features.
- Select the app that is causing issues and click the Uninstall button.
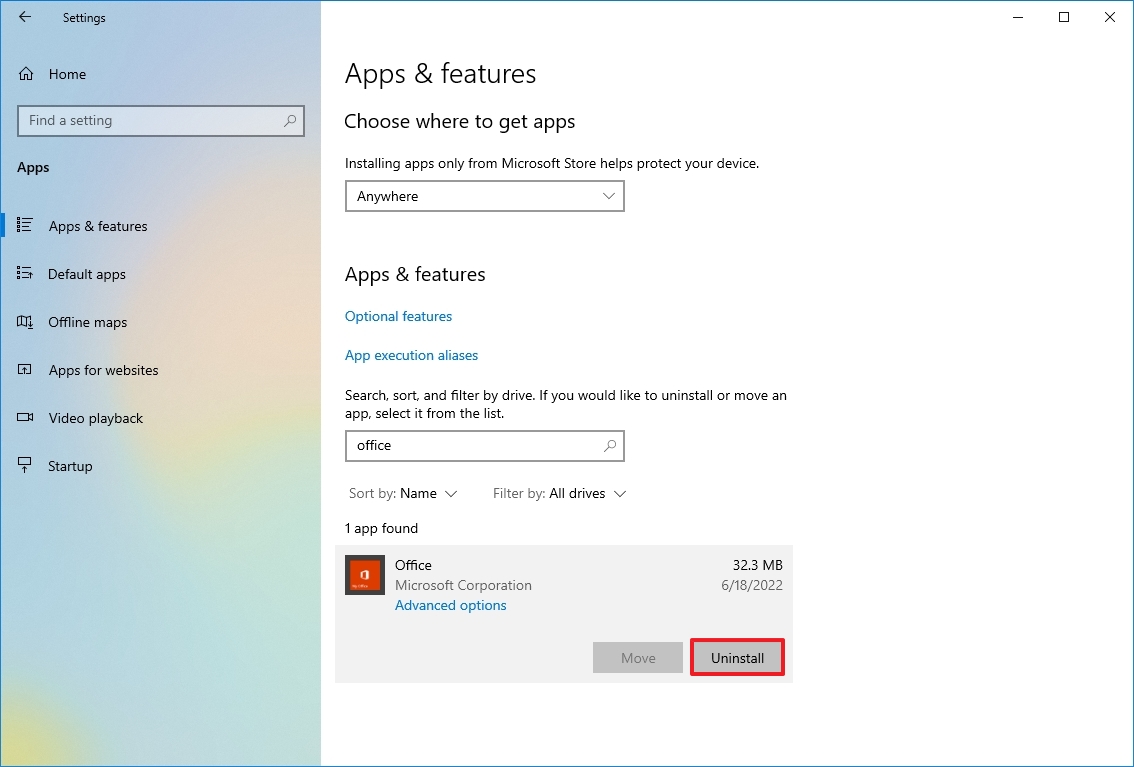
- Click the Uninstall button again.
- Quick note: If this is a classic desktop application, you may need to continue with the on-screen directions to complete the uninstall process.
Once you complete the steps, you may need to repeat the instructions to uninstall additional apps, and then you can try the upgrade one more time. After the update, you can reinstall the apps again.
Redownload installation files
Sometimes, if you use the Windows Update option to upgrade a device, you could see a Blue Screen of Death when installation files were damaged during the download process. In this case, you can use the Settings app to clear the previous files, allowing the system to re-download the upgrade bits.
To re-download the upgrade files through Windows Update, use these steps:
- Open Settings.
- Click on System.
- Click on Storage.
- Under the main drive section, click the Temporary files item.
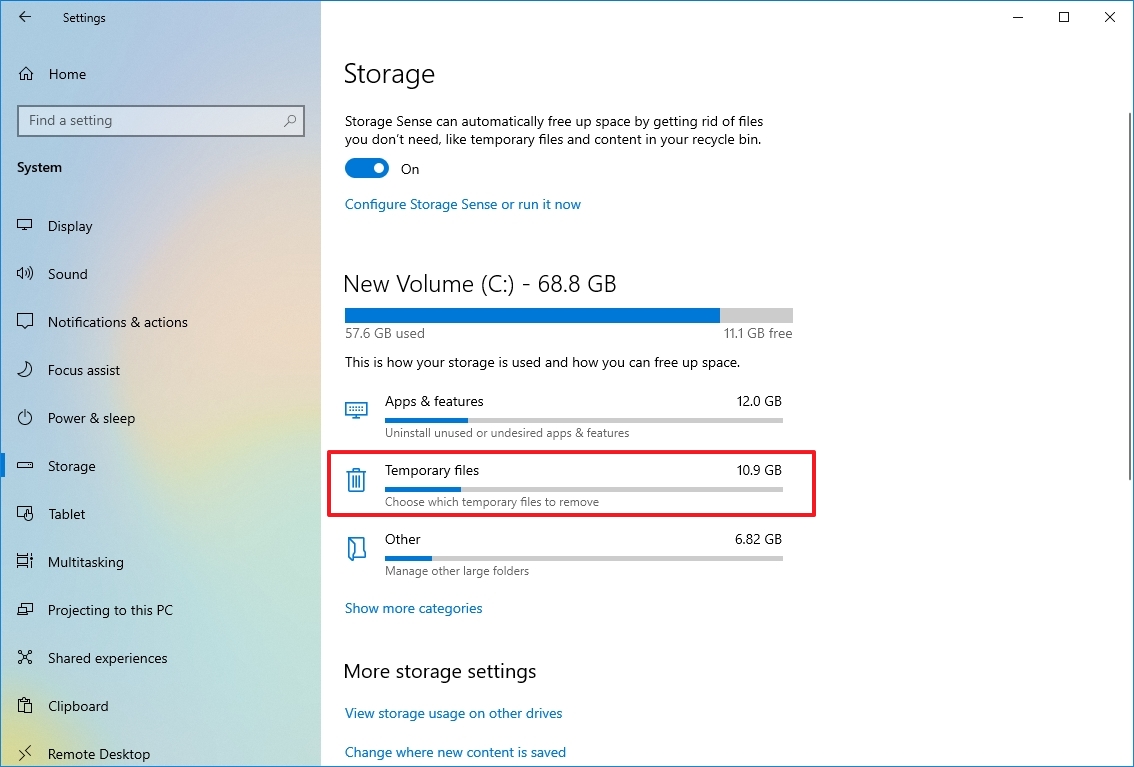
- Clear the already selected options.
- Check the «Temporary Windows installation files» option.
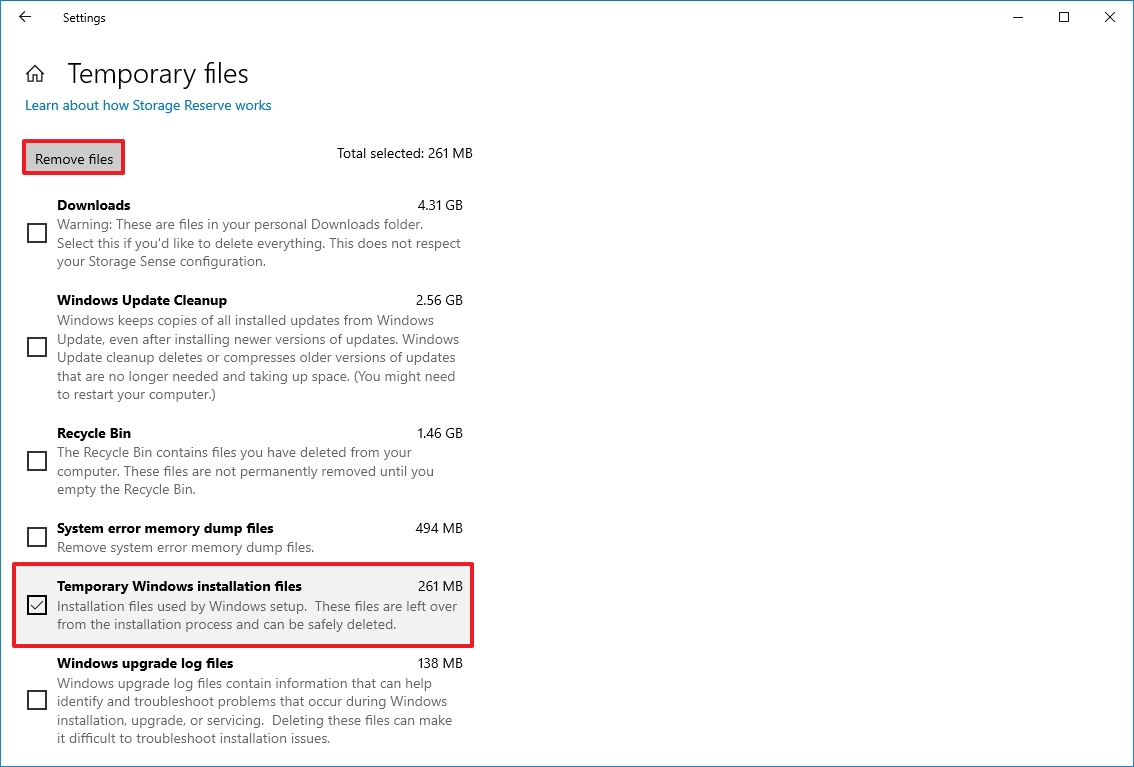
- Click the Remove files button.
After you complete the steps, open the Windows Update settings and proceed with the steps to upgrade the computer one more time.
If you continue with the same problem, you should consider using the Update Assistant utility to perform an in-place upgrade. Or, if the utility does not work, try using the Media Creation Tool to create an installation media to install the new version of Windows 10.
Analyze upgrade problem
Alternatively, you can also troubleshoot blue screen errors with the «SetupDiag» tool. SetupDiag is a Microsoft tool that offers an optional download to diagnose and determine why an update or upgrade failed to apply, which is valuable data that can help resolve virtually any problem.
To use SetupDiag after the upgrade of Windows 10 failed with a blue screen, use these steps:
- Open the SetupDiag download page (opens in new tab).
- Click the Download SetupDiag button.
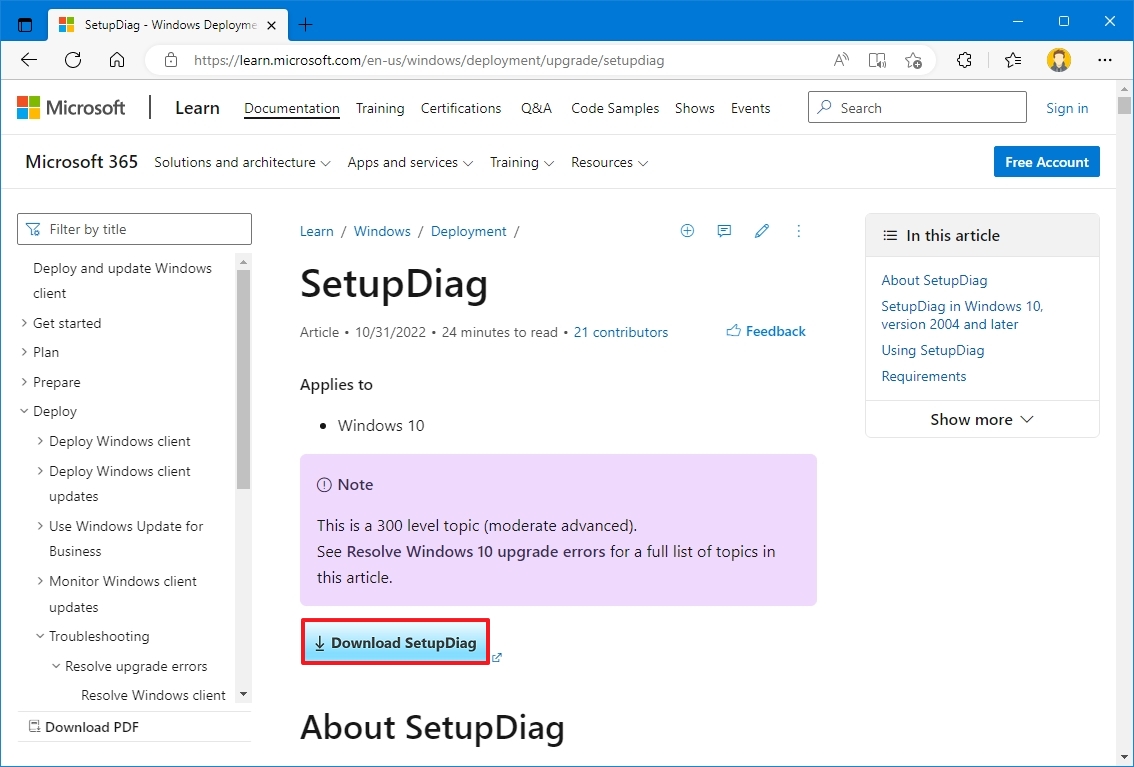
- Select a destination folder to save the file.
- Click the Save button.
- Open File Explorer.
- Open the folder where you downloaded the file.
- Right-click the «SetupDiag.exe» and select the Run as administrator option.
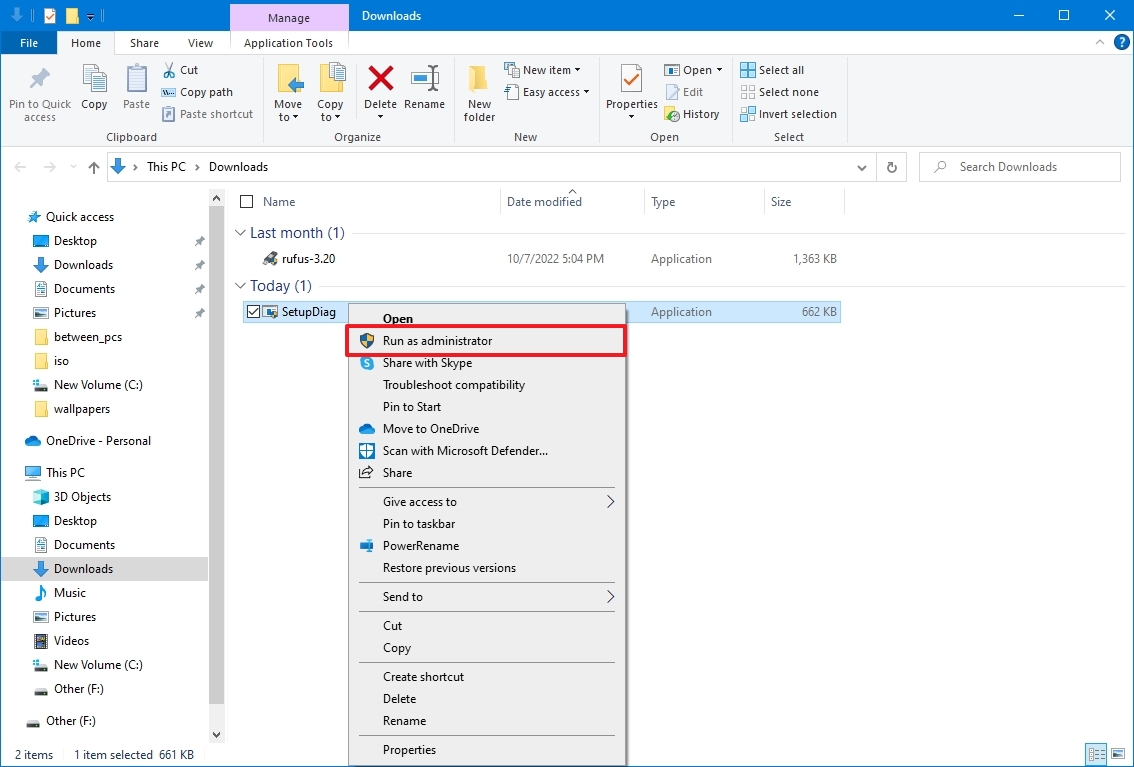
- Right-click the SetupDiagResults.log file and select the Open option.
Once you complete the steps, the default text editor will open the file with the diagnostic results based on the known rules.
If an error was detected, the logs will describe the information to determine why the device blue screened during the update, and if it’s a known issue, you’ll also get the steps to resolve it.
Sometimes you won’t get any recommendations. If this happens, follow the link that might be available in the log file or use the error code or any meaningful information to research the problem online. (Use this guide for more detailed instructions.)
Disconnect non-essential peripherals
Windows can also crash due to a hardware-related problem. As a result, it’s always recommended to disconnect all non-essential peripherals, including external hard drives, printers, secondary monitors, phones, and other USB or Bluetooth devices, before proceeding with an installation to minimize the chances of errors. The upgrade process only requires a keyboard, mouse, monitor, and internet connection.
After the installation, you can always reconnect the peripherals. If the issue persists, it could be a compatibility problem. You can usually resolve this issue by downloading and installing a newer driver version from your manufacturer’s support website.
If the computer uses the most recent driver and the problem continues, it could be a compatibility issue with the new version of Windows 10, or the hardware in question may need to be replaced.
You can always visit the Microsoft health dashboard website (opens in new tab) to review any issues available with the latest release of Windows 10.
Perform clean installation
The best way to upgrade to a new version of Windows 10 is to erase everything and start from scratch with a clean installation. The process will help you avoid the Blue Screen of Death, and it will help improve system performance and resolve issues.
If you decide to perform a clean install, you first want to confirm that the computer can start from USB. This means that you may need to change the boot order of the Unified Extensible Firmware Interface (UEFI) or Basic Input/Output System (BIOS) firmware to configure the correct boot order.
Typically, the steps to open the motherboard firmware settings require pressing one of the function keys (F1, F2, F3, F10, or F12), the Esc key, or the Delete key as soon as the device starts. However, these settings are always different per manufacturer and even by device model. If you are not sure, it’s best to check the manufacturer’s support website for more specific details.
While in the firmware interface, open the «Boot» page, set the boot order to start from USB, and save the new changes. Once the device can start from the flash drive, create a bootable installation media and use it to start the Windows 10 setup, and then continue with the steps below.
To clean install Windows 10 avoiding blue screen errors, use these steps:
Warning: This is a friendly reminder that you’ll be making changes to your current setup, which can cause problems and even data loss if you don’t do it correctly. It’s recommended to make a temporary full backup before proceeding.
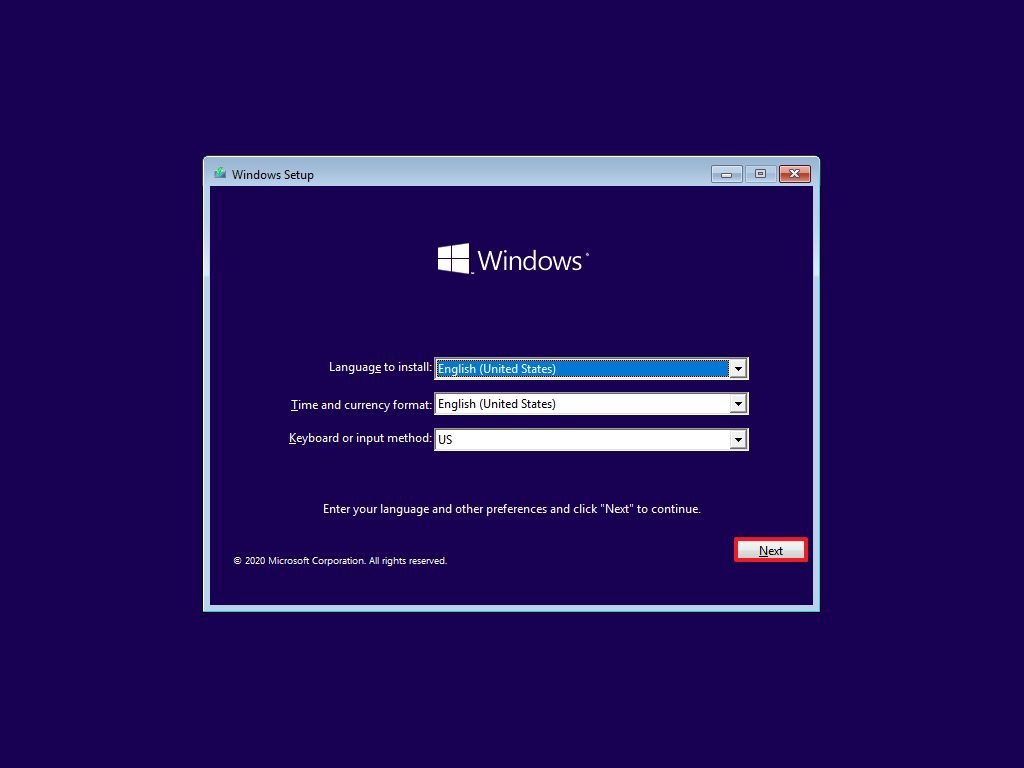
- Start PC with Windows 10 installation media.
- On «Windows Setup,» click the Next button.
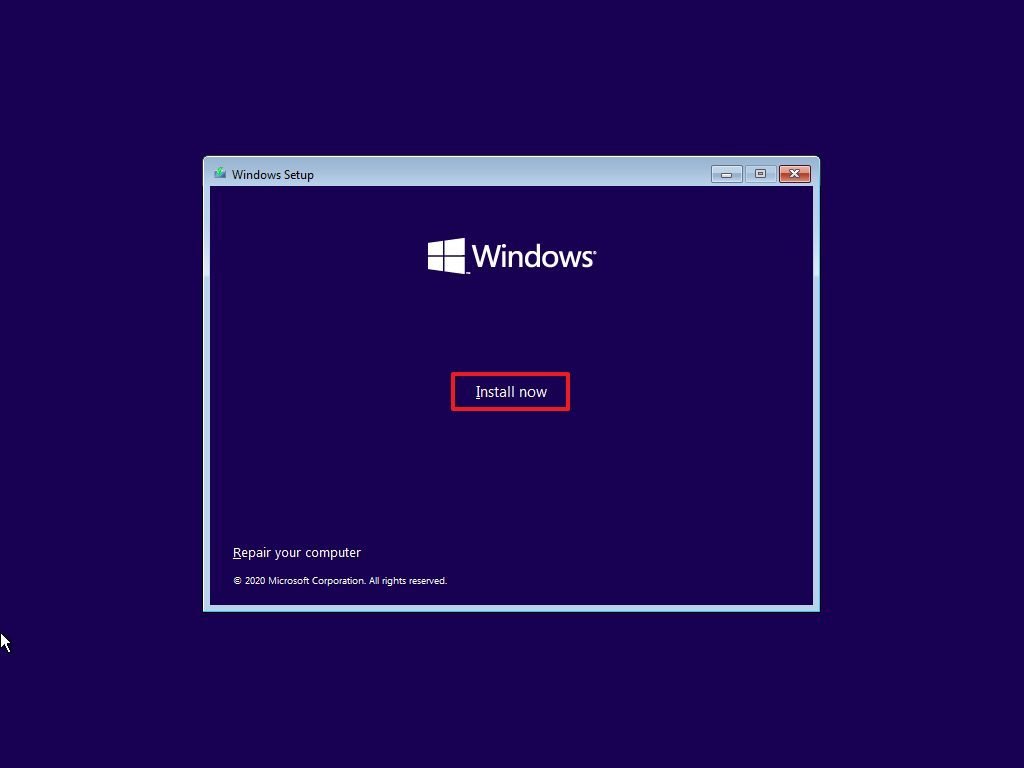
- Click the Install Now button.
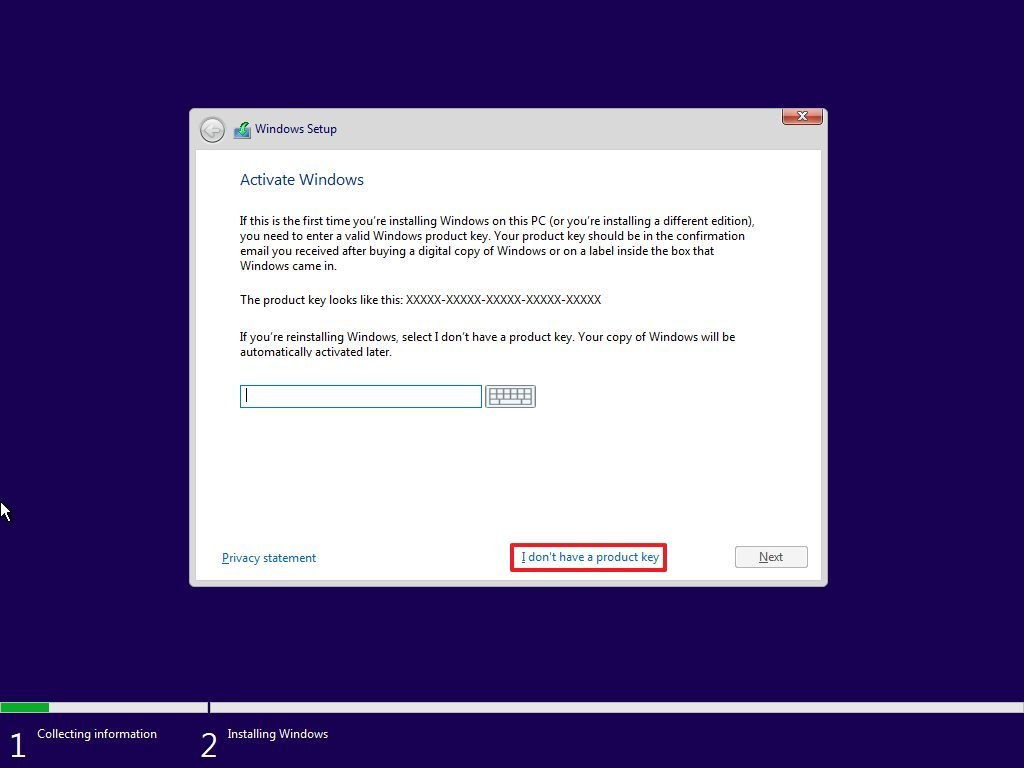
- Click the I don’t have a product key option to continue (assuming that your PC was already properly activated).
- Select the edition of Windows 10 (if applicable).
- Quick note: This selection must match the edition that the license activates. Otherwise, the product key won’t work, and you may need to reinstall Windows again.
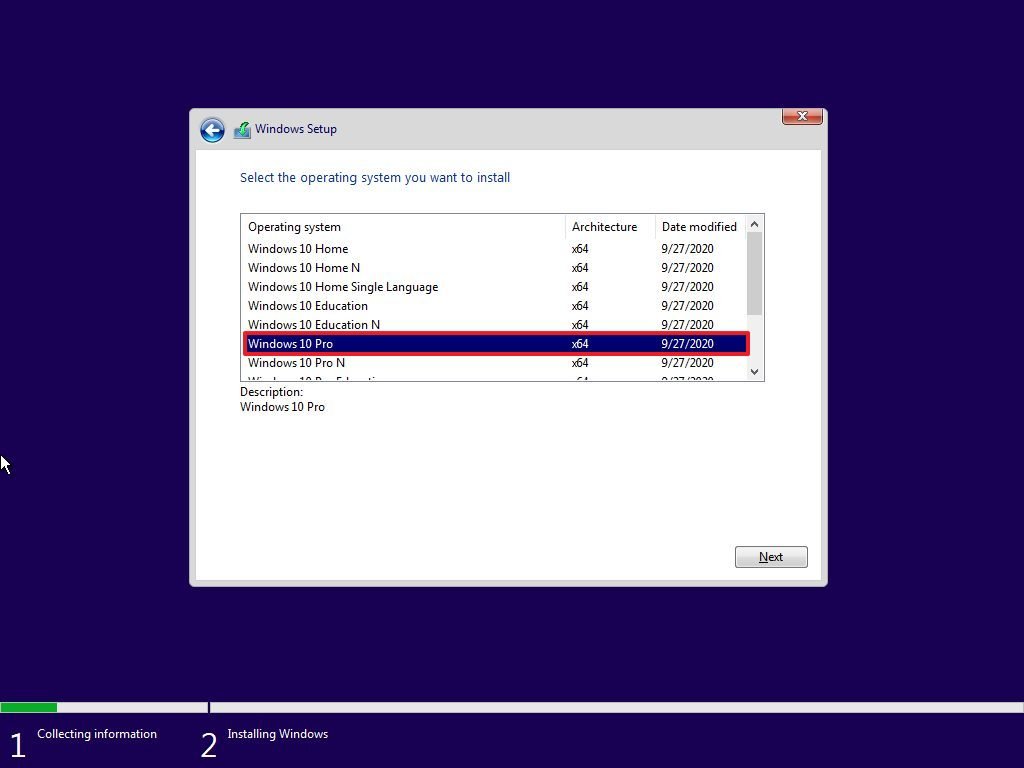
- Click the Next button.
- Check the I accept the license terms option to continue.
- Click the Next button.
- Click on the «Custom: Install Windows only (advanced)» option.

- Select the partition with the current installation of Windows (usually «Drive 0»), and click the Delete button to remove the partition from the hard drive.
- Quick tip: If you have multiple partitions on the primary hard drive (Drive 0), select and delete each one. The setup will recreate the required partitions automatically. You don’t need to delete partitions from secondary drives to reinstall Windows 10.
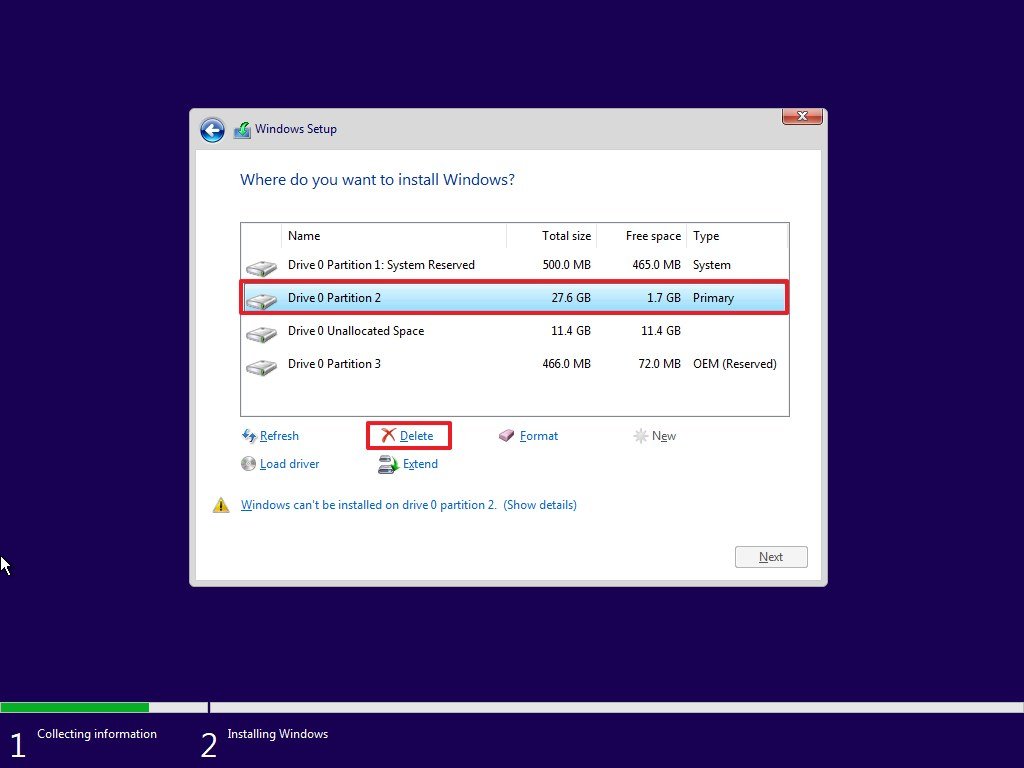
- Select the empty drive labeled «Drive 0 Unallocated Space.»
- Click the Next button.
Once you complete the steps, the setup will begin installing Windows 10, avoiding many blue screen errors. After the installation, you’ll need to continue with the out-of-box experience (OOBE) to finish setting up the computer by creating a new account and selecting the preferred settings. You can use this guide to perform a complete installation of Windows 10.
How to fix blue screen error without desktop access on Windows 10
If the computer no longer starts correctly, you can use some of the advanced system features, such as System Restore, Safe mode, or the Advanced startup environment to resolve the problem.
In case the error happened after adding new hardware, consider disconnecting it to double-check to see whether the new hardware is the reason the computer is bumping into this problem.
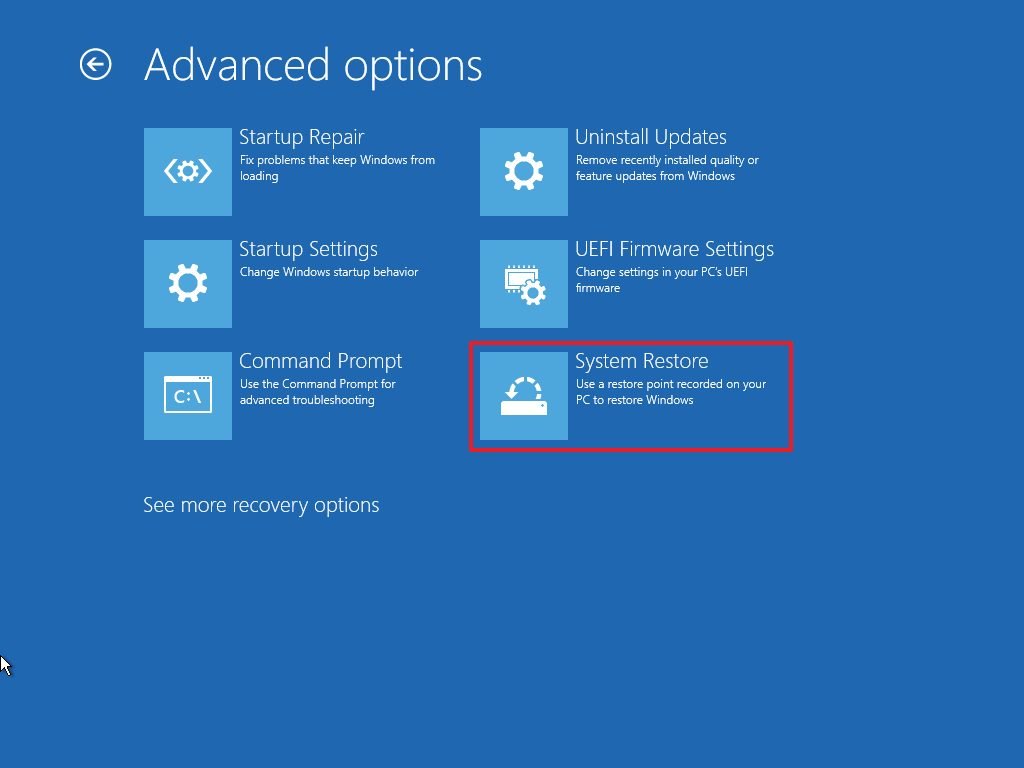
Resolve BSoD with System Restore
System Restore is a legacy feature that allows you to undo changes without affecting your files to roll back the computer to a previous point in time when Windows 10 was working correctly.
The only downside about this feature is that you have to enable it manually before using it. If System Restore was previously enabled and configured, you can use a restore point to fix the stop error.
On Windows 10, there are at least two ways to access System Restore through Advanced startup, including through the boot options menu or USB installation media. (Choose one of the methods below, and continue with the steps.)
Advanced startup access from boot
To launch the Advanced startup settings to access System Restore, use these steps:
- Start your computer.
- As soon as the Windows logo appears, press and hold the power button to interrupt the boot sequence.
- Repeat steps 1 and 2 two more times.
After the third interruption, Windows 10 should open the Advanced startup environment and continue with the steps below to access System Restore.
Advanced startup access from USB
You can also use Windows 10 installation media to open the Advanced startup with these steps:
- Start your computer using USB media.
- Quick tip: If the computer isn’t starting from USB, you’ll need to change your system’s BIOS settings to make sure it can boot from USB. You can usually access the BIOS by powering up your device and pressing one of the function, Delete, or Esc keys, but make sure to check your manufacturer’s support website for more specific details.
- Click the Next button.
- Click the «Repair your computer» option from the bottom-left corner.
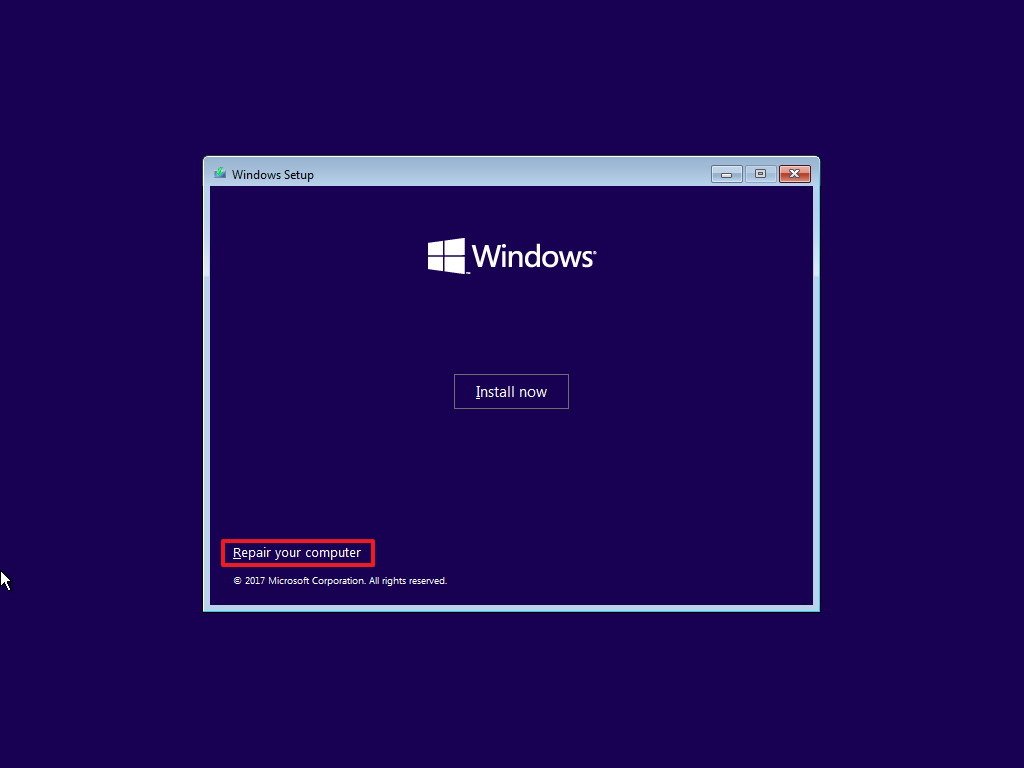
Once you complete the steps, continue with the Restore Point instructions below.
Select Restore Point to fix bug check
To use a Restore Point to fix blue screen problems on Windows 10, use these steps:
- Click the Advanced Startup option.
- Quick note: If accessing Advanced Startup from USB media, you will have the Troubleshoot option instead (see step 2).
- Click the Troubleshoot option.

- Click the Advanced options button. (This step is not part of the process when using USB media.)
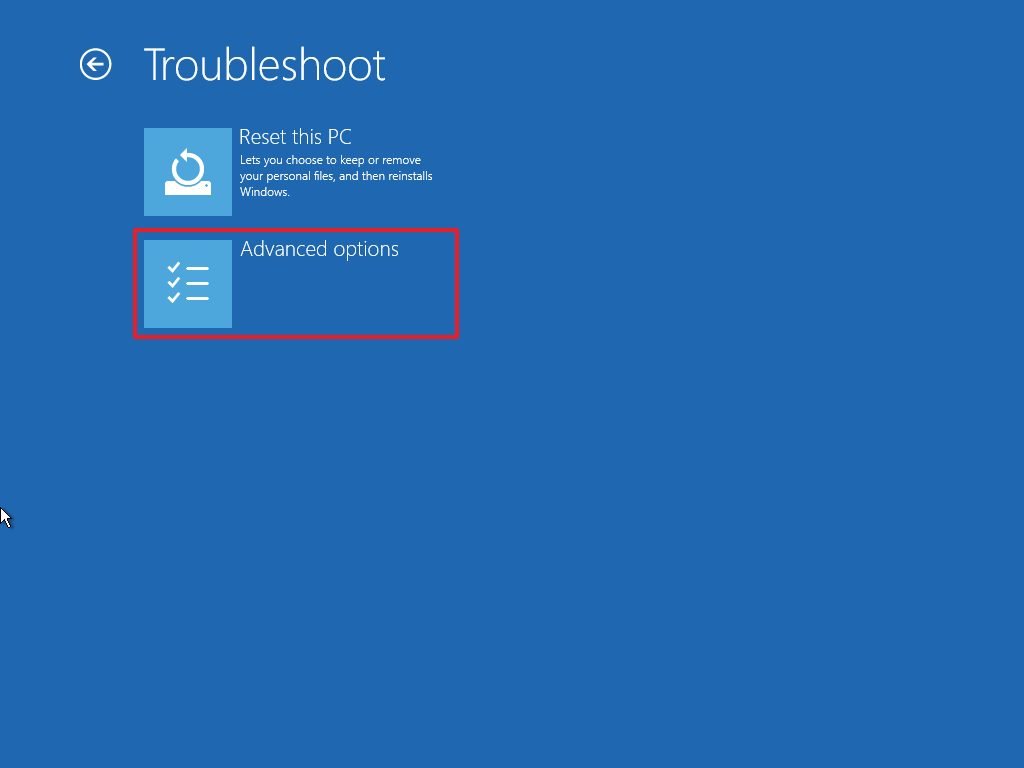
- Click the System Restore option.
- Select your account.
- Confirm your account password.
- Click the Continue button.
- Click the Next button.
- Select the most recent restore point to resolve the blue screen error.

- Click the «Scan for affected programs» button to determine the apps that may be affected using a restore point.
- Click the Close button.
- Click the Next button.
- Click the Finish button.
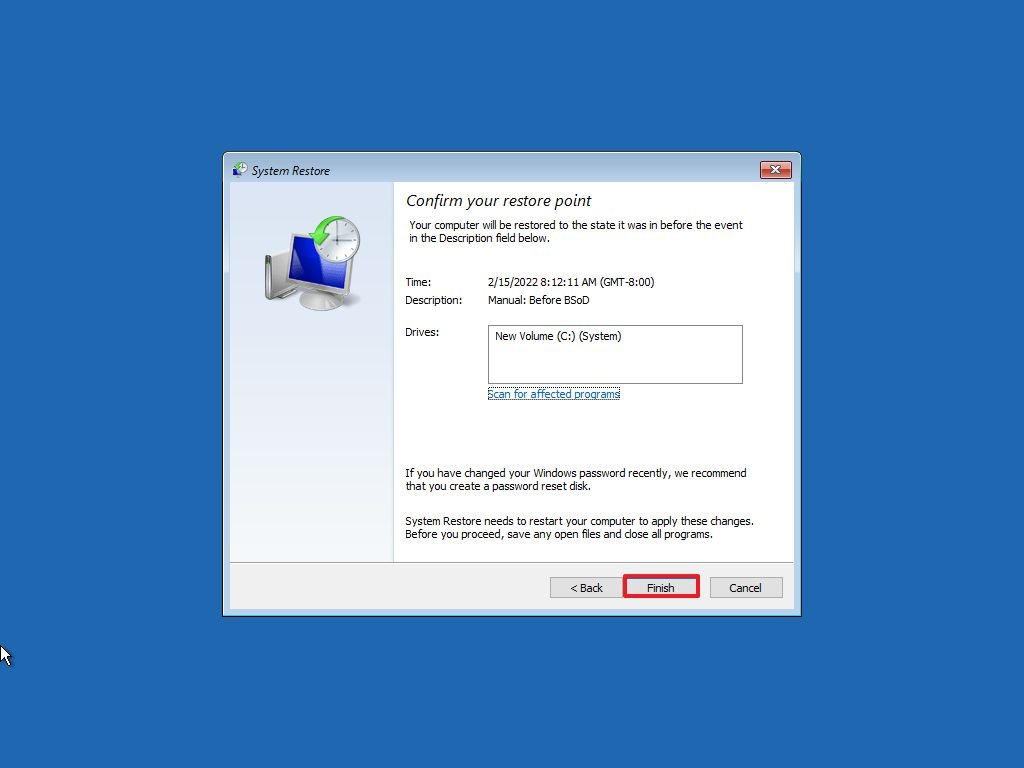
After you complete the steps, the feature will undo updates, drivers, apps, and system changes done after the point of restoration was created, fixing the system crashes.
Resolve BSoD with Safe mode
Windows 10 also has «Safe mode,» an environment that only loads the basic drivers and services needed to access the desktop to troubleshoot any issue, including system crashes.
You can access Safe mode by using the Advanced startup menu during boot or by using Windows 10 installation media. (Select one of the options below, and continue with the steps.)
Advanced startup access from boot
To access the Advanced startup settings to boot in Safe mode, use these steps:
- Start your computer.
- As soon as the Windows logo appears, press and hold the power button to interrupt the boot sequence.
- Repeat steps 1 and 2 two more times.
After the third interruption, Windows 10 should open the Advanced startup menu and continue with the steps below to access Safe mode.
Advanced startup access from USB
You can also use USB installation media to access the Advanced startup menu to enable Safe mode using these steps:
- Start your computer using USB installation media.
- Click the Next button.
- Click the «Repair your computer» option in the bottom-left corner.
Once you complete the steps, continue with the Safe mode instructions below.
Use Safe Mode to fix bug check
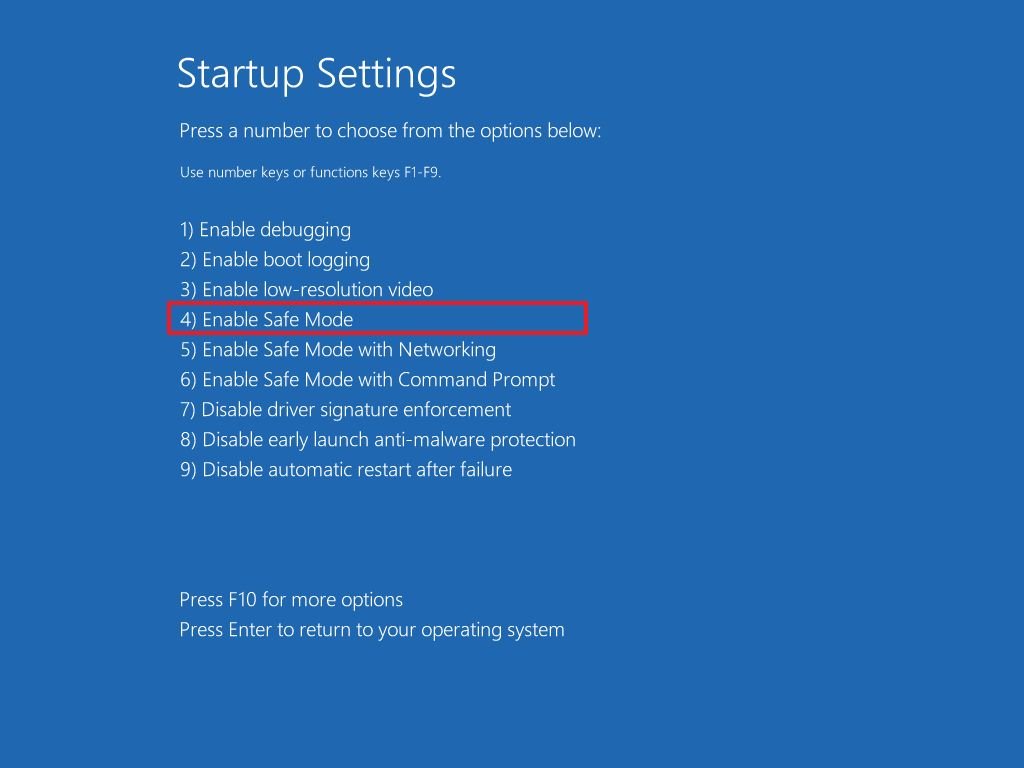
To access Safe mode to troubleshoot and fix Blue Screen of Death errors, use these steps:
- Click the Advanced Startup option.
- Quick note: If accessing Advanced Startup from USB media, you will have the Troubleshoot option instead (see step 2).
- Click the Troubleshoot option.
- Click on Advanced options. (This step is not part of the process when using USB media.)
- Click the Startup Settings option.
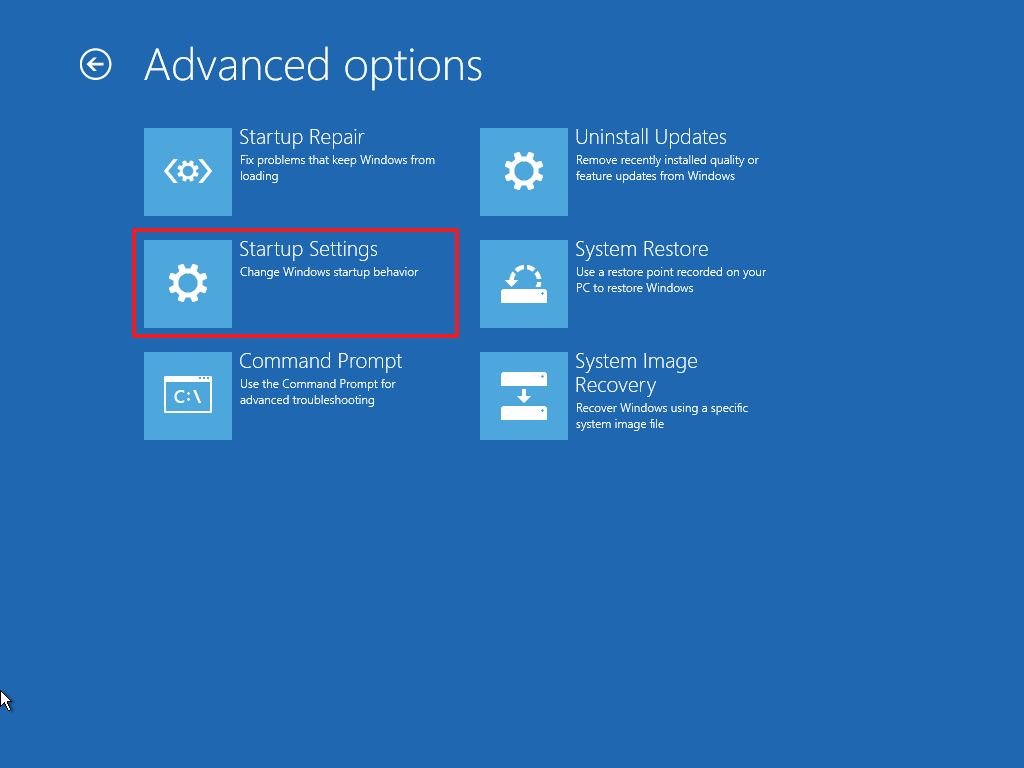
- Click the Restart button.
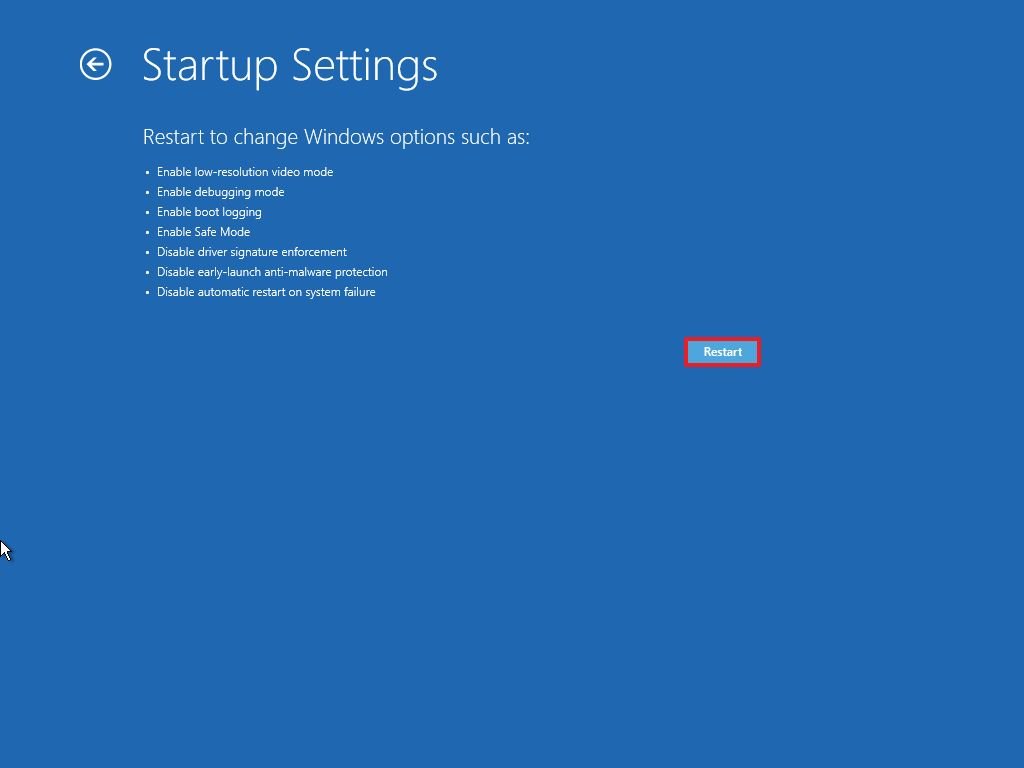
- After your computer reboots, press the F4 (or 4) key to select the «Enable Safe Mode» option.
While in Safe mode, you can use the steps below to uninstall updates and device drivers that may be causing problems.
Remove buggy system updates
To uninstall a problematic update on Windows 11, use these steps:
- Open Settings.
- Click on Update & Security.
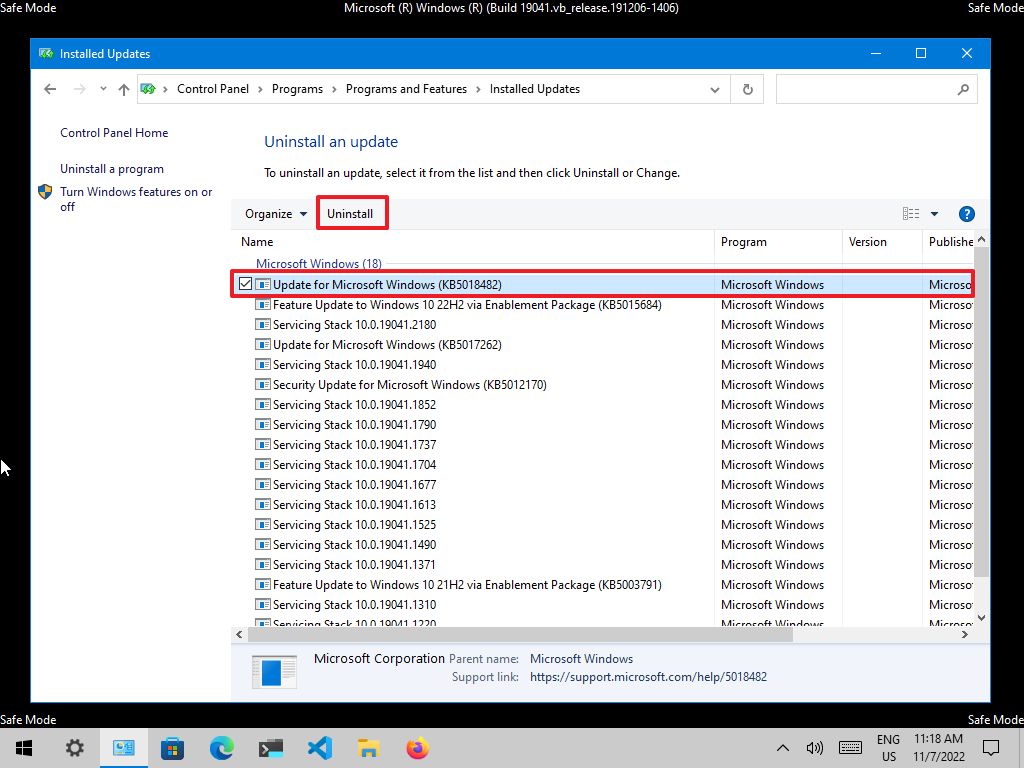
- Click the «View update history» option.
- Click the Uninstall updates option.

- Quick note: If the Windows Update settings doesn’t show option to remove an update, then open Control Panel > Programs and Features > View installed updates, and continue with the steps below.
- Select the most recent update (refer to the «Installed On» column).
- Click the Uninstall button.
After you complete the steps, restart the device and confirm that the error is no longer happening.
Remove buggy device drivers
To uninstall an incompatible driver with Safe mode, use these steps:
- Open Start.
- Search for Device Manager and select the top result to open the app.
- Expand the branch with the device causing the problem.
- Right-click the device and choose the Uninstall device option.
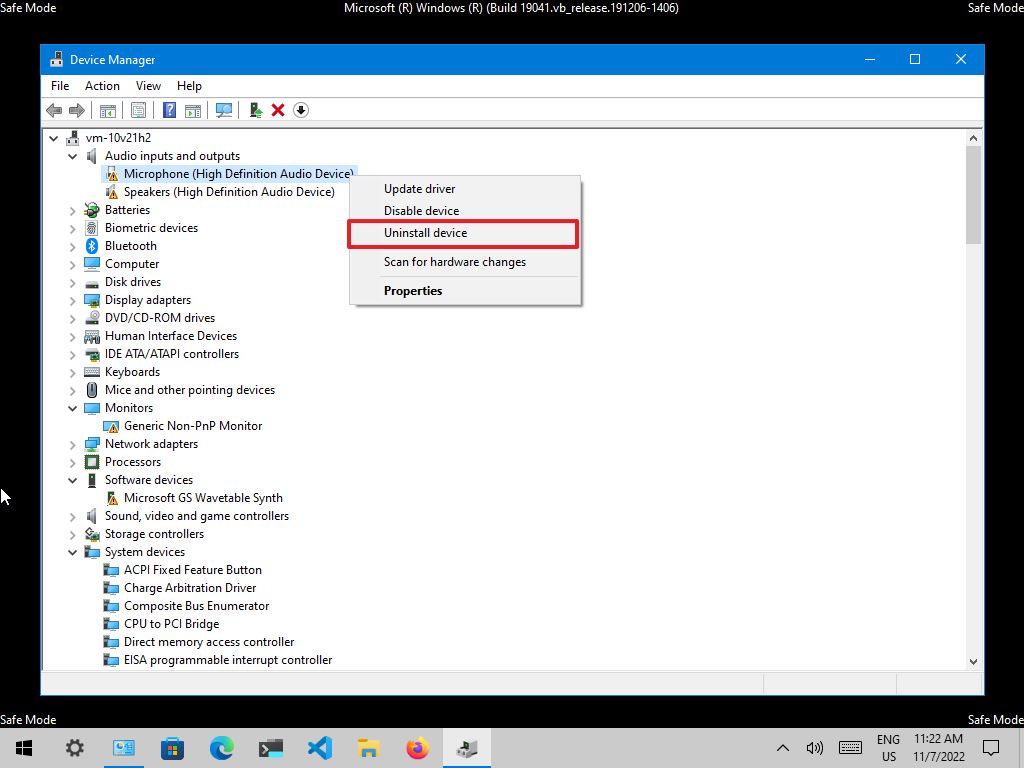
- Click the OK button.
Once you complete the steps, restart the computer and determine whether the bug check has been resolved.
If, after removing the update, the computer no longer shows a BSoB error, block the update or driver to prevent Windows 10 from reinstalling it automatically until a newer update becomes available.
Troubleshoot bug check with Event Viewer
If you cannot see the error code during the blue screen or want more details about the problem, the Event Viewer records every hardware failure, driver malfunction, app crash, and more information, which you can use to diagnose most problems.
To troubleshoot blue screens with the Event Viewer on Windows 10, use these steps:
- Open Start.
- Search for Event Viewer and click the top result to open the app.
- Expand the Windows Logs group.
- Select the System category.
- Right-click the «System» category and choose the «Filter Current Log» option.
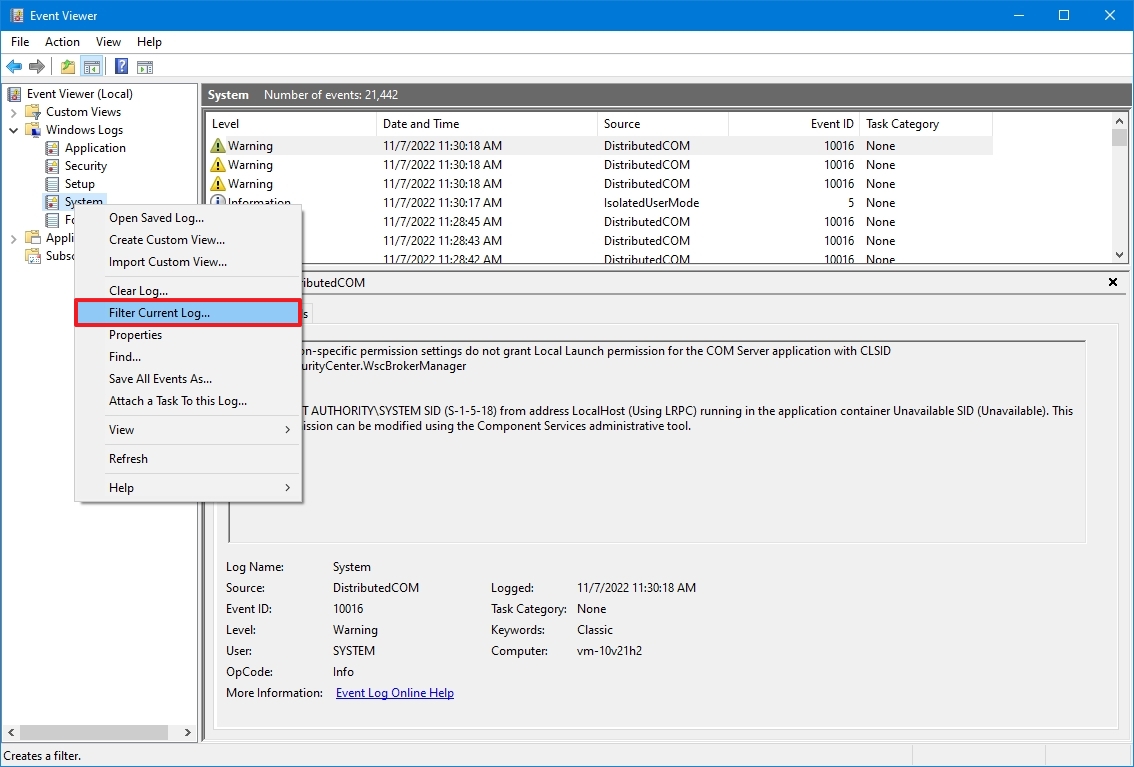
- Click the Filter tab.
- Use the Logged drop-down menu and select the time range when BSoD happened — for example, Last 12 hours.
- Under the «Event level» section, check the Critical and Error options.
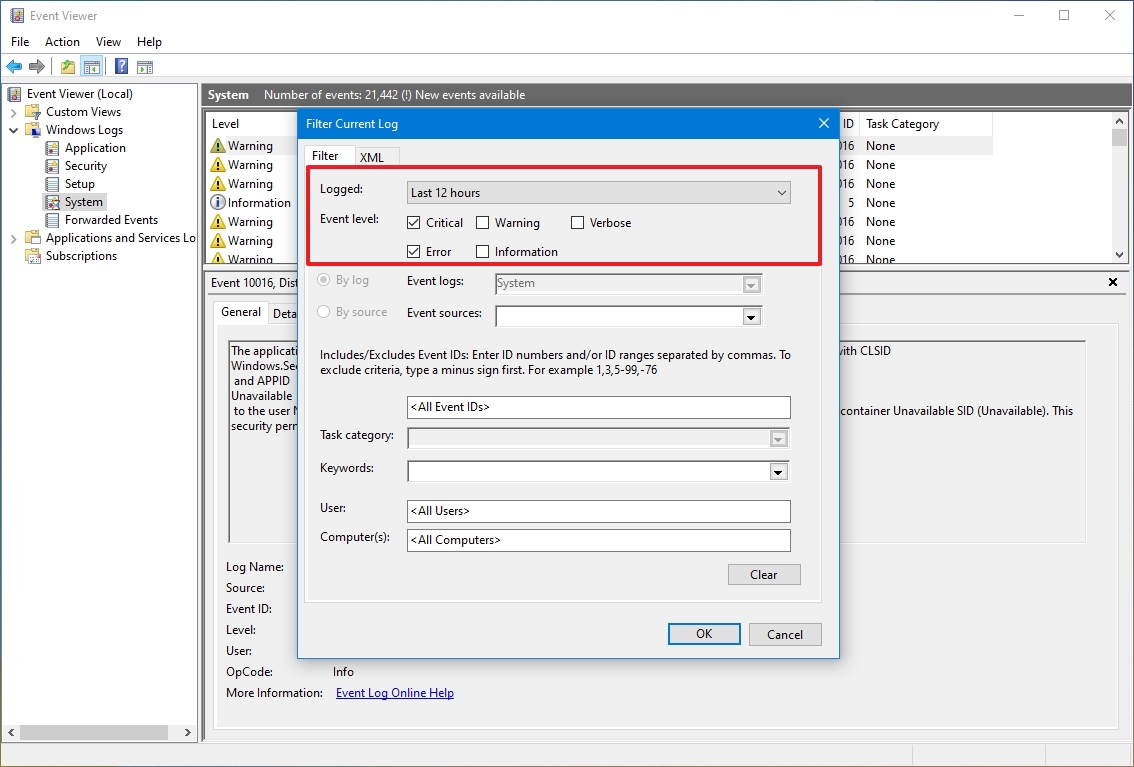
- Click the OK button.
- Double-click to open each log to learn more details about the problem.
- Review event log details.
- Quick tip: When a blue screen occurs, the system will create a memory dump file, and it’ll restart the device automatically. This means that if you have a list with many errors because the computer rebooted immediately after the bug check, the error causing the problem is likely to be the one after a critical Kernel-Power event.
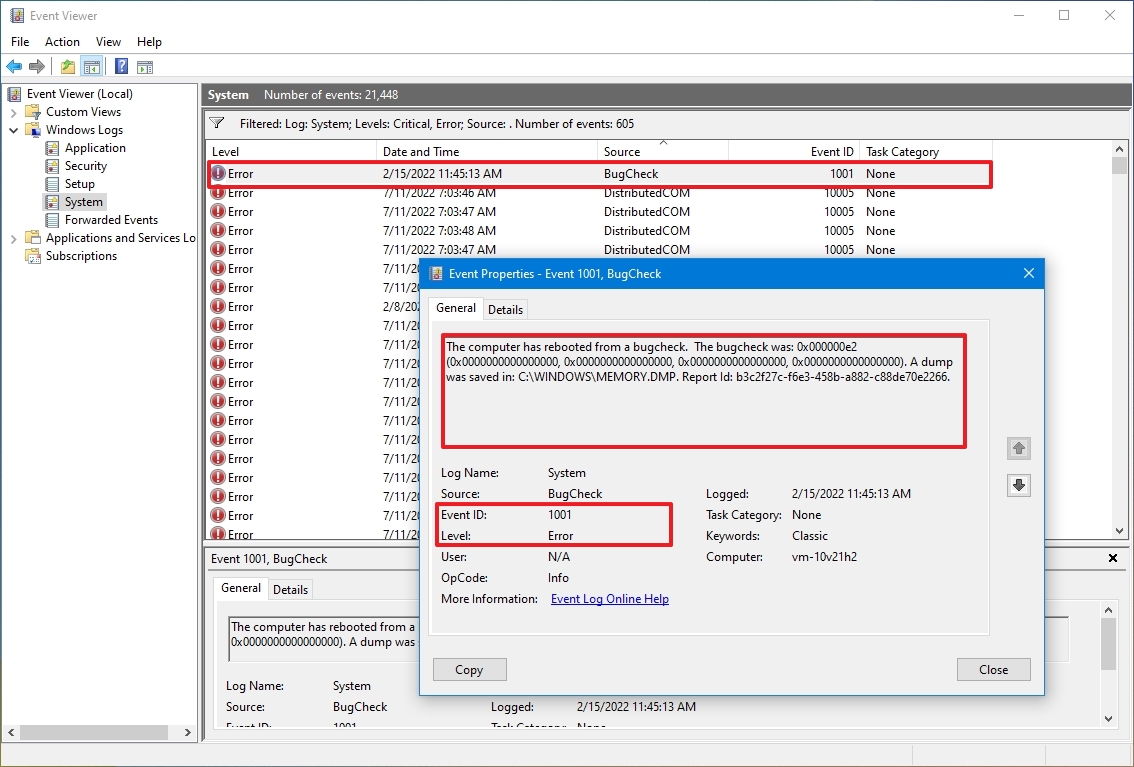
In the event log, the «General» tab includes a brief technical description of the error that might give you a hint of the blue screen problem.
In this guide, I forced a bug check using these instructions, so the event notes that the source of the problem was a «bug check» that caused the computer to reboot unexpectedly. However, it’s not always easy to determine the source of the issue. If you can’t find out the reason based on the event information, copy the description, source, and event ID and use it to research online for a possible solution.
Resolve BSoD with Advanced startup
Windows 10 also includes a feature to uninstall problematic updates directly from the Advanced startup menu.
Select one of the options to access Advanced startup, and continue with the instructions to remove quality or feature updates causing the Blue Screen of Death.
Advanced startup access from boot
To access the Advanced startup menu with the boot option, use these steps:
- Start your computer.
- As soon as the Windows logo appears, press and hold the power button to interrupt the boot sequence.
- Repeat steps 1 and 2 two more times.
After the third interruption, Windows 10 should open the Advanced startup environment, and then you can continue with the steps below to boot in Safe mode.
Advanced startup access from USB
To access the Advanced startup menu with USB installation media, use these steps:
- Start your computer using USB media.
- Click the Next button.
- Click the «Repair your computer» option in the bottom-left corner.
Once you complete the steps, continue with the Windows 10 Safe mode instructions below.
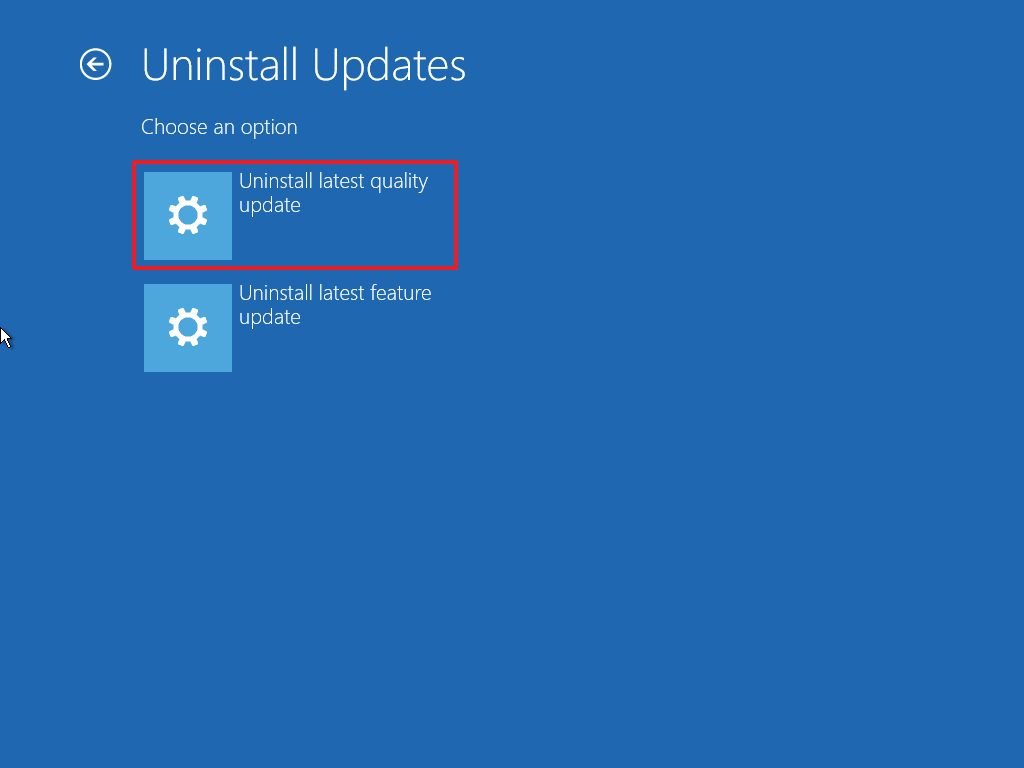
Uninstall quality or feature updates
To uninstall the most recent quality or feature update causing the Blue Screen of Death, use these steps:
- Click the Advanced Startup option.
- Quick note: If accessing Advanced Startup from USB media, you will have the Troubleshoot option instead (see step 2).
- Click the Troubleshoot option.
- Click on Advanced options. (This step is not part of the process when using USB media.)
- Click the Uninstall Updates option.

- Click the Uninstall latest quality update to remove a recent monthly update. Or click the Uninstall latest feature update option to roll back to a previous version.
- Quick tip: If you select the «Uninstall latest feature update» option, you can continue with the same steps to remove the recent upgrade of Windows 10 (as long as it’s been less than 10 days since the installation).
- Select your user account to continue.
- Confirm your account password.
- Click the Continue button.
- Click the «Uninstall quality update» button.
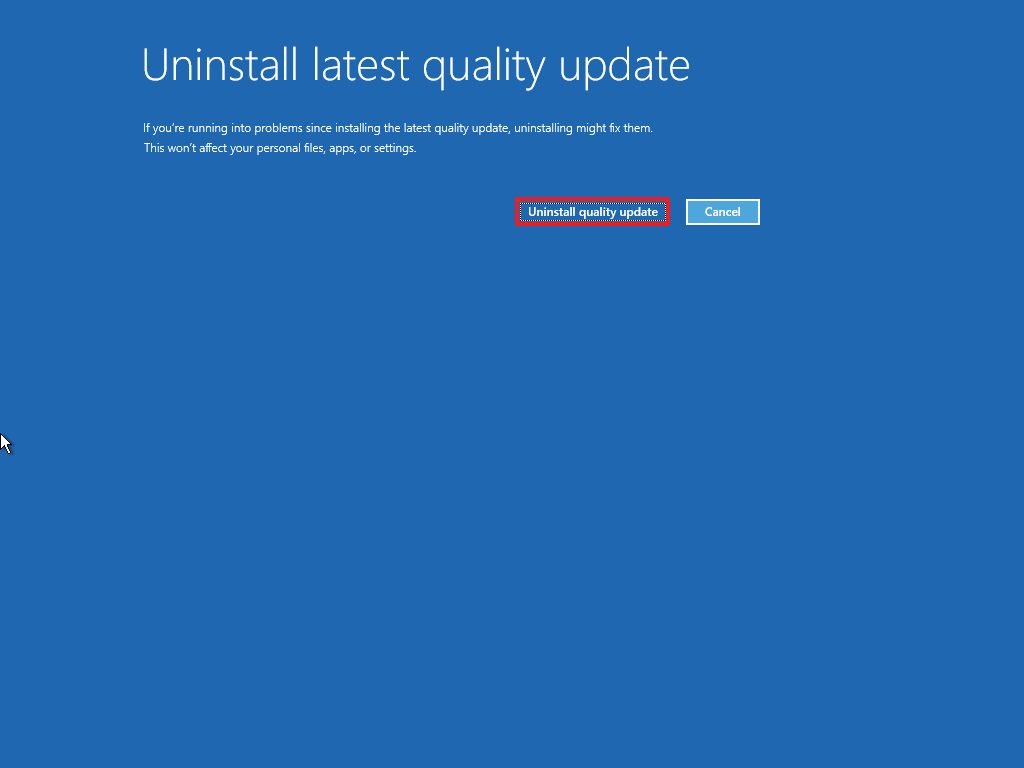
- Click the Done button.
- Click the Continue option.
After you complete the steps, Windows 10 will remove the most recent cumulative update or feature update, fixing the blue screen problem on Windows 10.
How to fix blue screen error with desktop access on Windows 10
If you come across a Blue Screen of Death message, but you still have access to the desktop, the problem is usually the case of a missing system update, an issue with a specific driver, or a recently installed app.
Update Windows 10 and drivers
If you have access to the desktop, installing the latest updates for Windows 10 and drivers can help stop the blue screen error.
System update
Windows 10 downloads and installs updates periodically, but you may still need to check manually to download a critical update.
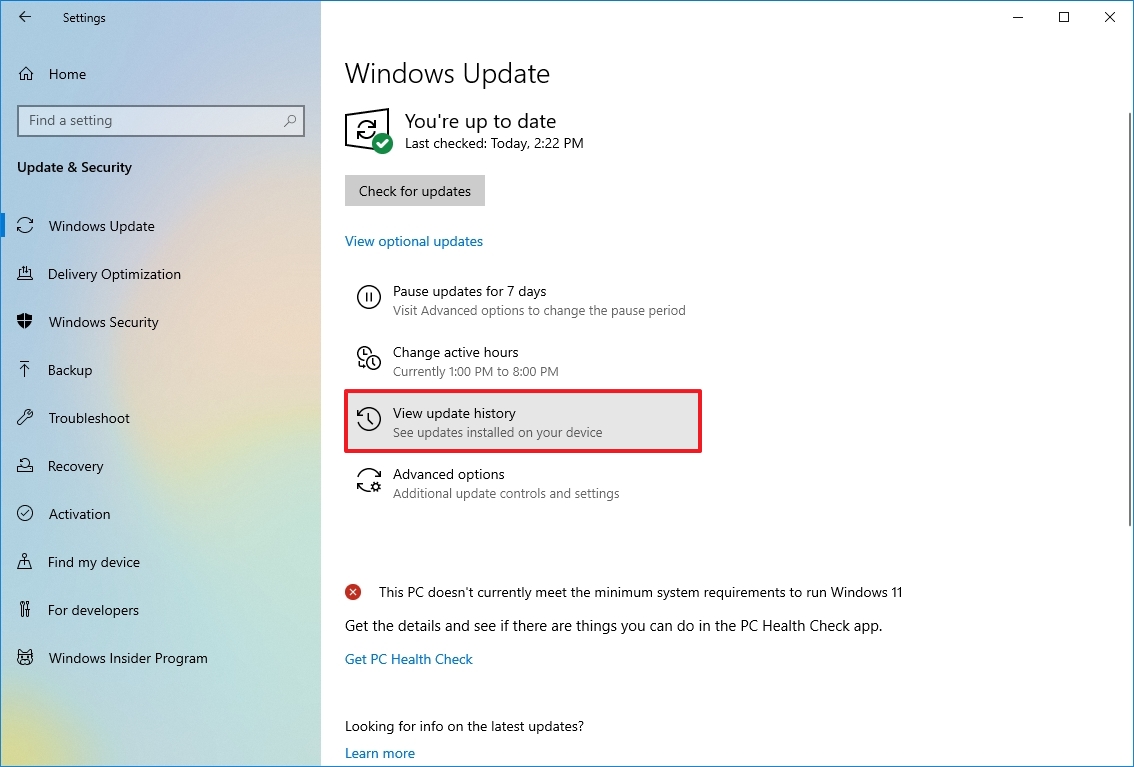
To download and install updates on Windows 10, use these steps:
- Open Settings.
- Click on Update & Security.
- Click on Windows Update.
- Click the Check for updates button.
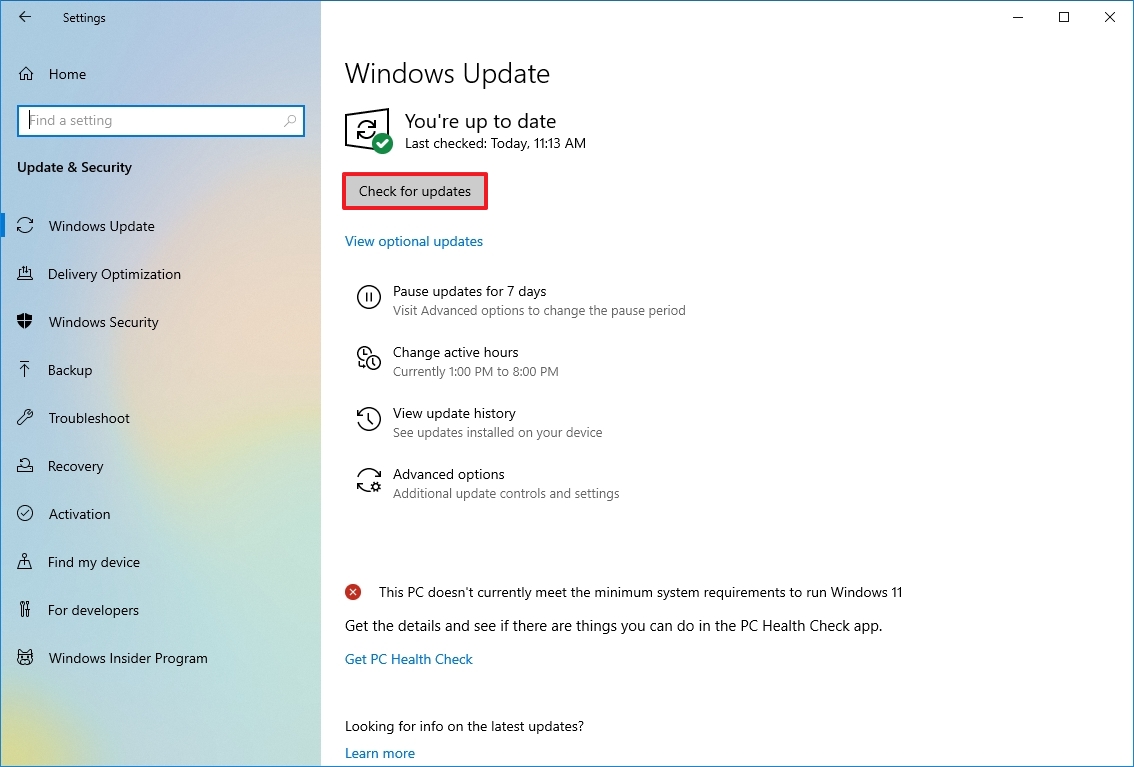
If there’s an update available, but it does not download, try to download and install the missing quality update manually.
Driver update
When the problem is an outdated driver, you’ll need to download and install the latest version.
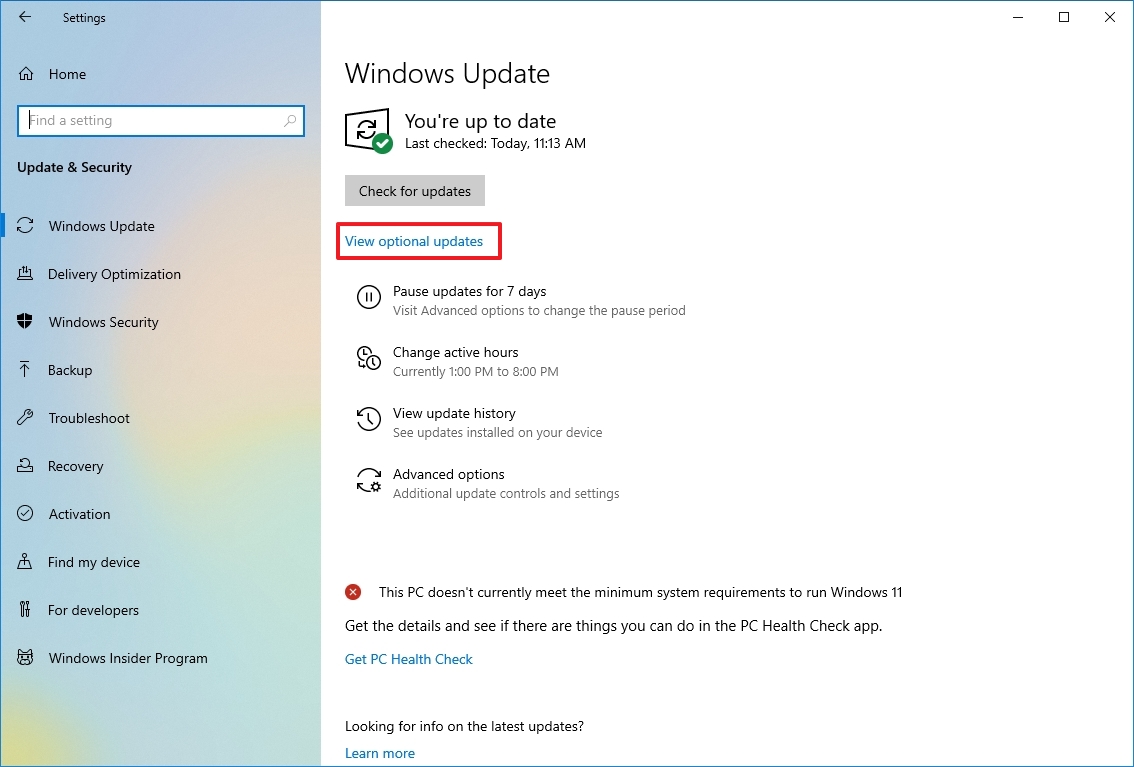
To install a newer version of a driver, use these steps:
- Open Settings.
- Click on Update & Security.
- Click on Windows Update.
- Click the Check for updates button (if applicable).
- Click the «View optional updates» option.
- Quick tip: If the option isn’t available, it means that Windows Update doesn’t have any updates for your system configuration.
- Click the Driver updates tab.
- Select the driver update.
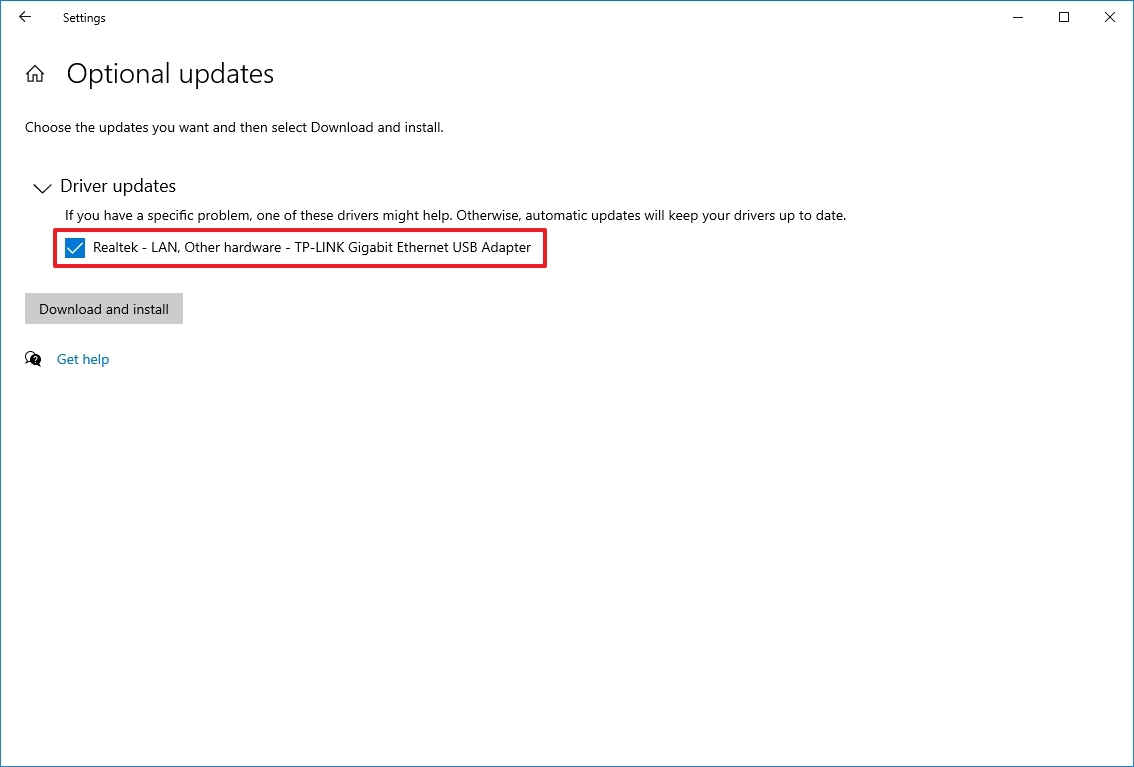
- Click the Download and install button.
Once you complete the steps, the latest version of the driver should solve the problem. If no updates were available, you might need to check the manufacturer’s support website to download and install a newer driver using their instructions. If the support website doesn’t have a version higher than the one you already have, you may also want to try a beta version of the driver as it may contain a preview of the fix the company may plan to release on a future release.
Remove problematic updates, drivers, apps
Software and hardware companies can also release buggy updates that cause problems like BSoD on Windows 10.
Uninstall system updates
To uninstall a buggy system update, use these steps to remove it:
- Open Settings.
- Click on Update & Security.
- Click the «View update history» option.
- Click the Uninstall updates option.
- Select the most recent update (refer to the «Installed On» column).

- Click the Uninstall button.
After you complete the steps, the problematic update will be uninstalled, fixing the Blue Screen of Death error. You can also use these steps to prevent the Windows Update settings from trying to install the same update again.
Uninstall device driver
To uninstall a buggy driver, use these steps:
- Open Start.
- Search for Device Manager and click the top result to open the app.
- Right-click the device and select the Uninstall device option.
- Click the OK button.
Once you complete the steps, you should no longer see the bug check error on the computer.
Roll back device driver
It’s also possible to roll back the previous version of the driver to resolve the issue until another update replaces the buggy update.
To roll back to a previous version of the driver on Windows 10, use these steps:
- Open Start.
- Search for Device Manager and click the top result to open the console.
- Expand the category of the device with the problem.
- Right-click the device and select the Properties option.
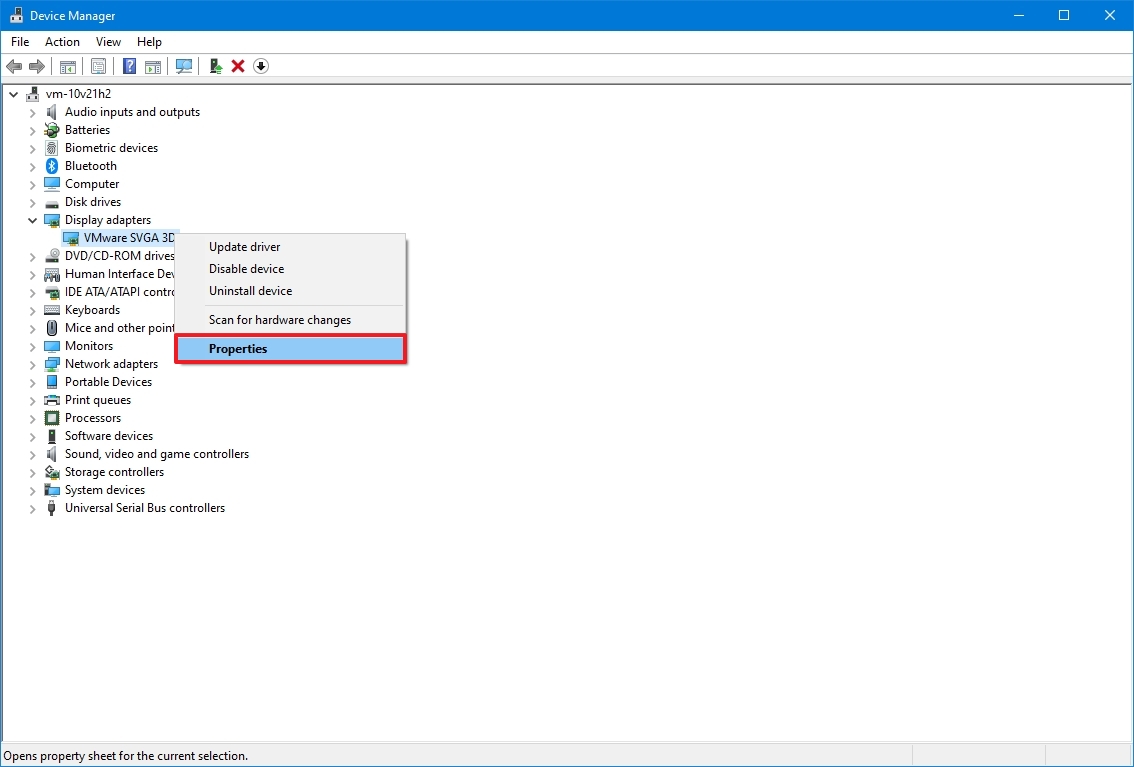
- Click the Driver tab.
- Click the Roll Back Driver button (if available).
- Quick tip: If the option isn’t available, the system doesn’t have a backup of the previous driver.
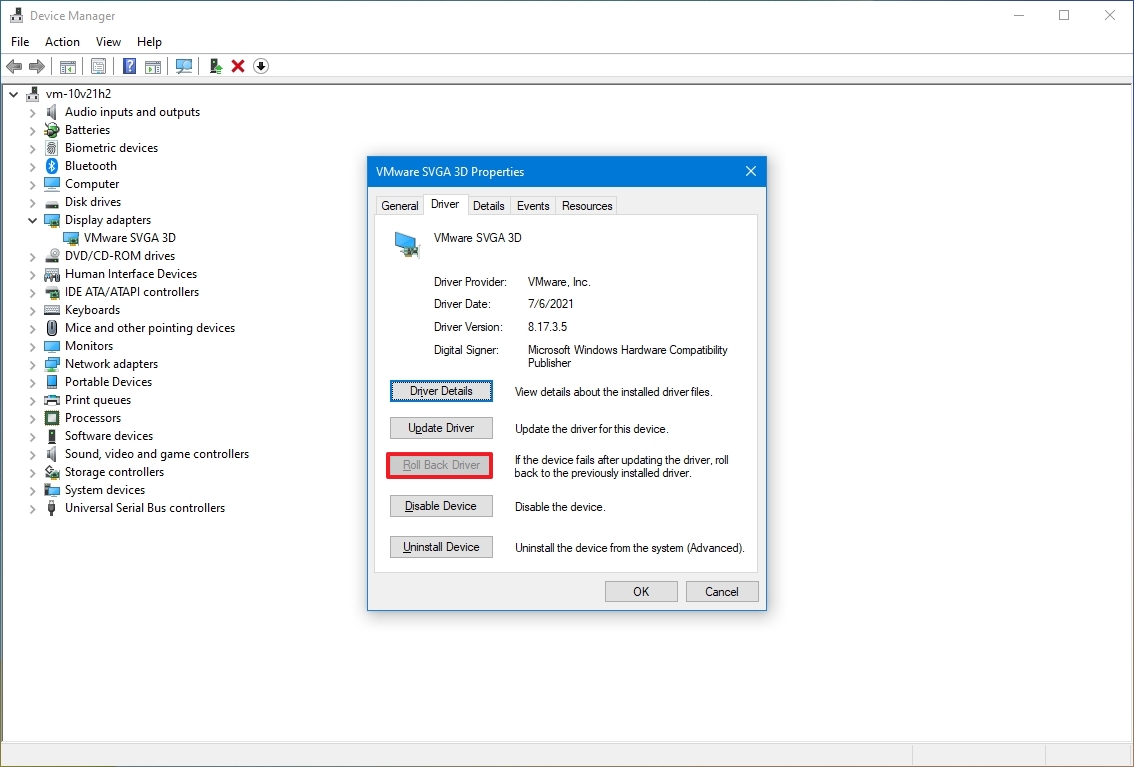
- Select one of the available options to answer the question.
- Click the Yes button.
After you complete the steps, the older version of the driver will apply to the system, fixing the system crashes.
Disable device driver
If you cannot roll back the driver, another workaround you can use involves disabling the hardware to mitigate the blue screen error until a new update becomes available to fix the issue permanently.
To disable specific hardware on Windows 10, use these steps:
- Open Start.
- Search for Device Manager and click the top result to open the app.
- Expand the category of the device with the problem.
- Right-click the device and select the Disable device option.

- Click the Yes button.
Once you complete the steps, you should no longer experience system crashes.
Uninstall conflicting apps
If you have an app causing compatibility problems, the Blue Screen of Death is likely to happen randomly, or every time you launch the program.
You can get around this problem by downloading and installing the latest version of the app from the software support website. If an update isn’t available, it’s recommended to uninstall that program to mitigate the problem until a permanent solution becomes available.
To uninstall a problematic app on Windows 10, use these steps:
- Open Settings.
- Click on Apps.
- Click on Apps & features.
- Select the app causing the Blue Screen of Death and click the Uninstall button.
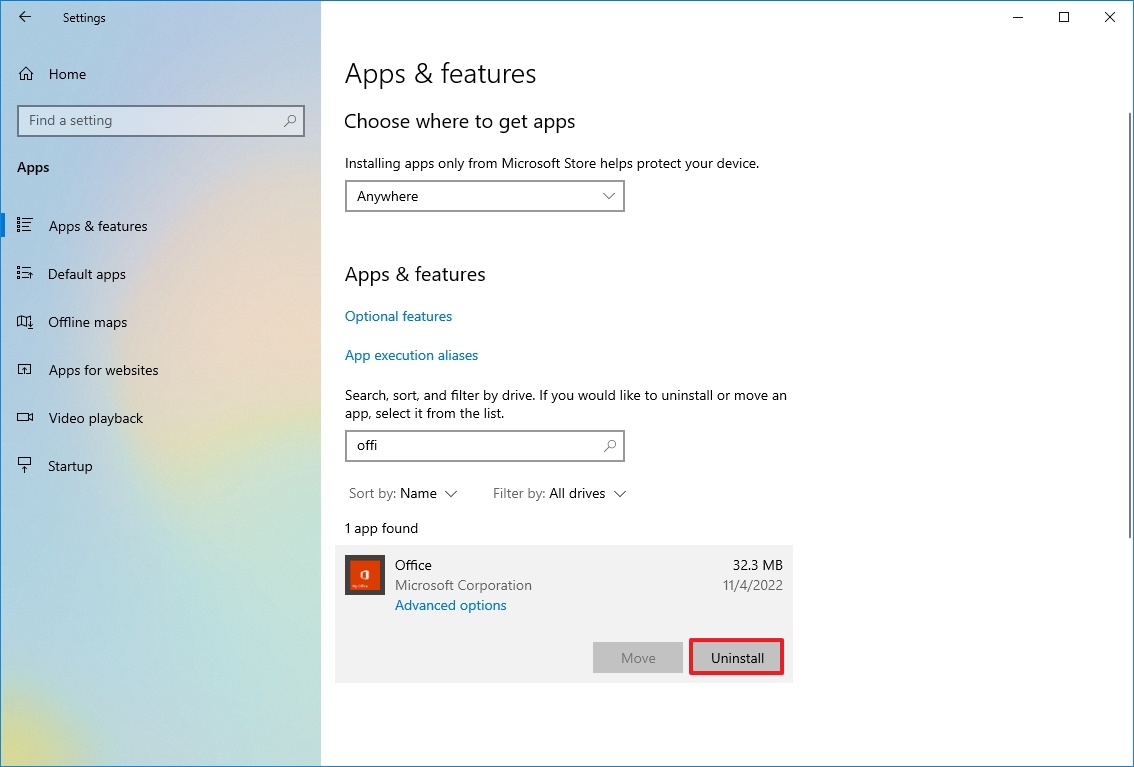
- Click the Uninstall button again.
- Continue with the on-screen directions (if applicable).
Once you complete the steps, you should no longer experience blue screen error codes on the device.
Disconnect non-essential peripherals
On Windows 10, you may also see a Blue Screen of Death message after connecting new hardware (for example, graphics card, USB device, etc.). When this happens, the problem is likely because the hardware is not compatible, broken, or the system is attempting to install the wrong driver.
If it’s a compatibility issue, you may have to contact technical support or find a compatible replacement.
It’s rare, but if the system keeps applying the wrong driver, use the previous steps to uninstall and install the correct driver manually using the manufacturer’s instructions.
Run DISM and SFC tools
When dealing with a blue screen error, you can also use the System File Checker (SFC) combined with the Deployment Servicing and Management (DISM) tool to repair damaged system files to resolve the problem.
Repair image files with DISM
To repair the locally available image with DISM, use these steps:
- Open Start.
- Search for Command Prompt, right-click the top result, and select the Run as administrator option.
- Type the following command to repair the Windows 10 image and press Enter: DISM /Online /Cleanup-Image /RestoreHealth
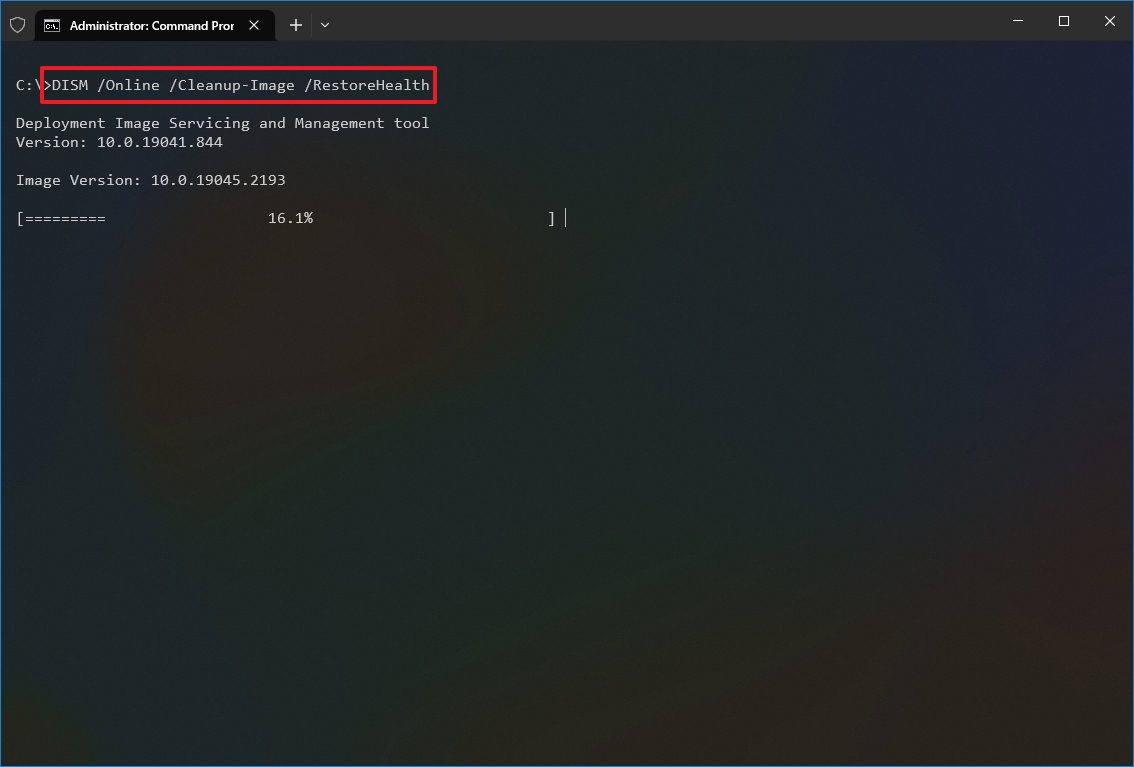
Once you complete the steps, the tool will download and replace any system file that may be damaged in the local image of Windows 10.
Repair blue screen error with SFC
To use the SFC command tool to repair the current setup using the local image (already inspected and repaired with the DISM tool), use these steps:
- Open Start.
- Search for Command Prompt, right-click the top result, and select the Run as administrator option.
- Type the following command to repair the installation of Windows 10 and press Enter: SFC /scannow
- Quick tip: If errors are found, you may want to run the command multiple times to ensure that everything is fixed correctly.

After you complete the steps, SFC will repair any system files using the local image files to fix the blue screen problem.
You can also refer to this guide to learn more about using the DISM and SFC tool on Windows 10.
Troubleshoot bug check with Event Viewer
If you still can log in to your account, you can also use the Event Viewer to determine the reason for the problem to find a proper solution.
To check the event logs for hints about the Blue Screen of Death messages, use these steps:
- Open Start.
- Search for Event Viewer and click the top result to open the app.
- Expand the Windows Logs group.
- Right-click the «System» category and choose the «Filter Current Log» option.
- Click the Filter tab.
- Use the Logged drop-down menu and select the time range when BSoD happened — for example, Last 12 hours.
- Under the «Event level» section, check the Critical and Error options.
- Click the OK button.
- Double-click to open each log to learn more details about the problem.
- Review event log details.
In the event log, the «General» tab includes a brief technical description of the error, which might give you a hint of the bug check problem. If you can’t determine the reason based on that information, copy the description, source, and event ID and use them to search online for a possible solution.
When you experience a blue screen error, it’s always a sign that a program or hardware isn’t working correctly. Although there are a lot of troubleshooting steps you can use, you may still need assistance to resolve the problem. If you made it through all our recommendations, and the problem persists, you may want to consult the Windows Central forums or the official Microsoft forums (opens in new tab). At this time, it’s also a good idea to contact your device manufacturer’s technical support for assistance.
Alongside the Blue Screen of Death, you may also encounter a black screen problem, which usually occurs because of an issue with the graphics driver, connection issue, or something in the installation. If the device experiences screen flickering issues, it’s likely a problem with an application or video driver.
More Windows resources
For more helpful articles, coverage, and answers to common questions about Windows 10 and Windows 11, visit the following resources:
- Windows 11 on Windows Central — All you need to know
- Windows 10 on Windows Central — All you need to know
Get the best of Windows Central in in your inbox, every day!
Mauro Huculak is technical writer for WindowsCentral.com. His primary focus is to write comprehensive how-tos to help users get the most out of Windows 10 and its many related technologies. He has an IT background with professional certifications from Microsoft, Cisco, and CompTIA, and he’s a recognized member of the Microsoft MVP community.
На чтение 8 мин. Просмотров 94 Опубликовано 11.07.2019
В Windows 10 улучшены многие функции, представленные в Windows 8, но также возникли и новые проблемы. Процедура обновления для Windows – не лучшая вещь для ПК, но поскольку бесплатное предложение Windows 10 предназначалось только для обновлений с Windows 7 и 8, большинство людей, работающих под управлением Windows 10, выбрали обновление, что привело к возникновению всех проблем с это с ними.
Windows 10 может иметь множество конструктивных улучшений, которых не было в Windows 8, но с точки зрения стабильности она все еще продолжает традицию ломать, что было у Microsoft с момента первого выпуска Windows. Сегодня мы поговорим о синих петлях экрана.
Все мы знаем о печально известном синем экране – экране, который появляется, когда сама Windows не может обработать ошибки в коде. Это может быть любой код – драйвер или загруженное вами программное обеспечение. На протяжении многих лет Microsoft работает над устранением этого синего экрана смерти, но есть еще много вещей, которые до сих пор исправить. Хотя этого не сделано, все, что мы можем сделать, это попытаться выяснить, что не так, и попытаться исправить это, чтобы мы могли вернуться к нашей реальной работе. Итак, здесь мы рассмотрим два решения этой проблемы: они могут сработать или не сработать, это зависит от того, страдаете ли вы от аналогичной причины или нет – но в любом случае стоит попробовать.
Содержание
- Синяя петля экрана на Windows 10, как это исправить?
- Решение 1. Проверьте свой антивирус
- Решение 2 – Удалить драйверы в безопасном режиме
- Решение 3 – Ремонт вашей установки Windows 10
- Решение 4 – Отключить принудительное использование подписи драйверов
- Решение 5 – Скопируйте резервную копию вашего реестра
- Решение 6. Попробуйте выполнить восстановление системы
Синяя петля экрана на Windows 10, как это исправить?
Синяя петля экрана может быть проблематичной и препятствовать доступу к вашей системе. Говоря о проблемах с синим экраном, вот некоторые распространенные проблемы, о которых сообщили пользователи:
- Цикл перезагрузки с синим экраном . Цикл перезагрузки может быть большой проблемой, но в большинстве случаев вы можете это исправить, найдя и удалив проблемный драйвер.
- Ошибка бесконечного цикла на синем экране . Иногда вы можете застрять в бесконечном цикле на компьютере. Чтобы устранить проблему, мы рекомендуем вам выполнить восстановление при загрузке и проверить, решает ли это проблему.
- Синяя петля экрана Windows 10, 8.1, 7 . Эта проблема может возникать практически в любой версии Windows, и даже если вы не используете Windows 10, вы сможете применить большинство наших решений для ваша версия Windows.
- Синий экран смертельного цикла загрузки Windows 10 . Синий экран также известен как синий экран смерти, и если вы не можете получить доступ к Windows из-за этой ошибки, обязательно попробуйте некоторые из наших решений.
- Синий цикл автоматического восстановления . Иногда вы можете застрять в цикле автоматического восстановления. Если это произойдет, попробуйте переустановить Windows 10 и проверьте, помогает ли это.
Решение 1. Проверьте свой антивирус

Иногда из-за вашего антивируса может появиться синяя петля экрана. Хотя наличие хорошего антивируса важно, иногда ваш антивирус может мешать работе вашей системы и вызывать различные проблемы.
Чтобы решить эту проблему, мы рекомендуем вам войти в безопасный режим и удалить антивирус. Даже если вы удалите антивирус, вы все равно будете защищены Защитником Windows, поэтому вам не нужно беспокоиться о вашей безопасности.
Если удаление вашего антивируса решит проблему, вам следует подумать о переходе на другое антивирусное решение. Bitdefender – это одно из лучших антивирусных приложений на рынке, которое никак не повлияет на вашу систему, поэтому, если вы ищете новый антивирус, Bitdefender может быть правильным выбором для вы.
Решение 2 – Удалить драйверы в безопасном режиме
В Windows 10 есть некоторые проблемы со старыми аудиодрайверами, которые вы, возможно, используете, поскольку вы обновили старые версии Windows. Так что вам нужно будет перейти в безопасный режим. Чтобы перейти в безопасный режим, выполните следующие действия.
- Одновременно нажмите кнопку клавиша Windows + I на клавиатуре, и вы увидите всплывающее окно настроек.
- Теперь в этом окне перейдите в раздел Обновление и безопасность.
-
Теперь перейдите в раздел Восстановление> Расширенный запуск> Перезагрузить сейчас.

- После того, как ваш компьютер перезапустится на экране выбора параметров, выберите Устранение неполадок> Дополнительные параметры> Параметры запуска> Перезагрузка .

Если вы вообще не можете получить доступ к Windows, просто перезагрузите компьютер пару раз. Теперь перейдите в раздел Устранение неполадок> Дополнительные параметры> Параметры запуска и запустите компьютер в безопасном режиме.
После входа в безопасный режим необходимо запустить диспетчер устройств и удалить проблемные драйверы. Это довольно просто сделать, и вы можете сделать это, выполнив следующие действия:
-
Нажмите Windows Key + X , чтобы открыть меню Win + X. Теперь выберите Диспетчер устройств .
-
Найдите драйвер, который хотите удалить, щелкните его правой кнопкой мыши и выберите Удалить устройство .
-
Когда появится диалоговое окно подтверждения, установите флажок Удалить программное обеспечение драйвера для этого устройства , если оно доступно. Теперь нажмите кнопку Удалить .


После удаления проблемных драйверов перезагрузите компьютер и проверьте, сохраняется ли проблема. Мы должны отметить, что определение проблемного драйвера может быть проблемой, но в большинстве случаев это ваша видеокарта или сетевой драйвер. Если вы хотите узнать точный драйвер, который вызывает проблему, вам нужно провести небольшое исследование самостоятельно.
Решение 3 – Ремонт вашей установки Windows 10

В некоторых случаях вы можете решить проблему, просто воспользовавшись функцией восстановления при загрузке. Это относительно простая процедура, и вы можете сделать это, выполнив следующие действия:
- Загрузите и запустите Инструмент создания мультимедиа . Подключите USB-накопитель и следуйте инструкциям на экране, чтобы создать загрузочный носитель.
- Когда вы будете готовы с загрузочной флешкой или DVD, вставьте его в компьютер и перезагрузите. Он должен спросить вас, хотите ли вы загрузиться с загрузочного устройства, если по какой-то причине этого не происходит – откройте BIOS и найдите параметры для порядка загрузки, затем установите DVD-диск или USB-накопитель поверх порядка загрузки и перезагрузите компьютер. снова.
- После того, как вы загрузитесь в установку Windows, вы увидите вариант устранения неполадок в одном из углов, щелкните по нему.
- Теперь нажмите «Восстановить компьютер» и перейдите в раздел Дополнительные параметры , где вам нужно будет найти параметр Восстановление при загрузке .
- Теперь нажмите Восстановление при загрузке и просто следуйте инструкциям на экране.
Решение 4 – Отключить принудительное использование подписи драйверов
В Windows 10 есть полезная функция, которая называется принудительное использование подписи драйверов, и эта функция предназначена для защиты вашего компьютера от вредоносных драйверов. Используя эту функцию, вы сможете устанавливать только драйверы с цифровой подписью.
Хотя эта функция великолепна, несколько пользователей сообщили, что она может вызвать появление синего экрана на вашем ПК. Чтобы решить эту проблему, мы собираемся временно отключить эту функцию. Вы можете сделать это, выполнив следующие действия:
- Перезагрузите компьютер несколько раз во время загрузки.
- Теперь выберите Устранение неполадок> Дополнительные параметры> Параметры запуска и нажмите кнопку Перезагрузить .
- После перезагрузки компьютера вам будет представлен список опций. Выберите Отключить принудительное использование подписи драйверов , нажав F7 .
Теперь ваш компьютер должен загрузиться на Windows 10. Имейте в виду, что это всего лишь временное решение, но вы можете использовать его для доступа к Windows и дальнейшего устранения проблемы.
Решение 5 – Скопируйте резервную копию вашего реестра
Если вы застряли в синей петле экрана, проблема может быть в поврежденных файлах на вашем компьютере. К счастью, Windows 10 создает резервную копию ваших файлов, что позволяет легко восстанавливать ваши файлы. Чтобы восстановить ваши файлы, вам просто нужно сделать следующее:
- Перезагрузите компьютер несколько раз во время загрузки.
- Теперь выберите Устранение неполадок> Дополнительные параметры> Командная строка .
- Теперь выполните следующие команды:
- Копировать d: windowssystem32config *. * d: windowssystem32config * .bak
- Копировать d: windowssystem32configregback *. * d: windowssystem32config/Y
После выполнения этих двух команд закройте командную строку и проверьте, сохраняется ли проблема с синим экраном. Имейте в виду, что это не универсальное решение, поэтому оно может работать не во всех случаях.
Решение 6. Попробуйте выполнить восстановление системы
Если вы застряли в синей петле экрана, вы можете решить проблему, выполнив Восстановление системы. Если вы не знаете, «Восстановление системы» – это функция Windows, которая восстанавливает вашу систему до прежнего состояния и устраняет различные проблемы на этом пути.
Чтобы использовать Восстановление системы за пределами Windows 10, вам просто нужно сделать следующее:
- Перезагрузите компьютер пару раз во время загрузки.
- Теперь перейдите в раздел Устранение неполадок> Дополнительные параметры> Восстановление системы .
- Выберите свою учетную запись и введите ее пароль.
-
Появится окно Восстановление системы . Нажмите Далее , чтобы продолжить.
-
Если доступно, установите флажок Показать больше точек восстановления , выберите нужную точку восстановления и нажмите Далее .
- Следуйте инструкциям на экране для завершения процесса восстановления.


После завершения процесса восстановления проблема должна быть решена, и ваш компьютер снова начнет работать.
Надеюсь, что это помогло – если это не так, то вам, возможно, потребуется правильно переустановить Windows 10, чтобы загрузочный диск, который мы сделали в методе 2, мог пригодиться в конце концов. Или вы можете просто продолжить свой квест и найти какое-то решение, которое может работать на вас. Bluescreens в конце концов простые ошибки программного обеспечения, особенно если они начали появляться только после обновления программного обеспечения. Устранение таких ошибок в такой сложной операционной системе, как Windows, займет время даже у такого гиганта, как Microsoft.
Hey Guys, Just wanted to put this out there, but recently my computer updated my Windows 10 and I thought no big deal and went on to play Blizzard’s Overwatch for an hour or two when all of a sudden I experienced the BSOD and it said WHEA_UNCORRECTABLE_ERROR. I thought, «Well that doesn’t sound to good.» However when my computer turned back on everything was fine and dandy. I started a new game in PUBG and after about 3 games (45 mins or so) it happened again. This time I knew there was a huge problem.
When the computer restarted, it lasted only for 10 mins. And after that varying from 10-1 minute. I was frustrated because looking up the error, i was told it was either a hardware or driver issue. I updated my drivers and that did not work. I turned off my overclocking feature for my i7 7700k, and that did not work, however my computer did not run slow or seem to have any trouble besides the BSOD happening. I tried a system restore and went back from the previous windows update. No luck. I reinstalled windows using the tool included with windows 10. Nothing. I even reset my bios and plugged my computer into the wall instead of the power protector. Nothing seemed to work.
I finally reconfigured the whole partition (after removing all personal files) and that worked. A new install of Windows 10 and it stopped crashing every 10 mins. However i tried and decided to experiment (because why not? ive gone this far..) I let it update with the latest windows 10 updates and boom. It immediately started again. I was sorta relived knowing it was the updates and not my computer that was the problem. So I reconfigured the whole partition again and started getting all my programs back. Here I am 8 hrs later and it is working like a charm.
So if any of you are having trouble with it, take my advice and if you can easily repartition it, do it. Block the Windows 10 update until Microsoft fixes it after you install a fresh copy. It seriously saved me from trying new hardware parts. My computer is only 6 months old and i was like no way did a part of my computer just die.
I did find a article (http://www.techradar.com/news/confusion-reigns-over-windows-10-update-that-causes-blue-screen-of-death ) stating there is a problem with the recent update, but it didnt report on anything i experienced. So thought I’d drop it here. Suggestions of how to contact Microsoft about this would be great.
If you see a Stop Error – 0x7B INACCESSIBLE_BOOT_DEVICE after applying Windows Updates on your Windows 11/10/8/7 system, know that it is the result of the boot state that the system gets. Microsoft has laid down some steps that will help you address this issue. Let us take a look at them.
0x7B INACCESSIBLE_BOOT_DEVICE Blue Screen after Windows Updates
When you get the 0x7B INACCESSIBLE_BOOT_DEVICE error, you might be at a loss. Maybe you can’t even understand the problem, but don’t worry, that is only normal. What’s more, this apparently complicated problem has some working solutions.
This stop error stems from a flaw in the boot state due to device drivers and data corruption. Sometimes it could also be a result of hardware failure or a virus. Without exception, you will get this stop 0x0000007B error on the Blue Screen of Death or Stop Error.
Even when Windows recovers from the problem, you still get a prompt that says “Windows has recovered from an unexpected shutdown” and this problem can happen on any version of Windows. If this is your problem too, here are some solutions.
Just restart the device to see if the problem solves itself. Sometimes it does and never reappears again. Eles, read on.
1] Make changes to the Hard Drive Controller
If you recently make changes to your hard drive controller, this could be the reason, so reverse the situation by undoing these changes. You carry out any of the following procedures :
- Use System Restore.
- Reconfigure the new hard drive controller.
- Remove the new hard drive controller if reconfiguring doesn’t work and you don’t essentially require it.
- Run Startup Repair
- Go back to the version of the hard drive controller and device drivers you had before the driver update.
All these may or may not solve the problem depending on what caused it. If this solution doesn’t work, at least you’ll know your hard drive controller isn’t the problem.
2] Verify SCSI chain termination
If you are using SCSI hard drives, faulty termination is likely the cause of the error. So you need to cater to this problem in order to solve it. However, home computers usually use PATA and SATA and not SCSI, so this might not be your problem, to begin with.
3] Verify installation
Make sure the hard drive is installed correctly. If you haven’t installed any new drive recently, the problem could be something else.
4] Verify BIOS configuration
You need to make sure that your hard drive is correctly configured in the BIOS. Change settings as needed to ensure proper configuration.
5] Scan for virus
As mentioned earlier, the stop error can be a result of a virus. So you need to scan for virus and mainly check the boot sector and MBR for malware attacks. If this is the problem, follow the usual routine of antivirus software assistance and restart your device. Always keep your antivirus updated in order to prevent this problem from happening at all.
6] Update drivers
Outdated hard drive controller drivers can cause this error, so update the device drivers.
7] Change mode in BIOS
Some advanced SATA features can cause this error. Change the SATA (AHCI) mode to IDE mode (ATA or Compatibility Mode) to undo the error and avoid it in the future. In some older versions, the solution might be just the other way around. Clearing the CMOS can also help.
8] Run chkdsk
If the boot volume is corrupted, running chkdsk on the hard drive will solve the problem. You might have to run chkdsk from the Recovery console.
9] Hard drive errors
If a hard drive has gone bad, you will need to replace it. There is no way out from a damaged hard drive.
In order to avoid the error from occurring again, configure the patching infrastructure so that CU and delta updates are not simultaneously installed during a single reboot.
Read: Bluescreen after installing Drivers in Windows
Advanced Troubleshooting: Error 7B Inaccessible_Boot_Device after Windows Update installation
When you receive Error 7B Inaccessible_Boot_Device after Windows Update installation, then it’s completely different from the scenarios we have covered above. We will have to check if there is a pending Windows 11/10 installation and unload the registry hive to fix it. Boot Windows into Safe Mode using any media installation or if you can get access to Advanced Recovery mode.
Windows Update Installation Status
Open the Command Prompt, and run the following command to verify the Windows update installation and dates. Assuming C is your system drive:
Dism /Image:C: /Get-packages
The result of this command should reveal the Install pending and Uninstall Pending packages.
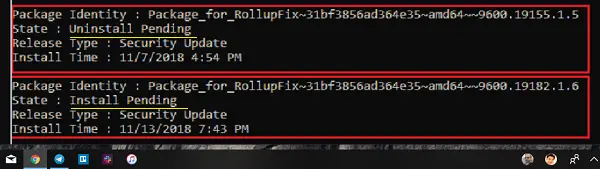
- Run the command dism /Image:C: /Cleanup-Image /RevertPendingActions.
- Navigate to C:WindowsWinSxS, and then check whether the pending.xml file exists. If it does, rename it to pending.xml.old.
Revert Registry Changes
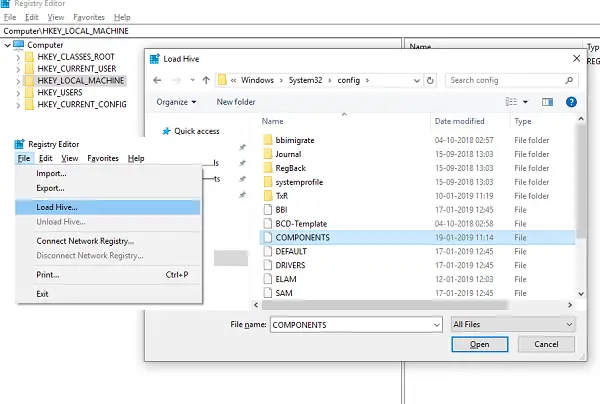
Load Hive
- Type regedit in the run prompt to open the Registry Editor.
- Select HKEY_LOCAL_MACHINE, and then go to File > Load Hive.
- Navigate to C:WindowsSystem32config, select the file that is named COMPONENT. Open it.
- Save the name as “OfflineComponentHive.” It is our new Hive.
- Expand HKEY_LOCAL_MACHINEOfflineComponentHive, and check whether the PendingXmlIdentifier key exists.
- Create a backup of the OfflineComponentHivekey, and then delete the PendingXmlIdentifier key.
Unload Hive:
Select OfflineComponentHive, and then select File> Unload Hive. Select HKEY_LOCAL_MACHINE, go to File > Load Hive. Navigate to C:WindowsSystem32config, select the file that is named SYSTEM. Open it. When prompted, enter the name OfflineSystemHive for the new hive.
Expand HKEY_LOCAL_MACHINEOfflineSystemHive, and then select the Select key. Check the data for the Default value.
- If the data in HKEY_LOCAL_MACHINEOfflineSystemHiveSelectDefault is 1, expand HKEY_LOCAL_MACHINEOfflineHiveControlSet001.
- If it is 2, expand HKEY_LOCAL_MACHINEOfflineHiveControlSet002, and so on.
Expand ControlSession Manager. Check whether the PendingFileRenameOperations key exists. If it does, back up the SessionManagerkey, and then delete the PendingFileRenameOperations key.
Reboot the computer, and you should not get any error related to 7B Inaccessible_Boot_Device.
For a few more suggestions, visit Technet.
See this post if you receive INACCESSIBLE_BOOT_DEVICE error after you used Reset in Windows.
What causes inaccessible boot?
There are several reasons behind the inaccessible boot, including corrupted or damaged boot partition on the hard drive, damaged or incorrectly configured boot loader, malfunctioning or failed hardware components, such as the hard drive or RAM, and so on. The inaccessible boot can often be fixed using a diagnostic or repair tool, such as the Windows Startup Repair Tool. If the problem persists, it may be due to a hardware failure, wherein you will need to get a new one and reinstall everything.
Can a new Windows Update cause BSOD?
Yes, a new Windows Update can cause a Blue Screen of Death (BSOD) error. This can happen if the update contains bugs or conflicts with other software or drivers on the system. It is always a good idea to back up your important files before installing any updates in case of a problem. You can also check Microsoft Forums and take peer feedback to find out if anybody has reported any major issues after recent Windows updates.