What to Know
- Windows 11: Go to Settings > Windows Update > Advanced Options.
- Windows 10: Go to Settings > Update & Security > Windows Update > Advanced options.
- We recommend turning on updates for other Microsoft products, and enabling metered connection downloads.
Windows Update exists to help make it easy to keep Windows up to date with the latest patches, service packs, and other updates. How easy depends on how Windows Update is configured to download and apply updates.
When you first turned on your new computer or were finishing your Windows operating system install, you told Windows Update how you wanted it to act—a little more automatic or a little more manual.
If your original decision isn’t working out, or you need to change how it works to avoid repeating an auto-update issue, like what happens on some Patch Tuesdays, you can simply adjust how Windows receives and installs updates.
Depending on your version of Windows, this could mean downloading but not installing the updates, notifying you but not downloading them, or even disabling Windows Update completely.
Time Required: Changing how Windows updates are downloaded and installed should only take you a few minutes at most.
Microsoft made changes to the location and wording of Windows Update and its settings almost every time a new version of Windows was released. Below are three sets of instructions for changing/disabling Windows Update: one for Windows 11, one for Windows 10, one for Windows 8, Windows 7 or Windows Vista, and one for Windows XP.
Not sure what version of Windows you’re running? Use the Lifewire System Info Tool to find out:
If you’re changing Windows Update settings on another device and not sure what version it’s running, see What Version of Windows Do I Have? for help.
How to Change Windows Update Settings in Windows 11
The Windows Update settings in Windows 11 didn’t change much from Windows 10, aside from small things like different names for the options and the method you take to get to the settings.
-
Right-click the Start button, and choose Settings. You can also left-click the Start button and search for Settings.
-
Choose Windows Update from the menu on the left.
-
Select Advanced Options.
-
The options here control how Windows 11 will download and install updates for the operating system and, if selected, other software from Microsoft.
We highly recommend that you do the following: turn on Receive updates for other Microsoft products and turn on Download updates over metered connections. All things considered, this is the safest way to go.
-
Changes you make to Windows 11’s Windows Update settings are saved automatically. You can close the Settings window when you’re finished customizing the settings.
Here are more details on all these settings that are available to you in Windows Update for Windows 11:
Receive updates for other Microsoft products: Just as it sounds, you can have Windows Update deliver updates for other Microsoft programs that you have installed, such as Microsoft Office.
Get me up to date: Your PC will restart ASAP so that updates will finish installing as quickly as possible. You’ll get a restart prompt 15 minutes before it happens so that you can save your work.
Download updates over metered connections: You’ll receive automatic updates even if you’re connected to a data-limited network. Most people, especially home users, are on unlimited data plans, so this is only relevant for people on a limited network, like through a mobile data plan.
Notify me when a restart is required to finish updating: A restart prompt will appear when Windows Update is ready to reboot your computer.
Active hours: Change this if Windows is rebooting your computer while you’re using it. Telling Windows that your active hours are, say 9 AM to 5 PM, will force it to not reboot for updates during that time frame. The automatic option will choose the active hours based on your activity.
Delivery Optimization: Set download and upload speed limits to ensure that not all of your network bandwidth is used for updates. You can also allow or deny letting your PC send already-downloaded Windows updates to other devices on your local network.
On the main Windows Update screen are some other options:
Pause updates: If updates are getting in the way of your computer usage, you can pause them for anywhere from 1 week to 5 weeks. Windows will resume updates after the pause period is up.
Windows Insider Program: This lets you receive early versions of major updates to Windows 11. This is the fastest way to get the newest features as they become available, before everyone else. However, depending on the option you choose after enabling this, you might end up using an unstable version that isn’t fit for public use just yet. This is accessible from the main Windows Update screen.
How to Change Windows Update Settings in Windows 10
Beginning in Windows 10, Microsoft simplified the options available to you regarding the Windows Update process, but also removed some of the finer control you may have enjoyed in earlier versions.
-
Select Start and then choose the settings icon.
-
Choose Update & Security.
-
Choose Windows Update from the menu on the left, assuming it’s not already selected.
-
Select Advanced options.
-
The various settings on this page control how Windows 10 will download and install updates for the operating system, and perhaps other software, from Microsoft.
We highly recommend that you do the following: turn on Receive updates for other Microsoft products when you update Windows, turn on Download updates over metered connections (extra charges may apply), and don’t enable any deferred/pause updates options (if you see them).
-
Changes to Windows Update settings in Windows 10 are saved automatically once you make them. Once you’re done selecting or deselecting things, you can close the Advanced options window that’s open.
Here are more details on all the «advanced» Windows Update settings that are available to you in Windows 10:
Update notifications: Choose this option to automatically download updates of all kind—security and non-security. You’ll be told when Windows needs to restart to apply them, so that you can prepare by saving work, etc.
There is no official way to turn off automatic updating in Windows 10, nor is there a straightforward way to disable Windows Update altogether.
Here’s what some of that other stuff on the Advanced options screen is for:
Receive updates for other Microsoft products when you update Windows: This is pretty self-explanatory. We recommend checking this option so other Microsoft programs you have installed will get automatic updates, too, like Microsoft Office. (Updates for your Windows Store apps are handled in the Store. Open Settings from the Store and then toggle on or off the Update apps automatically option.)
Pause Updates: Choosing one of these options will stop Windows from updating your computer for several days, up to 35. When that time period is over, Windows Update will be forced to install the newest updates before you can pause them again.
Defer upgrades: There are two deferred update options in Windows 10, letting you delay feature updates and/or quality updates. Doing so lets you wait several days or months before these updates will automatically install. Deferring upgrades isn’t supported in Windows 10 Home.
On the primary Windows Update screen is another option:
Change active hours: If Windows is restarting for updates when you’re using your computer, you can adjust this setting to tell Windows when you’re on your computer, to make sure that updates don’t force-restart during that time. Pick the automatic option and Windows will choose the active hours based on your activity.
Depending on the version of Windows 10 you’re running, you might also see the options listed below.
Choose the branch readiness level: Windows Update lets you choose when to install updates. You can pick Semi-Annual Channel (Targeted) which means the update is ready for most people, or Semi-Annual Channel which refers to updates that are ready for widespread use in organizations.
Choose how updates are delivered: These options, if you see them, allow you to enable or disable the downloading, as well as the uploading, of Windows Update related files around your local network or even the entire internet. Participating in the Updates from more than one place program helps speed up the Windows Update process in Windows 10.
Get insider builds: If you see it, it allows you to sign up to get early versions of major updates to Windows 10. When enabled, you’ll have Fast or Slow options, indicating how soon after these Windows 10 test versions are made available that you’ll get them.
How to Change Windows Update Settings in Windows 8, 7, & Vista
Microsoft ended support for Windows 7 in January of 2020. That means no more updates. Windows 8 support ended in 2016 and Vista ended many years before that. If you are still running one of those versions of Windows you have nothing to worry about because there won’t be any updates.
Windows 8.1 will still get updates until January 10, 2023.
These three versions of Windows have very similar Windows Update settings but we’ll call out any differences as we walk through the process.
-
Open Control Panel. In Windows 8, the WIN+X Menu is the quickest way, and in Windows 7 & Vista, check the Start menu for the link.
-
Select System and Security, or just Security in Windows Vista.
If you’re viewing the Classic View, Large icons, or Small icons view of Control Panel, choose Windows Update instead and then skip to Step 4.
-
Choose Windows Update from the System and Security window.
-
Select Change settings on the left.
-
The settings you see on the screen right now control how Windows Update will look for, receive, and install updates from Microsoft.
We recommend that you choose to Install updates automatically (recommended) from the drop-down and then check all the other items on the page. This will make sure your computer receives and installs all the updates it needs.
You can also customize the time that downloaded updates are installed. In Windows 8, this is behind the Updates will be automatically installed during the maintenance window link, and in Windows 7 & Vista, it’s right there on the Windows Update screen.
-
Choose OK to save the changes. Feel free to close any open windows related to Windows Update.
Here’s a bit more on all of those options you have:
Install updates automatically (recommended): Choose this option to have Windows Update automatically check for, download, and install important security patches.
Download updates but let me choose whether to install them: Choose this to have Windows Update automatically check for and download important updates but not install them. You’ll have to explicitly choose to install the updates either from Windows Update or during the next shutdown process.
Check for updates but let me choose whether to download and install them: With this option, Windows Update will check for and notify you of available updates but you’ll need to manually approve the download and installation of them.
Never check for updates (not recommended): This option disables Windows Update completely in Windows 8, 7, or Vista. When you choose this, Windows Update won’t even check with Microsoft to see if important security patches are available.
Here are what some of those other checkboxes mean, not all of which you’ll see, depending on your version of Windows and how your computer is configured:
Give me recommended updates the same way I receive important updates: This option gives Windows Update permission to treat patches that Microsoft «recommends» the same way as patches thought to be «critical» or «important,» and download and install them as you’ve selected in the drop-down box.
Allow all users to install updates on this computer: Check this if you have other, non-administrator accounts on your computer that actually get used. This will let those users install updates, too. However, even when unchecked, updates installed by an administrator will still get applied to those user accounts, they just won’t be able to install them.
Give me updates for other Microsoft products when I update Windows: Check this option, which is a bit wordier in Windows 7 & Vista, if you own other Microsoft software and you want Windows Update to handle updating those as well.
Show me detailed notifications when new Microsoft software is available: This is pretty self-explanatory—check it if you want to get notifications, via Windows Update, when Microsoft software you don’t have installed is available for your computer.
How to Change Windows Update Settings in Windows XP
Microsoft ended support for Windows XP many years ago. There will be no more updates. For your archives, here’s how it worked back when they did still send updates.
Windows Update is more an online service than an integrated part of Windows XP, but the update settings can be set from within the operating system.
-
Open Control Panel, usually via Start, and then its link on the right.
-
Click Security Center.
If you’re viewing Control Panel in the Classic View, you won’t see this link. Instead, double-click Automatic Updates and then skip to Step 4.
-
Click the Automatic Updates link near the bottom of the window.
-
These four options you see in the Automatic Updates window control how Windows XP gets updated.
We highly recommend that you choose the Automatic (recommended) option and the everyday choice from the drop-down that appears underneath, along with a time you’re not using your computer.
Windows XP is no longer supported by Microsoft and so they no longer push updates to Windows XP. However, considering that exceptions could be made in the future and that you still might not have the most up to date patches and features, we recommended keeping the «automatic» settings enabled.
-
Click OK to save your changes.
Here are more details on what those four choices actually mean for your Windows Update experience in Windows XP:
Automatic (recommended): Windows Update will automatically check for, download, and install updates, with no input from you needed.
Download updates for me, but let me choose when to install them: Updates will be checked for, and downloaded, from Microsoft’s servers, but they won’t be installed until you manually approve them.
Notify me but don’t automatically download or install them: Windows Update will check for new updates from Microsoft, and let you know about them, but they won’t be downloaded and installed until you say so.
Turn off Automatic Updates: This option completely disables Windows Update in Windows XP. You won’t even be told that updates are available. You can, of course, still visit the Windows Update website yourself and check for any new patches.
Disabling Windows Update & Turning off Automatic Updates
While it is possible, at least prior to Windows 10, we do not recommend completely disabling Windows Update. At the very least, choose an option where you’re notified of new updates, even if you choose not to have them automatically download or install.
And on that thought…we also do not recommend turning off automatic updating. Letting Windows Update check, download, and automatically install updates is a very good way to make sure you’re protected from being exploited by security issues after they’re discovered. Yes, at least in Windows 8, 7, and Vista, you could compromise by making that critical «install» part up to you, but that’s just one more thing you have to remember to do.
Bottom line: we say keep it simple by keeping it automatic.
How to Fix Problems Caused by Windows Updates
Windows 11 offers you the choice of when and how to get the latest updates to keep your device running smoothly and securely. If you’re not ready to get recommended updates, you can choose to temporarily pause them from being downloaded and installed.
-
Select Start > Settings > Windows Update .
-
Select the amount of time you’d like to pause for.
Note: After the pause limit is reached, you’ll need to install the latest updates before you can pause updates again.
Your device will need to restart to finish installing updates. If you’re asked to restart your device while you’re busy using it, you can schedule the restart for a more convenient time:
-
Select Start > Settings > Windows Update .
-
Select Schedule the restart and choose a time that’s convenient for you.
Open Windows Update
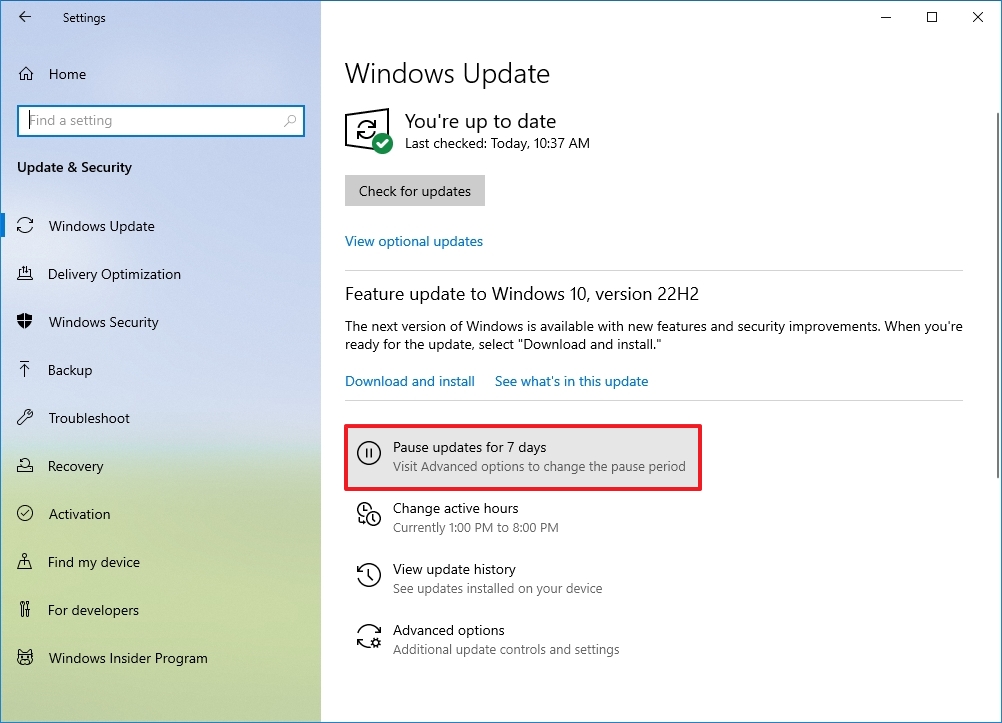
Windows 10 offers you the choice of when and how to get the latest updates to keep your device running smoothly and securely. If you’re not ready to get recommended updates, you can choose to temporarily pause them from being downloaded and installed. In Windows 10, version 1903 (or later), Windows 10 Pro, version 1809, or Windows 10 Enterprise, version 1809:
-
Select Start > Settings > Update & Security > Windows Update .
-
Select either Pause updates for 7 days or Advanced options. Then, in the Pause updates section, select the drop-down menu and specify a date for updates to resume.
Note: After the pause limit is reached, you’ll need to install the latest updates before you can pause updates again.
Your device will need to restart to finish installing updates. If you’re asked to restart your device while you’re busy using it, you can schedule the restart for a more convenient time:
-
Select Start > Settings > Update & Security > Windows Update .
-
Select Schedule the restart and choose a time that’s convenient for you.
Open Windows Update
Early versions of Windows 10 did not offer any control over Windows Updates. After hearing user feedback, Microsoft has added a few options and settings to control Windows Updates in recent versions. That said, Windows 10 still does not give you full control over the Windows Update service.
In this guide, we will see how to change the default behavior of Windows Update in Windows 10.
Pause Windows Updates
Method 1 of 3
Pause updates for 7 days
Step 1: On the Settings > Update & Security > Windows Update page, click on the Pause updates for 7 days option to immediately stop getting updates for the next seven days.
If you want to receive updates before the end of 7 days, click on the Resume updates button present on the same page.
Method 2 of 3
Pause updates for up to 35 days
Step 1: On The Windows Update page, click Advanced options to open the advanced settings page.
Step 2: Scroll down the page to see the Pause updates section. Here, select a date until which you want to temporarily pause updates on your computer. Note that you cannot pause updates again after 35 days without installing the pending updates.
Method 3 of 3
Pause feature & quality updates
Microsoft churns out two feature updates in a year. If you want to delay a feature update, you can do so for a year. That is, you can defer a feature update for up to 365 days. However, quality updates can be deferred for up to 30 days only.
To do that:
Step 1: On the Windows Update page, click Advanced options.
Step 2: In the Choose when updates are installed section, you will see two options:
1. A feature update includes new capabilities and improvements. It can be deferred for this many days.
2. A quality update includes security improvements. It can be deferred for this many days.
To defer the feature update, in the box below the “A feature update includes new capabilities and improvements. It can be deferred for this many days”, select the number of days until which you want to defer the feature update. As said, you can delay a feature update for up to 365 days.
To delay a quality update, select the number of days from the drop-down box below the “A quality update includes security improvements. It can be deferred for this many days” option. Quality updates can be postponed for a maximum of 30 days.
Do not download updates over a metered connection
Windows 10 allows you to configure the Windows Update settings to prevent it from downloading updates when you are on a metered connection. Here is how to do that.
Step 1: Settings > Update & Security > Windows Update > Advanced options.
Step 2: Turn off Download updates over metered connections.
NOTE: You first need to set a network as metered. Refer to our how to set a network as metered connection in Windows 10 guide for directions.
Limit Windows Update bandwidth
If you are on a relatively slow internet connection and want to limit how much bandwidth is used to download updates, you can do that as well.
Step 1: Go to Settings > Update & Security > Delivery Optimization page.
Step 2: Click the Advanced options link.
Step 3: In the Download settings section, select both Limit how much bandwidth is used for downloading updates in the background and Limit how much bandwidth is used for downloading updates in the foreground options.
Set the value by moving the slider. No need to restart or click any other button to save the changes.
You do not need to change or configure the Upload settings unless you have not turned on Allow downloads from other PCs option present on the Go to Settings > Update & Security > Delivery Optimization page.
Stop Windows Update from installing driver updates
With default settings, Windows 10 automatically downloads and updates device drivers. If you want to stop that, you can do that via the Registry.
Step 1: Type Regedit.exe in the Start/taskbar search and press the Enter key to open the Registry Editor.
Step 2: Go to the following key:
HKEY_LOCAL_MACHINESOFTWAREPoliciesMicrosoftWindowsWindowsUpdate
Step 3: On the right-side, right-click on an empty spot, click New, click DWORD (32-bit) Value and then name it as ExcludeWUDriversInQualityUpdate.
Step 4: Finally, double-click on the newly created ExcludeWUDriversInQualityUpdate value and set its value to 1 to stop Windows 10 from serving device drivers via Windows Update service.
View & Uninstall installed Windows Updates
Step 1: Navigate to Settings > Update & Security > Windows Update > View update history to view all recently installed feature and quality updates.
Step 2: To uninstall an update, click on the Uninstall update link located at the top of the page. This will open the classic Installed Updates window.
Step 3: Here, right-click on the update that you want to remove and then click the Uninstall option.
If you want to uninstall updates without booting into Windows 10, refer to our how to uninstall updates when your PC is not booting guide.
On Windows 10, cumulative updates download and install automatically as soon as they become available. Although this approach allows laptops and desktop computers to receive security updates to patch vulnerabilities, improve performance, and bring enhancements without user interaction, it is a very controversial feature.
Typically, it’s because updates contain bugs that can negatively affect the experience in many ways. For example, they could break existing features, introduce driver and application compatibility problems, or cause the Blue Screen of Death (BSoD), and they require a system restart to complete the installation, which can disrupt your workflow.
If you experience more problems than benefits during updates, or if you have a good reason to use a device without updates, depending on your edition of Windows 10, you can disable automatic updates using the Settings app or permanently with Group Policy and Registry.
This guide will walk you through the steps to prevent Windows Update from automatically downloading and installing updates on Windows 10.
How to disable automatic updates using Settings
You do not need to disable Windows Update permanently if you want to prevent the system from downloading a specific update immediately. Instead, you could pause updates for up to seven days.
To disable automatic updates temporarily, use these steps:
- Open Settings.
- Click on Update & Security.
- Click on Windows Update.
- Click the «Pause updates for 7 days» option.
Once you complete the steps, Windows Update will no longer download for the time you specified. When the system reaches the pause limit, you will need to install the latest patch available to make the option available again.
You can always undo the changes with the instructions outlined above, but on step 4, choose the Select date option. Alternatively, you can accomplish the same effect by clicking the Resume updates button.
How to disable automatic updates using Group Policy
On Windows 10 Pro, the Local Group Policy Editor includes policies to permanently disable automatic updates or change the update settings to choose when patches should be installed on the device.
Disable Windows 10 updates
To disable automatic updates on Windows 10 permanently, use these steps:
- Open Start.
- Search for gpedit.msc and click the top result to launch the Local Group Policy Editor.
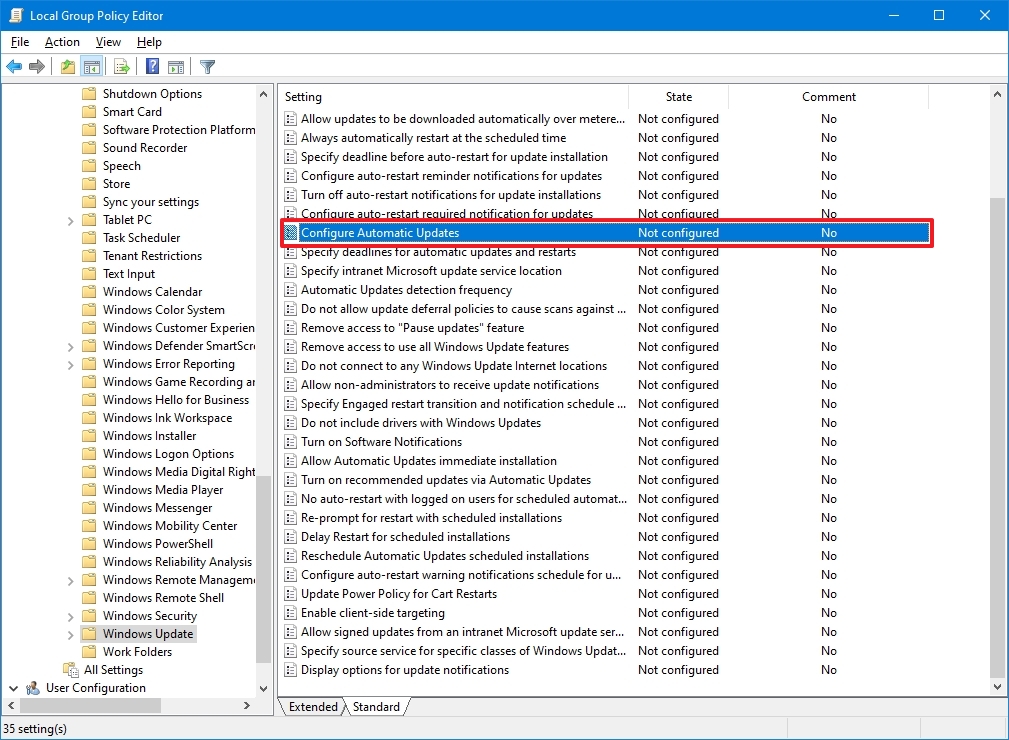
- Navigate to the following path: Computer Configuration > Administrative Templates > Windows Components > Windows Update
- Double-click the «Configure Automatic Updates» policy on the right side.
- Check the Disabled option to turn off automatic Windows 10 updates permanently.
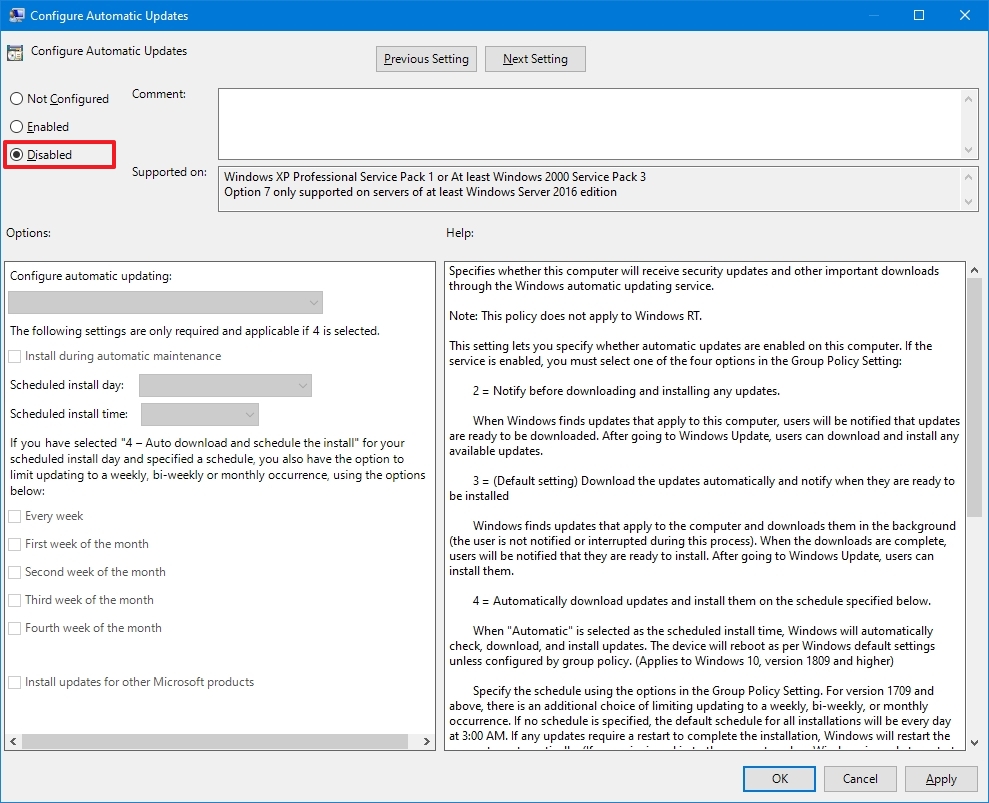
- Click the Apply button.
- Click the OK button.
After you complete the steps, Windows 10 will stop downloading updates automatically. However, the ability to check for updates manually will continue to be available on Settings > Update & Security > Windows Update, and clicking the Check for updates button to download the most recent patches as needed.
If you want to enable automatic updates on the computer again, you can use the same instructions outlined above, but in step 5, make sure to select the Not Configured option.
Limit Windows 10 updates
The Local Group Policy Editor also lets you choose how to disable automatic updates.
To manage Windows Update automatic downloads with Group Policy on Windows 10, use these steps:
- Open Start.
- Search for gpedit.msc and select the top result to launch the experience.
- Navigate to the following path: Computer Configuration > Administrative Templates > Windows Components > Windows Update
- Double-click the Configure Automatic Updates policy on the right side.
- Check the Enable option to turn on the policy.
- Under the «Options» section, select the option to prevent updates from downloading automatically on Windows 10:
- 2 — Notify for download and auto install.
- 3 — Auto download and notify for install.
- 4 — Auto download and schedule the install.
- 5 — Allow local admin to choose setting.
- 7 — Auto Download, Notify to install, Notify to Restart.
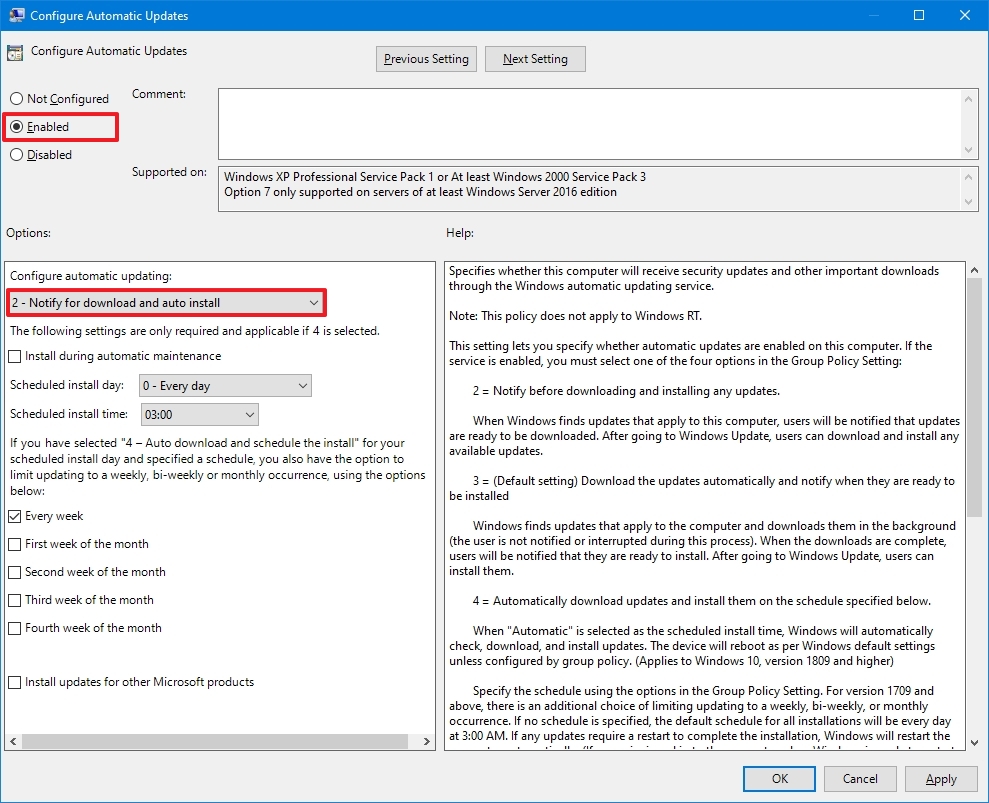
- Quick tip: The best option to disable automatic updates is the 2 — Notify for download and auto install option, but you can make a different selection. If you choose option 2, updates won’t download automatically. Instead, you will now see an «Install now» button to manually trigger an update on the Windows Update settings page.
- Click the Apply button.
- Click the OK button.
Once you complete the steps, automatic updates will be permanently disabled on Windows 10. However, when new updates become available, you can install them manually from the Windows Update settings page.
How to disable automatic updates with Registry
You can also use the Registry in two different ways to disable automatic updates on Windows 10.
Warning: This is a friendly reminder that editing the Registry is risky and can cause irreversible damage to your installation if you don’t do it correctly. Before proceeding, it’s recommended to make a backup of your PC.
Disable updates
To disable Windows 10 updates permanently by changing the Registry settings, use these steps:
- Open Start.
- Search for regedit and click the top result to launch the Registry Editor.
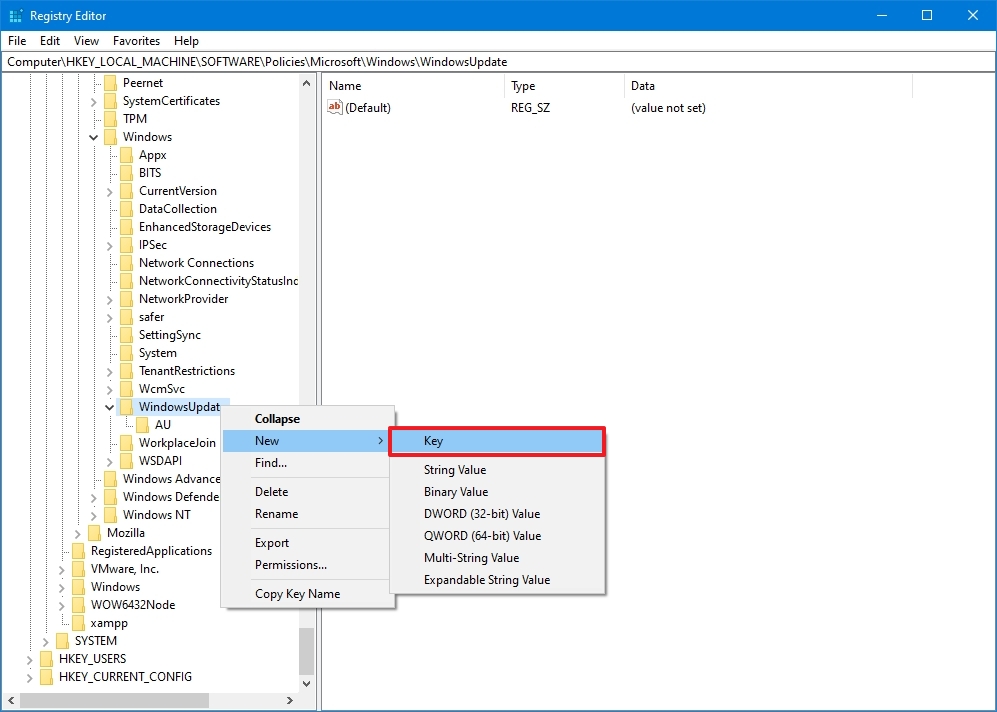
- Navigate to the following path: HKEY_LOCAL_MACHINESOFTWAREPoliciesMicrosoftWindows
- Right-click the Windows (folder) key, select the New submenu and choose the Key option.
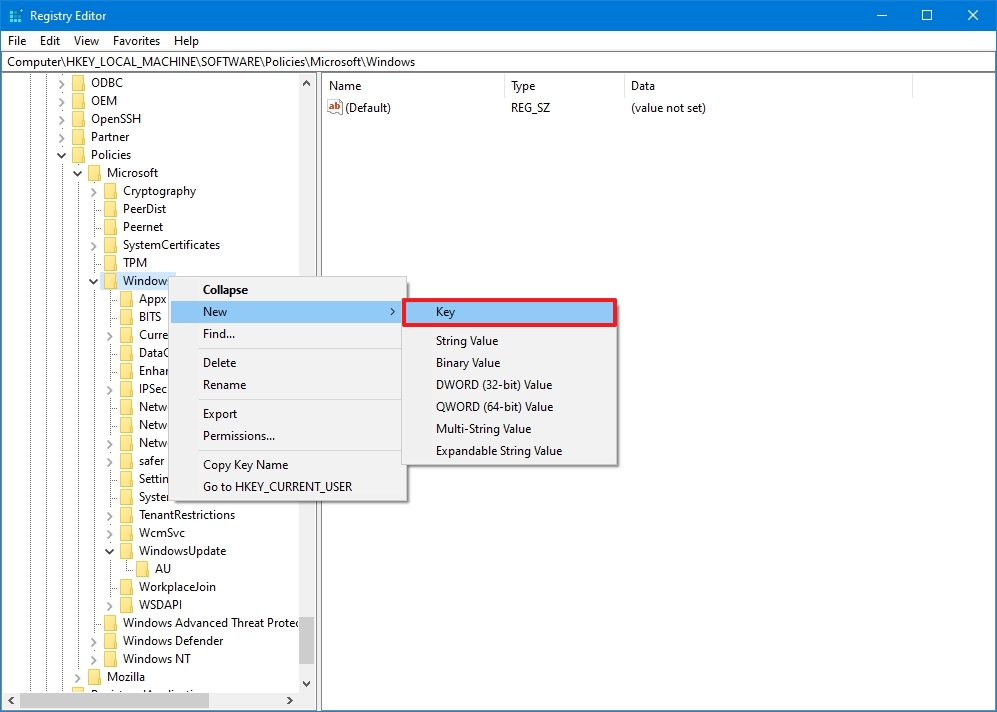
- Name the new key WindowsUpdate and press Enter.
- Right-click the newly created key, select the New submenu, and choose the Key option.
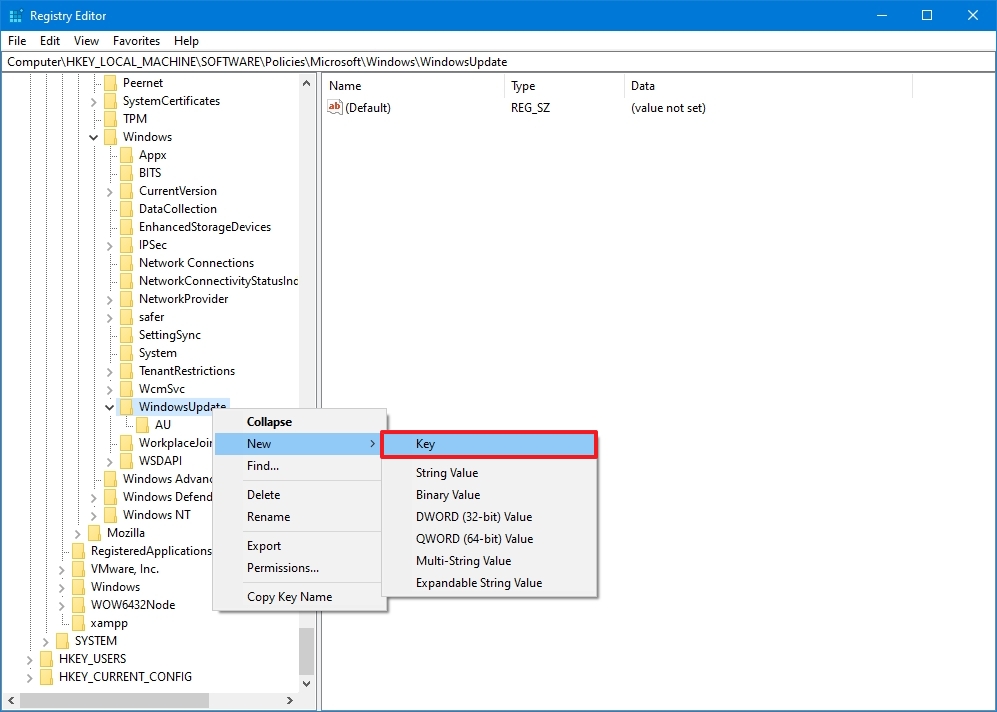
- Name the new key AU and press Enter.
- Right-click the AU key, select the New submenu, and choose the DWORD (32-bit) Value option.
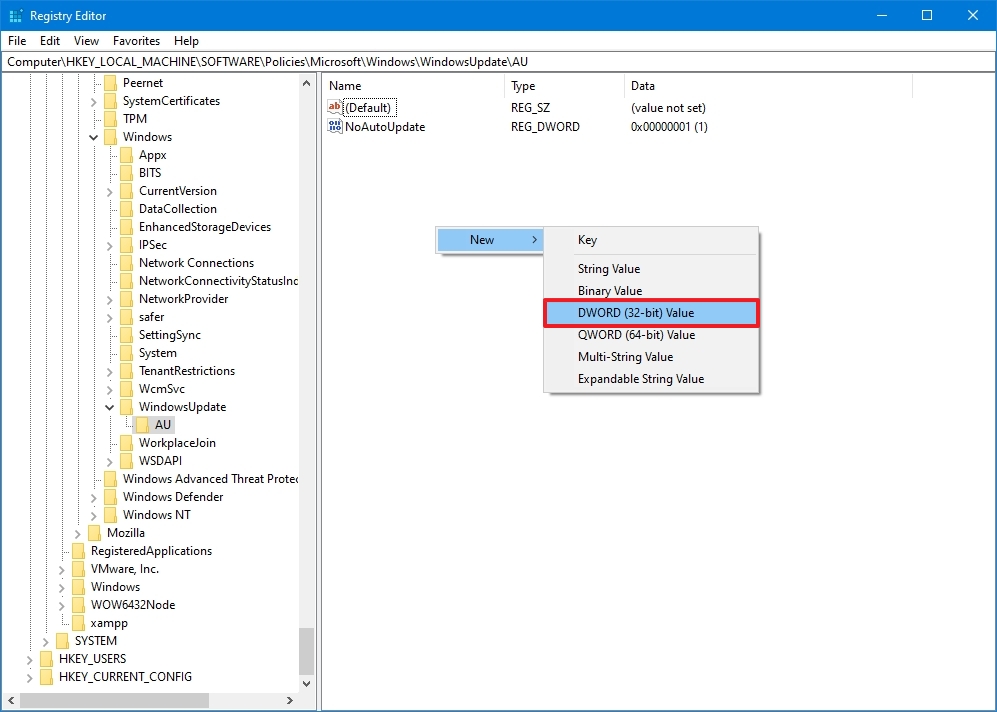
- Name the new key NoAutoUpdate and press Enter.
- Double-click the newly created key and change its value from 0 to 1.
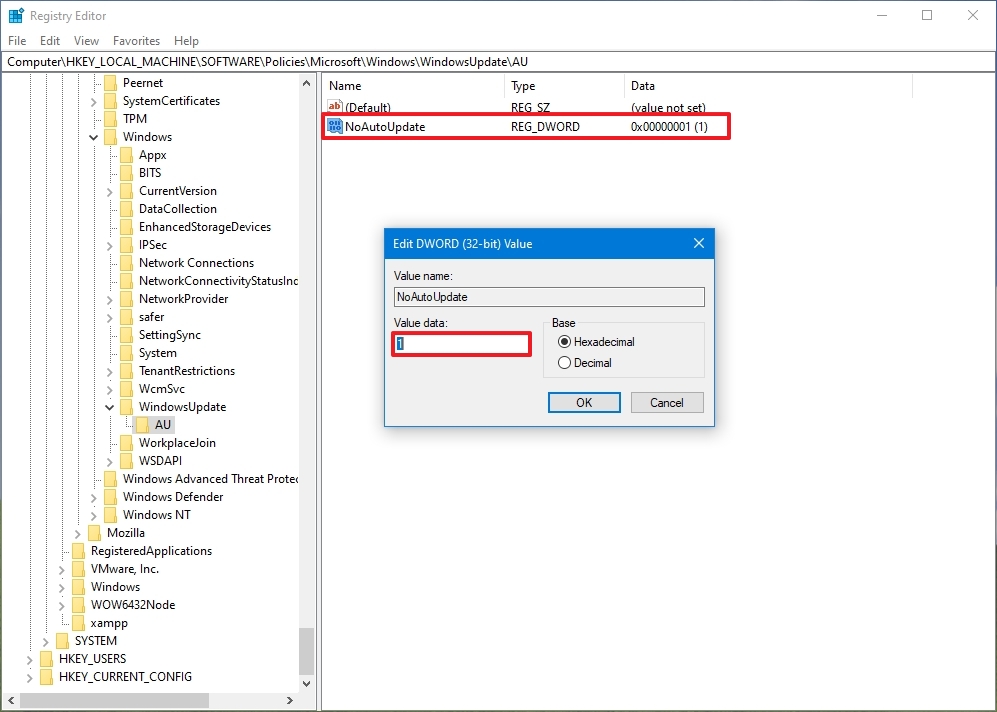
- Click the OK button.
- Restart the computer.
After you complete the steps, automatic updates will be disabled permanently on the device. However, you will still be able to download updates by clicking the Check for updates button on the Windows Update settings page.
If you want to undo the changes, you can use the same instructions outlined above, but on step 4, right-click the WindowsUpdate key, select the Delete option, then reboot the computer to apply the settings.
Limit updates
Finally, you can use the Registry to configure the system settings to decide how to get updates on Windows 10.
To use the Registry to stop automatic updates (but choosing how to receive updates), use these steps:
- Open Start.
- Search for regedit and click the top result to open the Registry Editor.
- Navigate to the following path: HKEY_LOCAL_MACHINESOFTWAREPoliciesMicrosoftWindows
- Right-click the Windows (folder) key, select the New submenu and choose the Key option.
- Name the new key WindowsUpdate and press Enter.
- Right-click the newly created key, select the New submenu, and choose the Key option.
- Name the new key AU and press Enter.
- Right-click the AU key, select the New submenu, and select the DWORD (32-bit) Value option.
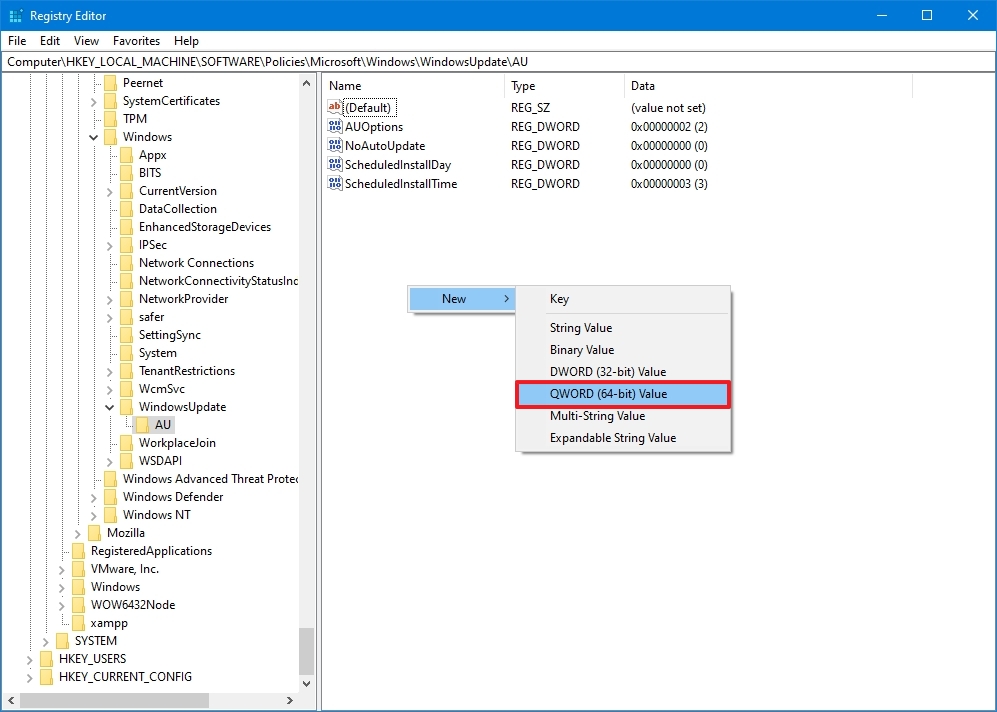
- Name the new key AUOptions and press Enter.
- Double-click the newly created key and change the value (number only) to:
- 2 — Notify for download and auto install.
- 3 — Auto download and notify for install.
- 4 — Auto download and schedule the install.
- 5 — Allow local admin to choose settings.
- 7 — Auto Download, Notify to install, Notify to Restart.
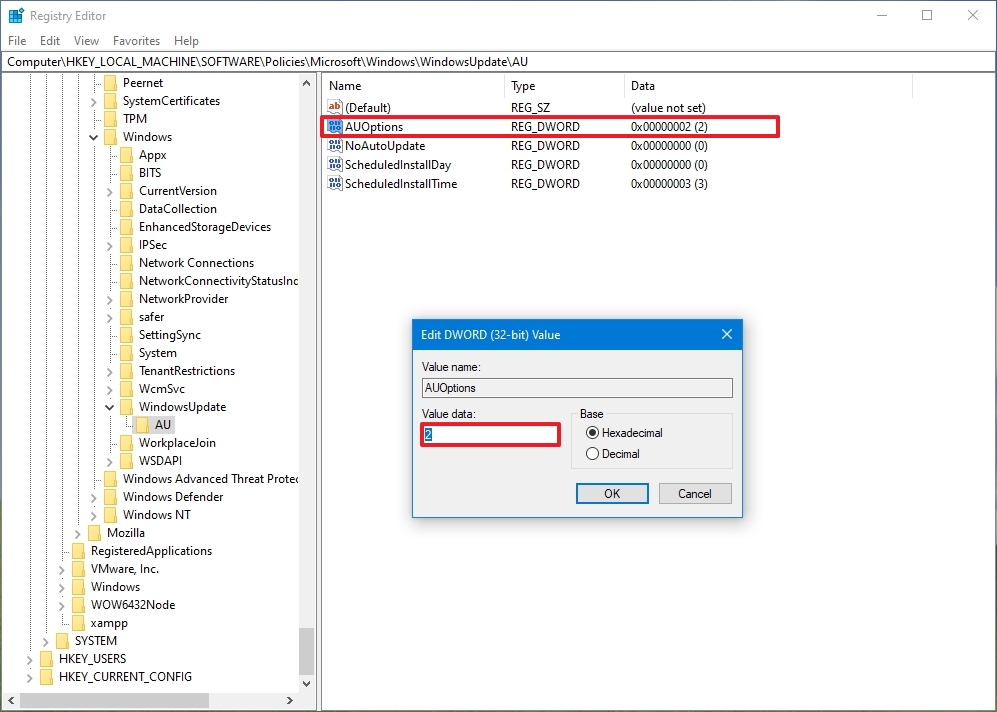
- Quick note: These options are the same as the Group Policy settings, and option 2 is the closest to disable Windows Update permanently.
- Click the OK button.
- Restart the computer.
Once you complete the steps, cumulative updates will no longer download and install automatically. However, when a new update becomes available, you will find the option to install it manually from the Windows Update settings.
You can use the same instructions outlined above to restore the original settings, but on step 4, right-click the WindowsUpdate key, select the Delete option, and reboot the computer.
Updates are essential to fix security vulnerabilities, resolve issues, and improve the overall experience, no matter the version of Windows you use. However, you may still need to disable this feature in some situations. For instance, when you want to have complete control over updates on Windows 10, when you want to avoid issues since bugs are common in most rollouts, or when you are using a critical app or equipment and you do not want to encounter any compatibility issues.
More resources
For more helpful articles, coverage, and answers to common questions about Windows 10 and Windows 11, visit the following resources:
- Windows 11 on Windows Central — All you need to know
- Windows 10 on Windows Central — All you need to know
Get the best of Windows Central in in your inbox, every day!
Mauro Huculak is technical writer for WindowsCentral.com. His primary focus is to write comprehensive how-tos to help users get the most out of Windows 10 and its many related technologies. He has an IT background with professional certifications from Microsoft, Cisco, and CompTIA, and he’s a recognized member of the Microsoft MVP community.
Imagine a situation when your system administrator or a 3rd party software or a malware disabled/restricted Windows Update settings page. In such situations, you won’t be able to change Windows Update download and installation related settings because all available options would be grayed out or completely removed.
Same thing happened with Windows 10 operating system. Microsoft has disabled customization of Windows Update settings in Windows 10 by removing all options related to Windows Update downloading and installation. They did this because they wanted Windows 10 to automatically download and install all updates and hotfixes. Microsoft didn’t want Windows 10 users to modify Windows Update settings, the company wanted to prevent them from disabling Automatic Updates in Windows 10.
In Windows 10, you can’t change settings of automatically download and install Windows updates in its settings page. Now Windows 10 will automatically download and install new updates without your knowledge and you’ll have no idea when and which updates Windows were installed. If you open Windows Update settings page in Windows 10, you get following screen:

You can see in above screenshot, Windows 10 is showing that available updates will be downloaded and installed automatically.
If you are on a limited bandwidth or slow Internet connection, you may want to change the settings to notify you before downloading and installing the updates so that you can select which updates do you want to install and when.
If you are using Windows 10 and want to be able to change Windows Update settings, this guide will help you.
Today in this article, we are going to tell you methods to remove this restriction and to become able to modify Windows Update download and install related settings. After following these methods you’ll be able to force Windows 10 to notify and ask you before downloading new updates as shown in following screenshot:

You can see in the above screenshot, Windows Update is showing that you’ll be asked to download available updates which means it’ll not download new updates automatically. You’ll be notified about available updates first. Once you click on Download button, Windows will start downloading available updates otherwise not.
Proof: Forcing Windows 10 to Always Notify Before Downloading Updates
Good news is that we can remove this restriction from Windows Update settings using following 2 methods:
- METHOD 1: Using Group Policy Editor (gpedit.msc)
- METHOD 2: Using Registry Editor (regedit.exe)
So without wasting time lets start the tutorial:
METHOD 1: Using Group Policy Editor (gpedit.msc)
1. Press WIN+R keys together to launch RUN dialog box. Now type gpedit.msc and press Enter. It’ll open Group Policy Editor.
2. Now go to:
Computer Configuration -> Administrative Templates -> Windows Components -> Windows Update
3. In right-side pane, look for “Configure Automatic Updates” option.

4. The option would be set to Not Configured. Double-click on it and set it to Enabled.
Now select any of the given options according to your requirements:
- 2 – Notify for download and notify for install
- 3 – Auto download and notify for install
- 4 – Auto download and schedule the install
- 5 – Allow local admin to choose setting

PS: Select the last option “5 – Allow local admin to choose setting” to be able to choose options in drop-down box on Windows Update settings page.
That’s it. Apply changes and open Windows Update settings page. Now you’ll be able to change desired settings.
IMPORTANT NOTE:
After applying changes in Group Policy Editor, open Windows Update page in Settings app. Now click on “Check for updates” button to force Windows 10 to apply your changes. After that the new settings will be applied successfully.
METHOD 2: Using Registry Editor (regedit.exe)
If you are using Windows 10 Home edition, you’ll not be able to run gpedit.msc command because this edition doesn’t come with Group Policy Editor.
If you can’t use or don’t want to use Group Policy Editor, you can take help of Registry Editor for the same task. Just follow these simple steps:
1. Press WIN+R keys together to launch RUN dialog box. Now type regedit and press Enter. It’ll open Registry Editor.
2. Now go to following key:
HKEY_LOCAL_MACHINESOFTWAREPoliciesMicrosoftWindows
3. Create a new key under Windows key and set its name as WindowsUpdate
4. Create another new key under WindowsUpdate key and set its name as AU
So the final key path would be:
HKEY_LOCAL_MACHINESOFTWAREPoliciesMicrosoftWindowsWindowsUpdateAU
5. Now select AU key and in right-side pane create a new DWORD AUOptions and set its value to any of following according to your requirements:
- 2 (To notify for download and notify for install)
- 3 (To auto download and notify for install)
- 4 (To auto download and schedule the install)
- 5 (To allow local admin to choose setting)

PS: Set the value of AUOptions to 5 to be able to choose options in drop-down box on Windows Update settings page.
NOTE: If you are using 64-bit edition of Windows, you’ll also need to follow steps 3-5 for following Registry key:
HKEY_LOCAL_MACHINESOFTWAREWow6432NodePoliciesMicrosoftWindows
6. Close Registry Editor and open Windows Update settings page. Now you’ll be able to change desired settings.
PS: If you are not familiar with Registry editing tasks, we are also providing ready-made Registry script to do the task automatically. Download following ZIP file, extract it and run .REG file. It’ll ask for confirmation, accept it. Restart your computer and Windows will always notify you before downloading new updates:
IMPORTANT NOTE:
After applying changes in Registry Editor, restart your computer. After reboot, open Windows Update page in Settings app. Now click on “Check for updates” button to force Windows 10 to apply your changes. After that the new settings will be applied successfully.
Further Read:
Fixing Windows 10 Automatic Updates Install Problem
[Windows 10 Tip] Disable Automatic Driver Updates Installation via Windows Update
You are here: Home » Troubleshooting Guides » [Windows 10 Tip] Change Windows Update Download and Installation Related Settings
В Windows 10 подход к обновлению системы кардинально изменился, в связи с чем возможности по настройке автоматического обновления сильно урезаны. Кроме того, доступные настройки зависят от используемой редакции Windows.
Так в Windows 10 Home все новые функции, апдейты и обновления безопасности устанавливаются с Windows Update, при этом у пользователя нет никакой возможности управления процессом обновления. Единственное, что может сделать пользователь — это ненадолго отложить перезагрузку. Редакция Pro более гуманна и позволяет управлять некоторыми параметрами обновления — выбирать источник обновления, задавать расписание и откладывать установку обновлений (кроме обновлений безопасности) на длительный срок. Возможность полного отключения автоматического обновления не предусмотрена ни в одной из редакций в принципе.
Конечно, автоматическое обновление является важным компонентом операционной системы, а регулярная загрузка и установка обновлений, особенно критических исправлений и обновлений безопасности, необходима для стабильного и безопасного функционирования системы. Однако у пользователя должна быть возможность выбрать когда, как и какие обновления загружать и устанавливать. И даже возможность полностью выключить автоматическую проверку наличия обновлений тоже должна быть. О том, как реализовать эту возможность и пойдет речь далее.
Я постараюсь описать все известные мне способы управления автоматическими обновлениями в Windows 10. Начнем с самого простого и доступного.
Центр обновления Windows
В Windows 10 привычный классический «Центр обновления Windows» окончательно убран из панели управления и более недоступен. Новый центр обновления находится в разделе параметров системы и для его открытия надо в меню «Пуск» перейти в раздел «Параметры» — «Обновление и безопасность».
В основном окне центра обновления выбора практически нет, можно только просмотреть список доступных обновлений и сведения о них.

Единственная доступная настройка позволяет выбрать время для обязательной перезагрузки. Здесь можно указать желаемые день и время перезагрузки либо перезагрузиться сразу, чтоб долго не мучаться 🙂

В редакции Home это все доступные настройки, а в старших редакциях Windows 10 (Pro, Enterprise и Education) пользователь может перейти по ссылке «Дополнительные параметры».

В дополнительных параметрах есть возможность выбрать способ установки обновлений. Правда выбор небогатый и состоит всего из двух вариантов:
• Автоматически — обновления автоматически загружаются и устанавливаются, после чего следует автоматическая перезагрузка;
• Уведомлять о планировании перезагрузки — загрузка и установка обновлений также происходит автоматически, но перезагрузку можно запланировать на удобное для себя время.

Также можно включить опцию «Отложить обновления», которая позволяет на некоторое время отключить загрузку и установку обновлений. Эта опция рассчитана в основном на корпоративных пользователей и предназначена для того, чтобы дать им возможность протестировать новый функционал (который теперь может включаться в обновления) перед его массовым внедрением в организации. У пользователей редакции Home такой возможности нет, поэтому они невольно выступают тестерами 🙂 для корпоративного сектора.
В отложенные обновления не входят критические исправления и обновления безопасности, которые будут автоматически устанавливаться в любом случае. Точный срок, на который откладываются обновления, неизвестен, в разных источниках встречаются цифры от нескольких дней до нескольких месяцев.

Еще один интересный момент. В Windows 10 встроен новый механизм доставки обновлений (Windows Update Delivery Optimisation), основанный на P2P технологии. Проще говоря, после загрузки обновлений с серверов Windows Update ваш компьютер начинает раздавать их на другие устройства в сети, по принципу торрент-клиента.
Эта функция включена по умолчанию и для ее отключения надо перейти по ссылке «Выберите, как и когда получать обновления» и установить ползунок в положение Откл.

Просмотреть установленные обновления можно в Панели управления, перейдя в раздел «Программы и компоненты» — «Установленные обновления». Если после обновления появились проблемы, то здесь же любое из установленных обновлений можно удалить.

Отключение автоматического обновления драйверов
Операционная система Windows содержит в себе хранилище драйверов для наиболее распространенных устройств. Загрузка новых версий драйверов по умолчанию производится автоматически, с помощью Windows Update. В некоторых случаях наличие в системе нужного драйвера довольно удобно, однако Windows Update далеко не всегда содержит самый свежийлучший драйвер, да и обновлять драйвера лучше вручную во избежании неожиданных проблем с оборудованием. Поэтому автоматическое обновление драйверов лучше все-таки отключить, благо эта возможность в Windows 10 пока еще есть.
Для того, чтобы добраться до настроек обновления драйверов, нужно открыть в панели управления раздел «Система» и выбрать пункт «Дополнительные параметры системы», затем перейти на вкладку «Оборудование» и нажать кнопку «Параметры установки устройств». Также открыть нужное окно можно, нажав Win+R и выполнив команду rundll32 newdev.dll,DeviceInternetSettingUi.

Для отключения автоматической загрузки драйверов выбираем пункт «Никогда не устанавливать драйверы из центра обновления Windows».

Отключение автоматического обновления современных приложений
Современные приложения (приложения из магазина Windows) также обновляются автоматически. Чтобы это исправить, надо в меню «Пуск» открыть пункт «Магазин», кликнуть по значку человечка, в открывшемся меню выбрать пункт «Параметры», а затем в пункте «Обновлять приложения автоматически» поставить переключатель в положение Выкл.

После этого приложения из магазина не будут обновляться автоматически, и при необходимости их придется обновлять вручную.

Примечание. Изначально пользователи Windows 10 Home не могли отключить автоматическое обновление приложений из магазина Windows. Эта возможность была добавлена позднее, с обновлением KB3081448.
Утилита Show or hide update
Старый Центр обновления помимо прочего давал возможность выбирать и откладывать на неопределенный срок (скрывать) обновления. В новом этой возможности изначально нет, но зато есть специальная утилита от Microsoft с названием Show or hide update, которая умеет делать примерно то-же. Утилита не входит в состав системы а загружается отдельно.
Установка не требуется, достаточно скопировать и запустить файл wushowhide.diagcab, после чего утилита приступает к сбору данных о доступных обновлениях.

После сбора данных предлагается выбрать действие. Для скрытия обновлений выбираем «Hide updates».

Отмечаем те обновления, которые необходимо скрыть, и жмем «Далее».

Пока обновление скрыто, операционная система не будет его устанавливать. А при необходимости скрытые обновления можно восстановить, для чего надо снова запустить утилиту, выбрать «Show hidden updates» и поставить галочку напротив нужного обновления. После этого обновление будет установлено в общем порядке.

Использование «Show or hide update» дает возможность отложить установку любых проблемных обновлений (в том числе и обновлений безопасности), однако полностью избежать обновления таким образом не получится. Все мелкие обновления входят в состав крупных и рано или поздно будут установлены.
Это были простые способы, потихоньку переходим к более продвинутым.
Настройка автоматического обновления с помощью PowerShell
Для управления обновлениями можно воспользоваться модулем PSWindowsUpdate из центра сценариев Microsoft. Для использования скачиваем архив, распаковываем его и кладем в папку %WINDIR%System32WindowsPowerShellv1.0Modules. Затем запускаем консоль PowerShell и разрешаем выполнение неподписанных скриптов командой:
Set-ExecutionPolicy Bypass -Force
Импортируем модуль в текущий сеанс:
Import-Module PSWindowsUpdate
И выводим список команд для модуля:
Get-Command -Module PSWindowsUpdate

Модуль содержит 14 командлетов:
Get-WUList — выдает список доступных обновлений;
Get-WUInstall — запускает загрузку и установку обновлений;
Get-WUUninstall — удаляет выбранные обновления;
Invoke-WUInstall — служит для управления обновлением на удаленных компьютерах;
Hide-WUUpdate — скрывает выбранные обновления;
Get-WUHistory — выводит информацию об установленных обновлениях;
Add-WUOfflineSync — регистрирует службу которая позволяет производить установку обновлений из локального кеша (Offline sync service);
Remove-WUOfflineSync — удаляет зарегистрированную службу;
Get-WUServiceManager — выводит список доступных служб обновления (Windows Update, WSUS и т.п.);
Add-WUServiceManager — регистрирует выбранную службу обновления;
Remove-WUServiceManager — удаляет выбранную службу обновления;
Get-WUInstallerStatus — показывает статус службы Windows Update Installer;
Get-WURebootStatus — позволяет уточнить необходимость перезагрузки;
Update-WUModule — служит для централизованного обновления модуля PSWindowsUpdate на удаленных компьютерах.
Для примера выведем список доступных обновлений и скроем одно из них:
Get-WUList
Hide-WUUpdate -KBArticleID KB3087040 -Confirm:$false
После этого обновление KB3087040 не будет установлено. При необходимости его можно разблокировать такой командой:
Hide-WUUpdate -KBArticleID KB3087040 -HideStatus:$false

Вообще модуль PSWindowsUpdate имеет довольно много возможностей, с которыми, по хорошему, надо подробно разбираться. Поддержка Windows 10 автором пока не заявлена, однако команды вполне корректно выполняются.
Настройка автоматического обновления с помощью групповых политик
Этот способ доступен только для старших редакций Windows 10, т.к. в редакции Home нет редактора групповых политик. Для открытия оснастки редактора локальных групповых политик нажимаем Win+R и выполняем команду gpedit.msc. Настройки автоматического обновления находятся в разделе Конфигурация компьютера — Административные шаблоны — Компоненты Windows — Центр обновления Windows.

Все основные настройке задаются в политике «Настройка автоматического обновления». Сначала ее надо включить, после чего можно выбрать один из 4-х вариантов обновления:
2 — уведомление о загрузке и установке обновлений;
3 — автоматическая загрузка и уведомление об установке;
4 — автоматическая загрузка и установка по расписанию;
5 — разрешить локальному администратору выбирать параметры автоматического обновления.
Если выбран вариант 4, то дополнительно можно задать день и час для установки обновлений, а также указать устанавливать обновления только в период простоя, во время автоматического обслуживания системы.

Примечание. При активации данной политики настройки в Центре обновления Windows становятся недоступны. Исключение составляет вариант под номером 5, позволяющий локальным администраторам изменять режим обновления в центре обновления.
Если выбран вариант автоматической загрузки и установки по расписанию, то дополнительно можно использовать следующие настройки.
Всегда автоматически перезагружаться в запланированное время
Если эта политика включена, то после установки обновлений компьютер будет перезагружен независимо не от чего. Чтобы перезагрузка не была внезапной и пользователи успели сохранить результаты своей работы, можно задать таймер перезагрузки от 15 минут до 3 часов.
Не выполнять автоматическую перезагрузку при автоматической установке обновлений, если в системе работают пользователи
Тут все ясно из названия политики. Если эта политика включена, то после установки обновлений компьютер не перезагружается автоматически, а выводит уведомление о завершении установки и ждет перезагрузки пользователем. Отменяет действие предыдущей политики.
Повторный запрос для перезагрузки при запланированных установках
Эта политика определяет время, через которое система выдаст повторный запрос при отмене запланированной перезагрузки. Если эта политика не активна, то запросы будут выдаваться каждые 10 минут.
Задержка перезагрузки при запланированных установках
В этой политике задается время, которое должно пройти с момента окончания установки обновлений до перезагрузки.
Перенос запланированных автоматических установок обновлений
В том случае, если компьютер был выключен и установка обновлений не была произведена в запланированное время, она будет запущена сразу после следующего запуска компьютера. В этой политике можно указать время, которое должно пройти с момента загрузки системы до начала установки.
Запретить установку устройств, не описанных другими параметрами политики
Эта политика служит для отключения автоматического обновления драйверов и находится в разделе Конфигурация компьютера — Административные шаблоны — Система — Установка устройств — Ограничение на установку устройств.

Примечание. Я описал настройку локальных групповых политик, но есть и точно-такие же доменные. И если компьютер находится в сети предприятия и является членом домена Active Directory, то (как правило) настройки автоматического обновления определяются доменными политиками. Доменные политики имеют высший приоритет и переопределяют любые локальные настройки.
Настройка автоматического обновления с помощью реестра
Наиболее мощное средство управления системой — редактирование реестра. В реестре можно задать все те-же настройки, что и с помощью групповых политик, кроме того он дает возможность полностью выключить автоматическое обновление.
Для настройки открываем редактор реестра (Win+R -> Regedit) и заходим в раздел HKLMSOFTWAREPoliciesMicrosoftWindows. Создаем новый раздел WindowsUpdate, в нем подраздел с именем AU. В разделе AU создаем параметры типа DWORD, которые отвечают за автоматическое обновление.
Вот наиболее важные из них.
AUOptions — основной параметр, отвечающий за способ получения и установки обновлений. Может иметь следующие значения:
• 2 — уведомлять перед загрузкой и установкой любых обновлений;
• 3 — автоматически загружать обновления и уведомлять о готовности установки;
• 4 — автоматически загружать обновления и устанавливать согласно расписанию;
• 5 — Разрешить локальным администраторам управлять параметрами обновления.
NoAutoUpdate — параметр, позволяющий полностью отключить автоматический поиск и установку обновлений. Значение 1 — автоматическое обновление отключено, 0 — обновления будут загружаться и устанавливаться согласно установкам, заданным в параметре AUOptions.
В случае, если значение включено автоматическая загрузка и установка по расписанию (AUOptions = 4), то дополнительно можно указать дополнительные параметры.
ScheduledInstallDay — день недели, на который запланирована установка обновлений. Значение 0 означает ежедневную установку, значения от 1 до 7 указывают на конкретный день недели (1 — понедельник).
ScheduledInstallTime -время, на которое запланирована установка обновлений. Для этого параметра доступны значения от 0 до 23 часов, что соответствует часам в сутках.
AutomaticMaintenanceEnabled — значение 1 означает, что установку обновлений надо производить во время простоя, в рамках автоматического обслуживания системы.
NoAutoRebootWithLoggedOnUsers — значение 1 запрещает автоматическую перезагрузку после установки обновлений. Служба автоматического обновления будет ожидать перезагрузки любым вошедшим в систему пользователем.

Примечание. Чисто теоретически управление обновлениями с помощью редактирования реестра может работать и в Windows 10 Home. На практике это не проверялось по причине отсутствия у меня нужной редакции.
Для отключения автоматического обновления драйверов надо в разделе HKLMSOFTWAREMicrosoftWindowsCurrentVersionDriverSearching найти параметр SearchOrderConfig и установить его значение равным 0.

Отключение службы автоматического обновления
И на самый экстренный случай отключить автоматическое обновление можно, остановив соответствующую службу. Для этого надо открыть оснастку «Службы» (Win+R -> services.msc), найти службу с названием «Центр обновления Windows» и остановить ее. А чтобы она не запустилась самостоятельно, тип запуска надо установить в положение Отключено.

То же самое можно сделать и с помощью PowerShell. Для остановки используем такую команду:
Stop-Service wuauserv -Force
Для отключения такую:
Set-Service wuauserv -StartupType Disabled
Посмотреть состояние службы можно так:
Get-Service wuauserv
Ну а так можно вернуть все обратно и запустить службу:
Set-Service wuauserv -StartupType Manual
Start-Service wuauserv

После отключения службы Центр обновления станет выдавать ошибку при попытке проверить наличие обновлений. Это крайне грубый способ, хотя он и работает на всех без исключения редакциях десятки, но повторюсь — использовать его стоит в экстренных случаях, например при необходимости срочно остановить процесс обновления.
Заключение
Как видите, хотя управлять автоматическими обновлениями в Windows 10 стало сложнее, способов для этого достаточно. В заключение скажу, что Microsoft не рекомендует надолго откладывать или полностью останавливать автоматическое обновление. Обновления имеют определенный срок годности, поэтому если не обновляться в течение 8 месяцев, то новые обновления невозможно будет установить.
Skip to content
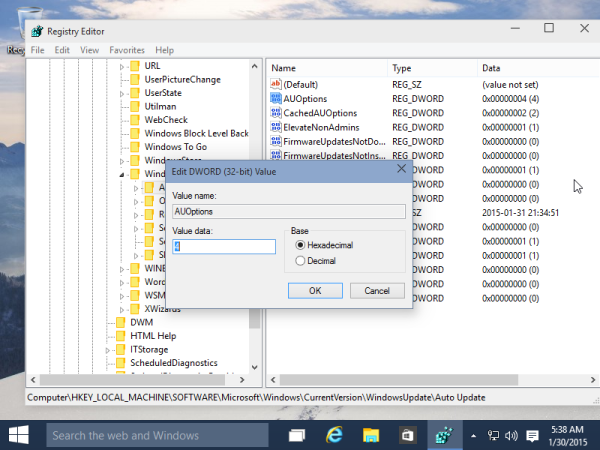
In Windows 10 build 9926 Windows Update settings are locked to «Install updates automatically (recommended)». The user cannot change this behavior. This is not acceptable even if it’s a preview build. Thankfully, it is possible to change it with a tweak which we will see right now.
To change Windows Update settings in Windows 10 build 9926 and set it from «Install updates automatically (recommended)» to anything else, you need to do the following:
- Open Registry Editor.
- Go to the following Registry key:
HKEY_LOCAL_MACHINESOFTWAREMicrosoftWindowsCurrentVersionWindowsUpdateAuto Update
Tip: See how to jump to the desired Registry key with one click.
- Set the AUOptions DWORD value here to one of the following values:
1 = Never check for updates
2 = Check for updates but let me choose whether to download and install them
3 = Download updates but let me choose whether to install them
4 = Install updates automaticallySee the following screenshot:

- Restart your computer.
That’s it. You are done.
Support us
Winaero greatly relies on your support. You can help the site keep bringing you interesting and useful content and software by using these options:
If you like this article, please share it using the buttons below. It won’t take a lot from you, but it will help us grow. Thanks for your support!
Hello. Add your message here.
Are you searching on the web – How to change Windows Update Settings in Windows 10? If “yes” then don’t worry, you are going to get all the appropriate information regarding your search from this tutorial.
If you have recently upgraded to Windows 10 from the previous version of Windows then one most important thing you need to know that: In Windows 10 technical preview build 9926, the Windows Update settings are locked to “Install updates automatically (recommended)“.
It means, your computer will be automatically upgraded to the upcoming Windows version or new build. Even, Microsoft hasn’t provided any option to change this behavior (Windows Update settings).
But thankfully, a simple solution is available to change Windows Update settings in Windows 10 build 9926. So, if you want to change the update settings from “Install updates automatically (recommended)” to anything else then follow the below-mentioned step by step guide. Here’s how:
Step (1): First of all, open Registry Editor. To open registry editor, press Win+R keys and type regedit inside the Run dialog-box then press Enter.
Step (2): On the Registry Editor, navigate to the following Registry keys:
HKEY_LOCAL_MACHINESOFTWAREMicrosoftWindowsCurrentVersionWindowsUpdateAuto Update
Step (3): In the right pane of Registry Editor window, create a new DWORD value named AUOptions and inside the value data box, enter one value according to your need from the following values:
- 1 = Never check for updates
- 2 = Check for updates but let me choose whether to download and install them
- 3 = Download updates but let me choose whether to install them
- 4 = Install updates automatically
For example a screenshot is given below:

Step (4): Once completed, click on OK button and close the Registry Editor window.
Step (5): Finally, Restart your computer. That’s it!
Thus, you can easily change Microsoft windows update settings in Windows 10 (build 9926) from “Install updates automatically (recommended)” to other option.
Feel free to ask or share your views with us through comments. If you have any another way to Change Windows Update Settings in Windows 10, please share with us.
You may also be interested in checking out:
- How to Fix Windows Updates Stuck at 0% in Windows 10 / 8 / 7
- How to Stop Windows 10 Update in Progress
- How to Fix Windows 10 Disk Cleanup Stuck on Windows Update Cleanup
- How to Fix Windows Update not Working in Windows 7
- What is the Difference Between Windows Update and Cumulative Update?
- How to Change Windows Update Settings in Windows 10
- How to Fix Windows 10 Night Light Not Working After Update
- How to Disable Automatic Restart in Windows 10 after Updates Installation
- How to Fix Potential Windows Update Database error detected in Windows 10
Reader Interactions