Since Windows 10 1709 and Server 2019, Microsoft has been shipping the Windows Update Provider PowerShell module with the OS. Its functions master the basic tasks of patch management. Admins can also use them to remotely initiate the download and installation of updates.
Contents
- Availability as an advantage
- More control over updates
- Overview of the range of functions
- Checking for updates
- Downloading and installing updates
- Querying pending reboot
- Conclusion
- Author
- Recent Posts

Wolfgang Sommergut has over 20 years of experience in IT journalism. He has also worked as a system administrator and as a tech consultant. Today he runs the German publication WindowsPro.de.
While most Windows features have long supported detailed automation via PowerShell, this option was missing for the update client; it is now available to a limited extent. Compared to the popular PSWindowsUpdate by Michal Gajda, Microsoft’s own module is less powerful.
Availability as an advantage
The main advantages of Windows Update Provider are its official support by Microsoft and that all newer versions of the operating system already have it on board. Therefore, when using it for remote management, you can assume that the required functions are already available on the target computer. In contrast, third-party modules must first be installed on every managed PC.
However, it is not possible to copy Microsoft’s Windows Update Provider to older versions of Windows, such as Server 2012 R2 or 2016, because the CIM class required by the functions does not exist on those versions.
More control over updates
Command line tools such as usoclient.exe, wuinstall, or PowerShell cmdlets give admins more control over the update process because they can explicitly request the scan, download, install, or restart. This is useful, for example, if you want to secure a freshly installed computer by installing the latest patches. In addition, PowerShell is useful on Server Core because there is no GUI for managing updates.
Overview of the range of functions
If you search for Windows Update modules using
Get-Module -Name *Update*
then the command returns two results. While one of them is WindowsUpdate, the module only contains a function called Get-WindowsUpdateLog.
The commands intended for the management of the update client can be found in WindowsUpdateProvider. They can be listed with:
Get-Command -Module WindowsUpdateProvider
As you can see, these are not cmdlets but only functions.

Functions of the WindowsUpdateProvider module
For example, if you want to display the contents of Start-WUScan with
Get-Content Function:Start-WUScan
then you can see that this function operates on the basis of the CIM class MSFT_WUOperations. The same applies to Install-WUUpdates.
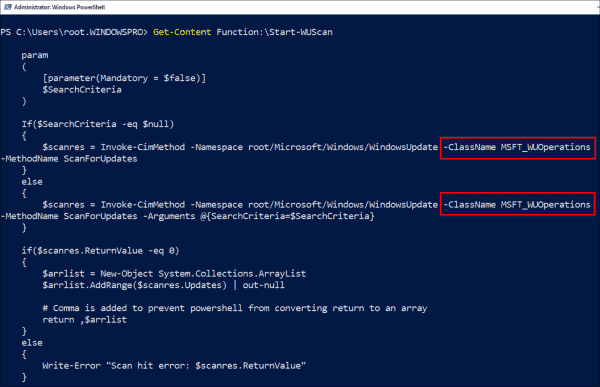
The functions of the WindowsUpdateProvider module use the methods of the CIM class MSFT WUOperations
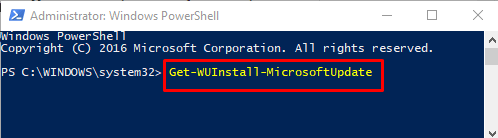
While Get-WULastInstallationDate and Get-WULastScanSuccessDate are used to examine previous updates, and Get-WUAVersion outputs the version of the client, the three remaining functions provide the actual update management.
Checking for updates
As the name suggests, Start-WUScan looks for available updates. You cannot specify a source for updates; rather, the function queries the update server configured on the computer. This is a WSUS server in most cases.
If you don’t specify any parameter, all updates that apply to the system will appear in the results. The only way to restrict the list is with SearchCriteria, which you have to pass a search expression:
Start-WUScan -SearchCriteria "Type='Software' AND IsInstalled=0"
The permitted search criteria follow the syntax described in the API documentation, but Microsoft does not offer any specific information on WindowsUpdateProvider as a whole.
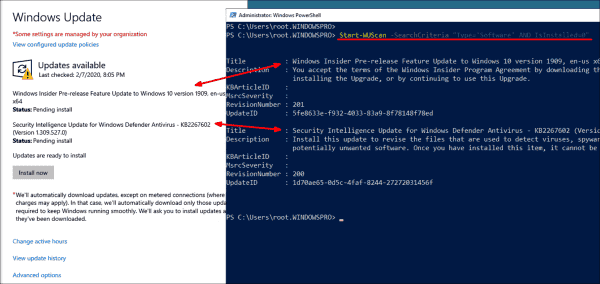
As an alternative to the settings app, you can use Start WUScan to check for new updates
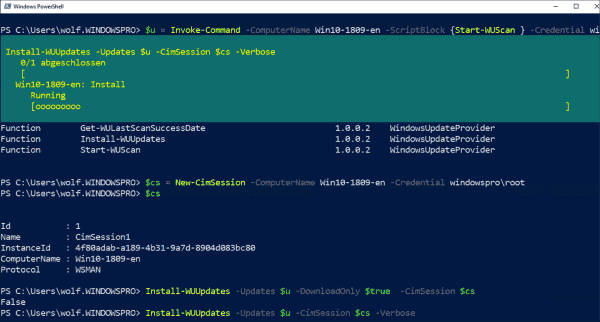
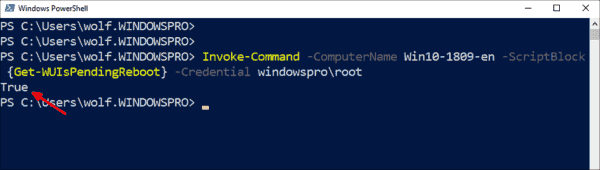
For example, it is practical to query remote computers to find out whether a specific update is installed there. Since the ComputerName parameter is not supported, you have to use the Invoke-Command:
$u = Invoke-Command -ComputerName MyPC -ScriptBlock {Start-WUScan -SearchCriteria "UpdateId='<GUID-of-Update>' AND IsInstalled=1"} -Credential admincontoso
After executing the command, the variable $u will contain all updates which match the search criteria.
Downloading and installing updates
If you want to install pending updates, you have to save the result of Start-WUScan in a variable, as in the example above. You then pass this on to Install-WUUpdates. But first you establish a CIM session on the remote computer:
$cs = New-CimSession -ComputerName MyPC -Credential Credential admincontoso
Install-WUUpdates -Updates $u -DownloadOnly -CimSession $cs
This example command only downloads the updates.
Find, download, and install updates on a remote PC with the WindowsUpdateProvider functions
You then initiate the actual installation by executing Install-WUUpdate once more without the DownloadOnly switch:
Install-WUUpdates -Updates $u -CimSession $cs
Querying pending reboot
If the computer must be restarted after installing updates, you cannot initiate it via Install-WUUpdates. However, it is possible to query whether a reboot is pending with another function of this module:
Get-WUIsPendingReboot
If the command yields the value $true, then you can reboot the PC at the desired time using the Cmdlet Restart-Computer.
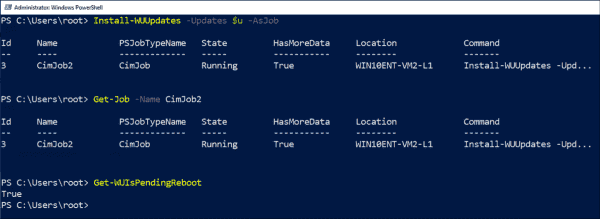
After installing the updates, you can query a pending reboot with Get WUIsPendingReboot
Get-WUIsPendingReboot can also be used to query a pending reboot of a remote computer.
Check remotely whether a restart is required
The function simplifies this task considerably compared to the method that looks for it in the registry.
Subscribe to 4sysops newsletter!
Conclusion
With the WindowsUpdateProvider module, Microsoft has provided the basic functions for managing updates via PowerShell, beginning with Windows 10 1709 and Server 2019. They are particularly suitable for updating computers remotely. However, the integrated module does not come close to the capabilities of PSWindowsUpdate.
Вы можете использовать PowerShell модуль PSWindowsUpdate для управления обновлениями Windows из командной строки. Модуль PSWindowsUpdate не встроен в Windows и доступен для установки из репозитория PowerShell Gallery. PSWindowsUpdate позволяет администраторам удаленно проверять, устанавливать, удалять и скрывать обновления на рабочих станциях и серверах Windows. Модуль PSWindowsUpdate особо ценен при использовании для управления обновлениями в Core редакциях Windows Server (в которых отсутствуют графический интерфейс), а также при настройке образа Windows в режиме аудита.
Содержание:
- Установка модуля управления обновлениями PSWindowsUpdate
- Обзор команд модуля PSWindowsUpdate
- Управление обновлениями Windows на удаленных компьютерах через PowerShell
- Получить список доступных обновлений Windows из PowerShell
- Установка обновлений Windows с помощью Install-WindowsUpdate
- Просмотр истории установленных обновлений Windows (Get-WUHistory)
- Удаление обновлений в Windows с помощью Remove-WindowsUpdate
- Как скрыть ненужные обновления Windows с помощью PowerShell (Hide-WindowsUpdate)?
Установка модуля управления обновлениями PSWindowsUpdate
Если вы используете Windows 10/11 или Windows Server 2022/2019/2016, вы можете установить (обновить) модуль PSWindowsUpdate из онлайн репозитория через менеджер пакетов PackageManagement всего одной командой:
Install-Module -Name PSWindowsUpdate
После окончания установки нужно проверить наличие пакета:
Get-Package -Name PSWindowsUpdate
В старых версиях Windows 2012R2/Windows 8.1 и ниже при установке PowerShell модуля может появится ошибка:
Install-Module: Unable to download from URI.Unable to download the list of available providers. Check your internet connection.
Для установки модуля нужно использовать для подключения протокол TLS 1.2. Включите его:
[Net.ServicePointManager]::SecurityProtocol = [Net.SecurityProtocolType]::Tls12
Если у вас установлена более старая версия Windows (Windows 7/8.1/ Windows Server 2008 R2/ 2012 R2) или отсутствует прямой доступ в Интернет, вы можете установить модуль PSWindowsUpdate вручную (см. полную инструкцию по офлайн установке модулей PowerShell).
- Скачайте модуль PSWindowsUpdate на любой онлайн компьютер:
Save-Module –Name PSWindowsUpdate –Path C:ps
; - Скопируйте модуль на целевой компьютер, и поместите его в каталог
%WINDIR%System32WindowsPowerShellv1.0Modules
(при постоянном использовании модуля это лучший вариант); - Разрешите выполнение PowerShell скриптов:
Set-ExecutionPolicy –ExecutionPolicy RemoteSigned -force - Теперь вы можете импортировать модуль в свою сессию PowerShell:
Import-Module PSWindowsUpdate
Примечание. В Windows 7 / Server 2008 R2 при импорте модуля PSWindowsUpdate вы можете столкнутся с ошибкой вида:
Имя "Unblock-File" не распознано как имя командлета
. Дело в том, что в модуле используются некоторые функции, которые появились только в PowerShell 3.0. Для использования этих функций вам придется обновить PowerShell, либо вручную удалить строку | Unblock-File из файла PSWindowsUpdate.psm1.
После установки модуля PSWindowsUpdate на своем компьютере вы можете удаленно установить его на другие компьютеры или сервера с помощью командлета Update-WUModule. Например, чтобы скопировать PSWindowsUpdate модуль с вашего компьютера на два удаленных сервера, выполните команды (нужен доступ к удаленным серверам по протоколу WinRM):
$Targets = "Server1", "Server2"
Update-WUModule -ComputerName $Targets -local
Чтобы сохранить модуль в сетевой каталог для дальнейшего импорта модуля на других компьютерах, выполните:
Save-Module -Name PSWindowsUpdate –Path \fs01ps
Обзор команд модуля PSWindowsUpdate
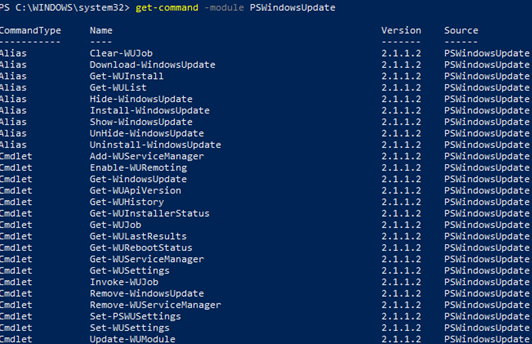
Список доступных командлетов модуля можно вывести так:
get-command -module PSWindowsUpdate
Вкратце опишем назначение команд модуля:
- Clear-WUJob – использовать Get-WUJob для вызова задания WUJob в планировщике;
- Download-WindowsUpdate (алиас для Get-WindowsUpdate –Download) — получить список обновлений и скачать их;
- Get-WUInstall, Install-WindowsUpdate (алиас для Get-WindowsUpdate –Install) – установить обвновления;
- Hide-WindowsUpdate (алиас для Get-WindowsUpdate -Hide:$false) – скрыть обновление;
- Uninstall-WindowsUpdate -удалить обновление с помощью Remove-WindowsUpdate;
- Add-WUServiceManager – регистрация сервера обновления (Windows Update Service Manager) на компьютере;
- Enable-WURemoting — включить правила Windows Defender файервола, разрешающие удаленное использование командлета PSWindowsUpdate;
- Get-WindowsUpdate (Get-WUList) — выводит список обновлений, соответствующим указанным критериям, позволяет найти и установить нужное обновление. Это основной командлет модуля PSWindowsUpdate. Позволяет скачать и установить обновления с сервера WSUS или Microsoft Update. Позволяет выбрать категории обновлений, конкретные обновления и указать правила перезагрузки компьютера при установке обновлений;
- Get-WUApiVersion – получить версию агента Windows Update Agent на компьютере;
- Get-WUHistory – вывести список установленных обновлений (история обновлений);
- Get-WUInstallerStatus — проверка состояния службы Windows Installer;
- Get-WUJob – запуска заданий обновления WUJob в Task Scheduler;
- Get-WULastResults — даты последнего поиска и установки обновлений (LastSearchSuccessDate и LastInstallationSuccessDate);
- Get-WURebootStatus — позволяет проверить, нужна ли перезагрузка для применения конкретного обновления;
- Get-WUServiceManager – вывод источников обновлений;
- Get-WUSettings – получить настройки клиента Windows Update;
- Invoke-WUJob – удаленное вызов заданий WUJobs в Task Schduler для немедленного выполнения заданий PSWindowsUpdate.
- Remove-WindowsUpdate – удалить обновление;
- Remove-WUServiceManager – отключить Windows Update Service Manager;
- Set-PSWUSettings – сохранить настройки модуля PSWindowsUpdate в XML файл;
- Set-WUSettings – настройка параметров клиента Windows Update;
- Update-WUModule – обновить модуль PSWindowsUpdate (можно обновить модуль на удаленном компьютере, скопировав его с текущего, или обновить из PSGallery);
- Reset-WUComponents – позволяет сбросить настройка агента Windows Update на компьютере к настройкам по-умолчанию.
Чтобы проверить текущие настройки клиента Windows Update, выполните команду:
Get-WUSettings
ComputerName                                 : WKS22122
WUServer                                     : http://MS-WSUS:8530
WUStatusServer                               : http://MS-WSUS:8530
AcceptTrustedPublisherCerts                  : 1
ElevateNonAdmins                             : 1
DoNotConnectToWindowsUpdateInternetLocations : 1
TargetGroupEnabled                           : 1
TargetGroup                                  : WorkstationsProd
NoAutoUpdate                                 : 0
AUOptions                                    : 3 - Notify before installation
ScheduledInstallDay                          : 0 - Every Day
ScheduledInstallTime                         : 3
UseWUServer                                  : 1
AutoInstallMinorUpdates                      : 0
AlwaysAutoRebootAtScheduledTime              : 0
DetectionFrequencyEnabled                    : 1
DetectionFrequency                           : 4
В данном примере клиент Windows Update на компьютере настроен с помощью GPO на получение обновлений с локального сервера WSUS.
Команда
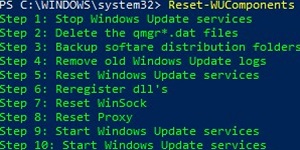
Reset-WUComponents –Verbose
позволяет сбросить все настройки агента Windows Update, перерегистрировать библиотеки и восстановить исходное состояние службы wususerv.
Управление обновлениями Windows на удаленных компьютерах через PowerShell
Практически все командлеты модуля PSWindowsUpdate позволяют управлять установкой обновлений на удаленных компьютерах. Для этого используется атрибут
-Computername Host1, Host2, Host3
. На удаленных компьютерах должен быть включен и настроен WinRM (вручную или через GPO).
Установите модуль PSWindowsUpdate на удаленных компьютерах и разрешите в файерволе доступ по динамическим RPC портам к процессу dllhost.exe. Можно использовать Invoke-Command для настройки модуля PSWindowsUpdate на удаленных компьютерах:
Invoke-Command -ComputerName $computer -ScriptBlock {Set-ExecutionPolicy RemoteSigned -force }
Invoke-Command -ComputerName $computer -ScriptBlock {Import-Module PSWindowsUpdate; Enable-WURemoting}
Модуль PSWindowsUpdate можно использовать для удаленного управлений обновлениями Windows как на компьютерах в домене AD, так и в рабочей группе (потребует определенной настройки PowerShell Remoting)
Для удаленного управления обновлениями компьютерах, нужно добавить имена компьютеров доверенных хостов winrm, или настроить удаленное управление PSRemoting через WinRM HTTPS:
winrm set winrm/config/client ‘@{TrustedHosts="HOST1,HOST2,…"}’
Или с помощью PowerShell:
Set-Item wsman:localhostclientTrustedHosts -Value wsk-w10BO1 -Force
Получить список доступных обновлений Windows из PowerShell
Вывести список обновлений, доступных для данного компьютера на сервере обновлений можно с помощью команд Get-WindowsUpdate или Get-WUList.
Чтобы проверить список доступных обновлений на удаленном компьютере, выполните:
Get-WUList –ComputerName server2
Вы можете проверить, откуда должна получать обновления ваша ОС Windows. Выполните команду:
Get-WUServiceManager
ServiceID IsManaged IsDefault Name
--------- --------- --------- ----
8b24b027-1dee-babb-9a95-3517dfb9c552 False False DCat Flighting Prod
855e8a7c-ecb4-4ca3-b045-1dfa50104289 False False Windows Store (DCat Prod)
3da21691-e39d-4da6-8a4b-b43877bcb1b7 True True Windows Server Update Service
9482f4b4-e343-43b6-b170-9a65bc822c77 False False Windows Update

Как вы видите, компьютер настроен на получение обновлений с локального сервера WSUS (Windows Server Update Service = True). В этом случае вы должны увидеть список обновлений, одобренных для вашего компьютера на WSUS.
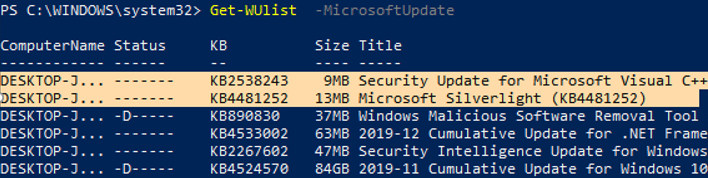
Если вы хотите просканировать ваш компьютер на серверах Microsoft Update (кроме обновлений Windows на этих серверах содержатся обновления Office и других продуктов) в Интернете, выполните команду:
Get-WUlist -MicrosoftUpdate
Вы получаете предупреждение:
Get-WUlist : Service Windows Update was not found on computer
Чтобы разрешить сканирование на Microsoft Update, выполните команду:
Add-WUServiceManager -ServiceID "7971f918-a847-4430-9279-4a52d1efe18d" -AddServiceFlag 7
Теперь можете выполнить сканирование на Microsoft Update. Как вы видите, в данном случае были найдены дополнительные обновления для Microsoft Visual C++ 2008 и Microsoft Silverlight.

Чтобы проверить версию агента Windows Update на компьютере, выполните команду:
Get-WUApiVersion
ComputerName PSWindowsUpdate PSWUModuleDll ApiVersion WuapiDllVersion
------------ --------------- ------------- ---------- ---------------
FS01 2.2.0.2 2.2.0.2 8.0 10.0.19041.1320

Чтобы убрать определенные продукты или конкретные KB из списка обновлений, которые получает ваш компьютер, вы их можете исключить по:
- Категории (-NotCategory);
- Названию (-NotTitle);
- Номеру обновления (-NotKBArticleID).
Например, исключим из списка обновления драйверов, OneDrive и одну конкретную KB:
Get-WUlist -NotCategory "Drivers" -NotTitle OneDrive -NotKBArticleID KB4533002
Установка обновлений Windows с помощью Install-WindowsUpdate
Чтобы автоматически загрузить и установить все доступные обновления для вашей версии Windows с серверов Windows Update (вместо локального WSUS), выполните:
Install-WindowsUpdate -MicrosoftUpdate -AcceptAll -AutoReboot
Ключ AcceptAll включает одобрение установки для всех пакетов, а AutoReboot разрешает автоматическую перезагрузку Windows после установки обновлений.
Также можно использовать следующе параметры:
- IgnoreReboot – запретить автоматическую перезагрузку;
- ScheduleReboot – задать точное время перезагрузки компьютера.
Можете сохранить историю установки обновлений в лог файл (можно использовать вместо WindowsUpdate.log).
Install-WindowsUpdate -AcceptAll -Install -AutoReboot | Out-File "c:$(get-date -f yyyy-MM-dd)-WindowsUpdate.log" -force
Можно установить только конкретные обновления по номерам KB:
Get-WindowsUpdate -KBArticleID KB2267602, KB4533002 -Install

В данном случае нужно подтверждать установку каждого обновления вручную.
Если вы хотите исключить некоторые обновления из списка на установку, выполните:
Install-WindowsUpdate -NotCategory "Drivers" -NotTitle OneDrive -NotKBArticleID KB4011670 -AcceptAll -IgnoreReboot
Модуль позволяет удаленно запустить установку обновлений сразу на нескольких компьютерах или серверах (на компьютерах должен присутствовать модуль PSWindowsUpdate). Это особенно удобно, так как позволяет администратору не заходить вручную на все сервера во время плановой установки обновлений. Следующая команда установит все доступные обновление на трех удаленных серверах:
ServerNames = “server1, server2, server3”
Invoke-WUJob -ComputerName $ServerNames -Script {ipmo PSWindowsUpdate; Install-WindowsUpdate -AcceptAll | Out-File C:WindowsPSWindowsUpdate.log } -RunNow -Confirm:$false -Verbose -ErrorAction Ignore
Командлет Invoke-WUJob (ранее командлет назывался Invoke-WUInstall) создаст на удаленном компьютере задание планировщика, запускаемое от SYSTEM. Можно указать точное время для установки обновлений Windows:
Invoke-WUJob -ComputerName $ServerNames -Script {ipmo PSWindowsUpdate; Install-WindowsUpdate –AcceptAll -AutoReboot | Out-File C:WindowsPSWindowsUpdate.log } -Confirm:$false -TriggerDate (Get-Date -Hour 20 -Minute 0 -Second 0)
Можно установить обновления на удаленном компьютере и отправить email отчет администратору:
Install-WindowsUpdate -ComputerName server1 -MicrosoftUpdate -AcceptAll - IgnoreReboot -SendReport –PSWUSettings @{SmtpServer="smtp.winitpro.ru";From="[email protected]";To="[email protected]";Port=25} -Verbose
Проверить статус задания установки обновления можно с помощью Get-WUJob:
Get-WUJob -ComputerName $ServerNames
Если команда вернет пустой список, значит задача установки на всех компьютерах выполнена.
Просмотр истории установленных обновлений Windows (Get-WUHistory)
С помощью команды Get-WUHistory вы можете получить список обновлений, установленных на компьютере ранее автоматически или вручную.

Можно получить информацию о дате установки конкретного обновления:
Get-WUHistory| Where-Object {$_.Title -match "KB4517389"} | Select-Object *|ft

Чтобы получить информацию об наличии установленного обновления на нескольких удаленных компьютерах, можно воспользоваться таким кодом:
"server1","server2" | Get-WUHistory| Where-Object {$_.Title -match "KB4011634"} | Select-Object *|ft
Проверить, нужна ли перезагрузка компьютеру после установки обновления:
Get-WURebootStatus –ComputerName WKS80JT
Проверьте значение атрибутов
RebootRequired
и
RebootScheduled
.
Получить дату последней установки обновлений на всех компьютерах в домене можно с помощью командлета Get-ADComputer из модуля AD PowerShell:
$Computers=Get-ADComputer -Filter {enabled -eq "true" -and OperatingSystem -Like '*Windows*' }
Foreach ($Computer in $Computers)
{
Get-WULastResults -ComputerName $Computer.Name|select ComputerName, LastSearchSuccessDate, LastInstallationSuccessDate
}
По аналогии можно найти компьютеры, которые не устаналивали обновления более 40 дней и вывести результат в графическую таблицу Out-GridView:
[email protected]()
Foreach ($Computer in $Computers) {
$result+= Get-WULastResults -ComputerName $Computer.Name
}
$result| Where-Object { $_.LastInstallationSuccessDate -lt ((Get-Date).AddDays(-30)) }| Out-GridView
Удаление обновлений в Windows с помощью Remove-WindowsUpdate
Для корректного удаления обновлений используется командлет Remove-WindowsUpdate. Вам достаточно указать номер KB в качестве аргумента параметра KBArticleID. Чтобы отложить автоматическую перезагрузку компьютера можно добавить ключ
–NoRestart
:
Remove-WindowsUpdate -KBArticleID KB4011634 -NoRestart
Как скрыть ненужные обновления Windows с помощью PowerShell (Hide-WindowsUpdate)?
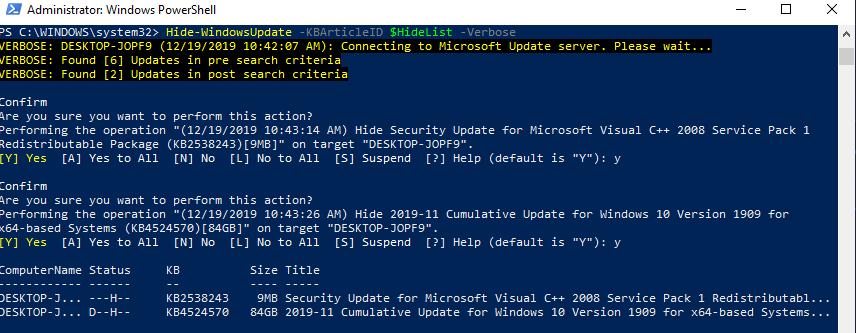
Вы можете скрыть определенные обновления, чтобы они никогда не устанавливались службой обновлений Windows Update на вашем компьютер (чаще всего скрывают обновления драйверов). Например, чтобы скрыть обновления KB2538243 и KB4524570, выполните такие команды:
$HideList = "KB2538243", "KB4524570"
Get-WindowsUpdate -KBArticleID $HideList -Hide
или используйте alias:
Hide-WindowsUpdate -KBArticleID $HideList -Verbose
Теперь при следующем сканировании обновлений с помощью команды
Get-WUlist
скрытые обновления не будут отображаться в списке доступных для установки патчей.
Вывести список обновлений, которые скрыты на данном компьютере можно так:
Get-WindowsUpdate –IsHidden
Обратите внимание, что в колонке Status у скрытых обновлений появился атрибут H (Hidden).

Отменить скрытие некоторых обновлений можно так:
Get-WindowsUpdate -KBArticleID $HideList -WithHidden -Hide:$false
или так:
Show-WindowsUpdate -KBArticleID $HideList
Для тех, кто себя некомфортно чувствует в консоли PowerShell, для управления обновлениями Windows 10 могу порекомендовать графическую утилиту Windows Update MiniTool.
Windows 10 updates happen automatically or manually through the Windows Update settings. However, if you try to patch a new installation or create a custom script to automate the process, you can use commands to download and install missing patches with “PSWindowsUpdate” on PowerShell.
PSWindowsUpdate is a community module by Michal Gajda, available through the PowerShell Gallery. It includes the components to make it easy to check, download, and install quality updates on Windows 10.
In this guide, you’ll learn the steps to check and install updates for Windows 10 using PowerShell.
- Update Windows 10 from PowerShell
- Manage updates with PowerShell
To check and install updates with PowerShell, use these steps:
-
Open Start on Windows 10.
-
Search for PowerShell, right-click the top result, and select the Run as administrator option.
-
Type the following command to install the module to run Windows Update and press Enter:
Install-Module PSWindowsUpdate

Quick note: After installing the module, you no longer need to repeat step No. 3 to use the module and manage updates.
-
Type A and press Enter to confirm.
-
Type the following command to check for updates with PowerShell and press Enter:
Get-WindowsUpdate
-
Type the following command to install the available Windows 10 updates and press Enter:
Install-WindowsUpdate

-
Type A and press Enter to confirm.

Once you complete the steps, the latest cumulative updates will download and install on your computer.
Manage updates with PowerShell
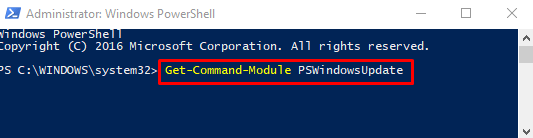
The PSWindowsUpdate module includes many options that you can use to manage updates. You can always use the Get-Command –Module PSWindowsUpdate command to query a list of the available commands.
For example, the following steps will download, install, and then reboot the computer to complete the update process:
-
Open Start.
-
Search for PowerShell, right-click the top result, and select the Run as administrator option.
-
Type the following command to download and install all the available updates and reboot the system, and press Enter:
Get-WindowsUpdate -AcceptAll -Install -AutoReboot
After completing the steps, Windows 10 will download and install all the available updates, rebooting the computer to apply the changes automatically.
Install specific update command
To download and install a specific update on Windows 10 from PowerShell, use these steps:
-
Open Start.
-
Search for PowerShell, right-click the top result, and select the Run as administrator option.
-
Type the following command to list the available updates along with their KB numbers with PowerShell and press Enter:
Get-WindowsUpdate
-
Type the following command to download, install a specific update, reboot the system, and press Enter:
Get-WindowsUpdate -Install -KBArticleID 'KB5021233'
In the command, replace “KB5021233” with the KB name of the update you want to install.
Once you complete the steps, in this case, Windows 10 will download and install update KB5021233 on your device.
Windows 10 comes with the Windows Update Provider, but it has limited options compared to the PSWindowsUpdate module, and it’s more complicated to use.
We may earn commission for purchases using our links to help keep offering the free content. Privacy policy info.
All content on this site is provided with no warranties, express or implied. Use any information at your own risk. Always backup of your device and files before making any changes. Privacy policy info.
Installing Windows Updates manually can be a drag. Why not automate the entire process with PowerShell? Get started controlling Windows updates with the PSWindowsUpdate module in PowerShell!
In this tutorial, you will learn how to download and install updates on your Windows machine through PowerShell.
Prerequisites
This tutorial uses Windows 10 Build 19042 for demonstrations throughout this tutorial, but older ones, such as Windows 7 and 8.1, will work.
Installing the PSWindowsUpdate Module
The PSWindowsUpdate module is a third-party module available in PowerShell Gallery that lets you manage Windows updates from the PowerShell console. The PowerShell Gallery is the central repository where you can find and share PowerShell modules.
With the PSWindowsUpdate module, you can remotely check, install, update and remove updates on Windows servers and workstations. But first, you need to install the PSWindowsUpdate module on your machine.
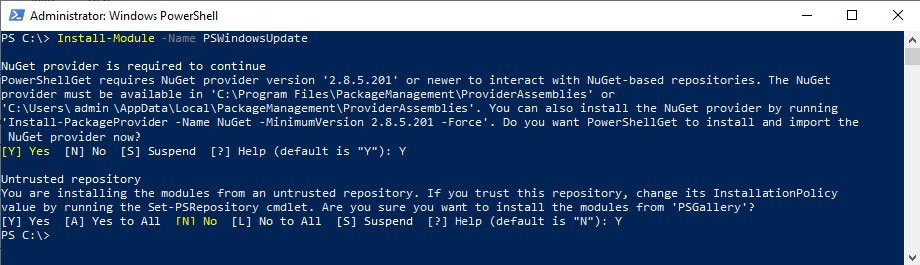
1. Open PowerShell as administrator.
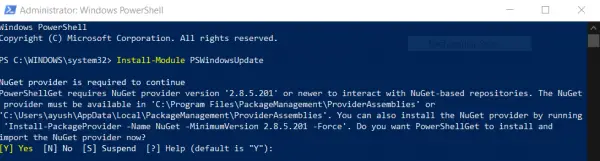
2. Run the Install-Module command to download and install the PSWindowUpdate module from the PowerShell gallery repository. The -Force parameter tells the command to ignore prompt messages and continue installing the module.
Install-Module -Name PSWindowsUpdate -ForceIf you’re on an older version of Windows, you can download the PSWindowsUpdate module manually.
3. Next, run the Import-Module command below to import the PSWindowsUpdate module to PowerShell’s current session. Once imported, you can then use the module to manage Windows updates on your machine.
You may run into an error importing the module for the first time saying “The specified module ‘PSWindowsUpdate’ was not loaded”. In that case, you must allow executing scripts on your machine.
Run the command
Set-ExecutionPolicy -ExecutionPolicy RemoteSignedto enable execute remote scripts on your computer. Now try importing thePSWindowsUpdatemodule again.
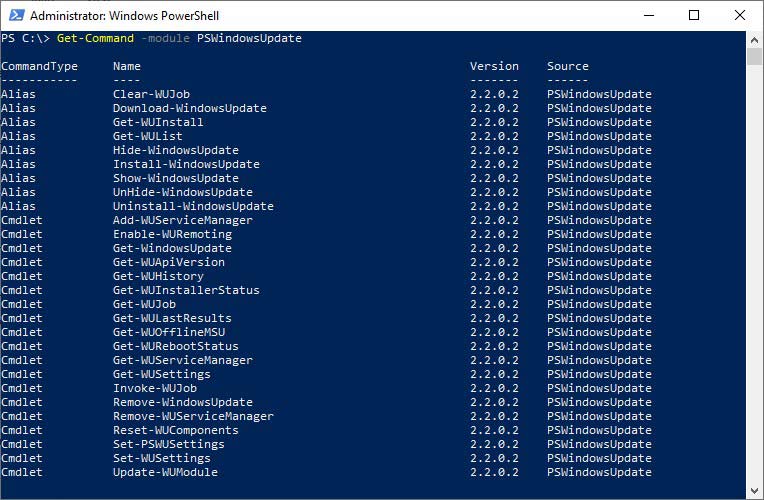
Import-Module PSWindowsUpdate4. Finally, run the command below to see all commands (Get-Command) available for the PSWindowsUpdate module. Some of these commands are what you will use to manage Windows updates on your machine. Get-Command -Module PSWindowsUpdate
Get-Command -Module PSWindowsUpdateChecking for Available Windows Updates
With the PSWindowsUpdate module installed, you can now run a command to list the updates available for your computer before installing them. Checking the list of updates is a good practice to avoid installing an update you don’t need.
Run the Get-WindowsUpdate command to list all the Windows updates
Below, you can see the list of available Windows updates along with their Knowledge-Base (KB) numbers. Take note of any KB number of a Windows update that you may want to prevent installing later, perhaps one that you deem not important.

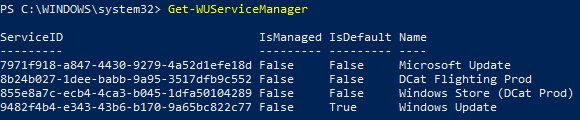
Perhaps you also want to check where Windows gets an update from to see if the source is trustworthy. If so, the Get-WUServiceManager command will do the trick.
Run the Get-WUServiceManager to show the list of available update services.
There’s no official documentation about the update the sources, but each is defined below:
- Microsoft Update – the standard update source
- DCat Flighting Prod – an alternative MS supdate ource for specific flighted update items (from previews, etc)
- Windows Store (DCat Prod) – normally just Windows Store, but has Dcat Prod when for insider preview PC
- Windows Update – an older update source for Windows Vista and older Windows OS.
Excluding Windows Updates from Installing
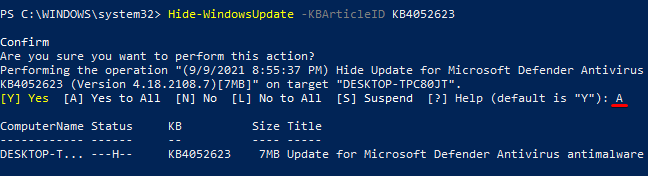
Now you’ve seen the Windows updates available, perhaps you prefer not to install some of them on your computer. In that case, you can choose not to install them by hiding them.
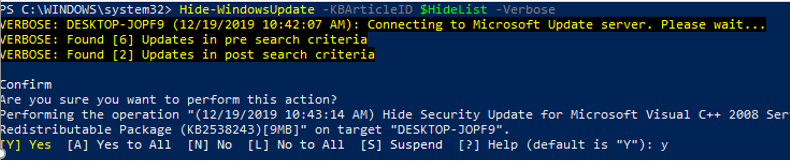
Run the Hide-WindowsUpdate command below to hide a Windows update tagged with the specified KB number (-KBArticleID KB4052623). You can specify the KB number you took note of in the “Checking for Available Windows Updates” section instead.
PowerShell will ask for your confirmation before executing the command. Confirm the command with the “A” key, then press Enter.
Hide-WindowsUpdate -KBArticleID KB4052623
If you change your mind and want to install the update in the future, you can show the update similar to how you hid the update. To show the update, run the
Show-WindowsUpdatecommand along with the update’s KB number, like this:Show-WindowsUpdate -KBArticleID KB4052623
Installing Windows Updates
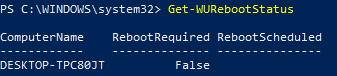
Now that you can discover and exclude some updates from installing, let’s now check out how to install them.
But before installing updates, checking if updates require a system reboot is a good practice. Why? Knowing whether the Windows updates require a reboot beforehand tells you to save all your work and complete other ongoing installations before diving to the Windows update.
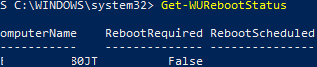
Now run the Get-WURebootStatus command to determine if any of the Windows updates require a reboot. The command returns either True or False value to indicate the reboot status
Below, you can see the command returned a False value, which indicates a reboot is not required. So go nuts and install the updates you deem are necessary.
Downloading and Installing All Available Updates
If you’re not picky when it comes to updates, running the Install-WindowsUpdate command on its own lets you install all available Windows updates. But perhaps, you want to install the updates without having to accept prompts. If so, you need to add the -AcceptAll parameter as shown below.
Run the Install-WindowsUpdate command below to install all available Windows updates. The -AcceptAll parameter tells the command to suppress prompts and continue installing all updates.
If you prefer to reboot your computer once the installation is completed automatically, add the -AutoReboot parameter.
Install-WindowsUpdate -AcceptAll -AutoReboot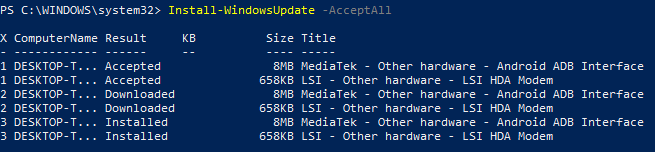
If you prefer to install selected updates only, add the
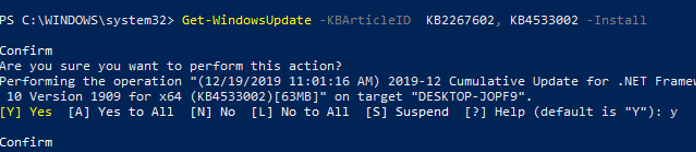
-KBArticleIDparameter in theInstall-WindowsUpdatecommand, followed by the update’s KB number, like this:Install-WindowsUpdate -KBArticleID KB2267602
Checking Windows Update History
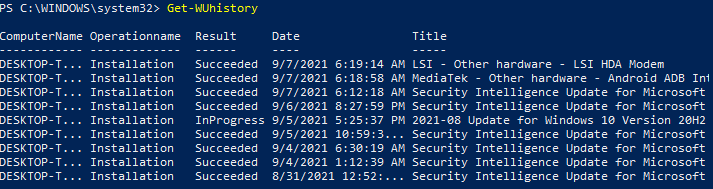
Now you have installed windows updates on your computer, but perhaps something has gone wrong during the installation. If so, you can check your update history using the Get-WUHistory command. The Get-WUHistory prints out all the installed updates to the console with their installation result.
Run the Get-WUHistory command below to check Windows update history.
Below, you can see that most of the updates have the Succeeded result status, while some have InProgress status.
Uninstalling Windows Updates
There are times when you install an update you don’t deem important at the moment, or there are updates you suspect of causing an issue on your system. In those times, you can properly uninstall the updates with the Remove-WindowsUpdate command.
Run the Remove-WindowsUpdate command below to uninstall a Windows update tagged with a specific KB number (-KBArticleID KB2267602).
PowerShell will require confirmation before executing the command. Press the “A” key and hit enter to confirm the command.
Remove-WindowsUpdate -KBArticleID KB2267602
Conclusion
Throughout this tutorial, you’ve learned about the PSWindowsUpdate Module. You’ve also gone through selectively installing and uninstalling Windows updates.
You’ve learned that you have full control over the Windows updates with PowerShell. Now, would you prefer installing updates in PowerShell over a GUI method? Perhaps learn more about building a Windows update report?


September 2, 2020
Last updated on May 6, 2022
As is well known, keeping systems updated is essential to protecting enterprises from malicious attacks and security breaches that may compromise confidential information or even cause sensitive data losses.
Installing Windows update patches has always been a tedious, complex, and long process. Although Microsoft eases these procedures through tools such as Windows Server Update Services (WSUS) or System Center Configuration Manager (SCCM), administrators still require command-line tools to automate the installation of the update in certain scenarios. The PowerShell Windows Update module, or PSWindowsUpdate, is one such tool.
How to install PSWindowsUpdate
PSWindowsUpdate is a third-party module that is not integrated into Windows by default. It can be downloaded from the PowerShell gallery, the most used repository for sharing PowerShell code. This module includes different cmdlets to manage the deployment of Windows updates from the command line.
- Download the latest PSWindowsUpdate version from the PowerShell gallery.
**Previous versions of the module are also available in the Microsoft Technet Gallery, but Microsoft has retired this repository and now remains in read-only mode.
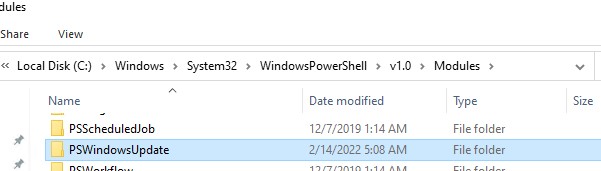
- Create a new folder named “PSWindowsUpdate” in %WINDIR%System32WindowsPowerShellv1.0Modules and extract the content of the nupkg file.
**A NuGet package is a ZIP archive with some extra files. Some browsers, like Internet Explorer, automatically replace the .nupkg file extension with .zip
- Open an elevated PowerShell prompt and run Set-ExecutionPolicy RemoteSigned to allow the execution of scripts signed by a trusted publisher.
- Install Import-Module -Name PSWindowsUpdate.
If the PowerShell setup is already configured to allow online downloads, the PSWindowsUpdate module can also be installed directly from the online repository (PSGallery) running Install-Module -Name PSWindowsUpdate.
Commands in PSWindowsUpdate
Installed aliases and cmdlets can be displayed by typing Get-Command–module PSWindowsUpdate.
A brief description of principal commands is described below:
Get-WindowsUpdate: This is the main cmdlet of the module. It lists, downloads, installs, or hides a list of updates meeting predefined requisites and sets the rules of the restarts when installing the updates.
Remove-WindowsUpdate: Uninstalls an update.
Add-WUServiceManage: Registers a new Windows Update API Service Manager.
Get-WUHistory: Shows a list of installed updates.
Get-WUSettings: Gets Windows Update client settings.
Get-WUInstallerStatus: Gets Windows Update Installer Status, whether it is busy or not.
Enable-WURemoting: Enables firewall rules for PSWindowsUpdate remoting.
Invoke-WUJob: Invokes PSWindowsUpdate actions remotely.
Clear-WUJob: Clears the WUJob in Task Scheduler.
Get-WUInstall, Install-WindowsUpdate (alias for Get-WindowsUpdate –Install): Installs Windows updates.
Uninstall-WindowsUpdate: Removes updates using the Remove-WindowsUpdate command.
Get-WULastResults: Gets the dates for the last search and installation of updates.
Get-WURebootStatus: Checks if a reboot is needed to apply an update.
Remove-WUServiceManager: Disables the Windows Update Service Manager.
Set-PSWUSettings: Saves settings of the PSWindowsUpdate module to an XML file.
Set-WUSettings: Configures the Windows Update client’s settings.
Reset-WUComponents: Resets the Windows Update agent to its default state.
Like for all PowerShell cmdlets, different usage examples can be shown for each command by typing Get-Help “command” -examples.
PSWindowsUpdate Main Parameters
The previous section shows that the PSWindowsUpdate module includes different predefined aliases to ease patching processes. However, the main parameters for the Get-WindowsUpdate cmdlet will be listed and explained below:
Filtering Updates:
- AcceptAll: Downloads or installs all available updates.
- KBArticleID: Finds updates that contain a KBArticleID (or sets of KBArticleIDs).
- UpdateID: Specifies updates with a specific UUID (or sets of UUIDs).
- Category: Specifies updates that contain a specified category name, such as ‘Updates,’ ‘Security Updates’ or ‘Critical Updates’.
- Title: Finds updates that match part of title.
- Severity: Finds updates that match part of severity, such as ‘Important,’ ‘Critical’ or ‘Moderate’.
- UpdateType: Finds updates with a specific type, such as ‘Driver’ and ‘Software.’ Default value contains all updates.
Actions and Targets:
- Download: downloads approved updates but does not install them.
- Install: installs approved updates.
- Hide: hides specified updates to prevent them to being installed.
- ScheduleJob: specifies date when job will start.
- SendReport: sends a report from the installation process.
- ComputerName: specifies target server or computer.
Client Restart Behavior:
- AutoReboot: automatically reboots system if required.
- IgnoreReboot: suppresses automatic restarts.
- ScheduleReboot: specifies the date when the system will be rebooted.
How to Avoid Accidental Installs
Windows updates and patches improve the features and stability of the system. However, some updates can mess up your system and cause instability, especially automatic updates for legacy software such as graphic card drivers. To avoid automatic updates and accidental installs for such applications, you can pause Windows updates.
Alternatively, you can hide the specific updates for those features you don’t want to get updated. When you hide the updates, Windows can no longer download and install such updates. Before you can hide the update, you need to find out its details, including its knowledge base (KB) number and title. Type the cmdlet below to list all the available updates on your system:
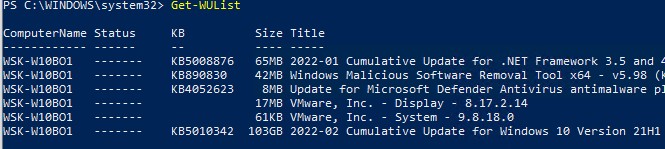
Get-WUList
To hide a specific update using the KB number, use your mouse to copy that KB number. Next, type the command below:
Hide-WUUpdate -KBArticleID KB_Number
Highlight the “KB_Number” and click paste to replace that part with the actual KB number.
When prompted to confirm the action, type A, and hit the Enter key. If the command succeeds, the “Get-WUList” lists all the available updates, with hidden updates appearing with the symbol “H” under their status.
The KB number for the update may not be available for some updates. In this case, you can use the title to hide the update. To do this, list all the available updates via the cmdlet below:
Get-WUList
Next, use your mouse to copy the update title. Ensure it is distinct from other update titles. Now, type below command below to hide the update:
Hide-WUUpdate -Title “Update_Title”
Don’t forget to paste the actual update title in the “Update Title” section.
When prompted to confirm the action, type A, and hit the Enter key. If the command succeeds, the “Get-WUList” lists all the available updates. However, the status of hidden updates appears with the symbol “H” underneath them.
How to Determine Errors
It is of crucial importance to have as much information as possible about Windows Updates installation processes in order to be able to fix erroneous deployments. The Get-WindowsUpdate cmdlet and the rest of the cmdlets available in the module provide a very detailed log level when managing updates, including status, KB ID, Size, or Title.
Centralizing all of the computer logs and analyzing them to search for errors, administrators will always be able to know the patch level of their Windows computers and servers.
Check and Download Windows Updates with PowerShell
You can use PowerShell to check and download Windows updates from a server set up with Windows Server Update Services (WSUS).
To check where a computer gets its updates from, run the Get-WUServiceManager command. If you see a Windows Server Update Service = True in the results, that means that it is set to receive updates from your WSUS server.
To get a list of updates for a remote server or computer, run Get-WUList –Computername computername. For example, Get-WUList –ComputerName server1.
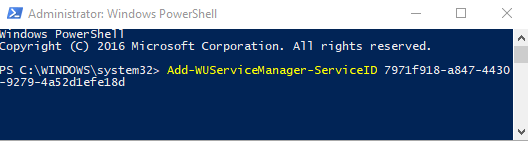
If you need updates for Microsoft Office and other Microsoft products, you can also scan for updates from Microsoft Update servers by running Get-WUList –MicrosoftUpdate. If you get a warning, run Add-WUServiceManager -ServiceID “7971f918-a847-4430-9279-4a52d1efe18d” -AddServiceFlag 7, then run the command again.
To install all updates without getting approval prompts for each package, run Install-WindowsUpdate –AcceptAll. To ignore reboots at the end without a prompt, add an –IgnoreReboot switch at the end, e.g., Install-WindowsUpdate –AcceptAll –IgnoreReboot.
Install Windows Updates on Remote Computers with PowerShell
You can use PowerShell to install updates to multiple remote servers simultaneously, so long as PSWindowsUpdate is also installed on the servers. To install Windows Updates on two remote servers, for example, you need to run:
Invoke-WUInstall -ComputerName server1, server2-Script {ipmo PSWindowsUpdate; Get-WUInstall -AcceptAll -AutoReboot | Out-File C:WindowsPSWindowsUpdate.log } -Confirm:$false -Verbose -SkipModuleTest –RunNow
Flexible PowerShell management with Parallels RAS
Parallels® Remote Application Server (RAS) is a remote work solution that provides 24/7 virtual access to applications and desktops from any device.
Many administrators decide to build their Parallels RAS farms based on templates to optimize the new machine’s deployment time and management efforts. When working with templates and cloning techniques, patching procedures are only done once in the master image. Deploying new machines based on the updated template will upgrade the environment within minutes.
Parallels RAS PowerShell SDK (Software Development Kit) includes a complete set of tools to manage and configure RAS farms, including specific cmdlets to create templates from existing virtual machines or deploy new machines based on those templates. By combining these commands with the PSWindowsUpdate PowerShell module, administrators will be able to automate the complete patching process of their infrastructure servers and their template-based machines.
Different RAS cmdlets can be used to automate the updates installation processes, as seen in this example: Parallels RAS PowerShell – VDI Example.
The complete set of RAS commands is available here: Parallels RAS PowerShell Reference.
See how Parallels RAS can simplify the Windows Updates management process!
Download the Trial
You can use the PSWindowsUpdate PowerShell module to manage Windows updates from the command line. The PSWindowsUpdate module is not built into Windows and is available for installation from the PowerShell Gallery repository. PSWindowsUpdate allows administrators to remotely check, install, remove, and hide updates on Windows servers and workstations. The PSWindowsUpdate module is especially valuable to manage updates on Windows Server Core or Hyper-V Server (which don’t have a GUI), and when configuring a Windows image in the audit mode.
Contents:
- Installing the PSWindowsUpdate Module
- PSWindowsUpdate Cmdlets List
- Scan and Download Windows Updates with PowerShell
- Installing Windows Updates with PowerShell (Install-WindowsUpdate)
- Install Windows Update on Remote Computers with PowerShell
- Check Windows Update History with PowerShell (Get-WUHistory)
- Uninstalling Windows Updates with PowerShell (Remove-WindowsUpdate)
- How to Hide Windows Updates with PowerShell?
Installing the PSWindowsUpdate Module
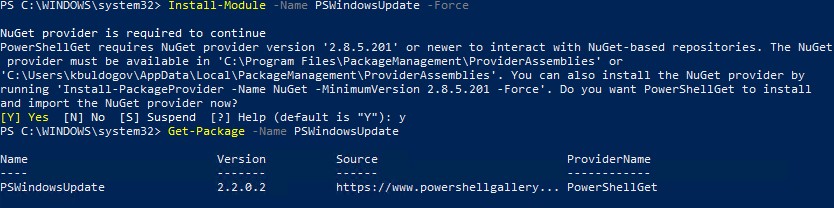
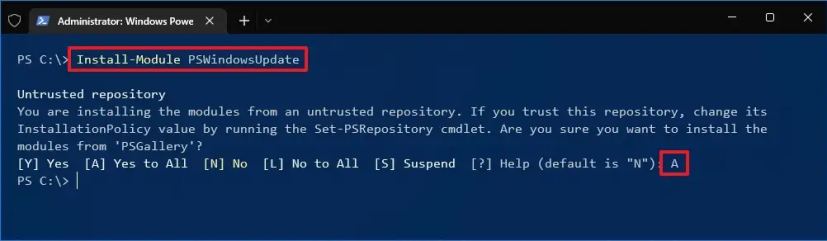
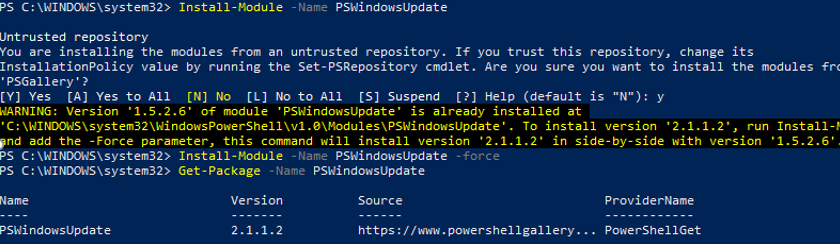
You can install the PSWindowsUpdate module on Windows 10/11 and Windows Server 2022/2019/2016 from the online repository (PSGallery) using the PackageManagement with a single command:
Install-Module -Name PSWindowsUpdate -Force
After the installation is complete, you need to check the package:
Get-Package -Name PSWindowsUpdate
When installing the PowerShell module on earlier versions of Windows 2012R2/Windows 8.1 and below, you may receive an error:
Install-Module: Unable to download from URI.Unable to download the list of available providers. Check your internet connection.
To install the module, you need to use the TLS 1.2 protocol for connection. Enable it for the current PowerShell session with the command:
[Net.ServicePointManager]::SecurityProtocol = [Net.SecurityProtocolType]::Tls12
PowerShell Install-Module Error: Unable to Download from URI
If you have an older Windows version (Windows 7/8.1/Windows Server 2008 R2/2012 R2) or you don’t have direct Internet access, you can install PSWindowsUpdate manually (check the guide “How to install PowerShell modules offline?”).
- Download the PSWindowsUpdate module to any online computer:
Save-Module –Name PSWindowsUpdate –Path C:ps; - Copy the module to the following folder on the target computer
%WINDIR%System32WindowsPowerShellv1.0Modules;
- Configure the PowerShell script execution policy:
Set-ExecutionPolicy –ExecutionPolicy RemoteSigned -force - You can now import the module into your PowerShell session:
Import-Module PSWindowsUpdate
Note. In Windows 7/Windows Server 2008 R2, when importing the PSWindowsUpdate module, the following error may appear: The term “Unblock-File” is not recognized as the name of a cmdlet. The cause is that the module uses some functions that appeared only in PowerShell 3.0. To use these functions, you will have either to update the PowerShell version or delete the | Unblock-File line from the PSWindowsUpdate.psm1 file manually.
After installing the PSWindowsUpdate module on your computer, you can remotely install it on other computers or servers using the Update-WUModule cmdlet. For example, to copy the PSWindowsUpdate module from your computer to two remote hosts, run the commands (you need access to the remote servers via the WinRM protocol):
$Targets = "lon-fs02", "lon-db01"

Update-WUModule -ComputerName $Targets –Local
To save (export) the PoSh module to a shared network folder for further importing on other computers, run:
Save-Module -Name PSWindowsUpdate –Path \lon-fs02psmodules
PSWindowsUpdate Cmdlets List
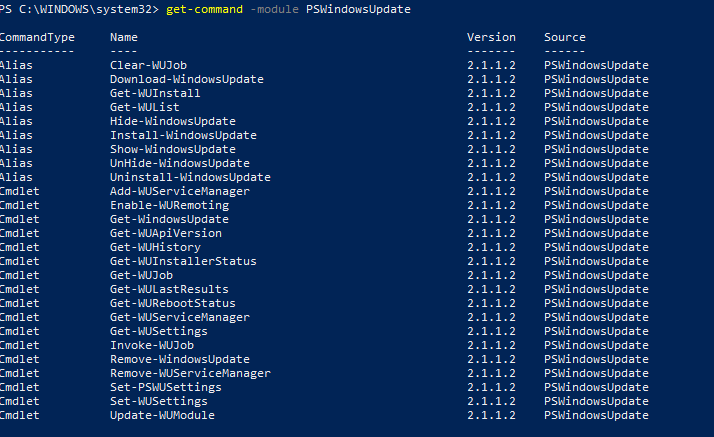
You can display the list of available cmdlets in the PSWindowsUpdate module as follows:
get-command -module PSWindowsUpdate
Let’s describe the usage of the module commands in brief:
- Clear-WUJob – use the Get-WUJob to clear the WUJob in Task Scheduler;
- Download-WindowsUpdate (alias for
Get-WindowsUpdate –Download) — get a list of updates and download them; - Get-WUInstall, Install-WindowsUpdate (alias for
Get-WindowsUpdate –Install) – install Windows updates; - Hide-WindowsUpdate (alias for
Get-WindowsUpdate -Hide:$false) – hide update; - Uninstall-WindowsUpdate – remove update using the Remove-WindowsUpdate;
- Add-WUServiceManager – register the update server (Windows Update Service Manager) on the computer;
- Enable-WURemoting — enable Windows Defender firewall rules to allow remote use of the PSWindowsUpdate cmdlets;
- Get-WindowsUpdate (Get-WUList) — displays a list of updates that match the specified criteria, allows you to find and install the updates. This is the main cmdlet of the PSWindowsUpdate module. Allows to download and install updates from a WSUS server or Microsoft Update. Allows you to select update categories, specific updates and set the rules of a computer restart when installing the updates;
- Get-WUApiVersion – get the Windows Update Agent version on the computer;
- Get-WUHistory – display a list of installed updates (update history);
- Get-WUInstallerStatus — check the Windows Installer service status;
- Get-WUJob – check for WUJob update tasks in the Task Scheduler;
- Get-WULastResults — dates of the last search and installation of updates (LastSearchSuccessDate and LastInstallationSuccessDate);
- Get-WURebootStatus — allows you to check whether a reboot is needed to apply a specific update;
- Get-WUServiceManager – list update sources;
- Get-WUSettings – get Windows Update client settings;
- Invoke-WUJob – remotely call WUJobs task in the Task Scheduler to immediately execute PSWindowsUpdate commands;
- Remove-WindowsUpdate – allows to uninstall an update by KB ID;
- Remove-WUServiceManager – disable Windows Update Service Manager;
- Set-PSWUSettings – save PSWindowsUpdate module settings to the XML file;
- Set-WUSettings – configure Windows Update client settings;
- Update-WUModule – update the PSWindowsUpdate module (you can update the module on a remote computer by copying it from the current one, or updating from PSGallery);
- Reset-WUComponents – allows you to reset the Windows Update agent on the computer to the default state.
To check the current Windows Update client settings, run the command:
Get-WUSettings
ComputerName                                 : WKS5S2N39S2
WUServer                                     : http://MN-WSUS:8530
WUStatusServer                               : http://MN-WSUS:8530
AcceptTrustedPublisherCerts                  : 1
ElevateNonAdmins                             : 1
DoNotConnectToWindowsUpdateInternetLocations : 1
TargetGroupEnabled                           : 1
TargetGroup                                  : ServersProd
NoAutoUpdate                                 : 0
AUOptions                                    : 3 - Notify before installation
ScheduledInstallDay                          : 0 - Every Day
ScheduledInstallTime                         : 3
UseWUServer                                  : 1
AutoInstallMinorUpdates                      : 0
AlwaysAutoRebootAtScheduledTime              : 0
DetectionFrequencyEnabled                    : 1
DetectionFrequency                         : 4
In this example, the Windows Update agent on the computer is configured with a GPO to receive updates from the local WSUS server.
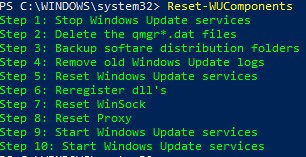
The Reset-WUComponents -Verbose cmdlet allows you to reset all Windows Update Agent settings, re-register libraries, and restore the wususerv service to its default state.
Scan and Download Windows Updates with PowerShell
You can list the updates available for the current computer on the update server using the Get-WindowsUpdate or Get-WUList commands.

To check the list of available updates on a remote computer, run this command:
Get-WUList –ComputerName server2
You can check where your Windows should receive updates from. Run the following command:
Get-WUServiceManager
ServiceID IsManaged IsDefault Name
--------- --------- --------- ----
8b24b027-1dee-babb-9a95-3517dfb9c552 False False DCat Flighting Prod
855e8a7c-ecb4-4ca3-b045-1dfa50104289 False False Windows Store (DCat Prod)
3da21691-e39d-4da6-8a4b-b43877bcb1b7 True True Windows Server Update Service
9482f4b4-e343-43b6-b170-9a65bc822c77 False False Windows Update

As you can see, the computer is configured to receive updates from the local WSUS server (Windows Server Update Service = True). In this case, you should see a list of updates approved for your computer.
If you want to scan your computer against Microsoft Update servers on the Internet (in addition to Windows updates, these servers contain Office and other Microsoft product updates), run this command:
Get-WUlist -MicrosoftUpdate
You will get this warning:
Get-WUlist : Service Windows Update was not found on computer. Use Get-WUServiceManager to get registered service.
To allow scanning on Microsoft Update, run this command:
Add-WUServiceManager -ServiceID "7971f918-a847-4430-9279-4a52d1efe18d" -AddServiceFlag 7
You can now scan against Microsoft Update. In this case, additional updates were found for Microsoft Visual C ++ 2008 and Microsoft Silverlight.
To check the version of the Windows Update Agent on the computer, run the command:
Get-WUApiVersion
ComputerName PSWindowsUpdate PSWUModuleDll ApiVersion WuapiDllVersion
------------ --------------- ------------- ---------- ---------------
DESKTOP-J... 2.1.1.2 2.2.0.2 8.0 10.0.19041.1320

To remove specific products or KBs from the list of updates received by your computer, you can exclude them by:
- Category (
-NotCategory); - Title (
-NotCategory); - Update number (
-NotKBArticleID).
For example, let’s exclude OneDrive, driver updates, and the specific KB from the list:
Get-WUlist -NotCategory "Drivers" -NotTitle "OneDrive" -NotKBArticleID KB4489873
Installing Windows Updates with PowerShell (Install-WindowsUpdate)
To automatically download and install all available updates for your Windows device from Windows Update servers (instead of local WSUS), run the command:
Install-WindowsUpdate -MicrosoftUpdate -AcceptAll -AutoReboot
The AcceptAll parameter accepts the installation of all update packages, and AutoReboot allows Windows to automatically restart after the updates are installed.
You can also use the following options:
- IgnoreReboot – disable automatic reboot;
- ScheduleReboot – set the exact time to restart the computer.
You can save the update installation history to a log file (you can use it instead of WindowsUpdate.log file).
Install-WindowsUpdate -AcceptAll -Install -AutoReboot | Out-File "c:logs$(get-date -f yyyy-MM-dd)-WindowsUpdate.log" -force
You can install only the specific update packages by KB numbers:
Get-WindowsUpdate -KBArticleID KB2267602, KB4533002 -Install
In this case, you need to confirm the installation of each update manually.
If you want to exclude certain updates from the installation list, run this command:
Install-WindowsUpdate -NotCategory "Drivers" -NotTitle OneDrive -NotKBArticleID KB4011670 -AcceptAll -IgnoreReboot
Install Windows Update on Remote Computers with PowerShell
The PSWindowsUpdate module allows you to install updates remotely on multiple workstations or servers at once (the PSWindowsUpdate must be installed/imported on these computers). This is very convenient because the administrator doesn’t have to manually log on to remote Windows hosts to install updates. WinRM must be enabled and configured on remote computers (manually or via GPO).
Almost all PSWindowsUpdate module cmdlets allow you to manage and install Windows updates on remote computers with the –Computername attribute.
Install the PSWindowsUpdate module on remote computers and allow access via dynamic RPC ports to the dllhost.exe process in the Windows Defender Firewall. You can use the Invoke-Command cmdlet to configure the PSWindowsUpdate module on remote computers:
$Targets = "lon-fs02", "lon-db01"

Invoke-Command -ComputerName $Target -ScriptBlock {Set-ExecutionPolicy RemoteSigned -force }

Invoke-Command -ComputerName $Target -ScriptBlock {Import-Module PSWindowsUpdate; Enable-WURemoting}
The PSWindowsUpdate module can be used to remotely manage Windows updates both on computers in an AD domain and in a workgroup (requires PowerShell Remoting configuration for workgroup environment).
In order to manage updates on remote computers, you need to add hostnames to your winrm trusted host list or configure PowerShell Remoting (WinRM) via HTTPS:
winrm set winrm/config/client '@{TrustedHosts="server1,server2,…"}'
Or with PowerShell :
Set-Item wsman:localhostclientTrustedHosts -Value server1 -Force
The following command will install all available updates on three remote Windows hosts:
$ServerNames = "server1, server2, server3"

Invoke-WUJob -ComputerName $ServerNames -Script {ipmo PSWindowsUpdate; Install-WindowsUpdate -AcceptAll | Out-File C:WindowsPSWindowsUpdate.log } -RunNow -Confirm:$false -Verbose -ErrorAction Ignore
The Invoke-WUJob cmdlet (previously called Invoke-WUInstall) will create a scheduler task on the remote computer that runs under a local SYSTEM account.
You can specify the exact time to install Windows updates:
Invoke-WUJob -ComputerName $ServerNames -Script {ipmo PSWindowsUpdate; Install-WindowsUpdate –AcceptAll -AutoReboot | Out-File C:WindowsPSWindowsUpdate.log } -Confirm:$false -TriggerDate (Get-Date -Hour 22 -Minute 0 -Second 0)
You can check the status of the update installation task using the Get-WUJob:
Get-WUJob -ComputerName $ServerNames
If the command returns an empty list, then the update installation task on all computers has been completed.
You can install updates on a remote computer and send an email report to the administrator:
Install-WindowsUpdate -ComputerName nysrv1 -MicrosoftUpdate -AcceptAll - IgnoreReboot -SendReport –PSWUSettings @{SmtpServer="smtp.woshub.com";From="update_alert@woshub.com";To="wsus_admin@woshub.com";Port=25} -Verbose
Check Windows Update History with PowerShell (Get-WUHistory)
Using the Get-WUHistory cmdlet, you can get the list of updates installed on a computer earlier automatically or manually.

You can get the information about the installation date of a specific update:
Get-WUHistory| Where-Object {$_.Title -match "KB4517389"} | Select-Object *|ft

To find out if the specific update has been installed on multiple remote computers, you can use this PowerShell code:
"server1","server2" | Get-WUHistory| Where-Object {$_.Title -match "KB4011634"} | Select-Object *|ft
Check if the computer needs to be restarted after installing the update (pending reboot):
Get-WURebootStatus –ComputerName WKS21TJS

Check the value of the RebootRequired and RebootScheduled attributes.
You can generate a report with the dates when updates were last installed on all computers in the domain using the Get-ADComputer cmdlet (from the Active Directory for PowerShell module):
$Computers=Get-ADComputer -Filter {enabled -eq "true" -and OperatingSystem -Like '*Windows*' }

Foreach ($Computer in $Computers)

{

Get-WULastResults -ComputerName $Computer.Name|select ComputerName, LastSearchSuccessDate, LastInstallationSuccessDate

}
By analogy, you can find computers that have not installed updates for more than 60 days and display the result in the Out-GridView interactive table:
$result=@()

Foreach ($Computer in $Computers) {

$result+= Get-WULastResults -ComputerName $Computer.Name

}

$result| Where-Object { $_.LastInstallationSuccessDate -lt ((Get-Date).AddDays(-60)) }| Out-GridView
Uninstalling Windows Updates with PowerShell (Remove-WindowsUpdate)
You can use the Remove-WindowsUpdate cmdlet to correctly uninstall the updates with PowerShell. Just specify the KB number as an argument of the KBArticleID parameter. To delay automatic computer restart, add the –NoRestart option:
Remove-WindowsUpdate -KBArticleID KB4489873 -NoRestart
How to Hide Windows Updates with PowerShell?
You can hide the specific updates so they will be never installed by the Windows Update service on your computer (most often you need to hide the driver updates). For example, to hide the KB4489873 and KB4489243 updates, run these commands:
$HideList = "KB4489873", "KB4489243"

Get-WindowsUpdate -KBArticleID $HideList –Hide
Now the next time you scan for updates using the Get-WUlist command, the hidden updates won’t be displayed in the list of updates available for installation.
This is how you can display the list of updates hidden on this computer:
Get-WindowsUpdate –IsHidden
Notice that the H (Hidden) attribute has appeared in the Status column of hidden updates.

To unhide some updates, run this command:
Get-WindowsUpdate -KBArticleID $HideList -WithHidden -Hide:$false
or:
Show-WindowsUpdate -KBArticleID $HideList
For those who feel uncomfortable in the PowerShell console, I would recommend a graphic Windows Update MiniTool to manage updates in Windows 10/11 and Windows Server 2022/2019.
Начиная с версии Windows 10 1709, PowerShell обзавелся несколькими командлетами позволяющими выполнить установку обновлений.
Содержание
- Проверка Наличия Обновлений
- Установка Доступных Обновлений
- Дополнительные Командлеты
- Итог
Проверка Наличия Обновлений
Прежде чем выполнить обновление, нужно убедиться в их наличии. Дальнейшие действия предполагают, что командная оболочка PowerShell была запущена от имени администратора (Win+X, выбрать в открывшемся меню пункт Windows PowerShell (администратор)).
Выполняем проверку наличия новых обновлений.
Start-WUScan
Если выполнение команды завершилось выводом списка обновлений, то значит данные обновления в системе отсутствуют. В противном случае обновлений необходимых для установки нет.
Установка Доступных Обновлений
Установка ранне найденных обновлений выполняется командлетом Install-WUUpdates. Но простой запуск данного командлета ничего не даст. Так же как и подстановка UpdateID в качестве аргумента.
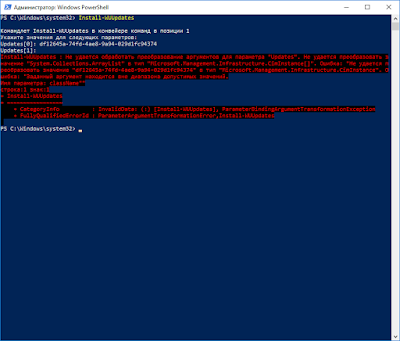
В качестве аргумента командлет Install-WUUpdates ожидает массив объектов типа Microsoft.Management.Infrastructure.CimInstance[], или же любой другой объект который можно привести к данному типу.
Получить подходящий объект можно из вывода командлета Start-WUScan.
$wu = Start-WUScan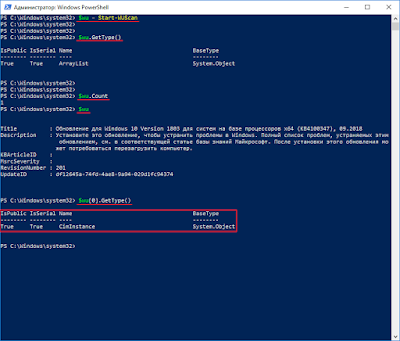
Переменная $wu в данном случае будет содержать массив объектов CimInstance. Как раз то, что необходимо командлету Install-WUUpdates.
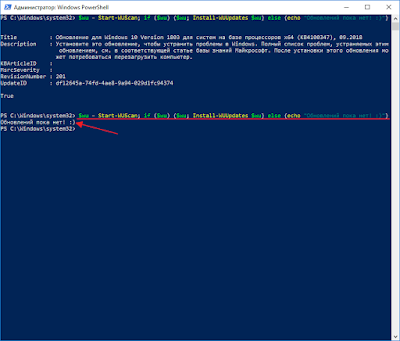
Install-WUUpdates $wuУчитывая все вышесказанное составим итоговую команду выполнения установки обновлений.
$wu = Start-WUScan; if ($wu) {$wu; Install-WUUpdates $wu} else {echo "Обновлений пока нет! :)"}

Данная команда запускает процесс получения списка обновлений в переменную $wu, и если список не пуст, то запускается командлет Install-WUUpdates с переданным списком ей списком $wu в качестве аргумента.
Запуск данной команды, при отсутствии доступных обновлений завершится соответствующим сообщением.
Выполнение процедуры по отдельности будет выглядеть следующим образом.
# Выпоолняем получение списка обновлений в переменную $wu
$wu = Start-WUScan

# Выводим содержимое переменной $wu чтобы убедиться в наличии в ней данных (обновлений)
$wu

# Выполняем установку обновлений при условии что переменная $wu не пуста
Install-WUUpdates $wu
Дополнительные Командлеты
Get-WUIsPendingReboot — проверяет, необходимо ли выполнять перезагрузку операционной системы после выполнения процедуры обновления. Возможные варианты вывода True (перезагрузка необходима) или False (перезагружать не нужно).

Get-WULastScanSuccessDate — выводит дату последнего сканирования обновлений выполненного через Центр обновления Windows.
Get-WULastInstallationDate — выводит дату последней установки обновлений выполненных через Центр обновления Windows.

Install-WUUpdates -DownloadOnly … — выполняет загрузку указанного списка обновлений без установки.
Итог
Темы освещенные в данной статье: Как выполнить обновление Windows 10 последних редакций штатными средствами через PowerShell. Как выполнить проверку наличия обновлений Windows 10 в PowerShell. Как выполнить установку обновлений командлетом Install-WUUpdates.
Windows 10 Powershell is a very powerful command-line tool.
With the latter, you can very easily download and install Windows Update.
This goes even further because you can control Windows Update such as restart expectations to install the updates.
This article gives you most of the Powershell commands and cmdlets to download and install Windows Update updates.
Introduction
There are two solutions for finding and installing PowerShell updates:
- WindowsUpdateProvider: This group of cmdlets is included by default in Windows 10 and Windows Server 2018.
- PSWindowsUpdate: Additional module which offers additional functionalities such as listing the update history.
This article details these two groups of Powershell commands.
To list and display the latest updates installed, the command to use is:
gwmi win32_quickfixengineering |sort installedon -descWindowsUpdateProvider
Here is the list of available commands:
- Start-WUScan: Check for available updates.
- Install-WUUpdates: Download and install updates.
- Get-WUIsPendingReboot: Indicates if an update is waiting to install at the next reboot. It returns true in this case.
- Get-WULastInstallationDate: Returns the date of the last installation of an update.
- Get-WULastScanSuccessDate: Returns the date of the last successful Windows Update verification.
- Get-WUAVersion: Returns the version of the Windows Update client.
Check for updates
The Start-WuScan command is used to check for updates.
If you do not specify any parameters, all updates that apply to the system will appear in the results.
To filter on software updates:
Start-WUScan -SearchCriteria "Type='Software' AND IsInstalled=0"But it can work on a remote computer.
$u = Invoke-Command -ComputerName MonPC -ScriptBlock {Start-WUScan -SearchCriteria "UpdateId='' AND IsInstalled=1"} -Credential administrateuradmin$ u then contains the list of available updates.
Install updates
Then we use the Powershell command Install-WUUpdates to install the update.
Then to install the pending updates.
$Updates = Start-WUScan
Write-Host "Updates Found: " $Updates.Count
Install-WUUpdates -Updates $Updates
Finally, the command to update a remote PC:
$cs = New-CimSession -ComputerName MonPc -Credential Credential admin admin
Install-WUUpdates -Updates $u -CimSession $cs
The parameter -DownloadOnly allows you to download the update without installing it.
Windows Update PowerShell Module
Installation
By default PowerShell does not allow you to control Windows Update.
But we can extend these functions by installing the Windows Update PowerShell Module.
Set-ExecutionPolicy -ExecutionPolicy Unrestricted
Import-Module PSWindowsUpdate
Powershell Command-List
Here are the Powershell cmdlets available to control Windows Update:
- Download-WindowsUpdate (aka Get-WindowsUpdate -Download) : Download updates
- Get-WUList: Get a list of available updates that meet certain criteria.
- Get-WUInstall, Install-WindowsUpdate: Download and install updates.
- Add-WUOfflineSync: Save the scanner service offline
- Get-WUServiceManager: Display the configuration of the Service Manager.
- Get-WUHistory: Get a list of previous updates.
- Get-WUInstallerStatus: Check the status of the Windows Update installer.
- Get-WURebootStatus: Check the restart status of Windows Update and offers to restart the PC.
- Get-WUUninstall: Uninstall the update.
- Hide-WindowsUpdate (alias Get-WindowsUpdate -Hide: $ false): hide an update.
- Remove-WUOfflineSync: Unregister the offline scanner service.
Check for updates
Here is the Powershell command to list the Windows Update updates awaiting installation:
Get-WUlistAnd to list the updates from a remote PC:
Get-WUList -ComputerName NomDeLaMachineInstall updates
Here is the command to install all the updates:
Install-WindowsUpdate -AcceptAllAnd to force the restart:
Install-WindowsUpdate -AcceptAll -AutoRebootBut also to install specific updates in PowerShell:
Get-WindowsUpdate -KBArticleID KB2267602, KB4533002 -InstallAnd finally to exclude updates, here is the PowerShell command:
Install-WindowsUpdate -NotCategory "Drivers" -NotTitle OneDrive -NotKBArticleID KB4011670 -AcceptAll -IgnoreRebootInstall an update on a remote PC
And if you want to install Windows Update updates by PowerShell on remote PCs:
$Serveurs= "serveur1, serveur2, serveur3"
Invoke-WUJob -ComputerName $ServerNames -Script {ipmo PSWindowsUpdate; Install-WindowsUpdate -AcceptAll | Out-File C:WindowsPSWindowsUpdate.log } -RunNow -Confirm:$false
Block and Hide an update
$HideList = "KB4489873", "KB4489243"
Get-WindowsUpdate -KBArticleID $HideList –Hide
Finally to list the hidden updates:
Get-WindowsUpdate –IsHiddenFinally to unlock updates, here are two different Powershell commands:
Get-WindowsUpdate -KBArticleID $HideList -WithHidden -Hide:$false
Show-WindowsUpdate -KBArticleID $HideList
Uninstall an update
To uninstall an update with PowerShell, we use Get-WUUninstall:
Get-WUUninstall -KBArticleID KBXXX
Ways to Get Windows Update With PowerShell on Windows 10. – PowerShell options have occupied locations on the Win+X menu replacing Command prompt. Microsoft is emphasizing the use of this Command line shell on Windows 10. So let’s learn to use PowerShell to receive the Windows update on Windows 10. See a very interesting guide in this concern How to Create Restore Point on Windows 10 Using PowerShell.
PowerShell, however, was misunderstood to be the replacement for Command Prompt. This is why users did not use PowerShell as much as they use command prompt. There is nothing to be feared of while using the PowerShell. It has a completely different purpose except the inclusion and execution using commands thing in the former.You can update and upgrade your Windows version easily by using the PowerShell.
Launched in 2006, this tool has established itself to be the first choice for network administrators and advanced users altogether. Not just this, it has even extended its functionality by coming with the Linux versions as well. The Powershell, being a framework, targets to achieve configuration management and task automation. It consists of a command shell and a language based on the NET framework.
This article will tell you that how you can get Windows Update With PowerShell. So without wasting more time, let’s get started.
Section 1 – Installation of PowerShell Windows Update Module
Read the steps given below carefully to install this module on your system.
Step 1 – Go to Microsoft TechNet and download the zip file named PSWindowsupdate.zip from there.
Step 2 – Right click on the downloaded file and choose Extract all. This will make a separate folder for its components (file’s).
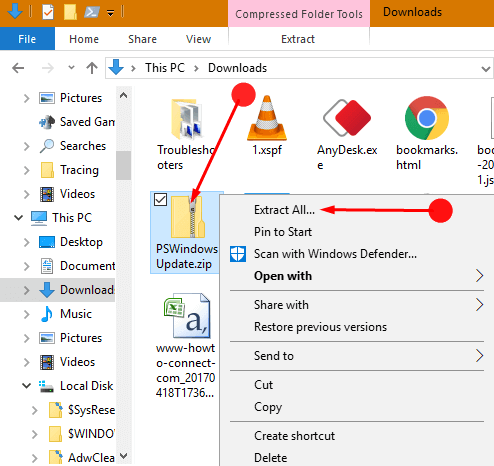
Step 3 – Select a destination or extract the Zip content (archive) to C: > Windows > System32 > WindowsPowerShell > v1.0 > Modules
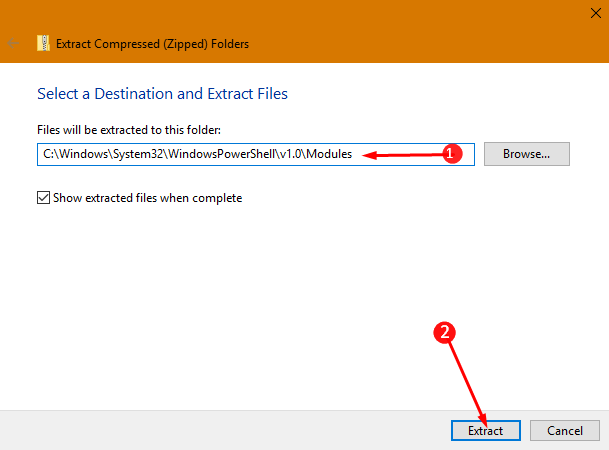
Step 4 – After clicking extract, click on Continue on the Destination Folder Access Denied pop up.

Step 5 – Open elevated PowerShell (as an admin) and change the policy from Restricted to RemoteSigned. Just type in the following cmdlet:
Set-ExecutionPolicy RemoteSigned
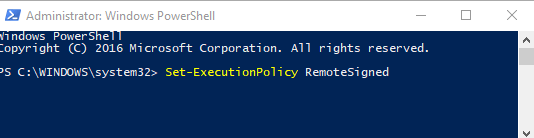
Enter Y to accept the above-mentioned command. This will allow you to run scripts of PowerShell from any unknown publisher as well.
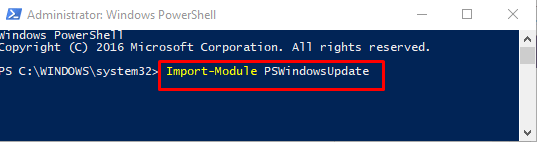
Step 6 - Import the PSWindowsUpdate module with the following command:
Import-Module PSWindowsUpdate
Step 7 – You can also get a complete list of all cmdlets for PSWindowsUpdate through the following command:
Get-Command-Module PSWindowsUpdate
Section 2 – Add Support for other products (Optional)
Step 1 – Go to the Settings app > update & Security > Windows Update > Advanced Options to change your preferences if you wish to receive updates to other Microsoft products while updating your Windows.
Enable the same facility in PSWindowsUpdate using the following command:
Add-WUServiceManager-ServiceID 7971f918-a847-4430-9279-4a52d1efe18d
Type Y to accept the command and entering it for execution
Section 3 – Check, Install or hide Windows Update with PowerShell anytime
Step 1 – To obtain the list of all the updates, type the following cmdlet:
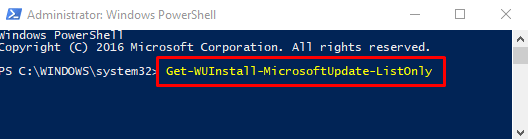
Get-WUInstall-MicrosoftUpdate-ListOnly
Step 2 – To obtain/ check updates and feature upgrades that are available for Windows, type the following cmdlet.
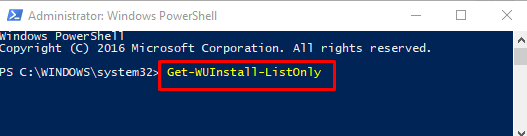
Get-WUInstall-ListOnly
Step 3 – Simply filter the updates with the full or partial title of an update to hide it from the list.
Step 4 – Now type – Hide-WUUpdate-Title “Microsoft*”-Confirm: $ False
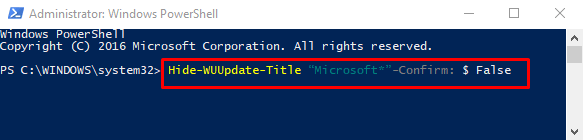
This command will hide all the updates having the work Microsoft in their title.
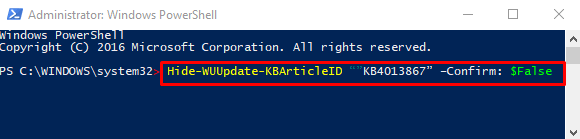
Step 5 – You can even hide any update using KB ID instead of using the title. Use the following command:
Hide-WUUpdate-KBArticleID “”KB4013867” –Confirm: $False
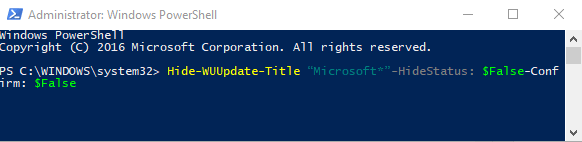
To unhide the updates or feature upgrades:
KB ID or using filters or titles can also unhide an update in the list. Use the following cmdlet for this:
Hide-WUUpdate-Title “Microsoft*”-HideStatus: $False-Confirm: $False
To install all updates with manually handling rejection and acceptance requests from each, use the following cmdlet:
Get-WUInstall
To add additional Microsoft updates, use:
Get-WUInstall-MicrosoftUpdate
Step 8 – Enter Y to accept and N to reject each update manually.
Step 9 – Without accepting manually, switch to the automatic mode by adding the parameter Autoboot or AutoAccept to the command to restart the system.
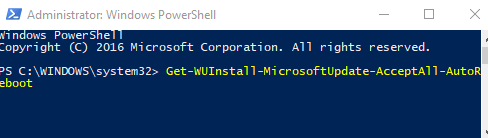
Get-WUInstall-MicrosoftUpdate-AcceptAll-AutoReboot
Step 10 – You can hide or unhide feature upgrades like Windows installer builds as we did for the case of updates (to hide them).
Section 4 – Uninstalling an Update or to Check the Update History
Step 1 – Enter the following command to check the update history anytime:
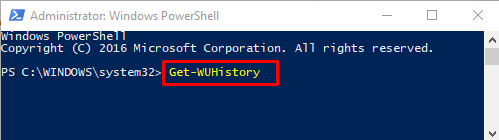
Get-WUHistory
Step 2 – Uninstall the updates using the following cmdlet:
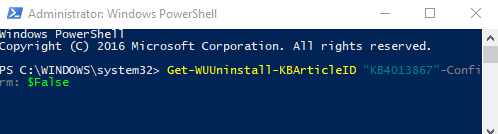
Get-WUUninstall-KBArticleID “KB4013867”-Confirm: $False
Section 5 – To obtain Help (the final section)
PowerShell help is also available but you need to type certain cmdlets for that. For example, to get help about Hide-WUUpdate, type the following cmdlet.
Get-Help Hide-WUUpdate

Accept the command by entering Y in the prompt. Get-Help has to be updated while running it for the first time. It is no major concern as it is only a one-time process and need not be done again and again.
That’s it; this is how you can easily Get Windows Update With PowerShell in Windows 10 anytime. Type and execute the commands carefully as failing to this can easily build-up errors in the smooth functioning of the system.
Windows Updates can be run from PowerShell and Command Prompt in Windows 11/10. In this article, we will be checking out how to do it. Windows Update is one of the most highlighted features of Windows 10. Because with the release of Windows 10, Windows was offered to the customers as a service rather than a product. Under the scenario of Software as a Service, this led to the Windows Updates on Windows 10 being on by default and without an option for anyone to disable it.
Now, while some criticized this move by Microsoft, ultimately this is a step towards the customer’s greater good. Because Windows Update helps the users stay secured against all kinds of threats and provide them with the latest and the greatest from Microsoft. So, for those who appreciate this service, today we are going to talk about another way to run these updates.
The following methods will be carried out to run Windows Update from Command Line on Windows 11/10-
- Using Windows Powershell.
- Using Command Prompt.
1] Run Windows Update using Windows Powershell
Running Windows Updates on Windows Powershell will require you to manually Install the Windows Update module, Get Windows Updates downloaded and Install Windows Updates. And for this, open Windows Powershell by searching for Powershell in the Cortana search box and run it with Administrator level privileges.
Install the PSWindowsUpdate Module
Type in,
Install-Module PSWindowsUpdate
to install the Windows Update module for Windows Powershell.
Check for Updates
After that,
Get-WindowsUpdate
to connect to the Windows Update servers and download the updates if found.
Install Updates
Finally, type in,
Install-WindowsUpdate
to install the Windows Updates downloaded on your computer.
Check for Microsoft Updates
Add-WUServiceManager -MicrosoftUpdate
Install specific updates only
Get-WindowsUpdate -KBArticleID "KB1234567" -Install
Hide specific Update
Install-WindowsUpdate -NotKBArticle "KB1234567" -AcceptAll
Skip Updates belonging to specific categories
Install-WindowsUpdate -NotCategory "Drivers","FeaturePacks" -AcceptAll
Related: Command-line switches to deploy Microsoft software Update packages
2] Run Windows Update using Command Prompt
Command Prompt on Windows Operating Systems exists since a very long time whereas Windows Powershell is comparatively new. Hence, it has similar capabilities to run Windows Updates, but the highlighting point here is that you do not need to download any module for Windows Updates.
First, open Command Prompt by searching for cmd in the Cortana search box and run it with Administrator level privileges.
Click on Yes for the UAC Prompt that you get.
Finally, type in the following commands and hit the Enter key in order to perform the respective operations,

Start checking for updates:
UsoClient StartScan
Start downloading Updates:
UsoClient StartDownload
Start installing the downloaded updates:
UsoClient StartInstall
Restart your device after installing the updates:
UsoClient RestartDevice
Check, Download and Install Updates:
UsoClient ScanInstallWait
It is worth noting that, the Command Prompt commands mentioned above are just meant for Windows 11/10 only.
Related read: How to Update Drivers using Command Prompt.
Hope you find this post useful.