You are here:
Home » Windows 10 » How To Clean Install Windows 10 From ISO File (Without USB/DVD)
Windows operating system’s performance deteriorates with time. The best possible fix to make Windows fast again is to reinstall or perform a clean install of Windows 10 by deleting files, settings, and installed programs.
Traditionally, when it comes to installing or reinstalling Windows, users prepare a bootable media and then use it to install/reinstall Windows operating system.
To clean install or reinstall Windows 10, you don’t need to prepare a bootable USB of Windows 10. All you need is Windows 10 ISO, which you can get from Microsoft with the help of the official Media Creation Tool.
Well, it’s possible to clean install or reinstall Windows 10 from an ISO file. Clean installing Windows 10 from ISO is not vastly different from clean installing Windows 10 from USB or DVD. The only difference is that we are not going to create bootable media while installing Windows 10 directly from the ISO file.
What about the product key?
Note that you won’t need a product key if you have legally upgraded your current PC from Windows 7/8.1 to Windows 10 and successfully activated it, before clean installing Windows 10 on the same PC. Likewise, if you got Windows 10 preloaded on your PC and activate your copy of Windows 10, you have nothing to worry about.
When you are prompted to enter a product key during the product installation, click the Skip button. Your PC will be automatically activated after installing Windows 10 as long as you have installed the same edition of Windows 10 was activated on your current PC by using the free upgrade offer.
However, when you clean install Windows 10 on a different PC or newly built PC, you will have to enter a valid product key.
If at all, Windows 10 is not activated after the clean install or reinstall, use the built-in activation troubleshooter to fix the issue.
Perform a clean install of Windows 10 from ISO image
Here is how to clean install Windows 10 from the ISO image file without having to create a bootable USB or DVD.
Step 1: If you haven’t downloaded your Windows 10 ISO yet, please follow the instructions in our download Windows 10 ISO from Microsoft guide to download the ISO image file.
Step 2: On your Windows 10 PC, where you want to perform a clean install of Windows 10, back up all data as we are going to clean install Windows 10 by removing installed programs and personal files. So it’s a good idea to backup everything using the right backup solution.
Step 3: Right-click on the Windows 10 ISO image file, and then click Mount option to mount the ISO image.
Step 4: Open up This PC, and then open up the newly mounted drive (containing Windows 10 installation files) by right-clicking on the drive and then clicking Open in new window option.
Step 5: Perform a double-click on the Setup.exe file to launch the Windows 10 Setup.
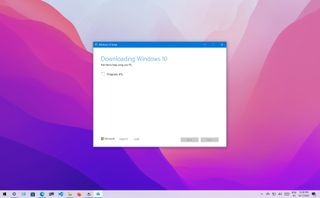
Step 6: When you see the following screen, select the first option labeled Download and install updates (recommended), or you can also choose the option titled Not right now, as we can always download and install updates after clean installing Windows 10.
If you have selected Download and install updates option, the setup will check for available updates and download them if available.
Step 7: Next is the user agreement screen where you need to click the Accept button to accept the license terms to install and use Windows 10.
Step 8: Once again, the setup might start looking for updates and download them.
Step 9: Once everything is ready, you will see Ready to install screen.
Step 10: Here, select Keep nothing if you want to perform a clean install of Windows 10 by removing all installed programs and data. We have chosen Keep personal files and apps as we don’t want to lose installed apps and important data.
And if you want to keep your data, please select Keep personal files option by clicking Change what to keep link.
Step 11: Finally, click the Install button to begin installing Windows 10.
Note that although the installation screen shows an “Upgrading” message, it’s actually clean installing. From here on, follow the straight-forward on-screen directions to complete installing or reinstalling Windows 10.
(Image credit: Future)
A clean installation of Windows 10 is the process of erasing everything to start with a fresh copy of the operating system when a computer has problems. For example, this method can resolve performance, memory, startup, shutdown, and app issues. Also, it’s perhaps the best approach to remove viruses and other types of malware, and it can help to improve battery life.
In addition, it’s an excellent solution to remove preloaded bloatware (unnecessary preloaded software) from Windows 10. You can use this method to decommission a computer without giving away your personal information. Or you can set up a new installation after replacing the hard drive.
Furthermore, if you have had the same setup for some time, a clean installation is a great option to upgrade to the latest version of Windows 10 or upgrade from an older version (such as Windows 7 and Windows 8.1), minimizing the risks of problems during and after the process.
This guide will walk you through the complete process of performing a clean installation of Windows 10.
How to prepare PC for clean install of Windows 10
As you prepare to proceed with a clean installation of Windows 10, completing some essential tasks is recommended to minimize issues and potential data loss.
If you already have a backup of the computer and files. You have an activation product key. The device can start from a USB flash drive, and non-essential peripherals are disconnected. Then, you can skip this part and jump to the bootable media creation and a clean install process.
Create backup
The install process of Windows 10 deletes everything on the drive, which means that backing up the entire device (or at least your files) is a crucial step unless you don’t have anything important you want to keep.
Back up entire system
You should create a temporary backup to revert the settings or recover files if something goes wrong during the installation.
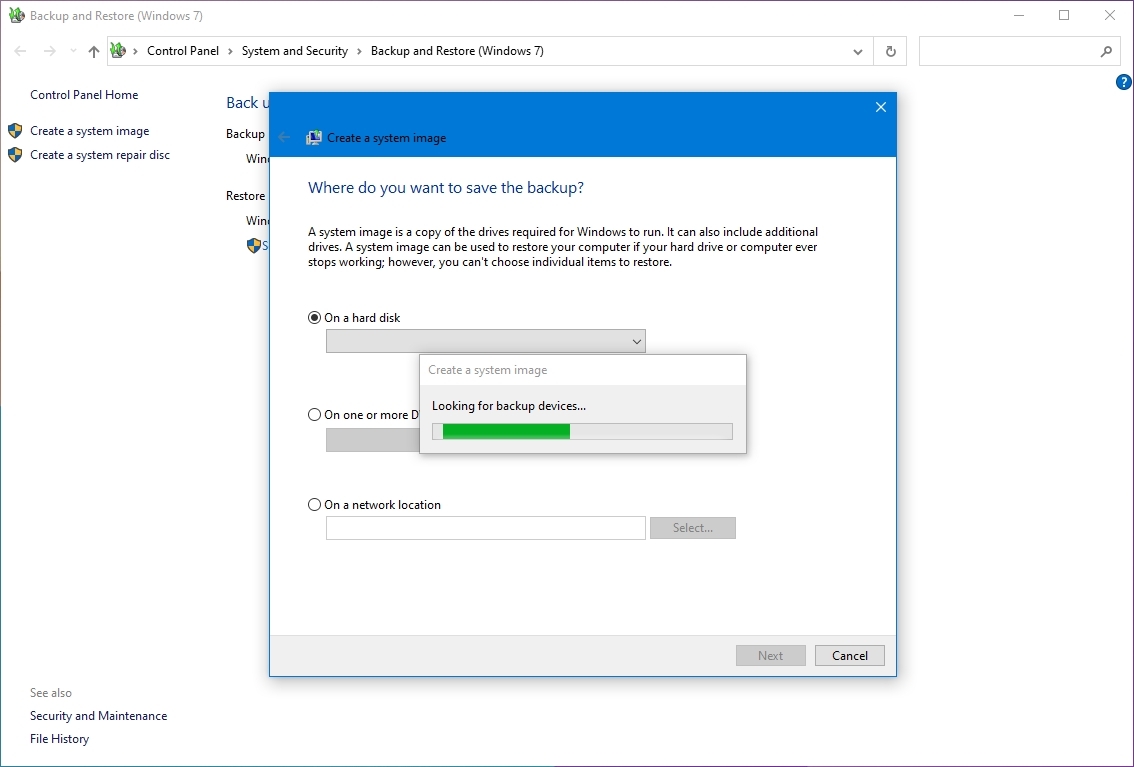
You can choose many different solutions, but the easiest way to create a full backup is to use the System Image Backup legacy tool available on Windows 10. It’s a deprecated feature, but it continues to work. The tool is also available for Windows 8.1 and Windows 7.
Back up files to OneDrive
If you need to back up your documents, pictures, and other important files, you can upload the data to OneDrive or another cloud storage service.
In case you use OneDrive, you can also use the backup settings page to sync your profile folders, including Documents, Pictures, and Desktop, to the cloud automatically.
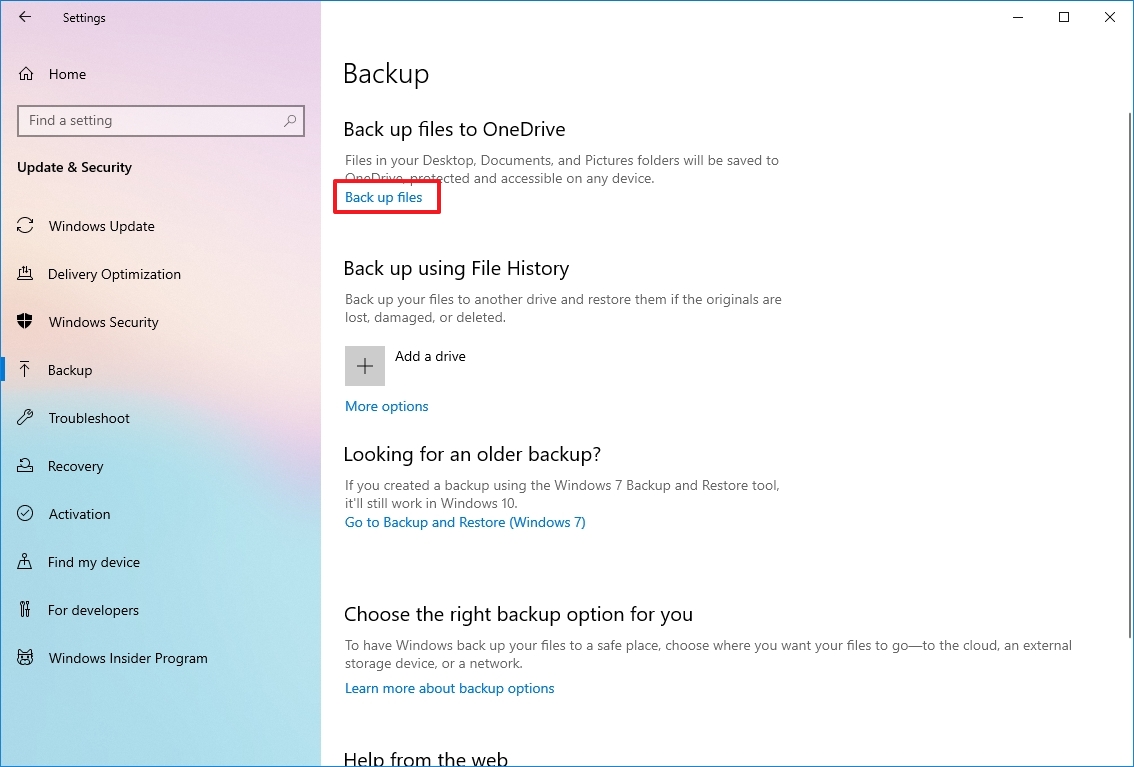
To configure OneDrive backup on Windows 10, use these steps:
- Open Settings.
- Click on Update & Security.
- Click on Backup.
- Under the «Back up files to OneDrive» section, click the «Back up files» option.
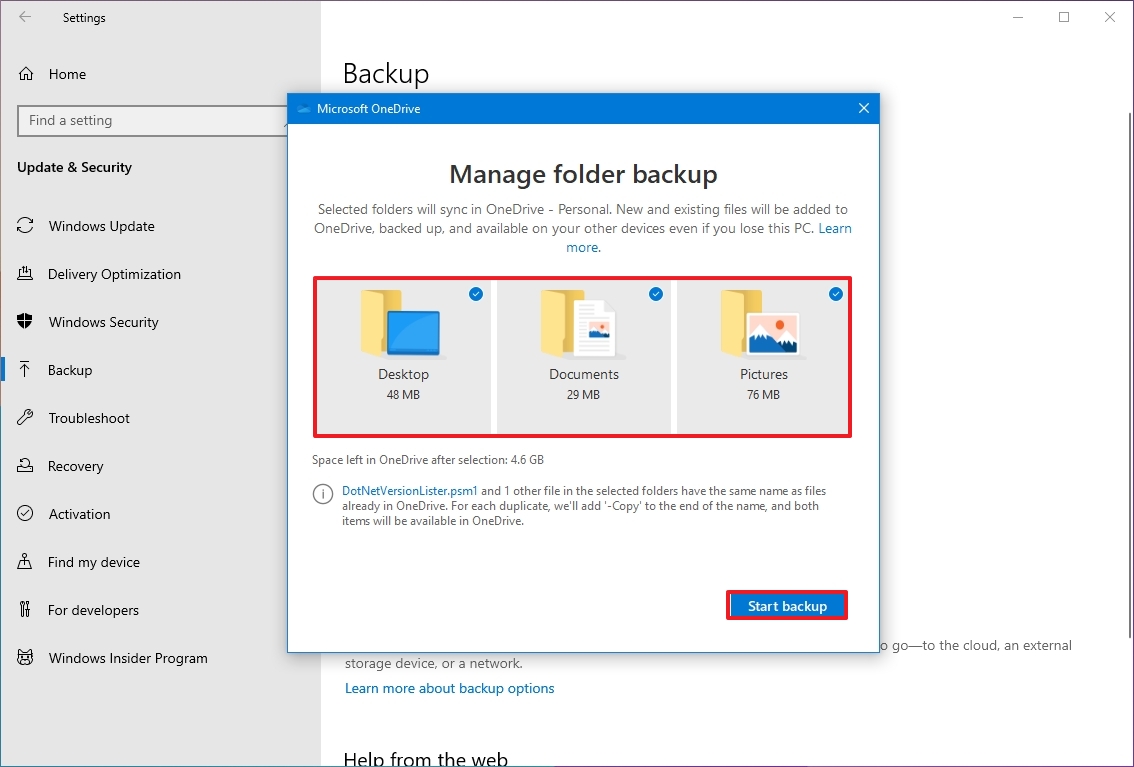
- (Optional) Click to clear the folder you don’t want to back up in the cloud.
- Click the Start backup button.
Back up files to external storage
If you have a lot of data, syncing the files to the cloud can be expensive and take a long time, and the available space may not even be enough. If this is the case, perhaps the best option would be to copy the files to an external USB hard drive.
To create a file backup manually, connect an external drive with enough storage space to your Windows 10 computer, and use these steps:
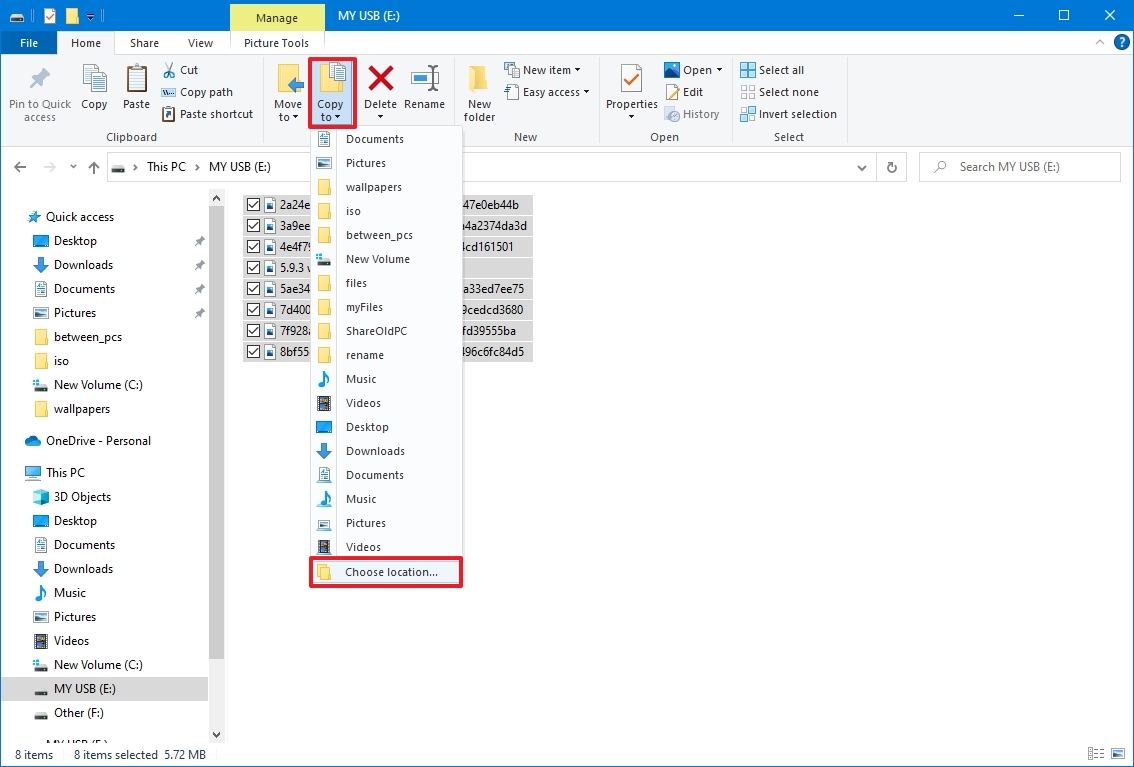
- Open File Explorer.
- Type the following path in the address bar and press Enter: %HOMEPATH%

- Click the Select all button from the «Home» tab.
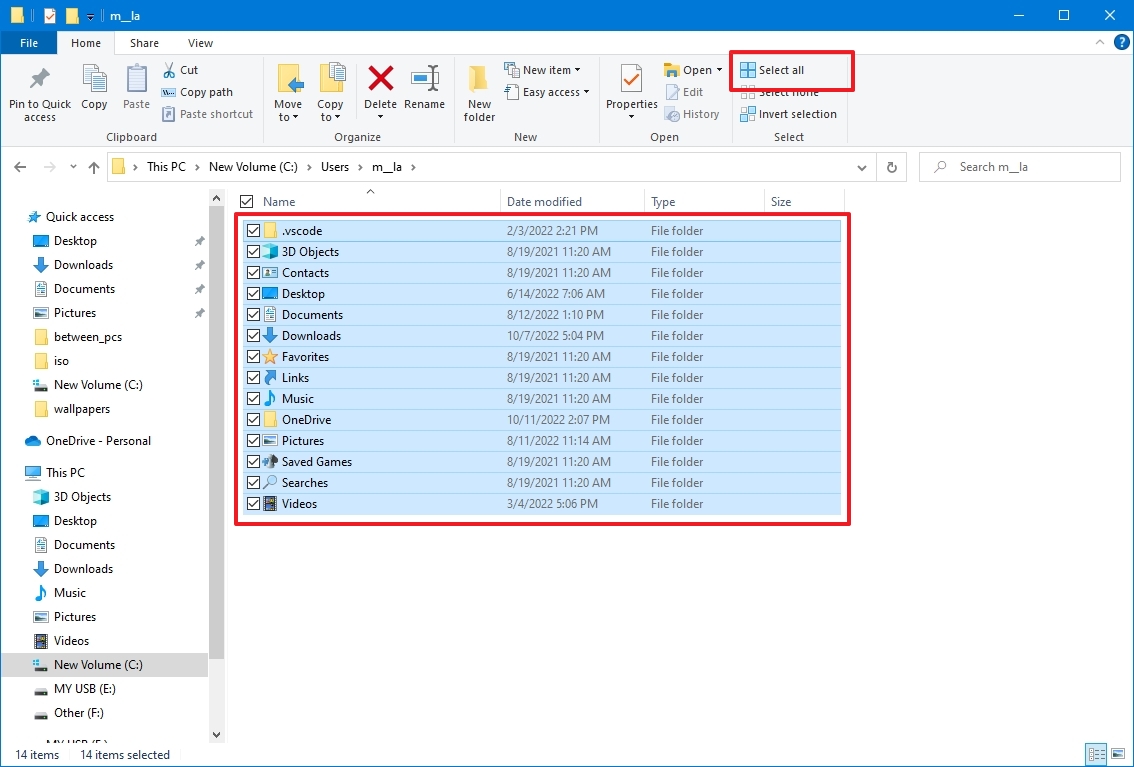
- Click the Copy to button from the «Home» tab.
- Select the Choose location option.
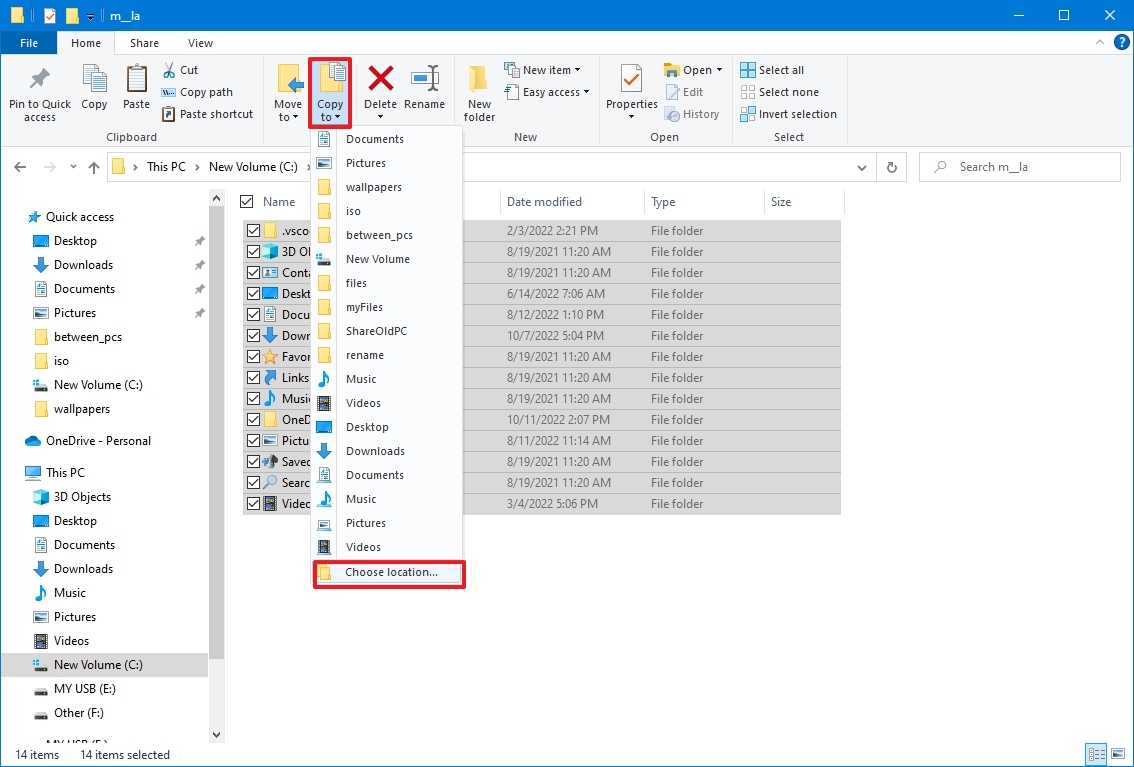
- Select the destination location.
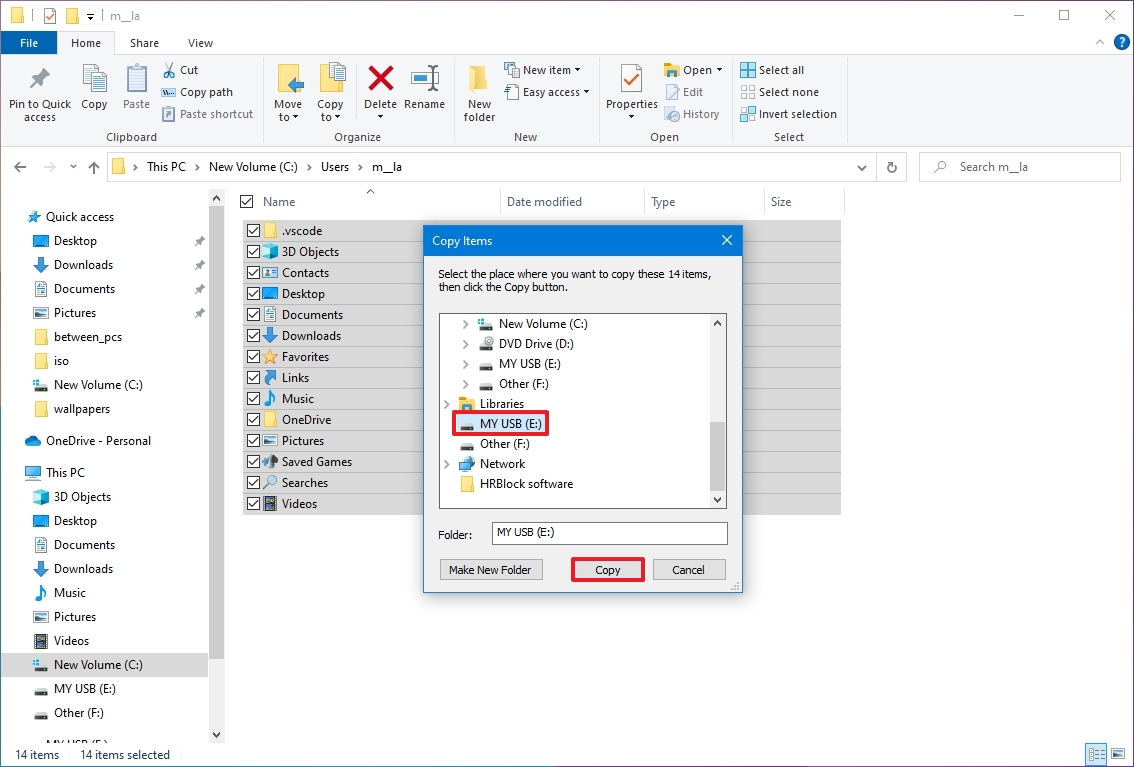
- Click the Copy button.
After you complete the steps, repeat the instructions to back up the remaining accounts (as necessary). In addition to copying your files, creating a list of the installed programs with their respective product keys (if applicable) is also a good idea to know the apps to reinstall after the installation.
If you usually don’t sync passwords and bookmarks with an online service, now’s a good time to export your browser credentials and links, as you’ll need them later to access your online services.
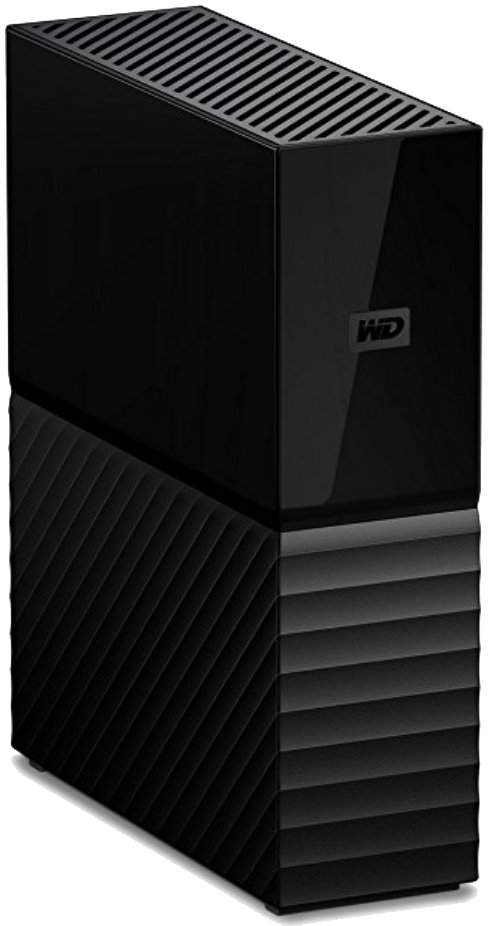
In case you don’t have an external hard drive or one without enough space, we recommend the Western Digital Elements Desktop Hard Drive because of its portability, capacity, and price.
(opens in new tab)
Western Digital Elements Desktop Hard Drive
Bulk storage
If you’re in the market for an external drive to store file backups, look no further than the Western Digital Elements Desktop Hard Drive. Get up to 18TB of storage and connect with USB-A 3.0 for fast file transfers.
Check Windows 10 activation
Although after activating Windows 10, you no longer have to provide a product key for reinstallation on the same computer. Once the new installation completes, the system will automatically reactivate when it connects to the internet.
To confirm whether Windows 10 is properly activated, use these steps:
- Open Settings.
- Click on Update & Security.
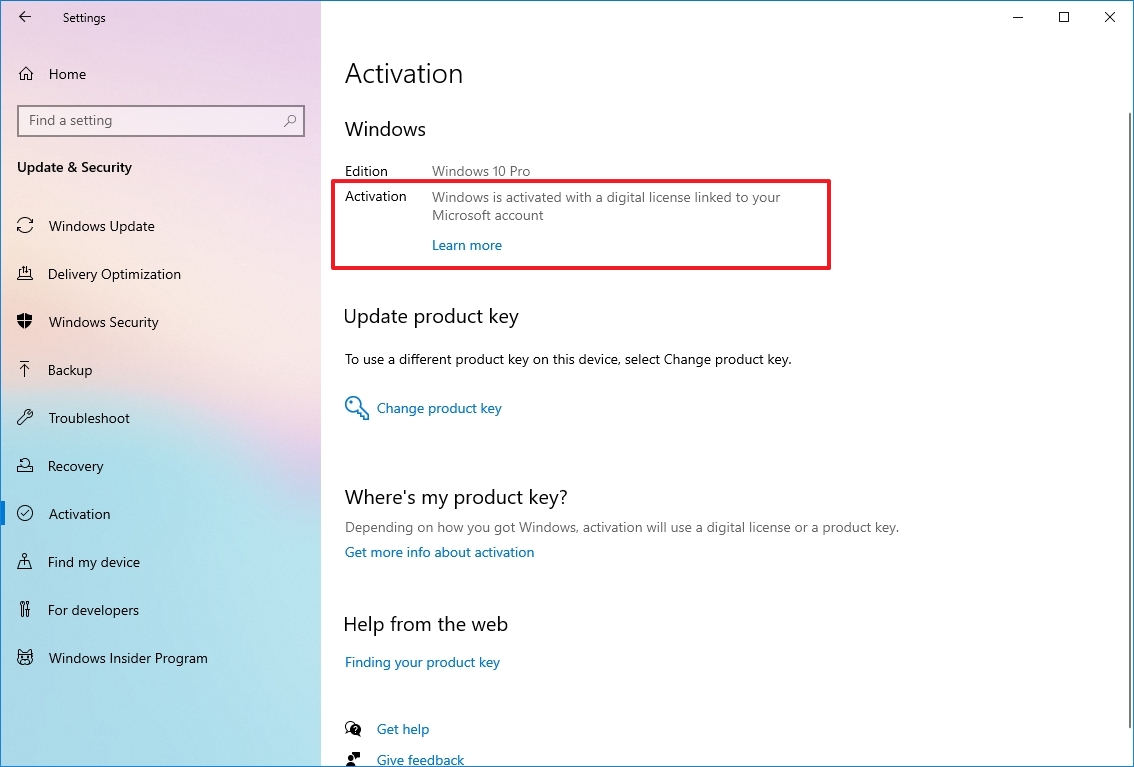
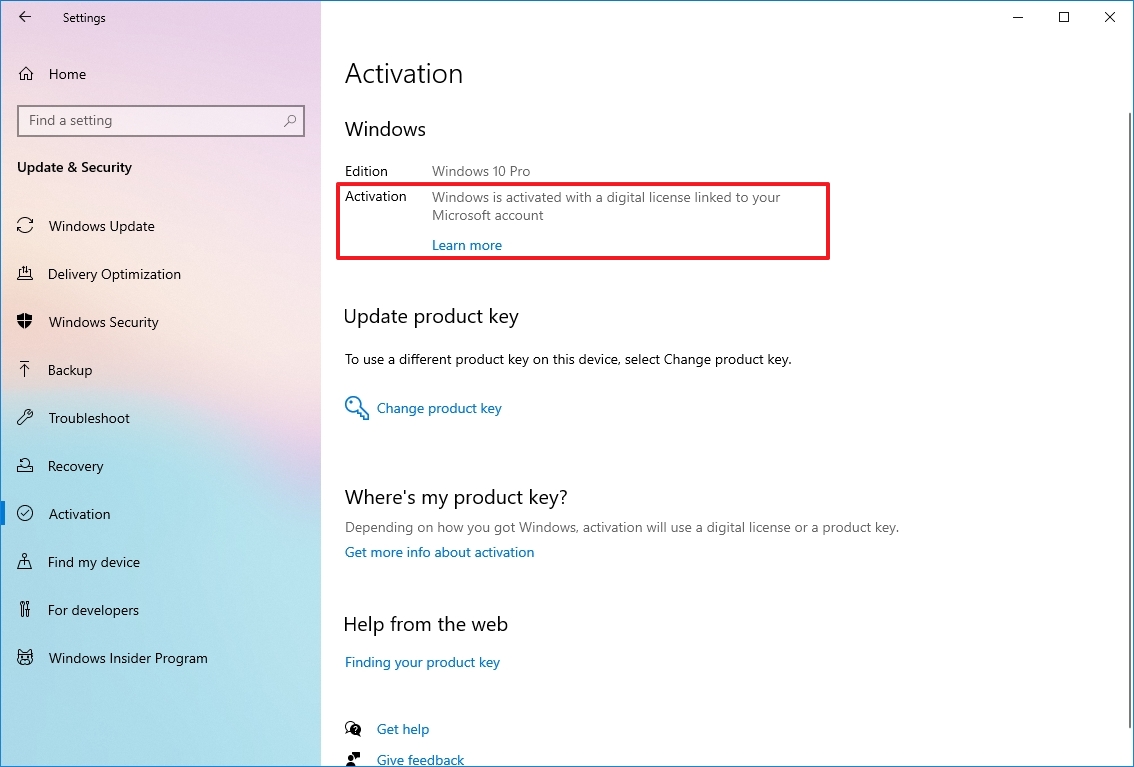
- Click on Activation.
- Under the «Windows» section, confirm the activation. If the computer has been properly activated, you’ll see one of these messages:
- Windows is activated with a digital license: The installation has been activated, but it isn’t linked to your Microsoft account.
- Windows is activated with a digital license linked to your Microsoft account: The installation has been activated, and the license is linked to your Microsoft account.
After you complete the steps, Windows 10 should automatically reactivate after the clean installation if your current setup is activated.
Obtain Windows 10 genuine key
If you have to set up an installation on a computer that never had an activated version of Windows 10, or you plan to upgrade from Windows 8.1 or Windows 7, you will have to purchase a valid license from the Microsoft Store (opens in new tab), Amazon, or another retailer.
Download essential drivers
Windows 10 can detect and install most drivers automatically. However, it’s usually recommended to download at least the essential drivers before the process (such as for the network adapter and graphics card), as a precaution, in case the setup fails to add these drivers correctly, especially on custom computer builds.
You can use our guide to install device drivers on Windows 10.
Here’s a list of the most popular manufacturers to download the latest device drivers:
- Dell (opens in new tab)
- HP (opens in new tab)
- Lenovo (opens in new tab)
- ASUS (opens in new tab)
- Acer (opens in new tab)
- Samsung (opens in new tab)
- MSI
Confirm Windows 10 requirements
If the device already has Windows 10, the following major update will likely meet the minimum hardware requirements. However, if you’re about to upgrade a computer running Windows 7 or Windows 8.1, you want to check that the device meets the minimum requirements.
Here are the minimum requirements to install Windows 10 versions 21H2, 22H2, and higher:
- Processor: 1GHz or System on a Chip (SoC).
- Memory: 1GB for 32-bit or 2GB for 64-bit.
- Storage: 32GB for 64-bit or 32-bit.
- Graphics card: DirectX 9 or later with WDDM 1.0 driver.
- Display: 800×600.
You can use these instructions to check the device technical specifications to confirm you can do a clean install of Windows 10.
Change boot order on firmware
It’s also important to ensure the computer can boot from a USB flash drive. If this is not the case, you’ll need to change the Basic Input/Output System (BIOS) or Unified Extensible Firmware Interface (UEFI) on the motherboard.
Change boot order using UEFI
On computers already running Windows 10 or 8.1, you can access the settings to change the boot order within the desktop interface.
UEFI settings on Windows 10
To change the UEFI settings on Windows 10, use these steps:
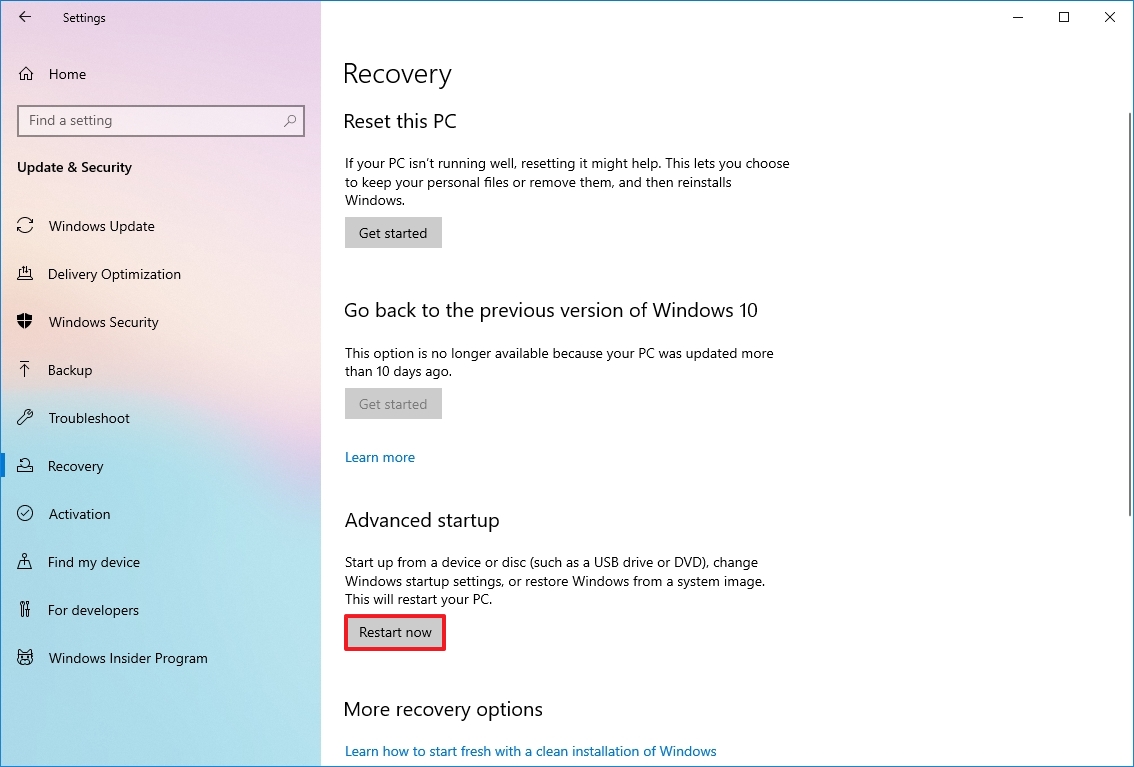
- Open Settings.
- Click on Update & Security.
- Click on Recovery.
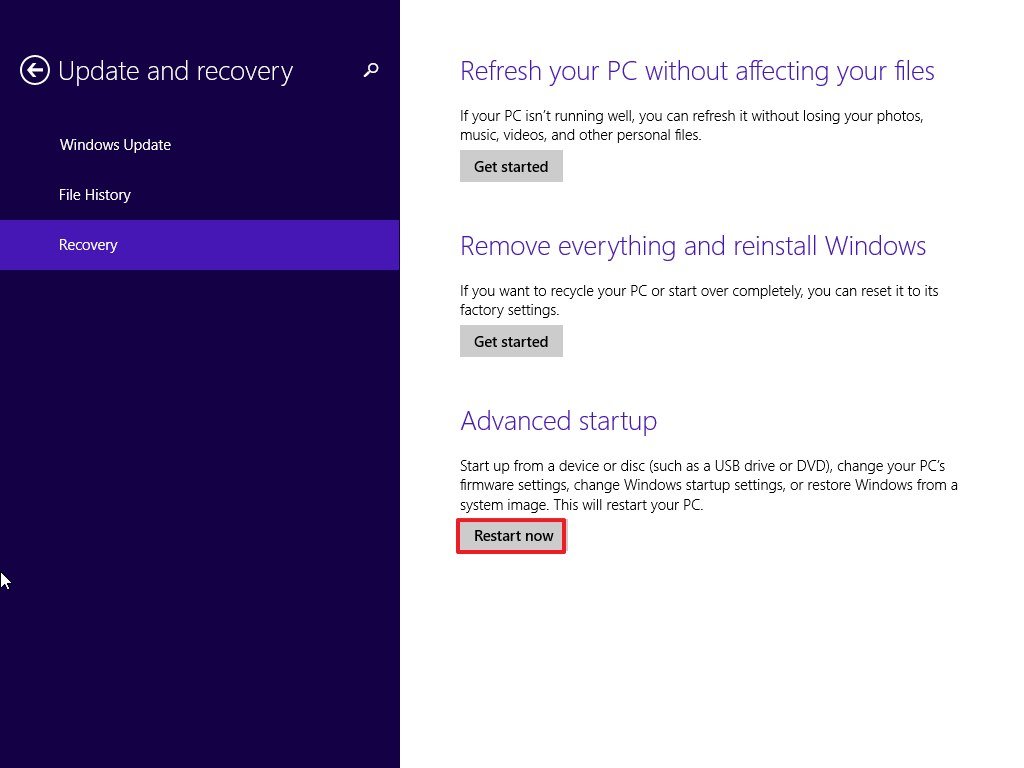
- Under the «Advanced startup» section, click the Restart now button.
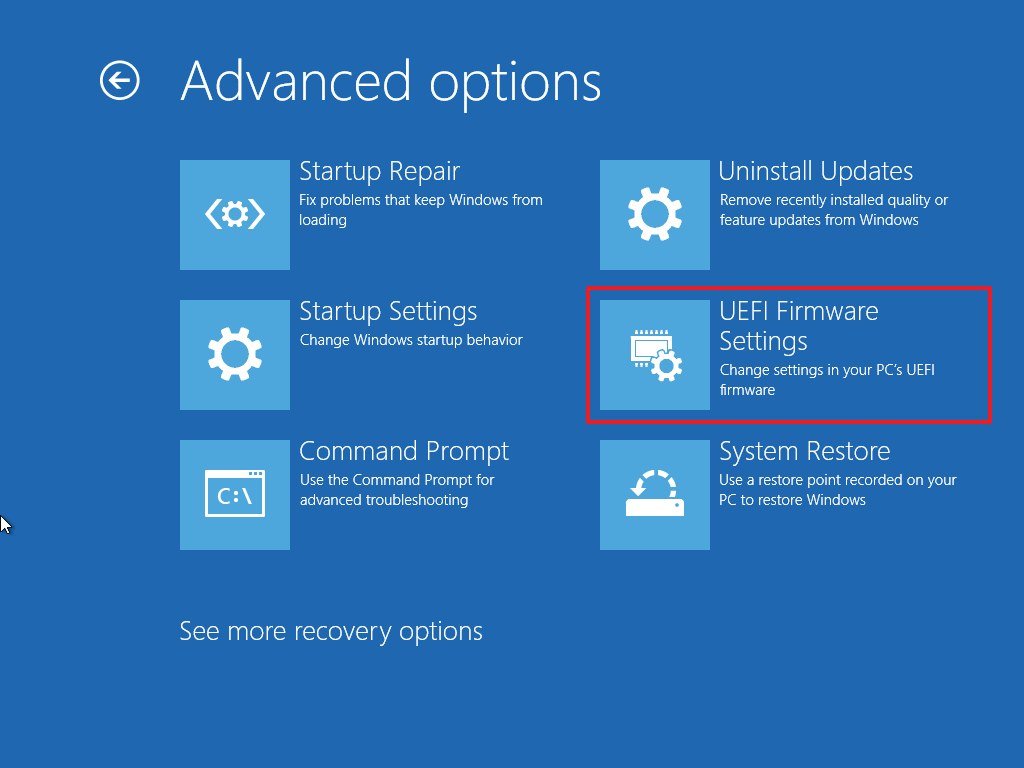
- Click the Troubleshoot button.
- Click on Advanced options.
- Click the «UEFI Firmware Settings» option.
- Click the Restart button.
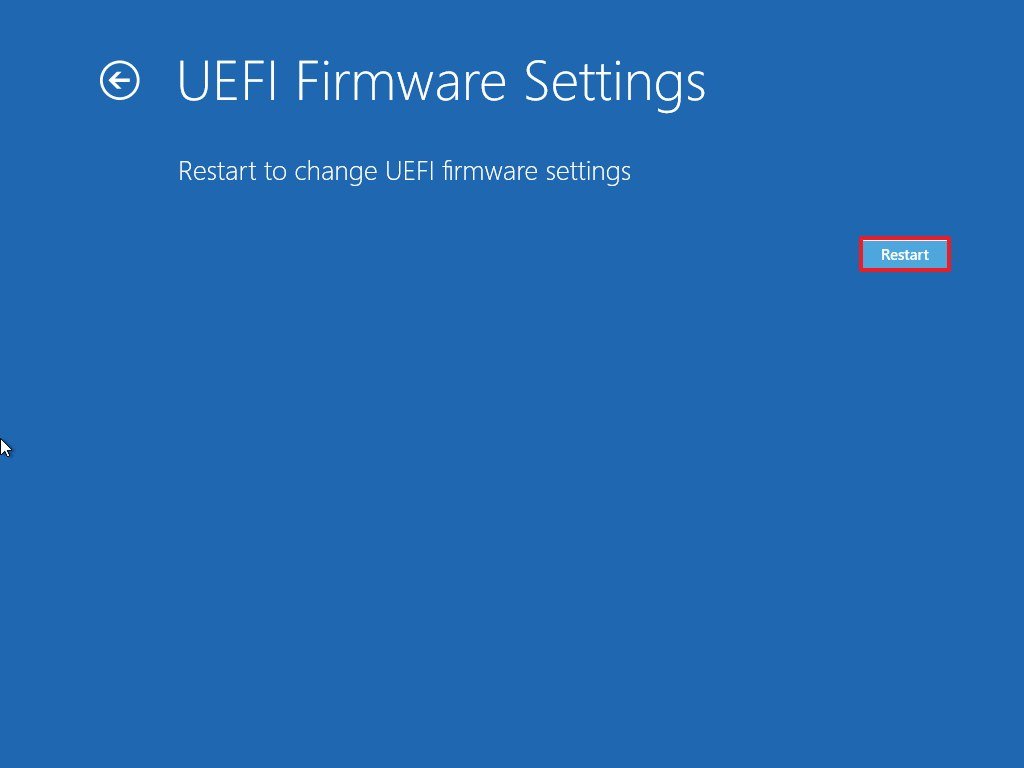
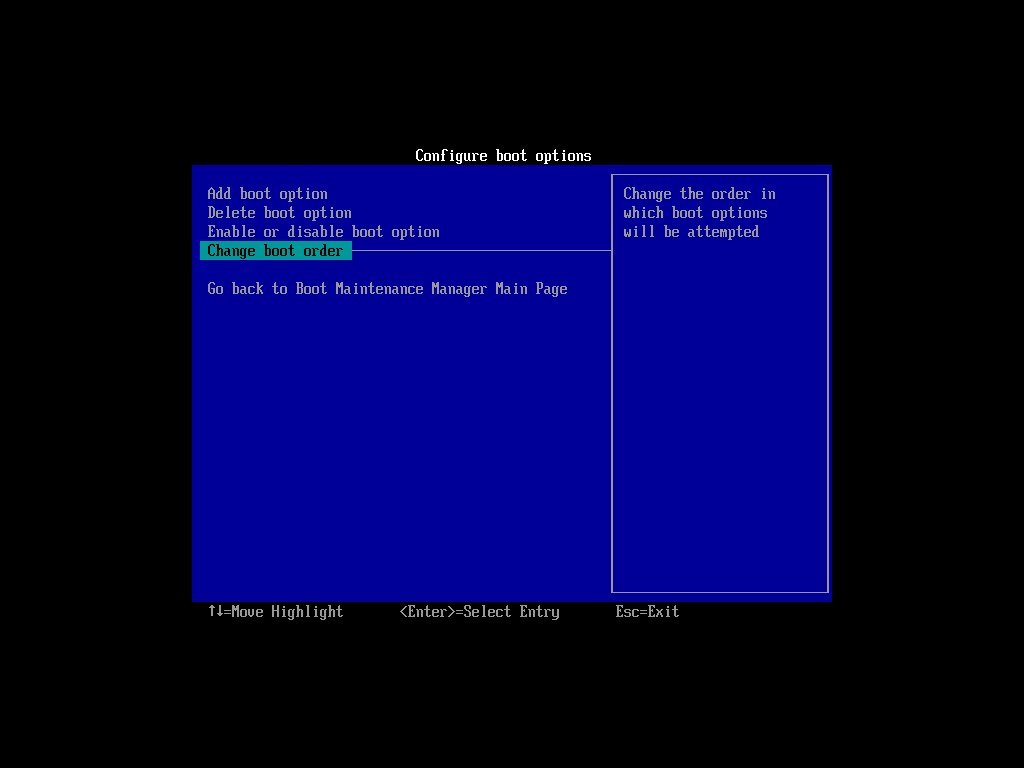
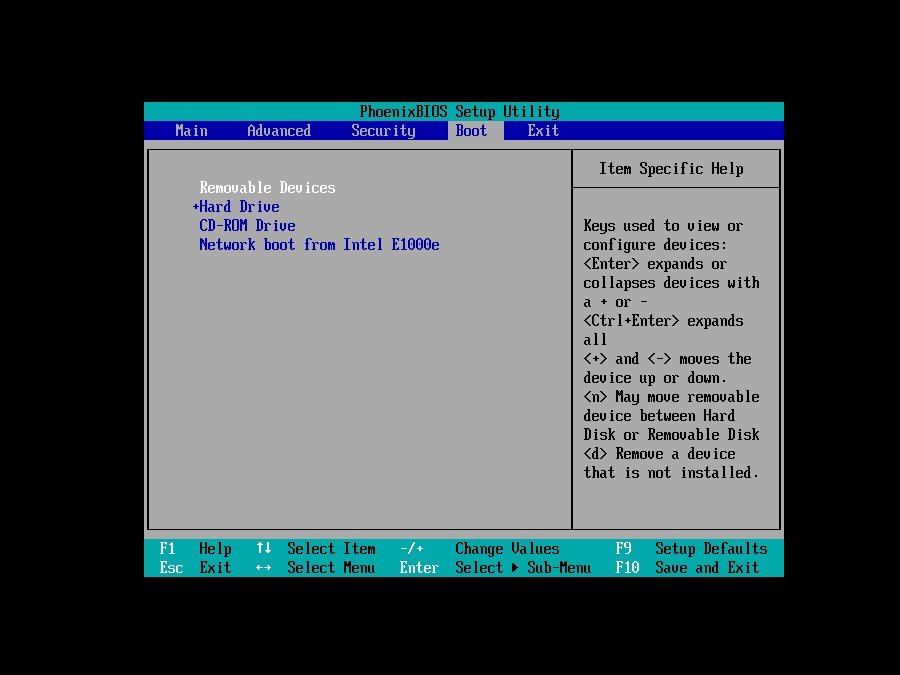
- Inside the motherboard firmware settings, open the Boot page.
- Set the boot order to start from the USB flash drive with the Windows 10 installation files.
- Save the changes.
After you complete the steps, the computer should now be able to start from a USB bootable media.
UEFI settings on Windows 8.1
To change the UEFI settings on Windows 8.1, use these steps:
- Open Settings.
- Click on Update and recovery.
- Click on Recovery.
- Under the «Advanced Startup» section, click the Restart now button.
- Click the Troubleshoot option.
- Click on Advanced options.
- Click the UEFI Firmware Settings option.
- Click the Restart button.
- Inside the motherboard firmware settings, open the Boot page.
- Set the boot order to start from the USB media with the Windows 10 installation files.
- Save the changes.
Once you complete the steps, the device will start from a USB flash drive to proceed with the installation.
UEFI settings on Windows 7
To change the UEFI settings on Windows 7, use these steps:
- Start the PC.
- As soon as it starts, press the F1, F2, F3, F10, F12, Esc, or Delete keys to access the firmware.
- Quick tip: You may need to check your manufacturer support website for more specific steps to access the firmware settings.
- Inside the motherboard firmware settings, open the Boot page.
- Set the boot order to start with the Windows 10 installation files from the USB media.
After you complete the steps, you should be able to start the device using a bootable media.
Configure boot order using BIOS
If you have a legacy BIOS firmware, you can change the boot order with these steps:
- Start the PC.
- As soon as the computer starts booting up, press one of the function keys (F1, F2, F3, F10, or F12), Esc, or Delete key.
- Inside the motherboard firmware settings, open the Boot page.
- Set the boot order to start with the Windows 10 installation files from the USB media.
- Save the changes.
Once you complete the steps, the computer can now start from the USB flash drive to upgrade to Windows 10.
Disconnect non-essential peripherals
Typically, peripherals are among the most common reason for problems during a Windows 10 installation. If you have non-essential peripherals connected to the computer (such as removable storage and other USB and Bluetooth devices, printers, scanners, cameras, and others), it’s recommended to disconnect them.
You only need a monitor, keyboard, mouse, and internet connection. After the setup, you can reconnect the peripherals (one at a time) to ensure they don’t cause any issues.
How to create USB for clean install of Windows 10
You will need a USB bootable media to perform a clean installation of Windows 10. You can easily create one using many tools, including the Microsoft Media Creation Tool and Rufus.
Create Windows 10 USB with Media Creation Tool
To create an installation media using the Media Creation Tool, connect a USB flash drive of at least 8GB of space, and use these steps:
- Open the Windows 10 download page (opens in new tab).
- Under the «Create Windows 10 installation media» section, click the «Download tool now» button to save the file on the computer.
- Double-click the MediaCreationToolxxxx.exe file to launch the tool.
- Click the Accept button to agree to the Microsoft terms.
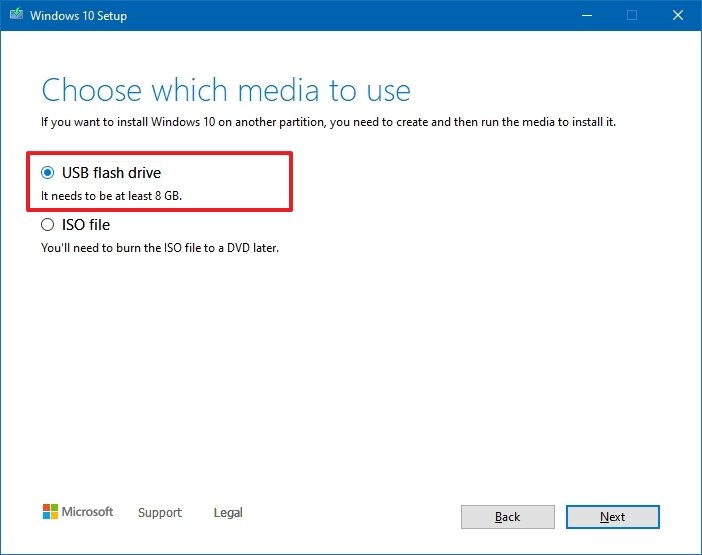
- Select the «Create installation media (USB flash drive, DVD, or ISO file) for another PC» option.
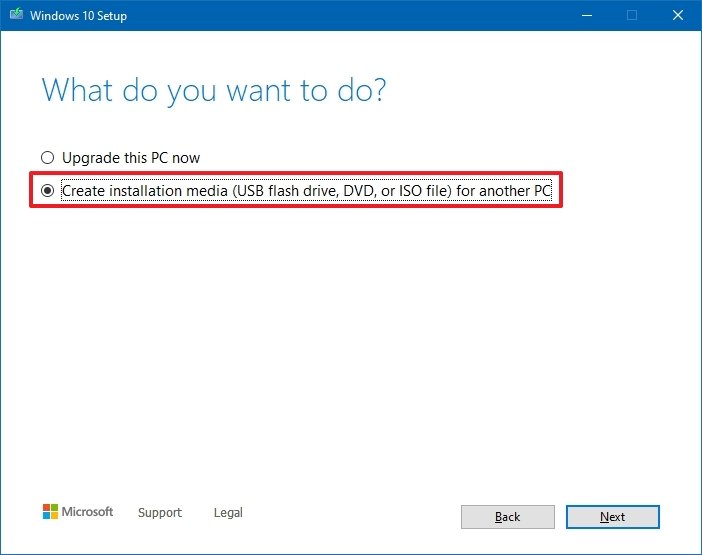
- Click the Next button.
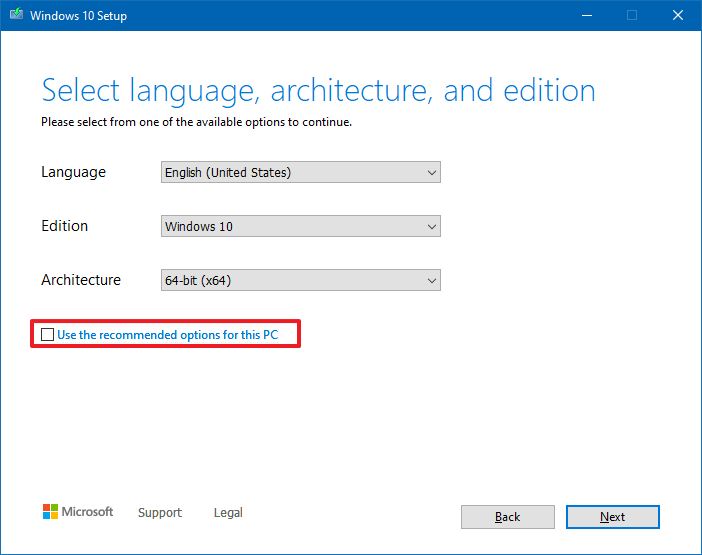
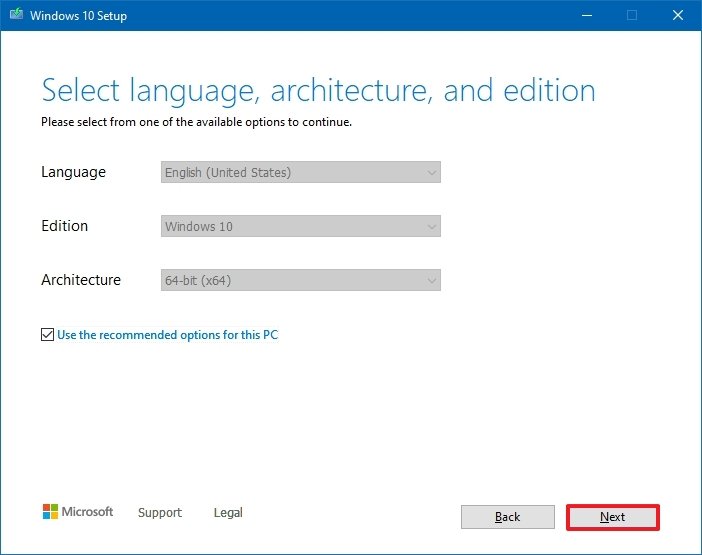
- (Optional) Clear the «Use the recommended options for this PC» option.
- Select the correct language, architecture, and edition of Windows 10.
- Click the Next button.
- Click the Next button.
- Select the USB flash drive (or click the «Refresh drive list» option to make it available).
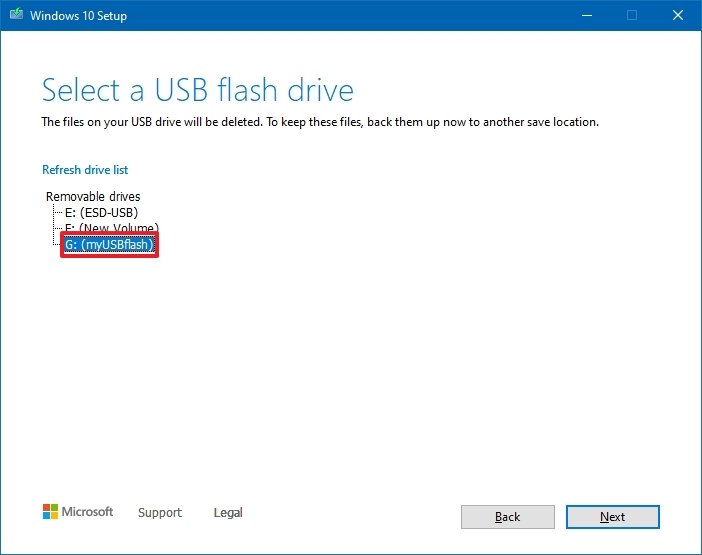
- Click the Next button.
- Click the Finish button.
Once you complete the steps, the tool will download the files and create an installer with the latest installation files, which you can then use to start the device and configure a fresh copy of Windows 10.
Create Windows 10 USB with Rufus
Alternatively, the Rufus tool can help you create an installation media for computers with UEFI or BIOS firmware.
Rufus is a free tool with many options to help you create a bootable media of Windows 10 faster. However, it’s important to remember that it’s a third-party option, which Microsoft does not support. As a result, use it at your own risk.
To create a Windows 10 USB installer with Rufus, connect a USB flash drive of at least 8GB of space, and then use these steps:
- Open the Rufus download page.
- Under the «Download» section, click the link to save the latest release on the computer.

- Double-click the Rufus-x.xx.exe file to launch the tool.
- Click the Settings button (third button from the left) at the bottom of the page.
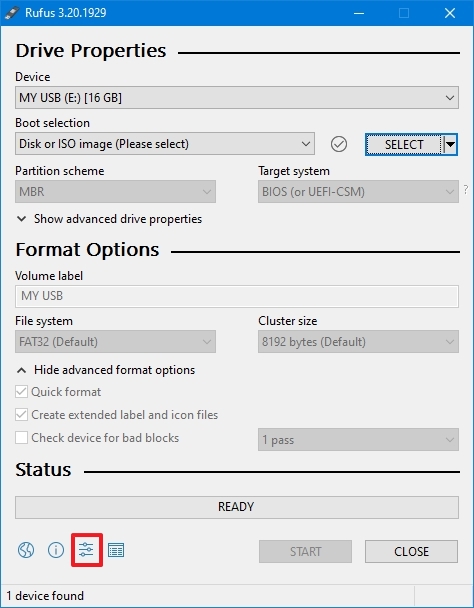
- Under the «Settings» section, use the Check for updates drop-down menu and select the Daily option.
- Quick tip: These steps are necessary to enable the option to use the tool to download the ISO file of Windows 10.
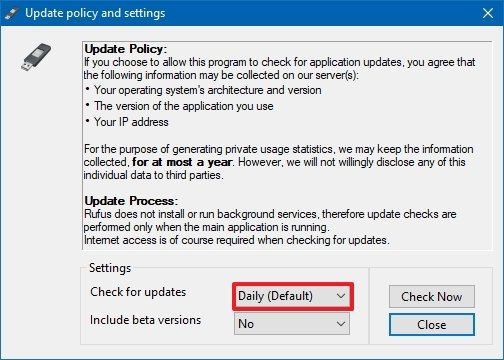
- Click the Close button.
- Close the Rufus tool.
- Relaunch the Rufus tool.
- Under the «Device» section, use the drop-down menu to select the USB flash drive.
- Under the «Boot selection» section, click the down arrow button on the right and select the Download option.
- Quick tip: If you already have an ISO file, click the Select button, choose the Windows 10 ISO file, and continue with step 20.
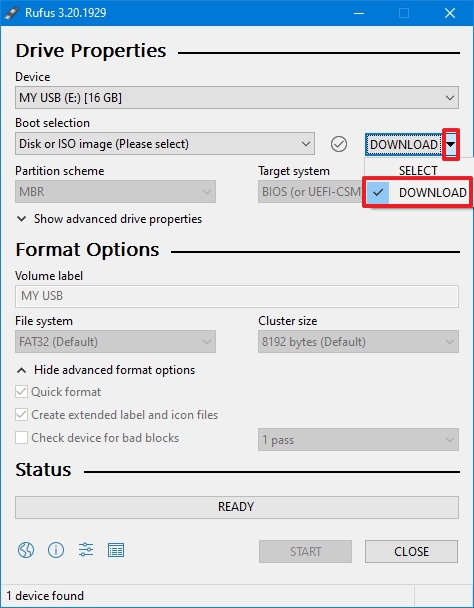
- Click the Download button.
- Use the «Version» drop-down menu and select the Windows 10 option.
- Click the Continue button.
- Select the 21H2 (Build 19044.xxx — xxxx.xx) option to download the Windows 10 November 2021 Update.
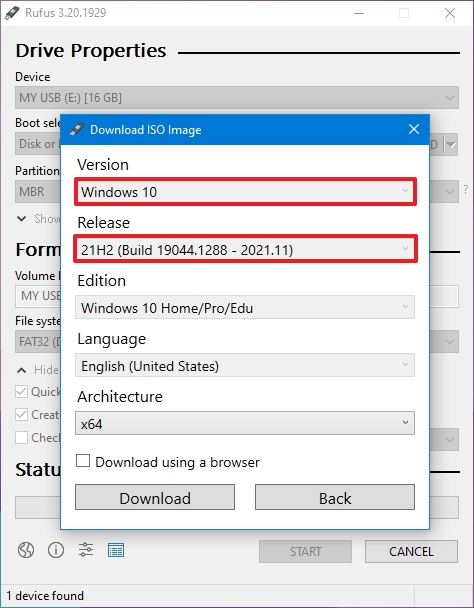
- Click the Continue button.
- Use the «Edition» drop-down menu and select the Windows 10 Home/Pro option.
- Click the Continue button.
- Use the «Language» drop-down menu and select the installation language.
- Quick tip: In the United States, choose the «English» option, not «English International.»
- Click the Continue button.
- Use the «Architecture» drop-down menu and select the 32-bit or 64-bit (recommended).
- Click the Download button.
- Select the location to download the ISO file.
- Click the Save button.
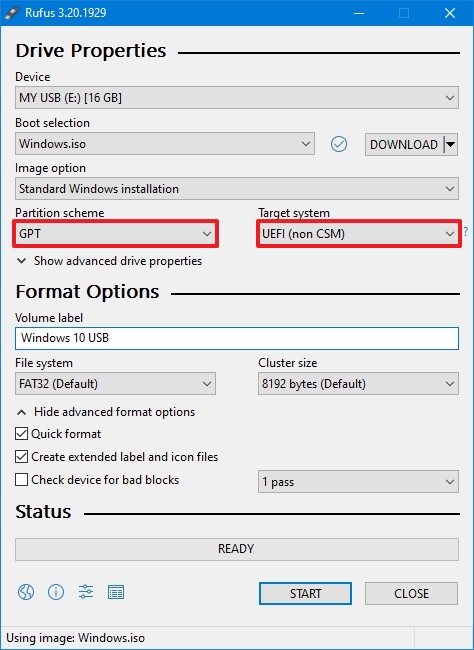
- Use the «Image option» drop-down menu to select the Standard Windows installation option.
- Use the «Partition scheme» drop-down menu to select the GPT option.
- Use the «Target system» drop-down menu to select the UEFI (non CSM) option.
- Quick note: If the computer includes a legacy BIOS, select the MBR option for partition scheme and BIOS (or UEFI-CSM) option target system.
- Under the «Show Advanced drive properties» section, don’t change the default settings.
- (Optional) Under the «Volume label» field, enter a descriptive name for the drive — for example, «win10_usb.»
- Under the «File system» and «Cluster size» sections, don’t change the default settings.
- Click the Show advanced format options button.
- Select the Quick format and Create extended label and icon files options.
- Click the Start button.
- Click the OK button to confirm.
- Click the Close button.
After you complete the steps, Rufus will download the ISO file from the Microsoft servers, and it’ll create the bootable media to perform a clean install of Windows 10.
How to perform clean install of Windows 10
The installation process of Windows 10 has two main parts, including the setup and out-of-box experience (OOBE). In the setup process, that’s where you will select some of the basic settings, and you’ll find the options to erase the hard drive, configure the partitions, and install Windows 10. The out-of-box experience happens after the setup is complete, and it’s the stage where you’ll configure your settings, such as region, network, account, privacy, and other settings.
Windows 10 clean install process
After the preparation, you can proceed with the clean installation of Windows 10.
Warning: This is another friendly reminder that this process will erase everything on the computer. Before proceeding, making a temporary full backup of your PC is always recommended.
To do a clean installation of Windows 10, use these steps:
- Start the PC with Windows 10 USB media.
- On prompt, press any key to boot from the USB flash drive.
- On the «Windows Setup,» click the Next button.
- Quick tip: If your language, time and currency, and keyboard are different from the default selections, make sure to select the correct settings.

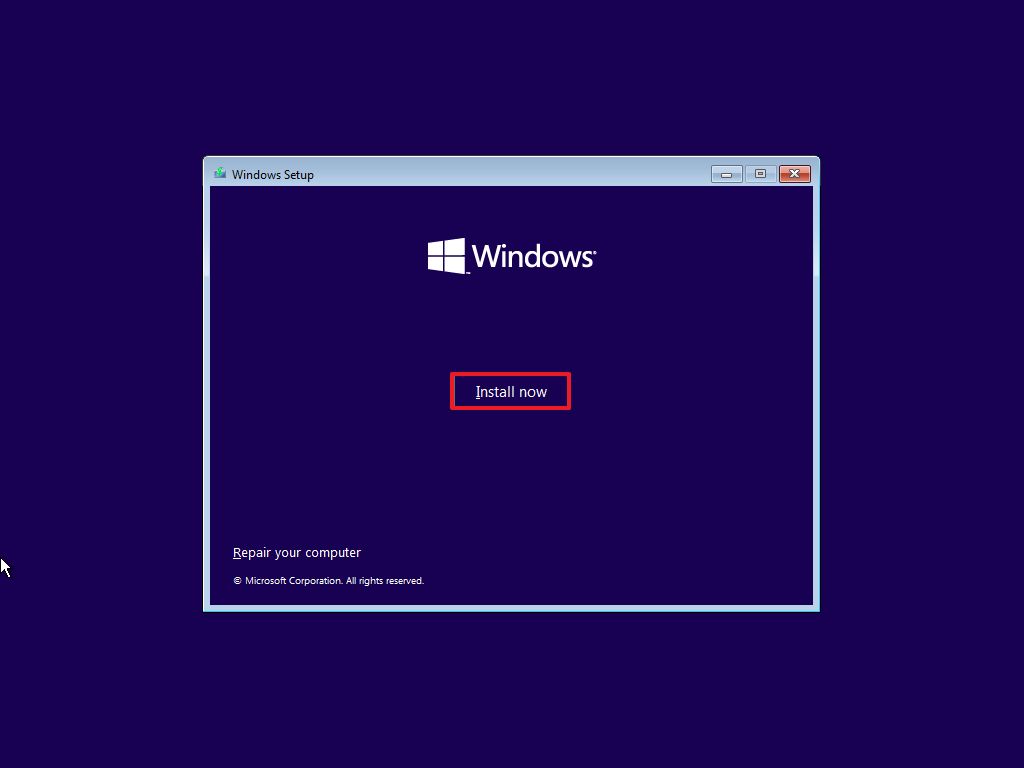
- Click the Install now button.
- On a reinstallation, click the «I don’t have a product key» option to continue (assuming your device was already activated). Otherwise, if this is your first time installing Windows 10, enter the product key.
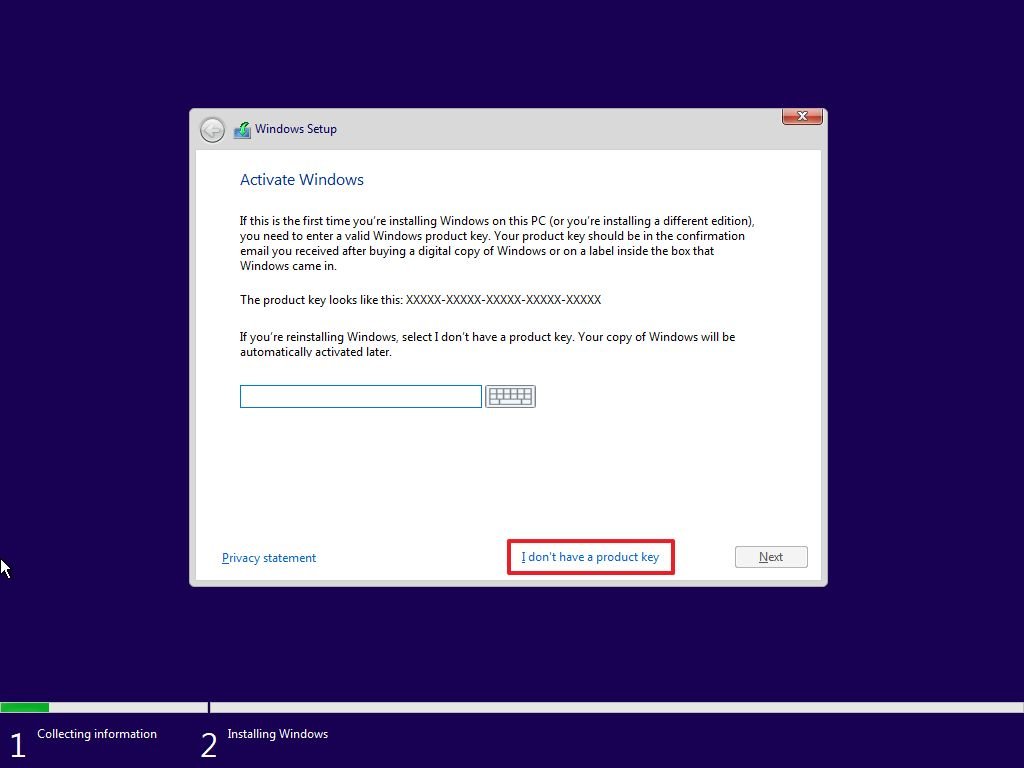
- Click the Next button.
- Select the edition of Windows 10 (If applicable).
- Quick note: The selection has to match the edition of your product key. If you don’t select the correct edition, Windows 10 won’t activate, and you’ll have to redo the entire process.
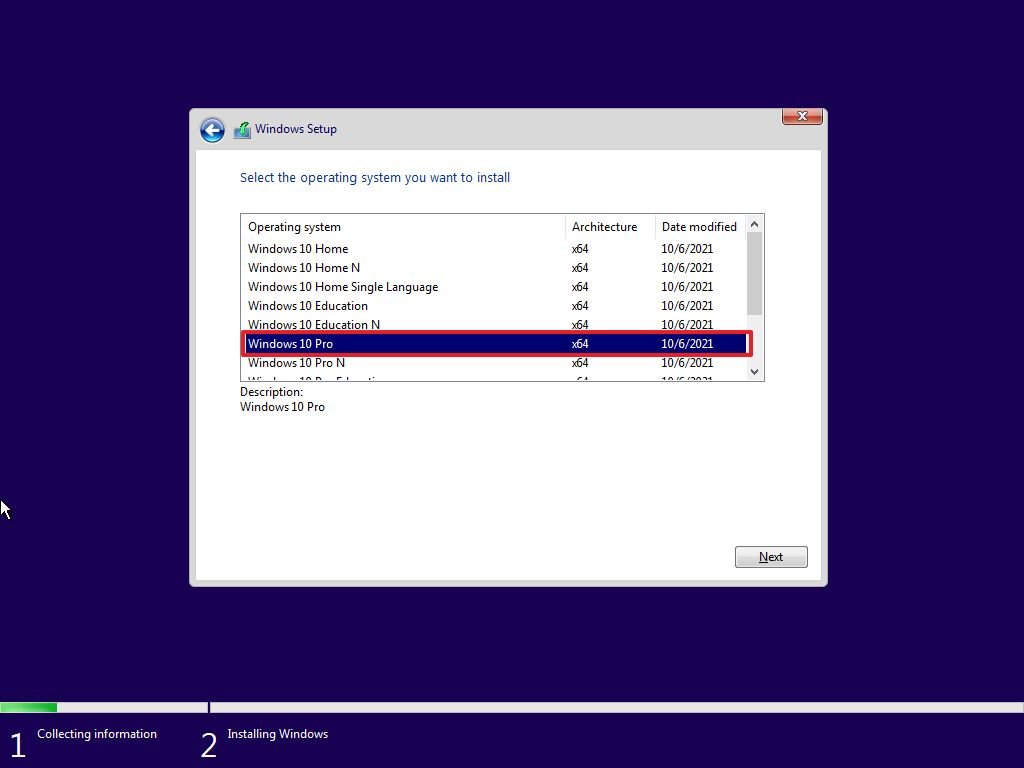
- Click the Next button.
- Select the «I accept the license terms» option to continue.
- Click the Next button.
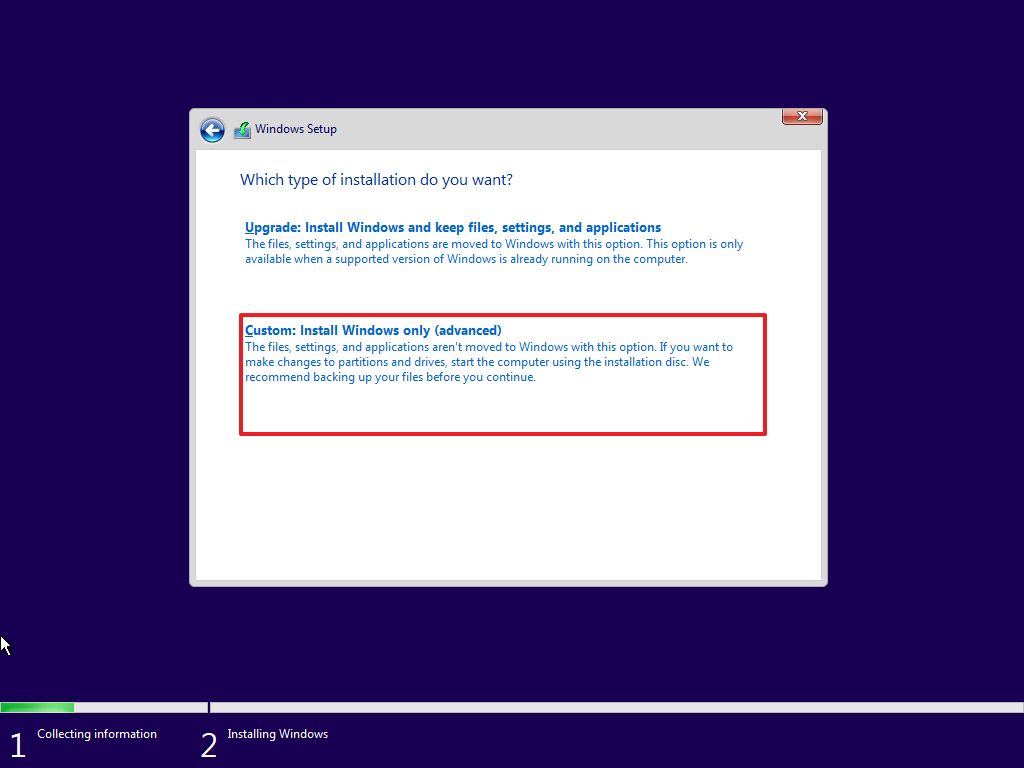
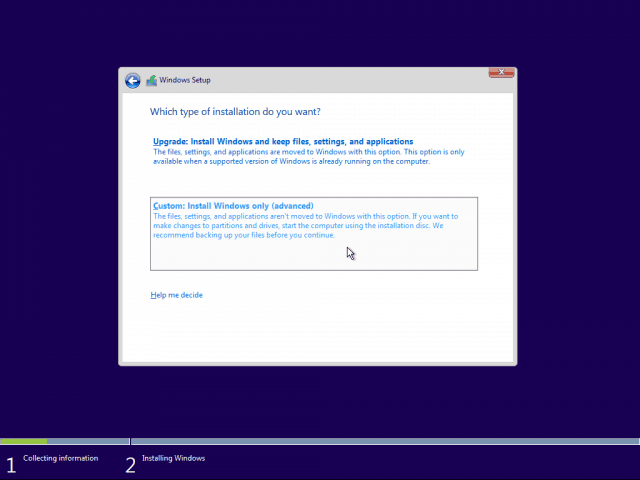
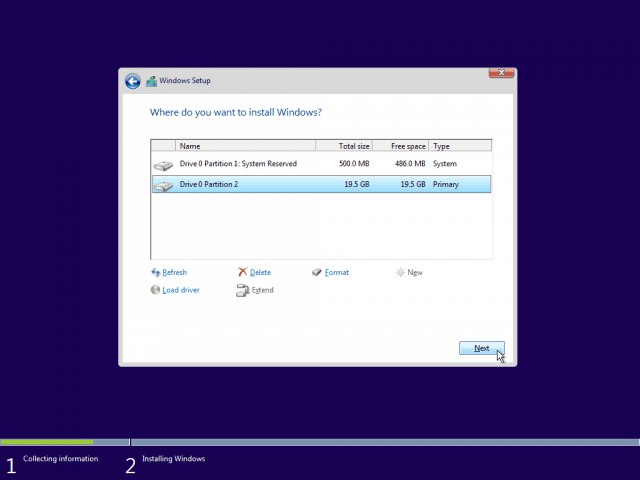
- Click the «Custom: Install Windows only (Advanced)» option to continue with a clean installation.
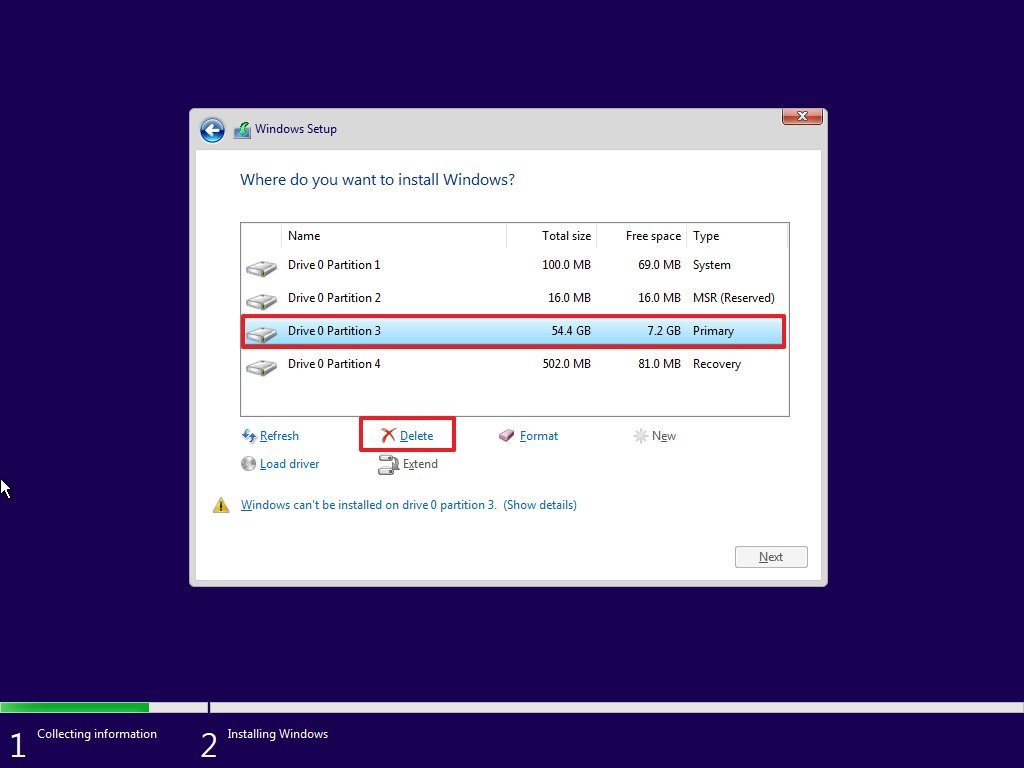
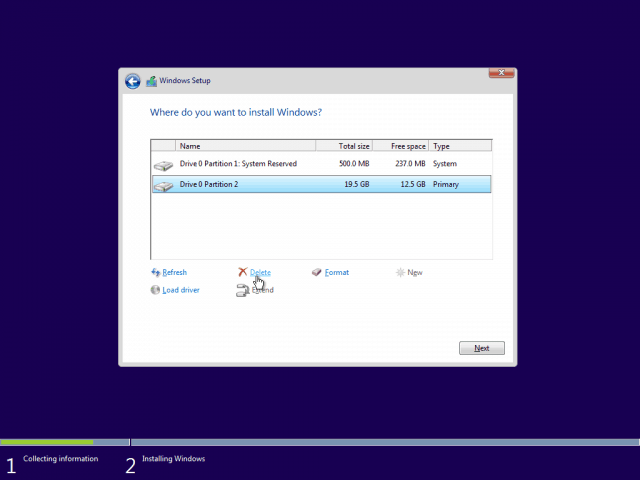
- Select the partition with the current installation (usually «Drive 0») and click the Delete button.
- Quick tip: If «Drive 0» has multiple partitions, you must select and delete each partition to allow the setup to use the entire hard drive for the new clean installation. The setup will create the required partitions automatically during the process. Also, it’s not necessary to delete the partitions on secondary drives.
- Click the Yes button.
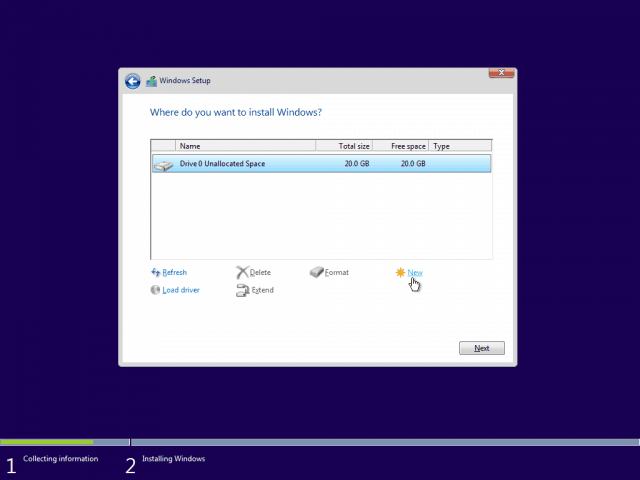
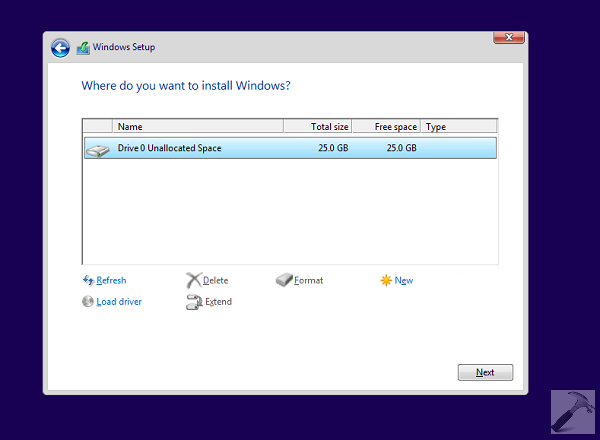
- Select the empty drive (Drive 0 Unallocated Space).

- Click the Next button.
Once you complete the steps, the setup will install a fresh copy of Windows 10 on the device.
If you plan to decommission the computer, you do not need to continue with the out-of-box experience. If this is an upgrade, continue with the instructions below.
Windows 10 out-of-box experience
After the setup, you must continue with the out-of-box experience to configure your preferences and create a new account.
To complete the OOBE on Windows 10, use these steps:
- Select your Region option.
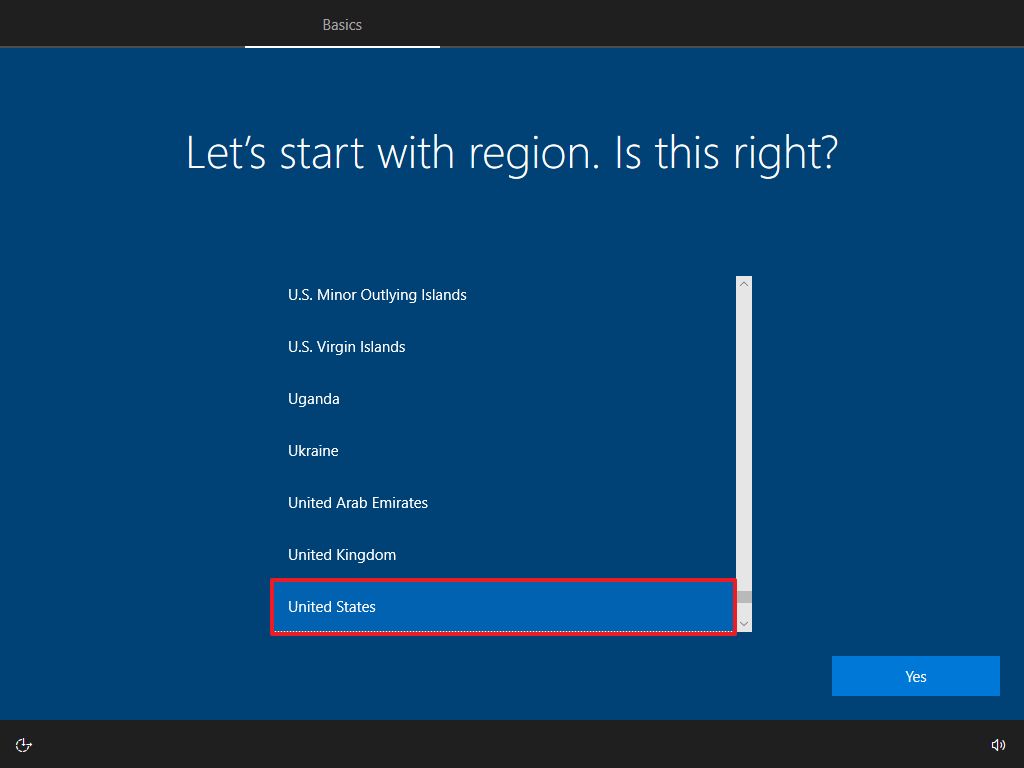
- Click the Yes button.
- Select your keyboard layout option.
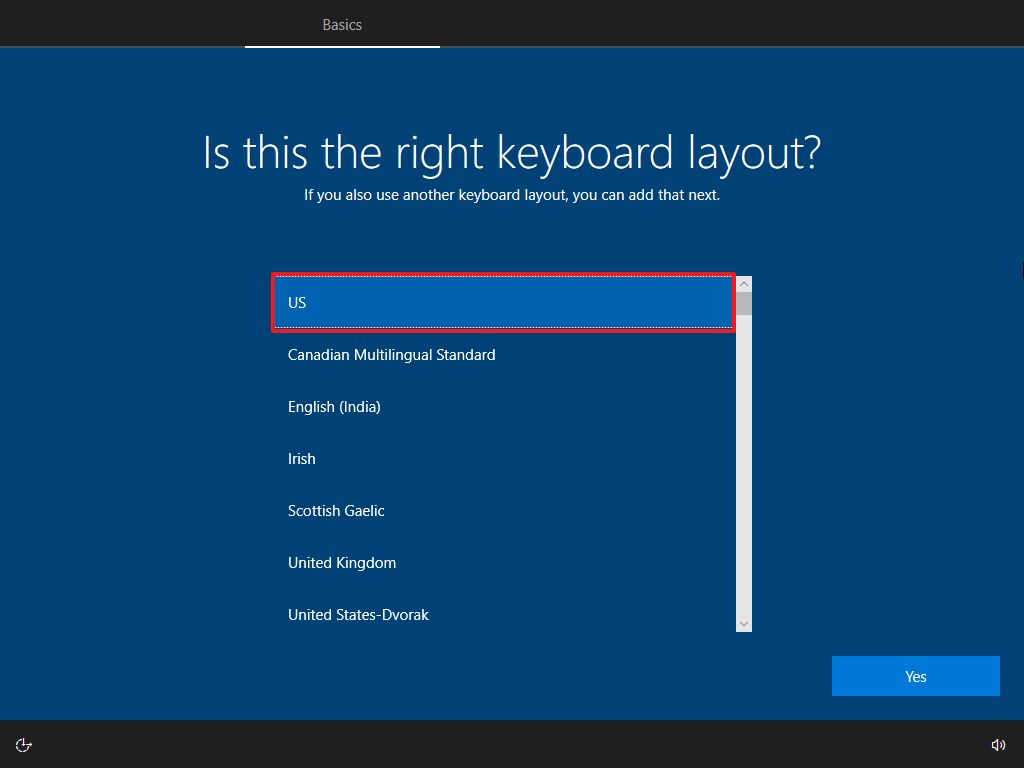
- Click the Yes button.
- Click the Skip button (unless you need to add a second keyboard layout).
- Quick note: If you don’t have a wired network connection, you’ll have to sign into the wireless network.
- Select the «Set up for personal use» option. (This option is only available on Windows 10 Pro.)
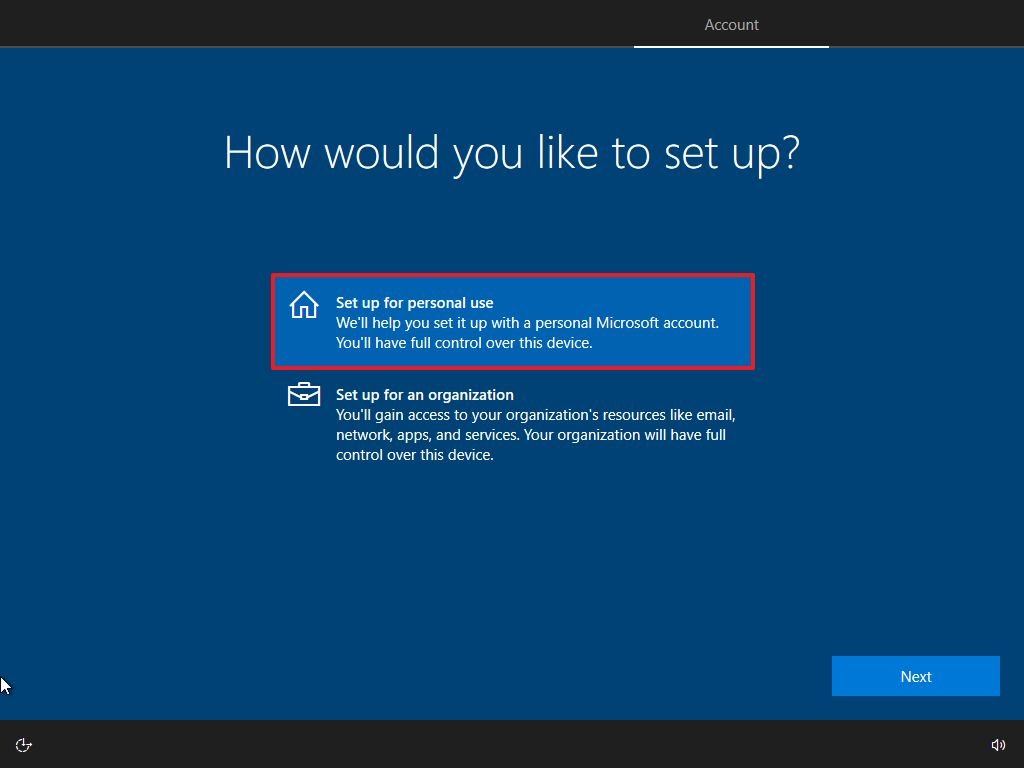
- Click the Next button.
- Confirm your Microsoft account information to create an account.
- Quick note: The recommended process is to use a Microsoft account. However, if you want to use a traditional local account, you’ll need to click the Offline account option from the bottom-left corner and continue with the on-screen directions.
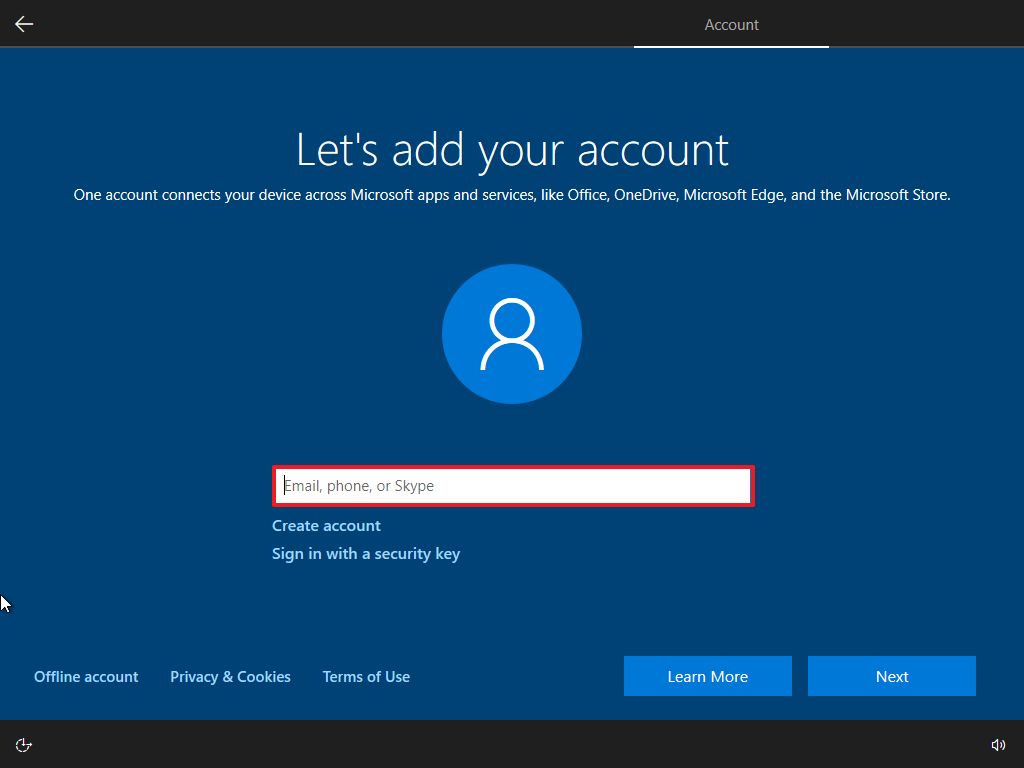
- Click the Next button.
- Confirm your account password.
- Click the Next button.
- Click the Create PIN button.
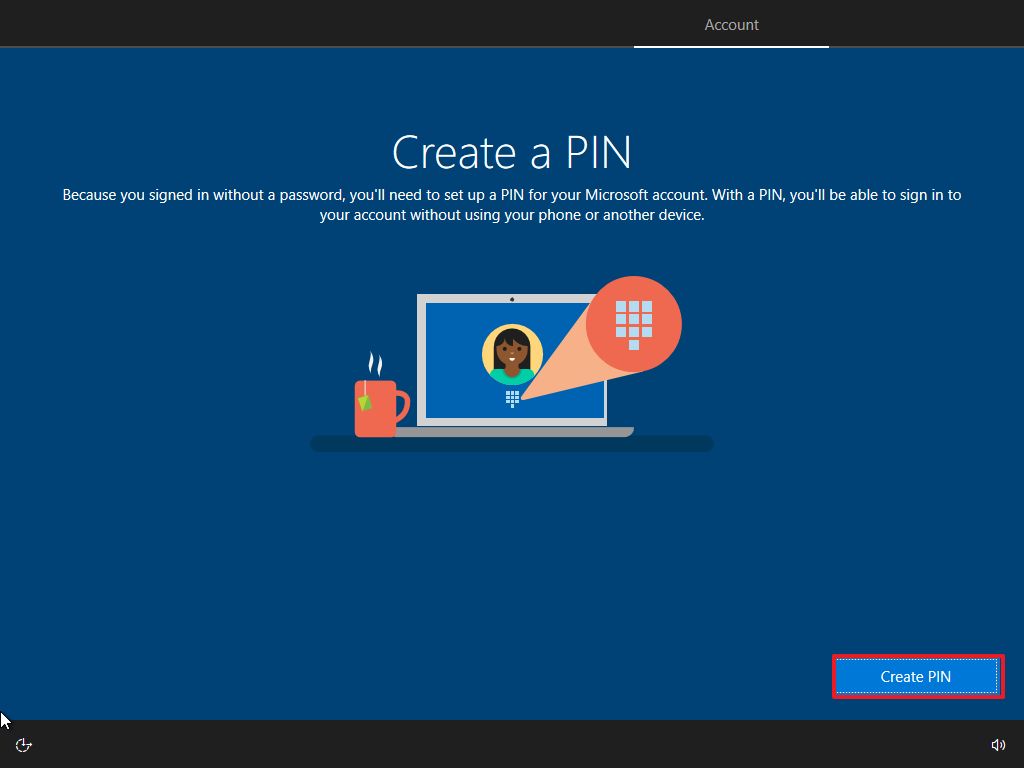
- Create a four-digit Windows Hello PIN.
- Quick tip: If you want to continue using a traditional password, click the Cancel button to skip the process.

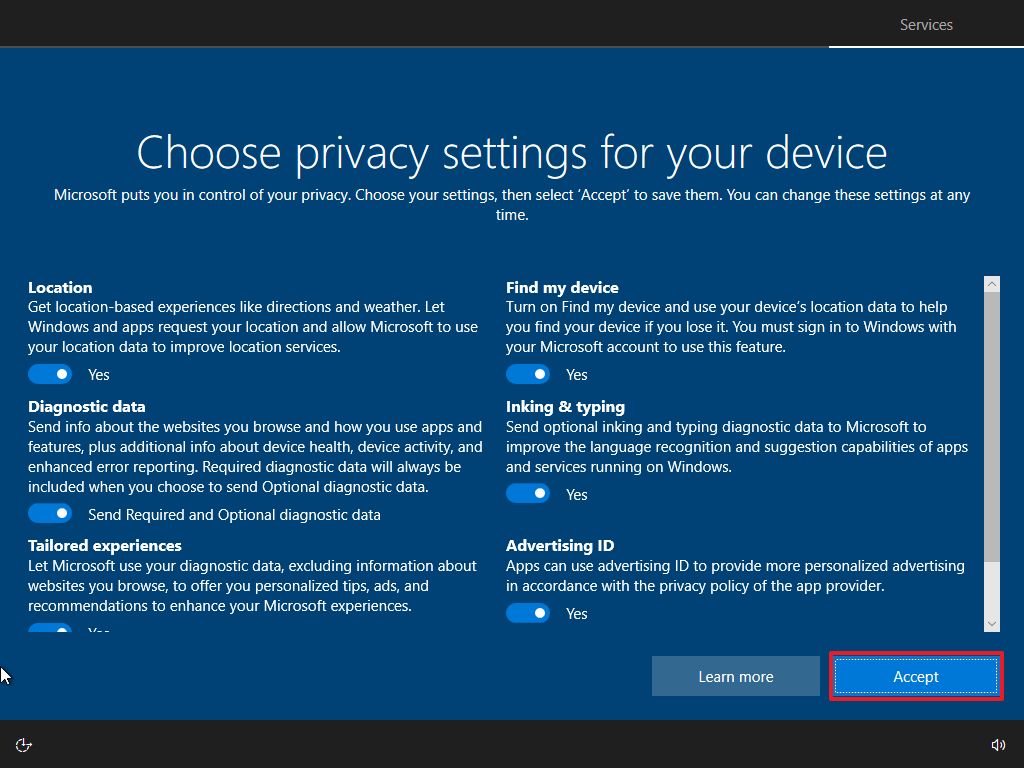
- Select the privacy settings for the device (and don’t forget to scroll down the page to review all the available settings).
- Click the Accept button.
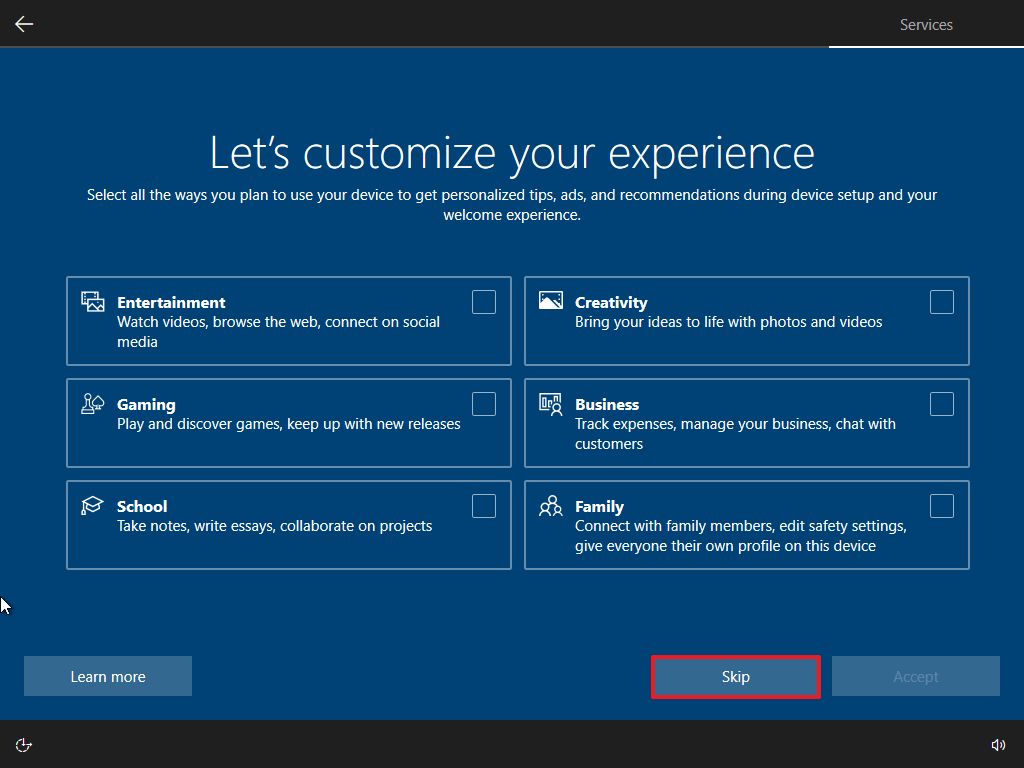
- (Optional) Click the Skip button, or select how you will be using the device to receive targeted ads, tips, and other recommendations and click the Accept button.
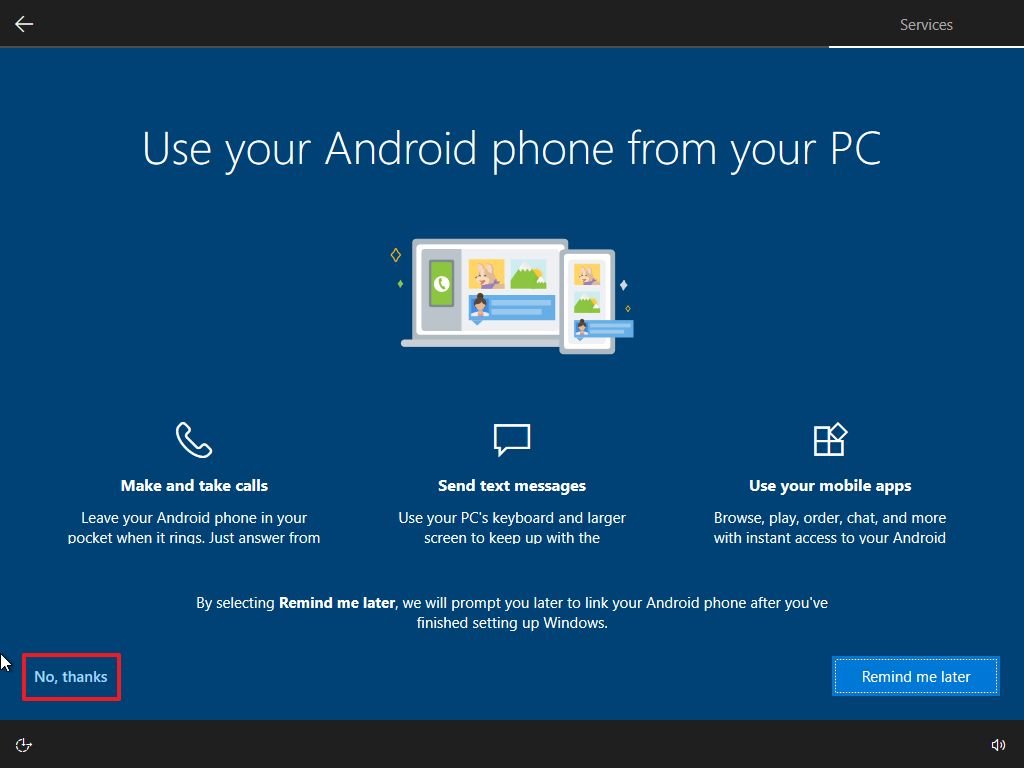
- (Optional) Click the «No, thanks» button to skip the phone link process.
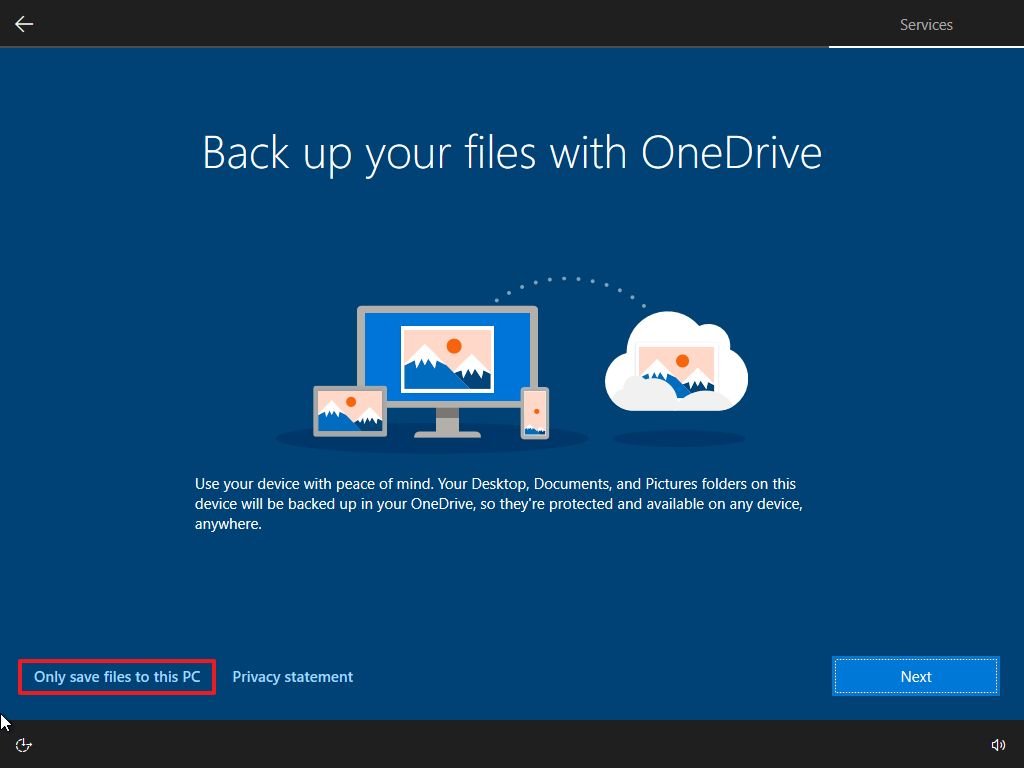
- (Optional) Click the Next button to allow OneDrive to back up the Desktop, Documents, and Pictures folders to the cloud. If you use another cloud service or prefer not to upload files to the cloud, click the «Only save files to this PC» option in the screen’s bottom-left corner.
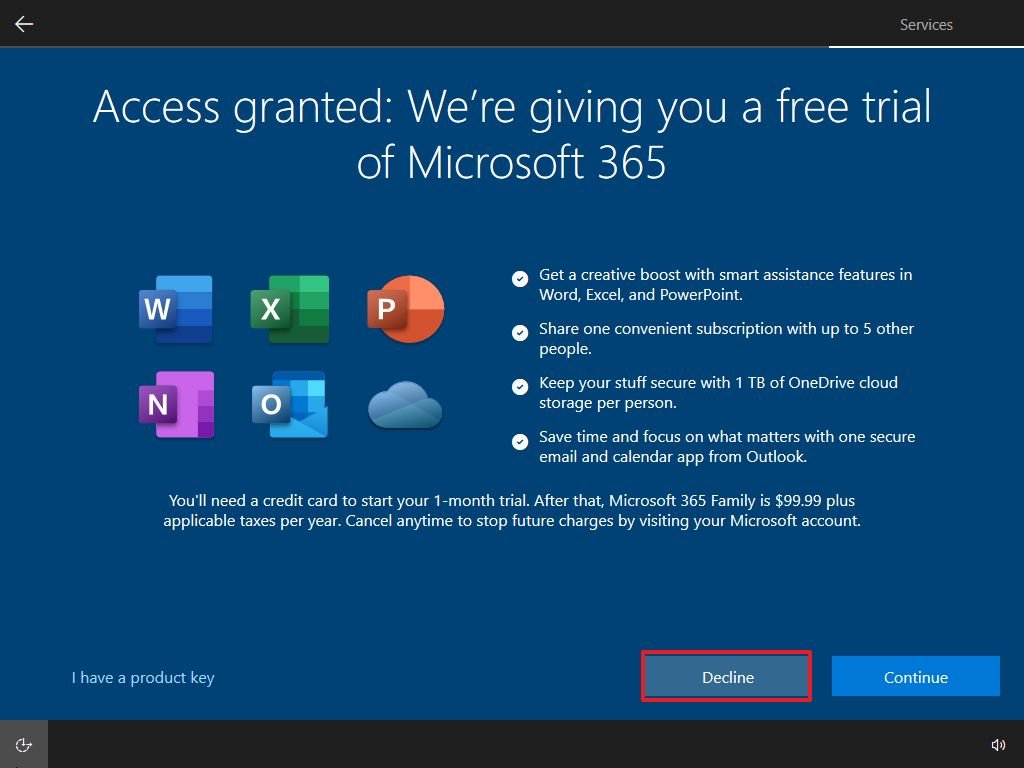
- Click the Decline button to skip the Microsoft 365 setup (if applicable).
- Quick tip: If you have an Office product key, you can click the «I have a product key» option, and then the apps will install automatically.
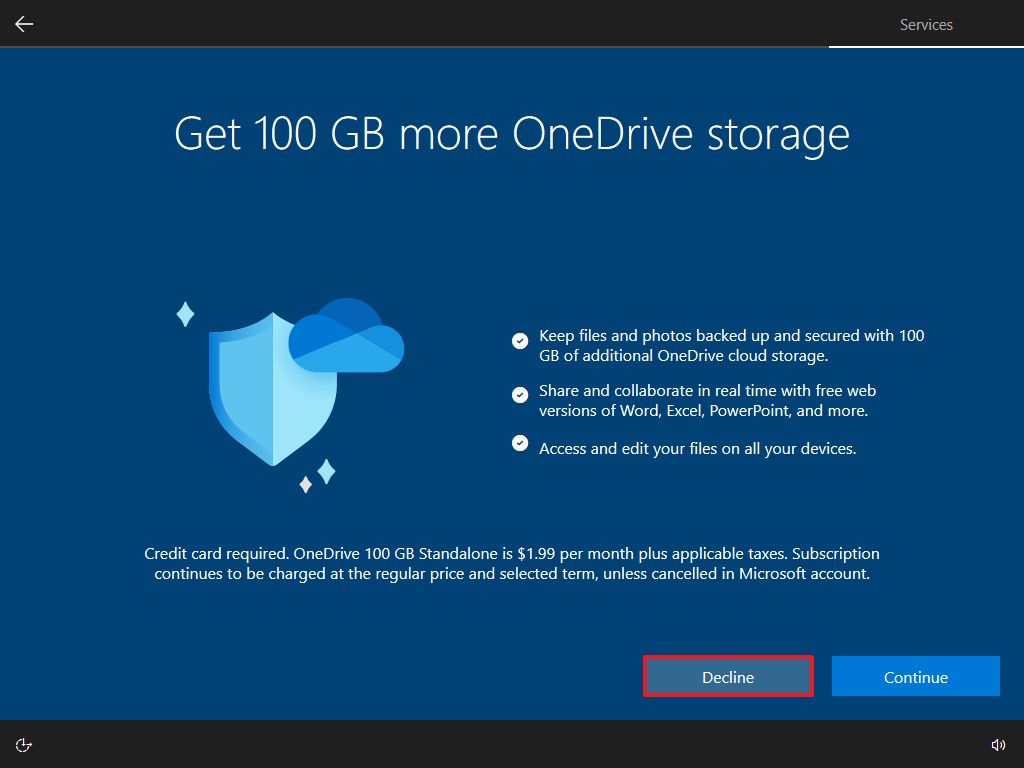
- Click the Decline button to skip the OneDrive storage promotion.
- Click the «No Thanks» button to skip the Game Pass promotion.

- (Optional) Click the «Not now» button to continue without setting up Cortana.

After you complete the steps, the settings will apply to the clean installation of Windows 10, and you should be able to see the default desktop experience.
How to complete setup after installation of Windows 10
Once the installation is complete, it’s also good to check that Windows 10 isn’t missing any critical updates or drivers and is properly activated.
Install updates
To download and install the latest updates, use these steps:
- Open Settings.
- Click on Update & Security.
- Click on Windows Update.
- Click the Check for updates button.
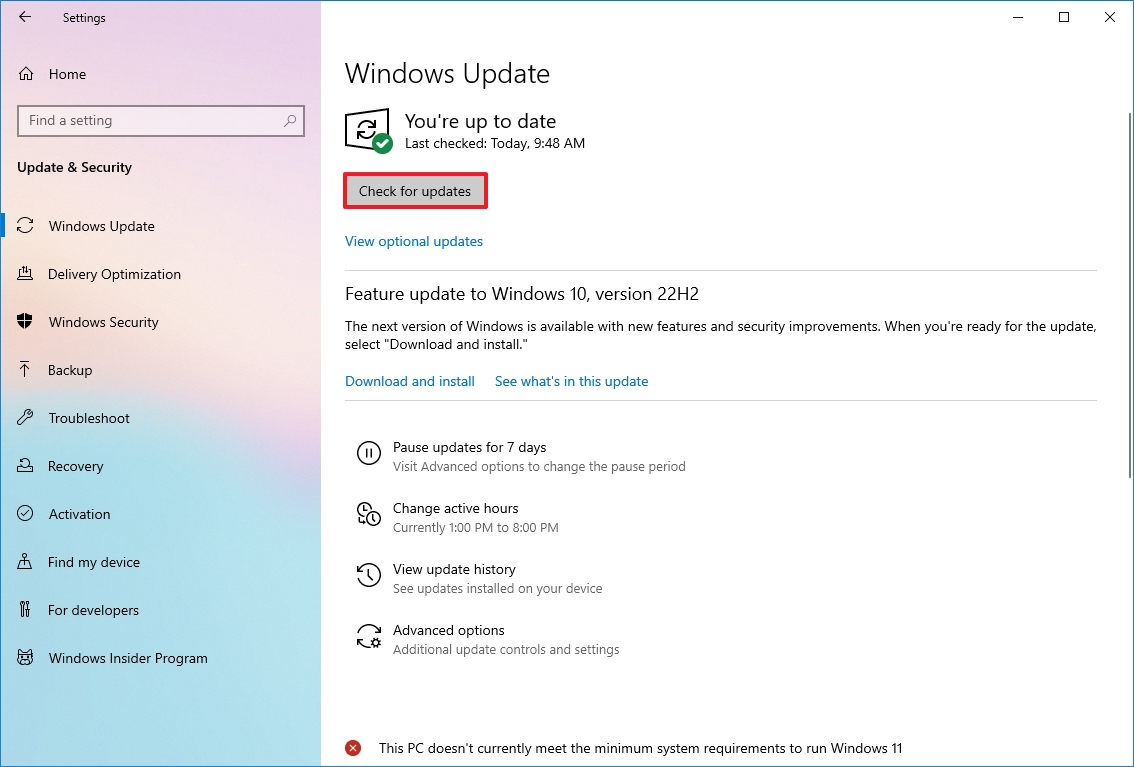
Once you complete the steps, any available updates will automatically download and install. Also, a restart may be required to complete the update process.
Check missing drivers
To determine whether drivers are missing on Windows 10, use these steps:
- Open Start.
- Search for Device Manager and click the top result to open the app.
- Confirm that none of the devices has a yellow or red mark, and make sure nothing is listed as unknown.
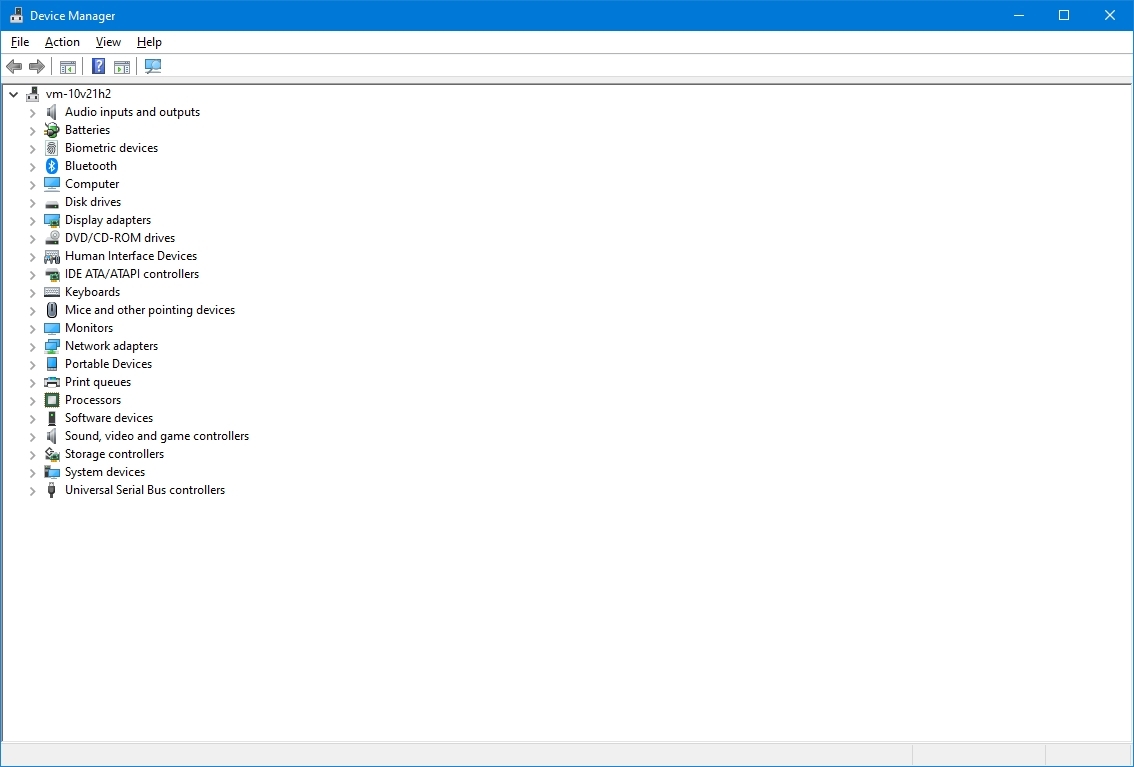
If some hardware components have problems, you may need to manually install the latest drivers from your computer manufacturer’s support website. You can use this guide to install device drivers on Windows 10.
Install missing drivers
On Windows 10, drivers can also be part of the optional updates. If the computer doesn’t have all the required drivers, you may be able to download them from Windows Update.
To download missing drivers on Windows 10, use these steps:
- Open Settings.
- Click on Update & Security.
- Click on Windows Update.
- Click the «View optional updates» option. If the option isn’t available, it means that Windows Update doesn’t have any driver updates for the computer.
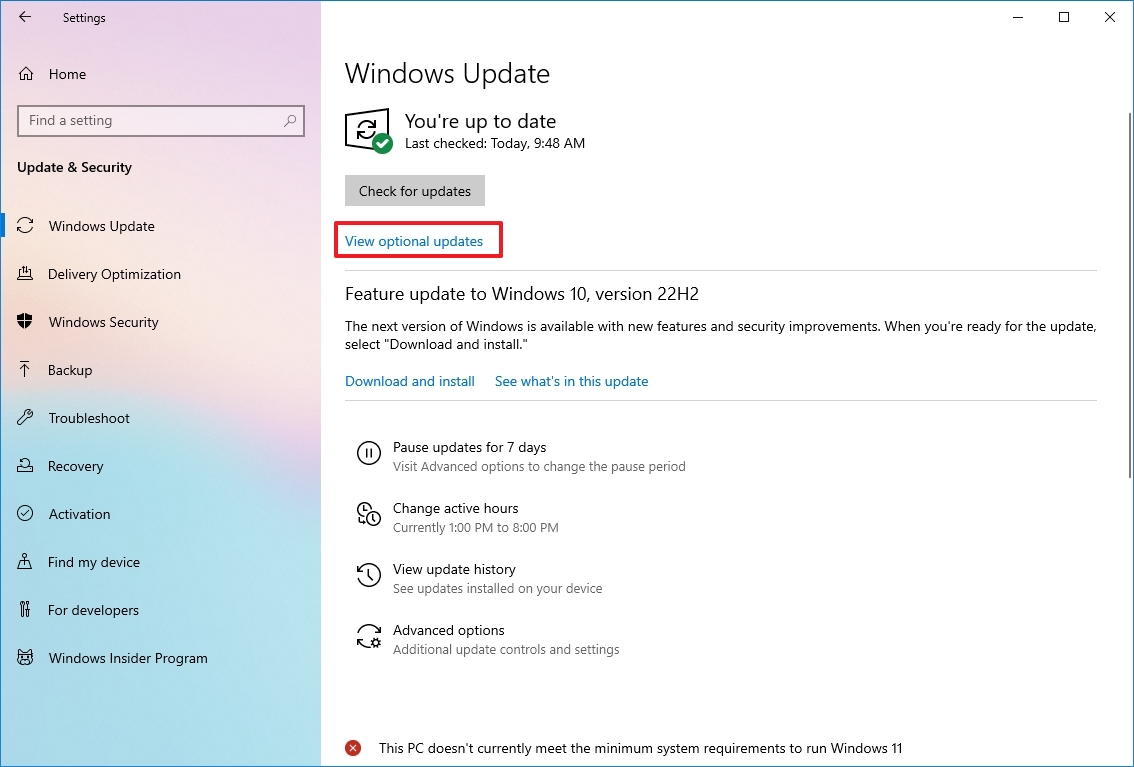
- Click the Driver updates section.
- Select the missing driver.
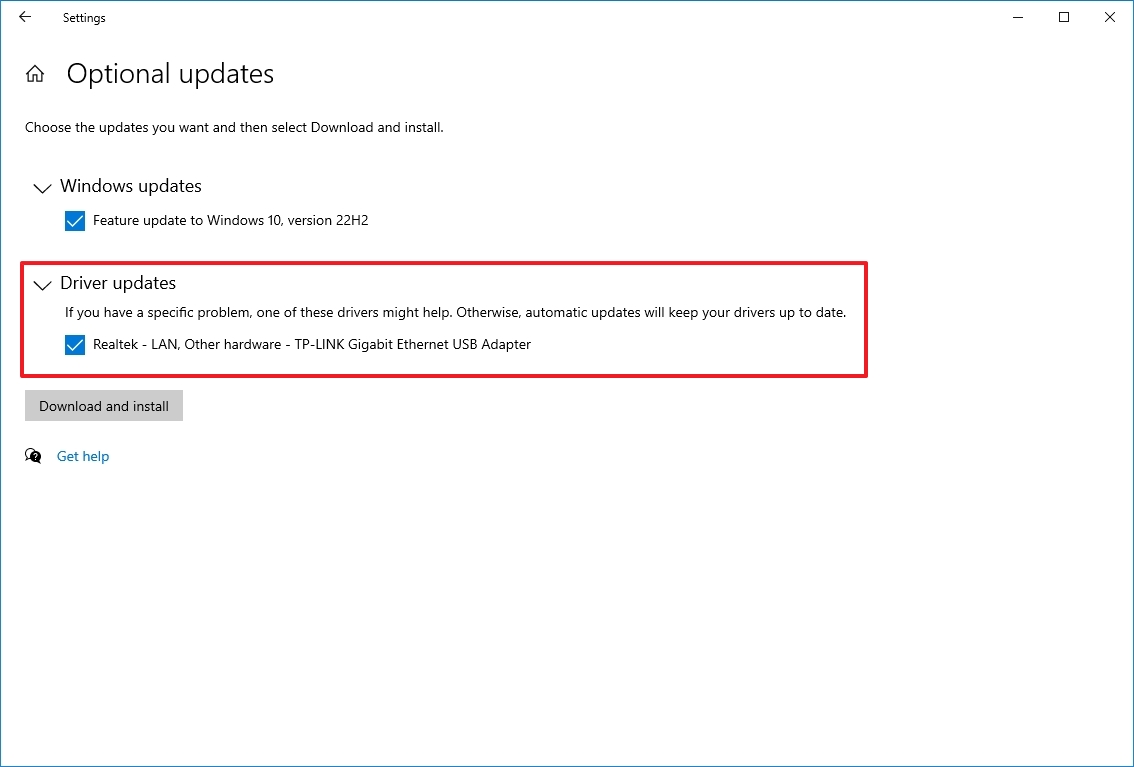
- Click the «Download and install» button.
After you complete the steps, Windows Update will download and install the missing drivers automatically.
Confirm activation
To confirm Windows 10 was activated correctly, use these steps:
- Open Settings.
- Click on Update & Security.
- Click on Activation.
- If Windows 10 is activated successfully, you will see one of these messages:
- Windows is activated with a digital license: The installation has been activated, but it isn’t linked to your Microsoft account.
- Windows is activated with a digital license linked to your Microsoft account: The installation has been activated, and the license is linked to your Microsoft account.
In case Windows 10 didn’t activate, the device will try to reactivate at a later time. If you’re still having issues after a couple of days, you can use the Activation Troubleshooter to activate.
Reinstall apps
Now, it’s time to reinstall the apps, including your preferred web browser, such as Google Chrome, Mozilla Firefox (opens in new tab), or Opera (opens in new tab), to browse the web.
If you use Spotify (opens in new tab) or iTunes (opens in new tab) to listen to tunes while working or surfing the internet, you can download these apps and others from the Microsoft Store.
Also, it’s now a good time to download and install the Microsoft Office apps (opens in new tab) to start working with Word, Excel, and PowerPoint and managing your emails with Outlook.
Restore files from backup
The last thing left is restoring your documents from a previous backup. If you previously configured file backup with OneDrive, the data should already be available inside the OneDrive folder, but if the app didn’t configure automatically, use this guide.
If you have a backup of your files on an external drive, reconnect the storage to restore the data into the default folders (Documents, Downloads, Pictures, etc.).
To restore files from a previous backup on Windows 10, use these steps:
- Open File Explorer.
- Under the This PC section in the left pane, select the external drive with the file backup.
- Select the folders with the file to restore.
- Click the Copy to menu from the «Home» tab.
- Select the Choose location option.
- Select the destination to restore the files — for example, the Documents folder.
- Click the Copy button.
After you complete the steps, the files will restore to the new location.
Although you can start a clean installation using the Media Creation Tool without a USB media and even the «Reset this PC» option from the recovery settings, these methods have limitations and do not always work as expected. The bootable media is the alternative if you want the best possible clean installation method.
More resources
For more helpful articles, coverage, and answers to common questions about Windows 10 and Windows 11, visit the following resources:
- Windows 11 on Windows Central — All you need to know
- Windows 10 on Windows Central — All you need to know
Get the best of Windows Central in in your inbox, every day!
Mauro Huculak is technical writer for WindowsCentral.com. His primary focus is to write comprehensive how-tos to help users get the most out of Windows 10 and its many related technologies. He has an IT background with professional certifications from Microsoft, Cisco, and CompTIA, and he’s a recognized member of the Microsoft MVP community.
- To clean install Windows 10, boot PC with a USB bootable flash drive, continue with on-screen directions, skip activation, and select the “Custom” option. Then select the installation drive, click “Next,” and finish the out-of-the-box experience (OOBE).
- Also, you can do a clean installation of Windows 10 with the Media Creation Tool, Reset this PC feature, Advanced startup, or ISO file.
A clean install of Windows 10 is recommended for upgrading to the latest operating system version. The reason is that this method allows you to erase the hard drive and start with a fresh copy of Windows 10 without custom settings, drivers, apps, or files that may interfere with the upgrade process.
If you have had the same installation for a long time, this process can also help fix performance issues, problems shutting down and starting up, memory, and apps. Also, a clean installation is the process of choice to upgrade from an older version like Windows 7 or 8.1. Or you can use this option to delete all preloaded bloatware from the manufacturer image on a new computer.
Whatever the reason, Microsoft offers several ways to perform a clean install of Windows 10, including using a USB flash drive to set up the installation on an SSD (Solid-State Drive). You can use the Media Creation Tool to do a fresh install on a device already running Windows 10. It’s also possible to use the “Reset this PC” feature to quickly wipe out the hard drive and reinstall the operating system without additional tools. Or, if the computer does not start, you can use the Advanced startup options or mount the ISO file to File Explorer to complete a clean install.
This guide will teach you the different ways to perform a clean installation of Windows 10 on your computer, whether you plan to reinstall the same version or upgrade to a later release, including version 22H2, 21H2, 21H1, or 20H2.
- Clean install Windows 10 from USB
- Clean install Windows 10 from Media Creation Tool
- Clean install Windows 10 from Reset this PC (local)
- Clean install Windows 10 from Reset this PC (cloud)
- Clean install Windows 10 from WinRE
- Clean install Windows 10 from ISO file
Important: This process will delete everything on your device. It’s recommended to make a full backup of your computer before proceeding. You’ve been warned.
The best way to complete a fresh installation of Windows 10 is to use a USB flash drive, which you must first create using the Media Creation Tool, Command Prompt, or third-party tools like Rufus. Also, you must ensure the computer can start from USB, which means you may need to adjust the BIOS or UEFI settings. However, since most devices have different settings, you must check your manufacturer support website for more specific details.
To clean install Windows 10 from USB, use these steps:
-
Start the PC with the Windows 10 USB flash drive.
-
Press any key to continue.
-
Click the Next button.

-
Click the Install now button.

-
Click the “I don’t have a product key” option if you are doing a reinstallation. If Windows 10 was already activated after the installation, reactivation would happen automatically.

-
Select the edition of “Windows 10” that your license key activates (if applicable).

-
Check the “I accept the license terms” option.
-
Click the Next button.
-
Select the “Custom: Install Windows only (advanced)” option to perform a clean install.

-
Select each partition in the hard drive you want to install Windows 10 and click the Delete button. (Typically, the “Drive 0” is the drive that contains all the installation files.)
Warning: Deleting a partition also deletes all data on the drive. Also, it is not required to delete the partitions from a secondary hard drive.
-
Select the hard drive (Drive 0 Unallocated Space) to install Windows 10.

-
Click the Next button.
-
Select your region setting after the installation on the first page of the out-of-the-box experience (OOBE).

-
Click the Yes button.
-
Select your keyboard layout setting.
-
Click the Yes button.
-
Click the Skip button if you do not need to configure a second layout.
-
The computer will automatically connect to the network using an Ethernet connection. If you have a wireless connection, you must set up the link manually (a security key may be required).
-
Select the “Set up for personal use” option for Windows 10 Pro. (The “Home” edition does not have this option.)
-
Click the Next button.
-
Confirm your Microsoft account email, phone number, or Skype identification to create an account.
-
Click the Next button.
-
Confirm your Microsoft account password.
-
Click the Next button.
-
Click the “Create a PIN” button.
-
Create a new PIN password.
-
Click the OK button.
-
Confirm the privacy settings best suit your needs by turning on or off the toggle switch for each option.
-
Click the Accept button.
-
(Optional) On the “Customize your device” page, select one or more ways you plan to use the device to allow the setup to suggest tools and services customization during this experience.
-
Click the Accept button to continue. Or click the Skip button to skip this part of the setup.
-
Click the “No, thanks” button to skip linking your phone to your PC. (You can always do this from the Settings app.)
-
Click the Next button to allow OneDrive to automatically upload your Desktop, Pictures, and Documents folders to the cloud. Or click the “Only save files to this PC” option to skip this step.
-
Click the “No, thanks” button to skip the Microsoft 365 setup.
-
Click the Decline button to skip the OneDrive storage offer.
-
Click the “No Thanks” button to skip the Game Pass offer.
-
Click the “Not now” button to disable Cortana.


Once you complete the steps, Windows 10 will apply the settings and finish the setup.
Clean install Windows 10 from Media Creation Tool
You can also perform a clean installation using the Media Creation Tool with the option to keep nothing. This option is available for devices already using Windows 10, Windows 8.1, or Windows 7, and it provides an option to roll back to the previous installation.
To clean install Windows 10 with the Media Creation Tool, use these steps:
-
Open Microsoft support website.
-
Under the “Create Windows 10 installation media” section, click the “Download tool now” button.
-
Save the installer to the device.
-
Double-click the MediaCreationToolXXXX.exe file to launch the tool.
-
Click the Accept button.
-
Select the “Upgrade this PC now” option.

-
Click the Accept button again.
-
Click the “Change what to keep” option.
-
Select the Nothing option.
-
Click the Next button.
-
Click the Install button.
-
Select your region setting after the installation on the first page of the out-of-the-box experience (OOBE).
-
Click the Yes button.
-
Select your keyboard layout setting.
-
Click the Yes button.
-
Click the Skip button if you do not need to configure a second layout.
-
The computer will automatically connect to the network using an Ethernet connection. If you have a wireless connection, you must set up the link manually (a security key may be required).
-
Select the “Set up for personal use” option for Windows 10 Pro. (The “Home” edition does not have this option.)
-
Click the Next button.
-
Confirm your Microsoft account email, phone number, or Skype identification to create an account.
-
Click the Next button.
-
Confirm your Microsoft account password.
-
Click the Next button.
-
Click the “Create a PIN” button.
-
Create a new PIN password.
-
Click the OK button.
-
Confirm the privacy settings best suit your needs by turning on or off the toggle switch for each option.
-
Click the Accept button.
-
(Optional) On the “Customize your device” page, select one or more ways you plan to use the device to allow the setup to suggest tools and services customization during this experience.
-
Click the Accept button to continue. Or click the Skip button to skip this part of the setup.
-
Click the “No, thanks” button to skip linking your phone to your PC. (You can always do this from the Settings app.)
-
Click the Next button to allow OneDrive to automatically upload your Desktop, Pictures, and Documents folders to the cloud. Or click the “Only save files to this PC” option to skip this step.
-
Click the “No, thanks” button to skip the Microsoft 365 setup.
-
Click the Decline button to skip the OneDrive storage offer.
-
Click the “No Thanks” button to skip the Game Pass offer.
-
Click the “Not now” button to disable Cortana.


After you complete the steps, the setup will continue with the fresh installation of the operating system.
Clean install Windows 10 from Reset this PC (local)
Using the local image, you can also use the recovery settings to start fresh with a clean copy of Windows 10. However, unlike the USB, Media Creation Tool, and ISO file methods, you can only use this option to reinstall the same version of Windows 10 already on the computer. If you want to upgrade to a newer version, you will need to use one of the other alternative methods.
To clean install Windows 10 with the Reset this PC feature using the local image, use these steps:
-
Open Settings.
-
Click on Update & Security.
-
Click on Recovery.
-
Under the “Reset this PC” section, click the Get started button.

-
Click the “Remove everything” option to perform a fresh install of Windows 10.

-
Click the “Local reinstall” option.
-
(Optional) Click the Change settings option.
-
Configure the reinstallation options:
- Clean data: If this option is set to No (recommended), then the setup will only delete files, apps, and settings quickly. If the option is set to Yes, the setup will securely clean the drive before installing the operating system, but it will take longer.
- Delete files from all drives: Only the installation drive will be erased if the option is set to No (recommended). Otherwise, if this option is set to Yes, all the drives on the device will be deleted.
- Download Windows: If this option is set to No (recommended), the local image will be used for installation. If the option is set to Yes, the “Cloud download” option will be activated.
-
Click the Confirm button.
-
Click the Next button.
-
Click the Reset button.
-
Select your region setting after the installation on the first page of the out-of-the-box experience (OOBE).
-
Click the Yes button.
-
Select your keyboard layout setting.
-
Click the Yes button.
-
Click the Skip button if you do not need to configure a second layout.
-
The computer will connect to the network automatically if it uses an Ethernet connection. If you have a wireless connection, you must set up the link manually (a security key may be required).
-
Select the “Set up for personal use” option for Windows 10 Pro. (The “Home” edition does not have this option.)
-
Click the Next button.
-
Confirm your Microsoft account email, phone number, or Skype identification to create an account.
-
Click the Next button.
-
Confirm your Microsoft account password.
-
Click the Next button.
-
Click the “Create a PIN” button.
-
Create a new PIN password.
-
Click the OK button.
-
Confirm the privacy settings best suit your needs by turning on or off the toggle switch for each option.
-
Click the Accept button.
-
(Optional) On the “Customize your device” page, select one or more ways you plan to use the device to allow the setup to suggest tools and services customization during this experience.
-
Click the Accept button to continue. Or click the Skip button to skip this part of the setup.
-
Click the “No, thanks” button to skip linking your phone to your PC. (You can always do this from the Settings app.)
-
Click the Next button to allow OneDrive to automatically upload your Desktop, Pictures, and Documents folders to the cloud. Or click the “Only save files to this PC” option to skip this step.
-
Click the Decline button to skip the OneDrive storage offer.
-
Click the “No Thanks” button to skip the Game Pass offer.
-
Click the “No, thanks” button to skip the Microsoft 365 setup.
-
Click the “Not now” button to disable Cortana.


Once you complete the steps, a clean installation will be performed using the local image. If this is a branded computer, the setup will restore all the original settings previously available with the device. This means manufacturer-specific settings, drivers, applications, and tools. If you don’t want to reinstall the custom image provided by the manufacturer, use the “Cloud Download” option (see steps below).
Clean install Windows 10 from Reset this PC (cloud)
Windows 10 also includes the “Cloud Download” option in the “Reset this PC” feature, which allows you to reset the device with a clean installation, removing apps, files, and settings like the local image option. However, the difference is that when you select this option, the setup will download a fresh installation image from the Microsoft server.
This option has been designed to reinstall Windows 10 when the recovery feature is not working with the local image or using a branded computer with a custom image. If you choose this option, the setup will download the same version already installed on the device, which means you cannot use this method to upgrade the computer to a newer version. Also, if the device has a custom image from the manufacturer, this option will replace it with the one from Microsoft with all the standard settings and without custom drivers or trial software and tools.
To reinstall Windows 10 with the Reset this PC using the “Cloud Download” option, use these steps:
-
Open Settings.
-
Click on Update & Security.
-
Click on Recovery.
-
Under the “Reset this PC” section, click the Get started button.
-
Click the “Remove everything” option.
-
Click the “Cloud Download” option.
-
(Optional) Click the Change settings option.
-
Configure the reinstallation options: Clean data:
- Clean data: If this option is set to No (recommended), then the setup will only delete files, apps, and settings quickly. If the option is set to Yes, the setup will securely clean the drive before installing the operating system, but it will take longer.
- Delete files from all drives: Only the installation drive will be erased if the option is set to No (recommended). Otherwise, if this option is set to Yes, all the drives on the device will be deleted.
- Download Windows: If the option is set to Yes (recommended), the “Cloud download” option will be activated. If this option is set to No, then the local image will be used for installation.
-
Click the Confirm button.
-
Click the Next button.
-
Click the Reset button.
-
Select your region setting after the installation on the first page of the out-of-the-box experience (OOBE).
-
Click the Yes button.
-
Select your keyboard layout setting.
-
Click the Yes button.
-
Click the Skip button if you do not need to configure a second layout.
-
The computer will connect to the network automatically if it uses an Ethernet connection. If you have a wireless connection, you must set up the connection manually (a security key may be required).
-
Select the “Set up for personal use” option for Windows 10 Pro. (The “Home” edition does not have this option.)
-
Click the Next button.
-
Confirm your Microsoft account email, phone number, or Skype identification to create an account.
-
Click the Next button.
-
Confirm your Microsoft account password.
-
Click the Next button.
-
Click the “Create a PIN” button.
-
Create a new PIN password.
-
Click the OK button.
-
Confirm the privacy settings best suit your needs by turning on or off the toggle switch for each option.
-
Click the Accept button.
-
(Optional) On the “Customize your device” page, select one or more ways you plan to use the device to allow the setup to suggest tools and services customization during this experience.
-
Click the Accept button to continue. Or click the Skip button to skip this part of the setup.
-
Click the “No, thanks” button to skip linking your phone to your PC. (You can always do this from the Settings app.)
-
Click the Next button to allow OneDrive to automatically upload your Desktop, Pictures, and Documents folders to the cloud. Or click the “Only save files to this PC” option to skip this step.
-
Click the “No, thanks” button to skip the Microsoft 365 setup.
-
Click the Decline button to skip the OneDrive storage offer.
-
Click the “No Thanks” button to skip the Game Pass offer.
-
Click the “Not now” button to disable Cortana.


Once you complete the steps, the feature will take over and reset your device to the default settings by erasing and reinstalling a fresh copy of Windows 10 downloaded from the cloud.
Clean install Windows 10 from WinRE
If the computer does not start correctly and you want to reinstall Windows 10 to resolve the problem, the Windows Recovery Environment (WinRE) includes an option to perform a clean installation using the local or cloud image.
Technically, these are the same options available through the “Reset this PC” settings. However, you can also access the feature through the “Advanced startup” option, making it ideal for performing a clean installation of Windows 10 when the computer has problems. Or when you cannot boot the system to access the Settings app.
Again, you can only use this option to reinstall the same operating system version already installed on the computer. If you also want to upgrade to the latest version, you must use the Media Creation Tool, ISO file, or USB options.
To clean install Windows 10 from the Windows Recovery Environment, use these steps:
-
Start device.
-
Immediately after the Power-On Self-Test (POST), press the Power button again to shut down.
-
Repeat steps 1 and 2 twice, and in the third restart, the operating system should enter the Windows Recovery Environment (WinRE).
Quick note: Windows 10 has multiple ways to open the Advanced startup settings. You can use these other options if you cannot access the recovery environment.
-
Click the Advanced options button.

-
Click on Troubleshoot.

-
Click on the “Reset this PC” option.

-
Select the “Remove everything” option.

-
Click the Cloud download or Local reinstall option. Cloud download: Downloads a fresh image from the Microsoft servers and performs a fresh installation. Local reinstall: Uses the locally available image to install a clean copy of Windows 10.

-
Select the “Only the drive where Windows is installed” option. (The All drives option will delete the data on all drives. This option is usually recommended only when you want to decommission the device.)

-
Select the “Just remove my files or Full clean the drive” option.
- Just remove my files: Deletes the drive contents quickly.
- Full clean the drive: It also deletes everything on the drive but performs a secure erase that takes several hours—this option is suited when preparing to give away the device.

-
Click the Reset button.

-
Select your region setting after the installation on the first page of the out-of-the-box experience (OOBE).
-
Click the Yes button.
-
Select your keyboard layout setting.
-
Click the Yes button.
-
Click the Skip button if you do not need to configure a second layout.
-
The computer will connect to the network automatically if it uses an Ethernet connection. If you have a wireless connection, you must set up the connection manually (a security key may be required).
-
Select the “Set up for personal use” option for Windows 10 Pro. (The “Home” edition does not have this option.)
-
Click the Next button.
-
Confirm your Microsoft account email, phone number, or Skype identification to create an account.
-
Click the Next button.
-
Confirm your Microsoft account password.
-
Click the Next button.
-
Click the “Create a PIN” button.
-
Create a new PIN password.
-
Click the OK button.
-
Confirm the privacy settings best suit your needs by turning on or off the toggle switch for each option.
-
Click the Accept button.
-
(Optional) On the “Customize your device” page, select one or more ways you plan to use the device to allow the setup to suggest tools and services customization during this experience.
-
Click the Accept button to continue. Or click the Skip button to skip this part of the setup.
-
Click the “No, thanks” button to skip linking your phone to your PC. (You can always do this from the Settings app.)
-
Click the Next button to allow OneDrive to automatically create a backup of your Desktop, Pictures, and Documents folders to the cloud. Or click the “Only save files to this PC” option to skip this step.
-
Click the “No, thanks” button to skip the Microsoft 365 setup.
-
Click the Decline button to skip the OneDrive storage offer.
-
Click the “No Thanks” button to skip the Game Pass offer.
-
Click the “Not now” button to disable Cortana.


Once you complete the steps, the process will take over and reset your computer to the default settings by erasing and reinstalling a clean copy of Windows 10. The completion time will depend on your computer hardware configuration and selected reset configuration.
Clean install Windows 10 from ISO file
If you only have a Windows 10 ISO file, a USB flash drive or disc is not required to continue with the installation. You can always mount the ISO in File Explorer to launch a clean install or in-place upgrade on a device with the operating system already installed.
To clean install Windows 10 from an ISO file, use these steps:
-
Download the Windows 10 ISO without using the Media Creation Tool.
-
Right-click the ISO file and select the Mount option.

-
Select the virtual drive from the left navigation pane.
-
Double-click the Setup file to begin the Windows 10 installation.

-
(Optional) Click the “Change how Windows Setup downloads updates” option.
-
Select the “Not right now” option.
-
Click the Next button.
-
Click the Accept button to agree to the terms.
-
Click the “Change what to keep” option.
-
Select the Nothing option.
-
Click the Next button.
-
Click the Install button.
-
Select your region setting after the installation on the first page of the out-of-the-box experience (OOBE).
-
Click the Yes button.
-
Select your keyboard layout setting.
-
Click the Yes button.
-
Click the Skip button if you do not need to configure a second layout.
-
The computer will connect to the network automatically if it uses an Ethernet connection. If you have a wireless connection, you must set up the connection manually (a security key may be required).
-
Select the “Set up for personal use” option for Windows 10 Pro. (The “Home” edition does not have this option.)
-
Click the Next button.
-
Confirm your Microsoft account email, phone number, or Skype identification to create an account.
-
Click the Next button.
-
Confirm your Microsoft account password.
-
Click the Next button.
-
Click the “Create a PIN” button.
-
Create a new PIN password.
-
Click the OK button.
-
Confirm the privacy settings best suit your needs by turning on or off the toggle switch for each option.
-
Click the Accept button.
-
(Optional) On the “Customize your device” page, select one or more ways you plan to use the device to allow the setup to suggest tools and services customization during this experience.
-
Click the Accept button to continue. Or click the Skip button to skip this part of the setup.
-
Click the “No, thanks” button to skip linking your phone to your PC. (You can always do this from the Settings app.)
-
Click the Next button to allow OneDrive to automatically create a backup of your Desktop, Pictures, and Documents folders to the cloud. Or click the “Only save files to this PC” option to skip this step.
-
Click the Decline button to skip the OneDrive storage offer.
-
Click the “No Thanks” button to skip the Game Pass offer.
-
Click the “No, thanks” button to skip the Microsoft 365 setup.
-
Click the “Not now” button to disable Cortana.


Once you complete the steps, the clean installation process will begin, like using the Media Creation Tools or USB flash drive to upgrade the system.
A while ago we showed you how to get a Windows 10 ISO for a clean install. Today we’ll show how to clean install Windows 10 from beginning to end.
A while ago, we showed you how to get a Windows 10 ISO for a clean install. Today we’ll go in-depth on how to fully perform a clean install of Windows 10 from beginning to end.
Also, take a look at our article on how to clean install Windows 11.
Step 1. Configuring your computer’s BIOS*
*Note: This may not be necessary if your computer is correctly set up and boots from USB/DVD automatically. Upon restart, you see a screen “Press any key to boot from USB/DVD…” you can press any key on your keyboard and move to the next step.
Start by inserting your Windows 10 installation media into the PC — this can be a DVD or USB flash drive. If you haven’t created it yet, read our article on how to create a Windows 10 USB flash drive. Now restart the computer and enter the BIOS (F2, F9, F12, or Del on most PCs).

Tip: If you’re on a laptop and you’re unsure what your BIOS key is, a simple Google search like this should help you out.
After pressing the correct key, navigate to the Boot section of the BIOS using the right arrow key.
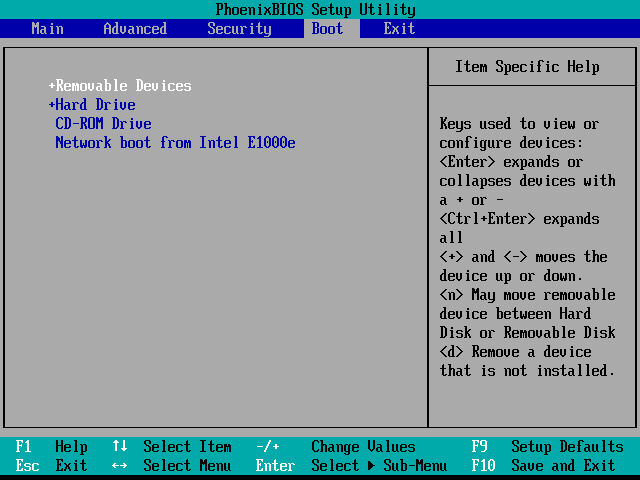
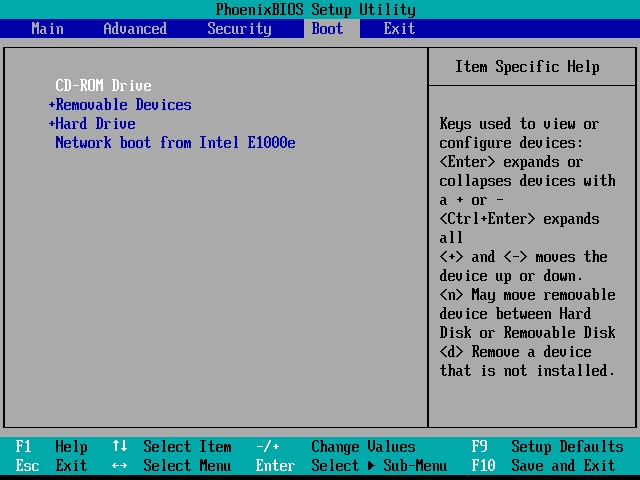
The controls of each BIOS are usually displayed at the bottom (unless you’re lucky enough to have a GUI BIOS – in which case you’ll be able to use the mouse to navigate). Use these to navigate to the device from which you will install Windows and place it at the top. I’ll be using a DVD, so I’ll place “CD-ROM Drive” at the top. If you use a USB drive, you should move “USB Device” or “Removable Devices” to the top.
Once you’re done with changing the boot order, use the right arrow key to move to the Exit section of the BIOS. From there, you’ll want to select “Exit Saving Changes” followed by a Yes or “y.”
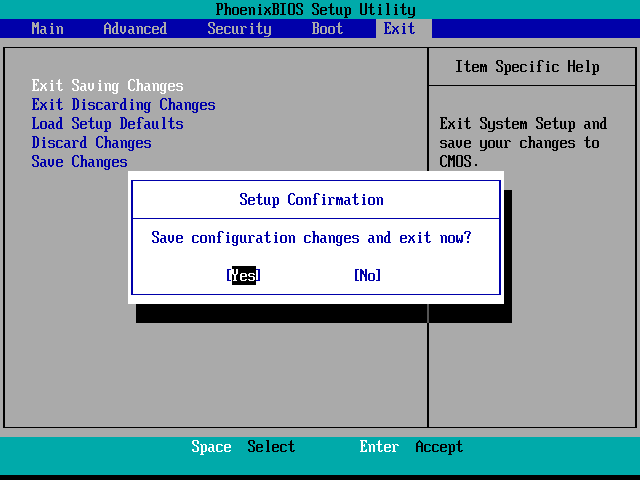
After this, your computer should be able to restart straight into the Windows installer.
Note: — if greeted by a “Press any key to boot from…” do press that key! You won’t get to the installer otherwise.
Step 2. Installing Windows 10
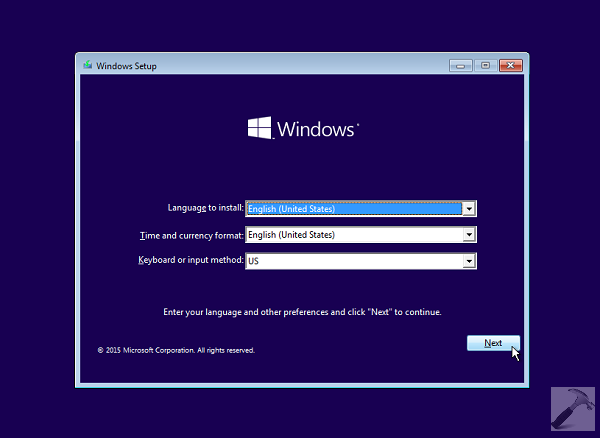
After rebooting, you should see the Language select screen. From here, select your desired language, time and currency format, and keyboard input. Then press Next to continue.

On the next screen, press the “Install now” button.

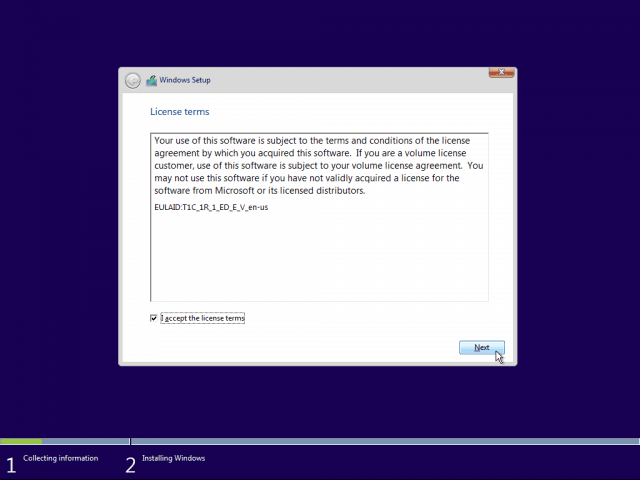
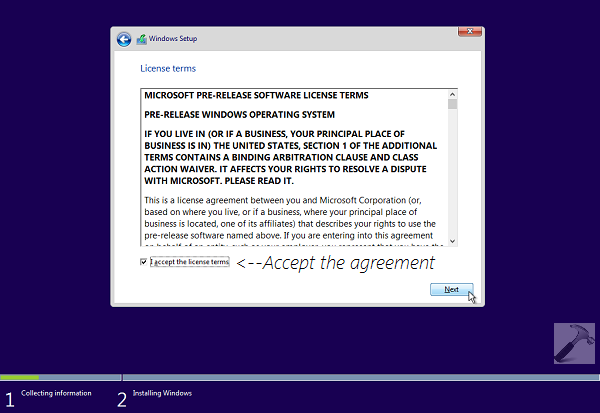
You’ll need to agree to the Microsoft EULA before you can continue. Read it (…or not) and tick the checkbox before pressing “Next.”
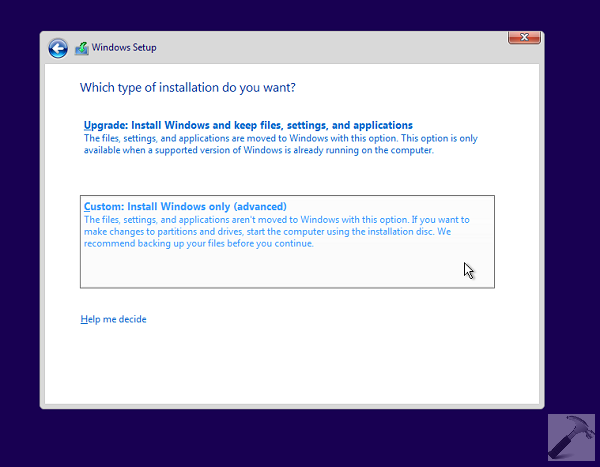
To perform a clean install, you’ll need to select the “Custom: Install Windows only” option. As the installer says — you should have a backup of your files and programs to copy them to the new installation after it’s complete.
This next part may be a bit tricky if you have multiple hard drives or partitions. You’ll need to delete the primary partition and the system partition. To ensure a 100% clean install, it’s better to fully delete these instead of just formatting them.
After deleting both partitions, you should be left with some unallocated space. Select it and click the “New” button to create a new partition.
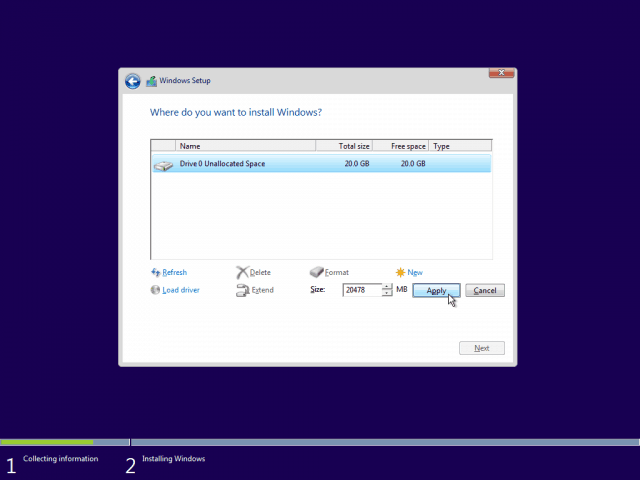
By default, Windows inputs the maximum available space for the partition. I’d advise you to leave the size as-is and press “Apply.”
Note: You will most likely be informed that Windows may create additional system partitions. This is normal and necessary for most windows installs, so simply press “OK”.
After creating the new partition(s), select the primary one and press “Next.”
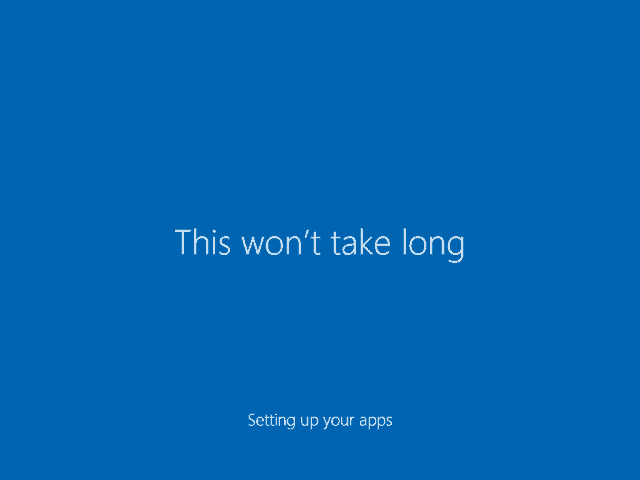
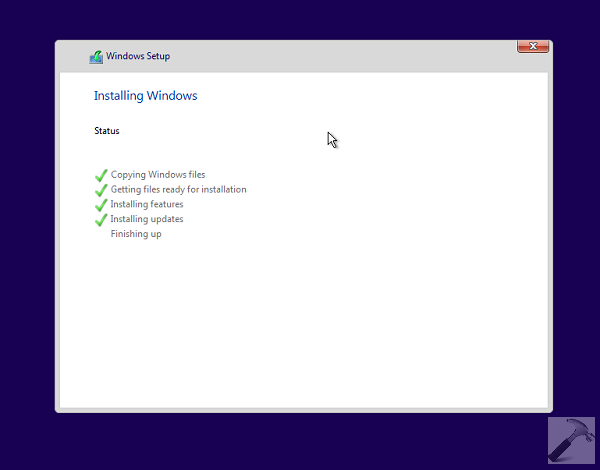
The Windows setup should now begin. Clean installs are usually significantly faster than upgrades, so you should get from this…
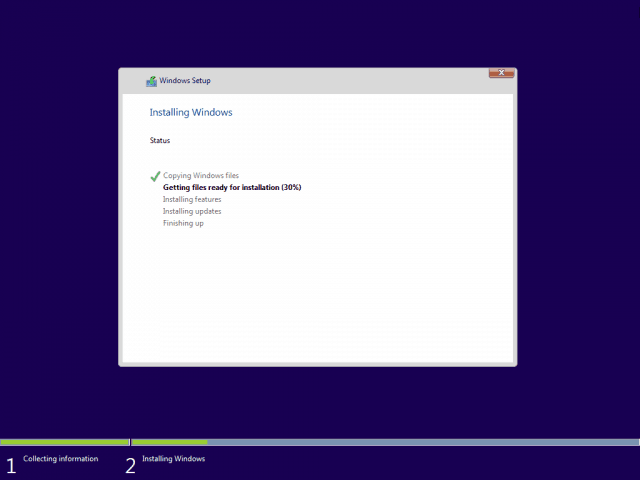
… to this in a matter of minutes.

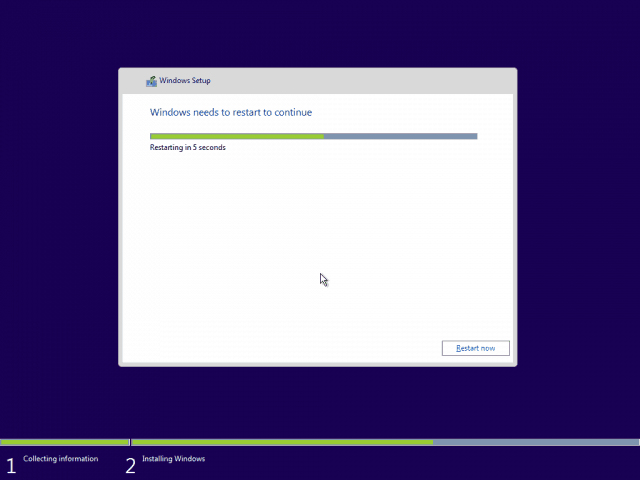
After “Finishing up,” you will be notified that Windows will now restart.
Warning: If the “Press any key to boot from USB/DVD…” screen appears while restarting DO NOT PRESS ANY KEY! Pressing one will result in starting the install all over again.
Step 3. Configuring Windows
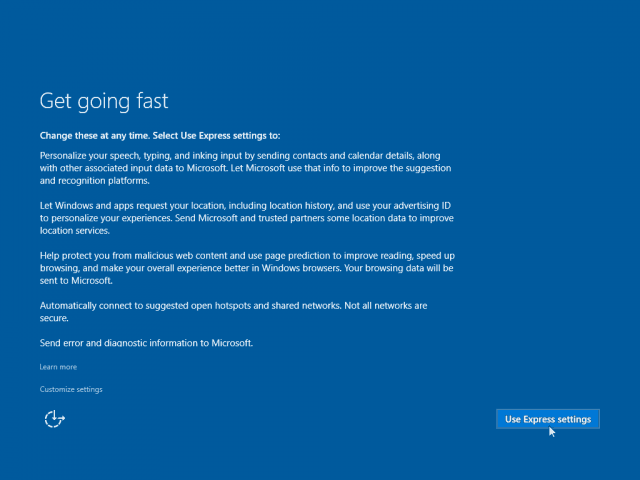
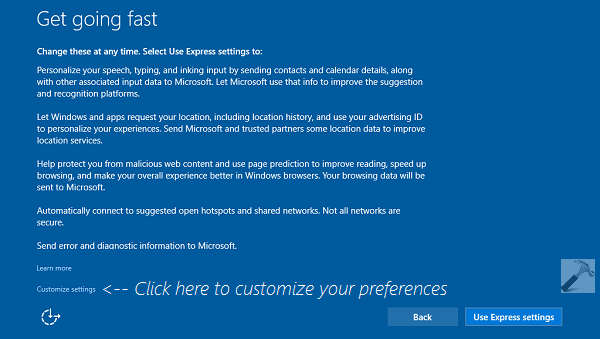
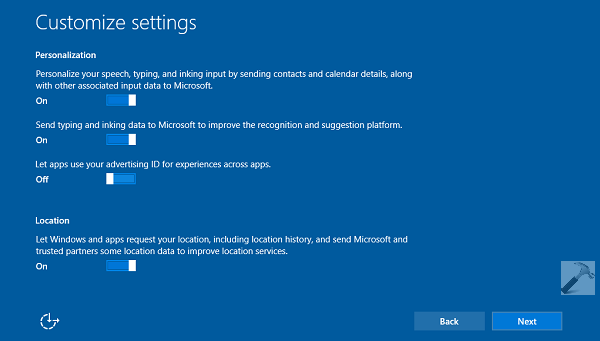
After the reboot, you should be greeted by the following screen. The default Windows 10 settings are excellent and don’t really mess with your privacy, so we advise you to Use Express settings. Optionally, you can also Customize the settings if you insist on turning some features off.
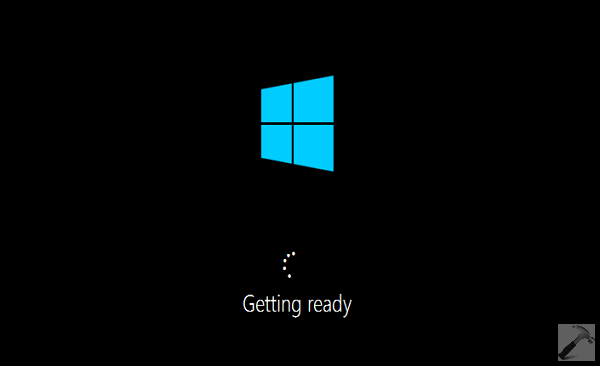
Windows will now go through a few setup procedures.
Note: Frequent reboots at this stage are normal, simply leave the computer be until you reach the “Create an account” screen.

Once you reach this screen, fill in your new account details and press Next.

Windows will now go through the final steps of setting up…
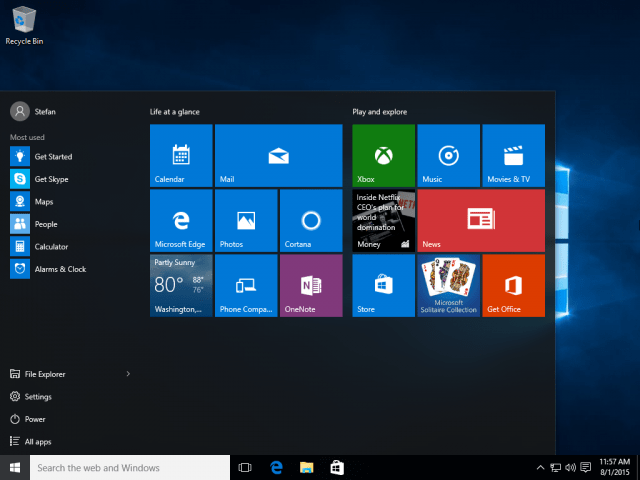
…and will boot straight to the Desktop afterward. Congrats!
What now?
You’ll have a lot to see in Windows 10 – from configuring general settings to checking out the new and exciting features. Here are a few articles you can check out right away:
- Windows 10 Tip: Find Apps by First Letter from Start Menu
- Windows 10 Tip: Add or Remove System Icons to the Desktop
- Windows 10 Tip: Pin Specific Settings to Start Menu
- Windows 10 Tip: Pin Websites from Edge Browser to Start Menu
- Windows 10 Tip: Pin Favorite Music Playlists to Start Menu
- Windows 10 Tip: Enable and Create a System Restore Point
- How to Create Live Tile Groups in Windows 10 Start Menu
- Add Gmail and Other Email to Windows 10 Mail & Calendar
- Make Windows 10 Mail App Sync More Frequently
- Windows 10 Tip: Make Edge Browser Open to Multiple Web Pages
- How to Set Default Apps in Windows 10
- How to Enable Hibernate Mode in Windows 10
- How to Create a Windows 10 USB Recovery Drive
- Transfer iTunes Playlists to Windows 10 Music App
- Make Windows 10 File Explorer Open to This PC Instead of Quick Access
- Add More Folder Locations to Windows 10 Start Menu
![]()
Windows 10, the last version of Windows desktop operating systems (OSes) is full of all the features you’ll need. Microsoft has worked very hard to develop this OS and implemented the best features of Windows series in it. Windows 10 is pretty much advanced and supports latest Universal Apps along with Continuum UI.
In this article, we’re going to share the step-by-step procedure to install Windows 10 from scratch. You will need following items to proceed with this guide:
a. Windows 10 installation disc or bootable USB created for installing Windows 10. If you’ve an ISO file, you can make bootable USB from it using the steps 1 to 4 of this article.
b. A device with Windows 10 compatibility. Here are the system requirements:
- Processor: 1 GHz or faster with support for PAE, NX, and SSE2
- RAM: 1 GB (32-bit) or 2 GB (64-bit)
- Hard disk space: 16 GB (32-bit) or 20 GB (64-bit)
- Graphics card: Microsoft DirectX 9 graphics device with WDDM driver
- Firmware: UEFI 2.3.1, Secure boot enabled, BIOS
c. The device used in point b must have charging above 60% if its a laptop or tablet. If it’s a computer, make sure you have proper power connectivity and power cut doesn’t occurs in the middle of installation. For preventing this, you can connect the computer to UPS.
Now let us begin with the how-to part:
How To Make Clean Install Of Windows 10
1. Plug-in the bootable USB or Windows 10 installation DVD and boot the machine. You must see Press any key to boot from CD or DVD… message. So press any key to continue.

2. Identify and select your language, time and currency format and keyboard input method in the below shown window. Click Next:
3. Now click on Install now button then:
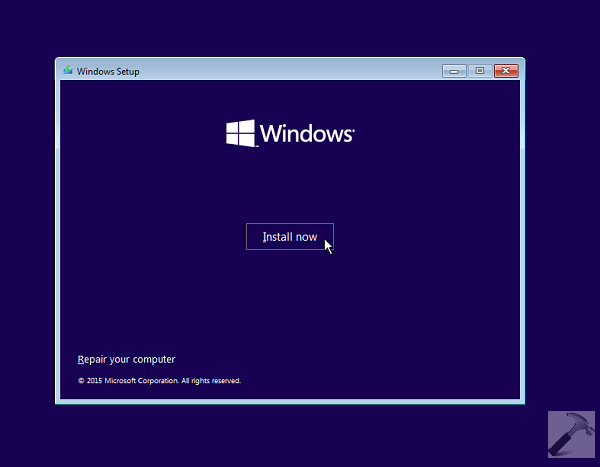
Immediately, you’ll see the Setup is starting message:
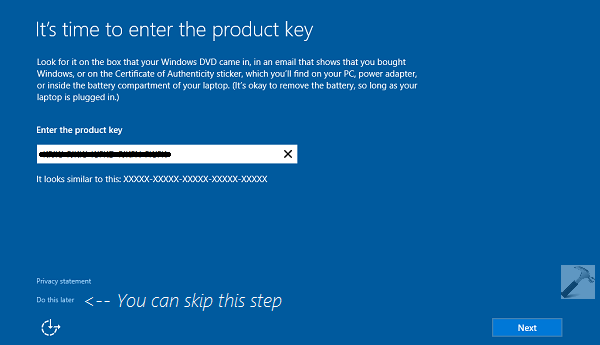
4. Now when setup wizard starts, you’ll be asked to enter the product key. If you have the product key with you, enter it. Else, you can skip this step for now by clicking Skip option.

5. Moving on, accept the software licensing terms and conditions from Microsoft. Check I accept the license terms and hit Next:
6. So now we arrive to an important stage with Which type of installation do you want screen. Since we’re making a clean install, we’ll select the Custom: Install Windows only (advanced) option. If you select Upgrade : Install Windows and keep files, settings and applications, then you may receive Compatibility Report and thus you won’t be able to proceed further, for that refer this guide.
7. Then you can pick the correct drive which has sufficient space to install and save your stuff later. Also its better to format the drive once onto which you’re installing, so that we can suppress errors, if any. When you’re done with your choice, click Next.
8. As the setup is progressing, you can now see that Windows is installing. The installation may take few minutes depending upon your system’s hardware capability. We used a 4th generation i5 processor in this tutorial, and it hardly took around 5 minutes to complete the installation.
9. Once the installation is completed, Windows will attempt to restart itself. In case if it fails to do so, you can hit the Restart now button.
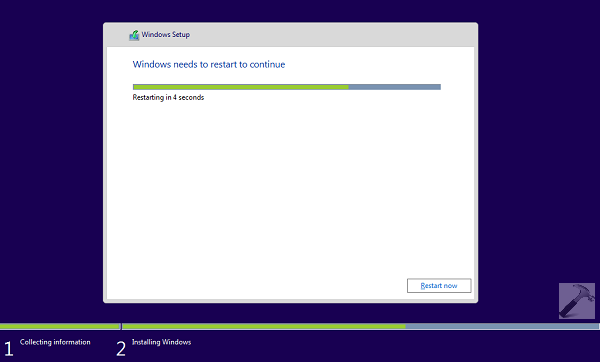
Important Advice: Sometimes users may trap themselves into restarting loop after this step. It is because, when Windows completes installation and restarts, they again see Press any key to boot from CD or DVD…. message and they hit any key. Keep in mind that you don’t have to react upon this message now, else the setup will again launch from starting. So simply ignore the message so that Windows automatically takes you to below shown screen. Alternatively, when you see Windows is starting in some seconds, immediately remove the installation media as soon as Windows closes and make sure you remove/eject media before it starts. However, ignoring the message would be great idea.
10. This is an automatic step and you don’t have to act. Windows will make the hardware and communicate with the resources to make the devices ready to use.
11. After few seconds, another restart will bring this screen. We recommend you to choose Use Express settings option. However, you can also Customize settings to have custom preferences.
12. In the Customize settings screen, configure you settings and click Next.
13. Then you’ll be again asked to enter your product key if you’ve clicked Skip in step 4. If you want to do the activation later, due to absence of network connectivity etc. you can click Do this later link.
14. Then it’s time to enter your account details and create a new user account to use this system. By default, this will be built-in administrator account.
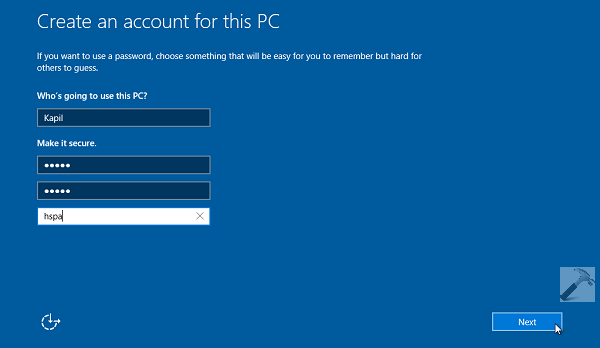
Next, you’ll see the screen making primary initialization for your account, so keep patience and wait for few moments.
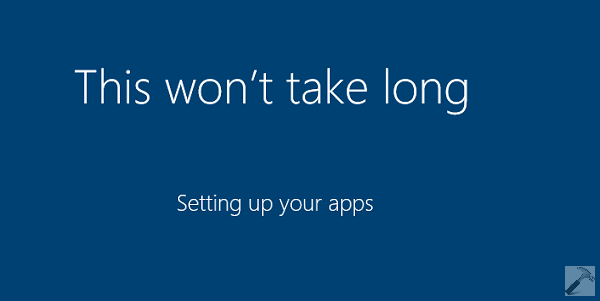
15. Finally, you will arrive at Desktop. In this way you’ve completed the clean install of Windows 10.
Hope you enjoy Windows 10 and find it awesome!
READ THESE ARTICLES NEXT
- Microsoft released Windows 10 Version 22H2
- Differences between Windows 10 and Windows 11
- Run programs in Compatibility Mode in Windows 11/10
- How to Manage & Free Up Storage on Windows
- Fix: Recycle Bin Not Refreshing in Windows 11/10
- Fix: Location Settings Greyed Out in Windows 11/10
- Fix: Location Tab Missing in Properties on Windows 11/10
- Enable or Disable Memory Compression in Windows 11/10
- How to Schedule Automatic Shutdown in Windows 11/10
- Fix: Your device is missing important security and quality fixes
A clean install is when you reboot your computer to the original Windows files. This means all your documents, folders, apps, etc., will be erased. Microsoft Office, printers, and even media players will no longer exist on your computer. Sometimes this is needed to fix a frustrating error such as this one. It is truly a way to start fresh.
Windows Automatic Repair Tool

System Information
-
Your machine is currently running Windows 10 -
Restoro is compatible with your operating system.
Recommended: To repair Windows Errors, use this software package; Restoro System Repair. This repair tool has been proven to identify and fix these errors and other Windows problems with very high efficiency.

-
100% safe as confirmed by Norton. -
Only your system and hardware are evaluated.
When Should You do a fresh install of Windows 10?
The first and foremost reason you would do a clean install is if you are upgrading your computer. Yes, Microsoft offers “upgrade” options that promise to painlessly transfer all your files, documents, settings, and programs, but these hang during the upgrade and sometimes create big problems.
Upgrades don’t just transfer the files and apps you need; they transfer everything, including some registry changes from old, uninstalled programs that you might not want on the new version of your operating system (OS). Chances are good; even if the upgrade completes, you will still spend time reinstalling programs that will not run because they are set to run on the old OS.
Also, upgrades will transfer all the bloatware initially installed on your computer. Because of all this, cleaning and installing the new OS version is much better.
Purchase of a new Computer
Another good reason to do a clean install of windows 10 is if you purchase a new computer. Before you add files from your old computer, install new programs, or make any setting changes, you can install the OS clean to eliminate the bloatware installed in the factory. This saves you from going through and manually uninstalling all of it. Remember, if there are programs you want to keep, you will need to reinstall those after the clean install.
Repair Windows Issues
A clean install is also sometimes needed for specific computer issues. If you have Windows 10 on your computer, it is usually best to try the “Reset” feature before attempting a clean install for computer trouble. In this case, you have worked through troubleshooters and cannot resolve a serious problem any other way.
At that point, you would reset the computer as a last resort before a clean install. Here are the steps to perform a system reset if you are having computer problems and want to reset the computer to factory standards:
- See Also: [FIXED] “There is a Problem with this Windows Installer Package” Error
The clean installation process for Windows 10
Step #1
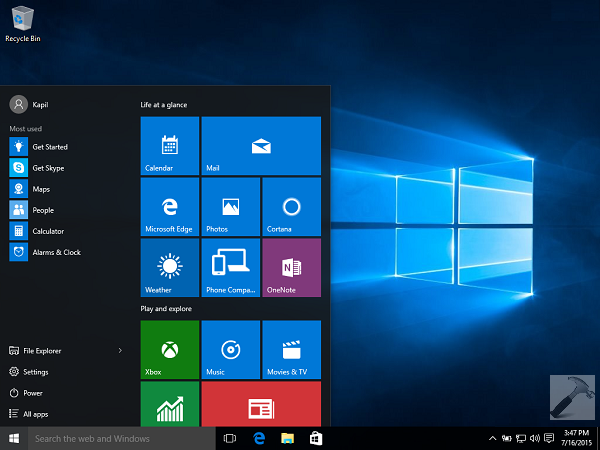
Press the [X] and [Windows] keys together. Choose “Settings” from the menu.

Step #2
Click on “Update & Security.” Then click “Recovery” on the left side. You should see “Reset this PC” on the right. Click the “Get started” button found underneath that.

Step #3
Now choose “Keep files” or “Remove everything” and continue. The computer will reset to Windows 10 factory conditions and save any documents you have if you choose to keep your files. Otherwise, your files and documents will all be removed.

If you have tried all other repair methods, including the factory reset that removes everything from your computer, a clean install may be your only option.
Stop and Do This Before You Continue!
- You will need an Internet connection, sufficient storage (16 GB is recommended), and a computer that meets Windows 10 system requirements.
- Make a backup of all your documents and files. These will all be lost during the process. You should also perform a separate system backup if something goes wrong with the clean install.
- Make a copy of your recovery drive. Also, backup any partitioned drives. All partitions and the data on them will be removed with a clean install.
- Create a Microsoft account (if you don’t already have one) and make sure your version of Windows and other installed Microsoft software is activated on that account. This makes it easier to maintain your product registration after you perform the clean install, especially if something goes wrong.
- A clean install deletes all apps that do not come with Windows. You might be surprised to find out that Office and the manufacturer’s apps are no longer on your computer after the installation, including manufacturer support apps. You will have to reinstall these apps manually after the clean install if you wish to keep them. Make sure you have copies of the software, licenses, and product registration keys.
- In addition to losing apps, you will probably lose your digital app content and licenses, and in some cases, you may no longer be able to use apps even if you paid for them. You need to visit manufacturer websites, even Microsoft’s Office website, and learn if it is possible to keep your license and how to do it through this process if you wish to maintain any of these.
- Make a note of the drivers you need for your hardware and download these if you need to reinstall them later. You can access the device manager by right-clicking each device and looking at the driver name, manufacturer, and version properties. The drivers are available on the manufacturer’s website.
- If upgrading from a previous version of Windows, you should ensure your BIOS is set to compatibility mode or UEFI.
After finishing all your backups and downloads, disconnect any external drives, hard drives, flash drives, etc., from your computer. During the installation process, only the flash drive with the Windows 10 installation software on it should be connected to the computer to prevent the installation from overwriting your backup information.
Two Methods for Performing a Clean Install
1. Use the Built-in Fresh Start Option
Windows 10 comes with a “Refresh Option” that contains fewer steps than booting from a flash drive. In some cases, a flash drive may be the only option. But if you can access “Refresh,” you might want to use this method. You still need to follow the “Do This Before You Continue” list, but this method has fewer steps than restoring from media.
Step #1
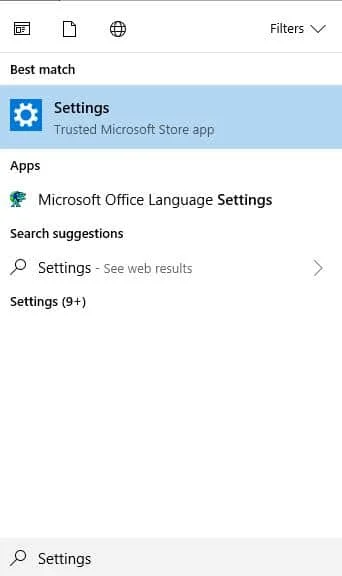
Type “Settings” into the Start menu, and select the Settings option.
Step #2
In the Settings window, choose “Updates & Security.”

Step #3
Now, click “Recovery” on the left and then choose “Learn how to start fresh with a clean installation of Window,” which is found under “More recovery options” on the right.

Step #4
The link will take you to a Microsoft web page with a link to download the refresh tool. Click “Download tool now.”

Step #3
After the tool has finished downloading, click on it in the folder where it was downloaded to open and run it. When it asks you to choose what you want to keep, choose “Nothing.”

Step #4
Now, Windows will return your computer to a clean state. This process takes time. When Fresh Start is finished, you will be on the login screen and can log in as you usually would. Once you are logged in, setup will begin. Follow the prompts. After everything is complete, immediately check for updates, reinstall any apps and drivers you want, and re-download your saved files.
2. Create Installation Media
You must follow this method to perform the clean install from a flash drive. Please note if you have the Windows Enterprise version or Windows Education version, this process will not work.
Step #1
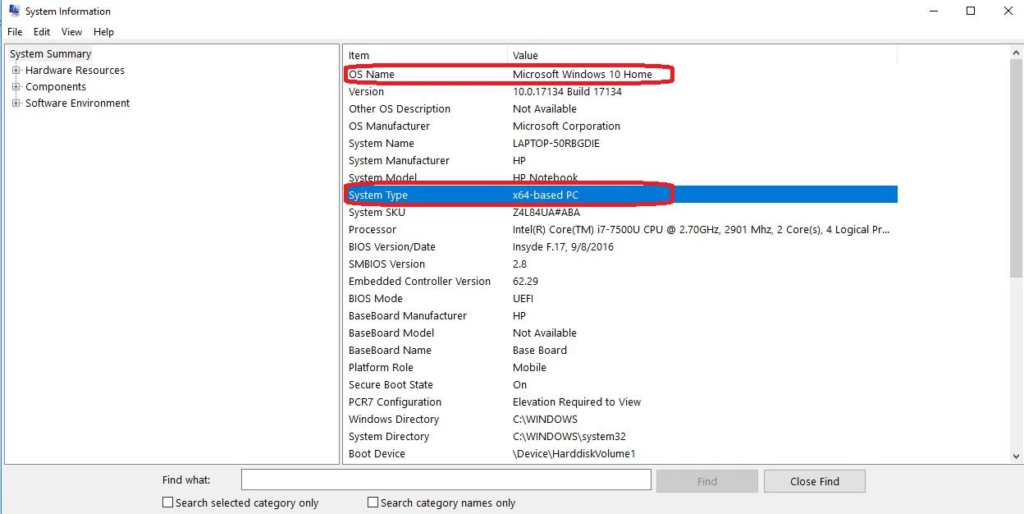
Find out what version of Windows you are using and whether it is x32 or x64 bit. You can find this by typing “System Information” into the Start menu and choosing that option. You will also need to find out which language your version of Windows is using if you don’t already know.
You can do this by typing “Region and language” into the Start menu and selecting that option. You must reinstall the same version of Windows that you already have.
Step #2
After doing the, “Do This Before You Continue” list, go to the Microsoft website and click the “Download tool now” button, and select “Run.” You must be logged on as an administrator to run this tool.
Step #3
In the Windows 10 Setup window that opens, you will first see a Terms of Service agreement. Read and accept this to continue.

Step #4
At this point, it will ask what you want to do. You must plug your clean 16GB USB drive into the computer and choose “Create installation media for another PC.” Then select “Next.”

Step #5
At this point, you will need to select the language, edition, and architecture that you currently have on your computer. This is just picking what you learned in the first step.

Step #6
Now, choose a USB flash drive as the media you are using.

Step #7
Now you will have the option to select a flash drive. Since you should only have one plugged into your computer, you should see only one option.
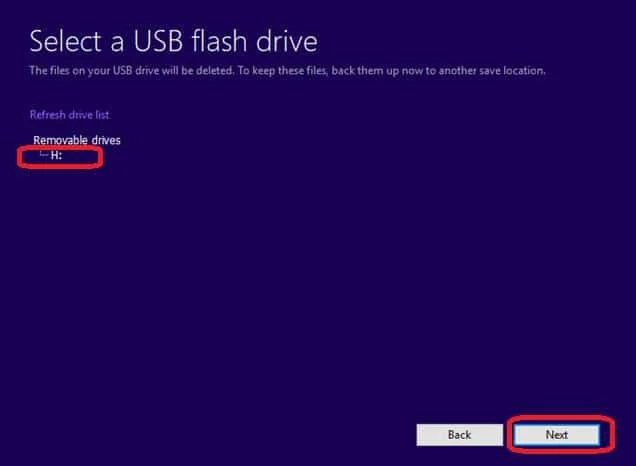
Step #8
Once you click next in the previous step, Windows 10 will begin downloading. This could take a very long time, depending on your connection speed. When the download is finished, Microsoft will then verify that the download is OK.
This will take even more time. Be patient. You will be told when your drive is ready. Click “Finish.”

Step #9
Now, type “Settings” into the Start menu, and select the Settings option.
Step #10
Choose “Updates & Security.”

Step #11
Click “Recovery” on the left and then choose “Restart now,” which is found under “Advanced startup” on the right.

Step #12
You should see the “Choose an Option” menu. Click on “Use a device.” Then, choose your device from the menu.

Step #13
You need to follow any onscreen prompts, answering questions about your language and keyboard preferences, until you get to the “Install now” button, which you click.

Step #14
You can skip the product key step(s) if you do not have one. Make sure you choose the right edition for what you previously had (Home or Pro). You cannot change editions using this method when doing a clean install; if you attempt to, you will have to start over from the beginning.

Step #15
You will need to wait a bit and then be asked to agree to the Terms of Service- review these, ensure the box is checked, and click “Next.”
Step #16
At this point, click “Custom: Install Windows only (advanced).” Note: Restart the setup if you get a driver missing error after clicking this. When you come to this screen, ensure your flash drive is not active and remove your flash drive before clicking “Custom: Install Windows only (advanced).”
Once you have removed the drive, you should be able to continue the process. You will be prompted when you should reinsert the drive at a later time. Removing the flash drive while it is active can erase or corrupt the files, so be careful if you need to do this.

Step #16
Next, you will be asked where you want to install Windows. You should only have one option available. (If you have multiple options, your drive is still partitioned. You need to remove the partitions by clicking on the bottom option and deleting it.
Continue deleting partitions until there is only one drive option left that should read something like “Drive 0 Unallocated Space.”) Select the drive and click “New.”
Then you need to click “Apply” and finally “OK.” Now You created an adequately partitioned drive, and part of the drive will be reserved for System Restore. Click the central (largest) partition and then click “Next.”

Step #17
Again, have patience because this process takes time. Windows will restart a few times when the clean install is finished and take you through some setup screens. After everything is complete, readjust your settings (such as screensavers and wallpaper) to reflect your preferences, check immediately for updates, reinstall any apps and drivers you want, and re-download your saved files.
Frequently Asked Questions
Can you clean Install Windows from a USB Flash Drive?
To cleanly install windows from a USB Flash Drive, you’ll need to format the drive first. This can be done using a tool like Diskpart. Once the drive is formatted, you’ll need to copy over the Windows installation files. This can be done using a tool like Xcopy. Finally, you’ll need to run the Windows setup program from the USB drive.
Does Windows 10 activate automatically after a clean install?
Yes, Windows 10 will activate automatically after a clean install. Microsoft’s activation servers will recognize that the product key has been used before and will automatically activate the new installation. This is a convenient feature for users who want to reinstall their operating system without activating it manually.
How do you clean install Windows from an iso file?
To clean install Windows from an iso file, you must first create a bootable USB drive or DVD. Once you have created the bootable media, insert it into your computer and restart. Boot from the media and follow the on-screen instructions to begin the process. During the install process, you will be given the option to perform a clean install. Select this option and continue with the installation. Once the installation is complete, you will need to activate Windows.
Does a clean install of Windows improve performance?
A clean installation of Windows can improve performance by removing unnecessary files and settings that can clutter the operating system and cause it to run slowly. In addition, a clean install can also help to fix problems that may be causing your computer to run slowly or experience other issues.
How to reinstall Windows 10 without losing files?
If you want to reinstall Windows 10 without losing files, you can do so by using the default settings in the Windows installer. However, it’s always a good idea to perform a file backup before doing any major changes to your system, just in case something goes wrong.
How long does the clean installation process take for windows 10
To do a clean install of Windows 10 usually takes about 30 minutes to complete. Before beginning the installation, users are prompted to create recovery settings and a USB with the latest installation files. The entire setup process is straightforward, though it can take some time to download and install the latest updates on a particular computer. In general, it is best to allow the computer to restart a few times during the installation for all updates to be installed properly.
Windows 10 is the best of Windows 8, and Windows 7 combined. The latest operating system, dubbed the ‘last’ version of Windows’, is designed to make using the software just as easy on a traditional laptop as on a tablet.
If you are yet to upgrade from Windows 8.1, you’ve unfortunately missed out on the free upgrade, which ended in July 2016. Now, you can upgrade to Windows 10 by purchasing a new computer with the operating system pre-loaded, or purchasing Windows 10 Home which costs £99.99 in the UK and $119.99 in the United States.
There are two ways that you can install Windows 10 onto your machine. The most popular and common way of updating your machine is using the Windows Update system, which is typically easy and more accessible for the average user. You can also download Windows 10 as an ISO file, which opens up like an application and gives you instructions on how to download.
When you perform this OS update, you also have the option of performing a clean install, whereby all your settings are refreshed and all your files removed, giving you essentially a factory-fresh device. You can also choose to keep some settings and all of your files.
Download Windows 10
Head over to the Microsoft Store (www.microsoftstore.com) and take a look at all the Windows 10 options that are available. Choose the option that best suits you – the Home edition is best for the average user – and choose the ‘Buy and Download Now’ option. Follow the on-screen instructions and you will be asked what kind of install you would like to perform.
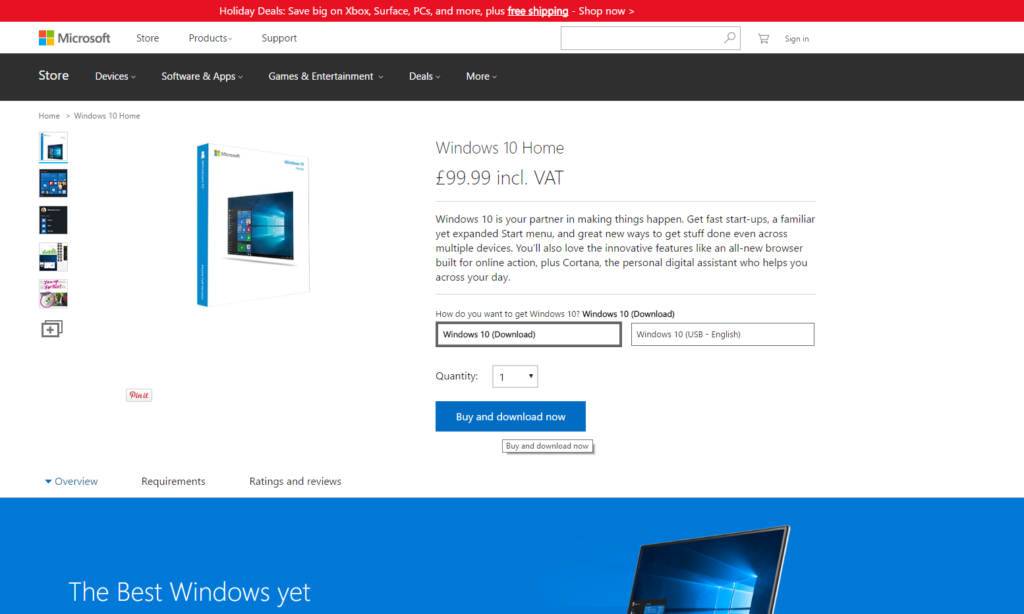
Basic Windows 10 Requirements
Before installing Windows 10, you will need to ensure that your PC has the specs to handle it. Windows is not incredibly demanding, meaning most modern PCs will be able to install the operating system.
Here are the specifications outlined by Microsoft:
- 1GB RAM for 32-bit Windows 10.
- 2GB RAM for 64-bit Windows 10.
- 1 GHz processor or quicker.
- Up to 20GB of available hard drive space.
- A screen resolution of 800 x 600 or higher.
- A DirectX 9 graphics processor complete with WDDM driver.
- Internet access – Ethernet or Wi-Fi.
- A Microsoft account.
Follow the on-screen instructions and your PC will turn off and on again multiple times. Ensure that your machine is plugged into a power source and is not disrupted during the update process.
Installing Via USB or DVD
If you have downloaded the Windows 10 .ISO file, but intend to install the software on another computer, you will be able to do so through a USB or DVD. You can purchase a USB pre-loaded with Windows 10 direct from Microsoft, but you can also make your own.
To start, you will need a USB flash drive that has at least 4GB of free space. You should also remove everything that is on the drive – reformat the entire thing and back up any files that you might have on there.
If you’re using a DVD, you’ll of course need to make sure the computer you’re installing the operating system on has an optical drive. You will also need a Windows 10 .ISO file, and your product key that you were given when you purchased it online or in a retail store.
Creating Bootable Drives
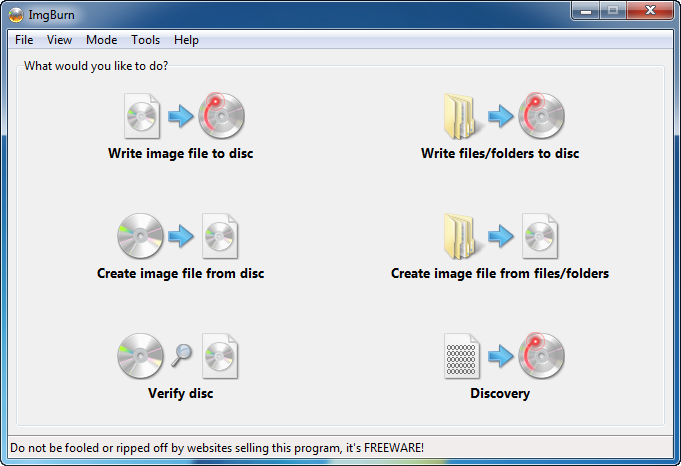
Once you have everything ready, you’ll need to use a piece of software that burns .ISO files to a disk. A popular software for this is ImgBurn for USB drives, and Rufus for DVD, but there are plenty of alternative out there.
Insert your USB drive into your computer and load up your software. Follow the on-screen instructions to create a bootable disk, select the drive that you’re using, and select the .ISO file you have already downloaded. The process will then begin and it should take no longer than 10 or 15 minutes.
If you’re using ImgBurn to create a bootable DVD, load up the software and insert your disc. Choose ‘write image file to disc’, choose your DVD drive in the drop down menu as the destination, and then in the ‘source’ field, make sure you have the ISO file chosen.
Installing from Your Drive
Now it comes to installing from your drive. Plug in your USB drive or insert your DVD, and turn off your computer. Now, turn your PC back on and as soon as the manufacturer’s logo appears on the screen, you will need to tap and hold either the F2 or F12 button to open up the boot menu in BIOS. Here you will be able to tell your PC where to boot from. Choose your USB or DVD bootable drive.

The Windows 10 installer will then appear, allowing you to install a fresh Windows operating system.

Kevin Arrows
Kevin is a dynamic and self-motivated information technology professional, with a Thorough knowledge of all facets pertaining to network infrastructure design, implementation and administration. Superior record of delivering simultaneous large-scale mission critical projects on time and under budget.