В Windows 10 имеется встроенный антивирус Windows Defender («Защитник Windows»), защищающий компьютер и данные от нежелательных программ: вирусов, шпионских программ, программ-вымогателей и многих других типов вредоносных программ и действий хакеров.
И хотя встроенного решения для защиты достаточно для большинства пользователей, бывают ситуации, в которых вы можете не захотеть пользоваться этой программой. К примеру, если вы настраиваете устройство, которое не будет выходить в сеть; если вам необходимо выполнить задачу, блокируемую этой программой; если вам нужно уложиться в требования политики безопасности вашей организации.
Единственная проблема связана с тем, что полностью удалить или отключить Windows Defender у вас не выйдет – эта система глубоко интегрирована в Windows 10. Однако есть несколько обходных путей, при помощи которых вы можете отключить антивирус – это использование локальной групповой политики, реестра или настроек Windows в разделе «Безопасность» (временно).
Как отключить Защитник Windows через настройки безопасности Windows
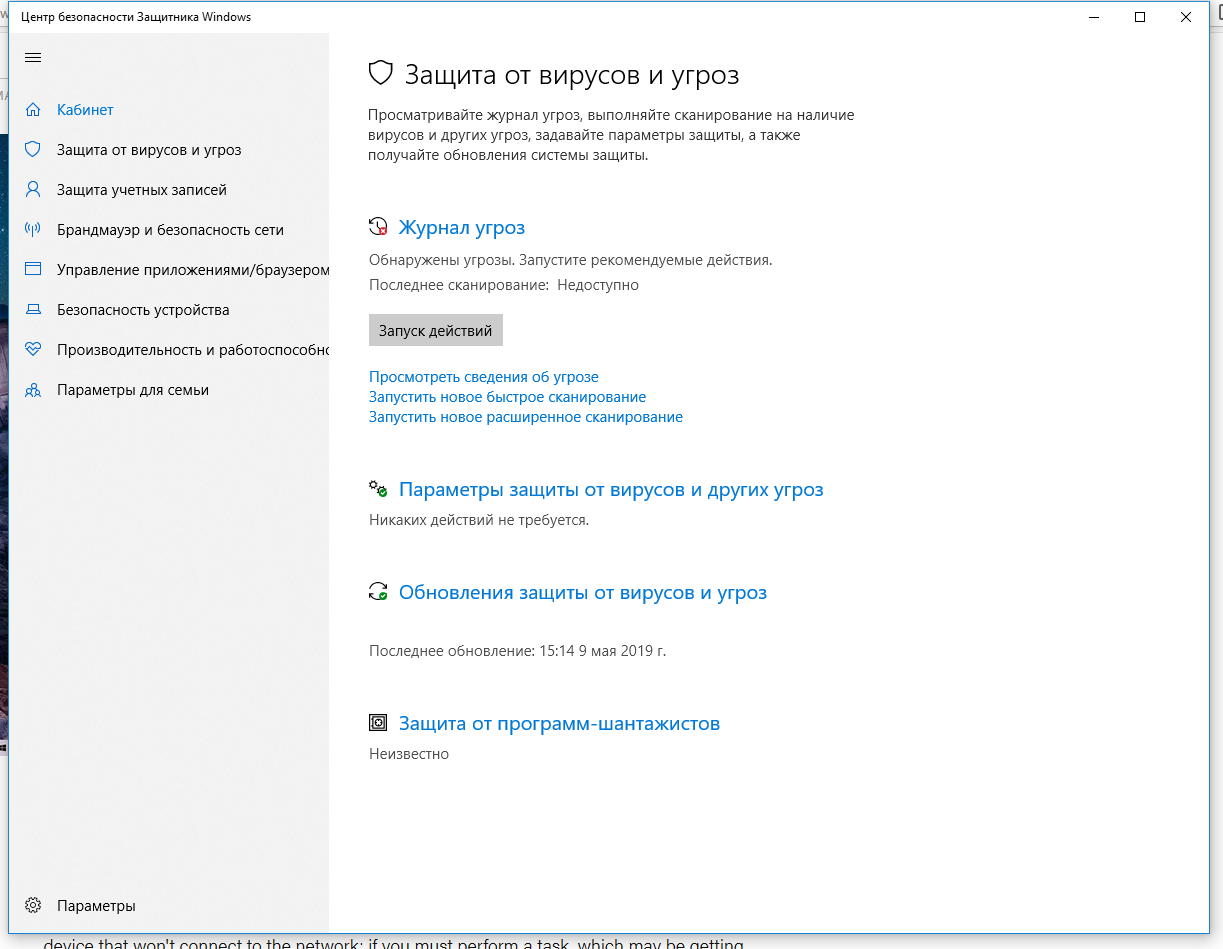
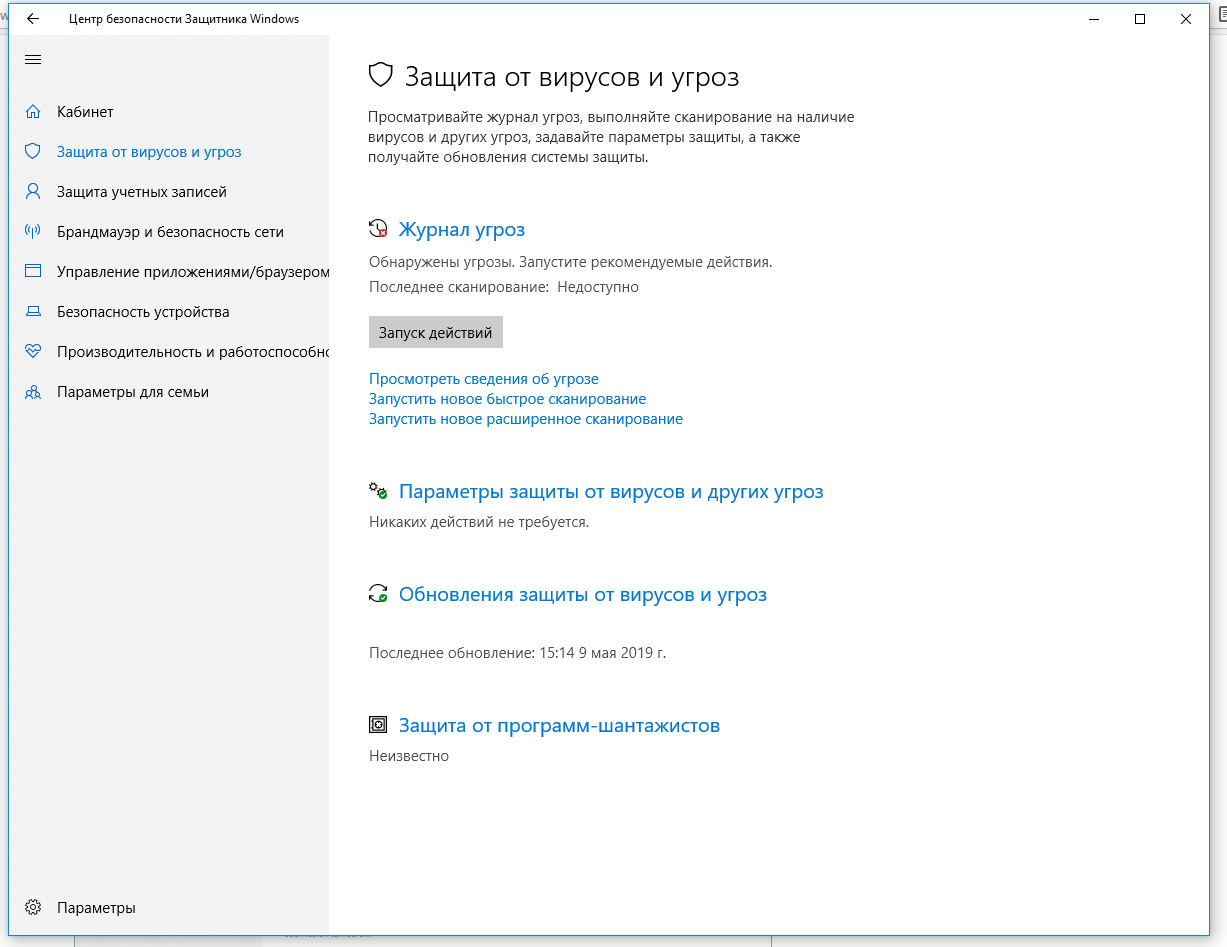
Если вам нужно выполнить определённую задачу, и не нужно отключать Защитника полностью, вы можете сделать это временно. Для этого при помощи поиска в кнопке «Пуск» найдите раздел «Центр безопасности Защитника Windows», и выберите в нём пункт «Защита от вирусов и угроз».
Там перейдите в раздел «Параметры защиты от вирусов и других угроз» и кликните по переключателю «Защита в режиме реального времени».
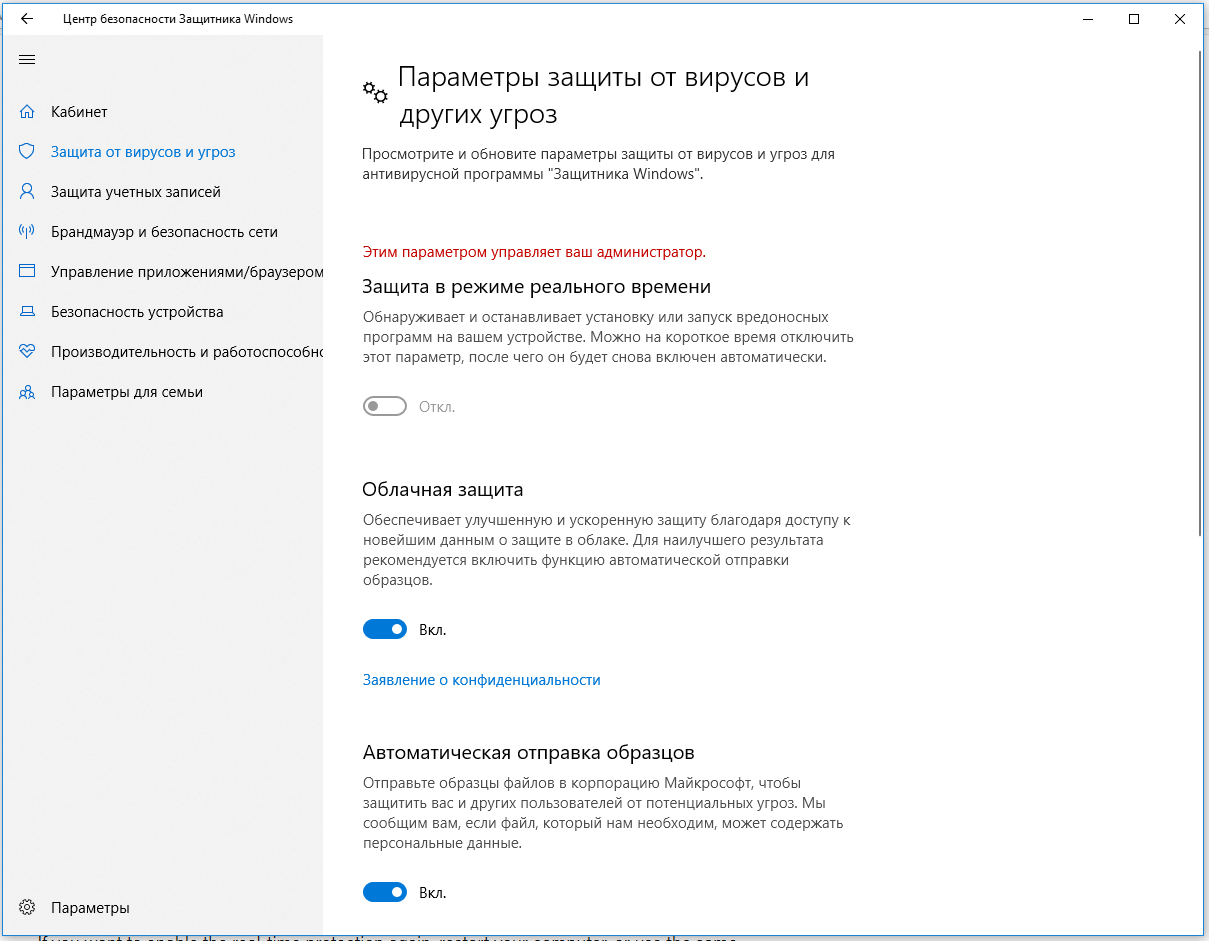
После этого антивирус отключит защиту компьютера в реальном времени, что позволит вам устанавливать приложения или выполнять определённую задачу, которая была недоступна вам из-за того, что антивирус блокировал необходимое действие.
Чтобы снова включить защиту в реальном времени, перезапустите компьютер или заново пройдите все этапы настроек, но на последнем шаге включите переключатель.
Это решение не является постоянным, но лучше всего подходит для отключения антивируса Windows 10 для выполнения определённой задачи.
Как отключить Защитник Windows через групповые политики
В версиях Windows 10 Pro и Enterprise вам доступен редактор локальных групповых политик, где можно навсегда отключить Защитника следующим образом:
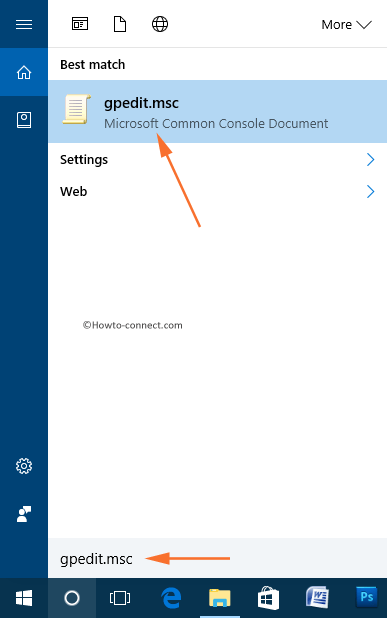
Через кнопку «Пуск» запустите исполняемый скрипт gpedit.msc. Откроется редактор политик. Перейдите по следующему пути: Конфигурация компьютера > Административные шаблоны > Компоненты Windows > Антивирусная программа «Защитник Windows».

Двойным нажатием откройте пункт «Выключить антивирусную программу „Защитник Windows“». Выберите настройку «Включено» для включения этой опции, и, соответственно, отключения Защитника.
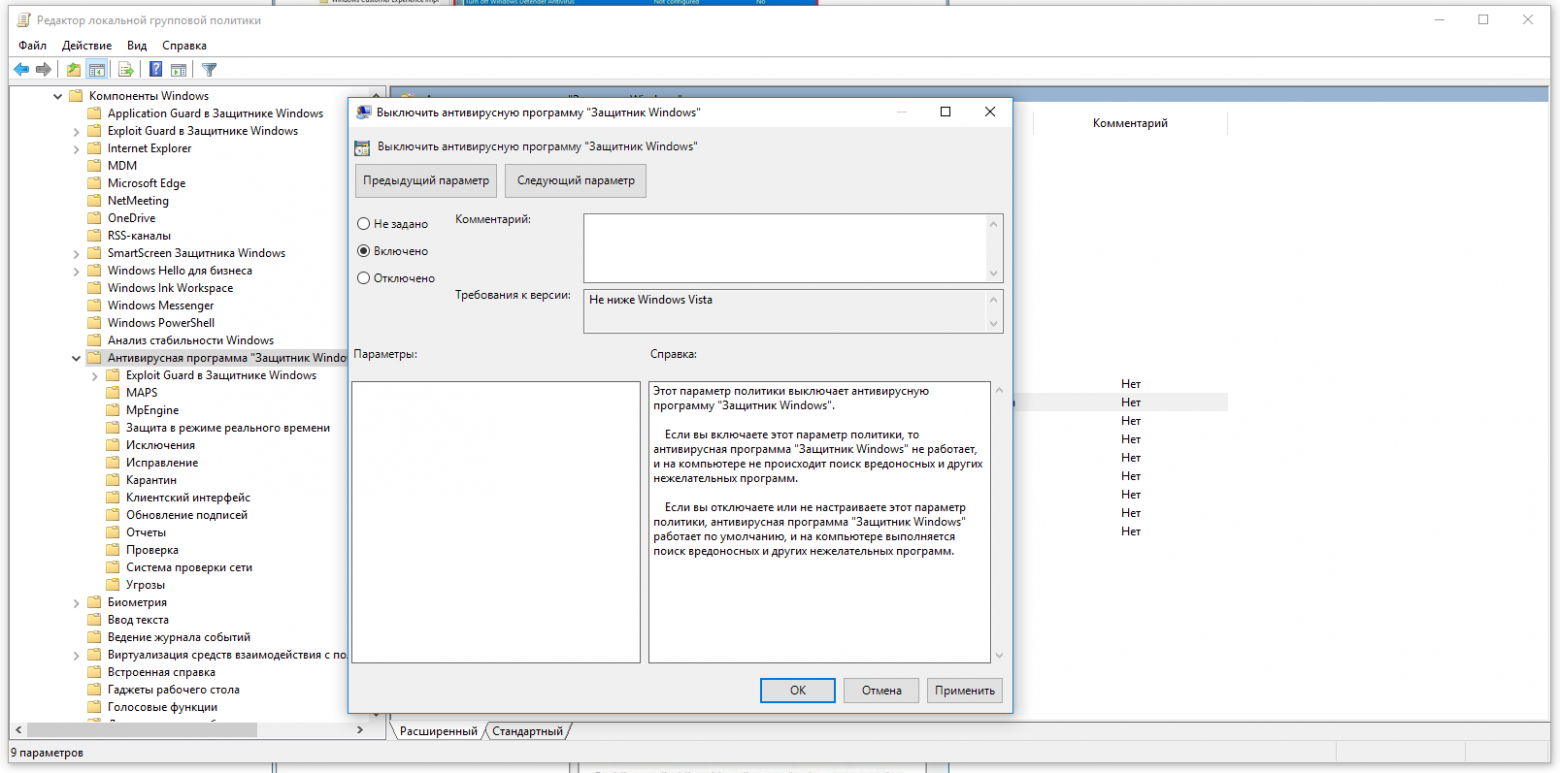
Нажмите «ОК» и перезапустите компьютер.
После этого антивирус будет навсегда отключён на вашем устройстве. Но вы заметите, что иконка со щитом останется в панели задач – так и должно быть, поскольку эта иконка принадлежит к приложению «Безопасность Windows», а не самому антивирусу.
Если вы передумаете, вы всегда можете заново включить Защитника, повторив эти шаги, и на последнем шаге выбрав вариант «Не задано», после чего снова нужно будет перезагрузить компьютер.
Как отключить Защитник Windows через реестр
Если у вас нет доступа к редактору политик, или у вас установлена Windows 10 Home, вы можете отредактировать реестр Windows, отключив тем самым Защитника.
Напоминаю, что редактировать реестр рискованно, и ошибки в этом деле могут нанести непоправимый ущерб текущей установленной копии Windows. Лучше сделать резервную копию системы перед тем, как начинать редактирование.
Чтобы полностью отключить Защитиника через реестр, запустите через кнопку «Пуск» программу regedit, и перейдите в ней по следующему пути:
HKEY_LOCAL_MACHINESOFTWAREPoliciesMicrosoftWindows Defender
Совет: этот путь можно скопировать и вставить в адресную строку редактора реестра.
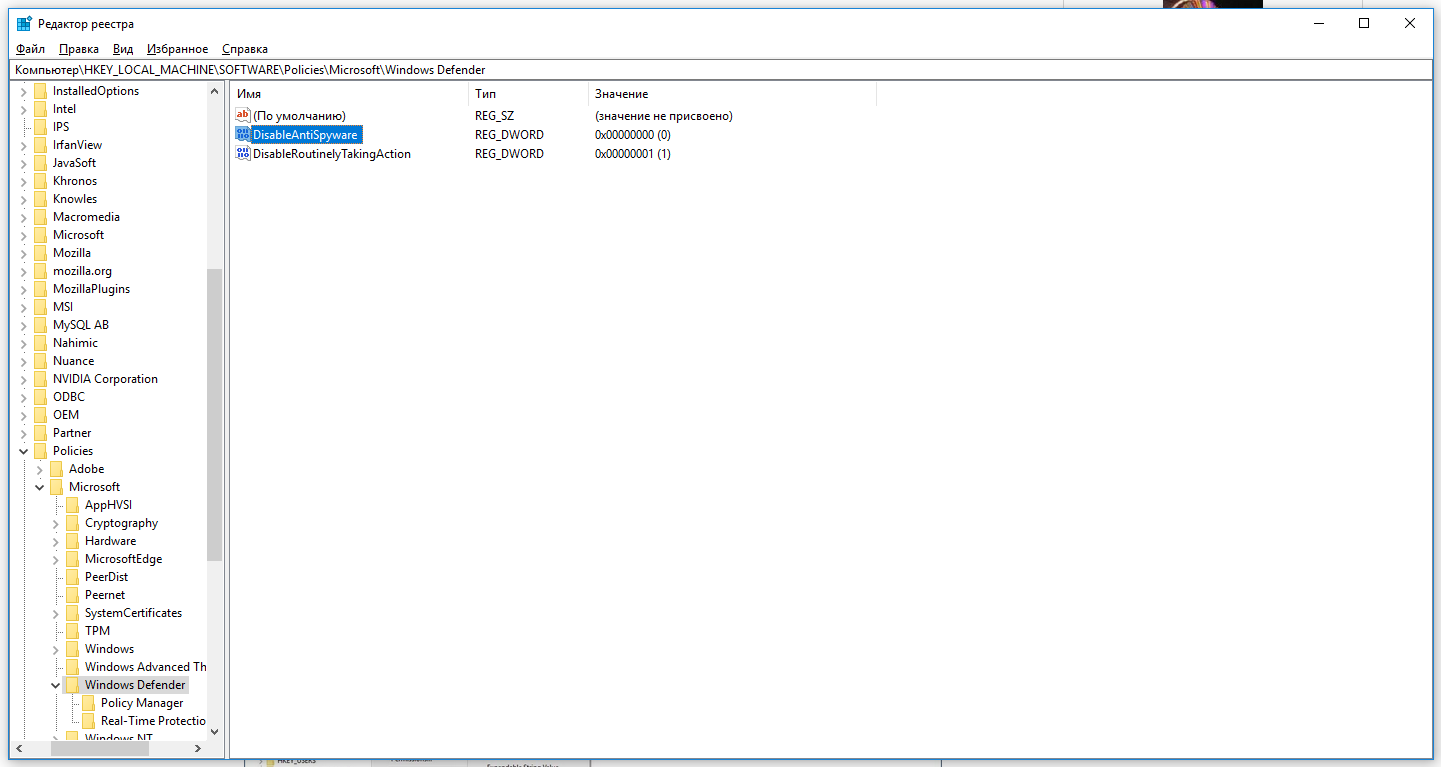
Затем правой клавишей нажмите на ключ (каталог) Windows Defender, выберите «Новый» и DWORD (32-bit) Value. Назовите новый ключ DisableAntiSpyware и нажмите «Ввод». Затем двойным щелчком откройте редактор ключа и задайте ему значение 1.
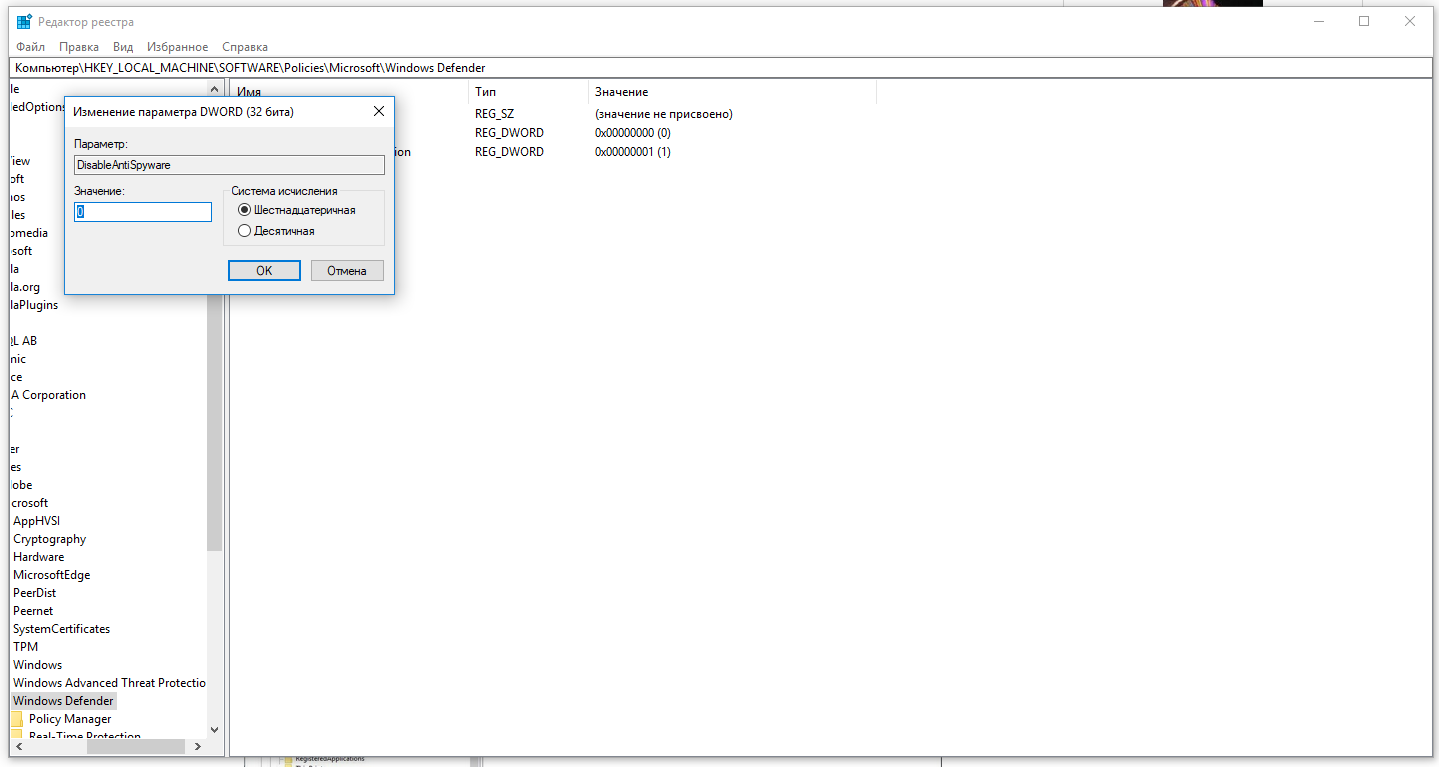
Нажмите ОК, и перезапустите компьютер.
После этого Защитник Windows уже не будет защищать вашу систему. Если вы захотите отменить эти изменения, повторите все шаги, но в конце удалите этот ключ или назначьте ему значение 0.
Рекомендации
Несмотря на наличие нескольких методов отключения Защитника Windows, мы не рекомендуем использовать компьютер вообще без антивирусных программ. Однако вы можете столкнуться с ситуациями, в которых отключение этой функции будет лучшим вариантом. А если вы устанавливаете стороннюю программу-антивирус, вам не нужно отключать Защитника вручную, поскольку во время установки он отключится автоматически.
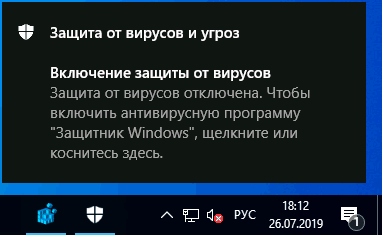
 Если, настраивая Windows 10, вы отключали Защитник Windows, фильтр SmartScreen или соответствующие службы, а иногда и просто после установки стороннего антивируса, вы можете столкнуться с регулярными уведомлениями «Защита от вирусов и угроз» с дополнительной информацией, например «Включение защиты от вирусов. Защита от вирусов отключена». При отключении брандмауэра вам также сообщат о том, что он отключен и предложат снова его включить.
В этой инструкции о том, как отключить такие уведомления и не получать их в дальнейшем, при условии, что встроенную защиту вы отключили осмысленно и вам действительно не нужны сообщения о защите от вирусов и угроз. См. также: Как отключить Защитник Windows 10, Как отключить SmartScreen в Windows 10.
Отключение всех уведомлений о Защите от вирусов и угроз и Брандмауэра и защиты сети от Центра безопасности Windows 10
Самый исправно работающий на сегодняшний день способ отключить сообщения «Защита от вирусов и угроз» — использовать соответствующие параметры уведомлений центра безопасности защитника Windows 10 в реестре:
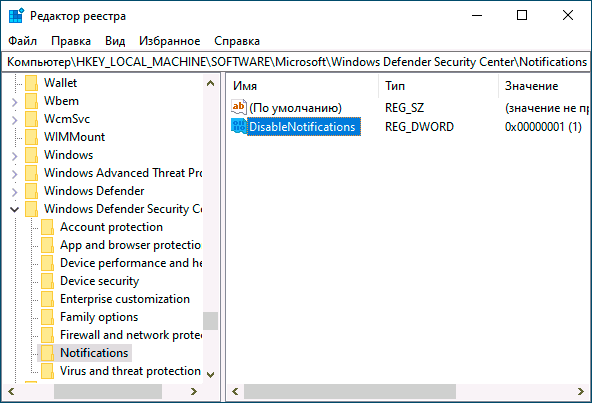
- Нажмите клавиши Win+R, введите regedit и нажмите Enter.
- Откроется редактор реестра. В нём перейдите к разделу
HKEY_LOCAL_MACHINESOFTWAREMicrosoftWindows Defender Security CenterNotifications
- В правой панели редактора реестра нажмите правой кнопкой мыши, выберите в контекстном меню «Создать» — параметр DWORD (32 бита, даже для 64-битной ОС) и задайте имя DisableNotifications для этого параметра.
- Дважды нажмите по вновь созданному параметру и задайте для него значение 1.

- Повторите то же самое в разделе
HKEY_LOCAL_MACHINESOFTWAREPoliciesMicrosoftWindows Defender Security CenterNotifications
Вместо ручного редактирования реестра вы можете создать и использовать следующий reg-файл:
Windows Registry Editor Version 5.00

[HKEY_LOCAL_MACHINESOFTWAREMicrosoftWindows Defender Security CenterNotifications]

"DisableNotifications"=dword:00000001

[HKEY_LOCAL_MACHINESOFTWAREPoliciesMicrosoftWindows Defender Security CenterNotifications]

"DisableNotifications"=dword:00000001
Обычно, указанные параметры вступают в силу без перезагрузки вашего компьютера или ноутбука и уведомления о защите от вирусов и угроз больше не появляются.
Некоторые дополнительные уведомления о безопасности и обслуживании будут отключены, если:
- Зайти в Пуск — Параметры — Система — Уведомления и действия.
- Отключить уведомления для пункта «Центр безопасности и обслуживания».


Видео инструкция
Дополнительно, ранние версии Windows 10 (если не ошибаюсь, до 1803) поддерживали параметр реестра Enabled (DWORD) со значением 0 для отключения уведомлений о безопасности и обслуживании в разделе:
HKEY_CURRENT_USERSoftwareMicrosoftWindowsCurrentVersionNotificationsSettingsWindows.SystemToast.SecurityAndMaintenance
Однако, в актуальных версиях ОС этот параметр не работает тем образом, которым делал это ранее.
Don’t like constant notifications from Windows Defender? Here’s a simple way to disable Windows Defender notifications in Windows 10.
Windows Defender is a pretty good default antivirus software in Windows 10. It works silently in the background and provides you the much needed real-time protection from all kinds of threats. Along as there is no other antivirus application on your system, Windows Defender constantly runs in the background. One of the best things about Windows Defender is that it consumes the least system resources and provides one of the best protection in the antivirus industry.
Windows Defender automatically scans your system from time to time and displays the results in the form of notifications. Not only that but Windows Defender also displays other kinds of notifications like account, firewall, and network. This is applicable even if you are using third-party antivirus software to protect your system. If these notifications are overwhelming you or causing unnecessary distractions, you can disable them or control them.
So, without further ado, let me show the steps to disable Windows Defender notifications in Windows 10.
Types of Windows Security Notifications
Windows Defender divides all its notifications into three major categories. They are as follows.
Information Notifications: This notification channel is responsible for displaying Windows Defender activities like scan reports, threat alerts, and blocked files and folder. I recommend you not to disable this notification category as it shows only important notifications.
Account Protection Notifications: This notification channel is responsible for Windows Hello and Dynamic lock settings.
Firewall & Network Protection Notifications: As the name implies, this channel is responsible for showing Windows Firewall activities. For example, if an application is blocked by Windows Firewall, then Windows Defender uses this channel to show the notification of that activity.
Depending on what you need, you can disable all notifications or individual notification types or channels.
1] Disable Windows Defender Notifications via Settings App
Once you know the Windows Defender notification types, you can easily pick and choose the type of notifications you want to receive.
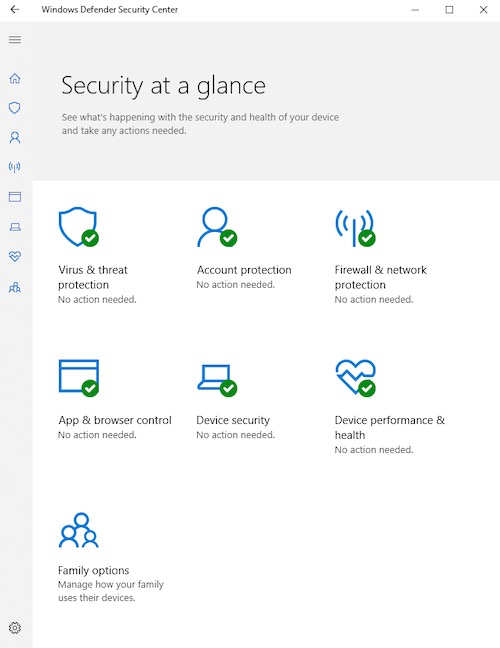
1. First, search for “Windows Security” in the start menu and click on the search result to open the Windows Security app.
Note: Microsoft renamed Windows Defender to Windows Security

2. Once the application has been opened, click on the “Settings” tab appearing on the bottom left corner. Next, click on the “Manage Notifications” link under the Notifications section.

3. The above action will take you to the Notification channels page. Here, you will see three different notification channels as discussed above. If you want to disable all three notification channels, toggle the switch to the OFF position under each notification channel.
Note: I strongly recommend you turn ON the “Informational Notifications” channel (the first one).

Alternatively, you can also pick and choose which types of notifications you want to receive. To do that, uncheck the checkboxes next to the notification types you want to disable. For example, I don’t want to receive notifications for Dynamic Lock. So, I deselected that option.

That is it. After configuring, close the Windows Security app and you are done.
2] (Alternative) via Group Policy – GPO
If you are looking for a much simpler alternative method then the Group Policy object is the way to go.
1. Open the start menu, search for “Edit Group Policy” and click on the result to open the Group Policy Editor.
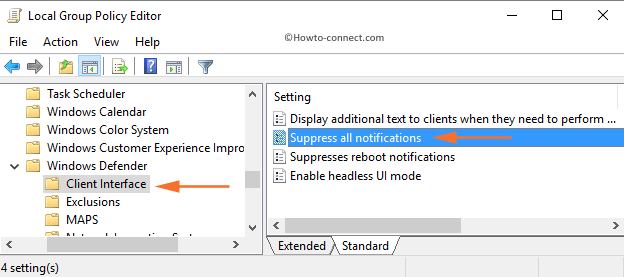
2. In the Group Policy Editor, go to the following folder by expanding the folder tree on the left panel.
Computer Configuration → Administrative Templates → Windows Components → Windows Defender Antivirus → Client Interface
3. On the right panel, find and double-click on the “Suppress all notifications” policy.

4. Now, select the “Enabled” option and click on the “Ok” button to save changes. This action will disable Windows Security notifications.

5. Finally, either reboot Windows or execute gpupdate /force command in elevated Command Prompt.
That is all. It is that simple to disable Windows Defender notifications in Windows 10. If you are stuck or need some help, comment below and I will try to help as much as possible. If you like this article, do check how to limit Windows Defender CPU usage and how to schedule Windows Defender scan.
Turn ON and OFF Windows Defender Notifications on Windows 10. – Although a number of antivirus software are available in the retail market, Windows operating systems are already equipped with an inbuilt antivirus solution. This solution is none other than Windows Defender.
By default, Windows defender stays around in turned ON state until you run an outsider antivirus software. Windows defender sometimes does not recognize if new antivirus software is installed. In this circumstance, or even when you oppositely don’t prefer windows defender to safeguard the machine, you manually switch it to OFF condition.
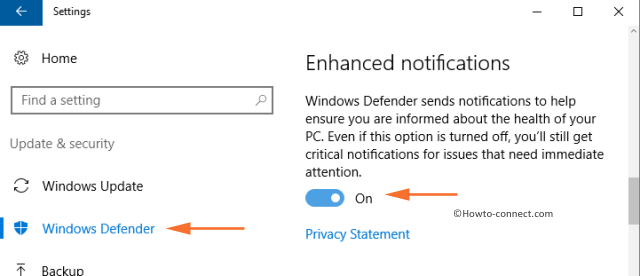
Windows Defender ejects notifications about certain events itself. If there is any notification, it means there needs to be some user interaction with the problem to rectify it. With Windows 10 particularly, the Windows Defender also carries a characteristic titled ‘Enhanced Notifications’ which arrive even when there are events running internally that are not hazardous.
This feature though very safe but as there are frequent notifications, it seems to be very annoying at times. Windows 10 has more than just one way to turn OFF these notifications.
Method 1 – Using the Settings Application
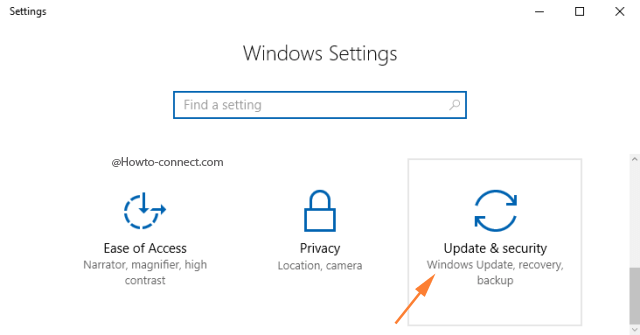
Step 1 – Press Win Key + I and launch Settings home page.
Step 2 – Choose the last icon, Update & Security.
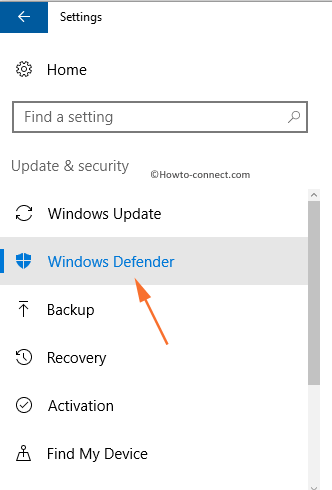
Step 3 – Now, click Windows Defender which is available in the left pane.
Step 4 – On the right panel, find Enhanced notifications. Use its toggle switch to either turn the notification ON or OFF.
Method 2 – Using Group Policy Editor
Using the Group Policy is the best option to control the Windows Notification. This is because it gives us extreme control over the program and the options are available to us in a very simple and straight-forward way.
Step 1 – Tap on Windows key and start typing the code gpedit.msc. As a result, Cortana will show the same command on the top, click on it.
Step 2 – Now select the options as mentioned in the Group Policy Editor interface:
Computer Configuration > Administrative Templates > Windows Components > Windows Defender > Client Interface
Step 3 – On the right panel of Client Interface, locate and double-click Suppress all notifications setting.
Step 4 – This will open up a new window, where you can see three radio buttons on the left portion.
Not configured – This is the default option. Select this policy to specify if you desire Windows Defender notifications to display.
Enabled – If you choose this option, Windows Defender notifications will not come up anymore.
Disabled – This is same as the first option, Not configured. With this option, Windows Defender notifications will show on clients. If you select this option, Windows Defender notifications will come into view.
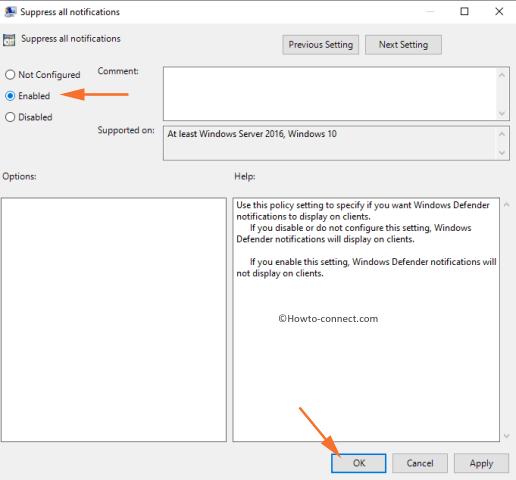
Step 5 – Depending on your requirement, choose any option and then click Ok to effectively manages to Turn On / Off Windows Defender Notifications on Windows 10.
Method 3 – Using Registry Editor
Using this advanced method also, users can handle the notifications of Windows Defender. This method is little similar to the Group Policy.
Reference – How to Enable Windows Defender Via Registry Editor Windows 10
Step 1 – First of all, launch taskbar search and start typing the code regedit. The result will display regedit with its icon on the top, click on it.
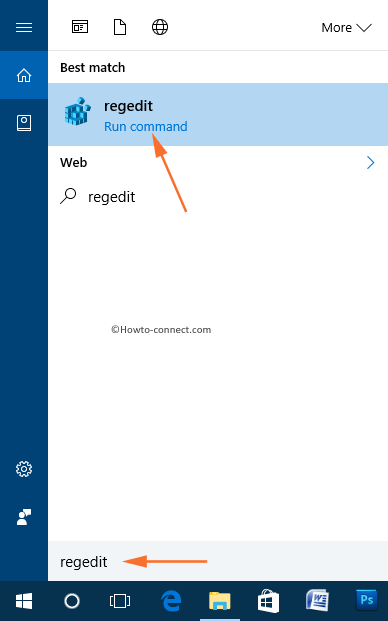
Step 2 – Affirm the UAC prompt by clicking on the Yes button.
Step 3 – Now, navigate to the following key as mentioned.
HKEY_LOCAL_MACHINESOFTWAREPoliciesMicrosoftWindows DefenderUX Configuration
Step 4 – Create a key if it is not present already. For instance, if the key UX Configuration is not there, then quickly generate it. Hence, right-click on Windows Defender key, choose New and click Key from the submenu. Now, name this key as UX Configuration.

Step 5 – Next, move to the right pane of UX Configuration. There, locate an empty space, do a right-click and point to the option New. A submenu will pop up, click DWORD (32-bit) Value.

Step 6 – Now, name this DWORD as Notification_Suppress and then double-click on it.
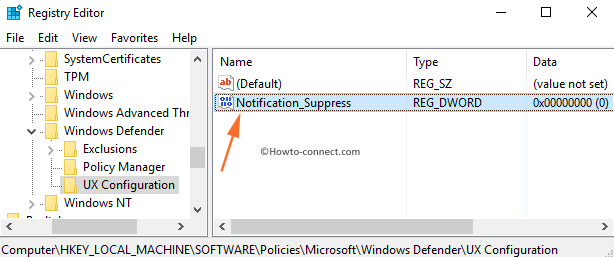
Step 7 – An Edit box will appear, and by default, the value for this DWORD is 0. Set any of the below numbers as Value data, depending on your requirement.

0 = Turn On Windows Defender notifications.
1 = Turn Off Windows Defender notifications.
Therefore, Notification Suppress registry key effectively manages to Turn On / Off Windows Defender Notifications on Windows 10.
Conclusion
Now, apply any of the methods and have your own control over the notifications. Whatever may be your choice, the software will be active in the background. You may always look for the critical events and unblock the file that was downloaded for instance by going into the quarantine section.
Windows Defender Firewall is a useful tool in Windows 10 to prevent hackers and harmful threats from getting into your computer. While you work on your PC, you can have peace of mind knowing that Windows Defender Firewall maintains the security and protection of your computer.
As the security app blocks malicious access to your PC, it also sends notifications to alert you of its activities. Some users need to know what apps are getting blocked by Windows Defender Firewall. However, not everyone is happy to receive these notifications, some people want it to stop bothering them.
Now, you have the option to turn on or off the Windows Defender Firewall pop-up notifications on your Windows 10 PC. Check out how you can do it below.
How to Disable or Enable Windows Security Firewall Notifications on Windows 10 PC

There are two ways to enable or get rid of your Windows 10 Firewall notifications. You can read the methods below and choose the one you find most practical for you.
Turn On or Off Windows 10 Firewall Notifications via Windows Security Defender Security Center
- Launch the Search bar of your Windows 10 PC.
- Enter Windows Security.
- Click the Windows Security app.
- Select the Firewall & network protection.
- Scroll down and look for Firewall notification settings. Click to open it.
- Go to the Notifications section.
- Click Manage notifications.
- Under Firewall & network protection notifications, you will find Notify me when Windows Defender Firewall blocks a new app.
- Uncheck or check the firewall options that you want to disable or enable. To turn on or off all three firewalls, toggle the button.
Enable or Disable Windows Defender Firewall Notifications Via Control Panel
- Launch the Control Panel of your Windows PC.
- Go to System and Security.
- Select Windows Firewall.
- Click the Change notification settings on the left panel.
- Look for Notify me when Windows Firewall blocks a new app and check or uncheck the box.
- Click OK.
Advance users also have the option to enable or disable Windows Firewall notifications using the Windows 10 Group Policy or Registry Editor.
Would you prefer to enable or disable the Windows Defender Firewall Notifications? You can share your reasons with us in the comments below.