If your Windows 10 Task Manager shows 100% disk usage, something is causing your hard drive to over-work. The good news is, it’s usually not a hard problem to fix.
8 fixes for 100% disk usage on Windows 10
Here are a few fixes that have helped other users resolve their Windows 10 100% disk usage problem. You may not need to try them all; just work your way down the list until you find the one that works for you.
- Disable SuperFetch service
- Update your device drivers
- Check for corrupted system files
- Perform a disk check
- Reset Virtual Memory
- Disable Antivirus Software temporarily
- Fix your StorAHCI.sys driver
- Switch to ChromeOS
Fix 1: Disable SuperFetch
SuperFetch helps to decrease boot time and make must-load programs more efficiently. However, it has been identified as a potential cause of disk performance issues in Windows 8 and later versions of Windows, including Windows 10. Here’s how to stop this service:
1) On your keyboard, press Windows logo key, type command prompt, then select Run as administrator.

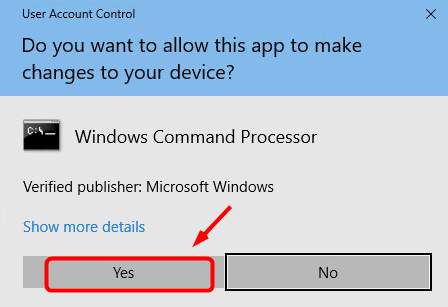
2) Click Yes at the User Account Control prompt.

3) The command prompt will once again display. Type in the following command:
net.exe stop superfetch
4) Hit Enter on your keyboard.
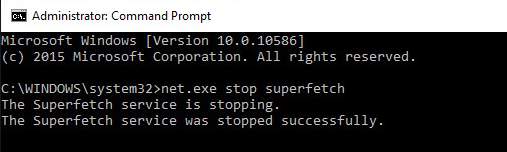
5) If the command above isn’t valid, try the following one instead:
net.exe stop sysmain
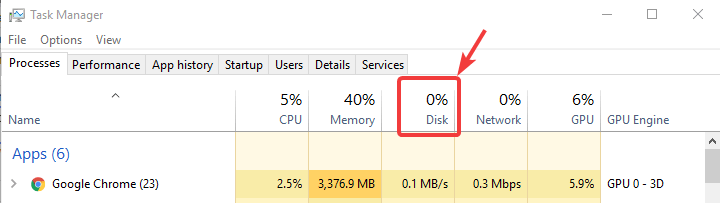
6) Wait for a few minutes to see if your computer starts performing better. Or check your computer’s disk usage: Type “task manager” in the Windows search bar and select Task Manager, then in the Processes tab, look at the % at the top of the Disk column. If it’s no longer 100%, you’ve fixed the problem!
If the 100% disk usage problem persists, try the next method, below.
Fix 2: Update your device drivers
If the steps above don’t resolve your 100% disk usage problem in Windows 10, it may be caused by a device driver.
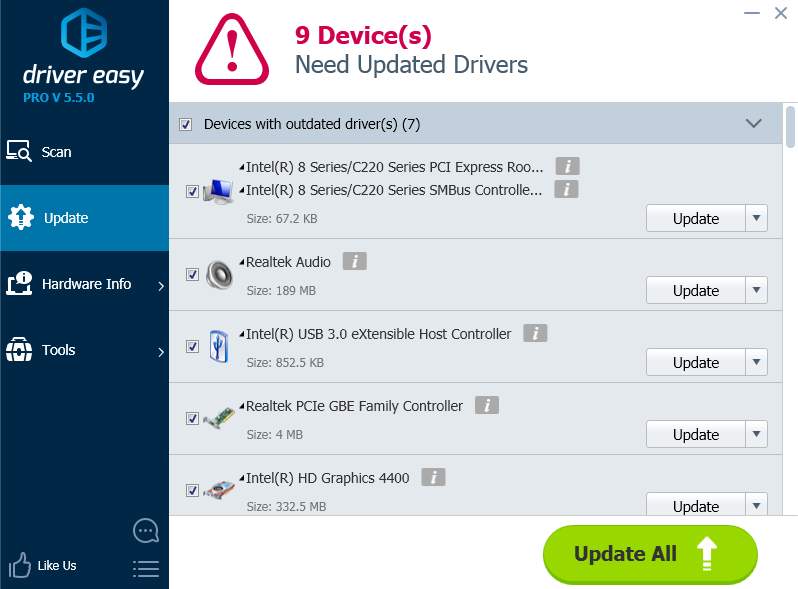
You can automatically update all your device drivers to the latest correct version with Driver Easy.
Driver Easy will automatically recognize your system and find the correct drivers for it. You don’t need to know exactly what system your computer is running, you don’t need to risk downloading and installing the wrong driver, and you don’t need to worry about making a mistake when installing.
You can update your drivers automatically with either the FREE or the Pro version of Driver Easy. But with the Pro version it takes just 2 clicks (and you get full support and a 30-day money back guarantee):
1) Download and install Driver Easy.
2) Run Driver Easy and click Scan Now button. Driver Easy will then scan your computer and detect any problem drivers.

3) Click the Update button next to any flagged device to automatically download and install the correct version of that driver (you can do this with the FREE version).
Or click Update All to automatically download and install the correct version of all the drivers that are missing or out of date on your system (this requires the Pro version – you’ll be prompted to upgrade when you click Update All).
4) Check your computer’s disk usage: Type “task manager” in the Windows search bar and select Task Manager, then in the Processes tab, look at the % at the top of the Disk column. If it’s no longer 100%, you’ve fixed the problem!
If the 100% disk usage problem persists, try the next method, below.
Fix 3: Check for corrupted system files
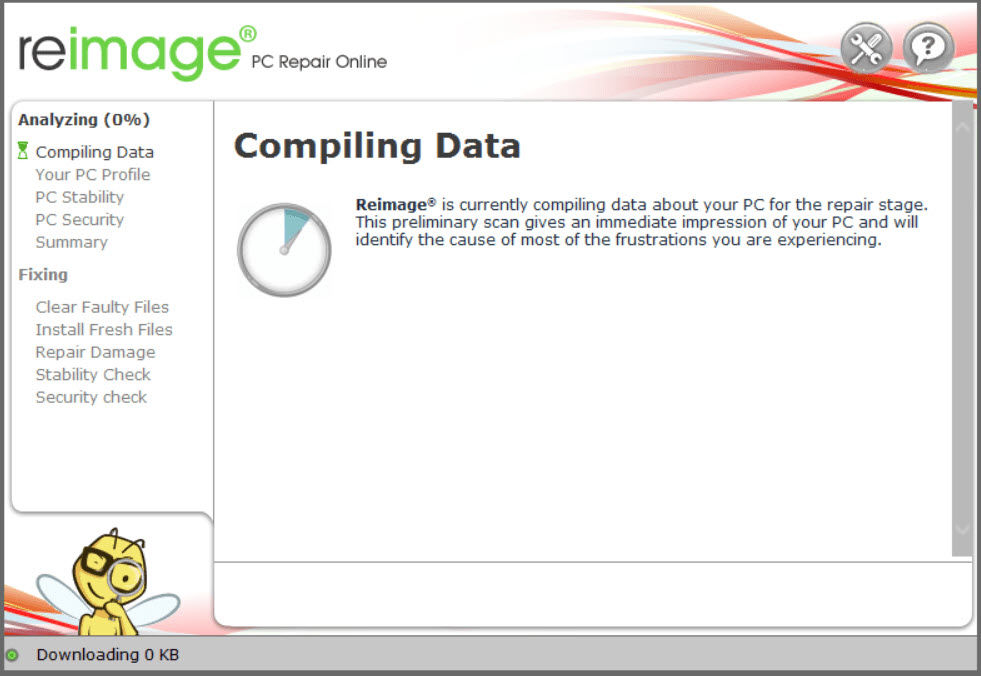
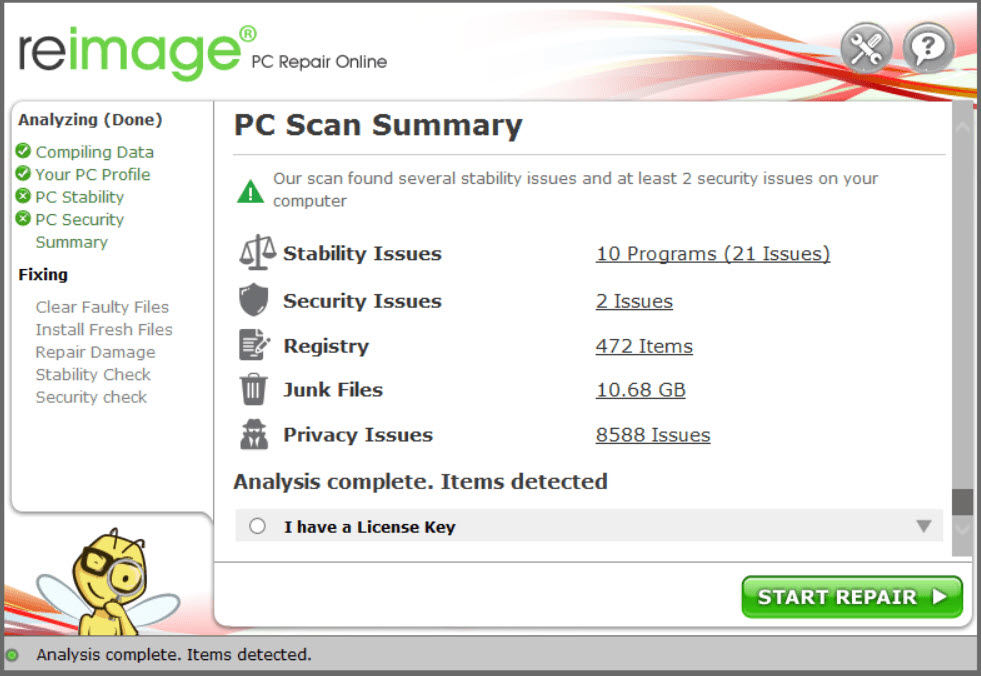
Corrupted or missing system files can also cause the 100% disk usage error. To see if this is the cause for you, run a system scan to detect broken system files with Reimage.
Reimage is a professional Windows repair tool that can scan your system’s overall status, diagnose your system configuration, identify faulty system files, and repair them automatically. It gives you entirely fresh system components with just one click, so you don’t have to reinstall Windows and all your programs, and you don’t lose any personal data or settings. (Read Reimage Trustpilot reviews.)

Here’s how to use Reimage to check for broken system components in just one click:
1) Download and install Reimage.
2) Open Reimage and run a free scan on your PC. (This may take a few minutes and you’ll get a detailed report of your PC status after this.)
3) You can review a summary of the issues detected after the scan. Click Start Repair to start the repair process. (This requires the full version – which comes with a 60-day Money-Back Guarantee.)
Restart your computer to see if you still get the 100% disk usage error. If you do, please try the next fix below.
The Pro version of Reimage comes with 24/7 technical support. If you need any assistance, please contact Reimage support:
Phone: 1-213-275-3200
Email: support@reimageplus.com
Fix 4: Perform a disk check
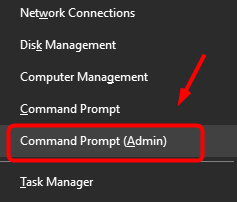
1) On your keyboard, press Windows key and X at the same time, then choose Command Prompt (Admin).
2) Click Yes at the User Account Control prompt.
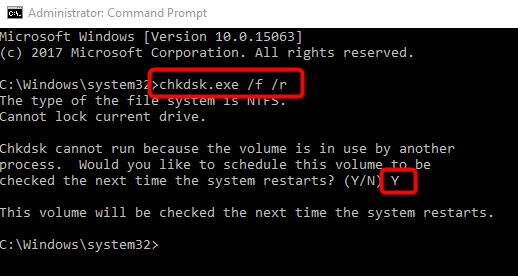
3) The command prompt will once again display. Type in the following command:
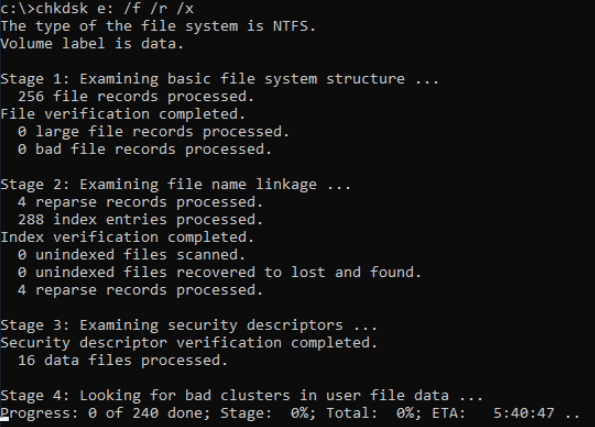
chkdsk.exe /f /r
4) Hit Enter on your keyboard, then type Y to confirm that you’d like to perform the disk check the next time you restart your computer. Please make sure you have closed all of your applications first.
IMPORTANT: Disk check will start the next time you boot your PC and it might take some time to complete (could be a day for some). If, when you restart, you don’t have time to wait for the disk check to complete, you can skip it. You’ll need to reschedule it again, as described above, though.
5) Once you’ve completed the disk check, check your computer’s disk usage again: Type “task manager” in the Windows search bar and select Task Manager, then in the Processes tab, look at the % at the top of the Disk column. If it’s no longer 100%, you’ve fixed the problem!
If the 100% disk usage problem persists, try the next method, below.
Fix 5: Reset Virtual Memory
Virtual memory can be considered an extension of your computer’s physical memory. It’s a combination of RAM and a portion of your hard drive. When the RAM isn’t enough to perform a task, Windows will temporarily store files in virtual memory, then swap them back to RAM when required.
To reset virtual memory:
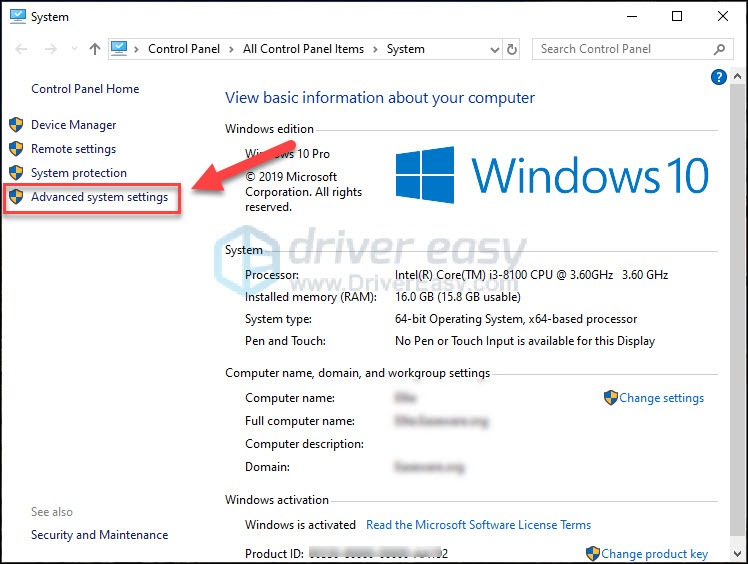
1) On your keyboard, press Windows key and Pause/ Break key at the same time. Then choose Advanced System Settings on the left panel.
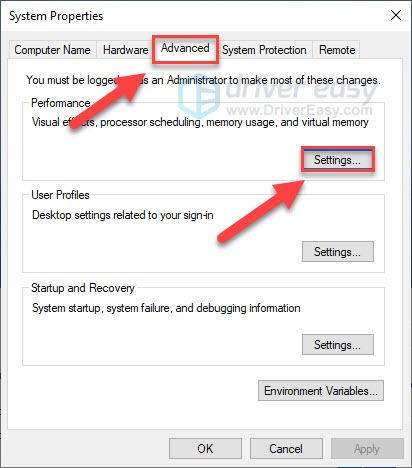
2) Go to the Advanced tab, then click Settings.
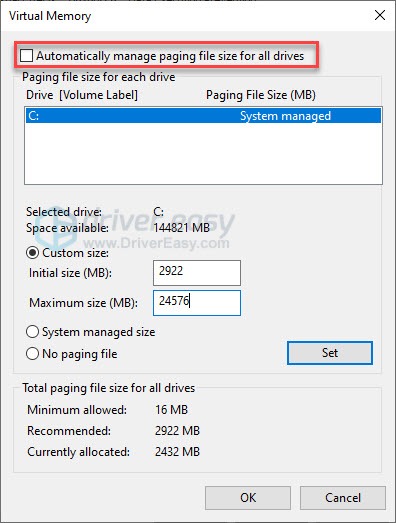
3) Go to the Advanced tab again, and choose Change… in the Virtual memory section.
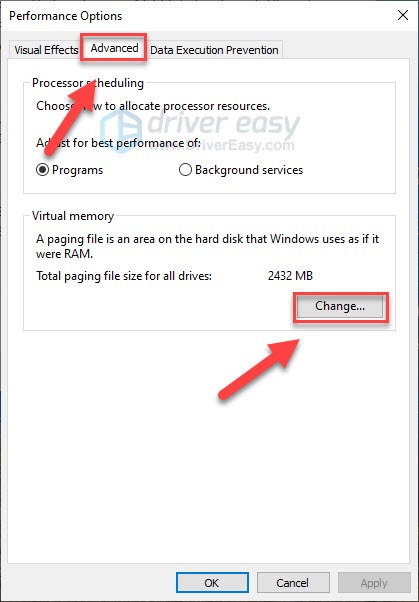
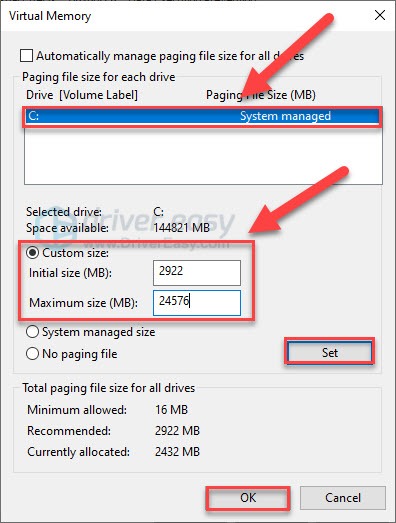
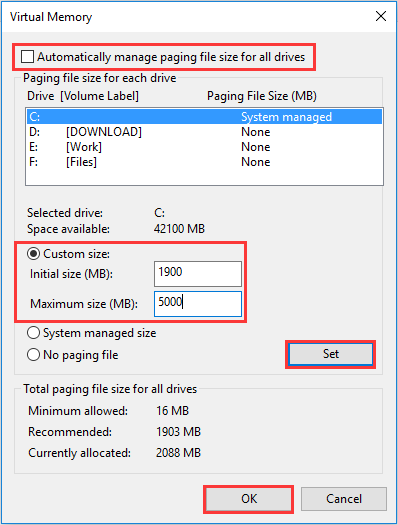
4) Ensure the Automatically manage paging file size for all drives checkbox is NOT ticked.
5) Select your windows drive (the hard drive or partition that has Windows installed on it – usually C:), and enter an Initial size and Maximum size for your virtual memory:
- Initial size – This value varies, depending on your computer. If you’re not sure what value to use, just enter whatever the number is in the Recommended category.
- Maximum size – Don’t set this value too high. It should be about 1.5 times the size of your physical RAM. e.g. A PC with 4 GB (4096 MB) of RAM should have no more than about 6,144 MB virtual memory (4096 MB x 1.5).
Once you’ve entered your virtual memory values, click Set, then click OK to continue.
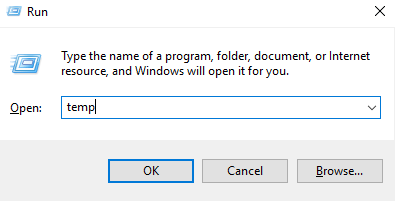
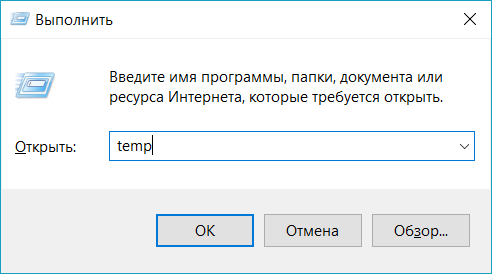
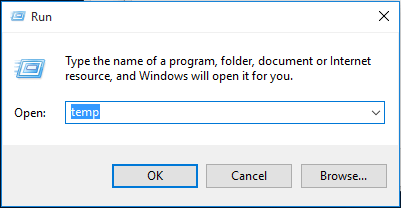
6) Clear all your computer’s ‘temp’ files. On your keyboard, press Windows key and R at the same time, then in the Run form, type temp and hit Enter. This will invoke Windows Explorer with your Temp folder open, showing you all the temp files on your computer.
7) Select all the files in the Temp folder and delete them.
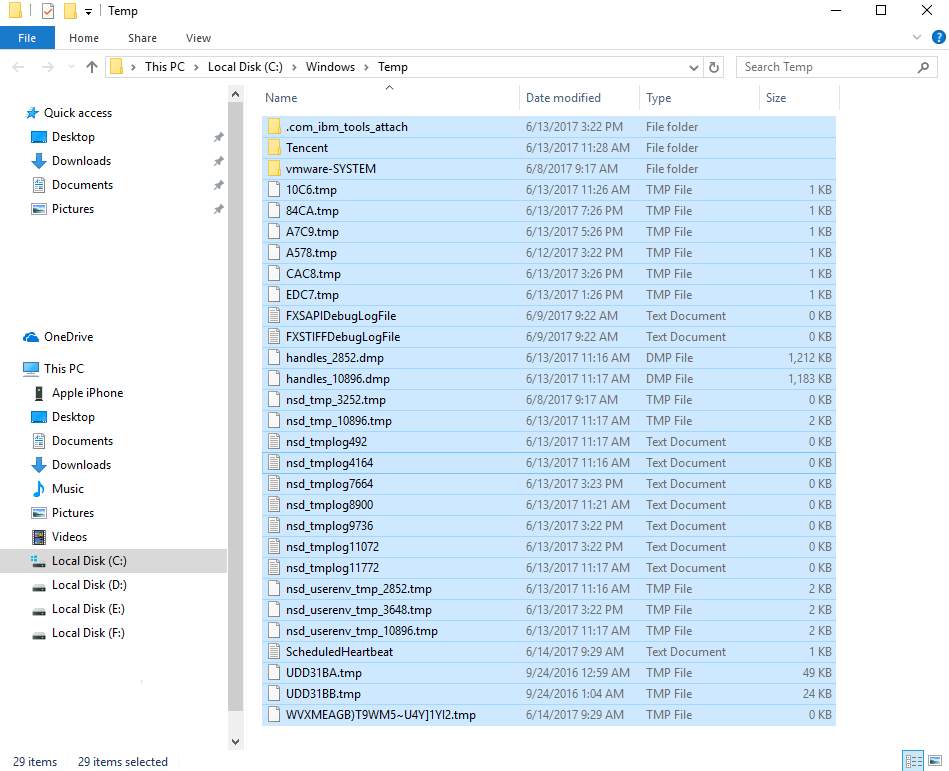
 Check your computer’s disk usage: Type “task manager” in the Windows search bar and select Task Manager, then in the Processes tab, look at the % at the top of the Disk column. If it’s no longer 100%, you’ve fixed the problem!
If the 100% disk usage problem persists, try the next method, below.
Fix 6: Disable Antivirus Software temporarily
If you’ve installed antivirus or anti-malware programs such as Norton, Kaspersky, AVG, Avast Behavior Shield or Malwarebytes, you should temporarily turn them off or disable them to see if they’re causing your disk usage problem.
Please see your antivirus software’s documentation to learn how to disable it. You might also find these links useful:
- How to temporarily turn off Norton Antivirus program?
- How to stop AVG temporarily?
- How to disable Avast temporarily?
Note that Microsoft has its own default anti-malware, Windows Defender. It’s automatically enabled even if you also have other antivirus applications installed. Even if you disable your other antivirus programs, Windows Defender is always there for you during that certain time range. So, no need to worry too much about temporarily turning antivirus off.
Once you’ve disabled your antivirus, check your computer’s disk usage again: Type “task manager” in the Windows search bar and select Task Manager, then in the Processes tab, look at the % at the top of the Disk column. If it’s no longer 100%, you’ve found the problem, and you should contact the vendor of your antivirus software to see if they can provide some help.
If the 100% disk usage problem persists, try the next method, below.
Fix 7: Fix your StorAHCI.sys driver
Note: A million thanks to our warm-hearted reader Javier for the following solution.
The Windows 10 100% disk usage problem might also be caused by some Advanced Host Controller Interface PCI-Express (AHCI PCIe) models running with the inbox StorAHCI.sys driver due to a firmware bug.
Here’s how to determine if this is your problem and fix it:
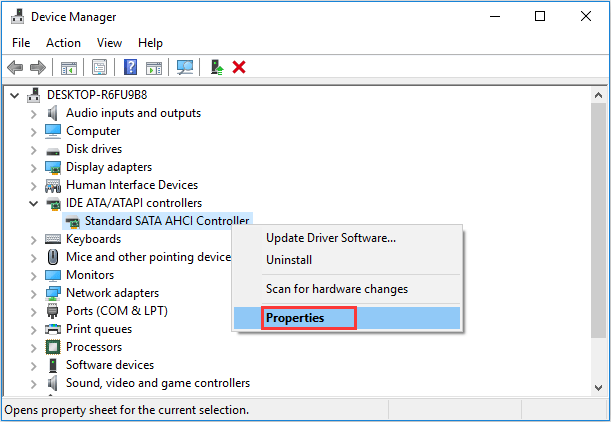
1) Open Device Manager by pressing Windows logo key and X at the same time to choose Device Manager.

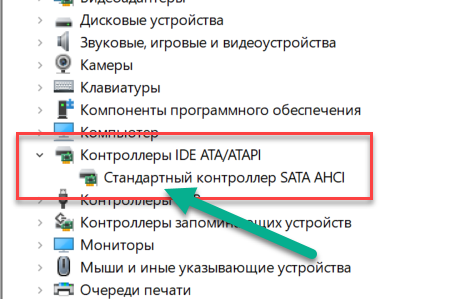
2) Expand the IDE ATA/ATAPI Controllers category, and double-click the AHCI controller.
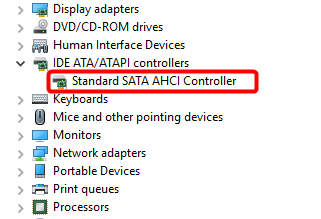
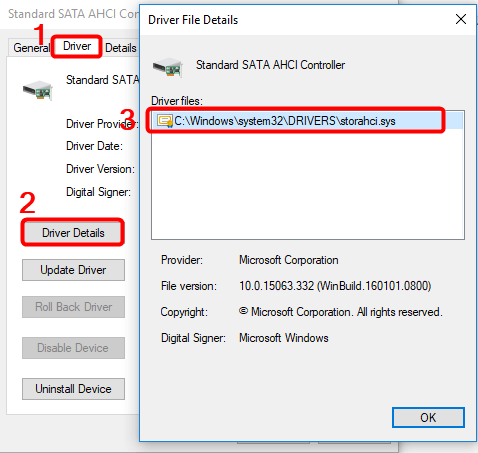
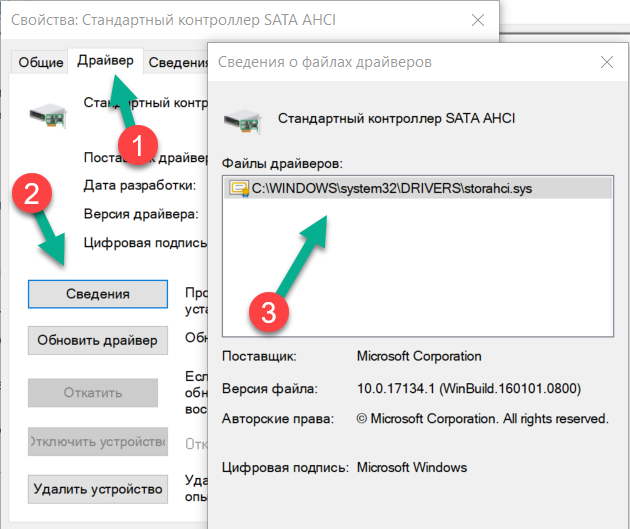
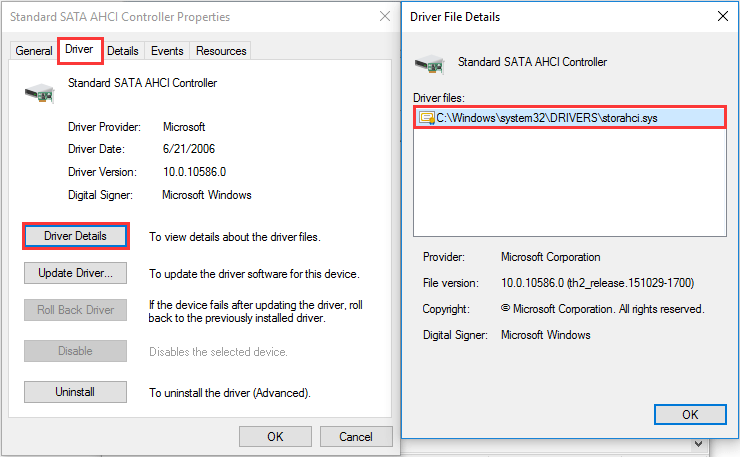
3) Go to the Driver tab and click Driver Details. If you can see storahci.sys stored in a path of system32 folder, then you are running the inbox AHCI driver.
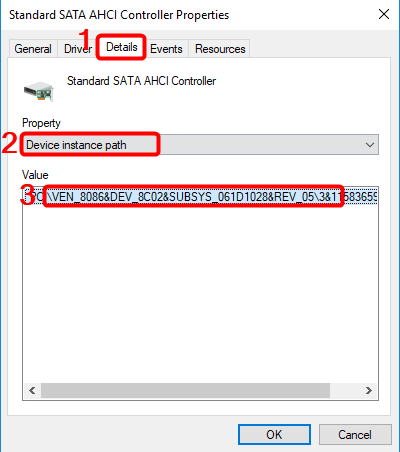
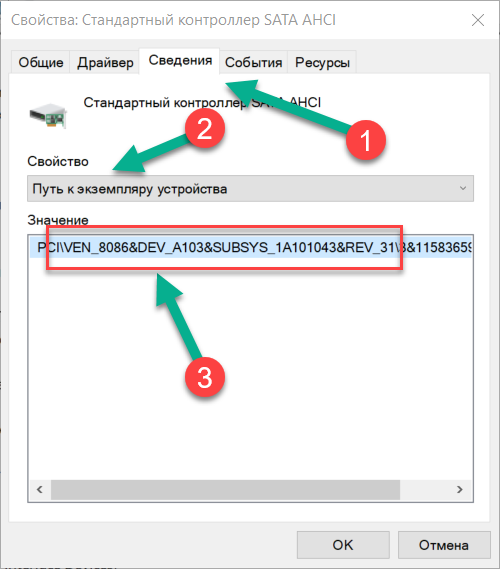
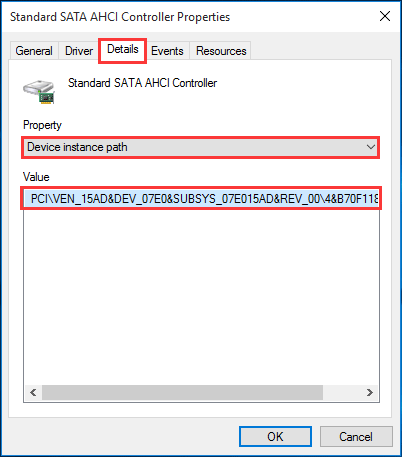
4) Close the Driver Details window and go to Details tab. From the drop-down menu, select Device Instance Path. Make note of the path, starting from VEN_.
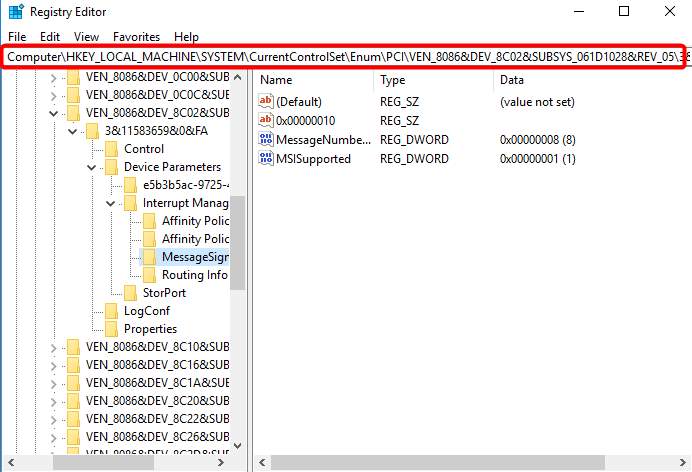
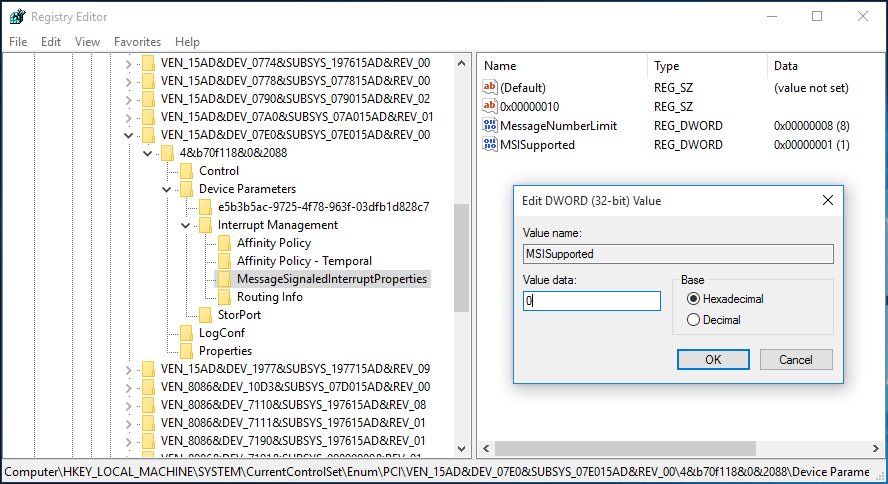
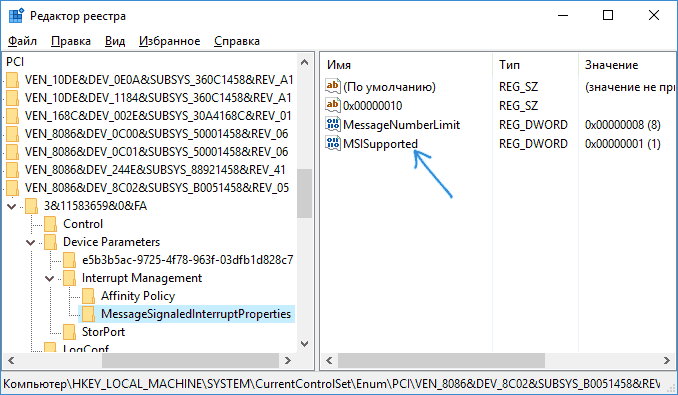
5) Type regedit in the search box of Start panel, then hit Enter on your keyboard to run Registry Editor. Then go to:
HKEY_LOCAL_MACHINESystemCurrentControlSetEnumPCI <AHCI Controller><Random Number>Device ParametersInterrupt ManagementMessageSignaledInterruptProperties
The <AHCI Controller> here refers to the name you see from step 2).
The <Random Number> differs on different machines.
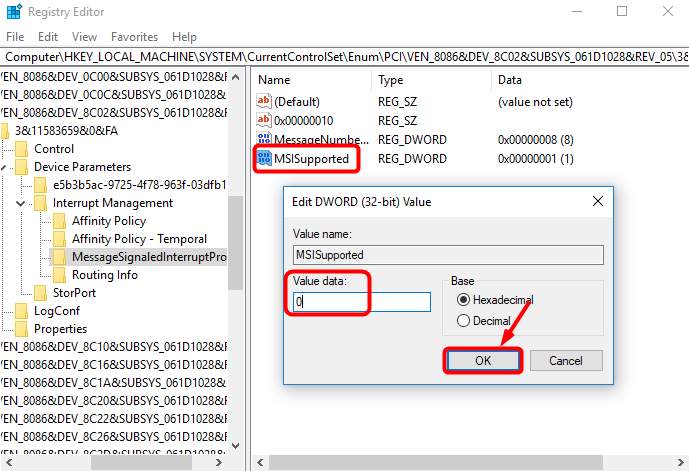
6) Double click the MSISupported key and change the value to 0.
7) Restart your computer after the change, then check your computer’s disk usage: Type “task manager” in the Windows search bar and select Task Manager, then in the Processes tab, look at the % at the top of the Disk column. If it’s no longer 100%, you’ve fixed the problem!
Fix 8: Switch to ChromeOS
Windows is a very old technology. Sure, Windows 10 is relatively new, but it’s still just the latest iteration of a decades-old operating system, designed for a bygone era (pre-internet).
Now that we have the internet, fast connection speeds, free cloud storage, and endless web apps (like Gmail, Google Docs, Slack, Facebook, Dropbox and Spotify), the entire Windows way of doing things – with locally installed programs and local file storage – is totally outdated.
Why is that a problem? Because when you’re constantly installing uncontrolled third-party programs, you’re constantly opening the door to viruses and other malware. (And Windows’ insecure permission system compounds this problem.)
Plus the way Windows manages installed software and hardware has always been a problem. If your computer shuts down unexpectedly, or a program installs, uninstalls or updates incorrectly, you can get ‘registry’ corruptions. That’s why Windows PCs always slow down and become unstable over time.
Also because everything’s installed and saved locally, it doesn’t take long before you run out of disk space, and your disk gets fragmented, which makes everything even slower and more unstable.
For most people, the simplest way to solve Windows problems is to ditch Windows altogether, and switch to a faster, more reliable, more secure, easier to use and cheaper operating system…
Google ChromeOS.
ChromeOS feels much like Windows, but instead of installing heaps of programs to email, chat, browse the internet, write documents, do school presentations, create spreadsheets, and whatever else you normally do on a computer, you use web apps. You don’t need to install anything at all.
That means you don’t have virus and malware problems, and your computer doesn’t slow down over time, or become unstable.
And that’s just the start of the benefits…
To learn more about the benefits of ChromeOS, and to see comparison videos and demos, visit GoChromeOS.com.
Windows 10 users who experience issues such as slow response time may look into their Task Manager for guidance. Task Manager provides you with a wealth of information regarding the processes that are currently running on your machine.
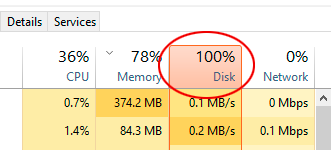
Among the metrics, you can monitor with Task Manager is your computer’s disk usage. If you see a disk usage of 100% your machine’s disk usage is maxed out and your system’s performance will be degraded. You need to take some corrective action.
Many users who have recently upgraded to Windows 10 have complained of their computers running slowly and Task Manager reporting 100% disk usage.
Here are 10 methods you can use to attempt to resolve the problem of high disk usage on your Windows 10 system. Some may take longer than usual due to the stress and increased usage that your hard drive is already under.
Way 1: Restart Your System
You know from experience that restarting your machine can often resolve all kinds of issues. Your Windows 10 100% disk usage problem is no exception. While taking this route may not help you find out the underlying reason for the problem, if it goes away, that may be sufficient for you.

Be sure to use the “Restart” option which starts your system in a fresh state as opposed to the “Shut Down” option which preserves your system state and may not resolve your disk issue.
Way 2: Update Windows
Installing the latest updates can often resolve mysterious problems with your Windows 10 system. Check if you are up to date by going into the “Update and security” section of the Windows Settings app.
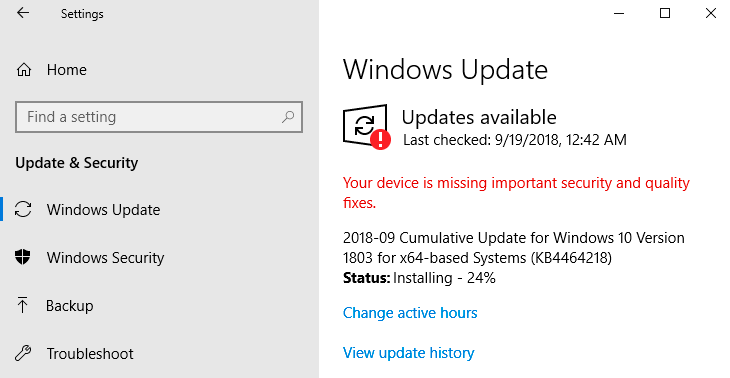
You can check for new updates and install them if they are available.
Settings > Update & Security settings > Windows Update
This may improve the overall performance of your system including that of your hard drive.
➡️ Also check: How to Upgrade Windows 10 to Windows 11 without Losing Data
Way 3: Disable Windows Search
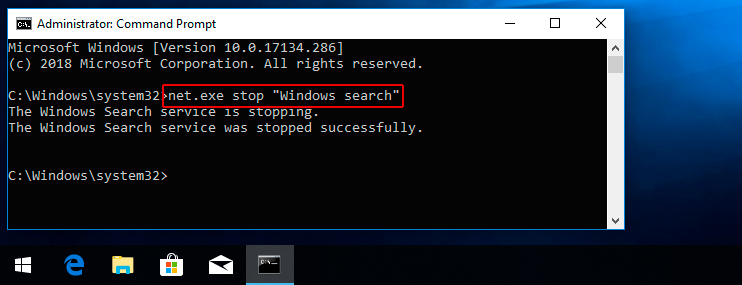
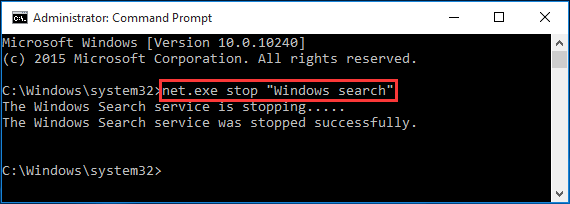
A known bug in Windows 8 and 10 can cause a search loop that can be the cause of your high disk usage. To temporarily stop the Windows Search facility and see if it improves your disk issue, open an admin prompt and enter the command: net.exe stop “Windows search”. This will stop Windows search from running until the next time Windows is restarted.
If it turns out that Windows Search was responsible for your Windows 10 disk usage reaching 100%, you can disable it permanently by following this procedure:
Way 4: Check For Malware
Your computer may be infected with malware that is causing your disk usage to spike. If you have antivirus software running in the background it should have caught the issue. Nothing is perfect though, so force your antivirus package to scan your hard drive for a potential infection. This could be a time-consuming process since your disk is already experiencing high usage but might be necessary to identify and remove malicious software.
Way 5: Stop the Superfetch Service
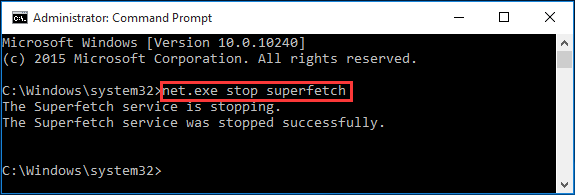
Another Windows 10 feature that can cause problems is the Windows Superfetch service. You can disable this service temporarily in a similar fashion to Windows search with the command: net.exe stop superfetch.

To disable the service permanently, use the same procedure as for disabling Windows search.
Way 6: Change Energy Options from Balanced to High Performance
This change of energy settings seems to have worked for a number of users who have experienced 100% disk usage on Windows 10.
Use this procedure:
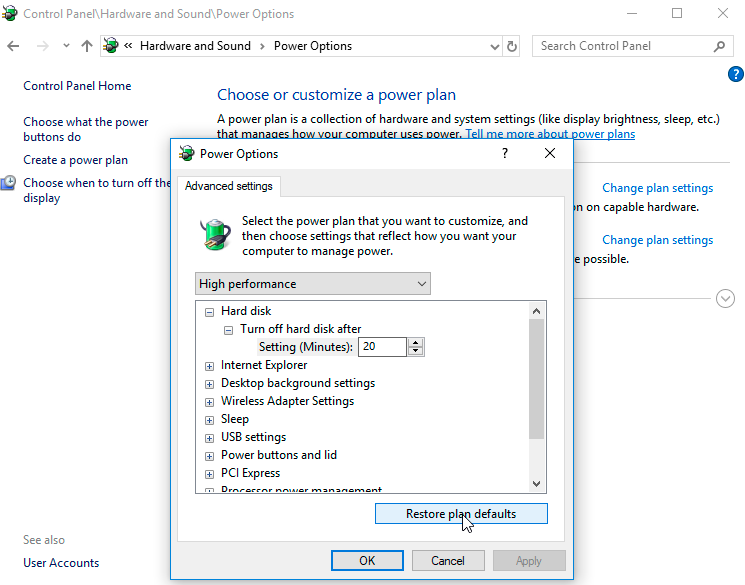
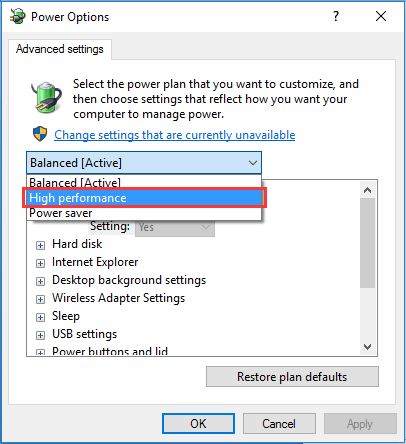
- Go to Power Options > Change plan settings > Change advanced power settings.
- Select the High-performance option from the drop-down box and make sure all plan settings are set to their defaults.
Way 7: Temporarily Turn Off Your Antivirus Software
Another step to take when investigating the cause behind your Windows 10 100% disk usage problem is to turn off your antivirus software temporarily. See if this improves your disk usage. If so, you may want to consider changing antivirus packages. Even Windows Defender can cause problems by increasing I/O and network usage which might lead to high disk usage.
Way 8: Reset Virtual Memory in Windows 10
Virtual memory treats your disk as if it is RAM and uses it to swap out temporary files when it runs out of actual RAM. Errors in the pagefile.sys can cause 100% disk usage on your Windows 10 machine. The remedy to this problem is to reset your virtual memory settings.
Follow these steps to reset your virtual memory:
Way 9: Run Check Disk
A check disk can show you if there are any physical problems with your hard drive. Usually, a high disk usage indicates that there is an application or logical issue driving the disk usage, but it is worth your time to rule out any physical damage. Run check disk and note its results.
Way 10: Change Settings in Google Chrome and Skype
Some users have reported that making these changes to your Google Chrome and Skype settings can have a beneficial effect on your disk usage.
For Chrome, make this change:
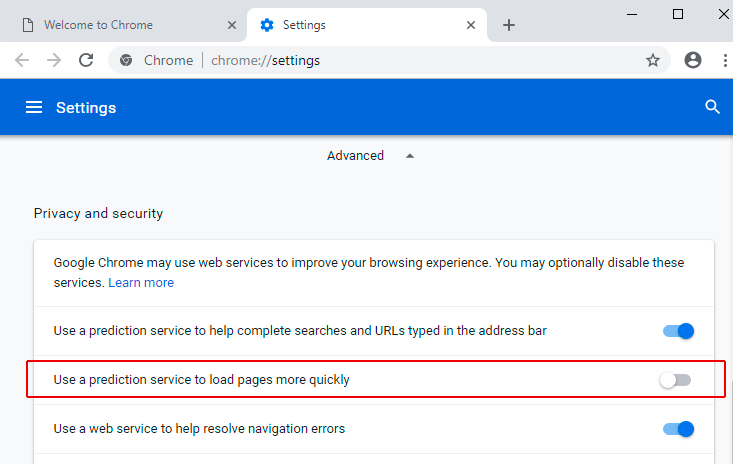
- Settings -> Show advanced settings.
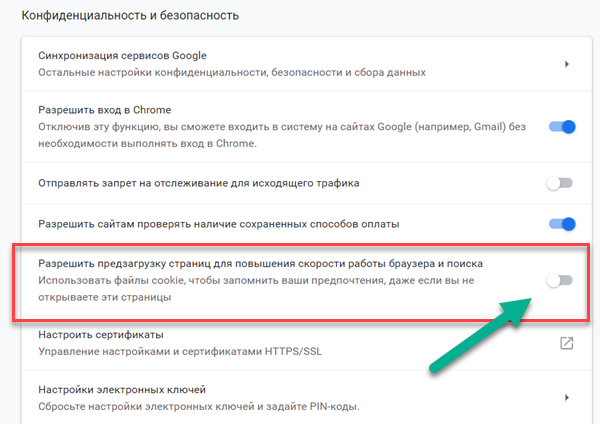
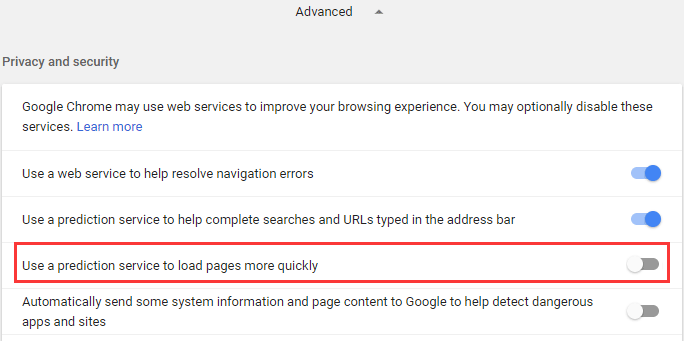
- Under Privacy section, uncheck the “Use a prediction service to load pages more quickly” option.
- You should also try disabling Flash in Google Chrome.
If these methods don’t resolve your issue with 100% disk usage on your Windows 10 computer, you may need to look into replacing your hard drive. One last thing to try is to disable any automatic defrag processes that are running as they may be causing you problems. In general, your hard drive should never be at 100% usage, so if it is, there is some reason for the condition. You need to fix the issue or risk a very slow moving computer.

Jeff Cochin
Jeff Cochin is a data management and recovery expert. He also serves as a technical writer, testing and reviewing tech solutions in various fields. Jeff Cochin is a professional data management, warehousing and recove…
Read full bio
Jeff Cochin is a data management and recovery expert. He also serves as a technical writer, testing and reviewing tech solutions in various fields. Jeff Cochin is a professional data management, warehousing and recove…
Read full bio

Approved by
Brett Johnson
This article has been approved by Brett Johnson, Data Recovery Engineer at ACE Data Recovery. Brett has a Bachelor’s Degree in Computer Systems and Network, 12 years of experience.
This article has been approved by Brett Johnson, Data Recovery Engineer at ACE Data Recovery. Brett has a Bachelor’s Degree in Computer Systems and Network, 12 years of experience.
Просмотров 190к. Опубликовано 27 июня, 2019 Обновлено 29 июня, 2019
Если вы открываете диспетчер задач Windows 10 и видите в процессах что диск загружен на 100%, что-то вызывает перегрузку жесткого диска. Ваш компьютер начинает медленно работать, что его практически невозможно использовать, и вы задаетесь вопросом, что вы сделали неправильно. Ответ — ничего! Эта проблема может возникнуть сама по себе. Но хорошая новость в том, что эту проблему можно легко решить.
8 способов исправлений проблемы использования 100% диска в Windows 10
Вот несколько способов, которые помогли другим пользователям решить проблему с диском в Windows 10 на 100%. Возможно, вам не нужно пробовать их все; просто пройдите вниз по списку, пока не найдете тот, который работает для вас.
Способ 1: Отключите поиск Windows
Временно отключить поиск Windows
Windows Search — это функция windows, которая выполняет поиск файлов на вашем компьютере намного быстрее. Если вы вообще не используете его или у вас есть другое поисковое приложение, вы можете полностью отключить его. Отключение этой службы остановит индексацию всех файлов. Но у вас все равно будет доступ к поиску, который займет больше времени.
Вот как временно отключить Windows Search и выяснить, является ли это причиной загрузкой жесткого диска на 100 процентов. (Обратите внимание, что поиск Windows включится после перезагрузки компьютера.)
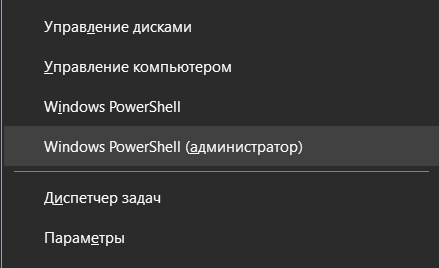
- На клавиатуре одновременно нажмите клавишу с логотипом windows
 + X, затем выберите «Командная строка» («Администратор»). Вместо командой строки, у вас может быть Windows PoweShell.

- Нажмите «Да» в окне запроса контроля учетных записей.
- Появится окно с черным или синим фоном. Это окно командной строки. В этом окне введите следующую команду:
net.exe stop "Windows search" - Нажмите Enter на клавиатуре.
Проверьте, улучшается ли использование вашего диска и производительность вашего компьютера. Если это способ помог, можете навсегда отключить Windows Search, как описано ниже. Если не помогло, переходите к способу 2.
Навсегда отключить поиск Windows
Если вы обнаружили, что Windows Search вызывает 100% ошибку использования диска в Windows 10, вы можете навсегда отключить Windows Search:
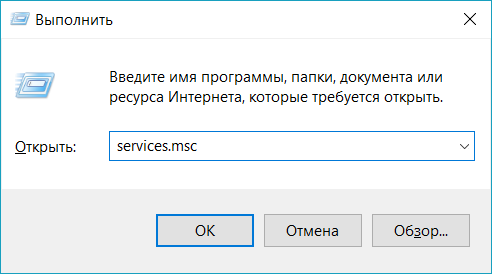
- Одновременно нажмите клавишу с логотипом + R и введите
services.msc.
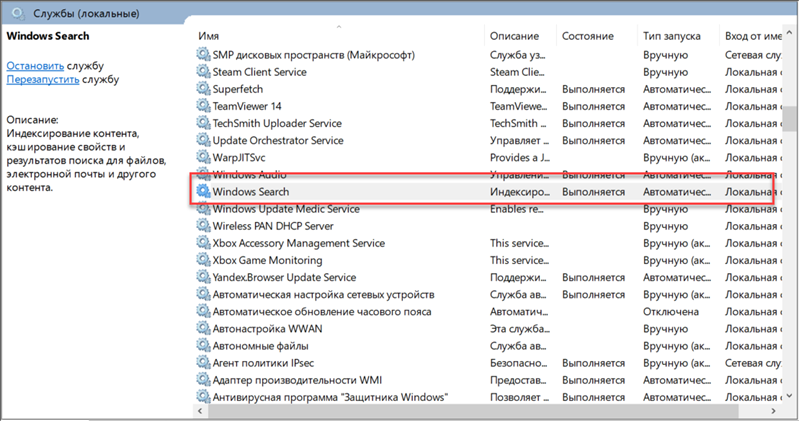
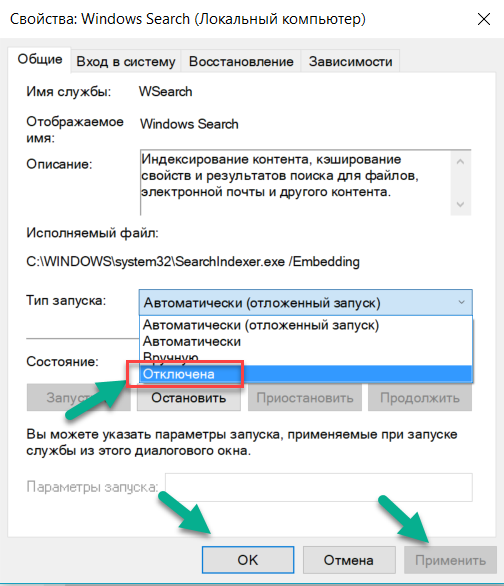
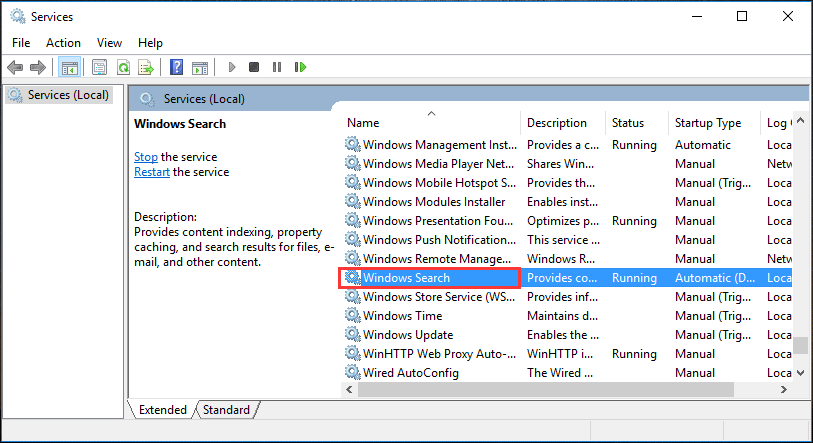
- Найдите параметр Windows Search, дважды щелкните по нему, чтобы открыть окно свойств.

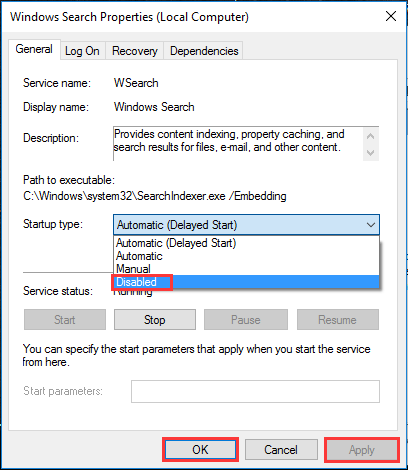
- Измените тип запуска на Отключена. Затем нажмите Применить и OK, чтобы сохранить изменения.

- Проверьте использование диска вашего компьютера: введите «диспетчер задач» в строке поиска Windows и выберите «Диспетчер задач», затем на вкладке «Процессы» посмотрите на % в верхней части столбца «Диск». Если больше не 100%, вы устранили проблему!

Если проблема с использованием диска на 100% не устранена, попробуйте следующий способ, описанный ниже.
Способ 2: Обновите драйвера вашего устройства
Если описанные выше действия не решают проблему 100% использования диска в Windows 10, это может быть вызвано драйвером устройства.
Смотрите также: Топ бесплатных программ для обновления драйверов для Windows
Вы можете автоматически обновить все драйверы устройств до последней правильной версии с помощью Driver Booster.
Driver Booster автоматически распознает вашу систему и найдет для нее правильные драйверы. Вам не нужно точно знать, на какой системе работает ваш компьютер, вам не нужно рисковать загрузкой и установкой неправильного драйвера, и вам не нужно беспокоиться об ошибках при установке.
Способ 3: Отключите SuperFetch
SuperFetch помогает сократить время загрузки и повысить эффективность загрузки программ. Тем не менее, он был определен как потенциальная причина проблем с производительностью диска в Windows 8 и более поздних версиях Windows, включая Windows 10. Вот как остановить эту службу:
- На клавиатуре одновременно нажмите клавишу с логотипом windows + X, затем выберите «Командная строка» («Администратор»). Вместо командой строки, у вас может быть Windows PoweShell.
- Нажмите «Да» в окне запроса контроля учетных записей.
- Появится окно с черным или синим фоном. Это окно командной строки. В этом окне введите следующую команду:
net.exe stop superfetch - Нажмите Enter на клавиатуре.
- Подождите несколько минут, чтобы увидеть, начинает ли ваш компьютер работать лучше. Или проверьте загруженность диска вашего компьютера: откройте «Диспетчер задач», затем на вкладке «Процессы» посмотрите на % в верхней части столбца «Диск». Если это больше не 100%, вы устранили проблему!
Если проблема с использованием диска на 100% не устранена, попробуйте следующий способ, описанный ниже.
Способ 4: Выполните проверку диска
- На клавиатуре одновременно нажмите клавишу с логотипом windows + X, затем выберите «Командная строка» («Администратор»). Вместо командой строки, у вас может быть Windows PoweShell.
- Нажмите «Да» в окне запроса контроля учетных записей.
- Появится окно с черным или синим фоном. Это окно командной строки. В этом окне введите следующую команду:
chkdsk.exe /f /r - Нажмите Enter на клавиатуре, затем введите
Y, чтобы подтвердить, что вы хотите выполнить проверку диска при следующей перезагрузке компьютера. Пожалуйста, сначала убедитесь, что вы закрыли все свои приложения.
ВАЖНО! Проверка диска начнется при следующей загрузке компьютера, и на ее выполнение может потребоваться некоторое время (для некоторых компьютеров может потребоваться более трех часов). Если при перезагрузке у вас нет времени ждать завершения проверки диска, вы можете пропустить ее.
- Подождите несколько минут, чтобы увидеть, начинает ли ваш компьютер работать лучше. Или проверьте загруженность диска вашего компьютера: откройте «Диспетчер задач», затем на вкладке «Процессы» посмотрите на % в верхней части столбца «Диск». Если это больше не 100%, вы устранили проблему!Если проблема с использованием диска на 100% не устранена, попробуйте следующий способ, описанный ниже.
Способ 5: Сброс виртуальной памяти
Виртуальная память может считаться расширением физической памяти вашего компьютера. Это комбинация оперативной памяти и части вашего жесткого диска. Если оперативной памяти недостаточно для выполнения задачи, Windows временно сохраняет файлы в виртуальной памяти, а затем, при необходимости, возвращает их обратно в оперативную память.
Для сброса виртуальной памяти:
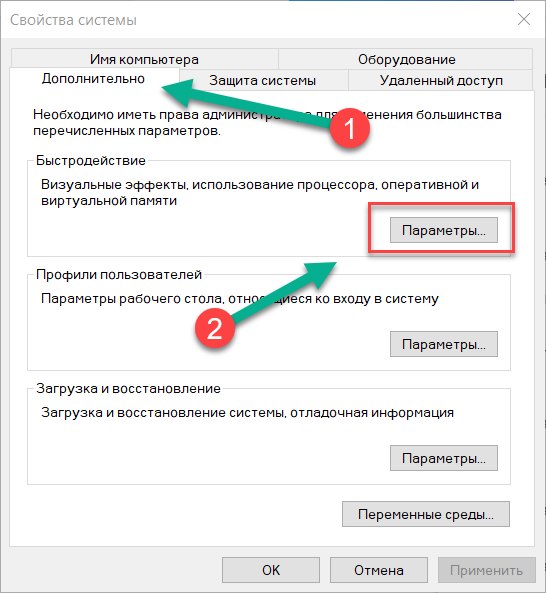
- На клавиатуре, нажмите клавишу + Pause/Break. Затем выберите «Дополнительные параметры системы» на левой панели.

- Перейдите на вкладку «Дополнительно», затем нажмите «Параметры» в разделе «Быстродействие».

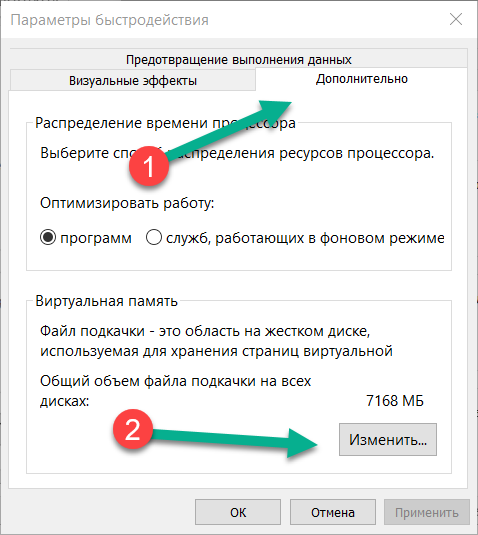
- Снова перейдите на вкладку «Дополнительно» и выберите « Изменить…» в разделе «Виртуальная память».

- Убедитесь, что флажок «Автоматически выбирать объем файла подкачки» для всех дисков НЕ отмечен.

- Выберите диск (жесткий диск или раздел, в котором установлен Windows, как правило это диск C: ) , и введите начальный размер и максимальный размер виртуальной памяти:
- Начальный размер — это значение варьируется в зависимости от вашего компьютера. Если вы не уверены, какое значение использовать, просто введите любое число из категории Рекомендуемые .
- Максимальный размер — не устанавливайте это значение слишком высоким. Это должно быть примерно в 1,5 раза больше вашего физического ОЗУ. Например, ПК с 4 ГБ (4096 МБ) оперативной памяти должен иметь не более примерно 6,144 МБ виртуальной памяти (4096 МБ х 1,5).После ввода значений виртуальной памяти нажмите « Установить» , затем нажмите « ОК» для продолжения.
- Очистите все временные файлы вашего компьютера. На клавиатуре нажмите клавишу + R , затем в окне Выполнить, введите
tempи нажмите Enter. Это откроет проводник Windows с открытой папкой Temp и покажет вам все временные файлы на вашем компьютере. - Выберите все файлы в папке Temp и удалите их.
- Проверьте загруженность диска вашего компьютера: откройте «Диспетчер задач», затем на вкладке «Процессы» посмотрите на % в верхней части столбца «Диск». Если это больше не 100%, вы устранили проблему!Если проблема с использованием диска на 100% не устранена, попробуйте следующий способ, описанный ниже.


Способ 6: Временно отключите антивирус
Если вы установили антивирусные или антивирусные программы, такие как Norton, Kaspersky, AVG, Avast Behavior Shield или Malwarebytes, вы должны временно отключить их или отключить, чтобы убедиться, что они вызывают проблемы с использованием вашего диска.
Обратите внимание, что у Microsoft есть собственная антивирусная программа по умолчанию, Защитник Windows . Он автоматически включается, даже если у вас также установлены другие антивирусные приложения. Даже если вы отключите другие антивирусные программы, Защитник Windows всегда будет рядом с вами в течение определенного промежутка времени. Поэтому не нужно слишком беспокоиться о временном отключении антивируса.
После того, как вы отключили антивирус , проверьте загруженность диска вашего компьютера: откройте «Диспетчер задач», затем на вкладке «Процессы» посмотрите на % в верхней части столбца «Диск». Если это больше не 100%, вы устранили проблему!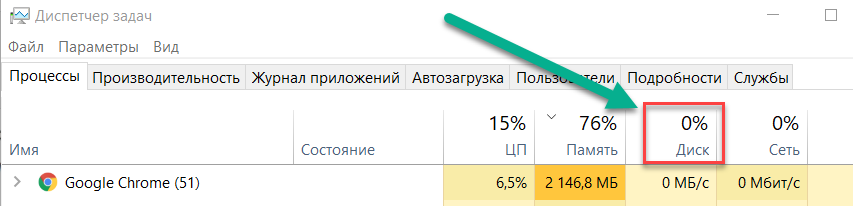
Если проблема с использованием диска на 100% не устранена, попробуйте следующий способ, описанный ниже.
Способ 7: Измените настройки Google Chrome и Skype
Для некоторых пользователей Windows 10 определенная комбинация настроек браузера Skype и Google Chrome вызывает проблему 100% загруженности диска в Windows 10. Вот как исправить эти настройки (обратите внимание, что формулировка в разных версиях Chrome может немного отличаться):
- В Google Chrome нажмите трехточечный значок в верхнем правом углу и выберите «Настройки».
- Прокрутите вниз до нижней части страницы и нажмите «Дополнительно».
- В категории «Конфиденциальность и безопасность» убедитесь, что использование службы прогнозирования для более быстрой загрузки страниц отключено.

- Убедитесь, что ваш Skype не работает.
- В проводнике Windows перейдите в
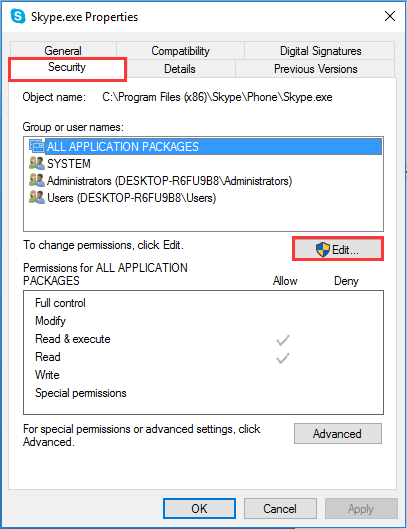
C:Program Files (x86)SkypePhone. - Щелкните правой кнопкой мыши по Skype.exe и выберите «Свойства».
- Перейдите на вкладку «Безопасность» и выберите «Изменить».
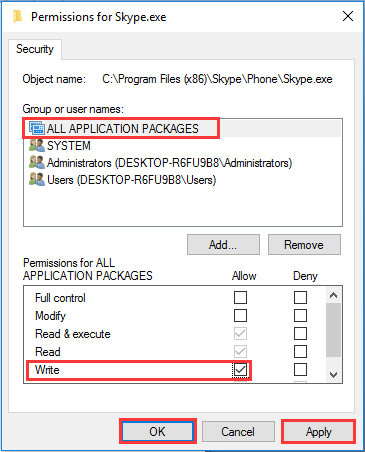
- Нажмите ВСЕ ПАКЕТЫ ПРИЛОЖЕНИЙ и установите флажок Разрешить для записи. Затем нажмите Применить и ОК, чтобы сохранить изменения.
- Проверьте загруженность диска вашего компьютера: откройте «Диспетчер задач», затем на вкладке «Процессы» посмотрите на % в верхней части столбца «Диск». Если это больше не 100%, вы устранили проблему!
Если проблема с использованием диска на 100% не устранена, попробуйте следующий способ, описанный ниже.
Способ 8: Исправьте ваш драйвер StorAHCI.sys
Проблема 100 процентной загрузки диска в Windows 10 также может быть вызвана некоторыми моделями расширенного интерфейса хост-контроллера PCI-Express (AHCI PCIe), работающими с драйвером входящей почты StorAHCI.sys из-за ошибки микропрограммы.
Вот как определить, является ли это вашей проблемой, и исправить ее:
- Откройте Диспетчер устройств, одновременно нажав клавишу с логотипом + X , чтобы выбрать Диспетчер устройств.

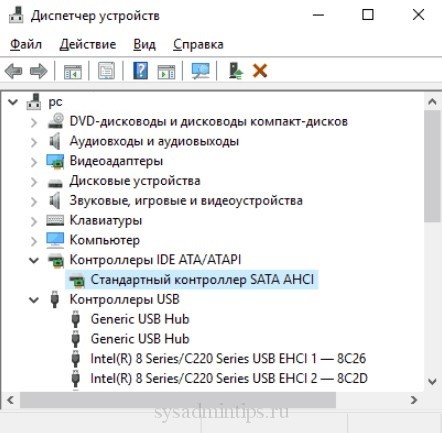
- Разверните категорию Контроллеры IDE ATA / ATAPI и дважды щелкните Стандартный контроллер SATA AHCI.

- Перейдите на вкладку «Драйвер» и нажмите «Сведения». Если вы видите, что storahci.sys хранится в пути к папке system32, значит, вы используете драйвер AHCI для входящих сообщений.

- Закройте окно «Сведения о драйвере» и перейдите на вкладку «Сведения». В раскрывающемся меню выберите «Путь к экземпляру устройства». Запишите путь, начиная с VEN_.

- Введите regedit в поле поиска на панели «Пуск», затем нажмите «Enter» на клавиатуре, чтобы запустить редактор реестра. Затем перейдите к:
HKEY_LOCAL_MACHINESystemCurrentControlSetEnumPCI <AHCIController><Случайное число>Device ParametersInterruptManagementMessageSignaledInterruptProperties<AHCI Controller> здесь относится к имени, которое вы видите на шаге 2.
<Случайное число> отличается на разных машинах.
- Дважды щелкните ключ MSISupported и измените значение на 0.
- Перезагрузите компьютер после внесения изменений, затем проверьте загруженность диска вашего компьютера: откройте «Диспетчер задач», затем на вкладке «Процессы» посмотрите на % в верхней части столбца «Диск». Если это больше не 100%, вы устранили проблему!

Пожалуйста отпишитесь в комментарии, какой способ вам помог, а также может вы знаете ещё способы, поделитесь, мы обязательно добавим в статью с упоминанием вас как автора способа решения проблемы с 100 процентной загруженности диска в диспетчере задач.
Recently, many users report that their disk utilization reaches 100%, leading to lagging and unresponsive system. Learn how to fix Windows 10 100 percent disk usage problem in this post.
Recently, more and more Windows 10 users report that they have come across 100 disk usage Windows 10 issue and they are seeking for a way to lower disk usage. See a Windows 10 user thread from answers.microsoft.com:
Q: Disk Usage at 100% on Windows 10
When I load into Windows, I could move the mouse, but nothing else was responsive. It took about a minute to open up the start menu when I opened the Task Manager, my disk 1 (C:) is at 100% utilization. Meanwhile, my CPU is at 5% 2.72GHz, and my memory is at 8% 2.6/31.9GB.
Anybody can help? After few restarts sometimes it’s no more 100% sometimes it’s again 100% usage…
Symptoms of 100 Disk Usage Windows 10
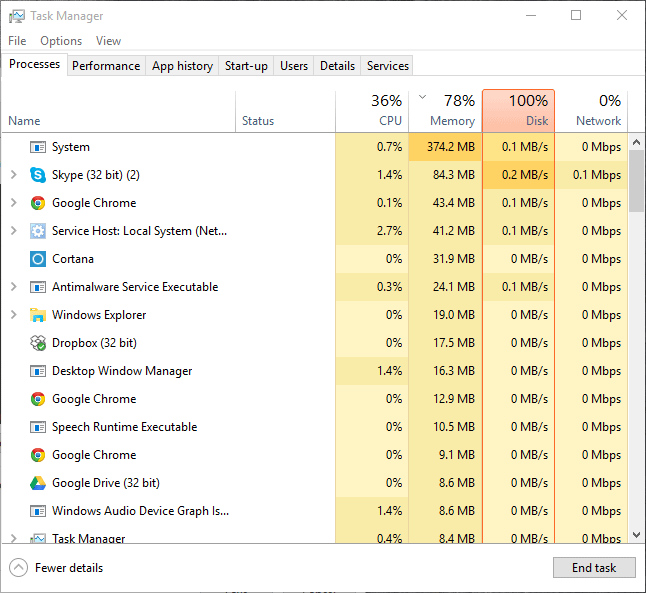
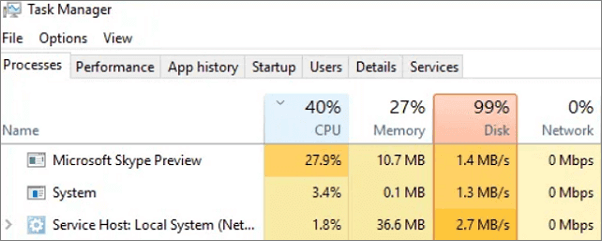
How do you know you have 100 disk usage Windows 10? In the Task Manager, under the Process and Performance tab, the disk utilization reaches 100%, leading to lagging and unresponsive system. The system starts freezing until disk usage reduces from 100%.
This can be observed in the following screenshot:
In addition, the system event log contains numerous events with Event ID 129, which represents resets of the disk controller.
Are you troubled by disk usage 100 Windows 10 and wonder «why is my disk always at 100», «how to lower disk usage»? Next, we will show you the worth-trying 12 ways to address Windows 10 100% disk usage.
See also: 3 Ways to Help You Get out of Low Disk Space Warning in Windows 7/8.1/10
Quick Video Guide:
Fix 1: Fix Your StorAHCI.sys Driver
According to Microsoft support, Event ID 129, the resets of the disk controller, can be caused by many factors. One of the known ones is that some Advanced Host Controller Interface PCI-Express (AHCI PCIe) models cause these symptoms in Windows 10 when running with the inbox StorAHCI.sys driver.
Due to a firmware bug, the Solid-state drive (SSD) does not properly complete input/output when Message Signaled Interrupt (MSI) mode is enabled. As a result, the Windows storage stack attempts to reset the device after waiting on unresponsive read/write for a period of time.
So, the first solution to fix 100 percent disk usage Windows 10 here is to disable MSI mode via the registry. Follow the guide below:
First Move: Identify if You Are Running the Inbox AHCI Driver (StorAHCI.sys)
Step 1. Press «Win+R» to call out the Run box, then type «devmgmt.msc» and hit Enter.
Step 2. Under «IDE ATA/ATAPI Controllers», right-click «Standard SATA AHCI Controller» and select «Properties».
Step 3. Navigate to the «Driver» tab and click «Driver Details». If you see «storahci.sys» in the list, you are running the inbox driver.
Second Move: Disable MSI for the Controller in the Registry
Step 1. In the same properties window, navigate to the «Details» tab and select «Device instance path» from the Property drop-down menu. Please pay attention to the Value that starts with PCIVEN, which will be useful in Step 3.
Step 2. Open the registry editor by typing «regedit» in the same Run box.
Step 3. Navigate to «HKEY_LOCAL_MACHINESystemCurrentControlSetEnumPCI<AHCI Controller>Device ParametersInterrupt ManagementMessageSignaledInterruptProperties», where <AHCI Controller> refers to the device instance path you noticed in Step 1. Then change the value of the MSISupported key from «1» to «0».
Reboot the machine and see whether this works for resolving disk utilization 100 Windows 10.
Fix 2: Change Energy Options from Balanced to High Performance
According to the feedback provided by the suffers, changing energy options from Balanced to High Performance works well on 100 percent disk usage Windows 10. Please do the followings:
Go to Power Options > Change plan settings > Change advanced power settings, then choose High performance from the drop-down box and make sure all plan settings are on default.
Reboot your computer and check if this helps lower disk usage.
Fix 3: Change Settings in Google Chrome and Skype
A lot of users also recommend changing settings in Google Chrome and Skype. For some unknown reasons, a particular combination of Skype and Google Chrome browser settings can cause the 100% disk utilization problem in Windows 10.
First Move: Change Settings in Google Chrome
Step 1. In Google Chrome, go to «Settings».
Step 2. Scroll down to the bottom of the page and click «Advanced».
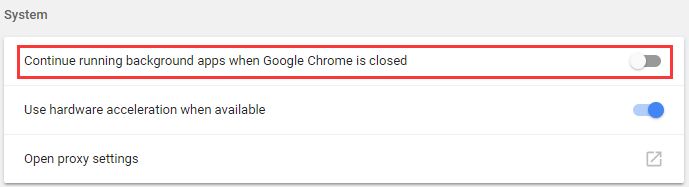
Step 3. In the «Privacy and security» category, make sure the «Use a prediction service to load pages more quickly» is turned off. In addition, ensure that «Continue running background apps when Google Chrome is closed» is disabled in «System» settings.
Second Move: Change Skype Settings
Step 1. Make sure that your Skype is quitted in the Taskbar.
Step 2. Open Windows Explorer and open «C:Program Files (x86)SkypePhone».
Step 3. Right click «Skype.exe» and choose «Properties» from the context menu. Then open the «Security» tab and select «Edit».
Step 4. Highlight «ALL APPLICATION PACKAGES» and then check the «Write» box. Finally, click «Apply», «OK» and then «OK» again to save changes.
Now check your disk usage in Task Manager to see if this has resolved high disk usage Windows 10. If not, uninstall Skype and update Chrome to V64 and above versions.
Fix 4: Disable Windows Search
Windows Search enables to search files on your PC fast. If you don’t use it at all, you can disable it completely. Disabling Windows Search service will stop the indexing of all files. However, to identify whether this is the cause of your 100% disk utilization problem, we recommend temporarily disabling Windows Search first.
First Move: Temporarily Disable Windows Search
Note that Windows Search will start again when you restart your computer. So, this change has no impact on your computer performance.
Step 1. Press «Win+X» combination keys and select «Command Prompt (Admin)». Then allow its user account control.
Step 2. In the Command Prompt window, type «net.exe stop “Windows search”» (image attached) and hit the Enter key.
Check if your disk usage and the performance of your computer improve. If YES, you should permanently disable Windows Search as described below.
Second Move: Permanently Disable Windows Search
Step 1. Press «Win+R» combination keys to call out the Run box, then type «services.msc» and hit Enter.
Step 2. Locate «Windows Search» and double-click it to enter its «Properties» window.
Step 3. Change the Startup type option to «Disabled». Then click «Apply» and «OK» to save your change.
Check whether this works for 100 disk usage Windows 10.
Fix 5: Disable SuperFetch Service
SuperFetch helps to decrease boot time and make must-load programs more efficiently. However, it has been identified as a potential cause of high disk usage Windows 10. Here’s how to stop this service:
Step 1. Press «Win+X» combination keys, then choose «Command Prompt (Admin)» and allow its user account control.
Step 2. In the Command Prompt window, type «net.exe stop superfetch» and hit the Enter key.
Wait for a few minutes and check if your computer starts performing better.
Fix 6: Disable Antivirus Software
If you’ve installed some antivirus or anti-malware programs on computer, you can temporarily disable them to see if they’re the cause of your 100 percent disk usage problem. If your computer’s disk usage returns to normal, you may need to contact the software vendor to see if they can provide some help.
If no improvement is offered by the vendor, you don’t need to worry too much. Microsoft has its own default anti-malware, Windows Defender. It’s automatically enabled no matter you have other antivirus applications installed or not. So even if you disable the antivirus programs you installed, Windows Defender is always there.
Fix 7: Uninstall Any Flash Player Update
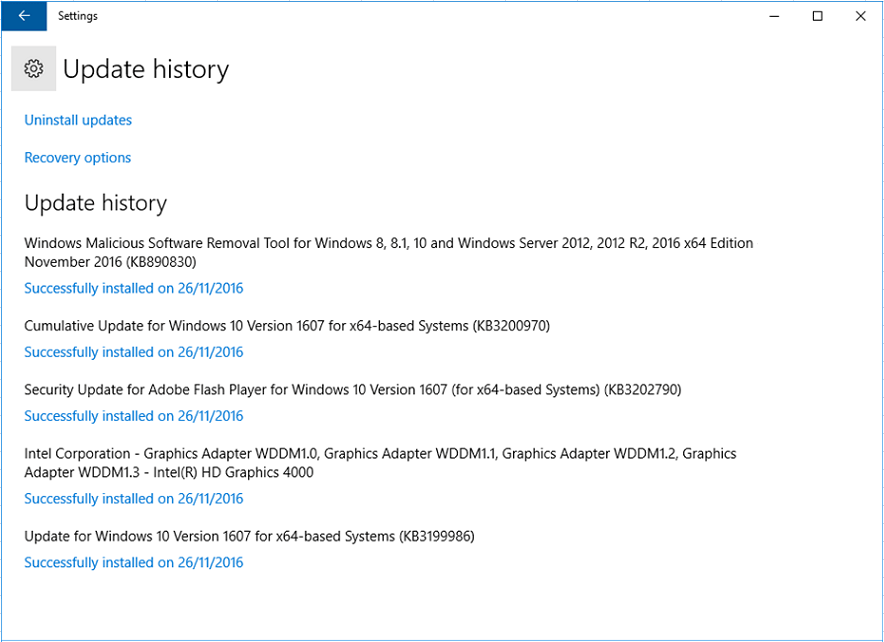
Uninstalling any flash player update is also reported as a good solution that has helped some users get out of disk utilization 100 Windows 10. To do so, go to Settings > Update & Security > Windows Update > Advanced Options > View your update history > Uninstall updates. Then uninstall the flash player update.
Fix 8: Reset Virtual Memory
Virtual memory is a portion of your hard drive and is regarded as an extension of your computer’s physical memory. When the RAM is not enough to perform a task, Windows will temporarily store files in virtual memory, and swap them back to RAM when required.
However, unreasonable virtual memory may lead to Windows 10 high disk usage. Here is how to reset virtual memory:
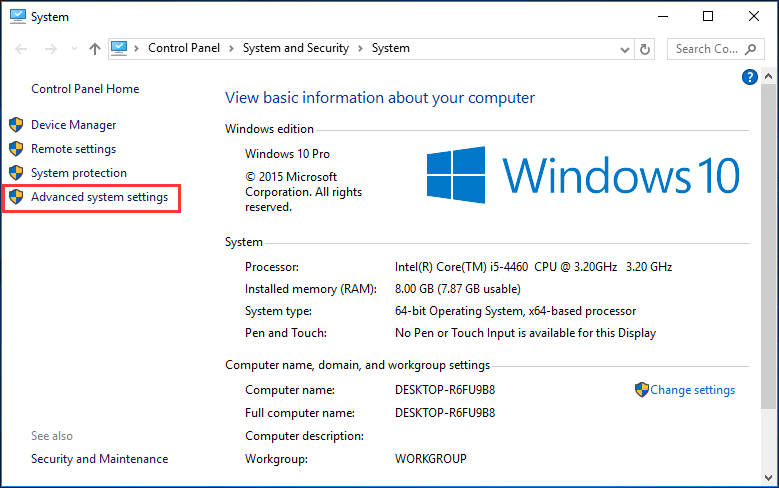
Step 1. Press «Win+Pause/Break» keys to call out «System» information. Then choose «Advanced system settings» on the left panel.
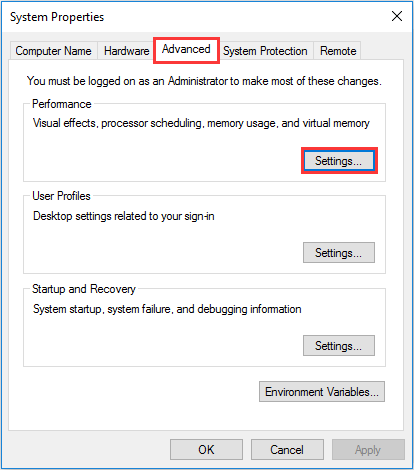
Step 2. Go to the «Advanced» tab, and click «Settings».
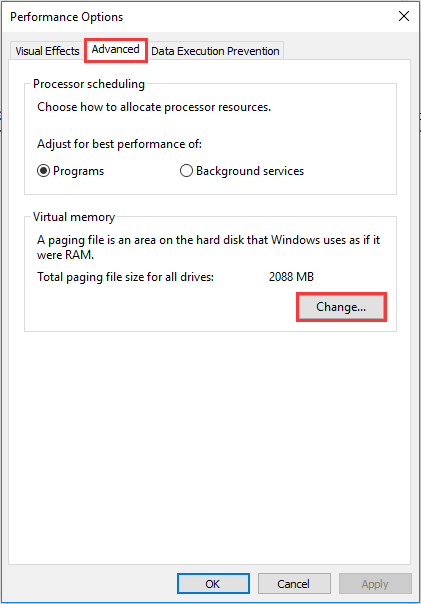
Step 3. Go to the «Advanced» tab, and choose «Change…» in the Virtual memory section.
Step 4. Make sure «Automatically manage paging file size for all drives» is NOT checked. Then highlight your system drive and customize the Initial size and Maximum size for your virtual memory. Finally, click «Set», and then «OK» to continue.
- Initial size: this value can vary depending on your computer. If you’re not sure what value to enter, just enter the recommended number.
- Maximum size: it is recommended to set this value 1.5 times the size of your physical RAM. If you PC has a 4GB (4096 MB) RAM, the value should be no more than about 6,144 MB (4096 MB x 1.5).
Step 5. Now it is time to clear all temporary files on your PC. Press «Win+R» keys to call out the Run dialogue, then type «temp» and hit Enter. This will invoke Windows Explorer, with your Temp folder open.
Step 6. Select all the files in the Temp folder and delete them.
Wait a few minutes and see if Windows 10 100 disk usage is fixed.
Fix 9: Disable Windows Update Service
Some of our users suggested that Windows Update Service could also bring 100 disk usage Windows 10. You may just have a try to disable it and check later.
Step 1. Run «services.msc» and press «OK».
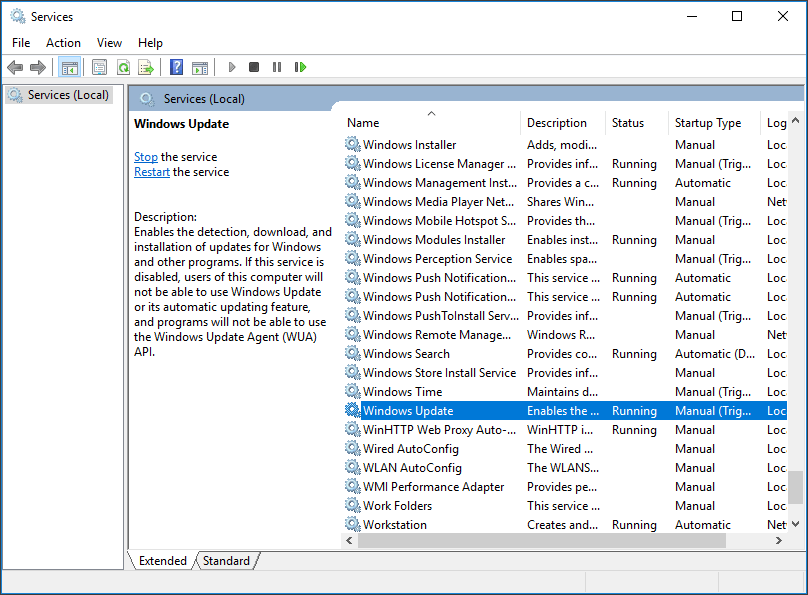
Step 2. Scroll down to find «Windows Update» and double-click on it.
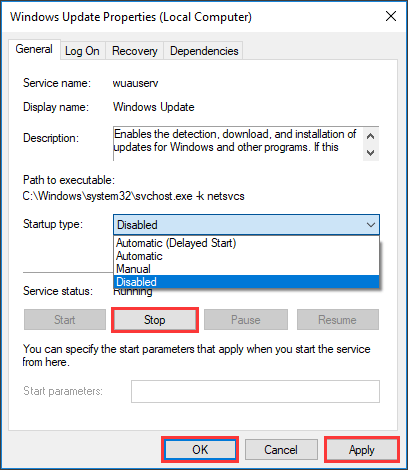
Step 3. In the pop-up window, drop down the Startup type box and choose “Disabled”. Then press “Stop”, “Apply” and “OK” orderly.
For more information, read How to Disable Windows 10 Update.
Fix 10: Change File Explorer Options
Step 1. Open Windows 10 File Explorer, and then navigate to «View» and click «Options».

Step 2. Switch to the «Search» tab and UNCHECK these two options:
- «Include compressed files (ZIP, CAB…)»
- «Always search file names and contents (this might take several minutes)»
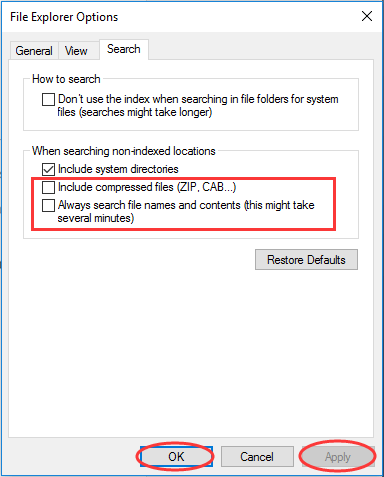
Step 3. Click “Apply” and then “OK”.
Some Other Fixes You May Have a Try:
Since you are here, take a look at the suggestions put forward by users who have successfully overcome the 100% disk utilization problem.
- Remove Adobe Creative Cloud and Photoshop CC. You may have to allow their update before you can uninstall.
- Uninstall disk driver and reboot.
- Disable «Intel Rapid Start Technology» in BIOS.
But if all of these fixes do not help. Continue reading Fix 11 and Fix 12.
Fix 11: Perform a Disk Check
If the above solutions all do not help, it is necessary having a check of your hard drive. You can do this by using MiniTool Partition Wizard Free which simplifies things within a few clicks. With this tool, you can manage hard drive partitions in all aspects even you are not professional.
Download MiniTool Partition Wizard Free and install it on computer.
Free Download
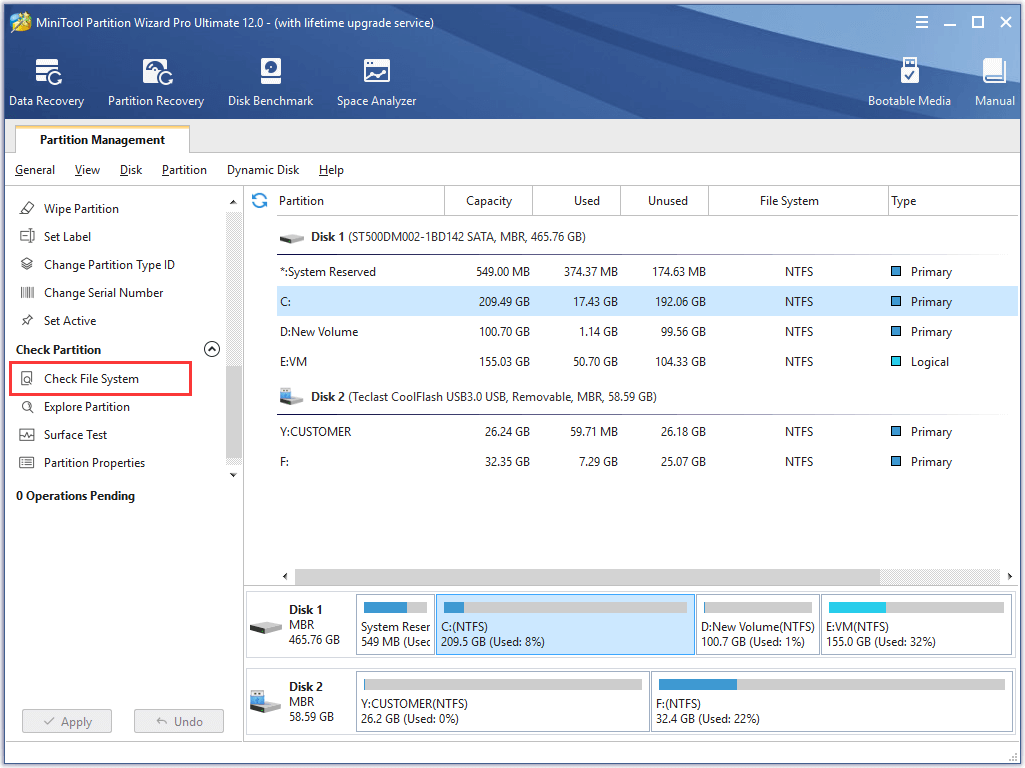
Step 1. In the main interface of MiniTool Partition Wizard, select the system partition from the disk map and choose “Check File System” from the action panel.
Step 2. Select “Check & fix detected errors” in the pop-up window. Then click Start to begin.
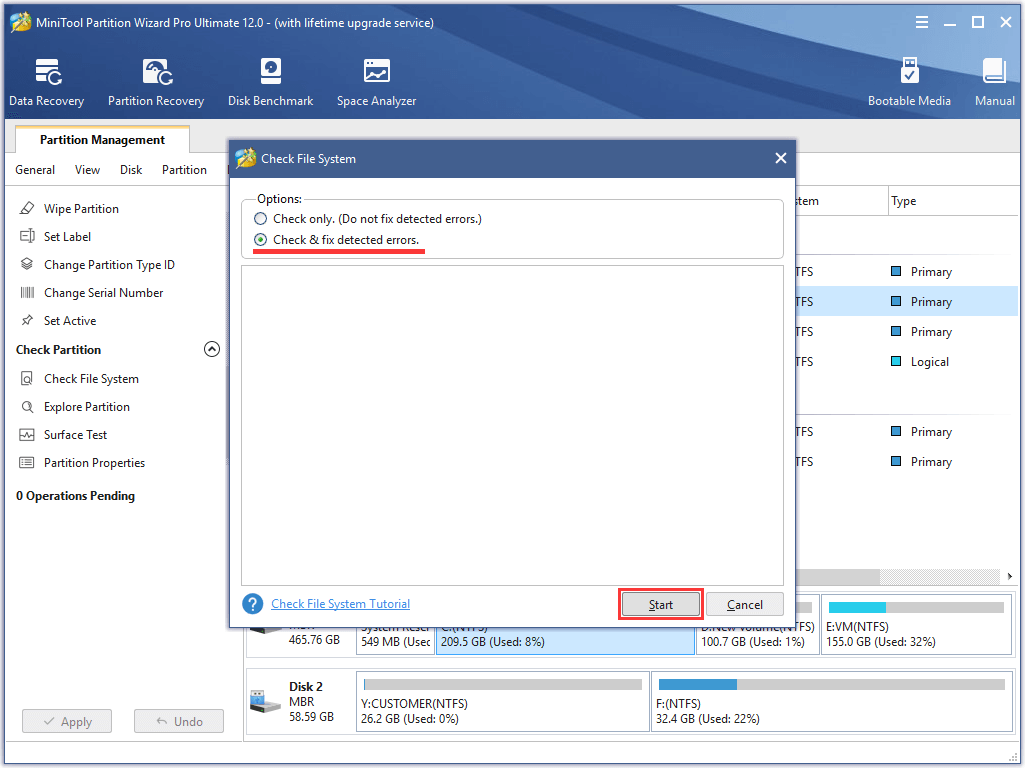
Continue to check and fix errors on the rest drives. If no error is found, you can try the last way.
Fix 12: Wipe SSD and Reinstall Windows 10
The last resort is to totally wipe the hard drive and reinstall Windows 10. You may completely back up the SSD, prepare a Windows 10 installation media, and do a clean install.
First Move: Back up SSD
Back up Windows 10 hard drive is necessary. On the one hand, all important data are safeguarded. On the other hand, if the reinstallation does not help at all, you do have a chance to return to your previous Windows 10 to avoid the troublesome system settings and application installations.
Here you can also use MiniTool Partition Wizard Free to do this job.
Free Download
Step 1. After launching and MiniTool Partition Wizard, select the system disk as the source disk and choose “Copy Disk” from the menu.
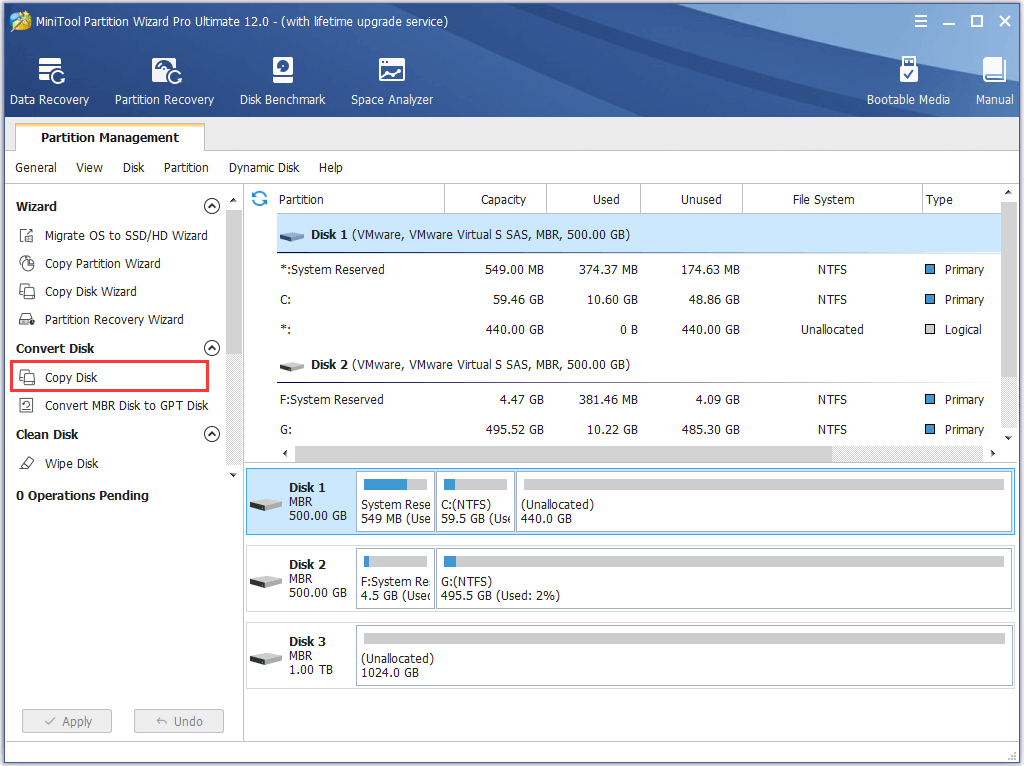
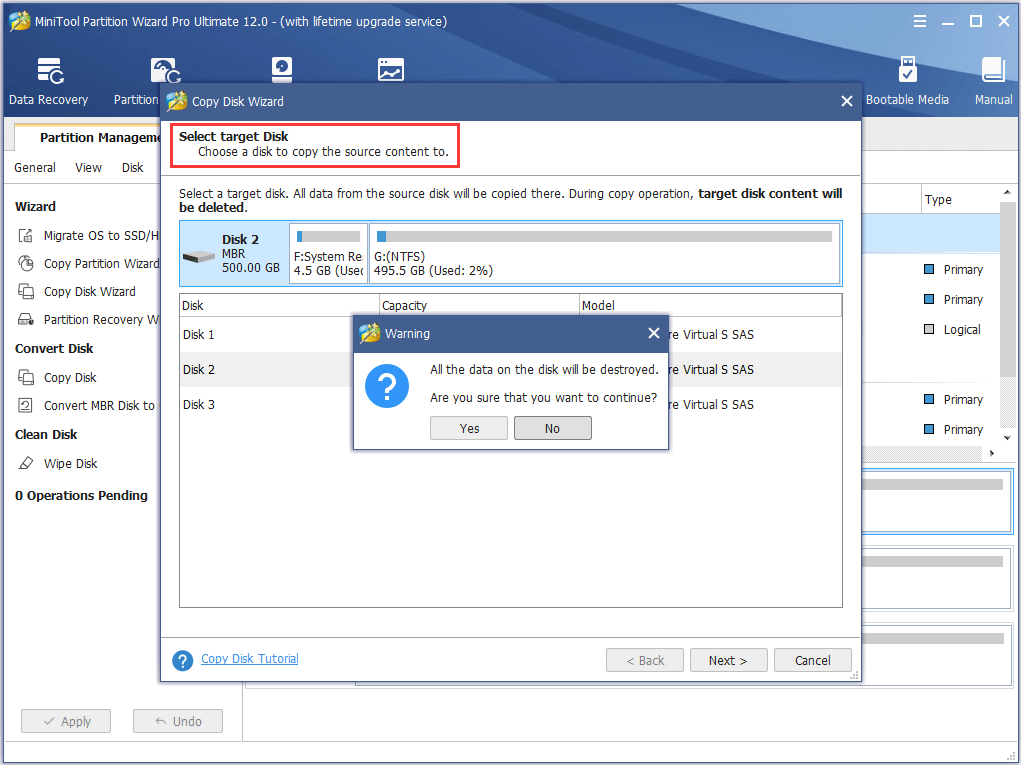
Step 2. Choose a hard disk as the target disk. It is important to know that all data on the target disk will be removed for a successful disk clone.
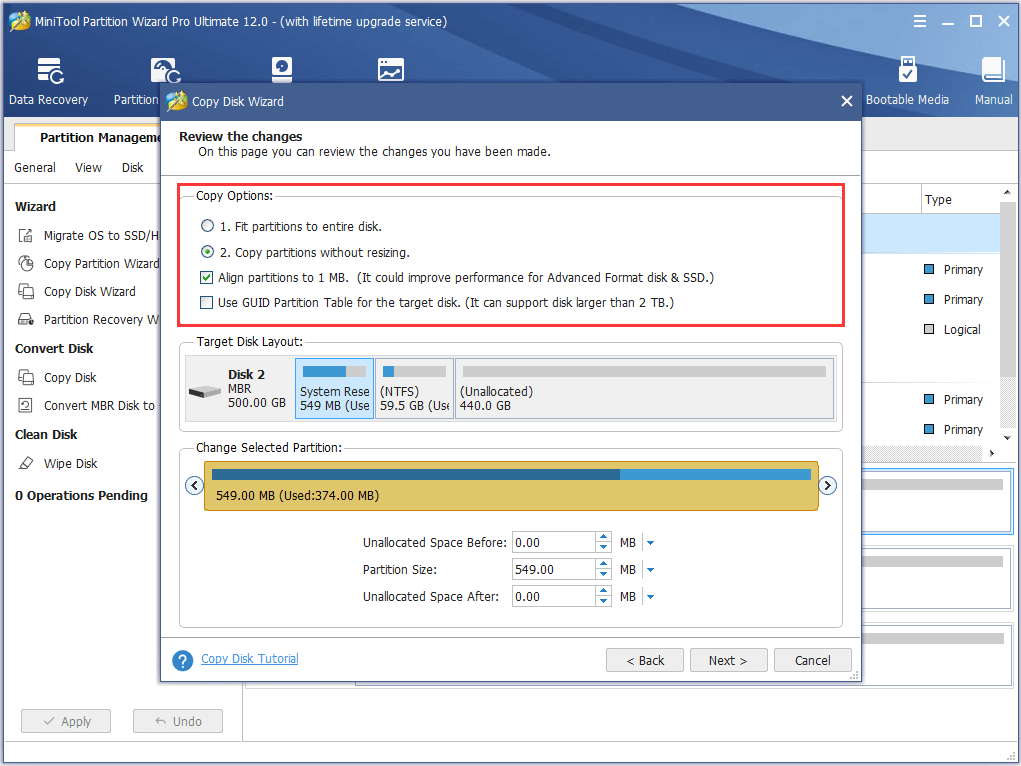
Step 3. Continuing to the next page, you see several copy options are listed here. Select the desired options you want and go on.
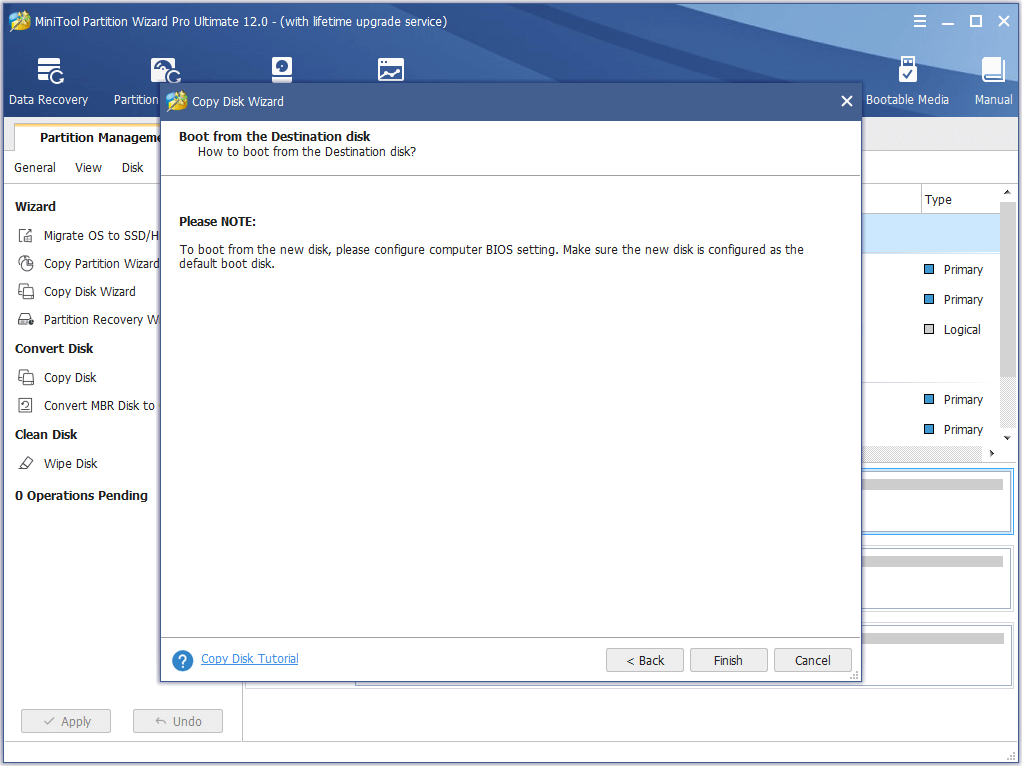
Step 4. When coming across the «how to boot from the new disk» message, read it carefully and click Finish.
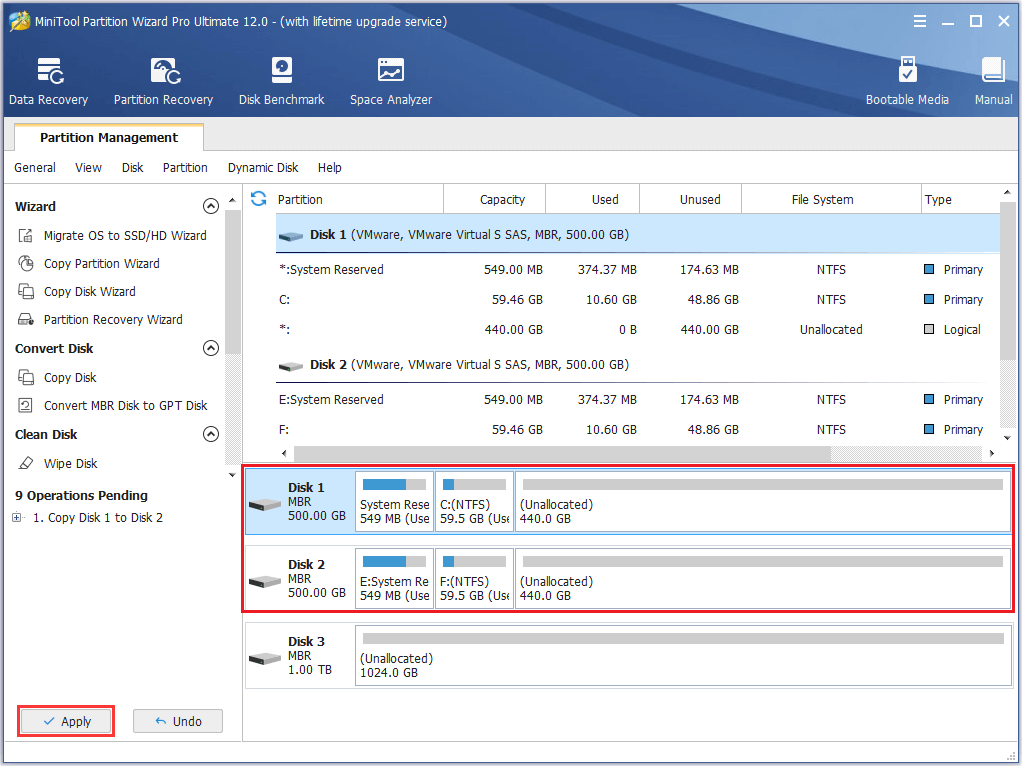
Step 5. Finally, click “Apply” to start copying the whole drive.
See also: Solved — Windows Backup Failed Not Enough Disk Space with 0x80780119 Code
Second Move: Reinstall Windows 10
Step 1. Download Windows 10 media creation tool to create a Windows 10 installation media.
Step 2. Connect the installation media you just prepared and follow the installation process to complete. When you see «Where do you want to install Windows», select each partition to do the deletion and then choose the unallocated space to do a clean install.
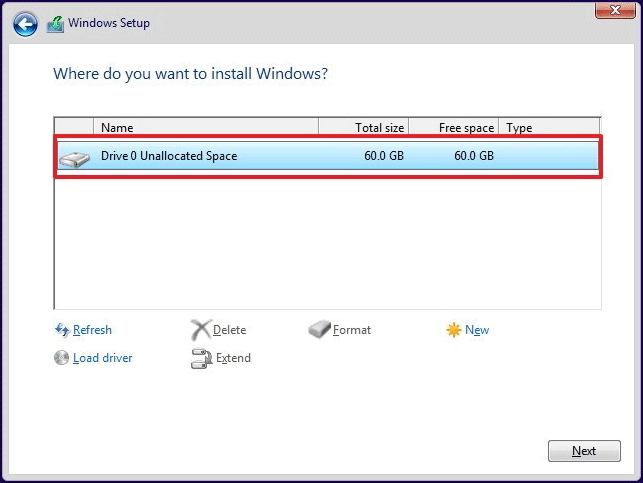
See also: How to install Windows 10 on a New Hard Drive (with Pictures)
Now you can check whether Windows 10 high disk usage is reduced. If NOT, replace the hard drive by using the backup copy and check if this drive gives better performance (if so, the original hard drive may be failing).
«Here are 12 solutions to 100% disk usage Windows 10. I tried the second one, and it worked like magic. Try these ways out!»Click to Tweet
Sum up
Here comes to the end of this post. Now all solutions to Windows 10 100% disk usage in Task Manager are introduced to lower disk usage. You may try them one by one. Hope they are helpful.
If you have any question or better suggestion, leave it in the following comment section or send email to [email protected]. We read every thread!
Updated by
Cici on Dec 06, 2022
Quick Navigation: How to Fix Disk 100 in Task Manager (10 Tips)
Most Windows 11/10/8.1/8/7 users may have experienced this issue — Windows is running slow and has a slow response time. Just like the picture shows, your windows 11/10 is at 100% usage. To fix the Windows 11/10 100% disk usage issue, you must follow the tips below.
| Workable Solutions | Troubleshooting 100 Disk Usage |
|---|---|
| Ways 1. Restart your computer | Click the «Start» icon. Go to «Shut down or sign out > Restart.»…Full steps |
| Ways 2. Check for malware | Your security software should be able to deal with this, whether it’s a free app or a paid suite…Full steps |
| Way 3. Update Windows 10 | Click the «Start» icon. Go to «Settings > Update & Security settings > Windows Update»…Full steps |
| Way 4. Fix disk error | Press the Windows key and type cmd. Right-click «Command Prompt» and…Full steps |
| More Effective Fixes | Disable Superfetch service > Clean Up Junk Files > Reset Virtual Memory > Perform a Clean Boot…Full steps |
Check What Causes Task Manager Disk 100 Usage in Windows 11/10
First, we’re going to open the task manager and take a look at our disk usages. So as you can see, if it is now 100% and is slowing our computer down.
Step 1. Type task manager in the Windows search bar and select «Task Manager.»
Step 2. In the Processes tab, look at the «Disk» process to see what is causing your hard disk 100% usage.
Here are the top 10 methods that have helped other users fix their Windows 10 100% disk usage problem. Simply follow the operation procedures to resolve disk usage 100 in Task Manager.
Way 1. Restart Your Computer to Fix 100 Disk Usage
We often restart our computer or laptop if the computer screen just froze, outlook crashed. A restart solves much of the computer issues, and your Windows 10 100% disk usage problem is no exception. You can also restart your PC to tackle this problem. It is a sufficient way.
Step 1. Click the «Start» icon.
Step 2. Go to «Shut down or sign out > Restart.»
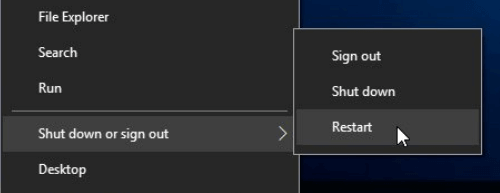
After the restart, you may have resolved your disk issue. If you still have a problem, read on.
Way 2. Check For Malware in Windows 11/10
Usually, the virus could be the leading cause of loss of situations, and 100% disk usage is no exception. Your security software should be able to deal with this, whether it’s a free app or a paid suite. At the very least, tools such as BitDefender, Avast, and AVG anti-virus should be able to scan your system drive and detect any problems, although with a heavy load on your drive already, this may take a while. This method would take some time since your disk is already experiencing high usage. But it is still necessary to identify and remove malware.
Way 3. Update Windows to Solve 100 Disk Usage
The latest updates can often resolve severe problems with your Windows 10. Make sure that you have the latest Windows updates installed on your PC. Windows 10 offers you the choice of when and how to get the latest updates to keep your device running smoothly and securely. To manage your options, follow the steps below.
Step 1. Click the «Start» icon.
Step 2. Go to «Settings > Update & Security settings > Windows Update».
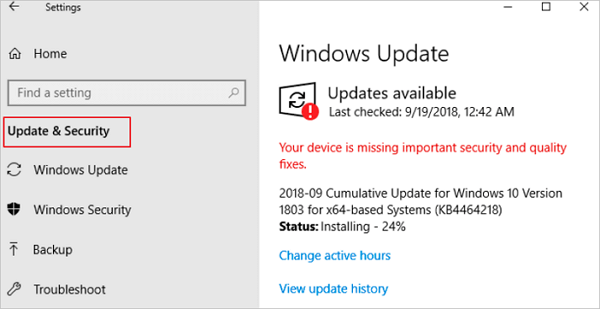
You can check for new updates and install them if they are available. This solution may do good to the overall performance of your system, including that of your hard drive.
Way 4. Fix Disk Error If 100 Disk Usage Still Exists
If nothing above is working, then you could have a problem with your hard drive.
Whenever you find your hard drive performs poorly, or Windows asks you to repair drive errors, you can first try to run CHKDSK to do the job.
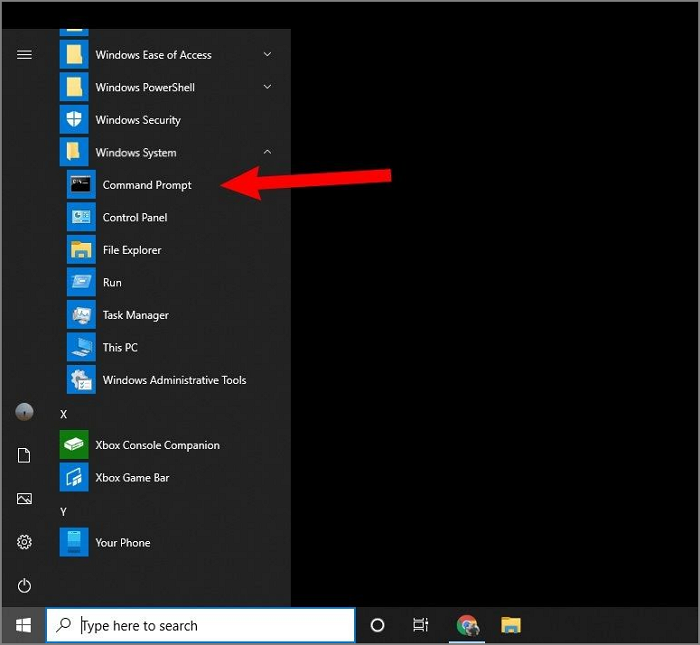
Step 1. Press the Windows key and type cmd.
Step 2. Right-click «Command Prompt» and choose «Run as administrator.»
Step 3. Enter the following command: chkdsk E: /f /r /x
«E» means the drive letter of the partition you want to check.
Way 5. Stop the Superfetch Service
Superfetch is like drive caching, which copies all your commonly used files to RAM. This feature allows programs to boot faster. However, if your system doesn’t have the latest hardware, Service Host Superfetch can easily cause high disk usage. High disk usage due to this service isn’t always a problem. You can stop this service to solve Windows 100 disk usage error.
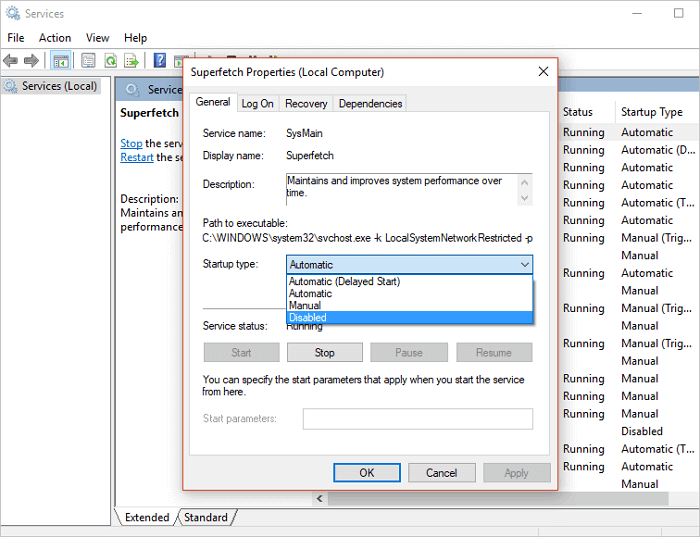
Step 1. Press Windows + R or type Run in the Windows 10 search box. Type services.msc into the «Open» box and click the «OK» button.
Step 2. Now find «Superfetch». Right-click it > select «Properties» > click «Stop» on the pop-up windows > click «Disabled» from the ‘startup type’ drop-down menu.
Way 6. Reset Virtual Memory and Increase the Ram
Virtual memory is a combination of RAM and a portion of your hard drive. «When the RAM isn’t enough to perform a task, Windows will temporarily store files in virtual memory, then swap them back to RAM when required.»
Some computers’ operating systems don’t support more than a certain amount of RAM. For example, 32-bit versions of Windows can’t use more than 4 GB of RAM, so installing more than 4 GB of RAM is a waste. If your computer supports installing more Ram, click here to Increase the Ram. If increasing the Ram is a waste, reset the virtual memory.
Steps to reset virtual memory:
Step 1. Press Windows key + Pause/ Break key at the same time. Then choose Advanced System Settings on the left panel.
Step 2. Go to the «Advanced» tab, then click «Settings».
Step 3. Go to the «Advanced» tab again, and choose Change in the Virtual memory section.
Step 4. Make sure that the Automatically manage paging file size for all drives checkbox is NOT ticked.
Step 5. Select your windows drive (the hard drive or partition that has Windows installed on it – usually C:), and enter an Initial size and Maximum size for your virtual memory:
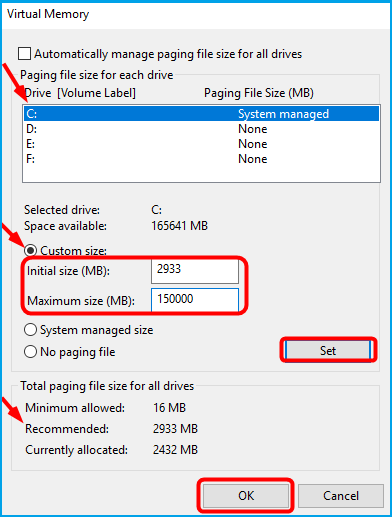
- Initial size: This value varies, depending on your computer.
- Maximum size: Don’t set this value too high. It should be about 1.5 times the size of your physical RAM. e.g., A PC with 4 GB (4096 MB) of RAM should have no more than about 6,144 MB virtual memory (4096 MB x 1.5).
Once you’ve entered your virtual memory values, click Set, then click «OK» to continue.
Step 6. Clear all your computer’s ‘temp’ files. On your keyboard, press the Windows key and R at the same time, then in the Run form, type temp and hit Enter. This will invoke Windows Explorer with your Temp folder open, showing you all the temp files on your computer.
Step 7. Select all the files in the Temp folder and delete them.
Way 7. Clean Up Junk Files and Running Memory
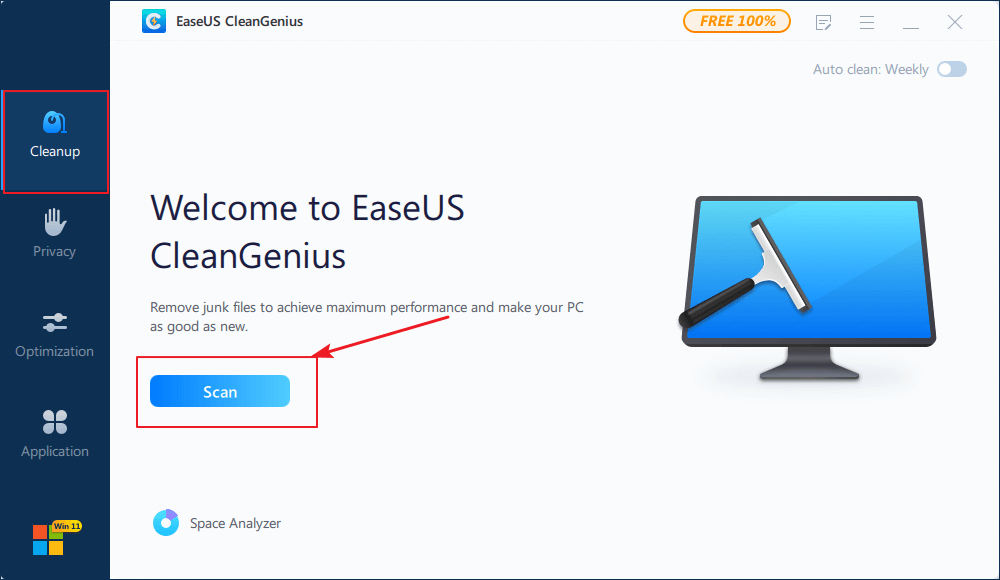
Clear up junk files and running memory appropriately will low disk usage. EaseUS CleanGenius offers you with junk file cleanup feature. You can clear up your PC for free without difficulty. Follow the simple steps to solve the 100% disk usage problem.
Step 1. Download and install EaseUS Partition Master Suite on your PC. Click to download PC Cleaner on panel.
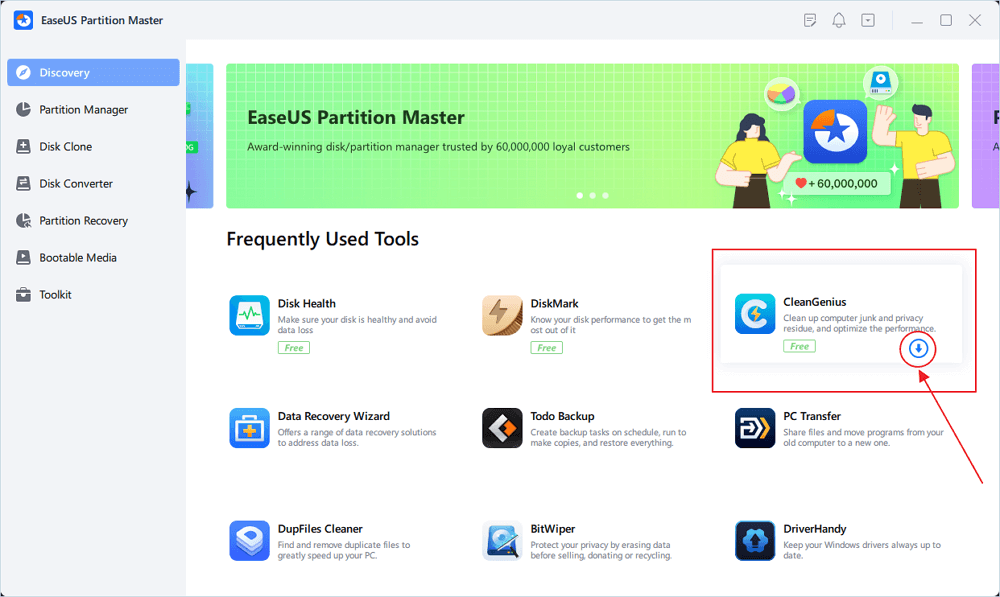
Step 2. Install EaseUS CleanGenius on your PC. To begin with, navigate to «Cleanup» and click «Scan.»
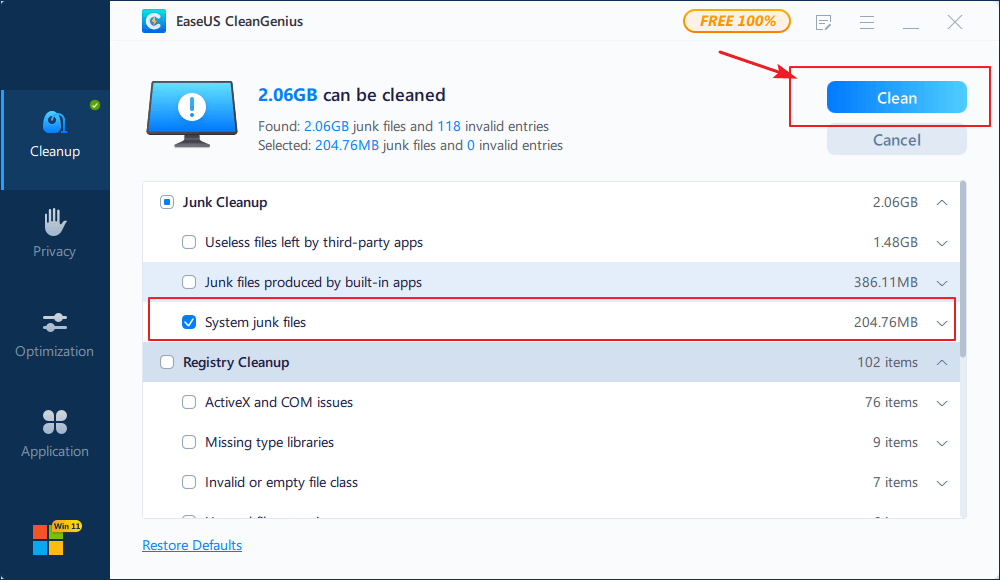
Step 3. EaseUS CleanGenius will start immediately to scan all the useless files, select system junk files and invalid entries, and click «Clean» over all your PC.
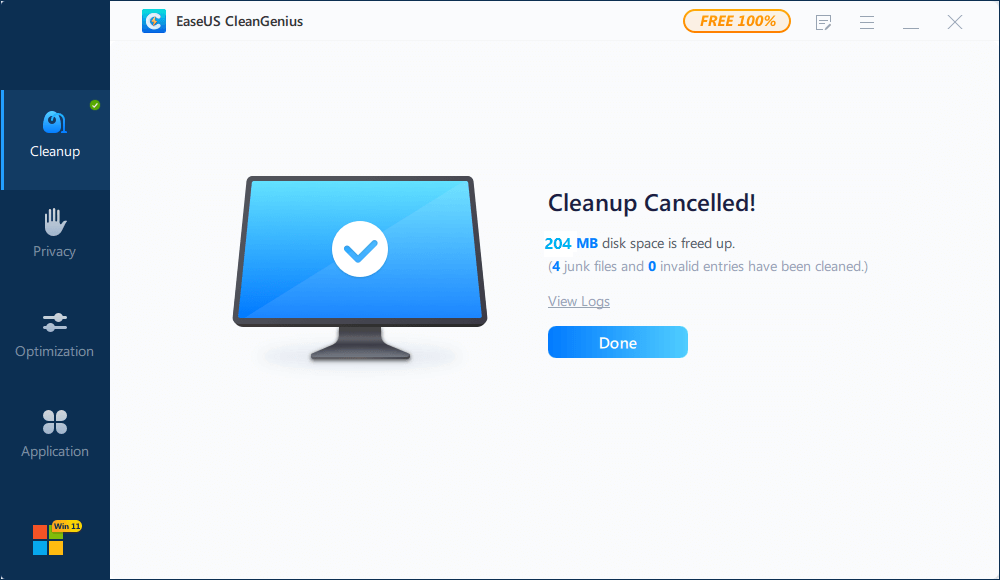
Step 4. Once completed, you can see clearly how many MBs or GBs of data are cleaned. Click «Done» to finish the process.
Way 8. Perform a Clean Boot on Windows 11/10
Clean Boot State is used to diagnose and troubleshoot advanced Windows problems. A «clean boot» starts Windows with a minimal set of drivers and startup programs so that you can determine whether a background program is interfering with your system performance. If you have never performed a clean boot, now is the time to learn.
Step 1. Type msconfig in start search and hit «Enter» to open «System Configuration.»
Step 2. Click the «General» tab, and then click «Selective Startup.» Clear the «Load Startup Items» checkbox, and ensure that «Load System Services» and «Use Original boot configuration» are checked.
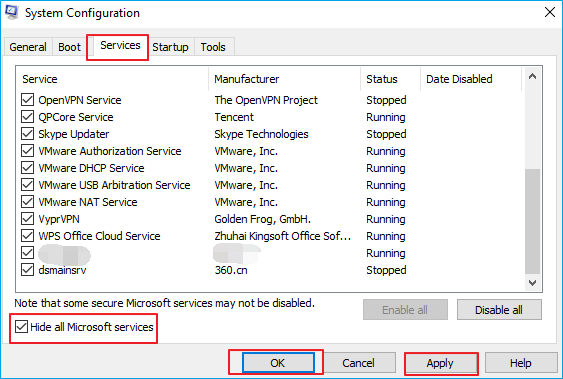
Step 3. Click the «Services» tab. Select the «Hide all Microsoft services» checkbox. Select the item and then select «Disable all.»
Step 4. Click «Apply/OK» and restart the computer. This will put Windows into a Clean Boot State.
Way 9. Upgrade the Hard Drive to a Larger One
The hard drive that develops too many bad sectors on it would largely send your computer into a loop with high disk usage. Or, your computer hard drive might be too old to work properly, even there is plenty of unused space available. Still, your computer functions like a turtle and consistently reports 100% disk usage.
It’s time to upgrade the hard drive. EaseUS Partition Master can help you replace the hard drive in question with a new one without taking the time to reinstall Windows 11/10. This is how you start:
Connect the alternative hard disk to the computer (If it is a new hard disk, initialize it to an MBR disk).
Step 1. Select the source disk.
- Go to the «Clone» tab, click «Clone OS Disk» or «Click Data Disk». And then click «Next» to continue.
- Select the source disk that you want to copy or clone. Then, select «Next».

Step 2. Select the target disk.
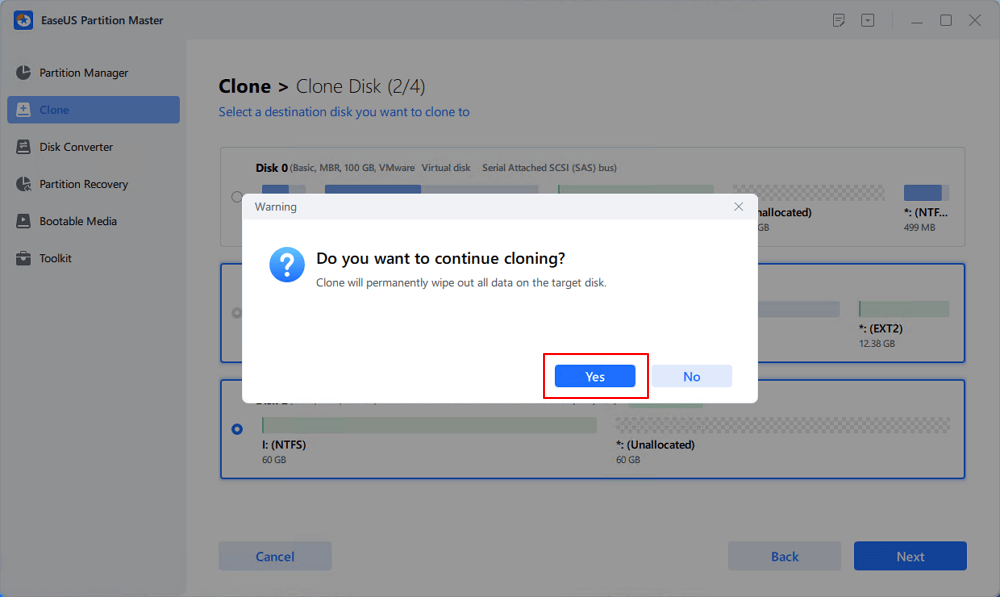
- Choose the wanted HDD/SSD as your destination and click «Next» to continue.
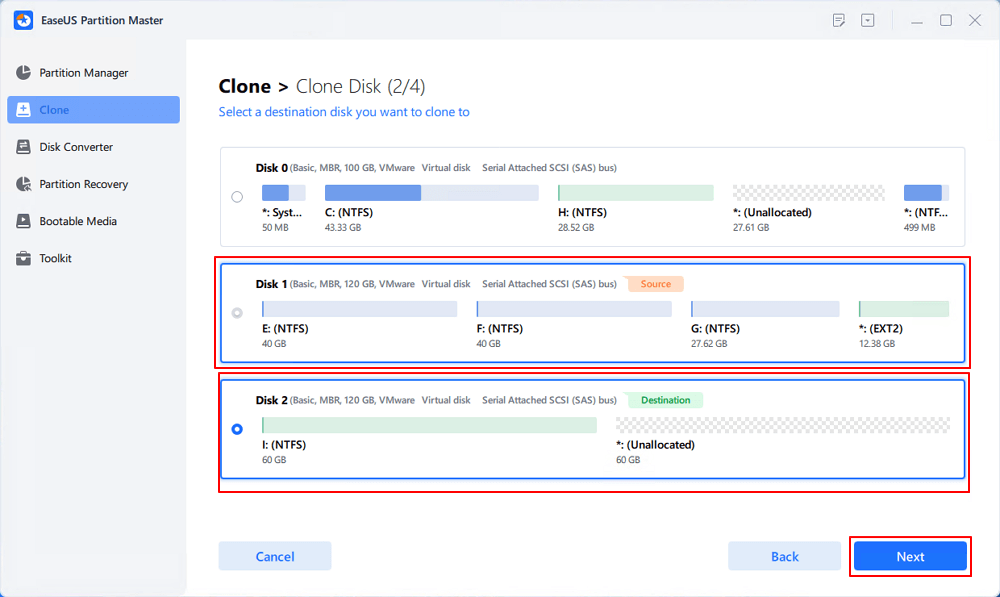
- Check the warning message and click «Yes» to confirm.
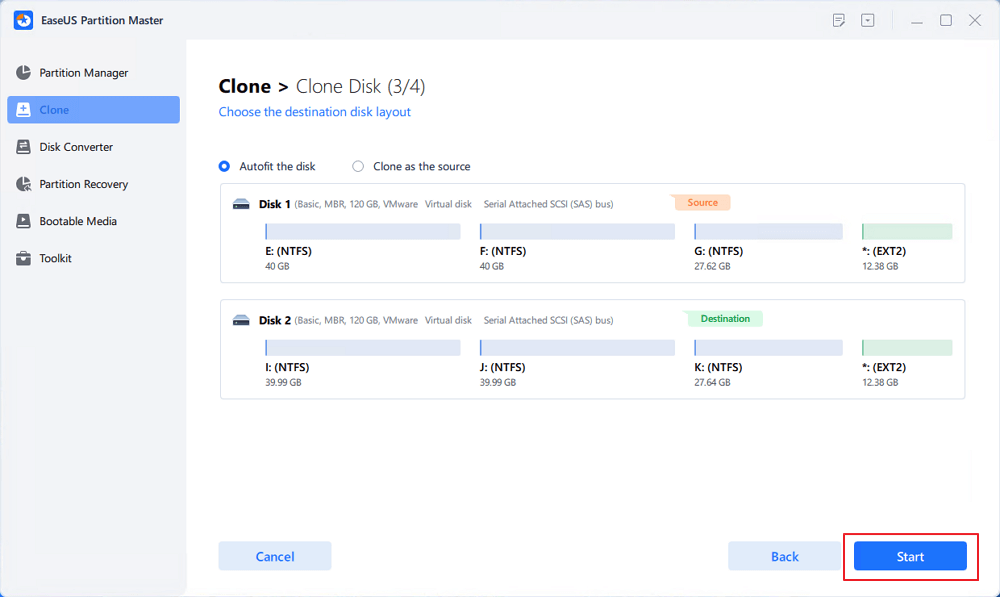
Step 3. Select clone mode.
You can select «Autofit the disk», «Clone as the source» to customize your disk layout.
Step 4. Click «Start» to start cloning process.
Way 10. Turn to Remote Assistance
Is the 100% disk usage issue slowing down your Windows 8.x or Windows 10 computer? Have any of these methods fixed the problem? Tell us, and let’s see if we can get it resolved. EaseUS also provides 1-on-1 remote assistance to fix the Windows issue. If the solution above does not work for you, contact our professionals via email or LiveChat on this page.
Don’t Try These Solutions to Fix Windows 11/10 100 Disk Usage (Important)
When you search for Windows 10 100 disk usage, you get millions of results to help you solve your problem.
However, I come across a whole bunch of solutions that just don’t settle well with 100% disk usage in the task manager. But these operations cause problems later on. The situation is like this example — the whole arm has been anesthetized for a long time because you want to treat your finger. Try to avoid doing anything listed below:
Disabling the BITS Service — It’s required by Windows for your PC to be updated, and it won’t help to disable it.
Disabling Windows Search Services — Disabling this will not solve your problem. On the contrary, these are core Windows services, and you should not disable them.
Modifying Page File -You should leave it so that Windows manages the page file. Don’t try custom values.
Disabling Windows Defender — Don’t disable Defender, your computer may be infected with a virus.
![]()
Conclusion
Try the real fixes to resolve disk 100 usage errors in the task manager. Avoid the four useless solutions, as I have mentioned before. If you still have problems, you can always ask us for help. We are glad to help.
Related Questions About 100% Disk Usage
There are hot topics about the 100% disk usage issue on the internet. You can read on if you are interested in any one of them.
Why is my disk usage at 100 Windows 10?
In general, your hard drive should never be at 100% usage, so if it is, there is some reason for the condition. You need to fix the issue or risk a very slow-moving computer. You can check your disk situation in the task manager and solve the problem in this post.
Is 100 disk usage bad?
Even if your drive seems pretty comfortable acting as a chronic overachiever, keep in mind that 100% disk usage is not something good for you. Your disk working at or near 100 percent causes your computer to slow down and become laggy and unresponsive. As a result, your PC cannot perform its tasks properly.
Is it OK to disable SuperFetch?
Yes! There is no risk of side effects if you decide to turn it off. Our recommendation is that if your system is running well, leave it on. If you have issues with high HDD usage, high RAM usage, or degraded performance during RAM-heavy activities, then try turning it off and see if it helps.
How much RAM do you need for Windows 10?
2GB RAM. 2GB of RAM is the minimum system requirement for the 64bit version of Windows 10.
 Одна из проблем, встречающаяся в Windows 10, похоже, чаще, чем в предыдущих версиях ОС — загрузка диска на 100% в диспетчере задач и, как следствие, заметные тормоза системы. Чаще всего это просто ошибки работы системы или драйверов, а не работа чего-либо вредоносного, но возможны и иные варианты.
В этой инструкции подробно о том, почему жесткий диск (HDD или SSD) в Windows 10 может быть загружен на 100 процентов и что делать в этом случае, чтобы исправить проблему.
Примечание: потенциально некоторые из предложенных способов (в частности, способ с редактором реестра), могут привести к проблемам с запуском системы при невнимательности или просто стечении обстоятельств, учитывайте это и беритесь, если готовы к такому результату.
Программы, активно использующие диск
Несмотря на то, что этот пункт сравнительно нечасто оказывается причиной нагрузки на HDD в Windows 10, рекомендую начать с него, особенно если вы не являетесь опытным пользователем. Проверьте, а не является ли какая-то установленная и запущенная (возможно, находящаяся в автозагрузке) программа причиной происходящего.
Для этого вы можете выполнить следующие действия
- Откройте диспетчер задач (сделать это можно через правый клик по меню пуск, выбрав соответствующий пункт в контекстном меню). Если в нижней части диспетчера задач вы увидите кнопку «Подробнее», нажмите ее.
- Отсортируйте процессы в колонке «Диск», нажав на ее заголовок.


Обратите внимание, а не какая-то из ваших собственных установленных программ вызывает нагрузку на диск (т.е. находится первой в списке). Это может быть какой-либо антивирус, выполняющий автоматическое сканирование, торрент-клиент, или просто неправильно работающее ПО. Если это так, то стоит убрать эту программу из автозагрузки, возможно, переустановить ее, то есть искать проблему с нагрузкой на диск не в системе, а именно в стороннем ПО.
Также нагружать диск на 100% может какая-либо служба Windows 10, запущенная через svchost.exe. Если вы видите, что именно этот процесс вызывает нагрузку, рекомендую посмотреть статью про svchost.exe грузит процессор — в ней приводится информация о том, как с помощью Process Explorer узнать, какие именно службы запущены через конкретный экземпляр svchost, вызывающий нагрузку.
Неправильная работа драйверов AHCI
Мало кто из пользователей, устанавливающих Windows 10, выполняет какие-либо действия с драйверами дисков SATA AHCI — у большинства в диспетчере устройств в разделе «Контроллеры IDE ATA/ATAPI» будет значится «Стандартный контроллер SATA AHCI». И обычно это не вызывает проблем.
Однако, если без видимых причин вы наблюдаете постоянную нагрузку на диск, следует обновить этот драйвер на тот, что предусмотрен производителем вашей материнской платы (если у вас ПК) или ноутбука и доступен на официальном сайте производителя (даже если там он в наличии только для предыдущих версий Windows).
Как произвести обновление:
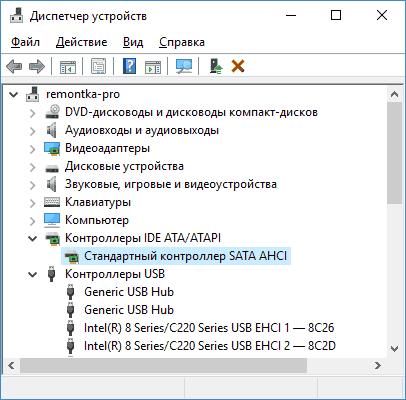
- Зайдите в диспетчер устройств Windows 10 (правый клик по пуску — диспетчер устройств) и посмотрите, действительно ли у вас установлен «Стандартный контроллер SATA AHCI».
- Если да, найдите раздел загрузки драйверов на официальном сайте производителя вашей материнской платы или ноутбука. Найдите там драйвер AHCI, SATA (RAID) или Intel RST (Rapid Storage Technology) и загрузите его (на скриншоте ниже пример таких драйверов).

- Драйвер может быть представлен в виде установщика (тогда просто запускаем его), либо в виде zip-архива с набором файлов драйвера. Во втором случае распаковываем архив и выполняем следующие шаги.
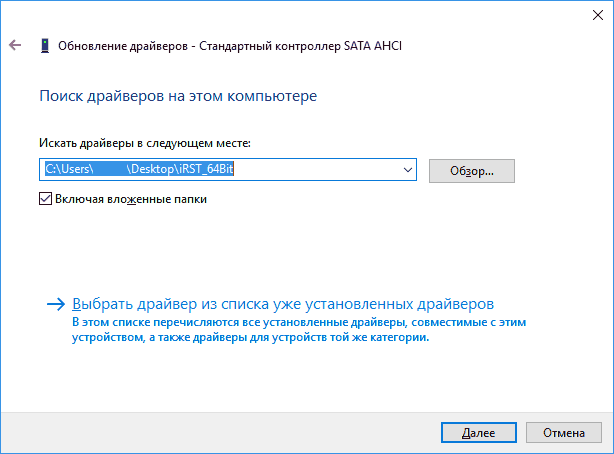
- В диспетчере устройств нажмите правой кнопкой мыши по Стандартному контроллеру SATA AHCI и нажмите «Обновить драйверы».
- Выберите «Выполнить поиск драйверов на этом компьютере», затем указываем папку с файлами драйвера и нажимаем «Далее».

- Если всё прошло успешно, вы увидите сообщение о том, что ПО для данного устройства было успешно обновлено.


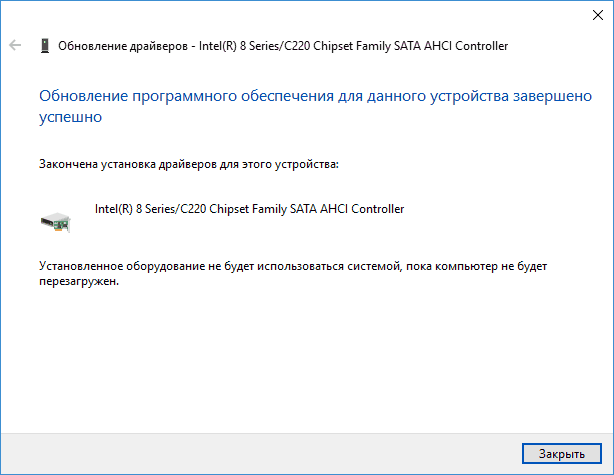
По завершении установки, перезагрузите компьютер и проверьте, остается ли проблема с нагрузкой на HDD или SSD.
Если не удается найти официальные драйвер AHCI или он не устанавливается
Данный способ может исправить 100-процентную нагрузку на диск в Windows 10 только в тех случаях, когда у вас используется стандартный драйвер SATA AHCI, а в сведениях о файле драйвера в диспетчере устройств указан файл storahci.sys (см. скриншот ниже).
Способ срабатывает в тех случаях, когда отображаемая нагрузка на диск вызвана тем, что оборудование не поддерживает технологию MSI (Message Signaled Interrupt), которая по умолчанию включена в стандартном драйвере. Это достаточно распространенный случай.
Если это так, то выполните следующие шаги:
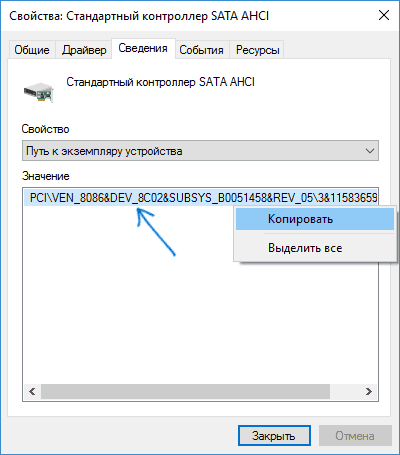
- В свойствах контроллера SATA откройте вкладку «Сведения», выберите свойство «Путь к экземпляру устройства». Не закрывайте это окно.

- Запустите редактор реестра (нажать клавиши Win+R, ввести regedit и нажать Enter).
- В редакторе реестра перейдите к разделу (папки слева) HKEY_LOCAL_MACHINE System CurrentControlSet Enum Путь_к_контроллеру_SATA_из_окна_в_пункте_1 Подраздел_со_случайным_номером Device Parameters Interrupt Management MessageSignaledInterruptProperties

- Дважды кликните по значению MSISupported в правой части редактора реестра и задайте для него значение 0.


По завершении закройте редактор реестра и перезагрузите компьютер, после чего проверьте, была ли исправлена проблема.
Дополнительные способы исправить нагрузку на HDD или SSD в Windows 10
Существуют дополнительные простые способы, которые могут исправить нагрузку на диск в случае некоторых ошибок работы стандартных функций Windows 10. Если ни один из способов выше не помог, попробуйте и их.
- Зайдите в Параметры — Система — Уведомления и действия и отключите пункт «Получать советы, подсказки и рекомендации при использовании Windows».
- Запустите командную строку от имени администратора и введите команду wpr -cancel
- Отключите службы Windows Search и О том, как это сделать, см. Какие службы можно отключить в Windows 10.
- В проводнике в свойствах диска на вкладке «Общие» снимите отметку «Разрешить индексировать содержимое файлов на этом диске в дополнение к свойствам файла».
На данный момент времени — это все решения, которые я могу предложить на ситуацию, когда диск загружен на 100 процентов. Если ничто из перечисленного не помогает, и, при этом, раньше в этой же системе подобное не наблюдалось, возможно, стоит попробовать сброс Windows 10.
Windows 10 порой преподносит неприятных сюрпризов не меньше, чем ее предшественники – Windows 8.1, 8, и проверенная временем «семерка». При всех своих преимуществах и нововведениях случаются каверзные моменты во время продолжительного пользования, или спустя определенное время, или и вовсе сразу же после установки. Одна из таких проблем, перекочевавших еще с Windows 7 – внезапная полная загруженность жесткого диска на 100%, что на ноутбуках, что на стационарных ПК. Более осведомленные пользователи знают, о чем сейчас идет речь, но вкратце: даже во время полного бездействия со стороны юзера операционная система (ОС) начинает подозрительно задумчиво работать. Особенно любопытно это наблюдать, если Windows 10 совсем недавно появилась на этом компьютере, и никакого стороннего программного обеспечения пока еще даже не установлено, да и вирусов быть не может – система чистая.
Довольно вступлений, начнем разбираться. С ходу найти виновника, к сожалению, не получится – причин этой проблемы предостаточно. Что бы не запутаться, по сложившейся традиции разберем все «по полочкам» согласно плану.
Хотелось бы заметить,что не обязательно применять все шаги из инструкции. Достаточно пошагово проверять влияние перечисленных факторов на процент загрузки диска в Диспетчере задач. Если конкретный метод не помог, можно откатить внесенные изменения обратно и попробовать следующий.
Предупреждение:
- Все действия, описанные в статье, вы производите на свой страх и риск.
- Перед внесением изменений не забудьте сделать резервную копию системы и важных данных.
- Если сомневаетесь, то лучше не делать или обратиться к специалисту.
Почему диск загружен на 100 процентов: способы диагностики и поиска причин
Почему бы и нет? Первое что приходит в голову в такие моменты – это просмотреть все ли в порядке в Диспетчере задач. Отсортировав все процессы по процентам нагрузки на HDD, есть шанс найти виновника. Ну а комбинацию «Ctrl-Alt-Delete» знает любой школьник.
Диспетчер задач
На вкладке Процессы сортируем столбец Диск по убыванию и находим процессы, которые максимально загружают локальный диск.

Щелкнув правой кнопкой по нужной строке, можно тут же снять задачу и убедиться помогло это или нет. Хуже всего, когда диск грузит процесс System (ntoskrnl.exe), тогда выявить причину бывает непросто и тут пригодятся варианты, перечисленные в статье.
Если нужно посмотреть графическую сводку переходим на вкладку Производительность:

Монитор ресурсов
Еще один вариант – посмотреть Монитор ресурсов. В таких случаях он используется реже, но если возникла необходимость, его можно открыть, нажав ссылку «Открыть монитор ресурсов» в левом нижнем углу окна на предыдущем скриншоте, или в командной строке выполнить perfmon /res:
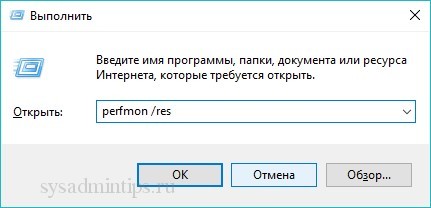
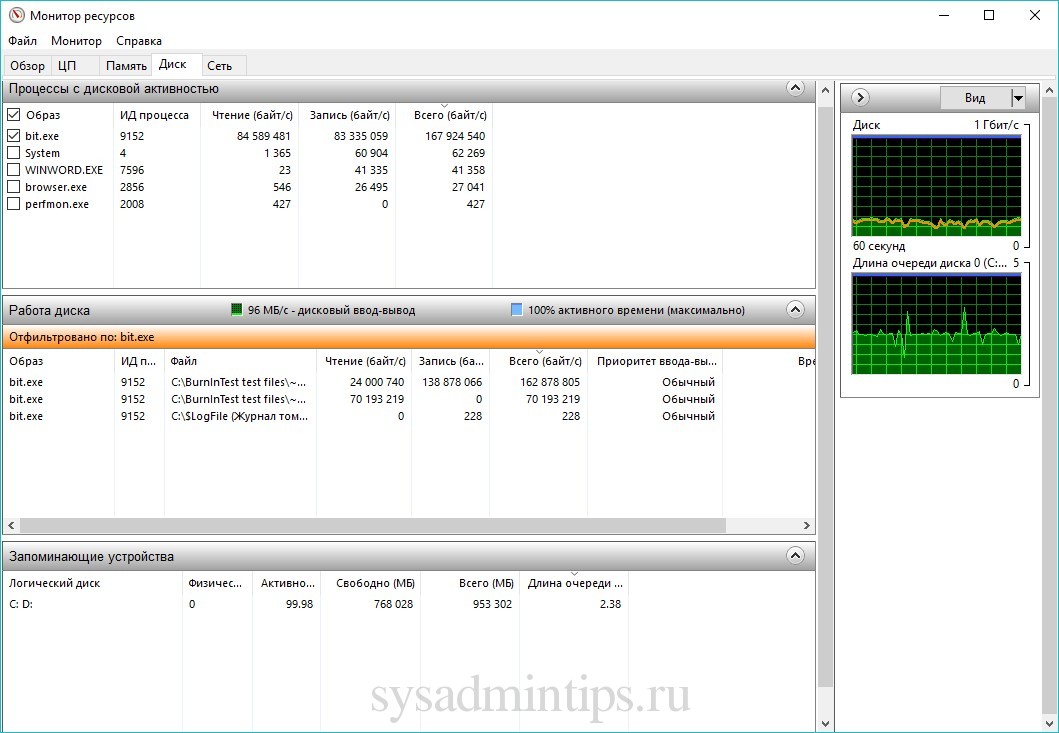
Здесь открываем вкладку Диск, сортируем по убыванию по столбцу “Всего (байт/c)” и находим процессы, активно использующие жесткий диск. В средней части окна вы увидите конкретные файлы, которые в данный момент читаются или в которые происходит запись выбранным процессом.
Справа в динамике можно также наблюдать графики скорости обмена с диском и длину очереди. Очередь диска обычно не должна превышать 2, в противном случае дисковая система перегружена и поступающие запросы ввода-вывода не успевают обработаться.
Системный монитор
Для продвинутых пользователей возможно понадобиться изучить счетчики производительности в Системном мониторе. Запустить его можно, командой perfmon.


Простому обывателю обычно нет необходимости пользоваться этими расширенными средствами диагностики производительности Windows, поэтому дело чаще всего ограничивается обычным Диспетчером задач.
Отключение индексация и Windows Search
Часто обсуждаемая, кстати, тема. Судя по отзывам пользователей, нередко здесь чаще всего и кроется причина постоянной загрузки диска на 100 процентов. Изначально задуманная для ускорения процесса поиска файлов, служба Windows Search может неслабо нагрузить своей активностью системный диск. Остановить это можно, опять же, нажав знакомую комбинацию «Win+R» и введя «cmd». В появившемся окне командной строки необходимо ввести net.exe stop “Windows search” и подтвердить нажатием «Enter». После небольшого ожидания служба остановится, но полностью активность системного поиска можно остановить, отключив индексацию на диске. Сделать это можно, щелкнув правой кнопкой по диску, и на вкладке «Общие» снять галочку с параметра индексации.

Отключение службы Superfetch
В старенькой операционной системе Windows 7 эта служба тоже не давала покоя системному диску, пытаясь повысить производительность путем ускорения часто используемых программ. На деле же, часто получалось наоборот, она вгоняла в ступор компьютер своими неустанными попытками ускорить запуск всего и вся. На сколько эта проблема актуальна для Windows 10 сказать трудно, но почему бы и не попробовать. Вопрос решается командой:
net.exe stop superfetch
Временное отключение антивирусного ПО
Всплеск активности в работе антивирусных программ часто является причиной максимальной загрузки локального диска. Особенно это проявляется, если идет процесс полного сканирования. Обычно выявить нагрузку от антивирусного ПО достаточно просто в Диспетчере задач или Мониторе ресурсов, как было рассказано выше. После этого нужно попробовать временно отключить антивирус или снять процесс там же в Диспетчере задач, и оценить его влияние на производительность дисковой подсистемы. Если причина выявлена, нужно изменить настройки антивирусного софта – режима, проверяемых типов файлов, агрессивности сканирования и т.п., или искать, пробовать альтернативное ПО.
Для примера настройки в Symantec Endpoint Protection:


Как отключить Защитник Windows 10 можно ознакомиться в этой статье.
Отключение обновлений Windows
Тоже неплохой вариант решения проблемы. Многим ненавистные обновления из Windows Update нередко портят жизнь простым пользователям. В какие случаях можно ожидать высокой нагрузки на дисковую подсистему:
- при автоматическом сканировании системы на предмет установленных патчей;
- при скачивании обновлений из Интерне;
- непосредственно при установке обновлений.
Высокая активность может быть для вас неожиданной, если был установлен полностью автоматический режим установки в Центре обновления Windows.
Выключение Центра обновления Windows можно сделать через оснастку Службы. Снова набираем на клавиатуре «Win+R» и вводим services.msc. Щелкнув по имени службы правой кнопкой мыши, можно ее вырубить, выбрав в контекстном меню пункт «Отключена».

Аналогичный результат с помощью команд:
sc stop wuauserv
sc config wuauserv start= disabled
Отключение телеметрии Windows
На самом деле телеметрия оказывает влияние на диск небольшое, но оно все же есть. Редки те случаи, когда сбор телеметрии настолько мощно нагружал винчестер, однако и отключение его лишним не будет. Сделать это можно через Редактор реестра. Снова комбинация «Win+R», затем вводим regedit. Конечная цель – это создать ключ с запретом на телеметрию. Для этого необходимо найти пункт под названием «DataCollection», находящийся по адресу:
HKEY_LOCAL_MACHINE/SOFTWARE/Policies/Microsoft/Windows/DataCollection.
Здесь-то и нужно создать новое значение DWORD с именем AllowTelemetry, присвоить этому ключу значение «0» и перезагрузить компьютер.
Отключение службы Connected User Experiences and Telemetry
Очередная служба сбора диагностики, в точнее слежки за пользователем в Windows 10, которая маловероятно кому-то пригодится. Предыдущее название службы – Diagnostics Tracking Service. В Диспетчере задач, во вкладке «Службы» она зовется «DiagTrack». Ее и вырубаем, выбрав пункт «Остановить». Теперь, когда она временно приостановлена, необходимо выбрать «Отключена», а перейдя на вкладку «Восстановление» не забыть поставить в меню Первого сбоя «Не выполнять никаких действий».
Аналогичные действия можно выполнить с помощью команд:
sc stop DiagTrack
sc config DiagTrack start= disabled
Остановка Windows Performance Recorder (WPR)
WPR – он же Регистратор производительности Windows, он же еще одна телеметрия. Не стоит объяснять, что он делает на самом деле, все и так понятно. Снова командная строка в окне «Выполнить» и очередная команда:
WPR –cancel
К сожалению, данный способ только приостановит эту службу на текущий сеанс пользования, и при следующем запуске системы это действие придется повторять.
Подробнее про опции команды читайте на сайте Microsoft.
Обновление драйверов контроллера SATA AHCI
Раз уж пошел детальный разбор всех возможных причин, нельзя и эту тему не затронуть. Самыми частыми причинами проблем в ОС Windows – синих экранов (BSOD), зависаний, тормозов – являются устаревшие драйверы устройств.
Стандартный драйвер контроллера SATA AHCI (storahci.sys) стоит в Диспетчере устройств, когда не установлен свой «родной» драйвер на материнскую плату. Этого драйвера хватает, чтобы в большинстве ситуаций не вызывать проблем во время работы, но если на то пошло – простая установка или обновление драйверов «материнки» часто решает проблему стопроцентной загрузки диска.
До установки драйвера:
После

После обновления драйверов перезагрузка Windows обязательна.
Проверка диска
Так же стоит убедиться в целостности жесткого диска и файловой системной встроенной утилитой проверки chkdsk. Особенно это актуально, если компьютер часто подвергался внезапному отключению из сети питания во время работы. Проверить диск можно, введя в командной строке:
chkdsk.exe буква_диска: /f /r
Скриншот с ключами запуска утилиты:

Предупреждение: Запуск утилиты нужны производить с административными правами. Если будет проверяться системный диск или диск, на котором в данный момент открыты файлы, то утилита предупредит об этом и предложит провести проверку после следующей перезагрузки ОС. Если выбран ключ /R и диск большой, то проверка может занять очень много времени.
Конечно, никто не запрещает воспользоваться и сторонними утилитами, например, TestDisk или SSDLife для владельцев накопителей SSD – есть уже огромное множество подобных программ, и платных, и бесплатных, но сегодня не об этом.
Прочие возможные решения загрузки диска на 100 процентов
Помимо всего вышеперечисленного рассмотрим еще возможные причины почему диск загружен на 100 процентов в Windows 10, пусть и самые малые. Отключение дополнительных параметров слежения за пользователем так же может подкинуть свежих сил системному диску. Сделать это действие можно, набрав сочетание клавиш «Windows+I», далее в разделе «Конфиденциальность» поискать, что в данный момент включено.
Настройка параметров конфиденциальности

Отключение уведомлений
Так же, после нажатия «Win+R» в «Параметрах Windows» не лишним будет заглянуть в настройки различных уведомлений. Находятся они в разделе «Система» на вкладке «Уведомления и действия».

Отключение OneDrive
Если верить отзывам пользователей, сервис OneDrive тоже может быть причастен к загруженности диска. Явление это довольно редкое, поэтому и описано оно здесь, в самом конце статьи. Разорвать связь с этим сервисом довольно просто: обычно его иконка находится в нижнем правом углу экрана, правый щелчок мыши откроет его контекстное меню, в котором следует выбрать «Параметры». На вкладке «Учетная запись» есть та самая ссылка «Удалить связь OneDrive», и далее появится кнопка «Отвязать учетную запись». Так же в «Программах и компонентах» на «Панели управления» можно полностью удалить Microsoft OneDrive.
Изменение настроек Google Chrome и Skype
Для некоторых пользователей определенная комбинация настроек установленного браузера Google Chrome и Skype приводило к использованию жесткого диска на 100 процентов в Windows 10.
Для устранения причин нужно зайти в настройки Chrome, далее «Дополнительные» и «Конфиденциальность и безопасность», и выключить предзагрузку страниц.

Далее нужно, закрыть Skype, если он работает. Найти расположение исполняемого файла skype.exe, например:
C:Program Files (x86)SkypePhoneSkype.exe
И зайти на вкладку «Безопасность» в «Свойствах» контекстного меню.

Далее нажать «Изменить» и для ВСЕ ПАКЕТЫ ПРИЛОЖЕНИЙ установить разрешение на запись. Применить изменения.

Проверьте, как изменилась нагрузка на диск в Диспетчере задач.
Почему диск загружен на 100 процентов в Windows 10?
Высокая нагрузка на диск наблюдается в Windows 10 намного чаще, чем в предыдущих версиях ОС. Как, собственно, выглядит проблема: пользователь замечает резкое и продолжительное падение производительности системы, и если открыть окно диспетчра задач (Task Manager), можно заметить, что степень загрузки (использования) диска достигает 100%. Как правило, частое возникновение такой проблемы свидетельствует о некорректности настройки системы, или ошибках в одном из системных драйверов, а не о наличии на компьютере вредоносного ПО (хотя бывают и исключения).
В этой статье мы рассмотрим основные причины, которые могут вызвать высокую загрузку дисковой подсистемы (будь то HDD или SSD) в Windows 10 и типовые способы противодействия.
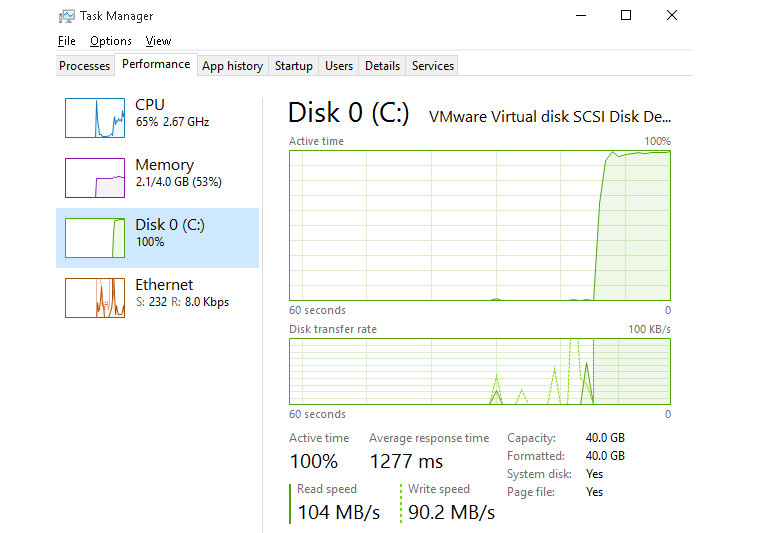
Примечание. Некоторые из предложенных методов (особенно метод с реестром) следует выполнять с осторожностью, четко понимая что и зачем вы делаете. В противном случае, система может просто перестать загружаться.
Содержание:
- Поиск программ, активно использующих диск
- Проблемный драйвер AHCI
- Еще несколько способов решить проблему с высокой загрузкой HDD или SSD в Windows 10
Поиск программ, активно использующих диск
В первую очередь стоит попытаться обнаружить программу (возможно расположенную в автозагрузке), которая активно использует диск.
Для этого:
- Запустите диспетчер задач Task Manager (Ctrl+Shift+Esc)
- Перейдите на вкладку процессов (Processes) и отсортируйте процессы по столбцу Disk

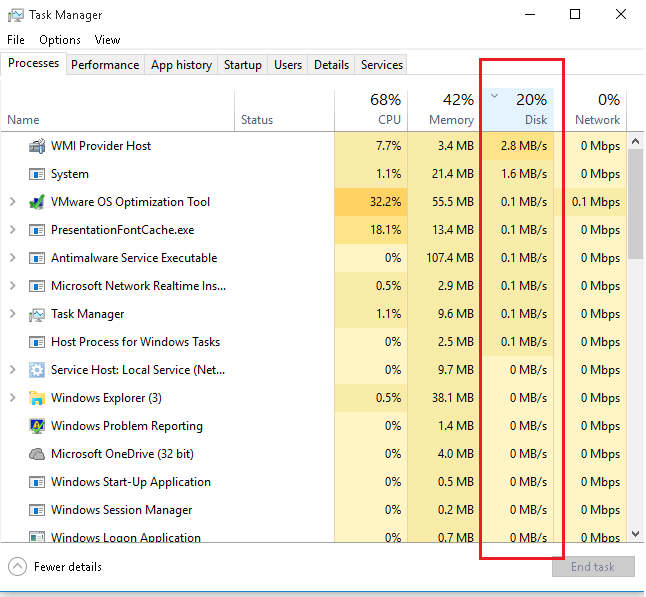
Проверьте, возможно одна из запущенных программ вызывает высокую нагрузку на диск (она будет первая в списке процессов и потреблять существенной количество ресурсов дисковой подсистемы). Это может быть задача антивирусного сканирования, торрент клиент и т.п. В зависимости от ситуации, можно попробовать установить последнюю версию проблемного ПО, удалить его или перенастроить.
Проблемный драйвер AHCI
На большинстве системах с Windows 10 используется стандартных AHCI драйвер для контроллера SATA дисков. В этом можно убедиться, если открыть диспетчер устройств (Device Manager) и посмотреть тип устройства в разделе IDE ATA / ATAPI controllers . Как правило, там будет указано контролер «Standard controller SATA AHCI», и в большинстве случаев это не проблема.
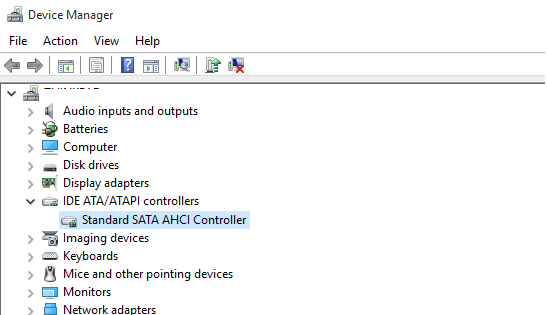
Однако, если без видимых причин на вашем компьютере наблюдается высокая загрузка диска, попробуйте сменить данный драйвер на «родной» драйвер, скачанный с сайта производителя чипсета вашего компьютера.
Совет. На сайте вендора этот драйвер нужно искать по ключевым словам AHCI, SATA (RAID) или Intel RST (Rapid Storage Technology)
После установки драйвера, перезагрузите компьютер и проверьте, осталась ли проблема.
Если вы не смогли найти официальный драйвер AHCI, или он не устанавливается корректно, возможно причина большой нагрузки на диск, в том, что контроллер вашего диска не поддерживает технологию MSI (Message Signaled Interrupt), которая включена по умолчанию в стандартном драйвере. Это довольно распространённое явление.
Совет. Этот метод поможет решить проблему в случае, если используется стандартный драйвер Standard controller SATA AHCI, и в свойствах драйвера в диспетчере устройств присутствует файл storahci.sys.
- Откройте свойства драйвера Standard controller SATA AHCI и перейдите на вкладку Details. В списке свойств драйвера, найдите свойство Device Instance Path и скопируйте его значение.
- Запустите редактор реестра, и перейдите в ветку HKEY_LOCAL_MACHINESystemCurrentControlSetEnumPCI[your_sata_path][тут_некий_уникальный_id]Device ParametersInterrupt ManagementMessageSignaledInterruptProperties
- Смените значение ключа MSISupported на 0.
- Закройте редактор реестра и перезагрузите компьютер. Проверьте, пропала ли проблема.
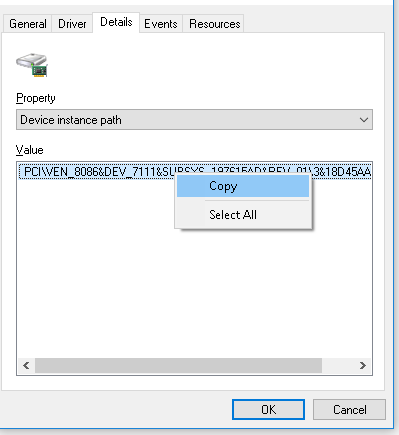
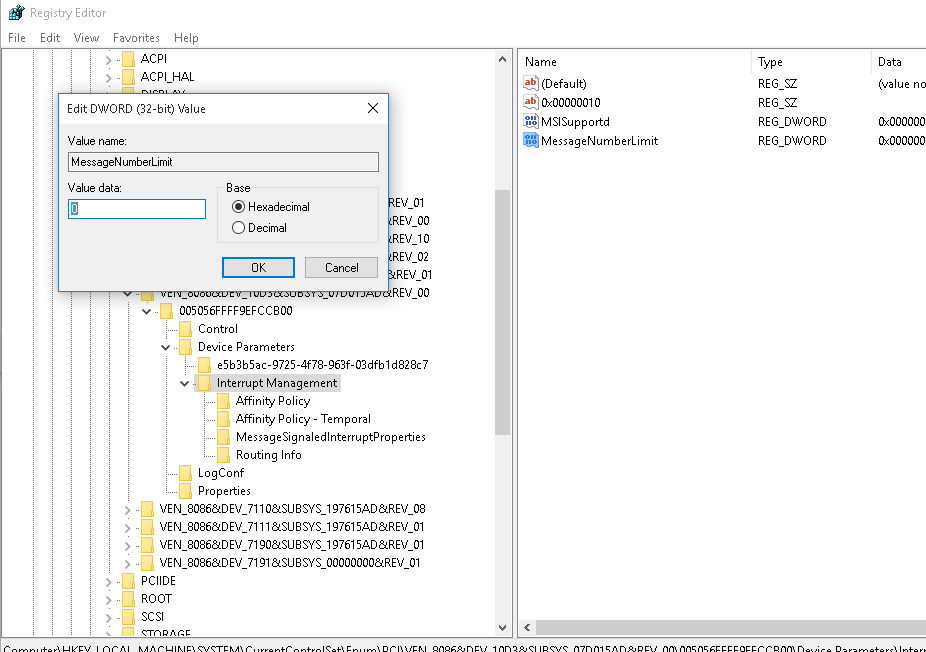
Еще несколько способов решить проблему с высокой загрузкой HDD или SSD в Windows 10
Есть еще несколько типовых способов, которое в некоторых случаях могут помочь снизить высокую загрузку на диск путем отключения некоторых некорректно работающих функций Windows 10. И если ни один из рассмотренных способов не помог решить проблему, попробуйте отключить службы Windows 10 (службу поиска, Prefetch и Superfetch) с помощью следующих команд в консоли PowerShell:
- Отключить службу Superfetch
net stop SysMain
set-service SysMain -StartupType Disable - Отключить службу поиска Windows (Windows Search Service)
net stop Wsearch
set-service Wsearch -StartupType Disable - Отключить Prefetch, изменив ключ реестра с помощью PoSh
set-itemproperty -path «HKLM:SYSTEMCurrentControlSetControlSession ManagerMemory ManagementPrefetchParameters» -name EnablePrefetcher -value 0