Windows 10 Features on Demand — DVD (x86/x64) (2015) [Eng]
![Windows 10 Features on Demand - DVD (x86/x64) (2015) [Eng]](https://torrent-windows.com/uploads/posts/2015-07/thumbs/1438266689_fb1e1c9d8456a7f9c7cbdd833c3f45da.jpg "Windows 10 Features on Demand - DVD (x86/x64) (2015) [Eng]")
Стадия разработки : Release
Год/Дата Выпуска: 2015
Версия: 10240
prog_build: 16384.150709-1700
Разработчик: Microsoft
Сайт разработчика: microsoft.com
Разрядность: 32+64bit
Язык интерфейса: Английский
Таблэтка: Отсутствует
Системные требования: Процессор:
Не менее 1 ГГц или SoC
ОЗУ:
1 ГБ (для 32-разрядных систем) или 2 ГБ (для 64-разрядных систем)
Место на жестком диске:
16 ГБ (для 32-разрядных систем) или 20 ГБ (для 64-разрядных систем)
Видеокарта:
DirectX версии 9 или выше с драйвером WDDM 1.0
Дисплей:
800 x 600
Описание: Оригинальные английские образы Windows 10 Features on Demand (x86/x64), доступный подписчикам MSDN
Доп. информация: Windows 10 features on demand are additional feature options available through Windows Update. This download allows organizations to pre-configure Windows 10 installation software with these features prior to deployment. This download can also be used to install features from local media.
File Name: en_windows_10_features_on_demand_x86_dvd_6848469.iso
Languages: English
SHA1: 677B3ACDC5574A000A5A49CED85B7D96228F4474
File Name: en_windows_10_features_on_demand_x64_dvd_6846440_.iso
Languages: English
SHA1: 5B1050FD0B7502207FF2C22E08E02662A62C3473
![Windows 10 Features on Demand - DVD (x86/x64) (2015) [Eng]](http://foto-pic.ru/thumbs/2015-07/30/ayuo8cv1gaz8b4lpdfxelxbzd.png "Windows 10 Features on Demand - DVD (x86/x64) (2015) [Eng]")
![Windows 10 Features on Demand - DVD (x86/x64) (2015) [Eng]](http://foto-pic.ru/thumbs/2015-07/30/bg9mzpnoa2ldmbkn1iout5yzr.png "Windows 10 Features on Demand - DVD (x86/x64) (2015) [Eng]")
Размер: 7.81 GB
- Remove From My Forums
-
Question
-
Добрый день.
Возникла необходимость в Win10 1909 установить оснастку AD «Пользователи и компьютеры», ПК введен в домен. Прочел, что для установки необходим диск с набором дополнительных компонент, даже нашел название iso-файла
en_windows_10_features_on_demand_part_1_version_1903_x64_dvd_1076e85a.iso
Есть вопрос, могу ли загрузить файл законным способом? Попробовал найти файл через подписку Visual Studio (наименование подписки Visual Studio Dev Essentials), но его нет.
Доступа к другой подписке нет.
В Windows 7 свободно устанавливал компонент без необходимости загрузки дополнительного образа.
Как быть сейчас?
-
Edited by
Thursday, February 18, 2021 2:13 PM
-
Edited by

With the release of Windows 10 1809 and the current spring 1903 version, Microsoft changed the way the Remote Server Administration Tools (RSAT) gets installed. With Windows 10 1809+ the Feature On Demand option must be used vs manually downloading the RSAT MSU installer from previous versions of Windows 10. There are PowerShell scripts you can find to install RSAT for 1903 and 1809 while the PC is ONLINE but that requires the task sequence have access to the internet during MDT or SCCM OS Deployment. However, in this post (Quick Start Guide RSAT W10 1903 Offline FOD – SCCM-MDT OSD), I will outline how to do this in an OFFLINE approach without the need for an internet connection when the OSD task sequence runs for Windows 10 1903. Sure a proxy service account can be used by an SCCM task sequence step but this approach removes that need.
High-Level Goals
- Install Windows 10 1903 x64 RSAT using Feature On Demand without an Internet Connection (No need to worry about Proxy or security team request)
- Use PowerShell script to integrate the process into the MDT or SCCM OSD task sequence for deployment use in production
- Use the custom PowerShell script to extract only the RSAT files to keep the MDT/SCCM package source files small (154 MB for Win10 1903) since the full Feature On Demand ISO is 5GB!
Requirements
- Applies to Windows 10 1809 or higher.
- Pre-download the MSDN/VLSC Windows 10 1903 (or 1809) Feature On Demand Part 1 ISO media only
- MDT / SCCM task sequence step configured to use the PowerShell install script set to “Bypass“
- Run the W10_FOD_RSAT_Offline_CopySource.ps1 (linked here) PowerShell script to extract only the RSAT files
- Run the W10_FOD_RSAT_Offline_Install.ps1 (linked here) PowerShell script to perform the Offline install of the Windows 10 1903 Feature On Demand RSAT features during the MDT/SCCM OSD task sequence
- Must have local administrator rights on the source PC where you will extract the ISO content
- Must set the PowerShell execution policy to “unrestricted” while you extract the ISO content
Get RSAT Capabilities using PowerShell Command
Run the following command on a Windows 10 1903 or 1809 PC to show that RSAT tools are not installed. The output will show “Not Present“.
Command: Get-WindowsCapability -online | ? Name -like Rsat* | FT

Download the MSDN/VLSC Feature On Demand ISO
Login to your MSDN subscription or Volume License site (VLSC) and download Part 1 (Disk 1) of the Windows 10 1903 (or 1809) “Feature On Demand” ISO content. Search for “Feature On Demand“. If the option is not available for 1903 VLSC, it may take some time for a newer version of Windows 10.
Click on the “Windows 10 Feature on Demand part 1, Version 1903 (x64) DVD” ISO. Save to an applicable download or package source location on a local PC where the W10_FOD_RSAT_Offline_CopySource.ps1 script will be run.

The PowerShell Scripts
Download both PowerShell scripts from my Github locations found here:
Script 1: W10_FOD_RSAT_Offline_CopySource.ps1
Script 2: W10_FOD_RSAT_Offline_Install.ps1
The first script needs to be modified to include the path to the Feature On Demand ISO media that was downloaded in the previous steps. Modify line 3 of the script to provide the ISO path and line 17 to provide the extraction path (Default C:temp). It’s also a good idea to rename the ISO media at this time to a shorter name.
W10_FOD_RSAT_Offline_CopySource.ps1 PowerShell Script
CRITICAL NOTE: Lines 21 and 22 had to be modified to ensure the commands were one string and not word wrapped. The defaults from Microsoft were not in the same line so I kept getting errors for the -include and -Container parameters in the original files.

On a Windows 10 PC where you have copied the Feature On Demand ISO, from an elevated PowerShell command prompt run the following command and select “Yes To All”: Set-ExecutionPolicy Unrestricted
Run the W10_FOD_RSAT_Offline_CopySource.ps1 PowerShell script downloaded from the previous step from an elevated PowerShell command prompt. The content will look like this:

Copy the W10_FOD_RSAT_Offline_Install.ps1 that was previously downloaded in the previous step to the C:TEMPRSAT_1903_en-US folder location (or whatever folder name if it was changed in the script). This will be the source files for the Feature On Demand Offline MDT / SCCM package content that will be used in the OSD task sequence.
W10_FOD_RSAT_Offline_Install.ps1 PowerShell Script

The RSAT source extracted ISO content will look like this. In the screenshot, I’ve renamed the folder to a different name that will be used for import into MDT or SCCM as package content. Make sure you copy the install PowerShell script into this location.

Create/Import the FOD RSAT Extracted Content into MDT or SCCM
Use the following steps to create the MDT application or SCCM package that will be used within the OSD task sequence.
MDT Deployment OS Deployment
For MDT OS Deployments, create an application and point to the source location where the RSAT content was extracted and where the “W10_FOD_RSAT_Offline_Install.ps1” script was copied. Ensure the quiet install command line is as shown below to run the PowerShell command as a step in the MDT task sequence.
C:WindowsSystem32WindowsPowerShellv1.0powershell.exe -ExecutionPolicy Bypass -file W10_FOD_RSAT_Offline_Install.ps1

Once the MDT application is added, reference the new application in the MDT task sequence as shown here.

Run the MDT Windows 10 1903 OS deployment and the RSAT Feature On Demand files will install OFFLINE as shown here.

When the MDT deployment is complete, the RSAT tools will be installed on the Start Menu as shown here like normal.

SCCM Deployment OS Deployment
For SCCM OS Deployments, create a legacy package and point to a network share source location where the RSAT content was extracted and where the “W10_FOD_RSAT_Offline_Install.ps1” script was copied. Create a Run PowerShell Script step shown below to run the PowerShell command as a step in the SCCM task sequence. There is not a need to create a program during the package creation wizard since a “Run PowerShell Script” option will be used within the SCCM task sequence.


Note: In the below example, SCCM 1902 was used so the Run “PowerShell script” may look different depending on the version of SCCM.
Ensure the step is set to “Bypass” for the execution policy.

Run the SCCM OSD task sequence and the RSAT Offline tools will install for the Windows 10 1903 (or 1809) deployment.


Once the SCCM OS deployment is complete, login and the RSAT tools for Windows 10 1903 will be listed and working as shown below.

That concludes this blog post “Quick Start Guide RSAT W10 1903 Offline FOD – SCCM-MDT OSD” to ensure the Windows 10 1903 (or 1809+) RSAT tools can be installed in an offline manner as part of the MDT or SCCM OS deployment task sequence. It’s great to be able to install RSAT in an OFFLINE manner approach especially for customers with Proxy restrictions to the internet for SCCM OSD. Also, with Windows 10 1809+ the RSAT tools will remain with each In-Place OS upgrade to the next release of Windows 10.
References:
RSAT on Windows 10 1809 in Disconnected Environments – Microsoft reference article showing how to install RSAT in an offline manner approach.
/ April 21, 2019 / Filed Under: 1809, 1903, Windows 10 RSAT /
Windows 10 — Features on Demand
Posted on 28/08/2015 by sie
Когда скачивал дистрибутив Windows 10 с сайта Microsoft Volume Licensing Service Center (VLSC), то обратил внимание, что есть дополнительный ISO файл en_windows_10_features_on_demand_x64_dvd_6846440_.iso.
По факту там содержались cab файлы без всяких комментариев.
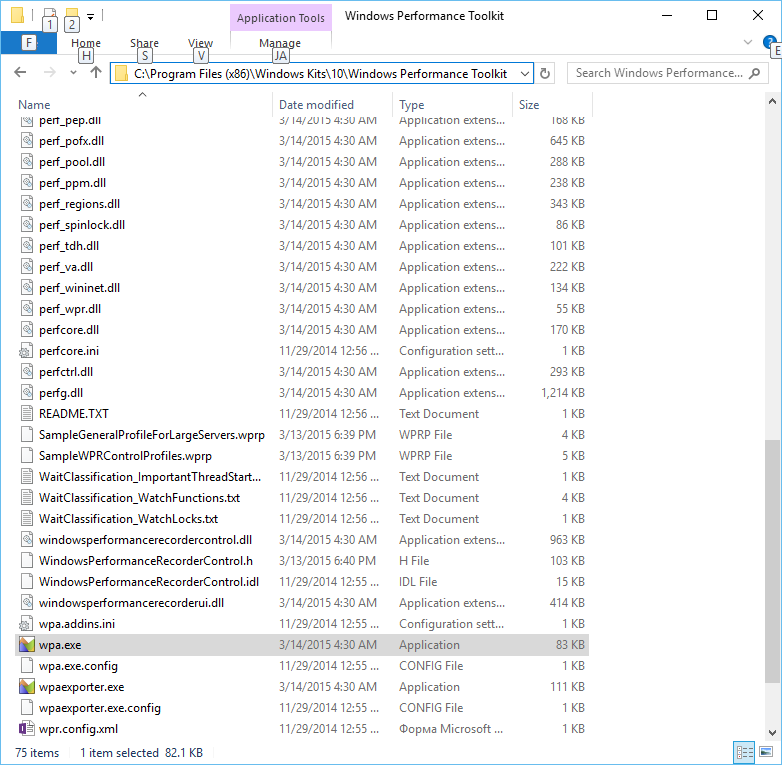
Среди них находился файл с именем Microsoft-Windows-Performance-WPT-Package.cab, которое наводило на мысль, что теперь не нужно качать и устанавливать Windows SDK, а можно сразу установить Windows Performance Toolkit.
Оказалось это действительно так:
dism /online /add-package /PackagePath:E:Microsoft-Windows-Performance-WPT-Package.cab
Вот результат:

Остальные файлы в ISO это в основном дополнения к Language Packs. Сам языковой пакет только меняет интерфейс. Если вы хотите проверку правописания, распознавание голоса, рукописного письма и другие возможности, то можете поставить дополнительные пакеты. Назначение пакетов в большинстве случаев ясно из названия.
Microsoft-Windows-InsiderHub-Package.cab – если хотите принять участие в программе тестирования промежуточных версий.
Microsoft-OneCore-Graphics-Tools-Package.cab – Включение поддержки инструментов для графики DirectX.
Microsoft-Windows-NetFx3-OnDemand-Package.cab – Установка пакета .Net Framework 3.0
Microsoft-Windows-MediaFeaturePack-OOB-Package.cab – несколько пакетов для поддержки Web-камер, MediaPlayer, Streaming и т.п.
Microsoft-Windows-ServicingStack-Package-For-Windows-Upgrade.cab – средства настройки образа (Package Manager и прочее)
Microsoft-Windows-RetailDemo-OfflineContent-Content-ru-ru-Package.cab — Russian (Russia) Retail Demo Content
Filed under: Windows, Windows 10 | Tagged: Windows, Windows 10 |
Содержание
- Overview
- Types of Features on Demand
- Adding or removing Features on Demand
- Using DISM /add-package to add or remove FODs
- Using DISM /add-capability to add or remove FODs
- Работаем с Windows Features
- Управление Features on Demand (FOD)
- Установка и переустановка пакетов языков (Language Interface Packs, LIP)
- Windows XP
- Свежие записи
- Топ записей
- Архивы
- Подписка на email
- Windows 10 — Features on Demand
Overview
Features on Demand (FODs) are Windows feature packages that can be added at any time. Common features include language resources like handwriting recognition or other features like the .NET Framework (.NetFx3). When Windows 10 or Windows Server needs a new feature, it can request the feature package from Windows Update.
You can also preinstall FODs so they’re ready if a user needs them. FODs are distributed as .cab files on the Feature on Demand ISO and you can use DISM to add a FOD to a Windows image. If you’re using the FOD ISO to preinstall FODs, make sure you’re using the FOD ISO that matches your Windows image version.
Add language packs, FODs, and apps, in that order, prior to installing an update. If you add an update prior to adding language packs, FODs, and apps you’ll have to reinstall the update.
Types of Features on Demand
Starting with Windows 10, version 1809 and Windows Server 2019, Windows has two different types of Features on Demand:
FODs without satellite packages: FODs with all language resources packaged into the same package. These FODs are distributed as a single .cab file.
They can be added using either DISM /Add-Capability or /Add-Package .
FODs with satellite packages: Language-neutral FODs that have language and/or architecture resources in separate packages (satellites). When you install this type of FOD, only the packages that apply to the Windows image are installed, which reduces disk footprint. These FODs are distributed as a set of several .cab files, but are installed by specifying a single /capabilityname . These are new for Windows 10, version 1809.
They can only be added using DISM /Add-Capability (and not /Add-Package ).
FODs with satellites require a well-formed FOD repository. This can either be the full FOD repository on the ISO, or a custom repository created with DISM /export-source . They cannot be added by pointing to a directory with a handful of FOD files hand-copied from the repository, because DISM requires additional metadata to make the right connections.
See Available Features on demand for more information about which FODs have satellites. Language FODs don’t have satellites.
While you can add non-satellite FODs using /add-package , we recommend adding all FODs with /add-capability because you can use it to add both satellite and non-satellite FODs.
Adding or removing Features on Demand
Using DISM /add-package to add or remove FODs
You can add non-satellite Features on demand to a Windows image with DISM /add-package . The FODs that you can add with /add-package include the language FODs, the FODs that come preinstalled with Windows, and the FODs that we recommend for preinstallation.
OEMs can generally add FODs to their Windows images using DISM /add-package , unless they need to preinstall a FOD that has satellites.
| Command | Description | Example |
|---|---|---|
| /add-package | Adds a package, including a FOD .cab to an image. add-package can only be used to add FODs that don’t have satellite packages. | DISM.exe /image:C:mountWindows /add-package /packagepath:E:Microsoft-Windows-Holographic-Desktop-FOD-Package |
.cab
/Get-Packages
Get a list of all packages in an image.
DISM /image:C:MountWindows /get-packages
/Get-Packageinfo
Get information of a package in an image.
DISM /image:C:mountWindows /get-packageInfo /packagename:Microsoft-Windows-Xps-Xps-Viewer-Opt-Package
10.0.17134.1000
/Remove-Package
Removes a package from an image. Note: Don’t remove a package that other packages depend on. For example, if you have the French handwriting and basic packages installed, don’t remove the basic package.
DISM.exe /image:C:mountWindows /Remove-Package /PackageName:Microsoft.Windows.Calc.Demo
Using DISM /add-capability to add or remove FODs
You can also install FODs with DISM /add-Capability . You have to use /add-capability to preinstall satellite FODs. If you’re preinstalling a FOD onto an offline image, use the /source option to tell Windows where to find the FOD installation files. The /source could be a FOD repository or a mounted FOD ISO. You can use multiple /source arguments in a command.
If you’re adding a FOD to an online image, /add-capability downloads features from Windows Update and adds them to the image. If you don’t want to install from Windows Update, you can use /LimitAccess , which tells DISM to not check Windows Update or Windows Server Update Services for the capability source files.
- Use the /online option to add the capability to your PC.
- Use /Image: with the /source option to add the capability to a mounted Windows image.
| Command | Description | Example |
|---|---|---|
| /add-capability |
Adds a capability to an image.
For packages with dependencies this also pulls dependent packages. For example, if you add the Speech package, you’ll also get the Text-to-speech and Basic packages in addition to Speech.
DISM looks for source files in the following locations:
- If /Source is specified, DISM looks in the specified locations first.
- If /Source is not specified, or if the source files are not found in the specified locations, DISM checks the locations specified by group policy.
- If the files still aren’t found, and if DISM is running against an online image, and if /LimitAccess is not specified, it looks for the files on Windows Update.
DISM.exe /image:C:mountWindows /add-capability /CapabilityName:Language.Basic
DISM.exe /Online /add-capability /CapabilityName:Language.Basic
0.0.1.0
/Get-Capabilities
Get capabilities in the image.
DISM /image:C:MountWindows /Get-Capabilities
/Get-CapabilityInfo
Get information of a capability in the image.
DISM /image:C:mountWindows /Get-CapabilityInfo /CapabilityName:Language.Basic
0.0.1.0
/Remove-Capability
Removes a capability from an image.
Note: You cannot remove a capability that other packages depend on. For example, if you have the French handwriting and basic capabilities installed, you can’t remove the basic capability.
DISM.exe /image:C:mountWindows /Remove-Capability /CapabilityName:Language.Basic
To see all available DISM commands for capabilities, see DISM Capabilities Package Servicing Command-Line Options.
Как известно, Windows 10 отличается набором компонентов от предыдущих версий операционных систем Windows. Зачастую требуется их включить или выключить, чтобы они не потребляли системные ресурсы, да и просто не мешали. В этой статье мы рассмотрим как это сделать быстрее и эффективнее.
Начнем с того, что существует два основных способа работы с компонентами (они еще называются features) — утилита DISM и командлеты Powershell. И то и другое встроено в Windows 10, в отличие от Windows 7, где dism можно было добавить или установив пакет Windows ADK, или руками скопировав dism.exe с другого компьютера.
Сразу отмечу, что утилиту dism и среду powershell для работы с системой необходимо запускать от имени администратора, даже если ваш аккаунт уже находится в группе локальных админов. Итак, вы или находите cmd или windows powershell в меню и, кликнув правой кнопкой мышки, выбираете «Запуск от имени администратора».
В Windows 10 есть понятие Features и Capabilities. Первое — это привычные нам компоненты, которые можно найти в Панели управления -> Программы и компоненты -> Включение и отключение компонентов Windows. То есть это встраиваемые модули, которые выполняют определенный сервисный функционал.
Capabilities — это дополнительные возможности, которые расширяют возможности интерфейса и увеличивают удобство пользователя. Среди них — Language packs, наборы шрифтов. Да, Microsoft удалил часть нестандартных шрифтов, которые теперь вынесены в опциональные компоненты. Скачать эти компоненты можно в виде ISO файла с сайта Volume Licensing Service Center или напрямую через Internet и графический интерфейс Windows. Такую концепцию Microsoft назвала Features on Demand (FOD). Их в более ранних версия Windows не было.
Работаем с Windows Features
Итак, список установленных компонентов можно посмотреть командой
Dism /online /Get-Features
Вот как в Powershell можно получить список всех компонентов командлетами Get-WindowsFeature (для Windows Server) или Get-WindowsOptionalFeature (Windows 10):
Чтобы получить список отключенных компонентов, введите:
Get-WindowsOptionalFeature -Online | ? state -eq ‘disabled’ | select featurename
Этот список также можно вывести в файл (для windows Server):
Get-WindowsFeature | Where-Object <$_.Installed -match “True”>| Select-Object -Property Name | Out-File C:TempWindowsFeatures.txt
Посмотрев список названий и их состояние, можно использовать эти названия для того, чтобы компоненты включить или выключить:
Dism /online /Enable-Feature /FeatureName:TFTP /All
ключ /All позволяет включить также все дочерние компоненты;
Установка компонентов через Powershell выполняется командой Enable-WindowsOptionalFeature.
Enable-WindowsOptionalFeature -Online -FeatureName RSATClient-Roles-AD-Powershell
Параметр -All включает все дочерние компоненты.
Dism /online /Disable-Feature /FeatureName:TFTP
Аналогично, через Powershell это можно сделать командой Disable-Windowsoptionalfeature -online -featureName [feature name].
Обратите внимание, некоторые фичи имеют разные названия в Windows 7 и Windows 10. Например, RSAT в Windows 7 — это RemoteServerAdministrationTools, а в Windows 10 — RSATclient.
Управление Features on Demand (FOD)
Если вы устанавливаете их через графический интерфейс, то вам необходимо пройти “System –> App & features –> Manage optional features” и нажать знак + напротив необходимых компонентов.
Чтобы сделать это автоматизированно через командную строку, наберите чтобы получить список доступных компонентов:
DISM.EXE /Online /Get-Capabilities
или на Powershell:
Как и прежде, запомните название необходимых вам компонентов, чтобы включить их командой (на примере .Net Framework 3):
DISM.EXE /Online /Add-Capability /CapabilityName:NetFx3
или на Powershell:
Add-WindowsCapability –Online -Name NetFx3
Если же у вас нет доступа в Интернет, то есть выход. Итак, вы скачиваете ISO образ диска с FOD компонентами с сайта Volume Licensing Service Center. Файлы будут разные для разных релизов Windows 10 — 1511, 1607, 1703, 1709. Важно помнить, что компоненты одного релиза не подходят к другому. Если вы сделаете in-place upgrade (установка одного релиза поверх другого через обновление), то несовместимые установленные компоненты будут удалены без вашего желания! Да, Microsoft удаляет то, что считает несовместимым при обновлении.
Так вот, ISO файл содержит набор неизвестных и сложных для понимания файлов с расширением cab. Вот чудесный файлик на сайта Microsoft, который обясняет назначение каждого файла. Итак, существуют следующие типы FOD:
- Microsoft-Windows-LanguageFeatures-Basic — проверка правописания для различных языков и раскладок клавиатуры;
- Microsoft-Windows-LanguageFeatures-Fonts — национальные шрифты, например, азиатские
- Microsoft-Windows-LanguageFeatures-OCR — средства для распознавания шрифтов
- Microsoft-Windows-LanguageFeatures-Handwriting — средства для распознавания рукописного ввода
- Microsoft-Windows-LanguageFeatures-TextToSpeech — средства преобразования текста в голос, используемые подсказчиком Cortana
- Microsoft-Windows-LanguageFeatures-Speech — распознавание голоса
- Microsoft-Windows-InternationalFeatures — пакеты национальных настроек, например, для Тайваня
Итак, для добавления таких FOD компонентов, используйте команды вида (замените имя компонента):
Dism /Online /Add-Capability /CapabilityName:Language.Basic
Для удаления FOD:
Dism /Online /Remove-Capability /CapabilityName:Language.Basic
Установка и переустановка пакетов языков (Language Interface Packs, LIP)
Язык интерфейса Windows можно поменять, установив так называемые LIP. ранее они назывались MUI (Multi user interface). Файлы LIP выглядят так: Microsoft-Windows-Client-Language-Pack_x64_es-es.cab для испанского языка. Выглядеть установка будет примерно так:
Dism /Add-Package /online /PackagePath:»C:LanguagesMicrosoft-Windows-Client-Language-Pack_x64_fr-fr.cab»
Dism /Remove-Package /online /PackageName:Microsoft-Windows-Client-LanguagePack-Package
В следующей статье мы поговорим как с помощью DISM и Powershell управлять так называемыми Modern-приложениями AppX.
Windows XP
Свежие записи
Топ записей
Архивы
- Январь 2020 (2)
- Декабрь 2019 (1)
- Ноябрь 2019 (4)
- Октябрь 2019 (2)
- Сентябрь 2019 (5)
- Июль 2019 (2)
- Май 2019 (1)
- Апрель 2019 (3)
- Март 2019 (5)
- Февраль 2019 (5)
- Январь 2019 (3)
- Декабрь 2018 (1)
- Ноябрь 2018 (3)
- Октябрь 2018 (1)
- Сентябрь 2018 (1)
- Август 2018 (1)
- Июль 2018 (3)
- Июнь 2018 (4)
- Май 2018 (3)
- Апрель 2018 (4)
- Март 2018 (1)
- Февраль 2018 (3)
- Январь 2018 (4)
- Декабрь 2017 (8)
- Ноябрь 2017 (3)
- Октябрь 2017 (2)
- Сентябрь 2017 (3)
- Август 2017 (1)
- Июль 2017 (5)
- Июнь 2017 (2)
- Май 2017 (1)
- Апрель 2017 (6)
- Март 2017 (3)
- Февраль 2017 (5)
- Январь 2017 (1)
- Декабрь 2016 (4)
- Ноябрь 2016 (3)
- Октябрь 2016 (5)
- Сентябрь 2016 (4)
- Август 2016 (6)
- Июль 2016 (5)
- Июнь 2016 (6)
- Май 2016 (8)
- Апрель 2016 (8)
- Март 2016 (7)
- Февраль 2016 (8)
- Январь 2016 (5)
- Декабрь 2015 (4)
- Ноябрь 2015 (6)
- Октябрь 2015 (14)
- Сентябрь 2015 (7)
- Август 2015 (6)
- Июль 2015 (3)
- Июнь 2015 (4)
- Май 2015 (8)
- Апрель 2015 (5)
- Март 2015 (10)
- Февраль 2015 (7)
- Январь 2015 (6)
- Декабрь 2014 (7)
- Ноябрь 2014 (14)
- Октябрь 2014 (8)
- Сентябрь 2014 (9)
- Август 2014 (8)
- Июль 2014 (6)
- Июнь 2014 (4)
- Май 2014 (8)
- Апрель 2014 (6)
- Март 2014 (7)
- Февраль 2014 (5)
- Январь 2014 (9)
- Декабрь 2013 (2)
- Ноябрь 2013 (11)
- Октябрь 2013 (10)
- Сентябрь 2013 (9)
- Август 2013 (4)
- Июль 2013 (4)
- Июнь 2013 (3)
- Апрель 2013 (6)
- Март 2013 (2)
- Февраль 2013 (1)
- Январь 2013 (4)
- Декабрь 2012 (3)
- Ноябрь 2012 (4)
- Октябрь 2012 (6)
- Сентябрь 2012 (7)
- Август 2012 (10)
- Июль 2012 (9)
- Июнь 2012 (6)
- Май 2012 (7)
- Апрель 2012 (7)
- Март 2012 (5)
- Февраль 2012 (7)
- Январь 2012 (6)
- Декабрь 2011 (4)
- Ноябрь 2011 (2)
- Сентябрь 2011 (11)
- Август 2011 (8)
- Июль 2011 (5)
- Июнь 2011 (3)
- Май 2011 (1)
- Апрель 2011 (3)
- Март 2011 (4)
- Февраль 2011 (1)
- Январь 2011 (2)
- Декабрь 2010 (4)
- Ноябрь 2010 (1)
- Сентябрь 2010 (2)
- Июль 2010 (3)
- Май 2010 (3)
- Апрель 2010 (1)
- Март 2010 (3)
- Декабрь 2009 (1)
- Ноябрь 2009 (2)
- Октябрь 2009 (11)
- Сентябрь 2009 (3)
- Август 2009 (5)
- Июль 2009 (5)
Подписка на email
Windows 10 — Features on Demand
Когда скачивал дистрибутив Windows 10 с сайта Microsoft Volume Licensing Service Center (VLSC), то обратил внимание, что есть дополнительный ISO файл en_windows_10_features_on_demand_x64_dvd_6846440_.iso.
По факту там содержались cab файлы без всяких комментариев.
Среди них находился файл с именем Microsoft-Windows-Performance-WPT-Package.cab, которое наводило на мысль, что теперь не нужно качать и устанавливать Windows SDK, а можно сразу установить Windows Performance Toolkit.
Оказалось это действительно так:
Остальные файлы в ISO это в основном дополнения к Language Packs. Сам языковой пакет только меняет интерфейс. Если вы хотите проверку правописания, распознавание голоса, рукописного письма и другие возможности, то можете поставить дополнительные пакеты. Назначение пакетов в большинстве случаев ясно из названия.
Download PC Repair Tool to quickly find & fix Windows errors automatically
In this post, we will discuss what are Windows 10 Features on Demand and why some users (specifically Windows 10 systems managed via WSUS) might be unable to download and install FOD (Features on Demand).
Windows 10 Features On Demand are additional feature options available through Windows Update. This download allows organizations to pre-configure Windows 10 installation software with these features prior to deployment. This download can also be used to install features from local media.
Features on Demand (FODs) are Windows feature packages that can be added at any time. Common features include language resources like handwriting recognition or other features like the .NET Framework (.NetFx3). When Windows 10 or Windows Server needs a new feature, it can request the feature package from Windows Update.
Unlike previous Feature Packs, Features on Demand v2 can apply to multiple Windows builds and can be added using DISM without knowing the build number. Always use Features on Demand that match the architecture of the operating system. Adding Features on Demand of the wrong architecture might not return an error immediately, but will likely cause functionality issues in the operating system.
Windows has two different types of Features on Demand:
- FODs without satellite packages: FODs with all language resources packaged into the same package. These FODs are distributed as a single .cab file and can be added using either DISM /Add-Capability or /Add-Package.
- FODs with satellite packages: When you install this type of FOD, only the packages that apply to the Windows image are installed, which reduces disk footprint. These FODs are distributed as a set of several .cab files, but are installed by specifying a single /capabilityname. They can only be added using DISM /Add-Capability (and not /Add-Package).
Windows Features on Demand not installing
Starting with Windows 10 version 1809, FOD (Features on Demand) and language packs can only be installed from Windows Update and not via WSUS.
If you cannot install Windows 10 Features on Demand, you’ll need to configure the Group Policy to go directly to Windows Update to download and install FOD.
Press Windows key + R, type gpedit.msc, hit Enter to launch the Group Policy editor.
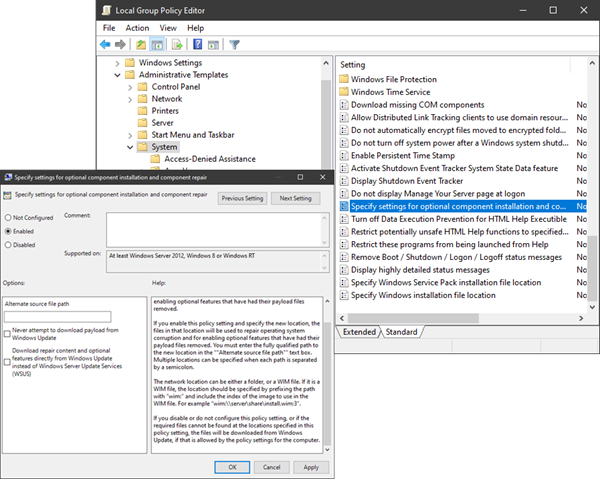
Navigate to Computer Configuration > Administrative Templates > System.
Scroll down on the right pane, locate and double-click Specify settings for optional component installation and component repair.
This policy setting specifies the network locations that will be used for the repair of operating system corruption and for enabling optional features that have had their payload files removed.
If you enable this policy setting and specify the new location, the files in that location will be used to repair operating system corruption and for enabling optional features that have had their payload files removed. You must enter the fully qualified path to the new location in the “”Alternate source file path”” text box. Multiple locations can be specified when each path is separated by a semicolon.
The network location can be either a folder, or a WIM file. If it is a WIM file, the location should be specified by prefixing the path with “wim:” and include the index of the image to use in the WIM file. For example “wim:\servershareinstall.wim:3”.
If you disable or do not configure this policy setting, or if the required files cannot be found at the locations specified in this policy setting, the files will be downloaded from Windows Update, if that is allowed by the policy settings for the computer.
Click the radio button for Enabled
Also, set the following:
- Alternate source file path: <BLANK>
- Never attempt to download payload from Windows Update: Uncheck
- Download repair content and optional features directly from Windows Update instead of Windows Server Update Services (WSUS): Check
Click Apply > OK.
Windows 10 v1809 and later users should now be able to download and install Features on Demand.

Obinna Onwusobalu has studied Information & Communication Technology and is a keen follower of the Windows ecosystem. He has been a Windows Insider MVP (2020). He runs a computer software clinic.
Как известно, Windows 10 отличается набором компонентов от предыдущих версий операционных систем Windows. Зачастую требуется их включить или выключить, чтобы они не потребляли системные ресурсы, да и просто не мешали. В этой статье мы рассмотрим как это сделать быстрее и эффективнее.
Начнем с того, что существует два основных способа работы с компонентами (они еще называются features) — утилита DISM и командлеты Powershell. И то и другое встроено в Windows 10, в отличие от Windows 7, где dism можно было добавить или установив пакет Windows ADK, или руками скопировав dism.exe с другого компьютера.
Сразу отмечу, что утилиту dism и среду powershell для работы с системой необходимо запускать от имени администратора, даже если ваш аккаунт уже находится в группе локальных админов. Итак, вы или находите cmd или windows powershell в меню и, кликнув правой кнопкой мышки, выбираете «Запуск от имени администратора«.
В Windows 10 есть понятие Features и Capabilities. Первое — это привычные нам компоненты, которые можно найти в Панели управления -> Программы и компоненты -> Включение и отключение компонентов Windows. То есть это встраиваемые модули, которые выполняют определенный сервисный функционал.
Capabilities — это дополнительные возможности, которые расширяют возможности интерфейса и увеличивают удобство пользователя. Среди них — Language packs, наборы шрифтов. Да, Microsoft удалил часть нестандартных шрифтов, которые теперь вынесены в опциональные компоненты. Скачать эти компоненты можно в виде ISO файла с сайта Volume Licensing Service Center или напрямую через Internet и графический интерфейс Windows. Такую концепцию Microsoft назвала Features on Demand (FOD). Их в более ранних версия Windows не было.
Работаем с Windows Features
Итак, список установленных компонентов можно посмотреть командой
Dism /online /Get-Features
Вот как в Powershell можно получить список всех компонентов командлетами Get-WindowsFeature (для Windows Server) или Get-WindowsOptionalFeature (Windows 10):
Чтобы получить список отключенных компонентов, введите:
Get-WindowsOptionalFeature -Online | ? state -eq 'disabled' | select featurename
Этот список также можно вывести в файл (для windows Server):
Get-WindowsFeature | Where-Object {$_.Installed -match “True”} | Select-Object -Property Name | Out-File C:TempWindowsFeatures.txt
Посмотрев список названий и их состояние, можно использовать эти названия для того, чтобы компоненты включить или выключить:
Dism /online /Enable-Feature /FeatureName:TFTP /All
ключ /All позволяет включить также все дочерние компоненты;
Установка компонентов через Powershell выполняется командой Enable-WindowsOptionalFeature.
Enable-WindowsOptionalFeature -Online -FeatureName RSATClient-Roles-AD-Powershell
Параметр -All включает все дочерние компоненты.
Dism /online /Disable-Feature /FeatureName:TFTP
Аналогично, через Powershell это можно сделать командой Disable-Windowsoptionalfeature -online -featureName [feature name].
Обратите внимание, некоторые фичи имеют разные названия в Windows 7 и Windows 10. Например, RSAT в Windows 7 — это RemoteServerAdministrationTools, а в Windows 10 — RSATclient.
Управление Features on Demand (FOD)
Если вы устанавливаете их через графический интерфейс, то вам необходимо пройти “System –> App & features –> Manage optional features” и нажать знак + напротив необходимых компонентов.
Чтобы сделать это автоматизированно через командную строку, наберите чтобы получить список доступных компонентов:
DISM.EXE /Online /Get-Capabilities
или на Powershell:
Get-WindowsCapability -Online
Как и прежде, запомните название необходимых вам компонентов, чтобы включить их командой (на примере .Net Framework 3):
DISM.EXE /Online /Add-Capability /CapabilityName:NetFx3~~~~
или на Powershell:
Add-WindowsCapability –Online -Name NetFx3~~~~
Если же у вас нет доступа в Интернет, то есть выход. Итак, вы скачиваете ISO образ диска с FOD компонентами с сайта Volume Licensing Service Center. Файлы будут разные для разных релизов Windows 10 — 1511, 1607, 1703, 1709. Важно помнить, что компоненты одного релиза не подходят к другому. Если вы сделаете in-place upgrade (установка одного релиза поверх другого через обновление), то несовместимые установленные компоненты будут удалены без вашего желания! Да, Microsoft удаляет то, что считает несовместимым при обновлении.
Так вот, ISO файл содержит набор неизвестных и сложных для понимания файлов с расширением cab. Вот чудесный файлик на сайта Microsoft, который обясняет назначение каждого файла. Итак, существуют следующие типы FOD:
- Microsoft-Windows-LanguageFeatures-Basic — проверка правописания для различных языков и раскладок клавиатуры;
- Microsoft-Windows-LanguageFeatures-Fonts — национальные шрифты, например, азиатские
- Microsoft-Windows-LanguageFeatures-OCR — средства для распознавания шрифтов
- Microsoft-Windows-LanguageFeatures-Handwriting — средства для распознавания рукописного ввода
- Microsoft-Windows-LanguageFeatures-TextToSpeech — средства преобразования текста в голос, используемые подсказчиком Cortana
- Microsoft-Windows-LanguageFeatures-Speech — распознавание голоса
- Microsoft-Windows-InternationalFeatures — пакеты национальных настроек, например, для Тайваня
Итак, для добавления таких FOD компонентов, используйте команды вида (замените имя компонента):
Dism /Online /Add-Capability /CapabilityName:Language.Basic~~~en-US~0.0.1.0
Для удаления FOD:
Dism /Online /Remove-Capability /CapabilityName:Language.Basic~~~en-US~0.0.1.0
Установка и переустановка пакетов языков (Language Interface Packs, LIP)
Язык интерфейса Windows можно поменять, установив так называемые LIP. ранее они назывались MUI (Multi user interface). Файлы LIP выглядят так: Microsoft-Windows-Client-Language-Pack_x64_es-es.cab для испанского языка. Выглядеть установка будет примерно так:
Dism /Add-Package /online /PackagePath:"C:LanguagesMicrosoft-Windows-Client-Language-Pack_x64_fr-fr.cab"
А удаление так:
Dism /Remove-Package /online /PackageName:Microsoft-Windows-Client-LanguagePack-Package~31bf3856ad364e35~amd64~en-US~10.0.10120.0
В следующей статье мы поговорим как с помощью DISM и Powershell управлять так называемыми Modern-приложениями AppX.
 [Посещений: 19 982, из них сегодня: 10]