![]() Ранее мы уже писали об особенностях установки пакета Remote Server Administration Tools (RSAT) в Windows 10. Но время идёт и новые релизы Windows 10 вносят новые правила работы с этим пакетом. В этой заметке мы поговорим об особенностях автономной установки RSAT в актуальной версии Windows 10 1903.
Ранее мы уже писали об особенностях установки пакета Remote Server Administration Tools (RSAT) в Windows 10. Но время идёт и новые релизы Windows 10 вносят новые правила работы с этим пакетом. В этой заметке мы поговорим об особенностях автономной установки RSAT в актуальной версии Windows 10 1903.
Графический интерфейс «Параметры Windows» и UAC
В рассматриваемой нами версии Windows 10 активацию компонент RSAT можно выполнить через графический интерфейс Windows, пройдя последовательно в Параметры Windows > Приложения > Дополнительные возможности > Добавить компонент
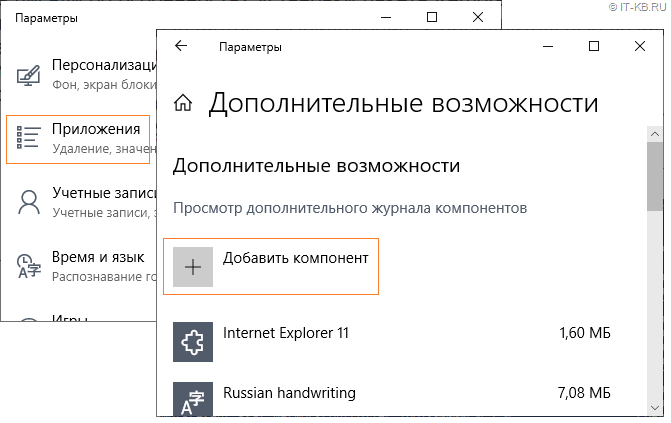
Однако, если с помощью этого графического интерфейса мы попытаемся выполнить добавление компонент на системе, подключенной к локальному серверу WSUS/SCCM SUP, то может получиться так, что мы даже не сможем получить перечень доступных к установке компонент.
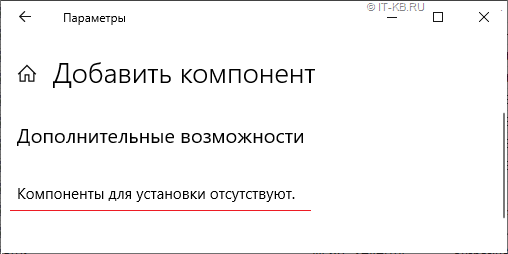
Эта проблема будет воспроизводится в том случае, если текущий пользователь системы не имеет прав локального администратора и доступ к интерфейсу добавления компонент выполняется с запросом повышения привилегий UAC. При этом, если войти в систему интерактивно с правами администратора, то список компонент в графическом интерфейсе мы всё же сможем увидеть.
Компоненты RSAT и PowerShell
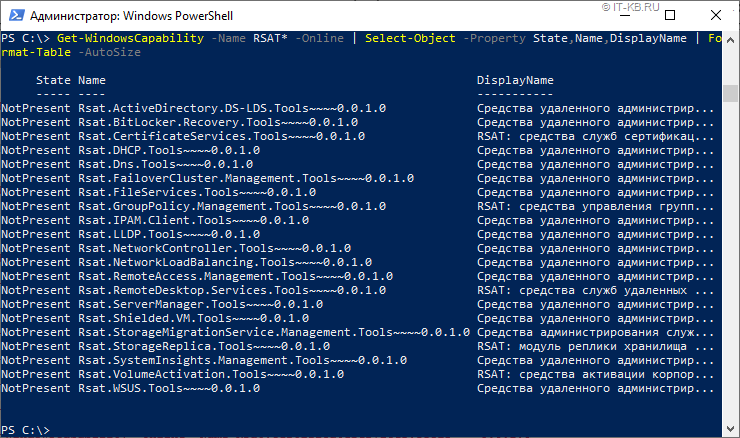
В качестве альтернативного варианта получения списка опциональных компонент Windows можно использовать оболочку PowerShell, запущенную с правами администратора. Для получения компонент, относящихся к пакету RSAT можно выполнить команду:
Get-WindowsCapability -Name RSAT* -Online | Select-Object -Property State,Name,DisplayName | Format-Table -AutoSize
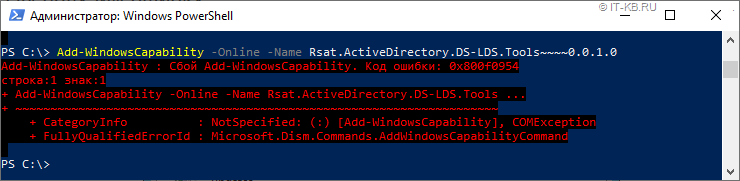
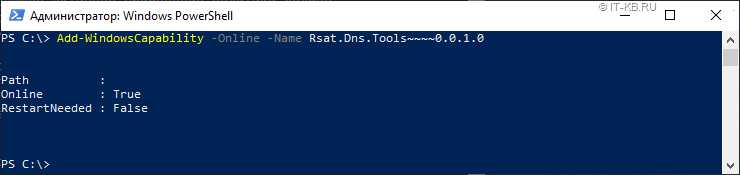
Установку той или иной компоненты можно выполнить командой типа:
Add-WindowsCapability -Online -Name Rsat.ActiveDirectory.DS-LDS.Tools~~~~0.0.1.0
Feature On Demand и проблема Offline-клиентов
Теперь нам понятно, что графический интерфейс Windows 10 1903 работает с UAC криво, а в PowerShell всё в этом плане хорошо. Однако, безотносительно способа установки, в том случае, если компьютер настроен на использование WSUS/SUP и не имеет прямого доступа в интернет, при попытке установки выбранной компоненты мы можем получить ошибку 0x800f0954.
И ошибка эта будет воспроизводиться как при использовании PowerShell, так и при использовании графического интерфейса. Правда, в графическом интерфейсе, опять же, это может быть не так очевидно.
Как я понял, связано это с тем, что для установки опциональных компонент требуется наличие доступа к комплекту пакетов установки Feature On Demand (FOD) для нашей «модной» версии Windows 1903. Именно в этот комплект включаются компоненты RSAT, начиная с обновления Windows 10 1809 от Октября 2018 года. Об этом, в частности, гласит примечание на странице загрузки Remote Server Administration Tools for Windows 10
Интересно то, что на этой же веб-странице имеется сноска о том, что пользователям, использующим WSUS/SUP, и получающим выше обозначенную ошибку 0x800f0954, для возможности установки компонент RSAT придётся настраивать прямой доступ на Windows Update, либо использовать метод с сетевым каталогом.
Known issues affecting various RSAT versions:
Issue: RSAT FOD installation fails with error code 0x800f0954
Impact: RSAT FODs on Windows 10 1809 (October 2018 Update) in WSUS/SCCM environments
Resolution: To install FODs on a domain-joined PC which receives updates through WSUS or SCCM, you will need to change a Group Policy setting to enable downloading FODs directly from Windows Update or a local share.
И в этой ситуации администраторы используют разные пути. Некоторые идут по пути наименьшего сопротивления, не заморачиваясь при этом вопросами удобства и безопасности, и отключают на время установки RSAT нацеливание клиента на WSUS с последующей организацией прямого доступа к Windows Update.
На мой взгляд, этот метод «так себе», так как далеко не всегда и не во всех ситуациях возможно, или даже временно допустимо, обеспечивать прямой доступ на внешние интернет-узлы. К тому же решение с временной правкой реестра и последующим перезапуском службы клиента Windows Update назвать удобным язык не повернётся. При этом ведь ещё нужно помнить про том, что нигде в групповых политиках не должно быть настроено явных запретов на до-загрузку контента Windows c Windows Update.
Feature On Demand и WSUS
А что же нам в этой ситуации может предложить наш локальный источник обновлений — WSUS? Если заглянуть в свойствах сервера WSUS в перечень продуктов, относящихся к Windows 10 (…интересно, в Microsoft сами ориентируются в этом списке?…), то мы увидим такую интересную позицию, как Windows 10 Feature On Demand.
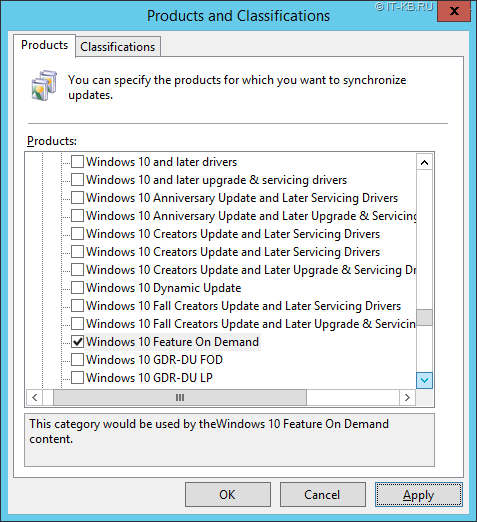
Не найдя нигде в открытых источниках вменяемого развёрнутого описания этой позиции (…впрочем, как и многих других…) мы решили включить её и проверить, что она нам даст. По итогу могу сказать, что среди метаданных о более, чем тысячи обновлений, прилетевших после синхронизации WSUS с Windows Update, я увидел только некоторые компоненты FOD, большинство из которых применимы только для старых версий Windows 10. Ну и в придачу мы получили целый ворох языковых пакетов на всех мыслимых и немыслимых языках, невзирая на то, что в настройках сервера WSUS у нас включены только английский и русский языки. В общем и целом эта позиция на WSUS для нас оказалась бесполезной и даже вредительской.
Раздача Feature On Demand для Offline-клиентов
В результате проведённых экспериментов стало очевидно, что единственным приемлемым в нашей ситуации вариантом, позволяющим выполнять Offline-установку RSAT, является вариант с развёртыванием специального сетевого каталога с компонентами Feature On Demand с нацеливанием клиентов на этот каталог через групповые политики.
Для начала нам потребуется получить образы дисков с компонентами FOD для нашей версии Windows 10. Загрузить эти образы можно вручную с сайта Volume Licensing Service Center (VLSC)
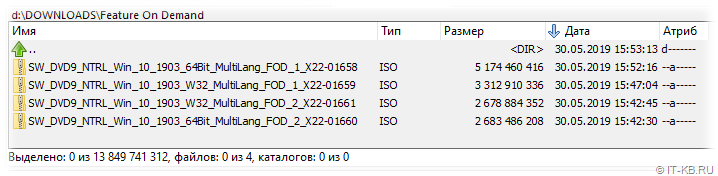
Создаём на файловом сервере общедоступный сетевой ресурс для клиентских систем 64-bit и распаковываем в него всё содержимое образов SW_DVD9_NTRL_Win_10_1903_64Bit_MultiLang_FOD_.ISO. Рядом создаём аналогичный ресурс для систем 32-bit и распаковываем туда образы SW_DVD9_NTRL_Win_10_1903_W32_MultiLang_FOD_.ISO.
Распакованный контент будет представлять из себя множество *.cab файлов, среди которых есть и интересующие нас опциональные компоненты RSAT.
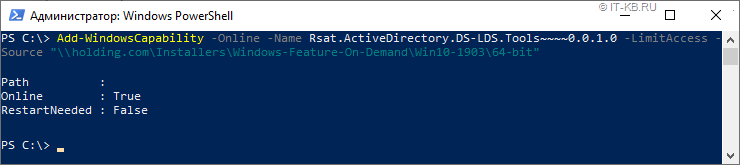
Теперь на любом Offline-клиенте c Windows 10 1903 мы можем попытаться выполнить установку компонент RSAT c помощью PowerShell, указывая в качестве источника получения подготовленный сетевой каталог:
Add-WindowsCapability -Online -Name Rsat.ActiveDirectory.DS-LDS.Tools~~~~0.0.1.0 -LimitAccess -Source \holding.comInstallersWindows-Feature-On-DemandWin10-190364-bit
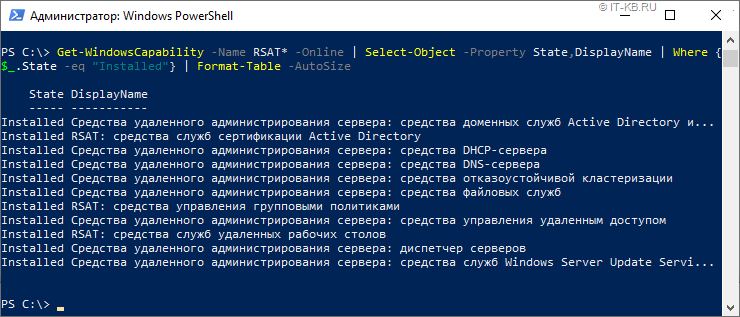
Имейте в виду, что командлет Add-WindowsCapability работает довольно специфично. То есть он может отработать без ошибки, но если в указанном источнике не будут найдены файлы, подходящие для данной системы, никакой установки на самом деле не произойдёт… Разумеется, «это не баг, а фича»… Поэтому после выполнения командлета установки всех нужных компонент, лучше повторно проверять установленные компоненты:
Get-WindowsCapability -Name RSAT* -Online | Select-Object -Property State,DisplayName | Where {$_.State -eq "Installed"} | Format-Table -AutoSize
После этого установленные компоненты RSAT можно будет видеть в уже «горячо полюбившейся» нам графической оболочке Windows 10 1903 в ранее упомянутом перечне дополнительных компонент Windows
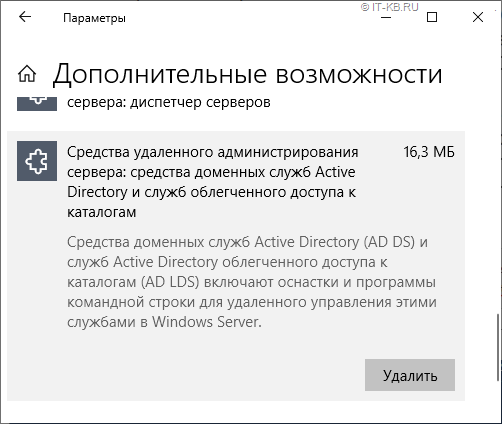
И отсюда же их можно будет удалить при необходимости.
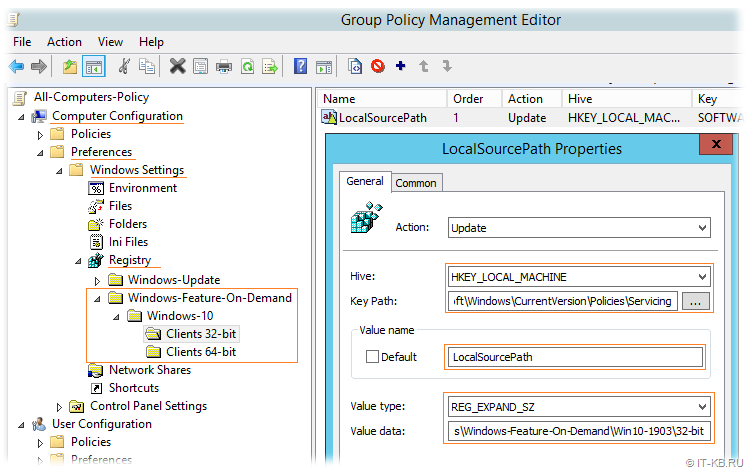
Таким образом все администраторы в организации смогут с помощью PowerShell вручную установить нужные им компоненты RSAT на свои системы Windows 10 1903, не имея прямого доступа в интернет. Однако Offline-установку можно сделать ещё удобней, если дополнительно настроить специальный параметр групповой политики, указывающий клиентам расположение сетевого каталога с компонентами FOD. Описан этот параметр GPO, например, в документе: How to make Features on Demand and language packs available when you’re using WSUS/SCCM.
Переходим в консоль управления групповыми политиками и в разделе политик Administrative Templates > System находим параметр «Specify settings for optional component installation and component repair«
Включаем этот параметр и указываем путь к сетевому каталогу с компонентами FOD в поле «Alternate source file path«.
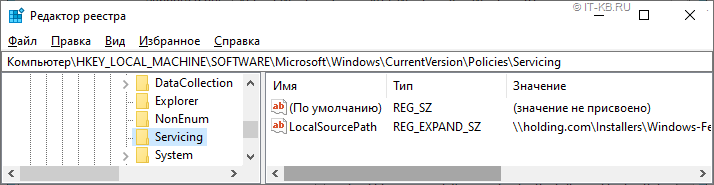
Этот параметр групповой политики фактически принесёт на клиентские системы параметр реестра «LocalSourcePath» в ключе HKLMSOFTWAREMicrosoftWindowsCurrentVersionPoliciesServicing
После этого Offline-установка компонент FOD станет доступна и через графический интерфейс Windows без использования танцев с PowerShell
Однако при этом стоит помнить про ранее обозначенный нюанс с пустым списком компонент в случае использования графического интерфейса в связке с UAC. То есть выполнять установку компонент FOD через графический интерфейс окна «Параметры Windows» нужно только при интерактивном входе в систему из под административной учётной записи. Если по какой-то причине заходить в систему администратором интерактивно нет желания/возможности, то можно использовать выше описанный метод с установкой через PowerShell.
При этом опять же стоит отметить то, что приятным плюсом использования настройки пути к компонентам FOD через групповую политику станет и то, что теперь при использовании PowerShell не потребуется явно указывать путь для установки нужных компонент:
И вроде бы теперь всё здорово, результат достигнут, то есть Offline-установка работает и через графический интерфейс и через PowerShell. Но дивные «фичи» на этом не кончаются.
Обработка «LocalSourcePath» с несколькими путями
Ещё одной странной штукой, которая была обнаружена при работе с выше обозначенным параметром групповой политики, это то, что, судя по описанию в GPO, значение опции «Alternate source file path» может принимать несколько путей с разделителем в виде точки с запятой. Однако практические эксперименты с Windows 10 1903 показали, что при считывании значения «LocalSourcePath» из реестра система заглядывает только в первый по счёту каталог (указанный до точки с запятой), а остальные игнорирует. Такое поведение вполне вписывается в рамки обработки значения ключа -Source командлета Add-WindowsCapability, в описании которого есть соответствующее примечание
If you specify multiple Source arguments, the files are gathered from the first location where they are found and the rest of the locations are ignored.
Вариантом выхода из этой ситуации может быть отказ от использования классического параметра из административных шаблонов GPO и настройка пути в реестре средствами Group Policy Preferences (GPP) с использованием таргетинга по версии и разрядности клиентской операционной системы.
По крайней мере именно на таком варианте мы и остановились, как на наиболее гибком и работоспособном.
Финиш
В итоге квест под названием «Выполнить Offline-установку RSAT в Windows 10 и не слететь с катушек» пройден, и теперь все административные пользователи, работающие на новой Windows 10 1903, могут устанавливать компоненты RSAT, как через графический интерфейс Windows, так и через PowerShell фактически в Offline-режиме и без дополнительных сложностей и манипуляций по аналогии с Online-клиентами.
PS: Никогда ещё установка RSAT в Windows у меня не была такой увлекательной и долгой. Чем больше смотрю на новые релизы Windows 10, тем становится интересней, во что же вся эта тенденция в итоге выльется. Коллега предположил, что в итоге получится, что-то вроде ранних выпусков Mandriva Linux – жутко красиво, но пользоваться этим без слёз невозможно 

With the release of Windows 10 1809 and the current spring 1903 version, Microsoft changed the way the Remote Server Administration Tools (RSAT) gets installed. With Windows 10 1809+ the Feature On Demand option must be used vs manually downloading the RSAT MSU installer from previous versions of Windows 10. There are PowerShell scripts you can find to install RSAT for 1903 and 1809 while the PC is ONLINE but that requires the task sequence have access to the internet during MDT or SCCM OS Deployment. However, in this post (Quick Start Guide RSAT W10 1903 Offline FOD – SCCM-MDT OSD), I will outline how to do this in an OFFLINE approach without the need for an internet connection when the OSD task sequence runs for Windows 10 1903. Sure a proxy service account can be used by an SCCM task sequence step but this approach removes that need.
High-Level Goals
- Install Windows 10 1903 x64 RSAT using Feature On Demand without an Internet Connection (No need to worry about Proxy or security team request)
- Use PowerShell script to integrate the process into the MDT or SCCM OSD task sequence for deployment use in production
- Use the custom PowerShell script to extract only the RSAT files to keep the MDT/SCCM package source files small (154 MB for Win10 1903) since the full Feature On Demand ISO is 5GB!
Requirements
- Applies to Windows 10 1809 or higher.
- Pre-download the MSDN/VLSC Windows 10 1903 (or 1809) Feature On Demand Part 1 ISO media only
- MDT / SCCM task sequence step configured to use the PowerShell install script set to “Bypass“
- Run the W10_FOD_RSAT_Offline_CopySource.ps1 (linked here) PowerShell script to extract only the RSAT files
- Run the W10_FOD_RSAT_Offline_Install.ps1 (linked here) PowerShell script to perform the Offline install of the Windows 10 1903 Feature On Demand RSAT features during the MDT/SCCM OSD task sequence
- Must have local administrator rights on the source PC where you will extract the ISO content
- Must set the PowerShell execution policy to “unrestricted” while you extract the ISO content
Get RSAT Capabilities using PowerShell Command
Run the following command on a Windows 10 1903 or 1809 PC to show that RSAT tools are not installed. The output will show “Not Present“.
Command: Get-WindowsCapability -online | ? Name -like Rsat* | FT

Download the MSDN/VLSC Feature On Demand ISO
Login to your MSDN subscription or Volume License site (VLSC) and download Part 1 (Disk 1) of the Windows 10 1903 (or 1809) “Feature On Demand” ISO content. Search for “Feature On Demand“. If the option is not available for 1903 VLSC, it may take some time for a newer version of Windows 10.
Click on the “Windows 10 Feature on Demand part 1, Version 1903 (x64) DVD” ISO. Save to an applicable download or package source location on a local PC where the W10_FOD_RSAT_Offline_CopySource.ps1 script will be run.

The PowerShell Scripts
Download both PowerShell scripts from my Github locations found here:
Script 1: W10_FOD_RSAT_Offline_CopySource.ps1
Script 2: W10_FOD_RSAT_Offline_Install.ps1
The first script needs to be modified to include the path to the Feature On Demand ISO media that was downloaded in the previous steps. Modify line 3 of the script to provide the ISO path and line 17 to provide the extraction path (Default C:temp). It’s also a good idea to rename the ISO media at this time to a shorter name.
W10_FOD_RSAT_Offline_CopySource.ps1 PowerShell Script
CRITICAL NOTE: Lines 21 and 22 had to be modified to ensure the commands were one string and not word wrapped. The defaults from Microsoft were not in the same line so I kept getting errors for the -include and -Container parameters in the original files.

On a Windows 10 PC where you have copied the Feature On Demand ISO, from an elevated PowerShell command prompt run the following command and select “Yes To All”: Set-ExecutionPolicy Unrestricted
Run the W10_FOD_RSAT_Offline_CopySource.ps1 PowerShell script downloaded from the previous step from an elevated PowerShell command prompt. The content will look like this:

Copy the W10_FOD_RSAT_Offline_Install.ps1 that was previously downloaded in the previous step to the C:TEMPRSAT_1903_en-US folder location (or whatever folder name if it was changed in the script). This will be the source files for the Feature On Demand Offline MDT / SCCM package content that will be used in the OSD task sequence.
W10_FOD_RSAT_Offline_Install.ps1 PowerShell Script

The RSAT source extracted ISO content will look like this. In the screenshot, I’ve renamed the folder to a different name that will be used for import into MDT or SCCM as package content. Make sure you copy the install PowerShell script into this location.

Create/Import the FOD RSAT Extracted Content into MDT or SCCM
Use the following steps to create the MDT application or SCCM package that will be used within the OSD task sequence.
MDT Deployment OS Deployment
For MDT OS Deployments, create an application and point to the source location where the RSAT content was extracted and where the “W10_FOD_RSAT_Offline_Install.ps1” script was copied. Ensure the quiet install command line is as shown below to run the PowerShell command as a step in the MDT task sequence.
C:WindowsSystem32WindowsPowerShellv1.0powershell.exe -ExecutionPolicy Bypass -file W10_FOD_RSAT_Offline_Install.ps1

Once the MDT application is added, reference the new application in the MDT task sequence as shown here.

Run the MDT Windows 10 1903 OS deployment and the RSAT Feature On Demand files will install OFFLINE as shown here.

When the MDT deployment is complete, the RSAT tools will be installed on the Start Menu as shown here like normal.

SCCM Deployment OS Deployment
For SCCM OS Deployments, create a legacy package and point to a network share source location where the RSAT content was extracted and where the “W10_FOD_RSAT_Offline_Install.ps1” script was copied. Create a Run PowerShell Script step shown below to run the PowerShell command as a step in the SCCM task sequence. There is not a need to create a program during the package creation wizard since a “Run PowerShell Script” option will be used within the SCCM task sequence.


Note: In the below example, SCCM 1902 was used so the Run “PowerShell script” may look different depending on the version of SCCM.
Ensure the step is set to “Bypass” for the execution policy.

Run the SCCM OSD task sequence and the RSAT Offline tools will install for the Windows 10 1903 (or 1809) deployment.


Once the SCCM OS deployment is complete, login and the RSAT tools for Windows 10 1903 will be listed and working as shown below.

That concludes this blog post “Quick Start Guide RSAT W10 1903 Offline FOD – SCCM-MDT OSD” to ensure the Windows 10 1903 (or 1809+) RSAT tools can be installed in an offline manner as part of the MDT or SCCM OS deployment task sequence. It’s great to be able to install RSAT in an OFFLINE manner approach especially for customers with Proxy restrictions to the internet for SCCM OSD. Also, with Windows 10 1809+ the RSAT tools will remain with each In-Place OS upgrade to the next release of Windows 10.
References:
RSAT on Windows 10 1809 in Disconnected Environments – Microsoft reference article showing how to install RSAT in an offline manner approach.
/ April 21, 2019 / Filed Under: 1809, 1903, Windows 10 RSAT /
Содержание
- Download Windows 10 1809 1903 RSAT Install Using New Windows FoD
- What are Windows 10 Features on Demand?
- Download Windows 10 1809 1903 RSAT Install Using New Windows FoD
- Use PowerShell to Download Windows 10 1809 1903 RSAT FoD and Install
- Wrapping Up
- Windows 10 features on demand version 1903
- Question
- All replies
- Установка Remote Server Administration Tools (RSAT) в Windows 10 v1903 в Offline-режиме
- What’s new in Windows 10, version 1903 for IT Pros
- Deployment
- Windows Autopilot
- Windows 10 Subscription Activation
- SetupDiag
- Reserved storage
- Servicing
- Security
- Windows Information Protection
- Security configuration framework
- Security baseline for Windows 10 and Windows Server
- Intune security baselines
- Microsoft Defender for Endpoint
- Microsoft Defender for Endpoint next-gen protection technologies:
- Threat Protection
- System Guard
- Identity Protection
- Security management
- Microsoft Edge
- See Also
Download Windows 10 1809 1903 RSAT Install Using New Windows FoD
For the past several versions of Windows 10, I have been used to having to pull the latest Remote Server Administration Tools (RSAT) down from Microsoft from the Microsoft downloads page. Even if you have RSAT installed, when you upgrade Windows 10, the RSAT installation is wiped out. This is cumbersome, especially after finishing an upgrade and all your administration tools are gone. However, Microsoft has made a really good switch in my opinion in the way the Remote Server Administration Tools are deployed as a departure from the way we have been doing it for the past several Windows 10 versions. With Windows 10 1903, the RSAT tools are a Features on Demand (FoD) installation. In other words, RSAT is already a part of Windows 10 1903 and higher. All you have to do is turn on the feature for the Remote Server Administration Tools you want to install. Let’s take a look at download Windows 10 1809 1903 RSAT install using new Windows FoD “Features on Demand”.
What are Windows 10 Features on Demand?
You may wonder what “Features on Demand” are. Features on Demand or FoD are Windows feature packages that can be added at any time. When Windows 10 or Windows Server needs a new feature, it can request the feature package from Windows Update.
As a side note, I first got acquainted with Features on Demand with Windows Server Core. Microsoft first touted FoDs there as Server Core has the added ability to install these Features on Demand so you can extend the functionality of Windows Server Core.
There are two types of Features on Demand that can be installed:
Download Windows 10 1809 1903 RSAT Install Using New Windows FoD
To get to the point of installing the new Remote Server Administration Tools via the Features on Demand install, navigate to the Apps & features configuration page in Windows 10 1809 and 1903 that is found under the Windows Settings page. You can get to Windows Settings quickly by pressing the “Windows key + I” buttons together.
Click the Apps menu that allows you to uninstall, configure defaults, and install optional features.
This will take you to the Apps & features page. Click the Apps & features link on the left side of the page, then click the Optional features link.
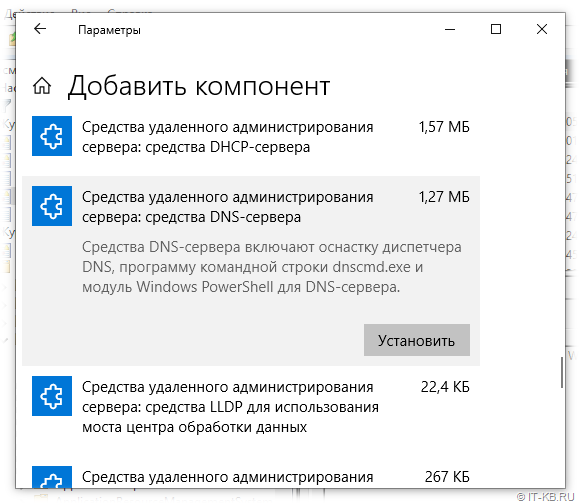
Once you click the Optional features link, click the Add a feature button.
This will launch the Add a feature page. Scroll down until you see the list of available RSAT tools available for download and install. There are several to choose from. ***Note*** the screenshot below does not include all the available RSAT tools.
Click the Features on Demand you want to install, and click the Install button for each to begin the installation.
If you go back to the Optional features page just one level back, you will see the progress of the RSAT installations.
Use PowerShell to Download Windows 10 1809 1903 RSAT FoD and Install
If you are into scripting and automation with PowerShell (which you should be :-), then you can easily install the Windows 10 1903 RSAT FoD using PowerShell. It is an easy way to especially install ALL the RSAT tools with a simple one-liner.
Launch PowerShell as an Administrator and run the following PowerShell cmdlet:
Wrapping Up
The new direction that Microsoft has taken to Download Windows 10 1809 1903 RSAT Install Using New Windows FoD is a welcomed change to the traditional RSAT download and installation that gets wiped out with every Windows Update to the next major version.
The Features on Demand RSAT installation method is super easy and is “built-in” to the Windows 10 1809 and 1903 releases and all the future releases to come. The other great thing is you can use PowerShell to install the RSAT Feature on Demand and easily install ALL the RSAT tools if desired, instead of clicking each one in the GUI to install.
Источник
Windows 10 features on demand version 1903

Question
Возникла необходимость в Win10 1909 установить оснастку AD «Пользователи и компьютеры», ПК введен в домен. Прочел, что для установки необходим диск с набором дополнительных компонент, даже нашел название iso-файла
Есть вопрос, могу ли загрузить файл законным способом? Попробовал найти файл через подписку Visual Studio (наименование подписки Visual Studio Dev Essentials), но его нет.
Доступа к другой подписке нет.
В Windows 7 свободно устанавливал компонент без необходимости загрузки дополнительного образа.
Я не волшебник, только учусь. MCTS, CCNA. Если вам помог чей-либо ответ, пожалуйста, не забывайте нажать на кнопку «отметить как ответ» или проголосовать за «полезное сообщение». Disclaimer: Мнения, высказанные здесь, являются отражением моих личных взглядов, а не позиции работодателя. Вся информация предоставляется как есть, без каких-либо на то гарантий. Блог IT Инженера, Яндекс Дзен, YouTube, GitHub, Facebook, TechNet Forum Team.
ничего вам не надо, кроме PowerShell, административных прав и подключения к интернету.
ничего вам не надо, кроме PowerShell, административных прав и подключения к интернету.
Я не волшебник, только учусь. MCTS, CCNA. Если вам помог чей-либо ответ, пожалуйста, не забывайте нажать на кнопку «отметить как ответ» или проголосовать за «полезное сообщение». Disclaimer: Мнения, высказанные здесь, являются отражением моих личных взглядов, а не позиции работодателя. Вся информация предоставляется как есть, без каких-либо на то гарантий. Блог IT Инженера, Яндекс Дзен, YouTube, GitHub, Facebook, TechNet Forum Team.
тоже самое, только с использованием PowerShell и интернет
прежде чем давать подобные советы, убедитесь в их правильности. Напомню, что автора вопроса версия ОС 1909. По ссылке, которую привели вы, RSAT для этой версии нет:
Более того, даже Microsoft не рекомендует загрузку RSAT для более современных версий. Вы хотя бы прочитайте описание скачиваемого пакета.
надо было сразу писать про ограничения с подключением к интернету.
— научить прокси пропускать этот трафик без проксирования (читайте логи, создавайте правила)
— подлючить компьютер к интернету в обход прокси.
Если изменились условия и для загрузки файла установки оснастки «Пользователи и компьютеры» нужны согласия правообладателя, то будет проще подключить ПК к интернет (чтобы был прямой выход) или загрузить файл образа features on demand по законной подписке.
Чтобы загрузить файл через прокси, нужно, чтобы клиент Windows Update работал через прокси. Пробовал, но не удалось настроить на локальном ПК. Доступа к настройке самой прокси нет.
Если изменились условия и для загрузки файла установки оснастки «Пользователи и компьютеры» нужны согласия правообладателя
Повторюсь, настройки прокси-сервер организации изменить не могу.
Прокси-сервер типа HTTP, с аутентификацией kerberos, фильтрация url не используется.
Клиент Windows Update умеет использовать HTTP-прокси (использует адрес, указанный в стандартных настройках Windows 10), но не проводит аутентификацию kerberos.
Для ее выполнения с использованием центра обновлений в Интернет (не локального WSUS-сервера) в ветке реестра
«HKEY_LOCAL_MACHINESOFTWAREPoliciesMicrosoftWindowsWindowsUpdateAU»
задаю значение ключа «UseWUServer» равным 0 и перезапускаю службу «Центр обновления Windows».
Удалось успешно добавить оснастку с использованием стороннего ПО WinFoom (https://github.com/ecovaci/winfoom).
ПО прослушивает локальный порт и пробрасывает подключение к нему на адрес указанного прокси-сервера с использованием учетных данных текущего залогиненного пользователя.
Так можно обеспечить выход в интернет через прокси-сервер с использованием аутентификации kerberos для ПО, которое не умеет проводить аутентификацию kerberos.
В настройках WinFoom указал прослушивать локальный порт 3129, указал адрес и порт прокси-сервера организации, затем в стандартных настройках Windows 10 указал прокси-сервер localhost:3129 (вместо прокси-сервера организации).
Тогда команду powershell по добавлению оснастки выполнил успешно, оснастка добавлена.
Источник
 Ранее мы уже писали об особенностях установки пакета Remote Server Administration Tools (RSAT) в Windows 10. Но время идёт и новые релизы Windows 10 вносят новые правила работы с этим пакетом. В этой заметке мы поговорим об особенностях автономной установки RSAT в актуальной версии Windows 10 1903.
Графический интерфейс «Параметры Windows» и UAC
В рассматриваемой нами версии Windows 10 активацию компонент RSAT можно выполнить через графический интерфейс Windows, пройдя последовательно в Параметры Windows > Приложения > Дополнительные возможности > Добавить компонент
Однако, если с помощью этого графического интерфейса мы попытаемся выполнить добавление компонент на системе, подключенной к локальному серверу WSUS/SCCM SUP, то может получиться так, что мы даже не сможем получить перечень доступных к установке компонент.
Эта проблема будет воспроизводится в том случае, если текущий пользователь системы не имеет прав локального администратора и доступ к интерфейсу добавления компонент выполняется с запросом повышения привилегий UAC. При этом, если войти в систему интерактивно с правами администратора, то список компонент в графическом интерфейсе мы всё же сможем увидеть.
Компоненты RSAT и PowerShell
В качестве альтернативного варианта получения списка опциональных компонент Windows можно использовать оболочку PowerShell, запущенную с правами администратора. Для получения компонент, относящихся к пакету RSAT можно выполнить команду:
Установку той или иной компоненты можно выполнить командой типа:
Feature On Demand и проблема Offline-клиентов
И ошибка эта будет воспроизводиться как при использовании PowerShell, так и при использовании графического интерфейса. Правда, в графическом интерфейсе, опять же, это может быть не так очевидно.
Как я понял, связано это с тем, что для установки опциональных компонент требуется наличие доступа к комплекту пакетов установки Feature On Demand (FOD) для нашей «модной» версии Windows 1903. Именно в этот комплект включаются компоненты RSAT, начиная с обновления Windows 10 1809 от Октября 2018 года. Об этом, в частности, гласит примечание на странице загрузки Remote Server Administration Tools for Windows 10
Known issues affecting various RSAT versions:
Issue: RSAT FOD installation fails with error code 0x800f0954
Impact: RSAT FODs on Windows 10 1809 (October 2018 Update) in WSUS/SCCM environments
Resolution: To install FODs on a domain-joined PC which receives updates through WSUS or SCCM, you will need to change a Group Policy setting to enable downloading FODs directly from Windows Update or a local share.
И в этой ситуации администраторы используют разные пути. Некоторые идут по пути наименьшего сопротивления, не заморачиваясь при этом вопросами удобства и безопасности, и отключают на время установки RSAT нацеливание клиента на WSUS с последующей организацией прямого доступа к Windows Update.
На мой взгляд, этот метод «так себе», так как далеко не всегда и не во всех ситуациях возможно, или даже временно допустимо, обеспечивать прямой доступ на внешние интернет-узлы. К тому же решение с временной правкой реестра и последующим перезапуском службы клиента Windows Update назвать удобным язык не повернётся. При этом ведь ещё нужно помнить про том, что нигде в групповых политиках не должно быть настроено явных запретов на до-загрузку контента Windows c Windows Update.
Feature On Demand и WSUS
Не найдя нигде в открытых источниках вменяемого развёрнутого описания этой позиции (…впрочем, как и многих других…) мы решили включить её и проверить, что она нам даст. По итогу могу сказать, что среди метаданных о более, чем тысячи обновлений, прилетевших после синхронизации WSUS с Windows Update, я увидел только некоторые компоненты FOD, большинство из которых применимы только для старых версий Windows 10. Ну и в придачу мы получили целый ворох языковых пакетов на всех мыслимых и немыслимых языках, невзирая на то, что в настройках сервера WSUS у нас включены только английский и русский языки. В общем и целом эта позиция на WSUS для нас оказалась бесполезной и даже вредительской.
Раздача Feature On Demand для Offline-клиентов
В результате проведённых экспериментов стало очевидно, что единственным приемлемым в нашей ситуации вариантом, позволяющим выполнять Offline-установку RSAT, является вариант с развёртыванием специального сетевого каталога с компонентами Feature On Demand с нацеливанием клиентов на этот каталог через групповые политики.
Для начала нам потребуется получить образы дисков с компонентами FOD для нашей версии Windows 10. Загрузить эти образы можно вручную с сайта Volume Licensing Service Center (VLSC)
Распакованный контент будет представлять из себя множество *.cab файлов, среди которых есть и интересующие нас опциональные компоненты RSAT.
Теперь на любом Offline-клиенте c Windows 10 1903 мы можем попытаться выполнить установку компонент RSAT c помощью PowerShell, указывая в качестве источника получения подготовленный сетевой каталог:
Имейте в виду, что командлет Add-WindowsCapability работает довольно специфично. То есть он может отработать без ошибки, но если в указанном источнике не будут найдены файлы, подходящие для данной системы, никакой установки на самом деле не произойдёт… Разумеется, «это не баг, а фича»… Поэтому после выполнения командлета установки всех нужных компонент, лучше повторно проверять установленные компоненты:
После этого установленные компоненты RSAT можно будет видеть в уже «горячо полюбившейся» нам графической оболочке Windows 10 1903 в ранее упомянутом перечне дополнительных компонент Windows
И отсюда же их можно будет удалить при необходимости.
Таким образом все администраторы в организации смогут с помощью PowerShell вручную установить нужные им компоненты RSAT на свои системы Windows 10 1903, не имея прямого доступа в интернет. Однако Offline-установку можно сделать ещё удобней, если дополнительно настроить специальный параметр групповой политики, указывающий клиентам расположение сетевого каталога с компонентами FOD. Описан этот параметр GPO, например, в документе: How to make Features on Demand and language packs available when you’re using WSUS/SCCM.
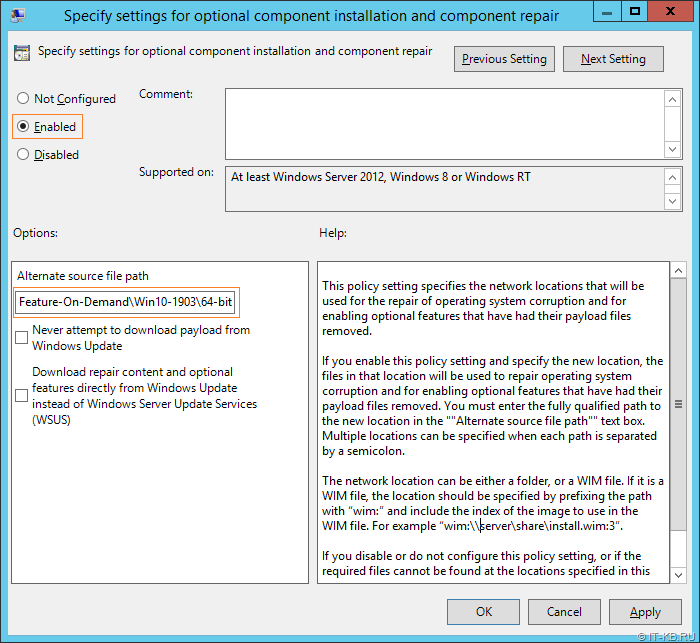
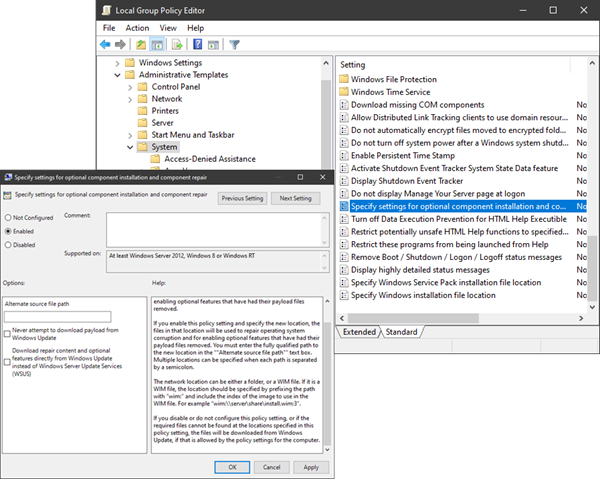
Переходим в консоль управления групповыми политиками и в разделе политик Administrative Templates > System находим параметр «Specify settings for optional component installation and component repair«
Включаем этот параметр и указываем путь к сетевому каталогу с компонентами FOD в поле «Alternate source file path«.
Этот параметр групповой политики фактически принесёт на клиентские системы параметр реестра » LocalSourcePath » в ключе HKLMSOFTWAREMicrosoftWindowsCurrentVersionPoliciesServicing
После этого Offline-установка компонент FOD станет доступна и через графический интерфейс Windows без использования танцев с PowerShell
Однако при этом стоит помнить про ранее обозначенный нюанс с пустым списком компонент в случае использования графического интерфейса в связке с UAC. То есть выполнять установку компонент FOD через графический интерфейс окна «Параметры Windows» нужно только при интерактивном входе в систему из под административной учётной записи. Если по какой-то причине заходить в систему администратором интерактивно нет желания/возможности, то можно использовать выше описанный метод с установкой через PowerShell.
При этом опять же стоит отметить то, что приятным плюсом использования настройки пути к компонентам FOD через групповую политику станет и то, что теперь при использовании PowerShell не потребуется явно указывать путь для установки нужных компонент:
И вроде бы теперь всё здорово, результат достигнут, то есть Offline-установка работает и через графический интерфейс и через PowerShell. Но дивные «фичи» на этом не кончаются.
Обработка «LocalSourcePath» с несколькими путями
Ещё одной странной штукой, которая была обнаружена при работе с выше обозначенным параметром групповой политики, это то, что, судя по описанию в GPO, значение опции «Alternate source file path» может принимать несколько путей с разделителем в виде точки с запятой. Однако практические эксперименты с Windows 10 1903 показали, что при считывании значения » LocalSourcePath » из реестра система заглядывает только в первый по счёту каталог (указанный до точки с запятой), а остальные игнорирует. Такое поведение вполне вписывается в рамки обработки значения ключа -Source командлета Add-WindowsCapability, в описании которого есть соответствующее примечание
If you specify multiple Source arguments, the files are gathered from the first location where they are found and the rest of the locations are ignored.
Вариантом выхода из этой ситуации может быть отказ от использования классического параметра из административных шаблонов GPO и настройка пути в реестре средствами Group Policy Preferences (GPP) с использованием таргетинга по версии и разрядности клиентской операционной системы.
По крайней мере именно на таком варианте мы и остановились, как на наиболее гибком и работоспособном.
Финиш
В итоге квест под названием «Выполнить Offline-установку RSAT в Windows 10 и не слететь с катушек» пройден, и теперь все административные пользователи, работающие на новой Windows 10 1903, могут устанавливать компоненты RSAT, как через графический интерфейс Windows, так и через PowerShell фактически в Offline-режиме и без дополнительных сложностей и манипуляций по аналогии с Online-клиентами.
Источник
What’s new in Windows 10, version 1903 for IT Pros
Applies to
This article lists new and updated features and content that are of interest to IT Pros for Windows 10 version 1903, also known as the Windows 10 May 2019 Update. This update also contains all features and fixes included in previous cumulative updates to Windows 10, version 1809.
New disk space requirement for Windows 10, version 1903 applies only to OEMs for the manufacture of new PCs. This new requirement does not apply to existing devices. PCs that don’t meet new device disk space requirements will continue to receive updates and the 1903 update will require about the same amount of free disk space as previous updates. For more information, see Reserved storage.
Deployment
Windows Autopilot
Windows Autopilot is a collection of technologies used to set up and pre-configure new devices, getting them ready for productive use. The following Windows Autopilot features are available in Windows 10, version 1903 and later:
Windows 10 Subscription Activation
Windows 10 Education support has been added to Windows 10 Subscription Activation.
With Windows 10, version 1903, you can step-up from Windows 10 Pro Education to the enterprise-grade edition for educational institutions – Windows 10 Education. For more information, see Windows 10 Subscription Activation.
SetupDiag
SetupDiag version 1.4.1 is available.
SetupDiag is a command-line tool that can help diagnose why a Windows 10 update failed. SetupDiag works by searching Windows Setup log files. When searching log files, SetupDiag uses a set of rules to match known issues. In the current version of SetupDiag there are 53 rules contained in the rules.xml file, which is extracted when SetupDiag is run. The rules.xml file will be updated as new versions of SetupDiag are made available.
Reserved storage
Reserved storage: Reserved storage sets aside disk space to be used by updates, apps, temporary files, and system caches. It improves the day-to-day function of your PC by ensuring critical OS functions always have access to disk space. Reserved storage will be enabled automatically on new PCs with Windows 10, version 1903 pre-installed, and for clean installs. It will not be enabled when updating from a previous version of Windows 10.
Servicing
Security
Windows Information Protection
With this release, Microsoft Defender for Endpoint extends discovery and protection of sensitive information with Auto Labeling.
Security configuration framework
With this release of Windows 10, Microsoft is introducing a new taxonomy for security configurations, called the SECCON framework, comprised of 5 device security configurations.
Security baseline for Windows 10 and Windows Server
The draft release of the security configuration baseline settings for Windows 10, version 1903 and for Windows Server version 1903 is available.
Intune security baselines
Intune Security Baselines (Preview): Now includes many settings supported by Intune that you can use to help secure and protect your users and devices. You can automatically set these settings to values recommended by security teams.
Microsoft Defender for Endpoint
Microsoft Defender for Endpoint next-gen protection technologies:
Threat Protection
Windows Sandbox: Isolated desktop environment where you can run untrusted software without the fear of lasting impact to your device.
Microphone privacy settings: A microphone icon appears in the notification area letting you see which apps are using your microphone.
Standalone users can install and configure their Windows Defender Application Guard settings without needing to change Registry key settings. Enterprise users can check their settings to see what their administrators have configured for their machines to better understand the behavior.
WDAG is now an extension in Google Chrome and Mozilla Firefox. Many users are in a hybrid browser environment, and would like to extend WDAG’s browser isolation technology beyond Microsoft Edge. In the latest release, users can install the WDAG extension in their Chrome or Firefox browsers. This extension will redirect untrusted navigations to the WDAG Edge browser. There is also a companion app to enable this feature in the Microsoft Store. Users can quickly launch WDAG from their desktop using this app. This feature is also available in Windows 10, version 1803 or later with the latest updates.
To try this extension:
WDAG allows dynamic navigation: Application Guard now allows users to navigate back to their default host browser from the WDAG Microsoft Edge. Previously, users browsing in WDAG Edge would see an error page when they try to go to a trusted site within the container browser. With this new feature, users will automatically be redirected to their host default browser when they enter or click on a trusted site in WDAG Edge. This feature is also available in Windows 10, version 1803 or later with the latest updates.
Windows Defender Application Control (WDAC): In Windows 10, version 1903 WDAC has a number of new features that light up key scenarios and provide feature parity with AppLocker.
System Guard
This new feature is displayed under the Device Security page with the string “Your device exceeds the requirements for enhanced hardware security” if configured properly:

Identity Protection
Security management
Microsoft Edge
Several new features are coming in the next version of Edge. See the news from Build 2019 for more information.
See Also
What’s New in Windows Server, version 1903: New and updated features in Windows Server.
Windows 10 Features: Review general information about Windows 10 features.
What’s New in Windows 10: See what’s new in other versions of Windows 10.
What’s new in Windows 10: See what’s new in Windows 10 hardware.
What’s new in Windows 10 for developers: New and updated features in Windows 10 that are of interest to developers.
Источник
Как известно, Windows 10 отличается набором компонентов от предыдущих версий операционных систем Windows. Зачастую требуется их включить или выключить, чтобы они не потребляли системные ресурсы, да и просто не мешали. В этой статье мы рассмотрим как это сделать быстрее и эффективнее.
Начнем с того, что существует два основных способа работы с компонентами (они еще называются features) — утилита DISM и командлеты Powershell. И то и другое встроено в Windows 10, в отличие от Windows 7, где dism можно было добавить или установив пакет Windows ADK, или руками скопировав dism.exe с другого компьютера.
Сразу отмечу, что утилиту dism и среду powershell для работы с системой необходимо запускать от имени администратора, даже если ваш аккаунт уже находится в группе локальных админов. Итак, вы или находите cmd или windows powershell в меню и, кликнув правой кнопкой мышки, выбираете «Запуск от имени администратора«.
В Windows 10 есть понятие Features и Capabilities. Первое — это привычные нам компоненты, которые можно найти в Панели управления -> Программы и компоненты -> Включение и отключение компонентов Windows. То есть это встраиваемые модули, которые выполняют определенный сервисный функционал.
Capabilities — это дополнительные возможности, которые расширяют возможности интерфейса и увеличивают удобство пользователя. Среди них — Language packs, наборы шрифтов. Да, Microsoft удалил часть нестандартных шрифтов, которые теперь вынесены в опциональные компоненты. Скачать эти компоненты можно в виде ISO файла с сайта Volume Licensing Service Center или напрямую через Internet и графический интерфейс Windows. Такую концепцию Microsoft назвала Features on Demand (FOD). Их в более ранних версия Windows не было.
Работаем с Windows Features
Итак, список установленных компонентов можно посмотреть командой
Dism /online /Get-Features
Вот как в Powershell можно получить список всех компонентов командлетами Get-WindowsFeature (для Windows Server) или Get-WindowsOptionalFeature (Windows 10):
Чтобы получить список отключенных компонентов, введите:
Get-WindowsOptionalFeature -Online | ? state -eq 'disabled' | select featurename
Этот список также можно вывести в файл (для windows Server):
Get-WindowsFeature | Where-Object {$_.Installed -match “True”} | Select-Object -Property Name | Out-File C:TempWindowsFeatures.txt
Посмотрев список названий и их состояние, можно использовать эти названия для того, чтобы компоненты включить или выключить:
Dism /online /Enable-Feature /FeatureName:TFTP /All
ключ /All позволяет включить также все дочерние компоненты;
Установка компонентов через Powershell выполняется командой Enable-WindowsOptionalFeature.
Enable-WindowsOptionalFeature -Online -FeatureName RSATClient-Roles-AD-Powershell
Параметр -All включает все дочерние компоненты.
Dism /online /Disable-Feature /FeatureName:TFTP
Аналогично, через Powershell это можно сделать командой Disable-Windowsoptionalfeature -online -featureName [feature name].
Обратите внимание, некоторые фичи имеют разные названия в Windows 7 и Windows 10. Например, RSAT в Windows 7 — это RemoteServerAdministrationTools, а в Windows 10 — RSATclient.
Управление Features on Demand (FOD)
Если вы устанавливаете их через графический интерфейс, то вам необходимо пройти “System –> App & features –> Manage optional features” и нажать знак + напротив необходимых компонентов.
Чтобы сделать это автоматизированно через командную строку, наберите чтобы получить список доступных компонентов:
DISM.EXE /Online /Get-Capabilities
или на Powershell:
Get-WindowsCapability -Online
Как и прежде, запомните название необходимых вам компонентов, чтобы включить их командой (на примере .Net Framework 3):
DISM.EXE /Online /Add-Capability /CapabilityName:NetFx3~~~~
или на Powershell:
Add-WindowsCapability –Online -Name NetFx3~~~~
Если же у вас нет доступа в Интернет, то есть выход. Итак, вы скачиваете ISO образ диска с FOD компонентами с сайта Volume Licensing Service Center. Файлы будут разные для разных релизов Windows 10 — 1511, 1607, 1703, 1709. Важно помнить, что компоненты одного релиза не подходят к другому. Если вы сделаете in-place upgrade (установка одного релиза поверх другого через обновление), то несовместимые установленные компоненты будут удалены без вашего желания! Да, Microsoft удаляет то, что считает несовместимым при обновлении.
Так вот, ISO файл содержит набор неизвестных и сложных для понимания файлов с расширением cab. Вот чудесный файлик на сайта Microsoft, который обясняет назначение каждого файла. Итак, существуют следующие типы FOD:
- Microsoft-Windows-LanguageFeatures-Basic — проверка правописания для различных языков и раскладок клавиатуры;
- Microsoft-Windows-LanguageFeatures-Fonts — национальные шрифты, например, азиатские
- Microsoft-Windows-LanguageFeatures-OCR — средства для распознавания шрифтов
- Microsoft-Windows-LanguageFeatures-Handwriting — средства для распознавания рукописного ввода
- Microsoft-Windows-LanguageFeatures-TextToSpeech — средства преобразования текста в голос, используемые подсказчиком Cortana
- Microsoft-Windows-LanguageFeatures-Speech — распознавание голоса
- Microsoft-Windows-InternationalFeatures — пакеты национальных настроек, например, для Тайваня
Итак, для добавления таких FOD компонентов, используйте команды вида (замените имя компонента):
Dism /Online /Add-Capability /CapabilityName:Language.Basic~~~en-US~0.0.1.0
Для удаления FOD:
Dism /Online /Remove-Capability /CapabilityName:Language.Basic~~~en-US~0.0.1.0
Установка и переустановка пакетов языков (Language Interface Packs, LIP)
Язык интерфейса Windows можно поменять, установив так называемые LIP. ранее они назывались MUI (Multi user interface). Файлы LIP выглядят так: Microsoft-Windows-Client-Language-Pack_x64_es-es.cab для испанского языка. Выглядеть установка будет примерно так:
Dism /Add-Package /online /PackagePath:"C:LanguagesMicrosoft-Windows-Client-Language-Pack_x64_fr-fr.cab"
А удаление так:
Dism /Remove-Package /online /PackageName:Microsoft-Windows-Client-LanguagePack-Package~31bf3856ad364e35~amd64~en-US~10.0.10120.0
В следующей статье мы поговорим как с помощью DISM и Powershell управлять так называемыми Modern-приложениями AppX.
 [Посещений: 19 982, из них сегодня: 10]
Download PC Repair Tool to quickly find & fix Windows errors automatically
In this post, we will discuss what are Windows 10 Features on Demand and why some users (specifically Windows 10 systems managed via WSUS) might be unable to download and install FOD (Features on Demand).
Windows 10 Features On Demand are additional feature options available through Windows Update. This download allows organizations to pre-configure Windows 10 installation software with these features prior to deployment. This download can also be used to install features from local media.
Features on Demand (FODs) are Windows feature packages that can be added at any time. Common features include language resources like handwriting recognition or other features like the .NET Framework (.NetFx3). When Windows 10 or Windows Server needs a new feature, it can request the feature package from Windows Update.
Unlike previous Feature Packs, Features on Demand v2 can apply to multiple Windows builds and can be added using DISM without knowing the build number. Always use Features on Demand that match the architecture of the operating system. Adding Features on Demand of the wrong architecture might not return an error immediately, but will likely cause functionality issues in the operating system.
Windows has two different types of Features on Demand:
- FODs without satellite packages: FODs with all language resources packaged into the same package. These FODs are distributed as a single .cab file and can be added using either DISM /Add-Capability or /Add-Package.
- FODs with satellite packages: When you install this type of FOD, only the packages that apply to the Windows image are installed, which reduces disk footprint. These FODs are distributed as a set of several .cab files, but are installed by specifying a single /capabilityname. They can only be added using DISM /Add-Capability (and not /Add-Package).
Windows Features on Demand not installing
Starting with Windows 10 version 1809, FOD (Features on Demand) and language packs can only be installed from Windows Update and not via WSUS.
If you cannot install Windows 10 Features on Demand, you’ll need to configure the Group Policy to go directly to Windows Update to download and install FOD.
Press Windows key + R, type gpedit.msc, hit Enter to launch the Group Policy editor.
Navigate to Computer Configuration > Administrative Templates > System.
Scroll down on the right pane, locate and double-click Specify settings for optional component installation and component repair.
This policy setting specifies the network locations that will be used for the repair of operating system corruption and for enabling optional features that have had their payload files removed.
If you enable this policy setting and specify the new location, the files in that location will be used to repair operating system corruption and for enabling optional features that have had their payload files removed. You must enter the fully qualified path to the new location in the “”Alternate source file path”” text box. Multiple locations can be specified when each path is separated by a semicolon.
The network location can be either a folder, or a WIM file. If it is a WIM file, the location should be specified by prefixing the path with “wim:” and include the index of the image to use in the WIM file. For example “wim:\servershareinstall.wim:3”.
If you disable or do not configure this policy setting, or if the required files cannot be found at the locations specified in this policy setting, the files will be downloaded from Windows Update, if that is allowed by the policy settings for the computer.
Click the radio button for Enabled
Also, set the following:
- Alternate source file path: <BLANK>
- Never attempt to download payload from Windows Update: Uncheck
- Download repair content and optional features directly from Windows Update instead of Windows Server Update Services (WSUS): Check
Click Apply > OK.
Windows 10 v1809 and later users should now be able to download and install Features on Demand.

Obinna Onwusobalu has studied Information & Communication Technology and is a keen follower of the Windows ecosystem. He has been a Windows Insider MVP (2020). He runs a computer software clinic.
Introduction
Sometimes you need to install Windows features that normally need internet access (to install other components), language packs installed today are done in a modular and different format from previous years. In previous times you could simply install a language pack for the associate language and all was good, now there are additional components that also need to be installed otherwise Windows will attempt to download them from the internet (and notify you via the notification center if it cannot).
I needed to install Windows 10 LTSC version 2019 in an offline environment (with no internet access) and I also needed to configure language pack settings and configure keyboard layout. I came up with a solution that works for me and I thought I’d share it. You might know of a simpler or better way, if so feel free to comment.
Note: The LTSC (Long Term Servicing Channel) version of Windows 10 is suited for special environments, and environments without Internet certainly are special. I’ve even verified that the equivalent version of Windows 10 (aka Windows 10 version 1809) behaves the same way, in fact the screenshots used here are from Windows 10 1809, I didn’t import LTSC into my lab yet. I’ve also tested this method with Windows 10 version 2004 (and the associated version 2004 LP and FOD files and it works perfectly !
Step 1. Get the feature on demand packages
Normally if you install a language pack on a Windows 10 computer with valid internet, it will automatically download the associated features on demand for that language and those can include:
- Display language
- Text-to-speech
- Handwriting
- Speech recognition
- Typing
You can see these additional items listed in the screenshot below. Depending on the language pack capabilities, some will have all of these and some will have only a few.
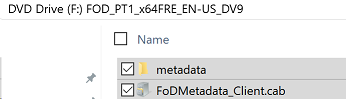
Most of these components (features on demand or FOD packages) can be found on the features on demand ISO for the respective operating system and you can download those ISOs from the Volume License Servicing Center (VLSC) website or go to Visual Studio downloads (formally MSDN). Below you can see some of the FOD packages listed on the mounted ISO.

There are FOD packages for different types of function within Windows and the packages I was most interested in were any related to language (specifically). You may find that you want to install additional FODs for your particular solution.
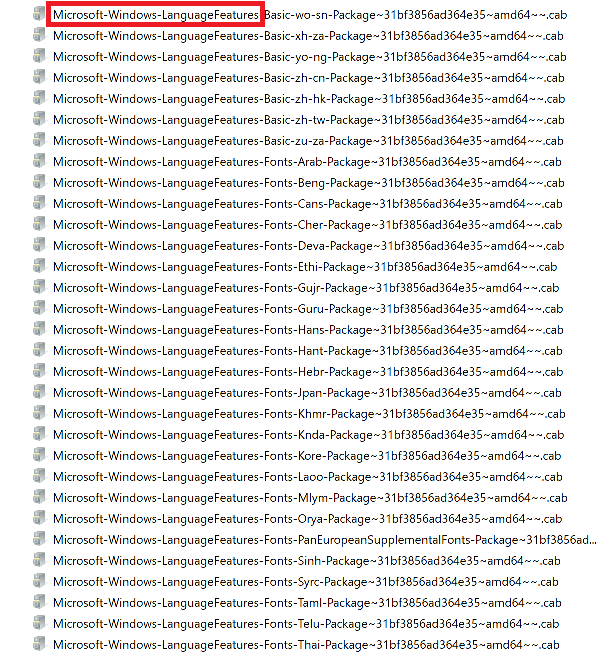
If you scroll down the long list of FOD packages you’ll see some that begin with Microsoft-Windows-LanguageFeatures, and they are sorted by country code (where applicable) into the following sections.
- Microsoft-Windows-LanguageFeatures-Basic
- Microsoft-Windows-LanguageFeatures-Fonts
- Microsoft-Windows-LanguageFeatures-Handwriting
- Microsoft-Windows-LanguageFeatures-OCR
- Microsoft-Windows-LanguageFeatures-Speech
- Microsoft-Windows-LanguageFeatures-TextToSpeech
such as below.

This was my first clue to solve this. I decided to copy all the LanguageFeatures FOD packages from the ISO to somewhere local. The next thing I found on the ISO was Metadata, so I copied that also.
Step 2. Get the Language packs
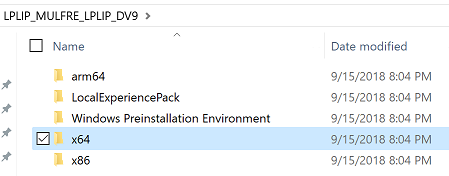
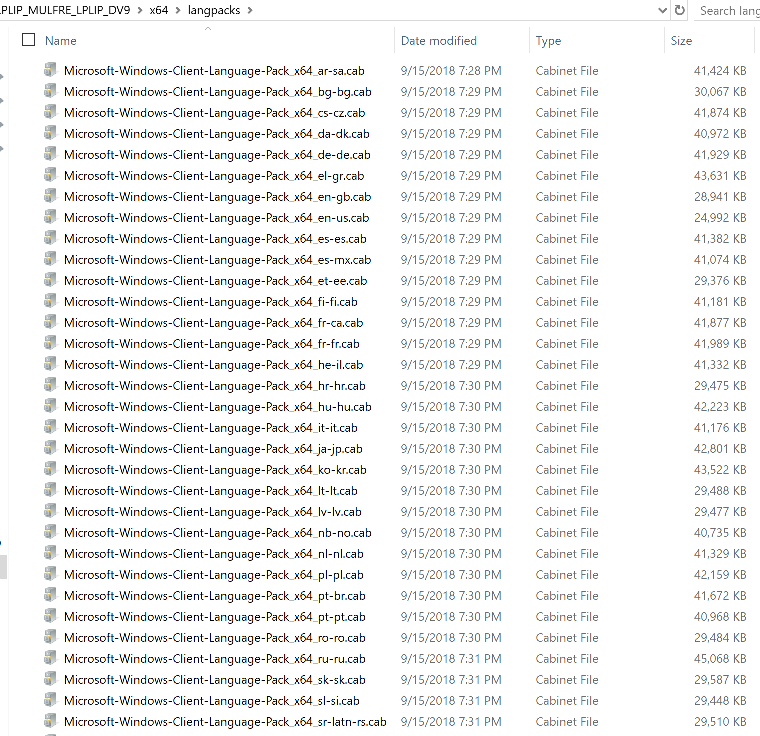
Finally, there are also Language Pack ISOs available for download for your respective version of Windows 10, and on that ISO are larger cab files containing the client language pack for each language that is available. You can find the language packs in the architecture folder on this ISO.
They’ll look something like this.
Step 3. Sort the downloads by country code
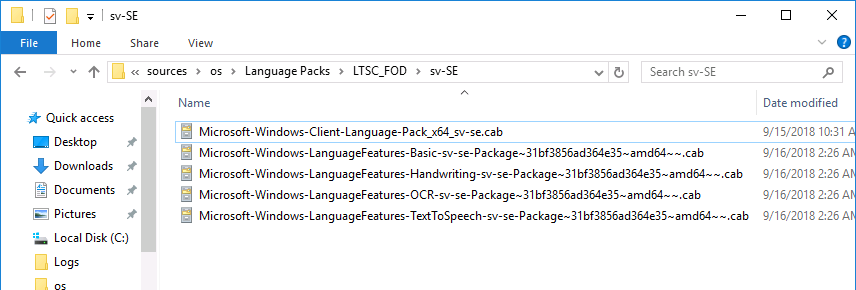
Now that you’ve got the necessary files, you need to decide which languages you are going to support during OSD and sort them into their own respective folders. I copied language specific FOD packages and the client language pack for each language I was interested in into it’s own separate folder like below (sv-SE for Sweden), and then copied those folders onto my package sources folder on the ConfigMgr server.
Note that some languages may have more (or less) FOD packages available than others, so copy all that are available on the ISO and you should be good to go. The first cab file listed below is the Client Language Pack from the Language Pack ISO and the remaining 4 cabs are from the FOD ISO.
You can read the remainder of this blog post here on wind0ws-noob.com
Introduction
Sometimes you need to install Windows features that normally need internet access (to install other components), language packs installed today are done in a modular and different format from previous years. In previous times you could simply install a language pack for the associate language and all was good, now there are additional components that also need to be installed otherwise Windows will attempt to download them from the internet (and notify you via the notification center if it cannot).
I needed to install Windows 10 LTSC version 2019 in an offline environment (with no internet access) and I also needed to configure language pack settings and configure keyboard layout. I came up with a solution that works for me and I thought I’d share it. You might know of a simpler or better way, if so feel free to comment.
Note: The LTSC (Long Term Servicing Channel) version of Windows 10 is suited for special environments, and environments without Internet certainly are special. I’ve even verified that the equivalent version of Windows 10 (aka Windows 10 version 1809) behaves the same way, in fact the screenshots used here are from Windows 10 1809, I didn’t import LTSC into my lab yet. I’ve also tested this method with Windows 10 version 2004 (and the associated version 2004 LP and FOD files and it works perfectly !
Step 1. Get the feature on demand packages
Normally if you install a language pack on a Windows 10 computer with valid internet, it will automatically download the associated features on demand for that language and those can include:
- Display language
- Text-to-speech
- Handwriting
- Speech recognition
- Typing
You can see these additional items listed in the screenshot below. Depending on the language pack capabilities, some will have all of these and some will have only a few.

Most of these components (features on demand or FOD packages) can be found on the features on demand ISO for the respective operating system and you can download those ISOs from the Volume License Servicing Center (VLSC) website or go to Visual Studio downloads (formally MSDN). Below you can see some of the FOD packages listed on the mounted ISO.

There are FOD packages for different types of function within Windows and the packages I was most interested in were any related to language (specifically). You may find that you want to install additional FODs for your particular solution.
If you scroll down the long list of FOD packages you’ll see some that begin with Microsoft-Windows-LanguageFeatures, and they are sorted by country code (where applicable) into the following sections.
- Microsoft-Windows-LanguageFeatures-Basic
- Microsoft-Windows-LanguageFeatures-Fonts
- Microsoft-Windows-LanguageFeatures-Handwriting
- Microsoft-Windows-LanguageFeatures-OCR
- Microsoft-Windows-LanguageFeatures-Speech
- Microsoft-Windows-LanguageFeatures-TextToSpeech
such as below.
This was my first clue to solve this. I decided to copy all the LanguageFeatures FOD packages from the ISO to somewhere local. The next thing I found on the ISO was Metadata, so I copied that also.
Step 2. Get the Language packs
Finally, there are also Language Pack ISOs available for download for your respective version of Windows 10, and on that ISO are larger cab files containing the client language pack for each language that is available. You can find the language packs in the architecture folder on this ISO.
They’ll look something like this.
Step 3. Sort the downloads by country code
Now that you’ve got the necessary files, you need to decide which languages you are going to support during OSD and sort them into their own respective folders. I copied language specific FOD packages and the client language pack for each language I was interested in into it’s own separate folder like below (sv-SE for Sweden), and then copied those folders onto my package sources folder on the ConfigMgr server.
Note that some languages may have more (or less) FOD packages available than others, so copy all that are available on the ISO and you should be good to go. The first cab file listed below is the Client Language Pack from the Language Pack ISO and the remaining 4 cabs are from the FOD ISO.
Next create another folder with the Metadata files within it.

Step 4. Create packages
In ConfigMgr, create a separate package for each language you intend to add support for and point it to the folder containing the Client Language Pack and FOD packages.
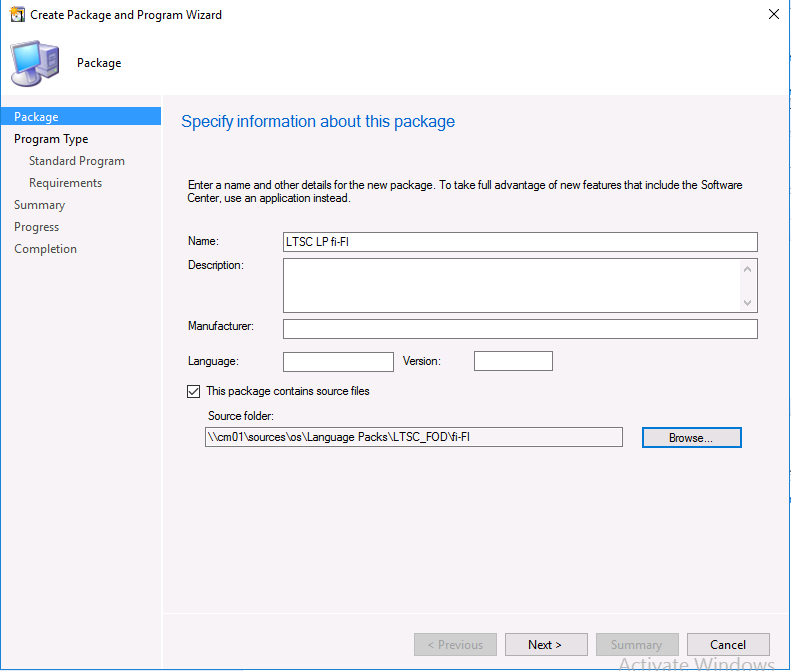
Once you’ve created all the language pack packages, don’t forget to create the Metadata package.
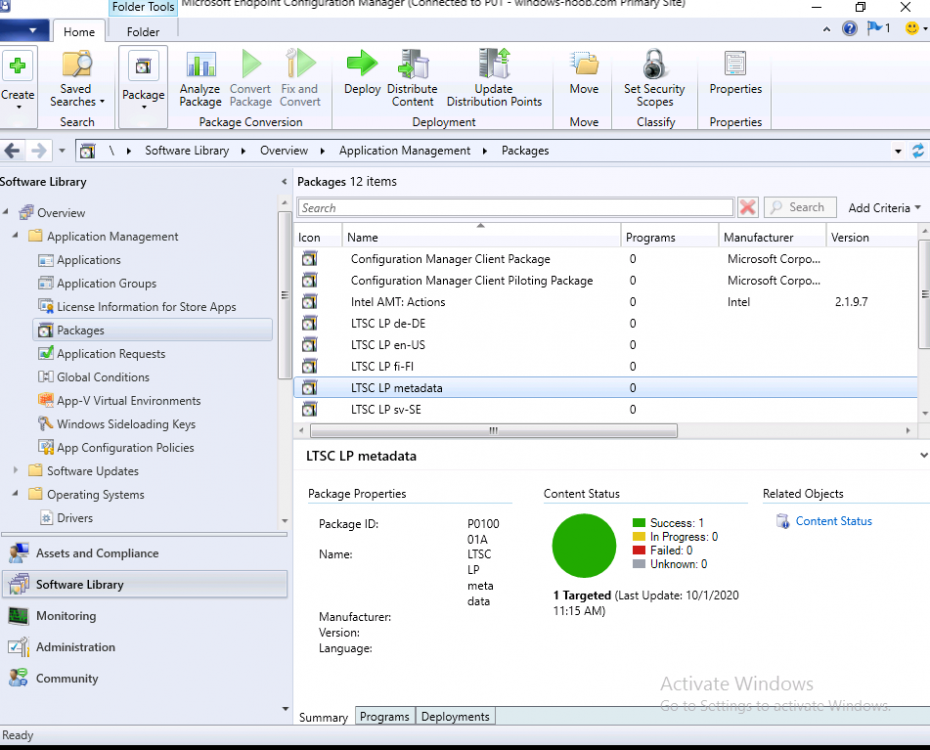
Distribute the packages to your distribution points.
Step 5. Import the task sequence
To save you a lot of effort all you need to do is import my task sequence and then modify the package references to suit your environment.
Note: This is an MDT integrated task sequence so if you want to use it please integrate MDT with ConfigMgr. You will get messages about missing content during the import, choose ‘ignore dependancies’ and it will import the task sequence steps anyway. However, you must then step through each step in the task sequence that references a package, and point it to the equivalent package on your ConfigMgr environment.
After importing the task sequence, make sure to add your language packages (and metadata) to the appropriate steps that reference them otherwise this won’t work, pretty much all of the xcopy steps will need a package attached to them.
Download the following, and import into ConfigMgr.
Windows 10 LTSC language packs without internet.zip
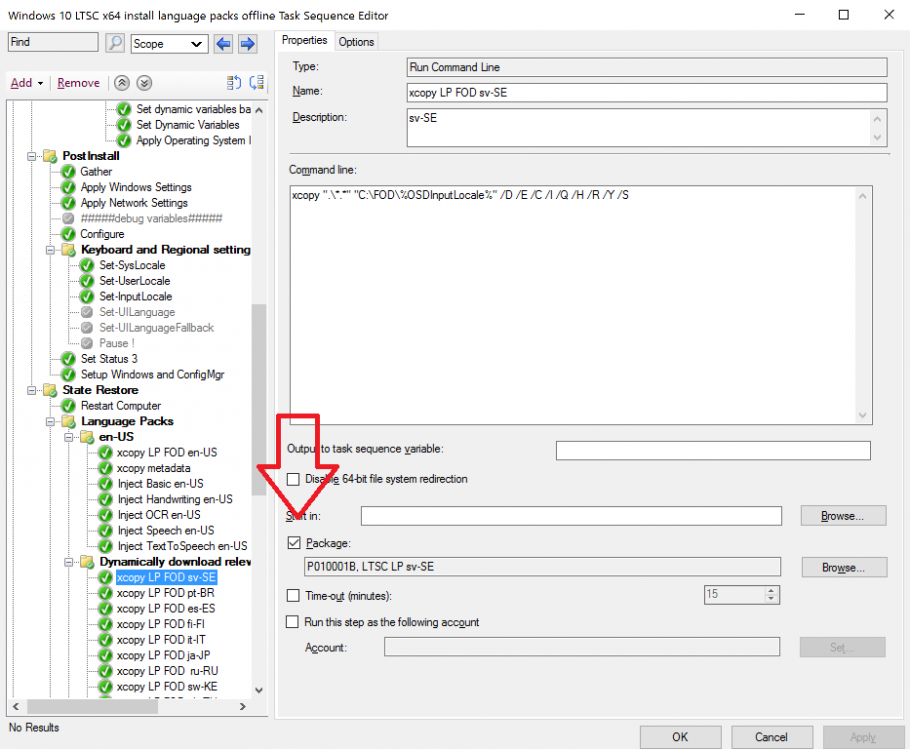
Step 6. A quick look at the task sequence logic
The task sequence works by first setting a variable, called Location. You can set this as a step in the task sequence dynamically based on various inputs (such as DHCP IP address, gateway, computer variable, collection variable). That I leave up to you, I’ve forced this example to use Sweden as the location.
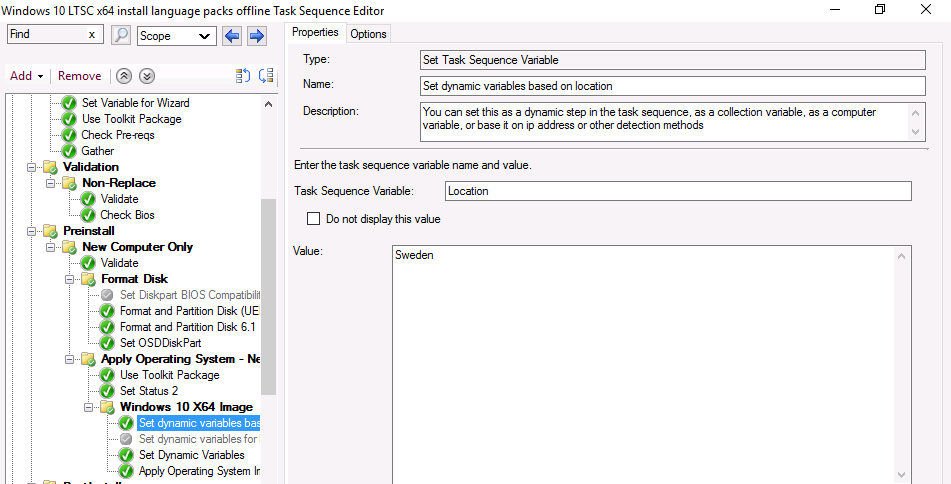
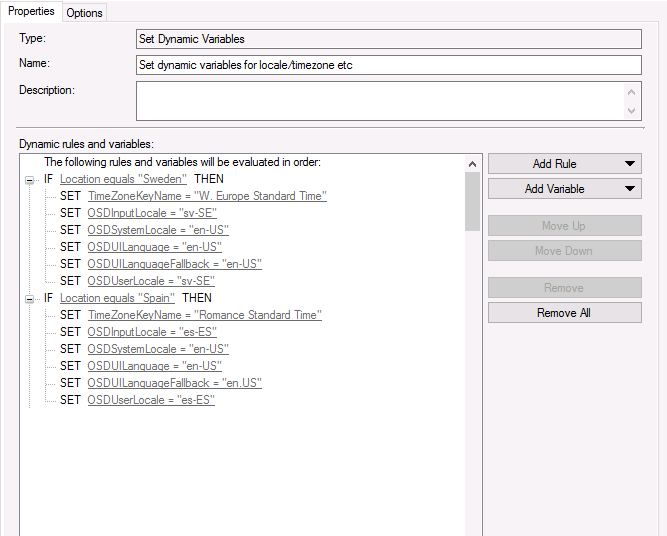
Next, it dynamically sets Language specific variables based on the Location set previously.
You need to add one of these dynamic groups for each language you intend to support. The below screenshot shows two languages configured but you could have multiple.
Next (1) it injects the system, user, locale specific settings based on the dynamic variables set above.
- SysLocale
- UserLocale
- InputLocale
Thee next group (2) copies the en-US language pack+FOD packages, and metadata. This is needed if you want to be able to switch languages via the input switch in the task tray (language bar).
Next, it dynamically downloads (3) the FOD package containing the needed files to add features on demand plus the language pack for the language you are adding support for. It then uses a bunch of DISM commands (4) to inject the necessary FOD packages. After that it sets some reg-keys (5) to deal with known issues relating to language packs cleanup before adding some more steps to allow both languages (en-US and sv-SE in this example) to display on the login screen using the input methods switch.
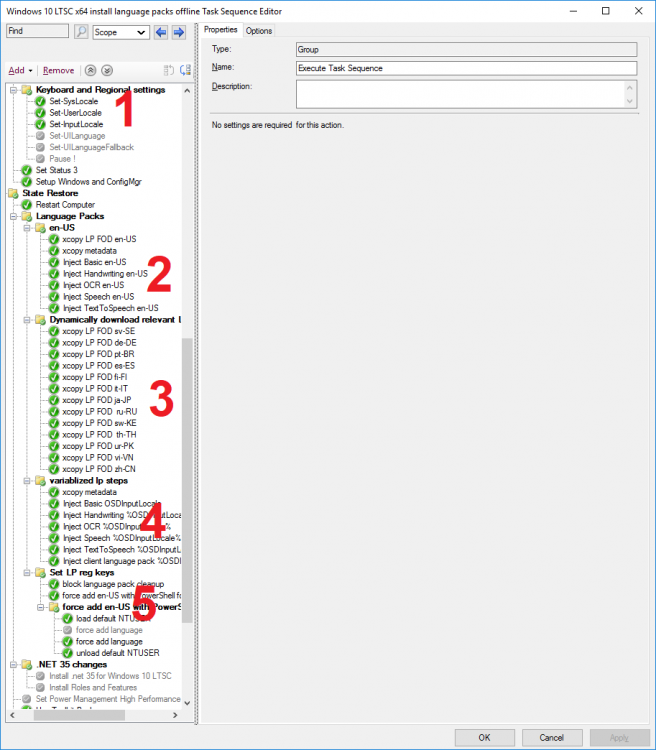
Step 7. Viewing the result
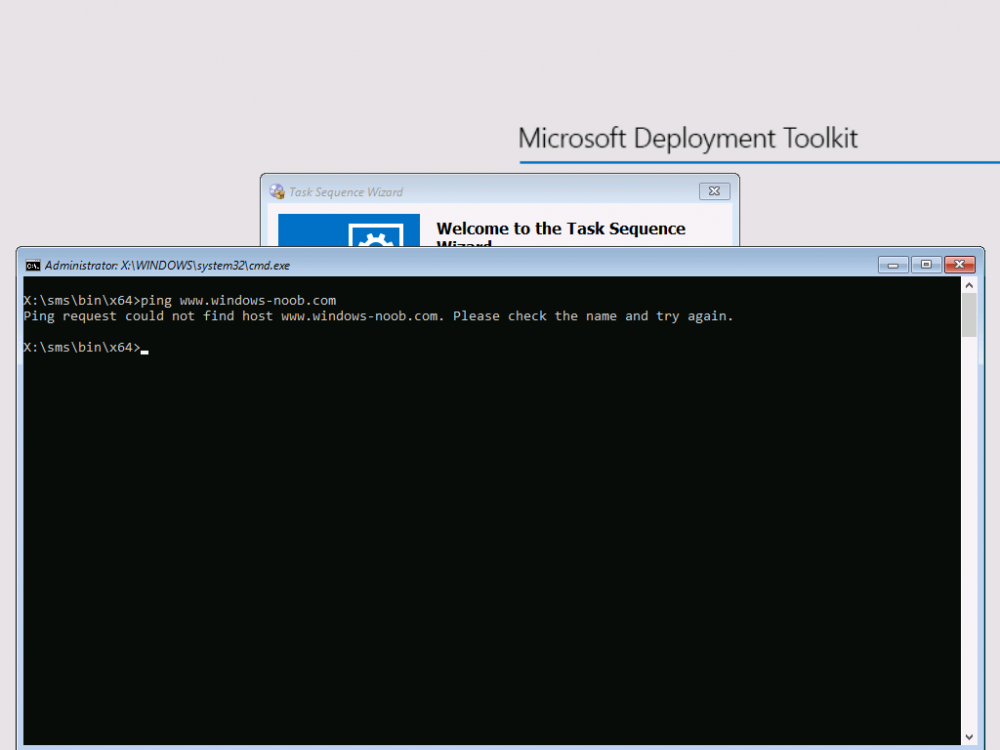
After all that hard work you’ll want to see the end result. In this lab I’ve disabled internet access by simply powering off my Smoothwall (which controls internet to the lab). We can see in WinPE that there is no internet.
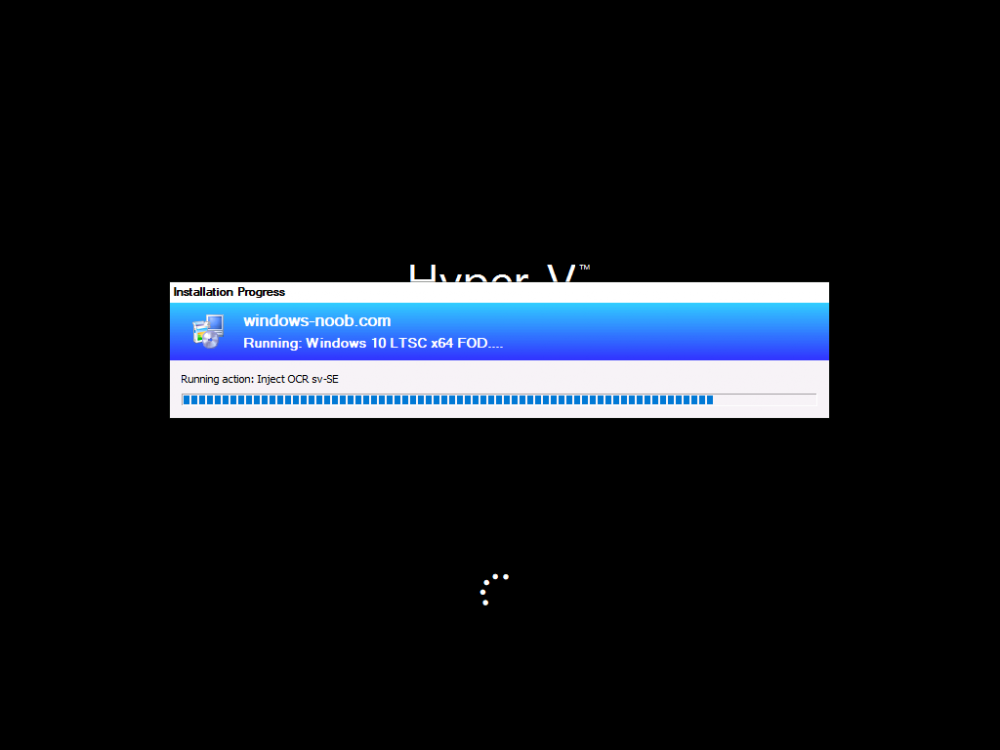
After selecting the task sequence it downloads the Operating System, applies it and then starts injecting the cab files and other dism operations. Below you can see it inject one of the FOD packages
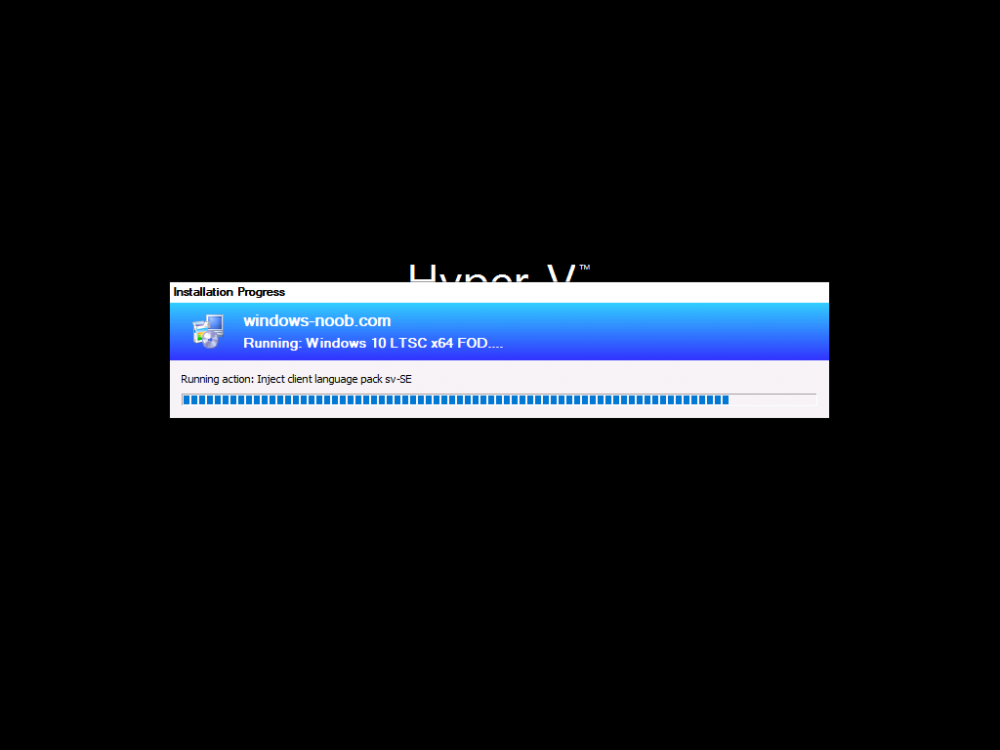
And below it’s injecting the Client Language Pack, all of this is dynamic based on the Location variable.
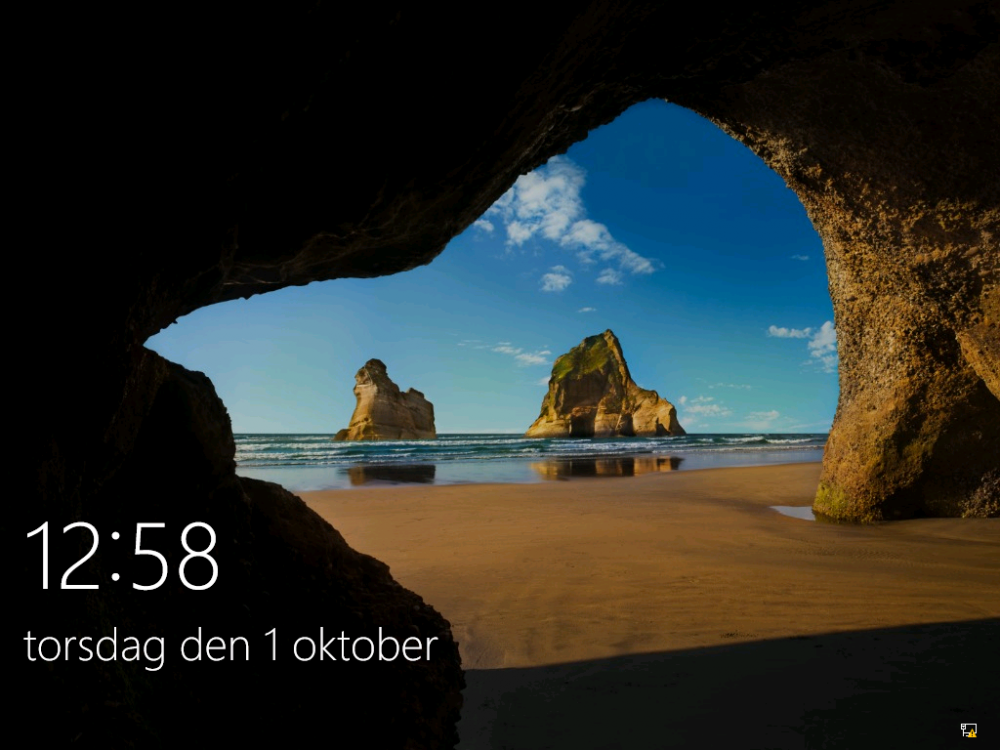
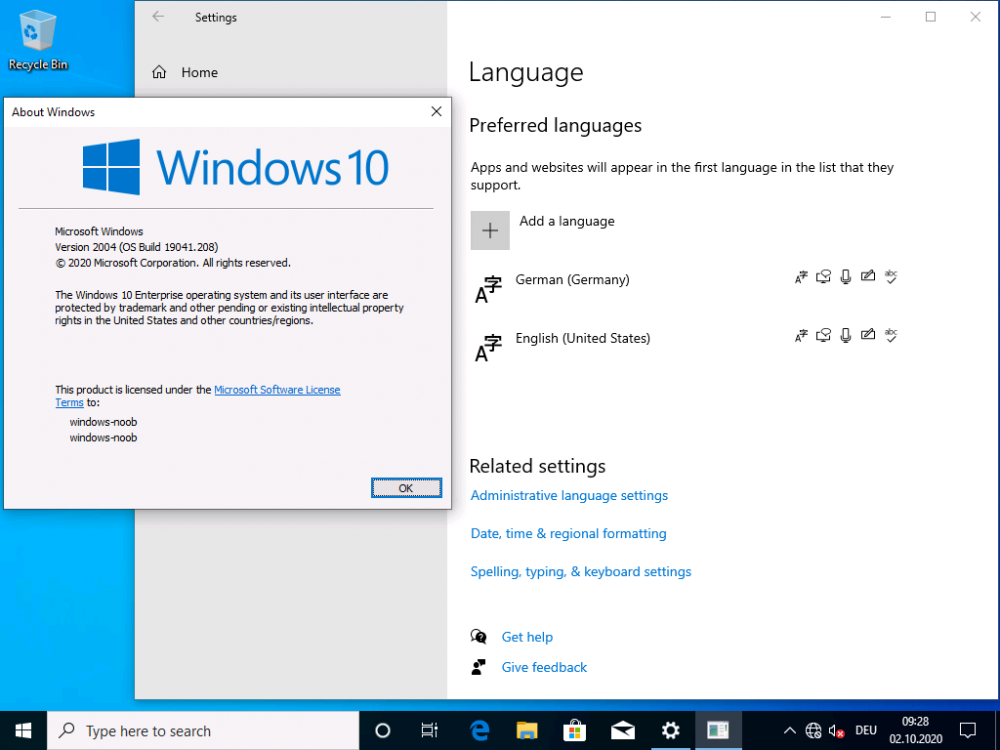
After installation is complete the login screen shows no internet in the LAN connection, but the language is in Swedish.
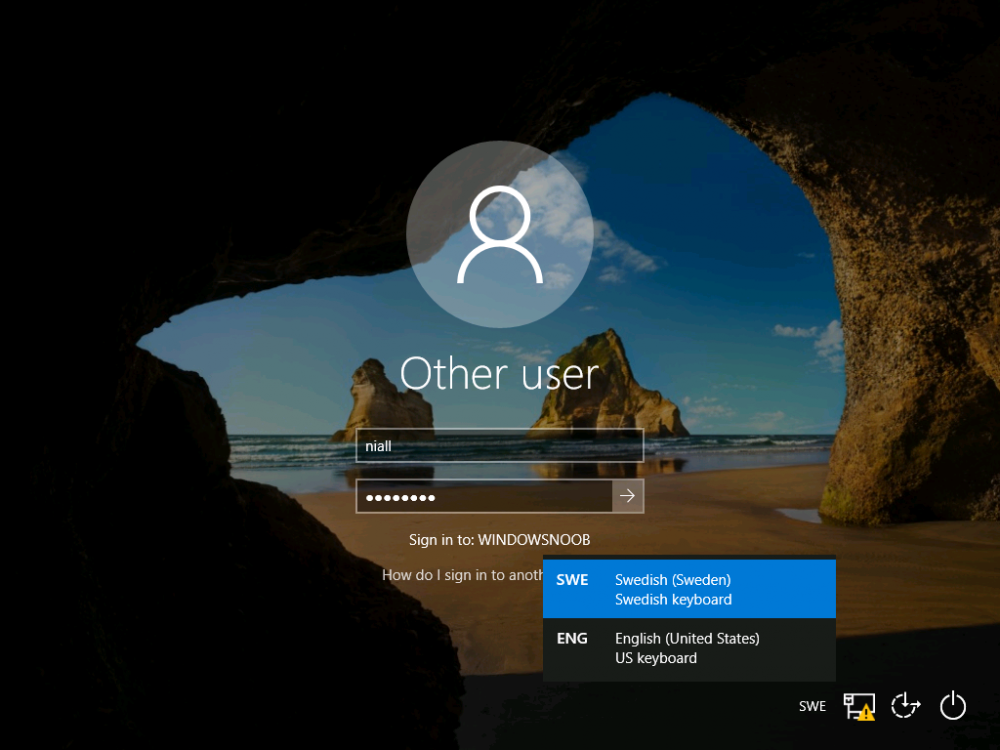
When you attempt to login you’ll see the language bar, awesome.
And after logging in, you will see that your chosen language pack is installed along with the necessary FOD packages, automatically and dynamically even without internet !
Awesome or what !
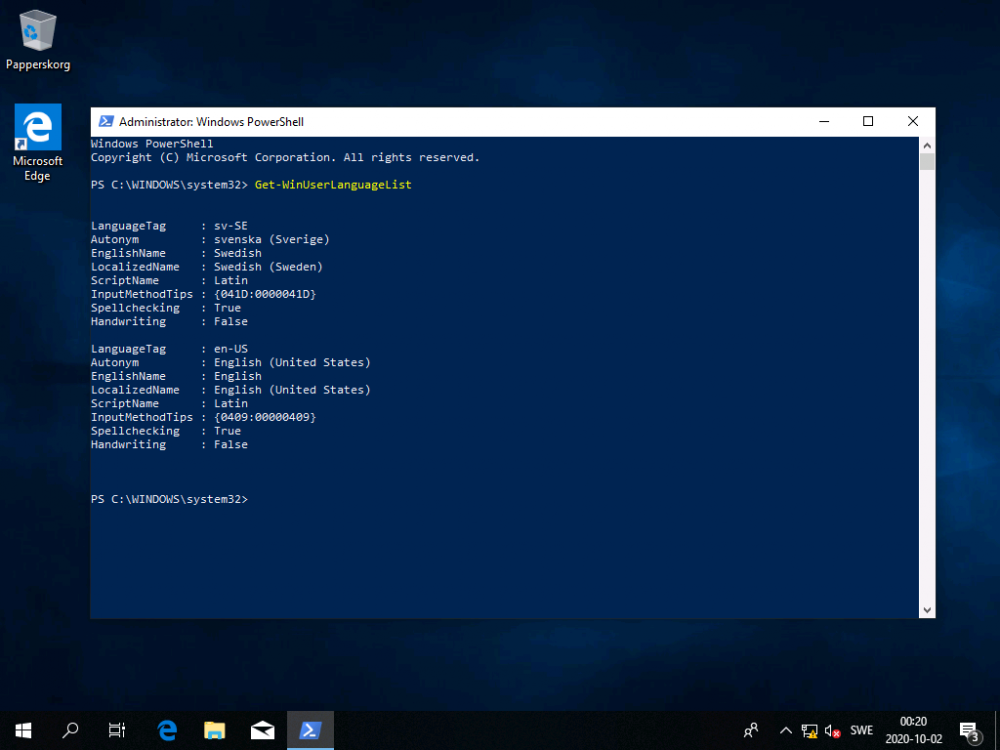
And of course you can use PowerShell to verify the installation of your language pack with Get-WinUserLanguageList.
Windows 10 version 2004
What about Windows 10 version 2004 ? it works perfectly using this exact same method, just switch out the Operating System wim file with the 2004 version and replace the FOD and LP packages with the correct version, see below.
Recommended reading
- Add language packs to Windows — https://docs.microsoft.com/en-us/windows-hardware/manufacture/desktop/add-language-packs-to-windows
- Known issues — https://docs.microsoft.com/en-us/windows-hardware/manufacture/desktop/language-packs-known-issue
- Available languages — https://docs.microsoft.com/en-us/windows-hardware/manufacture/desktop/available-language-packs-for-windows
- Language and region feature on demand — https://docs.microsoft.com/en-us/windows-hardware/manufacture/desktop/features-on-demand-language-fod
- https://docs.microsoft.com/en-us/powershell/module/international/get-winuserlanguagelist?view=win10-ps
-
Partition Wizard
-
Partition Manager
- How to Add and Remove Win 10 Features on Demand?
How to Add and Remove Win 10 Features on Demand? [Partition Manager]
By Vicky | Follow |
Last Updated December 01, 2020
Have you ever heard Windows 10 Features on Demand (FOD)? And do you know how to add and remove it? In this post, MiniTool shows you what FOD is, how to use it, and something else about it. Now, let’s check them one by one.
Features on Demand (FOD) is the Windows features package that can be added at any time. The package includes language resources like handwriting recognition or other features like the .NET Framework.

Varying from previous Features Packs, FOD V2 can be applied to multiple Windows builds and can be added using DISM without knowing the build number. But note that you should always use Features on Demand that match the architecture of the operating system because a wrong adding will likely cause functionality issues in the operating system.
There are two different types of Features on Demand when Windows 10, version 1809 and Windows Server 2019 come out.
- FODs without satellite packages: FODs with all language resources are packaged into the same package. These FODs are distributed as a single.cab file and can be added using DISM/Add-Capability or Add-package.
- FODs with satellite packages: Only the package that applies to the Windows image is installed if you install this type of FOD. This can reduce disk footprint. This type of FODs is distributed as a set of several.cab files, but are installed by specifying a single /capabilityname. Another difference from the first type is that these FODs can only be added using DISM /Add-Capability.
Add or Remove Windows 10 FOD
As the above content shows, you can use some DISM commands to add FODs without satellite packages and FODs with satellite packages. Now, let’s see more information about how to manage FOD.
Tip: You can just use the add-capability command to add both satellite and non-satellite FODs.
Use DISM /Add-Package
To just add FODs without satellite packages to a Windows image, you can use the DISM /add-package command. Now, let’s see the specific commands to add or remove Windows 10 Features on Demand.
/add-package: Adds a package that includes a FOD .cab to an image. Example: DISM.exe/image:C:MountWindows/add-package/packagepath:E:Microsoft-Holographic-Destop-FOD-package~31bf3856ad364e35~amd64~~.cab
/get-package: Get a list of all packages in image. Example: DISM /image:CMountWindows/get-package
/get-packageinfo: Get information of a package in an image. Example: DISM/image:C:MountWindows/get-packageInfo/packagename:Microsoft-Windpws-Xps -Xps-Viewer-Opt-Package~31bf3856ad364e35~amd64~~10.0.17134.1000
/remove-package: Removes a package from an image. Example: DISM.exe/image:C:Windows/remove-package/packagename:Microsoft.Windows.Calc.Demo~6595b6144ccf1df~x86~en~1.0.0.0
Use DISM/Add-Capability
The second choice to add or remove Windows 10 Features on Demand is using DISM /Add-Capability. This DISM command not only helps you add the non-satellite FODs but also satellite FODs.
But there are some things you need to note that are:
- Use the /source command to tell Windows where to find FOD installation files if you are preinstalling a FOD onto an offline image.
- Use /LimitAccess if you do not want to install FOD from Windows Update. This tells DISM to not check Windows Update or Windows Server Update Services for the capability source files.
- Use /Add-Capability to download features from Windows Update and add them to an online image if you are adding a FOD to the image.
Now, let’s see the specific commands.
- /Add-Capability: Adds a capability to an image. Example: DISM.exe/image:C:MountWindows/add-capability/capabilityname:Language.Basic~~~en-US~0.0.1.0 /Source:E:
- /Get-Capabilities: Gets capabilities un the image. Example: DISM/image:C:MountWindwos/get-capabilities
- /Get-CapabilityInfo: Gets information of a capability in the image. Example: DISM/image:C:MountWindows/get-capabilityInfo/CapabilityName:Lamguage.Basic~~~en-US~0.0.1.0
- /Remove-Capability: Removes a capability from an image (Note that you cannot remove a capability that other packages depend). Example: DISM.exe/image:C:MountWindwos/remove-capability/CapabilityName:Language.Basic~~~en-US~0.0.1.0
About The Author

Position: Columnist
Vicky is a website editor who has been writing tech articles since she was graduated from university. Most of her articles talk about Windows PC and hard disk issues. Some of her articles also touch on YouTube usage and issues.
During her spare time, she likes to spend time reading, watching videos, and sitting on her Yoga mat to relax.