
Набор компонентов RSAT (Remote Server Administration Tools / Средства удаленного администрирования сервера) позволяет удаленно управлять серверными ролями и компонентами на серверах Windows Server с обычной рабочей станции . В RSAT входят как графические MMC оснастки, так и утилиты командной строки, и модули PowerShell. Вы можете установить RSAT как на десктопных версиях Windows 10 или 11, так и на платформе Windows Server. В этой статье мы покажем, как установить RSAT в Windows 10 и Windows 11, и в Windows Server 2022/2019/2022 в онлайн и в офлайн режиме через Feature on Demand из графического интерфейса Windows и через консоль PowerShell.
Содержание:
- Установка RSAT из графического интерфейса Windows 10 через Features on Demand (FoD)
- Установка RSAT в Windows 10 с помощью PowerShell
- Установка RSAT в Windows 11
- Как установить Remote Server Administration Tools в Windows Server 2022,2019,2016?
- Ошибка 0x800f0954 при установке RSAT в Windows 10
- Установка RSAT в Windows 10 в офлайн режиме
- Частые ошибки установки Remote Server Administration Tools в Windows
Установка RSAT из графического интерфейса Windows 10 через Features on Demand (FoD)
До версии Windows 10 1809 пакет удаленного администрирования серверов RSAT (Remote Server Administration Tools) устанавливался в виде MSU обновления, которое нужно было вручную скачивать с серверов Microsoft и устанавливать на компьютерах. При каждом обновлении билда Windows 10 нужно было устанавливать новую версию RSAT. Сейчас на странице загрузки RSAT сайте Microsoft висит следующая надпись:
IMPORTANT: Starting with Windows 10 October 2018 Update, RSAT is included as a set of “Features on Demand” in Windows 10 itself.
Дело в том, что в современных билдах Windows 10 пакет Remote Server Administration Tools не нужно скачивать вручную. Средства его установки уже встроены в образ Windows 10 и доступны через опцию Функции по требованию / Features on Demand.
Дистрибутив Windows 10 не включает в себя установочные файлы RSAT. Для их установки вашему компьютеру нужен прямой доступ в Интернет. Кроме того установить RSAT можно Professional и Enterprise редакциях в Windows 10, но не в Windows 10 Home.
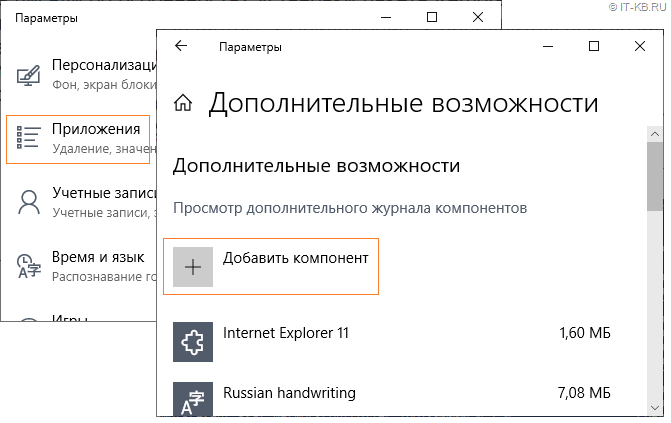
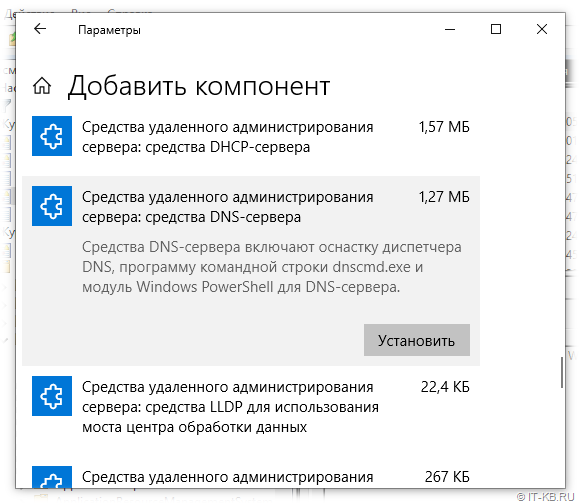
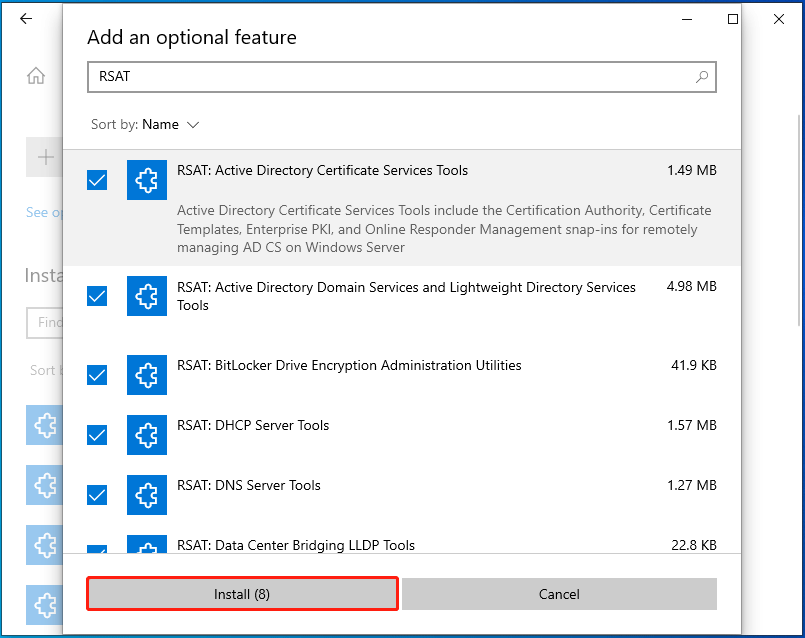
Чтобы установить RSAT в Windows 10 нужно перейти в раздел Settings -> Apps -> Optionla Features -> Add a feature (Параметры Windows -> Приложения -> Дополнительные возможности -> Добавить компонент).
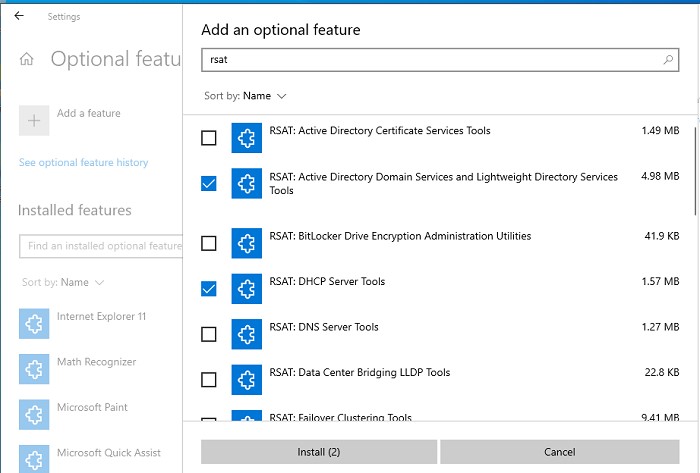
Выберите нужные компоненты RSAT и нажмите Install.
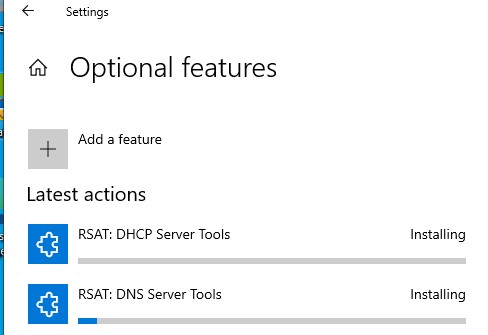
Для установки некоторых компонентов RSAT может потребоваться перезагрузка.
Для Windows 10 доступны следующие инструменты администрирования RSAT:
- RSAT: Active Directory Domain Services and Lightweight Directory Services Tools
- RSAT: BitLocker Drive Encryption Administration Utilities
- RSAT: Active Directory Certificate Services Tools
- RSAT: DHCP Server Tools (настройка и управление DHCP сервером на Windows Server)
- RSAT: DNS Server Tools
- RSAT: Failover Clustering Tools
- RSAT: File Services Tools
- RSAT: Group Policy Management Tools
- RSAT: IP Address Management (IPAM) Client
- RSAT: Data Center Bridging LLDP Tools
- RSAT: Network Controller Management Tools
- RSAT: Network Load Balancing Tools
- RSAT: Remote Access Management Tools
- RSAT: Remote Desktop Services Tools
- RSAT: Server Manager
- RSAT: Shielded VM Tools
- RSAT: Storage Migration Service Management Tools
- RSAT: Storage Replica Module for Windows PowerShell
- RSAT: System Insights Module for Windows PowerShell
- RSAT: Volume Activation Tools (консоль активации KMS сервера)
- RSAT: Windows Server Update Services Tools
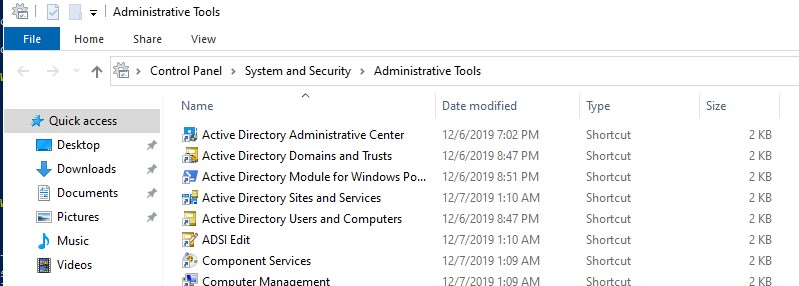
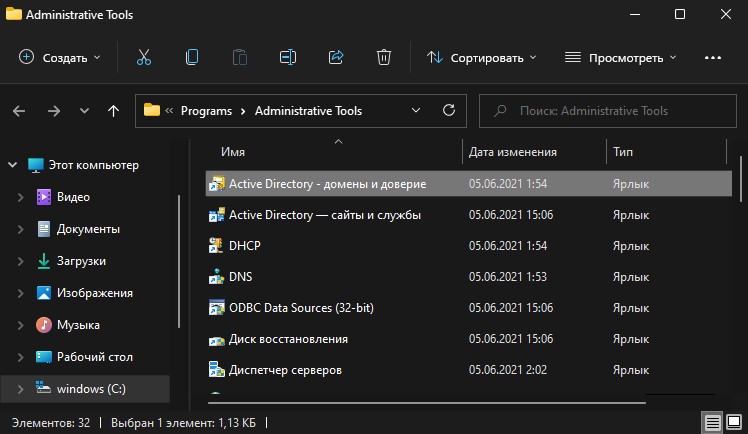
После установки, графические mmc оснастки RSAT доступны в панели управления в секции Administrative Tools (Control PanelSystem and SecurityAdministrative Tools).
Установка RSAT в Windows 10 с помощью PowerShell
Вы можете установить компоненты администрирования RSAT с помощью PowerShell. В этом примере мы покажем, как управлять компонентами RSAT в Windows 10 20H2.
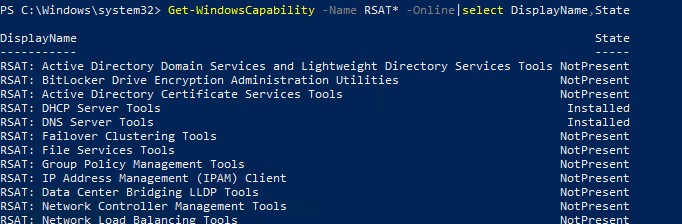
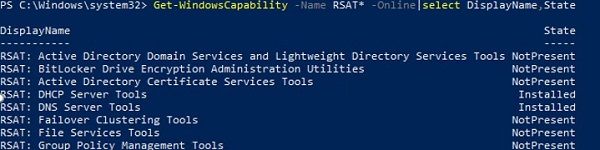
С помощью следующей PowerShell команды можно вывести список компонентов RSAT, установленных на вашем компьютере:
Можно представить статус установленных компонентов RSAT в более удобной таблице:
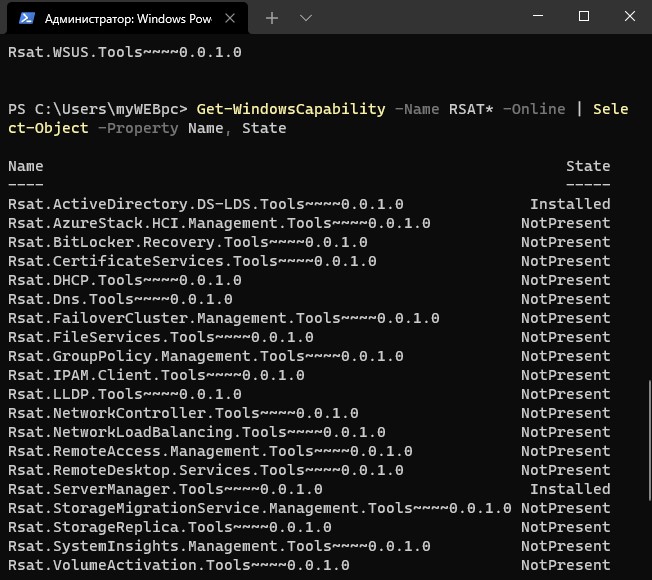
Get-WindowsCapability -Name RSAT* -Online | Select-Object -Property DisplayName, State
В нашем примере инструменты управления DHCP и DNS установлены (
Installed
), а все остальные модуль RSAT отсутствуют (
NotPresent
).
Для установки RSAT в Windows используется PowerShell командлет Add-WindowsCapability.
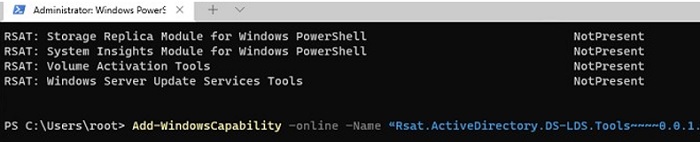
Чтобы установить конкретный инструмент RSAT, например инструменты управления AD (в том числе консоль ADUC из модуль Active Directory для Windows Powershell), выполните команду:
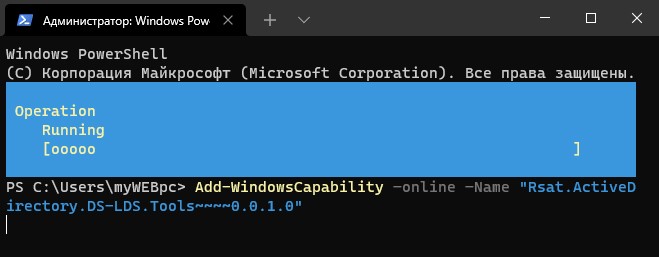
Add-WindowsCapability –online –Name Rsat.ActiveDirectory.DS-LDS.Tools~~~~0.0.1.0
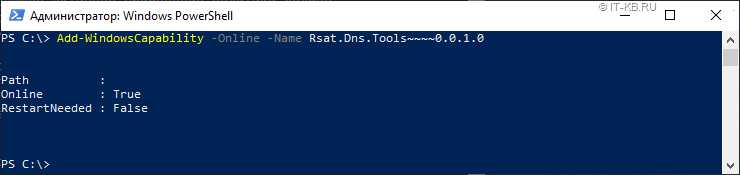
Для установки консоли управления DNS и модуля PowerShell DNSServer, выполните:
Add-WindowsCapability –online –Name Rsat.Dns.Tools~~~~0.0.1.0
И т.д.
Add-WindowsCapability -Online -Name Rsat.BitLocker.Recovery.Tools~~~~0.0.1.0
Add-WindowsCapability -Online -Name Rsat.CertificateServices.Tools~~~~0.0.1.0
Add-WindowsCapability -Online -Name Rsat.DHCP.Tools~~~~0.0.1.0
Add-WindowsCapability -Online -Name Rsat.FailoverCluster.Management.Tools~~~~0.0.1.0
 Add-WindowsCapability -Online -Name Rsat.FileServices.Tools~~~~0.0.1.0
Add-WindowsCapability -Online -Name Rsat.GroupPolicy.Management.Tools~~~~0.0.1.0
Add-WindowsCapability -Online -Name Rsat.IPAM.Client.Tools~~~~0.0.1.0
Add-WindowsCapability -Online -Name Rsat.LLDP.Tools~~~~0.0.1.0
Add-WindowsCapability -Online -Name Rsat.NetworkController.Tools~~~~0.0.1.0
Add-WindowsCapability -Online -Name Rsat.NetworkLoadBalancing.Tools~~~~0.0.1.0
Add-WindowsCapability -Online -Name Rsat.RemoteAccess.Management.Tools~~~~0.0.1.0
Add-WindowsCapability -Online -Name Rsat.RemoteDesktop.Services.Tools~~~~0.0.1.0
Add-WindowsCapability -Online -Name Rsat.ServerManager.Tools~~~~0.0.1.0
Add-WindowsCapability -Online -Name Rsat.Shielded.VM.Tools~~~~0.0.1.0
Add-WindowsCapability -Online -Name Rsat.StorageMigrationService.Management.Tools~~~~0.0.1.0
Add-WindowsCapability -Online -Name Rsat.StorageReplica.Tools~~~~0.0.1.0
Add-WindowsCapability -Online -Name Rsat.SystemInsights.Management.Tools~~~~0.0.1.0
Add-WindowsCapability -Online -Name Rsat.VolumeActivation.Tools~~~~0.0.1.0
Add-WindowsCapability -Online -Name Rsat.WSUS.Tools~~~~0.0.1.0
Чтобы установить сразу все доступные инструменты RSAT, выполните:
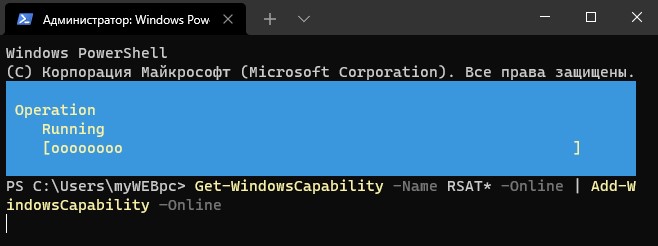
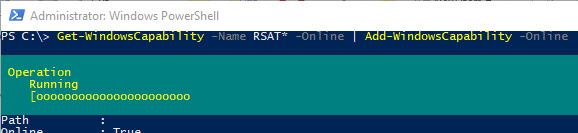
Get-WindowsCapability -Name RSAT* -Online | Add-WindowsCapability –Online
Также вы можете установить компоненты RSAT с помощью утилиты управления образом DISM. Например:
DISM.exe /Online /add-capability /CapabilityName:Rsat.ActiveDirectory.DS-LDS.Tools~~~~0.0.1.0 /CapabilityName:Rsat.GroupPolicy.Management.Tools~~~~0.0.1.0 /CapabilityName:Rsat.WSUS.Tools~~~~0.0.1.0
Чтобы установить только отсутствующие компоненты RSAT, выполните:
Get-WindowsCapability -Name RSAT* -Online | where State -EQ NotPresent | Add-WindowsCapability –Online
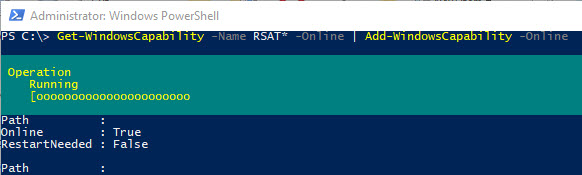
Теперь убедитесь, что инструменты RSAT установлены (статус Installed);

После этого установленные инструменты RSAT отобразятся в панели Manage Optional Features.
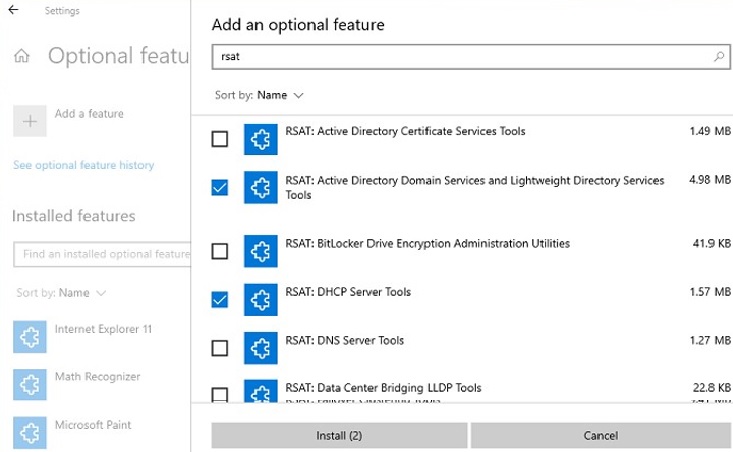
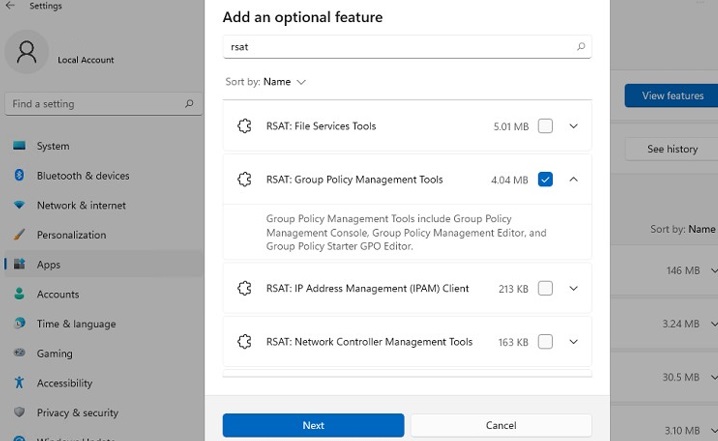
RSAT в Windows 11 также можно установить через панель Settings -> Apps -> Optional Features -> Add an optional feature (View features).
Наберите
RSAT
в поисковой строке и выберите компоненты для установки.

Также вы можете использовать PowerShell для установки RSAT в Windows 11:
Add-WindowsCapability –online –Name Rsat.ActiveDirectory.DS-LDS.Tools~~~~0.0.1.0

Как установить Remote Server Administration Tools в Windows Server 2022,2019,2016?
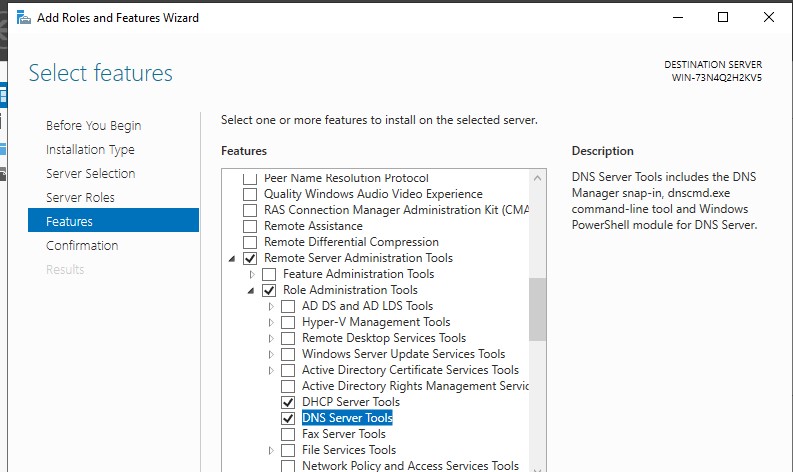
В Windows Server для установки RSAT не нужен доступ в интернет. Компоненты RSAT можно устанавливать при установке соответствующих ролей или фич Windows Server, либо можно установить их через Server Manager (Add roles and Features -> Features -> Remote Server Administration Tools). Все компоненты RSAT разбиты на две секции: Feature Administration Tools и Role Administration Tools. Выберите необходимые компоненты и нажмите Next -> Next.
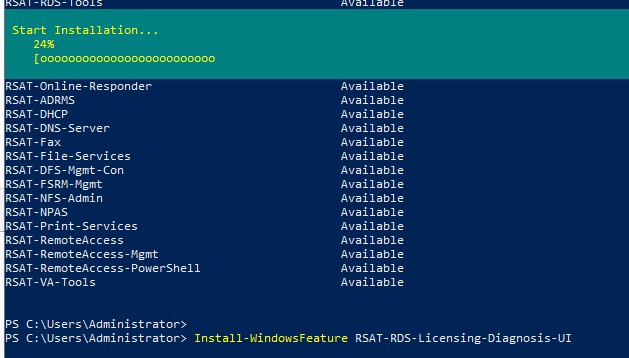
Для установки RSAT в Windows Server используется командлет установки компонентов и ролей — Install-WindowsFeature. Вывести список доступных компонентов RSAT в Windows Server 2022, 2019 и 2016:
Get-WindowsFeature| Where-Object {$_.name -like "*RSAT*"}| ft Name,Installstate
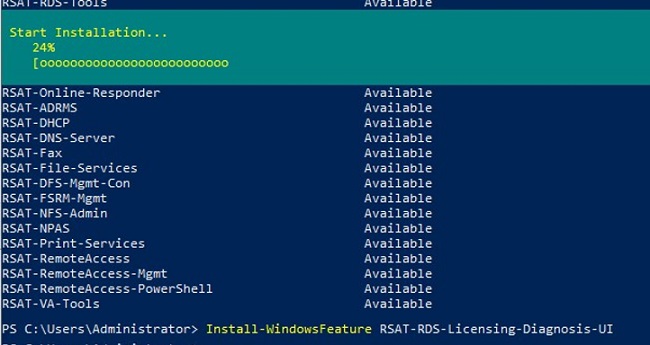
Для установки выбранного компонента RSAT, укажите его имя. Например, установим консоль диагностики лицензирования RDS:
Install-WindowsFeature RSAT-RDS-Licensing-Diagnosis-UI
Установленные графические консоли RSAT доступны из Server Manager или через панель управления.
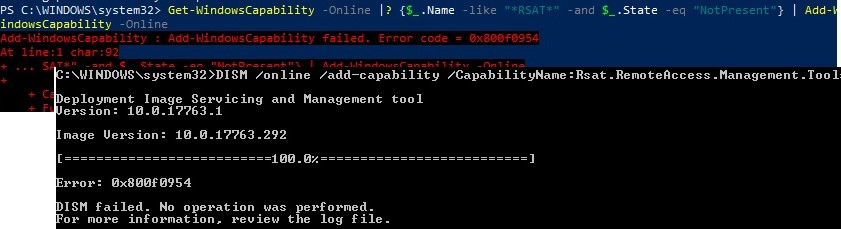
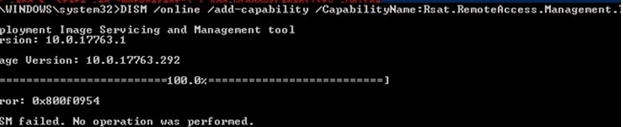
Ошибка 0x800f0954 при установке RSAT в Windows 10
Если ваш компьютер Windows 10 с помощью групповой политики настроен на получение обновлений с локального сервера обновлений WSUS или SCCM SUP, то при установке RSAT через Add-WindowsCapability или DISM вы получите ошибку 0x800f0954.
Для корректной установки компонентов RSAT в Windows 10 вы можете временно отключить обновление со WSUS сервера в реестре (HKLMSOFTWAREPoliciesMicrosoftWindowsWindowsUpdateAU параметр UseWUServer= 0) и перезапустить службу обновления. Воспользуйтесь таким скриптом PowerShell:
$val = Get-ItemProperty -Path "HKLM:SOFTWAREPoliciesMicrosoftWindowsWindowsUpdateAU" -Name "UseWUServer" | select -ExpandProperty UseWUServer
Set-ItemProperty -Path "HKLM:SOFTWAREPoliciesMicrosoftWindowsWindowsUpdateAU" -Name "UseWUServer" -Value 0
Restart-Service wuauserv
Get-WindowsCapability -Name RSAT* -Online | Add-WindowsCapability –Online
Set-ItemProperty -Path "HKLM:SOFTWAREPoliciesMicrosoftWindowsWindowsUpdateAU" -Name "UseWUServer" -Value $val
Restart-Service wuauserv -Force
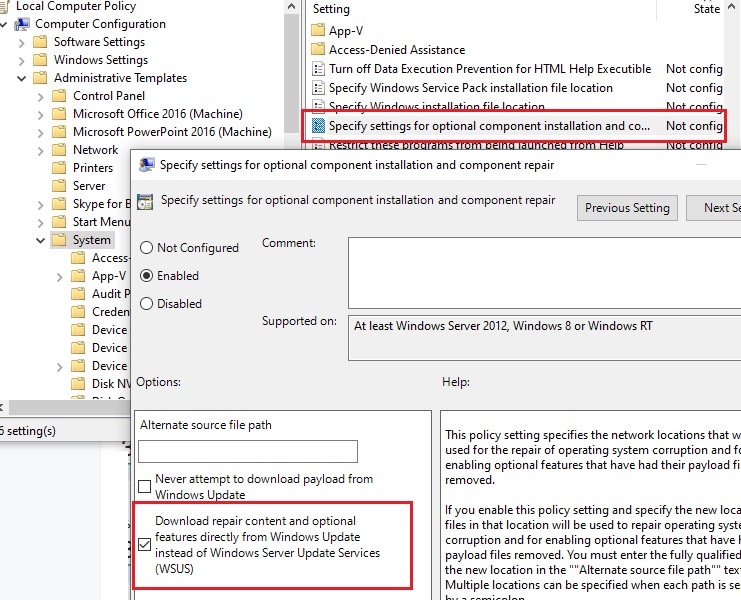
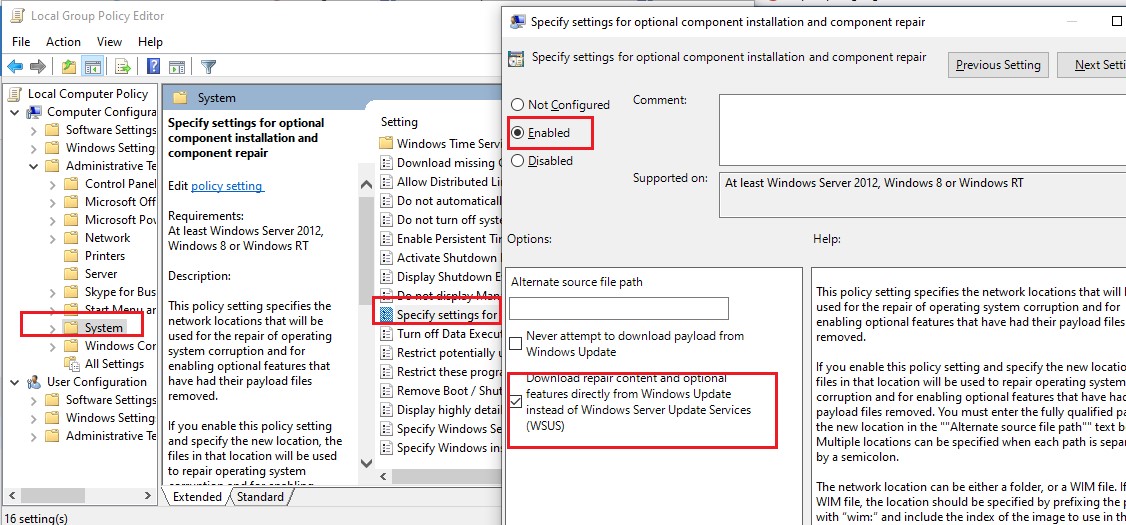
Либо вы можете настроить новый параметр GPO, который позволяет настраивать параметры установки дополнительных компонентов Windows и Feature On Demand (в том числе RSAT).
- Откройте редактор локальной GPO –
gpedit.msc
или используйте доменную консоль управления GPO –
gpmc.msc
); - Перейдите в раздел Computer Configuration -> Administrative Templates -> System;
- Включите политику Specify settings for optional component installation and component repair, и включите опцию Download repair content and optional features directly from Windows Updates instead of Windows Server Updates Services (WSUS) (опция “Скачайте содержимое для восстановления и дополнительные компненты непосредственно из Центра обновления Windows вместо использования службы WSUS”);

- Сохраните изменения и обновите настройки групповых политик (
gpupdate /force
).
Теперь установка RSAT через PowerShell или Dism должна выполняться без ошибок.
Установка RSAT в Windows 10 в офлайн режиме
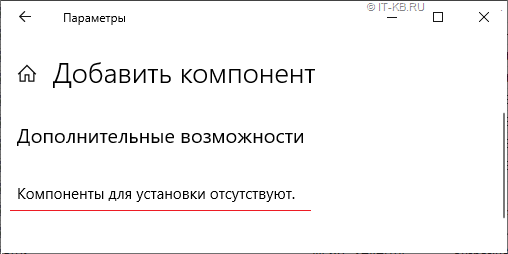
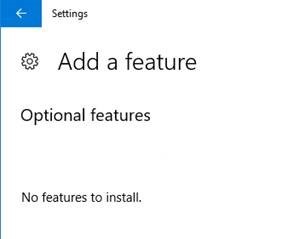
Если при установке RSAT вы столкнетесь с ошибкой Add-WindowsCapability failed. Error code = 0x800f0954, или в списке дополнительных компонентов вы не видите RSAT (Компоненты для установки отсутствуют), скорее всего ваш компьютер настроен на получение обновлений со внутреннего WSUS/SCCM SUP сервера. Если вы не можете открыть прямой доступ с рабочей станции к серверам Windows Update, вы можете воспользоваться офлайн установкой RSAT (рекомендуется для корпоративных сетей без прямого доступа в Интернет).

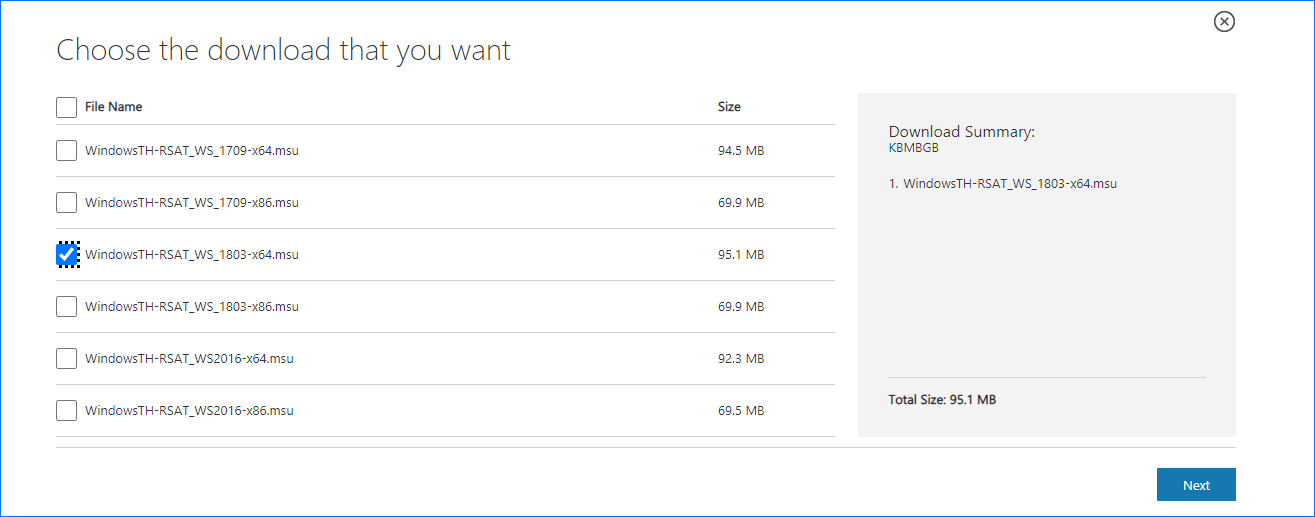
Для офлайн установки RSAT нужно скачать ISO образ диска с компонентами FoD для вашей версии Windows 10 из вашего личного кабинета на сайте лицензирования Microsoft — Volume Licensing Service Center (VLSC). Образ называется примерно так: Windows 10 Features on Demand, version 1903.
Например, для Windows 10 1903 x64 нужно скачать образ SW_DVD9_NTRL_Win_10_1903_64Bit_MultiLang_FOD_.ISO (около 5 Гб). Распакуйте образ в сетевую папку. У вас получится набор из множества *.cab файлов, среди которых есть компоненты RSAT.
Теперь для установки компонентов RSAT на десктопе Windows 10 нужно указывать путь к данному сетевому каталогу с FoD. Например:
Add-WindowsCapability -Online -Name Rsat.ActiveDirectory.DS-LDS.Tools~~~~0.0.1.0 -LimitAccess -Source msk-fs01DistrWindows-FODWin101903x64

Также вы можете указать путь к каталогу с компонентами FoD с помощью рассмотренной выше групповой политики. Для этого в параметре Alternative source file path нужно указать UNC путь к каталогу.
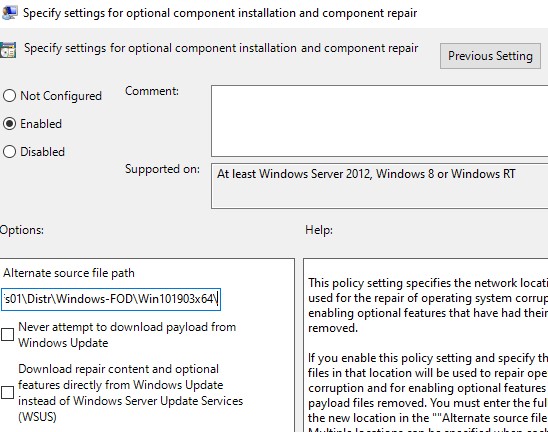
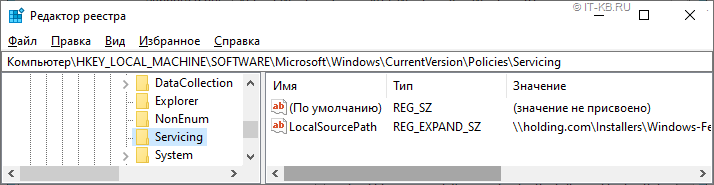
Или можете задать этот параметр через реестр отдельной политикой, указав путь к каталогу в параметр LocalSourcePath (тип REG_Expand_SZ) в ветке реестра HKLMSOFTWAREMicrosoftWindowsCurrentVersionPoliciesServicing.
После этого, пользователи смогут самостоятельно устанавливать компоненты RSAT через графический интерфейс добавления компонент Windows 10.
В изолированной среде, если вы не можете получить образ FoD, можно также скачать обновление
WindowsTH-RSAT_WS2016-x64.msu
из каталога Microsoft Update , извлечь содержимое MSU файла обновления и с помощью DISM установит компонент KB2693643-x64.cab (протестировано на Windows 10 2004):
expand -f:* c:WindowsTH-RSAT_WS2016-x64.msu C:RSAT
dism.exe /online /add-package /packagepath:C:RSATWindowsTH-KB2693643-x64.cab
Частые ошибки установки Remote Server Administration Tools в Windows
- 0x8024402c, 0x80072f8f – Windows не может поучить доступ к серверам обновления Windows для получения компонентов RSAT. Проверьте доступ в интернет или установите компоненты из локального образа FoD:
Add-WindowsCapability -Online -Name Rsat.Dns.Tools~~~~0.0.1.0 -LimitAccess -Source E:RSAT - 0x800f081f – проверьте путь к каталогу с компонентами RSAT, указанному в параметре –Source;
- 0x800f0950 – ошибка аналогична 0x800f0954;
- 0x80070490 –проверьте целостность образа Windows с помощью DISM:
DISM /Online /Cleanup-Image /RestoreHealth

Всем привет.
Набор компонентов RSAT (Remote Server Administration Tools/Средства удаленного администрирования сервера) позволяет удаленно управлять серверными ролями и компонентами на серверах Windows Server с обычной рабочей станции. В RSAT входят как графические MMC оснастки, так и утилиты командной строки, и модули PowerShell. Вы можете установить RSAT как на десктопных версиях Windows 10 или 11, так и на платформе Windows Server. В этой статье мы покажем, как установить RSAT в Windows 10 и Windows 11, и в Windows Server 2022/2019/2022 в онлайн и в офлайн режиме через Feature on Demand из графического интерфейса Windows и через консоль PowerShell.
Обычно советуют ставить RSAT либо через отключение WSUS либо GPO. Можно попробовать для начала установить RSAT с временным отключением WSUS:
$UseWUServer = Get-ItemProperty -Path «HKLM:SOFTWAREPoliciesMicrosoftWindowsWindowsUpdateAU» -Name «UseWUServer» | Select-Object -ExpandProperty UseWUServer
Set-ItemProperty -Path «HKLM:SOFTWAREPoliciesMicrosoftWindowsWindowsUpdateAU» -Name «UseWUServer» -Value 0
Restart-Service «Windows Update»
Get-WindowsCapability -Name «RSAT*» -Online | Add-WindowsCapability –Online
Set-ItemProperty -Path «HKLM:SOFTWAREPoliciesMicrosoftWindowsWindowsUpdateAU» -Name «UseWUServer» -Value $UseWUServer
Restart-Service «Windows Update»
Можно попрoбовать правкой GPO через gpedit.msc:
Computer Configuration > Policies > Administrative Templates >System > Specify settings for optional component installation and component repair:
Set it to Enabled
Alternate source file path: <пусто>
Never attempt to download payload from Windows Update: Disabled
Download repair content and optional features directly from Windows Update instead of Windows Server Update Services (WSUS): Enabled
Get-WindowsCapability -Name «RSAT*» -Online | Add-WindowsCapability –Online
Если при установке RSAT вы столкнетесь с ошибкой Add-WindowsCapability failed. Error code = 0x800f0954, или в списке дополнительных компонентов вы не видите RSAT (Компоненты для установки отсутствуют), скорее всего ваш компьютер настроен на получение обновлений со внутреннего WSUS/SCCM SUP сервера. Если вы не можете открыть прямой доступ с рабочей станции к серверам Windows Update, вы можете воспользоваться офлайн установкой RSAT (рекомендуется для корпоративных сетей без прямого доступа в Интернет).
Вот тут как раз мой случай.
Для оффлайн установки RSAT нужно скачать ISO образ диска с компонентами FoD для вашей версии Windows 10 из вашего личного кабинета на сайте лицензирования Microsoft — Volume Licensing Service Center (VLSC). Образ называется примерно так: Windows 10 Features on Demand, version 1903.
Например, для Windows 11 21Н2 x64 нужно скачать образ SW_DVD9_WIN_11_21H2_X64_MULTILANG_LANGPACKALL_LIP_LOF_X22-62148.ISO и распаковать его в сетевую папку (мой диск «H»). У вас получится набор из множества *.cab файлов, среди которых есть компоненты RSAT в папке LanguagesAndOptionalFeatures:
А дальше просто указываем:
dism /online /enable-feature /featurename:Rsat.ActiveDirectory.DS-LDS.Tools~~~~0.0.1.0 /all /Source:H:LanguagesAndOptionalFeatures /LimitAccess
Или в Powershell:
Add-WindowsCapability –online –Name Rsat.ActiveDirectory.DS-LDS.Tools~~~~0.0.1.0 -LimitAccess -Source H:LanguagesAndOptionalFeatures
Если наш образ замаплен через RDP-сессию тогда пишем так:
Add-WindowsCapability –online –Name Rsat.ActiveDirectory.DS-LDS.Tools~~~~0.0.1.0 -LimitAccess -Source TSCLIENTHLanguagesAndOptionalFeatures
Проверяем результат:
Get-WindowsCapability –online –Name Rsat.ActiveDirectory.DS-LDS.Tools~~~~0.0.1.0 -LimitAccess
Частые ошибки установки Remote Server Administration Tools в Windows:
- 0x8024402c, 0x80072f8f – Windows не может поучить доступ к серверам обновления Windows для получения компонентов RSAT. Проверьте доступ в интернет или установите компоненты из локального образа FoD: Add-WindowsCapability -Online -Name Rsat.Dns.Tools~~~~0.0.1.0 -LimitAccess -Source E:RSAT
- 0x800f081f – проверьте путь к каталогу с компонентами RSAT, указанному в параметре –Source;
- 0x800f0950 – ошибка аналогична 0x800f0954;
- 0x80070490 –проверьте целостность образа Windows с помощью DISM: DISM /Online /Cleanup-Image /RestoreHealth
Успехов.
![]() Ранее мы уже писали об особенностях установки пакета Remote Server Administration Tools (RSAT) в Windows 10. Но время идёт и новые релизы Windows 10 вносят новые правила работы с этим пакетом. В этой заметке мы поговорим об особенностях автономной установки RSAT в актуальной версии Windows 10 1903.
Ранее мы уже писали об особенностях установки пакета Remote Server Administration Tools (RSAT) в Windows 10. Но время идёт и новые релизы Windows 10 вносят новые правила работы с этим пакетом. В этой заметке мы поговорим об особенностях автономной установки RSAT в актуальной версии Windows 10 1903.
Графический интерфейс «Параметры Windows» и UAC
В рассматриваемой нами версии Windows 10 активацию компонент RSAT можно выполнить через графический интерфейс Windows, пройдя последовательно в Параметры Windows > Приложения > Дополнительные возможности > Добавить компонент
Однако, если с помощью этого графического интерфейса мы попытаемся выполнить добавление компонент на системе, подключенной к локальному серверу WSUS/SCCM SUP, то может получиться так, что мы даже не сможем получить перечень доступных к установке компонент.
Эта проблема будет воспроизводится в том случае, если текущий пользователь системы не имеет прав локального администратора и доступ к интерфейсу добавления компонент выполняется с запросом повышения привилегий UAC. При этом, если войти в систему интерактивно с правами администратора, то список компонент в графическом интерфейсе мы всё же сможем увидеть.
Компоненты RSAT и PowerShell
В качестве альтернативного варианта получения списка опциональных компонент Windows можно использовать оболочку PowerShell, запущенную с правами администратора. Для получения компонент, относящихся к пакету RSAT можно выполнить команду:
Get-WindowsCapability -Name RSAT* -Online | Select-Object -Property State,Name,DisplayName | Format-Table -AutoSize
Установку той или иной компоненты можно выполнить командой типа:
Add-WindowsCapability -Online -Name Rsat.ActiveDirectory.DS-LDS.Tools~~~~0.0.1.0
Feature On Demand и проблема Offline-клиентов
Теперь нам понятно, что графический интерфейс Windows 10 1903 работает с UAC криво, а в PowerShell всё в этом плане хорошо. Однако, безотносительно способа установки, в том случае, если компьютер настроен на использование WSUS/SUP и не имеет прямого доступа в интернет, при попытке установки выбранной компоненты мы можем получить ошибку 0x800f0954.
И ошибка эта будет воспроизводиться как при использовании PowerShell, так и при использовании графического интерфейса. Правда, в графическом интерфейсе, опять же, это может быть не так очевидно.
Как я понял, связано это с тем, что для установки опциональных компонент требуется наличие доступа к комплекту пакетов установки Feature On Demand (FOD) для нашей «модной» версии Windows 1903. Именно в этот комплект включаются компоненты RSAT, начиная с обновления Windows 10 1809 от Октября 2018 года. Об этом, в частности, гласит примечание на странице загрузки Remote Server Administration Tools for Windows 10
Интересно то, что на этой же веб-странице имеется сноска о том, что пользователям, использующим WSUS/SUP, и получающим выше обозначенную ошибку 0x800f0954, для возможности установки компонент RSAT придётся настраивать прямой доступ на Windows Update, либо использовать метод с сетевым каталогом.
Known issues affecting various RSAT versions:
Issue: RSAT FOD installation fails with error code 0x800f0954
Impact: RSAT FODs on Windows 10 1809 (October 2018 Update) in WSUS/SCCM environments
Resolution: To install FODs on a domain-joined PC which receives updates through WSUS or SCCM, you will need to change a Group Policy setting to enable downloading FODs directly from Windows Update or a local share.
И в этой ситуации администраторы используют разные пути. Некоторые идут по пути наименьшего сопротивления, не заморачиваясь при этом вопросами удобства и безопасности, и отключают на время установки RSAT нацеливание клиента на WSUS с последующей организацией прямого доступа к Windows Update.
На мой взгляд, этот метод «так себе», так как далеко не всегда и не во всех ситуациях возможно, или даже временно допустимо, обеспечивать прямой доступ на внешние интернет-узлы. К тому же решение с временной правкой реестра и последующим перезапуском службы клиента Windows Update назвать удобным язык не повернётся. При этом ведь ещё нужно помнить про том, что нигде в групповых политиках не должно быть настроено явных запретов на до-загрузку контента Windows c Windows Update.
Feature On Demand и WSUS
А что же нам в этой ситуации может предложить наш локальный источник обновлений — WSUS? Если заглянуть в свойствах сервера WSUS в перечень продуктов, относящихся к Windows 10 (…интересно, в Microsoft сами ориентируются в этом списке?…), то мы увидим такую интересную позицию, как Windows 10 Feature On Demand.
Не найдя нигде в открытых источниках вменяемого развёрнутого описания этой позиции (…впрочем, как и многих других…) мы решили включить её и проверить, что она нам даст. По итогу могу сказать, что среди метаданных о более, чем тысячи обновлений, прилетевших после синхронизации WSUS с Windows Update, я увидел только некоторые компоненты FOD, большинство из которых применимы только для старых версий Windows 10. Ну и в придачу мы получили целый ворох языковых пакетов на всех мыслимых и немыслимых языках, невзирая на то, что в настройках сервера WSUS у нас включены только английский и русский языки. В общем и целом эта позиция на WSUS для нас оказалась бесполезной и даже вредительской.
Раздача Feature On Demand для Offline-клиентов
В результате проведённых экспериментов стало очевидно, что единственным приемлемым в нашей ситуации вариантом, позволяющим выполнять Offline-установку RSAT, является вариант с развёртыванием специального сетевого каталога с компонентами Feature On Demand с нацеливанием клиентов на этот каталог через групповые политики.
Для начала нам потребуется получить образы дисков с компонентами FOD для нашей версии Windows 10. Загрузить эти образы можно вручную с сайта Volume Licensing Service Center (VLSC)
Создаём на файловом сервере общедоступный сетевой ресурс для клиентских систем 64-bit и распаковываем в него всё содержимое образов SW_DVD9_NTRL_Win_10_1903_64Bit_MultiLang_FOD_.ISO. Рядом создаём аналогичный ресурс для систем 32-bit и распаковываем туда образы SW_DVD9_NTRL_Win_10_1903_W32_MultiLang_FOD_.ISO.
Распакованный контент будет представлять из себя множество *.cab файлов, среди которых есть и интересующие нас опциональные компоненты RSAT.
Теперь на любом Offline-клиенте c Windows 10 1903 мы можем попытаться выполнить установку компонент RSAT c помощью PowerShell, указывая в качестве источника получения подготовленный сетевой каталог:
Add-WindowsCapability -Online -Name Rsat.ActiveDirectory.DS-LDS.Tools~~~~0.0.1.0 -LimitAccess -Source holding.comInstallersWindows-Feature-On-DemandWin10-190364-bit
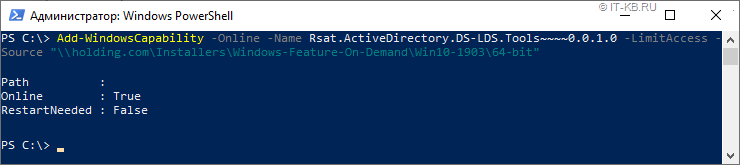
Имейте в виду, что командлет Add-WindowsCapability работает довольно специфично. То есть он может отработать без ошибки, но если в указанном источнике не будут найдены файлы, подходящие для данной системы, никакой установки на самом деле не произойдёт… Разумеется, «это не баг, а фича»… Поэтому после выполнения командлета установки всех нужных компонент, лучше повторно проверять установленные компоненты:
Get-WindowsCapability -Name RSAT* -Online | Select-Object -Property State,DisplayName | Where {$_.State -eq "Installed"} | Format-Table -AutoSize
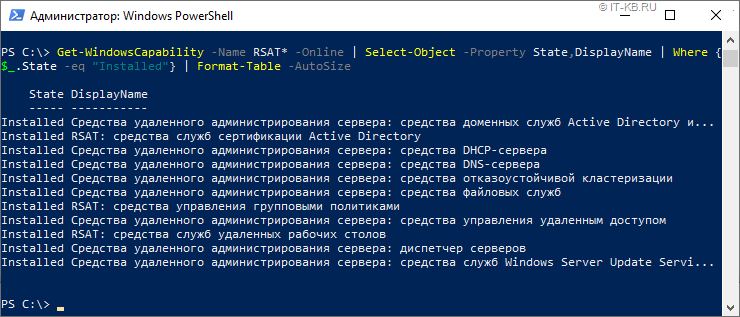
После этого установленные компоненты RSAT можно будет видеть в уже «горячо полюбившейся» нам графической оболочке Windows 10 1903 в ранее упомянутом перечне дополнительных компонент Windows
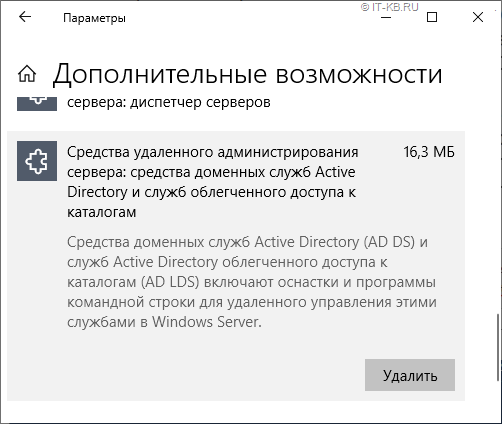
И отсюда же их можно будет удалить при необходимости.
Таким образом все администраторы в организации смогут с помощью PowerShell вручную установить нужные им компоненты RSAT на свои системы Windows 10 1903, не имея прямого доступа в интернет. Однако Offline-установку можно сделать ещё удобней, если дополнительно настроить специальный параметр групповой политики, указывающий клиентам расположение сетевого каталога с компонентами FOD. Описан этот параметр GPO, например, в документе: How to make Features on Demand and language packs available when you’re using WSUS/SCCM.
Переходим в консоль управления групповыми политиками и в разделе политик Administrative Templates > System находим параметр «Specify settings for optional component installation and component repair«
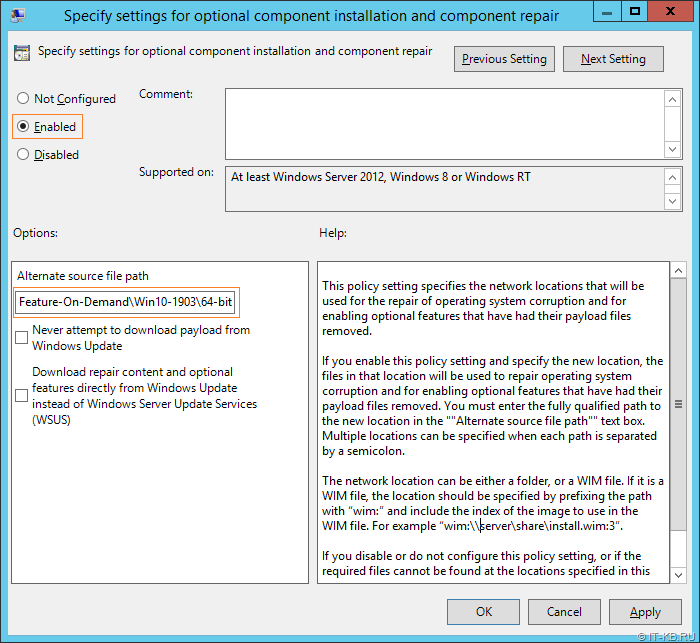
Включаем этот параметр и указываем путь к сетевому каталогу с компонентами FOD в поле «Alternate source file path«.
Этот параметр групповой политики фактически принесёт на клиентские системы параметр реестра «LocalSourcePath» в ключе HKLMSOFTWAREMicrosoftWindowsCurrentVersionPoliciesServicing
После этого Offline-установка компонент FOD станет доступна и через графический интерфейс Windows без использования танцев с PowerShell
Однако при этом стоит помнить про ранее обозначенный нюанс с пустым списком компонент в случае использования графического интерфейса в связке с UAC. То есть выполнять установку компонент FOD через графический интерфейс окна «Параметры Windows» нужно только при интерактивном входе в систему из под административной учётной записи. Если по какой-то причине заходить в систему администратором интерактивно нет желания/возможности, то можно использовать выше описанный метод с установкой через PowerShell.
При этом опять же стоит отметить то, что приятным плюсом использования настройки пути к компонентам FOD через групповую политику станет и то, что теперь при использовании PowerShell не потребуется явно указывать путь для установки нужных компонент:
И вроде бы теперь всё здорово, результат достигнут, то есть Offline-установка работает и через графический интерфейс и через PowerShell. Но дивные «фичи» на этом не кончаются.
Обработка «LocalSourcePath» с несколькими путями
Ещё одной странной штукой, которая была обнаружена при работе с выше обозначенным параметром групповой политики, это то, что, судя по описанию в GPO, значение опции «Alternate source file path» может принимать несколько путей с разделителем в виде точки с запятой. Однако практические эксперименты с Windows 10 1903 показали, что при считывании значения «LocalSourcePath» из реестра система заглядывает только в первый по счёту каталог (указанный до точки с запятой), а остальные игнорирует. Такое поведение вполне вписывается в рамки обработки значения ключа -Source командлета Add-WindowsCapability, в описании которого есть соответствующее примечание
If you specify multiple Source arguments, the files are gathered from the first location where they are found and the rest of the locations are ignored.
Вариантом выхода из этой ситуации может быть отказ от использования классического параметра из административных шаблонов GPO и настройка пути в реестре средствами Group Policy Preferences (GPP) с использованием таргетинга по версии и разрядности клиентской операционной системы.
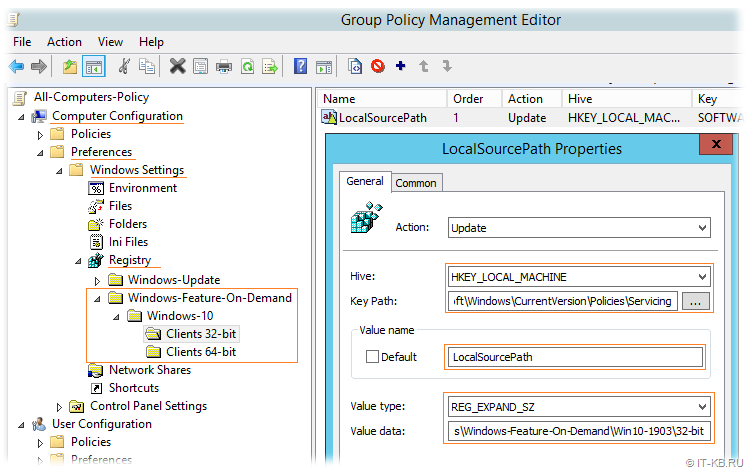
По крайней мере именно на таком варианте мы и остановились, как на наиболее гибком и работоспособном.
Финиш
В итоге квест под названием «Выполнить Offline-установку RSAT в Windows 10 и не слететь с катушек» пройден, и теперь все административные пользователи, работающие на новой Windows 10 1903, могут устанавливать компоненты RSAT, как через графический интерфейс Windows, так и через PowerShell фактически в Offline-режиме и без дополнительных сложностей и манипуляций по аналогии с Online-клиентами.
PS: Никогда ещё установка RSAT в Windows у меня не была такой увлекательной и долгой. Чем больше смотрю на новые релизы Windows 10, тем становится интересней, во что же вся эта тенденция в итоге выльется. Коллега предположил, что в итоге получится, что-то вроде ранних выпусков Mandriva Linux – жутко красиво, но пользоваться этим без слёз невозможно 
Средства удаленного администрирования сервера (RSAT) — позволяет системным администраторам управлять серверами Windows со своих компьютеров без необходимости входа на каждый из них по отдельности.
В Windows 11 и Windows 10 с версии 1809 инструмент RSAT можно установить из дополнительных функций не скачивая с сайта исполняемый «.exe» файл.
Установка RSAT в Windows 11
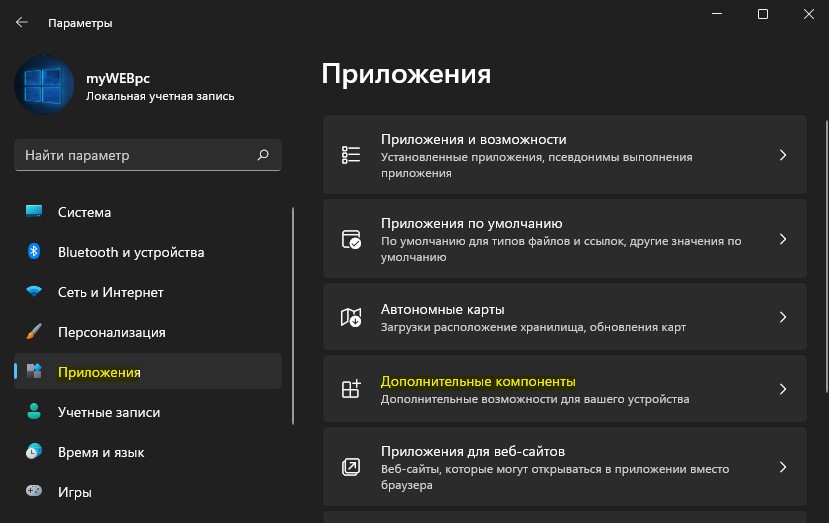
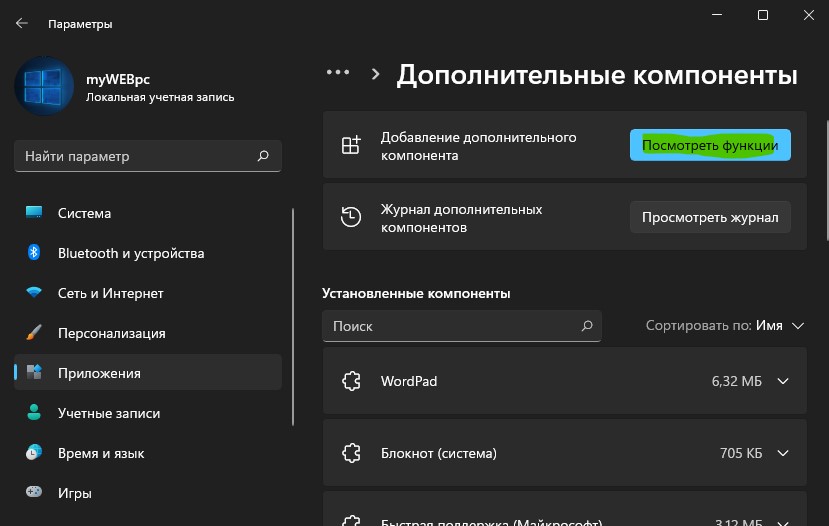
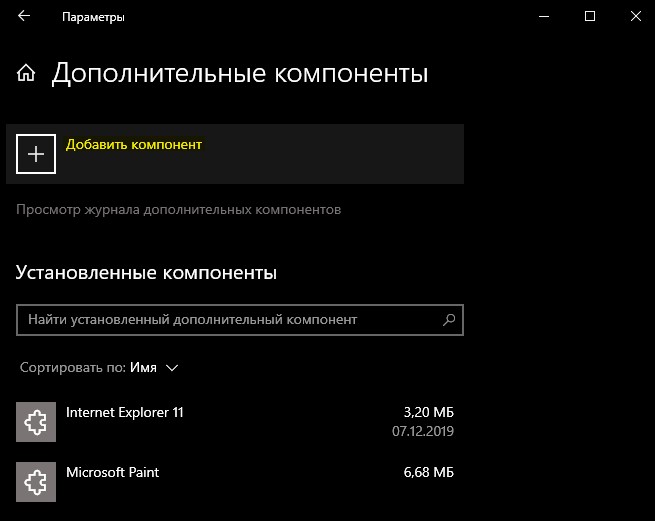
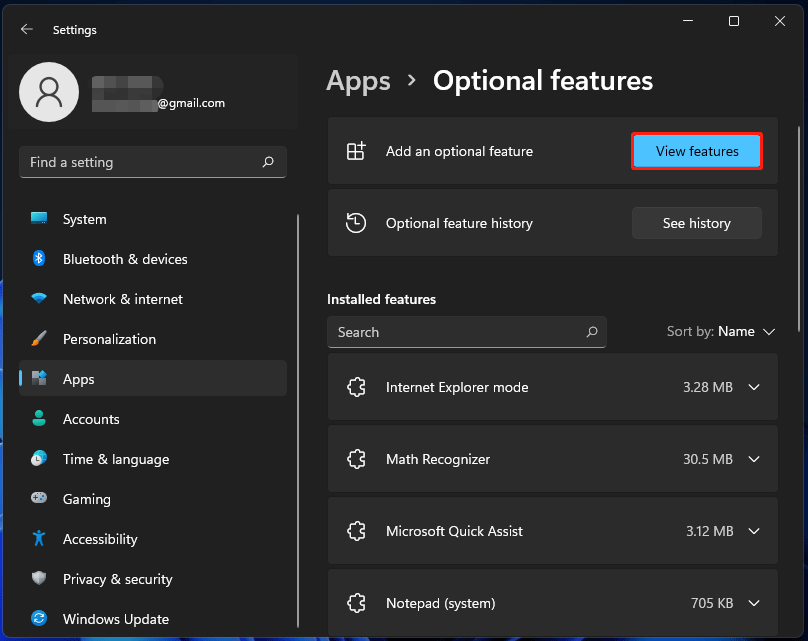
- Откройте «Параметры» > «Приложения» > «Дополнительные компоненты».

- В графе добавление дополнительных компонентов нажмите на «Посмотреть функции«.

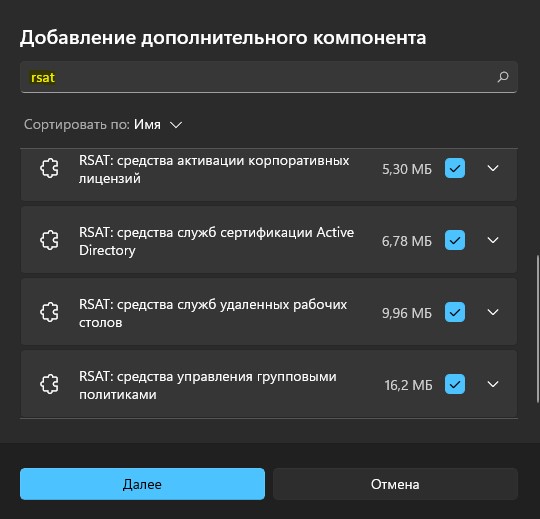
- В поле поиска напишите RSAT и отметьте галочками нужные вам функции, после чего нажмите далее. Компоненты RSAT установятся автоматически.

Установка RSAT в Windows 10
- Откройте «Параметры» > «Приложения» > «Приложения и возможности» > «Дополнительные компоненты«.

- В новом окне нажмите на «Добавить компонент«.

- Напишите в поле поиска RSAT и выберите нужные компоненты для установки.


Установить RSAT при помощи PowerShell
Чтобы установить все компоненты RSAT в Windows 11 и Windows 10 при помощи PowerShell, то запустите PowerShell от имени администратора и введите ниже апплет:
Get-WindowsCapability -Name RSAT* -Online | Add-WindowsCapability –Online
Если нужно установить конкретный инструмент RSAT, то вместо звездочки * нужно указать имя модуля. Чтобы проверить доступные модули с именами, введите:
Get-WindowsCapability -Name RSAT* -Online | Select-Object -Property Name, State
Далее введите ниже команду с нужным полным именем
Add-WindowsCapability –online –Name "Rsat.ActiveDirectory.DS-LDS.Tools~~~~0.0.1.0"
Где найти установленные функции RSAT?
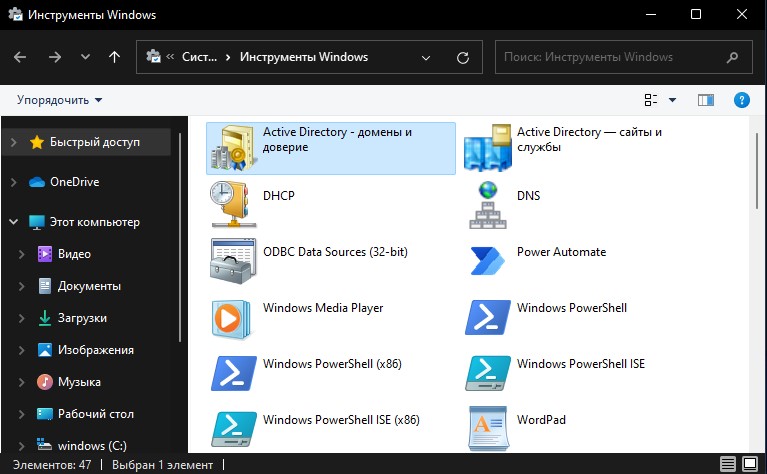
Установленные компоненты RSAT можно найти нажав Win+R и ввести %ProgramData%MicrosoftWindowsStart MenuProgramsAdministrative Tools.
Кроме того, можно открыть через панель управления по пути:
Windows 10: Панель управленияСистема и безопасностьАдминистрирование
Windows 11: Панель управленияСистема и безопасностьИнструменты Windows
Примечание: Удалить RSAT можно через компоненты, где выше мы добавляли. Если при удалении компонентов RSAT будут ошибки с невозможностью удалить, то загрузитесь в безопасном режиме и удалите.
Смотрите еще:
- Как установить MySQL в Windows 10 при помощи CMD (winget)
- Как в Windows 10 HOME включить и установить Hyper-V
- Как установить обновление Windows 10 с помощью PowerShell
- Как установить подсистему Linux для Windows 10
- Как установить NET Framework 2.0 3.0 и 3.5 в Windows 10
[ Telegram | Поддержать ]
Remote Server Administration Tools (RSAT) for Windows 10 can be installed through multiple ways. We can install it through PowerShell, dism command line using online method (by connecting to internet), or we can install it in offline mode as well using Feature on Demand package.
Table Of Contents
- What is RSAT
- List of RSAT Windows 10 Components
- How to install RSAT Tools
- Install RSAT Tools using PowerShell
- Install RSAT Tools using Command Prompt
- Conclusion
What is RSAT
RSAT is a set of tools which helps Administrators to remotely manage roles and features of Windows Server such as Group Policy Management editor, Active Directory users and Computers etc from your local computer running Windows 10 or Windows 7. You can install RSAT only on Professional or Enterprise edition of the Windows client operating system. Check here for more details on Remote Server Administration Tools.
If you are thinking on how to install ad on Windows 10, which refers to download active directory administrative tools using RSAT tools.
Starting onwards Windows 10 version 1809 (Windows 10 October 2018 Update), Microsoft have included RSAT for Windows 10 as set of “Features on Demand” in it.
List of RSAT Windows 10 Components
Microsoft RSAT tools consists of various features, or we can say multiple packages which we can use separately depending upon our needs. I am demonstrating this installation on Windows 10 21H1 (OS Build 19043)
Run following PowerShell command to see list of available RSAT tools:
Get-WindowsCapability -Name Rsat* -Online | Select -Property Name, DisplayName
| Name | Display Name |
| Rsat.ActiveDirectory.DS-LDS.Tools~~~~0.0.1.0 | RSAT: Active Directory Domain Services and Lightweight Directory Services Tools |
| Rsat.BitLocker.Recovery.Tools~~~~0.0.1.0 | RSAT: BitLocker Drive Encryption Administration Utilities |
| Rsat.CertificateServices.Tools~~~~0.0.1.0 | RSAT: Active Directory Certificate Services Tools |
| Rsat.DHCP.Tools~~~~0.0.1.0 | RSAT: DHCP Server Tools |
| Rsat.Dns.Tools~~~~0.0.1.0 | RSAT: DNS Server Tools |
| Rsat.FailoverCluster.Management.Tools~~~~0.0.1.0 | RSAT: Failover Clustering Tools |
| Rsat.FileServices.Tools~~~~0.0.1.0 | RSAT: File Services Tools |
| Rsat.GroupPolicy.Management.Tools~~~~0.0.1.0 | RSAT: Group Policy Management Tools |
| Rsat.IPAM.Client.Tools~~~~0.0.1.0 | RSAT: IP Address Management (IPAM) Client |
| Rsat.LLDP.Tools~~~~0.0.1.0 | RSAT: Data Center Bridging LLDP Tools |
| Rsat.NetworkController.Tools~~~~0.0.1.0 | RSAT: Network Controller Management Tools |
| Rsat.NetworkLoadBalancing.Tools~~~~0.0.1.0 | RSAT: Network Load Balancing Tools |
| Rsat.RemoteAccess.Management.Tools~~~~0.0.1.0 | RSAT: Remote Access Management Tools |
| Rsat.RemoteDesktop.Services.Tools~~~~0.0.1.0 | RSAT: Remote Desktop Services Tools |
| Rsat.ServerManager.Tools~~~~0.0.1.0 | RSAT: Server Manager |
| Rsat.Shielded.VM.Tools~~~~0.0.1.0 | RSAT: Shielded VM Tools |
| Rsat.StorageMigrationService.Management.Tools~~~~0.0.1.0 | RSAT: Storage Migration Service Management Tools |
| Rsat.StorageReplica.Tools~~~~0.0.1.0 | RSAT: Storage Replica Module for Windows PowerShell |
| Rsat.SystemInsights.Management.Tools~~~~0.0.1.0 | RSAT: System Insights Module for Windows PowerShell |
| Rsat.VolumeActivation.Tools~~~~0.0.1.0 | RSAT: Volume Activation Tools |
| Rsat.WSUS.Tools~~~~0.0.1.0 | RSAT: Windows Server Update Services Tools |

RSAT tools can be installed in multiple ways depending upon your situation and how you want to install it. I will cover all scenarios. I am picking 1 specific component ie. Active Directory Users and Computers from the above list, however you can use the method for any other component as well.
RSAT can easily be install through settings app. Follow the steps to install RSAT tools:
- Click on Start menu, type “Add Optional feature” and launch it. This will take you to Settings > Apps > Optional Features
- Click on Add a feature, search for RSAT to display list of available tools, select “RSAT: Active Directory Domain Services and Lightweight Directory Services Tools” to install.
You may check How to install RSAT using SCCM ( Configuration Manager )
Below mentioned installation methods could be more useful for automatic the solution.
Install RSAT Tools using PowerShell
To install RSAT using PowerShell, lets try to find which RSAT component is available for Active Directory Users and Computers. As mentioned in above table, I shared the command to show all RSAT tools, you can find the name of the tool ie. Rsat.ActiveDirectory.DS-LDS.Tools~~~~0.0.1.0. We can also narrow it down above mentioned list by running following PowerShell command with elevated rights:
get-WindowsCapability -Name Rsat.Active* -Online

Now we know the name of the tool, and can see the status showing as NotPresent. Lets install it using command:
Add-WindowsCapability -Name Rsat.ActiveDirectory.DS-LDS.Tools~~~~0.0.1.0 -Online

(Note: -Online doesn’t mean that you are connected to internet, rather it means you are making change into operating system while it up and running)
If you are not connected to internet you will get error code 0x8024402c, which indicates either you are not connected to internet, or there is WSUS / SCCM configuration in place for the workstation.

In case internet connectivity or direct Microsoft connection is not there because of WSUS / Configuration Manager settings applied, you can use Feature on Demand (FOD) iso which can serve as a source to install the tool. Mount Feature-on-Demand ISO and run following PowerShell command:
Add-WindowsCapability -Name Rsat.ActiveDirectory.DS-LDS.Tools~~~~0.0.1.0 -LimitAccess -Online -Source D:
(where -LimitAccess prevents the system contacting the internet, -source points to FOD directory, -LogPath is optional if you want to capture the install status)

For removal of RSAT component, you can use following command:
remove-WindowsCapability -Name Rsat.ActiveDirectory.DS-LDS.Tools~~~~0.0.1.0 -Online
Install RSAT Tools using Command Prompt
We will use Dism command (Deployment Image Servicing and Management tool) version 10.0.19041.844 which is inbuilt into Windows 10 and can be run via cmd prompt.
To check the status of the tool, run following command:
dism /online /get-capabilityinfo /capabilityname:Rsat.ActiveDirectory.DS-LDS.Tools~~~~0.0.1.0
State is showing as “Not present”

To install with internet and direct access to Microsoft without WSUS/SCCM in place, run the command:
dism /online /add-capability /capabilityname:Rsat.ActiveDirectory.DS-LDS.Tools~~~~0.0.1.0

If you see error code 0x8024402c (because of internet access issue), run following command using a source (Feature On Demand source), run the command:

If you see the exit code 0x800f081f, it means the source location specified doesn’t contain the required files to install the tool.

Conclusion
We can see the RSAT tools can be installed in multiple ways. Whether you use PowerShell, Dism command, the important thing to remember is whether you are directly connected to internet or not, whether there is wsus /configuration manager in place which can stop you downloading from internet. If thats the case, use Feature on Demand iso provided by Microsoft which contains the source of RSAT tool you are looking for.
If you want to manage functions and roles in Windows Server on a PC that runs Windows 11 or 10, you can use Remote Server Administration Tools (RSAT). How to download and install RSAT on Windows 11/10? MiniTool will show you many details about this task in this post.
RAST, short for Remote Server Administration Tools, is a set of tools that can help you to remotely manage roles and features in Windows Server from a local computer running Windows 11, 10, 8, or 7. You won’t log into each Windows server individually. RSAT is not installed on computers by default. To use it, you need to install it manually on your PC.
Microsoft releases RAST for different Windows versions. On Windows 11 and Windows 10, the ways to install RSAT are different. Now, let’s go to see how to do the work.
How to Install RSAT on Windows 11
Install RSAT Components from Settings
Installing RSAT in Windows 11 via Settings is pretty straightforward and the following is what you should do.
Step 1: Click Start > Settings to open Windows 11 Settings.
Step 2: Click Apps from the left side and choose Optional features.
Step 3: Click View features next to Add an optional feature.
Step 4: Type RSAT in the search bar, press Enter, and all the variants of RSAT are listed here. Choose one tool you want to install and click Next. Of course, you can choose all the listed tools to install.
Step 5: Click the Install button. Then, Windows 11 will start installing the RSAT tool you have selected.
Install RSAT on Windows 11 via PowerShell
To install RSAT, you can run Windows PowerShell. This allows you to install all the RSAT components at one time or choose individual tools to install according to your preference.
Step 1: Type in powershell to the search box of Windows 11 and right-click Windows PowerShell to choose Run as administrator.
Step 2: Copy & paste the command — Get-WindowsCapability -Name RSAT* -Online | Select-Object -Property DisplayName, State, and press Enter. Then, all the RSAT tools available for your computer and their current status can be viewed. You can know exactly what to install.
- To install all the RSAT tools at once, type the command — Get-WindowsCapability -Name RSAT* -Online | Add-WindowsCapability –Online and press Enter.
- To install RSAT components individually, execute the command Add-WindowsCapability -Online -Name «Rsat.<tool name>.Tools». Replace <tool name> with the tool name you wish to install.

The tool name can be ActiveDirectory.DS-LDS, BitLocker.Recovery, FileServices, GroupPolicy.Management, CertificateServices, DHCP, Dns, Failover.Cluster.Management, IPAM.Client, LLDP, and NetworkController.
Related article: What Is Active Directory Users and Computers and How to Install
How to Install RSAT on Windows 10
Depending on different versions of Windows 10, the way to install RSAT varies.
RSAT Windows 10 Download (for V1803 or Earlier)
In Windows 10 V1803 or an earlier version, you need to manually download the RSAT tool and install it. Just go to the Download Remote Server Administrator Tools for Windows page, choose a language, and click the Download button. Then choose a proper version and click Next to download it on your PC. Then, double-click the file to start installing.
For Windows 10 Version 1809 or an advanced version, Microsoft simplifies the installation process of RSAT that is included as a set of «Features on Demand» in Windows 10 itself. And you can install RSAT via Windows Settings.
To install RSAT Windows 10 20H2/21H1/1909, etc., follow these steps below.
Step 1: Press Win + I to get Windows 10 Settings.
Step 2: Click Apps > Optional features > Add a feature.
Step 3: Type RSAT to the search box and press Enter.
Step 4: Choose all the RSAT components you want to install and click Install.
In addition, you can also install RSAT on Windows 10 via PowerShell. The commands are introduced in part Install RSAT on Windows 11 via PowerShell.
After finishing the installation of RSAT, you can run tools on your PC.
In Windows 11, click the Start button, click App apps > Windows Tools and you can see all the installed RSAT components. Double-click on any one to launch one tool you want to use.
In Windows 10, you can launch Control Panel, view all the items by large icons, click Administrative Tools, and then run any tool there.
The Remote Server Administration Tools (RSAT) allow you to remotely manage roles and features on Windows Server hosts from desktop computers. RSAT includes both graphical MMC snap-ins, command-line tools, and PowerShell modules. You can install RSAT on both desktop computers running Windows 10 or 11, as well as on the Windows Server hosts. In this article, we’ll show you how to install RSAT on Windows 10, Windows 11, and Windows Server 2022/2019/2022 online and offline through Feature on Demand from the Windows GUI and using the PowerShell console.
Contents:
- Install RSAT on Windows 10 as Features on Demand (FoD)
- Install Remote Server Administration Tools (RSAT) on Windows 10 via PowerShell
- Installing RSAT Tools on Windows 11
- How to Install Remote Server Administration Tools on Windows Server 2022,2019, and 2016?
- RSAT Tools Installation Error 0x800f0954 on Windows 10
- Deploying RSAT on Windows 10 Offline Using FoD ISO Image
Install RSAT on Windows 10 as Features on Demand (FoD)
Prior to Windows 10 build 1809, the Remote Server Administration Tools (RSAT) was installed as a separate MSU update that had to be manually downloaded from Microsoft servers and installed on computers. After each Windows 10 build upgrade, you had to manually download the new MSU package with the latest version of the RSAT package and install it on your computer. However, today the following message is displayed on the RSAT download page on the Microsoft website:
IMPORTANT: Starting with Windows 10 October 2018 Update, RSAT is included as a set of “Features on Demand” in Windows 10 itself.
The fact is that in current Windows 10 builds, the Remote Server Administration Tools package doesn’t need to be downloaded manually. Now the Remote Server Administration Tools installation package is built-in into the Windows 10 image and is installed as a separate feature (Features on Demand). You can now install RSAT on Windows 10 from the Settings app.
The Windows 10 distro doesn’t contain RSAT installation files. To install the RSAT package, your computer needs direct Internet access. In addition, you can install RSAT in Professional and Enterprise editions in Windows 10, but not in Windows 10 Home.
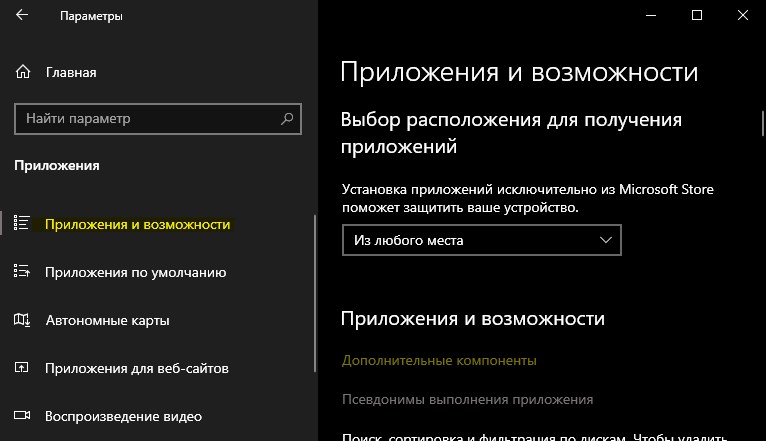
To install RSAT in Windows 10, go to Settings -> Apps -> Manage Optional Features -> Add a feature.
Select the required RSAT components and click Install.
Some RSAT components may require a reboot to install.
The following server administration tools are available on Windows 10:
- RSAT: Active Directory Domain Services and Lightweight Directory Services Tools
- RSAT: BitLocker Drive Encryption Administration Utilities
- RSAT: Active Directory Certificate Services Tools
- RSAT: DHCP Server Tools (used to configure and manage DHCP server on Windows Server)
- RSAT: DNS Server Tools
- RSAT: Failover Clustering Tools
- RSAT: File Services Tools
- RSAT: Group Policy Management Tools
- RSAT: IP Address Management (IPAM) Client
- RSAT: Data Center Bridging LLDP Tools
- RSAT: Network Controller Management Tools
- RSAT: Network Load Balancing Tools
- RSAT: Remote Access Management Tools
- RSAT: Remote Desktop Services Tools
- RSAT: Server Manager
- RSAT: Shielded VM Tools
- RSAT: Storage Migration Service Management Tools
- RSAT: Storage Replica Module for Windows PowerShell
- RSAT: System Insights Module for Windows PowerShell
- RSAT: Volume Activation Tools (KMS server console)
- RSAT: Windows Server Update Services Tools.
Once installed, the graphical mmc RSAT snap-ins are available in the Control Panel under Administrative Tools (Control PanelSystem and SecurityAdministrative Tools).
Install Remote Server Administration Tools (RSAT) on Windows 10 via PowerShell
You can install RSAT administration components using PowerShell. In this example, we will show you how to manage RSAT components in Windows 10 20H2.
Using the following command, you can list the RSAT components installed on your computer:
Get-WindowsCapability -Name RSAT* -Online | Select-Object -Property DisplayName, State
In our example, the DHCP and DNS management tools are installed (Installed), and all other RSAT modules are missing (NotPresent).
You can use the Add-WindowsCapability cmdlet to install RSAT features on Windows.
To install a specific RSAT tool, such as AD management tools (including the ADUC console and the Active Directory module for Windows PowerShell), run the command:
Add-WindowsCapability –online –Name Rsat.ActiveDirectory.DS-LDS.Tools~~~~0.0.1.0
To install the DNS management console and the PowerShell DNSServer module, run:
Add-WindowsCapability –online –Name Rsat.Dns.Tools~~~~0.0.1.0
Etc.
Add-WindowsCapability -Online -Name Rsat.FileServices.Tools~~~~0.0.1.0

Add-WindowsCapability -Online -Name Rsat.GroupPolicy.Management.Tools~~~~0.0.1.0

Add-WindowsCapability -Online -Name Rsat.IPAM.Client.Tools~~~~0.0.1.0

Add-WindowsCapability -Online -Name Rsat.LLDP.Tools~~~~0.0.1.0

Add-WindowsCapability -Online -Name Rsat.NetworkController.Tools~~~~0.0.1.0

Add-WindowsCapability -Online -Name Rsat.NetworkLoadBalancing.Tools~~~~0.0.1.0

Add-WindowsCapability -Online -Name Rsat.BitLocker.Recovery.Tools~~~~0.0.1.0

Add-WindowsCapability -Online -Name Rsat.CertificateServices.Tools~~~~0.0.1.0

Add-WindowsCapability -Online -Name Rsat.DHCP.Tools~~~~0.0.1.0

Add-WindowsCapability -Online -Name Rsat.FailoverCluster.Management.Tools~~~~0.0.1.0

Add-WindowsCapability -Online -Name Rsat.RemoteAccess.Management.Tools~~~~0.0.1.0

Add-WindowsCapability -Online -Name Rsat.RemoteDesktop.Services.Tools~~~~0.0.1.0

Add-WindowsCapability -Online -Name Rsat.ServerManager.Tools~~~~0.0.1.0

Add-WindowsCapability -Online -Name Rsat.Shielded.VM.Tools~~~~0.0.1.0

Add-WindowsCapability -Online -Name Rsat.StorageMigrationService.Management.Tools~~~~0.0.1.0

Add-WindowsCapability -Online -Name Rsat.StorageReplica.Tools~~~~0.0.1.0

Add-WindowsCapability -Online -Name Rsat.SystemInsights.Management.Tools~~~~0.0.1.0

Add-WindowsCapability -Online -Name Rsat.VolumeActivation.Tools~~~~0.0.1.0

Add-WindowsCapability -Online -Name Rsat.WSUS.Tools~~~~0.0.1.0
You can also install RSAT using the DISM utility. For example:
DISM.exe /Online /add-capability /CapabilityName:Rsat.ActiveDirectory.DS-LDS.Tools~~~~0.0.1.0 /CapabilityName:Rsat.GroupPolicy.Management.Tools~~~~0.0.1.0 /CapabilityName:Rsat.WSUS.Tools~~~~0.0.1.0
To install all the available RSAT tools at once, run:
Get-WindowsCapability -Name RSAT* -Online | Add-WindowsCapability –Online
To install only the missing RSAT tools, run:
Get-WindowsCapability -Name RSAT* -Online | where State -EQ NotPresent | Add-WindowsCapability –Online
Now make sure that all RSAT tools are installed (Installed state).

After that, the installed RSAT tools will appear in the Manage Optional Features panel.
Installing RSAT Tools on Windows 11
You can install RSAT on Windows 11 through the Settings -> Apps -> Optional Features -> Add an optional feature (View features) panel.
Type RSAT in the search field and select the RSAT features to install.
Also, you can use PowerShell to install RSAT on Windows 11:
Add-WindowsCapability –online –Name Rsat.ActiveDirectory.DS-LDS.Tools~~~~0.0.1.0
How to Install Remote Server Administration Tools on Windows Server 2022,2019, and 2016?
On Windows Server, you don’t need direct Internet access to install RSAT. RSAT features can be installed when the corresponding Windows Server roles or features are installed, or you can install them via Server Manager (Add Roles and Features -> Features -> Remote Server Administration Tools). All RSAT components are located into two sections: Feature Administration Tools and Role Administration Tools. Select the required options and click Next -> Next.

You can use the Install-WindowsFeature PowerShell cmdlet to install RSAT on Windows Server 2022, 2019, and 2016:
Get-WindowsFeature| Where-Object {$_.name -like "*RSAT*"}| ft Name,Installstate
To install the selected RSAT component, specify its name. For example, let’s install the RDS Licensing Diagnostic console:
Install-WindowsFeature RSAT-RDS-Licensing-Diagnosis-UI
You can access installed graphical RSAT consoles from Server Manager or through the Control Panel.
RSAT Tools Installation Error 0x800f0954 on Windows 10
If your Windows device is configured to receive updates from a local WSUS update server or SCCM SUP using Group Policy, you will receive error 0x800f0954 when installing RSAT via Add-WindowsCapability or DISM.
To correctly install RSAT components in Windows 10, you can temporarily disable updating from the WSUS server through the registry (open the registry key HKLMSOFTWAREPoliciesMicrosoftWindowsWindowsUpdateAU and change the UseWUServer to 0) and restart the Windows Update Service (wuauserv).
You can use the following PowerShell script:
$currentWU = Get-ItemProperty -Path "HKLM:SOFTWAREPoliciesMicrosoftWindowsWindowsUpdateAU" -Name "UseWUServer" | select -ExpandProperty UseWUServer

Set-ItemProperty -Path "HKLM:SOFTWAREPoliciesMicrosoftWindowsWindowsUpdateAU" -Name "UseWUServer" -Value 0

Restart-Service wuauserv

Get-WindowsCapability -Name RSAT* -Online | Add-WindowsCapability –Online

Set-ItemProperty -Path "HKLM:SOFTWAREPoliciesMicrosoftWindowsWindowsUpdateAU" -Name "UseWUServer" -Value $currentWU

Restart-Service wuauserv -force
Or you can configure a new Group Policy parameter that allows you to configure installation options for additional Windows and Features On Demand components (including RSAT).
- Open the local GPO editor –
gpedit.mscor use the domain Group Policy Management Console (gpmc.msc); - Go to the GPO section Computer Configuration -> Administrative Templates -> System;
- Enable the policy Specify settings for optional component installation and component repair, and check the option Download repair content and optional features directly from Windows Updates instead of Windows Server Updates Services (WSUS);

- Save the changes and update Group Policy settings (
gpupdate /force).
Installing RSAT via PowerShell or DISM should now be completed without error.
Deploying RSAT on Windows 10 Offline Using FoD ISO Image
If you are facing the “Add-WindowsCapability failed. Error code = 0x800f0954” error when installing RSAT, or you don’t see RSAT in the list of optional features (No features to install), most likely your computer is configured to receive updates from the internal WSUS/SCCM SUP server. Let’s consider how to install RSAT in Windows 10 1903 offline (in disconnected environments / corporate domain networks without direct access to the Internet).
For offline RSAT installation, you need to download the FoD ISO image for your Windows 10 build from your personal section on the Microsoft MSDN / Volume Licensing Service Center (VLSC). The image is named something like this: Windows 10 Features on Demand, version 1903.
For example, for Windows 10 1903 x64 you need to download the image file SW_DVD9_NTRL_Win_10_1903_64Bit_MultiLang_FOD.ISO (about 5 GB). Extract the iso image file to the shared network folder. You will get a set of *.cab files, including RSAT cab files.
Now, to install the RSAT components on the Windows 10 desktop, you need to specify the path to this FoD shared network folder. For example:
Add-WindowsCapability -Online -Name Rsat.ActiveDirectory.DS-LDS.Tools~~~~0.0.1.0 -LimitAccess -Source fs01Windows-FODWin101903x64

You can also specify the path to the directory with the FoD components using the Group Policy parameter discussed above. To do this, in the Alternative source file path you need to specify the UNC directory path to the FoD folder.
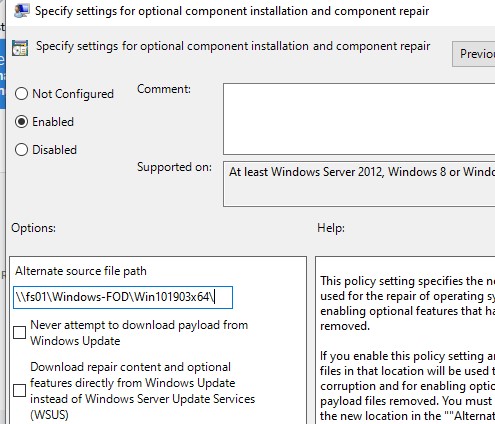
Or you can set this parameter through the registry with a separate policy by specifying the directory path in the LocalSourcePath parameter (REG_Expand_SZ) under the registry key HKLMSOFTWAREMicrosoftWindowsCurrentVersionPoliciesServicing.
After that, users will be able to independently install RSAT components in Windows 10 through the graphical interface of Manage Optional Features.
If you cannot get the FoD image from VLSC, you can also download the update “WindowsTH-RSAT_WS2016-x64.msu”, extract the contents of MSU file and use DISM to install the KB2693643-x64.cab file (tested on Windows 10 2004):
expand -f:* c:WindowsTH-RSAT_WS2016-x64.msu C:RSAT

dism.exe /online /add-package /packagepath:C:RSATWindowsTH-KB2693643-x64.cab
Common Remote Server Administration Tools Installation Errors
- 0x8024402c, 0x80072f8f – Windows cannot access the Microsoft Update service to download RSAT files. Check internet access or install components from local FoD image:
Add-WindowsCapability -Online -Name Rsat.Dns.Tools~~~~0.0.1.0 -LimitAccess -Source E:RSAT - 0x800f081f – check the path to the directory with RSAT components specified in the
–Sourceparameter; - 0x800f0950 – the error is similar to 0x800f0954;
- 0x80070490 – check and repair your Windows image using DISM:
DISM /Online /Cleanup-Image /RestoreHealth
This post covers the steps to install RSAT tools on Windows 10 version 1809 and later. Remote Server Administration Tools for Windows 10 lets IT administrators manage Windows Server from a remote computer running Windows 10. In the past RSAT tools were available for downloads in the form of .msu files. So one could simply download the msu file and install RSAT Tools.
Another way of deploying RSAT tools was using SCCM. Here is my blog post on deploying RSAT tools for windows 10 using SCCM.
Starting with Windows 10 October 2018 Update, RSAT is included as a set of “Features on Demand” in Windows 10. That means you do not need to download an RSAT package now. Instead, on your Windows 10 computer, go to “Manage optional features” in Settings and click “Add a feature”. You will see the list of available RSAT tools. Select and install the specific RSAT tools you need.

Suppose that I require only group policy management tool, I can simply select Group Policy Management Tools and install it. Most of all the advantage of installing it via Features on Demand is that installed features persist across Windows 10 version upgrades.
Before you plan to install RSAT tools on Windows 10 version 1809, ensure you read the below points.
- You cannot install RSAT on computers that are running Home or Standard editions of Windows.
- You can install RSAT only on Windows 10 Professional or Enterprise editions.
Method 1 – Using Add a Feature Install RSAT Tools on Windows 10 version 1809
To install RSAT Tools on Windows 10 version 1809, click Start. Click Settings and from the settings page, click Apps.

On the right pane, under Apps & features, click Manage optional features.

Now click + Add a feature.

Wait for the list of features to be populated. Scroll down until you see RSAT features. Now select any of the RSAT feature that you wish to install. In this case, I am selecting RSAT: Group Policy Management Tools feature. Click Install.

Click the back icon and wait until the feature is installed. Now you should find Group Policy Management Tools under Start > Windows Administrative Tools.

Method 2 – Using DISM to Install RSAT Tools on Windows 10 version 1809
In addition to installing via the graphical Settings app, you can also install specific RSAT tools via command line or automation using DISM /Add-Capability.
On Windows 10 computer, launch the command prompt as administrator. Run the below command.
DISM.exe /Online /Get-Capabilities
This command lists all the capabilities and shows whether the capability is present or not present. In this case, I will be installing the RSAT group policy management tools. Therefore right click and copy the capability identity.

Now in the same command prompt, run the below command to install RSAT Group policy management tools.
DISM.exe /Online /add-capability /CapabilityName:Rsat.GroupPolicy.Management.Tools~~~~0.0.1.0
The tools are installed and you will see the message that the operation is completed successfully.

Uninstall RSAT Feature on Windows 10
In the above steps you understood how to install RSAT feature. To uninstall the RSAT feature, go to Manage optional features. Select the RSAT feature that’s currently installed on Windows 10. Click Uninstall and this will uninstall the selected RSAT feature.


Prajwal Desai is a Microsoft MVP in Enterprise Mobility. He writes articles on SCCM, Intune, Configuration Manager, Microsoft Intune, Azure, Windows Server, Windows 11, WordPress and other topics, with the goal of providing people with useful information.
- Remove From My Forums
-
Question
-
Добрый день.
Возникла необходимость в Win10 1909 установить оснастку AD «Пользователи и компьютеры», ПК введен в домен. Прочел, что для установки необходим диск с набором дополнительных компонент, даже нашел название iso-файла
en_windows_10_features_on_demand_part_1_version_1903_x64_dvd_1076e85a.iso
Есть вопрос, могу ли загрузить файл законным способом? Попробовал найти файл через подписку Visual Studio (наименование подписки Visual Studio Dev Essentials), но его нет.
Доступа к другой подписке нет.
В Windows 7 свободно устанавливал компонент без необходимости загрузки дополнительного образа.
Как быть сейчас?
-
Edited by
Thursday, February 18, 2021 2:13 PM
-
Edited by
Today, we are introducing the next feature update to Windows 10, version 21H1. As people continue to rely on Windows more than ever to work, learn and have fun, we understand the importance of providing the best possible update experience to help people and organizations stay protected and productive. It is a responsibility we do not take lightly and why for the first time an H1 (first half of the calendar year) feature update release will be delivered in an optimized way using servicing technology, while continuing our semi-annual feature update cadence. In today’s blog I will cover details on how we plan to service the release, its scope, and next steps.
Fast and focused
Based on feedback and learnings during the past year of extensive remote work, learning and play, version 21H1 will be delivered with servicing technology (like that used for the monthly update process and how 20H2 was delivered). Windows 10, version 21H1 will have a scoped set of features improving security, remote access and quality. The features we are releasing in this update are focused on the core experiences that customers have told us they’re relying on most right now. So, we optimized this release to support our customers’ most pressing needs.
New features include multicamera support for Windows Hello and security related performance improvements.
- Windows Hello multicamera support to set the default as the external camera when both external and internal Windows Hello cameras are present.
- Windows Defender Application Guard performance improvements including optimizing document opening scenario times.
- Windows Management Instrumentation (WMI) Group Policy Service (GPSVC) updating performance improvement to support remote work scenarios.
Customers running either Windows 10, version 2004 or version 20H2 who choose to update to the new release will have a fast installation experience because the update will install like a monthly update. For consumer or commercial users coming from versions of Windows 10 earlier than the May 2020 Update (version 2004), the process of updating to the new release will be the same as it has been and will work in a similar manner to previous Windows 10 feature updates, using the same tools and processes. As this Windows 10 release is targeted for the first half of 2021, all Windows 10 editions of version 21H1 will receive 18 months of servicing.
Next steps
Our multilayered approach to the development and launch of feature updates continues and includes fully leveraging the Windows Insider Program to obtain user feedback and data insights on quality. We will begin releasing 21H1 builds to Windows Insiders in the Beta channel today to those Insiders who seek to opt in, and new features will be offered in future Windows Insider Preview Builds as they are ready. Broad availability of Windows 10, version 21H1 will begin later in the first half of this calendar year, and we will provide more information on the release and how to get it as we get closer to the launch of this next feature update. We look forward to hearing your feedback.
Editor’s note – Feb. 17, 2021 – The bullet point on Windows Hello multicamera support was updated for clarity.
![]() Ранее мы уже писали об особенностях установки пакета Remote Server Administration Tools (RSAT) в Windows 10. Но время идёт и новые релизы Windows 10 вносят новые правила работы с этим пакетом. В этой заметке мы поговорим об особенностях автономной установки RSAT в актуальной версии Windows 10 1903.
Ранее мы уже писали об особенностях установки пакета Remote Server Administration Tools (RSAT) в Windows 10. Но время идёт и новые релизы Windows 10 вносят новые правила работы с этим пакетом. В этой заметке мы поговорим об особенностях автономной установки RSAT в актуальной версии Windows 10 1903.
Графический интерфейс «Параметры Windows» и UAC
В рассматриваемой нами версии Windows 10 активацию компонент RSAT можно выполнить через графический интерфейс Windows, пройдя последовательно в Параметры Windows > Приложения > Дополнительные возможности > Добавить компонент
Однако, если с помощью этого графического интерфейса мы попытаемся выполнить добавление компонент на системе, подключенной к локальному серверу WSUS/SCCM SUP, то может получиться так, что мы даже не сможем получить перечень доступных к установке компонент.
Эта проблема будет воспроизводится в том случае, если текущий пользователь системы не имеет прав локального администратора и доступ к интерфейсу добавления компонент выполняется с запросом повышения привилегий UAC. При этом, если войти в систему интерактивно с правами администратора, то список компонент в графическом интерфейсе мы всё же сможем увидеть.
Компоненты RSAT и PowerShell
В качестве альтернативного варианта получения списка опциональных компонент Windows можно использовать оболочку PowerShell, запущенную с правами администратора. Для получения компонент, относящихся к пакету RSAT можно выполнить команду:
Get-WindowsCapability -Name RSAT* -Online | Select-Object -Property State,Name,DisplayName | Format-Table -AutoSize
Установку той или иной компоненты можно выполнить командой типа:
Add-WindowsCapability -Online -Name Rsat.ActiveDirectory.DS-LDS.Tools~~~~0.0.1.0
Feature On Demand и проблема Offline-клиентов
Теперь нам понятно, что графический интерфейс Windows 10 1903 работает с UAC криво, а в PowerShell всё в этом плане хорошо. Однако, безотносительно способа установки, в том случае, если компьютер настроен на использование WSUS/SUP и не имеет прямого доступа в интернет, при попытке установки выбранной компоненты мы можем получить ошибку 0x800f0954.
И ошибка эта будет воспроизводиться как при использовании PowerShell, так и при использовании графического интерфейса. Правда, в графическом интерфейсе, опять же, это может быть не так очевидно.
Как я понял, связано это с тем, что для установки опциональных компонент требуется наличие доступа к комплекту пакетов установки Feature On Demand (FOD) для нашей «модной» версии Windows 1903. Именно в этот комплект включаются компоненты RSAT, начиная с обновления Windows 10 1809 от Октября 2018 года. Об этом, в частности, гласит примечание на странице загрузки Remote Server Administration Tools for Windows 10
Интересно то, что на этой же веб-странице имеется сноска о том, что пользователям, использующим WSUS/SUP, и получающим выше обозначенную ошибку 0x800f0954, для возможности установки компонент RSAT придётся настраивать прямой доступ на Windows Update, либо использовать метод с сетевым каталогом.
Known issues affecting various RSAT versions:
Issue: RSAT FOD installation fails with error code 0x800f0954
Impact: RSAT FODs on Windows 10 1809 (October 2018 Update) in WSUS/SCCM environments
Resolution: To install FODs on a domain-joined PC which receives updates through WSUS or SCCM, you will need to change a Group Policy setting to enable downloading FODs directly from Windows Update or a local share.
И в этой ситуации администраторы используют разные пути. Некоторые идут по пути наименьшего сопротивления, не заморачиваясь при этом вопросами удобства и безопасности, и отключают на время установки RSAT нацеливание клиента на WSUS с последующей организацией прямого доступа к Windows Update.
На мой взгляд, этот метод «так себе», так как далеко не всегда и не во всех ситуациях возможно, или даже временно допустимо, обеспечивать прямой доступ на внешние интернет-узлы. К тому же решение с временной правкой реестра и последующим перезапуском службы клиента Windows Update назвать удобным язык не повернётся. При этом ведь ещё нужно помнить про том, что нигде в групповых политиках не должно быть настроено явных запретов на до-загрузку контента Windows c Windows Update.
Feature On Demand и WSUS
А что же нам в этой ситуации может предложить наш локальный источник обновлений — WSUS? Если заглянуть в свойствах сервера WSUS в перечень продуктов, относящихся к Windows 10 (…интересно, в Microsoft сами ориентируются в этом списке?…), то мы увидим такую интересную позицию, как Windows 10 Feature On Demand.
Не найдя нигде в открытых источниках вменяемого развёрнутого описания этой позиции (…впрочем, как и многих других…) мы решили включить её и проверить, что она нам даст. По итогу могу сказать, что среди метаданных о более, чем тысячи обновлений, прилетевших после синхронизации WSUS с Windows Update, я увидел только некоторые компоненты FOD, большинство из которых применимы только для старых версий Windows 10. Ну и в придачу мы получили целый ворох языковых пакетов на всех мыслимых и немыслимых языках, невзирая на то, что в настройках сервера WSUS у нас включены только английский и русский языки. В общем и целом эта позиция на WSUS для нас оказалась бесполезной и даже вредительской.
Раздача Feature On Demand для Offline-клиентов
В результате проведённых экспериментов стало очевидно, что единственным приемлемым в нашей ситуации вариантом, позволяющим выполнять Offline-установку RSAT, является вариант с развёртыванием специального сетевого каталога с компонентами Feature On Demand с нацеливанием клиентов на этот каталог через групповые политики.
Для начала нам потребуется получить образы дисков с компонентами FOD для нашей версии Windows 10. Загрузить эти образы можно вручную с сайта Volume Licensing Service Center (VLSC)
Создаём на файловом сервере общедоступный сетевой ресурс для клиентских систем 64-bit и распаковываем в него всё содержимое образов SW_DVD9_NTRL_Win_10_1903_64Bit_MultiLang_FOD_.ISO. Рядом создаём аналогичный ресурс для систем 32-bit и распаковываем туда образы SW_DVD9_NTRL_Win_10_1903_W32_MultiLang_FOD_.ISO.
Распакованный контент будет представлять из себя множество *.cab файлов, среди которых есть и интересующие нас опциональные компоненты RSAT.
Теперь на любом Offline-клиенте c Windows 10 1903 мы можем попытаться выполнить установку компонент RSAT c помощью PowerShell, указывая в качестве источника получения подготовленный сетевой каталог:
Add-WindowsCapability -Online -Name Rsat.ActiveDirectory.DS-LDS.Tools~~~~0.0.1.0 -LimitAccess -Source \holding.comInstallersWindows-Feature-On-DemandWin10-190364-bit
Имейте в виду, что командлет Add-WindowsCapability работает довольно специфично. То есть он может отработать без ошибки, но если в указанном источнике не будут найдены файлы, подходящие для данной системы, никакой установки на самом деле не произойдёт… Разумеется, «это не баг, а фича»… Поэтому после выполнения командлета установки всех нужных компонент, лучше повторно проверять установленные компоненты:
Get-WindowsCapability -Name RSAT* -Online | Select-Object -Property State,DisplayName | Where {$_.State -eq "Installed"} | Format-Table -AutoSize
После этого установленные компоненты RSAT можно будет видеть в уже «горячо полюбившейся» нам графической оболочке Windows 10 1903 в ранее упомянутом перечне дополнительных компонент Windows
И отсюда же их можно будет удалить при необходимости.
Таким образом все администраторы в организации смогут с помощью PowerShell вручную установить нужные им компоненты RSAT на свои системы Windows 10 1903, не имея прямого доступа в интернет. Однако Offline-установку можно сделать ещё удобней, если дополнительно настроить специальный параметр групповой политики, указывающий клиентам расположение сетевого каталога с компонентами FOD. Описан этот параметр GPO, например, в документе: How to make Features on Demand and language packs available when you’re using WSUS/SCCM.
Переходим в консоль управления групповыми политиками и в разделе политик Administrative Templates > System находим параметр «Specify settings for optional component installation and component repair«
Включаем этот параметр и указываем путь к сетевому каталогу с компонентами FOD в поле «Alternate source file path«.
Этот параметр групповой политики фактически принесёт на клиентские системы параметр реестра «LocalSourcePath» в ключе HKLMSOFTWAREMicrosoftWindowsCurrentVersionPoliciesServicing
После этого Offline-установка компонент FOD станет доступна и через графический интерфейс Windows без использования танцев с PowerShell
Однако при этом стоит помнить про ранее обозначенный нюанс с пустым списком компонент в случае использования графического интерфейса в связке с UAC. То есть выполнять установку компонент FOD через графический интерфейс окна «Параметры Windows» нужно только при интерактивном входе в систему из под административной учётной записи. Если по какой-то причине заходить в систему администратором интерактивно нет желания/возможности, то можно использовать выше описанный метод с установкой через PowerShell.
При этом опять же стоит отметить то, что приятным плюсом использования настройки пути к компонентам FOD через групповую политику станет и то, что теперь при использовании PowerShell не потребуется явно указывать путь для установки нужных компонент:
И вроде бы теперь всё здорово, результат достигнут, то есть Offline-установка работает и через графический интерфейс и через PowerShell. Но дивные «фичи» на этом не кончаются.
Обработка «LocalSourcePath» с несколькими путями
Ещё одной странной штукой, которая была обнаружена при работе с выше обозначенным параметром групповой политики, это то, что, судя по описанию в GPO, значение опции «Alternate source file path» может принимать несколько путей с разделителем в виде точки с запятой. Однако практические эксперименты с Windows 10 1903 показали, что при считывании значения «LocalSourcePath» из реестра система заглядывает только в первый по счёту каталог (указанный до точки с запятой), а остальные игнорирует. Такое поведение вполне вписывается в рамки обработки значения ключа -Source командлета Add-WindowsCapability, в описании которого есть соответствующее примечание
If you specify multiple Source arguments, the files are gathered from the first location where they are found and the rest of the locations are ignored.
Вариантом выхода из этой ситуации может быть отказ от использования классического параметра из административных шаблонов GPO и настройка пути в реестре средствами Group Policy Preferences (GPP) с использованием таргетинга по версии и разрядности клиентской операционной системы.
По крайней мере именно на таком варианте мы и остановились, как на наиболее гибком и работоспособном.
Финиш
В итоге квест под названием «Выполнить Offline-установку RSAT в Windows 10 и не слететь с катушек» пройден, и теперь все административные пользователи, работающие на новой Windows 10 1903, могут устанавливать компоненты RSAT, как через графический интерфейс Windows, так и через PowerShell фактически в Offline-режиме и без дополнительных сложностей и манипуляций по аналогии с Online-клиентами.
PS: Никогда ещё установка RSAT в Windows у меня не была такой увлекательной и долгой. Чем больше смотрю на новые релизы Windows 10, тем становится интересней, во что же вся эта тенденция в итоге выльется. Коллега предположил, что в итоге получится, что-то вроде ранних выпусков Mandriva Linux – жутко красиво, но пользоваться этим без слёз невозможно
This article is contributed. See the original author and article here.
Windows 10, version 21H1 is now available through Windows Server Update Services (WSUS) and Windows Update for Business, and can be downloaded today from Visual Studio Subscriptions, the Software Download Center (via Update Assistant or the Media Creation Tool), and the Volume Licensing Service Center[1]. Today also marks the start of the 18-month servicing timeline for this H1 (first half of the calendar year) Semi-Annual Channel release.
Windows 10, version 21H1 (also referred to as the Windows 10 May 2021 Update) offers a scoped set of improvements in the areas of security, remote access, and quality to ensure that your organization and your end users stay protected and productive. Just as we did for devices updating from Windows 10, version 2004 to version 20H2, we will be delivering Windows 10, version 21H1 via an enablement package to devices running version 2004 or version 20H2—resulting in a fast installation experience for users of those devices. For those updating to Windows 10, version 21H1 from Windows 10, version 1909 and earlier, the process will be similar to previous updates.
Jump to: What is an enablement package? | Tools | Resources | Features to explore | Deployment recommendations | Office hours
What is an enablement package?
Simply put, an enablement package is a great option for installing a scoped feature update like Windows 10, version 21H1 as it enables devices to update with a single restart, reducing downtime. This works because Windows 10, version 21H1 shares a common core operating system with an identical set of system files with versions 2004 and 20H2. As a result, the scoped set of features in version 21H1 were included in the May 2021 monthly quality updates for version 2004 and version 20H2, but were delivered in a disabled/dormant state. These features remain dormant until they are turned on with the Windows 10, version 21H1 enablement package—a small, quick to install “switch” that activates these features. Using an enablement package, installing the Windows 10, version 21H1 update should take approximately the same amount of time as a monthly quality update.
Note: If you are connected to WSUS and running Windows 10, version 2004 or version 20H2, but have not installed the May 2021 updates (or later), you will not see the version 21H1 enablement package offered to your device. Devices running version 2004 or version 20H2 connecting directly to Windows Update will be able to install the enablement package, but will also install the Latest Cumulative Update (LCU) at the same time (if needed), which may increase the overall installation time slightly.
Which tools are being updated for version 21H1?
To support the release of Windows 10, version 21H1, we have released updated versions of the following tools:
- Security baseline (final) for Windows 10, version 21H1 – Microsoft-recommended configuration settings, including explanations of their security impact.
- Administrative Templates (.admx) for Windows 10, version 21H1 – While natively accessible via the C:WindowsPolicyDefinitions folder in Windows, administrative template files can be downloaded separately and used to populate policy settings in the user interface of Group Policy tools, allowing you to manage registry-based policy settings.
- Group Policy settings reference spreadsheet for Windows 10, version 21H1 – List of the policy settings for computer and user configurations included in the ADMX files delivered for Windows 10, version 21H1.
- Windows 10 Enterprise Evaluation – Free 90-day evaluation of Windows 10, version 21H1 for IT professionals interested in trying Windows 10 Enterprise on behalf of their organization.
What about other tools?
As Windows 10, version 21H1 shares a common core and an identical set of system files with version 2004 and 20H2, the following tools do not need to be updated to work with version 21H1:
- Windows Assessment and Deployment Kit (Windows ADK) for Windows 10, version 2004 –Customize Windows images for large-scale deployment or test the quality and performance of your system, added components, and applications with tools like the User State Migration Tool, Windows Performance Analyzer, Windows Performance Recorder, Window System Image Manager (SIM), and the Windows Assessment Toolkit.
- Windows PE add-on for the Windows ADK, version 2004 – Small operating system used to install, deploy, and repair Windows 10 for desktop editions (Home, Pro, Enterprise, and Education). (Note: Prior to Windows 10, version 1809, WinPE was included in the ADK. Starting with Windows 10, version 1809, WinPE is an add-on. Install the ADK first, then install the WinPE add-ons to start working with WinPE.)
- Remote Server Administration Tools (RSAT) for Windows 10 – Tools that let you manage Windows Server roles and features from a Windows 10 PC. Starting with Windows 10, version 1809, RSAT are included as a set of “Features on Demand” in Windows 10 itself.
Any resources being updated?
To support Windows 10, version 21H1, we are updating the key resources you rely on to effectively manage and deploy updates in your organization, including:
- Windows release health hub – The quickest way to stay up to date on update-related news, announcements, and best practices; important lifecycle reminders, and the status of known issues and safeguard holds.
- Windows 10 release information – A list of current Windows 10 versions by servicing option along with release dates, build numbers, end of service dates, and release history.
- Windows 10, version 21H1 update history – A list of all updates (monthly and out-of-band) released for Windows 10, version 21H1 sorted in reverse chronological order.
New features to explore
As noted above, Windows 10, version 21H1 offers a scoped set of features focused on the core experiences that you rely on the most as you support both in person and remote workforces. Here are the highlights for commercial organizations:
- Windows Hello multi-camera support. For devices with a built-in camera and an external camera, Windows Hello would previously use the built-in camera to authenticate the user, while apps such as Microsoft Teams were set to use the external camera. In Windows 10, version 21H1, Windows Hello and Windows Hello for Business now default to the external camera when both built-in and external Windows Hello-capable cameras are present on the device. When multiple cameras are available on the same device, Windows Hello will prioritize as follows:
- SecureBio camera
- External FrameServer camera with IR + Color sensors
- Internal FrameServer camera with IR + Color sensors
- External camera with IR only sensor
- Internal camera with IR only sensor
- Sensor Data Service or other old cameras
- Microsoft Defender Application Guard enhancements. With Windows 10, version 21H1, end users can now open files faster while Application Guard checks for possible security concerns.
- Security updates. Windows 10, version 21H1 provides security updates for Windows App Platform and Frameworks, Windows Apps, Windows Input and Composition, Windows Office Media, Windows Fundamentals, Windows Cryptography, the Windows AI Platform, Windows Kernel, Windows Virtualization, Internet Explorer, and Windows Media.
- Windows Management Instrumentation (WMI) Group Policy Service (GPSVC) updating performance improvements to support remote work scenarios. When an administrator would make changes to user or computer group membership, these changes would propagate slowly. Although the access token eventually updates, the changes would not be reflected in a troubleshooting scenario when the gpresult /r or gpresult /h commands were executed. This was especially experienced in remote work scenarios and has been addressed.
What else have we been up to?
Aside from Windows 10, version 21H1, we’ve been busy with other new, exciting features and solutions that you may have heard about! (Note that some of these may require additional licensing or services.) Check out the links for details:
- Passwordless authentication – Speaking of Windows Hello for Business, I wanted to make sure you didn’t miss our March announcement that passwordless authentication is now generally available for hybrid environments! This is a huge milestone in our zero-trust strategy, helping users and organizations stay secure with features like Temporary Access Pass.
- Windows Update for Business deployment service – Approve and schedule content approvals directly through a service-to-service architecture. Use Microsoft Graph APIs to gain rich control over the approval, scheduling, and protection of content delivered from Windows Update.
- Expedite updates – Expediting a security update overrides Windows Update for Business deferral policies so that the update is installed as quickly as possible. This can be useful when critical security events arise and you need to deploy an update more rapidly than normal.
- Known Issue Rollback – Quickly return an impacted device back to productive use if an issue arises during a Windows update. Known Issue Rollback supports non-security bug fixes, enabling us to quickly revert a single, targeted fix to a previously released behavior if a critical regression is discovered.
- News and interests – For devices running Windows 10, version 1909 or later, news and interests in the taskbar enables users to easily see local weather and traffic as well as favorite stocks and the latest news on topics related to professional or personal interests. To learn how to manage news and interests via Group Policy or Microsoft Endpoint Manager, see Manage news and interests on the taskbar with policy,
- Universal Print – Now generally available, Universal Print is ready for your business! Universal Print is the premier cloud-based printing solution, run entirely in Microsoft Azure, and requires no on-premises print infrastructure.
- …and so much more! Follow the Windows IT Pro Blog (and @MSWindowsITPro on Twitter) to keep up-to-date on Windows announcements and new feature releases, and the Microsoft Endpoint Manager Blog (and @MSIntune on Twitter) for announcements and features new to Intune and Configuration Manager.
Deployment recommendations
With today’s release, you can begin targeted deployments of Windows 10, version 21H1 to validate that the apps, devices, and infrastructure used by your organization work as expected with the new features. If you will be updating devices used in remote or hybrid work scenarios, I recommend reading or revisiting Deploying a new version of Windows 10 in a remote world. For insight into our broader rollout strategy for this release, see John Cable’s post, How to get the Windows 10 May 2021 Update.
If you need a refresher on Windows update fundamentals, see:
- Overview of Windows as a service
- Manage updates using Windows Update for Business
- Prepare updates using Windows Server Update Services
- Manage updates using Configuration Manager
For step-by-step online learning to help you optimize your update strategy and deploy updates more quickly across your device estate, see:
- Stay current with Windows 10 and Microsoft 365 Apps
- Manage Windows updates in the cloud
To get an early peek at some of the new features before we release them, join the Windows Insider Program for Business! Insiders can test new deployment, management, and security features, and provide feedback before they become generally available. Learn about managing the installation of Windows 10 Insider builds across multiple devices and get started today!
Join us for Office Hours
And finally, make sure you join our monthly Windows Office Hours, where you can ask your deployment, servicing, and updating questions and get answers, support, and help from our broad team of experts. Submit questions live during the monthly one-hour event or post them in advance if that schedule does not work for your time zone. Our next event is Thursday, May 20, 2021 so add it to your calendar and join us!

[1] It may take a day for downloads to be fully available in the VLSC across all products, markets, and languages.
Brought to you by Dr. Ware, Microsoft Office 365 Silver Partner, Charleston SC.

Microsoft has released a new version of Windows 10, dubbed version 21H1. This version brings new functionality that many organizations are eager to utilize. In many organizations, Windows-based devices are joined to Active Directory Domain Services (AD DS), so devices can be managed centrally and end-users can sign-in on any domain-joined device of their liking.
A new Windows version means that Active Directory needs to be properly prepared. In this blogpost, I’ll show you how to prepare Active Directory for Windows 10, version 21H1:
Group Policy
Windows 10, version 21H1 comes with ten new Group Policy settings. To centrally manage Group Policy, you can update the Group Policy Central Store with the new Group Policy template (*.admx) and Group Policy language (*.adml) files. This way, you can centrally manage the versioning of Group Policy templates.
Note:
If your organization doesn’t use the Group Policy Central Store feature, yet, now is a good time to implement it.
You can download the Download Administrative Templates (.admx) for Windows 10 May 2021 Update (21H1) from the Microsoft Download Center. This download includes *.adml files for the Czech, Danish, German, Greek, English, Spanish, Finnish, French, Hungarian, Italian, Japanese, Korean, Norwegian, Dutch, Polish, Portuguese, Russian, Swedish, Turkish and Chinese languages.
Copy the new PolicyDefinitions folder over the existing PolicyDefinitions folder in the Active Directory System Volume (SYSVOL) share to update the Group Policy Central Store.
When you’re a fan of Microsoft’s security baselines, you can download and implement the Security baseline (final) for Windows 10, version 21H1.
Windows Activation
Active Directory-based Activation (ADbA) is available since Windows Server 2012 as a replacement for Microsoft’s Key Management Services (KMS).
Note:
If your organization doesn’t use Active Directory-based Activation, yet, now is a good time to implement it.
You can download the product keys for your organization from the Volume Licensing Service Center (VLSC). Enter the product keys to automatically activate Windows 10 when it comes into scope of your Windows activation method.
Remote Server Administration Tools
In previous Windows 10 version, the Remote Server Administration Tools (RSAT) needed to be downloaded manually to allow admins to manage Windows Server features from these devices. However, since Windows 10, version 1809, the RSAT are included as Features on Demand in Windows 10 itself.
Do not download an RSAT package from this page. Instead, perform the following steps on a device running Windows 10, version 21H1:
- Press the Start button.
- Search for Manage optional features.
Click the search result with the same name - Click Add a feature.
You now see the list of available optional features. - Select and install the specific RSAT tools you need. All RSAT tools names are prefixed with RSAT: , so this makes for easy filtering.