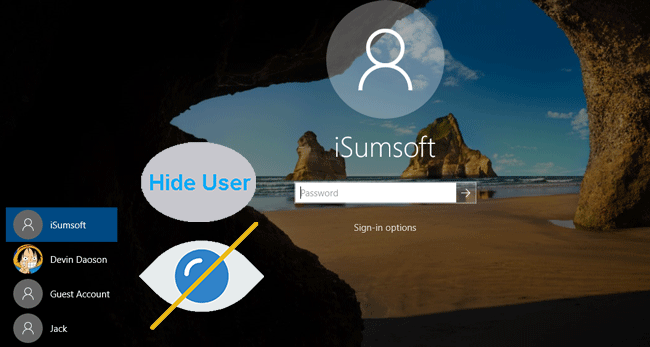
Windows 10 shows you a list of all user accounts available on your PC in the bottom left corner of the logon screen. You can click the user avatar, enter the password if it is necessary, and login using the provided credentials. It is possible to hide a specific user from this list, so the account becomes hidden. Nobody will be able to see that you have such a user account. This can be done with a simple registry tweak.
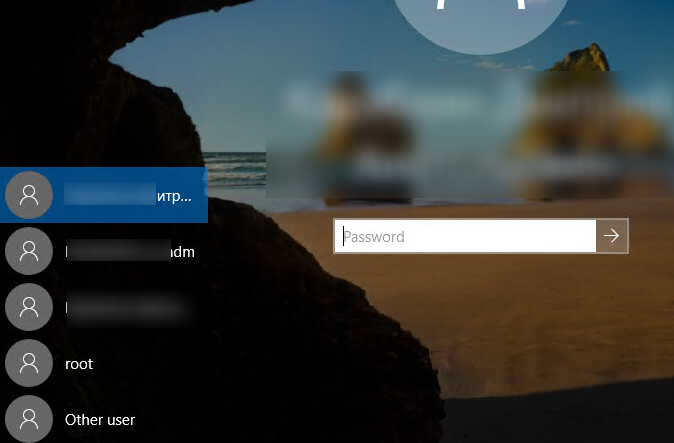
Here is how the login screen looks in Windows 10:
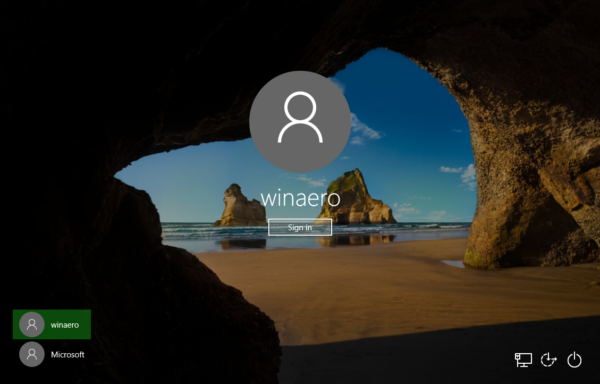 For example, let’s hide the account named «Microsoft».
Before you continue
To login into the hidden account, you need to make Windows to ask for user name and password during log on.
To hide a user account from the login screen in Windows 10, you need to do the following.
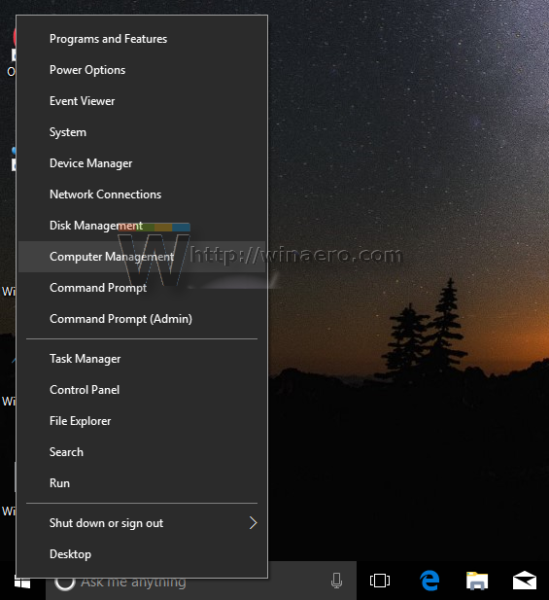
- Right click the Start button in the taskbar File Explorer and choose Computer Management from its context menu.

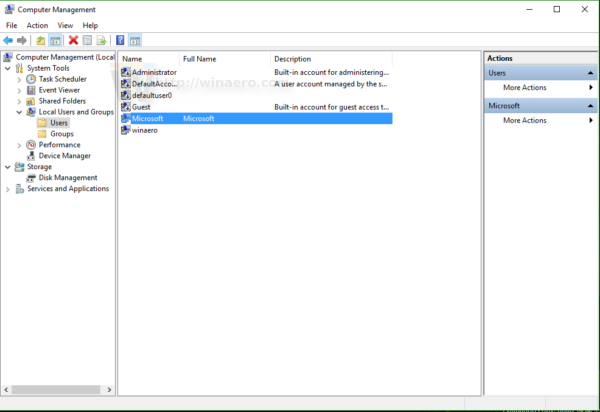
- Under Computer Management -> System Tools, select the item Local Users and Groups -> Users.
 Note the value of the first column, «Name». By default, Windows shows the «Full Name» value on the login screen, but we need the actual login name.
 - Next, open Registry Editor.
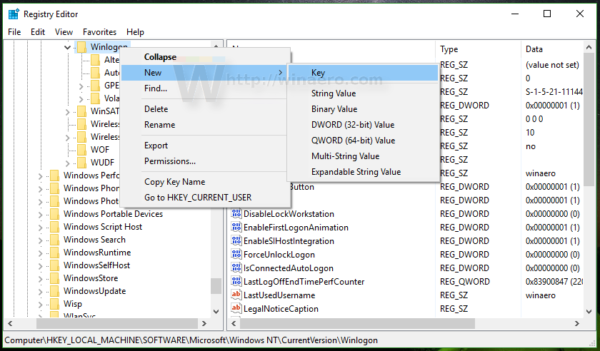
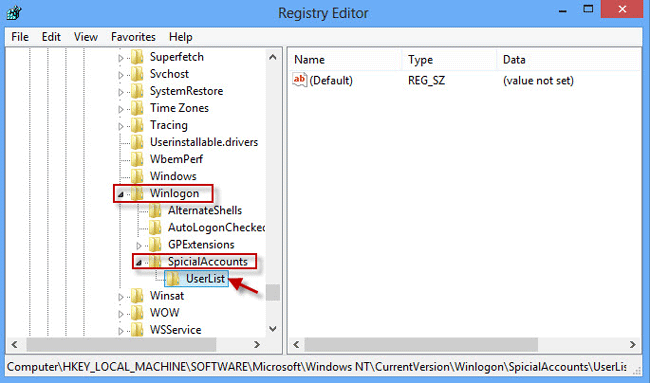
- Go to the following Registry key:
HKEY_LOCAL_MACHINESOFTWAREMicrosoftWindows NTCurrentVersionWinlogon
Tip: You can access any desired Registry key with one click.

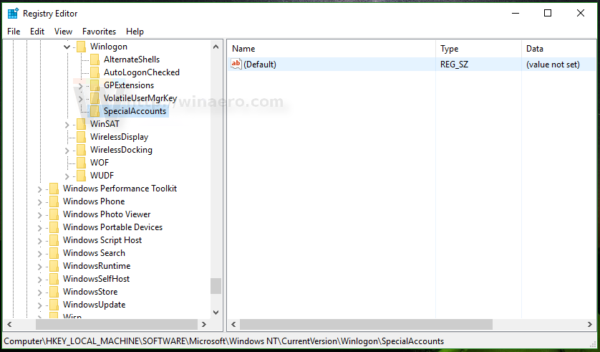
- Create a new subkey here called SpecialAccounts.

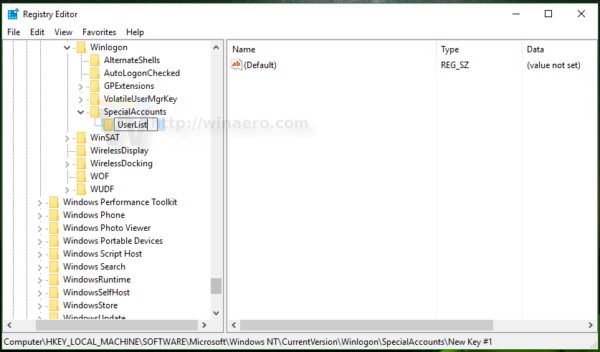
- Now create a key named UserList under the SpecialAccounts key. You should get the following path:
HKEY_LOCAL_MACHINESOFTWAREMicrosoftWindows NTCurrentVersionWinlogonSpecialAccountsUserList
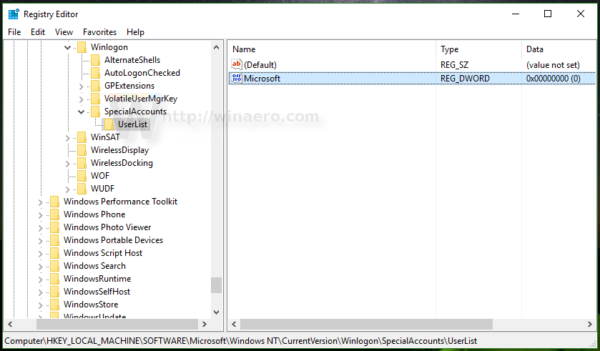
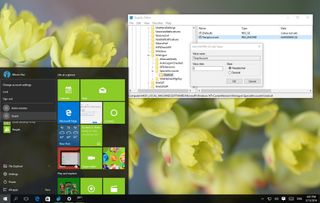
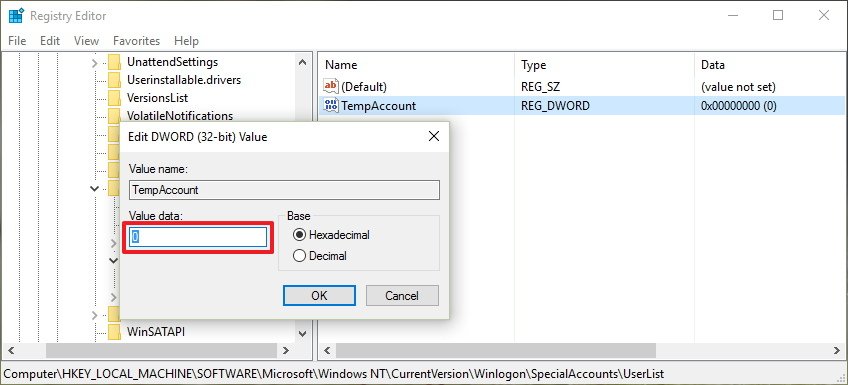
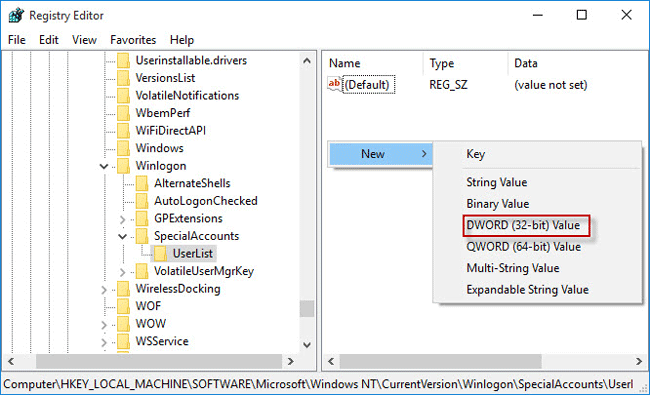
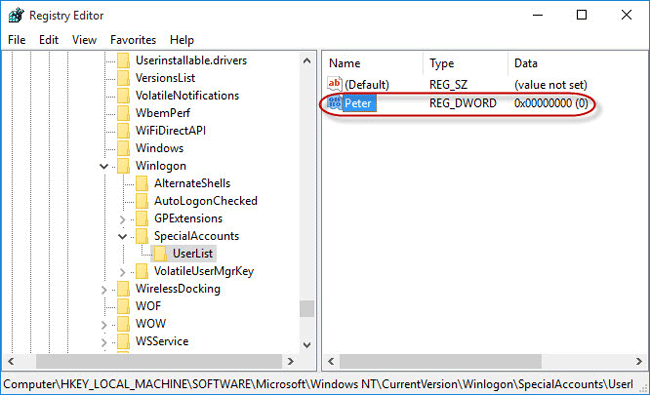
- Create a new DWORD value in the UserList subkey. Use the login name which you noted earlier in Local Users and Groups as the name of the new value you just created. Do not modify its default value, leave it at 0. You should get something like this:
 Note the value of the first column, «Name». By default, Windows shows the «Full Name» value on the login screen, but we need the actual login name.
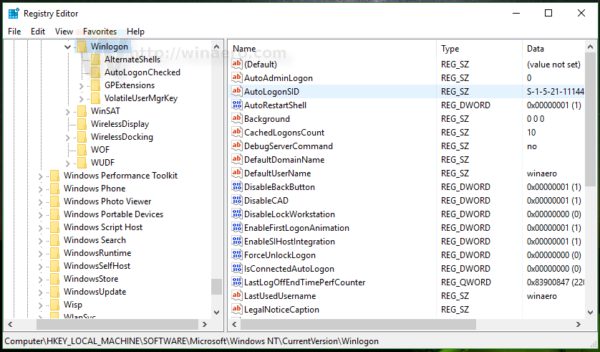
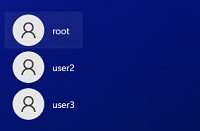
This is all you need to do. If you done everything properly, the account will disappear from the logon screen.
Before:
After: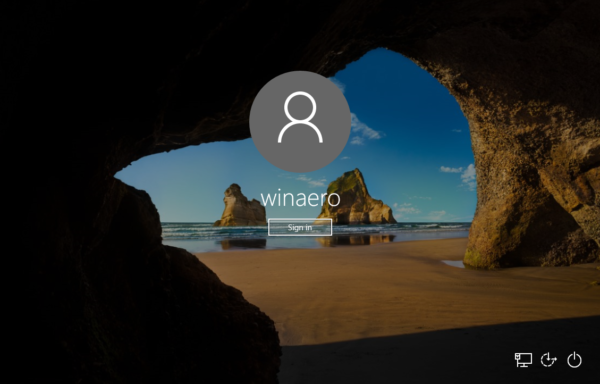
To login into the hidden account, you need to make Windows to ask for user name and password during log on.
How to make the hidden account visible
To show that account again, you need delete the DWORD value you created earlier under HKEY_LOCAL_MACHINESOFTWAREMicrosoftWindows NTCurrentVersionWinlogonSpecialAccountsUserList Registry key.
Here are a few notes.
if your current user account doesn’t have administrator privileges to edit Registry, but the hidden one has it, you can do the following:
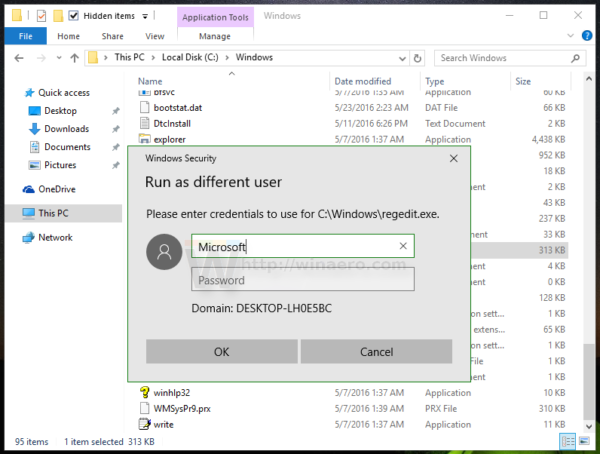
- Open File Explorer and go to folder C:Windows.
- Press and hold the SHIFT key on the keyboard and right click the file Regedit.exe.
- In the context menu, you will see a new item named «Run as different user»:

- Now, type the required user name into the dialog which will appear on the screen. This will allow you to edit Registry entries.


Here is an alternative solution for hose who locked themselves out hiding all admin accounts by mistake.
If you create the UserList registry key using an ordinary account rather than an adminsitartor account the key seems to allow ‘Users’ full permission on it.
You can create a text file using notepad like this :
Windows Registry Editor Version 5.00

[-HKEY_LOCAL_MACHINESOFTWAREMicrosoftWindows NTCurrentVersionWinlogonSpecialAccountsUserList]
Save it as UnhideAccounts.reg and then double click this file to merge it into Registry. This will make all your hidden accounts visible on the login screen.
That’s it. The similar solution can be used for Windows 8.
Support us
Winaero greatly relies on your support. You can help the site keep bringing you interesting and useful content and software by using these options:
If you like this article, please share it using the buttons below. It won’t take a lot from you, but it will help us grow. Thanks for your support!
When you share your computer with family members or friends, Windows 10 by default will list every user account on the sign-in screen. However, there could be times when you may have some additional accounts that you don’t want listed. For example, accounts for users who only login remotely to their PCs, or an account that you want to keep secret from regular users.
While the operating system doesn’t offer an option to pick which user accounts appear on the sign-in screen, you can easily hide any user from being listed by modifying the registry.
In this Windows 10 guide, we’ll walk you through the steps to hide user accounts from the sign-in screen on your computer.
Important: Before you make any changes, make sure to understand that you’ll be modifying the Windows registry, which could be a dangerous game that can cause irreversible damage to your computer when changes are not done properly. It’s recommended that you do a full backup of your system before proceeding. You’ve been warned!
How to hide user accounts from the sign-in screen
Windows 10 by default displays the full name on a user on the sign-in screen, but to make this work you’ll need the name of the account. You can find this information by opening Local Users and Groups. However, this option is only available for Pro users, as such we’ll be using the old User Accounts manager that is available on Windows 10 Pro as well as on Windows 10 Home.
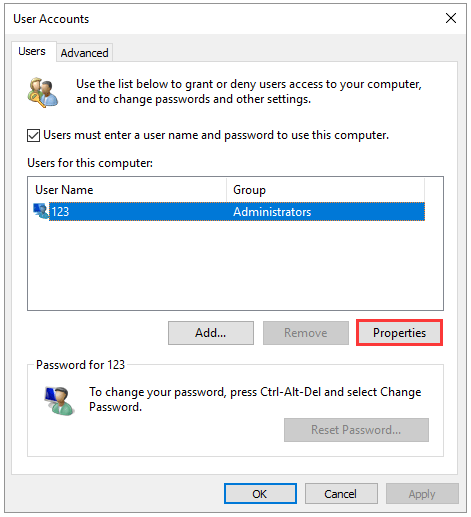
- Use the Windows key + R keyboard shortcut to open the Run command, type netplwiz, and click OK to open User Accounts.
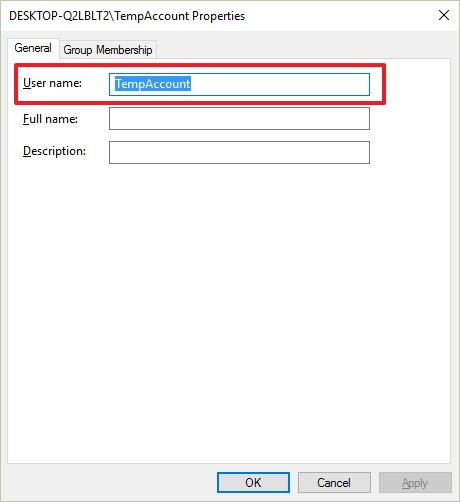
- Select the account you want to hide and click Properties.
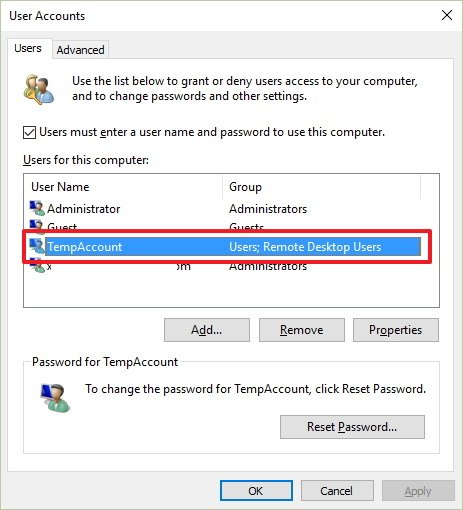
- Make note of the User name for the account.
Use the following steps to hide an account from sign-in screen on Windows 10:
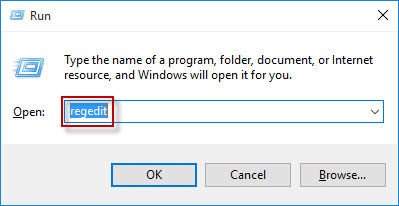
- Use the Windows key + R keyboard shortcut to open the Run command, type regedit, and click OK to open the Windows Registry.
- Browse the following path:
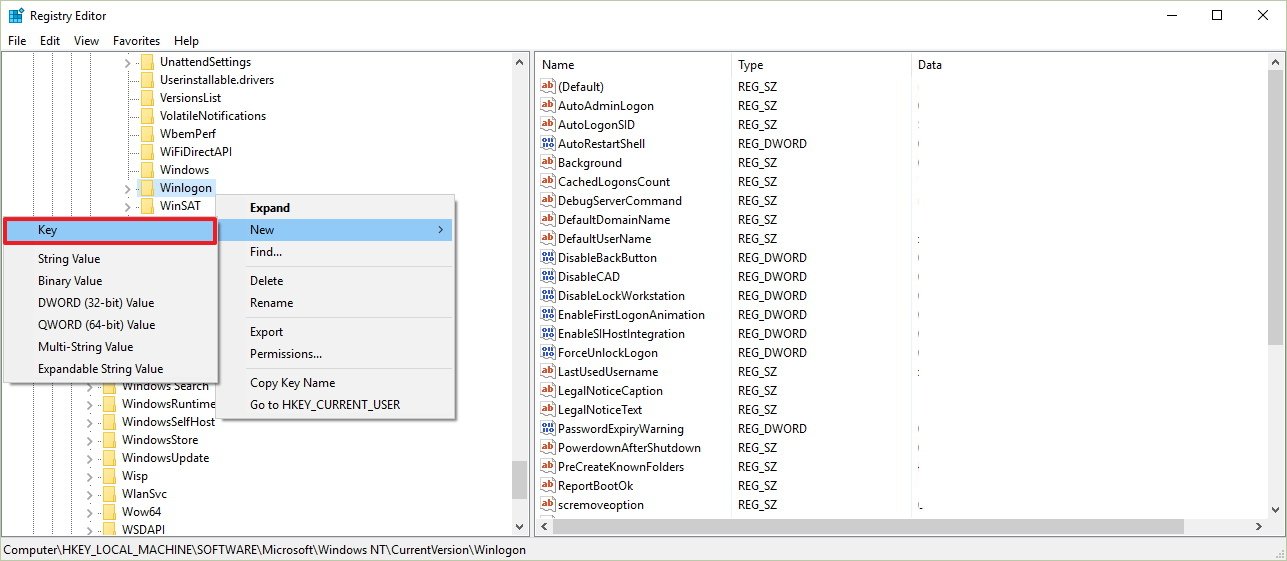
HKEY_LOCAL_MACHINESOFTWAREMicrosoftWindows NTCurrentVersionWinlogon - Right-click the Winlogon, select New, and click Key.
- Name the new key SpecialAccounts.
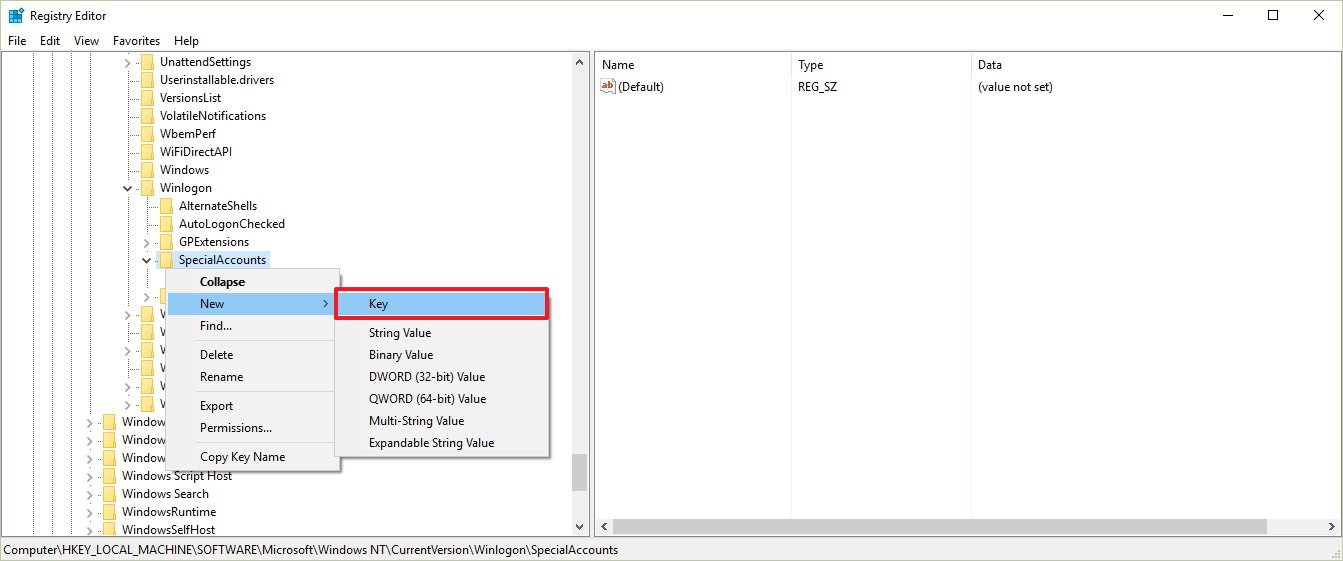
- Right-click the SpecialAccounts key, select new, and click Key.
- Name the new key UserList.
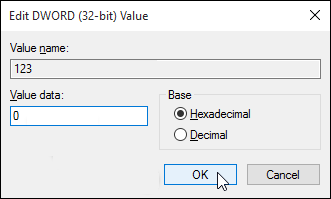
- Inside of UserList, right-click, select New, and click DWORD (32-bit) Value.
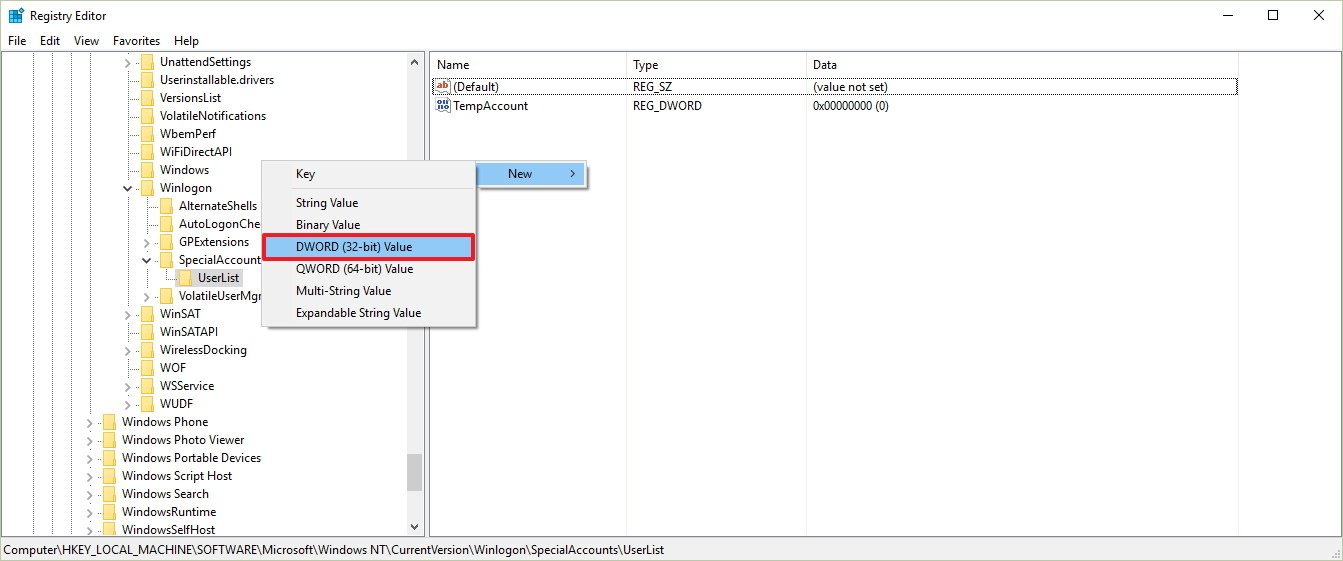
- Name the new DWORD key with the name of the account you’re trying to hide.
- Double-click the new DWORD key and make sure its data value is set to 0.
Sign-out and you’ll now notice that the account will no longer be available on the sign-in screen. In fact by doing this, you’re also hiding the account from virtually everywhere in the operating system, including the from the switch user menu in the Start menu, from Control Panel, and even from the Settings app.
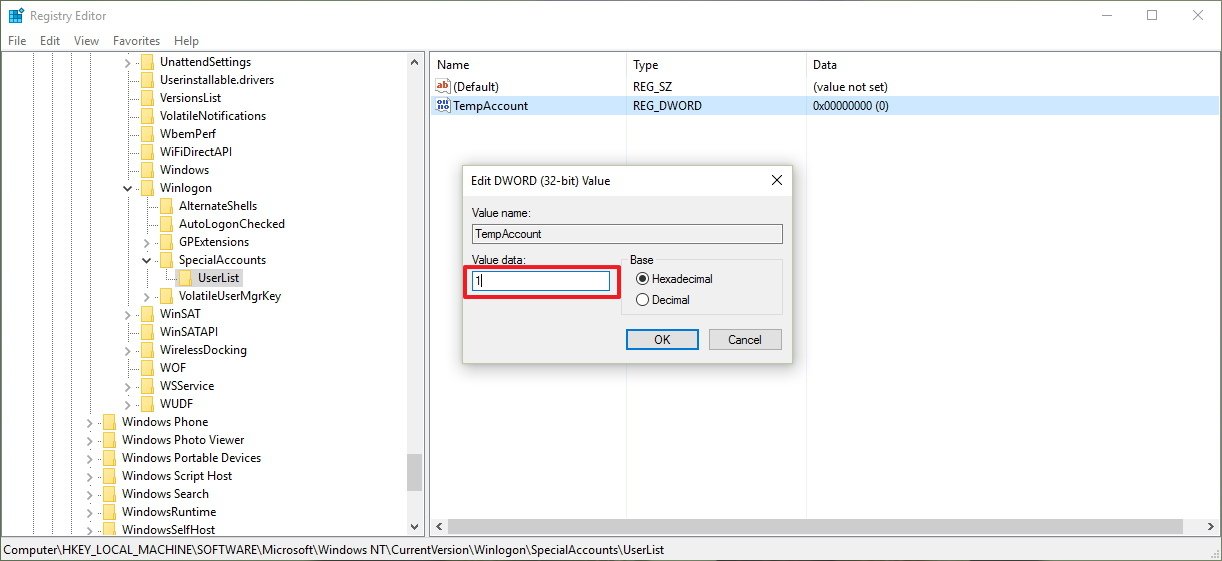
In order to make a hidden account visible again, you’ll have to go back to the registry UserList key using the steps mentioned above, and making sure to change the user name data key value from 0 to 1.
If you’re only hiding a remote user account, you don’t need to do anything else, as the user can login remotely without any issues.
Keep in mind that while this guide will help you to remove user accounts from the sign-in screen, it’s not recommended to remove all the accounts, including your own, as you may find tough to get back in.
These steps work on Windows 10, and it should also work on Windows 8.1 and Windows 7.
More Windows 10 resources
For more help articles, coverage, and answers on Windows 10, you can visit the following resources:
- Windows 10 on Windows Central – All you need to know
- Windows 10 help, tips, and tricks
- Windows 10 forums on Windows Central
Get the best of Windows Central in in your inbox, every day!
Mauro Huculak is technical writer for WindowsCentral.com. His primary focus is to write comprehensive how-tos to help users get the most out of Windows 10 and its many related technologies. He has an IT background with professional certifications from Microsoft, Cisco, and CompTIA, and he’s a recognized member of the Microsoft MVP community.
Windows OS Hub / Windows 10 / How to Hide or Show User Accounts from Login Screen on Windows 10/11?
By default, the login screen on Windows 10/11 and Windows Server 2019/2016/2012R2 displays the account of the last user who logged in to the computer. You can configure different behavior of this feature: you can show the last logon username, hide it, or even list all local/logged domain users on your device’s welcome screen.
Contents:
- Do Not Display the Last Username on Windows Logon Screen
- Show All Users on Windows 10/11 Sign-in Screen
- Show Logged In Domain Users on Windows Login Screen
- Hide Specific User Accounts from the Sign-in Screen on Windows 10 and 11
Do Not Display the Last Username on Windows Logon Screen
End users are comfortable when the last logged account name is displayed on the Windows Logon Screen and doesn’t need to be typed in manually. But this makes it easier for an attacker to access the computer. To access your device, he only needs to find the correct password. To do this, there are various ways of social engineering, brute-force attacks, or a banal sticky piece of paper with a password on the monitor.
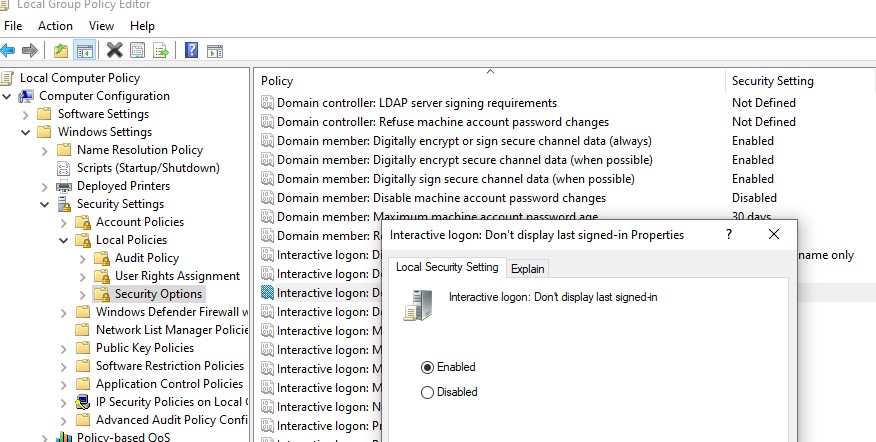
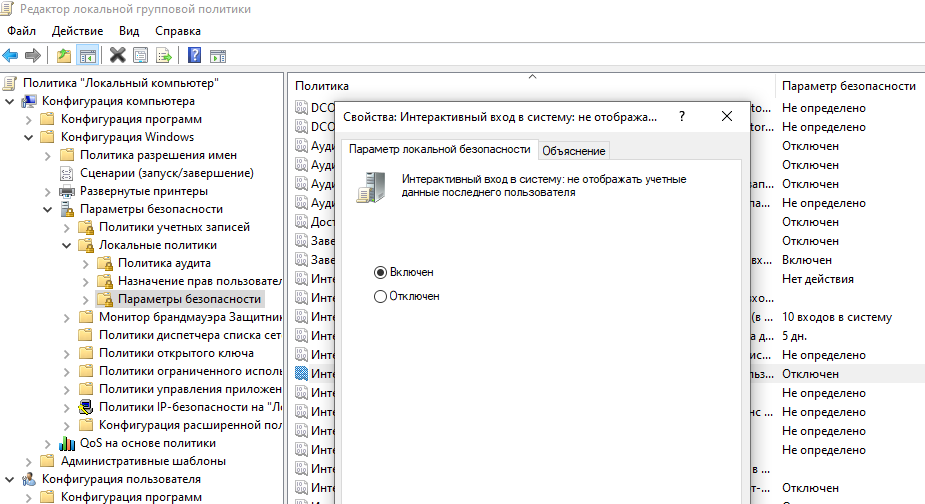
You can hide the last logged username on a Windows logon screen through the GPO. Open the domain (gpmc.msc) or local Group Policy editor (gpedit.msc) and go to the section Computer Configuration -> Windows Settings -> Security Settings -> Local Policies -> Security Options. Enable the policy “Interactive logon: Do not display last user name”. This policy is disabled by default.
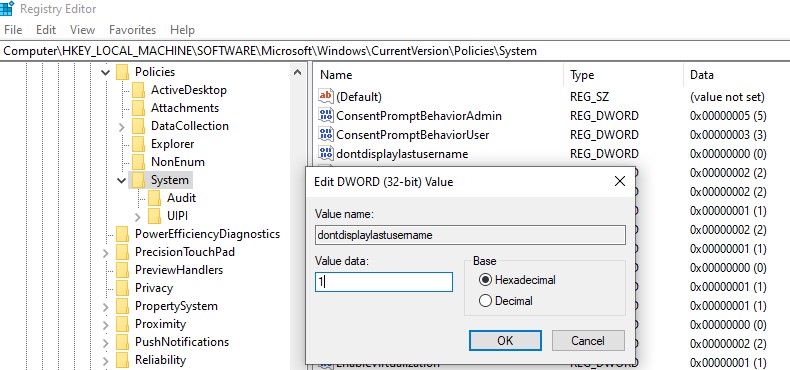
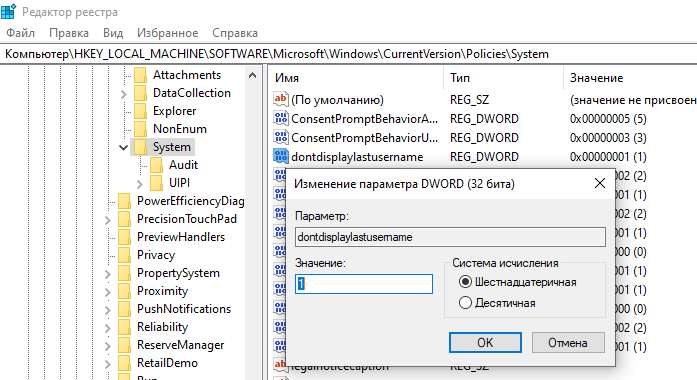
Also, you can hide the last username from the login screen through the registry. To do this go to the registry key HKEY_LOCAL_MACHINESOFTWAREMicrosoftWindowsCurrentVersionPoliciesSystem, create a new DWORD parameter named dontdisplaylastusername with the value 1.
The username is also displayed on the computer if its screen is locked (by pressing Win+L or via the lock screen GPO). You can hide the username on a computer lock screen. To do this, in the same section of the GPO, you must enable the policy “Interactive logon: Display user information when the session is locked” and set the value “Do not display user information.
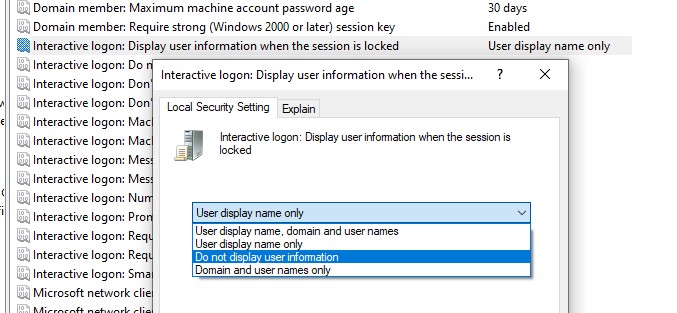
A registry parameter named DontDisplayLockedUserId in the same registry key with a value of 3 matches this policy parameter.
Other possible values for this parameter:
- 1 — show user display name, domain, and usernames
- 2 — show only user display names
- 3 — do not display users.
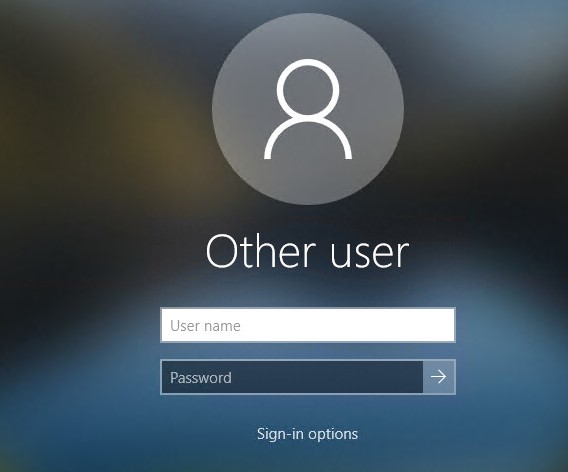
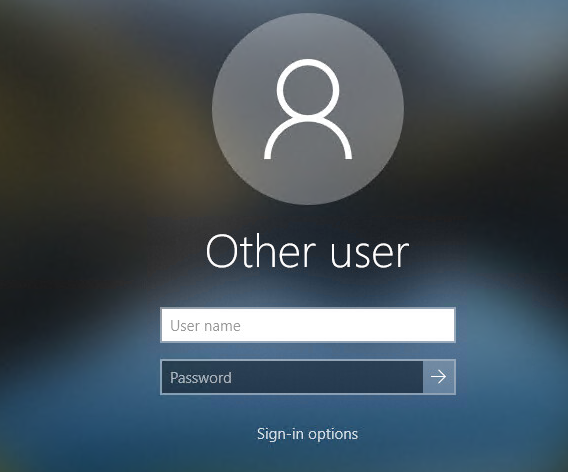
The computer login screen and Windows lock screen now display the blank username and password fields.
Show All Users on Windows 10/11 Sign-in Screen
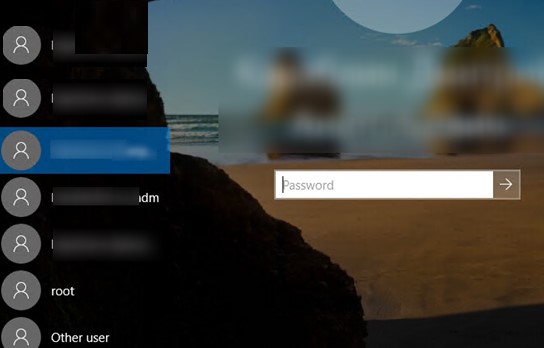
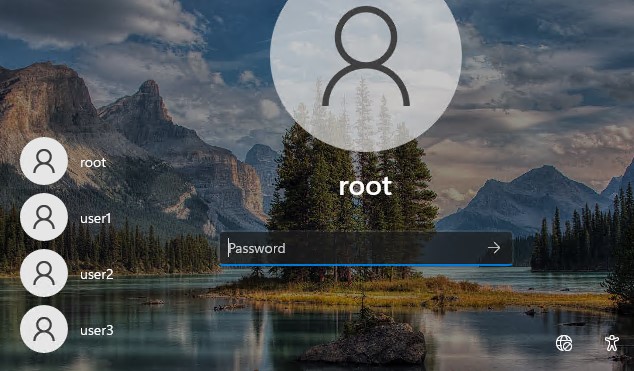
By default, modern versions of Windows (tested on Windows 11 21H2 and Windows 10 21H1) always show the list of enabled local users in the bottom left corner of the login screen. Only hidden (see below) or disabled users are not displayed.
To log in to the computer, the user just needs to click on the required user account and specify its password. This only works on computers that are not joined to the Active Directory domain.
If no password is set for the user account, this user will be automatically logged on, even if autologon is not enabled.

If the list of local users is not displayed on the computer logon screen, check the settings of the following local Group Policy options (use the gpedit.msc):
- Interactive Logon: Do not display last signed-in =
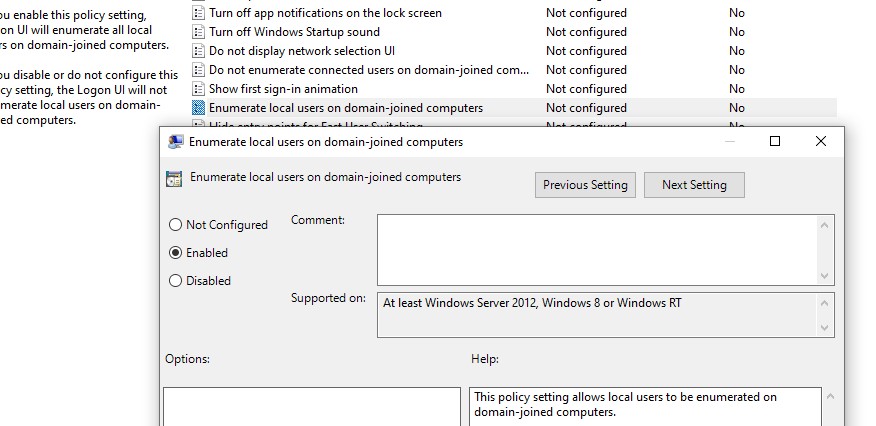
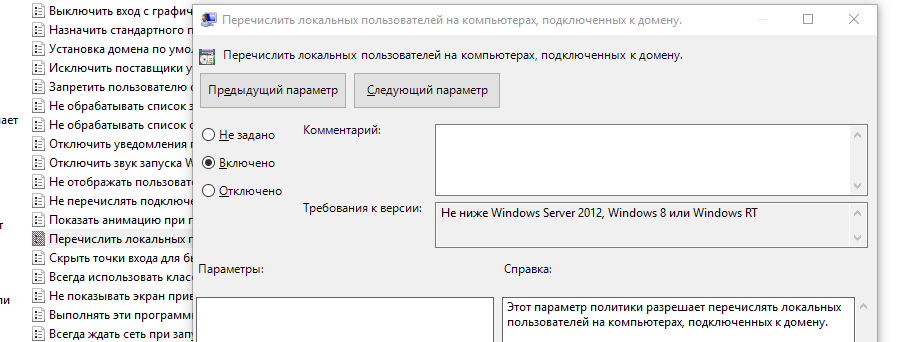
Disabled(Computer Configuration -> Windows Settings -> Security Settings -> Local Policies -> Security Options); - Enumerate local users on domain-joined computers =
Enabled(Computer Configuration -> Administrative Templates -> System -> Logon) - Do not enumerate connected users on domain-joined computer =
Disabled/Not Configured(in the same GPO section)
Restart your computer to apply the new Group Policy settings.
In some old Windows 10 builds (from 1609 up to 1903), there was another problem with displaying all local users on the Windows Welcome screen, related to user switching mode.
To display all local user accounts on the Windows login screen, you need to change the value of Enabled parameter to 1 in the following registry key: HKEY_LOCAL_MACHINESOFTWAREMicrosoftWindowsCurrentVersionAuthenticationLogonUIUserSwitch. This option allows you to switch the current user on the Windows sign-in screen. However, Windows automatically resets the value of the Enabled parameter to 0 at each user logon.
In order to fix this problem, you need to create a scheduler task that will change the parameter value to 0 on each user logon.
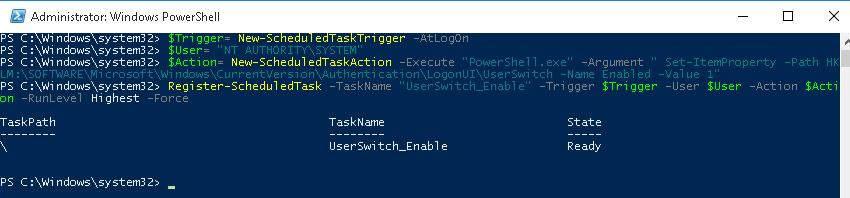
You can create a new Scheduler task with PowerShell:
$Trigger= New-ScheduledTaskTrigger -AtLogOn

$User= "NT AUTHORITYSYSTEM"

$Action= New-ScheduledTaskAction -Execute "PowerShell.exe" -Argument "Set-ItemProperty -Path HKLM:SOFTWAREMicrosoftWindowsCurrentVersionAuthenticationLogonUIUserSwitch -Name Enabled -Value 1"

Register-ScheduledTask -TaskName "UserSwitch_Enable" -Trigger $Trigger -User $User -Action $Action -RunLevel Highest –Force
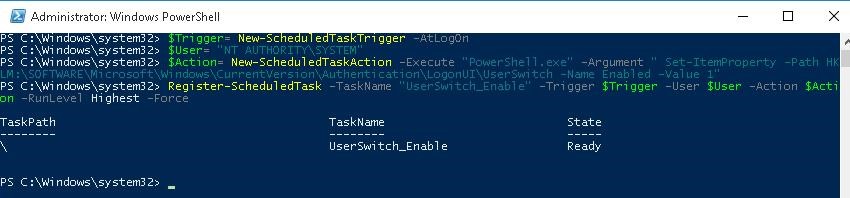
Make sure that the task appeared in Windows Task Scheduler (taskschd.msc).
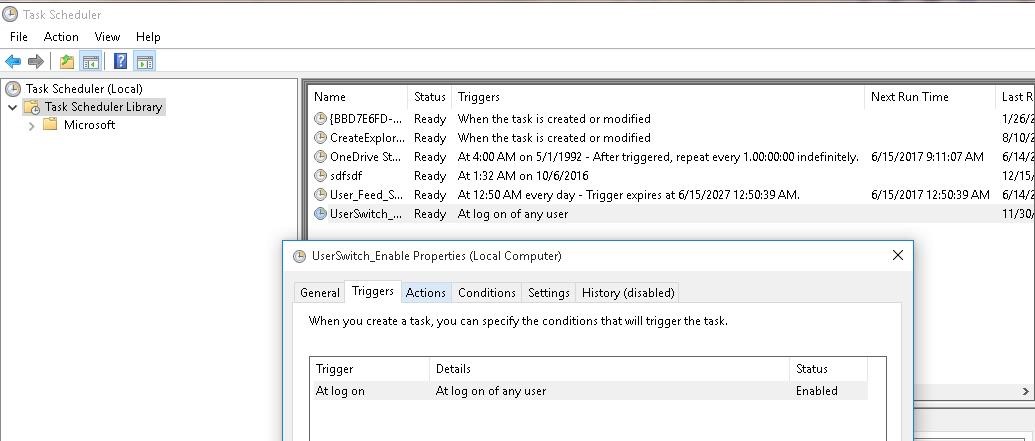
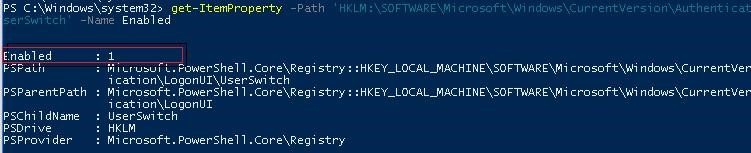
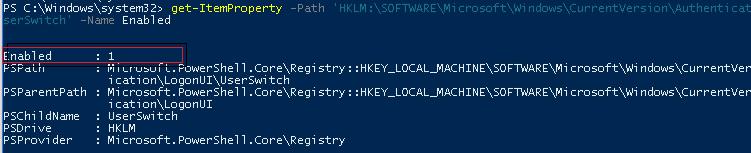
Log off and then log on again. The task must start automatically and change the value of Enabled registry parameter to 1. Check the current value of the parameter using Get-ItemProperty. As you can see, it is 1:
get-ItemProperty -Path 'HKLM:SOFTWAREMicrosoftWindowsCurrentVersionAuthenticationLogonUIUserSwitch' -Name Enabled
Show Logged In Domain Users on Windows Login Screen
If multiple domain users share the same computer, you can display a list of users with active sessions on the welcome screen. An active session means that users are logged into the computer. It can be a shared computer (used in user switching mode), kiosks, Windows Server RDS hosts, or Windows 11 and 10 devices with multiple RDP connections allowed).
To do this, check that in the Computer Configuration -> Windows Settings -> Security Settings -> Local Policies -> Security Options the following policies are disabled:
- Interactive logon: Don’t display last signed-in: Disabled
- Interactive logon: Don’t display username at sign-in: Disabled

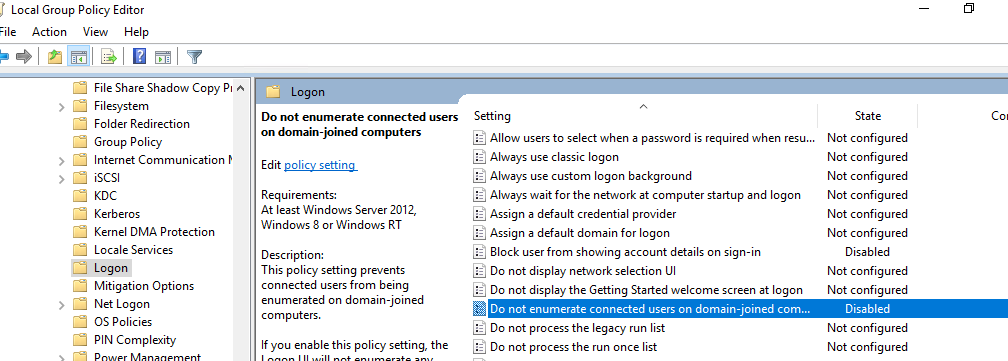
Then disable the policies in the section Computer Configuration -> Administrative Templates -> System -> Logon:
- Block user from showing account details on sign-in: Disabled
- Do not enumerate connected users on domain-joined computer: Disabled
After that, the welcome screen will display a list of logged-on users. Both active sessions and sessions of users with the disconnected status (for example, by RDP timeout) will be displayed here. The user only needs to log in once, and then just select an account from the list and enter a password.
Note that Group Policy settings on domain computers can be managed by domain administrators. If one of the local GPO settings doesn’t apply to your computer, check to see if it is overridden by domain GPOs. Use rsop.msc or gpresult to get the resulting Group Policy settings on your device.
Hide Specific User Accounts from the Sign-in Screen on Windows 10 and 11
The Windows Welcome screen always displays users who are members of one of the following local groups: Administrators, Users, Power Users, Guests.
Disabled users don’t show on the Windows sign-in screen.
You can hide specific users from the list on the welcome screen through the registry. To do this, you need to use the HKLMSOFTWAREMicrosoftWindows NTCurrentVersionWinlogonSpecialAccountsUserList registry key. You need to create a DWORD parameter with username and value 0 for each user you want to hide.
You can list local user names with PowerShell or cmd:
Net user
Or:
Get-LocalUser | where {$_.enabled –eq $true}
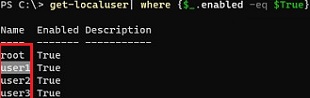
To hide a specific user account from the Windows 11 or 10 welcome screen (for example, user1), run the command:
reg add "HKLMSOFTWAREMicrosoftWindows NTCurrentVersionWinlogonSpecialAccountsUserList" /t REG_DWORD /f /d 0 /v UserName
If you want to show the hidden user on the login screen again, you need to delete this registry parameter or change its value to 1.
If the built-in Windows administrator account is enabled on the computer, and this is not the only account with local administrator permissions on the computer (!!!), you can hide it too:
reg add "HKLMSOFTWAREMicrosoftWindows NTCurrentVersionWinlogonSpecialAccountsUserList" /t REG_DWORD /f /d 0 /v administrator
If you want to hide all users except the last one logged into the computer, configure the following GPO settings in Computer Configuration -> Administrative Templates -> System -> Logon:
- Enumerate local users on domain—joined computers = Disabled
- Do not enumerate connected users on domain-joined computer = Enabled
-
Partition Wizard
-
Partition Manager
- Hide Specific User Accounts from Login Screen on Windows 10
By Vicky | Follow |
Last Updated December 01, 2020
You may be willing to share your computer with your family members and friends. But Windows 10 by default will list every user account on the sign-in screen and you may want to keep some of them secret for other reasons. In this post, MiniTool shows you how to hide specific user accounts from login screen.
Hide Specific User Accounts from Login Screen
You may have set up no less one user accounts on your Windows 10 computer. But you do not want the person who borrows your computer to use one of the accounts. Let’s see how to hide user accounts from login screen on Windows 10.
Note: It is not recommended that you hide all the accounts, including your own, because it is maybe tough to get back in.
Stage 1: Get the Full Name of Your User Account
To complete this work, you need to get the full name of the user account you want to hide from login screen first.
Here is the tutorial on checking the exact name of the user accounts.
Step 1: Press the Windows key and the R key on the keyboard simultaneously to call out the Run window.
Step 2: On the Run window, please type netplwiz and click the OK button to launch User Accounts.
Step 3: Select the user account you want to hide and then click the Properties button.
Step 4: Copy the user name on the newly popping-up window to Word or a place you prefer.
Now you have gotten the exact name of the user account you want to hide, and you can move to Stage 2 to complete hiding this account from login screen.
Stage 2: Hide the User Account from Login Screen via Registry Editor
To complete this work, you need to make some changes in Registry Editor. This may be risky if the changes are not done properly. Therefore, it is wise to back up your computer in case something goes wrong and then you can start hiding one user account.
Here is the tutorial on how to hide specific user accounts from login screen.
Step 1: Call out the Run window and then type regedit and click the OK button to launch Registry Editor.
Step 2: Look at the left pane of the current window and navigate to the path below.
HKEY_LOCAL_MACHINE > SOFTWARE > Microsoft > Windows NT > CurrentVersion > Winlogon
Step 3: Right-click the Winlogon and select New > Key. Name the key as SpecialAccounts.
Step 4: Right-click the SpecailAccounts key and select New > Key to create a key named UserList.
Step 5: Expand the UserList key, right-click the empty space in the right pane, and select Next > DWORD (32-bit) Value.
Step 6: Name the DWORD as the name of the user account that you want to hide (the name you have copied in Step 4 in Stage) and set its Value data to 0.
After completing the above steps, your user account should be invisiable on the login screen. Apart from the screen, the account is also hidden from the switch user menu in the Start menu, from Control Panel, from the Settings app, etc.
If you want to show the hidden user account on login screen again, you just need to change the Value data of the account from 0 to 1 in Registry Editor.
Are you interested in keeping your digital data secret? If yes, you can read 5 Operations to Keep Your Digital Data Secure Effectively. This post shows you a detailed tutorial.
Bottom Line
Have you mastered how to hide specific user accounts from login screen? If you have any questions about this work, please leave them in the comment zone and we will reply to you as soon as possible.
About The Author

Position: Columnist
Vicky is a website editor who has been writing tech articles since she was graduated from university. Most of her articles talk about Windows PC and hard disk issues. Some of her articles also touch on YouTube usage and issues.
During her spare time, she likes to spend time reading, watching videos, and sitting on her Yoga mat to relax.
В Windows 10/11 и Windows Server 2019/2016/2012R2 на экране входа в систему (logon screen, экран приветствия) по-умолчанию отображается только учетная запись последнего пользователя, который логинился на компьютере. Вы можете настроить различное поведение этой функции на экране приветствия: можно показать имя пользователя, скрыть его или даже вывести список всех локальных или активных доменных пользователей компьютера (сервера).
Содержание:
- Как скрыть имя последнего пользователя на экране приветствия Windows?
- Показать список всех локальных пользователей на экране входа в Windows
- Вывести список доменных пользователей на экране входа в Windows
- Как скрыть пользователя на экране приветствия Windows?
Как скрыть имя последнего пользователя на экране приветствия Windows?
Конечным пользователям удобно, когда на экране входа в Windows отображается имя учетной записи и его не нужно набирать вручную. Но это облегчает задачу злоумышленнику, получившему доступ к компьютеру. Для входа в систему ему нужно только подобрать правильный пароль. Для этого есть различные способы социальной инженерии, брутфорса или банального приклеенного листочка с паролем на мониторе.
Вы можете отключить отображение имени последнего пользователя на экране входа Windows через GPO. Откройте редактор доменных
(gpmc.msc
) или локальных политик (gpedit.msc) и перейдите в раздел Конфигурация компьютера -> Конфигурация Windows -> Параметры безопасности -> Локальные политики -> Параметры безопасности (Computer Configuration -> Windows Settings -> Security Settings -> Local Policies -> Security Options). Включите политику “Интерактивный вход в систему: Не отображать учетные данные последнего пользователя” (Interactive logon: Do not display last user name). По умолчанию эта политика отключена.
Вы можете скрыть имя последнего пользователя на экране входа через реестр. Для этого в ветке HKEY_LOCAL_MACHINESOFTWAREMicrosoftWindowsCurrentVersionPoliciesSystem создайте параметр dontdisplaylastusername типа DWORD и значением 1.
Имя пользователя также отображается на компьютере, если его экран заблокирован (нажатием Win+L или через GPO блокировки экрана). Вы можете скрыть имя пользователя на заблокированном компьютере. Для этого в этом же разделе GPO нужно включить политику “Интерактивный вход в систему: отображать сведения о пользователе, если сеанс заблокирован” (Interactive logon: Display user information when the session is locked) и выбрать значение “Не отображать сведения о пользователе” (Do not display user information).
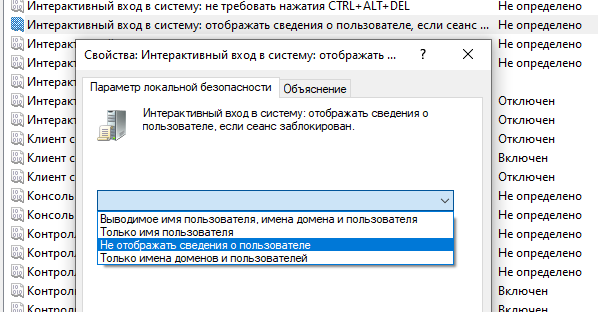
Этой политике соответствует ключ реестра в той же ветке DontDisplayLockedUserId со значением 3.
Другие возможные значения этого параметра:
- 1 — показывать отображаемое имя, домен и имя пользователя;
- 2 — показывать только отображаемое имя;
- 3 — не отображать сведения о пользователе.
Теперь на экране входа в компьютер и на экране блокировки Windows отображаются пустые поля для ввода имени пользователя и пароля.
Показать список всех локальных пользователей на экране входа в Windows
По умолчанию современные версии Windows (проверено на Windows 11 21H2 и Windows 10 21H1) всегда показывают список включенных локальных пользователей в левом нижнем углу. Не отображаются только скрытые (см. ниже) или отключенные пользователи.
Чтобы авторизоваться на компьютере, пользователю достаточно лишь щелкнуть по нужной учетной записи и указать ее пароль. Это работает только на компьютерах, не включенных в домен Active Directory.
Если для учетной записи пользователя не задан пароль, то будет выполнен автоматический вход систему, даже если не настроен автологон.
Если список локальных пользователей не отображается на экране входа компьютере, проверьте настройки следующих локальных политик (в редакторе локальной GPO
gpedit.msc
должны быть заданы следующие политики).
- Interactive Logon: Do not display last signed-in =
Disabled
(Computer Configuration -> Windows Settings -> Security Settings -> Local Policies -> Security Options) - • Enumerate local users on domain-joined computers (Перечислить локальных пользователей на компьютерах, подключенных к домену) =
Enabled
(Computer Configuration -> Administrative Templates -> System -> Logon /Конфигурация компьютера -> Административные шаблоны -> Вход в систему) – политика позволяет вывести список локальных пользователей на доменных компьютерах - Do not enumerate connected users on domain-joined computer =
Disabled/Not Configured
(в этом же разделе GPO)
Перезагрузите компьютер, чтобы применить новые настройки групповых политик.
В некоторых старых билдах Windows 10 (от 1609 до 1903), была другая проблема с отображением всех локальных пользователей на экране приветствия Windows.
Чтобы показать список пользователей нужно в ветке реестра HKEY_LOCAL_MACHINESOFTWAREMicrosoftWindowsCurrentVersionAuthenticationLogonUIUserSwitch изменить значение параметра Enabled на 1. Эта опция разрешает сменить текущего пользователя на экране приветствия Windows 10. Однако при каждом входе Windows меняла значение этого параметра на 0.
Чтобы исправить эту проблему, нужно было создать задание планировщика, который при каждом входе менял значение параметра на 0.
Новое задание планировщика можно создать с помощью PowerShell.
$Trigger= New-ScheduledTaskTrigger -AtLogOn
$User= "NT AUTHORITYSYSTEM"
$Action= New-ScheduledTaskAction -Execute "PowerShell.exe" -Argument "Set-ItemProperty -Path HKLM:SOFTWAREMicrosoftWindowsCurrentVersionAuthenticationLogonUIUserSwitch -Name Enabled -Value 1"
Register-ScheduledTask -TaskName "UserSwitch_Enable" -Trigger $Trigger -User $User -Action $Action -RunLevel Highest –Force
Убедитесь, что новое задание появилось в планировщике Windows (
taskschd.msc
).
 Перезайдите под пользователем. Задание должно автоматически запуститься и изменить значение параметра реестра Enabled на 1. С помощью Get-ItemProperty проверьте текущее значение параметра. Как вы видите, оно равно единице:
get-ItemProperty -Path 'HKLM:SOFTWAREMicrosoftWindowsCurrentVersionAuthenticationLogonUIUserSwitch' -Name Enabled
Вывести список доменных пользователей на экране входа в Windows
Если одним компьютером пользуется несколько пользователей, вы можете отобразить на экране приветствия список пользователей с активными сессиями. Активная сессия подразумевает, что пользователи выполнили вход на компьютер. Это может быть общий компьютера (работает в режиме переключения пользователей), кассы, киоски, Windows Server RDS хосты или его аналоги на десктопных версия Windows 11 и 10).
Проверьте, что в разделе GPO Computer Configuration -> Windows Settings -> Security Settings -> Local Policies -> Security Options отключены политики:
- Interactive logon: Don’t display last signed-in: Disabled
- Interactive logon: Don’t display username at sign in: Disabled
Затем отключите политики в разделе Computer Configuration -> Administrative Templates -> System -> Logon:
- Block user from showing account details on sign-in: Disabled
- Do not enumerate connected users on domain-joined computer: Disabled
После этого на экране приветствия будет отображаться список пользователей, которые выполнили вход в систему. Здесь будут отображаться как активные сессии, так и сессии пользователей со статусом disconnected (например по RDP таймауту). Пользователю достаточно один раз выполнить вход, а после этого просто выбрать учетную запись из списка и ввести пароль.
Обратите внимание, что на доменных компьютерах настройками групповых политик могут управлять администраторы домена. Если к компьютеру не применяется один из параметров локальной GPO, проверьте, возможно она переопределена доменными GPO. Для получения результирующих настроек групповых политик используйте
rsop.msc
или gpresult.
Как скрыть пользователя на экране приветствия Windows?
На экране входа в Windows всегда отображаются пользователи, которые входят в одну из следующих локальных групп: Администраторы, Пользователи, Опытные пользователи, Гости.
Отключенные пользователи не отображаются на экране приветствия.
Однако вы можете скрыть определенных пользователей в списке на экране входа в систему через реестр. Для этого нужно создать ветку реестра
HKLMSOFTWAREMicrosoftWindows NTCurrentVersionWinlogonSpecialAccountsUserList
. Для каждого пользователя, которого вы хотите скрыть нужно создать DWORD параметр с именем пользователя и значением 0.
Список локальных пользователей можно вывести в PowerShell или cmd:
Net user
Или:
Get-LocalUser | where {$_.enabled –eq $true}
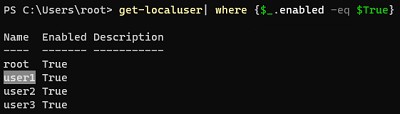
Чтобы скрыть определенного пользователя на экране приветствия Windows 11 или 10 (например, user1), выполните команду:
reg add "HKLMSOFTWAREMicrosoftWindows NTCurrentVersionWinlogonSpecialAccountsUserList" /t REG_DWORD /f /d 0 /v user1
Если нужно опять показать пользователя на экране входа, нужно удалить это параметр реестра или изменить его значение на 1.
Если на компьютере включен аккаунт встроенного администратора Windows, и это не единственный аккаунт с правами локального администратора на компьютере (!!!), вы можете скрыть его:
reg add "HKLMSOFTWAREMicrosoftWindows NTCurrentVersionWinlogonSpecialAccountsUserList" /t REG_DWORD /f /d 0 /v administrator
Если вы хотите скрыть всех пользователи, кроме последнего вошедшего на компьютер, настройте следующие параметры GPO в разделе Computer Configuration -> Administrative Templates -> System -> Logon:
- Enumerate local users on domain—joined computers =
Disabled
(Computer Configuration -> Administrative Templates -> System -> Logon /Конфигурация компьютера -> Административные шаблоны -> Вход в систему) – политика позволяет вывести список локальных пользователей на доменных компьютерах - Do not enumerate connected users on domain-joined computer =
Enabled
Download PC Repair Tool to quickly find & fix Windows errors automatically
If you have multiple users on Windows 11/10 computer, the names are listed on the login screen. Respective users can select the account available at the bottom left, and enter the password to get access to the account. That said, if you want to hide a user account from the login screen in Windows 11/10, here is how you can get it done. Follow the steps in reverse to show all user accounts.

If you want to hide all the accounts from the Sign-in or Log-in screen, follow the linked post. It will replace the current login screen with a prompt where the user needs to enter the username manually. No user account is displayed in this case.
Since we are hiding that user account, it means we do not want the person to use it at all. Follow the steps to hide a specific User Account from the sign-in screen or login screen in Windows 11/10:
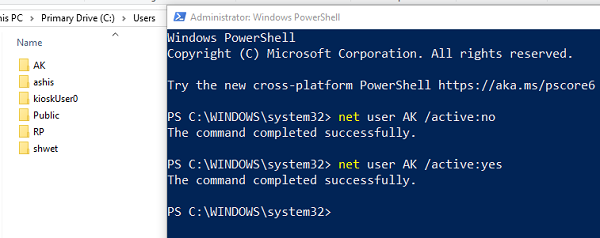
- Open File Explorer and navigate to C:Users
- The username you want to hide and one the folder name available here should match.
- So the User AK has the folder name AK. Note down this name
- Open PowerShell as Administrator
- Type net user [USERNAME] /active:no where [USERNAME] = AK.
- It will hide the Windows user account and also hide the user from the login screen.
To bring back the username in the Login Screen, type the following and hit Enter:
net user [USERNAME] /active:yes
Here [USERNAME] = AK. It will activate the user account, and it will show the user account on the login screen.
If you cannot use the Net User command, then you can also use the Registry method. It works on Windows 10 Home as well.
Show or Hide user account On Sign in screen using Registry
Here when you will select Key it will create a folder. Do remember that.
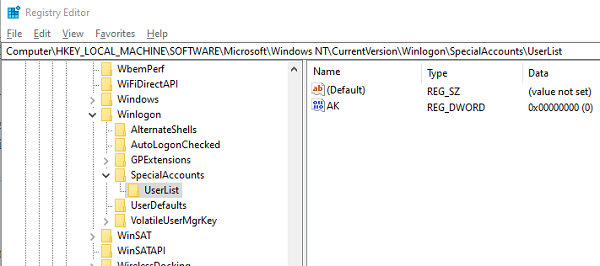
Open Registry Editor and navigate to the following path:
HKEY_LOCAL_MACHINESOFTWAREMicrosoftWindows NTCurrentVersionWinlogon
Right-click on Winlogon, select New >Key from the menu.
Name the new key as SpecialAccounts. Right-click the SpecialAccounts key, select New >Key from the menu.
Name the new key as UserList. Inside of UserList, again right-click, and this time choose New> DWORD (32-bit) Value.
Make sure to name this DWORD the same as the user account name you plan to hide.
Then set the value as 0. You can double-click to edit the value.
To unhide, either remove the DWORD or set it to 1.
If this key exists, then you will need not to create the values manually-
ComputerHKEY_LOCAL_MACHINESOFTWAREMicrosoftWindows NTCurrentVersionWinlogonSpecialAccountsUserList
We hope the tutorial was easy to follow, and you were able to show or hide the specific User Accounts from the Sign-in screen on Windows 11/10.

Ashish is a veteran Windows and Xbox user who excels in writing tips, tricks, and features on it to improve your day-to-day experience with your devices. He has been a Microsoft MVP (2008-2010).
If you have a number of user accounts on your Windows 10 computer that you don’t want to see on the login screen, you can now hide the particular user accounts on the Windows 10 login screen with a simple registry hack.
Before you do so, you must know the name of the account that you want to hide. This is not the full name that you have entered on your computer. This is another name that your computer uses to uniquely identify you on your computer.
Note: If you happen to use the Pro version of Windows 10, please skip the following section and go to the second section where you can use the “Local Users and Groups” panel to find out your account name.
Using Accounts Manager to Find Out Account Name
1. Launch the Run utility on your computer by pressing the “Windows + R” key combination. When it opens, type in netplwiz, and click on “OK” to open accounts manager.

2. On the following screen, you will see all of the user accounts on your computer. Click on the one that you want to hide, and then click on “Properties” to open the Properties panel for that user account.

3. On the following screen you should be able to see the account name in the “User name” field.

Note the account name as you are going to need it in the following steps.
Here are the steps for the Pro users
Using Local Users and Groups to Find Out Account Name
1. Launch Local Users and Groups on your computer by opening the Run utility and typing in lusrmgr.msc and pressing Enter.

2. Click on “Users” on the following screen and you should be able to see the users list. Double-click on the user name you want to hide.
You should be able to see the account name if the user is highlighted in the following screenshot.

Hide Specific User Accounts from the Sign-in Screen in Windows 10
1. Open the Run utility by using the “Windows + R” key combination, and then type in regedit and click on “OK” to open the Registry Editor for your computer.

2. When the Registry Editor opens, head to the following path by clicking on the directories in the left-panel:
HKEY_LOCAL_MACHINESOFTWAREMicrosoftWindows NTCurrentVersionWinlogon
3. Once you are at that path, right-click on the directory named “Winlogon” and select “New” followed by “Key” to create a new key inside that directory.

4. Enter “SpecialAccounts” as the name of the key and press Enter.
Right-click on the newly created key “SpecialAccounts,” and select “New” followed by “Key” to create a new key.

5. Enter “UserList” as the name of the key and press Enter. Right-click on the “UserList” key and select “New” followed by “DWORD (32-bit) Value” to create a new DWORD in this directory.

6. As for the name of the DWORD, enter the account name that you obtained using the previous section. It is the name that you have noted from the above section.
Enter “0” (zero) in the “Value data” field, and click on “OK” to save the changes.

7. Restart your computer, and you should no longer see that account on the sign-in screen.
While the account is hidden, it still exists in your computer. You can still log in with its username and password.
Conclusion
If there’s a user account that you wish to hide from the sign-in screen on your Windows 10 computer, you have a way to do so using the built-in Registry Editor on your computer.

Mahesh Makvana
Mahesh Makvana is a freelance tech writer who’s written thousands of posts about various tech topics on various sites. He specializes in writing about Windows, Mac, iOS, and Android tech posts. He’s been into the field for last eight years and hasn’t spent a single day without tinkering around his devices.
Subscribe to our newsletter!
Our latest tutorials delivered straight to your inbox
- Blog>
- Windows 10>
- How to Hide User Account on Windows 10 Sign-in Screen
By default, Windows 10 shows the list of all user accounts in the lower left corner of the sign-in screen. Now, if you want to hide some of the user accounts in Windows 10 and make them invisible on the sign-in screen, read this page to learn how to do it.
You need to sign into Windows 10 as admin account before the following steps.
Step 1: Open Computer Management window (This PC -> Manage). Then expand Local Users and Groups and select Users. Then on the right-side pane check the name of the user account you want to hide and note down the name.

Step 2: Press Win + R to open Run dialog box. Then type regedit and click OK to open Registry Editor. Confirm the User Account Control dialog if prompted.
Step 3: Navigate to the key: HKEY_LOCAL_MACHINESOFTWAREMicrosoftWindows NTCurrentVersionWinlogon. Right-click on the Winlogon folder and select New -> Key to create a new key. Then you name the new key as SpecialAccounts.
Step 4: Right-click on the SpecialAccounts key, and select New -> Key to create a new subkey. Name this new key as UserList.
Step 5: Select the UserList key. Then on the right-side pane, right-click on the blank area and select New -> DWORD (32-bit) Value to create a new DWORD.
Step 6: Name the DWORD the same name as the user account that you want to hide on Windows 10 sign-in screen. Don’t change its value; just leave it 0.
Step 7: Restart your computer to make the changes take effect. Then you can see the user account disappear on Windows 10 sign-in screen.
3 tips:
- If you want to hide more user accounts, just repeat Step 5, 6, 7 as shown above. If you need to unhide the user account, just need to change the DWORD value from 0 to 1, or delete the entire SpecialAccounts key.
- Don’t hide all your admin account, otherwise, you will lose administrative access to Windows 10 and have to create another administrator account or enable the built-in administrator account by using a Windows 10 setup disc.
- As Registry is a very important part in Windows, some errors or mistakes may cause system failure, be careful to edit the registry. It’s a good idea to back up the registry before you edit it.