To manage all aspects of the input and display language settings on your Windows 11 PC, use the following methods.
To switch the keyboard layout you’re using, press and hold the Windows key and then repeatedly press the Spacebar to cycle through all your installed keyboards. (If this doesn’t do anything, it means you have only one installed.)
You can also select the language abbreviation in your taskbar then choose the language or input method you want to use.
Note: In the input field, press the Windows logo key + period (.) to access the Emoji & more keyboard, if your language supports it.
If you can’t find the keyboard layout you want, you may have to add a new keyboard.
Adding an input language lets you set a language-preference order for websites and apps, as well as change your keyboard language.
-
Select the Start > Settings > Time & language > Language & region.
-
Select the language that has the keyboard you want, then select Options.
-
Select Add a keyboard and choose the keyboard you want to add. If you don’t see the keyboard you want, you may have to add a new language to get additional options. If this is the case, go on to step 4.
-
Return to the Language settings page, go to Preferred languages, then select Add a language.
-
Choose the language you want to use from the list, then select Next.
-
Review any language features you want to set up or install, and select Install.
«Add a keyboard» shortcut
The display language you select changes the default language used by Windows features like Settings and File Explorer.
-
Select Start > Settings > Time & language > Language & region.
-
Choose a language from the Windows display language menu.
«Change your display language» shortcut
If a language is listed under Preferred languages but doesn’t appear on the Windows display language list, you’ll first need to install its language pack (if it’s available).
-
Select Start > Settings > Time & language > Language & region.
-
In Preferred languages, select Add a language, enter the language you want, then select Next.
-
Select Download from the Download language pack option.
-
After the language pack is installed, select Back.
-
Choose a language from the Windows display language menu.
«Install a language pack» shortcut
If you receive an «Only one language pack allowed» or «Your Windows license supports only one display language» message, you have a single language edition of Windows 10. Here’s how to check your Windows 10 language edition:
-
Select Start > Settings > About, and then go to the Windows specification section.
-
If you see Windows 11 Home Single Language next to Edition, you have a single language edition of Window 11, and you can’t add a new language unless you purchase an upgrade to either Windows 11 Home or Windows 11 Pro.
Upgrade to Windows 11 Home or Windows 11 Pro
-
Select Start > Settings > Time & language > Language & region.
-
Under Preferred languages, select the language you want to remove, and then select Remove.
-
To remove an individual keyboard, select the language (see step 2), select Options, scroll down to the Keyboards section, select the keyboard you want to remove, and select Remove.
To manage all aspects of the input and display language settings on your Windows 10 device, use the following methods.
To switch the keyboard layout you’re using in Windows 10, press and hold the Windows key and then repeatedly press the Spacebar to cycle through all your installed keyboards. (If this doesn’t do anything, it means you have only one installed.)
You can also select the language abbreviation on the far right of the taskbar and then choose the language or input method you want to use.
Note: In the input field, press Windows +period (.) to access the emoji keyboard, if your language supports this.
If you can’t find the keyboard layout you want, you may have to add a new keyboard.
Adding an input language lets you set a language-preference order for websites and apps, as well as change your keyboard language.
-
Select the Start button, then select Settings > Time & Language > Language.
-
Under Preferred languages, select the language that contains the keyboard you want, and then select Options.
-
Select Add a keyboard and choose the keyboard you want to add. If you don’t see the keyboard you want, you may have to add a new language to get additional options. If this is the case, go on to step 4.
-
Return to the Language settings page, and select Add a language.
-
Choose the language you want to use from the list, and then select Next.
-
Review any language features you want to set up or install, and select Install.
«Add a keyboard» shortcut
Some languages require additional language features
For some languages to work properly, you need an admin on your PC to install the language features. Here’s a list of the languages that are affected:
-
Microsoft IME – Primary keyboard of Japanese
-
Microsoft Pinyin – Primary keyboard of Chinese (Simplified, China), Primary keyboard of Chinese (Simplified, Singapore)
-
Microsoft Wubi – Secondary keyboard of Chinese (Simplified, China), Secondary keyboard of Chinese (Simplified, Singapore)
-
Microsoft Bopomofo – Primary keyboard of Chinese (Traditional, Taiwan), Secondary keyboard of Chinese (Traditional, Hong Kong SAR), Secondary keyboard of Chinese (Traditional, Macao SAR)
-
Microsoft ChangJie – Secondary keyboard of Chinese (Traditional, Taiwan), Secondary keyboard of Chinese (Traditional, Hong Kong SAR), Secondary keyboard of Chinese (Traditional, Macao SAR)
-
Microsoft Quick – Secondary keyboard of Chinese (Traditional, Taiwan), Primary keyboard of Chinese (Traditional, Hong Kong SAR), Primary keyboard of Chinese (Traditional, Macao SAR)
-
Bangla Phonetic – Secondary keyboard of Bengali (India)
-
Gujarati Phonetic – Secondary keyboard of Gujarati
-
Hindi Phonetic – Secondary keyboard of Hindi
-
Kannada Phonetic – Secondary keyboard of Kannada
-
Malayalam Phonetic – Secondary keyboard of Malayalam
-
Marathi Phonetic – Secondary keyboard of Marathi
-
Odia Phonetic – Secondary keyboard of Odia
-
Punjabi Phonetic – Secondary keyboard of Punjabi (Gurmukhi)
-
Tamil Phonetic – Secondary keyboard of Tamil (India)
-
Telugu Phonetic – Secondary keyboard of Telugu
The display language you select changes the default language used by Windows features like Settings and File Explorer.
-
Select the Start button, then select Settings > Time & Language > Language.
-
Choose a language from the Windows display language menu.
«Change your display language» shortcut
If a language is listed under Preferred languages but doesn’t appear on the Windows display language list, you’ll first need to install its language pack (if it’s available).
-
Select the Start button, then select Settings > Time & Language > Language.
-
Choose a language from the Add a language list under Preferred languages, and then select Options.
-
Select Download from the Download language pack option.
-
After the language pack is installed, select Back .
-
Choose a language from the Windows display language menu.
«Install a language pack» shortcut
If you receive an «Only one language pack allowed» or «Your Windows license supports only one display language» message, you have a single language edition of Windows 10. Here’s how to check your Windows 10 language edition:
-
Select the Start button, select Settings > About, and then scroll down to the Windows specification section.
-
If you see Windows 10 Home Single Language next to Edition, you have a single language edition of Window 10, and you can’t add a new language unless you purchase an upgrade to either Windows 10 Home or Windows 10 Pro.
Upgrade to Windows 10 Home or Windows 10 Pro
-
Select the Start button, then select Settings > Time & Language > Language.
-
Under Preferred languages, select the language you want to remove, and then click Remove.
-
To remove an individual keyboard, select the language in question (see step 2), select Options, scroll down to the Keyboards section, select the keyboard you want to remove, and click Remove.
Need more help?
(Image credit: Windows Central)
Although Windows 10 will help you configure the default language during the initial setup, if you didn’t select the correct option or use a computer already configured with a different language, you don’t have to struggle when your requirements are different.
If you have to change the device’s default language settings, you can complete this task using the Settings app without reinstalling Windows 10.
In this Windows 10 guide, we will walk you through the steps to change the system default language on your computer.
How to change default system language on Windows 10
If you happen to be using the incorrect language on Windows 10, you can adjust the system settings to configure the correct language without reinstallation.
Disable language sync
On Windows 10, when using a Microsoft account, some of your preferences (including language) will sync across the device. If you only plan to change the settings on the computer, you should disable the option to sync your language settings to prevent changing the same settings on other devices.
To disable language preference sync on Windows 10, use these steps:
- Open Settings.
- Click on Accounts.
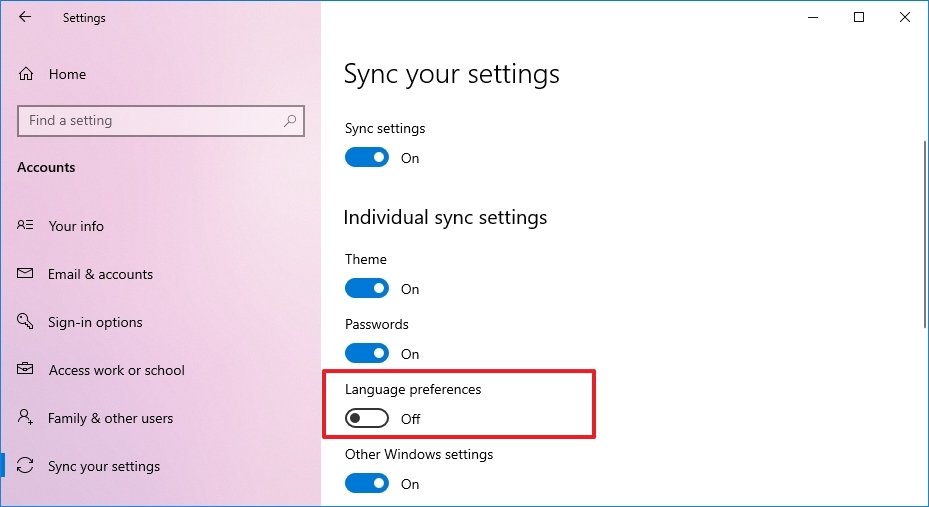
- Click on Sync your settings.
- Under the «Individual sync settings» section, turn off the Language preferences toggle switch.
Once you complete the steps, you can change the language settings without affecting the other devices connected with the same Microsoft account.
Change system language settings
To change the system default language, close your apps, and use these steps:
- Open Settings.
- Click on Time & Language.
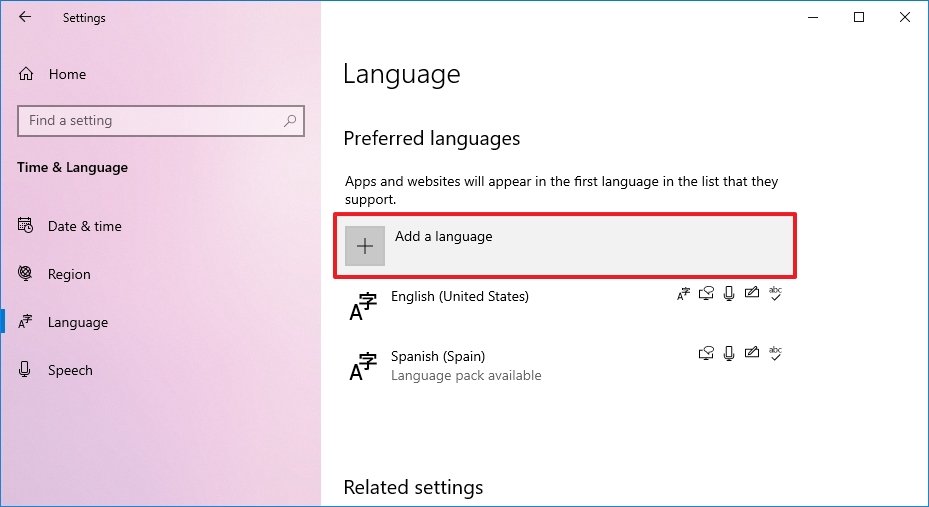
- Click on Language.
- Under the «Preferred languages» section, click the Add a language button.
- Search for the new language using the language or country name.
- Select the package from the result.
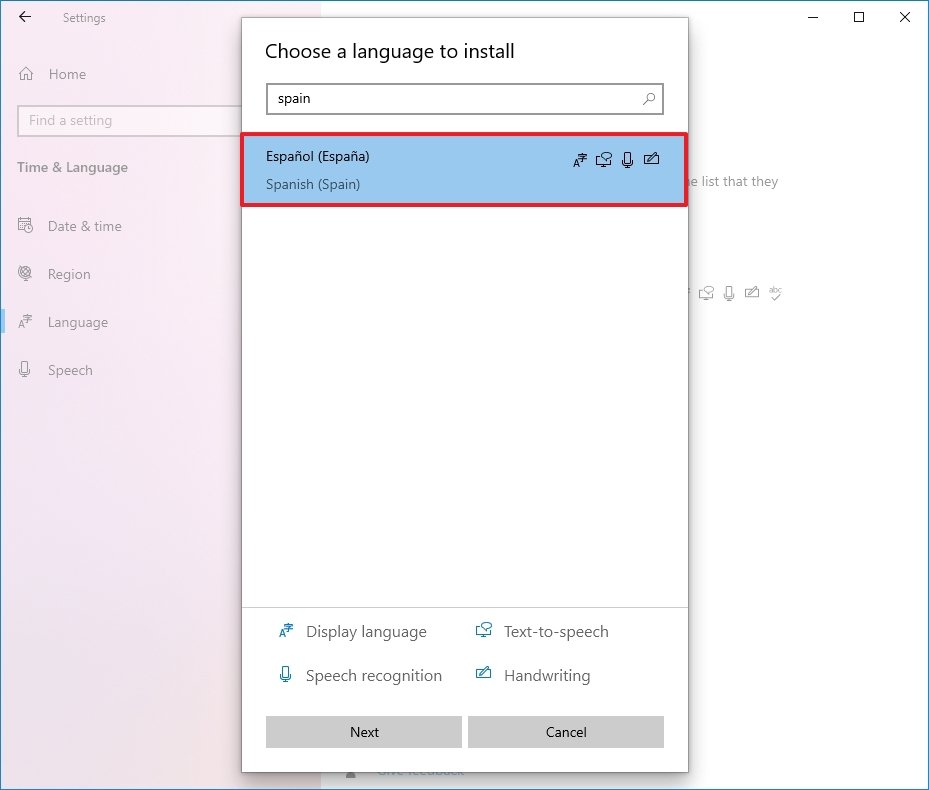
- Click the Next button.
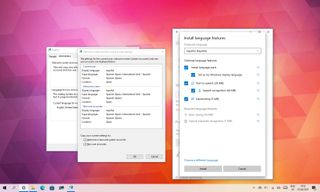
- Check the Install language pack option.
- Check the Set as my Windows display language option.
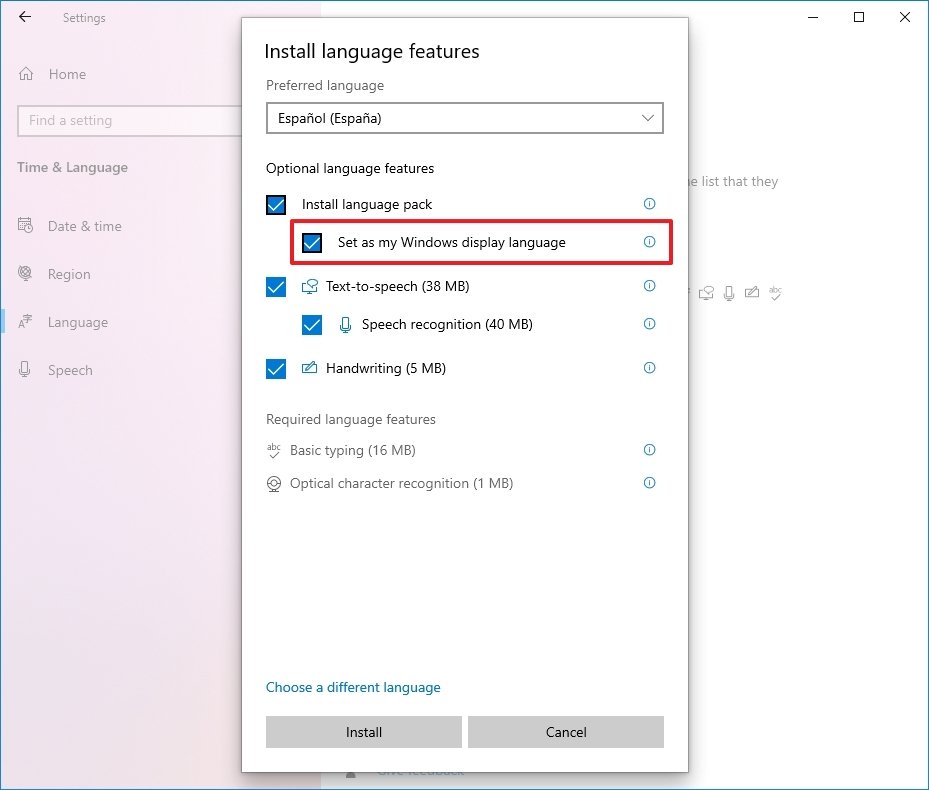
- Check the additional features as needed — for example, «Text-to-speech» and «Handwriting.»
- Click the Install button.
- Click the Yes, sign out now button.
- Sign back into the account.
After you complete the steps, the Windows 10 language will change across the experience, including the Sign-in screen, Settings app, File Explorer, Desktop, apps, browser, and websites you visit.
Change system region settings
You will also have to change the region settings if you need to adjust the language settings because you are in a different region.
To change the local region settings on Windows 10, use these steps:
- Open Settings.
- Click on Time & Language.
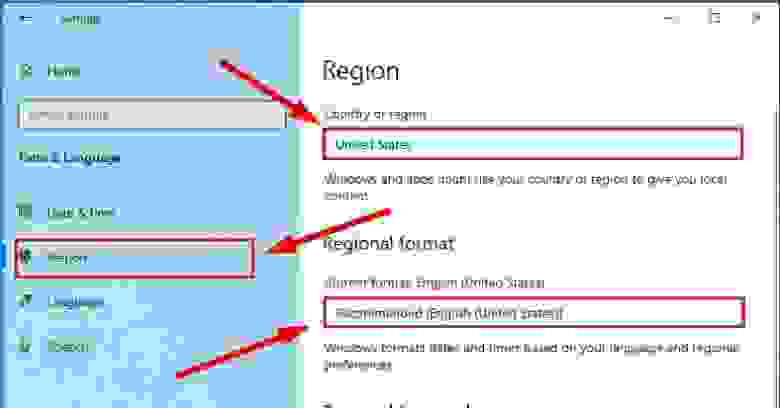
- Click on Region.
- Under the «Region» section, select the current location with the «Country or region» drop-down menu (if applicable).
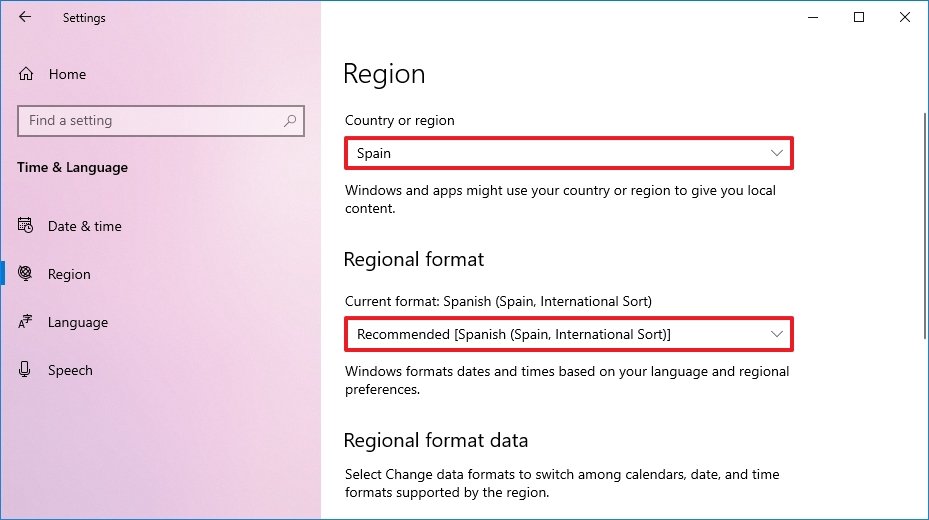
- Under the «Regional format» section, select the formats for the region’s date and time with the «Current format» drop-down menu (if applicable).
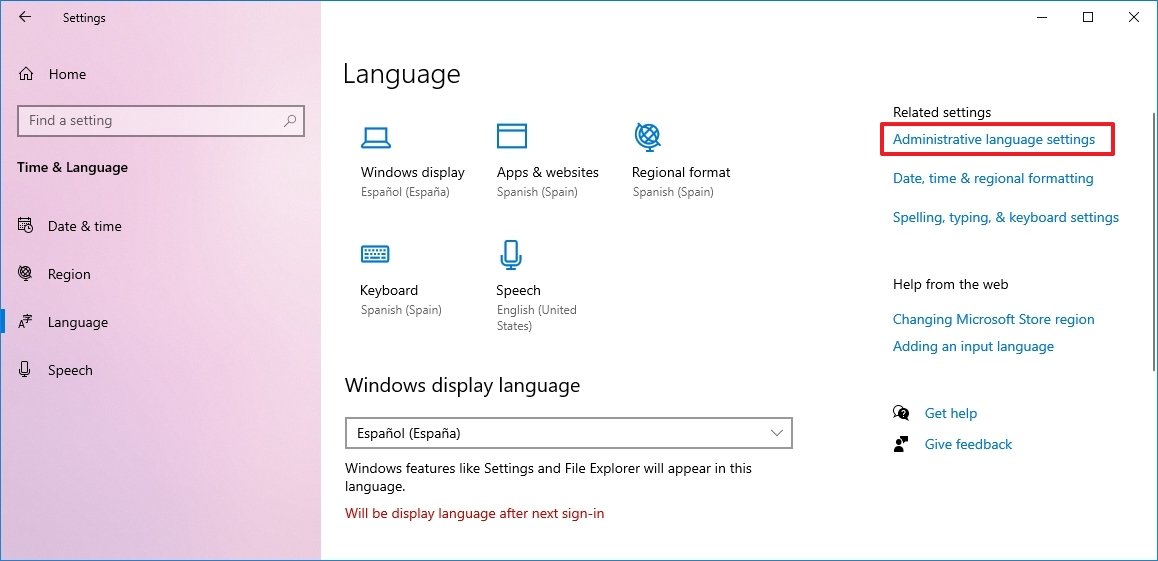
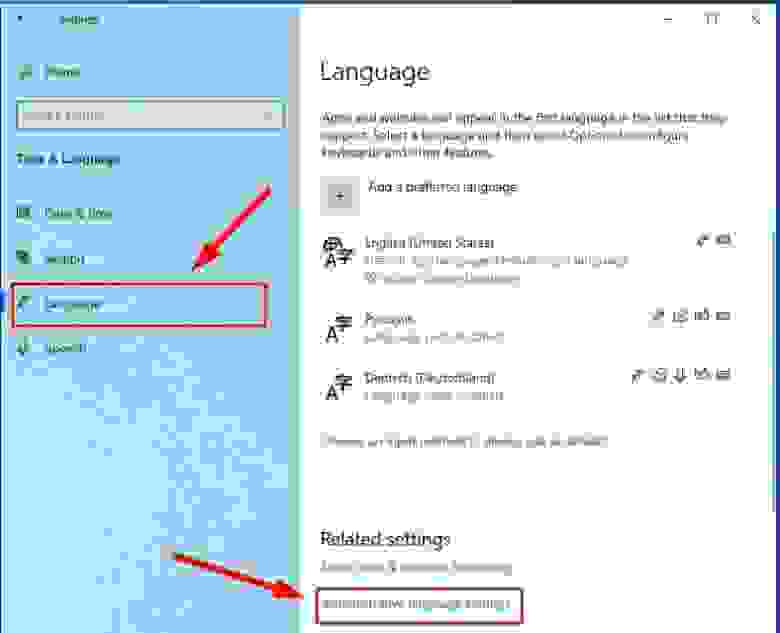
- Click on Language.
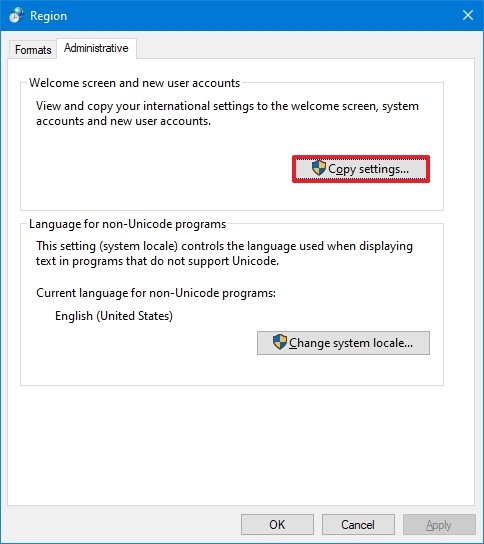
- Under the «Related settings» section, click the Administrative language settings option.
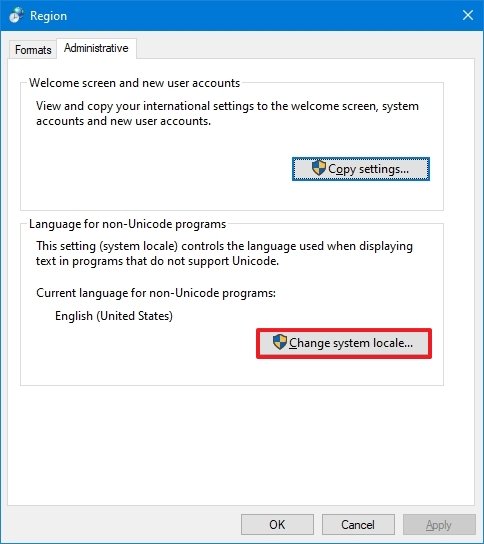
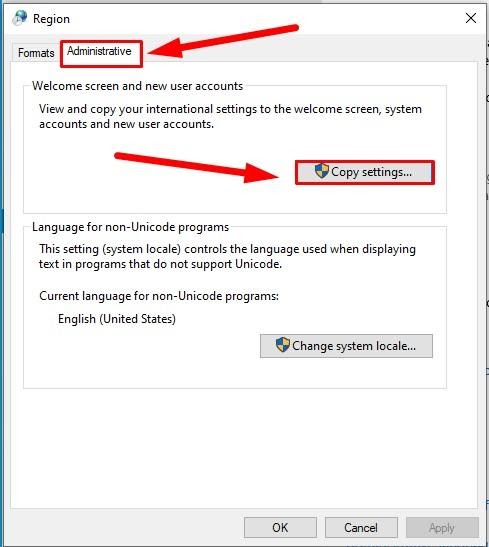
- Click the Administrative tab.
- Under the «Language for non-Unicode programs» section, click the Change system locale button.
- Select the new system locale language with the «Current system locale» drop-down menu.

- Click the OK button.
- Click the Copy settings button in the «Administrative» tab.
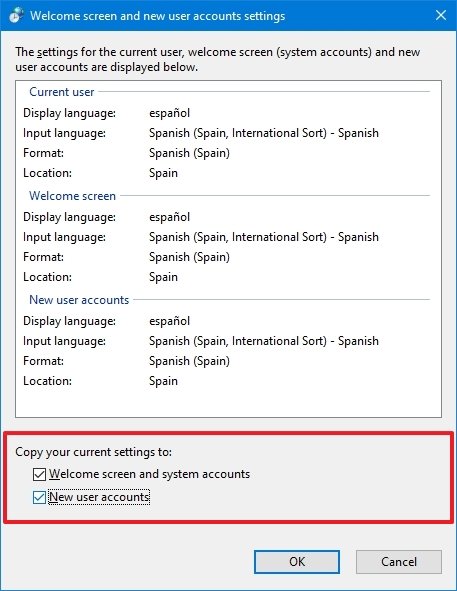
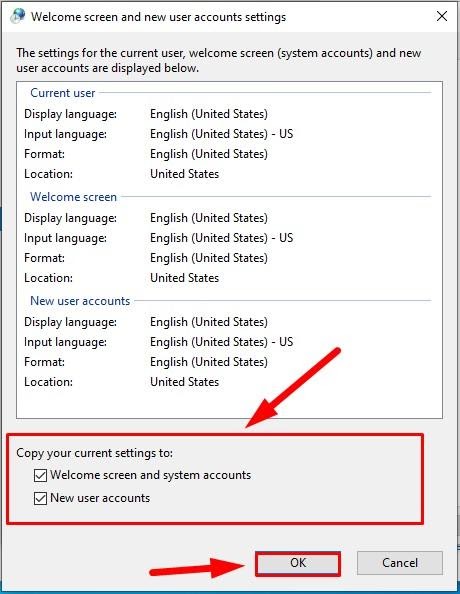
- Under the «Copy your current settings to» section, check the Welcome screen and system accounts and New user accounts options.
- Click the OK button.
- Click the OK button again.
- Click the Restart now button.
Once you complete the steps, the settings will apply, and the computer will now use the correct region settings.
Usually, you rarely have to change or install additional languages on Windows 10. However, changing these settings may come in handy in organizations working with people who need to use different preferences. It’s also a helpful feature to match the locale settings if you relocate to another region or when buying a new device that ships from a different country.
The only caveat with changing the region settings is that it will also change the settings for the Microsoft Store, which may block access to certain apps and services, depending on the location. In the same way, you can change the region settings to access an application from the Microsoft Store that is only available in a specific region. If you happen to be one of the remaining users using Cortana, consider changing the region settings that may prevent you from accessing the digital assistant.
More Windows resources
For more helpful articles, coverage, and answers to common questions about Windows 10 and Windows 11, visit the following resources:
- Windows 11 on Windows Central — All you need to know
- Windows 11 help, tips, and tricks
- Windows 10 on Windows Central — All you need to know
Get the best of Windows Central in in your inbox, every day!
Mauro Huculak is technical writer for WindowsCentral.com. His primary focus is to write comprehensive how-tos to help users get the most out of Windows 10 and its many related technologies. He has an IT background with professional certifications from Microsoft, Cisco, and CompTIA, and he’s a recognized member of the Microsoft MVP community.
The default Language in Windows 10 is English (US). However, it is easy to change both System & Display Language on your computer. You will find below the steps to Change Language in Windows 10.

During the setup process, Windows 10 provides the option to choose your Language and this becomes the System and Display Language on your computer.
However, if you did not choose your language during the setup process, you can switch to your preferred language, even after completing the setup process.
It is possible to change both Display and System Language on your computer to English, Chinese, Arabic, Spanish and a host of other languages, without re-installing Windows 10.
Note: If you are using Microsoft Account, changes in Language Settings will Sync to all your devices. Hence, if you want to change Language on one device, you will have to disable “Language Sync”.
To disable Language Sync, go to Settings > Accounts > Sync Your Settings > Turn OFF Language Preferences.
Steps to Change System & Display Language in Windows 10
You can follow the steps below to change System and Display Language in Windows 10.
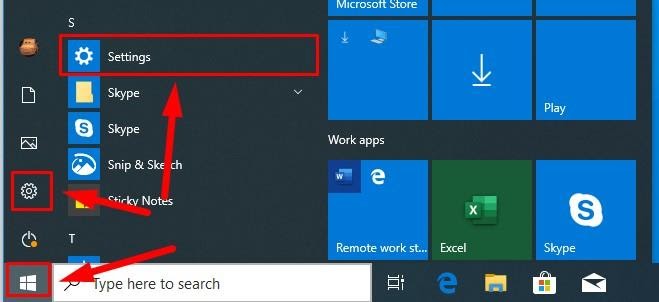
1. Open Settings and click on Time & language.

2. On the next screen, click on Language in the left pane. In the right-pane, scroll down and click on Add a language.

3. On Choose a Language screen, select the Language that you want to add and click on the Next button.

Note: You can search for your Language by typing in the search bar or scroll down the list of Languages arranged in alphabetical order.
4. On the next screen, select Install language pack and set as my Windows display language and click on the Install button.

Note: Selecting “Set as my Windows display language” will change the display language on your computer from English to the Foreign Language that you are now installing.
5. After Installing your chosen Language, make sure that the installed Language is selected as Windows display language on Language Settings Screen.

Change Language in Welcome Screen and New User Accounts
Installing and Applying a Language Pack to a User Account may not necessarily change the Language in Welcome and Login screens, Start Menu and User Accounts.
1. Open Settings and click on Time & Language.
2. On the next screen, click on Language in the left pane. In the right pane, scroll down and click on Administrative language settings located under “Related Settings” section.

3. On the next screen, click on the Administrative tab and click on Copy settings button.

4. On the next screen, select or check Welcome screen and system accounts, New user accounts and click on OK.

This will copy your new Language Settings to the Welcome screen and all User Accounts on your computer.
- How to Change Display Language in Chrome Browser
- How to Change Display Language on Android Phone or Tablet
Read this article to find out how to change the language of Windows 10 interface without having to reinstall it, what system languages can be installed and what settings should be modified for that purpose.
Introduction
In Windows 10, people usually choose the preferred language for the entire operating system when they install it. However, if the language settings were wrong, or people have to use computing devices with certain language preferences, there are some settings to be modified in order to bring them in line with your personal likings.
So if you ever need to change language preferences in Windows 10, this can be done in a quick and easy way with the help of the Settings app and without having to reinstall the operating system.
In today’s article, we will show you how to change the default display language into any other, including doing it for new and existing user accounts.
How to change the default display language in Windows 10?
If you have to move to a different region or you need to use a display language different from the default choice, or the initial language settings for the computing device have been wrong, there is absolutely no point in reinstalling Windows 10. All you need is to modify a couple of system settings to enjoy the experience of using your operating system in the right language.
Disable language synchronization
If you are using a Microsoft account, the language settings will apply to all devices linked to such account. If you plan to change regional and language settings for one computer only, you need to disable synchronization of such settings before you proceed.
This is how you disable language sync in Windows 10.
Open the main system application, Settings. You can do it in any way you prefer. For example, click on the Start button in the lower left corner of your desktop, on the Taskbar, and open the main Windows menu. Use the scroll bar or the mouse wheel to search the list of all programs and applications installed on this computer and find the line Settings, or click on the Settings button in the left side of the user menu, and the application will open.
In the main Settings window, scroll down if necessary and choose the tab Accounts.

In the left panel, go to Sync your settings.
In the right panel, find the section Individual sync settings and the line Language preferences, then set the slider to the Off position (disabled).

When these steps are taken, you can start changing language settings for the copy of Windows 10 installed on this computer, without worrying that this can affect similar settings in other linked devices.
The steps to take if you want to change the display language
To change the display language of your Windows 10, you should close all running applications and do what is described below.
Use any method you prefer to open the Settings application. For example, right-click on the Start button that you can find on the Taskbar, in the left lower corner of the desktop, or press the key sequence Windows + X instead to open the context menu, and select the line Settings. The application will start immediately.
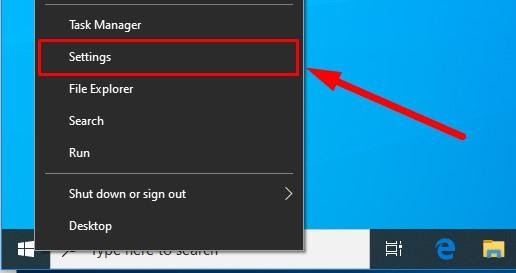
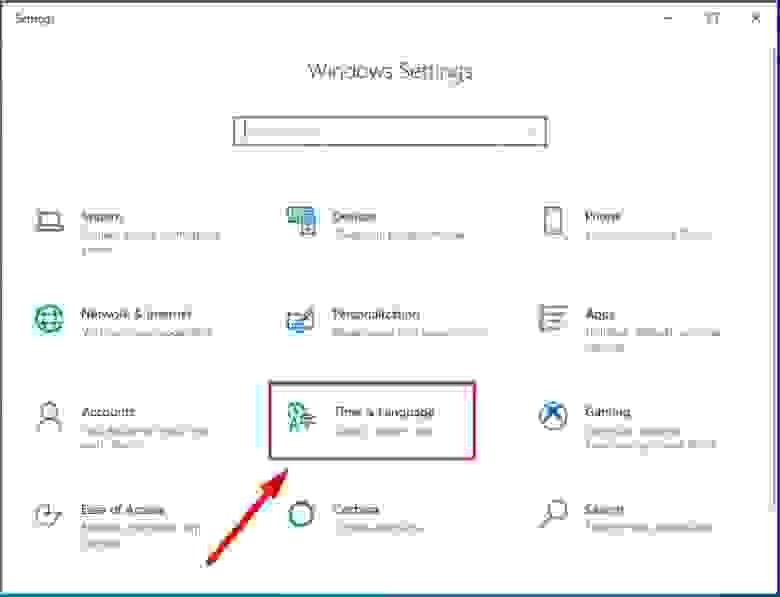
Use the scroll bar or the mouse wheel to navigate the Settings window, and find the tab Time and language.
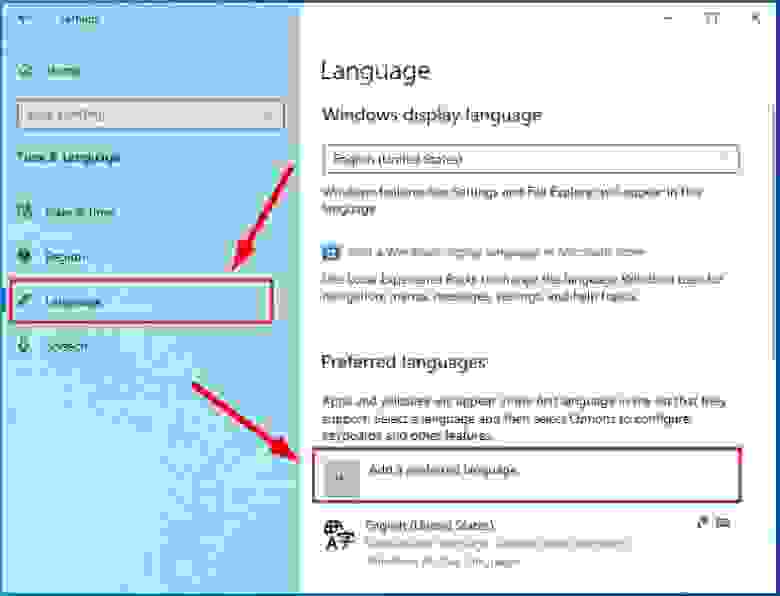
In the left panel, go to Language.
Now look to the right and find the section Preferred languages, where you can prioritize language settings, and click on the button Add a preferred language, with a + (plus) symbol on it.
In the new window Choose a language to install use the scroll bar or the mouse wheel to find the language you need, or start typing its name in the search field above.
Choose the language pack you are planning to use in Windows 10 from the list.

When the language is chosen, hit Next.
In the next page Install language features check the box for Install language pack to confirm your choice (the box with the tick will become blue, i.e. active).
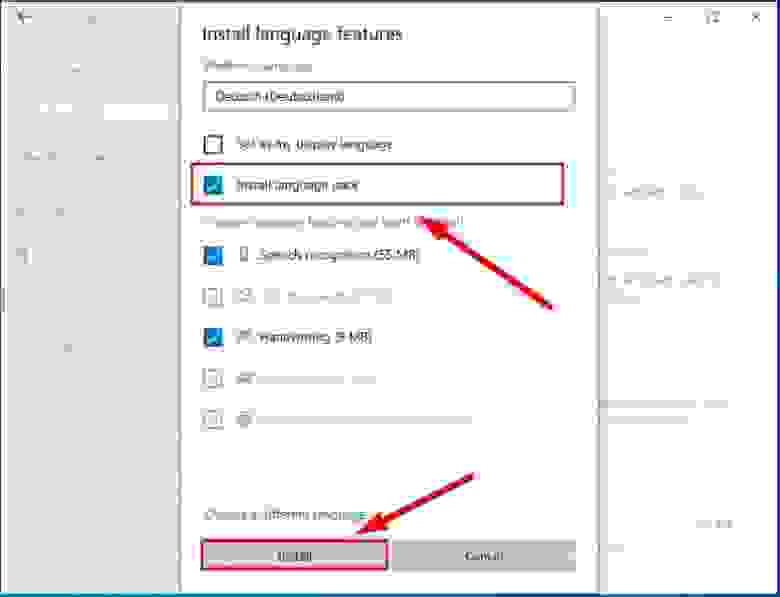
Click Install below.
Changes will take effect after the language package is installed, which usually takes several minutes only. In some cases, restarting your Windows 10 may be required, and then the corresponding language settings will apply to all system elements. The changes will affect the sign-in screen, the Settings app, Windows Explorer, desktop, all applications, preferred browsers and websites you visit. From now on, they will use the new language by default. Besides, Windows 10 may suggest reviewing your current privacy settings.
Changing region settings
If you change the display language for Windows 10 because you move to a different region, then regional settings should be modified too.
Changing them in Windows 10 is easy enough: just follow the steps below.
Open the main system application, Settings, using any way you prefer. For example, press the keyboard shortcut Windows + I to access the app directly.
In the main window of the Settings app, find and select the tab Time and language.
In the left panel, select Region.
In the right panel, find the section Region and use the nested menu Country or region to specify your new location if it differs from the current settings.
In the section Regional format use another nested menu to select proper formats to display date and time in Windows, if these differ for your time and region.
Now look at the left panel and jump to the tab Language again.
Use the scroll bar or the mouse wheel to find the section Related settings and click on the link Administrative language settings.
In the new pop-up Region window, jump to the tab Administrative and in the section Welcome screen and new user accounts hit the button Copy settings.
The new window will show you corresponding screen and account settings. In the section Copy your current settings to check the boxes for each option: Welcome screen and system accounts and New user accounts.
Click ОК.
Click ОК one more time, and then restart the computer.
After all these steps, your computer will display proper regional settings specified according to your physical location.
Most of the time, people don’t change or install additional languages regularly for their personal needs. This opportunity to change language packs quickly is more often required in small or large companies that need to deal with customers having various language preferences.
Besides, this option would be useful for people who have to move to a different region and would like their regional settings to comply. Another scenario is buying a computer from another country when the required configuration is not available locally.
Also, you should remember that modifying language settings may disable some functions like Cortana because this service is not supported in certain regions.
Conclusion
Preferred display language is one of the easily customizable things in the operating system. If you ever need to change the language settings, use one of the methods described here to replace the language pack currently used by Windows 10 without having to reinstall it.
See the full article with all additional video tutorials. If you still have any questions, please ask in a comments. Also visit our Youtube channel, there are over 400 video tutorials.
How can I type Chinese on my computer?

How to Type Chinese on a Computer
- Go to System Preferences.
- Choose Keyboard.
- Choose Input Sources.
- Click +
- Select Chinese (Simplified) – Pinyin – Simplified then click Add.
- Make sure ‘Show Input menu in menu bar’ is checked.
- Use the language icon in the menubar at the top to switch modes.
How do I change my keyboard to Chinese Windows 10?
In order to resolve this issue follow these steps:
- In the Cortana box type ‘Region’.
- Click on ‘Region and Language Settings’.
- Click on ‘Add a Language’.
- From the list of languages select Chinese Simplified.
- Select Chinese (Simplified, China).
- Click on Language pack available.
- Click on Options button.
How do I type Chinese on my laptop?
Scroll down to the Chinese language you want, e.g. Chinese (Simplified, PRC).
To change this:
- Click on the Chinese keyboard in the ‘Text Services and Input Languages’ windows.
- Click on the ‘Properties…’ button.
- In the new window that appears, click the drop-down menu under ‘Keyboard layout:’.
- Select ‘HanYu Pinyin’.
How do I make my mouse type Chinese in Windows 10?
After setting Chinese characters on your keyboard, you need to launch touch keyboard. To do so, right-click from your taskbar > Show touch keyboard button > click the keyboard icon > select and click the paper and pen icon. Now, use your mouse to have a Chinese handwriting.
How do I uninstall Chinese from Windows 10?
The Install or Uninstall display languages panel will open. Select the language, click on Next and the Language Interface Pack will start uninstalling. You will then be asked to restart your computer. Restart your Windows 10 PC to complete the process.
How do I get Pinyin on Windows 10?
In order to resolve this issue follow these steps:
- In the Cortana box type ‘Region’.
- Click on ‘Region and Language Settings’.
- Click on ‘Add a Language’.
- From the list of languages select Chinese Simplified.
- Select Chinese (Simplified, China).
- Click on Language pack available.
- Click on Options button.
How do I change keyboard shortcuts in Windows 10?
Change Hotkeys to Switch Keyboard Layout in Windows 10
- Open Settings.
- Go to Time & language – Keyboard.
- Click on the Advanced keyboard settings link.
- There, click on the link Language bar options.
- This will open the familiar dialog “Text Services and Input Languages”.
- Switch to the Advanced Key Settings tab.
- Select Between input languages in the list.
How do I change my keyboard back to normal on Windows 10?
Open Control Panel > Language. Select your default language. If you have multiple languages enabled, move another language to the top of the list, to make it the primary language – and then again move your existing preferred language back to the top of the list. This will reset the keyboard.
How do I change the function keys on my keyboard Windows 10?
To add a new keyboard layout on Windows 10, use these steps:
- Open Settings.
- Click on Time & Language.
- Click on Language.
- Select your default language from the list.
- Click the Options button.
- Under the “Keyboards” section, click the Add a keyboard button.
- Select the new keyboard layout that you want to add.
How do I download Chinese on my computer?
- Open the Windows Control Panel.
- (If the Control Panel is in “Category view”) Select “Date, Time, Language and Regional options.”
- Open the “Regional and Language Options” icon.
- Choose the “Languages” tab, and ensure the “Install files for East Asian languages” is checked, as per the screenshot below:
How do you type Traditional Chinese with pinyin?
5 Answers
- Right click on the keyboard/IME icon in the system tray.
- Select “Settings” from the popup menu.
- The “Text Services and Input Languages” dialog will appear.
- Under “Installed services” click on “Add”.
- Find the section “Chinese (Traditional, Taiwan).
- Select “Chinese (Traditional) – New Phonetic”.
How do I add Chinese fonts to Microsoft Word?
Add a language and associated fonts
- Click the Windows Start button, click Settings, and then click Time & language.
- Click Region & language, and then click Add a language.
- Click the language for the font you want to add. Any fonts associated with that language will be downloaded, and your text should display correctly.
How do I get Chinese handwriting on Windows 10?
How to Use Handwriting Input on Windows 10
- Windows 10’s handwriting keyboard allows you to enter text into any application with a pen or other stylus.
- Tap the keyboard button at the bottom right corner of the touch keyboard.
- Tap the handwriting keyboard icon, which looks like a pen over an empty panel.
- The handwriting input keyboard appears.
What is Chinese stroke input method?
5-stroke input method) is a relatively simple Chinese input method for writing text on a computer or a mobile phone. It is based on the stroke order of a word, not pronunciation. It uses five or six buttons, and is often placed on a numerical keypad.
How do I add Chinese handwriting to my keyboard?
Adding a Chinese handwriting keyboard to your iOS device
- Step 1: Go to ‘Settings’
- Step 2: Tap ‘General’ and scroll down to ‘Keyboard’
- Step 3: Tap ‘Keyboards’ and ‘Add New Keyboard’
- Step 4: Either tap ‘Chinese (Simplified/ Traditional)’ in the ‘Suggested Keyboards’ section.
How do I remove the English US keyboard from Windows 10?
Open Settings, and click/tap on the Time & Language icon. Starting with Windows 10 build 17686, you would click/tap on Language on the left side instead. If the keyboard layout you want to remove is not listed here, then you may need to add it using Option One first, then remove it.
How do I remove the preferred language from Windows 10?
Changing system language
- Open Settings.
- Click on Time & Language.
- Click on Language.
- Under the “Preferred languages” section, click the Add a preferred language button.
- Search for the language that you want to use on Windows 10.
- Select the language package from the result.
- Click the Next button.
How do I get rid of the language bar in Windows 10?
To remove or turn off, simply uncheck the Use the desktop language bar when it’s available setting. You may also right-click Taskbar > Properties > Taskbar and Navigation Properties > Taskbar tab. Click the Notification Area – Customize button. Next, in the new window which opens, click Turn system icons on or off.
Photo in the article by “Navy.mil” https://www.navy.mil/ah_online/OPSEC/
Looking to Change the System Language in Windows 10? Or want to change the system language to another language like Spanish, Chinese, German, or Hindi on Windows 10? Basically, while installing and setting up Windows 10, you’re asked to choose a system language. But yes you can change the system language later on your windows computer. For Windows 10, Microsoft offers a total of 106 language packs that are available for download and use by anyone with a valid license. Here’s how to download and install any language pack and how to Change the System Language from English to the language of your choosing.
Note: You are required to sign in to Windows 10 and use an administrative account to proceed.
Post Contents :-
- 1 Change the System Language on Windows 10
- 1.1 Download language packs on Windows 10
- 1.2 Download the Language Pack and Other Options
- 1.3 Add a Keyboard
- 1.4 Set a Language as the Default
- 1.5 Apply a Language to the Entire System
- 1.6 Remove a Language From Windows 10
Change the System Language on Windows 10
Windows 10 comes with a lot of languages making it likely to accommodate your language needs. You can easily change the system language as needed. Here follow the steps to change the system language on Windows 10. And know where to download all language packs of Windows 10. How To Apply a Language to the Entire System, Let’s start
Changing the system language in Windows 10 is straightforward. If you don’t understand the current language, follow the screenshots below. Otherwise, you can follow this brief list of steps:
- Go to Start > Settings > Time & language.
- Switch to the Region & language tab.
- Under Languages, click Add a language and choose the desired language from the list. You can also search for the language you want using the Search box at the top of the window. Type the language name and then click on the result you want.
Back on the Region & language tab, click the Options button for the new language to check whether you need to download the language pack. To apply the new language to the system, click Set as default. You’ll have to log out and back in for the change to come into effect.
Download language packs on Windows 10
Microsoft has published a list of all the available language packs that are available for Windows 10, on this page: Language packs: Windows 10. You can consult it and see whether Windows 10 is available in your local language. If it isn’t, then you are out of luck and this guide won’t work for you. We’re sorry but this is only up to Microsoft.
Also, there’s another unfortunate situation where you might have purchased Windows 10 Home Single Language Edition. If you did, then you are stuck with the language that you purchased and you can’t install another display language using the instructions in our guide.
Download the Language Pack and Other Options
If you would like to tweak the Windows 10 system language, like adding a keyboard for a particular language or applying a new language to all user accounts, follow the steps below.
First open Start > Settings > Time & language -> Region & language -> Add a language then select your language.
Once you’ve selected your language, it’s added to the list of Languages on the Region & language screen. If you need to download a language pack for the newly added language, you’ll see a Language pack available under the language name. To download the language pack, click on the language and then click Options.
When you first access the options for the selected language, you’ll see Searching Windows Update for language features under Language options. When that’s finished, you’ll see Basic typing, Handwriting, and Speech, all with Download buttons under them. Click the Download button for each option you want.
Add a Keyboard
A standard keyboard is added by default for the language you chose. If you want to add another keyboard, click Add a keyboard and select one from the popup list.
Set a Language as the Default
Once the language pack is downloaded and installed, the language is ready to use. To set the newly added language as the default language, click the language on the Region & language screen, and then click Set as default. Log out and back in to use the new language in the current user account. The language you chose to set as the default is now listed first under languages with a message saying that it will be the display language after the next time you sign in.
When you have more than one language listed on the Region & language screen, the current default language displays on the right side of the Taskbar next to the date and time. When you move your mouse over the language indicator, you’ll see a popup displayed in that language.
Apply a Language to the Entire System
So far we have described the steps only to change the language for the Current user account only. But You can force the welcome screen, and any new user accounts you create from now on, to display in that language also. This way, everything in the system is in your desired language.
To do this open the Control panel, Change the View by Small icons, and click on Region. Here On the Region dialog box, click the Administrative tab and click on Copy settings.
The Welcome screen and new user accounts settings dialog box display, showing the current display language for the Current user, Welcome screen, and New user accounts. You can’t change these individual settings here, but you can set the current display language as the new system default by checking the Welcome screen and system accounts and New user accounts boxes. Click OK and restart your computer. The language you chose will be set as the default for the entire system once your computer reboots.
Remove a Language From Windows 10
If anytime you have decided to remove the installed language pack. You can remove a language if it’s not the only one on your computer. Before removing a language, you must select a different language as the default. You cannot remove the current system language. All you need to do is select another language as the default. You do not need to log out and back in. Once the language you want to remove is not the default, click on that language on the Region & language screen and then click Remove.
Alternatively, you can open the command prompt as administrator And type the command Lpksetup /u, and hit the enter key. The Install or uninstall display languages dialog box displays. Check the box for the language you want to uninstall and click Next. Follow on-screen instructions and Restart your PC to complete the uninstallation process.
I hope following this post How to Change the System Language in Windows 10, Now you can easily change/ Switch your windows 10 System Language to a Different one like Spanish, Chinese, German Hindi, etc. Have any queries, suggestions about this post Change the display language in Windows 10 feels free to discuss on comments below. Also, Read
- Fix Windows 10 Frequently Disconnect Internet Connection
- Enable Windows sandbox Feature on windows 10 version 21H2
- How To Speed up Windows 10 November 2021 update Version 21H2 !!!
- Microsoft edge slow and unresponsive after windows 10 21H2 upgrade? Here how to fix
- How to reset Windows 10 21H2 without losing data and programs
Содержание
- Как загрузить языковой пакет для Windows 10 и изменить язык интерфейса
- Для чего нужен языковой пакет
- Установка ЯП
- Установка ЯП при помощи настроек параметров Windows
- Установка ЯП из панели управления Windows
- Добавление языка из cab-файла
- Изменение языка интерфейса
- Видео: работа с языковыми пакетами в Windows 10
- Изменения языка приветствия
- Установка ЯП на Single Language версию
- Изменения языка программ
- Как изменить язык в Windows 10: включаем русский интерфейс
- Изменение языка системы в Windows 10: английский на русский
- Как изменить язык в Windows 10 home single language
- Как поменять язык интерфейса в Windows 10
- Как в windows 10 можно поменять язык системы?
- Как поменять язык системы в версии Windows 10 Home Single Language
- Как добавить русский язык Windows 10 в одноязычной версии?
- Как добавить русский язык в windows 10 для одного языка?
- Добавляем еще один язык интерфейса в Windows 10 пошагово
- Добавляем язык ввода в раскладку клавиатуры Windows 10
Как загрузить языковой пакет для Windows 10 и изменить язык интерфейса

Язык интерфейса в Windows 10 выбирается при установке операционной системы. Но после того как процедура установки закончена, его можно изменить. Для этого понадобится языковой пакет.
Для чего нужен языковой пакет
Языковой пакет (далее «ЯП» для краткости) – набор слов и предложений, обеспечивающий перевод системы на определённый язык. Например, установив русский ЯП, вы переведёте все системные сообщения, приложения и настройки на русский язык. Соответственно, выбрав ЯП другого языка, вы сможете пользоваться Windows на наиболее удобном для вас языке.
Установка ЯП
В Windows 10 встроено несколько методов, позволяющих работать с ЯП. Благодаря им можно выбирать язык из уже скачанных пакетов, а также устанавливать новые ЯП.
Установка ЯП при помощи настроек параметров Windows
В Windows 10 есть встроенная утилита «Параметры», позволяющая управлять настройками системы. Если ОС на вашем компьютере уже обновлена до версии 1803 April Update, то с помощью этой утилиты можно загрузить дополнительный ЯП. Если у вас установлена более старая версия Windows, то воспользуйтесь любым из описанных ниже методов — результат будет тот же. Для загрузки ЯП с помощью утилиты «Параметры» сделайте следующее:
Как только загрузка закончится, в списке языков появится новый ЯП — выберите его, чтобы осуществить перевод системы на нужный язык.
Установка ЯП из панели управления Windows
Пользователи, не обновившие ещё свою Windows до версии 1803 или более поздней, могут выполнить смену ЯП через панель управления. Для этого сделайте следующее:
Готово. Новый ЯП загружен и применён. Возможно, вас попросят выйти из системы, чтобы применить изменённые параметры. Дайте согласие, затем снова войдите в свою учётную запись и проверьте результат.
Добавление языка из cab-файла
Если у вас есть отдельно загруженный ЯП в формате cab, то для его установки выполните следующие шаги:
Изменение языка интерфейса
Установка нового ЯП не гарантирует того, что язык системы изменится. Обычно для этого нужно ввести соответствующую команду, которая изменит язык интерфейса. Выполните следующие шаги:
Видео: работа с языковыми пакетами в Windows 10
Изменения языка приветствия
Если вы хотите при входе в систему видеть тот же язык, который назначили языком интерфейса, то выполните дополнительные шаги:
Установка ЯП на Single Language версию
Есть специальная редакция Windows — Single Language. Она включает в себя только один язык и не позволяет загрузить дополнительные ЯП через панель управления или утилиту «Параметры». Сделано это для того, чтобы неопытный пользователь случайно не перевёл систему не непонятный ему язык.
Если вы столкнулись с тем, что на вашем компьютере установлена версия Single Language, а новый ЯП вам нужен, то воспользуйтесь методом, описанным в пункте «Добавление языка из cab-файла». Установить пакет и начать пользоваться им можно, предварительно загрузив cab-файл со стороннего ресурса.
Изменения языка программ
Сторонние программы работают на том языке, который вы выбрали при установке, но встроенные в Windows приложения и утилиты, загруженные из официального магазина Microsoft, при определении языка интерфейса опираются на настройки системы. Используемый в них язык выбирается на основе данных о местоположении.
В более ранних версиях Windows 10 языковые пакеты устанавливаются через панель управления, а в последних — через параметры системы. Универсальный способ — установить ЯП при помощи cab-файла. После того как пакет будет установлен, перейдите в настройки региональных стандартов и измените язык интерфейса, приветствия и стандартных программ.
Источник
Как изменить язык в Windows 10: включаем русский интерфейс
Изменение основного языка системы может быть необходимым, например, если на компьютере установлена англоязычная версия системы, а вам нужен русский интерфейс. Вы можете скачать и установить дополнительные языковые пакеты для Windows 10 и Windows 10 Enterprise 1903 / LTSC 2019, чтобы получить интерфейс операционной системы на требуемым языке.
Изменение языка системы в Windows 10: английский на русский
Прежде всего, войдите в учетную запись администратора устройства. Нажмите сочетание клавиша Windows + I для запуска приложения Settings (Параметры), а затем перейдите в раздел Time & Language (Время и язык).
В разделе Windows display language (Язык интерфейса Windows) нажмите ссылку Add a Windows display language in Microsoft Store (Добавьте язык интерфейса Windows в Microsoft Store).
Откроется страница Microsoft Store со всеми доступными для установки языковыми пакетами. Найдите и выберите язык, который нужно установить – например, русский (пакет локализованного интерфейса на русском).
На следующей странице нажмите Get (Получить).
Затем нажмите Install (Установить).
Дождитесь загрузки и установки выбранного языкового пакета. Выберите Yes, sign out now (Да, выйти сейчас), чтобы выйти из учетной записи для применений изменений или No, sign out later (Нет, выйти из системы позже).
Система будет доступна на выбранном языке после выхода из учетной записи или перезагрузки.
Источник
Как изменить язык в Windows 10 home single language
По сути Windows 10 home single language исходя из название поддерживает только один язык интерфейса, но как говорится “Что не запрещено – то разрешено”. В сегодняшней статье расскажем как поменять язык интерфейса в Windows 10 home single language.
Изменить язык интерфейса windows 10 home single language
1.Для начала вам нужно знать какая разрядность вашей Windows 10: один из вариантов зайти в “Пуск”=> Параметры => Система => о системе => в поле “Тип системы” разрядность вашей Windows 
2. Копируйте ссылку нужного языка и вставляете в браузер => нажимаете Enter => начнется загрузка файла;
Windows 10 x64:
| ar-SA | Download |
| bg-BG | Downloadk |
| cs-CZ | Download |
| da-DK | Download |
| de-DE | Download |
| el-GR | Download |
| en-GB | Download |
| en-US | Download |
| es-ES | Download |
| es-MX | Download |
| et-EE | Download |
| fi-FI | Download |
| fr-CA | Download |
| fr-FR | Download |
| he-IL | Download |
| hr-HR | Download |
| hu-HU | Download |
| it-IT | Download |
| ja-JP | Download |
| ko-KR | Download |
| lt-LT | Download |
| lv-LV | Download |
| nb-NO | Download |
| nl-NL | Download |
| pl-PL | Download |
| pt-BR | Download |
| pt-PT | Download |
| ro-RO | Download |
| ru-RU | Download Download2 |
| sk-SK | Download |
| sl-SI | Download |
| sr-Latn-RS | Download |
| sv-SE | Download |
| th-TH | Download |
| tr-TR | Download |
| uk-UA | Download |
| zh-CN | Download |
| zh-TW | Download |
| af-ZA | Download |
| am-ET | Download |
| as-IN | Download |
| az-Latn-AZ | Download |
| be-BY | Download |
| bn-BD | Download |
| bn-IN | Download |
| bs-Latn-BA | Download |
| ca-ES | Download |
| ca-ES-valencia | Download |
| chr-CHER-US | Download |
| cy-GB | Download |
| eu-ES | Download |
| fa-IR | Download |
| fil-PH | Download |
| ga-IE | Download |
| gd-GB | Download |
| gl-ES | Download |
| gu-IN | Download |
| ha-Latn-NG | Download |
| hi-IN | Download |
| hy-AM | Download |
| id-ID | Download |
| ig-NG | Download |
| is-IS | Download |
| ka-GE | Download |
| kk-KZ | Download |
| km-KH | Download |
| kn-IN | Download |
| kok-IN | Download |
| ku-Arab-IQ | Download |
| ky-KG | Download |
| lb-LU | Download |
| lo-LA | Download |
| mi-NZ | Download |
| mk-MK | Download |
| ml-IN | Download |
| mn-MN | Download |
| mr-IN | Download |
| ms-MY | Download |
| mt-MT | Download |
| ne-NP | Download |
| nn-NO | Download |
| nso-ZA | Download |
| or-IN | Download |
| pa-Arab-PK | Download |
| pa-IN | Download |
| prs-AF | Download |
| quc-Latn-GT | Download |
| quz-PE | Download |
| rw-RW | Download |
| sd-Arab-PK | Download |
| si-LK | Download |
| sq-AL | Download |
| sr-Cyrl-BA | Download |
| sr-Cyrl-RS | Download |
| sw-KE | Download |
| ta-IN | Download |
| te-IN | Download |
| tg-Cyrl-TJ | Download |
| ti-ET | Download |
| tk-TM | Download |
| tn-ZA | Download |
| tt-RU | Download |
| ug-CN | Download |
| ur-PK | Download |
| uz-Latn-UZ | Download |
| vi-VN | Download |
| wo-SN | Download |
| xh-ZA | Download |
| yo-NG | Download |
| zu-ZA | Download |
Windows 10 x86 :
| ar-SA | Download |
| bg-BG | Download |
| cs-CZ | Download |
| da-DK | Download |
| de-DE | Download |
| el-GR | Download |
| en-GB | Download |
| en-US | Download |
| es-ES | Download |
| es-MX | Download |
| et-EE | Download |
| fi-FI | Download |
| fr-CA | Download |
| fr-FR | Download |
| he-IL | Download |
| hr-HR | Download |
| hu-HU | Download |
| it-IT | Download |
| ja-JP | Download |
| ko-KR | Download |
| lt-LT | Download |
| lv-LV | Download |
| nb-NO | Downloadk |
| nl-NL | Download |
| pl-PL | Download |
| pt-BR | Download |
| pt-PT | Download |
| ro-RO | Download |
| ru-RU | Download Download2 |
| sk-SK | Download |
| sl-SI | Download |
| sr-Latn-RS | Download |
| sv-SE | Download |
| th-TH | Download |
| tr-TR | Download |
| uk-UA | Download |
| zh-CN | Download |
| zh-TW | Download |
| af-ZA | Download |
| am-ET | Download |
| as-IN | Download |
| az-Latn-AZ | Download |
| be-BY | Download |
| bn-BD | Download |
| bn-IN | Download |
| bs-Latn-BA | Download |
| ca-ES | Download |
| ca-ES-valencia | Download |
| chr-CHER-US | Download |
| cy-GB | Download |
| eu-ES | Download |
| fa-IR | Download |
| fil-PH | Download |
| ga-IE | Download |
| gd-GB | Download |
| gl-ES | Download |
| gu-IN | Download |
| ha-Latn-NG | Download |
| hi-IN | Download |
| hy-AM | Download |
| id-ID | Download |
| ig-NG | Download |
| is-IS | Download |
| ka-GE | Download |
| kk-KZ | Download |
| km-KH | Download |
| kn-IN | Download |
| kok-IN | Download |
| ku-Arab-IQ | Download |
| ky-KG | Download |
| lb-LU | Download |
| lo-LA | Download |
| mi-NZ | Download |
| mk-MK | Download |
| ml-IN | Download |
| mn-MN | Download |
| mr-IN | Download |
| ms-MY | Download |
| mt-MT | Download |
| ne-NP | Download |
| nn-NO | Download |
| nso-ZA | Download |
| or-IN | Download |
| pa-Arab-PK | Download |
| pa-IN | Download |
| prs-AF | Download |
| quc-Latn-GT | Download |
| quz-PE | Download |
| rw-RW | Download |
| sd-Arab-PK | Download |
| si-LK | Download |
| sq-AL | Download |
| sr-Cyrl-BA | Download |
| sr-Cyrl-RS | Download |
| sw-KE | Download |
| ta-IN | Download |
| te-IN | Download |
| tg-Cyrl-TJ | Download |
| ti-ET | Download |
| tk-TM | Download |
| tn-ZA | Download |
| tt-RU | Download |
| ug-CN | Download |
| ur-PK | Download |
| uz-Latn-UZ | Download |
| vi-VN | Download |
| wo-SN | Download |
| xh-ZA | Download |
| yo-NG | Download |
| zu-ZA | Download |
3. После того как файл загрузится, в строке поиска или через выполнить введите команду lpksetup => нажимаете Enter

4. В появившемся мастере установки выберите «Установить язык интерфейса»

5. Нажмите «Обзор» и найдите файл языкового пакета скачанный чуть ранее => после чего нажмите «Далее» => отпишитесь о результате.

По сути, чтобы была возможность менять языки интерфейса нужно покупать другую версию Windows. Но есть такой метод и он многим людям помог и вы можете попробовать. На сегодня всё, если есть дополнения – пишите комментарии! Удачи Вам 🙂
Источник
Как поменять язык интерфейса в Windows 10
По какой-то неведомой мне причине в Microsoft Windows 10 сильно осложнен процесс смены языка интерфейса операционной системы. Когда я захотел поменять язык системы с российского на английский, то столкнулся с определенными трудностями. Например, при открытии в Control Panel пункта региональные настройки:
Control PanelClock, Language, and RegionLanguage
я видел список языков раскладки клавиатуры (английский, украинский, русский), а возле русской раскладки стояла пометка, что это язык системы. При этом возле украинской и английской раскладки стояла пометка, что языковые пакеты недоступны. Если возле каждого с языков нажать кнопку Options, то открывшаяся форма все-равно не дает никакой возможности изменить язык системы. Другие стандартные способы изменения языка системы, которые отлично работали в widows xp, windows 7 и windows 8 — в десятке не сработали. Более того, если попытаться скачать желаемый языковый пакет для Windows 10 с официального сайта Microsoft, то ничего не выйдет, поскольку на официальном сайте их просто нет.
Так что же делать?
Как в windows 10 можно поменять язык системы?
Вот простой, проверенный мною способ:

1. Откройте Control Panel.
2. Перейдите в раздел Control PanelAll Control Panel ItemsLanguageAdvanced settings
3. В открывшейся форме в самом верхнем списке выбора у вас указан ваш текущий язык системы. Вместо него выберите пункт Использовать список языков (рекомендовано) / Use language list (recommended). Нажмите кнопку Сохранить / Save.
4. После этого вернитесь на предыдущую форму. Возле названия языка, для которого вы хотите скачать языковый пакет, справа есть кнопка Параметры / Options. Кликните на нее.
5. На открывшейся форме, после того, как вы проделали шаг 3 этой инструкции, появится пункт Скачать и установить языковый пакет / Download and install language pack — для того языка, который вы хотите активировать в качестве системного языка Windows 10. Нажимайте на эту ссылку.
6. В принципе, это все. На этом шаге ОС Виндовс начнет скачивать языковый пакет, после чего установит его в системе и сделает языком интерфейса по умолчанию.
Вот такие вот танцы с бубном надо проделать, чтобы изменить язык интерфейса в windows 10. Почему-то, пока не проделать шаг 3, то на шаге 5 не будет никакой возможности для скачивания нового языкового пакета системы.
Как поменять язык системы в версии Windows 10 Home Single Language
Если у вас на компьютере установлена версия операционной системы Windows 10 Home Single Language, это значит, что в системе изначально предустановлен только один языковый пакет, согласно купленной вами лицензии. Поэтому в этой сборке Windows вообще не предусмотрена функция смены языка системы. Но поменять язык даже в версии Single Language тоже возможно. Для этого попробуйте проделать следующие шаги:
1. Перейдите по соответствующей ссылке ниже, в зависимости от разрядности вашей операционной системы (32 или 64 бита), и скачайте необходимый вам языковый пакет lp.cab. Скопируйте его, например, в корень диска С (т.е., путь = С:lp.cab):
Windows 10 x64 (Build 10240):
Windows 10 x86 (Build 10240):
2. От имени администратора запустите командную строку CMD. Для этого нажмите на клавиатуре сочетание клавиш WIN+X и в появившемся слева экрана окошке кликните мышкой по пункту Command Promt (Admin). В командной строке выполните друг за другом следующие команды:
2.1 Установка нового языкового пакета:
dism /Online /Add-Package /PackagePath:C:lp.cab
2.2 Вывод перечня установленных языков в системе:
dism /Online /Get-Packages
В случае с версией ОС Windows 10 Home Single Language, в перечне найдите изначально установленный в системе язык, который вы хотите удалить и который начинается с текста Microsoft-Windows-Client-LanguagePack-Package-. Запомните идентификатор этого языка (поле Package Identity), он вам пригодится на следующем шаге. Главное, не спутайте его с тем языковым пакетом, который вы установили на шаге 2.1.
2.3 Удаление оригинального языкового пакета:
dism /Online /Remove-Package /PackageName:Microsoft-Windows-Client-LanguagePack-Package
Только не забудьте в этой команде после /PackageName: указать ваш языковый пакет системы, который вы вычислили в шаге 2.2.
На этом процедура окончена, вы успешно поменяли язык системы в Windows 10 Home Single Language.
Источник
Как добавить русский язык Windows 10 в одноязычной версии?
Здравствуйте, друзья! Сегодня принесли ноутбук на настройку. Малыш — Dell Inspiron 11 3000 серии для работы в поездках, довольно быстрый. У человека вдруг отказал скайп и заодно все остальные программы.
Причина оказалась банальна- на ноутбуках этой серии вместо стандартных жестких дисков стоит накопитель размером всего 32 Гб. Что то среднее между планшетом и обычным ноутбуком. Но? зато сенсорный экран и полноценная клавиатура. Шустрый, мне понравился.

Оказалось, что ноутбук этот приехал из Америки. Дети давно проживают там, а родители здесь. Общаются ежедневно по Skype, а тут такая незадача.
Как добавить русский язык в windows 10 для одного языка?


Теперь приступим. Действовать будем через «Панель управления». Чтобы не лазить по меню я создал на рабочем столе ярлык и в свойствах его прописал слово control

Мы добавили ярлык «панели управления». Там мы проделаем все остальные действия. Жмем на ярлык и выбираем Clock, Language, Region (часы,язык и регион).

Добавляем еще один язык интерфейса в Windows 10 пошагово
Сначала сменим местонахождение (это небоходимо для правильного формата дат, времени и т.д) Переходим в «Location» (Местоположение):

Выбираем нужную нам страну…

На этом этапе компьтер попросит перезапуска. Если так случилось — перезапускаем. Снова идем в Control — (Часы, язык и регион). Добавляем новый язык

Находим «Русский». Он спрятан, не сразу находится иногда можно искать по алфавиту либо в поисковом окне сверху «Search Language»)…:

Система предложит скачать языковой пакет (нужно подключение к интернету) в виде обновления:


После скачивания и установки нужно выбрать «Сделать этот язык основным»:

Система потребует перезапуска и в следующем заходе вы увидите меню и рабочий стол на русском.

Осталось добавить русский язык в раскладку, чтобы вводить русский текст и переключаться на английский, когда надо.
Добавляем язык ввода в раскладку клавиатуры Windows 10
Добавляем метод ввода:

Здесь же переключим выбранный язык вверх — система при загрузке будет выбирать нужный язык.

В «Дополнительных параметрах» выбираем переключение методов ввода…

И делаем так, как привыкли. У меня сделано вот так:
Источник