You are here:
Home » Windows 10 » How To Remove Programs From Startup In Windows 10
One of the better ways to improve Windows boot time is to stop unwanted programs from loading with Windows operating system. Programs like Skype, Evernote, and TeamViewer automatically start with Windows operating system with default settings.
In previous Windows 7 previous versions, the option to remove or disable startup entries was present under System Configuration utility. In Windows 8/8.1 and Windows 10, the same has been moved under Task Manager.
In this guide, we will see the top four easy ways to remove programs from the startup in Windows 10.
Method 1 of 4
Disable startup programs using Task Manager
Step 1: Open Task Manager by simultaneously pressing Ctrl, Shift, and Esc keys. Alternatively, right-click on the empty spot of the taskbar and then click Task Manager to open the same.
Step 2: If the Task Manager is launched with a minimal view, click More details button to view the actual Task Manager.
Step 3: Click on the Startup tab to switch to the same.
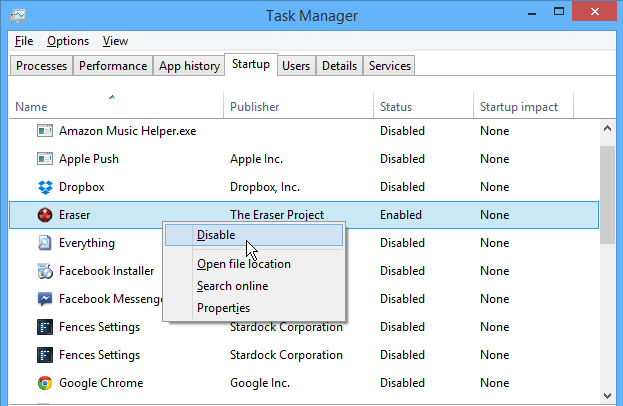
Step 4: Here, right-click on the program entry that you want to stop from loading with Windows 10 and then click Disable option to remove it from the Windows 10 startup folder. That’s it!
Method 2 of 4
Disable startup programs via the Settings app
The Settings app now supports managing startup items.
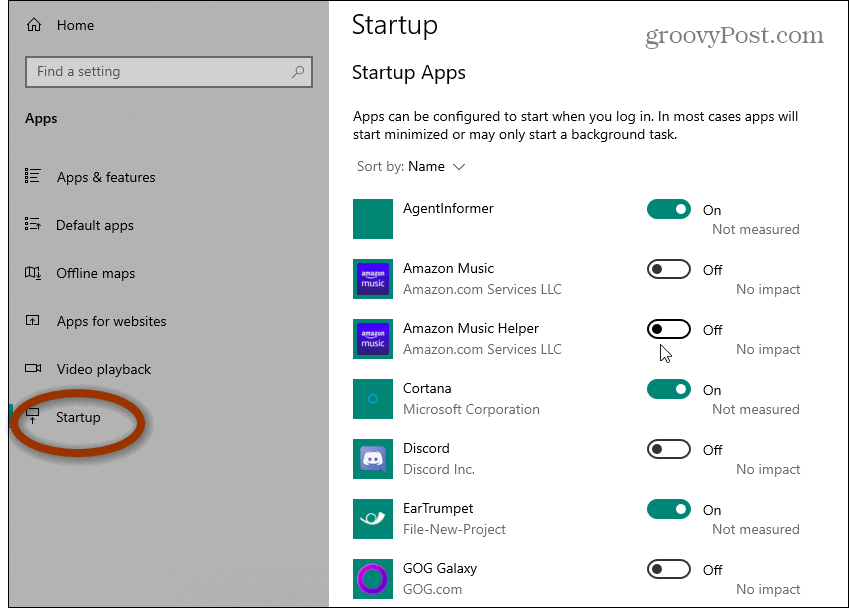
Step 1: Navigate to Settings app > Apps > Startup.
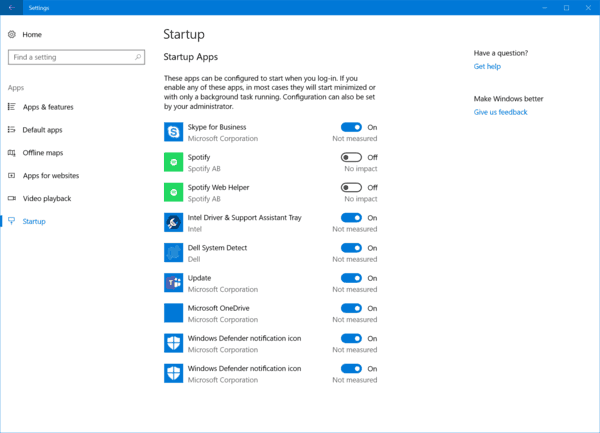
Step 2: Turn off apps that you don’t want to load with Windows 10 by moving the slider to the off position.
Method 3 of 4
Delete startup programs from Startup folder
As said before, shortcuts of programs that start with Windows 10 are mostly saved in a folder called Startup. You can delete a program shortcut from this folder to stop the program from starting with Windows 10. Here is how to do it. Note that you might not be able to find all applications that startup Windows under the Startup folder. If you can’t find the program shortcut that you’re looking for, please follow the instructions in other methods.
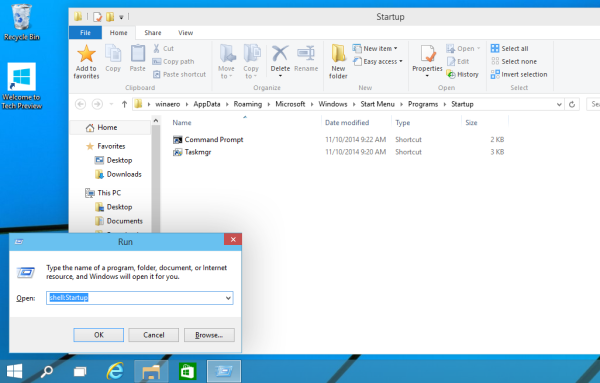
Step 1: Open Run command box by simultaneously pressing the Windows logo and R keys.
Step 2: In the field, type shell:startup, and then press Enter key to open the Startup folder.
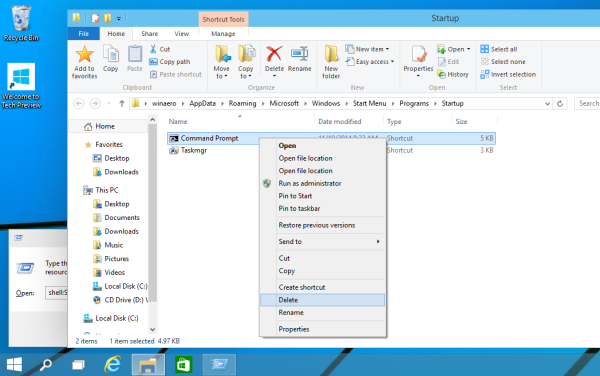
Step 3: Select the program shortcut that you want to remove from Windows 10 startup, and then press Delete key.
Method 4 of 4
Remove startup programs using CCleaner
Many of the popular Windows optimization utilities like CCleaner and Glary Utilities help you remove programs from Windows startup. In this guide, we will see how to remove startup programs using the popular CCleaner (free).
Step 1: Download CCleaner and install the same, if not installed already.
Step 2: Launch CCleaner, click Tools and then click Startup.
Step 3: Under the Windows tab, select the entry of the program that you want to remove from startup, and then click the Disable button.
That’s it!
How to add apps installed from Store to startup in Windows 10 guide might also interest you.
by Madalina Dinita
Madalina has been a Windows fan ever since she got her hands on her first Windows XP computer. She is interested in all things technology, especially emerging technologies… read more
Updated on September 2, 2022
- If booting your OS seems to last forever, you might want to take action.
- Start by managing your startup apps so that you only keep those you need. Here’s how to quickly remove programs from the Startup.
- Check out more handy fixes on our Windows 10 Guides.
- Don’t be shy to explore the Tutorials Hub as well for more tech tricks and tips.

XINSTALL BY CLICKING THE DOWNLOAD FILE
This software will repair common computer errors, protect you from file loss, malware, hardware failure and optimize your PC for maximum performance. Fix PC issues and remove viruses now in 3 easy steps:
- Download Restoro PC Repair Tool that comes with Patented Technologies (patent available here).
- Click Start Scan to find Windows issues that could be causing PC problems.
- Click Repair All to fix issues affecting your computer’s security and performance
- Restoro has been downloaded by 0 readers this month.
Does it take a long time to start up your operating system? Maybe the boot process is lengthy because there are many applications that load at startup.
There are different tools to manage startup apps. It can be done via the Startup Manager, Task Manager, Explorer, or Registry editor. Below, you can find a few methods that will guide you through the process of adding or removing the startup apps.
You can, also, learn how to enable or disable different apps.
How to manage Startup Programs in Windows 10
How to remove Startup Programs in Windows 10
You can easily remove startup programs in Windows 10 by using the built-in Startup Manager tool. This tool allows you to configure which programs and apps you want your PC to start upon booting. You can either enable or disable them in just a few clicks.
1. Press the key combination Win + R and enter the following command: taskmgr /0 /startup. This will open the Startup tab.
2. In the Startup tab, you can observe a list of applications that are starting when your PC boots.
3. Disable startup application: Right-click on the application you want and select from the menu the Disable feature. The application will no longer start with the OS.
4. Enable startup application: Right-click on the application you want and select from the menu the Enable feature. In this case, the application will start with the OS.
Use the File Explorer
- Press the Win + R key combination.
- Enter the following command: shell:Startup, and press the Enter key.
Note: If you want to add or remove startup apps for all users, you need to enter the following command: shell: Common Startup. - A Startup window will open. Find the application executable file that needs to load when Windows boots.
- Create a shortcut of this app. Copy it and paste it in the Startup window. This is the way for adding a startup application in Windows 10.
- To remove the application, delete the shortcut from the Startup folder.
Use the registry
- Press the Win + R key combination.
- Enter the following command: regedit without quotes and press the Enter key.
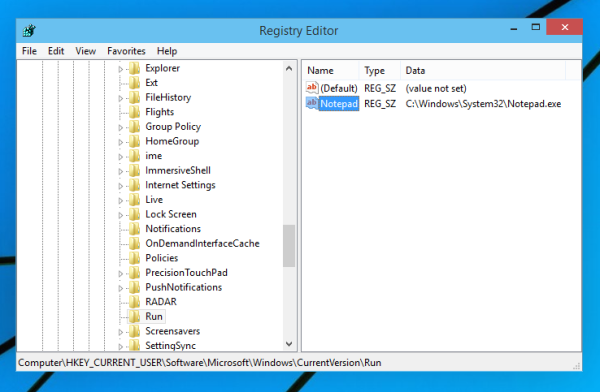
- Navigate to the following path or register key:
HKEY_CURRENT_USERSoftwareMicrosoftWindowsCurrentVersionRun - In the name column, you can find the application that starts automatically, when Windows boots.
- Remove the application from the Startup:
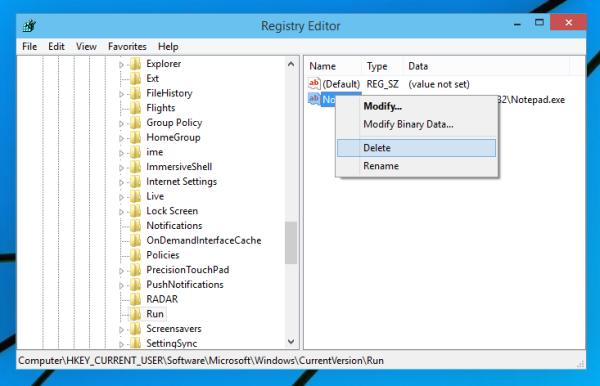
- Right-click on the application name and choose Delete feature.
- Adding the application in the Startup:
- Right-click in the Registry Editor window and select New -> String value feature.
- Add value name (the name of the application).
- Add value data: enter the full path to the executable (*.exe) of the application that you wish to run at the startup.
Looking for the Windows 10 Startup Folder? Check out this amazing guide that will point you to its location in no time.
Use the Group Policy Editor
If you want to add applications to startup, you can do so using Group Policy Editor. We have to mention that this tool isn’t available in Home versions of Windows, but if you’re using Pro or Enterprise version, this tool should be available for you.
To add an application to startup using Group Policy Editor, do the following:
- Press Windows Key + R and enter gpedit.msc. Press Enter or click OK.
- When Group Policy Editor opens, in the left pane navigate to User Configuration > Windows Settings > Scripts (Logon/Logoff). Now in the right pane double click on Logon.
- Logon Properties window will appear. Click on the Add button.
- When Add a script window opens, click on the Browse button.
- Select the application you want to start. After doing that, click on OK.
- Now click on Apply and OK to save changes. After saving the changes, restart your PC and check if the application starts automatically with Windows.
Some PC issues are hard to tackle, especially when it comes to corrupted repositories or missing Windows files. If you are having troubles fixing an error, your system may be partially broken.
We recommend installing Restoro, a tool that will scan your machine and identify what the fault is.
Click here to download and start repairing.
This is a simple method, but in order to use it, you need to have Pro or Enterprise version of Windows. If you’re a Home user, you’ll have to look for a different solution.
Use the Task Scheduler
Windows comes with a useful tool called Task Scheduler. Using this tool you can set certain applications to start at a specific time, but you can also use it to add applications to startup.
The tool is relatively simple to use, and you can create startup applications by following these steps:
- Press Windows Key + R and enter taskschd.msc. Press Enter or click OK.
- When Task Scheduler starts, in the right pane click on Create Task.
- Create Task window will appear. Enter the name of your task and check Run with highest privileges option. In the Configure for field choose Windows 10.
- Go to the Triggers tab and click on the New button.
- When the New Trigger window opens, set Begin the task to At log on. If you want, you can set this task to run only for a specific user or for all users on the PC. If needed, you can even delay and repeat the task. After choosing your settings, click on OK.
- Navigate to the Actions tab and click on New.
- Set Action to Start a program and click on the Browse button.
- Choose the desired application and click on OK.
- Click OK again to save your task.
After doing that, the desired application will start automatically every time with Windows. Task Scheduler is a powerful tool and it allows you to configure your tasks any way you want.
This method is perfect for advanced users that want to have full control over their tasks and startup applications. Even if you’re a basic user, you should be able to add applications to startup by using this solution.
Use dedicated tools to manage Startup programs
If previous solutions seem a bit complicated for you, you might need something more user-friendly. Not long ago we covered the best apps to manage startup items, and while most of these apps allow you to disable or remove startup items, some of them have the ability to add new apps to the startup.
Most of these applications are free and relatively simple to use, so we strongly suggest that you check them out if you’re looking for a user-friendly way to add startup items.
Check programs’ configuration
The simplest way to add a program to startup (or remove startup programs) is to check its configuration. Most applications can start automatically with Windows, and in order to do that, you just have to check their settings.
Now you just have to find start with Windows or similar option and check it. After doing that, the application will automatically start as soon as the Windows starts.
As you can see, this is a simple method but it requires you to check and change individual settings for all applications that you want to add to startup.
Keep in mind that some applications don’t even support the startup option, so this method won’t work for them.
There you go, some quick and simple methods that will allow you to manage the startup apps. How do you handle startup apps? Share your experience with us by leaving a comment below.
Still having issues? Fix them with this tool:
SPONSORED
If the advices above haven’t solved your issue, your PC may experience deeper Windows problems. We recommend downloading this PC Repair tool (rated Great on TrustPilot.com) to easily address them. After installation, simply click the Start Scan button and then press on Repair All.
![]()
Newsletter
Home » Windows 10 » How to Disable Startup Programs in Windows 10
If your computer is slowing down and taking a long time to boot up, you can find below the steps to Disable Startup programs in Windows 10.

Many Windows Apps and Programs have a default tendency to automatically start up with the computer and keep running in the background.
This can often lead to unwanted Apps and Programs starting up with the computer and remaining active or running in the background, unnecessarily using up resources on your computer.
Luckily, it is easy to prevent Apps and Programs from starting in Windows 10 using different methods as provided below.
1. Disable Startup Apps & Programs Using Settings
An easy way to remove Prevent Apps and Programs from starting up with the computer is by using Settings.
Go to Settings > Apps and select Startup in the left-pane. In the right-pane, disable the Apps/Programs that you want to remove from startup by moving the toggle to OFF position.

When you restart the computer, you will no longer find the disabled Apps starting up with your device and hiding in background.
2. Disable Startup Apps & Programs Using Task Manager
Another way to prevent unwanted Apps and programs from starting up with the computer is by using Task Manager.
Right-click on the Start button and select Task Manager.

On Task Manager screen, switch to Startup tab, right-click on the program that you want to remove from Startup and select the Disable option.

Note: If the “Disable” button is greyed out or unavailable, you need to login with you Admin Account.
You can repeat the above steps to prevent all unnecessary Apps & Programs from Startup.
3. Remove Apps from Windows Startup Folder
Another way to prevent unwanted Apps from opening at Startup in Windows 10 is to remove the App from the Startup Folder on your computer.
Right-click on the Start button and click on Run. In the Run Command window, type shell:startup and click on OK to open the Startup Folder on your computer.

In the Startup Folder, right-click on the Program that you want to prevent from opening at startup and click on Delete.

Once the program is removed from the Startup Folder, it will no longer bother you by starting automatically with your computer.
- How to Uninstall Updates in Windows 10
- How to View Installed Updates in Windows 10
As you use your Windows 10 PC, it’s inevitable that you’ll build up a library of third-party apps and software. However, by default, many of these will open each and every time you boot up your PC.
While that can be convenient in some cases – it’s great to not have to remember to open
cloud storage services – many are simply not necessary. That’s especially true when you consider that in the startup list adds a bit more time between you pressing the power button and your computer being ready to use.
The good news is that Windows 10 not only allows you to modify which programs open at startup, it also lets you see which apps are likely to be causing any longer boot times.
You can also achieve the same thing by using a utility such as
CCleaner. This will also perform a number of other jobs, including cleaning the Registry, clearing browsing data and removing cookies.
How to startup apps in Windows 10
You can change startup programs in Task Manager. To launch it, simultaneously press Ctrl + Shift + Esc. Or, right-click on the taskbar at the bottom of the desktop and choose Task Manager from the menu that appears.
Another way in Windows 10 is to right-click the Start Menu icon and choose Task Manager.

When the utility is first launched it will default to the programs that are currently running on your system. To access the information you need to move the cursor down to the bottom left corner where it says More details. Click on this.

Now you’ll see a wealth of information displayed, including background processes and the resources that they are currently using.
To find the startup items click on the tab along the top that is marked Start-up.

This displays a list of everything that can load when you turn on your machine.
It’s important to note the Status column, as not everything on the list is actually enabled. If an item it marked as Disabled then you can ignore it as it will not load in the startup sequence.
To simplify matters click on the Status column so that it sorts the items into groups of enabled and disabled apps.
How to remove startup programs using Task Manager
If you see any apps that you don’t want as part of your startup sequence then it is very easy to remove them.
Simply right-click on the relevant app, then select the Disable option from the pop-up menu.

The app will remain on the list, but will no longer launch automatically when you turn on your machine. To enable it again just right click on it and select Enable.
Remember that you’ll need to reboot your machine for these changes to take effect.
If you love to tweak things, here’s
how to change the default font on Windows 10.
The more apps you install on your computer, the longer it will take to start up Windows. This is because many apps load at startup and slow down the boot process. The longer that list gets, the slower your OS loads after a restart or shutdown. In this article, we will review some basic ways to manage startup apps in Windows 10 so your OS remains more responsive. This article is also applicable to Windows 8.1 and Windows 8.
Update: Starting with Windows 10 build 17017, there is a special page in Settings to manage startup apps. You can find it under Settings — Apps — Startup. See the following screenshot:
To manage startup apps, you need to review all of them so you can turn off the ones you don’t want. This can be done via Task Manager in Windows 10. All you need to do is to open the Task Manager app and go to the Startup tab: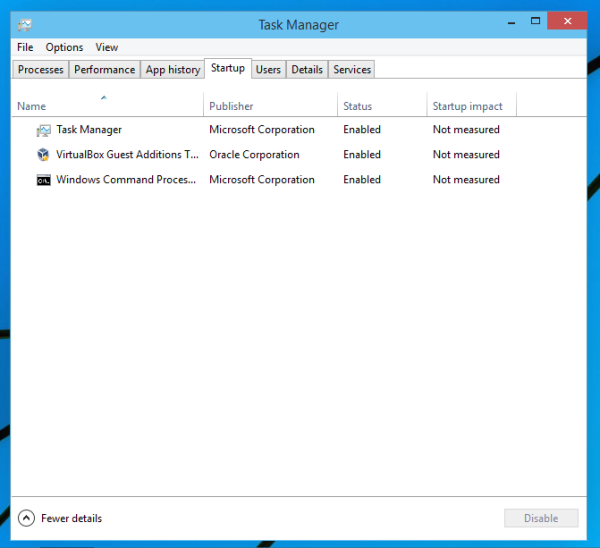
Tip: You open the Startup tab of Task Manager directly in Windows 10 by running the following command:
taskmgr /0 /startup
Press Win + R shortcut keys together on the keyboard and type the command mentioned above in the Run box. See the following article for more details: How to open the Startup tab of Task Manager directly in Windows 8.
On the Startup tab you will see the full list of apps which start with Windows.
Tip: You might be curious how Task Manager calculates the «Startup Impact» of Apps.
Using the Startup tab of Task Manager, you can easily prevent an app from starting with your OS. It is very easy — just right click the desired app and pick «Disable» from the context menu.
To enable the disabled app, you just need to right click it again and choose the «Enable» command from the context menu.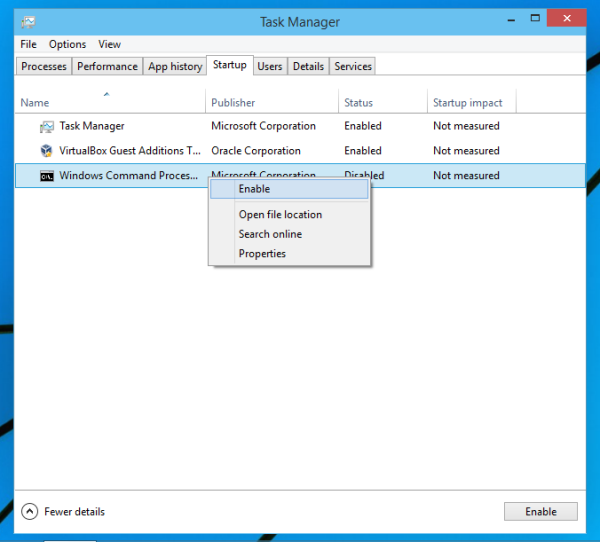
Now you know how to enable or disable startup apps. Let’s see how to add a new app to load at startup or remove an existing one.
How to add or remove startup apps for the current user
Startup items for the current user are stored usually at two locations: the Registry and the special «Startup» folder. The Startup folder is an easier way to manage apps. To add or remove an app from the Startup folder, you need to do the following:
- Press Win + R shortcut keys together and type the following into the Run box:
shell:Startup
The text above is a special shell command which will open the Startup folder for you directly.

The Startup folder is located here:
C:UsersYour user nameAppDataRoamingMicrosoftWindowsStart MenuProgramsStartup
Just copy and paste a shortcut in this folder so that the app loads when Windows boots. To remove the application from the Startup folder, delete the appropriate shortcut.

That’s it!To add or remove startup apps for the current user from the Registry, you need to follow the instructions below:
- Open Registry Editor.
- Go to the following key:
HKEY_CURRENT_USERSoftwareMicrosoftWindowsCurrentVersionRun
- There you will find startup items for current users which are stored in the Registry:

To delete an item, right click it and choose Delete from the context menu: To add a new startup item, you need to create a new string value with any desired name and set its value data to the full path of the application which you want to load at startup:
How to add or remove startup apps for all users
The method is pretty much the same as adding an app for a single user. The Startup folder and Registry key are different for All users.
To add or remove startup items for all users via the Startup folder, type the following shell command in the Run dialog:
shell:Common Startup
The following folder will be opened:
C:ProgramDataMicrosoftWindowsStart MenuProgramsStartup
There you can add or remove shortcuts for any app you want. Shortcuts from this folder will start with Windows for all users of your PC.
As for the All Users Registry key, you will need to go to the following key:
HKEY_LOCAL_MACHINESOFTWAREMicrosoftWindowsCurrentVersionRun
Here you need to create or delete string values as described above. The value name can be anything but the value data must contain the full path to the executable (.EXE) of the app that you wish to run at startup.
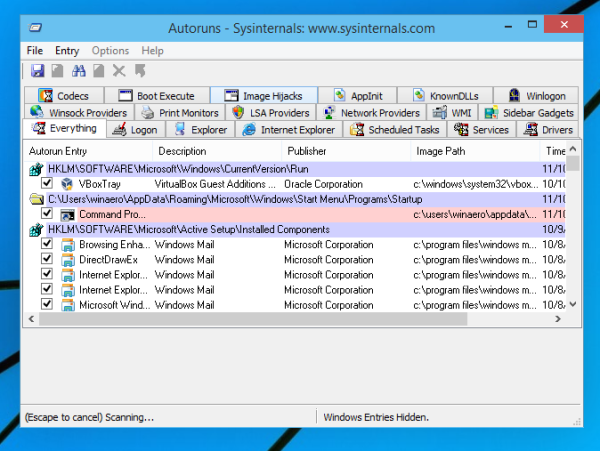
That’s it. For advanced management of startup apps, I recommend you to take a look at the excellent SysInternals Autoruns tool:

The Autoruns app is the most comprehensive startup management app and covers all locations. It not only allows you to manage Startup apps but also many other objects including shell extensions which load with the Explorer shell, Scheduled tasks, system services and other system components.
 To add a new startup item, you need to create a new string value with any desired name and set its value data to the full path of the application which you want to load at startup:
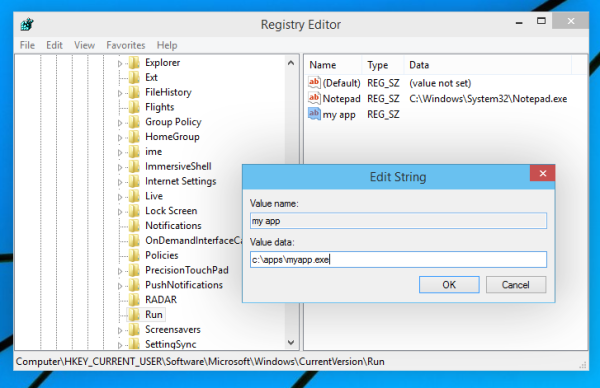
Add an app installed from the Windows Store to Startup
If you want to add an app installed from the Windows Store to Startup, you cannot use traditional methods. See how it can be done in the following article:
How to Add Store Apps to Startup in Windows 10
That’s it.
Support us
Winaero greatly relies on your support. You can help the site keep bringing you interesting and useful content and software by using these options:
If you like this article, please share it using the buttons below. It won’t take a lot from you, but it will help us grow. Thanks for your support!

Having a lot of apps starting up when you boot your computer slows down the process. Here’s how to disable some and improve startup speed.
Windows 10 is a fast and responsive operating system. But if you have many apps set to start up when you log in, it can bog down the boot process substantially. Many apps you install will add themselves to the boot process. Let’s review how to disable startup programs/apps on Windows 10 and make the boot process fast again.
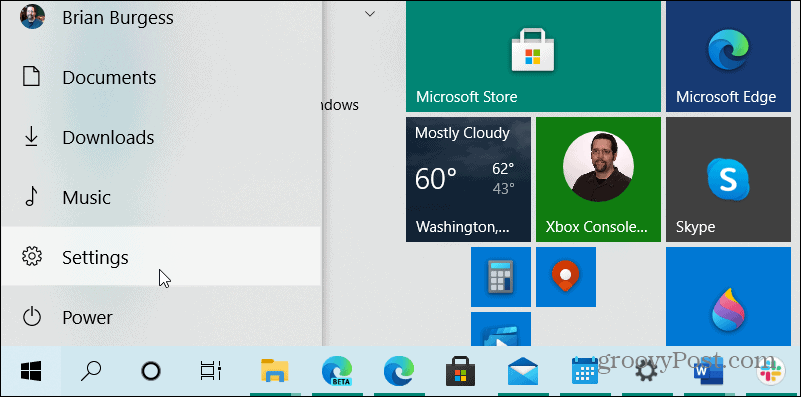
Click the Start button and choose Settings, or you can use the keyboard shortcut Windows Key + I to open Settings.
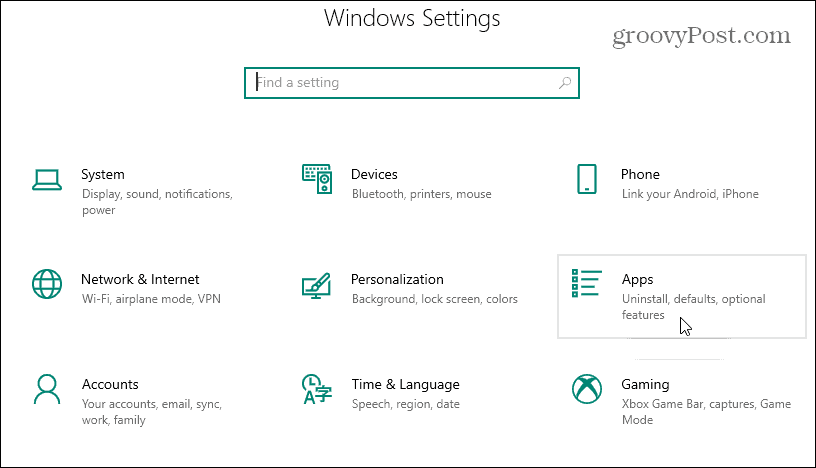
Once Settings has opened, click on Apps.
On the next screen, click on Startup in the left panel. And on the right, all of the installed apps set to startup during boot will be listed. You can scroll through the list and turn off the ones you don’t want to run.
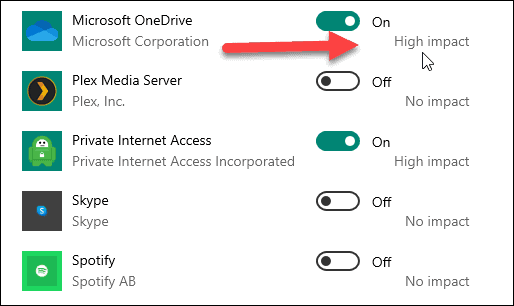
Next to each one, you will see the app’s impact on the startup process. For example, here, you can see Microsoft OneDrive has a high impact. That can help you in determining which apps you allow to run or not during startup.
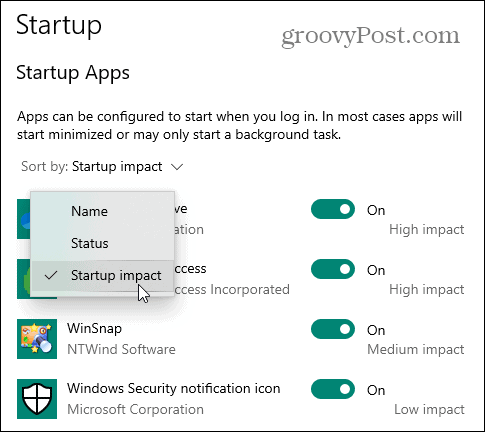
It’s also worth noting that there is an option to sort apps by name, startup impact, or status.
Disable Startup Apps via Task Manager
You can also use the old-school method of disabling startup apps as you can on older versions of Windows. Here are the steps:
Step 1: Right-click on an empty area on the taskbar and select Task Manager.

Step 2: When Task Manager comes up, click the Startup tab, and look through the list of programs and apps that are enabled to run during startup. Then to stop them from running, either highlight the app and click the Disable button or right-click on one and select Disable from the menu.

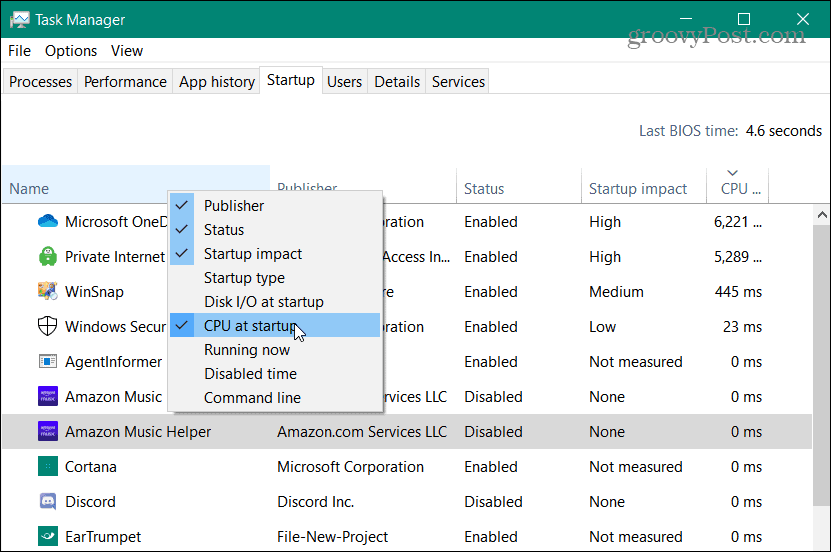
Task Manager in Windows 10 also provides a few more options in determining if you want to disable an app from startup or not. Like in Settings, you can sort by startup impact, name, or status; but you can also sort by publisher. And if you want to add more columns to sort by, you can right-click a column header and check what you want to add. For example, here, I added a “CPU at startup” column.
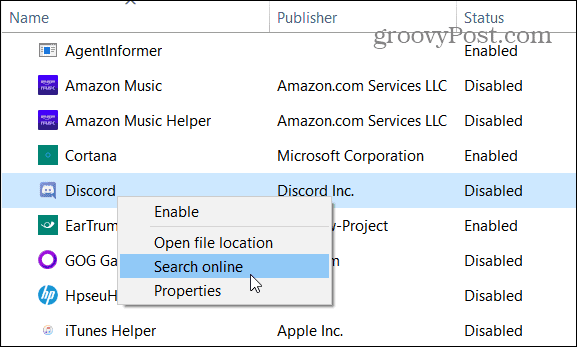
Over time you might install so many programs you forget what they’re for. And Task Manager allows you to open an app’s file location and properties. And if that doesn’t help, you can search for the app online. Just right-click on an app and choose the information you need.
After setting up a new computer, I will disable all but a few programs. Another thing to remember after installing a new app is to see if it added itself to startup. Then you can disable it if it’s something you need to access quickly. Or if you notice your PC isn’t starting up as fast as it used to, this is a good place to look first. Run through the list and disable anything that isn’t necessary – especially apps that have a high startup impact.
I often get the question: “Which apps need to be enabled?” and the answer is simple: None! You can disable them all, and Windows will start up normally. However, some things you want at the ready won’t be. You’ll need to start them up manually.
It’s not a perfect science, but you can experiment and see which apps are delaying the startup process when you log in.
Not on Windows 10 yet? Check out our articles on how to disable startup programs on Windows 7 (which is no longer supported) or Windows 8.1.
![]()
If you already know how to control startup programs by enabling and disabling them, there are also ways to add startup programs and completely removing them as well. You can choose whether to do it for a single user or for all users too. We do not usually get to see where the storage place for startup items is. You can access it either through the unique folder for startup programs or through the system Registry.
In Windows 10 it is quite easy to add or remove Startup Apps directly from the Startup folder.
Option 1: Directly adding and removing apps to the Startup Folder
Here is how to do it from the Startup folder:
Go to “Run”. You do this by pressing Windows + R on your keyboard. There are several other methods to access the Run utility as well; but this is the quickest and most popular.
On the resulting window, type “shell: Startup”. This is a designated command that will directly take you to the Startup folder. If interested you can note down the directory (C:UsersYour user nameAppDataRoamingMicrosoftWindowsStart MenuProgramsStartup).

Now that you have located the startup folder, it is time to deploy the programs that you need to be among startup items. There are two ways to do this. Copy and paste the shortcut of the program that you want to be added onto the Startup folder. The shortcuts are usually on your desktop so this is very simple. In case you do not want to go back to the desktop every time to check for the program shortcuts, right click on an empty space in the Startup folder. On the resulting menu, navigate downwards and click on “New” and then select “Shortcut”. A window will immediately appear. If you know the directory for the program you need, type its location in the text box. Otherwise, just click on browse.
Locate the program file for the desired startup program or app and double click on it. Press NEXT. When asked to rename the shortcut you can opt to give it a preferred name or just go on with the preset name. When you boot your PC next time, the programs and apps loaded in the Startup folder will be deployed automatically.
This short animation shows how i added Google Chrome to the startup items, as i need it to open automatically when the computer starts up.

Removing the applications from Startup in Windows 10 is equally simple. Just navigate to the Startup folder as described above and delete the shortcuts of the programs you want to remove.
Option 2: Adding and removing programs to Startup folder via Registry (Advanced Users)
NOTE: Going to the registry is a bit technical. If you are not very familiar with the workings of the system registry it is advisable not to use this method. At the very least edit system registry settings under the supervision of proficient computer users or administrators.
Here is how toad and remove programs to the Startup folder via the registry:
Like in Option 1, go to “Run”. Use any method that you prefer.
Type “regedit” in the Run window and press ENTER. On the window that appears, navigate to this key: HKEY_CURRENT_USERSoftwareMicrosoftWindowsCurrentVersionRun. You can easily identify these entries on the left hand side of the registry editor. Just keep unfolding on each entry/subfolder until you reach “Run”.
All startup programs will be listed on the right hand side of the Registry editor.
To remove an item from Startup, just right – click on the corresponding identity and then click DELETE.
To add a startup entry, all you need to do is make a new string value and you can name it anything you want. Once more, navigate to “Run” in the registry just like in the previous step. Right click on an empty space on the right hand side of the registry editor and select New String. Under VALUE NAME, write a preferred name and then under VALUE DATA; type the path to the application launcher of the program you want to start up with.
Note here that all the above methods add startup applications for a single user. However you can add and remove startup programs for all users. You will follow all the above steps except a few things. Via direct addition and removal, you should type the command “shell:Common Startup” (notice the difference here, the word COMMON has been added). This command opens the directory “C:ProgramDataMicrosoftWindowsStart MenuProgramsStartup”. This is the folder to which you will add all your intended startup items (via pasting shortcuts). Now for all users the programs you selected will start at boot time. In the registry editor, the process is the same but the VALUE DATA has to be specific up to the executable launcher file.
There you have it. You now have full control over your startup applications.

Kevin Arrows
Kevin is a dynamic and self-motivated information technology professional, with a Thorough knowledge of all facets pertaining to network infrastructure design, implementation and administration. Superior record of delivering simultaneous large-scale mission critical projects on time and under budget.
Here are the steps to autostart some applications with Windows 10 login or remove and deactivate unwanted programs from autostarting to increase the system speed.
Disable startup programs in Windows 10
The below-given steps will deactivate startup programs installed by you and appearing under the Task Manager.
- Right-click on Windows 10 Taskbar.
- Select Task manager. Alternatively, we can use a keyboard shortcut to open Task manager by pressing [Ctrl] + [Shift] + [Esc] keys simultaneously.
- Select the “Autostart” tab given at the top.
- All the programs that run automatically with Windows 10 startup will be listed, here.
- Select the desired application and then click on the “Disable” button at the bottom right of Task manager as shown in the screenshot to Deactivate it.


Delete startup program Windows 10/7 entry using CCleaner
If you are using CCleaner then you can delete or remove the Startup application entry completely from the auto startup. Apart from that, an option to Disable the same is also available.
- Install CCleaner, if you have not.
- Select Tools option from Vertical left menu.
- Switch to the “Startup” submenu and select the Windows tab.
- You can now remove the entry with the free cleaning tool CCleaner.
- Just select the desired autostart program entry and then hit the Delete button.

Well, in case you have just installed any application and it doesn’t offer settings to autostart then we can manually add it to Windows 10 startup folder. Here are the steps to follow.
- Press the Win+R key to open the Run command box.
- Type shell:startup command in that.

- And press the OK button.
- This will open Windows 10 startup folder.
- Now, past any file, script, or shortcut of some application that you want to run when Windows starts.

Note: The path of this folder is – C:Usersyour-userAppDataRoamingMicrosoftWindowsStart MenuProgramsStartup