 Долгое время Hyper-V не имел возможности организации NAT собственными средствами, что в ряде случаев сильно ограничивало сетевые возможности гипервизора. Особенно остро это чувствовалось в лабораторных и тестовых средах, которые требовалось отделить от локальной сети, обеспечив при этом выход в интернет. С введением поддержки контейнеров потребность в сетях NAT только возросла, что сделало закономерным добавление функции преобразования сетевых адресов в гипервизор. Более подробно о настройке и особенностях применения NAT в Hyper-V мы расскажем в данной статье.
Научиться настраивать MikroTik с нуля или систематизировать уже имеющиеся знания можно на углубленном курсе по администрированию MikroTik. Автор курса, сертифицированный тренер MikroTik Дмитрий Скоромнов, лично проверяет лабораторные работы и контролирует прогресс каждого своего студента. В три раза больше информации, чем в вендорской программе MTCNA, более 20 часов практики и доступ навсегда.
Создание сетей NAT возможно в Windows Server 2016, Hyper-V Server 2016 и более поздних версиях, а также Windows 10. На одном гипервизоре может быть создана только одна сеть NAT. Также обратите внимание, что в отличие от средств настольной виртуализации, таких как VMWare Workstation или VirtualBox, служба NAT в Hyper-V не предоставляет дополнительных сетевых служб, таких как DHCP или DNS, поэтому сетевые настройки виртуальным машинам вам придется назначить самостоятельно.
Также настройка NAT производится исключительно в консоли PowerShell и недоступна в графическом интерфейсе, однако это не представляет никаких сложностей.
Подключимся к нужному нам гипервизору, перейдем в командную строку и запустим консоль PowerShell:
powershellЦвет консоли при этом не изменится, останется черным, но в начале строки приглашения появятся буквы PS.
Теперь создадим новый виртуальный коммутатор с типом сети Внутренняя:
New-VMSwitch -SwitchName "VM_NAT" -SwitchType Internalгде VM_NAT — имя нашего виртуального коммутатора, которое можно задать произвольно.
 При создании сети данного типа автоматически создается виртуальный сетевой адаптер на хосте, поэтому просмотрим список адаптеров командой:
Get-NetAdapter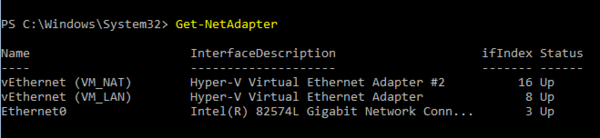 Из полученной информации нам нужно выяснить и запомнить индекс сетевого интерфейса, в нашем случае 16. Следующим шагом мы настроим на нем шлюз. Перед этим следует определиться с адресацией будущей сети NAT, выделив ей свою подсеть и указав адрес шлюза. В нашем случае это будут 192.168.192.0/24 и 192.168.192.1, теперь можно настраивать шлюз:
New-NetIPAddress -IPAddress 192.168.192.1 -PrefixLength 24 -InterfaceIndex 16Где IPAddress — адрес шлюза, PrefixLength — префикс сети, префикс 24 соответствует маске 255.255.255.0, InterfaceIndex — индекс интерфейса, для которого мы выполняем настройку.
 Ну и наконец создадим NAT:
New-NetNat -Name "vNAT" -InternalIPInterfaceAddressPrefix 192.168.192.0/24где Name — имя нашей сети NAT, в нашем случае vNAT, задается на ваше усмотрение, InternalIPInterfaceAddressPrefix — внутренняя сеть NAT.
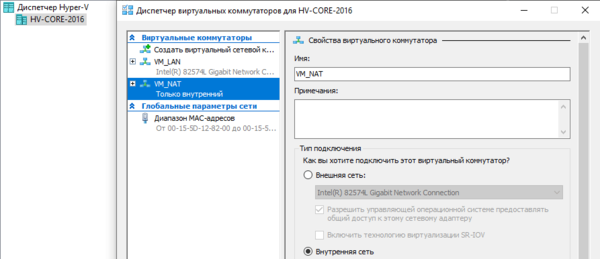
 Теперь можно вернуться в оснастку управления Hyper-V, в Диспетчере виртуальных коммутаторов у нас появится новая сеть — VM-NAT.
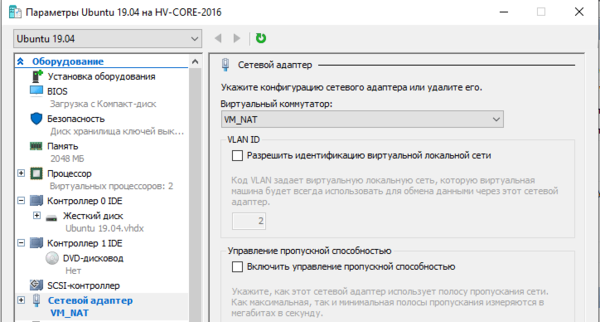
 Чтобы ее использовать, просто укажите этот коммутатор в настройках виртуальной машины:
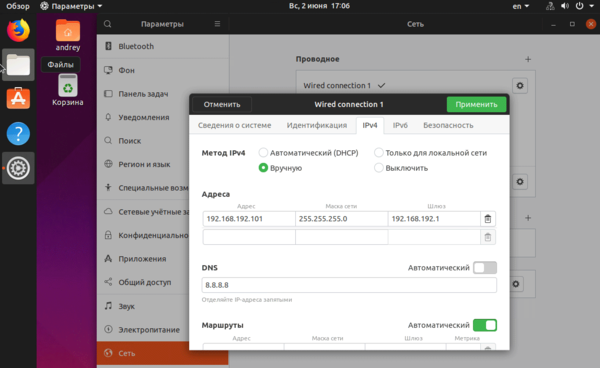
 Также вам потребуется выполнить ручную настройку сети внутри виртуальной машины, ей нужно выдать адрес и указать шлюз из внутренней сети NAT, а также любые доступные DNS:
 Просмотреть существующие сети NAT, напоминаем, она должна быть только одна, можно командой:
Get-NetNatДля удаления используйте:
Get-NetNat | Remove-NetNatПосле этого вам также потребуется удалить назначенный шлюзу IP-адрес:
Remove-NetIPAddress -IPAddress 192.168.192.1 -InterfaceIndex 16Это может потребоваться, если вы захотите изменить адресное пространство NAT. В этом случае удаляете старую сеть NAT и создаете новую, с требуемыми параметрами. Виртуальный коммутатор и виртуальный сетевой интерфейс при этом остаются прежними.
Если вы полностью хотите отказаться от NAT, то дополнительно удалите виртуальный коммутатор, это можно сделать через графический интерфейс, либо командой, указав в ней имя коммутатора:
Remove-VMSwitch -SwitchName "VM_NAT"Связанный с коммутатором виртуальный сетевой адаптер будет удален автоматически.
Научиться настраивать MikroTik с нуля или систематизировать уже имеющиеся знания можно на углубленном курсе по администрированию MikroTik. Автор курса, сертифицированный тренер MikroTik Дмитрий Скоромнов, лично проверяет лабораторные работы и контролирует прогресс каждого своего студента. В три раза больше информации, чем в вендорской программе MTCNA, более 20 часов практики и доступ навсегда.
The Windows 10 Fall Update/1511 (and Windows Server 2016 TP4) includes new functionality in Hyper-V that supports native network address translation (NAT). This functionality wasn’t previously available in Hyper-V without setting up Internet sharing within the OS or running an intermediary VM as a gateway. In this article, I’ll show you how to set up NAT in Windows 10 Hyper-V using the new NAT virtual switch.
Contents
- Create the NAT switch
- View the switch in the Virtual Switch Manager
- View the new vEthernet adapter
- Configure the VM manually
- DHCP Server for Windows
- Author
- Recent Posts

Kyle Beckman works as a systems administrator in Atlanta, GA supporting Office 365 in higher education. He has 17+ years of systems administration experience.
Setting up NAT in Windows 10 has always been one of the shortcomings of Hyper-V on the Windows desktop OS when compared to other virtualization products such as VMware Workstation and Oracle VirtualBox. In the past, it was necessary to set up Internet connection sharing or use a VM running Windows Server with two NICs to share your computer’s Internet connection under NAT.
In previous versions of Hyper-V, three types of virtual switches exist: External, Internal, and Private. In Windows 10 Fall Update, a fourth switch, the NAT switch, is included. As of today, the NAT switch type can only be created using PowerShell. But, it’s pretty safe to assume it will make it into the GUI eventually.
Create the NAT switch
Creating the NAT switch is a two-part process. You’ll first need to create the switch and then configure the NAT object in the host OS. To create the virtual switch, open a PowerShell window with Admin rights and run the following command:
New-VMSwitch -Name "NAT" -SwitchType NAT -NATSubnetAddress 10.0.75.0/24
The -Name parameter sets the name of the new virtual switch. The –SwitchType parameter (which needs to be set to NAT) is what selects NAT as the switch type. The –NATSubnetAddress parameter sets the subnet that will be used on the NAT network. The virtual NIC that is created on the host computer will use the top address, .1, as its IP. In the example subnet I used, the virtual NIC will use 10.0.75.1.
Next, you’ll need to create the NAT object on the host system. In the same PowerShell window, run the following command:
New-NetNat –Name NAT –InternalIPInterfaceAddressPrefix 10.0.75.0/24
The -Name parameter sets the name for the NAT object. The –InternalIPInterfaceAddressPrefix parameter sets the subnet that NAT will use; it should be the same subnet that you used in the last command.

Configuring the NAT virtual switch with PowerShell
View the switch in the Virtual Switch Manager
In Hyper-V Manager, go to Virtual Switch Manager to see your new virtual switch named “NAT.” The GUI doesn’t recognize the new switch type and shows it as an Internal switch. An Internal switch allows the VMs on the host system to communicate with each other as well as with the host system. So, it makes sense that it would see the switch this way—at least until the GUI is updated.

NAT virtual switch in Hyper-V Virtual Switch Manager
View the new vEthernet adapter
The process of adding the new NAT switch will also create a new vEthernet adapter on the system. If you open the properties of the virtual NIC, it should show the IP address 10.0.75.1. This address can be used as the default gateway on VMs connected to the switch.

New vEthernet adapter created on the Hyper-V host
Configure the VM manually
After you configure a VM to use the NAT virtual switch, you will need to manually configure the network settings for the VM. Unfortunately, the built-in NAT switch doesn’t include a DHCP server for automatic network configuration. In my example VM below, I’ve configured the gateway to 10.0.75.1 and used 10.0.75.10 as the IP address of the VM. For a DNS server, I’ve used Google’s public DNS server, 8.8.8.8.

Manually configuring the Hyper-V VM
Obviously, you’re not going to want to manually configure all of your VMs that use the NAT switch. One option if you’re already running a small lab on your Windows 10 system is to use DHCP on a Windows Server. If you don’t want to run a full server for DHCP, I’ve found one other option.
DHCP Server for Windows
You can use a small, freeware, DHCP server called DHCP Server for Windows for providing DHCP to your NAT network in Hyper-V. After you download the software, extract it and run the dhcpwiz.exe utility to configure the server.
First, select the network interface vEthernet (NAT). Good news: the GUI does a good job of warning you about setting up a DHCP server on a NIC that is already receiving an IP address through DHCP.

Selecting the vEthernet NAT network interface
Set the pool of IP addresses you want to use as well as a lease time. When you’re done, make sure you click the Advanced… button.

Setting the pool of IP addresses in DHCP Server for Windows
In Advanced Configuration, you’ll need to configure your gateway (10.0.75.1) and DNS servers.

Configuring DNS and gateway in Advanced Configuration
In the final screen of the wizard, click the Write INI file button to save your settings to an .ini file and then click Next.
Once you’re done, the control application, dhcpsrv.exe, should run automatically. If it doesn’t, the executable is in the same folder as the setup wizard.

DHCP Server for Windows control application
You’ll first need to click the Admin… button to run the executable with Admin rights (if you didn’t already). In this utility, you can set the Windows Firewall rules necessary to run the DHCP server. You can also install the executable as a service and start/stop it from running. After you’ve installed it as a service and started the service, you’re ready to start using NAT with your VMs on Hyper-V.
Начиная с версии Hyper-V в Windows Server 2016/Windows 10 появилась встроенная возможность создавать сеть NAT (Network Address Translation). В этой статье мы рассмотрим, как настроить NAT сеть для виртуальных машин Hyper-V.
Основные ограничения:
- Вы можете создать только одну NAT сеть;
- Для NAT сети не будут доступны такие дополнительные службы, как DNS и DHCP. Это означает, что вам придется задавать сетевые настройки вашим виртуальным машинам за NAT сетью самостоятельно;
- Настройка NAT сети выполняется только из консоли PowerShell.
Рассмотрим, как создать и настроить NAT сеть с помощью PowerShell.
Создайте новый виртуальный коммутатор с типом сети Internal:
New-VMSwitch -SwitchName "NAT_NET" -SwitchType Internal
При этом на хосте Hyper-V появляется новый виртуальный адаптер. Выведите список виртуальных адаптеров с помощью команды:
Get-NetAdapter
Запомните индекс сетевого интерфейса для вашей NAT сети (ifIndex). В нашем примере это 8.

Теперь нужно задать сетевые настройки этого интерфейса. Обратите внимание, что от этих настроек будет зависеть адресация виртуальных машин за NAT. Данный сетевой адаптер будет служить для них шлюзом по-умолчанию.
New-NetIPAddress -IPAddress 192.168.51.1 -PrefixLength 24 -InterfaceIndex 8- InterfaceIndex – номер виртуального интерфейса NAT коммутатора
- PrefixLength – соответствует маске подсети 255.255.255.0 (/24)
Теперь моно создать NAT сеть:
New-NetNat -Name "vHW_NAT" -InternalIPInterfaceAddressPrefix 192.168.51.0/24
Чтобы подключить виртуальную машину к сети через NAT, вам нужно в ее свойствах выбрать коммутатор NAT_NET. Вы можете переключить ВМ в NAT сеть через диспетчер Hyper-V или с помощью PowerShell:
Get-VM TestVM1,TestVM2|Get-VMNetworkAdapter| Connect-VMNetworkAdapter –SwitchName “NAT_NET”
Теперь нужно назначить корректный IP адрес и DNS настройки для гостевой ВМ. Вы можете развернуть в NAT сети отдельный сервис с ролями DHCP и DNS, или задать настройки сетевого адаптера вручную:
Вы можете подключить к ВМ с хоста Hyper-V через PowerShell Direct:
Enter-PSSession -VMName TestVM1
Теперь можно задать сетевые настройки:
Get-NetAdapter
Get-NetIPAddress -InterfaceIndex 5
New-NetIpAddress -InterfaceIndex 5 -IpAddress 192.168.51.20 -PrefixLength 24 -DefaultGateway 192.168.51.1
Set-DNSClientServerAddress –InterfaceIndex 5 –ServerAddresses 192.168.10.15,8.8.8.8
Проверьте что вы все настроили правильно:
Get-NetIPAddress -InterfaceIndex 5
Проверьте доступность внешних ресурсов:
ping 8.8.8.8
Вы можете пробросить порт с внешней сети (коммутатор Hyper-V) на любую из виртуальных машин за NAT. Например, пробросьте порт 22 (SSH) в одну из ВМ:
Add-NetNatStaticMapping -NatName "vNAT_TestVM1_SSH" -Protocol TCP -ExternalIPAddress 0.0.0.0/24 -ExternalPort 22 -InternalIPAddress 192.168.51.20 -InternalPort 22
Теперь вест трафик TCP/22, который приходит на хост Hyper-V будет перенаправляться на соответствующий порт виртуальной машины за NAT.
Полный список правил перенаправления портов можно вывести так:
Get-NetNatStaticMapping
Вы можете удалить одно правило NAT трансляции адресов или сразу все:
Remove-NetNatStaticMapping -StaticMappingID "vNAT_TestVM1_SSH"
Remove-NetNatStaticMapping
Если вы захотите изменить IP адресацию в NAT сети, вам придется удалить виртуальный коммутатор NAT и пересоздать его заново:
Remove-VMSwitch -SwitchName "NAT_VM"
Напоминаю, что в Hyper-V может быть только одна NAT сеть.
Windows 10 Hyper-V has NAT (Network Address Translation) network feature, but it needs to setup using PowerShell now. I will show you step by step instructions how to do it. NAT Switch provides Internet access to the VM without creating External Switch (linking the switch to physical wired or wireless adaptor).
Before we start, here are the requirements to prepare it ahead of time.
1. IP Network to be used in Guests. You need to find a subnet that is not being using in your Office network. If you are setting up on your Home, you can choose any subnet that is not used in your home. E.g., 192.168.200.0/24
2. Guest VMs are needed to assign IP address/subnet/gateway manually from the subnet you choose on requirement 1 above. Or you may need to setup in DHCP server in one of the Guest VMs for automatic IP assignment. If you only have one or two guest VMs, you may set the IP address manually on NICs.
Now the step by step instruction.
Step 1: Open PowerShell with Administrative privileges.
Search PowerShell in Start menu search, right click on PowerShell and choose More ==> Run As Administrator.
Step 2: Create Hyper-V internal only switch.
Run this command on the PowerShell.
New-VMSwitch –SwitchName “NAT-Switch” –SwitchType Internal –Verbose
Step 3: Find the Interface Index number
Type this cmdlet and note down the interface index (ifIndex) for NAT-Switch adaptor.
Get-NetAdapter
Step 4: Create NAT Gateway
Run this cmdlet.
New-NetIPAddress –IPAddress 192.168.200.1 -PrefixLength 24 -InterfaceIndex 16 –Verbose
Replace the parameters as below.
IP Address (gateway) with your own (should be from the network subnet you chose in the requirements section above)
PrefixLength is the subnet mask number for the subnet you chose
Interface index you noted down on previous step.
Step 4.1: Create NAT Network
Run this cmdlet and replace InternelIPInterfaceAddressPrefix with your chosen network.
New-NetNat –Name NATNetwork –InternalIPInterfaceAddressPrefix 192.168.200.0/24 –Verbose
Step 5: Connect your VM to the NAT-Switch
You may manually assign the Guest NIC to the “NAT-Switch” which we created in Step-2. Or you may run this cmdlet to assign NIC from all Guest VMs to the “NAT-Switch”
Get-VM | Get-VMNetworkAdapter | Connect-VMNetworkAdapter –SwitchName “NAT-Switch”
Step 6: Assign IP Address to the NICs in Guests
Open NIC properties in your Guest VMs, Assign IPv4 addresses from the network subject you setup in Step-4. Or run DHCP server from one of your Guests to dish IP address automatically.
E.g.,
Guest VM 1:
IP Address: 192.168.200.11
Subnet: 255.255.255.0
Gateway: 192.168.200.1
DNS: 4.2.2.2 and 8.8.8.8 (or your own DNS server from the office network).
Guest VM 2:
IP Address: 192.168.200.12
Subnet: 255.255.255.0
Gateway: 192.168.200.1
DNS: 4.2.2.2 and 8.8.8.8 (or your own DNS server from the office network).
That’s all. By now the guest machine(s) should have access to External networks and Internet.
Hope this helped you. Leave me a reply below.

Published by —Anand—
Being in Silicon Valley for years, I became a IT Infrastructure Geek by experience and surrounded by other Geeks everywhere. I try to help others by the solutions I found on odd occasions.
View all posts by —Anand—
Published
January 6, 2018May 5, 2020
In this post, I will show how you can create a Windows 10 or Windows Server 2016 (WS2016) Hyper-V virtual switch that uses network address translation (NAT), enabling virtual machines to be isolated behind a single shared IP address on the host.
Scaling and Isolation
What is NAT? NAT is a system that is used in just about every Internet-connected home and business, which we non-network types rarely think about. The system allows a private network to connect to a larger network using a single IP address; this means that we can have many machines in the private network, consuming just a single address on the larger network and this increases the scalability of the larger network.
An added benefit of scaling out the possible number of machines on the network is that NAT effectively isolates the machines in the smaller private network. We can only access machines in the NAT’d network by creating NAT rules, translating an external TCP or UDP port on the external interface into a private TCP or UDP port listening on a NIC or IP address of a machine on the private network.
It is these two features that make NAT interesting in WS2016 Hyper-V networking. We can create a NAT virtual switch and use it in a few interesting scenarios, including:
- Deploying Windows Server or Hyper-V containers on a virtual switch with a private address range, enabling many containers to be hosted on a single IP address that is assigned to the host.
- Creating a classroom full Windows 10 PCs, running Client Hyper-V, with identical virtual machines running on each PC.
I recently had a need to deploy that second example at work when we built a new training room for teaching Microsoft server and cloud solutions. I needed to provide each attendee with a set of machines, including domain controllers, file servers, SQL Server instances, and so on. Instead of creating a unique domain for each host, with each machine having a unique LAN address, I created 1 set of machines, copied them to each host, and imported them into Hyper-V. Networking is provided by a NAT-enabled virtual switch, meaning that the virtual machines can connect to the LAN and Internet via the host’s LAN IP address, but the machines on one PC cannot connect to or interfere with those on another PC.
Deploying a NAT Virtual Switch
You only need three lines of PowerShell to deploy an NAT-enabled virtual switch on a Windows 10 or WS2016 Hyper-V machine.
The first step is to create an Internal virtual switch; this is a switch that is not connected to a physical NIC on the host; instead, the host management OS has a virtual NIC that is connected to the virtual switch; the end result is that (to begin with) that virtual machines on the internal virtual switch can talk to the host, but they cannot talk to the network that the host is connected to.
New-VMSwitch -SwitchName “NATSwitch” -SwitchType Internal
The next step updates the virtual NIC that connects the host management OS to the internal virtual switch. The following command will assign an IP address to this virtual NIC, and this IPv4 address will be the default gateway for the network on NAT network that we are creating.
New-NetIPAddress -IPAddress 192.168.0.1 -PrefixLength 24 -InterfaceAlias “vEthernet (NATSwitch)”
The final step in the process will configure the network address of the NAT network that will run on the virtual switch; this is the private range of addresses that the virtual machines will use in the abstracted virtual switch; note that the IPv4 address in the previous step must be in this range.
New-NetNAT -Name “NATNetwork” -InternalIPInterfaceAddressPrefix 192.168.0.0/24
The resulting deployment is depicted in the following illustration.
![A NAT switch on Windows 10 or Windows Server 2016 Hyper-V [Image Credit: Aidan Finn]](https://petri-media.s3.amazonaws.com/2017/02/Hyper-VNATSwitch.png)
A NAT switch on Windows 10 or Windows Server 2016 Hyper-V [Image Credit: Aidan Finn]
Any virtual machine that runs on the virtual switch will use an IPv4 address in the 192.168.0.0 address range. The machines will route to the LAN via the management OS NIC and NAT, the same way that your laptop or tablet accesses the Internet via the router in your home. As far as the LAN is concerned, these machines are accessing the LAN from the single LAN IP address of the host.
By default, there is no way to remotely access the machines from the LAN, but you can create NAT rules to enable access via port translation (forward TCP 50002 from the host IP address to TCP 3389 on 192.168.0.2).
There is no DHCP functionality in the virtual switch. If you want DHCP, then you must build one or more DHCP servers as machines on the switch. Otherwise, you can assign static IP addresses to the machines.
Создание сетей NAT возможно в Windows Server 2016, Hyper-V Server 2016 и более поздних версиях, а также Windows 10. На одном гипервизоре может быть создана только одна сеть NAT. Также обратите внимание, что в отличие от настольных средств виртуализации (VMWare Workstation или VirtualBox), служба NAT в Hyper-V не предоставляет дополнительных сетевых служб (DHCP или DNS), поэтому сетевые настройки виртуальным машинам необходимо назначить самостоятельно.
Также настройка NAT производится исключительно в консоли PowerShell и недоступна в графическом интерфейсе.
Создаем новый виртуальный коммутатор с типом сети Внутренняя:
New-VMSwitch -SwitchName "VM_NAT" -SwitchType Internal
Смотрим ifIndex только что созданного коммутатора:
Get-NetAdapter
Задаем адресацию:
New-NetIPAddress -IPAddress 192.168.10.1 -PrefixLength 24 -InterfaceIndex 21
Пояснения:
Создаем Nat:
New-NetNat -Name "vNAT" -InternalIPInterfaceAddressPrefix 192.168.10.0/24
Проверим что NAT создался:
Get-NetNat
Теперь для вновь создаваемых виртуальных машин нужно указать сеть VM_NAT и при настройке сети прописать адрес шлюза 192.168.10.1
Удалить можно командой
Remove-NetNat
После этого потребуется удалить назначенный шлюзу IP-адрес:
Remove-NetIPAddress -IPAddress 192.168.10.1 -InterfaceIndex 21
Это может потребоваться, если вы захотите изменить адресное пространство NAT. В этом случае удаляете старую сеть NAT и создаете новую, с требуемыми параметрами. Виртуальный коммутатор и виртуальный сетевой интерфейс при этом остаются прежними.
Если вы полностью хотите полностью удалить NAT, то дополнительно удалите виртуальный коммутатор, это можно сделать через графический интерфейс, либо командой, указав в ней имя коммутатора:
Remove-VMSwitch -SwitchName «VM_NAT»
Создаем проброс порта 22 в виртуальную машину:
Add-NetNatStaticMapping -NatName "vNAT" -Protocol TCP -ExternalIPAddress 0.0.0.0/24 -ExternalPort 22 -InternalIPAddress 192.168.10.1 -InternalPort 22
Посмотреть список:
Get-NetNatStaticMapping
Удалить конкретное правило по ID:
Remove-NetNatStaticMapping -StaticMappingID <ID>
Удалить все правила:
Remove-NetNatStaticMapping
Установку компонент интеграции Hyper-V можно выполнить из официальных репозиториев Debian. После установки желательно перезагрузить гостевую ОС, чтобы убедиться в успешном автоматическом запуске служб:
# apt-get install hyperv-daemons
# reboot
Проверим состояние служб после перезагрузки:
# systemctl status hyperv-daemons.hv-*
A couple of months ago, I wrote a blog post about how you can create a new Hyper-V NAT Switch. Now, this worked fine in some early Windows 10 builds, but Microsoft removed the parameter for the NAT Switch in some Windows 10 Insider builds. You can find more about the Hyper-V Virtual Switches on Microsoft Docs. In the latest versions in the Windows 10 client operating system, Microsoft already includes a “Default Virtual Switch”, which allows you to use Hyper-V NAT Networking, without doing any configuration changes.
If you want to create an additional VM Switch which uses NAT on Windows 10, or you want to use the Hyper-V NAT VM Switch on Windows Server, you can follow this guide. The NAT VM Switch is especially heady if you use Nested Virtualization.
Requirements:
- Windows 10 and Windows Server 2016 build 14295 or later
- Enabled Hyper-V role
- PowerShell, since this setting is not available in the UI right now
Set up a Hyper-V NAT Switch
Create a new Hyper-V Virtual Switch
New-VMSwitch –SwitchName “NATSwitch” –SwitchType Internal
Configure the NAT Gateway IP Address
This configures the Virtual Network Adapter which was created while creating the Internal Virtual Hyper-V Switch.
New-NetIPAddress –IPAddress 172.21.21.1 -PrefixLength 24 -InterfaceAlias "vEthernet (NATSwitch)"
Now you can configure the NAT rule
New-NetNat –Name MyNATnetwork –InternalIPInterfaceAddressPrefix 172.21.21.0/24
After that, you have finally created your NAT network, and you can now use that network to connect your virtual machines and use IP addresses from 172.21.21.2-172.21.21.254.
Create a new NAT forwarding
To forward specific ports from the Host to the guest VMs, you can use the following commands.
This example creates a mapping between port 80 of the host to port 80 of a Virtual Machine with an IP address of 172.21.21.2.
Add-NetNatStaticMapping -NatName "VMSwitchNat" -Protocol TCP -ExternalIPAddress 0.0.0.0 -InternalIPAddress 172.21.21.2 -InternalPort 80 -ExternalPort 80
This example creates a mapping between port 82 of the Virtual Machine host to port 80 of a Virtual Machine with an IP address of 172.21.21.3.
Add-NetNatStaticMapping -NatName "VMSwitchNat" -Protocol TCP -ExternalIPAddress 0.0.0.0 -InternalIPAddress 172.16.0.3 -InternalPort 80 -ExternalPort 82
This also works with Windows and Hyper-V Containers. I hope this gives you a good overview of NAT Networking and the Hyper-V NAT Switch. If you have any questions, feel free to leave a comment.
Tags: Container, Containers, Hyper-V, Hyper-V NAT Switch, Hyper-V Virtual Switch, Microsoft, NAT, NAT Switch, PowerShell, Virtual Switch, Windows, Windows 10, Windows Server, Windows Server 2016 Last modified: July 22, 2019
About the Author / Thomas Maurer

Thomas works as a Senior Cloud Advocate at Microsoft. He engages with the community and customers around the world to share his knowledge and collect feedback to improve the Azure cloud platform. Prior joining the Azure engineering team, Thomas was a Lead Architect and Microsoft MVP, to help architect, implement and promote Microsoft cloud technology.
If you want to know more about Thomas, check out his blog: www.thomasmaurer.ch and Twitter: www.twitter.com/thomasmaurer