Если вы используете Windows в течение длительного времени, а точнее Windows 10, то вы могли столкнуться с рядом экранов ошибок в своей системе хотя бы один раз или, возможно, много раз. Они обычно известны как BSOD или «Синие экраны смерти».
Это действительно раздражающий экран, который отображается, когда ваша система сталкивается с какой-то ошибкой. Многие причины могут вызвать синий экран. Одним из самых серьезных виновников такой ошибки является ошибка «Just a Moment». Давайте посмотрим, как решить и исправить проблему с экраном «Мгновение» в Windows 10.
Ошибка Just a Moment, если честно, очень раздражает. Хотя ошибка говорит о том, что вам нужно подождать несколько минут, эти моменты могут занять от 5 минут до 5 часов. Да, 5 часов. Это может даже увеличиться, если вы работаете на более медленном или старом ПК. Есть много причин, по которым появляется этот экран Just a Moment. Давайте посмотрим, в каких ситуациях появляются эти экраны, и какие есть исправления и решения, которые можно сделать с экраном ошибки.
Исправить экран Windows 10 «Just a Moment»
Основная цель экрана Just a Moment заключается в том, что система выполняет некоторые изменения, и вы должны вернуться на рабочий стол в течение 5–10 минут или около того. Но, когда это занимает больше нескольких минут, пользователь будет просто раздражен. Существует несколько сценариев, в которых отображается этот экран.
- Когда ваша система устанавливает обновление.
- При установке новой ОС
- Когда ваш компьютер не может установить обновление
- Обновление с Windows 10 до Windows 11
- Когда ваша система вылетает из-за синего экрана.
Теперь, когда вы увидели несколько сценариев того, где и когда появляется этот экран «Just a Moment», давайте рассмотрим все исправления, чтобы уйти от экрана «Just a Moment».
При установке новой ОС
Теперь, если вы выполняете чистую установку Windows 10 или Windows 11, вы можете несколько раз увидеть экран «Мгновение». Хотя этот экран должен длиться несколько секунд, иногда он может длиться от 35 до 50 минут. И, по правде говоря, это нормально, не стоит об этом беспокоиться.
Но если это занимает больше часа или около того, рекомендуется выполнить чистую переустановку ОС. Кроме того, экран появляется, если системе не удалось получить доступ к Интернету во время первоначальной настройки. Итак, когда вы выполняете установку, лучше оставить систему подключенной к Интернету, и установка сделает свое дело.
Обновление с Windows 10 до Windows 11
Когда вы выполняете обновление до Windows 11 со страницы обновления Windows 10, это нормально. Экран «Немедленно» появится в конце установки и может оставаться на экране от 5 до 20 минут. В такой ситуации волноваться не стоит. Да, это может занять еще больше времени, если вы устанавливаете обновление на более медленную систему. Вам не нужно беспокоиться об этом. ОС сразу перенесет вас на рабочий стол.
Другие сценарии
Теперь, если мы рассмотрим другие сценарии, такие как установка обновления, сбой обновления или, если на то пошло, даже если файл Windows поврежден, вы можете ожидать, что появится экран «Just a Moment». Итак, что делает система, когда появляется этот экран?
Ну, он пытается исправить проблемы, если это возможно. Это может быть связано с отменой обновления или даже с вероятностью того, что система пытается загрузиться, но несколько файлов были повреждены. Есть несколько способов, которыми вы можете воспользоваться, чтобы выйти из этого экрана «Just a Moment».
1. Загрузитесь в безопасном режиме
Если и всякий раз, когда ваша система зависает на экране Just a Moment, вам придется принудительно выключить систему. Если вы находитесь на ПК, то вам необходимо отключить его от источника питания. И, если вы используете ноутбук, вам нужно будет нажать кнопку питания на несколько секунд, пока ваш ноутбук не выключится. Как только он выключится, сделайте следующее.

- Включите вашу систему и продолжайте нажимать клавишу F8 (или любую другую клавишу, предназначенную для загрузки вашей системы в режим восстановления).
- При появлении синего экрана выберите параметр «Устранение неполадок».
- Теперь выберите Дополнительные параметры.
- Здесь вы можете выбрать «Параметры запуска» и, наконец, выбрать «Перезагрузить».
- Теперь, когда ваша система перезагрузится, вы сможете увидеть список различных вариантов запуска.
- Просто нажмите номер на клавиатуре, который соответствует.
- Вы также можете выбрать «Включить безопасный режим с сетью».
- Как только опция будет выбрана, ваша система перезагрузится, чтобы загрузиться в безопасном режиме.
2. Отключить автоматический перезапуск
После того, как вы загрузились в безопасном режиме, пришло время внести некоторые изменения.

- Теперь нажмите клавишу Windows и R.
- Это вызовет диалоговое окно «Выполнить».
- Введите system.cpl в поле поиска и нажмите клавишу ввода.
- Откроется окно свойств системы.
- Перейдите на вкладку «Дополнительно», а затем нажмите кнопку «Настройки» в разделе «Запуск и восстановление».
- Теперь снимите флажок «Автоматический перезапуск» и установите флажок «Записать событие в системный журнал».
- Нажмите OK и теперь перезагрузите систему, чтобы загрузиться из безопасного режима.
3. Внесите изменения в редактор реестра
Помимо простого отключения автоматического перезапуска, вы также можете вносить изменения в профили с помощью редактора реестра. Вот как вы можете внести изменения.

- Убедитесь, что вы загрузились в безопасном режиме.
- Теперь откройте диалоговое окно «Выполнить», нажав клавиши Windows и R.
- Введите regedit в строке поиска и нажмите Enter.
- Редактор реестра теперь откроется на рабочем столе.
- В адресной строке редактора реестра вставьте или перейдите к этому пути к файлу ComputerHKEY_LOCAL_MACHINESOFTWAREMicrosoftWindows NTCurrentVersionProfileList
- Теперь выберите первую папку в ProfileLists.
- Вы увидите значение ключа реестра с именем ProfileImagePath.
- Выберите значение и просто удалите его.
- Вы увидите 4 или более других папок, подобных этой. Перейдите в каждую папку и удалите указанный выше раздел реестра.
- Как только вы это сделаете, перезагрузите систему. Вы больше не должны смотреть на экран Just a Moment.
Сбросить ПК
Потому что, если ваш компьютер не может загрузить или загрузить некоторые файлы из-за того, что они либо отсутствуют, либо повреждены, лучше всего выполнить сброс. Выполнение сброса просто и легко. Вот как вы можете это сделать.

- Откройте приложение «Настройки», защелкнув его в меню «Пуск».
- В открытом приложении «Настройки» нажмите «Обновление и восстановление».
- И, наконец, нажмите «Восстановление».
- Вы увидите кнопку «Сбросить этот компьютер». Нажмите здесь.
- Есть два варианта на выбор. Либо выберите, чтобы сохранить все файлы, либо удалите все.
- После того, как вы сделали выбор, начнется процесс сброса.
- Сброс системы должен занять около 20 минут или меньше.
- Выполнив сброс, все поврежденные файлы будут исправлены, и вы больше не будете получать экран Just a Moment на своем ПК.
Заключение
И вот у вас есть методы устранения неполадок, которым вы можете следовать, когда обнаружите экран «Just a Moment» на своем ПК с Windows. Хотя в большинстве случаев это безвредно и само по себе, иногда это может просто продолжаться часами. Мы надеемся, что это руководство помогло вам решить проблему с экраном «Мгновение» на вашем ПК с Windows.
Содержание
- Установка Windows 10 зависает на мгновение Цикл (исправлено)
- ПРОФЕССИОНАЛЬНЫЙ ТИП:
- Windows 10 застряла на мгновение? Используйте эти решения, чтобы исправить это [Советы по MiniTool]
- Резюме :
- Быстрая навигация:
- Вы столкнулись с проблемой Windows 10 лишь на мгновение?
- Причины зависания Windows 10 на мгновение
- Решение 1.Проверьте, отвечает ли ПК
- Если ваш компьютер все еще отвечает
- Если ваш компьютер не отвечает
- Решение 2. Чистая установка Windows 10
- Как восстановить данные с незагружаемого ПК перед установкой
- Just a moment windows 10 долго что делать
- Windows 10 ‘Just a moment’ installation error
- ‘Just a moment’ Windows 10 fix
- Check if your computer has locked up and is not responding
- Go for a fresh installation of Windows 10
- When installing from Windows 10 sysprep image
- Windows 10 Install Stuck at Just a moment Loop [Fixed]
- PRO TIP:
Установка Windows 10 зависает на мгновение Цикл (исправлено)
Windows 10 Install Stuck Just Moment Loop
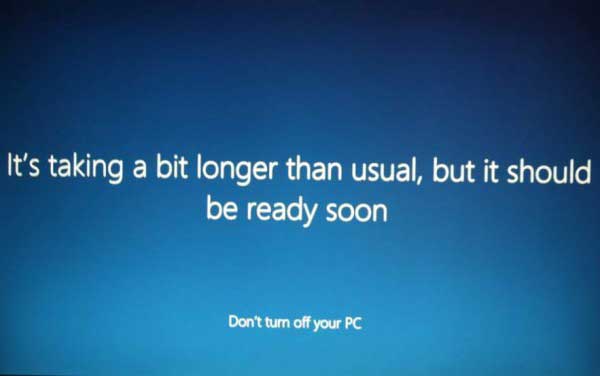
Решено: Windows 10 зависала на мгновение экране при обновлении или установке. Это займет немного больше времени, чем обычно, но скоро оно будет готово. Легкий путь

Прежде чем что-либо делать, обратите внимание на состояние вашей машины: шумит ли она? Индикатор устройства мерцает или мигает? Если да, то вам следует подождать еще немного.
Если вы уверены, что в данный момент с вашим компьютером ничего не происходит, вам следует подумать о том, чтобы сделать следующее:
Удалите все подключенные USB-устройства, включая клавиатуру, мышь, принтер, USB-накопитель, адаптер переменного тока и т. Д.
Тогда посмотрите, решена ли проблема. После того, как вы сможете войти в свой рабочий стол, подключите или включите Wi-Fi или получите USB-устройство, чтобы система могла идентифицировать устройства. Когда эти устройства будут запущены, перезагрузите компьютер. Теперь проблема должна исчезнуть.
ПРОФЕССИОНАЛЬНЫЙ ТИП:
Когда вы сможете войти в систему, вам может потребоваться проверить, установлены ли у вас подходящие драйверы для ваших устройств. Вы должны это проверить и обновить те, которые этого не сделали.
Driver Easy автоматически распознает вашу систему и найдет для нее подходящие драйверы. Вам не нужно точно знать, в какой системе работает ваш компьютер, вам не нужно рисковать, загружая и устанавливая неправильный драйвер, и вам не нужно беспокоиться о том, что вы ошиблись при установке.
Вы можете автоматически обновлять драйверы с помощью БЕСПЛАТНОЙ или Pro версии Driver Easy. Но с версией Pro требуется всего 2 клика (и вы получаете полную поддержку и 30-дневную гарантию возврата денег):
1) Скачать и установите Driver Easy.
2) Запустите Driver Easy и нажмите Сканировать сейчас кнопка. Затем Driver Easy просканирует ваш компьютер и обнаружит проблемы с драйверами.

3) Щелкните значок Обновить рядом со всеми отмеченными устройствами, чтобы автоматически загрузить и установить правильную версию их драйверов (вы можете сделать это в БЕСПЛАТНОЙ версии).
Источник
Windows 10 застряла на мгновение? Используйте эти решения, чтобы исправить это [Советы по MiniTool]
Windows 10 Just Moment Stuck
Резюме :

Быстрая навигация:
Вы столкнулись с проблемой Windows 10 лишь на мгновение?
К счастью, это можно исправить. Но сначала давайте выясним причины этой проблемы.
Причины зависания Windows 10 на мгновение
Скорость обновления и установки Windows 10 зависит от технических характеристик оборудования, доступного дискового пространства, скорости чтения-записи жесткого диска, скорости подключения к Интернету и многого другого. Если процесс длится слишком долго, вы можете увидеть следующий экран:

Но если что-то не так с оборудованием, жестким диском или подключением к Интернету, Windows 10 зависает. Вероятно, возникнет проблема.
Мы потратили время на поиск доступных решений, а теперь обобщаем их для вас в этой статье.
Решение 1.Проверьте, отвечает ли ПК
Если ваш компьютер все еще отвечает
Вы должны сначала проверить, работает ли ваш компьютер. Чтобы выполнить эту работу, вы можете проверить, не шумит ли машина. Это явный признак того, что процессор еще работает. Конечно, есть и другой вздох: мерцающий свет.
Когда эти два знака показывают, что процессор все еще работает, не вмешивайтесь в этот процесс. Мы уже упоминали выше: скорость процесса зависит от условий подключения к Интернету, свободного дискового пространства на вашем компьютере и т. Д. Подождите и посмотрите.
Если ваш компьютер не отвечает
После этого повторно подключите USB-устройства к компьютеру, а затем проверьте, может ли компьютер нормально работать. Если да, вы можете восстановить подключение к Интернету, чтобы увидеть, может ли процесс обновления или установки выполняться успешно.
Однако, если вышеуказанная мера не работает в вашей ситуации, вам необходимо выполнить полную перезагрузку компьютера: нажмите и удерживайте кнопку питания, пока компьютер не выключится, а затем перезагрузите его.
Если проблема с Windows 10 Just a moment по-прежнему не устранена, вам нужно попробовать следующее решение.
Решение 2. Чистая установка Windows 10
Таким образом, если вас беспокоит, что Windows 10 застряла на мгновенной проблеме, вы можете выполнить чистую установку Windows 10, чтобы попробовать.
В следующем руководстве мы рассмотрим шаги по чистой установке Windows 10, включая следующие три части:
Как восстановить данные с незагружаемого ПК перед установкой
В процессе чистой установки все будет удалено с жесткого диска вашего компьютера. Поэтому мы думаем, вам лучше заранее восстановить данные на внешний диск. Здесь вы можете использовать профессиональные программное обеспечение для восстановления данных : MiniTool Power Data Recovery.
Это программное обеспечение специально разработано для восстановления данных с различных типов устройств хранения данных, включая жесткие диски компьютеров, USB-накопители, карты памяти, SD-карты и т. Д. Эти данные могут быть как удаленными, так и существующими элементами.
Если вы хотите восстановить файлы с компьютера, который обеспокоен проблемой Windows 10, вам необходимо использовать MiniTool Power Data Recovery Bootable Edition, который должен быть создан с помощью MiniTool Snap-in WinPE Bootable Builder.
Однако только выпуски Deluxe и выше предлагают MiniTool Bootable Media Builder. Вам необходимо получить одну из этих редакций в Официальный магазин MiniTool в соответствии с вашей реальной ситуацией. Если вы личный пользователь, Personal Deluxe Edition может полностью удовлетворить ваши потребности.
Получите нормальный рабочий компьютер, чтобы получить это программное обеспечение, а затем обратитесь к следующему руководству, чтобы создать загрузочный носитель и запустить с него незагружаемую машину:
Затем пора восстановить данные с компьютера с помощью этого программного обеспечения:
Шаг 1. Выберите целевой раздел для сканирования
Выберите целевой раздел, с которого нужно восстановить данные, и нажмите на Сканировать кнопку, чтобы начать процесс сканирования.

Наконечник: Если вам нужно получить только некоторые типы файлов, вы можете использовать Настройки функция этого программного обеспечения, чтобы сделать некоторые выборы.
Шаг 2. Выберите файлы, которые хотите восстановить.
Когда процесс сканирования завершится, вы увидите результаты сканирования, классифицированные по пути. Вы можете открыть каждый путь, чтобы найти файлы, которые хотите восстановить.

Обычно на жестком диске вашего компьютера хранится множество файлов, и обычно бывает сложно быстро найти нужные. В этой ситуации вы можете попробовать Тип и найти функции этого программного обеспечения, чтобы легко находить нужные файлы.
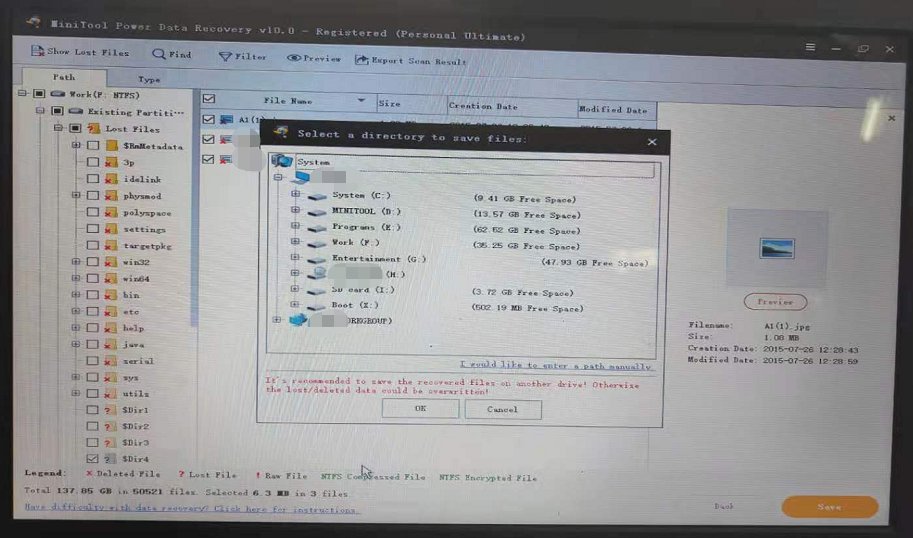
Шаг 3. Сохраните выбранные файлы на внешний диск.
Подключите к компьютеру внешний диск, на котором достаточно места для хранения необходимых файлов, а затем проверьте файлы, которые вы хотите восстановить. После этого нажмите кнопку Сохранить кнопку, чтобы выбрать вставленный внешний диск, чтобы сохранить выбранные элементы.

Теперь ваши необходимые данные сохранены в надежном месте. Далее вам нужно создать загрузочный USB-носитель. Перейдите к следующей части, чтобы получить шаги.
Источник
Just a moment windows 10 долго что делать
WiFi should come up as an option to connect after the OS installs. That will only occur if you unplug ethernet cable (otherwise it will probably default to wired connection) and once u see the Network Connect option, click your WiFi SSID and enter the Password/Paraphrase used to get access to that network.
However, Win10 might also not have a built-in driver for your particular Wired / Wireless Adapters, so be mindful of that.
If it is a new Win10 machine, the OS should already be installed, it just needs to load up and then have u enter the info for personalization, such as User Account Name and you should be good to go. You do not have to enter into a new user using Microsoft Live Account; that can always be done at a later time.


Well, It might help to know what pc you have.
Yes what is the Brand+Model of this PC?
If you really do have further issues, I would cotact the OEM brand of the PC

WiFi should come up as an option to connect after the OS installs. That will only occur if you unplug ethernet cable (otherwise it will probably default to wired connection) and once u see the Network Connect option, click your WiFi SSID and enter the Password/Paraphrase used to get access to that network.
However, Win10 might also not have a built-in driver for your particular Wired / Wireless Adapters, so be mindful of that.
If it is a new Win10 machine, the OS should already be installed, it just needs to load up and then have u enter the info for personalization, such as User Account Name and you should be good to go. You do not have to enter into a new user using Microsoft Live Account; that can always be done at a later time.
Источник
Windows 10 ‘Just a moment’ installation error


Microsoft, not surprisingly, is pushing hard to see higher uptake of its latest Windows 10 versions. Fortunately for most, the upgrade process too has been largely hassle free. However, there are also those for whom things haven’t just played out in a copybook manner, with a common grouse being things getting stuck during the closing stages of Windows 10 installation.
The error has come to be referred as the ‘Just a moment‘ error, and is characterised by the dreaded Windows 10 blue screen displaying the above message. Sure there is the spinning ball animation that you can keep yourself engaged with though things easily becomes frustrating after a while, more so if this continues for hours on end.
Fortunately, like with most other things, there is a fix to the above situation. Read on to find out.
‘Just a moment’ Windows 10 fix
Check if your computer has locked up and is not responding
The first thing for you to do will be to ensure your computer has indeed stopped working. For this, see if your PC is making any noise, which should be a clear sign your processor is at work. A flickering light is another tell-tale sign of your processor being hard at work.
If that be the case, try not to tinker with the installation process. There are several factors like the speed of your internet connection, available disk space, processor speed or memory size that can have a direct bearing on your installation time.
However, if you are sure your PC has fallen silent and has indeed got stuck at the seemingly infinite loop displaying the ‘Just a moment’ message, there are a few things you can do to set things back on track.

Unplug all USB devices attached to the PC, which should include even the keyboard and mouse along with the printer or any USB drive.
Disable all network connection, which means turning off Wi-Fi along with disconnecting any internet cable attached to the PC.
Reconnect the mouse and keyboard and see if you can gain control of the PC. If it does, establish internet connectivity again and see if the installation process gets started.
However, in case none of the above works than you might have to perform a hard reboot (press and hold on to the power button until your system shuts down or restarts on its own). In most cases, this should fix the issue and for the rest of the installation to proceed normally.

Go for a fresh installation of Windows 10
If the above steps have yielded a null, opt for installing Window 10 again. This should rewrite all the files again and hopefully, avoid the situation that led it to freeze at the ‘Just a moment’ screen. So if you have the bootable Windows 10 installation either in a disk or a USB, insert/attach it to the PC and restart.
In case you are attempting a new installation using a bootable USB drive, you might have to change the boot order from BIOS to prioritise loading from the USB drive above all else. To get into BIOS, press F2 when the computer restarts and change boot order to ensure USB drive appears first. However, the computer restarts several times during installation. Change the boot order subsequently to allow hard drive being at the top.

When installing from Windows 10 sysprep image
It is not unusual for your installation to freeze at the ‘Just a moment’ screen when you are attempting loading from a syspreped image of Windows 10. In such a scenario a proven way to prevent the above error to creep in will be to boot into Audit Mode right at the start when your system boots and before you select ‘Use Express Setting’. Press Ctrl+Shift+F3 to get into Audit Mode. Thereafter, add / remove software and then sysprep OOBE.
So that is it. This should serve as a comprehensive guide to prevent the ‘Just a moment’ error that has plagued many a Windows 10 installations worldwide.
You can also have more information about Windows 10 installations from the following articles.
Источник
Windows 10 Install Stuck at Just a moment Loop [Fixed]
Last Updated: 4 years ago
 Just a moment loop If your Windows 10 Upgrade or Install hangs or failed during the installation, and you’re seeing circle saying Just a moment but you’ve waited for centuries, you’re not alone. Many Windows users are reporting this problem as well. But no worries, it’s possible to fix.
The speed of your upgrade is related to your hardware specification, disk space, hard disk read-write speeds and the speed of your Internet connection etc. If the process is taking you too much time, like extraordinarily long time, you might even see the notification below:

Before you begin to do anything, please pay attention to the status of your machine: is it making any noise? Is the device’s light flickering or flashing? If the answers are yes, then you should wait for some longer time.
If you are sure that there is nothing going on with your computer at the moment, you should consider doing the following things:
Remove any USB devices plugged in, including keyboard, mouse, printer, USB drive, AC adapter etc.
Then see if the problem is solved. Once you are able to log into your desktop, plug in or turn on Wi-Fi, or have USB device to have the system to identify the devices. Once theses devices are up and running, restart your computer. The problem should be gone now.
PRO TIP:
When you’re able to log in, you may need to check if you have the right drivers for your devices. You should verify this, and update those that don’t.
If you don’t have the time, patience or computer skills to update your drivers manually, you can do it automatically with Driver Easy.
Driver Easy will automatically recognize your system and find the correct drivers for it. You don’t need to know exactly what system your computer is running, you don’t need to risk downloading and installing the wrong driver, and you don’t need to worry about making a mistake when installing.
You can update your drivers automatically with either the FREE or the Pro version of Driver Easy. But with the Pro version it takes just 2 clicks (and you get full support and a 30-day money back guarantee):
2) Run Driver Easy and click the Scan Now button. Driver Easy will then scan your computer and detect any problem drivers.

3) Click the Update button next to all flagged devices to automatically download and install the correct version of their drivers (you can do this with the FREE version).
Or click Update All to automatically download and install the correct version of all the drivers that are missing or out of date on your system (this requires the Pro version – you’ll be prompted to upgrade when you click Update All).
Источник
This is a common issue that can be solved in a few minutes
by Ivan Jenic
Passionate about all elements related to Windows and combined with his innate curiosity, Ivan has delved deep into understanding this operating system, with a specialization in drivers and… read more
Updated on January 30, 2023
Reviewed by
Alex Serban

After moving away from the corporate work-style, Alex has found rewards in a lifestyle of constant analysis, team coordination and pestering his colleagues. Holding an MCSA Windows Server… read more
- Users have reported their PC’s getting stuck on the Windows 10 Just a Moment screen.
- This happens as soon as they boot their computers.
- The first thing you need to do to fix this is force your PC to shut down.
XINSTALL BY CLICKING THE DOWNLOAD FILE
This software will repair common computer errors, protect you from file loss, malware, hardware failure and optimize your PC for maximum performance. Fix PC issues and remove viruses now in 3 easy steps:
- Download Restoro PC Repair Tool that comes with Patented Technologies (patent available here).
- Click Start Scan to find Windows issues that could be causing PC problems.
- Click Repair All to fix issues affecting your computer’s security and performance
- Restoro has been downloaded by 0 readers this month.
Microsoft, not surprisingly, is pushing hard to see higher uptake of its latest Windows 10 versions. Fortunately for most, the upgrade process too has been largely hassle free. However, there are also those for whom things haven’t just played out in a copybook manner, with a common grouse being things getting stuck during the closing stages of Windows 10 installation.
The error has come to be referred as the ‘Just a moment‘ error, and is characterised by the dreaded Windows 10 blue screen displaying the above message. Sure there is the spinning ball animation that you can keep yourself engaged with though things easily becomes frustrating after a while, more so if this continues for hours on end.
Fortunately, like with most other things, there is a fix to the above situation. Read on to find out.
How can I fix the Windows 10 Just a Moment blue screen?
The first preliminary solution to try out before using more advanced methods of troubleshooting this issue is performing a hard shutdown on your PC. Basically, you need to press on the Power button for a couple of seconds until the PC shuts down, and then restart it.
If this doesn’t work, you can simply disconnect your PC from the power source instead to force it to close.
- How can I fix the Windows 10 Just a Moment blue screen?
- 1. Check if your computer has locked up and is not responding
- 2. Go for a fresh installation of Windows 10
- 3. Boot into Audit Mode
1. Check if your computer has locked up and is not responding
The first thing for you to do will be to ensure your computer has indeed stopped working. For this, see if your PC is making any noise, which should be a clear sign your processor is at work. A flickering light is another tell-tale sign of your processor being hard at work.
If that be the case, try not to tinker with the installation process. There are several factors like the speed of your internet connection, available disk space, processor speed or memory size that can have a direct bearing on your installation time.
However, if you are sure your PC has fallen silent and has indeed got stuck at the seemingly infinite loop displaying the ‘Just a moment’ message, there are a few things you can do to set things back on track.
Some PC issues are hard to tackle, especially when it comes to corrupted repositories or missing Windows files. If you are having troubles fixing an error, your system may be partially broken.
We recommend installing Restoro, a tool that will scan your machine and identify what the fault is.
Click here to download and start repairing.
Unplug all USB devices attached to the PC, which should include even the keyboard and mouse along with the printer or any USB drive.
Disable all network connection, which means turning off Wi-Fi along with disconnecting any internet cable attached to the PC.
Reconnect the mouse and keyboard and see if you can gain control of the PC. If it does, establish internet connectivity again and see if the installation process gets started.
However, in case none of the above works than you might have to perform a hard reboot (press and hold on to the power button until your system shuts down or restarts on its own). In most cases, this should fix the issue and for the rest of the installation to proceed normally.
2. Go for a fresh installation of Windows 10
If the above steps have yielded a null, opt for installing Window 10 again. This should rewrite all the files again and hopefully, avoid the situation that led it to freeze at the ‘Just a moment’ screen. So if you have the bootable Windows 10 installation either in a disk or a USB, insert/attach it to the PC and restart.
In case you are attempting a new installation using a bootable USB drive, you might have to change the boot order from BIOS to prioritise loading from the USB drive above all else. To get into BIOS, press F2 when the computer restarts and change boot order to ensure USB drive appears first. However, the computer restarts several times during installation. Change the boot order subsequently to allow hard drive being at the top.
3. Boot into Audit Mode
It is not unusual for your installation to freeze at the ‘Just a moment’ screen when you are attempting loading from a syspreped image of Windows 10.
In such a scenario a proven way to prevent the above error to creep in will be to boot into Audit Mode right at the start when your system boots and before you select ‘Use Express Setting’. Press Ctrl+Shift+F3 to get into Audit Mode. Thereafter, add / remove software and then sysprep OOBE.
- Fix: Brother Printer Scanner Not Working/Connecting to PC
- PC Not Detecting GPU: These 5 Methods Will Surely Help
- Windows 10 Won’t Boot on My PC: 5 Simple Solutions
- Windows 10 Brightness Slider not Working: 6 Fixes to Use
- How to Fix The Network Security Key Isn’t Correct on Windows
So that is it. This should serve as a comprehensive guide to prevent the Windows 10 Just a Moment blue screen.
![]()
Newsletter
This is a common issue that can be solved in a few minutes
by Ivan Jenic
Passionate about all elements related to Windows and combined with his innate curiosity, Ivan has delved deep into understanding this operating system, with a specialization in drivers and… read more
Updated on January 30, 2023
Reviewed by
Alex Serban
After moving away from the corporate work-style, Alex has found rewards in a lifestyle of constant analysis, team coordination and pestering his colleagues. Holding an MCSA Windows Server… read more
- Users have reported their PC’s getting stuck on the Windows 10 Just a Moment screen.
- This happens as soon as they boot their computers.
- The first thing you need to do to fix this is force your PC to shut down.
XINSTALL BY CLICKING THE DOWNLOAD FILE
This software will repair common computer errors, protect you from file loss, malware, hardware failure and optimize your PC for maximum performance. Fix PC issues and remove viruses now in 3 easy steps:
- Download Restoro PC Repair Tool that comes with Patented Technologies (patent available here).
- Click Start Scan to find Windows issues that could be causing PC problems.
- Click Repair All to fix issues affecting your computer’s security and performance
- Restoro has been downloaded by 0 readers this month.
Microsoft, not surprisingly, is pushing hard to see higher uptake of its latest Windows 10 versions. Fortunately for most, the upgrade process too has been largely hassle free. However, there are also those for whom things haven’t just played out in a copybook manner, with a common grouse being things getting stuck during the closing stages of Windows 10 installation.
The error has come to be referred as the ‘Just a moment‘ error, and is characterised by the dreaded Windows 10 blue screen displaying the above message. Sure there is the spinning ball animation that you can keep yourself engaged with though things easily becomes frustrating after a while, more so if this continues for hours on end.
Fortunately, like with most other things, there is a fix to the above situation. Read on to find out.
How can I fix the Windows 10 Just a Moment blue screen?
The first preliminary solution to try out before using more advanced methods of troubleshooting this issue is performing a hard shutdown on your PC. Basically, you need to press on the Power button for a couple of seconds until the PC shuts down, and then restart it.
If this doesn’t work, you can simply disconnect your PC from the power source instead to force it to close.
- How can I fix the Windows 10 Just a Moment blue screen?
- 1. Check if your computer has locked up and is not responding
- 2. Go for a fresh installation of Windows 10
- 3. Boot into Audit Mode
1. Check if your computer has locked up and is not responding
The first thing for you to do will be to ensure your computer has indeed stopped working. For this, see if your PC is making any noise, which should be a clear sign your processor is at work. A flickering light is another tell-tale sign of your processor being hard at work.
If that be the case, try not to tinker with the installation process. There are several factors like the speed of your internet connection, available disk space, processor speed or memory size that can have a direct bearing on your installation time.
However, if you are sure your PC has fallen silent and has indeed got stuck at the seemingly infinite loop displaying the ‘Just a moment’ message, there are a few things you can do to set things back on track.
Some PC issues are hard to tackle, especially when it comes to corrupted repositories or missing Windows files. If you are having troubles fixing an error, your system may be partially broken.
We recommend installing Restoro, a tool that will scan your machine and identify what the fault is.
Click here to download and start repairing.
Unplug all USB devices attached to the PC, which should include even the keyboard and mouse along with the printer or any USB drive.
Disable all network connection, which means turning off Wi-Fi along with disconnecting any internet cable attached to the PC.
Reconnect the mouse and keyboard and see if you can gain control of the PC. If it does, establish internet connectivity again and see if the installation process gets started.
However, in case none of the above works than you might have to perform a hard reboot (press and hold on to the power button until your system shuts down or restarts on its own). In most cases, this should fix the issue and for the rest of the installation to proceed normally.
2. Go for a fresh installation of Windows 10
If the above steps have yielded a null, opt for installing Window 10 again. This should rewrite all the files again and hopefully, avoid the situation that led it to freeze at the ‘Just a moment’ screen. So if you have the bootable Windows 10 installation either in a disk or a USB, insert/attach it to the PC and restart.
In case you are attempting a new installation using a bootable USB drive, you might have to change the boot order from BIOS to prioritise loading from the USB drive above all else. To get into BIOS, press F2 when the computer restarts and change boot order to ensure USB drive appears first. However, the computer restarts several times during installation. Change the boot order subsequently to allow hard drive being at the top.
3. Boot into Audit Mode
It is not unusual for your installation to freeze at the ‘Just a moment’ screen when you are attempting loading from a syspreped image of Windows 10.
In such a scenario a proven way to prevent the above error to creep in will be to boot into Audit Mode right at the start when your system boots and before you select ‘Use Express Setting’. Press Ctrl+Shift+F3 to get into Audit Mode. Thereafter, add / remove software and then sysprep OOBE.
- Fix: Brother Printer Scanner Not Working/Connecting to PC
- PC Not Detecting GPU: These 5 Methods Will Surely Help
So that is it. This should serve as a comprehensive guide to prevent the Windows 10 Just a Moment blue screen.
![]()
Newsletter
Is your PC stuck on Just a moment loop? Your Windows may have failed to install one or more updates properly and caused a system failure. Or a software you installed may have corrupted the system files. Or something may have corrupted your boot partition.
The simplest solution that you can do is to perform a restart of your PC. Windows should try to reload the required updates again. Hopefully, this should prevent the loop screen from appearing. But if it doesn’t work, you may have a real problem here.
Below, I have compiled a few approaches to help resolve the issue. I have arranged the methods in the order of severity of the issue. Make sure you start working from the first approach. Continue working your way down until the endless Windows 10 blue screen goes away.
Logging Into Safe Mode
Before diving into the actual steps, it is important to learn how to boot your Windows 10 into safe mode. Safe mode is a feature of Windows that boots Windows with the least number of required files. This means disabling any additional drivers, startup software, anti-virus programs, etc.
Safe Mode also restricts the use of certain applications so you cannot use it the same way as normal mode. It is merely for troubleshooting purposes. Once you are done using Safe Mode, you can just restart the computer and it will boot back to normal mode.
Use the following steps to log into Windows with safe mode enabled.
- Force shut down your device by holding the power button for at least 10 seconds.
- Press the power button. When the manufacturer’s logo appears, hold the power button for 10 seconds again.

- Press the power button again.
- When the Windows logo appears, hold the power button for 10 seconds.
- Press the power button again one last time.
- When the device starts up, it will enter winRE(Recovery Environment).
- Under Choose an option, select Troubleshoot.

- Select Advanced options.
- Select Startup Settings.
- Select Restart.
- When the device restarts, under the list of options select option 5. You can also press F5 for Safe Mode with Networking.


Modifying System Notifications
- Start Windows in Safe Mode.
- Right-click on the Start Menu and select Settings.
- Select System option in the new window.
- Under the left navigation pane, select Notifications & actions.
- Uncheck the following two options under Notifications.
- “Show me the Windows welcome experience after updates and occasionally when I sign in to highlight what’s new and suggested“
- “Suggest ways I can finish setting up my device to get the most out of Windows“
- Restart your PC and try logging back into Normal mode.


Disable Automatic Restart
- Start Windows in Safe Mode.
- Press Win key + R to open the Run window.
- Type
sysdm.cpland press OK to bring up a new window. - Go to the Advanced tab.
- Under Start-up and Recovery, select Settings.
- Uncheck the Automatically restart option.
- Check the Write an event to the system log option.
- Press OK.
- Select Apply and OK to close the window.
- Restart PC into normal mode.


Using Windows 10 Media Creation Tool
- Start Windows in Safe Mode.
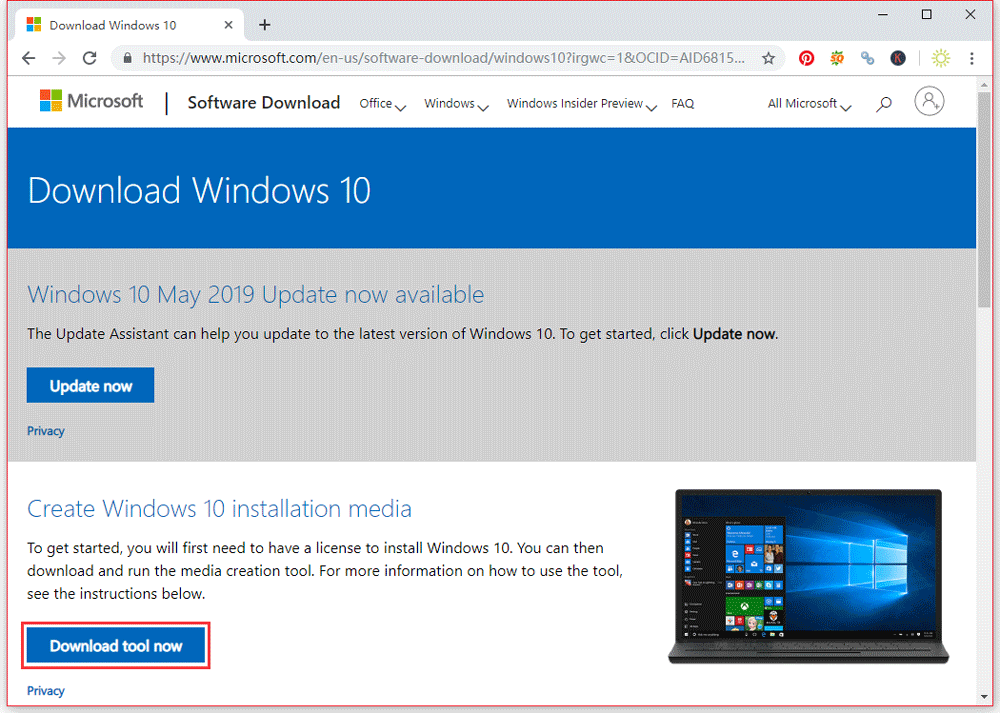
- Go to this link in the browser.
- Click on the Download tool now.
- Once complete, head over to the Downloads folder.
- Double-click on the newly-downloaded MediaCreationTool2xxx.exe file to open it.
- Select Accept to accept all applicable notices and license terms.
- Select Upgrade this PC now.
- Click on Next.
- The system tool will now download and install Windows 10 upgrade on its own. Note that you do not need to enter a product key to reinstall Windows 10.
- When the tool completes downloading, select Change what to keep.
- Select Keep personal files and apps or Keep personal files only. If you select Nothing it will remove everything and install a fresh copy of Windows 10 instead.
- When ready, select Install.
- Note that it is normal for Windows 10 to restart multiple times when installing.


Using Windows Registry Editor
- Start Windows in Safe Mode.
- Press Win key + R to open the Run window.
- Type
regeditand press OK to bring up a new window.
- Navigate to the following path.
HKEY_LOCAL_MACHINESOFTWAREMicrosoftWindowsNTCurrentVersionProfileList - Firstly, back up the registry key by going to the File menu and selecting Export.
- Save the file to a secure location.
- Now, expand the ProfileList from the left navigation pane.
- Select the first entry under ProfileList.
- Check to see if there is a ProfileImagePath registry key on it.
- If yes, remove the entry completely by pressing the Delete key.
- Repeat Steps 7-9 for each entry under ProfileList.


Using Bootrec Command
- Start Windows in Safe Mode.
- Right-click on Start Menu and select Windows Powershell(Admin) to open a new window.
- Type the following commands one after the other.
- Once completed, restart your PC after exiting safe mode.
Using Automatic Repair
- Power off Windows by pressing the power button for 10 seconds.
- Power it back on.
- When the logo appears, hold the power button for another 10 seconds to power it off.
- Repeat Steps 1-3 several times. You will see the Preparing Automatic Repair message underneath the Windows logo screen.
- Under the Automatic Repair screen, select Advanced options.
- Select Troubleshoot.
- Select Command Prompt.
- Type the following to enter into the system config folder.
cd C:windowssystem32config Md backupto create a new backup directory. You need this in case you need to restore your config files.Copy *.* backupto copy all system config files to the backup folder.Cd regbackto go to the regback folder.Copy *.* ..to copy all files inside regback to the system config folder.- A to select All from the input prompt to overwrite all files.
- Exit to close the command prompt.
- Select Turn off your PC.
- Power it back on.


Using Reset Your PC
- Start Windows in Safe Mode.
- Right-click on Start Menu and select Settings.
- Select Update & Security.
- On the left navigation pane, select Recovery.
- Under Reset this PC, select Get started.
- Select one of two options.
- Keep my files when you need to remove just the apps and keep your files and data.
- Remove everything when you need to remove all apps and personal files.
- Once complete, restart your PC normally.


Using Startup Settings
- Power off Windows by pressing the power button for 10 seconds.
- Power it back on.
- When the logo appears, hold the power button for another 10 seconds to power it off.
- Repeat Steps 1-3 several times. You should see the Preparing Automatic Repair message on the Windows logo screen.
- Under the Automatic Repair screen, select Advanced options.
- Select Startup Settings.
- Select Restart.
- When Windows restarts, try with one of the following options disabled.
- Driver signature enforcement by pressing 7 or F7
- Early-launch anti-malware protection by pressing 8 or F8
- Automatic restart on system failure by pressing 9 or F9
- Continue on the boot process to see if you can get past the Please wait screen.
- If unsuccessful, repeat the steps and try disabling the next option.
- Repeat until you identify what caused the issue.


Using System Restore
- Power off Windows by pressing the power button for 10 seconds.
- Power it back on.
- When the logo appears, hold the power button for another 10 seconds to power it off.
- Repeat Steps 1-3 several times. You should see the Preparing Automatic Repair message on the Windows logo screen.
- Under the Automatic Repair screen, select Advanced options.
- Select System Restore.
- Select a restore point that you would like to restore to. All files and data that were created or modified past this restore point will be deleted. This will include apps as well as data.


Using System File Checker and CHKDSK Utility
- Start Windows in safe mode.
- Right-click on Start Menu and select Powershell(Admin).
- Type
sfc /scannowand press Enter. This will launch the system file checker tool to scan all system files and reports if corrupted. It replaces the files with a cached copy located in a compressed folder at C:System32dllcache. - Type
chkdsk /f /r /x C:and press Enter. This will do the following operations.- /f will lock the disk and fixes any errors
- /r will locate the bad sectors and recover readable information
- /x will force the disk to dismount and invalidate all open handles to the drive
- C: is the target disk where you have installed your Windows 10.
- Once completed, restart Windows in normal mode.


Perform a Clean Installation
- Get a USB thumb drive with at least 8GB of storage.
- Start Windows in Safe Mode.
- Plug the USB drive into your PC. Make sure that you back up any files in the drive before moving ahead.
- Go to this link in the browser.
- Click on the Download tool now.
- Once complete, head over to the Downloads folder.
- Double-click on the newly-downloaded MediaCreationTool2xxx.exe file.
- Select Accept to accept all applicable notices and license terms.
- Select Create installation media.
- Check Use the recommended options for this PC option. This will automatically fill in the details required to fix your current PC.
- Alternatively, if you are doing this on a second PC, make sure you fill in the proper information needed for your broken PC.
- Select Next.
- Select USB flash drive and click on Next.
- Select the USB drive letter from the displayed list.
- Select Next.
- Wait until you see the Your USB flash drive is ready message and click on Finish.
- With the USB drive still plugged in, restart your PC.
- Boot into the USB drive. Check your manufacturer to see how you can change boot order settings inside the BIOS menu.
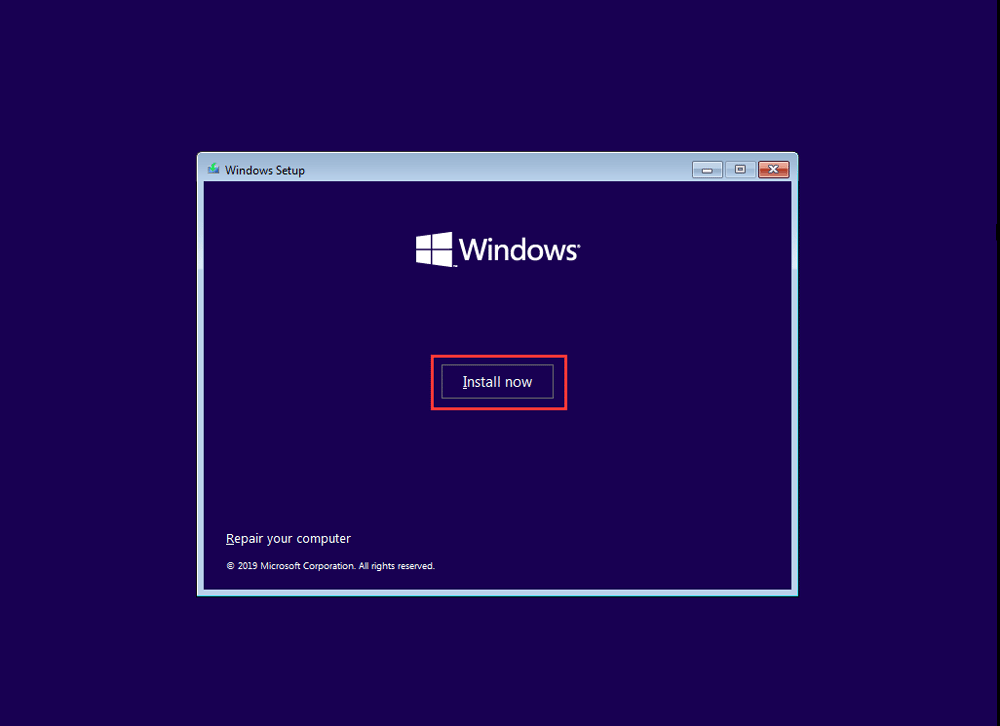
- In the Windows Setup window, select Next.
- Select Install now.
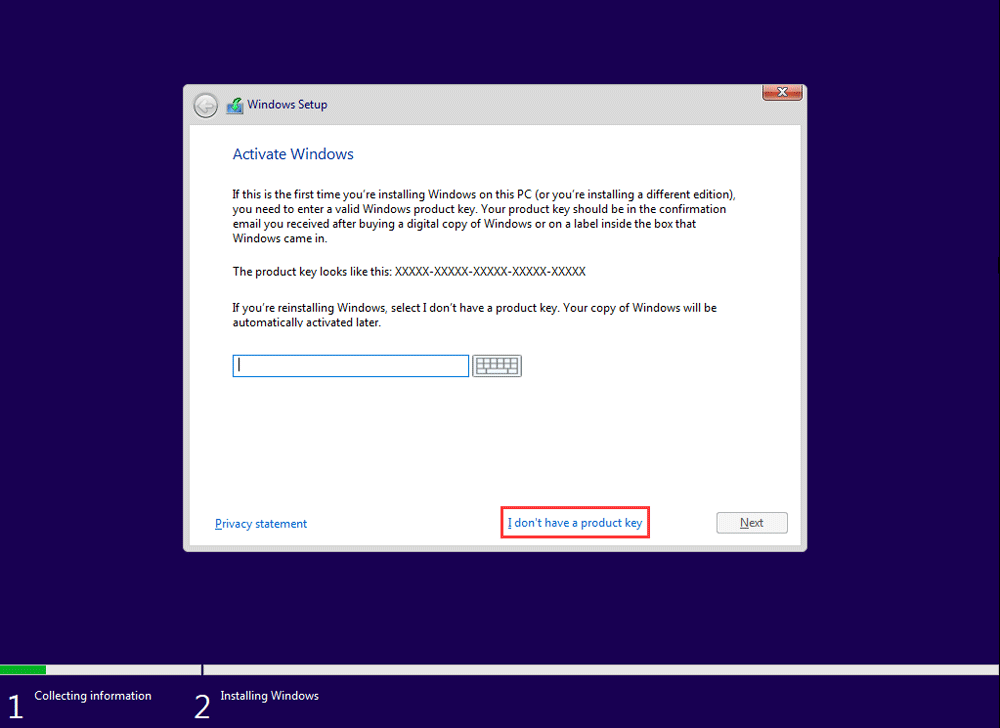
- As you already have a licensed Windows, you don’t need to enter the product key. Click on I don’t have a product key. Windows will later verify your copy of Windows digitally.
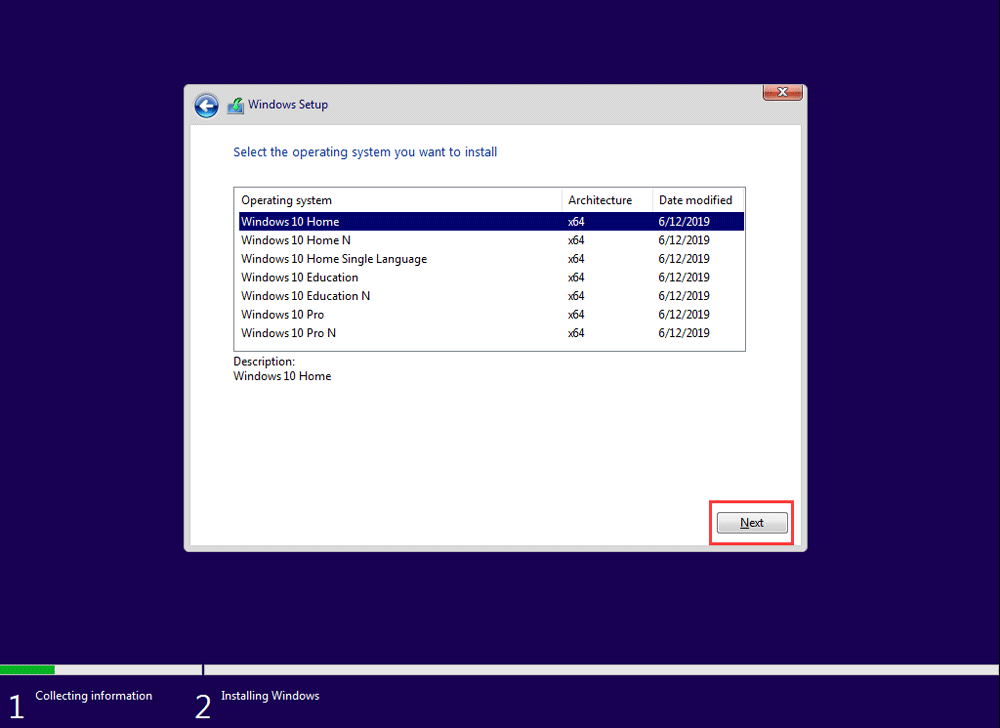
- Select the edition of Windows 10 that you own.
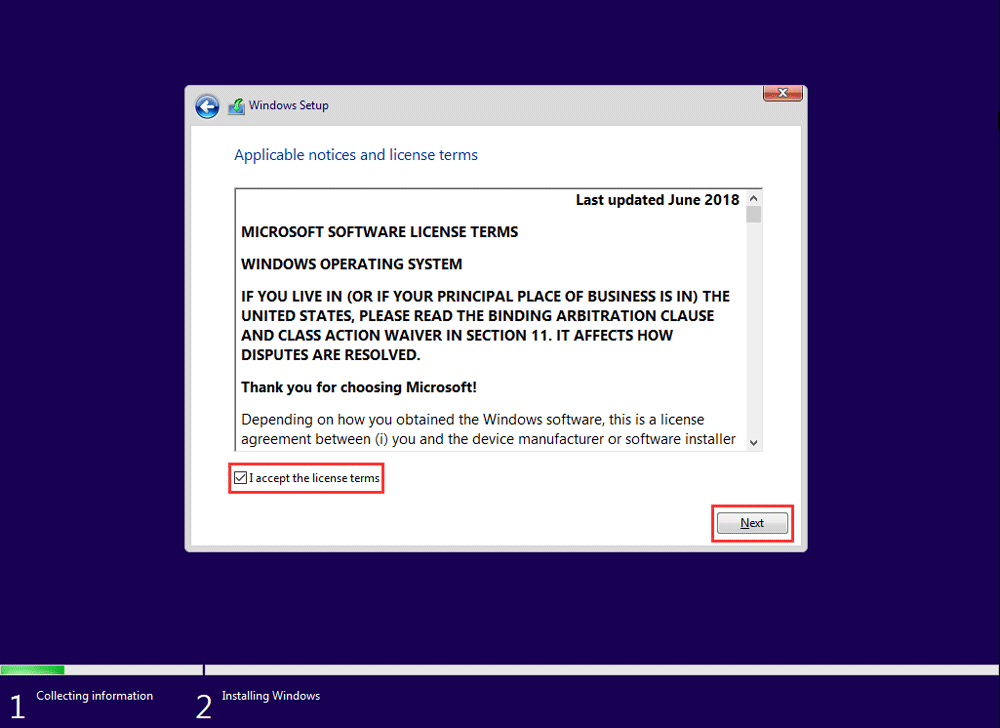
- Check the I accept the license terms option and select Next.
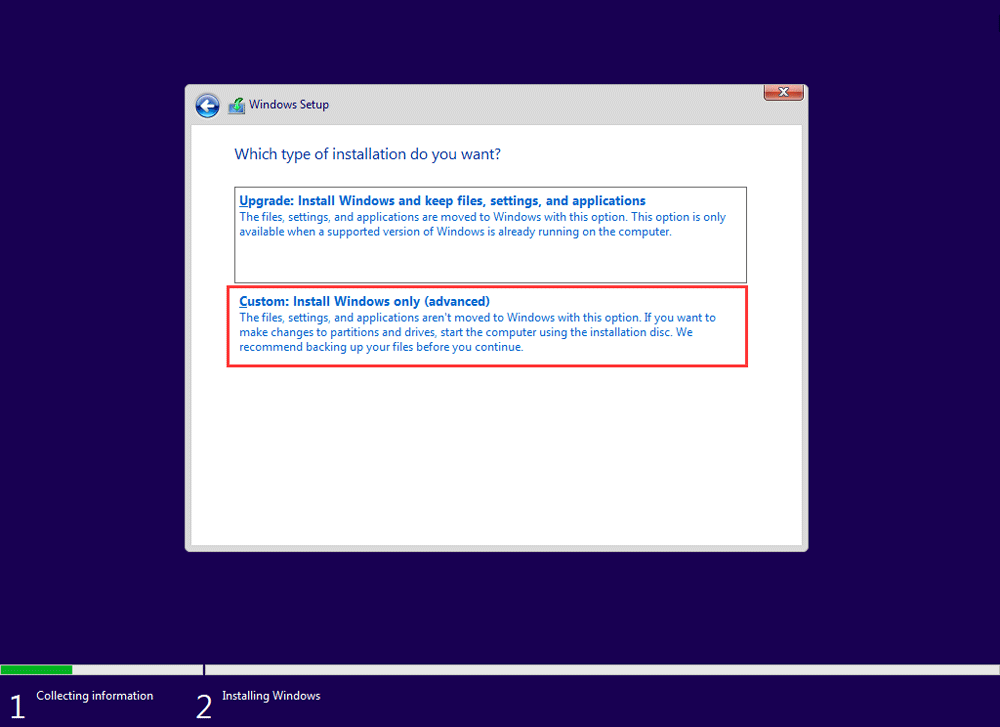
- Select Custom: Install Windows only.
- Select which drive you want to install Windows on. Normally, the first drive Drive 0 corresponds to the drive C where Windows is currently installed. The goal here is to replace current Windows but keep files in all other drives untouched.
- Select Drive 0 and click on Delete.
- After deleting, choose the empty partition and click on Next.
- Wait until Windows 10 is installed in the system properly. All your files will be intact but the Windows 10 is replaced with the latest version of it. Note that you will need to reinstall all of your software and apps again after this.


Windows 10 Just a moment stuck is not a rare issue and many users reflect they have encountered this issue when updating your Windows operating system or reinstalling Windows without an installation medium. Are you also looking for an effective method to get rid of this issue? You come to the right place. In this article, we will show you two available solutions.
Are You Facing Windows 10 Just a Moment Issue?
Sometimes, your computer may boot into a screen saying Just a moment. Yes, you just wait for centuries but only find Windows 10 Just a moment is stuck. This issue always happens when updating the system or reinstalling Windows 10 without an installation medium.
You are not alone. When you search for this issue on the internet, you will discover that many users are bothered by Windows 10 stuck on Just a moment and the phenomenon are various, such as Windows 10 Just a moment then black screen, Windows 10 Just a moment after update, and so forth.
Fortunately, it is possible to fix it. But firstly, let’s find out the causes of this issue.
Tip: When updating your Windows 10 computer, you might encounter Windows update stuck on checking for updates issue. If it is so, you can refer to this post to get the solutions: How to Fix: Windows Update Stuck on Checking for Updates.
Reasons for Windows 10 Stuck on Just a Moment
The speed of Windows 10 update and installation relies on the hardware specification, available disk space, hard drive read-write speeds, the speed of internet connection, and more. When the process lasts too long, you may see the following screen:
But, if there is something wrong with the hardware, hard disk, or the internet connection, Windows 10 stuck on Just a moment issue is likely to happen.
We have spent time looking for the available solutions and now we summarize them for you in this article.
Solution 1: Check Whether the PC Is Responding
If Your Computer Is Still Responding
You should first check whether your computer is still working. To do this job, you can go to check if the machine is making any noise. It is a clear sign of whether the processor is still at work. Of course, there is the other sigh: a flickering light.
When these two signs show that the processor is still at work, do not tinker with that process in progress. We have mentioned above: the process speed is possible decided by the internet connect condition, free disk space on your computer, etc. Wait and see.
If Your Computer Is Not Responding
If your computer has fallen into silent and stuck on the seemingly infinite loop: Just a moment, you can consider doing these things:
- Disable network devices, turn off Wi-Fi and unplug network cable if there is any.
- Remove any USB devices which are connected with the computer, including keyboard, mouse, printer, USB drive, AC adapter, and so on.
After that, reconnect the USB devices to your PC and then check whether the computer can run normally. If yes, you can re-establish the internet connectivity to see whether the update or installation process can run successfully.
However, if the above measure doesn’t work for your situation, you need to perform a hard restart of your computer: press and hold on the power button until your computer shuts down and then reboot it.
If Windows 10 Just a moment issue still persists, you need to try the next solution.
Solution 2: Clean Install Windows 10
When your computer is having performance and other issues, the most effective way to get rid of the issues is to perform a clean installation. This way will remove everything from the hard drive on your machine and start from scratch.
Thus, when you are bothered by Windows 10 stuck on Just a moment issue, you can clean install Windows 10 to have a try.
In the following guide, we will walk through the steps to clean install Windows 10 including these three parts:
- How to restore data from the unbootable PC before installation
- How to create a USB bootable media of Windows 10
- How to perform a clean installation of Windows 10
How to Restore Data from the Unbootable PC before Installation
The clean installation process will delete everything from your computer hard drive. So, we think you’d better restore your data to an external drive in advance. Here, you can use the professional data recovery software: MiniTool Power Data Recovery.
This software is specially designed to recover data from various types of data storage devices, including computer hard drives, USB flash drives, memory cards, SD cards, and more. These data can be both deleted and existing items.
If you want to restore files from a computer which is bothered by Windows 10 Just a moment issue, you need to use MiniTool Power Data Recovery Bootable Edition that should be built by a MiniTool Snap-in WinPE Bootable Builder.
However, only the advanced editions offer MiniTool Bootable Media Builder. You need to get one of these editions from the MiniTool official store according to your actual situation.
Get a normal working computer to obtain this software and then refer to the following guide to build a bootable medium and start the unbootable machine from it:
- How to Build Boot CD/DVD Discs and Boot Flash Drive with Bootable Media Builder?
- How to Boot from Burned MiniTool Bootable CD/DVD Discs or USB Flash Drive?
Then, it’s time to restore data from the computer with this software:
Step 1: Choose the target partition to scan
Choose the target partition you need to restore data from and click on the Scan button to start the scanning process.

Tip: If you only need to retrieve some certain types of files, you can use the Settings feature of this software to make some selections.
Step 2: Choose the files you want to recover
When the scanning process ends, you can see the scan results which are classified by path. You can open each path to find the files you want to restore.
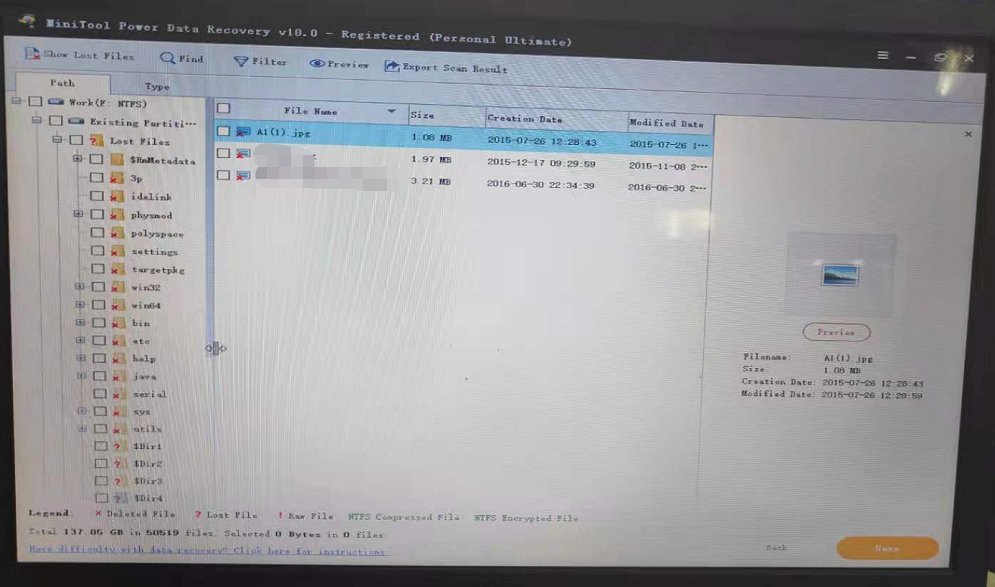
Usually, there are numerous files on your computer hard drive and it is usually difficult to find out the needed ones quickly. In this situation, you can try the Type and Find features of this software to locate your needed files easily.
Additionally, with the Bootable Edition, you can preview the image files and text files which are no larger than 20MB. That is to say, when you are not sure whether it is the image or text file you need to restore, you can use the Preview feature to identify.
Step 3: Save the selected files to the external drive
Connect an external drive which has enough space to store your needed files to your computer and then check the files you want to restore. After that, press the Save button to choose the inserted external drive to keep the selected items.
Now, your needed data is saved to a safe place. Next, you need to create a USB bootable medium. Go to the next part the get the steps.
Click to Tweet
How to Create a USB Bootable Medium of Windows 10
The direct way to create a USB bootable medium is to use the Media Creation Tool. Here, you need to prepare a USB flash drive of at least 8GB and a normal working computer.
Note: The creation process will delete all files on the USB flash drive. If these files are important, you’d better back up USB flash drive in advance.
After that, you can follow these steps to create a USB bootable medium:
1. Go to the Windows 10 download page on the web browser.
2. Click the Download tool now button and save the file on your computer.
3. Find the downloaded file and then double-click on it to launch it.
4. Press the Accept button to agree to the Applicable notices and license terms.
5. Choose the Create installation media (USB flash drive, DVD, or ISO file) for another PC option and click on the Next button to continue.

6. In the following interface, you can select language, architecture, and edition you want to use. Since you are not going to clean install Windows 10 on this current working machine, you need to make sure that the Use the recommended options for this PC option IS NOT CHECKED.
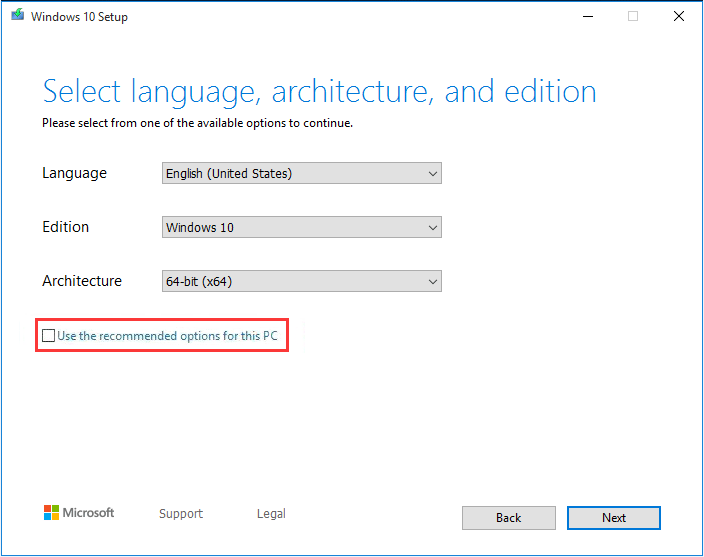
7. Click Next.
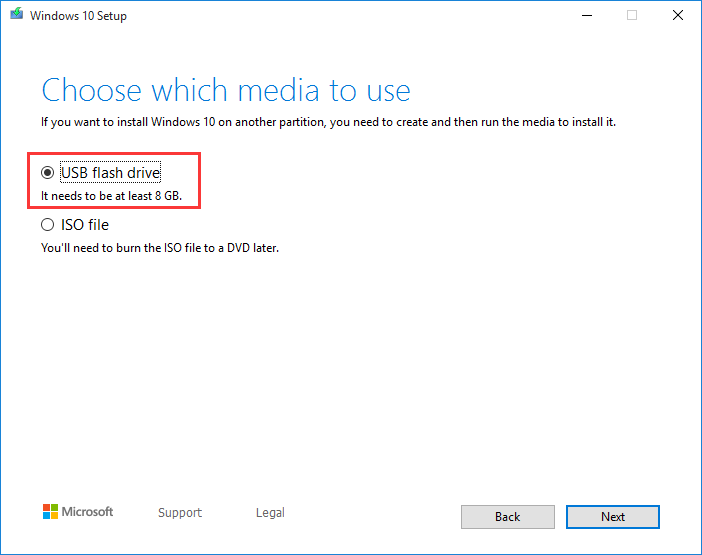
8. Select the USB flash drive option and click the Next button to continue.
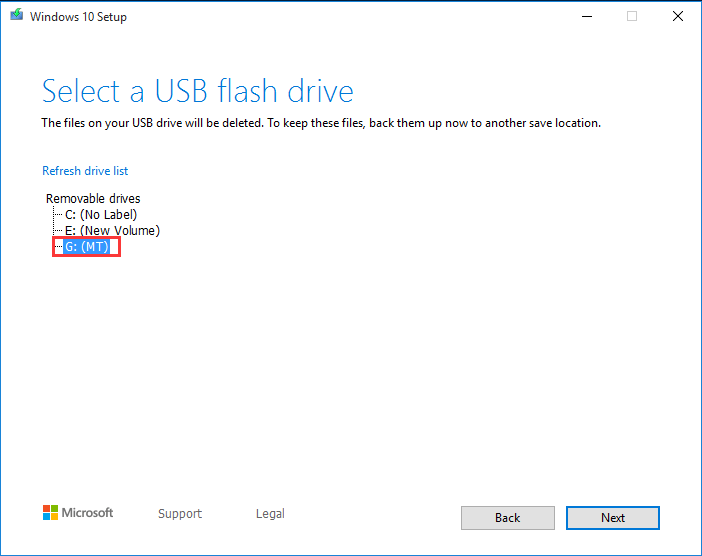
9. Click on the USB flash drive you want to make it bootable and click Next.
10. When you see the Your USB flash drive is ready interface, press the Finish button to end the process.
After these steps, you can use this USB flash drive to perform a clean install on the computer which is bothered by Windows 10 stuck on Just a moment issue.
Click to Tweet
How to Perform a Clean Installation of Windows 10
To perform a clean install of Windows 10 with the bootable USB flash drive, you need to follow these steps:
1. Set your computer to boot from the USB flash drive.
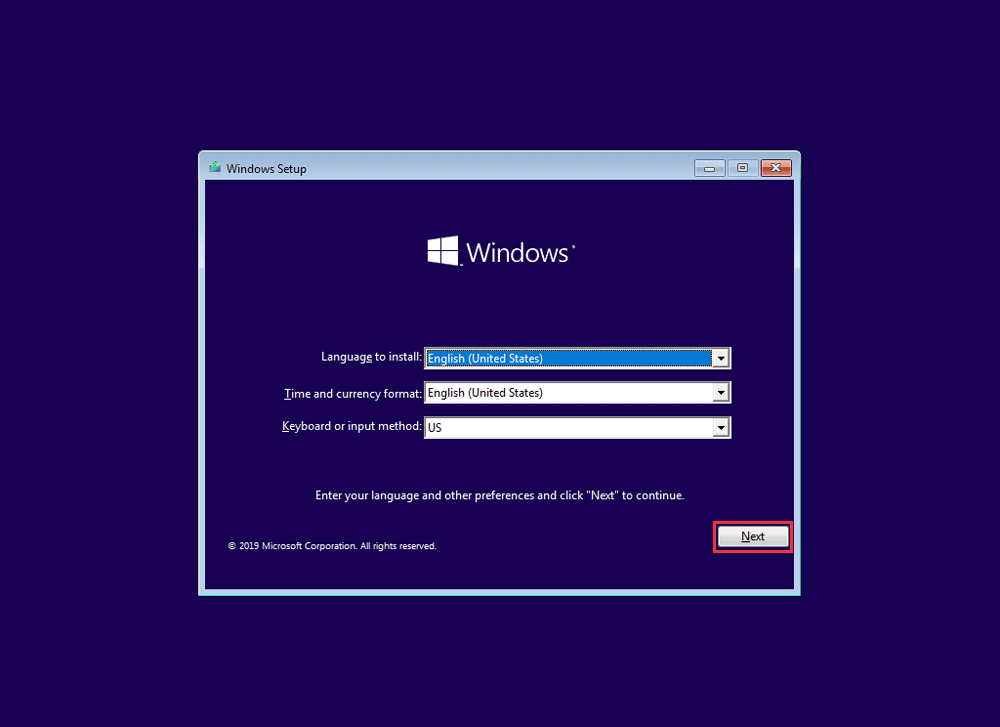
2. When entering the Windows setup interface, press the Next button to start the process.
3. When entering the following interface, click the Install Now button to continue.
4. If you’re upgrading an old version, you must input a genuine product key. However, if you’re reinstalling Windows 10, you can press the I don’t have a product key option to continue if your computer has been activated.
5. Choose a Windows 10 edition that must match your product key and press the Next button to continue.
6. Check the I accept the license terms option and then press Next to continue.
7. Choose the Custom: Install Windows only (Advanced) option to continue.
8. Then you need to choose where to install Windows 10. Usually, it is a partition on Drive 0 that contains the current installation of Windows. Then, press the Delete button to remove it from the hard drive.
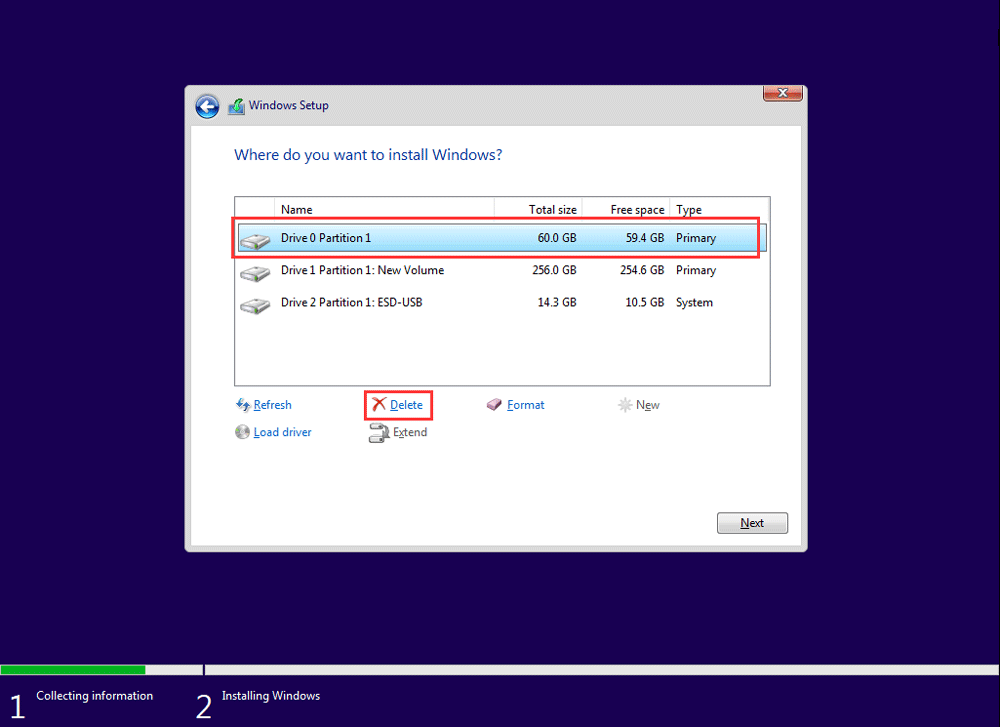
9. Click the OK button on the popup window to confirm the deletion.
10. Choose the empty partition and click on the Next button to start the installation process.
After the installation, you still need to customize the out-of-box experience to create a new account and set up your environment. Now, you can follow this post to do the job: How to Complete the Out of Box Experience (OOBE) in Windows 10.
After a clean install of Windows 10, we believe that you can use your computer as usual.
Bottom Line
When you are getting in the trouble of Windows 1 Just a moment loop, you can refer to these two solutions mentioned in this post to help you out.
If you are bothered by some other issues when dealing with this issue, you can just send an email to [email protected] or let us know in the comment. Of course, you can also share your opinions or suggestions here.
If you are someone that has been using Windows for a long time, and more specifically Windows 10, then you might have encountered a number of error screens on your system at least once or probably numerous times. These are usually known as BSODs or Blue Screens of Death. It is indeed an annoying screen that is displayed when your system runs into some sort of error. Many reasons could fire up the blue screen. One of the worst offenders of such error is the Just a moment error. Let’s take a look at how to solve and fix Just a moment screen issue on Windows 10.
The Just a Moment error is, to be honest, very annoying. While the error says that you need to wait for a few moments, these moments can take anywhere between 5 minutes to 5 hours. Yes, 5 hours. It can even increase if you are on a little slower or older PC. There are many reasons why this Just a Moment screen pops up. Let’s take a look at during what situations these screens popup and what are the fixes and solutions to get done with the error screen.
Fix Windows 10 Just a Moment Screen
The main purpose of the Just a Moment screen is that the system is performing some changes, and it should put you back on the desktop within 5 to 10 minutes or so. But, when it takes longer than a few minutes, the user will simply be annoyed. There are multiple scenarios where this screen is displayed.
- When your system is Installing an Update.
- When you are installing a new OS
- When your PC fails to install the update
- Upgrading from Windows 10 to Windows 11
- When your system crashes from a blue screen.
Now that you have seen the number of scenarios as to where and when this Just a moment screen appears, let’s take a look at all the fixes to get away from the Just a Moment screen.
When Installing a New OS
Now, if you are someone that is performing a clean install of Windows 10 or Windows 11, then you might see the Just a Moment screen a few times. While this screen should last a few seconds, it can sometimes last between 35 and 50 minutes. And, in all fairness, it is normal, You shouldn’t worry about it.
But, if it is taking a bit way too longer than an hour or so, then it would be recommended to perform a clean reinstall of the OS. Also, the screen appears if the system wasn’t able to access the internet during its initial setup. SO, when you perform an installation, it is best to leave the system connected to the internet and the setup do its thing.
Upgrading from Windows 10 to Windows 11
When you are performing an upgrade to Windows 11 from the Windows 10 update page, then it is normal. The Just a moment screen will appear at the end of the installation and can stay for 5 to 20 minutes. In this type of situation, there is no need to worry. Yes, it can take even longer time if you are installing the update on a slower system. You do not need to worry about it. The OS will take you to the desktop right away.
Other Scenarios
Now, if we look at other scenarios such as when an update is being installed, an update fails, or for that matter even if the Windows file gets corrupted, then you can expect the Just a Moment screen to show up. So, what is the system doing when this screen shows up? Well, it is trying to fix up issues if possible. This might be in the form of reversing the update or even a possibility that the system is trying to boot, but a few files have been corrupted. There are a few ways you can follow to get out of this Just a Moment screen.
1. Boot into Safe Mode
If and whenever your system is stuck at the Just a Moment screen, you will have to forcefully shut your system down. If you are on a PC, then you need to disconnect it from the power source. And, if you are on a laptop, you will need to press the power button for a few seconds till your laptop shuts itself down. Once it has shut itself down, do the following.

- Power up your system and keep mashing the F8 key (or whatever key is designated for your system to boot into recovery mode.)
- With the blue screen showing up, choose the Troubleshoot option.
- Now, select Advanced options.
- Here, you can select Startup Settings and finally pick Restart.
- Now, when your system restarts, you will be able to see a list of different startup options.
- Simply press the number on your keyboard that corresponds to.
- You can also pick the Enable Safe Mode with the networking option.
- Once the option has been selected, your system will restart to boot into a safe mood.
2. Disable Automatic Restart
Once you have booted into safe mode, it’s time to make some changes.

- Now, press the Windows Key and R.
- This will bring up the Run dialogue box.
- Type in system.cpl in the search box and hit the enter key.
- A system properties window will now open up.
- Click on the Advanced tab and then click on the Settings button under the Startup and Recovery option.
- Now, uncheck the Automatic Restart option and check the Write event to system log option.
- Press OK and now restart your system to boot out of safe mode.
3. Make Changes To Registry Editor
Apart from just disabling automatic restarts, you can also make changes to the profiles with the help of the registry editor. Here is how you can make the changes.

- Make sure that you are booted into Safe Mode.
- Now, pull up the Run dialog by pressing the Windows and R keys.
- Type regedit in the search bar and hit enter.
- The Registry Editor will now open up on the desktop.
- In the address bar of the Registry Editor, paste or navigate to this file path ComputerHKEY_LOCAL_MACHINESOFTWAREMicrosoftWindows NTCurrentVersionProfileList
- Now, select the first folder under the ProfileLists.
- You will see a registry key value called ProfileImagePath.
- Select the value and simply delete it.
- You will see 4 or more other folders like it. Go to each folder and delete the above registry key.
- Once you have done that, restart your system. You should no longer face the Just a Moment screen.
Reset The PC
Because if your PC is unable to boot or load some files because they are either missing or have got corrupted, your best option is to perform a reset. Performing a Reset is simple and easy. Here is how you can go about it.

- Open up the Settings app by latching it from the Start menu.
- With the Settings app open, click on the update and recovery option.
- And finally, click on the Recovery option.
- You will see a Reset This PC button. Click on it.
- There are two options to choose from. Either select to keep all files, or remove everything.
- Once you have made the choice, the reset process will begin.
- It should take around 20 minutes or less to get the system reset.
- By performing a reset, all the corrupted files will be fixed, and you will no longer keep getting the Just a Moment screen on your PC.
Conclusion
And there you have, the troubleshooting methods you can follow whenever you find the Just a moment screen on your Windows PC. While most of the time it is harmless and gets done with itself, at times, it can simply go on for hours and hours. We hope this guide has helped you solve the Just a moment screen on your Windows PC.
More Related Articles:
- How to Install Chocolatey on Windows 11 & Windows 10
- How to get redesigned Windows 11 Paint app on a Windows 10 PC
- How to Install Windows 10 on Steam Deck (Guide)

Скорость вашего обновления зависит от технических характеристик вашего оборудования, дискового пространства, скорости чтения-записи жесткого диска, скорости вашего подключения к Интернету и т. Д. Если процесс занимает у вас слишком много времени, например, чрезвычайно долго, вы можете даже увидеть уведомление ниже:
Прежде чем что-либо делать, обратите внимание на состояние вашей машины: шумит ли она? Индикатор устройства мерцает или мигает? Если да, то вам следует подождать еще немного.
Если вы уверены, что в данный момент с вашим компьютером ничего не происходит, вам следует подумать о том, чтобы сделать следующее:
- Отключите сетевые устройства, выключите Wi-Fi и отсоедините сетевой кабель, если он есть.
-
Удалите все подключенные USB-устройства, включая клавиатуру, мышь, принтер, USB-накопитель, адаптер переменного тока и т. Д.
Тогда посмотрите, решена ли проблема. После того, как вы сможете войти в свой рабочий стол, подключите или включите Wi-Fi или получите USB-устройство, чтобы система могла идентифицировать устройства. Когда эти устройства будут запущены, перезагрузите компьютер. Теперь проблема должна исчезнуть.
ПРОФЕССИОНАЛЬНЫЙ ТИП:
Когда вы сможете войти в систему, вам может потребоваться проверить, установлены ли у вас подходящие драйверы для ваших устройств. Вы должны это проверить и обновить те, которые этого не сделали.
Если у вас нет времени, терпения или навыков работы с компьютером для обновления драйверов вручную, вы можете сделать это автоматически с помощью Водитель Easy .
Driver Easy автоматически распознает вашу систему и найдет для нее подходящие драйверы. Вам не нужно точно знать, в какой системе работает ваш компьютер, вам не нужно рисковать, загружая и устанавливая неправильный драйвер, и вам не нужно беспокоиться о том, что вы ошиблись при установке.
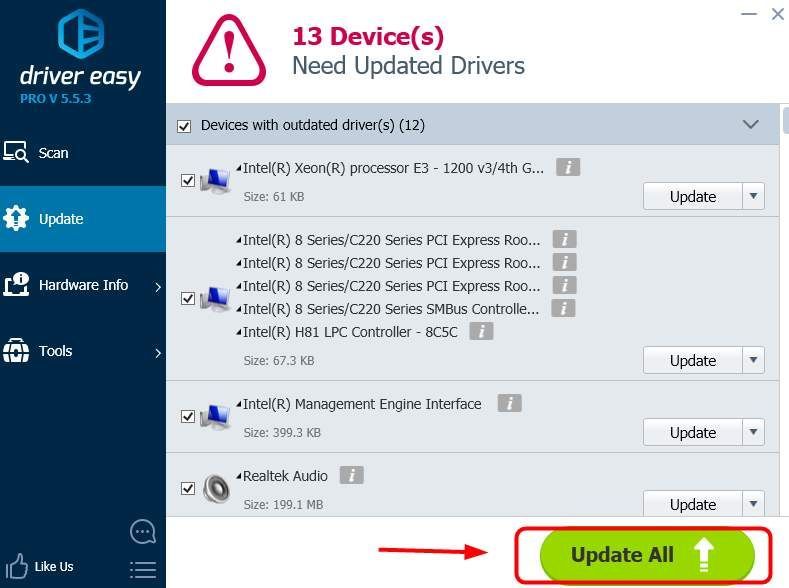
Вы можете автоматически обновлять драйверы с помощью БЕСПЛАТНОЙ или Pro версии Driver Easy. Но с версией Pro требуется всего 2 клика (и вы получаете полную поддержку и 30-дневную гарантию возврата денег):
1) Скачать и установите Driver Easy.
2) Запустите Driver Easy и нажмите Сканировать сейчас кнопка. Затем Driver Easy просканирует ваш компьютер и обнаружит проблемы с драйверами.
3) Щелкните значок Обновить рядом со всеми отмеченными устройствами, чтобы автоматически загрузить и установить правильную версию их драйверов (вы можете сделать это в БЕСПЛАТНОЙ версии).
Или нажмите «Обновить все», чтобы автоматически загрузить и установить правильную версию всех драйверов, которые отсутствуют или устарели в вашей системе (для этого требуется Pro версия — вам будет предложено выполнить обновление, когда вы нажмете «Обновить все»).
27.05.2019, 20:27. Показов 7712. Ответов 1

Привет Киберфорум!")
Сегодня значит вхожу я в свой Компьютер и вижу что перед мною вот такая вот картина (скриншот будет внизу(извиняюсь за низкое качество, увы это камера iPad)).
Just a moment… вот честно длиться это может до бесконечности и путём проб и ошибок выяснил что процесс вызывающий такую-вот безобразную вещь называется Microsoft Account.
Удаётся открыть меню на CTRL+ALT+DEL, ALT+TAB
Диспетчер задач через альт+таб видно, но открыть его нельзя. Один раз даже удалось открыть его каким-то неведомым мне способом но на этом всё. На втором пользователе всё нормально. Можно даже этот процесс крашнуть и зайти через первого пользователя опять назад и тогда уже всё работает.
Что мне делать?
Пожалуйста помогите!
Миниатюры

__________________
Помощь в написании контрольных, курсовых и дипломных работ, диссертаций здесь
0