Похоже Microsoft решила сделать оригинальный новогодний подарок и продлить новогодние праздники ещё немного, выпустив обновление делающее невозможным VPN-подключение по протоколу L2TP, который часто используется для удалённой работы. То что обновления Windows, приносят не только исправления но и новые баги — уже не новость. Однако ввиду того что данная проблема носит широкий характер из-за большой вероятности появления и большого распространения удалённой работы решил что неплохо бы предупредить сообщество.
Итак, обновления от 11 января 2022 года, которые, вероятно, и являются причиной данной проблемы:
- Windows 10 — KB5009543 (также упоминается KB5008876)
- Windows 11 — KB5009566 (также упоминается KB5008880)
Упомянутые в скобках обновления пришли параллельно с проблемными, судя по комментариям они к рассматриваемой проблеме отношения не имеют.
Стоит отметить что обновление не в 100 % случаях приводит к проблеме, частично это зависит от конечной точки к которой осуществляется подключение. Проблема наблюдается как при создании нового подключения так и для уже для настроенных подключений.
Если обновление уже установлено в качестве решения проблемы на данный момент предлагается только откат обновления, например следующим PowerShell-скриптом (требуются админские права).
if (get-hotfix -id KB5009543) {
wusa /uninstall /kb:5009543
}

if (get-hotfix -id KB5009566) {
wusa /uninstall /kb:5009566
}
В комментариях отметили что обновление KB5009624 для Windows Server 2012 R2, также вышедшее накануне, вызывает проблемы с виртуальными машинами Hyper-V.
При появлении других решений добавлю их в конце публикации.
Если обновление ещё не установлено — рекомендуется воспользоваться функцией приостановки обновлений.
Обсуждение проблемы на Reddit (и хейт «в пользу» Microsoft)
UPD:
В комментариях сообщают что сломалось не само L2TP, а варианты авторизации MS-Chap и EAP, поэтому возможна неработоспособность других подключений, использующих эти алгоритмы.
Также предлагают отключить или ослабить IPSec, однако это снижает безопасность подключения, и не помогает, если на сервере VPN настроено строгое шифрование (поэтому самым актуальным на данный момент являет решение с откатом обновления).
От себя пожелаю больше благ и меньше багов в Новом Году! ✨
![]()
В Windows 10 существует проблема с подключением по VPN в качестве клиента по протоколу L2TP/IPSec. В очередной раз столкнулся с ней недавно, когда свежеустановленная система отказалась подключаться к VPN-серверу, запущенному в другой квартире на роутере Keenetic.
С учетом того, что вряд ли эту проблему исправят в грядущих обновлениях, публикую памятку по ее самостоятельному исправлению.
Содержание
- 1 Причина и симптомы
- 2 Решение проблемы
- 2.1 Вариант 1 — через редактор реестра
- 2.2 Вариант 2 — через Powershell
- 3 Заключение
Причина и симптомы
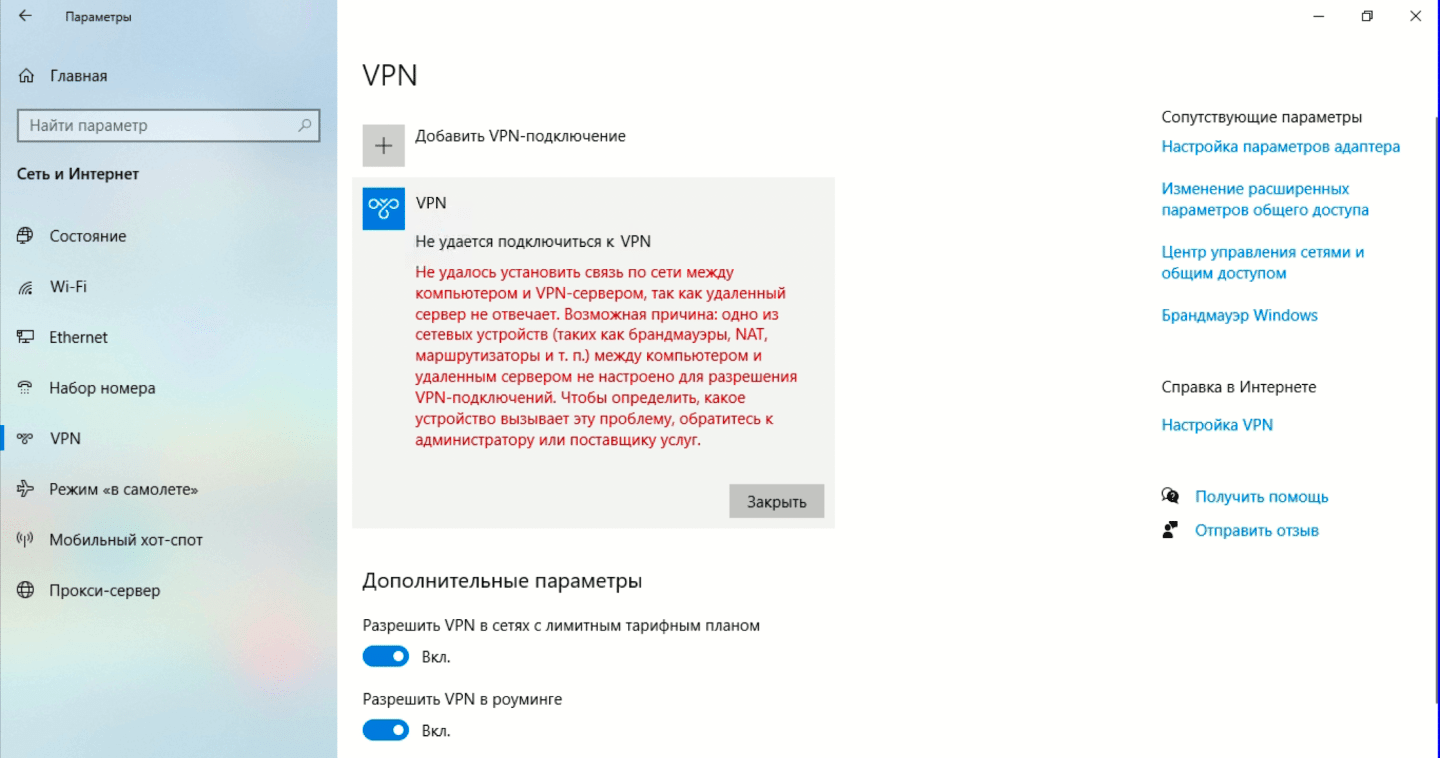
Симптомы. При попытке подключения со всеми корректно введенными настройками система долго думает и в конце концов выдает ошибку:
Не удалось установить связь по сети между компьютером и VPN-сервером, так как удаленный сервер не отвечает.
Причина заключается в том, что с настройками по умолчанию встроенный VPN-клиент Windows не поддерживает подключение через NAT.
В двух словах про NAT
NAT — это механизм преобразования роутером внешнего IP-адреса (предоставляемого провайдером при подключении) в локальные IP-адреса устройств, подключенных к вашей домашней сети. Практически все пользователи домашнего интернета «сидят за NATом», исключение составляют лишь случаи, когда интернет-кабель от провайдера подключен непосредственно к компьютеру в обход роутеров и свитчей.
В целом родной VPN-клиент в Windows 10 способен работать за NAT, но для этого необходимо поменять один пункт в его настройках — и делается это не самым очевидным способом.
Решение проблемы
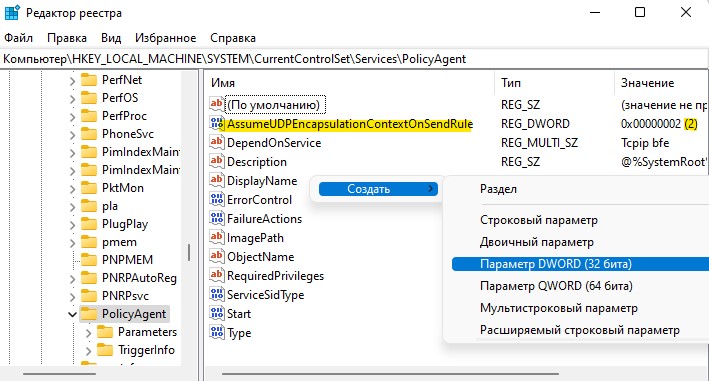
Для решения проблемы нужно открыть следующую ветку реестра:
HKEY_LOCAL_MACHINESYSTEMCurrentControlSetServicesPolicyAgent
И внести в нее параметр AssumeUDPEncapsulationContextOnSendRule со значением 2.
Вариант 1 — через редактор реестра
Запускаем редактор реестра, открыв окно поиска и введя в нем regedit:

Находим в реестре ветку HKEY_LOCAL_MACHINESYSTEMCurrentControlSetServicesPolicyAgent и создаем в нем 32-битный параметр DWORD с именем AssumeUDPEncapsulationContextOnSendRule и значением 2:

Вариант 2 — через Powershell
Запускаем Windows PowerShell, введя powershell в окне поиска и выбрав в контекстном меню запуск от имени администратора:

В открывшемся окне выполняем следующую команду:
Set-ItemProperty -Path "HKLM:SYSTEMCurrentControlSetServicesPolicyAgent" -Name "AssumeUDPEncapsulationContextOnSendRule" -Type DWORD -Value 2 –Force;

Заключение
После внесения изменений, независимо от способа которым они были внесены, необходимо перезагрузить компьютер чтобы параметр подтянулся в используемые настройки. Затем снова запускаем подключение к VPN-серверу и убеждаемся, что оно успешно стартует.
Стоит отметить, что данная проблема присуща исключительно Windows и не встречается ни в Linux, ни в macOS, ни в iOS.
Learn how to correctly configure L2TP to avoid any errors on your PC
by Elena Constantinescu
Elena started writing professionally in 2010 and hasn’t stopped exploring the tech world since. With a firm grasp of software reviewing and content editing, she is always trying… read more
Updated on October 28, 2022
Reviewed by
Edgar Nicov

Since the dial-up Internet era, Edgar was interested in online resources. From forums to e-commerce websites, he started digging into how those resources could generate revenue. Today he… read more
- If you cannot connect to L2TP VPN on Windows 10, your VPN or OS is at fault.
- However, if it’s a VPN server-side issue, you must fix it there or contact the server admin.
- Our complete guide shows how to fix L2TP VPN connection issues on Windows 10 one step at a time.
- We prepared 12 solutions and 1 better alternative for your PC to prevent recurring problems.

If you created an L2TP VPN connection on Windows 10 but cannot connect, you can fix this problem by trying the workarounds in this guide.
L2TP is one of the most secure VPN protocols. It supports 256-bit encryption, which is highly recommended by privacy experts.
It’s meant to offer good VPN speed and a stable connection, so if your configuration isn’t working, make sure to tweak your setup.
Why is my L2TP VPN not working?
A failed L2TP VPN connection could occur due to several reasons, such as:
- Invalid username and password
- Inaccurate server name or address
- Wrong certificate or pre-shared key
- Bad proxy settings
- Faulty encryption settings on the server side
- Incorrect authentication settings
- The connection is blocked by your firewall
- The VPN server, client, or both are behind NAT
Our complete step-by-step guide below shows how to fix L2TP VPN connection issues on Windows 10. If possible, you should also check the L2TP connection settings on the VPN server.
Quick Tip:
Use a premium VPN instead. If you keep having problems with your current configuration, consider using a dedicated VPN app that’s way easier to configure.
ExpressVPN is a great alternative that supports L2TP/IPsec. The only thing you have to do is to install it and select the protocol in one click from settings.
ExpressVPN
Connect to ExpressVPN using its L2TP/IPsec protocol and get high-speed connections without any errors!
How do I fix L2TP VPN connection issues on Windows 10?
1. Check the username and password
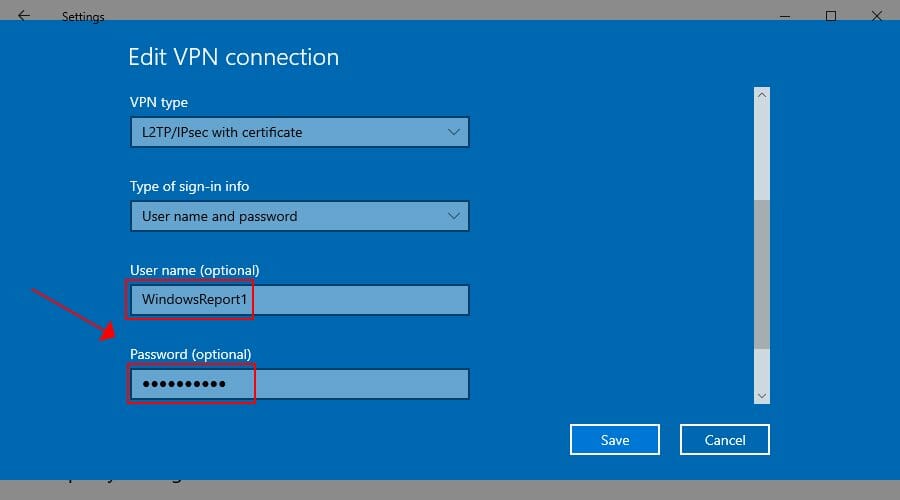
- Right-click the Start button and go to Network Connections.
- Click VPN on the left side.
- Select your L2TP VPN connection and click Advanced options.
- Press Edit.
- Retype your User name and Password.
- Click Save.
If your entered your VPN credentials wrong or if they were changed by the VPN server administrator in the meantime, then a simple update to your username and password should help if you cannot connect to L2TP VPN on Windows 10.
2. Check the server name or address
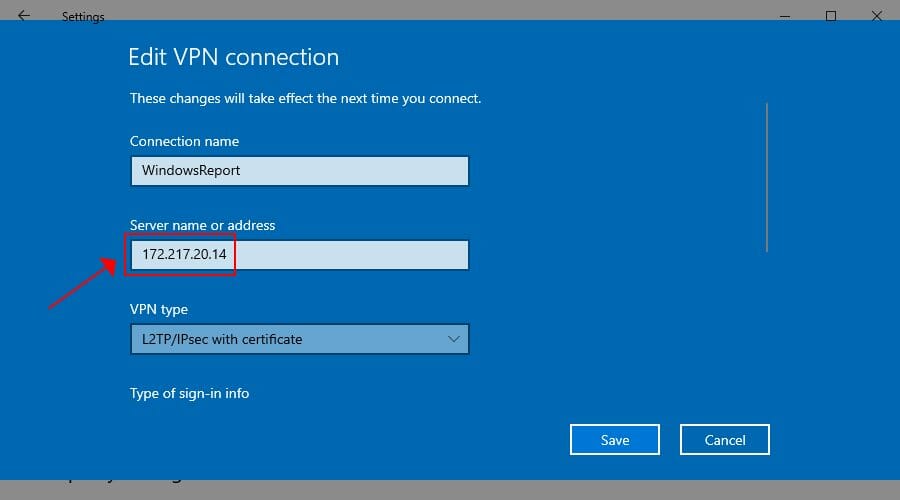
- Go to VPN settings and choose the L2TP VPN profile.
- Click Advanced options and then Edit.
- Retype your Server name or address or try a different one.
- Click Save.
The L2TP VPN connection problem could be caused by a simple typo made to your server name or address, so make sure to re-enter this information. Otherwise, the remote L2TP VPN server might not be working. In that case, you can try connecting to another server if possible.
3. Check the certificate or pre-shared key
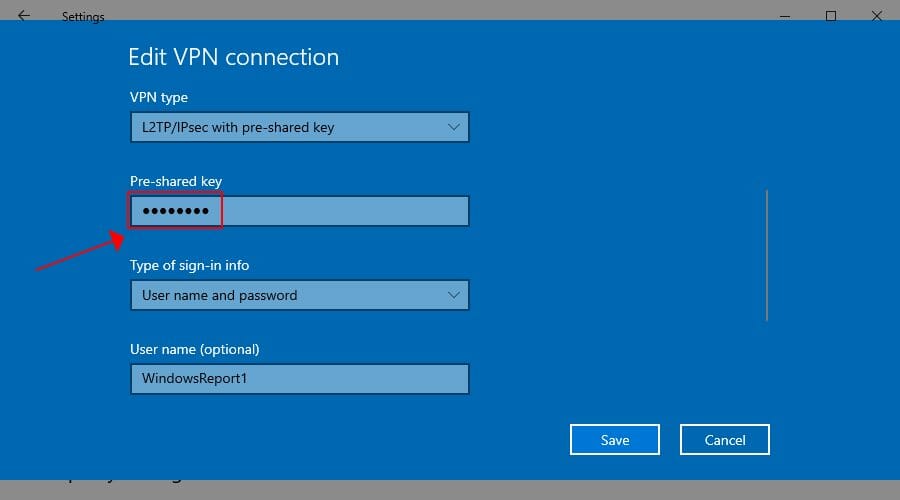
- Go to VPN settings and select your L2TP VPN connection.
- Click Advanced options and then Edit.
- Retype your Pre-shared key.
- Click Save.
Similar to the username and password situation, the pre-shared key you initially typed could have been wrong or changed by the VPN server administrator. After adding the new pre-shared key, try to connect to the L2TP VPN again to see if it works now.
However, if there’s an issue with the L2TP VPN certificate, there’s nothing you can do on the VPN client side. You have to either verify the certificate on the server or contact the administrator for help.
Alternatively, try switching between L2TP/IPsec with certificate and pre-shared key, in case the server admin changed the VPN type.
4. Check the VPN proxy settings
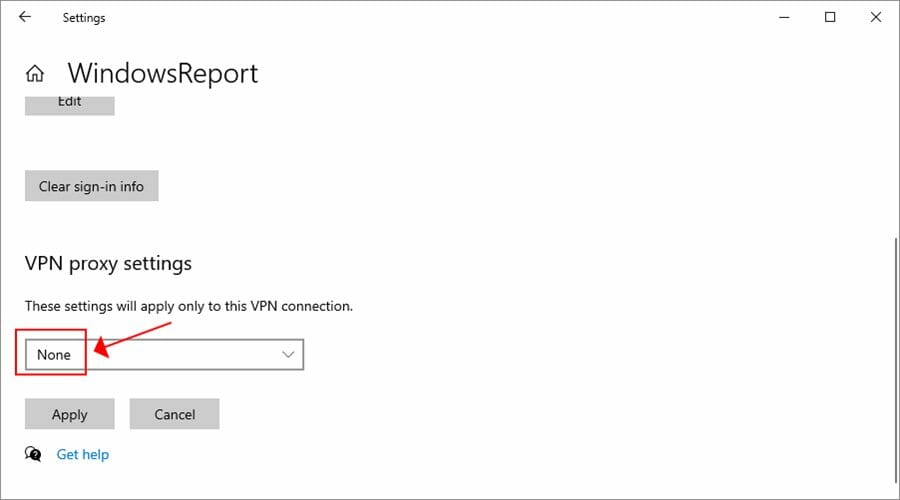
- Go to VPN settings and click your L2TP VPN profile.
- Select Advanced options.
- Scroll down to VPN proxy settings
- If you need to redirect your VPN connection to a proxy server, make sure the proxy settings are correct.
- Otherwise, remove the proxy by selecting None.
- Click Apply.
Even if you need to use a VPN proxy server, disable it temporarily and try to connect to L2TP VPN again to see if it’s really the proxy’s fault. It might not be working properly.
In that case, you should fix proxy server connection issues, use another proxy, or keep it disabled.
5. Check the encryption settings
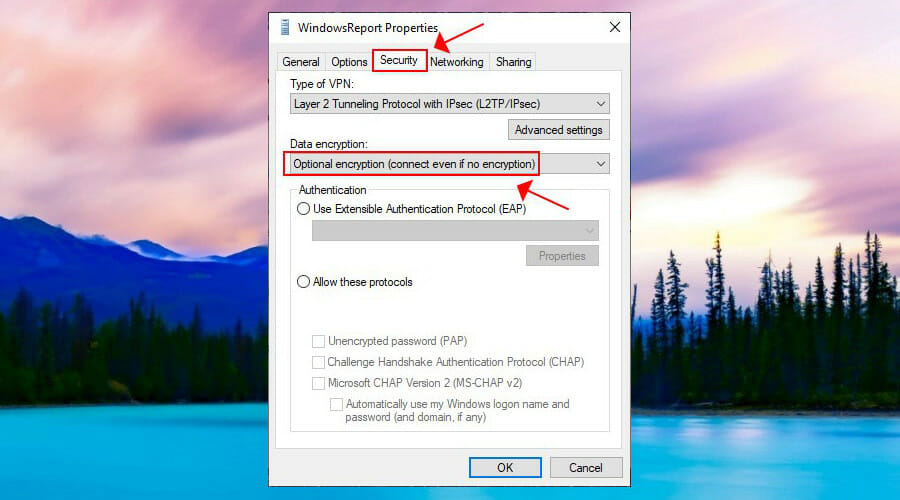
- Right-click the Start button and go to Network Connections.
- Click Change adapter options.
- Right-click your VPN connection and select Properties.
- Switch to the Security tab.
- Set Data encryption to Optional encryption (connect even if no encryption).
- Click OK.
If the VPN server has encryption issues, this could be the reason why you cannot connect to L2TP VPN on Windows 10. By making the encryption optional, you might be able to temporarily solve this problem.
However, encryption is a critical component of a VPN connection, so you should contact the VPN server administrator to fix this issue as soon as possible.
6. Check the authentication settings
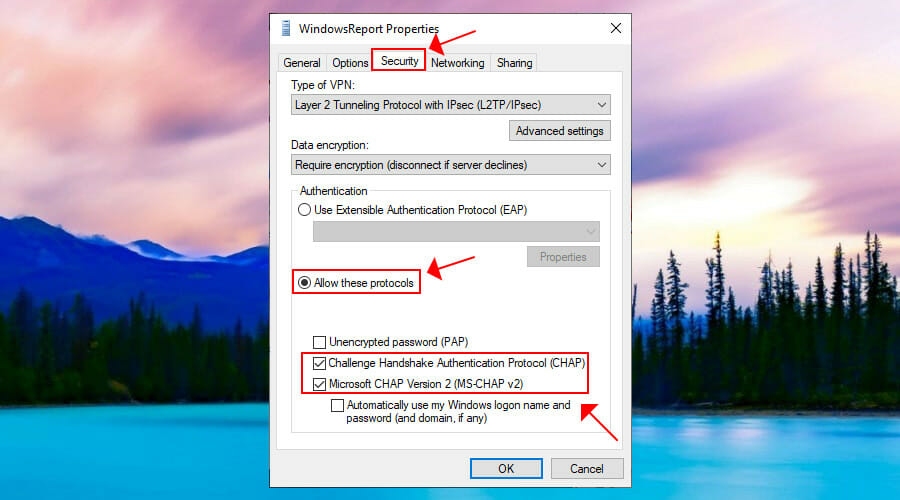
- Go to Network Connections > Change adapter options.
- Right-click your VPN and go to Properties.
- Switch to the Security tab.
- At Authentication, select Allow these protocols.
- Enable Challenge Handshake Authentication Protocol (CHAP).
- Enable Microsoft CHAP Version 2 (MS-CHAP v2).
- Click OK.
L2TP connection issues are typically caused by invalid VPN authentication settings. Try the configuration above to see if it works. Otherwise, you should get in touch with the VPN server administrator and request assistance.
7. Open L2TP ports in your firewall
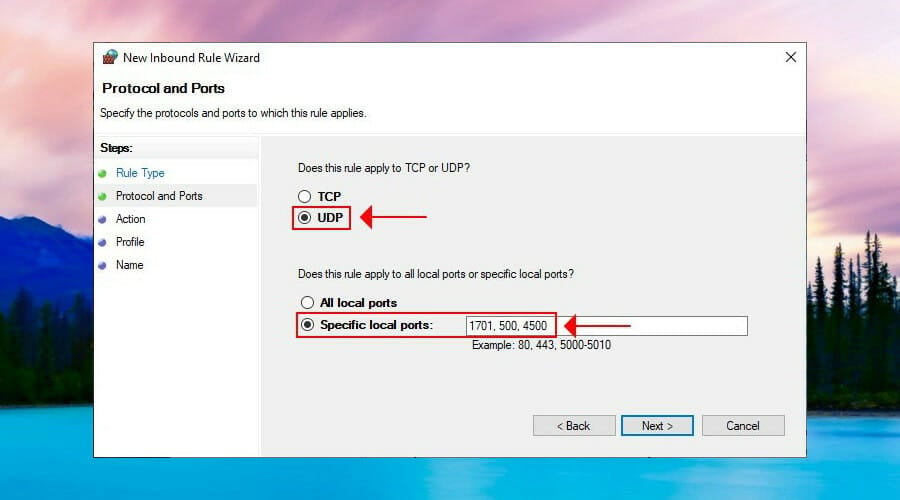
- Click the Start button, type firewall, and select Firewall & network connection.
- Click Advanced settings and Yes if prompted by UAC (User Account Control).
- Select Inbound Rules on the left side.
- Click New Rule on the right actions panel.
- At Rule Type, select Port.
- At Protocol and Ports, select UDP with Specific local ports and type 1701, 500, 4500.
- Set Action to Allow the connection if it is secure.
- Enter any rule name and click Finish.
- Go to Outbound Rules and do the same.
If your L2TP VPN connection gets blocked by the firewall, then you have to open the correct ports for sending and receiving network traffic. However, the firewall configuration above should also be made on the VPN server.
This solution can help fix The connection was terminated by the remote computer before it could be completed, also known as VPN error 628.
8. Make an easy tweak to the registry
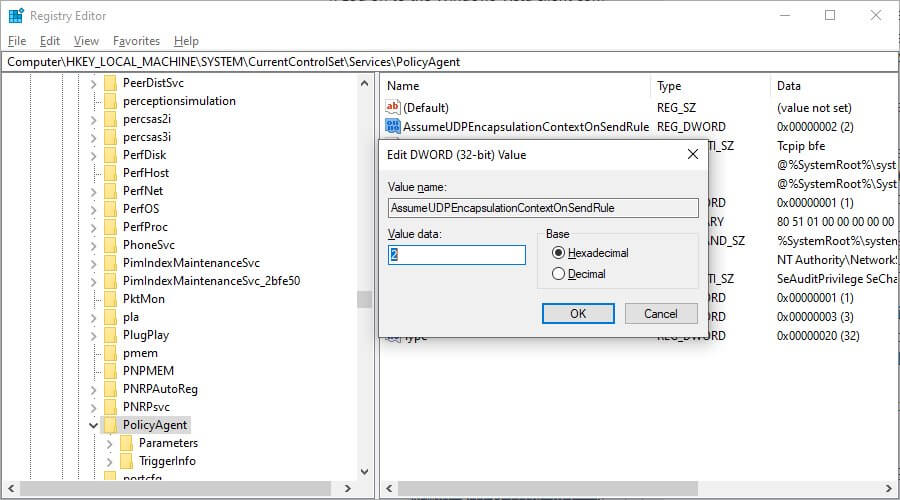
- Press Ctrl+R, type regedit, hold down Shift, and press Enter.
- Click Yes if prompted by User Account Control.
- Delete what’s inside the address bar on top.
- Paste the following address and press Enter:
HKEY_LOCAL_MACHINESYSTEMCurrentControlSetServicesPolicyAgent - Open Edit menu > New and click DWORD (32-bit) Value.
- Set AssumeUDPEncapsulationContextOnSendRule as the value name.
- Right-click AssumeUDPEncapsulationContextOnSendRule and press Modify.
- Set Value data to 2.
- Set Base to Hexadecimal.
- Click OK.
- Next, paste this address and hit Enter:
HKEY_LOCAL_MACHINESYSTEMCurrentControlSetServicesRasMan - Open Edit menu > New and click DWORD (32-bit) Value.
- Set ProhibitIpSec as the value name.
- Right-click ProhibitIpSec and click Modify.
- Set Value data to 0.
- Set Base to Hexadecimal.
- Click OK.
- Restart your computer.
If the VPN server, client, or both as behind a NAT, such as a home router, you can use the registry tweaks above to fix the NAT traversal problem.
A faster way to tweak the registry and make Windows 10 connect to L2TP VPN by entering a couple of lines of code in Command Prompt (look inside the article to see how).
9. Reinstall the network adapters
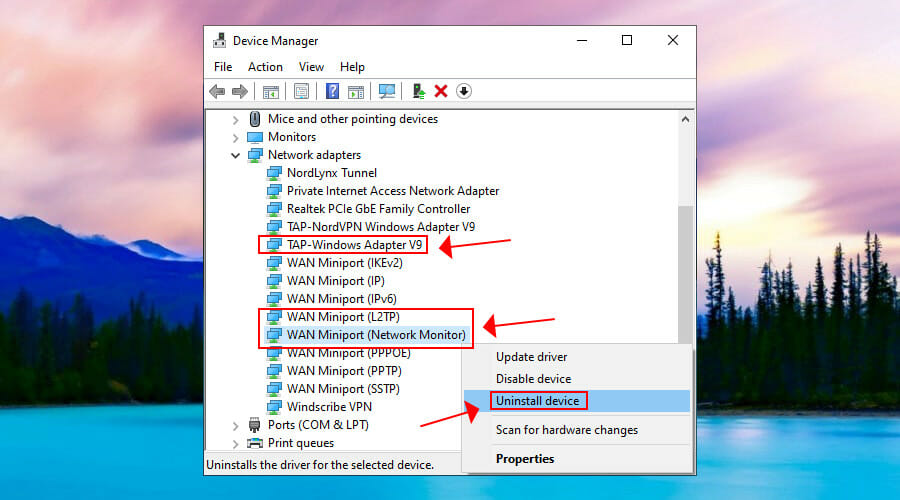
- Right-click the Start button and go to Device Manager.
- Expand the Network adapters menu.
- Right-click TAP-Windows Adapter V9 and select Uninstall device.
- Leave Delete the driver software for this device unchecked.
- Click Uninstall.
- Do the same for WAN Miniport (L2TP) and WAN Miniport (Network Monitor).
- Open the Action menu and select Scan for hardware changes.
If you uninstall the network adapters but without also removing the driver software, Windows will automatically reinstall them.
Fixing Windows 10 network adapter problems is a practical way to handle the L2TP VPN connection issue.
It can also help fix the L2TP connection attempt failed, also known as VPN error 789.
10. Update the network drivers
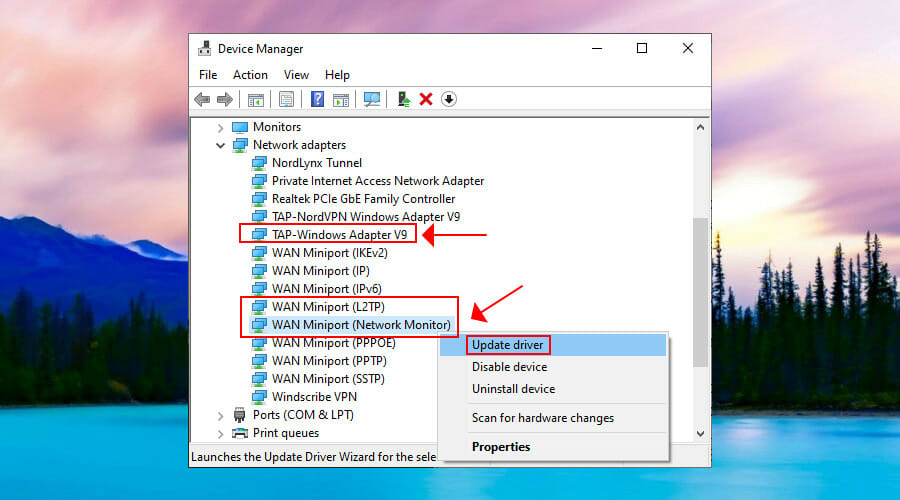
- Go to Device Manager and expand the Network adapters menu.
- Right-click TAP-Windows Adapter V9 and select Update Driver.
- Choose Search automatically for updated driver software.
- Follow the on-screen instructions.
- Do the same for WAN Miniport (L2TP) and WAN Miniport (Network Monitor).
If you receive The best drivers for your device are already installed message, you can look for newer driver versions in Windows Update, install the drivers manually, or find and install newer device drivers automatically using driver update tools.
11. Restart the IPsec service
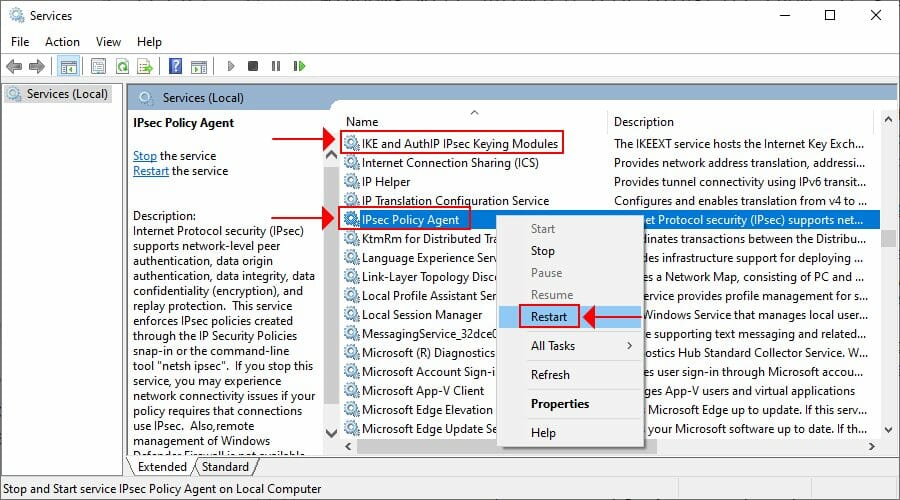
- Click the Start button, type Services, and press Enter.
- Find and right-click IKE and AuthIP IPsec Keying Modules.
- Press Restart (or Start if the service is stopped).
- Do the same for IPsec Policy Agent.
Windows 10 uses L2TP in combination with IPsec to establish a secure tunnel. If there’s a problem with IPsec, not with the L2TP, then you can restart its service.
It’s also a good way to fix VPN error 789.
12. Turn off Xbox Live Networking Service
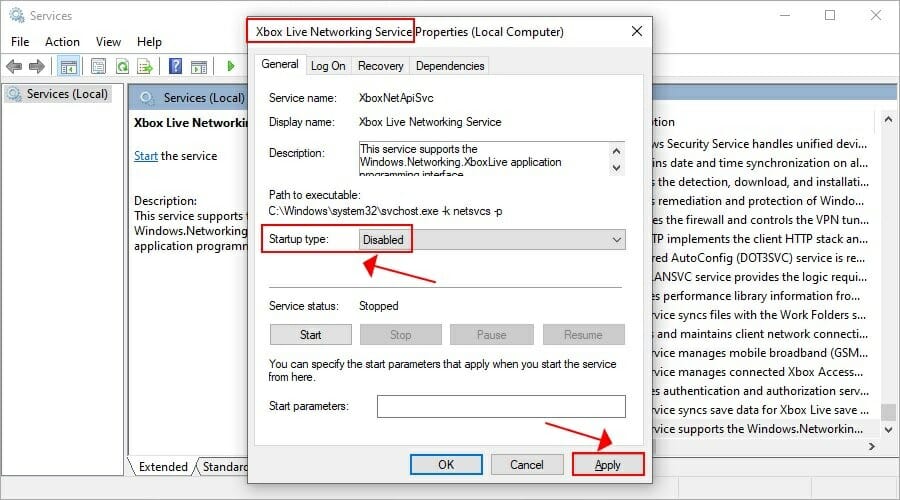
- Go to Services and locate Xbox Live Networking Service (last on the list).
- Double-click this entry and set Startup type to Disabled.
- Click Apply.
- Restart your PC.
Xbox Live Networking Service uses the IPsec protocol for chatting and multiplayer features. However, the Windows 10 L2TP VPN also uses IPsec. And many ISPs don’t permit two or more simultaneous IPsec connections.
Therefore, you can disable Xbox Live Networking Service to fix this problem, especially if you don’t play Xbox multiplayer games. This is also a workaround to fix VPN error 809.
In conclusion, the solutions above should help you if you cannot connect to L2TP VPN on Windows 10. However, if you don’t want to worry about such problems anymore, we suggest skipping to the 13th step and using ExpessVPN instead. It’s also the best VPN for Google Chrome.
Your connection is not secure — websites you visit can find out your details:

- Your IP Address:
loading

Companies can sell this information, alongside your location and internet provider name, and profit from it by serving targeted ads or monitoring your data usage.
We recommend Private Internet Access, a VPN with a no-log policy, open source code, ad blocking and much more; now 79% off.
![]()
Newsletter

Как у самурая нет цели, а есть только путь, так и Windows движется своим особым путём, порой идущим вразрез с общепринятыми стандартами. Сегодня хочу рассказать почему в Windows 10 не работает подключение к VPN серверу по протоколу L2TP/IPSec и как можно решить данную проблему.
Не удалось установить связь по сети между компьютером и VPN-сервером, так как удаленный сервер не отвечает. Возможная причина: одно из сетевых устройств (таких как брандмауэры, NAT, маршрутизаторы и т.п.) между компьютером и удаленным сервером не настроено для разрешения VPN-подключений. Чтобы определить, какое устройство вызывает эту проблему, обратитесь к администратору или поставщику услуг.
Однако не стоит верить написанному, так как «винда» направляет нас по ложному следу в поисках проблемы. Виноваты все, кроме самой операционной системы Windows, хотя дело именно в ней и проблема эта уже давно известна и описана в статье https://support.microsoft.com/en-us/kb/926179.
Всё дело в том, что встроенный VPN клиент Windows, по умолчанию, не поддерживает подключение L2TP/IPsec через NAT. Что такое NAT, маскарад и проброс портов простыми словами я рассказывал ранее, кому интересно переходите по ссылке.
Если совсем кратко, то практически все домашние сети (роутеры) работают именно в таком режиме и для успешного прохождения L2TP/IPsec через NAT требуется поддержка протокола NAT Traversal (или NAT-T), которая по умолчанию включена почти во всех операционных системах (Linux, macOS, iOS, Android), кроме Windows.
Для самой популярной и дружелюбной операционной системы в мире, поддержку протокола NAT-T приходится включать вручную, естественно полазив в системном реестре. Для чего перемещаемся в редактор реестра regedit и находим там ветку:
HKEY_LOCAL_MACHINESYSTEMCurrentControlSetServicesPolicyAgent
Для Windows XP ветка будет немного иная, читайте по ссылке приведённой ранее на сайте Microsoft (смысла рассказывать здесь не вижу, в виду сильного устаревания системы).
Создаём недостающий DWORD параметр с именем AssumeUDPEncapsulationContextOnSendRule и значением 2:
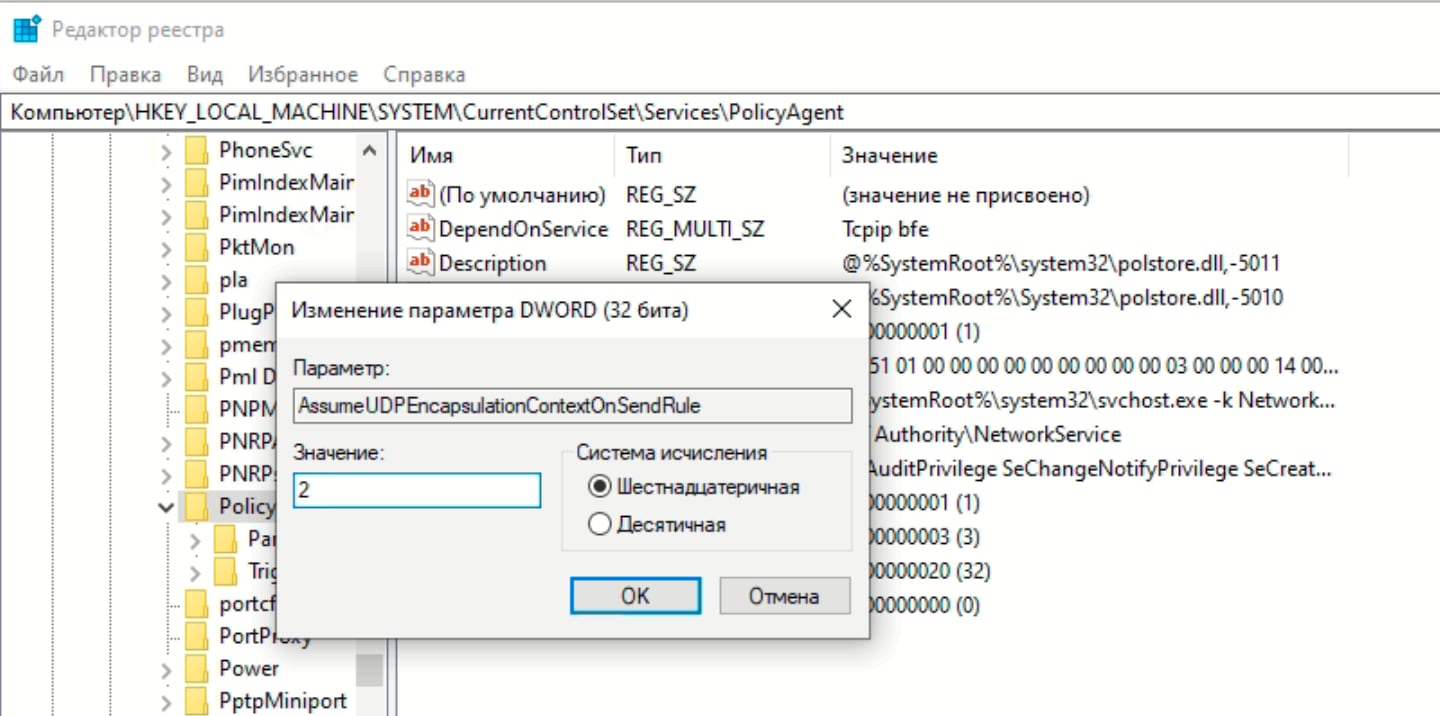
Примечание: Возможные значения параметра AssumeUDPEncapsulationContextOnSendRule:
- 0 – (значение по-умолчанию), VPN сервер подключен к интернету без NAT;
- 1 – VPN сервер находится за NAT;
- 2 — клиент и сервер находятся за NAT.
По идее, произведённые настройки вступают в силу без перезагрузки операционной системы, но если перезагрузитесь, хуже не будет. Теперь подключение к VPN серверу должно успешно заработать через NAT (в том числе двойной NAT).
Если вам не хочется возиться с реестром вручную, можно использовать воспользоваться PowerShell:
Set-ItemProperty -Path "HKLM:SYSTEMCurrentControlSetServicesPolicyAgent" -Name "AssumeUDPEncapsulationContextOnSendRule" -Type DWORD -Value 2 –Force;
Подписывайтесь на канал
Яндекс.Дзен
и узнавайте первыми о новых материалах, опубликованных на сайте.
Ошибка Попытка подключения L2TP не удалась из-за ошибки, произошедшей на уровне безопасности во время согласований с удаленным компьютером появляется в Windows 11/10 из-за не правильных настроек PPP и отключенного протокола Microsoft CHAP v2.
L2TP — соединение с протоколом 2-го уровня туннелирования, которое используется в основном в частных виртуальных сетях (VPN). Сам VPN используется для маскировки соединения путем удаленного сервера, чтобы обойти ограничения в интернете.

Как исправить ошибку подключения L2TP в Windows 11/10
1. Включение MS-CHAP v2
- Нажмите сочетание кнопок Win+R и введите ncpa.cpl
- Нажмите правой кнопкой мыши по VPN соединению и выберите Свойства
- Перейдите во вкладку Безопасность
- Установите Разрешить следующие протоколы
- Отметьте Протокол Microsoft CHAP версии 2
- Нажмите OK и попробуйте подключиться к VPN

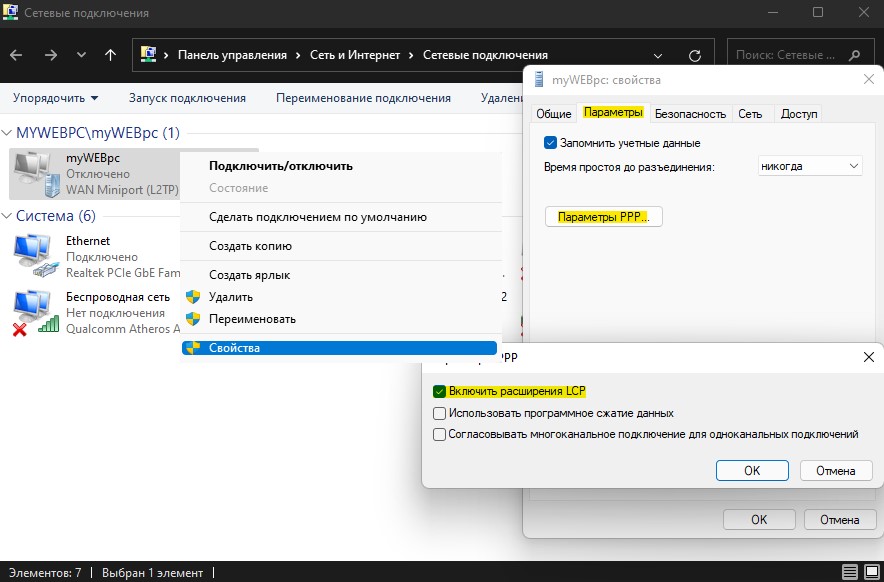
2. Включение расширений LCP
- Нажмите сочетание кнопок Win+R и введите ncpa.cpl
- Выберите Свойства на подключении VPN
- Перейдите во вкладку Параметры
- Нажмите на Параметры PPP…
- Установите галочку Включить расширения LCP
3. Перезапуск службы IPSec
- Нажмите Win+R и введите services.msc
- Найдите Модули ключей IPsec для обмена ключами…
- Нажмите по службе правой кнопкой мыши и Перезапустить
- Щелкните теперь по ней дважды, чтобы открыть свойства
- Установите тип запуска Автоматически
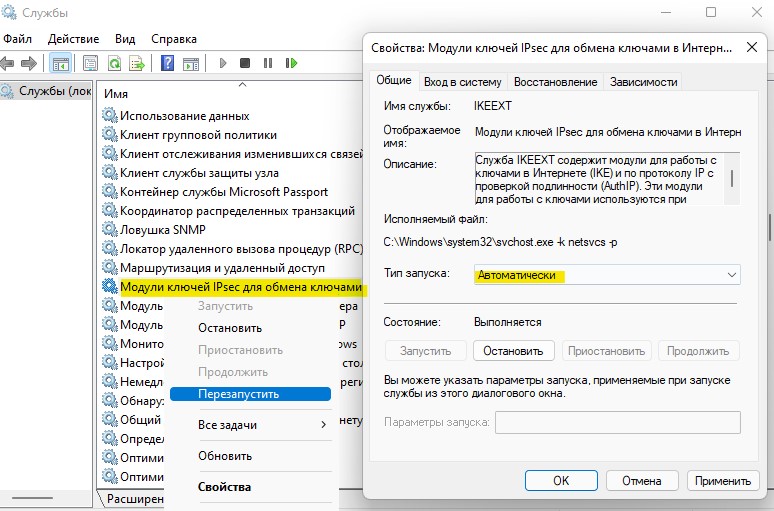
- Теперь найдите службу Агент политики IPsec и повторите всё тоже самое.

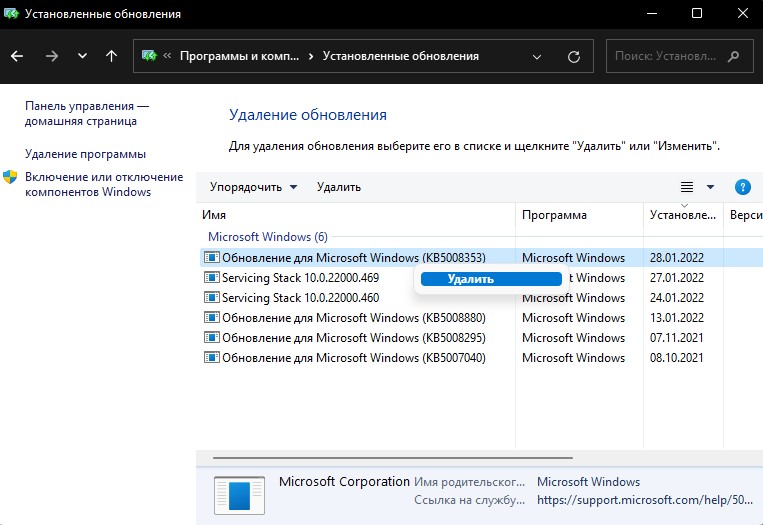
4. Удалить последнее обновление
- Нажмите Win+R и введите APPWIZ.CPL
- Слева в столбце кликните по Просмотр установленных обновлений
- Нажмите правой кнопкой мыши по последнему патчу и Удалить
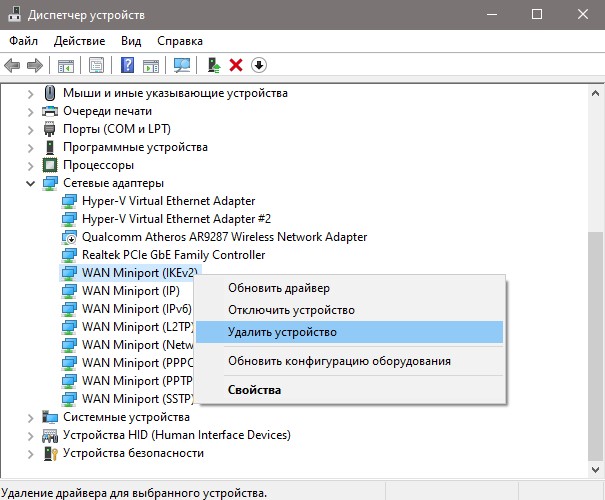
5. Переустановить сетевой адаптер
- Нажмите Win+R и введите devmgmt.msc
- Разверните графу Сетевые адаптеры
- Удалите все WAN Miniport
- Перезагрузите компьютер
6. Создать в реестре UDPE Encapsulation
Нажмите Win+R и введите regedit, чтобы открыть редактор реестра. Далее перейдите по пути:
HKEY_LOCAL_MACHINESYSTEMCurrentControlSetServicesPolicyAgent
- На пустом поле справа нажмите правой кнопкой мыши
- Создать > Параметр DWORD (32 бита)
- Назовите его AssumeUDPEncapsulationContextOnSendRule
- Далее щелкните по нему дважды и установите значение 2
- Перезагрузите компьютер
Смотрите еще:
- Ошибка 720 при подключении к интернету в Windows 10
- Ошибка 734: Протокол PPP был прерван
- Нет подключения к Интернету, защищено в Windows 10
- Исправить ошибки подключения к Интернету и веб-сайтам
- Как раздавать Интернет с ноутбука на телефон в Windows 11
[ Telegram | Поддержать ]