Бывают случаи, когда вам нужно записать Windows на флешку в Linux, например, когда вы хотите поставить эту систему второй для использования специализированных программ, или вам нужно переустановить операционку своим знакомым. Или же есть пользователи Linux, которые решили вернуться на Windows, но единственную флешку уже перезаписали под Linux LiveUSB.
Загрузочная флешка Windows в Linux создается достаточно просто. Я предлагаю несколько способов решения этой проблемы. Все их я перечислил ниже.
Загрузочную флешку можно создать с помощью терминала или специальных графических утилит. Настоятельно рекомендую отформатировать флешку в Fat32 (или Exfat) перед использованием любого из предложенных методов. Форматирование можно выполнить через Gparted, сfdisk+mkfs или через usb stick formatter (форматирование USB флеш накопителя).
Способ 1. Утилита USB Image Write
Для создания флешки можно воспользоваться утилитой Запись образа на USB. В некоторых дистрибутивах она уже предустановленна (Ubuntu, Mint и др.):
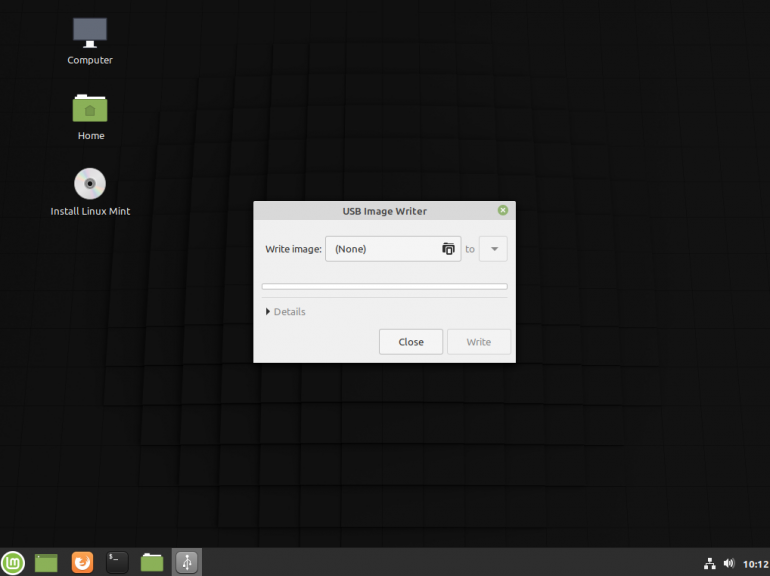
Выбрать образ в графе Write image образ и в поле to выбрать флешку. Далее нажимаем Write.
Способ 2. Утилита WoeUSB
Пожалуй, это самый простой способ создания. Установка в Ubuntu выполняется с помощью таких команд:
sudo add-apt-repository ppa:nilarimogard/webupd8
sudo apt update
sudo apt install woeusb
Откройте утилиту в меню приложений:
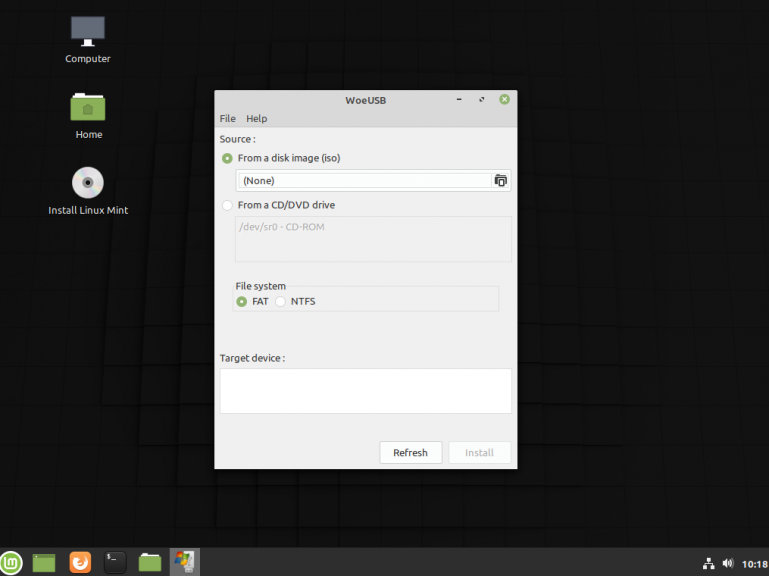
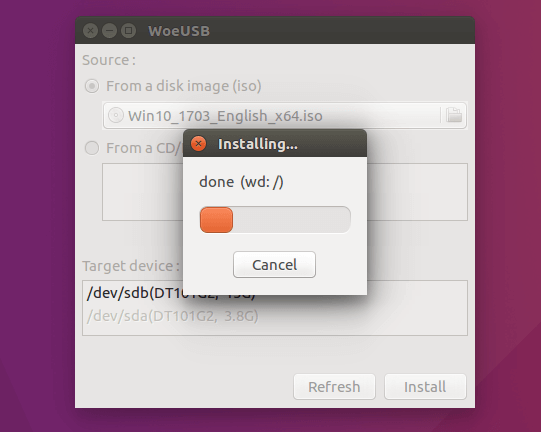
Интерфейс простой. Нажмите на кнопку Обзор со значком папки и выберите образ. Target device это флешка, на которую будет идти запись, если у вас их несколько выберите нужную. Ещё есть поле File system, где нужно выбрать какую файловую систему будете использовать. Рекомендую FAT. Затем нажмите Install и дождитесь окончания.
При появлении ошибки с кодом 256 Source media is currently mounted, размонтируйте образ ISO с Windows, если вы его смонтировали. При ошибке Target device is currently busy, извлеките флешку, затем снова подключите её. Если не сработало, попробуйте отформатировать её.
Способ 3. Терминал и Gparted
Положите образ в домашнюю папку и переименуйте его в windows.iso во избежание проблем с пробелами. Затем перейдите в терминале в домашнюю папку
cd ~
Запустите терминал через главное меню или с помощью сочетания клавиш Ctrl + Alt + T затем используйте команду dd для записи образа на флешку:
dd if=/windows.iso of=/dev/sdX
Замените X на букву вашей флешки! Узнать её можно через Gparted. В правом верхнем углу есть кнопка переключения дисков:
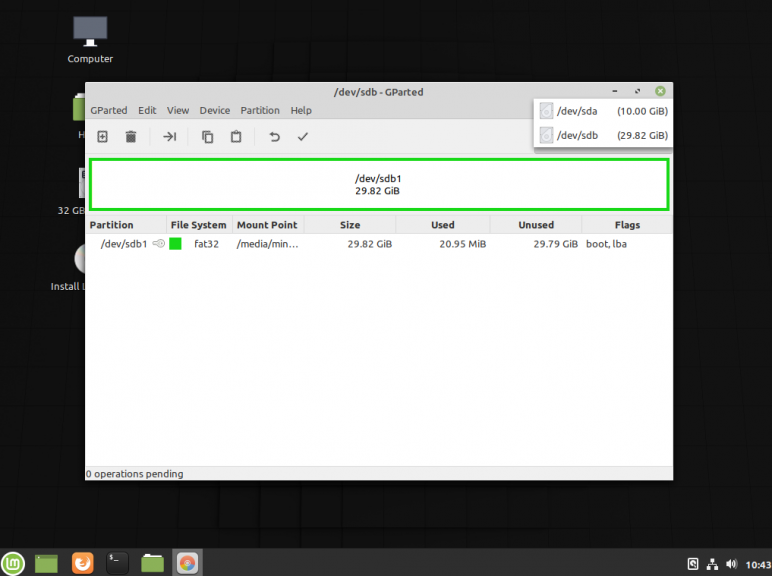
Тот диск который соответствует размеру вашей флешки и есть ваша флешка. В моем случае флешка на 32 гб это /dev/sdb. Значит команда будет иметь вид:
dd if=/windows.iso of=/dev/sdb
Дождитесь окончания записи и извлеките флешку.
Выводы
Как видите, создание загрузочной флешки Windows в Linux не представляет сложности. Это были все способы, которые я знаю. Если они вам помогли, напишите об этом. Если вы знаете еще способы, обязательно напишите о них в комментариях!

Статья распространяется под лицензией Creative Commons ShareAlike 4.0 при копировании материала ссылка на источник обязательна .
Об авторе

Здравствуйте, я изучаю Linux и обладаю хорошими знаниями английского.
This tutorial is going to show you an easy way to create a Windows 10 bootable USB on Linux. I use Ubuntu 20.04 as an example. The method applies to any Linux distribution. I use Windows to do online banking because my bank doesn’t support Linux and sometimes play games that can’t run on Linux.
What you need
- A computer running Linux
- A USB flash drive at least 8GB
- Windows 10 ISO
Download Windows 10 ISO
First, you should download Windows 10 ISO from Microsoft official download link. Note that you might not be able to download the ISO from this link on a Windows computer. This download link is visible to users on Linux computer. Once downloaded, follow the instructions below.
Note: It’s recommended to download the Windows 10 April 2018 update ISO, because the October Update ISO contains a file that is larger than 4GB, which can not be copied to a FAT32 partition.

Update: Microsoft doesn’t allow you to download the Windows 10 April 2018 Update ISO from their website anymore. You can download the ISO via this link: Win10 1803 English x64 ISO
Creating a Windows 10 Bootable USB for UEFI Firmware
This method works for UEFI firmware and is very simple. You create a GUID partition table on your USB stick, create a FAT32 file system on it, and then mount Windows 10 ISO image and copy those Windows 10 files to your USB stick and you are done. The following is a step-by-step guide.
First, install GParted partition editor on your Linux distribution. Ubuntu users run the following command.
sudo apt install gparted
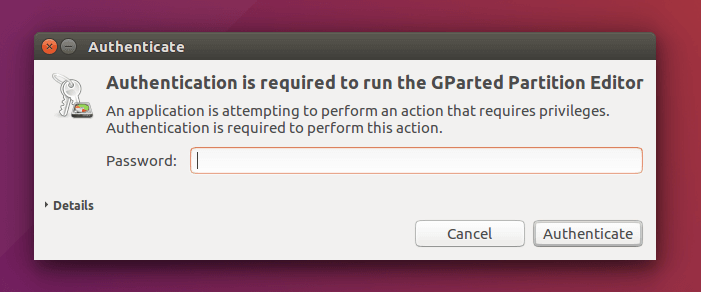
Then insert your USB stick to your computer. Make sure you back up important files in your USB stick if there’s any. Next, launch Gparted. You will need to enter your password in order to use GParted.
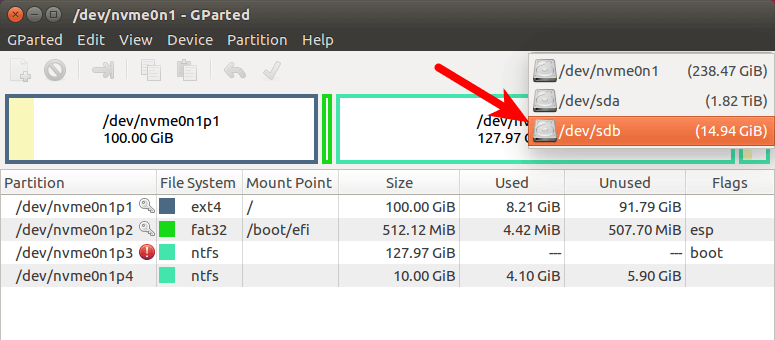
Select your USB stick from the drop-down menu on the upper-right corner. My USB stick is /dev/sdb. Yours may be different.
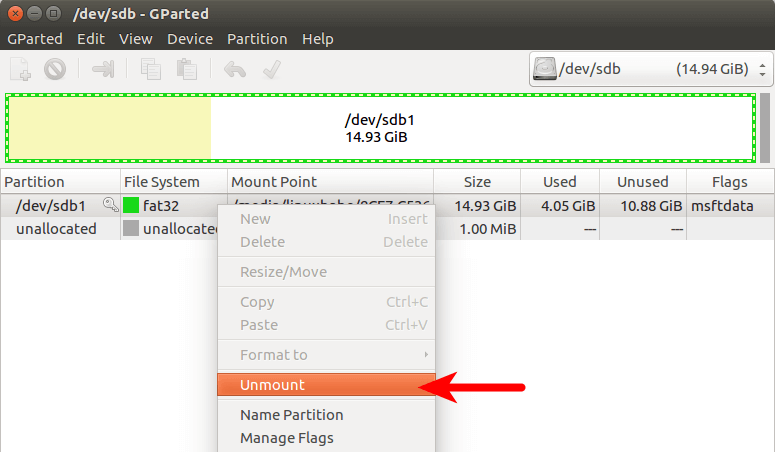
If there’s a key icon after the partition name, that means the partition is mounted. Make sure all partitions on your USB stick are unmounted. To unmount a partition, simply right-click on it and select unmount.
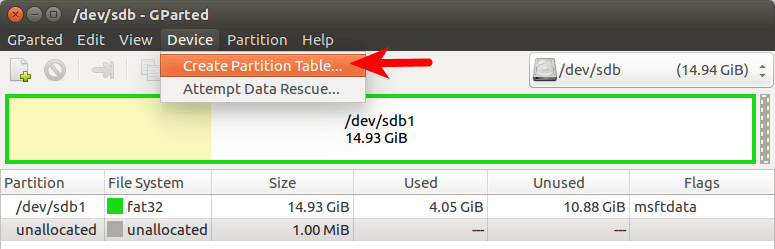
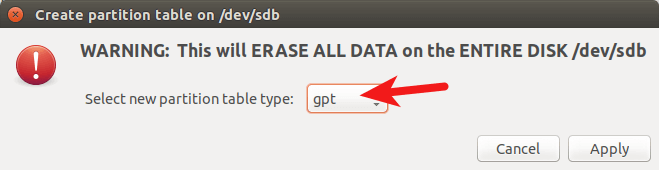
Next, on the menu bar, select Device > Create partition table.
Choose GPT as the partition table type and click Apply.
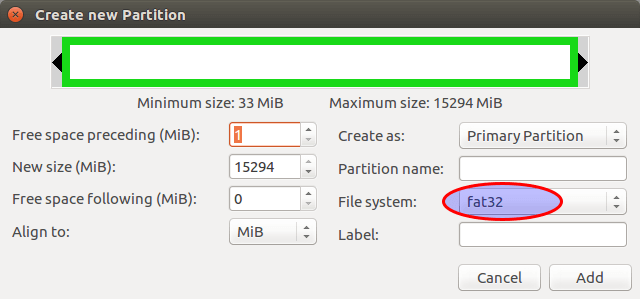
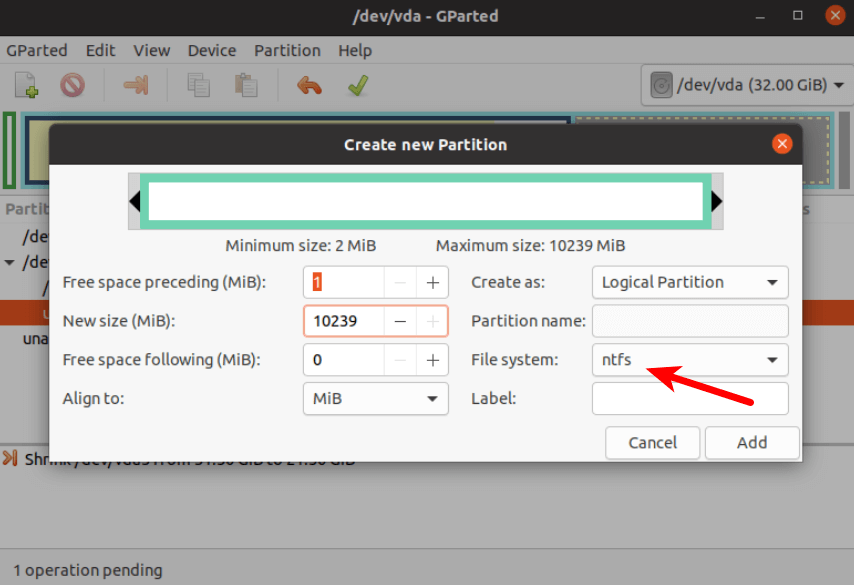
Then right-click on the unallocated space and select New to create a new partition.

Change file system type from ext4 to fat32 and click Add.
Note: The install.wim file in Windows 10 October 2018 update ISO is 4.1G, so if you downloaded this ISO image, you need to change ext4 to ntfs. If you downloaded Windows 10 April 2018 Update ISO, which contains a 3.9G size install.wim file, you can change ext4 to fat32
Update: It is my observation that my NTFS formatted USB stick isn’t bootable on my old laptop, which was bought in 2012. However, it is bootable on my desktop computer, which was bought in 2017. It has a graphical UEFI firware (I can use my mouse to configure firmware settings).
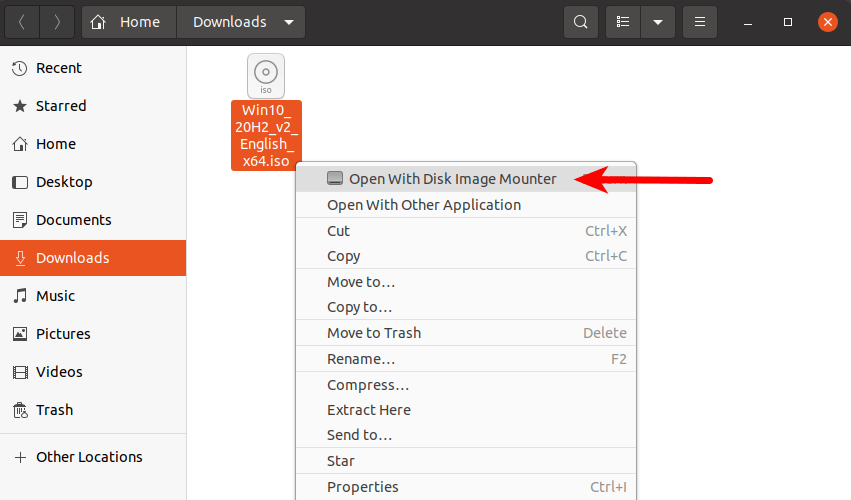
Next, click the green check button on the toolbar to apply this operation. Once that’s done, close GParted (This is important), then find your Windows 10 ISO in file manager. Open it with disk image mounter.
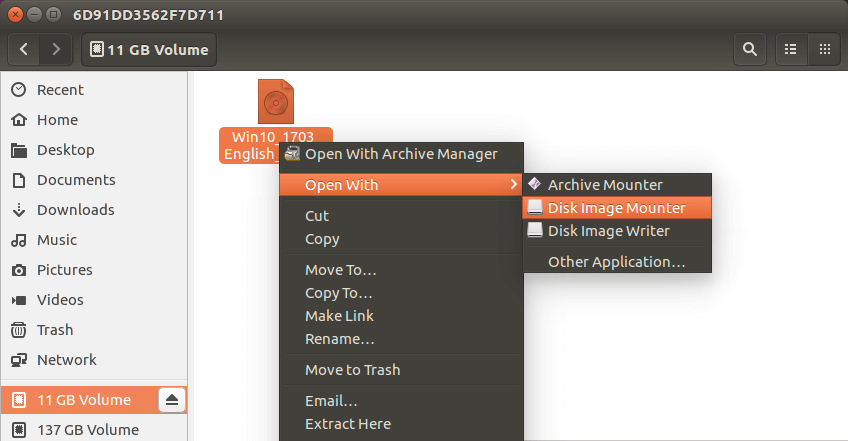
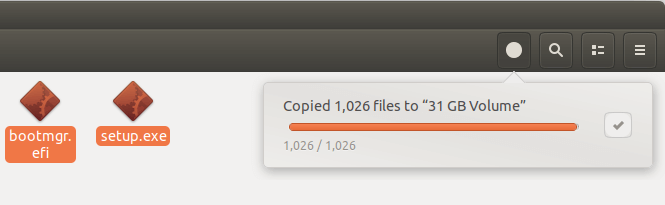
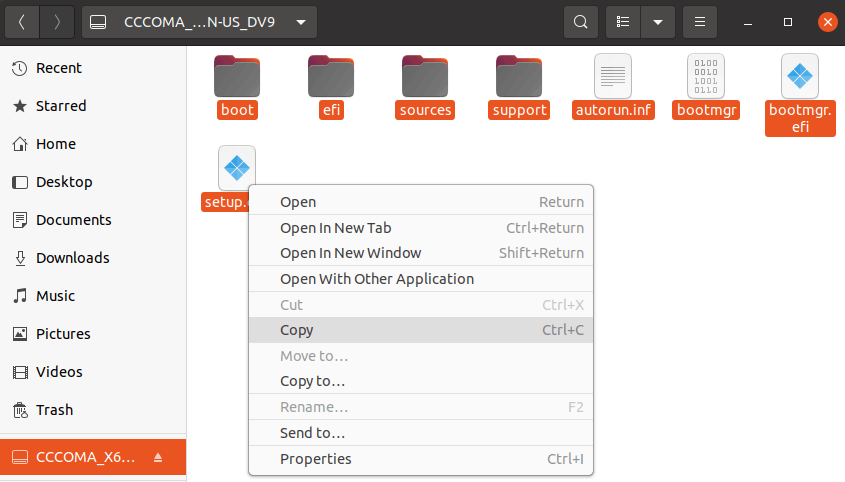
Open the mounted file system. Select all files and folders and copy them to your USB stick.
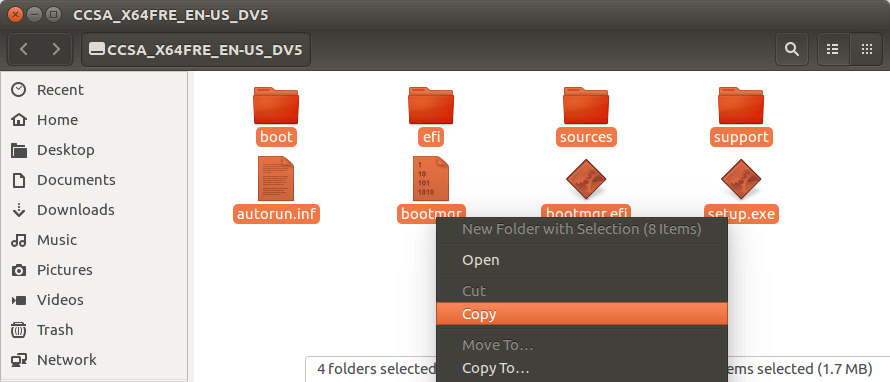
Sometimes the file manager on Ubuntu hangs and it seems that the copy operation has stopped. Actually it’s working, just be patient. When you see a check mark, it means the copy operation has finished.
If your file manager doesn’t have the Disk image mounter in the context menu, then you can use the following commands to mount. The first command will create a mount point for Windows 10 ISO and the second command will mount Windows 10 ISO under that mount point.
sudo mkdir /mnt/windows10/

sudo mount -t auto -o loop /path/to/window-10-iso /mnt/windows10/
Now in your file manager, go to /mnt/windows10/ and copy all files and folders to your USB stick.
Once the file and folders are copied, your windows 10 bootable USB is created! You can shut down your computer, boot it from this USB stick and install Windows 10 in UEFI mode. Keep in mind that you may need to disable compatibility support module (CSM) in the firmware in order to boot in UEFI mode. You may also need to remove USB stick from your computer and insert it back in order for the firmware to detect the boot loader on your USB stick.
Boot Windows 10 ISO Installer without USB (BIOS & UEFI)
Ever wondered if you can boot Windows 10 ISO installer without a USB flash drive? Yes, you can do it with GRUB2, which is the standard boot loader on Linux.
GRUB2 can not boot Windows 10 ISO directly. You need to create a separate NTFS partition on your hard disk or SSD with a partition editor like GParted and extract the Windows 10 ISO to that partition. Download the Windows 10 ISO file. The latest Windows 10 ISO file is 5.8G. The new NTFS partition should be at least 7G and it should not be used to store any other files.
Then find your Windows 10 ISO in file manager. Open it with disk image mounter.
Open the mounted file system. Select all files and folders and copy them to the NTFS partition.
Sometimes the file manager on Ubuntu hangs and it seems that the copy operation has stopped. Actually, it’s working. Just be patient. When you see a checkmark, it means the copy operation has finished.
Next, open up a terminal window and edit the /etc/grub.d/40_custom file with a text editor such as Nano.
sudo nano /etc/grub.d/40_custom
In this file, we can add custom entries to the GRUB boot menu. In this case, we want to add an entry to boot the Windows 10 installer. If your computer still uses the traditional BIOS firmware, then add the following lines in this file.
menuentry "Windows-10-Installer.iso" {
  set root=(hd0,6)
  insmod part_msdos
  insmod ntfs
  insmod ntldr
  #uncomment the following line if your computer has multiple hard drives.
  #drivemap -s (hd0) ${root}
  ntldr /bootmgr
}
My NTFS partition is the 6th partition on my first disk, so I use (hd0,6) as the root. You can run sudo parted -l command to check your NTFS partition number. If your computer has multiple hard drives, use the drivemap command to set the partition (hd0,6) as the first hard disk, so Windows will be able to boot.
If your computer uses UEFI firmware, then add the following text in this file.
menuentry "Windows-10-Installer.iso" {
  set root=(hd0,6)
  insmod part_gpt
  insmod ntfs
  insmod chain
  chainloader /efi/boot/bootx64.efi
}
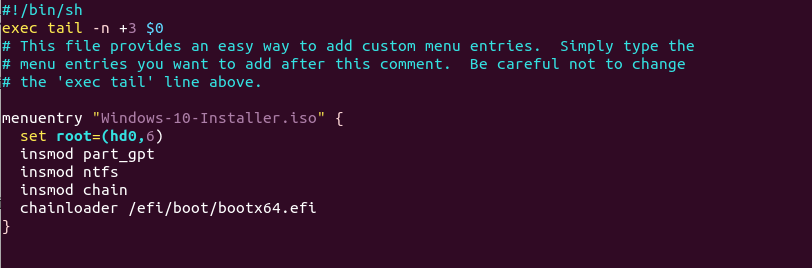
Save and close the file. (Press Ctrl+O, then press Enter to save a file in Nano text editor. Press Ctrl+X to exit.)
Then update GRUB boot menu.
sudo grub-mkconfig -o /boot/grub/grub.cfg
or
sudo grub2-mkconfig -o /boot/grub2/grub.cfg
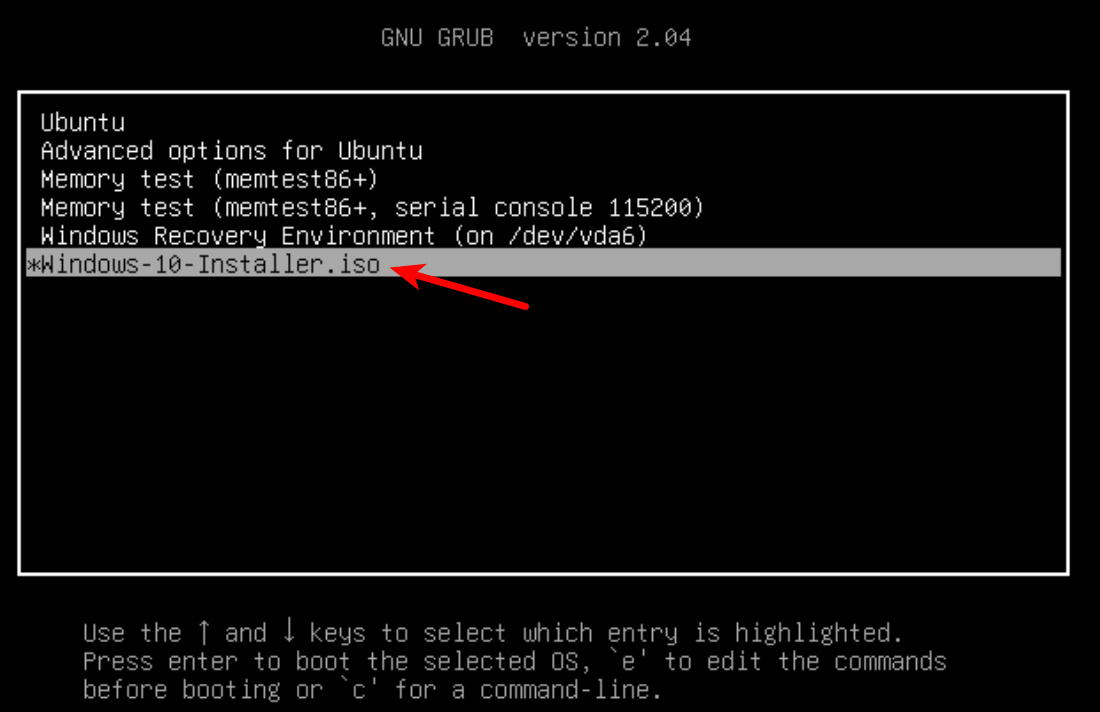
Next, set GRUB to boot the Windows 10 installer for the next boot with the following command.
sudo grub-reboot Windows-10-Installer.iso
or
sudo grub2-reboot Windows-10-Installer.iso
Unplug all your external USB storage devices, then reboot your computer. GRUB will choose the Windows 10 installer.
GRUB2 can also boot Linux ISO files stored on the hard drive, so you don’t need to create Linux live USB.
- How to Boot ISO Files From GRUB2 Boot Loader
Creating a Windows 10 Bootable USB for Legacy BIOS Using WoeUSB
WoeUSB is a fork of WinUSB. Both of them are open-source software (licensed in GPL) for making Windows bootable USB sticks on Linux platform, but the latter hasn’t been updated since 2012. You may be wondering why it’s named WoeUSB. The author said it’s a GNU convention to abbreviate software that support Windows to “woe”.
To install WoeUSB on Ubuntu 14.04/16.04/17.04, you can use the following PPA. Simply open up a terminal window and run the following commands one by one. Other Linux distro users can compile this software by following the instructions on the Github project page.
sudo add-apt-repository ppa:nilarimogard/webupd8

sudo apt update

sudo apt install woeusb
This PPA contains many other software. If you don’t need them, you can now remove this PPA from your system.
sudo add-apt-repository --remove ppa:nilarimogard/webupd8

sudo apt update
You can launch WoeUSB from Unity Dash or your application menu.
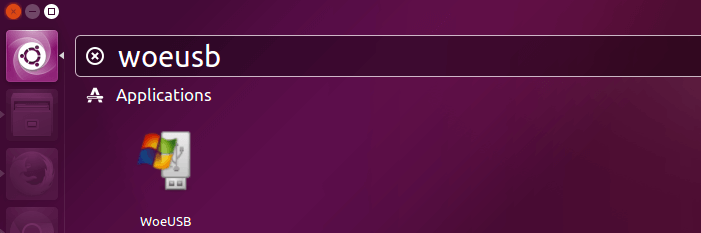
You can also start it from command line with:
woeusbgui
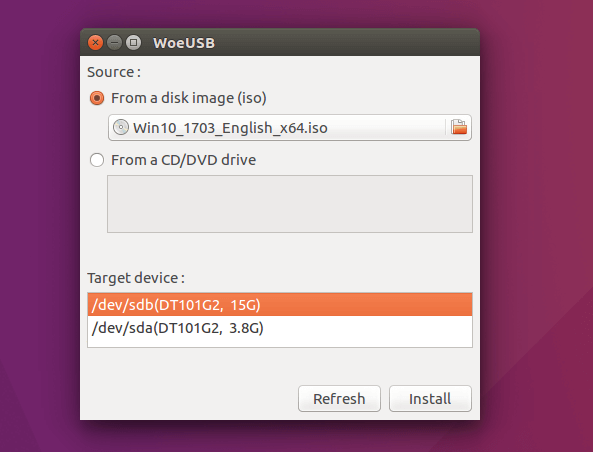
It’s very easy to use the WoeUSB GUI. Select Windows ISO image and your target USB device. Make sure your data on the USB device is backed up before hitting the Install button.
Then wait for the installation to complete.
Once done, you can use the bootable USB to install Windows 10 on your computer.
How to Use WoeUSB From the Command Line
First, find the device name of your USB stick using the following command.
lsblk
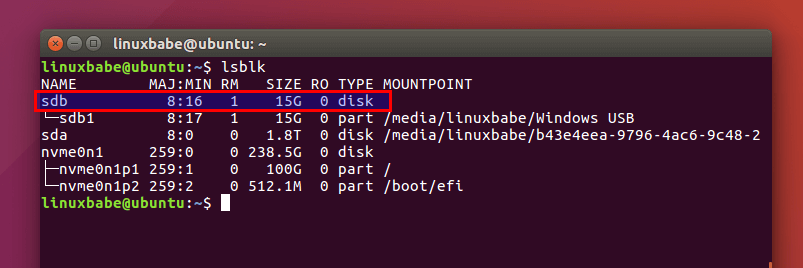
Mine is /dev/sdb. Make sure your USB is unmounted with the following command. Replace /dev/sdb1 with your own partition name.
sudo umount /dev/sdb1
Then create a bootable Windows 10 USB like below. Red texts shoudl be adapted to your own ISO file name and USB device name. The -v (--verbose) option will give more detailed output.
sudo woeusb -v --device windows-10.iso /dev/sdb
In my test, the Windows 10 USB created with WoeUSB can boot in both legacy and UEFI mode on my old computer. On my new computer, it can boot in legacy mode but failed in UEFI mode. I don’t know the exact reason, but it’s probably because of bug in this software.
That’s it! I hope this tutorial helped you create windows 10 bootable USB on Ubuntu or any Linux distribution. As always, if you found this post useful, then subscribe to our free newsletter to get new tutorials.
Rate this tutorial
[Total: 112 Average: 4.3]
Brief: This tutorial shows you how to create a bootable Windows 10 USB in Linux with and without a GUI tool called Ventoy.
I have talked a lot about creating bootable USB of Linux in Windows. How about the other way round? How about creating a bootable Windows 10 USB in Linux?
If you are uninstalling Linux from dual boot or if you want to reinstall Windows completely or you simply want to have a Windows installation disk ready, you’ll need a bootable Windows 10 USB or DVD.
In this tutorial, I am going to show you how to create a Windows 10 bootable USB in Linux. I am using Ubuntu for this tutorial but the steps should be valid for other Linux distributions as well.
There are two ways to do that and I have discussed both in this tutorial.
- The first method is mounting the ISO image of Windows to a USB disk formatted in ExFAT system. This works most of the times but there could be instances where it wouldn’t boot.
- The second method is to use a tool like Ventoy. It creates a UEFI compatible bootable disk.
Creating a Bootable Windows 10 USB in Linux
Prerequisite: Get Microsoft Windows 10 ISO and a USB of at least 8 GB in size
You can download Windows 10 ISO from Microsoft’s website. You have to specify the Windows 10 version, language and then you should see the link to download Windows 10.
Note that the Windows 10 ISO download link is valid for 24 hours only. So use a download manager in Linux to download the ~5-6 GB file and finish it within 24 hours.
Since the ISO and its content are more than 4 GB in size, I recommend a USB of at least 8 GB in size.
I have also made a video of this tutorial so that you can see the steps in action.
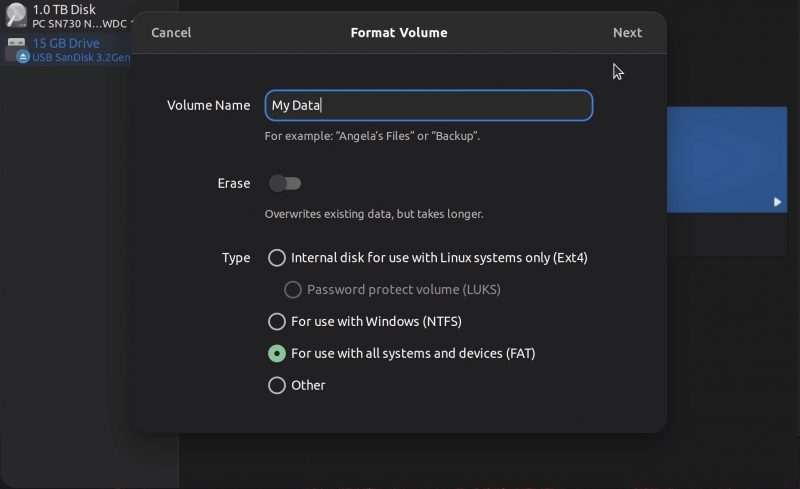
Step 2: Properly format the USB for creating bootable Windows USB
Insert your USB. You have to format it so make sure that you don’t have important data on the USB key.
In Ubuntu, press Super key (Windows key) and search for ‘Disks’. You have to use this tool to format the USB key.

In the Disks tool, make sure to select your USB drive and hit format.
It will ask to choose a partitioning scheme. It could be either MBR or GPT. Select one of them and hit Format.
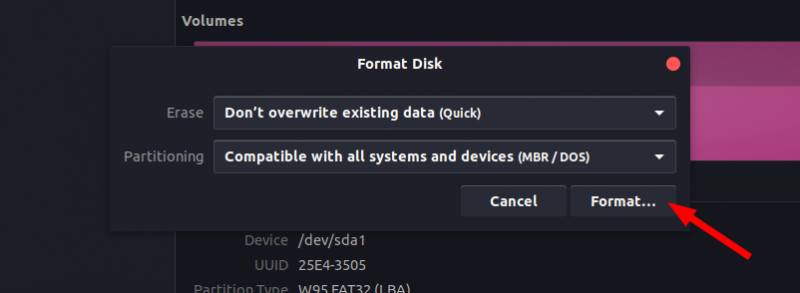
It will show you a warning that you data will be erased.

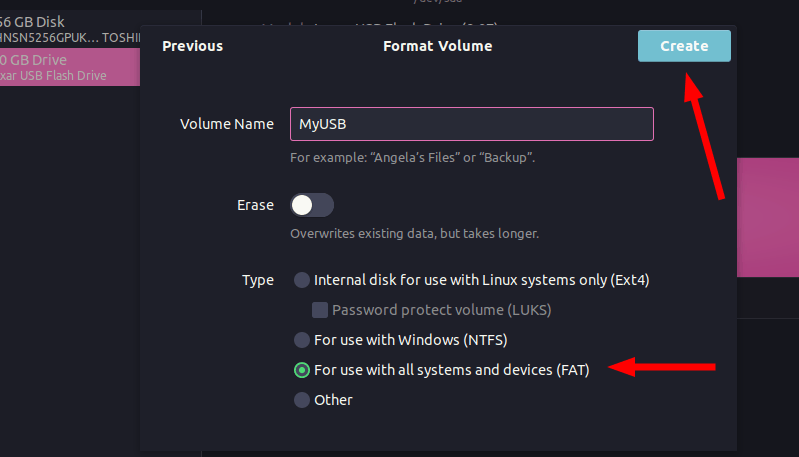
The formatting of USB is not over yet. Now, you need to create a partition on the newly formatted USB.
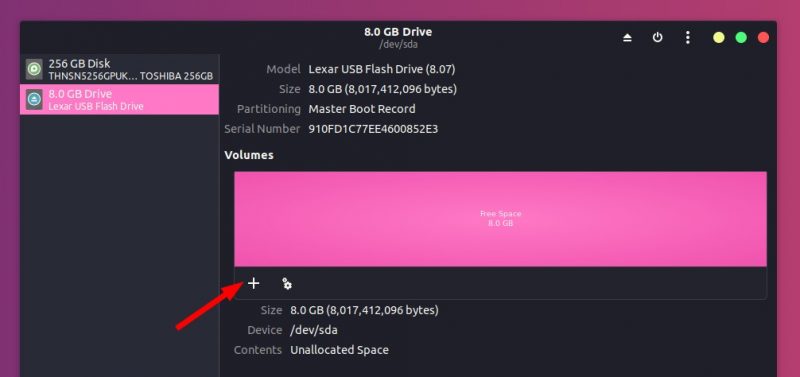
Select the entire USB disk as the partition size.
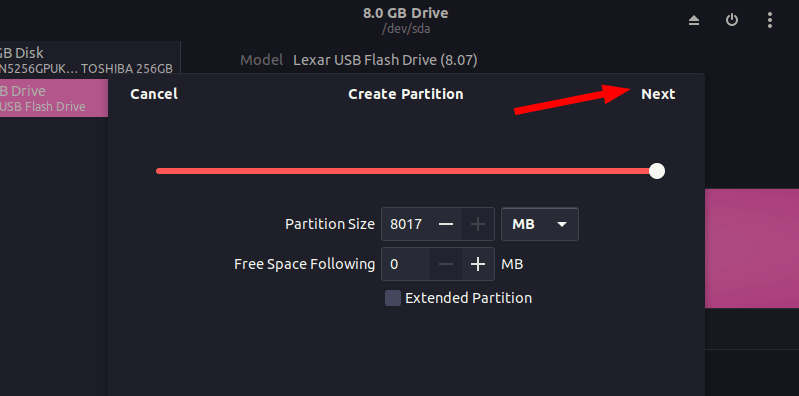
Give a name to your USB and hit Create button.
Once done, your USB should be automatically mounted. It is now ready for creating bootable Windows 10 USB disk.
Tip: Files larger than 4 GB?
Newer Windows 10 ISO might have files larger than 4 GB. In that case, FAT filesystem won’t work as it doesn’t allow a single file of size greater than 4 GB.You should then format the USB in ExFAT format.
This newer format allows files bigger than 4 GB. Use this tutorial to learn how to format a USB in ExFAT format in Linux.
Step 3: Copy the content of the ISO to USB
Now it’s time to copy the content of the Windows 10 ISO to the newly formatted USB.
You may ask, Abhishek, there is only one file and that is the ISO file itself. What are you talking about?
ISO is basically an archive format and you can see it’s content like any zip file in Linux. But to do that, you need to use ‘Disk Image Mounter’ tool that is installed by default in Ubuntu.
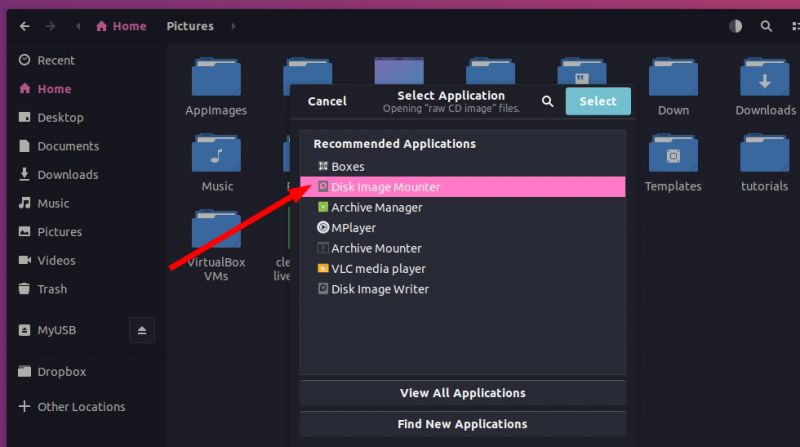
Go to your Windows 10 ISO, select it and right click on it. Now select ‘Open with other application’.
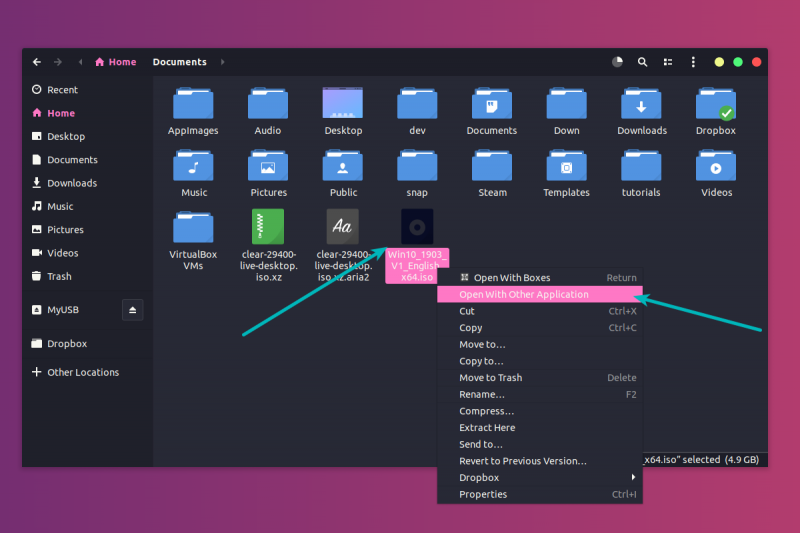
In the applications list, select Disk Image Mounter:
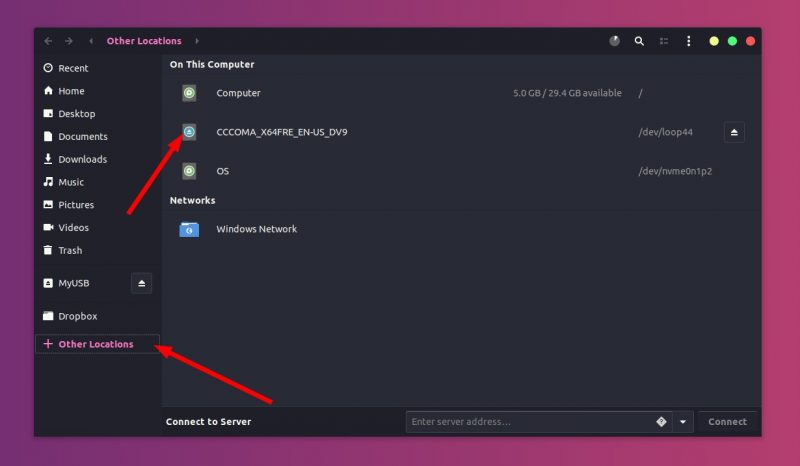
The ISO will be mounted. You may not see it in the left sidebar but if you click on the Other Locations, you should see it. Click on it to enter this mounted ISO folder.
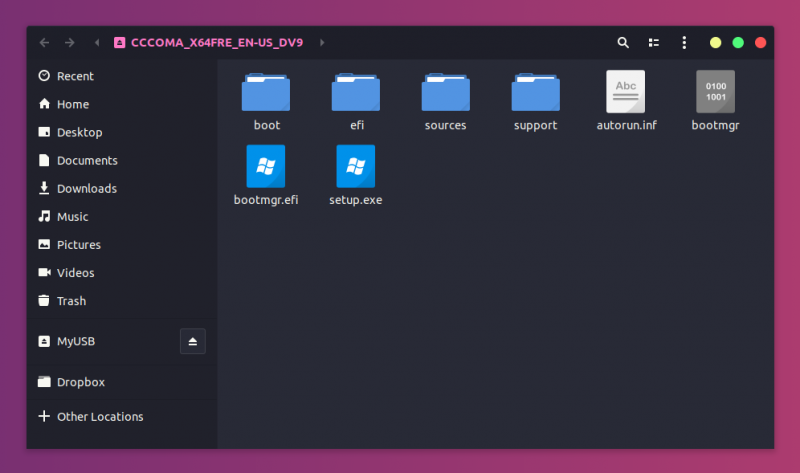
You’ll see its content. All you need to do is to select all the files (Ctrl+A), copy it (Ctrl+C) and paste it in the USB drive (Ctrl+V).
Wait for the copying process to finish as it may take some time in copying 4-5 GB of data. Once it’s done, you have a bootable Windows 10 USB in your hand. Take out the USB and use it to any system you want, restart the system and change the boot settings to boot from the USB.
Method 2: Create bootable Windows 10 USB using Ventoy
Ventoy is an open source tool for making live USBs. You can use it to create a multi-boot USB, persistent Linux live USB and bootable Windows USB.
I find Ventoy an unorthodox tool. It is slightly tricky to use and this is the reason I am writing this step-by-step tutorial.
Step 1: Prepare your USB drive
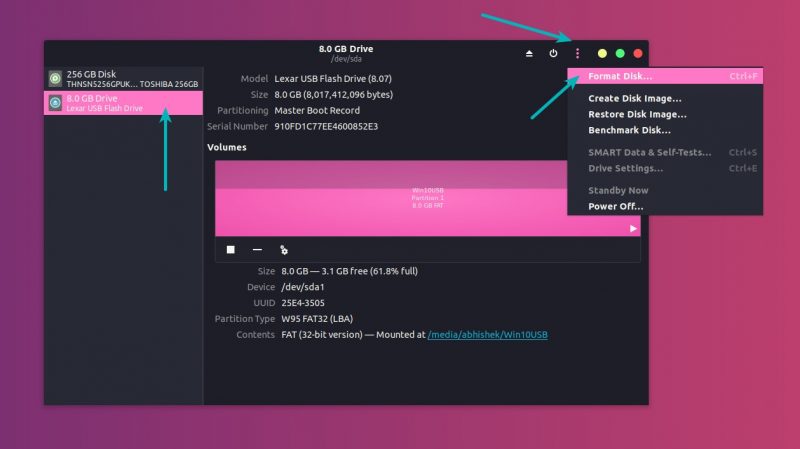
Ventoy formats the USB disk while creating the bootable disk. However, I noticed it failed to do so for an already bootable Linux disk. For this reason, I advise you to format the USB disk before you proceed further.
Plug in and then format the USB disk. You can do that by right-clicking on the mounted disk and then selecting the format option.

It doesn’t matter which filesystem you choose during formatting. It will be formatted again by Ventoy in the later steps.
Once it is formatted, keep it plugged in and go on to the next step of installing Ventoy.
Step 2: Download and install Ventoy on Linux
Ventoy is a mix of GUI and CLI tool. It can be used on any Linux distribution. Download Ventoy for Linux from the release page of its GitHub repository.
You’ll find the .tar.gz file with Linux in its name. This is the file you should download.
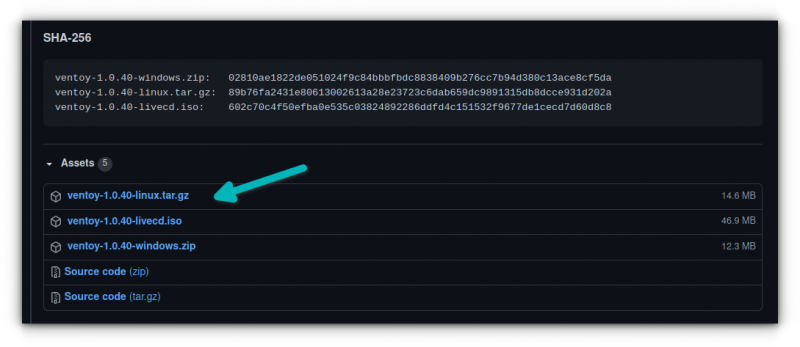
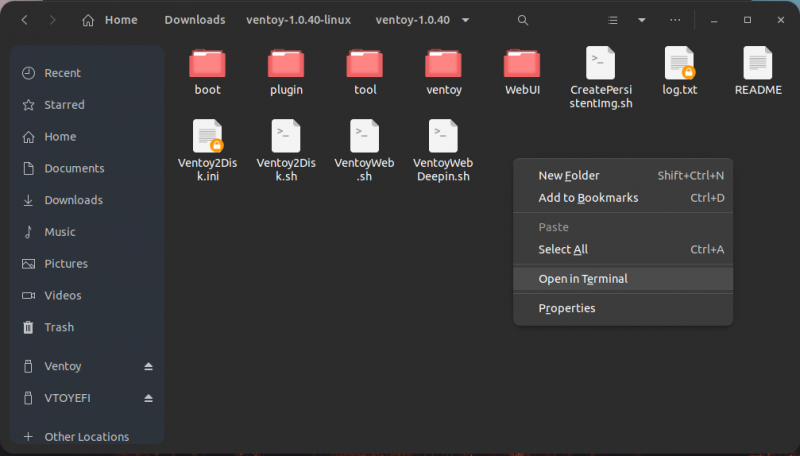
Once downloaded, extract the tar gz file. Simply right click on it and extract it.

Go inside the extracted folder, and you’ll find a few scripts in it. You need to run one named VentoyWeb.sh. To do that, you’ll have to use the command line.
Now if you are familiar with Linux command line, I presume that you can easily find your way to the file by using the cd command.
Alternatively, you can use the “open in terminal” feature of the file manager to open the location in a terminal.
Once you are in the correct directory in the terminal, use the following command to run Ventoy:
sudo ./VentoyWeb.shVentoy runs inside a browser. It will give you the URL when you run it. Copy this URL and paste it in a browser.
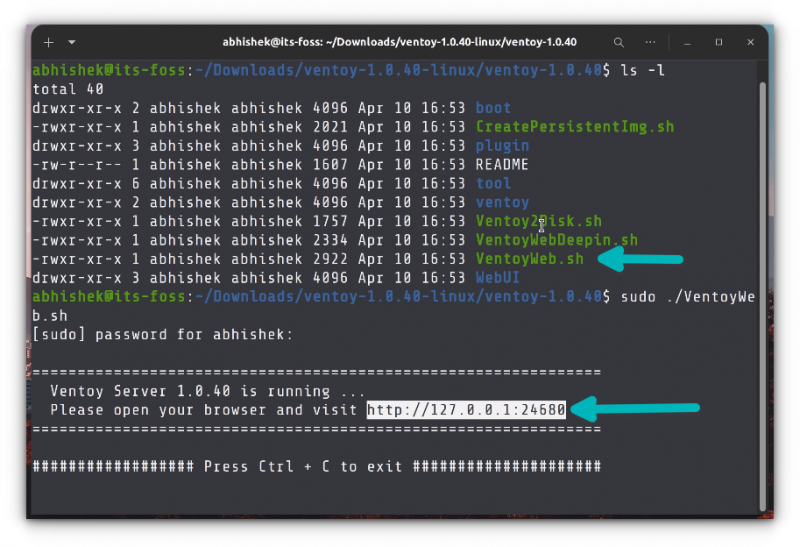
It will open a web page with Ventoy running in it and if the USB is already plugged in, it should recognize it. If not, press the refresh button.
Step 3: Use Ventoy to create bootable Windows 10 USB disk
Though Ventoy has the option to create a bootable disk with secure boot, it is experimental and may not work.
Considering you are going for a UEFI installation, it will be wise use GPT for partitioning scheme.
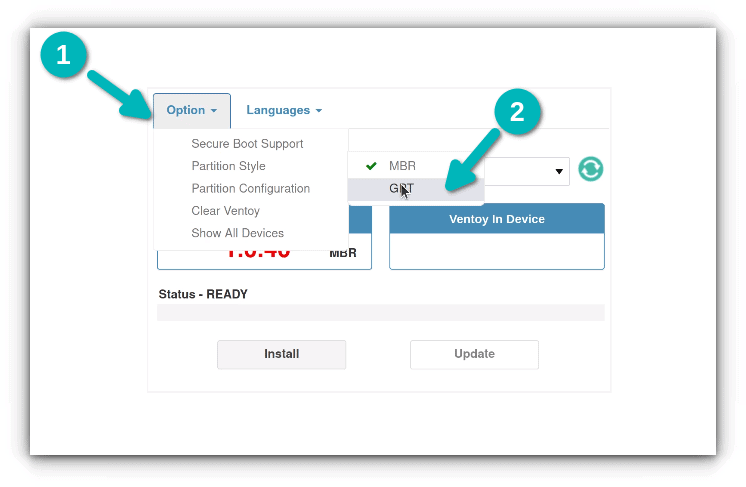
Once things are set, hit the install button. It will show you a couple of obligatory warnings. If the installation completes successfully, you should see a success message.
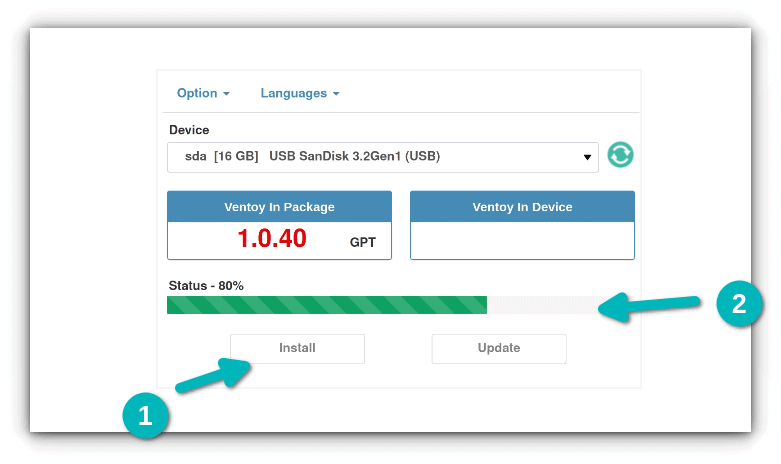
Note: If you do not see Ventoy disk mounted after the successful installation, please plug out the USB and then plug it in again.
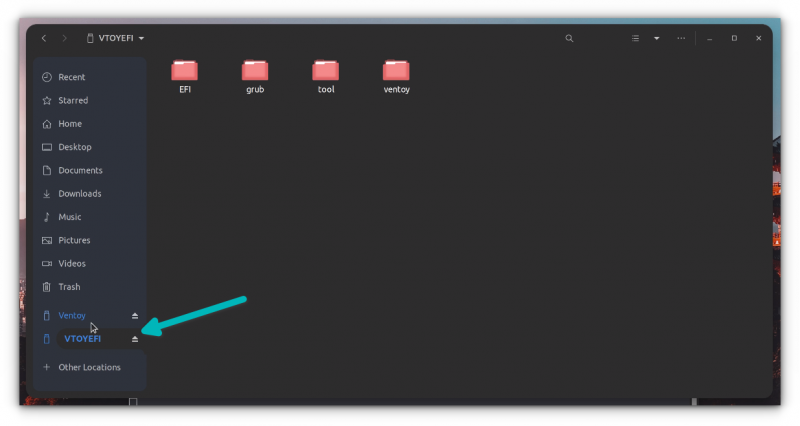
When you hit the install button, it creates two partitions on the USB disk.
- VTOYEFI: A small partition for the UEFI files.
- Ventoy: A big, empty partition in ExFAT format where you’ll copy the ISO image.
Yes. That’s what you need to do. Copy the ISO image of the Windows 10 into the bigger ExFAT partition on the USB disk.
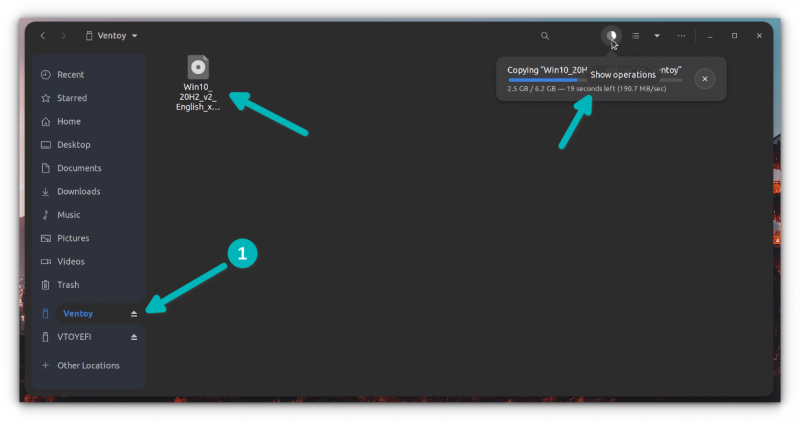
Once the copying finishes, DO NOT RUSH to plug out the USB just yet. Click on the unmount option from the file manager. Chances are that some files are still being written and it may show an error message.

Wait for a few more minutes and you should see a message that it is safe to remove the disk. Now you can unplug it and use it on whichever system you want.
Step 4: Using the bootable Windows 10 disk
Alright! You are almost there. Plug in your bootable Windows USB you created in the previous section. Start the computer and go to the BIOS setting by using the F2/F10 or F12 key at the time you see the logo of your computer’s manufacturer.
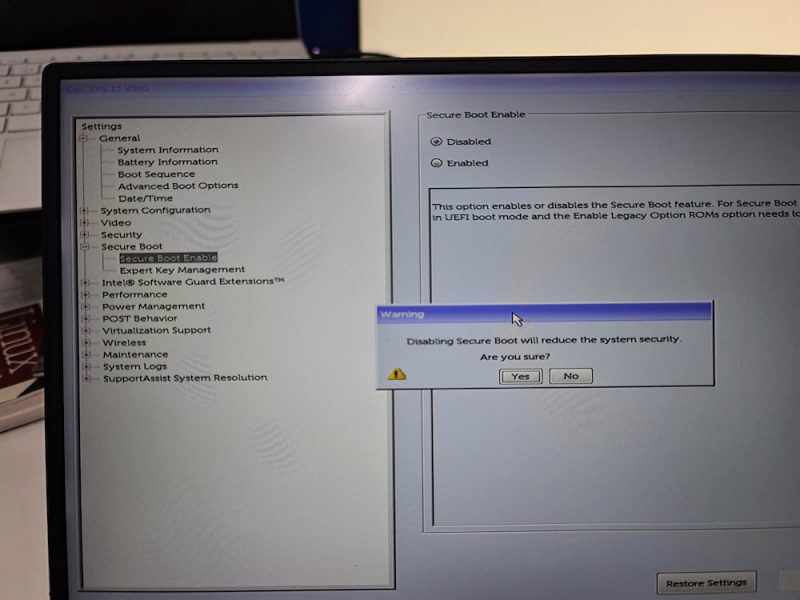
In here, look for the secure boot settings and disable it. If the secure boot is enabled, chances are that your system won’t allow you to boot from the USB disk (to secure your system and data at boot time).
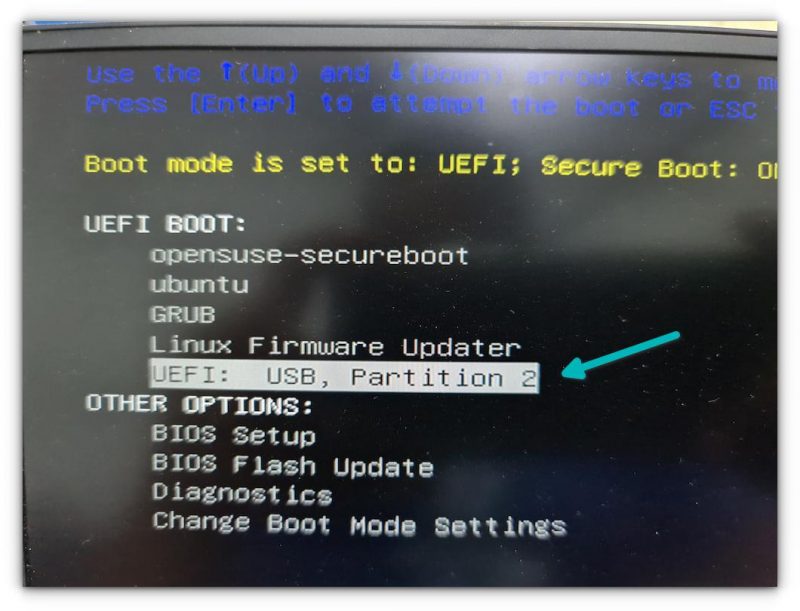
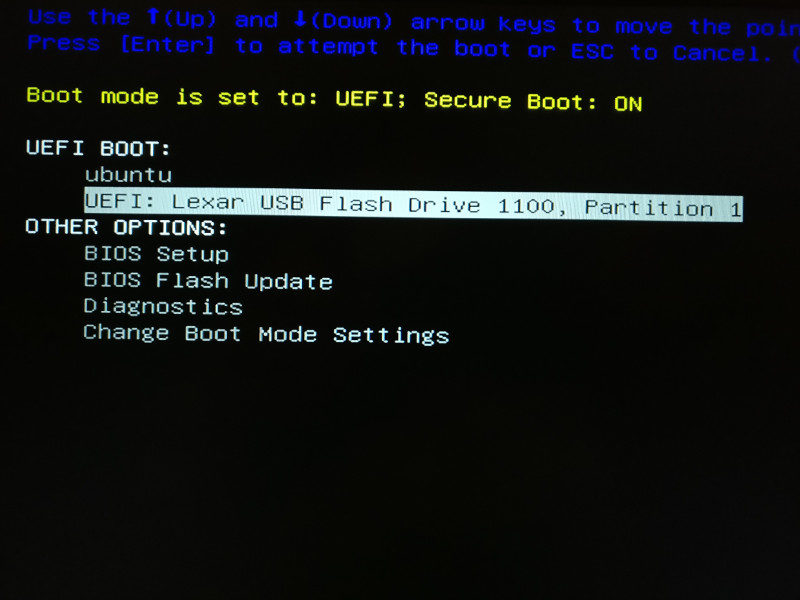
After disabling the secure boot, go into the boot order and then choose the UEFI USB Disk to boot from. Some systems will give this option after you press F12 or F10 button.
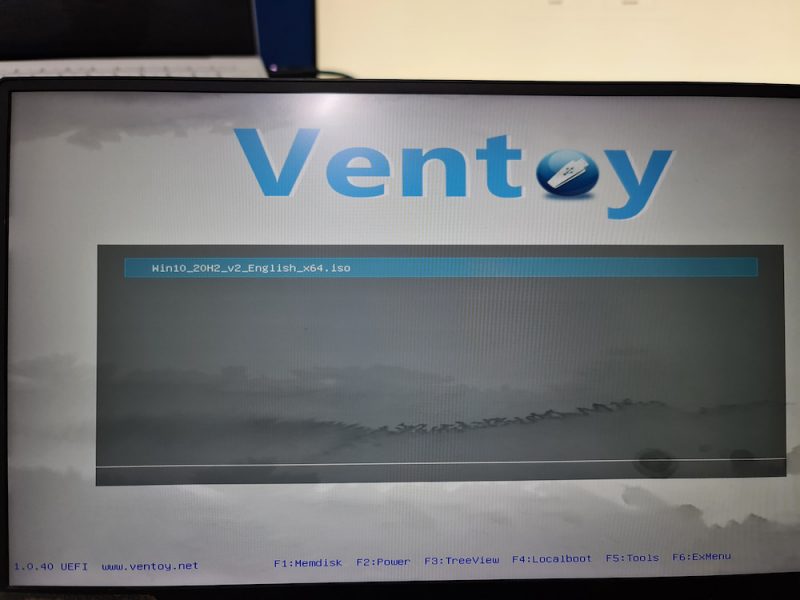
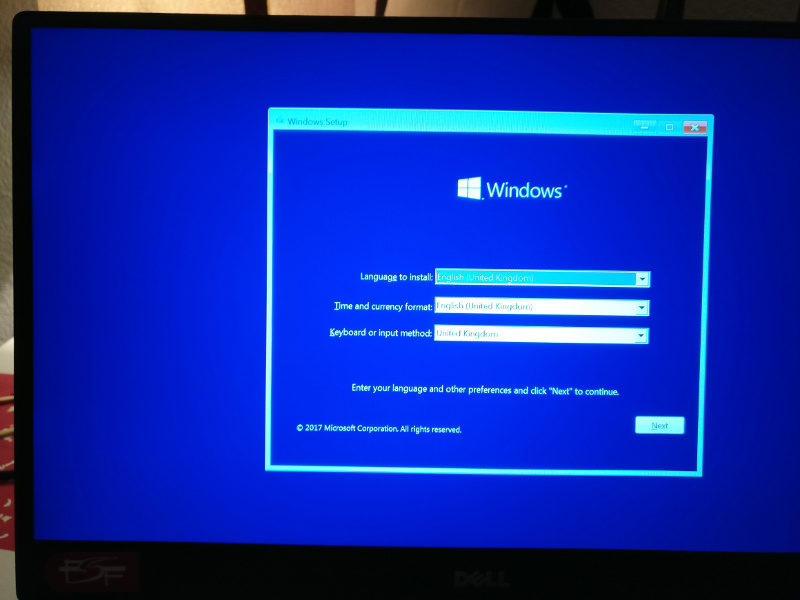
It takes a couple of minutes to start the Windows disk. You should see a screen like this and it will give you the option to repair boot or install Windows.
I think you can take things from here. Enjoy it 
There is another popular tool WoeUSB that can also be used for this purpose.
Step 4: Using Windows 10 bootable USB
Once the bootable USB is ready, restart your system. At boot time, press F2 or F10 or F12 repeatedly to go to the boot settings. In here, select to boot from USB.
You’ll see that Windows 10 is being booted and it gives you the option to install or repair your system. You know what to do now from here.
I hope you find this tutorial useful for creating bootable USB of Windows 10 in Linux. If you have questions or suggestions, please feel free to leave a comment.
Windows 10 October 2018 release UEFI bootable USB drive on any Linux distribution.
Notice, that since Windows 10 October 2018 release the installation file sources/install.wim is larger than the maximum FAT32 file size, so we will format USB drive to NTFS. Windows installer also cannot work with an EFI partition (code ef00), so we will use Microsoft basic data partition type (code 0700).
Variant A (For PCs with NTFS support)
Steps for creating USB drive with name /dev/sdc (Replace all commands with YOUR device name!):
- Insert USB drive to computer and make sure it is unmounted. Some distributions like to automount USB drives, so make sure you unmount them. Mounted partitions can be found with
mount -l | grep '/dev/sdc', then unmount withsudo umount /dev/sdcX(whereXis partition number). - Open USB block device using
gdisk /dev/sdc, configure it asGPTand createMicrosoft basic datapartition (code0700), then write changes and quit (Next steps will destroy partition table in your USB drive!!!).
sudo gdisk /dev/sdc
o
> This option deletes all partitions and creates a new protective MBR.
> Proceed? (Y/N): y
n
> Partition number ... > hit Enter
> First sector ... : > hit Enter
> Last sector ... : > hit Enter
> Current type is 'Linux filesystem'
> Hex code or GUID (L to show codes, Enter = 8300): 0700
p
> Should print something like:
> Disk /dev/sdc: 15646720 sectors, 7.5 GiB
> Model: DataTraveler 160
> Sector size (logical/physical): 512/512 bytes
> Disk identifier (GUID): ...
> Partition table holds up to 128 entries
> Main partition table begins at sector 2 and ends at sector 33
> First usable sector is 34, last usable sector is 15646686
> Partitions will be aligned on 2048-sector boundaries
> Total free space is 2014 sectors (1007.0 KiB)
> Number  Start (sector)    End (sector)  Size       Code  Name
>    1            2048        15646686   7.5 GiB     0700  Microsoft basic data
w
> Final checks complete. About to write GPT data. THIS WILL OVERWRITE EXISTING PARTITIONS!!
> Do you want to proceed? (Y/N): y
q
- Format new partition as NTFS (thx @Alex for
-Qidea):
sudo mkfs.ntfs -Q /dev/sdc1
- Mount new USB partition to temporary directory in your home:
mkdir ~/tmp-win10-usb-drive
sudo mount /dev/sdc1 ~/tmp-win10-usb-drive
- Download Windows installation ISO, create new temporary directory in your home and mount it there:
mkdir ~/tmp-win10-iso-mnt
sudo mount Win10_1809Oct_English_x64.iso ~/tmp-win10-iso-mnt
- Copy all files from mounted ISO to USB drive (you can use
rsyncto see progress):
sudo cp -rT ~/tmp-win10-iso-mnt/ ~/tmp-win10-usb-drive/
- Unmount Windows ISO and USB drive and remove temporary directories:
sudo umount ~/tmp-win10-iso-mnt/ ~/tmp-win10-usb-drive/
rmdir ~/tmp-win10-iso-mnt/ ~/tmp-win10-usb-drive/
- Insert USB drive to new computer and boot from it.
Variant B (For PCs without NTFS support)
Steps for creating USB drive with name /dev/sdc (Replace all commands with YOUR device name!):
- Insert USB drive to computer and make sure it is unmounted. Some distributions like to automount USB drives, so make sure you unmount them. Mounted partitions can be found with
mount -l | grep '/dev/sdc', then unmount withsudo umount /dev/sdcX(whereXis partition number). - Open USB block device using
gdisk /dev/sdc - Configure it as
GPT - Create first partition of 1GB size and type
Microsoft basic data(code0700). - Create second partition of rest of the size and type
Microsoft basic data(code0700). - Write changes and quit (Next steps will destroy partition table in your USB drive!!!).
sudo gdisk /dev/sdc
> o
> This option deletes all partitions and creates a new protective MBR.
> Proceed? (Y/N): y
> n
> Partition Number: Enter
> First sector: Enter
> Last sector: 1G
> Type: 0700
> n
> Partition Number: Enter
> First sector: Enter
> Last sector: Enter
> Type: 0700
> p
# Should print something like:
> Disk /dev/sdc: 30031250 sectors, 14.3 GiB
> Model: Ultra USB 3.0
> Sector size (logical/physical): 512/512 bytes
> Disk identifier (GUID): C657C0AF-3FE2-4152-8BF1-CE3CCA9F3541
> Partition table holds up to 128 entries
> Main partition table begins at sector 2 and ends at sector 33
> First usable sector is 34, last usable sector is 30031216
> Partitions will be aligned on 2048-sector boundaries
> Total free space is 4061 sectors (2.0 MiB)

> Number  Start (sector)    End (sector)  Size       Code  Name
>    1            2048         2048000   999.0 MiB   0700  Microsoft basic data
>    2         2050048        30031216   13.3 GiB    0700  Microsoft basic data

w
> Final checks complete. About to write GPT data. THIS WILL OVERWRITE EXISTING PARTITIONS!!
> Do you want to proceed? (Y/N): y
q
- Format first partition as FAT32 and second as NTFS:
sudo mkfs.fat -F32 /dev/sdc1
sudo mkfs.ntfs -Q  /dev/sdc2
- Mount new USB partitions to temporary directories in your home:
mkdir ~/tmp-win10-fat-usb-drive
mkdir ~/tmp-win10-ntfs-usb-drive
sudo mount /dev/sdc1 ~/tmp-win10-fat-usb-drive
sudo mount /dev/sdc2 ~/tmp-win10-ntfs-usb-drive
- Download Windows installation ISO, create new temporary directory in your home and mount it there:
mkdir ~/tmp-win10-iso-mnt
sudo mount Win10_1809Oct_English_x64.iso ~/tmp-win10-iso-mnt
- Copy following files with from mounted ISO to FAT32 formatted USB drive (basically copy everything besides
sources/but includesources/boot.wim):
sudo cp ~/tmp-win10-iso-mnt/* ~/tmp-win10-fat-usb-drive/
sudo cp -r ~/tmp-win10-iso-mnt/boot ~/tmp-win10-fat-usb-drive/
sudo cp -r ~/tmp-win10-iso-mnt/efi ~/tmp-win10-fat-usb-drive/
sudo cp -r ~/tmp-win10-iso-mnt/support ~/tmp-win10-fat-usb-drive/
sudo mkdir ~/tmp-win10-iso-mnt/sources ~/tmp-win10-fat-usb-drive/
sudo cp ~/tmp-win10-iso-mnt/sources/boot.wim ~/tmp-win10-fat-usb-drive/sources
- Copy everything from mounted ISO to NTFS formatted USB drive:
sudo cp -rT ~/tmp-win10-iso-mnt/ ~/tmp-win10-ntfs-usb-drive/
- Unmount Windows ISO and both USB partitions and remove temporary directories:
sudo umount ~/tmp-win10-iso-mnt/ ~/tmp-win10-usb-fat-drive/ ~/tmp-win10-usb-ntfs-drive/
rmdir ~/tmp-win10-iso-mnt/ ~/tmp-win10-usb-drive/
- Insert USB drive to new computer and boot from it.
We have previously looked at how you can create a bootable USB drive of various Linux distributions from a Windows PC. Some of these posts include Creating a Linux Mint Live USB drive on Windows and create a bootable Ubuntu Live USB drive on Windows using tools like Rufus and PowerISO. This post will do the reverse – How to create Windows 10 USB installation Drive in Linux.
You Might Be Interested In
Requirements
- Windows 10 ISO file
- A USB drive (at least 8GB)
- Root privileges
- An active internet connection to download some of the tools
Creating Windows 10 USB installation Drive in Linux
To get started, download the Windows 10 ISO file from their official website. Earlier versions were around 4GB in size, but I saw the latest version is nearly 5.7GB. That’s why I recommend you have a USB drive with at least 8GB of space. However, if you are using an earlier Windows ISO version (maybe Windows 10 2015), which is about 3.6GB, a 4GB-USB Drive would be okay.
Download Windows 10
Format the USB Drive
Even though we will look at various methods you can use to make the USB drive bootable, always ensure your USB is formatted with the right file format. We will use the disk utility that comes pre-installed with most Linux distribution and Gparted. Note: GParted is not pre-installed in most Linux distribution, but it’s one of the best tools to manage and partitions your disks. Our post on How to safely create or resize partitions in Linux using GParted can give you a little more insight into this fantastic tool.
Format USB with Disks Utility
Step 1. Insert/Plug your USB drive and launch the Disks utility from the applications menu.

Launch Disks
Step 2. The Disk Utility window will open, listing all the available Hard drives and USB drives connected to your PC. Select your USB drive. From the image below, you can see I have my 8GB USB drive selected.

Disk Utility
Step 3. With your USB selected, click on the Settings button (represented with a gear icon). A menu will pop-up with several options. Select the first option, which is ‘Format.’

Open Settings
Step 4. A window will pop-up listing several options. Enter the Volume Name (can be any) and select the file format you want to use.
Note: If your Windows ISO file is less than 4GB, you can select the FAT option. However, if it’s bigger than that, use the NTFS option as I have done on the image below. That is because the FAT file system only supports a maximum file size of 4GB; for any file more extensive than 4GB, use exFAT or NTFS. Click Next when done.

Format USB
Step 5. You will see a warning – “all data on the volume will be lost.” You can also see the configurations below. Click on Format to finalize the process.

Confirm and Format USB
Once the format process complete, you can now create a bootable USB drive of Windows.
Format USB with GParted
Gparted is a free Disk manager utility available for most Linux distributions. It creates, resize, and move partitions, format and also create partition tables.
To install Gparted, execute any of the commands below depending on your distribution.
-
Ubuntu/Debian
sudo apt install gparted
-
Fedora
su -c "yum install gparted"
-
Mageia
sudo urpmi gparted
-
OpenSUSE
sudo zypper install gparted
Once you have successfully installed GParted, proceed to launch it from the applications menu or execute the command GParted on the Terminal. Note: GParted requires root privileges. You will, therefore, be required to enter your Root password.

Launch GParted
Select your USB drive from the drop-down menu at the top-left corner.

Select USB drive
Right-click on your USB drive and select the Format option. Use the NTFS file system. If you don’t see these options (or they are greyed out), you might need to unmount your USB drive first. You will see the unmount option when you right-click on the USB.
Once done, click on the Green tick at the top to apply the changes.
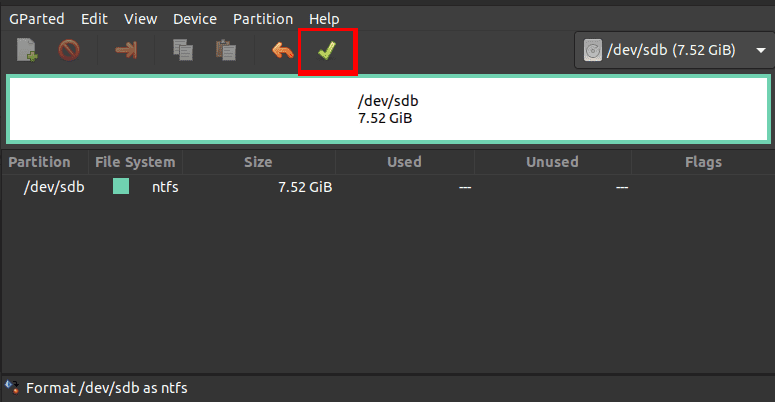
Apply Changes
Let’s now look at the various methods you can use to create a bootable USB drive of Windows on Linux.
1. Create a bootable Windows USB with Disk Image Mounter
Step 1. Launch the File Manager and navigate to the directory containing your Windows ISO file. Right-click on it and select the option “Open with Disk Image Mounter.”

Disk Image Mounter
Step 2. The Windows ISO file will be mounted as a drive, and you can find it on the left side of the file manager. For some, you might need to click on “Other Locations” to see the mounted Windows ISO.

Mount Windows ISO
Step 3. Click on the mounted Windows ISO and copy all the contents to the USB drive. You can use the shortcuts Ctrl + A to select everything, Ctrl + C to copy, and Ctrl + V to paste the files to the USB drive.

Copy Files to USB
Now, wait for the process to complete. Once done, you can proceed to eject your PC from the file manager. Do this by right-clicking on the drive and clicking the eject option. You might get an error like “Do not unplug the drive until the write process has finished.” Please wait for a while until you see the notification, “can be safely removed.”

Eject USB Drive
Note: From my experience working with Linux systems, never remove/unplug your USB drive from your PC without ejecting it from the file manager first. That’s especially when copying files. Even though it might show a “tick,” which means the copying process is complete, that might not be the case, and you will lose data if you forcefully unplug it without ejecting it.
If you did everything correctly, you now have a bootable USB drive of Windows 10. You can proceed to use it to boot up your PC and install Windows 10.
2. Create a bootable Windows USB with WoeUSB
WoeUSB is a Linux tool used to create a bootable USB drive for Windows. The tool is available in two formats. The woeusb program runs on the command-line and the woeusbgui, which presents a graphical interface. WoeUSb is free, and the source code is available on GitHub.
Install WoeUSb
Below are the installation procedure and commands for various Linux distributions.
-
Ubuntu/Debian
sudo add-apt-repository ppa:nilarimogard/webupd8
sudo apt update
sudo apt install woeusb
Alternatively, you can download the DEB file from the link below;
Download WoeUSB DEB
Note: If you get an error like “woeusb : Depends: libwxgtk3.0-0v5 (>= 3.0.4+dfsg), but it is not installable – E: Unable to correct problems, you have held broken packages” while executing the commands above, download and install the libwxgtk package from this link. Once done, try installing WoeUSB again.

Broken package error
-
Fedora
To install WoeUSb on Fedora, we will use the Snap package format. Execute the commands below:
sudo dnf install snapd
sudo ln -s /var/lib/snapd/snap /snap
sudo snap install woe-usb --edge
-
Linux Mint
use the commands below:
sudo add-apt-repository ppa:nilarimogard/webupd8
sudo apt update
sudo apt install woeusb
-
Elementary OS
Like Fedora, use the snap package manager to install WoeUSb on Elementary OS:
sudo apt update
sudo apt install snapd
sudo snap install woe-usb --edge
If you are using any other Linux distribution that is not mentioned above, use Snap to install WoeUSb. Now, let’s proceed and see how you can create a bootable USB drive of Windows in Linux systems.
Step 1. Format the USB drive. Use any of the methods described above.
Step 2. Once you have successfully installed WoeUSB, launch it from the applications menu.

Launch WoeUSB
The main WoeUSB window will open. It contains three main sections. The Source section is where you will select the Windows ISO file you want to use. In the File system section, select the file system format you want to use – whether FAT or NTFS. The final section is the Target device. Here, you will need to select the destination USB drive that you want to make bootable.

WoeUSB main window
Step 3. After you have selected the ISO file, chosen the file system format to use, and the destination USB drive, click on the Install button at the bottom right. WoeUSB will start copying the files to the destination USB drive.

WoeUSB
Note: It might take some time to make the USB drive bootable (up to 15 minutes). You might see the “Done” notification but don’t eject the USB drive until you see an “Installation Success” pop-up window.

Installation Success
Step 4. Click OK and close the WoeUSb window. You can now eject the USB drive from the file manager and use it to boot and install Windows.
3. Create a bootable Windows USB with UNebootin
UNetbootin is a cross-platform utility used to create a bootable USB drive. Unlike WoeUSb, which supports only Windows ISO files, UNetbootin can also create bootable USB drives of Linux files. One additional exciting feature with the UNetbootin is it is available as a bin file. Therefore, you are only required to make it executable and run it. You don’t need to install it.
Step 1. Download UNetbootin bin file.
To download the 64bit file of UNetbootin, execute the command below.
wget https://github.com/unetbootin/unetbootin/releases/download/675/unetbootin-linux64-675.bin
To download the 32bit file of UNetbootin, execute the command below:
wget https://github.com/unetbootin/unetbootin/releases/download/675/unetbootin-linux-675.bin
In my case, I will download the 64bit file.

UNetbootin 64bit
Step 2. Make the UNetbootin bin file executable with the command below
chmod +x unetbootin-linux64-675.bin

Make the file executable
Step 3. Once done, you can proceed to run the bin file. Execute the command below to run UNetbootin as root.
sudo QT_X11_NO_MITSHM=1 /home/tuts/Downloads/Programs/unetbootin-linux64-675.bin
Please note, you might need to change the path to point to the directory containing the Windows ISO file.

Launch UNetbootin
The UNetbootin main window will open.

UNetbootin Main Window
Step 4. There are two main sections – Distribution and Diskimage. Select the Diskimage area and choose the path of the Windows ISO file. Just below that, select Disk Type and the USB drive. Once done, Click OK.

UNetbootin
Step 5. UNetbootin will start making the USB drive bootable. You can follow what’s happening on the UNetbootin window. You can track the overall progress at the bottom of the window in the progress bar.

UNetbootin Booting process
Step 6. Once done, you will see the Complete Installation message. Click on the Exit button that appears.

UNetbootin Finish window
You can now eject the USB from the file manager and use it to boot and install Windows.
Conclusion
That’s our complete guide on how you can create a bootable USB drive of Windows on Linux systems. Out of the three methods discussed above, I would highly recommend the Disk Image Mounter method. Do you have another way that you use to create a bootable USB drive of Windows on Linux? Please, share with our readers in the comments below. If you come across any errors executing the commands above, feel free to hit the comments.
If you are new with the whole procedure of booting your PC from a USB drive, please check out our post on How to boot your Windows or Linux PC from a USB Drive. It will give you a detailed guide on the entire process.
You Might Be Interested In
 Если вам по той или иной причине потребовалась загрузочная флешка Windows 10 (или другой версии ОС), при этом на имеющемся компьютере в наличии только Linux (Ubuntu, Mint, другие дистрибутивы), вы сравнительно легко можете записать её.
В этой инструкции пошагово о двух способах создать загрузочную флешку Windows 10 из Linux, которые подойдут как для установки на UEFI-системе, так и для того, чтобы установить ОС в Legacy режиме. Также могут пригодиться материалы: Лучшие программы для создания загрузочной флешки, Загрузочная флешка Windows 10.
Загрузочная флешка Windows 10 с помощью WoeUSB
Первый способ создания загрузочной флешки Windows 10 в Linux — использование бесплатной программы WoeUSB. Созданный с её помощью накопитель работает и в UEFI и в Legacy режиме.
Для установки программы используйте следующие команды в терминале
sudo add-apt-repository ppa:nilarimogard/webupd8
sudo apt update
sudo apt install woeusb
Если эти команды не сработали, попробуйте такой вариант:
wget mirrors.kernel.org/ubuntu/pool/universe/w/wxwidgets3.0/libwxgtk3.0-0v5_3.0.4+dfsg-3_amd64.deb
sudo dpkg -i libwxgtk*_amd64.deb
sudo apt update
sudo apt --fix-broken install
sudo apt install woeusb
После установки порядок действий будет следующим:
- Запустите программу.
- Выберите ISO образ диска в разделе «From a disk image» (также, при желании, можно сделать загрузочную флешку с оптического диска или смонтированного образа).
- В разделе «Target device» укажите флешку, на которую будет записан образ (данные с неё будут удалены).

- Нажмите кнопку Install и дождитесь завершения записи загрузочной флешки.

- При появлении ошибки с кодом 256 «Source media is currently mounted», размонтируйте образ ISO с Windows 10.

- При ошибке «Target device is currently busy», размонтируйте и отключите флешку, затем снова подключите её, обычно помогает. Если не сработало, попробуйте предварительно отформатировать её.


На этом процесс записи завершен, можно использовать созданный USB накопитель для установки системы.
Создание загрузочной флешки Windows 10 в Linux без программ
Этот способ, пожалуй, ещё проще, но подойдет только в том случае, если вы планируете загружаться с созданного накопителя на UEFI-системе и устанавливать Windows 10 на GPT диск.
- Отформатируйте флешку в FAT32, например, в приложении «Диски» в Ubuntu.

- Смонтируйте образ ISO с Windows 10 и просто скопируйте всё его содержимое на отформатированную флешку.


Загрузочная флешка Windows 10 для UEFI готова и с неё можно без проблем загрузиться в EFI-режиме.
Содержание
- Загрузочная флешка Windows в Linux
- Загрузочная флешка Windows в Linux
- Способ 1. Утилита USB Image Write
- Способ 2. Утилита WoeUSB
- Способ 3. Терминал и Gparted
- Выводы
- Оцените статью:
- Об авторе
- 62 комментария
- Как создать загрузочный USB для Windows 10 в Linux
- Сделать загрузочную Windows 10 USB на Linux
- 1] Во-первых, вам нужно установить WoeUSB
- 2] Приступить к созданию загрузочного USB
- Загрузочная флешка Windows в Linux
- Загрузочная флешка Windows в Linux
- Способ 1. Терминал и Gparted
- Первый вариант
- Второй вариант
- Способ 2. утилита winUSB
- Способ 3. Утилита Etcher
- Выводы
- Создаём загрузочный USB диск с Windows из под Linux
- Подготовка USB диска
- Копирование файлов Windows на USB диск
- Делаем USB-диск загрузочным
- Если создаем MBR загрузочный диск
- Если создаем UEFI загрузочный диск
- Способы создания загрузочной флешки Windows в Linux
- Терминал и Gparted
- Утилита WINUSB
- Утилита Etcher
- Создание загрузочной флешки Windows в Linux без программ
Загрузочная флешка Windows в Linux
Бывают случаи, когда вам нужно записать Windows на флешку в Linux, например, когда вы хотите поставить эту систему второй для использования специализированных программ, или вам нужно переустановить операционку своим знакомым. Или же есть пользователи Linux, которые решили вернуться на Windows, но единственную флешку уже перезаписали под Linux LiveUSB.
Загрузочная флешка Windows в Linux создается достаточно просто. Я предлагаю несколько способов решения этой проблемы. Все их я перечислил ниже.
Загрузочная флешка Windows в Linux
Загрузочную флешку можно создать с помощью терминала или специальных графических утилит. Настоятельно рекомендую отформатировать флешку в Fat32 (или Exfat) перед использованием любого из предложенных методов. Форматирование можно выполнить через Gparted, сfdisk+mkfs или через usb stick formatter (форматирование USB флеш накопителя).

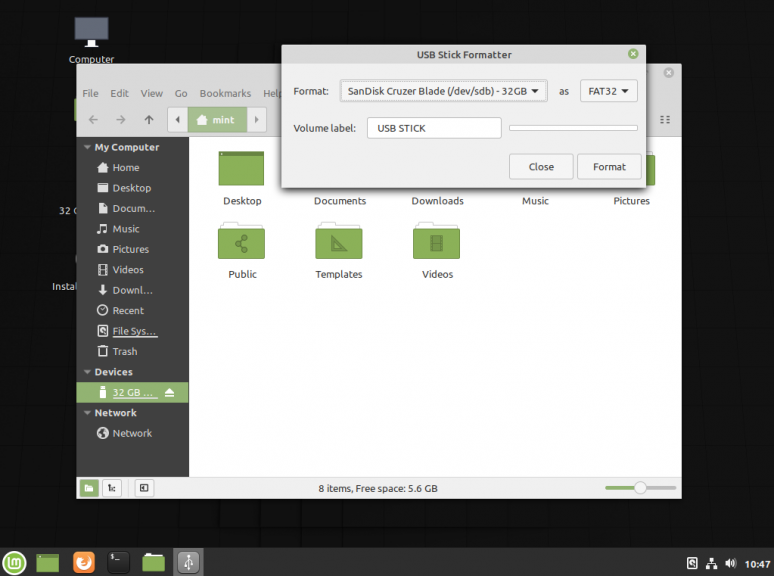
Способ 1. Утилита USB Image Write
Для создания флешки можно воспользоваться утилитой Запись образа на USB. В некоторых дистрибутивах она уже предустановленна (Ubuntu, Mint и др.):

Выбрать образ в графе Write image образ и в поле to выбрать флешку. Далее нажимаем Write.
Способ 2. Утилита WoeUSB
Пожалуй, это самый простой способ создания. Установка в Ubuntu выполняется с помощью таких команд:
sudo add-apt-repository ppa:nilarimogard/webupd8
sudo apt install woeusb
Откройте утилиту в меню приложений:

Интерфейс простой. Нажмите на кнопку Обзор со значком папки и выберите образ. Target device это флешка, на которую будет идти запись, если у вас их несколько выберите нужную. Ещё есть поле File system, где нужно выбрать какую файловую систему будете использовать. Рекомендую FAT. Затем нажмите Install и дождитесь окончания.
При появлении ошибки с кодом 256 Source media is currently mounted, размонтируйте образ ISO с Windows, если вы его смонтировали. При ошибке Target device is currently busy, извлеките флешку, затем снова подключите её. Если не сработало, попробуйте отформатировать её.
Способ 3. Терминал и Gparted
Положите образ в домашнюю папку и переименуйте его в windows.iso во избежание проблем с пробелами. Затем перейдите в терминале в домашнюю папку
Запустите терминал через главное меню или с помощью сочетания клавиш Ctrl + Alt + T затем используйте команду dd для записи образа на флешку:
dd if=/windows.iso of=/dev/sdX
Замените X на букву вашей флешки! Узнать её можно через Gparted. В правом верхнем углу есть кнопка переключения дисков:

Тот диск который соответствует размеру вашей флешки и есть ваша флешка. В моем случае флешка на 32 гб это /dev/sdb. Значит команда будет иметь вид:
dd if=/windows.iso of=/dev/sdb
Дождитесь окончания записи и извлеките флешку.
Выводы
Как видите, создание загрузочной флешки Windows в Linux не представляет сложности. Это были все способы, которые я знаю. Если они вам помогли, напишите об этом. Если вы знаете еще способы, обязательно напишите о них в комментариях!


Оцените статью:
Об авторе
Здравствуйте, я изучаю Linux и обладаю хорошими знаниями английского.
62 комментария
8.1 не запишешь, как и 10.
Для ларки например.
wine, lutris, proton в помощь. Почти на 100% уверен в работоспособности.
Через Woe USB можно. Было много людей кто через него windows 10 записывали и у них получалось.
пишет 10 легко и не принужденно
Не упомянули консольную dd
dd if=/windows.iso of=/dev/sdx
Угу,только # пропустил,ибо от рута нужно,ну и lsblk выполнить перед dd не помешает,чтобы не промахнуться)
Только это в статью нужно было добавить.
Ошибка у тебя тут, команда должна выглядеть так sudo dd if=/dev/sdx of=/windows.iso поменяйте пожалуйста
Etcher не делает загрузочную флэш с десяткой из под убунты
У меня чего-то грузит. Ща посмотрим.
нет в линуксе средства,которое создаст загрузочную флешку с виндоус(имеется ввиду актуальная версия и актуальная разрядность).единственное может прокатить,создание fat32 на gpt таблице,с флагом esp,boot http://pix.toile-libre.org/upload/original/1498154969.png
multibootusb в помощь. и винда и линукс и убунту рядышком накатываются на флешку спокойно
На данный момент не существует инструмента под линукс, которым можно непосредственно в линуксе создать загурзочную флешку с виндой, позднее «семёрки». Не надо вводить в заблуждение. Всё уже опробовано не раз. Если у кого-то что-то грузится, то это скорее специфика конкретного железа, нежели исключительность метода записи образа. Etcher, к слову, не все образы линукса пишет нормально. Самый лучший способ писать под виндой (виртуалка) через программу Rufus.
Константин,исправь(те) в информации о себе : познакомитЬся и сертифИкат.
Вы совсем одичали со своим линуксом. Флэшка с windows делается проще простого. Скачиваете образ, его нужно только распаковать. И все файлы банально скопировать на флэшку. И ВСЁ. Единственная заморочка, это распаковать образ.
Разве это не только для UEFI?
Именно так, только для UEFI. Но записать образ 7ки можно практически всегда любым из описанных вами способов, а ставить 10ку не в UEFI особого резона нет, так что парень прав 🙂
woeusb это тот самый winusb с некоторыми поправками (работает коректно)
Etcer помог, спасибо,
попробовал уже практически все! и не помогает в 18.4.1 посмотрю как etcher. если и он не то тогда пойду за болванкой
И не забыть форматнуть флешку в NTFS, так как если последняя будет в Fat, то прога будет падать с подписью Error: Target partition is currently mounted, unmount the partition then try again
Target device is busy, please make sure you unmount all filesystems on target device or shutdown the computer before detaching it.
Чёт у меня пишет ошибку что, мол, не удаётся добавить PPA:colingille/freshlight
Во-первых, здесь нет форума, дебил. Это классный блог с коментами, в которых ты успешно демонстрируешь своё скудоумие. Во-вторых, если ты рукожопый, то тебе здесь нечего делать. Для начала, запишись к хирургу и закончи школу, особенно уделив внимание русскому языку и литературе. Потом можешь возвращаться.
Приветствую вас дамы и господа! У меня Юбунту 18.04 Долгосрочная, прикол в том, что Пробовал Этчер, и он не сработал, выскочило якобы «парень пшел в лес, совсем тронулся через меня юзать флешку»(это образно говоря:) ), сейчас смотрю что и как покажет «Винка»)
утилита дискнаходим флешку(отмечаем)ґ жмем стоп. пишем. или автор добавь про отмонтированние
А скопирывать на флешку не терминальной командой будет тот же результат?
Не устанавливается winUSB. Вот такая ошибка:
E: Unable to locate package winusb
У меня Ubuntu 16.04 LTS
не_пашут-Все_эти-методы_
у_меня_8_реаниматоров_с_нужной_мне_программой_mhdd-victoria
нечем_блин_записать
Winusb,woeusb,etcher,rosaimagewriter
2_суток-пишу
была_бы_Винда_давно-бы_протестил_хард.
sudo add-apt-repository ppa:nilarimogard/webupd8
sudo apt-get update(добавилось)
alex@NOUT:
$ sudo apt-get install winusb
Чтение списков пакетов… Готово
Построение дерева зависимостей
Чтение информации о состоянии… Готово
E: Не удалось найти пакет winusb
alex@NOUT:
/ISO$ sudo dd if=Win7PE_32_xalex_final.iso of=/dev/sdb
утилита Диск. найдите свою флешку нажмите стоп (отмонтировать) и пишите woeusb спокойно
офигенный сайт по linux-ам.
утилита Диск. найдите свою флешку нажмите стоп (отмонтировать) и пишите woeusb спокойно
как после ETCHER восстановить флэшку чтоб на винде показывался полный ее объем?
Как собрать сборку винды на линусе вот в чём вопрос!
Уважаемый Админ, вы не упомянули встроенную в Линукс программу «Запись образа на ЮСБ накопитель».
https://i111.fastpic.ru/big/2019/1119/7d/16e382136b19bf19aa15717c1b7fe17d.jpeg
команду нужно вводить так sudo dd if=windows.iso of=/dev/sdX,где X буква вашей флешки,
а не sudo dd if=/windows.iso of=/dev/sdX.
для dd под дебианом работающая команда копирования образа выглядит так:
sudo dd if=windows.iso of=/dev/sdb
через несколько минут в терминале появилось сообщение
9973484+0 записей получено
9973484+0 записей отправлено
5106423808 байт (5,1 GB, 4,8 GiB) скопирован, 350,409 s, 14,6 MB/s
dd if=/home/ololoev/win10.iso of=/dev/sdX
записал без проблем, 1 строчка
Прогресс и синхронизация для dd
sudo dd bs=4M if=/path/to/archlinux.iso of=/dev/sdx conv=fdatasync status=progress
Образ последней Windows 10 сильно раздули.
В общем у меня сработало только это:
Форматируем флешку в `ntfs` / `gpt`
Для установки WoeUSB в Ubuntu можно воспользоваться PPA-репозиторием. Выполните в терминале следующие команды:
Я думаю ни один из этих способов не сработает. Во первых у вас iso не то. Это не образ диска как в линуксе, это просто его содержимое, что далеко не одно и тоже. Тут надо дописывать заголовки форматировать носитель в NTFS, как вы это сделаете на Линкусе? Я не знаю. Можно попробовать записать на DVD. Просто когда вы так делаете, то ваша писалка автоматически дописывает всё нужное. Если вы делаете загрузочную флэщку, то не проканает. Можно запустить rufus через wine. Но он не видит флэщек, не может создать таблицу разделов дисков и прочее. И отформатировать не может так же, а надо! К тому же вся эта билиберда годится только для ubunty поганая система. Нормальные люди такой не пользуются. некоторые команды можно адаптировать, но не все.
Я токо не понял а нафига запускать gparted чтоб посмотреть диски? Можно тупо залезть в папку /dev(есть такая, а иначе как бы вы могли монтировать ваши партишны!), в которой есть все устройства видимые вашей системой и которые она определяет. Главное не забудьте вставить вашу флэшку, а то она там не появится. Но можно никуда не лазить, а просто запустить команду lsblk и она вам выдаст все устройства на всех дисках, подсоединённых к компу. Если только вы их не вытащили! Это админовская утилита, но её можно запустить и так.. Она вам не покажет UUID от юзера и ряд др инфы, которую она может показать, но что вам надо вы увидите. Это большая разница запустить большой громоздкий gparted(который кстати надо ещё и установить, если его у вас нет) и маленькую утилиту lsblk. Но я например вообще не люблю эту прогу, хрень какая и не всё может Предпочитаю KDE partinionmanager. Он может всё легко и быстро. Но так же легко всё испортить окончательно и бесповоротно. Но этой прогой хорошо делать бэкап партишн. Это классно.
Источник
Как создать загрузочный USB для Windows 10 в Linux

Вы все в значительной степени знакомы с процедурой создания загрузочного носителя Windows 10 на компьютерах с операционной системой Windows. В этом посте мы покажем вам процедуру создания загрузочного USB / CD с Windows 10 на компьютерах с операционной системой Linux.
Все слишком известный процесс создания загрузочного USB / CD с Windows 10 с помощью Media Creation Tool (MCT) работает только в операционной системе Microsoft, Windows 10. Следовательно, необходимо показать вам, как выполнить то же действие на компьютере с Linux.
Некоторые могут спросить, действительно ли этот учебник необходим. Ответ на этот вопрос — да. Эта процедура для создания загрузочного носителя Windows 10 на компьютере с Linux будет полезна, если, например, ваш рабочий компьютер с Windows 10 упаковывается, и вам нужно подготовить другой компьютер на лету, но все компьютеры, к которым у вас есть доступ, — все Машины Linux, на которых вы не можете создать загрузочный носитель Windows 10 обычным способом. Итак, это ценные технические ноу-хау, которые вы должны иметь в своем наборе.
Сделать загрузочную Windows 10 USB на Linux
Для успешного создания загрузочного USB для Windows 10 в Linux вам потребуется следующее;
1] Во-первых, вам нужно установить WoeUSB
Если вы получили сообщение о том, что «add-apt-repository» не найден, перейдите к установке с помощью следующей команды:
Затем снова запустите указанную выше команду « add-apt-repository ».
Если следующая команда « apt install woeusb » не работает, потому что она не может найти пакет, сделайте это вручную, используя следующую команду:
Затем установите WoeUSB с помощью этой команды:
В Fedora установите с помощью команды:
На OpenSUSE вы можете получить WoeUSB отсюда.
2] Приступить к созданию загрузочного USB
Подключите USB и запустите WoeUSB GUI из меню запуска. Если вы не можете найти его там, вызовите его с помощью этой команды:
Если на вашем USB-устройстве есть файловая система, она будет автоматически смонтирована операционной системой. Откройте браузер файлов и размонтируйте его, нажав на стрелку извлечения рядом с ним.
Теперь выберите поле в поле « Из образа диска (iso)» и перейдите в папку, в которую вы загрузили ISO-образ Windows.
Наконец, в разделе «Целевое устройство» нажмите на свое USB-устройство.
Нажмите «Установить» и дождитесь завершения процесса. Не закрывайте приложение и не извлекайте USB-устройство, пока не получите сообщение об успешном завершении операции.
И вот как вы можете создать загрузочный USB для Windows 10 на компьютере с Linux.
Источник
Загрузочная флешка Windows в Linux

Бывают случаи, когда вам нужно записать Windows на флешку в Linux, например, когда вы хотите поставить эту систему второй для использования специализированных программ, или вам нужно переустановить операционку своим знакомым. Или же есть пользователи Linux, которые решили вернуться на Windows, но единственную флешку уже перезаписали под Linux LiveUSB.
Загрузочная флешка Windows в Linux создается достаточно просто. Я предлагаю несколько способов решения этой проблемы. Все их я перечислил ниже.
Загрузочная флешка Windows в Linux
Загрузочную флешку можно создать с помощью терминала или специальных графических утилит. Сначала рассмотрим ручной способ.
Способ 1. Терминал и Gparted
Запустите терминал через главное меню или с помощью сочетания клавиш «Ctrl + Alt + T» в Ubuntu и Ubuntu-подобных, кроме Kubuntu.
Первый вариант
использовать команду dd:
Второй вариант
Установите gparted и ntfsprogs. В Ubuntu для этого используйте команду:
Далее нам нужно отформатировать флешку. Можно сделать это через gparted, а можно в терминале.
Для форматирования USB-накопителя в Gparted в правом верхнем углу нажимаем на иконку диска и выбираем флешку.

Правой кнопкой мыши вызываем контекстное меню для раздела и жмем «Отмонтировать»:

Затем нажимаем «форматировать в …» в открывшемся меню выбираем «ntfs».


Отвечаем на вопрос «Применить эту операцию?» согласием.
Командой все сделать немного проще:
Вместо sdb1 название вашей флешки (не метка!). Чтобы узнать как она называется выполните:
Идём дальше. Откройте Gparted, если вы его ещё не открыли и выберите флешку, если ещё не выбрали. Нажмите правой кнопкой мыши и выберите «Установить флаги». Поставьте галочку boot и нажмите «применить».

Дальше нужно открыть образ windows.iso.
Осталось только скопировать все файлы из образа на флешку:
Это был способ для тех, кто не любит ставить много одноразовых утилит в систему. Создание загрузочной флешки Windows в Linux с помощью сторонних утилит выглядит проще.
Способ 2. утилита winUSB
Пожалуй, это самый простой способ создания. Установка в Ubuntu:
Установка Debian / Ubuntu 14

Интерфейс простой. Нажмите сверху на кнопку «Обзор»(иконка папка) и выберите образ. Затем нажмите «Install» и дождитесь окончания.
Способ 3. Утилита Etcher
Если WinUSB не помог, не запустился, его нет для вашего дистрибутива, вам поможет утилита Etcher. Утилита в настоящее время находится в интенсивной разработке, но даже в бета-версии программа исправно выполняет свою функцию писателя iso-образов. Etcher поддерживает запись Linux, macos 10.9 +, Windows 7+. Может быть, создана загрузочная флешка Windows 10 в Linux.

После установки вы можете запустить программу из главного меню или из appimage файла, если вы выбрали этот путь. Когда программа запустится, найдите у себя загруженный iso-образ:


Нажмите кнопку «Flash» и дождитесь окончания записи. У вас появится примерно такая надпись:

Выводы
Как видите, создание загрузочной флешки Windows в Linux не представляет сложности. Это были все способы, которые я знаю. Если они вам помогли, напишите об этом. Если вы знаете еще способы, обязательно напишите о них в комментариях!
Источник
Создаём загрузочный USB диск с Windows из под Linux
Перед тем как я продолжу, следует указать что в Windows мире два метода загрузки:
Прежде всего USB-диск необходимо подготовить. В Linux наиболее простой и удобной для этих целей утилитой является gparted.
Ставим его если не установлен:
Подготовка USB диска
Выбираем нашу USB флэшку, отмонтируем её если она смонтирована:

Отмонтирование USB диска в gparted

Gparted создание таблицы разделов
После этого выбираем неразмеченную область, нажимаем правой кнопкой мыши по ней же и выбираем пункт меню «Новый». В появившемся окне выбираем файловую систему NTFS или FAT32. Если у вас какая-то нестандартная сборка в которой могут быть файлы больше 4 гигабайт, то файловая система должна быть определенно NTFS, в противном случае, можно выбрать FAT32, и, тогда, так же можно будет загрузиться с UEFI. Так же необходимо указать метку для USB-диска. Важно: метка должна быть не просто «Windows», а какой либо более уникальной. Если файловая система FAT32, то метка должна быть указана заглавными буквами.

Создание нового раздела Gparted
Применяем все наши изменения:

Применение изменений в Gparted
Выходим из gparted.
Копирование файлов Windows на USB диск
Теперь необходимо смонтировать образ с Windows и скопировать данные с него на наш подготовленный ранее usb диск. В большинстве современных рабочих окружений это можно сделать из файлового менеджера. По необходимому образу нажимаем правой кнопкой мыши, выбираем Открыть с помощью и выбираем Disk Image Mounter :

Монтирование образа с Windows в файлом менеджере Thunar
Если у вас нет такой утилиты, то можно смонтировать из командной строки:
Делаем USB-диск загрузочным
Если создаем MBR загрузочный диск
Для создания MBR загрузочной записи будем использовать grub:
Теперь на USB-диске в директории boot/grub необходимо создать файл grub.cfg с таким содержимым:
Если создаем UEFI загрузочный диск
Источник
Способы создания загрузочной флешки Windows в Linux
Если вы хотите записать установочник Windows на отдельный носитель, а ваш компьютер при этом работает на Linux, никаких проблем не будет – несмотря на конкуренцию между двумя операционными системами, это совсем несложная задача. Есть несколько способов записи: используя функционал «Линукс» и посредством сторонних приложений. Разберем четыре самых простых варианта с последовательными инструкциями.

Терминал и Gparted
Для создания загрузочной флешки с образом Windows 10, нам понадобится «Командная строка» в Linux – так называемый терминал, либо же «Редактор разделов» — Gparted. Начнем с первого.
Теперь сделаем то же самое через «Редактор разделов» Gparted.

Как видите, можно справиться своими силами с ОС, но если это не для вас, читайте ниже о том, как всё автоматизировать.
Утилита WINUSB
Создать загрузочную флешку с Windows 10 на Linux можно также с помощью специальной программы – это намного быстрее, чем выполнение всех предыдущих шагов. Наверное, вы уже знаете, что программы в Linux можно устанавливать прямо из «Командной строки». Воспользуемся этой приятной опцией и зададим значения:
$ sudo add-apt-repository ppa:colingille/freshlight
$ sudo apt update
$ sudo apt install winusb

Можно также установить это приложение, просто воспользовавшись поиском в репозитории, вовсе без командной строки. Когда откроется окно программы, вы увидите два предложения:
Выбирайте первое и подтверждайте начало процесса. Больше не потребуется никаких манипуляций – можно вынимать флешку и пользоваться.
Утилита Etcher
Предыдущая программа очень проста и хороша, но, к сожалению, совместима не со всеми разновидностями Linux и не всегда запускается, потому что разработчики не часто представляют публике актуальные обновления. Если это ваш случай, то попробуйте Etcher. Как и все приложения для Linux, оно распространяется бесплатно. С помощью «Этчер» можно записать образ Linux и Windows 7-10 буквально в несколько кликов. Только перед загрузкой обратите внимание, подходит ли ПО к вашей сборке. А теперь разберем, как сделать загрузочную флешку:

Создание загрузочной флешки Windows в Linux без программ
На основе всего вышенаписанного вы можете вообще обойтись без посредничества стороннего ПО и сформировать флешку с установочником в «Линукс» гораздо быстрее. Для этого:
Далее порядок действий такой:

Надо отметить, что данный способ будет эффективен только для обновленного посредника между ОС и микропрограммами – UEFI с системой структурирования разделов GPT и разрядностью 64 бита. Для более ранней версии БСВВ такой метод не подойдет – вы просто не найдете нужных файлов. Чтобы воспользоваться флешкой, очень важно настроить UEFI таким образом, чтоб накопитель распознавался, как средство запуска ОС. Для этого перезагрузите ПК и нажмите сочетание клавиш, подходящее под вашу версию БСВВ (чаще F2 или Del, но могут быть и другие варианты), и вызовите посредника. Вы увидите окошко с изображениями жестких дисков, которые пронумерованы по порядку. Выберите вашу флешку (она должна быть заранее подключена) и перетащите её на первое место (к счастью, UEFI позволяет пользоваться мышкой и имеет более-менее понятный внешний вид). После повторной перезагрузки сразу запустится окно установки Windows.
Источник