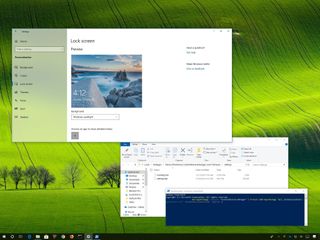
On Windows 10, Windows Spotlight is a feature that downloads and sets Bing images as the background on the Lock screen automatically, which allows you to get a fresh look every time you sign in.
However, Spotlight is not a perfect feature and sometimes you may experience problems. For instance, you may see the image stuck in the Lock screen for a long time, or the feature may suddenly stop working.
Although the Settings app doesn’t offer an option to reset Windows Spotlight, you can fix most common problems with two simple workarounds.
In this Windows 10 guide, we’ll walk you through the steps to fix common problems with Windows Spotlight on your device to keep the Lock screen showing fresh and beautiful images from Bing.
- How to reset Windows Spotlight on Windows 10
- How to reset Windows Spotlight settings using PowerShell
How to reset Windows Spotlight on Windows 10
If Windows Spotlight isn’t working or it’s stuck in with the same image, you can follow these steps to clean the downloaded images and reset the settings to get the feature working again.
Disabling Spotlight feature
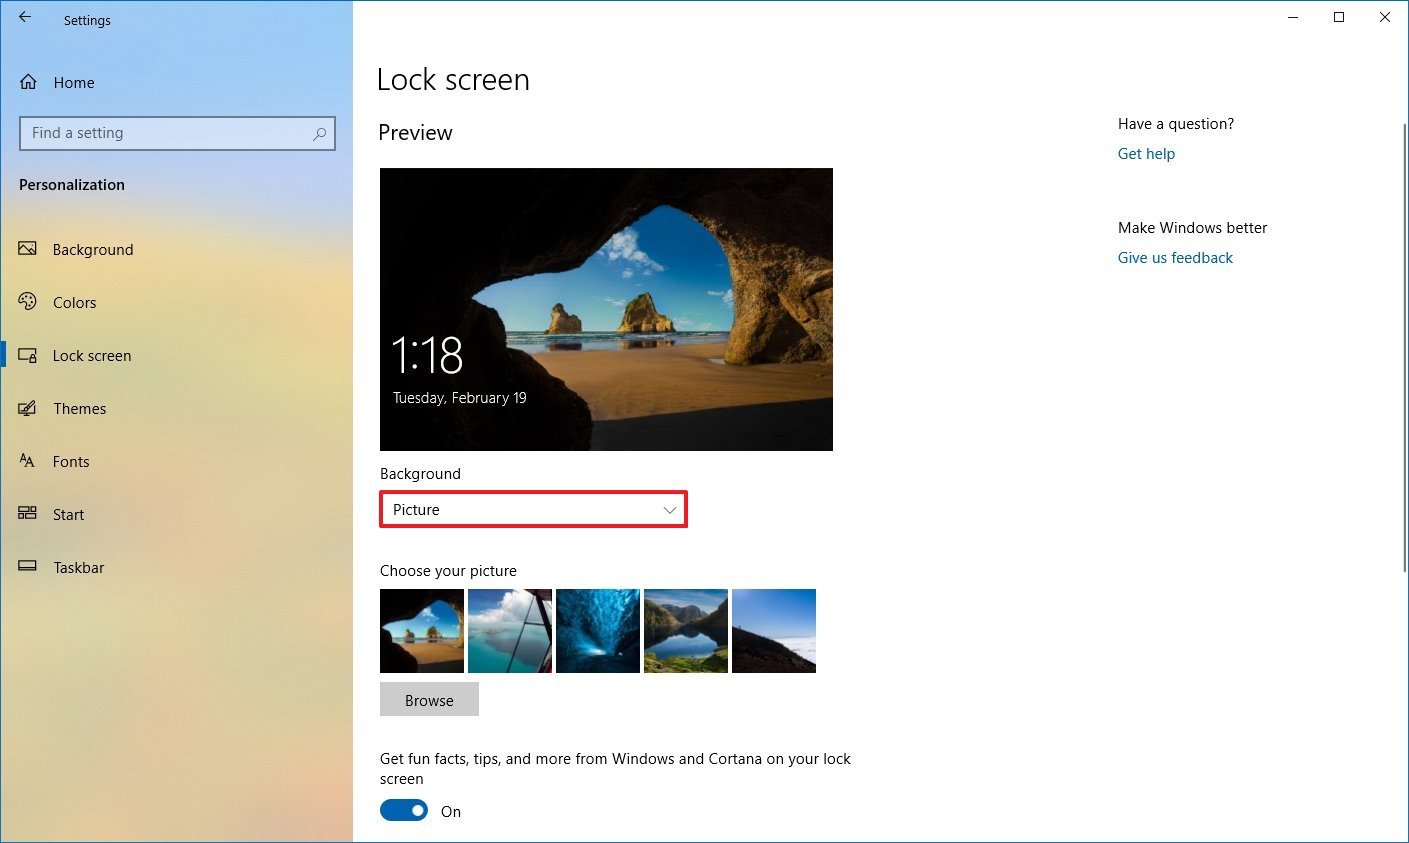
To disable Spotlight on Windows 10, use these steps:
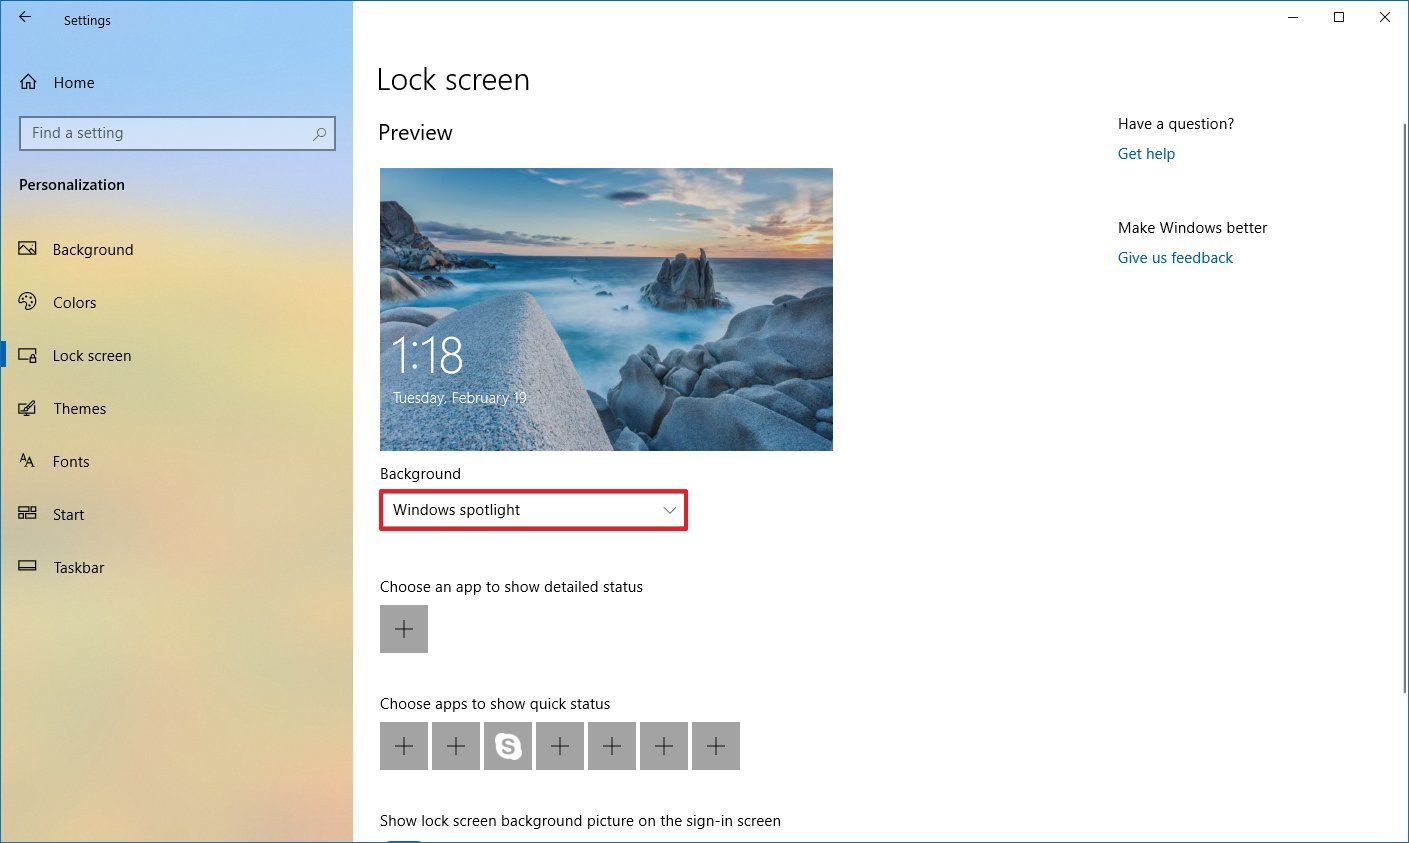
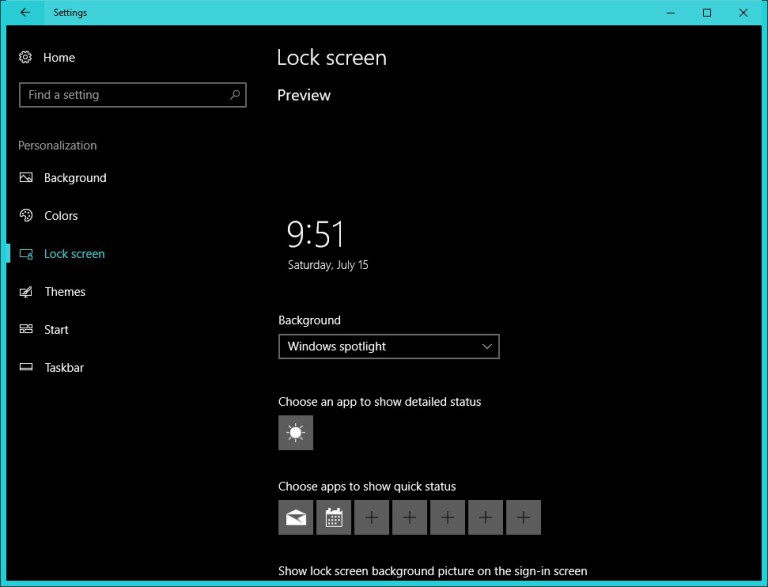
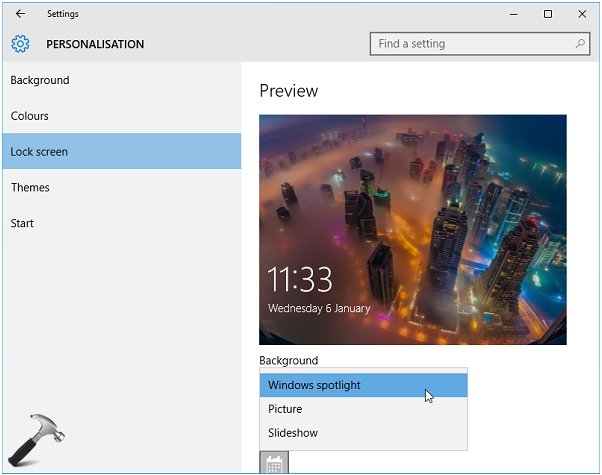
- Open Settings.
- Click on Personalization.
- Click on Lock screen.
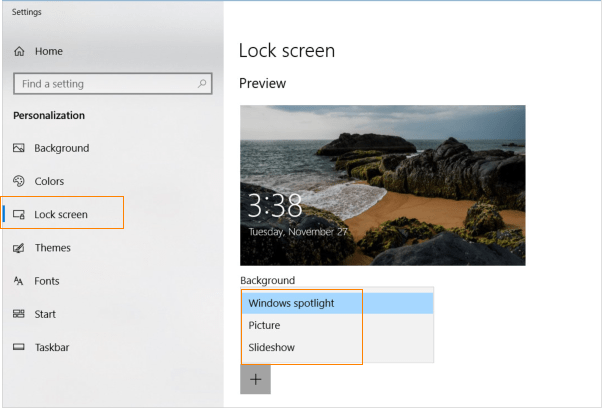
- Use the «Background» drop-down menu, and select the Picture or Slideshow option.
Once you complete these steps, you can proceed with the instructions below to clear the assets, reset the settings, and re-enable the feature.
Cleaning Spotlight assets
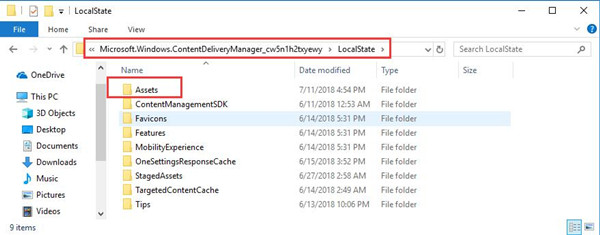
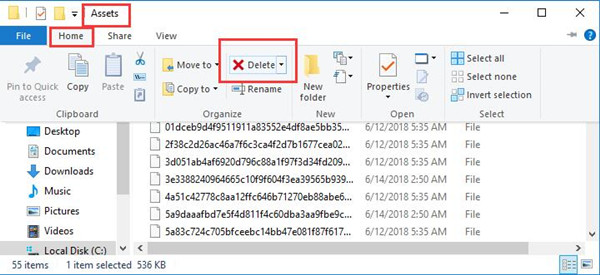
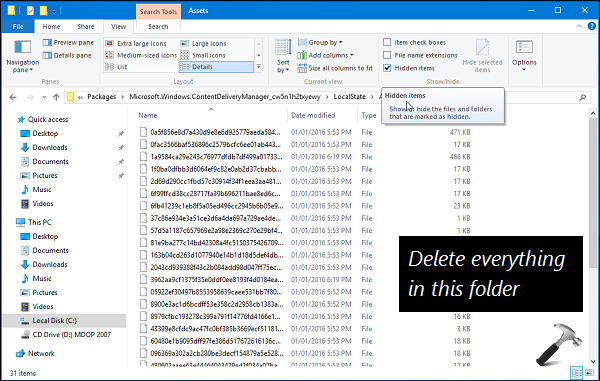
To delete the images already locally stored on your device, use these steps:
- Open Start.
- Search for Run and click the top result.
- Type the following path and click the OK button.
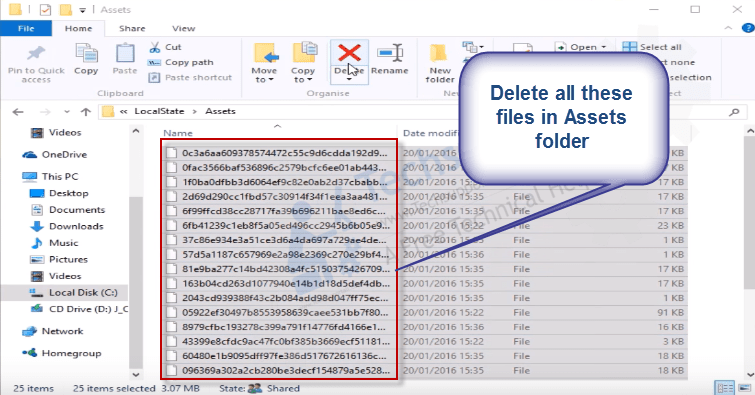
%USERPROFILE%/AppDataLocalPackagesMicrosoft.Windows.ContentDeliveryManager_cw5n1h2txyewyLocalStateAssets
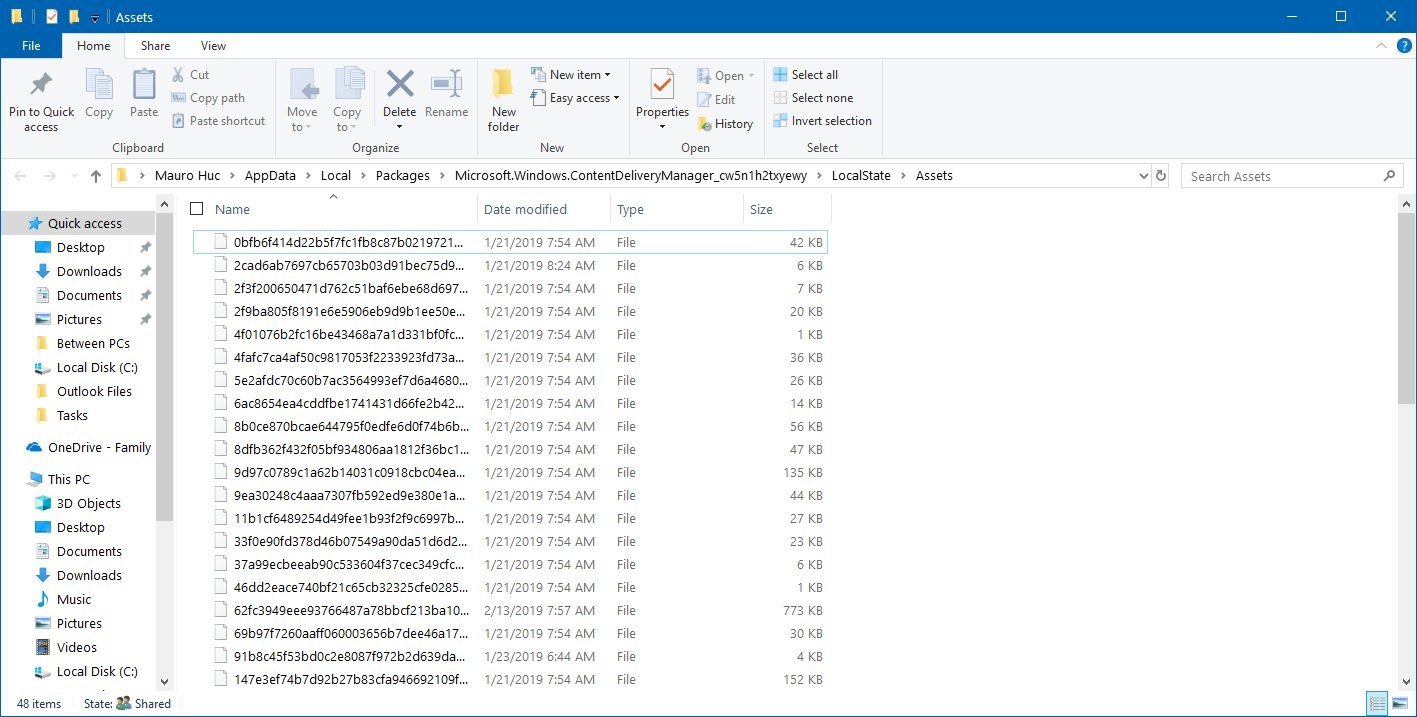
- Select all the files (Ctrl + A keyboard shortcut) and press the Delete key to clear the old images (if applicable).
After you complete these steps, proceed with the steps below to reset the Windows Spotlight settings.
Resetting Spotlight settings
To reset the Spotlight settings on Windows 10, use these steps:
- Open Start.
- Search for Run and click the top result.
- Type the following path and click the OK button.
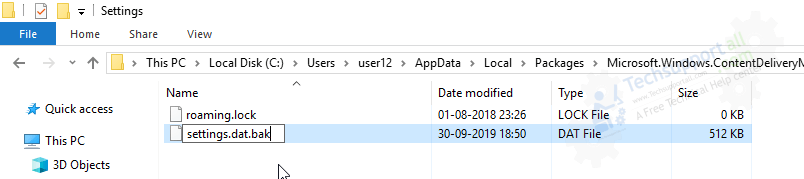
%USERPROFILE%/AppDataLocalPackagesMicrosoft.Windows.ContentDeliveryManager_cw5n1h2txyewySettings - Inside the Settings folder, right-click the settings.dat and roaming.lock files individually, then click the Rename option and change their names to settings.dat.bak and roaming.lock.bak.
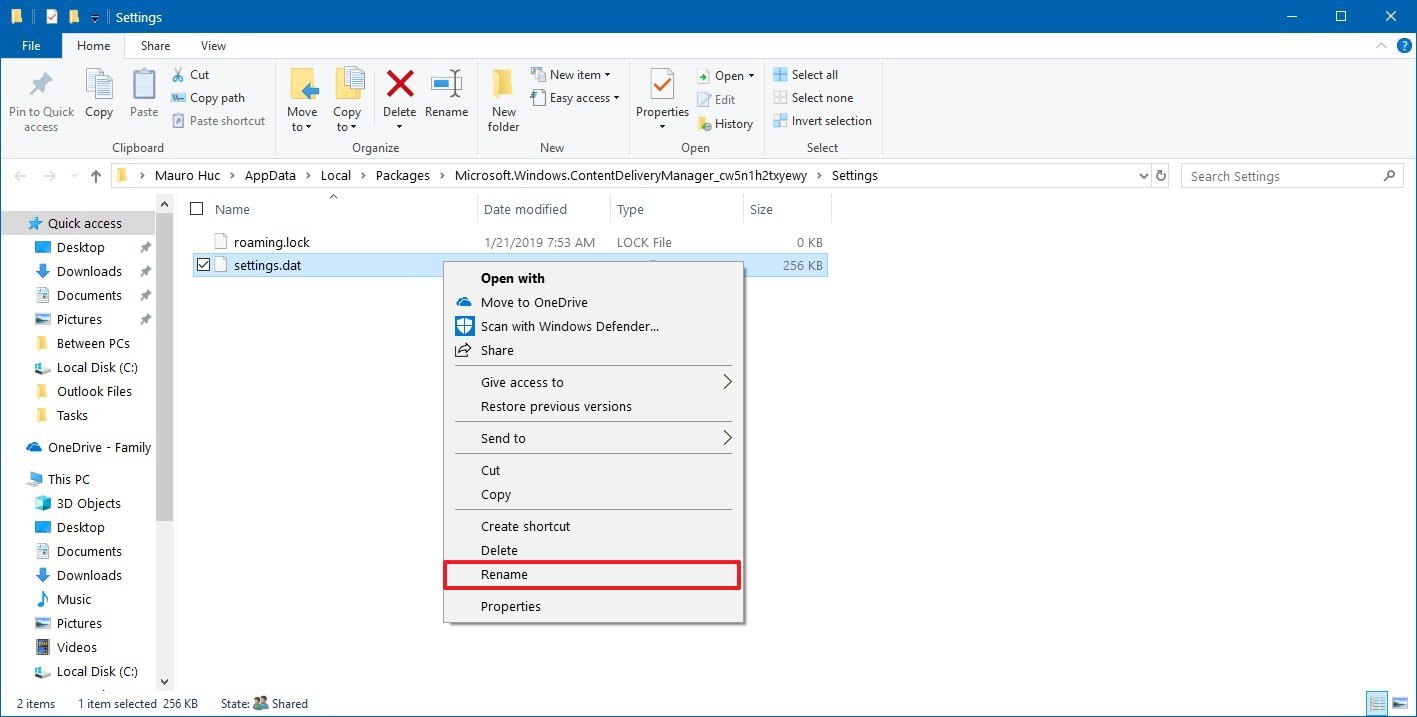
- Restart your computer.
Once you complete the steps, the last step left to do is to re-enable the feature using the Settings app.
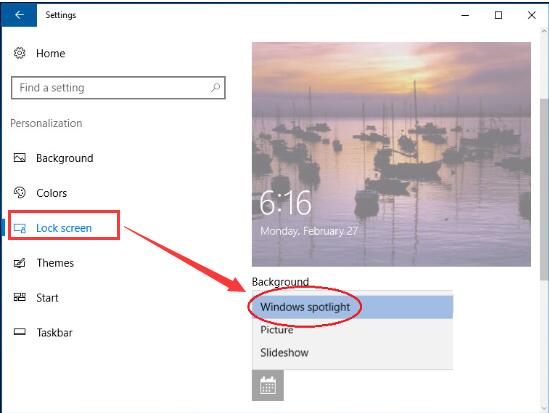
Enabling Spotlight feature
To enable Windows Spotlight, use these steps:
- Open Settings.
- Click on Personalization.
- Click on Lock screen.
- Use the «Background» drop-down menu, and select the Windows Spotlight option.
After completing the steps, you can test that Windows Spotlight is working correctly by locking your device (Windows key + L keyboard shortcut) and making sure that new images rotate in the background every time you sign in.
How to reset Windows Spotlight settings using PowerShell
Alternatively, if you’re still having issues with Windows Spotlight, you can use PowerShell to reset its settings with these steps.
Disabling Spotlight feature
To disable Spotlight on Windows 10, use these steps:
- Open Settings.
- Click on Personalization.
- Click on Lock screen.
- Use the «Background» drop-down menu, and select the Picture or Slideshow option.
Once you complete these steps, you can use PowerShell to reset the Windows Spotlight settings and re-enable the feature.
Resetting Spotlight settings
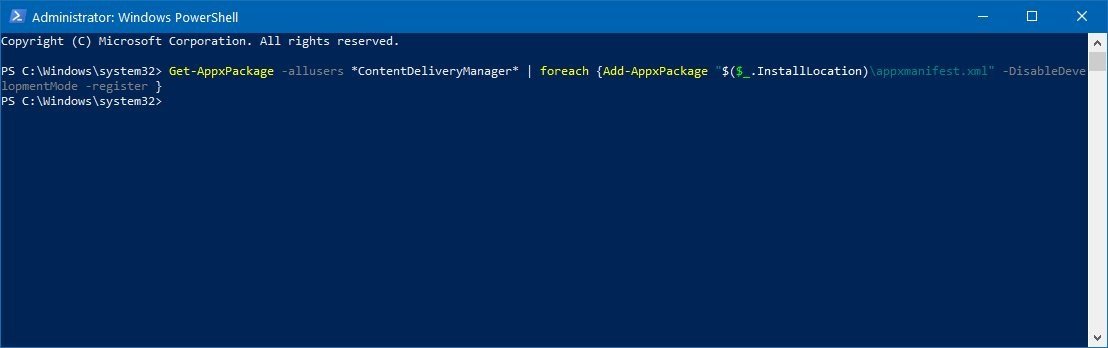
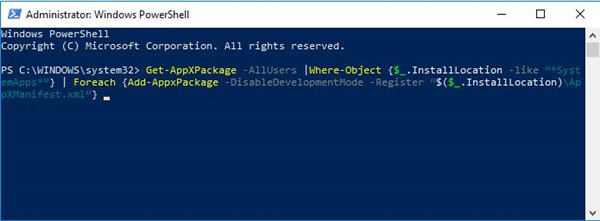
To fix problems with Windows Spotlight with PowerShell commands, use these steps:
- Open Start.
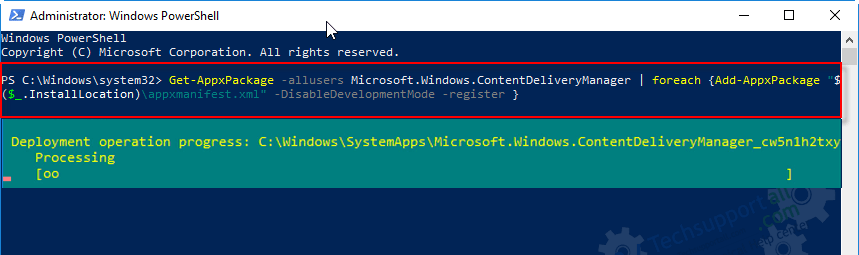
- Search for PowerShell, right-click the top result, and select the Run as administrator option.
- Type the following command and press Enter:
Get-AppxPackage -allusers *ContentDeliveryManager* | foreach {Add-AppxPackage "$($_.InstallLocation)appxmanifest.xml" -DisableDevelopmentMode -register }
- Restart your computer.
After completing the steps, Spotlight should start working again on your Windows 10 installation after re-enabling the feature using the Settings app.
Enabling Spotlight feature
To enable Windows Spotlight, use these steps:
- Open Settings.
- Click on Personalization.
- Click on Lock screen.
- Use the «Background» drop-down menu, and select the Windows Spotlight option.
Once you complete the steps, make sure the workaround fixed the issue by locking your computer and checking if new images appear in the background.
Updated February 19, 2019: This guide has been revised and updated to make sure it’s current with the latest version of Windows 10.
More Windows 10 resources
For more helpful articles, coverage, and answers to common questions about Windows 10, visit the following resources:
- Windows 10 on Windows Central – All you need to know
- Windows 10 help, tips, and tricks
- Windows 10 forums on Windows Central
Get the best of Windows Central in in your inbox, every day!
Mauro Huculak is technical writer for WindowsCentral.com. His primary focus is to write comprehensive how-tos to help users get the most out of Windows 10 and its many related technologies. He has an IT background with professional certifications from Microsoft, Cisco, and CompTIA, and he’s a recognized member of the Microsoft MVP community.
Windows Spotlight is a feature in Windows 10 that isn’t appreciated enough until you notice that it’s no longer working. Windows 10 users still report issues with their system despite it being one of the most popular operating systems to this day. One of these common issues is Windows Spotlight not working.
In this article, you can learn more about what Windows Spotlight is, how it works, and how you can restore it. Let’s get started!
What is the Windows Spotlight?
Windows 10 has introduced many new features upon its launch and continues to improve even today. One of the original new features was Windows Spotlight, which is included by default in all versions of the operating system.
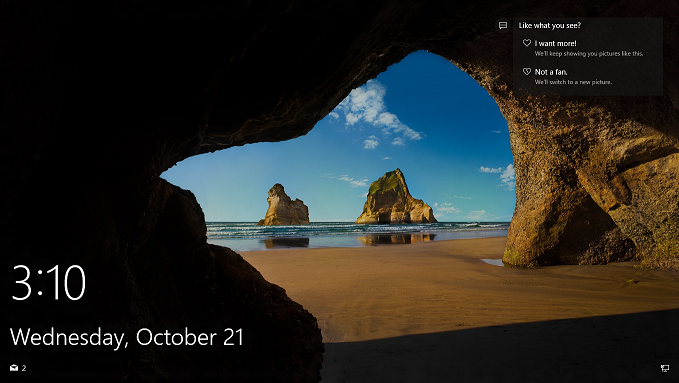
When you launch your computer, sign out of your user account, or lock your computer, you’re automatically shown the lock screen. This is where Windows Spotlight operates. It grabs a random nature scenery from a collection of high-quality images provided by Bing, making the lock screen lively and pleasing.
In 2017, Microsoft started to add location information to images, allowing users to learn more about what they see. The images used in Windows Spotlight originate from all around the world, all the way from Perce Rock in Quebec, Canada to the Deogyusan mountains of South Korea. You can even catch occasional animal images!
Tip: To view an extended list of Windows Spotlight image locations, we recommend visiting the Wikipedia page. You can also search for and download Windows Spotlight images from Windows 10 SpotLight Images. You may even find an image taken in your country!
How to fix Windows Spotlight
Users enjoy Windows Spotlight as it gives their computer a more professional and pleasing look as opposed to a default Windows 10 background. This means that when Windows Spotlight abruptly stops working, many people begin to search for a solution.
If you’re also looking to get your lock screen back into working order, you’re in the right place.
Below are several methods to help you restore the Windows Spotlight feature. No Windows 10 user should be left without beautiful imagery to look at whenever they turn on their computer.
Method 1: Restart Windows Spotlight
Many users have reported that simply restarting the Windows Spotlight feature fixed the issues they were experiencing. You can do this by simply turning the service off, restarting your device, then turning it back on.
For detailed steps, follow this guide:
- Click on the Windows icon in your taskbar to open the Start menu, then choose Settings. Alternatively, you can use the Windows + I keyboard shortcut.

- Click on the Personalization tile.

- Make sure to stay on the default Lockscreen menu.

- Under the Background section, select either “Picture” or “Slideshow”. These options use images locally stored on your computer, not requiring you to connect to and use the Windows Spotlight feature.

- Close the Settings app and restart your computer.
- Repeat Step 1. to Step 3. then choose the Windows spotlight option from the Background drop-down menu. This will make sure that you have the feature enabled again.

- Close the Settings app and restart your computer again. When your computer boots up, you should be able to see a randomly pulled Spotlight image on the lock screen.


Method 2: Manually reset Windows Spotlight by cleaning Spotlight assets (Prerequisite: Disable Spotlight)
If a simple restart didn’t do the trick, we need to dig deeper and try something more advanced. By deleting all pre-stored Spotlight assets, you’re able to reset the feature and potentially get it to work again.
Here’s what you need to do to manually reset Windows Spotlight:
- Click on the Windows icon in your taskbar to open the Start menu, then choose Settings. Alternatively, you can use the Windows + I keyboard shortcut.
- Click on the Personalization tile.
- Make sure to stay on the default Lockscreen menu.
- Under the Background section, select either “Picture” or “Slideshow”. These options use images locally stored on your computer, not requiring you to connect to and use the Windows Spotlight feature.
- Next, press the Windows + R keys on your keyboard to bring up the Run utility. You need to copy and paste the following path into the input field, then press the OK button: %USERPROFILE%/AppDataLocalPackagesMicrosoft.Windows.ContentDeliveryManager_cw5n1h2txyewyLocalStateAssets
- Select everything in the Assets folder that just opened on your screen (you can use the Ctrl + A shortcut,) then right-click and choose Delete.
- Press the Windows + R keys on your keyboard to bring up the Run utility again. Copy and paste the following path into the input field, then press the OK button: %USERPROFILE%/AppDataLocalPackagesMicrosoft.Windows.ContentDeliveryManager_cw5n1h2txyewySettings
- You should see a Settings folder open up on your computer. Here, right-click on the following two files and choose Rename. Change:
- settings.dat into settings.dat.bak
- roaming.lock into roaming.lock.bak
- Restart your computer.
- Repeat Step 1. to Step 3. then choose the Windows spotlight option from the Background drop-down menu. This will make sure that you have the feature enabled again.
Method 3: Re-register the Spotlight application using PowerShell
We left the most complicated method for last — re-registering Windows Spotlight using a series of commands in PowerShell. We know, this sounds intimidating. However, many users have reported that this fixed their issue.
Note: To perform this method, you’ll need to have an administrator account.
If you’re unsure of how to do this, carefully follow the guide below:
- Click on the Windows icon in your taskbar to open the Start menu, then choose Settings. Alternatively, you can use the Windows + I keyboard shortcut.
- Click on the Personalization tile.
- Make sure to stay on the default Lockscreen menu.
- Under the Background section, select either “Picture” or “Slideshow”. These options use images locally stored on your computer, not requiring you to connect to and use the Windows Spotlight feature.
- Next, press the Windows + X keys on your keyboard at the same time, then choose Windows PowerShell (Admin) from the menu.

- If prompted, allow PowerShell to make changes on your computer by pressing the Yes button.
- Copy-paste the following command into PowerShell, then press the Enter key on your keyboard:Get-AppxPackage -allusers *ContentDeliveryManager* | foreach {Add-AppxPackage «$($_.InstallLocation)appxmanifest.xml» -DisableDevelopmentMode -register }
- After the re-registration is complete, restart your computer.
- Repeat Step 1. to Step 3. then choose the Windows spotlight option from the Background drop-down menu. This will make sure that you have the feature enabled again.

By following one of the methods described above, you should be able to restore Windows Spotlight.
We hope the steps above were able to help you restore the Windows Spotlight lock screen. Enjoy the beautiful images on your computer lock screen to make your environment more lovely and lively!
Are you interested in learning more about Windows 10? You can browse our dedicate Help Center section for related articles.
If you’re looking for a software company you can trust for its integrity and honest business practices, look no further than SoftwareKeep. We are a Microsoft Certified Partner and a BBB Accredited Business that cares about bringing our customers a reliable, satisfying experience on the software products they need. We will be with you before, during, and after all the sales.
That’s our 360 Degree SoftwareKeep Guarantee. So, what are you waiting for? Call us Today on +1 877 315 1713 or email sales@softwarekeep.com. As well, you can reach us via Live Chat.
Troubleshooting lock screen errors
Updated on September 1, 2022
Windows Spotlight is a Windows 10 feature that displays images from Bing as the background for the login or lock screen. Occasionally, Windows Spotlight stops working, and new images stop loading.
If this happens to you, there are two easy ways to fix it when Windows Spotlight stops working. This includes running a command in Powershell to reset the feature or clearing the system files to force the service to reinitialize the next time you restart the computer.
Causes of Windows Spotlight Not Working
There are a couple of things that may cause Windows Spotlight to stop working.
- Occasionally, a Windows Update crashes the service and stops it from loading new Bing images for the lock screen background.
- In other cases, either image files or the Windows Spotlight system files become corrupt. This may cause the service to crash or freeze.
How to Fix Windows Spotlight Not Working
Work through the following steps to have the Windows Spotlight feature working again.
-
Check the network connection. Microsoft Spotlight downloads lock screen images from the internet. Without an internet connection, Microsoft Spotlight can’t rotate through images. When you first start the PC, you should see the Wi-Fi or LAN connection enabled status in the lower-right corner of the screen. If this isn’t active, troubleshoot the network connection.
-
Stop the Windows Spotlight Service. Select the Start menu, type Settings, and choose the Settings app. Select Personalization > Lock Screen. Then select the Background drop-down arrow and choose either Picture or Slideshow. When you finish, reboot the computer, and switch to Spotlight.
-
Re-register the Windows Spotlight service using Powershell. If the previous solution didn’t work, you’ll need to take it a step further. Start by repeating the process, up until the reboot. Then, launch the command prompt as administrator. Type the following commands and press Enter after each.
powershell
Get-AppXPackage -AllUsers |Where-Object {$_.InstallLocation -like "*SystemApps*"} | Foreach {Add-AppxPackage -DisableDevelopmentMode -Register "$($_.InstallLocation)AppXManifest.xml"}
Once this is finished, change the Personalization setting you changed above back to Windows Spotlight. Restart the computer, then check if Windows Spotlight works.
-
Reset Stoplight settings. If the previous step didn’t work, force a reset of Windows Stoplight. To do this, use Windows Explorer to navigate to the following path for your user profile:
%USERPROFILE%/AppDataLocalPackagesMicrosoft.Windows.ContentDeliveryManager_cw5n1h2txyewySettings
Rename the settings.dat and roaming.lock files by adding .bak to the end of the files. Once finished, restart the computer and test to see if Windows Spotlight works again.
-
Delete Spotlight files. Windows Spotlight collects images from Bing. If any of these are corrupt, it could potentially affect Windows Spotlight. Deleting these files can help. Use Windows Explorer to navigate to the following path for your user profile:
%USERPROFILE%/AppDataLocalPackagesMicrosoft.Windows.ContentDeliveryManager_cw5n1h2txyewyLocalStateAssets
Select all of the files and delete them. Restart the computer and check if Windows Spotlight is working.
-
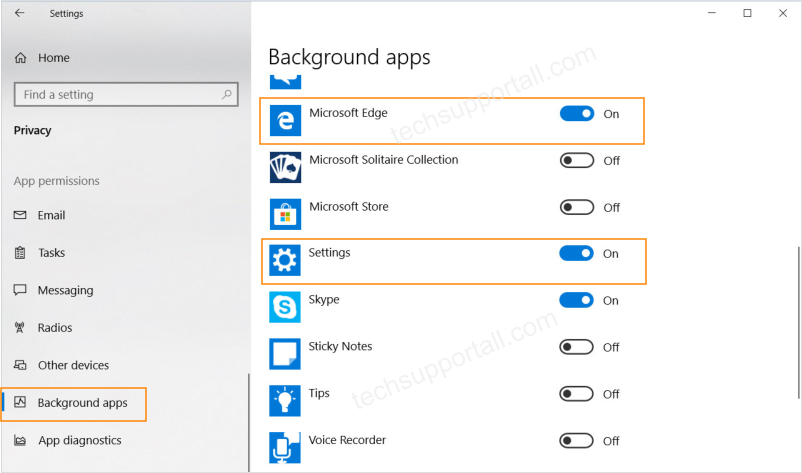
Turn on Microsoft Edge. If Windows Spotlight still isn’t working, then some necessary background apps may not be running. Select the Start menu, type Settings, then select the Settings app. Select Privacy > Background apps, then make sure the setting for Microsoft Edge is turned on.
-
Force Windows update. If it still doesn’t update the lock screen image after completing all those steps, you may have outdated Windows files. Perform a manual Windows update to ensure your system is completely up to date.
-
Update device drivers. Faulty or corrupt device drivers on a Windows system can cause many unpredictable issues. To ensure this isn’t the case, make sure all the device drivers are fully updated to the latest versions.
-
Wait 24 hours. Sometimes, when Microsoft Spotlight first launches on a computer, it can take up to a day for the app to fully sync images with Bing. Before moving to the last and final step, give your system a day, then check to see if Microsoft Spotlight is working.
-
Perform a Windows system restore. As a last resort, you may need to restore your Windows system.
FAQ
-
Where are Spotlight images located in Windows 10?
-
How do I save a Spotlight photo in Windows 10?
Open the Spotlight image directory and copy the files in it to a new folder. In the new folder, add the .jpg extension to all the files — this will turn them into viewable images. Since they’ve been copied, all you have to do is get rid of the ones you don’t want and hang onto the ones you do.
-
How do I turn off text in Windows 10 Spotlight?
Open the Start menu and select Settings > Personalization > Lock Screen. Under Background, deselect the Get fun facts, tips, tricks, and more on your lock screen option.
Thanks for letting us know!
Get the Latest Tech News Delivered Every Day
Subscribe
The Windows Spotlight is a feature in Windows 10, that automatically changes the background image on the Lock Screen. However, sometimes Windows Spotlight is not working or does not change the lock screen image. In this tutorial, you ‘ll find several methods to fix the following Spotlight problems in Windows 10:
- Windows Spotlight not working.
- Windows Spotlight stuck on an image.
- Can’t change lock screen wallpaper in Windows 10.
- Lock screen wallpaper not changing in Windows 10
How to FIX Windows Spotlight Problems.
Method 1. Allow Required Apps & Spotlight to Run in the Background.
Method 2. Reset Windows Spotlight Settings.
Method 3. Reset and Re-Register Windows Spotlight.
Method 4. Repair Windows 10 with DISM & SFC tools.
Method 1. Allow Required Apps & Spotlight to Run in the Background.
1. Click Start ![]() > Settings
> Settings ![]() and select Privacy.
and select Privacy.

2. Now select Background Apps on the left and at the right:
-
- Toggle the Let apps run in the background switch to ON.
- Under the Choose which apps can run in the Background, make sure that the following apps are allowed to run in Background:
-
Settings
-
Microsoft Edge
-
Microsoft Store
-
Spotlight (If exists)

3. Press the Win ![]() + L keys, to lock the screen and see if the Spotlight is working
+ L keys, to lock the screen and see if the Spotlight is working
Method 2. Reset Spotlight Settings.
If Windows Spotlight does not work, proceed to reset it to its default settings:
1. Click Start ![]() > Settings
> Settings ![]() and select Personalization.
and select Personalization.

2. Select Lock Screen on the left and make these changes:
-
- Toggle the Show lock screen background picture on the sign-in screen switch to OFF.
- Change Background to Picture.

3. Now open Windows Explorer, copy/paste the following address in the address bar and hit Enter:
- %LocalAppData%PackagesMicrosoft.Windows.ContentDeliveryManager_cw5n1h2txyewySettings

4. Delete, or rename (by adding the extension .OLD)* the following two (2) files:
-
- roaming.lock
- settings.dat
* Note: For precautionary reasons just rename the mentioned files to roaming.lock.old & settings.dat.old

5. Restart your PC.
6. After restart, go to Start ![]() > Settings
> Settings ![]() > Personalization.
> Personalization.
7. At Lock Screen options:
-
- Change Background to Windows Spotlight.
- Toggle the Show lock screen background picture on the sign-in screen switch to ON.

8. Press the Win ![]() + L keys, to lock the screen and see if the Spotlight is working.
+ L keys, to lock the screen and see if the Spotlight is working.
Method 3. Reset and Re-Register Windows Spotlight.
1. Click Start ![]() > Settings
> Settings ![]() and select Personalization.
and select Personalization.
2. Select Lock Screen on the left and change the Background to Picture.

3. Open Command Prompt as Administrator. to do that:
-
- In the Search box type: cmd or command prompt
- Right-click on Command Prompt and select Run as Administrator.

4. Now give the below command to delete all Spotlight Images.
- DEL /F /S /Q /A «%USERPROFILE%/AppDataLocalPackagesMicrosoft.Windows.ContentDeliveryManager_cw5n1h2txyewyLocalStateAssets»

5. Then give the following command to delete the Spotlight settings.
- DEL /F /S /Q /A «%USERPROFILE%/AppDataLocalPackagesMicrosoft.Windows.ContentDeliveryManager_cw5n1h2txyewySettings»

6. Close Command Prompt.
7. Open PowerShell As Administrator. To do that:
-
- In the Search box type: powershell
- Right-click on Windows PowerShell and select Run as Administrator.

8. In PowerShell window copy and paste the following command and press Enter to re-register Windows Spotlight:
- Get-AppxPackage -allusers *ContentDeliveryManager* | foreach {Add-AppxPackage «$($_.InstallLocation)appxmanifest.xml» -DisableDevelopmentMode -register }

9. Close the PowerShell window and restart your computer.
10. After restart, go to Start ![]() > Settings
> Settings ![]() > Personalization.
> Personalization.
11. At Lock Screen options, change Background to Windows Spotlight.

Method 4. Repair Windows 10 with DISM & SFC tools.
1. Open command prompt as administrator.
2. At the command prompt window, type the following command & press Enter:
- Dism.exe /Online /Cleanup-Image /Restorehealth

3. Be patient until DISM repairs the component store. When the operation is completed, (you should be informed that the component store corruption was repaired), give this command and press Enter:
- SFC /SCANNOW

4. When SFC scan is completed, restart your computer.
5. Check if Spotlight is working in login screen.
That’s it! Which method worked for you?
Let me know if this guide has helped you by leaving your comment about your experience. Please like and share this guide to help others.
If this article was useful for you, please consider supporting us by making a donation. Even $1 can a make a huge difference for us in our effort to continue to help others while keeping this site free:

If you want to stay constantly protected from malware threats, existing and future ones, we recommend that you install Malwarebytes Anti-Malware PRO by clicking below (we
do earn a commision from sales generated from this link, but at no additional cost to you. We have experience with this software and we recommend it because it is helpful and useful):
Full household PC Protection — Protect up to 3 PCs with NEW Malwarebytes Anti-Malware Premium!
You are here: Home / How To / [FIXED] Windows Spotlight Not Working or Stuck Image
Windows 10 Spotlight feature is something that is loved by all Windows users. Windows spotlight feature basically downloads pictures and advertisements from Bing and then displays them on the lock screen. This no doubt is the great feature but some Windows users have issues that bother them. The Windows Spotlight Not Working error has become common.
The error is also shown as Windows spotlight stuck on the same picture.
Even after enabling the Windows spotlight feature it is sometimes observed that Windows Spotlight not working error occurs or sometimes the Windows spotlight stuck on the same picture is seen. If you have ever come across this error, then this article is for you.
Here I have mentioned some best ways to Fix Windows Spotlight Not Working Error in Windows 10. After following these methods your lock screen images will not be stuck anymore.
Let’s get started.
Contents
- 1 What is Windows Spotlight Feature?
- 2 How to Fix Windows Spotlight Not Working Error
- 2.1 Method 1- Reset the Windows Spotlight
- 2.2 Method 2- Clean the Spotlight’s download folder
- 2.3 Method 3- Disabling Proxy Settings
- 2.4 Method 4- Disabling Calendar and Mail from the Lock screen
What is Windows Spotlight Feature?
Windows 10 presents a stylish feature called Windows Spotlight. This feature allows downloading of images and advertisements from Bing. Then these pictures and ads are displayed or shared on the lock screen. You can also select if you wish to get less or more images of the same kind. It gives you an option to give feedback whether you like the picture or not. You get information regarding the location. Windows Spotlight adds color to your lock screen. This prodigious feature is popular among all the Windows 10 users.
How to Fix Windows Spotlight Not Working Error
There are plenty of reasons, why your Windows 10 machine is not fetching new wallpaper or pictures from Bing. One of the reason might be a proxy setting enabled or the spotlight folder being corrupted. Therefore here we are presenting you some best fixes on how to fix Windows spotlight not showing. But before you begin just make sure that you have a working Internet connection.
Method 1- Reset the Windows Spotlight
The first thing method that can be applied to fix spotlight image stuck problem is to re-register the spotlight application. But before applying this fix, make sure all of your work is saved and close all application.
Step 1- To begin with, launch the search bar by pressing Windows + S. Then type “Cortana” in the space box. Click to open “Cortana and search settings”.
Step 2- Go to the settings menu and uncheck all the options. This will switch off Cortana from your PC.
Step 3- Now launch the search bar again and type “lock screen”. Of all the option open the first result.
Step 4- In the lock screen settings, select “Picture” from the drop-down menu. Wait for the picture to till it gets reviewed properly.
Step 5- Close all the settings and open the search bar again. Type “Powershell” in the command window. Right click on the result and click on “Run as administrator”.
Step 6- Powershell will start executing the list of commands. Press Enter after each command. This process will take a few minutes to complete.
Step 7- Installation of Windows Spotlight will get refreshed.
Step 8- Open lock screen settings and Re-enable Windows Spotlight.
That’s it and you can now check whether the Spotlight not working error is fixed or not.
Method 2- Clean the Spotlight’s download folder
In addition, you can try to clean the content from the download folder where the Spotlight photos get stored. This method is worth a try and so to follow with this method the steps are mentioned here below-
Step 1- Right-click on the desktop. Click to open Personalize menu. Now open the Lock Screen tab.
Step 2- Under Background option, switch from Windows Spotlight to a Picture or the Slideshow.
Step 3- In next step navigate to the following path-
C:UsersUsernameAppDataLocalPackagesMicrosoft.Windows.ContentDeliveryManager_cw5n1h2txyewyLocalStateAssets
Step 4- Now you need to enable Hidden Folders in order to access the files.
Step 5- Go to Assets folder and then press Ctrl + A to select all files. Now delete them.

Step 6- Now return to Desktop > Personalize > Lock Screen > Background.
Step 7- Finally enable the Spotlight again and log off.
Method 3- Disabling Proxy Settings
If you are using proxy settings then it is possible that this may lead to the issue. Proxy settings enable provides another way for the internet to work. They do not allow full internet access or monitor it. So to disable proxy servers follow the given steps-
Step 1- Press Windows + S to launch the search bar. Search for “proxy” in it.
Step 2- Press the option of “LAN settings” present at the end of the window.
Step 3- Uncheck the option “Use a proxy server for your LAN” and then press OK to save the changes.

Now finally check if your issue is solved or not.
Method 4- Disabling Calendar and Mail from the Lock screen
Another method to fix Windows 10 spotlight image stuck issue is by disabling a few items from your Windows 10 Lock Screen.
Windows usually syncs with your live account to fetch information about your calendar and email. These utilities are present on your lock screen. Their enabling is by default. However, synchronization process for your utilities is not being updated along with the Windows Spotlight hence possess an issue. This kind of updating error occurs as a spotlight refuses to load images.
So disabling mail and calendar from the settings may help you solve or fix Windows Spotlight Not Working error.
Step 1- Press Windows + S to open the search box. Type and search for “Weather” in the dialogue box. Open the first result from the list of results.
Step 2- The “Weather” will open so click on the settings icon.
Step 3- Go to the General tab. Scroll down to find a setting named “Launch Location”. Now, save it as “Default Location”. Exit the application after making desired changes.
Step 4- Again, open the search box and search for the lock screen. Open the first option available.
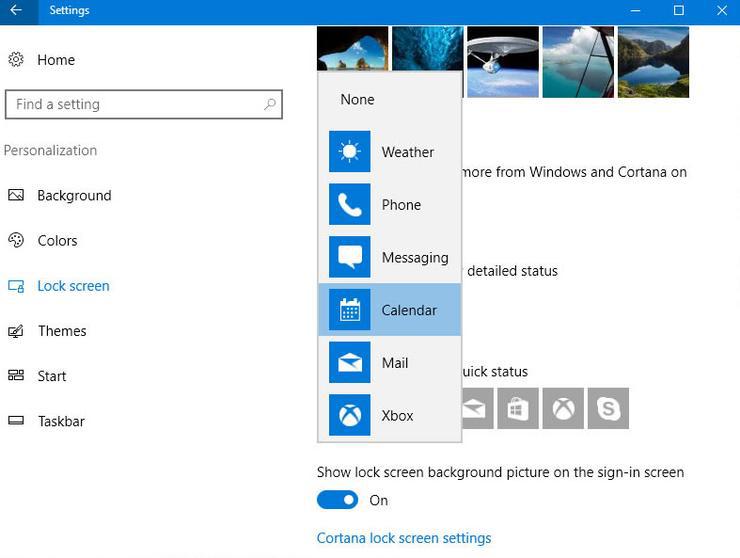
Step 5- Open the lock screen settings and click on the Mail icon. Then click on “Choose apps to show quick status”. Reach the top of the option and select “None”.
Do the same for “Calendar”.
Step 6- Now, uncheck the option “Show lock screen background on the sign-in screen”.
Step 7- After making desired changes, press Windows + L to check if the Spotlight started working again. Restart your computer.
You will no longer come across the same problem.
Well, these all were some of the methods that are worth a try to fix Windows Spotlight Not Working error or same Picture error. For any further doubt be free to ask.
Suddenly a few days ago I noticed that the Windows spotlight on my windows 10 laptop stopped working. I spent a lot of time to fix this issue. And in the end I found that it was a permission issue. This tutorial will help you to fix the errors associated with the Windows Spotlight. First of all lets know about the Windows Spotlight.
What is Windows Spotlight?
Windows spotlight is a Windows 10 feature to show the stunning / beautiful wallpapers on the login screen and lock screen. It also displays the location information and facts of the image. Occasionally Microsoft may show the text advertisement with it. Don’t worry, they are almost unnoticeable. This is an interesting feature that lets Windows show you unique wallpapers changing automatically on the login and lock screen.
How to Enable / Disable Windows Spotlight
Windows spotlight can be simply enabled or disabled from the Settings.
- Click on the Start menu button → go to Settings → Personalization → Lock Screen.
- Set the Background as Windows Spotlight.
You can also enable the slideshow of your photos available on the computer. Choose the slideshow option and add folders that contain photos.
Many people have found that the Spotlight feature is not working properly. Some people faced that it stopped working after the Windows update or due to other unspecified reasons. Here are some common errors and fixes for the Windows Spotlight. There can be two scenarios that can happen, please see both the scenarios and its solutions, please check it out.
Problem 1: Unable to select the Windows Spotlight option
Some users found that they are unable to select the Windows Spotlight option from the drop down list. It will automatically go back to Slideshow or Picture mode. In my case this was the actual problem.
Solution: Check if the necessary background apps are enabled & run properly
If this is the case, then the first option is to check that the necessary permissions are enabled and essential background apps are running. In my case, the settings app was disabled. Follow the steps below to fix it.
- Click on the Start menu button → go to Settings ⇾ Privacy → Background Apps.
- Make sure Settings and Microsoft Edge are enabled in background apps. If not, then enable both of them. These two services are necessary to run in the background to run the Windows Spotlight feature smoothly.
Note: If the settings app is not listed then you’ll have to list it by re-register the settings app. After resetting the settings app, it will start listed as given in the below screenshot:

- If this does not fix the issue, then go to method 2.
Problem 2: Windows Spotlight not working properly? Lock screen stuck on a single image
Windows spotlight is selected successfully from the drop-down (in the settings) but the lock screen image is stuck with a single image – spotlight image is not refreshing (updating) images. Images are not showing at all, slideshow not changing images, A loading icon keeps revolving continuously etc. then to get rid of all these issues reset and register Windows Spotlight feature.
Solution 1: Reset Windows Spotlight
To fix this issue, you need to reset / re-register the Windows Spotlight feature in Windows 10. Follow the steps below.
- First, check that the ‘Settings‘ and ‘Microsoft Edge‘ apps are running in the background. Refer to method 1 for details.
- Click on Start menu button → go to Settings ⇾ Personalization ⇾ Lock Screen.
- Set the Background as Pictures or Slideshow option.
- Go to ‘Users/username‘ directory and then browse: AppDataLocalPackagesMicrosoft.Windows.ContentDeliveryManager_cw5n1h2txyewySettings
Note: Appdata folder is normally in a hidden state, unhide it.

- Rename the settings.dat file to settings.dat.bak
- Rename the roaming.lock file to roaming.lock.bak

- Go to one step back from the Settings folder and go to the folder LocalState → Assets folder and then delete everything in Assets folder.

- Go two-steps back from the Assets folder, go to the folder Localcache folder, and then delete everything in the Localcache folder.
- Now, click on the Start menu button → Settings → Personalization → Lock Screen.
- Set the Background as Windows spotlight option. Once you click on that, the renamed files will regenerate itself automatically. The Windows spotlight has been reset successfully.
- Reboot the computer.

Solution 2: Reinstall Windows Spotlight completely
- Right-click on the Start Menu → Windows PowerShell (Admin) and run the below command in PowerShell:
Make sure you are running Powershell in Admin Mode.Get-AppxPackage -allusers Microsoft.Windows.ContentDeliveryManager | foreach {Add-AppxPackage "$($_.InstallLocation)appxmanifest.xml" -DisableDevelopmentMode -register }
- Also run the following commands one by one:
Get-AppXPackage -AllUsers |Where-Object {$_.InstallLocation -like "*SystemApps*"} | Foreach {Add-AppxPackage -DisableDevelopmentMode -Register "$($_.InstallLocation)AppXManifest.xml"}dism /online /cleanup-image /restorehealth
sfc /scannow
- Reboot the computer.
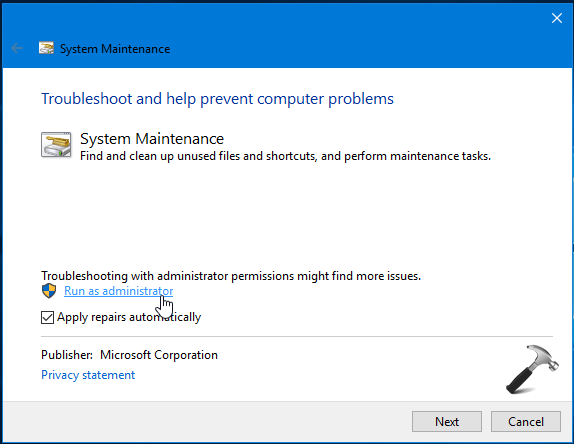
Solution 3: Run System Maintenance Troubleshooter
If the above steps did not work for you, then we suggest you try Windows 10 system maintenance tool troubleshooter.
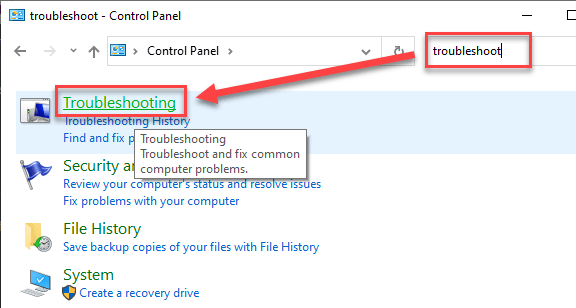
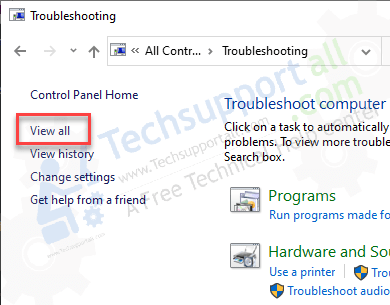
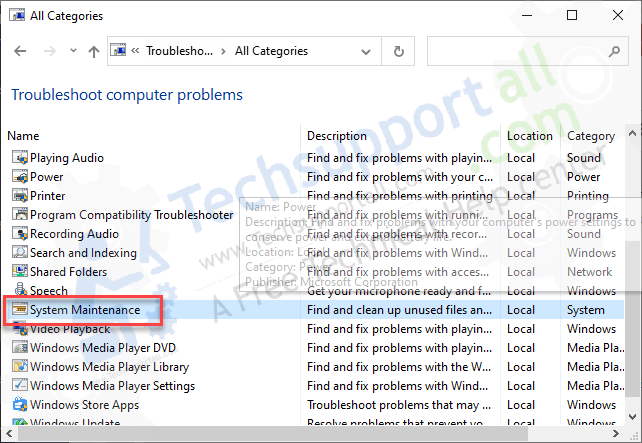
-
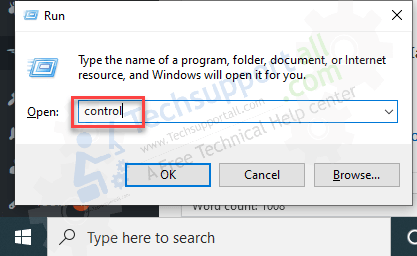
- Open Control Panel

- Search for Troubleshooting

- Click on View All

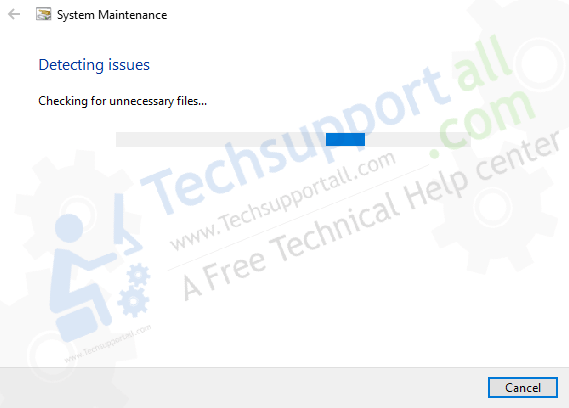
- Click on System Maintenance and follow its on-screen instructions to complete system maintenance troubleshooting.

- Click on Next

- Click on try to run this troubleshooter in administrator mode.

- After that, click on finish after detecting the issue.
- Open Control Panel

Get more guidance on how to run Windows 10 system maintenance troubleshooters.
Check whether the error was resolved or not. You can press the Windows Key + L key to go immediately to the lock screen to see the preview.
Solution 3: Select the correct Regional Language in settings
Sometimes Microsoft servers cannot take your location from your regional language settings to give you personalized background images. You need to re-select the regional language to re-fetch your regional location. Let’s see how to do so:
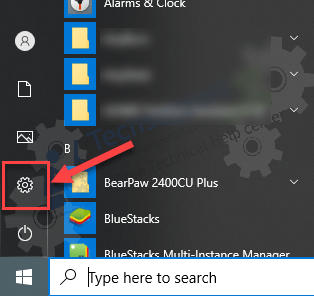
- Click on the Start menu and click on settings (gear icon).

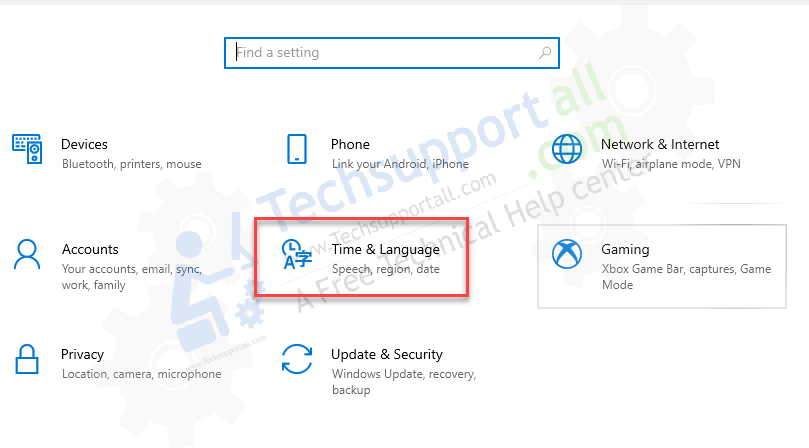
- Click on ‘Time & Language‘

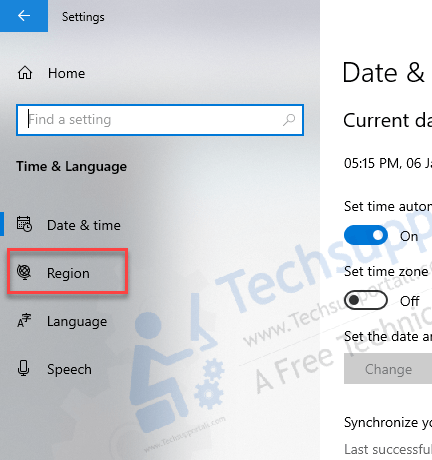
- Click on Region.

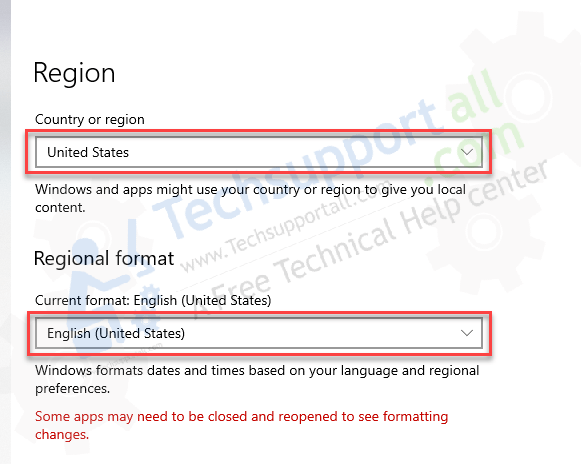
- Select the regional language that you want. If you have already selected then select anything else first and then choose the right one (your language) to reset the language.

- That’s it. Reboot your computer after you’re done. Hopefully, the issue should be fixed. If it is not fixed then let me know in the comment down below.
If the problem still persists then use DISM command and follow the above steps again. Sure, that will fix the issue. If that doesn’t work, then please leave your comments below so that we can find an alternative fix.
In normal cases, Windows 11 and Windows 10 would set lock screen background automatically from Bing and you can see different lock screen when login in your PC.
But in fact, you will always run into Windows spotlight not working or Windows spotlight images not changing with unknown reasons. In that situation, you are unable to change spotlight pictures on boot.
Or sometimes, you would have chosen to show advertisements in lock screen background. While Windows 10 spotlight not showing, it is natural that you cannot see the advertisement as well.
Now it is high time that you managed to fix Windows 11/10 spotlight lock screen errors.
Why Windows Spotlight Images Not Changing Windows 11/10?
When Windows failed to borrow pictures from Bing or other browsers, it means there is something went wrong with your computer. Maybe it is the corrupted system files or damaged images or problematic key in registry editor relevant to spotlight Windows 10.
Whatever the cause of the not changing lock screen spotlight is, follow this thread to troubleshoot this Windows spotlight not showing issue.
How to Fix Windows 11/10 Spotlight Not Working?
As this lock screen spotlight error is somewhat complicated, you might as well try the following methods to solve it effectively.
In the very beginning, you need to fix WIFI issues on Windows 10/11 as the lock screen spotlight requires an internet connection to fetch pictures from Bing.
Solutions:
- 1: Run SFC and DISM to Fix Spotlight Not Working Issue
- 2: Reset Windows Spotlight Preference Settings
- 3: Re-register Spotlight on Windows 10
Solution 1: Run SFC and DISM to Fix Spotlight Not Working Issue
Now that the corrupted files and images can result in Windows spotlight cannot change pictures, you may as well manage to make use of System File Checker (SFC) and Deployment Imaging Servicing Management (DISM) to help fix the spotlight not updating issue on Windows 10.
1. Input Command Prompt in Start search box and then right click it to Run as administrator.
2. In Command Prompt, type in sfc /scannow and then hit Enter to run this command.
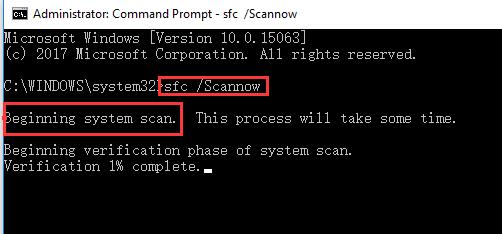
Then SFC will scan your system files and check if there are any corruptions on your computer. Once it finds an error, it will automatically correct the erroneous files and fix them for you automatically.
When System File Checker (SFC) finished its job, you can observe the unavailable spotlight backs to Windows 10 lock screen as normal.
3. In Command Prompt, copy and paste the command dism /online /cleanup-image /restorehealth and then press Enter to run DISM.
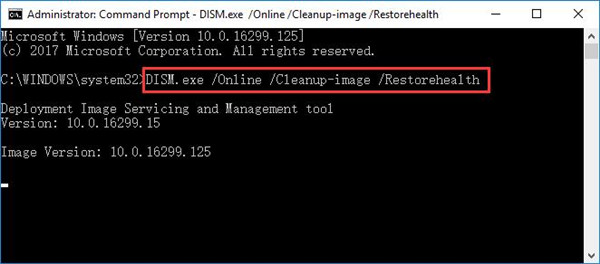
DISM will correct the damaged images. If possible, Windows spotlight not working error will be fixed on Windows 10.
Solution 2: Reset Windows Spotlight Preference Settings
Another way you can turn to is to change the preferred lock screen picture for Windows 10 or Windows 11. It demands that you personalize the background and then make adjustments in File Explorer. On that occasion, try to fix Windows spotlight not changing issue from this perspective.
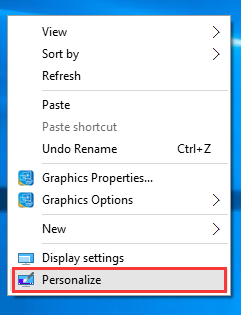
1. Right click the Desktop and then select Personalize from the right-click list.
2. Under Lock screen, in Background, select Picture.
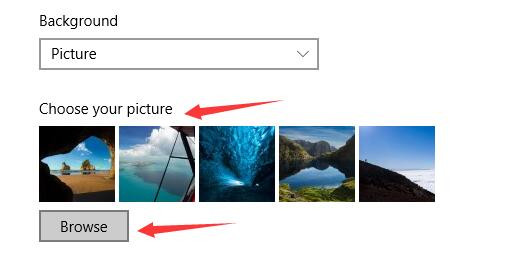
Then choose a picture and set it as default lock screen picture.
3. Then double This PC on your Desktop to open it.
4. In This PC, navigate to C:Users<USERNAME>AppDataLocalPackagesMicrosoft.Windows.ContentDeliveryManager_<Package ID>LocalStateAssets.
5. Then open Assets folder and click Home tab, then hit Delete to remove all the files of Assets.
6. Then go back to Personalization settings and under Lock screen again, choose Windows spotlight.
At this time, you will have correctly reset Windows spotlight. What you are supposed to do is to check if Windows spotlight not working after Windows 10 update will come again on your PC.
Solution 3: Re-register Spotlight on Windows 11/10
After running SFC and DISM, you can also manage to register spotlight app to see whether Windows 10 lock screen not changing will be away from you.
You can re-register spotlight in Windows Powershell with the following steps.
1. Type in Powershell in the Start search box and then press Enter to move into Windows Powershell.
2. In Windows Powershell, copy and paste the following code, then click Enter to execute this command.
Get-AppXPackage -AllUsers |Where-Object {$_.InstallLocation -like “*SystemApps*”} | Foreach {Add-AppxPackage -DisableDevelopmentMode -Register “$($_.InstallLocation)AppXManifest.xml”}
3. Exit Windows Powershell and reboot your computer to take effect.
Once the spotlight application is registered, it is likely that your Windows 10 spotlight lock screen not changing disappeared from your computer.
To conclude, the instant you stumble upon Windows 11/10 lock screen spotlight not changing, it is advisable and feasible that you make reference for the solutions provided in this post.
More Articles:
Fixed: OBS Game Capture Black Screen on Windows 11,10, 8, 7
Computer Turns on But No Display: 2022 Update
How to Change Screensaver Settings on Windows 11/10
Windows Spotlight is stuck on one image or Windows 10 Spotlight is not working after the recent update? You have selected Windows 10 Spotlight feature for the lock screen but it doesn’t change images regularly, rather it only shows one picture? let’s see how to fix the windows spotlight not working on windows 10.
What is Windows Spotlight?
Windows Spotlight is a feature included with Windows 10 that uses Bing to automatically download and set new background images on the Lock screen, to keep your experience fresh every time you sign in. But sometimes Especially after recent windows 10 upgrade users experience Windows Spotlight is stopped working, or you’ll notice that it gets stuck on the same image. Unfortunately, Windows 10 doesn’t include an option to reset this feature. But it’s possible to fix the Windows 10 Spotlight with a simple workaround.
Fix windows spotlight stuck on one picture
Note: The spotlight feature is available only when your PC is connected to the internet. The pictures on the lock screen change automatically every day to day if you are connected to the internet.
Turn off metered connection
When your PC is connected to a metered network, it might not download spotlight images to reduce the data usage. Its recommended to check and turn off if metered connection is enabled. To do this
- open settings using windows key + I,
- Go to the network and Internet then Status
- Click on change connection properties, scroll down and toggle off button under set as metered connection.

Disable and re-enable windows spotlight
Also Before trying out any solutions, we recommend turn off Windows Spotlight and then turn it on again.
- Open Settings using Windows key + I,
- Click Personalization then Lock screen,
- Select the Picture option as background (this will turn off the feature) and then select Windows Spotlight.

Tweak from File Explorer
Open the File Explorer using Windows key + E, switch to the View tab, checkmark on Hiden items and Now navigate to
C:UsersUserNameAppDataLocalPackages Microsoft.Windows.ContentDeliveryManager_cw5n1h2txyewyLocalStateAssets
In the above path, replace “C” with the drive letter of the drive where Windows 10 is installed and replace “UserName” with your actual username.

Here press Ctrl+ A to Select all files and then hit the Delete key. Next, navigate to the following folder:
C:UsersUserNameAppDataLocalPackages Microsoft.Windows.ContentDeliveryManager_cw5n1h2txyewySettings
Here again, Under the Settings folder, you should find two files: roaming.lock and settings.dat. Select both files and delete them. Reboot your PC now, Windows Spotlight feature should start working again now.
Re-register Spotlight App
Right-click on the Windows 10 start menu and select PowerShell (Admin). At the PowerShell window, copy and paste the following command and then hit Enter key:
Get-AppxPackage Microsoft.Windows.ContentDeliveryManager -allusers | foreach {Add-AppxPackage -register “$($_.InstallLocation)appxmanifest.xml” -DisableDevelopmentMode}

After completely execute the command restart your PC. Windows Spotlight must start working now by showing a new picture on the lock screen.
Run System file checker
If the issue still persists try to check the system files using SFC utility that scans all protected system files and replaces incorrect versions with correct Microsoft versions.
- Open Command Prompt as administrator
- In the command prompt, type sfc /scannow and hit Enter.
- Exit command prompt.
Wait until 100% complete the scanning process, after that restart windows and check this helps.
Did these solutions help to fix the Windows spotlight not working after the windows 10 update? Let us know on the comments below,
Also Read
- How To Find and Save Windows Spotlight Lock Screen Images in Windows 10
- Fix windows installer service could not be accessed Error On Windows 10
- How to Reset Windows 10 password without any Software
- Cannot install apps from Microsoft store – Windows 10 Version 21H2
- Simple Tweaks to Speed up Windows 10 computer for free
If you’re using Windows Phone, you should be aware of Bing lock screen wallpaper feature. This feature automatically refreshes your lock screen image on a daily basis. The feature was very well appreciated by the users and Microsoft has now brought the same feature to Windows 10 and called it Windows Spotlight. It was available from build 10240 onwards, which was also the first Windows 10 RTM, released last year. However, as far as build 10240 is concerned, the feature was missing from Pro editions. With the November Update (V1511, Build 10586), the feature was included in Pro editions as well.
Windows Spotlight Feature In Windows 10
If you’re new to Windows 10, let me tell you how to enable Windows Spotlight feature. Open Settings app and go to Personalization > Lock Screen. Then in the corresponding right pane, click the drop down against Background and you’ll able to see Windows Spotlight option. Once it is selected, Windows Spotlight feature gets active on your machine.
Please note that you must be connected to the Internet to make this feature working. Else, Windows will not able to download or get new images for your lock screen. Here is lock screen featuring Windows Spotlight image:
Recently, few Windows 10 users asked me to suggest a solution, as Windows Spotlight feature was not working for them. If you’re also having same issue, you can try out the suggestions mentioned below and see if something works for you.
FIX : Windows Spotlight Not Working In Windows 10
FIX 1 – Using File Explorer
1. Disable Windows Spotlight feature in Settings app, i.e. select Picture/Slideshow option for Lock Screen background.
2. Press  + E keys to open File Explorer and click View. Then check Hidden items option. Now navigate to following location:
C:Users<USERNAME>AppDataLocalPackagesMicrosoft.Windows.ContentDeliveryManager_<Package ID>LocalStateAssets
*Substitute C: with your system root drive and <USERNAME> with your user account name. Here, Package ID may be arbitrary value like cw5n1h2txyewy.
3. In the Assets folder, delete everything and make the folder empty.
4. Now enable Windows Spotlight feature in Settings app. Then press + L keys to lock screen and check. You should be able to see Windows Spotlight screen now.
FIX 2 – Using System Maintenance Troubleshooter
In case if issue still persists after trying FIX 1, you can run the System Maintenance troubleshooter.
Here is the step-by-step guide to learn how to run this troubleshooter:
How to run System Maintenance troubleshooter in Windows 10
I hope after trying both the fixes, problem would be resolved. Here is the video to illustrate more:
If Windows Spotlight is still not working as expected, go here to re-register Windows Spotlight or create a new user account. Don’t forgot to check, how to save spotlight images in Windows 10.
That’s it!
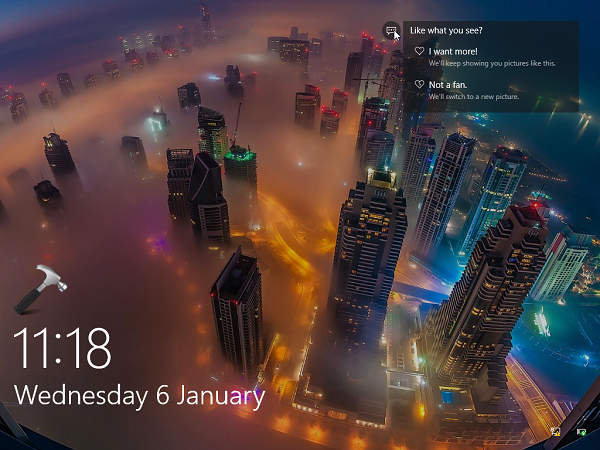
Also See: ‘Like What You See’ Missing For Windows Spotlight.
READ THESE ARTICLES NEXT
- Windows Spotlight ‘Switch to next picture’ is greyed out
- Fix: Windows Spotlight not working in Windows 11
- Use Spotlight image as Desktop wallpaper in Windows 11
- Show lock screen or Windows Spotlight image on login screen in Windows 11
- FIX: ‘Like What You See’ Missing For Windows Spotlight
- [How To] Set Windows Spotlight Image As Login Screen Background In Windows 10
- [How To] Re-register Windows Spotlight In Windows 10
- [TIP] Save Windows Spotlight Images In Windows 10