Microsoft accessories Windows 10 Windows 8.1 Windows 7 Windows 11 More…Less
If you are having trouble with your microphone features, the following information can help you troubleshoot and resolve issues.
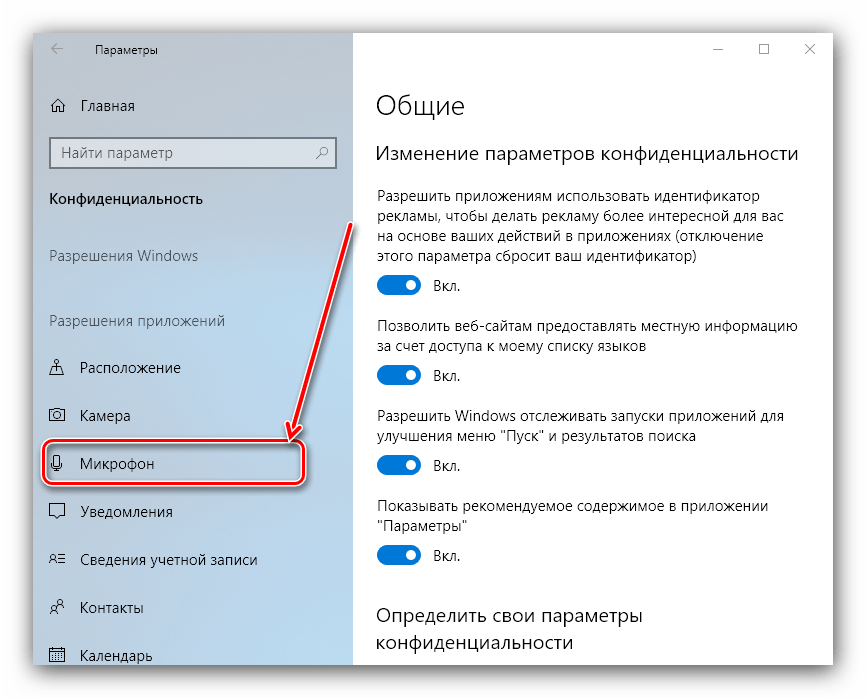
Make sure apps have access to the microphone
If your microphone isn’t detected after updating Windows 11, you may need to give your apps permission to use it. Here’s how:
-
Select Start > Settings > Privacy & security > Microphone and make sure Microphone access is turned on.
-
Make sure Let apps access your microphone is turned on, then choose which apps have access. Desktop apps won’t appear in this list.
If you want to give access to desktop apps, make sure that Let desktop apps access your microphone is turned on. You can’t turn off microphone access for individual apps.
Others can’t hear me
Try the following solutions:
-
If your headset has a Mute button, make sure it isn’t active.
-
Make sure that your microphone or headset is connected correctly to your computer.
-
Make sure that your microphone or headset is the system default recording device. Here’s how to do this in Windows 11:
-
Select Start > Settings > System > Sound.
-
In Input, go to Choose a device for speaking or recording, and select the device you want.
-
To test your microphone, speak into it. In Volume, make sure the blue bar moves to make sure Windows hears you.
-
The microphone volume is too low or does not appear to be working at all
Try the following solutions:
-
Make sure that the microphone or headset is connected correctly to your computer.
-
Make sure that the microphone is positioned correctly.
-
Increase the volume of your microphone. Here’s how to do this in Windows 11:
-
Select Start > Settings > System > Sound.
-
In Input, select a microphone to see its properties.
-
In Input volume, make sure the blue bar adjusts as you speak into the microphone.
-
If it doesn’t, go to Test your microphone and Start test. This will help you troubleshoot any issues with your microphone.
-
If you are having trouble with your microphone features, the following information can help you troubleshoot and resolve issues.
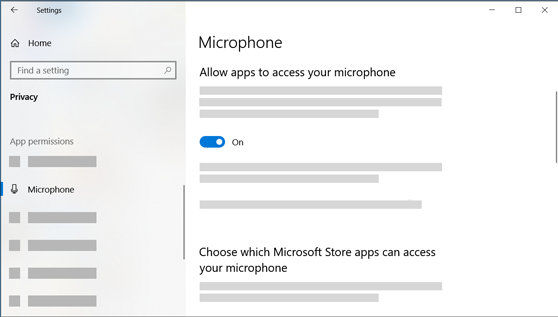
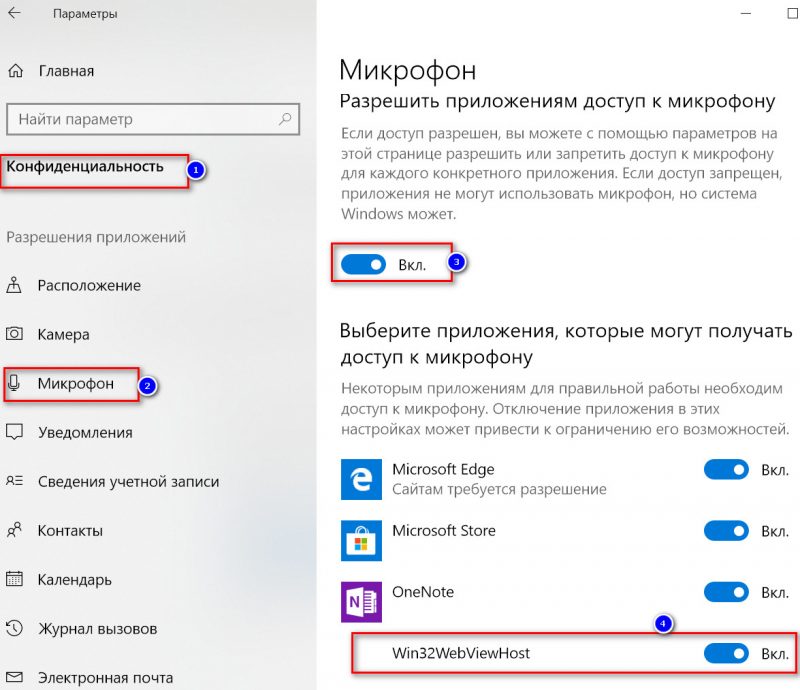
Make sure apps have access to the microphone
If your microphone isn’t detected after updating Windows 10, you may need to give your apps permission to use it.
-
To let apps access the microphone, select Start ,then select Settings > Privacy > Microphone . Select Change, then turn on Allow apps to access your microphone.
-
After allowing access to the microphone, you can choose which Microsoft Store apps can access these features under Choose which Microsoft Store apps can access your microphone, and give access to non-Microsoft-Store desktop apps by ensuring that the switch beneath Allow desktop apps to access your microphone is set to On.
Others can’t hear me
Try the following solutions:
-
If your headset has a Mute button, make sure it isn’t active.
-
Make sure that your microphone or headset is connected correctly to your computer.
-
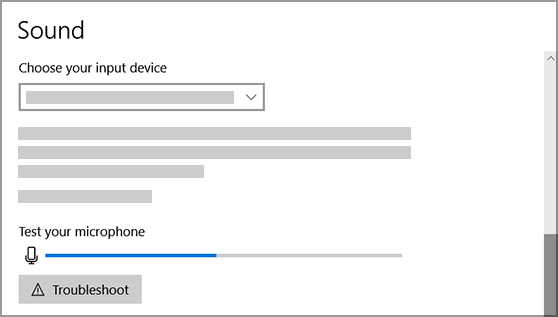
Make sure that your microphone or headset is the system default recording device. Here’s how to do this in Windows 10:
-
Select Start , then select Settings > System > Sound .
-
In Input, ensure your microphone is selected in Choose your input device.
-
To test your microphone, speak into it and check Test your microphone to make sure Windows is hearing you.

-
The microphone volume is too low or does not appear to be working at all
Try the following solutions:
-
Make sure that the microphone or headset is connected correctly to your computer.
-
Make sure that the microphone is positioned correctly.
-
Increase the volume of your microphone. Here’s how to do this in Windows 10:
-
Select Start , then select Settings > System > Sound .
-
In Input, ensure your microphone is selected under Choose your input device, then select Device Properties.
-
On the Levels tab of the Microphone Properties window, adjust the Microphone and Microphone Boost sliders as needed, then select OK.
-
Speak into your microphone while checking under Test your microphone to make sure your settings work. If you see the line moving from left to right, your microphone is working. If you see no change, the microphone is not picking up sound.
-
Others cannot hear me in Skype calls
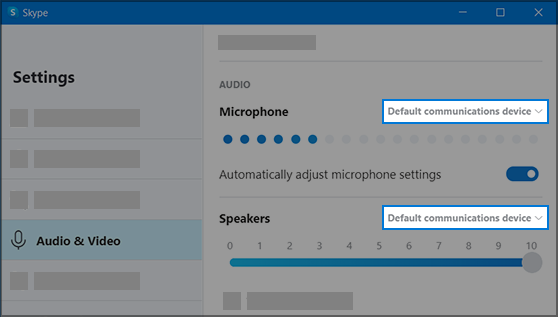
Make sure that your microphone or headset is the Skype default recording device. Here’s how:
-
If Skype is not open, select Start , then Skype to open it.
-
In the upper right corner of the Contacts List in Skype, select More , then Settings.
-
In Audio & Video, under Microphone, make sure your microphone or headset is selected.
-
Under Speakers, make sure your preferred speaker or headset is selected.
Need more help?
Microphone Is Not Working in Windows 10. How to Easily Fix It
Many users experience problems with microphones not recording sound, and being unable to use Skype and other similar apps. If your microphone isn’t working, this article will help you fix that.

Why Is My Microphone Not Working?
This problem has become more prevalent after the introduction of the Windows 10 Creators update. There are many reasons why internal and external microphones don’t work, including incorrect audio drivers, operating system issues, hardware problems, and so on.
How to Test My Microphone?
First, ensure that the microphone is not damaged. Connect the microphone to another computer. It would be even better if the other computer is not running the same operating system version.
For example, if you are using Windows 10, we recommend that you test your microphone on a computer running Windows 7 and so on. If the microphone is not working when connected to the other computer, the microphone itself is likely damaged.
If possible, connect a different microphone to your current computer and see if it works. This will help you determine if the problem is with the computer or microphone.
If you are using a desktop computer and an external microphone, try to connect it to the rear port of the computer. In some cases, front ports don’t always work.
If you tried connecting your microphone to another computer and it is working, read the guide below to find out how to fix this problem. The steps also apply to laptop computers with internal microphones.
Video Showing How to Fix Microphone Not Working on Windows 10:
Table of Contents:
- Introduction
- Run Windows Troubleshooter
- Make Sure That Microphone Is Enabled
- Set Your Microphone as a Default Device
- Make Sure That Microphone Is Not Muted
- Reinstall or Update Your Microphone Drivers
- Restart Windows Audio Service
- Restore Your System Using Restore Points
- Video Showing How to Fix Microphone Not Working on Windows 10
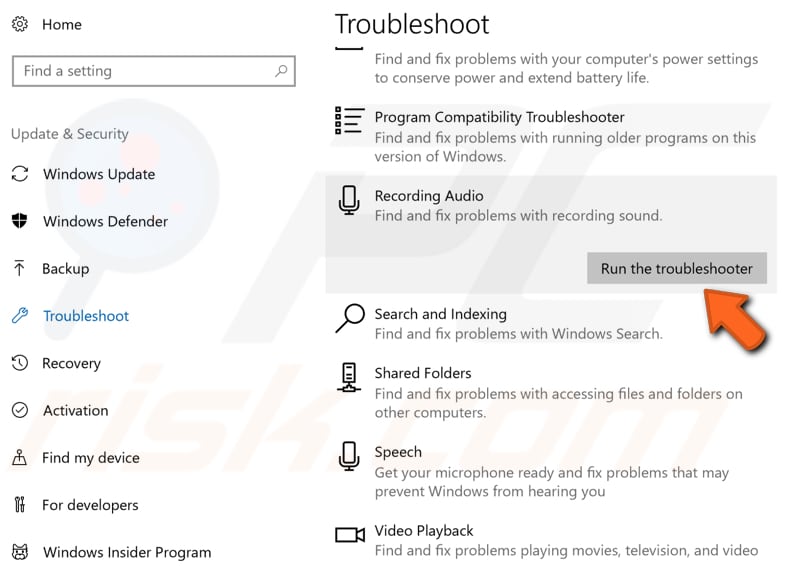
Run Windows Troubleshooter
Windows includes several troubleshooters designed to quickly diagnose and automatically resolve various computer problems.
Go to Settings, type «troubleshoot», and select «Troubleshoot» from the list to start troubleshooting.
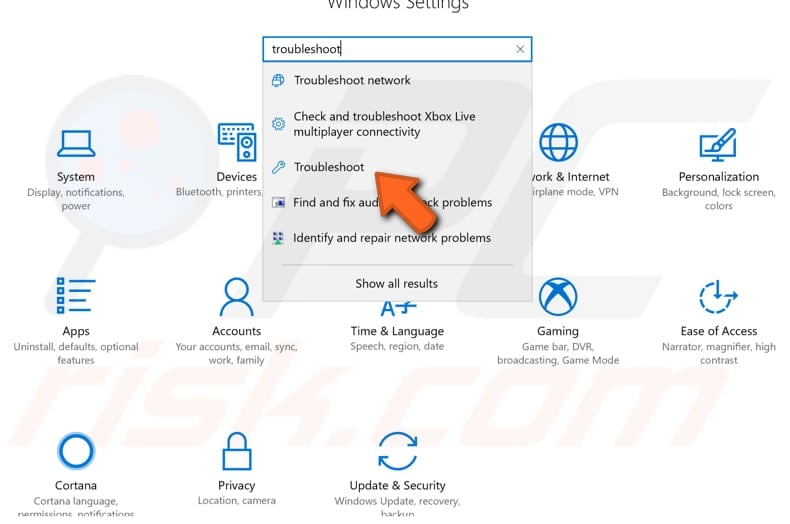
Find «Recording Audio» under «Find and fix other problems» and select it. Click «Run the troubleshooter» and follow the instructions. See if the Windows Update Troubleshooter solves the problem with the external or internal microphone. In addition, run the «Speech» troubleshooter.
[Back to Table of Contents]
Make Sure That Microphone Is Enabled
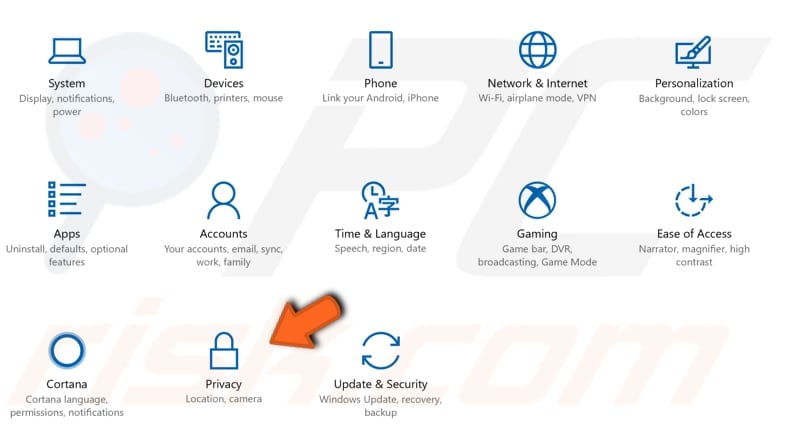
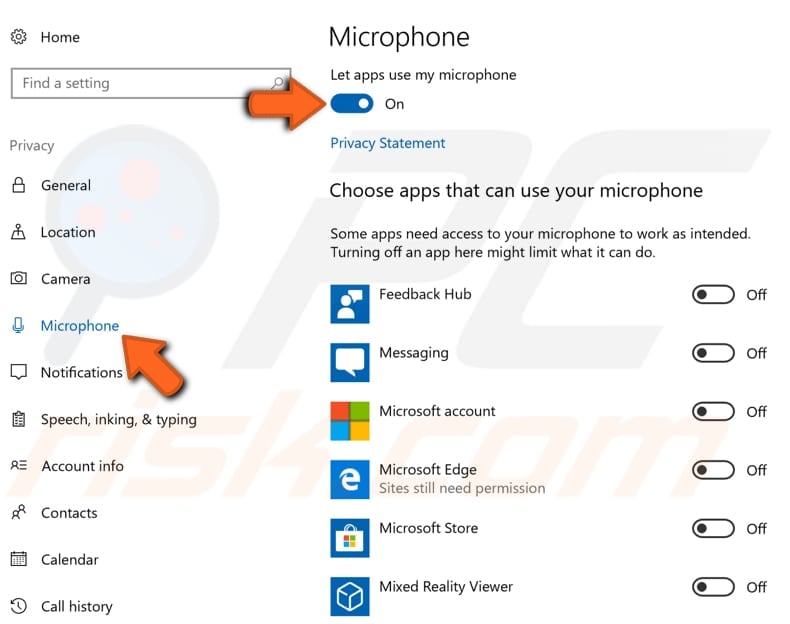
Ensure that your microphone in the Windows 10 operating system is enabled. It may be simply turned off — the reason why it does not work. To see if it is enabled in Windows, go to Settings, find and click «Privacy».
In the Privacy settings window, find and select the «Microphone» section on the left pane. Ensure that the toggle under «Let apps use my microphone» is switched to the «On» position. If you are using your microphone with a particular application, check that you gave that app access to the microphone.
Find the app in the list and check that the toggle is switched to the «On» position. See if this solves the problem with the microphone.
[Back to Table of Contents]
Set Your Microphone as a Default Device
If the external microphone is connected to your computer, this does not necessarily mean that it is set as the default device — you might need to do this manually.
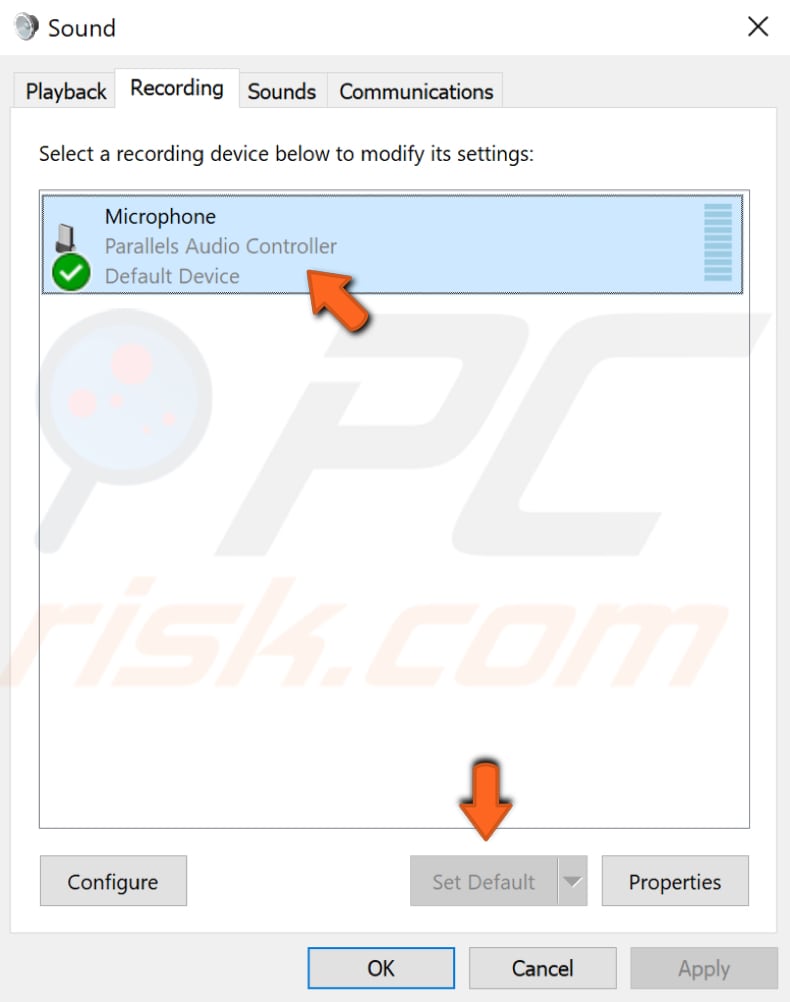
To do so, right-click the speaker/volume icon and select «Recording devices» from the contextual menu.
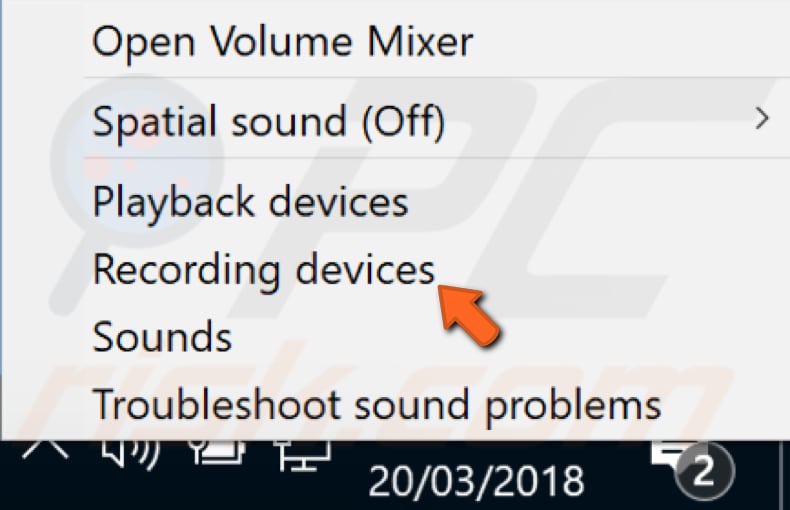
In the Recording tab, select your microphone and then click «Set Default» to set it as the default recording device. Check if this solves the problem with the microphone.
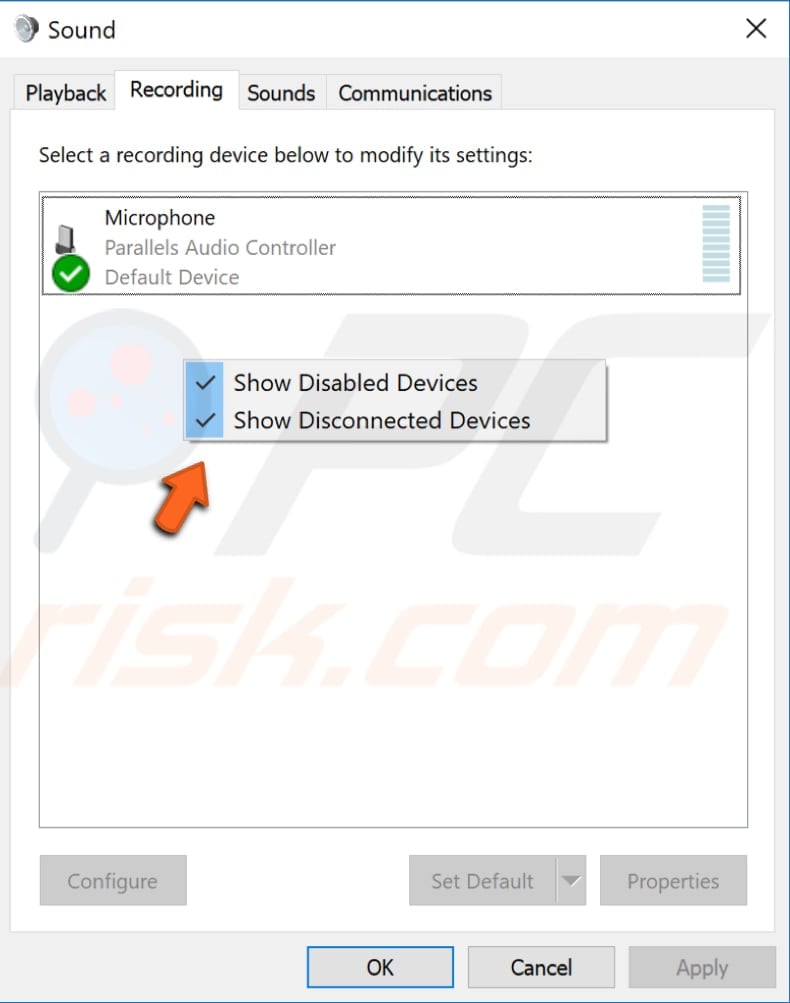
If there is no microphone in the recording devices list, right-click on the empty space in the Recording tab window and enable the «Show Disabled Devices» and «Show Disconnected Devices» options.
The microphone should appear, and you will be able to set it as the default device by performing the step described previously.
[Back to Table of Contents]
Make Sure That Microphone Is Not Muted
Another reason your microphone might not work is if it was muted or the volume set to a minimum.
To check, right-click the speaker icon in the Taskbar and select «Recording devices». Select the microphone (your recording device) and click «Properties».
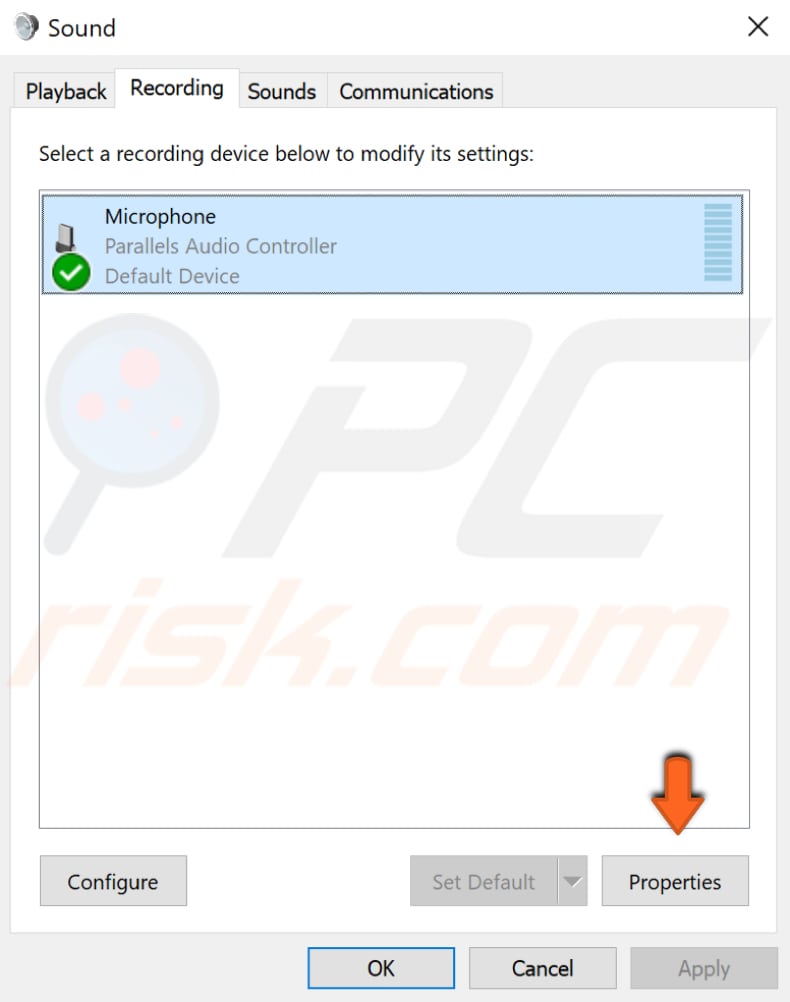
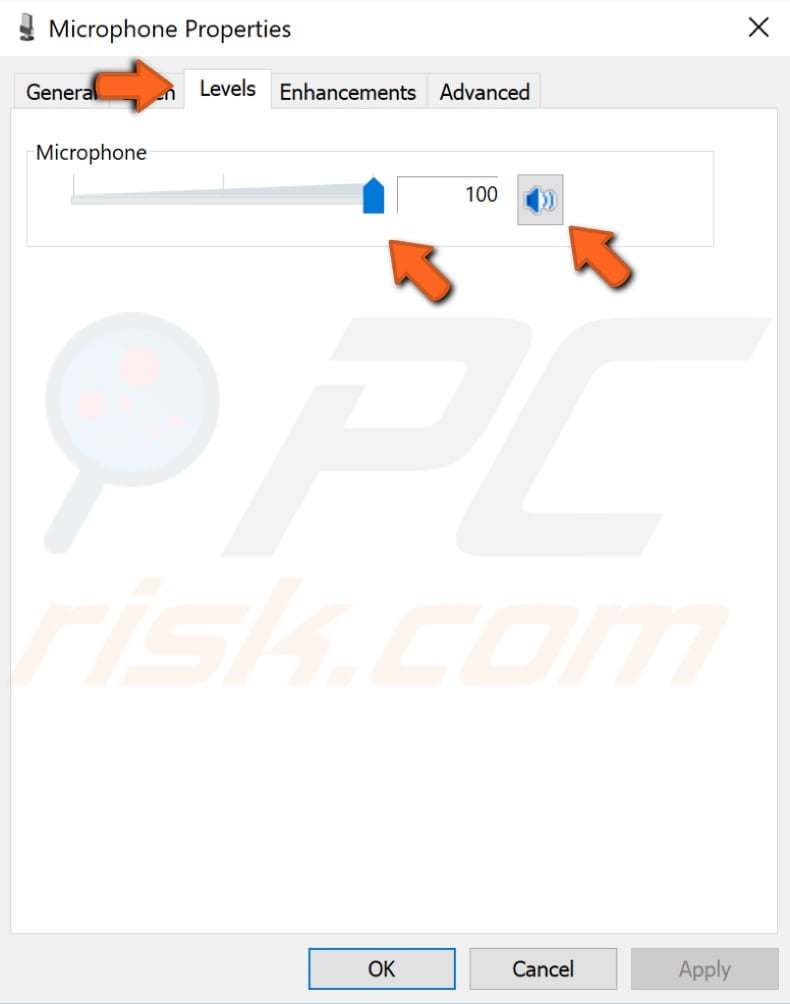
In the Microphone Properties window, click the «Levels» tab and ensure that the speaker icon has no red sign beside it and the volume is set to 100. Check the changes if needed and click «Apply». See if the microphone problem persists.
[Back to Table of Contents]
Reinstall or Update Your Microphone Drivers
A device driver provides information to the operating system and other software about how to interact with specific hardware. If the correct driver is not installed, the device might not function properly, if at all.
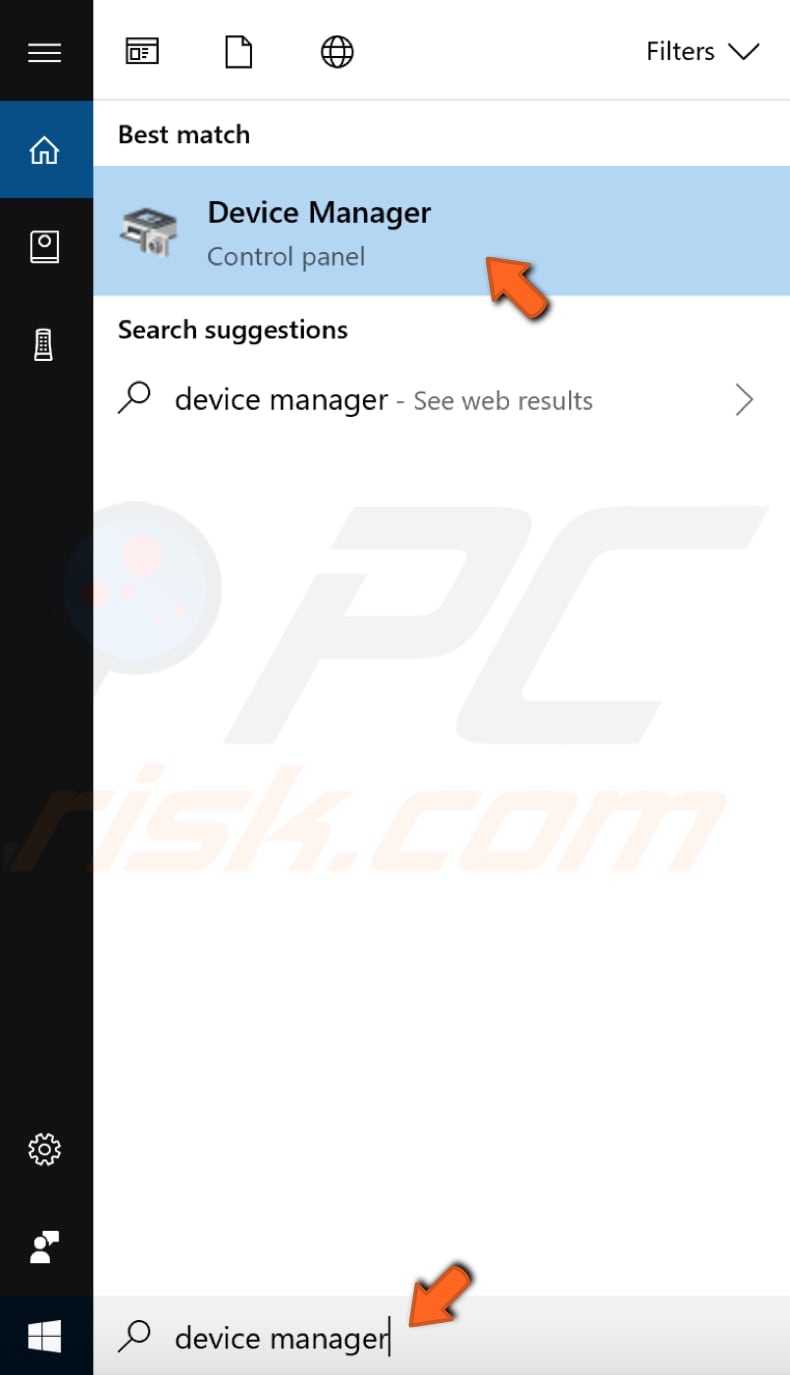
You can try to uninstall and then let Windows reinstall drivers automatically, or you can update drivers manually (or try both methods). To reinstall microphone drivers, type «device manager» in Search and click the «Device Manager» result.
Double-click «Audio inputs and outputs» (or click the arrow) in the Device Manager window to expand that section.
Right-click the recording device (your microphone) and select «Uninstall driver» from the contextual menu. Restart the computer, and Windows will reinstall the missing drivers.

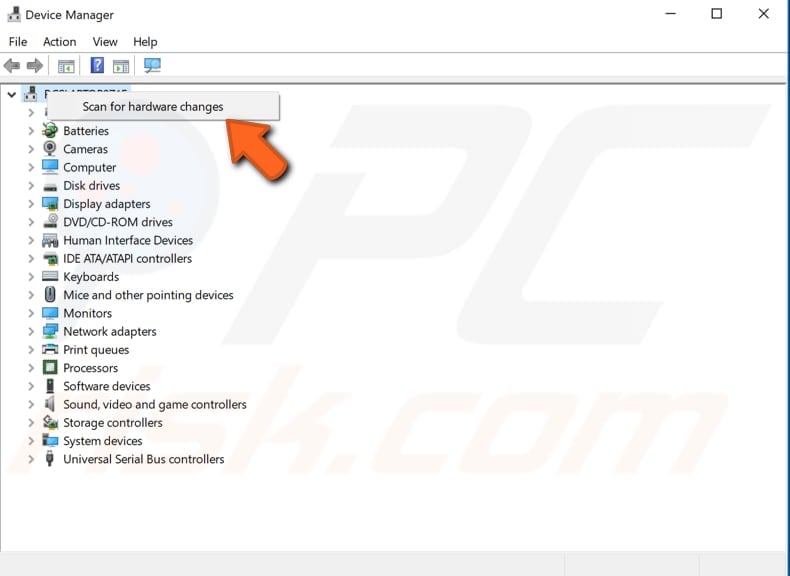
If Windows fails to reinstall the driver, you can force the system to reinstall by going to Device Manager and right-clicking the computer name (it should be the first one on the list).
Select «Scan for hardware changes», and Windows will install the missing drivers.
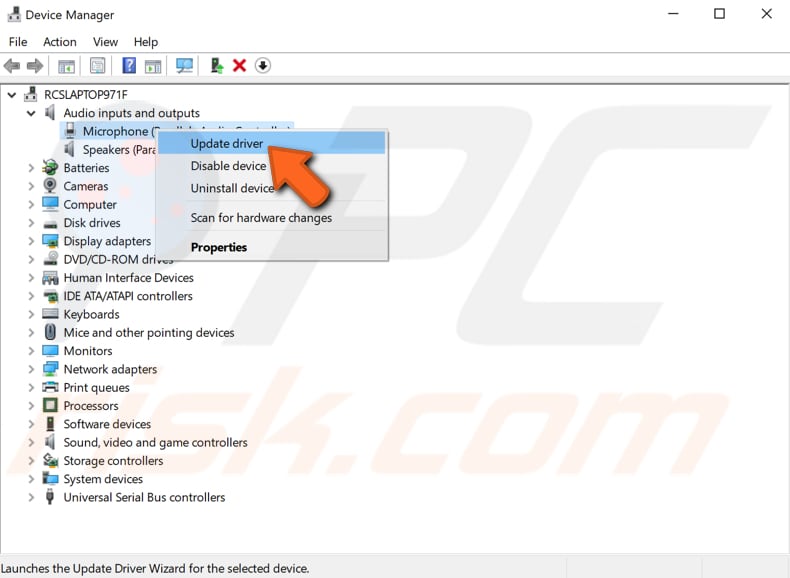
If you want to update your drivers manually or automatically, right-click the recording device in Device Manager and select «Update driver» from the contextual menu.
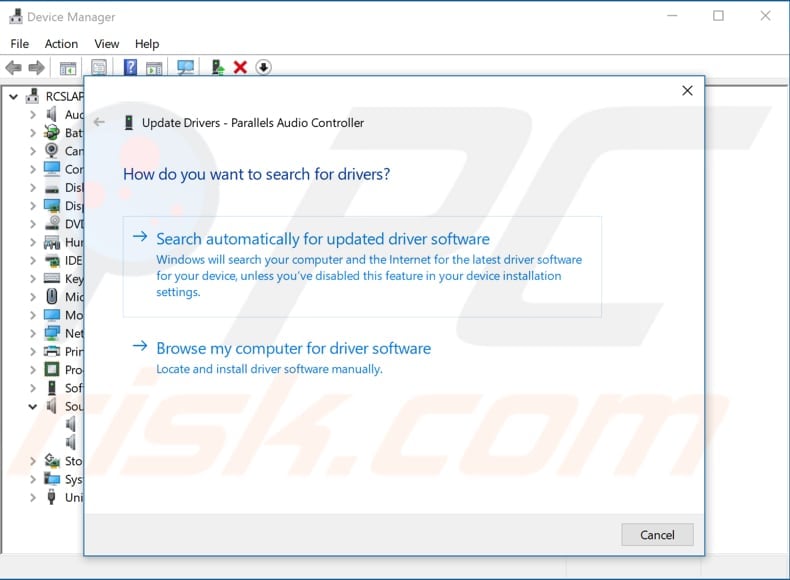
You will be asked to search for updated driver software automatically online or browse the computer for driver software. If you select the first option, Windows will search the computer and Internet for the latest driver software for your device.
If you select the second option, you must locate and install drivers manually. Using this option requires having previously downloaded drivers to the computer or a USB flash drive.
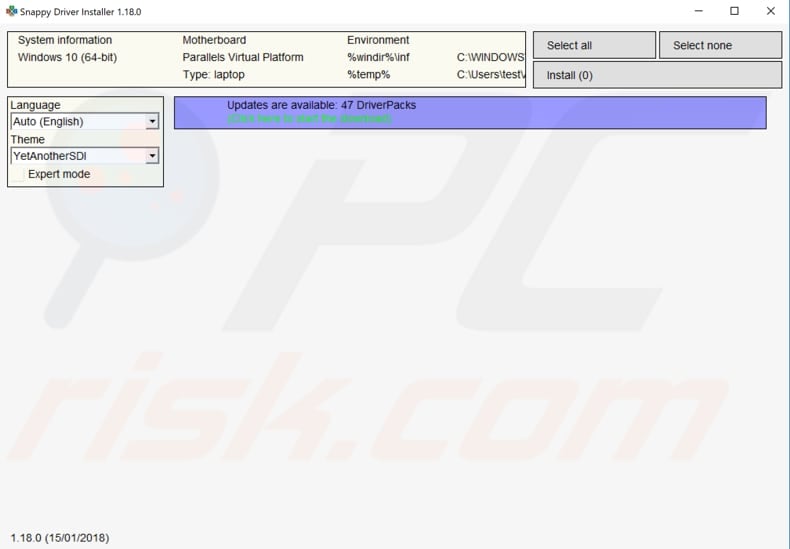
Another way to update or install new drivers for devices is by using third-party software such as Snappy Driver Installer. Snappy Driver Installer (SDI) is a free driver updater for Windows. Drivers downloaded through Snappy Driver Installer are simply collections (packs) of drivers for various hardware such as sound devices, video cards, network adapters, etc. You can download Snappy Driver Installer from here.
[Back to Table of Contents]
Restart Windows Audio Service
Windows Services (also known as services.msc) are used to modify how Windows services run on your system. These services are responsible for running available programs and managing many system settings and resources. You can modify a service’s settings for security, troubleshooting, and performance-related reasons.
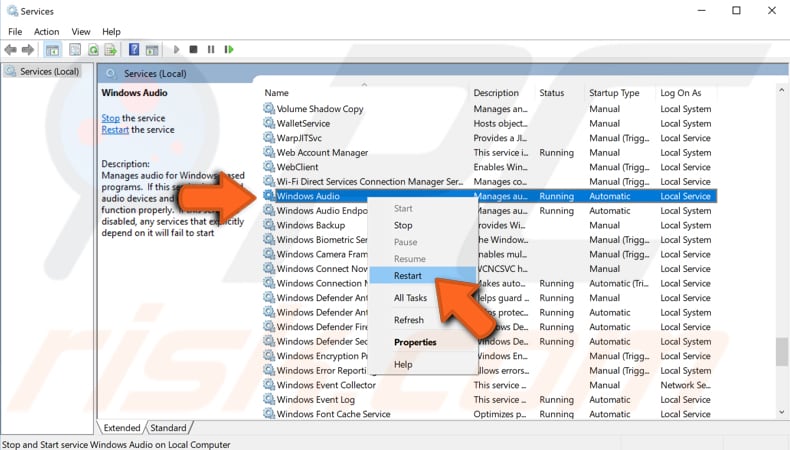
Windows Audio service manages audio for Windows-based programs. If this service is stopped, audio devices and effects will not function properly. If it is disabled, any services that depend on it will fail to start.
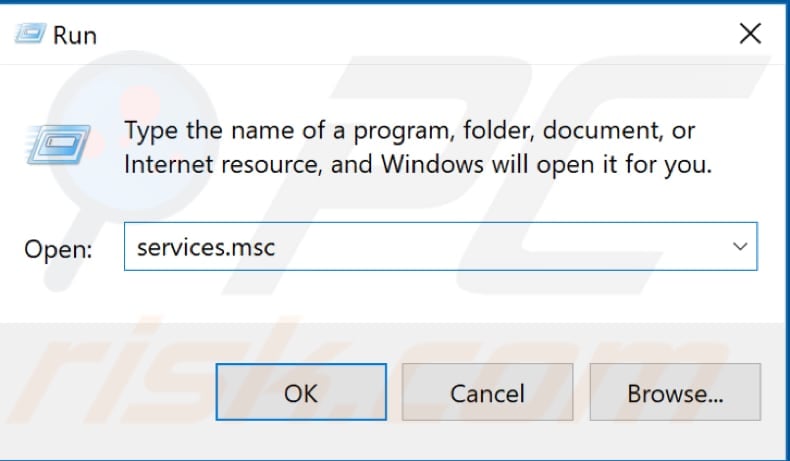
To restart Windows Audio services, press the Windows key + R on the keyboard or type run in Search and click the «Run» result to open the Run dialog box. Once it is open, type «services.msc» and press Enter on your keyboard or click «OK».
In the Services window, you will see a list of Windows services. Find the «Windows Audio» service and right-click it. Select «Restart» from the contextual menu. Alternatively, you can select «Stop» and then right-click it again and select «Start». Check if this solves the microphone problem.
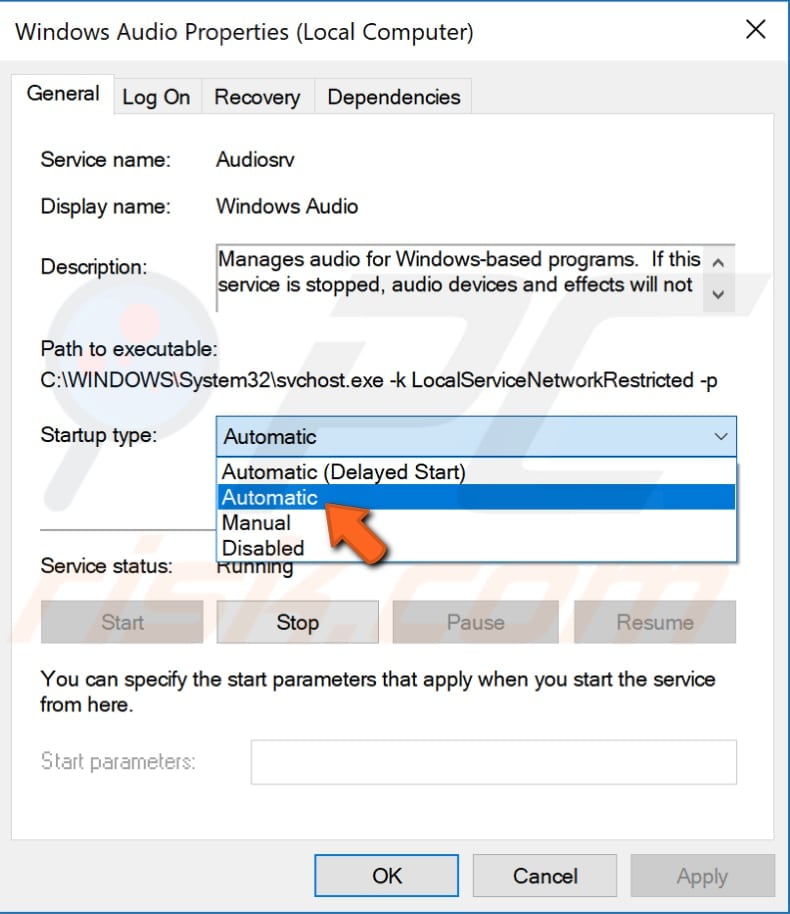
If that does not work, right-click the «Windows Audio» service and select «Properties» from the contextual menu. Check if the «Startup type» is set to «Automatic» in the Windows Audio service properties window. If not, set it to Automatic and click «Apply» to save the changes. Restart the computer and see if this solves the problem.
[Back to Table of Contents]
Restore Your System Using Restore Points
The System Restore tool creates restore points. A restore point is a collection of important system files stored by System Restore on a given date and time. System Restore reverts everything to a saved restore point, but first, you must have one recorded. If a restore point does not exist on your computer, System Restore has nothing to revert to.
To use this tool, you must have created restore points. With a created restore point, this feature will bring your system back to the previous working state without affecting your files and data.
Apply this method only if your microphone stopped working recently. For example, if this problem occurred after you updated Windows. If you have any system restore points created before you started experiencing issues with the microphone, you might be able to fix the problem by performing a System Restore.
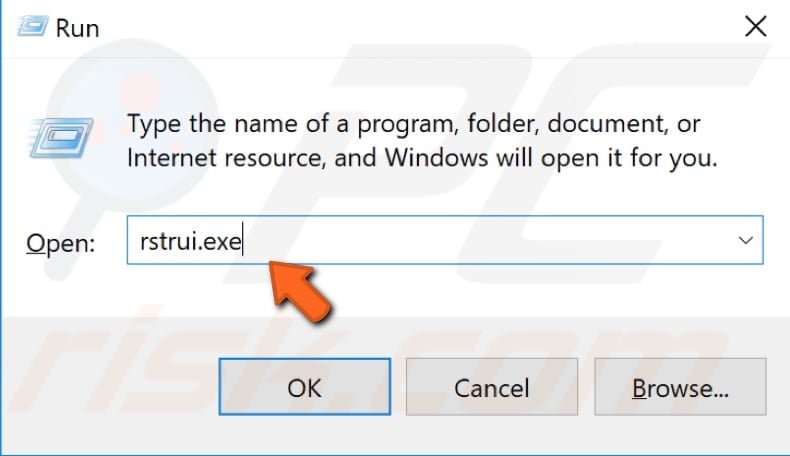
To restore your system, launch Run by pressing the Windows Key + R and typing «rstrui.exe». In the Run dialog box, press Enter or click «OK».
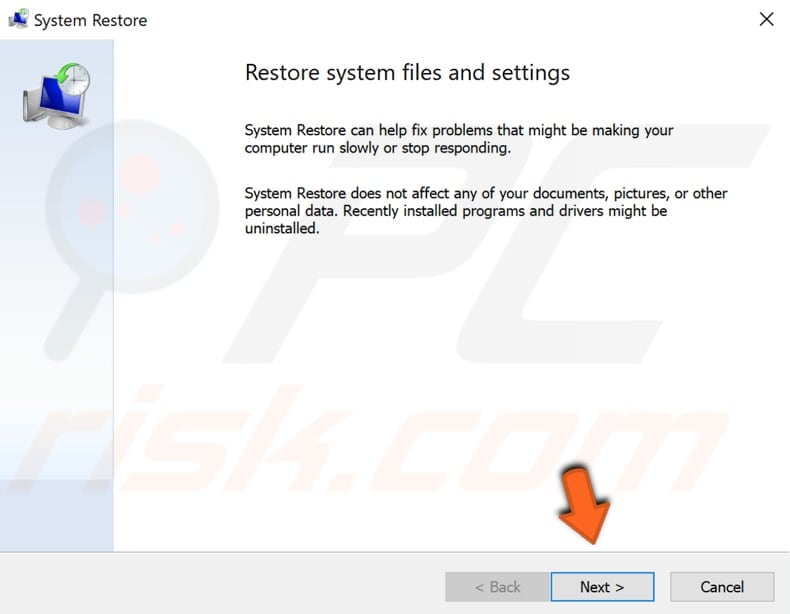
In the System Restore window, click «Next».
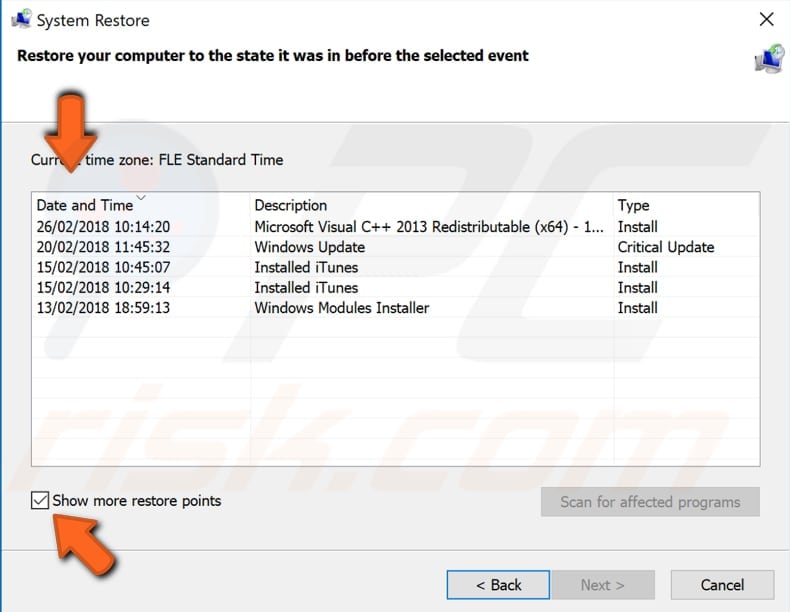
If there are restore points created, you will see a list of them. Mark the «Show more restore points» checkbox. This should display more restore points. Select the most appropriate restore point (depending on the time created, etc.) and click «Next».
Do not select a Restore Point when the problems with your microphone are already present.
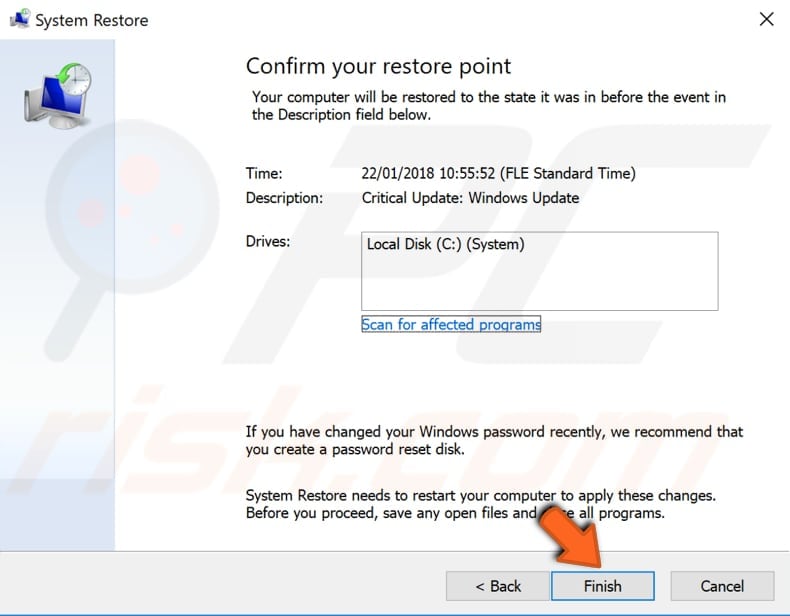
Confirm the restore point. Your computer will be restored to the state before the event detailed in the «Description» field. If you are happy with your choice, click «Finish» and begin the system restore process.
We hope that this guide was helpful and you can solve the problem with your microphone. If you know of another method that solved this problem not mentioned in our guide, please share it with us by leaving a comment in the section below.
[Back to Top]
It is needless to talk about the importance of the microphone in your PC. Just think of all your meetings on Skype or Zoom and the like, and you already realize how much of a setback a non-functional microphone on your Windows 11 or Windows 10 laptop is.
It may not be a frequent occurrence that your microphone is not working, but there could have been a few factors to trigger this issue. One common culprit is updates not being properly installed. It could also be a hardware issue, and in such case, your technician may be the best bet to fix it.
Here we walk through the steps to fix the microphone not working issue in Windows 11 and 10. It is best to follow all these methods in chronological sequence for a systematic resolution. However, if you think your microphone just feels “mute,” jump straight to the first, second and last steps for a quick fix.
Content
- 1. Check Microphone Privacy Settings
- 2. Check Microphone Driver
- 3. Disable and Re-enable Microphone
- 4. Check the Sounds Settings
- 5. Test Your Microphone
- 6. The Sound Troubleshooter
- 7. Configure Speech Recognition
- Frequently Asked Questions
1. Check Microphone Privacy Settings
Back in 2019, Microsoft introduced new privacy features to Windows that give you more granular control over which apps are accessing your microphone. The side effect of this is that certain apps may be blocked from using your microphone without you even knowing.
To check Microsoft privacy settings in Windows 10 and 11, follow the settings below:
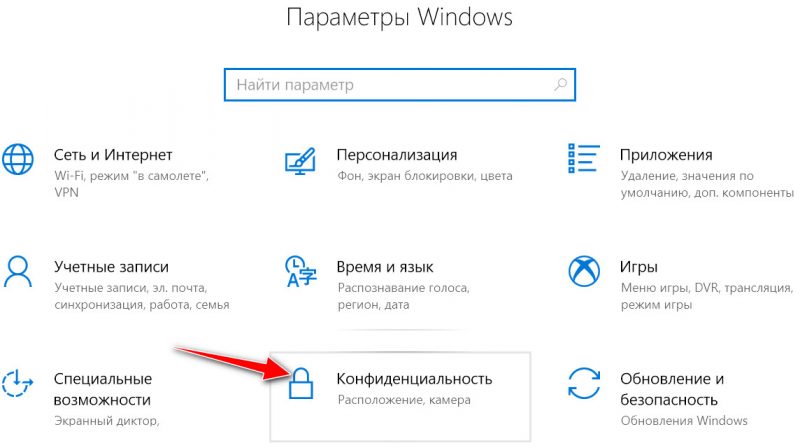
- In Windows 10, Go to “Settings -> Privacy -> Microphone.” The corresponding option in Windows 11 is “Settings -> Privacy & Security -> Microphone.”
Alternatively, you can also do a Start menu search to directly look for “Microphone privacy settings.”

- Click “Change” and make sure the Windows 11 “Microphone access” slider is set to “On.” This will broadly mean that the mic is now enabled on your PC.

- In Windows 10, go to “Allow access to the microphone on this device” and make sure the slider is “On.” If it shows “Off,” click “Change” to turn it back on.

- Make sure the slider under “Allow apps to access your microphone” is set to “On.” Look through the list of Microsoft Store apps to ensure the apps you want to use with the mic have been turned on.

- Of course, you’re likely to be using many apps not from the Microsoft Store, so to ensure these are enabled in Windows 10, scroll down even further and set the “Allow desktop apps … ” slider to “On.” In Windows 11, the corresponding option is “Let desktop apps access your Microphone.” Turn its slider to “On.”

2. Check Microphone Driver
After you’re done checking the microphone privacy issues, you must verify that the microphone drivers have been installed and are working properly. It is highly recommended to check the drivers, as they may have malfunctioned or simply become outdated.
If you have a newly-installed Windows version and still have an outdated Microphone driver, then it is likely you will face problems of no sound, recording fails or a mute microphone.
To check the driver status, follow these steps:
- In your Start menu, search for “Device Manager.” You can also search for “Devmgmt.msc” from the Run command by pressing Win + R.

- In the device manager window, search for “Sound, video and game controllers” and expand it.
- Once expanded, you should see your audio drivers. Note that the names of these will vary depending on the manufacturer. In my case, I have two called “Intel(R) Audio display” and “Realtek High Definition Audio.”

- On Intel(R) Display Audio, right-click and select properties. In the General tab, check to see that the device is working properly.

- If it is not working properly, click on the driver tab and select the “update” option.

- Repeat steps 4 and 5 for the other audio drivers.
- Restart the computer and check whether the microphone problem is fixed.
3. Disable and Re-enable Microphone
From the same Device Manager, you can try disabling and reenabling the microphone device to troubleshoot any sound issues.
- Go to Device Manager by searching for it in Start menu search or from the Run command by typing “devmgmt.msc.”
- Go to “Sound, video and game controllers” and expand it to identify the microphone device you are using. Right-click to disable the device.

- After a few seconds, right-click again on the microphone device to reenable it.

- Repeat the procedure for all audio drivers on your device to see if the microphone not working issue in Windows 10/11 has been resolved.
4. Check the Sounds Settings
There are a variety of sound adjustments that can ensure your Windows microphone will start working again. These include audio enhancements, full green bars, and some advanced settings.
Follow the directions below for our Windows system:
Windows 10
- In the taskbar of Windows 10, right-click on the sound icon at the far-right corner and select the “Sounds” option.
- On the “Recording” tab of the Windows 10 Sound control panel, click on the microphone and select the “Properties” option. Check whether the full green bars are moving on the selected default microphone.

- Select the “Levels” tab and increase the volume. Do the same for the speaker/headphone and its “Balance.”

- Go to the “Advanced” tab of Microphone Properties and check the “Exclusive Mode” fields, including “Allow applications to take exclusive control of this device” and “Give exclusive mode applications priority.”
- Apply these changes and click “OK.” Restart the device to see if the microphone issues have been resolved.
Windows 11
- In Windows 11, right-click on the speaker icon next to the sound icon in the taskbar and select “Sound settings.”
- Once the Sound Settings page is open, scroll down to “Microphone.” Click it to open a new menu.

- In the next screen, you should be able to see the details of the microphone in use on your device. Realtek Audio could show up as the default on your PC or laptop. If you’re using a headphone, it will show as a microphone.
- Verify that you have selected and enabled the correct device in Windows 11 to serve as your default microphone. Click it once to open “Microphone Properties.”

- Go to the “Levels” tab in Microphone Properties and check that its highest volume levels have been set.

- Go to the “Advanced” tab of the same pop-up and verify that the “Enable audio enhancements” mode plus “Exclusive Mode” boxes have been checked.

- Click “OK” and restart the Windows 11 computer to check whether the microphone issues have been resolved.
5. Test Your Microphone
Also from the Sound Settings in Windows 11/10, you can test your microphone for its volume levels. To do this, follow the steps below.
- In Windows 11, go to “Sound Settings” from the search menu followed by “Input settings” and “Test your Microphone.” For Windows 10, the corresponding “Settings” option is “Sound” followed by “Input.”

- Click “Start test” in Windows 11 to test your volume on the device. On Windows 10, once the default “Test your Microphone” icon shows up, you only need to speak up.
- In both cases, the test microphone will report the available microphone volume as a percentage of the total volume. If the figure is very small, it means you need to fix the microphone volume through other techniques.

6. The Sound Troubleshooter
You can troubleshoot any sound issues including the microphone by running Windows built-in audio troubleshooter.
- In Windows 11/10, right-click on the sound icon at the far-right corner of the taskbar and select “troubleshoot sound problems.”

- The computer will detect any fault that exists with your audio and recommend fixes for you. You just need to read through the prompts and click the options that you think will work for you.

- It starts with a quick scan of the audio issues on your Windows device. This will pose a series of random tests – for example, playing a beep. You need to confirm whether you can hear the computer-generated sound.

- The audio troubleshooter will zero in on one of the possible causes for sound issues on your device. It can be a missing or outdated audio driver. Take the corrective action as advised; for example, reinstalling the drivers.

Once the corrective solution has been adopted, the audio problems concerning the microphone should be fixed.

7. Configure Speech Recognition
One of the best solutions to microphone issues on a Windows 11/10 device is to configure it once again for speech recognition. This is a practical tip if you are facing mic trouble during Zoom or Skype calls.
- Go to “Control Panel” from the search menu and navigate to “Ease of access” followed by “Speech Recognition.”
- Select “Set up microphone” to ensure your computer works properly with speech recognition.

- Select the kind of microphone you want to use for speech recognition. If there are no external devices connected to your laptop or PC, select “Desktop microphone.” Click “Next” to proceed.

- Ensure proper placement of the microphone. It should be no more than 2 feet (0.6 meters) from your mouth, and should point directly at your head.
- Adjust the volume of the microphone by reading the sentences shown in your natural voice. This will move the green bar rapidly – indication that your microphone is good to go for speech.

- Look for a confirmation status that the microphone you are using is ready to use with the computer. Click “Finish” to exit this wizard.

Frequently Asked Questions
1. How do I reset my microphone in Windows 11/10?
To reset the microphone in Windows 11/10, you need to set it as your default device. First set up the microphone for speech recognition through a simple wizard, which can be done from “Ease of Access” in “Control Panel” (see above).
After that, go the far-right corner of taskbar and find the “Sounds” menu. Here in the “Recordings” tab, you need to enable the intended microphone as a default speaker.
2. Why is my Windows microphone not showing up in Device Manager?
Sometimes the microphone device seems invisible in Device Manager. This problem can be solved by going to “Sound Control Panel” from “Sounds” in the taskbar sound icon. Here under the “Recording” tab, you should see all available microphones. Right-click to view the disabled microphones on your Windows device. You will need to reenable them.
For more Windows fixes, see our guide on how to fix a monitor when it’s not waking up after sleep and fix the latest Windows 10 update problems.

Sayak Boral
Sayak Boral is a technology writer with over eleven years of experience working in different industries including semiconductors, IoT, enterprise IT, telecommunications OSS/BSS, and network security. He has been writing for MakeTechEasier on a wide range of technical topics including Windows, Android, Internet, Hardware Guides, Browsers, Software Tools, and Product Reviews.
Subscribe to our newsletter!
Our latest tutorials delivered straight to your inbox
Содержание
- Способ 1: Включение микрофона
- Способ 2: Выдача разрешений на управление микрофоном (Windows 10 1803 и новее)
- Способ 3: Удаление обновлений ОС
- Способ 4: Устранение аппаратных проблем
- Вопросы и ответы
С выделенными микрофонами редко возникают проблемы, однако такие устройства тоже подвержены сбоям – например, могут не работать, даже если подключены и распознаются компьютером. Далее мы хотим познакомить вас с причинами того, почему микрофон функционирует некорректно, и методами их устранения.
Способ 1: Включение микрофона
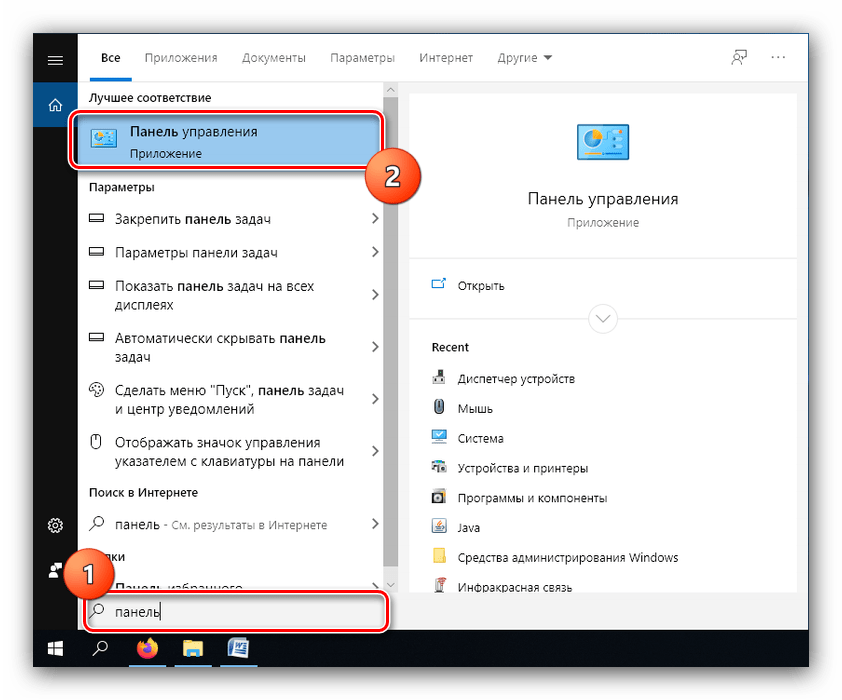
Может оказаться так, что устройство для звукозаписи отключено. Проверить его состояние и включить можно следующим образом:
- Откройте «Панель управления» любым удобным способом – например, напечатайте название оснастки в «Поиске» и выберите нужный результат.

Читайте также: Как открыть «Панель управления» в Windows 10
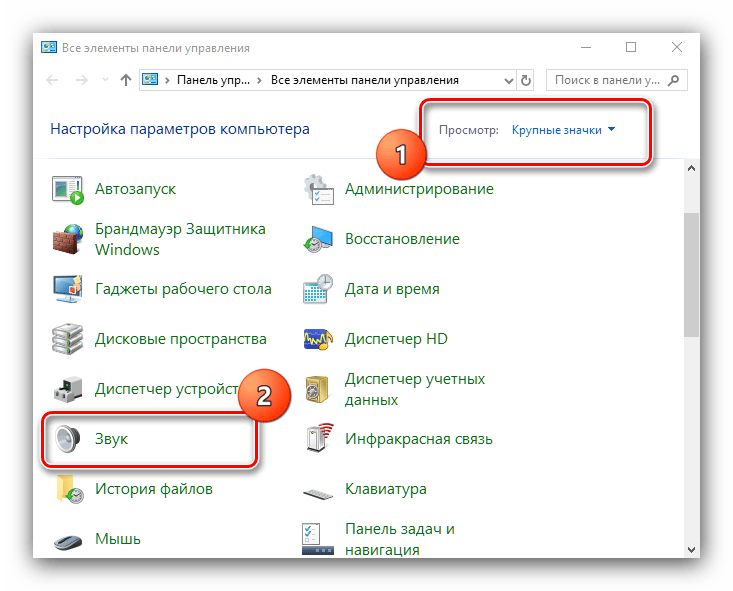
- Переключите режим отображения в «Крупные значки», после чего щёлкните по пункту «Звук».
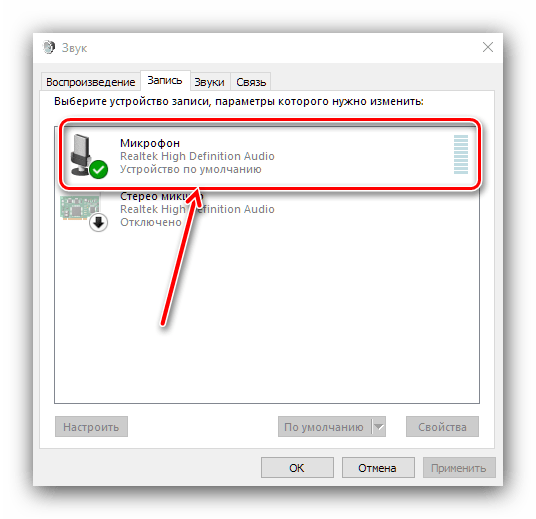
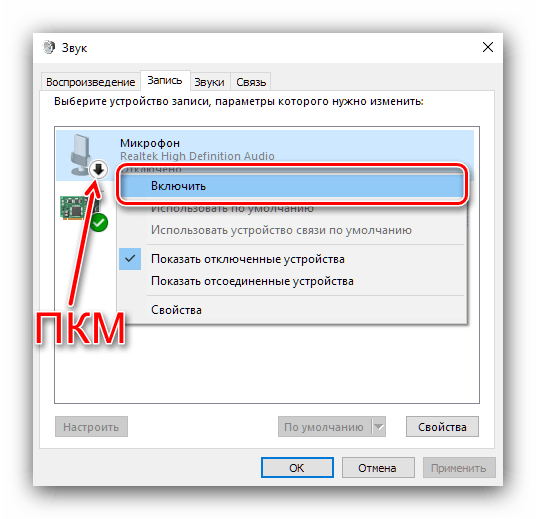
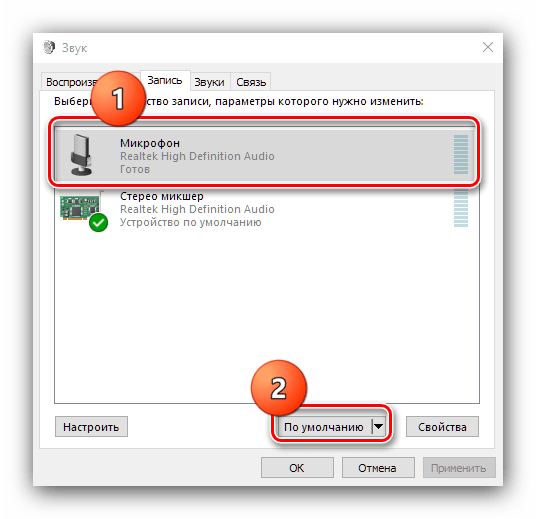
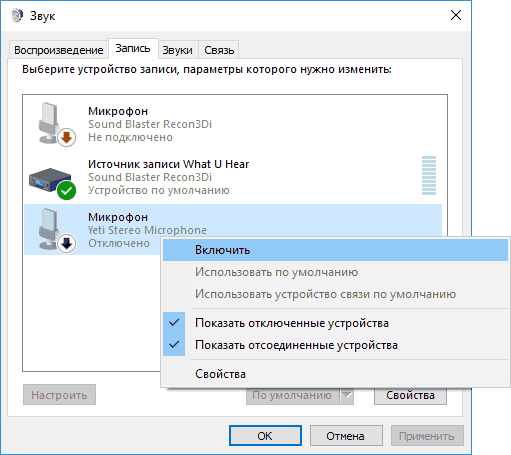
- Далее перейдите на вкладку «Запись» – будет открыт список распознанных микрофонов. Целевой компонент должен быть активен и выбран как основной

В случае когда это не так, выделите элемент, щёлкните по нему ПКМ, затем воспользуйтесь кнопкой «Включить».
Далее кликните по пункту «По умолчанию».
Если включение не дало результатов или же устройство уже включено, это означает, что причина проблемы заключается в другом и следует воспользоваться одним из способов ниже.
Способ 2: Выдача разрешений на управление микрофоном (Windows 10 1803 и новее)
Пользователям «десятки» 1803 и выше может понадобиться дополнительно выдать разрешения на управление устройством для звукозаписи. Это делается через «Параметры».
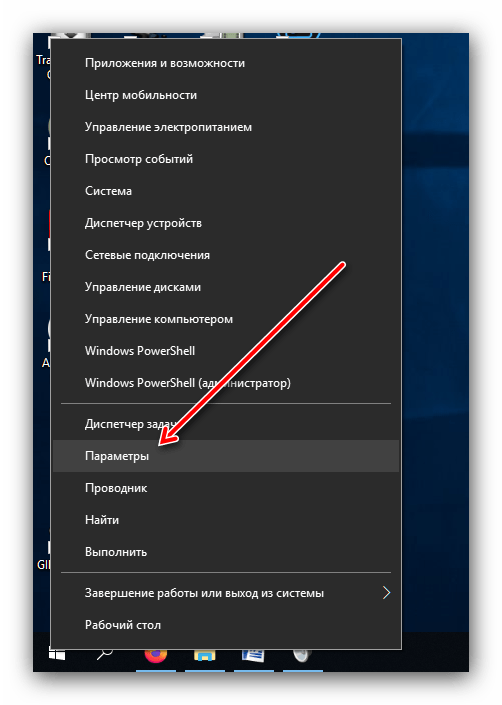
- Запустите «Параметры» любым подходящим методом – например, кликните ПКМ по значку «Пуска», после чего выберите нужный вариант.
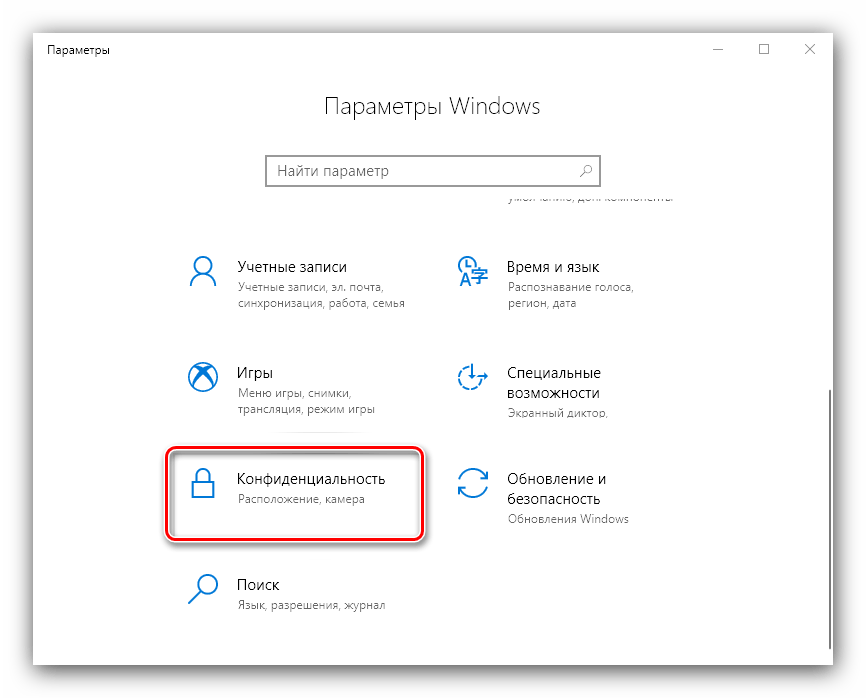
- Найдите раздел «Конфиденциальность» и щёлкните по нему.
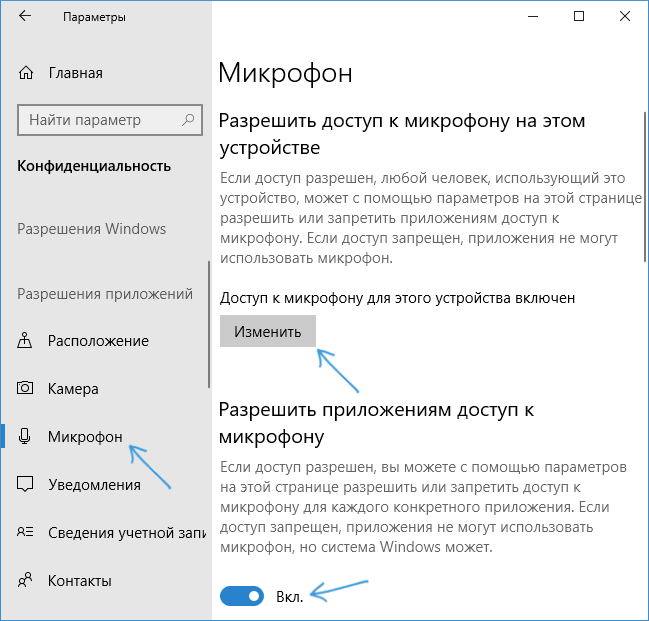
- С помощью бокового меню откройте пункт «Микрофон».
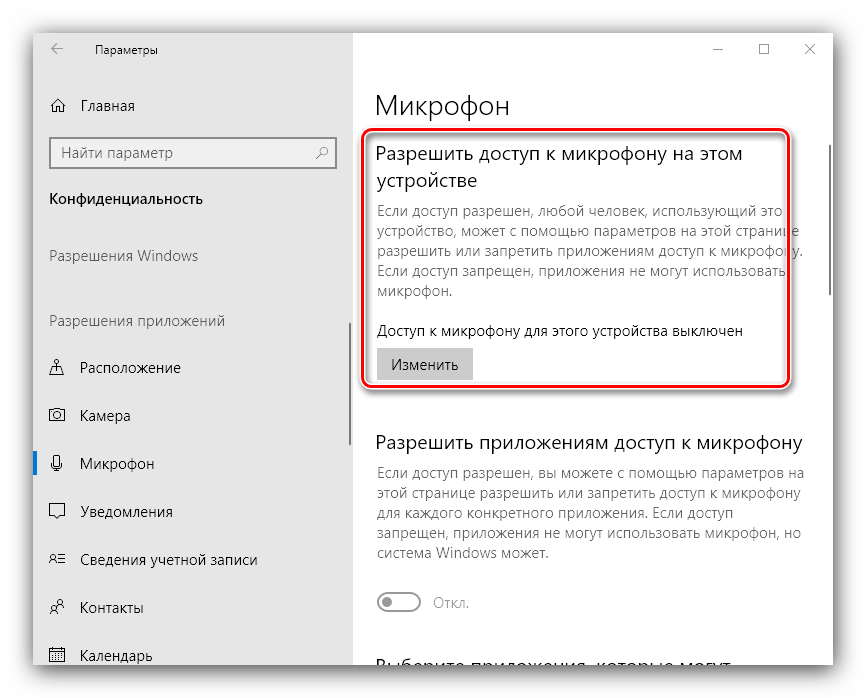
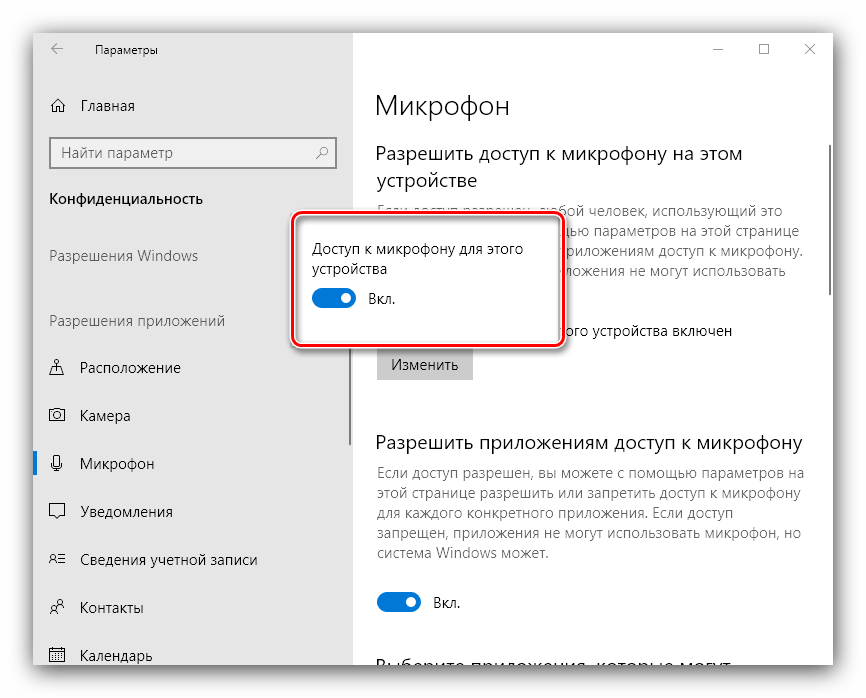
- В самом верху страницы находится раздел «Разрешить доступ к микрофону на этом устройстве», под ним найдите элемент с названием «Доступ к микрофону для этого устройства…». Если он обозначен как «Выключен», воспользуйтесь кнопкой «Изменить».

Переведите переключатель в положение «Вкл».
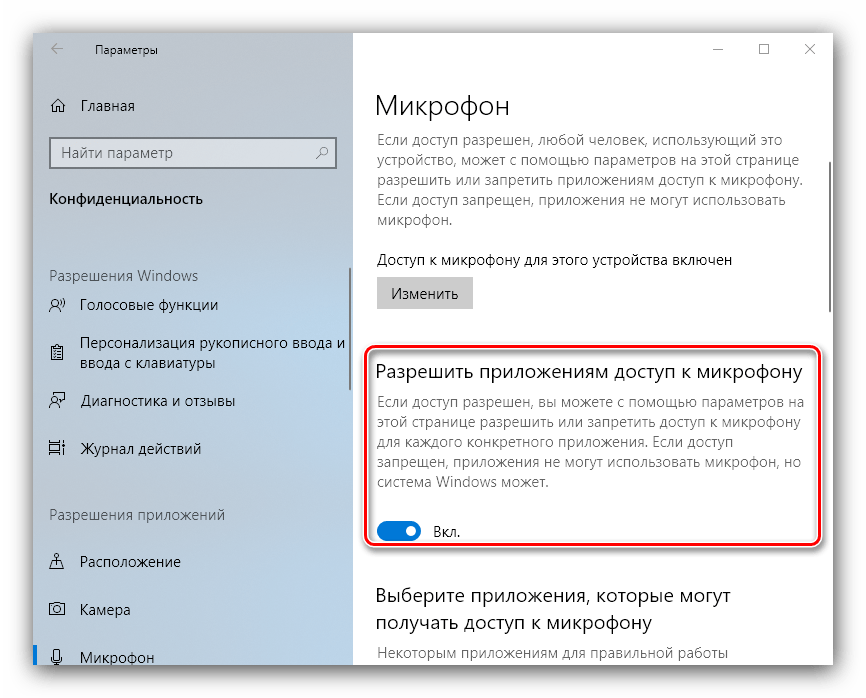
- Убедитесь, что параметр «Разрешить приложениям доступ к микрофону» тоже включён.
Ознакомьтесь со списком программ, которым разрешено пользоваться звукозаписью, и включите по отдельности те, которые нужны вам.

Способ 3: Удаление обновлений ОС
Также источником сбоев может оказаться некорректно установленное или проблемное обновление для Виндовс, поэтому разумным будет их удалить.
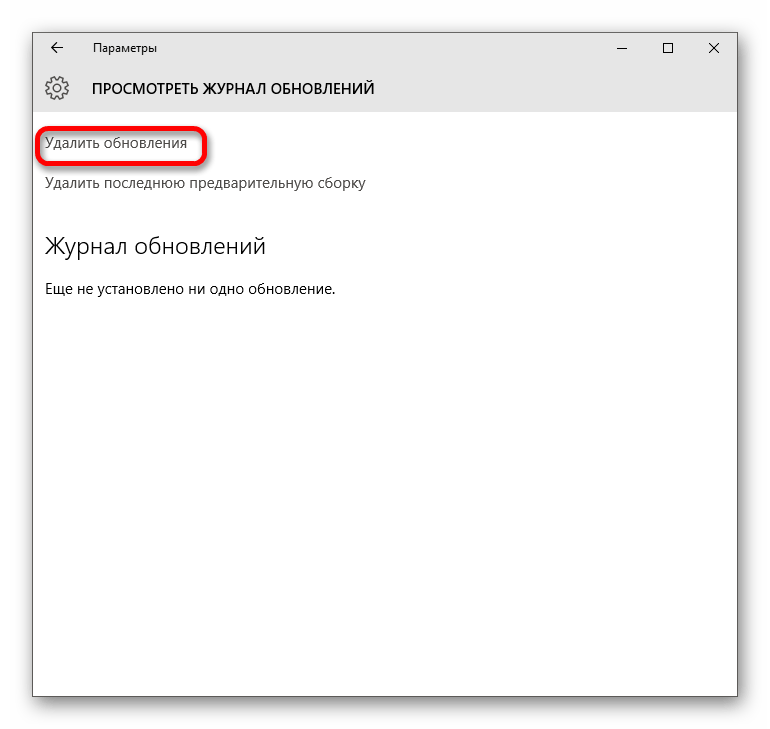
Урок: Удаление обновлений в Windows 10
Способ 4: Устранение аппаратных проблем
Нередко подключённый микрофон не функционирует корректно из-за аппаратных дефектов с ним или целевым компьютером. Для выявления таких неполадок выполните следующие действия:
- Попробуйте соединить микрофон с другим ПК или ноутбуком, желательно с точно такой же версией Виндовс. Если он всё равно не работает, скорее всего, комплектующее сломано и требует замены либо ремонта.
- Если на втором ПК или ноутбуке девайс функционирует как следует, проверьте порты подключения (USB или линейные выходы) на основном компьютере. Также для настольных вариантов рекомендуется подсоединять периферию к задней панели, поскольку передний вариант в некоторых случаях может не работать из-за плохого контакта с «материнкой».
Читайте также: Подключение передней панели к материнской плате
Нельзя исключать и поломки выходов и/или платы, поэтому продиагностируйте и их.
Подробнее: Руководство по диагностике материнской платы компьютера
Таким образом, мы рассмотрели причины, по которым подключённый к компьютеру с Windows 10 микрофон может не распознаваться, и указали методы устранения этой ошибки.
Еще статьи по данной теме:
Помогла ли Вам статья?
 Одна из частых проблем в Windows 10 — проблемы с работой микрофона, особенно участившиеся после недавнего обновления Windows. Микрофон может не работать вообще или в каких-то конкретных программах, например, в Skype, либо целиком во всей системе. В этой инструкции пошагово о том, что делать, если перестал работать микрофон в Windows 10 на компьютере или ноутбуке, как после обновления, так и после переустановки ОС или же вообще без каких-либо действий со стороны пользователя. Также в конце статьи есть видео, в котором продемонстрированы все шаги.
Прежде чем приступать, обязательно проверьте подключение микрофона (чтобы был подключен в нужный разъем, подключение было плотным), даже если полностью уверены, что с ним всё в порядке. Важное примечание: если у вас наушники с микрофоном с одним коннектором, они требуют наличия совмещенного входа/выхода под микрофон и наушники, а такой в наличии не на любом ПК и ноутбуке.
Микрофон перестал работать после обновления Windows 10 или переустановки
После недавнего большого обновления Windows 10 многие столкнулись с рассматриваемой проблемой. Аналогичным образом микрофон может перестать работать и после чистой установки последней версии системы.
Причина тому (часто, но не всегда, могут потребоваться и далее описанные методы) — новые параметры конфиденциальности ОС, позволяющие настроить доступ к микрофону различных программ.
Поэтому, если у вас установлена последняя версия Windows 10, прежде чем предпринимать методы из следующих разделов руководства, попробуйте эти простые шаги:
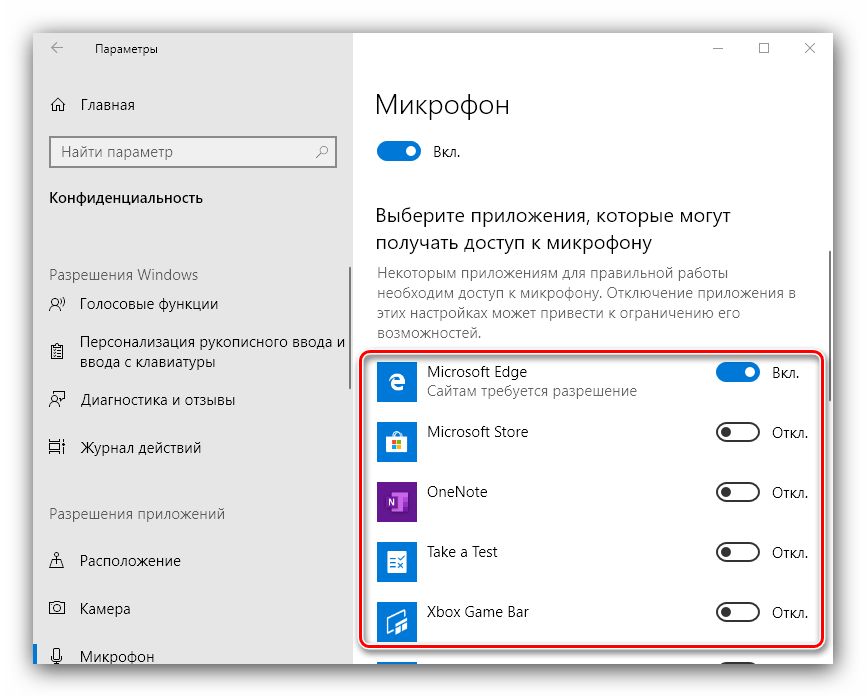
- Откройте Параметры (клавиши Win+I или через меню «Пуск») — Конфиденциальность.
- Слева выберите пункт «Микрофон».
- Убедитесь, что доступ к микрофону включен. Иначе, нажмите «Изменить» и включите доступ, также включите доступ приложениям к микрофону чуть ниже.

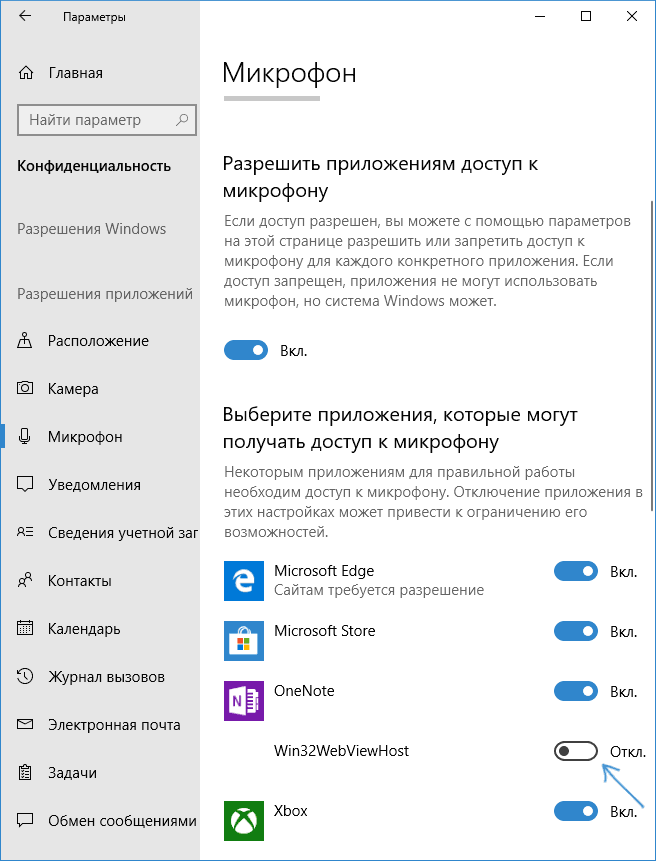
- Еще ниже на этой же странице настроек в разделе «Выберите приложения, которые могут получать доступ к микрофону», убедитесь, что доступ включен для тех приложений, где вы планируете его использовать (если программы нет в списке — всё в порядке).

- Здесь же включите доступ для приложения Win32WebViewHost (или Веб-средство просмотра классических приложений).
После этого можно проверить, была ли решена проблема. Если нет, пробуем использовать следующие способы исправить ситуацию.
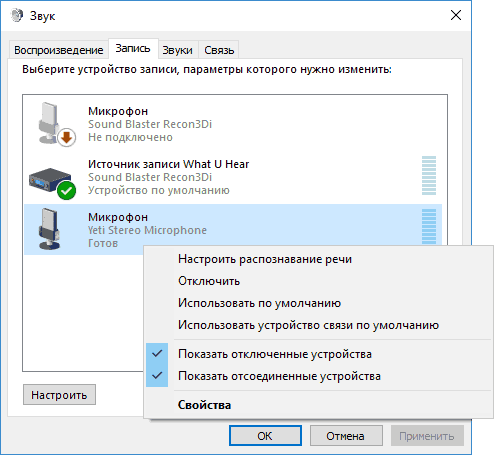
Проверка устройств записи
Убедитесь, что в качестве устройства записи и связи по умолчанию установлен ваш микрофон. Для этого:
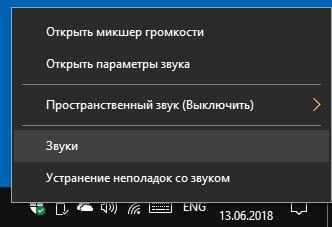
- В последней версии Windows 10 нажмите правой кнопкой по значку динамика, выберите пункт «Открыть параметры звука», а на следующем экране — «Панель управления звуком» в разделе «Сопутствующие параметры», затем перейдите на вкладку «Запись». В Windows 10 более ранних версий нажмите правой кнопкой мыши по значку динамика в области уведомлений, выберите пункт «Звуки», а в открывшемся окне откройте вкладку «Запись».

- Если ваш микрофон отображается, но не указан в качестве устройства связи и записи по умолчанию, нажмите по нему правой кнопкой мыши и выберите пункты «Использовать по умолчанию» и «Использовать устройство связи по умолчанию».

- Если микрофон есть в списке и уже задан в качестве устройства по умолчанию, выберите его и нажмите кнопку «Свойства». Проверьте параметры на вкладке «Уровни», попробуйте отключить отметки «Монопольный режим» на вкладке «Дополнительно».

- Если микрофон не отображается, аналогичным образом нажмите в любом месте списка правой кнопкой мыши и включите показ скрытых и отсоединенных устройств — есть ли среди них микрофон?
- Если есть и устройство отключено, нажмите по нему правой кнопкой мыши и выберите пункт «Включить».

Если в результате указанных действий ничего не удалось достичь и микрофон всё так же не работает (или же не отображается в списке устройств записи), переходим к следующему методу.
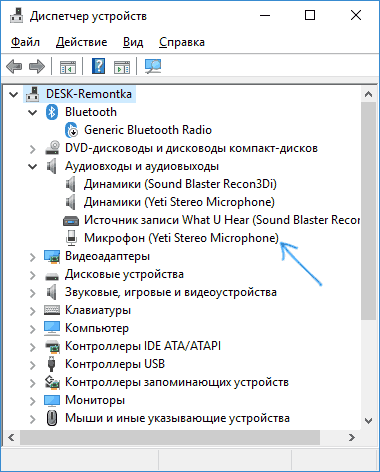
Проверка микрофона в диспетчере устройств
Возможно, проблема в драйверах звуковой карты и микрофон не работает по этой причине (а его работа зависит и от вашей звуковой карты).
- Зайдите в диспетчер устройств (для этого можно нажать правой кнопкой мыши по «Пуск» и выбрать нужный пункт контекстного меню). В диспетчере устройств откройте раздел «Аудиовходы и аудиовыходы».

- Если микрофон там не отображается — у нас либо проблемы с драйверами, либо микрофон не подключен, либо неисправен, попробуйте продолжить с 4-го шага.
- Если микрофон отображается, но около него вы видите восклицательный знак (работает с ошибкой), попробуйте нажать по микрофону правой кнопкой мыши, выбрать пункт «Удалить», подтвердить удаление. Затем в меню Диспетчера устройств выбрать «Действие» — «Обновить конфигурацию оборудования». Возможно, после этого он заработает.
- В ситуации, когда микрофон не отображается, можно попробовать переустановить драйверы звуковой карты, для начала — простым способом (автоматически): откройте раздел «Звуковые, игровые и видеоустройства» в диспетчере устройств, нажмите правой кнопкой мыши по вашей звуковой карте, выберите пункт «Удалить», подтвердите удаление. После удаления в диспетчере устройств выберите «Действие» — «Обновить конфигурацию оборудования». Драйверы должны будут установиться заново и, возможно, после этого микрофон снова появится в списке.
Если же вам пришлось прибегнуть к 4-му шагу, но это не решило проблемы, попробуйте установить драйверы звуковой карты вручную с сайта производителя вашей материнской платы (если это ПК) или ноутбука именно для вашей модели (т.е. не из драйвер-пака и не просто «Realtek» и подобные из сторонних источников). Подробнее об этом в статье Пропал звук Windows 10.
Видео инструкция
Микрофон не работает в Skype или другой программе
Некоторые программы, такие как Skype, другие программы для общения, записи экрана и прочих задач, имеют собственные настройки микрофона. Т.е. даже если вы установите правильное устройство записи в Windows 10, настройки в программе могут отличаться. Более того, даже если вы уже настраивали правильный микрофон, а затем отключали его и снова подключили, эти настройки в программах иногда могут сбрасываться.
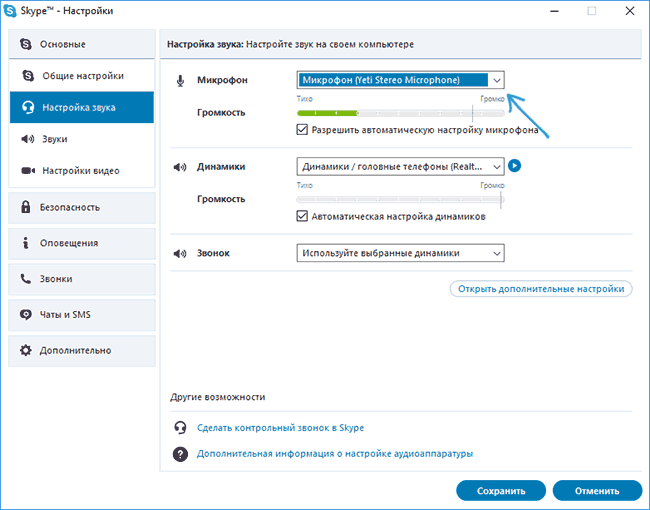
Поэтому, если микрофон перестал работать лишь в какой-то конкретной программе, внимательно изучите её настройки, возможно, всё, что требуется сделать — указать правильный микрофон там. Например, в Skype этот параметр находится в Инструменты — Настройки — Настройка звука.
Также учитывайте, что в некоторых случаях, проблема может быть вызвана неисправным разъемом, не подключенными разъемами передней панели ПК (если подключаем микрофон к ней), кабелем микрофона (можно проверить его работу на другом компьютере) или какими-то другими аппаратными неисправностями.
After install the latest Windows 10 Update, a number of users have reported a strange issue that the Microphone not working in certain apps like Skype, Discord etc. The issue affects all types of devices including laptops, tablets, and desktop PCs. When we try to find out the reason behind this “Microphone not working after Windows 10 update” We found Application/Apps access permissions for the hardware microphone causing the issue.
Windows 10 Microphone not working
Starting with Windows 10 version 21H2, Microsoft included a number of new options under Privacy. These include the ability to control user permissions for your Library/data folders. Another option allows managing access permissions for the hardware microphone. As a result your apps and programs not able to access your microphone.
Also Sometimes incorrect configuration, Outdated/Corrupted Audio driver also cause sound and microphone not working on Windows 10 PC. Whatever the reason here are some solutions you may apply to get back the Microphone not working on windows 10.
Allow apps to access your microphone
— Advertisement —
With Windows 10 version 21H2, Microsoft changed the behavior of the microphone app access setting so that it affects desktop applications as well. If the problem started after the recent windows 10 version 21H2 upgrade then you must first follow the steps below to get back the microphone working back.
- Open the Settings app using the keyboard shortcut Windows Key+I
- Click on Privacy then Microphone
- Set allows access to the Microphone on this device
- Allow apps to access your microphone – Make it ON
- Choose which apps can access your Microphone – If needed make required to ON.
Run Audio Troubleshooters
Run the built-in audio troubleshooter and let windows detect and fix the problem for you. To run Windows 10 audio troubleshooter follow the steps below.
- Type Troubleshoot in the Windows Start Search box and Click Troubleshoot settings,
- select playing audio then click Run the Troubleshooter
- This will start to diagnose problems causing Windows audio sound problems.
- Also, run select Recording Audio and click Run the troubleshooter
- Next select Speech Run the troubleshooter
- This will check and fix if any problem causing to stop windows sounds and microphone.
- Now restart your PC and check if Windows sound working normally.
Check Microphone is not disabled and is set as default
- Open control panel
- Select Hardware and sound then Click Sound
- Here Under the Recording tab, right-click on an empty space and select, Show disconnected devices and Show disabled devices
- Select Microphone and click on Properties
- make sure that the microphone is enabled
- You may also check if the microphone that you are using is set as default.
— Advertisement —
Set up microphone
Type microphone in Windows Start Search box > Click Set up a Microphone > Select required type of microphone (for the internal mic, select Others) > Follow the on-screen directions to set it up.
— Advertisement —
Check the microphone’s driver
First of all, make sure your microphone is well connected to your PC. Check if your PC detects the microphone correctly by going to the Sound setting from the taskbar. If everything is connected and configured properly but still the microphone not working properly then there is a chance the Audio Driver is not compatible with the current windows version or its get corrupted while the windows 10 upgrade process.
- We recommend to update the driver from Windows Key+X > Device Manager
- Expand Sound, Video & game controllers, Right Click on the entry below select Properties then go to Driver Tab.
- Click on Update Driver then Browse my computer for driver software
- Click Let my pick from a list of device drivers on my computer > Choose the driver > Click Next to update
If this does not work, select Search automatically for the updated driver in place of Browse my computer for driver software > Restart your computer
- Roll Back – If the Roll back driver is enabled, roll it back
- Uninstall – Uninstall Device and restart to reinstall it automatically
Or visit the Device manufacturer website, download, and install the latest available driver for your Audio sound / Microphone device. After that restart windows and check the problem is resolved.
If all the above method fails to fix the problem then the last option simply rollback windows to the previous version and let the current build to fix the bug which may cause the microphone not working.
Did these solutions help to fix “Microphone not working after Windows 10 update” let us know on the comments below
Also Read
- Windows 10 Timeline “The star of its latest update” Here is how it works
- 3 Different ways to Create Windows 10 Installation media
- How to fix network resources not available in windows 10
- How To Fix Device Driver Problems On Windows 10
- Solved: Bluetooth device not connecting in windows 10, 8.1 and 7
- How to Quickly Fix Blue Screen of Death Errors in Windows 10
by Ivan Jenic
Passionate about all elements related to Windows and combined with his innate curiosity, Ivan has delved deep into understanding this operating system, with a specialization in drivers and… read more
Updated on February 4, 2022
- You’re probably using Skype on your computer almost on a daily basis, or at least one other application that requires a microphone. Check if your microphone isn’t muted.
- Sometimes these issues occur if your microphone isn’t set as default or if it’s disabled. Read our guide below to see how you can fix this.
- If you have any other Windows 10-related issues you can check for the solution in our Windows 10 Fix section.
- Do you have any other problems with your peripherals? You can go to our Peripherals troubleshooting Hub and fix the problem with our expert guides.
XINSTALL BY CLICKING THE DOWNLOAD FILE
This software will keep your drivers up and running, thus keeping you safe from common computer errors and hardware failure. Check all your drivers now in 3 easy steps:
- Download DriverFix (verified download file).
- Click Start Scan to find all problematic drivers.
- Click Update Drivers to get new versions and avoid system malfunctionings.
- DriverFix has been downloaded by 0 readers this month.
You’re probably using Skype on your computer almost on a daily basis, or at least one other application that requires a microphone.
Many users are complaining that their microphone isn’t working on Windows 10, so if you’re one of those unfortunate users, we might have a solution for you.
What can I do if microphone stops working in Windows 10, 7?
Table of contents:
- Check if your microphone isn’t disabled
- Check if your microphone isn’t muted
- Uninstall and reinstall the default driver
- Boost the sensitivity of your microphone
- Run Hardware troubleshooter
- Change the default format of your microphone
- Run the SFC scan
Fix: Microphone not recording in Windows 10, 8.1, 7
1. Check if your microphone isn’t disabled
Sometimes these issues occur if your microphone isn’t set as default or if it’s disabled, and here’s a way how can you quickly enable your microphone and set it as default.
- Make sure your microphone is connected to your computer.
- Right-click the volume icon in the bottom right of the screen and select Recording devices.
- Click on empty space in the window and then click on Show disconnected devices and Show disabled devices.
- To check if your microphone is enabled select Microphone and click on Properties, and you’ll be able to see if it’s enabled or not. If it’s not enabled, enable it.
- From there you can also check if your microphone is set as a default audio input device.
2. Check if your microphone isn’t muted
Right-click on the Sound icon in the bottom right of your screen and choose Volume Mixer from the menu.
When Volume Mixer opens, find the Microphone slider and raise it up to 100%. Also, make sure that nothing is muted.
Close Volume Mixer and click on the Sound icon again and choose Recording devices and test your microphone.
If there’s no activity in the volume level indicator, you might need to boost the sensitivity of your microphone.
3. Uninstall and reinstall the default driver
- Open the Device Manager. You can do this by clicking Start and typing devmgmt.msc in the search field.
- In Device manager find Sound, video and game controllers, and double-click the entry of your sound card.
- Click the Driver tab and then click Uninstall.
- Restart your computer and your Windows should load with default drivers.
- If the problem persists, download the latest drivers for your sound card/motherboard.
3.1 Update drivers automatically
If you don’t want to go through the hassle of updating your microphone drivers manually, there is a tool that will do the work for you automatically.
Some PC issues are hard to tackle, especially when it comes to corrupted repositories or missing Windows files. If you are having troubles fixing an error, your system may be partially broken.
We recommend installing Restoro, a tool that will scan your machine and identify what the fault is.
Click here to download and start repairing.
Utilizing advanced software will quick the job in total safety and will prevent any PC damage caused by updating the wrong version of the driver.
The software will check your PC’s hardware and peripherals for possible driver upgrades with only a few clicks. The utility will start operating automatically after installation, so you won’t have to look for a shortcut or the source folder.
In just a few seconds, DriverFix will scan your system for any faults or missing drivers and generate a report. Use one to save yourself some valuable time.
⇒ Get DriverFix
4. Boost the sensitivity of your microphone
- Right-click the Sound icon in the bottom right of your screen and choose Recording.
- Double click on the Microphone.
- Microphone Properties window should open, and you’ll need to go to the Levels tab and move the microphone slider to 100%. Also, check if your microphone isn’t muted while you’re there.
- Slowly move Microphone Boost slider to the right and test the microphone by gently tapping on it.
- Click OK and test your microphone.
- If your microphone still isn’t working open Microphone Properties and click on the Enhancements tab.
- Check the Disable all sound effect.
- Press Apply and then OK and test your microphone again.
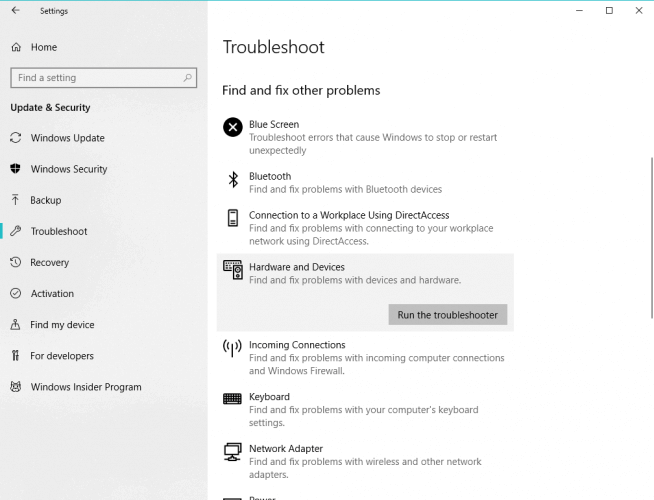
5. Run Hardware troubleshooter
If you’re still having problems with your microphone, let’s try the hardware troubleshooter that’s built-in inside Windows 10. Here’s how to run it:
- Go to Settings.
- Head over to Updates & Security > Troubleshoot.
- Select Hardware & Devices, and go to Run the Troubleshooter.

- Follow further on-screen instructions and let the process finish.
- Restart your computer.
6. Change the default format of your microphone
- To do this right-click the Sound icon in the bottom right of your screen.
- Then select Recording.
- Double click the Microphone to open Microphone Properties.
- In Microphone Properties window go to Advanced.
- Under the Default Format choose any of the 16-bit options.
- Click Apply, then OK.
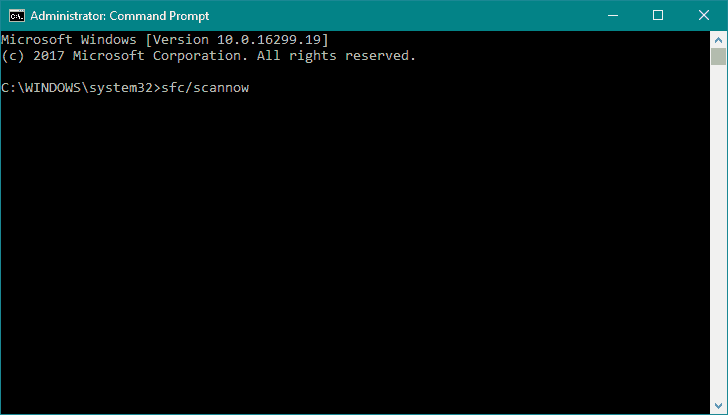
7. Run the SFC scan
And finally, if none of the previous solutions resolved the microphone issue, let’s put your computer through a (not so) quick SFC scan. This tool will scan your computer for potential problems and interferences, and solve them if possible.
Here’s how to run the SFC scan:
- Go to Search, type cmd, and open the Command Prompt as Administrator.
- Type in the following command, and press Enter: sfc/scannow

- Wait for the process to finish.
- Restart your computer.
If your microphone isn’t working on Windows 10 we hope that at least one of these solutions was helpful to you. As you can see, most of the issues can be fixed by playing with Recording settings.
If the problem is caused by the sound driver then the best solution is to use the default Windows driver or to wait for the manufacturer to release a specific Windows 10 driver for your audio device.
![]()
Newsletter

Вопрос от пользователя
Здравствуйте.
Пару дней назад моя Windows 10 самостоятельно обновилась (сердце чувствовало, что ненужно было, но меня не спросили…). Теперь у меня не работает микрофон — при разговорах никто меня не слышит. Можно ли что-то сделать? Уже подумываю сносить ее и поставить Windows 7 (но у меня на ноутбуке на HDD были записаны драйвера только для Windows 10 — тоже засада…)
Доброго времени!
Да, к сожалению, Windows 10/11 иногда обновляется без «разрешения» пользователя (обновление, кстати, можно отключить! Да, и судя по последним новостям, эту политику хотят «смягчить»… По крайней мере, в Windows 11 появилась возможность временно приостановить обновления).
Что касается микрофона: в подавляющем большинстве случаев он перестает работать из-за настроек конфиденциальности (смешно 😉. Вводят такие «жесткие» настройки приватности, и в тоже время сама Windows 10/11 «следит» за пользователем…).
Итак, теперь ближе к теме…
*
Содержание статьи
- 1 Что делать, если не работает микрофон
- 1.1 Проверьте настройки конфиденциальности
- 1.2 Настройка устройств звукозаписи
- 1.3 Установлены ли «родные» драйвера. Настройки драйверов
- 1.4 По поводу Skype, Steam и др. приложений для разговоров
- 1.5 На что еще обратить внимание

→ Задать вопрос | дополнить
Что делать, если не работает микрофон
Проверьте настройки конфиденциальности
Это первое с чего следует начать. Необходимо открыть параметры Windows, нажав Win+i (не путайте с панелью управления), раздел «Конфиденциальность и безопасность» (см. скрин ниже 👇).
Примечание: чтобы открыть параметры Windows, нажмите сочетания кнопок Win+i, либо воспользуйтесь меню ПУСК.
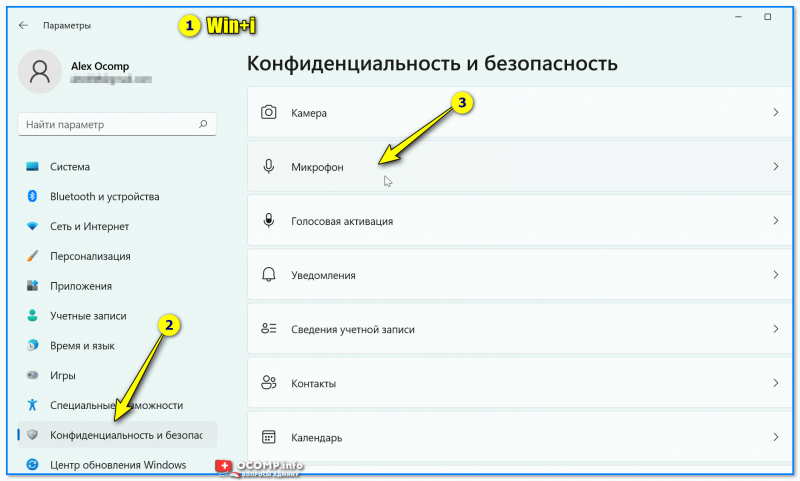
Windows 11: конфиденциальность и безопасность
Windows 10: Параметры Windows / Кликабельно
Далее во вкладке «Микрофон» сделайте следующее:
- разрешите доступ к микрофону (см. скрине ниже 👇);
- в Windows 10: разрешите доступ к микрофону для «Win32WebViewHost»;
- в Windows 11: разрешите доступ к микрофону для классических приложений;
- проверьте также, чтобы в списке разрешенных приложений было и то приложение, в котором у вас не работает микрофон.
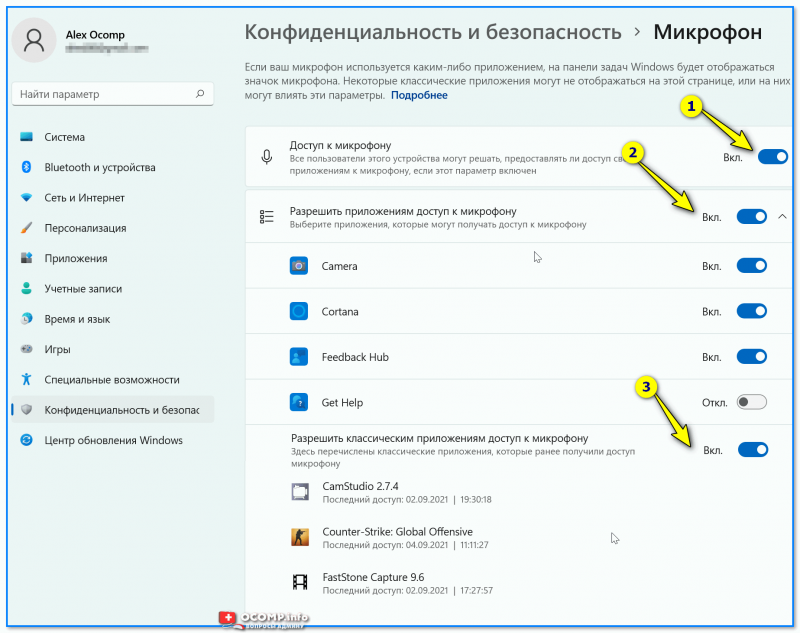
Windows 11. Разрешите доступ к микрофону
Windows 10. Параметры конфиденциальности | Кликабельно
После внесения изменений в раздел конфиденциальности, перезапустите ОС Windows, попробуйте заново открыть приложение и проверить микрофон. В большинстве случаев, подобные «манипуляции» возвращают работу микрофона. 👌
*
Настройка устройств звукозаписи
Пожалуй, это второе, на что нужно обратить внимание…
Дело тут в том, что при определенных настройках, звук с микрофона может стать практически не слышимым (т.е. он вроде и есть, но едва различимый).
Для проверки подобных настроек, рекомендую открыть 📌панель управления Windows, раздел «Оборудование и звук/Звук» (см. пример на скрине ниже 👇).
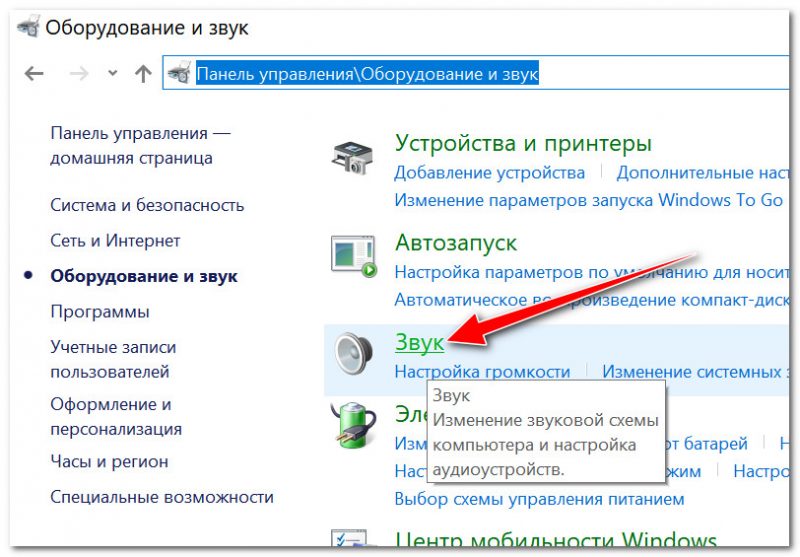
Панель управления — звук
Далее перейдите во вкладку «Запись» и откройте свойства текущего микрофона.
Обратите внимание, кстати, если у вас два и более микрофонов — тот ли микрофон выбран по умолчанию для записи? (прим.: тот, который выбран — с зеленой галочкой). Просто, возможно, у вас не работает микрофон из-за того, что Windows «выбирает» по умолчанию не то устройство…
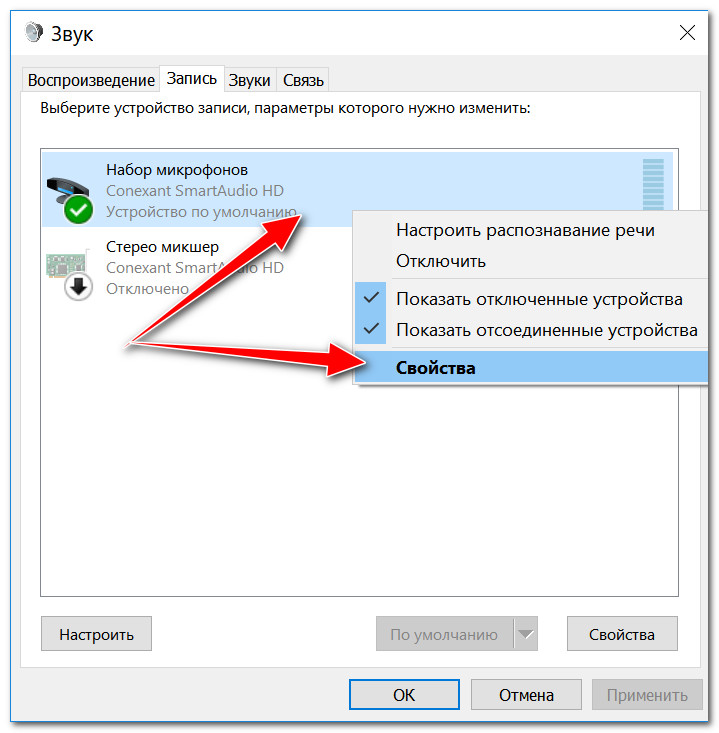
Свойства текущего микрофона
Во вкладке «Общие» проверьте, чтобы напротив устройство горел статус «Использовать это устройство (Включено)». 👇
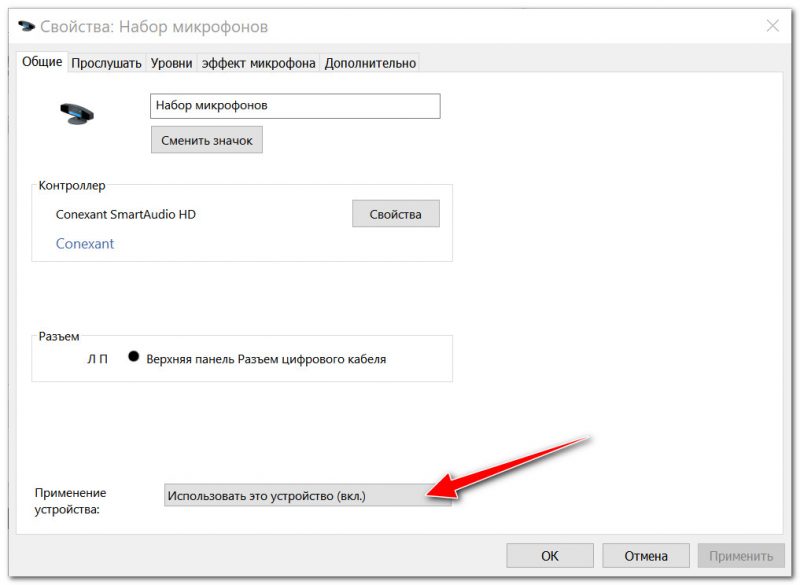
Включено ли устройство
Во вкладке «Прослушать» проверьте, чтобы стояла галочка напротив пункта «Продолжать работу при переходе на питание от аккумулятора» (иначе, в некоторых случаях, для экономии заряда батареи микрофон может выключаться).
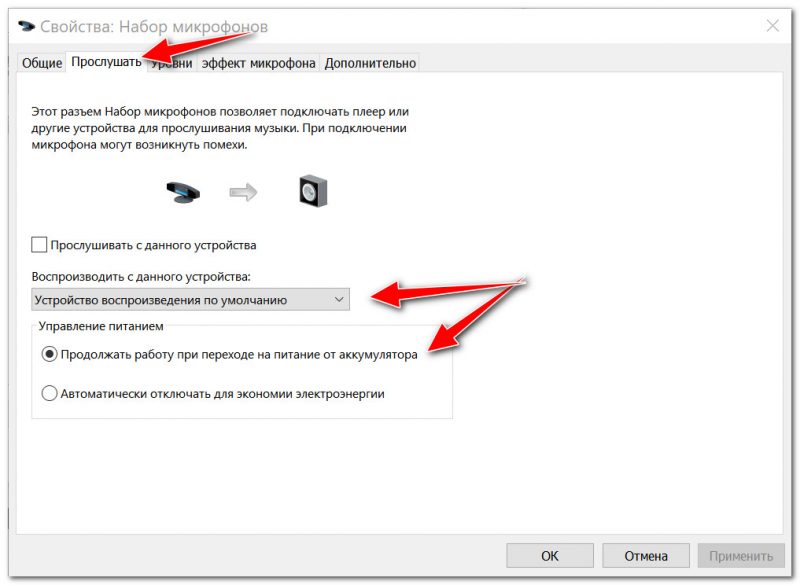
Продолжать работу при переходе на питание от аккумулятора
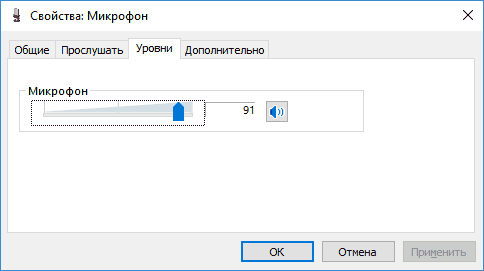
Во вкладке «Уровни» проверьте:
- набор микрофонов: установите ползунок в район 80-90;
- усиление микрофона: попробуйте передвинуть ползунок в сторону усиления (например, в моем случае микрофон хорошо себя ведет при +12 дБ).
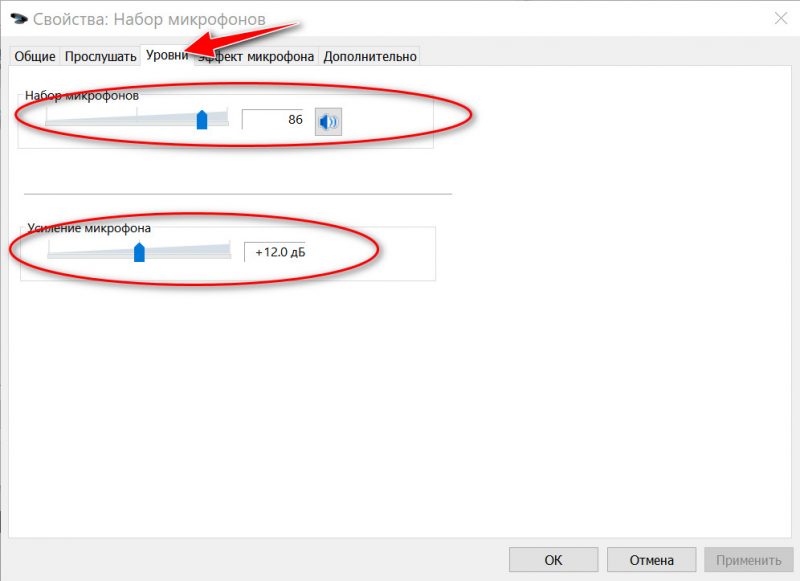
Усиление микрофона
Во вкладке «Эффект микрофона» я порекомендую для начала вообще отключить все эффекты (при определенных условиях, тоже подавление шума может подавлять и ваш голос в том числе…). 👇
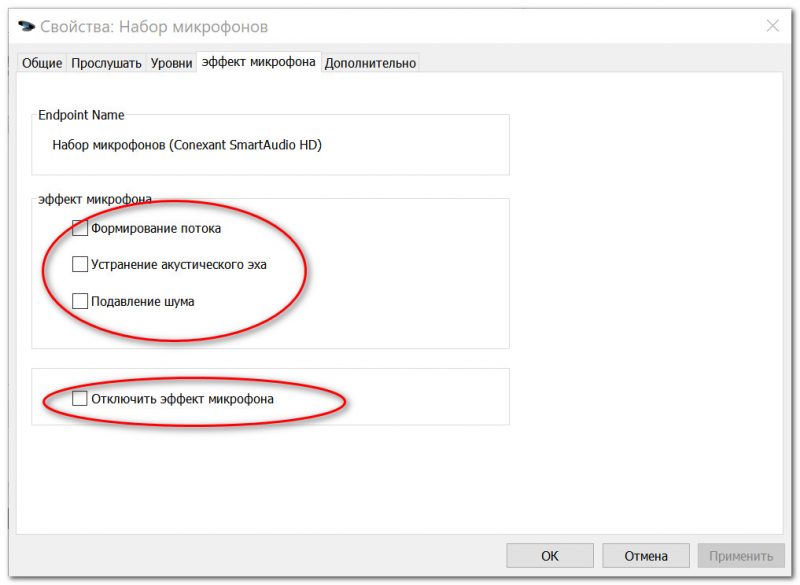
Отключаем эффекты микрофона
Ну и в последней вкладке «Дополнительно» попробуйте поменять разрядность и частоту дискретизации: установите в режим, например, 24 бит, 48000 Гц (студийная запись). 👇
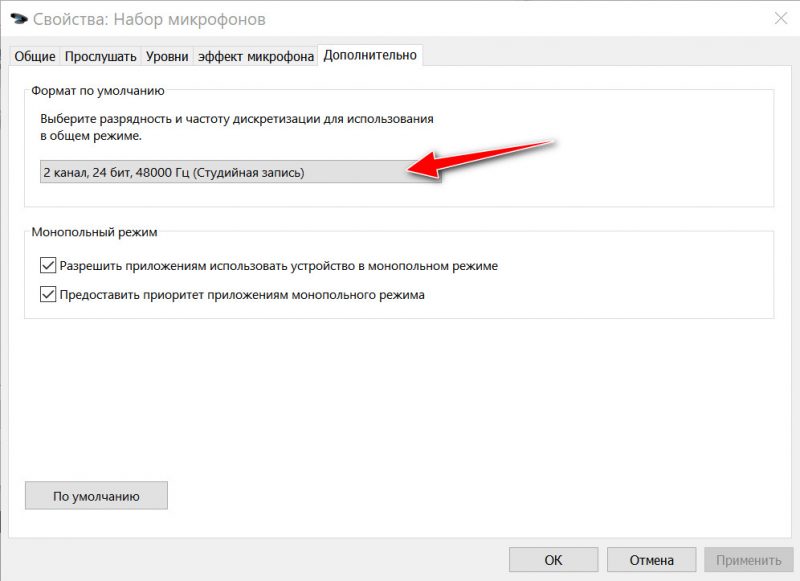
Формат по умолчанию
Сохранение измененные настройки и проверьте заново работу микрофона.
*
Установлены ли «родные» драйвера. Настройки драйверов
При установке (обновлении*) Windows 10/11 инсталлирует в систему «универсальный» драйвер микрофона, который далеко не всегда корректно работает. Поэтому, после установки системы, я всегда рекомендую обновлять драйвер, загрузив его с официального сайта вашего оборудования.
Для проверки наличия драйвера, достаточно войти 👉 в диспетчер устройств и посмотреть, нет ли устройств в желтыми воскл. знаками, определена ли модель устройства. См. скрин ниже — драйвер установлен. 👇
Кстати, там же вы можете запустить автоматическое обновление драйвера (достаточно кликнуть по устройству правой кнопкой мышки).
Примечание!
Чтобы войти в диспетчер устройств — нажмите сочетание кнопок Win+R, в появившееся окно «Выполнить» введите команду devmgmt.msc.
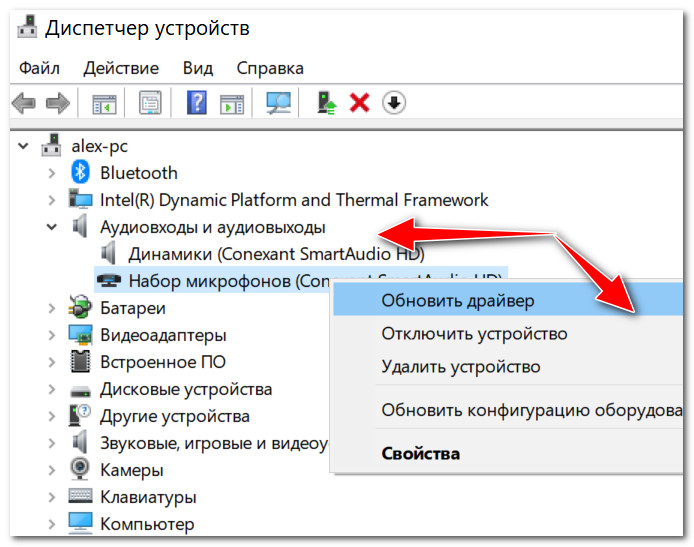
Микрофон — обновить драйвер (диспетчер устройств)
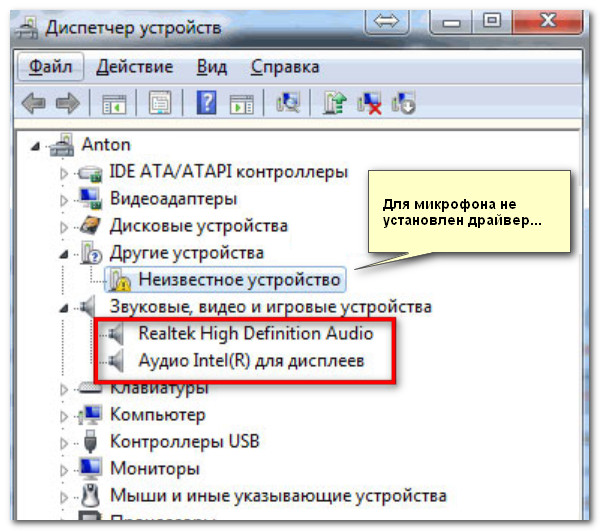
Кстати, для сравнения приведу ниже еще один скриншот: обратите внимание, что во вкладке звуковых устройств микрофона нет, но во вкладке «Других устройств» — есть одно неизвестное. 👇 Это означает, что для микрофона просто нет драйвера в системе…
Диспетчер устройств — для микрофона нет драйвера
*
👉 Как можно обновить драйвер микрофона:
- если у вас есть диск, шедший в комплекте к вашему микрофону, воспользуйтесь им (правда, если микрофон был куплен уже давно, на нем может не оказаться драйвера под современную ОС Windows 10/11);
- посмотреть точную модель микрофона с помощью спец. утилит, и загрузить нужный драйвер с официального сайта производителя;
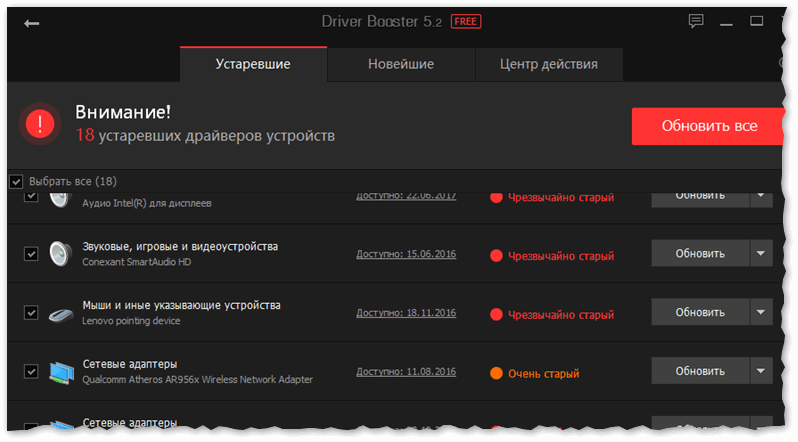
- воспользоваться спец. 👉 утилитами для авто-обновления драйверов. Они все сделают за вас: определят модель устройства, проверят, нет ли более нового драйвера для него, и загрузят его (в случае необходимости).

Driver Booster — найдено 18 устаревших драйверов, в т.ч. и для аудио-устройств // пример работы программы
*
📌 Рекомендация!
Перед установкой нового драйвера (при ручном обновлении) удалите старый драйвер. О том, как это сделать — см. здесь: https://ocomp.info/kak-udalit-drayvera.html
PS
Если ваш микрофон достаточно старый, возможно, что для него просто нет драйвера для Windows 10/11. В этом случае можно либо установить на ПК более старую ОС, либо купить более современный микрофон.
👉 Примечание!
Купить микрофон можно по бросовым ценам в китайских-интернет магазинах (если поймать акцию + воспользоваться сервисом кэшбек). Об этом можете узнать здесь.

*
Кстати, после обновления и установки драйверов, не забудьте зайти в их настройки и проверить уровни громкости, эффекты и пр. параметры. Как правило, они имеют более приоритетное значение, чем настройки звука в Windows.
Настройка звука, микрофона
*
По поводу Skype, Steam и др. приложений для разговоров
Во всех этих приложениях есть свои собственные настройки звука. После обновления ОС Windows, могло так стать, что в этих настройках сейчас выбрано неправильное устройство (то бишь вместо реального вашего микрофона — указано получать звук с др. устройства, которое в данный момент вообще может быть не подключено!).
Также, если касаться того же Skype, обратите внимание на галочку «Разрешить автоматическую настройку микрофона». Не всегда эта «фишка» работает правильно. Рекомендую попробовать ее снять и настроить звук вручную.
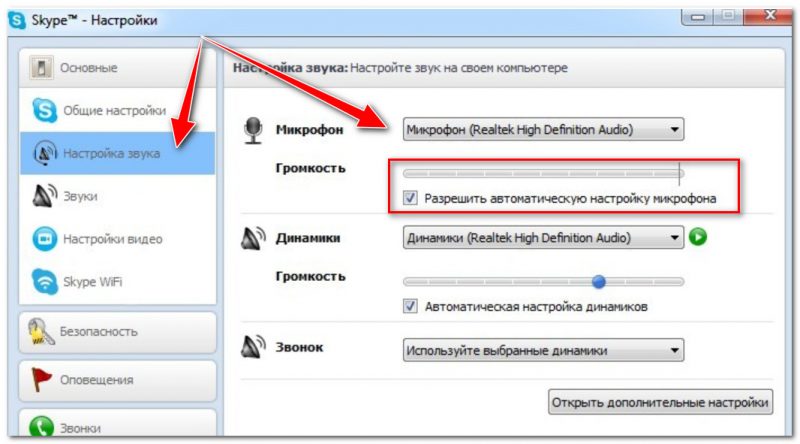
Skype — настройка микрофона и динамиков
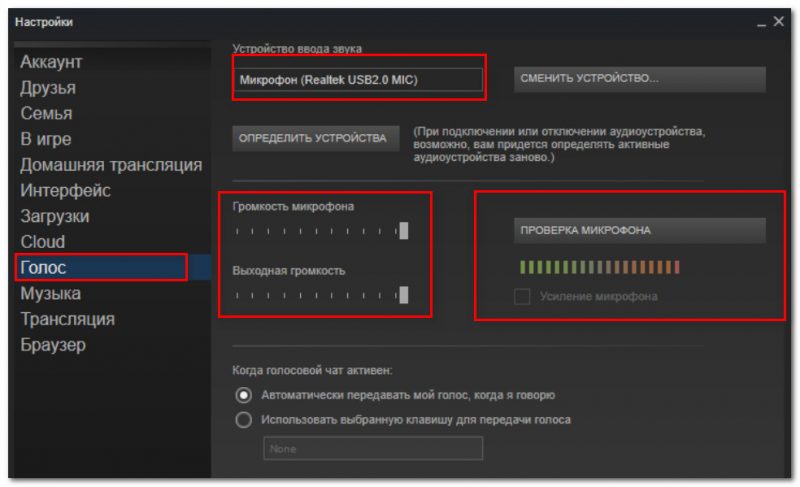
В Steam, на мой взгляд, настроек для микрофона еще больше (раздел «Голос»). Можно настроить громкость (в т.ч. выходную), проверить его работу, можно задать определенную клавишу для передачи звука, указать вручную микрофон (актуально, если у вас их несколько).
Steam — настройка микрофона (вкладка «Голос»)
*
На что еще обратить внимание
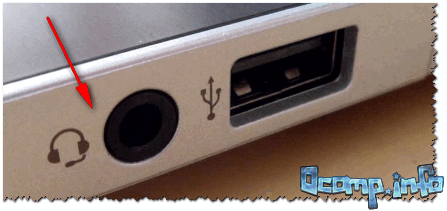
1) один разъем для наушников
Если у вас на ноутбуке гарнитурный разъем (т.е. у вас 1 разъем для одновременного подключения микрофона и наушников), то подключив к такому порту «обычный» классический микрофон — шансов, что он будет работать, не много. 👇
Гарнитурный разъем
👉 Примечание!
Вообще, у меня на блоге этой проблеме посвящена целая статья. Рекомендую ознакомиться: «Один вход для наушников и микрофона в ноутбуке — как их подключить».
*
2) Попробуйте запустить средство отладки и поиска неисправностей
За что следует поблагодарить разработчиков Windows 10/11 — так это за появление все большого числа мастеров устранения неполадок. Суть этого мастера в том, что ОС Windows в автоматическом режиме попытается найти и устранить причину неисправности. Во многих случаях помогает решить проблему.
Чтобы запустить средство отладки: откройте параметры Windows (сочетание кнопок Win+i), далее откройте раздел:
- в Windows 11: «Система / устранение неполадок / другие средства устранения неполадок», инструмент «Запись звука»;
- в Windows 10: «Обновление и безопасность/устранение неполадок», инструмент «Запись звука» (см. скрин ниже 👇).
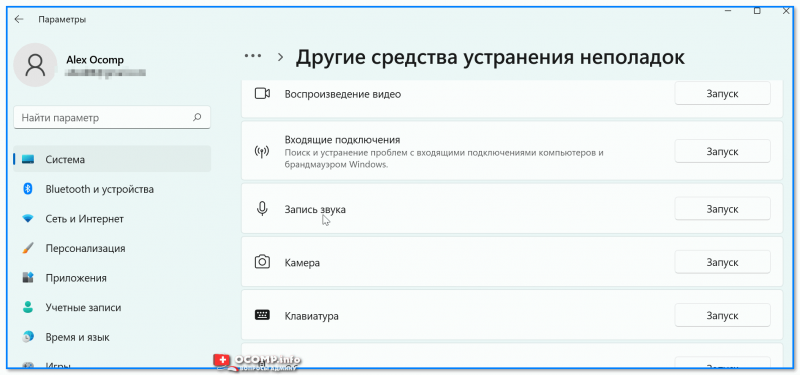
Windows 11. Система — устранение неполадок — другие…
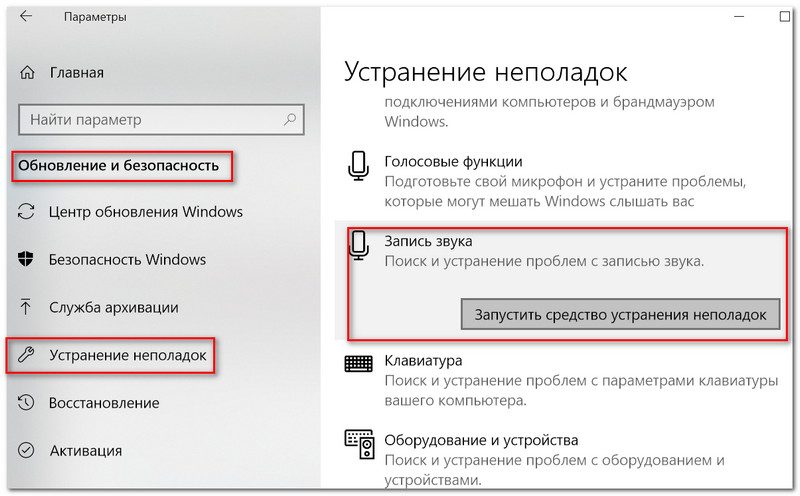
Windows 10. Обновление и безопасность — устранение неполадок
В течении минуты-другой Windows «задумается», а потом предложит варианты решений (в качестве примера см. скрин ниже 👇).
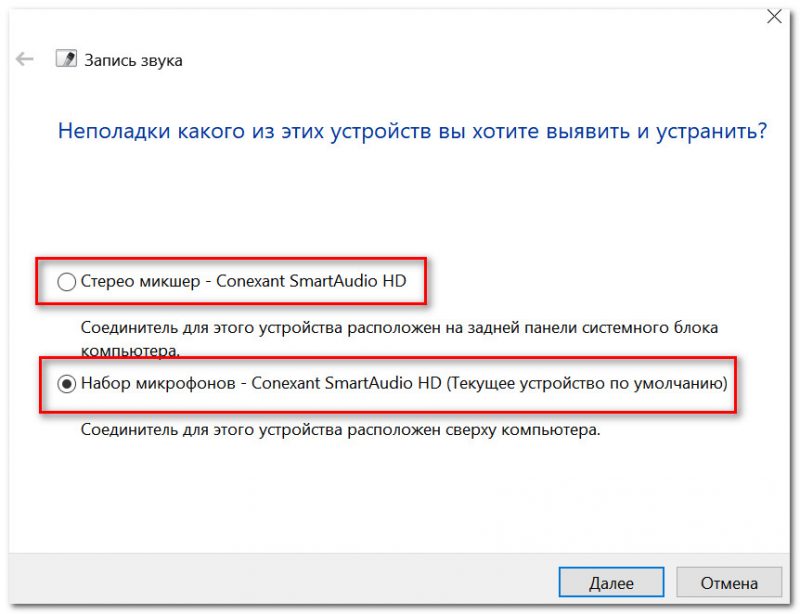
Набор микрофонов (или стерео-микшер)
*
3) Проверьте состояние гнезд, кабеля
Если микрофон вообще не подает признаков «жизни» — обратите внимание на штекер, гнезда и сам кабель. Нередко, на вид с кабелем может быть все в порядке, но из-за частых перегибов — внутри медные жилки могут быть перебиты. Неплохо было бы проверить микрофон на другом устройстве.
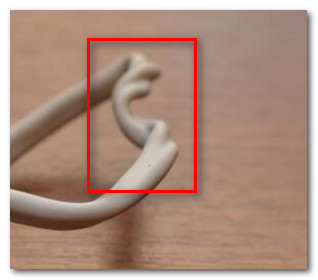
Кабель перегнут (скручен)
*
4) Обратите внимание на телефон (может создавать шум/помехи)
Если ваш мобильный телефон находится рядом с микрофоном — он может сказываться на качестве звука (фонить). Из-за этого будет слышен треск, шум, шипение и т.д. (может так стать, что из-за этих помех, вы не будете слышать себя…).
Отмечу, что подобное может происходить и из-за радио-телефонов, раций, различных гаджетов и приставок. Можно, конечно, попробовать экранировать устройства, но лучше просто разместить в разные стороны стола…
*
Дополнения к решению вопроса — приветствуются…
Удачи!
👋
Первая публикация: 09.08.2018
Корректировка: 7.10.2021


Полезный софт:
-
- Видео-Монтаж

Отличное ПО для создания своих первых видеороликов (все действия идут по шагам!).
Видео сделает даже новичок!
-
- Ускоритель компьютера

Программа для очистки Windows от «мусора» (удаляет временные файлы, ускоряет систему, оптимизирует реестр).
PC mic muted? Driver need an update? Or is it something else?
There are a number of fixes you can try when your Windows 10 microphone is not working. The first step is to figure out whether the issue lies with your computer or the mic itself.
Instructions in this article apply to internal and external microphones for Windows 10 PCs. Steps are the same regardless of your device’s manufacturer. The steps for fixing mic issues in Windows 11 are a little different.
Causes of a Computer Mic Not Working on Windows 10
If your PC mic isn’t working, it could be due to several causes, including:
- Faulty hardware
- Poor physical connections
- Missing device drivers
- Interference from other Bluetooth devices
- Conflicts between an external mic and the internal mic
- Audio input is muted on your computer.
- Audio input is muted on your headset.
Before you begin, it helps to test your Windows 10 microphone to try and narrow down the cause. You’ll likely uncover the solution as soon as you identify the reason for your problem.
How to Fix a Windows 10 Microphone Not Working
Try these solutions in order until your computer mic is working properly:
-
Run the Windows 10 troubleshooter. Windows 10 has a number of built-in troubleshooting tools. If you’re having mic issues, right-click the Speakers icon in the taskbar and choose Troubleshoot sound problems to have Windows search for potential solutions.
-
Look for a Mute button. External mics may have physical volume buttons, so make sure your device isn’t muted or turned down too low.
How to Increase Mic Volume on Windows 10
-
Check the device manager. To make sure your PC can detect your microphone, open the Windows Device Manager and expand the Audio inputs and outputs section, then select your mic and look under the Device Status section.
If you don’t see your mic listed, unplug it, and then plug it back in again. If it still doesn’t appear, then the problem lies with the connection.
-
Check your connections. If possible, use a different audio connector cable and try plugging the mic into a different USB port on the same device. If it still doesn’t work, try using it with a different computer.
If your mic works with other devices, then the problem could be the ports on your Windows PC. However, if it won’t connect to other computers, then you probably need a new mic.
-
Check individual app settings. Certain apps, such as Skype, have their own audio input options. If you’re having audio problems in a specific app, look for a settings menu where you can choose the audio input.
-
Change your Windows sound settings. Look under Input in the Windows 10 sound settings to make sure the mic you want to use is selected and enabled.
-
Increase the mic volume. In the sound settings, select Device properties under your mic selection to make sure the volume on your mic is turned on.
-
Disable other Bluetooth devices. When using a wireless microphone, other Bluetooth connections can interfere with the signal. If your Bluetooth isn’t working on Windows, turn off Bluetooth on any other connected devices one-by-one to see if that helps.
-
Update the hardware drivers. If you can see your microphone in the Device Manager, yet it’s still not detecting sound, check to see if drivers are up-to-date. Most external PC microphones don’t require any drivers, but you may want to check the instruction manual to see if there’s any additional software you have to install. You can also do a Google search for drivers or use a free driver updater tool.
-
Check your app permissions. Windows updates can sometimes reset app settings. If you’re having mic problems with a certain app, go to the Windows 10 app permissions settings and make sure the app has permission to access your microphone.
FAQ
-
How do I test my microphone in Windows 10?
To test your microphone in Windows 10, right-click the Speaker icon in the task bar and select Sounds > Recording. If your microphone appears in the list as Disabled, right-click the microphone and select Enable. Speak into the microphone while checking the on-screen sound meter—if the meter moves, the microphone is working.
-
How do I set the default microphone in Windows 10?
Select Start > Control Panel > Hardware & Sound > Sound > Recording. Select the microphone you want to use, then select Set default.
Thanks for letting us know!
Get the Latest Tech News Delivered Every Day
Subscribe