Главная » Уроки и статьи » Интернет
Пользователи очень часто жалуются на свой интернет. Например, он может быть подключен, но при этом не открывать страницы. В таком случае обратите внимание на его статус: там может быть подсказка к решению проблемы. Вероятно, у вас написано «Нет подключения к Интернету, защищено». В Windows 10 подобная ситуация возникает нередко, и ее можно решить множеством способов.
Возможные причины
Следует сразу отметить, что проблемы с открытием сайтов могут возникать по вине провайдера. Проявляться это может по-разному, в том числе и так. Решить данную проблему самостоятельно невозможно: остается только ждать. Для проверки попробуйте подключиться к тому же интернету с другого устройства и посмотреть, грузятся ли страницы. Если нет – скорее всего, проблема именно в этом. Также к списку распространенных причин можно отнести:
- Неправильная настройка роутера. Чаще всего подобного рода неполадки возникают после непредвиденного сброса параметров (к примеру, из-за внезапной потери питания).
- Повреждение кабеля или самого роутера. В некоторых случаях наличие указанного сообщения может говорить об неисправности маршрутизатора. Часто к такой проблеме приводит повреждение кабеля (в том числе того, который находится в подъезде).
- Некорректная работа ПК. Обычно проблемы возникают по причине изменения служб. Нужно учитывать, что оказывать негативное влияние могут вредоносные программы.
Как избавиться от проблемы «нет подключения к Интернету, защищено»
В первую очередь рекомендуется просто перезагрузить роутер, т. е. отключить питание, подождать хотя бы 30 секунд, а затем снова включить. Зачастую подобное возникает из-за одноразового сбоя, поэтому такой легкий и очевидный метод действительно может помочь.
Также можно сразу проверить компьютер на наличие вирусов. Для этого можно использовать любой антивирус, однако не рекомендуется осуществлять проверку с помощью встроенного брандмауэра: считается, что он обладает низкой результативностью. Кроме того, обратите внимание на сами защитные программы: различные файрволлы и антивирусы могут оказывать схожее воздействие. Попробуйте их временно отключить.
Проверка состояния службы
Возможно, у вас деактивирована служба «DNS-клиент». В таком случае интернет не будет работать корректно и начнут появляться ошибки. К счастью, проверить, работает ли служба, можно очень быстро и легко:
- Нужно открыть специальную встроенную утилиту, которая так и называется «Службы». Ее можно найти, используя поиск на панели задач. Также ярлык присутствует в меню «Пуск». Если ни один из вариантов не подходит – одновременно нажмите клавиши Win и R, чтобы открыть окно под названием «Выполнить», и введите команду «services.msc».

- В списке найдите нужную службу и сразу обратите внимание на колонку «Тип запуска». По умолчанию в ней стоит «Автоматически». Если служба деактивирована вами или какой-либо программой, то в данной колонке будет написано «Отключена». В таком случае перейдите к следующему шагу.

- Необходимо дважды нажать по службе ЛКМ, чтобы открыть ее настройки. Появится новое окно, в котором будет, в том числе и тип запуска (соответствующий пункт располагается в центре). Выберите вариант по умолчанию. Если это нужно, активируйте службу в принудительном режиме, нажав на кнопку «Запустить». Кликните по «OK», чтобы сохранить параметры.

Если вы столкнулись с тем, что нужный параметр недоступен (можно увидеть на скриншоте выше), то вы можете изменить тип в реестре. Важно понимать, что удаление/изменение других параметров и разделов может привести к нестабильной работе системы. Поэтому, прибегая к такому способу, вы берете на себя определенный риск. Обязательно строго придерживайтесь следующей инструкции:
- Откройте редактор. Как и в прошлый раз, можно использовать поиск, меню «Пуск» или же команду. В последнем случае нужно скопировать и вставить «regedit» (без кавычек).

- Перейдите по пути, который выделен на изображении ниже.

- Дважды клините по пункту «Start» в правой части окна.
- Появится маленькое окно с единственной доступной строкой. Введите в нее цифру 2.

- По окончанию процедуры перезагрузите ПК.
Установка подходящего DNS-сервера и сброс кэша
Данный способ тоже часто используется для решения различных ошибок, связанных с интернетом. Он заключается в том, чтобы настроить протокол, а точнее указать подходящий сервер, и сбросить DNS-кэш. Делается это в несколько этапов:
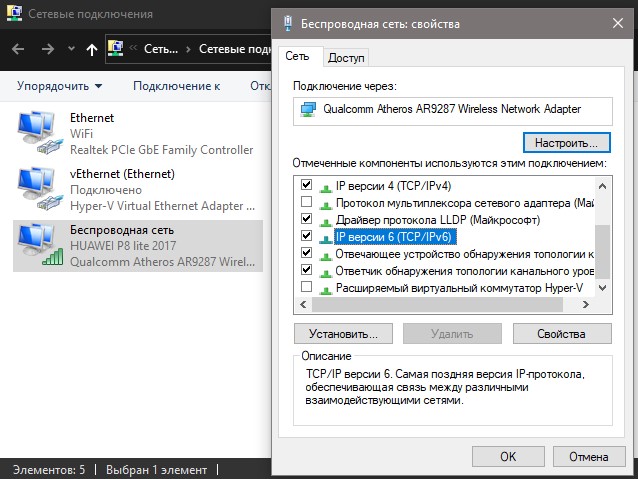
- Нам нужно попасть в настройки проблемной сети. Для этого требуется сначала открыть список сетей. Быстрый способ – открыть окно «Выполнить» (как это сделать, уже указывалось ранее) и написать в него «ncpa.cpl». Далее необходимо кликнуть ПКМ по нужной сети и выбрать пункт «Свойства» (самый последний). При этом вы увидите следующее окно:

- Найдите компонент «IP версии 4» и нажмите по нему ЛКМ, чтобы выделить его. После перейдите к свойствам, используя соответствующую кнопку. Располагается компонент в верхней части перечня:

- Скорее всего, у вас будет активировано автоматическое определение адресов DNS-сервера. В таком случае смените режим на ручной. Также вам понадобится установить адреса. Рекомендуется использовать вариант, указанный на скриншоте ниже. Если же у вас уже стоит ручной режим – переключитесь на автоматический: иногда это помогает.

- Не забудьте сохранить изменения, нажав на кнопку «OK».
- Затем откройте командную строку (введите название утилиты в поиске или кликните ПКМ по меню «Пуск» и выберите одноименный пункт в меню). Обязательно с правами администратора.

- Напишите «ipconfig /flushdns» (без кавычек) и нажмите на клавишу Enter.

Что делать, если ничего не помогает
В некоторых случаях бывает полезен сброс сети. Осуществляется он легко:
- Зайдите в параметры ОС. Это можно сделать при помощи сочетания клавиш Win+I.
- Выберите раздел, отвечающий за интернет.

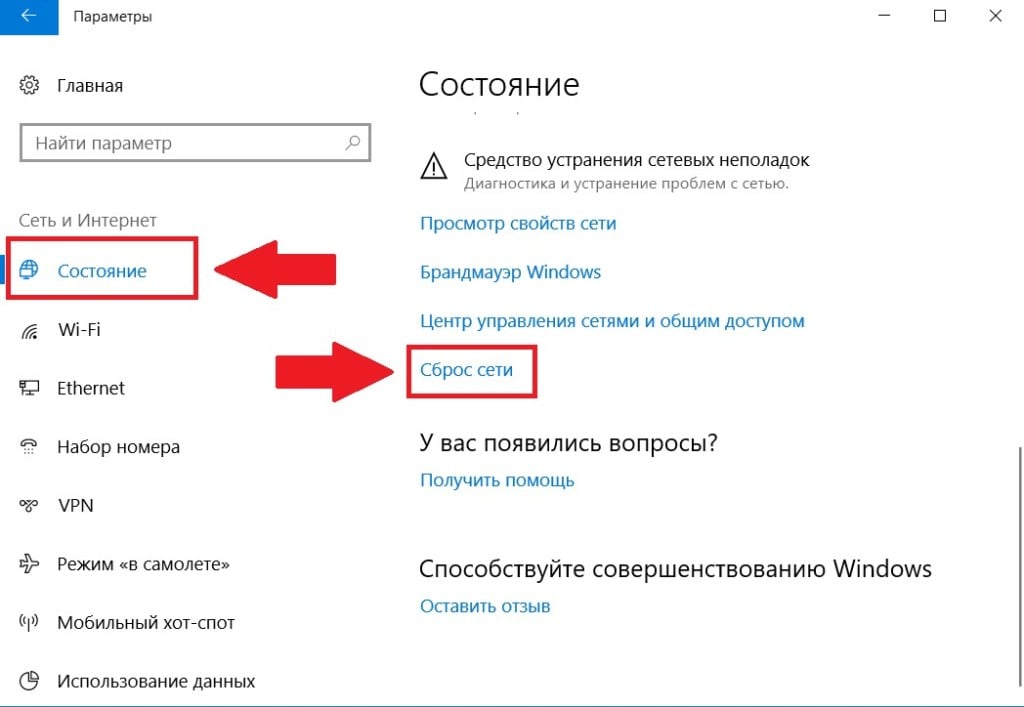
- Не меняя вкладку, пролистните параметры вниз и найдите надпись «Сброс сети». Кликните по ней.

- Подтвердите свои намерения и дождитесь перезагрузки устройства.

Таким образом, при появлении сообщения «Нет подключения к Интернету, защищено» в Windows 10 нужно в первую очередь обратить внимание на сам роутер: часто к появлению проблемы приводит его неправильная работа. Также важно помнить, что фактическое отсутствие интернета нередко возникает по вине провайдера. В дополнение возможно повреждение кабелей, находящихся в подъезде. В обоих случаях сделать вы ничего не сможете.
Понравилось? Поделись с друзьями!
Дата: 01.05.2022
Автор/Переводчик: Wolf
Когда пользователь подключается к Интернету через WiFi ноутбука или ПК к своему роутеру, то появляется сообщение, что «Нет подключения к Интернету, защищено» в Windows 10, хотя интернет есть и он работает. В других ситуациях появляется и другая ошибка как «Подключение к интернету отсутствует» при которой нет интернета. Чаще всего эту проблему можно встретить после очередных обновлений Windows 10. Давайте разберем, что делать и как исправить, когда нет подключения к Интернету по беспроводной сети WiFi в Windows 10 и оно защищено.

Как исправить, когда нет подключения к Интернету в Windows 10
Начнем с простых рекомендаций, чтобы исключить их из виновников данной проблемы:
- Попробуйте уменьшить расстояние между WiFi роутером и компьютером или ноутбуком. Плохая связь может быть виновником.
- Выключите на 2 минуты роутер (модем) и включите обратно. Попробуйте присоединиться к сети WiFi.
- Если используете VPN или прокси, то отключите или удалите.
1. Проверка компонентов
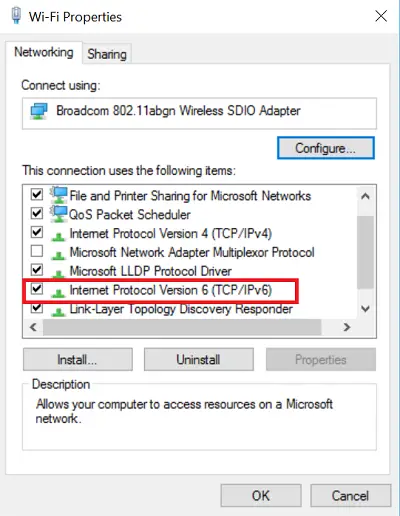
Нажмите сочетание кнопок на клавиатуре Win+R и введите ncpa.cpl, чтобы быстро открыть сетевые адаптеры. Нажмите правой кнопкой мыши по сетевому беспроводному адаптеру и выберите «свойства«. В списке используемых компонентов должны быть отмечены галочкой следующие пункты:
- Клиент для сетей Microsoft
- Общий доступ к папкам и принтерам для сетей Microsoft.
- IP версии 4 (TCP/Ipv4).
- IP версии 6 (TCP/Ipv6).
- Драйвер протокола LLDP.
- Ответчик обнаружения технологии канального уровня.
ВАЖНО: Если все в порядке, то снимите галочку с протокола IP версии 6 (TCP/Ipv6), перезагрузите систему и проверьте, устранена ли проблема. Если стояла галочка на Протокол мультиплексора сетевого адаптера, то снимите её так как некоторые маршрутизаторы конфликтуют с этим компонентом.
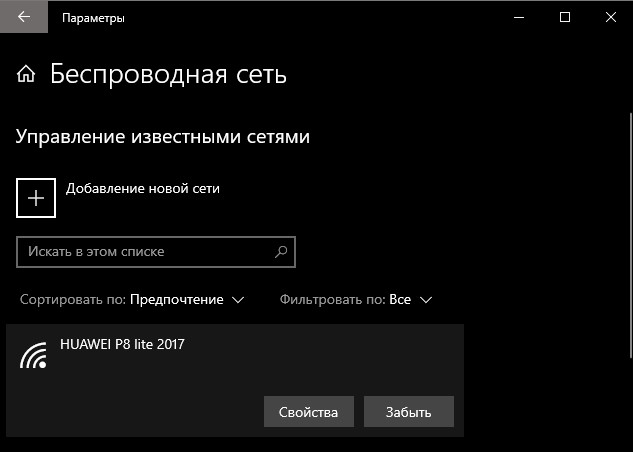
2. Удалить старые сети
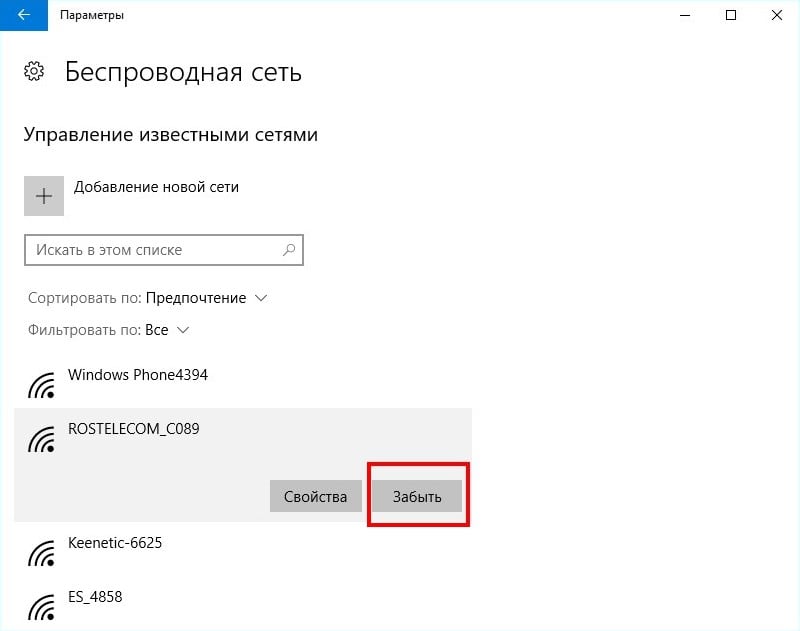
Старые сети WiFi могут конфликтовать с новыми. По этой причине их нужно удалить. Для этого откройте «Параметры» > «Сеть и Интернет» > «WiFi» > справа «Управление известными сетями«. Далее выделите все не нужные сети WiFi одним нажатием мыши и нажмите «Забыть» для удаления из списка. Перезагрузите систему, чтобы кэш сбросился.
3. Переустановить сетевой драйвер

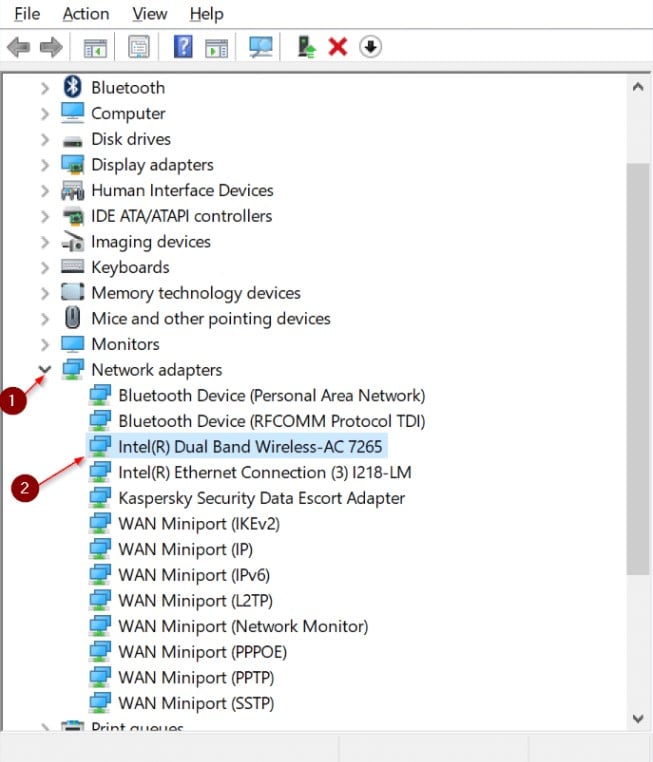
Если нет подключения к Интернету, хотя интернет есть, но он защищен, то переустановка сетевого драйвера может помочь устранить проблему. Нажмите сочетание кнопок Win+X и выберите «Диспетчер устройств«.
- В списке найдите и разверните графу «Сетевые адаптеры«.
- Нажмите правой кнопки мышки по адаптеру WiFi и выберите «Удалить устройство«. (Wireless обозначает беспроводной).
- В новом окне установите галочку «Удалить программы драйверов для этого устройства«, если будет предложено, и нажмите «Удалить».
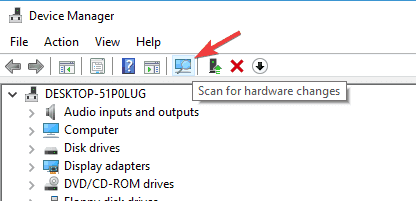
- После удаления нажмите сверху на вкладку «Действие» и выберите «Обновить конфигурацию оборудования«, и драйвера автоматически переустановятся.
Примечание: Вы можете попробовать «обновить драйвер» нажав по адаптеру правой кнопкой мыши.

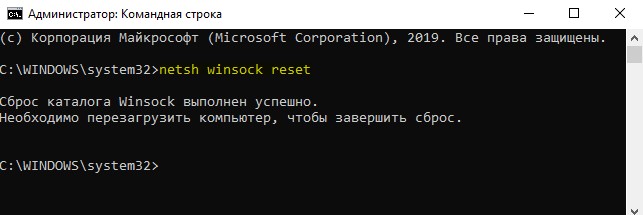
4. Сброс параметров сети
Запустите командную строку от имени администратора и введите ниже команды по порядку.
netsh winsock resetnetsh int ip resetipconfig /releaseipconfig /renewipconfig /flushdns
5. Ошибка после обновления Windows 10
Microsoft признала ошибку в обновлениях Windows 10 версии 2004 и она считается ложной. Если вы столкнулись с ошибкой «Нет подключения к Интернету, защищено» после обновления системы, то решение простое.
Нажмите Win+R и введите regedit, чтобы открыть редактор реестра. В реестре перейдите по пути:
HKEY_LOCAL_MACHINESYSTEMCurrentControlSetServicesNlaSvcParametersInternet- С правой стороны найдите параметр EnableActiveProbing и щелкните по нему два раза.
- Задайте значение 1 и нажмите OK.

6. Сторонний антивирус
Брандмауэр сторонних антивирусов может блокировать сетевое подключение, если он его сочтет за подозрительное. Виновником был замечен Comodo Antivirus. Если вы используете сторонний антивирус, то придется удалить его полностью, так как брандмауэр все ровно будет работать при отключении антивируса на время.
Смотрите еще:
- Не удается подключиться к этой сети WiFi в Windows 10
- Как удалить сеть WiFi в Windows 10
- WiFi не видит сети на ноутбуке Windows 10/7
- Пропал значок WiFi на ноутбуке Windows 10
- Исправить ошибки подключения к Интернету и веб-сайтам
[ Telegram | Поддержать ]
 При подключении к Wi-Fi сети в Windows 10 вы можете столкнуться с тем, что подключение происходит успешно, но сайты не открываются (но, в редких случаях, могут и открываться), а в статусе подключения указано «Нет подключения к Интернету, защищено» и не всегда ясно, в чем именно может быть дело.
В этой инструкции подробно о том, что означает это сообщение, о возможных причинах проблемы и о том, что делать, чтобы её исправить.
Почему Windows 10 сообщает, что нет подключения к Интернету

После установки сетевого соединения Windows 10 пробует установить связь с серверами Майкрософт. Если они доступны, то с точки зрения системы Интернет есть, если нет — вы видите сообщение о том, что нет подключения к Интернету. «Защищено», в свою очередь, означает что ваша Wi-Fi сеть защищена паролем и шифрованием, а вы успешно к ней подключились. Наиболее частые причины рассматриваемой проблемы:
- Ваш Wi-Fi роутер не настроен или, если недавно всё работало, по какой-то причине (сбой, гроза и т.п.) настройки были сброшены, в результате он не устанавливает соединение с провайдером.
- Временные проблемы и сбои на стороне провайдера.
- Проблемы с подключением кабеля провайдера к роутеру, особенно если он находится там, где его можно задеть. В некоторых случаях проблемы с кабелем могут быть не у вас в квартире, а в подъезде, если там проводились или проводятся какие-либо работы с электрооборудованием.
- Какая-то проблема со стороны непосредственно компьютера. Например, если сайты открываются и Интернет работает, можно предположить, что была выполнена блокировка доступа к серверам Майкрософт (например, для отключения слежки Windows 10 и тогда, возможно, предпринимать каких-либо действий не следует). Но возможны и другие варианты.
А теперь о том, что делать, чтобы исправить ситуацию «Нет подключения к Интернету, защищено» в Windows 10 в зависимости от обстоятельств:
- Как вам первым делом посоветует любая служба поддержки (и это действительно часто срабатывающий способ) — перезагрузите ваш Wi-Fi роутер (а попутно проверьте кабель провайдера в порте WAN/Internet): выключите его из розетки, включите снова через несколько секунд, дождитесь загрузки (минута-две) и заново подключитесь к сети.
- Если предыдущий пункт не помог, проверьте: а есть ли Интернет по этой же Wi-Fi сети на других устройствах (например, на телефоне, только предварительно отключите на нем передачу данных по мобильной сети). Если тоже нет — проблема на уровне роутера, кабельного подключения или со стороны провайдера. Если с другого устройства по этой же Wi-Fi сети Интернет доступен, то, видимо, проблема в настройках вашей Windows
- Если Интернет не доступен ни на каких устройствах по этой Wi-Fi сети, позвоните на номер справочной службы вашего провайдера: большинство крупных провайдеров после указания лицевого счета сразу сообщат, если с их стороны проводятся какие-либо работы или есть сбои. В такой ситуации останется лишь ждать, когда всё будет исправлено и Интернет снова станет доступен.
- В случае, когда провайдер сообщает, что с его стороны всё в порядке, а в работоспособности кабеля вы уверены, зайдите в настройки роутера и проверьте, сохранены ли они и соответствуют ли параметрам вашего провайдера (см. Настройка роутера).
- В ситуации, когда Интернет не работает только на одном компьютере, а на других устройствах, подключенных по этой же Wi-Fi сети всё в порядке, используйте шаги из инструкций Не удается получить доступ к сайту — как исправить и Не работает Интернет в Windows 10, один из предложенных методов должен помочь в исправлении проблемы.
Надеюсь, что-то из предложенных подходов оказалось полезным в вашем случае. Если же проблему решить не удалось, а ситуация отличается от описанных вариантов, опишите её в комментариях ниже — я постараюсь помочь.
An issue generally noticed with the Windows operating system these days is that new updates to the OS bring their own share of problems with them. For instance, you might fail to connect to the Internet soon after the update and see an error message – No Internet, Secured flashing on your screen. Luckily, methods to correct this problem do exist. In this post, we see ways on how we can troubleshoot the issue and fix the Internet connection issue.
We generally use a secure Wi-Fi connection at our home/office. So, if we get a “No internet, Secured” error, this could be because of an invalid IP configuration. Maybe something changed the settings. Here is what you can do.
- Update your Network Adapter driver
- Run Network Adapter Troubleshooter
- Change Adapter settings
- Delete Network Adapter completely
- Wifi Issues
- Change power management properties
- Disable WiFi sharing software
- Set a Fixed DNS Server
- Disable 5Ghz to Fix the “No Internet Secured” error in Windows 11/10
- Remove or disable internet security software
You will need admin permission to resolve the problem.
1] Update your Network Adapter driver
Update your Network Adapter driver software and see if that helps. You will have to do it via the Device Manager or Windows Update or directly download it from the OEM website.
Windows Update offers driver update through the additional update link. If there is no update, you can download the software and then install it.
2] Run Network Adapter Troubleshooter
Run Network Adapter Troubleshooter and check if it helps. Ordinarily, this built-in troubleshooting diagnostics will allow you to detect the problems that you are experiencing with your network. You will get it here – Control Panel > All Control Panel Items > Troubleshooting > Network and Internet. It finds and fixes problems with wireless and network adapters. You can also right-click on the network icon, and select the network troubleshooter.
3] Change Adapter settings
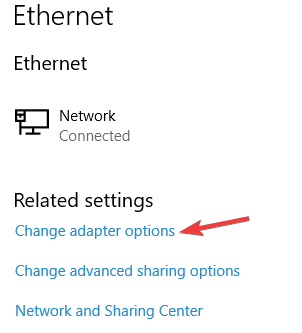
If this fails, try changing Adapter settings. To do so, select the change adapter settings option from the Network and Sharing Center window. You will find the adaptor option residing on the left side of the window.

Then, open the Properties of the Network Adapter and try locating the one that is currently in use. It should be visible to you as a Wireless Adapter.
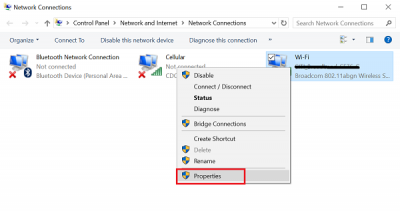
Now, find if the Internet Protocol Version 6 (TCP/IPv6) is listed under the options displayed. Click it open and uncheck it to disable IPv6.
Next, click on OK, and restart the computer to allow the changes to take effect.
4] Delete Network Adapter completely
If this fix does not work on your device, you could resort to one last option of deleting the Network Adapter completely so that Windows adds it as new on the next start of the system.
To uninstall and reinstall the Network driver, press Win+X altogether and select Device Manager. Then, In the list of devices, locate the Network device whose Driver you want to uninstall.
Right-click on the device and then select Uninstall.
In the Uninstall dialog that shows up on your computer screen, check the Delete the driver software for this device option to delete the Network driver package.
Following this, in the Action menu of Device Manager, check the Scan for Hardware changes option to reinstall the device.
Finally, restart your computer when the network driver installation process is complete.
5] WiFi problems?
WiFi is like a network adaptor, and it can have issues. Follow out the extensive guide if the Wifi Adaptor is giving issue. See this post if you face WiFi problems on Windows 10.
6] Change power management properties
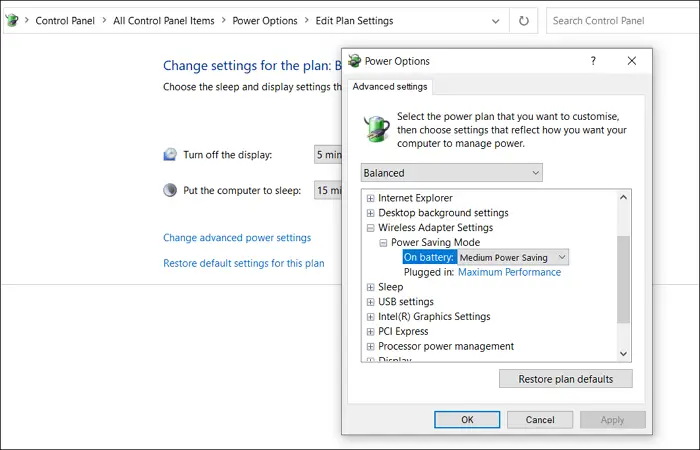
At times, Power Settings can make network adaptor sleep when not used for a long time. To make sure the Power Management doesn’t mess with the network, follow the steps:
- Locate the battery icon on the system tray, right-click and select Power Options
- Click on Change Plan Settings > Change advanced power settings
- Select Wireless Adapter Settings and change mode On battery and Plugged in
- You can choose Maximum Performance from the available options
Once you change your Power Plan settings, it should not be a problem anymore.
7] Disable WiFi sharing software
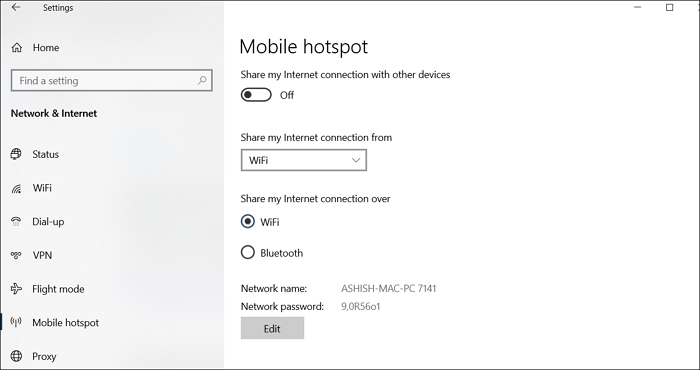
Windows offers a Mobile hotspot feature that allows you to share the wifi network to which it is already connected. It comes in handy when you don’t have the wifi network password. However, it is also known to interfere with the internet.
It is recommended to Go to Network & Internet > Mobile hotspot, and then turn off the hotspot.
8] Set a Fixed DNS Server
The same issue can occur if you are not connected to the correct or fixed DNS server. At times the ISPs DNS server may not work as expected, and it is best to change it. In case the ISP hasn’t offered any DNS, then you are on the dynamic DNS.
- Go to Windows Settings, and select the Network for which you want to change the DNS.
- Click on Properties and scroll to find the Edit button next to IP settings.
- Switch from DHPC to Manual and turn on IPv4.
- Fill in the details, including DNS, and apply the changes after changing the IP addresses.
9] Disable 5Ghz to Fix the “No Internet Secured” error in Windows 10
Some devices do not connect well to a Router over the 5 GHz band because of compatibility issues. However, this cannot be resolved from the PC; instead, you will need to do it from the router.
In the router Wifi Settings, you need to enable the 2.4 GHz profile support. Once done, you can then reconnect to the network, and it should work. It is usually a problem with old hardware or if the WIFI adaptor is not compatible.
10] Remove or disable internet security software
Internet security software is also known to cause issues with Wifi if the rules are strict. The best way to check is to remove or temporarily disable it and check if you can connect to the wifi network. If yes, then you need to configure the security setting, so there is no interference.
What do I do when my WiFi says No Internet Secured?
If your WiFi says No Internet, Secured instead of connecting to the internet, you could do several things to fix the issue. From updating your Network adapter driver to running Network Adapter Troubleshooter to restarting the WiFi router, there are lots of things to do. All the possible and working solutions are mentioned in this article, and you need to follow them one after one to eliminate the problem.
What does No Internet Secured mean on WiFi?
It denotes that you do not have an internet connection on your computer, but the connection between your computer and the WiFi router is encrypted. Since it is encrypted, your Windows 11/10 PC shows the “Secured” message while connecting to the network.
Hopefully, something should have helped!
See this post if you receive a No Internet Access message in Windows 11/10. Need more suggestions? Check Windows 10 cannot connect to the Internet.
You are connected to your wifi network on your Windows 10 laptop, but unable to access the internet. If you check your wireless network you see No Internet, secured instead of connected.
In the taskbar, you see a world symbol with a no access symbol through it. When you go over the symbol you will see the error message No internet access.
I have had this error myself so I know how annoying it can be. With this guide I am going to help you to resolve this error.
The error can be caused by different things, so I have listed different solutions that could solve the problem. We start with the most common solutions that will work for the most. Just follow every step and we will get you back online.
Only one device or multiple devices?
The first thing you should check is if it’s only one device that has no internet access, or that multiple devices are unable to connect.
The problem can either be in your Windows 10 laptop, or it could be an issue with your access point or router. If only one device gets the “No internet, secured” error, then continue reading. Otherwise, skip to this part.
Fix “No Internet, Secured” Windows 10 Connection Error
We are going to start with some basic settings to check and reset. If you already have done this, then just scroll down to the next steps. I assume you already have rebooted your laptop.
Throughout the steps, we will need to open a lot of settings screens, or command-line tools. To access these your can either press Windows key + X at the same time or click with your right mouse button on the start menu. Both will do the same, use what you prefer.
1. Resetting your Windows 10 Network Configuration
The first thing we are going to do is flush the local caches and reset your network configuration. Corrupt DNS caches are the most common problem for the “no internet, secured” error.
- Right-click on the start menu and choose PowerShell (admin) or command (admin)
- Click Yes when asked if you want to allow this app to make changes.
- Enter each command below. Hit enter after each one. If a command fails, just continue with the next one:
- ipconfig /flushdns
- ipconfig /release
- ipconfig /renew
- netsh winsock reset
- netsh int ip reset
- Reboot your computer and check if you have internet access
2. Check your Network Configuration
Before we are going to change or update anything, we first need to verify if your network adapter is configured correctly for a normal home or office network.
- Right-click on Start and select Network Connections
- Select Change Adapter Options
- Open your Network Adapter by double-clicking on the Wi-Fi Adapter
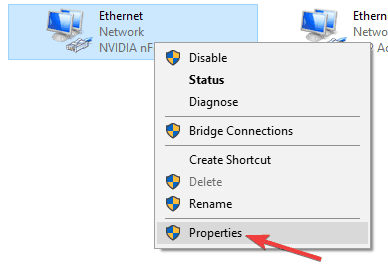
- Select Properties
- Check if the following items are checked:
- Client for Microsoft Networks
- File and Printer Sharing for Microsoft Networks
- QoS Packet Scheduler
- Internet Protocol Version 4 (TCP/IPv4)
- Microsoft LLDP Protocol Driver
- Link-Layer Topology Discovery Responder
- Link-Layer Topology Discovery Mapper I/O Driver
- Uncheck Internet Protocol Version 6 (TCP/IPv6) (this could be the cause of the problem).
- Double-click on Internet Protocol Version 4 (TCP/IPv4)
- Make sure that IP Address and DNS server are set on Obtain automatically
Click ok to close the properties window and check if the no internet access error is gone.
3. Set a Fixed DNS Server
Most of the time the problem is related to the DNS server. The DNS server is responsible for translating the domain names to an IP Address. Without a working DNS server, you can’t access the internet.
Follow steps 1 to 4 from the previous chapter to open the properties again of your network adapter.
- Double-click on Internet Protocol Version 4 (TCP/IPv4)
- Check Use the following DNS server addresses
- Enter the following IP Address
- Preferred DNS server: 1.1.1.1
- Alternate DNS server: 1.0.0.1
- Click Ok and check if the No internet secured error is solved.
4. Disable 5Ghz to Fix the “No Internet Secured” error in Windows 10
This step actually fixed the “no internet secured” problem on my Windows 10 laptop. All the above steps are important to try first.
Almost every laptop these days support both 2.4Ghz wireless networks as 5Ghz wireless networks. A driver update or firmware update of your access point can cause connection problems.
Your laptop will always try to use the faster 5Ghz network, so we are going to disable it to see if it fixes the no internet access error.
- Press Windows key + X and select Network Connections
- Click Change adapter options
- Double-click on your wireless network
- Select Properties
- Click on Configure
- Open the tab Advanced
- Select 802.11n/ac wireless mode and change it to Disabled
- Click ok, your wireless network should now reconnect over 2.4Ghz
If your internet connection is working again, you can go back and try if 802.11n only works. In my case, only the 802.11ac protocol was the problem that caused the wifi no internet access error.
To permanently fix the issue your should check if there is a firmware update for your access points or revert back to an older version. And try to update your network card driver.
5. Re-install and Update your Network Adapter
Updating your network adapter is a bit difficult because the computer in question doesn’t have an internet connection. So the first thing we are going to do in an attempt to fix the “no internet, secured” error is re-install it. This way we are sure all settings are reset and the best driver is automatically selected by Windows 10.
Windows will automatically reinstall the network adapter after you have uninstalled it and rebooted your laptop.
- Press Windows key + X
- Select Device Manager
- Expand Network adapters
- Right-click on your wireless network adapter and
- Select Uninstall device
- Reboot your laptop and check if the no internet secured error is resolved
If this didn’t help you can try to update the driver. The best way to do this is to first check the current driver version:
- Go back to the Device Manager
- Double-click on the wireless network adapter
- Select the driver tab
- Note the network adapter name (1) and driver version (2)
Use another computer to download a newer or older version of the driver. Newer is prefered ofcourse, but sometimes the problems occur after a driver update. Rolling back to an older version of the driver could solve the problem.
To update the driver, copy the driver files over on a USB stick and run the installation or Update Driver function in the Device Manager. Restart to computer to check if the no internet secured error is fixed.
6. Disable Wi-Fi Sharing / Wi-Fi Hotspot software
Wi-Fi Sharing or hotspot software can cause configuration errors in your network adapter. If you are using this kind of software, then first try to update the sofware or if possible, uninstall it.
If the error “No internet secured” persist after the update or removal, then we need to disable any non-Microsoft items from the network adapter:
- Press Windows key + X
- Open Network Connections
- Click Change adapter options
- Double-click on your wireless network
- Select Properties
- Disable all non-Microsoft items. You should only have enabled the following items:
- Reboot your computer
7. Windows 10 build 2004 No Internet Access bug
Windows 10 periodically test the network connection by requesting the following url: http://www.msftconnecttest.com/connecttest.txt. If you have an internet connection, then the content “Microsoft Connect Test” is returned.
In build 2004 of Windows 10 was a bug in the Network Connectivity Status Indicator preventing it from doing the connection test, resulting in the no internet secured error.
To fix this you need to change a registry value:
- Press Windows key + R
- Type regedit and press enter
- Navigate to: HKEY_LOCAL_MACHINESYSTEMCurrentControlSetServicesNlaSvcParametersInternet
- Change the key EnableActiveProbing from 0 to 1
Restart the computer to test if the no internet access is resolved.
8. Remove or disable internet security software
If you are using internet security software, like Kaspersky Total Security or Norton Internet Security, then try disabling it. These kinds of software are known of causing problems with your internet connection. Most of the time you can easily disable them to see if this resolved your problem.
9. Change your Power Plan settings
Energy saving or balanced power plans in Windows 10 can turned components of your computer. This could cause network connection errors like the “No internet, Secured” error, that result in no internet access.
- Press Windows key + X
- Select Power Options
- Select Additional Power Settings
- Click Change plan settings
- Select Change Advanced Settings
- Make sure that the Wireless Adapter Settings -> Power Saving Mode is set to Maximum Performance. Do the same for the Link State Power Management
- Click Apply and close the windows.
Multiple devices with No Internet Secured error
When multiple devices have no internet access then the problem is most likely related to your router or access point. The first thing your can do is restart your network:
- Turnoff the router and leave of for more then 10 seconds. Restart the router, give it some time to fully start. Sometimes it can take 5 minutes.
- If you have seperate access point, restart those after the 5 min waiting. Again, keep them turned off for 10 sec before you plug the power back in.
- After another 5 minutes, restart your computer and see if you can connect to the internet.
The 10 seconds is important for the capacitors to deplete completely. Capacitors are like tiny batteries that can hold power for a couple of seconds. Waiting for them to fully discharge ensures that all temporary memory (caches) are cleared.
If you are using power line adapters, wireless network extenders that you plugin your wall socket, then make sure they are on the same electrical group. Test your network without them, or place the adapters closer to each other.
Wired or Wireless problem alone?
If you still have network connection problems then it’s a good idea to see if the problem only occurs on your wireless network or also on a wired connection.
Try to connect your laptop with a UTP directly to the router. If you are now able to access the internet, then we need to focus on your wireless network. When a wired connection doesn’t work either, then we need to focus on the router.
No internet access over Wireless network only
Okay, so the problem only occurs when you use your wireless network. If you have a seperate access point, make sure that DHCP is turned off.
For wireless networks in general your can check the following settings:
- Change the channel of your wireless network. If it’s set to automatic, change it to channel 6 for 2.4Ghz and 44 for the 5Ghz channel. Read more about wireless networks here.
- Lower the 5Ghz channel width to 20Mhz.
- Update the firmware of your router or access point
Wired and Wireless network problems
When both your wired and wireless network are not working then the problem is related to your router or modem. If you have a modem and a seperate router, then make sure that the modem is set in bridge mode and DHCP is turned off.
Other settings you can check are:
- Change the DNS server in the router to 1.1.1.1 and 1.0.0.1
- Make sure the DHCP range is in the same range as the router
- Update the firmware of the router
- Contact your ISP, maybe your modem or router is simply broken.
Frequently Asked Questions
What does no internet secured mean
The secured part refers to the use of passwords and secure encryption methods that is being used. No internet simply means that you are connected to the local network, but unable to reach the internet.
Why am I getting no Internet secured?
Your computer is unable to reach the internet. Try one of the steps in this guide to resolve the problem.
How do I fix no Internet secured Windows 10?
1. Press Windows Key + X
2. Select PowerShell (Admin)
3. Type ipconfig /flushdns <enter>
4. Follow the other steps in this article if the problem persists.
Can I safely un-install my network adapter?
Yes, Windows 10 will automatically re-install it when you reboot.
Wrapping Up
I hope your where able to fix the No internet Secured error in your computer. If nothing worked, then first double check if your windows 10 laptop is able to connect to a different wireless network, for example a hotspot on your mobile phone.
Another option is to use a wireless network adapter to you can plugin to a USB port.
If you have any question, just drop a comment below.
You may also like the following articles:
- Best home network setup
- Best router cost only $50
- What is a DHCP server and how does it work
Quickly fix No Internet, secured error on Windows
by Radu Tyrsina
Radu Tyrsina has been a Windows fan ever since he got his first PC, a Pentium III (a monster at that time). For most of the kids of… read more
Updated on December 22, 2022
Reviewed by
Vlad Turiceanu

Passionate about technology, Windows, and everything that has a power button, he spent most of his time developing new skills and learning more about the tech world. Coming… read more
- If your Internet Protocol settings are not set accordingly, this could lead to issues like the No Internet secured error.
- This problem can be also caused by accidental changes in IP settings by the user, program installations, or even faulty Windows Updates.
- To fix the No Internet, secured problem, start by updating the drivers.
- You can also try running a dedicated troubleshooter from Windows.

XINSTALL BY CLICKING THE DOWNLOAD FILE
This software will repair common computer errors, protect you from file loss, malware, hardware failure and optimize your PC for maximum performance. Fix PC issues and remove viruses now in 3 easy steps:
- Download Restoro PC Repair Tool that comes with Patented Technologies (patent available here).
- Click Start Scan to find Windows issues that could be causing PC problems.
- Click Repair All to fix issues affecting your computer’s security and performance
- Restoro has been downloaded by 0 readers this month.
One issue that many Windows 10 users encounter is an inability to connect to the internet after downloading and installing new OS-related updates.
For instance, you might see an error message on your screen that states no internet, secured usually caused by an invalid IP configuration.
Why is it showing No Internet, Secured on Windows 10?
One of the culprits could be that recent Windows updates you installed changed the configuration settings, so we listed below some methods we think could help you troubleshoot the problem.
No Internet, secured message can prevent you from using your Internet connection. This can be a big problem, and speaking of network issues, here are some similar issues that users reported:
- No Internet secured hotspot, on all devices, Windows 10, Ethernet, unidentified network
- There are various network issues that can occur on your PC, and all versions of Windows can be affected by these issues.
- However, you should be able to solve most of these problems by using one of our solutions.
- No Internet secured Netgear, TP Link
- This issue can appear with any network adapter, and Netgear and TP-Link devices aren’t an exception.
- If you have issues with your network adapter, be sure to update your drivers and check if that solves the problem.
- No Internet secured Windows 10 laptop, on HP laptop, ASUS, Dell
- This message can affect almost any laptop brand, and users reported this problem on ASUS, Dell, and HP.
- If you have this problem, be sure to check for any applications that can interfere with your network.
- Surface Pro No Internet secured
- According to users, this message can appear on Surface Pro devices as well.
- To fix the problem, be sure to change your Wi-Fi settings.
How do I fix the No Internet, secured On Windows 10?
- Why is it showing No Internet, Secured on Windows 10?
- How do I fix the No Internet, secured On Windows 10?
- 1. Run Internet Connections Troubleshooter
- 2. Reset Your Connection
- 3. Update Your Drivers
- 4. Change Your Adapter Settings
- 5. Reinstall the Network Adapter
- 7. Make sure that Required Network Features are Enabled
- 8. Reset your Network Configuration
- 9. Uninstall Problematic Applications
- 10. Enable the Use Random Addresses for This Network Feature
1. Run Internet Connections Troubleshooter
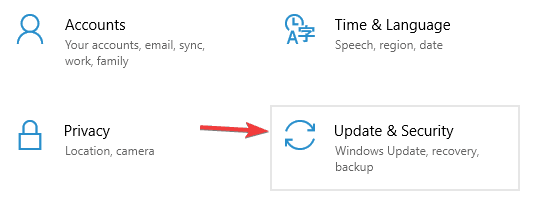
- Press Windows Key + I to open the Settings app.
- Go to the Update & Security section.

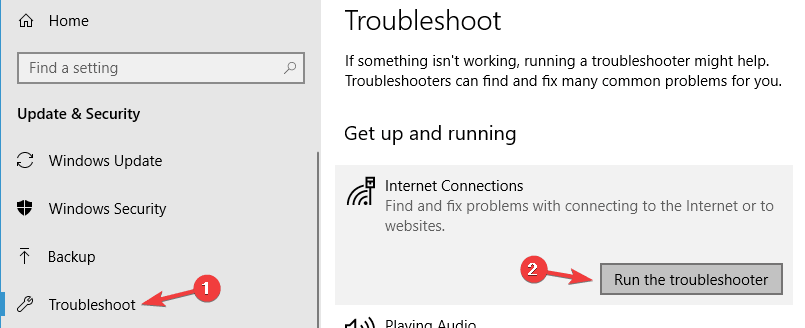
- Select Troubleshoot from the menu on the left and in the right pane select Internet Connections.
- Choose Run the troubleshooter.

Once the troubleshooter is finished, check if the problem is still there. If the issue is present, try running Network Adapter troubleshooter and check if that solves your issue.
Windows 10 comes with a variety of troubleshooters that can fix common problems on your PC, and if you’re having problems with No Internet, secured message, a network troubleshooter might be able to fix your problem.
2. Reset Your Connection
- Click on the Wi-Fi network in question in the system tray and hit Forget. Also, unplug any plugged Ethernet cable.
- After completely disconnecting your device from that access point, turn on Airplane mode.
- Restart your device and switch off the Airplane mode.
- Connect to the Wi-Fi network in the system tray again. Wait for a few minutes before your connection goes back to normal.
Another fix for the issue at hand is resetting your internet connection.
3. Update Your Drivers
If you keep getting No Internet, secured message, the problem might be your drivers. Outdated drivers can cause this issue to appear, and in order to fix the problem, it’s advised to download and install the latest drivers for your network adapter.
To do that, you’ll need a device with stable Internet access. Now you need to visit the manufacturer of your network adapter and download the latest drivers for your device. After doing that, transfer those drivers to your PC and try to install them.
Updating the drivers manually can be a tedious task, but if you want to update all your drivers with a single click there is automated software that can help you with that.
We recommend DriverFix for this job as it’s very fast, reliable and it repairs and updates your drivers automatically.
First, Download and install DriverFix. As soon as it finishes installing it will already start and in just a few seconds you will receive a complete list with all the drivers that you should consider updating.
The last step is to decide whether you click on the Update all button on top to update all the drivers in bulk or to install them one by one. If you go for the second choice, you need to check the individual boxes for each driver and click on the corresponding Update button.
⇒ Get DriverFix
4. Change Your Adapter Settings
- Go to Properties of the Network Adapter and look for a wireless adapter that is currently running.
- Search for the Internet Protocol Version 6 (TCP/IPv6) under the options that show up and uncheck IPv6 to disable it.

- Click on OK and restart the computer to enforce the changes you made.
If the issue persists, change your adapter settings. You can access the adapter settings option from the Network and Sharing Center window.
5. Reinstall the Network Adapter
- Press Windows Key + X to open the Win + X menu and choose Device Manager.
- Choose the network device in question.
- Right-click on the device whose driver you want to delete and click Uninstall device.

- Be sure to check the Delete the driver software for this device box if available. Now click Uninstall.

- Then click the Scan for hardware changes icon to reinstall the device.

- Complete the installation of the driver before restarting your PC.
Try uninstalling the network adapter and reinstalling it again so that Windows recognizes the adapter anew on the next startup.
6. Check Your Antivirus
According to users, No Internet, secured message can sometimes appear due to your antivirus. Antivirus software can sometimes interfere with your network connection and cause this and other errors to appear.
Some PC issues are hard to tackle, especially when it comes to corrupted repositories or missing Windows files. If you are having troubles fixing an error, your system may be partially broken.
We recommend installing Restoro, a tool that will scan your machine and identify what the fault is.
Click here to download and start repairing.
To fix the problem, it’s advised to disable certain features of your antivirus, such as its firewall, and check if that solves the problem. Many users reported this issue with Comodo Antivirus, so if you’re using it, you might want to keep an open eye on it.
If the issue is still present, even after disabling certain features, you might want to consider disabling your antivirus entirely. Lastly, you can also try removing your antivirus and check if that solves the problem.
If removing the antivirus solves the problem, this might be a good time to consider switching to a different antivirus solution.
There are many great antivirus tools on the market, so you can benefit from full-protection service for your PC using a lightweight antivirus like ESET Internet Security.
7. Make sure that Required Network Features are Enabled
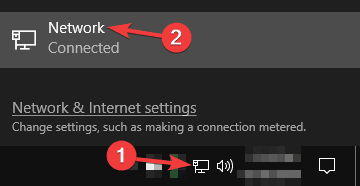
- Click the network icon in your system tray.
- Select the network name from the list.

- Click on the Change adapter options feature.

- Right-click your network connection and choose Properties from the menu.

- When the Properties window opens, be sure that the following items are checked:
- Client for Microsoft Networks
- File and Printer Sharing for Microsoft Networks
- Link-Layer Topology Discovery Mapper I/O Driver
- Internet Protocol Version 4 (TCP/IPv4)
- Reliable Multicast Protocol
- Internet Protocol Version 6 (TCP/IPv6)
- Link-Layer Topology Discovery Responder
According to users, sometimes No Internet, secured message can appear if certain features aren’t enabled. After enabling these features, save changes and check if the issue is resolved.
If the problem still persists, disable your network adapter, wait for a few seconds and turn it back on again.
Several users reported that Reliable Multicast Protocol is crucial for solving this problem, so be sure that this feature is enabled.
It’s also worth mentioning that several users managed to solve this problem simply by disabling Internet Protocol Version 6 (TCP/IPv6), so you might want to try that as well.
8. Reset your Network Configuration
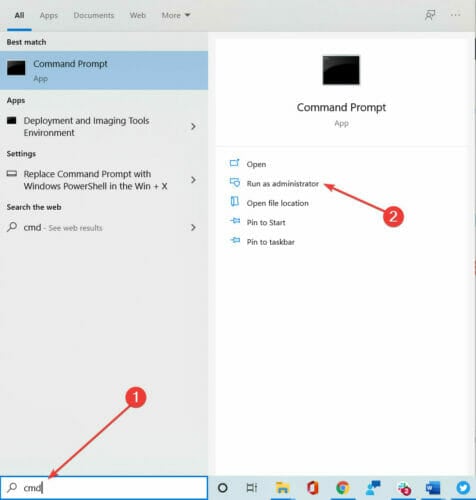
- Type cmd in Windows Search and click on Run as administrator to start the Command prompt with full privileges.

- When Command Prompt starts, run the following commands one by one:
netsh winsock resetnetsh int ip resetipconfig /releaseipconfig /renewipconfig /flushdns
After running these commands, your network configuration will reset and the issue should be resolved.
According to users, you might be able to fix this problem simply by resetting your network configuration. This is relatively simple, and in order to do it, you just need to run a couple of commands in Command Prompt.
9. Uninstall Problematic Applications
According to users, sometimes No Internet, secured message can appear due to third-party applications. The common cause of this problem can be applications that manage your network connections.
Users reported that ProSet application caused this problem on their PC, but after removing it, the problem was completely resolved.
There are several ways to remove an application, but to make sure it’s completely gone, we recommend you use a dedicated utility such as CCleaner.
This application displays all apps on your PC, just select the problematic one, click the Uninstall button and you are done.
Moreover, to make sure there’s no trace left of this app, run the registry and PC cleaning options in CCleaner. After that, you can try again and see if you can securely connect to the Internet.
10. Enable the Use Random Addresses for This Network Feature
- Open the Settings app and navigate to Network & Internet section.
- Go to Advanced options.
- In the Random hardware addresses section be sure to check the Use random addresses for this network.
If you’re having problems with No Internet, secured message on your PC, you might be able to solve the problem simply by changing your network settings. After enabling this feature, you need to check if the problem is resolved.
If you think we’ve missed some other helpful procedures, let us know in the comments.
Still having issues? Fix them with this tool:
SPONSORED
If the advices above haven’t solved your issue, your PC may experience deeper Windows problems. We recommend downloading this PC Repair tool (rated Great on TrustPilot.com) to easily address them. After installation, simply click the Start Scan button and then press on Repair All.
![]()
Newsletter
- The «No Internet, secured» message on Windows computers means that you’re connected to an internet signal, but it’s not transferring data.
- There are a few ways to fix the «No internet, secured» message, including resetting your router.
- You should also try running Windows’ built-in internet troubleshooter, which can fix some more advanced issues.
It doesn’t matter how much of a computer whiz you are — at some point in your life, you’re going to run into internet issues. And if you have a Windows 10 or Windows 11 computer, you might be familiar with the most common internet issue of them all: The «No Internet, secured» message.
If you haven’t dealt with it before, this status can be confusing. «No Internet, secured» means that your computer is connected to a private internet network, but there’s a problem with the connection, so you can’t receive any data. You’ll usually see this message when you try to connect to a Wi-Fi signal that’s too far away, but it can appear with almost any network.
Luckily, there are just as many ways to fix the issue as there are ways to cause it. Here are eleven ways to fix the «No Internet, secured» error in both Windows 11 and Windows 10.
Get closer to the internet router
As mentioned, the most common reason that you’ll see the «No Internet, secured» status is that you’re too far away from the source of your internet connection. This makes it so your computer can sense the Wi-Fi network and «connect» to it, but the signal will be too weak to actually transfer any data.
Move your PC closer to the internet router, or move your router closer to your PC. In general, you should keep your home’s internet router in a central location, high off the ground, away from any objects or barriers to block the signal.
United Photo Studio/Shutterstock
If your home is big enough that one internet router isn’t enough to get a strong signal everywhere, consider investing in a Wi-Fi extender, or even a mesh network. Both of these options will help carry a strong Wi-Fi signal throughout your home.
Restart your router and computer
Restarting your router will refresh its connection to your internet service provider (ISP), and all your devices. It might sound too simple to be true, but a quick restart can fix all sorts of internet problems.
You don’t need to do anything fancy to restart an internet router. Just unplug its power cable for at least ten seconds, then plug it back in and give the router a few minutes to start up. Once it’s ready, try connecting to the network again.
And of course, consider restarting your computer alongside it. This can help fix a surprising number of glitches too.
Disable your VPN
While VPNs are great for protecting your privacy online, they can also occasionally screw with your internet signal. It’s not uncommon for VPNs to slow down your internet connection, which can lead to «No Internet» errors.
If you find your internet cutting out while you’re using a VPN, try disabling it. If the connection suddenly starts working, it means there’s an issue with that VPN. You can change its settings, or try a different VPN program.
Use Windows’ internet troubleshooters
Windows 10 and Windows 11 are incredibly complex operating systems. Even the simplest PC has dozens of different processes — some of which were developed two decades ago — running at the same time. This makes it almost inevitable that you’ll run into an error or glitch at some point.
Microsoft knows this, so both versions of Windows include a suite of automatic troubleshooting tools. And internet issues are so common that Windows actually includes two separate troubleshooters dedicated to fixing them. These tools will go through a checklist of basic issues and try to fix whatever bugs you’re facing.
To find both of Windows’ internet troubleshooters:
1. Open the Settings app on your PC.
2. In Windows 10, select Update & Security. In Windows 11, select System.
3. Scroll down the list of options and click Troubleshoot, then select Additional troubleshooters (10) or Other troubleshooters (11).
4. Click and go through both of the internet troubleshooting tools on this page. They’re called Internet Connections and Network Adapter.
William Antonelli/Insider
These tools should identify the issue and fix it right away. But if it says that it can’t find any issues, or that it found an issue but can’t fix it, continue reading.
‘Forget’ the internet connection
When your PC connects to a Wi-Fi signal, it records and remembers a wealth of information about that signal. This makes it easier for your PC to use it in the future, but can also trip you up. If anything about that Wi-Fi connection changes — for example, its name or signal type — and Windows is still using outdated information, you might encounter the «No Internet» error.
You can fix this by erasing the information that Windows has saved, and then reconnecting to the Wi-Fi signal. This will refresh your PC’s records and update old data.
To forget a Wi-Fi network:
1. Open the Settings app on your PC and select Network & Internet.
2. Click Wi-Fi, and then Manage known networks.
3. Select the Wi-Fi network you’re trying to fix, then click Forget.
Once you’ve forgotten the network, connect to it again.
Reinstall the network drivers
Nearly all of the hardware on your Windows computer runs using «drivers,» small pieces of software that tell the computer how to function. As time goes on, some drivers can malfunction, and the hardware that they run will stop working. In this case, you can reset the driver by uninstalling it, and then reinstalling it.
To do this:
1. Right-click the Windows icon in your taskbar and select Device Manager from the list that appears.
2. In the Device Manager window, open the Network adapters menu and find your computer’s Wi-Fi driver. Its name will change from computer-to-computer, but look for phrases like Wi-Fi 6 and Wireless Network Adapter.
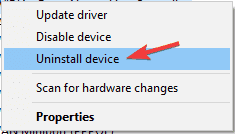
3. Right-click the driver and select Uninstall device.
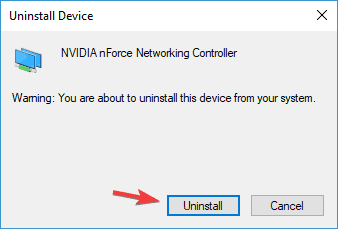
4. In the pop-up that appears, check the box that asks if you want to Delete the driver software (Windows 10) or Attempt to remove the driver (Windows 11), then click Uninstall.
5. Restart your PC.
William Antonelli/Insider
As the computer turns back on, it’ll reinstall the Wi-Fi driver. This will (hopefully) fix any issues it’s having.
Refresh your connection using the Command Prompt
The Command Prompt is a powerful but hard-to-master program that lets you control nearly every aspect of your PC. Its blank black screen can look intimidating, but if you know the commands to enter, there’s nothing to fear.
Search for the Command Prompt on your computer, and when it appears in the results, right-click on it and select Run as administrator.
Once it’s open, there are five separate commands that you’ll want to run. Type in a command and press Enter, then move onto the next.
- netsh winsock reset
- netsh int ip reset
- ipconfig /release
- ipconfig /renew
- ipconfig /flushdns
Then restart your computer.
William Antonelli/Insider
Change your Wi-Fi properties
This is a rare problem, but you’ll also want to make sure that the Wi-Fi network is communicating with your PC in the right way. If the PC thinks that your Wi-Fi doesn’t support full connectivity, it won’t work.
1. While you’re connected to the network that you’re trying to fix, open the Control Panel app and click Network and Internet, then Network and Sharing Center, and then Change adapter settings.
2. Right-click the Wi-Fi network you’re connected to and select Properties.
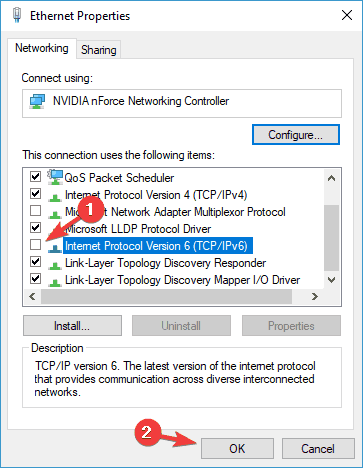
3. In the Networking tab, make sure that these seven options have checkmarks next to them:
- Client for Microsoft Networks
- File and Printer Sharing for Microsoft Networks
- QoS Packet Scheduler
- Internet Protocol Version 4 (TCP/IPv4)
- Microsoft LLDP Protocol Driver
- Link-Layer Topology Discovery Responder
- Link-Layer Topology Discovery Mapper I/O Driver
4. If Internet Protocol Version 6 (TCP/IPv6) has a checkmark, click the checkbox to remove it.
William Antonelli/Insider
Test your internet connection again. If nothing changes, come back here and check off Internet Protocol Version 6 (TCP/IPv6) again.
Change your DNS server
Your Wi-Fi connection’s DNS server — short for Domain Name System — is what allows you to connect to websites and other computers. If the DNS server that you’re using is faulty, it’ll cut you off from the internet.
In most cases, your PC will just use whatever DNS server your ISP provides. But you can also set your DNS server manually, which can fix «No Internet» errors.
1. Follow the steps in the Change your Wi-Fi properties section above to open your connection’s Properties window.
2. Double-click on the Internet Protocol Version 4 (TCP/IPv4) option to open a new window.
3. In the General tab, click the Use the following DNS server addresses option.
4. Enter in the new DNS servers that you want to use. If you aren’t sure, try 8.8.8.8 and 8.8.4.4 — these are the addresses for Google’s Public DNS project. You can also try 9.9.9.9 and 1.1.1.1, which belong to the DNS provider Quad9.
5. Click OK to save your changes.
William Antonelli/Insider
Perform a network reset
If nothing else has worked, this is the only other thing that you can do right from your computer.
Just like a factory reset will erase everything on your device and return it to its original state, a «network reset» will wipe out all of your Wi-Fi settings. It’ll be like you’ve never connected to the internet on your PC at all.
Note that doing this will erase any saved Wi-Fi passwords. And if your PC is connected to a wider network of computers, you’ll lose that connection too.
1. Open the Settings app and click Network and Internet.
2. In Windows 10, click Status. In Windows 11, scroll down and click Advanced network settings.
3. Click Network reset, and then Reset now.
Your computer will restart. Once it turns back on, all your internet settings will be erased.
William Antonelli/Insider
Contact your ISP or a repair shop
If you’ve gone through every method and you’re still getting the «No Internet, secured» message, there’s a deeper problem at play. And chances are that you can’t fix it yourself.
First, you should contact your internet service provider. Depending on where you live, this might be Verizon, Spectrum, Optimum, Comcast, or another company.
There’s a chance that the problem is coming from their end — maybe there’s an outage in your area, or a bug that’s blocking service. If you’re behind on paying bills, they might be cutting you off too. As a last resort, they might even replace your internet router.
If they can’t help, bring your PC to a repair shop. They can tell you if your computer’s Wi-Fi components are faulty, and fix them for you. Depending on the shop, they might be able to look at your internet router too.
William Antonelli
Tech Reporter for Insider Reviews
William Antonelli (he/she/they) is a writer, editor, and organizer based in New York City. As a founding member of the Reference team, he helped grow Tech Reference (now part of Insider Reviews) from humble beginnings into a juggernaut that attracts over 20 million visits a month.
Outside of Insider, his writing has appeared in publications like Polygon, The Outline, Kotaku, and more. He’s also a go-to source for tech analysis on channels like Newsy, Cheddar, and NewsNation.
You can find him on Twitter @DubsRewatcher, or reach him by email at wantonelli@insider.com.
Read more
Read less
We may receive a commission when you buy through our links, but our reporting and recommendations are always independent and objective.
Что делать, если “Нет подключения к Интернету, защищено” в Windows 10?
Иногда пользователи, решившие установить Windows 10, сталкиваются с ошибкой «Нет подключения к Интернету, защищено». Достаточно часто такая ошибка появляется при беспроводном подключении, но возможна и при обычном соединении посредством сетевого кабеля. Мы поможем исправить ее или, по крайней мере, сделать все возможное для этого.
Содержание
- Что значит «Нет подключения к Интернету, защищено»?
- Как исправить ошибку?
- Перезагружаем роутер
- Запускаем средство устранения неполадок
- Устанавливаем правильные параметры подключения к Интернету на роутере
- Проверяем правильность настройки Интернета на ПК
- Удаляем старую сеть и подключаемся повторно
- Сбрасываем настройки сети
- Переустанавливаем драйвера
- Обращаемся в техподдержку
Что значит «Нет подключения к Интернету, защищено»?
Причин появления ошибки может быть несколько:
- Wi-Fi роутер не настроен или возник какой-либо сбой, повлекший за собой сброс настроек.
- Проблемы на стороне провайдера.
- Неправильное подключение кабеля к роутеру. Также может быть его поломка.
- Проблемы с самим компьютером.
В большинстве случаев исправить эту ошибку можно самостоятельно, ведь дело в настройках.
Как исправить ошибку?
Несколько простых способов помогут быстро устранить эту неполадку без помощи специалиста.
Перезагружаем роутер
Иногда исправить проблему можно обычной перезагрузкой роутера. Большинство моделей имеют специальную кнопку для перезагрузки на обратной стороне. Если ее нет, нужно выключить роутер кнопкой питания, отключить его от сети, а спустя несколько минут снова включить.
Запускаем средство устранения неполадок
Если перезагрузка не помогла, нужно выполнить диагностику для обнаружения и устранения неполадок. Для этого нужно:
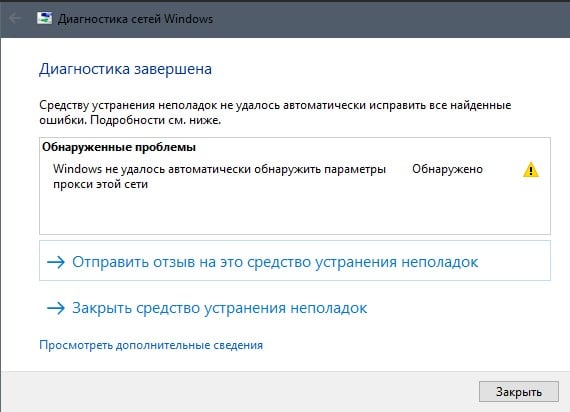
- Кликнуть по значку сетевого подключения в правом нижнем углу экрана (изображение компьютера или глобуса).
- В появившемся контекстном меню выбрать «Диагностика неполадок». Откроется новое окно, где отобразятся возникшие неполадки с подключением к интернету.
- Нужно нажать «Устранить неполадки» и перезагрузить компьютер.
В случае проблем в настройках компьютера, операционная система скорее всего их исправит самостоятельно.
Устанавливаем правильные параметры подключения к Интернету на роутере
Установить правильные параметры подключения к сети на Wi-Fi-маршрутизаторе можно при помощи админпанели.
Как настроить роутер:
- Открыть браузер и ввести в поисковую строку 192.168.0.1 или 192.168.1.1. Адрес может быть другим в зависимости от производителя. Обычно он указан на коробке или в инструкции к роутеру.
- В открывшейся админ-панели ввести логин и пароль, найти которые можно на обратной стороне роутера или в инструкции. Стандартно используется admin.
- Найти в панели пункт «Быстрая настройка», что облегчит процесс.
- Ввести все необходимые данные (тип соединения, шлюз, логин и пароль, имя сети, пароль доступа к вай-фай, мак-адрес и пр.). Практически все эти данные есть в документации, которую предоставляет провайдер.
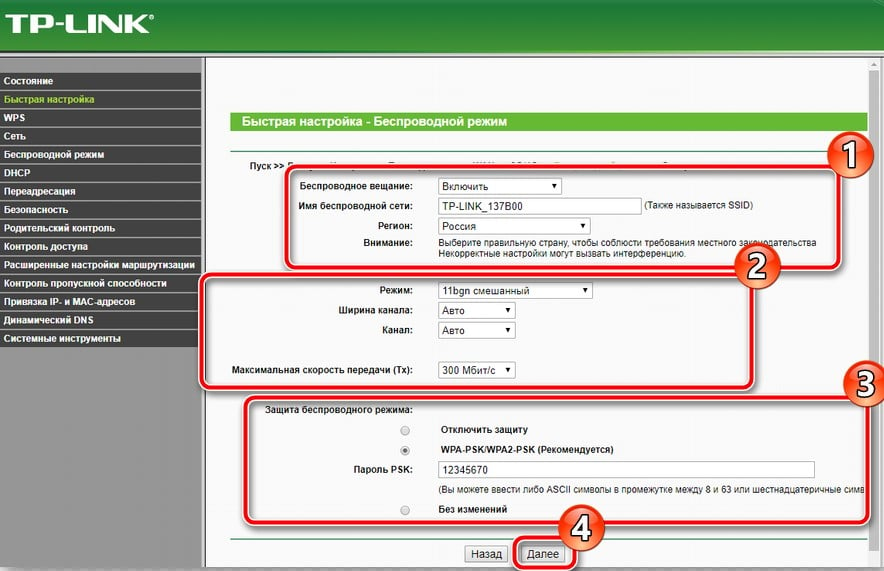
Также не будет лишним проверить настройки в разделе «Беспроводная сеть». Возможно, подключение по в Wi-Fi отключено и его нужно просто включить.
Проверяем правильность настройки Интернета на ПК
После того как убедились, что роутер настроен правильно, нужно проверить настройки подключения к сети на ПК. В случае с недоступностью DNS Windows не сможет автоматически это исправить.
- Открыть «Пуск», а затем «Панель управления».
- Найти подраздел «Центр управления сетями и общим доступом».
- Выбрать «Изменение параметров адаптера».
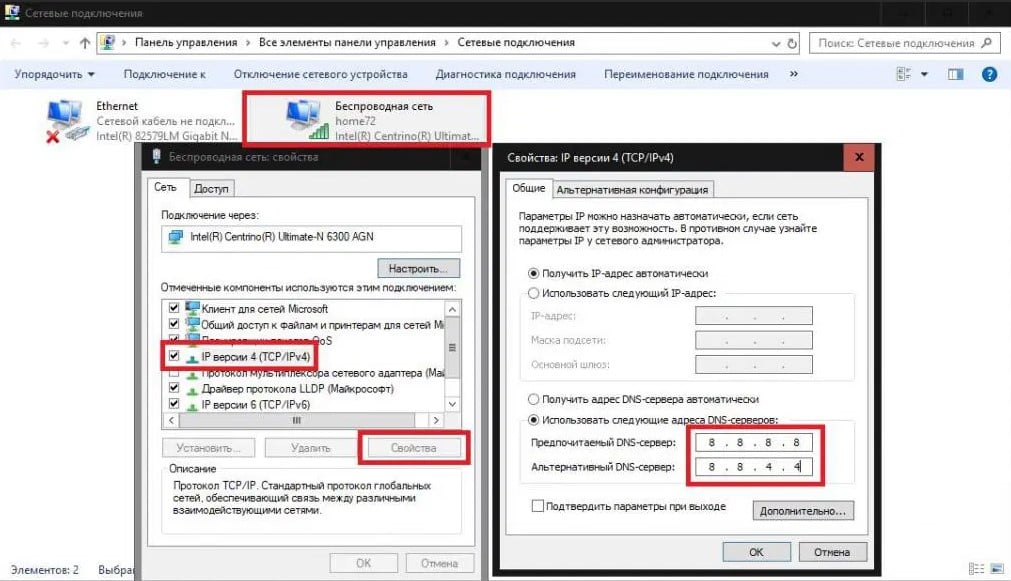
- Кликнуть правой кнопкой мыши по неопознанной сети и войти в «Свойства».
- Выбрать вкладку «Сеть», а после ««Свойства IP» версия 4».
- Убедиться, что здесь включена функция автоматического получения IP и DNS-адресов. Если они отключены, их нужно включить.
- Кликнуть «Ок», закрыть все окна и перезагрузить компьютер.
Удаляем старую сеть и подключаемся повторно
Иногда проблема может возникнуть из-за наличия старых сетей, которые конфликтуют. Поэтому старые подключения лучше удалить.
Инструкция:
- Нужно войти в «Параметры», а после «Сеть и интернет».
- Найти Wi-Fi, а с правой стороны «Управление известными сетями».
- Выбрать все ненужные сети и нажать «Забыть».
После нужно перезагрузить систему, чтобы сбросить кэш.
Сбрасываем настройки сети
Сбросить параметры сети легко, достаточно:
- Открыть «Пуск», а затем «Параметры».
- Выбрать раздел «Сеть и интернет», вкладку «Состояние».
- В открывшемся окне кликнуть по надписи «Сброс сети», потом «Сбросить сейчас» и подтвердить действие.
- После компьютер перезагрузится.
Переустанавливаем драйвера
Часто все дело в проблемах с драйверами. В таком случае их нужно переустановить. Это выполняется в несколько этапов:
- Нужно открыть «Диспетчер устройств», нажатием кнопок Win+X.
- Нажать правой кнопкой мыши по адаптеру Wi-Fi и удалить устройство.
- В открывшемся окне установить галочку возле «Удалить программы драйверов для этого устройства».
- После удаления нужно найти вверху вкладку «Действие» и выбрать «Обновить конфигурацию устройств». Драйвера автоматически будут переустановлены.
Также для обновления драйверов можно использовать специальные программы автоматического обновления.
Обращаемся в техподдержку
Если ни один из способов не помог, единственный вариант — обратиться за помощью к провайдеру. Телефон техподдержки можно найти в документации или на официальном сайте. Иногда проблемы с подключением могут быть связаны с обрывом связи, профилактическими работами, перебоями сети и пр. Провайдер уведомит о проблемах и проконсультирует по вопросам их решения.
Если вдруг интернет-соединение пропадает и появляется ошибка «Нет подключения к интернету, защищено», не стоит паниковать. В большинстве случаев эту проблему можно решить самостоятельно всего за несколько минут.
Sometimes you might fail to connect to the Internet, soon after the update and see an error message – No Internet, Secured flashing on your screen. You may notice WiFi-connected properly, but Browser fails to load Web pages. A number of users report this issue Windows 10 laptop WiFi is connected to at the time that this is happening would always display “no Internet secured” indicating that Internet access was not available. A reconnect helped sometimes, but not all the time.
In the most common cases, this error could be because of an invalid IP configuration. Or maybe something changed in network configuration settings. Here are some applicable solutions you may apply to fix this No Internet secured error on Windows 10, 8.1 and 7.
There are many ways to fix this problem, but restarting network devices include your Laptop is It’s a good idea that fixes the problem if a temporary glitch causes the issue.
Also, we recommend connect your smartphone to the same WiFi network to check your internet connection working properly. If the internet connection working, Fallow the steps below to troubleshoot your System. But if the Internet not working on another device as well Simply contact ISP for support.
Sometimes your security software can block the internet connection. Thus, disabling it might fix the Wi-Fi error for you. Also, try to disable VPN (if configured on your device).
Reconnect to WiFi network
Let’s forget the current connection and reconnect to the Wifi network again following the steps below.
- Right Click on the WiFi connection (in the System Tray) and click “Forget”.
- Again reconnect with proper credentials check WiFi is connected and the internet connection working properly.
Also, Check the WLAN auto configuration setting’s services status, And Start the service if it is stopped.
Open windows services console using services.msc Scroll down and look for services named DHCP, DNS client, TCP/IP NetBIOS Helper service, SSDP Discovery, UPnP Device Host and start them. If you don’t know how to start the services then this is for you:
- Select any service and double-click it. select Automatic next to Startup type.
- Click Apply and at last press the Start button to run the service.
Run Network Troubleshooter
Windows 10 has built-in troubleshooting tool which diagnostics and allows you to detect the problems that you are experiencing with your network. Run the troubleshooter and let windows detect and fix the problem itself.
- Press Windows + x keyboard shortcut and select settings
- Click Update & security then Troubleshoot
- Here on the right-hand side locate Internet connections click it
- Now click Run the troubleshooter to start the diagnosis process.
- Next, locate the network adapter and run the troubleshooter that detects and fixes the problem with network adapter driver compatibility and more.
- Once the diagnosis process completes restart your PC and check if this helps fix the problem.

Reset TCP/IP configuration
Open the command prompt with administrative privilege and run the following command one by one.
- netsh winsock reset
- netsh int ip reset
- ipconfig /release
- ipconfig /renew
- ipconfig /flushdns

Now type Exit to close command prompt And Restart windows check Internet started working.
Manually configure DNS address
- Press Windows + R, type ncpa.cpl and ok to open the network connections window.
- Right-click on Active network Adapter ( Ethernet/WiFi ) select properties.
- Double click on Internet protocol version 4 ( TCP/IPv4 ) to get its properties.
- Here select the radio button Obtain an IP address Automatically and on DNS address section Select the radio button Use the following DNS server addresses.
- Set preferred DNS server 8.8.8.8 and Alternate DNS server 8.8.4.4.
- Tick mark on validate settings upon exit and ok to make save changes. Now restart windows and check the Internet connection back to the normal working state.

Update Network Adapter driver
Again there is a chance an outdated driver can prevent your computer from connecting to the Internet. Let’s update the WiFi adapter driver with the latest version.
- Press Windows + x keyboard shortcut and select Device Manager,
- Expand Network adapters
- Locate the network adapter that your computer is currently using under the Network adapters section, right-click on it and click on Update Driver Software….
- Click on Search automatically for updated driver software, and wait for Windows to conduct the search.

Disable proxy settings
This is another helpful solution to fix most of internet connection problems.
- Press Windows + R, type inetcpl.cpl and click ok,
- This will open the Internet Options window,
- Now go to the Connections tab and then click on LAN settings.
- Make sure that “Automatically detect settings” is checked and “Use a proxy server for LAN” is unchecked.

Network Reset
Windows 10 offers a network reset feature which resets the network configuration to its default settings. And that is probably very helpful if any incorrect configuration causes the issue.
- Search for Network Reset and select the first result,
- A new window will open warning you about what will happen when your network.
- Click the “Reset now” button to reset the network and restart your PC.

Disable IPv6
- Open network connections window using ncpa.cpl
- Next, right-click on your wireless network and choose “properties”
- Uncheck the Internet protocol version 6 (TCP/IPv6) to disable it. Click OK

Change power management properties
Another possible cause of the “no Internet, secured” error could be due to power management settings.
- Press the Windows key + X Select device manager
- expand network adapters, Double-click your wireless network and go to the “power management” tab
- Uncheck the “Allow the computer to turn off this device to save power” option
- Restart your computer and check if you can connect to the Internet now.
These are some most effective solutions to fix No Internet, secured Wi-Fi Problem in Windows 10. And I am sure applying these solutions to fix the problem for you, and your internet starts working as normal. If you think we’ve missed some other helpful procedures, let us know in the comments.
Also, Read
- There is no internet connection – DNS Probe Finished No Internet
- Quick tips to Fix Your DNS Server might be unavailable in Windows 10
- Solved: Unidentified network no internet access on windows 10 !!!
- 15 Tips to Optimize Windows 10 for better performance
- Solved: DNS_probe_finished_no_internet windows 10 Google chrome