Before you proceed to download the software below, see our official installation guide.
Chances are that you’re coming from an outdated tutorial, so it’s recommended to follow the guide above to prevent any issues with the installation.
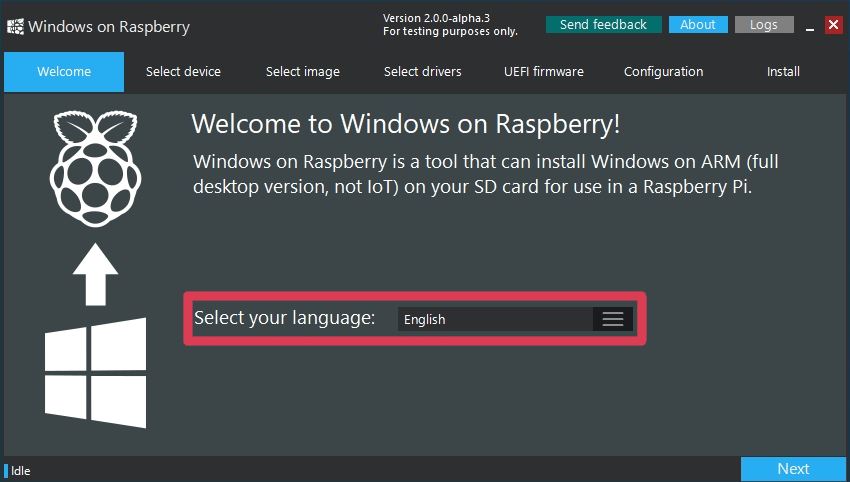
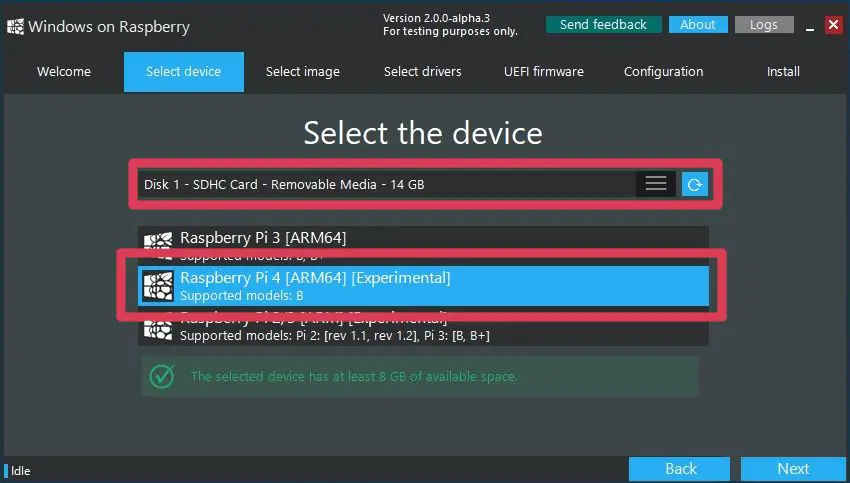
Windows on Raspberry imager
Download version 2.3.1
See the changelog
Customization options
Requirements:
- a computer with Windows 10 version 1703 or later. (Wine is not supported — see the PE-based installer for other OSes)
- a Raspberry Pi 2 rev 1.2, 3, 4 or 400. (minimum RAM requirement is 1 GB, but it will generally result in poor performance, especially on boards older than Raspberry Pi 4)
-
a good/reliable drive that has at least 8 GB of available space. It can be:
- an SD card (A1 rating is highly recommended; non-A1 rated cards may be too slow)
- an USB device (preferably SSD, or any drive that has decent random I/O speeds).
A slow drive can also cause other issues, besides being a bottleneck.
- a Windows 10 ARM64 build 19041 or newer image (up to Windows 11 version 2022 / build 22621): WIM/ESD, ISO or FFU
Windows on Raspberry PE-based installer
This is not a straightforward wizard tool like the Windows-only imager, so please follow the appropriate guide for it: How to install from other OSes.
Download package version 1.1.0
See the changelog
Customization options
Requirements:
Same as for the Windows-only version, with some exceptions:
- no specific OS required, as long as the tools needed to create the PE-based installer are available or can be compiled for it.
- the Windows ARM64 image can only have the ISO format. The reason for this is that some required files from the ISO cannot be found in the WIM/ESD.
- storage-wise, you need either:
- a drive that has at least 32 GB, for self-installation
- a drive that has at least 8 GB for the installation media, and another destination drive that has at least 16 GB for the OS (e.g.: an USB drive and an SD card)
Boot partition mount utility
Easily mount the boot partition of your Windows on Raspberry installation. Works directly on the Raspberry Pi or another computer.
Download version 1.1.0
PiMon
A simple hardware monitor for your Raspberry Pi running Windows. (https://github.com/driver1998/PiMon)
Download the latest version
See the changelog
Windows images
See the Getting Windows Images guide.
What about FFU images?
FFU images can speed up the deployment process significantly, especially on slow devices. They are not available for download due to legal reasons, but you can safely generate them yourself: How to generate FFU images?
Let me first say, I’m not a lawyer, so all I say here is just my opinion, or what I understand of this situation. Nothing I say should be interpreted as legal advice.
AFAIK an Windows 10 update License cost at least $139, and if I understand it MS claims you can only install it on Intel/AMD or Qualcomm (Arm) processors, (https://docs.microsoft.com/en-us/window … quirements) so it is still questionable if Microsoft condones this (on a CPU that is NOT on their compatibility list).
Also, an update licence implies that you already have system that runs an earlier version of windows, because for that money you buy an update to their latest OS, not a new installation. If you use the updater to install on a new empty storage device that may not be what they intend, so may be illegal.
I’m quite sure the RPF does NOT WANT you to use Windows 10, that means, (like Android) it won’t support the effort with drivers and such (so no USB driver support, and no GPU support and much more), these have to be reverse engineered, the ones included in the Windows update will not work.
But then IMHO from what I have seen in the past Microsoft knows very well that many Windows users don’t have a license, and it seems they are fine with that (up-to a point obviously). Probably their logic goes like this, «rather have them run an unlicensed windows, than a competitors OS».
Разработчики наконец установили оптимизированную для ARM версию Windows 10 на Raspberry Pi 4 после того, как некоторым людям удалось запустить ее на Raspberry Pi 3 в первой половине 2019 года.
Raspberry Pi 4 и Pi 3 официально поддерживают версию Windows 10 для IoT Core, которая не совпадает с версией Windows 10, которая работает на настольном компьютере, но является упрощенной версией для маломощных компьютерных плат.
Например, Windows 10 IoT Core не позволяет запускать традиционные приложения Win32 или даже загружаться на рабочий стол. IoT позволяет вам запускать одновременно одно приложение UWP, и реальная цель ОС на Pi – запускать небольшие приложения, предназначенные для миниатюрных компьютерных плат.
К счастью, есть новое руководство, чтобы заставить Windows 10 на ARM работать на Pi 3 B + и Pi 4B, используя неподдерживаемую техническую предварительную сборку. В отличие от IoT, Windows 10 on ARM представляет собой ARM-ориентированную версию ОС, которая поставляется с традиционным десктопом и поддержкой приложений Win32 посредством эмуляции.
Разработчику Marcin удалось установить Windows 10 on ARM на Raspberry Pi 4 Model B, и он также опубликовал подробное руководство.
Как установить Windows 10 на Raspberry Pi 4
– Загрузите прошивку UEFI
отсюда
и распакуйте ее на карту MicroSD в формате FAT32.
– Загрузите сборку Windows 10 ARM64
отсюда
. Только сборка 17134 была протестирована, но любая более новая сборка, которая проходит OOBE, также должна быть совместимой.
– Загрузите ISO-компилятор
отсюда
. В соответствии с разработкой, это создаст файл ISO, но вам все равно понадобится файл «install.wim» из «sources».
– Загрузите «Windows на Raspberry»
отсюда
. Оно установит Build 17134 или новее на USB-накопитель, но необходимо выбрать разметку GPT.
После загрузки этих файлов вы должны запустить командную строку и выполнить действия, описанные
здесь
.
Стоит отметить, что некоторые функции Raspberry Pi 4 могут не работать с Windows 10 на ARM. Например, вы можете использовать только USB-порт Type-C для зарядки и OTG. Windows 10 on ARM также ограничивает использование ОЗУ только в 1 ГБ, а драйвер контроллера Broadcom auxspi не работает.
Разработчики также портируют Windows 10 on ARM на телефоны Android, такие как Galaxy S8, OnePlus 6 и Xiaomi Mi Mix.
Windows 10 on Raspberry Pi 3
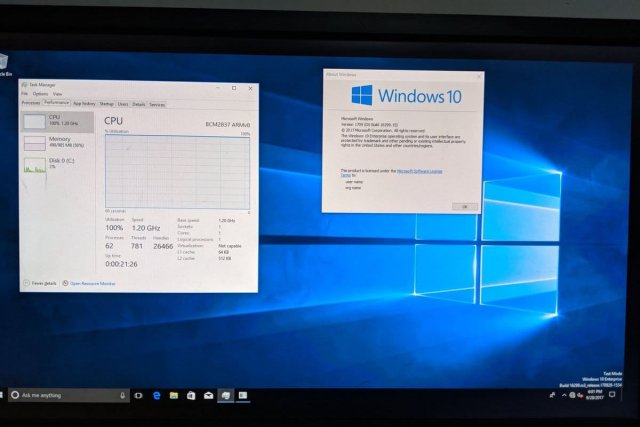
Build: 17134.1 for arm64
Note: I am not responsible for anything that happens to your Raspberry Pi. The steps listed have not been tested and may not work.
**You can follow Davindra’s tutorial, however this tutorial is step-by-step and may be clearer. In Davindra’s tutorial, the ISO was compiled, however you don’t have to compile the ISO if you use this tutorial. https://www.youtube.com/watch?v=c0VqVm8X_zQ
Note: I am not Davindra
There are two methods, however it is recommended that you follow Method 1.
Method 1 (not easy, but recommended)
You may try method 2 if you want to. It is easier, but it is not recommended.
Don’t download «install.wim — Extract.7z». If you want to use «install.wim — Extract.7z», follow Method 2.
Prerequisties
- Some time (a few hours)
- An SD card (16GB is fine, but you can use an SD card that is bigger than 16GB)
- MiniTool Partition Wizard
- Win10-on-64-bit-Pi3 Zip file
Steps:
- Download MiniTool Partition Wizard https://www.partitionwizard.com/free-partition-manager.html
- Download this repository and extract the files into a folder. Rename the folder to WinRpi.
- Open MiniTool Partition Wizard.
- Plug in your SD card into your computer.
- Locate your SD card in the Partition Wizard and delete all partitions. Note: This will remove all data.
- Create a partition that is more than 100MB and name it BOOT.
- Select Primary and set the file system as FAT32.
- Click OK.
- Create a partition with the remaining storage on the SD card and name it Windows.
- Select Primary and set the file system as NTFS.
- Click OK.
- Click Apply.
- Navigate to the folder where you extracted the files from this repository to and open up the UEFI files folder.
- Copy all the files in the UEFI folder and paste it in the BOOT drive of the SD card.
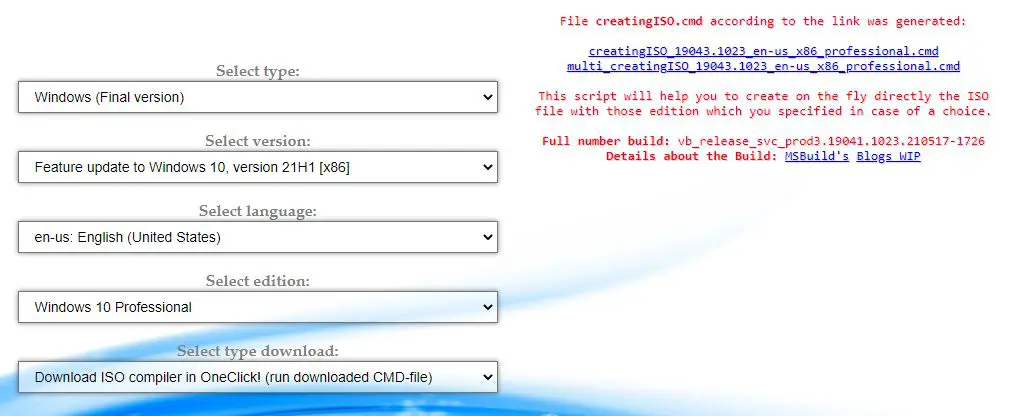
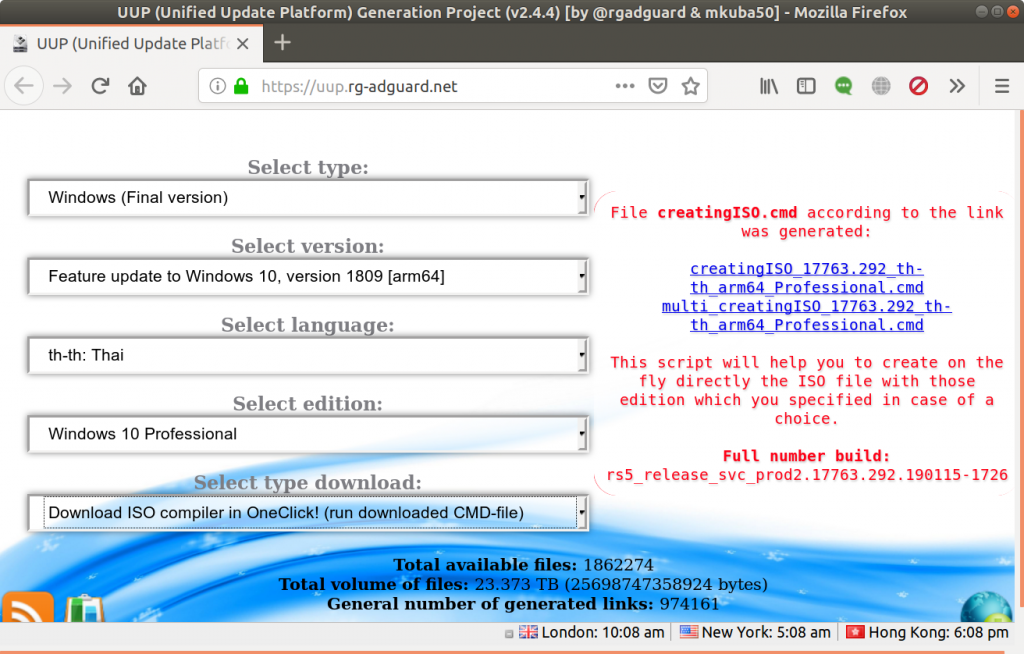
- Go to https://uup.rg-adguard.net/ and download Build 17134.1 [arm64] of Windows Insider build. Select your language and select Windows 10 Professional and choose Download ISO compiler in OneClick! (unZIP -> RUN creatingISO.cmd) and download the file.
- Extract the ZIP file that you downloaded from the UUP.
- Run creatingISO.cmd. The ISO will be created, however, it may take a long time.
- In the WinRpi folder, create a folder called «m».
- Right-click the ISO, Open With, Windows Explorer.
- Copy the install.wim to the WinRpi folder.
- Extract the Win10-on-64-bit-Pi3 Zip file.
- Eject the ISO by right-clicking on it and choosing Eject.
- Open a command prompt as administrator.
- cd into the WinRpi folder.
- Run the command
dism /mount-image /imagefile:install.wim /Index:1 /MountDir:m
- Run the command
dism /image:m /add-driver /driver:system32 /recurse /forceunsigned
- Run the command
dism /unmount-wim /mountdir:m /commit
- Run the command
dism /apply-image /imagefile:install.wim /index:1 /applydir:<**the drive letter of the Windows partition on the SD card**>:
- Run the command
bcdboot <**the drive letter of the Windows partition on the SD card**>:Windows /s <**the drive letter of the BOOT partition on the SD card**> /f UEFI
- Run the command
bcdedit /store <**the drive letter of the BOOT partition on the SD card**>:EFIMicrosoftBootbcd /set {default} testsigning on
- Run the command
bcdedit /store <**the drive letter of the BOOT partition on the SD card**>:EFIMicrosoftBootbcd /set {default} nointegritychecks on
- In the WinRpi folder, copy the finish.reg file to the main folder of the Windows partition on the SD card.
- Eject the SD card.
- Insert the SD card into your Raspberry Pi.
- Turn on your Raspberry Pi 3. It may take a couple of minutes (or longer) to boot.
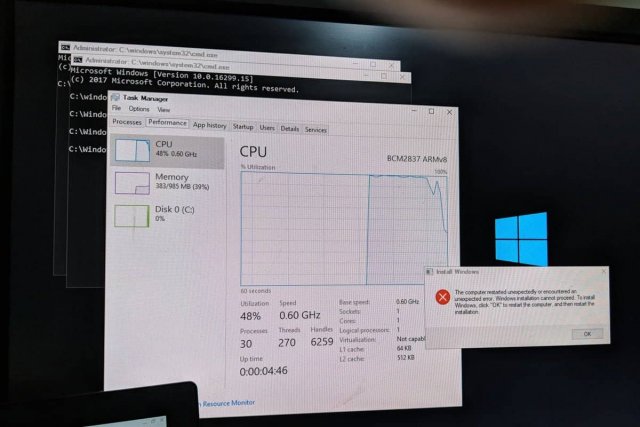
- When you see the error «Windows installation cannot proceed», press SHIFT+F10. The command prompt will open.
- In the command prompt, enter
- In mmc, click File, Add/Remove Snap-ins.
- Double-click Computer Management.
- Click Finish.
- Click Ok on the dialog box that says Event Viewer.
- Click Ok on the Add/Remove Snap-ins menu.
- In mmc, click Computer Management (Local), Local Users and Groups, Users.
- Double-click on the Administrator account.
- Uncheck Account is disabled.
- Right-click on the Administrator account and click Set Password.
- Click Proceed.
- Enter your password. You may leave the password blank.
- Click Ok on the Set Password dialog box.
- Click Ok on the Local Users and Groups dialog box.
- Close mmc.
- Click No.
- In the command prompt, navigate to the folder you copied the finish.reg to.
- In the command prompt, enter
- Restart the Raspberry Pi or enter
in the command prompt to restart it.
Note: If entering the command does not restart Windows, restart it manually.
Method 2
Method 2 is faster than Method 1, but it is not recommended. Method 1 is recommended.
Prerequisties
- Some time (a few hours)
- An SD card (16GB is fine, but you can use an SD card that is bigger than 16GB)
- MiniTool Partition Wizard
- «install.wim — Extract.7z»
Steps:
- Download MiniTool Partition Wizard https://www.partitionwizard.com/free-partition-manager.html
- Download this repository and extract the files into a folder
- Extract «install.wim — Extract.7z»
- Open MiniTool Partition Wizard.
- Plug in your SD card into your computer.
- Locate your SD card in the Partition Wizard and delete all partitions. Note: This will remove all data.
- Create a partition that is more than 100MB and name it BOOT.
- Select Primary and set the file system as FAT32.
- Click OK.
- Create a partition with the remaining storage on the SD card and name it Windows.
- Select Primary and set the file system as NTFS.
- Click OK.
- Click Apply.
- Copy the UEFI files to the drive of the BOOT partition on the SD card.
- Open a command prompt as administrator.
- In the command prompt, navigate to the folder you extracted the «install.wim — Extract.7z» file to.
- Run the command
dism /apply-image /imagefile:install.wim /index:1 /applydir:<**the drive letter of the Windows partition on the SD card**>:
- Run the command
bcdboot <**the drive letter of the Windows partition on the SD card**>:Windows /s <**the drive letter of the BOOT partition on the SD card**>: /f UEFI
- Run the command
bcdedit /store <**the drive letter of the BOOT partition on the SD card**>:EFIMicrosoftBootbcd /set {default} testsigning on
- Run the command
bcdedit /store <**the drive letter of the BOOT partition on the SD card**>:EFIMicrosoftBootbcd /set {default} nointegritychecks on
- Copy the finish.reg to the drive of the Windows partition on the SD card.
- Eject your SD card and insert it into your Raspberry Pi 3.
- Turn on your Raspberry Pi 3. It may take a couple of minutes (or longer) to boot.
- When you see the error «Windows installation cannot proceed», press SHIFT+F10. The command prompt will open.
- In the command prompt, enter
- In mmc, click File, Add/Remove Snap-ins.
- Double-click Computer Management.
- Click Finish.
- Click Ok on the dialog box that says Event Viewer.
- Click Ok on the Add/Remove Snap-ins menu.
- In mmc, click Computer Management (Local), Local Users and Groups, Users.
- Double-click on the Administrator account.
- Uncheck Account is disabled.
- Right-click on the Administrator account and click Set Password.
- Click Proceed.
- Enter your password. You may leave the password blank.
- Click Ok on the Set Password dialog box.
- Click Ok on the Local Users and Groups dialog box.
- Close mmc.
- Click No.
- In the command prompt, navigate to the folder you copied the finish.reg to.
- In the command prompt, enter
- Restart the Raspberry Pi or enter
in the command prompt to restart it.
Errors:
Note: If you have any errors, please make a issue in this GitHub.
| Issue | Solution |
|---|---|
| Windows setup could not configure to run on this computer’s hardware | Compile the ISO and try again |
| The specified domain either does not exist or could not be contacted | Compile the ISO and try again |
| BSOD — DRIVER_POWER_STATE_FAILURE | Remove all USB devices and restart Raspberry Pi |
| BSOD — INACCESSIBLE_BOOT_DEVICE | Compile the ISo and try again |
Credits to:
https://github.com/andreiw/RaspberryPiPkg
https://github.com/andreiw/rpi3winstuff
https://uup.rg-adguard.net/
https://sourceforge.net/p/windows-10-lite/wiki/Finish%20setup%20immediately/
https://www.youtube.com/watch?v=c0VqVm8X_zQ

The Raspberry Pi is usually associated with Linux operating systems like Raspberry Pi OS (formerly known as Raspbian), Ubuntu, etc. But what about running Windows 10 on your Raspberry Pi? Well, it would be great for sure. However, Windows 10 is still not officially supported for Raspberry Pi. Microsoft’s only OS for Pi is the old Windows 10 IoT Core that just lets you execute Visual Studio codes but cannot work as a standalone OS with its GUI.
Though it is so, it didn’t stop some passionate developers to find a way to run a full desktop version of Windows 10 on Raspberry Pi. They have made it possible with the WoR project. With that, they developed a tool to flash an ARM image of Windows 10 on an SD Card (or an SDD), that can boot on a Raspberry Pi.
In this guide, I’ll walk you through the exact steps to install Raspberry Pi Windows 10.
Contents
- Requirements
- Steps to Install Windows 10 on Raspberry Pi 4/3/2
- Step 1: Download the Required Files
- Step 2: Update Raspberry Pi Firmware
- Step 3: Build Windows 10 ISO File on your PC
- Step 4: Flash the ISO File with WoR Tool
- The First Boot
- Overclock the Raspberry Pi
- How Does Raspberry Pi Windows 10 Perform?
- Now it’s your turn..
Requirements
- Raspberry Pi 4/3/2
- MicroSD Card (Faster is better, so a class A2 card is recommended)
- Ethernet Cable or Wi-Fi dongle
- Keyboard, Mouse, and Monitor
Step 1: Download the Required Files
In order to get started with the installation, you have 2 things to download.
1. The WoR Tool [https://www.worproject.ml/downloads]
When you download this you will get a zip file with everything inside it. Keep it for now. We’ll use it later.
2. UUP file for Windows 10 ARM
For downloading a UUP file you can use any one of the following websites. Each of them works a bit differently. On these websites, you only have to choose a Windows version, build number, language, and edition like Pro, Home, Ultimate, etc.
- https://uupdump.net/ (for Linux or Mac PC)
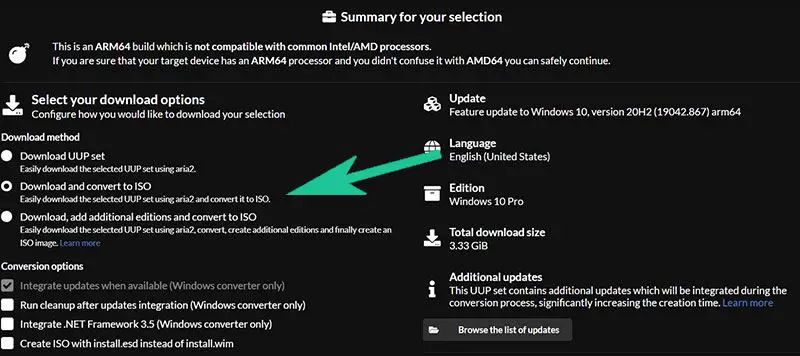
Download the file from this website only if your computer is not running on Windows OS. While on the website, I recommend selecting only one edition to keep the file size smaller and make the installation faster. Only check the required edition and leave others unchecked. Now choose the Download and convert to ISO option.
- https://uup.rg-adguard.net/ (for Windows PC only)
This site has got a much more intuitive interface where you can easily download the file. Use the drop-down arrows to choose the required version number, edition, build number, etc. Then click on the Download ISO compiler in One click! option in the download type. Download the cmd file by clicking on the link appearing on the right side. This will look something like this:
Step 2: Update Raspberry Pi Firmware
As usual, before doing something big, we have to update the firmware of our Raspberry Pi. To do the same, open a terminal and type the following command.
sudo apt update
sudo apt full-upgrade
Once done with that, stop your device and you don’t need the Raspberry Pi OS (Raspbian) anymore.
Step 3: Build Windows 10 ISO File on your PC
The next step is to build the Windows 10 ISO image file using the cmd file that we’ve download in step 1. If you downloaded the file from the second website you will get the direct cmd file whereas if you have downloaded it from the first website (uupdump.net) then you need to extract the zip file to see a file named “uudp_download_windows.cmd“.
- Double click on the cmd file and you will see a terminal window. Press 0 when asked. It will immediately start to download some files for the process. This will be of a few gigabytes and take a lot of time if your internet connection is slow.

- Once the downloads are complete it will automatically start to build the ISO image file.
- This also will take some time. If you encounter any stuck somewhere in the process just press the Enter.


Step 4: Flash the ISO File with WoR Tool
Now it’s time to flash the ISO file that we build just now. Here comes the use of the WoR tool. It is a simple and easy-to-use flashing tool. To flash the ISO, follow the below steps.
- Firstly, extract the WoR_Release_….zip archive to a new folder on your computer.
- Find the wor.exe file and double-click on it.
- Select your preferred language from the drop-down list.
- Choose the target drive (your SD Card or SSD drive) and the model of your Raspberry Pi board.
- Once all those selected, now navigate and choose the ISO file that we’ve built.
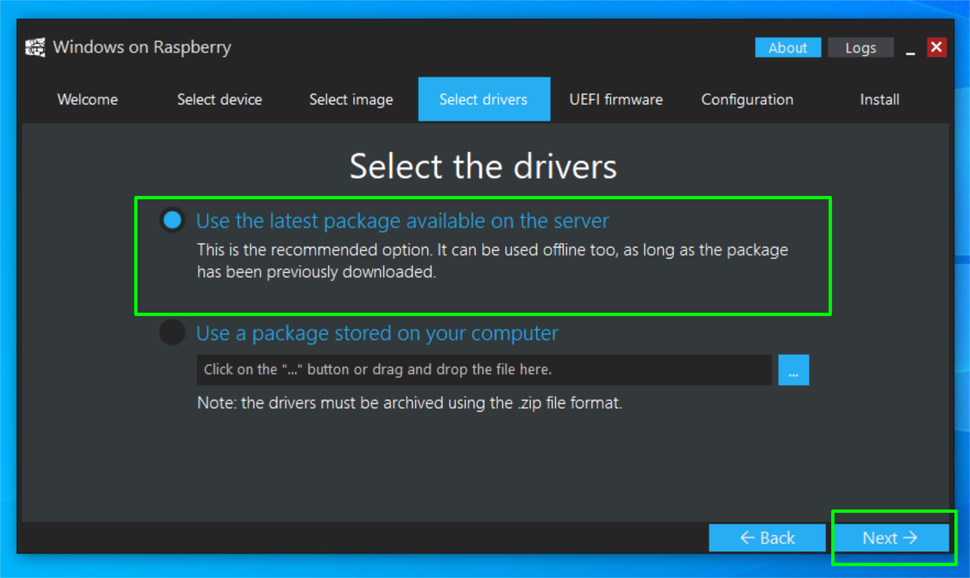
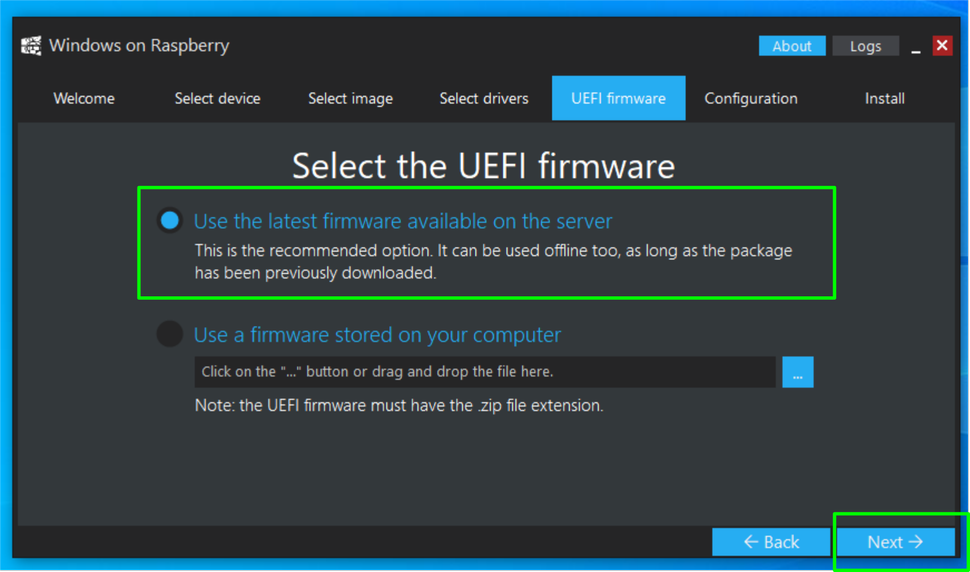
- The next step is to select the driver package from the server. Simply select the latest package.
- Then select the UEFI firmware to flash. Here also select the latest version available.
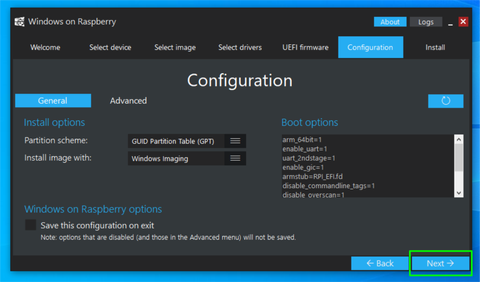
- Check the configuration and click Next.
- So you have selected all the things to get started with the install. Just double-check everything and click Install.
The installation may take as long as 1.5 to 2 hours, depending on the write speed of your SD Card. This is why I recommend getting an A1 or A2 class SD Card or else an SSD drive to get the job done much faster. On an SSD drive, it may take only about 15 minutes or so.
The First Boot
And now once the Raspberry Pi Windows 10 installation is completed and your device is ready, you can directly plug it (if you have an SSD) into the Pi or insert it if you have an SD card. Then boot it up.
Since it is the first boot, it will take some time to completely initialize and configure things according to your device and boot up. However, from the second boot onwards everything will be fine and will work as normal. If you are a beginner and don’t know how to set up a remote desktop on your Raspberry Pi, just relax – I’ve got that covered for you. Head over to this link: How to Setup Raspberry Pi Remote Desktop on Windows/ Linux/ Mac (5 Methods)
As usual with a typical Windows installation, you will need to configure some things manually: for example Cortana and the privacy policies that Windows normally tries to disable for you.
Once done with that, you will enter into a full-fledged Windows 10 on your cute little Raspberry Pi.
Overclock the Raspberry Pi
Now that you have successfully completed the Raspberry Pi Windows 10 installation, and thinking to boost the performance?
Well. That’s indeed a right thought. Overclocking a Raspberry Pi will help you get the most out of your SBC and take your projects to the next level. For this purpose, I have written a comprehensive article on how to overclock Raspberry Pi board. You can click on the link and refer to the article.
How Does Raspberry Pi Windows 10 Perform?
In my testing, the overall performance is pretty much decent and it’s smoothly usable. However, it has the following limitations.
- Resource limits will be reached quickly with some usage.
- CPU usage is almost 100% while streaming YouTube in Google Chrome.
- Bluetooth support is also limited as the RTS/CTS lines are not exposed.
- Problems with HDMI audio out.
Though it is having some limitations, you will get a nice Windows 10 experience on your tiny computer. You can get partially get rid of the resource exhausting problem by providing an A2 class 32/64 GB SD card or a super-fast SSD drive.
Now it’s your turn..
It’s now your turn to try the Raspberry Pi Windows 10 installation and share your experience. I’ve tried to make this tutorial as simple as possible and still if you have any queries just drop them in the comment section below.
Found an issue with this article? Report it here, so that I can resolve it.
Raspberry Pi 3 Model B/B + SBC официально поддерживает Windows 10 IoT, но если вы когда-нибудь захотите запустить полную версию Windows 10, вам не повезет, поскольку Microsoft не предоставляет эту опцию.
Однако, теперь есть неофициальное приложение под названием WoA Installer для Raspberry Pi 3, позволяющее установить Windows 10 Home/Professional Arm64 на вашу плату Raspberry Pi 3 B/B +. WoA расшифровывается как Windows on Arm, а проект размещается на Github.

Все, что вам нужно, это компьютер с Windows 10 с .NET Framework 4.6.1, карта micro SD класса A1/A2, плата RPi 3 и образ Windows 10 ARM64.
Интересно то, что вам, нужно будет сгенерировать образ .wim через веб-браузер, перейдя по адресу https://uup.rg-adguard.net/, где вы сможете выбрать:
- Тип — Windows (финальная версия), Windows (внутренняя версия), накопительное обновление для Windows 10
- Версия — на выбор x86 или arm64 для Windows. Убедитесь, что вы получили сборку arm64
- Язык
- Версия — Windows 10 Home или Windows 10 Professional
- Тип загрузки — Загрузить ISO-компиляцию в OneClick! (рекомендуется), Aria2, UpdateOS в OneClick !, или «ссылки для генерации по умолчанию»
Будет сгенерирован сценарий .cmd, который необходимо запустить в терминале Windows 10 для создания образа ISO, который можно будет смонтировать в Windows, и где вы найдете файл install.vim, который будет записан на карту микро SD через Инструменты установки WoA, упомянутые выше.
У нас нет уверенности, что этот метод не нарушает условия лицензии Microsoft, и запуск Windows 10 Home/ Pro только на 1 ГБ оперативной памяти может быть безумным, но по крайней мере такой вариант существует. Однако, большинство людей, скорее всего, захотят придерживаться Raspbian.
Выражаем свою благодарность источнику из которого взята и переведена статья, сайту cnx-software.com.
Оригинал статьи вы можете прочитать здесь.
С момента запуска Windows 11 энтузиасты пытались запустить новую ОС Microsoft практически на всем. Многие даже пытались запустить Windows 11 на одноплатном компьютере Raspberry Pi. И благодаря усилиям разработчика, известного под именем Botspot, теперь мы можем установить Windows 11 или Windows 10 на Raspberry Pi. Вам не нужно запачкать руки слишком большим количеством команд или технических навыков, если вы будете следовать этому процессу.
Итак, в этом руководстве мы представляем вам простое руководство по установке Windows 11/10 на Raspberry Pi. Вы сможете запускать официальную Windows на ARM (версия Pro) на своем Raspberry Pi. Итак, без промедления, приступим.
Установите Windows 11/10 на Raspberry Pi (2021 г.)
В этом руководстве мы подробно описали шаги по установке Windows 11/10 на Raspberry Pi. Вы можете установить Windows на Raspberry, даже на платы RPi 3 и RPi 2, но мы рекомендуем запускать Windows на Raspberry Pi 4 с как минимум 4 ГБ ОЗУ.
Требования для запуска Windows на Raspberry Pi
- Вам понадобится флэш-накопитель USB, SD-карта или SSD-накопитель с объемом памяти 32 ГБ или более . Если у вас есть внешнее хранилище объемом 16 ГБ, процесс установки займет больше времени. Внешний диск требуется только для создания образа Windows on Raspberry.
2. Вам понадобится Ubuntu или любой другой дистрибутив Linux на основе Debian для прошивки ОС Windows-on-Raspberry (WoR). Я использую ОС Raspberry Pi (скачать здесь), установленную на дополнительном диске на моем ПК, для прошивки образа. Вы даже можете использовать ОС Raspberry Pi на своем Raspberry Pi для прошивки образа, но это займет гораздо больше времени из-за маломощного процессора.
- Платы Raspberry Pi 4/3/2, Raspberry Pi 400 и RPi CM3 совместимы с Windows на Raspberry. К Raspberry Pi необходимо подключить как минимум 16 ГБ SD-карты.
Создать Windows на Raspberry Image
- В выбранном вами дистрибутиве Linux откройте Терминал. Я использую на своем компьютере ОС Raspberry Pi, но вы также можете использовать Ubuntu или любую другую ОС на основе Debian. В Терминале вы сначала вставляете приведенную ниже команду, чтобы обновить все пакеты и зависимости. Убедитесь, что вы не получаете ошибок при применении команды apt update. Обратите внимание, что вам может потребоваться ввести пароль для обновления системы.
sudo apt update && sudo apt upgrade -y
2. Затем выполните приведенную ниже команду, чтобы установить Git, если вы еще этого не сделали.
sudo apt install git
3. После этого выполните следующую команду в Терминале, чтобы загрузить wor-flasher.
git clone https://github.com/Botspot/wor-flasher
4. После этого выполните следующую команду, чтобы запустить сценарий. Это сценарий с графическим интерфейсом пользователя, который позволяет вам настроить и прошить образ Windows-on-Raspberry на SD-карту/USB-накопитель/SSD-накопитель. Обратите внимание, что вам может потребоваться нажать «Y» несколько раз во время процесса, чтобы подтвердить изменения установки.
~/wor-flasher/install-wor-gui.sh
5. Затем на вашем экране появится приглашение Windows on Raspberry. Здесь вы можете выбрать, хотите ли вы установить Windows 11 или 10 на свою плату Raspberry Pi. Вы также можете выбрать плату RPi из раскрывающегося меню во всплывающем окне. Затем нажмите «Далее» и выберите язык установки.

6. На этом этапе я предлагаю подключить SD-карту/USB-накопитель/SSD-накопитель к вашему ПК. Если вы используете сам Raspberry Pi для создания образа, подключите к плате внешний USB-накопитель/SSD-накопитель. Обратите внимание: если вы хотите установить Windows 11/10 на ту же SD-карту или USB-накопитель, у вас должно быть не менее 24 ГБ свободного места.
- Затем выберите внешний диск, на который вы хотите прошить образ WoR. Имейте в виду, что все файлы на внешнем диске будут удалены при установке Windows 11/10 на Raspberry Pi, поэтому обязательно сделайте резервную копию.

8. Наконец, просмотрите всю информацию и нажмите « Flash » в окне обзора.

9. Откроется окно терминала, в котором будет отображаться прогресс. Здесь скрипт загрузит Windows в файлы ARM прямо с сервера Microsoft и сгенерирует ISO-образ. Так что да, наберитесь терпения, так как процесс займет некоторое время. На моем компьютере создание изображения заняло около 40 минут. Обратите внимание: если на экране кажется, что экран застрял на «извлекающем устройстве», не беспокойтесь и позвольте ему завершить процесс.

10. После этого появится запрос с просьбой выполнить следующие шаги. Это означает, что вы успешно создали образ Windows-on-Raspberry. Теперь выключите Raspberry Pi.

Как загрузить Windows 11/10 на Raspberry Pi
Теперь, когда вы прошили образ, пришло время загрузить Windows 11/10 на Raspberry Pi. Следуйте инструкциям ниже, чтобы узнать, как это сделать:
- Если вы создали образ с помощью ПК, отключите внешний диск и вставьте его в Raspberry Pi через порт USB. Убедитесь, что к плате подключена SD-карта объемом 16 ГБ или более.
-
Теперь включите плату, и вы увидите логотип Raspberry Pi. После этого появится значок загрузки Windows. Просто подождите, и вы перейдете на страницу выбора диска. Если ничего не отображается, извлеките SD-карту и позвольте плате загрузиться с внешнего диска. На следующем шаге я предложил решение, когда вставлять SD-карту.

3. На странице выбора диска выберите SD-карту, на которую вы хотите установить Windows 11/10. Если SD-карта не отображается, нажмите кнопку «Обновить». Если он по-прежнему не отображается, перезапустите Raspberry Pi и вставьте SD-карту сразу после появления логотипа RPi. Теперь SD-карта появится в раскрывающемся меню.

4. Здесь выберите выпуск Windows, который вы хотите установить, и нажмите « Установить ».

5. Учтите, что для завершения процесса потребуется значительное время. Это может занять от 45 минут до 1 часа, поэтому не думайте, что экран завис. Просто оставьте это там, и процесс будет завершен.

6. Плата будет перезагружаться несколько раз во время процесса, как и любой другой ПК с Windows. Как только все будет сделано, вас встретят настройки подключения к Windows 11/10 на вашем Raspberry Pi.

7. Наконец, вы загрузитесь в Windows 11/10. Как и следовало ожидать, производительность невысока, но ее можно использовать. Также обратите внимание, что Wi-Fi на данный момент не работает, поэтому вам придется использовать Ethernet для использования интернет-сервисов в Windows 11/10 на Raspberry Pi.
Снять ограничение ОЗУ в Windows на Raspberry
Но есть еще одна проблема. Из-за некоторых технических ограничений объем оперативной памяти ограничен 3 ГБ, даже если на вашей плате может быть 4 ГБ или 8 ГБ ОЗУ. Чтобы исправить это, выполните следующие действия.
- Перезагрузите Windows на Raspberry, как на любом другом ПК. Нажмите «Esc», когда появится логотип Raspberry Pi. Вы войдете в экран настройки.

- Здесь перейдите в Диспетчер устройств -> Конфигурация Raspberry Pi -> Расширенная конфигурация. Теперь отключите параметр «Ограничить ОЗУ до 3 ГБ».


3. После этого продолжайте нажимать «Esc», чтобы вернуться, и нажмите «Y», чтобы сохранить изменения.

4. Нажмите «Esc» еще раз, чтобы вернуться в главное меню настройки. Затем перейдите к « Продолжить » внизу и нажмите Enter, а затем снова нажмите Enter, чтобы загрузить Windows 11/10 на Raspberry Pi.

5. Наконец, ограничение ОЗУ будет снято в Windows на Raspberry, как показано на скриншоте ниже.

Запустите Windows 11 или 10 на Raspberry Pi
Вот как вы можете установить Windows 11 или 10 на Raspberry Pi. Как мы знаем, Raspberry Pi работает на процессоре ARM, поэтому в основном вы будете запускать Windows на ARM на плате. Если вы используете Windows 11, эмуляция x86 будет лучше, но не ожидайте большой производительности из-за маломощного процессора на Raspberry Pi. Во всяком случае, это все от нас.
Do you think installing and starting Windows 10 on Raspberry is feasible? Yes, apparently it is possible, I tried it and it worked, to my great satisfaction. Now I will show you all the steps necessary to do this.
In fact, but not for long, all the material to carry out the transaction in title in total safety is present on the net. The developers finally installed the ARM-optimized version of Windows 10 on the Raspberry Pi 4, after some people managed to get it to work on the Raspberry Pi 3 in the first half of 2019 as well.
1. Windows IoT Core vs Windows 10 ARM
Raspberry Pi 4 and Pi 3 officially support the IoT Core version of Windows 10, which is not the same version of Windows 10, so to speak, the one that runs on a desktop PC, but is a smaller version for low-power computers.
The ARM version of windows 10, which we will install on Raspberry, is a normal windows version, as we all know it, but with only the necessary services active when the operating system starts, but I repeat that it is a normal windows installation with all the features to which windows in the meantime has accustomed us.

There is a huge difference between the Iot version of windows and a version compiled for ARM, but we see some differences between these two versions. For example, Windows 10 IoT Core won’t let you run traditional Win32 apps or launch on the desktop. The IoT allows you to run a single UWP app at a time, and the real purpose of the operating system on the Raspberryi is to run small applications, designed for tiny computer boards.
Fortunately, there is a new guide to getting Windows 10 running on ARM on Pi 3 B + and Pi 4B using an unsupported technical preview build. Unlike IoT, Windows 10 ARM is an ARM-focused OS redefinition, which comes with a traditional desktop and Win32 app support via emulation.
This means that by installing an ARM version of windows on Raspberry, you will be able to run any type of application that normally runs on traditional 32 and 64 bit versions of windows.
2. Download the necessary software
Before proceeding with the installation of the operating system, we must obtain everything necessary to continue. Then you will find listed below all the software needed to install Windows 10 on Raspberry Pi4 and 3.
2.1 Download UEFI firmware
Download the UEFI firmware for Pi4 from here and for Pi3 from here, for Pi4 click on the RPi4_UEFI_Firmware_v1.29.zip link, while for Pi3 on the RPi3_UEFI_Firmware_v1.29.zip link and extract it to a FAT32 formatted MicroSD card.
2.2 Download Windows 10 ARM
Download Windows 10 ARM64 Build from here. Click on the ARM64 button relating to the “Latest Public Release build”, never choose the cumulative version and if the system shows you multiple versions of windows 10, choose only one you like between Home and Pro, and follow all the suggested steps, at the end procedure you will download a zip file, with three batch files inside. If you are using windows on your pc, run the one with the cmd extension.
2.3 Download WOR “Windows on Raspberry”
Download “Windows on Raspberry” from here. This software will allow you to install the previously downloaded Build on the MicroSD that you will insert into the Raspberry.
After downloading these files, you need to carefully follow the technical steps that I will now give you.
3. Installing the Windows 10 ARM ISO on MicroSD
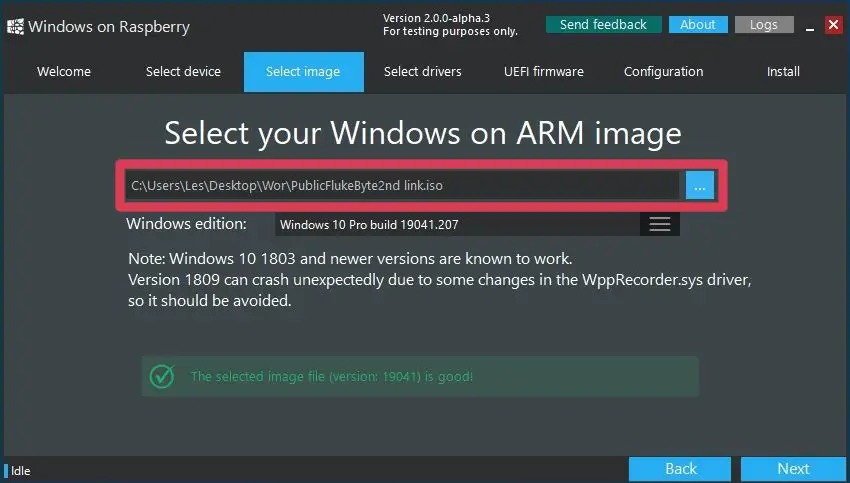
Let’s go back to the ISO you downloaded earlier for a moment. In the sources folder, there is a file: install.wim, remember this file and the path to reach it, it will be very useful when you are asked.
As a first step you have to mount the ISO, the operation is very simple click with the right mouse button on the ISO and select the mount context menu item. In the explorer you will find another device with all the ISO files mounted, just as if you were reading the contents of a DVD from the optical drive.
Now extract and start, with administrator rights, the “Windows on Raspberry” program, downloaded previously, by clicking on the executable WOR.exe in the extracted folder.
Well a little more patience and we are almost done. Once the WOR program, which stands for “Windows On Raspberry”, is open, the window will be shown as shown in the image below:
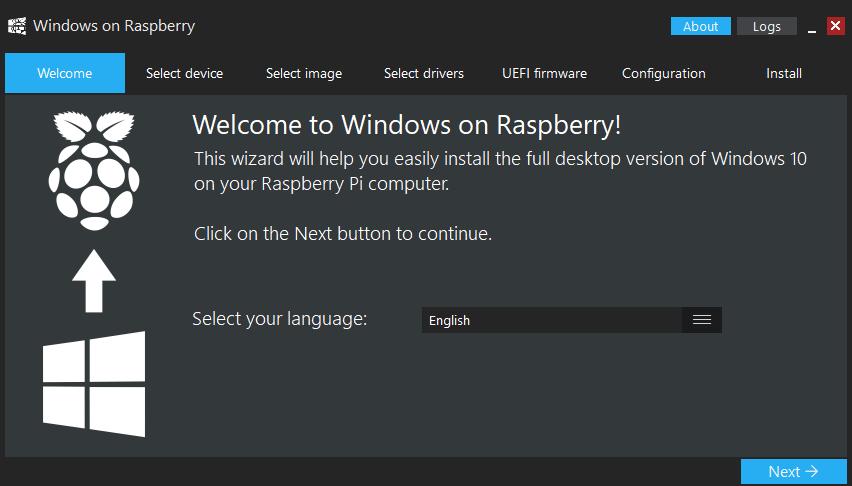
In the “welcome” tab, all you have to do is select the language and click Next.
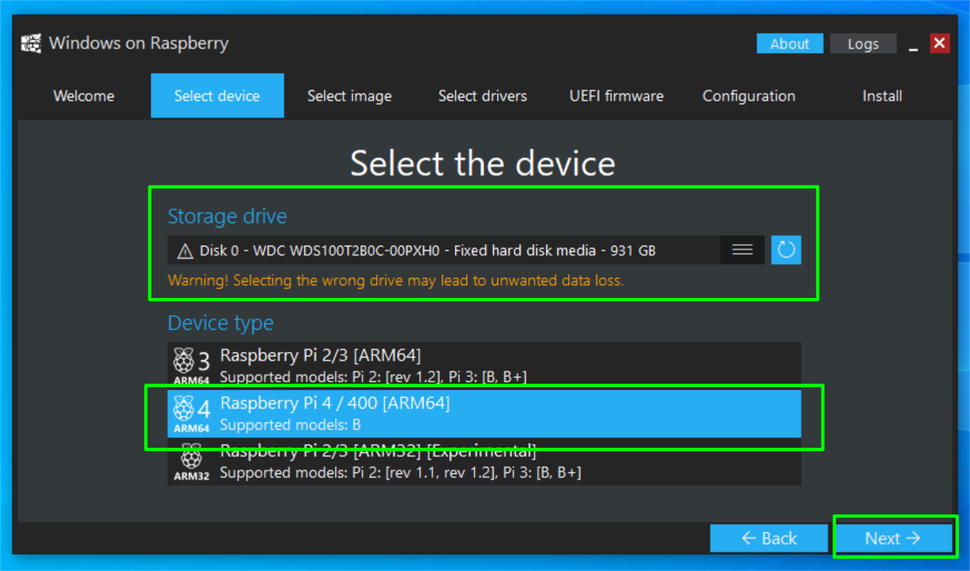
In the second “Select device” tab you must select the Raspberry Pi4 or Pi3, depending on your needs, also select the MicroSD and click Next.
It’s time to select our install.wim file, remember? Then click on the file selection button, present next to the wording “select image” and go to the resource created at the ISO mount and reach the sources folder, double click on the install.wim file and click on the Next button again.

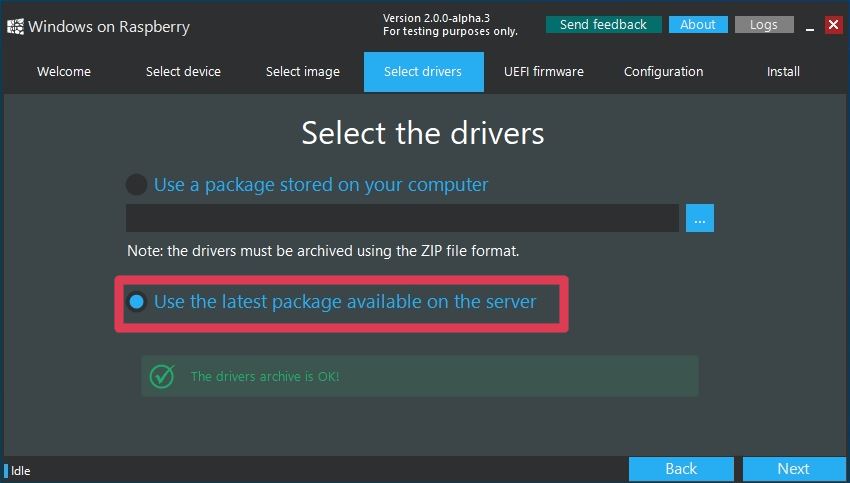
At the request to load the drivers, check the item “get the latest drivers from the internet”, click on Next again.
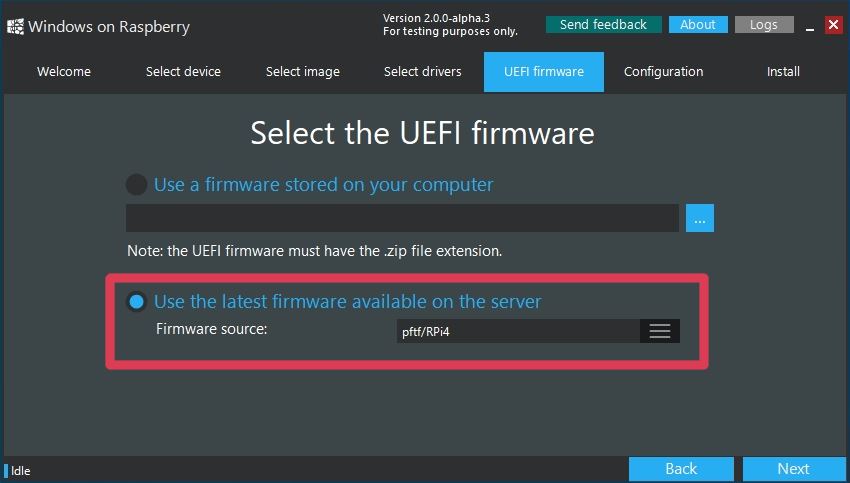
The time has come to specify the updated firmware appropriate to the type of Raspberry in your possession. Among the downloaded files, you will remember that you have downloaded two zip files one for the Pi4 and one for the Pi3, the file name is more or less in this form: RPi4_UEFI_Firmware… .zip or RPi3_UEFI_Firmware… .zip, logically you will feed it the appropriate zip file.
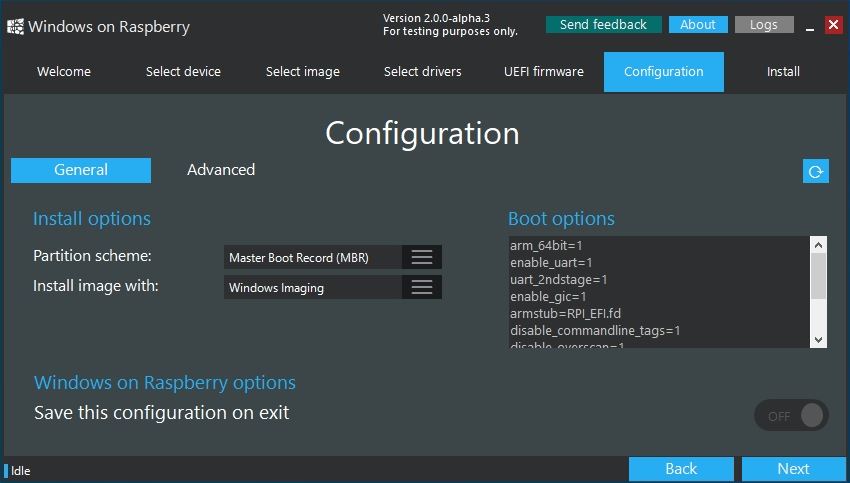
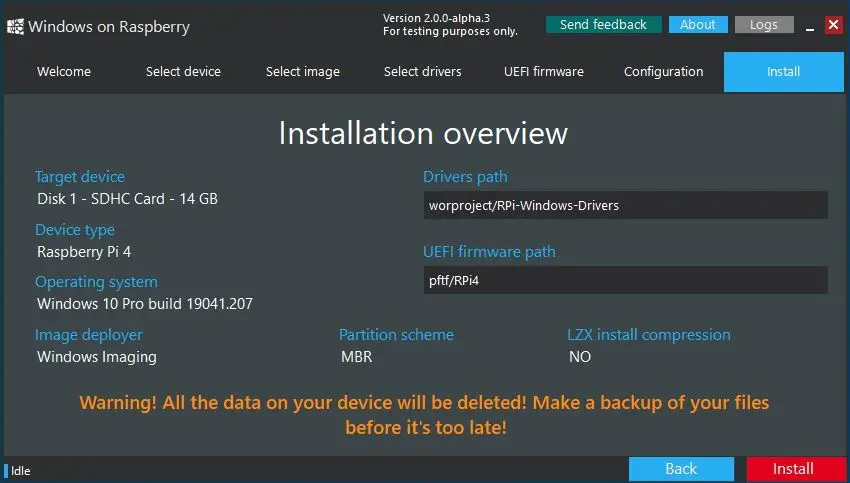
In the “Configuration” tab, make sure MBR is selected as the boot type and click Next again and then Install. To successfully conclude the procedure, there must be an internet connection for the entire ISO installation phase.
At the end of the entire installation procedure and only after the display of the message, which will indicate the correct transfer of the operating system to MicroSD, you can disconnect the MicroSD from the PC and insert it into the Raspberry. Connect the keyboard, mouse, monitor and power supply to the Raspberry and wait for the BIOS to load.
It is necessary, when starting the Raspberry, to click on esc, and reach the menu item change order boot, and specify the SD / MMC as the first loading device of the operating system. Another very useful advice is to try to overclock the Raspberry, selecting the max item in correspondence with what is indicated on the RPI Configuration page.
At this point, exit the BIOS and click on the continue link, present on the BIOS home page, and wait for the correct start of the windows 10 installation phase.
Read also: Controlling Raspberry Pi GPIO pins from script bash
4. Conclusions
Windows on ARM performs better on the Raspberry Pi 4 than its predecessor, but the system continues to drop frames when watching 1080p video or streaming Netflix using the Windows Store app. Graphics-intensive activities are incredibly slow, and some apps may crash if you switch between them. Logically we are talking about an intensive use of the operating system, it is worth remembering that the applications that we will run on Raspberry must be low impact applications for the operating system.
The developers are also bringing Windows 10 to ARM on Android phones such as Galaxy S8, OnePlus 6, OnePlus 5, and Xiaomi Mi Mix.
- About
- Latest Posts

Network administrator and developer. After years of experience in the industry, I designed a MYSQL data management system in PHP without writing a single line of code. Find out more….