In 2020, Apple introduced Mac computers with Apple silicon, with the first chip being the Apple M1.
This was a major change, and it affected many third party applications to the point where they simply don’t run on the M1 Mac.
One application that doesn’t run on M1 Macs is VirtualBox. Prior to the M1 Mac, we could use VirtualBox to install Windows on our Mac. VirtualBox is a free virtualisation application that enables you to install virtual machines (with other operating systems) on your Mac.
Fortunately, there’s a free alternative to VirtualBox – UTM.
In this article, I install Windows 10 on an M1 Mac. The key to doing this is to use the UTM virtualisation application instead of VirtualBox.
It also involves installing the Windows 10 on ARM Insider Preview. This requires an account with the Windows Insider Program (you can register for free).
Install UTM
First step is to install UTM (it’s free). UTM employs Apple’s Hypervisor virtualization framework to run ARM64 operating systems on Apple Silicon at near native speeds.
Basically, it enables us to create virtual machines on our M1 Mac. We can use UTM to install other operating systems (such as Windows) on our M1 Mac.
So to install UTM:
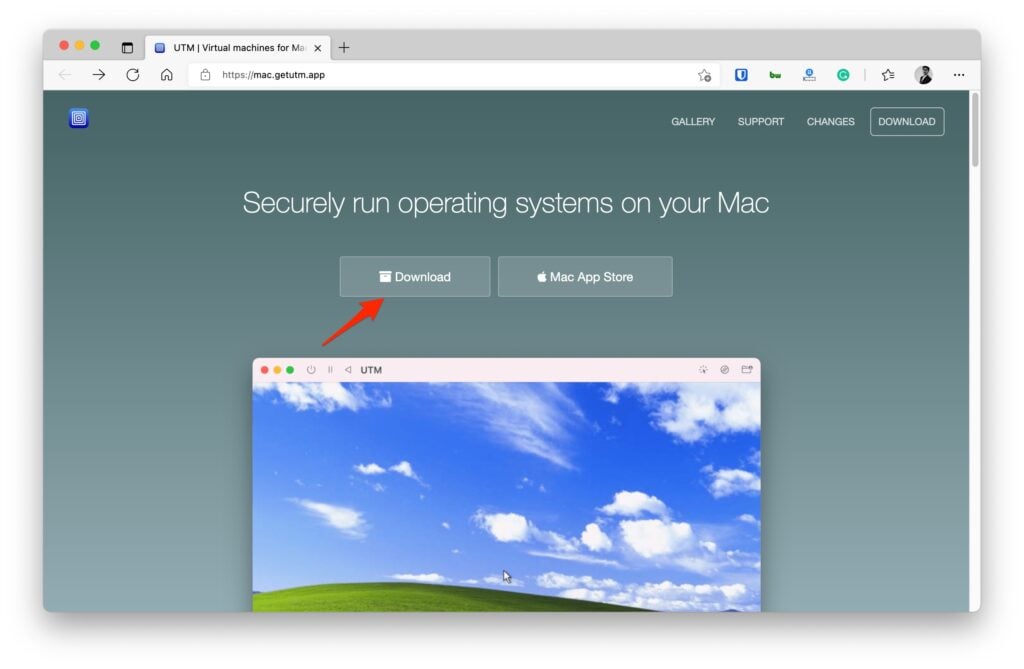
- Go to the UTM website and click
Download. - Once downloaded, double click the
UTM.dmgfile to launch it. - Drag the
UTM.appicon to yourApplicationsfolder.
The program is now installed. You can open it just as you can open other applications (e.g. by double clicking on its icon).
Download Windows
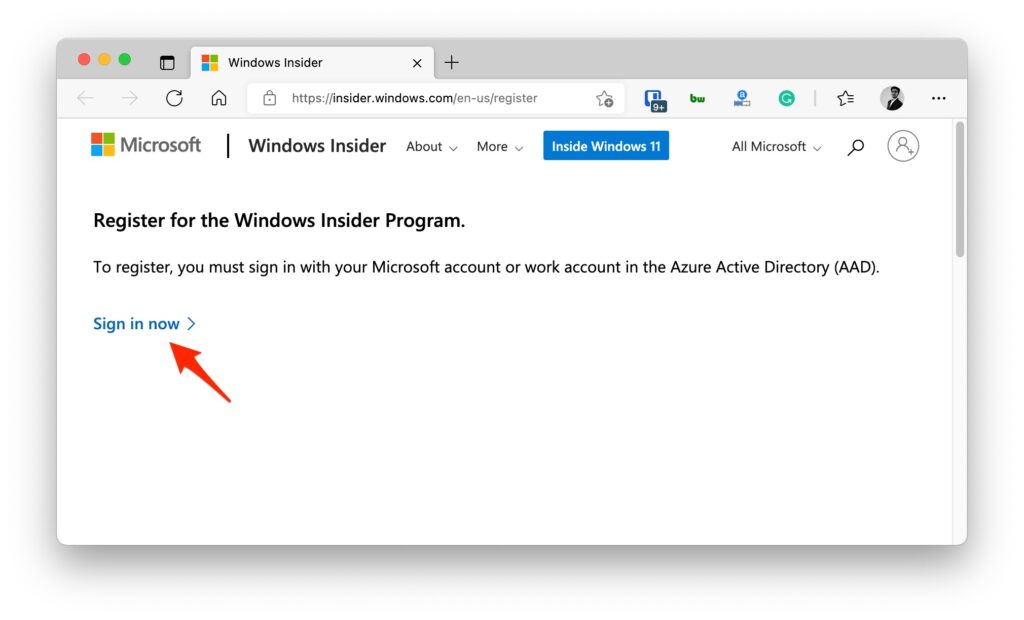
- Go to the Windows Insider Preview Downloads page.
- The instructions on the page depend on whether you’re logged in, and whether you’re part of the Windows Insider Program. If you are already logged in and you’re part of the Windows Insider Program, you’re good to go. If you’re not logged in or part of the program, follow the instructions on the page to log in and/or join the Windows Insider Program. Once done, the page will display the download link for the installation file.
- Click the button to download the installation file. In my case this blue button reads Windows 10 Client ARM64 Insider Preview – Build 21354.
It’s quite a large file (mine is 9.74 GB), so it might take a while to download.
Download the SPICE Guest Tools
- Go to the UTM Support page.
- Under the SPICE Guest Tools and QEMU Drivers (Windows) heading, click Download.
We will use this later, when we install Windows.
Convert the VHDX Image to a QCOW2 Image
According to the UTM documentation, sometimes the QEMU handling of VHDX images will result in Windows becoming corrupted. To prevent this, we’re advised to convert the VHDX file to a QCOW2 file, as follows.
The following steps require that Homebrew is installed. You can install it with the command on the Homebrew website.
With Homebrew installed, open a Terminal window and run the following:
brew install qemuIf you get an error that reads “Cannot install in Homebrew on ARM processor in Intel default prefix”, your Homebrew might not be configured for your M1 Mac. In this case, try this fix.
With QEMU now installed, run the following to convert the VHDX file to QCOW2:
qemu-img convert -p -O qcow2 ~/UTM_VM/Windows10_InsiderPreview_Client_ARM64_en-us_21354.VHDX ~/UTM_VM/Windows10_InsiderPreview_Client_ARM64_en-us_21354.qcow2In my case, I’d placed both the Windows file and the SPICE guest tools into a folder called ~/UTM_VM. You can put them elsewhere if you prefer, but be sure to replace ~/UTM_VM with your own path to the file.
Also, you may need to rename the Windows file (for example, replace 21354 with the applicable number on your file).
We can now use the QCOW2 image when creating the virtual machine below. It is recommended you do this with a fresh VHDX from Microsoft in case your image was already corrupted.
Create a Virtual Machine
Now we can go ahead and use UTM to create a virtual machine with which we will install Windows 10.
Open UTM and click Create a New Virtual Machine:
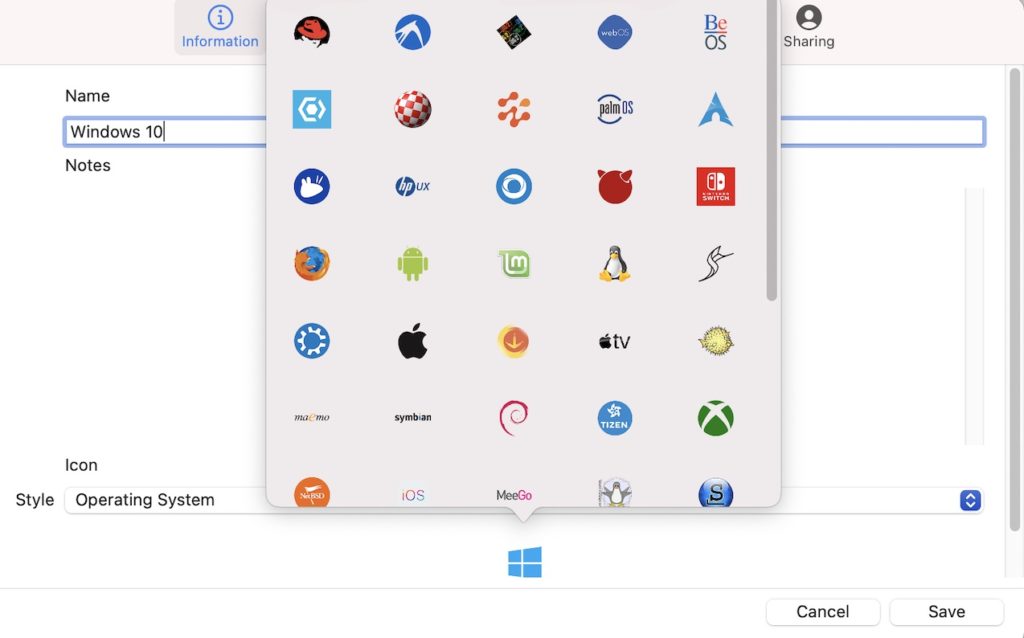
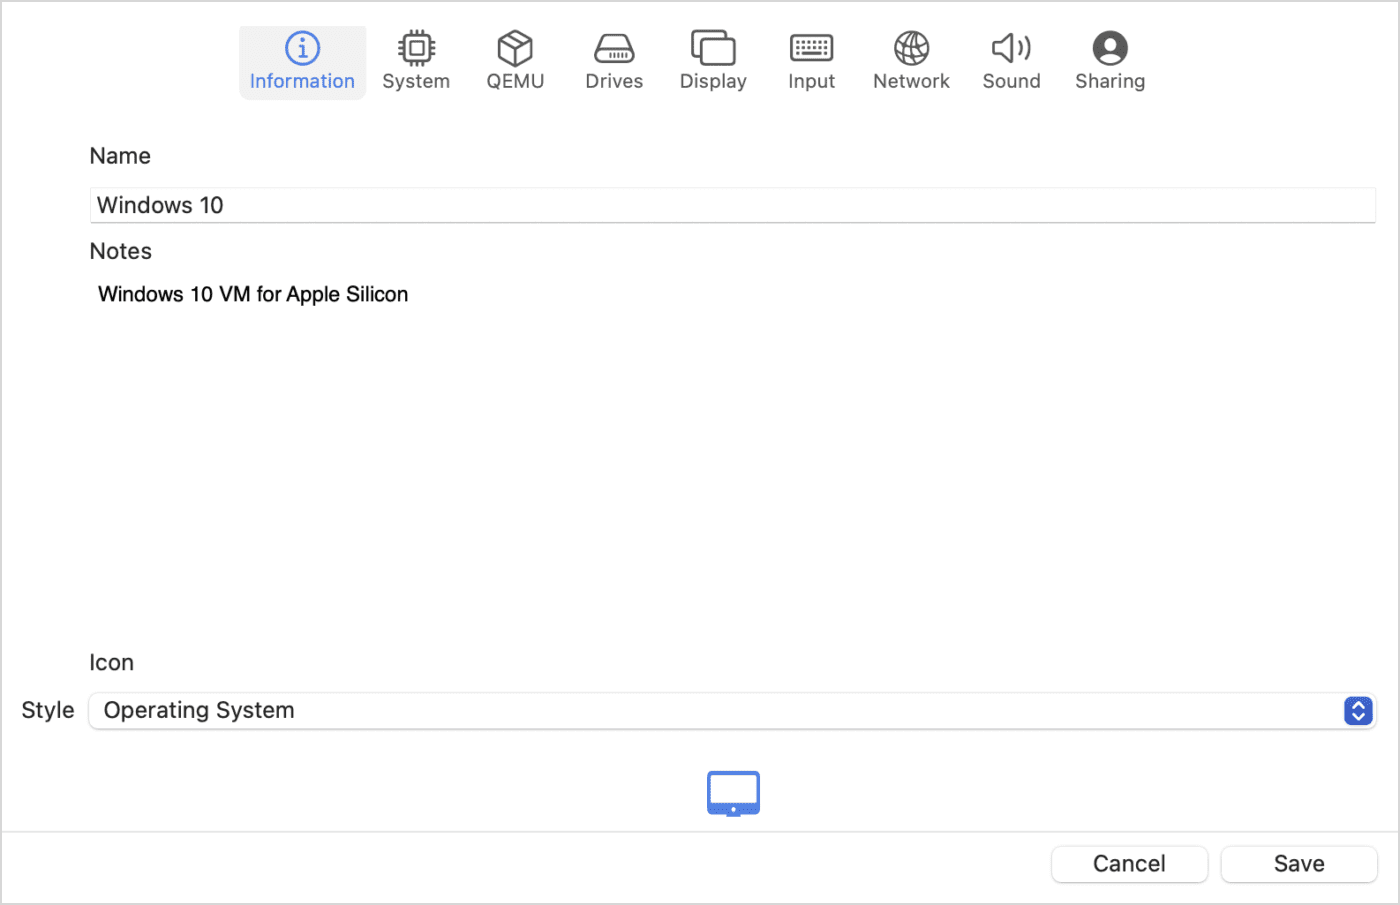
Enter a name for the VM. You can optionally choose an icon by selecting Operating System in the bottom drop down menu. This makes an icon appear below it. If its not the right icon, click it (which brings up a menu of other icons), and select the Windows icon:
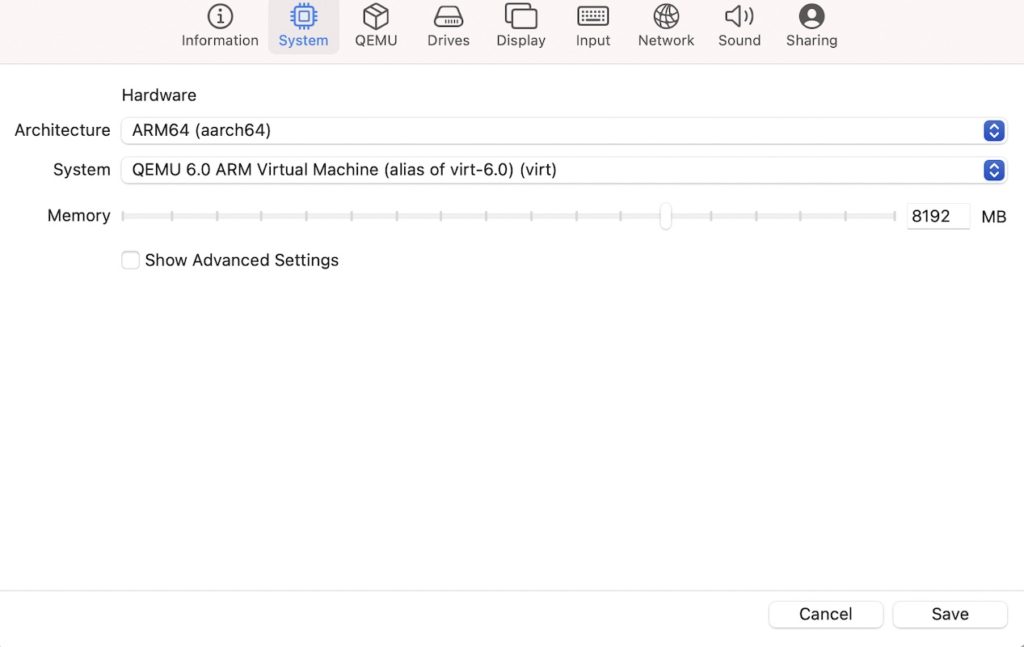
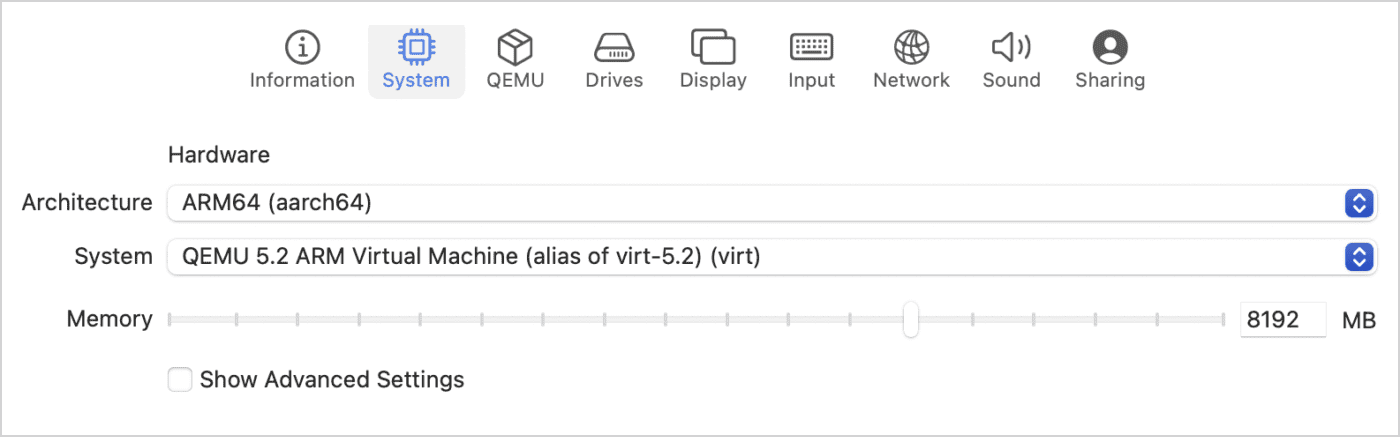
Now click the System button in the top menu and select ARM64 (aarch64) architecture. Also specify the amount of memory. At least half of your computer’s total memory is recommended for performance:
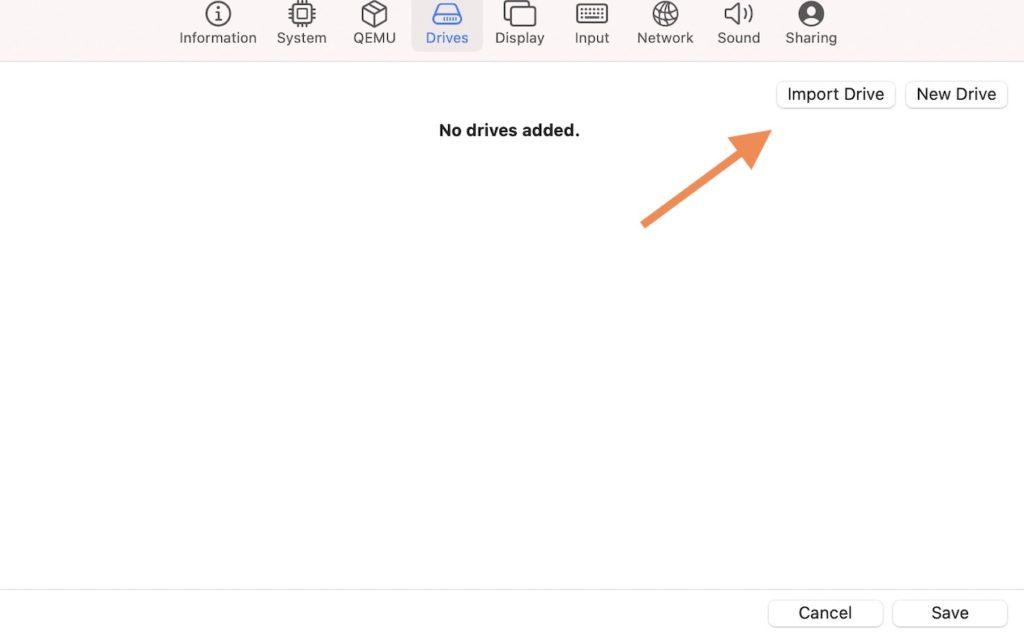
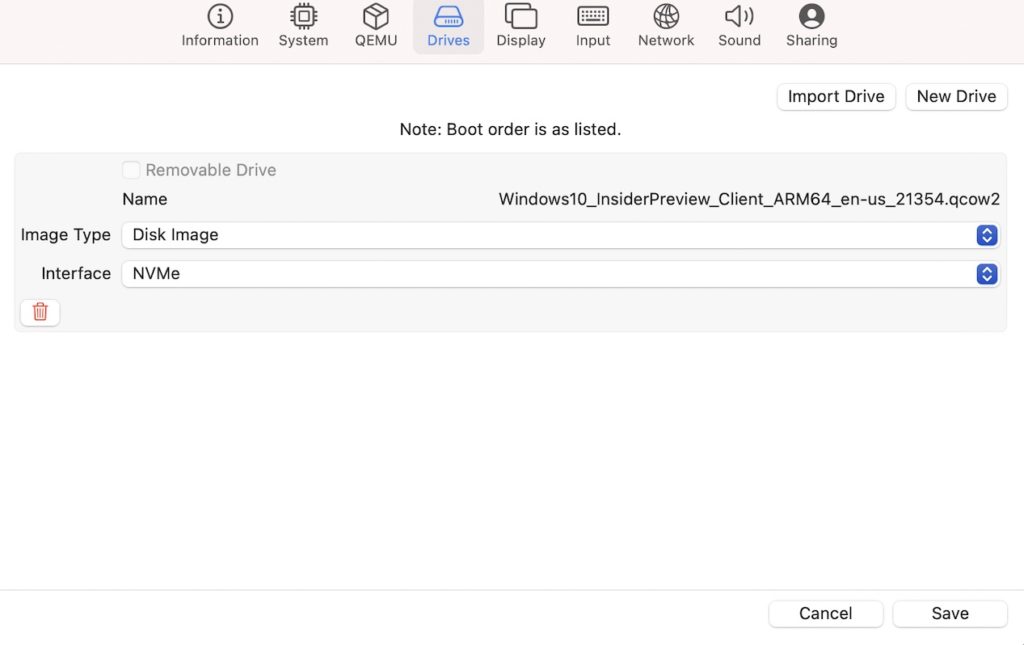
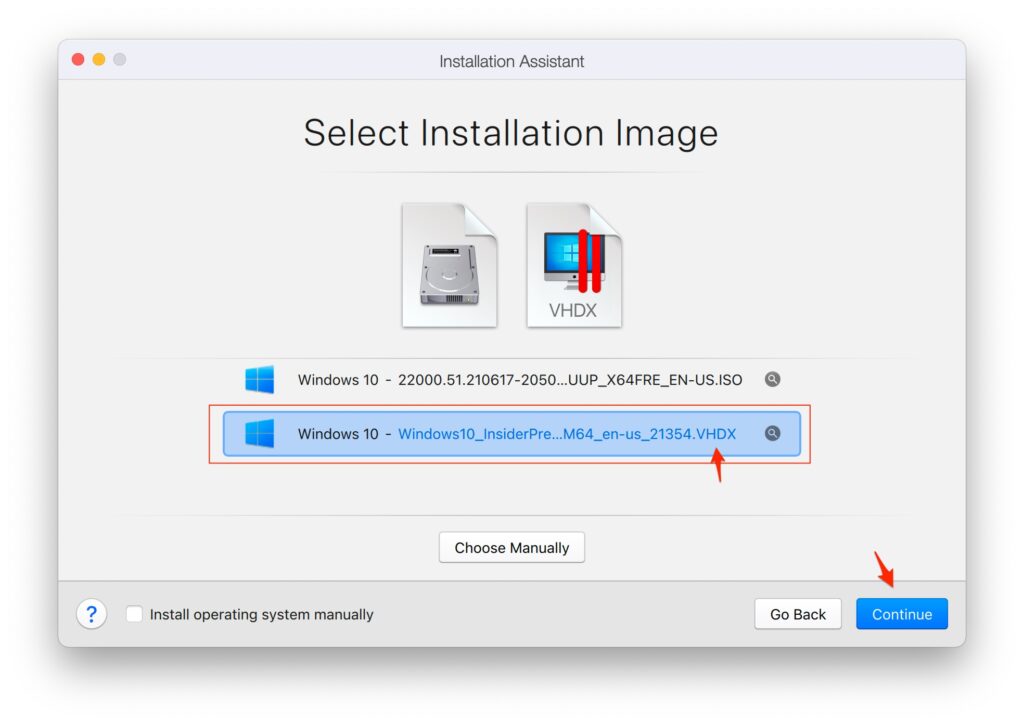
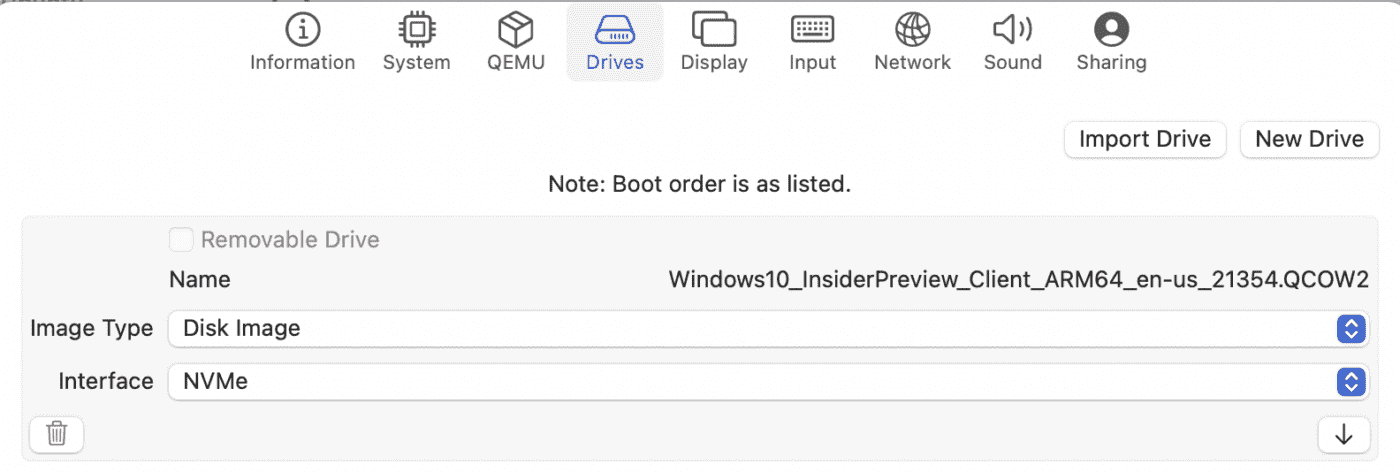
Click Drives from the top and then click Import Drive:
Browse to, and select the Windows 10 QCOW2 that you converted from the VHDX file previously. Once selected, set the interface to NVMe:
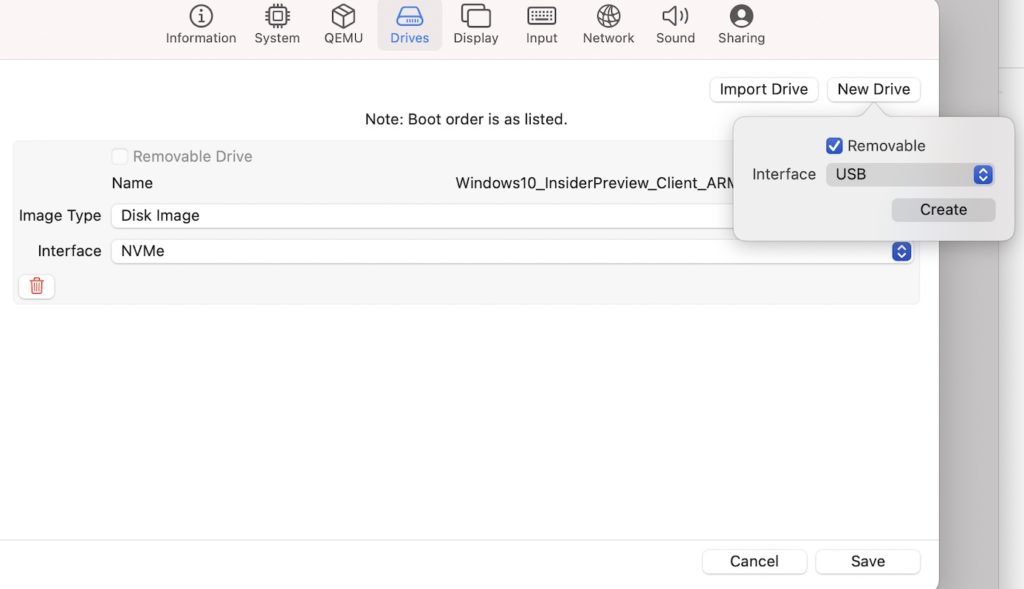
Now click New Drive and check Removable and click Create to add a CD drive:
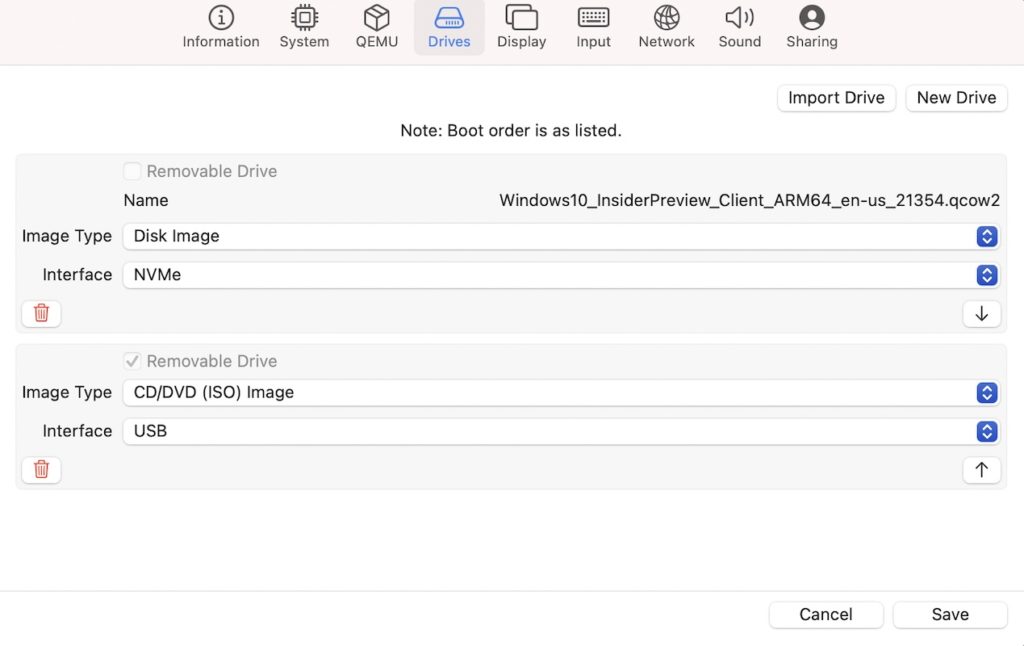
It should now look like the following screenshot. Click Save:
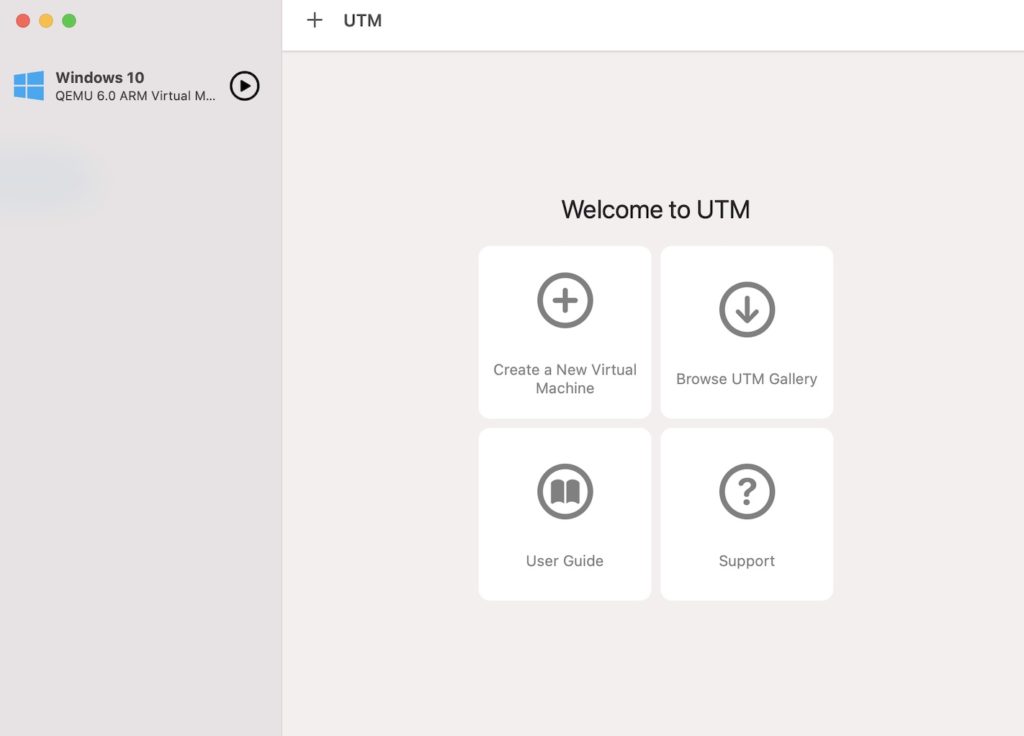
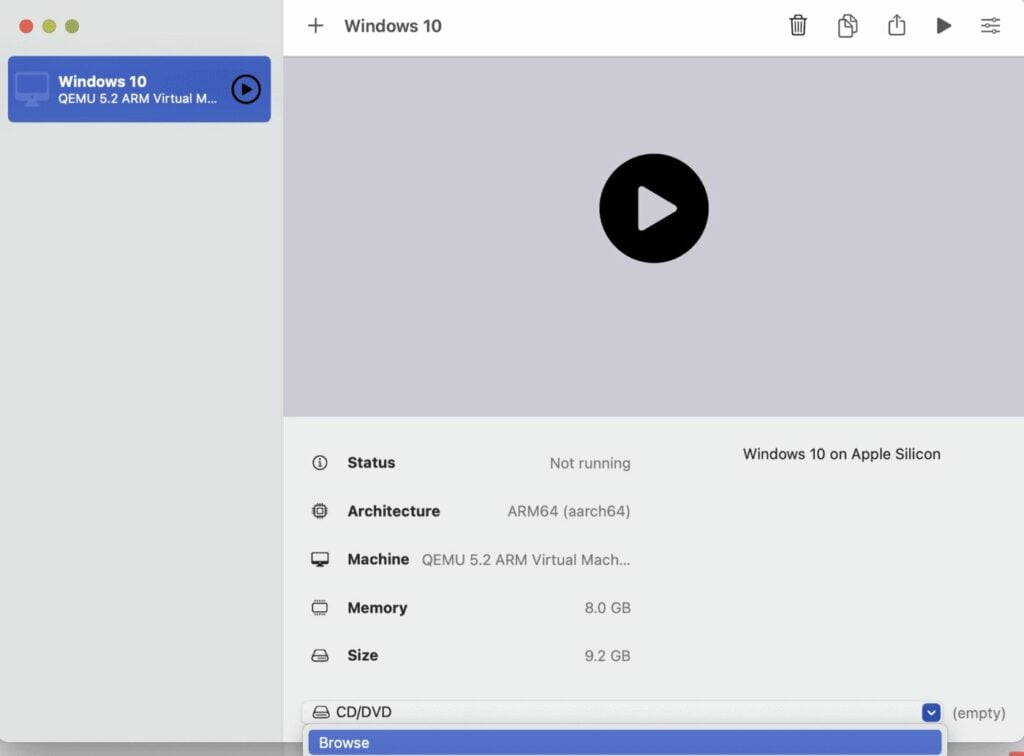
The VM now appears in the sidebar:
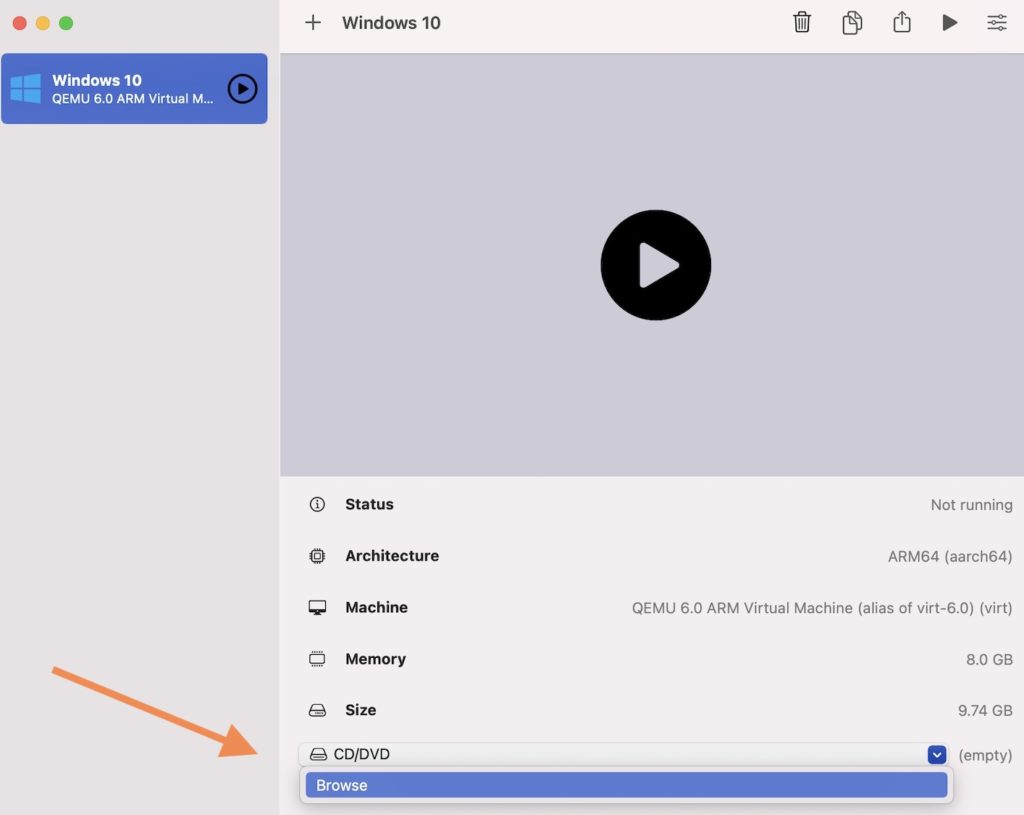
Click on the Windows 10 option in the left menu, and then select Browse (at the bottom of the right pane):
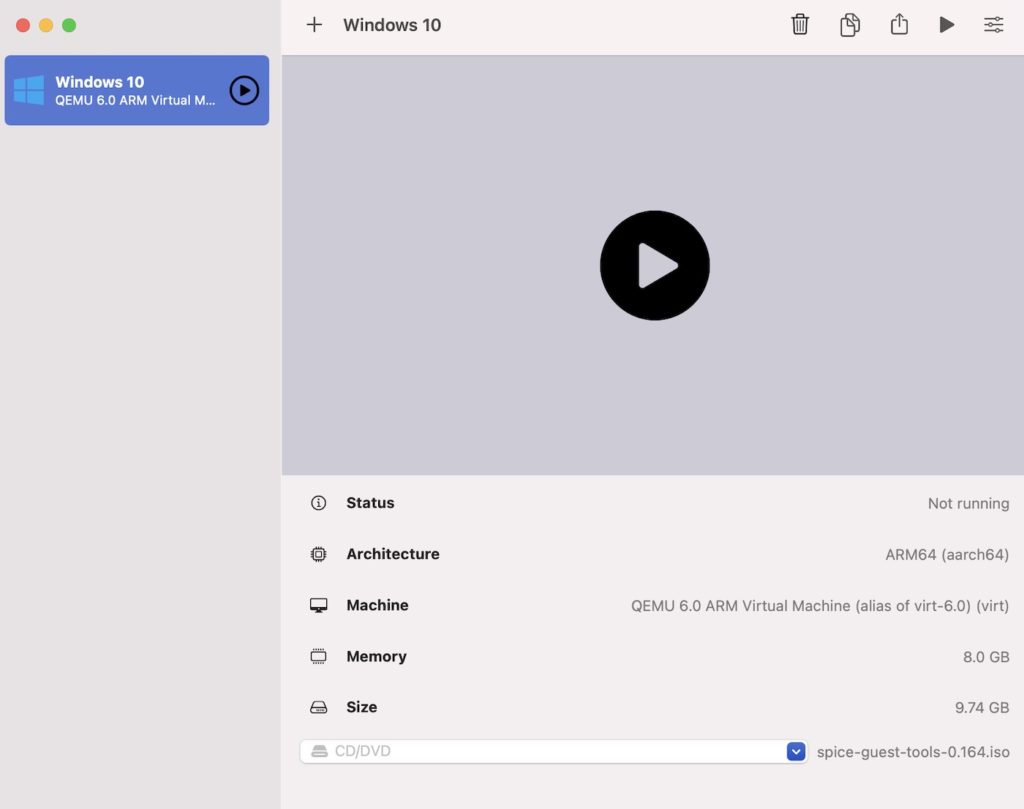
Browse to the SPICE guest tools ISO and click Open:
The name of the file now appears at the bottom of the screen, to the right of the dropdown.
The virtual machine is ready to use. If you need to change/check any of the settings, you can right click on the machine and select Edit.
We’re now all set to install Windows.
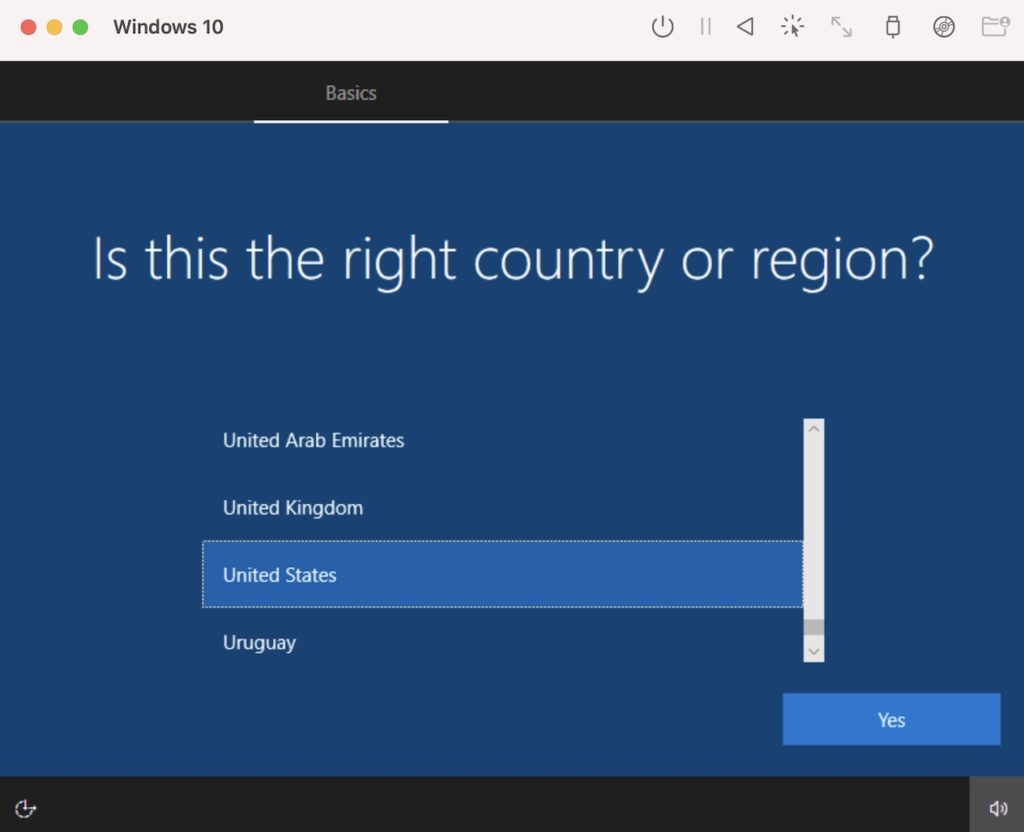
Click the big “Play” button in the middle of the screen to start the installation:
This launches a new window that boots up the Windows installation wizard:
Follow the prompts to install Windows.
If you get a “no bootable device” error, check that you selected ARM64 (aarch64) architecture on your virtual machine. From the UTM main screen, right click on the the virtual machine in the left and select Edit and select the System tab.
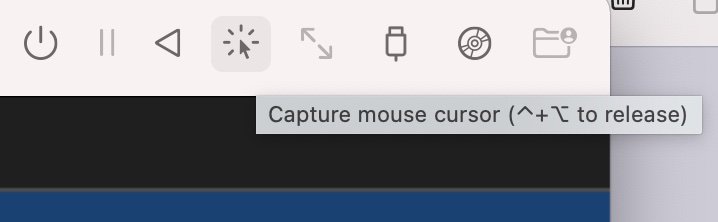
If your cursor suddenly seems to disappear, click the mouse capture button in the toolbar to send mouse input directly. Press Control+Option together to exit mouse capture mode.
When asked to connect to the internet, select I don’t have internet. This is because we won’t have internet until we install the SPICE guest tools (next).
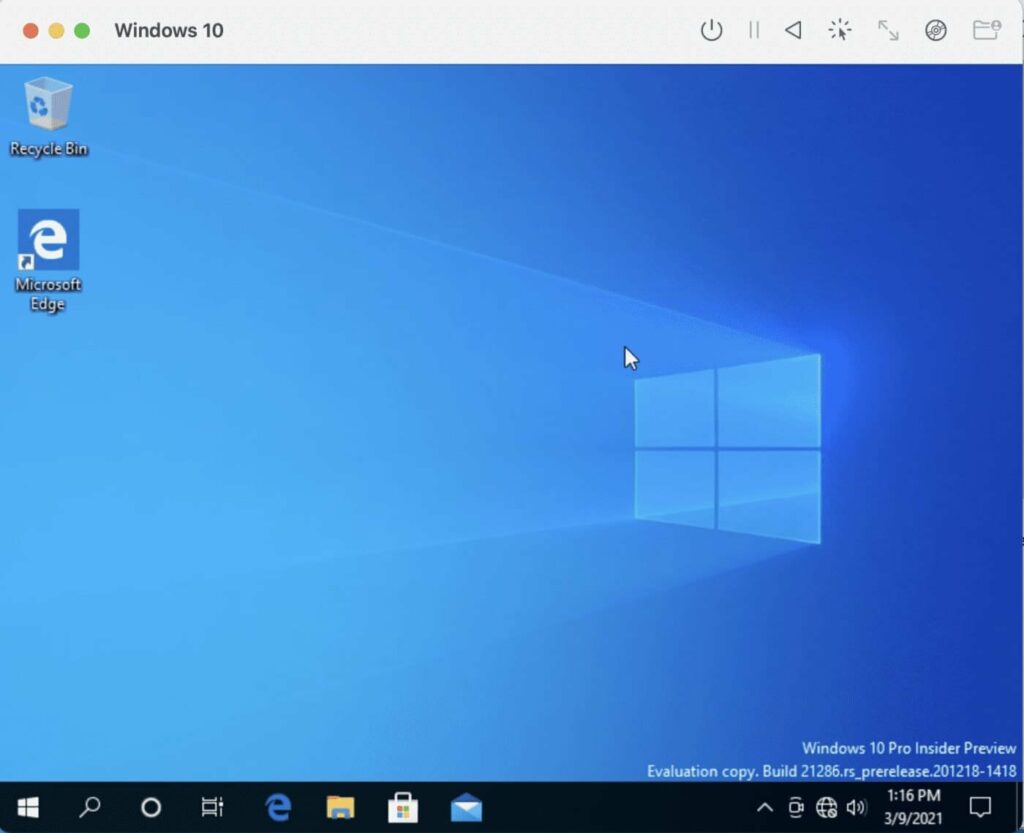
Once the installation is complete, the Windows desktop appears:
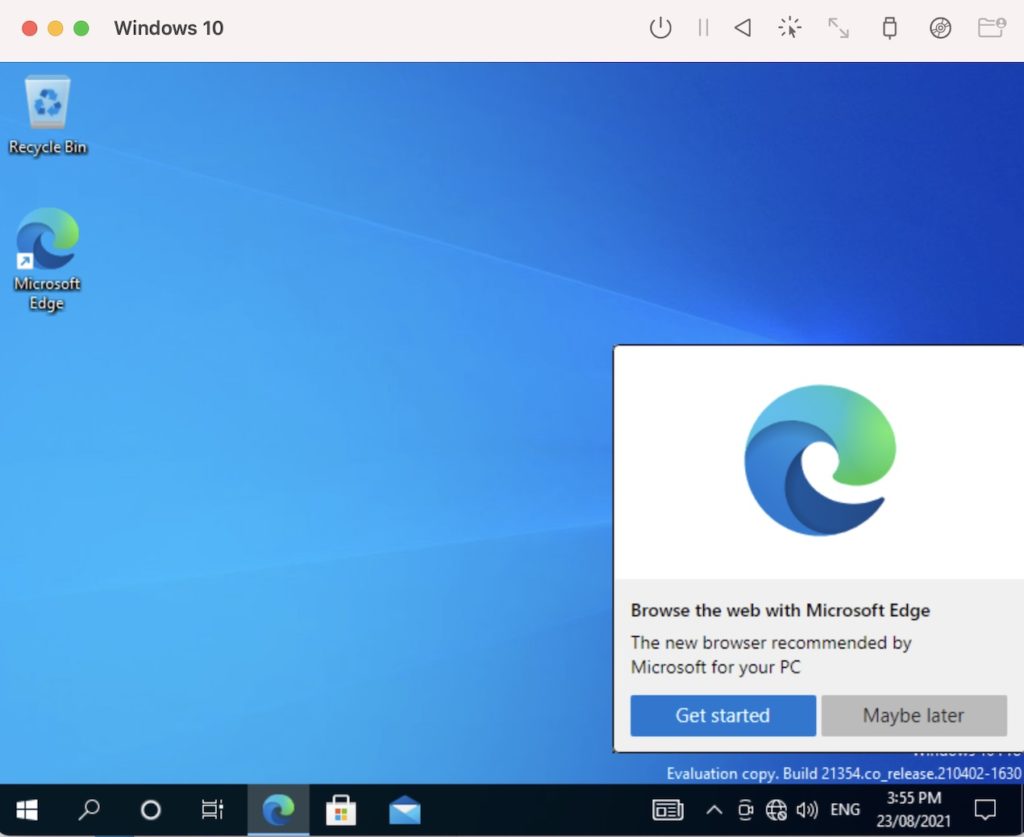
Install SPICE Guest Tools
There’s one more thing we need to do – install the SPICE guest tools.
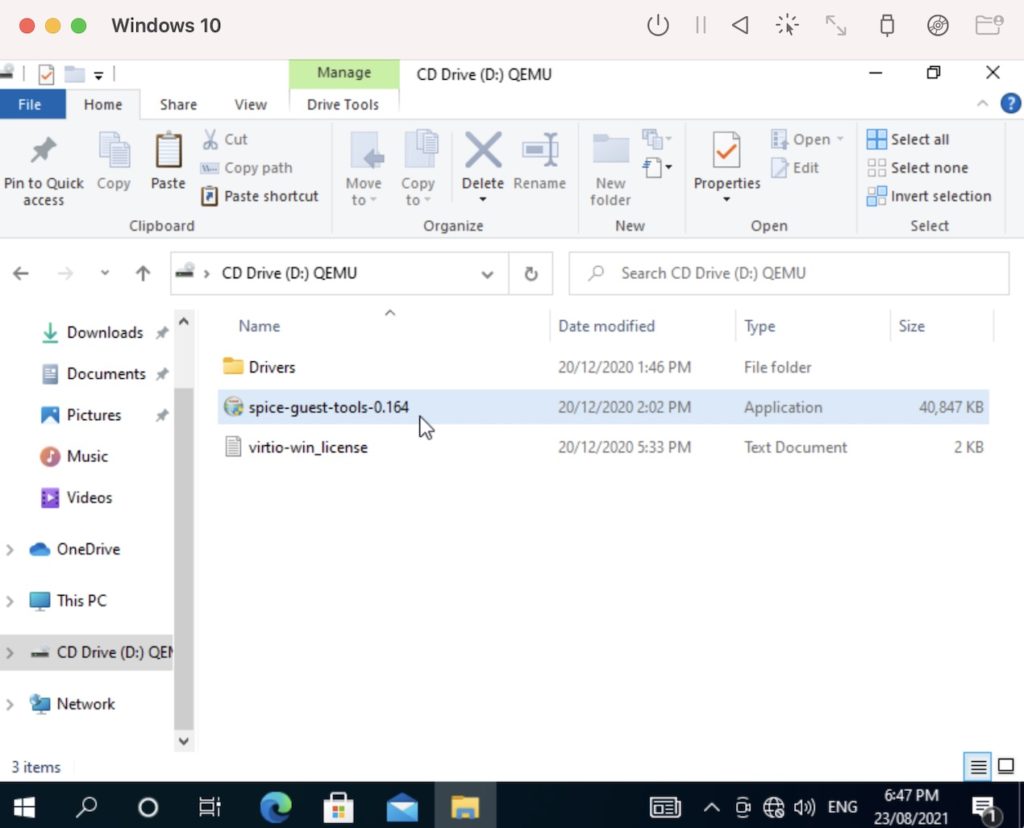
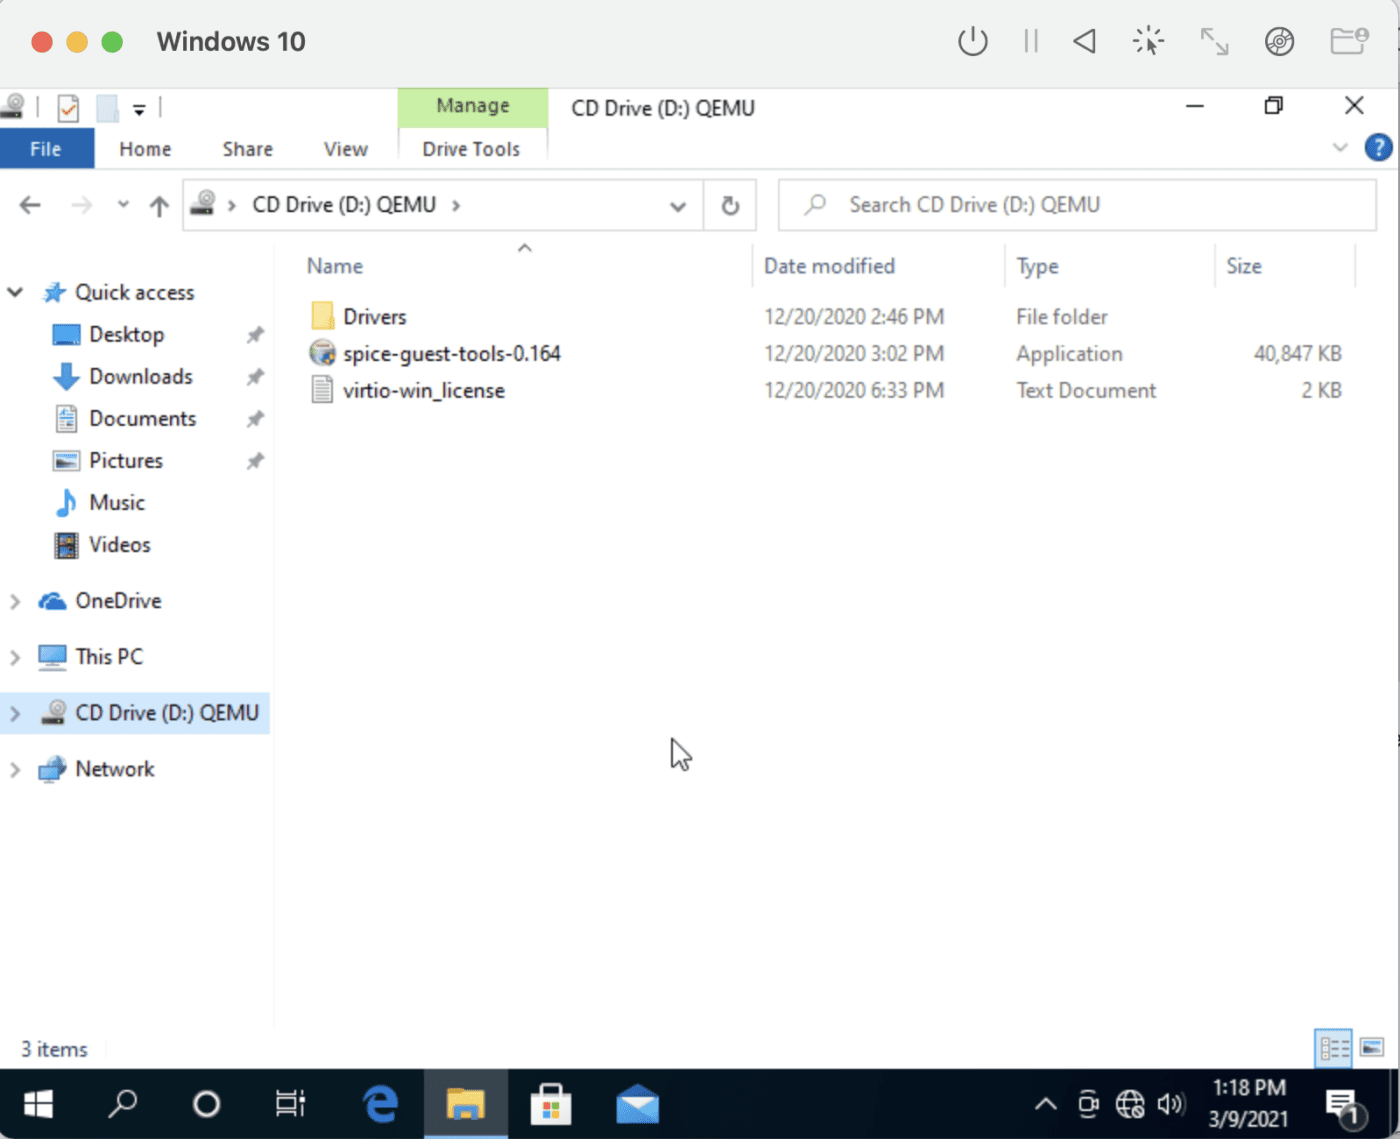
From within our freshly installed Windows machine (i.e. in the guest machine), open the File Explorer and select the D drive. From there, double click the SPICE guest tools executable file (in my case, this is called spice-guest-tools-0.164.exe):
This launches the installation wizard. Follow the prompts to install the SPICE guest tools. This installs various drivers, including one that enables an internet connection.
Windows 10 is now installed on our M1 Mac and ready to use.
I talked on the show a while back about how the one downside to an M1 Mac is that you can’t run Windows, or at least not without a lot of faffing about. I was actually surprised that in Knightwise’s recording about how much value he’s getting from his M1 MacBook Air, he never mentioned that as a downside. Knightwise’s mantra is “making technology work for you” and the center of that is being a slider who can use the best tool for the job, rather than being fanatically attached to one company’s technology (like some people we know). He has touted the Mac as the best platform because he can run macOS, Linux, and Windows all on one piece of hardware.
When I asked him about this limitation of the M1 he said he didn’t see it as an issue (not sure why) but that he hadn’t yet looked into whether the open source virtual machine software VirtualBox would run on the M1, at least to run a Linux distribution (or distro as the cool kids say.)
I did a bit of poking around looking into what virtual machine software runs on the M1s and discovered that VirtualBox from Oracle and the commercial software VMware Fusion do not, but Parallels Desktop does. And then I discovered an open source virtual machine app I hadn’t heard of called UTM which runs on M1 and even on iOS. Sadly, it requires you to jailbreak your iOS device so I declined that opportunity but running this on macOS Big Sur sounded like good fun.
UTM project on GitHub:
UTM Website for macOS and iOS
Under the hood of UTM is QEMU, a decades-old, free and open source emulation software that is widely used and actively maintained. The value that UTM brings to QEMU is that it’s a graphical user interface not requiring a plethora of command line options and flags, so the learning curve is much more gentle.
I found an article by Steve Sande on the OWC blog where he walks through the steps to configure UTM on an M1 Mac, and install Windows on ARM for free, legitimately. As I mentioned before, Windows on ARM isn’t really supported to do this, and even if I succeed, apps would have to be compiled for 64-bit ARM to run on it. This makes this a fun experiment, possibly a colossal waste of time, and when I’m done I’ll have something I don’t need. Of course, that’s all the motivation I needed to proceed.
Let’s Do This!

I’m not going to go through the installation in detail, because Steve Sande does a fabulous job of it. He tells you what to download, how to configure it, and which buttons to push to make it go, all with screenshots to make sure it’s clear what he’s telling you to do. I will, however, go through an overview of how this works though so you have context for my discovery in going through his steps.
Virtual machine software works by creating an image that is the virtual machine. You need two things to make an image work properly: an operating system and what are called Guest Tools tailored to your hardware. Without the Guest Tools, your mouse and keyboard may not work, your WiFi won’t be recognized, perhaps sounds won’t come out of your speakers, and more.
To run Windows 10 for ARM64, it turns out Microsoft allows you a free download if you sign up for a free membership in the Windows Insider Program. Those are the words I wanted to hear so I signed up. The file you download has an extension of VHDX, which stands for Hyper V virtual hard disk.
Windows Insider Program ARM64 Preview Download
The UTM virtualization software points you to a gallery of operating system virtual machines you can download, which are mostly different distributions of Linux (which may be even more fun than running Windows). You will see the ARM64 version of Windows 10, but if you’re on an Intel-based Mac you can only run Windows 7 or Windows XP. Kinda weird that you can’t get Windows 10 on Intel but maybe Microsoft doesn’t let you have that one for free because it’s actually useful!
Steve’s instructions walk you through how to configure a virtual machine, including setting the architecture to ARM64, choosing how much RAM to allocate, how to create the virtual disks for the operating system, and the Guest Tools, which for UTM are called Spice Guest Tools to make it work with your hardware.
And it Went Horribly Wrong

When Steve explains how to add drives, he shows how to point to the Windows 10 OS that you’ve already downloaded from Microsoft. Then he explains how to create a virtual CD/DVD Drive and point it to the Spice Guest Tools. As soon as I pointed to the Spice Guest Tools, UTM crashed.
When I opened UTM back up, my image for Windows hadn’t been preserved. No worries, it’s just a few steps. As soon as I tried to point it at the Windows VHDX file, I got an error saying that it couldn’t be copied to images because an item with that name already exists. I was faced with some temporary file not having gotten flushed when it crashed, but where on earth would I find this temp file?
Luckily, UTM is an open source project on GitHub, and under the Issues tab, I found Morac2 describing the same issue. Even luckier, Morac2 figured out where this temporary file was so I could delete it and try again.
Github issue 2576 – Spoiler, the file is in $TMPDIR/com.utmapp.UTM/Images
On my second time through the image creation instructions from Steve, I was able to save without a crash. However, when I tried to point at the Spice Guest Tools on the virtual removable drive, I got another error saying it couldn’t restore removable drives.
Ok, back to the Googles and I found someone with the same problem and they were advised to clear the Spice Guest Tools from the CD/DVD and try booting to Windows without it. Presumably, that would get a clean boot into Windows and then we could back out and try the Spice Guest Tools again.
Sadly, after getting stuck at the boot loader for ages and ages, I got a Microsoft stop code of INACCESSIBLE BOOT DEVICE and that it was going to restart. Which just happened over and over again. I believe, based on the baby blue background, that I was experiencing a blue screen of death.
As much fun as this was, I decided it was time to abandon that whole path and see if I could get something normal like Ubuntu to install.
Ubuntu 20.04

From the UTM gallery, I downloaded the Ubuntu 20.04 image, but it directed me to download Ubuntu server. I didn’t want Ubuntu server, so I hunted down the Ubuntu desktop operating system for ARM on my own. Not hard but it was another step. The step-by-step instructions on the UTM website were super easy to follow. And yet, I was unable to boot into Ubuntu.
I went back to the beginning of the instructions on the UTM website and realized that to use UTM with Ubuntu, you install the server first and then install the desktop version from there. Convoluted much?
I created the VM again, and as soon as I tried to point to the OS installer, it said I didn’t have permissions to “Images”. Well, that makes no sense, you let me access them a minute ago, how could permissions have changed like that? Let’s just turn it off and on again. I quit UTM and reopened and then it let me point at the Ubuntu Server ISO file. Yay.
Now I’ve got my Ubuntu VM configured exactly per the instructions, even including changing the icon to look like Ubuntu. And when I hit the big play button … it fails to load and gets stuck at the UEFI Interactive Shell. The only thing on this entire page I recognize is the acronym EFI, which is what firmware on a Mac is called.

At this point, someone with less fortitude (or more common sense) would have given up, but not me. Off to the Googles yet again and I find this issue on the UTM app’s GitHub pages as well. The interesting thing is that one of the developers tests a fix, closes the issue and then shortly after that reopens the issue because the failure didn’t go away. Luckily, he posted a fix in the troubleshooting section of the Ubuntu installer page for UTM.
GitHub Issue 2333
Workaround: mac.getutm.app/gallery/ubuntu-20-04#troubleshooting
You’re going to love the answer. All I had to do is verify that I saw FS0: Alias(s):CD0h0a0a::BLK1: at the top of the UEFI Interactive Shell window, then type in fs0:efibootbootaa64.efi and then I should see GRUB and be able to select Ubuntu Server. You know that’s what I was thinking of typing, just good to verify, right?
I typed in that bunch of glop I don’t understand and the shell came back with the response Command Error Status: Unsupported. I’m not joking.
My only move after that was to make a comment on the GitHub issue on the topic and move along.
How about ArchLinux for ARM?

I just could not let this go without getting ONE operating system to work as a VM with UTM. I looked at all of the other options and chose ArchLinux ARM, mostly because I’d never heard of it. Unlike Ubuntu where it gave the an ISO image of the OS, ArchLinux gave me a .utm file which is a fully-configured virtual machine, so I double clicked it. It opened inside UTM and I didn’t have to do any setup at all.
UTM for ArchLinux for ARM: https://mac.getutm.app/gallery/archlinux-arm
I clicked the play button and it typed a lot of unixy-looking glop on screen for me, pausing for dramatic effect from time time time and then starting to change again. And then it stopped changing for a really long time. I hit the enter key just for grins and giggles.
It responded with alarm login:. Well, on the download page it says the username and login are root and root so what the heck, I’ll try that.
It spat a bunch more glop on screen including a whole bunch of process ids, none of which made any sense to me, and ended with a simple command line prompt that says [[email protected] ~]#. And again, I’m stuck. Remember how this UTM software was supposed to hide the command line work that I would have had to do in QEMU? Yeah, not so much.
Debian ARM (Xfce)

I was determined that I was not going to let this virtual machine software defeat me. I kept plowing ahead and moved on to try Debian ARM (Xfce). Evidently this Xfce version of Debian is intended to be a lightweight desktop environment, which sounded fun. Debian also downloaded as a fully-configured UTM file and with a double click I was off to the races.
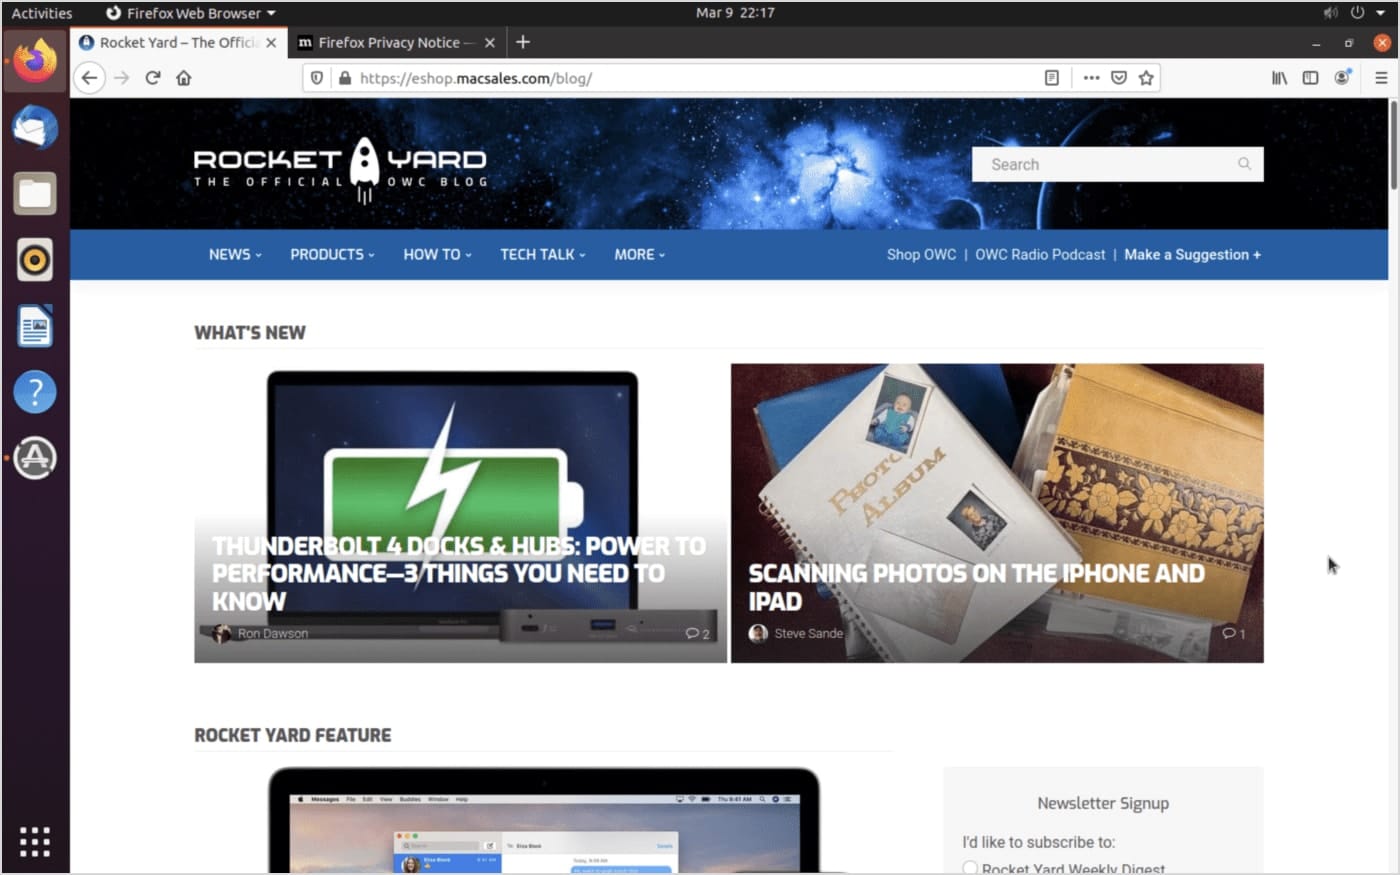
You’re not going to believe this, but it worked. I was as shocked as you are. It simply booted up and I was in Linux! The screen resolution was super low so I found in settings how to change the display and it looked grand. I opened up Firefox and navigated to podfeet.com (as one does) and it looked dandy.
But then when I went to move the window around, the screen tearing was simply awful. I thought maybe it was because the default installation was set to only 2GB of RAM, so I changed it to 8GB but that had no effect. Then I realized there isn’t a guest tools installer for this distribution. I did a short hunt for them online, but I have to admit that after spending about 3 hours on this little project, it wasn’t my best effort. I never did find the guest tools but I declared victory and ended my little project.
And Yet…

And yet there was still a little niggle in my brain that said the instructions from Steve Sande should have worked to install Windows on Arm. Earlier in some of my googling I’d run across a video about installing Windows on the M1 using UTM by someone who goes by the name Mr. Macintosh and I decided to watch his video to see if there was something I missed.
About 3.5 minutes in he hit the spot where I realized my mistake. In Steve Sande’s instructions, he clearly said that when adding the drive in the virtual machine for Windows that you had to choose NVMe as the interface. I’m 100% certain I did that the very first time, but I’m relatively certain I didn’t remember to set that in any of my subsequent attempts. I’m pretty sure I left it at the default of VirtlO, whatever the heck that is.
I had to try just one more time. And guess what? It WORKED! I had to answer a whole bunch of annoying Windows questions like three security questions that I bet 100% of you could answer with about a minute of googling, but then I was in. (And no, of course, I didn’t tell the truth on the security questions.) Once I had Windows 10 up in UTM, and I got a screenshot so I could prove it worked, it was time to get it working even better. The first improvement I wanted to make was to raise the screen resolution as it defaulted to 640×480. Mr. Macintosh gave instructions on how to interrupt the boot-up of the VM and get to the Device Manager to change the preferred resolution all the way up to a maximum of 1024×768.
I did that, rebooted…and Windows failed to launch. It gave me a blue screen of death with the beloved Stop code: 0xc00002e3 which evidently means “something has gone horribly wrong.” I tried booting into the Device Manager and undoing the crime of setting my screen resolution higher than a postage stamp but Windows was clearly mad at me and refused to boot. I started from scratch. Again.
After the new VM was created, it booted just fine, albeit at 640×480 but I left that well enough alone. The VM wasn’t recognizing my wired or wireless Ethernet cards, so I decided to try to get that sorted. A VM without networking isn’t much fun. I shut down Windows, closed the VM, and went into settings and found a Network tab in UTM where I could choose my real network card. Great! When I restarted Windows it blue screened again.
Through repeated experiments, I determined that Windows 10 is one-time use if running in UTM on an M1 Mac mini. I circled back with Steve Sande and he dusted off his Windows 10 installation in UTM from last March when he wrote the article, and he confirmed that he now gets a blue screen of death as well.
I opened an issue on GitHub and he added his configuration and information to my issue. It would have been nice if Steve had said, “You dummy, you forgot to…” But getting confirmation that something is broken is the second-best thing.
GitHub issue 2646
One More Thing
I was finishing up this article after finally calling it quits when Steve Sande mentioned that he did get Ubuntu working with UTM. You know what I had to do, right? I simply had to try again. I’ll not take you through all of it but after a few fits and starts that took maybe only another couple of hours, I actually got it working too. In fact, I did the write-up here about Ubuntu from inside the Ubuntu 20 virtual machine on UTM.

I’m pretty chuffed that I got it working, and it’s better than anything else I tried, but it does have the same screen tearing problem that I had with Debian. Networking is working, and I can play audio through it, and I can even copy and paste between macOS and Linux. I haven’t figured out how to install apps yet, but as soon as I do, I’ll be installing 1Password now that it’s available for Linux. I don’t need Linux but it sure is fun to be able to play with it.
Bottom Line
I couldn’t get Windows to run in a VM which was my original goal, but at least I finally got a workable Linux VM to run. I think I should put a pin in this by taking you back to one of the first things I said: “This makes this a fun experiment, possibly a colossal waste of time, and when I’m done I’ll have something I didn’t need.”
The new Apple Silicon CPU processors have brought a breath of fresh air to the world of computing, but for savvy users, they have also brought with them many limitations. If you used Windows on your Mac, perhaps via BootCamp, upgrading to a Mac equipped with an M1 processor will find you unable to continue doing so. And with this, you will find yourself facing even small daily problems.
If you are the classic Apple user who only uses Apple-specific software, you will have no problem, but if – like us – you are used to going beyond fences and blocks, keep reading and you will discover some interesting things.
ARM virtualization and x86 emulation on the new Apple Silicon M1 CPU chips
Let’s start with some clarifications: Apple and macOS do not have a proprietary virtualization system open to users – unlike Microsoft which has, for example, Hyper-V – but they open the platform to third-party software. The problem is that the situation has become complicated since Apple switched to Intel processors and these software pieces are struggling to arrive or perform.
Apple has developed a software, BootCamp, which allows the installation of Windows or other OS on Mac alongside macOS, but the use of these requires a restart, a really uncomfortable situation and which remains confined to Macs equipped with Intel processors. thus cutting out all the new machines equipped with Apple Silicon chips.
Also, keep in mind – for performance and problems – that virtualization is different from emulation, where the latter reconstructs the hardware elements via software, while virtualization has direct access to some hardware components – such as the processor, the GPU, the memory, ..etc .. – and for this reason, it is faster and more efficient. The architecture to allow virtualization must be the same on both the host machine and the guest, so – in our case – Windows ARM will be virtualized on M1 Mac but Windows x86 will only be emulated on M1 Mac.
Currently, the most practical and efficient solution for running Windows on the Mac M1 is to use a paid software called Parallels. Parallels Desktop for Mac has been rebuilt and optimized to natively run on Apple M1 and Intel-based Mac devices, improving speed and performance. Obviously, there are also many other alternatives – some still not totally reached as VMware – including some very interesting, free, and based on open-source software. And it is precisely the latter that we are going to deal with.

How to install a Windows 11 ARM Virtual Machine on an M1 Mac without running Parallels
First, if we want to install Windows 11 on our Mac, we must necessarily get a copy of this software. Being still in the beta phase, the software is easily obtainable from Microsoft thanks to the Preview program. Here is the direct link to download the latest Microsoft operating system in the updated ARM version: https://www.microsoft.com/en-us/software-download/windowsinsiderpreviewARM64.
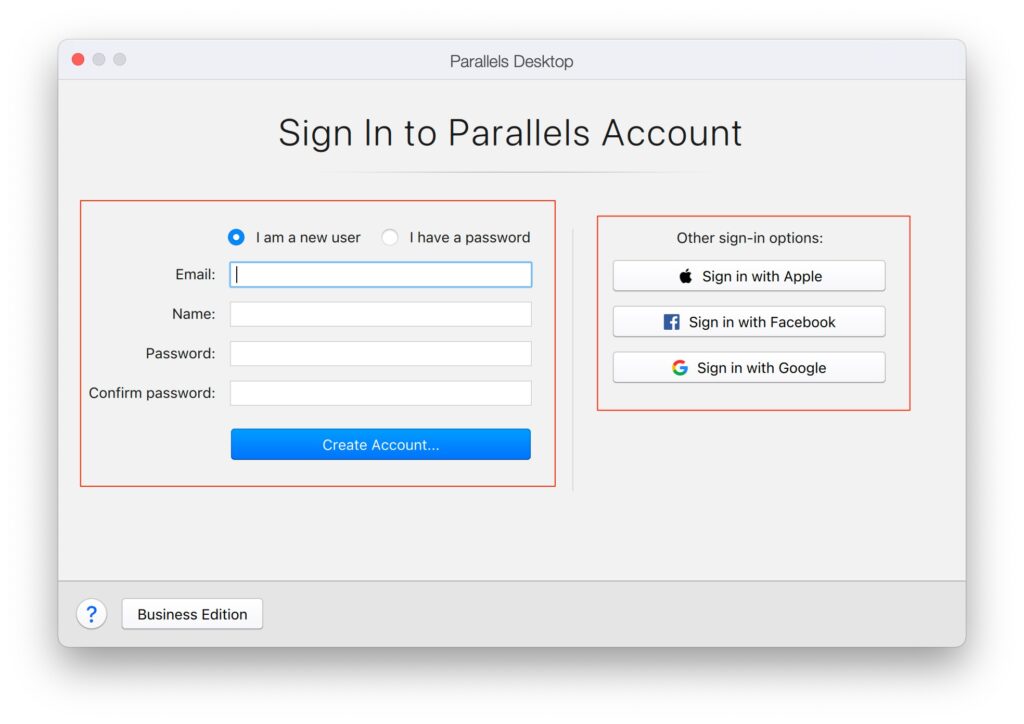
If you don’t have a Microsoft account, sign up quietly to get all the privileges of the Insiders.
Click Sign-In and sign in to download the image. The download in question will be a VHDX file, that is, designed to run on Hyper-V machines, but we can easily convert this image so it can be done for our purposes using some command-line tools.
Download and install UTM from https://mac.getutm.app/. Unlike other free virtualization software, UTM was created for macOS and only for Apple platforms. It is designed completely from the ground up for the new style introduced in Big Sur. UTM looks and feels like a Mac app with all the privacy and security features you expect as well. Under the hood of UTM is QEMU, a decades-old, free, and open-source emulation software that is widely used and actively maintained. While QEMU is powerful, it can be difficult to set up and configure with its plethora of command-line options and flags. UTM is designed to give users the flexibility of QEMU without the steep learning curve that comes with it. Also from https://mac.getutm.app/support/ download the SPICE Guest Tools and QEMU Drivers (Windows) with the download link; they will be useful later.
UTM is basically a GUI interface for QEMU built on top of it, so you don’t need to install QEMU on your macOS system to make it work, but we need to install anyway QEMU on our system to be able to convert the VHDX file in an image edible for UTM. The simpler way to install QEMU on a Mac is to use Homebrew.
Homebrew is The Missing Package Manager for macOS and you can install it following the instructions of the official website: https://brew.sh/. Just open a terminal window and paste this:
/bin/bash -c "$(curl -fsSL https://raw.githubusercontent.com/Homebrew/install/HEAD/install.sh)"
Now, you can install QEMU with this command:
brew install qemu
And finally, we can convert the VHDX file into an image for UTM:
qemu-img convert -p -O qcow2 /Users/YourName/Downloads/Windows11_InsiderPreview_Client_ARM64_en-us_22483.VHDX /Users/YourName/Downloads/Windows11_ARM.qcow2
*Check PATH and FILENAMES on your system.
Now, we can create a Virtual Machine to install Windows 11 ARM on it. Within UTM, select ‘New Virtual Machine’ e change the settings like these:
Architecture: ARM64 (aarch64)
System: QEMU 6.1 ARM Virtual Machine (virt-6.1) *If you have an issue during the installation process, you can try 5.0/5.1/5.2 and revert to 6.1 once installed
Memory: 8192MB (4096MB if your machine has not enough memory)
Also, in the Advanced Settings:
CPU: Default
CPU Cores: 8
Select Force Mutlicore
Under Drives: select Import Drive with NVMe interface and select the image created so as to import the Windows11_ARM.qcow2 but also create a new Removable Drive with a USB interface to load the Guest Tools later.
Once you’ve made all these settings, click save and you should see your brand new ARM virtual machine on the main UTM screen. Now, remove the Windows installer ISO and add the Guest Tools ISO to the CD Rom Drive in UTM by clicking on the drive and then browsing to the SPICE ISO called spice-guest-tools-0.164.2.iso.
Now you are ready to boot the Windows 11 ARM virtual machine and to complete the Windows 11 installation process. Once done, click on the CD-ROM and run the install file spice-guest-tools-0.164.exe to start the Guest Tools installation and make available drivers for UTM to allow Windows 11 to access the Mac network adapters and have a proper Internet connection. The tools also provide you with a better graphical resolution for the virtual screen and some minor improvements.
 x86 machine on an M1 Mac with UTM and QEMU")
How to emulate a Windows 10 (or 11) x86 machine on an M1 Mac with UTM and QEMU
Now that you are UTM and QEMU experts, we can indulge and have fun with some more exotic configurations. For example, we could emulate (yes emulate!) an x86 machine on our ARM Mac. We already tell you that the performances will not be very powerful, but for specific tasks, the machine will keep its usefulness in full.
If you need an emulated Windows x86 machine with acceptable performance, the advice is to turn to older and less demanding versions, such as Windows 7 or – even – XP. You can easily download some ready-go UTM template images from https://mac.getutm.app/gallery/ or get images from the Microsoft website.
Now, we can create a Virtual Machine to install Windows x86 on it. Within UTM, select ‘New Virtual Machine’ e change the settings like these:
Architecture: x86_64
System: Standard PC (Q35 + ICH9, 2009) pc-q35-6.1
Memory: 8192MB (4096MB if your machine has not enough memory)
Also, in the Advanced Settings:
CPU: Intel Core i7 9xx (Nehalem Class Core i7) (Nehalem-v1)
CPU Cores: 4
Select Force Mutlicore
Under Drives: select Import Drive with IDE interface and select the image created so as to import the Windows_x86.ISO (or the Windows.utm template) but also create a new Removable Drive with an IDE interface to load the Guest Tools later. Start the VM and install Windows normally as we did before, also if the VM hangs after installation, turn the VM off and on again.
In the end, replace the Windows installer ISO (or the UTM Windows template) with the SPICE ISO – former spice-guest-tools-0.164.iso – and run spice-guest-tools-0.164.exe.
And we are done.
Thanks to the work of @agraf, @KhaosT, @imbushuo, and others, we have Virtualization.framework working on M1 Macs. These changes have been merged with QEMU v5.2.0 RC3 (will rebase once the final release is out) and integrated with UTM, a brand new QEMU frontend designed in SwiftUI for iOS 14 and macOS 11.

Downloads
- UTM
- Windows for ARM
- Windows 10 ARM.utm
- VirtIO Drivers
Usage
- Install UTM.app to your Applications directory.
- Copy/move
Windows10_InsiderPreview_Client_ARM64_en-us_20231.VHDXtoWindows 10 ARM.utm/Images/. - Double click
Windows 10 ARM.utmto import into UTM. - Click UTM -> Preferences in the menu bar and select «Try to use hardware hypervisor when available».
- By default the VM will allocate 8GB of RAM, you may want to lower that by configuring the VM if your Mac only has 8GB of RAM.
- Run the VM.
Install Network Drivers
These directions were taken from this gist.
-
Mount device drivers by selecting the VirtIO drivers ISO in the main window or from the toolbar.
-
Disable device driver signature enforcement:
Boot Windows, then right click Windows Start button, then select Command Prompt (Admin).
Use BCDEdit to enable test-signed device drivers.
Bcdedit.exe -set TESTSIGNING ONThen reboot Windows.
See here for the details.
-
Install driver:
Once Windows booted again, then right click Windows Start button, then select Device Manager.
In Device Manager, select View menu then Devices by Connection.
Navigate in the device tree, select
ACPU ARM64-based PC,Microsoft ACPI-Compliant System,PCI Express Root Complex, then you will see threeUnknown devicethere. Select the first one.
(There are manyUnknown devicein tree but the first one underPCI Express Root Complexis the VirtIO NIC.)Right click
Unknown devicethen select Update Drivers, then Browse my computer for drivers, then selectD:NetKVMw10ARM64.Click Next to install
Red Hat VirtIO Ethernet Adapter.
Known Issues
BUGCODE_USB_DRIVERBSOD on boot: This happens sometimes and you can just reboot a few times and it will go away. This will be fixed in the next release.
Help & Support
Please report bugs and crashes to Github (after searching) to help improve the project! If you want help or to discuss the project, visit our Discord.
The M1 chip has really taken the market by storm. The MacBooks powered by M1 are some of the best laptops you will ever use. Now, if you are curious how the Windows 10 OS will work on Apple’s silicon, this article is just for you.
There is a way by which you can install Windows 10 on M1 Macs. Today, we are going to show you how to install Windows 10 on M1 Macs. The methods are pretty simple and anyone can easily do it.
Install Windows 10 on M1 Macs Using Parallels Desktop
Setting Up Your Mac
Now that Boot Camp is gone, you can’t run Windows 10 natively on a Mac.
So you will need a virtual machine to run Windows 10 on a Mac device. The best software to do that is Parallels Desktop. It is a virtualization engine that can run ARM-based operating systems in a virtual machine.
First of all, download and install Parallels Desktop on your M1 mac device from this link.

Registering for Windows Insider Program
In order to run Windows 10 using Parallels Desktop, you will need the ARM-based installation image of Windows 10. You can get the ARM image of Windows 10 by registering for Windows Insider Program. It is absolutely free of cost! Click on this link to get started.
Note: It is not mandatory to Register for Windows Insiser Program, but if you do register for it, you will get future updates too.
Downloading the Windows 10 ARM-Based Image
- Once you have successfully registered to the Windows Insider Program, visit the Windows Insider Preview Downloads web page.
- Navigate down and download the Windows 10 ARM Image by clicking on the Windows 10 Client ARM64 Insider Preview button. This will download the VDHX Image.

Installing Windows 10 on M1 Mac
- Once you have successfully downloaded the Windows 10 VDHX image, launch Parallels Desktop on your Mac.
- Click on ‘Continue’.

- You will now see the ‘Create New’ menu. Here click on ‘Install Windows or another OS from a DVD or image file’.

- Now Parallels Desktop will automatically search for the downloaded Windows 10 VDHX file.
- After that, Parallels Desktop will create a virtual machine for you. Now, this might take some time. So be patient.
- Now you will see the Configuration window where you can allocate the memory, number of processors, etc.
- You can click on the ‘Hardware’ tab to assign the memory depending on your requirements. We suggest you allocate half of the resources of the configuration of your mac to the virtual machine.
or you can select the auto setup option, by unchecking the manual configuration option, and let Parallel do the needful.

- Once you have set all the configurations, click on ‘Continue’ to complete the installation on Windows 10.

- Complete the installation.
Setting Up
Once the installation is complete, you will be asked to log in with your Parallels account. You can create an account if you haven’t already.
Once you do that, you will be able to run Windows 10 on your Mac. You can update Windows 10 to get everything you need. After that, you can download all of your favorite apps and games.

Install Windows 10 on M1 Macs Using UTM
Installing UTM on Your Mac
Using UTM you can create a Windows 10 virtual machine that can be used to run Windows 10 on your M1 Mac. To do that, you need to install UTM on your Mac. You can simply download and install UTM from the Apple Store or you can also download UTM from the official website.
Note: We will suggest you to donwload from official website only, as you can download dmg file from official site for free, whereas you will have to pay $9.99 in App Store.
Setting Up Your Mac
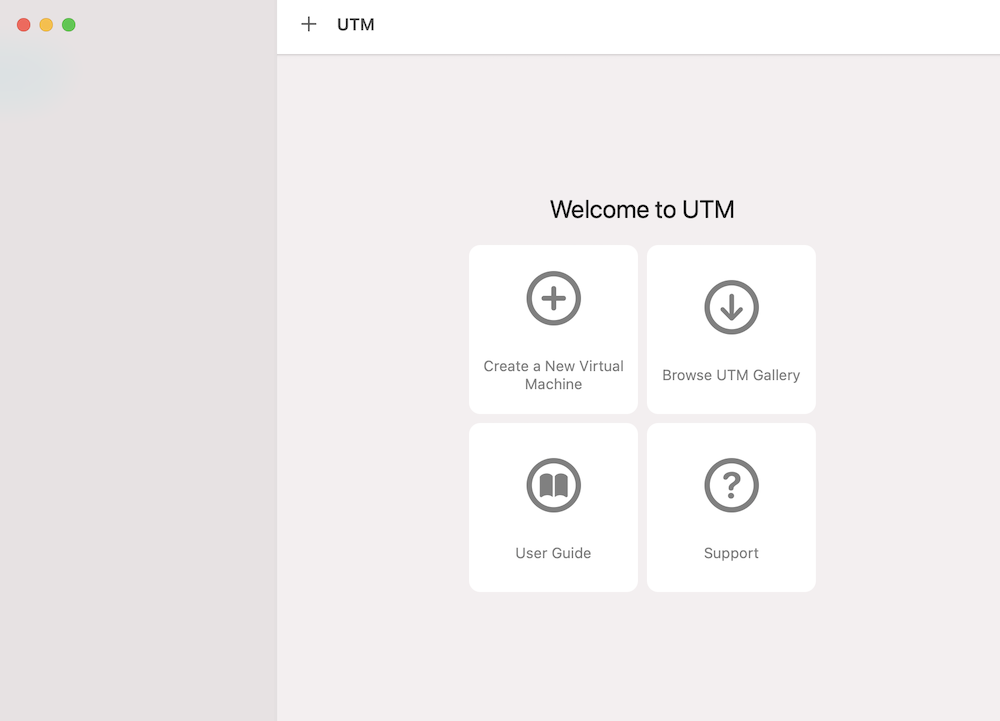
Once you have installed UTM on your Mac, launch the application. You will the interface with three options: Create a New Virtual Machine, Browse UTM Gallery, and User Guide.

Here click on Browse UTM Gallery and you will see a web page with links to download pages for a number of virtual machines.
Here click on Windows 10. Remember, you will need the Windows Insider membership in order to download the Windows 10 ARM-based image.

You will see a web page with details about what is needed: an Apple Silicon Mac, UTM for Mac, Windows for ARM, and SPICE Guest Tools. Make sure to download all the files before you go on to create a virtual machine. In this case, you will be required to download Windows for ARM and SPICE Guest Tools.

Creating a Virtual Machine
Step 1: Once you have downloaded all the required files. Open UTM and click on Create a New Virtual Machine.

Step 2: Here give the Name and Style to your new VM.

Step 3: Now go to the ‘System’ tab and select ARM64 (aarch64) as the architecture.
Step 4: Assign at least half of your Mac’s memory to the virtual machine.

Step 5: Click on the ‘Drives’ tab. Here click on the ‘Import Drive’ option.

Step 6: Select the Windows 10 VDHX file that you have downloaded.
Step 7: Select NVMe interface for the drive.

Step 8: Now click on the ‘New Drive’ option and select ‘USB’ interface. Then click on ‘Create’.

Step 9: Now you will see Windows Disk Image and the virtual USB CD/DVD Drive are listed on the Drives tab. Click on Save.
Step 10: You will now see Windows 10 Virtual Machine on the left side menu of UTM. Click on the Windows 10 Virtual Machine.
Step 11: On the right side, you will see CD/DVD column as ‘(empty)’. Click on the bottom arrow to open the drop-down menu.
Step 12: Click on ‘Browse’. Select the SPICE Guest Tools ISO file that you downloaded. Open it and it will be available to the Virtual Machine.
Step 13: Once you have done this, click on the big black play button on the right-side menu.
Step 14: Now this will start Windows 10 installation. Complete the installation and then you are good to use Windows 10 on your M1 Mac.
Finishing the Setup Process
Once that your Windows 10 virtual machine is running on your M1 Mac, Open the file explorer.
Now go to the CD Drive(D:).

Click on the SPICE Guest Tools application. Grant all the permissions and this will install all the drivers on your Windows 10 Virtual Machine.
That’s it and now you can enjoy Windows 10 to the fullest on your M1 Mac.
Closing Phrase – Install Windows 10 on M1 Mac
So that was all about how to install Windows 10 on M1 Macs. You can do it and enjoy Windows 10 even better on the fast M1 Macs. In case of any difficulty, feel free to reach out to us.
Also, Read: WWDC 2021: macOS Monterey, iOS 15, iPadOS
Your shiny and speedy new Apple Silicon Mac is missing something – the ability to run virtual machines. While you might be spending most of your time in macOS 11 Big Sur, your job might require you to use Windows-only apps, Perhaps you need a Linux VM for development work. UTM (which I believe stands for Universal Turing Machine) is an open source virtual machine environment.
UPDATE (July 9, 2021): Parallels Desktop now runs on Apple Silicon, a solution that was not available in March of 2021 when this article was first published. VMWare has pledged an Apple Silicon version of Fusion, but it won’t support Windows virtual machines! There’s still no word on whether the free VirtualBox VM environment will ever be updated to run on Apple Silicon.
That’s why I was happy to see that there is a VM environment that works on M1 Macs – UTM. It’s free to download or $9.99 on the Mac App Store. UTM also works on “the other Apple Silicon”, with versions of both iOS and iPadOS. If you’ve ever had a burning desire to run Windows on an iPhone or iPad, UTM does the job. However, your devices must be running iOS 11 – 13; iOS 14 requires a jailbreak. Let’s see an example of how UTM works on M1 Macs.
Download UTM
It’s quite simple to download UTM for Mac. To download the app you go directly to the app download page and either click the Download button or click the Mac App Store button to pay $9.99 for the app.
Why would you want to pay $9.99 when the app is free? Because you’ll get automatic updates just like any other Mac app downloaded from the Mac App Store. Your purchase also funds the future development of UTM. I would suggest downloading and using UTM for Mac for free; if you end up using it regularly for work or pleasure, purchase it.
Install UTM
If you purchased UTM from the Mac App Store, installation is done for you. If you download the app directly, a disk image file named UTM.dmg appears in your download folder. Open it to mount the disk image. Press the Command Key, then drag the UTM application icon from the disk image to the Applications folder.
Launch UTM
That was easy, wasn’t it? Now launch UTM, and a screen similar to this appears:
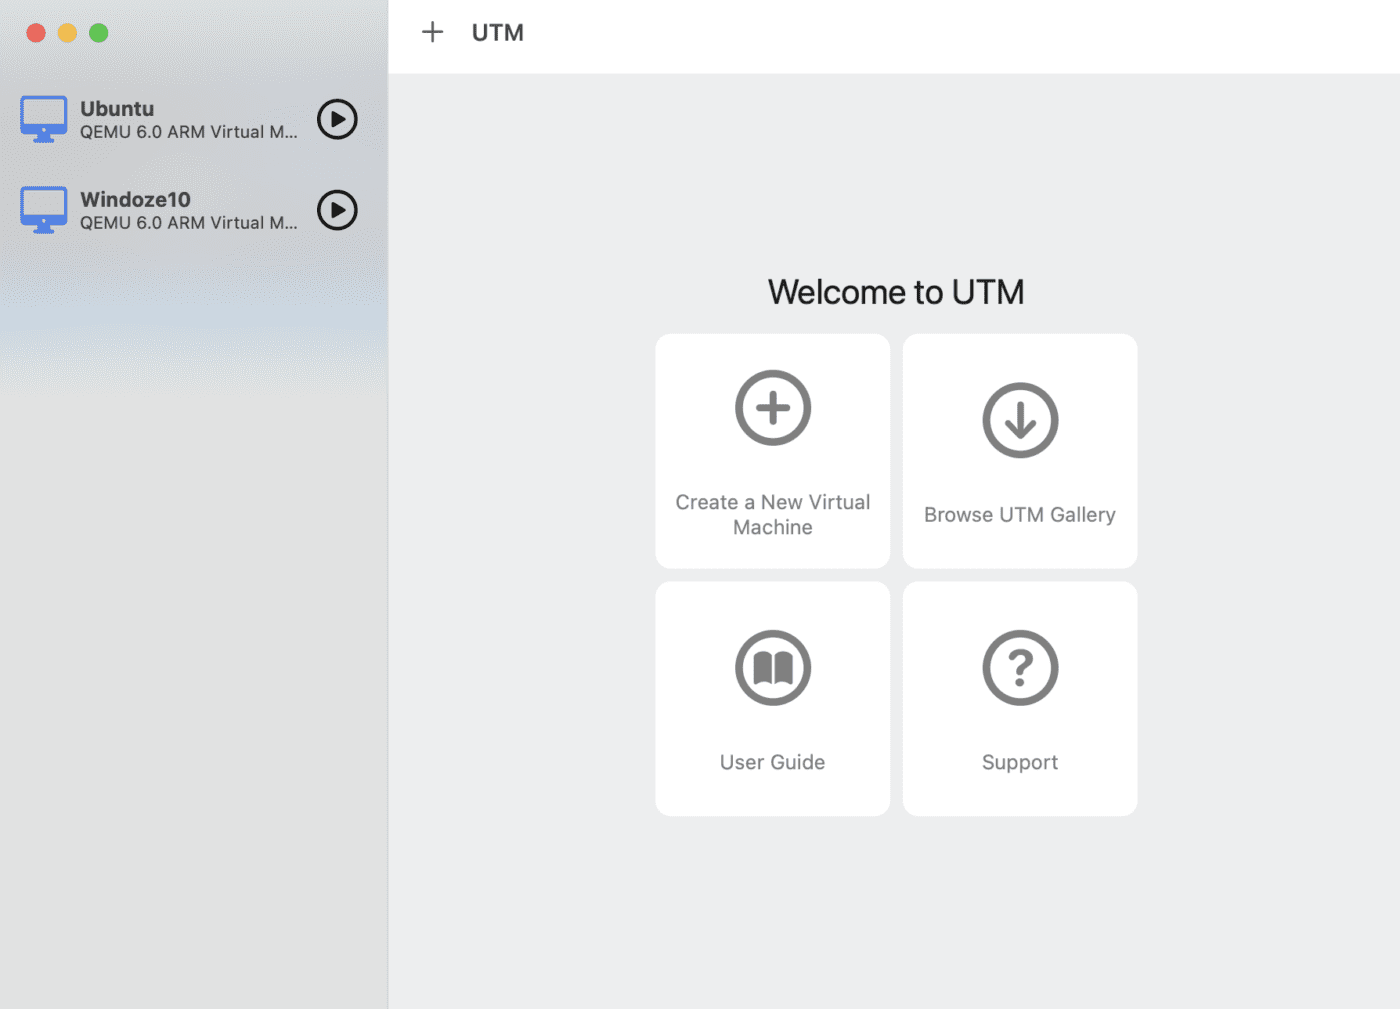
You’ll notice that this startup screen has four buttons: Create a New Virtual Machine, Browse UTM Gallery, User Guide and Support. Clicking the User Guide button launches a web page in your default browser displaying a succinct user guide.
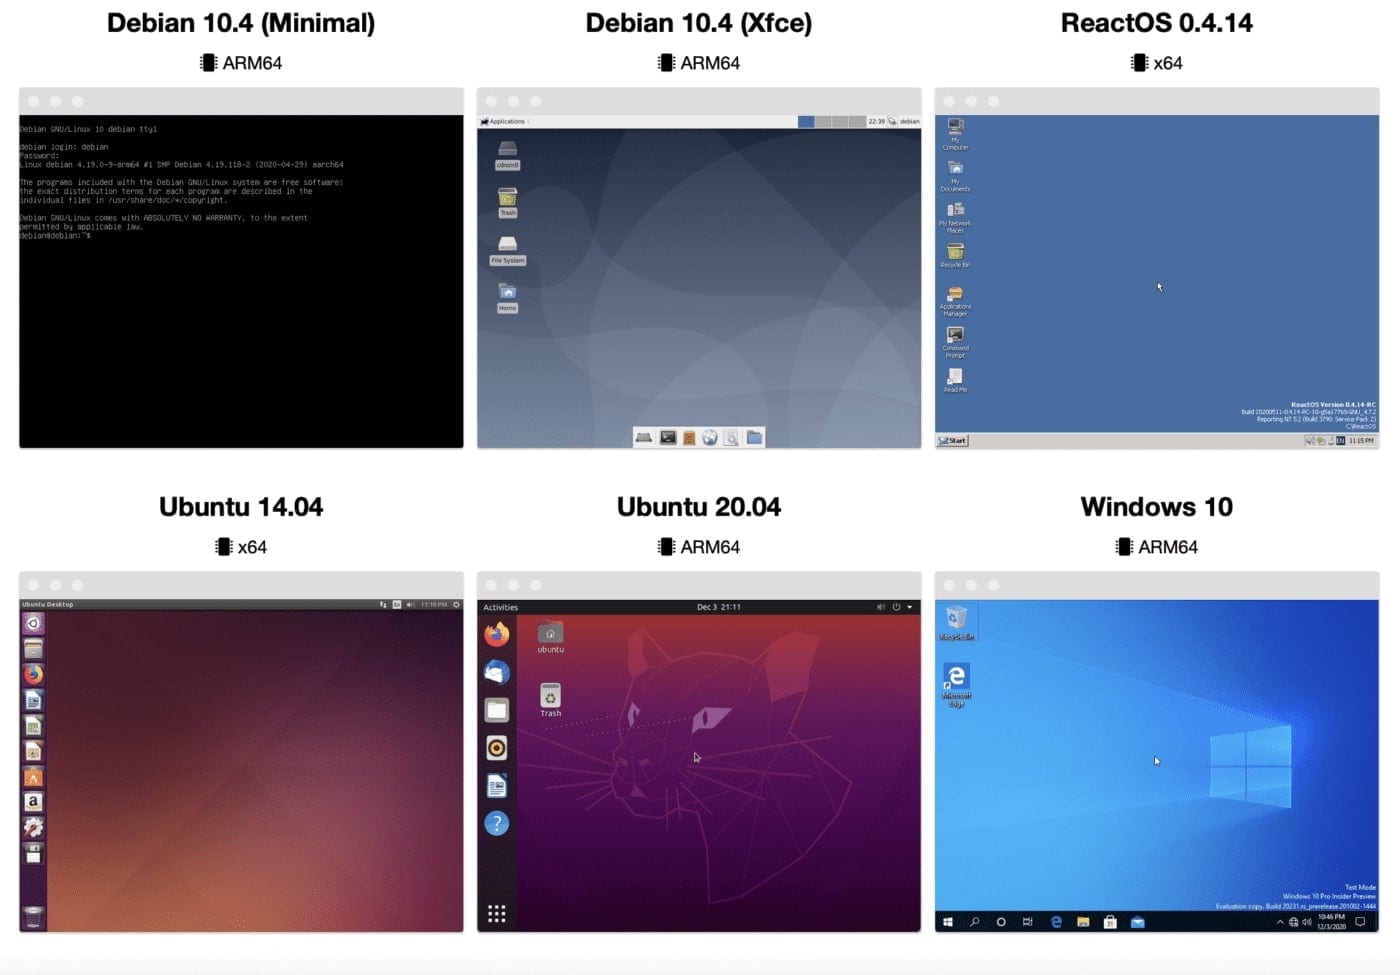
Probably the most useful button for new UTM users is Browse UTM Gallery. Click this to display a web page with links to download pages for a number of virtual machines (screenshot above). At this time, ARM native VMs are available for:
- ArchLinux
- Debian 10.4 (Custom i3, LDXE, Minimal or Xfce)
- ReactOS 0.4.14
- Ubuntu 20.04
- Windows 10 (requires free membership in the Windows Insider Program)
Creating a Windows 10 Virtual Machine with UTM
As an example, I’ll be creating a Windows 10 virtual machine. Click Windows 10 in the Gallery to display a web page showing requirements. Those consist of an Apple Silicon Mac, UTM for Mac, Windows for ARM, and SPICE Guest Tools. Links to the software components appear in the Gallery. Download each file to your Mac prior to starting the installation.
The Windows link downloads a VHDX (Hyper-V Virtual Hard Disk) with the installer. SPICE Guest Tools are a collection of utilities and drivers to aid running Windows on Apple Silicon.
UPDATE: In a previous version of this article, UTM booted from the VHDX file to install Windows. There’s a new critical step — that file must be converted to QCOW2 format. Here’s what the UTM team had to say about the conversion (from https://mac.getutm.app/gallery/windows-10-arm):
Due to an issue with QEMU handling of VHDX images, sometimes Windows will be corrupted from normal usage. This would result in BSOD or random application crashes/errors. To work around this issue, it is recommended that you convert the VHDX image to a QCOW2 image. Currently, UTM does not provide this functionality in the UI so you have to do it directly from QEMU.
- Install Homebrew if you do not have it already.
- Run
brew install qemu - Run
qemu-img convert -p -O qcow2 /path/to/Windows10_InsiderPreview_Client_ARM64_en-us_21286.VHDX /path/to/output/Windows10_InsiderPreview_Client_ARM64_en-us_21286.qcow2replacing the paths with your own. - Use the QCOW2 image with UTM. It is recommended you do this with a fresh VHDX from Microsoft in case your image was already corrupted.
Now comes the fun part! With UTM open on your M1 Mac, click the Create a New Virtual Machine button. I gave the VM the name “Windows 10”, added a note that this is “Windows 10 on Apple Silicon”, and added an optional operating system icon (see image below).
Next, click the System tab. Here, select ARM64 (aarch64) as the architecture, and select at least half of your system’s memory for the virtual machine. For an M1 Mac, that can be as much as 8GB (8192MB).
UPDATE: Note that you should use QEMU 6.0 ARM Virtual Machine (alias of virt-6.0) (virtual) rather than the 5.2 version shown below.
Connecting the Windows Drive
UPDATE: Now click the Drives tab. Click the Import Drive button, then navigate to the Windows 10 QCOW2 file you downloaded earlier. Open it, then select NVMe as the Interface to the drive (important – many people neglect this important step, resulting in boot errors!)
We need to add one more drive – a virtual CD/DVD drive to read ISO image files. Click New Drive, then add a removable drive with a USB interface (image below):

Click “Create”. The Windows Disk Image and the virtual USB CD/DVD Drive appear on the Drives tab. Click Save.
Add the SPICE Guest Tools ISO as a CD/DVD
You now see the Windows 10 virtual machine in the left sidebar of UTM. Click it, and on the right side of the screen, you’ll see the information. CD/DVD appears as “empty” – click on it and select Browse. Now find the SPICE Guest Tools ISO file that was downloaded earlier, select it, and Open it to make it available to the virtual machine (image below).

Install Windows
Ready to rock and roll? Click that big button in the middle of the virtual machine window (the “play” triangle in the black circle).
Sit back and watch as the Windows installer goes through its processes. You’ll be asked to select your region – in my case, the United States was selected, so I clicked Yes to continue. Note that you might not actually see the cursor on the Windows installer – if that’s the case, click the cursor button in the toolbar to make the cursor visible. You can also hold down the control and option keys to make the cursor visible in Windows.
Next, Windows wants to know if your keyboard layout is correct. Mine was listed as US, so I clicked Yes. You’ll be asked if you wish to add a second keyboard layout. I chose to skip this step.
Windows also wants you to connect to the Internet…yet there is no way at this point to actually select a Wi-Fi network. Click the “I don’t have Internet” link and continue the installation. Within a minute or so, the usual Windows 10 desktop appears:

Run the SPICE Guest Tools installer application
To load drivers and actually be able to do some useful things with the Windows 10 virtual machine, click on the File Explorer button (the file folder icon in the bottom toolbar – see below). Click the CD Drive (D:), and then double click on the spice-guest-tools-0.164 (version number might be different) application. Allow the application to write to your “Windows machine” and let it complete the installation of drivers.
This installs drivers you need for an Internet connection…although Windows may still tell you there’s no connection.
Sharing Files with your Mac
I’m not going to show you how to do everything with Windows, as where’s the fun in that? 😀 But there is one good thing to know, and that’s how to share files with your Mac (the “host” machine).
Shut down your Windows virtual machine, then with UTM running and the Windows VM selected, click on the Sharing tab. Click Enable Directory Sharing, then click Save.

You’ll see Shared Directory listed now under the idle virtual machine. Click it to browse for a Mac directory (folder) you wish to share with the Windows VM. At this point, you can launch the virtual machine again.
How Well Does UTM Work?
There are some little quirks you’ll run into using UTM and Windows. For example, it seemed like the cursor liked to disappear. That was usually resolved by using the control-option key combo to make it visible. I also noticed that after shutting down the Windows VM using the Windows “Shut Down” command, I’d lose the cursor completely. The only way I found to resolve that was to use Command ( ⌘ )-Option-Esc and Force Quit UTM.
Compared to most Windows virtual machines I’ve used, UTM and the ARM64 version of Windows seemed lightning fast. The UTM developers do mention that the app doesn’t do GPU emulation, so it’s probably not wise to try to play graphics-intensive games.
UPDATE: Fast scrolling of any window in the virtual machine also produces a somewhat pixellated image. This is normal.
Ubuntu Server for ARM
As a second experiment, I installed Ubuntu Server for ARM from the UTM Gallery. If you have followed the Ubuntu Server on Mac mini series, you’ll know that it was a rather convoluted and time-consuming process to get it running. Not so with UTM and the instructions on how to install Ubuntu Server for ARM.
I installed the server quickly following the directions, then install Ubuntu Desktop as well to give the virtual machine a friendly non-command-line interface. In less than 15 minutes, everything was up and running:
To be honest, the Ubuntu virtual machine installation went much smoother than the Windows installation, primarily because Ubuntu Linux “knew” immediately how to resize the VM screen to fit the MacBook Air at its highest resolution. The Mac mini server was no slouch in terms of speed, but the virtual machine on Apple Silicon is insanely fast.
Anyone with an Apple Silicon machine – the M1 MacBook Air, MacBook Pro, or Mac mini who has a need to run another operating system needs to take a look at UTM (especially since Virtualbox is not yet an option). It’s not perfect and can be a little finicky during setup, but with a little patience, you can be running Windows 10, Linux, or other operating systems at full speed.
Related Links

Steve has been writing about Apple products since 1986, starting on a bulletin board system, creating the first of his many Apple-related websites in 1994, joining the staff of The Unofficial Apple Weblog in 2008, and founding Apple World Today in 2015. He’s semi-retired, loves to camp and take photos, and is an FAA-licensed drone pilot.