Learn how to correctly configure L2TP to avoid any errors on your PC
by Elena Constantinescu
Elena started writing professionally in 2010 and hasn’t stopped exploring the tech world since. With a firm grasp of software reviewing and content editing, she is always trying… read more
Updated on October 28, 2022
Reviewed by
Edgar Nicov

Since the dial-up Internet era, Edgar was interested in online resources. From forums to e-commerce websites, he started digging into how those resources could generate revenue. Today he… read more
- If you cannot connect to L2TP VPN on Windows 10, your VPN or OS is at fault.
- However, if it’s a VPN server-side issue, you must fix it there or contact the server admin.
- Our complete guide shows how to fix L2TP VPN connection issues on Windows 10 one step at a time.
- We prepared 12 solutions and 1 better alternative for your PC to prevent recurring problems.

If you created an L2TP VPN connection on Windows 10 but cannot connect, you can fix this problem by trying the workarounds in this guide.
L2TP is one of the most secure VPN protocols. It supports 256-bit encryption, which is highly recommended by privacy experts.
It’s meant to offer good VPN speed and a stable connection, so if your configuration isn’t working, make sure to tweak your setup.
Why is my L2TP VPN not working?
A failed L2TP VPN connection could occur due to several reasons, such as:
- Invalid username and password
- Inaccurate server name or address
- Wrong certificate or pre-shared key
- Bad proxy settings
- Faulty encryption settings on the server side
- Incorrect authentication settings
- The connection is blocked by your firewall
- The VPN server, client, or both are behind NAT
Our complete step-by-step guide below shows how to fix L2TP VPN connection issues on Windows 10. If possible, you should also check the L2TP connection settings on the VPN server.
Quick Tip:
Use a premium VPN instead. If you keep having problems with your current configuration, consider using a dedicated VPN app that’s way easier to configure.
ExpressVPN is a great alternative that supports L2TP/IPsec. The only thing you have to do is to install it and select the protocol in one click from settings.
ExpressVPN
Connect to ExpressVPN using its L2TP/IPsec protocol and get high-speed connections without any errors!
How do I fix L2TP VPN connection issues on Windows 10?
1. Check the username and password
- Right-click the Start button and go to Network Connections.
- Click VPN on the left side.
- Select your L2TP VPN connection and click Advanced options.
- Press Edit.
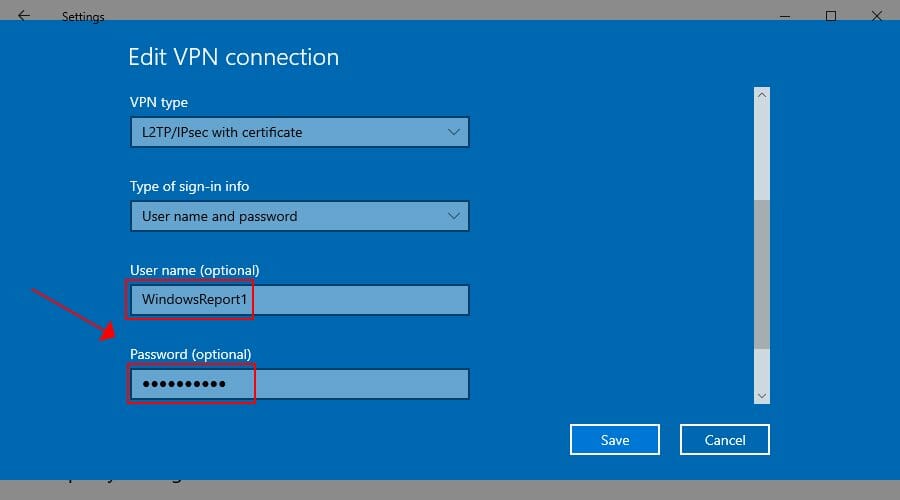
- Retype your User name and Password.
- Click Save.
If your entered your VPN credentials wrong or if they were changed by the VPN server administrator in the meantime, then a simple update to your username and password should help if you cannot connect to L2TP VPN on Windows 10.
2. Check the server name or address
- Go to VPN settings and choose the L2TP VPN profile.
- Click Advanced options and then Edit.
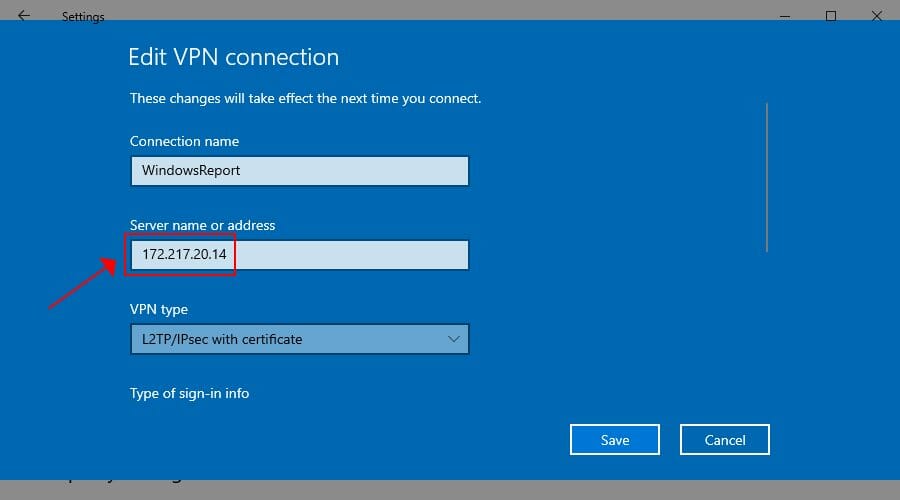
- Retype your Server name or address or try a different one.
- Click Save.
The L2TP VPN connection problem could be caused by a simple typo made to your server name or address, so make sure to re-enter this information. Otherwise, the remote L2TP VPN server might not be working. In that case, you can try connecting to another server if possible.
3. Check the certificate or pre-shared key
- Go to VPN settings and select your L2TP VPN connection.
- Click Advanced options and then Edit.
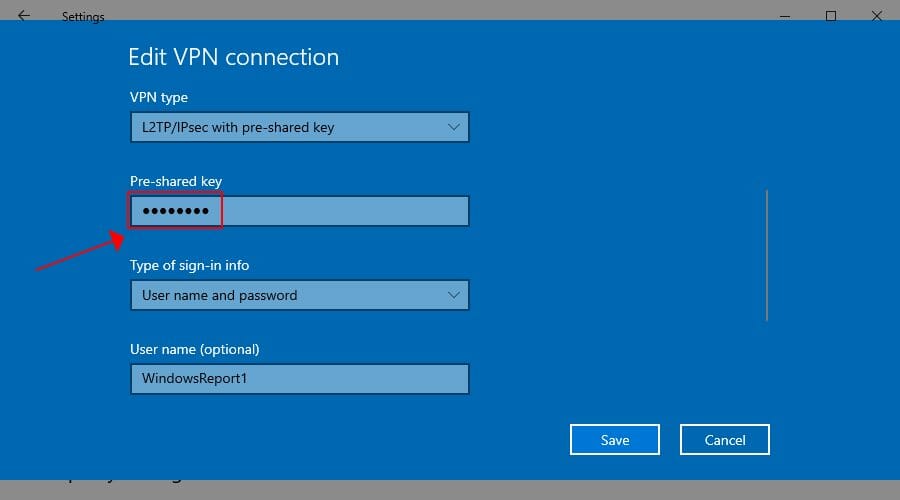
- Retype your Pre-shared key.
- Click Save.
Similar to the username and password situation, the pre-shared key you initially typed could have been wrong or changed by the VPN server administrator. After adding the new pre-shared key, try to connect to the L2TP VPN again to see if it works now.
However, if there’s an issue with the L2TP VPN certificate, there’s nothing you can do on the VPN client side. You have to either verify the certificate on the server or contact the administrator for help.
Alternatively, try switching between L2TP/IPsec with certificate and pre-shared key, in case the server admin changed the VPN type.
4. Check the VPN proxy settings
- Go to VPN settings and click your L2TP VPN profile.
- Select Advanced options.
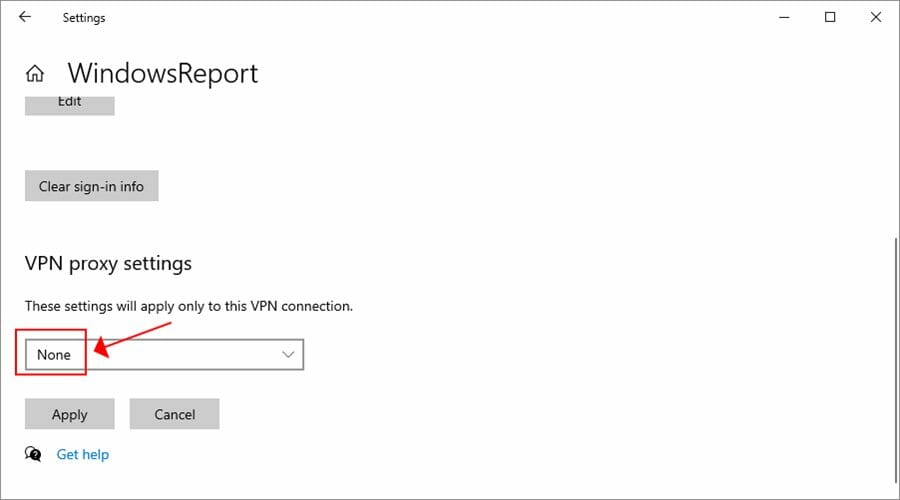
- Scroll down to VPN proxy settings
- If you need to redirect your VPN connection to a proxy server, make sure the proxy settings are correct.
- Otherwise, remove the proxy by selecting None.
- Click Apply.
Even if you need to use a VPN proxy server, disable it temporarily and try to connect to L2TP VPN again to see if it’s really the proxy’s fault. It might not be working properly.
In that case, you should fix proxy server connection issues, use another proxy, or keep it disabled.
5. Check the encryption settings
- Right-click the Start button and go to Network Connections.
- Click Change adapter options.
- Right-click your VPN connection and select Properties.
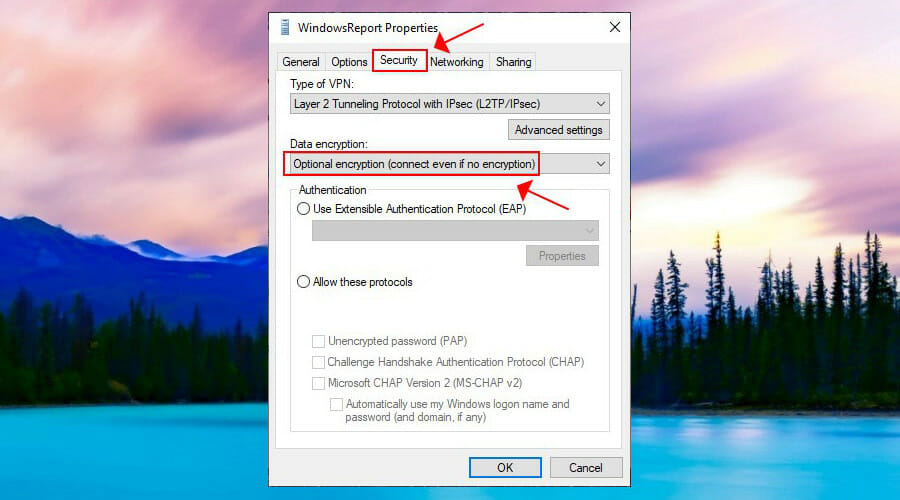
- Switch to the Security tab.
- Set Data encryption to Optional encryption (connect even if no encryption).
- Click OK.
If the VPN server has encryption issues, this could be the reason why you cannot connect to L2TP VPN on Windows 10. By making the encryption optional, you might be able to temporarily solve this problem.
However, encryption is a critical component of a VPN connection, so you should contact the VPN server administrator to fix this issue as soon as possible.
6. Check the authentication settings
- Go to Network Connections > Change adapter options.
- Right-click your VPN and go to Properties.
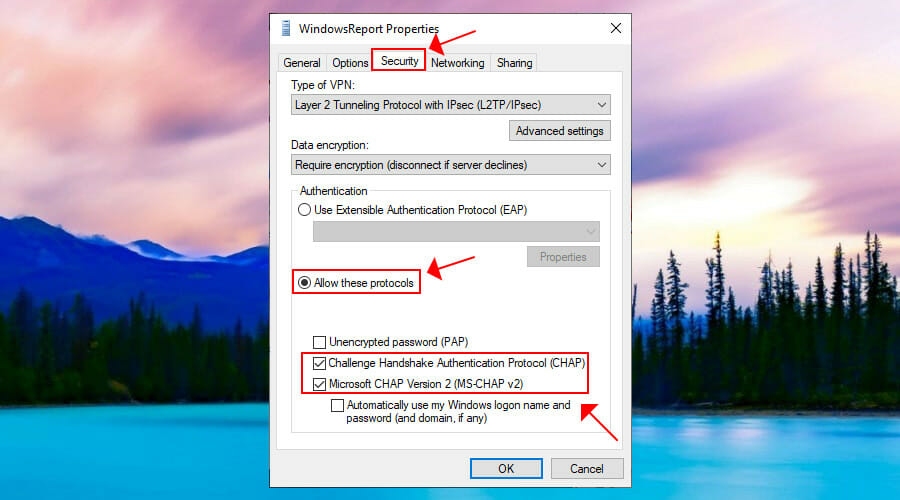
- Switch to the Security tab.
- At Authentication, select Allow these protocols.
- Enable Challenge Handshake Authentication Protocol (CHAP).
- Enable Microsoft CHAP Version 2 (MS-CHAP v2).
- Click OK.
L2TP connection issues are typically caused by invalid VPN authentication settings. Try the configuration above to see if it works. Otherwise, you should get in touch with the VPN server administrator and request assistance.
7. Open L2TP ports in your firewall
- Click the Start button, type firewall, and select Firewall & network connection.
- Click Advanced settings and Yes if prompted by UAC (User Account Control).
- Select Inbound Rules on the left side.
- Click New Rule on the right actions panel.
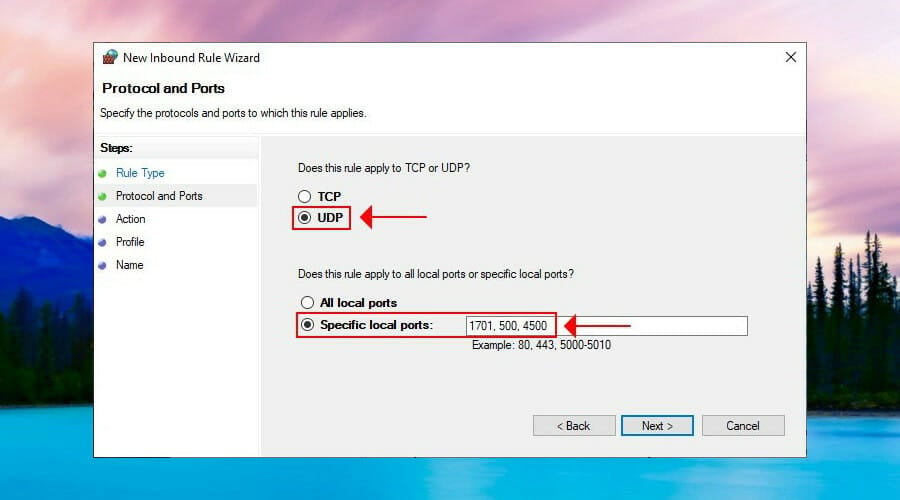
- At Rule Type, select Port.
- At Protocol and Ports, select UDP with Specific local ports and type 1701, 500, 4500.
- Set Action to Allow the connection if it is secure.
- Enter any rule name and click Finish.
- Go to Outbound Rules and do the same.
If your L2TP VPN connection gets blocked by the firewall, then you have to open the correct ports for sending and receiving network traffic. However, the firewall configuration above should also be made on the VPN server.
This solution can help fix The connection was terminated by the remote computer before it could be completed, also known as VPN error 628.
8. Make an easy tweak to the registry
- Press Ctrl+R, type regedit, hold down Shift, and press Enter.
- Click Yes if prompted by User Account Control.
- Delete what’s inside the address bar on top.
- Paste the following address and press Enter:
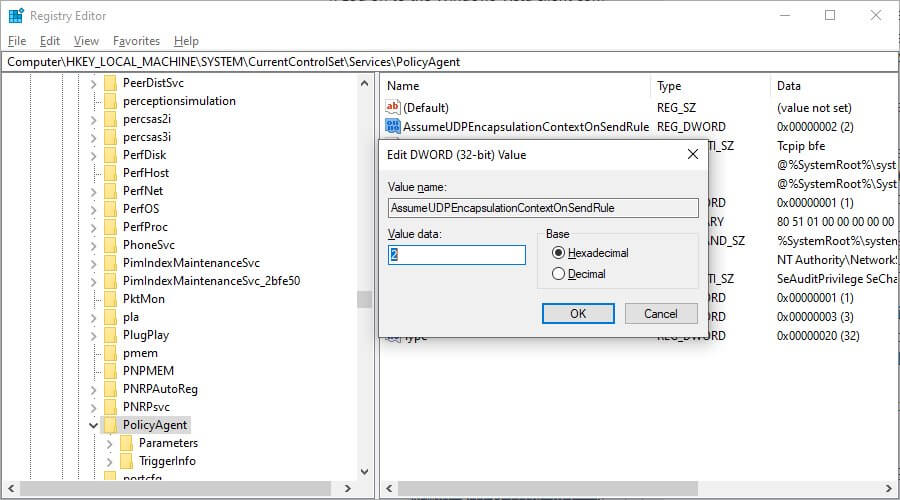
HKEY_LOCAL_MACHINESYSTEMCurrentControlSetServicesPolicyAgent - Open Edit menu > New and click DWORD (32-bit) Value.
- Set AssumeUDPEncapsulationContextOnSendRule as the value name.
- Right-click AssumeUDPEncapsulationContextOnSendRule and press Modify.
- Set Value data to 2.
- Set Base to Hexadecimal.
- Click OK.
- Next, paste this address and hit Enter:
HKEY_LOCAL_MACHINESYSTEMCurrentControlSetServicesRasMan - Open Edit menu > New and click DWORD (32-bit) Value.
- Set ProhibitIpSec as the value name.
- Right-click ProhibitIpSec and click Modify.
- Set Value data to 0.
- Set Base to Hexadecimal.
- Click OK.
- Restart your computer.
If the VPN server, client, or both as behind a NAT, such as a home router, you can use the registry tweaks above to fix the NAT traversal problem.
A faster way to tweak the registry and make Windows 10 connect to L2TP VPN by entering a couple of lines of code in Command Prompt (look inside the article to see how).
9. Reinstall the network adapters
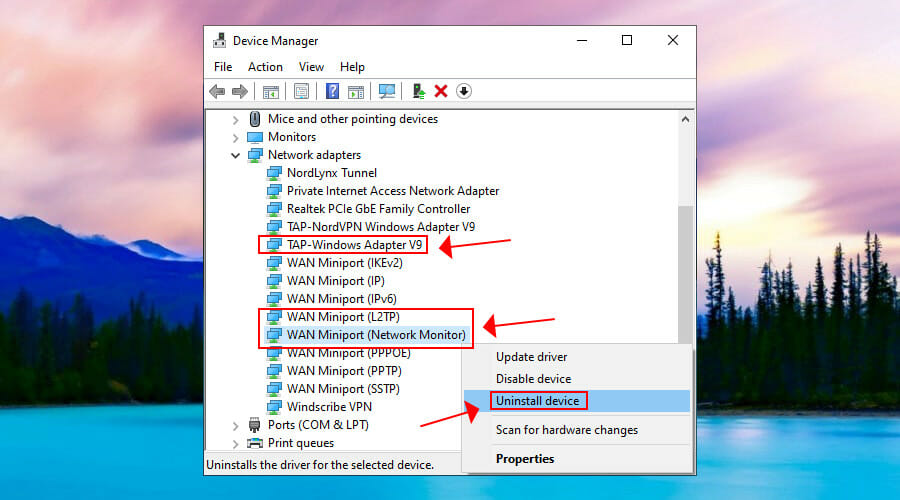
- Right-click the Start button and go to Device Manager.
- Expand the Network adapters menu.
- Right-click TAP-Windows Adapter V9 and select Uninstall device.
- Leave Delete the driver software for this device unchecked.
- Click Uninstall.
- Do the same for WAN Miniport (L2TP) and WAN Miniport (Network Monitor).
- Open the Action menu and select Scan for hardware changes.
If you uninstall the network adapters but without also removing the driver software, Windows will automatically reinstall them.
Fixing Windows 10 network adapter problems is a practical way to handle the L2TP VPN connection issue.
It can also help fix the L2TP connection attempt failed, also known as VPN error 789.
10. Update the network drivers
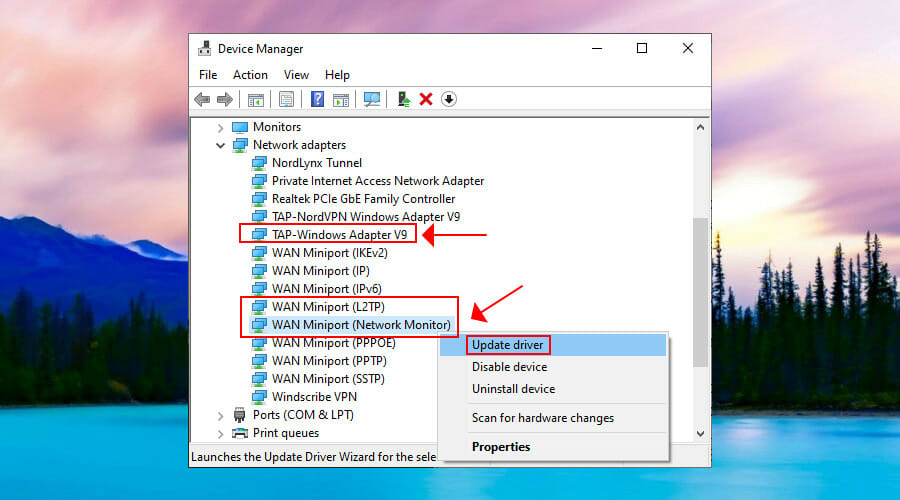
- Go to Device Manager and expand the Network adapters menu.
- Right-click TAP-Windows Adapter V9 and select Update Driver.
- Choose Search automatically for updated driver software.
- Follow the on-screen instructions.
- Do the same for WAN Miniport (L2TP) and WAN Miniport (Network Monitor).
If you receive The best drivers for your device are already installed message, you can look for newer driver versions in Windows Update, install the drivers manually, or find and install newer device drivers automatically using driver update tools.
11. Restart the IPsec service
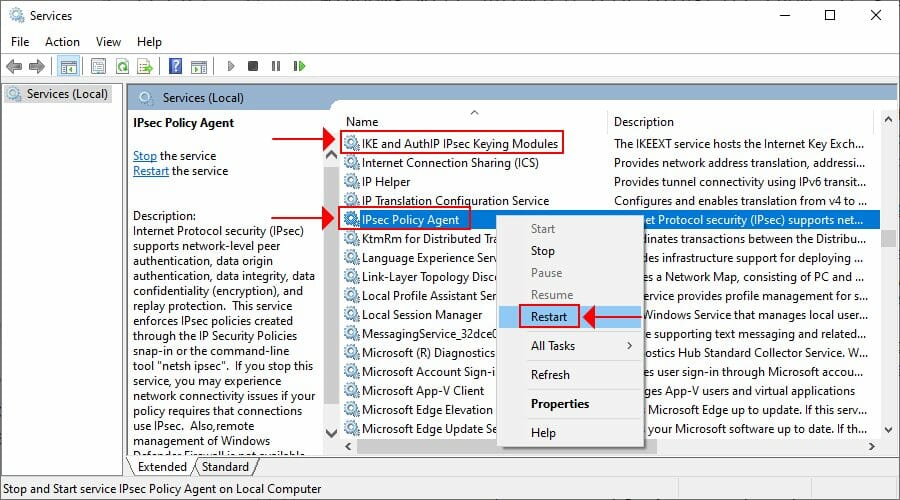
- Click the Start button, type Services, and press Enter.
- Find and right-click IKE and AuthIP IPsec Keying Modules.
- Press Restart (or Start if the service is stopped).
- Do the same for IPsec Policy Agent.
Windows 10 uses L2TP in combination with IPsec to establish a secure tunnel. If there’s a problem with IPsec, not with the L2TP, then you can restart its service.
It’s also a good way to fix VPN error 789.
12. Turn off Xbox Live Networking Service
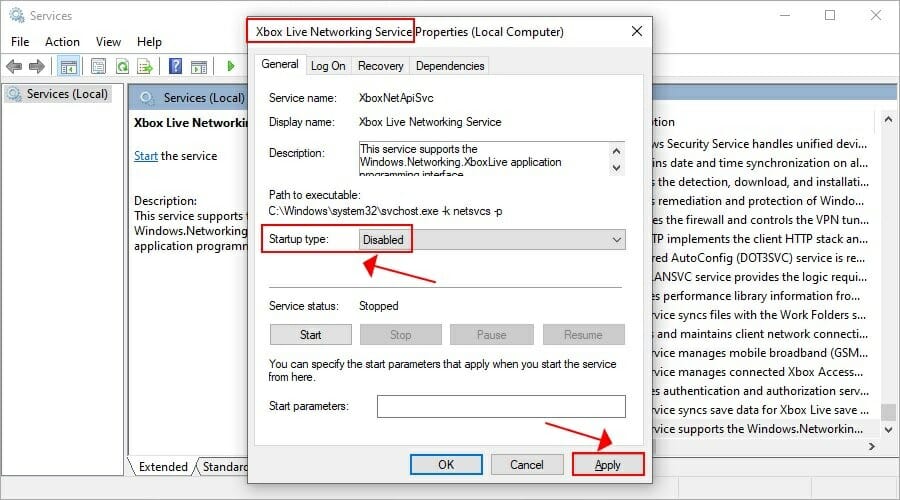
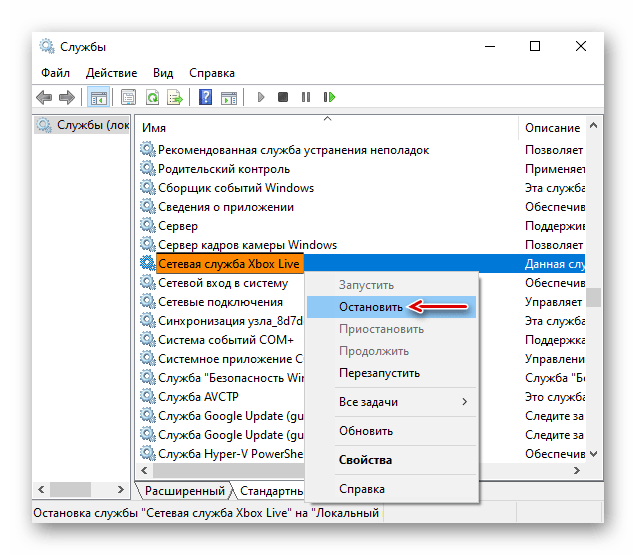
- Go to Services and locate Xbox Live Networking Service (last on the list).
- Double-click this entry and set Startup type to Disabled.
- Click Apply.
- Restart your PC.
Xbox Live Networking Service uses the IPsec protocol for chatting and multiplayer features. However, the Windows 10 L2TP VPN also uses IPsec. And many ISPs don’t permit two or more simultaneous IPsec connections.
Therefore, you can disable Xbox Live Networking Service to fix this problem, especially if you don’t play Xbox multiplayer games. This is also a workaround to fix VPN error 809.
In conclusion, the solutions above should help you if you cannot connect to L2TP VPN on Windows 10. However, if you don’t want to worry about such problems anymore, we suggest skipping to the 13th step and using ExpessVPN instead. It’s also the best VPN for Google Chrome.
Your connection is not secure — websites you visit can find out your details:

- Your IP Address:
loading

Companies can sell this information, alongside your location and internet provider name, and profit from it by serving targeted ads or monitoring your data usage.
We recommend Private Internet Access, a VPN with a no-log policy, open source code, ad blocking and much more; now 79% off.
![]()
Newsletter
Learn how to correctly configure L2TP to avoid any errors on your PC
by Elena Constantinescu
Elena started writing professionally in 2010 and hasn’t stopped exploring the tech world since. With a firm grasp of software reviewing and content editing, she is always trying… read more
Updated on October 28, 2022
Reviewed by
Edgar Nicov
Since the dial-up Internet era, Edgar was interested in online resources. From forums to e-commerce websites, he started digging into how those resources could generate revenue. Today he… read more
- If you cannot connect to L2TP VPN on Windows 10, your VPN or OS is at fault.
- However, if it’s a VPN server-side issue, you must fix it there or contact the server admin.
- Our complete guide shows how to fix L2TP VPN connection issues on Windows 10 one step at a time.
- We prepared 12 solutions and 1 better alternative for your PC to prevent recurring problems.
If you created an L2TP VPN connection on Windows 10 but cannot connect, you can fix this problem by trying the workarounds in this guide.
L2TP is one of the most secure VPN protocols. It supports 256-bit encryption, which is highly recommended by privacy experts.
It’s meant to offer good VPN speed and a stable connection, so if your configuration isn’t working, make sure to tweak your setup.
Why is my L2TP VPN not working?
A failed L2TP VPN connection could occur due to several reasons, such as:
- Invalid username and password
- Inaccurate server name or address
- Wrong certificate or pre-shared key
- Bad proxy settings
- Faulty encryption settings on the server side
- Incorrect authentication settings
- The connection is blocked by your firewall
- The VPN server, client, or both are behind NAT
Our complete step-by-step guide below shows how to fix L2TP VPN connection issues on Windows 10. If possible, you should also check the L2TP connection settings on the VPN server.
Quick Tip:
Use a premium VPN instead. If you keep having problems with your current configuration, consider using a dedicated VPN app that’s way easier to configure.
ExpressVPN is a great alternative that supports L2TP/IPsec. The only thing you have to do is to install it and select the protocol in one click from settings.
ExpressVPN
Connect to ExpressVPN using its L2TP/IPsec protocol and get high-speed connections without any errors!
How do I fix L2TP VPN connection issues on Windows 10?
1. Check the username and password
- Right-click the Start button and go to Network Connections.
- Click VPN on the left side.
- Select your L2TP VPN connection and click Advanced options.
- Press Edit.
- Retype your User name and Password.
- Click Save.
If your entered your VPN credentials wrong or if they were changed by the VPN server administrator in the meantime, then a simple update to your username and password should help if you cannot connect to L2TP VPN on Windows 10.
2. Check the server name or address
- Go to VPN settings and choose the L2TP VPN profile.
- Click Advanced options and then Edit.
- Retype your Server name or address or try a different one.
- Click Save.
The L2TP VPN connection problem could be caused by a simple typo made to your server name or address, so make sure to re-enter this information. Otherwise, the remote L2TP VPN server might not be working. In that case, you can try connecting to another server if possible.
3. Check the certificate or pre-shared key
- Go to VPN settings and select your L2TP VPN connection.
- Click Advanced options and then Edit.
- Retype your Pre-shared key.
- Click Save.
Similar to the username and password situation, the pre-shared key you initially typed could have been wrong or changed by the VPN server administrator. After adding the new pre-shared key, try to connect to the L2TP VPN again to see if it works now.
However, if there’s an issue with the L2TP VPN certificate, there’s nothing you can do on the VPN client side. You have to either verify the certificate on the server or contact the administrator for help.
Alternatively, try switching between L2TP/IPsec with certificate and pre-shared key, in case the server admin changed the VPN type.
4. Check the VPN proxy settings
- Go to VPN settings and click your L2TP VPN profile.
- Select Advanced options.
- Scroll down to VPN proxy settings
- If you need to redirect your VPN connection to a proxy server, make sure the proxy settings are correct.
- Otherwise, remove the proxy by selecting None.
- Click Apply.
Even if you need to use a VPN proxy server, disable it temporarily and try to connect to L2TP VPN again to see if it’s really the proxy’s fault. It might not be working properly.
In that case, you should fix proxy server connection issues, use another proxy, or keep it disabled.
5. Check the encryption settings
- Right-click the Start button and go to Network Connections.
- Click Change adapter options.
- Right-click your VPN connection and select Properties.
- Switch to the Security tab.
- Set Data encryption to Optional encryption (connect even if no encryption).
- Click OK.
If the VPN server has encryption issues, this could be the reason why you cannot connect to L2TP VPN on Windows 10. By making the encryption optional, you might be able to temporarily solve this problem.
However, encryption is a critical component of a VPN connection, so you should contact the VPN server administrator to fix this issue as soon as possible.
6. Check the authentication settings
- Go to Network Connections > Change adapter options.
- Right-click your VPN and go to Properties.
- Switch to the Security tab.
- At Authentication, select Allow these protocols.
- Enable Challenge Handshake Authentication Protocol (CHAP).
- Enable Microsoft CHAP Version 2 (MS-CHAP v2).
- Click OK.
L2TP connection issues are typically caused by invalid VPN authentication settings. Try the configuration above to see if it works. Otherwise, you should get in touch with the VPN server administrator and request assistance.
7. Open L2TP ports in your firewall
- Click the Start button, type firewall, and select Firewall & network connection.
- Click Advanced settings and Yes if prompted by UAC (User Account Control).
- Select Inbound Rules on the left side.
- Click New Rule on the right actions panel.
- At Rule Type, select Port.
- At Protocol and Ports, select UDP with Specific local ports and type 1701, 500, 4500.
- Set Action to Allow the connection if it is secure.
- Enter any rule name and click Finish.
- Go to Outbound Rules and do the same.
If your L2TP VPN connection gets blocked by the firewall, then you have to open the correct ports for sending and receiving network traffic. However, the firewall configuration above should also be made on the VPN server.
This solution can help fix The connection was terminated by the remote computer before it could be completed, also known as VPN error 628.
8. Make an easy tweak to the registry
- Press Ctrl+R, type regedit, hold down Shift, and press Enter.
- Click Yes if prompted by User Account Control.
- Delete what’s inside the address bar on top.
- Paste the following address and press Enter:
HKEY_LOCAL_MACHINESYSTEMCurrentControlSetServicesPolicyAgent - Open Edit menu > New and click DWORD (32-bit) Value.
- Set AssumeUDPEncapsulationContextOnSendRule as the value name.
- Right-click AssumeUDPEncapsulationContextOnSendRule and press Modify.
- Set Value data to 2.
- Set Base to Hexadecimal.
- Click OK.
- Next, paste this address and hit Enter:
HKEY_LOCAL_MACHINESYSTEMCurrentControlSetServicesRasMan - Open Edit menu > New and click DWORD (32-bit) Value.
- Set ProhibitIpSec as the value name.
- Right-click ProhibitIpSec and click Modify.
- Set Value data to 0.
- Set Base to Hexadecimal.
- Click OK.
- Restart your computer.
If the VPN server, client, or both as behind a NAT, such as a home router, you can use the registry tweaks above to fix the NAT traversal problem.
A faster way to tweak the registry and make Windows 10 connect to L2TP VPN by entering a couple of lines of code in Command Prompt (look inside the article to see how).
9. Reinstall the network adapters
- Right-click the Start button and go to Device Manager.
- Expand the Network adapters menu.
- Right-click TAP-Windows Adapter V9 and select Uninstall device.
- Leave Delete the driver software for this device unchecked.
- Click Uninstall.
- Do the same for WAN Miniport (L2TP) and WAN Miniport (Network Monitor).
- Open the Action menu and select Scan for hardware changes.
If you uninstall the network adapters but without also removing the driver software, Windows will automatically reinstall them.
Fixing Windows 10 network adapter problems is a practical way to handle the L2TP VPN connection issue.
It can also help fix the L2TP connection attempt failed, also known as VPN error 789.
10. Update the network drivers
- Go to Device Manager and expand the Network adapters menu.
- Right-click TAP-Windows Adapter V9 and select Update Driver.
- Choose Search automatically for updated driver software.
- Follow the on-screen instructions.
- Do the same for WAN Miniport (L2TP) and WAN Miniport (Network Monitor).
If you receive The best drivers for your device are already installed message, you can look for newer driver versions in Windows Update, install the drivers manually, or find and install newer device drivers automatically using driver update tools.
11. Restart the IPsec service
- Click the Start button, type Services, and press Enter.
- Find and right-click IKE and AuthIP IPsec Keying Modules.
- Press Restart (or Start if the service is stopped).
- Do the same for IPsec Policy Agent.
Windows 10 uses L2TP in combination with IPsec to establish a secure tunnel. If there’s a problem with IPsec, not with the L2TP, then you can restart its service.
It’s also a good way to fix VPN error 789.
12. Turn off Xbox Live Networking Service
- Go to Services and locate Xbox Live Networking Service (last on the list).
- Double-click this entry and set Startup type to Disabled.
- Click Apply.
- Restart your PC.
Xbox Live Networking Service uses the IPsec protocol for chatting and multiplayer features. However, the Windows 10 L2TP VPN also uses IPsec. And many ISPs don’t permit two or more simultaneous IPsec connections.
Therefore, you can disable Xbox Live Networking Service to fix this problem, especially if you don’t play Xbox multiplayer games. This is also a workaround to fix VPN error 809.
In conclusion, the solutions above should help you if you cannot connect to L2TP VPN on Windows 10. However, if you don’t want to worry about such problems anymore, we suggest skipping to the 13th step and using ExpessVPN instead. It’s also the best VPN for Google Chrome.
Your connection is not secure — websites you visit can find out your details:
-
- Your IP Address:
loading
Companies can sell this information, alongside your location and internet provider name, and profit from it by serving targeted ads or monitoring your data usage.
We recommend Private Internet Access, a VPN with a no-log policy, open source code, ad blocking and much more; now 79% off.
![]()
Newsletter
![]()
В Windows 10 существует проблема с подключением по VPN в качестве клиента по протоколу L2TP/IPSec. В очередной раз столкнулся с ней недавно, когда свежеустановленная система отказалась подключаться к VPN-серверу, запущенному в другой квартире на роутере Keenetic.
С учетом того, что вряд ли эту проблему исправят в грядущих обновлениях, публикую памятку по ее самостоятельному исправлению.
Содержание
- 1 Причина и симптомы
- 2 Решение проблемы
- 2.1 Вариант 1 — через редактор реестра
- 2.2 Вариант 2 — через Powershell
- 3 Заключение
Причина и симптомы
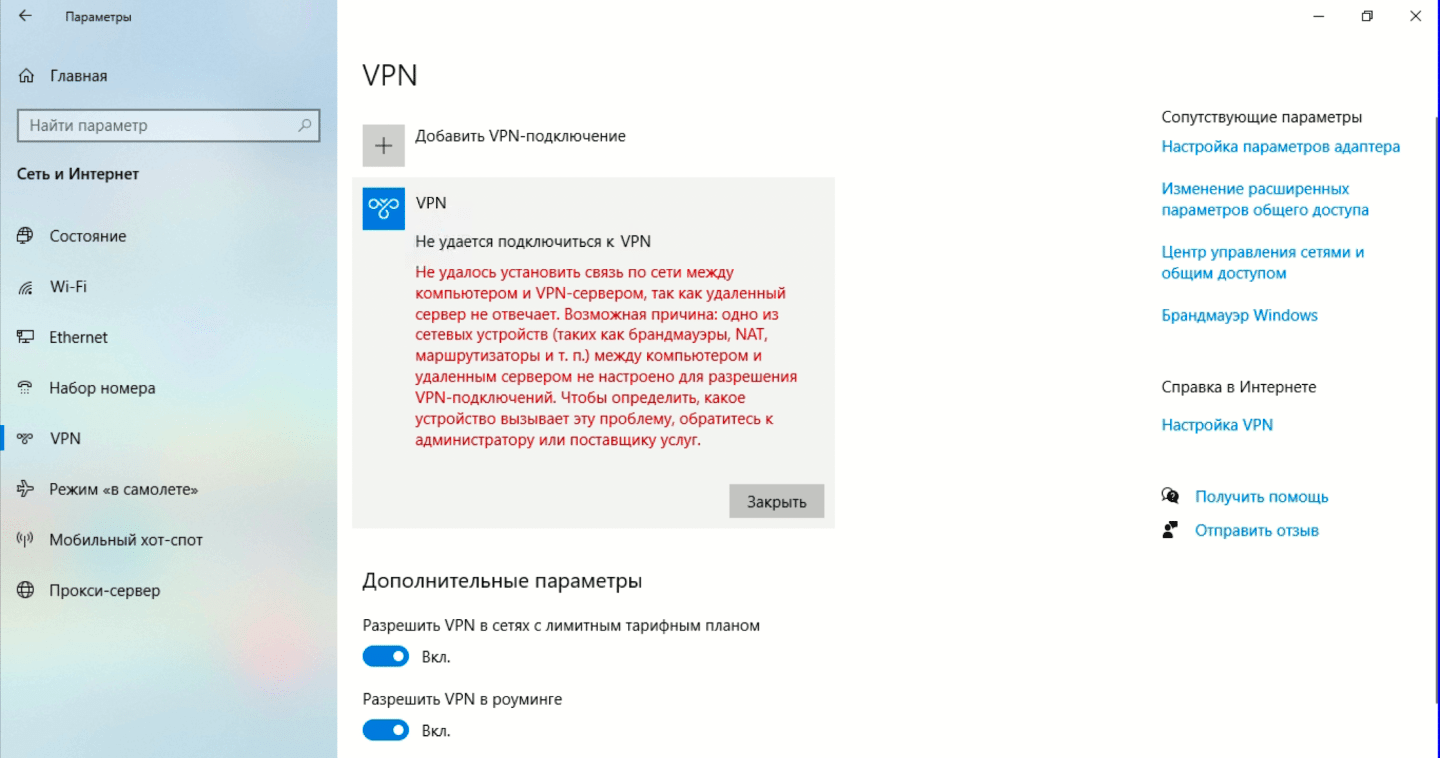
Симптомы. При попытке подключения со всеми корректно введенными настройками система долго думает и в конце концов выдает ошибку:
Не удалось установить связь по сети между компьютером и VPN-сервером, так как удаленный сервер не отвечает.
Причина заключается в том, что с настройками по умолчанию встроенный VPN-клиент Windows не поддерживает подключение через NAT.
В двух словах про NAT
NAT — это механизм преобразования роутером внешнего IP-адреса (предоставляемого провайдером при подключении) в локальные IP-адреса устройств, подключенных к вашей домашней сети. Практически все пользователи домашнего интернета «сидят за NATом», исключение составляют лишь случаи, когда интернет-кабель от провайдера подключен непосредственно к компьютеру в обход роутеров и свитчей.
В целом родной VPN-клиент в Windows 10 способен работать за NAT, но для этого необходимо поменять один пункт в его настройках — и делается это не самым очевидным способом.
Решение проблемы
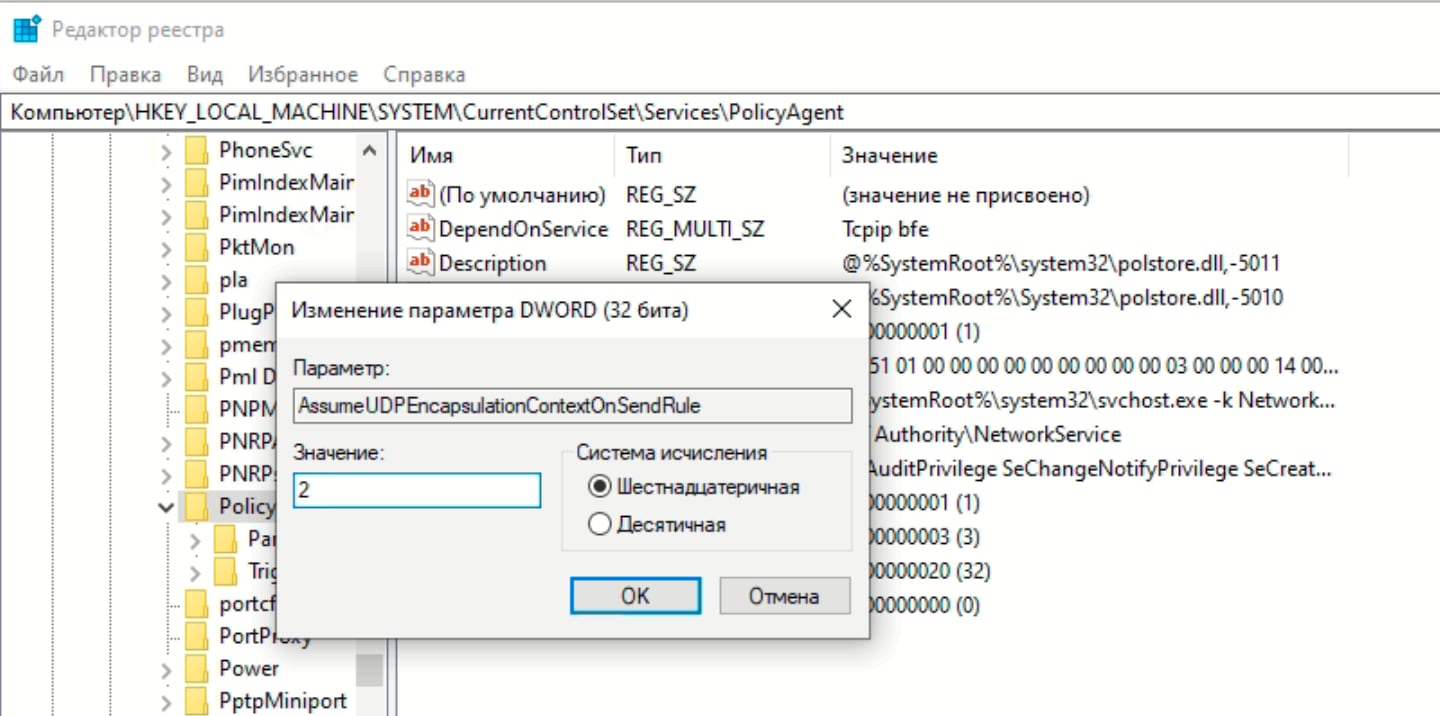
Для решения проблемы нужно открыть следующую ветку реестра:
HKEY_LOCAL_MACHINESYSTEMCurrentControlSetServicesPolicyAgent
И внести в нее параметр AssumeUDPEncapsulationContextOnSendRule со значением 2.
Вариант 1 — через редактор реестра
Запускаем редактор реестра, открыв окно поиска и введя в нем regedit:

Находим в реестре ветку HKEY_LOCAL_MACHINESYSTEMCurrentControlSetServicesPolicyAgent и создаем в нем 32-битный параметр DWORD с именем AssumeUDPEncapsulationContextOnSendRule и значением 2:

Вариант 2 — через Powershell
Запускаем Windows PowerShell, введя powershell в окне поиска и выбрав в контекстном меню запуск от имени администратора:

В открывшемся окне выполняем следующую команду:
Set-ItemProperty -Path "HKLM:SYSTEMCurrentControlSetServicesPolicyAgent" -Name "AssumeUDPEncapsulationContextOnSendRule" -Type DWORD -Value 2 –Force;

Заключение
После внесения изменений, независимо от способа которым они были внесены, необходимо перезагрузить компьютер чтобы параметр подтянулся в используемые настройки. Затем снова запускаем подключение к VPN-серверу и убеждаемся, что оно успешно стартует.
Стоит отметить, что данная проблема присуща исключительно Windows и не встречается ни в Linux, ни в macOS, ни в iOS.

Как у самурая нет цели, а есть только путь, так и Windows движется своим особым путём, порой идущим вразрез с общепринятыми стандартами. Сегодня хочу рассказать почему в Windows 10 не работает подключение к VPN серверу по протоколу L2TP/IPSec и как можно решить данную проблему.
Не удалось установить связь по сети между компьютером и VPN-сервером, так как удаленный сервер не отвечает. Возможная причина: одно из сетевых устройств (таких как брандмауэры, NAT, маршрутизаторы и т.п.) между компьютером и удаленным сервером не настроено для разрешения VPN-подключений. Чтобы определить, какое устройство вызывает эту проблему, обратитесь к администратору или поставщику услуг.
Однако не стоит верить написанному, так как «винда» направляет нас по ложному следу в поисках проблемы. Виноваты все, кроме самой операционной системы Windows, хотя дело именно в ней и проблема эта уже давно известна и описана в статье https://support.microsoft.com/en-us/kb/926179.
Всё дело в том, что встроенный VPN клиент Windows, по умолчанию, не поддерживает подключение L2TP/IPsec через NAT. Что такое NAT, маскарад и проброс портов простыми словами я рассказывал ранее, кому интересно переходите по ссылке.
Если совсем кратко, то практически все домашние сети (роутеры) работают именно в таком режиме и для успешного прохождения L2TP/IPsec через NAT требуется поддержка протокола NAT Traversal (или NAT-T), которая по умолчанию включена почти во всех операционных системах (Linux, macOS, iOS, Android), кроме Windows.
Для самой популярной и дружелюбной операционной системы в мире, поддержку протокола NAT-T приходится включать вручную, естественно полазив в системном реестре. Для чего перемещаемся в редактор реестра regedit и находим там ветку:
HKEY_LOCAL_MACHINESYSTEMCurrentControlSetServicesPolicyAgent
Для Windows XP ветка будет немного иная, читайте по ссылке приведённой ранее на сайте Microsoft (смысла рассказывать здесь не вижу, в виду сильного устаревания системы).
Создаём недостающий DWORD параметр с именем AssumeUDPEncapsulationContextOnSendRule и значением 2:
Примечание: Возможные значения параметра AssumeUDPEncapsulationContextOnSendRule:
- 0 – (значение по-умолчанию), VPN сервер подключен к интернету без NAT;
- 1 – VPN сервер находится за NAT;
- 2 — клиент и сервер находятся за NAT.
По идее, произведённые настройки вступают в силу без перезагрузки операционной системы, но если перезагрузитесь, хуже не будет. Теперь подключение к VPN серверу должно успешно заработать через NAT (в том числе двойной NAT).
Если вам не хочется возиться с реестром вручную, можно использовать воспользоваться PowerShell:
Set-ItemProperty -Path "HKLM:SYSTEMCurrentControlSetServicesPolicyAgent" -Name "AssumeUDPEncapsulationContextOnSendRule" -Type DWORD -Value 2 –Force;
Подписывайтесь на канал
Яндекс.Дзен
и узнавайте первыми о новых материалах, опубликованных на сайте.
Содержание
- Важная информация
- Способ 1: Переустановка сетевых адаптеров
- Способ 2: Изменение параметров реестра
- Способ 3: Настройка антивирусного ПО
- Способ 4: Отключение протокола IPv6
- Способ 5: Остановка службы Xbox Live
- Вопросы и ответы

Виртуальная частная сеть (VPN) – это сеть, состоящая из двух и более дозволенных узлов, а также программное обеспечение, которое позволяет скрывать реальные IP-адреса и надежно шифровать весь трафик. Таким образом эта технология обеспечивает высокую конфиденциальность и безопасность в интернете, а также позволяет посещать заблокированные ресурсы. Тем не менее даже при правильной настройке иногда к ВПН не удается подключиться. Сегодня мы расскажем, как можно исправить эту проблему на компьютере с Windows 10.
Важная информация
В первую очередь убедитесь, что у вас есть интернет. Для этого попробуйте открыть какой-нибудь сайт обычным способом. При отсутствии соединения сначала придется его восстановить. О том, как это сделать, мы писали в отдельных статьях.
Подробнее:
Исправляем проблему с подключением к Wi-Fi сети в Windows 10
Исправляем проблему с отсутствием интернета в Windows 10
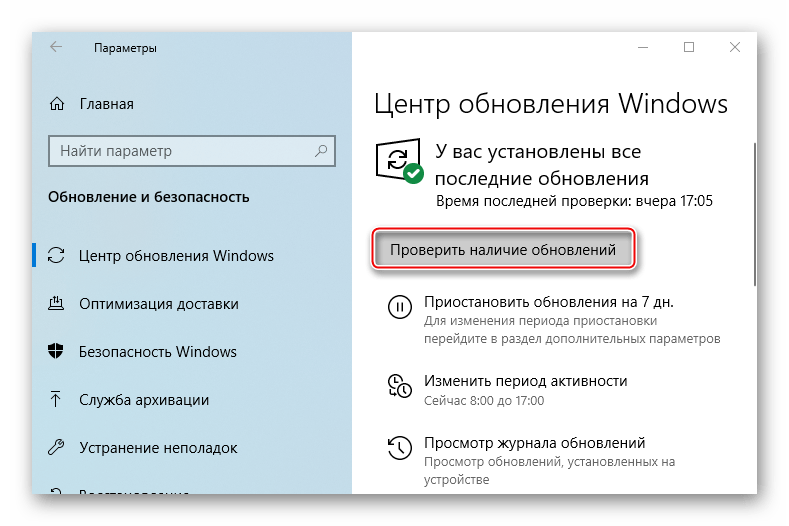
Убедитесь, что вы пользуетесь последней версией Виндовс 10. Для этого проверьте наличие обновлений к ней. О том, как обновить «десятку», мы рассказывали в другой статье.
Подробнее: Как обновить Windows 10 до последней версии
Причиной отсутствия подключения может быть конкретный ВПН-сервер. В этом случае попробуйте поменять его, например, выберите из списка сервер другой страны.
Если для реализации виртуальной частной сети используется стороннее ПО, а не встроенная в Windows функция, сначала попробуйте обновить его, а при отсутствии такой возможности просто переустановите.
Способ 1: Переустановка сетевых адаптеров
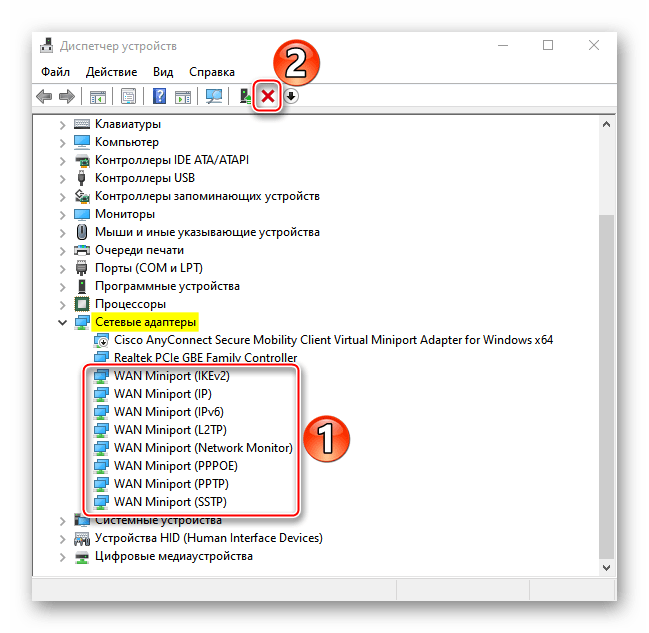
В зависимости от установленного на компьютере оборудования (сетевая карта, датчики Wi-Fi и Bluetooth) в «Диспетчере устройств» будет отображено несколько сетевых адаптеров. Там же будут устройства WAN Miniport – системные адаптеры, которые как раз используются для ВПН-подключения через различные протоколы. Для решения проблемы попробуйте переустановить их.
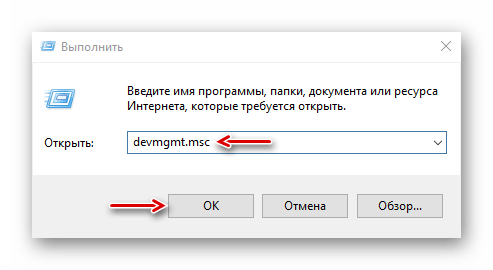
- Сочетанием клавиш Win+R вызываем окно «Выполнить», вводим команду
devmgmt.mscи жмем «OK».

Читайте также:
Вызов оснастки «Выполнить» в ОС Windows 10
Как открыть «Диспетчер устройств» в Windows 10 - Открываем вкладку «Сетевые адаптеры» и удаляем все устройства WAN Miniport.
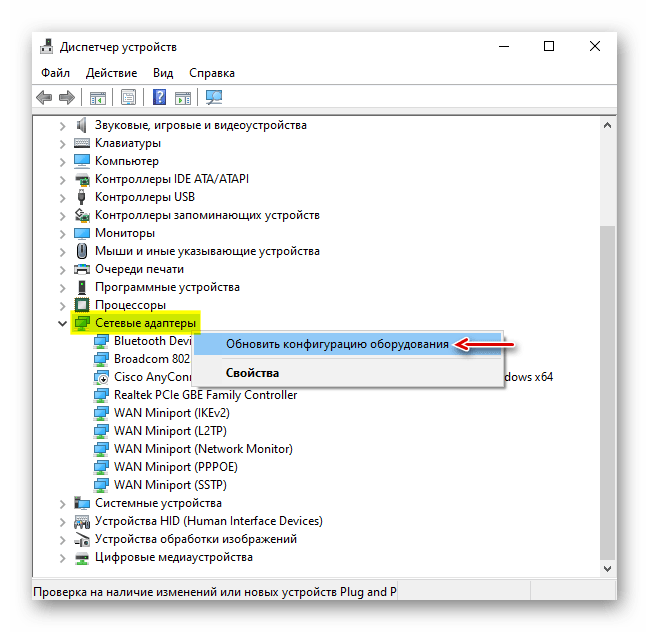
- Щелкаем правой кнопкой мышки по вкладке «Сетевые адаптеры» и жмем «Обновить конфигурацию оборудования». Устройства вместе с драйверами будут снова переустановлены. Перезагружаем компьютер.
Способ 2: Изменение параметров реестра
При использовании подключения L2TP/IPsec внешние компьютеры-клиенты под управлением Windows могут не подключиться к VPN-серверу, если он находится за NAT (устройство для преобразования частных сетевых адресов в публичные). Согласно статье, размещенной на странице поддержки Microsoft, обеспечить связь между ними можно, если дать понять системе, что сервер и ПК-клиент находятся за устройством NAT, а также разрешить UDP-портам инкапсулировать пакеты по L2TP. Для этого в реестре необходимо добавить и настроить соответствующий параметр.
- В окне «Выполнить» вводим команду
regeditи жмем «OK».

Читайте также: Как открыть реестр в Windows 10
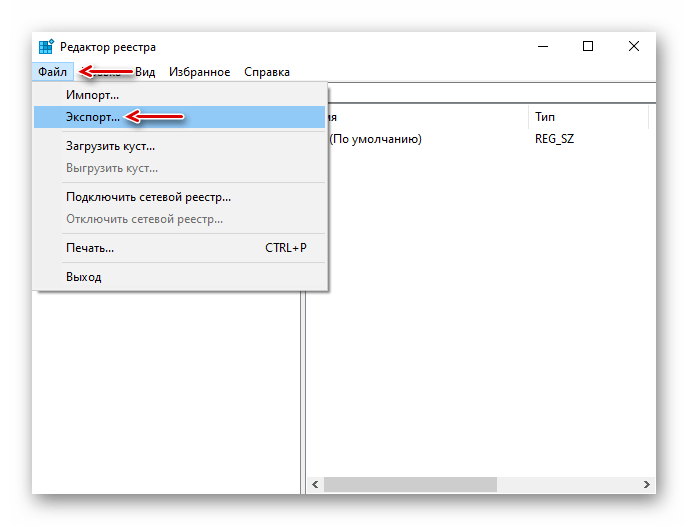
- Работать будем с разделом «HKEY_LOCAL_MACHINE (HKLM)», поэтому сначала делаем его резервную копию. Выделяем ветку, открываем вкладку «Файл» и щелкаем «Экспорт».
- Выбираем место сохранения копии, указываем ее имя и жмем «Сохранить».

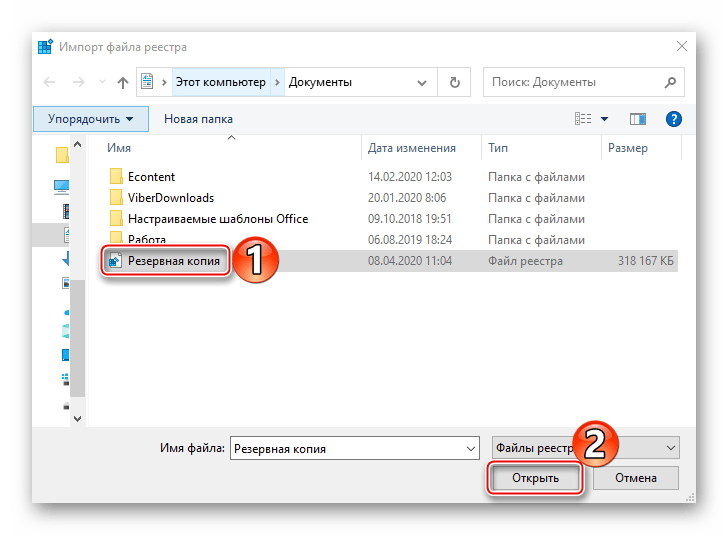
Чтобы потом восстановить раздел, открываем вкладку «Файл» и выбираем «Импорт».

Находим сохраненную копию реестра и нажимаем «Открыть».
- Переходим по пути:
HKLMSYSTEMCurrentControlSetServicesPolicyAgentВ правой части реестра щелкаем правой кнопкой мышки по свободной области, жмем «Создать» и выбираем «Параметр DWORD (32 бита)».
- В названии файла вписываем:
AssumeUDPEncapsulationContextOnSendRule
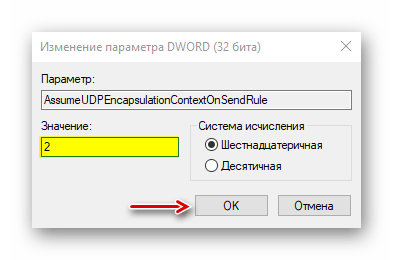
- Щелкаем правой кнопкой мышки по созданному файлу и жмем «Изменить».
- В поле «Значение» вводим 2 и щелкаем «OK». Перезагружаем компьютер.


Также важно, чтобы на роутере были открыты UDP-порты, необходимые для работы L2TP (1701, 500, 4500, 50 ESP). О пробросе портов на маршрутизаторах разных моделей мы подробно писали в отдельной статье.
Подробнее:
Как открыть порты на роутере
Как открыть порты в брандмауэре Windows 10

Способ 3: Настройка антивирусного ПО
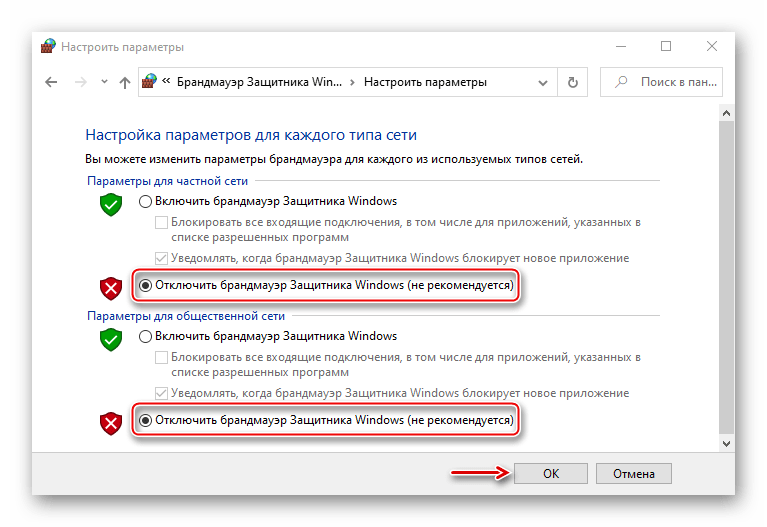
Брандмауэр Windows 10 или файервол антивирусной программы могут блокировать любые подключения, которые считают незащищенными. Чтобы проверить эту версию, отключите на время защитное ПО. О том, как это сделать, мы подробно писали в других статьях.
Подробнее:
Как отключить антивирус
Как отключить брандмауэр Windows 10
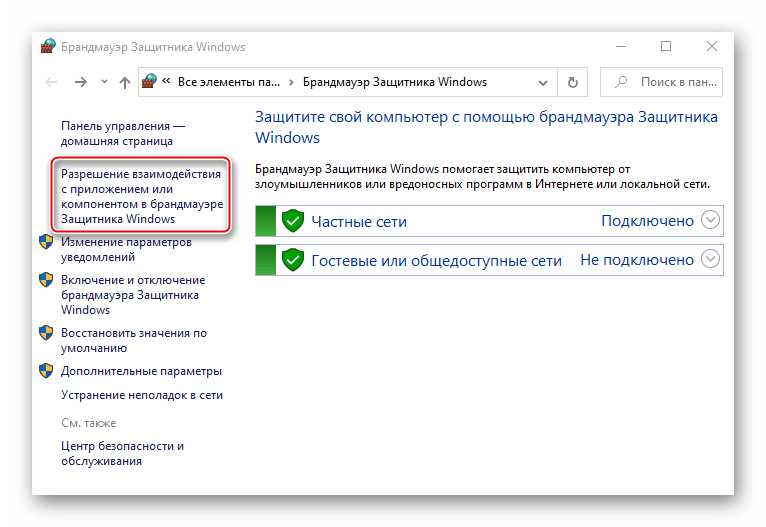
Долго оставлять систему без антивирусного ПО не рекомендуется, но если она блокирует ВПН-клиент, его можно добавить в список исключений антивируса или брандмауэра Виндовс. Информация об этом есть в отдельных статьях у нас на сайте.
Подробнее:
Как добавить программу в исключения антивируса
Как добавить программу в исключения брандмауэра Windows 10
Способ 4: Отключение протокола IPv6
VPN-подключение может оборваться из-за утечки трафика в публичную сеть. Нередко причиной этому становится протокол IPv6. Несмотря на то что ВПН обычно работает с IPv4, в операционной системе по умолчанию включены оба протокола. Поэтому IPv6 также может использоваться. В этом случае попробуйте отключить его для конкретного сетевого адаптера.
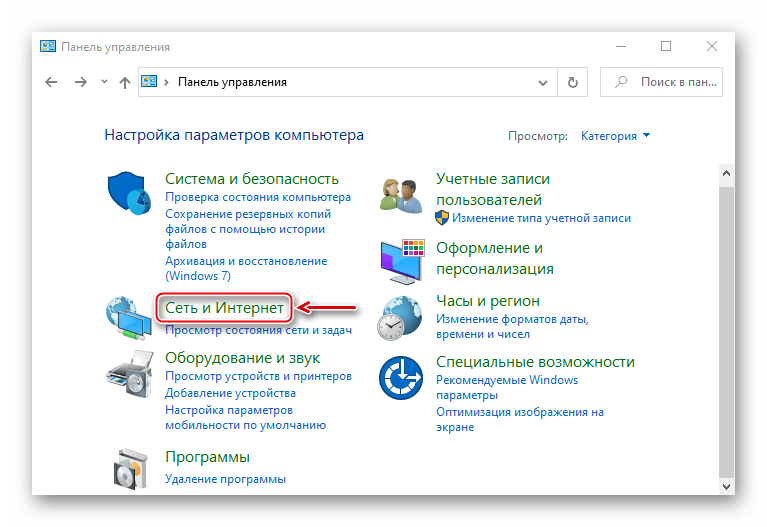
- В поиске Windows вводим «Панель управления» и открываем приложение.

Читайте также: Открытие «Панели управления» на компьютере с Windows 10
- Заходим в «Сеть и Интернет».
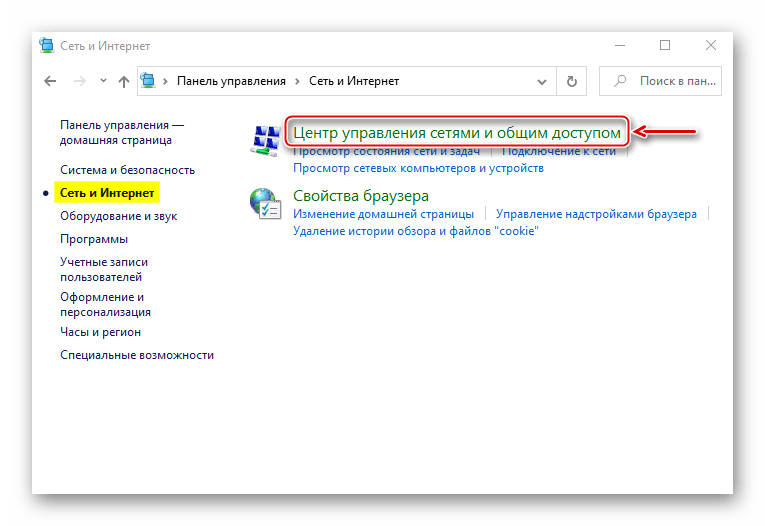
- Открываем «Центр управления сетями и общим доступом».
- Входим в раздел «Изменение параметров адаптера».
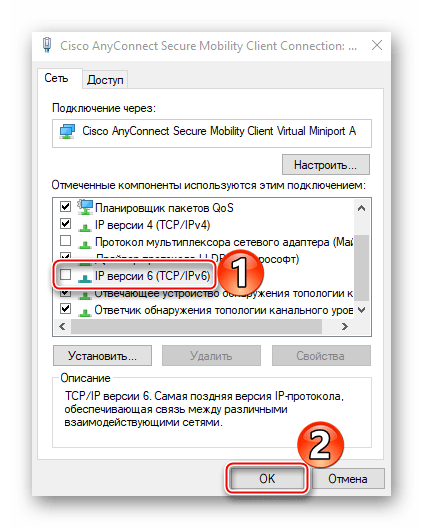
- Жмем правой кнопкой мышки по сетевому адаптеру, через который реализуется VPN, и открываем «Свойства».
- Снимаем галочку напротив IPv6 и нажимаем «OK». Перезагружаем компьютер.


Способ 5: Остановка службы Xbox Live
На стабильность ВПН-соединения может влиять разное ПО, включая системные компоненты. Например, согласно обсуждениям на форумах, многие пользователи смогли решить проблему путем остановки службы Xbox Live.
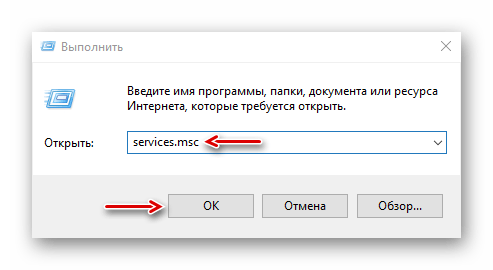
- В окне «Выполнить» вводим команду
services.mscи жмем «OK».
Читайте также: Запуск оснастки «Службы» в ОС Windows 10
- Находим компонент «Сетевая служба Xbox Live». Если она запущена, щелкаем по ней правой кнопкой мышки и жмем «Остановить».
Надеемся вы решили проблему с подключением к VPN в Windows 10. Мы рассказали о наиболее распространенных и общих способах. Но если вам не помогли наши рекомендации, обратитесь в службу поддержки поставщика ВПН. Со своей стороны, они должны помочь, особенно если вы оплатили услугу.
В Windows 10 вы можете настроить VPN-сеть средствами операционной системы, не прибегая к помощи сторонних программ. Для удобного создания VPN-подключения в Windows 10 и 11 разработчиками был реализован соответствующий графический интерфейс раздела приложения «Параметры», в котором пользователю предлагается ввести данные провайдера VPN. К сожалению, данная функция не отшлифована до конца.
На что указывают разные ошибки, время от времени выдаваемые системой при подключении к виртуальной сети.
Наиболее распространённой неполадкой при подключении к VPN в Windows 10 является сбой соединения L2TP, при этом система выдает сообщение «Попытка L2TP-подключения не удалась из-за ошибки, произошедшей на уровне безопасности…». Неполадка может быть вызвана некорректными настройками одного или нескольких сетевых устройств, однако, если вы не вносили изменений в их конфигурацию и до появления первого сбоя всё работало нормально, высока вероятность того, что причиной сбоя стали баги в обновлениях операционной системы.

Примечание: L2TP — это протокол соединения второго уровня, используемый в виртуальных сетях и представляющий собой расширение двухточечного протокола PPP, обеспечивающего прямую связь между устройствами. Основным преимуществом протокола L2TP является поддержка не только сетей IP, но также ATM, X.25 и Frame Relay.
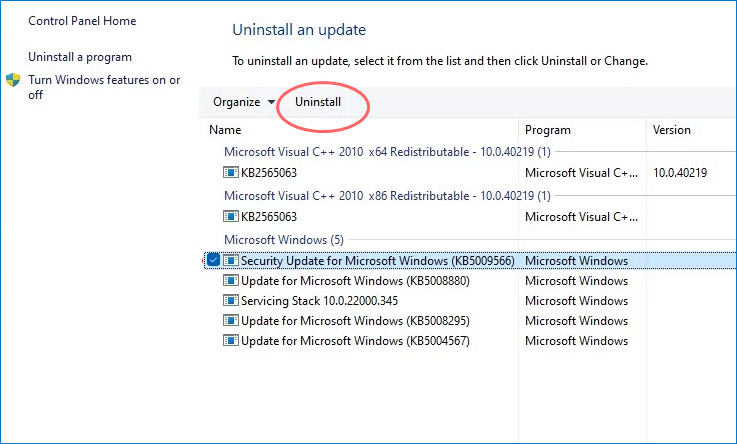
Так, было замечено, что указанная ошибка в Windows 10 стала появляться после установки накопительных обновлений безопасности KB5009543 и KB5009566.
Откройте журнал обновлений и посмотрите, имеются ли эти апдейты на вашем ПК.
Если да, удалите их и перезагрузите компьютер.
Если решение не дало положительного результата или обновления не установлены, переходим к другим способам устранения неполадки.
Проверьте настройки виртуального адаптера
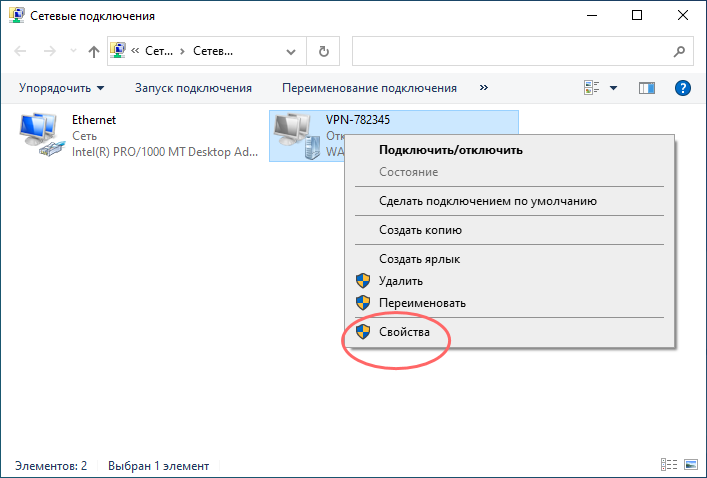
- Откройте командой ncpa.cpl настройки сетевых подключений, кликните по вашему виртуальному адаптеру правой кнопкой мыши и выберите «Свойства»;
- Переключитесь в окошке свойств на вкладку «Безопасность», активируйте радиокнопку «Разрешить следующие протоколы» и отметьте флажком пункт «Протокол Microsoft CHAP версии 2»;
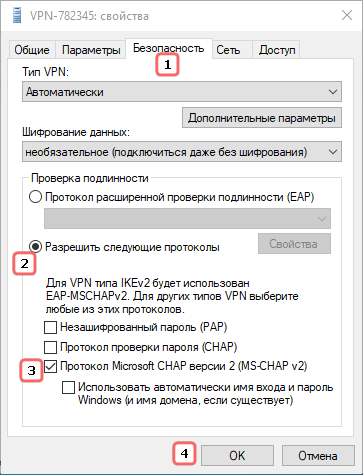
- Переключитесь на вкладку «Параметры» и нажмите кнопку «Параметры PPP»;
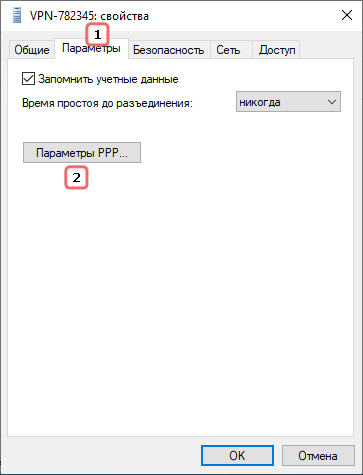
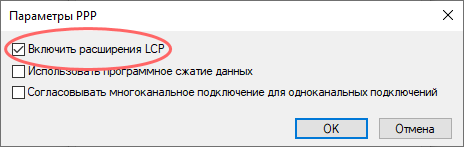
- Откроется диалоговое окошко параметров PPP. Убедитесь, что в пункте «Включить расширения LCP» установлена галочка. Если ее нет, поставьте и сохраните настройки.
Отсутствие или неверные настройки ключей реестра
Ошибка подключения L2TP может быть вызвана отсутствием или неверным значением предварительных ключей ProhibitIPSec и AllowL2TPWeakCrypto, обеспечивающих соединение с использованием протокола L2TP/IPSec.
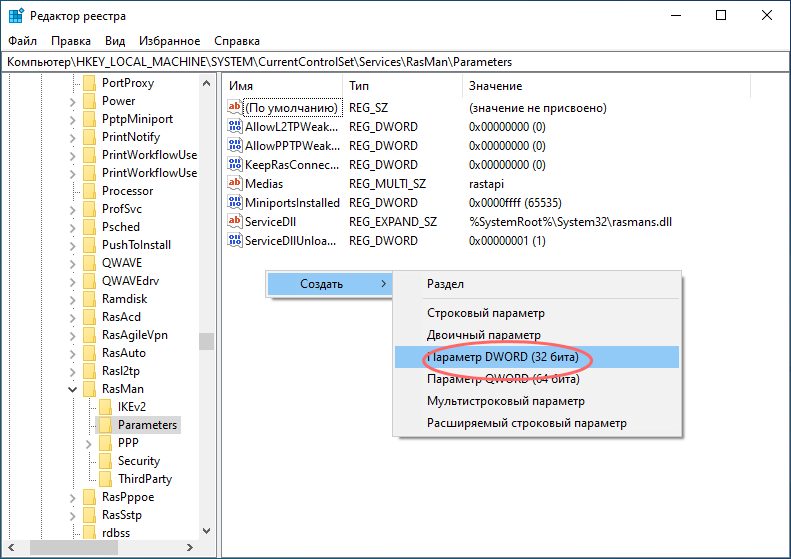
Если в свойствах VPN-подключения у вас выставлен тип L2TP, стоит проверить записи ветки реестра:
HKLMSystemCurrentControlSetServicesRasmanParameters
Откройте редактор реестра командой regedit, перейдите к указанной ветке и проверьте наличие в правой колонке DWORD-параметра ProhibitIPSec. Если таковой отсутствует, создайте его вручную.
И установите в качестве его значения 1.
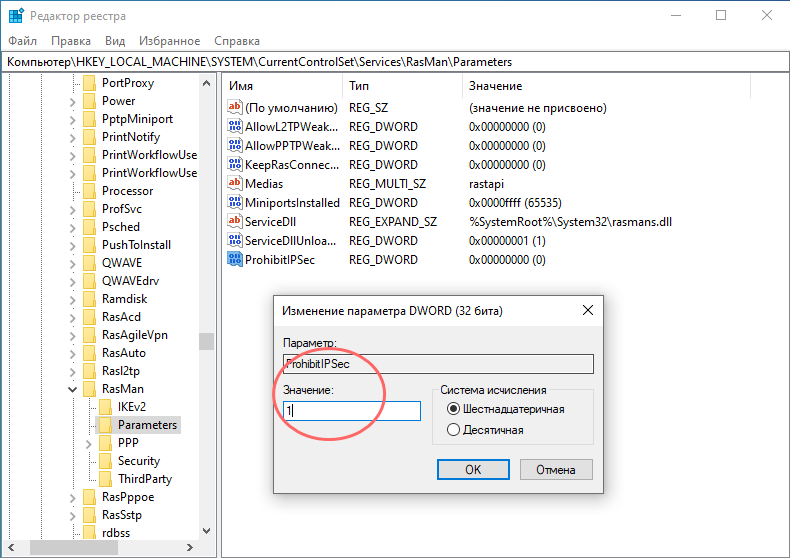
Заодно проверяем наличие DWORD-параметра AllowL2TPWeakCrypto, он также должен иметь значение 1.
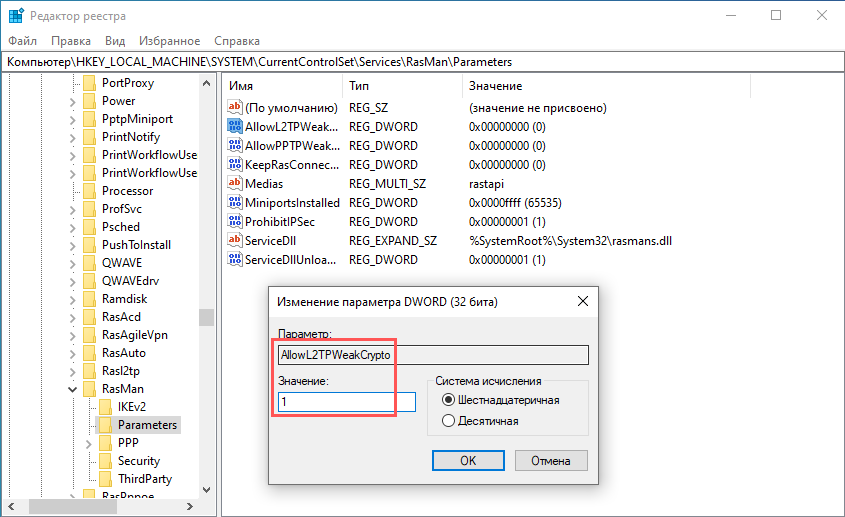
Если параметр отсутствует, создаем его, сохраняем настройки, перезагружаем компьютер и пробуем подключиться к VPN.
![]() Загрузка…
Загрузка…
В Windows 10 1903 обнаружил несколько странных багов с настроенными VPN подключениями. Первая проблема: при попытке подключиться к удаленному VPN L2TP серверу окно с VPN-подключением замирает в состоянии “connecting”. При этом не появляется даже запрос логина и пароля, а подключение через какое-то время разрывается без сообщения об ошибке.
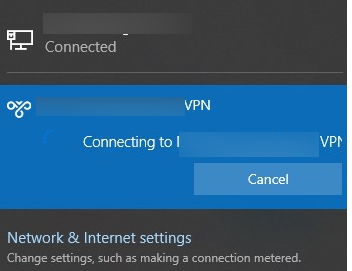
Не появляется запрос пароля для L2TP VPN подключения
Такое ощущение, что в этом диалоге VPN подключения почему-то блокируется вывод окна с запросом данных пользователя. В результате VPN подключение никак не может завершиться
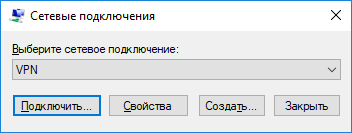
Есть обходное решение этой проблемы. Попробуйте использовать для установления VPN подключения старую-добрую Windows утилиту rasphone.exe, которая все еще присутствует в современных версиях Windows 10 (эта утилита должна быть знакома всем тем, кто пользовался dial-up подключением в Windows).
- Запустите утилиту: Win+R ->
C:WindowsSystem32rasphone.exe
- Выберите ваше VPN подключение и нажмите кнопку “Подключить”;
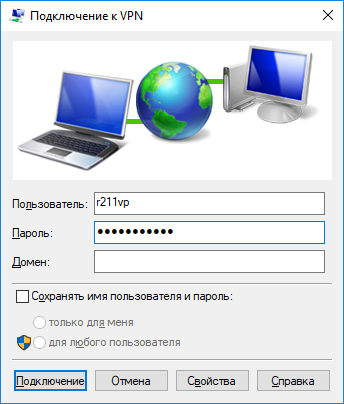
- После этого появится стандартное окно с указанием имени пользователя и пароля для VPN подключения;
- VPN туннель должен успешно подняться.
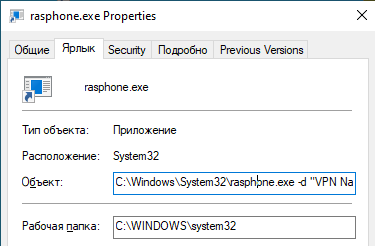
Для удобства пользователей вы можете вынести ярлык на rasphone.exe на рабочий стол. Для автоматического подключения вы можете указать в настройках ярлыка имя вашего VPN подключения так:
C:WINDOWSsystem32rasphone.exe -d "VPN Name"
(название VPN подключения можно взять из Control Panel -> Network Adapters и взять его в кавычки, если оно содержит пробелы в имени).
Что интересно, проблема возникает только c L2TP подключением (даже при включенном настроенном параметре реестра AssumeUDPEncapsulationContextOnSendRule = 2). Другое VPN подключение на этом же компьютере, но с протоколом PPTP и типом аутентификации MS-CHAP v2 работает нормально
Ошибка RASMAN для Always on VPN
Другая проблема возникает с VPN подключением к корпоративной сети в режиме Always on VPN (AOVPN). При инициализации такого VPN подключения служба RASMAN (Remote Access Connections Manager) останавливается, а в журнале событий Application появляется событие с Event ID 1000 и текстом:
“Faulting application name: svchost.exe_RasMan…”, “Faulting module name: rasmans.dll”, и “Exception code: 0xc0000005”.

Эта проблема признана Microsoft и по последним данным исправлена в октябрьском обновлении для Windows 10 1903 — KB4522355 (https://support.microsoft.com/en-us/help/4522355/windows-10-update-kb4522355). Вы можете скачать и установить данное обновление вручную или через Windows Update/WSUS.
Если обновление не исправило проблему, попробуйте переустановите виртуальные адаптеры WAN miniports в диспетчере устройств.
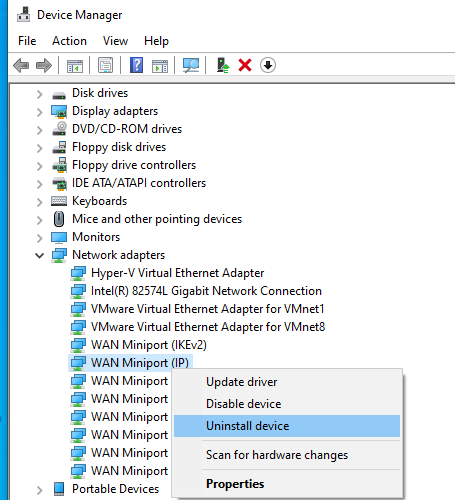
- Запустите Device manager (devmgmt.msc);
- Разверните секцию Network Adapters
- Последовательно щелкните правой кнопкой по следующим адаптерам и удалите их (Uninstall device): WAN Miniport (IP), WAN Miniport(IPv6) и WAN Miniport (PPTP).

- После удаления выберите в меню Action -> Scan for Hardware changes и дождитесь, пока Windows не обнаружит и не установит драйвера для этих виртуальных устройств;
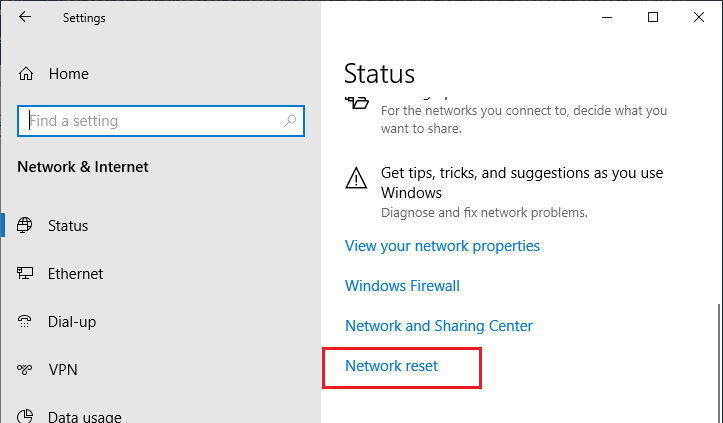
- После этого сбросьте сетевые настройки Windows 10 : Settings -> Network & Internet -> Network Reset -> Reset now;

- Теперь вам нужно пересоздать ваши VPN подключения (Руководство по VPN для начинающих) и проверить подключение.
Изначально проблема с режимом Always on VPN подключением была связана с тем, что пользователь отключил на компьютере телеметрию (эх, Microsoft). Для корректной работы Always on VPN подключения вам придется временного включить телеметрию на компьютере. Для включения телеметрии вы можете воспользоваться одним из способов, описанных ниже.
Способ 1. Откройте редактор локальных политики (gpedit.msc) и перейдте в секцию Computer Configuration -> Administrative Templates –> Windows Components -> Data Collection and Preview Builds.
Найдите и включите политику Allow Telemetry = Enabled. Установите один из следующих режимов: 1 (Basic), 2 (Enhanced) или 3 (Full). 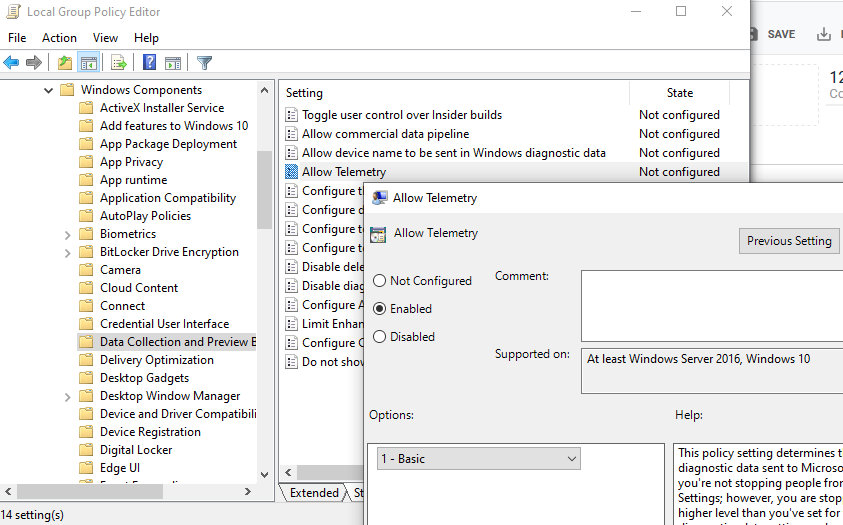
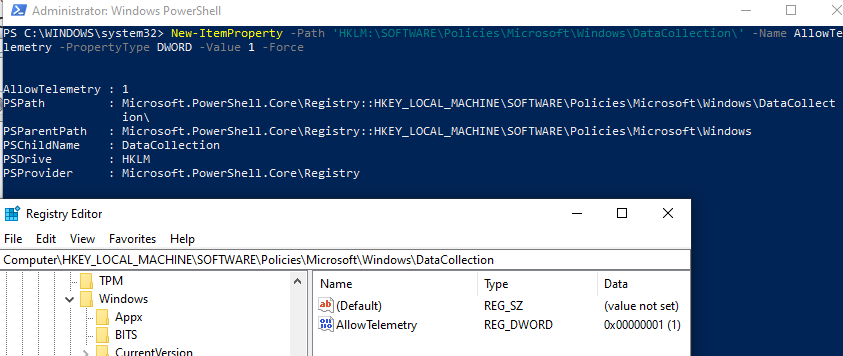
Способ 2. Того же самого эффекта можно добиться, вручную изменив параметр реестра AllowTelemetry (тип REG_DWORD) в ветке HKEY_LOCAL_MACHINESOFTWAREPoliciesMicrosoftWindowsDataCollection. Здесь также нужно установить одно из трех значение: 1, 2 или 3.
Вы можете изменить этот параметр с помощью редактора реестра (regedit.exe) или с помощью PowerShell-командлета New-ItemProperty:
New-ItemProperty -Path ‘HKLM:SOFTWAREPoliciesMicrosoftWindowsDataCollection’ -Name AllowTelemetry -PropertyType DWORD -Value 1 –Force
После этого нужно перезапустить службу Remote Access Connection Manager (RasMan) через консоль services.msc или с помощью командлета Restart-Service:
Restart-Service RasMan -PassThru
При одключении от VPN пропадает Интернет
Также в Windows 10 был другой баг, когда после отключения от VPN переставал работать доступ в Интернет. Проблема решалась созданием маршрута по-умолчанию или отключением/включением виртуального адаптера WAN Miniport (IP).