Содержание
- Способ 1: Удаление последнего обновления
- Откат к предыдущей сборке
- Способ 2: Пересоздание подключения
- Способ 3: Отключение протокола IPv6
- Способ 4: Переустановка сетевых устройств
- Вопросы и ответы
Способ 1: Удаление последнего обновления
Самым простым и очевидным способом устранения проблем с подключением к VPN после очередного обновления является удаление последнего.
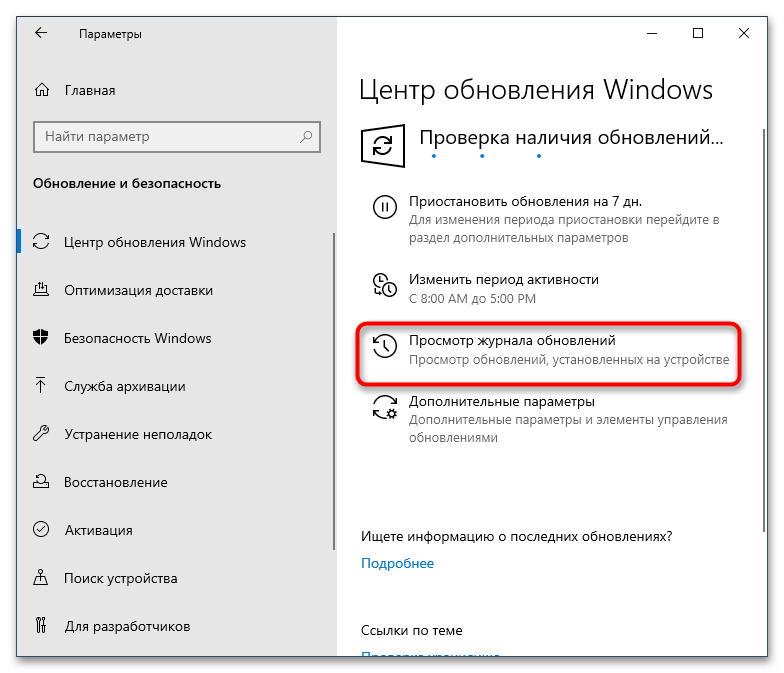
- Откройте приложение «Параметры», перейдите в раздел «Обновление и безопасность» → «Центр обновления Windows» и нажмите ссылку «Просмотр журнала обновлений».
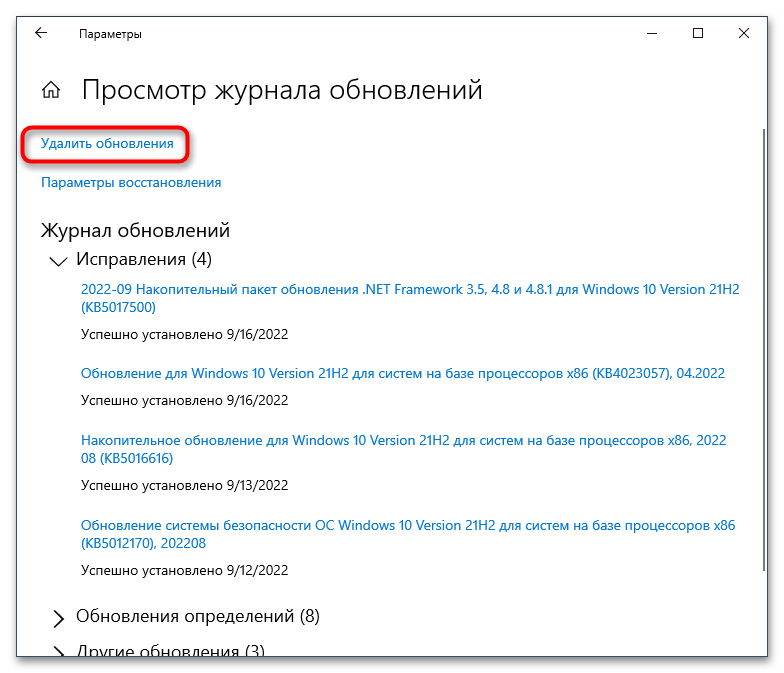
- Нажмите в следующем окне «Удалить обновления».
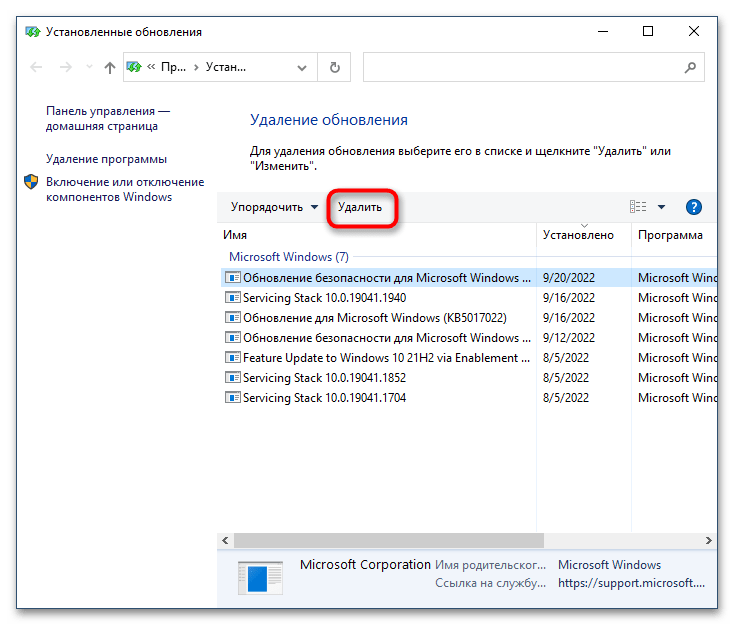
- Откроется окно со списком обновлений. Отсортируйте их, если необходимо, по дате установки и удалите те пакеты, которые были установлены с последним обновлением. Для запуска процедуры деинсталляции нажмите кнопку «Удалить» или используйте одноименную опцию контекстного меню.
- Подтвердите удаление и дождитесь завершения процесса.
После удаления обновления рекомендуется перезагрузить компьютер.
Читайте также: Другие способы удалить обновления в Windows 10
Откат к предыдущей сборке
Также вы можете откатить систему к предыдущей сборке, если обновление было выполнено не позднее 10 или 30 (зависит от версии) дней назад.
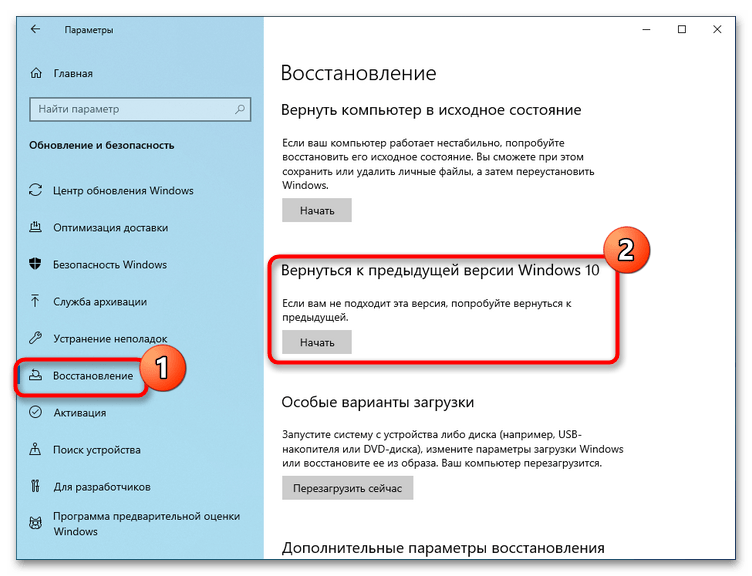
- В приложении «Параметры» прейдите в раздел «Обновление и безопасность» → «Восстановление» и нажмите в блоке «Вернуться к предыдущей версии Windows 10» кнопку «Начать».
- Выберите любую причину для выполнения отката и нажмите «Далее».
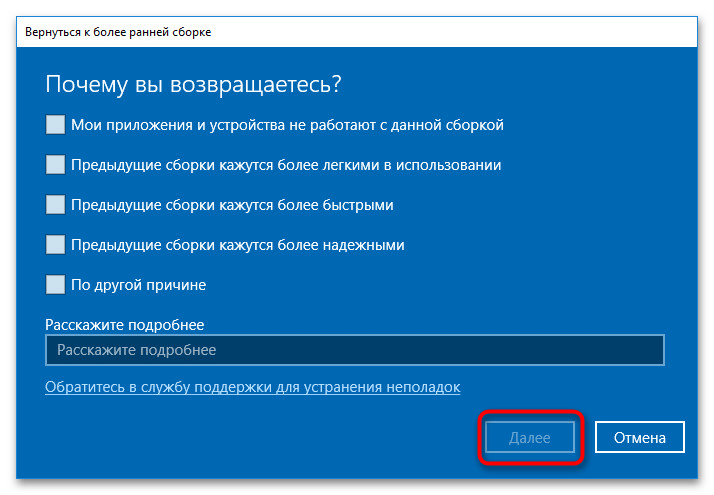
Процедура отката займет некоторое время. В итоге на компьютер будет установлена предыдущая сборка, учтите только, что все настройки, которые вы сделали после установки новой сборки, будут отменены.
Способ 2: Пересоздание подключения
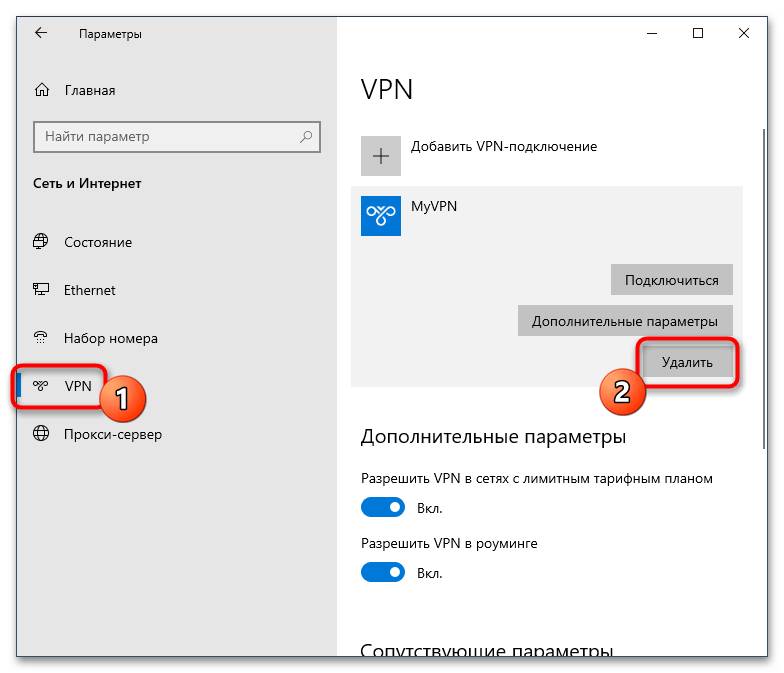
В неосложненных случаях решить проблему можно путем пересоздания подключения VPN. Запустив приложение «Параметры», перейдите в раздел «Сеть и интернет» → «VPN», выделите ваше VPN-подключение и нажмите «Удалить».
Создайте новое подключение VPN с теми же настройками и проверьте его работу.
Способ 3: Отключение протокола IPv6
Отмечены случаи, когда неполадки с туннельным подключением вызывались конфликтами в работе нового сетевого протокола IPv6. Попробуйте его отключить, оставив работающим только IPv4.
- Вызовите окошко быстрого выполнения команд нажатием комбинации клавиш Win + R и выполните в нем команду
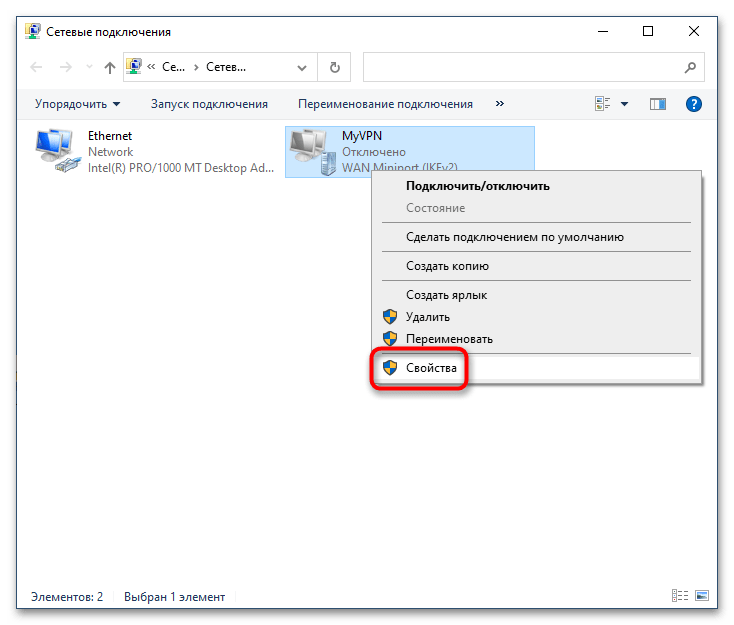
ncpa.cpl. - Кликните правой кнопкой мыши по виртуальному сетевому адаптеру VPN и выберите из контекстного меню пункт «Свойства».
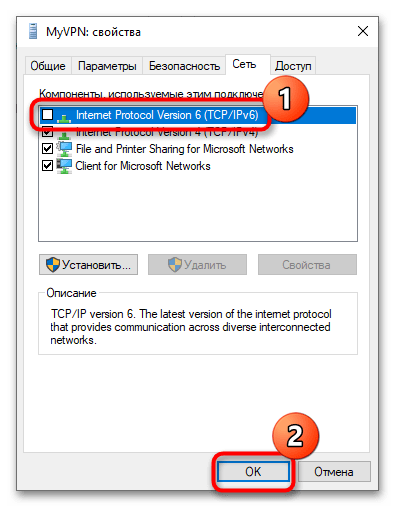
- Переключитесь в окне свойств на вкладку «Сеть» и снимите флажок с пункта «Internet Protocol Version 6 (TPC/IPv6)».
- Сохранив настройки, перезагрузите компьютер.

Способ 4: Переустановка сетевых устройств
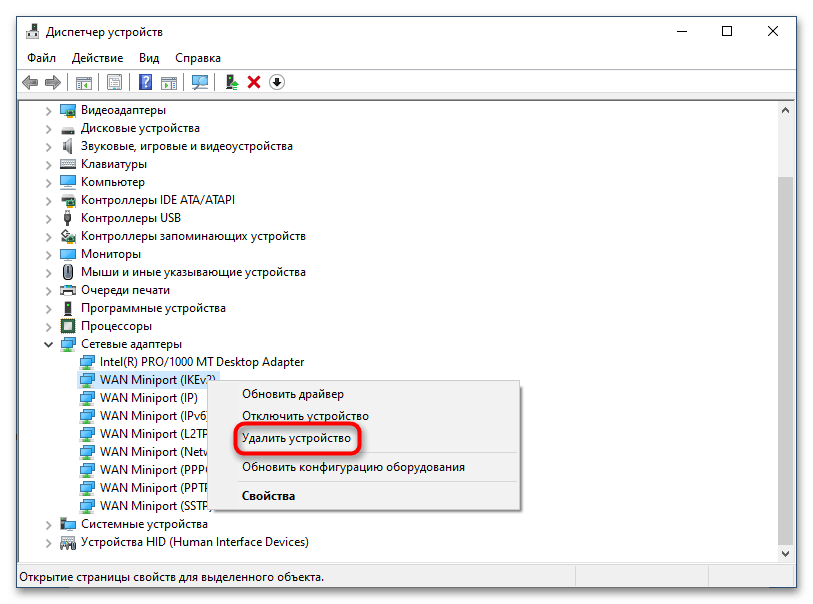
Если неполадка вызвана сбоем в работе сетевых устройств, который также нельзя исключать при обновлении Windows, устранить ее можно путем переустановки сетевых адаптеров WAN Miniport.
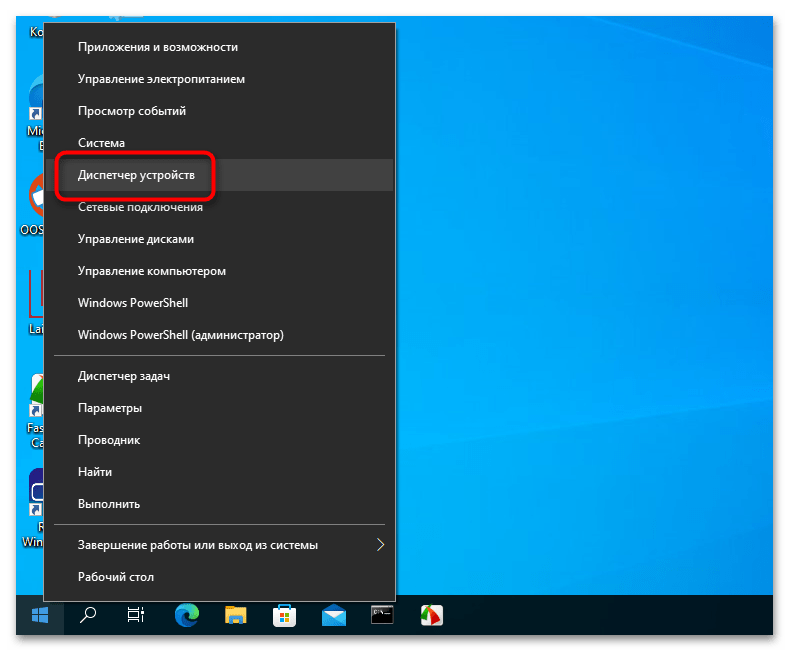
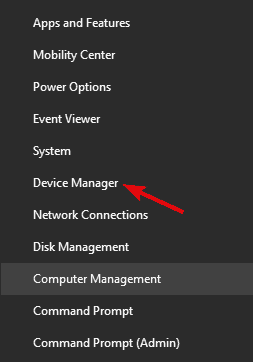
- Откройте «Диспетчер устройств» из контекстного меню кнопки «Пуск» или другим известным вам способом.
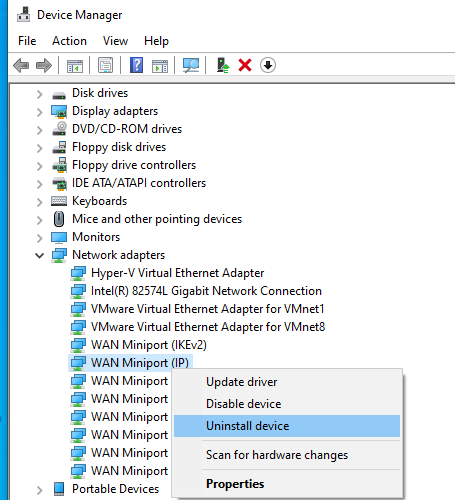
- Разверните узел «Сетевые адаптеры», нажмите правой кнопкой мыши по первому же устройству WAN Miniport и выберите из контекстного меню «Удалить устройство».
- Точно так же поступите с прочими адаптерами WAN Miniport.
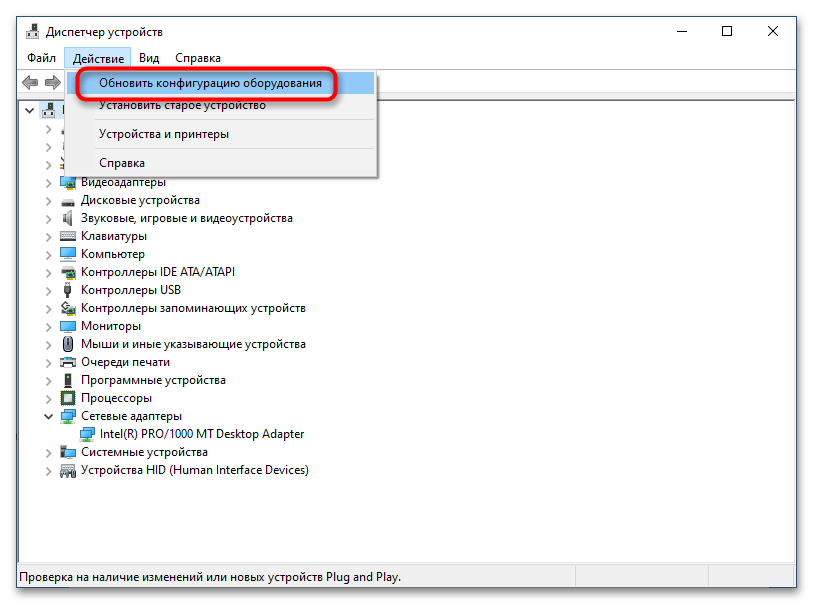
- Перейдите в меню «Действие» и выберите опцию «Обновить конфигурацию оборудования» либо перезагрузите компьютер.
В настоящее время проблема с подключением VPN в Windows 10 исправлена разработчиками, однако если вам придется столкнуться с подобной проблемой в будущем, вы будете знать, что делать.
Еще статьи по данной теме:
Помогла ли Вам статья?
Похоже Microsoft решила сделать оригинальный новогодний подарок и продлить новогодние праздники ещё немного, выпустив обновление делающее невозможным VPN-подключение по протоколу L2TP, который часто используется для удалённой работы. То что обновления Windows, приносят не только исправления но и новые баги — уже не новость. Однако ввиду того что данная проблема носит широкий характер из-за большой вероятности появления и большого распространения удалённой работы решил что неплохо бы предупредить сообщество.
Итак, обновления от 11 января 2022 года, которые, вероятно, и являются причиной данной проблемы:
- Windows 10 — KB5009543 (также упоминается KB5008876)
- Windows 11 — KB5009566 (также упоминается KB5008880)
Упомянутые в скобках обновления пришли параллельно с проблемными, судя по комментариям они к рассматриваемой проблеме отношения не имеют.
Стоит отметить что обновление не в 100 % случаях приводит к проблеме, частично это зависит от конечной точки к которой осуществляется подключение. Проблема наблюдается как при создании нового подключения так и для уже для настроенных подключений.
Если обновление уже установлено в качестве решения проблемы на данный момент предлагается только откат обновления, например следующим PowerShell-скриптом (требуются админские права).
if (get-hotfix -id KB5009543) {
wusa /uninstall /kb:5009543
}

if (get-hotfix -id KB5009566) {
wusa /uninstall /kb:5009566
}
В комментариях отметили что обновление KB5009624 для Windows Server 2012 R2, также вышедшее накануне, вызывает проблемы с виртуальными машинами Hyper-V.
При появлении других решений добавлю их в конце публикации.
Если обновление ещё не установлено — рекомендуется воспользоваться функцией приостановки обновлений.
Обсуждение проблемы на Reddit (и хейт «в пользу» Microsoft)
UPD:
В комментариях сообщают что сломалось не само L2TP, а варианты авторизации MS-Chap и EAP, поэтому возможна неработоспособность других подключений, использующих эти алгоритмы.
Также предлагают отключить или ослабить IPSec, однако это снижает безопасность подключения, и не помогает, если на сервере VPN настроено строгое шифрование (поэтому самым актуальным на данный момент являет решение с откатом обновления).
От себя пожелаю больше благ и меньше багов в Новом Году! ✨
Consider professional VPN to avoid Windows update errors
by Aleksandar Ognjanovic
Aleksandar’s main passion is technology. With a solid writing background, he is determined to bring the bleeding edge to the common user. With a keen eye, he always… read more
Updated on September 9, 2022
Reviewed by
Edgar Nicov
Since the dial-up Internet era, Edgar was interested in online resources. From forums to e-commerce websites, he started digging into how those resources could generate revenue. Today he… read more
- Usually, VPNs and Windows 10 running devices pair up smoothly.
- However, it seems that updates can throw this collaboration off the track.
- If your VPN went south after installing the latest Windows 10 updates, you need to take action.
- Check out our guide and learn how to restore your VPN functionality with ease.
The presence of VPN solutions in the current state of computing technologies reached its peak. And since Windows 10 is one of the most used operative systems, a large chunk of the Virtual Private Networks run on Microsoft’s Windows.
Although they mostly work well, reports say that VPN is not working after Windows 10 updates, especially after the major Windows Updates.
These issues are quite common after every new major release and we decided to provide you with a list of possible solutions that should help you address them.
If you’re suddenly stroke with a plethora of VPN issues after a Windows update, make sure to check them out below.
Can’t connect to any VPN after today’s Windows Updates Windows 10?
This occurring error on Windows 10 affects all users that install a specific Patch Tuesday update. This can interfere with the built-in VPN and prevent connecting to the network.
You may encounter this issue and it’s better to have the knowledge. This is how other similar users describe this VPN problem:
- Forticlient VPN not connecting Windows 10 (a network error prevented updates from being downloaded)
- Cisco VPN not working after the Windows 10 update
- Windows 10 update breaks L2TP VPN- the L2TP connection attempt failed because the security layer encountered a processing error
- The service profile is damaged. reinstall the service profile
- The remote access service IP configuration is unusable
- Windows 10 built-in VPN not connecting
- VPN connection not showing in Network Connections Windows 10
- Windows 10 VPN not working after sleep
- Windows 11 update breaks VPN
These are the most reported issues by users regarding this update error. Therefore, let’s tackle the subject and see how to resolve it.
How can I fix VPN issues on Windows 10 after updates?
1. Use a proper VPN client
In order to avoid issues and errors, we strongly recommend choosing a reliable and compatible VPN.
Our VPN of choice is ExpressVPN, a world-class VPN that brings all those professional privacy and security-oriented features to the table but without you having to break the bank to acquire a subscription. It’s actually very affordable.
Crafted for the Windows 10 architecture, it will seamlessly blend with your system and grant you the security you seek.
Kape Technologies-owned ExpressVPN has OpenVPN, PPTP, IPSEC/L2TP, and SOCKS5 (Proxy) technologies.
In fact, the industry-standard OpenVPN offers you the highest level of encryption via secure VPN tunnels.
Speaking about tunneling technology, the VPN uses a global VPN Tunnel Network powered by multiple gateways with worldwide access and unlimited bandwidth.

ExpressVPN
Install the latest Windows 10 updates without fearing privacy breaches. Team up with this authorized VPN!
2. Update Windows 10
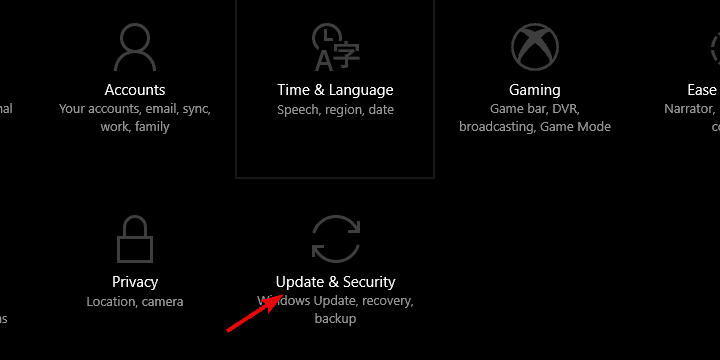
- Press Windows key + I to summon the Settings app.
- Select Updates & Security.
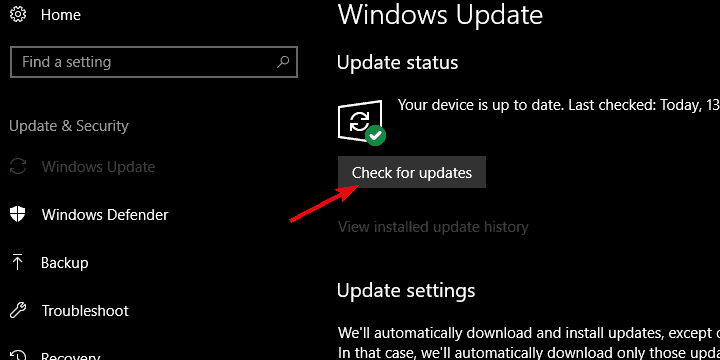
- Select Windows Update from the left pane.
- Click on the Check for updates button.
It seems that the Windows 10 Updates function, more or less, in the same sequence. Microsoft provides a major update in order to bring improvements, a large variety of bugs appear, and they then, overwhelmed by the large community backlash, end up pushing appropriate fixes as soon as possible.
That’s how it basically works. Since this is a widespread problem and it mostly occurred after some updates, they provided the resolution soon.
A lot of users who experienced issues with VPN after an update, get things sorted out after some time by updating Windows 10.
So, make sure that you have all available updates installed and try running the VPN again. In case you’re unable to make it work regardless, make sure to move to alternative steps.
Here’s how to check for available updates in Windows 10:
If you want to avoid VPN issues triggered by Windows Update, the obvious solution is to simply block the updates.
Keep in mind that not installing the latest security patches may pose a threat to your PC. Therefore, use this method only in extreme cases where you really need your VPN.
3. Reinstall drivers
- Right-click on Start and select Device Manager from the PowerUser menu.
- Expand the Network adapters section.
- Right-click on every individual WAN Miniport driver and uninstall it.
- Restart your PC and open Device Manager again.
- Navigate to Network Adapters, right-click every individual Miniport, and install it.
- Try running the VPN again.
Certain users resolved the issue by completely uninstalling all Network adapters, but you can settle for reinstalling WAN Miniport drivers.
Either way, we all know how notoriously Windows 10 manages drivers and how the generic and mandatory drivers can have an illicit effect on system performance and stability.
In order to avoid this, you can reinstall drivers changed by the last update and let them reinstall on their own. Also, secondary drivers provided by a third-party VPN are better than the ones Windows Update provides.
So, you can also uninstall them and the VPN, and then just obtain them by reinstalling your VPN from scratch.
Here’s how to reinstall WAN Miniport network drivers in Windows 10:
Update drivers automatically (suggested)
After you have uninstalled your drivers, we recommend reinstalling/updating them automatically.
Downloading and installing drivers manually is a process that carries the risk of getting the wrong driver installed, which may lead to serious malfunctions in your system.
The safer and easier way to update drivers on a Windows computer is by using a professional tool.
It will automatically identify each device on your computer and matches it with the latest driver versions from an extensive online database.
⇒ Get DriverFix
4. Edit registry
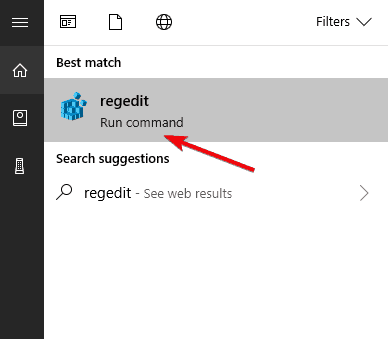
- In the Windows Search bar, type regedit and open regedit from the list of the results.
- Backup your registry.
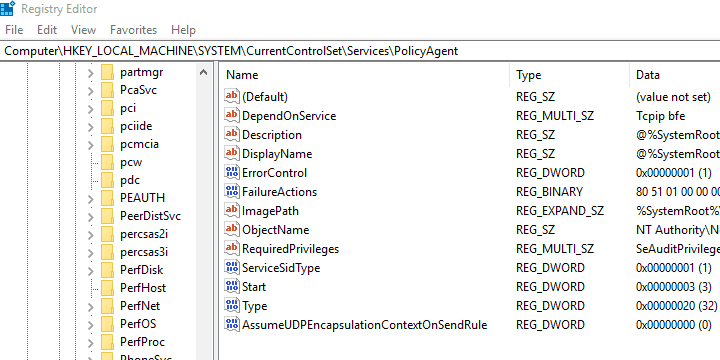
- Navigate to this location:
-
ComputerHKEY_LOCAL_MACHINESYSTEMCurrentControlSetServicesPolicyAgent
-
- Right-click on the blank area in the right window and select New > DWORD.
- Name the new DWORD input
AssumeUDPEncapsulationContextOnSendRule - Change its value to 2 and save it.
- Close Registry Editor and restart your PC.
As some tech-savvy users noted, this error can have roots in the Policy Editor. This is the main part of the Windows platform and it regulates the security and access policy for all individual users on one machine.
In order to address this possible instigator of the problem with VPN, we’ll need to change the policy settings by inserting an exception for UDP. Now, the best way to do so is to use Registry Editor.
Of course, with this tool we’re roaming in the dangerous area, so make sure to act with caution and don’t delete anything while there.
Follow these instructions to access Registry Editor and create a new input which should re-enable VPN in Windows 10:
5. Reinstall VPN
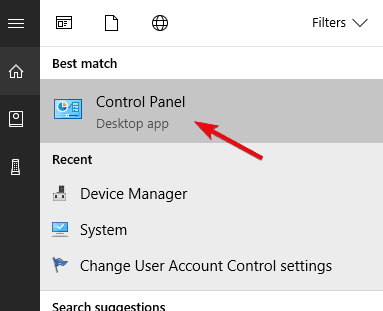
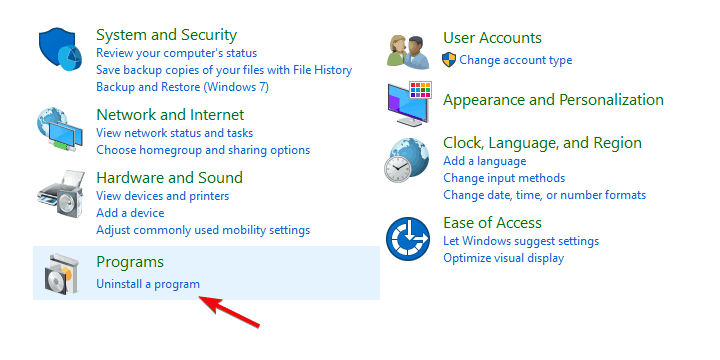
- In the Windows Search bar, type Control and open Control Panel from the list of results.
- From the Category view, click Uninstall a program under Programs.
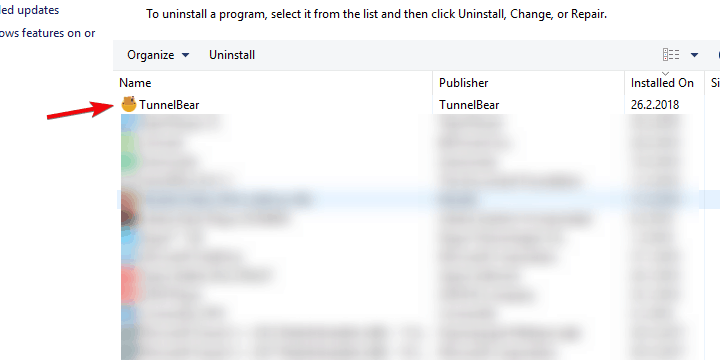
- Right-click on your VPN solution and Uninstall it.
- Use CCleaner or any other third-party uninstaller to clean all remaining files and registry entries the VPN has made.
- Restart your PC.
- Download the latest version of the VPN of your choice and install it.
Since the update-inflicted issues can affect both third-party VPNs and built-in Windows VPN, respectively, we decided to cover both.
Regarding the former, if you’re sure that everything was running smoothly before the update and then things suddenly went south, we advise you to reinstall the client you use.
Reinstallation is also the re-integration of the VPN into changed system surroundings, so this just might help. Also, while we’re at it, don’t forget to acquire the latest version of your VPN of choice.
We make sure to showcase the whole procedure, and decided to use TunnelBearVPN as the example, but this applies to all VPN solutions in general. Make sure to follow the instructions we provided below:
6. Disable antivirus
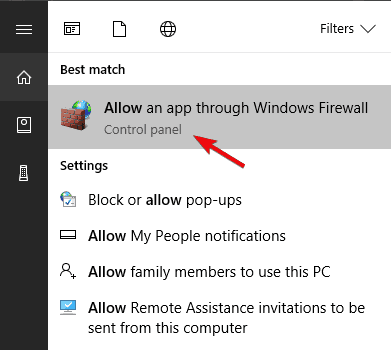
- In the Windows Search bar, type Allow and select Allow an app through Windows Firewall.
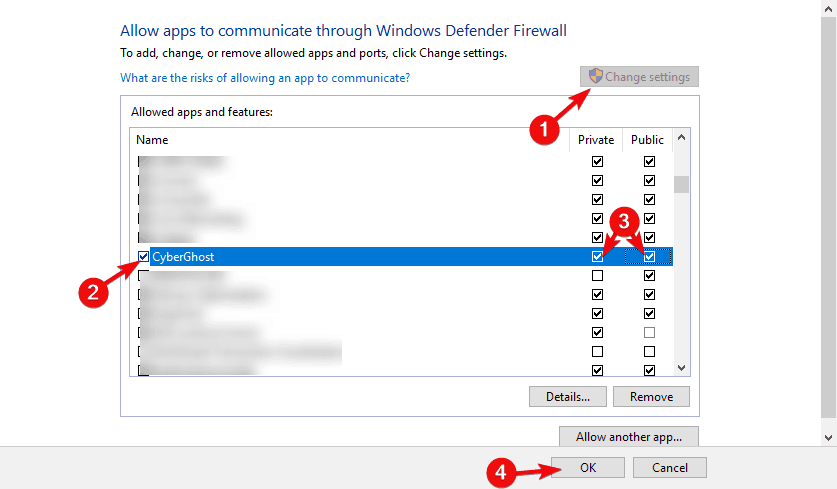
- Click on the Change settings button.
- Find your VPN on the list and check the box beside it. Also, make sure that both Public and Private networks are enabled.
- Confirm changes and try connecting through a VPN again.
Another possible reason for this error can lie in the third-party antivirus or some of its subsidiaries. Contemporary antivirus solutions often come in suits that include third-party Firewall security measures.
They do come in handy, especially if you’re knowledgeable enough to customize them, but are, on the other hand, known for conflicting with Windows services.
If you run a VPN through a Windows 10 antivirus provided by Microsoft, make sure to disable the third-party firewall before doing so.
Or even better, for the sake of troubleshooting, disable the antivirus completely and move from there.
Also, make sure that your native Windows Firewall isn’t preventing VPN from accessing the remote servers. Here’s how to add an exception to Windows Firewall in a few simple steps:
7. Disable IPv6
- Type Control in the Windows Search bar and open Control Panel from the list of results.
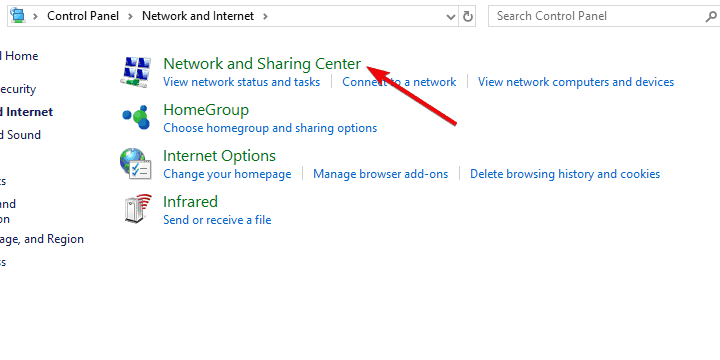
- Open Network and Internet and then Network and Sharing Center.
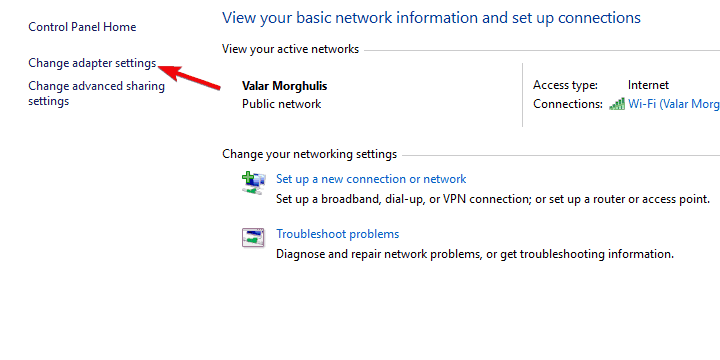
- Select Change adapter settings from the left pane.
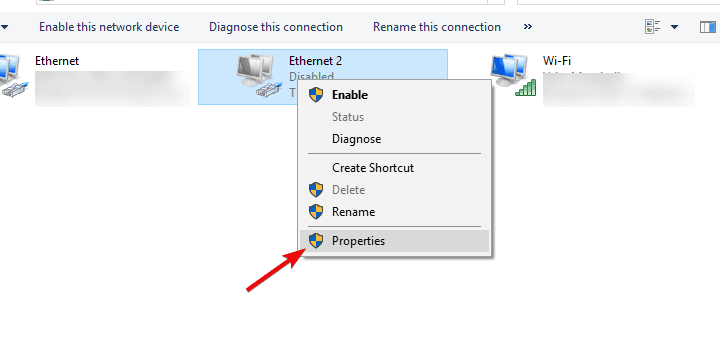
- Right-click on VPN network adapter and open Properties.
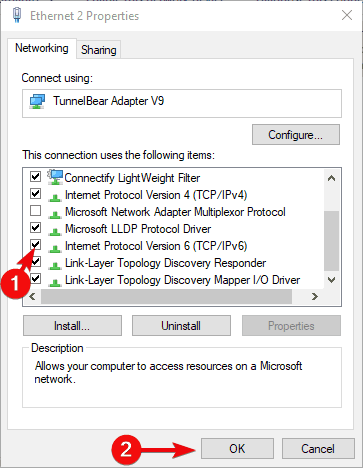
- Uncheck the box beside IPv6 and confirm changes.
- Try running a VPN afterward.
Connection issues, with or without VPN, are rather common after every new major update. Major updates tend to make certain changes to your adapter settings, making it unusable in the process.
Now, in step 7 we’ll try to address all-around connection settings, but this step concerns only IPv6. Namely, for users with the older configuration, the problem might occur due to conflict with the Internet Protocol.
Most users who found this step helpful disabled IPv6, but you can try disabling IPv4 and stick with IPv6, too.
If you’re not sure how to disable IPv6 (or IPv4, its older variation), follow the steps below:
If this method didn’t work, you should enable IPv6 back on. Check out this complete step-by-step guide to do that.
8. Troubleshoot your connection
We don’t want to point fingers at the VPN until we eliminate all possible connection issues.
In other words, make sure that you can connect without a VPN in the first place. If that’s not the case, we advise you to perform standard troubleshooting steps and move from there.
If you’re caught in the middle and unsure what to do, here are some actions that you should consider:
- Reset your router and/or modem.
- Flush DNS.
- Restart related services.
- Run dedicated Connection troubleshooter.
- Disable the router’s firewall.
- Update the router’s firmware.
- Reset router/modem to factory settings.
9. Reset your PC to factory settings
Finally, if none of the solutions proved helpful, we recommend resetting your PC to its factory values.
If you’re not sure how to reset your Windows 10 machine to default values and refresh it in the process, follow the instructions we provided below:
Which Windows Update is causing VPN issues?
There are multiple Windows 10 updates that can affect your VPN, so you should be aware. More exactly, the specific updates that can break your VPN are KB5009543 and KB5009566.
Besides that, you can encounter other Windows update versions such as 1903, 20h2, 2004, 1909, 2022
How do I uninstall a Windows update?
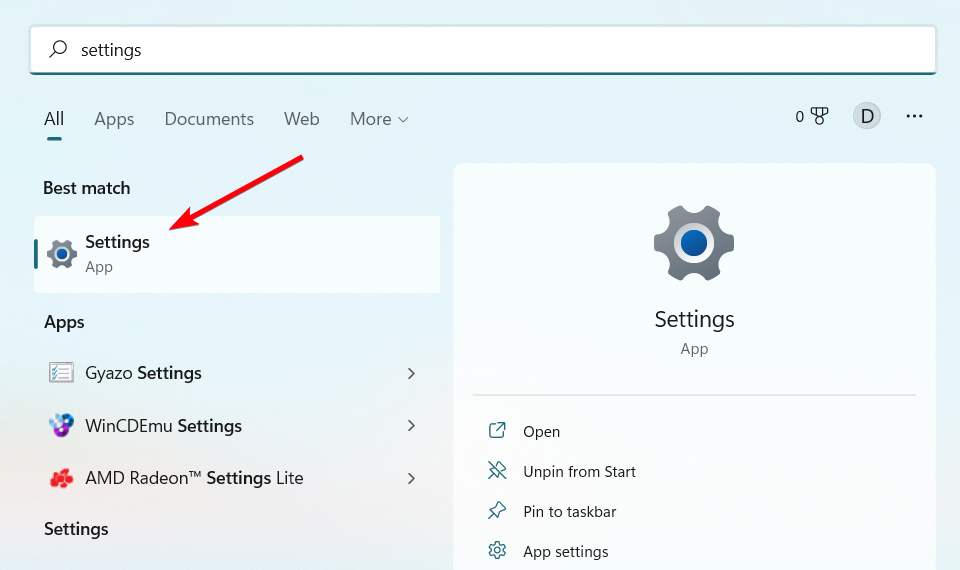
- In the Start Menu, click on Settings.
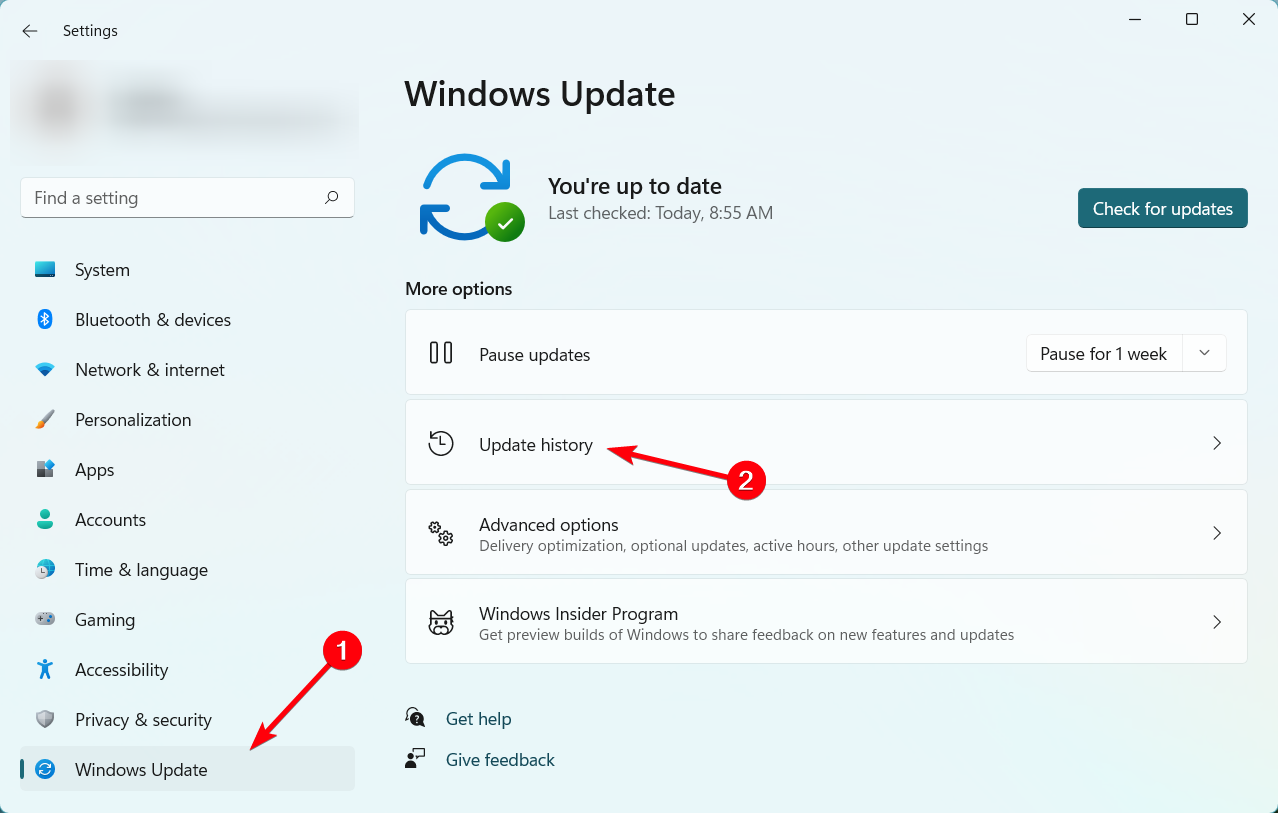
- Now, click on the Windows Update section.
- Press the Update history button.
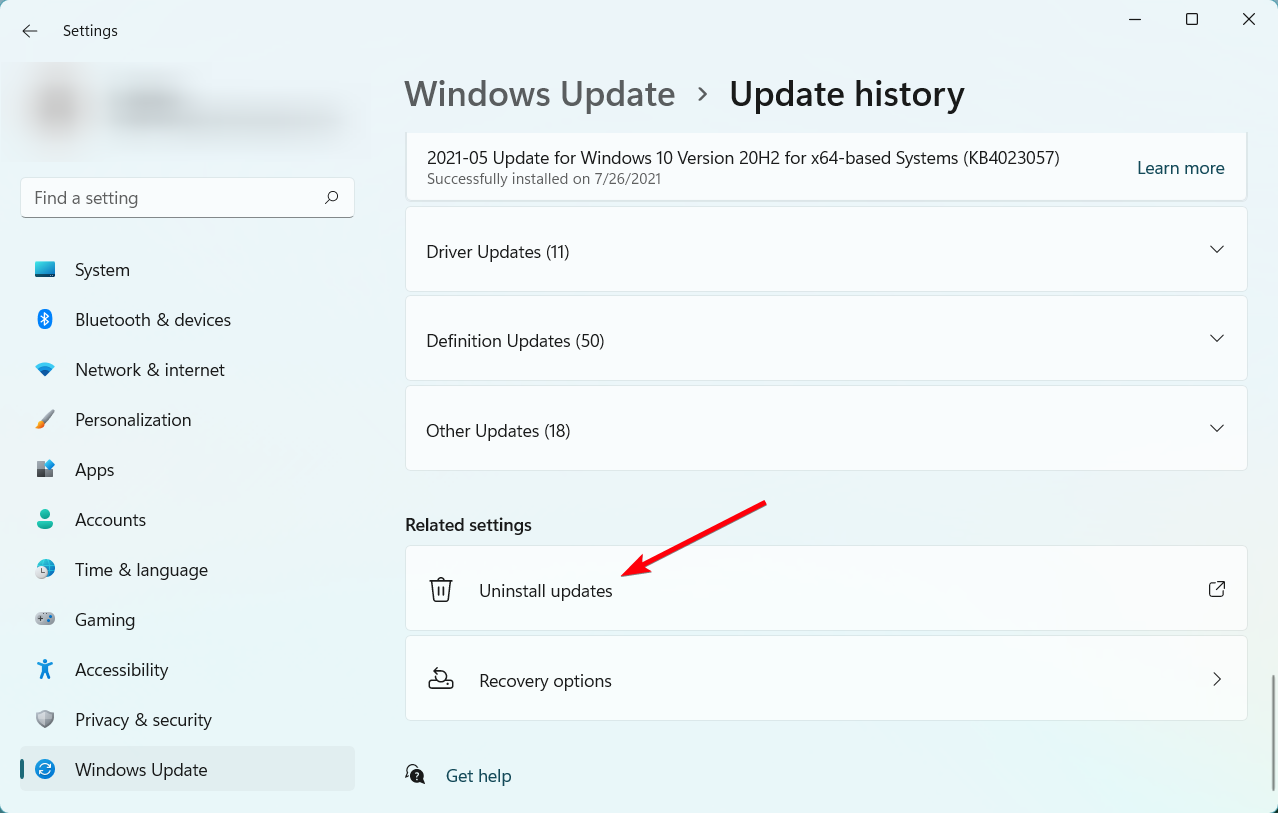
- Scroll down and click on Uninstall updates.
- Find the broken updates and uninstall them.
This should conclude it. In case you’re still unable to use your VPN on Windows 10 after an update, make sure to send a ticket to both Microsoft and your VPN provider.
Also, if you’re having issues with the business network, contact your network administrator. At least one should give you the helping hand, and chances are that the paid VPN service provider will be the one.
Either way, make sure to tell us if you have an alternative solution or a question regarding the ones we provided above.
Your connection is not secure — websites you visit can find out your details:
- Your IP Address:
loading
Companies can sell this information, alongside your location and internet provider name, and profit from it by serving targeted ads or monitoring your data usage.
We recommend Private Internet Access, a VPN with a no-log policy, open source code, ad blocking and much more; now 79% off.
Newsletter
Consider professional VPN to avoid Windows update errors
by Aleksandar Ognjanovic
Aleksandar’s main passion is technology. With a solid writing background, he is determined to bring the bleeding edge to the common user. With a keen eye, he always… read more
Updated on September 9, 2022
Reviewed by
Edgar Nicov
Since the dial-up Internet era, Edgar was interested in online resources. From forums to e-commerce websites, he started digging into how those resources could generate revenue. Today he… read more
- Usually, VPNs and Windows 10 running devices pair up smoothly.
- However, it seems that updates can throw this collaboration off the track.
- If your VPN went south after installing the latest Windows 10 updates, you need to take action.
- Check out our guide and learn how to restore your VPN functionality with ease.
The presence of VPN solutions in the current state of computing technologies reached its peak. And since Windows 10 is one of the most used operative systems, a large chunk of the Virtual Private Networks run on Microsoft’s Windows.
Although they mostly work well, reports say that VPN is not working after Windows 10 updates, especially after the major Windows Updates.
These issues are quite common after every new major release and we decided to provide you with a list of possible solutions that should help you address them.
If you’re suddenly stroke with a plethora of VPN issues after a Windows update, make sure to check them out below.
Can’t connect to any VPN after today’s Windows Updates Windows 10?
This occurring error on Windows 10 affects all users that install a specific Patch Tuesday update. This can interfere with the built-in VPN and prevent connecting to the network.
You may encounter this issue and it’s better to have the knowledge. This is how other similar users describe this VPN problem:
- Forticlient VPN not connecting Windows 10 (a network error prevented updates from being downloaded)
- Cisco VPN not working after the Windows 10 update
- Windows 10 update breaks L2TP VPN- the L2TP connection attempt failed because the security layer encountered a processing error
- The service profile is damaged. reinstall the service profile
- The remote access service IP configuration is unusable
- Windows 10 built-in VPN not connecting
- VPN connection not showing in Network Connections Windows 10
- Windows 10 VPN not working after sleep
- Windows 11 update breaks VPN
These are the most reported issues by users regarding this update error. Therefore, let’s tackle the subject and see how to resolve it.
How can I fix VPN issues on Windows 10 after updates?
1. Use a proper VPN client
In order to avoid issues and errors, we strongly recommend choosing a reliable and compatible VPN.
Our VPN of choice is ExpressVPN, a world-class VPN that brings all those professional privacy and security-oriented features to the table but without you having to break the bank to acquire a subscription. It’s actually very affordable.
Crafted for the Windows 10 architecture, it will seamlessly blend with your system and grant you the security you seek.
Kape Technologies-owned ExpressVPN has OpenVPN, PPTP, IPSEC/L2TP, and SOCKS5 (Proxy) technologies.
In fact, the industry-standard OpenVPN offers you the highest level of encryption via secure VPN tunnels.
Speaking about tunneling technology, the VPN uses a global VPN Tunnel Network powered by multiple gateways with worldwide access and unlimited bandwidth.

ExpressVPN
Install the latest Windows 10 updates without fearing privacy breaches. Team up with this authorized VPN!
2. Update Windows 10
- Press Windows key + I to summon the Settings app.
- Select Updates & Security.
- Select Windows Update from the left pane.
- Click on the Check for updates button.
It seems that the Windows 10 Updates function, more or less, in the same sequence. Microsoft provides a major update in order to bring improvements, a large variety of bugs appear, and they then, overwhelmed by the large community backlash, end up pushing appropriate fixes as soon as possible.
That’s how it basically works. Since this is a widespread problem and it mostly occurred after some updates, they provided the resolution soon.
A lot of users who experienced issues with VPN after an update, get things sorted out after some time by updating Windows 10.
So, make sure that you have all available updates installed and try running the VPN again. In case you’re unable to make it work regardless, make sure to move to alternative steps.
Here’s how to check for available updates in Windows 10:
If you want to avoid VPN issues triggered by Windows Update, the obvious solution is to simply block the updates.
Keep in mind that not installing the latest security patches may pose a threat to your PC. Therefore, use this method only in extreme cases where you really need your VPN.
3. Reinstall drivers
- Right-click on Start and select Device Manager from the PowerUser menu.
- Expand the Network adapters section.
- Right-click on every individual WAN Miniport driver and uninstall it.
- Restart your PC and open Device Manager again.
- Navigate to Network Adapters, right-click every individual Miniport, and install it.
- Try running the VPN again.
Certain users resolved the issue by completely uninstalling all Network adapters, but you can settle for reinstalling WAN Miniport drivers.
Either way, we all know how notoriously Windows 10 manages drivers and how the generic and mandatory drivers can have an illicit effect on system performance and stability.
In order to avoid this, you can reinstall drivers changed by the last update and let them reinstall on their own. Also, secondary drivers provided by a third-party VPN are better than the ones Windows Update provides.
So, you can also uninstall them and the VPN, and then just obtain them by reinstalling your VPN from scratch.
Here’s how to reinstall WAN Miniport network drivers in Windows 10:
Update drivers automatically (suggested)
After you have uninstalled your drivers, we recommend reinstalling/updating them automatically.
Downloading and installing drivers manually is a process that carries the risk of getting the wrong driver installed, which may lead to serious malfunctions in your system.
The safer and easier way to update drivers on a Windows computer is by using a professional tool.
It will automatically identify each device on your computer and matches it with the latest driver versions from an extensive online database.
⇒ Get DriverFix
4. Edit registry
- In the Windows Search bar, type regedit and open regedit from the list of the results.
- Backup your registry.
- Navigate to this location:
-
ComputerHKEY_LOCAL_MACHINESYSTEMCurrentControlSetServicesPolicyAgent
-
- Right-click on the blank area in the right window and select New > DWORD.
- Name the new DWORD input
AssumeUDPEncapsulationContextOnSendRule - Change its value to 2 and save it.
- Close Registry Editor and restart your PC.
As some tech-savvy users noted, this error can have roots in the Policy Editor. This is the main part of the Windows platform and it regulates the security and access policy for all individual users on one machine.
In order to address this possible instigator of the problem with VPN, we’ll need to change the policy settings by inserting an exception for UDP. Now, the best way to do so is to use Registry Editor.
Of course, with this tool we’re roaming in the dangerous area, so make sure to act with caution and don’t delete anything while there.
Follow these instructions to access Registry Editor and create a new input which should re-enable VPN in Windows 10:
5. Reinstall VPN
- In the Windows Search bar, type Control and open Control Panel from the list of results.
- From the Category view, click Uninstall a program under Programs.
- Right-click on your VPN solution and Uninstall it.
- Use CCleaner or any other third-party uninstaller to clean all remaining files and registry entries the VPN has made.
- Restart your PC.
- Download the latest version of the VPN of your choice and install it.
Since the update-inflicted issues can affect both third-party VPNs and built-in Windows VPN, respectively, we decided to cover both.
Regarding the former, if you’re sure that everything was running smoothly before the update and then things suddenly went south, we advise you to reinstall the client you use.
Reinstallation is also the re-integration of the VPN into changed system surroundings, so this just might help. Also, while we’re at it, don’t forget to acquire the latest version of your VPN of choice.
We make sure to showcase the whole procedure, and decided to use TunnelBearVPN as the example, but this applies to all VPN solutions in general. Make sure to follow the instructions we provided below:
6. Disable antivirus
- In the Windows Search bar, type Allow and select Allow an app through Windows Firewall.
- Click on the Change settings button.
- Find your VPN on the list and check the box beside it. Also, make sure that both Public and Private networks are enabled.
- Confirm changes and try connecting through a VPN again.
Another possible reason for this error can lie in the third-party antivirus or some of its subsidiaries. Contemporary antivirus solutions often come in suits that include third-party Firewall security measures.
They do come in handy, especially if you’re knowledgeable enough to customize them, but are, on the other hand, known for conflicting with Windows services.
If you run a VPN through a Windows 10 antivirus provided by Microsoft, make sure to disable the third-party firewall before doing so.
Or even better, for the sake of troubleshooting, disable the antivirus completely and move from there.
Also, make sure that your native Windows Firewall isn’t preventing VPN from accessing the remote servers. Here’s how to add an exception to Windows Firewall in a few simple steps:
7. Disable IPv6
- Type Control in the Windows Search bar and open Control Panel from the list of results.
- Open Network and Internet and then Network and Sharing Center.
- Select Change adapter settings from the left pane.
- Right-click on VPN network adapter and open Properties.
- Uncheck the box beside IPv6 and confirm changes.
- Try running a VPN afterward.
Connection issues, with or without VPN, are rather common after every new major update. Major updates tend to make certain changes to your adapter settings, making it unusable in the process.
Now, in step 7 we’ll try to address all-around connection settings, but this step concerns only IPv6. Namely, for users with the older configuration, the problem might occur due to conflict with the Internet Protocol.
Most users who found this step helpful disabled IPv6, but you can try disabling IPv4 and stick with IPv6, too.
If you’re not sure how to disable IPv6 (or IPv4, its older variation), follow the steps below:
If this method didn’t work, you should enable IPv6 back on. Check out this complete step-by-step guide to do that.
8. Troubleshoot your connection
We don’t want to point fingers at the VPN until we eliminate all possible connection issues.
In other words, make sure that you can connect without a VPN in the first place. If that’s not the case, we advise you to perform standard troubleshooting steps and move from there.
If you’re caught in the middle and unsure what to do, here are some actions that you should consider:
- Reset your router and/or modem.
- Flush DNS.
- Restart related services.
- Run dedicated Connection troubleshooter.
- Disable the router’s firewall.
- Update the router’s firmware.
- Reset router/modem to factory settings.
9. Reset your PC to factory settings
Finally, if none of the solutions proved helpful, we recommend resetting your PC to its factory values.
If you’re not sure how to reset your Windows 10 machine to default values and refresh it in the process, follow the instructions we provided below:
Which Windows Update is causing VPN issues?
There are multiple Windows 10 updates that can affect your VPN, so you should be aware. More exactly, the specific updates that can break your VPN are KB5009543 and KB5009566.
Besides that, you can encounter other Windows update versions such as 1903, 20h2, 2004, 1909, 2022
How do I uninstall a Windows update?
- In the Start Menu, click on Settings.
- Now, click on the Windows Update section.
- Press the Update history button.
- Scroll down and click on Uninstall updates.
- Find the broken updates and uninstall them.
This should conclude it. In case you’re still unable to use your VPN on Windows 10 after an update, make sure to send a ticket to both Microsoft and your VPN provider.
Also, if you’re having issues with the business network, contact your network administrator. At least one should give you the helping hand, and chances are that the paid VPN service provider will be the one.
Either way, make sure to tell us if you have an alternative solution or a question regarding the ones we provided above.
Your connection is not secure — websites you visit can find out your details:
- Your IP Address:
loading
Companies can sell this information, alongside your location and internet provider name, and profit from it by serving targeted ads or monitoring your data usage.
We recommend Private Internet Access, a VPN with a no-log policy, open source code, ad blocking and much more; now 79% off.
Newsletter
После очередного обновления Windows 10 VPN до работы перестал работать.
Проблема заключается в том CMAK VPN-клиент перестает работать после обновления Windows до Windows 10 версии 1703 (Creators Update), 10 Windows версии 1709 (Fall Creators Update), Windows 10 версии 1803 или Windows 10 версии 1809. Windows не удается запустить пакет Connection Manager Administration Kit (CMAK)-based Virtual Private Network (VPN) client.
Для решения проблемы портал техподдержки рекомендует переустановить пакет CMAK-based VPN.
Можно попытаться добавить ключ в реестр «PolicyAgent». Если этот метод не работает, вы всегда можете отменить изменения.
1. Нажмите Windows + R . В окне выполнить введите “regedit” и нажмите Enter.

2. Перейдите в редакторе реестра по следующему пути:
ComputerHKEY_LOCAL_MACHINESYSTEMCurrentControlSetServicesPolicyAgent
3. Правой кнопкой мыши выбрать
“Создать > Параметр DWORD (32-бита)”.

4. Введите в качестве имени следующее значение: «AssumeUDPEncapsulationContextOnSendRule«.
После создания двойным-кликом откройте параметр и установите значение «2«. Нажмите OK для сохранения изменений и выхода.

5. Перезагрузите компьютер и убедитесь, что проблема решена.
Полезные ссылки по теме:
CMAK-based VPN client doesn’t work after upgrade to Windows 10
Install the Connection Manager Administration Kit
Connection Manager Administration Kit
(Visited 4 876 times, 1 visits today)

Posted by Rewalon
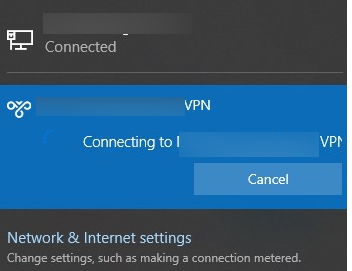
В Windows 10 1903 обнаружил несколько странных багов с настроенными VPN подключениями. Первая проблема: при попытке подключиться к удаленному VPN L2TP серверу окно с VPN-подключением замирает в состоянии “connecting”. При этом не появляется даже запрос логина и пароля, а подключение через какое-то время разрывается без сообщения об ошибке.
Не появляется запрос пароля для L2TP VPN подключения
Такое ощущение, что в этом диалоге VPN подключения почему-то блокируется вывод окна с запросом данных пользователя. В результате VPN подключение никак не может завершиться
Есть обходное решение этой проблемы. Попробуйте использовать для установления VPN подключения старую-добрую Windows утилиту rasphone.exe, которая все еще присутствует в современных версиях Windows 10 (эта утилита должна быть знакома всем тем, кто пользовался dial-up подключением в Windows).
- Запустите утилиту: Win+R ->
C:WindowsSystem32rasphone.exe
- Выберите ваше VPN подключение и нажмите кнопку “Подключить”;
- После этого появится стандартное окно с указанием имени пользователя и пароля для VPN подключения;
- VPN туннель должен успешно подняться.
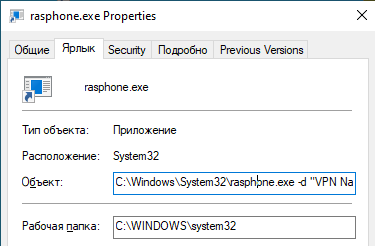
Для удобства пользователей вы можете вынести ярлык на rasphone.exe на рабочий стол. Для автоматического подключения вы можете указать в настройках ярлыка имя вашего VPN подключения так:
C:WINDOWSsystem32rasphone.exe -d "VPN Name"
(название VPN подключения можно взять из Control Panel -> Network Adapters и взять его в кавычки, если оно содержит пробелы в имени).
Что интересно, проблема возникает только c L2TP подключением (даже при включенном настроенном параметре реестра AssumeUDPEncapsulationContextOnSendRule = 2). Другое VPN подключение на этом же компьютере, но с протоколом PPTP и типом аутентификации MS-CHAP v2 работает нормально
Ошибка RASMAN для Always on VPN
Другая проблема возникает с VPN подключением к корпоративной сети в режиме Always on VPN (AOVPN). При инициализации такого VPN подключения служба RASMAN (Remote Access Connections Manager) останавливается, а в журнале событий Application появляется событие с Event ID 1000 и текстом:
“Faulting application name: svchost.exe_RasMan…”, “Faulting module name: rasmans.dll”, и “Exception code: 0xc0000005”.
Эта проблема признана Microsoft и по последним данным исправлена в октябрьском обновлении для Windows 10 1903 — KB4522355 (https://support.microsoft.com/en-us/help/4522355/windows-10-update-kb4522355). Вы можете скачать и установить данное обновление вручную или через Windows Update/WSUS.
Если обновление не исправило проблему, попробуйте переустановите виртуальные адаптеры WAN miniports в диспетчере устройств.
- Запустите Device manager (devmgmt.msc);
- Разверните секцию Network Adapters
- Последовательно щелкните правой кнопкой по следующим адаптерам и удалите их (Uninstall device): WAN Miniport (IP), WAN Miniport(IPv6) и WAN Miniport (PPTP).
- После удаления выберите в меню Action -> Scan for Hardware changes и дождитесь, пока Windows не обнаружит и не установит драйвера для этих виртуальных устройств;
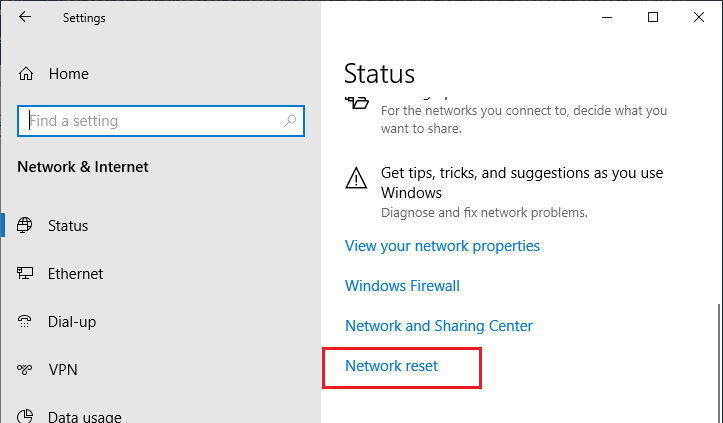
- После этого сбросьте сетевые настройки Windows 10 : Settings -> Network & Internet -> Network Reset -> Reset now;
- Теперь вам нужно пересоздать ваши VPN подключения (Руководство по VPN для начинающих) и проверить подключение.
Изначально проблема с режимом Always on VPN подключением была связана с тем, что пользователь отключил на компьютере телеметрию (эх, Microsoft). Для корректной работы Always on VPN подключения вам придется временного включить телеметрию на компьютере. Для включения телеметрии вы можете воспользоваться одним из способов, описанных ниже.
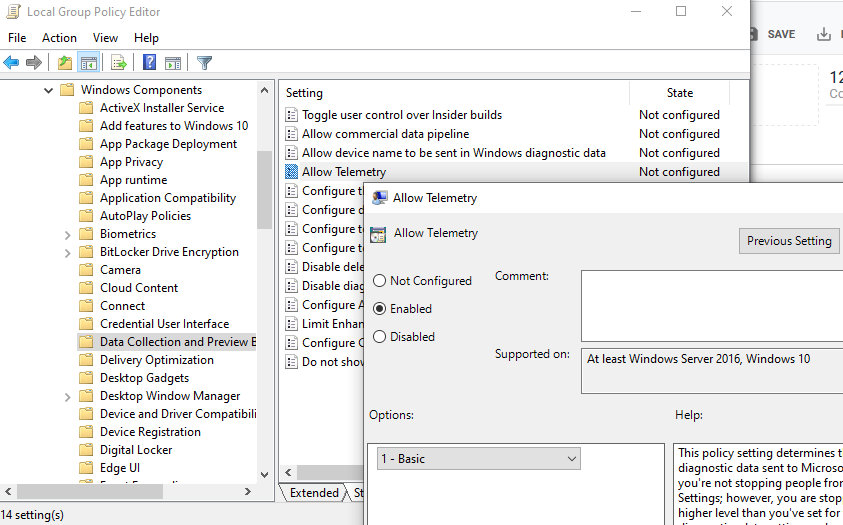
Способ 1. Откройте редактор локальных политики (gpedit.msc) и перейдте в секцию Computer Configuration -> Administrative Templates –> Windows Components -> Data Collection and Preview Builds.
Найдите и включите политику Allow Telemetry = Enabled. Установите один из следующих режимов: 1 (Basic), 2 (Enhanced) или 3 (Full).
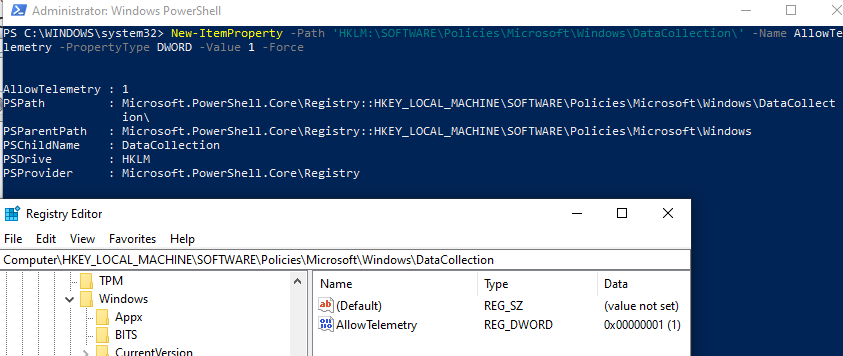
Способ 2. Того же самого эффекта можно добиться, вручную изменив параметр реестра AllowTelemetry (тип REG_DWORD) в ветке HKEY_LOCAL_MACHINESOFTWAREPoliciesMicrosoftWindowsDataCollection. Здесь также нужно установить одно из трех значение: 1, 2 или 3.
Вы можете изменить этот параметр с помощью редактора реестра (regedit.exe) или с помощью PowerShell-командлета New-ItemProperty:
New-ItemProperty -Path ‘HKLM:SOFTWAREPoliciesMicrosoftWindowsDataCollection’ -Name AllowTelemetry -PropertyType DWORD -Value 1 –Force
После этого нужно перезапустить службу Remote Access Connection Manager (RasMan) через консоль services.msc или с помощью командлета Restart-Service:
Restart-Service RasMan -PassThru
При одключении от VPN пропадает Интернет
Также в Windows 10 был другой баг, когда после отключения от VPN переставал работать доступ в Интернет. Проблема решалась созданием маршрута по-умолчанию или отключением/включением виртуального адаптера WAN Miniport (IP).


