Похоже Microsoft решила сделать оригинальный новогодний подарок и продлить новогодние праздники ещё немного, выпустив обновление делающее невозможным VPN-подключение по протоколу L2TP, который часто используется для удалённой работы. То что обновления Windows, приносят не только исправления но и новые баги — уже не новость. Однако ввиду того что данная проблема носит широкий характер из-за большой вероятности появления и большого распространения удалённой работы решил что неплохо бы предупредить сообщество.
Итак, обновления от 11 января 2022 года, которые, вероятно, и являются причиной данной проблемы:
- Windows 10 — KB5009543 (также упоминается KB5008876)
- Windows 11 — KB5009566 (также упоминается KB5008880)
Упомянутые в скобках обновления пришли параллельно с проблемными, судя по комментариям они к рассматриваемой проблеме отношения не имеют.
Стоит отметить что обновление не в 100 % случаях приводит к проблеме, частично это зависит от конечной точки к которой осуществляется подключение. Проблема наблюдается как при создании нового подключения так и для уже для настроенных подключений.
Если обновление уже установлено в качестве решения проблемы на данный момент предлагается только откат обновления, например следующим PowerShell-скриптом (требуются админские права).
if (get-hotfix -id KB5009543) {
wusa /uninstall /kb:5009543
}

if (get-hotfix -id KB5009566) {
wusa /uninstall /kb:5009566
}
В комментариях отметили что обновление KB5009624 для Windows Server 2012 R2, также вышедшее накануне, вызывает проблемы с виртуальными машинами Hyper-V.
При появлении других решений добавлю их в конце публикации.
Если обновление ещё не установлено — рекомендуется воспользоваться функцией приостановки обновлений.
Обсуждение проблемы на Reddit (и хейт «в пользу» Microsoft)
UPD:
В комментариях сообщают что сломалось не само L2TP, а варианты авторизации MS-Chap и EAP, поэтому возможна неработоспособность других подключений, использующих эти алгоритмы.
Также предлагают отключить или ослабить IPSec, однако это снижает безопасность подключения, и не помогает, если на сервере VPN настроено строгое шифрование (поэтому самым актуальным на данный момент являет решение с откатом обновления).
От себя пожелаю больше благ и меньше багов в Новом Году! ✨
Содержание
- Способ 1: Удаление последнего обновления
- Откат к предыдущей сборке
- Способ 2: Пересоздание подключения
- Способ 3: Отключение протокола IPv6
- Способ 4: Переустановка сетевых устройств
- Вопросы и ответы

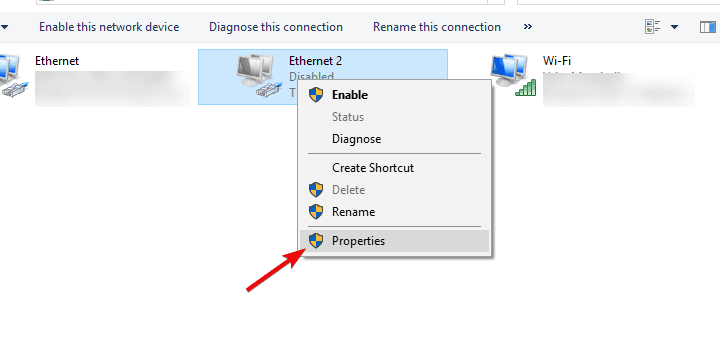
Способ 1: Удаление последнего обновления
Самым простым и очевидным способом устранения проблем с подключением к VPN после очередного обновления является удаление последнего.
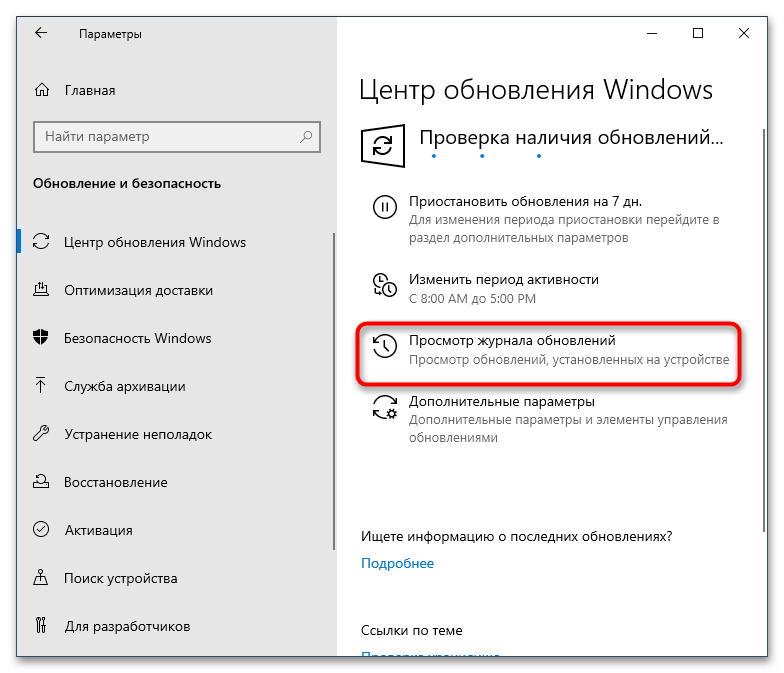
- Откройте приложение «Параметры», перейдите в раздел «Обновление и безопасность» → «Центр обновления Windows» и нажмите ссылку «Просмотр журнала обновлений».
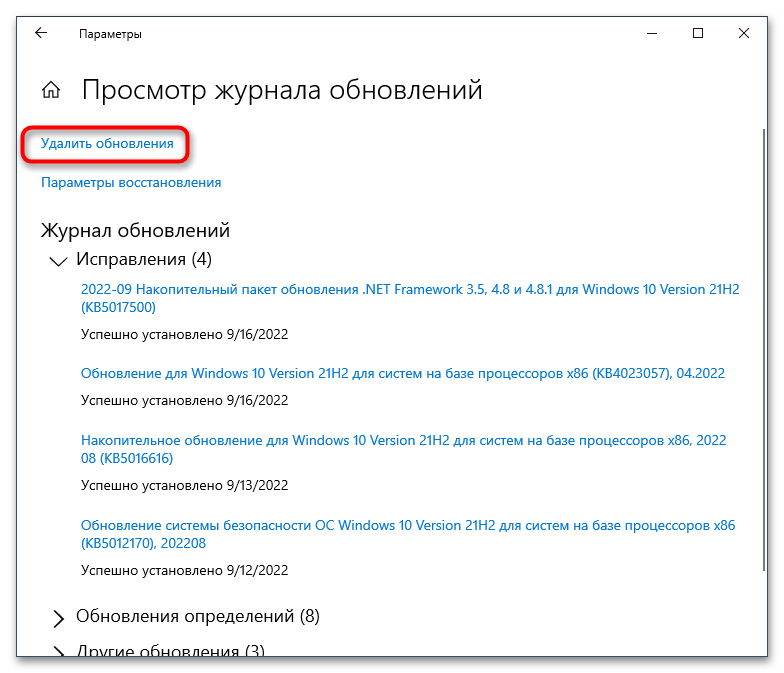
- Нажмите в следующем окне «Удалить обновления».
- Откроется окно со списком обновлений. Отсортируйте их, если необходимо, по дате установки и удалите те пакеты, которые были установлены с последним обновлением. Для запуска процедуры деинсталляции нажмите кнопку «Удалить» или используйте одноименную опцию контекстного меню.
- Подтвердите удаление и дождитесь завершения процесса.
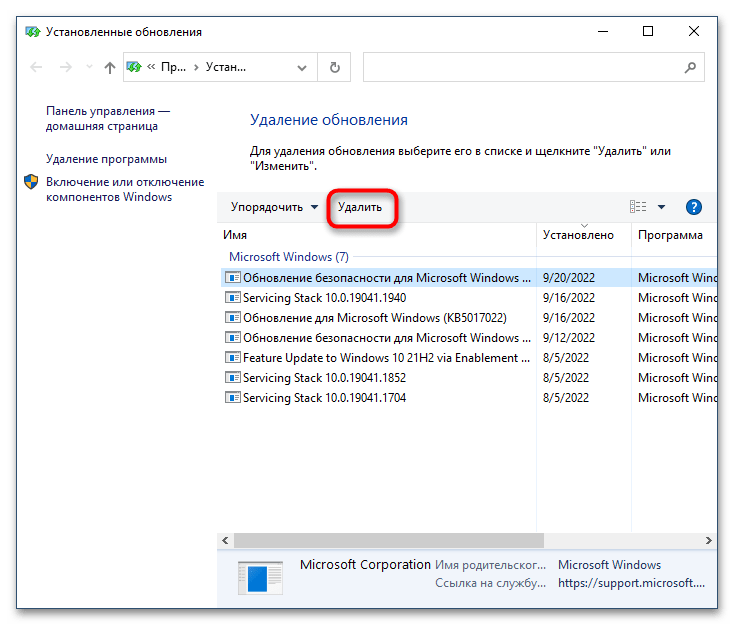
После удаления обновления рекомендуется перезагрузить компьютер.
Читайте также: Другие способы удалить обновления в Windows 10
Откат к предыдущей сборке
Также вы можете откатить систему к предыдущей сборке, если обновление было выполнено не позднее 10 или 30 (зависит от версии) дней назад.
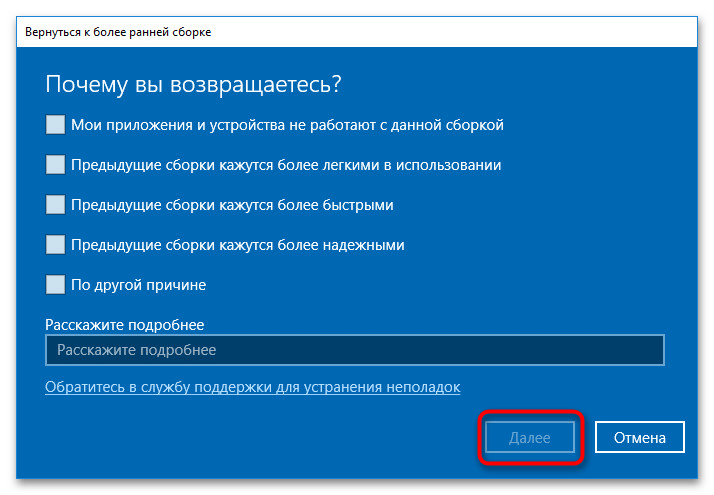
- В приложении «Параметры» прейдите в раздел «Обновление и безопасность» → «Восстановление» и нажмите в блоке «Вернуться к предыдущей версии Windows 10» кнопку «Начать».
- Выберите любую причину для выполнения отката и нажмите «Далее».
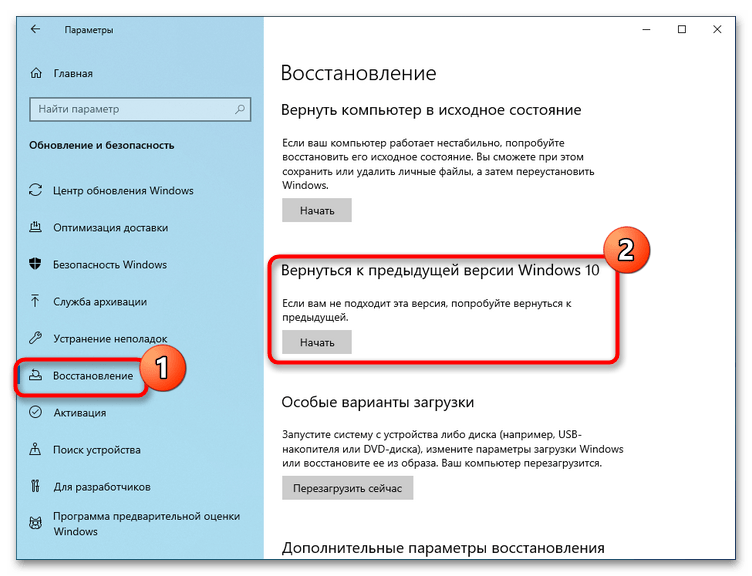
Процедура отката займет некоторое время. В итоге на компьютер будет установлена предыдущая сборка, учтите только, что все настройки, которые вы сделали после установки новой сборки, будут отменены.
Способ 2: Пересоздание подключения
В неосложненных случаях решить проблему можно путем пересоздания подключения VPN. Запустив приложение «Параметры», перейдите в раздел «Сеть и интернет» → «VPN», выделите ваше VPN-подключение и нажмите «Удалить».
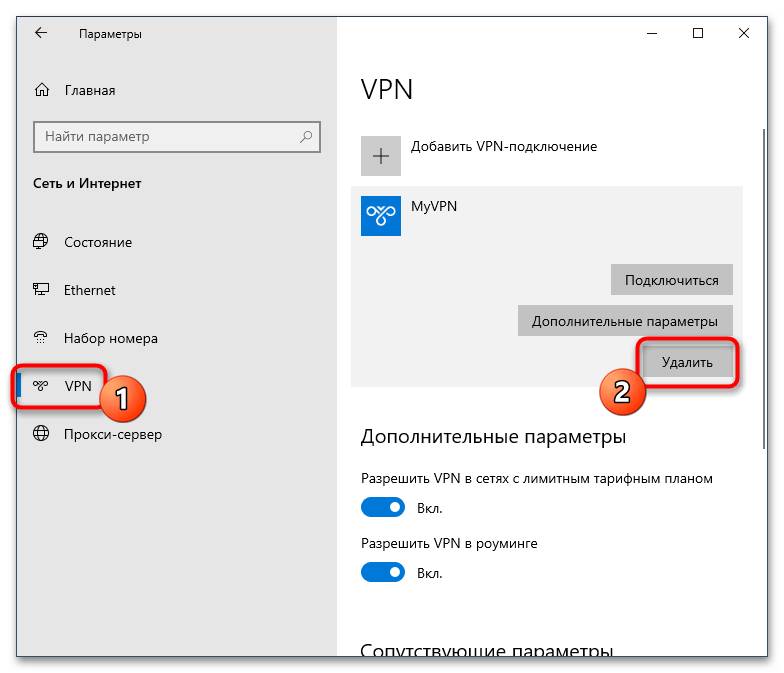
Создайте новое подключение VPN с теми же настройками и проверьте его работу.
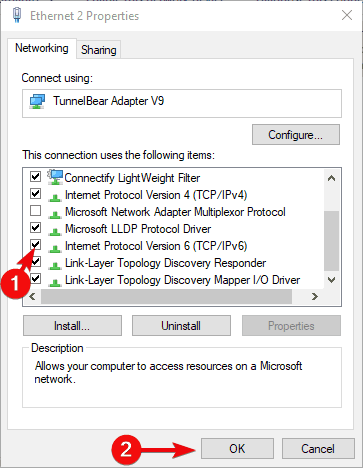
Способ 3: Отключение протокола IPv6
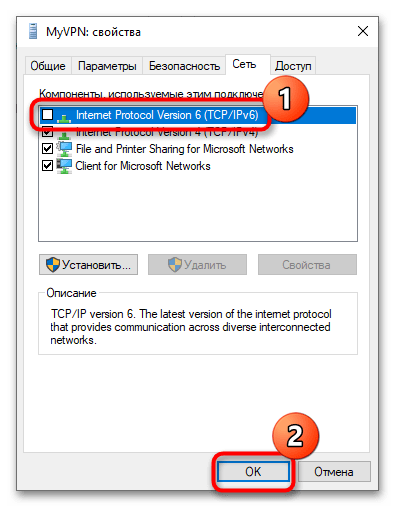
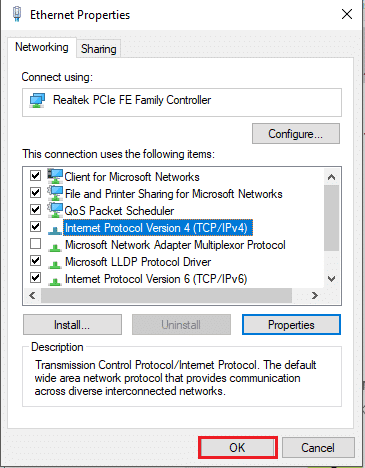
Отмечены случаи, когда неполадки с туннельным подключением вызывались конфликтами в работе нового сетевого протокола IPv6. Попробуйте его отключить, оставив работающим только IPv4.
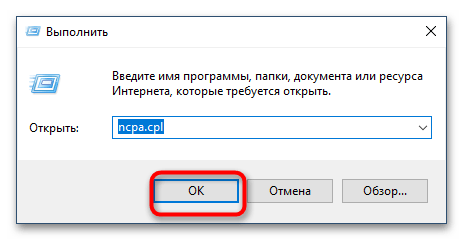
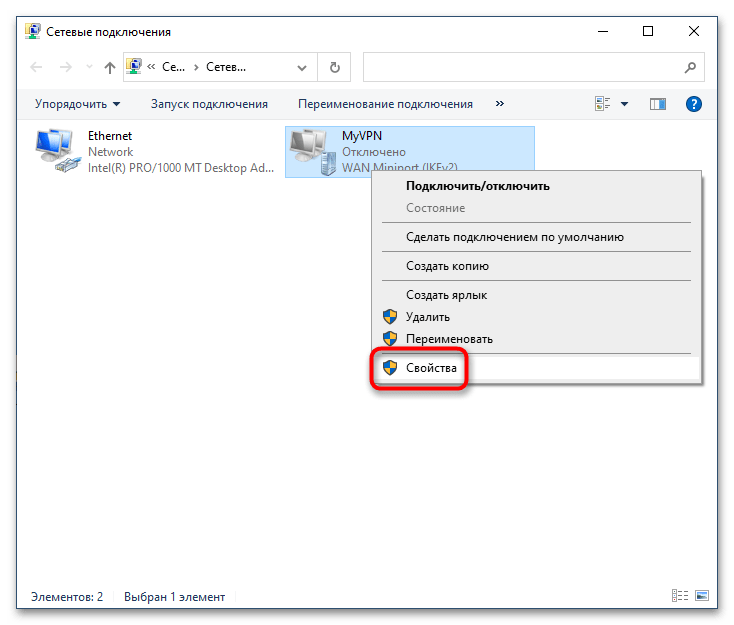
- Вызовите окошко быстрого выполнения команд нажатием комбинации клавиш Win + R и выполните в нем команду
ncpa.cpl. - Кликните правой кнопкой мыши по виртуальному сетевому адаптеру VPN и выберите из контекстного меню пункт «Свойства».
- Переключитесь в окне свойств на вкладку «Сеть» и снимите флажок с пункта «Internet Protocol Version 6 (TPC/IPv6)».
- Сохранив настройки, перезагрузите компьютер.

Способ 4: Переустановка сетевых устройств
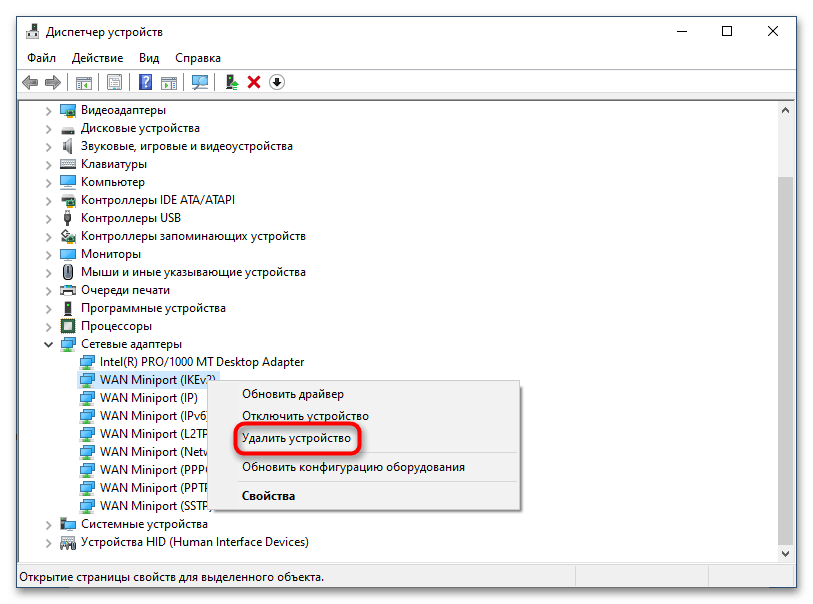
Если неполадка вызвана сбоем в работе сетевых устройств, который также нельзя исключать при обновлении Windows, устранить ее можно путем переустановки сетевых адаптеров WAN Miniport.
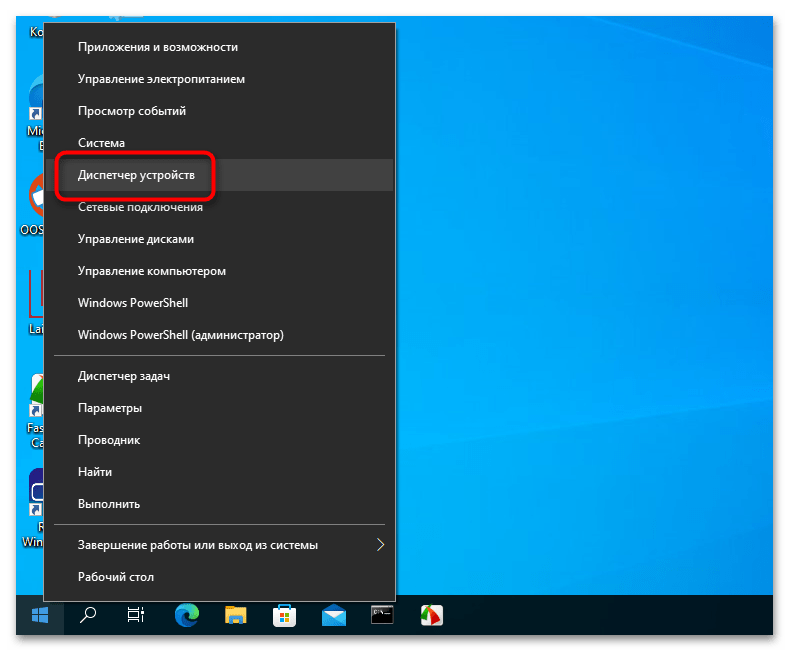
- Откройте «Диспетчер устройств» из контекстного меню кнопки «Пуск» или другим известным вам способом.
- Разверните узел «Сетевые адаптеры», нажмите правой кнопкой мыши по первому же устройству WAN Miniport и выберите из контекстного меню «Удалить устройство».
- Точно так же поступите с прочими адаптерами WAN Miniport.
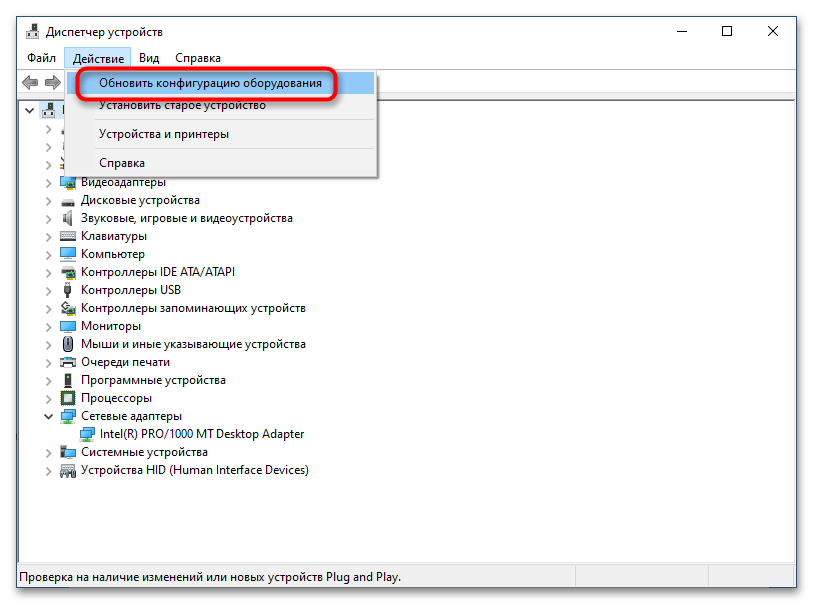
- Перейдите в меню «Действие» и выберите опцию «Обновить конфигурацию оборудования» либо перезагрузите компьютер.
В настоящее время проблема с подключением VPN в Windows 10 исправлена разработчиками, однако если вам придется столкнуться с подобной проблемой в будущем, вы будете знать, что делать.
Еще статьи по данной теме:
Помогла ли Вам статья?
Consider professional VPN to avoid Windows update errors
by Aleksandar Ognjanovic
Aleksandar’s main passion is technology. With a solid writing background, he is determined to bring the bleeding edge to the common user. With a keen eye, he always… read more
Updated on September 9, 2022
Reviewed by
Edgar Nicov

Since the dial-up Internet era, Edgar was interested in online resources. From forums to e-commerce websites, he started digging into how those resources could generate revenue. Today he… read more
- Usually, VPNs and Windows 10 running devices pair up smoothly.
- However, it seems that updates can throw this collaboration off the track.
- If your VPN went south after installing the latest Windows 10 updates, you need to take action.
- Check out our guide and learn how to restore your VPN functionality with ease.
The presence of VPN solutions in the current state of computing technologies reached its peak. And since Windows 10 is one of the most used operative systems, a large chunk of the Virtual Private Networks run on Microsoft’s Windows.
Although they mostly work well, reports say that VPN is not working after Windows 10 updates, especially after the major Windows Updates.
These issues are quite common after every new major release and we decided to provide you with a list of possible solutions that should help you address them.
If you’re suddenly stroke with a plethora of VPN issues after a Windows update, make sure to check them out below.
Can’t connect to any VPN after today’s Windows Updates Windows 10?
This occurring error on Windows 10 affects all users that install a specific Patch Tuesday update. This can interfere with the built-in VPN and prevent connecting to the network.
You may encounter this issue and it’s better to have the knowledge. This is how other similar users describe this VPN problem:
- Forticlient VPN not connecting Windows 10 (a network error prevented updates from being downloaded)
- Cisco VPN not working after the Windows 10 update
- Windows 10 update breaks L2TP VPN- the L2TP connection attempt failed because the security layer encountered a processing error
- The service profile is damaged. reinstall the service profile
- The remote access service IP configuration is unusable
- Windows 10 built-in VPN not connecting
- VPN connection not showing in Network Connections Windows 10
- Windows 10 VPN not working after sleep
- Windows 11 update breaks VPN
These are the most reported issues by users regarding this update error. Therefore, let’s tackle the subject and see how to resolve it.
How can I fix VPN issues on Windows 10 after updates?
1. Use a proper VPN client
In order to avoid issues and errors, we strongly recommend choosing a reliable and compatible VPN.
Our VPN of choice is ExpressVPN, a world-class VPN that brings all those professional privacy and security-oriented features to the table but without you having to break the bank to acquire a subscription. It’s actually very affordable.
Crafted for the Windows 10 architecture, it will seamlessly blend with your system and grant you the security you seek.
Kape Technologies-owned ExpressVPN has OpenVPN, PPTP, IPSEC/L2TP, and SOCKS5 (Proxy) technologies.
In fact, the industry-standard OpenVPN offers you the highest level of encryption via secure VPN tunnels.
Speaking about tunneling technology, the VPN uses a global VPN Tunnel Network powered by multiple gateways with worldwide access and unlimited bandwidth.
ExpressVPN
Install the latest Windows 10 updates without fearing privacy breaches. Team up with this authorized VPN!
2. Update Windows 10
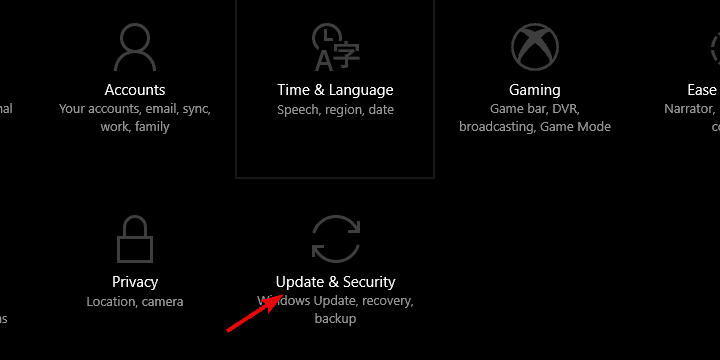
- Press Windows key + I to summon the Settings app.

- Select Updates & Security.
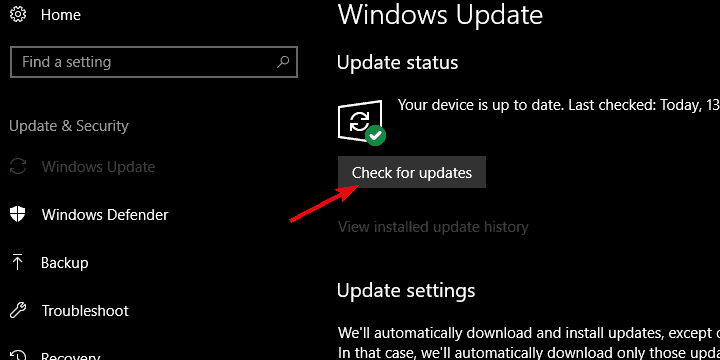
- Select Windows Update from the left pane.
- Click on the Check for updates button.
It seems that the Windows 10 Updates function, more or less, in the same sequence. Microsoft provides a major update in order to bring improvements, a large variety of bugs appear, and they then, overwhelmed by the large community backlash, end up pushing appropriate fixes as soon as possible.
That’s how it basically works. Since this is a widespread problem and it mostly occurred after some updates, they provided the resolution soon.
A lot of users who experienced issues with VPN after an update, get things sorted out after some time by updating Windows 10.
So, make sure that you have all available updates installed and try running the VPN again. In case you’re unable to make it work regardless, make sure to move to alternative steps.
Here’s how to check for available updates in Windows 10:
If you want to avoid VPN issues triggered by Windows Update, the obvious solution is to simply block the updates.
Keep in mind that not installing the latest security patches may pose a threat to your PC. Therefore, use this method only in extreme cases where you really need your VPN.
3. Reinstall drivers
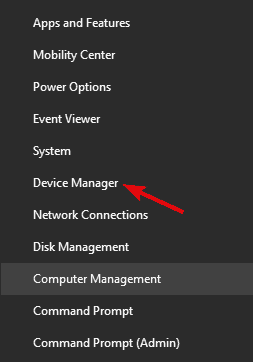
- Right-click on Start and select Device Manager from the PowerUser menu.

- Expand the Network adapters section.
- Right-click on every individual WAN Miniport driver and uninstall it.
- Restart your PC and open Device Manager again.
- Navigate to Network Adapters, right-click every individual Miniport, and install it.
- Try running the VPN again.

Certain users resolved the issue by completely uninstalling all Network adapters, but you can settle for reinstalling WAN Miniport drivers.
Either way, we all know how notoriously Windows 10 manages drivers and how the generic and mandatory drivers can have an illicit effect on system performance and stability.
In order to avoid this, you can reinstall drivers changed by the last update and let them reinstall on their own. Also, secondary drivers provided by a third-party VPN are better than the ones Windows Update provides.
So, you can also uninstall them and the VPN, and then just obtain them by reinstalling your VPN from scratch.
Here’s how to reinstall WAN Miniport network drivers in Windows 10:
Update drivers automatically (suggested)
After you have uninstalled your drivers, we recommend reinstalling/updating them automatically.
Downloading and installing drivers manually is a process that carries the risk of getting the wrong driver installed, which may lead to serious malfunctions in your system.
The safer and easier way to update drivers on a Windows computer is by using a professional tool.
It will automatically identify each device on your computer and matches it with the latest driver versions from an extensive online database.
⇒ Get DriverFix
4. Edit registry
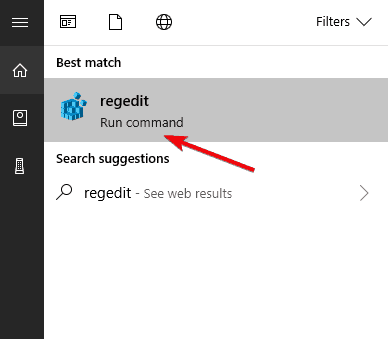
- In the Windows Search bar, type regedit and open regedit from the list of the results.

- Backup your registry.
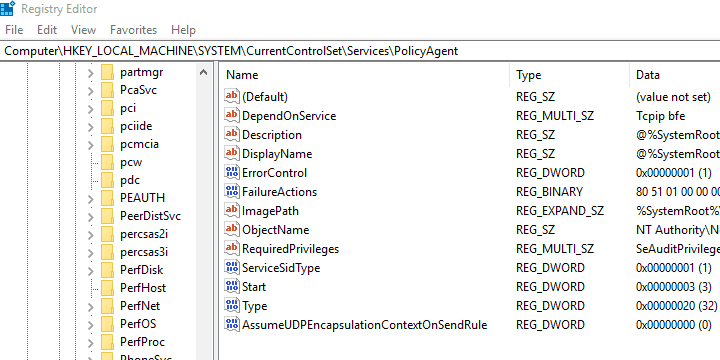
- Navigate to this location:
-
ComputerHKEY_LOCAL_MACHINESYSTEMCurrentControlSetServicesPolicyAgent
-
- Right-click on the blank area in the right window and select New > DWORD.
- Name the new DWORD input
AssumeUDPEncapsulationContextOnSendRule - Change its value to 2 and save it.
- Close Registry Editor and restart your PC.
As some tech-savvy users noted, this error can have roots in the Policy Editor. This is the main part of the Windows platform and it regulates the security and access policy for all individual users on one machine.
In order to address this possible instigator of the problem with VPN, we’ll need to change the policy settings by inserting an exception for UDP. Now, the best way to do so is to use Registry Editor.
Of course, with this tool we’re roaming in the dangerous area, so make sure to act with caution and don’t delete anything while there.
Follow these instructions to access Registry Editor and create a new input which should re-enable VPN in Windows 10:
5. Reinstall VPN
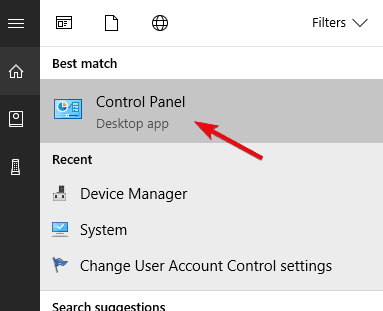
- In the Windows Search bar, type Control and open Control Panel from the list of results.

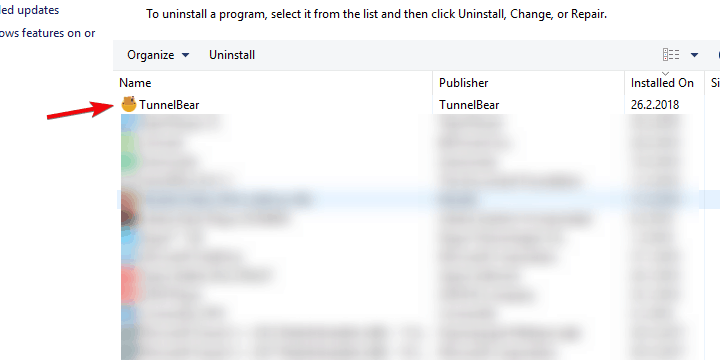
- From the Category view, click Uninstall a program under Programs.
- Right-click on your VPN solution and Uninstall it.
- Use CCleaner or any other third-party uninstaller to clean all remaining files and registry entries the VPN has made.
- Restart your PC.
- Download the latest version of the VPN of your choice and install it.

Since the update-inflicted issues can affect both third-party VPNs and built-in Windows VPN, respectively, we decided to cover both.
Regarding the former, if you’re sure that everything was running smoothly before the update and then things suddenly went south, we advise you to reinstall the client you use.
Reinstallation is also the re-integration of the VPN into changed system surroundings, so this just might help. Also, while we’re at it, don’t forget to acquire the latest version of your VPN of choice.
We make sure to showcase the whole procedure, and decided to use TunnelBearVPN as the example, but this applies to all VPN solutions in general. Make sure to follow the instructions we provided below:
6. Disable antivirus
- In the Windows Search bar, type Allow and select Allow an app through Windows Firewall.

- Click on the Change settings button.
- Find your VPN on the list and check the box beside it. Also, make sure that both Public and Private networks are enabled.

- Confirm changes and try connecting through a VPN again.
Another possible reason for this error can lie in the third-party antivirus or some of its subsidiaries. Contemporary antivirus solutions often come in suits that include third-party Firewall security measures.
They do come in handy, especially if you’re knowledgeable enough to customize them, but are, on the other hand, known for conflicting with Windows services.
If you run a VPN through a Windows 10 antivirus provided by Microsoft, make sure to disable the third-party firewall before doing so.
Or even better, for the sake of troubleshooting, disable the antivirus completely and move from there.
Also, make sure that your native Windows Firewall isn’t preventing VPN from accessing the remote servers. Here’s how to add an exception to Windows Firewall in a few simple steps:
7. Disable IPv6
- Type Control in the Windows Search bar and open Control Panel from the list of results.
- Open Network and Internet and then Network and Sharing Center.
- Select Change adapter settings from the left pane.
- Right-click on VPN network adapter and open Properties.
- Uncheck the box beside IPv6 and confirm changes.

- Try running a VPN afterward.
Connection issues, with or without VPN, are rather common after every new major update. Major updates tend to make certain changes to your adapter settings, making it unusable in the process.
Now, in step 7 we’ll try to address all-around connection settings, but this step concerns only IPv6. Namely, for users with the older configuration, the problem might occur due to conflict with the Internet Protocol.
Most users who found this step helpful disabled IPv6, but you can try disabling IPv4 and stick with IPv6, too.
If you’re not sure how to disable IPv6 (or IPv4, its older variation), follow the steps below:
If this method didn’t work, you should enable IPv6 back on. Check out this complete step-by-step guide to do that.
8. Troubleshoot your connection
We don’t want to point fingers at the VPN until we eliminate all possible connection issues.
In other words, make sure that you can connect without a VPN in the first place. If that’s not the case, we advise you to perform standard troubleshooting steps and move from there.
If you’re caught in the middle and unsure what to do, here are some actions that you should consider:
- Reset your router and/or modem.
- Flush DNS.
- Restart related services.
- Run dedicated Connection troubleshooter.
- Disable the router’s firewall.
- Update the router’s firmware.
- Reset router/modem to factory settings.
9. Reset your PC to factory settings
Finally, if none of the solutions proved helpful, we recommend resetting your PC to its factory values.
If you’re not sure how to reset your Windows 10 machine to default values and refresh it in the process, follow the instructions we provided below:
Which Windows Update is causing VPN issues?
There are multiple Windows 10 updates that can affect your VPN, so you should be aware. More exactly, the specific updates that can break your VPN are KB5009543 and KB5009566.
Besides that, you can encounter other Windows update versions such as 1903, 20h2, 2004, 1909, 2022
How do I uninstall a Windows update?
- In the Start Menu, click on Settings.

- Now, click on the Windows Update section.
- Press the Update history button.

- Scroll down and click on Uninstall updates.
- Find the broken updates and uninstall them.

This should conclude it. In case you’re still unable to use your VPN on Windows 10 after an update, make sure to send a ticket to both Microsoft and your VPN provider.
Also, if you’re having issues with the business network, contact your network administrator. At least one should give you the helping hand, and chances are that the paid VPN service provider will be the one.
Either way, make sure to tell us if you have an alternative solution or a question regarding the ones we provided above.
Your connection is not secure — websites you visit can find out your details:

- Your IP Address:
loading

Companies can sell this information, alongside your location and internet provider name, and profit from it by serving targeted ads or monitoring your data usage.
We recommend Private Internet Access, a VPN with a no-log policy, open source code, ad blocking and much more; now 79% off.
![]()
Newsletter
Consider professional VPN to avoid Windows update errors
by Aleksandar Ognjanovic
Aleksandar’s main passion is technology. With a solid writing background, he is determined to bring the bleeding edge to the common user. With a keen eye, he always… read more
Updated on September 9, 2022
Reviewed by
Edgar Nicov
Since the dial-up Internet era, Edgar was interested in online resources. From forums to e-commerce websites, he started digging into how those resources could generate revenue. Today he… read more
- Usually, VPNs and Windows 10 running devices pair up smoothly.
- However, it seems that updates can throw this collaboration off the track.
- If your VPN went south after installing the latest Windows 10 updates, you need to take action.
- Check out our guide and learn how to restore your VPN functionality with ease.
The presence of VPN solutions in the current state of computing technologies reached its peak. And since Windows 10 is one of the most used operative systems, a large chunk of the Virtual Private Networks run on Microsoft’s Windows.
Although they mostly work well, reports say that VPN is not working after Windows 10 updates, especially after the major Windows Updates.
These issues are quite common after every new major release and we decided to provide you with a list of possible solutions that should help you address them.
If you’re suddenly stroke with a plethora of VPN issues after a Windows update, make sure to check them out below.
Can’t connect to any VPN after today’s Windows Updates Windows 10?
This occurring error on Windows 10 affects all users that install a specific Patch Tuesday update. This can interfere with the built-in VPN and prevent connecting to the network.
You may encounter this issue and it’s better to have the knowledge. This is how other similar users describe this VPN problem:
- Forticlient VPN not connecting Windows 10 (a network error prevented updates from being downloaded)
- Cisco VPN not working after the Windows 10 update
- Windows 10 update breaks L2TP VPN- the L2TP connection attempt failed because the security layer encountered a processing error
- The service profile is damaged. reinstall the service profile
- The remote access service IP configuration is unusable
- Windows 10 built-in VPN not connecting
- VPN connection not showing in Network Connections Windows 10
- Windows 10 VPN not working after sleep
- Windows 11 update breaks VPN
These are the most reported issues by users regarding this update error. Therefore, let’s tackle the subject and see how to resolve it.
How can I fix VPN issues on Windows 10 after updates?
1. Use a proper VPN client
In order to avoid issues and errors, we strongly recommend choosing a reliable and compatible VPN.
Our VPN of choice is ExpressVPN, a world-class VPN that brings all those professional privacy and security-oriented features to the table but without you having to break the bank to acquire a subscription. It’s actually very affordable.
Crafted for the Windows 10 architecture, it will seamlessly blend with your system and grant you the security you seek.
Kape Technologies-owned ExpressVPN has OpenVPN, PPTP, IPSEC/L2TP, and SOCKS5 (Proxy) technologies.
In fact, the industry-standard OpenVPN offers you the highest level of encryption via secure VPN tunnels.
Speaking about tunneling technology, the VPN uses a global VPN Tunnel Network powered by multiple gateways with worldwide access and unlimited bandwidth.
ExpressVPN
Install the latest Windows 10 updates without fearing privacy breaches. Team up with this authorized VPN!
2. Update Windows 10
- Press Windows key + I to summon the Settings app.
- Select Updates & Security.
- Select Windows Update from the left pane.
- Click on the Check for updates button.
It seems that the Windows 10 Updates function, more or less, in the same sequence. Microsoft provides a major update in order to bring improvements, a large variety of bugs appear, and they then, overwhelmed by the large community backlash, end up pushing appropriate fixes as soon as possible.
That’s how it basically works. Since this is a widespread problem and it mostly occurred after some updates, they provided the resolution soon.
A lot of users who experienced issues with VPN after an update, get things sorted out after some time by updating Windows 10.
So, make sure that you have all available updates installed and try running the VPN again. In case you’re unable to make it work regardless, make sure to move to alternative steps.
Here’s how to check for available updates in Windows 10:
If you want to avoid VPN issues triggered by Windows Update, the obvious solution is to simply block the updates.
Keep in mind that not installing the latest security patches may pose a threat to your PC. Therefore, use this method only in extreme cases where you really need your VPN.
3. Reinstall drivers
- Right-click on Start and select Device Manager from the PowerUser menu.
- Expand the Network adapters section.
- Right-click on every individual WAN Miniport driver and uninstall it.
- Restart your PC and open Device Manager again.
- Navigate to Network Adapters, right-click every individual Miniport, and install it.
- Try running the VPN again.
Certain users resolved the issue by completely uninstalling all Network adapters, but you can settle for reinstalling WAN Miniport drivers.
Either way, we all know how notoriously Windows 10 manages drivers and how the generic and mandatory drivers can have an illicit effect on system performance and stability.
In order to avoid this, you can reinstall drivers changed by the last update and let them reinstall on their own. Also, secondary drivers provided by a third-party VPN are better than the ones Windows Update provides.
So, you can also uninstall them and the VPN, and then just obtain them by reinstalling your VPN from scratch.
Here’s how to reinstall WAN Miniport network drivers in Windows 10:
Update drivers automatically (suggested)
After you have uninstalled your drivers, we recommend reinstalling/updating them automatically.
Downloading and installing drivers manually is a process that carries the risk of getting the wrong driver installed, which may lead to serious malfunctions in your system.
The safer and easier way to update drivers on a Windows computer is by using a professional tool.
It will automatically identify each device on your computer and matches it with the latest driver versions from an extensive online database.
⇒ Get DriverFix
4. Edit registry
- In the Windows Search bar, type regedit and open regedit from the list of the results.
- Backup your registry.
- Navigate to this location:
-
ComputerHKEY_LOCAL_MACHINESYSTEMCurrentControlSetServicesPolicyAgent
-
- Right-click on the blank area in the right window and select New > DWORD.
- Name the new DWORD input
AssumeUDPEncapsulationContextOnSendRule - Change its value to 2 and save it.
- Close Registry Editor and restart your PC.
As some tech-savvy users noted, this error can have roots in the Policy Editor. This is the main part of the Windows platform and it regulates the security and access policy for all individual users on one machine.
In order to address this possible instigator of the problem with VPN, we’ll need to change the policy settings by inserting an exception for UDP. Now, the best way to do so is to use Registry Editor.
Of course, with this tool we’re roaming in the dangerous area, so make sure to act with caution and don’t delete anything while there.
Follow these instructions to access Registry Editor and create a new input which should re-enable VPN in Windows 10:
5. Reinstall VPN
- In the Windows Search bar, type Control and open Control Panel from the list of results.
- From the Category view, click Uninstall a program under Programs.
- Right-click on your VPN solution and Uninstall it.
- Use CCleaner or any other third-party uninstaller to clean all remaining files and registry entries the VPN has made.
- Restart your PC.
- Download the latest version of the VPN of your choice and install it.
Since the update-inflicted issues can affect both third-party VPNs and built-in Windows VPN, respectively, we decided to cover both.
Regarding the former, if you’re sure that everything was running smoothly before the update and then things suddenly went south, we advise you to reinstall the client you use.
Reinstallation is also the re-integration of the VPN into changed system surroundings, so this just might help. Also, while we’re at it, don’t forget to acquire the latest version of your VPN of choice.
We make sure to showcase the whole procedure, and decided to use TunnelBearVPN as the example, but this applies to all VPN solutions in general. Make sure to follow the instructions we provided below:
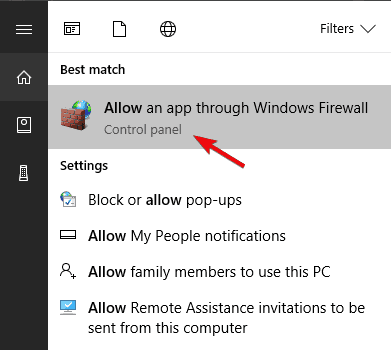
6. Disable antivirus
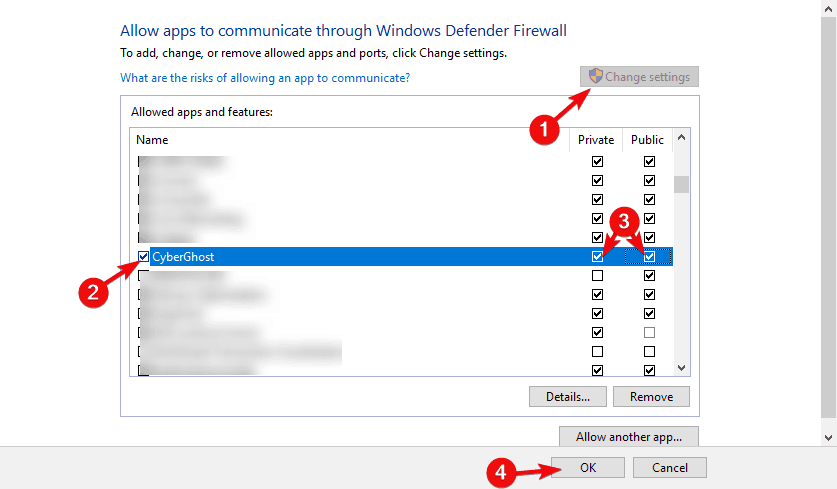
- In the Windows Search bar, type Allow and select Allow an app through Windows Firewall.
- Click on the Change settings button.
- Find your VPN on the list and check the box beside it. Also, make sure that both Public and Private networks are enabled.
- Confirm changes and try connecting through a VPN again.
Another possible reason for this error can lie in the third-party antivirus or some of its subsidiaries. Contemporary antivirus solutions often come in suits that include third-party Firewall security measures.
They do come in handy, especially if you’re knowledgeable enough to customize them, but are, on the other hand, known for conflicting with Windows services.
If you run a VPN through a Windows 10 antivirus provided by Microsoft, make sure to disable the third-party firewall before doing so.
Or even better, for the sake of troubleshooting, disable the antivirus completely and move from there.
Also, make sure that your native Windows Firewall isn’t preventing VPN from accessing the remote servers. Here’s how to add an exception to Windows Firewall in a few simple steps:
7. Disable IPv6
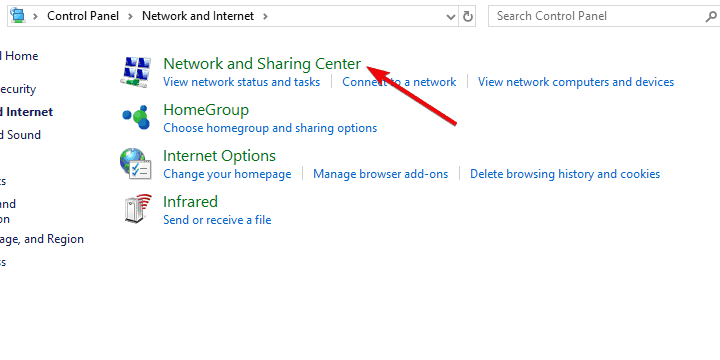
- Type Control in the Windows Search bar and open Control Panel from the list of results.
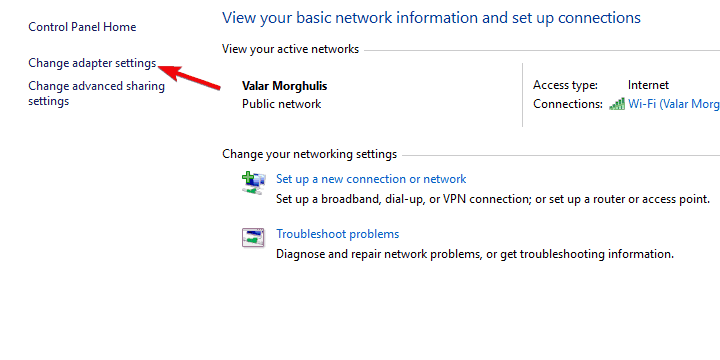
- Open Network and Internet and then Network and Sharing Center.
- Select Change adapter settings from the left pane.
- Right-click on VPN network adapter and open Properties.
- Uncheck the box beside IPv6 and confirm changes.
- Try running a VPN afterward.
Connection issues, with or without VPN, are rather common after every new major update. Major updates tend to make certain changes to your adapter settings, making it unusable in the process.
Now, in step 7 we’ll try to address all-around connection settings, but this step concerns only IPv6. Namely, for users with the older configuration, the problem might occur due to conflict with the Internet Protocol.
Most users who found this step helpful disabled IPv6, but you can try disabling IPv4 and stick with IPv6, too.
If you’re not sure how to disable IPv6 (or IPv4, its older variation), follow the steps below:
If this method didn’t work, you should enable IPv6 back on. Check out this complete step-by-step guide to do that.
8. Troubleshoot your connection
We don’t want to point fingers at the VPN until we eliminate all possible connection issues.
In other words, make sure that you can connect without a VPN in the first place. If that’s not the case, we advise you to perform standard troubleshooting steps and move from there.
If you’re caught in the middle and unsure what to do, here are some actions that you should consider:
- Reset your router and/or modem.
- Flush DNS.
- Restart related services.
- Run dedicated Connection troubleshooter.
- Disable the router’s firewall.
- Update the router’s firmware.
- Reset router/modem to factory settings.
9. Reset your PC to factory settings
Finally, if none of the solutions proved helpful, we recommend resetting your PC to its factory values.
If you’re not sure how to reset your Windows 10 machine to default values and refresh it in the process, follow the instructions we provided below:
Which Windows Update is causing VPN issues?
There are multiple Windows 10 updates that can affect your VPN, so you should be aware. More exactly, the specific updates that can break your VPN are KB5009543 and KB5009566.
Besides that, you can encounter other Windows update versions such as 1903, 20h2, 2004, 1909, 2022
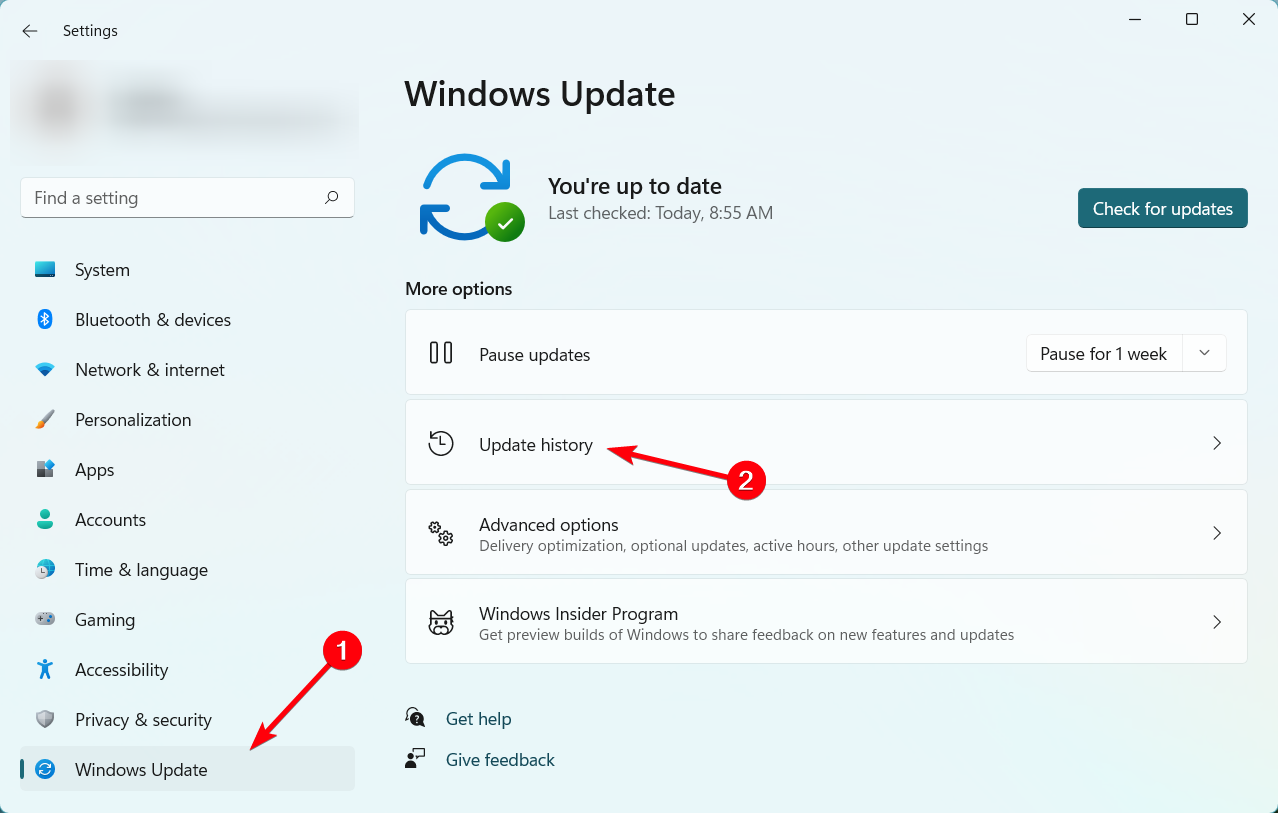
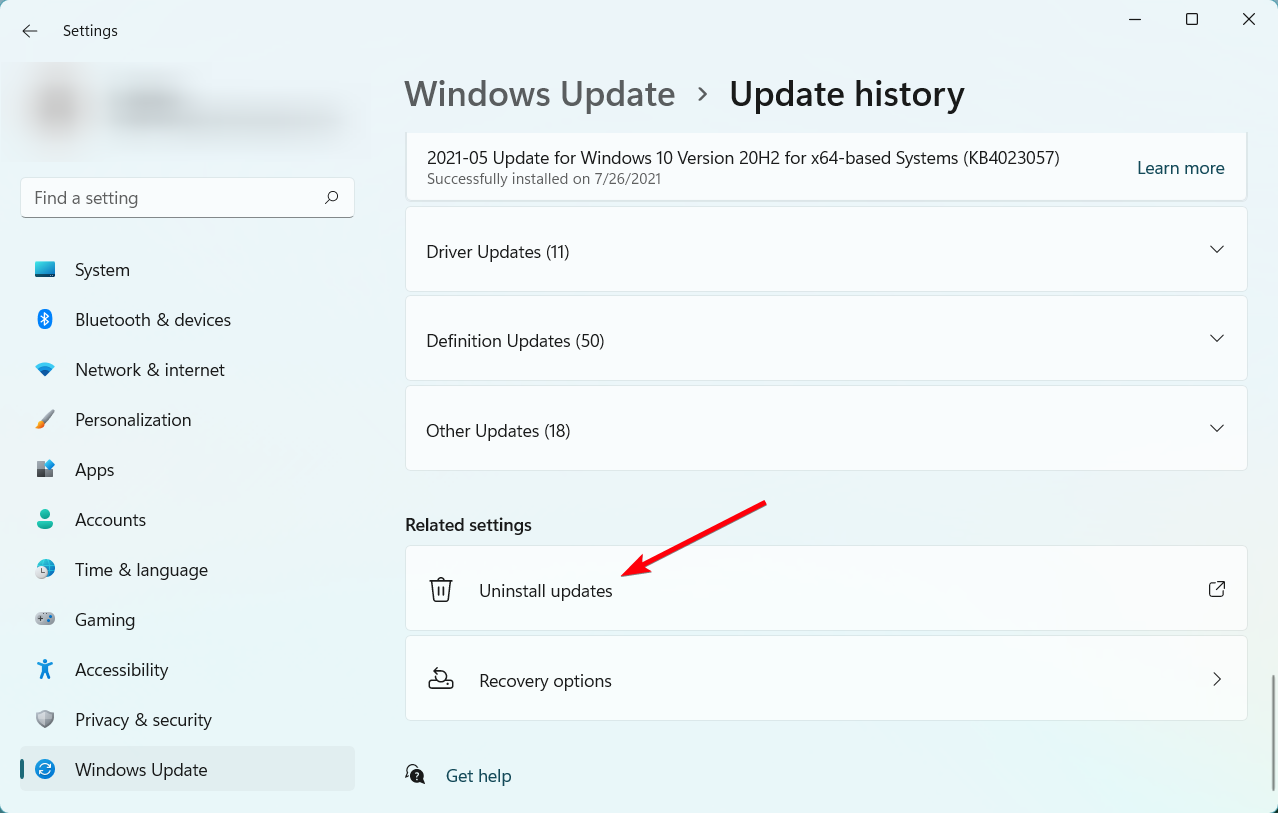
How do I uninstall a Windows update?
- In the Start Menu, click on Settings.
- Now, click on the Windows Update section.
- Press the Update history button.
- Scroll down and click on Uninstall updates.
- Find the broken updates and uninstall them.
This should conclude it. In case you’re still unable to use your VPN on Windows 10 after an update, make sure to send a ticket to both Microsoft and your VPN provider.
Also, if you’re having issues with the business network, contact your network administrator. At least one should give you the helping hand, and chances are that the paid VPN service provider will be the one.
Either way, make sure to tell us if you have an alternative solution or a question regarding the ones we provided above.
Your connection is not secure — websites you visit can find out your details:
-
- Your IP Address:
loading
Companies can sell this information, alongside your location and internet provider name, and profit from it by serving targeted ads or monitoring your data usage.
We recommend Private Internet Access, a VPN with a no-log policy, open source code, ad blocking and much more; now 79% off.
![]()
Newsletter
![]()
В Windows 10 существует проблема с подключением по VPN в качестве клиента по протоколу L2TP/IPSec. В очередной раз столкнулся с ней недавно, когда свежеустановленная система отказалась подключаться к VPN-серверу, запущенному в другой квартире на роутере Keenetic.
С учетом того, что вряд ли эту проблему исправят в грядущих обновлениях, публикую памятку по ее самостоятельному исправлению.
Содержание
- 1 Причина и симптомы
- 2 Решение проблемы
- 2.1 Вариант 1 — через редактор реестра
- 2.2 Вариант 2 — через Powershell
- 3 Заключение
Причина и симптомы
Симптомы. При попытке подключения со всеми корректно введенными настройками система долго думает и в конце концов выдает ошибку:
Не удалось установить связь по сети между компьютером и VPN-сервером, так как удаленный сервер не отвечает.
Причина заключается в том, что с настройками по умолчанию встроенный VPN-клиент Windows не поддерживает подключение через NAT.
В двух словах про NAT
NAT — это механизм преобразования роутером внешнего IP-адреса (предоставляемого провайдером при подключении) в локальные IP-адреса устройств, подключенных к вашей домашней сети. Практически все пользователи домашнего интернета «сидят за NATом», исключение составляют лишь случаи, когда интернет-кабель от провайдера подключен непосредственно к компьютеру в обход роутеров и свитчей.
В целом родной VPN-клиент в Windows 10 способен работать за NAT, но для этого необходимо поменять один пункт в его настройках — и делается это не самым очевидным способом.
Решение проблемы
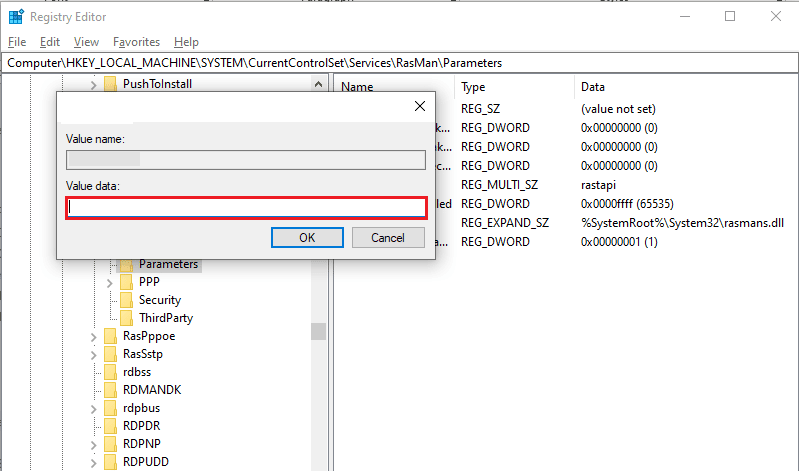
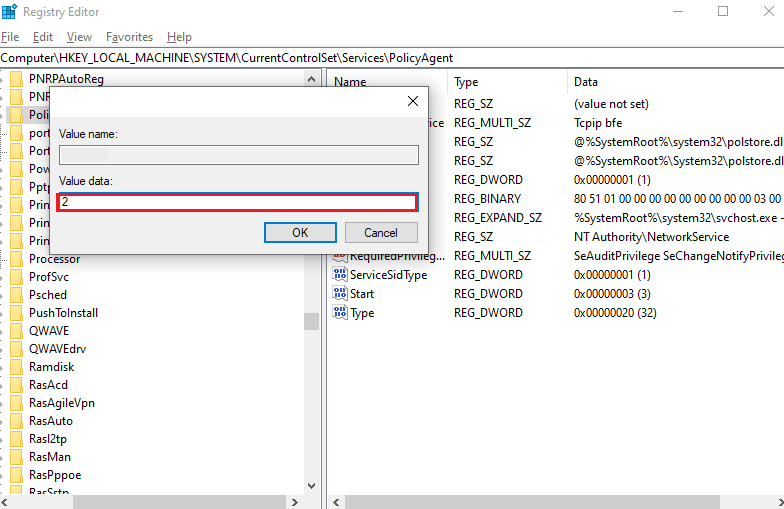
Для решения проблемы нужно открыть следующую ветку реестра:
HKEY_LOCAL_MACHINESYSTEMCurrentControlSetServicesPolicyAgent
И внести в нее параметр AssumeUDPEncapsulationContextOnSendRule со значением 2.
Вариант 1 — через редактор реестра
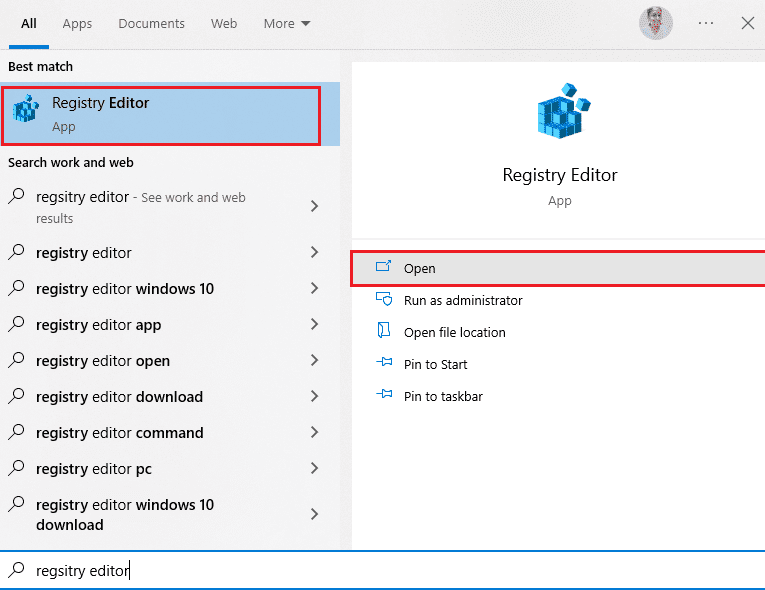
Запускаем редактор реестра, открыв окно поиска и введя в нем regedit:

Находим в реестре ветку HKEY_LOCAL_MACHINESYSTEMCurrentControlSetServicesPolicyAgent и создаем в нем 32-битный параметр DWORD с именем AssumeUDPEncapsulationContextOnSendRule и значением 2:

Вариант 2 — через Powershell
Запускаем Windows PowerShell, введя powershell в окне поиска и выбрав в контекстном меню запуск от имени администратора:

В открывшемся окне выполняем следующую команду:
Set-ItemProperty -Path "HKLM:SYSTEMCurrentControlSetServicesPolicyAgent" -Name "AssumeUDPEncapsulationContextOnSendRule" -Type DWORD -Value 2 –Force;

Заключение
После внесения изменений, независимо от способа которым они были внесены, необходимо перезагрузить компьютер чтобы параметр подтянулся в используемые настройки. Затем снова запускаем подключение к VPN-серверу и убеждаемся, что оно успешно стартует.
Стоит отметить, что данная проблема присуща исключительно Windows и не встречается ни в Linux, ни в macOS, ни в iOS.
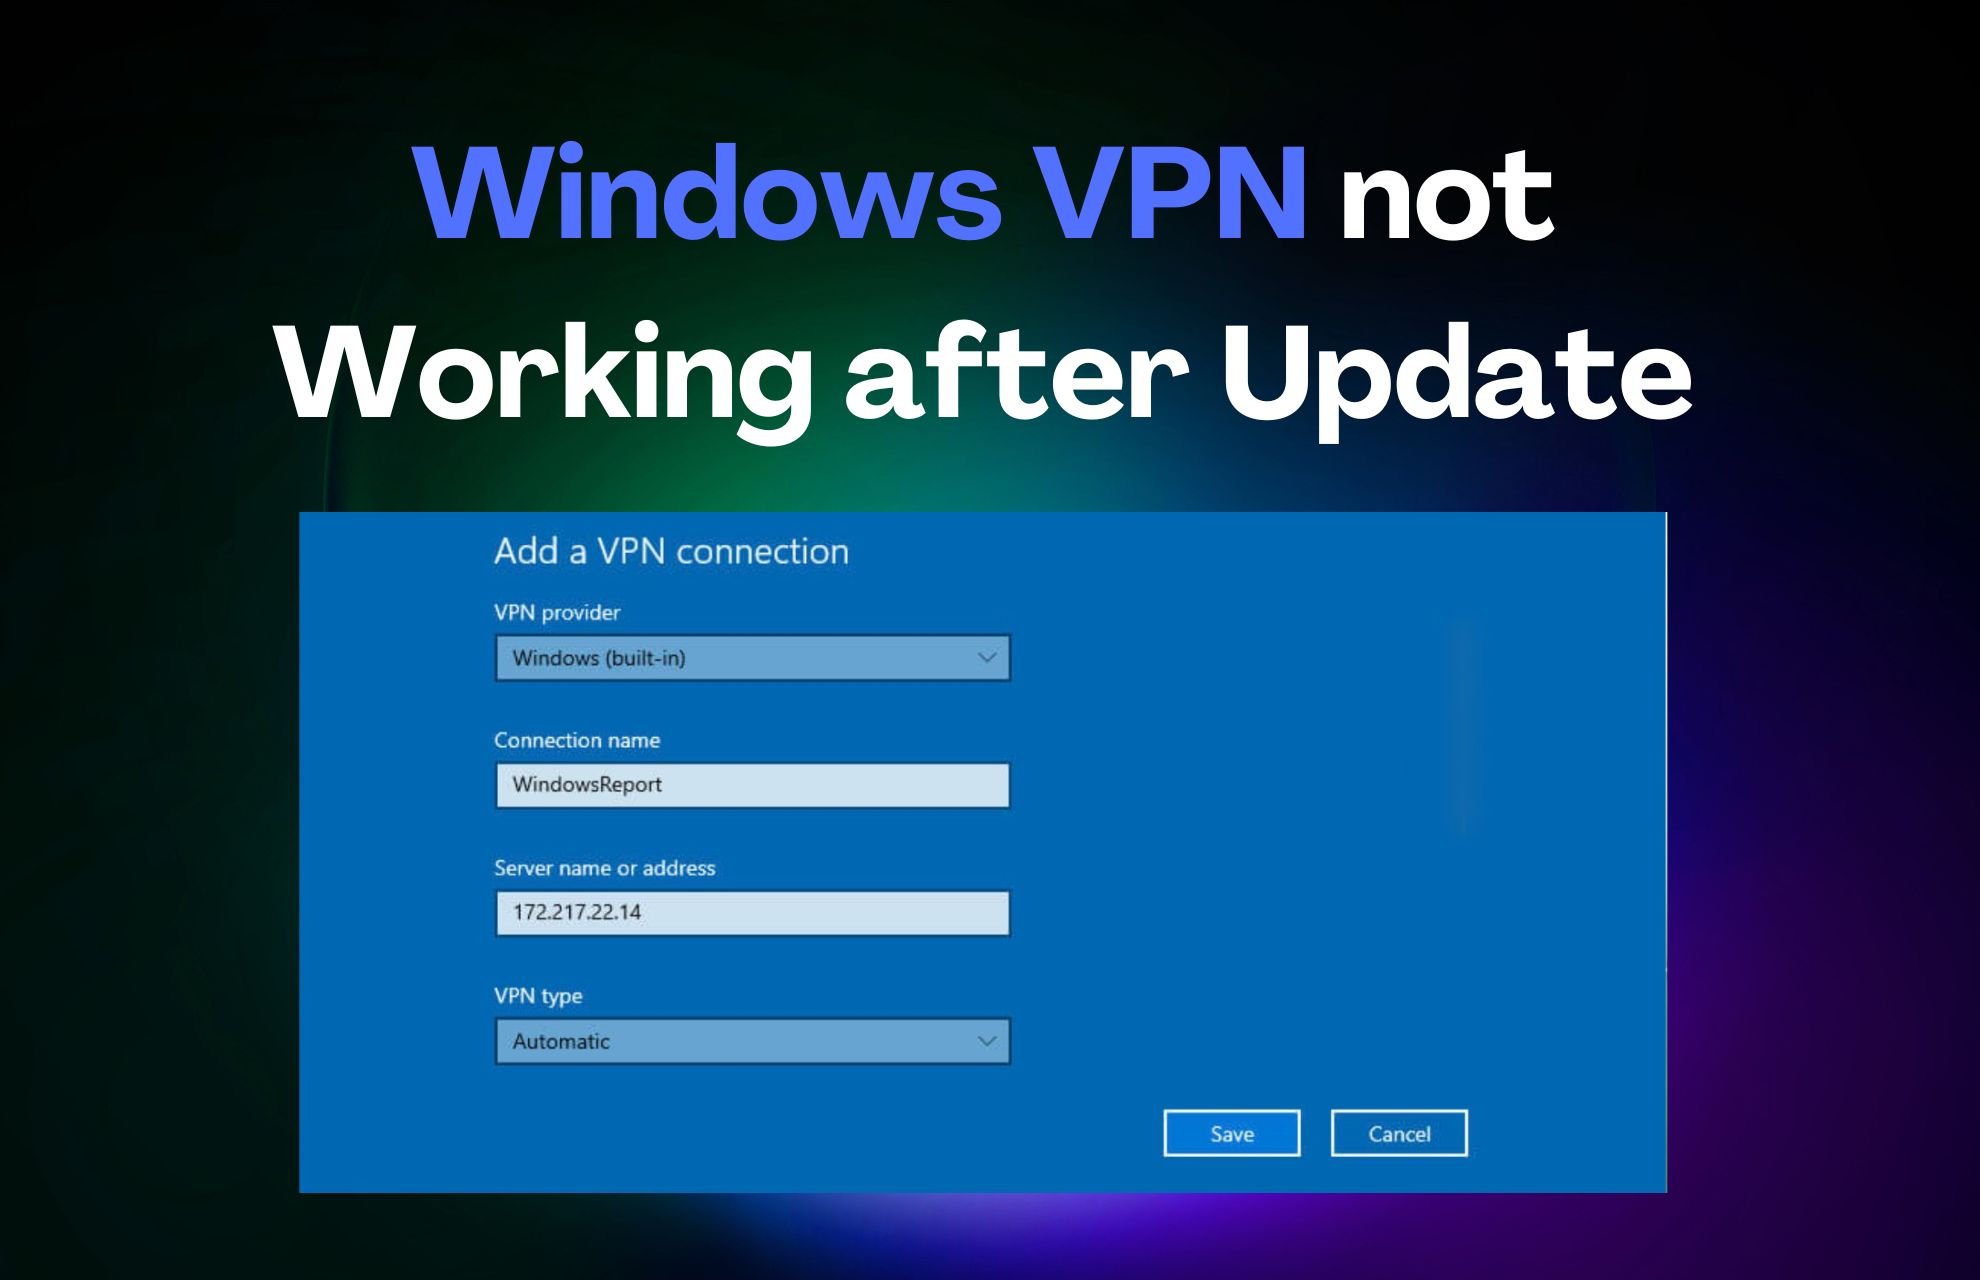
В Windows 10 вы можете настроить VPN-сеть средствами операционной системы, не прибегая к помощи сторонних программ. Для удобного создания VPN-подключения в Windows 10 и 11 разработчиками был реализован соответствующий графический интерфейс раздела приложения «Параметры», в котором пользователю предлагается ввести данные провайдера VPN. К сожалению, данная функция не отшлифована до конца.
На что указывают разные ошибки, время от времени выдаваемые системой при подключении к виртуальной сети.
Наиболее распространённой неполадкой при подключении к VPN в Windows 10 является сбой соединения L2TP, при этом система выдает сообщение «Попытка L2TP-подключения не удалась из-за ошибки, произошедшей на уровне безопасности…». Неполадка может быть вызвана некорректными настройками одного или нескольких сетевых устройств, однако, если вы не вносили изменений в их конфигурацию и до появления первого сбоя всё работало нормально, высока вероятность того, что причиной сбоя стали баги в обновлениях операционной системы.

Примечание: L2TP — это протокол соединения второго уровня, используемый в виртуальных сетях и представляющий собой расширение двухточечного протокола PPP, обеспечивающего прямую связь между устройствами. Основным преимуществом протокола L2TP является поддержка не только сетей IP, но также ATM, X.25 и Frame Relay.
Так, было замечено, что указанная ошибка в Windows 10 стала появляться после установки накопительных обновлений безопасности KB5009543 и KB5009566.
Откройте журнал обновлений и посмотрите, имеются ли эти апдейты на вашем ПК.
Если да, удалите их и перезагрузите компьютер.
Если решение не дало положительного результата или обновления не установлены, переходим к другим способам устранения неполадки.
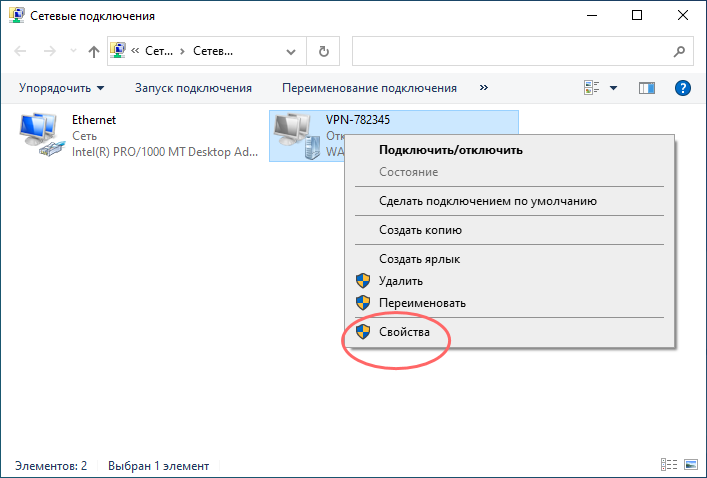
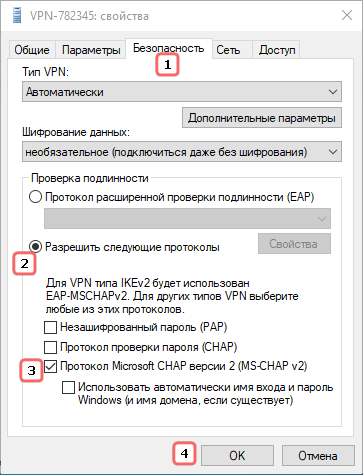
Проверьте настройки виртуального адаптера
- Откройте командой ncpa.cpl настройки сетевых подключений, кликните по вашему виртуальному адаптеру правой кнопкой мыши и выберите «Свойства»;
- Переключитесь в окошке свойств на вкладку «Безопасность», активируйте радиокнопку «Разрешить следующие протоколы» и отметьте флажком пункт «Протокол Microsoft CHAP версии 2»;
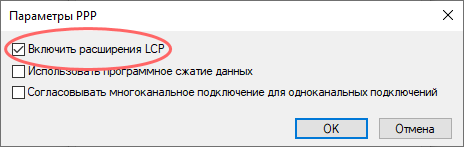
- Переключитесь на вкладку «Параметры» и нажмите кнопку «Параметры PPP»;
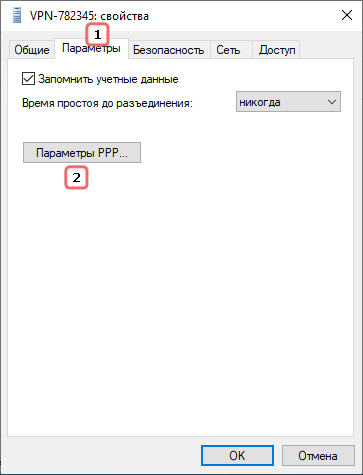
- Откроется диалоговое окошко параметров PPP. Убедитесь, что в пункте «Включить расширения LCP» установлена галочка. Если ее нет, поставьте и сохраните настройки.
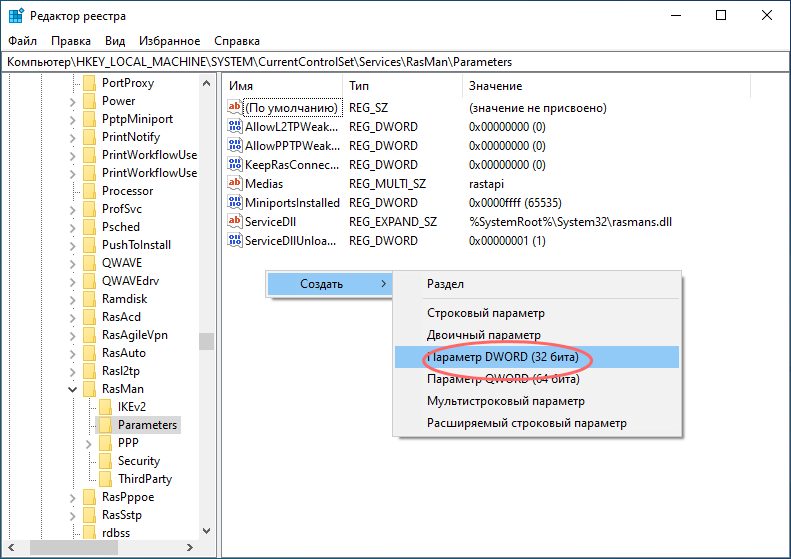
Отсутствие или неверные настройки ключей реестра
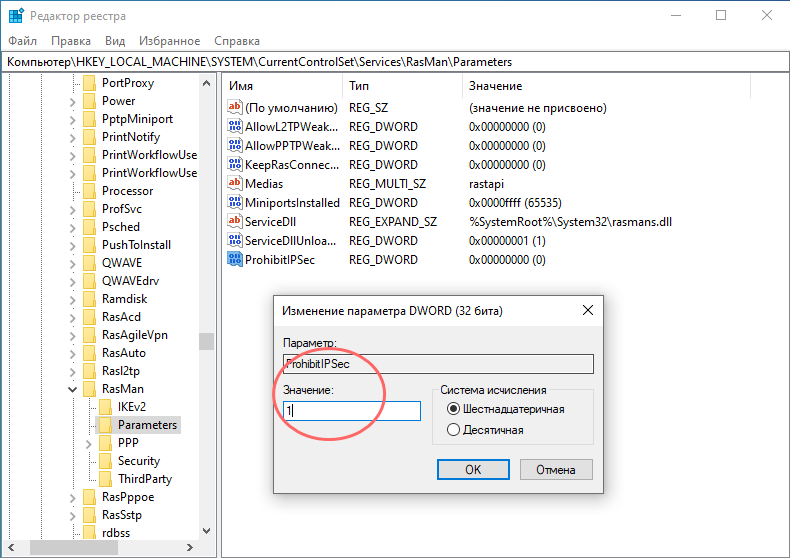
Ошибка подключения L2TP может быть вызвана отсутствием или неверным значением предварительных ключей ProhibitIPSec и AllowL2TPWeakCrypto, обеспечивающих соединение с использованием протокола L2TP/IPSec.
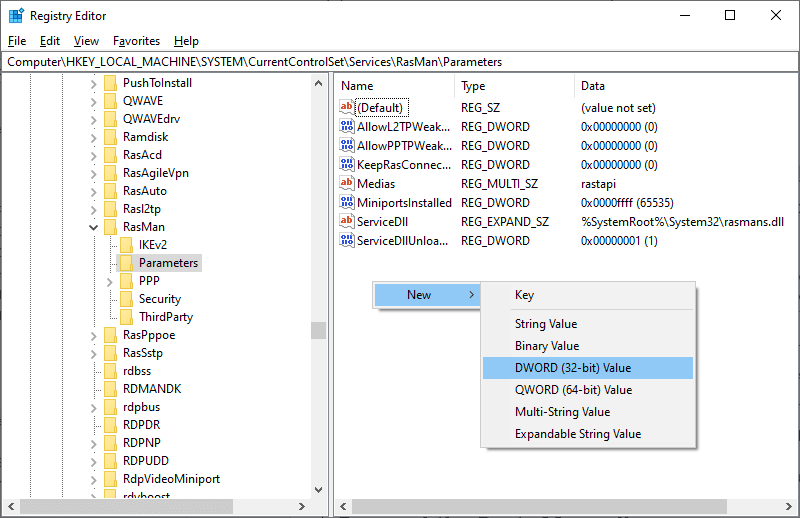
Если в свойствах VPN-подключения у вас выставлен тип L2TP, стоит проверить записи ветки реестра:
HKLMSystemCurrentControlSetServicesRasmanParameters
Откройте редактор реестра командой regedit, перейдите к указанной ветке и проверьте наличие в правой колонке DWORD-параметра ProhibitIPSec. Если таковой отсутствует, создайте его вручную.
И установите в качестве его значения 1.
Заодно проверяем наличие DWORD-параметра AllowL2TPWeakCrypto, он также должен иметь значение 1.
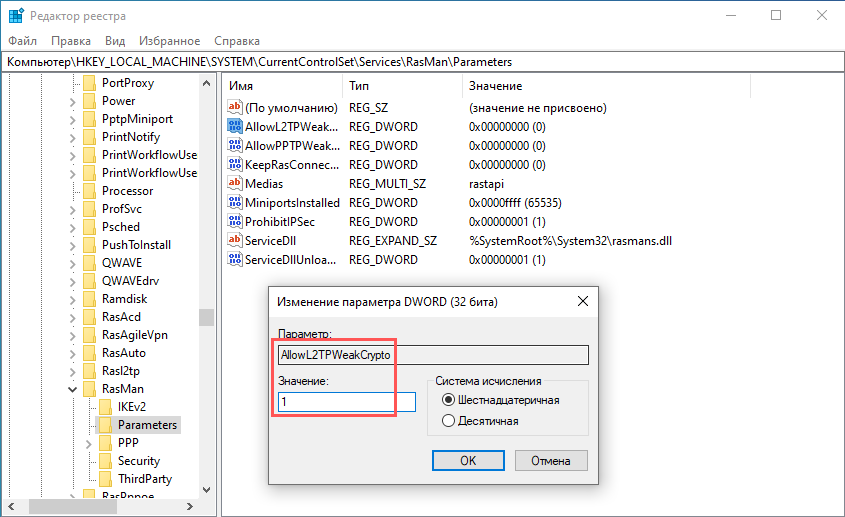
Если параметр отсутствует, создаем его, сохраняем настройки, перезагружаем компьютер и пробуем подключиться к VPN.
![]() Загрузка…
Загрузка…
Протокол туннелирования второго уровня (L2TP) в основном поддерживает виртуальные частные сети. Любая сеть VPN скрывает источник сетевого подключения, маскируя ваши исходные данные некоторыми другими данными сервера, расположенными в другой среде. Маскировка вашего географического местоположения поможет вам обойти любые ограничения в сетевом пути. В последние дни многие из вас жалуются на неудачную попытку подключения L2TP, поскольку уровень безопасности обнаружил ошибку обработки при попытке установить VPN-соединение. Если вы относитесь к этой категории, это руководство поможет вам решить эту проблему с помощью эффективных идей по устранению неполадок. Итак, продолжайте читать!
Мы собрали много данных от нескольких пользователей и онлайн-отчетов и разработали набор причин, вызывающих обсуждаемую проблему. Вам рекомендуется проанализировать причины одну за другой и проверить, какая из перечисленных ниже причин вызвала проблему.
- Вы используете дублированную версию ключа или сертификата VPN.
- Установленное соединение не удовлетворяет правилам преобразования сетевых адресов (NAT).
- Клиенту VPN не хватает сертификата компьютера или сертификат корневого компьютера не имеет «проверки подлинности сервера» в качестве EKU (расширенное использование ключа).
- Несколько важных служб, таких как модули ключей IPsec и службы агента политики, не работают.
- Протокол Point-to-Point неправильно настроен на вашем ПК.
- Протокол Microsoft CHAP v2 отключен на сервере VPN.
- Устаревшая операционная система Windows.
- Антивирус или брандмауэр мешают сетевому соединению.
Теперь вы знаете причины, по которым попытка подключения L2TP не удалась, поскольку уровень безопасности обнаружил ошибку обработки на ПК с Windows 10. Здесь вы узнаете идеи по устранению неполадок, которые помогут вам решить проблему.
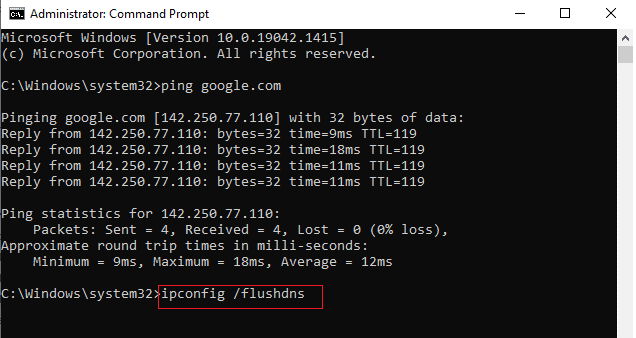
Способ 1. Запустите средство устранения неполадок сети
Если какие-либо проблемы с сетевым подключением способствуют сбою попытки подключения L2TP, вы можете использовать встроенный инструмент, предоставляемый на ПК с Windows 10, когда это необходимо. Следуйте нашему руководству «Устранение неполадок с сетевым подключением в Windows 10», чтобы узнать об основных шагах по устранению неполадок, чтобы устранить все проблемы, связанные с сетью, с помощью средства устранения неполадок сетевого адаптера Windows.
![]()
Вы можете использовать шаги, указанные в руководстве, для диагностики подключений Wi-Fi, Ethernet и всех сетевых адаптеров на вашем ПК с Windows 10.
Способ 2: восстановить поврежденные файлы
Наличие поврежденных файлов на вашем компьютере всегда мешает любому из процессов Windows. Вам рекомендуется восстановить все поврежденные файлы на вашем компьютере, чтобы решить обсуждаемую проблему. Прочтите наше руководство по восстановлению системных файлов в Windows 10 и следуйте инструкциям, чтобы восстановить все поврежденные файлы и компоненты, оставшиеся на вашем компьютере.
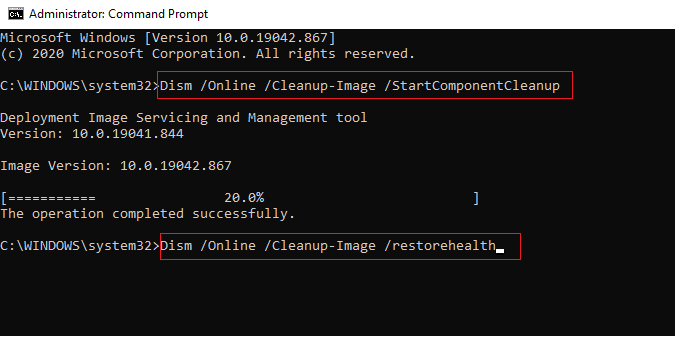
После того, как вы восстановили поврежденные компоненты вашего компьютера, проверьте, можете ли вы исправить неудачную попытку подключения L2TP к Windows 10 или нет.
Способ 3: запуск команд для запуска нескольких служб
Это простой и эффективный метод, который поможет вам исправить неудачную попытку подключения L2TP в Windows 10, выполнив простые командные строки. Несколько пользователей утверждают, что этот метод был полезен для решения обсуждаемой проблемы. Вот несколько шагов, чтобы реализовать то же самое.
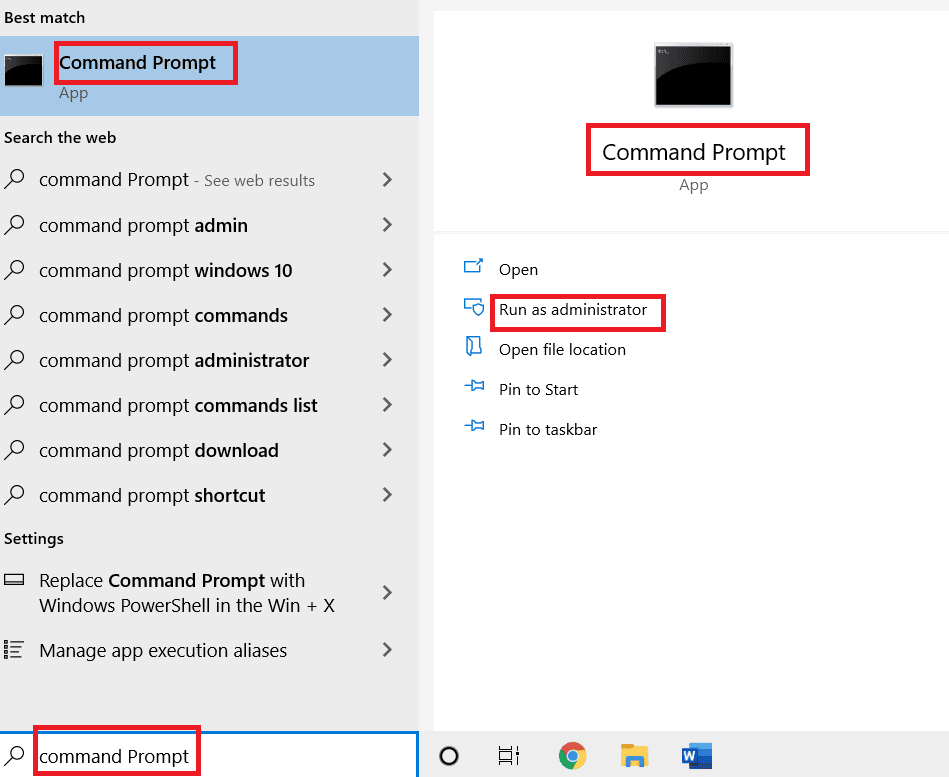
1. Нажмите клавишу Windows и введите cmd. Нажмите «Запуск от имени администратора».
2. Затем вставьте следующие команды одну за другой и нажимайте клавишу Enter после каждой команды.
sc config IKEEXT start=demand
sc config PolicyAgent start=demand
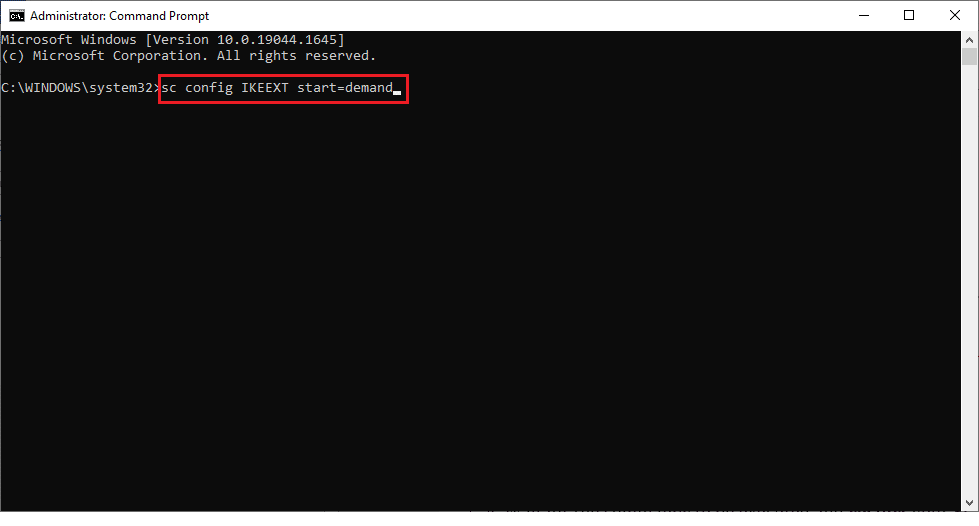
3. Дождаться выполнения команд и перезагрузить ПК.
Проверьте, не устранена ли попытка подключения L2TP из-за того, что уровень безопасности столкнулся с ошибкой обработки.
Способ 4: включить протокол MS-CHAP v2
Прежде чем подключить службу VPN к своему компьютеру, вы должны убедиться, что протокол Microsoft CHAP v2 включен или нет. Если нет, вы должны включить его вручную. В любом случае, протокол Microsoft CHAP v2 отключен на вашем компьютере, вы столкнетесь с проблемой неудачной попытки подключения L2TP в Windows 10. Следуйте приведенным ниже инструкциям, чтобы включить протокол MS-CHAP v2 на вашем устройстве.
Примечание. Убедитесь, что служба VPN настроена правильно, а учетные данные VPN верны и совпадают с VPN-сервером. Убедиться в этом можно тем, что, если вы правильно установили соединение, вы можете увидеть его в списке сетевых адаптеров.
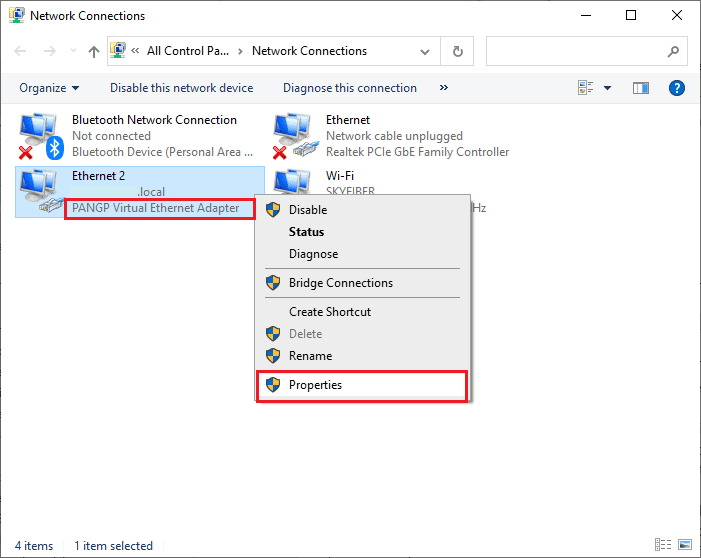
1. Откройте диалоговое окно «Выполнить», одновременно нажав клавиши Windows + R.
2. Теперь введите ncpa.cpl и нажмите клавишу Enter, чтобы запустить сетевые подключения.

3. Теперь щелкните правой кнопкой мыши сеть VPN-подключения и выберите параметр «Свойства».
4. Теперь перейдите на вкладку «Безопасность» и нажмите «Разрешить эти протоколы».
5. Теперь выберите Microsoft-CHAP версии 2.
6. Наконец, нажмите OK, чтобы сохранить изменения.
Теперь попробуйте установить VPN-подключение и проверьте, не удалось ли вам исправить попытку подключения L2TP из-за того, что уровень безопасности обнаружил ошибку обработки на вашем компьютере.
Способ 5: включить расширения протокола управления ссылками
В любой сети протокол «точка-точка» (PPP) отвечает за передачу, сжатие и аутентификацию любого VPN-подключения. Следовательно, параметры PPP в вашей сети должны быть правильно настроены, чтобы разрешать любые расширения Link Control Protocol (LCP), поскольку они являются важной частью любой сети PPP. Следовательно, выполните следующие шаги, чтобы включить расширения протокола управления ссылками (LCP) в вашем VPN-соединении.
1. Повторите шаги 1-3, как в предыдущем методе.
2. Теперь перейдите на вкладку «Параметры» и нажмите «Настройки PPP».
3. Затем нажмите «Включить расширения LCP».
4. Далее нажмите ОК.
5. Снова нажмите OK, чтобы сохранить изменения и подключиться к VPN сейчас.
Проверьте, не сталкиваетесь ли вы снова с неудачной попыткой подключения L2TP в Windows 10.
Способ 6: перезапустите основные службы
Многие пользователи, столкнувшиеся с неудачной попыткой подключения L2TP из-за ошибки обработки на уровне безопасности, предполагают, что повторный запуск модулей ключей IPsec и служб агента политики IPsec помог решить проблему. Вот несколько инструкций по включению перечисленных служб на вашем компьютере с Windows 10.
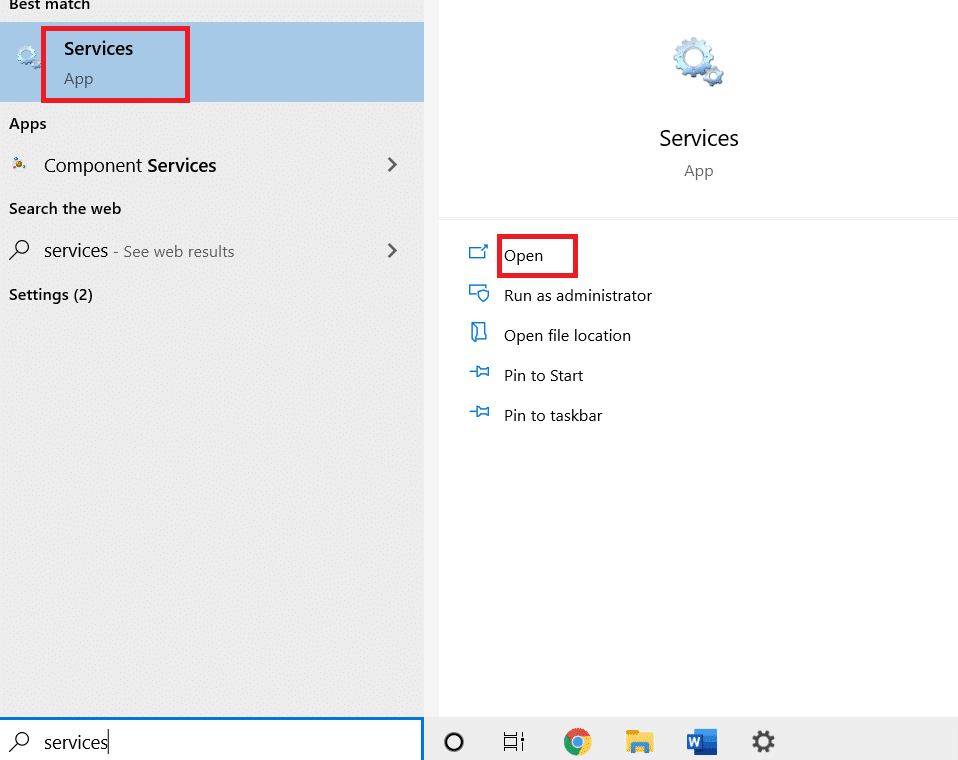
1. Нажмите клавишу Windows и введите «Службы», затем нажмите «Открыть».
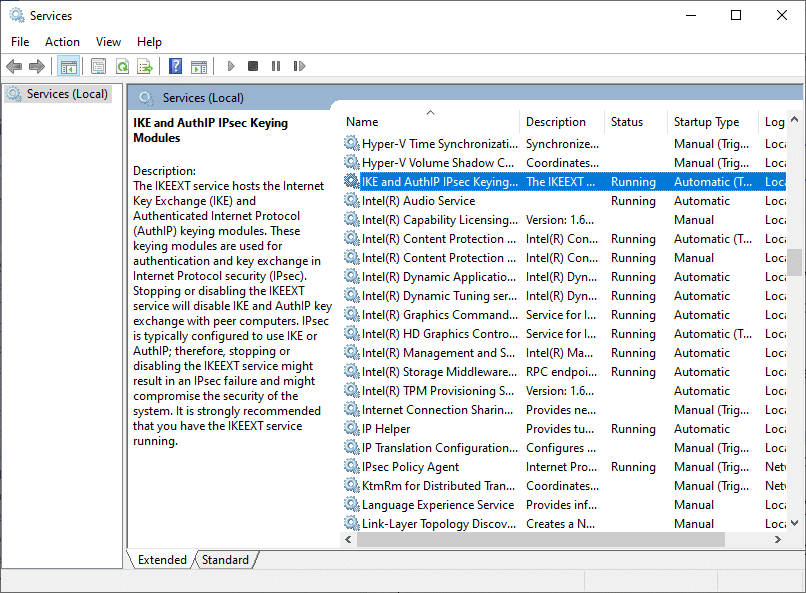
2. Затем прокрутите окно вниз и дважды щелкните службу модулей ключей IKE и AuthIP IPsec.
3. На вкладке «Общие» выберите для параметра «Тип запуска» значение «Автоматически» в раскрывающемся меню.
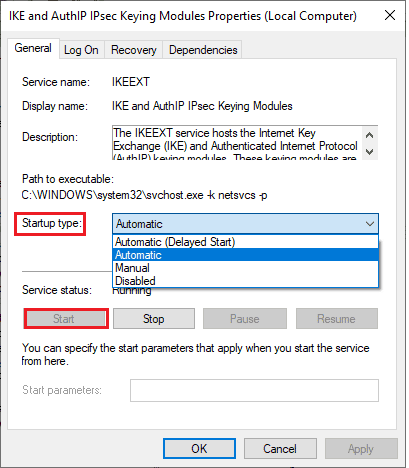
4. Убедитесь, что статус службы «Работает». Если нет, нажмите кнопку «Пуск».
5. Затем нажмите «Применить» и «ОК», чтобы сохранить изменения.
6. Повторите те же действия для службы агента политики IPsec и сохраните изменения.
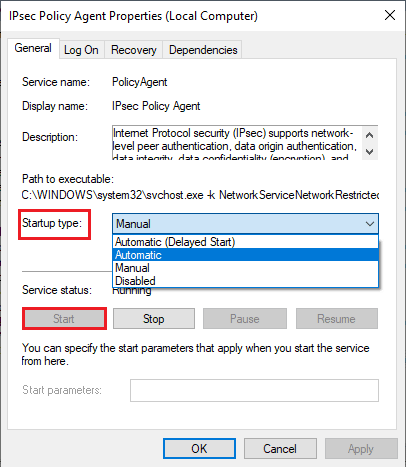
8. Наконец, попробуйте перезапустить службу VPN.
Способ 7: обновить Windows
Ваш ПК с Windows 10 выпускает обновления, чтобы импровизировать функции, с которыми вы знакомы. Обновление Windows очень важно и в большинстве случаев очень безопасно. Если вы хотите исправить неудачную попытку подключения L2TP в Windows 10, попробуйте обновить компьютер, как указано в нашем руководстве, используйте наше руководство «Как загрузить и установить последнее обновление Windows 10».
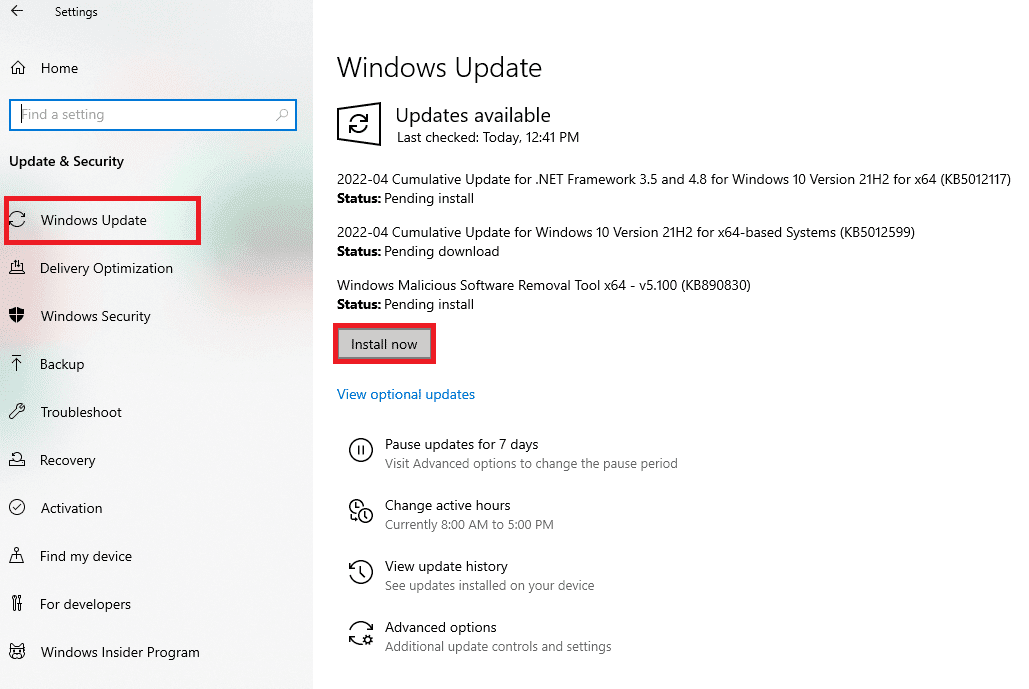
После обновления операционной системы проверьте, устранена ли проблема.
Способ 8: временно отключить антивирус (если применимо)
Иногда ваша антивирусная программа может мешать VPN-подключению и способствовать неудачной попытке подключения L2TP в Windows 10. Некоторые сторонние антивирусные программы, такие как Norton и Avast, предотвращают любые последние обновления, устраняющие ошибки на вашем компьютере. Поэтому следуйте нашему руководству «Как временно отключить антивирус в Windows 10», чтобы временно отключить антивирусную программу на вашем ПК.
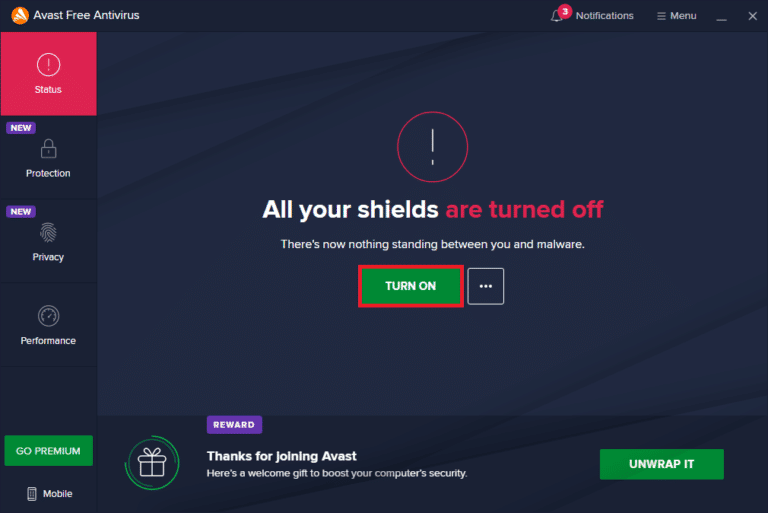
После устранения проблемы с VPN обязательно снова включите антивирусную программу, поскольку ПК без пакета безопасности всегда представляет угрозу.
Способ 9: отключить брандмауэр Windows (не рекомендуется)
В любом случае, если служба VPN заблокирована брандмауэром Защитника Windows, вам необходимо временно отключить ценные бумаги брандмауэра на вашем компьютере, чтобы исправить неудачную попытку подключения L2TP, поскольку уровень безопасности обнаружил ошибку обработки. Если вы не знаете, как отключить брандмауэр Защитника Windows, наше руководство по отключению брандмауэра Windows 10 поможет вам в этом. Вы также можете разрешить VPN-клиент, следуя нашему руководству «Разрешить или заблокировать приложения через брандмауэр Windows».

Как только вы сможете получить доступ к службе VPN, убедитесь, что вы снова включили пакет брандмауэра, ваш компьютер более подвержен атакам вредоносных программ без защиты брандмауэра.
Метод 10: сброс настроек TCP/IP
TCP (протокол управления передачей) необходим для сетевого подключения, поскольку он устанавливает правила и стандартные процедуры в Интернете. Следуйте нашему руководству по устранению проблем с сетевым подключением в Windows 10, чтобы сбросить TCP/IP.
После выполнения шагов проверьте, можете ли вы решить проблему или нет.
Способ 11: создать новую запись реестра
Немногие пользователи подтвердили, что создание новой записи в редакторе реестра Windows помогло им решить проблему неудачной попытки подключения L2TP в Windows 10. Вот несколько инструкций по реализации того же самого.
Примечание. Перед выполнением шагов рекомендуется создать резервную копию реестра. Если вы не знаете, как создать резервную копию реестра, воспользуйтесь нашим руководством «Как сделать резервную копию и восстановить реестр в Windows» и выполните описанные шаги.
1. Нажмите одновременно клавиши Windows + R, чтобы открыть диалоговое окно «Выполнить».
2. Теперь введите regedit в поле и нажмите клавишу Enter, чтобы запустить редактор реестра.

3. Теперь перейдите к следующему ключевому пути к папке в редакторе реестра.
HKEY_LOCAL_MACHINESystemCurrentControlSetServicesRasManParameters

4. Теперь щелкните правой кнопкой мыши на правой панели и выберите «Создать», а затем параметр «Значение DWORD (32-разрядное)», как показано на рисунке.
5. Теперь дважды щелкните ключ, который вы создали сейчас, установите для параметра «Значение» значение 1 и закройте все окна.
Способ 12: создать ключ реестра для инкапсуляции UDPE
Точно так же вам необходимо создать раздел реестра для инкапсуляции UDPE, чтобы исправить проблему с неудачной попыткой подключения L2TP в Windows 10. Этот ключ поможет вам исправить проблемы с подключением к VPN, которые вызывают нестабильность сети. Таким образом, вы можете легко подключиться к VPN-серверу, и вот шаги, чтобы сделать то же самое.
1. Нажмите клавишу Windows и введите Редактор реестра. Нажмите Открыть.
2. Теперь перейдите по следующему пути в редакторе реестра.
ComputerHKEY_LOCAL_MACHINESYSTEMCurrentControlSetServicesPolicyAgent

3. Теперь щелкните правой кнопкой мыши правое окно и выберите «Создать», а затем параметр «Значение DWORD (32-разрядное)», как показано на рисунке.

4. Назовите ключ AssumeUDPEncapsulationContextOnSendRule и дважды щелкните созданный ключ.
5. Затем установите для параметра «Значение» значение 2 и нажмите «ОК».
6. Наконец, перезагрузите компьютер.
Способ 13: вручную перенаправить порты
Этот метод будет перенаправлять все пакеты связи с одного порта и адреса назначения на другой, когда он перемещается по сети. Это улучшит производительность сети на вашем компьютере и тем самым поможет вам решить обсуждаемую проблему. Вот несколько инструкций по ручной переадресации портов.
1. Откройте вкладку в своем браузере и перейдите на веб-сайт Portforward и запишите порты по умолчанию для программы, которую вы хотите запустить.
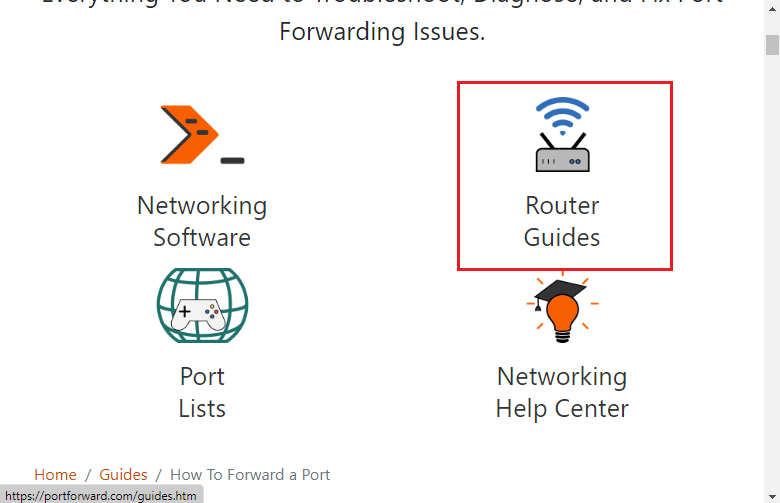
2. Затем найдите IP-адрес, имя пользователя и пароль своего беспроводного маршрутизатора.
Примечание. Если вы не знаете, как узнать IP-адрес вашего маршрутизатора, обратитесь к нашему руководству Как найти IP-адрес моего маршрутизатора? или вы также можете найти информацию в руководстве маршрутизатора.
3. Теперь запустите любой браузер и введите IP-адрес вашего маршрутизатора в адресной строке.

4. Теперь введите учетные данные маршрутизатора и войдите в систему.
5. Затем найдите любые данные с помощью переадресации портов. Вы можете найти его в дополнительных настройках или других подобных меню, в зависимости от модели маршрутизатора, который вы используете.
6. Затем включите Post Forwarding и нажмите на опцию, которая позволяет вам добавлять определенные порты.
7. Введите номер порта по умолчанию в пустые текстовые поля и нажмите Сохранить.
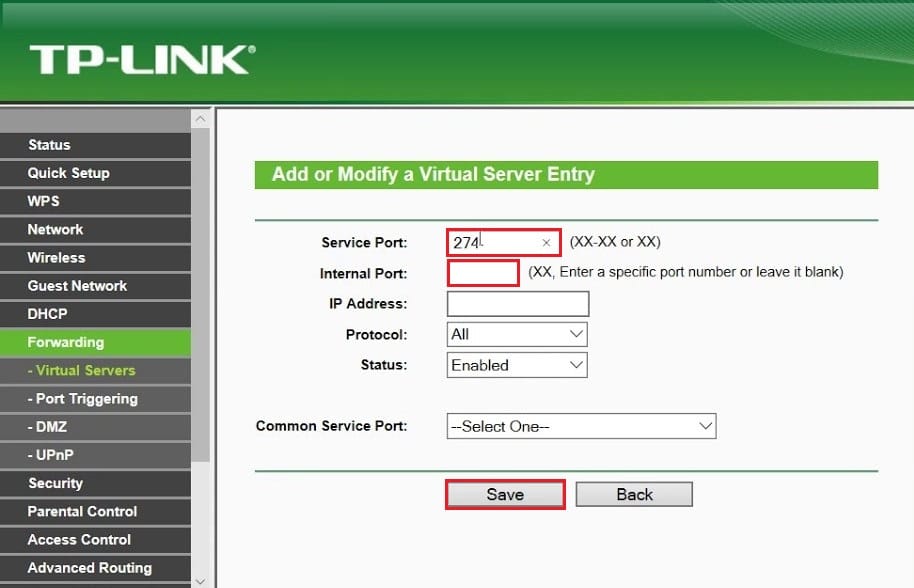
8. Наконец, проверьте, можете ли вы без проблем установить VPN-соединение.
Способ 14: переустановите VPN-адаптер
Если в ваших сетевых адаптерах есть какая-либо нестабильность, вы столкнетесь с неудачной попыткой подключения L2TP, поскольку уровень безопасности обнаружил ошибку обработки. Следуйте нашему руководству Как удалить и переустановить драйверы в Windows 10, чтобы переустановить драйверы на вашем компьютере с Windows 10.
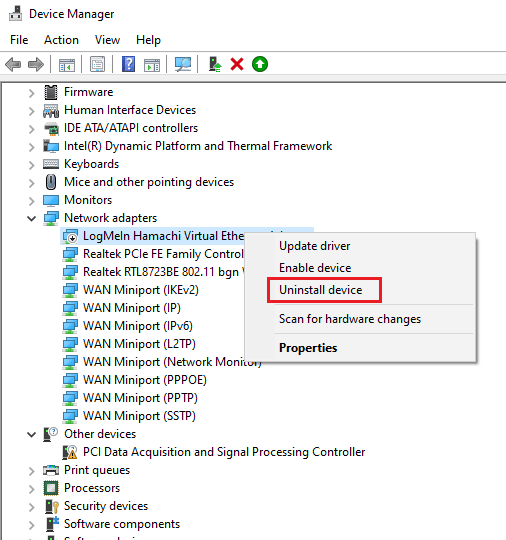
После переустановки сетевых драйверов проверьте, исправили ли вы обсуждаемую проблему или нет.
Метод 15: откатить VPN-адаптеры
При откате драйверов VPN все текущие версии аппаратного устройства будут удалены, а ранее установленные драйверы будут установлены на ваш ПК. Следуйте инструкциям в нашем руководстве «Как откатить драйверы в Windows 10», чтобы устранить проблему с неудачной попыткой подключения L2TP в Windows 10.
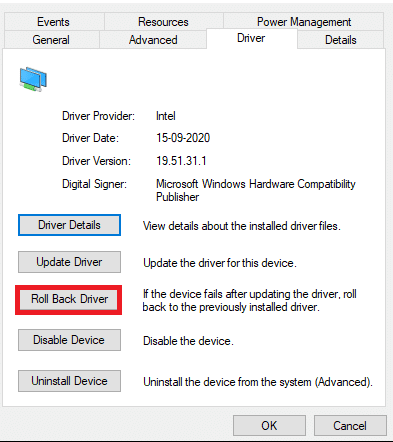
После того, как на вашем компьютере с Windows 10 установлена предыдущая версия драйверов, проверьте, устранена ли проблема с подключением к VPN.
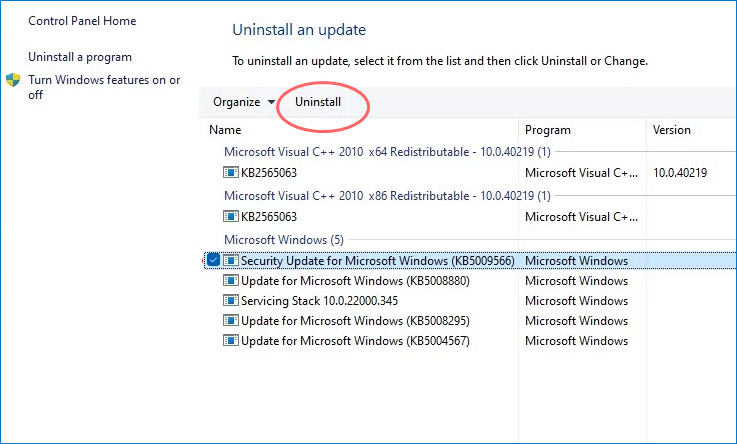
Способ 16: удалить последние обновления безопасности
Если вы столкнулись с ошибкой Windows 10 при попытке подключения L2TP после обновления ОС Windows, ваше VPN-подключение может быть несовместимо с новым обновлением, и в этом случае удалите последние обновления на вашем ПК. Это также повышает стабильность ПК после удаления неисправного обновления. Вот несколько инструкций по удалению последних обновлений на ПК с Windows 10.
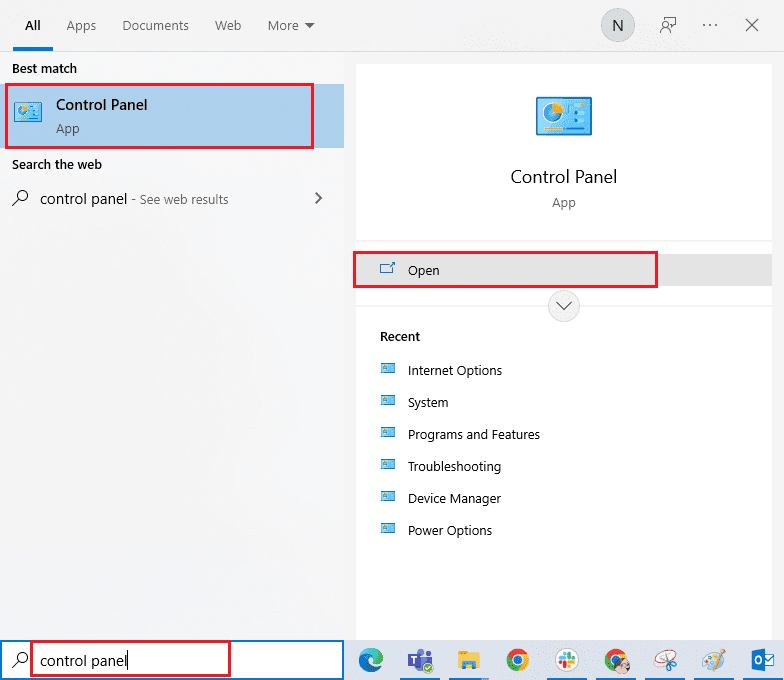
1. Нажмите клавишу Windows, введите «Панель управления» и нажмите «Открыть».
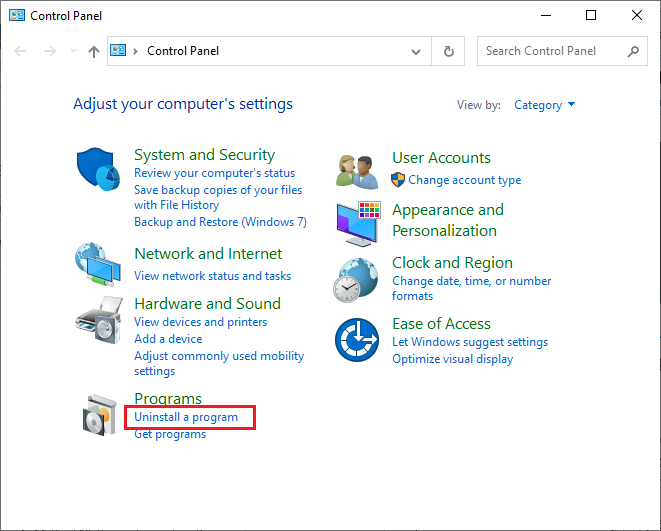
2. Теперь нажмите «Удалить программу» в меню «Программы», как показано на рисунке.
3. Теперь нажмите «Просмотр установленных обновлений» на левой панели, как показано здесь.

4. Теперь выберите самое последнее обновление (например, kb:5009543 для Windows 10, kb:5009566 для Windows 11) и нажмите «Удалить», как показано ниже.

5. Затем подтвердите запрос, если он есть, и перезагрузите компьютер.
***
Теперь вы бы исправили неудачную попытку подключения L2TP, поскольку уровень безопасности обнаружил ошибку обработки в Windows 10. Если вы застряли в середине процесса устранения проблемы, сообщите нам об этом в разделе комментариев. Не стесняйтесь обращаться к нам за дополнительными вопросами.