C:Users"username"AppDataRoamingMicrosoftWindowsStart MenuProgramsWindows PowerShell is where the shortcut of PowerShell resides. It too still goes to a different location to invoke the actual ‘exe’ (%SystemRoot%system32WindowsPowerShellv1.0powershell.exe).
Since PowerShell is user-profile driven when permissions are concerned; if your username/profile has the permissions to do something then under that profile, in PowerShell you would generally be able to do it as well. That being said, it would make sense that you would alter the shortcut located under your user profile, for example, C:Users"username"AppDataRoamingMicrosoftWindowsStart MenuProgramsWindows PowerShell.
Right-click and click properties. Click «Advanced» button under the «Shortcut» tab located right below the «Comments» text field adjacent to the right of two other buttons, «Open File Location» and «Change Icon», respectively.
Check the checkbox that reads, «Run as Administrator». Click OK, then Apply and OK. Once again right click the icon labeled ‘Windows PowerShell’ located in C:Users"username"AppDataRoamingMicrosoftWindowsStart MenuProgramsWindows PowerShell and select «Pin to Start Menu/Taskbar».
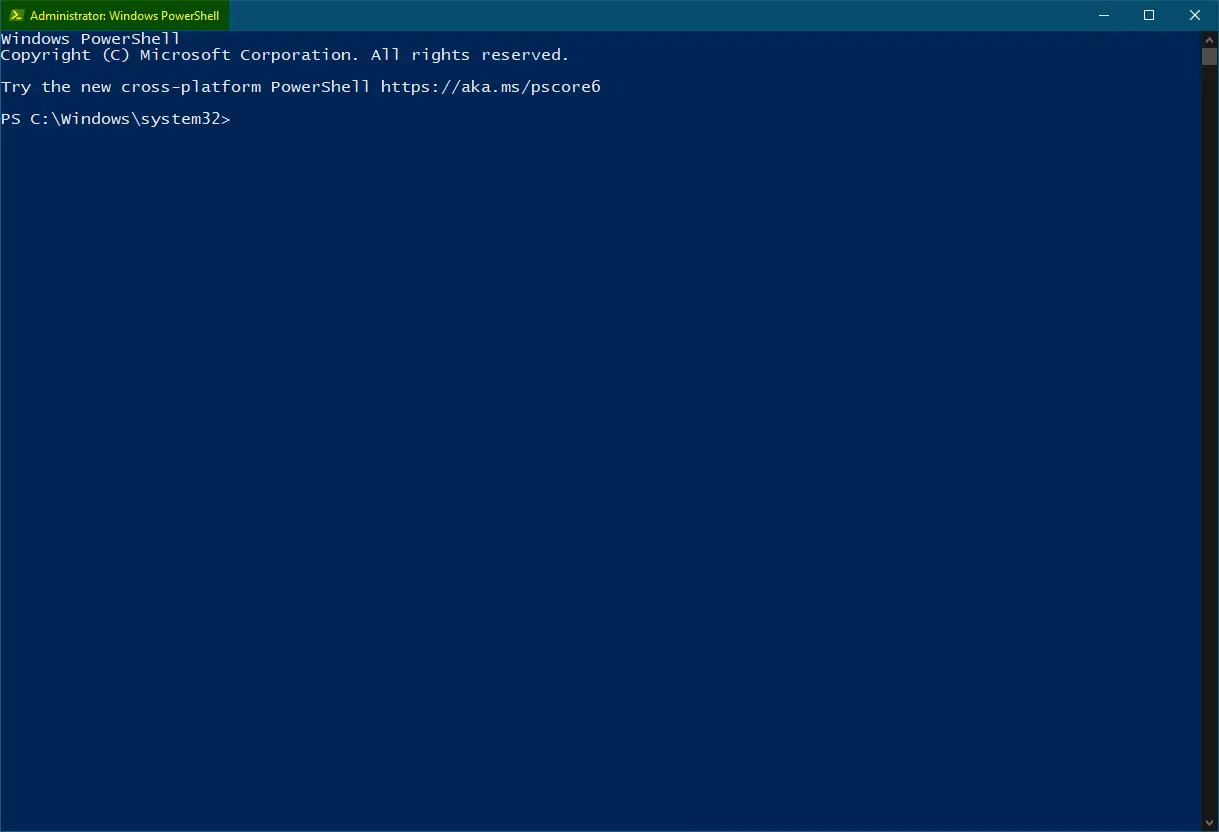
Now whenever you click that icon, it will invoke the UAC for escalation. After selecting ‘YES’, you will notice the PowerShell console open and it will be labeled «Administrator» on the top of the screen.
To go a step further… you could right click that same icon shortcut in your profile location of Windows PowerShell and assign a keyboard shortcut that will do the exact same thing as if you clicked the recently added icon. So where it says «Shortcut Key» put in a keyboard key/button combination like: Ctrl + Alt + PP (for PowerShell). Click Apply and OK.
Now all you have to do is press that button combination you assigned and you will see UAC get invoked, and after you select ‘YES’ you will see a PowerShell console appear and «Administrator» displayed on the title bar.
Whether you’re just starting out with PowerShell or you already know how to run commands, there are times when you must use PowerShell to ‘run as administrator’ Why? Because sometimes, any activity you do inside of PowerShell will require elevated privileges.
In this tutorial, you’re going to learn just about every way possible to run PowerShell as administrator from the perspective of an end-user, a command-line junkie, or an IT admin!
This tutorial has many sections each showcasing how to run PowerShell as administrator. Feel free to click on whichever method you prefer in the Table of Contents.
Prerequisites
This article will be a hands-on tutorial. If you’d like to follow along, please be sure you have:
- A Windows 10 PC – Although Windows 10 was used as an example for this article, most of the methods provided will work with Windows 7+.
- An account with administrator privileges. If you don’t already have one, learn how to create one here.
- PowerShell – Most of these methods will work with Windows PowerShell 5.1 or PowerShell 7.
Running PowerShell as Administrator with a Right-Click
One of the simplest ways to run PowerShell as administrator is with a right-click. There are a few different areas where you can right click on PowerShell and run it. Let’s run through them.
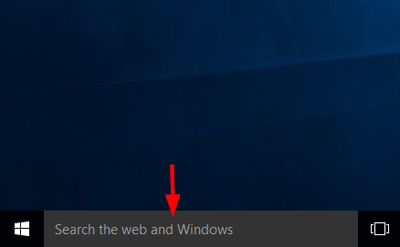
Using the Search Bar
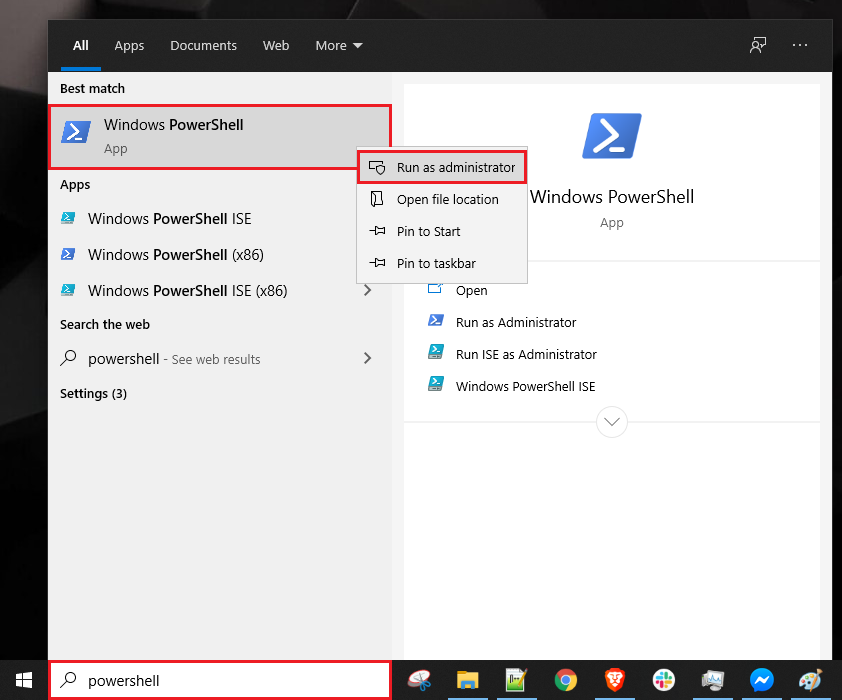
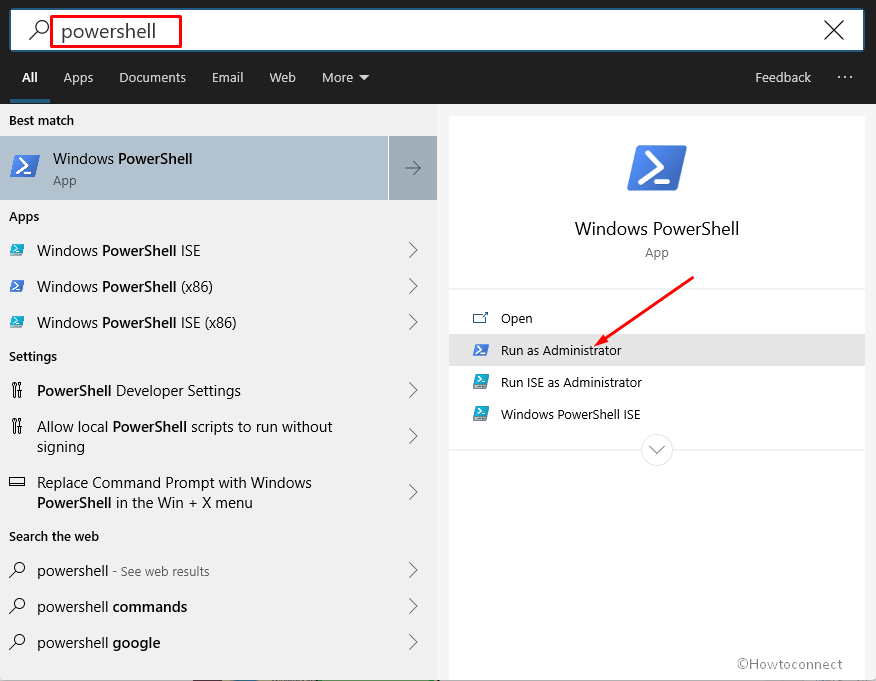
The Search Bar is practically one of the easiest ways to run most of the programs installed on your computer. It’s also an easy way to run any program as administrator, including PowerShell.
To run PowerShell, specifically, as administrator from the search bar:
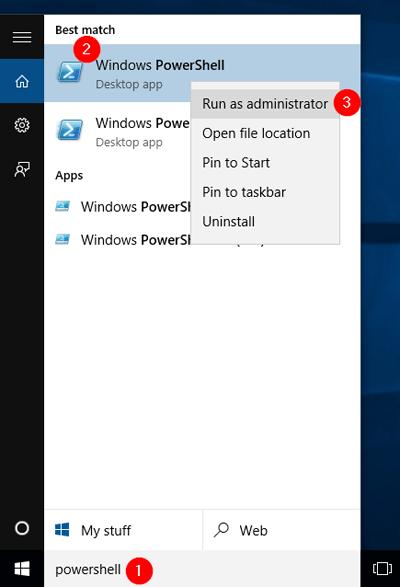
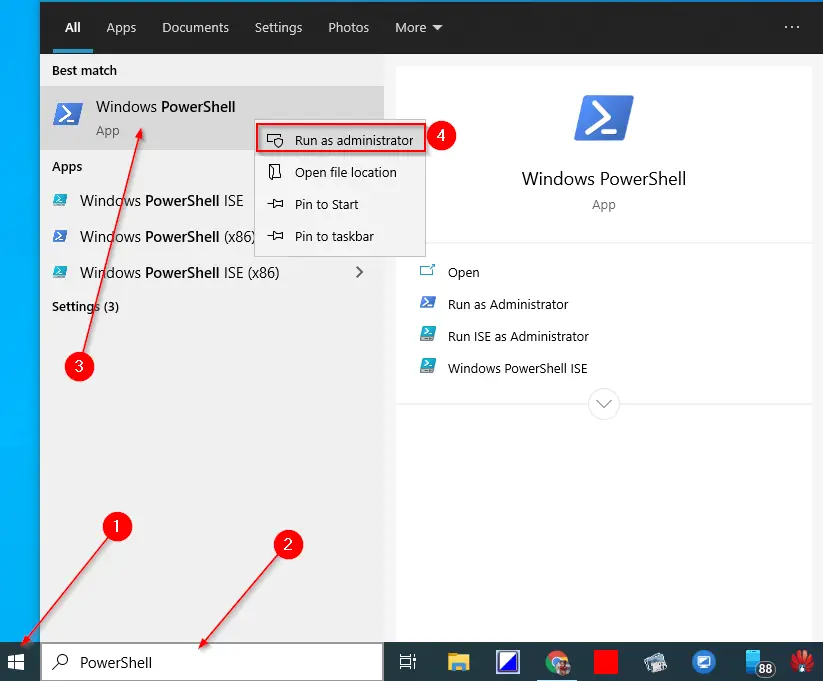
- Click on the search box at the taskbar and type powershell. This action will bring up the PowerShell edition of your preference.
- Look for Windows PowerShell or just PowerShell, if using PowerShell Core, from the search result.
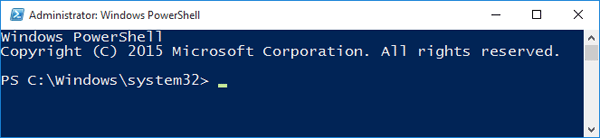
- Right-click on the menu item and select Run as administrator.
You can see these steps demonstrated in the screenshot below.
If you pin a program to the start menu or taskbar, you can also right-click on the menu item there as well. With this method, Windows 10 creates a shortcut for PowerShell that is more accessible to you at the start menu or the taskbar.
To run PowerShell as administrator on a pinned item:
- Find the PowerShell icon in the search box again.
- Right-click on the PowerShell icon and select Pin to Start or Pin to Taskbar.
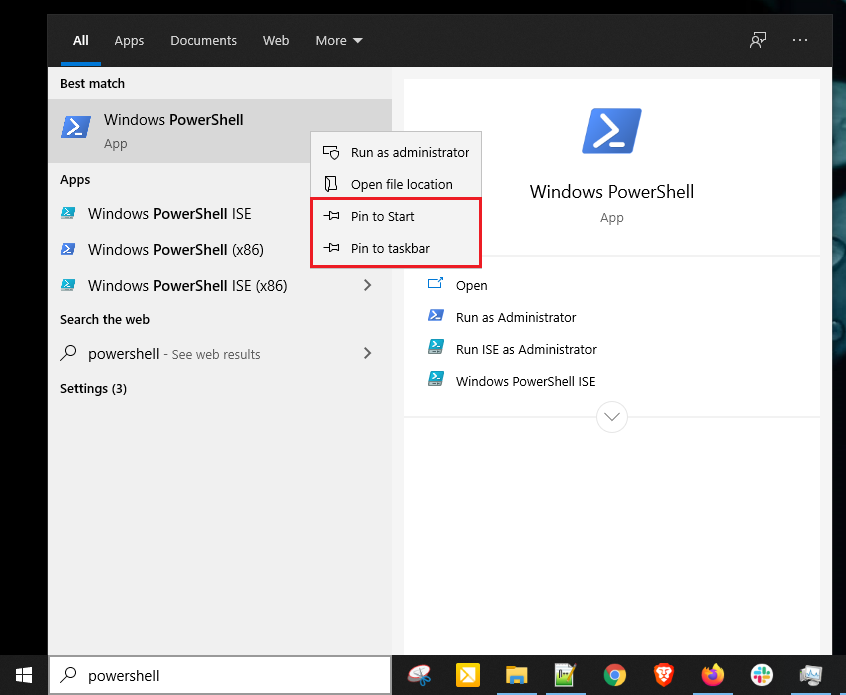
- Click on the Start button
- Look for Windows PowerShell (or PowerShell Core) on the right side of the Start Menu.
- Right-click on the menu item and choose Run as administrator.

Running PowerShell as Administrator Using File Explorer
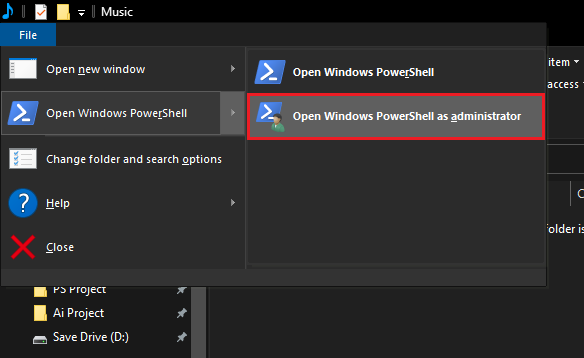
Are you in Windows’ File Explorer, you can fire up PowerShell as administrator there too!
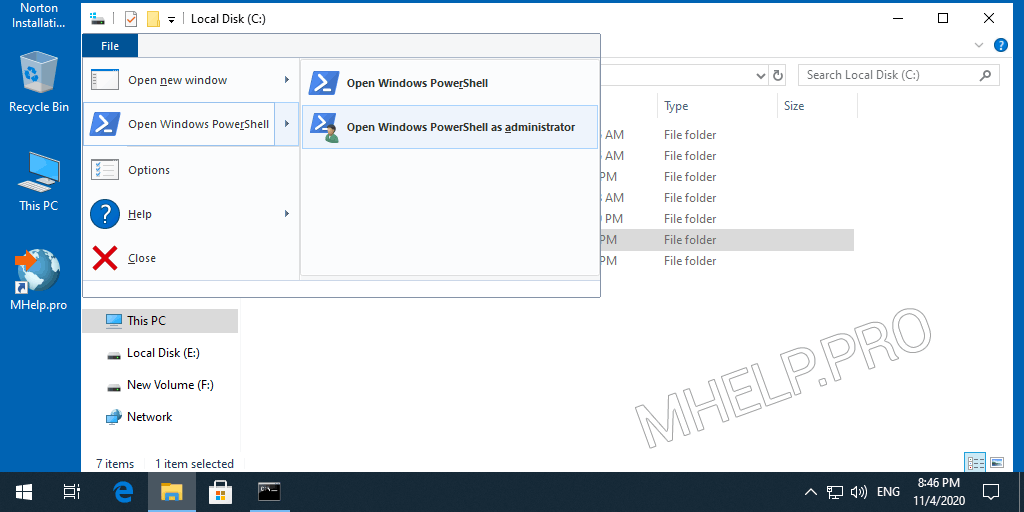
- Open up File Explorer by using Win Key + E shortcut keys or by simply clicking the icon at the taskbar as you can see on the screenshot below.
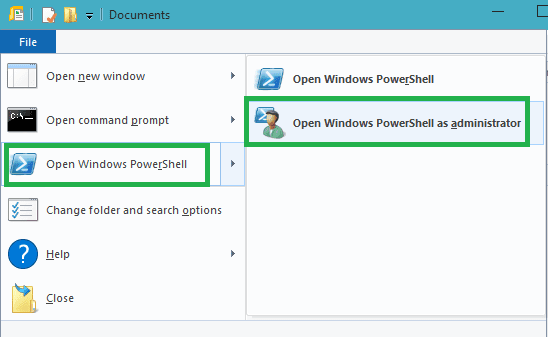
2. Once in File Explorer, click on File → Open Windows PowerShell → Open Windows PowerShell as administrator as shown below.
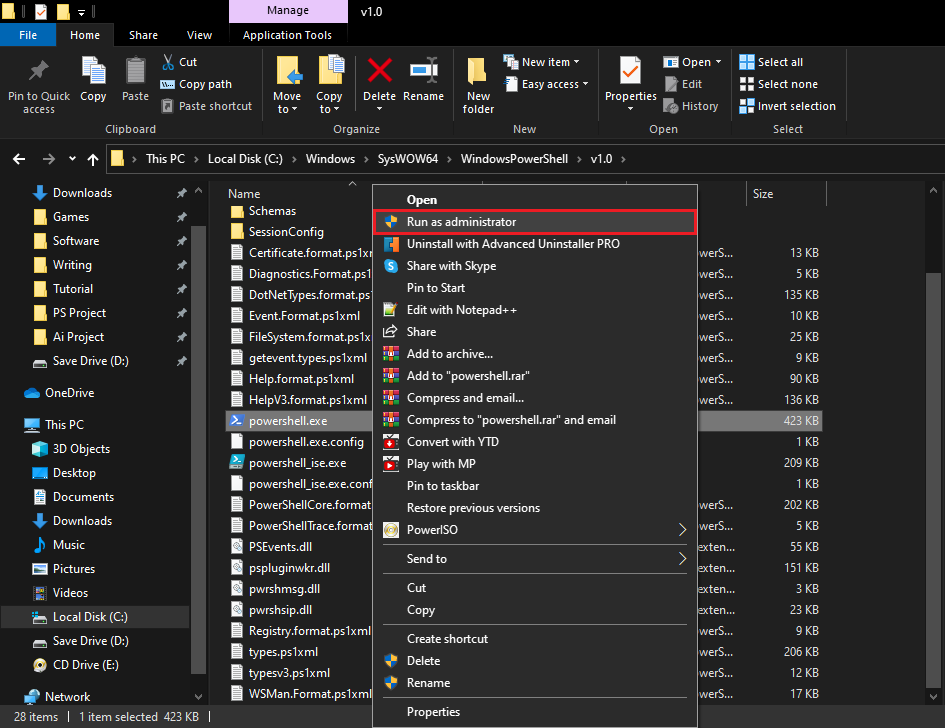
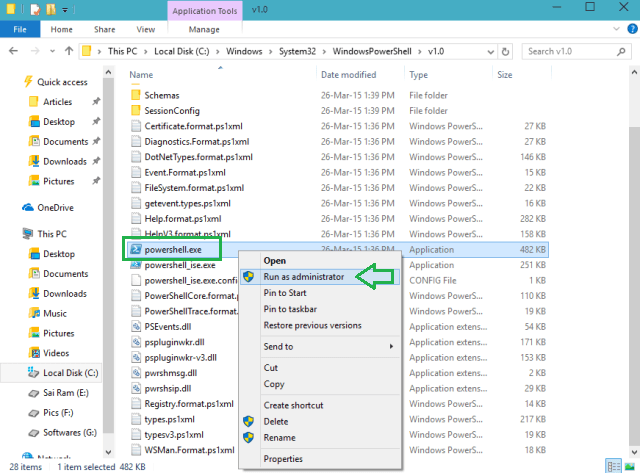
Using the PowerShell Executable
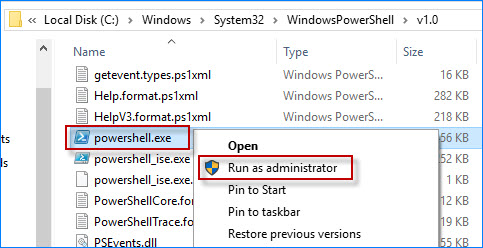
Whether you’re using a 32-bit or 64-bit operating system, you can run PowerShell as administrator from its respective location.
- In File Explorer, navigate to one of the folders below.
- For 32-bit OS: C:WindowsSystem32WindowsPowerShellv1.0
- For 64-bit OS: C:WindowsSysWOW64WindowsPowerShellv1.0
- Find the powershell.exe file.
- Right-click on powershel.exe and select Run as Adminstrator.
Creating a Shortcut for PowerShell on the Desktop
If you’d like an easy way to invoke PowerShell, you can also create a Windows shortcut for it.
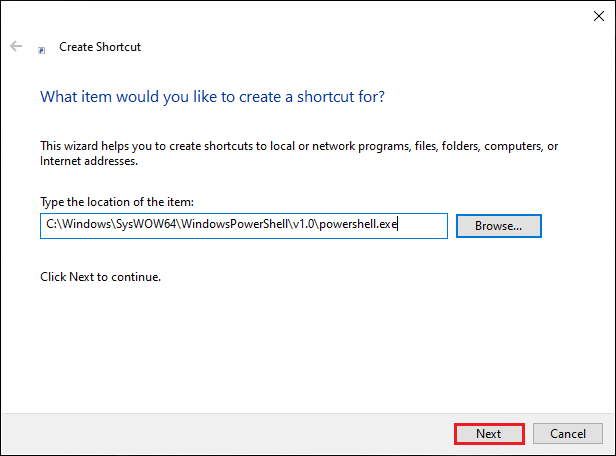
- Once you’ve got the Create Shortcut process started, provide the path to the PowerShell executable. For Windows PowerShell, that path is:
- For 32-bit OS: C:WindowsSysWOW64WindowsPowerShellv1.0powershell.exe
- For 64-bit OS: C:WindowsSystem32WindowsPowerShellv1.0powershell.exe
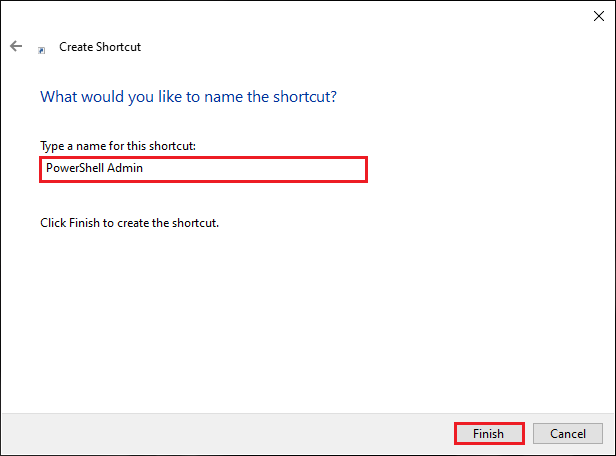
2. Provide the shortcut a handy name (PowerShell Admin for example).
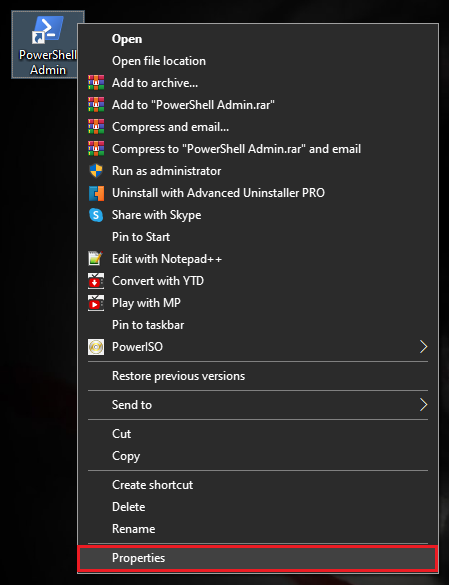
3. Find the shortcut you just created and right-click on it and choose Properties as shown below.
4. Click on Shortcut tab and then on the Advanced button and the Advanced Properties window will pop-up.
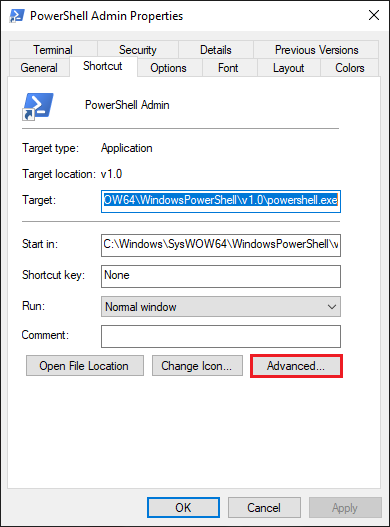
5. In the Advanced Properties window, select the Run as administrator checkbox and click OK.
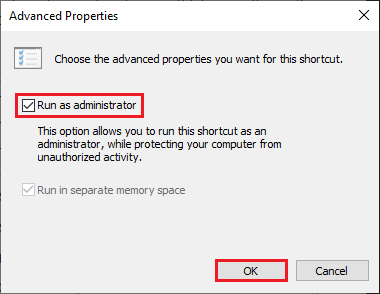
6. Back to the Shortcut Properties, click OK to apply the changes and you’re all set.
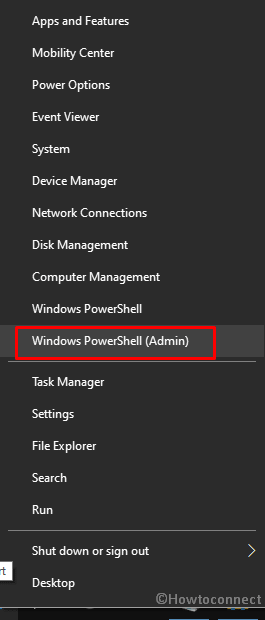
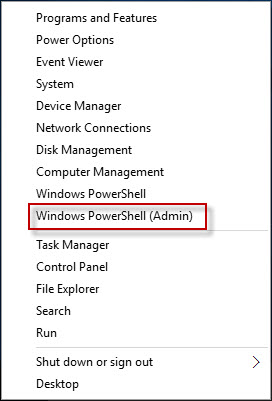
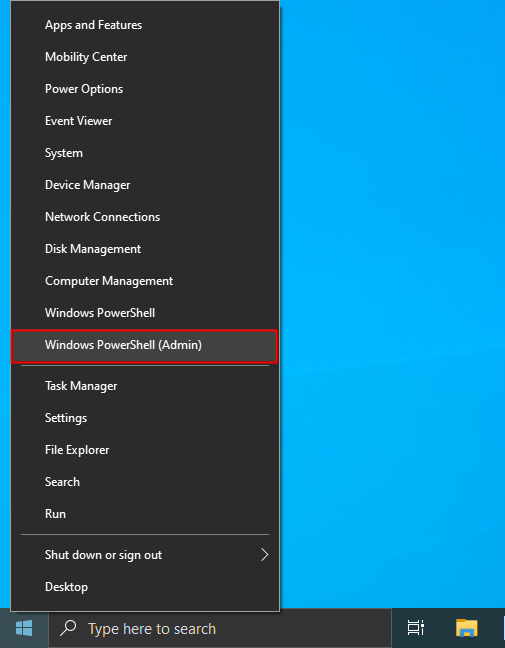
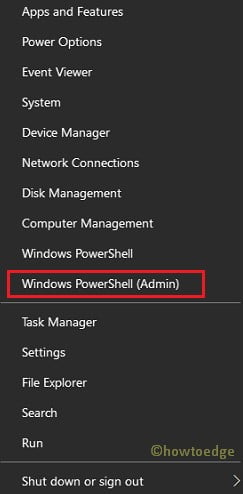
Another way to easily access PowerShell is via the Win-X menu as shown in the following screenshot. This menu was never given an official name but was widely referred to as Win-X (or power user menu) as the shortcut to access it is Win Key + X.
Once the menu is up, simply click on Windows PowerShell (Admin) and you’re off to th races.

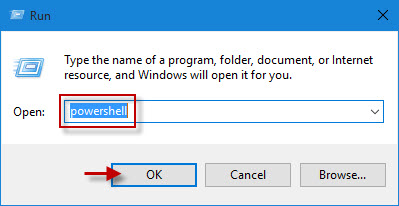
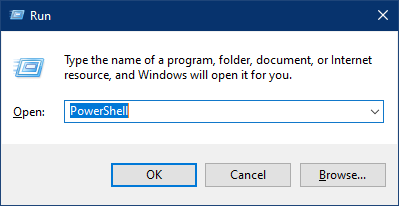
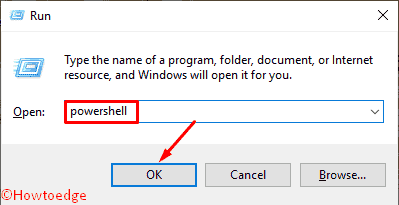
Using the Run Command Window
The Run Command Window is a powerful tool that lets you run programs without searching for them using the SearchBar, Start Menu or File Explorer. To run PowerShell as administrator via the Run command window:
- Press Win Key + R. A a small window will pop up as shown in the screenshot below.
- Type in powershell and press Ctrl+Shift+Enter or press and hold Ctrl+Shift.
- Click OK to make PowerShell run as administrator.
You’re now running PowerShell as administrator.
Using Task Manager
Task Manager is a tool that lets you monitor or end a process of the programs and services that are currently running on your computer. You can also use it to execute a task such as running PowerShell as administrator manually.
To run PowerShell as administrator via the task manager:
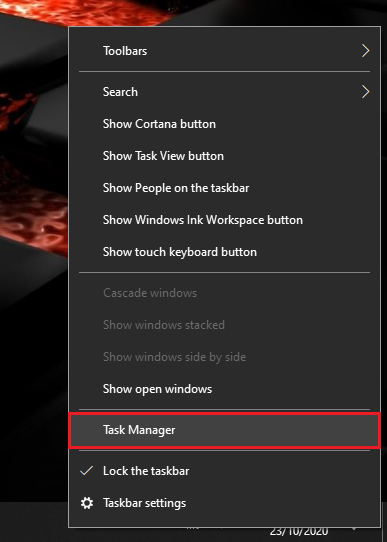
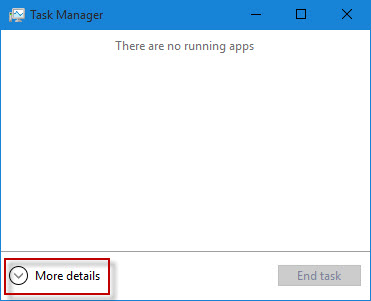
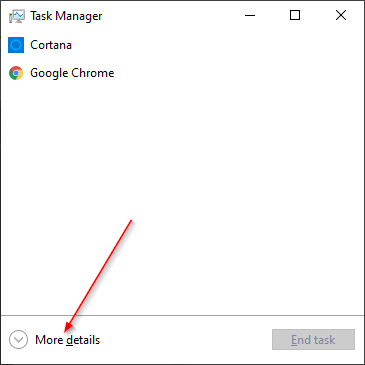
- Open the Task Manager by pressing Ctrl+Shift+Esc keys on your keyboard or as you see in the screenshot below
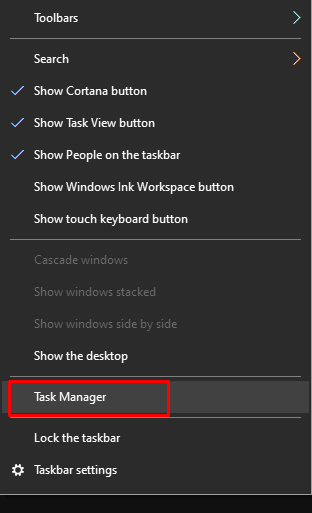
You can alternatively right-click on the Task Bar and select Task Manager to bring up Task Manager.
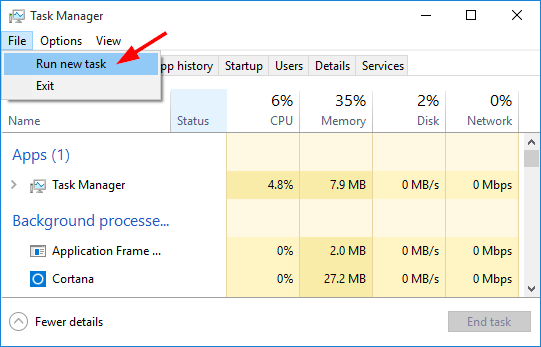
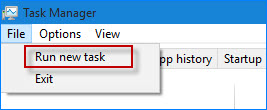
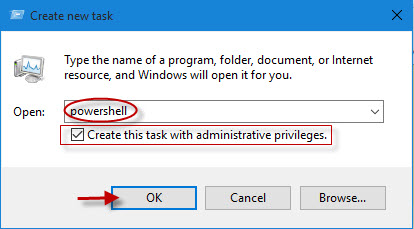
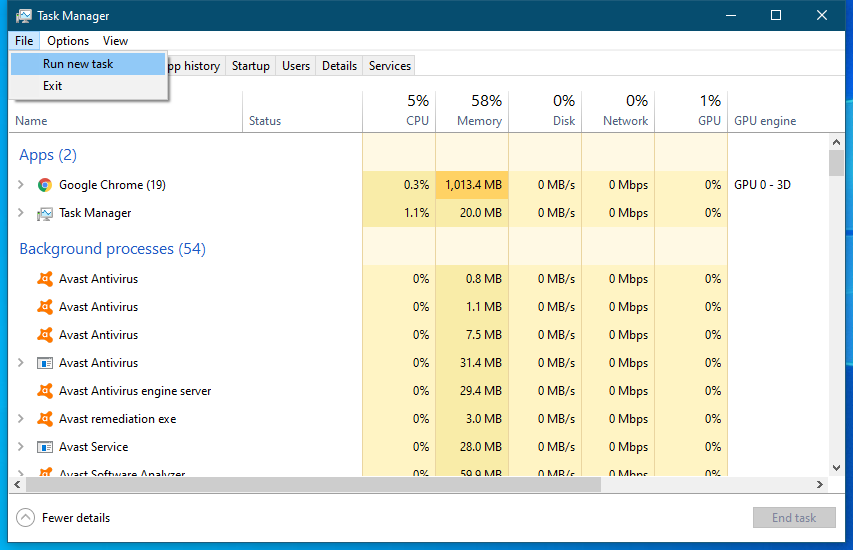
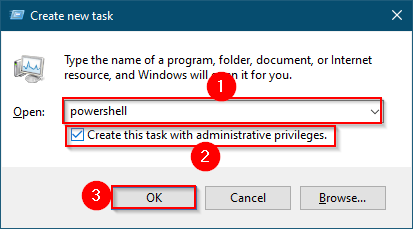
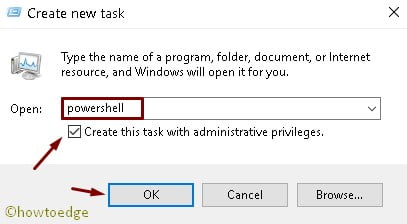
2. Once Task Manager opens, go up to File and click on Run new task as shown below.
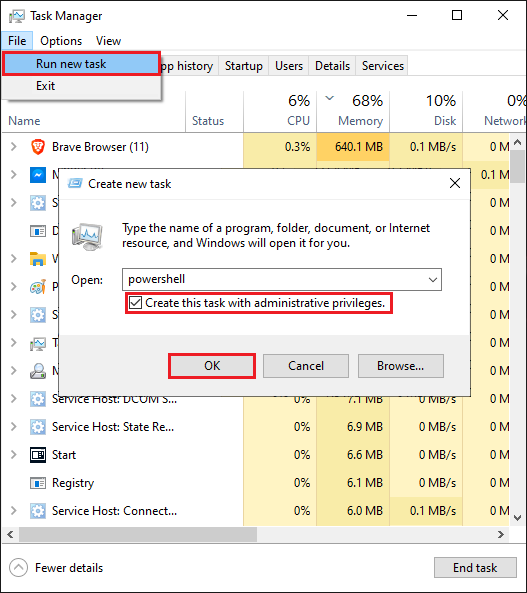
3. You should then see a window pop up that looks similar to the Run window described earlier.
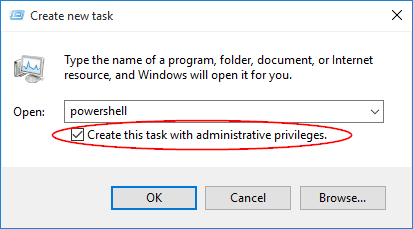
4. Type in powershell ensuring you also check the Create this task with administrative privileges checkbox and click OK to make PowerShell run as administrator.
Running PowerShell as Administrator with the Command Line
If you regularly find yourself on the command line, don’t fret, you can run PowerShell as administrator there too!
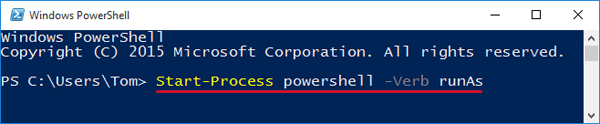
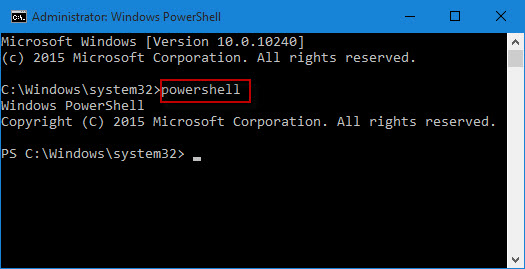
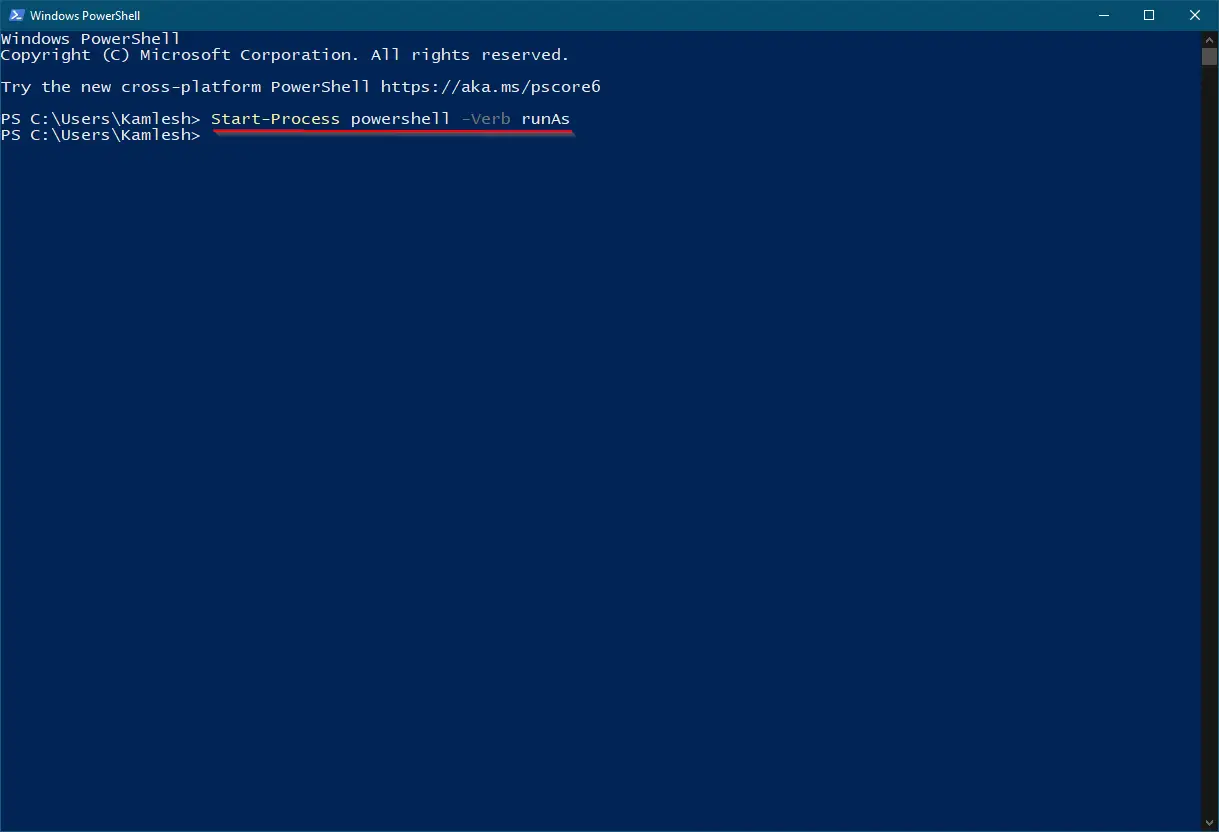
If you already have cmd. exe open running as adminstrator using the same techniques described in this article, you can simply run start powershell and it will be running as adminstrator.
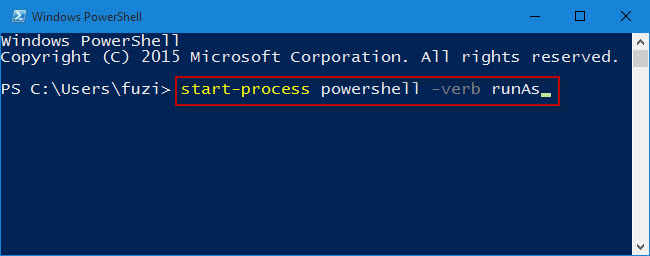
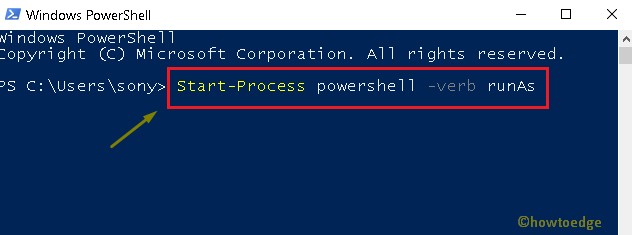
If you’re running a command prompt not as administrator yet, that’s not a problem. Invoke the Start-Process cmdlet with PowerShell from cmd. exe using the -Verb runas parameter.
powershell Start-Process powershell -Verb runAsIf you’re already in a PowerShell window, you can run Start-Process powershell -Verb runas directly to open a new PowerShell instance running as administrator
Creating a Batch File to Run PowerShell as Administrator
So you now know how to invoke PowerShell as administrator from a command prompt. If you already know how to do that, you can create a batch file to automate it!
Open up your favorite text editor, paste in the following line and save the file as PowerShell as admin.bat anywhere you’d like.
Powershell.exe -Command "& {Start-Process Powershell.exe -Verb RunAs}"Run the batch file and you’ll notice up comes a PowerShell window running as administrator!
Creating a Scheduled Task to Run PowerShell as Administrator
Task Scheduler is a built-in app on Windows 10 that lets you virtually run automated tasks. Hence, you can also use it to create a task that runs PowerShell as administrator each time you logon to your computer, for example.
Start up the Create Taskbox and specify the file to run as one of the below:
- For 32-bit OS: C:WindowsSystem32WindowsPowerShellv1.0powershell.exe
- For 64-bit OS: C:WindowsSysWOW64WindowsPowerShellv1.0powershell.exe
In the Create Task windows, provide the values to all of the menu items shown below ensuring the Run with highest privileges checkbox is checked.

Now when the scheduled task is invoked, it will execute PowerShell as administrator!
Further Reading
- PowerShell Objects, Properties and Methods
- How to Set Up and Manage Scheduled Tasks with PowerShell
Is there a way to run a PowerShell Prompt with elevated privileges from a command line? In this tutorial we’ll show you 5 simple ways to open PowerShell as Administrator in Windows 10.
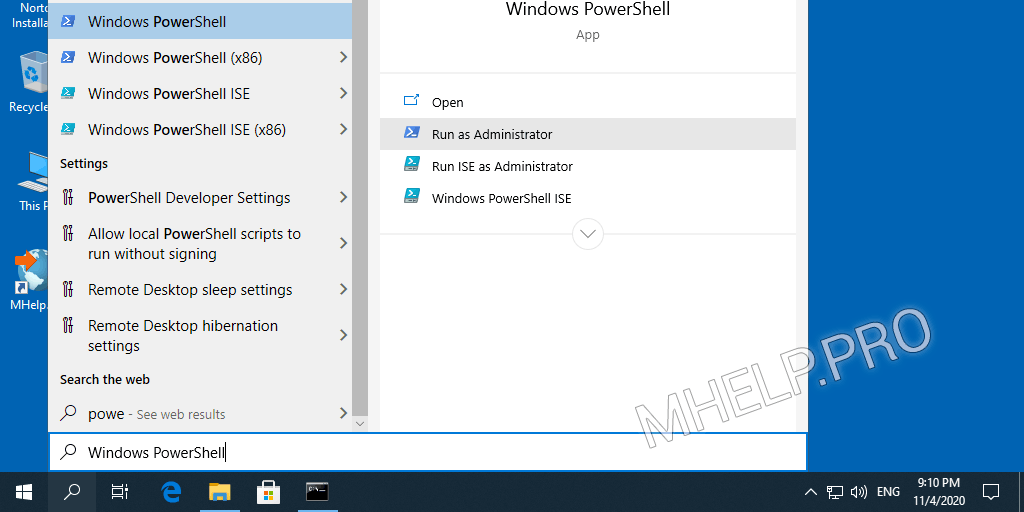
Method 1: Run PowerShell as Administrator Using Cortana Search Bar
Windows 10 comes with a Cortana search box in the taskbar. Just type powershell in the search box.
Right click on Windows PowerShell on the results and select Run as administrator.
The UAC prompt will ask you for your consent. Click Yes, and the elevated PowerShell prompt will open.
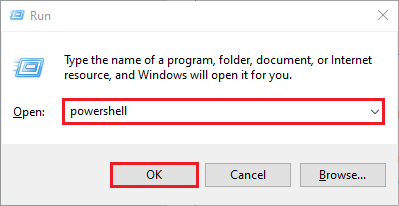
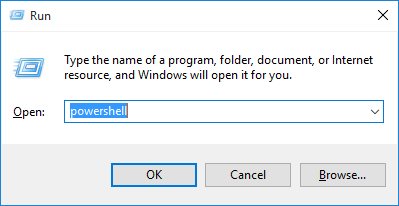
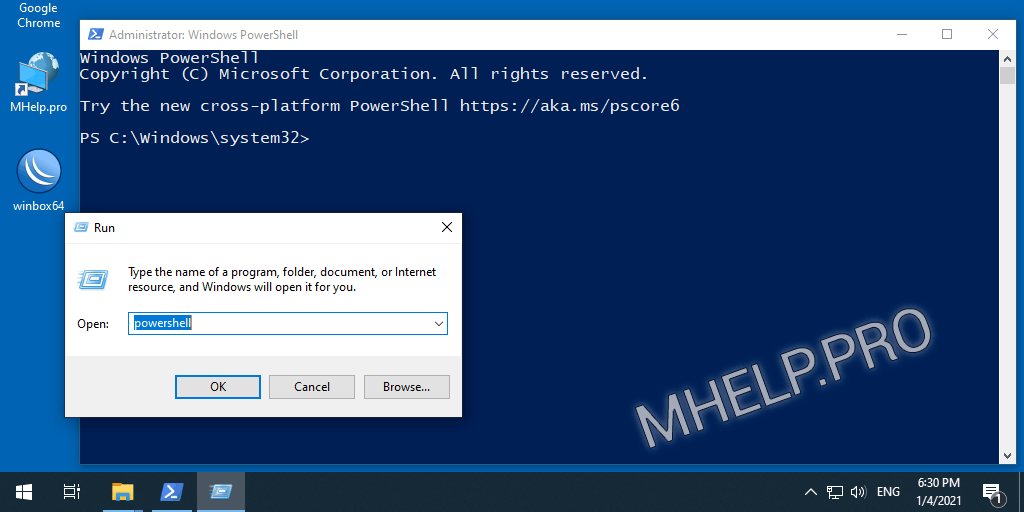
Method 2: Run PowerShell as Administrator Using the Run Window
Press Windows + R keys together on the keyboard to open the Run box. Type powershell and hit Enter.
Windows PowerShell will launch with the rights of the current user.
If you want to switch from normal mode to administrator mode, type the following PowerShell command and press Enter.
Start-Process powershell -Verb runAs
Method 3: Run PowerShell as Administrator from Command Prompt or WinX Menu
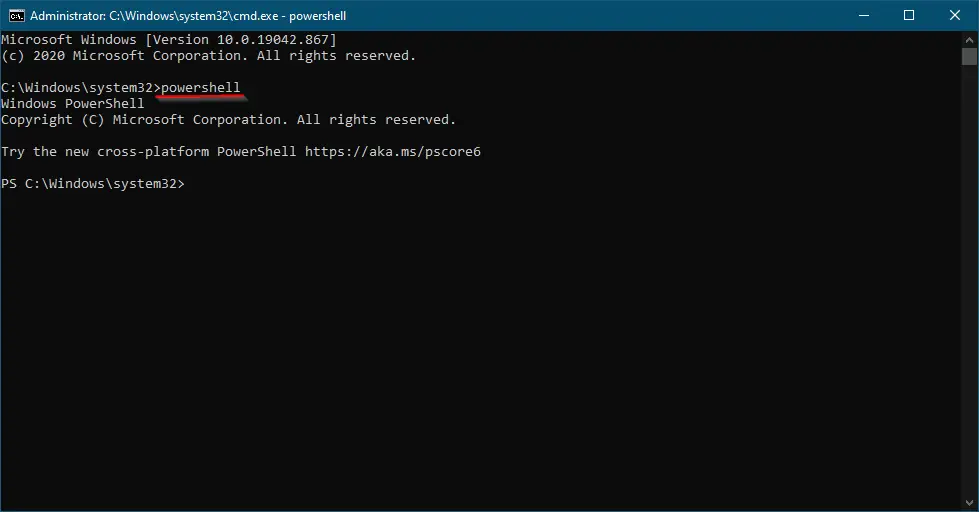
Open the Command Prompt as administrator, type powershell and press Enter.
Since Windows 10 Creators Update, you can also access PowerShell from the WinX menu. Press Windows + X keys together on the keyboard to open the WinX menu. Click on “Windows PowerShell (Admin)“.

Method 4: Run PowerShell as Administrator from Task Manager
First of all you need to access the Task Manager. This can be done by pressing Ctrl + Shift + Esc in Windows 10 / 8. By default Task Manager shows fewer details, and you need to click More Details.
Click on File menu and select New Task.
Type powershell and select the “Create this task with administrative privileges” check box and click OK to open an elevated PowerShell prompt.
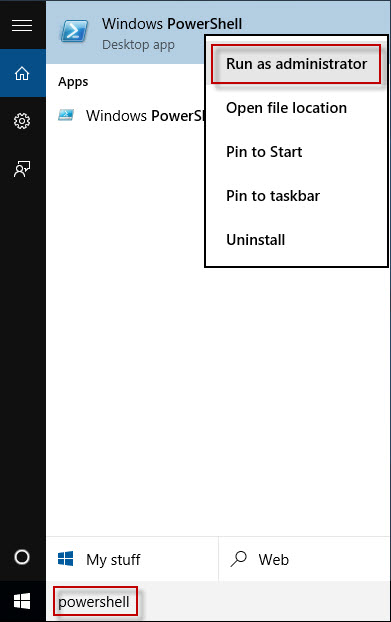
Method 5: Run PowerShell as Administrator from Start Menu
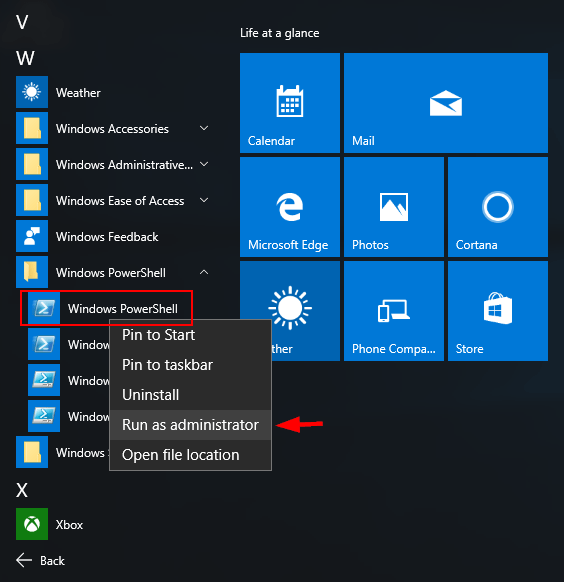
Click on the Start button to open the Start menu. Next click on All apps button at the bottom to expand the list of apps.
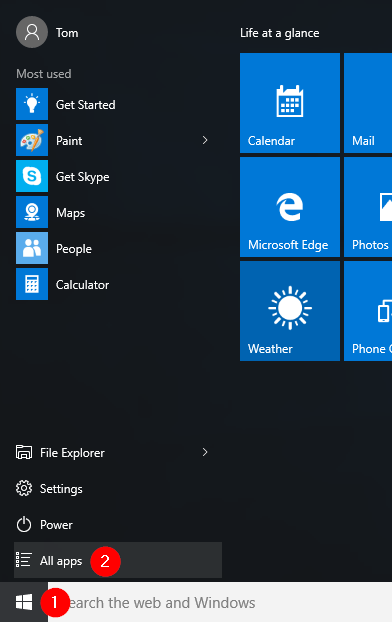
Scroll to the Windows PowerShell folder. Expand the folder and then right-click on Windows PowerShell shortcut. Select “Run as administrator“.
If you’re running Windows 7, Vista or XP, in order to start Windows PowerShell with administrator privileges, you need to click Start -> All Programs -> Accessories, point to Windows PowerShell, right-click Windows PowerShell, and select Run As Administrator.
- Previous Post: A Workaround to Disable PIN Login in Windows 10 / 8
- Next Post: Windows 10 Command Prompt: New Console vs. Legacy Console
Many users are aware of the Command Prompt whereas a very small number of people know about Windows PowerShell. Instead of Command Prompt, you can work with Windows PowerShell which provides your more power and authority over your Windows 10 computer. Hence, in this article, we are here with tips for different ways to Run PowerShell as administrator in Windows 10 operating system as administrator.
Microsoft has originated shell called Windows PowerShell in order to handle configuration and carry out task automation. Windows PowerShell comes to your rescue when you have a bunch of administrative works to solve. For instance, you ask PowerShell to recognize the programs that are not performing accurately and kill them. Also in a network, you can ask PowerShell to exhibit you all the installed USB gadgets on one or many computers. Well, Windows PowerShell can really do lots of things. If you prefer to give a shot to it, read out different ways to run it in Windows 10 as administrator.
1. Through File Explorer
With this method, you can access Windows PowerShell to the location or place of any particular selected drive or folder.
- Launch File Explorer, travel to the section where your preferred drive or folder is lying.
- Tap on the folder to pick which you want to start in an elevated PowerShell and keypunch (press) File on the extreme left portion of the menu bar.
- From the arrived options, hit Open Windows PowerShell succeeding with Open Windows PowerShell as administrator.
- Done!
2. Through Task Manager
- Right-click on the deserted field of Taskbar and press the 3rd option from the bottom Task Manager.
- Task manager Window emerges. On the left uppermost corner of menubar, you find File. Tap on this option. A drop-down comes fourth. choose the first choice from upward which says Run new task.

- Create new task window will arrive now. In the text field, type powershell and select the option Create this task with administrative privileges.

- Click Ok to continue.
- PowerShell with administrator rights will be seen on your screen.
3. Through Taskbar Search
- Click Taskbar search icon, type PowerShell in the text field and hit Enter key.
- You will see Windows PowerShell option with its icon. Select Run as administrator from the right flyout.
- PowerShell will be launched with administrator privileges.
4. Through from File Explorer again, but this time by Right Click Context menu.
- Access File Explorer on your screen and take yourself to the underneath path –
C:WindowsSystem32WindowsPowerShellv1.0
- Look for powershell.exe lying in the middle part of the file explorer. Right-click on it and go with the option on the second place from the top which says Run as administrator.
- These are the 4 different ways you can Run PowerShell as administrator in Windows 10.
Via Power user menu
- Right click on Start lying at the bottom left corner of the screen. Select Windows PowerShell (admin).

Like Command Prompt, Windows PowerShell is a command-line window designed in Windows, which is generally for system advanced administration, IT professionals and developers. Actually, Windows PowerShell is more powerful but less known than Command Prompt. In our previous post, we showed how to open Command Prompt as an administrator in Windows 10. Now in this post, we will show five ways to run PowerShell as an administrator in Windows 10.
- Way 1: from start menu
- Way 2: from Win + X menu
- Way 3: from the command prompt
- Way 4: from File Explorer
- Way 5: from task manager
- Way 6: from the Run dialog
Way 1: Run PowerShell as administrator from Start menu search box
Step 1: Bring up the Windows 10 Start menu.
Step 2: Type powershell. In the search result, right click on the Windows PowerShell app and select Run as administrator.
Way 2: Run PowerShell as admin from Win + X menu
Either Command Prompt or Windows PowerShell has usually included in Win + X menu.
Press Win + X keyboard shortcut to bring up Win + X menu. Then from the menu click Windows PowerShell (Admin).
Way 3: Run PowerShell as administrator from an elevated CMD
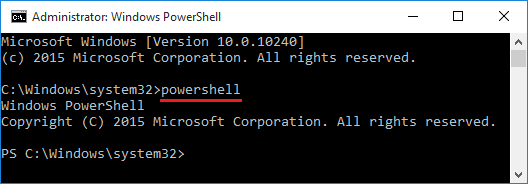
Step 1: Open Windows 10 Command Prompt as administrator.
Step 2: Type powershell and hit Enter. Then the command prompt will turn to Windows PowerShell.
Way 4: Run PowerShell as administrator from File Explorer
Step 1: Open File Explorer in Windows 10.
Step 2: Navigate to C:Windowssystem32WindowsPowerShellv1.0powershell.exe. Then right-click on the powershell.exe file and select Run as administrator.
Way 5: Run PowerShell as administrator from Task Manager
Step 1: Open Windows 10 task manager.
Step 2: Click on More details in the lower left corner to display the full screen of task manager.
Step 3: Click File > Run new task.
Step 4: In the Create new task dialog box, type powershell, check the box next to Create this task with administrative privileges and then click OK.
Step 1: Bring up Run dialog box by pressing Win + R keys.
Step 2: Type powershell in the box and click OK.
Step 3: A normal Windows PowerShell will open as your current user. Type start –process powershell –verb runAs and hit “Enter” key. This will bring up an elevated PowerShell as an administrator.
Introduction
When using Powershell, you may need to run an elevated Powershell window to perform a specific task or run a script.
The reason for this is the User Account Control (UAC). Introduced with Windows Vista User Account Control (UAC) keeps the user in a non-elevated state if not explicitly told to be elevated as an administrator. Some scripts and CMDlets in Powershell require you to run with the highest privileges to change the system.
To read more about how the User Account Control (UAC) works in Windows 10, refer to https://docs.microsoft.com/en-us/windows/security/identity-protection/user-account-control/how-user-account-control-works.
This blog post describes how to elevate to an administrator in Powershell.
For learning more about Powershell, I recommend signing up and using Pluralsight!
Which Powershell actions require elevation?
There are some actions in Powershell which require you to elevate, such as:
- Changing of the Execution Policy
- Modifications to System Files
- Modifications of the Registry
It is best practice always to start an elevated Powershell window to not run into any unexpected issues.
The only time I would not recommend this if you are testing a script intending to run as a regular user.
How to elevate Powershell to admin
There are several alternatives for elevating your Powershell command prompt.
Here are three options:
- Elevate Powershell to an administrator through Windows Search
- Create a new task in Task Manager
- Use the runAs command in Powershell
Alternative #1 – Elevate Powershell to admin through Windows Search
The easiest way to start elevated Powershell windows is by searching for the Powershell application.
Press the Windows button to open the start menu and type Powershell. Select Run as administrator to launch run a Powershell window with full privileges.

Press Yes in the UAC prompt, and you are good to go!
Alternative #2 – Create a new task in Task Manager
Press the Windows button and search for Task Manager.
Press File and Create a new task
Enter PowerShell and check Create this task with administrative privileges


Alternative #3 – Use the runAs command in Powershell
Run the following command from a non-elevated Powershell prompt:
Start-Process Powershell -Verb runAs
If prompted by the UAC, enter the administrative credentials.
There are now two Powershell windows, one elevated to an administrator and one not elevated to an administrator.

Conclusion
I hope you have found one way of opening Powershell as an administrator user. How do you elevate to an administrator? Please leave a comment below! 🙂
For learning more about Powershell, I highly recommend the courses provided by Pluralsight.
References
- Microsoft Docs – Powershell Documentation
- Microsoft Docs – User Account Control (Windows applications)
Further learning
- Learn Powershell at Pluralsight
- How To Check Bitlocker Encryption Status on Windows 10
- Add Active Directory users to groups using Powershell and a CSV file
- Add user to local administrator Group using Powershell
- How to check if Powershell is running as an administrator
- Copy a file to a new directory using Powershell
- How to create a Hyper-V Virtual Machine using Powershell
- How to change Powershell version for backward compatibility
- How to export RSOP results using Powershell
PowerShell is specially designed for IT professionals and system administrators to control & automate the administration of Windows OS and other applications. It provides new concepts to extend the knowledge you have gained and scripts created within the Windows Command Prompt and Windows Script Host environments.
Using PowerShell, you can perform various administrative tasks on your Windows 10 PC. For instance, we have used this utility to determine the serial number of HDD and SSD, determine device driver versions, open the Settings app, obtain the PC’s model number, etc.
What is PowerShell? According to Microsoft, “PowerShell is a cross-platform task automation solution made up of a command-line shell, a scripting language, and a configuration management framework. PowerShell runs on Windows, Linux, and macOS.”
PowerShell is a modern command shell that combines the best features of other popular shells. Unlike most shells that only accept and return text, PowerShell accepts and returns .NET objects also. The shell includes the following features:-
- Robust command-line history
- Tab completion and command prediction
- Supports command and parameter aliases
- Pipeline for chaining commands
- The in-console help system, similar to Unix man pages
As you can see above, various tasks can be performed using Windows PowerShell. This post will see the different ways to open the PowerShell as an Administrator in Windows 10. These are the following:-
- Open or run PowerShell as Administrator using the Run Dialog box.
- Launch PowerShell as Administrator from Command Prompt or WinX Menu.
- Start PowerShell as Administrator from Windows Task Manager.
- Begin PowerShell as Administrator from Start Menu.
How to open or run PowerShell as Administrator using the Run Command box?
To open or run the Windows PowerShell as administrator on Windows using the Run dialog box, perform the following steps:-
Step 1. Press Windows + R shortcut keys together on the keyboard to open the Run box.
Step 2. In the Run dialog box that opens, type the following and hit Enter from the keyboard:-
Powershell
Step 3. You will notice that the Windows PowerShell window has opened with current user rights. To switch it with administrator rights, copy and paste the following command and hit Enter from the keyboard:-
Start-Process powershell -Verb runAs
If User Account Control appears, click the Yes button.

Step 4. Now an another Windows PowerShell window will open with administrative rights.
Alternatively, open the Run dialog box by pressing the Windows logo + R keys together. Type PowerShell and press Ctrl + Shift + Enter shortcut keys from the keyboard to launch the Windows PowerShell with elevated rights.
How to launch PowerShell as Administrator from Command Prompt or WinX Menu?
To open the PowerShell as Administrator from Command Prompt, do the following steps:-
Step 1. Open the Command Prompt with administrative rights.
Step 2. In the elevated Command Prompt, type the following and hit Enter from the keyboard to launch the PowerShell with elevated right:-
PowerShell
Note: If you are using the latest update of Windows 10, it may not work.
In Windows 10 Creators Update, Microsoft has added PowerShell to the WinX menu. Press the Windows logo + X keys simultaneously on the keyboard or right-click on the Start Menu to open the WinX menu. Click on “Windows PowerShell (Admin)” to open the Windows PowerShell with elevated rights.
How to start or open PowerShell as Administrator from Windows 10 Task Manager?
Windows 10 Task Manager can be used to open or launch PowerShell as Administrator. Earlier in Gear Up Windows, we had seen the steps to run File Explorer with Admin Rights using Task Manager in Windows 10.
To launch the PowerShell as Administrator from Windows 10 Task Manager, perform the following steps:-
Step 1. Launch the Task Manager by pressing Ctrl + Shift + Escsimultaneously from the keyboard. By default Windows 10 Task Manager opens with fewer details. Click More Details to expand it.
Step 2. Click on the File menu and choose here Run new task option.
Step 3. A new dialog box opens “Create new task.”
Step 4. Type powershell in the box, and don’t forget to check the checkbox “Create this task with administrative privileges.”
Step 5. Finally, click the OK button to open the PowerShell with elevated rights.
This is the easiest method to open PowerShell as an Administrator. To run the PowerShell as Administrator, perform the following steps:-
Step 1. Click on the Start button/menu of Windows 10 and type PowerShell.
Step 2. On the top search result, right-click on the Windows PowerShell entry and select “Run as administrator.”
Once you complete the above steps, PowerShell will open with administrator or full rights.
When you open the PowerShell console on Windows via the Search bar, shortcut, or pinned taskbar item, the powershell.exe process starts in unprivileged mode. In this mode, you won’t be able to make system changes or perform administrative tasks. In this article, we’ll walk through a few easy ways to run a PowerShell console or script as an administrator.
Run PowerShell as Administrator Using Windows Search Bar
- Click on the Start button or press the Windows key on your keyboard;
- Type powershell in the search field;
- Right-click on the Windows PowerShell icon and select Run as administrator (or select this item in the right pane);

- A UAC window will appear, in which you need to confirm the start of the process in the elevated mode.

There is also a separate item for starting PowerShell with elevated permissions in the Win+X menu of Windows 10 and 11. Just press Windows + X on your keyboard or right-click the Start button and select Windows PowerShell (Admin).

Create Taskbar Shortcut to Run PowerShell as Administrator
If you often run the PowerShell console as an administrator, you can create a shortcut to start the PowerShell in elevated mode automatically.
- Find the PowerShell icon in the start menu, right-click on it and select Pin to taskbar;
- Right-click on the PowerShell icon in the taskbar, select Windows PowerShell > right-click > Properties;

- Click the Advanced button and enable the Run as administrator option;
- Click OK twice.


Now, when you click on the PowerShell icon in the taskbar, the PS console will always open in privileged mode.
When you run any PowerShell script (PS1 file) in an elevated session, it runs as an administrator. Or you can run a PowerShell script file as an administrator with the following command:
Start-Process powershell -verb runas -ArgumentList "-file C:PSScriptsmyPSScript.ps1"
Hint. Make sure the PowerShell Execution Policy on your computer is not blocking PowerShell scripts from running.
You can open the console as an administrator with the following command:
powershell Start-Process powershell -Verb runAs
You can execute this command in the cmd.exe command prompt, PowerShell, or using the Run feature.

When you run this command, a UAC window appears asking you to confirm privilege escalation:
User Account Control
Do you want to allow this app to make changes to your device?
Windows PowerShell

Running PowerShell as Administrator without UAC Prompt?
It is not recommended to disable UAC on Windows. Therefore, you can implement one of the following scenarios to run a PowerShell console with administrator rights without a UAC prompt. It is assumed that your account is a member of the local Administrators group. Otherwise, Windows will ask you to enter the Administrator password on a UAC prompt.
You can:
- Run powershell.exe from Task Manager.
- Create a new scheduled task with the checkbox “Run with highest privileges” enabled.
In the first case:
- ) Open the Task Manager (Ctlr+Alt+Esc or right-click on the taskbar and select Task Manager);
- Select the menu item File > Run new task;

- In the Open window, type powershell and enable the option Create the task with administrative privileges;

- Click OK. The PowerShell console should open without a UAC prompt.


Now let’s create a scheduled task to run PowerShell as administrator:
- Open the Task Scheduler console (taskschd.msc);
- Select Action > Create Task;
- Specify the task name PowerShellAdminTask;
- Check the option Run with highest privileges;
- Select Windows 10 in the Configure form;
- Uncheck the Hidden checkbox;

- Go to the Actions tab and select New > Start a program;
- Copy the following line to the Program field C:WindowsSystem32WindowsPowerShellv1.0powershell.exe;

- Save your task.


Now, to run the PowerShell console as an administrator without a UAC prompt, select the PowerShellAdminTask task in the Task Scheduler console, right-click on it, and select Run.

Or you can run the job from a non-elevated command prompt with the command:
schtasks.exe /run /tn PowerShellAdminTask

You can use the Task Scheduler solution to run PowerShell scripts as an administrator without the user’s input. In this case, in the Add argument field, you need to specify the path to your PowerShell script in the following format:
-executionpolicy bypass -file c:psscriptsmyposhscript.ps1

In this case, the script will be run as an administrator, even if the PowerShell Execution policy is enabled, which blocks unsigned scripts from running.
Check if PowerShell is Running as an Administrator
If your powershell.exe console is running with administrator privileges, the window title will say Administrator: Windows PowerShell.

In some PowerShell scripts, verifying if the script is running with administrator privileges is sometimes necessary before starting any action.
Run the command:
[Security.Principal.WindowsIdentity]::GetCurrent().Groups -contains 'S-1-5-32-544'
If the command returned True, then this PowerShell session was started with administrator permissions.
![]()
In PowerShell v4.0 and newer, you can use a special statement at the beginning of your scripts to prevent a PowerShell script from running as a regular (non-administrator) user:
#Requires -RunAsAdministrator
If a script with such a statement is executed in a non-elevated PowerShell process, you will receive an error message:
The script ‘test_admin_script.ps1’ cannot be run because it contains a “#requires” statement for running as an Administrator. The current Windows PowerShell session is not running as Administrator. Start Windows PowerShell by using the Run as Administrator option, and then try running the script again.
- About
- Latest Posts

I enjoy technology and developing websites. Since 2012 I’m running a few of my own websites, and share useful content on gadgets, PC administration and website promotion.
This basic tutorial details several ways to run PowerShell as Administrator on Windows.
Run PowerShell as Administrator, often needed when accessing or changing system settings.
Content
Run PowerShell as Administrator using:
- Start Menu
- Quick Link menu
- File menu
- Search menu
- Command prompt
- PowerShell (with user rights)
- Run menu
Article in other languages:
🇪🇸 – Cómo ejecutar PowerShell como administrador
🇷🇺 – Как запустить PowerShell от имени администратора
🇫🇷 – Comment exécuter PowerShell en tant qu’administrateur
🇩🇪 – So führen Sie PowerShell als Administrator aus
🇳🇱 – Hoe te PowerShell uitvoeren als administrator
The first way is to run PowerShell as an Administrator using the Start button.
- Click the Start button;
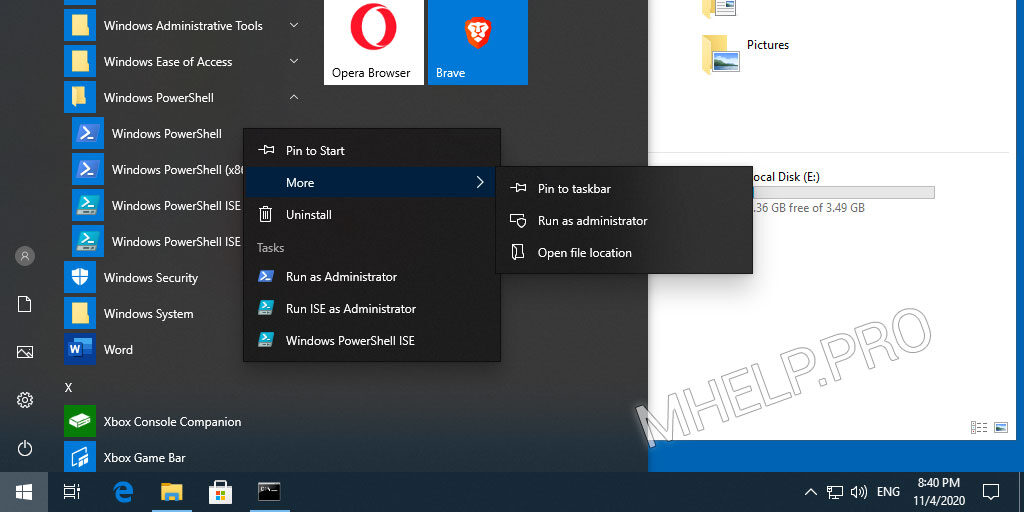
- In the list of programs, click Windows PowerShell;
- Right-click Windows PowerShell, select More and Run as Administrator.
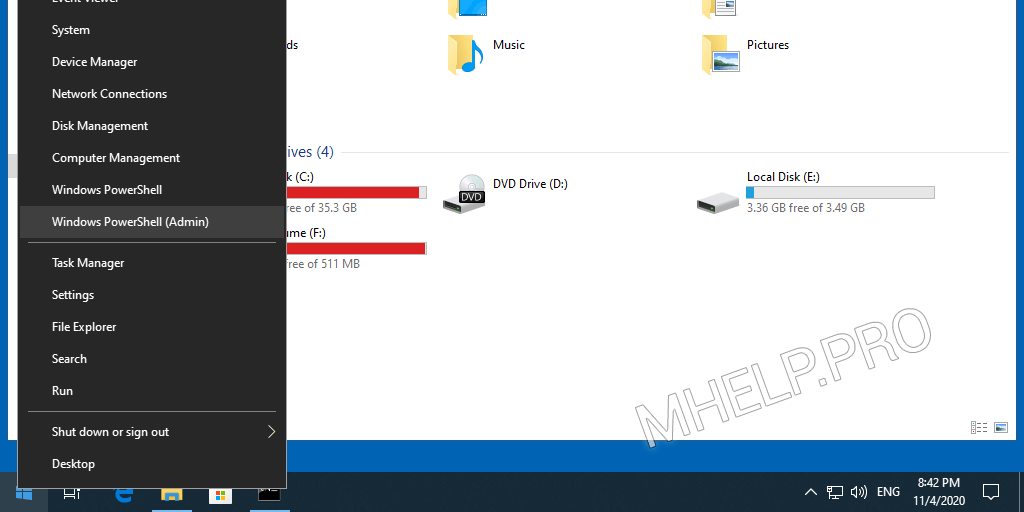
The second way is to run PowerShell as an Administrator using the Quick Link menu.
- Click on the Start button with the right mouse button (or press the combination Windows+X);
- Click Windows PowerShell (Admin).
The third way to run PowerShell as an Administrator is by using the File menu while selecting a file or folder in Windows Explorer.
- Select a file or folder in the Windows Explorer window;
- Click the File menu, point to Advanced Selection triangle in paragraph Open Windows PowerShell;
- Select Open Windows PowerShell as Administrator.
The fourth way to run PowerShell as an Administrator is by using Windows Search from the start menu.
- Click on the Search line on the taskbar (or press the Windows+S combination);
- Type the PowerShell text;
- Click the extended results triangle under Windows PowerShell and click Run as Administrator.
Run PowerShell as Administrator using Command Prompt
The fifth way is to run PowerShell as Administrator using the command prompt.
Run Command Prompt and run the command:
powershell "start-process powershell -verb runas"
Run PowerShell as Administrator using PowerShell (with user rights)
The sixth method is to run PowerShell as an Administrator using the PowerShell console running with user rights.
Start PowerShell console and run the command:
start-process powershell -verb runas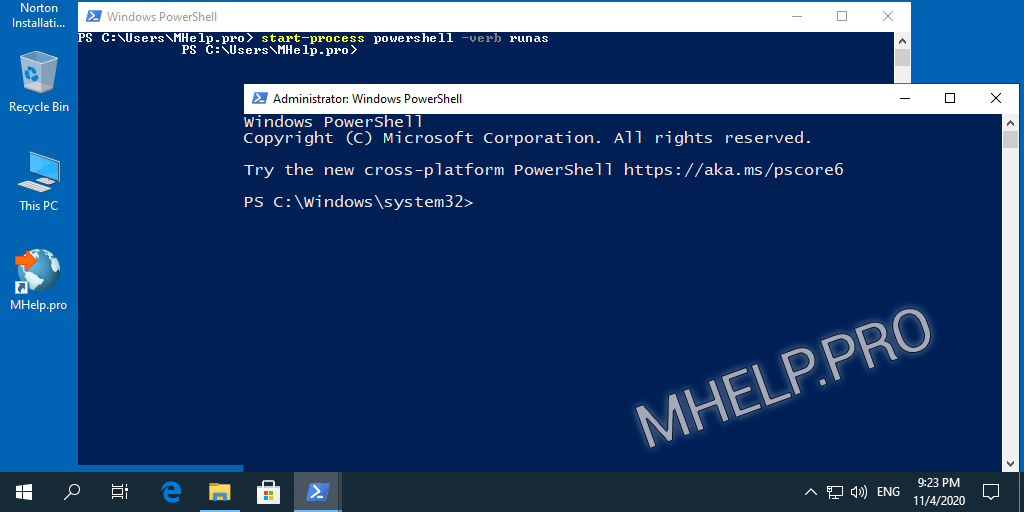
Seventh method – use the Run menu to start Windows PowerShell as an administrator.
Open the Run menu.
- Press the Windows+R key combination (or right-click on the Start button, select Run);
- Enter the powershell command;
- Press the keyboard shortcut Ctrl+Shift+Enter.
🟢 This article discussed how to run PowerShell as Administrator, to run programs or change system settings that require elevated rights. I hope you were able to launch an elevated PowerShell console using the method you chose. However, if you run into any problems starting PowerShell, feel free to write in the comments. I will try to help.
Nowadays, most users are aware of the Command Prompt that is present in all versions of Windows. Undoubtedly this is one of the most dominant tools on the Windows Operating System. However, Windows support another powerful application, PowerShell, to perform a wide range of operations. Just sign in as an Administrator and you may run PowerShell to handle configuration and carry out task automation.
PowerShell is task-based mechanization and a fully developed scripting tool that can accelerate the admin job. It instructs users to manage the device from the command line. In other words, you can say that PowerShell is an advanced form of cmd. Therefore in the coming days, it is quite possible that this tool can take the place of command prompt. So here are the five easy methods by following you can Open PowerShell as an administrator in Windows 10.
6 Ways to open PowerShell as Admin on Windows 10
Here is how to open Windows PowerShell having admin rights on the computer –
1] Using Cortana or Search bar
You can open this tool by using either Cortana or Search (Win + S), available on the Taskbar. Here’s what you need to do –
- Click on Cortana and type PowerShell.
- On the right pane, you will see an option “Run as Administrator“. Well, click on it.

- The User Account Control window will prompt next, hit Yes to authorize opening it.
- When Windows PowerShell starts, you may run whichever command you want to execute on your PC.
2] Using Run Command
- Press Win + R hotkey to open the Run dialog box.
- Type PowerShell and click OK.
Note: Windows PowerShell will open in normal mode.
- Now, type the command- Start-Process Powershell -verb runAs and press the Enter key.
- Its interface will switch to the administrator mode.
- There will appear a confirmation line regarding this request.
- Type Y and hit Enter to confirm this action.
3] By using the Command Prompt
- Press Win + S, and type Command Prompt.
- Right-click on the result and select Run as administrator.
- Give permission on the UAC window by clicking Yes.
- On the running Window, type PowerShell and hit Enter.

- Well, the default structure on CMD will now change to the PowerShell way. You may see the Snapshot above.
4] By using the Power menu
This method will only work if you hadn’t changed Windows PowerShell to Command Prompt sometime back on your PC. Let’s see how to open PowerShell using the Power Menu (Win + X) –
- Right-click on the Start button.
- Click on Windows PowerShell (Admin).
5] By using Task Manager
- Initially open the Task Manager by pressing ctrl + shift + Esc.
- Click on File, available in the top-left corner of the wizard.
- Hit Run new task option.
- Now, type PowerShell in the void box and tick the checkbox below the void space.
6. By using Start Menu
- Click on the start button; scroll down the menu list.
- Explore the drop-down menu to the Windows PowerShell folder.
- Now select this folder and it will expand.
- Right-click on the Windows PowerShell option and select Run as Administrator.

I hope you find this guide useful and all six methods work on your computer as well. Let’s know in the comment section if any method didn’t work.
That would be all!
Tip: If you are facing update, activation, or driver issues on your Windows PC, try RESTORO PC Repair Tool. This software will scan your device for potential issues and resolve them automatically.