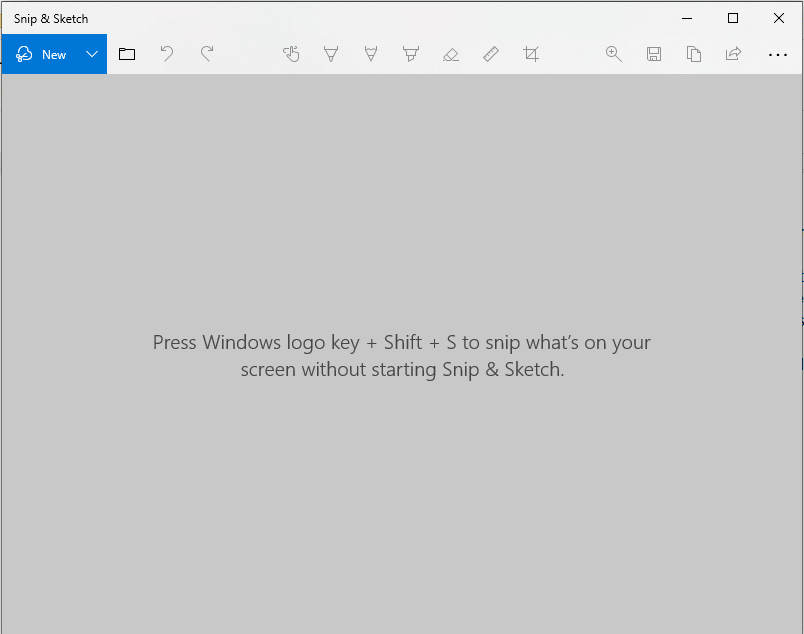
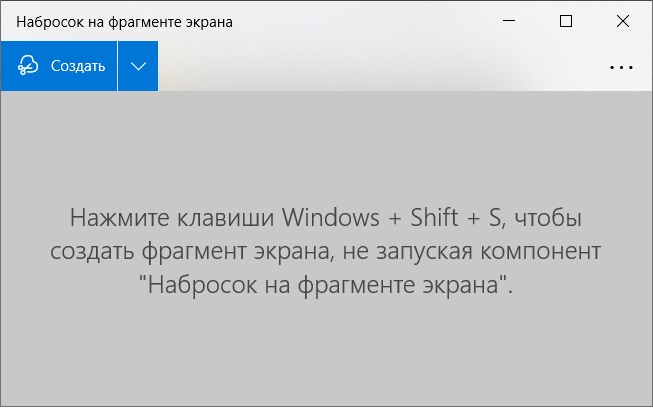
Starting with Windows 10 build 15002, you can capture a screen region to the clipboard. Windows 10 Creators Update comes with a new feature which allows you to take a screenshot of a selected part of the screen. This can be done with just a hotkey.
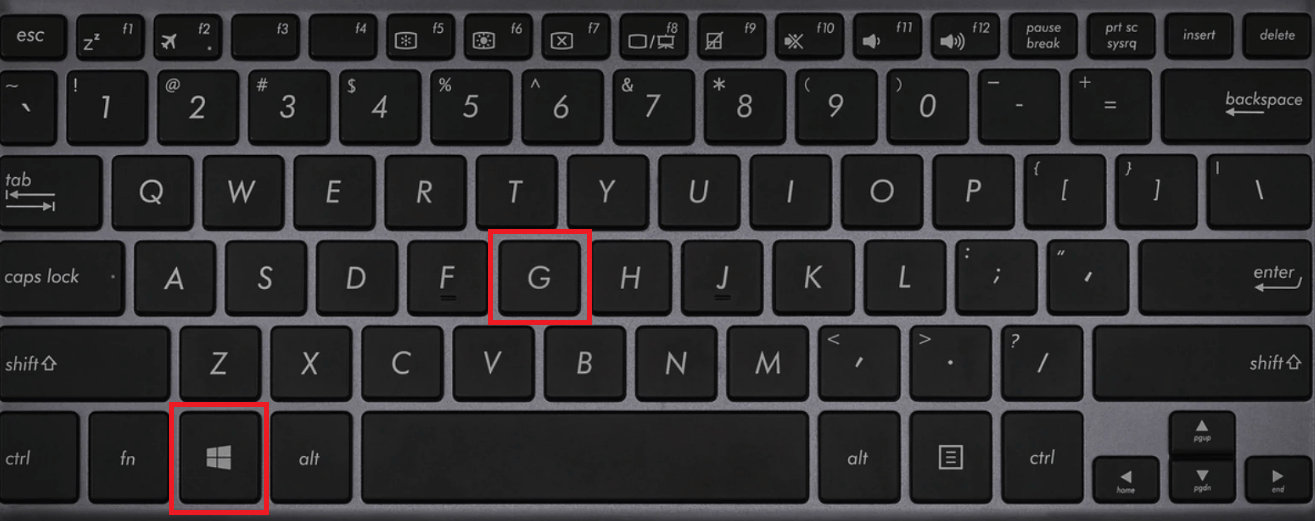
To take a screenshot of a screen region in Windows 10, press Win + Shift + S keys together on the keyboard. The mouse cursor will turn into a cross sign.
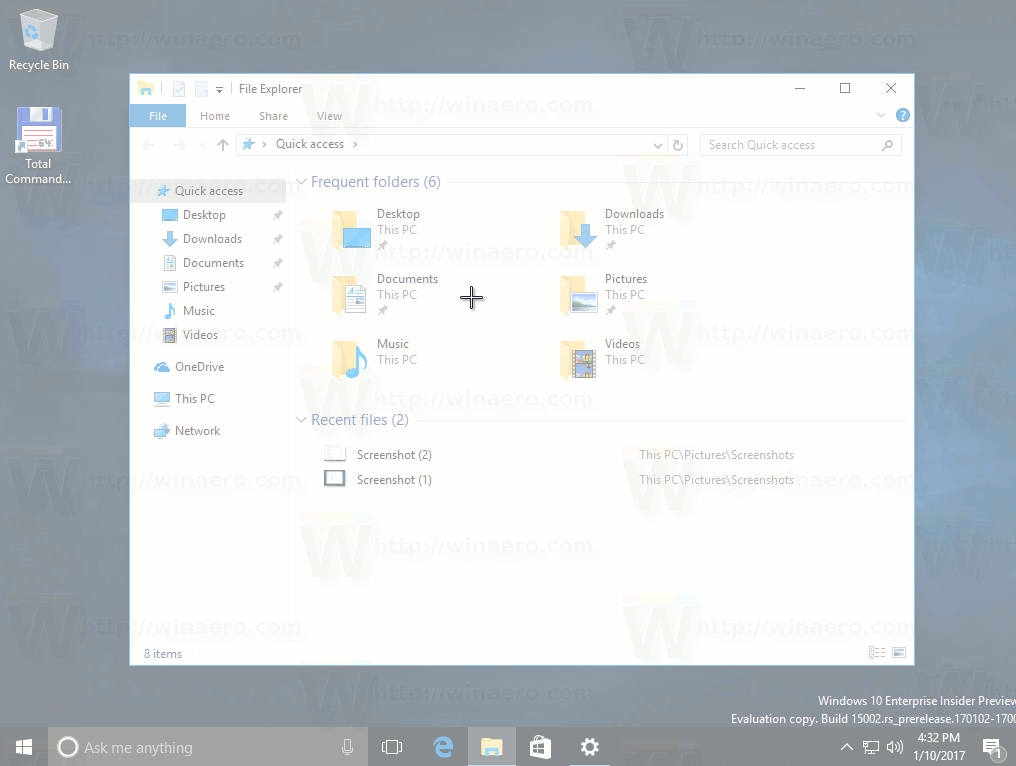
Select the area you want to capture and its screenshot will be taken and stored in the clipboard.
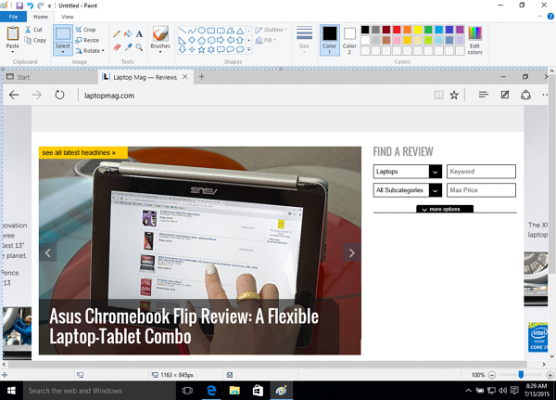
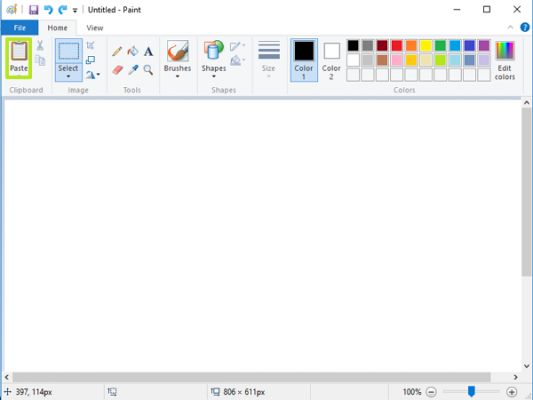
After you capture the screen region using the built-in feature of Windows 10, its contents will be stored in the clipboard. The operating system will not prompt you to save it to a file or open it in a program. Instead, you can open any app which supports image editing and paste your screenshot there.
For example, I can paste my screenshot of the selected region in Paint: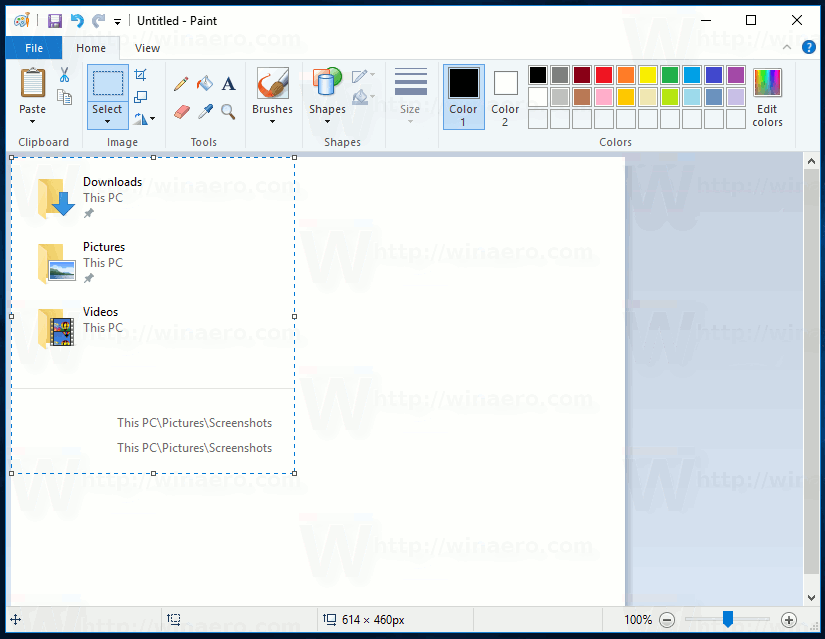
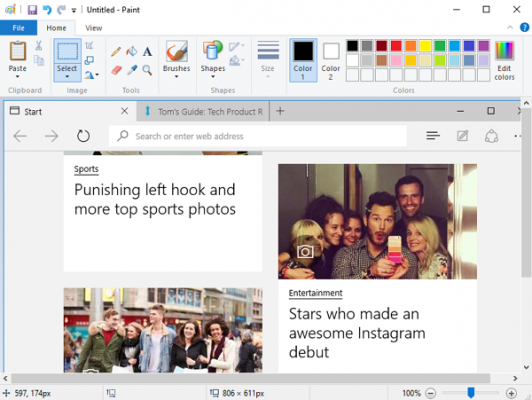
Or you can paste it into a WordPad document, Microsoft Word or any other modern word processor.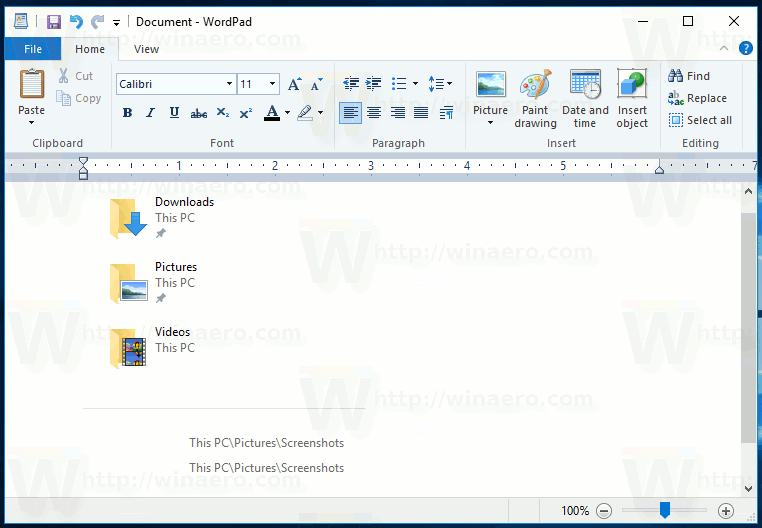
The original screenshot feature was implemented in Windows 95. In Windows 8, an enhanced screenshot feature was implemented which automatically saved it to a file by pressing Win + Print Screen. The entire screen’s contents will be captured in a file stored at %userprofile%PicturesScreenshots. During this operation, the screen will be dimmed for half a second to give visual feedback of the screenshot being taken. Every screenshot will saved as a *.PNG file and named ‘Screenshot (#).png’ where # indicates the screenshot index.
Tip: See How to reset screenshot index number in Windows 10.
So, Windows 10 offers you several ways to take a screenshot without using third party tools.
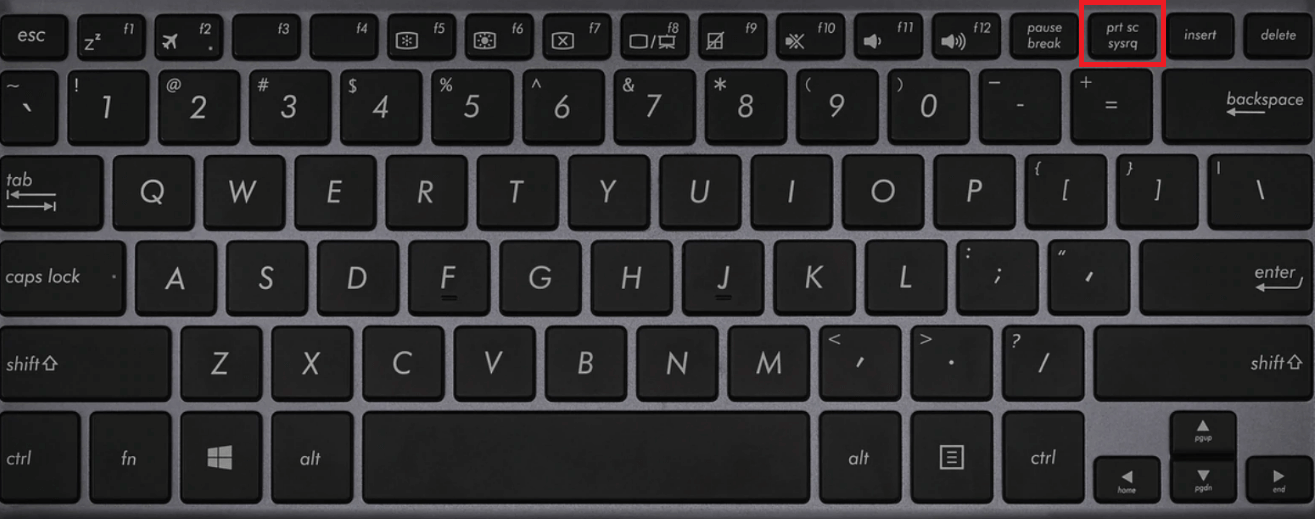
- The classic PrintScreen feature since Windows 95. If you press PrintScreen on your keyboard, the entire screen’s contents will be copied to the clipboard, but not saved to a file.
- Alt + PrintScreen shortcut key will capture a screenshot of only the active window to the clipboard.
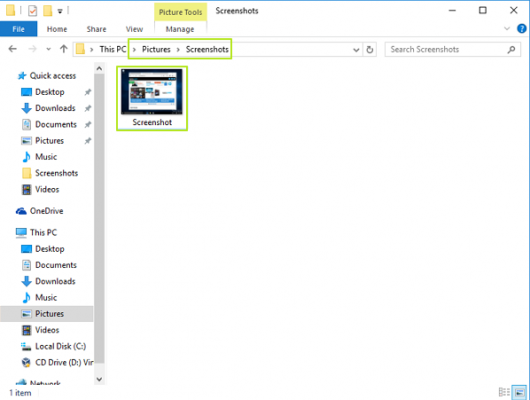
- Pressing Win + Print Screen will capture the entire screen and save it to a file in the %userprofile%PicturesScreenshots folder.
- Pressing Win + Shift + S will allow you to capture a selected region of the screen to the clipboard.
- Using the Snipping Tool which was also updated in Windows 10.
I wish Windows 10 would get the ability to save the captured screen region directly to a file, like Win + Print Screen does. Considering that Windows 10 build 15002 is a preview build, future releases might allow users to do that. The behavior of this feature can be improved in the final version of Windows 10 Creators Update. Now we just have to wait till April 2017 when it will be finalized.
Support us
Winaero greatly relies on your support. You can help the site keep bringing you interesting and useful content and software by using these options:
If you like this article, please share it using the buttons below. It won’t take a lot from you, but it will help us grow. Thanks for your support!
 В осеннем обновлении Windows 10 версии 1809 появился новый инструмент для создания скриншотов экрана или его области и простого редактирования созданного снимка экрана. В разных местах системы этот инструмент называется слегка по-разному: Фрагмент экрана, Фрагмент и набросок, Набросок на фрагменте экрана, но имеется в виду одна и та же утилита.
В этой простой инструкции о том, как сделать скриншот Windows 10 с помощью новой функции, которая в будущем должна будет заменить собой встроенную утилиту «Ножницы». Остальные способы для создания снимков экрана продолжают работать так же, как и раньше: Как создать скриншот Windows 10.
Как запустить «Фрагмент и набросок»
Я нашел 5 способов запустить создание скриншотов с помощью «Фрагмент экрана», не уверен, что все они пригодятся вам, но поделюсь:
- Использовать горячие клавиши Win + Shift + S (Win — это клавиша с эмблемой Windows).
- В меню пуск или в поиске на панели задач найти приложение «Фрагмент и набросок» и запустить его.

- Запустить пункт «Фрагмент экрана» в области уведомлений Windows (может отсутствовать там по умолчанию).

- Запустить стандартное приложение «Ножницы», а уже из него — «Набросок на фрагменте экрана».

Также есть возможность назначить запуск утилиты на клавишу Print Screen: для этого зайдите в Параметры — Специальные возможности — Клавиатура.
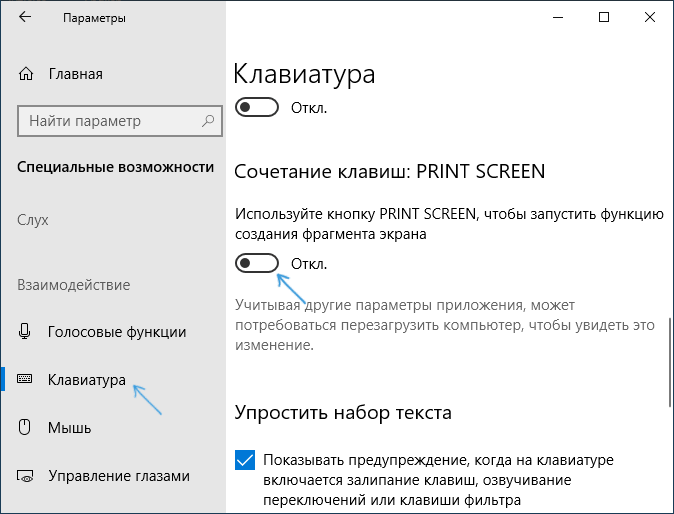
Включите пункт «Используйте кнопку Print Screen, чтобы запустить функцию создания фрагмента экрана».
Создание снимка экрана
Если запускать утилиту из меню Пуск, поиска или из «Ножницы», откроется редактор созданных скриншотов (где нужно нажать «Создать» для того, чтобы сделать снимок экрана), если же использовать остальные способы — сразу откроется создание скриншотов, работают они слегка отличающимся образом (будет отличаться второй шаг):
- Вверху экрана вы увидите три кнопки: для создания снимка прямоугольной области экрана, фрагмента экрана произвольной формы или скриншота всего экрана Windows 10 (четвертая кнопка — для выхода из инструмента). Нажмите по нужной кнопке и, если требуется выберите нужную область экрана.

- Если вы запускали создание скриншота в уже запущенном приложении «Фрагмент и набросок», вновь созданный снимок откроется в нём. Если с помощью горячих клавиш или из области уведомлений, скриншот будет помещен в буфер обмена с возможностью вставить в любую программу, а также появится уведомление, по нажатию на которых откроется «Фрагмент экрана» с этим изображением.


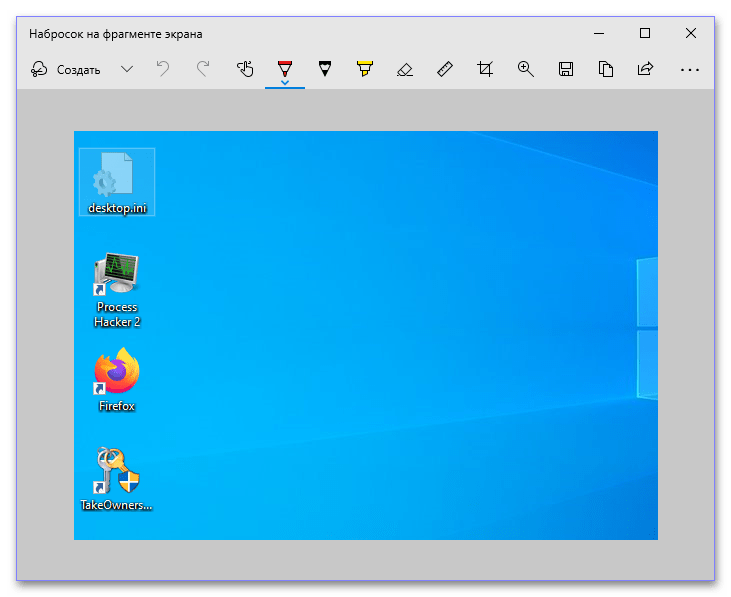
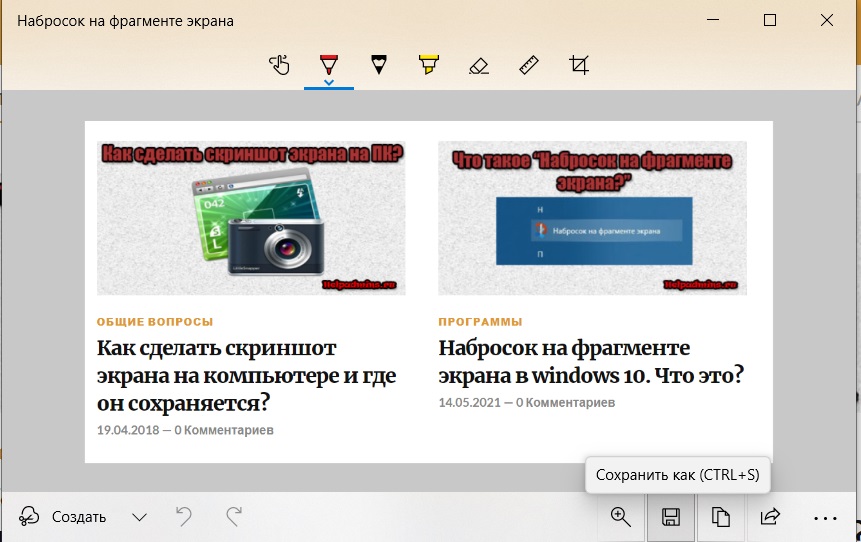
В приложении «Фрагмент и набросок» вы можете добавить надписи на созданный скриншот, удалить что-то с изображения, обрезать его, сохранить его на компьютер.
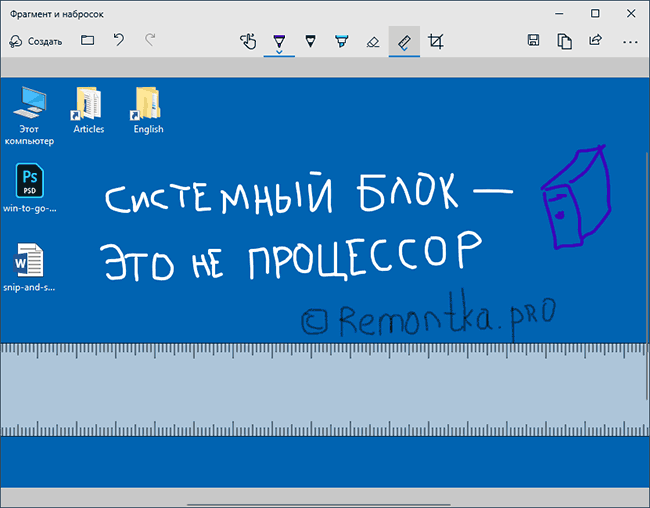
Здесь же присутствуют возможности для копирования отредактированного изображения в буфер обмена и стандартная для приложений Windows 10 кнопка «Поделиться», позволяющая отправить его через поддерживаемые приложения на компьютере.
Не берусь оценить, насколько новая возможность удобна, но, думаю, для начинающего пользователя будет полезна: большинство функций, которые могут потребоваться, присутствуют (кроме, разве что создания скриншота по таймеру, эту возможность вы можете найти в утилите «Ножницы»).
Take a snapshot to copy words or images from all or part of your PC screen. Use Snipping Tool to make changes or notes, then save, and share.
Capture any of the following types of snips:
|
Free-form snip |
Draw a free-form shape around an object. |
|
Rectangular snip |
Drag the cursor around an object to form a rectangle. |
|
Window snip |
Select a window, such as a dialog box, that you want to capture. |
|
Full-screen snip |
Capture the entire screen. |
When you capture a snip, it’s automatically copied to the Snipping Tool window where you make changes, save, and share.
Open Snipping Tool
|
For Windows 10 |
|
|
For Windows 8.1 or Windows RT 8.1 |
Swipe in from the right edge of the screen, select Search, enter snipping tool in the search box, and then select Snipping Tool from the list of results. |
|
For Windows 7 |
Select Start, then enter snipping tool in the search box, and then select Snipping Tool from the list of results. |
Work with your screenshots
With your Snipping Tool open, select one of the following to create and work with your screenshots.
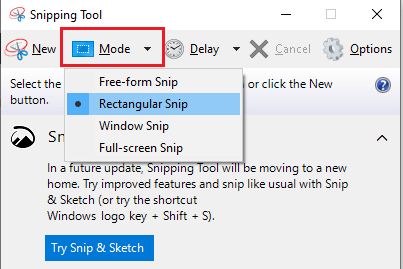
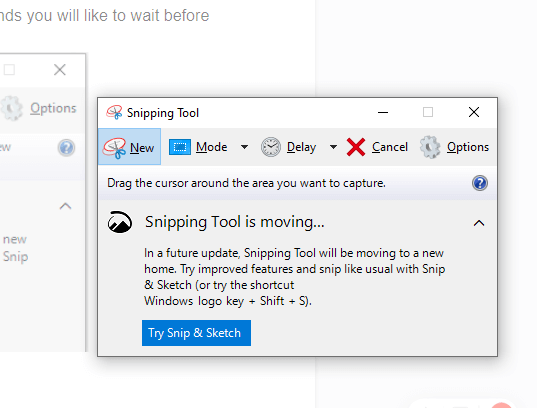
In Snipping Tool, select Mode. In earlier versions of Windows, select the arrow next to the New button. Next, when you choose the kind of snip you want, you’ll see the whole screen change slightly to gray. Then, choosing from anything currently displayed on the screen, select the area of your screen that you want to capture.

-
After you open Snipping Tool, open the menu that you want to capture. For Windows 7, press the Esc key before opening the menu.
-
Press Ctrl + PrtScn keys. The entire screen changes to gray including the open menu.
-
Select Mode, or in earlier versions of Windows, select the arrow next to the New button. Select the kind of snip you want, and then select the area of the screen capture that you want to capture.
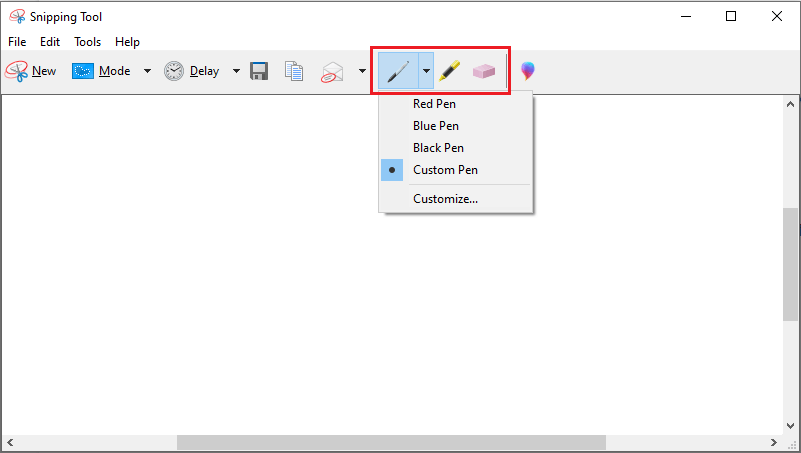
After you capture a snip, you can write or draw on or around it by selecting the Pen or Highlighter buttons. Select Eraser to remove the lines you’ve drawn.
-
After you capture a snip, select the Save Snip button.
-
In the Save As box, type a file name, location, and type, and then select Save.
When you capture a snip from a browser window and save it as an HTML file, the URL appears below the snip. To prevent the URL from appearing:
-
In the Snipping Tool, select the Options button.
-
In the Snipping Tools Options box, clear the Include URL below snips (HTML only) check box, then select OK.
After you capture a snip, select the arrow next to the Send Snip button, and then select an option from the list.
|
Press these keys |
To do this |
|---|---|
|
Alt + M |
Choose a snipping mode. |
|
Alt + N |
Create a new snip in the same mode as the last one. |
|
Shift + arrow keys |
Move the cursor to select from different types of snips. |
|
Alt + D |
Delay capture by 1-5 seconds |
|
Ctrl + C |
Copy the snip to clipboard |
|
Ctrl + |
Save the snip |
With your capture open in Snipping Tool, select Edit > Edit with Paint 3D to use features for sizing, color, text, and many other enhancements.
In the folder where you’ve saved your snip, right click on the snip. Select Print from the options and make choices for how you want to print your image.
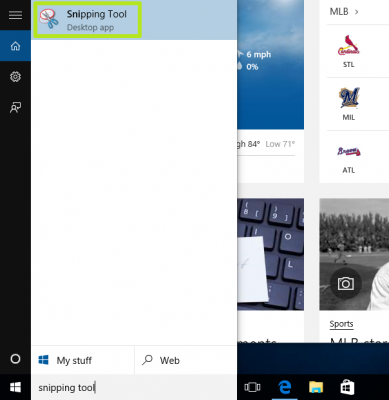
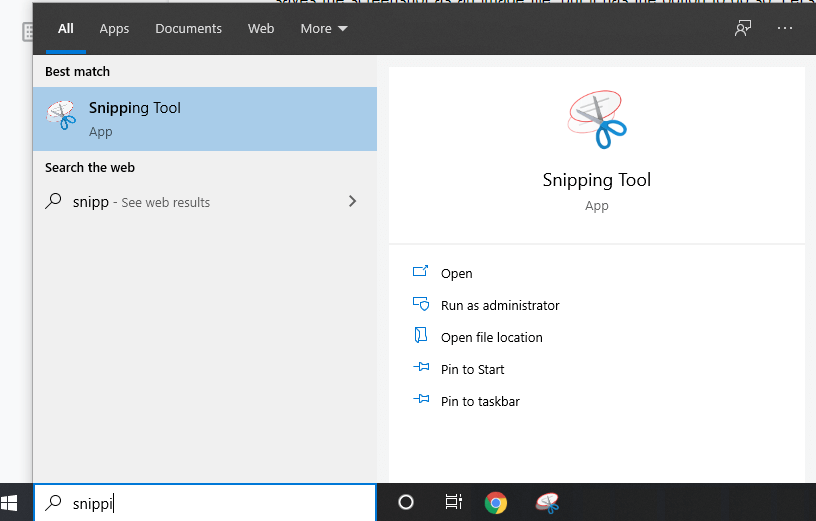
In the search box on the taskbar, type snipping tool. You’ll see the Snipping Tool app and a list of actions you can take. Select Pin to taskbar.
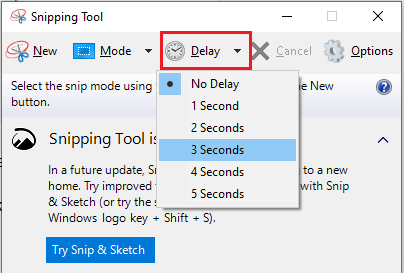
First, identify the menu or other components you want to capture. In Snipping Tool, select Delay and then select, for example, 5 seconds. Select Mode to start the 5-second countdown. Within 5 seconds, open a menu or otherwise compose your image. At 5 seconds, when you see the screen turn gray, use the mouse to draw around the area you want.
Need more help?
Содержание
- Способ 1: Инструмент «Ножницы»
- Способ 2: Инструмент «Фрагмент экрана»
- Способ 3: Сторонние приложения
- Вопросы и ответы
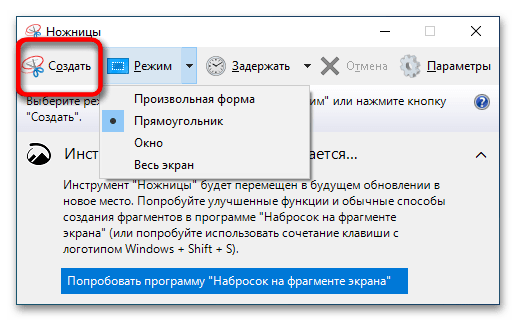
Способ 1: Инструмент «Ножницы»
В Windows 10 имеется встроенная программа «Ножницы», позволяющая создавать скриншоты выделенных областей как прямоугольной, так и произвольной формы.
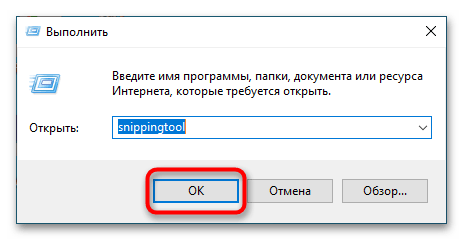
- Чтобы запустить приложение, нажмите комбинацию клавиш Win + R и выполните в открывшемся диалоговом окне команду
snippingtool. Также программу можно запустить через меню кнопки «Пуск», по запросу «ножницы». - Выберите на панели инструментов нужный вам режим захвата, после чего нажмите кнопку «Создать».
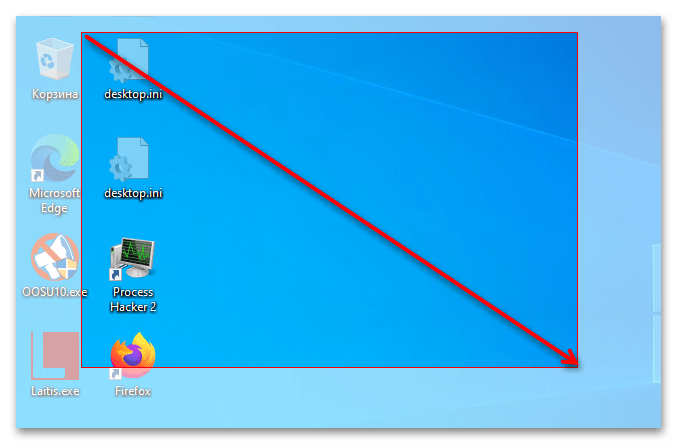
- Удерживая левую клавишу мыши, выделите участок залитого полупрозрачной маской экрана, снимок которого желаете создать, и отпустите клавишу.
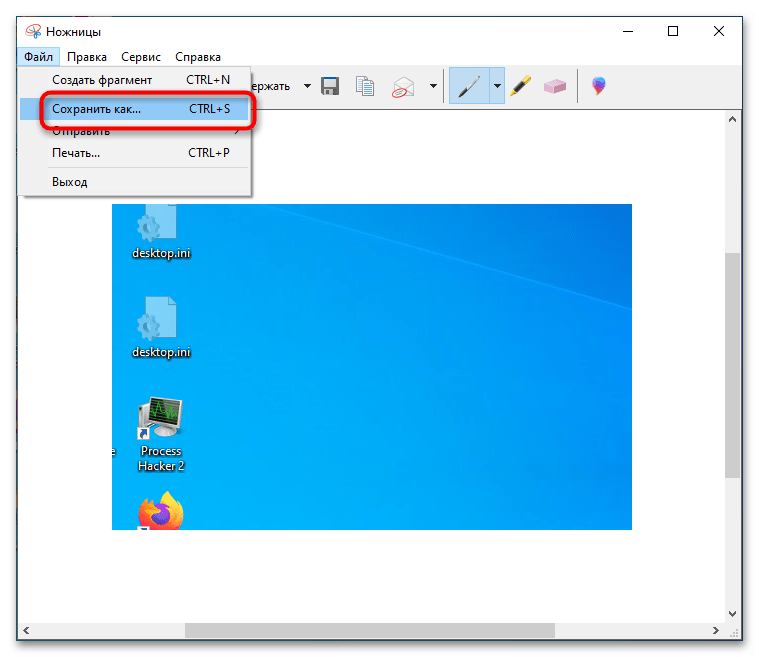
- Созданный скриншот будет передан во встроенный редактор «Ножниц», чтобы его сохранить, выберите в меню «Файл» → «Сохранить как» или нажмите комбинацию клавиш Ctrl + S.
Способ 2: Инструмент «Фрагмент экрана»
В Windows 10 1809 и новее для создания скриншотов выделенной области можно использовать новый инструмент «Фрагмент экрана», во многом похожий на «Ножницы».
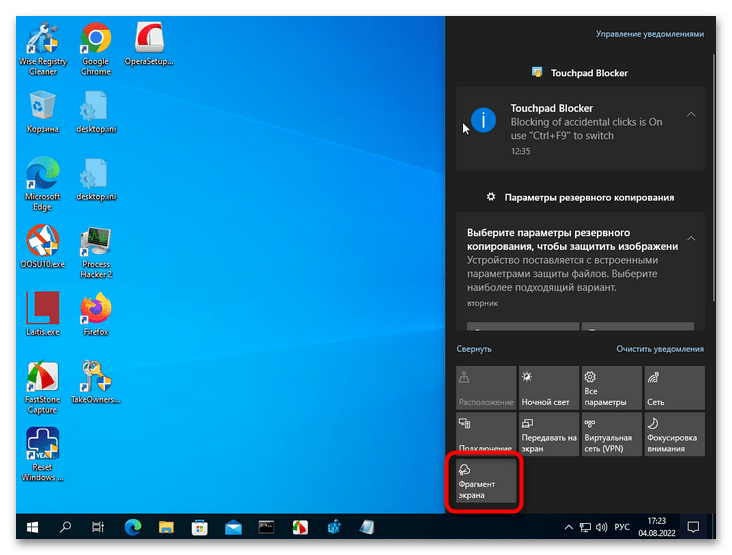
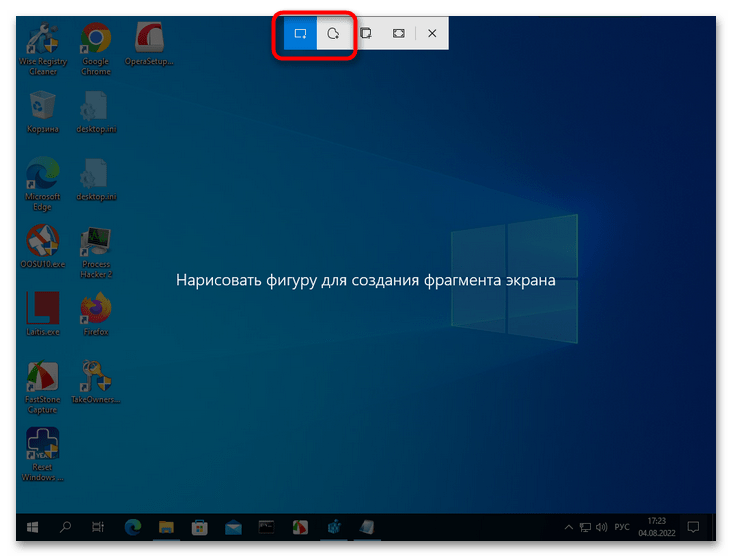
- Чтобы запустить инструмент, откройте область уведомлений и нажмите плитку «Фрагмент экрана». Также вы можете воспользоваться назначенной по умолчанию комбинацией клавиш Win + Shift + S.
- При этом экран будет залит полупрозрачной маской, а курсор превратится в крестик. Если необходимо, выберите режим выделения на панели у верхней границы экрана.
- Удерживая зажатой левую кнопку мыши, выделите нужный вам участок экрана и отпустите кнопку.
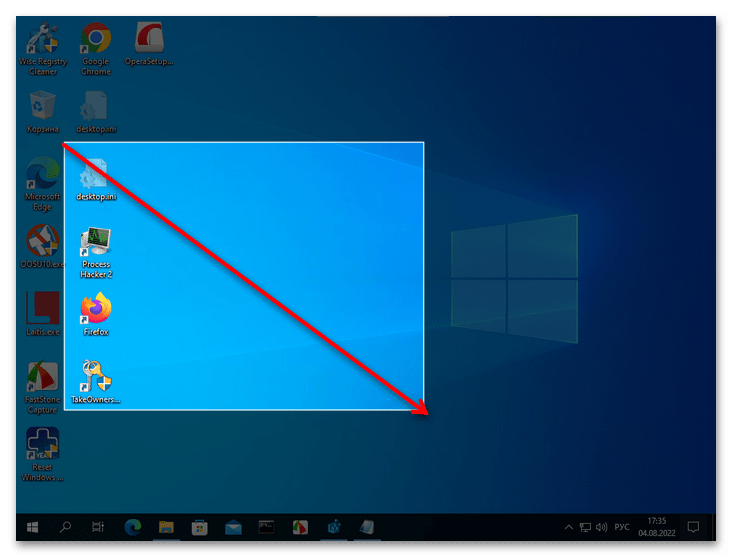
Созданный скриншот будет сохранен в буфер обмена, из которого вы затем сможете вставить его в другое приложение. Если же кликнуть по всплывающему уведомлению о создании снимка, скриншот откроется в штатном приложении «Набросок на фрагменте экрана».
Способ 3: Сторонние приложения
Более широкие возможности создания скриншотов обеспечивают сторонние программы. Одним из наилучших приложений для создания экранных снимков является FastStone Capture.
Скачать FastStone Capture
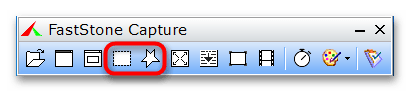
- Запустите программу и выберите на панели нужный вам режим захвата. Для создания снимков выделенной области подойдут эти два режима:
- «Rectangular Region» — выделенная прямоугольная область. Можно вызвать также нажатием комбинации клавиш Ctrl + PrtSc.
- «Freehand Region» — выделенная произвольная область. Для вызова инструмента можно использовать комбинацию клавиш Ctrl + Shrft + PrtSc.
Существуют также и другие программы-скриншотеры, поддерживающие создание снимков выделенной области экрана. Их достаточно много, с некоторыми из них вы можете познакомиться, перейдя по ссылке ниже.
Подробнее: Программы для создания скриншотов
Следует также отметить, что создавать скриншоты выделенной области экрана умеют актуальные версии таких браузеров как Google Chrome, Vivaldi, Opera и Mozilla Firefox, правда, только внутри собственных окон.

Еще статьи по данной теме:
Помогла ли Вам статья?
-
MiniTool
-
MiniTool News Center
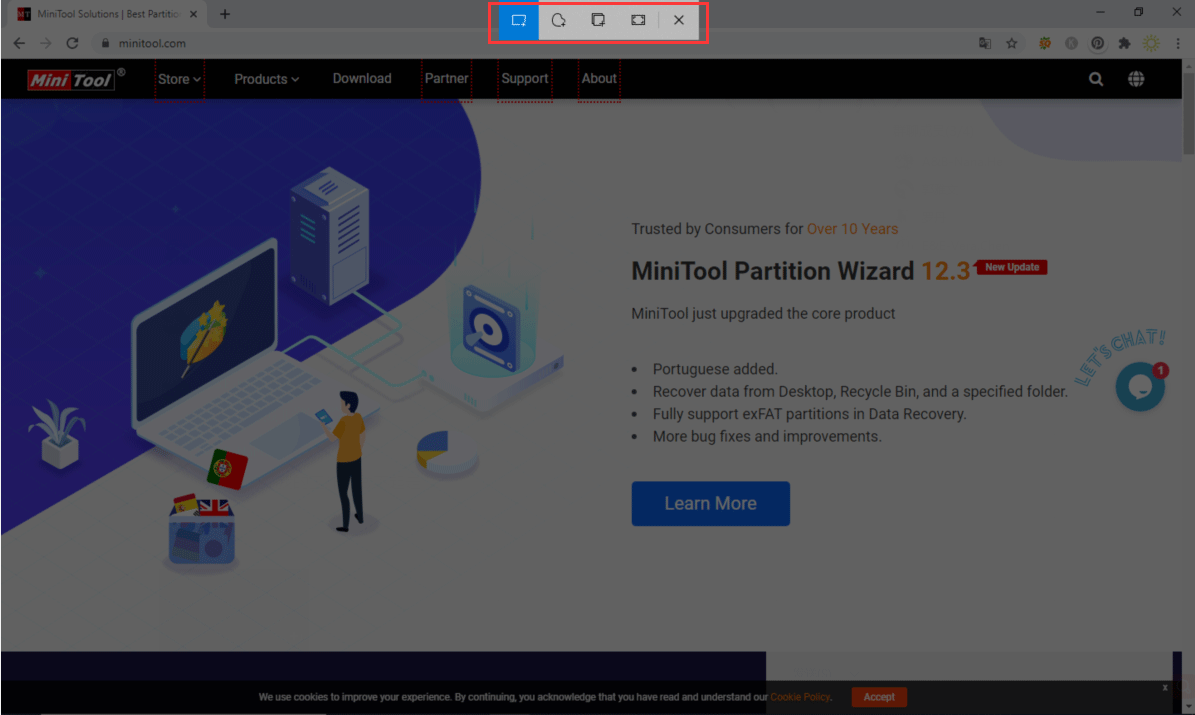
- How to Take a Full and Partial Screenshot in Windows 10?
By Stella | Follow |
Last Updated October 18, 2021
![]()
For some reason, you may need to take a full or partial screenshot on your Windows 10 computer. You can just use the Windows built-in tools or keyboard shortcuts to do this work and it is very simple. In this post, MiniTool Software will show you some methods that are suitable for you.
Taking a screenshot of your Windows screen is a common operation when using your computer. For example, you may want to take a full or partial screenshot in Windows 10 and then share it with your friend you are chatting with. Of course, there are some other situations in which you want to capture screenshots in Windows 10.
Some of you may don’t know how to do this work. Don’t worry, we will tell you how to do it using different methods.
How to Take a Partial Screenshot in Windows?
In this part, we will show you how to perform a Windows 10 partial screenshot using four methods. You can just select your preferred one to do this job.
How to Screenshot a Specific Area in Windows 10?
- Use the Print Screen Key
- Press Win+Shift+S
- Use Windows Snipping Tool
- Use Windows Snip & Sketch
Method 1: Use the Print Screen Key
There is a Print Screen key on your keyboard. Just like the name of the key, it is used to print the current screen of your computer. If you are using a wired keyboard, it is usually on the top-right side of the keyboard. If you are using a laptop, you can find it on the top line or the bottom line of the keyboard. The Print Screen can be shown as Print Screen or PrtSc.
How to screenshot a specific area in Windows 10? It is very easy:
- Press the Print Screen Key and you will see a small menu on the top middle side of your computer screen.
- Select the area you want to capture. The screenshot will be saved to the clipboard. Of course, you can click one of the icons in the menu according to your need to take a screenshot.
- Open an application like Paint or Word and paste the screenshot to it.
- Edit the screenshot or save it to a suitable location.
Method 2: Press Win+Shift+S
Pressing Win+Shift+S is equal to pressing the Print Screen key. It also calls out the small menu and you can then select the section you want to take on your computer screen. We will not repeat the steps here.
Method 3: Use Windows Snipping Tool
Windows Snipping Tool is a Windows snap-in tool. It has more features than the Print Screen key.
- Use Windows search to search for snipping tool and select the first result to open it.
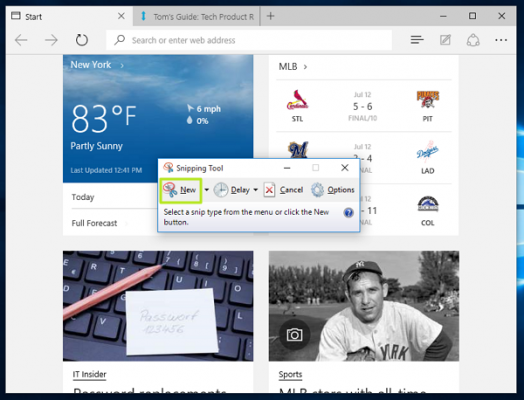
- Click New.
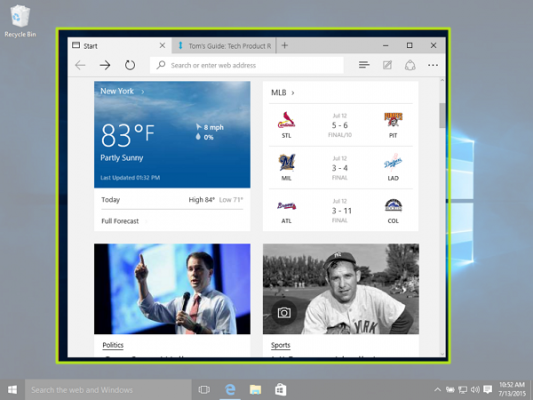
- Choose the area you want to screenshot.
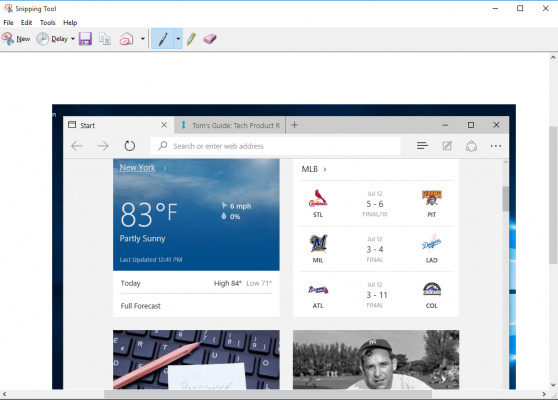
- The screenshot will show in the tool. You can use this tool to annotate the screenshot. You can also use the features in this tool to make up the screenshot.
- Go to File > Save As to choose a suitable location to save it.

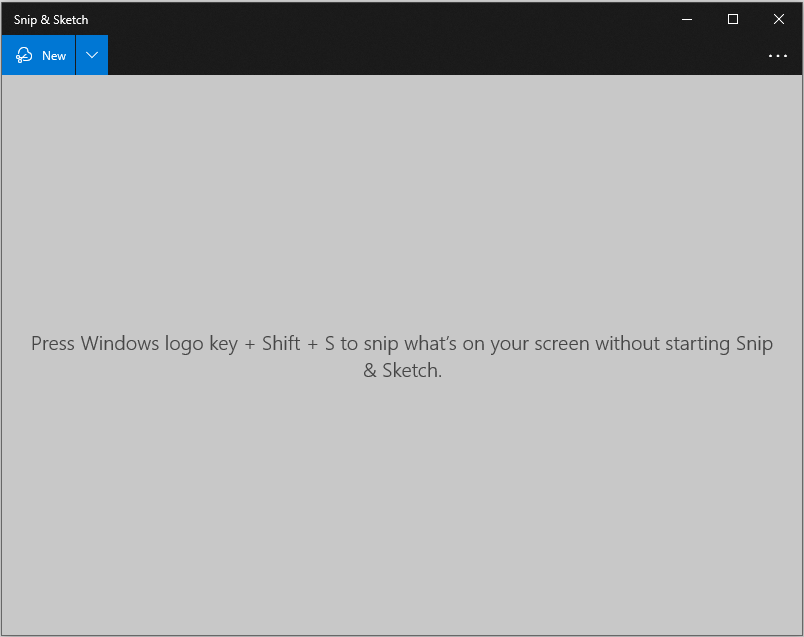
Method 4: Use Windows Snip & Sketch
Windows Snip & Sketch is another choice for you to take a partial screenshot in Windows 10. It is also a Windows snap-in tool.
- Use Windows Search to search for snip & sketch and select the first result to open it.
- Click New and then select the area you want to capture.
- The screenshot will be opened in the Snipping Tool.
- Click the Save As button to save the screenshot on your computer.
How to Take a Full Screenshot in Windows 10?
Take a full screen in Windows 10 is also very simple. We will show you four methods in this part.
How to Screenshot a Full Screen in Windows 10?
- Press Win+Print Screen
- Press Win+Shift+Print Screen
- Use Windows Snipping Tool
- Use Windows Snip & Sketch
Method 1: Press Win+Print Screen
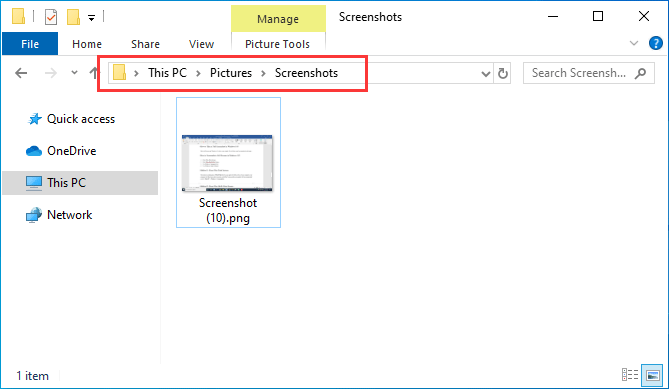
The shortcut combination of Win+Print Screen can capture the full screen of your computer. your computer will flash once after your press Alt+Print Screen and the screenshot will be automatically saved to This PC > Pictures > Screenshots.
Method 2: Press Win+Shift+Print Screen
You can also press Win+Shift+Print to take a full screen. But this time, you need to paste the screenshot to Paint or Word and then save it.
Method 3: Use Windows Snipping Tool
Windows Snipping Tool can also be used to take full screenshots in Windows 10. You can call it out and then select the whole screen to capture. After that, you can also use this tool to edit the image according to your requirements.
Method 4: Use Windows Snip & Sketch
Likewise, you can use Windows Snip & Sketch to capture the full screen in Windows 10. You need to use your mouse to select the full screen to capture after you open the tool. If needed, you can use this tool to edit the image.
Bottom Line
Now, you should know how to take a full or partial screenshot in Windows 10. If you delete your important screenshots by mistake, you can use a free file recovery tool, MiniTool Power Data Recovery, to restore them.
Free Download
If you encounter issues when capturing your computer screen, you can let us know in the comments. We will reply to you as soon as possible.
About The Author

Position: Columnist
Stella has been working in MiniTool Software as an English Editor for more than 4 years. Her articles mainly cover the fields of data recovery including storage media data recovery and phone data recovery, YouTube videos download, partition management, and video conversions.
Screenshots are an incredibly useful way to document and share what’s on your screen. Whether it’s a tweet you think someone may wind up deleting, a glitch that you’re explaining to a tech support person or a hilariously auto corrected line of text, the ability to save your screen for posterity is useful information.
Fortunately, there are more than a few ways to capture the screen you’re looking to save. There’s the old-school Print Screen key, a method that instantly creates a new file for you, Windows’ own Snipper Tool and if you’re always screengrabbing, there’s even a free and powerful third party program we can recommend.
MORE: How to Create Keyboard Shortcuts in Windows 10
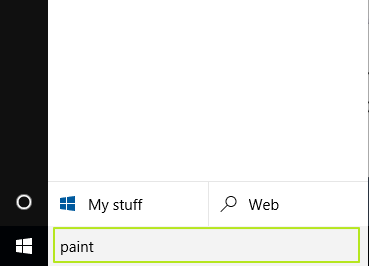
1. How To Take a Screenshot of Your Whole Screen
1. Tap the Print Screen button on your keyboard. The screen shot is now stored in your clipboard and you need to paste it into a graphics editor such as Windows Paint.
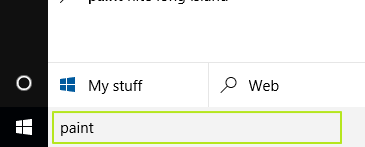
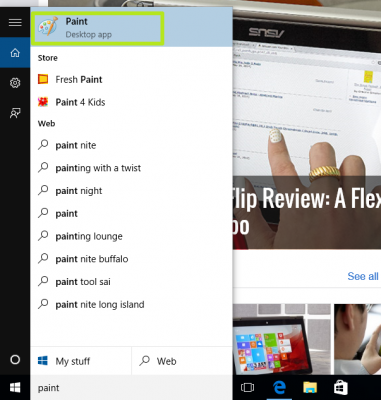
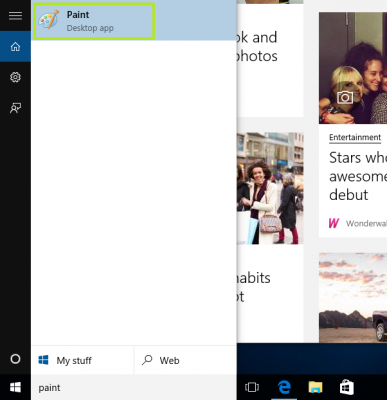
2. Type «paint» into the search bar next to the Start menu.
3. Select «Paint»
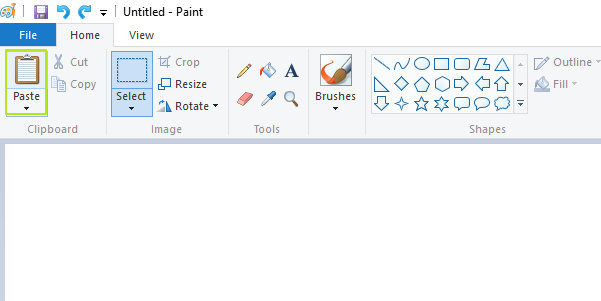
4. Click «Paste»
Your screenshot is ready!
2. How to Take a Screenshot of Just The Active Window
1. Hit Alt + Print Screen.
2. Type «paint» into the search bar next to the Start menu (if Paint is already open, click Control+N and then select OK when Paint asks you to approve the height and width).
3. Select «Paint»
4. Click «Paste»
Your screenshot is just of the window you had open and active!
3. How To Make A Screenshot File Without Any Additional Programs
1. Hit Windows key + Print Screen.

When you navigate to the Screenshots folder inside of your Pictures, your screensh0t will be there!
4. How To Take a Screenshot of a Specific Part of Your Screen
1. Type «snipping tool» into the search bar next to the Start menu.
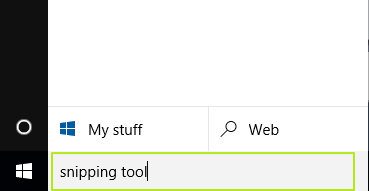
2. Select «Snipping Tool»
3. Click «New»
4. Click and drag the cursor to select the area of the screen you want to use; release the cursor once you’ve selected the space you want to capture.
Your screenshot is open in Snipping Tool!
5. How To Take Screenshots With Even More Tricks
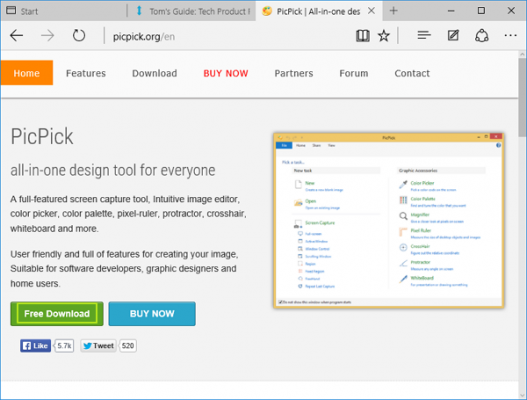
1. Open PicPick’s download page, and click on «Free Download»
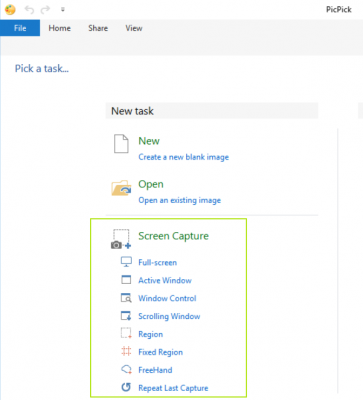
2. Follow the instructions to install PicPick, and you will find a menu of specific methods for capturing part or all of your screen. Clicking «Scrolling Window» will let you capture as much of a page or document as you can scroll through, rather than just the static version of the window.
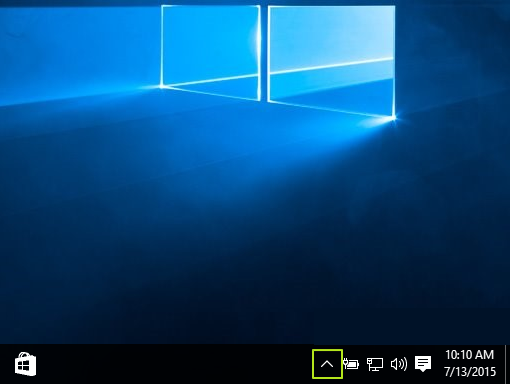
3. Installing PicPick will change your computer’s key commands for screenshots, so you should make yourself aware of those commands. Click on the «Show hidden icons» arrow in the bottom right corner of the screen.
4. Click on PicPick’s icon.
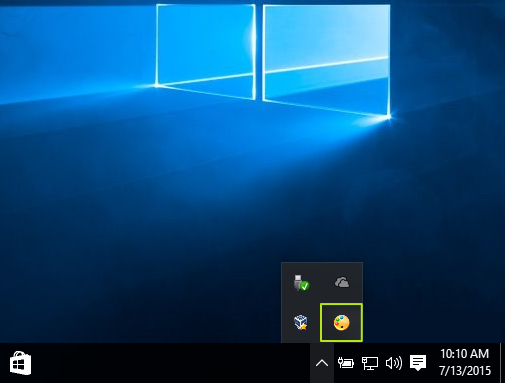
5. Select «Program Options»
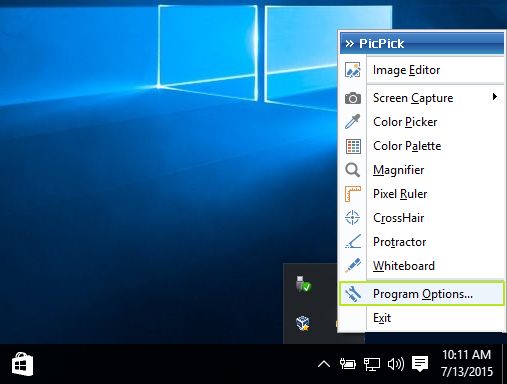
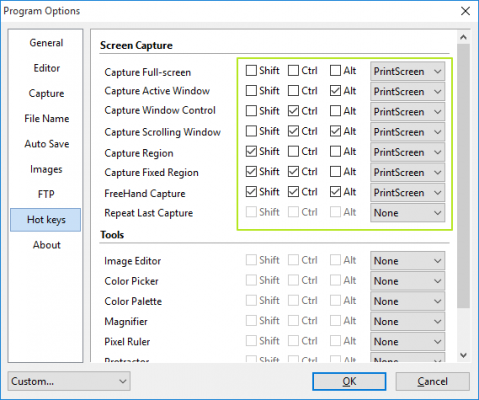
6. Select «Hot keys» from the left-hand menu.
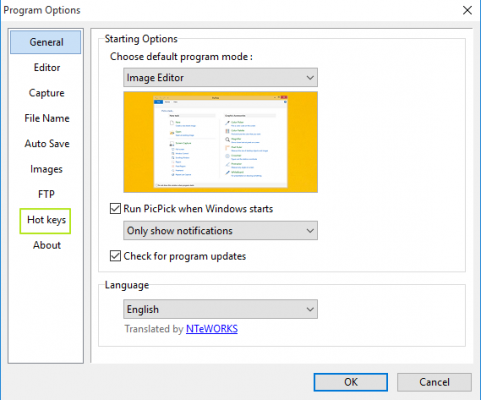
Here you can see what the default key commands are now that you’ve installed PicPick, as well as change them to suit your needs.
Windows 10 Basics
- Previous Tip
- Next Tip
- 7 Settings to Change Right Away
- Windows 10 Keyboard Shortcuts to Save You Clicks
- 5 Ways to Take Screenshots
- Change Your Password in Windows 10
- Uninstall Programs in Windows 10
- Enable or Disable Tablet Mode
- Add a User (Child or Adult)
- Change the Screen Resolution
- Sync Your Settings Across Devices
- Sync iPhone with Windows 10
- Control Windows 10 with Your Voice
- Upgrade to Windows 10 From Windows 7 or 8
- Eliminate Blue Light With Night Light
- Create a New Folder
- Get to the Desktop in Windows 10
- Add a Printer
- All Windows 10 Tips
- Set Alarms
Having issues with Windows 10? Our sister site, Tom’s Hardware, has a team of staffers standing by in the forums to answer your questions 24/7.
Get instant access to breaking news, the hottest reviews, great deals and helpful tips.
It’s common to want to take a screenshot on a PC. If you’re not using a third-party tool, you can do it manually. The most obvious way is to Hit the Prt Sc button/or Print Scrn button (print screen key), which will grab the entire PC screen. You do this when using Windows OS and press the Print Screen key (located in the top right of the keyboard) to take a full PC screenshot and copy the screen’s image to the clipboard or save it in the screenshots folder.
But there are more screen capture methods of taking screenshots on Windows.
This article will cover how to screenshot Windows 10 and all the steps you need to carry out. We’ll also answer some critical questions that most users ask:
- How do you take screenshots on Windows 10: full or minimized computer screen?
- How do I quickly take a screenshot on a PC?
- Taking screenshots and recordings on Windows using the Xbox game bar
In the FAQ, we also show you how to take a screenshot on Windows 11.
Windows 10 has many ways to achieve this, be it taking a screenshot of the entire screen, a particular window, or a part of the screen. Let’s take a look at them one by one.
Read: How to Fix Print Screen Not Working on Windows 11
How to screenshot on Windows 10: easy tricks
The following methods show you how to screenshot on windows to capture full or minimized screenshots:
- Print screen key to take a minimized or full-screen capture screenshot
- Use the game bar to grab the computer screen: full or minimized screenshot on Windows operating system
- Alt + Prt Sc (print screen button) screen capture
- Windows + Print Screen screen capture
- Use the Snipping Tool app to take a screenshot on Windows
- Using the Snip & Sketch app to take a screenshot
- Use a third-party app or image editor to capture screenshots on PC
Method 1. Use the Print Screen key/shortcut
The easiest way to take a PC/computer screenshot on Windows 10 is the Print Screen key (Prtscn). This button is usually located at the top row of the keyboard, near the Function (F#) keys. To capture your entire screen and automatically save the screenshot, tap the Windows key + Print Screen key. Your screen will briefly go dim to indicate that you’ve just taken a screenshot, and the screenshot will be saved to the Pictures > Screenshots folder. Let’s look at this in detail below:
To capture your entire screenshot on Windows, simply:
- Press PrtScn on the upper-right side of your keyboard to make the exact screen you want to print an active window
- You can take the PC screenshot through the keyboard, using the Prt Sc button/or Print Sc buttons. Hit the PrtScn button/ or Print Scrn button to take a full computer screen. The screenshot will be automatically saved to your Clipboard.
- To save the file, paste the screenshot into any program that allows you to insert images, like Microsoft Word or Microsoft Paint.
- Or, To capture your entire screen and automatically save the screenshot, tap the Windows key + Print Screen key [windows key print screen]. Your screen will briefly go dim to indicate that you’ve just taken a screenshot.
- The screenshot will be automatically saved to the Pictures > Screenshots folder.
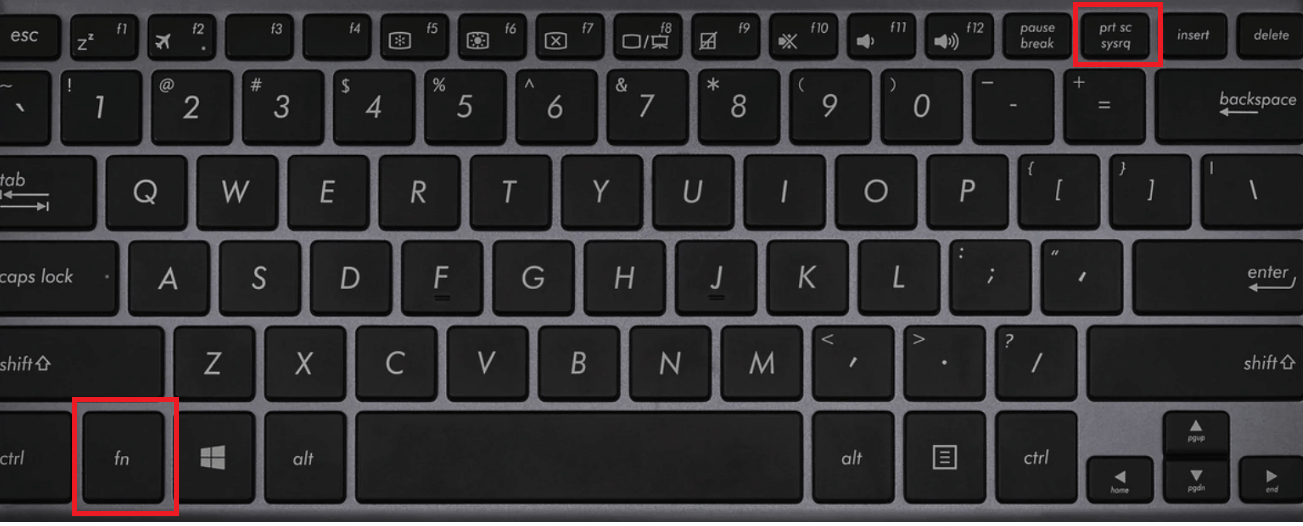
On some keyboards, you might need to press the Function (Fn) key and the Print Screen button to trigger the screen capture, i.e., Fn + PrtScn button/or Print Scrn (print screen)
The print screen key will capture the entire screen and save it on the clipboard. Check the notifications on the lower right corner of your screen to see the saved screenshots.
Note: if you have more than one display, it will be captured into a single image.
By default, this method does not save the image as a file; rather, it copies it to the Clipboard. After doing so, you can paste it (By pressing Ctrl+V or Right-Click > Paste) onto a document (Like a Word or Google document) or an image processor (Like Microsoft Paint, or even Photoshop).
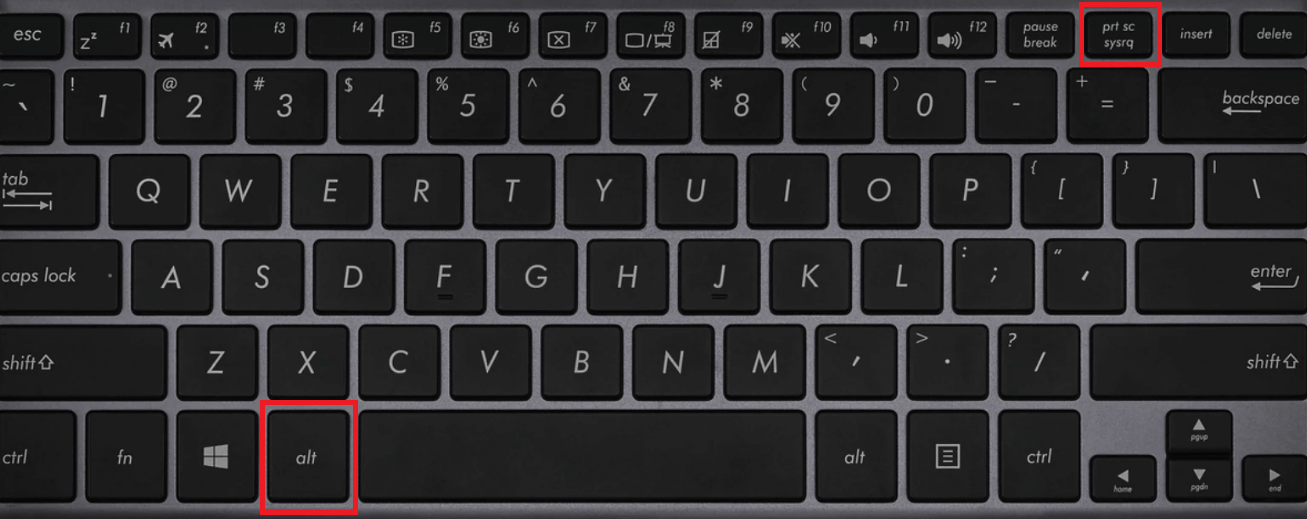
Method 2: Alt + Prt Sc (print screen button) screen capture
- If you only want to capture a Single active Window, you can use the keyboard shortcut Alt + Prt Sc (print screen).
- To take the screenshot of the active window you want, and not just any window, you will need to select the said window by clicking on it first.
- Then press Alt + Prt Sc (print screen button) or windows key print screen
- This will copy the image to the Clipboard, which you can retrieve by pasting it somewhere else.
If you want to save the image as a file, you can also do it with a keyboard shortcut.
- Simply press the Windows key (with the Windows logo) + Prt Sc (print screen key). [Windows key print screen button]
- This saves the image as a file.
- By default it’s located in C: Users<user name>Pictures>Screenshots.
Method 3: Windows logo + Print Screen screen capture

- To take a PC screenshot on Windows 10 and automatically save the file, press the Windows key + Prt Sc (print screen)
- Your screen will go dim, and a screenshot of your entire screen will save to the Pictures > Screenshots folder.
If you have issues with the Print Screen button not working properly, check How to Fix the Print Screen Not Working on Windows 10.
Method 4. Use the Snipping Tool to take a screenshot
The snipping tool is the best way to screenshot on Windows if you want to customize, annotate, or share your screen captures. The Snipping Tool app is an excellent tool for taking screenshots. It has been around since Windows Vista. You can use it to;
- Take a computer screenshot of the complete screen,
- A rectangular part of the screen, or
- A free-form screenshot.
However, note that taking screenshots using a snipping tool does not automatically save the screenshot as an image file, but it has the option to do so.
Here’re the steps to use the snip and snipping tool to take a PC screenshot:
- To open the screen snipping tool app, you’ll have to find it through the search bar. If you don’t see the search bar, you can right-click on the taskbar, hover to Search, and click on Show Search Box. A snip sketch tool active window will pop up.

- A new window will pop up. Here, select the Mode of the «snip» you want to take: a free-form snip, a rectangular snip, a window snip, or a full-screen capture. We will show you how to take a rectangular screen snip.

- The Snipping Tool also has the option to set a delay on taking a screenshot, allowing you to take screenshots after a certain amount of time. This is helpful to capture pop-up menus and tooltips. Click on delay to set the time in seconds you will like to wait before taking the screenshot.

- Once you are ready to take the screenshot, click on New. The screen will fade out and the cursor will turn into a cross. If you selected the delay option, the screen will fade after the selected amount of seconds.
- If you selected the Rectangular screen snip mode you can click and drag to create a rectangle on the screen. The rectangle you create will be the screenshot
- If you selected the Free-form snip you can click and draw the shape you want. Bear in mind that once you have stopped pressing the right-click, the screenshot will be taken.
- If you selected the Window snip, you can click on the particular windows you want to take the screenshot of.
- Finally, if you click on the full-screen snip, the tool will take a full-screen screenshot of the whole screen.
Once you have taken the screenshot, you have many options to
-
-
- You can save the image as a file by clicking on File > Save as… and placing it at your desired location.
- You can send it via email by clicking on File>Send to > Email recipient or as an attachment to an email.
- You can print the screenshot by clicking on File > Print.
- You can copy the screenshot to your clipboard by clicking on Edit > Copy
- You can also edit the screenshot using the Pen or Highlighter function. You can customize the color of the pen. This is useful if you want to focus the attention of the screenshot to a particular section.

-
Method 5. Using the Snip & Sketch app to take a screenshot.
The Snip & Sketch app (or snip sketch tool) replaced the Snipping Tool on Windows and is one of the drawing tools Windows users can use. Snip & Sketch app is the best way to screenshot on Windows if you’re looking to customize, annotate, or share your screen captures.
- To activate Snip & Sketch, use the keyboard shortcut Windows Key + Shift + S or search up Snip & Sketch app on the search bar.
- Your screen will dim and a mini menu will appear at the top of your screen, giving you the option to take a rectangular, free-form, window, or full computer screen capture.

- You can choose how you’d like to grab a screenshot. These are the same options found in the Snipping Tool. They are from left to right:
- Rectangular PC screen Snip, Freeform Snip, Window Snip, and Full screen capture or Snip.
- Taking a screenshot here will copy it to your Clipboard.
- You can then paste it (By pressing Ctrl+V or Right-Click> Paste) onto a document (Like a Word or Google document) or an image processor (Like Paint, or even Photoshop).
- If you open Snip & Sketch window by looking it up on the search bar a new window will appear.

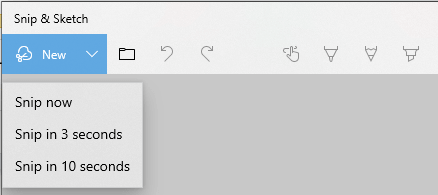
- In this window, you can click on New to start taking your screenshot or click on the arrow pointing down next to it to Snip in 3 or 10 seconds from then.

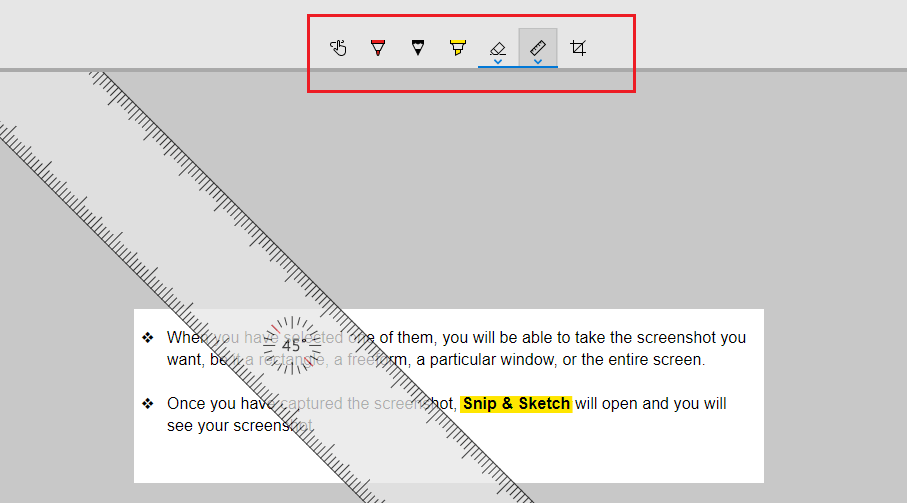
- After selecting one of the options the screen will darken and a toolbar will appear at the top of the screen. These are the same options found in the Snipping Tool. They are from left to right: Rectangular Snip, Freeform Snip, Window Snip, and full computer screen Snip.
- When you have selected one of them, you will be able to take the screenshot you want, be it a rectangle, a freeform, a particular window, or a full screen screenshot.
- Once you have captured the screenshot, Snip & Sketch app will open and you will see your screenshot. Here you can add annotations with a ballpoint pen, a pencil, or a highlighter. You can erase them using the eraser and you can also use a ruler (which you can rotate by using the mouse wheel) to make the annotations in the angles you want. There is also the option to crop the screenshot.

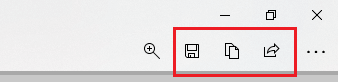
- Now that you’ve finished editing the image you can Save, Copy, or Share using the buttons at the top right corner. Clicking on Save will let you choose where to save the image. Clicking on Copy will copy the image to your Clipboard and clicking on Share will let you share the image to your contacts via email or via other apps.

- In this window, you can click on New to start taking your screenshot or click on the arrow pointing down next to it to Snip in 3 or 10 seconds from then.


Summary: With the snip sketch tool, take a snapshot to copy words or images from all or parts of your PC screen or take screenshots on the windows operating system. Open screen Snipping Tool to make changes or notes, then save, and share. You can capture any of the following types of snips using the snip sketch tool:
|
Free-form snip |
Draw a free-form shape around an object. |
|
Rectangular snip |
Drag the cursor around an object to form a rectangle. |
|
Window snip |
Select a window, such as a dialog box, that you want to capture. |
|
Full-screen snip |
Capture the entire screen. |
Also, it’s important to know that when you capture a snip, it’s automatically copied to the Snipping Tool window where you make changes, save, and share.
Note: The easiest way to call up Snip & Sketch is with the keyboard shortcut Windows key + Shift + S. You can also find the Snip & Sketch tool listed in the alphabetical list of apps accessed from the Start button as well as in the notification panel on the lower right corner where it listed as Screen (full) snip. Or you can just search for it if you don’t commit the keyboard shortcut to memory. (If you’re a regular screenshot taker, we recommend pinning the app to the taskbar.)
Also, after you capture the screenshot, it will be automatically saved to your clipboard and a preview notification will appear in the lower-right corner of your screen (notification panel). Click on the preview notification to open the Snip & Sketch app and edit the screenshot with the available drawing tools before saving or sharing.
Method 6. Using the Game Bar to take a screenshot.
The last method we are going to review involves the use of the Game Bar for screen capture. The game bar in Windows 10 allows you to record gameplay footage, record videos, and take screenshots, plus a number of other ones that we will not discuss in this article. You can take screenshots with the game bar even if you are not in a game. Let’s find out how to use it:
- To open up the Game Bar overlay press the Windows Key + G (windows key G). Before you press this make sure your active window is the exact window/screen you want to capture


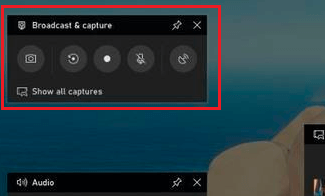
- In the top right corner of the screen, you will notice a window labeled Broadcast & capture. In order to take the screenshot, click on the Camera icon. This will save the screenshot as a PNG file and saves it in «C:UsersUsernameVideosCaptures.» This will be a full-screen image.


The game bar can help you record the screen in Windows 10.
The Game Bar is automatically installed in Windows 10. (If you can’t find it for some reason, you can download it here.) However, if you haven’t used it yet, it might be worth checking to make sure it’s working — especially before you try to record videos. To do this
- Press Windows Key + G (Windows Key G) on your keyboard. This should open up the Game Bar. If it doesn’t, here’s how to enable it:
- Go to the Start Menu
- Click on the cog icon to open Settings
- Click on «Gaming»
- Make sure the switch at the top labeled «Record game clips, screenshots, and broadcast using Game bar» is toggled to On
Note: The page you’ve opened also has keyboard shortcuts for Game Bar commands such as opening the Game Bar, taking a screenshot, and starting and stopping a PC screen recording. You can ALSO come up with your own shortcuts for these commands and enter them here if you wish.
Now, with the game bar enabled, you can begin your screen recording and record game clips of your favorite game.
How to Record your Screen with the Game Bar
Keep in mind that you can only use the Game Bar to perform a screen record of only one application or active window at a time, which is usually the last window you clicked into. Also, you can’t switch to recording another window after you start recording. The game bar won’t also let you record your whole screen, so you can’t record your Desktop or File Explorer or a few other apps, such as Maps. We recommend that you first experiment ahead of time if possible.
Here are the steps to undertake the screen record and record game clips with the game bar (using x box Game Bar):
- Open up the Windows application you want to record. You may need to close or minimize other windows or apps to avoid accidentally recording the wrong one. It may also help to make sure that any audio you don’t want in the recording is off, even if it’s from a different app or window. The screen recorder record all of the audio playing across applications on the device.
Read: How To Fix Discord Screen Share Audio Not Working (2022)
- Press the Windows key + G. This will open up Xbox Game Bar
- Click on the microphone button to enable external audio recording. This will allow you to add commentary or do a voiceover. (You’ll still be recording internal audio.)
- Click on the Record button (the one with a dot in it) to start recording. Alternatively, simply press Windows + Alt + R to start recording without going into the Game Bar.
- Either way, you’ll get a small pop-up bar with a timer and two recording controls.
- Click on the microphone button to switch your external mic on and off (your internal mic will still be on) and complete your recording.
- Click on the stop button or press Windows + Alt + R to stop recording the screen when you’re done. The screen record will save on your PC.
- A notification will pop up on the notification panel at the lower right corner, saying «Game clip recorded.» If you click on that notification you’ll open the «Captures» folder or the screenshots folder in File Explorer.
- An alternative to finding your recording is through File Explorer. Go to «This PC»> «Videos»> «Captures» or the screenshots folder.
Read here if you need further information about How to record your Windows PC screen using Xbox Game Bar.
Method 7: Use third party app to capture screenshots on PC
If the Windows provided methods can’t help you capture the screenshots well, you can resort to third party apps. Third party integrations are an integral feature for screenshot tools in Windows. They add further functionality to your screen capture such as capturing scrolling screen as well as easy sharing between various work productivity apps. The print screen software from third parties includes various integrations with image editing [image editor], project management, file sharing, and messaging tools to maximize tool efficiency and worker productivity.
Some of the third party screen capture tools include:
- ShareX
- PicPick
- ScreenPresso
- Snagit
- Apowersoft Screen Capture Pro
- Droplr
- CloudApp
- Screencast-O-Matic
- Lightshot
In this article, we detail how to use third party apps to capture scrolling screens.
Watch the video: How to screen shot on Windows 10 Video
Read: How to Get Started With Windows 10 including taking screenshots on Windows 10
How to screen shot on Windows 11 Guide
There’s more than one way to take a screengrab in Windows 11. Here are four different ways to show you how to screen shot on Windows 11.
Method 1. Take a screenshot of the entire screen with the Prt Sc key
Like in Windows 10, in Windows 11 you’ll use the PrtSc key on an active window.
- Tap on the PrtSc key
- The screenshot will be saved to your clipboard but you won’t receive any indication the screenshot has successfully been taken.
- To view the full-screen screenshot, use Ctrl-V to paste it into an application like Microsoft Paint or Microsoft Word, or even into the body of an email.
Method 2. Use Windows key + PrtSc key to take a full screen screenshot and save it to your computer
- Similar to the PrtSc key windows key, hitting the Windows key + Print Scren keys will grab a screenshot of your entire desktop but only on an active window.
- But it’ll also save the screenshot to a folder on your computer.
- If you hit the keys correctly, your whole screen will flash, indicating the screenshot has been taken and automatically saved.
- You can find all of your full-screen screenshots in Pictures -> Screenshots.
Method 3. Use the Snip & Sketch Tool to take a screenshot of only part of the screen
Perhaps you want to take only a section or an active window of the PC’s screenshot. In this case, Windows 11 gives you the option to take only a partial screenshot using the snip and sketch tool:
- Hit windows keys Win + Shift + S, your screen will flash and a small Snipping Tool menu will appear at the top of the screen.
- This screen will allow you to do the following (from left to right):
- Rectangular screen Snip: Draw a box around what you want to capture
- Freeform Snip: Draw any shape around what you want to capture.
- Window Snip: Choose a window to capture.
- Full-screen Snip: Capture your entire screen (same thing as PrtScr).
- Once the screenshot’s taken, it’ll be saved to your clipboard, as with the Prt Scr key option.
- You can then paste it elsewhere to look at it.
- However, if you click the Snipping Tool preview that appears at the bottom of the screen, you’ll find options to edit the screenshot (crop, rotate, and more) and save it to your desktop.
Method 4. Use the Snipping Tool to take delayed screenshots
The Snipping Tool comes built into Windows 11 just like it was IN Windows Vista, Windows 7, Windows 8, and Windows 10. It is the same tool used in the Snip and Sketch tool, except with a few tiny additions. To use it,
- Type in Snipping Tool in the Search feature and open the application to take a computer screenshot.
- If you click on New you’ll open the mini Snipping Tool menu where you can then choose between several different snips.
- However, with this full-version of the Snipping Tool, you can choose any of the four snipping options (rectangular, freeform, window, and fullscreen) and then choose a delay option.
- You can choose between a 3-, 5- and 10-second delay in the sketch window.
- This will give you a bit of time to set up whatever it is you’re attempting to screenshot and might make it easier than taking the shot manually.
- To take the delayed screenshot, simply hit Win-Shift-S, which will then be copied to your clipboard. You can also click on the screenshot preview that appears to make any edits or save it to your computer as a JPEG, PNG, or other.
Final Word
And that does it! You now have 5 methods at your disposal showing you how to screenshot on Windows 10. Do you have a Mac and want to take a mac screenshot? Check out our article on how to take screenshot on Mac.
If you want to find out more tricks on how to use your Windows at its maximum capacity, join our newsletter today! You even get a 10% discount code on our store!  Would you like to receive promotions, deals, and discounts to get our products for the best price?
Subscribe to our newsletter by entering your email address below! Receive the latest technology news in your inbox and be the first to read our tips to become more productive.
See Also
Создавайте снимки экрана с помощью системных инструментов или дополнительных программ.
Штатные средства Windows
1. Win + PrtSc
Начнём с самого простого. Чтобы мгновенно сделать снимок всего экрана, используйте комбинацию клавиш Win (с флажком) + PrtSc (Print Screen).
Система сделает скриншот и сразу сохранит его на жёсткий диск в формате PNG. Готовый файл вы найдёте по адресу: «Этот компьютер» → «Изображения» → «Снимки экрана».
2. PrtSc + Paint
Этот способ тоже позволяет создать снимок всего экрана, но при необходимости вы можете сразу отредактировать результат.
Нажмите клавишу PrtSc. Windows сделает скриншот, но не покажет его: система не сохранит изображение на жёсткий диск, а только скопирует в буфер обмена.
Чтобы увидеть скриншот, запустите Paint и вставьте изображение в окно программы с помощью клавиш Ctrl + V. Если необходимо, измените картинку с помощью редактора.
Нажмите «Файл» → «Сохранить как» и сохраните снимок экрана в нужном формате. Изображение появится в указанной вами папке. Вместо Paint можно использовать любой другой графический редактор, установленный на ПК.
3. Alt + PrtSc
Эта комбинация клавиш делает снимок активного окна и, как и предыдущий способ, копирует получившееся изображение в буфер.
Нажмите Alt + PrtSc. Затем откройте Paint или другой графический редактор и воспользуйтесь клавишами Ctrl + V, чтобы вставить скриншот. Отредактируйте изображение, если нужно, и сохраните его в любую папку в удобном формате.
4. Программа «Ножницы»
В Windows 10 есть встроенный менеджер скриншотов, который позволяет делать снимки всего экрана, отдельных фрагментов и выбранных окон. Это приложение «Ножницы». Его легко найти по названию через поиск по системе.
Запустив «Ножницы», нажмите «Режим» и выберите нужную область дисплея. Затем воспользуйтесь кнопкой «Создать» и кликните по экрану.
Когда скриншот будет готов, программа откроет его в новом окне. Здесь на изображение можно нанести свои пометки и отправить его по почте или просто сохранить на жёстком диске.
5. Программа «Фрагмент и набросок»
Недавно в Windows 10 добавили ещё одно приложение для работы со скриншотами — «Фрагмент и набросок». С его помощью тоже можно делать снимки выделенной области, выбранных окон или всего экрана. Скорее всего, в будущем эта утилита заменит «Ножницы».
Чтобы вызвать «Фрагмент и набросок», нажмите Win + Shift + S или найдите программу по названию через поиск по системе. Запустив её, выберите область скриншота с помощью появившихся на дисплее кнопок.
Чтобы увидеть снимок экрана, откройте Paint и нажмите Ctrl + V. Когда изображение появится в программе, его можно будет отредактировать и сохранить на жёстком диске. В некоторых сборках Windows во «Фрагменте и наброске» есть встроенный редактор, который позволяет обойтись без Paint.
Сторонние программы
Если стандартных способов вам мало, можете попробовать эти инструменты с дополнительными функциями.
1. Nimbus Capture
Nimbus Capture — это плагин для браузера, с помощью которого очень удобно делать скриншоты веб‑страниц. Помимо обычных снимков всего экрана, окна или выделенного фрагмента, он также позволяет захватывать полную длину страницы, даже если она не помещается в экран.
А ещё в Nimbus Capture вы можете редактировать изображения и сохранять их прямо в Google Drive. Плюс ко всему плагин умеет записывать видео экрана.
Чтобы сделать скриншот, достаточно кликнуть по кнопке Nimbus Capture на панели браузера и выбрать область экрана. Вы также можете настроить горячие клавиши и формат снимков: PNG или JPG.
Все перечисленные функции доступны бесплатно. Но, если вы захотите прицепить к скриншотам свой логотип, сохранять их в Dropbox и получать оперативную техподдержку, придётся оформить подписку стоимостью 15 долларов в год.

![]()
![]()
2. PicPick
Редактор изображений, очень похожий на Paint, с функцией создания скриншотов. PicPick умеет делать снимки всего экрана, любой выделенной области и выбранного окна — в том числе с прокруткой. Что касается редактора, помимо базовых функций вроде добавления текста и пометок, он позволяет корректировать цвета изображений и накладывать различные эффекты.
Вы можете настроить горячие клавиши и сохранять файл в одном из следующих форматы: PNG, JPG, BMP, PDF и GIF. После установки значок программы появляется на панели задач. Чтобы сделать скриншот, нужно кликнуть по нему и выбрать область экрана.
Программу можно использовать бесплатно, но в таком случае новые версии придётся скачивать с сайта вручную. За возможность автообновления разработчики просят одноразовый платёж размером 30 долларов.
Скачать PicPick →
3. LightShot
LightShot — простейший инструмент, который позволяет делать скриншоты выделенной области в пару кликов. Нужно лишь нажать на иконку программы и выделить мышью необходимый фрагмент. После вы сможете добавить текст, стрелки или что‑нибудь нарисовать поверх изображения.
С помощью LightShot очень удобно делиться снимками экрана. Сделав скриншот, вы можете сразу же сохранить его на сервере программы, чтобы получить прямую ссылку для отправки коллегам или друзьям. К вашим услугам два формата: PNG и JPG.
Приложение бесплатное, но перед установкой предлагает загрузить дополнительное ПО. Не забудьте от него отказаться.
Скачать LightShot →
Этот материал был впервые опубликован в январе 2017 года. В марте 2020‑го мы обновили текст.
Читайте также 💻📧📸
- 15 лучших графических редакторов, которые не стоят ни копейки
- Как установить в Windows 10 динамические обои из macOS Mojave
- Как изменить каталог установки программ по умолчанию в Windows
- 12 вещей, которые нужно сделать после установки Windows 10
- 15 лучших фоторедакторов для разных платформ
В данной статье показаны действия, с помощью которых можно сделать скриншот (снимок) экрана используя функцию «Фрагмент экрана» в Windows 10.
В операционной системе Windows 10 существует достаточное количество различных способов для того чтобы сделать скриншот (снимок) экрана. Но разработчики компании Microsoft не останавливаются на достигнутом и добавили новую, довольно удобную функцию с названием «Фрагмент экрана», с помощью которой можно сделать скриншот экрана.
Как сделать скриншот (снимок) экрана используя функцию «Фрагмент экрана»
Чтобы сделать скриншот экрана используя инструмент «Фрагмент экрана», откройте Центр уведомлений и нажмите на плитку быстрого действия с названием Фрагмент экрана, также запустить данную функцию можно нажав на клавиатуре сочетание клавиш ![]() + Shift + S.
+ Shift + S.

После этого экран будет затемнён и сверху появится панель с кнопками для управления функцией, с помощью которых можно выбрать прямоугольную вырезку (область) или вырезку в произвольной форме, а также создание скриншота всего экрана.

Удерживая левую кнопку мыши, можно выделить любую прямоугольную (или произвольную) область экрана, скриншот которой нужно сделать.

После того, как вы отпустите кнопку мыши, выделенная область экрана помещается в буфер обмена и при этом появится соответствующее уведомление с миниатюрой сделанного скриншота.

Нажав на уведомление, фрагмент сохраненный в буфере обмена откроется в приложении Набросок экрана, в котором можно пометить, сохранить или отправить сделанный скриншот.

Также можно через некоторое время сохранить свои скриншоты, так как они сохраняются в буфере обмена и доступны в виде уведомлений с миниатюрами в центре уведомлений.

Используя функцию «Фрагмент экрана», можно легко сделать скриншот экрана, добавить к нему аннотации, сохранить или поделиться снимком.
Видео-инструкция
Также, можно посмотреть видео ролик в котором показано как сделать скриншот (снимок) экрана используя функцию «Фрагмент экрана» в Windows 10».
.

Создание скриншота определенной области экрана
Для многих не секрет, что для создания снимка экрана (скриншота) на клавиатуре ПК имеется отдельная клавиша – Print Screen. Работает данная кнопка в любой версии Windows. Нажав на нее всего один раз, вы моментально перемещаете в буфер обмена фотографию текущего состояния всего экрана.
Но что делать, когда требуется сохранить не весь экран, а лишь его некоторую часть? Об этом мы расскажем Вам в данной статье.
Скриншот отдельной области
Когда возникает такая необходимость, многие начинают искать в интернете специальную программу. Но на самом деле в этом нет необходимости, ведь в Windows 10 по умолчанию присутствует два приложения, которые всего за несколько кликов мышкой помогут Вам сделать скриншот части экрана и при необходимости сохранить его в отдельный файл. Это программы “Ножницы” и “Набросок на фрагменте экрана“.
Найти их можно через меню “Пуск”.
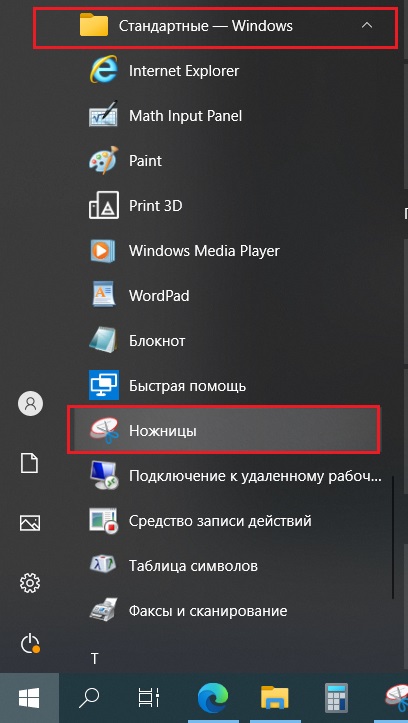
Ножницы в пуске Windows 10

Программа “Набросок на фрагменте экрана в пуске Windows 10”
Принцип их работы очень простой. Запускаете одно из приложений по ярлыку и в открывшемся окне нажимаете кнопку “Создать”.
Окно программы
Экран как бы притемняется, а курсор превращается в перекрестие.
Чтобы сделать снимок требуемой части экрана, нужно поставить перекрестие мыши в ее левый верхний угол, зажать левую кнопку мыши, и, не отпуская ее, протянуть курсор в правую нижнюю часть выделяемой области.
Готовый фрагмент экрана
После этого скриншот будет отображен в окне приложения, и вы сможете его сохранить в отдельный файл.
Лучшая благодарность автору — репост к себе на страничку: