-
Press Windows logo key + I on your keyboard to open Settings. If that doesn’t work, select the Start button, then select Settings .
-
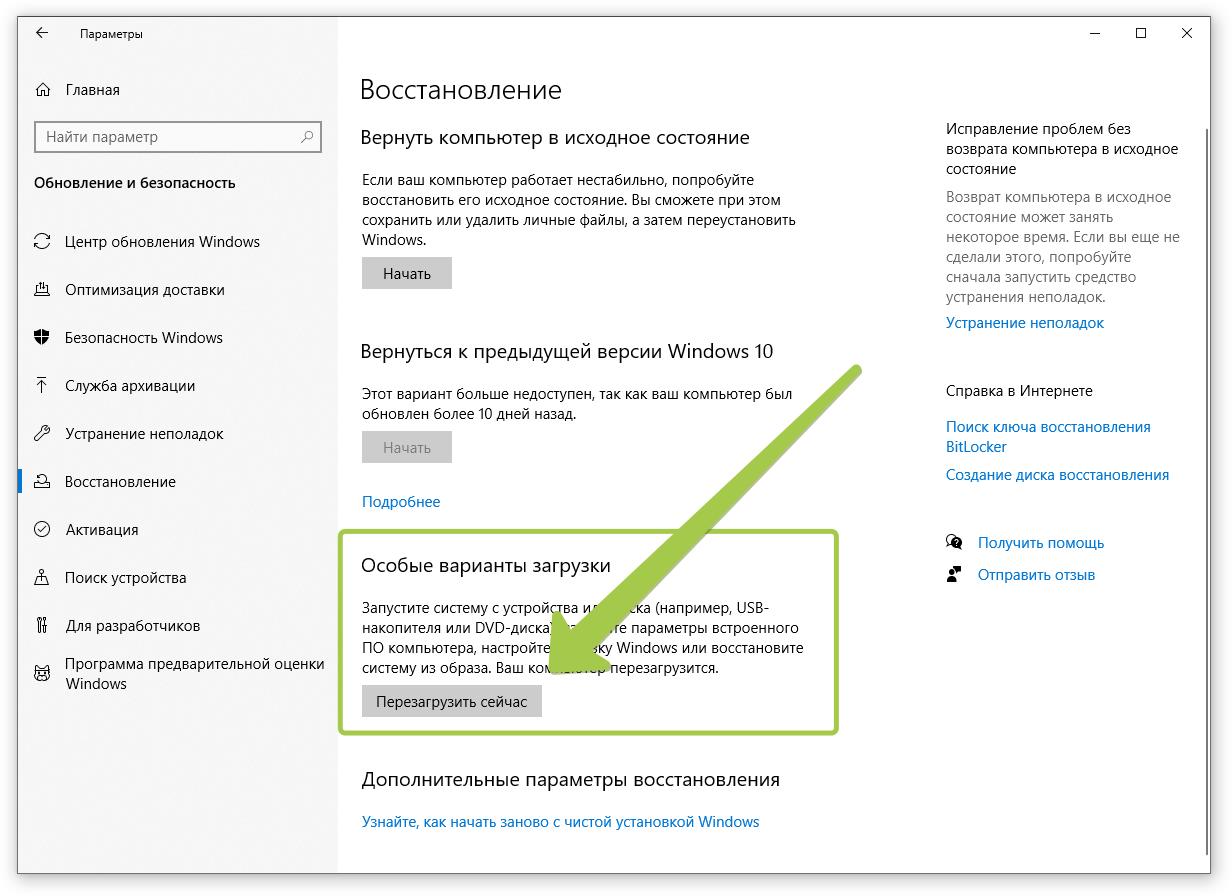
Select System > Recovery .
Open Recovery Settings -
Under Recovery options, next to Advanced startup, select Restart now.
-
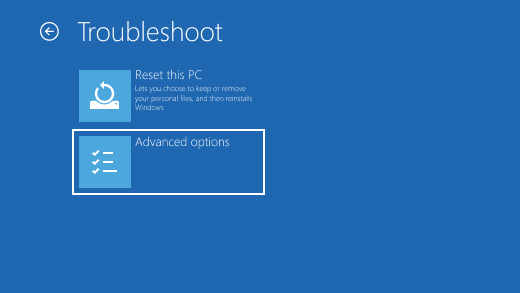
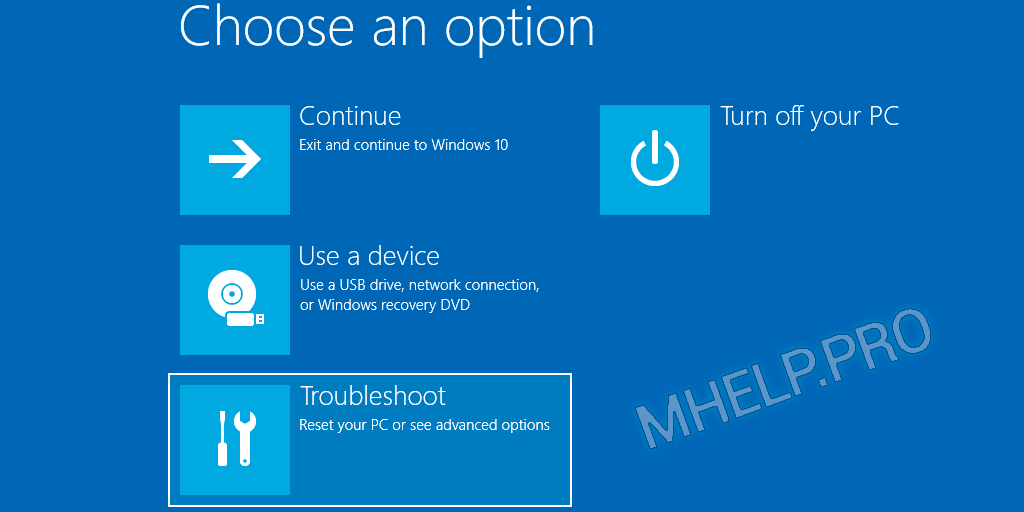
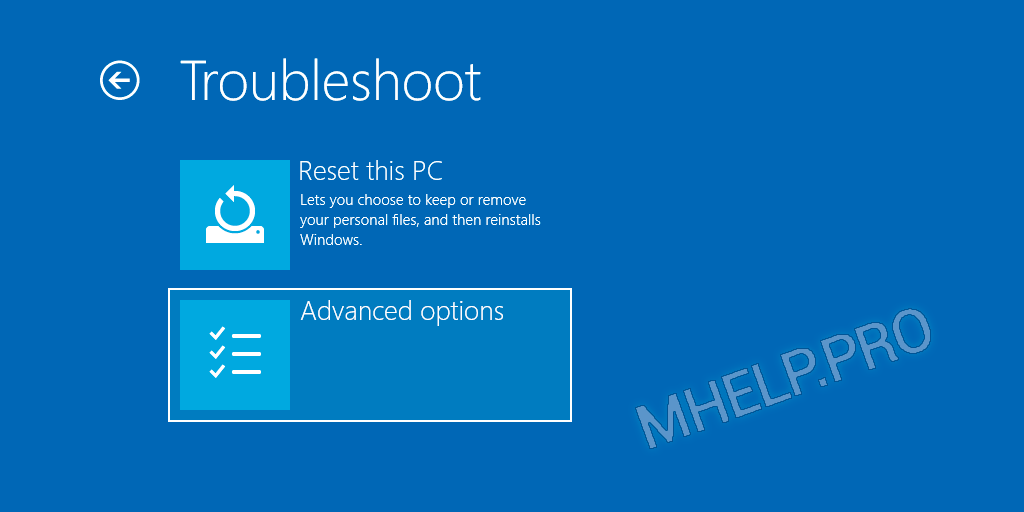
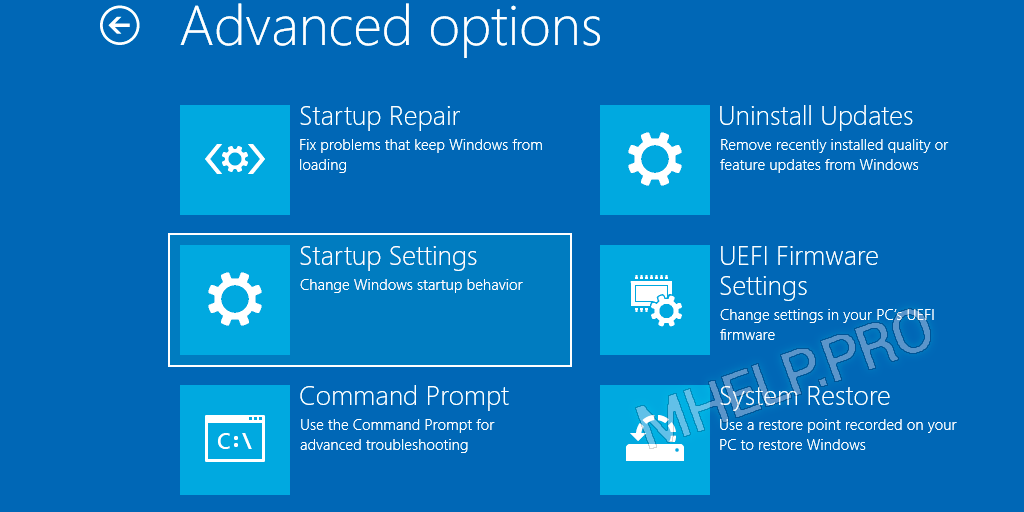
After your PC restarts to the Choose an option screen, select Troubleshoot > Advanced options > Startup Settings > Restart. You may be asked to enter your BitLocker recovery key.

-
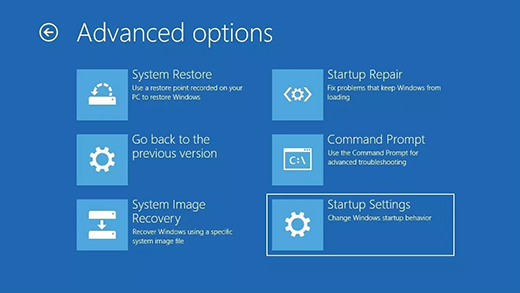
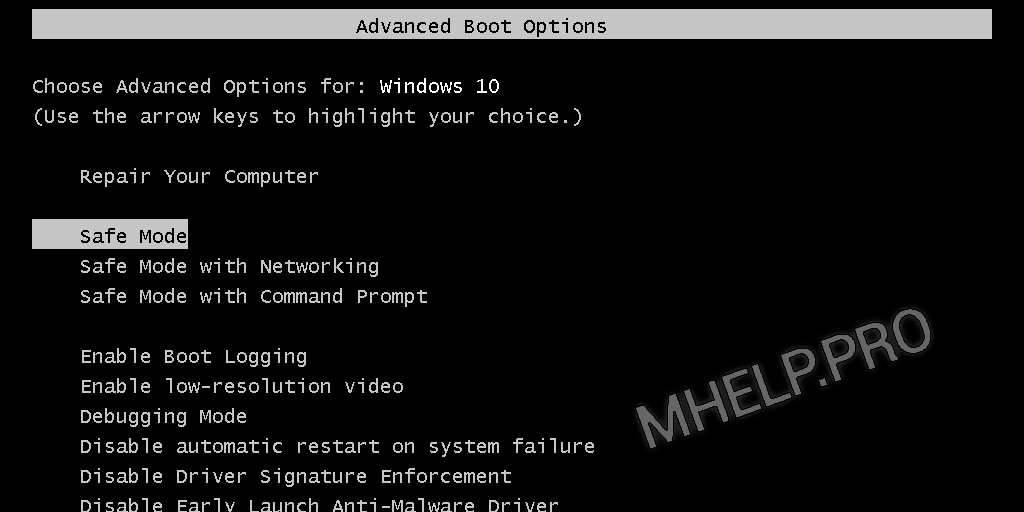
After your PC restarts, you’ll see a list of options. Select 4 or press F4 to start your PC in Safe Mode. Or if you’ll need to use the internet, select 5 or press F5 for Safe Mode with Networking.


When you can’t open Settings to get into safe mode, restart your device from the Windows sign-in screen.
-
On the Windows sign-in screen, press and hold the Shift key while you select Power > Restart .
-
After your PC restarts to the Choose an option screen, select Troubleshoot > Advanced options > Startup Settings > Restart. You may be asked to enter your BitLocker recovery key.
-
After your PC restarts, you’ll see a list of options. Select 4 or F4 to start your PC in safe mode. Or if you’ll need to use the internet, select 5 or F5 for Safe Mode with Networking.
Note: If you’ve encrypted your device, you’ll need your BitLocker key to start in safe mode.
Before you enter safe mode, you need to enter the Windows Recovery Environment (winRE). To do this, you will repeatedly turn your device off, then on:
-
Hold down the power button for 10 seconds to turn off your device.
-
Press the power button again to turn on your device.
-
On the first sign that Windows has started (for example, some devices show the manufacturer’s logo when restarting) hold down the power button for 10 seconds to turn off your device.
-
Press the power button again to turn on your device.
-
When Windows restarts, hold down the power button for 10 seconds to turn off your device.
-
Press the power button again to turn on your device.
-
Allow your device to restart into Automatic Repair, and select Advanced options to enter winRE.
Now that you are in winRE, you will follow these steps to take you to safe mode:
-
On the Choose an option screen, select Troubleshoot > Advanced options > Startup Settings > Restart.
-
After your device restarts, you’ll see a list of options. Select option 5 from the list or press F5 for Safe Mode with Networking.
If you need more info on a black or blank screen error, see Troubleshoot black screen or blank screen errors.
Notes: Restarting your device should be sufficient to exit you from Safe Mode back into normal mode. However, if for some reason your machine is still booting into Safe Mode on its own after restarting, try this:
-
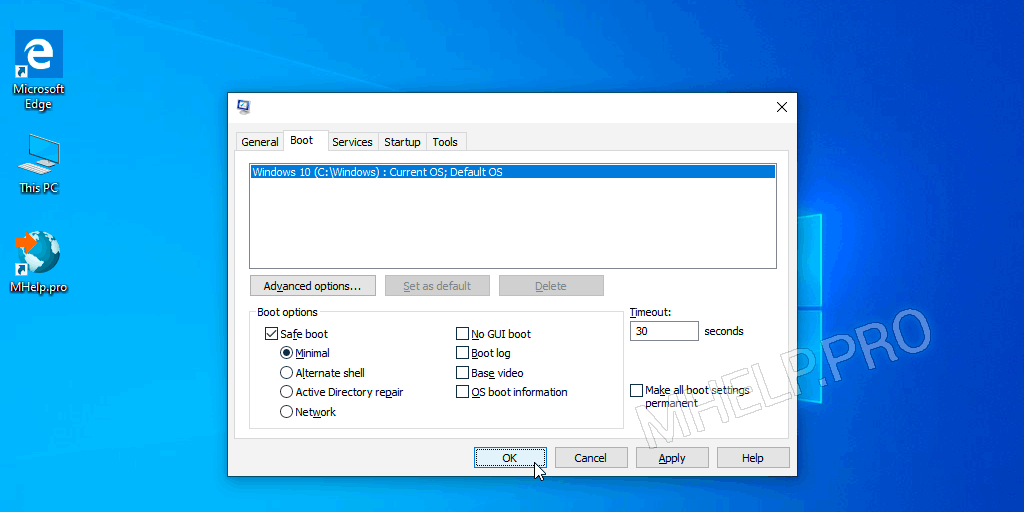
Press the Windows logo key + R.
-
Type msconfig in the Open box and then select OK.
-
Select the Boot tab.
-
Under Boot options, clear the Safe bootcheckbox.
-
Press Windows logo key + I on your keyboard to open Settings. If that doesn’t work, select the Start button, then select Settings .
-
Select Update & Security > Recovery .
Open Recovery Settings -
Under Advanced startup, select Restart now.
-
After your PC restarts to the Choose an option screen, select Troubleshoot > Advanced options > Startup Settings > Restart. You may be asked to enter your BitLocker recovery key.
-
After your PC restarts, you’ll see a list of options. Select 4 or press F4 to start your PC in Safe Mode. Or if you’ll need to use the internet, select 5 or press F5 for Safe Mode with Networking.
When you can’t open Settings to get into safe mode, restart your device from the Windows sign-in screen.
-
On the Windows sign-in screen, press and hold the Shift key while you select Power > Restart .
-
After your PC restarts to the Choose an option screen, select Troubleshoot > Advanced options > Startup Settings > Restart. You may be asked to enter your BitLocker recovery key.
-
After your PC restarts, you’ll see a list of options. Select 4 or F4 to start your PC in safe mode. Or if you’ll need to use the internet, select 5 or F5 for Safe Mode with Networking.
Note: If you’ve encrypted your device, you’ll need your BitLocker key to start in safe mode.
Before you enter safe mode, you need to enter the Windows Recovery Environment (winRE). To do this, you will repeatedly turn your device off, then on:
-
Hold down the power button for 10 seconds to turn off your device.
-
Press the power button again to turn on your device.
-
On the first sign that Windows has started (for example, some devices show the manufacturer’s logo when restarting) hold down the power button for 10 seconds to turn off your device.
-
Press the power button again to turn on your device.
-
When Windows restarts, hold down the power button for 10 seconds to turn off your device.
-
Press the power button again to turn on your device.
-
Allow your device to fully restart. You will enter winRE.
Now that you are in winRE, you will follow these steps to take you to safe mode:
-
On the Choose an option screen, select Troubleshoot > Advanced options > Startup Settings > Restart.
-
After your device restarts, you’ll see a list of options. Select option 5 from the list or press F5 for Safe Mode with Networking.
If you need more info on a black or blank screen error, see Troubleshoot black or blank screen errors.
Notes: Restarting your device should be sufficient to exit you from Safe Mode back into normal mode. However, if for some reason your machine is still booting into Safe Mode on its own after restarting, try this:
-
Press the Windows logo key + R.
-
Type msconfig in the Open box and then select OK.
-
Select the Boot tab.
-
Under Boot options, clear the Safe bootcheckbox.
 Безопасный режим Windows 10 может быть полезен при решении самых различных проблем с компьютером: для удаления вирусов, исправления ошибок драйверов, в том числе вызывающих синий экран смерти, сброса пароля Windows 10 или активации учетной записи администратора, запуска восстановления системы из точки восстановления. Отдельная инструкция: Как зайти в безопасный режим Windows 11.
В этой инструкции — несколько способов зайти в безопасный режим Windows 10 в тех случаях, когда система запускается и вы можете в нее зайти, а также когда запуск или вход в ОС по тем или иным причинам невозможен. К сожалению, знакомый многим путь запуска безопасного режима через F8 больше не работает (но вы можете сделать, чтобы работала: Как включить вход в безопасный режим клавишей F8 в Windows 10), а потому придется пользоваться иными методами. В конце руководства имеется видео, в котором наглядно показаны способы входа в безопасный режим.
- Как запустить безопасный режим Windows 10 через msconfig
- Вход в безопасный режим через особые варианты загрузки
- Добавление пункта «Безопасный режим» в меню загрузки
- Как зайти в безопасный режим Windows 10 с использованием загрузочной флешки
- Другие способы запуска безопасного режима
- Видео инструкция
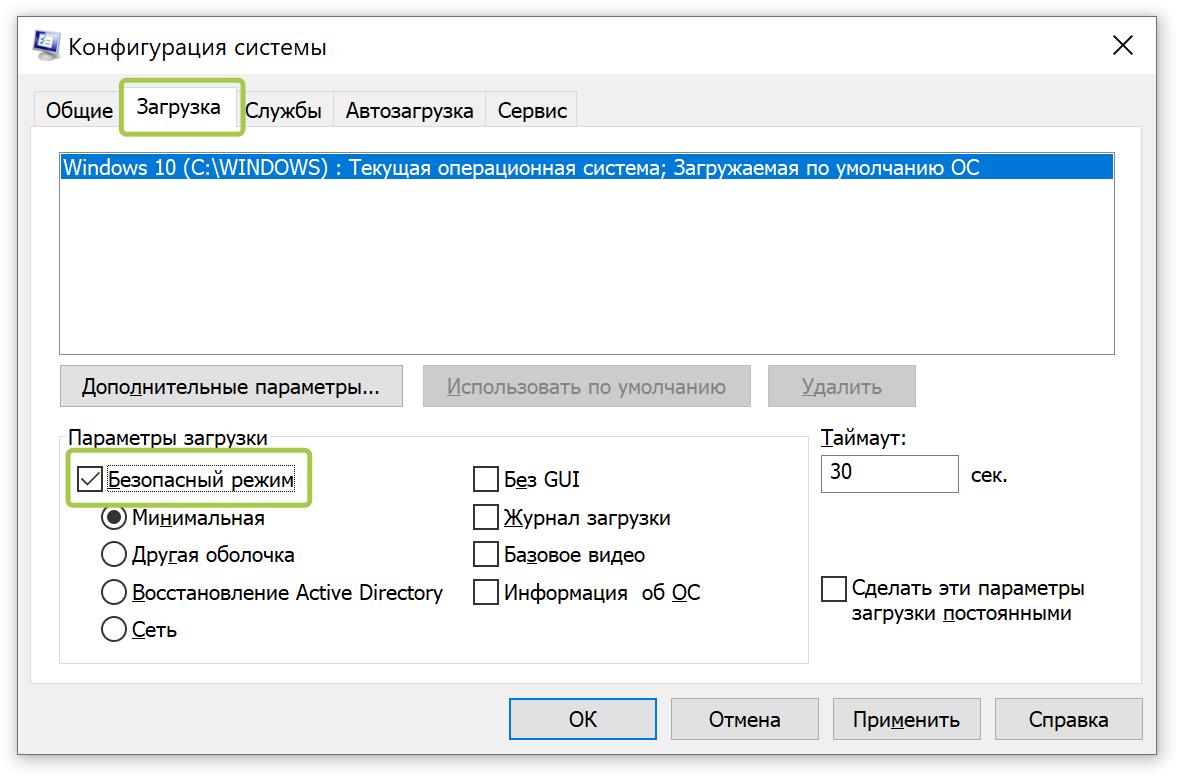
Вход в безопасный режим через конфигурацию системы msconfig
Первый, и, наверное, многим знакомый способ запустить безопасный режим Windows 10 (он работает и в предыдущих версиях ОС) — использовать встроенную утилиту конфигурации системы. Минус метода — невозможность попасть в безопасный режим, если система не запускается. Необходимые шаги:
- Нажмите клавиши Win+R на клавиатуре (Win — клавиша с эмблемой Windows), введите msconfig в окно «Выполнить» и нажмите Enter.
- В открывавшемся окне «Конфигурация системы» перейдите на вкладку «Загрузка», выберите ту ОС (обычно присутствует лишь один пункт меню и выбирать не требуется), которая должна запускаться в безопасном режиме и отметьте пункт «Безопасный режим».
- При этом, для него существуют несколько вариантов безопасного режима загрузки: минимальная — запуск «обычного» безопасного режима, с рабочим столом и минимальным набором драйверов и служб; другая оболочка — безопасный режим с поддержкой командной строки; сеть — запуск с поддержкой сети.
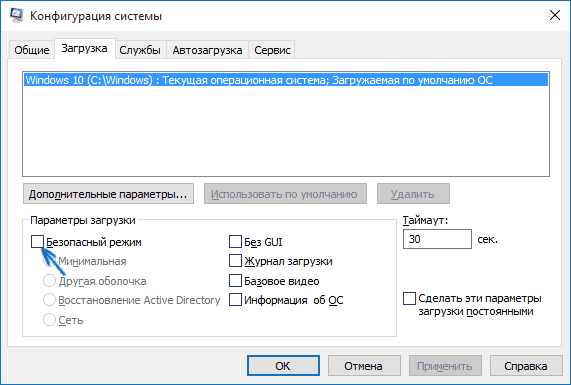
По завершении, нажмите «Ок» и перезагрузите компьютер, Windows 10 запустится в безопасном режиме.
Затем, чтобы вернуть обычный режим запуска, тем же методом снова используйте msconfig, но в этот раз снимите установленную ранее отметку запуска безопасного режима, примените настройки и перезагрузите ПК или ноутбук.
Запуск безопасного режима через особые варианты загрузки
Данный способ запуска безопасного режима Windows 10 в общем случае также требует, чтобы ОС на компьютере запускалась. Однако, есть две вариации этого способа, позволяющие зайти в безопасный режим, даже если вход в систему или ее запуск невозможен, которые я также опишу.
В общем случае способ подразумевает выполнение следующих простых шагов:
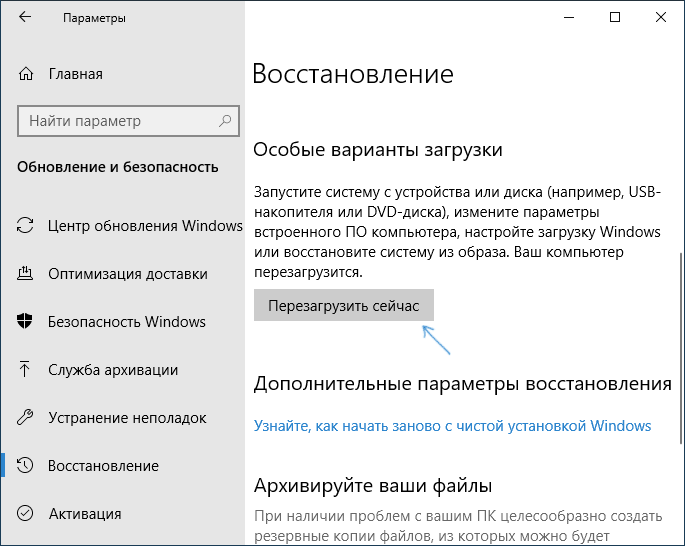
- Открыть Параметры (значок шестеренки в меню Пуск или клавиши Win+I), зайти в пункт «Обновление и безопасность», выбрать «Восстановление» и в пункте «Особые варианты загрузки» нажать «Перезагрузить сейчас». (В некоторых системах данный пункт может отсутствовать. В этом случае, для входа в безопасный режим используйте следующий способ).

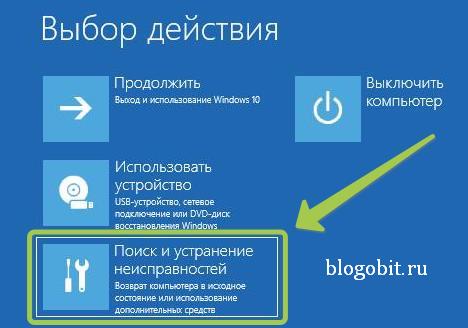
- На экране особых вариантов загрузки выбрать «Поиск и устранение неисправностей» — «Дополнительные параметры» — «Параметры загрузки». Если пункт «Параметры загрузки» отсутствует, нажмите «Дополнительные параметры восстановления». На более ранних версиях Windows 10 путь такой: «Диагностика» — «Дополнительные параметры» — «Параметры загрузки». И нажать кнопку «Перезагрузить».

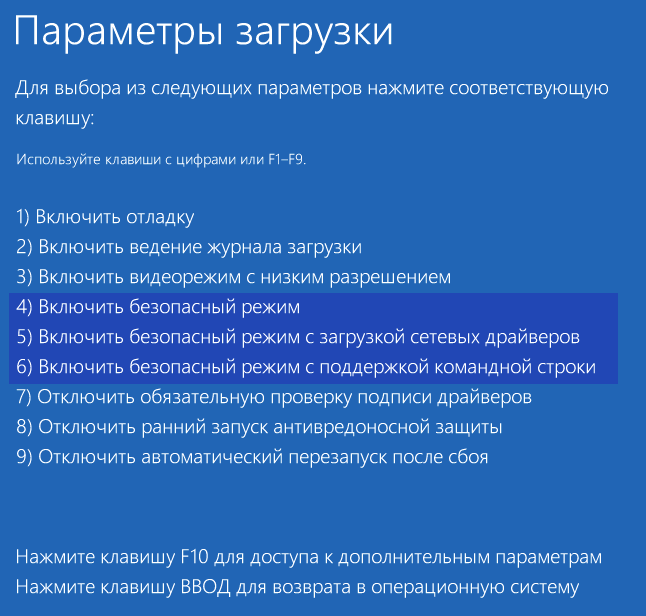
- На экране параметров загрузки, которые появятся после перезапуска системы, нажать клавиши от 4 (или F4) до 6 (или F6) для запуска соответствующего варианта безопасного режима.


Как добавить пункт «Безопасный режим» в меню загрузки Windows 10
При необходимости обезопасить себя от возможных проблем или если вы часто используете безопасный режим Windows 10, вы можете добавить его в меню загрузки вашего компьютера или ноутбука:
- Запустите командную строку от имени администратора и используйте следующие команды, нажимая Enter после каждой из них. После выполнения первой команды отобразится идентификатор GUID, который нужно будет использовать во второй команде.
-
bcdedit /copy {default} /d "Безопасный режим"
bcdedit /set {отобразившийся_GUID} safeboot minimal
- Готово, теперь при включении компьютера у вас будет отображаться меню, в котором, помимо простого запуска Windows 10 можно будет запустить и безопасный режим.


При необходимости, вы можете изменить время ожидания в меню загрузки (то есть то время, по истечении которого произойдет автоматическая загрузка Windows 10 в обычном режиме). Для этого используйте команду
bcdedit /timeout Время_в_секундах
Как зайти в безопасный режим Windows 10 с помощью загрузочной флешки или диска восстановления
И, наконец, если не удается попасть даже на экран входа в систему, то есть и еще один способ, но вам потребуется загрузочная флешка или диск с Windows 10 (которые можно легко создать на другом компьютере). Загрузитесь с такого накопителя, а затем либо нажмите клавиши Shift + F10 (это откроет командную строку), либо после выбора языка, в окне с кнопкой «Установить» нажмите «Восстановление системы», затем Диагностика — Дополнительные параметры — Командная строка. Также для этих целей можно использовать не дистрибутив, а диск восстановления Windows 10, который легко делается через панель управления в пункте «Восстановление».
В командной строке введите (безопасный режим будет применен к ОС, загружаемой на вашем компьютере по умолчанию, на случай, если таких систем несколько):
- bcdedit /set {default} safeboot minimal — для следующей загрузки в безопасном режиме.
- bcdedit /set {default} safeboot network — для безопасного режима с поддержкой сети.
Если требуется запуск безопасного режима с поддержкой командной строки, используйте сначала первую из перечисленных выше команд, а затем: bcdedit /set {default} safebootalternateshell yes

После выполнения команд, закройте командную строку и перезагрузите компьютер, он автоматически загрузится в безопасном режиме.
В дальнейшем, чтобы включить обычный запуск компьютера, используйте в командной строке, запущенной от имени администратора (или же способом, описанным выше) команду:
bcdedit /deletevalue {default} safeboot
Еще один вариант почти же способа, но запускающий не сразу безопасный режим, а различные варианты загрузки, из которых можно выбрать, при этом применяет это ко всем совместимым ОС, установленным на компьютере. Запустите командную строку с диска восстановления или загрузочной флешки Windows 10, как это уже было описано, затем введите команду:
bcdedit /set {globalsettings} advancedoptions true
И после успешного ее выполнения, закройте командную строку и перезагрузите систему (можно нажать «Продолжить. Выход и использование Windows 10». Система загрузится с предложением нескольких вариантов загрузки, как и в способе, описанном выше, и вы сможете войти в безопасный режим.
В дальнейшем, чтобы отключить особые варианты загрузки, используйте команду (можно из самой системы, используя командную строку от имени администратора):
bcdedit /deletevalue {globalsettings} advancedoptions
Дополнительные способы запустить безопасный режим
В дополнение к вышеизложенным методам, ещё два способа, позволяющих запустить Windows 10 в безопасном режиме, оба также показаны в видео ниже:
- Если вы можете попасть на экран блокировки, но не можете зайти в систему, нажмите по изображению кнопки питания справа внизу экрана блокировки, а затем, удерживая Shift, нажмите «Перезагрузка». Компьютер выполнит перезагрузку в среде восстановления, где как и в способе с особыми вариантами загрузки вы сможете попасть в безопасный режим.
- Этот метод я не могу рекомендовать, так как он потенциально может привести к проблемам с накопителями, но: если при начале загрузки Windows 10 дважды неправильно выключить компьютер или ноутбук (долгим удержанием кнопки питания), то вы попадете в окно «Автоматическое восстановление», где, нажав кнопку «Дополнительные параметры» и перейдя к пункту «Параметры загрузки» вы также сможете зайти в безопасный режим.
Безопасный режим Windows 10 — видео
И в завершение видео руководство, в котором наглядно показаны способы зайти в безопасный режим различными способами.
Думаю, какой-то из описанных способов вам непременно подойдет. Также в данном контексте может оказаться полезным руководство Восстановление Windows 10.
Download PC Repair Tool to quickly find & fix Windows errors automatically
The Safe mode in Windows, start the computer with a limited set of drivers and system files. Startup programs, add-ons, etc. first, do not run in Safe Mode, and only the basic drivers needed to start Windows 11/10/8/7 are started. This mode is quite useful for troubleshooting Windows problems.
If you want to restart and boot directly into Safe Mode, you have to watch the computer reboot, watch the various BIOS messages, select which operating system you want to boot with, and then press F8 at the exact moment to enable the Advanced Boot menu. In Windows 11/10, of course, things are a bit different. You have to first enable the F8 key if you want to use it to boot in Safe Mode.
Read: What are the different types of Safe Mode?
But you wish you can directly reboot into Safe Mode. To do this, open Run box, type msconfig and hit Enter to open the System Configuration utility.

Select the Boot tab, and under Boot Options, check Safe Mode. The Minimal option will get selected automatically. If you need other Safe Mode options like Networking, etc., you can select those.
Click on Apply > OK. You will now see a prompt. Click on the Restart button, and the computer will initiate the process to reboot your computer directly in safe mode. So before you click the Restart button, make sure that you have saved all your work.
Do note that, if you reboot again from Safe Mode, you will again reboot back into Safe Mode. So once you have completed your work in Safe Mode, again run msconfig and uncheck the Safe Boot option, Click Apply, and then restart your computer. This will bring you back to your desktop, after the restart.
Boot in Safe Mode using Command Prompt
You can execute the following command in an elevated command prompt, and restart your computer to boot into Safe Mode.
bcdedit /set {current} safeboot minimal
Boot into Safe Mode with Networking
bcdedit /set {current} safeboot network
Boot into Safe Mode with Command Prompt
bcdedit /set {default} safeboot minimal bcdedit /set {default} safebootalternateshell yes
To exit Safe Mode, use:
bcdedit /deletevalue {current} safeboot
Shortcut to reboot in Safe Mode
If you need to reboot in Safe Mode frequently, you can create its shortcut. Right-click on your desktop, select New > Shortcut. In the Location field, copy-paste the following path:
C:WindowsSystem32msconfig.exe -2
Click next and name the shortcut as, say, Restart Options.
BootSafe
Alternatively, you can download and use a simple .exe utility called BootSafe.
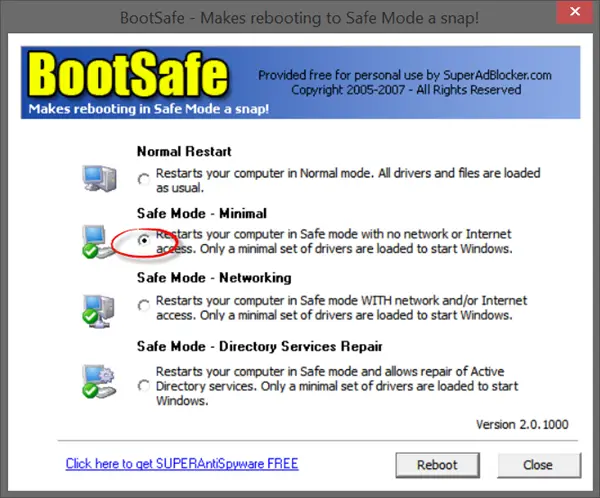
However, when you want to leave Safe Mode and return to Normal mode, you need to use this program again to get a reboot into Normal mode.
See this post if your PC is stuck and cannot exit Safe Mode.
These links too are sure to interest you:
- How to boot in Safe mode while dual-booting Windows
- Display Startup Settings & Boot into Safe Mode in Windows
- Safe Mode not working in Windows.

Anand Khanse is the Admin of TheWindowsClub.com, a 10-year Microsoft MVP (2006-16) & a Windows Insider MVP (2016-2022). Please read the entire post & the comments first, create a System Restore Point before making any changes to your system & be careful about any 3rd-party offers while installing freeware.
![]()
Download Article
![]()
Download Article
This wikiHow article teaches you how to start your Windows computer in Safe Mode, which is a boot option that prevents start-up programs from running and loads only the bare minimum programs needed to operate the PC. Safe Mode is a good way to access a computer that would otherwise run too slow to function.
Things You Should Know
- Suspend BitLocker if you need to.
- To reboot Windows in Safe Mode, power cycle your computer 3 times, then click «Troubleshoot > Advanced Options > Startup Settings > Restart > 4/5.
- Most 3rd-party applications will not work when you boot in Safe Mode.
-
1
Suspend BitLocker protection (if enabled). Go to Manage BitLocker then click on «Suspend protection». If you do not suspend BitLocker protection, then you will be asked for your recovery key to continue booting into safe mode.
-
2
Turn on or restart your computer. Do so by pressing your computer’s power button. If your computer is already on but malfunctioning, first press and hold the power button to turn it off.
- If you’re already logged in and you just want to restart in Safe Mode, open the Start menu instead by pressing the ⊞ Win key or by clicking the Windows logo in the bottom-left corner of the screen.
Advertisement
-
3
Click the start-up screen. Once your computer finishes starting (or waking up), you should see a screen with a picture and the time in the bottom-left corner. Clicking this screen will bring up the user selection screen.
-
4
Click the power icon. This icon, which is in the bottom-right corner of the screen, resembles a circle with a line through its top. Doing so invokes a pop-up menu.
-
5
Hold down ⇧ Shift and click Restart. The Restart option will appear near the top of the pop-up menu, and you’ll find the ⇧ Shift key on the left side of your computer’s keyboard. This process will restart your computer and open the Advanced Options page.
- You may need to click Restart anyway after clicking Restart. If so, keep holding ⇧ Shift while you do.
-
6
Click Troubleshoot. It should be the middle option on the Advanced Options page, which is a light-blue screen with white text.
-
7
Click Advanced options. It’s the bottom option on this page.
-
8
Click Startup Settings. This option is on the right side of the page, just below the Command Prompt option.
-
9
Click Restart. It’s in the bottom-right corner of the screen. Clicking it will restart your computer to the Startup Settings menu.
-
10
Press the 4 key. Once Windows has restarted to the Startup Settings page, pressing 4 will select Safe Mode as your current start-up option.
-
11
Wait for your computer to finish restarting. Once it finishes restarting, your computer will be in Safe Mode.
- Alternatively, power down then power up your computer three times to get the blue startup screen, then navigate to Troubleshoot > Advanced Options > Startup Settings > Restart > 4 / 5.[1]
- To exit Safe Mode, restart your computer normally.
- Alternatively, power down then power up your computer three times to get the blue startup screen, then navigate to Troubleshoot > Advanced Options > Startup Settings > Restart > 4 / 5.[1]


Advertisement
-
1
-
2
Press the Power button again. Pressing this again will prompt your computer to turn on.
-
3
Hold down the Power button for about 10 seconds. You can prompt your computer to turn off as soon as you see the startup logo.
-
4
Press the Power button again. This will turn your computer back on.
-
5
Hold down the Power button for about 10 seconds. You can prompt your computer to turn off as soon as you see the startup logo.
-
6
Press the Power button again. This will turn your computer back on in winRE (Windows Recovery Environment).
-
7
Click Troubleshoot and Advanced Options. The Troubleshoot tile is the last option in the list next to an icon of some tools. Once you click that, you’ll need to click Advanced Options to see more.
-
8
Click Startup Settings and Restart. Your computer will then restart and show you a blue screen with more options.
-
9
Select 4 or 5. If you press 4, your computer will start in Safe Mode. If you press 5, your computer will start in Safe Mode with internet access.
- If pressing 4 or 5 doesn’t work, press F4 or F5 instead.[2]
- If pressing 4 or 5 doesn’t work, press F4 or F5 instead.[2]


Advertisement
-
1
Locate the F8 key. It’s in the top row of keys on your computer’s keyboard. To access the Safe Mode option in Windows 7, you’ll have to press F8 while restarting your computer.
-
2
Turn on your computer. Do so by pressing your computer’s power button. If your computer is already on but malfunctioning, first press and hold the power button to turn it off.
- You can also restart your computer by clicking the Windows logo in the bottom-left corner of the screen, clicking the power icon, and clicking Restart.
-
3
Repeatedly press F8. Do so immediately after your computer begins to turn on. This action will launch the boot menu, which is a black screen with white text.
- The goal here is to press F8 before you see the «Starting Windows» screen.
- If nothing happens while pressing F8, you may need to hold the Fn key while pressing F8.
-
4
Press the ↓ key until «Safe Mode» is selected. This key should be on the right side of your keyboard. When «Safe Mode» has a white bar over it, you’ve successfully selected it.
-
5
Press ↵ Enter. Doing so will both select Safe Mode as your restart option and continue the start-up process.
-
6
Wait for your computer to finish restarting. Once it finishes restarting, your computer will be in Safe Mode.
- To exit Safe Mode, restart your computer normally.


Advertisement
Add New Question
-
Question
My PC audio didn’t work after I did safe mode. Why?

In safe mode, Windows will only boot with core drivers. Your audio may have not booted up in safe mode.
-
Question
What is safe mode and how does it work?
Safe mode is a stripped down version of Windows. Most people use it to remove viruses. For example, if a virus locked your computer, you could start it up in safe mode to safely remove the virus.
-
Question
What should I do if my hard drive is corrupted and cannot open even in safe mode?
You need to use a bootable disk or storage stick with emergency startup and repair software.
See more answers
Ask a Question
200 characters left
Include your email address to get a message when this question is answered.
Submit
Advertisement
-
When you start Windows in Safe Mode, the operating system only loads the minimum of software that is required for the operating system to work.
-
Restarting your computer again should exit Safe Mode, but if that’s not the case, press Win + R, type msconfig and click OK. Once that opens, click the Boot tab and clear the box next to Safe boot and click OK again.
-
If Safe Mode isn’t working for you, try using Command Prompt within Safe Mode.
Thanks for submitting a tip for review!
Advertisement
-
Most third-party programs will not work in Safe Mode.
Advertisement
About This Article
Article SummaryX
1. Restart the computer.
2. Click the power icon.
3. Hold the Shift key as you click Restart.
4. Click Troubleshoot.
5. Click Advanced options.
6. Click Startup settings.
7. Click Restart.
8. Press the 4 key.
Did this summary help you?
Thanks to all authors for creating a page that has been read 1,439,793 times.
Is this article up to date?
Если вы уже достаточно давно используете Windows 10, то могли заметить, что нажатие клавиш F8 или SHIFT+F8 на клавиатуре для входа в безопасный режим больше не работает (может работать, когда используется более старое «железо»), как это было в Windows 7. Этот метод перестал работать, потому что процедура запуска Windows 10 стала быстрее, чем в «семерке». Однако это не означает, что в Windows 10 нет безопасного режима. Просто чтобы добраться до него, вы должны использовать другие методы.

Когда вы загружаетесь в безопасном режиме в Windows 10, операционная система загружает минимальный пользовательский интерфейс, содержащий только основные службы и драйверы, необходимые для его работы. Этот режим упрощает устранение неполадок, поскольку он не загружает дополнительные службы, которые могут привести к сбою Windows. Ниже будут перечислены все решения, которые можно использовать для запуска Windows 10 в безопасном режиме, прочтите это руководство до конца и выберите наиболее подходящий для себя.
Содержание
- Запускаем безопасный режим используя приложение Параметры Windows 10
- Используйте клавишу Shift на экране входа в Windows 10
- Прервите нормальный процесс загрузки Windows 10 несколько раз подряд
- Используйте установочный диск Windows 10 и командную строку
- Загрузитесь с USB-накопителя для восстановления Windows 10
- Используйте инструмент настройки системы (msconfig.exe) для включения безопасного режима
Запускаем безопасный режим используя приложение Параметры Windows 10
Если ваша система начинает зависать или происходят сбои в её работе по непонятным причинам, но вы можете войти в учетную запись, то используйте данный метод. Приложение Параметры позволяет легко войти в безопасный режим, для выполнения этой задачи выполните следующую процедуру:
- Совместно нажмите горячую клавишу Win+I, чтобы запустить приложение Параметры.
- В открывшемся окне нажмите раздел Обновление и безопасность, а затем на левой панели выберите Восстановление.
- Переключитесь на правую панель и нажмите кнопку Перезагрузить сейчас в разделе Особые варианты загрузки.

- Когда компьютер перезагрузится, появится экран Выбор действия, выберите пункт Поиск и устранение неисправностей. Если компьютер перезагрузился и открылся экран входа в систему, то повторите Шаги 1-3.
- Далее на экране Диагностика нажмите Дополнительные параметры.
- Когда откроется экран Дополнительные параметры выберите Параметры загрузки.
- Теперь для запуска безопасного режима Windows 10 нажмите кнопку Перезагрузить.
- После перезагрузки компьютера выберите из списка нужный параметр запуска безопасного режима, для этого нажмите нужную функциональную клавишу на клавиатуре, например, для запуска безопасного режима нажмите 4 или F4, для запуска безопасного режима с загрузкой сетевых драйверов 5 или F5, чтобы загрузить безопасный режим с поддержкой командной строки 6 или F6.


Используйте клавишу Shift на экране входа в Windows 10
- Если вы не можете войти в Windows 10, но операционная система догружается до экрана входа, удерживайте клавишу Shift на клавиатуре, нажмите кнопку питания на экране входа, затем выберите пункт Перезагрузка.
- Windows 10 перезагрузится и предложит вам несколько вариантов дальнейших действий, выберите Поиск и устранение неисправностей.
- В окне Диагностика выберите пункт Дополнительные параметры.
- На экране Дополнительные параметры выберите Параметры загрузки. В зависимости от сборки Windows 10 установленной на вашем компьютере вы можете сначала не увидеть эту опцию, тогда нажмите на ссылку Посмотреть другие параметры восстановления.
- На экране появится страница Параметры загрузки, также будет сообщено, что вы можете перезагрузить устройство, чтобы изменить дополнительные параметры загрузки, в том числе включить безопасный режим. Нажмите Перезагрузить.
- После того, как Windows 10 перезагрузится еще раз, вы можете выбрать, какие параметры загрузки вы хотите включить. Чтобы войти в безопасный режим, у вас есть три разных варианта:
- Стандартный безопасный режим — нажмите клавишу 4 или F4 на клавиатуре, чтобы запустить его.
- Безопасный режим с загрузкой сетевых драйверов — нажмите 5 или F5
- Безопасный режим с командной строкой — нажмите 6 или F6.
- Войдите в безопасный режим Windows 10 с учетной записью пользователя с правами администратора и внесите необходимые изменения.


Прервите нормальный процесс загрузки Windows 10 несколько раз подряд
- Если Windows 10 два или три раза не загружается нормально, то после этого она по умолчанию переходит в режим автоматического восстановления. Используя этот режим, вы можете загрузиться в безопасном режиме. Чтобы запустить режим автоматического восстановления, вы должны несколько раз подряд прервать нормальный процесс загрузки: используйте кнопку Перезагрузка или кнопку Питание на системном блоке вашего компьютера. Если вы используете кнопку Питание, возможно, вам придется удерживать ее нажатой не менее 4 секунд, чтобы выключить питание. Когда Windows 10 переходит в режим автоматического восстановления, первое, что вы видите, это экран, который сообщает вам, что операционная система находится в состоянии Подготовка автоматического восстановления.
- Затем вас могут попросить выбрать учетную запись, чтобы продолжить. Выберите учетную запись с правами администратора и введите ее пароль. Если вас не спрашивают об этой информации, переходите к следующему шагу.
- Подождите, пока Windows 10 попытается выполнить автоматическую диагностику вашего компьютера.
- На экране Автоматическое восстановление нажмите кнопку Дополнительные параметры.
- Затем выберите Поиск и устранение неисправностей.
- С этого момента шаги, которые вы должны предпринять, такие же, как те, которые мы показали в первом методе из этого руководства. Следуйте по пунктам Дополнительные параметры -> Параметры запуска -> Перезагрузка. Затем нажмите клавишу 4 или F4 на клавиатуре для загрузки в стандартном безопасном режиме, нажмите 5 или F5, чтобы загрузиться в безопасном режиме с загрузкой сетевых драйверов, или нажмите 6 или F6, чтобы перейти в безопасный режим с командной строкой.


Используйте установочный диск Windows 10 и командную строку
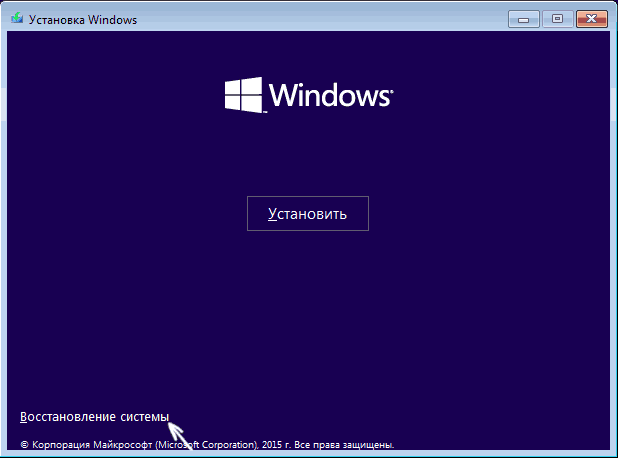
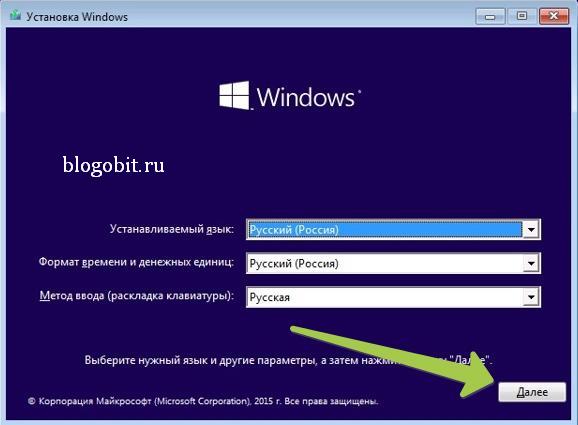
- Если у вас есть установочный DVD-диск с Windows 10 или USB-накопитель или вы можете создать его прямо сейчас, вы можете использовать его для загрузки вашего сломанного ПК с Windows 10 в безопасном режиме. Итак, загрузитесь с установочного диска или загрузочного USB-накопителя с Windows 10 и дождитесь загрузки среды установки. Выберите предпочитаемый язык и раскладку клавиатуры и нажмите Далее.
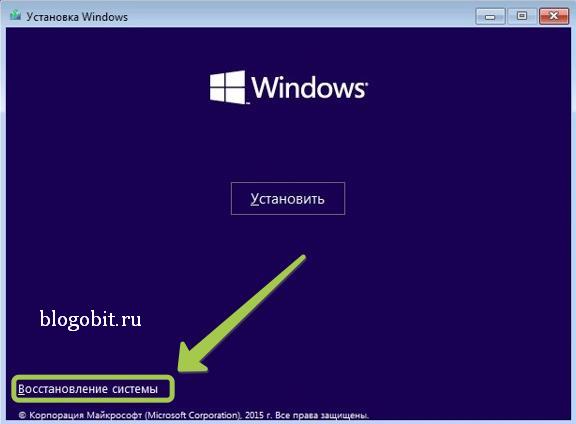
- Щелкните ссылку Восстановление системы в нижнем левом углу экрана.
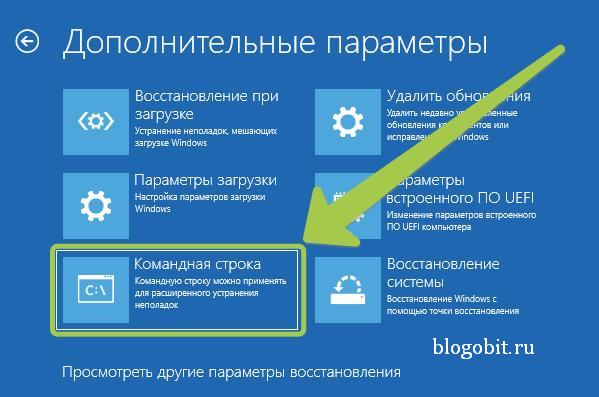
- Когда вас спросят, какой вариант вы предпочитаете, выберите Поиск и устранение неисправностей.
- На экране Дополнительные параметры нажмите Командная строка (Командную строку можно применять для расширенного устранения неполадок).
- После этого у вас на экране появится окно выбора учетной записи, выберите ту, которая обладает правами администратора, затем введите пароль от нее и нажмите кнопку Продолжить.
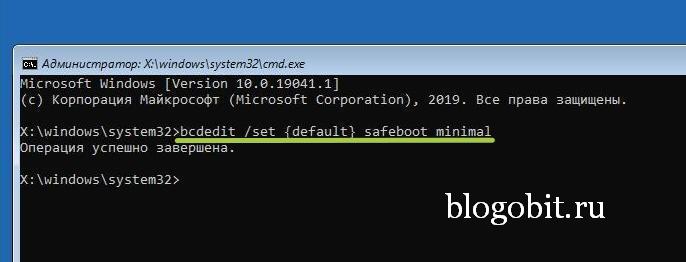
- После того, как откроется командная строка Windows 10 введите команду:
bcdedit / set {default} safeboot minimal
Нажмите Enter на клавиатуре, и через мгновение появится сообщение Операция успешно завершена.
- Закройте командную строку и выберите Продолжить в следующем окне.
- После перезагрузки компьютера Windows 10 перейдет в безопасный режим. Войдите в систему с учетной записью пользователя с правами администратора и внесите нужные изменения.


Предупреждение! Важная деталь этого метода заключается в том, что после процедур выше Windows 10 автоматически будет переходить в безопасный режим каждый раз, когда вы запускаете его, пока вы не отмените его. Чтобы отключить эту функцию и снова вернуть Windows 10 в нормальный режим запуска, повторите ту же процедуру еще раз и в командную строку введите команду:
bcdedit / deletevalue {default} safeboot
Загрузитесь с USB-накопителя для восстановления Windows 10
В Windows 10 вы можете создать USB-накопитель для восстановления системы. Поскольку ваш компьютер может не работать, создайте этот USB-накопитель восстановления на другом компьютере с Windows 10. Для этого в строке поиска Windows 10 введите Диск восстановления и следуйте дальнейшим инструкциям на экране. 
- Создав USB-накопитель для восстановления, используйте его для загрузки ПК или устройства с Windows 10 и, когда вас попросят загрузить его содержимое, сделайте это. На первом экране вас попросят выбрать раскладку клавиатуры. Выберите тот, который вы хотите использовать, или, если вы не видите его в списке, нажмите Просмотреть другие раскладки клавиатуры, чтобы вывести на экран полный список доступных раскладок.
- После того, как вы выбрали раскладку клавиатуры, которую хотите использовать, на экране Выбор действия перейдите в раздел Поиск и устранение неисправностей.
- Теперь повторите этапы, которые вы выполняли ранее, а точнее: Дополнительные параметры -> Параметры запуска -> Перезагрузка. Затем нажмите на клавиатуре клавишу 4 или F4 для запуска в стандартном безопасном режиме, нажмите клавиши 5 или F5, чтобы запустить компьютер в безопасном режиме с загрузкой сетевых драйверов, или нажмите клавиши 6 или F6, для загрузки ПК в безопасном режиме с командной строкой.

Используйте инструмент настройки системы (msconfig.exe) для включения безопасного режима
Если вы можете войти в Windows 10, одним из самых простых способов загрузки в безопасном режиме является использование инструмента Конфигурация системы. Многие пользователи знают этот инструмент по имени файла: msconfig.exe.
- Одновременно нажмите кнопки Win+R, чтобы открыть диалоговое окно Выполнить.
- В пустой области введите msconfig и нажмите OK, чтобы открыть окно Конфигурация системы.
- Теперь перейдите на вкладку Загрузка, затем установите флажок Безопасный режим и нажмите кнопку OK.
- После этого появится окно с предложением перезагрузить компьютер, нажмите кнопку Перезагрузка.
Предупреждение! После проделанных шагов Windows 10 будет постоянно загружаться в безопасном режиме, чтобы вернуть операционную систему в нормальный режим работы снимите флажок Безопасный режим на вкладке Загрузка.
What is Safe Mode and how to boot Safe mode Windows.
💡 For Windows 10, 8, 7; for laptop and computer.
Contents
- Safe Mode and Options
- Safe Mode after reboot (Windows 10,
- Using msconfig (Windows 10, 8, 7)
- Enable Advanced Boot Options (Windows 10,
- Safe Mode from System Restore (Windows 10,
- Safe mode from the command prompt (bcdedit)
- Safe mode using shutdown utility

Article in other languages:
🇪🇸 – Cómo iniciar Windows en Modo Seguro
🇷🇺 – Как зайти в безопасный режим Windows
🇫🇷 – Comment entrer en Mode sans échec Windows
🇩🇪 – So starten Sie Windows 10 im abgesicherten Modus
🇳🇱 – Hoe start je Windows in de veilige modus
Safe Mode and Options
Safe Mode is a diagnostic mode of a computer operating system. Safe mode is intended to help fix most, if not all problems within an operating system.
Wikipedia
Booting in Safe Mode Windows is often used to remove viruses and programs that cannot be removed during normal mode of the Operating System (OS).

In this mode, the minimum set of system programs and services necessary to start the system is loaded.
Starting non-system services from startup and not system programs is ignored.
🔔 The ability to work in this mode is limited.
There are three modes for starting Windows Safe Mode:
| Safe Mode | The minimum set of system services is loaded, the launch of not system programs and services is disabled. |
| Safe mode with Networking | The minimum set of system services and network services is loaded, the launch of not system programs and services is disabled. |
| Safe mode with Command Promt | The minimum set of system services + network services is loaded, the launch of not system programs and services is disabled. The command line starts, before starting Windows Explorer. |
The mode is designed to diagnose startup, fix problems and errors OS.
Safe mode after reboot (Windows 10,
An easy way to reboot Windows in safe mode.
💡 Suitable for Windows 10, 8.
- Press the START button;
- Click the Power button;
- Press and hold the SHIFT button and then click Restart. The advanced Windows boot menu is loading;
- Select the Troubleshoot;
5. In the Troubleshoot window, select the Advanced options;
6. In the Advanced options window, select the Startup Settings;
7. In the Startup Setting window, click the Restart button;

8. After restarting your computer, In the Boot Options window (Advanced Boot Options), select the required Windows boot mode.
Windows will boot in Safe mode.
To exit Safe Mode, restart your computer.
Using msconfig (Windows 10, 8, 7)
We use the msconfig utility to boot Windows in safe mode.
💡 Suitable for Windows 10, 8, 7.
- Right-click on the START button and select Run or press the key combination Windows+R;
- Enter the name of the msconfig utility and click OK;
- Switch to the Boot tab, check the Safe Mode checkbox, select Minimal and press ОК;
- Click Restart to start Windows Safe Mode.
To exit Safe mode, restart your computer.
🔔 The msconfig utility provides additional options for starting the computer (disabling the launch of services and applications).
Enable Advanced boot options (Windows 10,
💡 Suitable for Windows 10, 8.
In Windows 7, XP, when loading the OS, pressing the F8 button opened the Advanced boot options menu.
In Windows 10, 8, the call to this menu with the F8 button must be turned on manually.
- Run the command prompt as administrator;
- Enter the command:
bcdedit /set {default} bootmenupolicy legacy
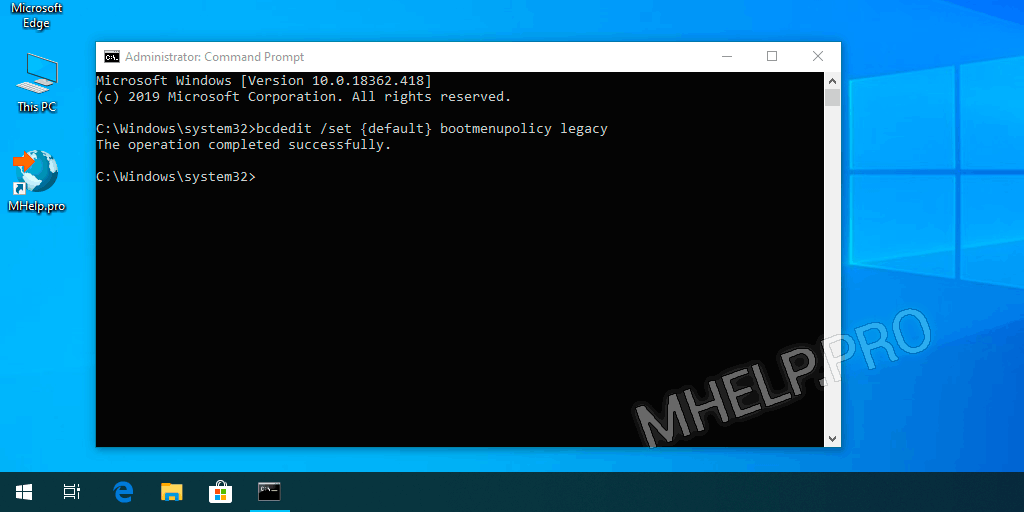
Close the command prompt window, restart the computer.
Before loading the operating system, press the F8 button, the Advanced boot options menu opens, where we can choose several options for starting Safe Mode or other Windows boot options.
🔔 If you have a laptop, you may have to press the Fn + F8 key combination.
Safe Mode from System Restore (Windows 10,
💡 Suitable for Windows 10, 8.
You can boot Safe Mode Windows 10, 8 from Recovery mode, after an incorrect OS boot.
After three consecutive power outages when loading Windows 10, 8, the system will start to boot Recovery mode.

Select See advanced repair options recovery options.
Further, the launch of Safe Mode will occur as in paragraph – Safe Mode after reboot (Windows 10, 8).
🔔 We dont recommend using this method of loading Windows Safe Mode, as this can cause permanent damage to the system!
Safe mode from the command prompt (bcdedit)
The bcdedit command changes persistent Windows boot options. After enabling Safe Mode, enter the command to change the configuration and disable booting into Safe Mode.
You can also use the bcdedit command in the command prompt in Windows Recovery mode.
You can boot Windows in Safe Mode by running the bcdedit command in the Command Prompt running with administrator rights.
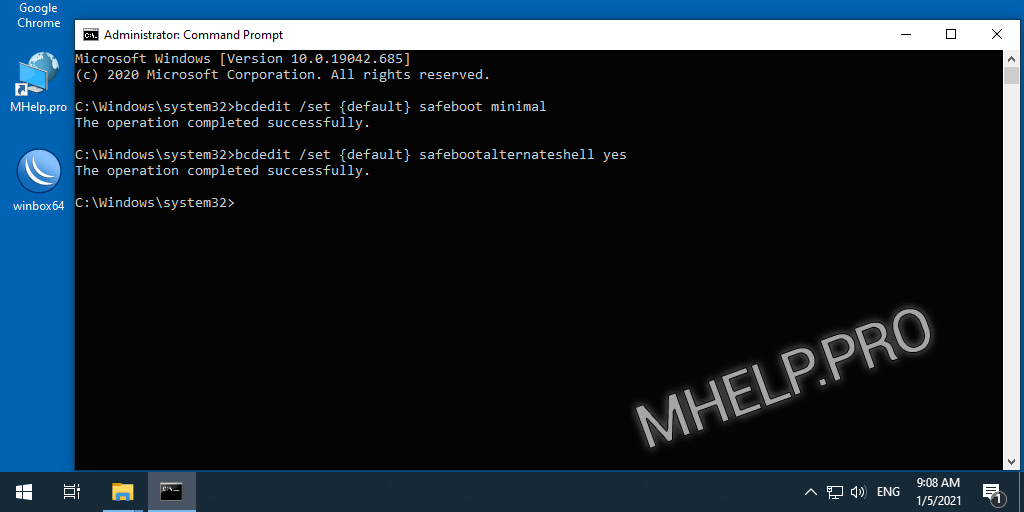
Enable Safe Mode:
bcdedit /set {default} safeboot minimal
Enable Safe Mode with Networking:
bcdedit /set {default} safeboot network
Enable Safe Mode with Command Prompt (enter two commands):
bcdedit /set {default} safeboot minimal
bcdedit /set {default} safebootalternateshell yes
Restart your computer to apply the new configuration settings.
To disable booting Safe Mode, in Windows configuration, run:
bcdedit /deletevalue {default} safeboot
Safe mode using shutdown utility
The shutdown utility is a built-in Windows program that allows you to restart, shutdown, hibernate, or end a user session.
Run in Command Prompt or PowerShell:
shutdown.exe /r /o
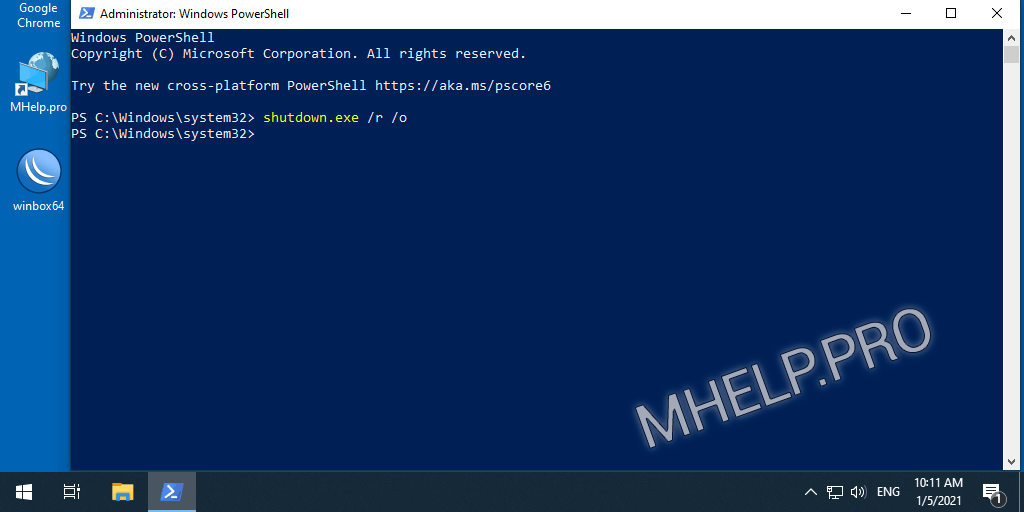
After rebooting, in the System Restore window, select the required option.
Learn more about the startup parameters of the shutdown utility – here.
I hope you were able to boot Windows in Safe Mode in a convenient way.
How to boot Windows Safe Mode:
- SHIFT button and Reboot
Hold the SHIFT button and press Reset button. More…
- Msconfig utility
Run the msconfig utility, select the Safe Mode – Minimal option. More…
- Enabling the Advanced Boot Menu
Use the bcdedit command to enable the Advanced boot menu and the press F8 button (as on Windows 7, XP) to call up the menu, when the Windows boot. More…
- System shutdown
Three times, power off the system to enable the Recovery mode and boot Windows Safe Mode. More…
These were the available options for boot Safe Mode Windows 10, 8, 7.
🟢 How to boot Safe Mode in Windows 10, 8, 7 was discussed in this article. I hope you can now configure Windows to start in Safe Mode. However, if you run into any problems, do not hesitate to write in the comments. I will try to help.