
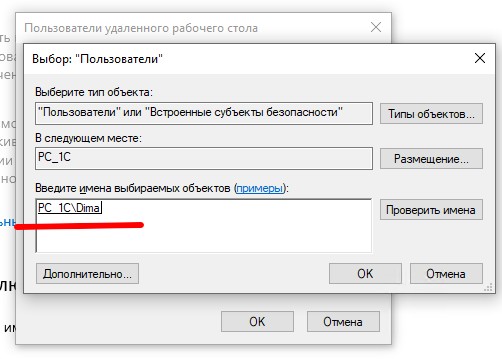
Can multiple users remote desktop at the same time? This article will uncover the answer.
NOTE: Our original article targeted Windows 10 users who need to implement multiple remote desktop connections. Fortunately, the information we offer here will also work with Windows 11, the newest version of the popular operating system. Read on to learn how to get around the limitations of remote desktop on a Windows system.
For users operating Windows 10 Pro and Enterprise editions (Home edition is not compatible), they are able to set up the remote desktop connections in Windows 10 via the Remote Desktop Protocol (RDP) Services. However, multiple remote desktop connections aren’t possible meaning that only one remote session can run at a time.
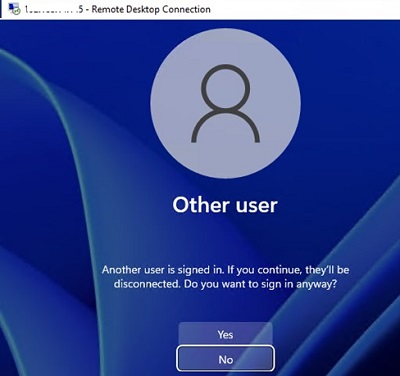
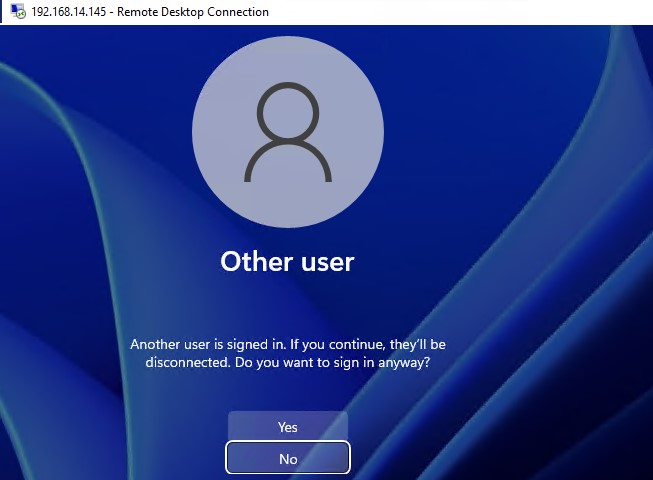
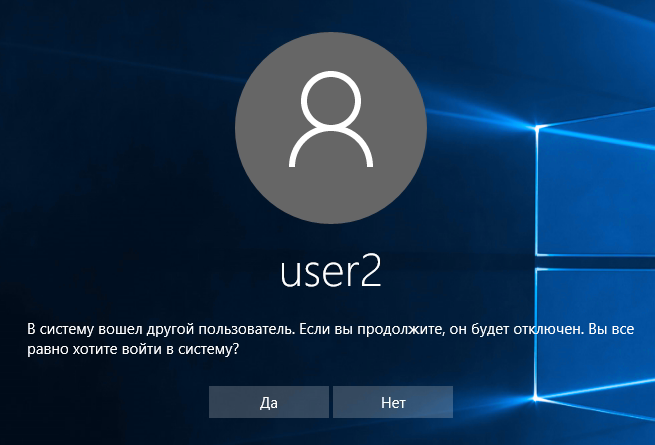
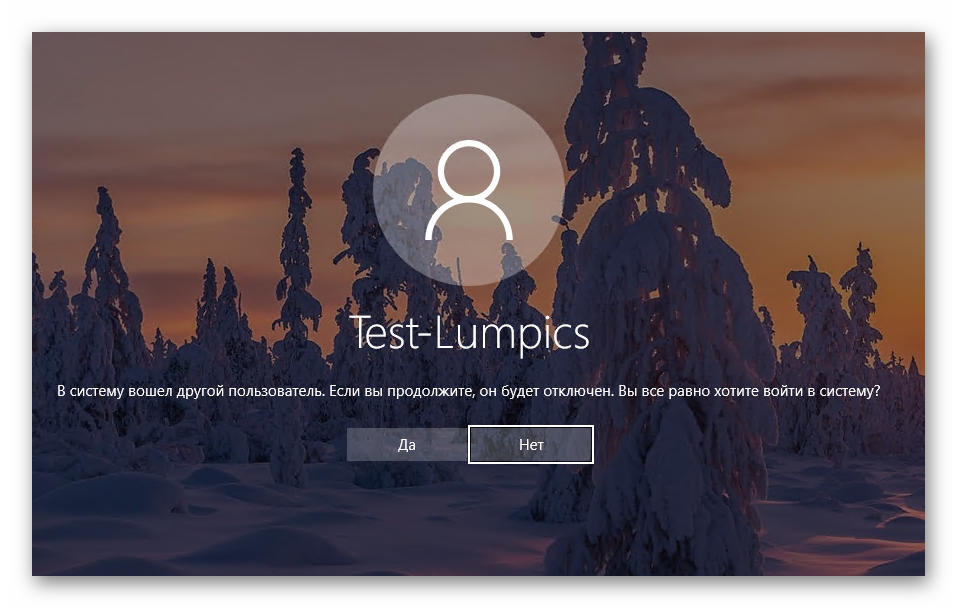
If an additional user attempts to run a second RDP session, they’ll receive a pop-up warning telling to disconnect the first/previous user session to proceed.
See the exact message below:
“Another user is signed in. If you continue, they’ll be disconnected. Do you want to sign in anyway?”
Now we’ll cover the most critical limitations of Remote Desktop Service on Windows 10 (as well as any previous versions).
- Remote Desktop Protocol is only supported by specific Windows editions (Pro and Enterprise.) Alternatively, Windows Home users cannot receive incoming remote desktop connections (and this can only be solved via the RDP Wrapper Library).
- Only a single RDP session/connection is allowed at a time, and if a secondary user tries to run an additional session, they’ll either be prompted to cancel their connection or proceed and automatically close the other connection already in use.
- If users work on a local computer console, newly created RDP connections will terminate the console session (RDP sessions can also be forcibly ended if users attempt to log in locally).
In all actuality, the Windows 10 multiple remote desktop sessions limitations are restricted per license and have nothing to do with technical limitations.
Thus, the user volume restrictions don’t permit users to create terminal RDP servers based on a single workstation that could be used by multiple individuals.
Microsoft’s policy towards multiple remote desktop sessions is clear: if users want a Remote Desktop server, then they should purchase a Windows Server license, RDS CALs, and then install and configure the role of the Remote Desktop Session Host (RDSH).
From a technical perspective, any version of Windows running enough RAM can enable concurrent remote desktop sessions for multiple users. An average of 150-200 MB of memory is needed per user session (without accounting for any apps launched during the session).
Quite frankly, the only limitations surrounding remote desktop multiple users capabilities, in theory, are based entirely on computer resources.
Now it’s time to review two methods for Windows 10 to allow multiple remote desktop connections. This is done via the RDP Wrapper app, and by editing the “termsrv.dll” file.
Please Note. System modifications described in this article are considered a violation of the Microsoft License Agreement, and with all the consequences that come with it. Perform them at your own risk.
How To Set Up Multiple Remote Desktop Connections
One option to enable remote desktop for multiple users on Windows 10 is by using the RDP Wrapper Library. The RDP Wrapper project permits users to support more than one simultaneous RDP session on Windows 10 (without replacing the termsrv.dll file).
RDP Wrapper acts as a layer between the Remote Desktop Service, and Service Control Manager (SCM). RDPWrap lets users enable support for multiple simultaneous RDP sessions, as well as enabling support of RDP Hosts on previously inaccessible Windows 10 versions, like Home.
This app doesn’t alter the termsrv.dll file, only loading the “termsrv” library with the altered parameters necessary for simultaneous connection. Meaning, RDPWrap will even work if the termsrv.dll file updates, meaning that users don’t have to dread Windows updates.
Please note: Prior to the installation of the RDP Wrapper library, users must ensure they’re using the original (unpatched) version of the “termsrv.dll” file. If they don’t use the unpatched file, the app may not function properly or won’t function at all.
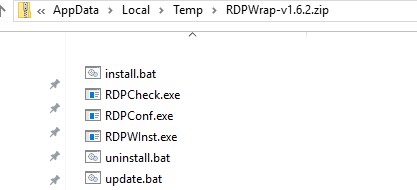
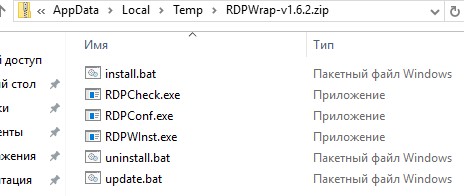
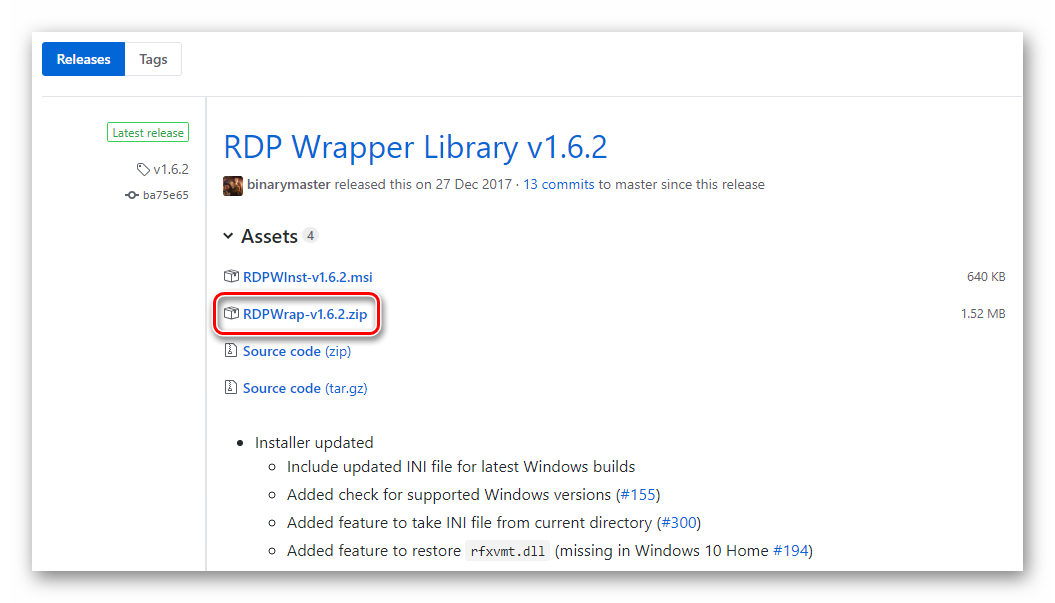
Users can download RDP Wrapper from the GitHub Repository (v1.6.2 is the latest available version of RDP Wrapper Library).
According to the information on the developer page, all versions of Windows are supported (Windows 10 support is available up to the 1809 build).
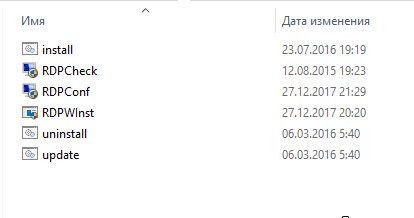
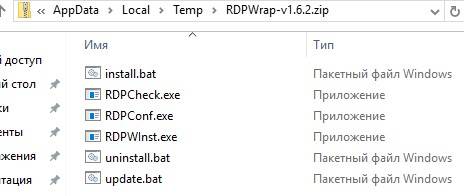
Users will find the following files contained within the RDPWrap-v1.6.2.zip archive:
- • RDPWinst.exe (RDP Wrapper Library installation/uninstallation program).
- • RDPConf.exe (RDP Wrapper configuration utility).
- • RDPCheck.exe (Local RDP Checker, RDP check utility).
- • install.bat, uninstall.bat, update.bat (batch files for install, uninstall, and updates for RDP Wrapper).

How to use RDP Wrapper to enabling multiple RDP Sessions in Windows 10
-
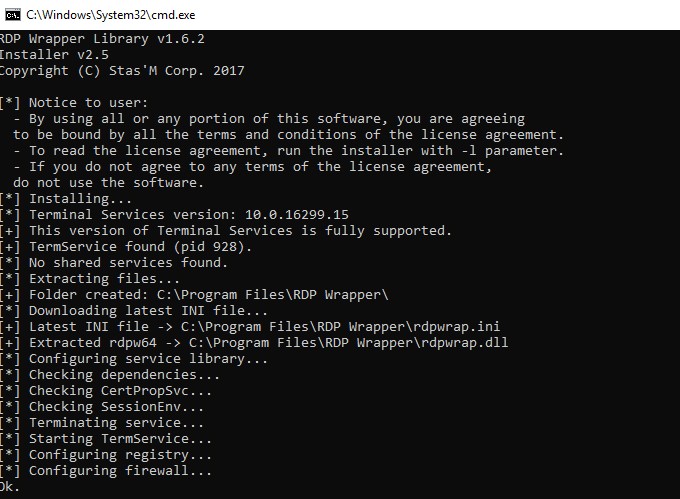
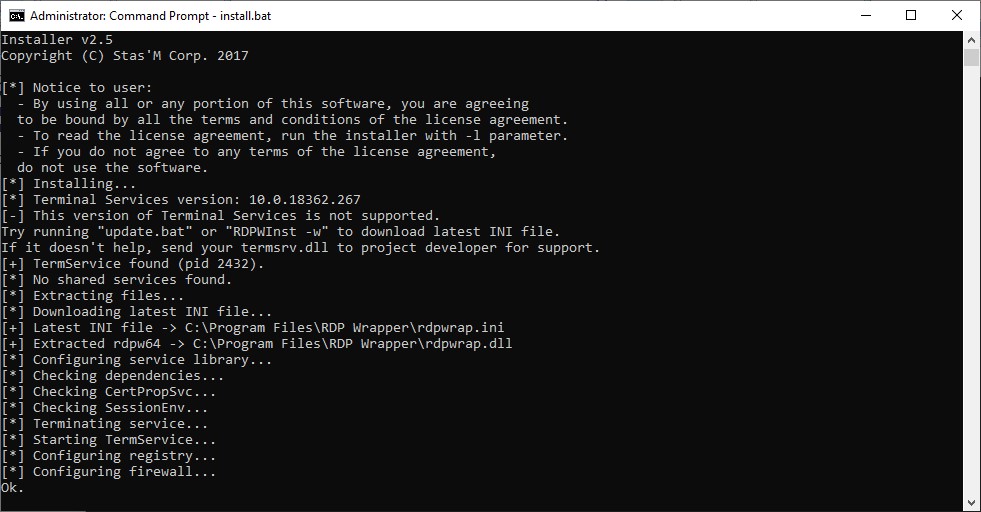
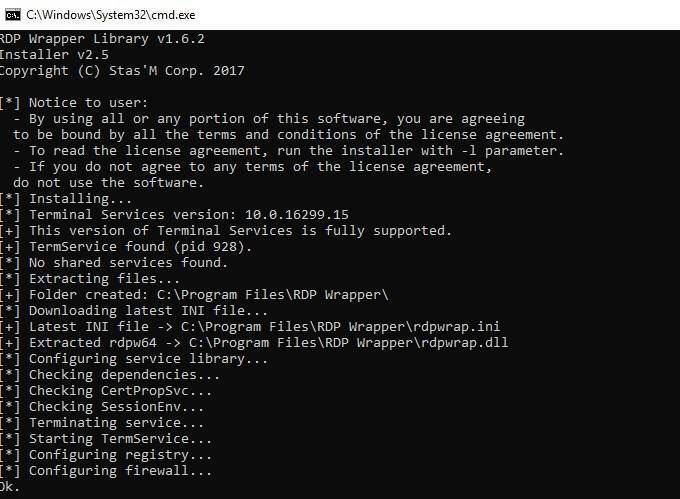
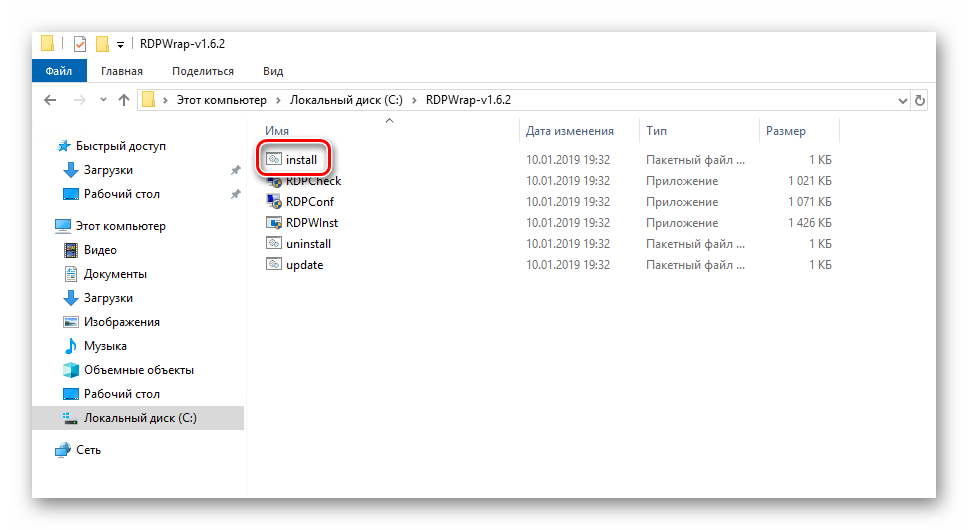
Run the install.bat with the Administrator privileges to install RDPWrap. The utility will access the GitHub site for the most recent versions of the “ini” file during the installation.
RDP Wrap will be installed in the C:Program FilesRDP Wrapper directory.

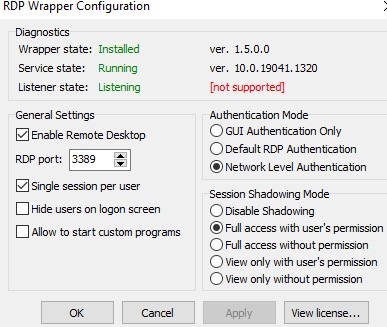
- Once installation is complete, users should run the RDPConfig.exe.
-
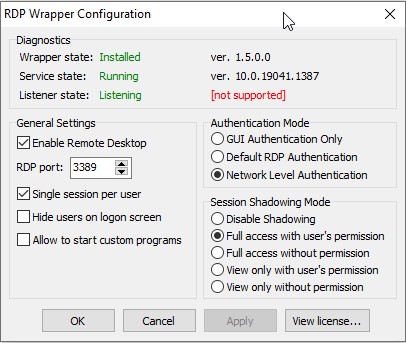
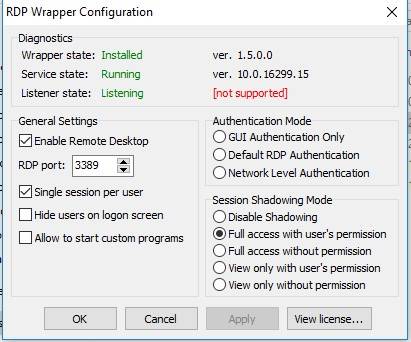
In the “Diagnostics” section, ensure all elements are green (see below).

- Run the RDPCheck.exe, then attempt to start a secondary RDP session (or connect multiple RDP sessions from remote computers).


That’s it! Now the Windows 10 machine should permit multiple users to access different RDP sessions simultaneously.
All Windows editions (Windows 7, Windows 8.1, and Windows 10) are supported by the RDPWrap utility. Meaning that users can establish a terminal (RDS) server on any desktop instance of Windows.
Additional noteworthy RDP Wrapper features:
- • The “Hide users on logon screen” option allows administrators to conceal user lists from the Windows Logon Screen.
- • If users disable the “Single session per user” option, more than one simultaneous RDP session will work under the same user account (the registry parameter “fSingleSessionPerUser = 0” is set under the key “HKLMSYSTEM CurrentControlSetControlTerminal ServerfSingleSessionPerUser”).
- • Users can edit the Remote Desktop port number from 3389 to a different number of their choosing.
- • The “Session Shadowing Mode” section lets users reconfigure the remote control (shadow) connection permissions to Windows 10 RDP sessions.
Modifying Termsrv.dll File to Allow Multiple RDP Session
To disable restrictions on the number of concurrent RDP user connections in Windows 10 without RDP Wrapper, users can replace the original “termsrv.dll” file (this is the library file utilized by Remote Desktop Service).
The “termsrv.dll” file can be found in the C:WindowsSystem32 directory.
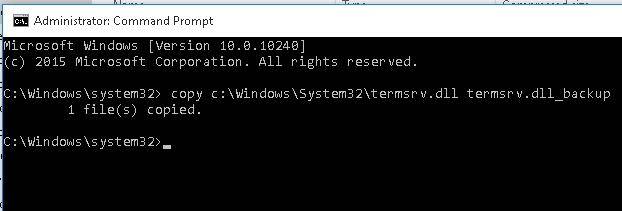
Please note: Prior to editing or replacing the “termsrv.dll” file, we recommend creating a backup copy as a precaution. That way, if anything doesn’t work out how you planned, it will be easy to revert back to the original file configuration.
copy c:WindowsSystem32termsrv.dll termsrv.dll_backup
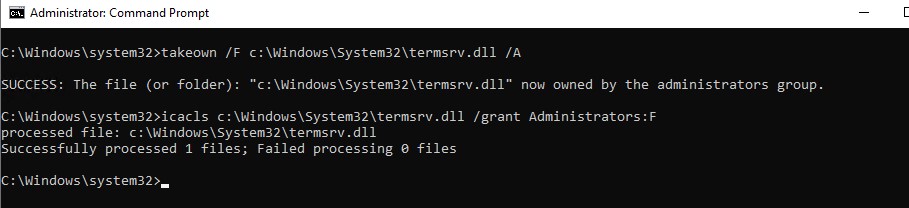
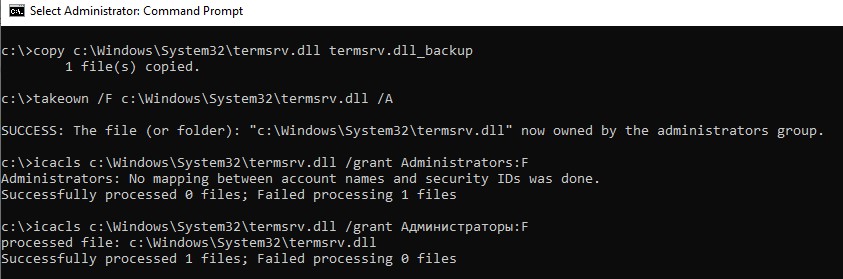
Before a user can alter the “termsrv.dll” file, they must become its owner, and give the Administrators group permission to it.
Using the Command Prompt is the simplest way to achieve this. Change the file owner from “TrustedInstaller” to a local administrators group using the command shown below:
takeown /F c:WindowsSystem32termsrv.dll /A
Users should now grant the local administrators group “Full Control” permission on the “termsrv.dll” file:
icacls c:WindowsSystem32termsrv.dll /grant Administrators:F
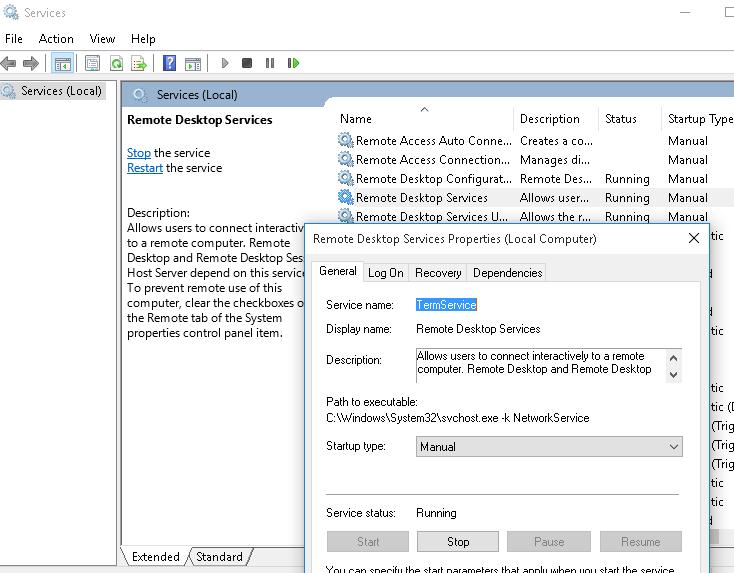
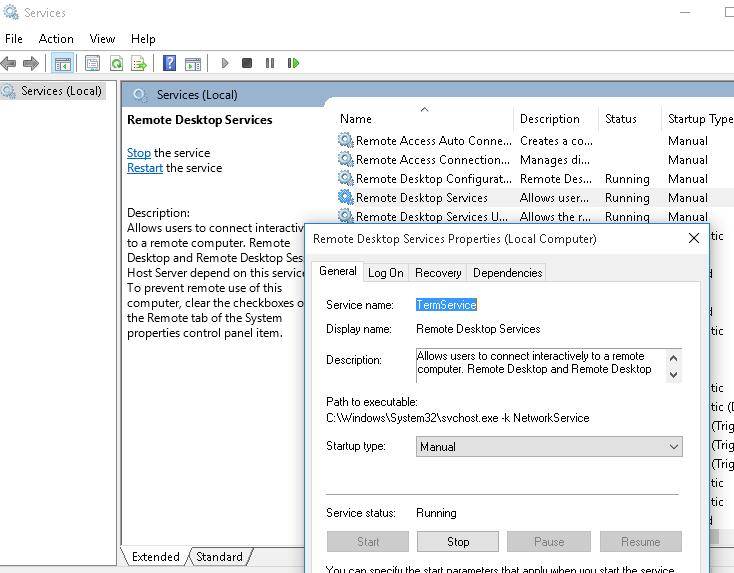
From there, end the Remote Desktop Service (TermService) via the services.msc console (as shown below) or from the Command Prompt:
Net stop TermService

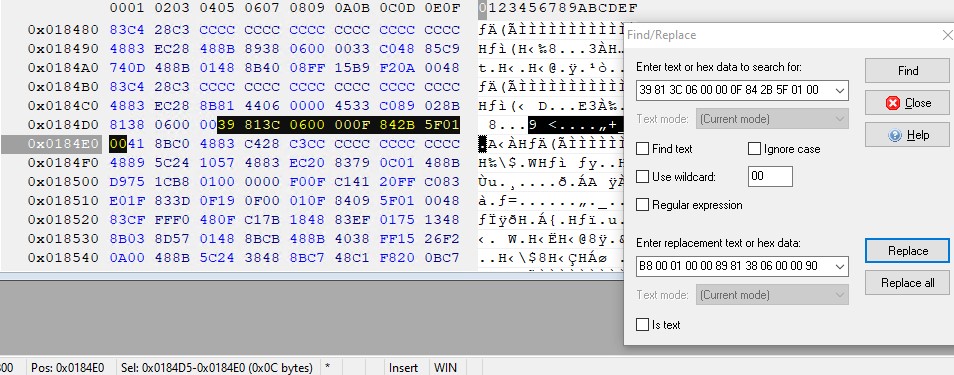
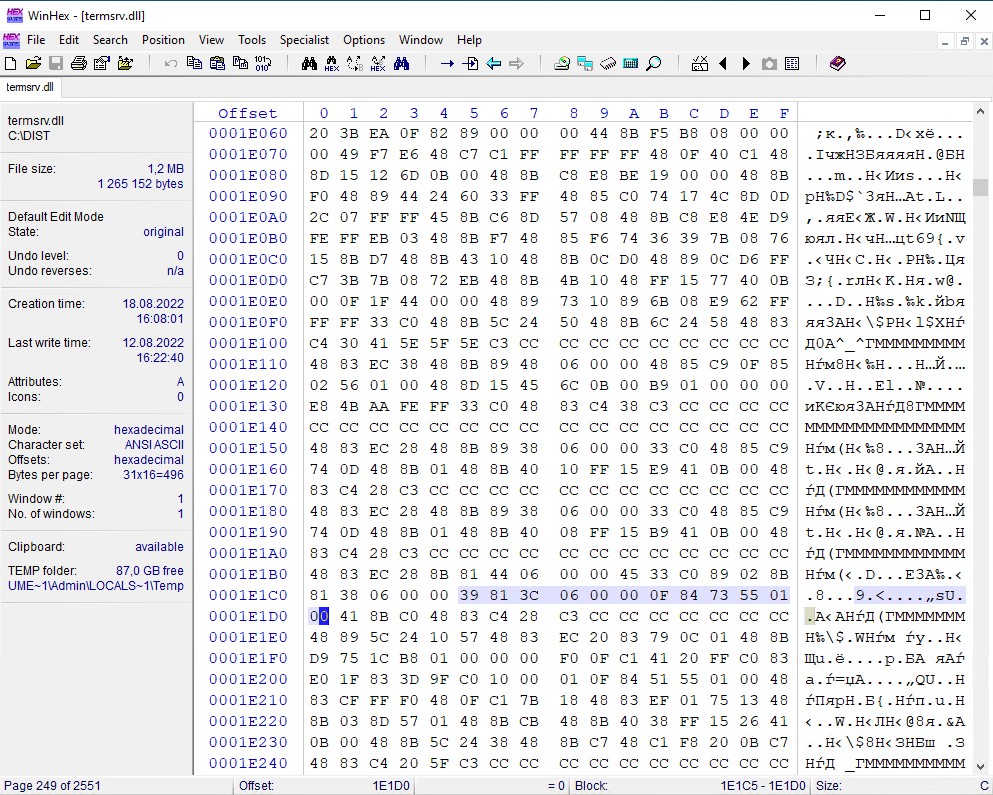
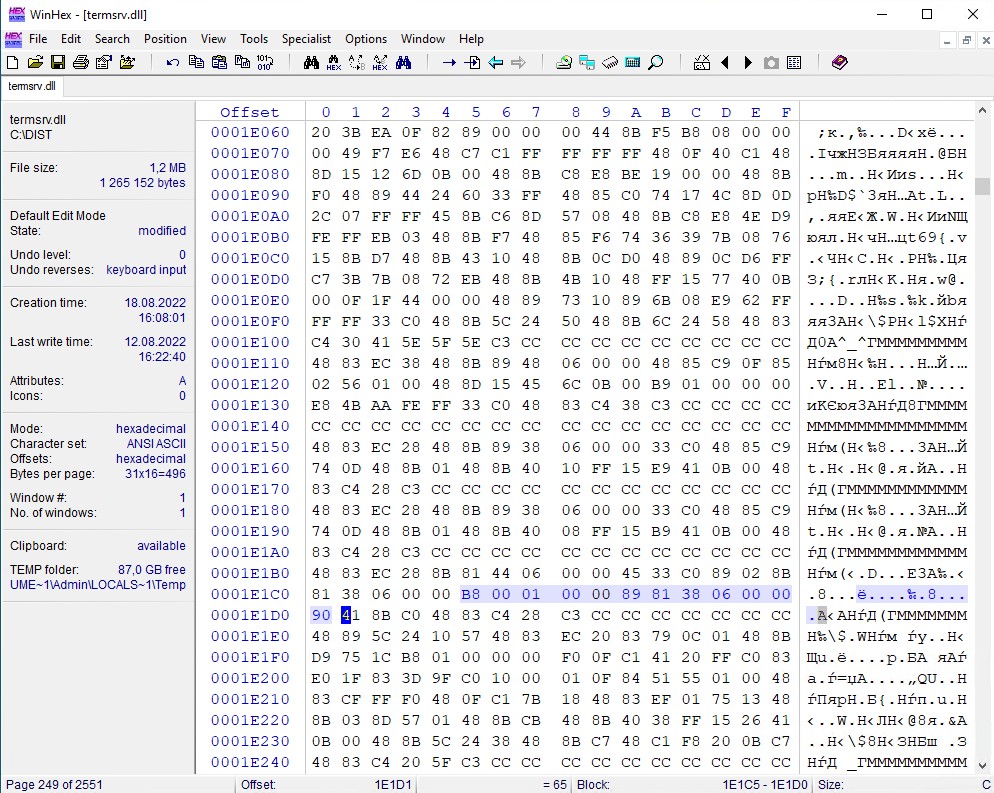
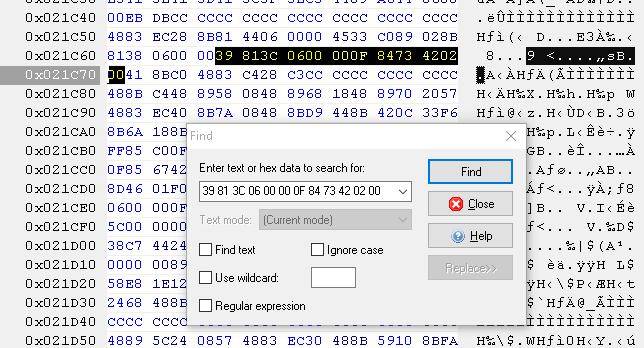
Open the “termsrv.dll” file using any HEX editor. Dending on the Windows 10 build installed on the machine, users will need to locate and replace the line
39 81 3C 06 00 00 0F 84 XX XX XX XX
and replace it with
B8 00 01 00 00 89 81 38 06 00 00 90
The final 4 pairs are unique to each version of Windows, so remember to replace the entire 12 pairs with the whole string.
Run TermService after saving the edited file.
If anything went wrong, and/or users encounter issues with Remote Desktop service, end the service and replace the modified “termsrv.dll” file with the original version of the file:
copy termsrv.dll_backup c:WindowsSystem32termsrv.dll
The advantage of the method of enabling multiple RDP sessions in Windows 10 by replacing the termsrv.dll file is that antiviruses do not respond on it (unlike the RDPWrap, which is detected by many antiviruses as a Malware/HackTool/Trojan).
The main drawback is that you will have to manually edit the termsrv.dll file each time you upgrade the Windows 10 build (or when updating the version of the termsrv.dll file during the installation of monthly cumulative updates).
Final thoughts on both methods for enabling multiple remote desktop sessions
The advantage of enabling multiple RDP sessions in Windows 10 by replacing the “termsrv.dll” file is that antiviruses don’t respond to it (whereas RDPWrap is treated like a Malware/HackTool/Trojan by many antivirus software).
The most notable disadvantage when using the “termsrv.dll” file method, is that users must manually edit the “termsrv.dll” file each and every time they upgrade their Windows 10 build.
They also need to re-edit the file when updating the version of the termsrv.dll file during monthly cumulative update installations.
Remote users can connect to their Windows 10 and 11 computers via the Remote Desktop Services (RDP). It is enough to enable RDP in the device settings and connect to the computer using any Remote Desktop client. But there is a restriction on the number of simultaneous RDP sessions – only one remote user can work simultaneously. If you try to open a second RDP session, a warning will appear asking you to disconnect the first user’s session.
Another user is signed in. If you continue, they’ll be disconnected. Do you want to sign in anyway?
All desktop Windows versions (including Win 10 and 11) have a number of restrictions on the Remote Desktop Service usage:
- You can remotely connect via RDP only to higher Windows editions (Professional and Enterprise). In Windows Home and Single Language editions the incoming remote desktop connections are forbidden;
- Only one simultaneous RDP connection is supported. When you try to open a second RDP session, the user is prompted to close the active connection;
- If there is a user who works on the console of the computer (locally), then when you try to create a new remote RDP connection, the console session will be disconnected. A remote RDP session will be also forcibly disconnected if the user will try to log in locally.
Actually, the number of simultaneous RDP connections on Windows is limited by the license (and not by any technical aspect). Thus, this restriction doesn’t allow to create a terminal RDP server based on the workstation that can be used by multiple users. Microsoft’s logic is simple: if you need a terminal server – buy a Windows Server license, RDS CALs, install and configure the Remote Desktop Session Host (RDSH) role.
Technically, any Windows version with a sufficient amount of RAM can support the simultaneous operation of several dozens of remote users. On average, 150-200 MB of RAM is required for one user session (excluding running apps). Those, the maximum number of simultaneous RDP sessions is theoretically limited only by computer resources.
Let’s consider two ways on how to allow simultaneous RDP connections on Windows 10 and 11: using the RDP Wrapper tool or patching the termsrv.dll system file.
Contents:
- RDP Wrapper: Enable Multiple RDP Sessions on Windows
- RDP Wrapper Not Working on Windows 10
- Modify the Termsrv.dll to Enable Multiple RDP Sessions
- Patching Termsrv.dll on Windows Using PowerShell
Note. System modifications described in the article are considered as a violation of the Microsoft License Agreement and you may perform them at your own risk.
RDP Wrapper: Enable Multiple RDP Sessions on Windows
The RDP Wrapper Library OpenSource project allows you to enable multiple RDP sessions on Windows 10 without replacing the termsrv.dll file. This tool works as a layer between SCM (Service Control Manager) and the Remote Desktop Services. RDPWrap allows you to enable not only support for multiple simultaneous RDP connections but also to build an RDP server on Windows Home editions. RDP Wrapper doesn’t make any changes to the termsrv.dll file, it’s just loading termsrv library with the changed parameters.
Thus, the RDPWrap will work even in the case of termsrv.dll file update. It allows you not to be afraid of Windows updates.
Important. Before installing RDP Wrapper, it is important to make that you are using the original (unpatched) version of the termsrv.dll file. Otherwise, RDP Wrapper may become unstable or not start at all.
You can download the RDP Wrapper from the GitHub repository https://github.com/binarymaster/rdpwrap/releases (the latest available version of the RDP Wrapper Library is v1.6.2). The project hasn’t been updated since 2017, but it can be used in all new builds of Windows 10 and even Windows 11.
The RDPWrap-v1.6.2.zip archive contains some files:
- RDPWinst.exe — an RDP Wrapper Library install/uninstall the program;
- RDPConf.exe — an RDP Wrapper configuration tool;
- RDPCheck.exe —an RDP check utility (Local RDP Checker);
- install.bat, uninstall.bat, update.bat — batch files to install, uninstall, and update RDP Wrapper.
To install RDPWrap, run the install.bat file as an administrator. The program will be installed to the C:Program FilesRDP Wrapper directory.
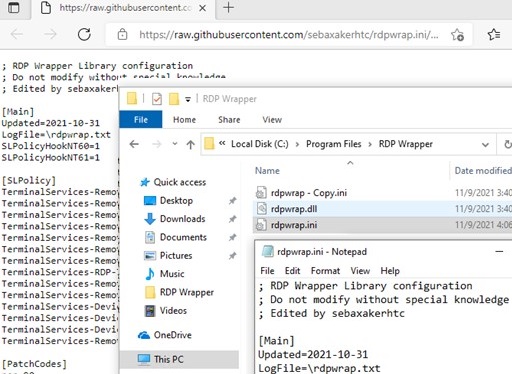
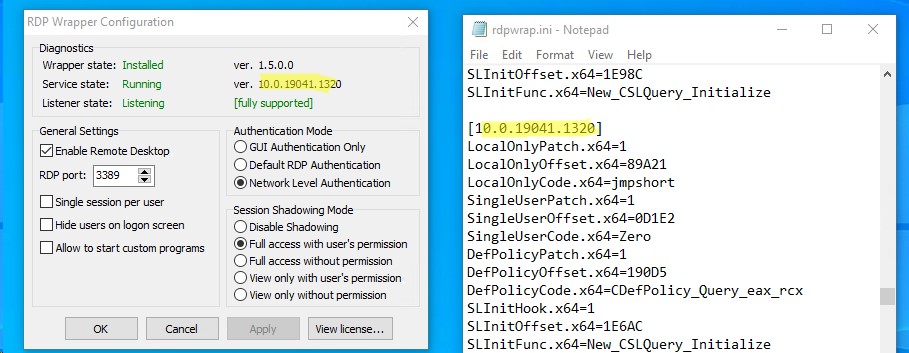
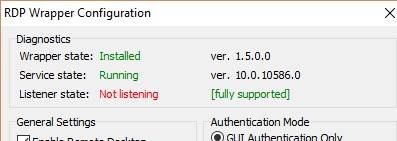
After the installation is complete, run the RDPConfig.exe. Most likely, immediately after installation, the tool will show that the RDP wrapper is running (Installed, Running, Listening), but not working. Note the red warning [not supported]. It reports that this version of Windows 10 (ver. 10.0.19041.1320) is not supported by the RDPWrapper.
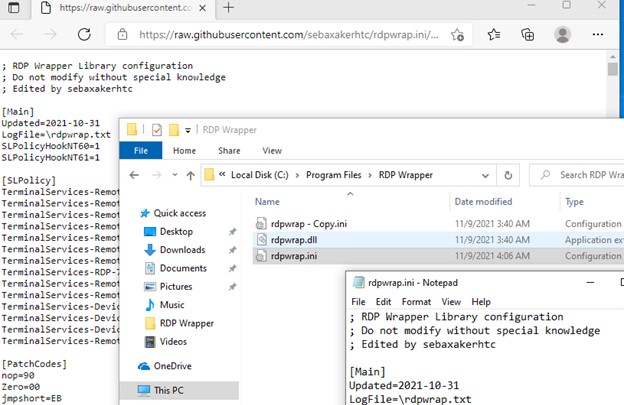
The fact is that for each version of Windows 10 there must be a description in the rdpwrap.ini configuration file. Your config file simply doesn’t have any settings for your Windows 10 build.
The current version of the rdpwrap.ini file can be downloaded here https://raw.githubusercontent.com/sebaxakerhtc/rdpwrap.ini/master/rdpwrap.ini
Manually copy the contents of this page to the “C:Program FilesRDP Wrapperrdpwrap.ini” file. Or download the file using the PowerShell cmdlet Invoke-WebRequest (you must first stop the Remote Desktop service):
Stop-Service termservice -Force

Invoke-WebRequest https://raw.githubusercontent.com/sebaxakerhtc/rdpwrap.ini/master/rdpwrap.ini -outfile "C:Program FilesRDP Wrapperrdpwrap.ini"
Restart your computer, run the RDPConfig.exe tool. Check that all items are green in the Diagnostics section and the caption [Fully supported] appears. The screenshot below shows that the RDP Wrapper with this new config works fine on Windows 11 as well.
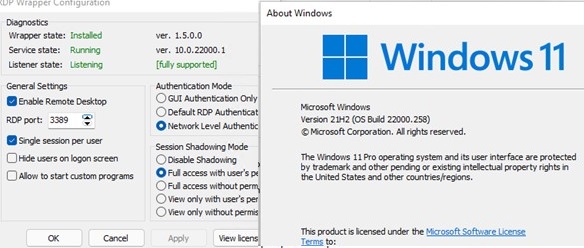
Try to establish several RDP sessions to your computer (use any RDP client: mstsc.exe, rdcman, etc.). It worked out well (you can even use saved RDP credentials)! Now your Windows 10 allows two (and more) remote users to use different RDP sessions simultaneously.

The RDPWrap tool is supported in all Windows editions, so you can build your own terminal (RDS) server on any Windows device.
Also, RDP Wrapper allows to:
- Enable Remote Desktop;
- The option Hide users on logon screen allows you to hide the list of users from the Windows Logon Screen;
- If you disable the Single session per user option, multiple simultaneous RDP sessions will be allowed under the same user account (the registry parameter fSingleSessionPerUser = 0 is set under the reg key
HKLMSYSTEM CurrentControlSetControlTerminal ServerfSingleSessionPerUser); - RDP Port — you can change the Remote Desktop port number from TCP 3389 to any other;
- In the Session Shadowing Mode section, you can configure the remote control (shadow) connection mode to RDP sessions.
RDP Wrapper Not Working on Windows 10
In some cases, the RDP Wrapper tool doesn’t work as expected and you cannot to your Windows host using multiple RDP sessions.
If the utility showed [not supported] in the status section, then the rdpwrap.ini file doesn’t contain configuration for your Windows build. Update the rdpwrap.ini file as described above.
If the RDP Wrapper doesn’t work after updating the rdpwrap.ini file, try opening the rdpwrap.ini file and looking for a description section for your Windows version. How to know if there is support for your version of Windows in the rdpwrapper config file?
The screenshot below shows that for my version of Windows 10 (10.0.19041.1320) there are two description sections:
[10.0.19041.1320]
…..

[10.0.19041.1320-SLInit]

…..
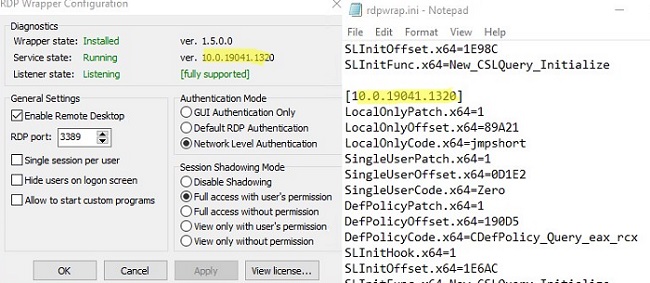
If there is no section in the config file for your version of Windows, try using Google to search for the rdpwrap.ini strings for your Windows build. Add the lines you find to the end of the file.
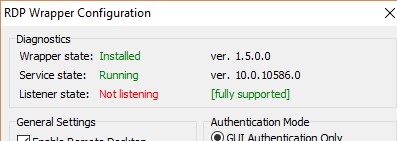
If after installing security updates or upgrading the Windows 10 build, RDP Wrapper doesn’t work correctly, check if the “Listener state: Not listening” is displayed in the Diagnostics section.
Try updating the rdpwrap.ini file, and then reinstalling the service:
rdpwinst.exe -u

rdpwinst.exe -i
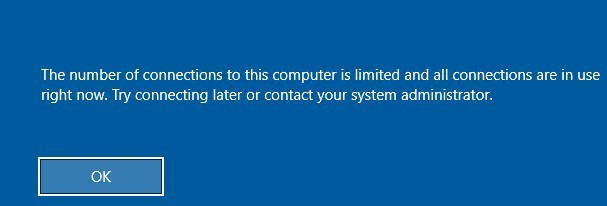
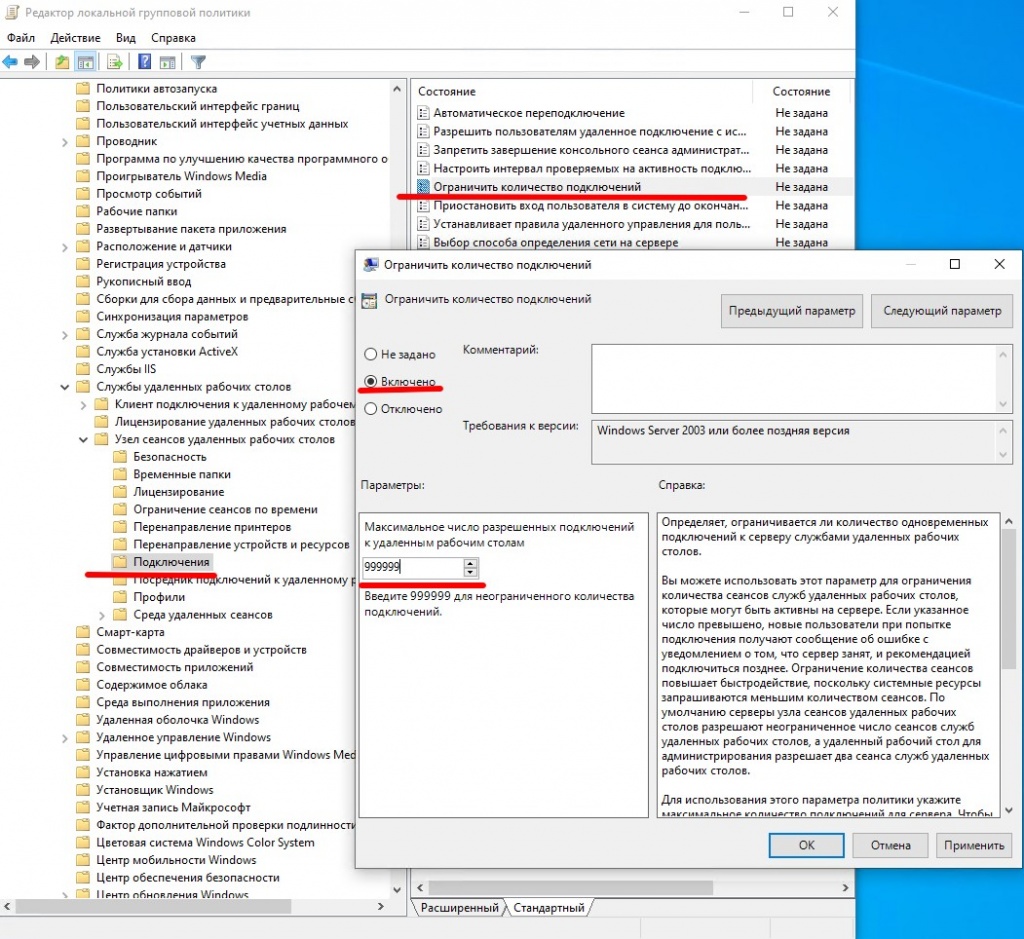
It happens that when you try to establish a second RDP connection under a different user account, you see a warning:
The number of connections to this computer is limited and all connections are in use right now. Try connecting later or contact your system administrator.
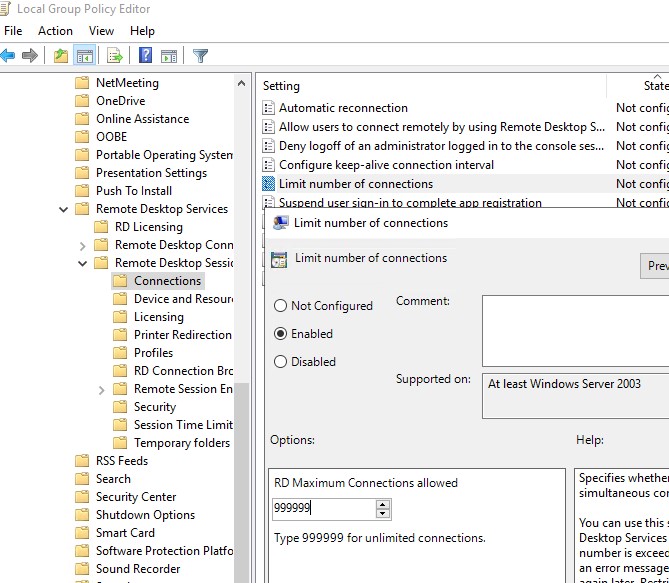
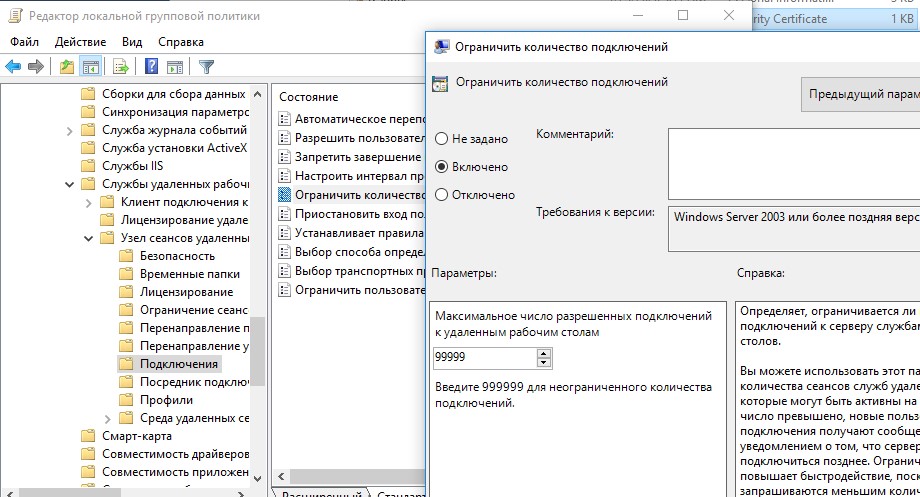
In this case, you can use the Local Group Policy Editor (gpedit.msc) to enable the policy “Limit number of connections” under Computer Configuration -> Administrative Templates -> Windows Components -> Remote Desktop Services -> Remote Desktop Session Host -> Connections section. Change its value to 999999.
Restart your computer to update the GPO and apply the settings.
Modify the Termsrv.dll to Enable Multiple RDP Sessions
To remove the restriction on the number of concurrent RDP user connections in Windows 10 without using rdpwrapper, you can replace the original termsrv.dll file. This is the main library file used by the Remote Desktop Service. The file is located in C:WindowsSystem32 directory.
Before you edit or replace the termsrv.dll file, it is advisable to create its backup copy. This will help you to revert to the original version of the file if necessary. Open the elevated command prompt and run the command:
copy c:WindowsSystem32termsrv.dll termsrv.dll_backup
Then you need to take ownership of the file. To change the owner of a file from TrustedInstaller to the local Administrators group using the command:
takeown /F c:WindowsSystem32termsrv.dll /A
SUCCESS: The file (or folder): c:WindowsSystem32termsrv.dll now owned by the administrators group
Now grant the local administrators group Full Control permissions on the termsrv.dll file using the icacls.exe:
icacls c:WindowsSystem32termsrv.dll /grant Administrators:F
processed file: c:WindowsSystem32termsrv.dll Successfully processed 1 files; Failed processing 0 files.
After that, stop the Remote Desktop service (TermService) using the services.msc console or from the command prompt:
Net stop TermService
The Remote Desktop Services UserMode Port Redirector service stops with it.
Before moving on, you need to find out your version (build number) of Windows 10. Open the PowerShell console and run the command:
Get-ComputerInfo | select WindowsProductName, WindowsVersion
In my case, Windows 10 build 21H1 is installed.
Then open the termsrv.dll file using any HEX editor (for example, Tiny Hexer). Depending on your Windows build, you need to find and replace the string according to the table below:
| Windows build | Find the string | Replace with |
| Windows 11 RTM (
21H2 – 22000.258) |
39 81 3C 06 00 00 0F 84 4F 68 01 00 |
B8 00 01 00 00 89 81 38 06 00 00 90 |
| Windows 10 x64 21H2 | 39 81 3C 06 00 00 0F 84 DB 61 01 00 | |
| Windows 10 x64 21H1 | 39 81 3C 06 00 00 0F 84 2B 5F 01 00 | |
| Windows 10 x64 20H2 | 39 81 3C 06 00 00 0F 84 21 68 01 00 | |
| Windows 10 x64 2004 | 39 81 3C 06 00 00 0F 84 D9 51 01 00 | |
| Windows 10 x64 1909 | 39 81 3C 06 00 00 0F 84 5D 61 01 00 | |
| Windows 10 x64 1903 | 39 81 3C 06 00 00 0F 84 5D 61 01 00 | |
| Windows 10 x64 1809 | 39 81 3C 06 00 00 0F 84 3B 2B 01 00 | |
| Windows 10 x64 1803 | 8B 99 3C 06 00 00 8B B9 38 06 00 00 | |
| Windows 10 x64 1709 | 39 81 3C 06 00 00 0F 84 B1 7D 02 00 |
Tiny Hexer editor cannot edit termsvr.dll file directly from system32 folder. Copy it to your desktop, and after modification replace the original file.
For example, my build of Windows 10 x64 is 21H1 (19043.1320) with the termsrv.dll file version 10.0.19041.1320. Open the termsrv.dll file in Tiny Hexer, then find the text:
39 81 3C 06 00 00 0F 84 2B 5F 01 00
and replace it with:
B8 00 01 00 00 89 81 38 06 00 00 90

Save the file and run the TermService.
If something goes wrong and you experience some problems with the Remote Desktop service, stop the service and replace the modified termsrv.dll file with the original version:
copy termsrv.dll_backup c:WindowsSystem32termsrv.dll
Patching Termsrv.dll on Windows Using PowerShell
In order not to modify the termsrv.dll file manually using a HEX editor, you can use the following PowerShell script to apply the patch automatically. This script is based on the Windows PowerShell version and doesn’t work on modern PowerShell Core. The script is universal and can be used to patch the termsrv.dll file on all editions of Windows 10 (1809+) and Windows 11.
# Stop RDP service, make a backup of the termsrv.dllfile and change the permissions

Stop-Service UmRdpService -Force

Stop-Service TermService -Force

$termsrv_dll_acl = Get-Acl c:windowssystem32termsrv.dll

Copy-Item c:windowssystem32termsrv.dll c:windowssystem32termsrv.dll.copy

takeown /f c:windowssystem32termsrv.dll

$new_termsrv_dll_owner = (Get-Acl c:windowssystem32termsrv.dll).owner

cmd /c "icacls c:windowssystem32termsrv.dll /Grant $($new_termsrv_dll_owner):F /C"

# search for a pattern in termsrv.dll file

$dll_as_bytes = Get-Content c:windowssystem32termsrv.dll -Raw -Encoding byte

$dll_as_text = $dll_as_bytes.forEach('ToString', 'X2') -join ' '

$patternregex = ([regex]'39 81 3C 06 00 00(sSS){6}')

$patch = 'B8 00 01 00 00 89 81 38 06 00 00 90'

$checkPattern=Select-String -Pattern $patternregex -InputObject $dll_as_text

If ($checkPattern -ne $null) {

$dll_as_text_replaced = $dll_as_text -replace $patternregex, $patch

}

Elseif (Select-String -Pattern $patch -InputObject $dll_as_text) {

Write-Output 'The termsrv.dll file is already patch, exitting'

Exit

}

else {

Write-Output "Pattern not found "

}

# patching termsrv.dll

[byte[]] $dll_as_bytes_replaced = -split $dll_as_text_replaced -replace '^', '0x'

Set-Content c:windowssystem32termsrv.dll.patched -Encoding Byte -Value $dll_as_bytes_replaced

# comparing two files

fc.exe /b c:windowssystem32termsrv.dll.patched c:windowssystem32termsrv.dll

# replacing the original termsrv.dll file

Copy-Item c:windowssystem32termsrv.dll.patched c:windowssystem32termsrv.dll -Force

Set-Acl c:windowssystem32termsrv.dll $termsrv_dll_acl

Start-Service UmRdpService

Start-Service TermService
The complete script code is available in my GitHub repository at https://github.com/maxbakhub/winposh/blob/main/termsrv_rdp_patch.ps1
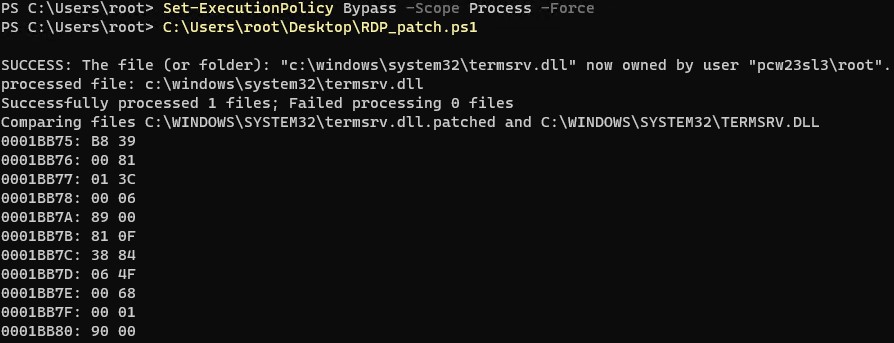
To execute the script, download it to your computer. Change the PowerShell execution policy settings for the current session:
Set-ExecutionPolicy Bypass -Scope Process -Force
And run the script:
C:usersrootdesktoptermsrv_rdp_patch.ps1

The script can be run after installing Windows updates to immediately make changes to the termsrv.dll file (you don’t have to modify the termsrv.dll file in the HEX editor after each update installation).
The advantage of the method of enabling multiple RDP sessions in Windows 10 or 11 by replacing the termsrv.dll file is that antiviruses do not respond to it (unlike the RDPWrap, which is detected by many antiviruses as a Malware/HackTool/Trojan).
The main drawback is that you will have to manually edit the termsrv.dll file each time you upgrade the Windows 10 build (or when updating the version of the termsrv.dll file during the installation of monthly cumulative updates). And if you are using RDPWrapper, you will also need to update the rdpwrap.ini file after installing Windows updates.
In this article, we looked at how to remove the restriction on the number of simultaneous RDP user connections and run a free terminal server on desktop versions of Windows.
Удаленные пользователи могут подключаться к своим компьютерам Windows 10 или 11 через службу удаленных рабочих столов (RDP). Достаточно разрешить RDP доступ и подключиться к компьютеру с помощью любого клиента. Но есть ограничение на количество одновременных RDP сессии – допускается одновременная работа только одного удаленного пользователя. Если вы попробуете открыть вторую RDP сессию, появится предупреждение с запросом отключить сеанс первого пользователя.
В систему вошел другой пользователь. Если вы продолжите, он будет отключен. Вы все равно хотите войти в систему?
В английской версии предупреждение такое:
Another user is signed in. If you continue, they’ll be disconnected. Do you want to sign in anyway?
Во всех десктопных версиях Windows (включая Win 10 и 11) есть ряд ограничений на использование службы удаленного рабочего стола
- Вы можете удаленно подключаться по RDP только к старшим редакциям Windows (Professional, Enterprise). В домашних редакциях (Home/Single Language) RDP доступ заблокирован;
- Поддерживается только одно одновременное RDP подключение. При попытке запустить вторую RDP-сессию, пользователю будет предложено завершить активное подключение;
- Если пользователь работает за консолью компьютера (локально), то при удаленном подключении по RDP, его локальный сеанс будет отключен (заблокирован). Правильно и обратное утверждение: удаленный RDP сеанс принудительно завершается, если пользователь входит через консоль Windows.
Ограничение на количество одновременных RDP подключений в Windows является не техническим, но программным и лицензионным. Таким образом Microsoft запрещает создавать терминальный RDP сервер на базе рабочей станции для одновременной работы нескольких пользователей. Логика Microsoft проста: если вам нужен терминальный сервер — купите лицензию Windows Server, лицензии RDS CAL, установите и настройте роль Remote Desktop Session Host (RDSH).
Технически любая редакция Windows при наличии достаточного количества оперативной памяти может обслуживать одновременную работу нескольких десятков удаленных пользователей. В среднем на одну RDP сессию пользователя без учета запускаемых приложений требуется 150-200 Мб памяти. Т.е. максимальное количество одновременных RDP сессий в теории ограничивается только ресурсами компьютера.
Мы рассмотрим два способа убрать ограничение на количество одновременных RDP подключений к Windows 10 и 11: с помощью приложения RDP Wrapper и с помощью модификации системного файла termsrv.dll.
Содержание:
- RDP Wrapper: разрешить несколько RDP сеансов в Windows
- Не работает RDP Wrapper в Windows 10
- Модификация файла termsrv.dll для снятия ограничений RDP в Windows 10 и 11
- Патчинг файл termsrv.dll с помощью PowerShell скрипта
Примечание. Модификации системы, описанные в этой статье, считаются нарушением лицензионного соглашения Windows, и вы можете выполнять их на свой страх и риск.
RDP Wrapper: разрешить несколько RDP сеансов в Windows
OpenSource проект RDP Wrapper Library позволяет включить конкурентные RDP сессии в Windows 10 без замены системного файла termsrv.dll. Эта программа работает в качестве прослойки между менеджером управления службами (SCM — Service Control Manager) и службой терминалов (Remote Desktop Services). RDPWrap позволяет включить не только поддержку нескольких одновременных RDP сессии, но и реализовать RDP сервер на домашних редакциях Windows 10. RDP Wrapper не вносит никаких изменений в файл termsrv.dll, просто подгружая termsrv с изменёнными параметрами.
Таким образом, RDPWrap будет работать даже при обновлении версии файла termsrv.dll, что позволяет не опасаться обновлений Windows.
Важно. Перед установкой RDP Wrapper важно убедится, чтобы у вас использовалась оригинальная (непропатченная) версия файл termsrv.dll. Иначе RDP Wrapper может работать не стабильно, или вообще не запускаться.
Вы можете скачать RDP Wrapper из репозитория GitHub: https://github.com/binarymaster/rdpwrap/releases (последняя доступная версия RDP Wrapper Library v1.6.2). Утилита не развивается с 2017 года, но ее можно использовать на всех билдах Windows 10 и даже в Windows 11.
Архив RDPWrap-v1.6.2.zip содержит несколько файлов:
- RDPWinst.exe —программа установки/удаления RDP Wrapper Library;
- RDPConf.exe — утилита настройки RDP Wrapper;
- RDPCheck.exe — Local RDP Checker — утилита для проверки RDP доступа;
- install.bat, uninstall.bat, update.bat — пакетные файлы для установки, удаления и обновления RDP Wrapper.
Чтобы установить RDPWrap, запустите файл
install.bat
с правами администратора.
После окончания установки запустите RDPConfig.exe. Проверьте, что в секции Diagnostics все элементы окрашены в зеленый цвет.
![rdp-wrapper: красная надпись не поддерживается [not supported]](https://winitpro.ru/wp-content/uploads/2015/09/rdp-wrapper-ne-podderzhivaetsya.jpg)
После окончания установки запустите RDPConfig.exe. Скорее всего сразу после установки утилита покажет, что RDP wrapper запущен (Installed, Running, Listening), но не работает. Обратите внимание на красную надпись. Она сообщает, что данная версий Windows 10 (ver. 10.0.19041.1320) не поддерживается ([not supported]).
Дело в том, что под каждую версию Windows 10 должно быть описание в конфигурационном файле rdpwrap.ini. В вашем файле конфигурации просто нет настроек для вашего билда Windows 10.
Актуальную версию файла rdpwrap.ini можно скачать здесь https://raw.githubusercontent.com/sebaxakerhtc/rdpwrap.ini/master/rdpwrap.ini
Вручную скопируйте содержимое данной страницы в файл «C:Program FilesRDP Wrapperrdpwrap.ini». Или скачайте файл с помощью PowerShell командлета Invoke-WebRequest (предварительно нужно остановить службу Remote Desktop):
Stop-Service termservice -Force
Invoke-WebRequest https://raw.githubusercontent.com/sebaxakerhtc/rdpwrap.ini/master/rdpwrap.ini -outfile "C:Program FilesRDP Wrapperrdpwrap.ini"
Перезагрузите компьютер, запустите утилиту RDPConfig.exe. Проверьте, что в секции Diagnostics все элементы окрашены в зеленый цвет, и появилось сообщение [Fully supported]. На скриншоте ниже показано, что RDP Wrapper с данным конфигом прекрасно работает и в Windows 11.

Осталось перезагрузить компьютер. Попробуйте подключиться к своим компьютерам несколькими RDP сессиями (воспользуйтесь любым RDP клиентом: mstsc.exe, rdcman и т.д.). Все получилось (можно даже использовать сохранённые RDP пароли)! Теперь ваша Windows 10 позволяет одновременно подключаться по RDP сразу двум (и более) удаленным пользователям.

Утилита RDPWrap поддерживается во редакциях Windows, таким образом из любой клиентской версии Windows можно сделать сервер терминалов.
Также из интересных возможностей RDP Wrapper можно выделить:
- Enable Remote Desktop — включить RDP доступ
- Опция Hide users onlogon screen позволяет скрыть список пользователей на экране приветствия;
- При отключении опции Single sessionper user — будут разрешены несколько одновременных RDP сессий под одной учетной записью (устанавливается параметр реестра fSingleSessionPerUser = 0 в ветке HKLMSYSTEM CurrentControlSetControlTerminal ServerfSingleSessionPerUser).
- RDP Port — можно изменить номера порта удаленного рабочего стола со стандартного TCP 3389 на любой другой;
- В секции Session Shadowing Mode вы можете настроить режим теневого подключения к рабочему столу пользователей Windows 10.
Не работает RDP Wrapper в Windows 10
В некоторых случая утилита RDP Wrapper не работает как ожидается, и вы не можете использовать несколько RDP подключений.
Если утилита в окне статуса показывала [not supported], значит в файле rdpwrap.ini отсутствует конфигурация для вашей версии Windows. Обновите файл rdpwrap.ini как описано выше.
Если RDP Wrapper не работает после обновления файла rdpwrap.ini, попробуйте открыть файл rdpwrap.ini и найти в нем описание для вашей версии Windows. Как понять, есть ли поддержка вашей версии Windows в конфиг фафле rdpwrapper?
На скриншоте ниже показано, что для моей версии Windows 10 (10.0.19041.1320) есть две секции с описаниями:
[10.0.19041.1320]
…..
[10.0.19041.1320-SLInit]
…..
Если для вашей версии Windows нет секции в конфигурационном файле, попробуйте поискать в сети строки rdpwrap.ini для вашего билда. Добавьте найденные строки в самый конец файл.
Также при проблемах с RDPWrap вы можете открыть ветку в https://github.com/stascorp/rdpwrap/issues. Здесь же можно найти актуальные файлы rdpwrap.ini до момента обновления в официальном репозитории.
Если после установки обновлений безопасности или после апгрейда билда Windows 10, RDP Wrapper не работает, проверьте, возможно в секции Diagnostics присутствует надпись Listener state: Not listening.

Попробуйте обновить ini файл, и затем переустановить службу:
rdpwinst.exe -u
rdpwinst.exe -i
Бывает, что при попытке второго RDP подключения под другим пользователем у вас появляется надпись:
Число разрешенных подключений к этому компьютеру ограничено и все подключений уже используются. Попробуйте подключиться позже или обратитесь к системному администратору.
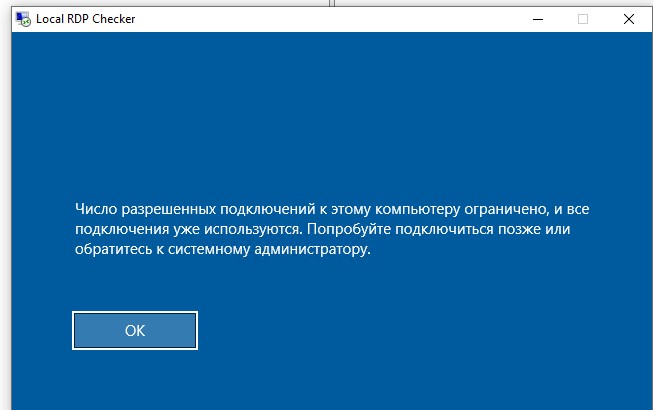
The number of connections to this computer is limited and all connections are in use right now. Try connecting later or contact your system administrator.
В этом случае нужно с помощью редактора групповых политики gpedit.msc в секции Конфигурация компьютера –> Административные шаблоны -> Компоненты Windows -> Службы удаленных рабочих столов -> Узел сеансов удаленных рабочих столов -> Подключения включить политику “Ограничить количество подключений” и изменить ее значение на 999999 (Computer Configuration -> Administrative Templates -> Windows Components ->Remote Desktop Services ->Remote Desktop Session Host -> Connections-> Limit number of connections).
Перезагрузите компьютер для обновления GPO и применения настроек .
Модификация файла termsrv.dll для снятия ограничений RDP в Windows 10 и 11
Чтобы убрать ограничение на количество RDP подключений пользователей в Windows 10 без использования rdpwraper, можно заменить файл termsrv.dll. Это файл библиотеки, которая используется службой Remote Desktop Services. Файл находится в каталоге C:WindowsSystem32.
Прежде, чем править или заменять файл termsrv.dll желательно создать его резервную копию. Это поможет вам в случае необходимости можно будет вернуться к исходной версии файла. Запустите командную строку с правами администратора и выполните команду:
copy c:WindowsSystem32termsrv.dll termsrv.dll_backup
Затем нужно стать владельцем файла. Проще всего это сделать из командной строки. Чтобы сменить владельца файла с TrustedInstaller на группу локальных администраторов с помощью команды:
takeown /F c:WindowsSystem32termsrv.dll /A
Должно появится сообщение: «SUCCESS: The file (or folder): «c:WindowsSystem32termsrv.dll» now owned by the administrators group».
Теперь с помощью icacls.exe предоставьте группе локальных администраторов полные права на файл termsrv.dll (Full Control):
icacls c:WindowsSystem32termsrv.dll /grant Administrators:F
(или
Администраторы
в русской версии Windows). Должно появится сообщение: «processed file: c:WindowsSystem32termsrv.dll Successfully processed 1 files; Failed processing 0 files«.
Теперь нужно остановить службу Remote Desktop Service (TermService) из консоли services.msc или из командной строки:
Net stop TermService
Вместе с ней останавливается служба Remote Desktop Services UserMode Port Redirector.

Прежде чем идти дальше, вам нужно узнать вашу версию (билд) Windows 10. Проще всего это сделать с помощью следующей команды PowerShell:
Get-ComputerInfo | select WindowsProductName, WindowsVersion
В моем случае установлена Windows 10 билд 21H1.
Затем откройте файл termsrv.dll с помощью любого HEX редактора (к примеру, Tiny Hexer). В зависимости от билда нужно найти и заменить строку:
| Версия Windows | Найти строку | Заменить на |
| Windows 11 RTM ( 21H2 22000.258) | 39 81 3C 06 00 00 0F 84 4F 68 01 00 |
B8 00 01 00 00 89 81 38 06 00 00 90 |
| Windows 10 x64 21H2 | 39 81 3C 06 00 00 0F 84 DB 61 01 00 | |
| Windows 10 x64 21H1 | 39 81 3C 06 00 00 0F 84 2B 5F 01 00 | |
| Windows 10 x64 20H2 | 39 81 3C 06 00 00 0F 84 21 68 01 00 | |
| Windows 10 x64 2004 | 39 81 3C 06 00 00 0F 84 D9 51 01 00 | |
| Windows 10 x64 1909 | 39 81 3C 06 00 00 0F 84 5D 61 01 00 | |
| Windows 10 x64 1903 | 39 81 3C 06 00 00 0F 84 5D 61 01 00 | |
| Windows 10 x64 1809 | 39 81 3C 06 00 00 0F 84 3B 2B 01 00 | |
| Windows 10 x64 1803 | 8B 99 3C 06 00 00 8B B9 38 06 00 00 | |
| Windows 10 x64 1709 | 39 81 3C 06 00 00 0F 84 B1 7D 02 00 |
Редактор Tiny Hexer не может редактировать файл termsvr.dll напрямую из папки system32. Скопируйте его на рабочий стол, а после модификации замените исходный файл.
Например, для самой редакции Windows 10 x64 21H1 19043.1320 (версия файла termsrv.dll — 10.0.19041.1320) нужно открыть файл termsrv.dll в Tiny Hexer. Затем найдите строку:
39 81 3C 06 00 00 0F 84 2B 5F 01 00
И замените ее на:
B8 00 01 00 00 89 81 38 06 00 00 90
Сохраните файл и запустите службу TermService.
Если что-то пошло не так, и у вас возникнут проблемы со службой RDP, остановите службу и замените модифицированный файл termsrv.dll исходной версией:
copy termsrv.dll_backup c:WindowsSystem32termsrv.dll
Патчинг файл termsrv.dll с помощью PowerShell скрипта
Чтобы не редактировать файл termsrv.dll вручную с помощью HEX редактора, вы можете использовать следующий PowerShell скрипт для автоматического патчинга файла. Данный скрипт написан для версии Windows PowerShell, и не работает на PowerShell Core. Скрипт универсальный и может использоваться для внесения изменений в файл termsrv.dll на всех версиях Windows 10 и Windows 11.
# Остановить службу, сделать копию файл и изменить разрешения
Stop-Service UmRdpService -Force
Stop-Service TermService -Force
$termsrv_dll_acl = Get-Acl c:windowssystem32termsrv.dll
Copy-Item c:windowssystem32termsrv.dll c:windowssystem32termsrv.dll.copy
takeown /f c:windowssystem32termsrv.dll
$new_termsrv_dll_owner = (Get-Acl c:windowssystem32termsrv.dll).owner
cmd /c "icacls c:windowssystem32termsrv.dll /Grant $($new_termsrv_dll_owner):F /C"
# поиск шаблона в файле termsrv.dll
$dll_as_bytes = Get-Content c:windowssystem32termsrv.dll -Raw -Encoding byte
$dll_as_text = $dll_as_bytes.forEach('ToString', 'X2') -join ' '
$patternregex = ([regex]'39 81 3C 06 00 00(sSS){6}')
$patch = 'B8 00 01 00 00 89 81 38 06 00 00 90'
$checkPattern=Select-String -Pattern $patternregex -InputObject $dll_as_text
If ($checkPattern -ne $null) {
$dll_as_text_replaced = $dll_as_text -replace $patternregex, $patch
}
Elseif (Select-String -Pattern $patch -InputObject $dll_as_text) {
Write-Output 'The termsrv.dll file is already patch, exiting'
Exit
}
else {
Write-Output "Pattern not found"
}
# модификация файла termsrv.dll
[byte[]] $dll_as_bytes_replaced = -split $dll_as_text_replaced -replace '^', '0x'
Set-Content c:windowssystem32termsrv.dll.patched -Encoding Byte -Value $dll_as_bytes_replaced
# Сравним два файла
fc.exe /b c:windowssystem32termsrv.dll.patched c:windowssystem32termsrv.dll
# замена оригинального файла
Copy-Item c:windowssystem32termsrv.dll.patched c:windowssystem32termsrv.dll -Force
Set-Acl c:windowssystem32termsrv.dll $termsrv_dll_acl
Start-Service UmRdpService
Start-Service TermService
Полный код скрипта доступен в моем GitHub репозитарии по ссылке https://github.com/winadm/posh/blob/master/Desktop/RDP_patch.ps1
Чтобы выполнить скрипт, скачайте его на свой компьютер. Измените настройки политики запуска скриптов PowerShell:
Set-ExecutionPolicy Bypass -Scope Process -Force
Запустите скрипт:
C:usersrootdesktoprdp_patch.ps1
Скрипт можно запускать после установки обновлений Windows, чтобы немедленно внести изменения в файл termsrv.dll (защищает вас от ручной правки файла после каждой установки обновлений). Скрипт подходит для всех версий Windows 10 старше 1809 и для Windows 11.
Преимущество способа включения нескольких RDP сессий в Windows 10 путем замены файла termsrv.dll в том, что на него не реагируют антивирусы. В отличии от утилиты RDPWrap, которую многие антивирусов считают Malware/HackTool/Trojan. Основной недостаток — вам придется вручную править файл при каждом обновлении билда Windows 10 (или при обновлении версии файла termsrv.dll в рамках ежемесячных кумулятивных обновлений). А если вы используете RDPWrapper, то после установки обновлений Windows вам придётся обновлять файл rdpwrap.ini.
В этой статье вы рассмотрели, как снять ограничение на количество одновременных RDP подключений пользователей, и запустить бесплатный терминального сервера на клиентской Windows 10 или 11.

Удаленные пользователи могут подключаться к своим компьютерам с ОС Windows 10 и Windows 11 через службы удаленных рабочих столов (RDP). Достаточно включить RDP в настройках устройства и подключиться к компьютеру с помощью любого клиента удаленного рабочего стола, такого как MSTSC. Но существует ограничение на количество одновременных сеансов RDP – одновременно может работать только один удаленный пользователь. Если вы попытаетесь открыть второй сеанс RDP, появится предупреждение с просьбой отключить сеанс первого пользователя.
Изменения от 27.01.2023 г.
Настройка службы RDP на Windows 10
RDP работает только на Windows 10/11 Pro, в Home версии отключены нужные системные компоненты. Кроме этого, потребуется защитить паролем вашу учетную запись.
Включение доступа и добавление пользователей.
Откройте Пуск и нажмите на шестеренку Параметры.
Откройте раздел с настройкой системы.
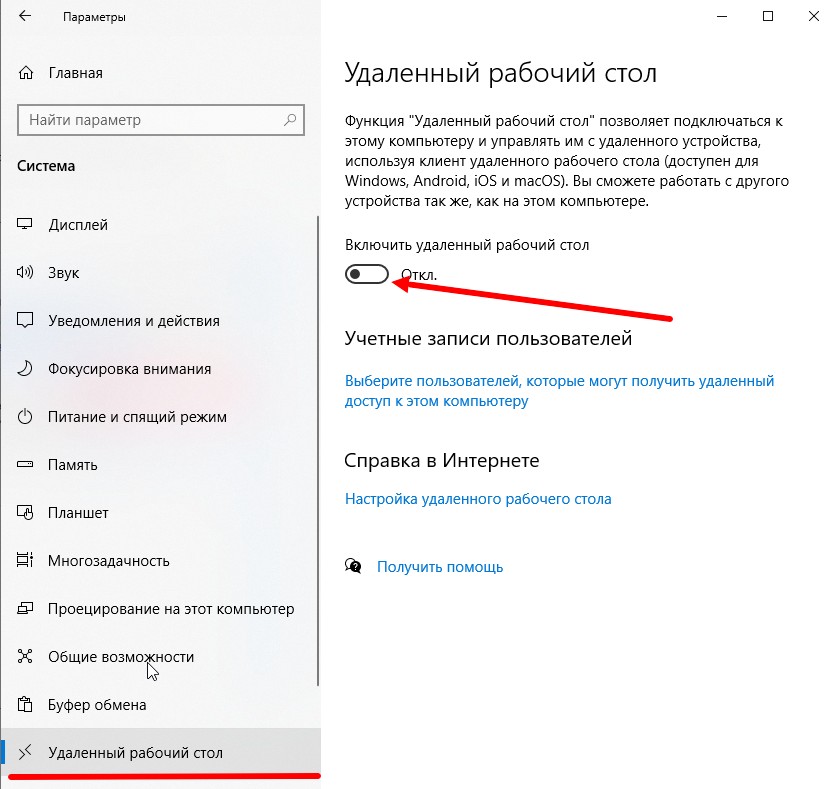
Далее перейдите к настройке удаленного рабочего стола.
Включить удаленный рабочий стол.
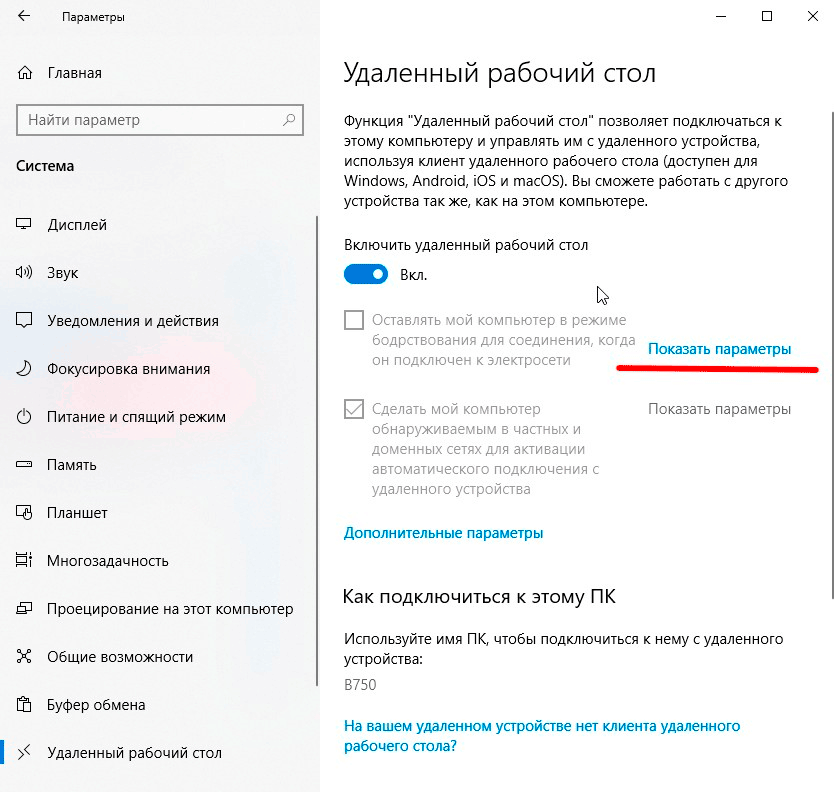
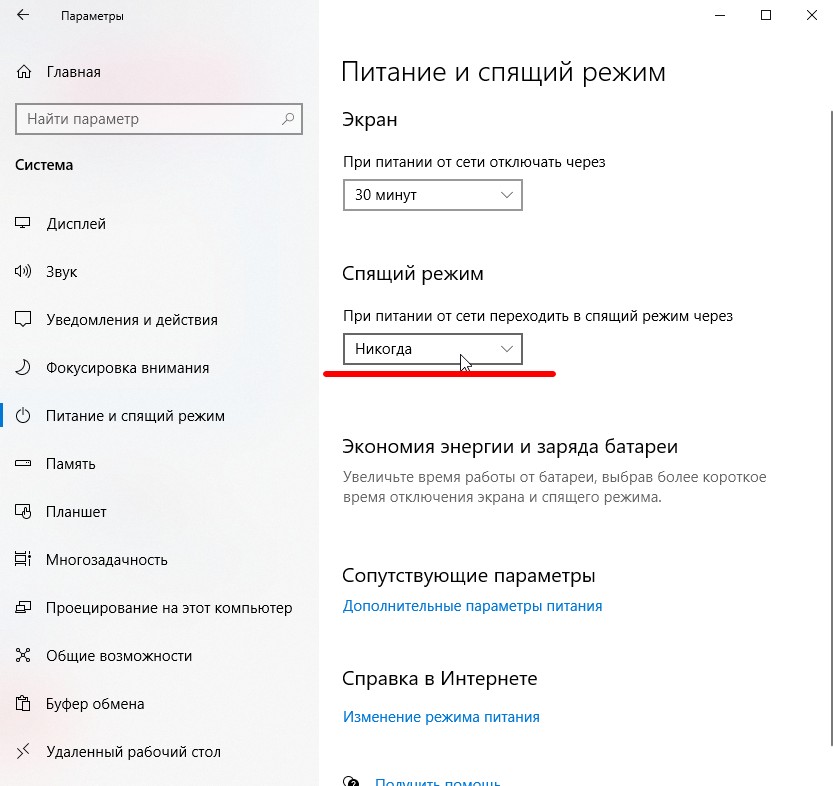
Перейти в настройки электропитания, отключить переход компьютера в спящий режим.
Далее необходимо пользователей, которым будет предоставлен доступ к RDP По умолчанию доступ предоставлен администратору компьютера.
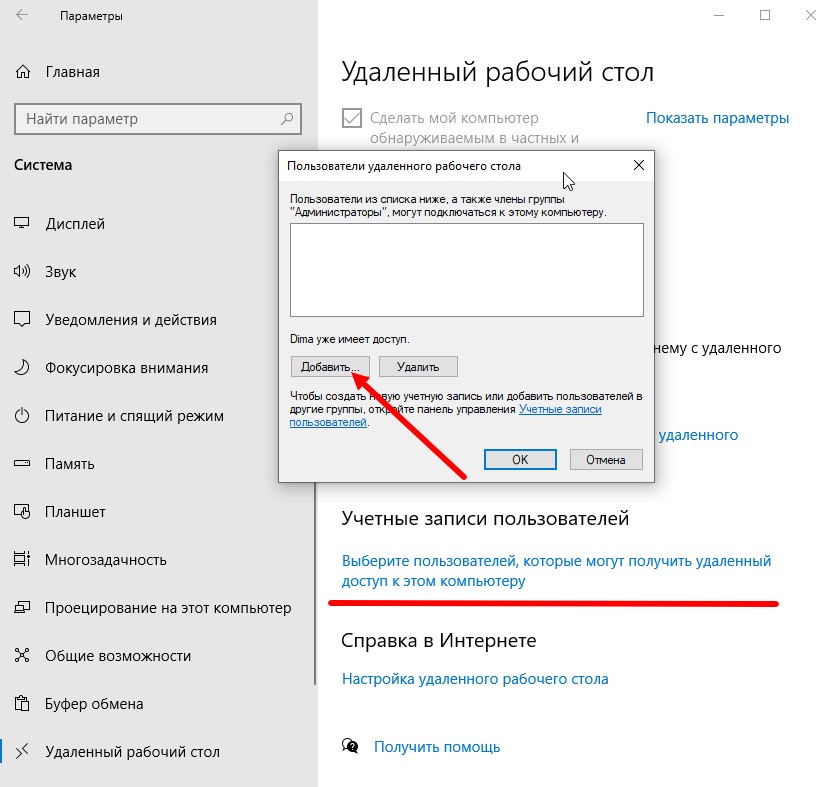
Добавляем еще пользователей.
Если вы попытаетесь открыть второй сеанс RDP, появится предупреждение с просьбой отключить сеанс первого пользователя.

На самом деле, количество одновременных подключений RDP в системе Windows ограничено лицензией, а не каким-либо техническим аспектом. Таким образом, это ограничение не позволяет создать терминальный RDP-сервер на базе компьютера с системой Windows 10/11. Логика компании Microsoft проста, если вам нужен сервер терминалов – купите лицензию Windows Server, RDS CALs, установите и настройте роль сервера сеансов удаленного рабочего стола.
Но технически, любая версия Windows, с достаточным объемом оперативной памяти может поддерживать одновременную работу нескольких удаленных пользователей. В среднем, для одного сеанса пользователя, требуется около 200 МБ оперативной памяти (без учета запущенных приложений). Т.е. максимальное количество одновременных сеансов RDP теоретически ограничено только компьютерными ресурсами.
Рассмотрим два способа разрешить одновременные RDP-подключения в Windows 10/11:
- с помощью RDP Wrapper
- исправления библиотеки termsrv.dll
RDP Wrapper
Проект RDP Wrapper – ПО с открытым исходным кодом, позволяет включить несколько сеансов RDP в Windows 10 без замены файла termsrv.dll. Этот инструмент работает как связующее звено между SCM (Service Control Manager) и службами удаленного рабочего стола. RDPWrap позволяет включить не только поддержку нескольких одновременных RDP-подключений, но и создать RDP-сервер в Windows Home. RDP Wrapper не вносит никаких изменений в termsrv.dll файл, это просто загрузка библиотеки termsrv с измененными параметрами.
Таким образом, RDPWrap будет работать даже в случае изменения файла termsrv.dll. Это позволяет не бояться обновлений Windows.
Вы можете загрузить RDP Wrapper из репозитория GitHub https://github.com/binarymaster/rdpwrap/releases (последняя доступная версия библиотеки RDP-оболочки — v1.6.2).
В RDPWrap-v1.6.2.zip содержит несколько файлов:
- RDPWinst.exe — библиотека-оболочка RDP для установки/удаления программы
- RDPConf.exe — инструмент настройки оболочки RDP
- RDPCheck.exe — утилита проверки RDP (Local RDP Checker)
- Install.bat, uninstall.bat, update.bat — пакетные файлы для установки, удаления и обновления оболочки RDP
Для установки оболочки необходимо запустить файл Install.bat с правами администратора.
RDPWrap не работает в Windows 10
После завершения установки запустите RDPConfig.exe . Скорее всего, сразу после установки инструмент покажет, что оболочка RDP запущена (установлена, запущена), но не работает. Обратите внимание на красное предупреждение [not supported]. В нем сообщается, что эта версия Windows 10 (версия 10.0.19041.1387) не поддерживается оболочкой RDP.
Дело в том, что для каждой версии Windows 10/11 должно быть описание в конфигурационном файле rdpwrap.ini. В текущем конфигурационном файле просто нет никаких настроек для вашей сборки Windows.
Текущую версию файла rdpwrap.ini можно загрузить здесь: https://raw.githubusercontent.com/sebaxakerhtc/rdpwrap.ini/master/rdpwrap.ini
Во всех источниках в интернете находятся советы, что необходимо скопировать новый файл rdpwrap.ini в “C:Program Файл FilesRDP Wrapperrdpwrap.ini” и перезапустить службу TermService. Но у меня это ни разу не получилось, ввиду того, что при перезапуске службы, оригинальный файл rdpwrap.ini восстанавливался на место нового.
Немного поискав решение этой проблемы, наткнулся на файл автоматического обновления rdpwrap.ini:
- С сайта GitHub
- С нашего сайта
Необходимо скопировать файлы RDPWinst.exe, RDPConf.exe, RDPCheck.exe и autoupdate.bat в каталог C:Program Файл FilesRDP Wrapper и запустить autoupdate.bat.
После завершения установки запустите RDPConfig.exe

Все работает!
Обновление Параметров Групповой политики
Количество подключений к компьютеру может быть ограничено правилами групповой политики.
В этом случае вы можете использовать редактор локальной групповой политики (gpedit.msc), чтобы включить политику “Ограничить количество подключений” в разделе Конфигурация компьютера -> Административные шаблоны -> Компоненты Windows -> Службы удаленных рабочих столов -> Узел сеансов удаленных рабочих столов -> Подключения –> Ограничить количество подключений.
Измените его значение на 999999.
Модификация Termsrv.dll
Второй, более трудозатратный метод – изменение файла Termsrv.dll.
для этого нужно сделать копию файла, затем нужно стать владельцем файла.
Для начала, остановите службу удаленного рабочего стола (TermService) из командной строки:
Net stop TermService
Чтобы изменить владельца файла с TrustedInstaller на локальную группу администраторов нужно выполнить команду:
takeown /F c:WindowsSystem32termsrv.dll /A
Теперь предоставьте локальной группе администраторов разрешения на полный контроль над termsrv.dll файл с использованием icacls.exe:
icacls c:WindowsSystem32termsrv.dll /grant Администраторы:F
Затем откройте termsrv.dll файл с использованием любого шестнадцатеричного редактора (например, WinHex). В зависимости от вашей сборки Windows вам необходимо найти и заменить строку в соответствии с приведенной ниже таблицей:
| Версия Windows | Строка поиска |
|
Windows 11 RTM (21H2 – 22000.258) |
39 81 3C 06 00 00 0F 84 4F 68 01 00 |
|
Windows 10 x64 22H2 19045.2486 |
39 81 3C 06 00 00 0F 84 DB 61 01 00 |
|
Windows 10 x64 21H2 |
39 81 3C 06 00 00 0F 84 85 45 01 00 |
|
Windows 10 x64 21H1 |
39 81 3C 06 00 00 0F 84 2B 5F 01 00 |
|
Windows 10 x64 20H2 |
39 81 3C 06 00 00 0F 84 21 68 01 00 |
|
Windows 10 x64 2004 |
39 81 3C 06 00 00 0F 84 D9 51 01 00 |
|
Windows 10 x64 1909 |
39 81 3C 06 00 00 0F 84 5D 61 01 00 |
|
Windows 10 x64 1903 |
39 81 3C 06 00 00 0F 84 5D 61 01 00 |
|
Windows 10 x64 1809 |
39 81 3C 06 00 00 0F 84 3B 2B 01 00 |
|
Windows 10 x64 1803 |
8B 99 3C 06 00 00 8B B9 38 06 00 00 |
|
Windows 10 x64 1709 |
39 81 3C 06 00 00 0F 84 B1 7D 02 00 |
Строка замены
B8 00 01 00 00 89 81 38 06 00 00 90
Данную таблицу я нашел на просторах интернета. Проверка данного метода в полевых условиях привела к тому, что я не нашел данную последовательность в своем файле termsrv.dll.
Но если понять суть, то все решается достаточно легко. Необходимо искать последовательность: 39 81 3C 06 00 00 0F 84, последние 4 байта не особо важны.
Я нашел последовательность 39 81 3C 06 00 00 0F 84 73 55 01 00
Замена на
B8 00 01 00 00 89 81 38 06 00 00 90
Обновление от 27.01.2023 г.
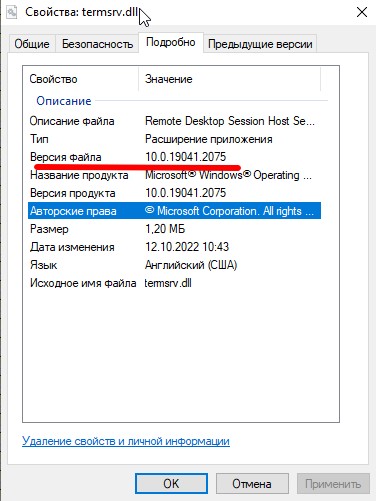
Вышло новое обновление Windows 10 22H2 версия сборки: 10.0.19045.2486
Версия файла termsrv.dll: 10.0.19041.2075
Открываем файл в WinHe[x, находим исходную последовательность: 39 81 3C 06 00 00 0F 84 85 45 01 00.
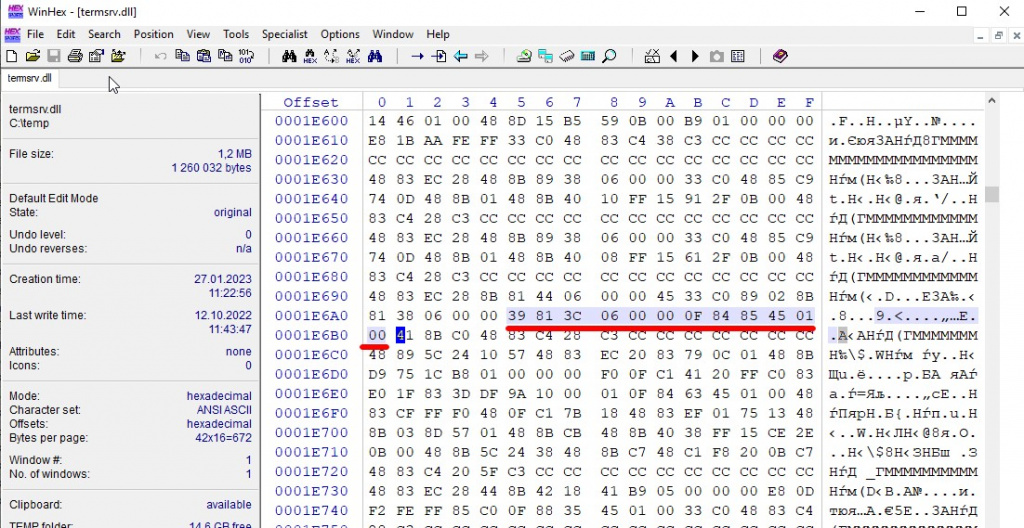
Меняем на строку замены.
Готовый файл можете скачать: termsrv.dll
Сохраните модифицированный файл и запустите службу TermService.
Если что-то пойдет не так, остановите службу и замените измененный termsrv.dll файл с оригинальной версией.
В моем случае модификация файла помогла включить несколько сеансов RDP.
Преимущество метода включения нескольких сеансов RDP в Windows 10 или 11 путем замены termsrv.dll файл заключается в том, что антивирусы на него не реагируют, в отличие от RDPWrap, который обнаруживается многими антивирусами как вредоносное ПО.
Основным недостатком является то, что вам придется вручную редактировать termsrv.dll файл при каждом обновлении сборки Windows 10/11. И если вы используете RDPWrap, вам также потребуется обновить файл rdpwrap.ini после установки обновлений Windows.
If you frequently access a remote Windows computer and get logged off because your colleague has logged on, and was unaware that you were logged on as well, then this article is for you.
By default, the Windows operating system only allows one RDP connection at a time. If another connection was made from another PC on the network, regardless if they use a different user account to sign in, you will be automatically logged off, and will get either one of the following prompts:
"You have been disconnected because another conenction was made to the remote computer"

Do you want to allow <computername/username> to connect to this machine? Click OK to disconnect your session immediately or click Cancel to stay conencted. No action will disconnect your session in 30 seconds.

Either way, both would not be allowed to be logged in on a remote PC simultaneously.
In this article, we address the issue of simultaneous RDP connections and how you can allow a client Windows PC (Windows 10 or 11) to have 2 or more RDP connections at the same time. This will increase your team’s productivity and save valuable time.
Before we begin, we would like to point out a few things.
Critical Considerations
Number one is that Microsoft wants you to use a Windows Server license instead of a Windows client license if you want to allow multiple RDP connections. This leads us to believe that the Windows OS does not technically lack any ability to be able to handle multiple RDP connections. Technically, it all comes down to the available system resources.
A typical RDP connection only requires 150-200 MBs of RAM per RDP session. If your system has the available RAM, you can allow multiple remote sessions using either one of the following methods stated below.
Secondly, we came across several websites that give a method to allow multiple RDP connections using the Group Policy editor by reconfiguring the “Restrict Remote Desktop Services user to a single Remote Desktop Services session” policy. Note that this method only works on Windows Servers.
Hence, do not waste your time editing the Group Policy, as we have already tested it out for you.
Thirdly, only the Professional and Enterprise Windows editions support RDP connections. If you have a Windows Home edition, then learn how to enable RDP or use the first method (RDPWrapper) to allow multi-user remote connection.
That being said, there is no native, straightforward method to allow multiple RDP connections on a client Windows PC. You either need to use a third-party utility or manipulate critical Windows files to enable multi-user RDP connection. Therefore, it is advised that you create a system restore point before proceeding forward with any of the two methods.
Enable Multiple RDP User Connections using RDPWrap
RDPWrap is an open-source project available on GitHub. RDPWrap enables support for numerous concurrent RDP sessions as well as RDP Hosts on previously inaccessible Windows editions, like Home.
Follow the steps below precisely as given to allow multiple RDP connections on the computer.
Note: All of the steps given below are to be performed on the remote (target) computer.
-
Download “RDPWInst.zip” from GitHub.
Note: If you are using Google Chrome to download the file, it will be flagged as malicious and blocked from downloading. Learn how to stop Chrome from blocking downloads.
-
Extract the contents of the zipped file.

Extract RDPWrap Right-click on the zipped file and click “Extract All” from the context menu. Then click “Extract” on the extraction wizard to finish the extraction.
-
Run “install.exe” with administrative privileges.
Run “install.exe” as administrator Right-click the “install.exe” file and then click “Run as administrator” from the context menu.
RDPWrap will now begin installation in a command window.
-
Press any key to continue the installation.
Press any key to finalize the installation -
Now run the “RDPConf.exe” file.
Run RDPConf.exe The RDP Wrapper Configuration window will now open.
-
Check that all elements in the Diagnostics section are green.
Ensure all elements are green Note that it states [Not Supported] in front of “Listener state” on the right. This is because the version of Windows would not be supported. To make RDPWrap support your OS version, you must replace the “rdpwrap.ini” file using the next few steps given below, which is located at “C:Program FilesRDP Wrapper.”
-
Run an elevated PowerShell instance.
-
Run the following cmdlet:
Stop-Service termservice -Force
Stop RDP service from PowerShell This will temporarily stop the Remote Desktop service.
-
Now run the following cmdlet to replace the rdpwrap.ini file:
Invoke-WebRequest https://raw.githubusercontent.com/sebaxakerhtc/rdpwrap.ini/master/rdpwrap.ini -outfile "C:Program FilesRDP Wrapperrdpwrap.ini"Replace the rdpwrap.ini file -
Restart the computer.
-
Run the “RDPConf.exe” file again to confirm that the status has changed from [Not Supported] to [Fully Supported].

RDPWrap is fully supported


That’s it! You should now be able to connect to the remote PC with multiple simultaneous connections using any RDP tool, like MSTSC, Microsoft RDP, rdcman, etc. However, you can only sign in using different local user accounts.
If you sign in with the same user account, the RDC connection using the account prior will be automatically disconnected.
Enable Multiple RDP User Connections by Modifying Termsrv.dll
If you do not wish to use RDPWrap, then you can modify the Termsrv.dll file to allow multiple RDP connections at the same time. This is the library the Remote Connection Protocol uses to establish a connection and is located at “C:WindowsSystem32.”
Let us remind you to create a system restore point before proceeding, so you can revert your settings if things do not go as planned.
Alternatively, we have also given steps to back up only the Termsrv.dll in the steps below so it can be replaced when needed.
Perform the following steps to modify the Termsrv.dll library and allow multiple RDP connections:
Note: All of the steps given below are to be performed on the remote (target) computer.
-
Launch an elevated Command Prompt.
-
Make a copy of the Termsrv.dll file by running this cmdlet:
copy c:WindowsSystem32termsrv.dll termsrv.dll_backupBackup termsrv.dll -
Take ownership of the original file by running the following command:
takeown /F c:WindowsSystem32termsrv.dll /ATake ownership of Termsrv.dll -
Grant the local Administrator group full control of the library by running this cmdlet:
icacls c:WindowsSystem32termsrv.dll /grant Administrators:FGrant the Administrator group full control of Termsrv.dll -
Now stop the Remote Desktop service by running this cmdlet:
Net stop TermServiceAlso, enter “Y” when asked for confirmation.
Stop the RDP service -
Determine and note down your OS version by typing in “winver” in the Run Command box.

Find your OS version This will be needed later.
-
Now open the termsrv.dll file (C:WindowsSystem32termsrv.dll) using a Hex editor.
You can download any hex editor online.
-
Search for the following string according to your OS version (determined in step 6 above) given in the table below and replace it with the following:
B8 00 01 00 00 89 81 38 06 00 00 90
Windows build String to replace Windows 11 22H2 39 81 3C 06 00 00 0F 84 75 7A 01 00 Windows 11 RTM (21H2 – 22000.258) 39 81 3C 06 00 00 0F 84 4F 68 01 00 Windows 10 x64 21H2 39 81 3C 06 00 00 0F 84 DB 61 01 00 Windows 10 x64 21H1 39 81 3C 06 00 00 0F 84 2B 5F 01 00 Windows 10 x64 20H2 39 81 3C 06 00 00 0F 84 21 68 01 00 Windows 10 x64 2004 39 81 3C 06 00 00 0F 84 D9 51 01 00 Windows 10 x64 1909 39 81 3C 06 00 00 0F 84 5D 61 01 00 Windows 10 x64 1903 39 81 3C 06 00 00 0F 84 5D 61 01 00 Windows 10 x64 1809 39 81 3C 06 00 00 0F 84 3B 2B 01 00 Windows 10 x64 1803 8B 99 3C 06 00 00 8B B9 38 06 00 00 Windows 10 x64 1709 39 81 3C 06 00 00 0F 84 B1 7D 02 00 Windows versions and corresponding hex string to replace Find and replace hex values in Termsrv.ini -
Make the changes and save the Termsrv.dll file.
Save the modified Termrv.dll file -
If prompted for confirmation or UAC, click Yes.
-
Close the hex editor.


You should now be able to connect multiple RDP sessions to the remote PC after modifying the Termsrv.dll file.
If things didn’t go as planned, you can restore the original Termsrv.dll file by running the following cmdlet in Command Prompt using the backup we had created in step 2 above:
copy termsrv.dll_backup c:WindowsSystem32termsrv.dllConclusion
Having the ability to have multiple RDP connections simultaneously on a Windows PC can result in a significant increase in productivity. Now, you and your team members can work on a client Windows PC at the same time, without having to wait on one another.
That said, the methods given in this post are tried-and-tested and you can perform them word-for-word on your Windows PC to allow simultaneous RDP sessions. However, even though the methods work, we advise you to create system backups just in case.
Also see:
Subhan Zafar is an established IT professional with interests in Windows and Server infrastructure testing and research, and is currently working with Itechtics as a research consultant. He has studied Electrical Engineering and is also certified by Huawei (HCNA & HCNP Routing and Switching).
In this article, we’ll look at potential issues and workarounds that will allow you to enable Remote Desktop sessions for multiple users on Windows 10 and Windows 8/8.1.
As with earlier versions of the Windows operating system, Windows 10 and 8 restrict the use of Microsoft’s Remote Desktop Protocol (RDP) to one remote connection, preventing users from making multiple RDP connections.
The issue with multiple Remote Desktop Sessions on Windows 10 and 8
Attempting to initiate a second Remote Desktop session will cause any users working locally on the machine or logged in through an existing RDP session to be kicked out. The issue is not a result of the technical capabilities of Windows 10 but rather with the license agreement.
Now that we’ve determined the obstacles we’re facing, let’s consider two popular options you can use to enable multiple Remote Desktop users on Windows 10 and 8: either by using the RDP Wrapper Library application or by editing the termsrv.dll file.
Enabling multiple RDP Sessions in Windows
Note: Before you begin, it’s important to remember that both of these processes are in violation of the Microsoft License Agreement.
RDP Wrapper Library
This is the easier, or at least less tedious, option. The problem that arises when you modify termsrv.dll, is that when installing a new Windows 10 build or simply some security updates, the termsrv.dll file can sometimes be updated automatically. As a result, you will have to modify termsrv.dll using HEX Editor after every update.
The RDP Wrapper Library, on the other hand, will simply be loading the file with changed parameters, so after any updates, it will continue to work without any issues.
Follow these steps to use the RDP Wrapper Library to enable multiple user RDP sessions:
-
Start by downloading the RDP Wrapper Library here. The latest version is 1.6.2. According to the developer page, this will be supported for all versions of Windows. The RDP Wrapper Library serves as a layer between SCM (Service Control Manager) and Terminal Services, and it not only enables support for multiple simultaneous RDP sessions, it also enables RDP Host support on Windows 10.
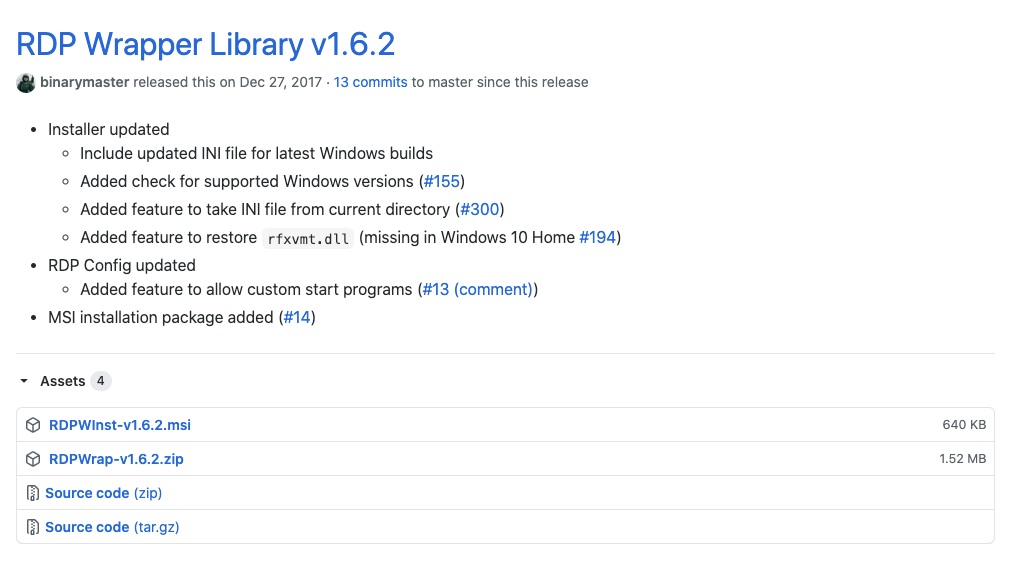
Figure 1. Screen capture from github.com
-
To use the RDP Wrapper, you’ll first need to install the RDP Wrapper Library by running install.bat with Administrator privileges.
-
Once the installation is complete, run RDPConfig.exe and first check that all elements in the Diagnostics section are green.
-
Test the ability to run multiple Remote Desktop connections by opening a second RDP session. You should be now able to successfully enable Remote Desktop connections for multiple users on Windows 10 or Windows 8.
Modifying termsrv.dll
The alternative to using the RDP Wrapper is to replace the original termsrv.dll file, which can be found in the C:WindowsSystem32 directory. Before editing or replacing anything, it is recommended that you manually create a backup of the file. You can do this through the command line prompt (cmd.exe) with the following command:
Copy c:WindowsSystem32termsrv.dll termsrv.dll_backup
Follow these steps to modify termsrv.dll:
-
First, you will need to become the owner of the termsrv.dll file and assign the Administrators group full rights to the file. Head into the Properties after right-clicking on the file. Then go to the Security tab and click on Edit. In the access list, find the local administrators group and give it full control over this file and save the changes.
-
Now you need to stop the Remote Desktop service (TermService) in either the services.msc console or from the command prompt with the following:
Net stop TermService
-
Now open the termsrv.dll file using any HEX editor (such as the freeware HxD editor) and search for the following line:
39 81 3C 06 00 00 0F 84 73 42 02 00
Replace this line with:
B8 00 01 00 00 89 81 38 06 00 00 90

Figure 2. Screen capture from mh-nexus.de
-
Finally, save the termsrv.dll file and run TermService before attempting to run multiple Remote Desktop connections by opening a second RDP session.
Regardless of what method you chose, you should now be able to connect multiple user Remote Desktop sessions on Windows 10 and Windows 8. If you experience any issues enabling multiple RDP connections or have some helpful advice to contribute, please share with us in the comments section below.
If you’re interested in learning how to allow multiple RDP sessions for Windows Server 2012, 2016 or 2019, check out our next blog post in this series.
Содержание
- 1 RDP Wrapper Library
- 2 Модификация файла termsrv.dll
- 3 Руководство по настройке терминального сервера Windows 10
- 4 Почему RDP на Windows 7/10 не работает для нескольких пользователей
- 5 Установка сервера терминалов займет секунды
- 6 RDP для Windows 7/10 не подключается
Как и в прошлых клиентских версиях операционных систем Майкрософт, пользователи Pro и Enterprise Windows 10 (но не Home) редакций могут удаленно подключаться к своим компьютерам через службу удаленных рабочих столов (RDP). Однако есть ограничение на количество одновременных RDP сессии – возможна одновременная работа только одного удаленного пользователя. При попытке открыть вторую RDP сессию, сеанс первого пользователя предлагается завершить.
В систему вошел другой пользователь. Если вы продолжите, он будет отключен. Вы все равно хотите войти в систему?
В английской версии предупреждение такое:
Another user is signed in. If you continue, they’ll be disconnected. Do you want to sign in anyway?
Дело в том, что в настольных редакциях операционных систем Microsoft есть следующие основные ограничения на использование службы удаленного рабочего стола:
- Поддержка RDP доступа имеется только в старших редакциях Windows (Professional и выше), а в домашних редакциях (Home) этот функционал отключен.
- Возможно только одно удаленного RDP подключения. При попытке открыть вторую RDP-сессию, пользователю предлагается завершить существующее подключение.
- В том случае, есть пользователь работает за консолью компьютера (локально), при удаленном подключении RDP, его сеанс будет отключен (заблокирован). Правильно и обратное утверждение: удаленный RDP сеанс принудительно завершается, если пользователь авторизуется на консоле системы
По сути, ограничение на количество одновременных rdp подключений является не техническим, а скорее лицензионным, запрещающее создавать на базе рабочей станции терминальный RDP сервер для работы нескольких пользователей. Хотя с технической точки зрения любая редакция Windows при наличии достаточного количества памяти может поддерживать одновременную работу нескольких десятков удаленных пользователей (в среднем на одну сессию пользователя без учета запускаемых приложений требуется 150-200 Мб памяти). Т.е. максимальное количество одновременных сессий в теории ограничивается только ресурсами компьютера.
Мы рассмотрим два способа отключить ограничение на количество одновременных RDP подключений к Windows 10:
Содержание:Важно. Изначально в самой первой версии статьи основным рабочим вариантом, позволяющим снять ограничение на количество одновременных RDP подключений пользователей был способ модификации и подмены файла termsrv.dll в папке %SystemRoot%System32. Однако при установке нового билда Windows 10 или некоторых обновлений безопасности, этот файл обновляется. В результате приходится каждый раз редактировать этот файл Hex редактором, что довольно утомительно. Поэтому в качестве основного способа организации бесплатного терминального сервера на клиентской Windows 10 стоит считать утилиту RDP Wrapper Library.Примечание. Модификации системы, описанные в этой статье, вероятно, будут считаться нарушением лицензионного соглашения на Windows со всеми вытекающими последствиями.
RDP Wrapper Library
Альтернативой модификации файла termsrv.dll является использование проекта RDP Wrapper Library. Эта программа работает в качестве прослойки между менеджером управления службами (SCM- Service Control Manager) и службой терминалов (Terminal Services) и позволяет включить не только поддержку нескольких одновременных RDP сессии, но и активировать поддержку RDP Host на домашних редакциях Windows 10. RDP Wrapper не вносит никаких изменений в файл termsrv.dll, просто подгружая termsrv с изменёнными параметрами.
Таким образом, это решение будет работать даже при обновлении версии файла termsrv.dll, что позволяет не опасаться обновлений Windows.
Важно. Перед установкой RDP Wrapper: важно, чтобы у вас использовалась оригинальная (непропатченная) версия файл termsrv.dll. В противном случае RDP Wrapper может работать не стабильно, или вообще не запускаться.
Скачать RDP Wrapper можно с репозитория GitHub: https://github.com/binarymaster/rdpwrap/releases (последняя доступная версия RDP Wrapper Library v1.6.2 вышла относительно недавно – 28 декабря 2017 года). Судя по информации на странице разработчика, поддерживаются все версии Windows. Windows 10 поддержиывается вплость до версии Insider Preview build 10.0.17063.1000 от 13 декабря 2017 года.
Совет. Кстати говоря, доступны исходники RDP Wrapper Library, что позволяет при желании самому собрать исполняемые файлы.
Архив RDPWrap-v1.6.2.zip содержит несколько файлов:
- RDPWinst.exe —программа установки/удаления RDP Wrapper Library
- RDPConf.exe — утилита настройки RDP Wrapper
- RDPCheck.exe — Local RDP Checker — утилита проверки RDP
- install.bat, uninstall.bat, update.bat — пакетные файлы для установки, удаления и обновления RDP Wrapper
Чтобы установить утилиту, запускам файл install.bat с правами администратора.
После окончания установки запускаем RDPConfig.exe. И удостоверяемся, что в секции Diagnostics все элементы окрашены в зеленый цвет.
Примечание. В моем случае, т.к. на компьютере отсутствует доступ в интернет, программа не смогла получить с Github актуальную версию INI файла с настройками под мою версию Windows. Поэтому в статусе указано [not supported]. Скачайте файл rdpwrap.ini с ресурса разработки и поместите его в каталог установки. Перезапустите службу и убедитесь, что надпись [not supported] сменилась на [fully supported].
Из интересных особенностей новой версии RDP Wrapper:
- опция Hide users on logon screen – позволяет скрыть список пользователей на экране приветствия.
- При отключении опции Single session per user — будут разрешены несколько одновременных RDP сессий под одной учетной записью (устанавливается ключ реестра fSingleSessionPerUser = 0 в ветке HKLMSYSTEM CurrentControlSetControlTerminal ServerfSingleSessionPerUser).
В том случае, если после обновления версии Windows, RDP Wrapper не работает, проверьте, что в секции Diagnostics присутствует надпись Listener state: Not listening.
Попробуйте обновить ini файл скриптом update.bat, либо вручную и переустановить службу
rdpwinst.exe -urdpwinst.exe -i
Пытаемся открыть вторую RDP сессию. Все получилось! Теперь наша Windows 10 позволяет одновременно подключаться по RDP сразу двум удаленным пользователям.
 Утилита должна работать на всех поддерживаемых на данный момент редакциях Windows : Windows Vista, Windows 7, Windows 8, Windows 8.1 и Windows 10. Таким образом из любой клиентской версии Windows можно сделать сервер терминалов.
Модификация файла termsrv.dll
Примечание. Данный способ применим только к RTM версии Windows 10 x64 (10240).
Убрать ограничение на количество RDP подключений можно с помощью модификации файла termsrv.dll (файл библиотеки, используемый службой Remote Desktop Services). Файл находится в каталоге C:WindowsSystem32).
Перед модификацией файла termsrv.dll желательно создать его резервную копию (в случае необходимости можно будет вернуться к первоначальной версии файла):
copy c:WindowsSystem32termsrv.dll termsrv.dll_backup
 Перед правкой файла termsrv.dll нужно стать его владельцем и предоставить группе администраторов полные права на него (все операции выполняются аналогично описанным в статье Убираем ограничение на количество RDP сессий в Windows 8). Затем остановите службу Remote Desktop service (TermService) из консоли services.msc или из командной строки:
Net stop TermService
 Для редакции Windows 10 x64 RTM (версия файла termsrv.dll — 10.0.10240.16384): Откройте файл termsrv.dll с помощью любого HEX редактора (к примеру, Tiny Hexer)
Найдите строку:
39 81 3C 06 00 00 0F 84 73 42 02 00
И замените ее на:
B8 00 01 00 00 89 81 38 06 00 00 90
 Сохраните файл и запустите службу TermService.
Готовый пропатченный файл termsrv.dll для Windows 10 Pro x64 можно скачать здесь: termsrv_windows_10_x64_10240.zip

По умолчанию операционная система Windows 10 не позволяет нескольким пользователям одновременно подключиться к одному компьютеру, но в современном мире подобная необходимость возникает все чаще и чаще. Причем эта функция применяется не только для удаленной работы, но и для личных целей. Из данной статьи вы узнаете о том, как настроить и использовать терминальный сервер в Windows 10.
Какой бы сложной на первый взгляд не казалась озвученная в теме статьи задача, на самом деле все до неприличия просто. Все что от вас требуется – четко следовать указанным инструкциям. Обратите внимание, что способ подключения схож с таковым в более ранних версиях ОС.
Подробнее: Создание терминального сервера на Windows 7
Шаг 1: Установка специализированного ПО
Как мы уже говорили ранее, стандартные настройки Windows 10 не позволяют использовать систему одновременно нескольким пользователям. При попытке такого подключения вы увидите следующую картину:
Чтобы исправить это, необходимо внести изменения в параметры ОС. К счастью, для этого есть специальный софт, который все сделает за вас. Сразу предупредим, что файлы, о которых пойдет речь далее, модифицируют системные данные. В связи с этим в некоторых случаях они распознаются как опасные для самой Windows, поэтому использовать их или нет – решать только вам. Все описанные действия были проверены на практике нами лично. Итак, приступим, в первую очередь выполните следующее:
- Перейдите по данной ссылке, после чего нажмите на строку, которая указана на изображении ниже.
В результате начнется загрузка архива с нужным софтом на компьютер. По окончании скачивания извлеките все его содержимое в любое удобное место и найдите среди полученных файлов тот, что называется «install». Запустите его от имени администратора. Для этого нажмите на нем правой кнопкой мышки и выберите из контекстного меню строчку с одноименным названием.</li>
Как мы упоминали ранее, система не определит издателя запускаемого файла, поэтому может сработать встроенный «Защитник Windows». Он попросту вас предупредит об этом. Для продолжения нажмите кнопку «Запустить».</li>
Если у вас включен контроль профилей, на экране может появиться запрос на запуск приложения «Командная строка». Именно в ней и будет выполняться инсталляция ПО. Кликните в появившемся окне «Да».</li>
Далее появится окно «Командная строка» и начнется автоматическая установка модулей. Вам необходимо лишь немного подождать, пока не появится просьба нажать любую клавишу, что и нужно сделать. Это автоматически закроет окно инсталляции.</li>Остается лишь проверить все внесенные изменения. Для этого в списке извлеченных файлов найдите «RDPConf» и запустите его.</li>В идеале все пункты, которые мы отметили на следующем скриншоте, должны быть зеленого цвета. Это означает, что все изменения внесены корректно и система готова к подключению нескольких пользователей.</li>На этом первый шаг по настройке терминального сервера завершен. Надеемся, у вас не возникло сложностей. Двигаемся далее.</ol>
Шаг 2: Изменение параметров профилей и настроек ОС
Теперь необходимо добавить профили, под которыми другие пользователи смогут подключаться к нужному компьютеру. Помимо этого, мы произведем некоторую настройку системы. Список действий будет следующим:
- Нажмите на рабочем столе вместе клавиши «Windows» и «I». Это действие активирует окно основных настроек ОС Windows 10.
- Перейдите в группу «Учетные записи».
- В боковой (левой) панели зайдите в подраздел «Семья и другие пользователи». Кликните на кнопку «Добавить пользователя для этого компьютера» несколько правее.
- Появится окно с параметрами входа Windows. Вводить ничего в единственную строку не стоит. Необходимо просто кликнуть по надписи «У меня нет данных для входа этого человека».
- Далее нужно нажать на строку «Добавить пользователя без учетной записи Майкрософт».
- Теперь укажите название нового профиля и ключ к нему. Помните, что пароль следует вводить в обязательном порядке. В противном случае в дальнейшем могут возникнуть проблемы с удаленным подключением к компьютеру. Все остальные поля также нужно заполнить. Но это уже требование самой системы. По окончании нажмите кнопку «Далее».
- Спустя несколько секунд новый профиль будет создан. Если все пройдет успешно, вы увидите его в списке.
- Теперь перейдем к изменению параметров операционной системы. Для этого на рабочем столе на иконке «Этот компьютер» нажмите правой кнопкой мышки. Выберите из контекстного меню параметр «Свойства».
- В следующем открывшемся окне нажмите на отмеченную ниже строчку.
- Перейдите в подраздел «Удаленный доступ». Ниже вы увидите параметры, которые и следует изменить. Отметьте галочкой строку «Разрешить подключения удаленного помощника к этому компьютеру», а также активируйте опцию «Разрешить удаленные подключения к этому компьютеру». По завершении нажмите кнопку «Выбрать пользователей».
- В новом маленьком окне выберите функцию «Добавить».
- Затем необходимо прописать имя пользователя, которому будет открыт удаленный доступ к системе. Сделать это нужно в самом нижнем поле. После ввода названия профиля нажмите на кнопку «Проверить имена», которая находится правее.
- В результате вы увидите, что имя пользователя преобразится. Это значит, что оно прошло проверку и было найдено в перечне профилей. Для завершения операции нажмите «ОК».
- Примените внесенные изменения во всех открытых окнах. Для этого нажмите в них на «ОК» или «Применить». Остается совсем немного.
Шаг 3: Подключение к удаленному компьютеру
Подключение к терминалу будет происходить посредством интернета. Это значит, что нам необходимо сперва узнать адрес системы, к которой будут подключаться пользователи. Сделать это не сложно:
- Откройте вновь «Параметры» Windows 10, используя клавиши «Windows+I» либо меню «Пуск». В настройках системы зайдите в раздел «Сеть и Интернет».
- С правой стороны открывшегося окна вы увидите строку «Изменить свойства подключения». Нажмите на нее.
- На следующей странице будет отображена вся имеющаяся информация о сетевом подключении. Спуститесь вниз до тех пор, пока не увидите свойства сети. Запомните цифры, которые расположены напротив отмеченной на скриншоте строчки:
- Все необходимые данные мы получили. Остается лишь подключиться к созданному терминалу. Дальнейшие действия нужно выполнять на том компьютере, с которого будет происходить подключение. Для этого нажмите на кнопку «Пуск». В списке приложений найдите папку «Стандартные-Windows» и откройте ее. В перечне элементов будет «Подключение к удаленному рабочему столу», его и нужно запустить.
- Затем в следующем окне введите IP адрес, который вы узнали ранее. В завершении нажмите кнопку «Подключить».
- Как и при стандартном входе в систему Windows 10, потребуется ввести имя пользователя, а также пароль от учетной записи. Учтите, что на данном этапе нужно вводить имя того профиля, которому вы дали разрешение на удаленное подключение ранее.
- В некоторых случаях вы можете увидеть уведомление о том, что системе не удалось проверить подлинность сертификата удаленного компьютера. Если такое произойдет, нажмите кнопку «Да». Правда делать это нужно лишь в том случае, если вы уверены в компьютере, к которому подключаетесь.
- Остается лишь немного подождать, пока система удаленного подключения загрузится. При первом подключении к терминальному серверу вы увидите стандартный набор опций, которые при желании можно изменить.
- В конечном итоге подключение должно завершится успехом, и вы увидите на экране изображение рабочего стола. В нашем примере это выглядит следующим образом:
Это все, о чем мы хотели вам рассказать в рамках данной темы. Проделав описанные выше действия, вы без труда сможете подключаться к своему или рабочему компьютеру удаленно практически с любого устройства. Если у вас впоследствии возникнут трудности или вопросы, рекомендуем ознакомиться с отдельной статьей на нашем сайте:
Подробнее: Решаем проблему с невозможностью подключения к удаленному ПКМы рады, что смогли помочь Вам в решении проблемы.Опишите, что у вас не получилось. Наши специалисты постараются ответить максимально быстро.
Помогла ли вам эта статья?
Сервер терминалов на Windows 10 в многопользовательском режимеRDP — это такой протокол удаленного доступа к одному компьютеру (серверу терминалов), который позволяет нескольким пользователям работать одновременно. Прикиньте, у каждого будет свой рабочий стол в режиме реального времени. Но и это еще не все. Многопользовательский режим на законных основаниях вообще недоступен в ОС, рассчитанных для клиентских машин (не серверных). Более того, если во время работы локального пользователя на компьютере, например, с Win 10 Pro будет осуществлено подключение терминального, то система попросит «выкинуть» первого из сессии, выдав сообщение.
В систему вошел другой пользователь. Если вы продолжите, он будет отключен. Вы все равно хотите войти в систему?
То есть по факту работать может только один человек: локальный (он же консольный), либо терминальный. Двое одновременно не уживаются никак. Отсюда вопрос.
Почему RDP на Windows 7/10 не работает для нескольких пользователей
Это решение компании Microsoft, которое основывается на приобретении платных лицензий на каждого подключающегося в таком режиме пользователя. А продаются такие лицензии только для серверных операционных систем. Но для домашних пользователей выход есть и он хорошо показал себя на практике. Главное понять, что в дальнейшем делать с моральным стыдом и угрызениями совести, поскольку такая схема идет вразрез с интересами вышеназванной корпорации. Знакомьтесь с решением, которые поможет-таки организовать сервер терминалов на Windows 7 и 10 в многопользовательском режиме. Это RDP Wrapper Library. Оно прекрасно подойдет для небольшого офиса, где количество рабочих мест около десятка. Данное ПО очень простое в настройке, что всегда хорошо воспринимается техническими специалистами на местах. Есть информация на форумах, что даже Home версии Windows поддерживаются, но я лично не проверял. Давайте переходить к делу и распаковывать скачанный архив. В нем мы видим следующее.
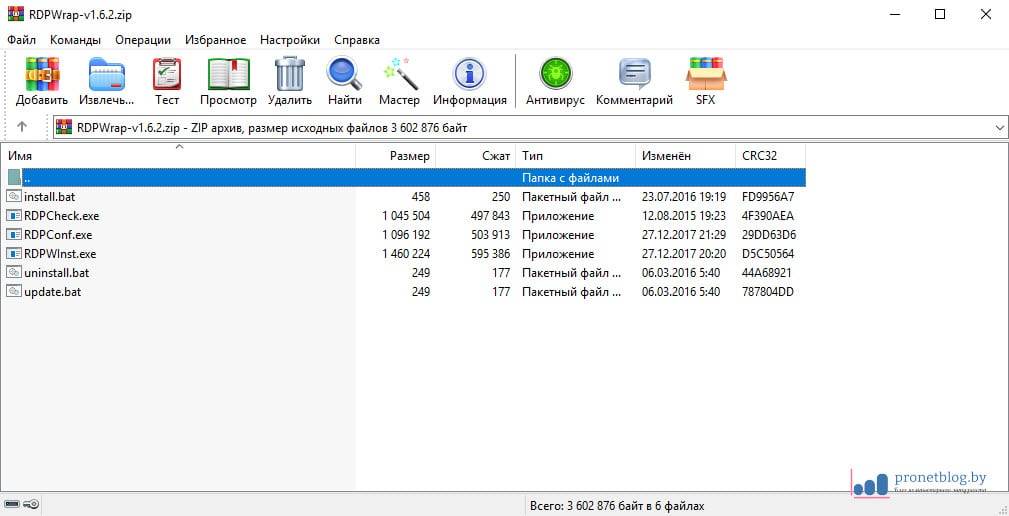
Где:
RDPWInst — установка и удалениеRDPConf — просмотр конфигурацииRDPCheck — проверка работоспособности*.bat — пакетные файлы установки, удаления и обновления
Рекомендую сразу распаковывать архив в рабочий каталог, чтобы потом не переносить файлы по двадцать раз.
Установка сервера терминалов займет секунды
Запускаем от имени администратора файл install.bat и наблюдаем за процессом, который должен завершиться победой, как в нашем случае.
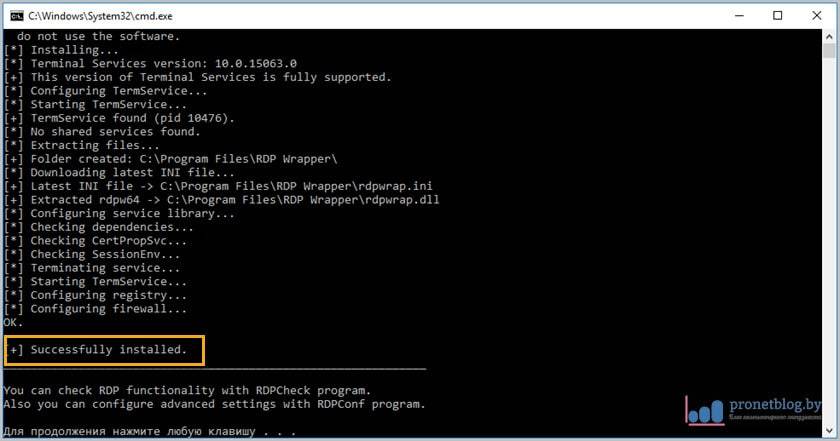
Но еще рано открывать шампанское, необходимо запустить файл RDPConf и убедиться, что все четыре пункта, показанные на скриншоте, горят зеленым цветом.

Если у вас так, значит, примите поздравления, сервер терминалов настроен и готов к работе в многопользовательском режиме. Осталось только создать группу пользователей удаленного рабочего стола, дать им нужные права на ресурсы и вперед. По случаю успешного запуска давайте рассмотрим некоторые интересные функции программы.
Single session per user — одновременный запуск нескольких сессий под логином одного пользователяHide users on logon screen — скрывает список пользователей (карусель) на экране приветствияAllow to start custom programs — автозапуск пользовательских программ при подключении к рабочему столу (как я понимаю)
Также интерес представляет секция с названием «Session Shadowing Mode». Это теневой режим подключения, который позволяет админу наблюдать за активным сеансом пользователя в режиме реального времени. Кому сильно интересно, гуглите.
RDP для Windows 7/10 не подключается
Поговорим о проблемах, ведь ситуации бывают разные. Вот некоторые из популярных траблов. Например, в строке «Listener State» могут красным гореть сообщения типа «Not listening» или «Not Supported». В таком случае попробуйте запустить файл update.bat, чтобы программа скачала последние обновления. Может сложиться ситуация, когда Windows обновилась в фоновом режиме и разработчики данного ПО еще не успели добавить поддержку конкретной сборки операционной системы. Если это не поможет, следует пройти в каталог Program Files — RDP Wrapper, открыть блокнотом файл rpdwrap.ini, спуститься вниз документа и убедиться, что здесь есть секции настроек с указанием номера именно вашей (или выше) сборки Win 7 или 10.
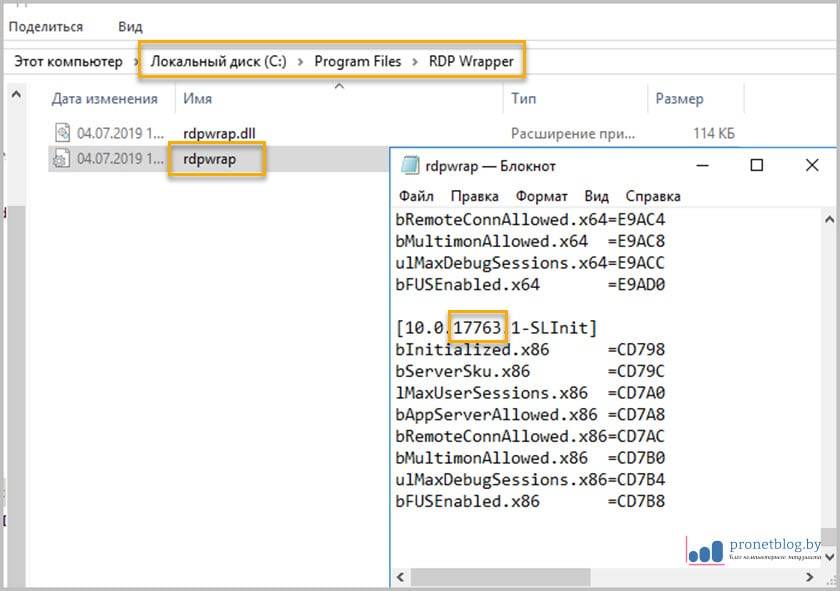
А вот что говорит вкладка «О системе». Как видим, в данном случае полный порядок.
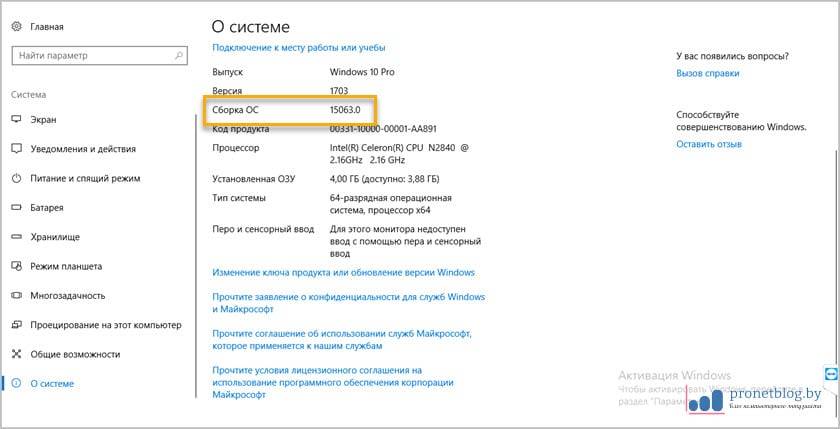
Продолжим разговор о файле rpdwrap.ini, поскольку чаще всего проблемы могут быть именно из-за его настроек, а вернее, их отсутствия. В случае если номера нужной сборки операционной системы в нем нет, нужно проследовать на форум разработчиков, где через какое-то время выкладывают новые версии данного файла. Следует его скачать, перезаписать в рабочем каталоге, затем переустановить службу. Пакетные файлы install.bat и uninstall.bat вам в помощь. Напоследок скажу еще один важный момент. До установки приложения RDP Wrapper Library, никакие другие способы организации терминального сервера на Windows 7/10 не должны осуществляться. Кстати, вариант, описываемый в этой статье, по информации из Сети вроде как не модифицирует никакие системные файлы, а работает как прослойка между службами Windows.Используемые источники:
- https://winitpro.ru/index.php/2015/09/02/neskolko-rdp-sessij-v-windows-10/
- https://lumpics.ru/terminal-server-on-windows-10/
- https://pronetblog.by/rdp-na-windows-7-i-10.html