Is your Windows 10 laptop or PC giving you trouble? Whether it takes more time for booting or is having frequent error messages, you may want to factory reset Windows 10 to its default settings. This means wiping all the information on your hard drive and starting again with a clean slate.
A Windows 10 reset is definitely a good way to fix many drive update issues and registry errors. However, you have to be patient, as the process can consume a lot of time, so allocate at least a few hours for this activity. This article discusses the various steps of factory reset on a Windows 10 laptop.
Always Make a Backup First
Since a clean reset will wipe all the information you have on your PC, it is necessary to make a backup elsewhere. You can either create a backup to a network drive or copy the files individually to an external hard disk.
I personally like to store the backup on the cloud. For this, I prefer Microsoft OneDrive since it’s tightly integrated with Windows. Also, the files and folders in OneDrive can be uploaded and downloaded exactly in the manner of your Windows PC appearance.

Whatever methods you find to be easy, don’t forget the backup stage, as on rare occasions things do go wrong while doing a factory reset. Screen freezes and infinite restart loops aren’t unheard of. If you encounter such issues during the factory reset, do a cold restart by hard-pressing the power button.
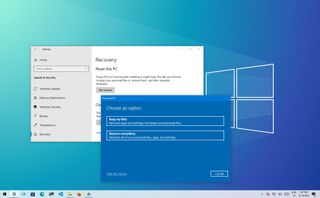
Turn on the “Reset this PC” Option
The Windows 10 reset option can be turned on simply from the Start menu. You can also access it from “Settings.”

Click “Get started” to reset the PC. You can also access this option from an “Advanced startup” menu discussed below.

You will be given two choices for resetting Windows 10. You can either keep your personal file and remove the apps and settings or go nuclear and delete everything.

Before you remove your data, you will be asked one last time whether you want to just remove the files. It also consumes less time than a complete reset. Click “Next” to ignore the advice.

It will take just a few minutes for the reset option to be enabled on your Windows PC.

In the next step your Windows 10 PC will prepare itself to reset everything. The process can take a little time, so be patient.
Once successful, the PC will prepare the restart and proceed further.

The PC will reset now in the background. It is a slow, time-consuming process. Windows will be reinstalled in the background itself. All apps that you installed will be removed. Only the apps that came pre-installed with Windows will be inserted. Wait for the process to complete itself, and you will have a similar desktop and an update back to the factory version of your Windows purchase.

Advanced Startup “Reset” Method
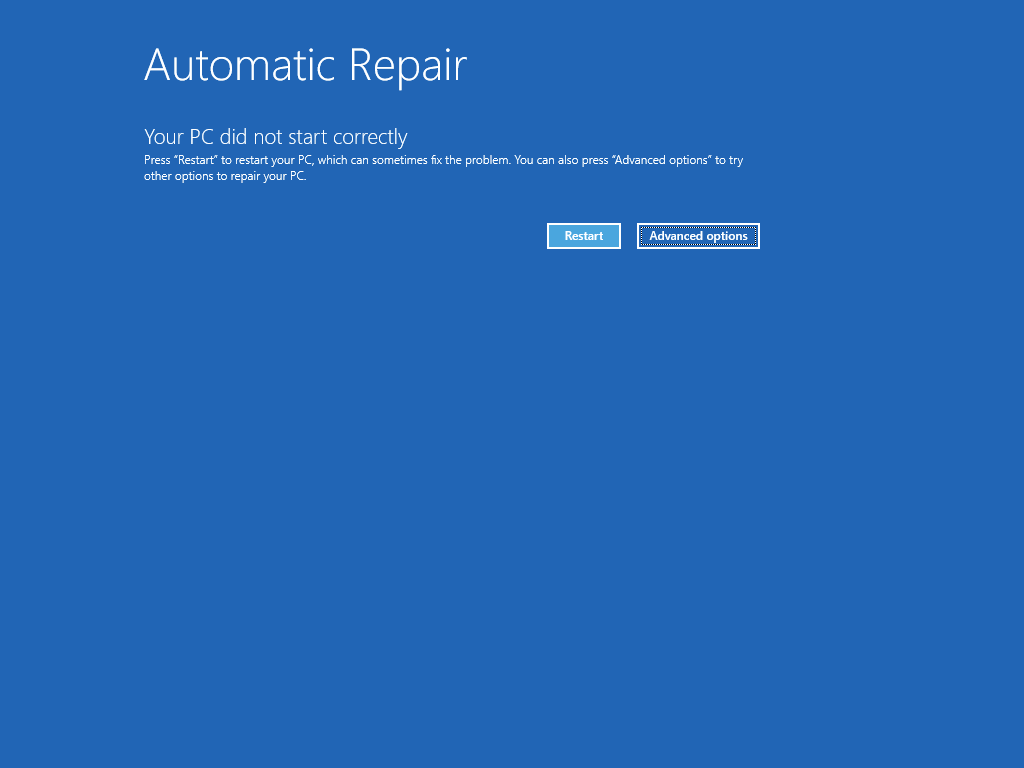
Another option is to reset the Windows PC in Safe mode. This is preferred if you are stuck infinitely in the “Prepare to reset” option in the above section. It is mostly a GUI error. The same procedure is used in safe mode option, but the steps are slightly different as shown below.
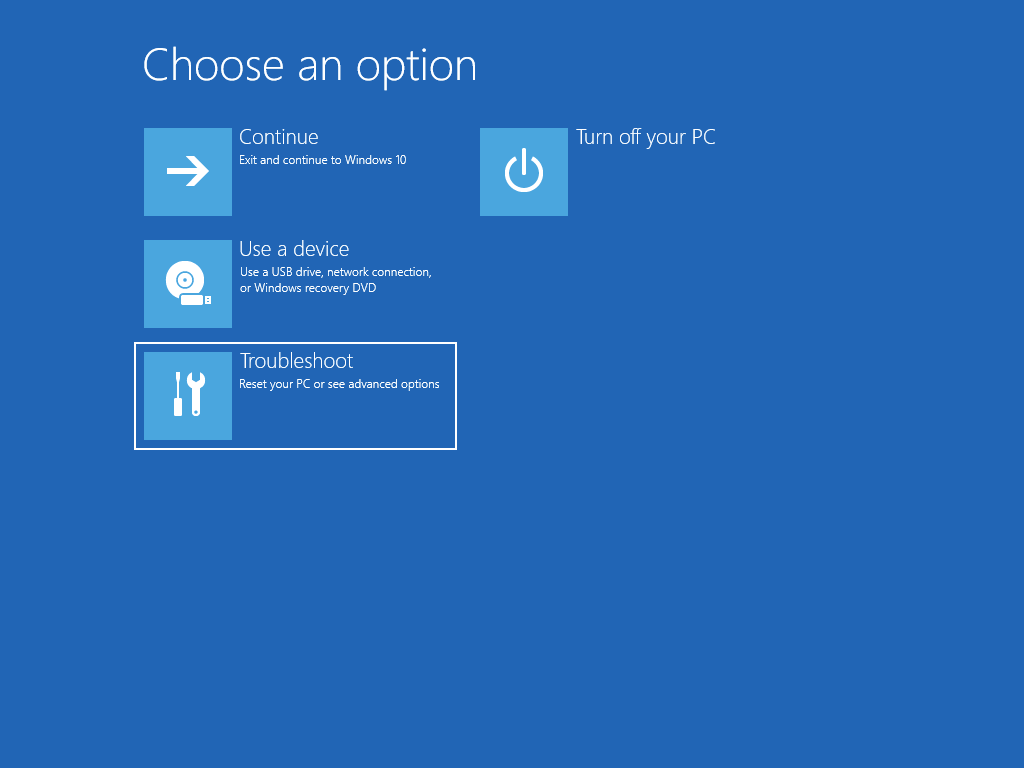
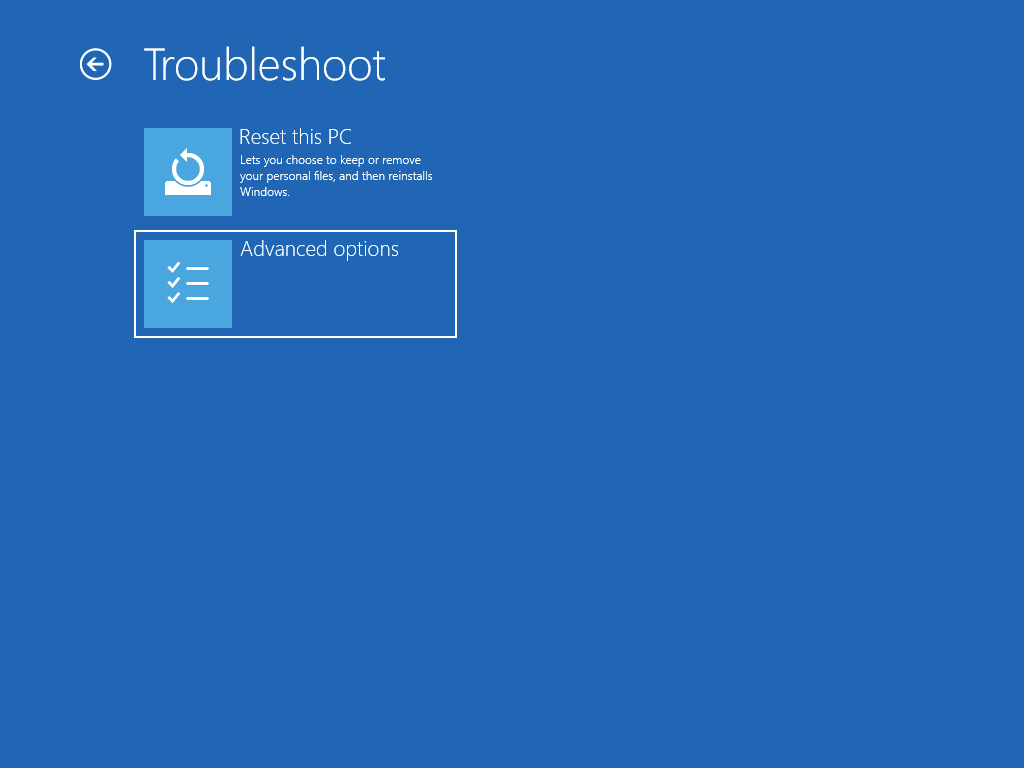
To reset Windows 10 in Safe mode, go to “Advanced Startup” in the Start menu. Once the blue screen starts, go to “Troubleshooting” followed by “Reset this PC.” Here, you get a choice to reset only the driver where Windows is installed or all drives. Choose the latter for a complete reset.

In the next step you get a choice to “fully clean the drive” or just “remove the files.”

The reset stage is ready. Once you click the “Reset” button, the PC will restart. and a Windows 10 reset will occur in the background.

Factory resetting the Windows 10 PC should be treated as a last option, as it is not uncommon to encounter problems while doing it. It is best to troubleshoot the issues first, be it a Windows Store error, a Critical Structure Corruption error, or a Bad System Config error. Only reset the PC if none of the solutions work.
Image credit: Boiler Reset Buttons

Sayak Boral
Sayak Boral is a technology writer with over eleven years of experience working in different industries including semiconductors, IoT, enterprise IT, telecommunications OSS/BSS, and network security. He has been writing for MakeTechEasier on a wide range of technical topics including Windows, Android, Internet, Hardware Guides, Browsers, Software Tools, and Product Reviews.
Subscribe to our newsletter!
Our latest tutorials delivered straight to your inbox
(Image credit: Future)
Although Windows 10 is a reliable operating system, you can encounter many problems over time. You may have issues with starting up or shutting down, excessive memory usage, performance running apps, and battery draining quickly, among many other issues, and when any of this happens, resetting to factory settings will come in handy.
If you experience persistent performance issues, Windows 10 has various recovery options to reset the system to the factory settings keeping or removing your files to resolve common problems and improve performance. You even have the option to download and use the original Windows image instead of the custom manufacturer recovery image that may contain bloatware and settings you don’t need.
This guide will walk you through how to reset your computer to its factory settings without your files or erasing everything on Windows 10.
How to factory reset Windows 10 using keep my files option
To reset Windows 10 to the factory default settings without losing your files, use these steps:
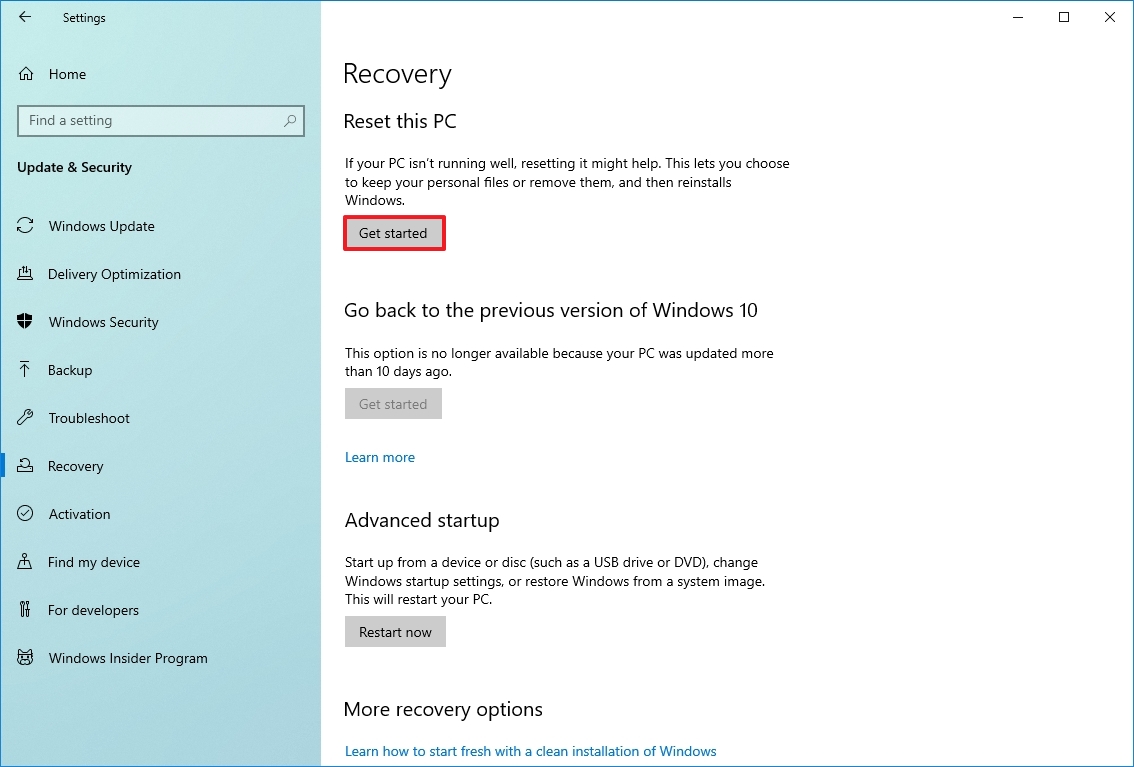
- Open Settings.
- Click on Update & Security.
- Click on Recovery.
- Under the «Reset this PC» section, click the Get started button.
- Click the «Keep my files» option.

- Choose the Windows 10 reset option:
- Cloud download: Download a fresh copy of the installation from the cloud and reinstall Windows 11. However, this option will not restore the tools, apps, and configuration that came with the original image provided by the manufacturer.
- Local reinstall: Uses the files already available to reset the computer. If this is a branded device (such as Dell, ASUS, Lenovo, etc.), this process will restore the factory drivers, settings, and tools.

- Click the Next button.
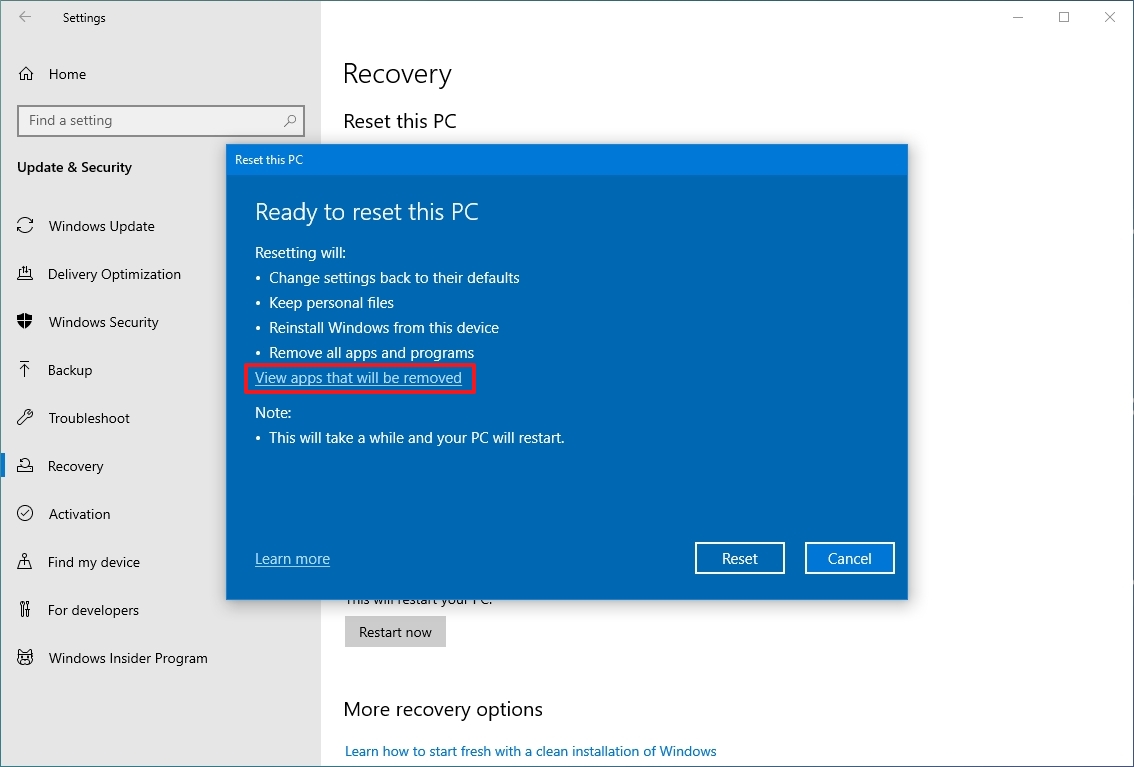
- Check the apps you’ll need to reinstall after resetting factory settings.
- Click the Reset button.
Once you complete the steps, the device will reset to the factory settings preserving your files during the process.
After factory reset steps
After the reset completes, you’ll still need to check for updates to ensure that Windows 10 isn’t missing any security, patches, or drivers, and you’ll need to reinstall some apps.
Check for updates
To install updates for Windows 10, use these steps:
- Open Settings.
- Click on Update & Security.
- Click on Windows Update.
- Click the Check for updates option.
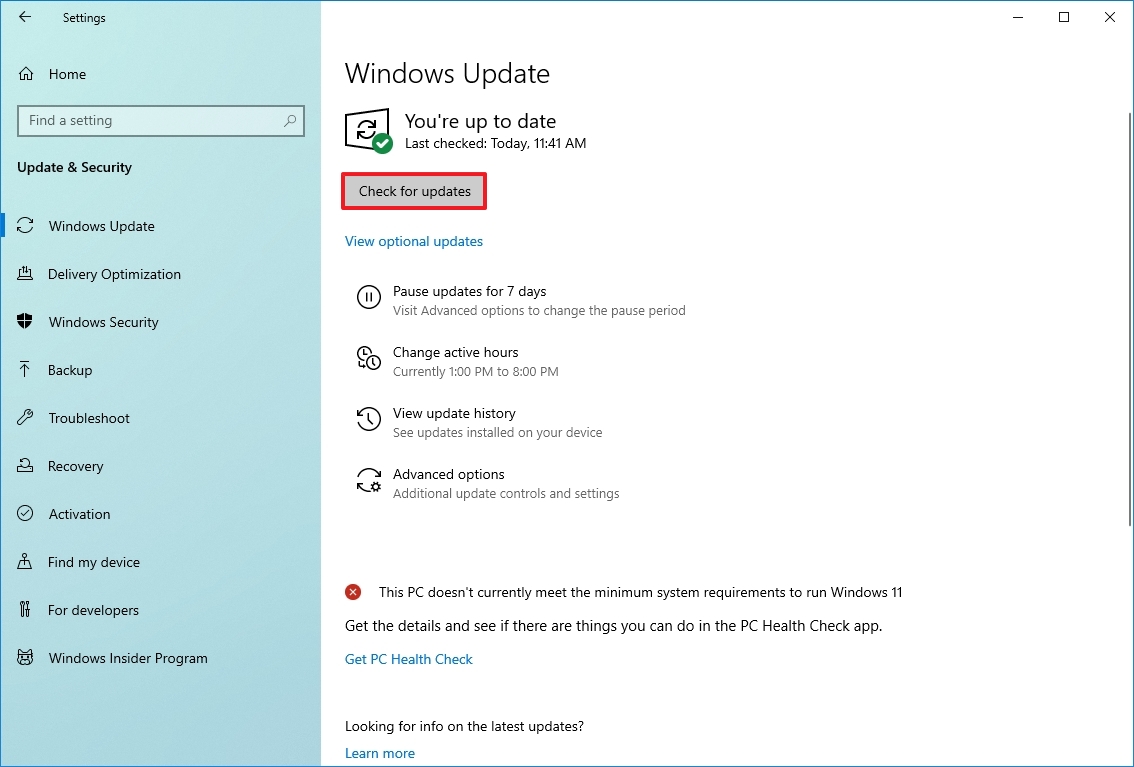
Once you complete the steps, Windows Update will download and install any missing updates and drivers (if available).
Check for drivers
To check for missing drivers after reset, use these steps:
- Open Start.
- Search for Device Manager and click the top result to open the tool.
- Confirm that there’s no branch called «Other devices,» which usually lists any missing device driver.

If you have one or more devices with missing drivers, you can use these instructions to update the components.
The last thing left is to reinstall any previously installed app on your computer (if applicable).
How to factory reset Windows 10 using remove everything option
To use the reset feature to remove everything on a computer, use these steps:
- Open Settings.
- Click on Update & Security.
- Click on Recovery.
- Under the «Reset this PC» section, click the Get started button.
- Click the Remove everything option.

- Choose the Windows 10 reset option:
- Cloud download: Download a fresh copy of the installation from the cloud and reinstall Windows 11. However, this option will not restore the tools, apps, and configuration that came with the original image provided by the manufacturer.
- Local reinstall: Uses the files already available to reset the computer. If this is a branded device (such as Dell, ASUS, Lenovo, etc.), this process will restore the factory drivers, settings, and tools.
- (Optional) Click the Change settings option.
- (Optional) Turn on the «Delete files from all drives» toggle switch if you have multiple drives and you only want to erase the installation storage.
- Click the Confirm button.
- (Optional) Click the «Show me the list of drives that will be affected» option to see drives that will be erased during the reset process.

- Click the Back button.
- Click the Next button.
- Click the Reset button.
After you complete the steps, the wizard will wipe out the system drives, depending on your selection, and it’ll reinstall a fresh copy of Windows 10, restoring the factory settings.
After factory reset steps
If you’re preparing to make some extra money selling your computer, there’s nothing else you need to do. However, if you’re refreshing the device to start over with a clean installation, you’ll still need to check for updates, make sure none of the drivers are missing, reinstall apps, and restore your files from a previous backup.
Checking for updates
To install updates for Windows 10, use these steps:
- Open Settings.
- Click on Update & Security.
- Click on Windows Update.
- Click the Check for updates option.

Once you complete the steps, Windows Update will download and install any missing updates and drivers (if available).
Check for drivers
To check for missing drivers, use these steps:
- Open Start.
- Search for Device Manager and click the top result to open the tool.
- Confirm that there’s no branch called «Other devices,» which usually lists missing device drivers.
If you have one or more devices with missing drivers, you can use these instructions to update the components.
Restore personal files
Lastly, you want to restore your files from the backup. The process will depend on your chosen method to create the file backup.
If you’re using OneDrive to back up your files, the files may already be syncing in the background. However, if they’re not, you may need to reconfigure the app again.
If you created a copy of your files on an external drive, connect the drive to your computer, and use these steps:
- Open File Explorer.
- Click on This PC from the left pane.
- Under the «Devices and drives» section, double-click the storage with the file backup.
- Select the files and folders.
- Click the Copy to button from the «Home» tab.
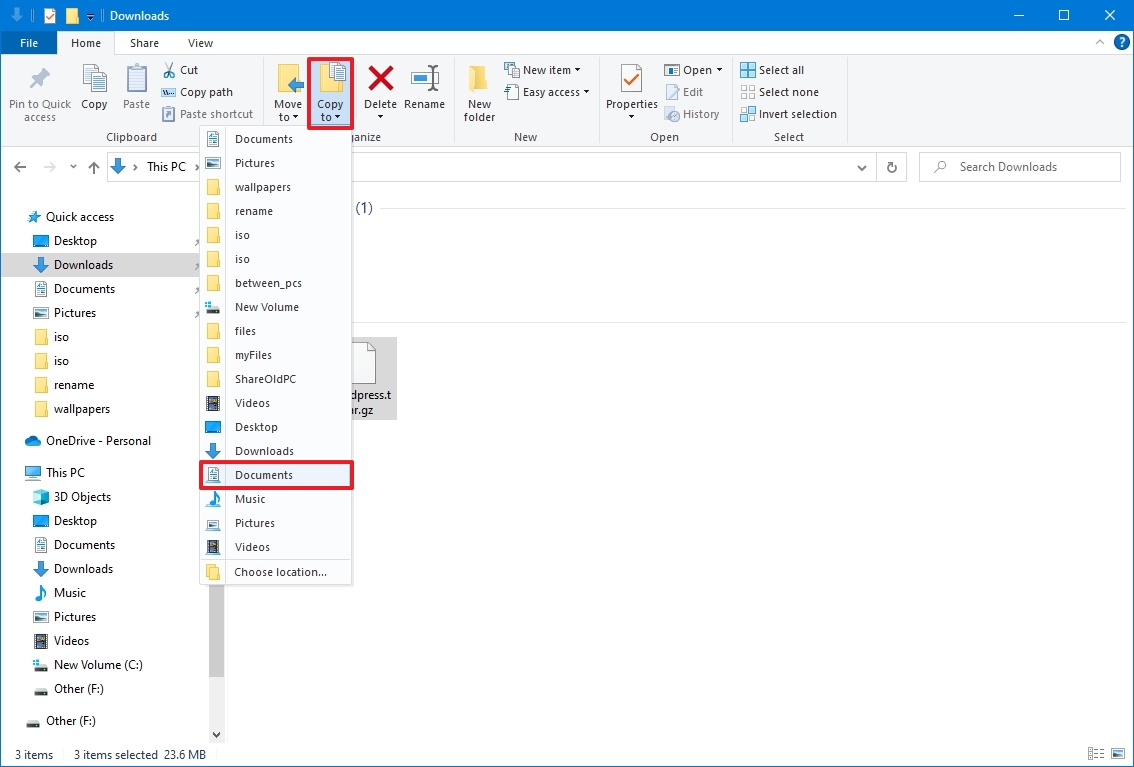
- Select the destination folder.
- Quick tip: You can select the Choose location option to choose another folder.
Once you complete the steps, you may need to repeat the steps to restore additional files.
Finally, make sure to reinstall any app that was previously available on your computer (if applicable).
This guide focuses on using the built-in reset tools, but you can also perform a clean installation of Windows 10 to reset your computer to the factory default settings.
More resources
For more helpful articles, coverage, and answers to common questions about Windows 10 or Windows 11, visit the following resources:
- Windows 11 on Windows Central — All you need to know
- Windows 10 on Windows Central — All you need to know

(opens in new tab)
Cutting-edge operating system
A refreshed design in Windows 11 enables you to do what you want effortlessly and safely, with biometric logins for encrypted authentication and advanced antivirus defenses.
Get the best of Windows Central in in your inbox, every day!
Mauro Huculak is technical writer for WindowsCentral.com. His primary focus is to write comprehensive how-tos to help users get the most out of Windows 10 and its many related technologies. He has an IT background with professional certifications from Microsoft, Cisco, and CompTIA, and he’s a recognized member of the Microsoft MVP community.
If you’re having problems with your PC, the following table can help you decide which recovery option to use.
|
Problem |
See this section |
|---|---|
|
Your PC isn’t working well and you recently installed an update |
Remove an installed Windows update |
|
Your PC isn’t working well and it’s been a while since you installed an app or changed system settings |
Reset your PC |
|
Your PC won’t start or is still loading |
Use the Startup Repair function |
|
Your PC won’t start, you haven’t created a recovery drive, and resetting your PC didn’t work |
Use installation media to reinstall Windows 11 |
|
Your PC won’t start and you haven’t created a recovery drive |
Use installation media to restore your PC |
|
Your PC won’t start and you’ve created a recovery drive |
Use a recovery drive to restore or recover your PC |
|
You want to reinstall your previous operating system |
Go back to your previous version of Windows |
|
Your PC isn’t working well and you recently installed an app |
Restore from a system restore point |
|
You suspect your device has been infected |
Use installation media to reinstall Windows 11 |
Click one of the recovery options below and follow the steps to try to get things working again.
If you’ve recently installed a Windows update, uninstall the update to try to resolve the issue.
-
Select Start > Settings > Windows Update > Update history > Uninstall updates .
View update history -
On the list that appears, select update you want to remove, and then select Uninstall.
Important:
-
If you’ve encrypted your device, you’ll need your BitLocker key to reset your PC. If you don’t know your BitLocker key, see Find my BitLocker recovery key.
-
During the resetting process, it is possible that your screen may go black for a long period of time (occasionally upwards of 15 minutes) and that your device may attempt to restart itself during this period. Manually attempting to restart the device yourself during this process could cause the reset to fail. Please be patient!
Resetting reinstalls Windows 11, but lets you choose whether to keep your files or remove them, and then reinstalls Windows. You can reset your PC from Settings, the sign-in screen, or by using a recovery drive or installation media.
Reset your PC from Settings
-
Select Start > Settings > System > Recovery .
Open Recovery settings -
Next to Reset this PC , select Reset PC. Then choose from the options and/or settings in the table below.
|
Option |
What it does |
|---|---|
|
Keep my files > Change settings > Preinstalled apps On |
|
|
Keep my files > Change settings > Preinstalled apps Off |
|
|
Remove everything |
Note: Data erasure On removes files and cleans the drive. If you’re planning to donate, recycle, or sell your PC, use this option. This might take an hour or two, but it makes it harder for other people to recover files you’ve removed. Data erasure Off just removes files. It takes less time, but is less secure. The data erasure functionality is targeted at consumers and does not meet government and industry data erasure standards. |
Reset your PC from the sign-in screen
If you can’t open Settings, you can reset your PC from the sign-in screen. Here’s how:
-
Press Windows logo key + L to get to the sign-in screen. Then restart your PC by pressing the Shift key while you select the Power button > Restart .
-
Your PC will restart in the Windows Recovery Environment (WinRE) environment.
-
On the Choose an option screen, select Troubleshoot > Reset this PC, and then choose one of the options in the previous table.

Startup Repair helps you fix common problems that can prevent Windows from starting up.
Note: If you’ve encrypted your device, you’ll need your BitLocker key to start in safe mode.
First, you need to enter the Windows Recovery Environment (winRE). To do this, you will repeatedly turn your device off, then on:
-
Hold down the power button for 10 seconds to turn off your device.
-
Press the power button again to turn on your device.
-
On the first sign that Windows has started (for example, some devices show the manufacturer’s logo when restarting) hold down the power button for 10 seconds to turn off your device.
-
Press the power button again to turn on your device.
-
When Windows starts again, hold down the power button for 10 seconds to turn off your device.
-
Press the power button again to turn on your device.
-
This time, allow your device to fully start up.
-
Select Advanced options.
-
Now that you’re in winRE, on the Choose an option screen, select Troubleshoot > Advanced options > Startup Repair > Restart.

Note: If you suspect that your device has been infected, make sure that your antivirus software is up to date. You can also reinstall Windows completely by starting your device using the installation media and performing a clean installation of Windows.

Having trouble playing the video? Watch it on YouTube.
To reinstall Windows 11 while Windows is running:
-
Connect the installation media you created to your PC.
-
Open File Explorer and select the drive with the installation media.
-
From the root directory of the drive, double-click setup.exe, and then select Yes when asked if you’d like to allow the app to make changes to your device.
-
Select Change what to keep.
-
Select one of the following options, and then select Next:
-
Keep personal files and apps – This will preserve your personal data, apps, and settings.
-
Keep personal files only – This will preserve your personal data and settings, but all your apps will be removed.
-
Keep nothing – This will remove all personal data, settings, and apps.
Warning: You cannot undo a reinstallation of Windows 10. Be sure to back up your files first if you choose the Keep nothingoption.
-
-
To finish, select Install to start reinstalling Windows 11 on your PC.
Your PC will restart several times during the reinstallation.
To reinstall Windows 11 by starting your PC using installation media:
-
Connect the installation media you created to your PC.
-
Start your PC using the installation media.
Note: Check with the PC manufacturer on how to start the PC using media.
-
When Windows Setup starts, select Next and then Install now.
-
If you have a Windows 11 product key, enter it when prompted. Otherwise, select I don’t have a product key.
-
If prompted, select a Windows edition (e.g. Home, Pro) to install and then select Next.
-
When prompted to choose a type of installation, select Custom: Install Windows only (advanced).
-
Select the disk or partition to which Windows 11 should be installed.
Note: If you suspect that your PC has been infected, consider deleting the existing partitions and reinstalling Windows 11 onto a clean disk. Your data on any deleted partitions will be lost.
-
Select Next to start reinstalling Windows 11 on your PC.
Your PC will restart several times during the reinstallation.
Important: If you’ve encrypted your device, you’ll need your BitLocker key to use a recovery drive to restore or reset your PC If you don’t know your BitLocker key, see Find my BitLocker recovery key.
If your PC won’t start and you haven’t created a recovery drive, download installation media and use it to restore from a system restore point or reset your PC.
-
On a working PC, go to the Microsoft software download website.
-
Download the Windows 11 media creation tool and then run it.
-
Select Create installation media for another PC.
-
Choose a language, edition, and architecture (64-bit or 32-bit).
-
Follow the steps to create installation media, and then select Finish.
-
Connect the installation media you created to your nonfunctional PC, and then turn it on.
-
On the initial setup screen, enter your language and other preferences, and then select Next. If you don’t see the setup screen, your PC might not be set up to boot from a drive. Check your PC manufacturer’s website for info on how to change your PC’s boot order, and then try again.
-
Select Repair your computer.
-
On the Choose an option screen, select Troubleshoot. From there, you can:
-
Restore from a system restore point by selecting Advanced options > System Restore. This will remove recently installed apps, drivers, and updates that might be causing your PC problems. Restoring from a restore point won’t affect your personal files.
-
Important: If you’ve encrypted your device, you’ll need your BitLocker key to use a recovery drive to restore or reset your PC If you don’t know your BitLocker key, see Find my BitLocker recovery key.
If your PC won’t start, you can use a recovery drive to restore from a system restore point or recover your PC. For info on how to create a recovery drive on a working PC, see Create a recovery drive.
To restore or recover using the recovery drive:
-
Connect the recovery drive and turn on your PC.
-
Press Windows logo key + L to get to the sign-in screen, and then restart your PC by pressing the Shift key while you select the Power button > Restart .
-
Your PC will restart in the Windows Recovery Environment (WinRE) environment.
-
On the Choose an option screen, select Troubleshoot, and then select one of the following two options. (If you don’t see the Choose your option screen, your PC might not be set up to boot from a drive. Check your PC manufacturer’s website for info on how to change your PC’s boot order.)

-
To restore from a system restore point, select Advanced Options > System Restore. This won’t affect your personal files, but it will remove recently installed apps, drivers, and updates that might be causing your PC problems.
-
To reinstall Windows 11, select Advanced Options > Recover from a drive. This will remove your personal files, apps and drivers you installed, and changes you made to settings.
For a limited time after upgrading to Windows 11, you’ll be able to go back to your previous version of Windows by selecting Start > Settings > System > Recovery . Next to Go back , select Go back. This will keep your personal files, but it’ll remove apps and drivers installed after the upgrade, as well as any changes you made to settings. In most cases, you’ll have 10 days to go back.
Open Recovery settings
To go back, you’ll need to:
-
Keep everything in the windows.old and $windows.~bt folders after the upgrade.
-
Remove any user accounts you added after the upgrade.
-
Have the USB drive you used to upgrade to Windows 11 (if you used one).
Notes:
-
The option in Settings to go back to your previous version of Windows is only available for a limited time after upgrading.
-
Apps that have been added, removed, or updated after the upgrade might not be available or function properly after going back to the previous version of Windows.
Info for Windows Insiders
If you’re an Insider and the current preview build isn’t working for you, select Start > Settings > System > Recovery . Next to Go back , select Go back. This won’t remove your personal files, but it’ll remove recently installed apps and drivers, and change settings back to their defaults.
Going back to an earlier build won’t remove you from the Insider Program. When the next preview build is ready, it’ll be installed on your PC.
This option takes your PC back to an earlier point in time, called a system restore point. Restore points are generated when you install a new app or driver, and when you create a restore point manually. Restoring won’t affect your personal files, but it will remove apps, drivers, and updates installed after the restore point was made.
-
In the search box on the taskbar, type control panel, and then choose it from the list of results
-
In the Control Panel search box, type recovery.
-
Select Recovery > Open System Restore.
-
In the Restore system files and settings box, select Next.
-
Select the restore point that you want to use in the list of results, and then select Scan for affected programs.
Notes:
-
If you don’t see the restore point that you want to use, select the Show more restore points check box to see more restore points.
-
If you’re not seeing any restore points, it might be because system protection isn’t turned on. Here’s how to check:
-
In the search box on the taskbar, type control panel, and then choose it from the list of results.
-
In the Control Panel search box, type recovery.
-
Select Recovery > Configure System Restore > Configure and see if the Turn on system protection option is selected.
-
If the Turn on system protection option is not selected, system protection isn’t turned on and there aren’t any restore points. In this scenario, you won’t be able to recovery your PC using a system restore point and will need to use one of the other recovery options listed on this page.
-
If the Turn on system protection option is selected, continue with step 6.
-
-
-
-
You’ll see a list of items that will be deleted if you remove this restore point. If you’re OK with the deletions, select Close > Next > Finish.
If you’re having problems with your PC, the following table can help you decide which recovery option to use.
|
Problem |
See this section |
|---|---|
|
Your PC isn’t working well and you recently installed an update. |
Remove an installed Windows update |
|
Your PC isn’t working well and it’s been a while since you installed an app or changed system settings. |
Reset your PC |
|
Your PC won’t start or is still loading |
Use the Startup Repair function |
|
Your PC won’t start, you haven’t created a recovery drive, and resetting your PC didn’t work. |
Use installation media to reinstall Windows 10 |
|
Your PC won’t start and you haven’t created a recovery drive. |
Use installation media to restore your PC |
|
Your PC won’t start and you’ve created a recovery drive. |
Use a recovery drive to restore or recover your PC |
|
You want to reinstall your previous operating system. |
Go back to your previous version of Windows |
|
Your PC isn’t working well and you recently installed an app. |
Restore from a system restore point |
|
You suspect your device has been infected. |
Use installation media to reinstall Windows 10 |
Click one of the recovery options below and follow the steps to try to get things working again.
If you’ve recently installed a Windows update, uninstall the update to try to resolve the issue.
-
Select the Start button, then select Settings > Update & Security > Windows Update > View your update history > Uninstall updates.
View update history settings -
Right-click the update you want to remove, and then select Uninstall.
Important:
-
If you’ve encrypted your device, you’ll need your BitLocker key to reset your PC. If you don’t know your BitLocker key, see Find my BitLocker recovery key.
-
During the resetting process, it is possible that your screen may go black for a long period of time (occasionally upwards of 15 minutes) and that your device may attempt to restart itself during this period. Manually attempting to restart the device yourself during this process could cause the reset to fail. Please be patient!
Resetting reinstalls Windows 10, but lets you choose whether to keep your files or remove them, and then reinstalls Windows. You can reset your PC from Settings, the sign-in screen, or by using a recovery drive or installation media.
Reset your PC from Settings
-
Select the Start button, then select Settings > Update & Security > Recovery .
Open Recovery settings -
Under Reset this PC, select Get started and then choose from the options and/or settings in the table below.
|
Option |
What it does |
|---|---|
|
Keep my files > Change settings > Preinstalled apps On |
|
|
Keep my files > Change settings > Preinstalled apps Off |
|
|
Remove everything |
Note: Remove everything > Change settings gives you two options. Data erasure On removes files and cleans the drive. If you’re planning to donate, recycle, or sell your PC, use this option. This might take an hour or two, but it makes it harder for other people to recover files you’ve removed. Data erasure Off just removes files. It takes less time, but is less secure. |
Reset your PC from the sign-in screen
If you can’t open Settings, you can reset your PC from the sign-in screen. Here’s how:
-
Press Windows logo key + L to get to the sign-in screen, and then restart your PC by pressing the Shift key while you select the Power button > Restart in the lower-right corner of the screen.
-
Your PC will restart in the Windows Recovery Environment (WinRE) environment.
-
On the Choose an option screen, select Troubleshoot > Reset this PC, and then choose one of the options in the previous table.
Startup Repair helps you fix common problems that can prevent Windows from starting up.
Note: If you’ve encrypted your device, you’ll need your BitLocker key to start in safe mode.
First, you need to enter the Windows Recovery Environment (winRE). To do this, you will repeatedly turn your device off, then on:
-
Hold down the power button for 10 seconds to turn off your device.
-
Press the power button again to turn on your device.
-
On the first sign that Windows has started (for example, some devices show the manufacturer’s logo when restarting) hold down the power button for 10 seconds to turn off your device.
-
Press the power button again to turn on your device.
-
When Windows starts again, hold down the power button for 10 seconds to turn off your device.
-
Press the power button again to turn on your device.
-
This time, allow your device to fully start up.
-
Select Advanced options.
-
Now that you’re in winRE, on the Choose an option screen, select Troubleshoot > Advanced options > Startup Repair > Restart.
Note: If you suspect that your device has been infected, make sure that your antivirus software is up to date. You can also reinstall Windows completely by starting your device using the installation media and performing a clean installation of Windows.
To reinstall Windows 10 while Windows is running:
-
Connect the installation media you created to your PC.
-
Open File Explorer and select the drive with the installation media.
-
From the root directory of the drive, double-click setup.exe, and then select Yes when asked if you’d like to allow the app to make changes to your device.
-
Select Change what to keep.
-
Select one of the following options, and then select Next:
-
Keep personal files and apps – This will preserve your personal data, apps, and settings.
-
Keep personal files only – This will preserve your personal data and settings, but all your apps will be removed.
-
Keep nothing – This will remove all personal data, settings, and apps.
Warning: You cannot undo a reinstallation of Windows 10. Be sure to back up your files first if you choose the Keep nothing option.
-
-
To finish, select Install to start reinstalling Windows 10 on your PC.
Your PC will restart several times during the reinstallation.
To reinstall Windows 10 by starting your PC using installation media:
-
Connect the installation media you created to your PC.
-
Start your PC using the installation media.
Note: Check with the PC manufacturer on how to start the PC using media.
-
When Windows Setup starts, select Next and then Install now.
-
If you have a Windows 10 product key, enter it when prompted. Otherwise, select I don’t have a product key.
-
If prompted, select a Windows edition (e.g. Home, Pro) to install and then select Next.
-
When prompted to choose a type of installation, select Custom: Install Windows only (advanced).
-
Select the disk or partition to which Windows 10 should be installed.
Note: If you suspect that your PC has been infected, consider deleting the existing partitions and reinstalling Windows 10 onto a clean disk. Your data on any deleted partitions will be lost.
-
Select Next to start reinstalling Windows 10 on your PC.
Your PC will restart several times during the reinstallation.
Important: If you’ve encrypted your device, you’ll need your BitLocker key to use a recovery drive to restore or reset your PC If you don’t know your BitLocker key, see Find my BitLocker recovery key.
If your PC won’t start and you haven’t created a recovery drive, download installation media and use it to restore from a system restore point or reset your PC.
-
On a working PC, go to the Microsoft software download website.
-
Download the Windows 10 media creation tool and then run it.
-
Select Create installation media for another PC.
-
Choose a language, edition, and architecture (64-bit or 32-bit).
-
Follow the steps to create installation media, and then select Finish.
-
Connect the installation media you created to your nonfunctional PC, and then turn it on.
-
On the initial setup screen, enter your language and other preferences, and then select Next. If you don’t see the setup screen, your PC might not be set up to boot from a drive. Check your PC manufacturer’s website for info on how to change your PC’s boot order, and then try again.
-
Select Repair your computer.
-
On the Choose an option screen, select Troubleshoot. From there, you can:
-
Restore from a system restore point by selecting Advanced options > System Restore. This will remove recently installed apps, drivers, and updates that might be causing your PC problems. Restoring from a restore point won’t affect your personal files.
-
Important: If you’ve encrypted your device, you’ll need your BitLocker key to use a recovery drive to restore or reset your PC If you don’t know your BitLocker key, see Find my BitLocker recovery key.
If your PC won’t start, you can use a recovery drive to restore from a system restore point or recover your PC. For info on how to create a recovery drive on a working PC, see Create a recovery drive.
To restore or recover using the recovery drive:
-
Connect the recovery drive and turn on your PC.
-
Press Windows logo key + L to get to the sign-in screen, and then restart your PC by pressing the Shift key while you select the Power button> Restart in the lower-right corner of the screen.
-
Your PC will restart in the Windows Recovery Environment (WinRE) environment.
-
On the Choose an option screen, select Troubleshoot, and then select one of the following two options. (If you don’t see the Choose your option screen, your PC might not be set up to boot from a drive. Check your PC manufacturer’s website for info on how to change your PC’s boot order.)
-
To restore from a system restore point, select Advanced Options > System Restore. This won’t affect your personal files, but it will remove recently installed apps, drivers, and updates that might be causing your PC problems.
-
To reinstall Windows 10, select Advanced Options > Recover from a drive. This will remove your personal files, apps and drivers you installed, and changes you made to settings.
For a limited time after upgrading to Windows 10, you’ll be able to go back to your previous version of Windows by selecting the Start button, then select Settings > Update & Security > Recovery and then selecting Get started under Go back to the previous version of Windows 10. This will keep your personal files, but it’ll remove apps and drivers installed after the upgrade, as well as any changes you made to settings. In most cases, you’ll have 10 days to go back.
Open Recovery settings
To go back, you’ll need to:
-
Keep everything in the windows.old and $windows.~bt folders after the upgrade.
-
Remove any user accounts you added after the upgrade.
-
Know the password you used to sign in to Windows 7 or Windows 8.1 (if you used one).
-
Have the USB drive you used to upgrade to Windows 10 (if you used one).
Notes:
-
The option in Settings to go back to your previous version of Windows is only available for a limited time after upgrading.
-
If you go back to Windows 8.1, some apps that came with Windows, like Mail and People, might not work anymore. To fix the apps, reinstall them from the Microsoft Store.
-
Apps that have been added, removed, or updated after the upgrade might not be available or function properly after going back to the previous version of Windows.
Info for Windows Insiders
If you’re an Insider and the current preview build isn’t working for you, select the Start button, then select Settings > Update & Security > Recovery . Under Go back to the previous version of Windows 10, select Get Started. This won’t remove your personal files, but it’ll remove recently installed apps and drivers, and change settings back to their defaults.
Going back to an earlier build won’t remove you from the Insider Program. When the next preview build is ready, it’ll be installed on your PC.
This option takes your PC back to an earlier point in time, called a system restore point. Restore points are generated when you install a new app or driver, and when you create a restore point manually. Restoring won’t affect your personal files, but it will remove apps, drivers, and updates installed after the restore point was made.
-
In the search box on the taskbar, type control panel, and then choose it from the list of results
-
In the Control Panel search box, type recovery.
-
Select Recovery > Open System Restore.
-
In the Restore system files and setting box, select Next.
-
Select the restore point that you want to use in the list of results, and then select Scan for affected programs.
Notes:
-
If you don’t see the restore point that you want to use, select the Show more restore points check box to see more restore points.
-
If you’re not seeing any restore points, it might be because system protection isn’t turned on. Here’s how to check:
-
In the search box on the taskbar, type control panel, and then choose it from the list of results.
-
In the Control Panel search box, type recovery.
-
Select Recovery > Configure System Restore > Configure and see if the Turn on system protection option is selected.
-
If the Turn on system protection option is not selected, system protection isn’t turned on and there aren’t any restore points. In this scenario, you won’t be able to recovery your PC using a system restore point and will need to use one of the other recovery options listed on this page.
-
If the Turn on system protection option is selected, continue with step 6.
-
-
-
-
You’ll see a list of items that will be deleted if you remove this restore point. If you’re OK with the deletions, select Close > Next > Finish.
If you’re having problems with your PC, you can:
-
Refresh your PC to reinstall Windows and keep your personal files and settings. Refresh also keeps the apps that came with your PC and the apps you installed from the Microsoft Store.
-
Reset your PC to reinstall Windows but delete your files, settings, and apps—except for the apps that came with your PC.
-
Restore your PC to undo recent system changes you’ve made.
If you’re having trouble starting (booting) your PC, see Windows Startup Settings (including safe mode), and go to the “Get to Windows Startup Settings in the Windows Recovery Environment” section. You can refresh, reset, or restore your PC from the Windows Recovery Environment.
If you want to back up and restore your personal files using File History, see Backup and Restore in Windows.
Before you start to refresh or reset your PC
In most cases, once you start to refresh or reset your PC, it’ll finish on its own. However, if Windows needs missing files, you’ll be asked to insert recovery media, which is typically on a DVD disc or thumb drive. If that happens, what you’ll need depends on your PC.
If your PC came with Windows 8.1 or Windows RT 8.1, you’ll need the discs or thumb drive that came with your PC. Check the info that came with your PC to see if your PC manufacturer provided these discs or media. In some cases, you might have created them when you first set up your PC.
If you don’t have either of those, you can make them if you have a USB thumb drive of 16 GB or larger. Having a recovery drive can help you troubleshoot and fix problems with your PC, even if it won’t start. For more info, see Create a USB recovery drive.
If you upgraded your PC to Windows 8.1 or Windows RT 8.1 with a DVD, use that disc. If you don’t have Windows 8.1 or Windows RT 8.1 media, contact Microsoft Support.
Refresh, reset, or restore
Select any of the following for more detailed info.
If your PC isn’t performing as well as it once did, and you don’t know why, you can refresh your PC without deleting any of your personal files or changing your settings.
Note: If you upgraded your PC from Windows 8 to Windows 8.1 and your PC has a Windows 8 recovery partition, refreshing your PC will restore Windows 8. You’ll need to upgrade to Windows 8.1 after the refresh has finished.
Warning: Apps you installed from websites and DVDs will be removed. Apps that came with your PC and apps you installed from Microsoft Store will be reinstalled. Windows puts a list of removed apps on your desktop after refreshing your PC.
To refresh your PC
-
Swipe in from the right edge of the screen, tap Settings, and then tap Change PC settings.
(If you’re using a mouse, point to the upper-right corner of the screen, move the mouse pointer down, select Settings, and then select Change PC settings.) -
Tap or select Update and recovery, and then tap or select Recovery.
-
Under Refresh your PC without affecting your files, tap or select Get started.
-
Follow the instructions on the screen.
If you want to recycle your PC, give it away, or start over with it, you can reset it completely. This removes everything and reinstalls Windows.
Note: If you upgraded your PC from Windows 8 to Windows 8.1 and your PC has a Windows 8 recovery partition, resetting your PC will restore Windows 8. You’ll need to upgrade to Windows 8.1 after the reset has finished.
Warning: All of your personal files will be deleted and your settings will be reset. All apps that you installed will be removed. Only apps that came with your PC will be reinstalled.
To reset your PC
-
Swipe in from the right edge of the screen, tap Settings, and then tap Change PC settings.
(If you’re using a mouse, point to the upper-right corner of the screen, move the mouse pointer down, select Settings, and then select Change PC settings.) -
Tap or select Update and recovery, and then tap or select Recovery.
-
Under Remove everything and reinstall Windows, tap or select Get started.
-
Follow the instructions on the screen.
Note: You’ll be asked to choose whether you want to erase data quickly or thoroughly. If you choose to erase data quickly, some data might be recoverable using special software. If you choose to erase data thoroughly, this will take longer but it makes recovering data less likely.
If you think an app or driver that you recently installed caused problems with your PC, you can restore Windows back to an earlier point in time, called a restore point. System Restore doesn’t change your personal files, but it might remove recently installed apps and drivers.
Notes:
-
System Restore isn’t available for Windows RT 8.1.
-
Windows automatically creates a restore point when you install desktop apps and new Windows updates, if the last restore point is older than 7 days. You can also create a restore point manually at any time.
To restore your PC to an earlier point in time
-
Swipe in from the right edge of the screen, and then tap Search.
(If you’re using a mouse, point to the upper-right corner of the screen, move the mouse pointer down, and then select Search.) -
Enter Control Panel in the search box, and tap or select Control Panel.
-
Enter Recovery in the Control Panel search box, and then tap or select Recovery.
-
Tap or select Open System Restore and then follow the instructions.
If you need additional help refreshing, resetting, or restoring your PC, check out the Repair and Recovery community pages in the Windows forum for solutions that other people have found for problems they’ve experienced.
 В этой инструкции о том, как сбросить Windows 10 на заводские настройки, выполнить сброс, откат в исходное состояние, или, иначе, автоматическую переустановку Windows 10 на компьютере или ноутбуке. Сделать это стало проще чем в Windows 7 и даже в 8, в связи с тем, что изменился способ хранения образа для сброса в системе и в большинстве случаев вам не нужен диск или флешка для того, чтобы выполнить описываемую процедуру. Если по какой-то причине все описанное не получается, вы можете просто выполнить чистую установку Windows 10.
Сброс Windows 10 в исходное состояние может пригодиться в тех случаях, когда система стала работать неправильно или даже не запускается, а выполнить восстановление (на эту тему: Восстановление Windows 10) другим способом не получается. При этом переустановка ОС таким способом возможна с сохранением ваших личных файлов (но без сохранения программ). Также, в конце инструкции, вы найдете видео, в котором описанное показано наглядно. Примечание: описание проблем и ошибок при откате Windows 10 на первоначальное состояние, а также возможные способы их решения описаны в последнем разделе этой статьи.
Обновление: в последних версиях Windows 10 появились дополнительные методы сброса системы, в том числе с удалением всех предустановленных производителем компьютера или ноутбука программ — Автоматическая чистая установка Windows 10, Восстановление Windows 10 из облака.
- Сброс Windows 10 в параметрах системы
- Как сбросить Windows 10 на заводские настройки с помощью функции «Новый запуск»
- Запуск сброса в среде восстановления
- Видео инструкция
- Ошибки и проблемы при восстановлении, их решение
Сброс Windows 10 в параметрах из установленной системы
Самый простой способ сброса Windows 10 предполагает, что система на вашем компьютере запускается. Если это так, то несколько простых шагов позволяют выполнить автоматическую переустановку.
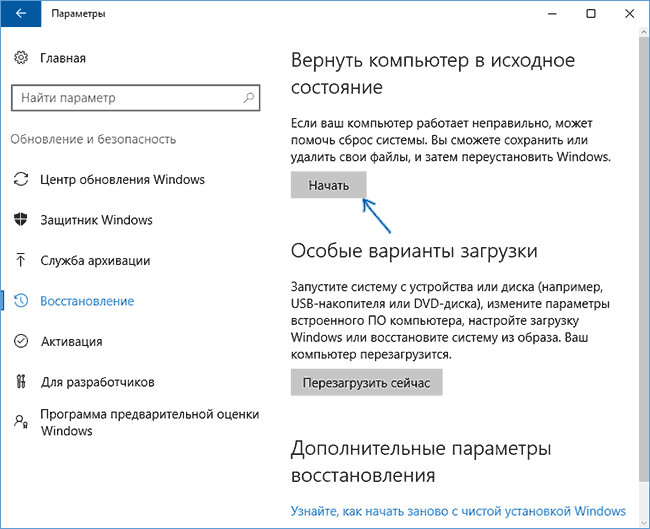
- Зайдите в Параметры (через пуск и значок шестеренки или клавиши Win+I) — Обновление и безопасность — Восстановление.

- В разделе «Вернуть компьютер в исходное состояние» нажмите «Начать». Примечание: если при восстановлении вам сообщат об отсутствии необходимых файлов, используйте способ из следующего раздела этой инструкции. Также, на этом этапе может появиться ошибка: Невозможно найти среду восстановления.
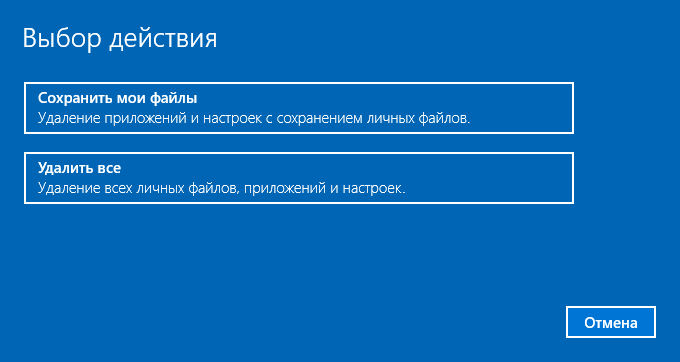
- Вам будет предложено либо сохранить личные файлы, либо удалить их. Выберите нужный вариант.

- В случае выбора варианта с удалением файлов, также будет предложено либо «Просто удалить файлы», либо «Полностью очистить диск». Я рекомендую первый вариант, если только вы не отдаете компьютер или ноутбук другому человеку. Второй вариант удаляет файлы без возможности их восстановления и занимает больше времени.
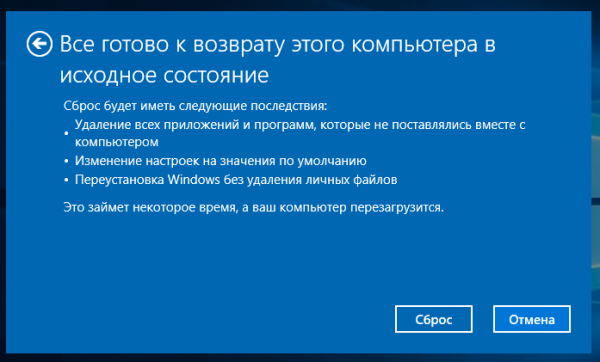
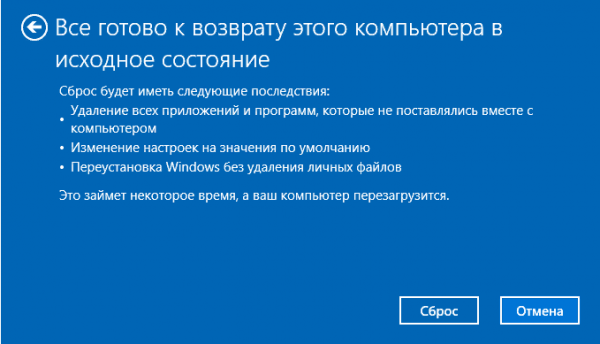
- В окне «Все готово к возврату этого компьютера в исходное состояние» нажмите «Сброс».


После этого начнется процесс автоматической переустановки системы, компьютер будет перезагружаться (возможно, несколько раз), а после сброса вы получите чистую Windows 10. Если вы выбирали «Сохранить личные файлы», то на системном диске также будет находиться папка Windows.old, содержащая файлы старой системы (там могут пригодиться папки пользователя и содержимое рабочего стола). На всякий случай: Как удалить папку Windows.old.
Автоматическая чистая установка Windows 10 с помощью «Новый запуск» (Refresh Windows Tool)
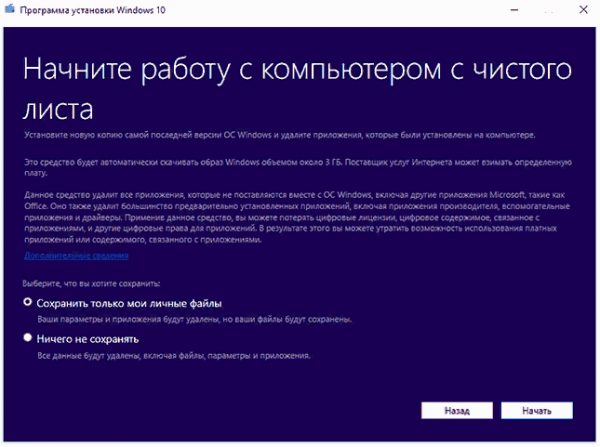
В последних версиях Windows 10 в параметрах восстановления появилась новая функция — «Новый запуск» (ранее называлась Refresh Windows Tool), позволяющая выполнить автоматическую чистую установку или переустановку Windows 10 с сохранением файлов, но с удалением предустановленных программ производителя. Ее использование позволяет выполнить сброс, когда первый способ не работает и сообщает об ошибках.
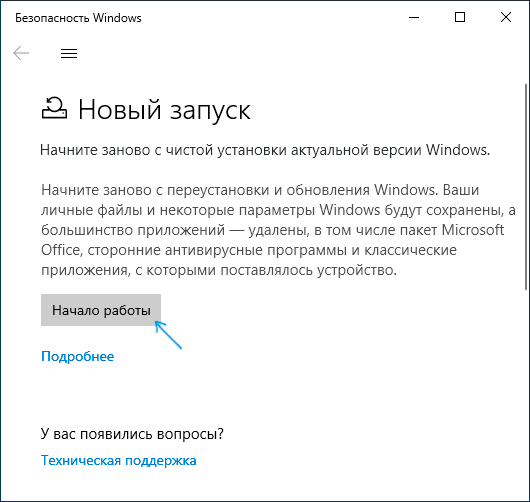
- В параметрах восстановления, внизу в разделе Дополнительные параметры восстановления, нажмите по пункту Узнайте, как начать заново с чистой установки Windows.

- Вам предложат перейти на соответствующую страницу центра безопасности Windows 10, нажмите Да.
- Нажмите кнопку «Начало работы» в разделе «Новый запуск».

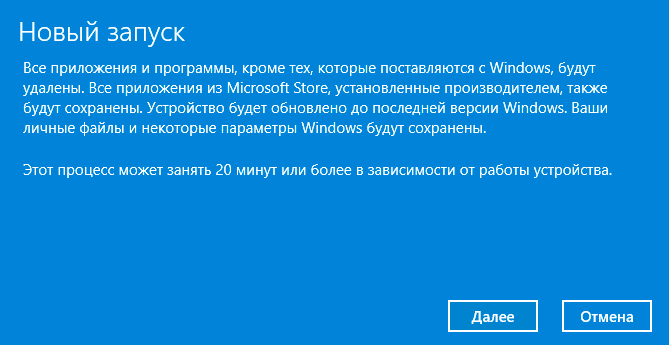
- Ознакомьтесь с тем, что именно представляет собой функция Начать заново и, если согласны, нажмите Далее.

- Дождитесь завершения сброса Windows 10 на заводские настройки.

По завершении процесса (который может занять продолжительное время и зависит от производительности компьютера, выбранных параметров и количества личных данных при сохранении) вы получите полностью переустановленную и работоспособную Windows 10. После входа в систему рекомендую также нажать клавиши Win+R, ввести cleanmgr нажать Enter, а затем нажать по кнопке «Очистить системные файлы».
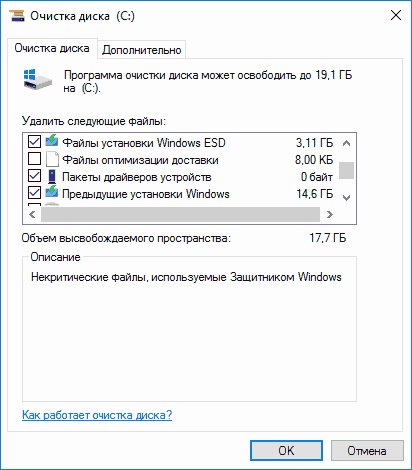
С большой вероятностью при очистке жесткого диска вы сможете удалить до 20 Гб данных, оставшихся после процесса переустановки системы.
Как сбросить Windows 10 если система не запускается или сброс из параметров не работает
В тех случаях, когда Windows 10 не запускается или сброс в параметрах не срабатывает, можно попробовать выполнить с помощью средств производителя или же с среде восстановления.
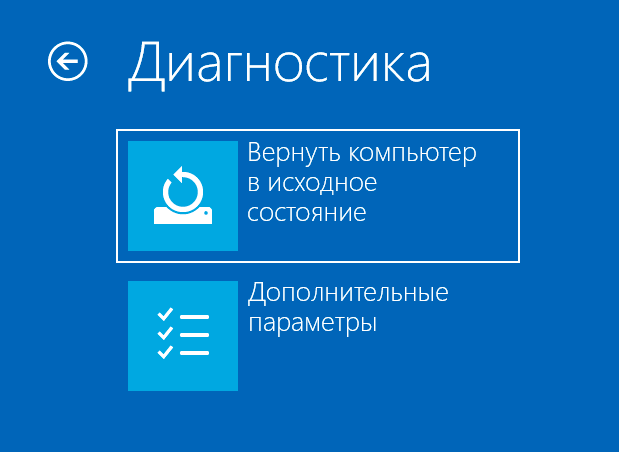
Если Windows 10 не запускается, но показывает синий экран с ошибкой, то нажав по пункту «Дополнительные параметры», вы можете попасть в среду восстановления. Если система запускается, но сбросить ОС не удается, зайдите в Параметры — Обновление и безопасность и нажмите кнопку «Перезагрузить сейчас» в разделе «Особые варианты загрузки».
После перезагрузки зайдите в раздел «Поиск и устранение неисправностей», а затем нажмите по пункту «Вернуть компьютер в исходное состояние».
Далее, также, как и в первом описанном методе вы можете:
- Сохранить или удалить личные файлы. При выборе «Удалить» будет также предложено либо полностью очистить диск без возможности их восстановления, либо простое удаление. Обычно (если вы не отдаете ноутбук кому-то), лучше использовать простое удаление.
- В окне выбора целевой операционной системы выберите Windows 10.
- В окне «Вернуть компьютер в исходное состояние» ознакомьтесь с тем, что будет проделано — удаление программ, сброс настроек на значения по умолчанию и автоматическая переустановка Windows 10 Нажмите «Вернуть в исходное состояние».
После этого начнется процесс сброса системы к исходному состоянию, в ходе которого компьютер может перезагружаться.
Если на вашем устройстве была предустановлена лицензионная Windows 10 при покупке, то самый простой способ сброса его на заводские настройки — использовать определенные клавиши при включении ноутбука или компьютера. Подробно о том, как это делается написано в статье Как сбросить ноутбук на заводские настройки (подойдет и для фирменных ПК с предустановленной ОС).
Видео инструкция
В видео ниже показаны оба способа запустить автоматическую переустановку Windows 10, описанные в статье.
Ошибки сброса Windows 10 в заводское состояние
Первые и самые простые методы, при возникновении проблем при сбросе Windows 10 на заводские настройки состоят из следующих шагов:
- Убедитесь, что на системном разделе диска (на диске C) достаточно свободного места. В идеале — 10 и более Гб.
- Удалите все сторонние антивирусы и другие программа защиты перед запуском восстановления.

Если при попытке сброса Windows 10 после перезагрузки вы увидели сообщение «Проблема при возврате ПК в исходное состояние. Изменение не внесены», обычно это говорит о проблемах с файлами, необходимыми для восстановления (например, если вы что-то делали с папкой WinSxS, из файлов в которой и происходит сброс). Можно попробовать проверку и восстановление целостности системных файлов Windows 10, но чаще приходится делать чистую установку Windows 10 (впрочем, при этом вы также можете сохранить личные данные).
Второй вариант ошибки — вас просят вставить диск восстановления или установочный накопитель. Тут появилось решение с функцией Начать заново, описанное во втором разделе этого руководство. Также в этой ситуации вы можете сделать загрузочную флешку с Windows 10 (на текущем компьютере или на другом, если этот не запускается) или диск восстановления Windows 10 с включением системных файлов. И использовать его в качестве требуемого накопителя. Используйте версию Windows 10 с той же разрядностью, что установлена на компьютере.
Еще один вариант действия в случае с требованием предоставить накопитель с файлами — зарегистрировать собственный образ для восстановления системы (для этого ОС должна работать, действия совершаются в ней). Мною такой способ не проверен, но пишут, что работает (но только для второго случая с ошибкой):
- Нужно скачать образ ISO Windows 10 (второй способ в инструкции по ссылке).
- Смонтировать его и скопировать файл install.wim из папки sources в заранее созданную папку ResetRecoveryImage на отдельном разделе или диске компьютера (не системном).
- В командной строке от имени администратора использовать команду reagentc /setosimage /path «D:ResetRecoveryImage» /index 1 (здесь в качестве отдельного раздела выступает D, у вас может быть другая буква) для регистрации образа восстановления.

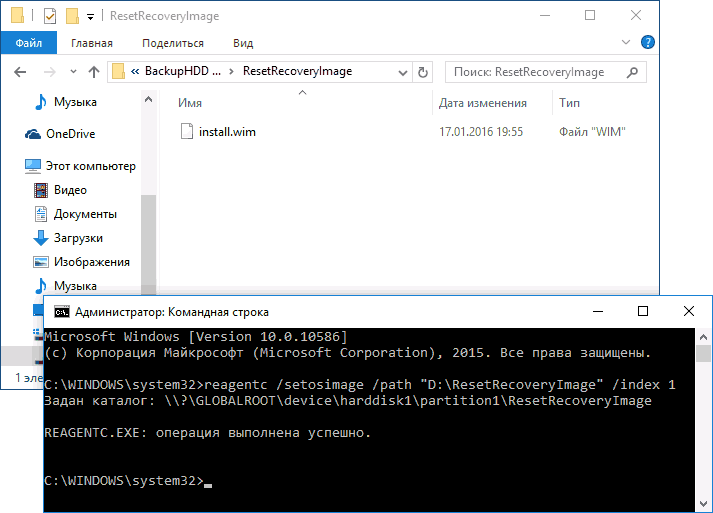
После этого попробовать снова запустить сброс системы в исходное состояние. Кстати, на будущее можно рекомендовать сделать собственную резервную копию Windows 10, которая может сильно упростить процесс отката ОС к предыдущему состоянию.
Ну а если у вас остались вопросы по переустановке Windows 10 или возврату системы к исходному состоянию — спрашивайте. Также напомню, что для предустановленных систем обычно существуют дополнительные способы сброса на заводские настройки, предусмотренные производителем и описанные в официальных инструкциях.
После нескольких месяцев или лет использования операционной системы Windows 10 можно столкнуться с тем, что она начнёт работать хуже: зависать, медлить и выдавать ошибки. Есть разные способы для устранения определённых типов проблем. Но есть универсальный метод — сброс.
Для чего нужно сбрасывать систему
Производительность операционной системы снижается из-за того, что в ней скапливается большое количество ненужных файлов и процессов. Устанавливая сторонние программы, изначально не входившие в состав Windows, вы создаёте некоторые элементы и сервисы, необходимые для их работы. Но после удаления этих приложений не все данные, связанные с ними, стираются — система засоряется.
Конечно, Windows пытается предотвратить появление мусора, вредоносных утилит и прочего софта, мешающего ей. Но чем дольше она работает, тем больше нагрузка, соответственно, шанс появления критических проблем выше.
Сброс настроек — это процесс, позволяющий откатить все параметры и файлы системы в исходное состояние, сохранив при этом файлы пользователя. Получив чистую Windows, вы как будто установите новую операционную систему, так как настройки, совершённые вами и выполняющимися программами, сбросятся до заводских значений. Ваши же файлы (музыка, картинки, видео, документы и прочие) останутся невредимы, хотя все программы будут удалены.
К сбросу стоит прибегать в том случае, если решить проблему откатом системы к точке восстановления не получается, или тогда, когда нужно быстро и без особых усилий получить свежую операционную систему.
Выполнение сброса
В Windows 10 предусмотрено несколько встроенных методов, позволяющих выполнить сброс. Компания Microsoft выпустила также отдельную утилиту, выполняющую этот процесс. Сброс можно выполнить как из системы, войдя в свою учётную запись, так и другим способом, не требующим доступа к Windows (он пригодится, когда система не запускается).
При помощи меню «Параметры»
В Windows 10 появилось новое меню, позволяющее работать с настройками системы — «Параметры». Используя его, можно начать сброс:
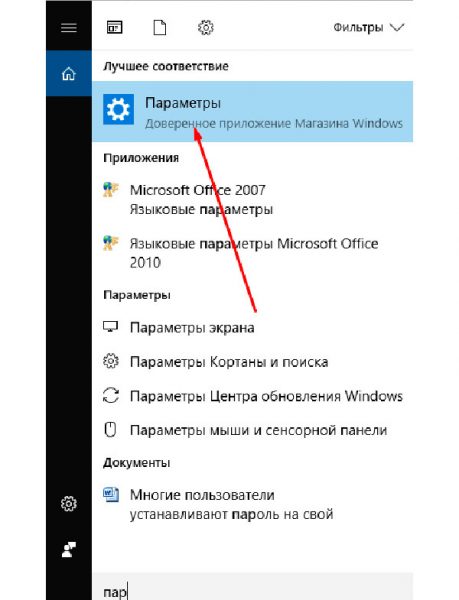
- Прибегнув к помощи системной поисковой строки, раскройте утилиту «Параметры».

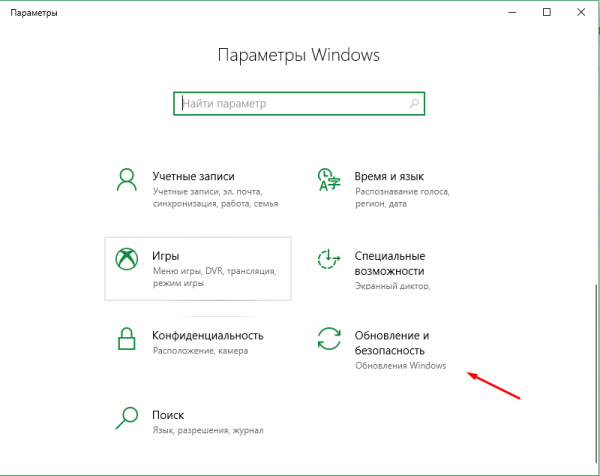
К параметрам компьютера проще всего перейти, начав набирать название этого меню в поисковой строке - Перейдите к блоку «Обновление и безопасность».

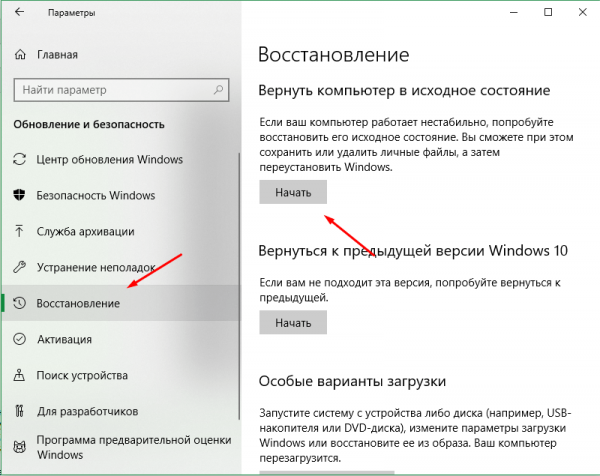
Открываем раздел «Обновление и безопасность» - Разверните подпункт «Восстановление» и кликните по кнопке «Начать».
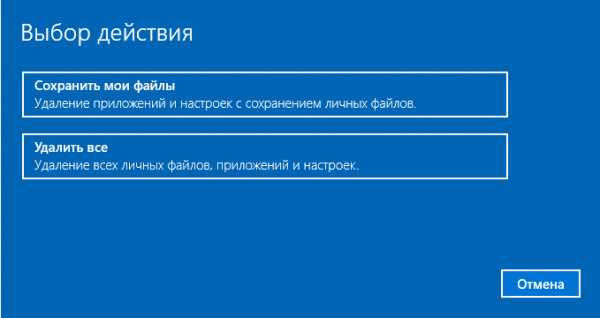
Если вы твёрдо решили сбросить операционную систему к начальным установкам, нажимайте кнопку «Начать» - Начнётся процедура сброса. Вас спросят, хотите ли вы оставить файлы пользователя. Выберите подходящий вариант.

Укажите, хотите ли вы сохранить свои файлы при сбросе - Подтвердите начало процесса, нажав кнопку «Сброс».

Для того чтобы начать процесс, нажмите кнопку «Сброс»
Как протекает процесс
Сброс может длиться от пары минут до нескольких часов — в зависимости от производительности и загруженности компьютера. Система будет несколько раз перезагружаться. Ни в коем случае не прерывайте процедуру, иначе могут возникнуть серьёзные ошибки. В процессе сброса может показаться, что система зависла, но дайте ей немного время (полчаса-час), а только по его истечении заканчивайте процедуру принудительно.
При помощи сторонней утилиты
Компания Microsoft выпустила стороннюю утилиту под названием RefreshWindowsTool, с помощью которой можно выполнить тот же самый сброс.
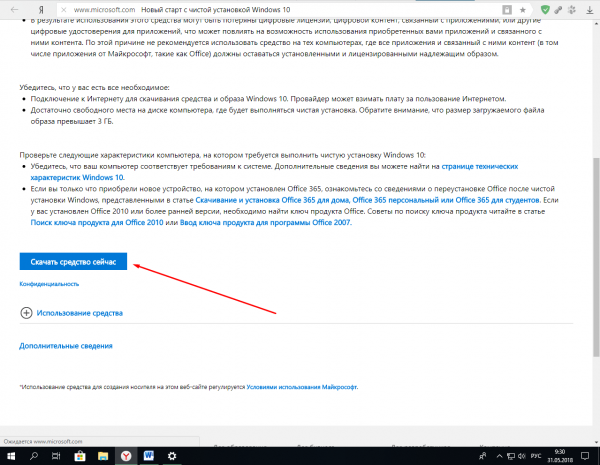
- Скачайте её на странице официального сайта — https://www.microsoft.com/ru-ru/software-download/windows10startfresh. Программа бесплатная и не требует установки — достаточно запустить загруженный файл.

Скачиваем средство восстановления на официальном сайте Microsoft - Выберите, стоит ли сохранять данные пользователя, и дождитесь окончания процедуры.

Нажимаем на кнопку «Начать» и ждём окончания процесса
При помощи меню восстановления (если доступ к системе отсутствует)
Если вы можете включить систему, то лучше использовать два вышеперечисленных метода, так как они быстрее и проще. Но если возможности войти в Windows нет, придётся прибегнуть к этому способу. Для выполнения процедуры вам потребуется один рабочий компьютер, так как с его помощью необходимо создать установочный носитель Windows. Нужен он для того, чтобы попасть в меню восстановления.
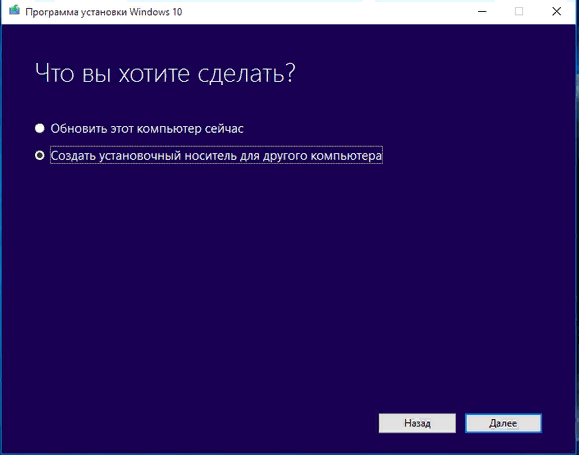
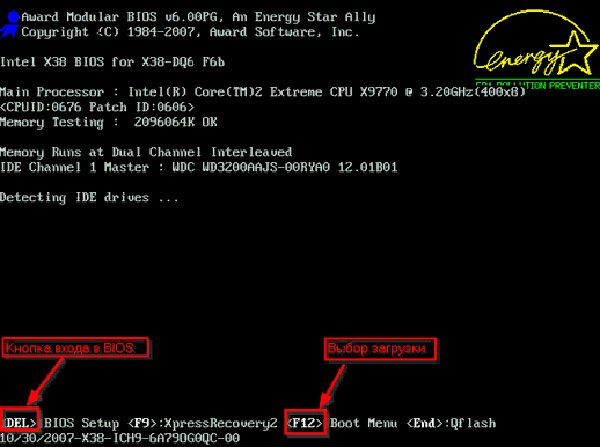
- Перейдите на официальный сайт Microsoft (https://www.microsoft.com/ru-ru/software-download/windows10) и скачайте утилиту MediaCreationTool, позволяющую создать установочную флешку. Вам понадобится носитель, имеющий как минимум 4 ГБ памяти и отформатированный в FAT32. Запустите средство и запишите образ на флешку, используя встроенные инструкции. При неправильном обращении утилита может сбросить тот компьютер, на котором вы работаете, поэтому будьте внимательны при её использовании. Обязательно выберите пункт «Создать установочный диск для другого компьютера».

Укажите программе, что вам нужно создать установочный носитель для другого компьютера - Вставьте флешку в компьютер, подлежащий восстановлению. Он при этом должен быть выключенным. Включите его и на первом этапе нажмите F12 (в зависимости от модели материнской платы кнопка может отличаться), чтобы войти в меню загрузки.
Нажмите F12 или другую кнопку, которая отвечает за вход в меню загрузки на вашем компьютере - Найдите во вкладке «Загрузка» (Boot) пункт, отвечающий за порядок загрузки. Укажите в нём, что в первую очередь нужно проверять сторонний носитель: для этого установите на первое место в списке флешку, на которую записан образ системы. Не забудьте сохранить новые параметры CMOS и выйдите из него.

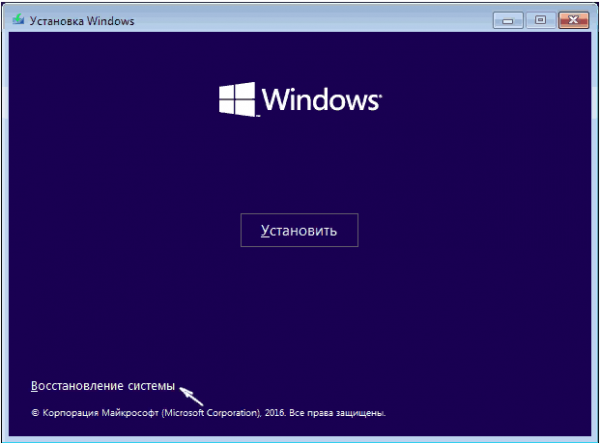
На вкладке Boot укажите системе, чтобы она начинала загрузку с флешки (USB-HDD) - Если все вышеописанные действия выполнены правильно, начнётся загрузка не системы, а установочной программы. Выберите язык, на котором хотите использовать установочную утилиту. На втором шаге не продолжайте установку Windows, а кликните по строке «Восстановление системы».

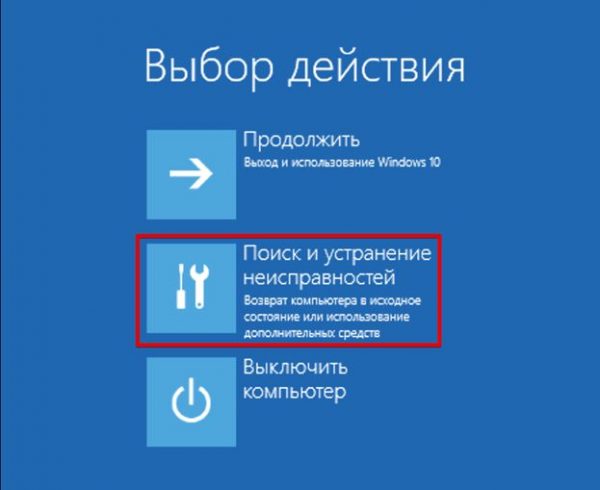
Нажмите на строку «Восстановление системы» - Запустится специальное меню, ради которого происходили вышеописанные этапы. Перейдите к поиску и устранению неисправностей.

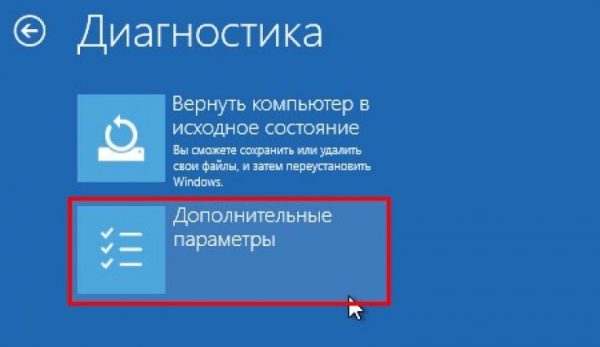
Перейдите к разделу «Поиск и устранение неисправностей» - Запустите процесс возвращения компьютера в исходное состояние. В разделе «Дополнительные параметры» можно указать некоторые условия сброса: до какой из возможных редакций сбрасывать Windows (выбирайте ту версию, которую использовали до начала сброса), сохранять ли данные пользователя или нет.

Выберите условия сброса в разделе «Дополнительные параметры» и нажмите на блок «Вернуть компьютер в исходное состояние» - Дождитесь завершения процедуры.

Видео: сброс настроек Windows 10
Сброс ноутбуков
Методы, описанные в разделе «Выполнение сброса», подходят для всех компьютеров и ноутбуков, работающих под Windows 10. Но обладатели ноутбуков имеют некоторое преимущество — большинство компаний вшивают в свои устройства дополнительные способы сброса. Нижеописанные действия помогут вам воспользоваться особыми методами. Разные фирмы используют немного отличающиеся программы сброса.
Asus
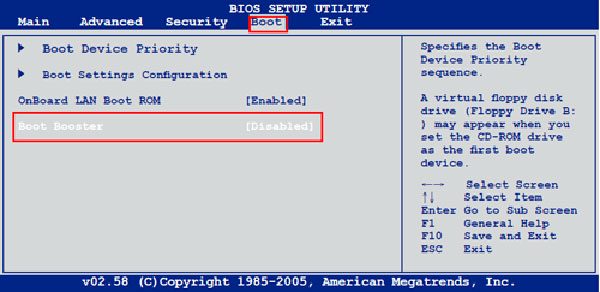
Перед тем как выполнять сброс на ноутбуках Asus, необходимо деактивировать режим быстрого включения. Сделать это можно в настройках BIOS
- Для входа в BIOS нажмите клавишу F2 на первом этапе включения ноутбука, до начала загрузки операционной системы. В блоке Boot отыщите пункт Boot Booster и установите в нём значение «Отключено». Сохраните новые параметры и выйдите из BIOS.

Переведите пункт Boot Booster на вкладке Boot в положение Disabled - Как только компьютер начнёт включаться снова, до начала загрузки операционной системы нажмите клавишу F9, чтобы активировать процесс сброса. Примите все условия, о которых вас уведомят, и подтвердите намерения.

Нажмите F9 до загрузки операционной системы для перехода к программе сброса
Процедура сброса на ноутбуках ничем не отличается от того же процесса на стационарных компьютерах: длится он от пары минут до нескольких часов, в течение которых система несколько раз перегружается и иногда уведомляет пользователя о том, на сколько процентов завершён сброс.
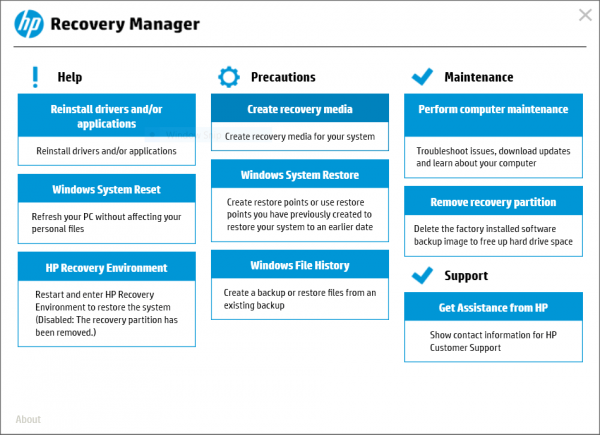
HP
Выключите ноутбук и на первом этапе включения нажмите клавишу F11 — запустится программа восстановления. Укажите, стоит ли сохранять ваши данные, а также примите все условия сброса. Запустите процесс, дождитесь его окончания и получите чистую систему.
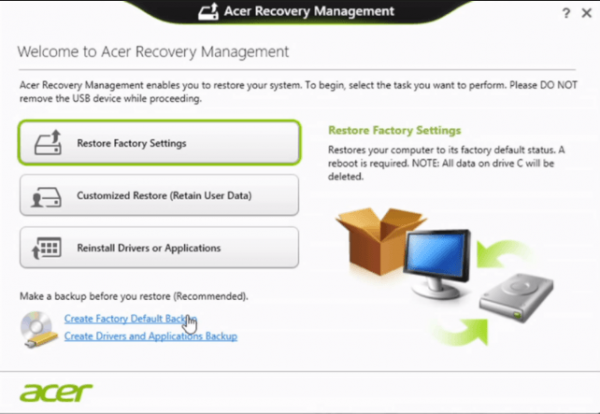
Acer
Выключите ноутбук и на первом этапе его включения зажмите одновременно Alt и F10 (возможно, придётся нажать несколько раз). Вас попросят ввести пароль: если вы его не меняли вручную, то введите стандартный — 000000. После того как доступ будет получен, кликните по кнопке Factory reset, тем самым запустив сброс, и дождитесь окончания процедуры.
Samsung
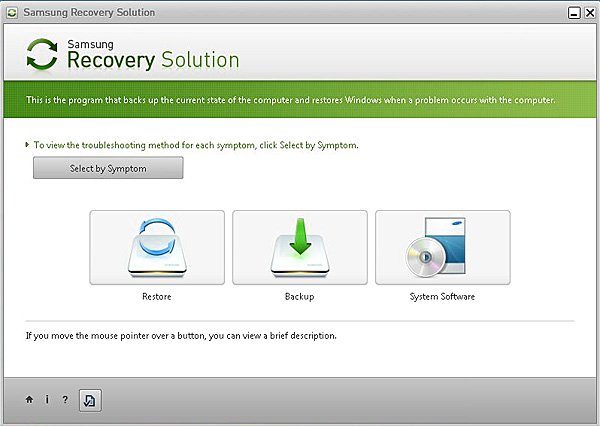
Для сброса Windows 10 на ноутбуках Samsung нужно выполнить следующие шаги:
- Выключите ноутбук и на первом этапе его включение нажмите клавишу F4. Запустите специальная программа, в которой необходимо будет выбрать блок Restore.
- Перейдите к разделу Complete Restore, а в нём запустите выполнение Computer Initial Status. Вас спросят, хотите ли вы сохранить данные пользователя, а после получения ответа начнётся сброс.

В менеджере программы восстановления выберите раздел Restore
Видео: восстановление заводского Windows 7/8/10 на ноутбуках Samsung
Toshiba
Выключите ноутбук, зажмите клавишу «0» (ноль) на клавиатуре и начните включение системы. Отпускать клавишу можно в тот момент, когда вы услышите сигнал, издаваемый компьютером. Начнётся процедура сброса, дождитесь её завершения.
Обладатели Windows Phone с Windows 10 также могут выполнить сброс операционной системы. Есть два способа: через настройки, когда доступ к системе телефона или планшета есть, или при помощи специальной комбинации, работающей даже тогда, когда устройство выключено и не может загрузиться.
При помощи настроек
Перед началом операции убедитесь, что заряд устройства выше 50%. Если это не так, сначала выполните зарядку, а только потом переходите к нижеописанным шагам.
- Отыщите в списке всех программ настройки устройства и откройте их.
- Перейдите к блоку «Сведения об устройстве».
- Запустите процесс сброса.

Перейдите к разделу «О системе» в настройках телефона и нажмите «Сброс настроек»
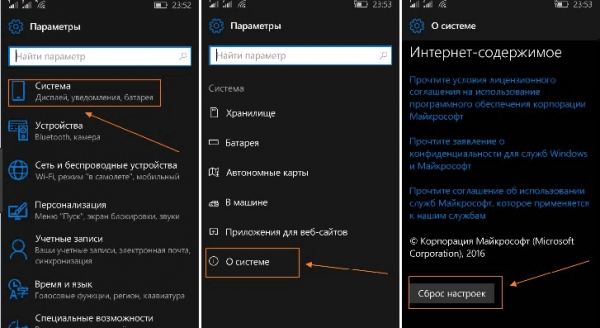
Процедура на мобильных устройствах обычно осуществляется за 10–20 минут, но может продлиться дольше, если телефон или планшет слабый или перегружен.
При помощи комбинации клавиш
Для сброса устройства с не отвечающим экраном можно выполнить принудительные команды. Зажмите на 10–15 секунд клавиши увеличения звука и блокировки экрана. Как только устройство начнёт вибрировать, зажмите кнопку уменьшения звука и не отпускайте её, пока не увидите восклицательный знак. После этого последовательно зажмите следующие кнопки: увеличение громкости, снижение громкости, блокировка экрана, снижение громкости. Учтите, нажать их необходимо последовательно, а не одновременно. Если все вышеописанные действия выполнены верно, начнётся процесс сброса.

Видео: сброс мобильного устройства с Windows
Сброс необходимо выполнять для того, чтобы получить чистую систему, но при этом сохранить собственные данные. Запустить сброс можно через системные настройки, программу от Microsoft или меню восстановления. На ноутбуках присутствуют специальные программы от производителей. Мобильное устройство сбрасывается через встроенные настройки или меню экстренного восстановления.
- Распечатать
Оцените статью:
- 5
- 4
- 3
- 2
- 1
(7 голосов, среднее: 4.3 из 5)
Поделитесь с друзьями!

If you need to know how to factory reset on Windows 10, chances are you’ve been having some issues that other troubleshooting steps haven’t been able to solve.
Typically, factory resetting a Windows device is the final tool in a troubleshooter’s toolbox — a nuclear option, so to speak, to be used when all other options have failed. By performing a factory reset on Windows 10, you’ll essentially be reverting your device back to the way it was when it rolled off the factory production line. So, while it may seem all doom and gloom, you could also think about it as a fresh start!
You must bear in mind, however, that doing this will potentially wipe everything from your machine, which is why a factory reset is often employed as part of the selling process for old devices. While the method we outline below features an option for preserving files, we would definitely recommend backing up all important data before you start, using one of the best cloud storage services or best external hard drives.
Once you’ve backed up or are confident about proceeding without doing so, simply read on to learn how to factory reset on Windows 10.
How to factory reset on Windows 10
1. Select Settings from the Start Menu. The start menu is found on the toolbar of your Windows 10 device. Just click the Windows icon in the bottom left corner of your screen. You can also use the adjacent search bar; just type in ‘settings.’
2. Select Updates and Security from the Setting Menu. Once you’ve got the Settings Menu loaded up, select ‘Updates and Security’ from the list of options. If you’re having trouble locating it, just can use the search bar at the top of the window to easily find it.
3. Select Recovery from the Updates and Security Menu. Along the left-hand side of the ‘Updates and Security’ menu there will be several different tabs; ‘Recovery’ is the one we need to select. If you’re having issues spotting it, feel free to make use of the search bar at the top.
4. Click Get Started under Reset this PC. Now that you’re in the ‘Recovery’ tab at the top of the window, you should see a heading marked ‘Reset this PC’ and underneath that is a short paragraph of text and a button labeled ‘Get started.’ Click this button.
5. Chosen to remove everything or keep files. You will now be given a choice: ‘Remove everything’ or ‘Keep my files.’ This is fairly self-explanatory, but essentially the former will wipe your entire device, whereas the latter will wipe your device but preserve your personal files.
6. Decide if you want to wipe the whole drive (if you selected ‘Remove everything’ in the previous step). Selecting ‘Keep my files’ will start the reset process, so skip to the next step. If you select ‘Removed everything,’ you will be faced with an additional options screen. Here you are given the choice of whether you want to just remove files from your device or completely wipe the drive. We recommend the second option if you want to fully reset your device.
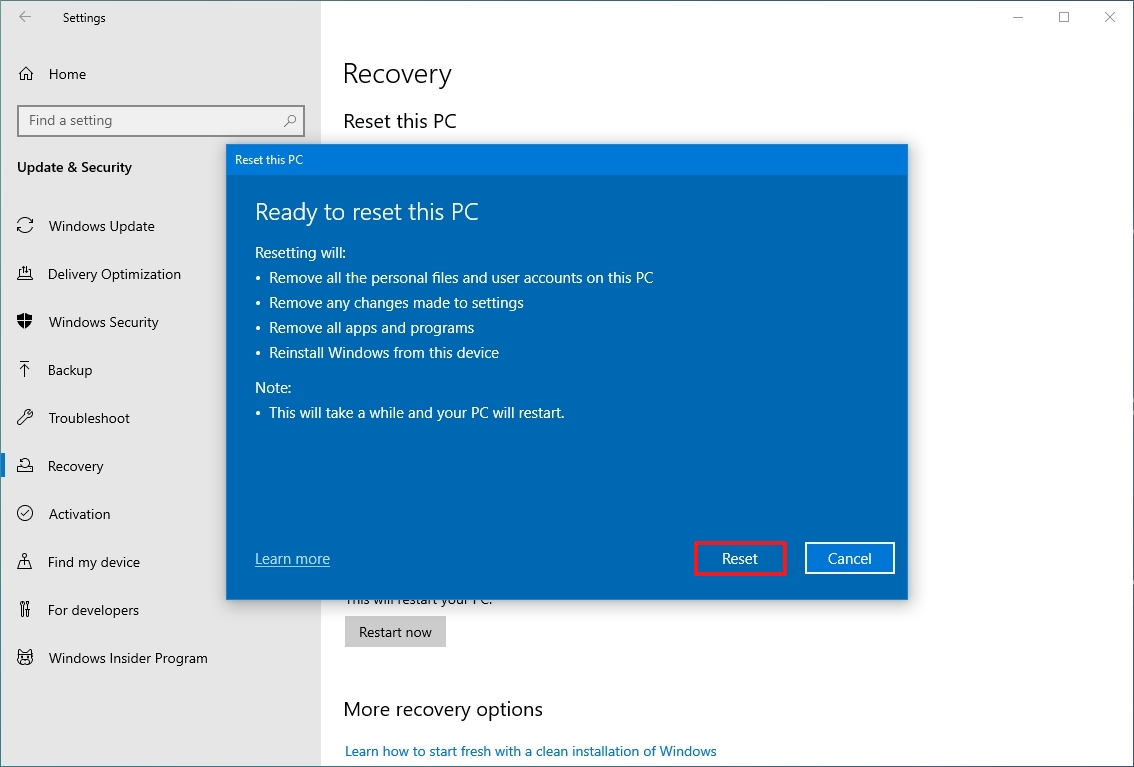
7. Confirm that you want to reset. Before the process begins fully, Windows 10 will ask for final confirmation that you definitely want to reset your device. This is the point of no return, so make sure you absolutely do want to go through with wiping your device before confirming.
8. Let the resetting process finish. Now that you’ve selected to reset your Windows 10 device there is nothing to do but wait for the process to be completed. Depending on what type of reset you’ve opted for, as well as how much is stored on the device, this could take up to a couple of hours.
9. Set up your device again. Once the reset is complete, Windows 10 will automatically restart and from here your device should be returned to the state in which it was brand new. Now you can set it up again.
More Windows 10 tips
Want to read more Windows troubleshooting tips? We have you covered. Get started with how to boot into Windows 10 safe mode, how to update drivers on Windows 10, how to map a network drive in Windows 10, how to update Windows 10 and how to reinstall Windows 10.
If you’re looking for more general Windows 10 tips, make sure you check out how to open Task Manager on Windows, how to find your Windows 10 product key, how to turn on Bluetooth for Windows 10, how to encrypt files on Windows 10, how to split the screen on Windows 10, how to screenshot on Windows 10, how to record a screen on Windows 10 and how to change the password on Windows 10.
Get instant access to breaking news, the hottest reviews, great deals and helpful tips.
Rory is a Deals Editor at Tom’s Guide based in the UK. He covers a wide range of topics but with a particular focus on deals, gaming and streaming. When he’s not scouring retailers for PS5 restock or writing hot takes on the latest gaming hardware and streaming shows, he can be found attending music festivals and being thoroughly disappointed by his terrible football team.
If your Windows machine is acting up, running Microsoft’s Refresh Windows tool or uninstalling a recent update might do the trick. You can even run your own diagnostic tests to make sure your hard disk is healthy. But if your PC is running poorly or you plan to get rid of your current machine, it may be time to reset your PC to its factory settings.
Whether you’re still running Windows 10 or have upgraded to Windows 11, the steps below are mostly the same. This process can wipe your files and current settings, depending on what options you choose, so make sure you back up your files first.
PCMag-Recommended Windows Accessories
Reset Windows 10
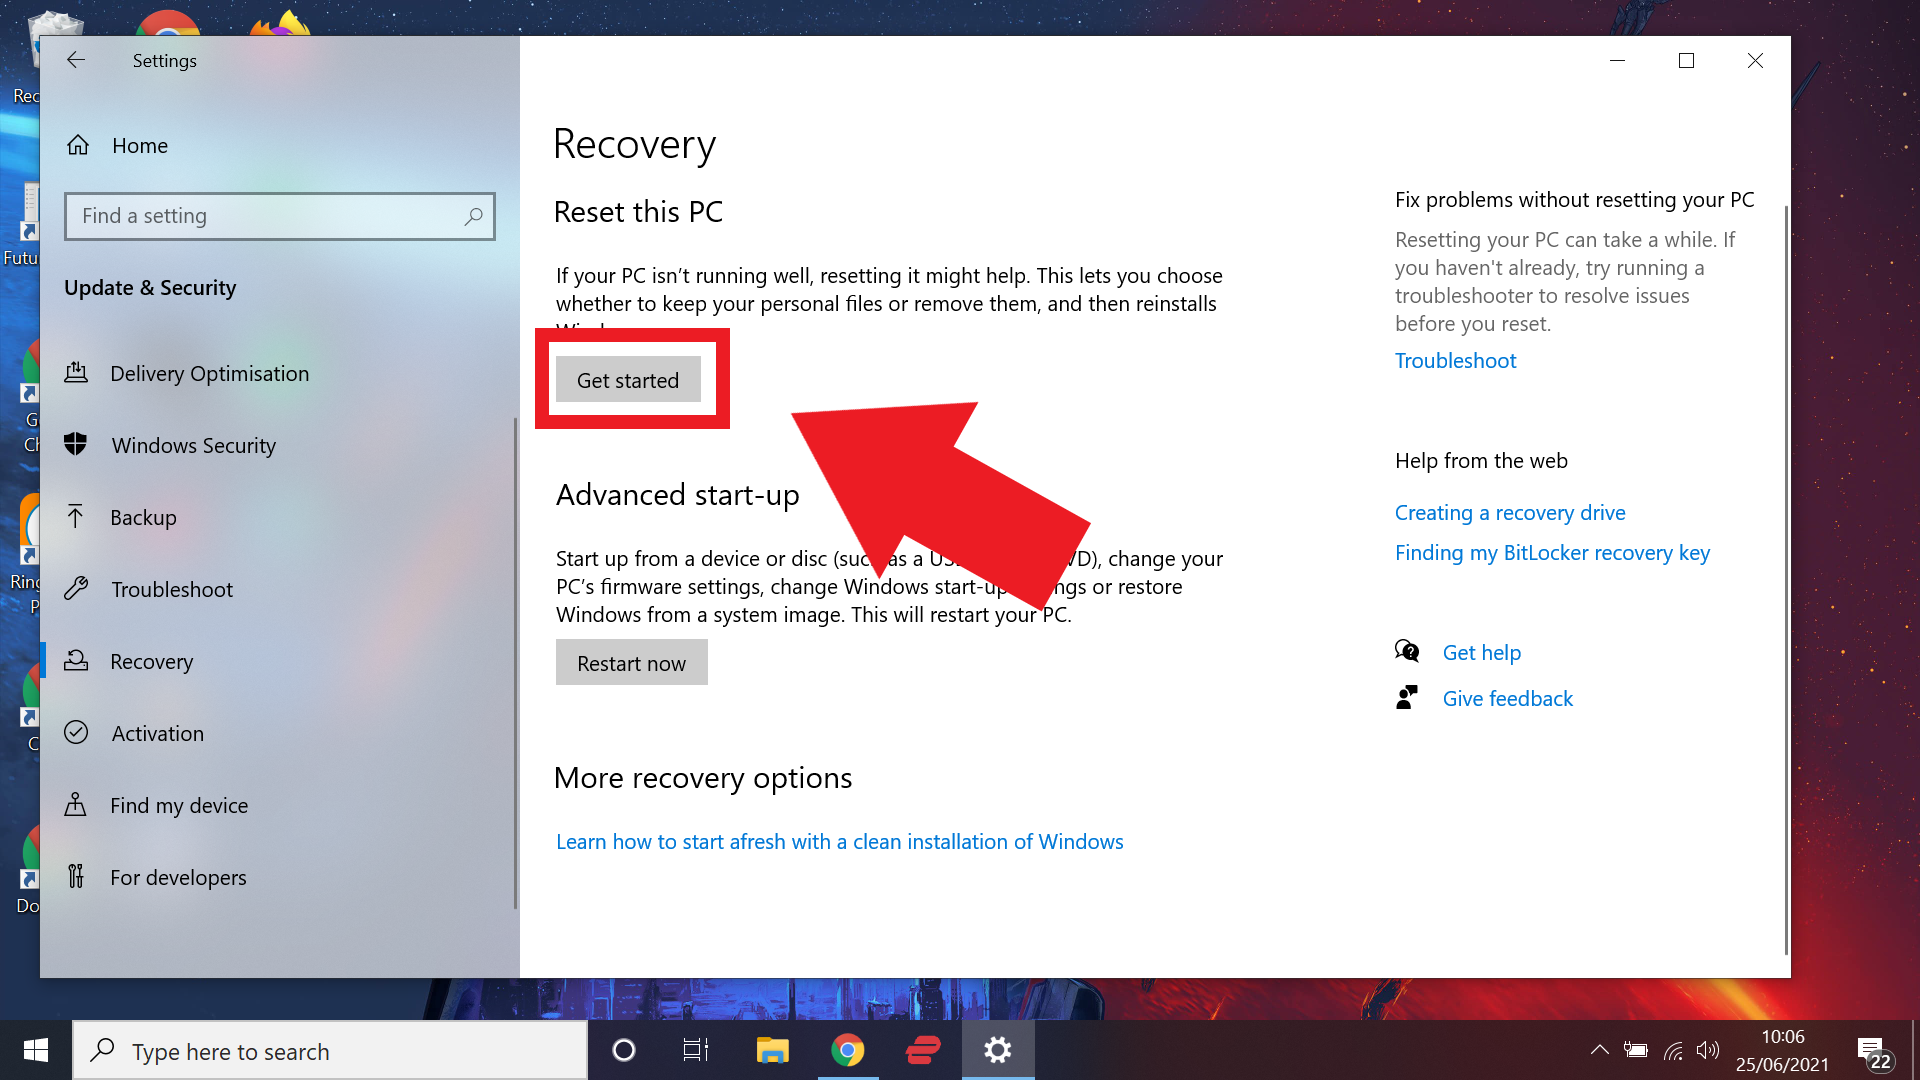
In Windows 10, click the Start menu and select the gear icon in the lower left to open up the Settings window. You can also select the Settings app from the app list. Under Settings, click Update & Security > Recovery, then select Get started under Reset this PC.
Reset Windows 11
In Windows 11, open Settings > System > Recovery (or Settings > Windows Updates > Advanced options > Recovery). Click Reset PC next to the Reset this PC option.
Choose What to Erase
On either OS, you can choose Keep my files to remove only downloaded apps and settings. This will preserve your personal files and is recommended if you are trying to roll back an issue.
If your drive is beyond saving or you plan to get rid of the computer, select Remove everything, which wipes the drive clean by removing downloaded apps, settings, and personal files.
Reinstall Options
Before you can hit the reset button, you must determine how to reinstall Windows. Choose Local reinstall if you prefer the more hands-on approach of installing Windows from local storage.
For an an easier route, click Cloud download to pull files directly from Microsoft’s servers. This option requires over 4GB of available storage space, but it is meant to be a faster and more reliable alternative to booting from a USB stick.
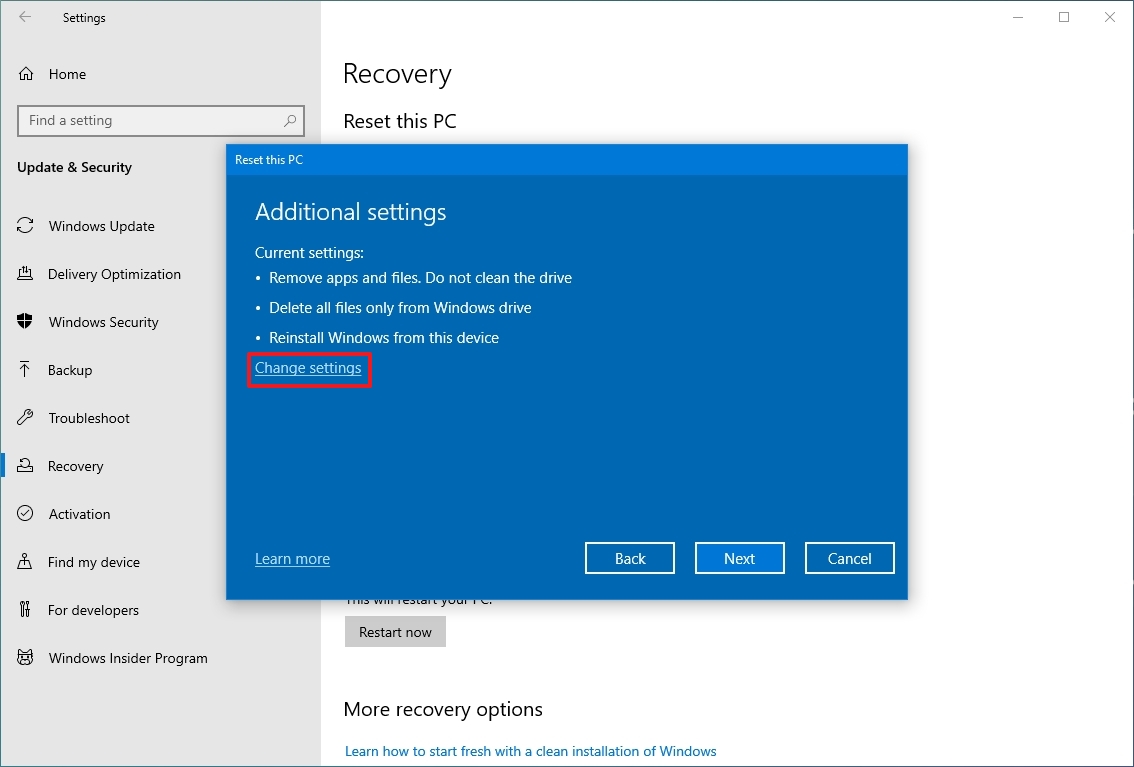
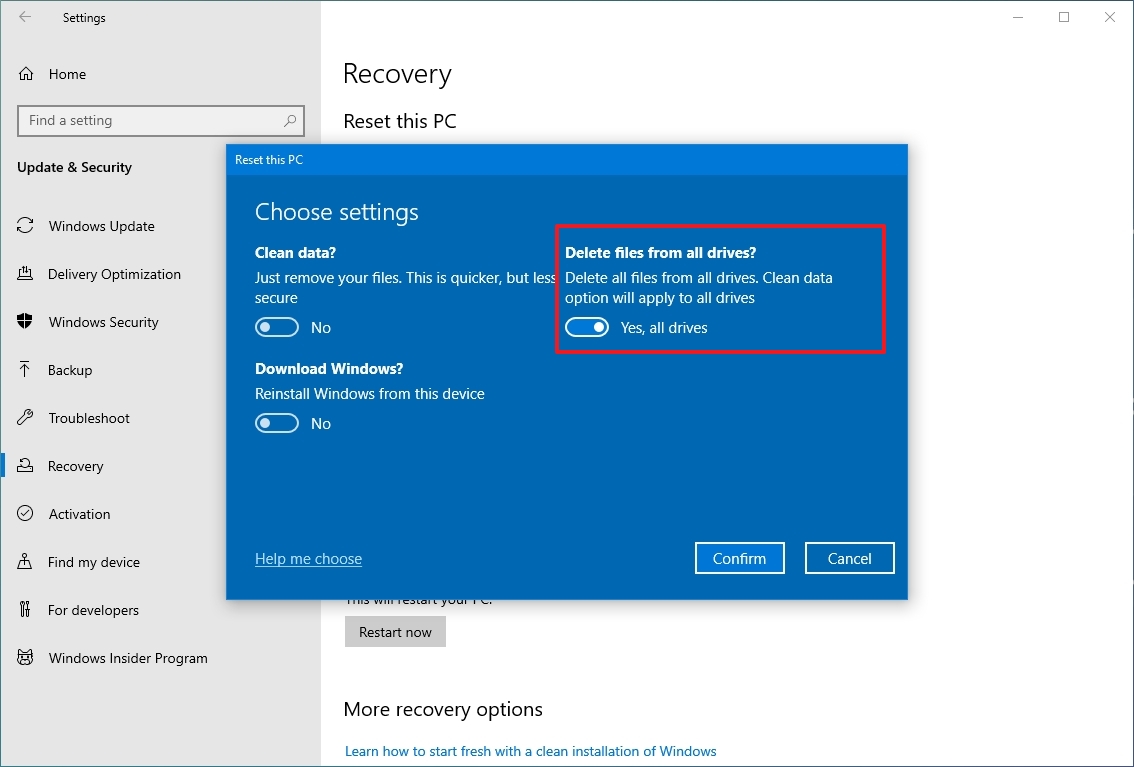
Customize Additional Settings
Once your selections have been made, there are a few extra settings you can customize, depending on what you picked. Click Change settings at the Additional settings screen to view your choices:
Recommended by Our Editors
-
If you chose Keep my files, apps and settings will default to what they were when the PC was brand new. You can change this by disabling Restore preinstalled apps.
-
If you chose Remove everything, Windows will erase all your files. This is the quickest way to remove personal files, but it’s less secure because those files can be recovered with the right software. If you plan to sell the machine, you’ll want to enable Clean data to ensure your data is overwritten and not just removed. This will take longer, but it’s worth the wait.
You already made the choice on how you wish to reinstall Windows, but you can change that answer from this menu. Enable or disable the Download Windows? option. By marking the choice as Yes, you will switch to a remote download of the operating system.
If you have multiple drives installed, there will also be an option to control if they should be wiped as well. Another option for deleting workplace resources may be present if certain configurations have been set up through your place of work. Check with your company’s IT department before changing this.
Reset Your Computer
Once you make all your decisions, click Next, and Windows will generate a screen that summarizes what will happen when you go through with the reset. If you selected Keep my files, you can look at a list of apps that will be removed with the reset. When you’re ready to commit, click Reset. Your computer will restart and boot back up again after some time.
If you are getting rid of the computer, your work is done. Otherwise, sign back into Windows and make sure what you opted to remove has been wiped from the machine. If you backed up your files using an online backup service or Recovery Drive, they can now be restored to the machine.
 Microsoft Windows 11 Preview
Like What You’re Reading?
Sign up for Tips & Tricks newsletter for expert advice to get the most out of your technology.
This newsletter may contain advertising, deals, or affiliate links. Subscribing to a newsletter indicates your consent to our Terms of Use and Privacy Policy. You may unsubscribe from the newsletters at any time.
Learn how to hard reset your device
by Milan Stanojevic
Milan has been enthusiastic about technology ever since his childhood days, and this led him to take interest in all PC-related technologies. He’s a PC enthusiast and he… read more
Updated on September 2, 2022
Reviewed by
Vlad Turiceanu

Passionate about technology, Windows, and everything that has a power button, he spent most of his time developing new skills and learning more about the tech world. Coming… read more
- Microsoft offers a built-in solution to reset Windows 10 back to the initial state, almost like when you had the computer for the first time installed.
- Since it is a very useful option instead of performing a clean install, we show you 4 different ways to do this, depending on which is easier for you.
- You can perform a total factory reset while removing all your files, or you can save some important ones.
XINSTALL BY CLICKING THE DOWNLOAD FILE
This software will repair common computer errors, protect you from file loss, malware, hardware failure and optimize your PC for maximum performance. Fix PC issues and remove viruses now in 3 easy steps:
- Download Restoro PC Repair Tool that comes with Patented Technologies (patent available here).
- Click Start Scan to find Windows issues that could be causing PC problems.
- Click Repair All to fix issues affecting your computer’s security and performance
- Restoro has been downloaded by 0 readers this month.
Problems with your operating system will appear sooner or later, and if that happens you’ll need to know how to deal with them.
You can usually fix most major problems with your PC by performing a factory reset, so today we’re going to show you how to factory reset your Windows 10 PC.
The factory reset option was available in Windows 8, and since it was a useful feature, Microsoft decided to enhance it even further.
Unlike Windows 8, Windows 10 doesn’t have a recovery partition available that works as an installation media.
If you don’t know how to create a Windows 10 UEFI bootable USB, check out our dedicated article.
However, by removing the recovery partition, users now have more storage space on their primary partition, and this is especially important for tablets or devices that use only SSD storage.
With the recovery drive option removed, the only way to fix problems on your PC is to factory reset Windows 10, and there are several different ways to do that.
How can I perform a Windows 10 factory reset?
1. Via Settings
1. Open the Settings app by pressing Windows Key + I keyboard shortcut.
2. Navigate to Update & security section.
3. Go to Recovery tab and in Reset this PC section click on Get started button.
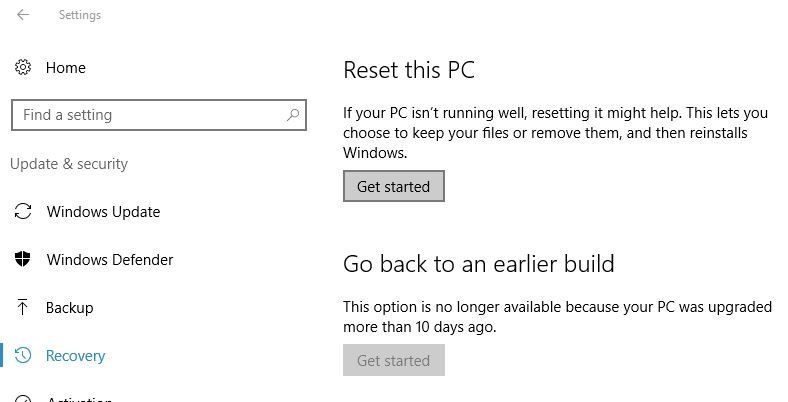
4. You’ll see two options available, Keep my files and Remove everything. The first option will remove all your installed applications, but it will keep your personal files.
You’ll even get the list of all removed applications on your Desktop so you can download them again.
5. If you choose Keep my files option, follow the instructions on the screen to complete the reset.
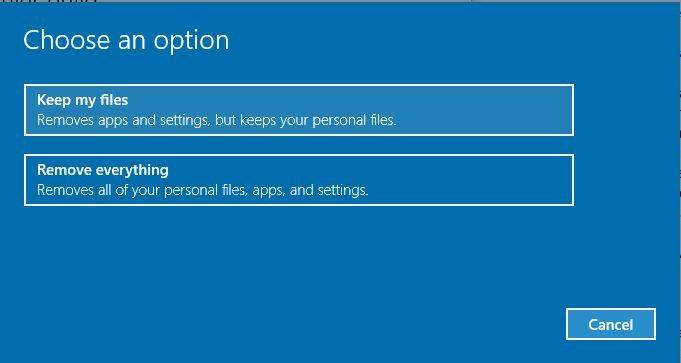
If you have any major PC problems, you should always use the Keep my files option first, but bear in mind that this option will remove your installed applications, so you might want to back up some of your files.
Although this option is great, it doesn’t always fix problems with Windows 10. If problems still persist, you need to use Remove everything option. To do that, follow these steps:
1. Open the Settings app, go to Update & security > Recovery and click the Get started button in Reset this PC section.
2. From the list of options choose Remove everything.
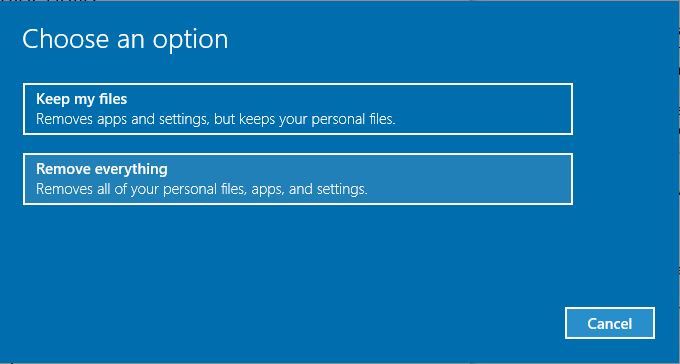
3. Now you can choose between two options, Just remove my files and Remove files and clean the drive. The first option will remove all your files and applications from the installation drive, but your files won’t be permanently removed, and some files might be recovered by special software.
Most users use this option because it’s faster, so feel free to use it on your PC. If you choose this option, we strongly recommend to back up all your important files to an external storage device.
Remove the files and clean the drive option will basically do the same thing, it will remove all your files and applications from the installation drive, with one small difference.
By choosing this option, Windows will delete all your files and write zeros at their location, so you won’t be able to recover your files in any way.
Settings app allows you to change all sorts of system settings easily, but it also allows you to perform a factory reset and fix any major problems that you have with your PC. Resetting Windows 10 is fairly simple, and you can do it by following the steps above.
Some PC issues are hard to tackle, especially when it comes to corrupted repositories or missing Windows files. If you are having troubles fixing an error, your system may be partially broken.
We recommend installing Restoro, a tool that will scan your machine and identify what the fault is.
Click here to download and start repairing.
Keep in mind that the Remove everything option doesn’t affect your hard drive negatively in any way, it just writes zeroes instead of your data, thus making your data impossible to recover. This option is useful if you want to sell your PC, and you want to be sure that your personal files can’t be recovered.
This option allows you to clean only the installation drive or all drives that you have on your PC. If you plan to keep your PC, be sure to clean only the drive where Windows is installed.
Some users might have the Restore factory settings option and this option will revert your PC to the factory settings. Your PC will revert to the initial state your Windows came without any updates installed.
2. Use Advanced Startup options
If you want, you can also factory reset Windows 10 by using Advanced Startup options. This method is useful if you can’t access Windows 10 due to constant crashing.
This mode will automatically start after your PC restarts a couple of times during the boot, but you can also enter Advanced Startup from Windows 10 by doing the following:
- Open the Start Menu and click the Power button. Hold the Shift key and click the Restart option. In addition, you can also start Advanced Startup by holding the Shift key and choosing the Restart option from the Windows 10 login screen.
- Now you’ll see several options available, choose Troubleshoot.
- Now choose the Reset this PC option.
- You’ll now see similar options that we mentioned in Solution 1. Choose Keep my files if you don’t want to remove all files from your PC or choose to Remove everything to perform a complete reset. If you choose the latter, be sure to only remove the files from the drive that has Windows 10 installed.
We have to mention that some branded PCs might have a Factory Image Restore option available from Advanced Startup, and you can also use this option to reset your Windows 10.
By using this option, you’ll reset Windows 10 to its original state with certain applications from the PC manufacturer installed. Keep in mind that not all PCs have this option available.
- Windows 10/11 Settings won’t open/crashing
- 10 Ways to Fix Your Keyboard if It’s Not Working in Firefox
- Fix: Second hard drive not detected in Windows 10/11
- How to create custom Start Menu Live Tiles in Windows 10
- Got an old USB flash drive? 20 great ideas on how to use it
3. Use a Recovery Drive
If you want to reset Windows 10, you can do so by using a Recovery Drive. In most cases, you’ll be able to reset Windows 10 by using one of the previous methods, but if you can’t access Windows 10 and if you can’t open Advanced Startup, you might want to consider using a Recovery Drive.
Before you can use the Recovery Drive, you’ll need to create it. Keep in mind that you’ll need a working version of Windows 10 in order to create the Recovery Drive.
We have to mention that 64-bit Recovery Drives work only with 64-bit versions of Windows 10. The same goes for the 32-bit version.
To create a Recovery Drive on Windows 10, do the following:
- Press Windows Key + S and enter recovery drive. Select Create a recovery drive from the list of options.

- When Recovery Drive window opens, check Back up system files to the recovery drive and click Next.
- Make sure that your USB flash drive is connected to your PC. Select it from the list and click Next. Keep in mind that you’ll need a USB flash drive that is 8GB or larger in order to create a Recovery Drive.
- Follow the instructions on the screen to complete the Recovery Drive creation process. Bear in mind that all your files from USB flash drive will be deleted when you create the Recovery Drive.

After creating the Recovery Drive, you can boot your PC from it and use the Recover from a drive option. If you want, you can also open access Advanced options or the Reset option.
4. Use a system image
Some computer manufacturers allow you to use the Factory Restore Image option to reset your PC, but often these Factory Images are filled with applications from the computer manufacturer that you don’t really use.
To fix this problem, you can create your own system image and use it to reset your PC.
By creating a system image you’ll create your own backup with desired applications and settings and use it to reset Windows 10. To create a system image, do the following:
- Press Windows Key + S and enter backup. Select the Backup and Restore option.

- When Backup and Restore window opens, select Create a system image option from the menu on the left.

- Select where you want to store the system image and click Next. Follow the instructions on the screen to complete the process.
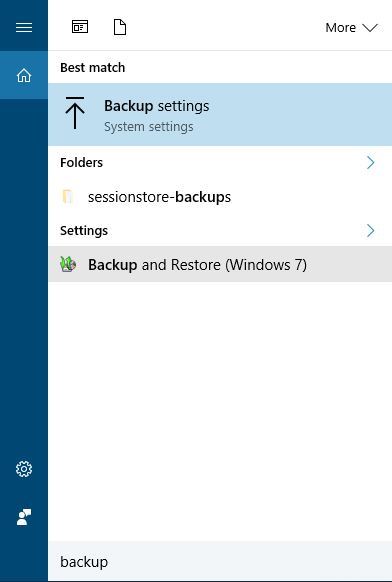
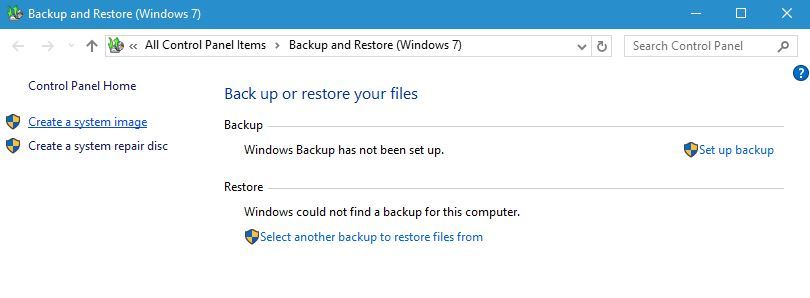

Keep in mind that system the image can be quite large and take up more than 10GB on your drive, so it might be better to store them on a USB flash drive or a portable hard drive. After creating a system image, you can reset your PC with it by following these steps:
- Start Advanced Startup.
- Select Troubleshoot > Advanced options > System Image Recovery.
- Select your system image and follow the instructions on the screen.
We have to mention that by using a system image all the files that you created after making the image will be removed, so it might be a good idea to back up all your important files.
Even though this option isn’t as same as factory reset, it’s quite similar to it.
If you want to achieve similar results to a factory reset, be sure to create a system image as soon as you install your operating system and the necessary programs.
Moreover, if for any reason you are unable to perform the factory reset procedure on Windows 10, you can count on our nifty tips to get it done in no time.
![]()
Newsletter
If you’re dealing with a sluggish or unresponsive computer, you may be close to just giving up. While your misery is understandable, don’t throw in the towel just yet. Before you ditch your computer and spend hundreds, or even thousands, of dollars on a new one, there’s one last trick that can save you time and money: A factory reset.
Contents
- First, back up your stuff!
- Reset Windows 10
- Reset Windows 11
- About Windows 7
- Alternative: Manufacturer recovery tools
Follow the steps below to easily and successfully reset your Windows 10 or 11 PC to its clean factory setting. And if you’re running into regular slowdowns, check out our guide on how to speed up Windows, too.
First, back up your stuff!
Before you reset your system, you’ll want to back up important information that you don’t want to lose. This includes documents, photos, music, and movies, but there are other items to back up as well. Make sure that you know all of your saved passwords, export all of your browser bookmarks, and have installation files for all the software you’ll want to reinstall — or know where to get them.
Also, make sure you back up app-specific data, like custom filters saved in a photo utility, save files from your favorite games, and back up emails if using an offline client.
Reset Windows 10
Windows 10’s reset feature is found in the settings panel. It can rebuild a fresh copy of Windows 10 if you so choose, replacing all drivers and resetting all settings.
Note that this might be technically different from a “factory reset” option provided by manufacturers. Check your documentation or give technical support a call if you want to return your PC to how it was when you first pulled it out of the box. The manufacturer might have special partitions set up on the hard drive or might be able to provide a factory restore image on bootable media.
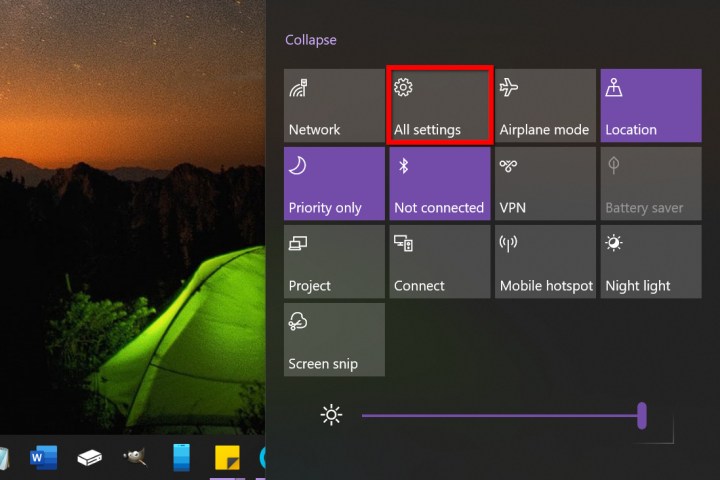
Step 1: Click the Notifications icon on the taskbar (or press the Windows button + A) and then click the All settings tile in the Action Center. You can also click the start button followed by the Gear icon on the Start Menu.
Step 2: Click Update & Security.
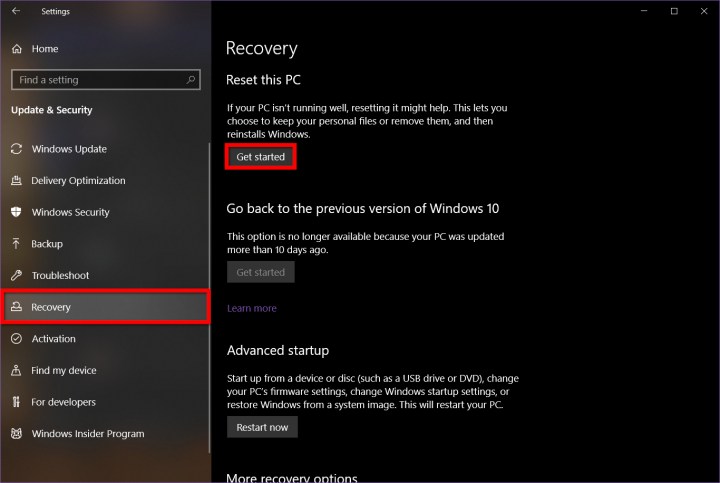
Step 3: Select Recovery listed on the left.
On the right, you’ll see two options. The first, Reset this PC, is the method we’re going to use for this guide.
The second, Advanced startup, is worth considering if you have a little more technical skill. It’s for modifying your computer on a deeper level or installing a completely different operating system. This comes in handy if your manufacturer provides a factory restore image or external drive containing the image to return your machine to its factory state — proprietary software included.
Unless you’re completely sure you understand what each of the options in this setting does, it’s probably best to leave it alone.
Step 3: When you are ready, click the Get Started button listed under Reset This PC.
A new window will appear with two options, Keep my files and Remove everything, as shown below.
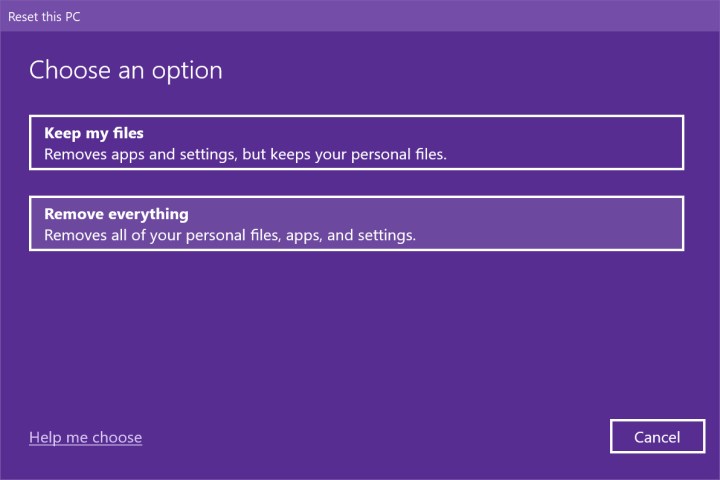
Here you need to decide whether you want to keep all of your files and folders intact, or truly start from scratch and then use your backup to restore those files and folders. Whichever you choose, you will need to reinstall all apps and programs acquired outside the Microsoft Store. Your settings, such as the Start Menu arrangement, will go back to their defaults.
Step 5: Click on one of the two options.
In both cases, it rebuilds Windows 10 using the current installation. It’s Microsoft’s “imageless recovery” system so installation media doesn’t need to lurk on a hidden partition, taking up space. However, the Local reinstall option may not be able to repair Windows 10 if it’s too broken, too corrupted. That’s where the Cloud download option comes in: Windows pulls everything from Microsoft’s servers to rebuild the local copy.
Both options return all settings to their factory defaults and remove all software not installed from the Microsoft Store. However, the Keep my files option keeps your profile intact along with the associated files and folders. What it doesn’t do is update Windows 10 to the latest version if you never bothered to install patches and feature updates. The Cloud download option installs the latest version stored in Microsoft’s cloud.

Step 6: Select a source: Cloud download or Local reinstall.
Step 7: On the following screen, click the Choose settings link if you would like to alter the current reset settings. Otherwise, skip to Step 9.
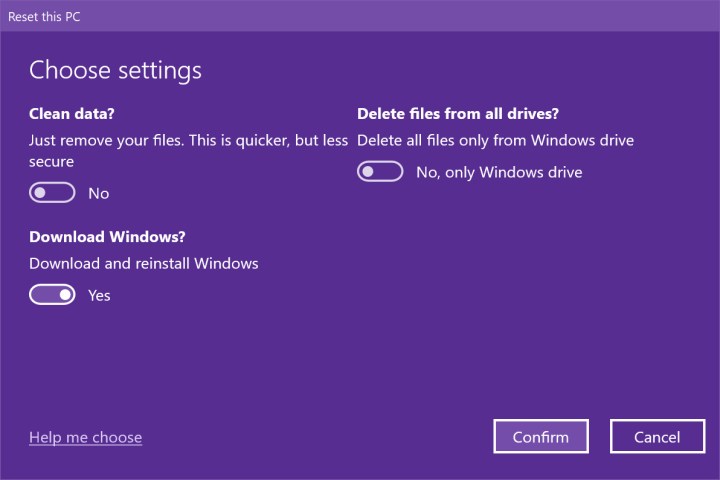
The image above is based on the Remove everything option and using the cloud as our source. Since our example PC has multiple drives, we have an additional Delete files from all drives setting. Note that you can toggle off reinstallation, but if you’re having serious issues related to Windows 10 components, a fresh copy might be ideal.
Likewise, if we took the Keep my files route and selected the Local reinstall option, we would see two toggles: Restore preinstalled apps and settings that came with the PC, and rebuild Windows 10 using the local installation.
Step 8: Click the appropriate toggle next to the setting you want to alter and then click Confirm.
Step 9: Click Next to proceed.
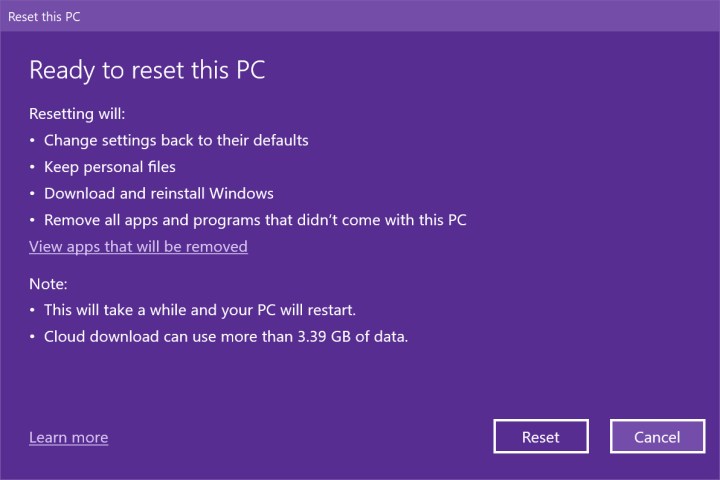
Step 10: The Reset tool will present a summary. If you chose the Keep my files option, you’ll see a link you can click to see all the apps that will be removed during the reset, like Google Chrome, Steam, and even Microsoft 365. This list will be saved to your desktop when you finish the recovery process. You won’t see this link when you select the Remove everything option.
Make sure you are good with everything, and then click the Reset button.
Your PC will reboot automatically and enter the Windows Recovery Environment. The reset process might take an hour or more, so if you’re using a laptop, it’s a good idea to plug in the power cord. It may reboot itself several times. Wait for Windows to restart and begin the setup process, then enter your personal information and login information if prompted.
Once you’ve confirmed everything’s working, make sure Windows 10 is up to date and install the latest drivers from hardware manufacturers.
Reset Windows 11

If you’re using the beta and wondering how to reset Windows 11 — betas can be a bit unstable, so this isn’t surprising — don’t worry: The reset procedures are more or less the same as Windows 10 with a slightly different appearance. Let’s run through the steps to highlight all the key points.
Step 1: Press the Windows and “I” keys together to open up important pinned apps. Here, look for the Settings menu with the gears icon, and select it.
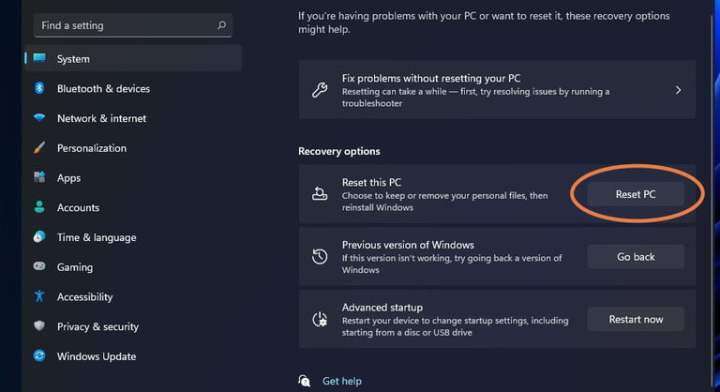
Step 2: Select Update & Security. Look at the left-side menu and choose Recovery.
Step 3: Select the Reset PC option on the right.
Step 4: At this point, things should look like they do in Windows 10. You will need to choose to Keep My Files or Remove Everything. Then you will be able to choose between a Cloud Download and a Local Reinstall.
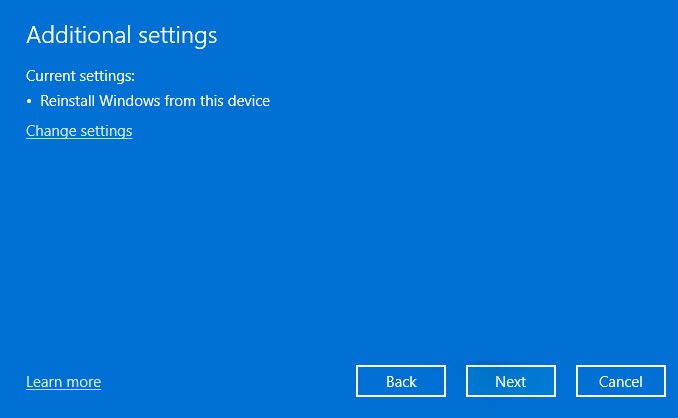
Step 5: Here things get a little different. Instead of another Settings menu, Windows 11 streamlines the process for clarification and shows you the current settings you have chosen in a summary window. If everything looks all right, select Next. Do one final check, then select Reset.
About Windows 7
Microsoft ended support for Windows 7 in January 2020, which means that Windows 7 won’t receive critical security updates, leaving those using it vulnerable. It’s been a significant period of time with barely any security updates, which means everyone using Windows 7 should have already upgraded to Windows 10. You can still do this for free if needed.
Alternative: Manufacturer recovery tools
Another method is to use the manufacturer’s recovery tool, usually located on a separate partition on your hard drive. You’ll find a wide variety of recovery software with name brands numerous enough to match the various brands of electronic devices in which you’ll install them. We have tried to make it less overwhelming by narrowing the list down to our preferred software. Each brand has a different name for what you are looking for, so here is a list of what to search for according to each brand:
- Acer: Acer eRecovery or Acer Recovery Management
- Asus: Asus Recovery Partition or AI Recovery
- Dell: Dell Factory Image Restore, DataSafe, Dell Backup & Recovery, and various other names
- HP: HP System Recovery or Recovery Manager
- Lenovo: Rescue and Recovery or ThinkVantage Recovery (on ThinkPads)
You can also access these recovery options outside of Windows, which means you still have hope if your OS won’t load. Every manufacturer is different, but you can find the method for accessing recovery just after powering on your machine. Read the text as your machine boots and look for the recovery mode key. Many devices use the F11 key as a shortcut to recovery mode.
![]()
Today’s tech news, curated and condensed for your inbox
Check your inbox!
Please provide a valid email address to continue.
This email address is currently on file. If you are not receiving newsletters, please check your spam folder.
Sorry, an error occurred during subscription. Please try again later.
Editors’ Recommendations
-
ChatGPT: how to use the viral AI text generator that’s taken the world by storm
-
Dell Laptop Deals: Save on XPS 13, XPS 15, XPS 17 and more
-
Best VPN services 2023: today’s top picks
-
Best microSD cards in 2023: top picks for your computer, camera, or drone
-
The best Chromebooks for 2023
Рассмотрим все возможные способы как сбросить до заводских настроек ОС Виндовс 10.
В результате запустится автоматическая переустановка системы.
Когда рекомендуется делать сброс системы?
Сброс настроек (или Hard Reset) – это процедура возврата к заводским параметрам. Все опции и настройки будут возвращены к первоначальным показателям.

В Виндовс 10 есть два типа сброса:
С сохранением пользовательских файлов. После сброса вы получите абсолютно новую систему, в которой будут установлены только стандартные для сборки приложения. Все параметры будут сброшены, но файлы и папки с фото, видео, документами не удалятся;
Полное удаление всех данных. В результате, вы получите копию ОС, которая идентична с только что установленным «чистым» Виндовс. Необходимо будет выполнить базовую настройку (указать регион, дату, время, войти в свою учетную запись или создать новую).
Откат к первоначальным настройкам следует делать в случае, если ваш компьютер начал тормозить, слишком долго загружаются программы или система загружается дольше нескольких минут.
Что дает сброс?
- Все ненужные программы и процессы будут удалены;
- Ошибочные настройки и временные файлы, которые «захламляют систему» исчезнут. Вместо них будут установлены правильные параметры, которые обеспечат нормальную работу ОС;
- Вирусы, появляющаяся реклама и прочие вредоносные приложения удаляются.
Если вы столкнулись с вирусами, рекомендуется выполнять сброс без сохранения пользовательской информации. В противном случае, в системе может остаться процесс, который запускает работу «вредителя».
Способ 1 – Сброс с уже установленной Виндовс 10
Заметьте, если вы обновились до Windows 10 с седьмой или восьмой версии ОС, в течении 31-го дня можно вернуть предыдущую систему и прекратить использование десятки.
Для этого зайдите в окно «Параметры» (сочетание клавиш Win+I) и выберите плитку «Обновление и безопасность».
В новом окне кликните на раздел «Восстановление». В правой части окна появится поле «Вернуться к…».
Кликните на «Начать» и дождитесь повторного включения компьютера с возвращенной старой версией системы. Пользовательские файлы, программы и настройки сохранены не будут.

Рис.2 – окно параметров восстановления ОС
Если же срок для возврата к старой версии ОС прошел или вы хотите получить сброшенную к заводском настройкам Windows 10, в поле «Вернуть компьютер в исходное состояние» нажмите на кнопку «Начать».

Рис.3 – откат системы
В этом варианте сброса вы сможете сохранить все пользовательские данные.
Будут удалены только настройки и установленные приложения.
Внешний вид рабочего стола и все ваши папки на жестком диске останутся нетронутыми.
Также, можно удалить всю информацию.
Выберите нужную опцию:

Рис.4 – окно выбора действия
Нажмите на кнопку «Сброс» после появления нового окна с сообщением о готовности к возврату в исходное состояние:

Далее компьютер перезапустится и на экране вы увидите прогресс бар сброса настроек.
Система может несколько раз перезагрузиться, а в результате вы получите «чистую» версию ОС, которую требуется настроить заново:
- Выставьте параметры вашего местоположения;
- Введите пароль сети маршрутизатора;
- Войдите в свою учетную запись Microsoft.

Способ 2 – Использование инструмента Refresh Windows
Refresh Windows Tool – это встроенная утилита для выполнения переустановки Виндовс 10 в автоматическом режиме.
Служба доступна для сборок, которые выпущены позже августа 2016-го года.
Если вы используете старую версию Виндовс 10, сначала рекомендуем обновить систему в окне Параметров и потом приступать к использованию службы.
Следуйте инструкции для запуска Refresh Tool:
- Откройте окно параметров системы с помощью клавиш Win+I;
- Далее кликните на «Восстановление»;
- В правой части окна найдите «Дополнительные параметры» и кликните на строку «Узнать, как начать заново»;

Рис.7 – окно дополнительных параметров
- Далее вы будете перенаправлены на веб-страницу сайта Майкрософт с подробными указаниями, как провести чистую установку Виндовс 10. Кликните на гиперссылку с названием «Скачать средство сейчас»;

Рис.8 – страница загрузки программного обеспечения от Майкрософта
- Запустите скачанный файл и в появившемся окне отметьте галочкой пункт «Я принимаю соглашение»;
- Далее укажите, нужно ли сохранять ваши файлы и личные данные.

Рис.9 – программа установки Windows
Следуйте всем инструкциям, которые будут появляться в окне утилиты.
После завершения процесса установки вы сможете начать использовать чистую версию ОС.
Все параметры и настройки будут возвращены к первоначальному состоянию.
Рекомендуем удалить возможные временные файлы с помощью окна свойств жёсткого диска.

Рис.9 – программа установки Windows
Обратите внимание! Процесс отката системы может занять продолжительное время. Всё зависит от количества удаляемых файлов и текущих настроек ОС.
Способ 3 – Сброс с помощью загрузочной флешки или диска
Если по каким-либо причинам у вас не получилось сделать откат к заводским настройкам с помощью вышеуказанных способов, можно воспользоваться загрузочным диском или флеш-накопителем.
Суть этого метода заключается в том, что вы скачиваете образ Windows 10 на любое другое устройство и перемещаете файл с расширением ISO на флешку или диск.
Если у вас уже есть лицензионный диск, с помощью которого вы устанавливали ОС на компьютер, можно воспользоваться им.

Рис.10 – очистка диска
Обратите внимание! Сборки установленной на вашем компьютере Windows 10 и версия, которая хранится на накопителе должны быть идентичными. К примеру, на флешку вы можете скачать Windows 10 Professional только в том случае, если на вашем компьютере установлена такая же модификация системы.
Для создания загрузочного накопителя воспользуйтесь программой эмуляции дисковода.
Наиболее популярные утилиты:
- Daemon Tools;
- Ultra ISO;
- Nero Burning ROM;
- Alcohol 120%;
- Gizmo Central и другие.
У всех указанных выше программ есть бесплатные версии, с помощью которых можно легко добавить скачанный ранее образ ОС на диск и сделать его загрузочным.

Рис.11 – меню создания загрузочного носителя в программе Ultra ISO
Также, в настройках БИОС следует указать новую очередь загрузки компонентов компьютера.
На первом месте должна быть не ОС, а ваш накопитель. После внесения изменений в эту очередь выключите ПК, подключите к нему диск/флешку и снова нажмите на клавишу «Питание».
Появится окно установки системы, в левой нижней части которого нужно выбрать поле «Восстановление»:

Рис.12 – окно установки Windows
В результате, вы будете перенаправлены в окно «Выбор действия». Кликните на плитку «Поиск неисправностей».

В новом окне нажмите на «Диагностика». Выберите плитку «Вернуть в исходное состояние» и дождитесь завершения сброса.
Также, вы можете начать переустановку системы, для этого в указанном на рисунке выше окне кликните на кнопку «Установка» и в новом окне выберите, сохранять пользовательские файлы или нет.

Рис.14 – окно диагностики ОС
Такой метод сброса к заводским параметрам будет эффективным в том случае, если вы не можете запустить ОС из-за возникновения фатальной ошибки или из-за работы вирусного ПО.
Способ 4 – Инструкция для ноутбуков
На всех ноутбуках разработчик предусматривает возможность быстрого восстановления.
Для этого на жестком диске системы выделен специальный раздел под заводскую копию ОС.
Если же вы выполняли форматирование HDD, сделать откат эти способом не удастся.
На вашем компьютере есть отдельный диск с названием Recovery? В таком случае можно запуститься с новой системой. Такая версия Windows 10 сохранит все программы и настройки, которые установил производитель.
Способ запуска утилиты сброса может быть разным.
Все зависит от марки вашего ноутбука:
- HP – сразу после нажатия клавиши «Питания» кликните на F Вместо значка Windows 10 появится окно включения службы восстановления. Следуйте инструкциям, чтобы откатить существующую ОС до первоначального состояния;
- ASUS – нажмите на F9, чтобы начать работать с окном утилиты Recovery Manager. Далее выберите пункт «Сбросить текущую версию Windows» и дождитесь завершения процесса. После автоматической перезагрузки компьютера вы начнёте использование «чистой» прошивки;
- Samsung – кликните на F4 в процессе включения компьютера. Далее выберите «Сбросить ОС к заводской версии»;
- Acer и Lenovo – нажмите на сочетание клавиш Alt+F На ноутбуках от Acer потребуется ввести пароль доступа. По-умолчанию это шесть нолей – 000000. Также, встроенную утилиту восстановления можно запустить и в среде Виндовс. Если не получилось запустить ПО в процессе включения, найдите в списке всех установленных программ значок Recovery и откройте утилиту.
Обратите внимание, часто пользователи сталкиваются с тем, что при нажатии нужной клавиши ничего не происходит. Начинается обычная загрузка системы вместо появления окна рекавери. Это происходит из-за активированной опции «Ускорение загрузки» в BIOS.
Зайдите в системное меню, нажав после включения клавишу ESC (также, для вашей модели ноутбука может быть определен свой способ запуска БИОСа. Плавающая строка внизу экрана включения подскажет, как это сделать).
В БИОСе откройте вкладку «Boot» («Загрузка») и деактивируйте параметр «Boot Booster», как показано на рисунке ниже:

Рис.15 – отключение ускоренной загрузки операционной системы
После выполнения сброса рекомендуем активировать этот параметр обратно, чтобы ОС включалась быстрее.
Итог
Как видите, сбросить Windows 10 до заводских параметров можно легко с помощью уже включенной системы.
Если же вы столкнулись с ошибками запуска ОС или работой вируса, воспользуйтесь загрузочным диском или дистрибутивом с образом системы.
Вызов окна диагностики поможет не только найти и устранить ошибки, но и сделать откат до первоначальной версии ОС.
Тематические видеоролики:
Источник