Содержание
- Что такое Winsock и для чего он нужен?
- Почему полезно сбросить Netsh Winsock
- Как перезапустить его в Windows 11 или Windows 10
- Выводы
Имя Винсока происходит от Разъем Windows . Можно сказать, что это программный интерфейс, который используется для установления связи между сетевым программным обеспечением Windows и сетевыми службами. Он использует протокол TCP/IP, чтобы программы, которым необходим доступ к Интернету, могли подключаться.
Это в основном служит для того, чтобы программы могут подключаться к Интернету . Например, приложение для обмена сообщениями, программа для загрузки файлов в облако и т. д. Любое приложение, которое вы установили в Windows и которому для работы требуется доступ к сети, будет зависеть от Winsock.
Несмотря на то, что он входит в стандартную комплектацию Microsoft операционных системах, мы также можем найти его в других, таких как macOS. Это не что-то новое, так как оно было создано несколько десятилетий назад. Со временем он адаптировался к новым версиям системы и к потребностям программ, которые мы устанавливаем.
Можно сказать, что Винсок отвечает за прием и отправка запросов . Что он делает, так это транслирует запросы для выполнения различных задач, требующих использования протокола TCP/IP. Таким образом, это необходимый инструмент для многих функций, которые мы выполняем в повседневной жизни в Интернете. Если что-то пойдет не так, если возникнет проблема, она не сможет работать правильно, и нам придется принять определенные меры, чтобы программы, зависящие от этой функции, могли выполняться правильно.
Почему полезно сбросить Netsh Winsock
Так чем же интересно сбросить Winsock? Уинсок будет хранить важную информацию о том, как эти приложения и коммуникации будут взаимодействовать. Эта база данных может быть повреждена и перестать работать должным образом. Например, если на компьютер проник вирус, неправильная конфигурация системы, неудачное обновление и т. д. Имейте в виду, что то, что мы упомянули, также может повлиять на просмотр, хотя это не то, что напрямую влияет на эту функцию Windows.
Это приведет к тому, что приложения не смогут нормально подключаться к Интернету. Вы можете увидеть сбои скорости, постоянные сбои или даже невозможность подключения. В этом случае начнут появляться сообщения о том, что приложению не удалось подключиться, или сообщения об ошибках, связанные с Winsock. Это в том случае, когда мы должны были бы принять меры для достижения оптимальной работы.
Поэтому, чтобы интернет-соединение работало корректно, может потребоваться использование Нетш Винсок , команда, позволяющая перезапустить его. Таким образом, мы сможем восстановить работу, перезапустить ту базу данных, которая будет создана, и снова сможем нормально использовать приложения.
Это может быть полезно для решения конкретных проблем, влияющих на Winsock, поскольку, если это более общая ошибка сети, мы ничего не сможем сделать, и нам нужно будет выяснить, в чем причина, чтобы принять правильные меры.
Как перезапустить его в Windows 11 или Windows 10
Сброс Winsock в Windows 10 или Windows 11 — очень простой процесс. Просто выполнив ряд шагов, вы сможете сбросить этот компонент и посмотреть, устраняет ли он ошибку, возникающую при подключении при использовании некоторых приложений. Вам не придется ничего устанавливать, так как все идет с самой операционной системой.
Первое, что вам нужно сделать, это зайти в «Пуск» и выполнить поиск «Терминал», «Командная строка» или «CMD». Вы должны запустить его с правами администратора, поэтому щелкните его правой кнопкой мыши и нажмите «Запуск от имени администратора». Это необходимо для выполнения команды.
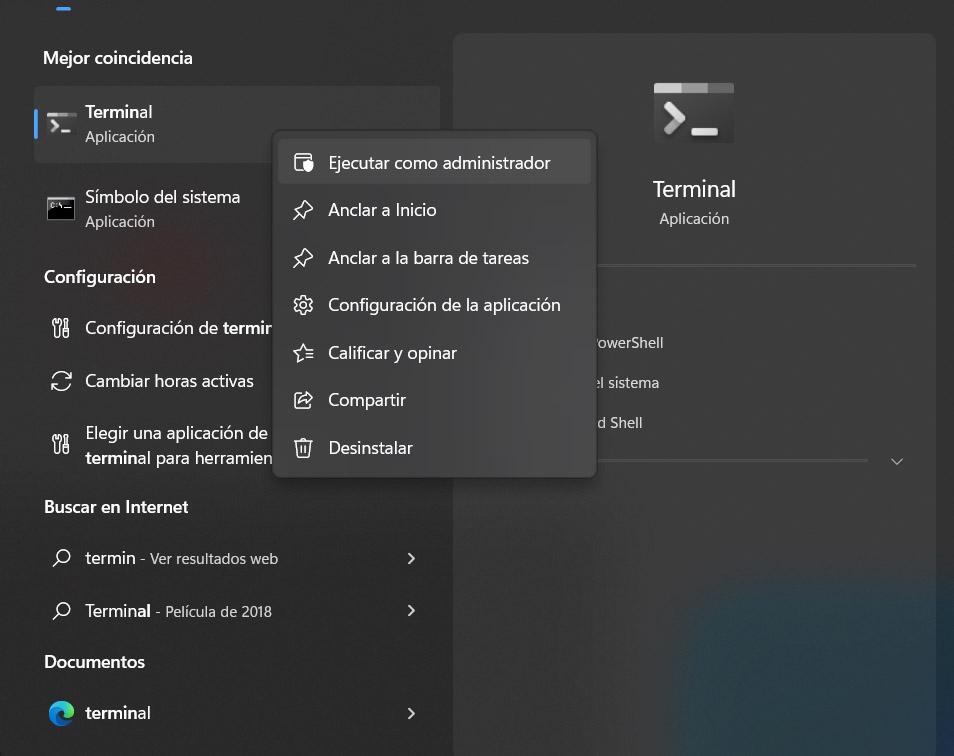
После того, как вы находитесь в терминале или командной строке и открыли его с правами администратора, следующее, что вам нужно сделать, это выполнить следующую команду в открывшемся окне:
- Netsh сброс Winsock
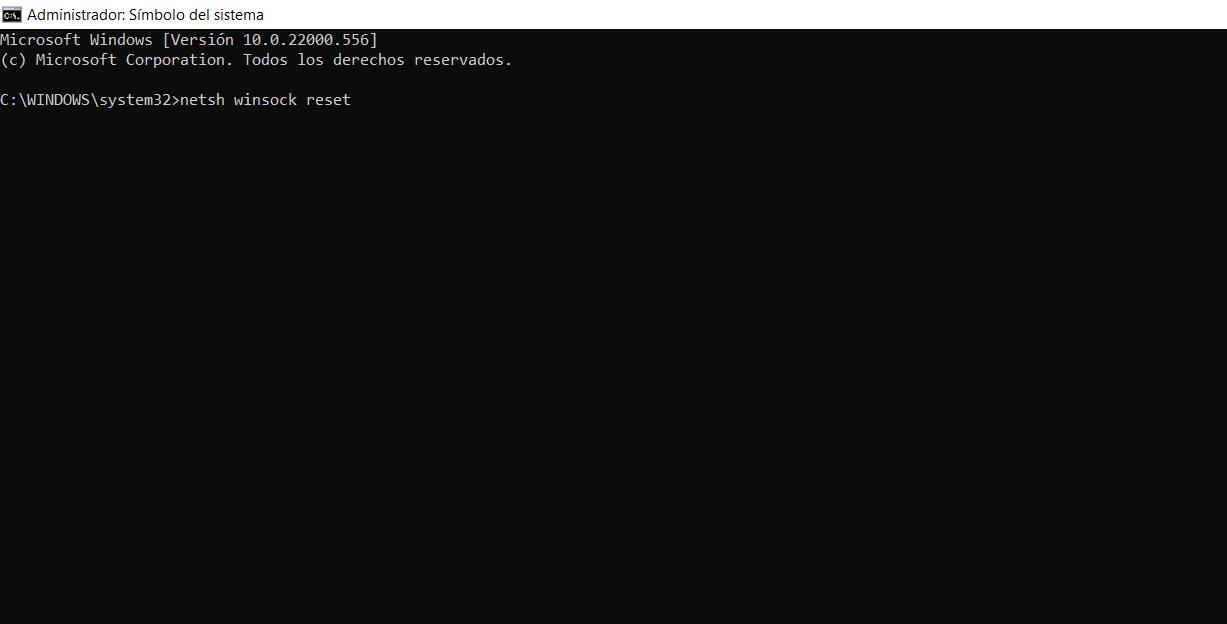
Позже вы должны увидеть сообщение в том же окне о том, что Winsock был успешно сброшен . Это быстрый процесс, и вам не нужно ничего делать. Если вы выполнили эти шаги, вы просто увидите это сообщение, указывающее, что оно было выполнено успешно, и все.
Процесс одинаков независимо от того, используете ли вы Windows 10 или Windows 11. Вы сможете запустить команду из Терминал or Командная строка и быстро сбросить эту системную функцию.
После сброса Winsock в Windows следующее, что нужно сделать, это перезагрузить систему. Это важно каждый раз, когда вы вносите такое изменение, так как это гарантирует, что оно было сделано правильно, и позволяет избежать проблем, которые могут повлиять на производительность и ограничить удобство использования.
Выводы
Короче говоря, как вы видели, это очень легко сбросить Winsock в Windows . Это процесс, который вам придется выполнить, если вы столкнетесь с проблемами подключения, такими как сбой в работе приложений, которым необходимо подключение к Интернету, есть обрывы или они даже не могут подключиться.
Одна из причин проблем с приложения, которым нужен интернет в Windows в том, что была проблема с Winsock. Поэтому, сбросив его, мы можем снова заставить его нормально работать и снова иметь доступ к сети при использовании этих программ.
Однако проблема с подключением может быть вызвана не Winsock. Поэтому, если вы видите, что после сброса этой функции у вас все еще есть проблемы, в идеале вы должны найти причину. Возможно, это связано с плохим покрытием, некоторыми вредоносными программами в системе, программой, блокирующей соединение и т. д. Все это может привести к тому, что приложения не смогут нормально подключаться к сети.
-
MiniTool
-
MiniTool News Center
- Use Netsh Winsock Reset Command to Fix Windows 10 Network Problem
By Alisa | Follow |
Last Updated October 21, 2022
![]()
You can use Netsh Winsock reset command to reset Winsock catalog and reset your network adapter’s software to default setting when you have Internet or network problems on Windows 10. Check the detailed step-by-step guide in this tutorial. MiniTool software also provides you many useful solutions in computer hard drive management, data recovery, system backup and restore, etc.
When you have network problems on Windows 10 computer, you can use Netsh Winsock reset command to reset Winsock Catalog, and reset your computer network adapter’s software back to default settings.
Winsock, short for Windows Socket, contains data that programs use to access the network. If a program needs to access the Internet, it has to use Windows Socket.
For how to troubleshoot Internet connection problems, performing a Netsh Winsock reset Windows 10 is a common troubleshooting step. Check the step-by-step guide below for how to use Netsh Winsock reset command to fix Windows 10 network problems.
How to Use Winsock Reset Command Windows 10 – 3 Steps
It’s quite easy to run Winsock reset command on Windows 10 to reset Winsock Catalog to default setting. Just follow the instructions below.
Step 1 – Run Command Prompt as Administrator
You can press Windows + R on the keyboard at the same time to open Run dialog. Type cmd in the search box. Press Ctrl + Shift + Enter to open and run Windows 10 Command Prompt as administrator.

You can also click Start, type cmd, right-click Command Prompt desktop app in the list, and choose Run as administrator to open the elevated Command Prompt.
Step 2 – Run Netsh Winsock Reset Command Windows 10
Then you can type the Netsh Winsock reset command line below in Command Prompt window, and hit Enter button to execute the command.
netsh winsock reset
Step 3 – Restart Your Windows 10 Computer
After the Netsh Winsock reset process is completed, you can restart your Windows 10 computer to let this Windows 10 Winsock reset take effect.

Download VeePN for PC, Mac, Mobile, and Browser
This post gives a VeePN review and offers guides on how to download VeePN for Chrome, Edge, Firefox, PC, Mac, Android, iOS, etc. to use this VPN service.
Read More
What Internet Connection Problems Can Winsock Reset Command Tackle?
Winsock reset Win 10 can resolve many networking problems for you. Normally it can repair these Internet connection problems.
- Fix network problem after you remove malware, virus, etc.
- Can’t access Internet or can’t open some webpages like meeting an error “This site can’t be reached” when trying to visit a website.
- See some pop-up network connections errors on your Windows 10 computer.
- WiFi connected but no Internet access error due to registry errors.
- Resetting TCP/IP didn’t fix Internet connectivity issue.
- Find some problems in DNS lookup.
- Fail to renew IP address.
- Fix some other DHCP errors.
- Limited Internet connectivity in Windows 10.
- Other devices can connect to the same Internet but your Windows 10 PC can’t.
- Other network problems in Windows 10.

Hola VPN Free Download for Chrome, PC, Mac, Android, iOS, etc.
Learn how to download free Hola VPN for Chrome, Edge, PC, Mac, Android, iOS, etc. to use it to unblock and access worldwide content online with no limit.
Read More
Bottom Line
When you are facing network connection problems on Windows 10, you can follow the guide above to fix Internet problems with Netsh Winsock reset command Win 10.
If you have other problems on your Windows 10 computer, you can further repair Windows 10 with Startup Repair, SFC Scannow, etc.
To recover lost data or mistakenly deleted files on Windows 10/8/7 computer, please turn to MiniTool Power Data Recovery. The free edition of this software allows you to recover up to 1GB data totally for free. Extremely intuitive interface and 100% clean.

About The Author

Position: Columnist
Alisa is a professional English editor with 4-year experience. She loves writing and focuses on sharing detailed solutions and thoughts for computer problems, data recovery & backup, digital gadgets, tech news, etc. Through her articles, users can always easily get related problems solved and find what they want. In spare time, she likes basketball, badminton, tennis, cycling, running, and singing. She is very funny and energetic in life, and always brings friends lots of laughs.
Download PC Repair Tool to quickly find & fix Windows errors automatically
Windows Sockets or Winsock is a technical specification or a programming interface which decides how any program handles input/output requests for Internet applications, i.e., TCP/IP in Windows. In this guide, we will learn about Winsock, why and when you need to reset, and how to reset Winsock in Windows 11/10.
What is Winsock
Like we said that it’s a programming interface. Windows 11/10 carries a DLL with name winsock.dll that implements the API and coordinates Windows programs and TCP/IP connections. The settings contain computer configuration for internet connection.
When do you need to reset Winsock
Sometimes Windows Sockets or Winsock may get corrupt as a result of which you may not be able to connect to the Internet. The error can occur when you download an unknown file which has a malicious script. These scripts can partially block Winsock, blocking your internet connection. If you have trouble opening websites, it could be due to corrupted Winsock settings.
If you receive any of the following or some similar error message, it means you need to reset Winsock:
- An error occurred while renewing interface ‘Internet’: An operation was attempted on something that is not a socket.
- An error occurred while renewing interface Local Area Connection: the requested service provider could not be loaded or initialized.
- An error occurred while renewing interface local area connection: an operation was attempted on something that is not a socket. Unable to contact driver Error code 2.
- The operation failed since no adapter is in the state permissible for this operation.
Here are the steps to undertake to reset Winsock in Windows 11/10:
- Right-click on Start button
- Select Command Prompt (Admin)
- Type netsh winsock reset and hit Enter
- To generate a log file as well, use netsh winsock reset c:winsocklog.txt instead.
- Restart your computer.
Before you go ahead and reset Winsock, do remember to create a system restore point first.
Next, open Command Prompt as administrator and type the following command and hit Enter.
netsh winsock reset
As an admin, you can also generate a log file of the changes.
To append a log file path to the above command:
netsh winsock reset c:winsocklog.txt
Wait for the Command Prompt to run through the reset. Now, you will have to restart your computer to see the effects.
What happens when you reset Winsock?
When you execute the command, it fixes any corruption that has occurred with the DLL file. So there is no fix except to replace it with a new copy of Winsock and bring it back to the default settings.
TIP: Our portable freeware FixWin allows you to reset this and most other Windows settings or functions with a single click.

NOTE: Here’s a Batch File to Release TCP/IP, Flush DNS, Reset Winsock, Reset Proxy all at once.
Related readings:
- How to Flush DNS Cache
- How to reset TCP/IP
- How to reset WinHTTP Proxy Server Settings.

Anand Khanse is the Admin of TheWindowsClub.com, a 10-year Microsoft MVP (2006-16) & a Windows Insider MVP (2016-2022). Please read the entire post & the comments first, create a System Restore Point before making any changes to your system & be careful about any 3rd-party offers while installing freeware.
Обычно сброс сетевых настроек в Windows это последнее средство, которое стоит попробовать для решения сложных проблем с доступом к локальной сети или Интернету. При этом на компьютере сбрасываются настройки сетевых адаптеров, настройки стека TCP/IP до стандартных настроек в чистой Windows, удаляются и переустанавливаются все сетевые адаптеры компьютера. В этой статье мы рассмотрим особенности сброса сетевых настроек в Windows из графического интерфейса и с помощью командной строки.
Прежде чем прибегать к сбросу сетевых настроек, убедитесь, что вы попробовали все стандартные средства диагностики работы с сетью: проверили настройки IP, работу маршрутизатора/роутера/провайдера, обновили драйвера сетевых адаптеров, перезагружали компьютер, воспользовались встроенным Windows Network Troubleshooter (команда
msdt.exe /id NetworkDiagnosticsNetworkAdapter
) и т.д. Если ни один инструментов не помог исправить сетевую проблему, можно попробовать сбросить сетевые настройки.
Содержание:
- Сохраните текущие сетевые настройки Windows
- Сброс сетевых настроек из панели управления Windows
- Сброс сетевых настроек из командной строки Windows
Сохраните текущие сетевые настройки Windows
При сбросе сети в Windows будут потеряны все настройки, которые вы задали вручную: IP адреса, DNS сервера, статические маршруты, настройки сетевых драйверов, очищены сохраненные Wi-Fi сети и т.д. Поэтому перед сбросом важно сохранить текущие настройки.
Выведите список сетевых адаптеров:
Get-NetAdapter|select name,InterfaceIndex,InterfaceDescription,InterfaceOperationalStatus,MediaConnectionState,DriverInformation|ft

Для всех подключенных сетевых адаптеров проверьте, получают ли они настройки автоматически (через DHCP) или вручную:
Get-NetIPInterface -InterfaceIndex 7

Если для интерфейса значение
Dhcp=Disabled
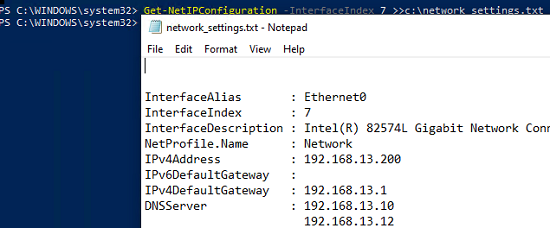
, значит для адаптера настройки IP заданы вручную и вам нужно сохранить текущие настройки в файл:
Get-NetIPConfiguration -InterfaceIndex 7 >>c:network_settings.txt
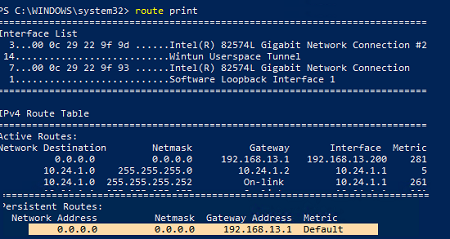
Выведите и запишите все статические маршруты в таблице маршрутизации (из секции Persistent Routes):
Route print
С помощью PowerShell выведите список VPN подключений, запишите их настройки:
Get-VpnConnection
В моем случае настройки сохраненных VPN подключений не были сброшены. Также не был удален виртуальный адаптер OpenVPN Wintun (адаптер для подключения к OpenVPN серверу).
Выведите WLAN профили и сохраните настройки беспроводных сетей в файл:
netsh wlan show profile
netsh wlan export profile name="Xiaomi_20F5" key=clear folder=c:ps
Сохраните настройки Winsock:
netsh winsock show catalog > c:winsock-backup.txt
После сброса сети сохраненная информация поможет вам восстановить все сетевые настройки, заданные вручную.
Сброс сетевых настроек из панели управления Windows
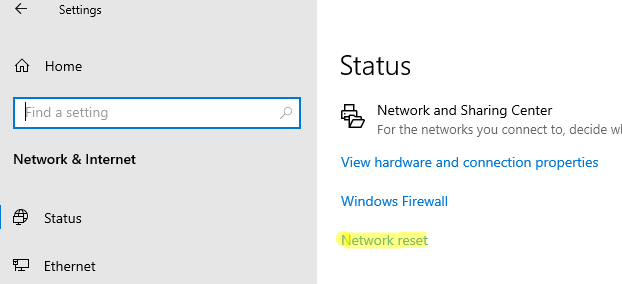
В Windows 10 (1607+), Windows 11 и Windows Server 2019/2022 можно сбросить сетевые настройки из панели Параметры (Settings). Перейдите в раздел Settings -> Network (или выполните команду быстрого доступа к ms-settings: ms-settings:network). Нажмите кнопку Network reset -> Reset now.
Подтвердите сброс сетевых настроек. Windows очистит все сетевые настройки и удалит сетевые карты (сетевые адаптеры не будут отображаться в Панели Управления). Настройки сети будут сброшены до заводских. Windows автоматически перезагрузится через 5 минут.
После загрузки Windows обнаружит все подключенные сетевые адаптеры и устанвит драйвера. Останется настроить параметры сетевых подключение и проверить, исправлена ли проблема.
Сброс сетевых настроек из командной строки Windows
Все те же действия, которая выполнила процедура сброса сети из панели Settings можно выполнить из командной строки.
Сбросьте кэш DNS:
ipconfig /flushdns
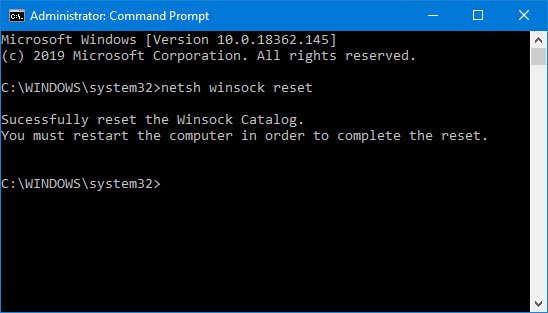
Сбросьте настройки WinSock:
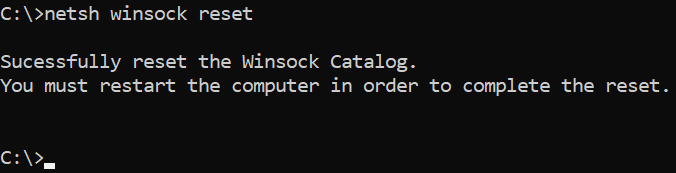
netsh winsock reset
Sucessfully reset the Winsock Catalog.
You must restart the computer in order to complete the reset.
Команда сбрасывает настройки в ветке реестра HKEY_LOCAL_MACHINESYSTEMCurrentControlSetServicesWinSock2Parameters . При этом старые настройки сохраняются в ветку Protocol_Catalog_Before_Reset. 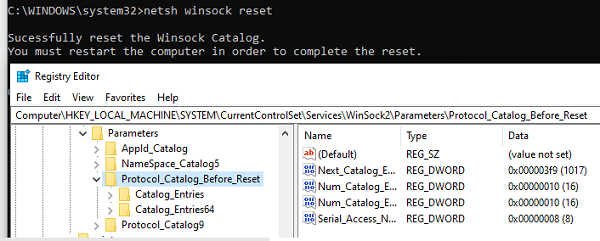
Сброс настроек стека TCP/IP:
netsh int ip reset
Для сброса настроек TCP/IPv6:
netsh int ipv6 reset
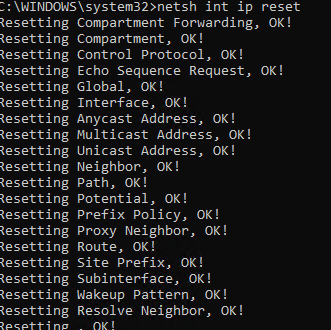
Resetting Compartment Forwarding, OK!
Resetting Compartment, OK!
Resetting Control Protocol, OK!
Resetting Echo Sequence Request, OK!
Resetting Global, OK!
Resetting Interface, OK!
Resetting Anycast Address, OK!
Resetting Multicast Address, OK!
Resetting Unicast Address, OK!
 Resetting Neighbor, OK!
Resetting Path, OK!
Resetting Potential, OK!
Resetting Prefix Policy, OK!
Resetting Proxy Neighbor, OK!
Resetting Route, OK!
Resetting Site Prefix, OK!
Resetting Subinterface, OK!
Resetting Wakeup Pattern, OK!
Resetting Resolve Neighbor, OK!
Resetting , OK!
Restart the computer to complete this action.
Сбрасываются настройки в ветках реестра HKLMSYSTEMCurrentControlSetServicesTcpipParameters и SYSTEMCurrentControlSetServicesDHCPParameters.
Удалите все сетевые адаптеры:
netcfg -d
Successfully removed all MUX Objects.
Removing device "Intel(R) 82574L Gigabit Network Connection"
Removing device "WAN Miniport (PPPOE)"
Skipping the removal of "Wintun Userspace Tunnel"
Removing device "WAN Miniport (PPTP)"
Removing device "WAN Miniport (IKEv2)"
Check to see if the "Microsoft Kernel Debug Network Adapter" bindings should be reset
"Microsoft Kernel Debug Network Adapter" binding check complete
Removing device "WAN Miniport (Network Monitor)"
Removing device "WAN Miniport (IP)"
Removing device "WAN Miniport (SSTP)"
Removing device "WAN Miniport (IPv6)"
Removing device "WAN Miniport (L2TP)"
Please reboot the computer...
Сброс всех правил Windows Defender Firewall:
netsh advfirewall reset
В PowerShell также есть отдельная команда для сброса расширенных настроек конкретного сетевого адаптера. Сначала вы можете получить текущие настройки адаптера:
Get-NetAdapterAdvancedProperty -Name Ethernet0|ft -AutoSize
Name DisplayName DisplayValue RegistryKeyword RegistryValue
---- ----------- ------------ --------------- -------------
Ethernet0 Flow Control Rx & Tx Enabled *FlowControl {3}
Ethernet0 Interrupt Moderation Enabled *InterruptModeration {1}
Ethernet0 IPv4 Checksum Offload Rx & Tx Enabled *IPChecksumOffloadIPv4 {3}
Ethernet0 Jumbo Packet Disabled *JumboPacket {1514}
Ethernet0 Large Send Offload V2 (IPv4) Enabled *LsoV2IPv4 {1}
Ethernet0 Large Send Offload V2 (IPv6) Enabled *LsoV2IPv6 {1}
Ethernet0 Maximum Number of RSS Queues 2 Queues *NumRssQueues {2}
Ethernet0 Packet Priority & VLAN Packet Priority & VLAN Enabled *PriorityVLANTag {3}
Ethernet0 Receive Buffers 256 *ReceiveBuffers {256}
Ethernet0 Receive Side Scaling Enabled *RSS {1}
Ethernet0 Speed & Duplex Auto Negotiation *SpeedDuplex {0}
Ethernet0 TCP Checksum Offload (IPv4) Rx & Tx Enabled *TCPChecksumOffloadIPv4 {3}
Ethernet0 TCP Checksum Offload (IPv6) Rx & Tx Enabled *TCPChecksumOffloadIPv6 {3}
Ethernet0 Transmit Buffers 512 *TransmitBuffers {512}
Ethernet0 UDP Checksum Offload (IPv4) Rx & Tx Enabled *UDPChecksumOffloadIPv4 {3}
Ethernet0 UDP Checksum Offload (IPv6) Rx & Tx Enabled *UDPChecksumOffloadIPv6 {3}
Ethernet0 Adaptive Inter-Frame Spacing Disabled AdaptiveIFS {0}
Ethernet0 Interrupt Moderation Rate Adaptive ITR {65535}
Ethernet0 Log Link State Event Enabled LogLinkStateEvent {51}
Ethernet0 Gigabit Master Slave Mode Auto Detect MasterSlave {0}
Ethernet0 Locally Administered Address -- NetworkAddress {--}
Ethernet0 Wait for Link Auto Detect WaitAutoNegComplete {2}
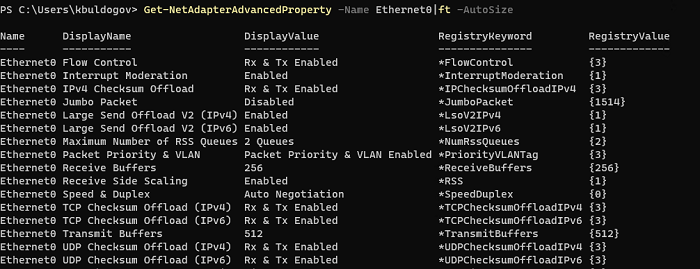
Здесь можно вывести настройки Jumbo Packet, VLAN, настройки буферов и т.д.
Для сброса этих параметров, выполните:
Reset-NetAdapterAdvancedProperty -Name Ethernet0
Перезагрузите компьютер и задайте все сетевые настройки заново. Если компьютер настроен на автоматическое получение IP адреса и настроек сети от DHCP сервера, ничего дополнительно настраивать не придется.
Are you having Windows network connectivity issues with software such as email clients and web browsers? Sometimes, these issues stem from a corrupt network configuration. The netsh winsock reset command will set important network settings to their defaults, often fixing these network problems!
In this article, you will learn how to reset the Winsock catalog which is a database of network settings, where incorrect configurations and malware affect your network connectivity. Read on to learn practical tips on fixing your network connection and what this cryptic Winsock term is all about!
Prerequisites
This article will be a tutorial. If you plan on following along step-by-step, use any supported version of Windows along with local administrative rights.
What is Winsock?
Based on the Berkeley UNIX Sockets interface, Winsock is an application programming interface (API) that orchestrates different network protocols communication between applications, such as a web browser, and actual network devices.
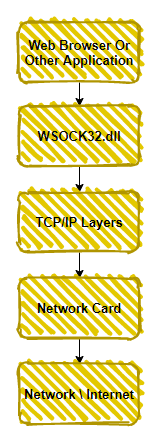
Included below is a great diagram to demonstrate where exactly the Winsock wsock32.dll library sits in the Windows networking stack.
Besides acting as an API, Winsock stores its settings in a database known as the Winsock catalog. In Windows 10 the catalog stores both namespace providers, providing a map between Winsock and a service such as DNS, and base service providers which provides detail on network protocols, such as TCP/IP.
Why “Resetting” Winsock is Necessary
Sometimes the Winsock catalog contains incorrect entries or becomes corrupt. Performing a Winsock reset via the netsh winsock reset in the Windows command prompt will set the Winsock catalog and associated registry settings to their defaults. The relevant registry settings are located in the below path.
HKEY_LOCAL_MACHINESYSTEMCurrentControlSetServicesWinSock2ParametersProtocol_Catalog9Why would you want to perform Winsock reset after all?
- Malware or adware that uses Winsock to get in between the user and the internet.
- A network device is incorrectly installed or removed.
- Registry or file system issues corrupt the Winsock catalog.
A real-life example of Winsock malware is HackTool.Win32.Proxifier.A, from the Trend Micro Threat Encyclopedia. Don’t worry, this won’t download any malware!
Prior to Windows Server 2012 and Windows Vista, incorrect settings and malware often existed as Layered Service Providers (LSP) in the Winsock catalog, as described in further detail later in the article. In recent versions of Windows, LSPs were deprecated with functionality moved into the Windows filtering platform.
Winsock problems do not crop up as often anymore, but they still can! Learn to fix incorrectly installed network devices or corrupted Winsock catalogs by reading on.
How to Reset Winsock with netsh winsock reset
Resetting Winsock is best done through the Windows command-line tool netsh. The netsh command displays and modifies the running computer’s network configuration, along with resetting the Winsock catalog.
When performing any Winsock change, you should first save a before and after snapshot of the changed settings, as shown in the below steps.
- Open a Command Prompt as an administrator.
2. Copy and run the command shown below to save the results of the Winsock catalog to the file C:winsock-before.txt prior to resetting the Winsock catalog.
The command below assumes you are in the C: directory, otherwise the file will save to the directory your command prompt is currently in.
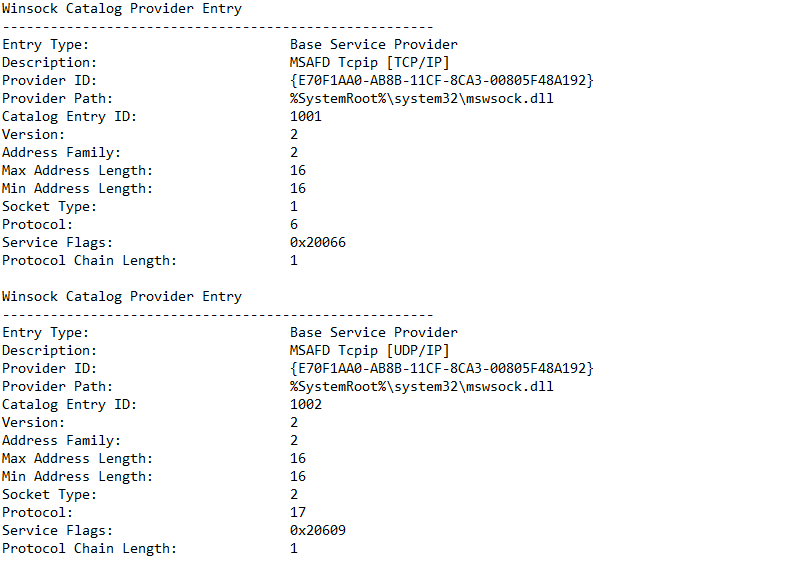
netsh winsock show catalog > winsock-before.txtAn example of the saved Winsock catalog is shown below. Yours will look similar to this, reflecting your network devices and entries.
3. Next, reset the Winsock catalog by running the following command.
netsh winsock reset command.Upon performing the reset command, the
Protocol_Catalog9registry entry is saved to:HKEY_LOCAL_MACHINESYSTEMCurrentControlSetServicesWinSock2ParametersProtocol_Catalog_Before_Reset. These entries are binary encoded, so it is much easier to read in plaintext.
4. Now take another snapshot of the Winsock Catalog again to document the changes just made.
netsh winsock show catalog > winsock-after.txt5. Restart the computer to complete the network reset.
Not all network issues can be solved using the netsh winsock reset command, and in those cases, the netsh int ip reset command comes in handy! Read on to learn when and where to use this command.
Reset TCP/IP Settings with netsh int ip reset
The Winsock catalog is not the only set of network settings that can cause problems. As mentioned earlier, malware and incorrect settings often existed as Winsock LSPs, which are not as prevalent anymore due to their deprecation in newer versions of Windows.
More commonly, network issues exist with TCP/IP configurations. If you have any of the following network problems, then read on to learn how to reset your TCP/IP settings.
- DNS lookup issues, provided that DNS is configured correctly.
- DHCP IP address assignment problems, perhaps
ipconfig /renewis not working correctly.
- Limited or no connectivity in your web browser or email client.
In the same local administrator command-prompt, follow the below steps to reset your TCP/IP settings.
- Before resetting your IP settings, run the following command to see a snapshot of your current IP settings. In case the reset fails, it is helpful to have a record of your prior network settings.
2. Run the following command in the command prompt to reset your IP settings.
To save the output of the reset command, redirect the output to a file using a command such as:
netsh int ip reset > log.txt.
When you reset the TCP/IP settings using the netsh int ip reset command, the following registry settings are overwritten.
SYSTEMCurrentControlSetServicesTcpipParameters
 SYSTEMCurrentControlSetServicesDHCPParameters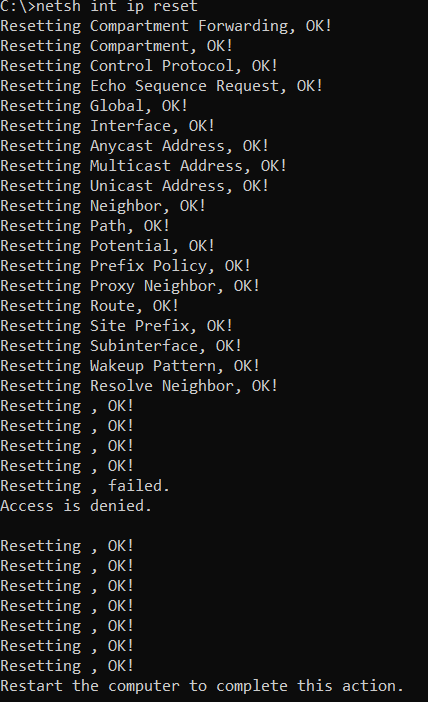
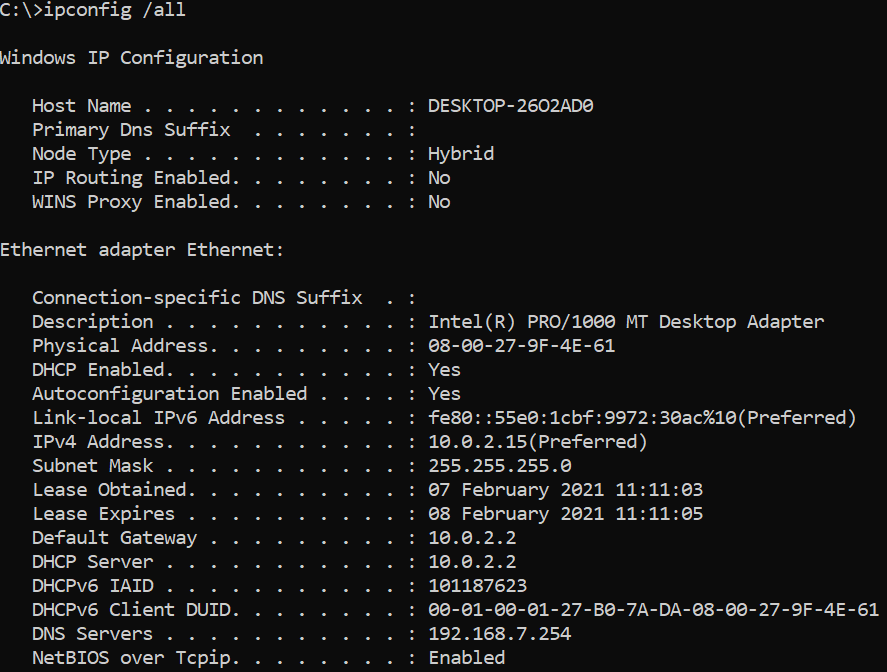
3. Verify your network settings with the ipconfig /all command again, such as IP addresses, default gateways, and DNS settings.
Further Reading & Next Steps
Networking is a complicated topic with many potential issues, but two additional resources that may help are linked below.
- Fix Wi-Fi connection issues in Windows
- Fix network connection issues in Windows 10
Although not all networking issues may be resolved by performing a netsh winsock reset or netsh int ip reset command, both commands provide a great starting point!

Многие пользователи встречают проблему когда интернет и сеть перестают работать на компьютере. Хотя на модеме или маршрутизаторе показывает что Интернет работает. Поэтому корпорация Майкрософт добавила в операционную систему Windows возможность выполнить самостоятельный сброс параметров адаптера.
Данная статья расскажет как сбросить сетевые настройки Windows 10 используя обновленные параметры системы и как сбросить сетевые настройки через командную строку. В любом из случаев используется команда netsh winsock reset, которая собственно и делает сброс сетевых настроек.
Сброс сетевых настроек
Перед переходом к сбросу сетевых настроек необходимо в первую очередь разобраться поможет ли он в той или иной ситуации. Первые симптомы проблем с сетевыми настройками системы могут быть разными, среди них стоит отметить часто встречаемые:
- Скорость загрузки файлов очень низкая.
- После включения компьютера буквально через несколько минут интернет пропадает (хотя несколько минут работает как полагается).
- Компьютер не получает IP-адрес автоматически.
Все текущие ситуации описаны в случае полной работоспособности интернета от провайдера. Сброс сетевых настроек нужен только в случаях проблемы в работе Вашей операционной системы.
Это действие удалит, а затем переустановит все сетевые адаптеры и вернет для других сетевых компонентов их исходные параметры. Возможно, после этого потребуется переустановить другое сетевое программное обеспечение (например, программное обеспечение клиента VPN или виртуальные коммутаторы).
- Открываем обновленные параметры системы используя комбинацию клавиш Win+I.
- Дальше переходим в раздел Сеть и Интернет > Состояние и нажимаем пункт Сброс сети.

- В открывшимся окне параметров нажмите кнопку Сбросить сейчас и подтверждаем сброс настроек сети.


После подтверждения сброса сетевых настроек Ваш компьютер будет перезагружен. При первом включении компьютера после сброса параметров пользователю будет предложено выбрать сеть в которой будет обслуживаться Ваш компьютер.
Cбросить сетевые настройки через командную строку Windows 10
До появления возможности сброса сетевых параметров адаптера в обновленных параметрах Windows 10 сброс сетевых настроек осуществлялся другим способом. Текущий способ с использованием командной строки подходить и для пользователей предыдущих версий операционной системы Windows.
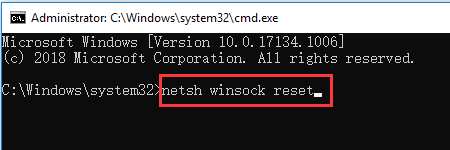
- Запускаем командную строку от имени администратора любым из способов.
- В открывшемся окне командной строки выполняем команду: netsh winsock reset.

- Самостоятельно выполняем перезагрузку операционной системы.

На вопрос что делает команда netsh winsock reset нужно сказать что, как и в предыдущем способе после выполнения текущей команды происходит полный сброс сетевых настроек адаптера. А также смотрите способы как запустить командную строку в Windows 10.
Если же пользователь получает сообщений, например DNS-сервер не отвечает или не удается найти DNS-адрес сервера, тогда перед выполнением команды netsh winsock reset, можно попытаться сбросить кэш DNS. Для этого нужно выполнить команду ipconfig /flushdns в командной строке запущенной от имени администратора.
Выводы
Полный сброс сетевых настроек операционной системы является отличным средством решения множества проблем. Поэтому мы рассмотрели как сбросить сетевые настройки Windows 10 используя параметры системы или через командную строку. При необходимости сбросить сетевые параметры в предыдущих операционных системах можно использовать команду netsh winsock reset, которая собственно и помогает сбросить сетевые параметры.
 (1 оценок, среднее: 5,00 из 5)

Администратор и основатель проекта Windd.ru. Интересуюсь всеми новыми технологиями. Знаю толк в правильной сборке ПК. Участник программы предварительной оценки Windows Insider Preview. Могу с лёгкостью подобрать комплектующие с учётом соотношения цены — качества. Мой Компьютер: AMD Ryzen 5 3600 | MSI B450 Gaming Plus MAX | ASUS STRIX RX580 8GB GAMING | V-COLOR 16GB Skywalker PRISM RGB (2х8GB).
A wired Ethernet connection lets you get a fast internet connection—plug one end of the Ethernet cable into your router at home, then plug the other end into the Ethernet port on your Windows PC. (If your PC doesn’t have an Ethernet port but you want to try this option, you might consider getting a USB to Ethernet adapter.)
If you’re using an Ethernet connection and can’t connect to the internet, there are a few things you can try to try to fix the problem and get connected.
On your home router
Try these things first to help you fix or narrow down the connection problem.
-
Check the Ethernet cable and connection. Make sure the Ethernet cable is securely plugged into the Ethernet port on both your router and Windows 11 PC. On your router, make sure the Ethernet cable is plugged into the correct Ethernet port—not the Internet port that’s used to connect your modem and router.
If one Ethernet cable doesn’t work and you have another one nearby, try the other Ethernet cable to see if that works. If it does, it might be a problem with the first cable.
-
Restart your modem and wireless router. This helps create a new connection to your internet service provider (ISP). When you do this, everyone that is connected to your Wi-Fi network will be temporarily disconnected. The steps you take to restart your modem and router can vary, but here are the general steps.
Note: If you have a cable modem/Wi-Fi router combo device, you only need to follow the steps for the single device.
-
Unplug the power cable for the router from the power source.
-
Unplug the power cable for the modem from the power source.
Some modems have a backup battery. If you unplug the modem and lights stay on, remove the battery from the modem.
-
Wait at least 30 seconds or so.
If you had to remove the battery from the modem, put it back in.
-
Plug the modem back into the power source. The lights on the modem will blink. Wait for them to stop blinking.
-
Plug your router back into the power source.
Wait a few minutes for the modem and router to fully power on. You can usually tell when they’re ready by looking at the status lights on the two devices.
-
On your PC, try to connect again using the Ethernet connection.
On your PC
-
Check the network status in Settings. Open Settings > Network & internet. Check your Ethernet connection status at the top of the screen. Make sure it says Connected underneath the network connection name. If there’s an error, such as one that says Action needed, select Ethernet to view your Ethernet connection settings.
If one Ethernet cable doesn’t work and you have another one nearby, try the other Ethernet cable to see if that works. If it does, it might be a problem with the first cable.
-
Connect to Wi-Fi instead. If your router is a Wi-Fi router, try to connect to Wi-Fi and see if you can get connected. This can do two things—help you get an internet connection and help you narrow down the source of the problem. For more info, see Connect to a Wi-Fi network in Windows.
-
Run network commands. Try running these network commands to manually reset the TCP/IP stack, release and renew the IP address, and flush and reset the DNS client resolver cache:
-
Select Search on the taskbar, type Command prompt. The Command Prompt button will appear. To the right of it, select Run as administrator > Yes.
-
At the command prompt, run the following commands in the listed order, and then check to see if that fixes your connection problem:
-
Type netsh winsock reset and select Enter.
-
Type netsh int ip reset and select Enter.
-
Type ipconfig /release and select Enter.
-
Type ipconfig /renew and select Enter.
-
Type ipconfig /flushdns and select Enter.
-
-
Uninstall the Ethernet network adapter driver and restart. If the previous steps didn’t work, try to uninstall the network adapter driver, and then restart your computer. Windows will automatically install the latest driver. Consider this approach if your network connection stopped working properly after a recent update.
Before uninstalling, make sure you have drivers available as a backup. Visit the PC manufacturer’s website and download the latest network adapter driver from there. If your PC can’t connect to the internet, you’ll need to download a driver on a different PC and save it to a USB flash drive so you can install the driver on your PC. You’ll need to know the PC manufacturer and model name or number.
-
Select Search on the taskbar, type Device Manager, and then select Device Manager from the list of results.
-
Expand Network adapters and locate the Ethernet network adapter for your device.
-
Select the network adapter, press and hold (or right-click), and then select Uninstall device > the Attempt to remove the driver for this device check box > Uninstall.
-
After uninstalling the driver, select the Start button > Power > Restart.
After your PC restarts, Windows will automatically look for and install the network adapter driver. Check to see if that fixes your connection problem. If Windows doesn’t automatically install a driver, try to install the backup driver you saved before uninstalling.
-
Use network reset. Using network reset should be the last step you try. Consider using it if the steps above don’t help to get you connected.
This can help solve connection problems you might have after upgrading from Windows 10 to Windows 11. It can also help to fix the problem where you can connect to the internet but can’t connect to shared network drives. Network reset removes any network adapters you have installed and the settings for them. After your PC restarts, any network adapters are reinstalled, and the settings for them are set to the defaults.
-
Select the Start button, then enter settings. Select Settings > Network & internet > Advanced network settings > Network reset.
Open Network & internet status settings
-
On the Network reset screen, select Reset now > Yes to confirm.
Wait for your PC to restart and see if that fixes the problem.
Notes:
-
After using network reset, you might need to reinstall and set up other networking software you might be using, such as VPN client software or virtual switches from Hyper‑V (if you’re using that or other network virtualization software).
-
Network reset might set each one of your known network connections to a public network profile. In a public network profile, your PC is not discoverable to other PCs and devices on the network, which can help make your PC more secure. However, if your PC is used for file or printer sharing, you’ll need to make your PC discoverable again by setting it to use a private network profile. To do this, select the Start button, then enter settings. Select Settings > Network & internet > Ethernet . On the Ethernet screen, under Network profile type, select Private.
-
On another PC
-
Try to connect to the same network on a different device. If you have another Windows PC in your home and a USB to Ethernet adapter, try to connect using that PC. If you can connect, the source of the problem is likely due to your first PC. If you can’t connect to the Ethernet network on either PC, it might be a problem with your router, internet service provider, or USB to Ethernet adapter.
On your home router
Try these things first to help you fix or narrow down the connection problem.
-
Check the Ethernet cable and connection. Make sure the Ethernet cable is securely plugged into the Ethernet port on both your router and Windows 10 PC. On your router, make sure the Ethernet cable is plugged into the correct Ethernet port—not the Internet port that’s used to connect your modem and router.
If one Ethernet cable doesn’t work and you have another one nearby, try the other Ethernet cable to see if that works. If it does, it might be a problem with the first cable.
-
Restart your modem and wireless router. This helps create a new connection to your internet service provider (ISP). When you do this, everyone that is connected to your Wi-Fi network will be temporarily disconnected. The steps you take to restart your modem and router can vary, but here are the general steps.
Note: If you have a cable modem/Wi-Fi router combo device, you only need to follow the steps for the single device.
-
Unplug the power cable for the router from the power source.
-
Unplug the power cable for the modem from the power source.
Some modems have a backup battery. If you unplug the modem and lights stay on, remove the battery from the modem.
-
Wait at least 30 seconds or so.
If you had to remove the battery from the modem, put it back in.
-
Plug the modem back into the power source. The lights on the modem will blink. Wait for them to stop blinking.
-
Plug your router back into the power source.
Wait a few minutes for the modem and router to fully power on. You can usually tell when they’re ready by looking at the status lights on the two devices.
-
On your PC, try to connect again using the Ethernet connection.
On your PC
-
Check the network status in Settings. Open Settings > Network & Internet > Status. Check your Ethernet connection status there. It should display You’re connected to the Internet underneath the Ethernet network connection.
If one Ethernet cable doesn’t work and you have another one nearby, try the other Ethernet cable to see if that works. If it does, it might be a problem with the first cable.
-
Connect to Wi-Fi instead. If your router is a Wi-Fi router, try to connect to Wi-Fi and see if you can get connected. This can do two things—help you get an internet connection and help you narrow down the source of the problem. For more info, see Connect to a Wi-Fi network in Windows.
-
Run network commands. Try running these network commands to manually reset the TCP/IP stack, release and renew the IP address, and flush and reset the DNS client resolver cache:
-
In the search box on the taskbar, type Command prompt. The Command Prompt button will appear. To the right of it, select Run as administrator > Yes.
-
At the command prompt, run the following commands in the listed order, and then check to see if that fixes your connection problem:
-
Type netsh winsock reset and select Enter.
-
Type netsh int ip reset and select Enter.
-
Type ipconfig /release and select Enter.
-
Type ipconfig /renew and select Enter.
-
Type ipconfig /flushdns and select Enter.
-
-
Uninstall the Ethernet network adapter driver and restart. If the previous steps didn’t work, try to uninstall the network adapter driver, and then restart your computer. Windows will automatically install the latest driver. Consider this approach if your network connection stopped working properly after a recent update.
Before uninstalling, make sure you have drivers available as a backup. Visit the PC manufacturer’s website and download the latest network adapter driver from there. If your PC can’t connect to the internet, you’ll need to download a driver on a different PC and save it to a USB flash drive so you can install the driver on your PC. You’ll need to know the PC manufacturer and model name or number.
-
In the search box on the taskbar, type Device Manager, and then select Device Manager from the list of results.
-
Expand Network adapters and locate the Ethernet network adapter for your device.
-
Select the network adapter, press and hold (or right-click), and then select Uninstall device > the Attempt to remove the driver for this device check box > Uninstall.
-
After uninstalling the driver, select the select the Start button > Power > Restart.
After your PC restarts, Windows will automatically look for and install the network adapter driver. Check to see if that fixes your connection problem. If Windows doesn’t automatically install a driver, try to install the backup driver you saved before uninstalling.
-
Use network reset. Using network reset should be the last step you try. Consider using it if the steps above don’t help to get you connected.
This can help fix the problem where you can connect to the internet but can’t connect to shared network drives. Network reset removes any network adapters you have installed and the settings for them. After your PC restarts, any network adapters are reinstalled, and the settings for them are set to the defaults.
-
Select the Start button, then select Settings > Network & Internet > Status > Network reset.
Open Network & internet status settings
-
On the Network reset screen, select Reset now > Yes to confirm.
Wait for your PC to restart and see if that fixes the problem.
Notes:
-
After using network reset, you might need to reinstall and set up other networking software you might be using, such as VPN client software or virtual switches from Hyper‑V (if you’re using that or other network virtualization software).
-
Network reset might set each one of your known network connections to a public network profile. In a public network profile, your PC is not discoverable to other PCs and devices on the network, which can help make your PC more secure. However, if your PC is used for file or printer sharing, you’ll need to make your PC discoverable again by setting it to use a private network profile. To do this, select the Start button, then select Settings > Network & Internet > Ethernet . On the Ethernet screen, select the Ethernet network connection you want to change, then select Private under Network profile.
-
On another PC
-
Try to connect to the same network on a different device. If you have another Windows PC in your home and a USB to Ethernet adapter, try to connect using that PC. If you can connect, the source of the problem is likely due to your first PC. If you can’t connect to the Ethernet network on either PC, it might be a problem with your router, internet service provider, or USB to Ethernet adapter.
Need more help?

Contents
- 1 How to Reset Your Windows 10 Network via Settings
- 2 How to Reset Network Settings with the “netsh winsock reset” command
We’ve all run into the dreaded taskbar icon that denotes Windows 10 internet connection issues. There are various reasons this can happen, but if you’re really struggling, the quickest fix is to perform a full Windows 10 network reset.
From the Anniversary Update onwards, Microsoft offers an easy way to reset Windows 10 network settings to their defaults. While you should always try other fixes first, such as running Windows network diagnostics, it’s a handy last resort.
This network fix will reset your WiFi adapter, WiFi passwords, Ethernet adapter, VPN connections, and virtual switches. It can solve most software-based issues as a result, but if you don’t know your WiFi password you’ll want to look elsewhere for a remedy.
With that warning, here’s how to perform a Windows 10 network reset, both via the network and internet settings menu and the netsh winsock reset command.
How to Reset Your Windows 10 Network via Settings
As mentioned, recent versions of Windows now let you perform a full Windows 10 Network reset via the settings interface. This greatly simplifies things and is the recommended route for most people.
- Open settings
Press the “Start” button, then click the setting cog in the bottom-left corner, above the power menu.

- Go to Network and Internet settings
This may be stylized as “Network & Internet” in your Windows 10 settings app.

- Click “Network reset”
Making sure you’re in the “Status” tab in the left sidebar, scroll until you see the “Network reset” text. Click it to begin the process.

- Press “Reset now” when ready
Before you do so, make sure you have saved content you were writing on any websites and are aware of what will be changed. This network fix will reset WiFi adapters and remove your VPNs, WiFi passwords, and virtual switches.

- Click “Yes” to the confirmation dialog


How to Reset Network Settings with the “netsh winsock reset” command
If you need to reset network settings on Windows 7 or Windows 8.1, or are getting an error, you may need to use PowerShell to get the desired results. If you’re a power user, this can also be faster.
Though netsh winsock reset is the main command we’ll be using, we’ll also use netsh int IP reset to reset the TCP/IP stack.
- Run PowerShell as an administrator
Press “Ctrl + X” to open the Quick Link menu, then click “Windows PowerShell (Admin)”. Note that it is necessary to use the administrator version to run this command.

- Run the “netsh winsock reset” commandThe
netsh winsock resetcommand is the first step of a full Windows 10 network reset. It helps to recover the computer from any socket errors that may have arisen from settings corruption or malware.Type
netsh winsock resetin your PowerShell window when ready and press Enter to run it. It will return a success message and a restart prompt. Do not restart your PC quite yet.
- Reset your TCP/IP settings
To perform a full Windows 10 or Windows 7 network reset, we should also reset TCP/IP. The command for this is
netsh int ip reset. Type it in the same PowerShell window and press Enter on your keyboard.
- Reset your IP configuration
We can now renew Windows’ IP address configuration. Run the following command:
ipconfig /renew
- Flush your DNSIt can also be useful to flush your PC’s DNS settings. This is particularly true if you have modified your DNS at any point, for example via faulty VPN software or by pointing it to Cloudflare or Google DNS. Type
ipconfig /flushdnsand press Enter.
- Run a full network device cleanup
You may also want to perform a full network device cleanup. This will remove all of your networking devices, VPN client software, and virtual switches. Make sure you have your network drivers downloaded locally just in case you can’t connect to the internet to download them afterwards.
In PowerShell, enter
netcfg -d. You can now restart your PC to apply the changes.


Now that your network has been reset, you may want to read our guide on how to set up a VPN in Windows 10. If you have a bandwidth cap, don’t forget to set up your metered connection.
Windows Sockets или Winsock – это техническая спецификация или программный интерфейс, который определяет, как любая программа обрабатывает запросы ввода/вывода для интернет-приложений, т. Е. TCP/IP в Windows. В этом руководстве мы узнаем о Winsock, почему и когда вам необходимо выполнить сброс, а также о том, как выполнить сброс Winsock в Windows 10.

Содержание
- Что такое Winsock
- Когда вам нужно сбросить Winsock
- Как сбросить Winsock в Windows 10
- Что происходит при сбросе Winsock
Что такое Winsock
Как мы уже говорили, это интерфейс программирования. Windows 10 содержит библиотеку DLL с именем winsock.dll , которая реализует API и координирует программы Windows и соединения TCP/IP. Настройки содержат конфигурацию компьютера для подключения к интернету.
Когда вам нужно сбросить Winsock
Иногда Windows Sockets или Winsock могут быть повреждены, в результате чего вы не сможете подключиться к Интернету. Ошибка может возникнуть при загрузке неизвестного файла с вредоносным скриптом. Эти скрипты могут частично блокировать Winsock, блокируя ваше интернет-соединение. Если у вас возникли проблемы с открытием веб-сайтов, это может быть связано с поврежденными настройками Winsock.
Если вы получаете какое-либо из следующих сообщений или похожее сообщение об ошибке, это означает, что вам нужно сбросить Winsock:
- Произошла ошибка при обновлении интерфейса «Интернет»: была предпринята попытка выполнить операцию на объекте, который не является сокетом.
- Произошла ошибка при обновлении интерфейса Local Area Connection: не удалось загрузить или инициализировать запрошенный поставщик услуг.
- Произошла ошибка при обновлении соединения локальной сети интерфейса: была предпринята попытка выполнить операцию на чем-то, что не является сокетом. Невозможно связаться с водителем. Код ошибки 2.
- Операция не выполнена, поскольку ни один адаптер не находится в состоянии, допустимом для этой операции.
Как сбросить Winsock в Windows 10
Прежде чем приступить к сбросу Winsock, не забудьте сначала создать точку восстановления системы.
Затем откройте командную строку от имени администратора, введите следующую команду и нажмите ввод.
netsh winsock reset
Как администратор, вы также можете создать журнал изменений. Чтобы добавить путь к файлу журнала к вышеуказанной команде:
netsh winsock reset c: winsocklog.txt
Подождите, пока командная строка не пройдет через сброс. Теперь вам придется перезагрузить компьютер, чтобы увидеть эффекты.
Что происходит при сбросе Winsock
Когда вы выполняете команду, она исправляет любое повреждение, которое произошло с файлом DLL. Таким образом, нет никакого решения, кроме как заменить его новой копией Winsock и вернуть его к настройкам по умолчанию.
Связанные чтения:
- Как очистить кэш DNS
- Как сбросить настройки прокси-сервера WinHTTP.
Netsh winsock reset in Windows 11 or 10 is super handy for resetting “Winsock” catalog. This is an important command line tool that you often need to run during multiple Network issues. winsock means Windows Socket and Reset indicates to restore the original configuration. So the command brings back the WSA (Windows Sockets API) default settings.
Furthermore, this is more useful when a malformed LSP is installed which basically results in the loss of network connectivity. Winsock is an API that interacts between Network Software and services. In other words, this interface handles any input or output requests on the system for an internet application. Hence, if your system encounters any of these problems, executing the netsh winsock reset command will eventually bypass them. The following list of errors needs to run the command in Windows 10 or 11 –
1) Any sort of network moreover internet issues after the removal of malware or virus.
2) Failure in the network adapter’s IP address renewal.
3) Interruptions in network connection post the installation or removal of any malware-scanner such as antispam, spyware, adware, VPN, firewall etc.
4) DNS related issues.
5) Inability or a limited ability to access any webpage(s).
6) Any network related pop-up error messages.
7) Registry errors result in poor or no network connectivity.
 Other networking related troubles.
Here is how does netsh winsock reset Work in Windows 11 or 10 –
Step-1: Open Run dialog box and to do so, hit “Win + R” shortcut keys. Here, type in cmd and altogether press “Ctrl + Shift + Enter“. Alternatively, follow the instructions here – How to Launch Elevated Command Prompt on Windows 10.
Step-2: Click Yes on the UAC prompt to give permission.
Step-3: Once you access the elevated Command Prompt, copy-paste or type in the underneath command. Hit Enter to execute it.
netsh winsock reset
Step-4: Restart Windows 10 PC and see if it bypasses the network related issues.
How does netsh winsock reset to resolve network related problems?
Once you run the above command, it will instantly reset the “Winsock catalog” to a clean condition or the default settings. Moreover, it will uninstall the network service providers that are present in your systems such as USB network connections, Bluetooth bridges, or malware installed providers. So, once you successfully remove the harmful elements from the system, you will not have any further network issues.
It will clear any Layered Service Providers that were installed previously. This ensures that any LSP that might be malfunctioning or cause the problem is removed, thus potentially resolves the trouble you were facing.
So, after you run this command, you will not come across any browsing or network problems as well.
That’s all!
Adjunct –
1) How to Fix Network Connection Problems in Windows 10 All in One
2) How to Troubleshoot Incoming Connections in Windows 10
3) How to Fix Airplane Mode Issues in Windows 10
4) Fix WiFi Missing from Network & Internet Settings in Windows 10
5) Network Discovery is Turned off Windows 10