Если вы из Windows 10 или 11 не можете открыть сетевые папки на других сетевых устройствах (NAS, Samba сервера Linux) или на компьютерах со старыми версиями Windows (Windows 7/ XP /2003), скорее всего проблема связана с тем, что в вашей версии Windows отключена поддержка устаревших и небезопасных версий протокола SMB (используется в Windows для доступа к общим сетевым папкам и файлам). В современных версиях Windows 10 и в Windows 11 по-умолчанию отключен протокол SMBv1 и анонимный (гостевой) доступ к сетевым папкам по протоколу SMBv2 и SMBv3.
Microsoft планомерно отключает старые и небезопасные версии протокола SMB во всех последний версиях Windows. Начиная с Windows 10 1709 и Windows Server 2019 (как в Datacenter так и в Standard редакциях) в операционной системе по умолчанию отключен протокол SMBv1 (помните атаку шифровальщика WannaCry, которая как раз и реализовалась через дыру в SMBv1).
Конкретные действия, которые нужно предпринять зависят от ошибки, которая появляется в Windows при доступе к общей сетевой папке и от настроек удаленного SMB сервера, на котором хранятся общие папки.
Содержание:
- Вы не можете получить гостевой доступ к общей папке без проверки подлинности
- Вашей системе необходимо использовать SMB2 или более позднюю
- Нет доступа к сетевой папке, у вас нет прав доступа
- Дополнительные способы проверки доступа к сетевой папке в Windows
Вы не можете получить гостевой доступ к общей папке без проверки подлинности
Начиная с версии Windows 10 1709 (Fall Creators Update) Enterprise и Education пользователи стали жаловаться, что при попытке открыть сетевую папку на соседнем компьютере стала появляться ошибка:
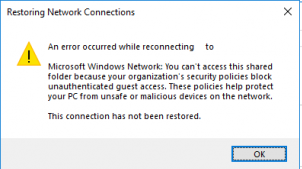
Вы не можете получить доступ к этой общей папке, так как политики безопасности вашей организации блокируют гостевой доступ без проверки подлинности. Эти политики помогают защитить ваш компьютер от небезопасных или вредоносных устройств в сети.
An error occurred while reconnecting Y: to
\nas1share Microsoft Windows Network: You can’t access this shared folder because your organization’s security policies block unauthenticated guest access. These policies help protect your PC from unsafe or malicious devices on the network.
При этом на других компьютерах со старыми версиями Windows 8.1/7 или на Windows 10 с билдом до 1709, эти же сетевые каталоги открываются нормально. Причина в том, что в современных билдах Windows 10 (начиная с 1709) по умолчанию запрещен сетевой доступ к сетевым папкам под гостевой учетной записью по протоколу SMBv2 (и ниже). Гостевой (анонимный) доступ подразумевают доступ к сетевой папке без аутентификации. При доступе под гостевым аккаунтом по протоколу SMBv1/v2 не применяются такие методы защиты трафика, как SMB подписывание и шифрование, что делает вашу сессию уязвимой против MiTM (man-in-the-middle) атак.
При попытке открыть сетевую папку под гостем по протоколу SMB2, в журнале клиента SMB (Microsoft-Windows-SMBClient) фиксируется ошибка:
Log Name: Microsoft-Windows-SmbClient/Security Source: Microsoft-Windows-SMBClient Event ID: 31017

Rejected an insecure guest logon.
Данная ошибка говорит о том, что ваш компьютер (клиент) блокирует не аутентифицированный доступ под аккаунтом guest.
Чаще всего с этой проблемой можно столкнуться при использовании старых версий NAS (обычно для простоты настройки на них включают гостевой доступ) или при доступе к сетевым папкам на старых версиях Windows 7/2008 R2 или Windows XP /2003 с настроенным анонимным (гостевым) доступом (см. таблицу поддерживаемых версий SMB в разных версиях Windows).
Microsoft рекомендует изменить настройки на удаленном компьютере или NAS устройстве, который раздает сетевые папки. Желательно переключить сетевой ресурс в режим SMBv3. А если поддерживается только протокол SMBv2, тогда нужно настроить доступ с аутентификацией. Это самый правильный и безопасный способ исправить проблему.
В зависимости от устройства, на котором хранятся сетевые папки, вы должны отключить на них гостевой доступ.
- NAS устройство – отключите гостевой доступ в настройках вашего NAS устройства (зависит от модели);
- Samba сервер на Linux — если вы раздаете SMB папку с Linux, добавьте в в секции [global] конфигурационного файла smb.conf строку:
map to guest = never
А в секции с описанием сетевой папки запретить анонимный доступ:
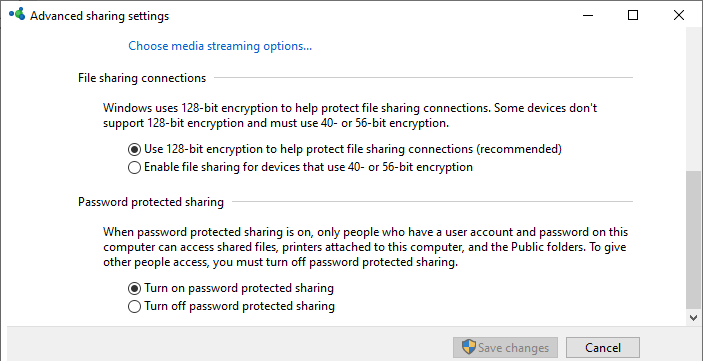
guest ok = no - В Windows вы можете включить общий доступ к сетевым папкам и принтерам с парольной защитой в разделе Control PanelAll Control Panel ItemsNetwork and Sharing CenterAdvanced sharing settings. Для All Networks (Все сети) в секции “Общий доступ с парольной защитой” (Password Protected Sharing) измените значение на “Включить общий доступ с парольной защитой” (Turn on password protected sharing). В этом случае анонимный (гостевой) доступ к папкам будет отключен и вам придется создать локальных пользователей, предоставить им доступ к сетевым папкам и принтерам и использовать эти аккаунты для сетевого доступа к общим папкам на этом компьютере..

Есть другой способ – изменить настройки вашего SMB клиента и разрешить доступ с него на сетевые папки под гостевой учетной записью.
Этот способ нужно использовать только как временный (!!!), т.к. доступ к папкам без проверки подлинности существенно снижает уровень безопасности ваших данных.
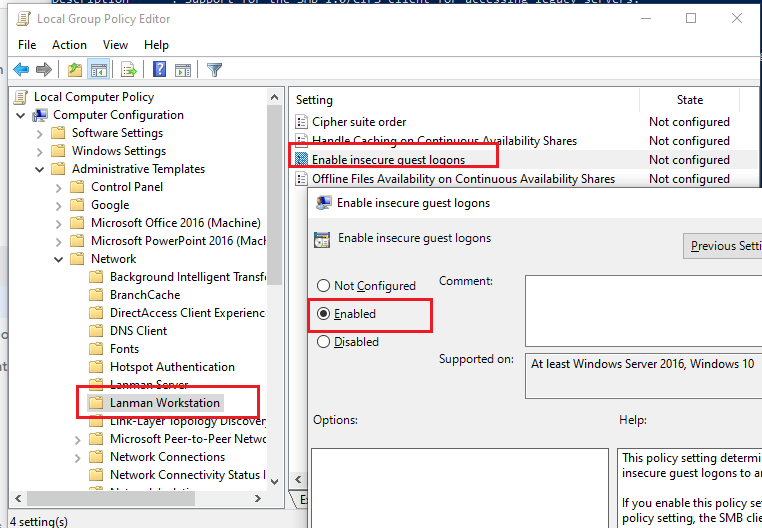
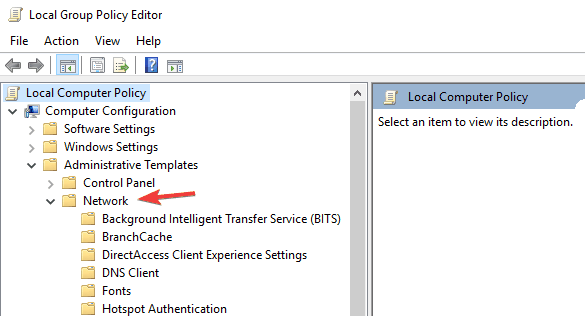
Чтобы разрешить гостевой доступ с вашего компьютера, откройте редактор локальных групповых политик (gpedit.msc) и перейдите в раздел: Конфигурация компьютера -> Административные шаблоны -> Сеть -> Рабочая станция Lanman (Computer Configuration ->Administrative templates -> Network (Сеть) -> Lanman Workstation). Включите политику Enable insecure guest logons (Включить небезопасные гостевые входы).
Обновите настройки групповых политик в Windows с помощью команды:
gpupdate /force
В Windows 10 Home, в которой нет редактора локальной GPO,вы можете внести аналогичное изменение через редактор реестра вручную::
HKLMSYSTEMCurrentControlSetServicesLanmanWorkstationParameters “AllowInsecureGuestAuth”=dword:1
Или такими командами:
reg add HKLMSYSTEMCurrentControlSetServicesLanmanWorkstationParameters /v AllowInsecureGuestAuth /t reg_dword /d 00000001 /f
reg add HKLMSoftwarePoliciesMicrosoftWindowsLanmanWorkstation /v AllowInsecureGuestAuth /t reg_dword /d 00000001 /f
Вашей системе необходимо использовать SMB2 или более позднюю
Другая возможная проблема при доступе к сетевой папке из Windows 10 – поддержка на стороне сервера только протокола SMBv1. Т.к. клиент SMBv1 по умолчанию отключен в Windows 10, то при попытке открыть шару или подключить сетевой диск вы можете получить ошибку:
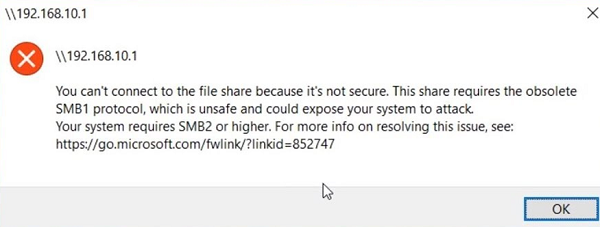
Не удалось выполнить сопоставление сетевого диска из-за следующей ошибки.
Вы не можете подключиться к общей папке, так как она небезопасна. Эта общая папка работает по устаревшему протоколу SMB1, который небезопасен и может подвергнуть вашу систему риску атаки.
Вашей системе необходимо использовать SMB2 или более позднюю версию.
You can’t connect to the file share because it’s not secure. This share requires the obsolete SMB1 protocol, which is unsafe and could expose your system to attack. Your system requires SMB2 or higher.
При этом соседние устройства SMB могут не отображаться в сетевом окружении и при открытии сетевых папок по UNC пути может появляться ошибка 0x80070035.
Сообщение об ошибки явно указывает, что сетевая папка поддерживает только SMBv1 для доступа к файлам. В этом случае нужно попытаться перенастроить удаленное SMB устройство для поддержки как минимум SMBv2 (правильный и безопасный путь).
Если сетевые папки раздает Samba сервер на Linux, вы можете указать минимально поддерживаемую версию SMB в файле smb.conf так:
[global]
server min protocol = SMB2_10
client max protocol = SMB3
client min protocol = SMB2_10
encrypt passwords = true
restrict anonymous = 2
В Windows 7/Windows Server 2008 R2 вы можете отключить SMBv1 и разрешить SMBv2 так через реестр:
Set-ItemProperty -Path "HKLM:SYSTEMCurrentControlSetServicesLanmanServerParameters" SMB1 -Type DWORD -Value 0 –Force
Set-ItemProperty -Path "HKLM:SYSTEMCurrentControlSetServicesLanmanServerParameters" SMB2 -Type DWORD -Value 1 –Force
В Windows 8.1 отключите SMBv1, разрешите SMBv2 и SMBv3 и проверьте что для вашего сетевого подключения используется частный или доменный профиль:
Disable-WindowsOptionalFeature -Online -FeatureName "SMB1Protocol"
Set-SmbServerConfiguration –EnableSMB2Protocol $true
Если ваше сетевое устройство (NAS, Windows XP, Windows Server 2003), поддерживает только протокол SMB1, в Windows 10 вы можете включить отдельный компонент SMB1Protocol-Client. Но это не рекомендуется!!!
Если удаленное устройство требует использовать SMBv1 для подключения, и этот протокол отключен в вашем устройстве Windows, в Event Viewer появляется ошибка:
Log Name: Microsoft-Windows-SmbClient/Security
Source: Microsoft-Windows-SMBClient
Event ID: 32000
Description:  SMB1 negotiate response received from remote device when SMB1 cannot be negotiated by the local computer.
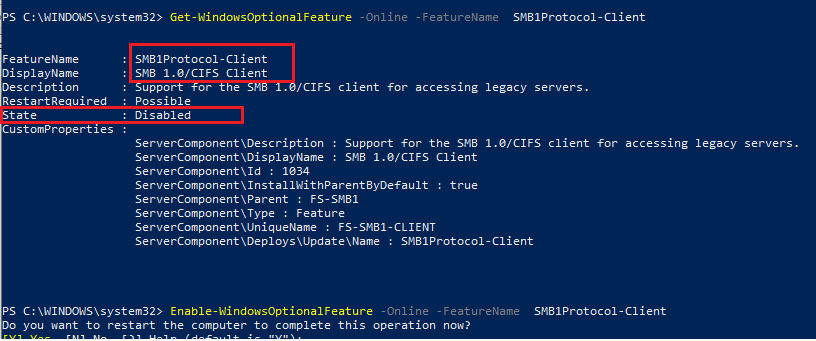
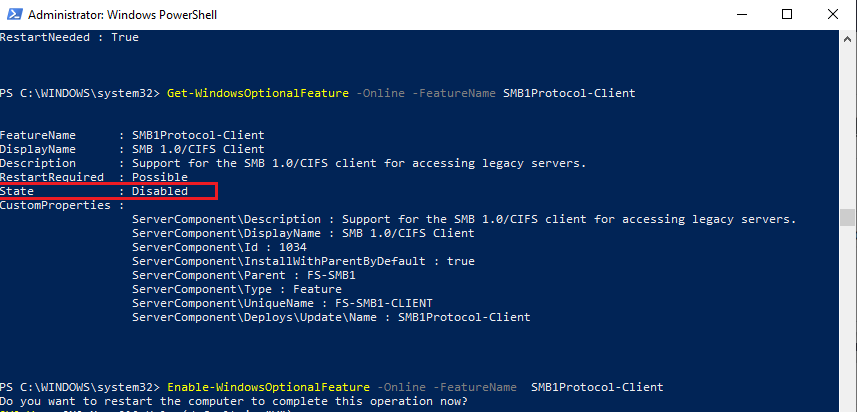
Запустите консоль PowerShell и проверьте, что SMB1Protocol-Client отключен (
State: Disabled
):
Get-WindowsOptionalFeature -Online -FeatureName SMB1Protocol-Client
Включите поддержку протокола SMBv1 (потребуется перезагрузка):
Enable-WindowsOptionalFeature -Online -FeatureName SMB1Protocol-Client
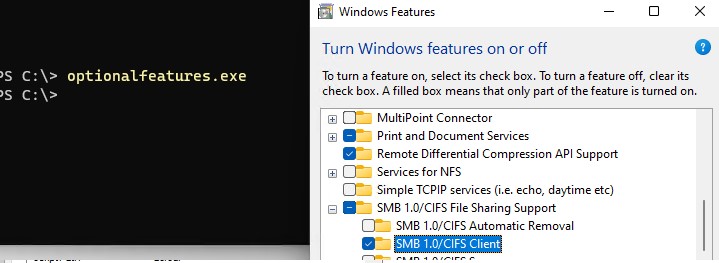
Также вы можете включить/отключить SMBv1 в Windows 10 и 11 из меню
optionalfeatures.exe
-> SMB 1.0/CIFS File Sharing Support –> SMB 1.0/CIFS Client.
В Windows 10 1709 и выше клиент SMBv1 автоматически удаляется, если он не использовался более 15 дней (за это отвечает компонент SMB 1.0/CIFS Automatic Removal).
В этом примере я включил только SMBv1 клиент. Не включайте компонент SMB1Protocol-Server, если ваш компьютер не используется устаревшими клиентами в качестве сервера для хранения общих папок.
После установке клиента SMBv1, вы должны без проблем подключиться к общей сетевой папке или принтеру. Однако, нужно понимать, что использование данного обходного решения не рекомендовано, т.к. подвергает снижает уровень безопасности.
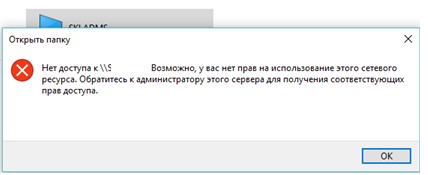
Нет доступа к сетевой папке, у вас нет прав доступа
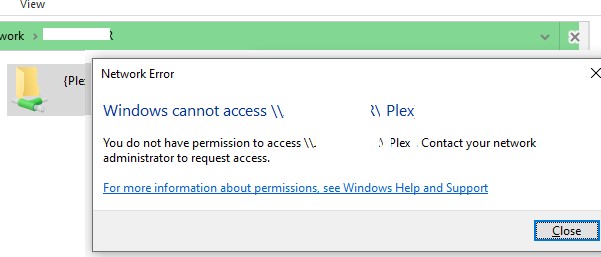
При подключении к сетевой папке на другом компьютере может появится ошибка:
Нет доступа к \ComputerNameShare. Возможно у вас нет прав на использование этого сетевого ресурса. Обратитесь к системному администратору этого сервера для получения соответствующих прав доступа.
Network Error
Windows cannot access \PC12Share
You do not have permissions to access \PC12Share. Contact your network administrator to request access.
При появлении это ошибки нужно:
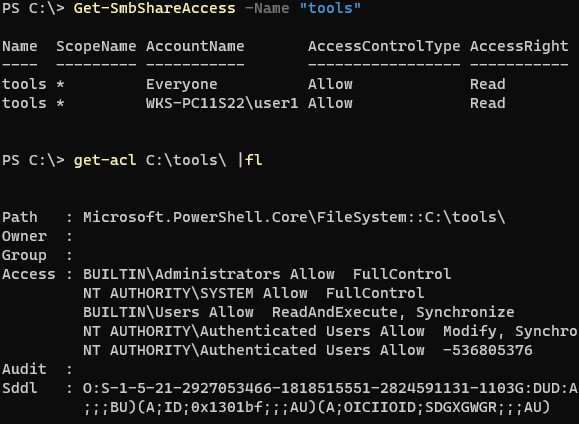
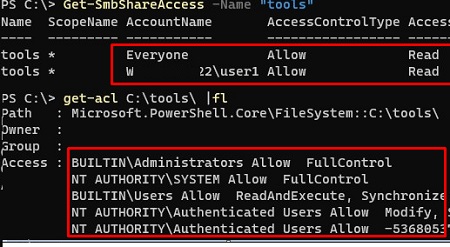
- Убедиться, что пользователю, под которым вы подключаетесь к сетевой папке, предоставлены права доступа на сервере. Откройте свойства общей папке на сервере и убедитесь что у вашего пользователя есть права доступа.
Проверьте разрешения сетевой шары на сервере с помощью PowerShell:
Get-SmbShareAccess -Name "tools"
Затем проверьте NTFS разрешения:
get-acl C:tools |fl

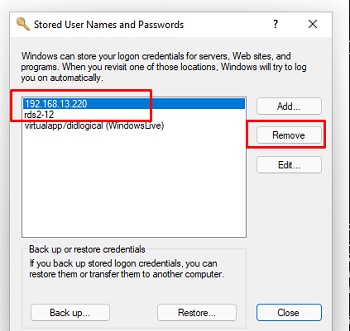
Если нужно, отредактируйте разрешения в свойствах папки. - Проверьте, что вы используете правильные имя пользователя и пароль для доступа к сетевой папки. Если имя и пароль не запрашиваются, попробуйте удалить сохраненные пароли для доступа к сетевой папке в диспетчере учетных записей Windows. Выполните команду
rundll32.exe keymgr.dll, KRShowKeyMgr
и удалите сохраненные учетные данные для доступа к сетевой папке.
При следующем подключении к сетевой папки появится запрос имени и пароля. Укажите имя пользователя для доступа к папке. Можете сохранить его в Credential Manager или добавить вручную.
Дополнительные способы проверки доступа к сетевой папке в Windows
В этом разделе указаны дополнительные способы диагностики при проблема с открытием сетевые папок в Windows:
Samba version: Version 4.1.17-Ubuntu
Ubuntu 15.10
When accessing a Samba share in windows, I can see the share but whenever I try and access it — entering the same username and password as the Samba user created with sudo smbpasswd -a benjamin (same as system user), I only get «Access is Denied». Here are my smb settings
[global]
server string = %h server (Samba, Ubuntu)
#encrypt passwords = No
map to guest = Bad User
obey pam restrictions = Yes
passdb backend = tdbsam
pam password change = Yes
passwd program = /usr/bin/passwd %u
passwd chat = *Entersnews*spassword:* %nn *Retypesnews*spassword:* %nn *passwordsupdatedssuccessfully* .
unix password sync = Yes
syslog = 0
log file = /var/log/samba/log.%m
max log size = 1000
dns proxy = No
usershare allow guests = Yes
panic action = /usr/share/samba/panic-action %d

wins support = yes

name resolve order = wins lmhosts host bcast


[TVShare]
path = /media/MEDIA2/TV
available = yes
valid users = benjamin
read only = no
browsable = yes
public = yes
writable = no
Where ls -dl /media/MEDIA2/TV/ reads
drwxrwxr-x 40 benjamin benjamin 4096 Sep 5 16:18 /media/MEDIA2/TV/
Sample log:
[2015/12/20 12:52:02,  2] ../source3/lib/tallocmsg.c:124(register_msg_pool_usage)
  Registered MSG_REQ_POOL_USAGE
[2015/12/20 12:52:02,  2] ../source3/lib/dmallocmsg.c:78(register_dmalloc_msgs)
  Registered MSG_REQ_DMALLOC_MARK and LOG_CHANGED
[2015/12/20 12:52:02.517860,  2] ../source3/param/loadparm.c:543(max_open_files)
  rlimit_max: increasing rlimit_max (1024) to minimum Windows limit (16384)
[2015/12/20 12:52:02.517954,  2] ../source3/param/loadparm.c:3582(do_section)
  Processing section "[TVShare]"
[2015/12/20 12:52:02.518169,  2] ../source3/lib/interface.c:341(add_interface)
  added interface eth0 ip=192.168.0.5 bcast=192.168.0.255 netmask=255.255.255.0
[2015/12/20 12:52:02.522658,  0] ../lib/util/become_daemon.c:136(daemon_ready)
  STATUS=daemon 'smbd' finished starting up and ready to serve connectionsFailed to fetch record!
Windows OS Hub / Windows 10 / Can’t Access Shared Folders or Map Network Drives from Windows 10 and 11
If you cannot open or map network shared folders on your NAS, Samba Linux server, computers with legacy Windows versions (Windows 7/XP/Server 2003) from Windows 10 or 11, most likely the problem is that legacy and insecure versions of the SMB protocol are disabled in the current Windows builds (SMB protocol is used in Windows to access shared network folders and files).
Microsoft is systematically disabling legacy and insecure versions of the SMB protocol in all recent versions of Windows. Starting with Windows 10 1709 and Windows Server 2019 (both in Datacenter and Standard editions), the unsafe SMBv1 protocol is disabled by default as well as anonymous (guest) access to network shared folders.
The specific steps to take depend on the error that appears in Windows when accessing a shared folder, and on the settings of the remote SMB server that hosts the network shares.
Contents:
- Can’t Access Shared Folder Because Security Policies Block Unauthenticated Guest Access
- Can’t Connect to the File Share Because It’s Not Secure and Requires the Obsolete SMB1 Protocol
- Windows Cannot Access Shared Folder: You Don’t Have Permissions
- Other Fixes: Windows Cannot Access Shared Folders
Can’t Access Shared Folder Because Security Policies Block Unauthenticated Guest Access
Starting with Windows 10 build 1709 Fall Creators Update (Enterprise and Education editions), users began to complain that when they tried to open a network shared folder on a neighboring computer, an error appeared:
Restoring Network Connections
An error occurs when you try to open a network folder:
An error occurred while reconnecting Y: to \nas1share
Microsoft Windows Network: You can’t access this shared folder because your organization’s security policies block unauthenticated guest access. These policies help protect your PC from unsafe or malicious devices on the network.

Moreover, on other computers with Windows 8.1, Windows 7, or Windows 10 with a build of up to 1709, the same shared network folders open normally. The point is that in modern versions of Windows 10 (build 1709+), the guest access to the shared folders using the SMBv2 protocol is disabled by default. Guest (anonymous) means access to a shared network folder without authentication. When accessing a network folder under a guest account over the SMBv1/v2 protocol, such methods of traffic protection as SMB signing and encryption are not used, which makes your session vulnerable to the MiTM (man-in-the-middle) attacks.
These changes are not applied on Windows 10 Home editions and the network access under the guest account is working fine.
If you try to open a shared network folder using the SMB v2 protocol under the guest account, the following error will appear in the Event Viewer of your computer (SMB client):
Log Name: Microsoft-Windows-SmbClient/Security
Source: Microsoft-Windows-SMBClient
Event ID: 31017
Rejected an insecure guest logon.
This error says that your computer (client) blocks non-authenticated access under the Guest account.
In most cases, you can face this problem when accessing old NAS devices (usually guest access is enabled on them for ease of setup) or when opening shared folders on legacy Windows 7/2008 R2/Windows XP/2003 devices with anonymous (guest) access enabled (see the table of supported SMB protocol versions in different Windows editions).
Microsoft recommends changing the settings on a remote computer or NAS device that hosts the shared network folders. It is advisable to switch the network share to the SMBv3 mode. Or configure access with authentication if only the SMBv2 protocol is supported by the device. This is the most correct and safest way to fix the problem.
Disable guest access on the device where your shared folders are stored:
- NAS devices – disable guest access in the settings of your NAS device (depending on vendor and model);
- Samba server on Linux — if you are sharing a network folder with Samba on Linux, add the following string to the smb.conf configuration file under the section [global]:
map to guest = never
And restrict anonymous access in the shared folder configuration section:guest ok = no - In Windows, you can enable sharing of network folders and printers with password protection via the Control Panel -> Network and Sharing Center -> Advanced sharing settings. For All Networks in the “Password Protected Sharing” section, change the value to the “Turn on password protected sharing”. In this case, anonymous (guest) access to the network shared folders will be disabled and you will have to create local users, grant them access permissions to the shared folders and printers and use these accounts to connect to the shared folders on a remote computer.

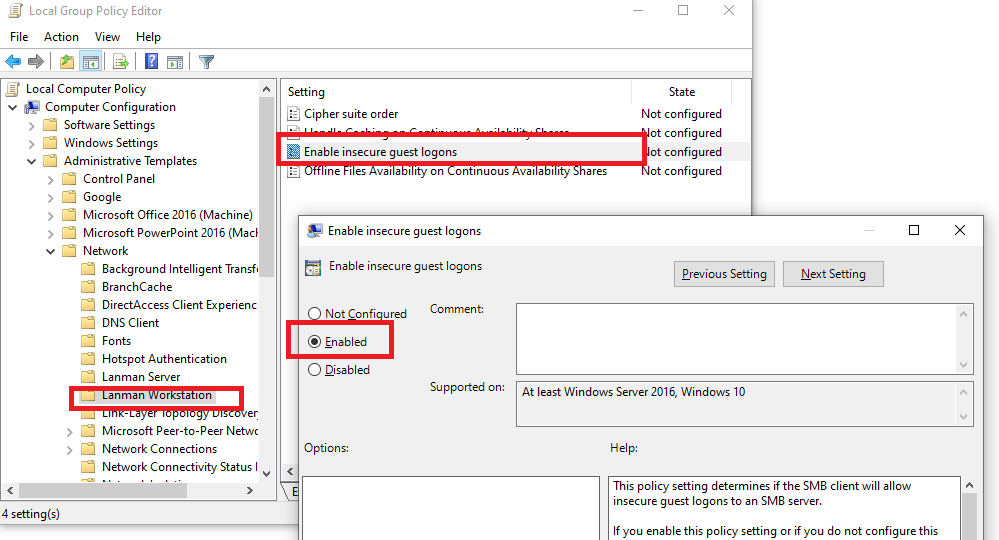
There is another way – you can change the settings on your Windows device to allow access to shared network folders under the guest account. This method should be used only as a temporary workaround (!!!), because access to folders without authentication significantly reduces your computer security.
To enable guest access from your computer, you need to use the Group Policy Editor (gpedit.msc). Go to the section: Computer Configuration -> Administrative templates -> Network -> Lanman Workstation. Find and enable the policy Enable insecure guest logons. This policy option determines whether the SMB client will allow an unsafe guest logon to the SMB server.
Update the Group Policy settings in Windows with the command:
gpupdate /force
In Windows 10 Home, which does not have a local GPO editor, you can make a similar change through the Registry Editor manually:
HKLMSYSTEMCurrentControlSetServicesLanmanWorkstationParameters “AllowInsecureGuestAuth”=dword:1
Or with these commands:
reg add HKLMSYSTEMCurrentControlSetServicesLanmanWorkstationParameters /v AllowInsecureGuestAuth /t reg_dword /d 00000001 /f

reg add HKLMSoftwarePoliciesMicrosoftWindowsLanmanWorkstation /v AllowInsecureGuestAuth /t reg_dword /d 00000001 /f
Can’t Connect to the File Share Because It’s Not Secure and Requires the Obsolete SMB1 Protocol
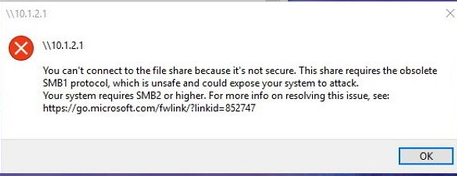
Another possible problem when accessing a network folder from Windows 10 is that only the SMBv1 protocol version is supported on the server-side. Since the SMBv1 client is disabled by default in Windows 10 1709+ when you try to open the shared folder or map a network drive, you may get an error:
You can’t connect to the file share because it’s not secure. This share requires the obsolete SMB1 protocol, which is unsafe and could expose your system to attack. Your system requires SMB2 or higher.
The error message clearly shows that the network shared folder only supports the SMBv1 client access protocol. In this case, you should try to reconfigure the remote SMB device to use at least SMBv2 (the correct and safe way).
If you use Samba server on Linux to share files, you can specify the minimum supported version of SMB protocol in the smb.conf file like this:
[global]
server min protocol = SMB2_10
client max protocol = SMB3
client min protocol = SMB2_10
encrypt passwords = true
restrict anonymous = 2
On Windows 7/Windows Server 2008 R2, you can disable the SMB 1 protocol and enable SMBv2 through the registry with the following PowerShell commands:
Set-ItemProperty -Path "HKLM:SYSTEMCurrentControlSetServicesLanmanServerParameters" SMB1 -Type DWORD -Value 0 –Force

Set-ItemProperty -Path "HKLM:SYSTEMCurrentControlSetServicesLanmanServerParameters" SMB2 -Type DWORD -Value 1 –Force
On Windows 8.1/Windows Server 2012 R2, you can disable SMBv1, allow SMBv2 and SMBv3 with the following command (verify that a private or domain profile is used for your network connection):
Disable-WindowsOptionalFeature -Online -FeatureName "SMB1Protocol"

Set-SmbServerConfiguration –EnableSMB2Protocol $true
If your network device (NAS, Windows XP, Windows Server 2003) supports only the SMB1 protocol, you can enable a separate SMB1Protocol-Client feature on Windows 10/11 or Windows Server. But this is not recommended!!!
If the remote device requires SMBv1 to connect, and this protocol is disabled on your Windows device, an error appears in the Event Viewer:
Log Name: Microsoft-Windows-SmbClient/Security
Source: Microsoft-Windows-SMBClient
Event ID: 32000
Description:  SMB1 negotiate response received from a remote device when SMB1 cannot be negotiated by the local computer.
Run the elevated PowerShell prompt and verify that the SMB1Protocol-Client is disabled (State: Disabled):
Get-WindowsOptionalFeature -Online -FeatureName SMB1Protocol-Client
Enable the SMBv1 client protocol (a reboot is required):
Enable-WindowsOptionalFeature -Online -FeatureName SMB1Protocol-Client
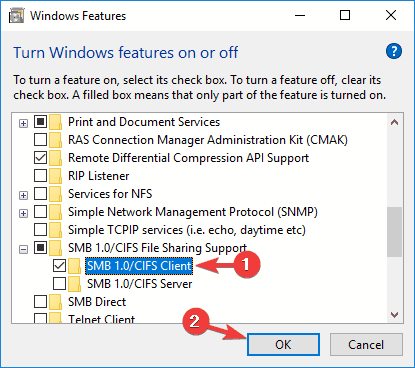
You can also enable/disable additional features in Windows 10 and 11 from the optionalfeatures.exe. Expand SMB 1.0/CIFS File Sharing Support and enable the SMB 1.0/CIFS Client.

On Windows 10 1809 and newer, the SMBv1 client is automatically removed if it has not been used for more than 15 days (the SMB 1.0/CIFS Automatic Removal component is responsible for this).
In this example, I enabled only the SMBv1 client. Do not enable the SMB1Protocol-Server feature if your computer is not used by legacy clients as an SMB server to host shared folders.
After installing the SMBv1 client, you should be able to connect to a shared folder or printer without any problems. However, you should understand this workaround is not recommended, because it reduces the security of your computer.
Windows Cannot Access Shared Folder: You Don’t Have Permissions
When connecting to a shared network folder on a remote computer, an error may appear:
Network Error
Windows cannot access \PC12Share
You do not have permission to access \PC12Share. Contact your network administrator to request access.
When this error occurs, you need to:
- Make sure that the user you are using to access the shared folder is granted access permissions on the remote share. Open the properties of the shared folder on the server and make sure your user has at least read permissions. Also, you can check the SMB file share permissions on the remote host using PowerShell:
Get-SmbShareAccess -Name "tools"
Then check the NTFS folder permissions:
get-acl C:tools |fl If necessary, edit the permissions in the folder and/or share properties;
 - Make sure you are using the correct username and password to access the network folder. If you’re not prompted for a username and password, try removing saved (cached) credentials for remote shares in Windows Credential Manager. Run the command
rundll32.exe keymgr.dll, KRShowKeyMgrand delete cached credentials for the remote computer you are trying to access.
The next time you connect to the shared folder, you will be prompted for a username and password. Specify the credentials to access the network shared folder on the remote computer. You can save it in Credential Manager or add it manually.
 If necessary, edit the permissions in the folder and/or share properties;
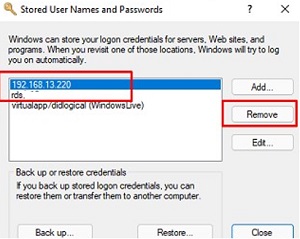
Other Fixes: Windows Cannot Access Shared Folders
This section provides additional ways to troubleshoot a problem opening network folders in Windows:
После обновления на домашнем ПК MS Windows до версии 1709 перестал подключаться к сетевой папке. Отваливается с ошибкой 0x80004005. Решение проблемы далее
Имеется домашний сервер на базе FreeBSD, на нем поднят SAMBA сервер, на котором расшарена папка. Безопасность в домашней сети нулевая, на SAMBA настроен гостевой доступ с полными правами к единственной сетевой папке. Все работало до обновления домашнего ПК с MS Windows 10 до версии 1709. После обновления этот комп перестал видеть шару. Остальные устройства видят шару как и раньше, без проблем. После обновления в MS Windows 10 «подкрутили гайки» с безопасностью и гостевой доступ стал недоступен.
Ослабляем гайки и возвращаем доступ
Для этого запускаем редактор групповой политики на ПК
Политика «Локальный компьютер»Конфигурация компьютераАдминистративные шаблоныСетьРабочая станция Lanman
Параметр «Включить небезопасные гостевые входы» — Состояние «Включена»
Перезагружаем ПК и проверяем, что доступ к сетевой папке появился
Где искать в английской версии:
Group Policy settings:
Computer configurationadministrative templatesnetworkLanman Workstation
«Enable insecure guest logons»
Настройки можно произвести и через реестр
Default Registry Value:
[HKEY_LOCAL_MACHINESYSTEMCurrentControlSetServicesLanmanWorkstationParameters]
«AllowInsecureGuestAuth»=dword:0
Configured Registry Value:
[HKEY_LOCAL_MACHINESYSTEMCurrentControlSetServicesLanmanWorkstationParameters]
«AllowInsecureGuestAuth»=dword:1
Здравствуйте. Пока борьба идет с громким матом, но хоть что-то уже получается. Итак.
Поставил самбу, настроил как здесь: http://bloglinux.ru/2011/06/26/kak-rassharit-papki-na-mashine-s-linux-dlya-se/
На винде диск видится, но выдает «отказано в доступе». Под линуксом такая же беда. Захожу в браузере smb://192.168.1.7/
Видно расшаренную папку и принтеры, в принтеры заходит, а вот в папку нет. Где копать?
#
# Sample configuration file for the Samba suite for Debian GNU/Linux.
#
#
# This is the main Samba configuration file. You should read the
# smb.conf(5) manual page in order to understand the options listed
# here. Samba has a huge number of configurable options most of which
# are not shown in this example
#
# Some options that are often worth tuning have been included as
# commented-out examples in this file.
#  - When such options are commented with ";", the proposed setting
#    differs from the default Samba behaviour
#  - When commented with "#", the proposed setting is the default
#    behaviour of Samba but the option is considered important
#    enough to be mentioned here
#
# NOTE: Whenever you modify this file you should run the command
# "testparm" to check that you have not made any basic syntactic
# errors.
#======================= Global Settings =======================
[global]
usershare owner only = false
## Browsing/Identification ###
# Change this to the workgroup/NT-domain name your Samba server will part of
workgroup = workgroup
# server string is the equivalent of the NT Description field
server string = %h server (Samba, Ubuntu)
host allow = ALL
# Windows Internet Name Serving Support Section:
# WINS Support - Tells the NMBD component of Samba to enable its WINS Server
# wins support = no
# WINS Server - Tells the NMBD components of Samba to be a WINS Client
# Note: Samba can be either a WINS Server, or a WINS Client, but NOT both
; wins server = w.x.y.z
# This will prevent nmbd to search for NetBIOS names through DNS.
dns proxy = no
#### Networking ####
# The specific set of interfaces / networks to bind to
# This can be either the interface name or an IP address/netmask;
# interface names are normally preferred
; interfaces = 127.0.0.0/8 eth0
# Only bind to the named interfaces and/or networks; you must use the
# 'interfaces' option above to use this.
# It is recommended that you enable this feature if your Samba machine is
# not protected by a firewall or is a firewall itself. However, this
# option cannot handle dynamic or non-broadcast interfaces correctly.
; bind interfaces only = yes
#### Debugging/Accounting ####
# This tells Samba to use a separate log file for each machine
# that connects
log file = /var/log/samba/log.%m
# Cap the size of the individual log files (in KiB).
max log size = 1000
# If you want Samba to only log through syslog then set the following
# parameter to 'yes'.
# syslog only = no
# We want Samba to log a minimum amount of information to syslog. Everything
# should go to /var/log/samba/log.{smbd,nmbd} instead. If you want to log
# through syslog you should set the following parameter to something higher.
syslog = 0
# Do something sensible when Samba crashes: mail the admin a backtrace
panic action = /usr/share/samba/panic-action %d
####### Authentication #######
# Server role. Defines in which mode Samba will operate. Possible
# values are "standalone server", "member server", "classic primary
# domain controller", "classic backup domain controller", "active
# directory domain controller".
#
# Most people will want "standalone sever" or "member server".
# Running as "active directory domain controller" will require first
# running "samba-tool domain provision" to wipe databases and create a
# new domain.
server role = standalone server
# If you are using encrypted passwords, Samba will need to know what
# password database type you are using.
; passdb backend = tdbsam
obey pam restrictions = yes
# This boolean parameter controls whether Samba attempts to sync the Unix
# password with the SMB password when the encrypted SMB password in the
# passdb is changed.
unix password sync = yes
# For Unix password sync to work on a Debian GNU/Linux system, the following
# parameters must be set (thanks to Ian Kahan <<kahan@informatik.tu-muenchen.de> for
# sending the correct chat script for the passwd program in Debian Sarge).
passwd program = /usr/bin/passwd %u
passwd chat = *Entersnews*spassword:* %nn *Retypesnews*spassword:* %nn *passwordsupdatedssuccessfully* .
# This boolean controls whether PAM will be used for password changes
# when requested by an SMB client instead of the program listed in
# 'passwd program'. The default is 'no'.
pam password change = yes
# This option controls how unsuccessful authentication attempts are mapped
# to anonymous connections
map to guest = bad user
########## Domains ###########
#
# The following settings only takes effect if 'server role = primary
# classic domain controller', 'server role = backup domain controller'
# or 'domain logons' is set
#
# It specifies the location of the user's
# profile directory from the client point of view) The following
# required a [profiles] share to be setup on the samba server (see
# below)
; logon path = \%Nprofiles%U
# Another common choice is storing the profile in the user's home directory
# (this is Samba's default)
# logon path = \%N%Uprofile
# The following setting only takes effect if 'domain logons' is set
# It specifies the location of a user's home directory (from the client
# point of view)
; logon drive = H:
# logon home = \%N%U
# The following setting only takes effect if 'domain logons' is set
# It specifies the script to run during logon. The script must be stored
# in the [netlogon] share
# NOTE: Must be store in 'DOS' file format convention
; logon script = logon.cmd
# This allows Unix users to be created on the domain controller via the SAMR
# RPC pipe. The example command creates a user account with a disabled Unix
# password; please adapt to your needs
; add user script = /usr/sbin/adduser --quiet --disabled-password --gecos "" %u
# This allows machine accounts to be created on the domain controller via the
# SAMR RPC pipe.
# The following assumes a "machines" group exists on the system
; add machine script = /usr/sbin/useradd -g machines -c "%u machine account" -d /var/lib/samba -s /bin/false %u
# This allows Unix groups to be created on the domain controller via the SAMR
# RPC pipe.
; add group script = /usr/sbin/addgroup --force-badname %g
############ Misc ############
# Using the following line enables you to customise your configuration
# on a per machine basis. The %m gets replaced with the netbios name
# of the machine that is connecting
; include = /home/samba/etc/smb.conf.%m
# Some defaults for winbind (make sure you're not using the ranges
# for something else.)
; idmap uid = 10000-20000
; idmap gid = 10000-20000
; template shell = /bin/bash
# Setup usershare options to enable non-root users to share folders
# with the net usershare command.
# Maximum number of usershare. 0 (default) means that usershare is disabled.
; usershare max shares = 100
# Allow users who've been granted usershare privileges to create
# public shares, not just authenticated ones
usershare allow guests = yes
username map = /etc/samba/smbusers
security = user
; encrypt passwords = yes
; guest ok = no
; guest account = nobody
#======================= Share Definitions =======================
# Un-comment the following (and tweak the other settings below to suit)
# to enable the default home directory shares. This will share each
# user's home directory as \serverusername
;[homes]
; comment = Home Directories
; browseable = no
omment = DATA
path = /media/data
browsable = yes
writable = yes
guest ok = yes
# By default, the home directories are exported read-only. Change the
# next parameter to 'no' if you want to be able to write to them.
; read only = yes
# File creation mask is set to 0700 for security reasons. If you want to
# create files with group=rw permissions, set next parameter to 0775.
; create mask = 0700
# Directory creation mask is set to 0700 for security reasons. If you want to
# create dirs. with group=rw permissions, set next parameter to 0775.
; directory mask = 0700
# By default, \serverusername shares can be connected to by anyone
# with access to the samba server.
# Un-comment the following parameter to make sure that only "username"
# can connect to \serverusername
# This might need tweaking when using external authentication schemes
; valid users = %S
# Un-comment the following and create the netlogon directory for Domain Logons
# (you need to configure Samba to act as a domain controller too.)
;[netlogon]
; comment = Network Logon Service
; path = /home/samba/netlogon
; guest ok = yes
; read only = yes
# Un-comment the following and create the profiles directory to store
# users profiles (see the "logon path" option above)
# (you need to configure Samba to act as a domain controller too.)
# The path below should be writable by all users so that their
# profile directory may be created the first time they log on
;[profiles]
; comment = Users profiles
; path = /home/samba/profiles
; guest ok = no
; browseable = no
; create mask = 0600
; directory mask = 0700
[printers]
comment = All Printers
browseable = no
path = /var/spool/samba
printable = yes
; guest ok = no
; read only = yes
create mask = 0700
# Windows clients look for this share name as a source of downloadable
# printer drivers
[print$]
comment = Printer Drivers
path = /var/lib/samba/printers
; browseable = yes
; read only = yes
; guest ok = no
# Uncomment to allow remote administration of Windows print drivers.
# You may need to replace 'lpadmin' with the name of the group your
# admin users are members of.
# Please note that you also need to set appropriate Unix permissions
# to the drivers directory for these users to have write rights in it
; write list = root, @lpadmin
[data]
comment = data
path = /media/data
writeable = yes
; browseable = yes
guest ok = yes
by Madalina Dinita
Madalina has been a Windows fan ever since she got her hands on her first Windows XP computer. She is interested in all things technology, especially emerging technologies… read more
Updated on March 25, 2020
XINSTALL BY CLICKING THE DOWNLOAD FILE
This software will keep your drivers up and running, thus keeping you safe from common computer errors and hardware failure. Check all your drivers now in 3 easy steps:
- Download DriverFix (verified download file).
- Click Start Scan to find all problematic drivers.
- Click Update Drivers to get new versions and avoid system malfunctionings.
- DriverFix has been downloaded by 0 readers this month.
Samba is an application-layer network protocol, with its primary purpose to provide shared access to files, however, many users reported Unable to access Samba share message while using it. This can be a big problem, so today we’ll show you how to fix it.
Samba runs on most Unix based systems, such as Linux OS for example. Samba also takes its name from Server Message Block or SMB. Most of the time, you’ll be using SMB to connect to devices that aren’t running Windows.
Starting from build 1709, Samba has a hard time working well since Windows disables unauthenticated access to shares that are using SMB2 with guest access enabled. However, there’s a way to fix this problem.
- Change Group Policy settings
- Enable SMB 1.0
- Disable Digitally sign communications policy
1. Change Group Policy settings
- Open Group Policy Editor.
- Select Computer Configuration and click on Administrative Templates.
- Select Network and choose the name of your Workstation.

- Modify Enable insecure guest logons to Enabled.
- Apply changes and restart your machine.
2. Enable SMB 1.0
The SMB1 protocol has been disabled since recent updates to Windows 10, but was never fully removed. Merely stowed away, meaning you can temporarily enable this protocol on your Windows 10 machine.
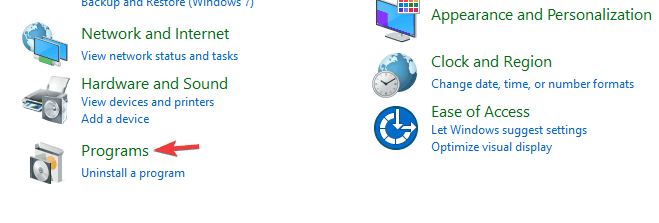
- Open the Control Panel, and click on Programs.

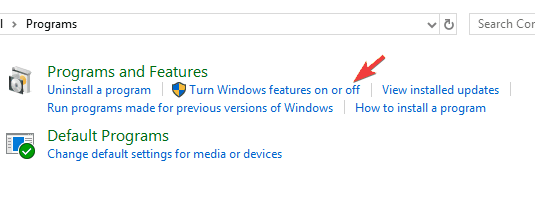
- Click on Turn Windows features on or off.

- Expand the SMB 1.0/CIFS File Sharing Support option.
- Check the SMB 1.0/CIFS Client option.

- Click the OK button and click the Restart button.
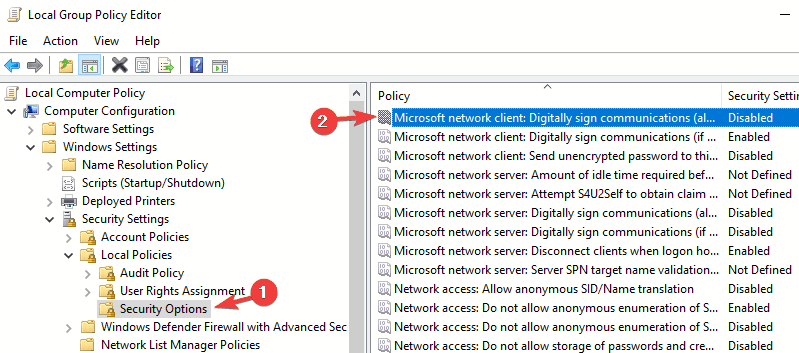
3. Disable Digitally sign communications policy
Say you’re in the situation that you have a network with two workstations. One is running Windows and the other one Linux, and you’re using Samba to share a local storage device. But sometimes, Samba might mismanage the session’s security negotiations with Windows. To fix that, do the following:
- Click Local Computer Policy then select Computer Configuration.
- Next, go to Windows Settings and select Security Settings.
- Select Local Policies and click on Security Options.
- Locate a policy named Microsoft network client: Digitally sign communications (always), it should always be Disabled.

- Apply changes and restart your machine.
Always remember, keep your Lan Manger’s authentication level to Send LM & NTLM – use NTLMv2 session security if negotiated. And if there’s any firewall involved, configure them correctly.
Unable to access Samba share message can cause certain issues, but we hope that you managed to fix it using our solutions.
RELATED STORIES TO CHECK OUT:
- 4 great Linux emulators for your Windows 10 PC
- Skype for Web drops support for ChromeOS and Linux
- 6 best network security antivirus to use for your business in 2019
Still having issues? Fix them with this tool:
SPONSORED
If the advices above haven’t solved your issue, your PC may experience deeper Windows problems. We recommend downloading this PC Repair tool (rated Great on TrustPilot.com) to easily address them. After installation, simply click the Start Scan button and then press on Repair All.
![]()
Newsletter
I have an issue under Windows 10 to access some Linux Samba shares with following error:
Check the spelling of the name. Otherwise, there might be a problem with your network. To try to identify and resolve network problems click Diagnose.
Error code: 0x80070035
The network path was not found
I can successfully browse from an old openSUSE 12.1 that uses only SMB1/CIFS but not from a more recent openSUSE Leap 15, except if I force NT1 protocol (that is for SMB1/CIFS) on its side, in /etc/samba/smb.conf global section:
[global]
...
min protocol = NT1
max protocol = NT1
For information, by default min protocol is LANMAN1 and max protocol is SMB3, that range then includes NT1 protocol (see SMB protocol min max values available?):
$ testparm --parameter-name="min protocol"
[...]
LANMAN1
$ testparm --parameter-name="max protocol"
[...]
SMB3
And I can access these shared folders from another Linux computer without forcing protocol with following command for example I can list folders:
smbclient -L MyLeap15Computer -N
Or connect to tmp shared folder with:
smbclient //MyLeap15Computer /tmp -N
I also confirmed that SMB2 and 3 are actually active with How to detect, enable and disable SMBv1, SMBv2, and SMBv3 in Windows, and also been able to access them from another Windows 10. And from the computer on which I cannot access them I successfully ping MyLeap15Computer.
Anyway, technically I can access my shared folders by forcing NT1 protocol, but since it should be possible I want to be able to access them from SMB2 or SMB3 since there are security issues in SMB1/CIFS (and then deactivate it in Windows 10 too), also, since I can access them from another Windows 10 without forcing this protocol it then should be something in Windows configuration but I cannot manage to see which since everything appears active on both.
And finally, even if issue seems to be more on client side, here is the server condifuration, /etc/samba/smb.conf without forcing to NT1 protocol (this configuration accepts guest users, then no credentials have to be given for connection):
[global]
workgroup = WORKGROUP
passdb backend = tdbsam
printing = cups
printcap name = cups
printcap cache time = 750
cups options = raw
map to guest = bad user
logon path = \%Lprofiles.msprofile
logon home = \%L%U.9xprofile
logon drive = P:
usershare allow guests = yes
usershare max shares = 100
winbind offline logon = yes
winbind refresh tickets = yes
create mask = 777
directory mask = 777
delete readonly = yes

[tmp]
comment = Temp folder
path = /tmp
browseable = yes
writable = yes
read only = no
guest ok = yes
mangled names = no
Edit: here are more information after what suggested @JW0914, what was suggested did not work but I found something interesting in server logs (added log level = 3 to /etc/samba/smb.conf global section then looked on /var/log/samba/log.smbd after having tried connection):
  check_ntlm_password:  Checking password for unmapped user [DOMAIN][USER]@[Windows10Computer] with the new password interface
[2020/02/05 14:21:23.845849,  3] ../source3/auth/auth.c:192(auth_check_ntlm_password)
  check_ntlm_password:  mapped user is: [DOMAIN][USER]@[Windows10Computer]
[2020/02/05 14:21:23.845879,  3] ../source3/auth/check_samsec.c:399(check_sam_security)
  check_sam_security: Couldn't find user 'USER' in passdb.
[2020/02/05 14:21:23.845890,  2] ../source3/auth/auth.c:332(auth_check_ntlm_password)
  check_ntlm_password:  Authentication for user [USER] -> [USER] FAILED with error NT_STATUS_NO_SUCH_USER, authoritative=1
[2020/02/05 14:21:23.845910,  2] ../auth/auth_log.c:760(log_authentication_event_human_readable)
  Auth: [SMB2,(null)] user [DOMAIN][USER] at [Wed, 05 Feb 2020 14:21:23.845900 CET] with [NTLMv2] status [NT_STATUS_NO_SUCH_USER] workstation [Windows10Computer] remote host [ipv4:172.168.0.69:56937] mapped to [DOMAIN][USER]. local host [ipv4:172.168.0.99:445]
[...]
  No such user USER [DOMAIN] - using guest account
[2020/02/05 14:21:23.847182,  3] ../source3/smbd/server_exit.c:244(exit_server_common)
  Server exit (NT_STATUS_CONNECTION_RESET)
I see server is trying to authenticate with user logged in Windows 10, but since not existing it falls back to guest user but connection is reset just after. In the other side, with a computer for which it is working, when logged with same domain/user and accessing successfully I have quite the same logs (different computer name and IP) but at the end:
  No such user USER [DOMAIN] - using guest account
[2020/02/05 14:43:21.147396,  3] ../lib/util/access.c:365(allow_access)
  Allowed connection from 192.168.0.77 (192.168.0.77)
I’m looking into it but I would be glad if anybody has a clue on what is happening.
Edit2: after a quick look I found a workaround on Windows 10 fall update and samba guest account but when trying net use command I have following issue, then this is my company that may have change security on newer computer (both used are on the same domain but the one not working comes from a newer installation):
You can't access this shared folder because your organization's security policies block unauthenticated guest access. These policies help protect your PC from unsafe or malicious devices on the network.
Thanks
На чтение 3 мин. Просмотров 187 Опубликовано 03.09.2019
Samba – это сетевой протокол прикладного уровня, основной целью которого является предоставление общего доступа к файлам, однако многие пользователи сообщали, что невозможно получить доступ к общему ресурсу Samba во время его использования. Это может быть большой проблемой, поэтому сегодня мы покажем вам, как ее исправить.
Samba работает в большинстве систем на основе Unix, таких как, например, ОС Linux. Samba также берет свое имя от блока сообщений сервера или SMB. В большинстве случаев вы будете использовать SMB для подключения к устройствам, которые не работают под управлением Windows.
Начиная со сборки 1709, Samba плохо работает, поскольку Windows отключает неаутентифицированный доступ к общим ресурсам, использующим SMB2 с включенным гостевым доступом. Тем не менее, есть способ решить эту проблему.
Содержание
- Как я могу исправить Windows не может получить доступ к сообщению общего доступа Samba?
- 1. Изменить параметры групповой политики
- 2. Включить SMB 1.0
- 3. Отключить цифровую подпись политики связи
Как я могу исправить Windows не может получить доступ к сообщению общего доступа Samba?
- Изменить параметры групповой политики
- Включить SMB 1.0
- Отключить цифровую подпись политики связи
1. Изменить параметры групповой политики
- Откройте Редактор групповой политики .
- Выберите Конфигурация компьютера и нажмите Административные шаблоны .
-
Выберите Сеть и выберите имя своей рабочей станции .
- Измените Включить небезопасные гостевые входы на Включено .
- Примените изменения и перезагрузите компьютер.

2. Включить SMB 1.0
Протокол SMB1 был отключен с момента последних обновлений до Windows 10, но никогда не удалялся полностью. Просто убран, что означает, что вы можете временно включить этот протокол на вашем компьютере с Windows 10.
-
Откройте Панель управления и нажмите Программы .
-
Нажмите Включить или выключить функции Windows .
- Разверните параметр Поддержка общего доступа к файлам SMB 1.0/CIFS .
-
Проверьте параметр SMB 1.0/CIFS Client .
- Нажмите кнопку ОК и нажмите кнопку Перезагрузить .


3. Отключить цифровую подпись политики связи
Скажем, вы находитесь в ситуации, когда у вас есть сеть с двумя рабочими станциями. Один работает под управлением Windows, а другой – под управлением Linux, и вы используете Samba для совместного использования локального устройства хранения. Но иногда Samba может неправильно управлять переговорами по безопасности сеанса с Windows. Чтобы это исправить, сделайте следующее:
- Нажмите Политика локального компьютера , затем выберите Конфигурация компьютера .
- Затем перейдите в Настройки Windows и выберите Настройки безопасности .
- Выберите Локальные политики и нажмите Параметры безопасности .
-
Найдите политику с именем Клиент сети Microsoft: используйте цифровую подпись (всегда) , она всегда должна быть отключена .
- Примените изменения и перезагрузите компьютер.

Всегда помните, что уровень аутентификации Lan Manger должен быть равен Отправлять LM и NTLM – используйте сеансовую безопасность NTLMv2, если согласовано . И если есть какие-либо брандмауэры, настройте их правильно.
Сообщение Невозможно получить доступ к общему ресурсу Samba может вызвать определенные проблемы, но мы надеемся, что вам удалось исправить это с помощью наших решений.