Note: This article focuses on how to share files or folders over a Local Area Network (or LAN), such as connected computers within your home or workplace. If you are trying to find out how to share a file over the Internet, for example with a friend or family member, OneDrive provides easy ways to accomplish this. For more details, see Share OneDrive files and folders.
Here are some answers to common questions about changes to file and folder sharing in Windows 11:
To share a file or folder over a network in File Explorer, do the following:
-
Right-click (or long-press) a file, and then select Show more options > Give access to > Specific people.

-
Select a user on the network to share the file with, or select Everyone to give all network users access to the file.

If you select multiple files at once, you can share them all in the same way. It works for folders, too—share a folder, and all files in it will be shared.
Right-click or press a file or folder, then select Show more options > Give access to > Remove access.

File Explorer shows the Remove access option for all files, even those that aren’t being shared over a network.
Open File Explorer, then type \localhost into the address bar.
Note: When you’ve shared a file from a folder in your user profile and you go to \localhost, you’ll see your user profile and all its files there. This doesn’t mean that all of your files are shared—just that you have access to all your own files.
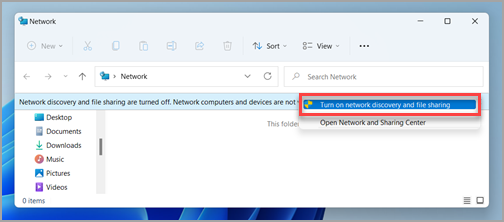
If you open File Explorer, go to Network, and see an error message («Network discovery is turned off….»), you’ll need to turn on network discovery to see devices on the network that are sharing files. To turn it on, select the Network discovery is turned off banner, then select Turn on network discovery and file sharing.
To troubleshoot problems with sharing files or folders, follow the steps below on all computers from which you’re trying to share.
-
Update Windows. Ensuring all machines are as updated as they can be is key to making sure you aren’t missing out on any driver or Windows updates.
Open Windows Update -
Make sure the computers are on the same network. For example, if your computers connect to the internet through a wireless router, make sure they all connect through the same wireless router.
-
If you’re on a Wi-Fi network, set it to Private. To find out how, read Make a Wi-Fi network public or private in Windows.
-
Turn on network discovery and file and printer sharing, and turn off password protected sharing.
-
Select the Start button, then select Settings .
-
In the Find a setting search bar, type manage advanced sharing settings and select Manage advanced sharing settings from the suggested results.
-
In the Advanced sharing settings window that appears, under Private, select Turn on Network discovery and Turn on file and printer sharing.
-
Under All Networks, select Turn off password protected sharing.
-
-
Make sharing services start automatically.
-
Press the Windows logo key + R.
-
In the Run dialog box, type services.msc, and then select OK.
-
Right-click each of the following services, select Properties, if they’re not running, select Start, and next to Startup type, select Automatic:
-
Function Discovery Provider Host
-
Function Discovery Resource Publication
-
SSDP Discovery
-
UPnP Device Host
-
-
Related topics
-
Share things with nearby devices in Windows
-
Share files in File Explorer
-
Make a Wi-Fi network public or private in Windows
-
Fix network connection issues in Windows
In Windows 10, some features of file and folder sharing over a network have changed, including the removal of HomeGroup. Read on for answers to common questions about other changes to file and folder sharing in Windows 10.
To share a file or folder in File Explorer, do one of the following:
-
Right-click or press a file, select Give access to > Specific people.
-
Select a file, select the Share tab at the top of File Explorer, and then in the Share with section select Specific people.

Select a user on the network to share the file with, or select Everyone to give all network users access to the file.
If you select multiple files at once, you can share them all in the same way. It works for folders, too—share a folder, and all files in it will be shared.
To stop sharing in File Explorer, do one of the following:
-
Right-click or press a file or folder, then select Give access to > Remove access.
-
Select a file or folder, select the Share tab at the top of File Explorer, and then in the Share with section select Remove access.

File Explorer shows the Remove access option («Stop sharing» in older versions of Windows 10) for all files, even those that aren’t being shared over a network.
Open File Explorer, then type \localhost into the address bar.
Note: When you’ve shared a file from a folder in your user profile and you go to \localhost, you’ll see your user profile and all its files there. This doesn’t mean that all of your files are shared—just that you have access to all your own files.
If you open File Explorer, go to Network, and see an error message («Network discovery is turned off….»), you’ll need to turn on network discovery to see devices on the network that are sharing files. To turn it on, select the Network discovery is turned off banner, then select Turn on network discovery and file sharing.

To troubleshoot problems with sharing files or folders, follow the steps below on all computers from which you’re trying to share.
-
Update Windows. Ensuring all machines are as updated as they can be is key to making sure you aren’t missing out on any driver or Windows updates.
Open Windows Update -
Make sure the computers are on the same network. For example, if your computers connect to the internet through a wireless router, make sure they all connect through the same wireless router.
-
If you’re on a Wi-Fi network, set it to Private. To find out how, read Make a Wi-Fi network public or private in Windows.
-
Turn on network discovery and file and printer sharing, and turn off password protected sharing.
-
Select the Start button, then select Settings > Network & internet , and on the right side, select Sharing options.
-
Under Private, select Turn on Network discovery and Turn on file and printer sharing.
-
Under All Networks, select Turn off password protected sharing.
-
-
Make sharing services start automatically.
-
Press the Windows logo key + R.
-
In the Run dialog box, type services.msc, and then select OK.
-
Right-click each of the following services, select Properties, if they’re not running, select Start, and next to Startup type, select Automatic:
-
Function Discovery Provider Host
-
Function Discovery Resource Publication
-
SSDP Discovery
-
UPnP Device Host
-
-
Related topics
-
Share things with nearby devices in Windows
-
Share files in File Explorer
-
Make a Wi-Fi network public or private in Windows
-
Fix network connection issues in Windows
Need more help?
On Windows 10, you can share files with other users over the network. While this might seem complicated, it’s technically a simple task using the operating system’s built-in tools.
Depending on your network environment and what you want to accomplish, there are at least four ways to set up file sharing on Windows 10. You can use the Public folder, a specific setup that lets you share files over the local network without configuring permissions. Or you can share content using the File Sharing feature on Windows 10. And if you are looking to share files with other people across the internet, you can use file sharing with OneDrive.
In previous versions, you could also use Homegroup, which, unlike the Public folder, automatically shared Windows 10 libraries folders (Pictures, Videos, Music, Documents), Printers, and other devices connected to your computer. However, it is no longer a feature on Windows 10.
This guide will teach you how to share files over the network using File Sharing and OneDrive on Windows 10.
- Share files between computers from File Explorer on Windows 10
- Share files over the network with no password on Windows 10
- Share files from OneDrive on Windows 10
- Share files with Nearby Sharing feature on Windows 10
Share files between computers from File Explorer on Windows 10
Using the built-in File Sharing feature on Windows 10 is the best method to share files in a local network, as it is more flexible. You can use more restrictive permissions and share files with virtually any device, including Mac, Android, and Linux devices.
There are two ways to share files using File Explorer. You can use the basic settings, which allow you to share files on the network with minimal configuration quickly, or you can use the advanced settings to set custom permissions and other advanced options.
To share files on a local network using the express settings, use these steps:
-
Open File Explorer on Windows 10.
-
Navigate to the folder you want to share.
-
Right-click the item, and select the Properties option.

-
Click on the Sharing tab.
-
Click the Share button.

-
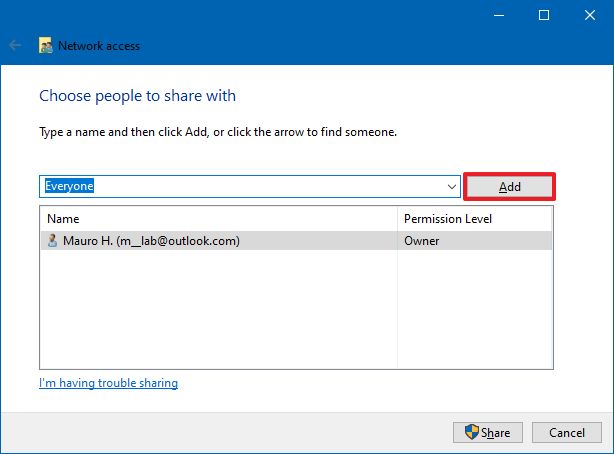
Use the drop-down menu to select the user or group to share a file or folder. (For this guide, select the Everyone group.)
-
Click the Add button.

-
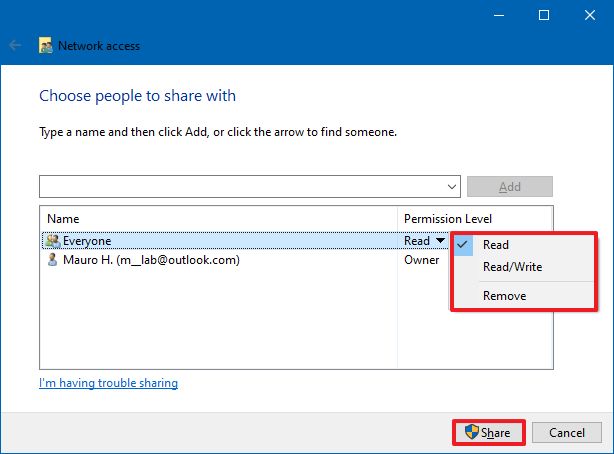
Under the “Permission Level” section, select the sharing permissions you want the folder to have. For instance, you can choose Read (default) if you only want users to view and open files. If you select Read/Write, users can view, open, modify, and delete the content on the shared folder.
-
Click the Share button.
-
Confirm the folder’s network path that other users need to access the network’s content and click the Done button.
-
Click the Close button.


Windows 10 file sharing using advanced settings
To share files on a local network using the advanced settings on Windows 10, use these steps:
-
Open File Explorer.
-
Open the location with the folder to share.
-
Right-click the item and select the Properties option.
-
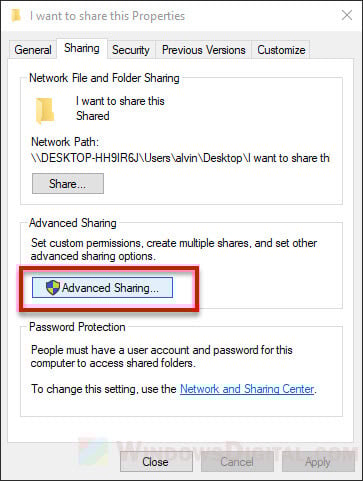
Click on the Sharing tab.
-
Click the Advanced Sharing button.
-
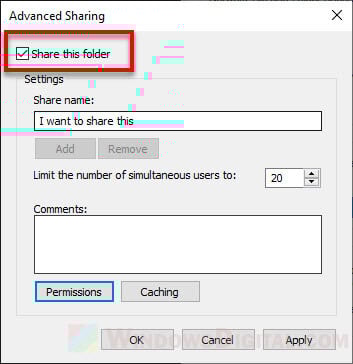
Check the “Share this folder” option.
-
Click the Permissions button.

Quick note: Windows 10 allows other users read-only access to the content you share by default, meaning they can only view files but cannot do anything else. If you want users to edit the files, delete, and create new documents in the location, you must manually select the permissions.
-
Select the Everyone group.
-
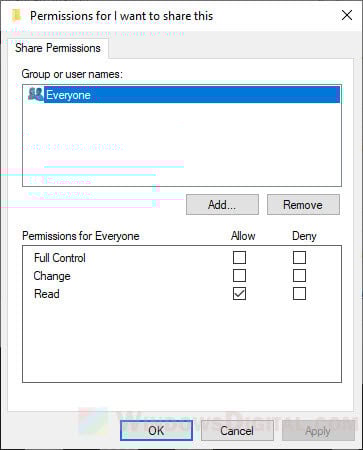
Check the permissions to access the contents of the folder:
- Full Control: Enables users to read, change, and edit permissions. Also, it allows them to take ownership of files.
- Change: Users can read, execute, write, and delete files and folders in the shared location.
- Read: Allows users to access and view the contents of the folder.

-
Click the Apply button.
-
Click the OK button.
-
Click the Security tab.
-
Click the Edit button.
-
Click the Add button.
-
Click the Advanced button.

-
Click the Find now button.
-
Select the Everyone group.

-
Click the OK button.
-
Click the OK button again.
-
Select the Everyone group again.
-
Check the Full control option.
-
Click the Apply button.
-
Click the OK button.
-
Click the Close button.


Once you complete the steps, the shared content should be available when browsing the remote computer on File Explorer > Network.
If you have a device set up with a Microsoft account, you will get a prompt to sign in to access the network contents in the shared location, and using your email and password is likely to fail. You can get around this problem by using a local account if you configure the share with the “Everyone” group or the user and password of an account available on the remote computer.
Alternatively, you could switch your Microsoft account to a local account and then again to a Microsoft account, and then you can use the account to sign in.
Share files over the network with no password on Windows 10
On Windows 10, any file you share is by default secured with a username and password, which means that only people who have an account and password on the computer can access shared files.
If you’re setting up file sharing on a local network for your family members or people you know, it is possible to disable the requirement to sign in with Windows credentials to allow users to access files on the sharing computer without needing a password.
To disable password protection for file sharing on Windows 10, use these steps:
-
Open Control Panel.
-
Click on Network and Internet.
-
Click on Network and Sharing Center.
-
Click the “Change advanced sharing settings” option on the left pane.

-
Expand the All Networks tab.
-
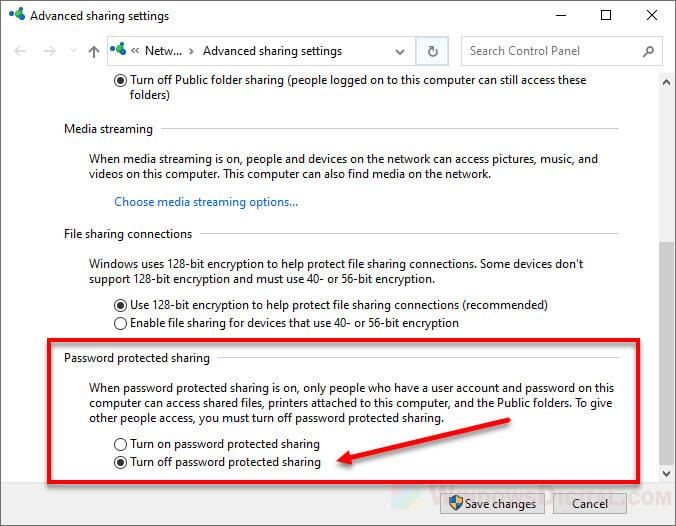
Under the “Password protected sharing” section, select the “Turn off password protected sharing” option.
-
Click the Save changes button.


After you complete the steps, users should be able to access the shared folder without a password.
Windows 10 file sharing with no password
To share files with everyone without a password over the network, use these steps:
-
Open File Explorer.
-
Navigate to the folder you want to share.
-
Right-click the item, and select the Properties option.
-
Click on the Sharing tab.
-
Click the Share button.
-
Use the drop-down menu to select the Everyone group.
-
Click the Add button.
-
Under the “Permission Level” section, select the sharing permissions you want the folder to have. For example, you can choose Read (default) if you only want users to view and open files. If you select Read/Write, users can view, open, modify, and delete the content on the shared folder.
-
Click the Share button.
-
Confirm the folder’s network path and click the Done button.
-
Click the Close button.
Once you complete the steps, other users won’t need the same account information on the devices to access the shared folder’s contents.
Share files from OneDrive on Windows 10
You can also share files across a network or worldwide using OneDrive.
To share files from OneDrive on Windows 10, use these steps:
-
Open your OneDrive folder on Windows 10.
-
Navigate to the folder you want to share.
-
Right-click the folder and select the Share option.

-
Confirm the email of the person to share the content. (Or the available options to copy the link or share files using other apps.)
-
Click the Send button.


Any user who receives your message can click the link and view the folder’s content on any web browser.
OneDrive file sharing from the web
If you want users to view and edit the content inside the OneDrive folder, you will need to share the folder using OneDrive on the web.
To share OneDrive files from the web, use these steps:
-
Open OneDrive online.
-
Navigate to the file or folder you want to share.
-
Right-click the item and select the Share option.

-
Specify the email for the person to share the files. (Or the available options to copy the link.)
-
Click the Send button.


Once you complete the steps, anyone with the link can edit the files in the folder.
If you only want to share files with specific users privately, you can share the content through email.
Files you share will only be available to users if your computer is turned on, except for the OneDrive sharing method. However, using OneDrive, users must have an internet connection to access the shared content.
Alternatively, you can use Nearby Sharing to share files with other people. However, you will be sending a copy of the file, you won’t be making the file available through your computer.
On Windows 10, Nearby Sharing is a feature that allows you to share files (not folders) and links to other nearby devices using Bluetooth or Wi-Fi. (You can share files between Windows 10 and 11 devices.)
To enable Nearby Sharing on Windows 10, use these steps:
-
Open Settings.
-
Click on System.
-
Click on Shared experiences.
-
Turn on the Nearby sharing toggle switch.


After you complete the steps, you can proceed to share files with other devices. (You must repeat these steps on all the devices participating in the sharing process.)
Windows 10 file sharing with Nearby Sharing
To share files with other devices with Nearby Sharing, use these steps:
-
Open File Explorer.
-
Browse to the folder with the files you want to share.
-
Right-click the file and select the Share option.

-
Select the device to share the file.

Once you complete the steps, on the other device, you should see a notification that you must confirm to complete the transfer. The file will download and store in the “Downloads” folder.
Предоставление общего доступа к папкам – необходимая процедура для создания локальной сети. Если нужно организовать обмен данными между несколькими компьютерами, без этого не обойтись. Задача несложная, однако у начинающих пользователей часто возникают трудности.
В сегодняшнем руководстве я на пальцах объясню, как создать, настроить и открыть общий доступ к папке в Windows 10.
Настраиваем общий доступ в Windows 10
Прежде чем переходить к настройке общего доступа, для начала нам потребуется установить частный сетевой профиль – в таком случае компьютер будет виден прочим устройствам и может быть открыт для совместного использования файлов.
Изменяем профиль сети:
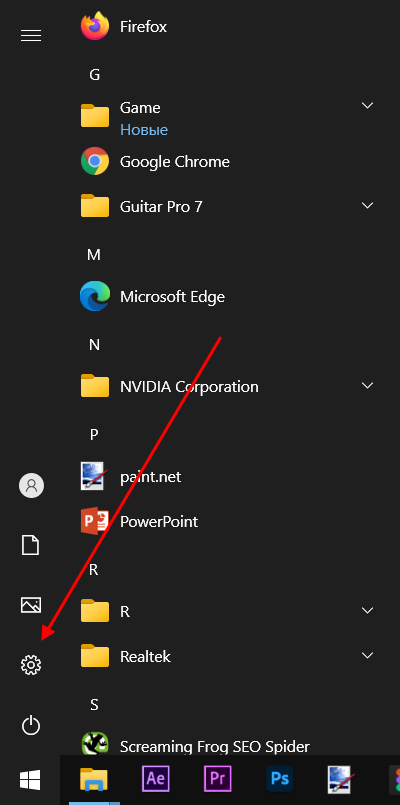
- Открываем меню «Пуск» и переходим в раздел «Параметры».
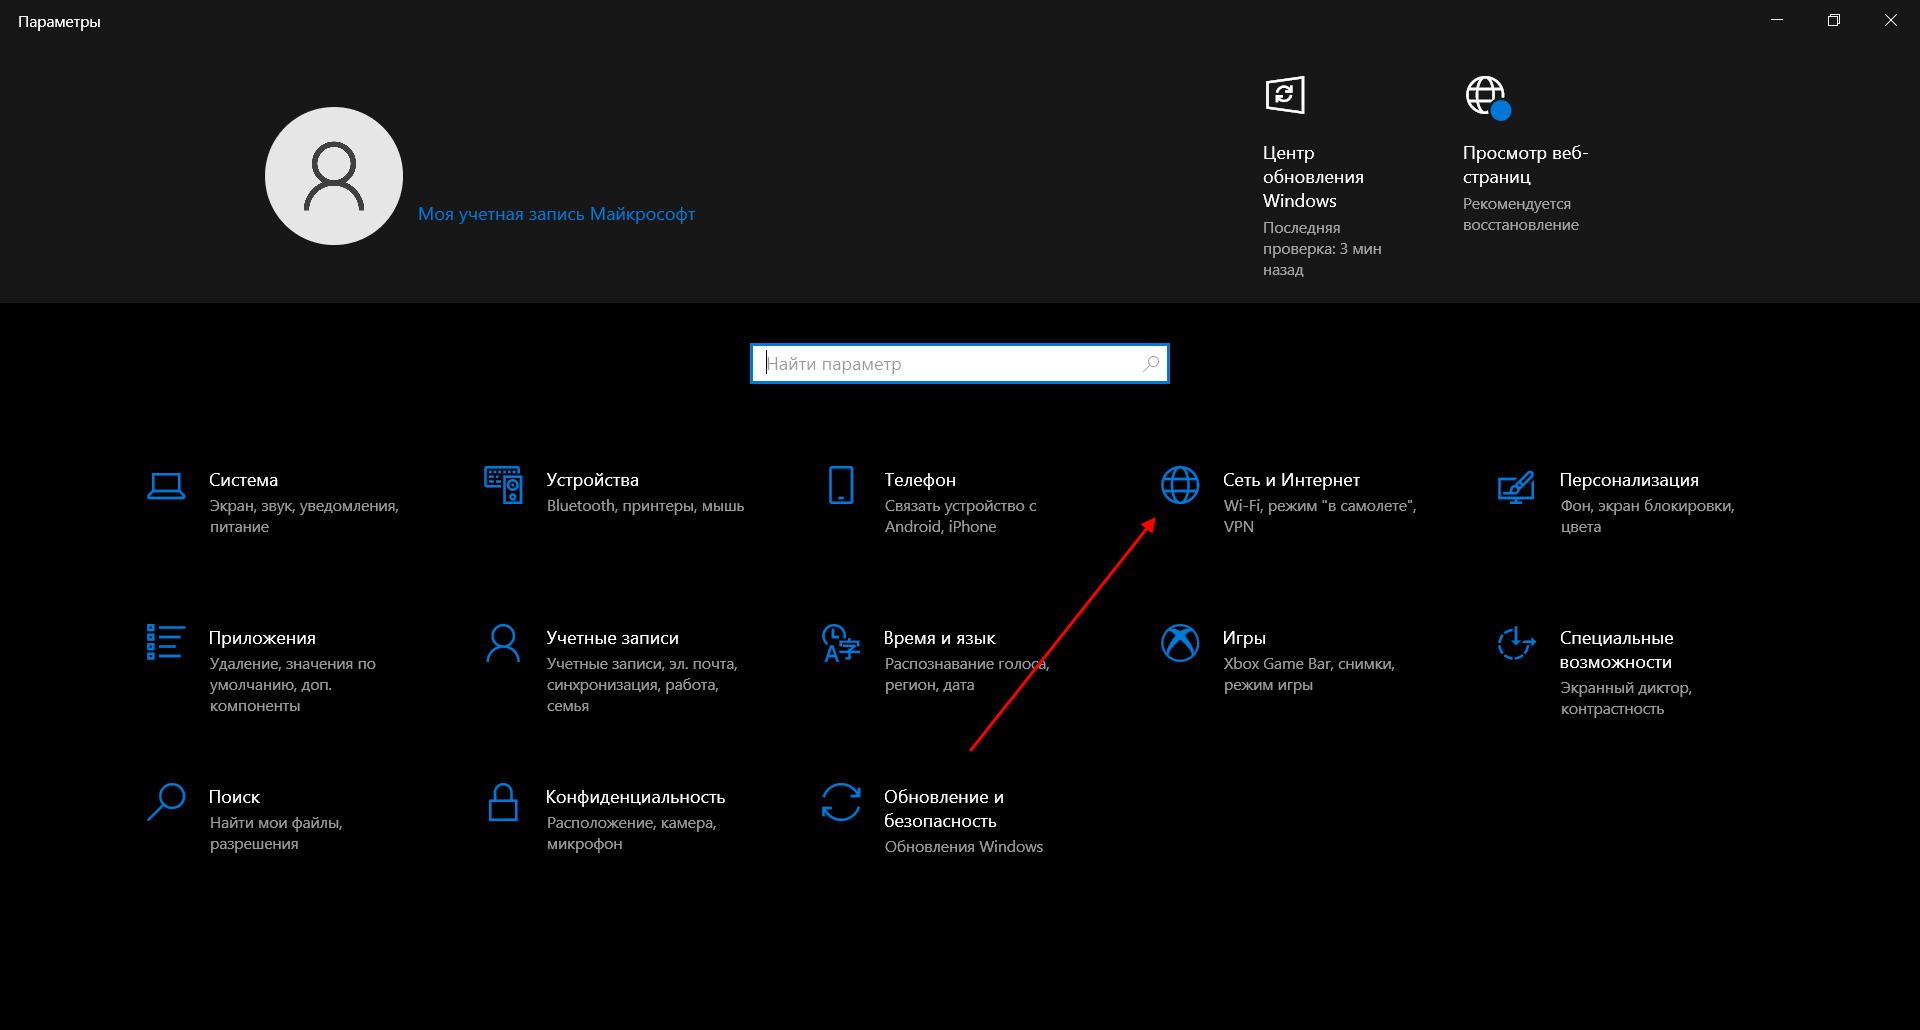
- Следующим шагом открываем подраздел «Сеть и интернет».
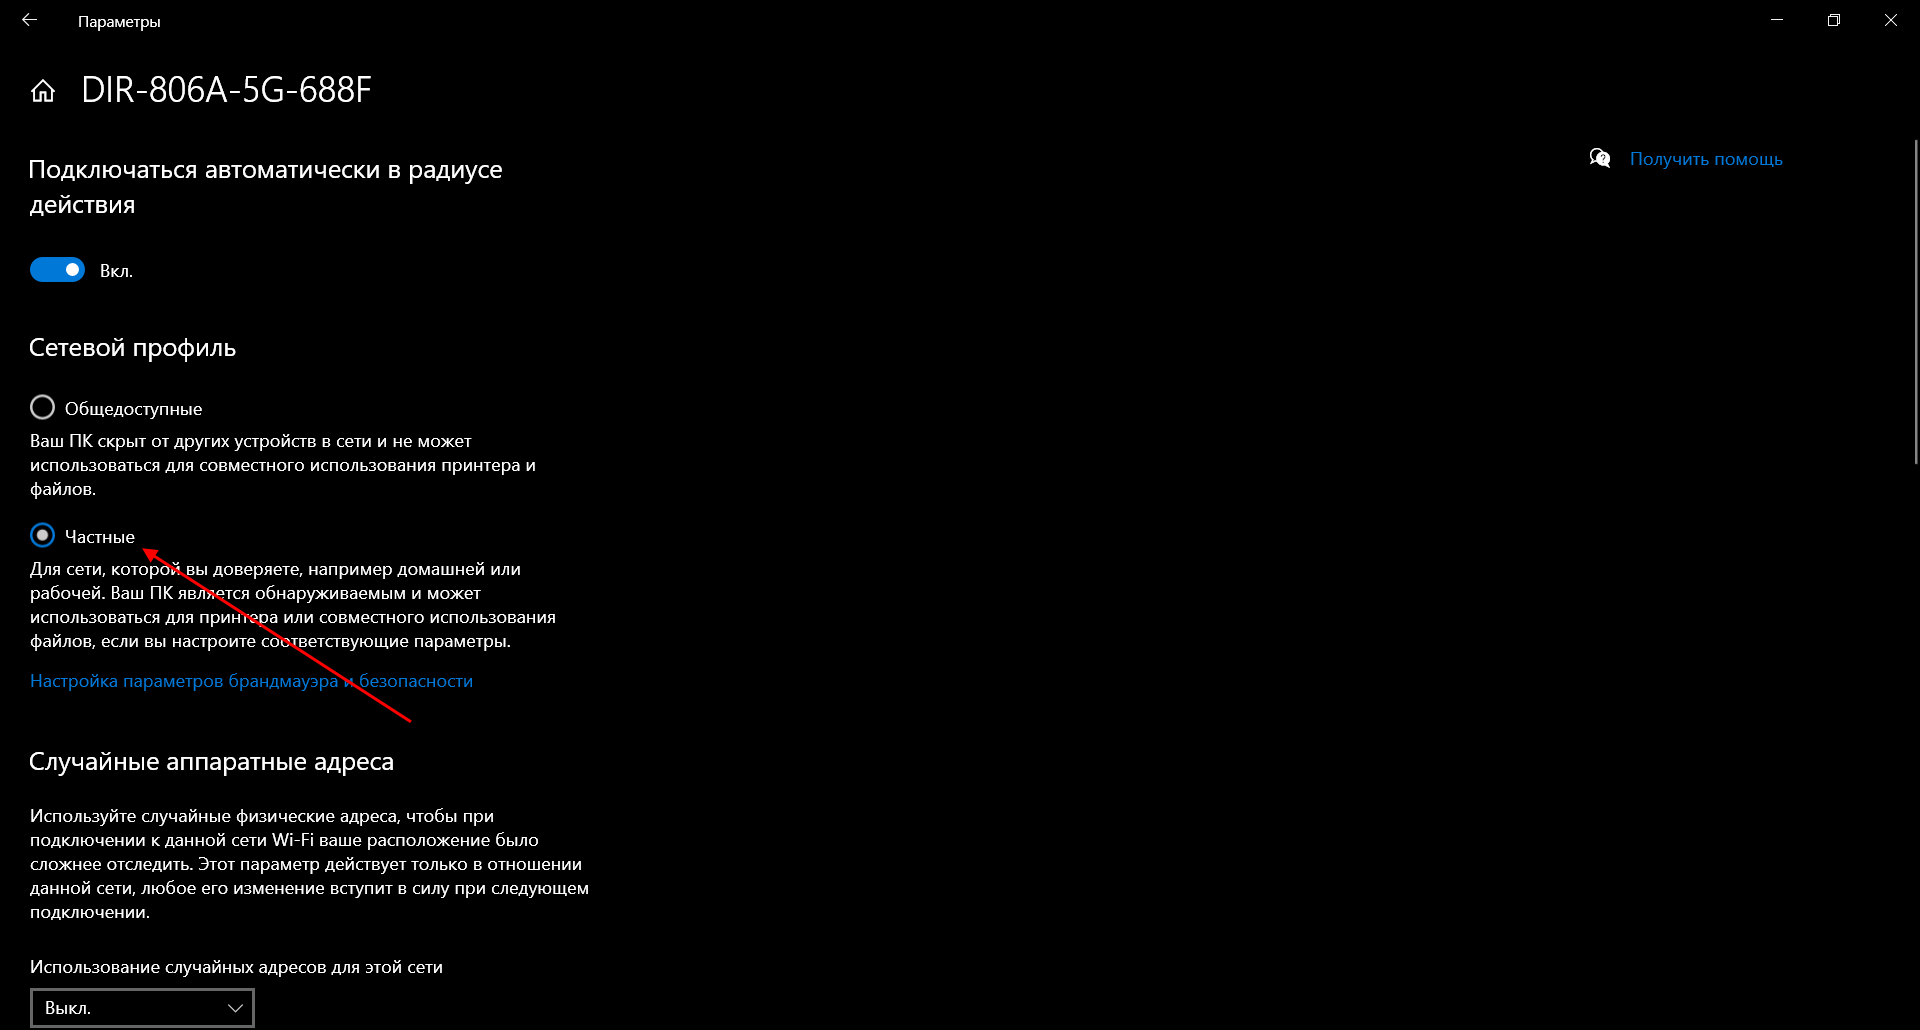
- Переходим в свойства подключенной сети.
- Меняем значение сетевого профиля на «Частные».

Теперь можем спокойно переходить к настройке общего доступа.
Способ №1
Открываем доступ к папке:
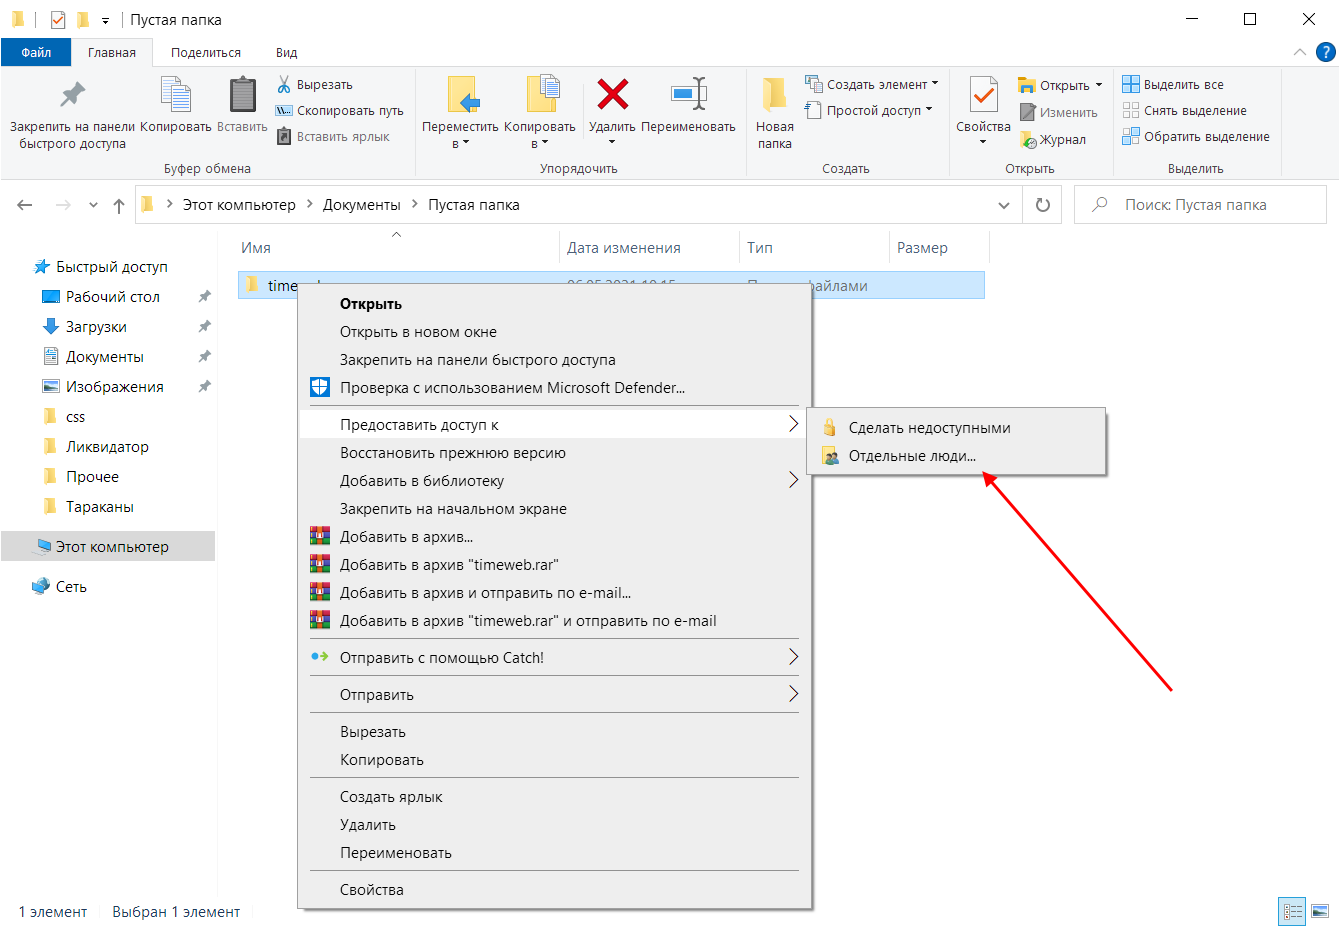
- Выбираем папку, которую нужно открыть для других компьютеров, и кликаем по ней правой кнопкой мыши. В отобразившемся меню выбираем «Предоставить доступ к» -> «Отдельные люди…».
- Осталось нажать «Поделиться», но подождите – в таком случае доступ к папке будет предоставлен, однако войти в нее можно будет только с помощью логина и пароля текущего компьютера. Если вы не хотите, чтобы кто-то знал ваши данные, нужно создать нового пользователя. О том, как это сделать, читайте в следующем пункте.
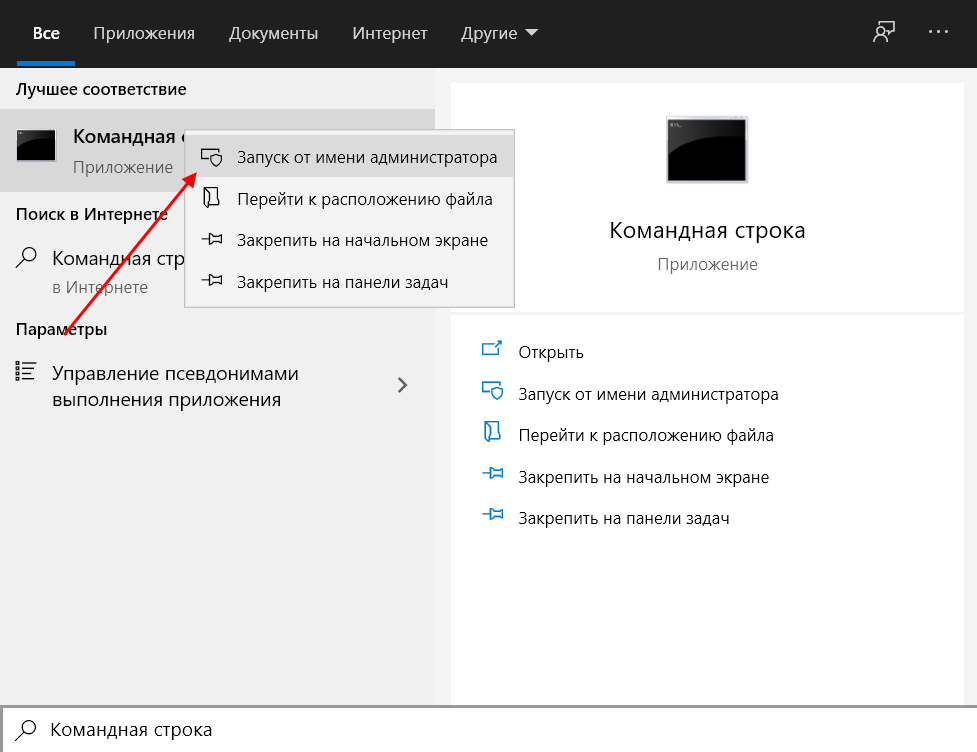
- Откроем командную строку от имени администратора – для этого перейдем в меню Пуск и введем соответствующий запрос. Затем кликнем по приложению правой кнопкой мыши и выберем «Запуск от имени администратора».
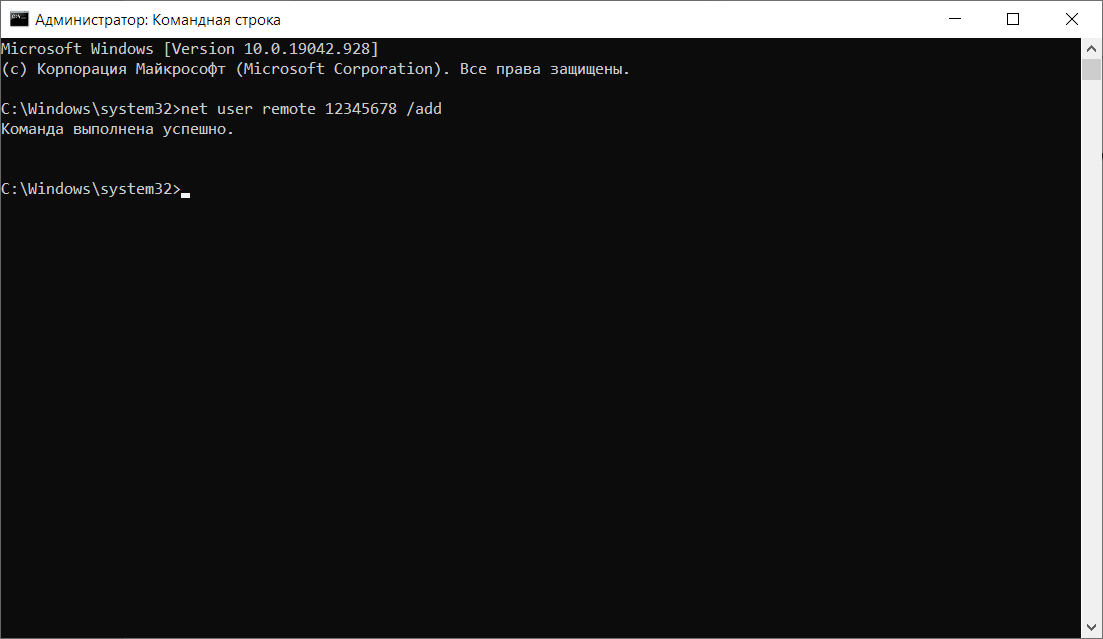
- В результате мы попадаем в консольное окно – оно-то нам и нужно. Вводим в него запрос net user Имя_пользователя Пароль /add. Жмем «Enter» и получаем информацию о том, что команда выполнена успешно.
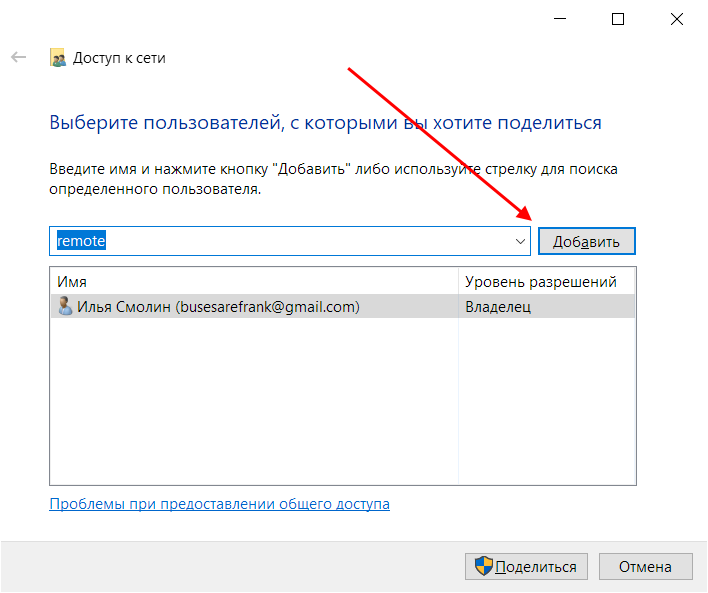
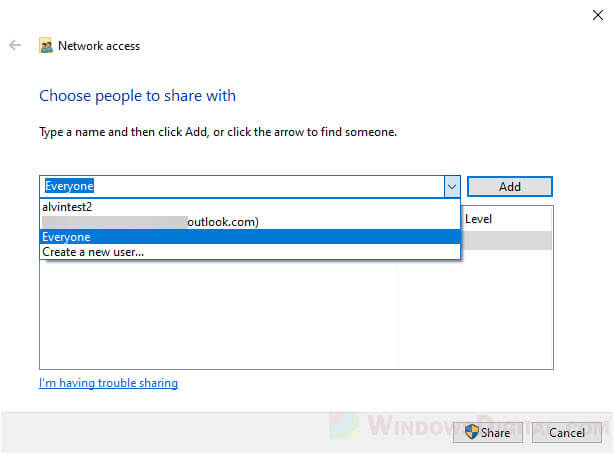
- Теперь снова выполняем действие под первым пунктом. Мы видим, что новых пользователей не прибавилось, и это нормально, так как их нужно добавить в само окно. Для этого в верхней части открываем выпадающее меню и выбираем нужного юзера, затем жмем «Добавить».
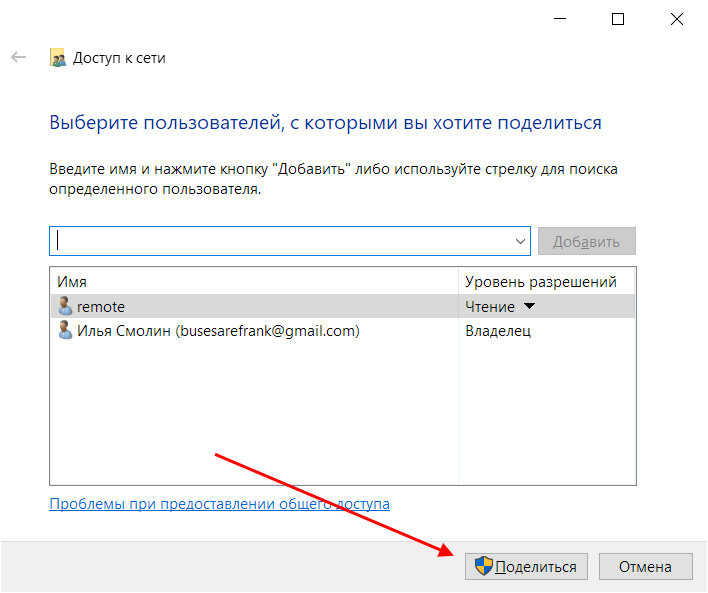
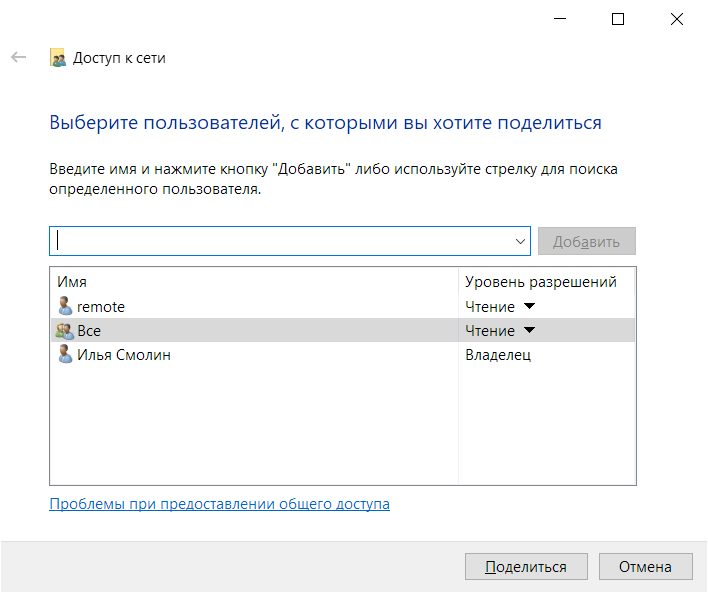
- Осталось выбрать пользователя и нажать на кнопку «Поделиться». Также справа от имени вы можете назначить уровень разрешений.
- Если все прошло успешно, то вы увидите примерно следующее окно:
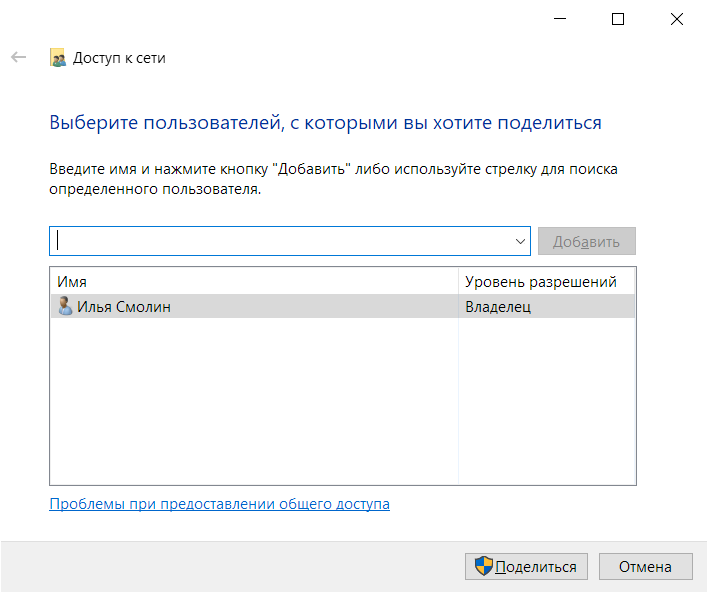
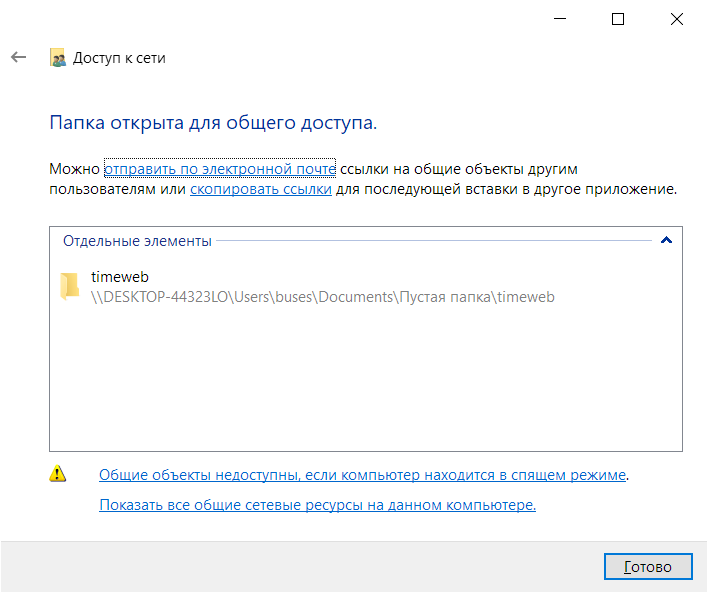
Папка для общего доступа открыта, и теперь в нее можно войти с другого компьютера, подключенного в ту же локальную сеть.
Способ №2
Данный способ подойдет не только для расшаривания папок, но и дисков. Например, вы можете предоставить доступ к локальному диску С. Сделать это можно следующим образом:
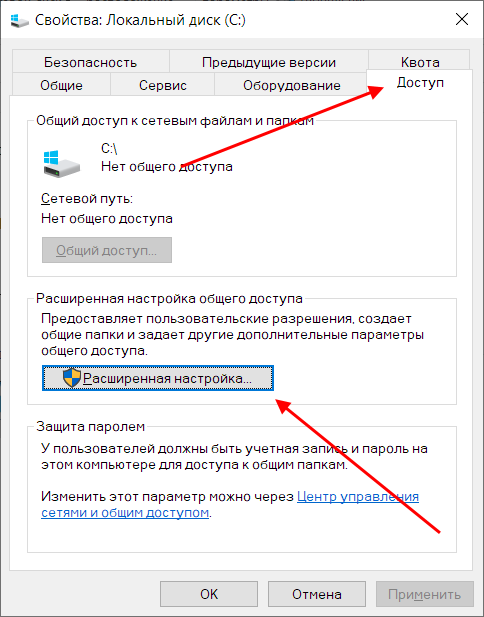
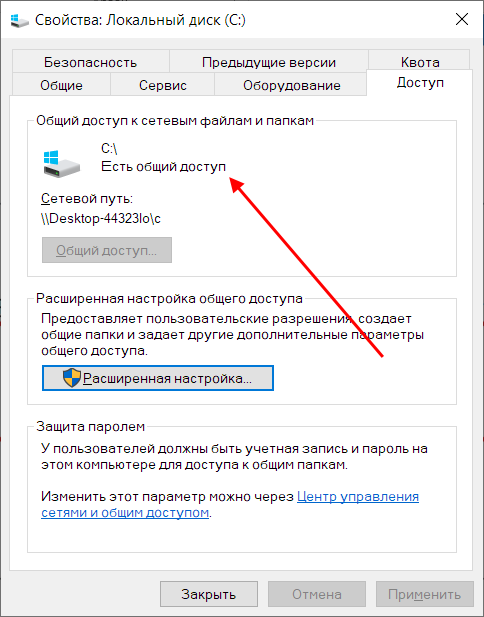
- Открываем папку «Этот компьютер» и выбираем диск, который нужно расшарить. Кликаем по нему правой кнопкой мыши и переходим в его свойства.
- Далее открываем подраздел «Доступ» и выбираем «Расширенная настройка…».
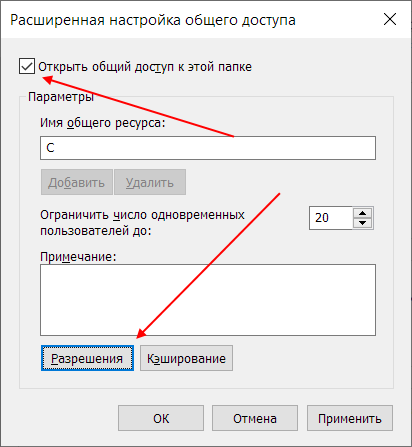
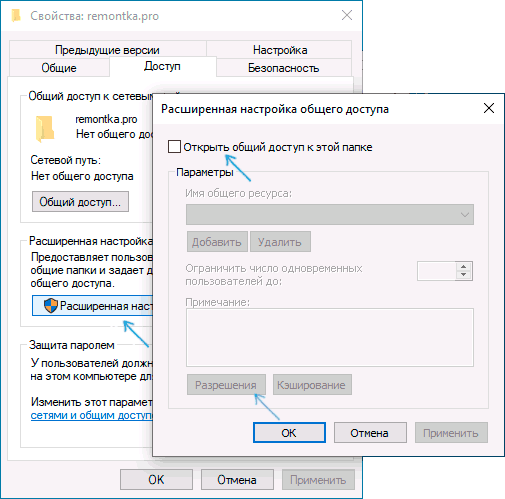
- Отмечаем галочкой пункт «Открыть общий доступ к этой папке». Также можно настроить разрешения – для это откроем соответствующее окно.
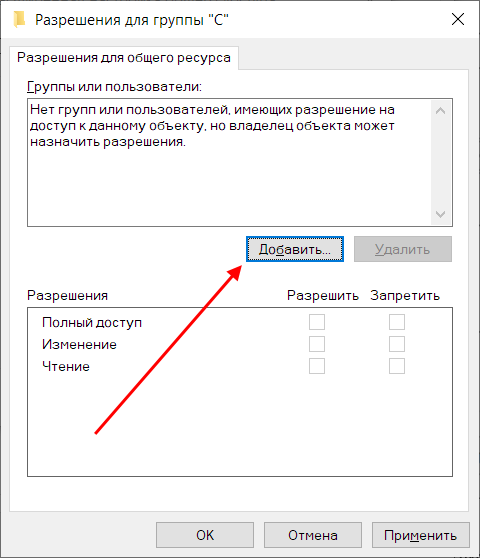
- В отобразившемся окне мы можем настроить различные права. Доступны такие параметры, как полный доступ, изменение и чтение. По умолчанию должна отображаться группа «Все». Если ее нет, то выбираем «Добавить…».
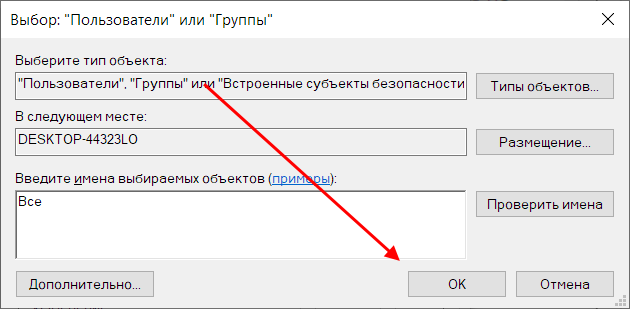
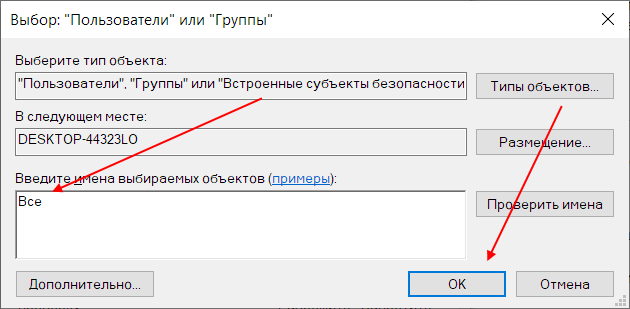
- В нижнее поле вводим «Все» без каких-либо кавычек и жмем «ОК».
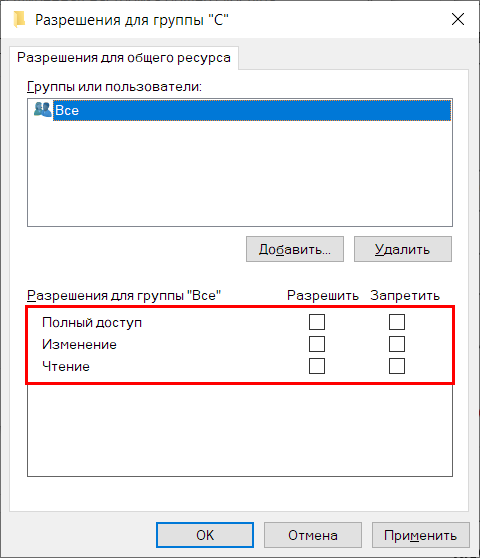
- Теперь мы можем настроить права доступа. Достаточно выбрать группу и в нижней части отметить нужные пункты.
- После этого сохраняем все внесенные изменения кнопкой «ОК». В результате в свойствах локального диска будет указано, что общий доступ предоставлен.

Аналогичным образом можно предоставить доступ для любого другого диска или папки.
Комьюнити теперь в Телеграм
Подпишитесь и будьте в курсе последних IT-новостей
Подписаться
Как подключиться к общей папке в Windows 10
Дело за малым – запустить компьютер из локальной сети и всего в несколько кликов перейти в общую папку. Не забудьте, что данный ПК также должен использовать частную сеть, о чем я говорил в начале.
Подключаемся к общей папке:
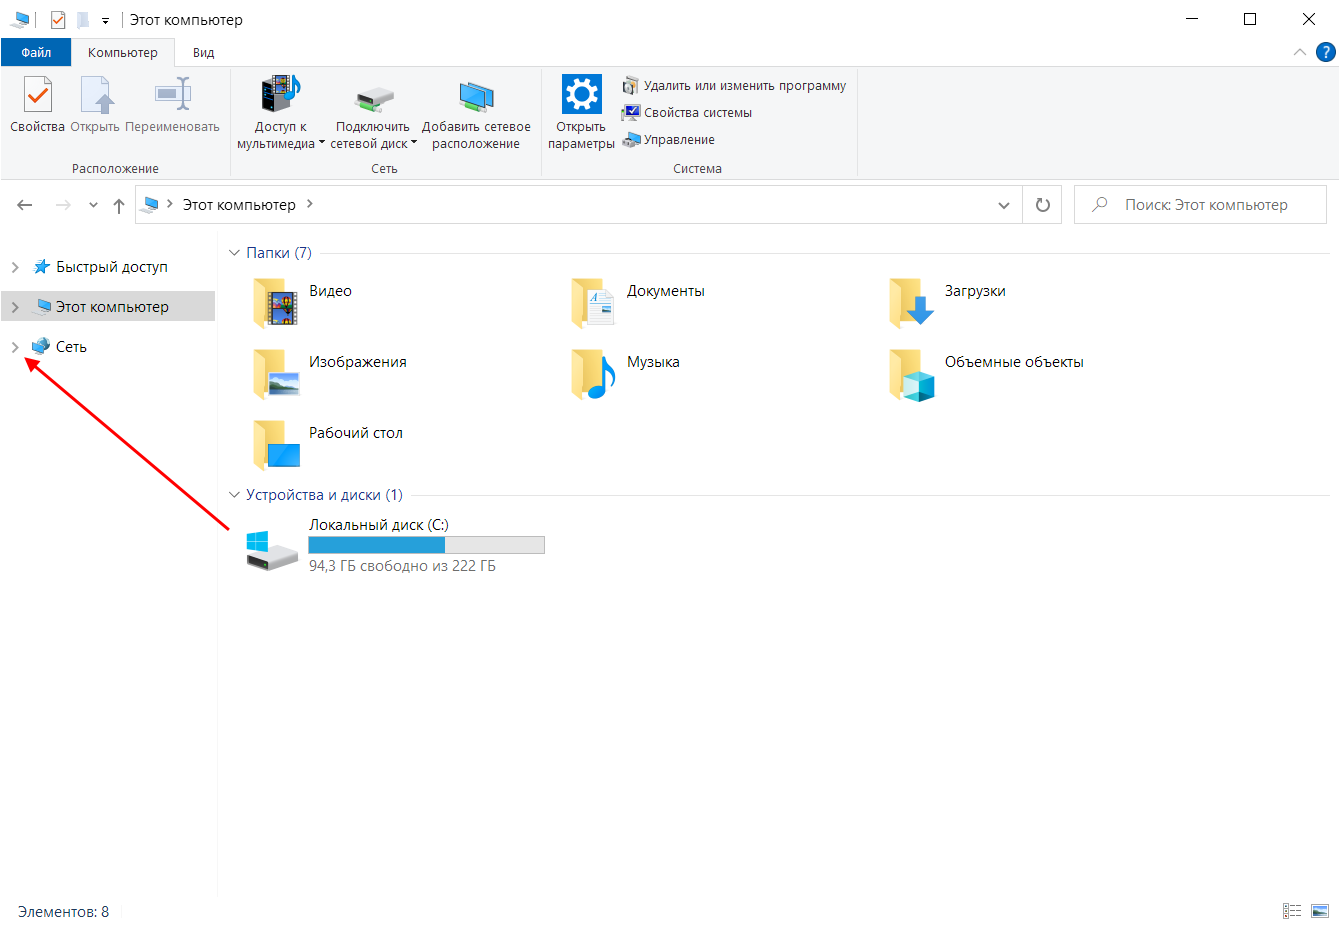
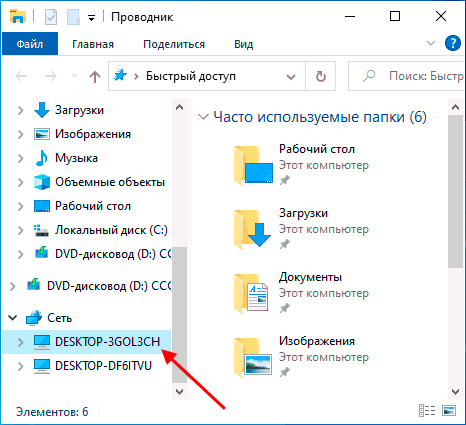
- Открываем любую папку и в левой части раскрываем пункт «Сеть».
- В результате должны отобразиться все компьютеры, подключенные к общей сети. Выбираем тот, где ранее мы открывали доступ к папке.
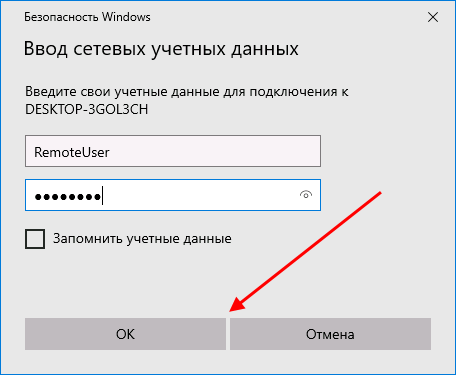
- Вводим логин и пароль пользователя, которого мы успешно создали на предыдущем этапе.
При успешной попытке мы подключимся к другому компьютеру и увидим все файлы, к которым предоставили доступ.
Как включить анонимный доступ без ввода данных
Ранее мы получали доступ к папке через авторизацию – вводили логин и пароль. Иногда в подобных манипуляциях нет необходимости, и их можно избежать. Работает, к сожалению, данный способ только на Windows 10 Pro и Enterprise. Если на вашем компьютере домашняя версия, то активировать анонимный доступ не получится.
Подключаем анонимный доступ:
- Снова переходим к предоставлению общего доступа для папки, как мы это делали в самом начале. Добавляем нового пользователя – теперь это будет группа «Все».
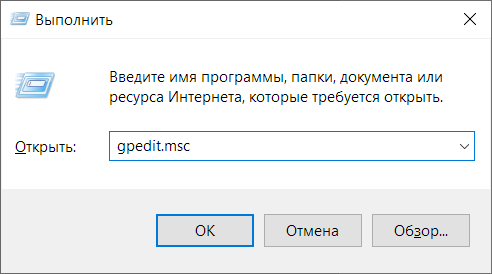
- Следующим шагом переходим в редактор локальной групповой политики – для этого зажимаем на клавиатуре комбинацию клавиш «WIN+R» и вводим запрос gpedit.msc.
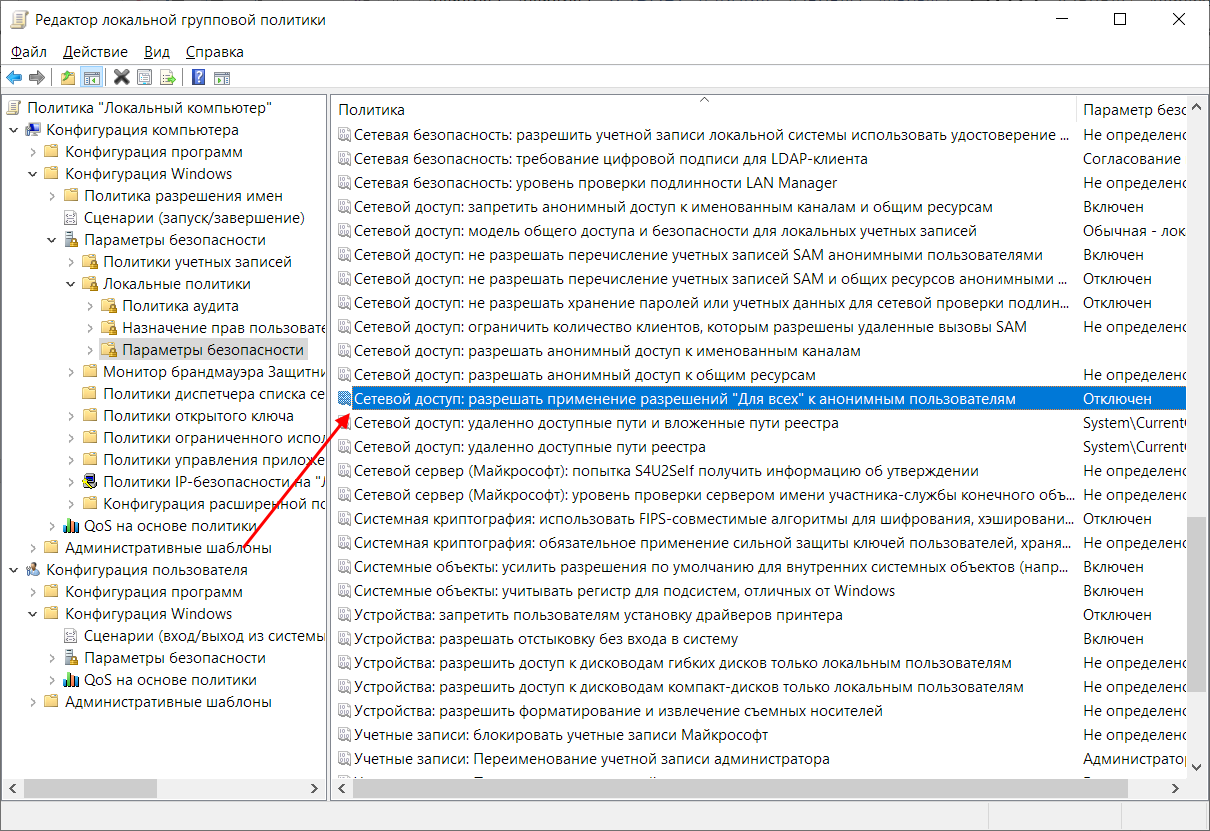
- Переходим в «Конфигурация компьютера» -> «Параметры безопасности» -> «Локальные политики» -> «Параметры безопасности». Затем находим строку «Сетевой доступ: разрешать применение “Для всех” к анонимным пользователям» и кликаем по ней двойным щелчком мыши.
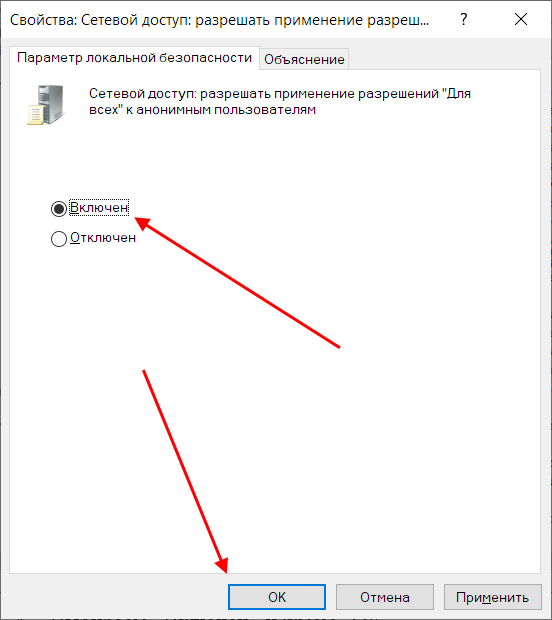
- Выбираем «Включен» и жмем «ОК».
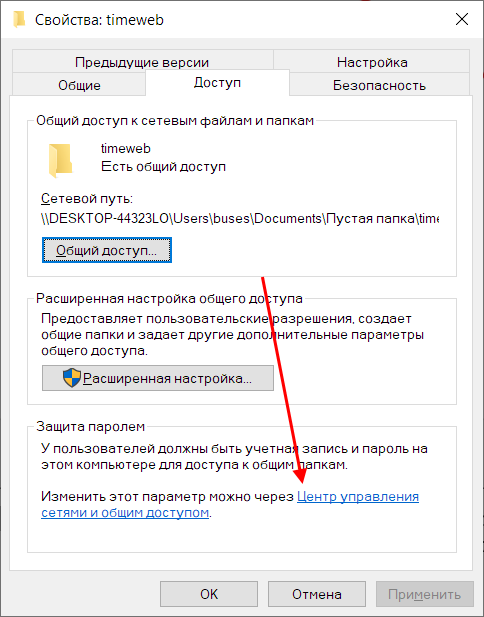
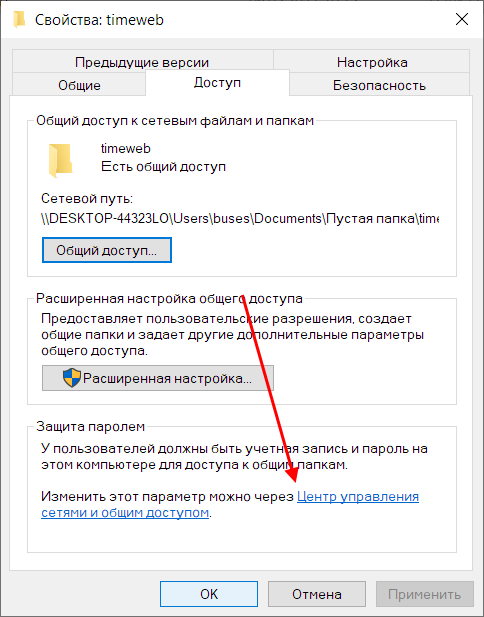
- Возвращаемся к нашей папке и заходим в ее свойства – там переходим в раздел «Доступ» и в нижней части кликаем по кнопке «Центр управления сетями и общим доступом».
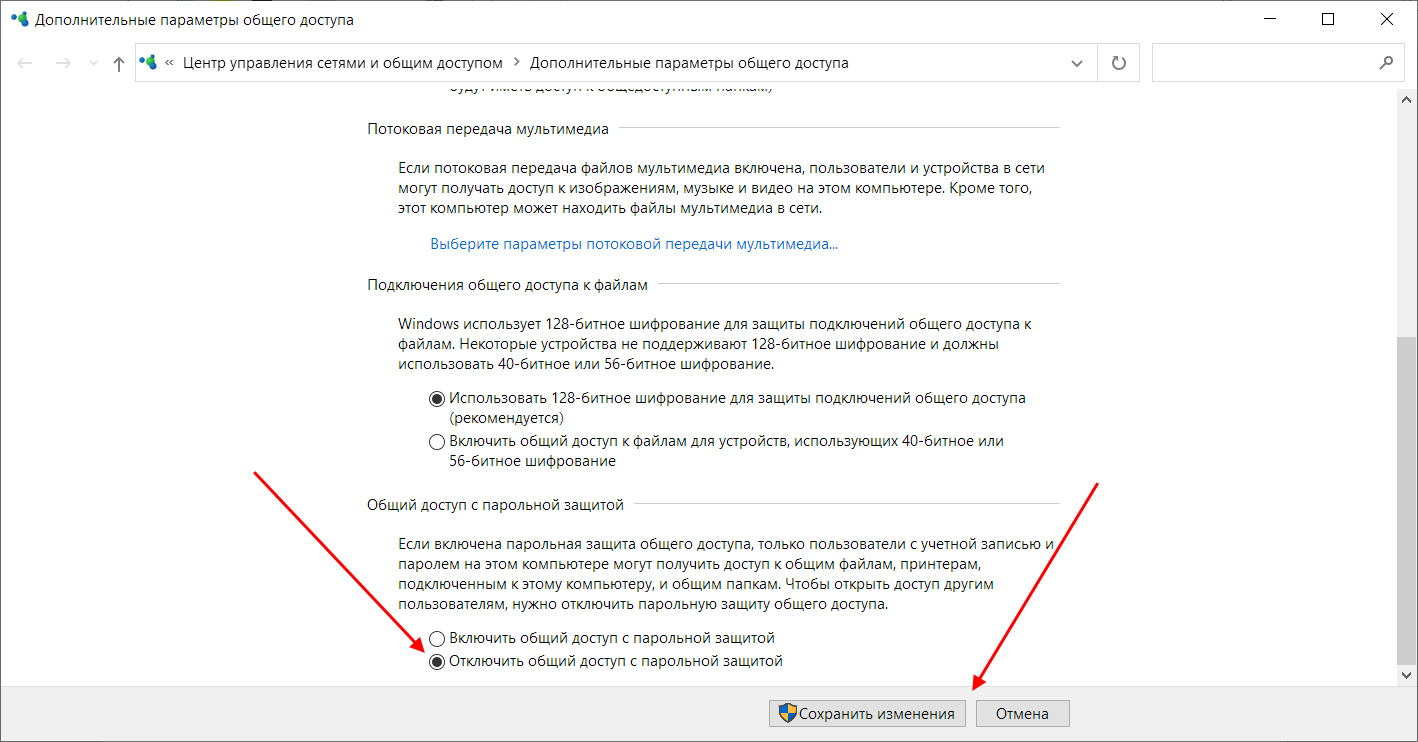
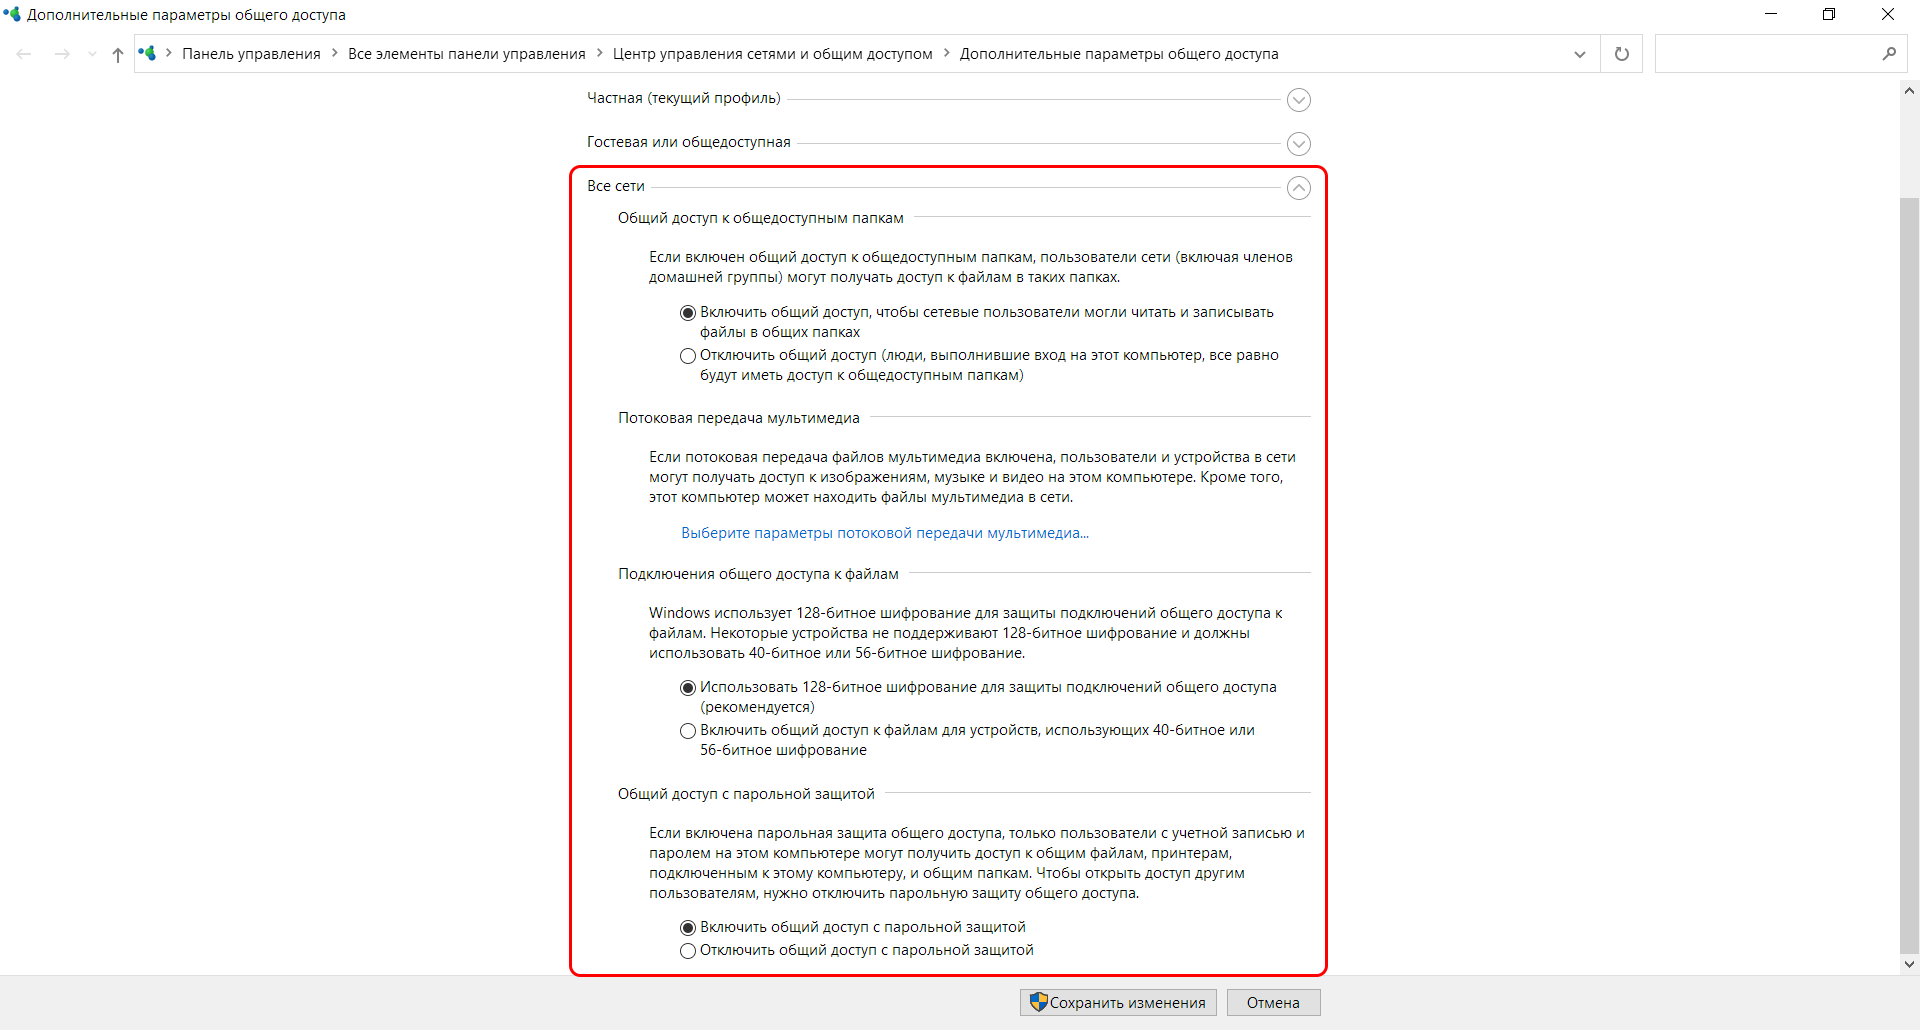
- Раскрываем пункт «Все сети» и в самом низу отмечаем пункт «Отключить общий доступ с парольной защитой». После нажимаем «Сохранить изменения».
На этом все. Теперь мы можем спокойно получить доступ к папке с другого компьютера без ввода логина и пароля.
В случае с диском все немного иначе:
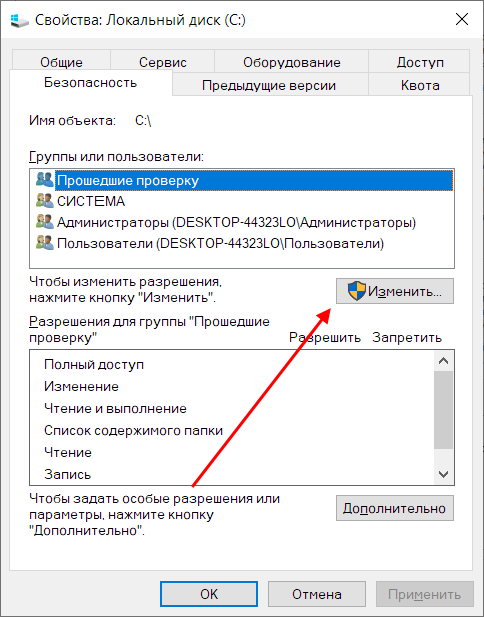
- Переходим в свойства локального диска и открываем раздел «Безопасность». Затем нажимаем «Изменить…».
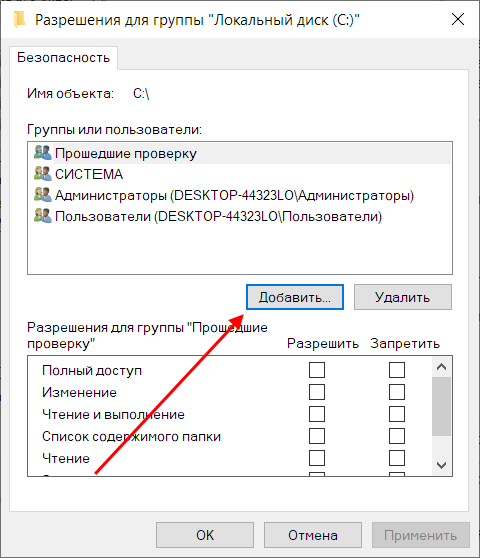
- Нажимаем «Добавить…».
- Добавляем новую группу «Все».
Вот так мы можем предоставить доступ к локальному диску без логина и пароля. Обязательно в конце примените внесенные изменения, по желанию добавьте нужные разрешения. Настройка редактора групповых политик аналогична той, что мы проводили выше.
Устранение неполадок при настройке общего доступа
В некоторых случаях система Windows 10 может выдавать предупреждения о недоступности сетевого ресурса либо просто «ругаться» на настройки. Все это можно исправить в «Центре управления сетями и общим доступом». Настройки стоит проверять на компьютере, к которому вы пытаетесь подключиться. Выглядеть они должны следующим образом:
- Для начала зайдем в нужное окно через свойство папки.
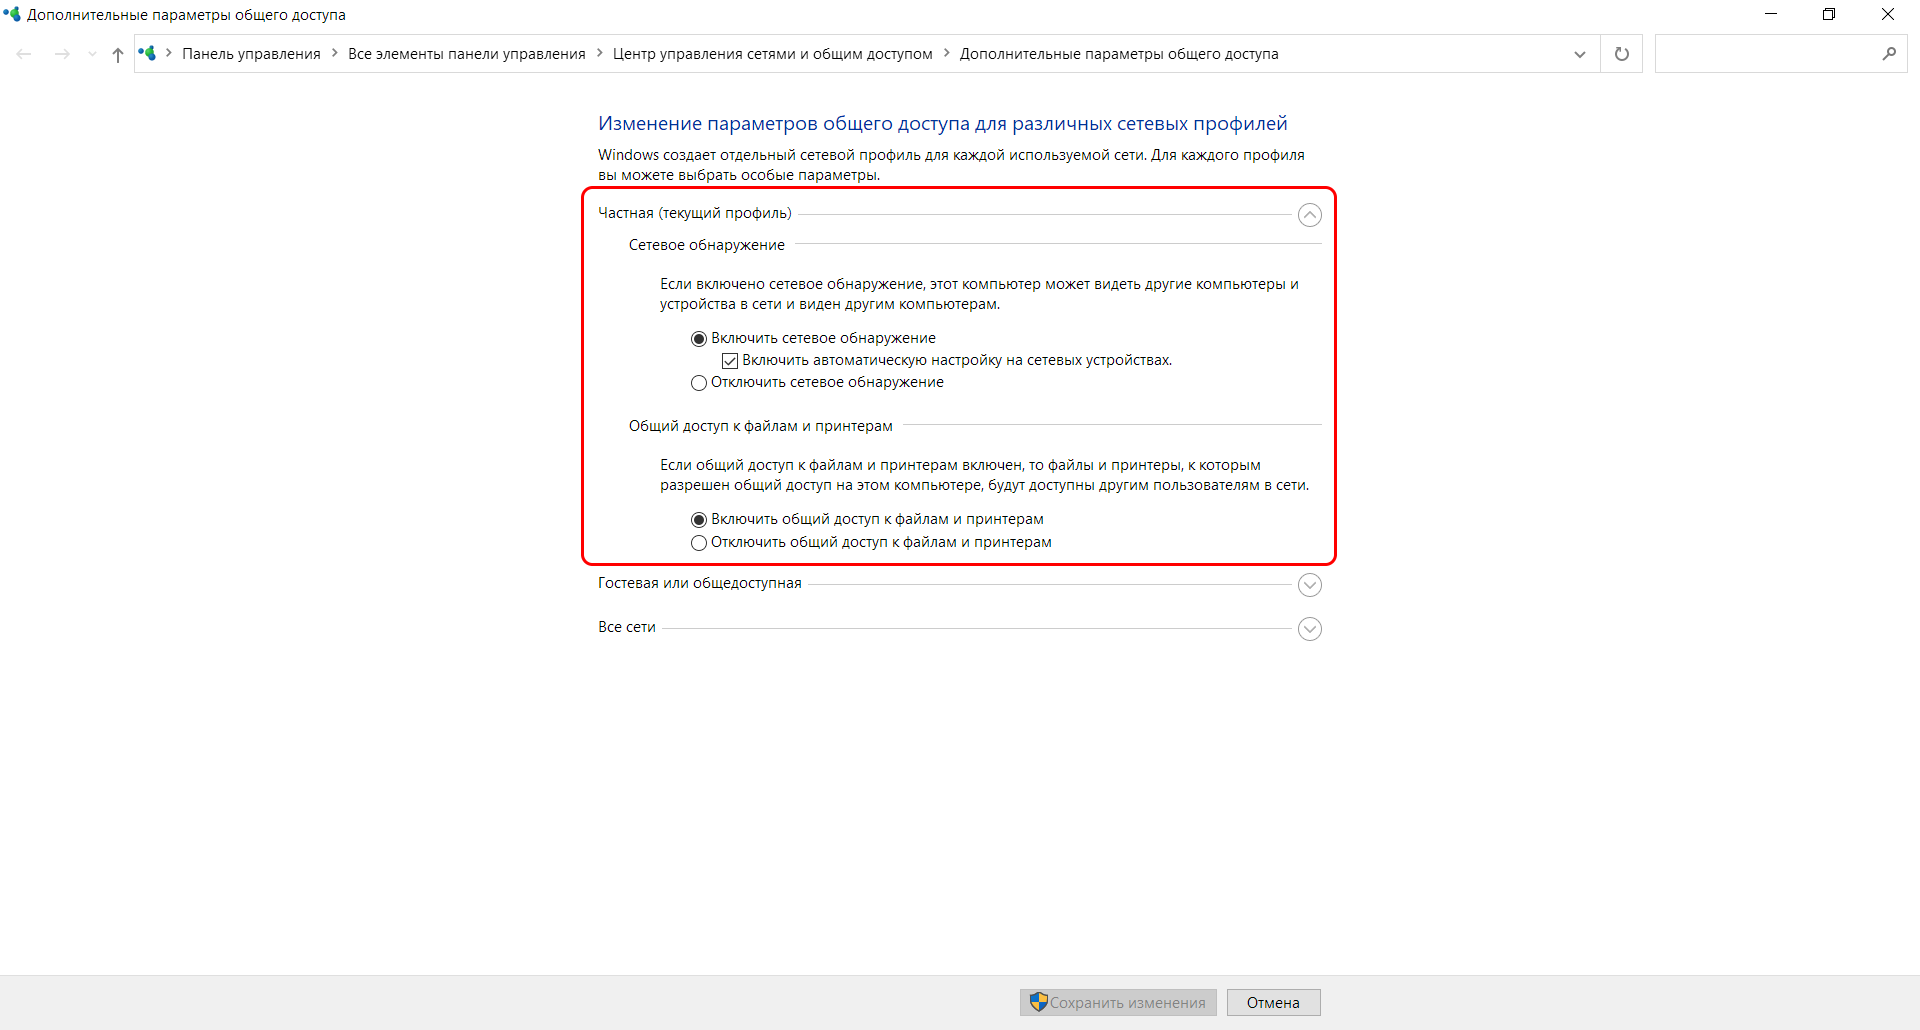
- Открываем первый пункт «Частная (текущий профиль)». Настройки должны быть выставлены так, как показано на скриншоте ниже:
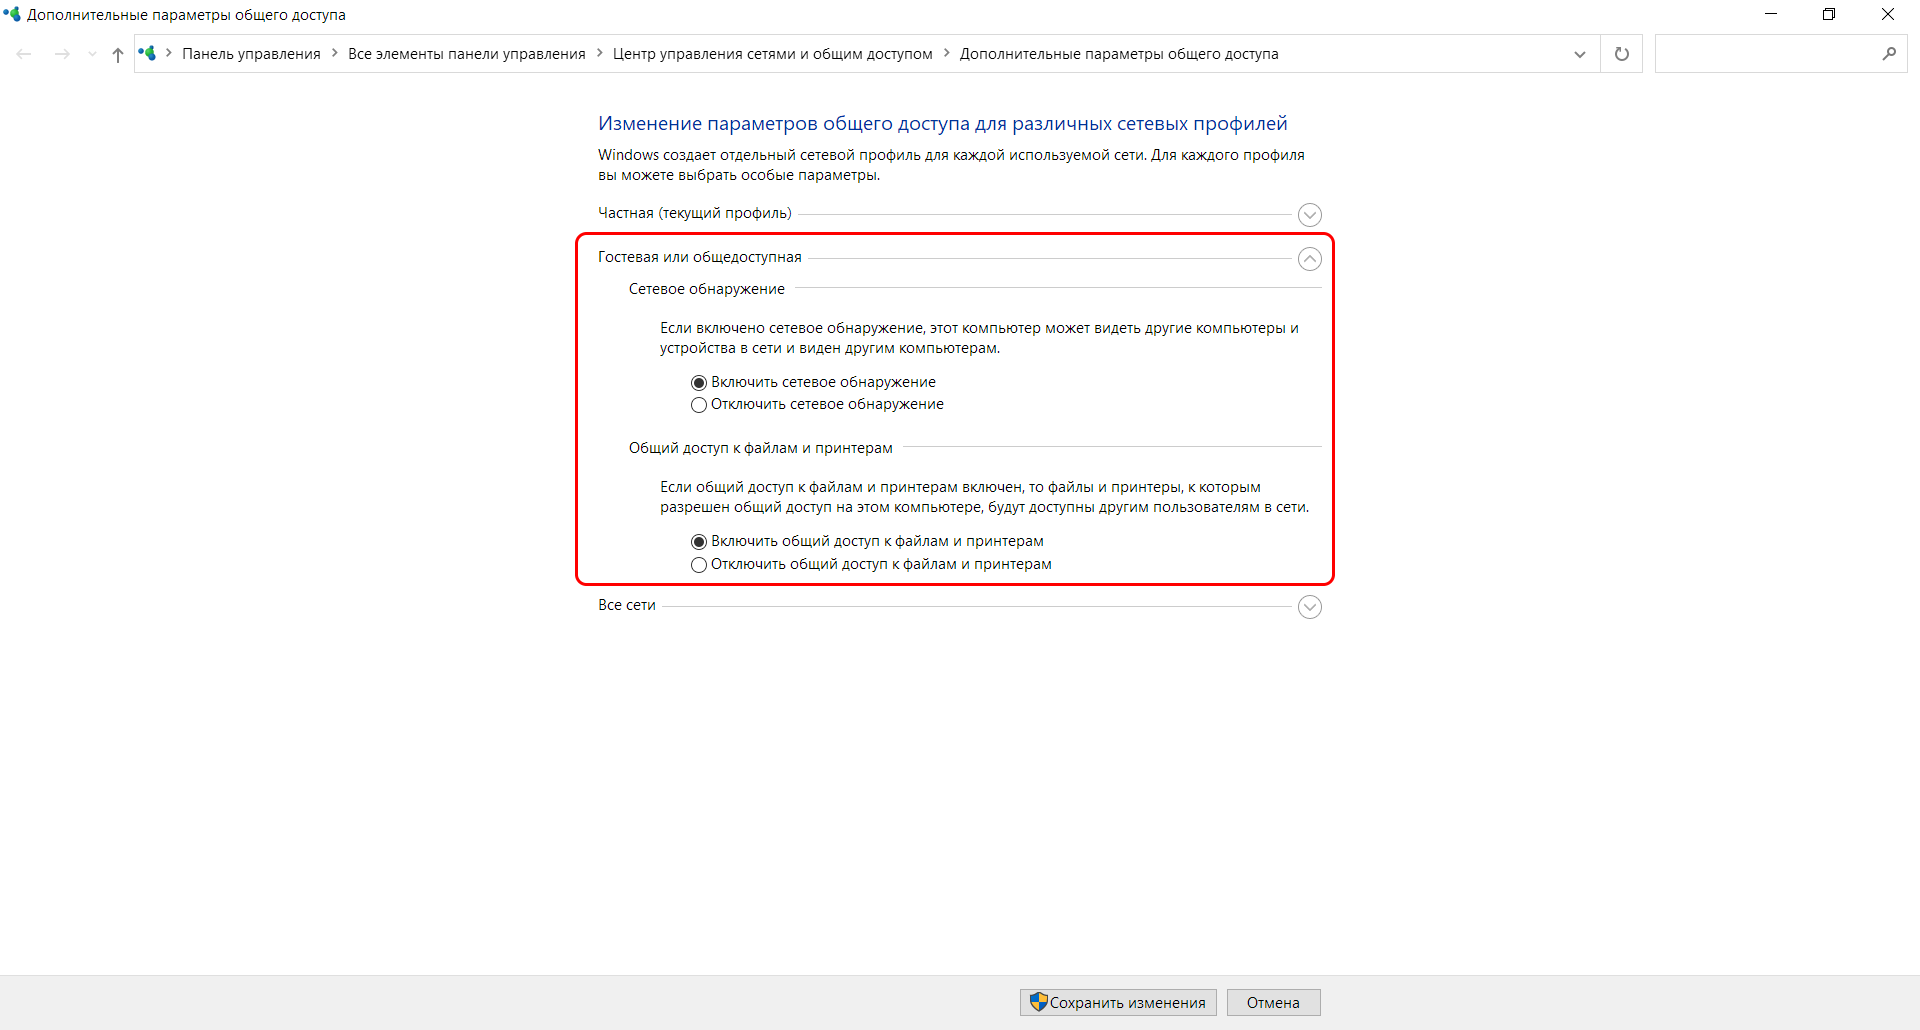
- Пункт «Гостевая или общедоступная»:
- Пункт «Все сети». Про последний блок я уже говорил – можно включить или отключить пароль.
Теперь можете снова подключиться к папке – все должно заработать. В некоторых случаях может потребоваться перезагрузка устройства.
Заключение
Получение общего доступа к папке или диску – простая задача, но со своими нюансами. Важно, чтобы оба устройства были подключены к одной сети – это может быть как проводное соединение, так и через Wi-Fi роутер. Если все учтено, но ошибки до сих пор не дают подключиться, то стоит отключить антивирусное средство либо воспользоваться вышеуказанной инструкцией.
 Если в вашей локальной сети несколько компьютеров (а если они подключены к одному роутеру — они уже в локальной сети), вы можете поделиться доступом к какой-либо папке на одном компьютере с другого ПК или ноутбука с предоставлением нужных прав (чтение, чтение и изменение и другие). Это не сложно, но у начинающих пользователей часто возникают проблемы с настройкой общего доступа к папкам Windows 10 по причине незнания некоторых нюансов.
В этой инструкции подробно о том, как настроить общий доступ к папкам в Windows 10 (то же самое подойдет и для дисков), о том, что для этого потребуется и дополнительная информация, которая может оказаться полезной.
- Как включить и настроить общий доступ к папке или диску в Windows 10
- Подключение к общей папке с другого компьютера или ноутбука
- Как включить анонимный доступ к общим папкам или сетевому диску
- Видео инструкция
Как включить и настроить общий доступ к папке или диску в Windows 10
Прежде чем начинать, учитывайте, что для настройки общего доступа к папкам и дискам у вас в Windows 10 в качестве профиля сети должна быть выбрана «Частная сеть». Вы можете изменить это перед началом настройки (Как изменить общедоступную сеть на частную и наоборот в Windows 10), либо пока не предпринимать никаких действий — на одном из этапов вам автоматически предложат это сделать. Дальнейшие шаги по предоставлению общего доступа к папке в Windows 10 выглядят следующим образом:
- Нажмите правой кнопкой мыши по папке, к которой нужно предоставить общий доступ по сети, выберите пункт «Предоставить доступ к» — «Отдельные люди».

- Если в качестве профиля сети у вас установлена «Общедоступная», вам будет предложено сделать сеть частной. Сделайте это (пункт «Нет, сделать эту сеть частной»).

- Откроется окно, в которой будет показано имя текущего пользователя и кнопка «Поделиться». Вы можете сразу нажать эту кнопку, чтобы предоставить общий доступ к папке, но в этом случае для подключения к этой папке с другого компьютера потребуется вводить имя пользователя и пароль именно этого пользователя этого компьютера с правами владельца. Внимание: если пользователь без пароля, подключение по умолчанию выполнить не получится.

- Если вы не хотите использовать имя пользователя и пароль администратора текущего компьютера при подключении с другого компьютера или ваш пользователь не имеет пароля, вы можете создать нового пользователя на текущем компьютере, не обязательно администратора, но обязательно с паролем (Как создать пользователя Windows 10), например с помощью командной строки, запущенной от имени администратора: net user Имя_пользвателя Пароль /add

- Затем указать это имя пользователя в поле вверху настройки общего доступа, нажать кнопку «Добавить» и указать нужный уровень разрешений.

- По завершении нажмите кнопку «Поделиться». Готово, теперь общий доступ к папке предоставлен.


Есть еще один вариант предоставления общего доступа к папке (подойдет и для диска) в Windows 10:
- Откройте свойства папки или диска, перейдите на вкладку «Доступ».
- Нажмите кнопку «Общий доступ» и выполните шаги 3-5 из предыдущего раздела.
- Если кнопка «Общий доступ» недоступна (что может быть при предоставлении доступа к диску), нажмите кнопку «Расширенная настройка», а затем — отметьте пункт «Открыть общий доступ к этой папке».

- В расширенной настройке в разделе «Разрешения» вы также можете указать пользователей, которым предоставлен доступ к диску.
- Примените сделанные настройки.
При необходимости отключить общий доступ к папкам, вы в любой момент можете либо вернуть профиль сети «Общественная», отменить общий доступ в свойствах папки или использовать контекстное меню «Предоставить доступ к» — «Сделать недоступными».
Подключение к общим папкам в Windows 10
Для того, чтобы подключиться к общей папке или диску с другого компьютера или ноутбука (в инструкции предполагается, что там так же установлена Windows 10, но обычно все работает и для предыдущих версий системы), выполните следующие шаги:
- В проводнике откройте раздел «Сеть» и нажмите по имени компьютера, на котором находится папка, к которой был предоставлен общий доступ.

- Если на компьютере, с которого мы подключаемся, включена «Общественная сеть», вам будет предложено включить профиль «Частная сеть», сделайте это (можно нажать по уведомлению вверху окна проводника и разрешить сетевое обнаружение и общий доступ к папкам и файлам).
- Введите имя пользователя и пароль для подключения к папке с общим доступом. Это должно быть имя пользователя и пароль пользователя не текущего, а удаленного компьютера, например, имя и пароль пользователя, который делился папкой или имя и пароль, которые мы создавали на 4-м шаге в первом способе.

- Если все прошло успешно, вы увидите общую папку и у вас будут те права доступа, которые вы задавали в столбце «Уровень разрешений».


Также при желании вы можете нажать правой кнопкой мыши по пункту «Сеть» в проводнике и нажать «Подключить сетевой диск», после чего указать путь к сетевому ресурсу (этот путь в любой момент можно посмотреть в свойствах папки или диска на вкладке «Доступ»), либо нажать по сетевой папке или диску и выбрать пункт «Подключить сетевой диск». В результате общая папка или диск с общим доступом будет подключен как простой диск.
Как включить анонимный доступ к общим папкам без ввода имени пользователя и пароля
Если вам требуется сделать так, чтобы открывать папки по сети можно было без ввода имени пользователя и пароля, в Windows 10 Pro и Enterprise сделать это можно следующим образом:
- На компьютере, на котором находится общая папка, в свойствах общего доступа добавьте группу «Все» (вводим Все в верхнем поле, нажимаем кнопку Добавить) и предоставьте нужные разрешения. В Windows 10, которая изначально была на английском языке эта группа называется Everyone.

- Зайдите в редактор локальной групповой политики (Win+R — gpedit.msc, внимание: элемент отсутствует в Windows 10 Домашняя), перейдите в раздел «Конфигурация Windows» — «Параметры безопасности» — «Локальные политики» — «Параметры безопасности».
- Включите параметр «Сетевой доступ: разрешать применение разрешений Для всех к анонимным пользователям», дважды нажав по нему и выбрав пункт «Включено».

- Откройте свойства папки и на вкладке «Доступ» внизу, в разделе «Защита паролем» нажмите по ссылке «Центр управления сетями и общим доступом» для изменения параметра. Раскройте раздел «Все сети», установите отметку «Отключить общий доступ с парольной защитой» и примените настройки.

- В случае, если мы предоставляем анонимный доступ к диску, а не отдельной папке, дополнительно зайдите в свойства диска, на вкладке «Безопасность» нажмите кнопку «Изменить», добавьте группу «Все» и установите необходимые разрешения.
- Некоторые инструкции предлагают в том же разделе редактора локальной групповой политики включить параметр «Учетные записи: Состояние учетной записи Гость», а затем открыть параметр «Сетевой доступ: разрешать анонимный доступ к общим ресурсам» и указать сетевое имя папки в строке (или несколько строк, если папок несколько), имя папки указывается без пути к ней, для диска просто указываем букву без двоеточия. Но в моих экспериментах анонимный доступ (ко всем общим папкам) работает и без этого, хотя это может пригодиться, если анонимный доступ нужно предоставить только для отдельных общих папок.


С этого момента с других компьютеров подключение к общей папке или сетевому диску можно выполнить без ввода логина и пароля (иногда может потребоваться перезагрузка компьютеров). Однако учитывайте, что это не очень хорошо с точки зрения безопасности.
Как настроить общий доступ к папкам и дискам в Windows 10 — видео инструкция
Надеюсь, инструкция оказалась полезной, а у вас всё получилось и общий доступ к папкам работает. Если по какой-то причине подключиться не удается, еще раз учитывайте, что компьютеры должны быть подключены к одной сети и, помимо этого, может оказаться, что общему доступу мешает ваш антивирус или сторонний файрволл.
In Windows 11 or 10, you can share a folder with other computers or devices connected to the same network using the Windows file sharing feature. In this guide, you will learn how to share a folder in Windows 11/10 in a local network without password.
A shared folder in Windows 11 or 10 can be viewed and accessed by any device – Android, iPhone (with a file explorer app), Mac or other Windows PC (Windows 7, 8 or 10), that have access to the same local network.
Also see: How to Update Network Drive Login Credentials in Windows 11
Previously in Windows prior to Windows 10 version 1803, users can share folders using the Homegroup feature. However, the Homegroup feature has been removed since the 1803 update.
There are 3 major steps to correctly share a folder in Windows 11 / 10 in a local network without username and password requirement.
- Turn on network discovery and file sharing in Windows 11/10 so that your PC (and shared folders) can be visible to other devices in the same network.
- Configure a folder to be a shared folder.
- Turn off password protected sharing so that username and password are not required when a user access to the shared folder from another device.
For step 1, read one of the following:
- Windows 11: Turn On Network Discovery and File Sharing
- How to Turn On Network Discovery and File Sharing in Windows 10
For step 2 and 3, use the instructions below in this page.
Step 2: How to share a folder in Windows 11 / 10
To set up a folder as a shared folder, follow the steps below.
- Right-click on the folder you want to share, then select Properties.
- In the Properties window, click on the “Sharing” tab.
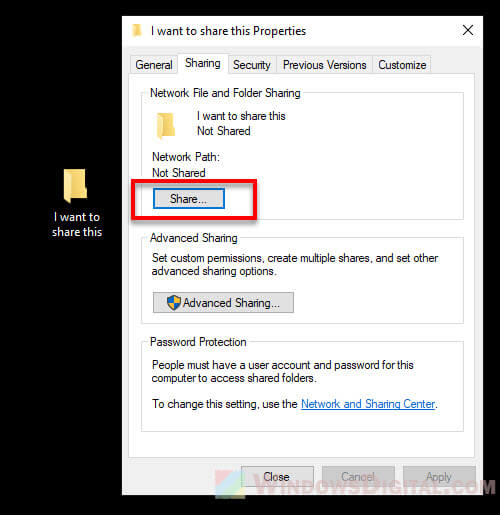
- Click on the “Share” button under “Network File and Folder Sharing”.

- When prompted to “choose people to share with”, click on the drop down menu and select Everyone. If you only want to share the folder with a specific user account, select the user account you want to share with or “Create a new user” instead.
- Click on “Add” to add the selected user.
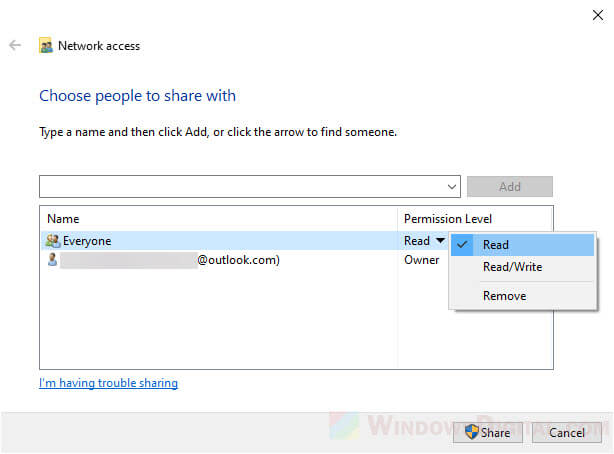
- Once added, you can change the permission level to “Read” or “Read and Write“. When Read only is selected, the user cannot make changes or delete any files in the folder.
- Finally, click “Share” to complete the sharing setup.
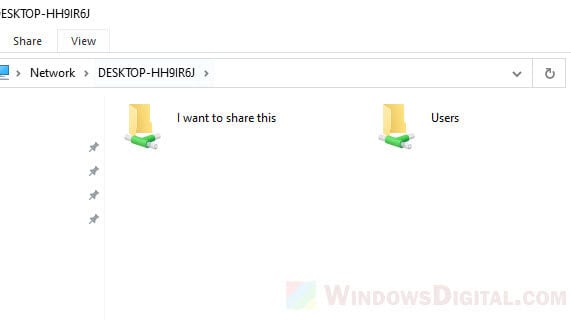
You can now view the shared folder from another Windows PC (in the Network folder) or other devices in the same local network.
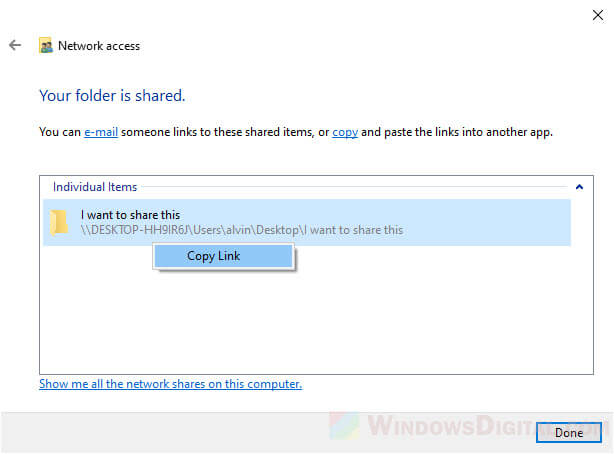
Optionally, you can copy the link of the shared folder path and paste the link onto the file explorer on another Windows computer to quickly access to the shared folder.
If the basic sharing doesn’t work, try Advanced Sharing instead:
Though both sharing methods are basically the same, if the basic sharing doesn’t work, you can try to use the advanced sharing instead. Here’s how.
Follow the step 1 and 2 above. In the “Sharing” tab, instead of clicking the “Share” button, click on “Advanced Sharing“.
Check the “Share this folder” checkbox.
To add or remove users and to configure the users’ permissions, click on the “Permissions” button.
If you want to share the folder with only a specific user, remove “Everyone” and click Add to add the user account you want to share with.
To configure permissions – Full Control, Change (the ability to modify and delete), or Read (read only), click on the user account, then click Allow for any permission you want to grant to the user account.
Step 3: Share folder in Windows 11/10 without password
To remove the need to enter a username and password when a user access the shared folder, you need to turn off the password protected sharing option. Here’s how.
On Windows search bar, search for and open Control Panel. Navigate to Network and Internet > Network and Sharing Center > Advanced sharing settings. Alternatively, you can directly search for and open “Advanced sharing settings” from the search bar.
In the Advanced sharing settings window, expand All Networks. Under Password protected sharing, click on the “Turn off password protected sharing” radio button.
You should now be able to access the shared folder from another PC or device without the need to enter a username or password.
You may still need to provide the username and password of the user account when you access the shared folder from an Android or iOS device.
(Image credit: Windows Central)
On Windows 10, HomeGroup was a feature to simplify the process of sharing resources across a small network with other users. However, since the feature has been removed, you now have to use different methods to share files, folders, and printers.
Some of these methods include Share and Nearby sharing, OneDrive, and the more advanced sharing options that offer virtually the same experience but using a different set of instructions.
In this Windows 10 guide, we’ll walk you through the steps to share files and printers inside the local network without HomeGroup.
- How to share files on Windows 10
- How to share printers on Windows 10
Windows 10 offers several ways to share files and folders with other users, including using the Share feature, OneDrive, and setting up a more advanced configuration File Explorer.
If you have to share one or more files with another user inside the home network, office, or across the world only one time, you can use the Share feature, which comes built into File Explorer and most modern apps.
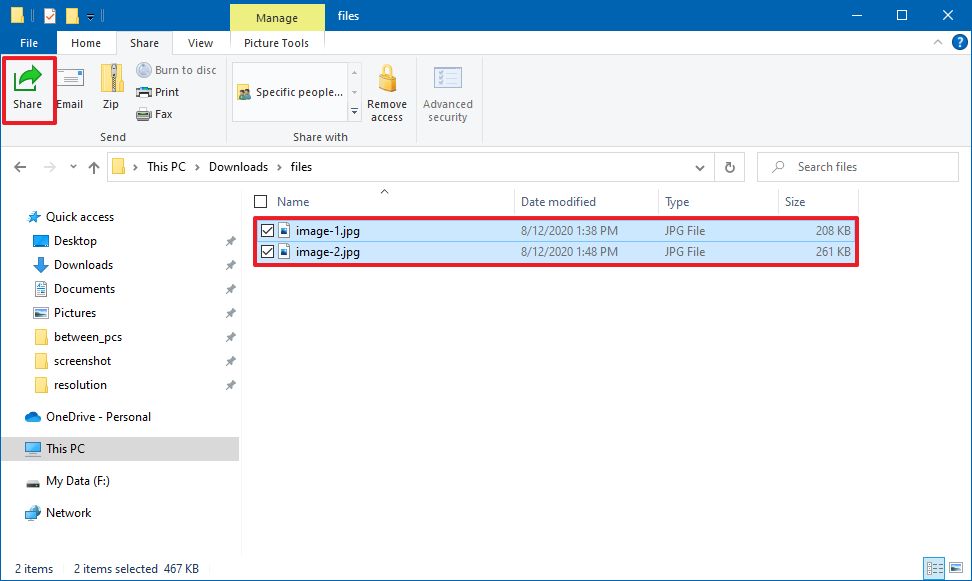
To share files using the Share feature on Windows 10, use these steps:
- Open File Explorer.
- Browse to the folder location with the files.
- Select the files.
- Click on the Share tab.Quick tip: Alternatively, you can right-click the selection and choose the Share option in the context menu. Also, the Share option can be found in many apps that you acquire from the Microsoft Store.
- Click the Share button.
- Select the app, contact, or nearby sharing device.
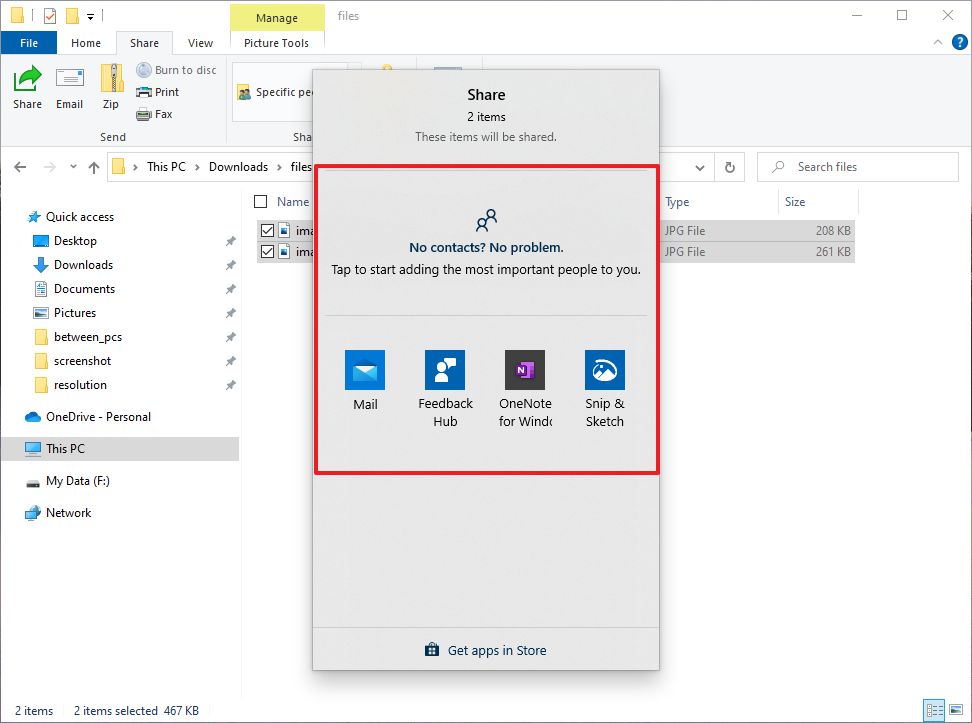
- Continue with the on-screen directions to share the content.
Although this is a sharing feature, you’re technically sending the files to another destination. If you’re about to share files with a nearby device, note that «Nearby sharing» needs to be enabled on the source and destination computers to work correctly. You can learn more about nearby sharing, in this guide.
On Windows 10, you can also use OneDrive to share files or folders with family, friends, or colleagues.
Unlike sending files using the Share feature, OneDrive allows you to share virtually any file by creating a secure link that others can use to access the content, which you can also revoke at any time.
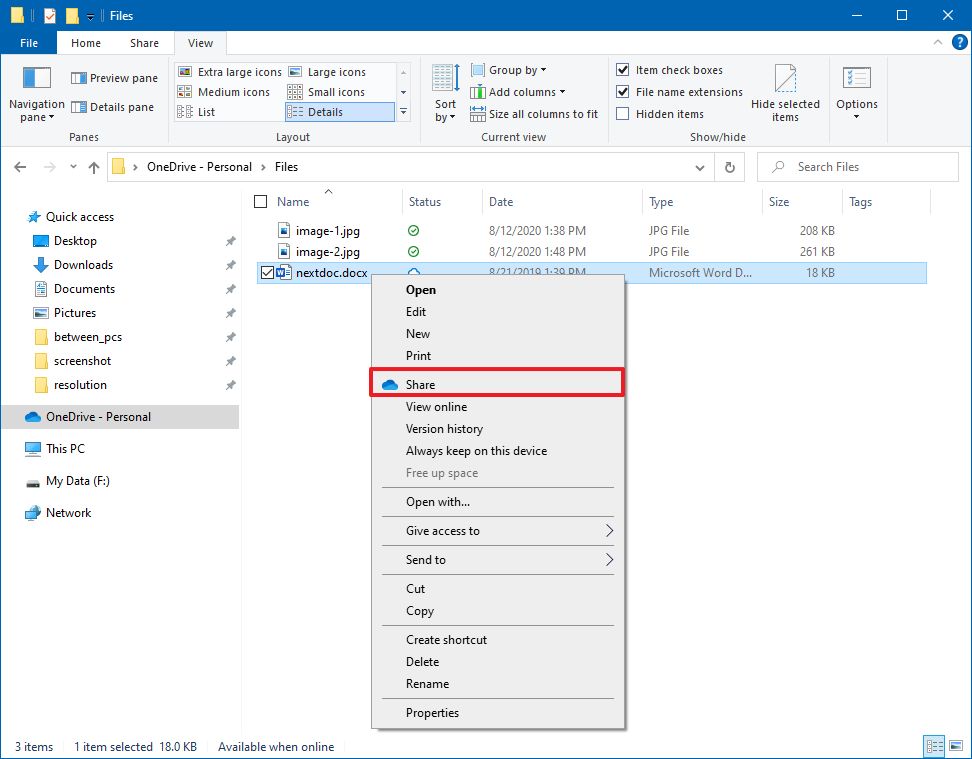
To share files with OneDrive, use these steps:
- Open File Explorer.
- Click the OneDrive folder from the left pane.
- Browse to the folder with the files.
- Right-click the file and select the Share option (blue icon).
- (Optional) Click the Anyone with the link can edit option.
- Clear the Allow editing option if you only want someone else to view the file.Quick tip: If you have a Microsoft 365 subscription (opens in new tab) or OneDrive plan, you can also set the expiration date and password for the link.
- Click the Apply button.
- Confirm the email address of the person you want to share the file. Or click the Copy Link option to copy the link to the clipboard.
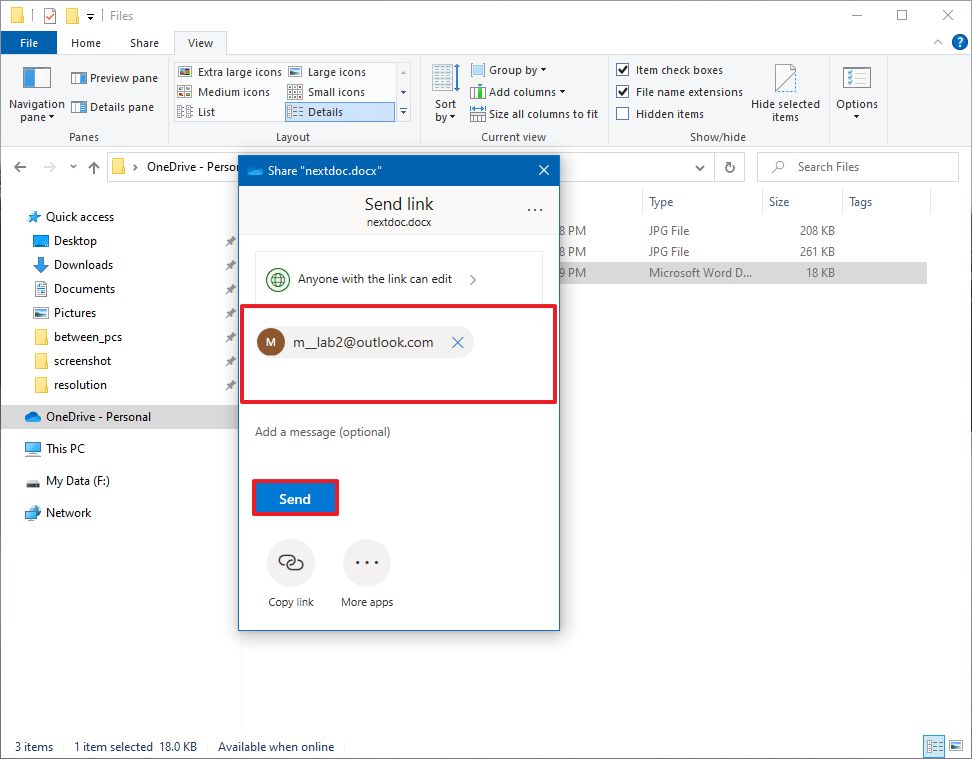
- (Optional) Add a personalized message for the share.
- Click the Send button.
After you complete the steps, the recipient will receive the link to access the shared file, and depending on the settings, the recipient will be able to view or edit the file.
Stop file sharing
To stop sharing a file in OneDrive, use these steps:
- Open File Explorer.
- Click the OneDrive folder from the left pane.
- Browse to the folder with the share.
- Right-click the shared file and select the Share option (blue icon).
- Click the three-dotted button in the top-right corner.
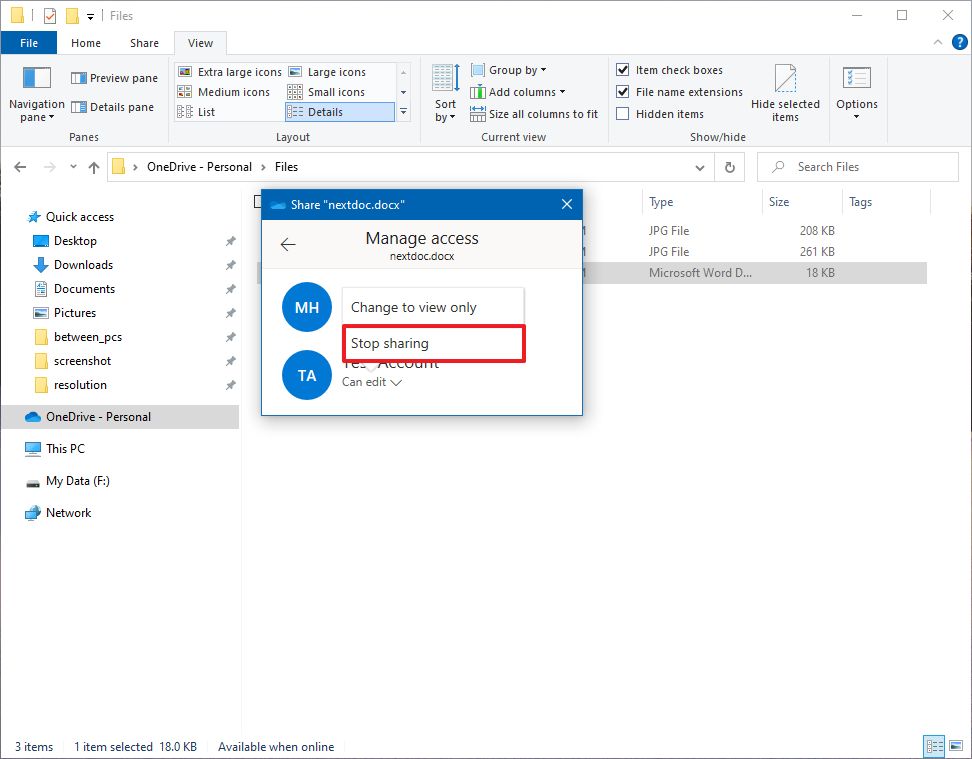
- Select the Manage Access option.
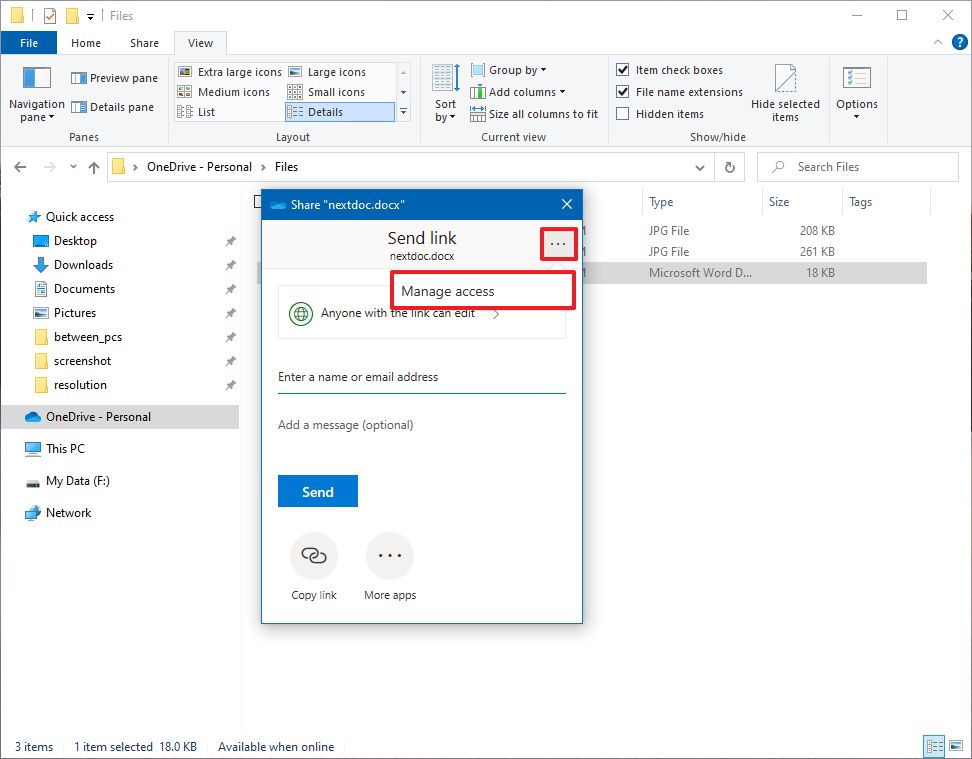
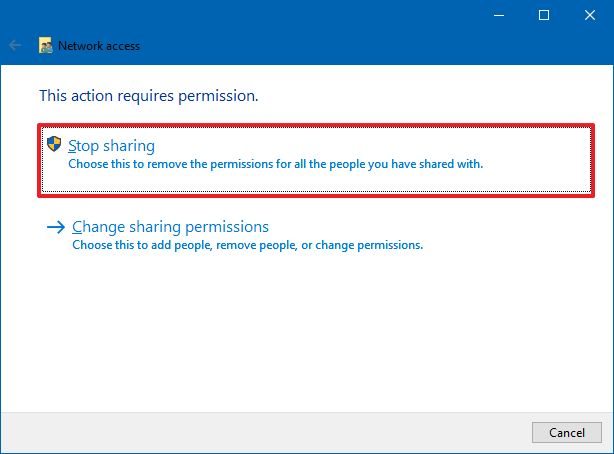
- Click the Can edito button and select the Stop sharing option.
Once you complete the steps, the files will no longer be accessible by other people with the link.
When you have to share multiple files in the local network, you can use the File Explorer advanced sharing options.
Quick tip: When sharing a folder, usually, you want to share the folder by creating a folder in the root of the «C» drive or secondary drive or partition. Always avoid sharing files from the system folders, including Desktop, Documents, Pictures, etc.
To create a basic folder share on Windows 10, use these steps:
- Open File Explorer.
- Browse to the folder with the content that you want to share.
- Right-click the folder, select the Give access to option, and click the Specific people option.
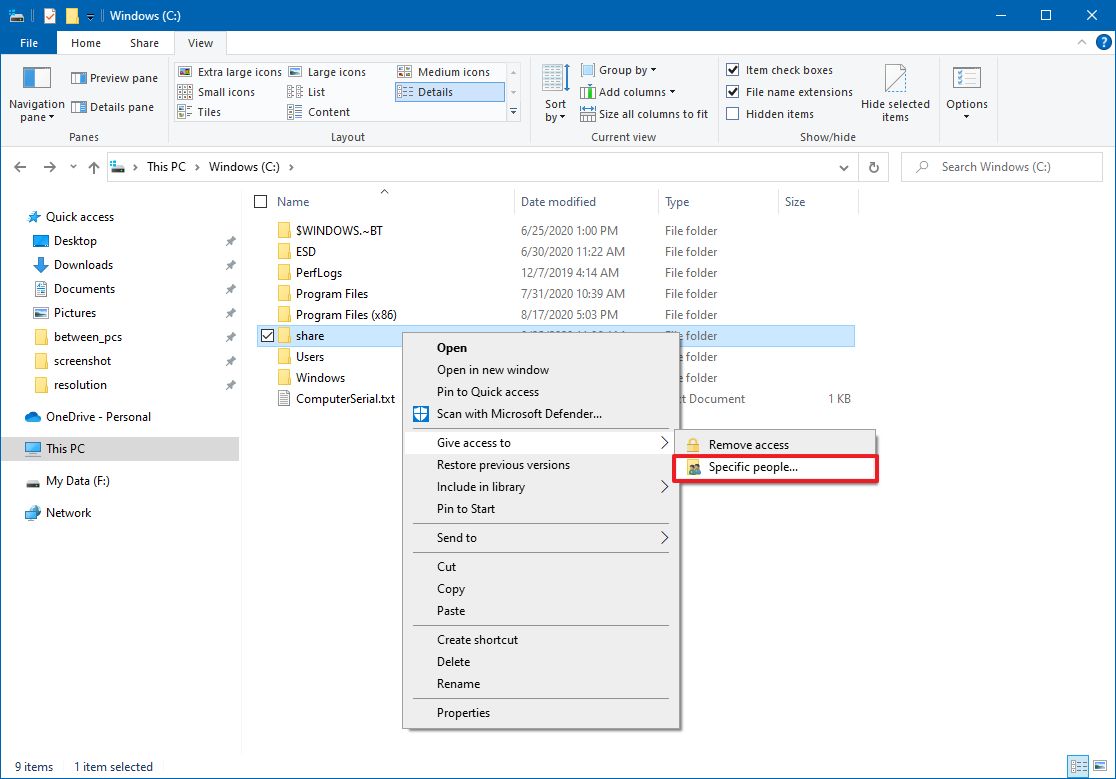
- Use the drop-down menu, and select the user or group to share the folder and its contents. Options available include:
- Local users — When you choose individual accounts, the user must provide username and password to access the files. If the user is signed in using the same credentials on their computer, then they may be able to access the data without any prompts.
- Everyone — Shares the contents with anyone in the network without entering a password to access the files.
Quick note: You may also find an option to create a new account, but it won’t be useful since Windows 10 no longer allows the creation of new accounts using Control Panel.
- Click the Add button.
- Under the «Permission Level» column, select the permissions that user will have to access the contents:
- Read — Gives network users the ability to list and open files, but they won’t be able to modify or delete existing files and folders. Also, they won’t be able to upload or create new folders or files.
- Read/Write — Allows users to list, open, modify, delete, upload, and create new files and folders.
- Remove — Blocks the specified user or group from accessing the folder.
- Click the Share button.
- Right-click the shared folder path and select the Copy Link option.

- Click the Close button.
After you complete the steps, you can share the link (which you copied to the clipboard on step No. 8) with users in the local network.
Connect to shared files over the network
To access a shared folder on Windows 10, use these steps:
- Open File Explorer.
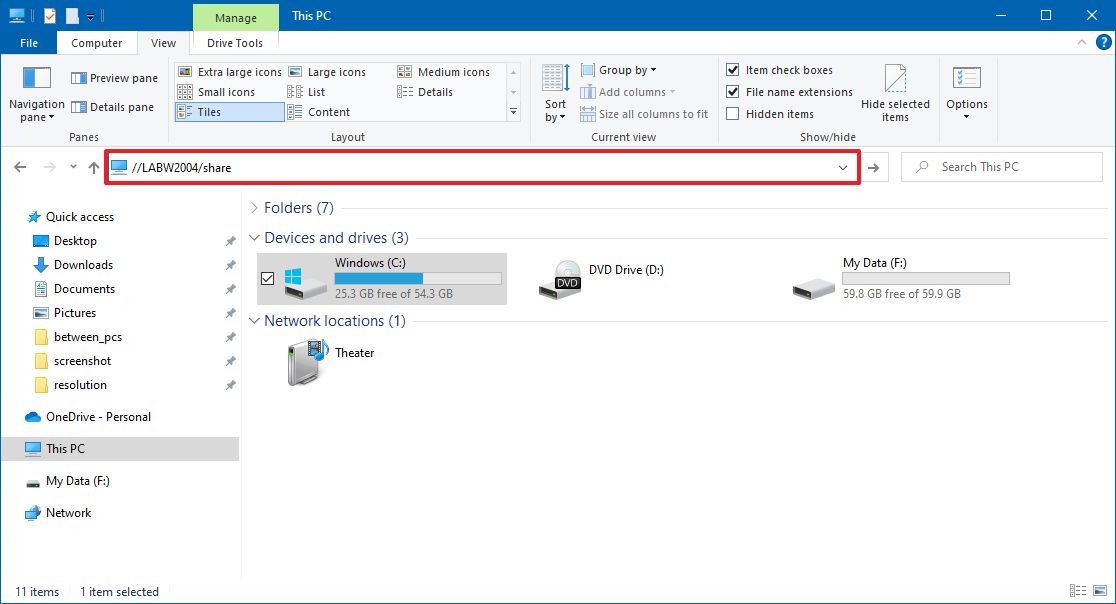
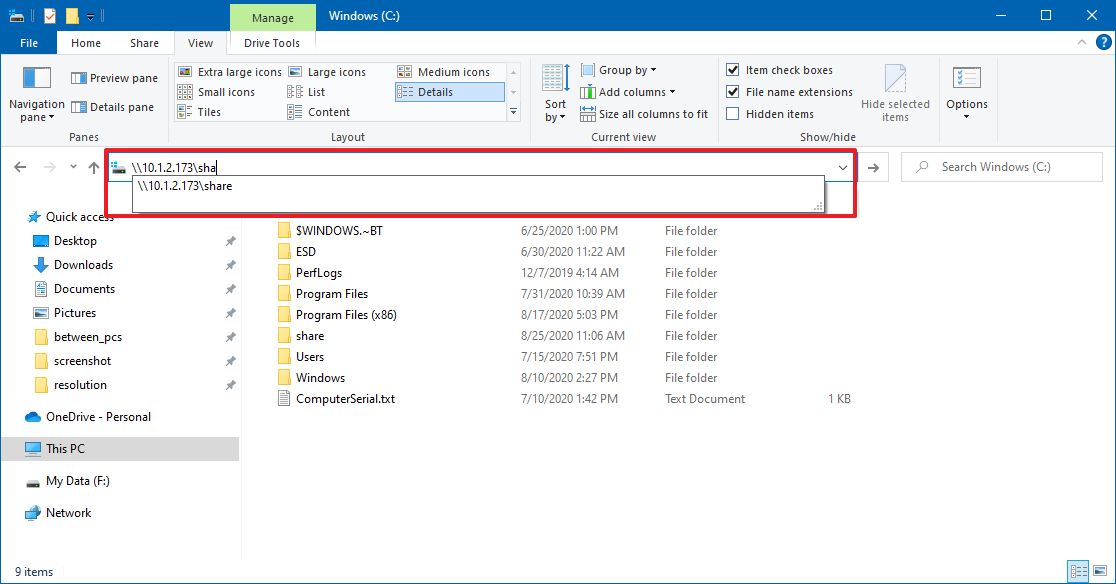
- Right-click and paste the network path for the shared folder in the address bar and press Enter.
- Confirm your account credentials (if applicable).
- Upload, download, or modify files as necessary.
If you’re logged on using a username and password that matches the credentials on the device sharing the folder, you may not need to sign in again to access the shared folder. However, if you’re prompted to log in, you must enter the account credentials of an account located on the computer sharing the folder.
Alternatively, users can also use the «Network» page from the File Explorer from left pane to browse the computer and access the shared folder contents.
When sharing folders in the network, users will only be able to access the files if the computer sharing the folder is on and connected to the network.
Stop sharing files over the network
If you no longer wish to share files in the network, use these steps:
- Open File Explorer.
- Browse to the folder with the content that you want to share.
- Right-click the folder, select the Give access to option, and click the Remove access option.
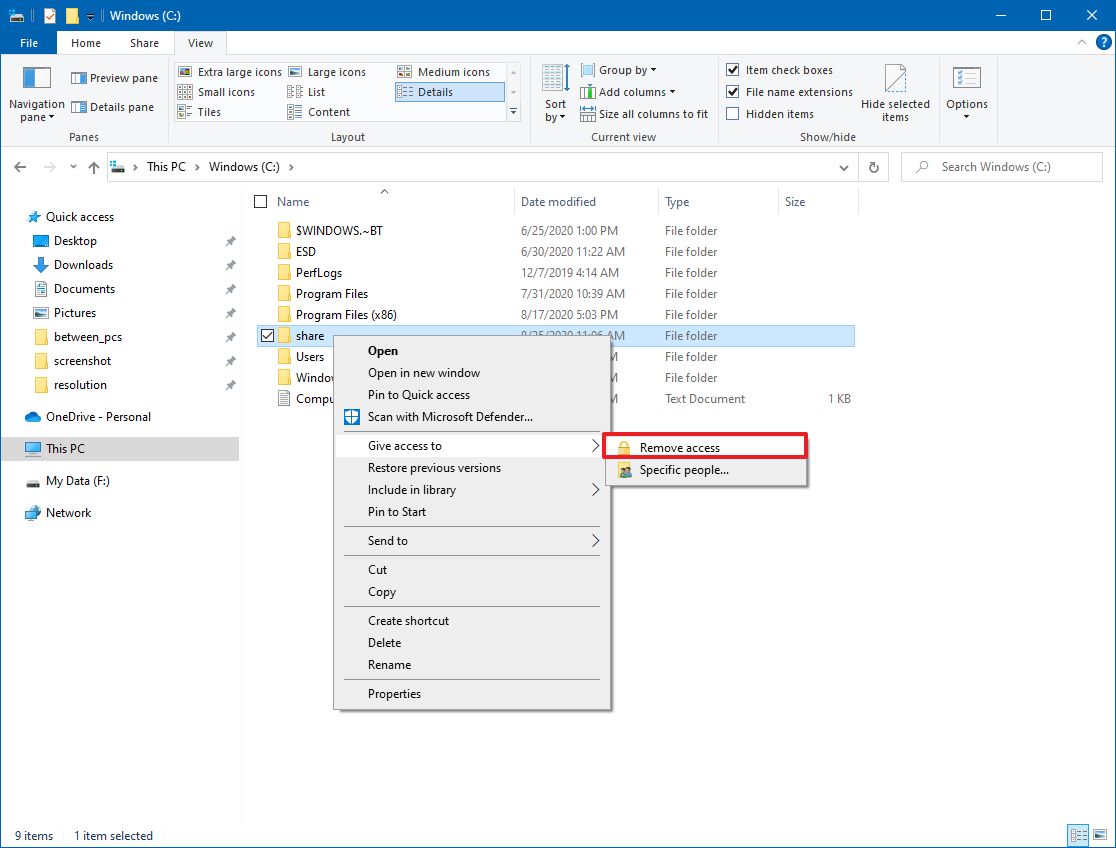
- Click the Stop sharing button.
Once you complete the steps, the content will no longer be accessible through the network.
Troubleshoot access to shared files
When sharing a folder or printer, there’s a chance you won’t be able to access the resources because of a problem translating the computer name to a TCP/IP address, issues with the firewall, or network profile settings.
Use IP address instead of computer name
To determine the device network address to replace the computer name in the path to access the shared resources, use these steps:
- Open Settings.
- Click on Network & Internet.
- Click on Status.
- Click the Properties buttons for the current Ethernet or Wi-Fi connection.
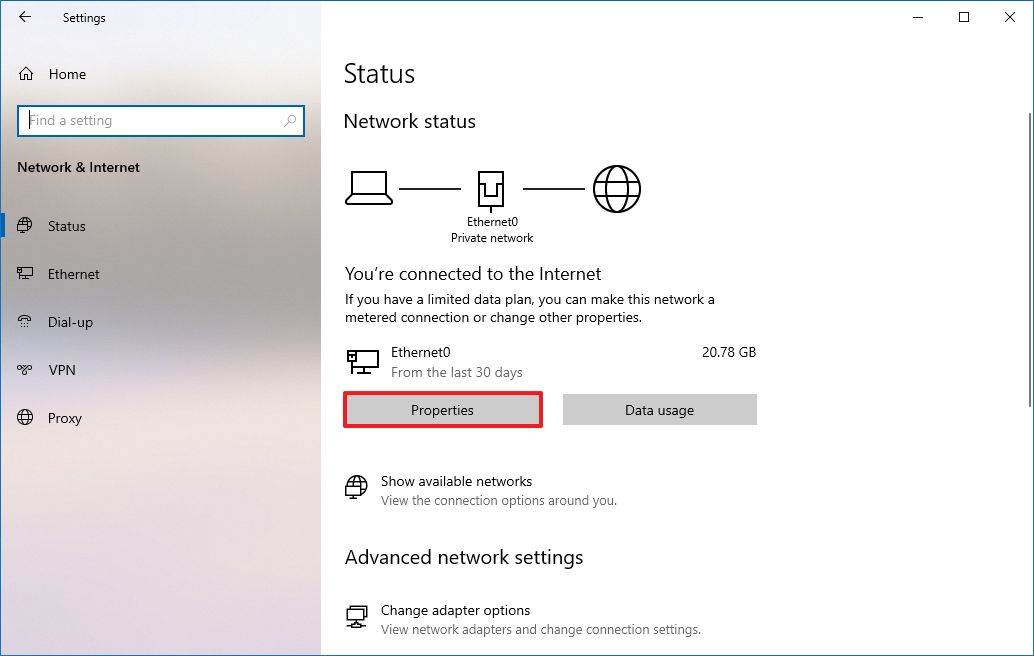
- Under the «Properties» section, confirm the current IPv4 address.
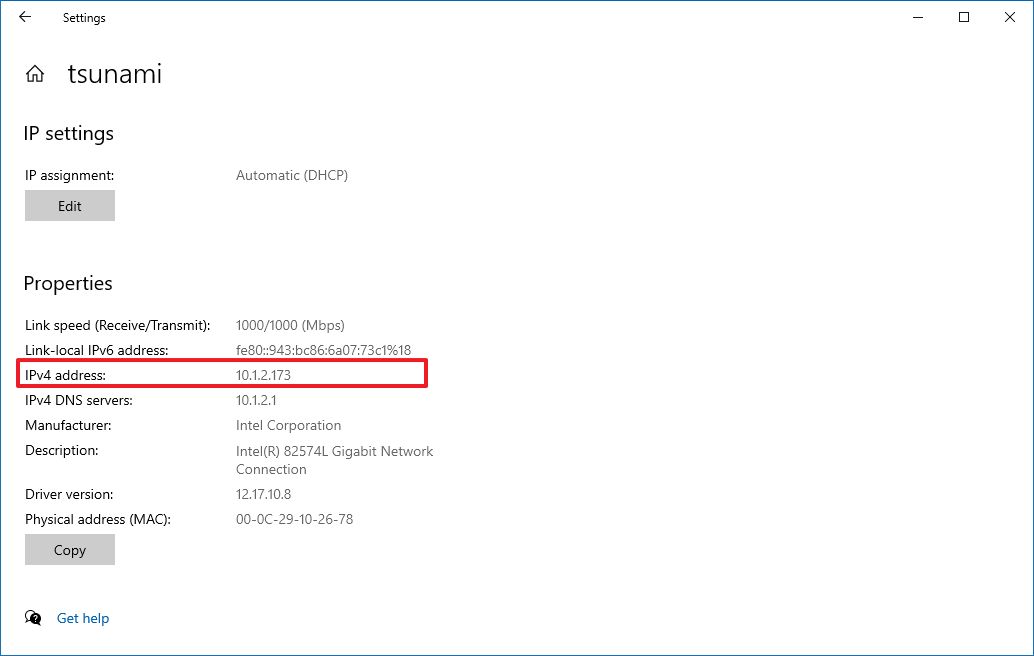
- In the network path to the shared folder, replace the computer name with the IP address.For example, after editing the link, the unique path should look like this:
//10.1.2.173/shareinstead of//homepc/share.
After you complete the steps, you should now be able to access the network content.
Change network profile to private
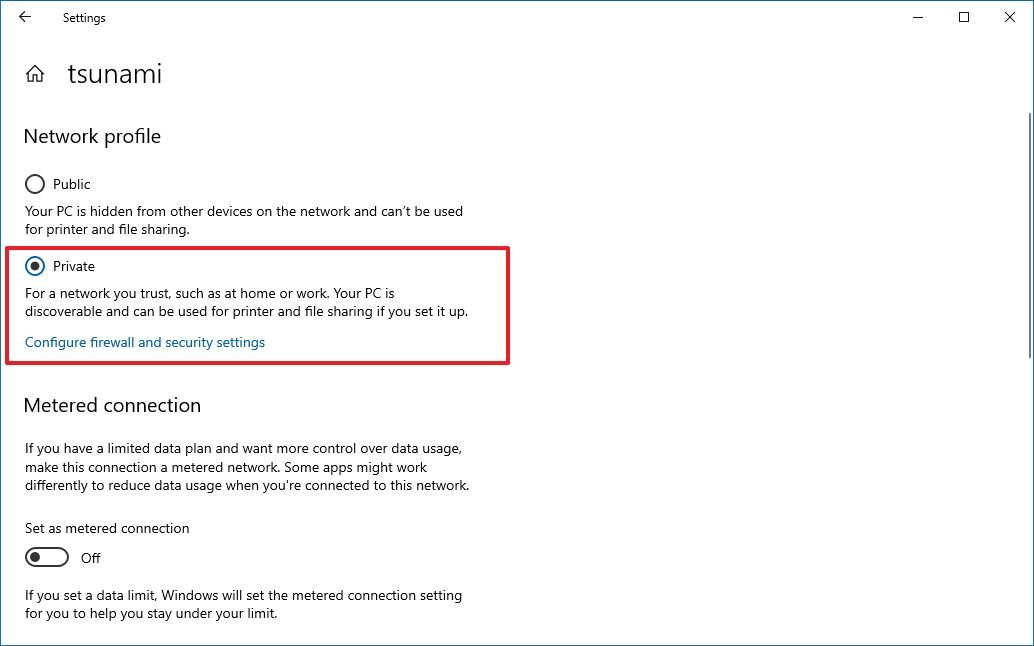
If the computer is using the public network profile, the folder or printer won’t be discoverable in the network. As a result, trying to access the resources will require to enter credentials. To avoid this issue, you must set the network profile to private on every computer.
To set the network profile to private, use these steps:
- Open Settings.
- Click on Network & Internet.
- Click on Status.
- Click the Properties buttons for the current Ethernet or Wi-Fi connection.
- Under the «Network profile» section, select the Private option.
Once you complete the steps, users should be able to access shared files and printers from any computer in the local network.
Configure access through firewall
You can temporarily disable the firewall on both devices to determine if that is the cause of the problem. If the firewall blocks access to the shared folder, you’ll need to open the corresponding ports.
Disable Microsoft Defender Firewall
To temporarily disable the firewall on Windows 10, use these steps:
- Open Windows Security.
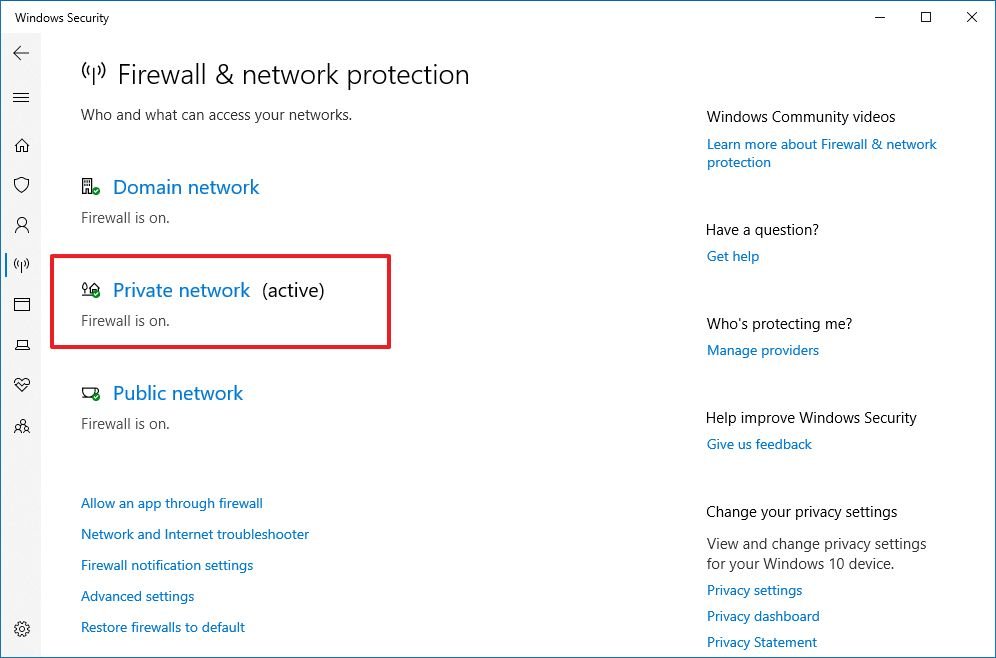
- Click on Firewall & network protection.
- Click the Private network option.
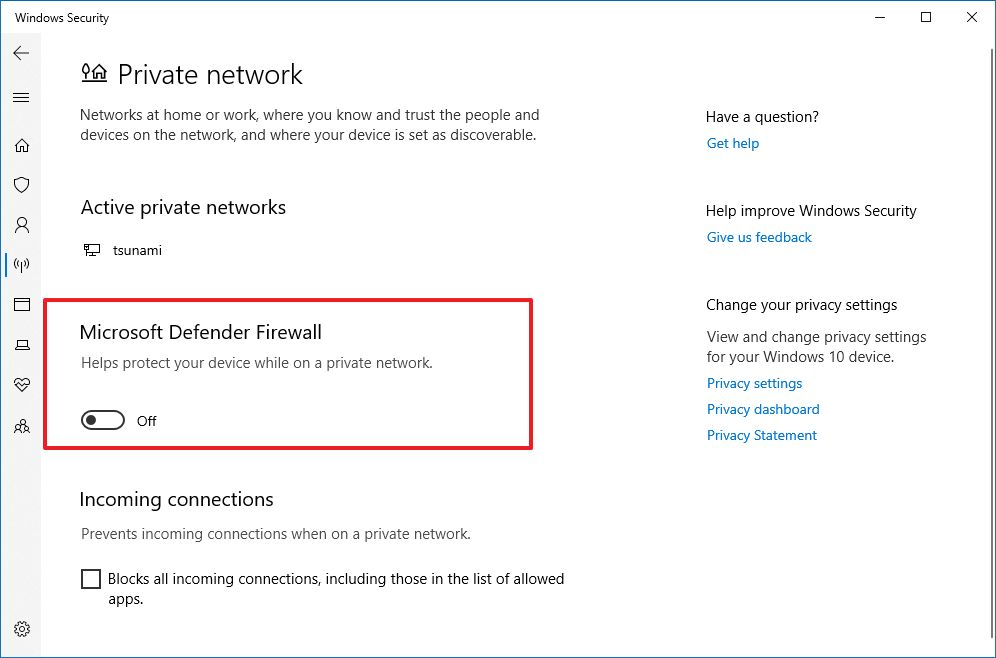
- Turn off the Microsoft Defender Firewall toggle switch.Quick tip: after finding out the issue, make sure to turn the firewall back on.
After you complete the steps, repeat the steps on the device, and then try to access the shared folder. If it’s a firewall problem, then you’ll need to open the corresponding network port. Also, after resolving the issue, remember to re-enable the firewall using the same instructions outlined above, but on step No. 4, make sure to turn on the Microsoft Defender Firewall toggle switch.
Open Microsoft Defender Firewall ports
To allow file and printer sharing through the firewall, use these steps:
- Open Windows Security.
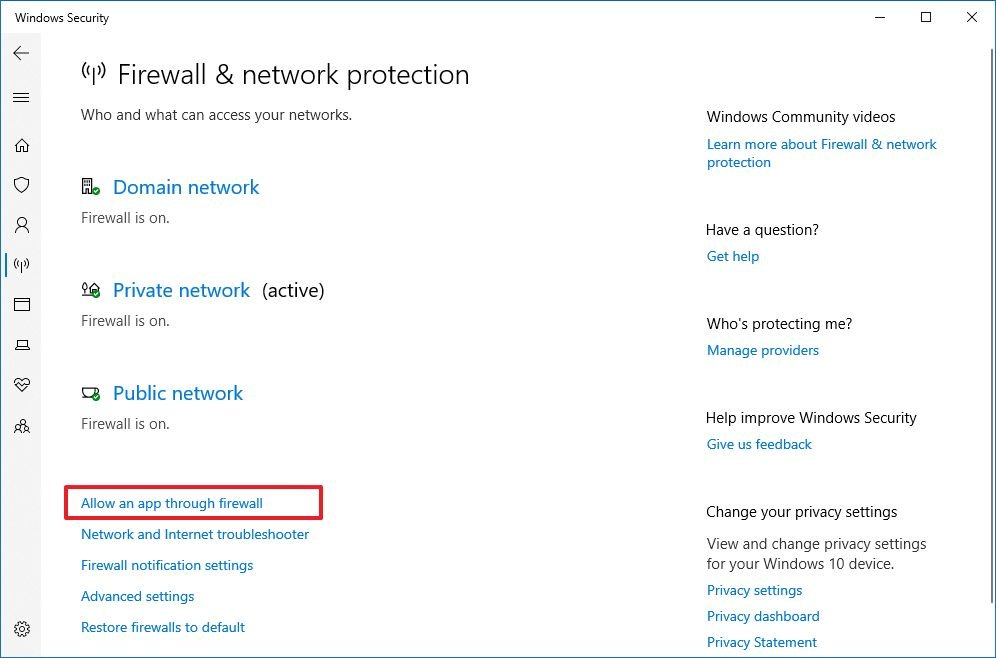
- Click on Firewall & network protection.
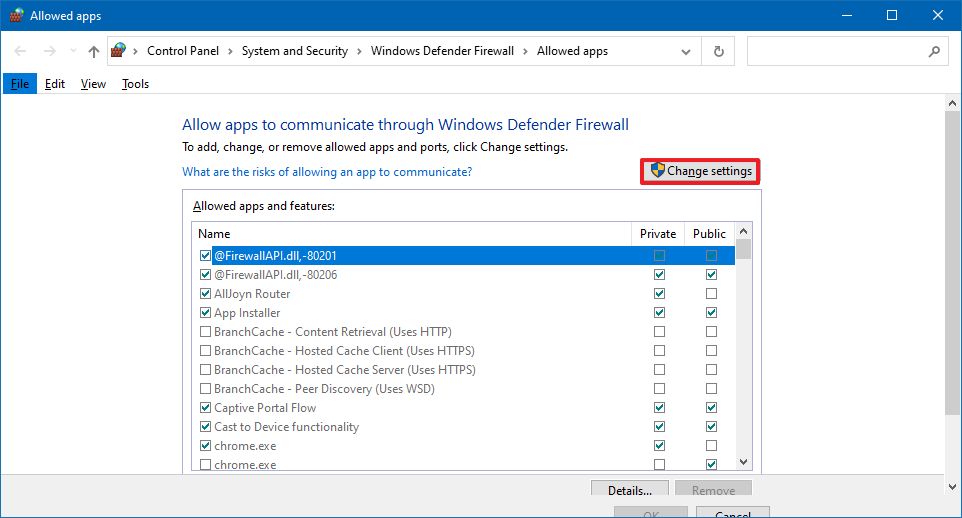
- Click the Allow app through firewall option.
- Click the Change settings button.
- Select the File and Printer Sharing option, and make sure to check the Private network option.
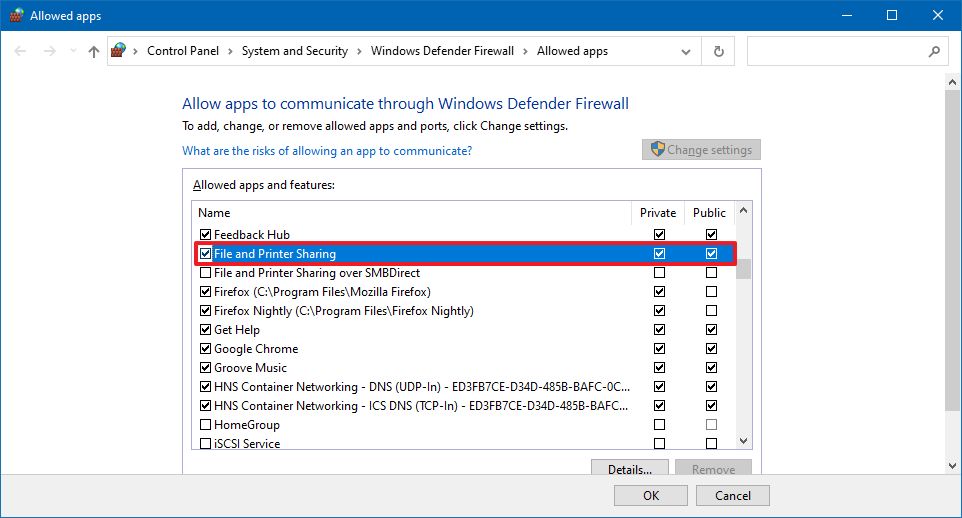
- Click the OK button.
Once you complete the steps, network users should be able to access the shared folder even with the firewall turned on.
If you’re using a third-party firewall solution, you’ll need to check your vendor support website for specific details on how to get around this problem.
In previous versions, the easiest method to share a printer was using HomeGroup, but now even without the feature, you can still share a USB printer with other users in the local network.
Important: If you have a printer with a built-in print server, it’s recommended to use that feature. You can refer to the printer manufacturer support website for instructions on connecting the device to the network. If you’re dealing with a print server, you only need to follow the steps below to share the printer and connect the computers.
To share a printer on Windows 10 (assuming it’s already installed), use these steps:
- Open Settings.
- Click on Devices.
- Click on Printers & scanners.
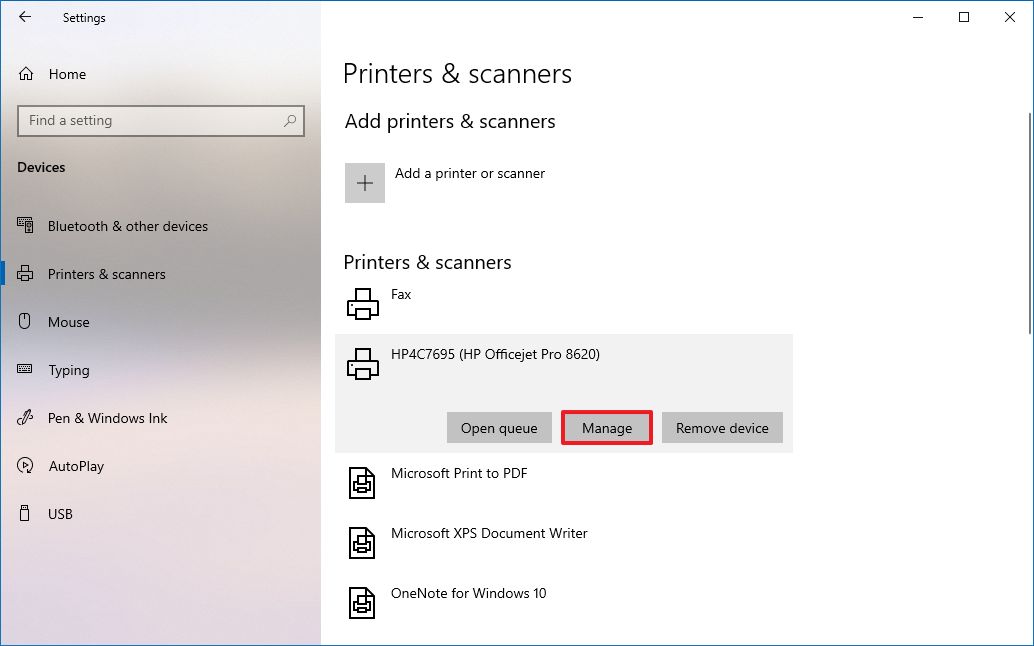
- Under the «Printer & scanners» section, select the printer that you want to share.
- Click the Manage button.
- Click the Printer properties option.
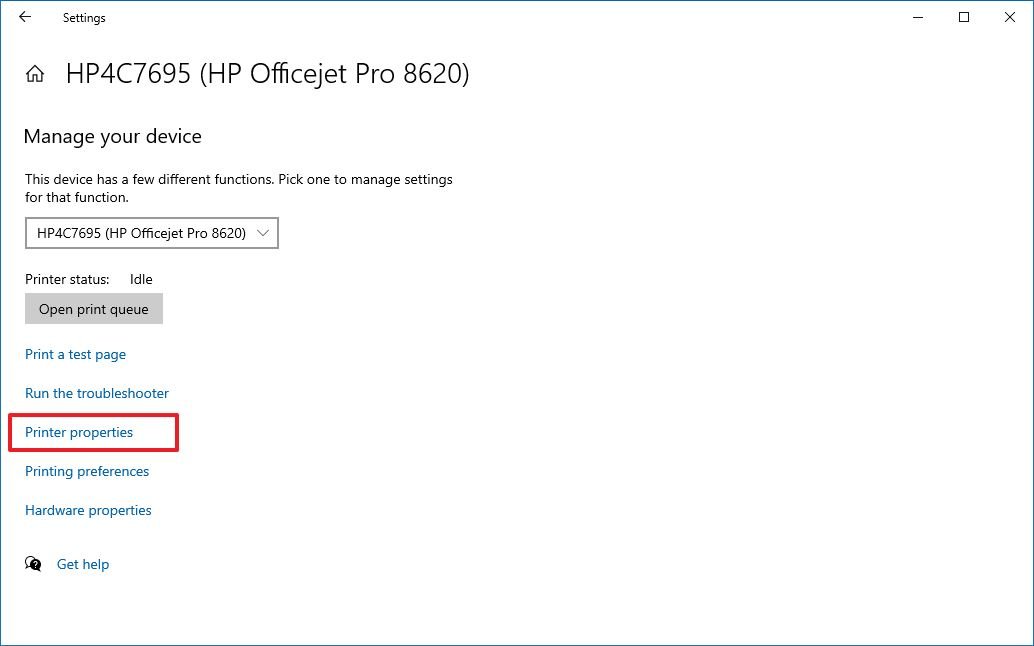
- Click the Sharing tab.
- Check the Share this printer option.
- In the «Share name» field, specify a new short and descriptive name. (If this is the only printer on the network, you can use the default name.)
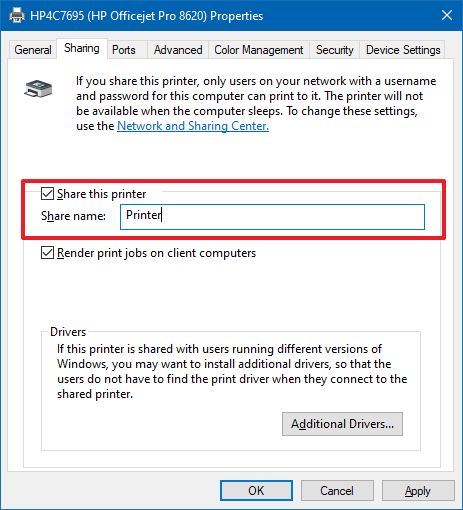
- Click the Apply button.
- Click the OK button.
After you complete the steps, the printer will be available to network users, but only if the computer is on.
To connect devices to the shared printer, use these steps:
- Open Settings.
- Click on Devices.
- Click on Printer & scanners.
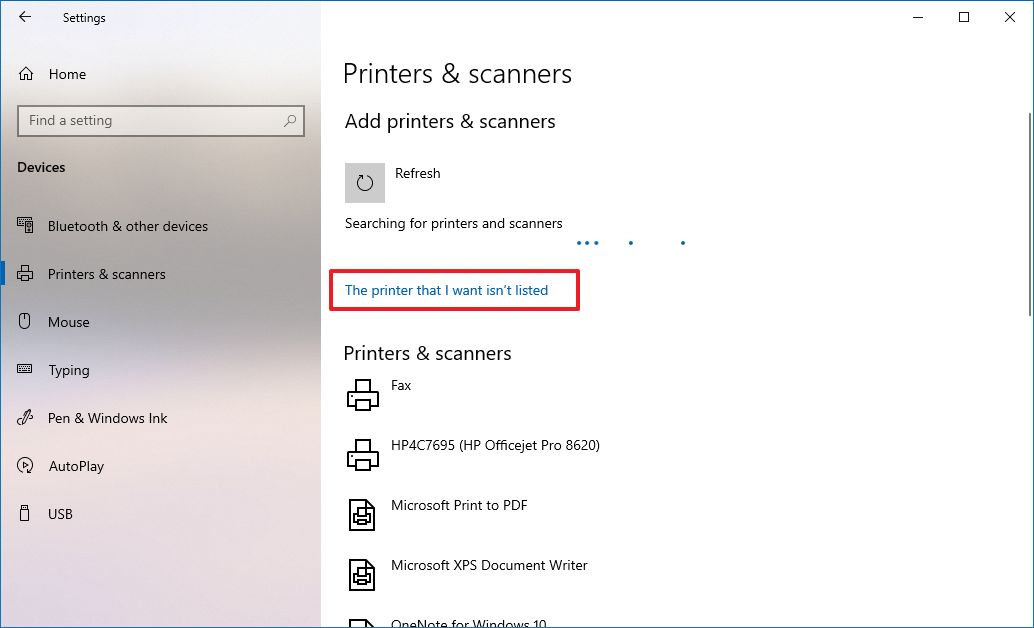
- Click the Add a printer or scanner button.
- Select the printer from the list.
- (Optional) If the discovery feature doesn’t work, click The printer that I want isn’t listed option.
- Choose the Select a shared printer by name option.
- Type the path of the printer location:
\xxx.xxx.xxx.xxxPRINTER-SHARE-NAMEIn the command, make sure to change the «xxx.xxx.xxx.xxx» and «PRINTER-SHARE-NAME» for the IP address (or computer name) and name of the printer.Quick tip: You can also click the Browse button to select the shared printer.
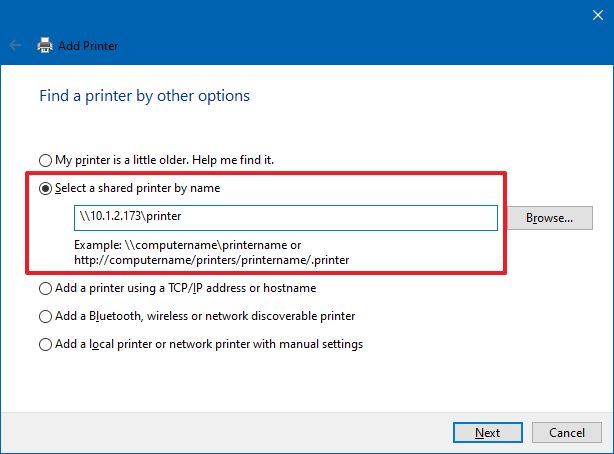
- Click the Next button.
- Click the Install driver button (if applicable).
- (Optional) Specify an name of the printer connection. For example, Network Printer.
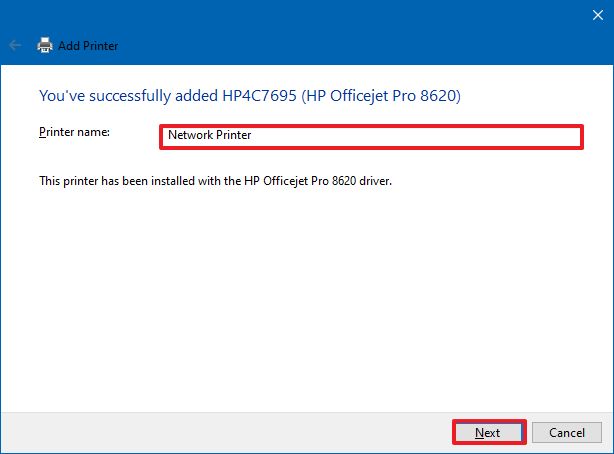
- Click the Next button.
- Click the Finish button.
Once you complete the steps, you should be able to successfully send a print job to the network printer.
Connect old devices to shared printer
If you’re running an old version of Windows 10, Windows 8.1, or Windows 7, the steps to connect to the printer will be slightly different.
To connect an old computer to a network shared printer, use these steps:
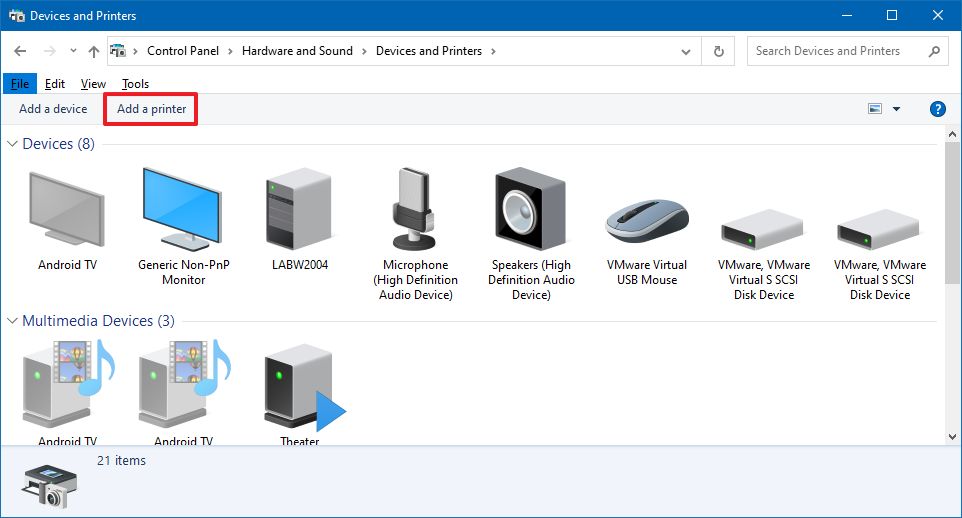
- Open Control Panel.
- Click on Hardware and Sound.
- Click on the Devices and Printers option.
- Click the Add a printer button.
- Select the printer from the list.
- If the discovery feature doesn’t work, click The printer that I want isn’t listed option.
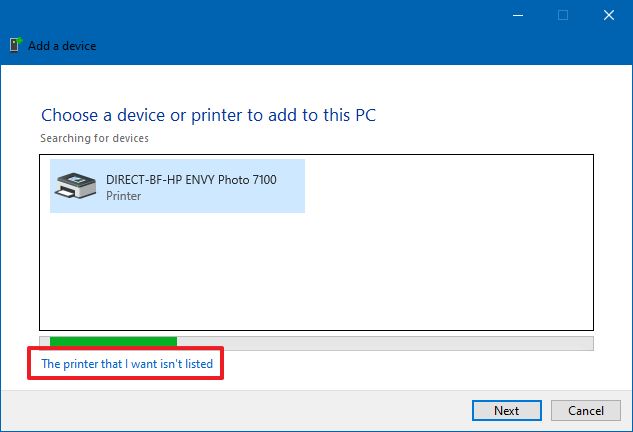
- Choose the Select a shared printer by name option.
- Type the path of the printer location:
\xxx.xxx.xxx.xxxPRINTER-SHARE-NAMEIn the command, make sure to change the «xxx.xxx.xxx.xxx» and «PRINTER-SHARE-NAME» for the IP address (or computer name) and share the name of the printer that you’re trying to connect.Quick tip: You can click the Browse button to locate and select the shared printer.
- Click the Next button.
- Click the Install driver button (if applicable).
- (Optional) Specify an name of the printer connection. For example, Network Printer.
- Click the Next button.
- Click the Finish button.
After you complete the steps, remember that users will only be able to print as long as the device sharing the printer is powered on and connected to the network. If the computer is sleeping, hibernating, or powered off, no one will be able to print.
Stop sharing printer on Windows 10
If there’s no need to share a printer over the network anymore, then use these steps:
- Open Settings.
- Click on Devices.
- Click on Printers & scanners.
- Under the «Printer & scanners» section, select the printer that you want to share.
- Click the Manage button.
- Click the Printer properties option.
- Click the Sharing tab.
- Clear the Share this printer option.
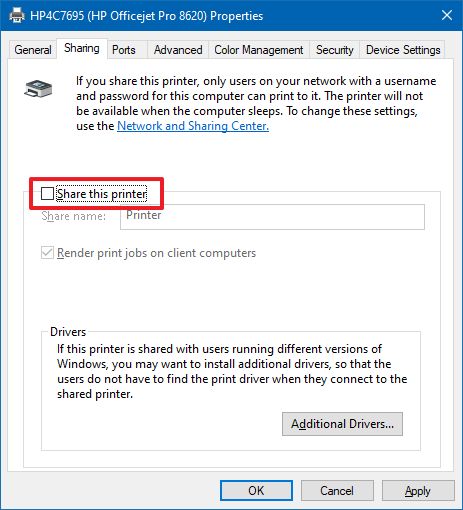
- Click the Apply button.
- Click the OK button.
Once you complete the steps, the printer will no longer be available for network users.
Wrapping things up
Windows 10 includes many features and advanced settings to share resources with network users, but in this guide, we’re focusing on using the essential configurations to help users coming from HomeGroup.
If you’re in an environment running different versions of Windows, you can still refer to this guide to share files and printers on older releases of Windows 10, Windows 8.1, and even Windows 7.
Get the best of Windows Central in in your inbox, every day!
Mauro Huculak is technical writer for WindowsCentral.com. His primary focus is to write comprehensive how-tos to help users get the most out of Windows 10 and its many related technologies. He has an IT background with professional certifications from Microsoft, Cisco, and CompTIA, and he’s a recognized member of the Microsoft MVP community.
- Обслуживание компьютеров в офисе / Локальные сети в офисе
- 111828
- 1
Содержание:
Выбор компьютера для расшаривания сетевой папки
Сперва следует решить на каком компьютере стоит делать сетевую папку. Если вы планируете открыть доступ для 20 или менее компьютеров, то можете переходить к следующему шагу.
Если в вашей сети больше 20 компьютеров, то вам стоит поискать может у вас есть Professional версия.
Поясню, MS Windows Home edition позволяет предоставлять доступ к сетевой папке не больше 20 компьютерам (пользователям). Для большего количества требуется версия Professional или Server.
Как узнать какая у вас версия Windows
- Заходим в любую папку.
- Нажимаем на значок «мой компьютер» в области навигации (слева).
- В основной области в месте, где нет никаких иконок нажимаем правой кнопкой мыши и в раскрывшемся меню выбираем пункт «Свойства».
- В открывшемся окне будет написано полное название и версия вашей операционной системы.


Проверяем все компьютеры и если есть компьютер с версией Professional, то делаем сетевую папку на нем.
Дополнительные параметры для выбора компьютера:
- Это должен быть компьютер с самым большим объёмом оперативной памяти. Как ее проверить? Выполняем все пункты из раздела как узнать какая у вас версия Windows, но в открывшемся окне смотрим чуть ниже пункт «Установленная память (ОЗУ)»
- В идеале этот компьютер должен включаться самым первым и выключаться самым последним. Если он вдруг выключится раньше, то все не сохраненные данные, с которыми в этот момент работали пропадут!
- В идеале у этого компьютера должен быть канал проходимости сети 1000 Мбит/сек (ссылка на якорь speed в локальной сети), а именно провод витой пары на 8 жил и обязательно гнездо в компьютере и в сетевом коммутаторе на 1000 Мбит/сек.
- Желательно чтобы он не был компьютером бухгалтера, иначе проблемы со скоростью работы будут и у бухгалтера, и у пользователей.

Создание сетевой папки
Если у вас на компьютере есть два жёстких диска (ну или 2 локальных диска, например «диск C:» и «диск D:») то лучше использовать не тот на котором установлен Windows, и на котором больше свободного места. Не забудьте оценить сколько гигабайт памяти вам понадобится для работы в течение следующего года и позаботиться о том, чтобы на выбранном диске её было достаточно.
- На выбранном диске создаем обычную папку, ее можно назвать «Сетевая папка», «Сервер» или как вам вздумается.
- Нажимаем на ней правой кнопкой мыши и заходим в «Свойства».
- В открывшемся окне убираем галочку на пункте «Только для чтения» и переходим во вкладку «Доступ». Далее нажимаем на расширенная настройка.
- В открывшемся окне включаем галочку «Открыть общий доступ к этой папке». В поле «Ограничить число одновременных пользователей до», увеличиваем до максимума. И нажимаем на кнопку «Разрешения».
- В открывшемся окне нажимаем на кнопку «Добавить», а в следующем «Дополнительно…».
- В этом окне нажимаем на кнопку «Поиск», находим пункт СЕТЬ, выбираем его и нажимаем кнопку «ОК».
- В окне (Выбор: «Пользователи» или «Группы») тоже жмем «ОК».
- В окне (Разрешение для группы «Название вашей папки») выбираем группу «СЕТЬ» и включаем галочку разрешить полный доступ. Нажимаем «Применить» а затем «ОК». В оставшемся окне «Расширенная настройка общего доступа так-же нажимаем «Применить» и затем «ОК».
- На данном этапе мы добавили, для нашей сетевой папки, группу пользователей в которую входят все компьютеры внутренней локальной сети. Теперь нам надо добавить такую-же группу в разделе безопасность, этой же папки. Переходим во вкладку «Безопасность», нажимаем кнопку «Изменить» и в открывшемся окне кнопку «Добавить».
- Дальше выполняем такие-же действия как в пунктах с 5 по 7.
- В оставшемся окне выбираем пункт «СЕТЬ», ставим галочку разрешить полный доступ, а дальше «Применить» и «ОК». Переходим обратно во вкладку «Доступ» и нажимаем на ссылку «Центр управления сетями и общим доступом».
- Сейчас мы создали и настроили сетевую папку. Но наш компьютер не настроен на общение с сетью. Он не передает другим компьютерам информацию и не берет ее у них.
Что мы делаем. В «Центре управления сетями и общим доступом» в профилях «Частная» и «Гостевая или общедоступная» включаем сетевое обнаружение и общий доступ к файлам и принтерам. А в профиле «Все сети» – «Включить общий доступ, чтобы все пользователи могли читать и записывать файлы в общих папках» и «Отключить общий доступ с парольной защитой».


Сетевая папка отрыта! Но как в нее попасть!?
Подключение сетевого диска
В сетевую папку вы можете попасть, перейдя в любую папку, далее в левом боковом меню найти иконку сеть, нажать на нее из появившегося списка компьютеров найти компьютер на котором находится наша сетевая папка, открыть его, и перейти в сетевую папку. Можно даже сделать ярлык этой сетевой папки на рабочем столе. Но работать она будет не очень стабильно.
Для стабильной работы сетевой папки рекомендую на всех компьютера, где должен быть доступ к ней, подключить сетевой диск от этой папки. Это обеспечит более надежное соединение.
- Заходим в мой компьютер.
- В верхней панели управления нажимаем на кнопку «Подключить сетевой диск».
- Выбираем букву для названия нового диска. Можно выбрать любую понравившуюся. Ставим галочку на пункте «Восстанавливать подключение при входе в систему» и нажимаем кнопку «Обзор».
- Ждем пока загрузится список компьютеров в сети, это может быть долго! Находим наш компьютер, выбираем сетевую папку и жмем «ОК». В оставшемся окне нажимаем «Готово».
Сетевой диск готов!
- Дальше для удобства можно добавить ярлык этой папки на рабочий стол. Нажимаем правой кнопкой мыши на созданном диске и выбираем пункт «Создать ярлык». Появится окно с предложением разместить его на рабочем столе. Соглашаемся.


Теперь вы найдете ярлык сетевой папки на рабочем столе.
Процедуру повторяем на всех компьютерах, у которых должен быть доступ к папке.
Обратите внимание!
Если кто-то подключит свой компьютер к вашей сети, он будет иметь доступ к этой сетевой папке. Для этого ему надо будет воткнуть провод в ваш сетевой коммутатор.
Ограничение доступа к части сетевой папки
Поясню. На каждом компьютере есть учетная запись. Вы можете сделать так, чтобы некоторые папки внутри сетевой папки были открыты для доступа только с определенных компьютеров (а точнее с конкретных учетных записей пользователей). Если кто-то подключится к вашей локальной сети, он не сможет в нее попасть. Или сотрудник (компьютер) которому вы не дали доступ к этой папке, тоже не сможет в нее попасть.
Принцип такой-же, как и при создании обычной сетевой папки. В случае с открытой сетевой папкой мы открываем доступ для группы СЕТЬ, в которую входят все компьютеры. В данном случае мы открываем доступ только для конкретных пользователей. Начнем.
Создаем учетные записи пользователей на компьютере с сетевой папкой
Первое что нам надо сделать, это переписать на листок бумаги имена учетных записей и пароли с компьютеров, которым мы хотим дать доступ к защищенной папке.
- Включаем компьютер, на котором должен быть доступ к этой папке. Нажимаете на клавиатуре комбинацию Win+R, вбиваете команду кnetplwiz и нажимаете на «ОК».
- Откроется окно управления пользователями. Вам надо точно переписать имя своей учетной записи на листок бумаги и вспомнить пароль. Если имя пользователя не уникальное в стиле «Пользователь», «User-PC», или как-то еще, то его надо сменить, и задать пароль. Обязательно записываем полное имя учетной записи и пароль на листок бумаги! Мы включили этот компьютер чтобы узнать их.
Пароль обязательно надо проверить, выйдя из системы и войдя при помощи этого пароля.
- Теперь у вас на руках есть имя пользователя и пароль от другого компьютера (которому мы хотим открыть доступ). Нам надо создать такого-же пользователя на нашем компьютере (на котором находится сетевая папка). Выполняем те же самые действия – Win+R и команда кnetplwiz. Откроется окно «Учетные записи и пользователи». Ставим галочку требовать ввод имени пользователя и пароля. Нажимаем кнопку добавить.
- Если на компьютере, которому вы хотите дать доступ стоит учетная запись Microsoft (у вас на бумажке в качестве логина написан e-mail), то вы вбиваете его и следуете инструкциям, если у вас обычная (локальная) учетная запись, то нажимаете внизу на ссылку «Вход без учетной записи Microsoft». Далее нажимаете кнопку «Локальная учетная запись».
- Создаете учетную запись в точности как написано у вас на бумажке. Я использовал пользователя «Buhgalter». В окне «Учетные записи пользователей» Нажимаем «Применить» и «ОК».
Важно!
Если на этом шаге вы добавили учетную запись Microsoft (в качестве пользователя у вас e-mail), то вам обязательно необходимо произвести вход в эту учетную запись на этом компьютере, иначе у этого пользователя (на другом компьютере, которому вы открываете доступ) не появится прав зайти в секретную сетевую папку.


Создаем защищенную сетевую папку и открываем доступ пользователям
- В сетевой папке создаем обычную папку. В нашем случае назовем ее «Финансы».
- После того как мы создали всех необходимых пользователей на компьютере с секретной сетевой папкой, надо раздать этим пользователям права на посещение и редактирование секретной папки. Переходим к нашей папке, в моем случае это «Финансы». Нажимаем на ней правой кнопкой мыши и выбираем пункт «Свойства».
- Переходим во вкладку доступ, нажимаем на кнопку расширенная настройка. В открывшемся окне включаем галочку «Открыть общий доступ к этой папке» и нажимаем на кнопку «Разрешения». В окне «Разрешения для группы…» нажимаем на кнопку добавить.
- Добавляем наших пользователей. Для этого в окне выбора пользователей и групп нажимаем на кнопку дополнительно. В открывшемся окне нажимаем на поиск выбираем нашего пользователя и нажимаем «ОК». Еще раз жмем дополнительно, находим следующего пользователя и так пока не добавим всех, кто нам нужен.
- Теперь в окне выбора пользователей или групп появился список наших пользователей. Жмем на «ОК» и в оставшемся окне задаем необходимые разрешения для наших новых пользователей. Для этого выбираем пользователя и ставим галочки нужных разрешений, потом выбираем следующего, и так пока не раздадим права всем. Нажимаем применить и «ОК». В оставшемся окне расширенных настроек так же нажимаем применить и «ОК».


Отменяем наследование правил защищенной сетевой папки в Win 10
Мы открыли доступ для нашей новой паки конкретным пользователям, но наша папка финансы находится внутри сетевой папки, в которой мы дали разрешение всем пользователям сети (группой «СЕТЬ») на чтение и редактирование вложенных в нее папок и файлов. Таким образом наша папка «Финансы» наследует все правила от папки «Сетевая папка». Надо отключить это наследование.
- В окне свойства нашей сетевой папки переходим во вкладку Безопасность. Нажимаем на кнопку дополнительно.
- В окне дополнительные параметры безопасности нажимаем на кнопку отключить наследование. Появится вопрос c предложением 2х вариантов. Если мы выберем «Удалить все наследованные разрешения из этого объекта», то мы удалим и свои административные права на эту папку и уже ничего не сможем с ней делать. А если мы выберем пункт «Преобразовать наследованные разрешения в явные разрешения этого объекта», то мы сможем удалить не нужные нам разрешения, оставить те, которые нужны и добавить новые.
- Удаляем разрешения для групп «СЕТЬ» и «Все». И для того, чтобы все файлы и папки внутри нашей защищенной папки (Финансы) унаследовали правила, которые мы зададим тут, включаем галочку «Заменить все записи разрешений дочернего объекта наследуемыми от этого объекта».
- Мы закрыли доступ неизвестным компьютерам сети. Теперь нам надо разрешить доступ для наших новых пользователей для этого во вкладке безопасность свойств нашей сетевой папки нажимаем на кнопку изменить. В открывшемся окне нажать на кнопку добавить.
- Дальше нам надо добавить новых пользователей и дать им разрешения. Для этого в открывшемся окне (Разрешения для группы …) повторить все так же, как в пункте 4 и 5 из раздела «Создаем защищенную сетевую папку и открываем доступ пользователям».
- Теперь у нас есть разрешение безопасности для нужных пользователей. В свойствах нажимаем применить и «ОК».
- Обязательно перезагружаем все компьютеры.


Защищенная сетевая папка готова! Вы можете попасть в нее войдя в подключенный сетевой диск нашей обычной сетевой папки, или подключить отдельный сетевой диск для более быстрого доступа.
Windows 10 has made it very easy to share files and folders over the local area network even without a dedicated hosting machine.
All you need to do in order to share a folder on Windows 10 over LAN is select the user to grant access to and decide if you want it to be available for offline access as well.
We made a quick video version of this guide which covers all the basic functionality, if you prefer following a video guide.
Check currently active systems in the network
The first step should be to check all the currently available systems within your local network.
The reason for this is because you must enter network credentials in order to access any files on a specific system.
Active network devices can be checked by first opening up File Explorer and then clicking on the Network icon in the drive hierarchy on the left side of the window.
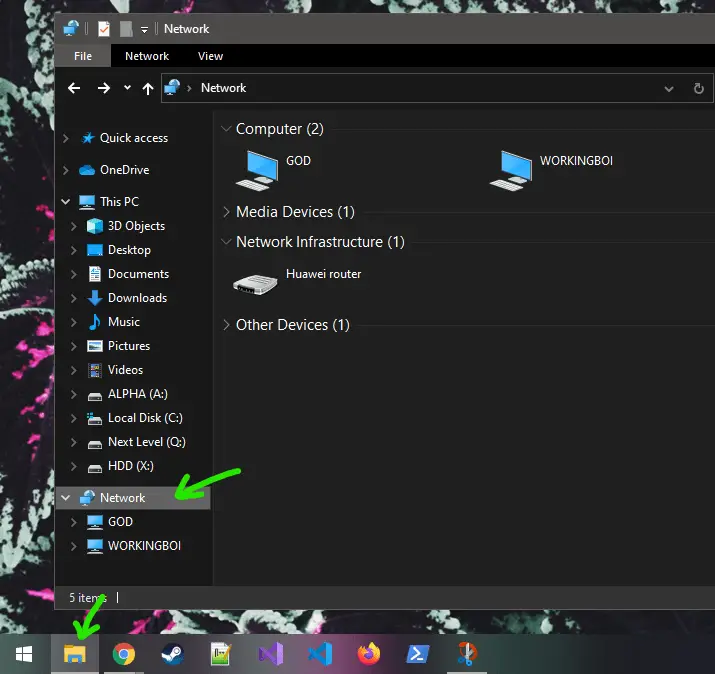
You should now see all the devices currently connected to your network and you should be able to connect to them by clicking on them.
However, in some cases network discovery is disabled, which will produce a warning message and not show any devices in the list.
What to do if you can’t see any computers in the network?
If you can’t see any systems in the local network, there can be a few issues that cause this.
The most common issue is that network discovery is disabled, which should show you an error message.
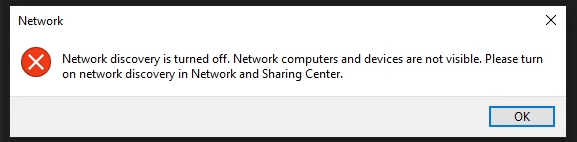
If you see this error, you should see a notification at the top of the file explorer asking to turn on network discovery.
This can be accomplished simply by clicking on the notification and selecting the first option.
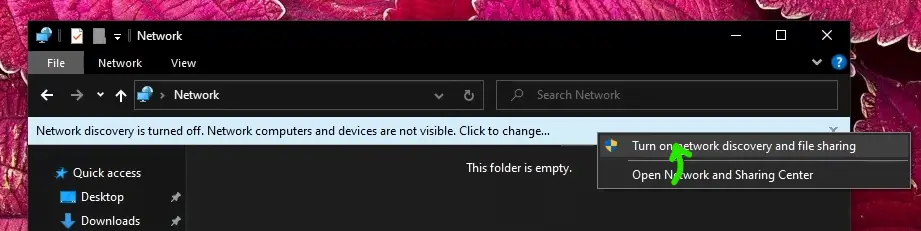
After this, you should be able to see all the online devices in the folder.
If you still don’t see the device you’re looking for, make sure that you have enabled discovery and file sharing on that system as well.
You also need to ensure that all your devices are connected to the same network or router.
It doesn’t matter if one device is connected using an Ethernet cable and another through Wi-Fi, as long as the traffic goes through the same router.
Access a system in the Local Network
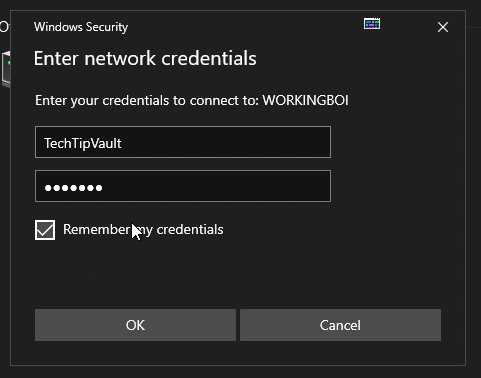
The next step is actually signing into the system you plan to share files with. You need to do this step only on the non-host device, meaning the system that needs to “ask” to access the files.
Accessing a device is as simple as clicking on it, after which Windows will prompt you for network credentials.
These credentials simply mean your Windows 10 login details. If you have a normal local user on your host machine, you can simply type in that users name and password into the prompt.
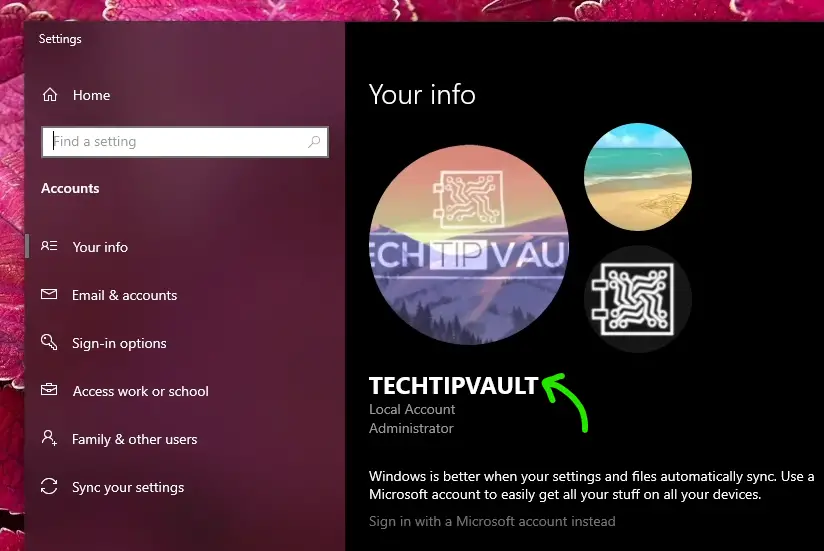
If you can’t find your username, you can simply type ‘Account info‘ into the search bar of the host machine and a window will pop up showcasing your username.
If you use a Microsoft account, it has been known to cause issues, especially if all your systems don’t use Windows 10.
If typing your Microsoft account e-mail and password doesn’t work, you can try typing MicrosoftAccountyouremail@email.com as the username. It has solved the issue for some users.
If even that doesn’t work, the easiest option is to create a normal local user and use those credentials to sign-in instead.
We recommend ticking the ‘Remember my credentials’ option so you don’t need to enter them again to access the shared folders.
After entering the credentials, if you see an empty folder, this means you have successfully entered the system and you’re ready to share files and folders.
Set sharing settings for a file or folder
Now that you’ve established a connection between the systems you want to share files between, it’s time to select what to share.
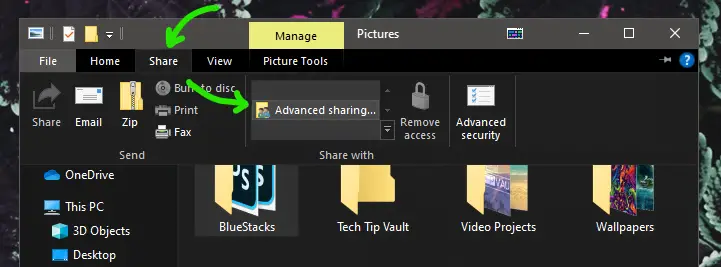
Thankfully Windows 10 has made this very easy. Once you find the folder you wish to share, select it and click on the ‘Share‘ tab at the top of the File Explorer.
Within the ‘Share’ tab, click on the ‘Advanced sharing…‘ button to select who should have access to the file or folder.
There seem to be two different layouts for the sharing options depending on your Windows 10 version, but their functionality is the same.
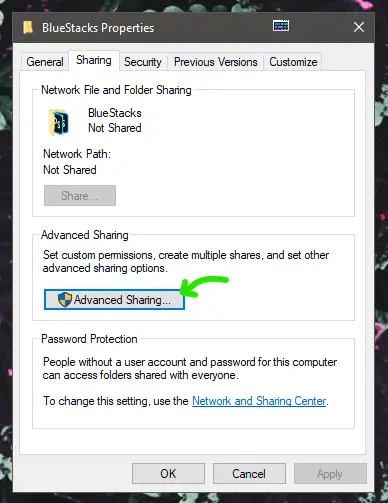
The more common interface is the normal properties view of the folder. After opening it up, click on the Advanced Sharing button as seen below.
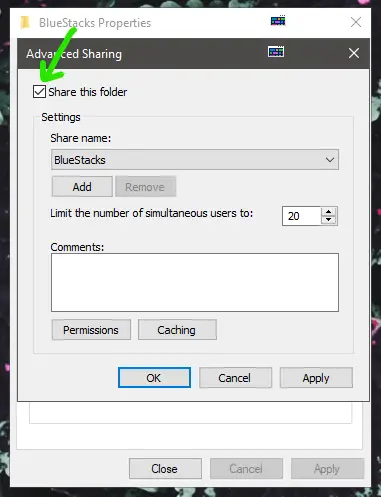
In the Advanced Sharing pop-up, all you need to do is tick the “Share this folder” checkbox and click OK.
Now other users can see your folder when they access your network device through the File Explorer.
Another possible layout can be seen in the video guide, which is a more clear layout when it comes to selecting different users.
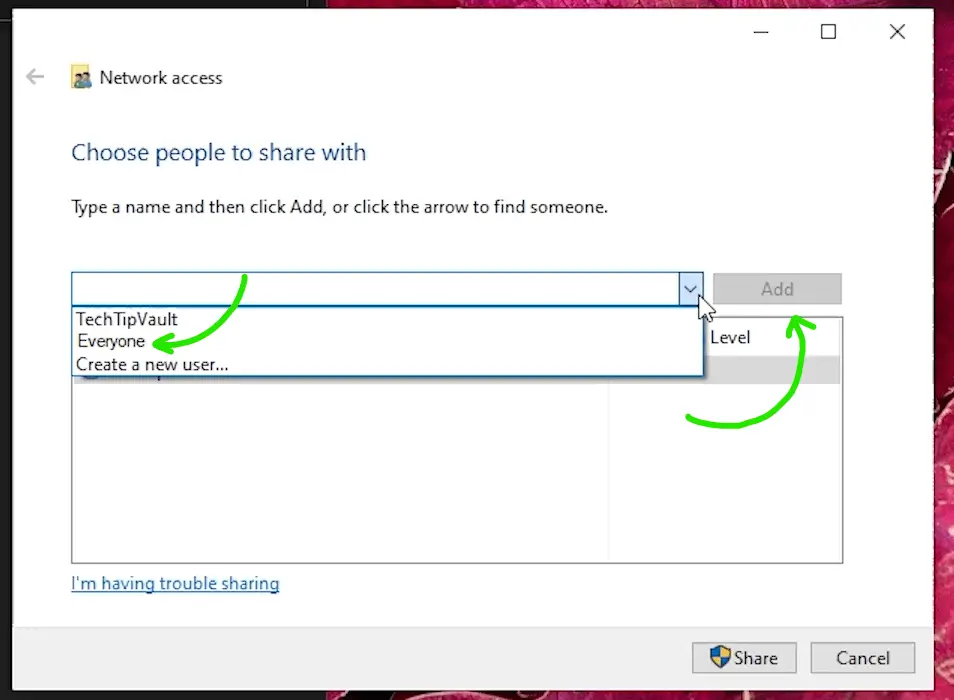
If you have the view above, all you need to do is select ‘Everyone‘ from the dropdown and click the Add button. This will share the folder with anyone who has access to your local network system.
Finally click the Share button to save the changes and make the folder go live.
Syncing a shared folder for offline viewing
One of the biggest issues when it comes to making network folders on Windows is the fact that the host PC has to be online to access the files from other systems.
Most people don’t have a system that is online 24/7, which can make accessing files from a shared folder very difficult.
Thankfully Microsoft thought about this and created the Windows Sync Center. It handles storing files from network folders to other systems’ local drives.
In order to synchronize a shared folder from another system, all you need to do is right-click on the folder and select ‘Always available offline‘.
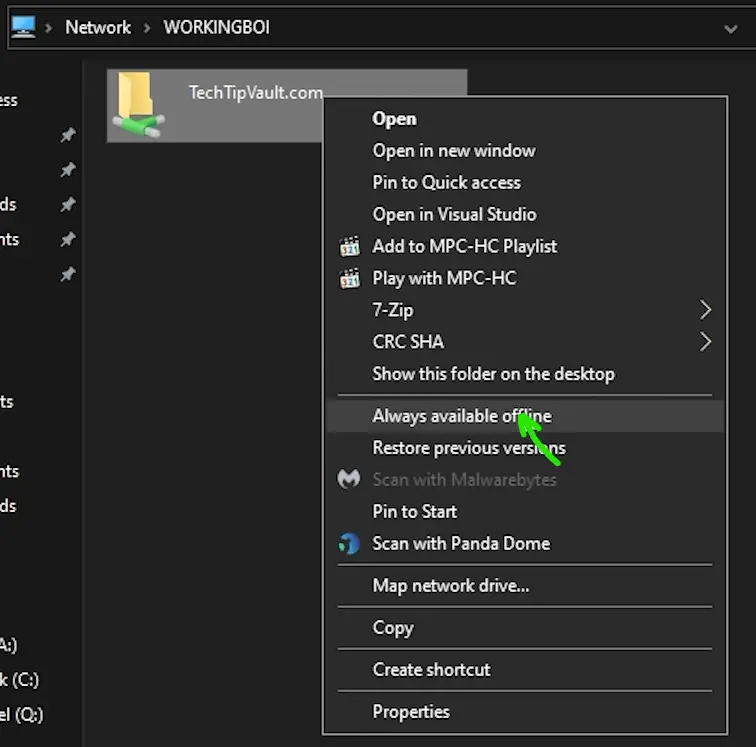
This option copies all the contents of the shared folder onto the current computers C-drive, so you can access the files even without having either system connected to the network.
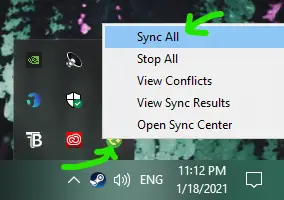
The only issue with syncing a folder is that you need to manually get any changes to the files.
This can be done simply by clicking on the Sync Center icon in the taskbar and choosing Sync All.
This functionality can be scheduled to run automatically through the Sync Center itself if you don’t want to do it manually every time.
If you don’t use Sync Center for the shared files, the host system has to be online at all times for any other PC to access those files, but the upside is that those files are always kept up-to-date automatically.
So if you do have the possibility to use an always-online system to act as the host for your files, it is definitely a more convenient option.
Check local storage of synced files
As mentioned earlier, if you decide to sync the files, they need to be stored somewhere on you system in order to access them offline.
It may seem like the files exist only in the shared network folder, but in reality Sync Center stores them onto your C-drive, hidden from view.
This hidden folder is actually located at C:WindowsCSC which stands for Client-Side-Caching. Changing this folder is fairly complex, but there is a great guide on how to move the CSC folder on Microsoft docs.
To see how much space your shared files are currently occupying, you can open up the Sync Center from the taskbar and clicking ‘Manage offline files‘ at the left of the window and then choosing the ‘Disk Usage‘ tab.
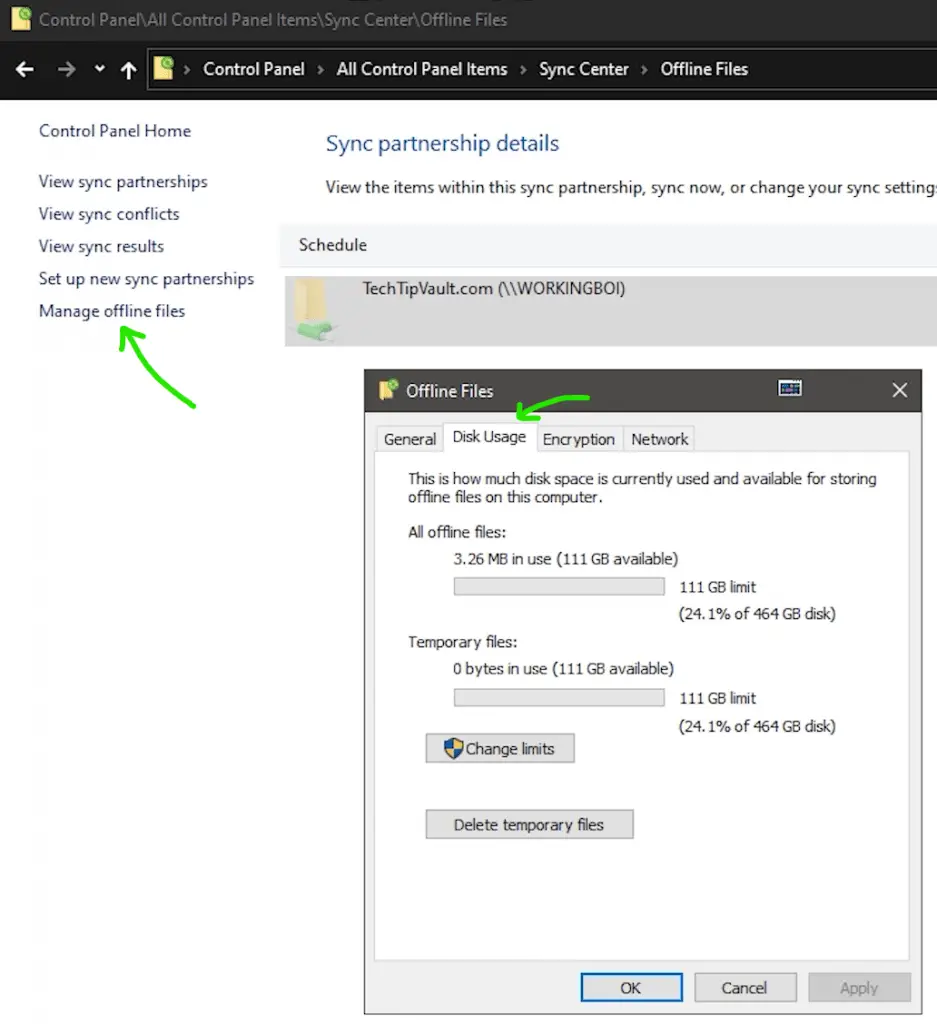
From this tab you can change the maximum amount you wish it to take from your C-drive, which might be a good idea if you accidentally transfer massive files into the network folder.
Making a shortcut for better accessibility
The fastest way to speed up your access to your shared folders is by adding them to the Quick access menu.
The Quick access menu can be seen on the left side hierarchy of the File Explorer and it also shows up when right-clicking File Explorer in the taskbar.
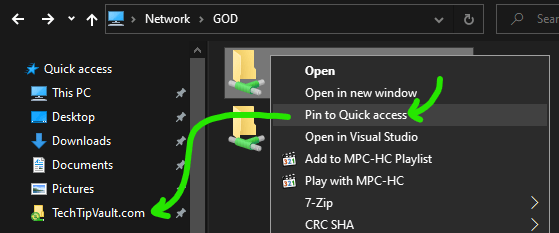
You can pin your shared local network folder to Quick access by right clicking on the folder and selecting ‘Pin to Quick access‘.
![]()
This method is great if you don’t need to pin the folder to your taskbar and are satisfied with opening it through the File Explorer every time.
However, if you wish to pin the folder to your taskbar, the folder can’t be simply dragged onto it.
To create a functional shortcut, you need to first right-click on your desktop and select ‘New > Shortcut‘.
Once the shortcut creation wizard opens up, click on Browse and find your shared folder.
Now you should see the path to your folder in the text box. All you need to do is add the path between double quotes and add the word ‘explorer’ in the beginning.

Before: \WORKINGBOITechTipVault.com
After: explorer "\WORKINGBOITechTipVault.com"
With that change you can click Next, choose any name for your shortcut and finish the wizard.
Now you can drag the shortcut into your taskbar and it will work normally. After pinning the shortcut, you can delete it from your desktop and the pinned item will still function normally.
If you wish to change the icon into something more recognizable, you can check the video in the beginning of this article.
How to check all your shared folders
Now that you’ve managed to share files and folders between multiple systems, it can get confusing to keep track of everything you’ve shared.
There is a handy little shortcut inside File Explorer which allows you to see everything you’ve shared within your local network from your current system.
To check your shared items, open up File Explorer and in the top bar type in \localhost and press Enter.
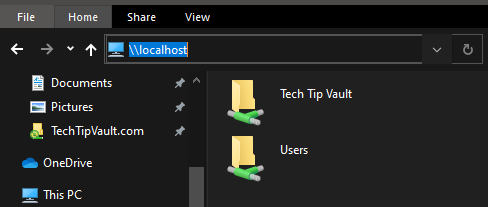
It is good to note that this path only shows the folders that you are hosting on your system. It will not show any files or folders you have access to on other systems.